
Telematics Connection Snapshot – Telematics Snapshot And Connection Data Summary
Route4Me’s Telematics Snapshot is an intuitive analytics tool that provides an overview of any Telematics Vendor Integration on your account. It brings vehicle data, route information, and key metrics from your Telematics Connection into one place, giving you visibility into fleet activity and performance. With a Telematics Snapshot, you can track synchronized vehicles, monitor last sync timestamps, and review detailed insights into vehicles, locations, routes, and individual trips to improve fleet efficiency.
Table of Contents
Open Telematics Snapshot – Telematics Data And Analytics Overview
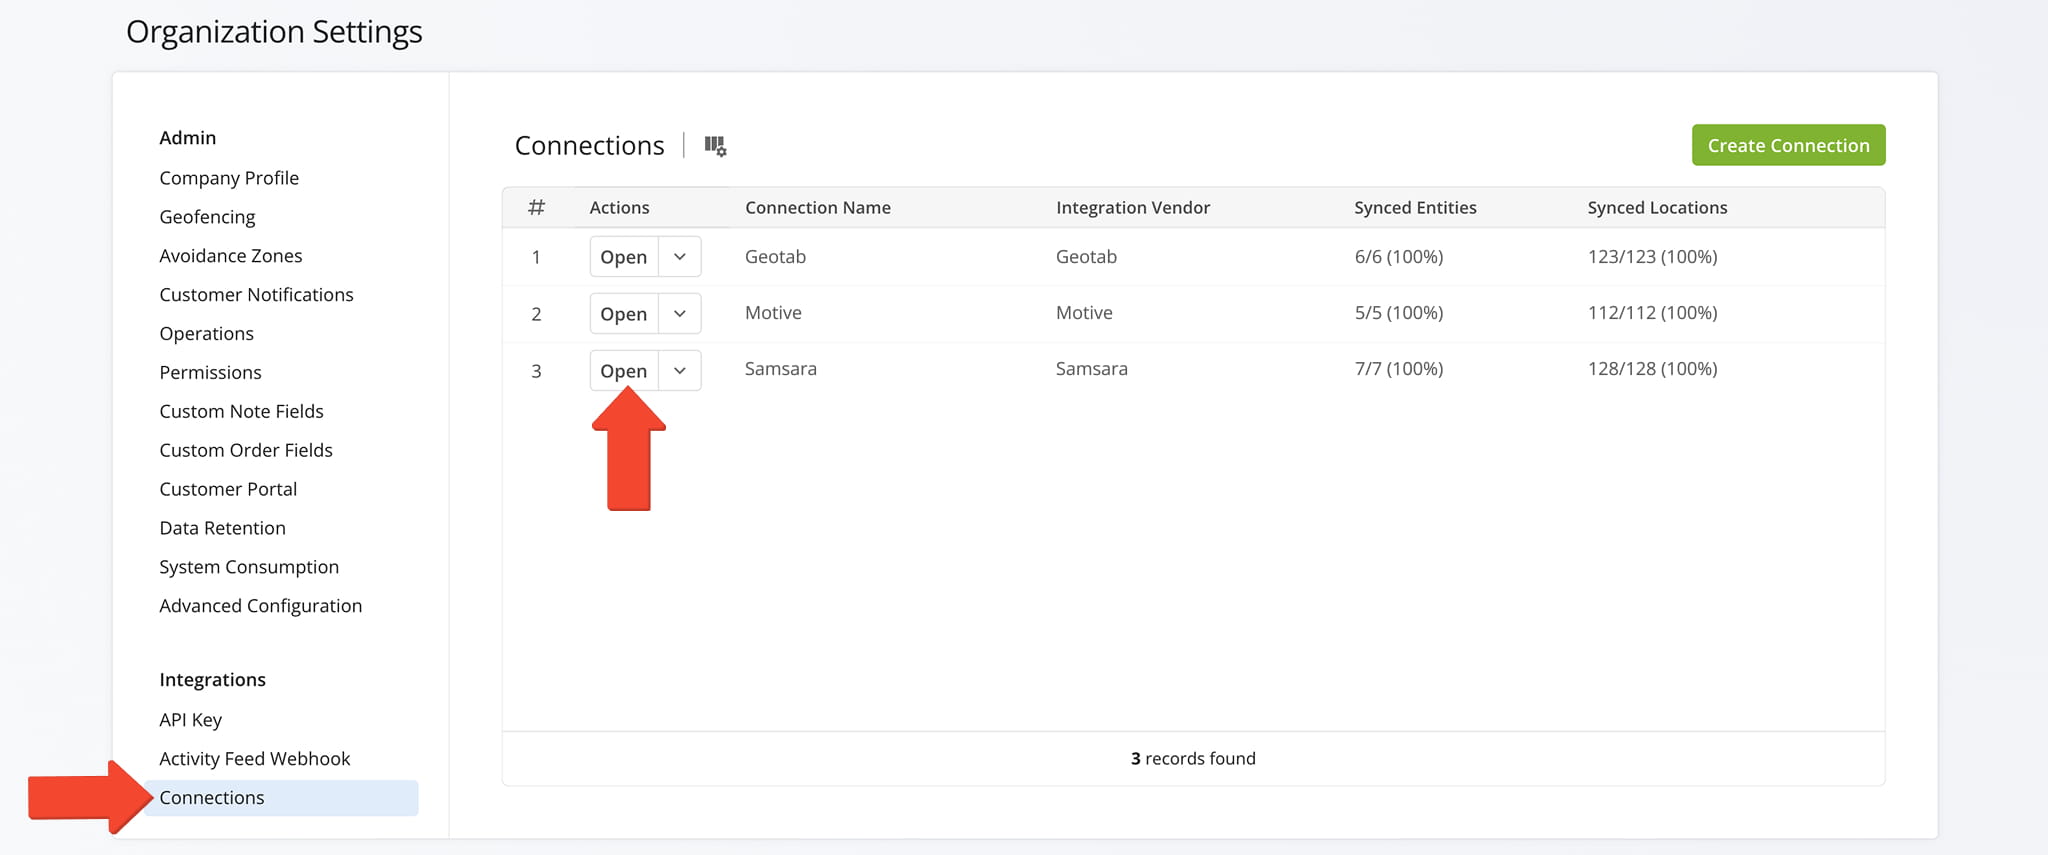
To open the Telematics Snapshot for any Telematics Connection, go to “Settings” > “Organization Settings” from the Navigation Menu. Then, click “Connections” > “Open” next to the desired connection.
Open Your Telematics Connections
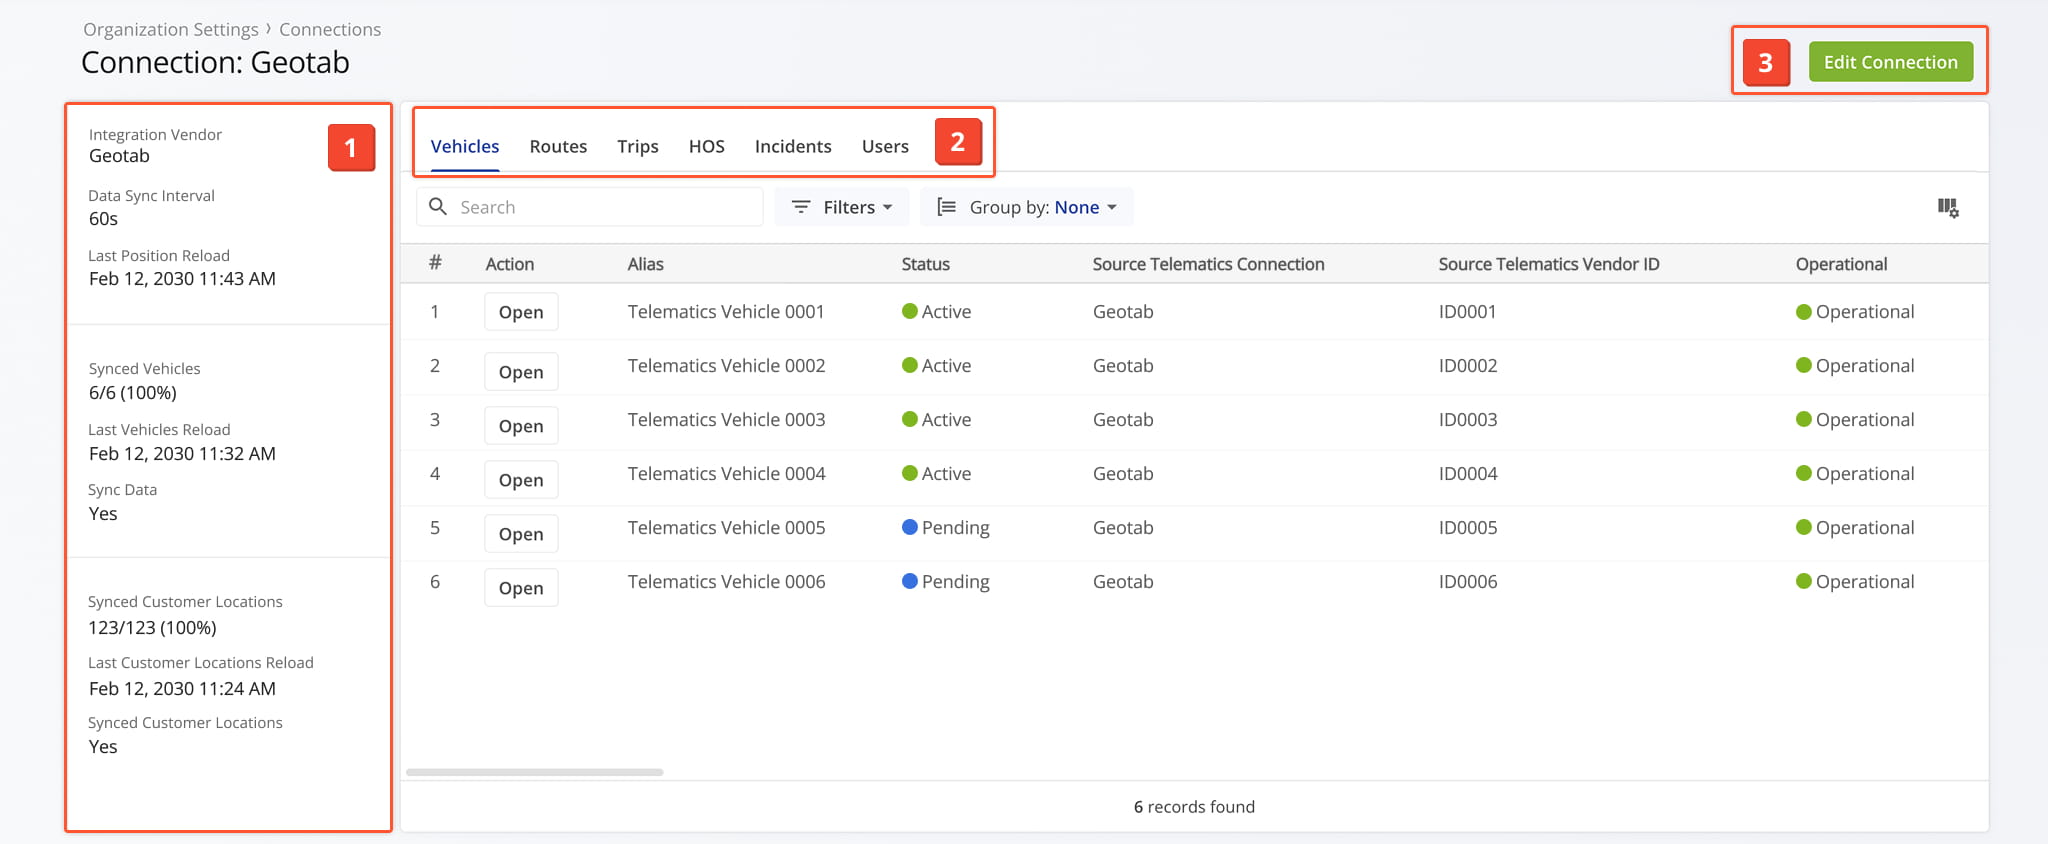
One the Snapshot is opened, you’ll see a detailed interface designed to help you review and manage all telematics data:
- Connection Summary: An overview of essential information related to the telematics connection.
- Connection Tabs: Switch between multiple tabs to explore telematics connection data which you can filter and customize as needed.
- Edit Controls: Click the “Edit Connection” button to modify connection details.
Telematics Information Panel – Integration, Sync Status, Data Overview
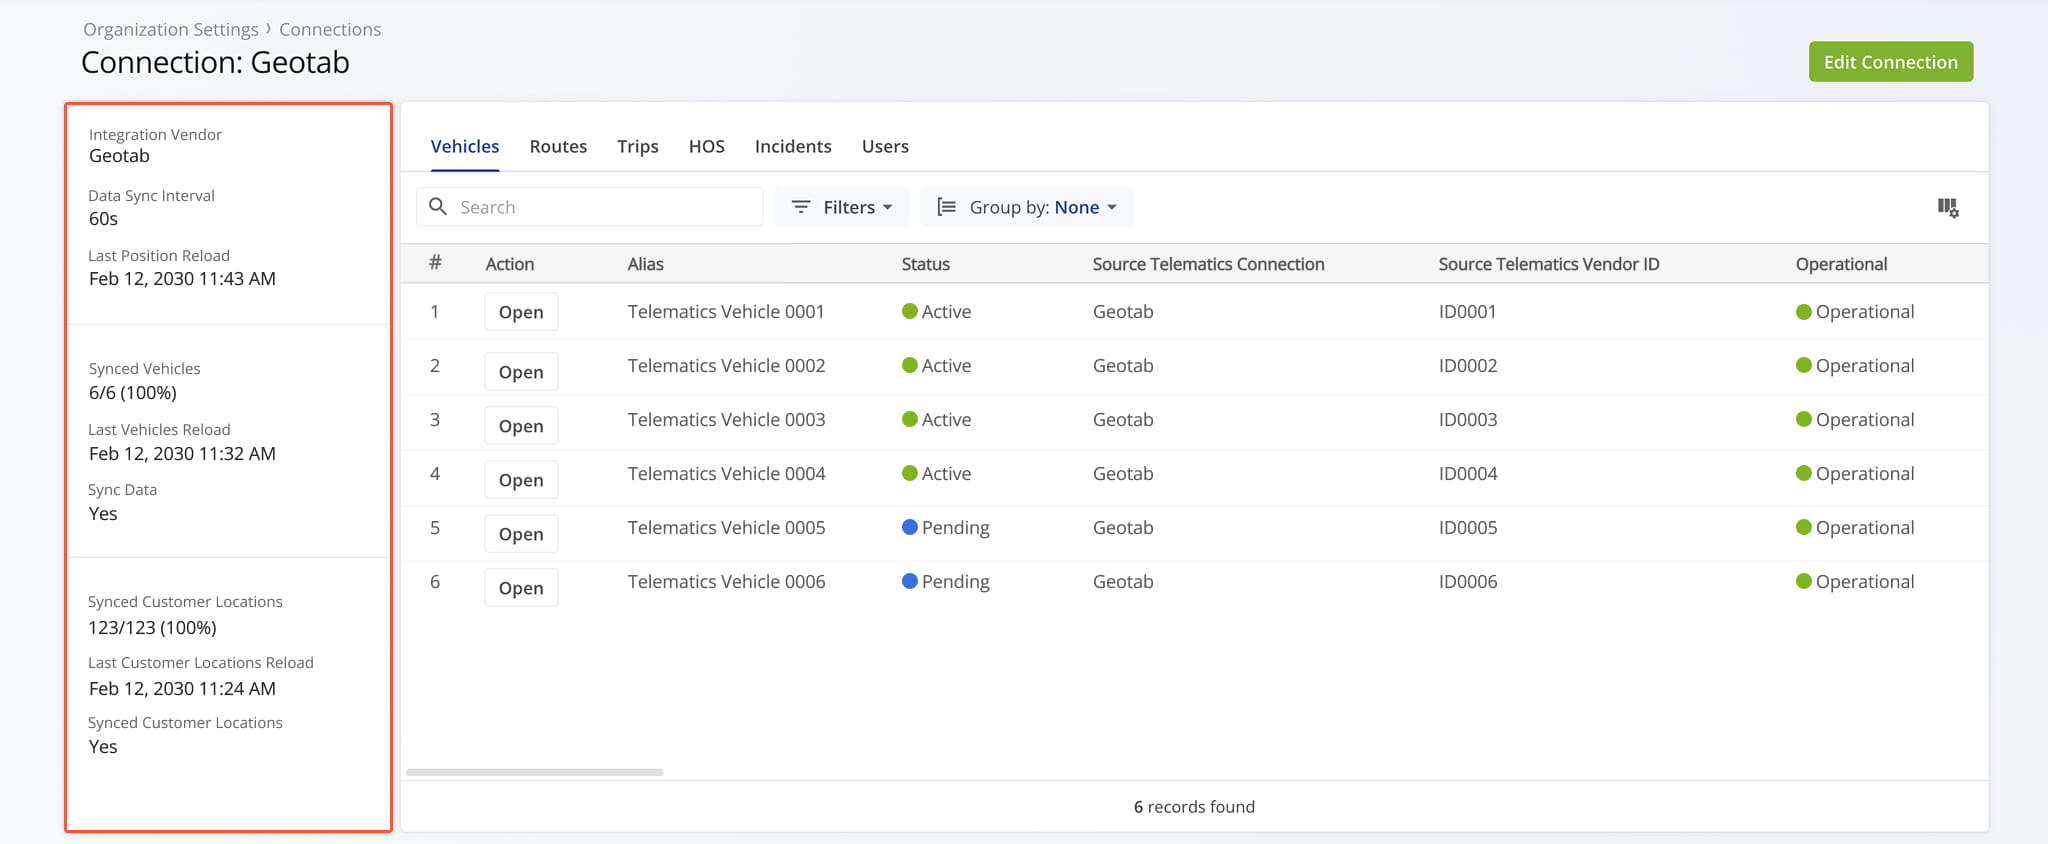
The Telematics Summary panel on the left provides an overview of the selected connection.
It shows the integration vendor, data sync interval, the number and percentage of synced vehicles and customer locations, and the date and time of the last vehicle and customer data updates.
Telematics Snapshot Categories – Analytics Overview Data Tabs
The Telematics Snapshot is organized into multiple tabs, each corresponding to a specific category of connected data.
The tabs include Vehicles, Locations, Routes, Trips, HoS, and Users. NOTE: The Locations tab is available only for accounts using a Geotab or Samsara integration. Each tab is described in detail below.
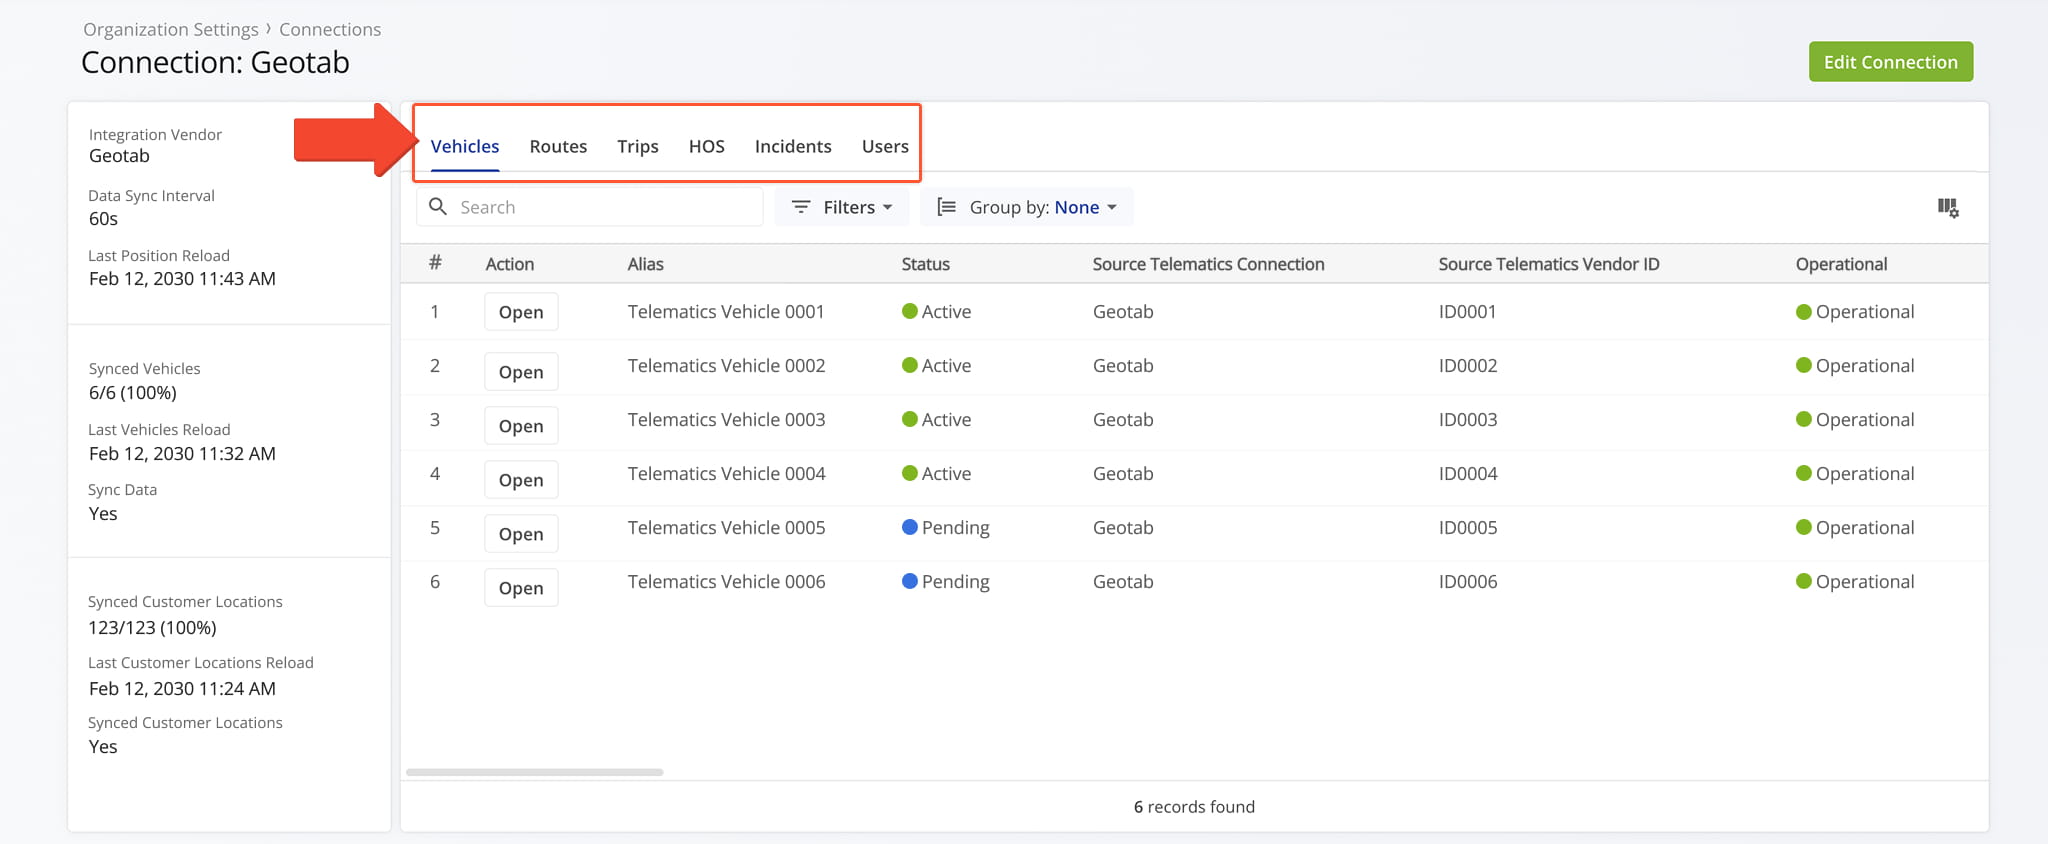
Vehicles Tab – Telematics Vehicle Data Overview
The Vehicles tab provides an overview of all vehicles synced with the selected Telematics Connection, displayed in a customizable data table. From this tab, you can manage and organize the vehicle data using the following features:
- Search: Locate specific vehicles quickly by entering keywords or vehicle identifiers.
- Filters: Narrow down the data by options such as default user, model year, model, and many other criteria detailed in the table below.
- Group By: Organize the table by attributes like status, make, model, facility, and additional categories detailed in the table below.
- “Open” Button: Click “Open” next to any vehicle to open its Vehicle Snapshot.
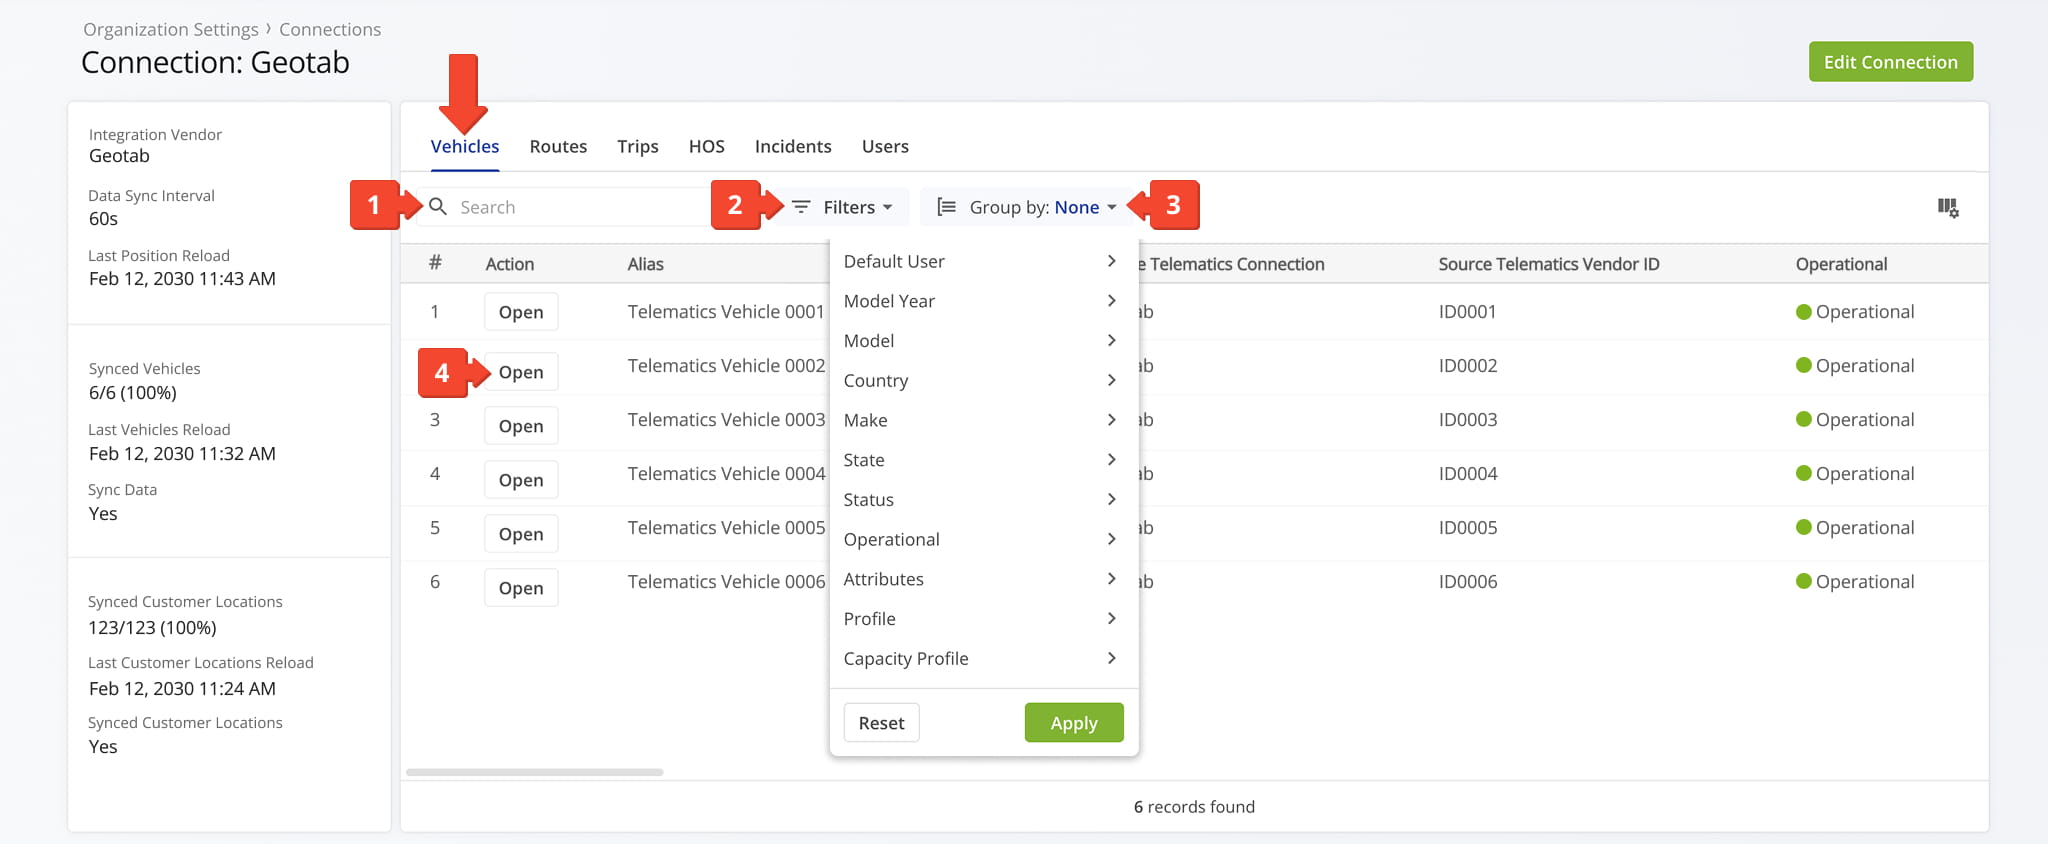
Vehicles Filters
You can also customize the data displayed in the table. Click the Column Icon in the upper right corner to select which route data fields appear and adjust their order to suit your operational needs.
The table below provides an overview of all available data columns, which you can reorder by dragging them into place.
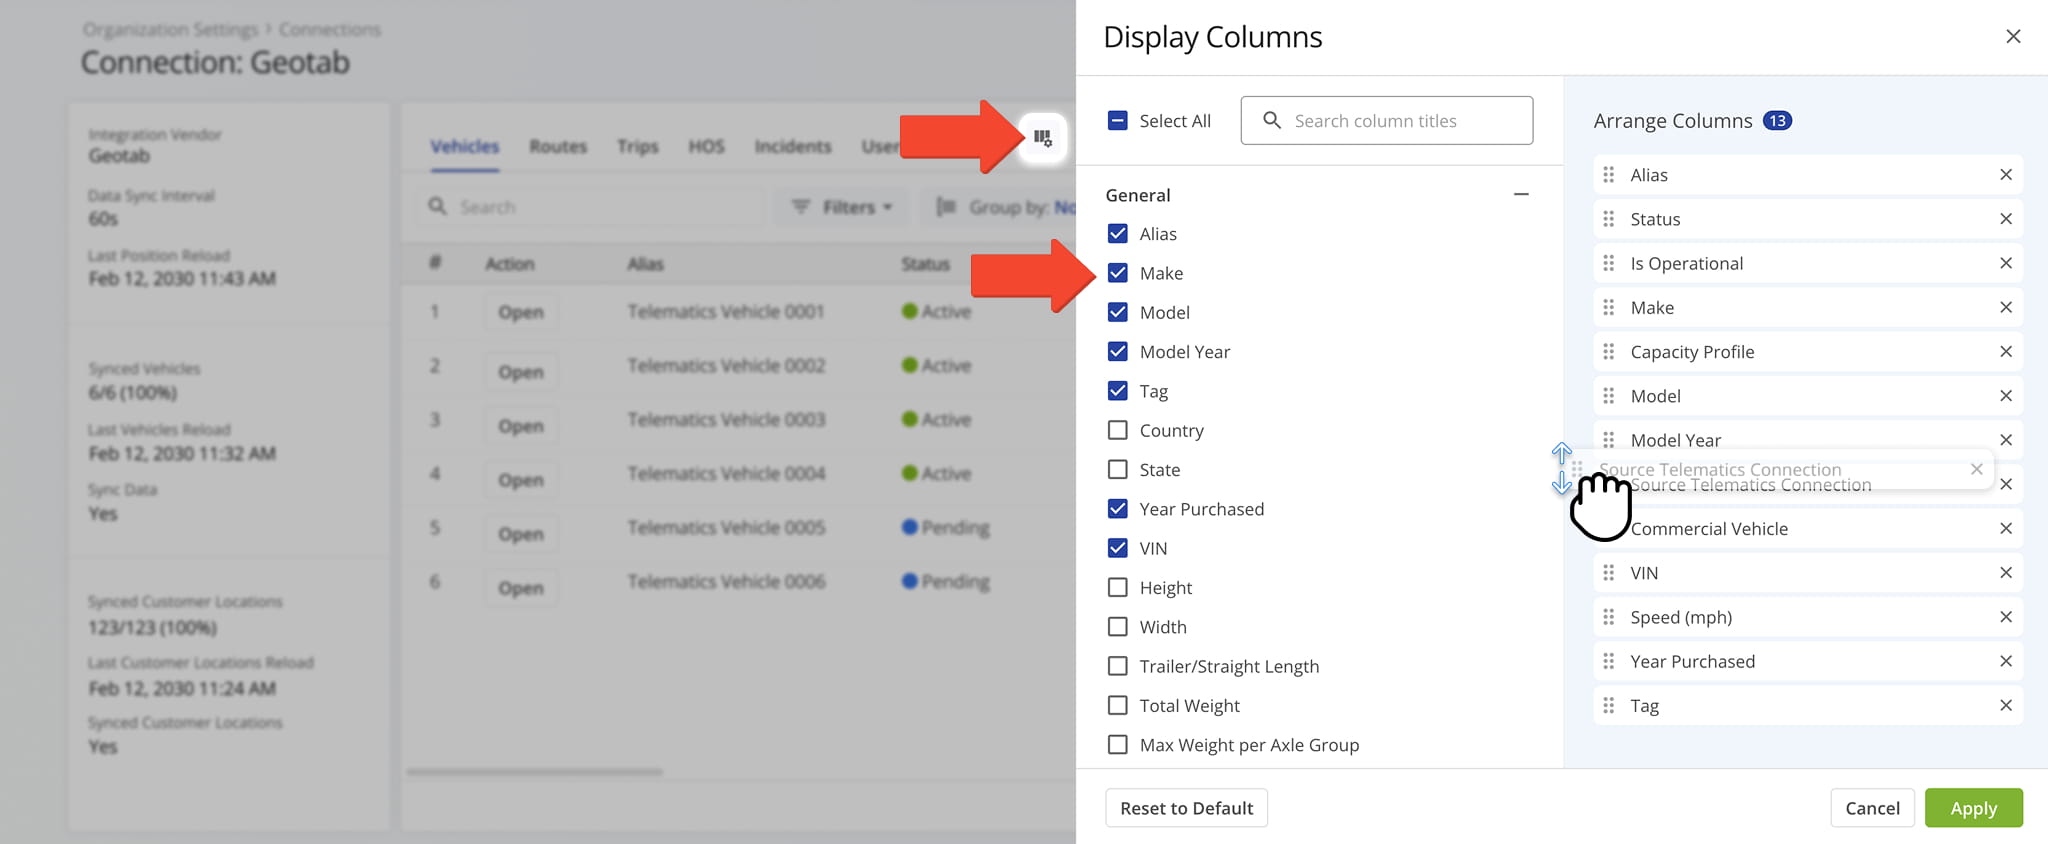
Vehicles Data Columns
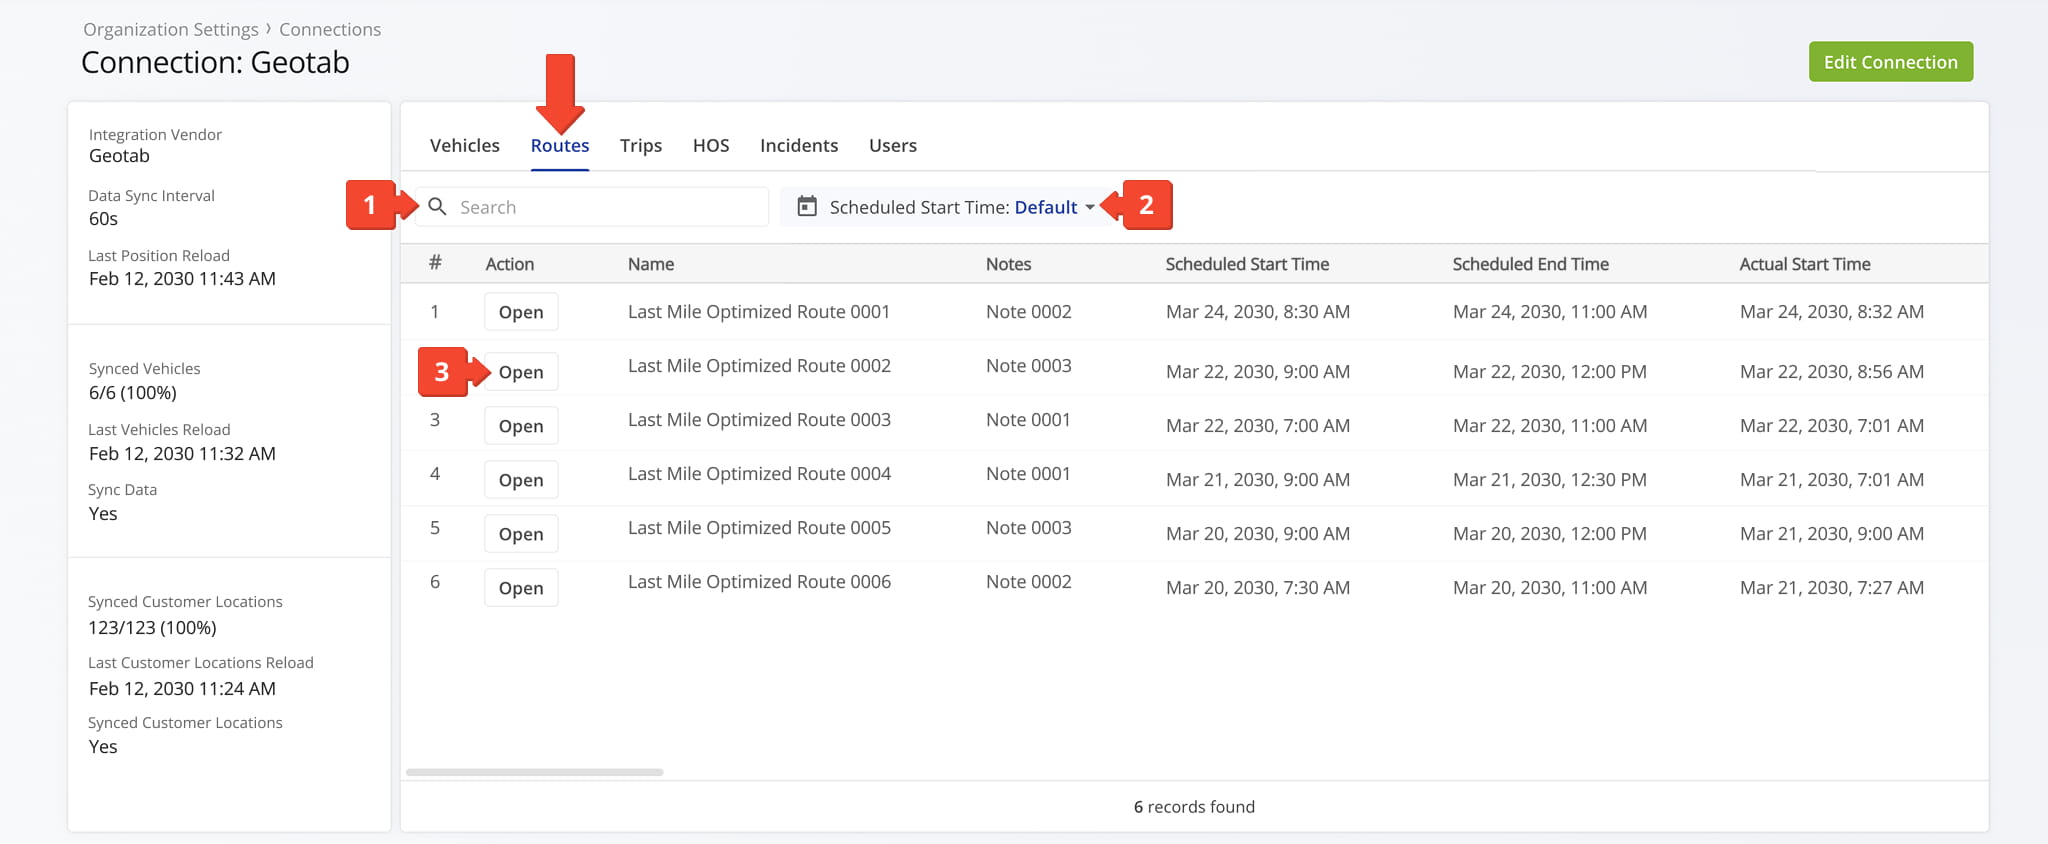
Routes Tab – Telematics Route Data Overview
The Routes tab provides an overview of all routes associated with the selected Telematics Connection. From this tab, you can review and organize route data using the following features:
- Search: Locate specific routes by entering keywords or route identifiers.
- Date Range Filter: View routes for a specific date or date range based on scheduled start or end times, or actual start or end times.
- “Open” Button: Click “Open” next to any route to open its Telematics Route Snapshot.
Trips Tab – Telematics Trips Data Overview
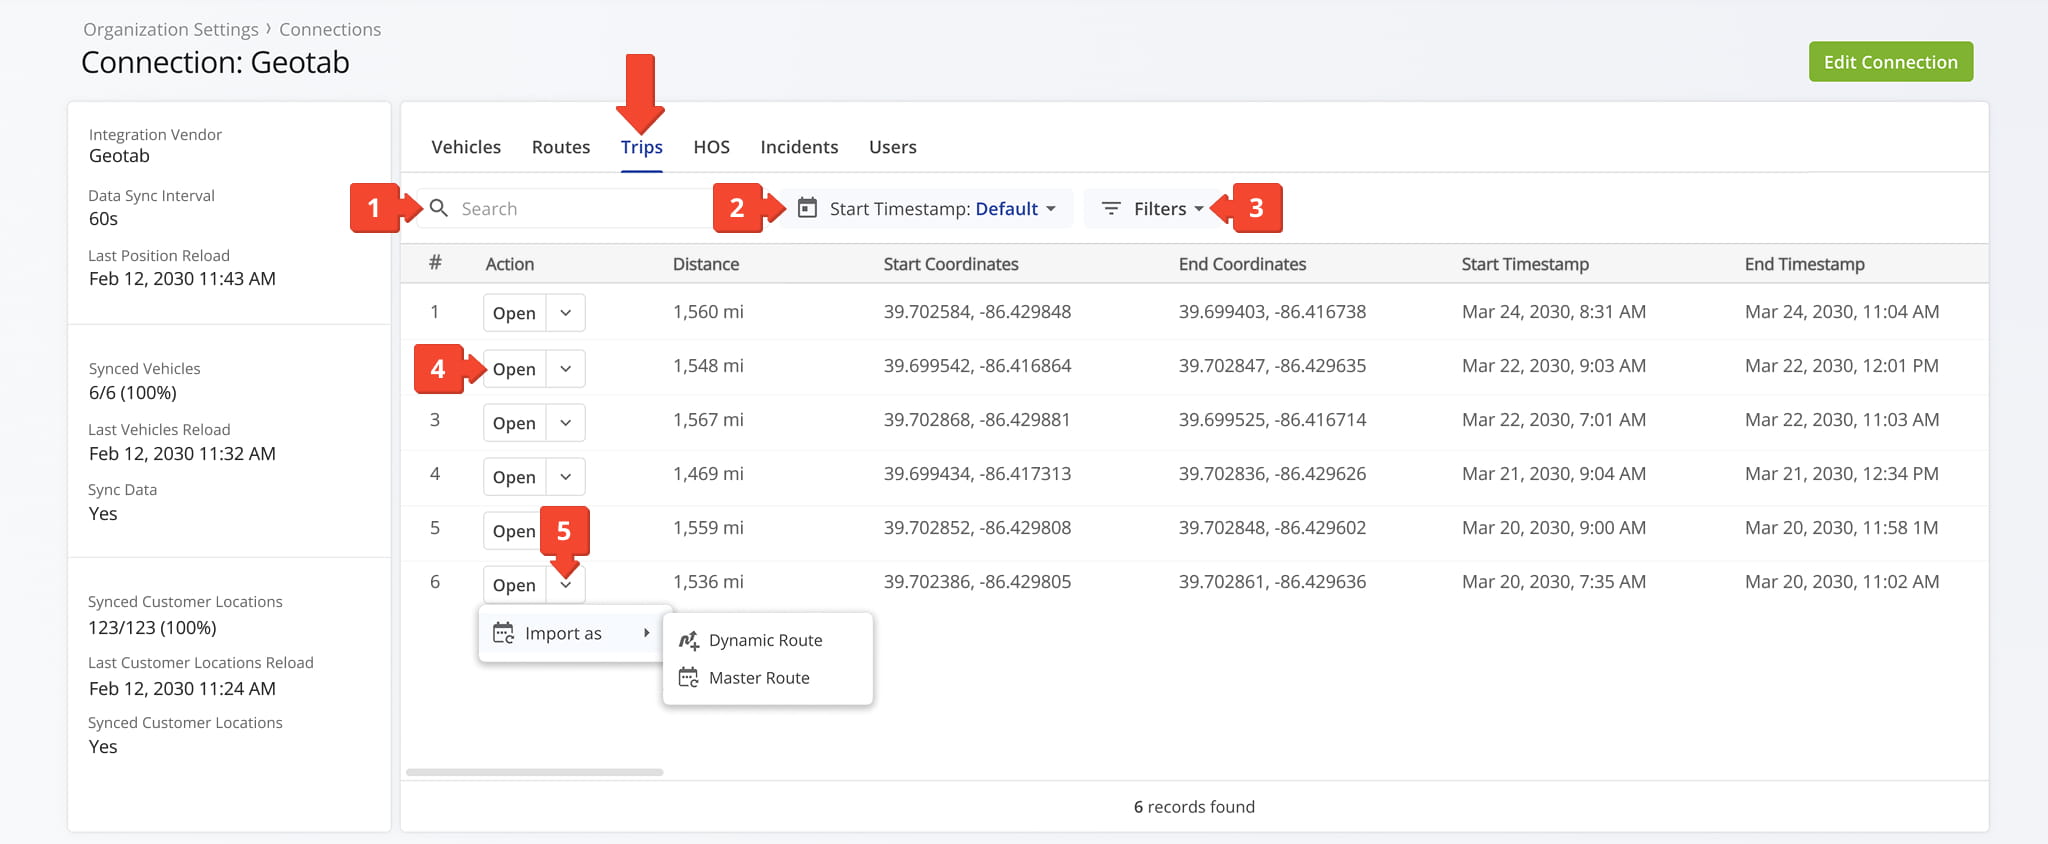
The Trips tab provides an overview of all trips imported from the selected Telematics Connection. From this tab, you can review and organize trip data using the following features:
- Search: Locate specific trips by entering keywords or route identifiers.
- Date Range Filter: View routes for a specific date or date range based on scheduled start or end times, or actual start or end times.
- Additional Filters: Narrow the data by distance, start odometer, or end odometer. More details can be found in the table below.
- “Open” Button: Click “Open” next to any route to open its Telematics Trip Snapshot.
- Down Arrow Button: Click the button to import the trip as a Master Route or as a Dynamic Route.
Trips Filters
Hours Of Service Tab – Telematics HOS Data Overview
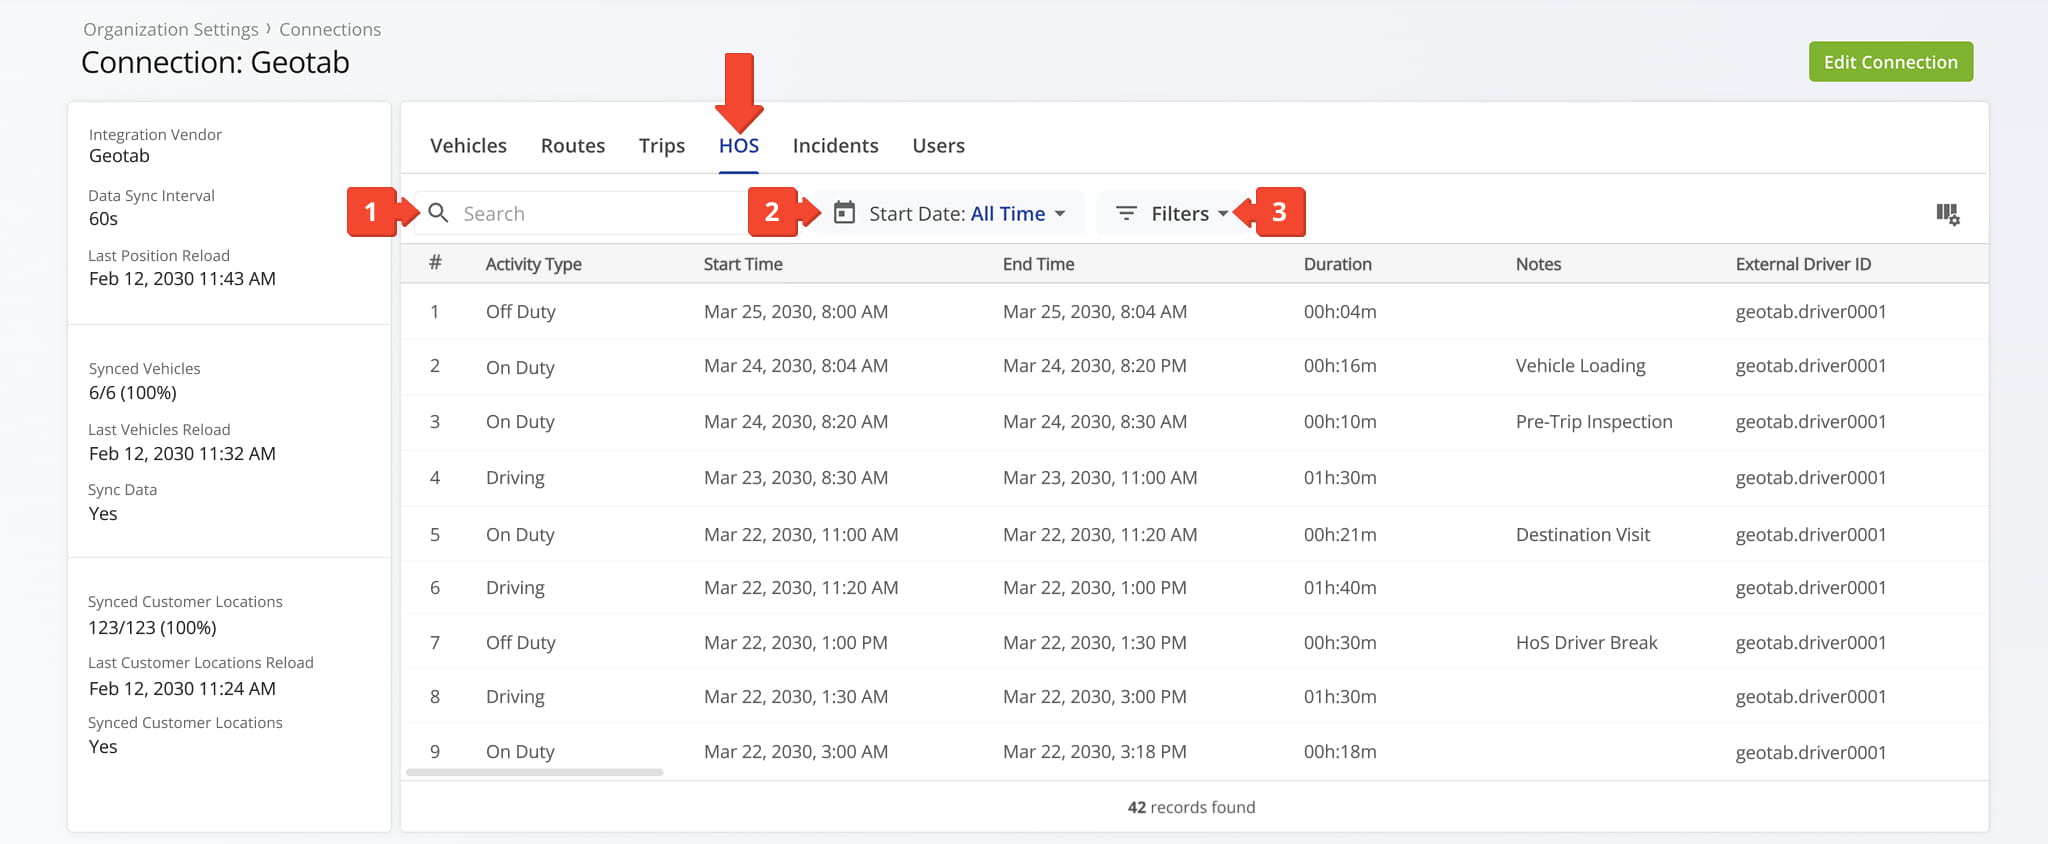
The Hours Of Service tab shows driver activity records imported from the selected Telematics Connection. From this tab, you can review and organize HOS data using the following features:
- Search: Locate specific data by entering keywords or route identifiers.
- Date Range Filter: View routes by start or end date.
- Additional Filters: Narrow the data by External vehicle ID, External Driver ID, or Activity Type. The table below details each filter.
HOS Filters
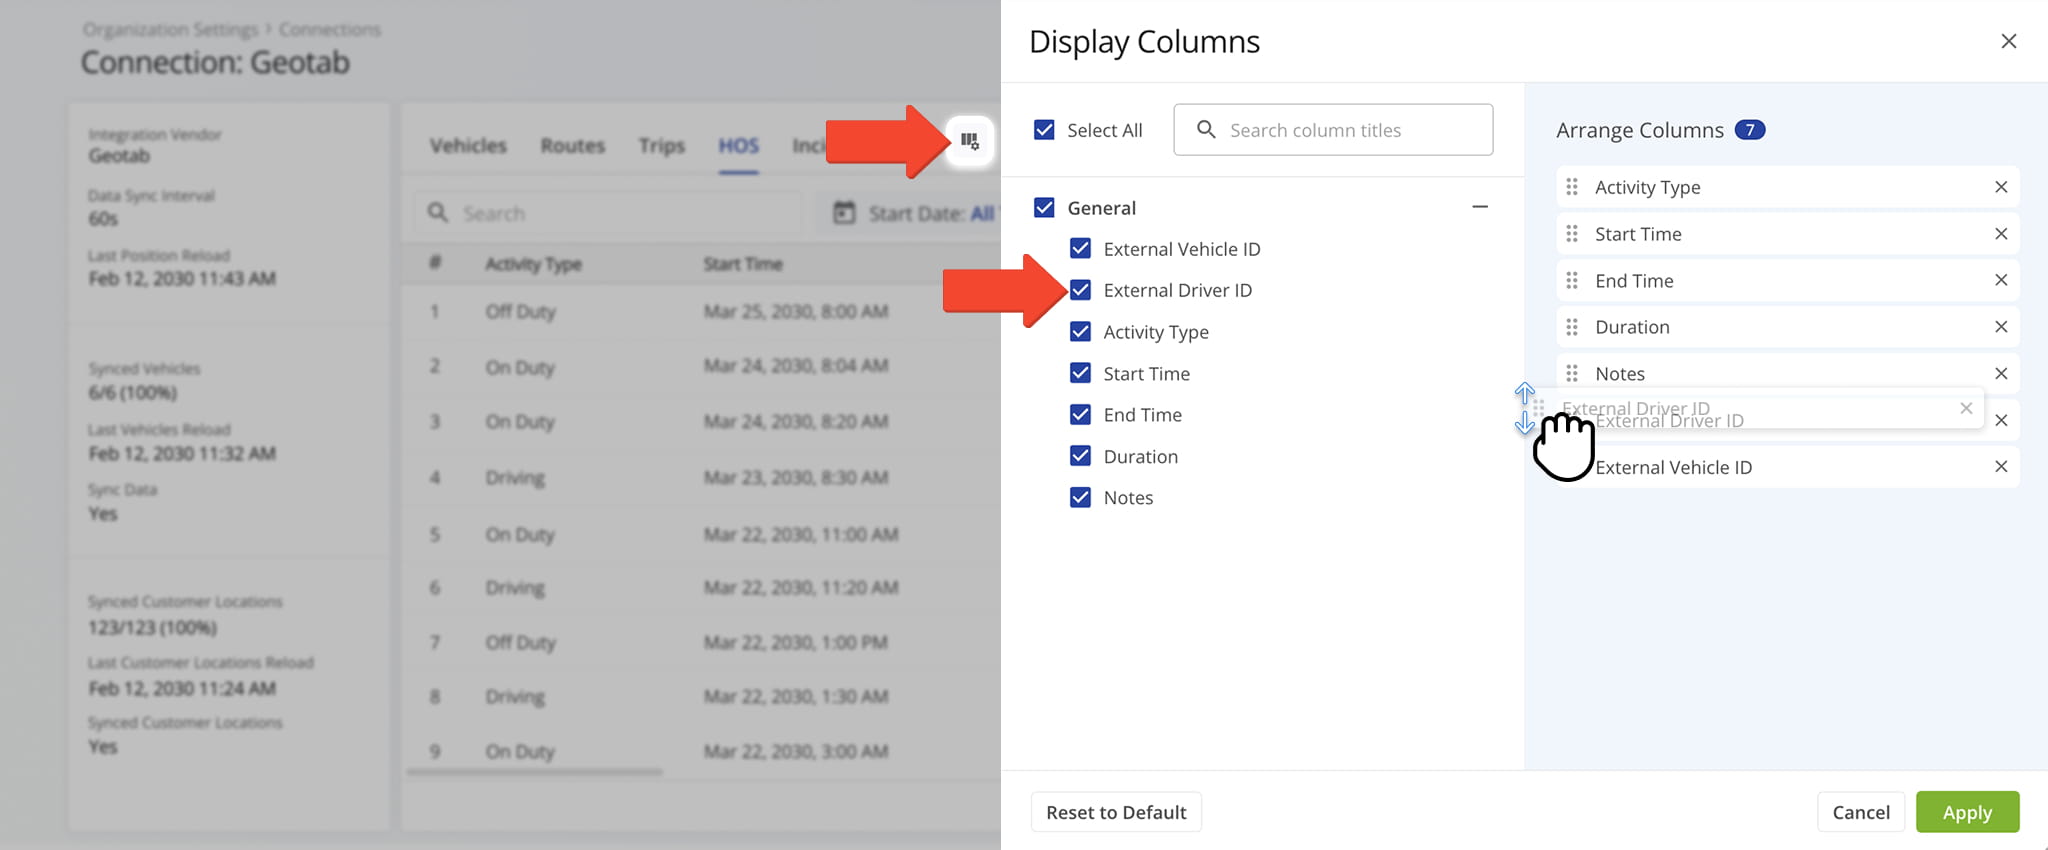
You can also customize the data displayed in the table. Click the Column Icon in the upper right corner to select which route data fields appear and adjust their order to suit your operational needs.
The table below provides an overview of all available data columns, which you can reorder by dragging them into place.
HOS Data Columns
Incidents Tab – Recorded Safety Incidents And Incident Data
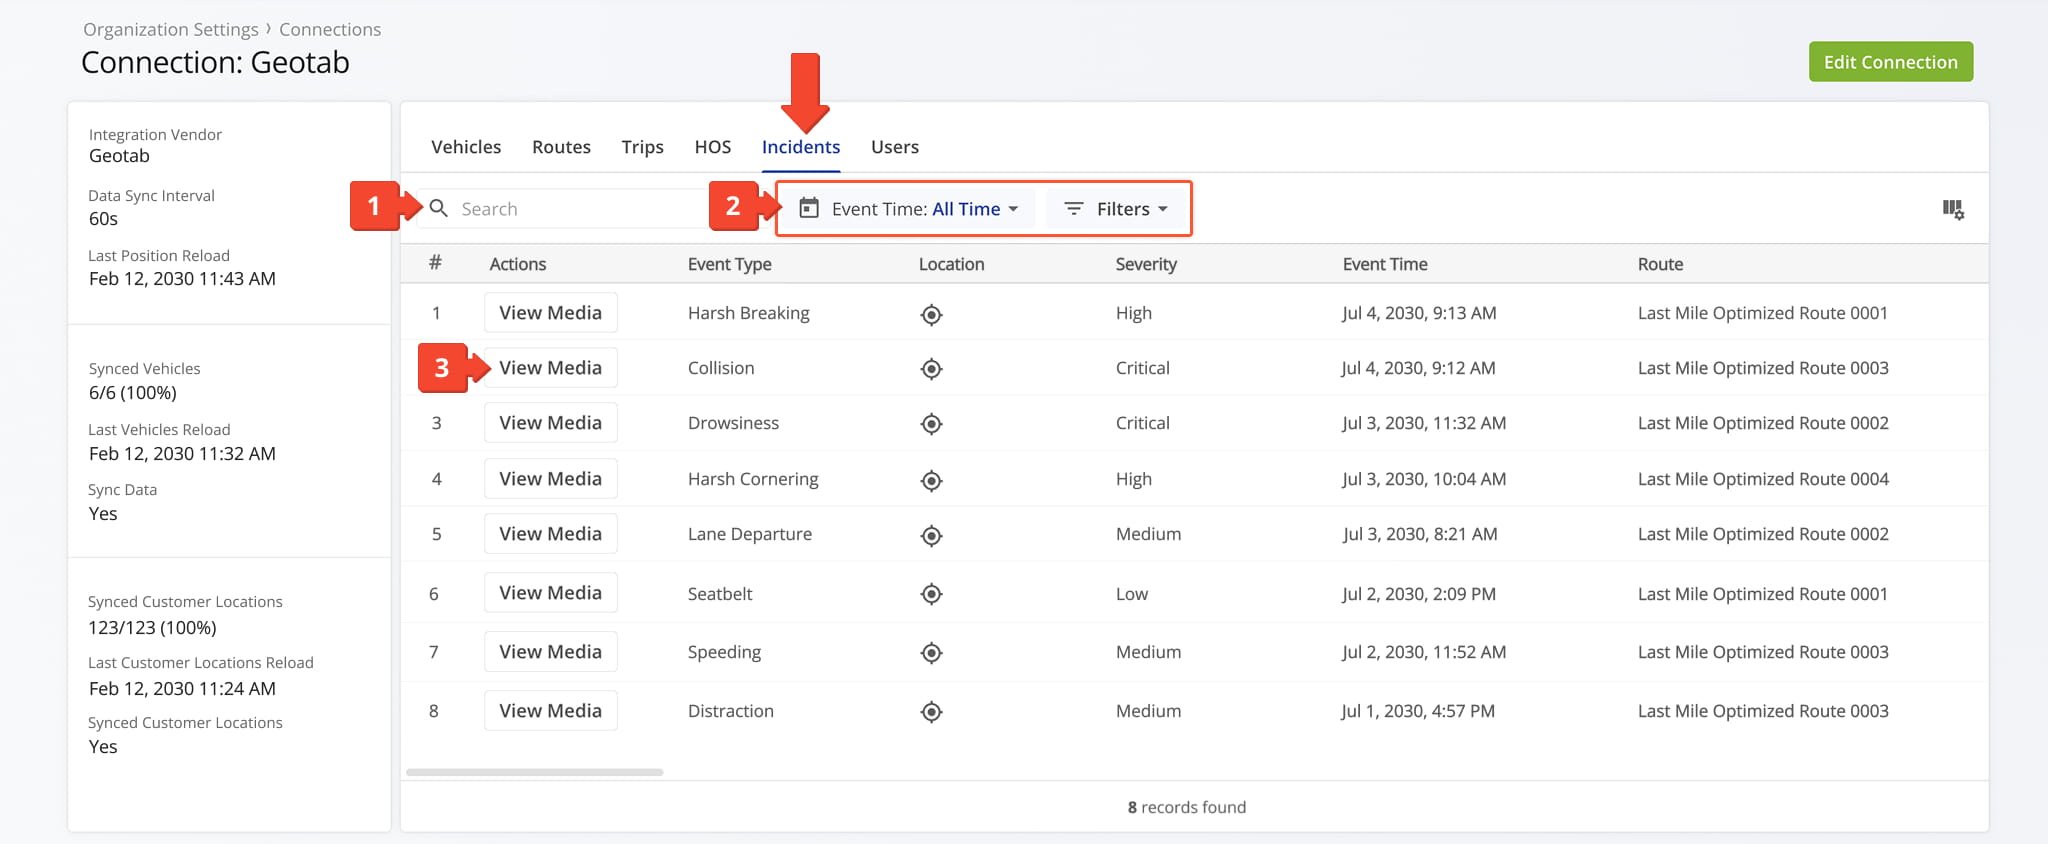
The “Incidents” tab displays all recorded safety incidents – pulled from your telematics device and dash cams – along with their details. From this tab, you can review and organize incidents data using the following features:
- Search: Locate specific data by entering keywords or incident identifiers.
- Date Range and Additional Filters: Define an Event Time or use Filters, described in the table below, to narrow which incidents are shown.
- “View Media” Button: Click “View Media” to open the media player and inspect the recording associated with an incident.
NOTE: Learn more about these features in our dedicated guide to Route4Me incidents reports.
Incidents Filters
You can also customize the data displayed in the table. Click the Column Icon to select which route data fields appear and adjust their order to suit your operational needs.
The table below provides an overview of all available data columns, which you can reorder by dragging them into place.
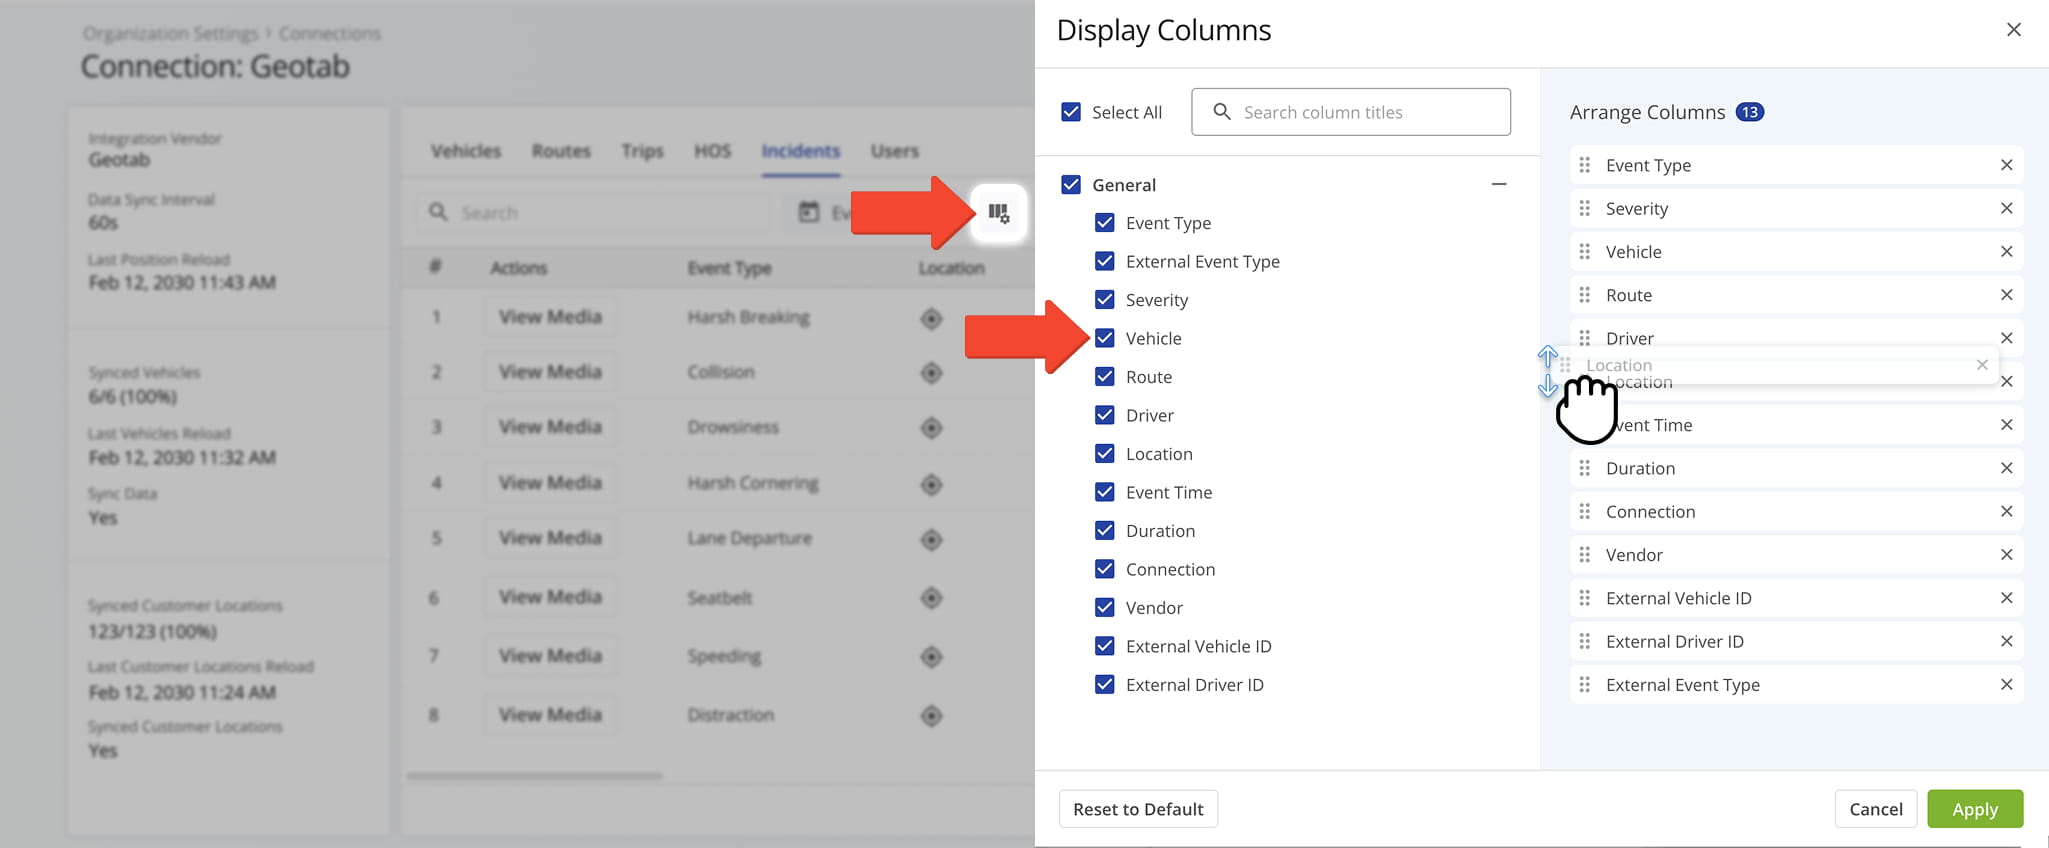
Incidents Data Columns
Users Tab – Telematics Driver And User Data Overview
The Users tab provides an overview of all users and drivers synced from the selected Telematics Connection, rather than created in Route4Me. From this tab, you can review and organize user data using the following features:
- Search: Locate specific trips by entering keywords or route identifiers.
- Date Range Filter: Filter routes by their updated date using preset ranges (e.g., today, last 30 days) or a custom date range.
- Additional Filters: Narrow the data by Status (“Active” or “Deactivated“) or by User role (“Is Driver“).
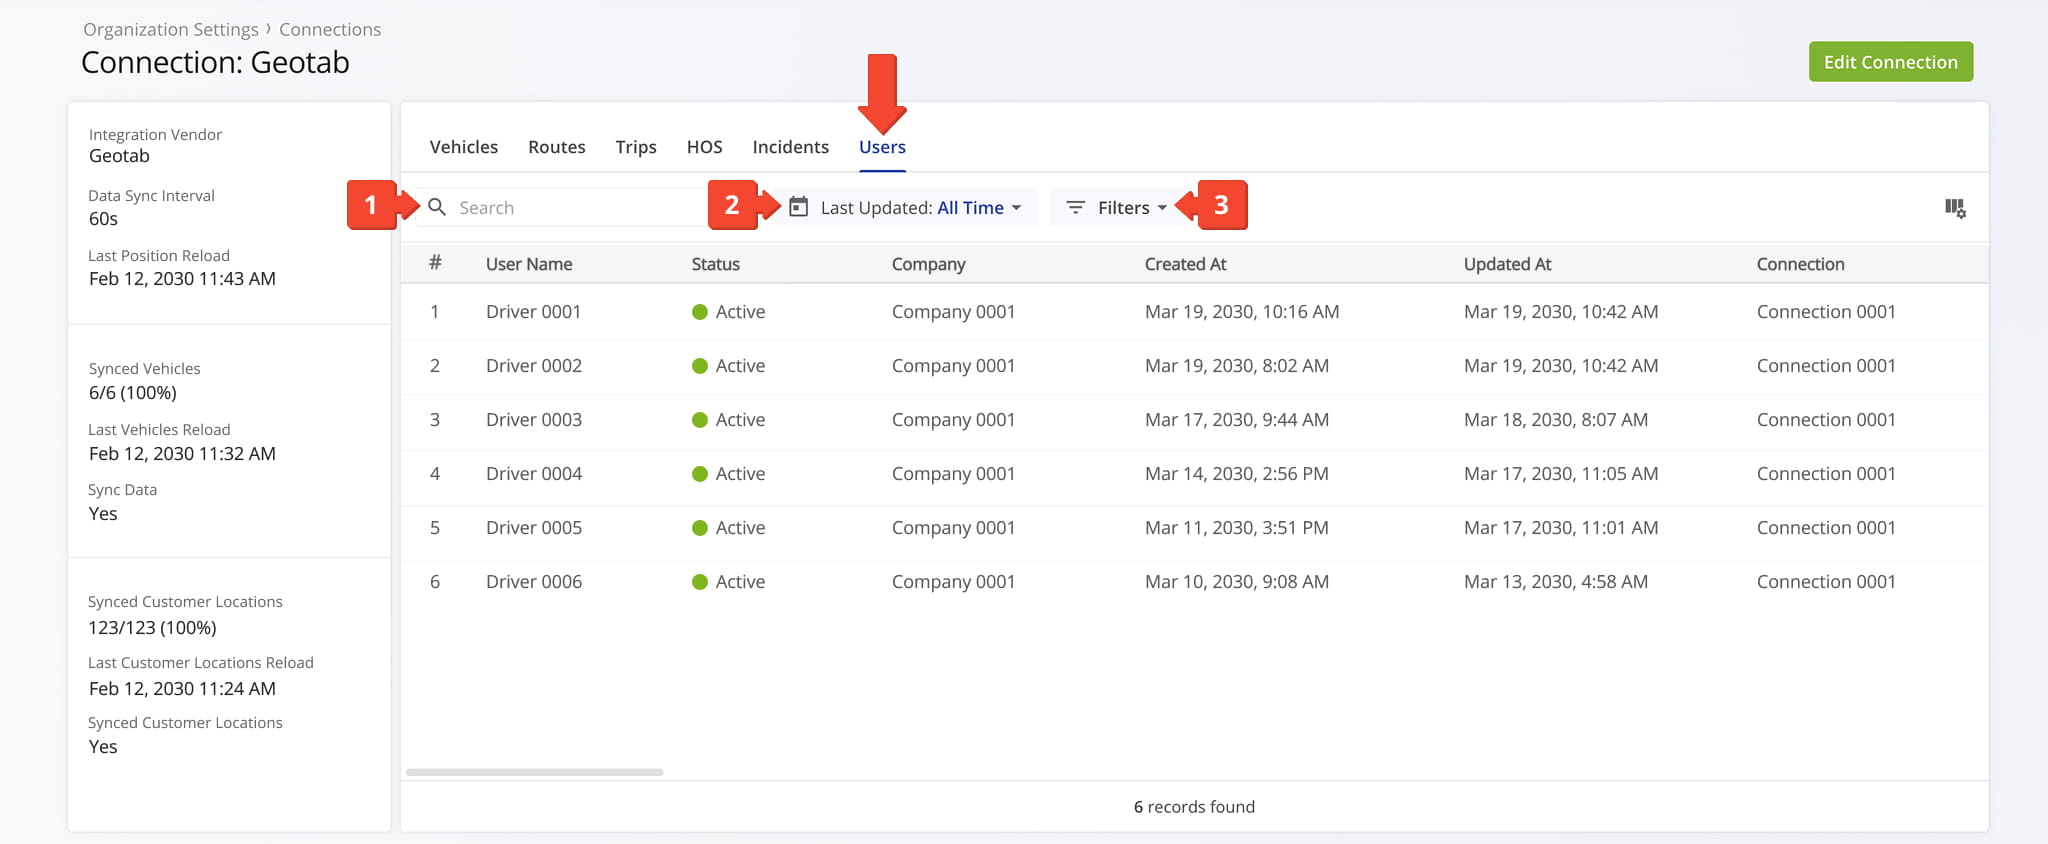
You can also customize the data displayed in the table. Click the Column Icon in the upper right corner to select which route data fields appear and adjust their order to suit your operational needs.
The table below provides an overview of all available data columns, which you can reorder by dragging them into place.
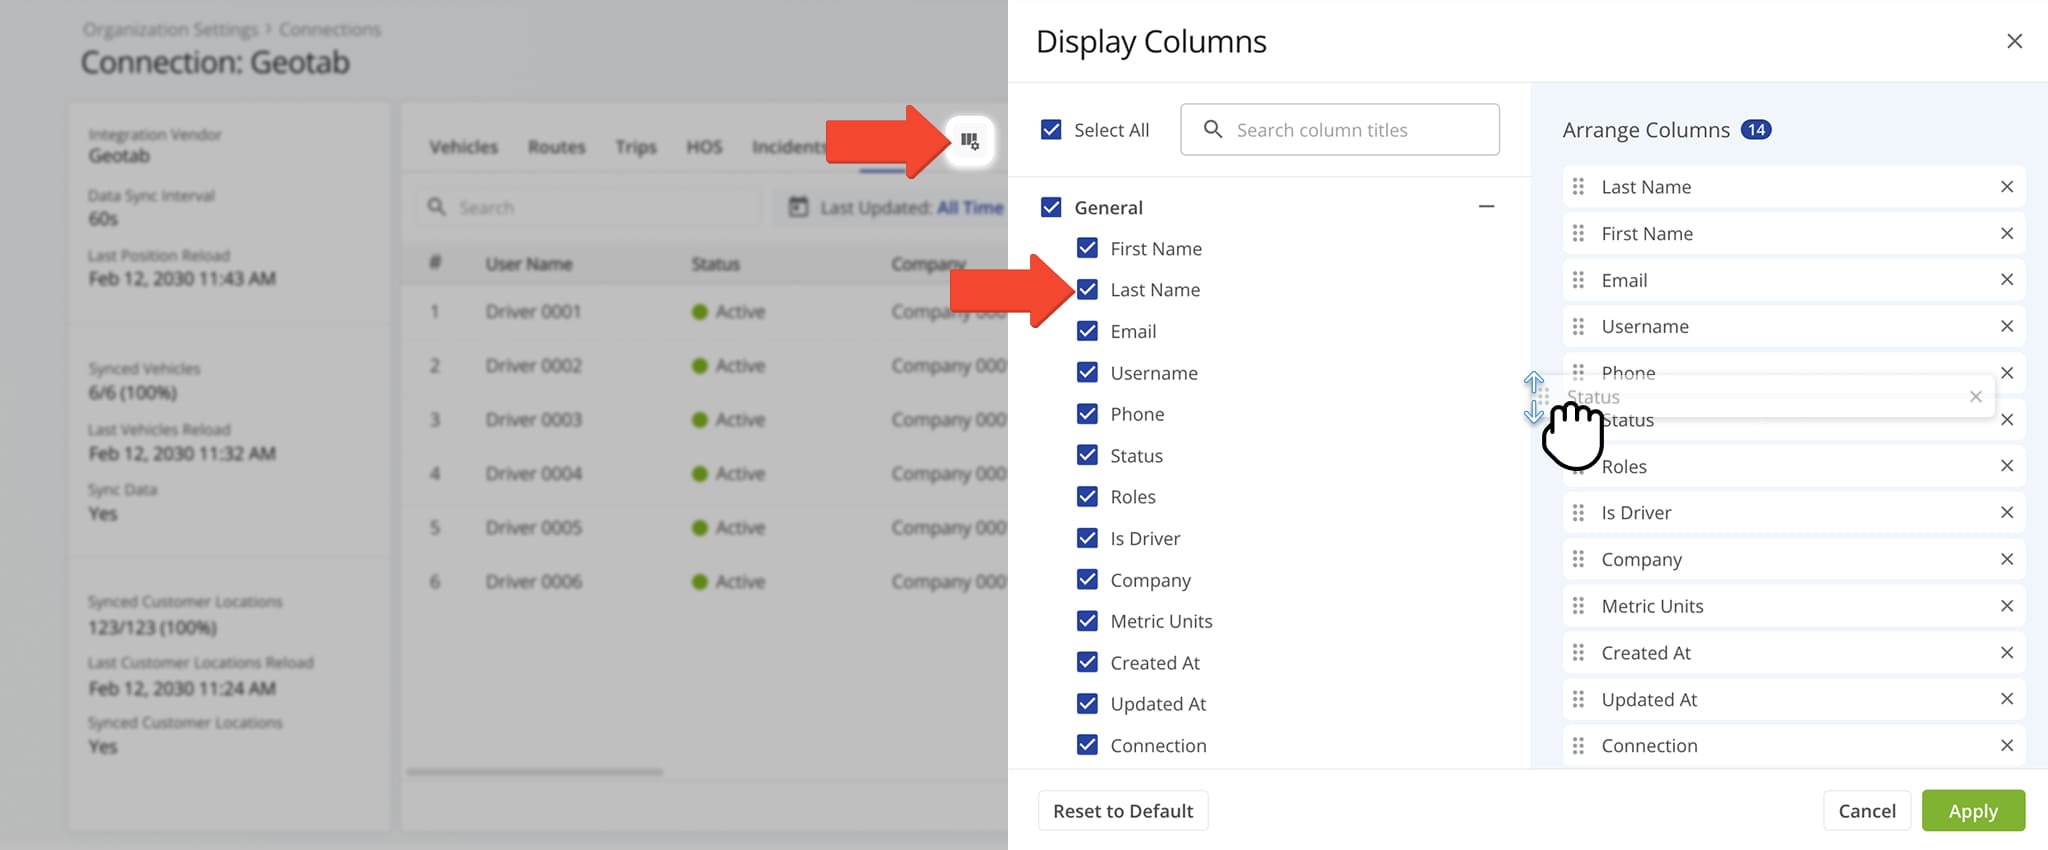
Users Data Columns
Data Catalog – Quick Reference For Available Telematics Data
For your convenience, the tables below offer a quick, at-a-glance reference for all data fields available across each tab in the Telematics Snapshot. Use them to easily identify which data points are accessible from the individual tabs.
Vehicles Tab Data Fields
Vehicles Data Columns
Routes Tab Data Fields
Routes Data Columns
Trips Tab Data Fields
Trips Data Columns
Hours Of Service Tab Data Fields
HOS Data Columns
Incidents Tab Data Fields
Incidents Data Columns
Users Tab Data Fields
Users Data Columns
Visit Route4Me's Marketplace to Check out Associated Modules:
- Operations
Audit Logging and Activity Stream
- Operations
Custom Data Add-On
- Operations
Advanced Team Management Add-On
About author: Daniel Archer

