
Add And Manage Users – Route4Me Team Management Guide
Route4Me’s Last Mile Transportation Team Software helps you build a structured routing team with clearly defined roles: Managers, Route Planners, Drivers, and other team members. Each user can be given tailored permissions, route visibility, and access to specific drivers and vehicles, all based on your enterprise model and last mile routing needs. This makes it easy to assign the right routes to the right people in real time. And, to keep everyone aligned, Route4Me syncs updates instantly across all connected devices. Use this guide to add, invite, upload, and manage users.
NOTE: To learn about your account’s user limit or to increase your user limit, please contact Route4Me Support.
Table of Contents
Add New User – Manually Create Profiles, Upload Users Spreadsheet, Invite Users Via Email
Route4Me offers several ways to add users to your team. You can create individual profiles manually, bulk upload multiple users via spreadsheet, or send email invites to new team members. Each method is explained in more detail below.
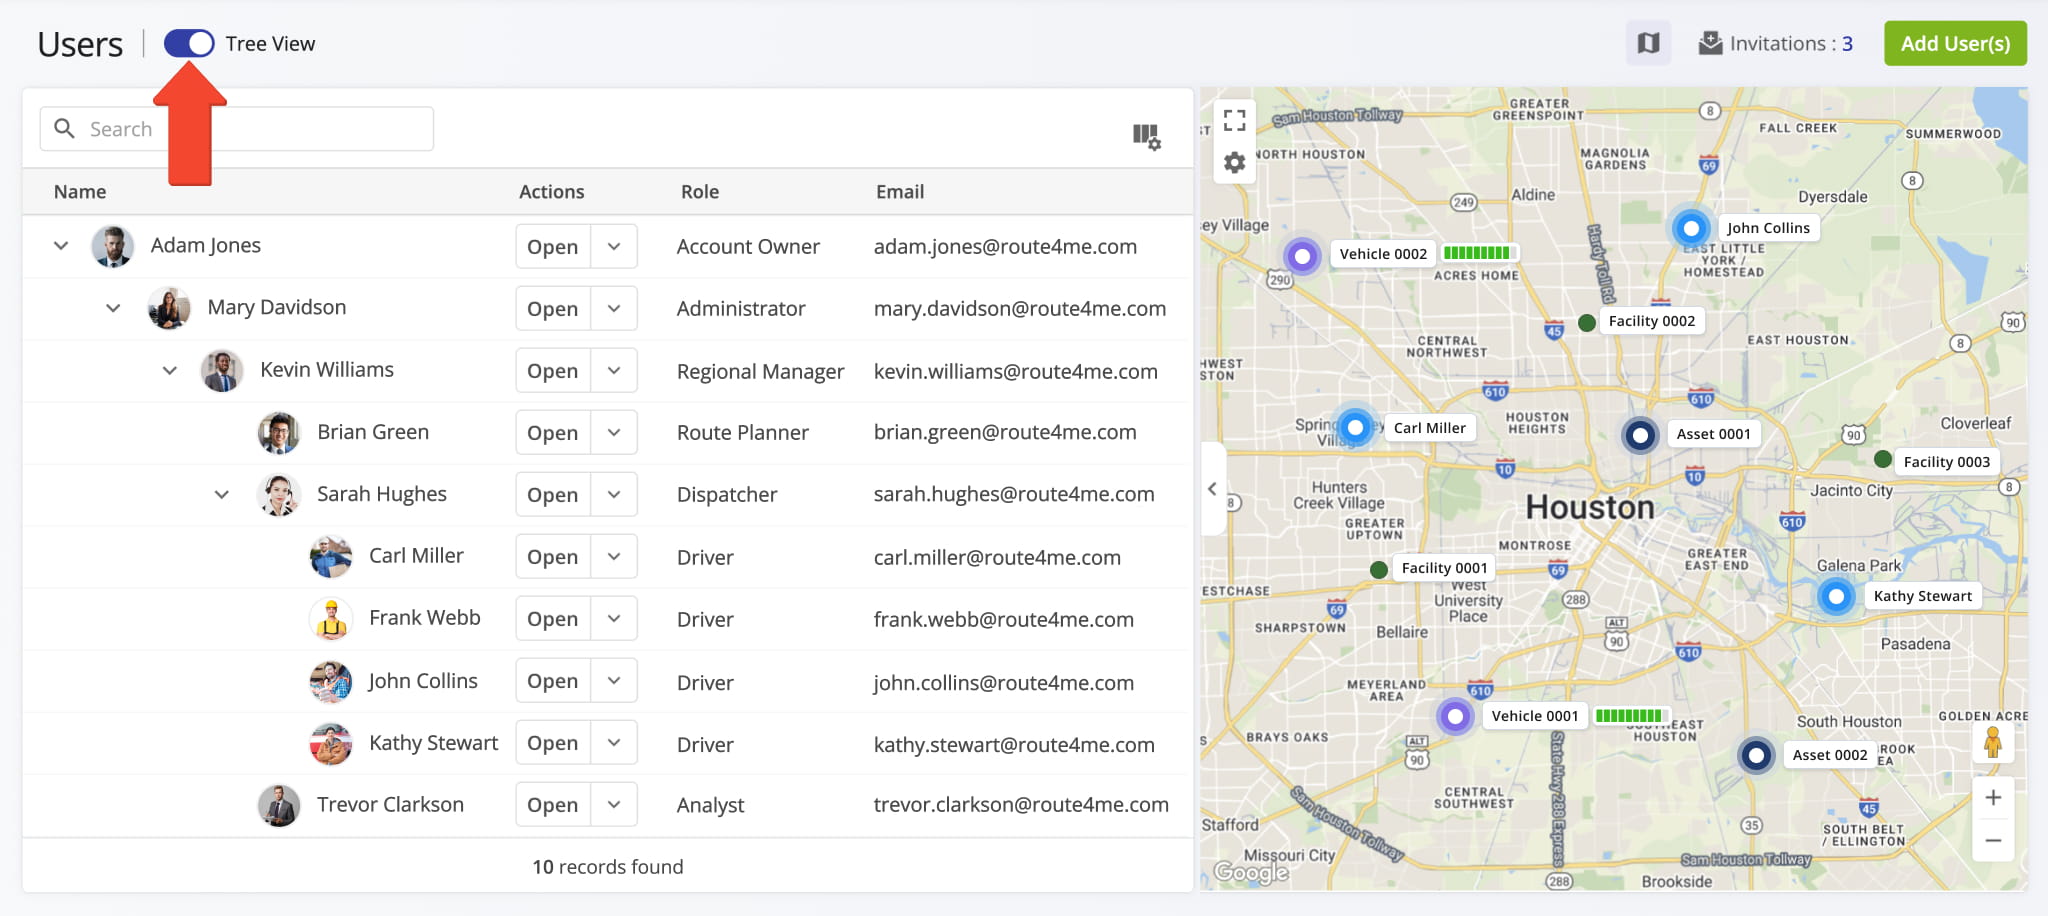
To view your team’s hierarchy and reporting structure, use the “Tree View” toggle at the top of the Users page.
Create Users – Manually Add New Users and Sub-Users To Your Team
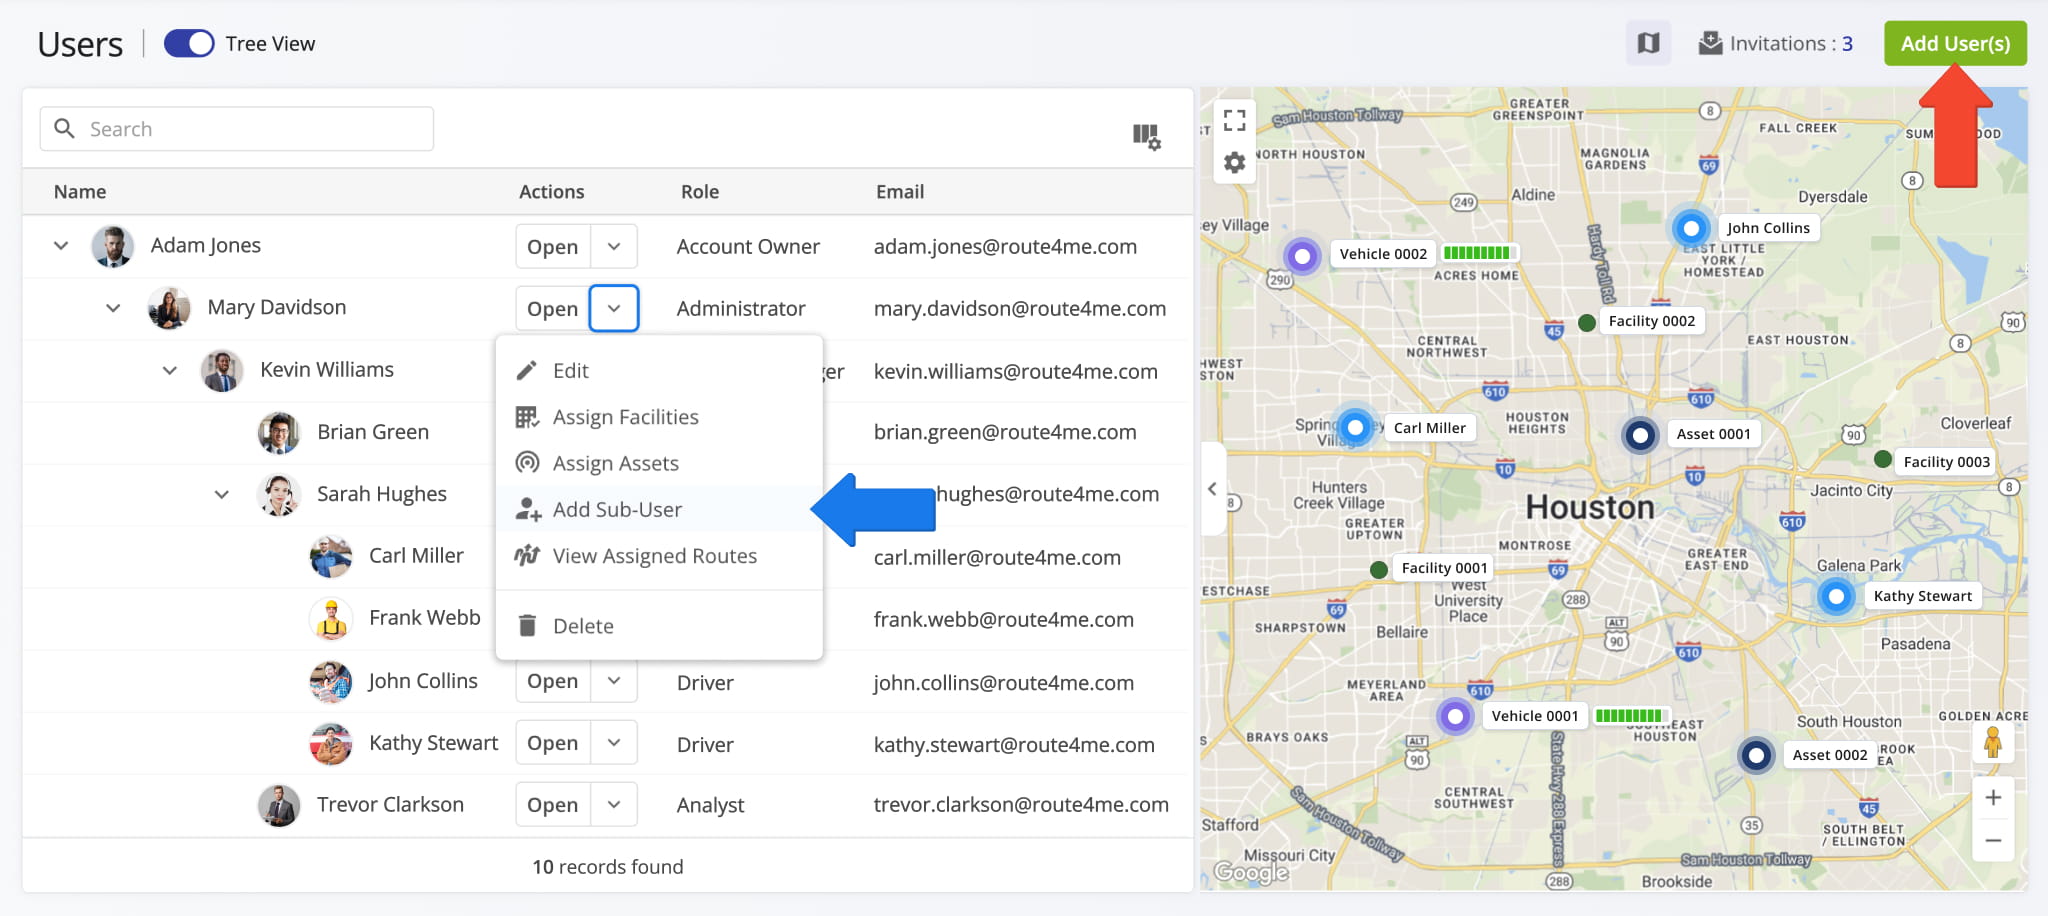
To create a new user, go to “Team & Equipment” > “Users” in the Navigation Menu, then, from your Users page, click “Add User(s)“. Alternatively, click the Down Arrow Button next to an existing user and select “Add Sub-User“.
Your ability to view and manage users depends on your User Type. Based on your permissions, you can add sub-users with different roles and assign them under your account or another team member.
NOTE: Learn more about Route4Me’s Team Hierarchy and User Account Level Permissions.
Next, click the “Create” tab to manually set up a new user account. Fill in the required profile fields, then click “Create User” to add the user to your team. Details about each profile section and field are provided in the table below.
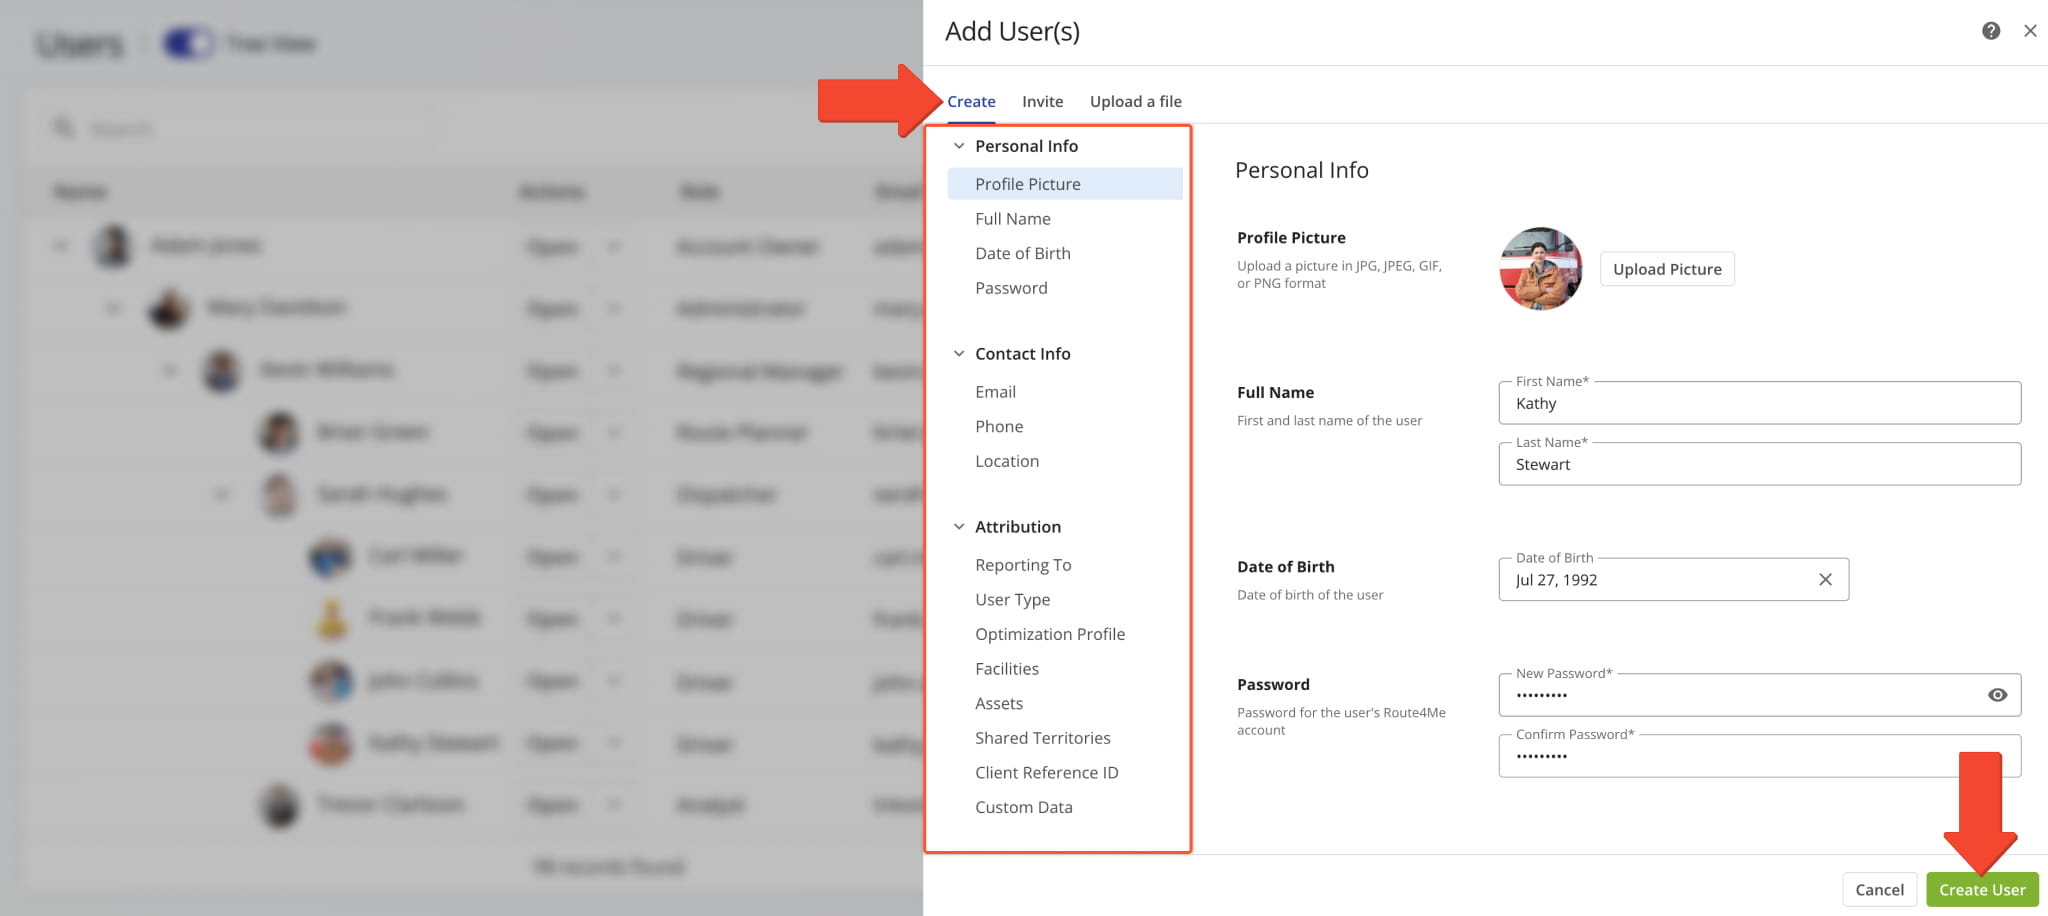
User Details, Profile Settings & Permissions
Invite Users – Invite New Team Members Via Email Link
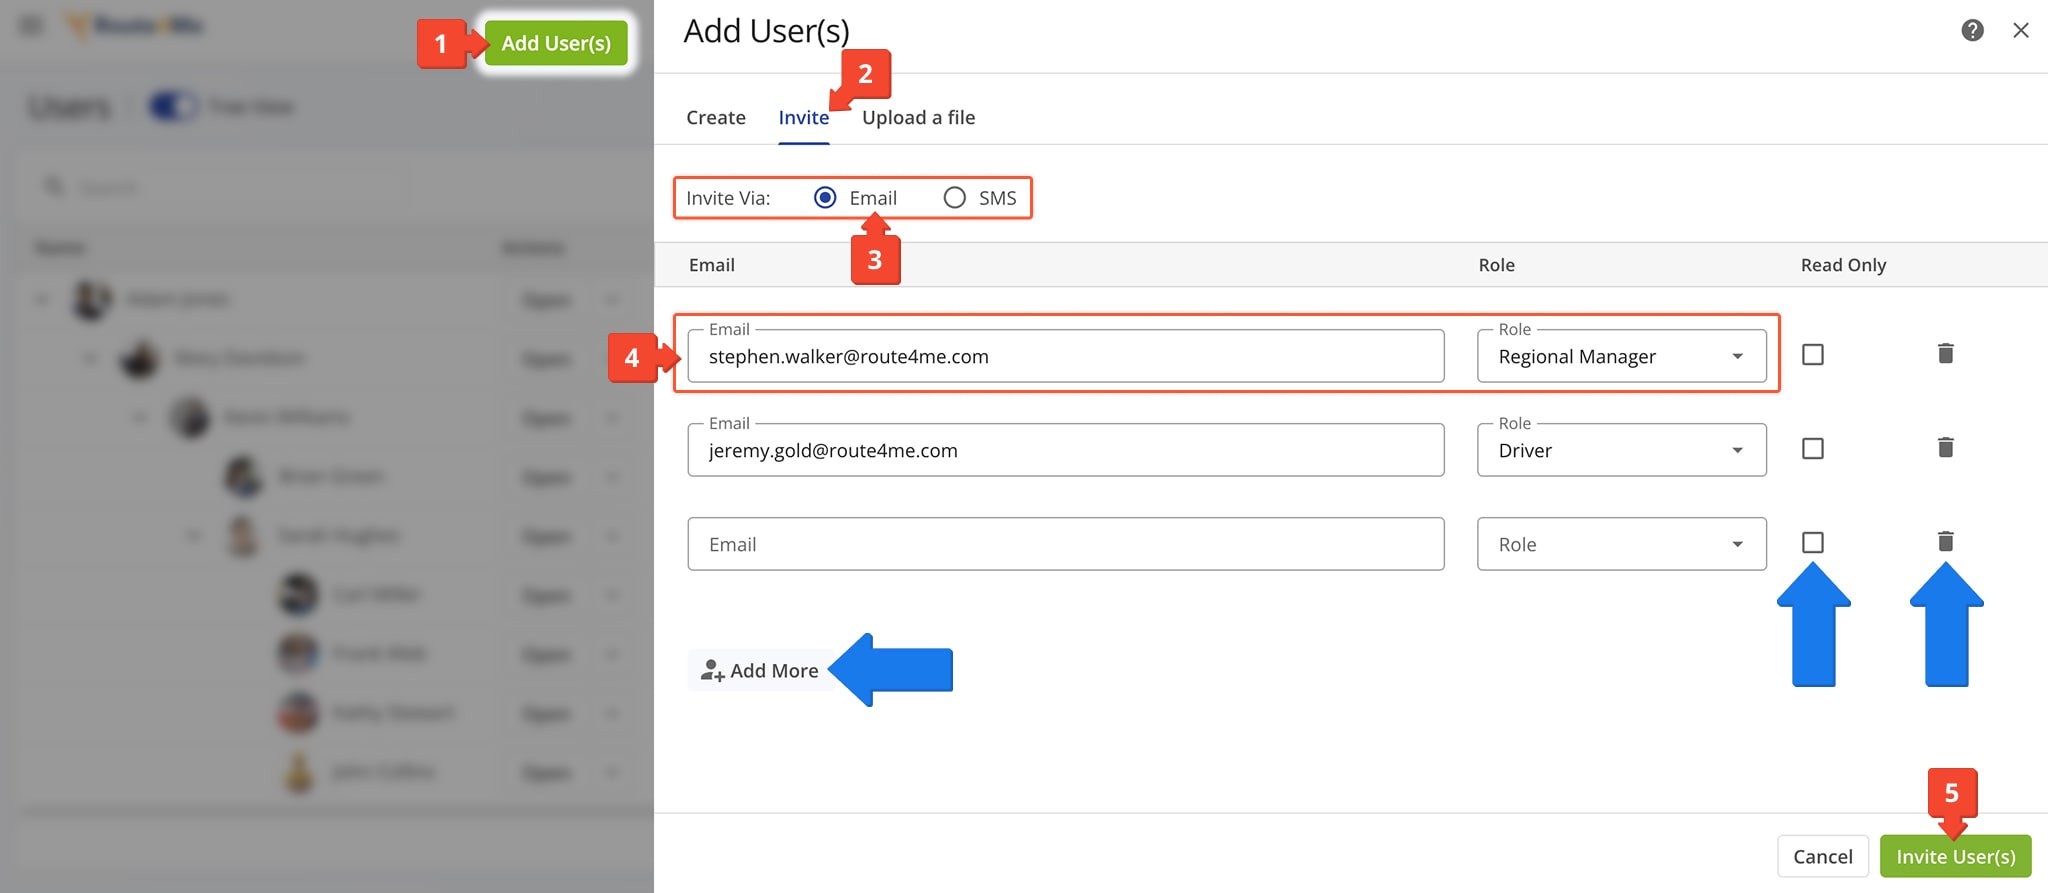
To invite new Users to your last mile transportation team via email:
- Click “Add User(s)” in the top-right of the Users Page.
- Click the “Invite” tab in the “Add User(s)” panel.
- Select “Invite Via: Email“.
- Enter the email address and role of the User(s) you’re inviting.
NOTE: Learn more about Route4Me User Types. - Click “Invite User(s)” to send invitations.
You can also enable Read Only Mode for any invitee by checking the box in the “Read Only” column. Add more invitation rows with the “Add More” button, or remove invitations by clicking the Delete Icon.
Invite Users – Invite New Team Members Via SMS
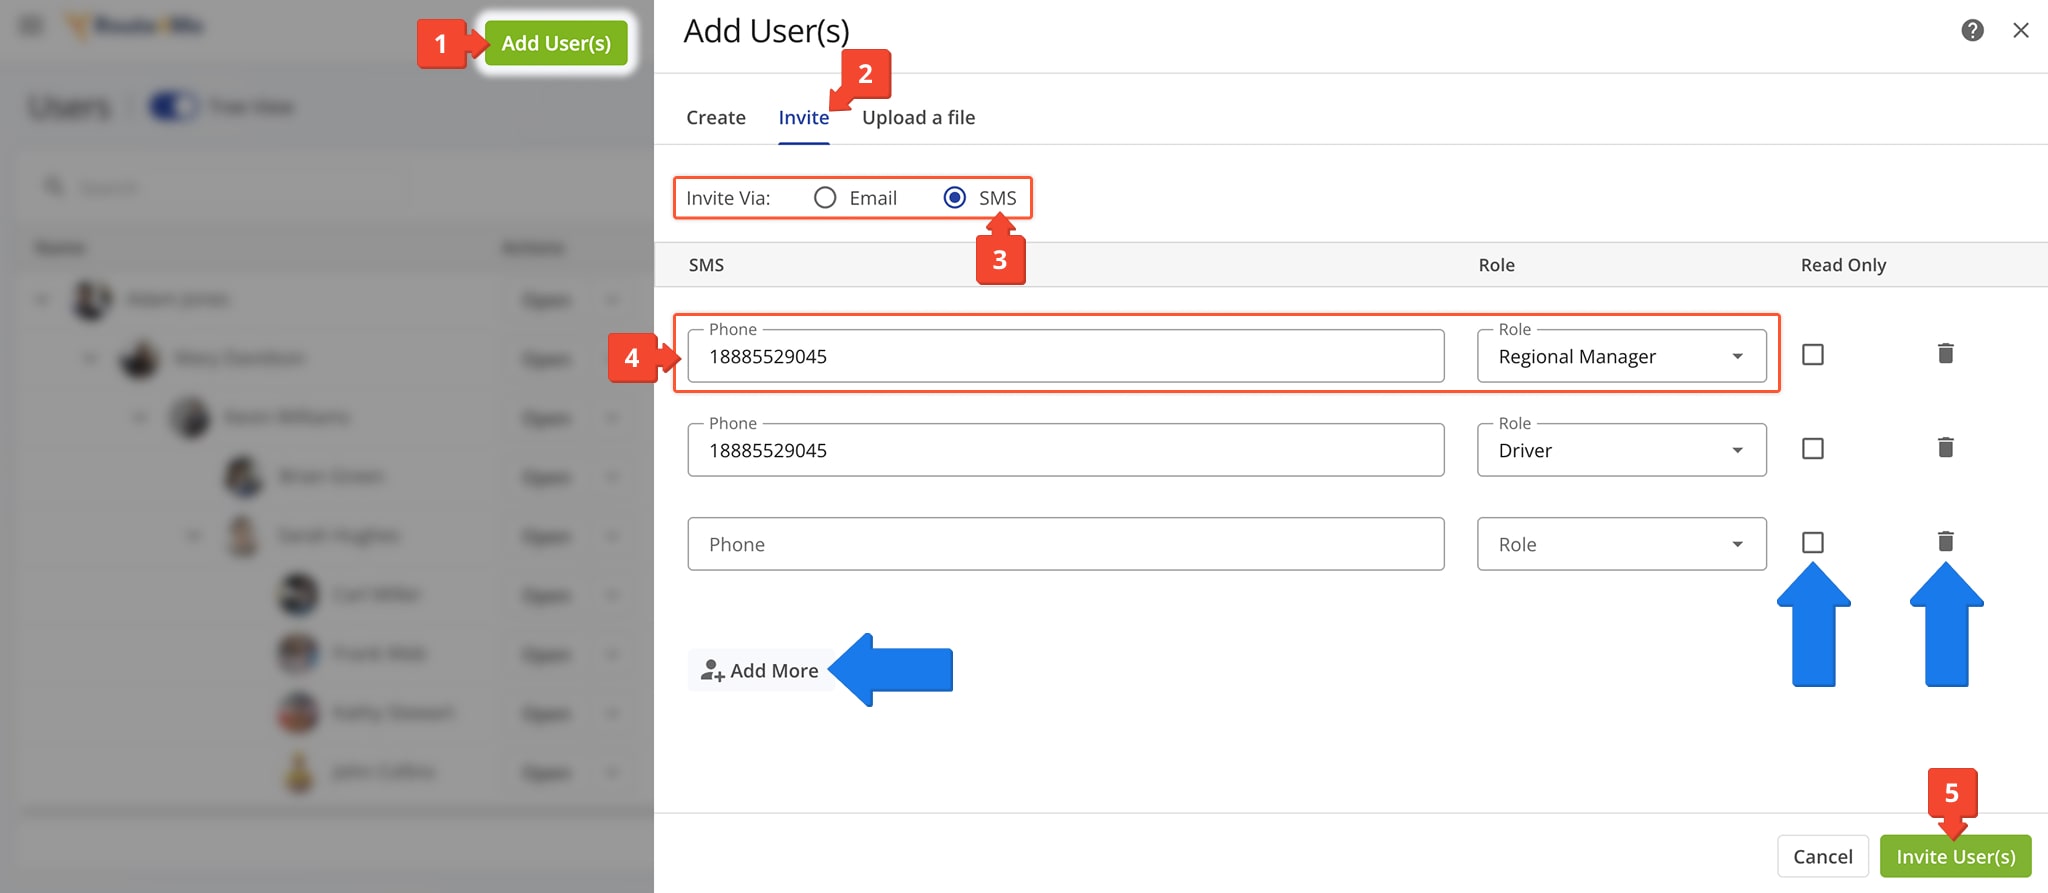
To invite new Users to your last mile transportation team via SMS:
- Click “Add User(s)” in the top-right of the Users Page.
- Click the “Invite” tab in the “Add User(s)” panel.
- Select “Invite Via: SMS“.
- Enter the phone number and role of the User(s) you’re inviting.
NOTE: Learn more about Route4Me User Types. - Click “Invite User(s)” to send invitations.
You can also enable Read Only Mode for any invitee by checking the box in the “Read Only” column. Add more invitation rows with the “Add More” button, or remove invitations by clicking the Delete Icon.
Track User Invitation Status And Re-Send User Invites
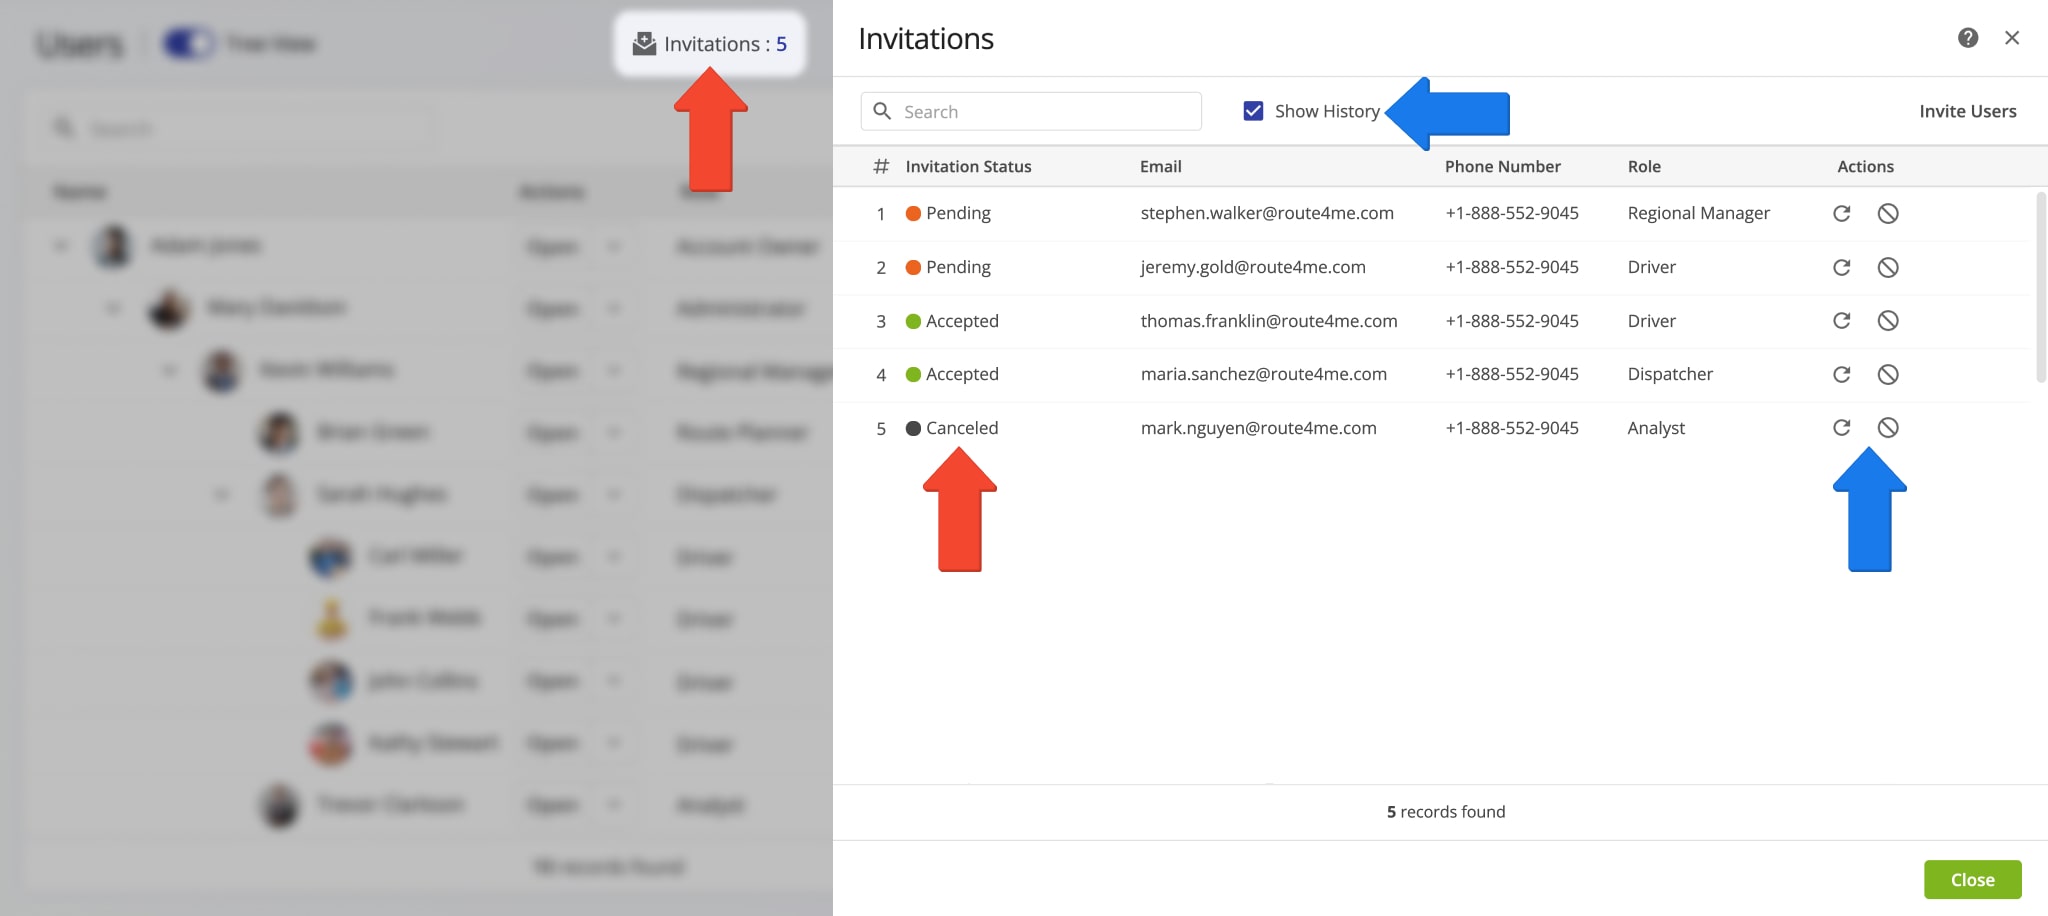
After sending user invitations, you can click the “Invitations” Button to view invitation statuses, or resend or cancel invitations.
To resend an invitation, click the Resend button next to the entry. To cancel one, click the delete icon; this deactivates the registration link immediately. You can also check “Show History” to view all accepted, canceled, or expired invitations.
Below, you’ll find descriptions of all invitation statuses.
User Invitation Statuses
Upload Users – Team Members Spreadsheet Formatting And Upload
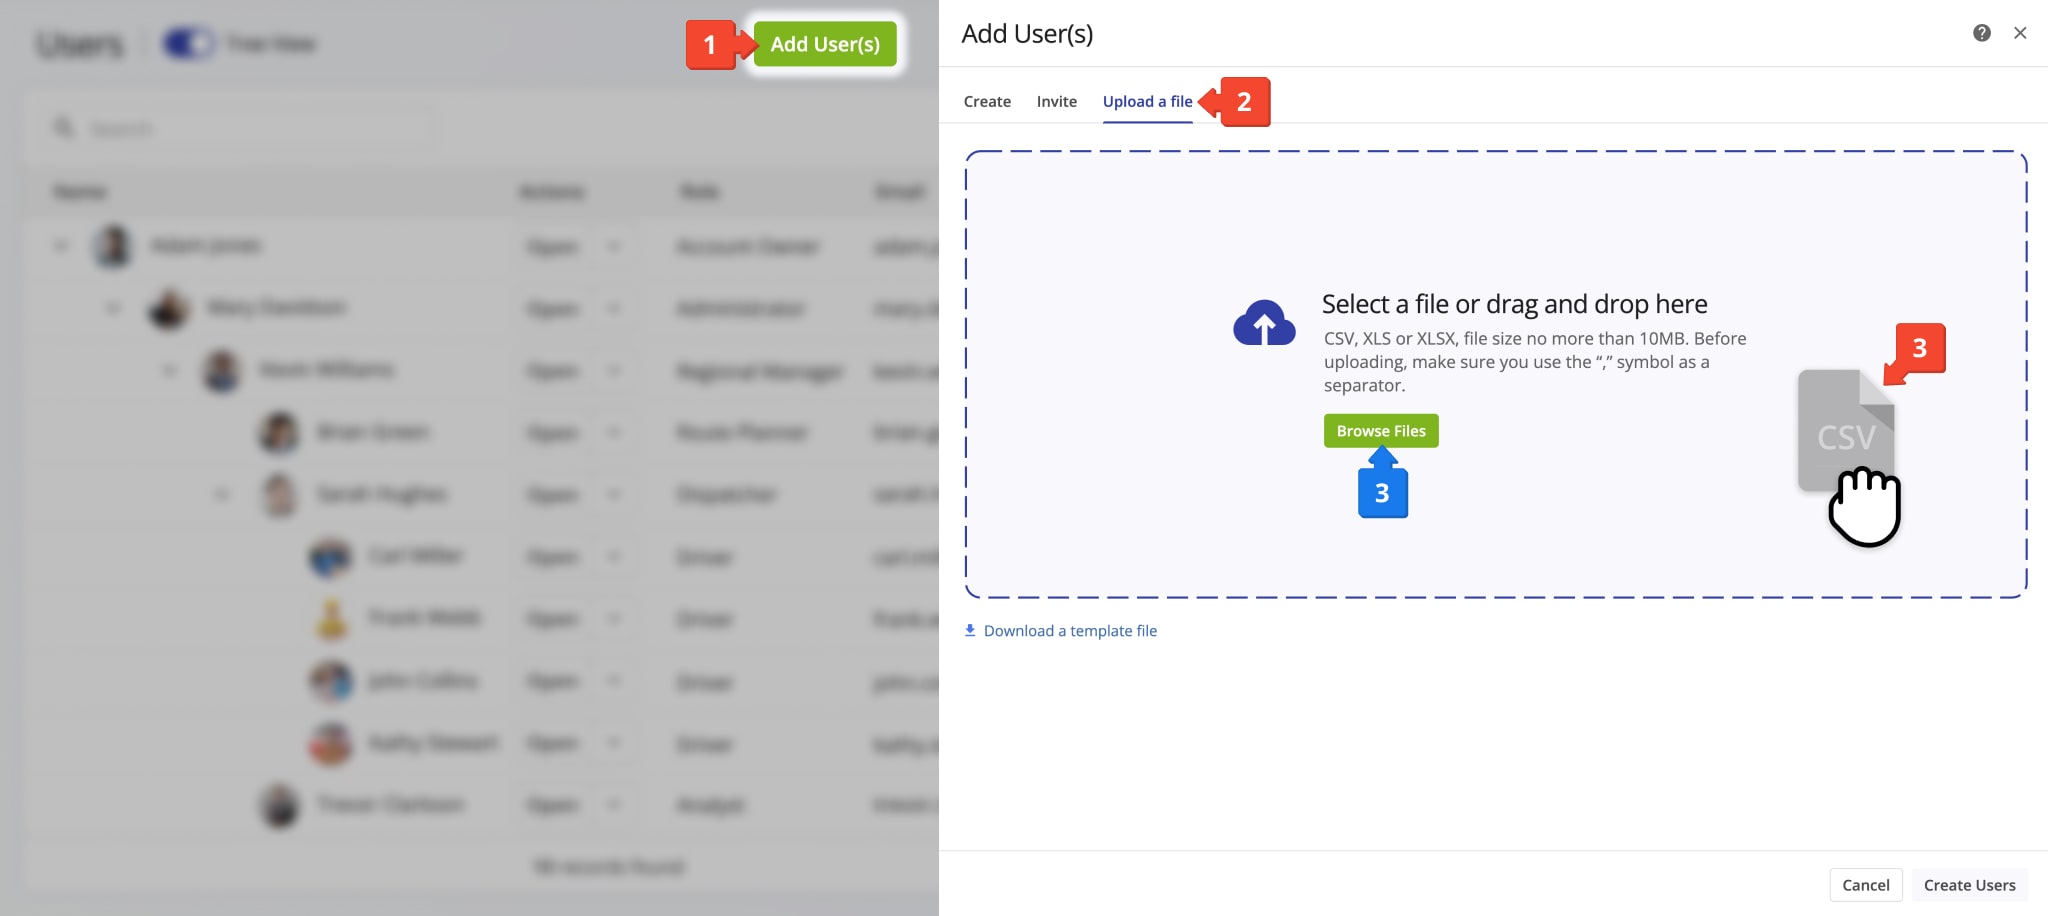
To import team members into your Route4Me account, follow the steps below:
- Click “Add User(s)” in the top-right of the Users Page.
- Click the “Upload A File” tab in the “Add User(s)” panel.
- Drag and drop a CSV, XLS, or XLSX file with user data into the highlighted area or click “Browse Files” to select your file.
For convenience, use Route4Me’s Bulk User Import Spreadsheet Template. Download the template, fill in your team’s information, and upload it to create multiple users at once.
Spreadsheet Formatting Details For Bulk User Upload
The user upload spreadsheet is organized into columns and rows. To add a new column, enter the desired column name in the header row, then fill in the corresponding user data below. Each row represents a single user.
NOTE: Learn more about Route4Me’s Spreadsheets Formatting Requirements.
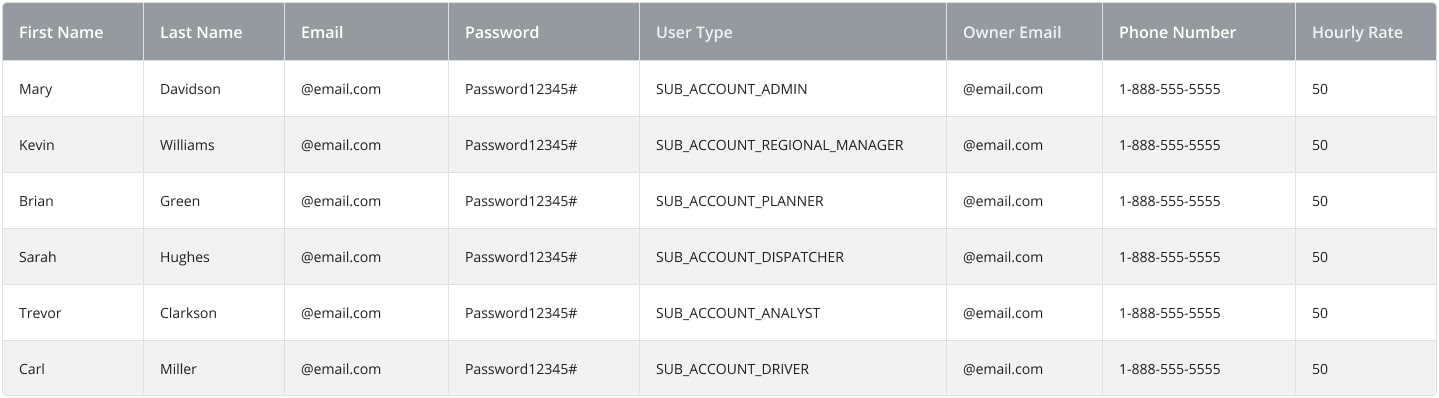
Below, you can find the list of column names you can add to your spreadsheet. Learn more about Route4Me’s User Types and User Permissions and Route4Me’s User Permissions Settings, Read-Only Mode, Route and Company Visibility Settings.
Users Spreadsheet Columns & Values
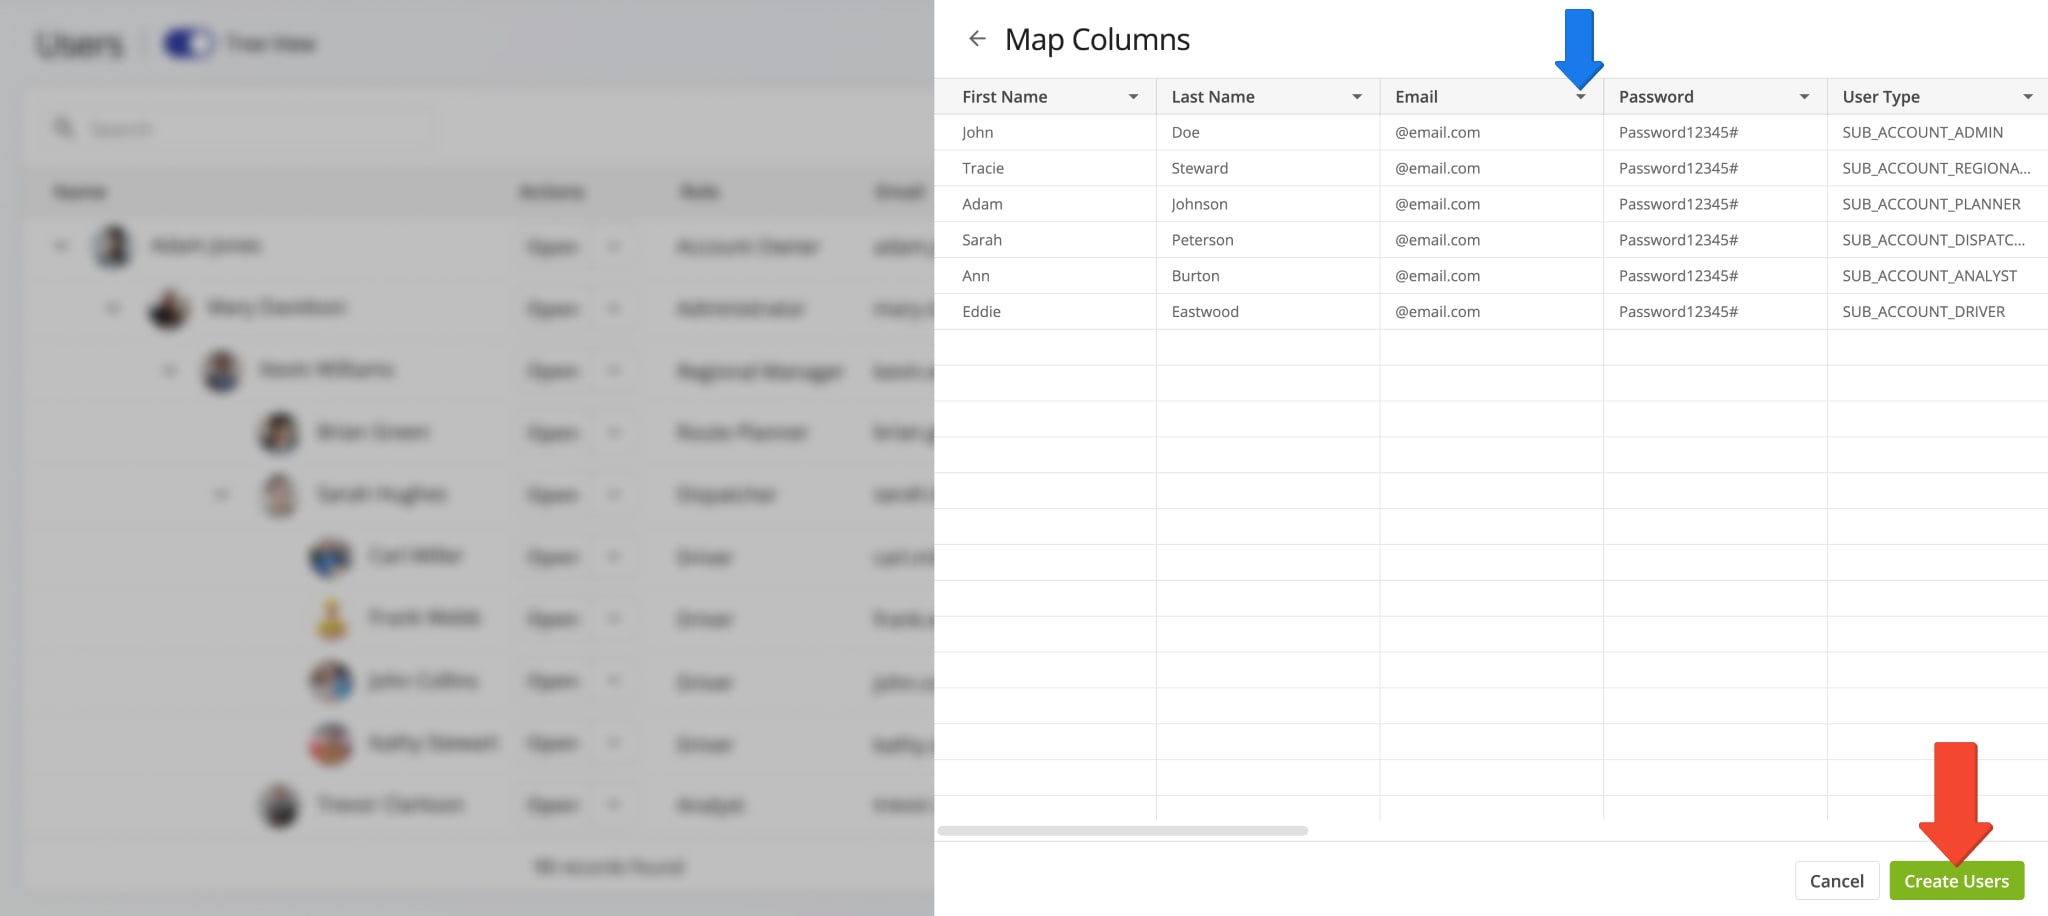
After uploading your spreadsheet, Route4Me automatically matches column headers to User profile fields. If any columns don’t match correctly, you can manually assign them by clicking the Down Arrow in the respective header and selecting the appropriate field from the menu.
Once you’ve confirmed the uploaded data, click “Create Users” to add the new Users to your last mile transportation team.
Assign Users To Routes, Facilities And Assets
Route4Me seamlessly integrates last mile team management and enterprise resource planning by enabling you to associate Users with Routes, Facilities, Assets, and more. Keep reading to learn about associating team members with company resources.
Assign Users To Routes – Dispatch Routes To Users
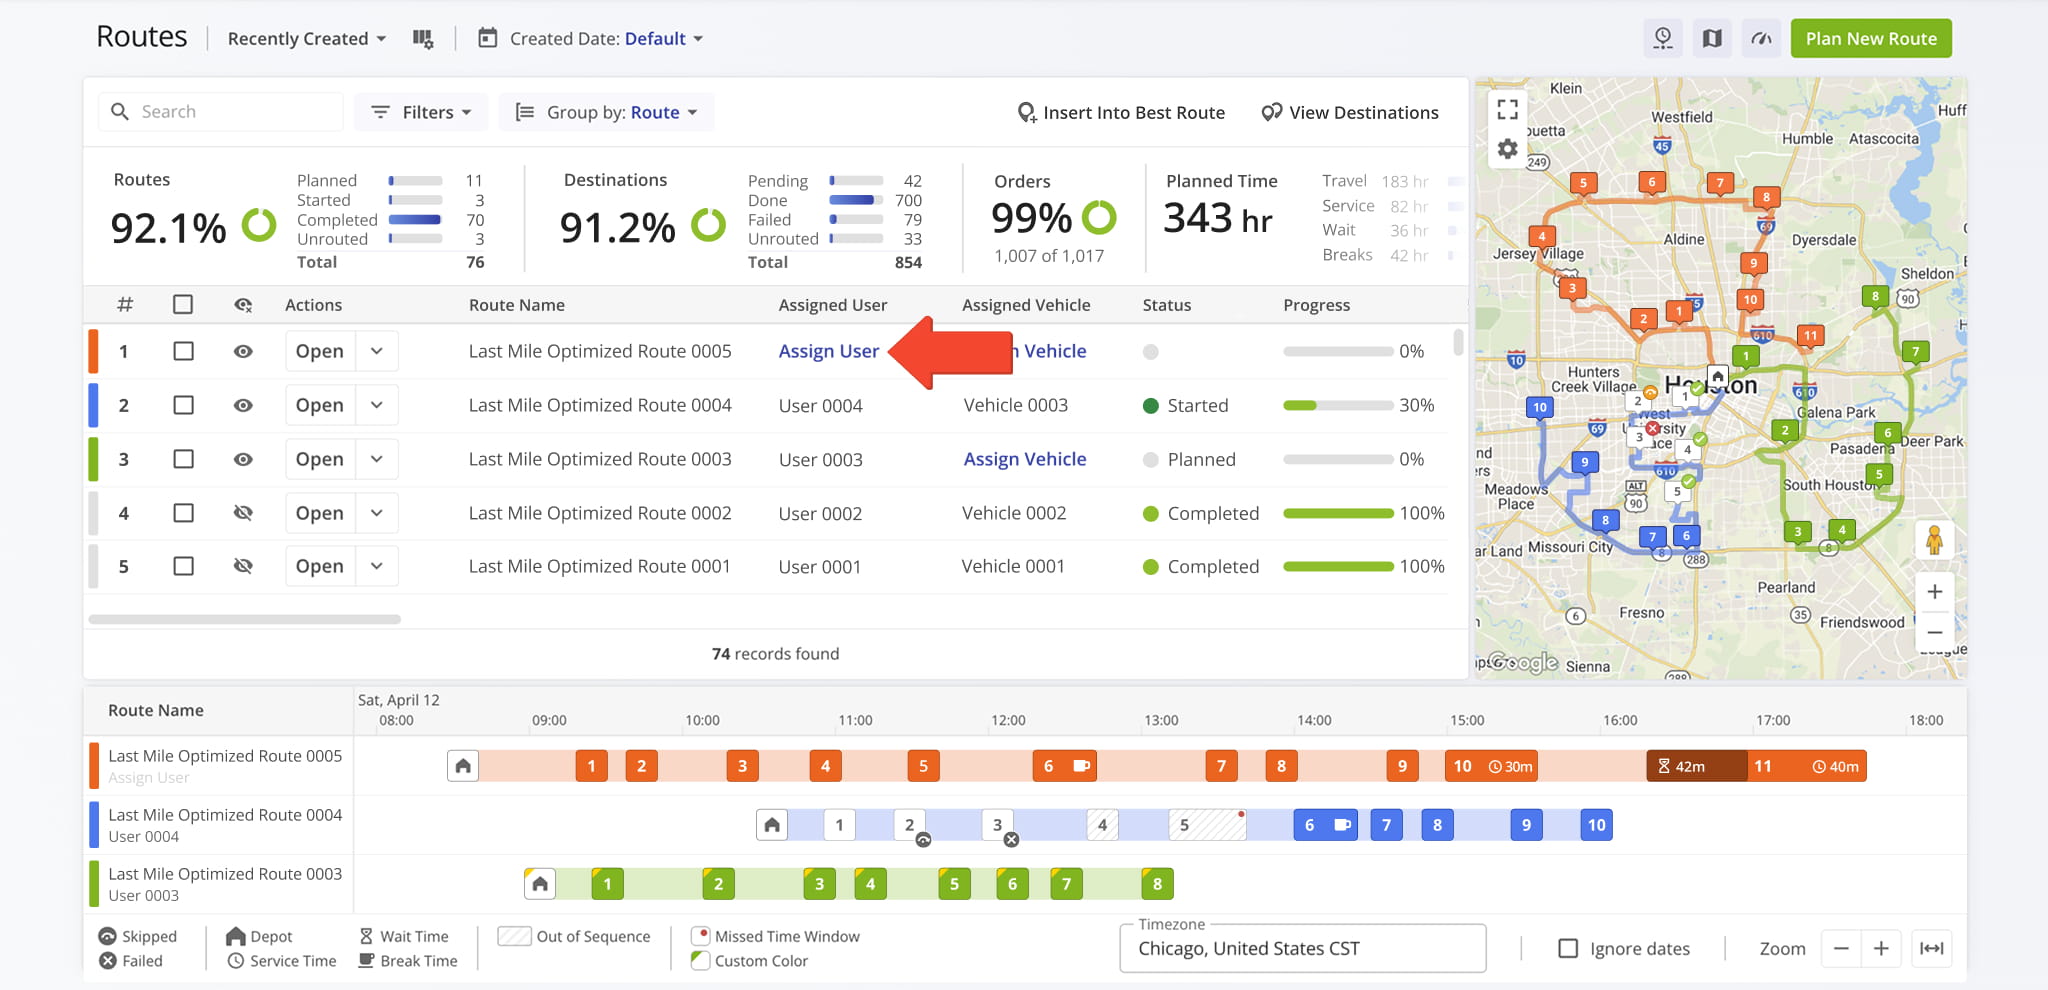
Once added to your team, you can assign Users to routes. This can be done automatically when planning routes with Optimization Profiles or Route Settings, or you can manually assign Users to routes from the Routes Page or Route Editor.
When you assign a User to a route, the route is automatically dispatched to them. After dispatching, you can track Users on routes and view their GPS route tracking history.
Assign Team Members To Company Facilities
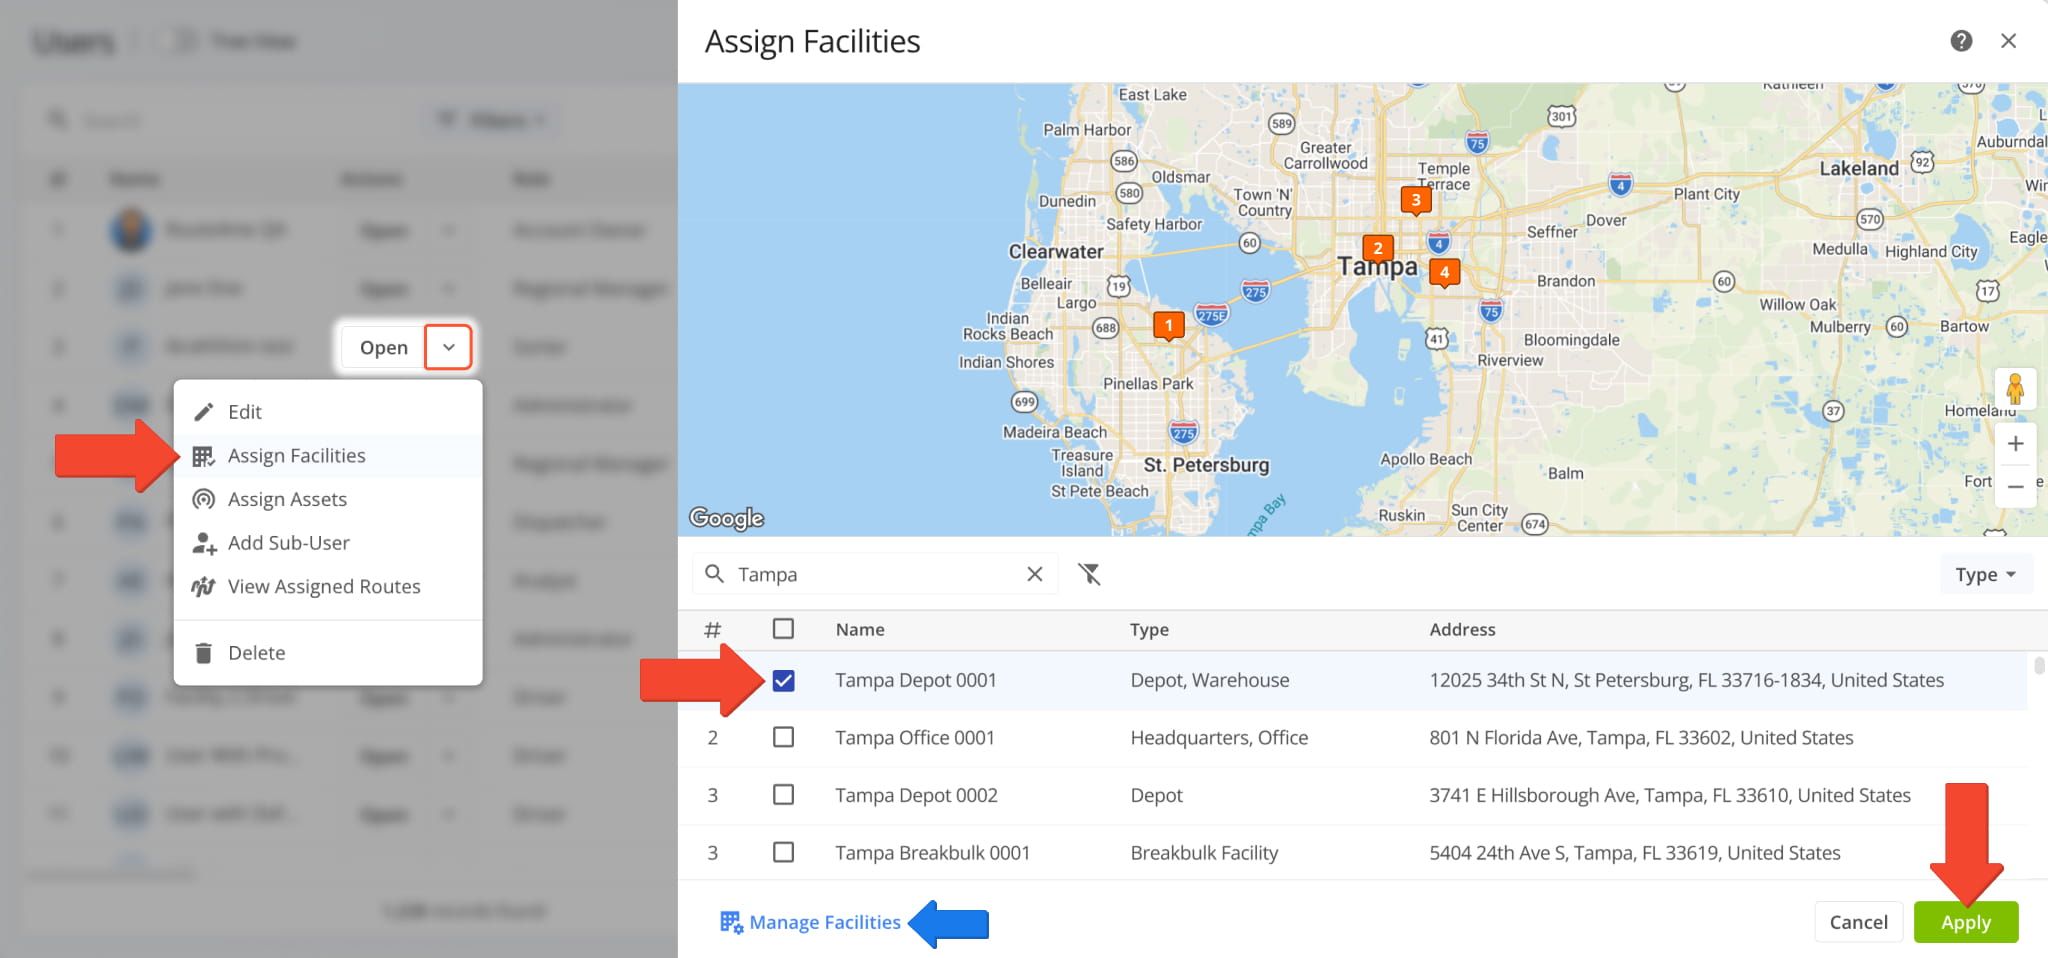
From the Users Page, you can assign team members to Facilities. To do so, click the Down Arrow and select “Assign Facilities“. Then, select the Facilities to which you’d like to assign the User and click “Apply” to finalize.
From here, you can also click “Manage Facilities” to open your Facilities Page.
Assign Team Members To Company Assets
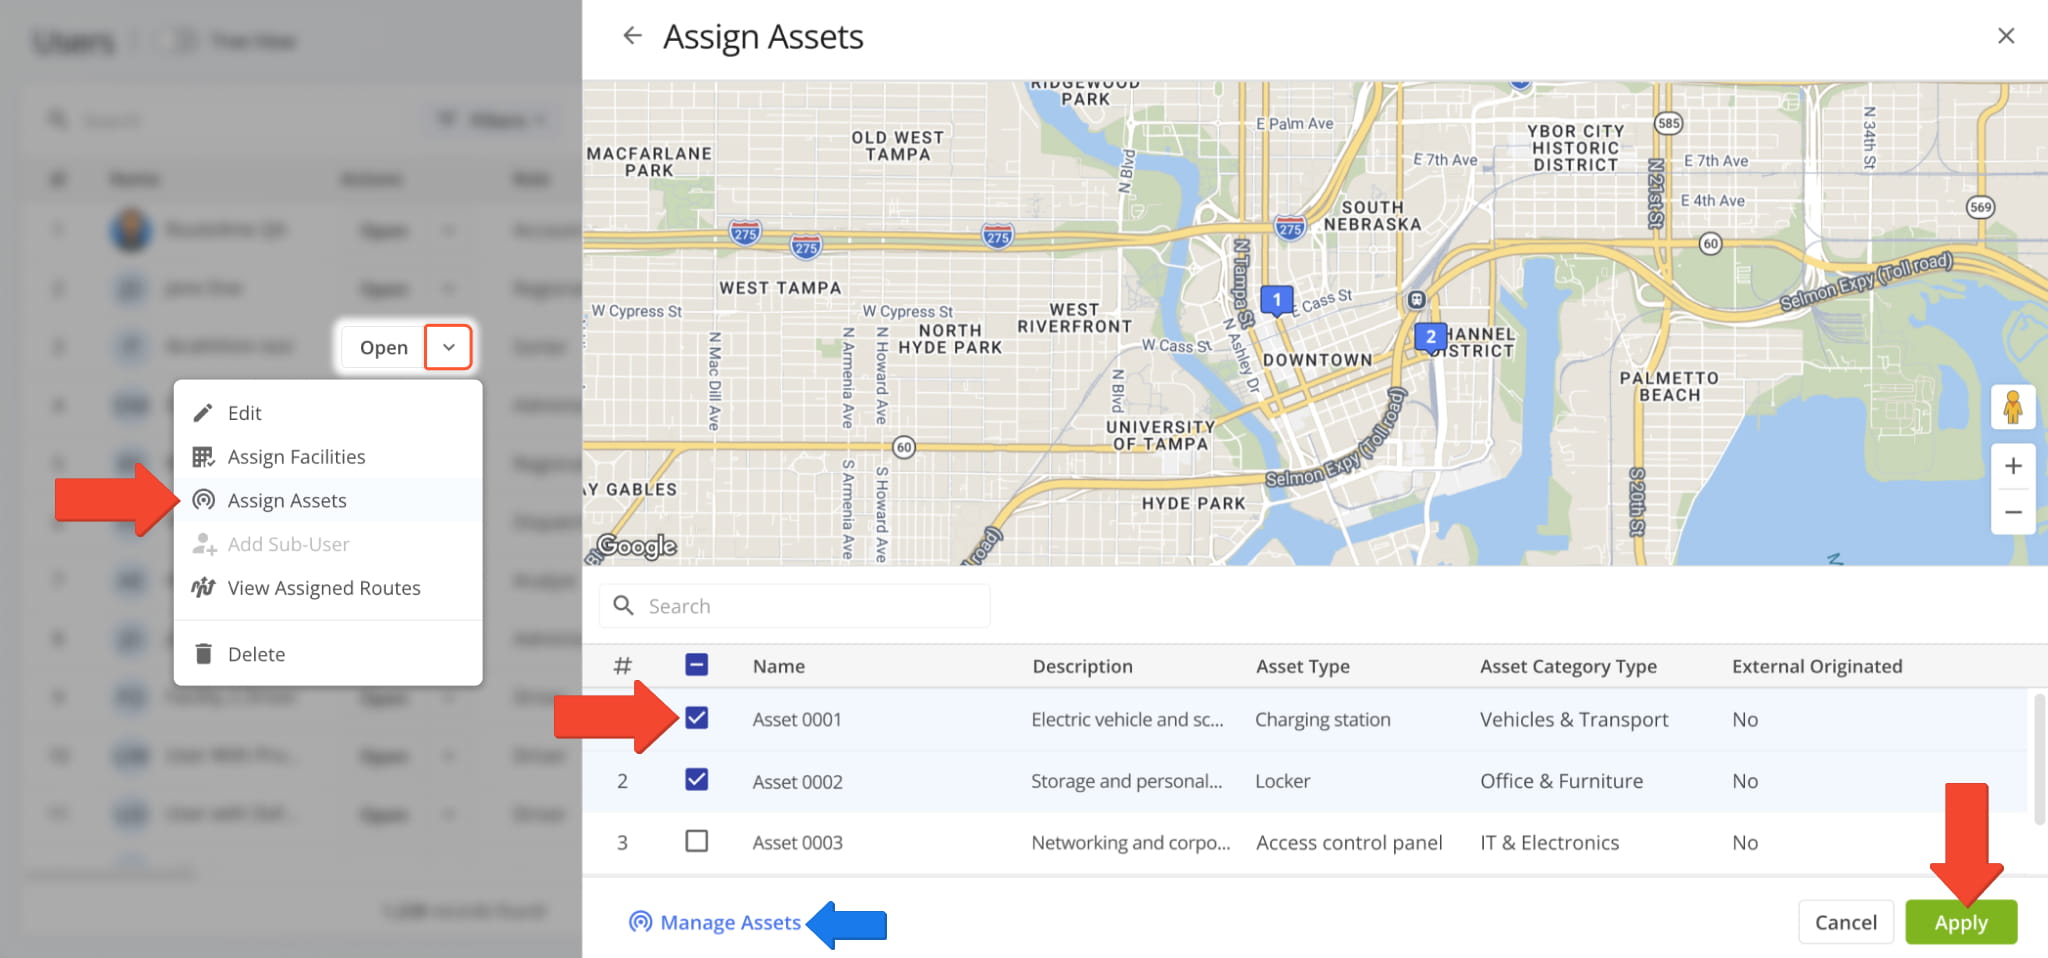
From the Users Page, you can assign team members to Company Assets. To do so, click the Down Arrow and select “Assign Assets“. Then, select the Assets to which you’d like to assign the User and click “Apply” to finalize.
From here, you can also click “Manage Assets” to open your Assets Page.
Users Map – Open And Use Dynamic Last Mile Team Map
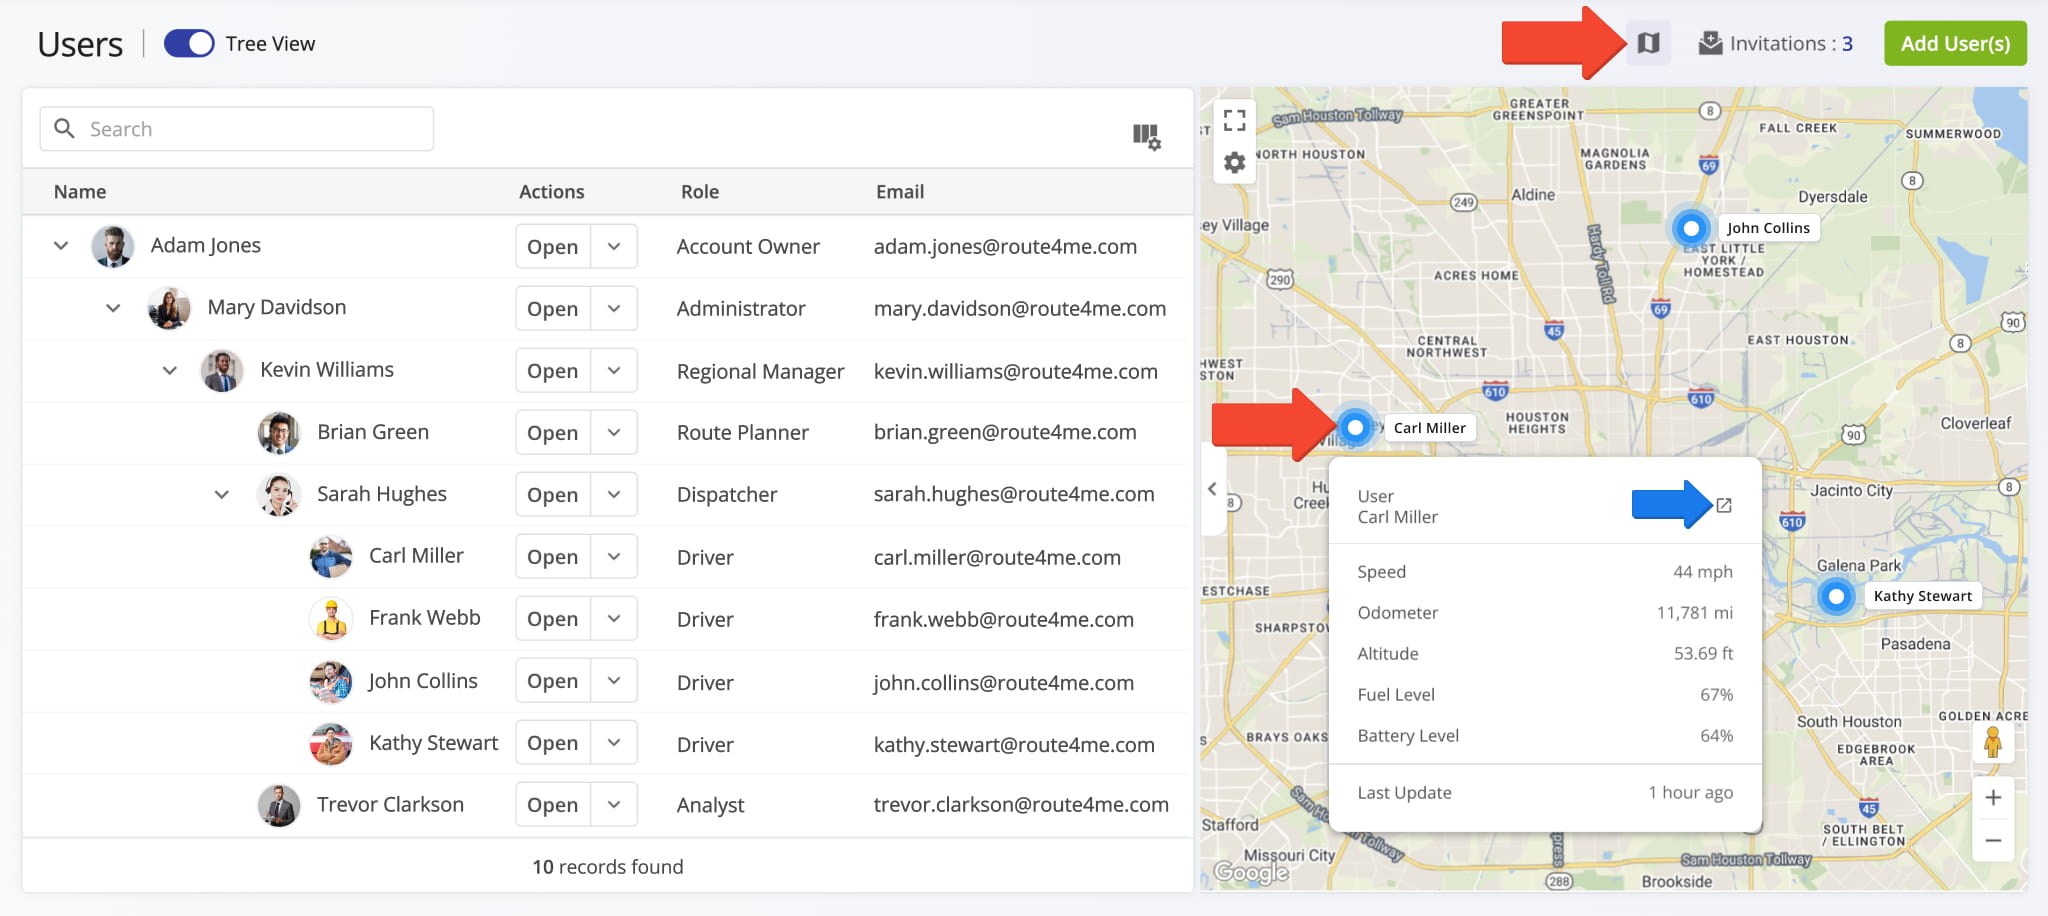
To open or close the Users Map, simply click the Map Icon in the top-right of the Users Page.
Users who have signed in on the Route4Me Mobile App and started a route are shown on the map as blue location markers. Hover over a location marker to see the associated User’s details, their last synced Vehicle statistics, and when their location was last synced with your account. You can also click the Open Icon to go to the corresponding User Snapshot.
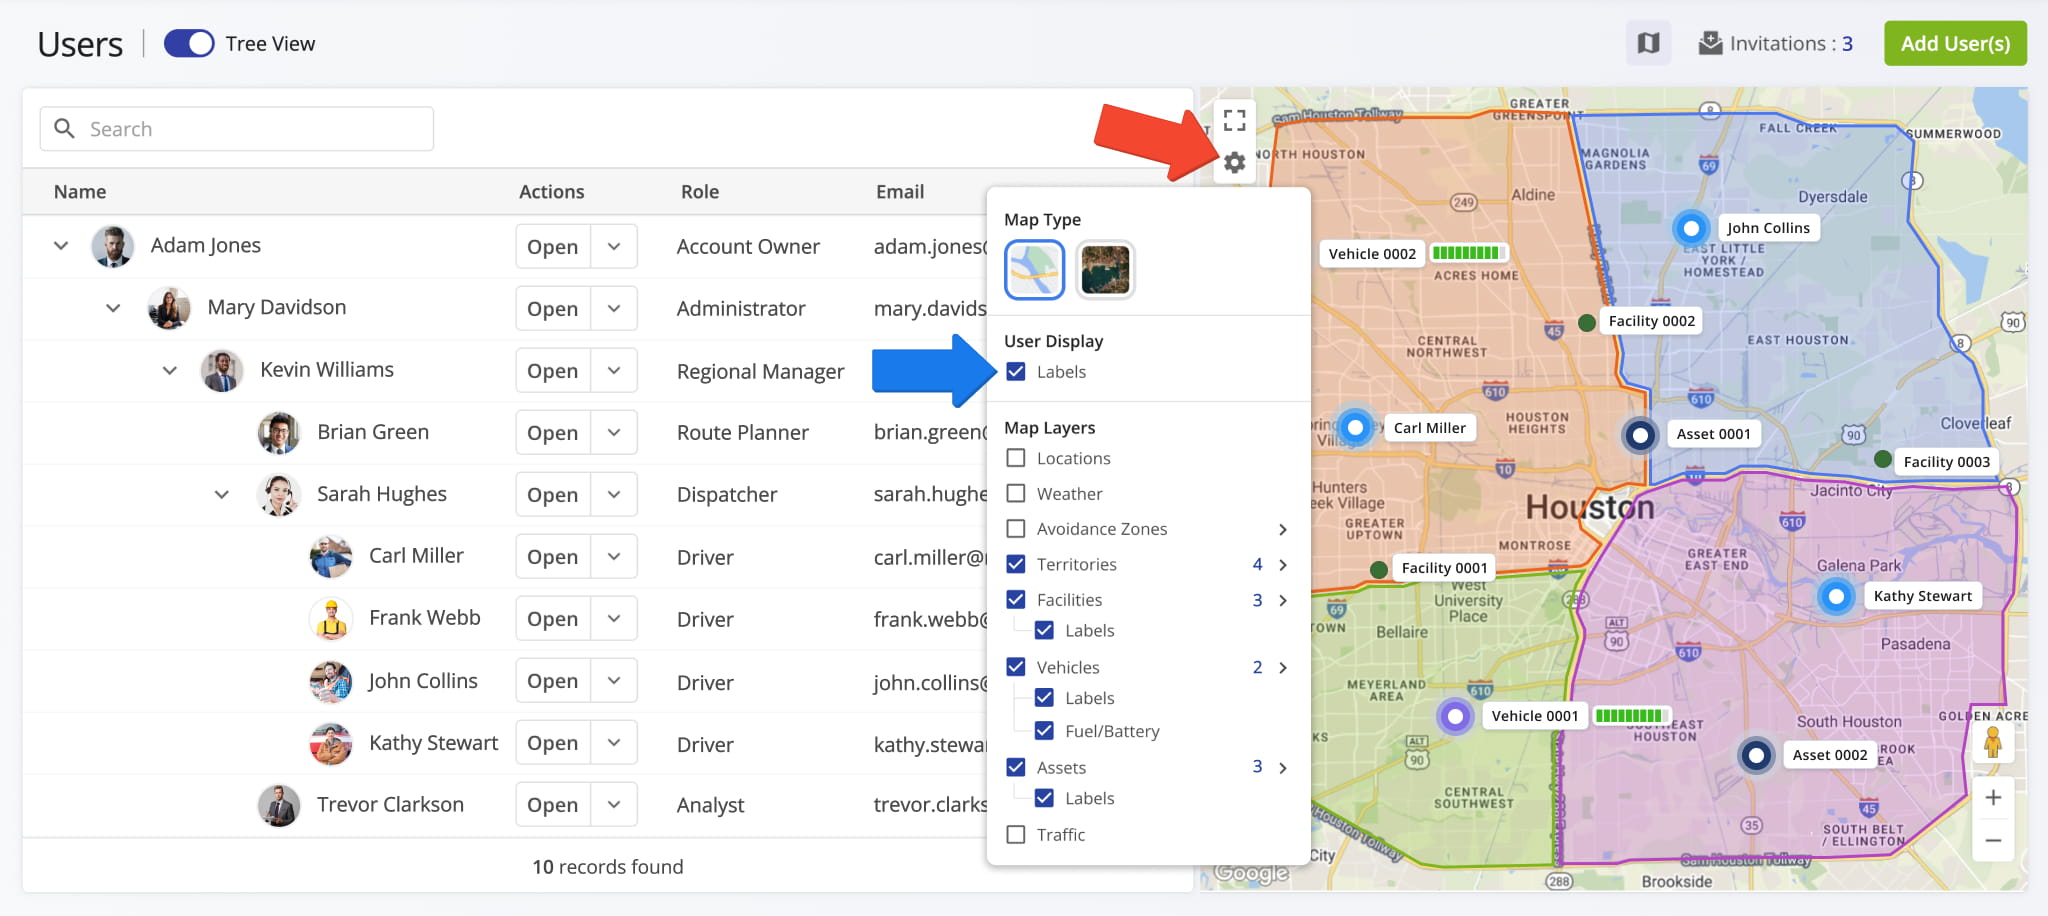
Click the Gear Icon in the top-left of the map to open the Map Settings. You can enable overlays to show the location of different zones, assets, and resources. To do so, check the box next to the options you want to enable on the map.
Enable the “Labels” option under “User Display” to see User names on the map. See the table below for a full list of settings available for the Users Page Map. NOTE: Some options may require specific Route4Me account features.
Users Map Settings
Manage Users – Edit Team Member Details, Permissions, And More
With Route4Me’s Last Mile Team Management Software, you can manage, edit, delete, or reassign users with just a few clicks. All the settings available when creating a new user, such as personal details, team hierarchy, user type, permissions, pay rates, and driver skills, can also be updated for any existing user or sub-user.
View And Edit Users – Adjust User Information, Visibility, And Access Permissions
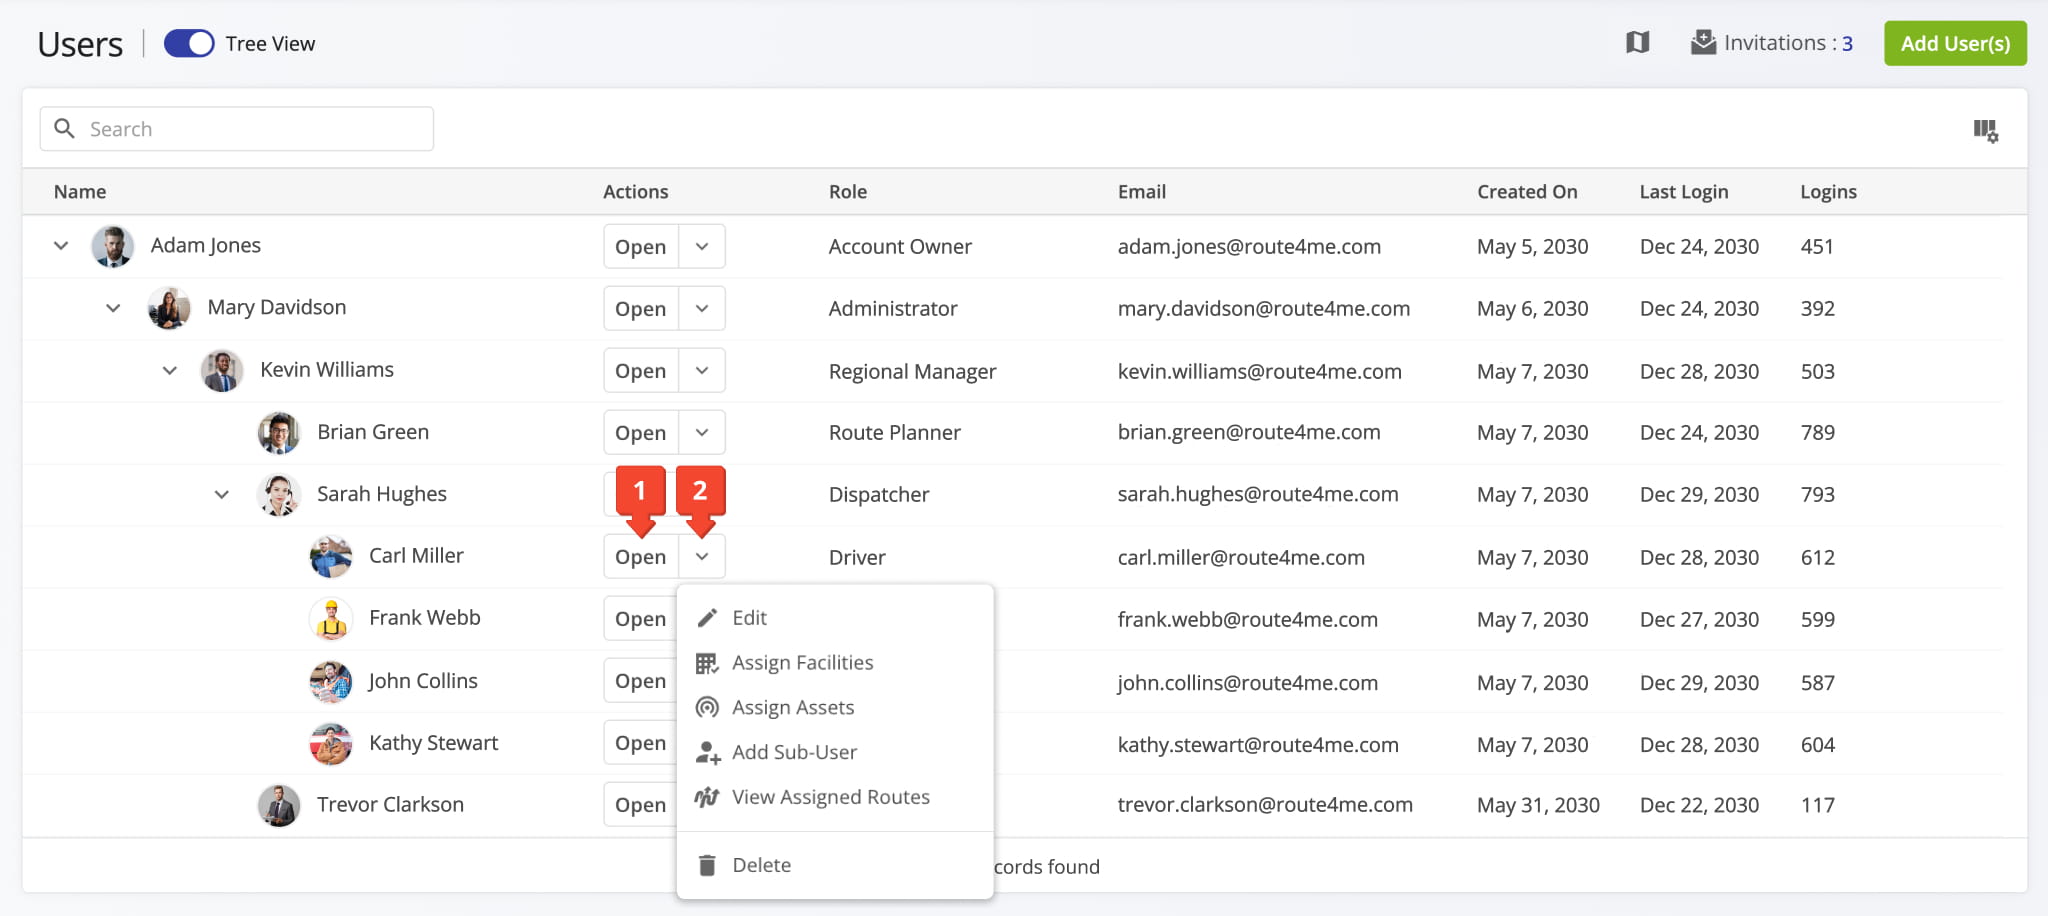
On your Users Page, you can view and manage all Users associated with your Route4Me account. Likewise, each user can see and manage their own sub-users. From here, you can:
- Click the “Open” button next to a User to open their corresponding User Snapshot.
- Click the Down Arrow next to a User to open the management actions menu.
See the table below for a full list and detailed explanations of the available User management actions.
User Management Actions
Edit User Permissions – Account-Level Permissions Settings
Once a user account is created, you can adjust their visibility and access rights in the “Permissions” tab of the “Edit User” panel. Detailed explanations of each permission setting are provided below.
NOTE: For additional guidance, refer to Route4Me’s User Account-Level Permissions Settings support documentation.
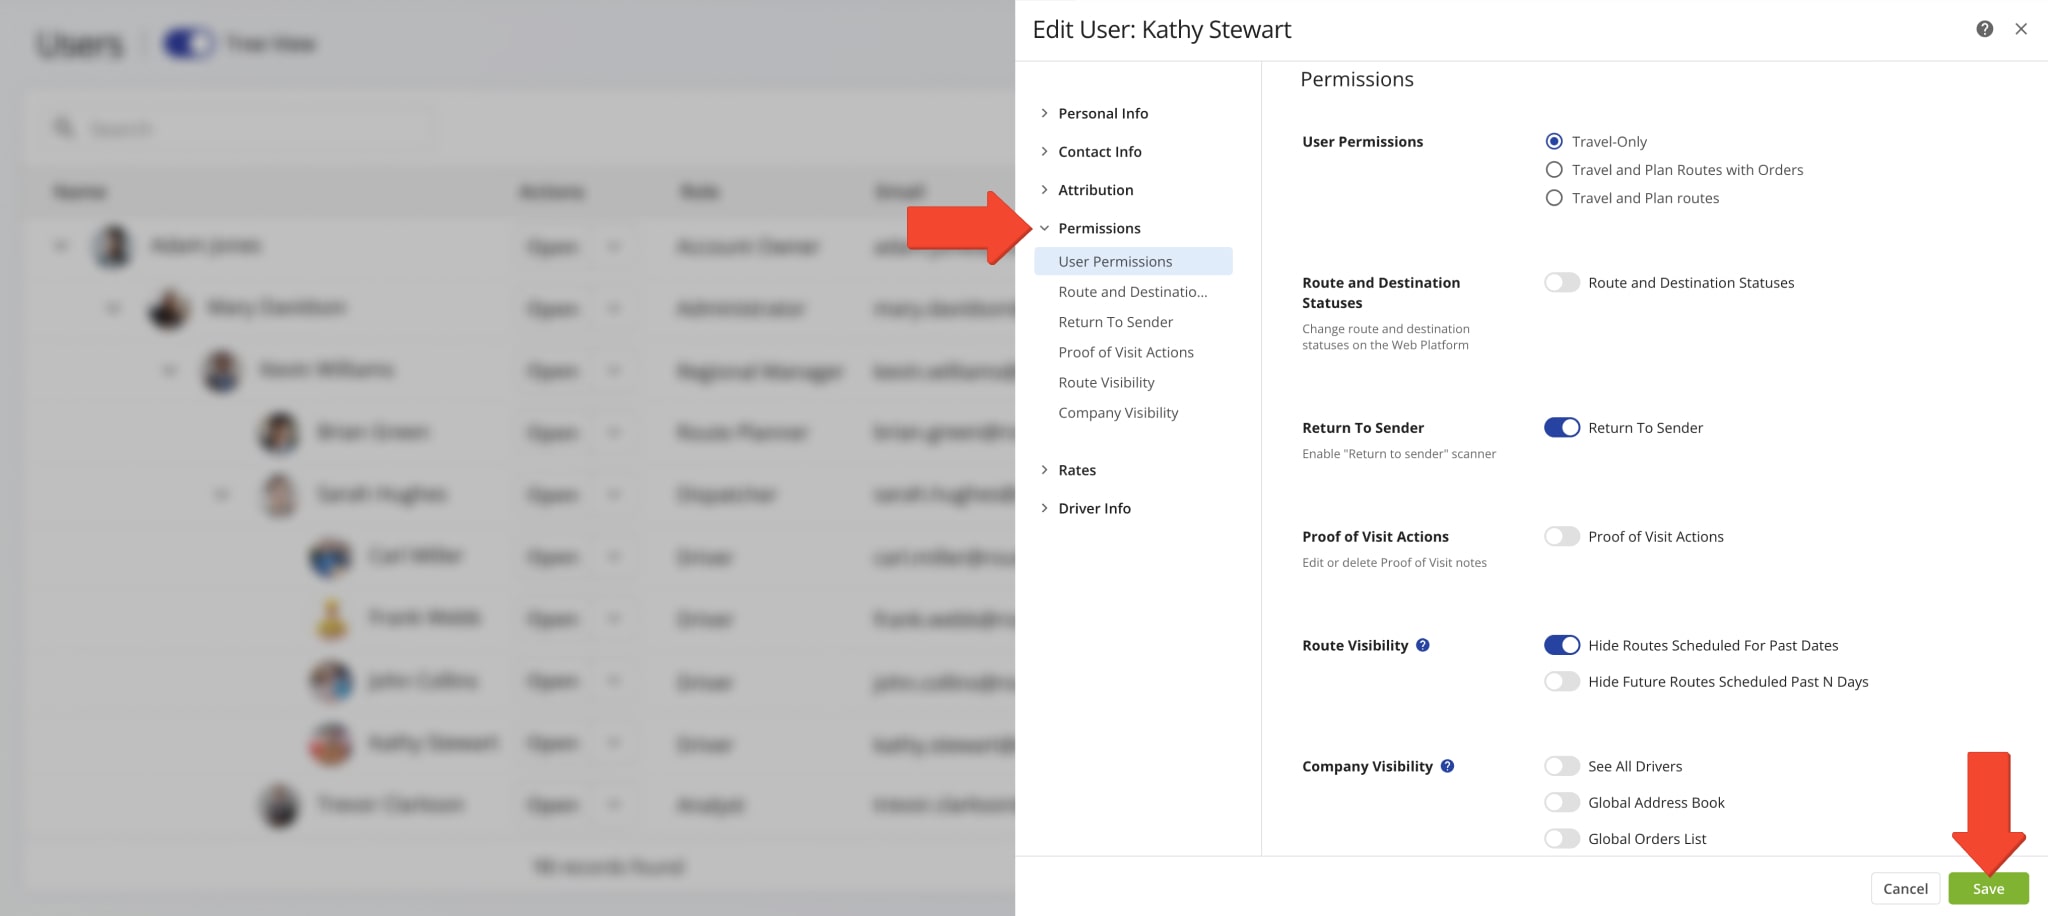
User Permissions Settings
Delete Users – Remove Team Members From Your Route4Me Account
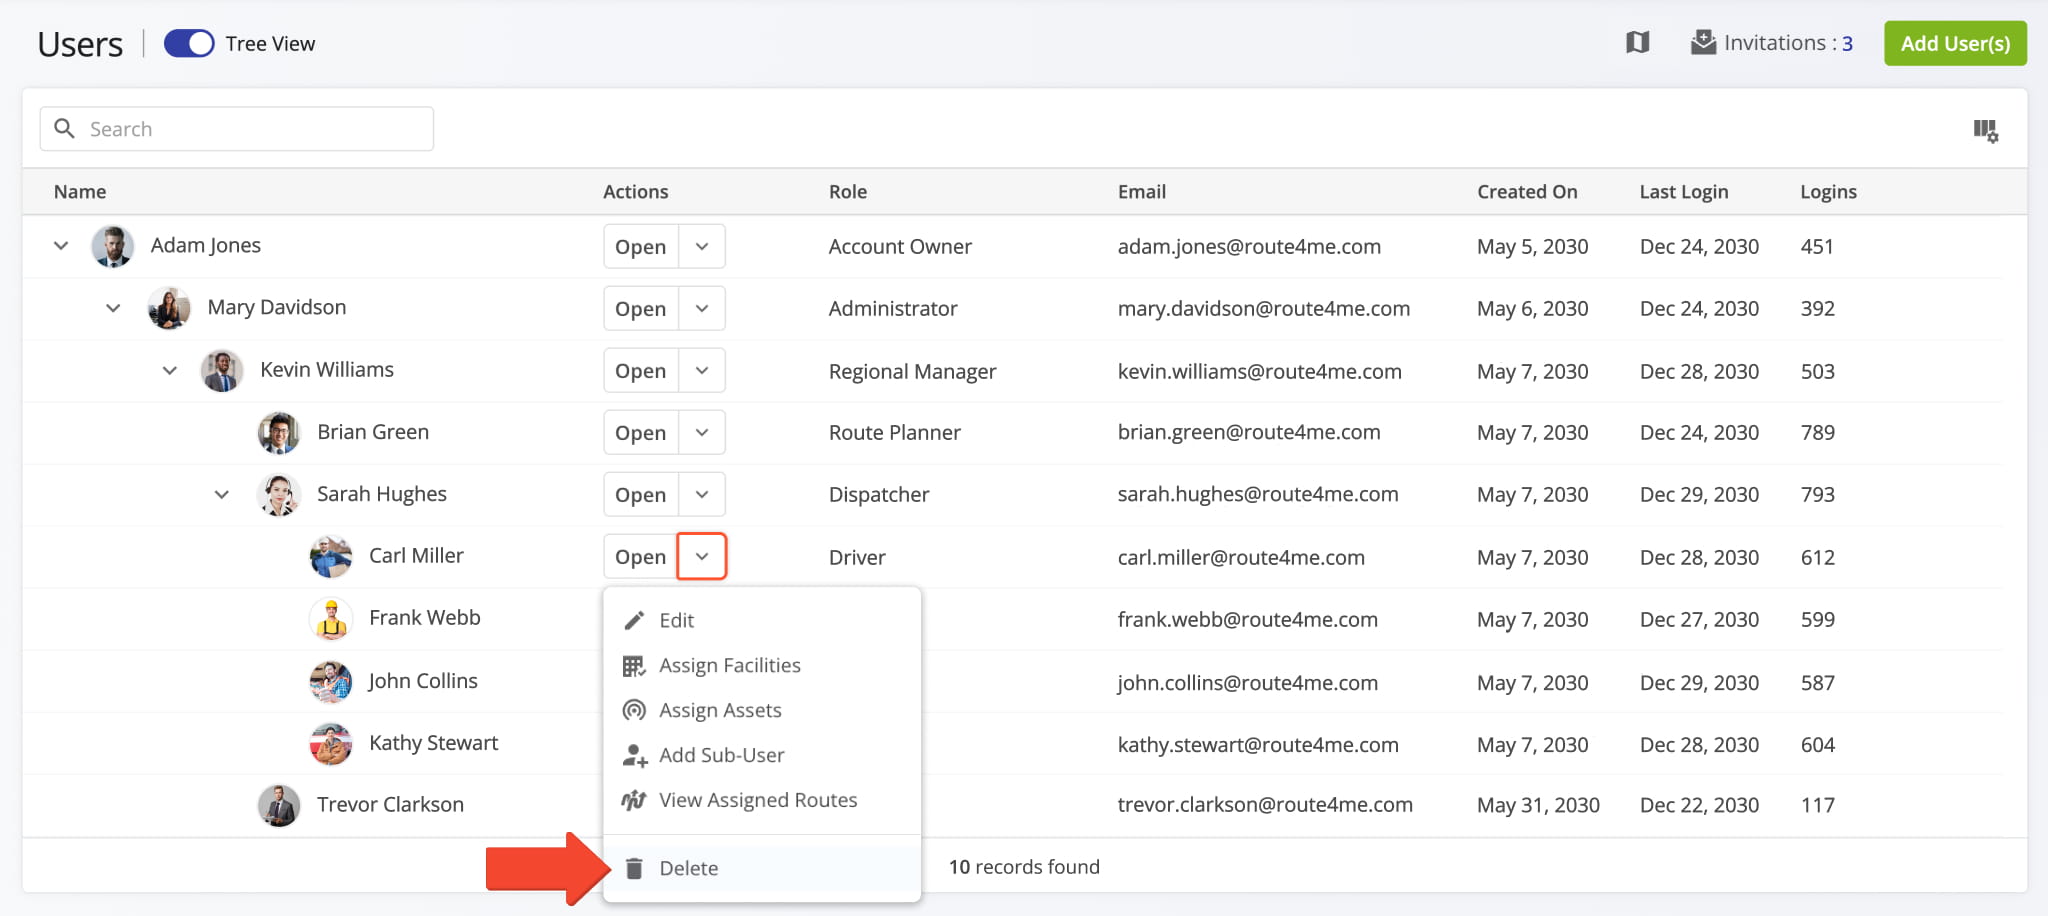
To delete a user, click the Down Arrow next to their name and select “Delete” from the menu. This action permanently removes the user and all associated data, including their assigned routes, and cannot be undone.
NOTE: If you want to keep the user’s routes, reassign them to another team member before deleting the account. For assistance with deleting users, contact Route4Me Support.
Configure Users Page – Add And Customize User Data Columns
You can customize the data columns on the Users page to display only the information relevant to your needs. Click the Display Columns Icon, then check the boxes next to the columns you want to show.
To reorder columns, drag and drop the column names. The order from top to bottom reflects how they appear left to right on the Users page. Refer to the table below for details on each column.
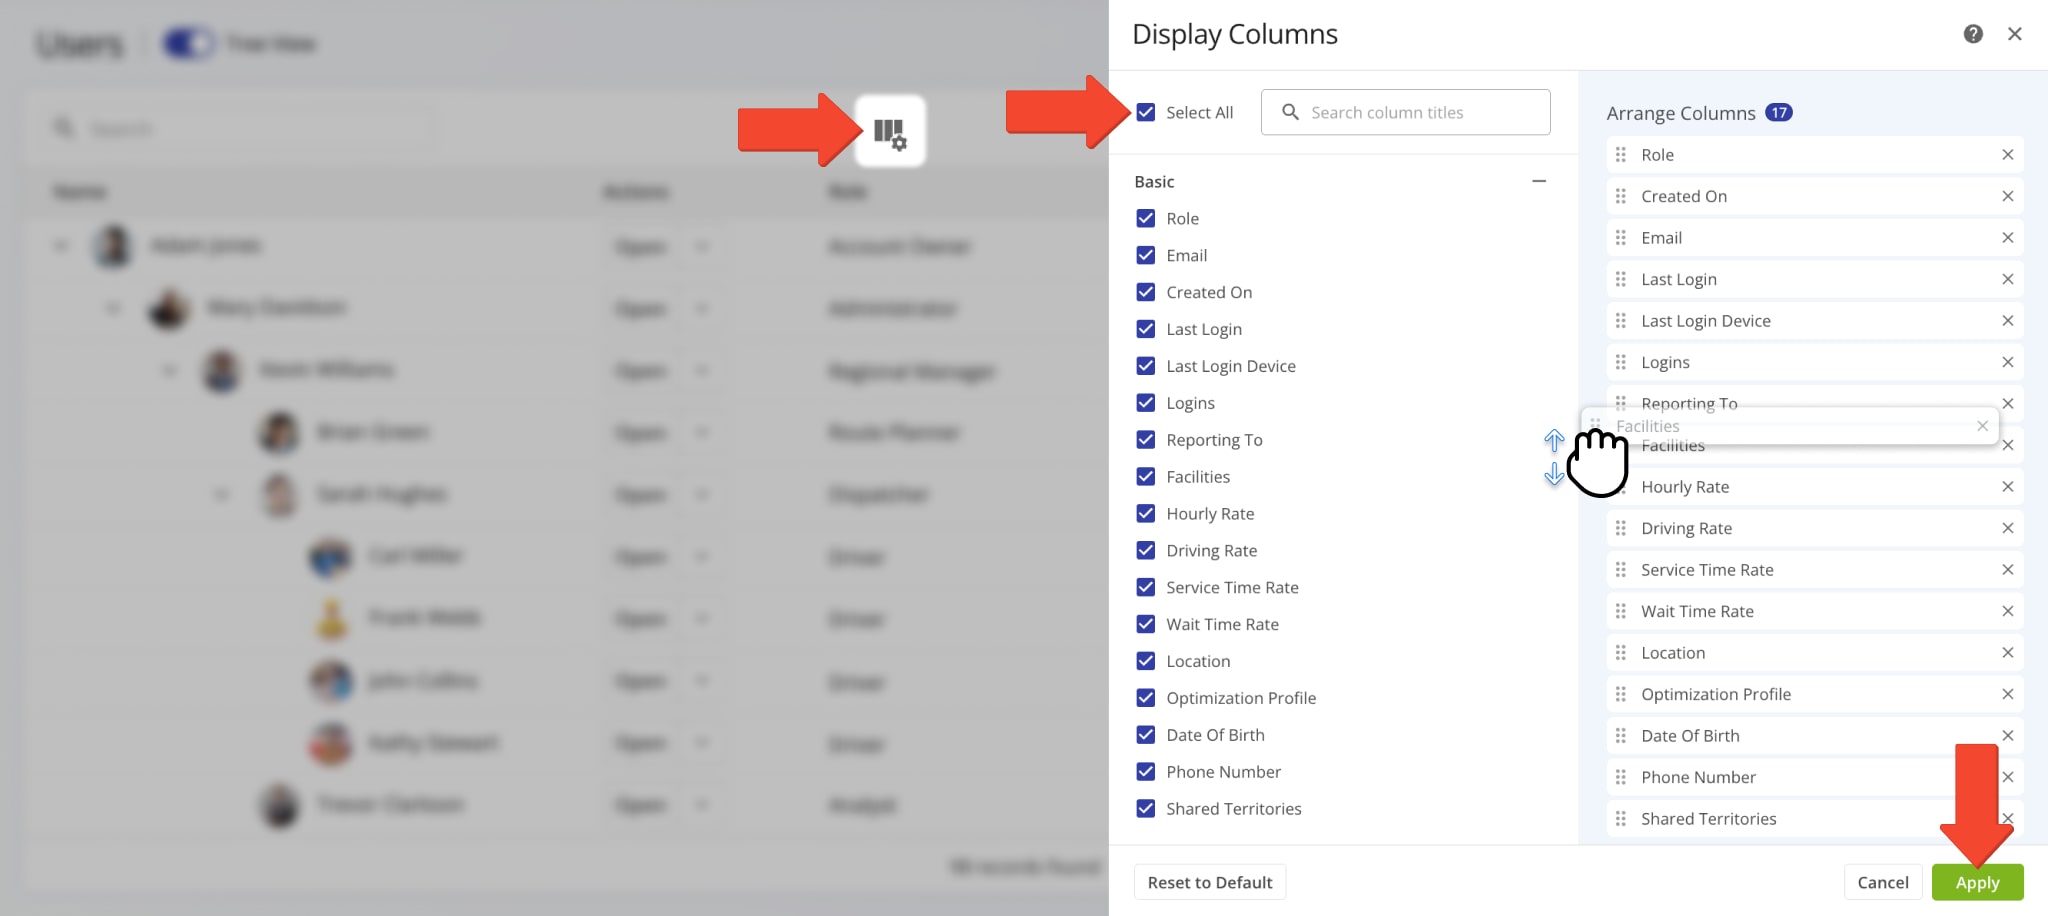
User Data Values & Display Columns
Route4Me Mobile Team Management And Real-Time Synchronization
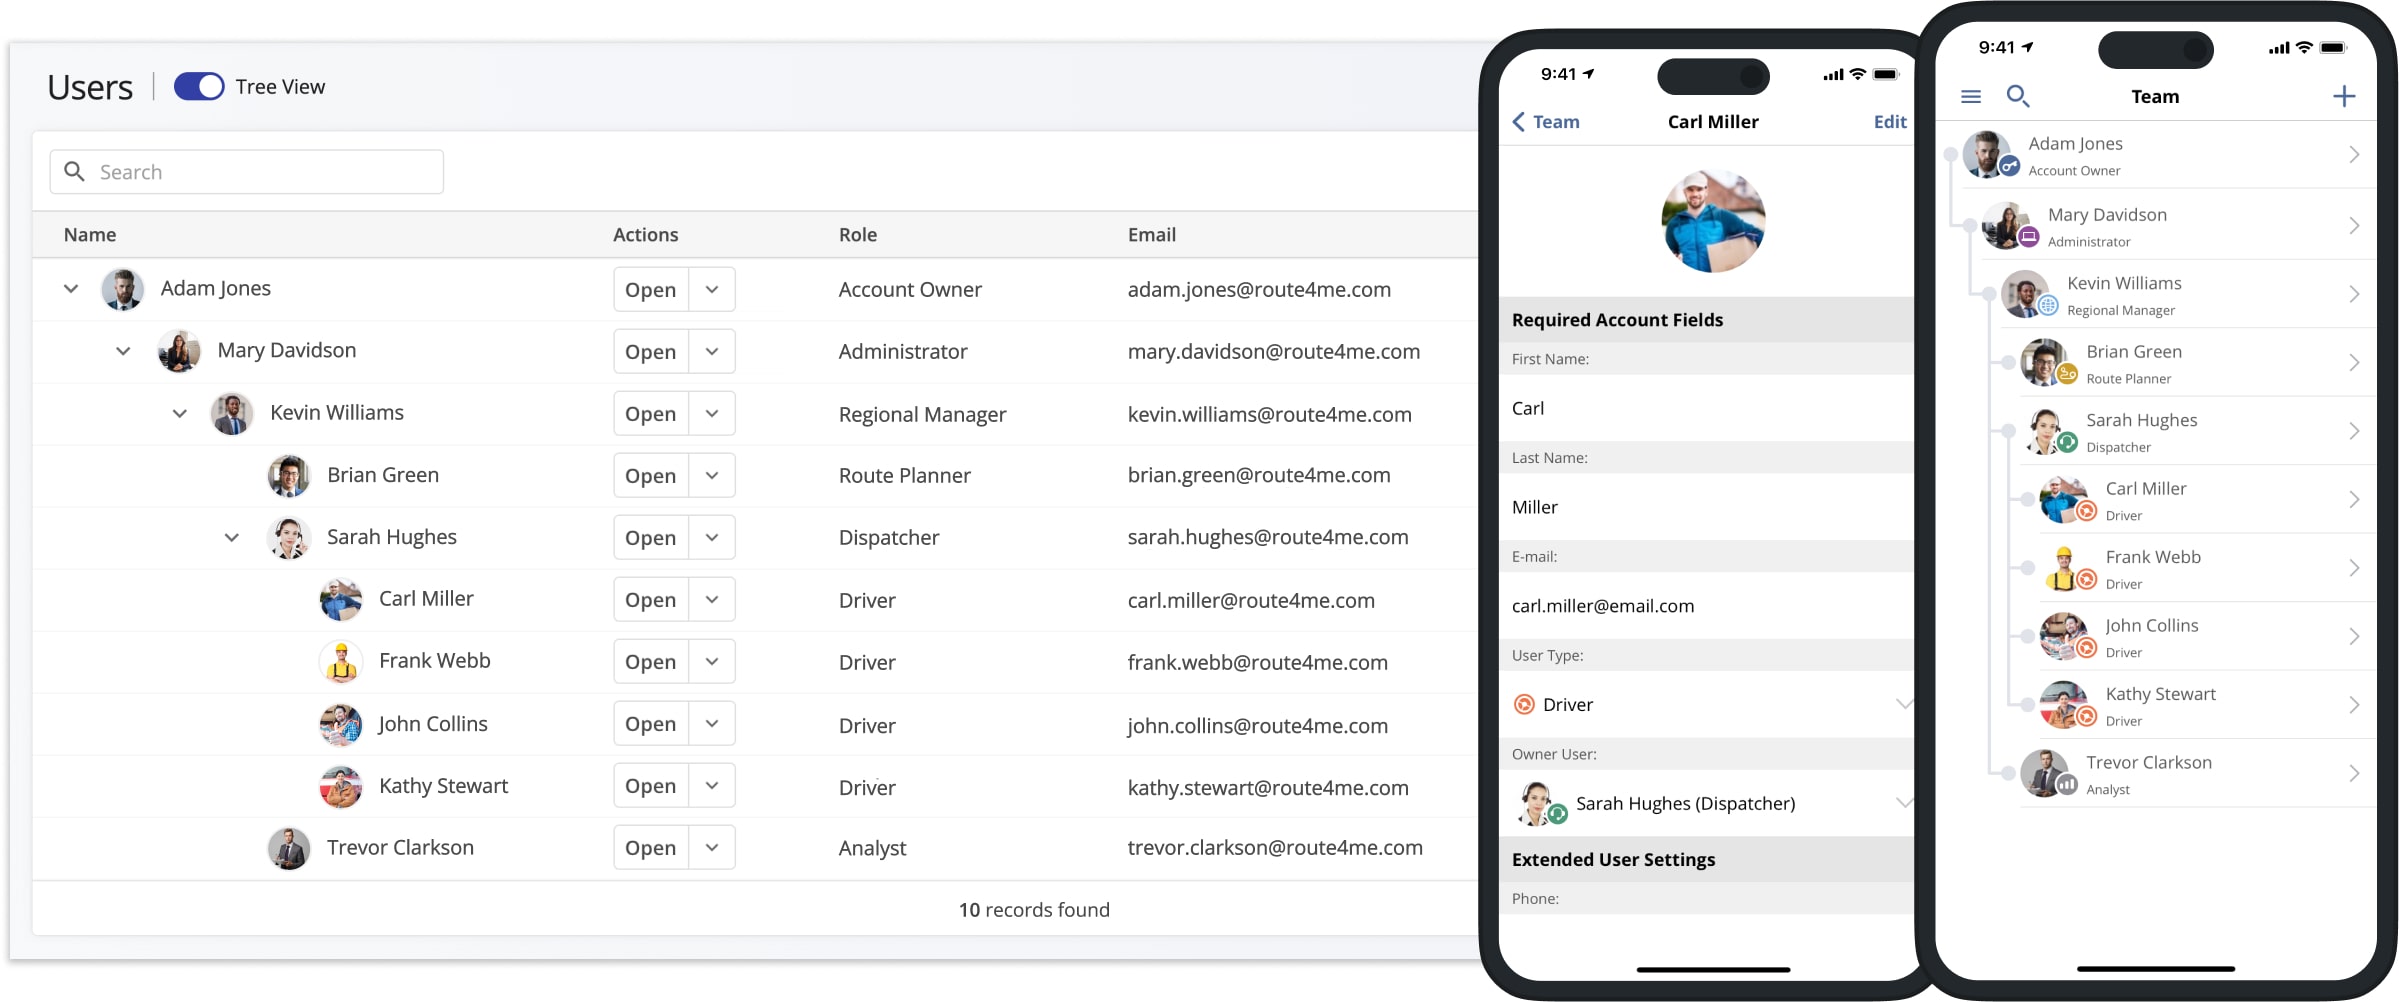
Route4Me provides real-time synchronization of route and team data across all connected devices. When you add a new team member, their profile is instantly available on all linked Route4Me accounts.
This allows you to access, assign, and manage users seamlessly from Route4Me Business Route Planner desktop software, as well as the iPhone Route Planning app and Android Route Planning app. For example, an Administrator can add new Drivers, and Dispatchers can immediately view them and assign routes.
NOTE: Learn more about team management using Route4Me’s iPhone Mobile App and Android Mobile App.
Visit Route4Me's Marketplace to Check out Associated Modules:
- Operations
Advanced Team Management Add-On
- Operations
Audit Logging and Activity Stream
About author: Kristian Andreev

