Route4Me Order Management And Order Routing System Guide
Route4Me helps medium and large last mile businesses manage every stage of the order lifecycle, from importing orders from CRMs to routing and fulfillment. Its Enterprise Resource Planning (ERP) tools enable managers, planners, dispatchers, and drivers to coordinate routes, manage service orders, and collect proof of service or delivery. Real-time data sync across connected devices keeps workflows smooth and provides live order status updates at every step. This end-to-end visibility makes it easy to process millions of orders while maintaining control and efficiency.
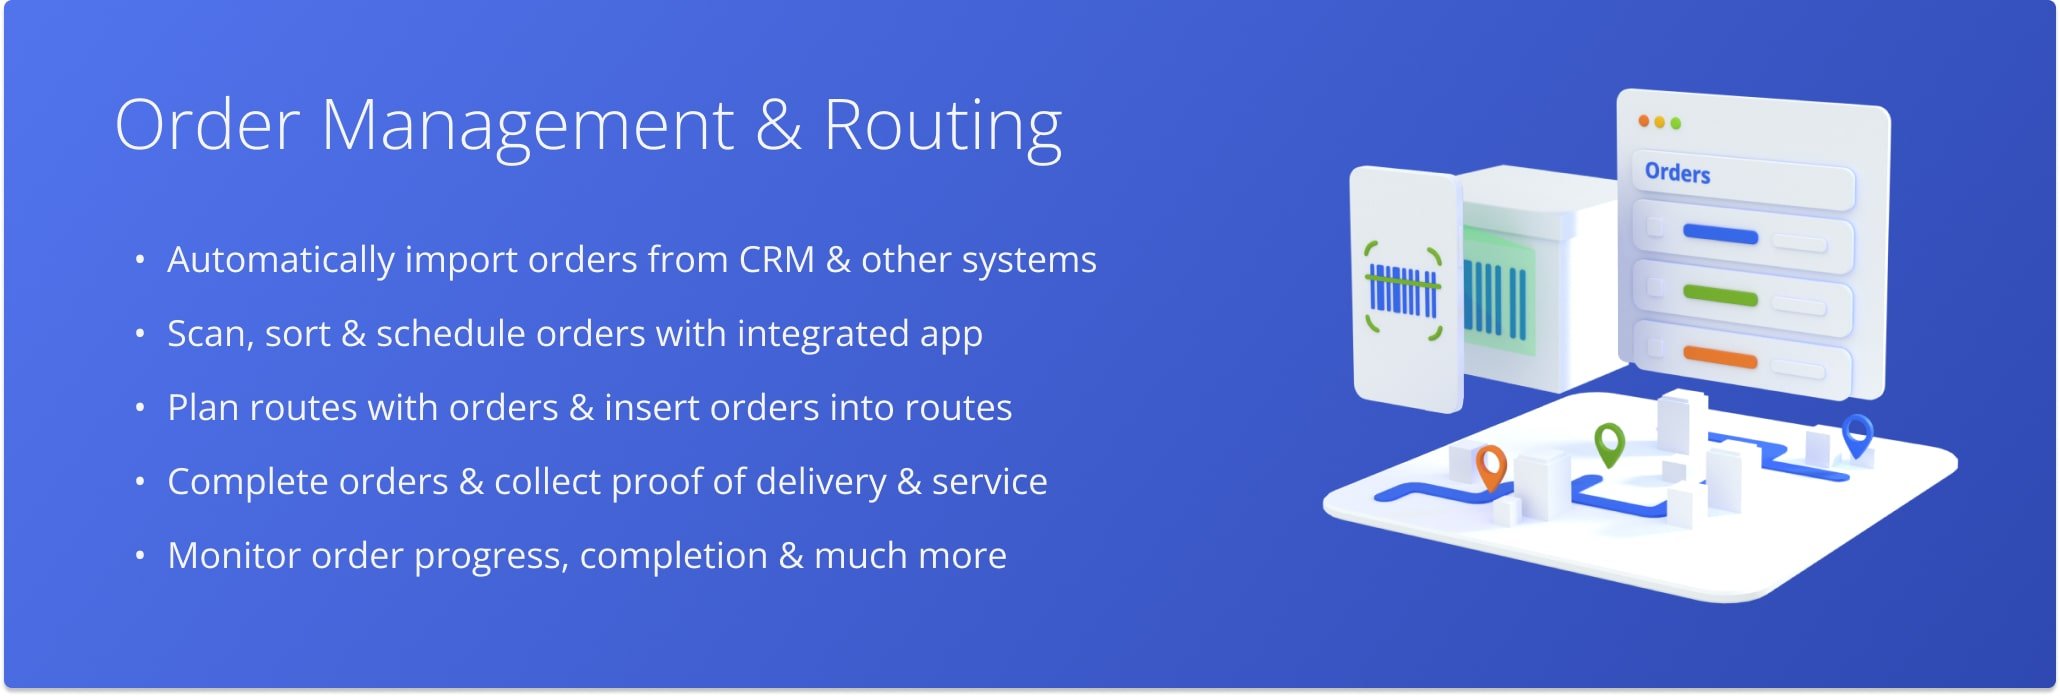
Table of Contents
Route4Me’s Order System: 6 Key Actions
Route4Me’s Order Management and Routing System streamlines delivery operations by connecting team members and automating key tasks. These six key actions help you efficiently add, organize, route, complete, and manage orders in real time.
- Add Orders: Create new orders manually, upload spreadsheets, or import directly from Route4Me’s API to populate your Orders List
- Add Facilities to Orders: Link orders to specific facilities, like warehouses or depots, to streamline fulfillment and optimize routes.
- Sort and Schedule Orders: Use the Mobile Route App‘s integrated barcode scanner to scan, sort by territory or route, update details, and schedule orders for delivery dates.
- Plan and Optimize Routes: Filter and organize orders, then use Route4Me to route order territories and route order groups to optimize new or existing routes for seamless delivery.
- Complete Orders: Drivers and Field Team members use the Mobile Route App to scan loaded orders, follow the route, unload orders, and collect electronic proof of delivery or service in real time.
- Manage and Analyze Orders: Monitor order status with real-time syncing, filter and export order data, reschedule or cancel orders if needed, and analyze performance via the web platform.
Add Orders – Import, Create, And Upload Orders
For efficient order management, you can quickly add millions of orders into Route4Me’s Last Mile Software by uploading a CSV spreadsheet, entering them manually, or importing them via Route4Me’s API.
Import Orders From Other CRM Systems To Route4Me ERP Software With API
With Route4Me’s Enterprise Routing API, you can import millions of orders directly into your Orders List. Each imported order is marked with a “New” status, ready to be scheduled, optimized into new routes, or added to existing ones.
The Order Import API also offers advanced features. Contact Route4Me Support to learn more.

Create Orders – Add New Orders Manually To Orders List
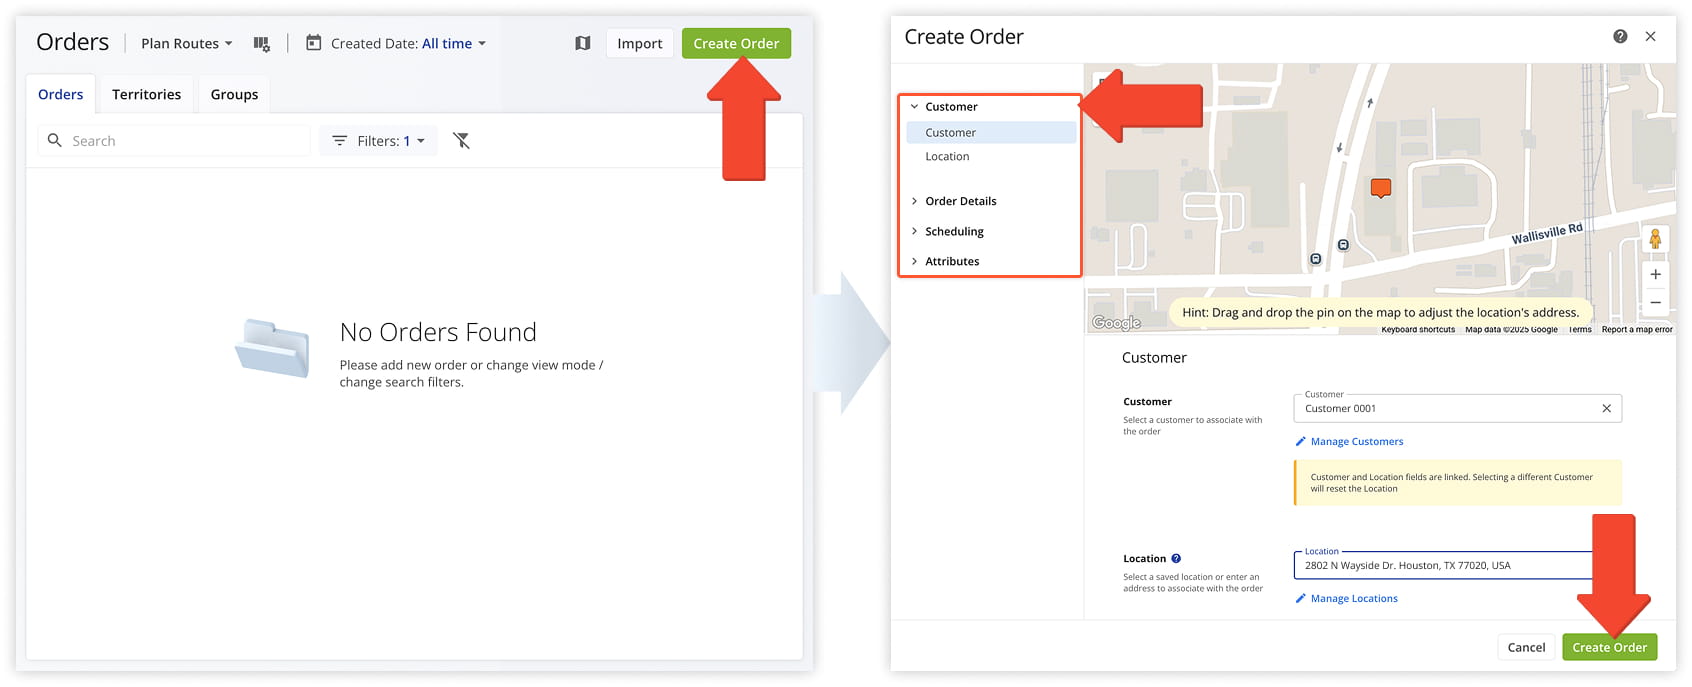
You can manually add custom orders to your Orders List by clicking “Business Operations” > “Orders” in the Navigation Menu. Then, click “Create Order” and enter your order and customer details, apply any optimization constraints or custom data, and schedule the day and time.
Route4Me will automatically geocode the address, generating its latitude and longitude coordinates. Once created, the order is marked as “Scheduled” and can be used to optimize new routes or added to existing ones.
You can also create new orders directly from the interactive Orders Map. Click the Orders Map Icon in the top-right of the Orders Page, then right-click near the desired address and select “Add The Nearest Valid Address”.
This opens the “Create Order” window, where you can enter the exact address and add order details and Custom Data.
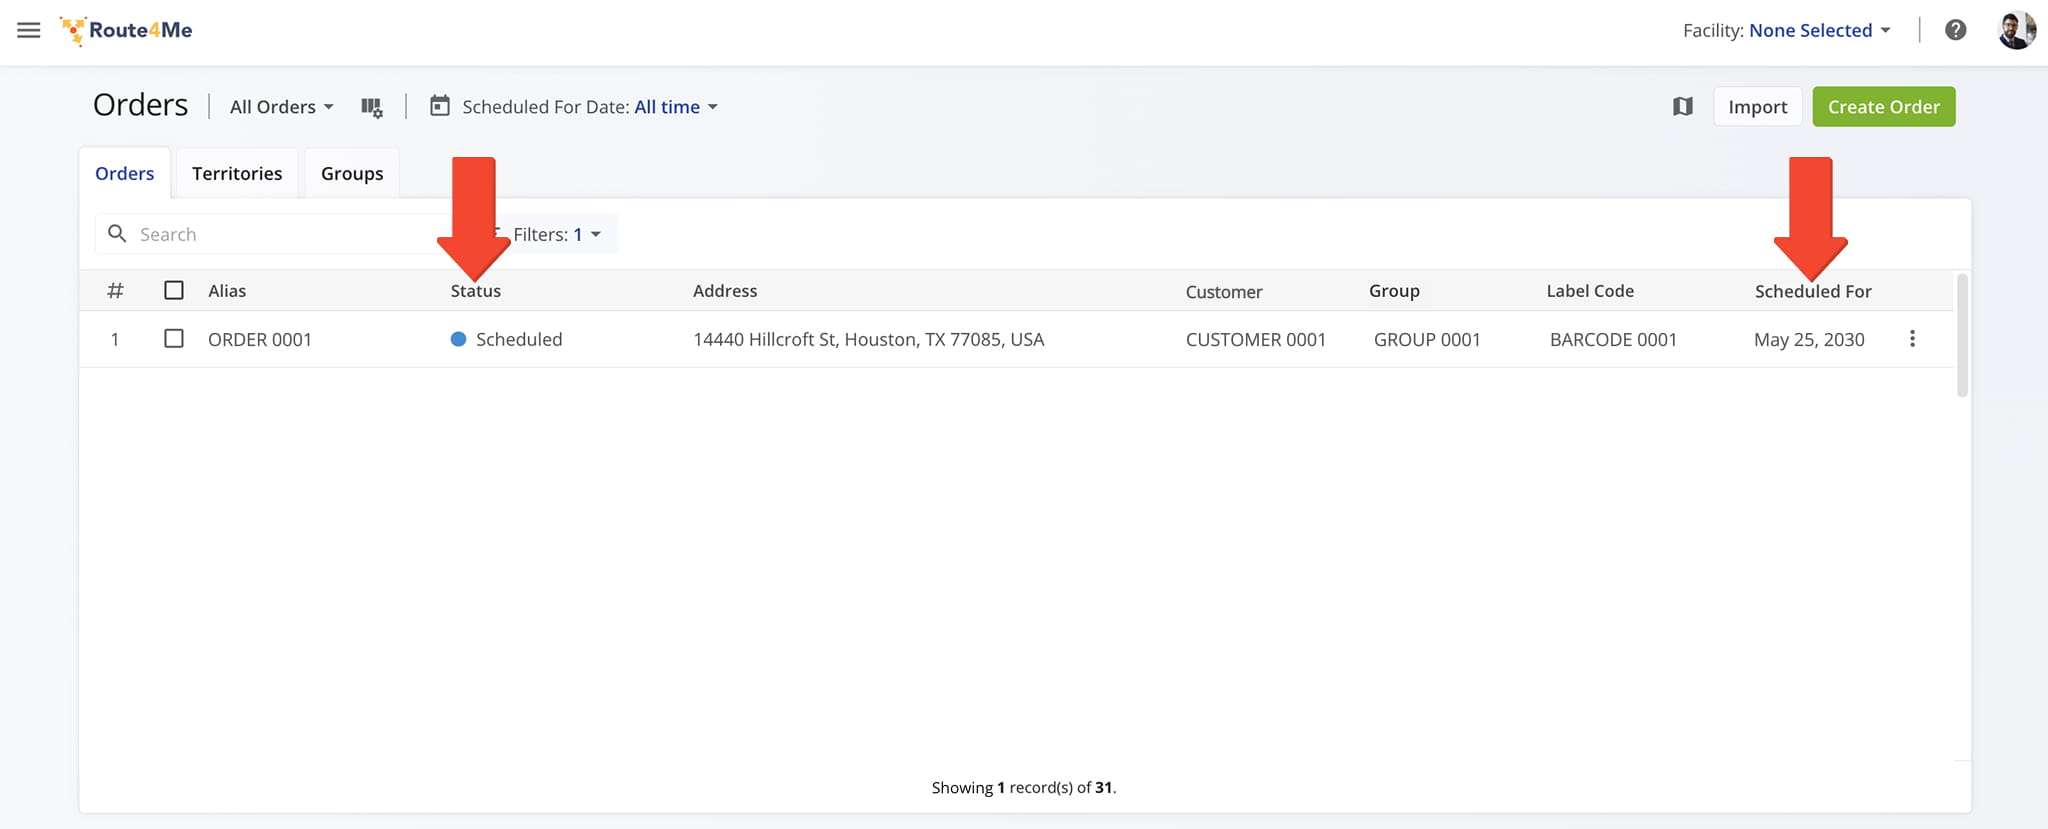
Once an order is created, it appears in your Orders List with a “Scheduled” status and is scheduled for the date you’ve specified. You can then use it to optimize new routes or insert it into already planned routes.
Upload Orders Spreadsheet To Route4Me’s Web Order Planner Software
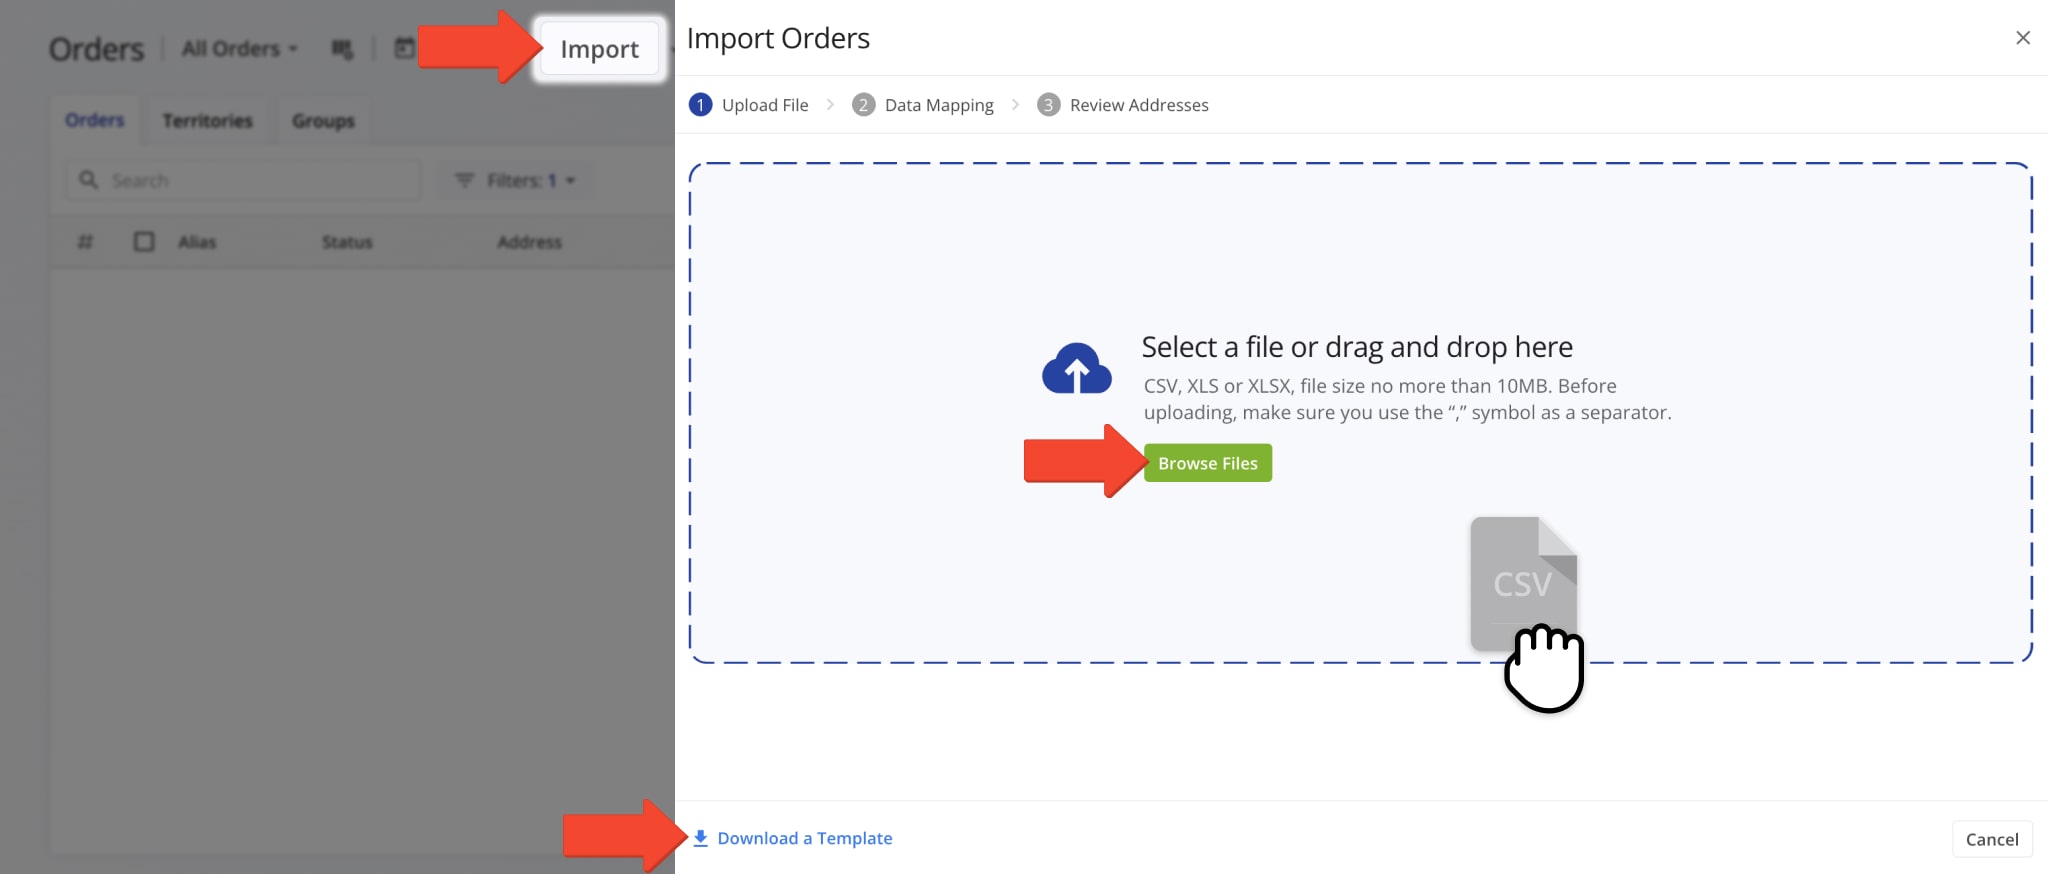
You can easily upload millions of orders into your Orders List using a CSV file. Click the “Import” button in the Orders List and select your CSV file with order data.
Alternatively, download the Route4Me Order Upload File Template, fill it out, and upload it. Uploaded orders are given a “New” status and can then be scheduled, optimized into new routes, or added to existing ones.
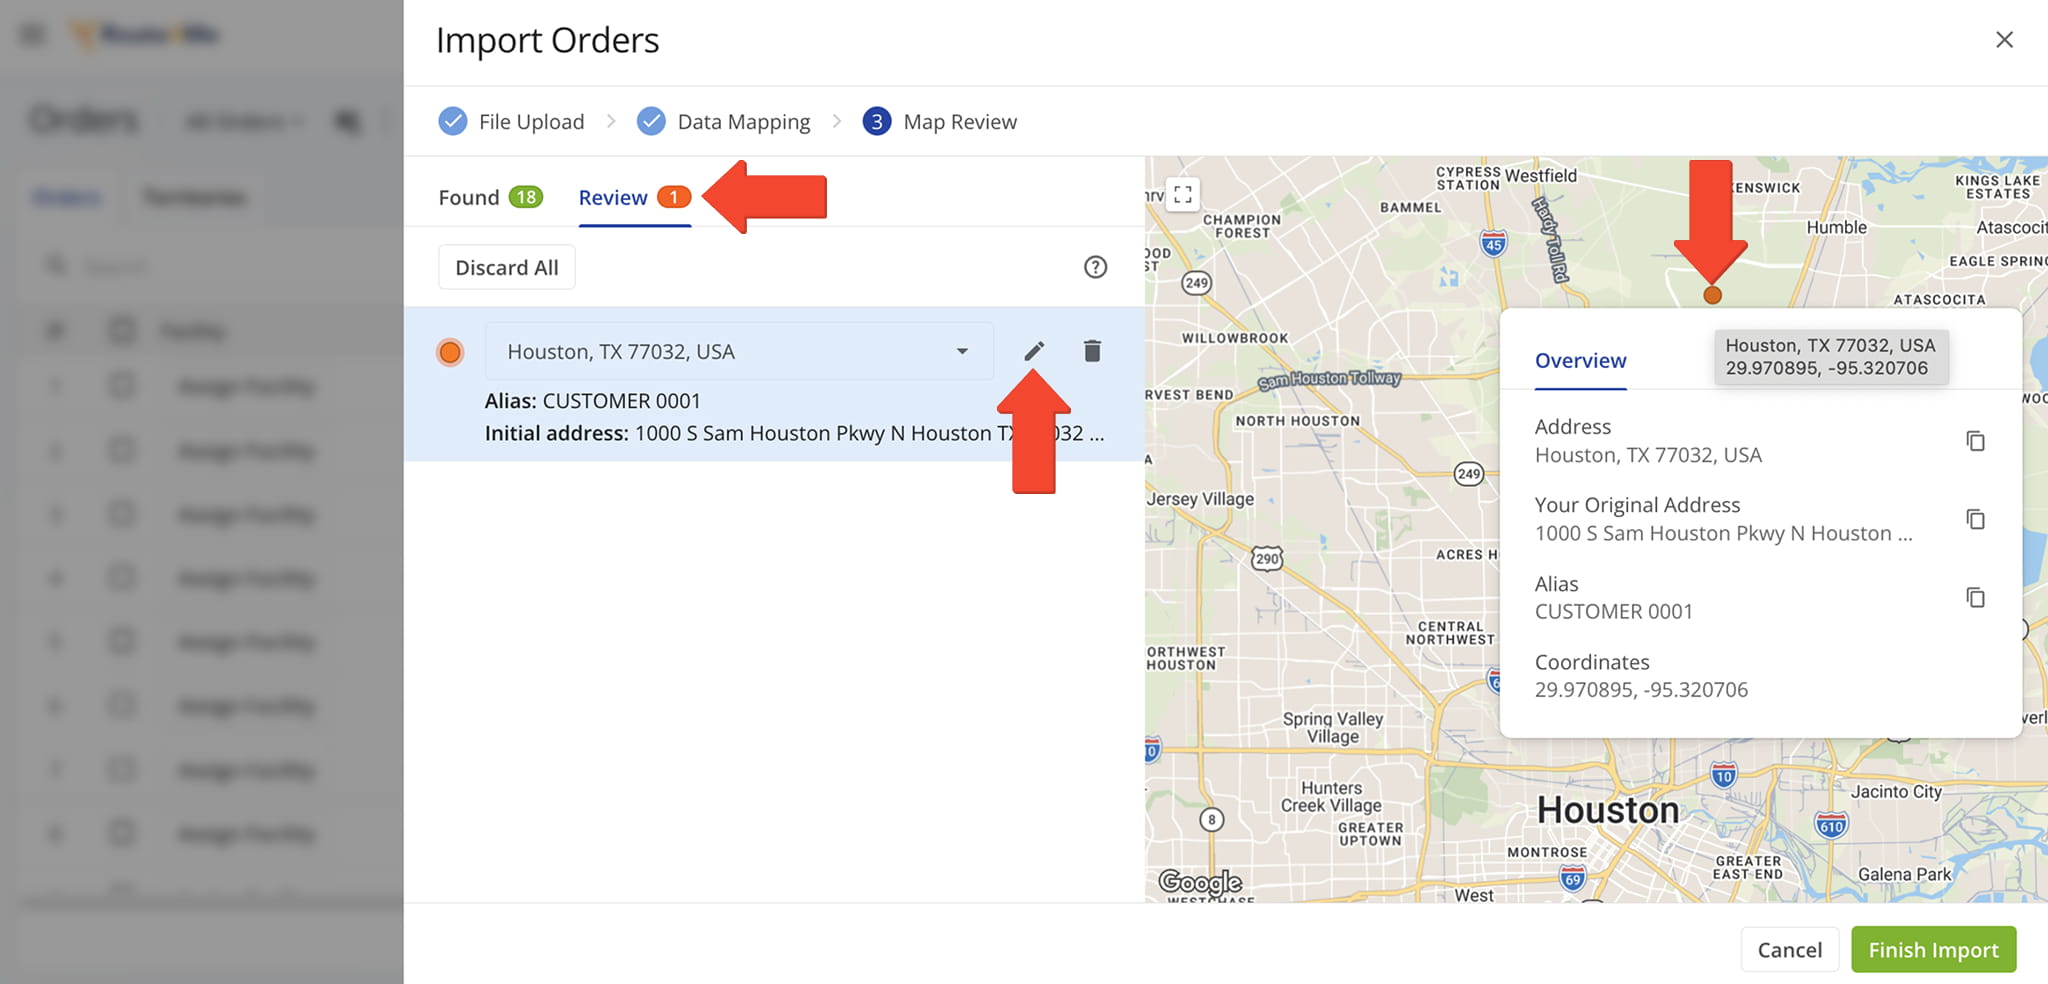
Once uploaded, Route4Me geocodes each address and displays all orders on the map for review. If any address cannot be accurately geocoded, you can review it directly on the map and make edits to correct the location before routing.
The orders appear in your Orders List with a “New” status and can be scheduled for the upload date or dates specified in the spreadsheet. Once scheduled, orders receive a “Scheduled” status and are ready to be used for routing.

View All Created, Uploaded And Imported Customer Orders On The Orders Map
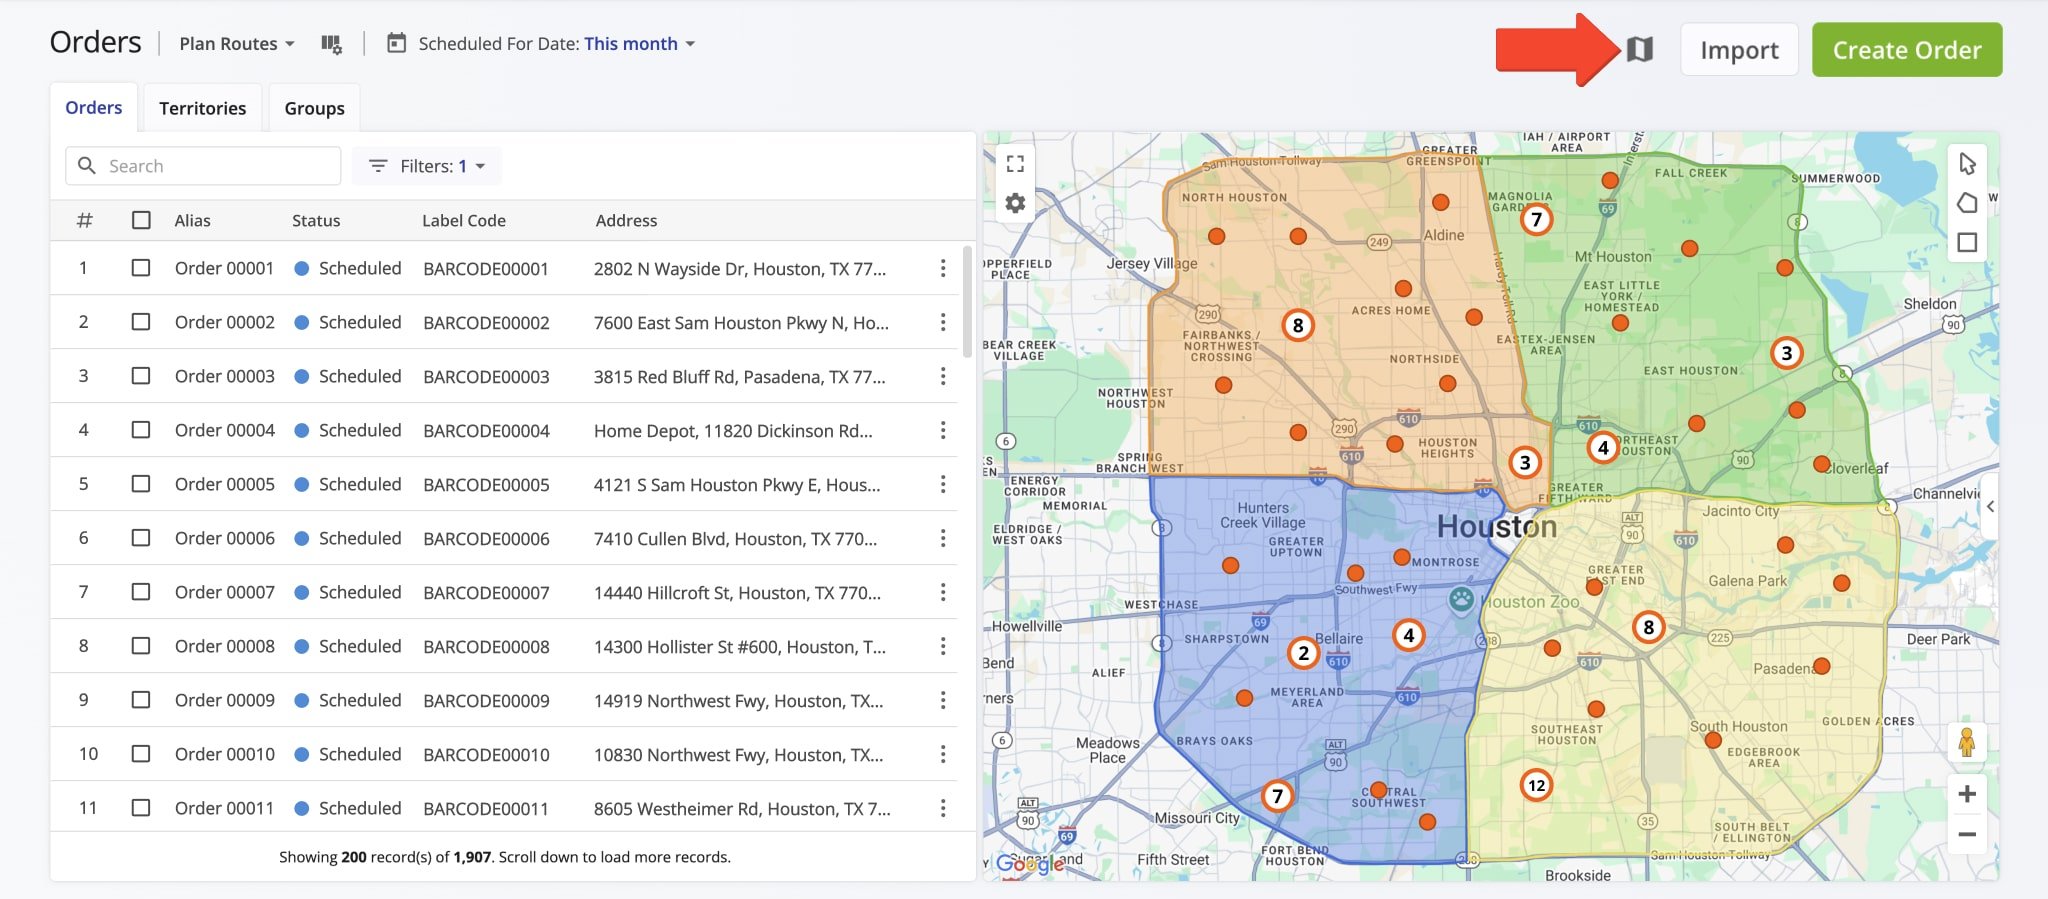
When orders are added to the system, they appear on your Orders Map. The map displays all orders that match your current View Mode and Filters. Any order visible in the Orders List is also shown on the Orders Map.
To view the Map, click the Orders Map Icon in the top-right of the Orders Page.
Add Facilities To Orders – Assign Warehouses And Depots
Assigning Facilities to orders links each order to a specific warehouse, depot, or service location. This helps streamline fulfillment, improve route planning, and manage resources across multiple locations.
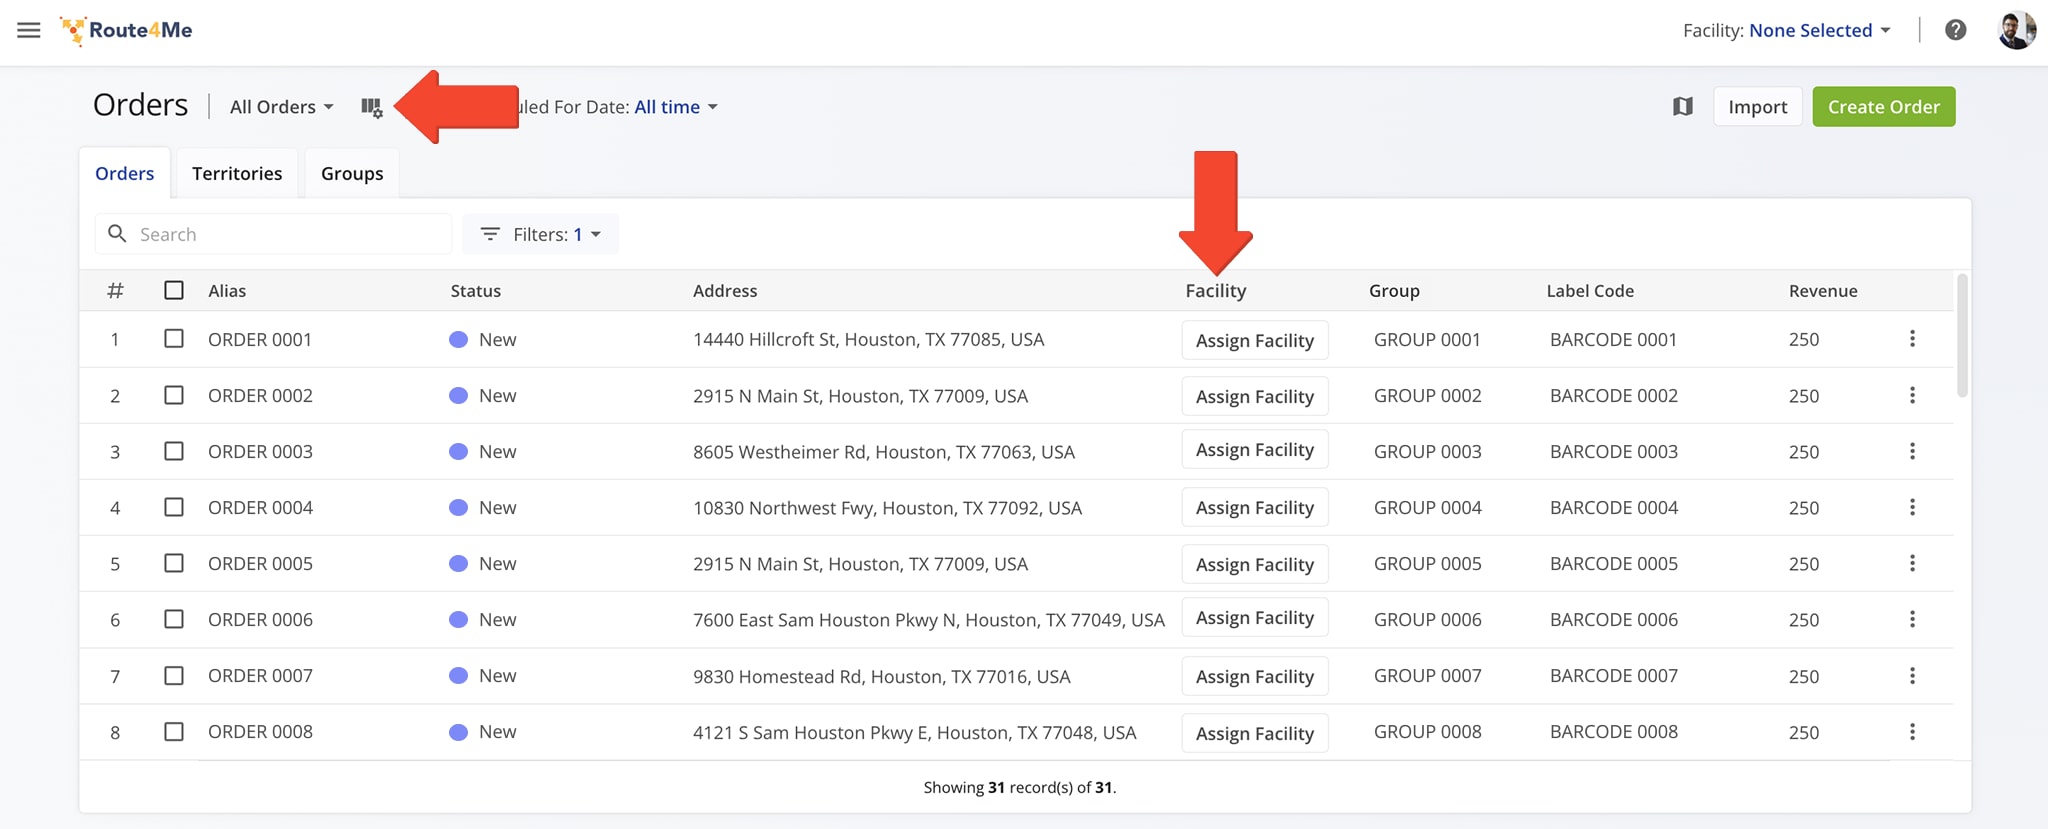
There are several ways to assign a Facility. One way is to click the Data Column Icon and check the “Facility” Column option so it appears in your Data Table.
Then, from “Assign Facility” in the Data Table, you can search for a specific Facility by alias or address and assign it to an Order.
You can also right-click an Order and, from the pop up menu, click “Assign Facility“. This will open a pop up window, into which you’ll be prompted to enter a Facility alias or address.
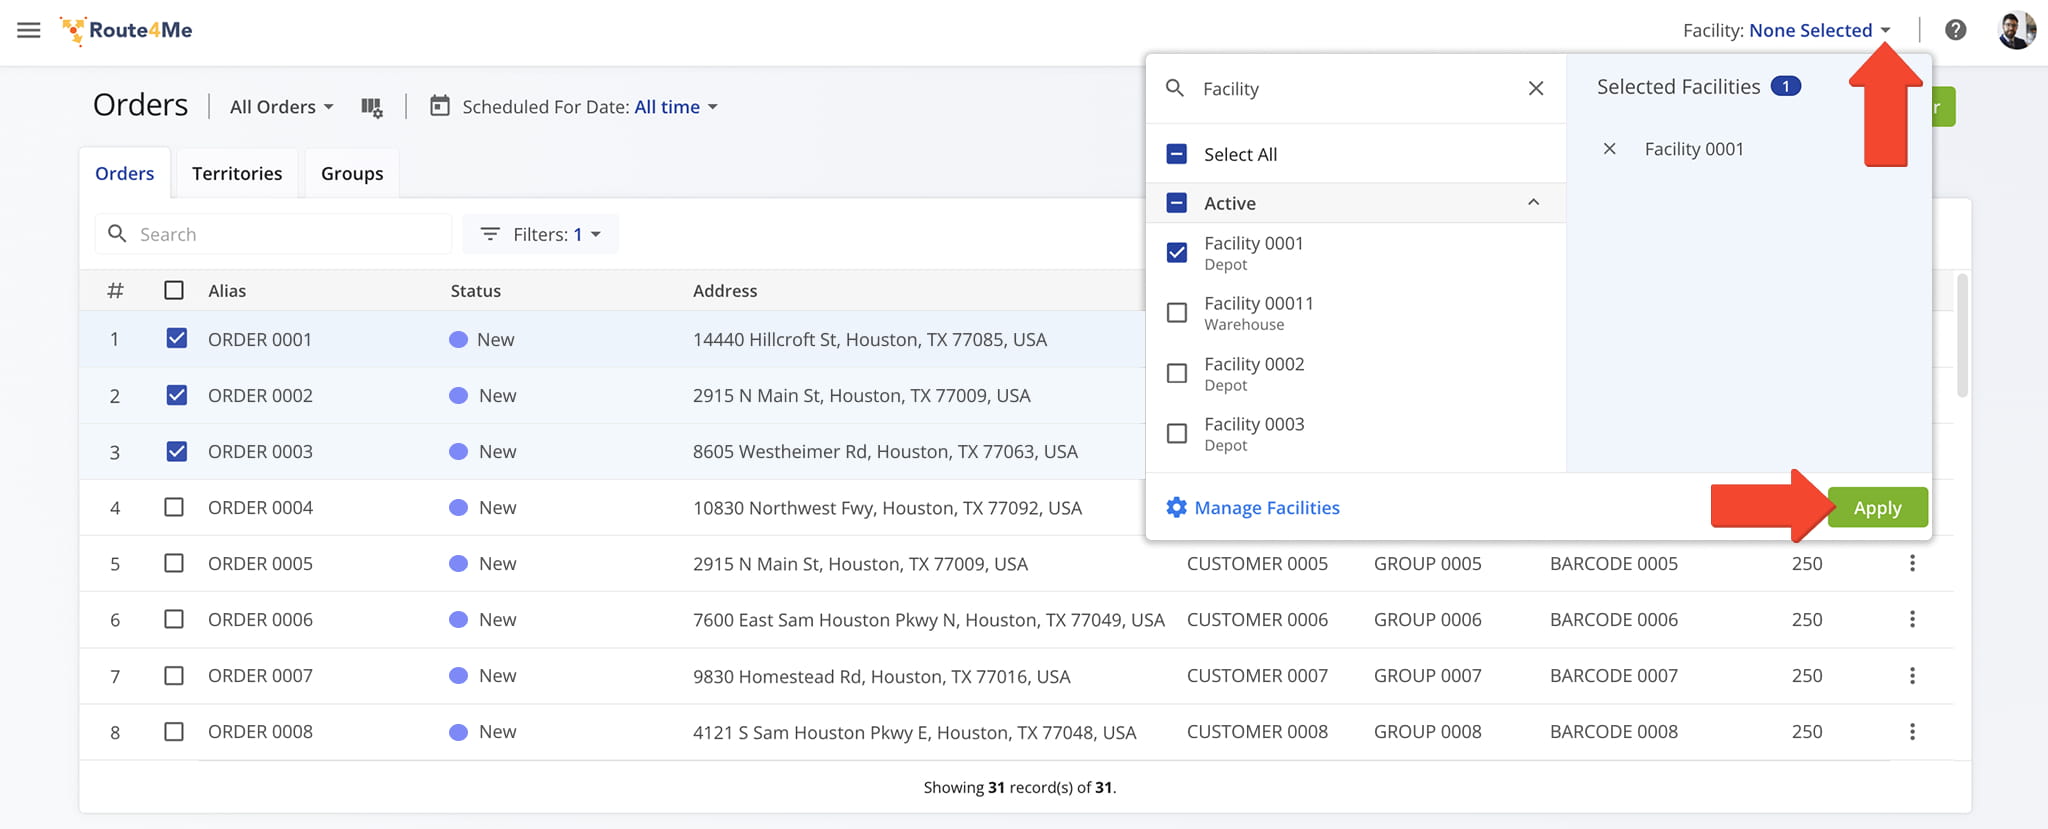
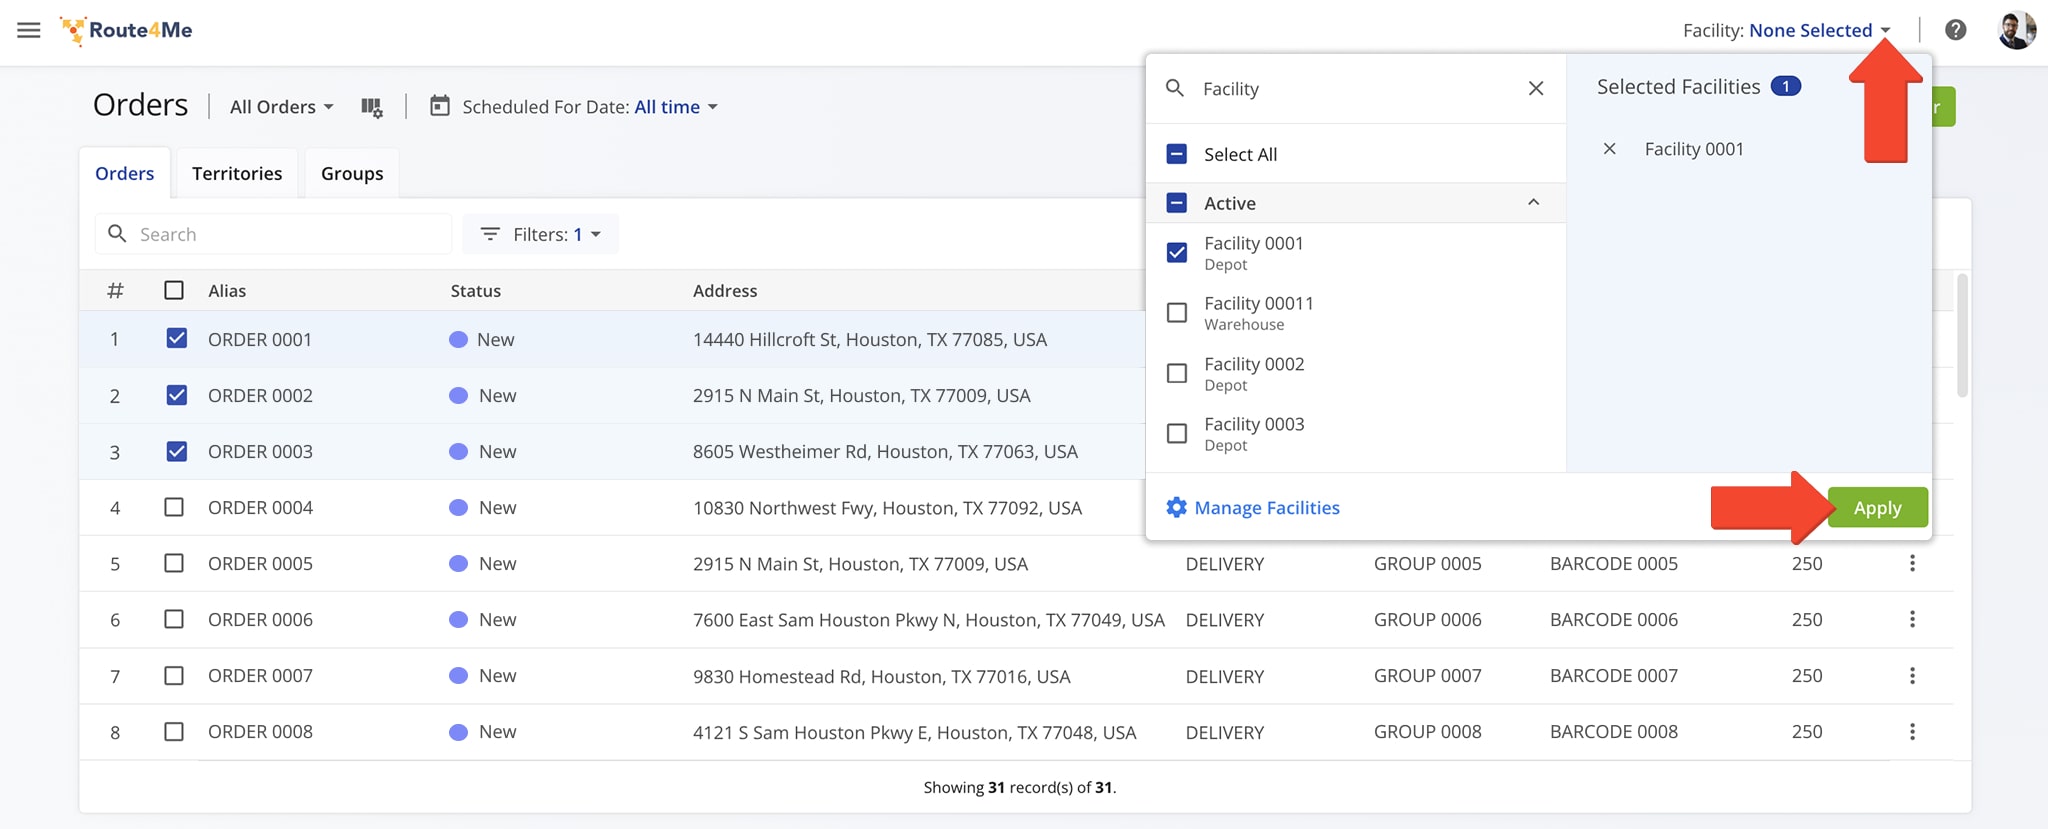
You can check the boxes next to one or more Orders, then in the “Facilities” pull down menu in the upper right corner, select a Facility to assign to those Orders.
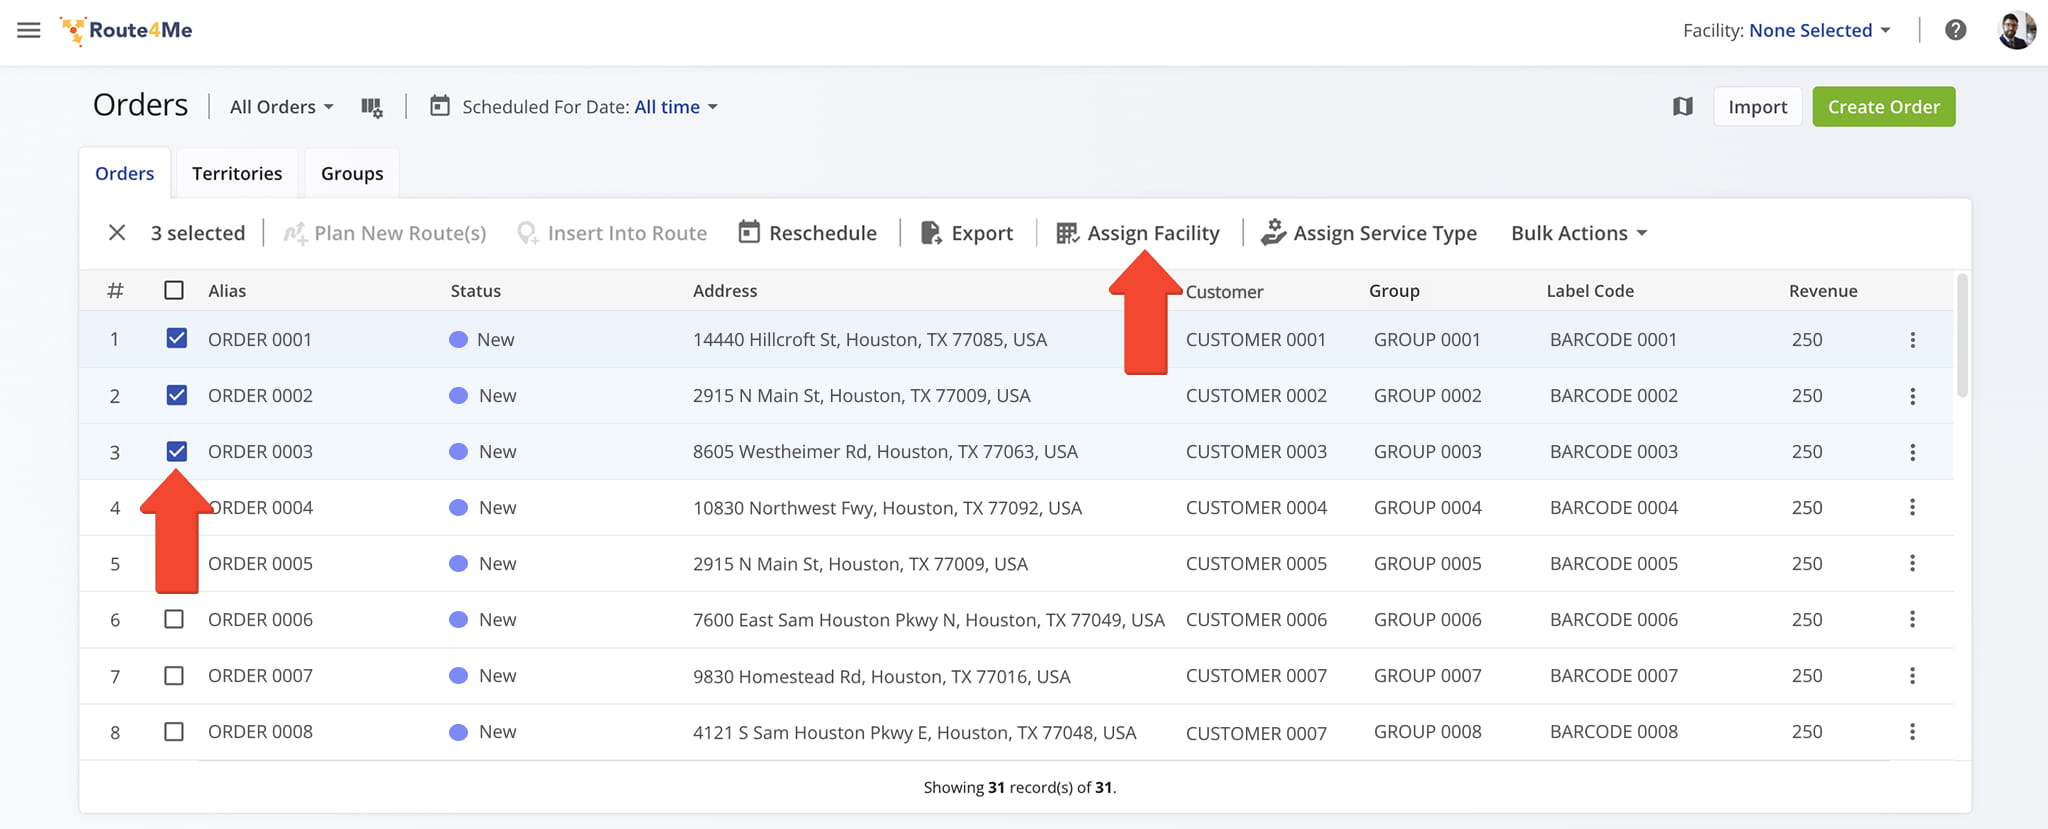
Finally, you can assign a Facility to multiple Orders at once by checking the boxes next to those Orders, then clicking “Assign Facility“. The Facility you chose will be automatically assigned to all selected Orders.
Global Orders Visibility – Orders List Visibility Permissions For Users
By default, new team members can’t see all orders in your main Route4Me account.
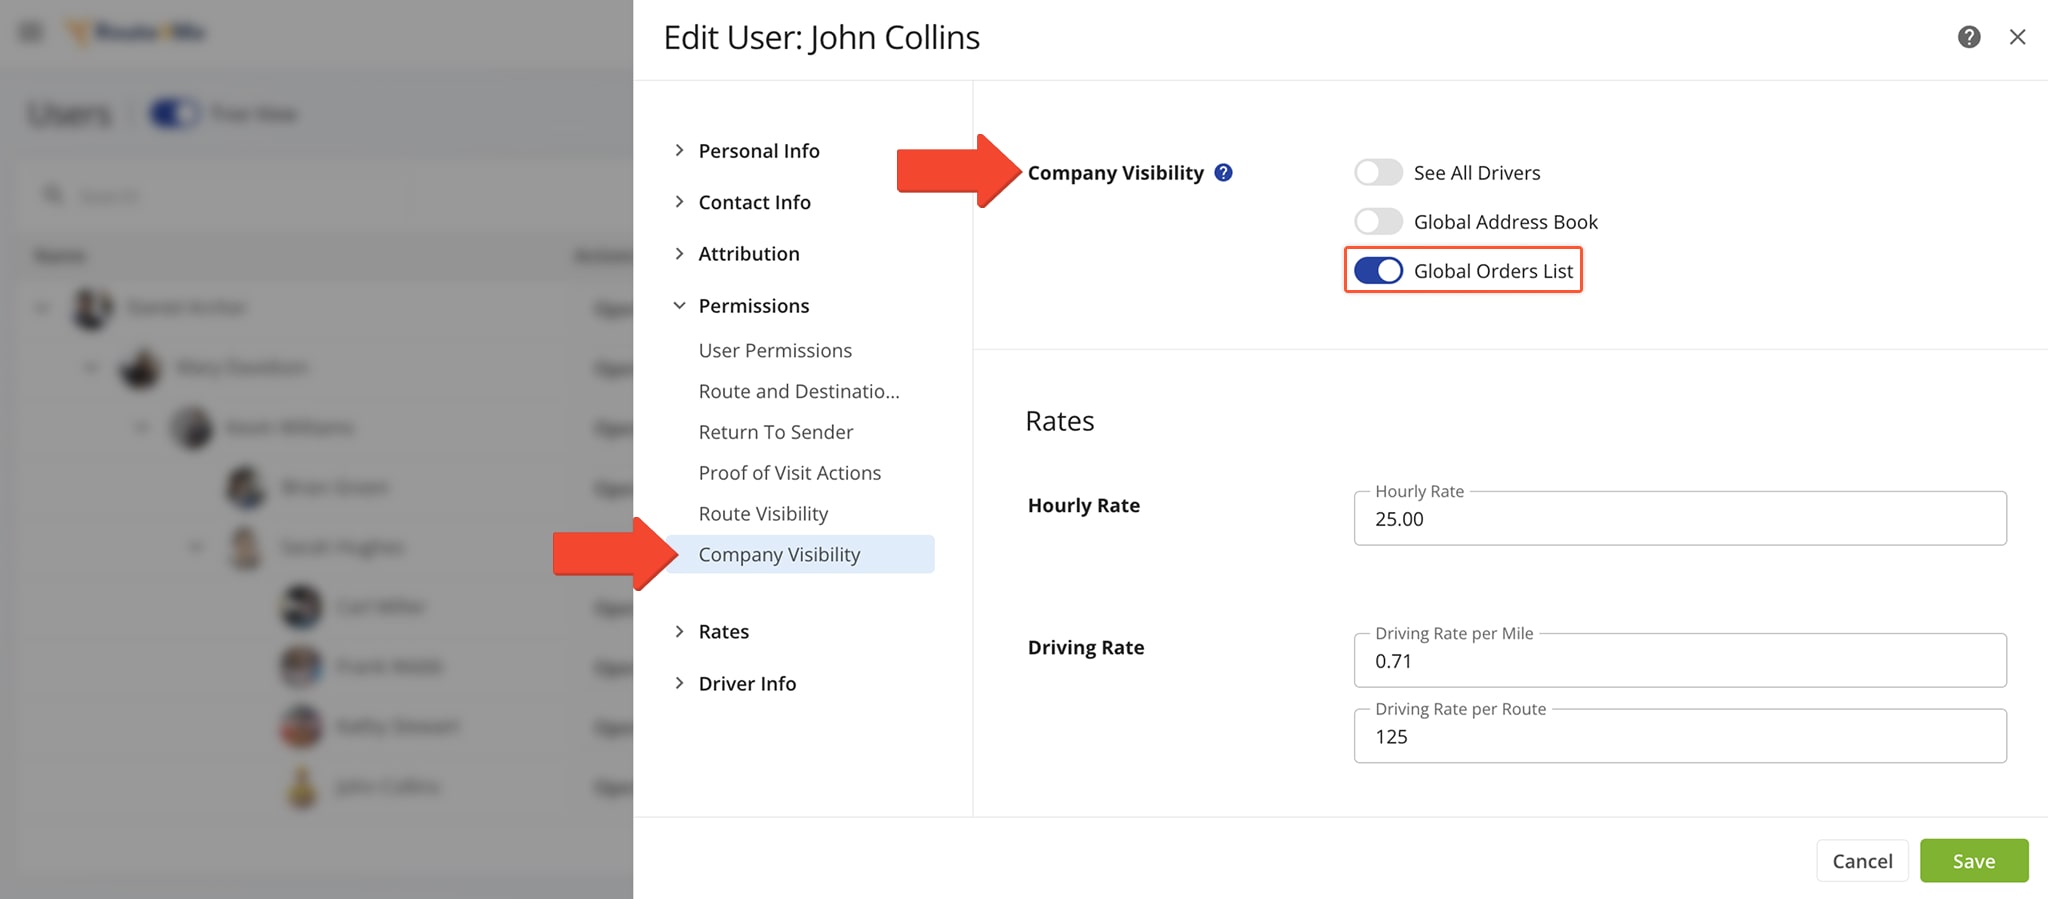
To give Sorters, Admins, Regional Managers, and others access to the Global Orders list, click “Team & Equipment” > “Users” in the Navigation Menu. Open the “Edit User” panel, click “Company Visibility” under “Permissions“, then toggle “Global Orders List“.
NOTE: Visibility settings can only be adjusted when editing existing Users. To change visibility for a new User, complete their creation first, then update their “Company Visibility” settings.
Scan Orders To Sort, Schedule, Plan Routes, Load, Unload And Complete Orders
Route4Me makes it easy to add, sort, and deliver orders by simply scanning a label code.
The Android Route Planner and iPhone Route Planner apps include a built-in scanner and support most commercial Bluetooth barcode scanners. You can use the in-app scanner to register orders, schedule them, assign them to territories, load or unload them on routes, and mark them as complete.
NOTE: Features may vary depending on your account settings and device type; some features are only available on the Android Order Routing App or on the iPhone Route Order App. To enable or disable features, contact Route4Me Support.
Scan And Schedule Orders – Scan Order Labels To Automatically Schedule Orders
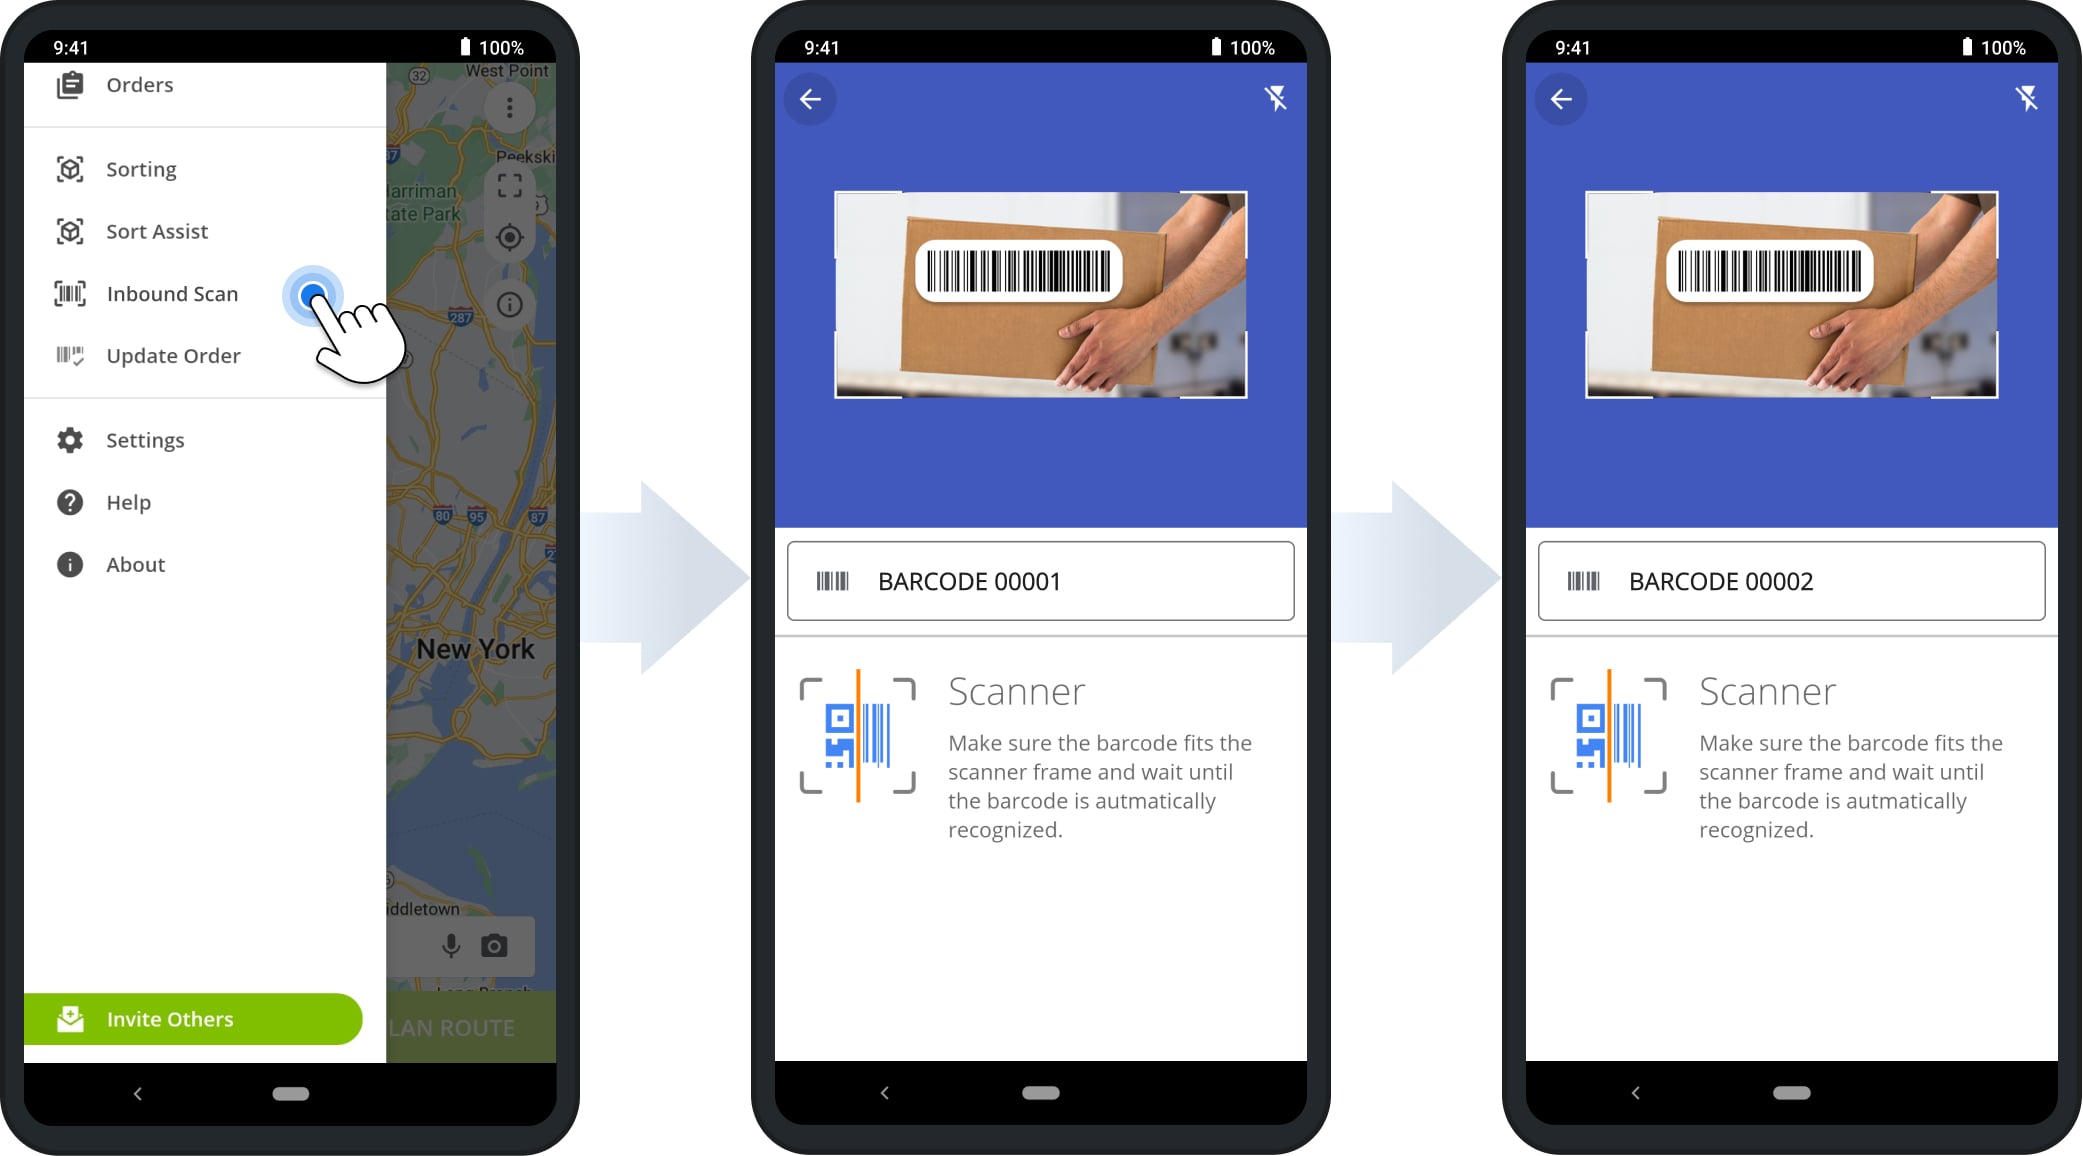
You can use the integrated barcode scanner to register orders already in the system. Open the Mobile App and select “Inbound Scan“. Then, scan order labels using the in-app scanner or a connected Bluetooth barcode scanner.
Each scanned code is automatically displayed, registered, and scheduled in the system. You can scan multiple labels in a row without closing the scanner.
If the scanned label doesn’t match an existing order, the system creates a new order using the scanned code. It’s automatically scheduled and given the “Scheduled” status. If no address is associated with the order, it receives an “Inbound Scan” status.
Sort Orders – Scan Barcodes To Sort And Schedule Orders
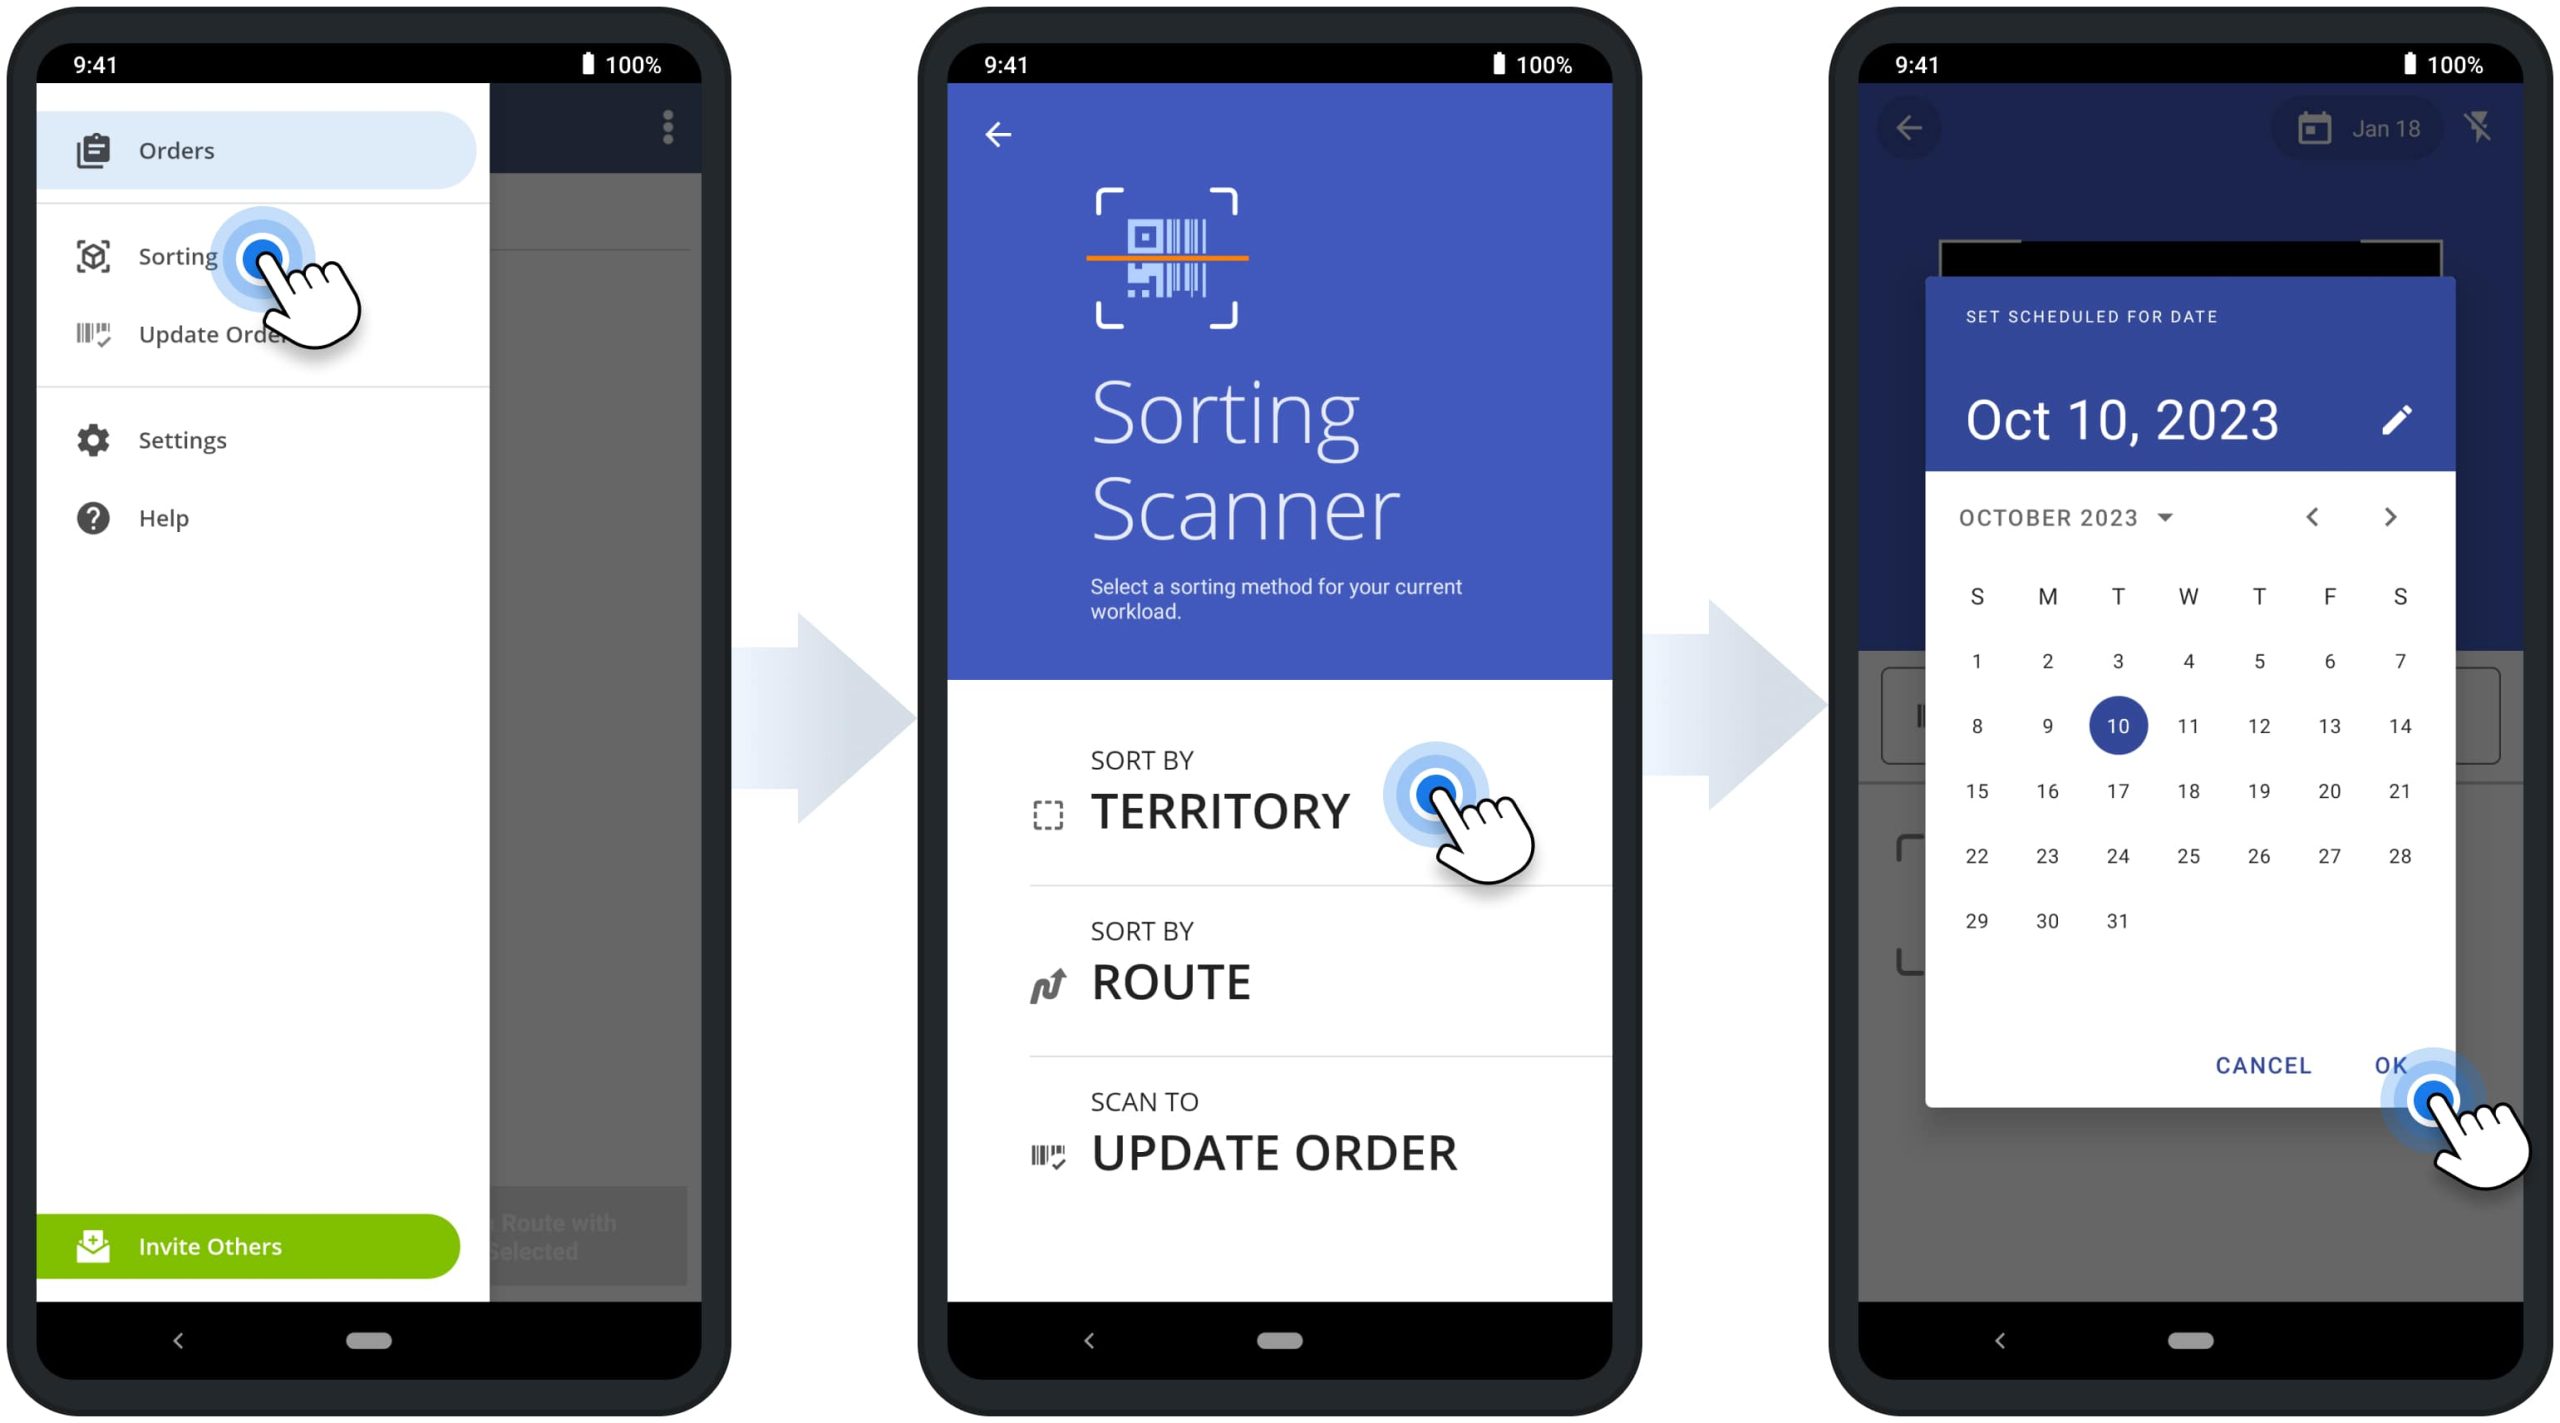
Sorting Scan is used to schedule orders for a specific date and automatically sort them by Territory based on their delivery address. Scheduling filters orders by date to prepare them for route planning and optimization, while sorting by Territory helps organize them into predefined delivery areas.
To begin, open the Mobile Order Scanner app and select “Sorting” from the Navigation Menu. Tap “Sort by Territory“, choose the target date, and the app will automatically launch the label scanner. You can scan order labels using the built-in scanner or a connected Bluetooth barcode scanner.
NOTE: Learn more about sorting and scheduling orders using the scanner.
Route Orders – Plan Routes With Orders, Territories, Groups, Orders Map And Mobile App
Once added, sorted, and scheduled, you can filter orders by any attribute and use them to plan optimized routes. You can route orders from your Orders List, Order Territories, or Order Groups, or scan barcodes to add orders to new or existing routes.
Orders List Routing – Plan Order Routes And Insert Orders In Routes
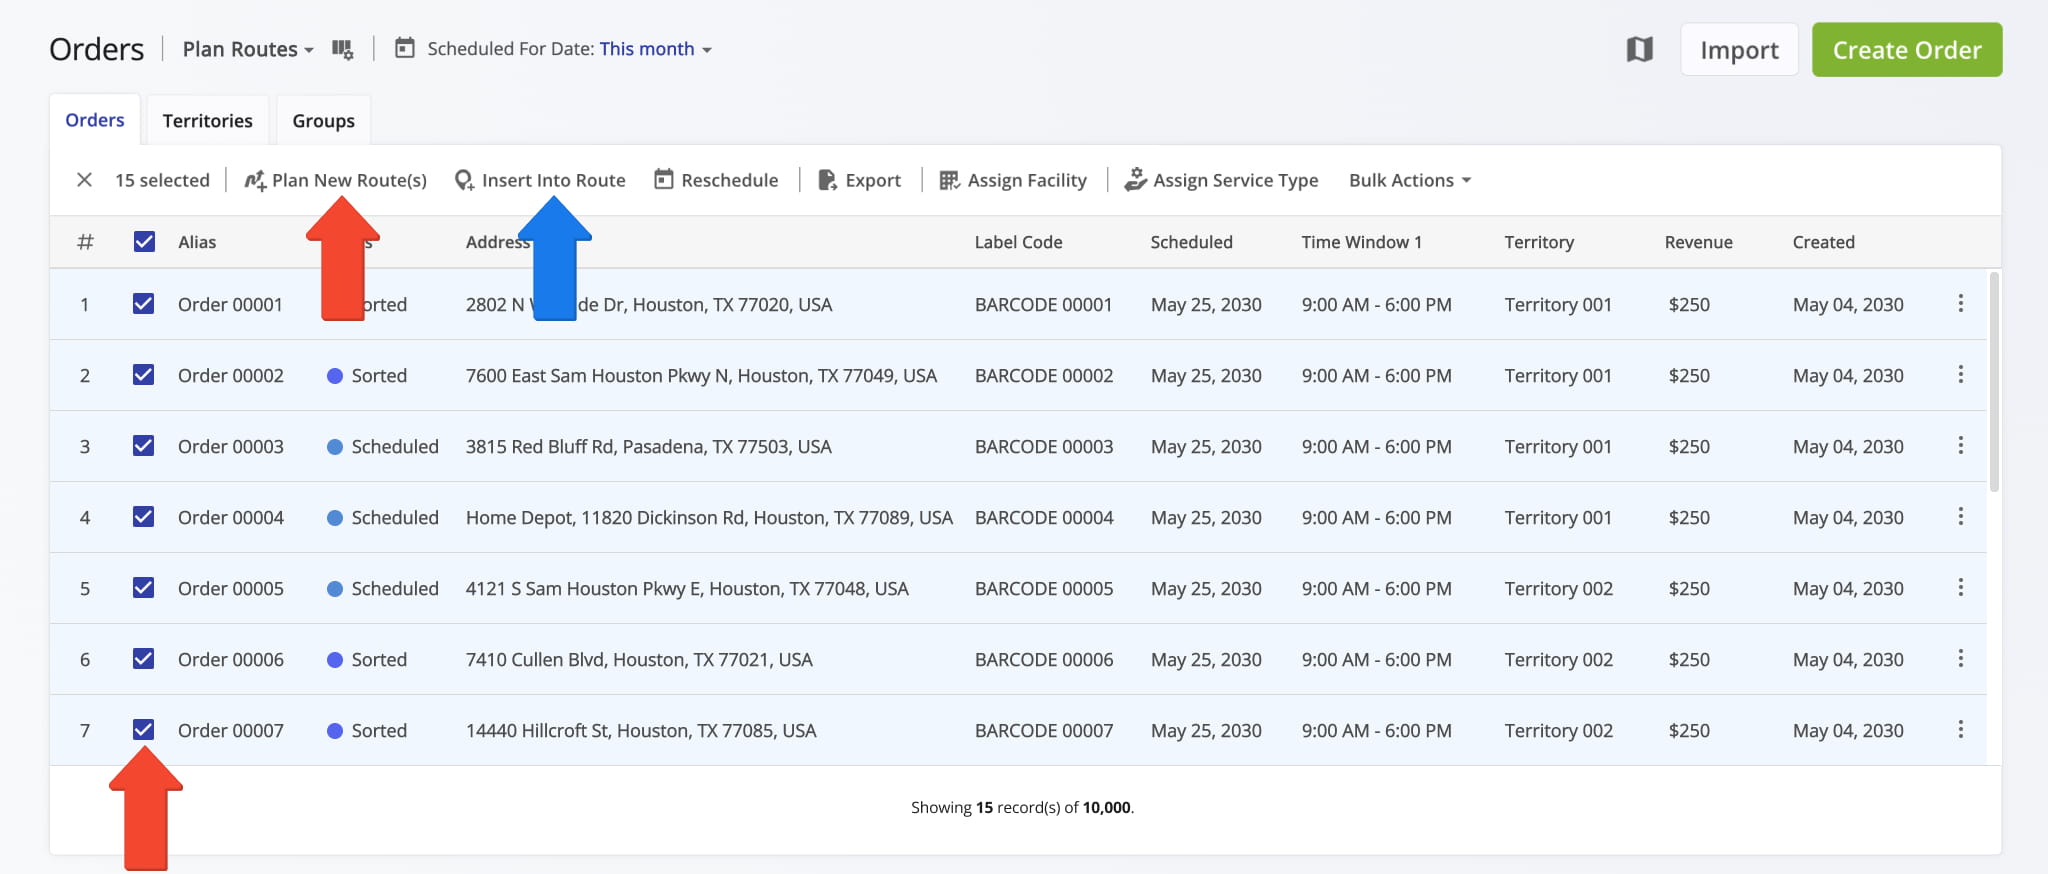
To plan routes with orders from the Orders List, check the boxes next to the orders you want to include, or check the box at the top to select all filtered orders. Then click “Plan New Route(s)” to create routes with the selected orders.
You can also insert orders into existing routes. This option is available for orders with a “Scheduled, “Sorted”, “Missing“, or “Unrouted” status. Just select the order and click “Insert Into Route“.
Order Territories Routing – Plan Routes With Orders In Geographical Territories
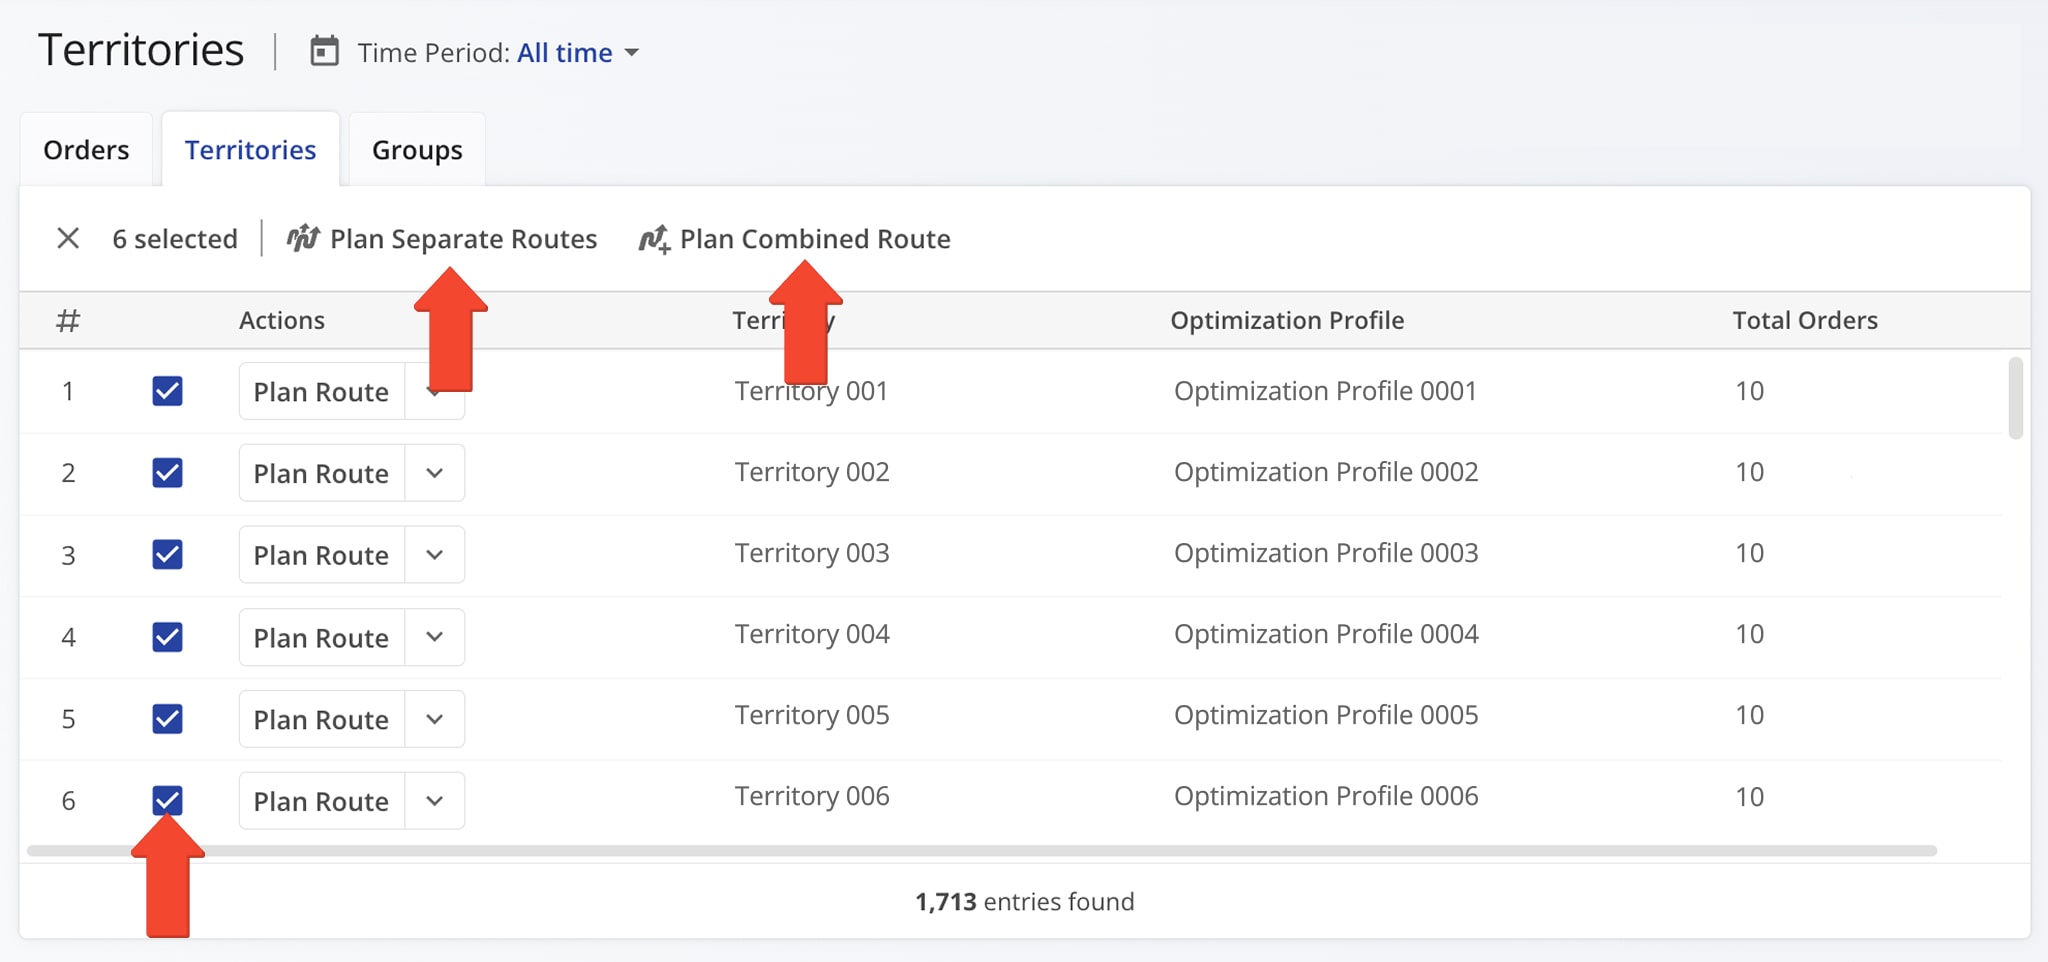
To plan routes from the “Territories” tab, select the territories you want to route, then click “Plan Combined Route” to create one route with all selected orders.
Alternatively, click “Plan Separate Routes” to generate a separate route for each territory without combining them.
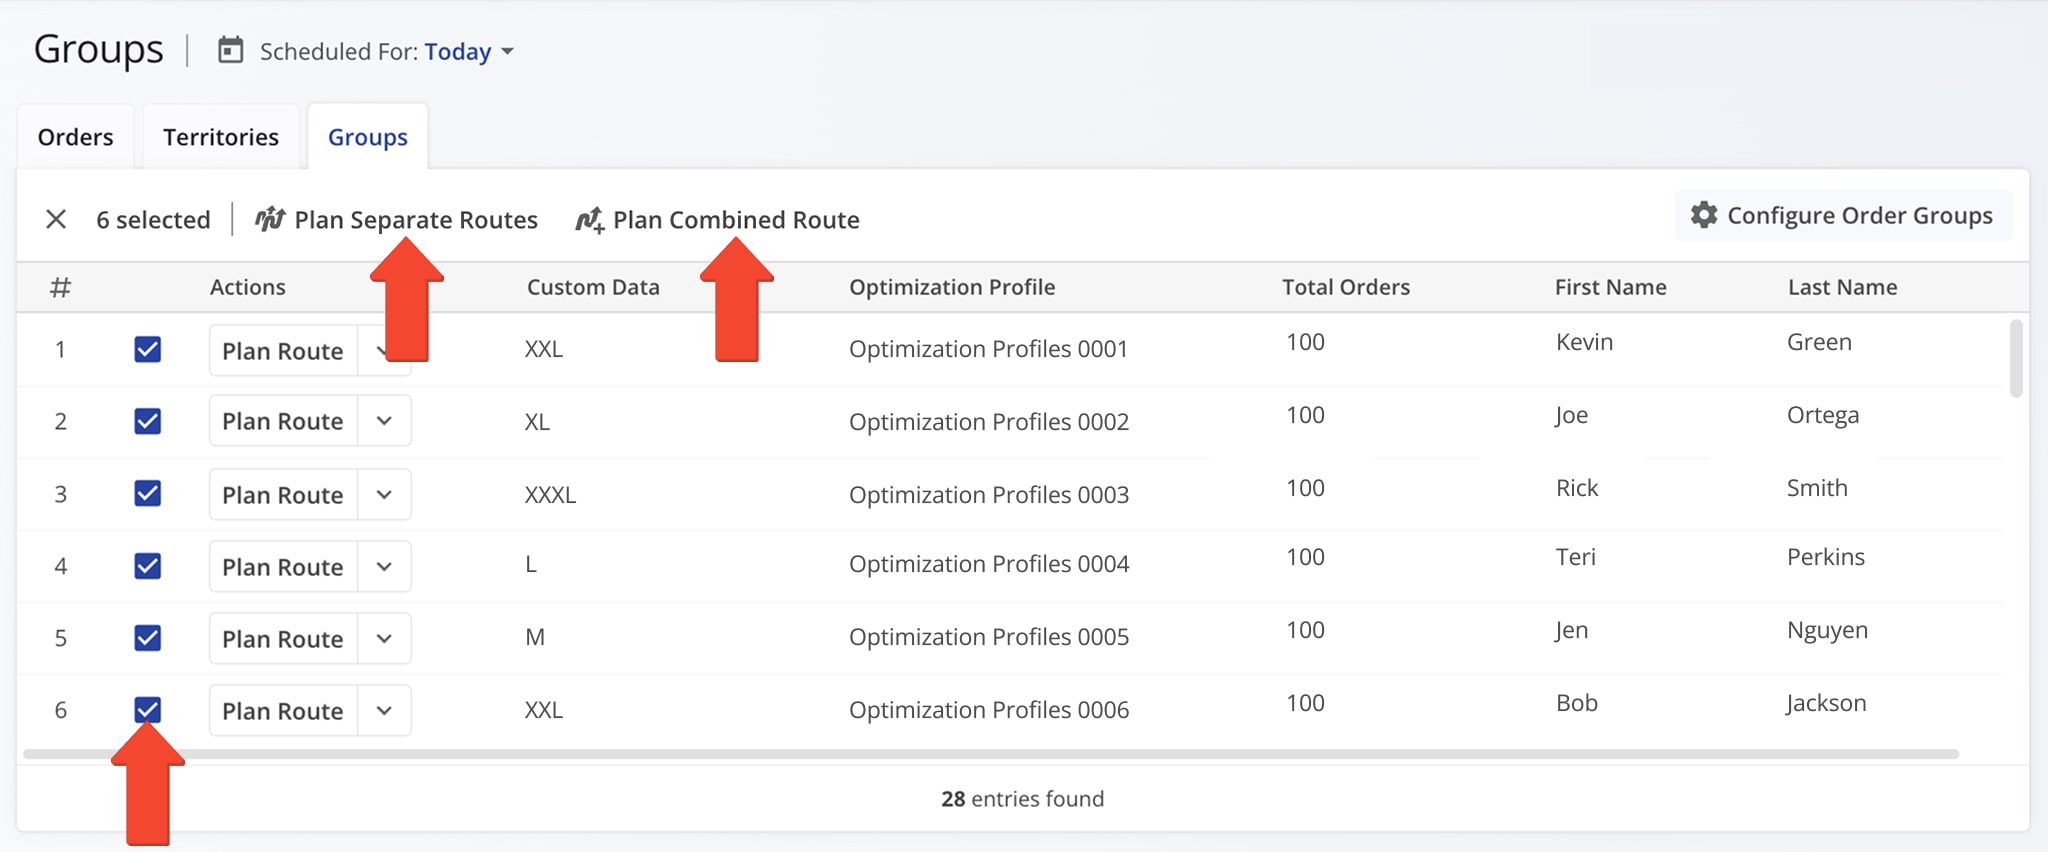
Order Groups Routing – Plan And Optimize Routes With Order Groups
You can also plan routes using Order Groups based on custom data, group, or ZIP code.
Select the groups you want to route, then click “Plan Combined Route” to create one route with all selected orders. Or, click “Plan Separate Routes” to generate a separate route for each group without combining them.
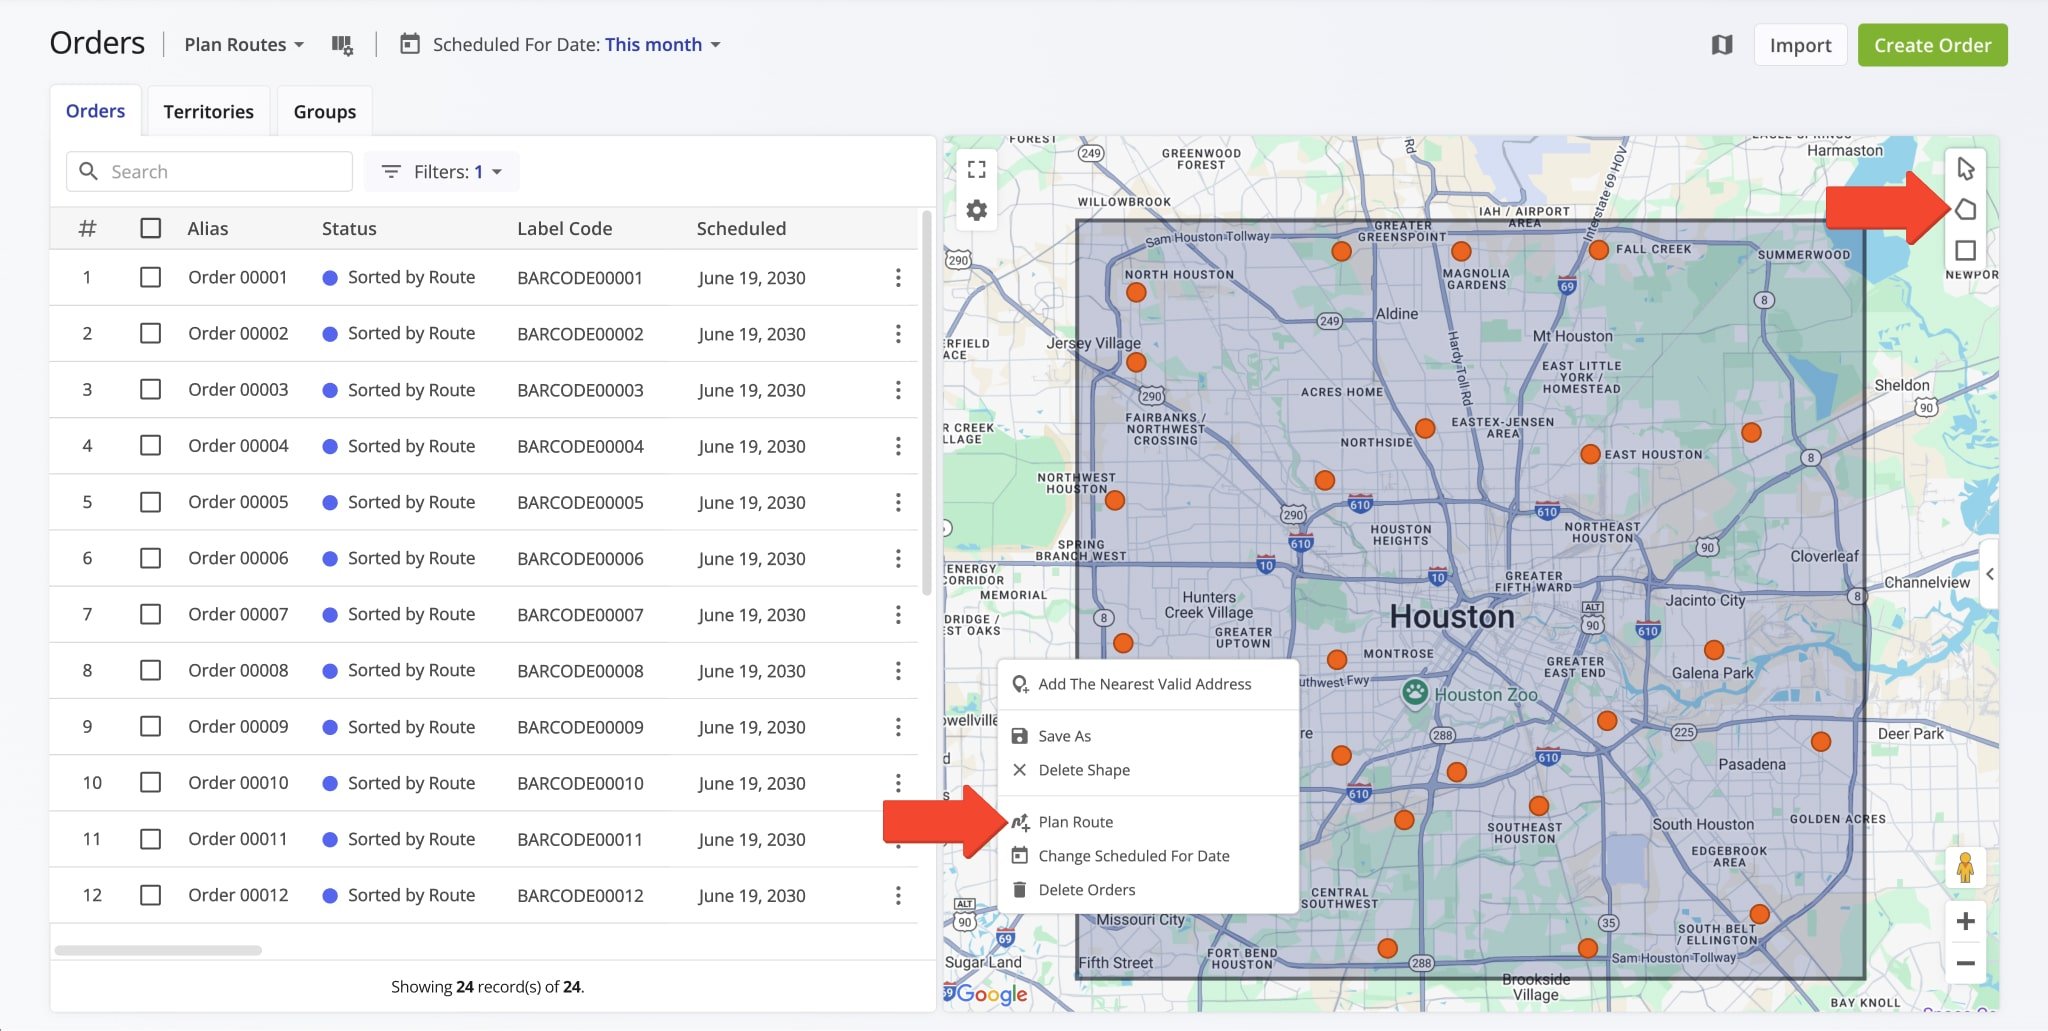
Orders Map Routing – Plan Routes With Customer Orders On The Map
With Route4Me’s Orders Map, you can plan routes directly by drawing shapes around orders on the map. Use the Draw Polygon or Draw Rectangle tools, or right-click on the map to choose a shape.
Then, draw a shape around the orders you want to route, right-click the shape, and choose “Plan Route”. This will open the Route Planning screen with the selected order details automatically added.
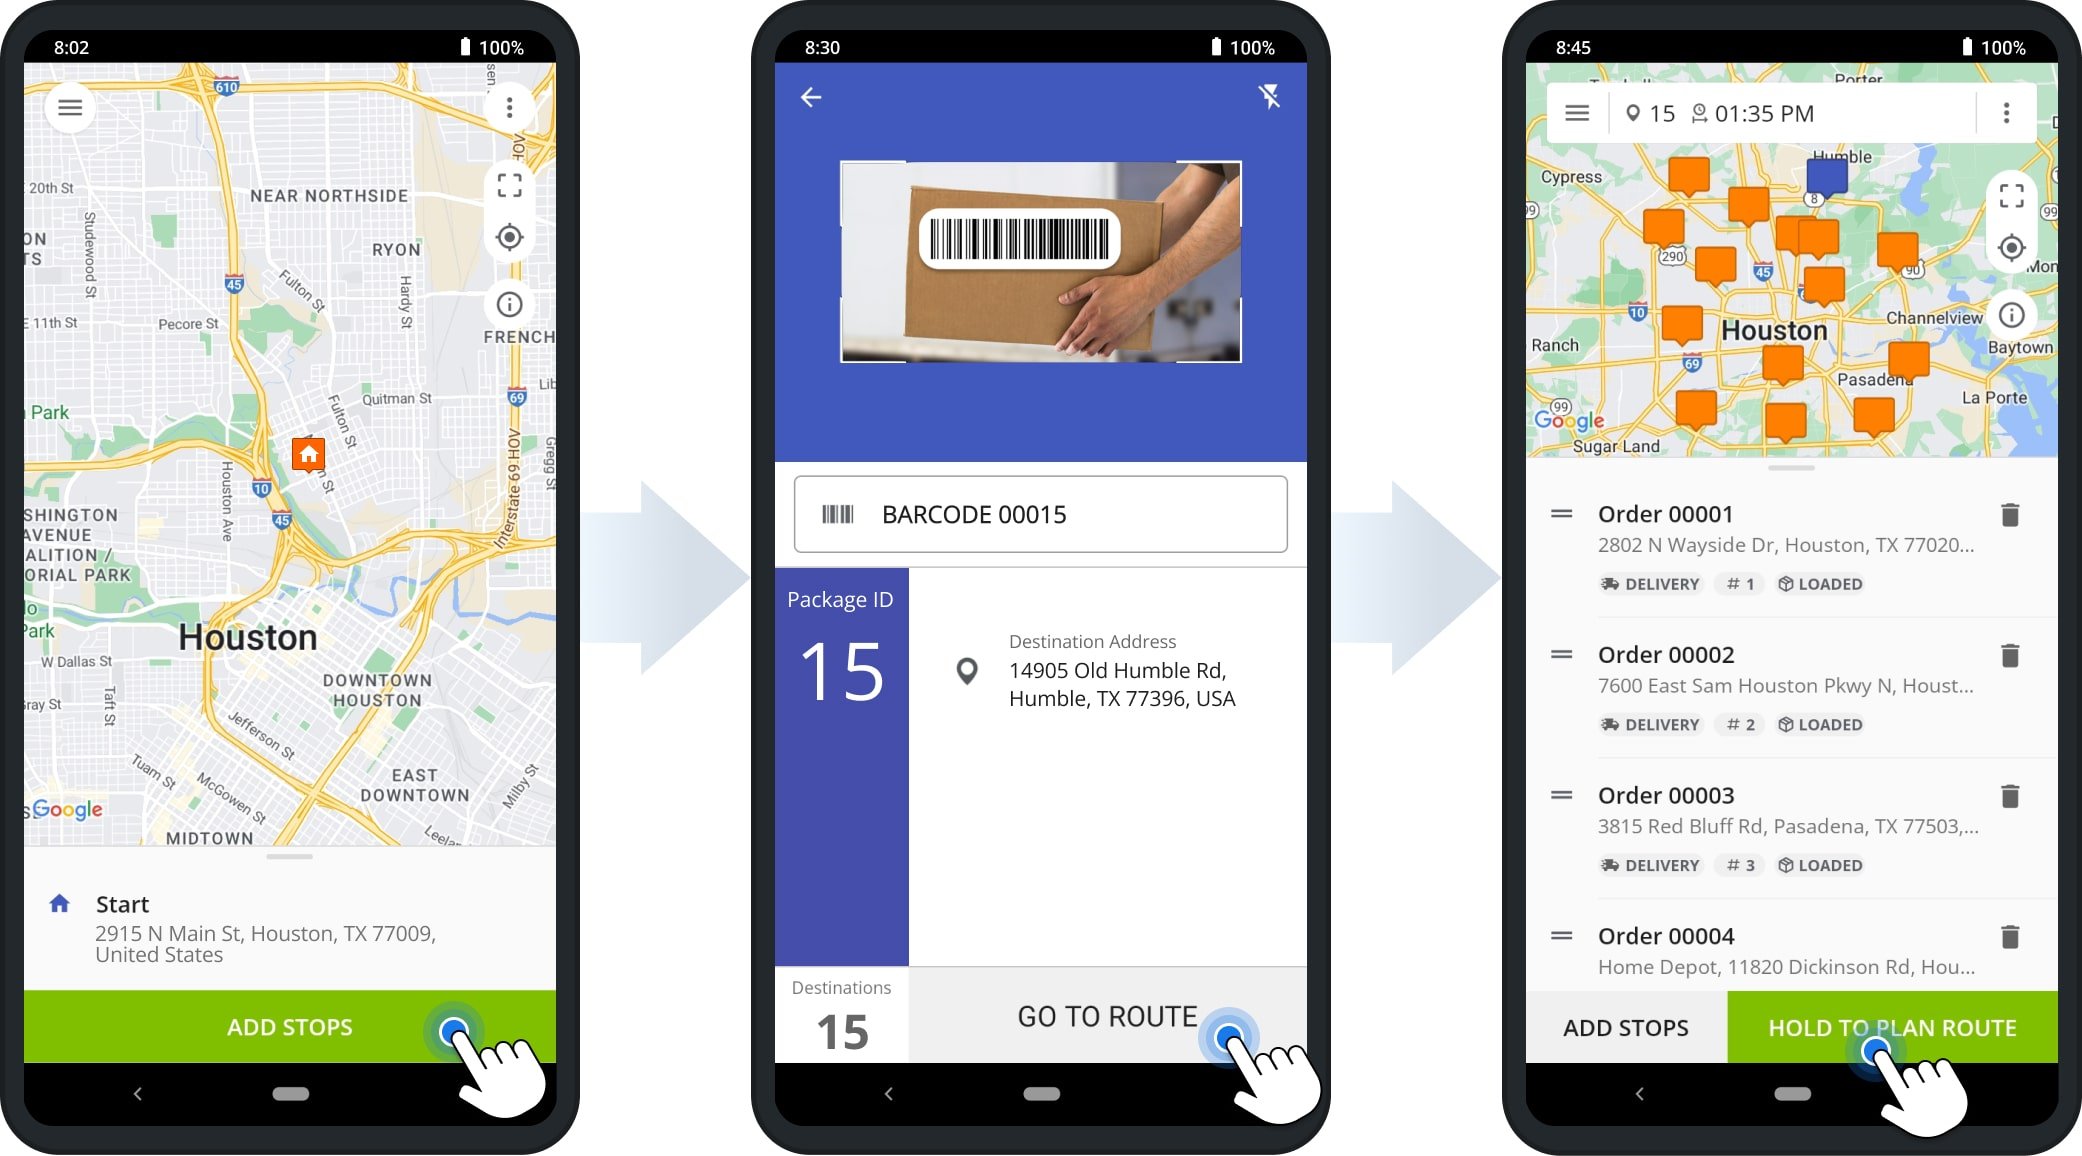
Grab & Go – Scan Order Labels To Plan Routes With Mobile App
Route4Me’s Grab & Go mobile order routing lets drivers scan order barcodes to instantly add addresses, optimize routes, and complete deliveries. From the Routes menu, tap “Add New Route” > “Add Stops” to launch the scanner and begin loading orders.
As drivers scan each barcode, destinations are added to the route, allowing them to start navigation, complete orders, and collect proof of delivery, all from the app.
Complete Orders – Order Routes Dispatch, Loading And Unloading, Customer Notifications
After planning routes with orders, you can dispatch them to assign drivers, load orders by scanning barcodes, and complete routes with real-time tracking.
Drivers can collect proof of delivery, service, or visit, unload orders, and mark stops as complete. You can also send automated customer notifications with order status updates, tracking links, and more.
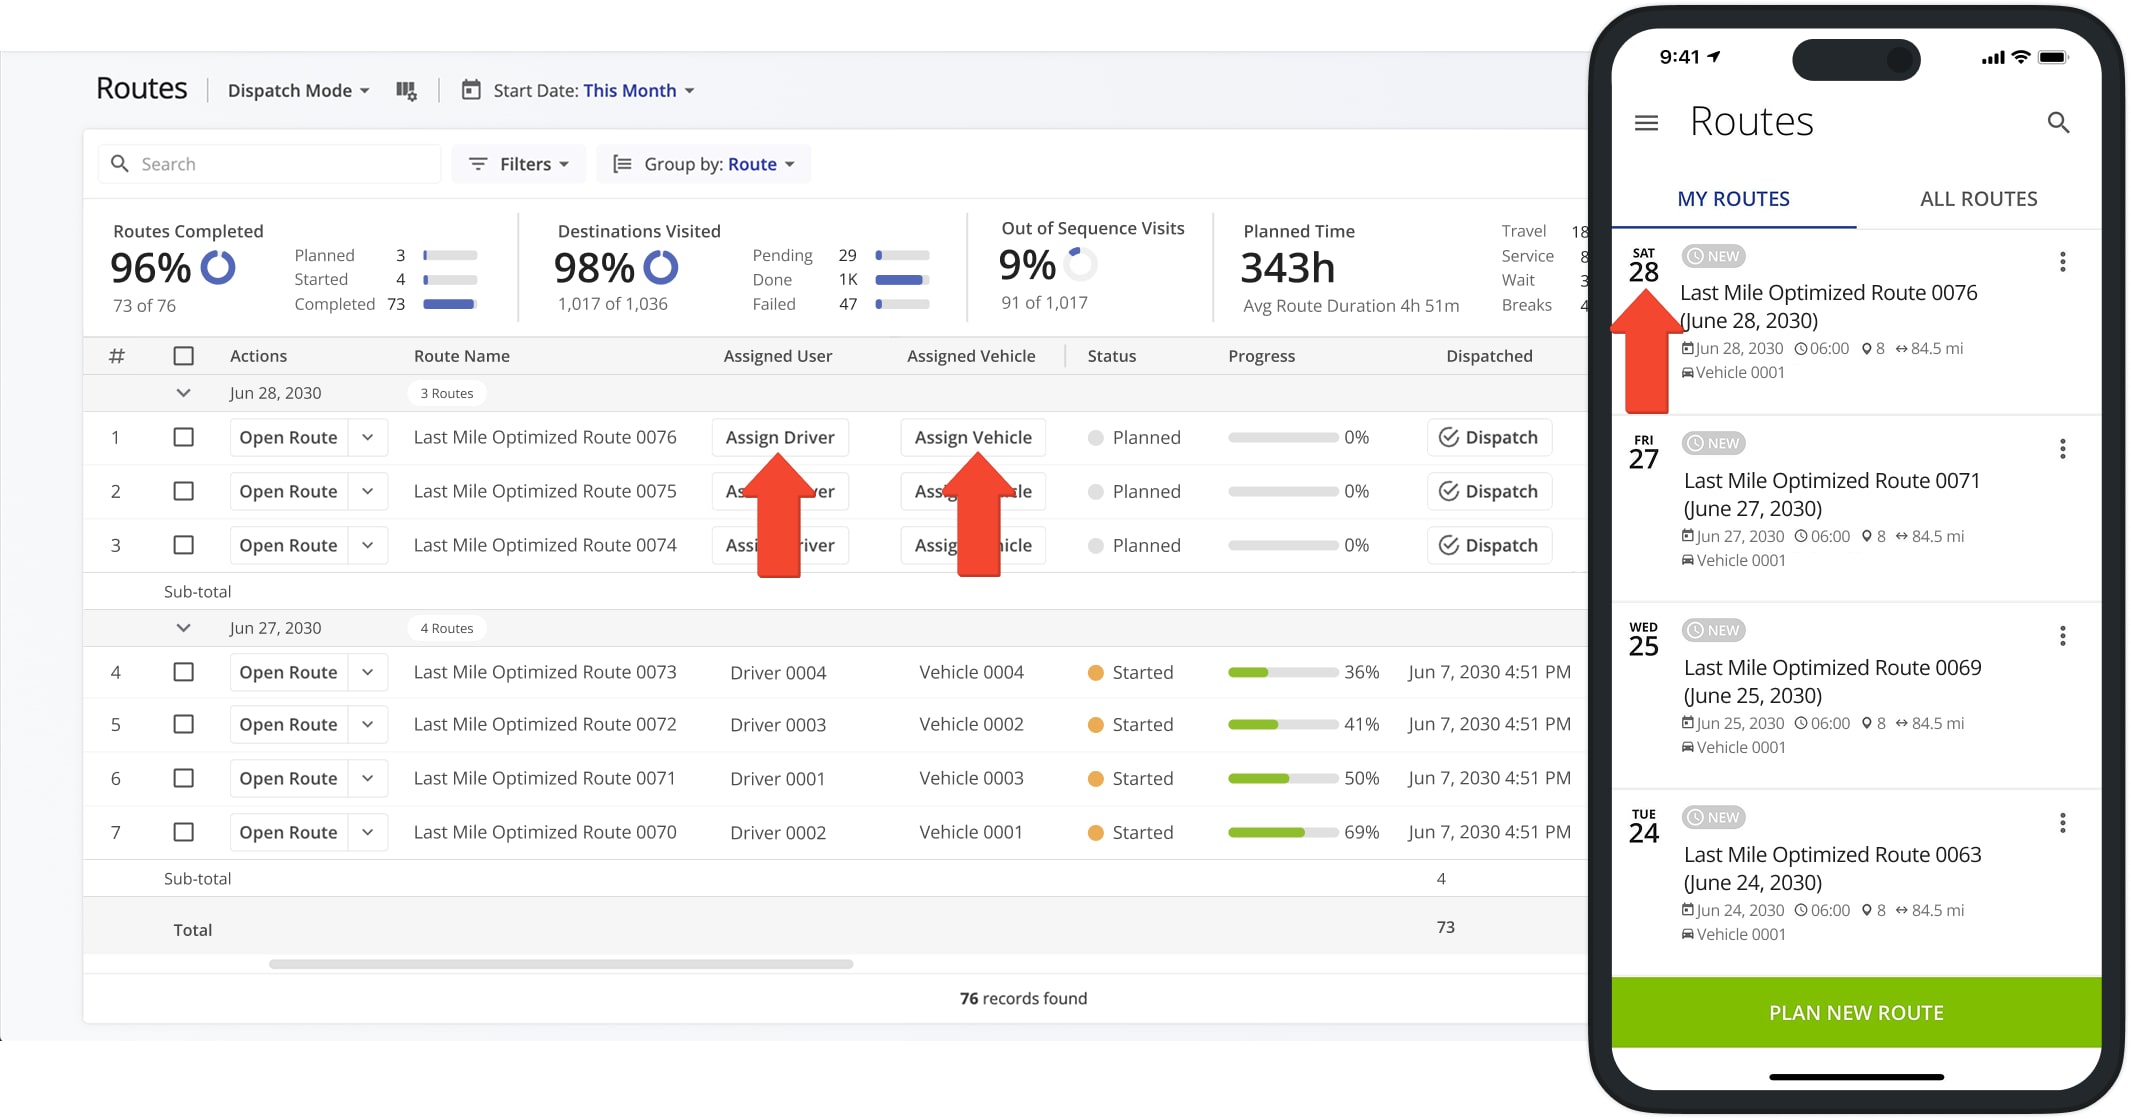
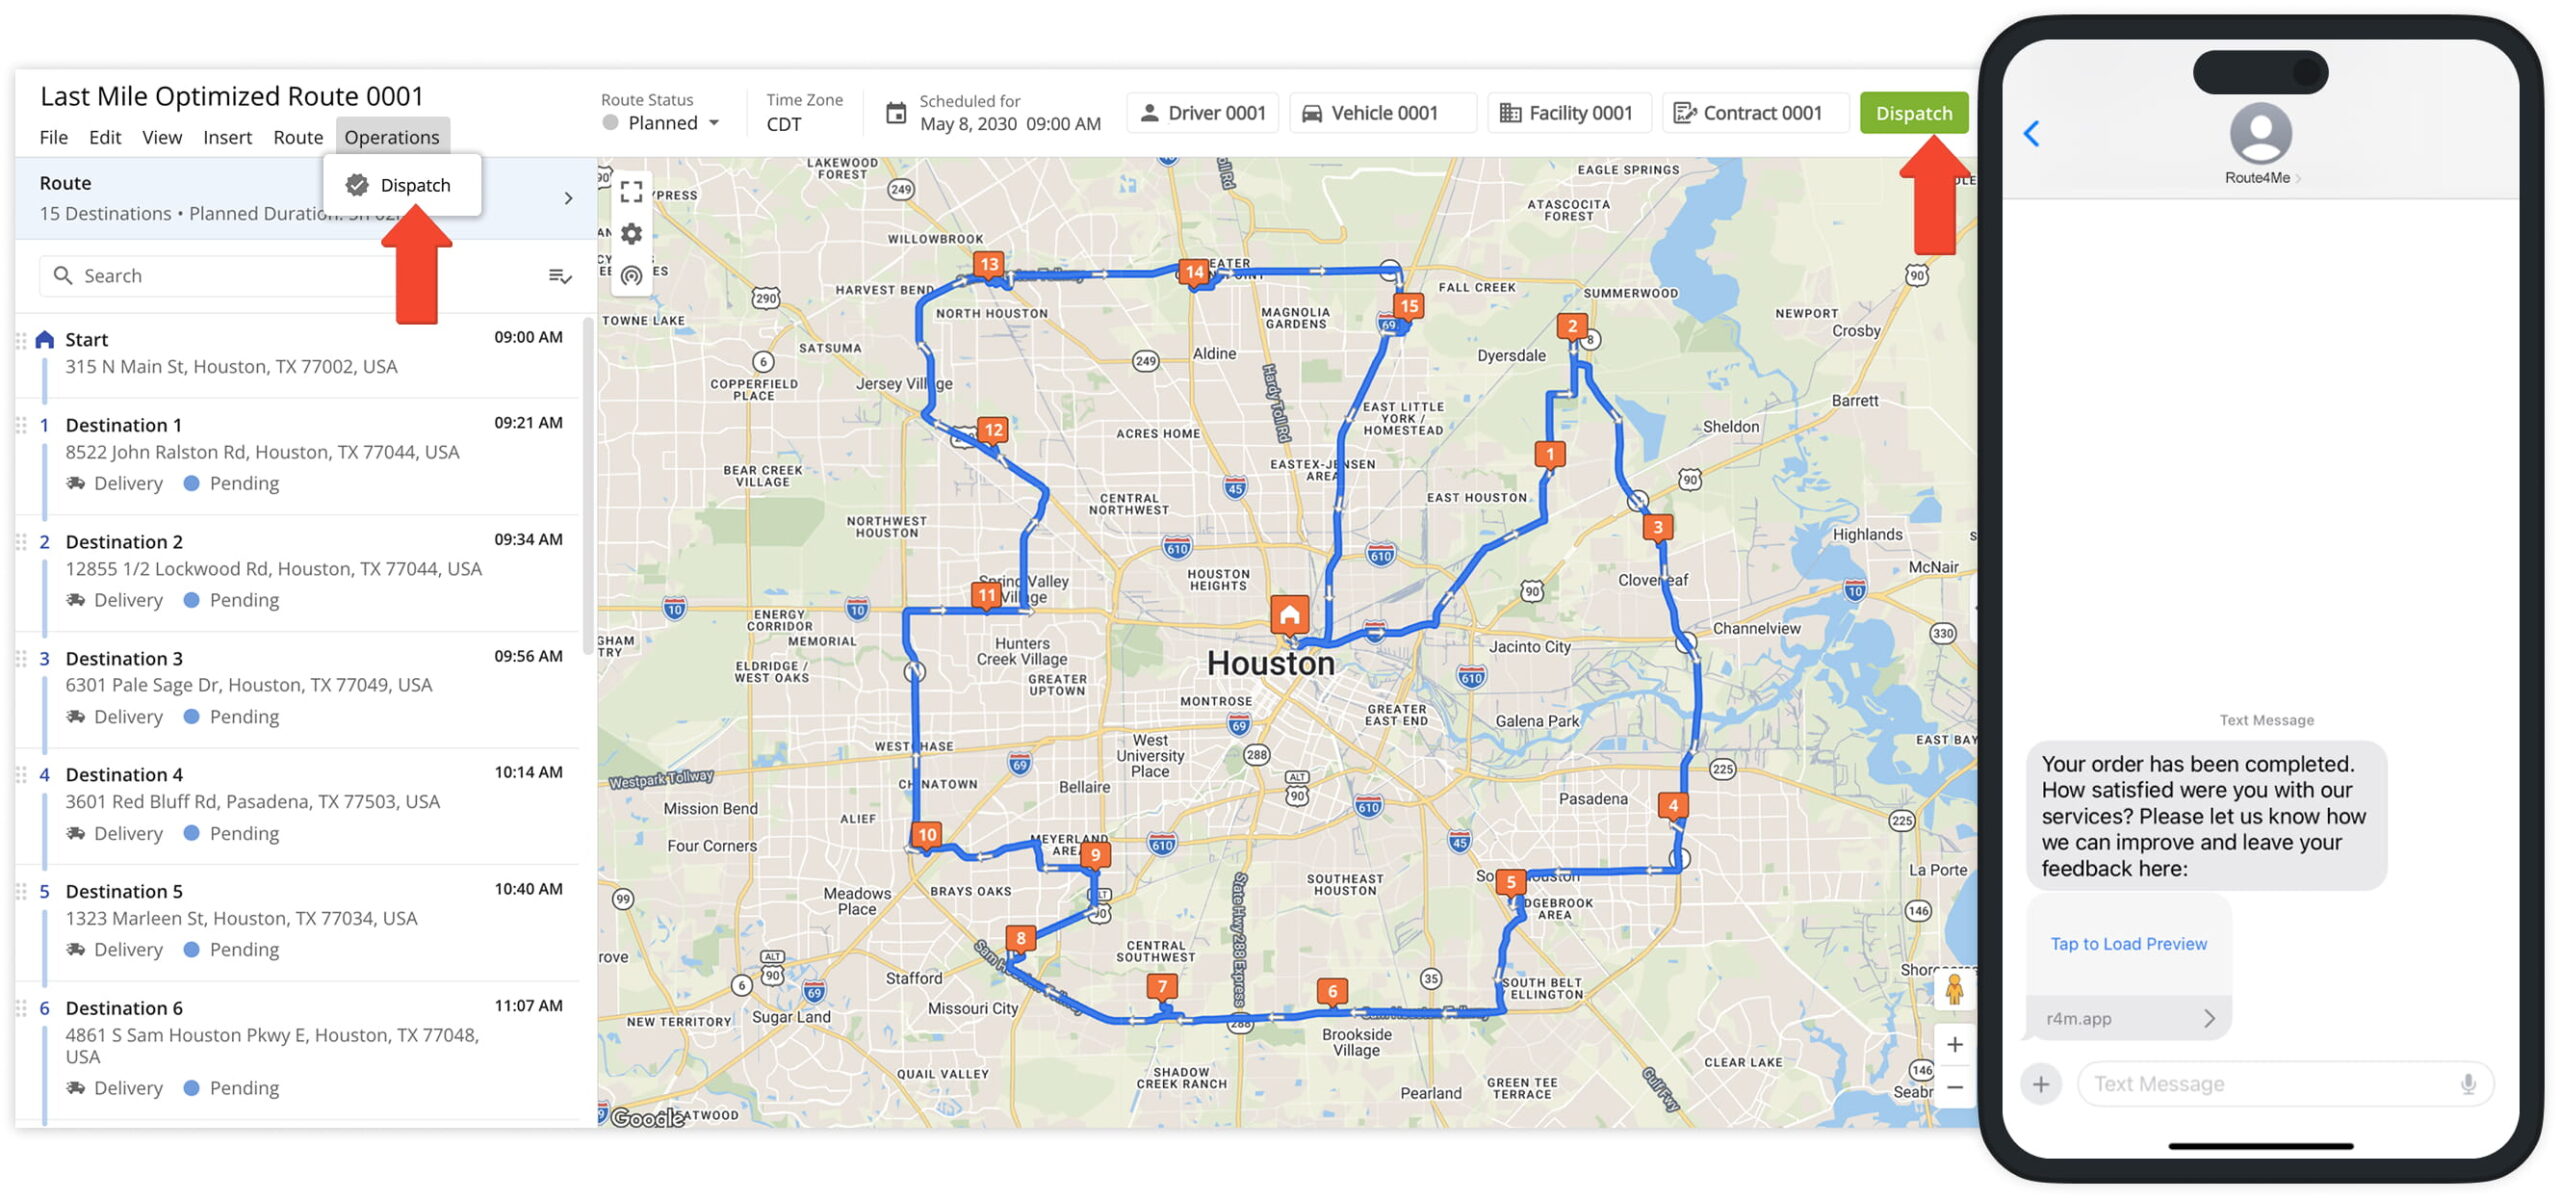
Dispatch Routes – Assign Drivers And Vehicles To Order Routes
With Route4Me’s route management software, you can easily dispatch routes and assign the right drivers and vehicles to each order route. Dispatch routes directly from the Routes List, Route Editor, or Routes Map.
The system also simplifies complex dispatching by automatically matching drivers and vehicles based on required driver skills and vehicle attributes.
Dispatch Route Notifications – Send Automated SMS And Email Customer Notifications
You can also send route notifications directly from the Routes List, Route Editor, or Routes Map. Customers then receive automated SMS and email updates.
These include order scheduling alerts, a link to the Online Order Tracking Portal, real-time status updates after dispatch, completion notices, and a link to the Customer Satisfaction Survey.
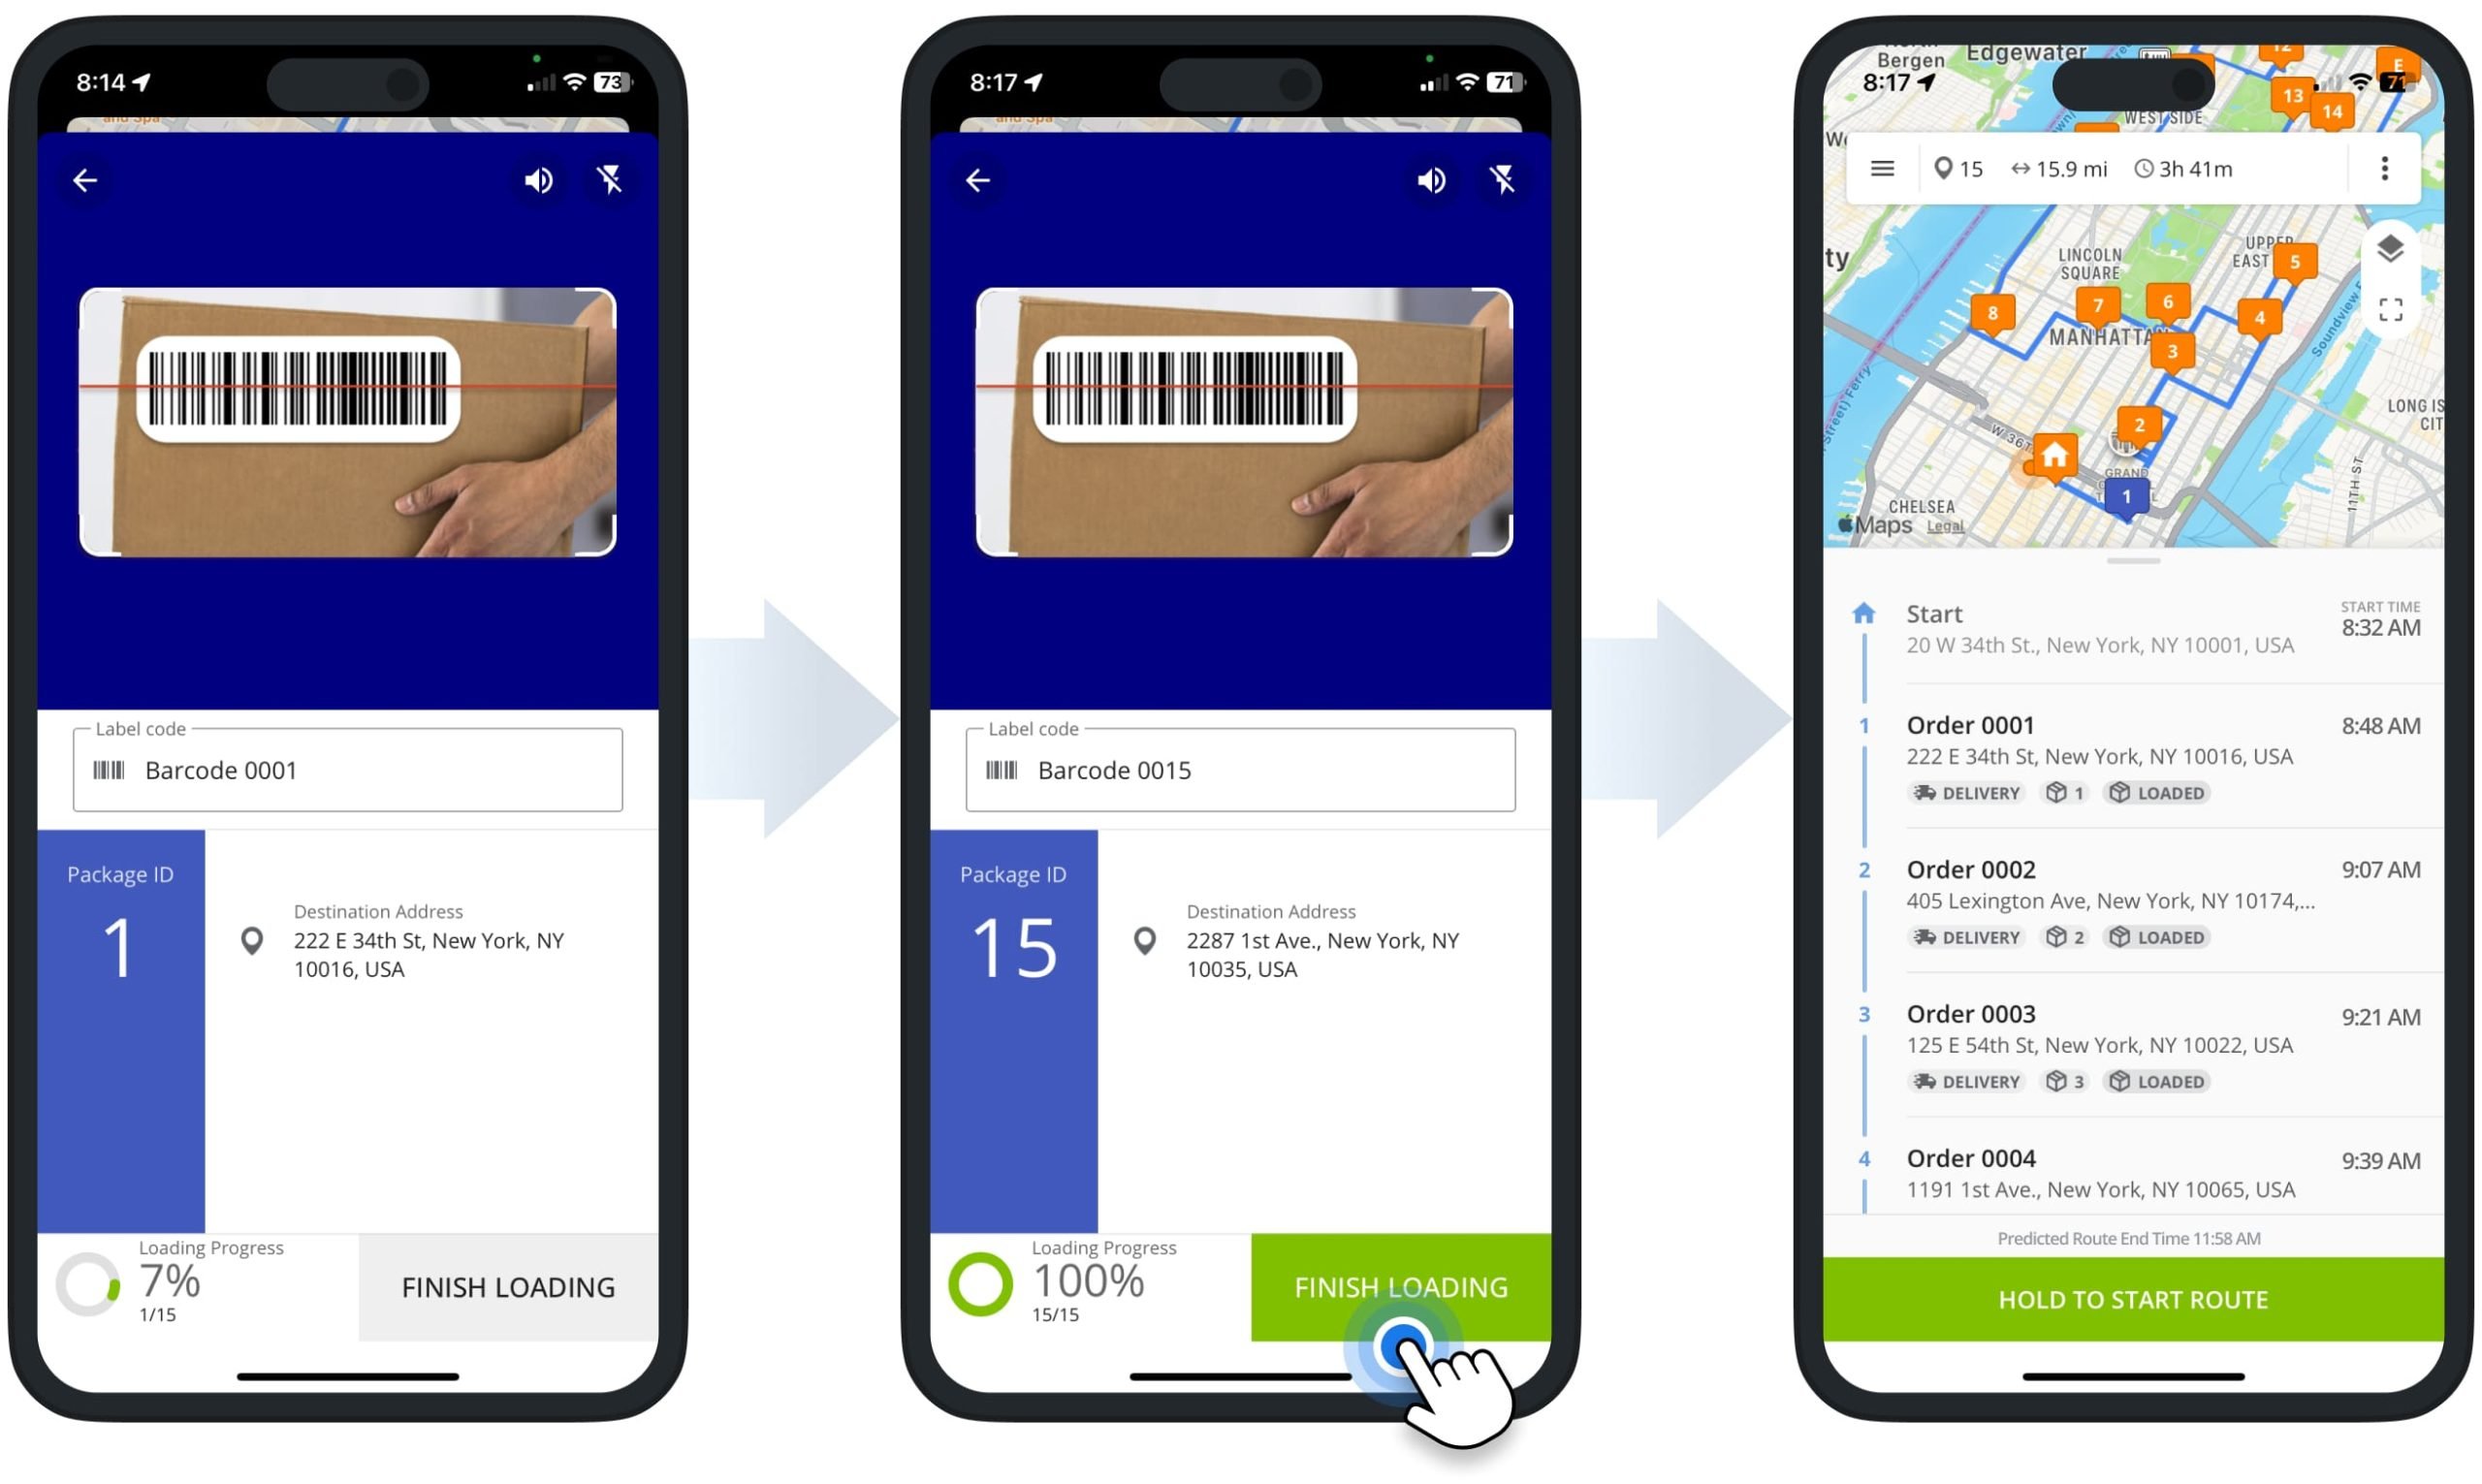
Load Orders – Scan Barcodes To Load Orders On Routes With Mobile App
After adding, sorting, scheduling, and routing orders, open the route in the app and tap “Start Loading” to launch the label scanner. Use your device camera or a Bluetooth scanner to scan and load orders onto the route.
Once loaded, each destination will show a “Loaded” status.
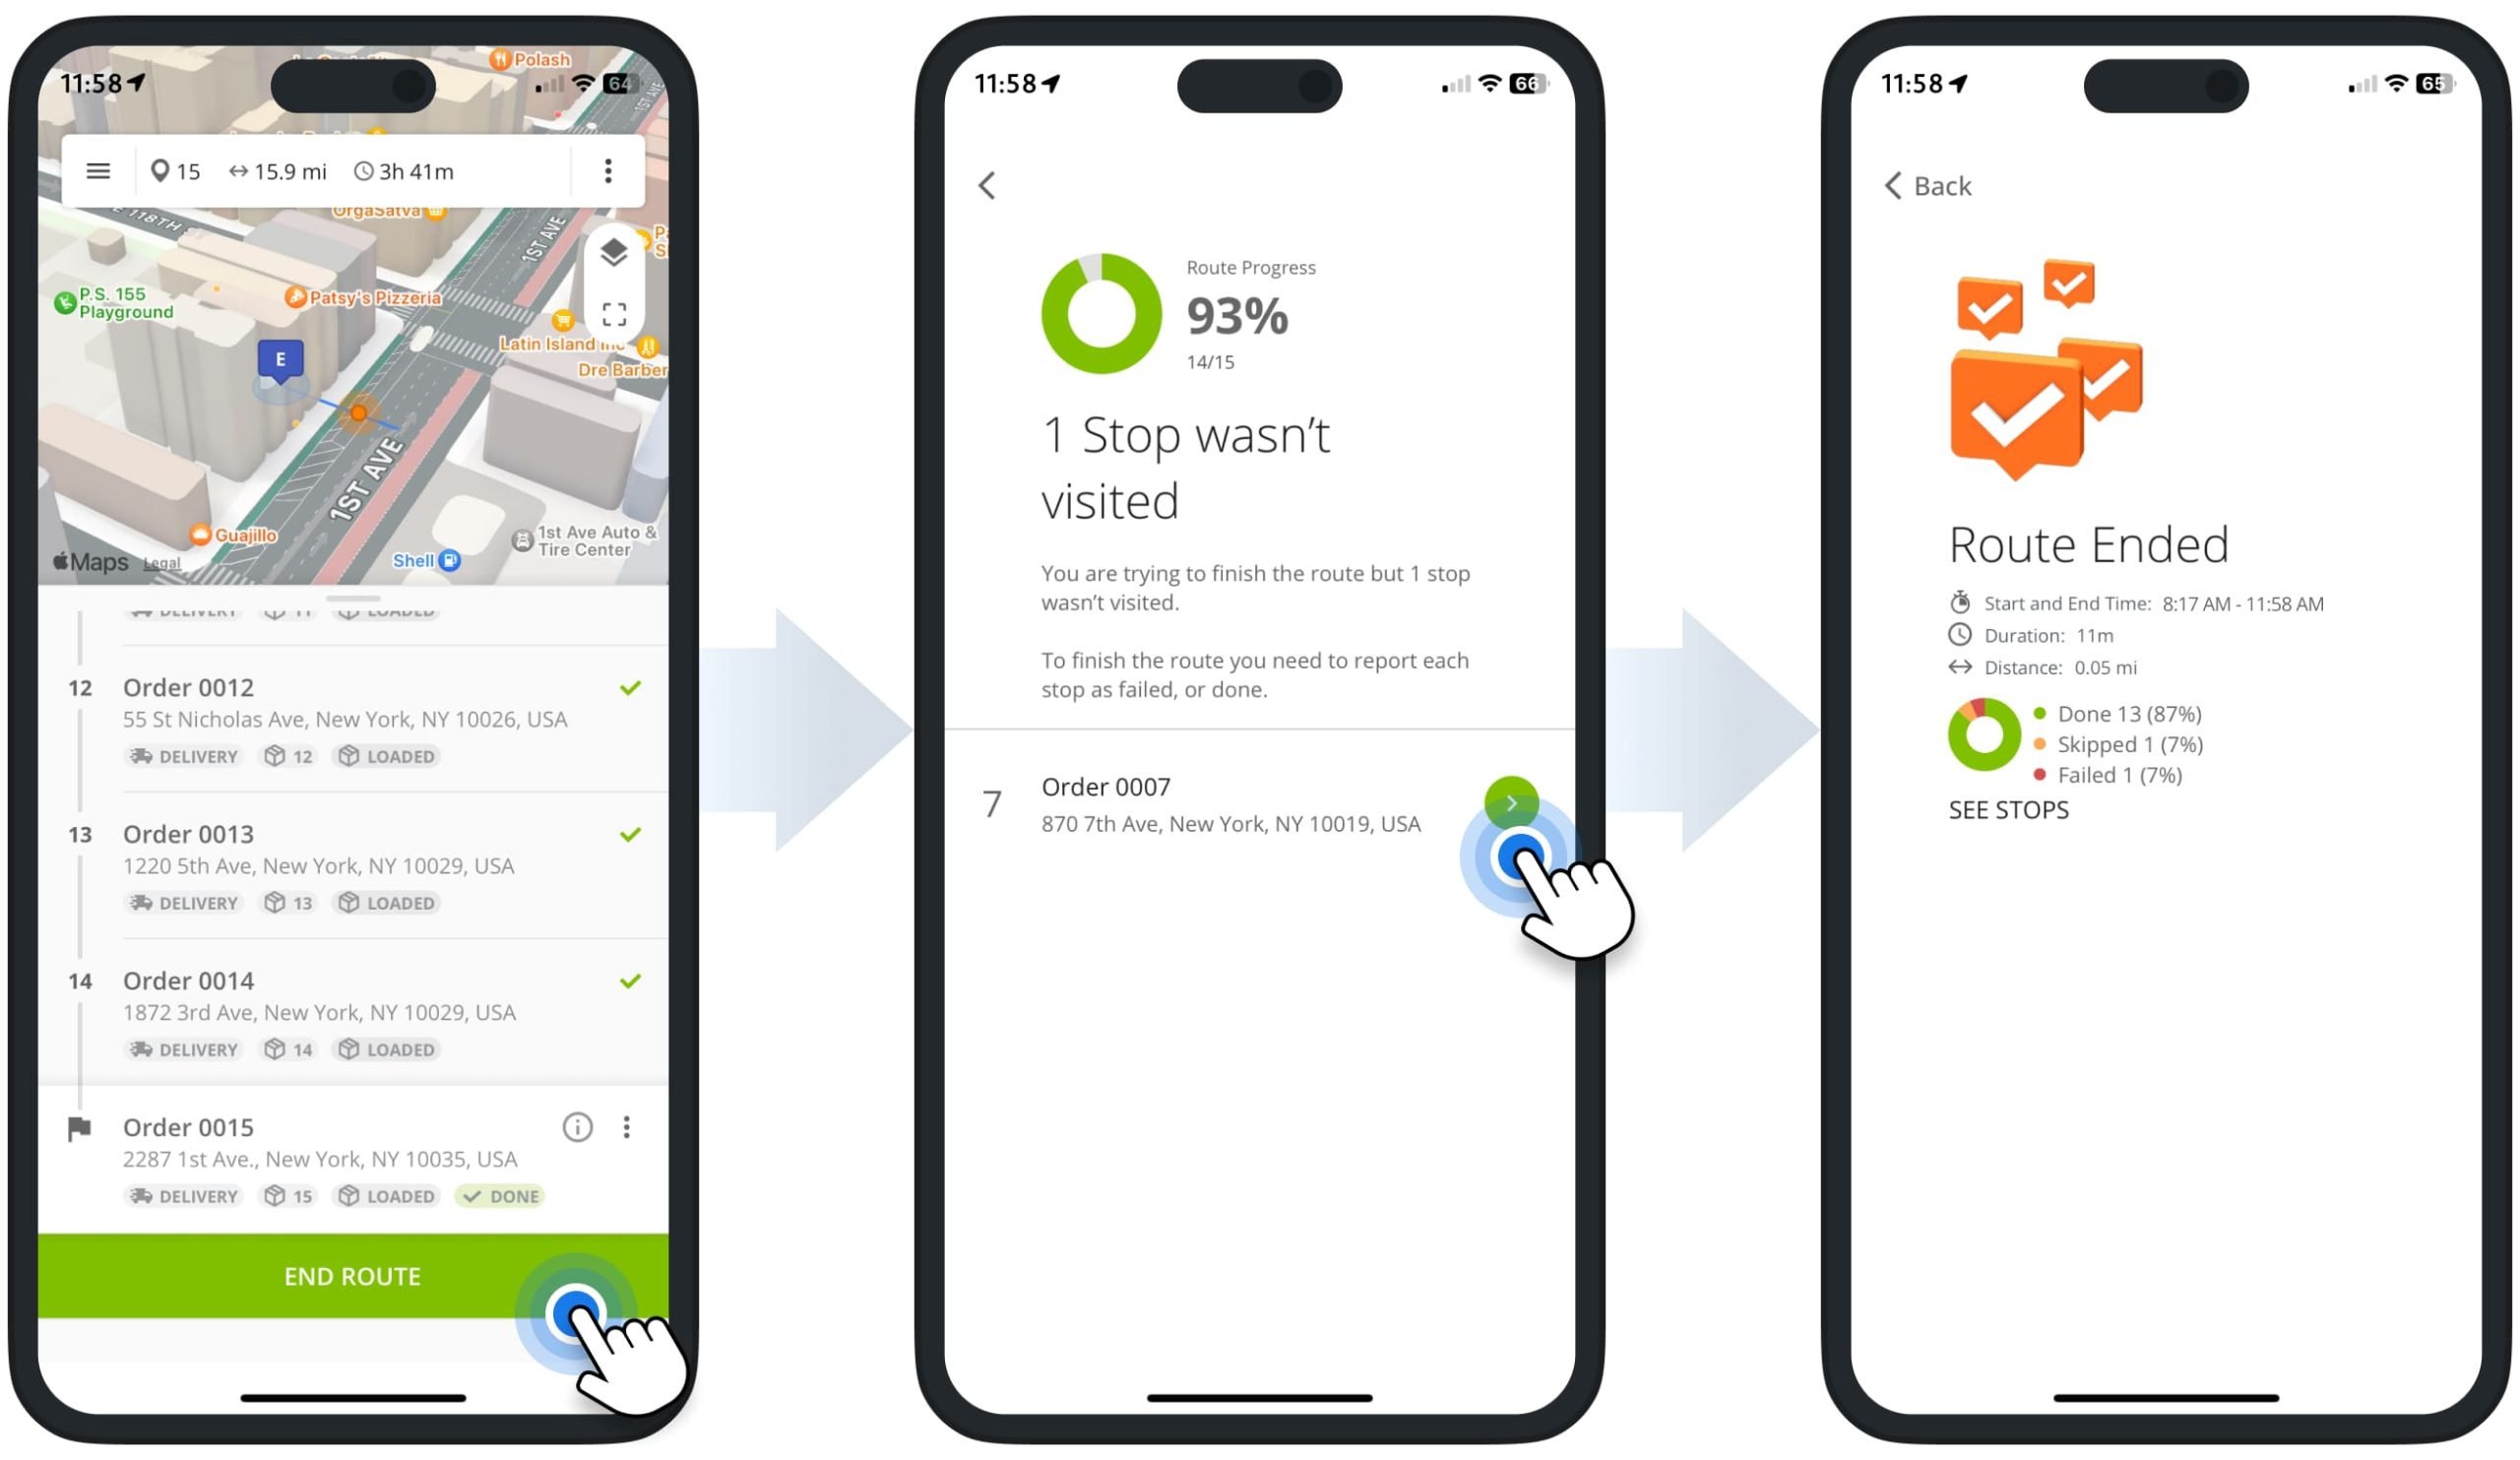
Complete Orders – Complete Workflows, Collect Proof Of Visit, Scan To Unload Orders
Once a driver starts the route, they can navigate to customer destinations, visit customers, and complete orders using the app.
The in-app barcode scanner lets drivers scan orders to unload, complete custom order workflows, and collect proof of visit like signatures, photos, notes, videos, and audio.
Throughout the process, you can track drivers, vehicles, and assets in real time with updates synced to Route4Me’s software.
Manage Orders And Track Order Progress And Statuses
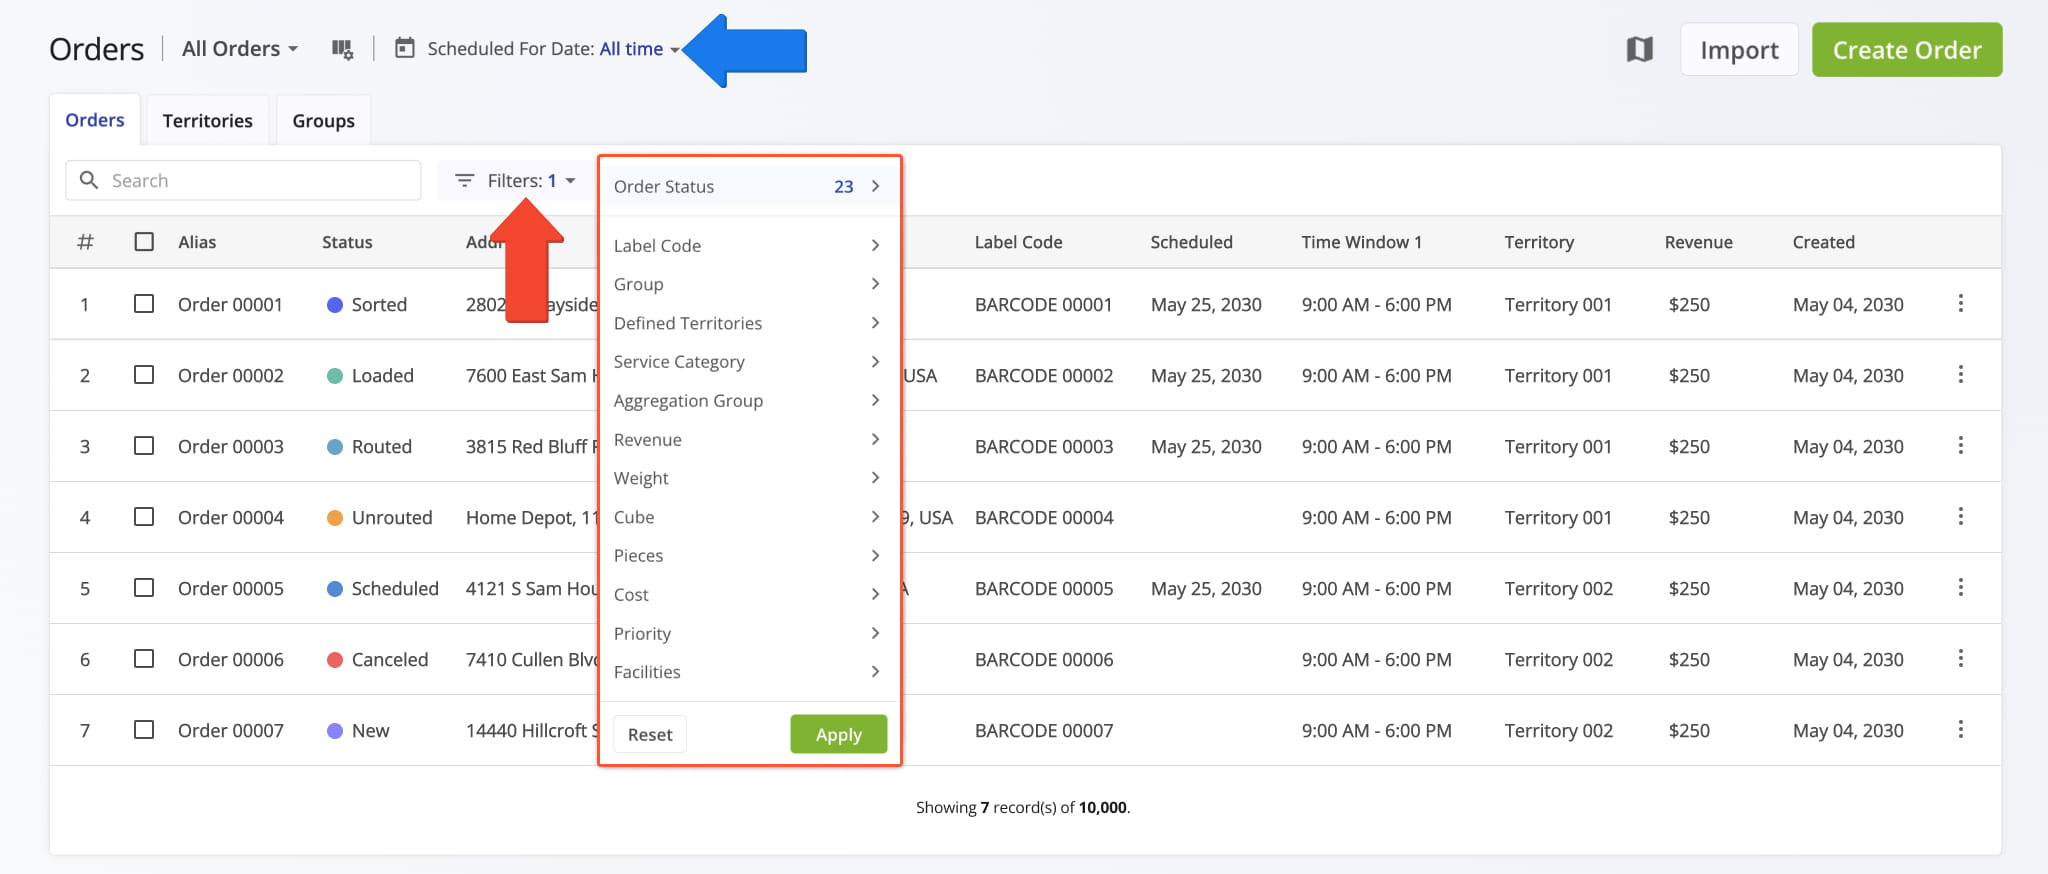
Each order has a status reflecting its progress through routing and completion. Your Orders List lets you filter orders by status, type, group, territory, weight, revenue, and more.
Customizable view modes and data columns help you focus on relevant orders and leverage analytics to improve order management.
Filter Orders – Customizable Dynamic Orders List Filters And View Modes
You can filter orders in the Route4Me Orders List by different attribute such as Label Code, Group, Territory, and more to quickly find the orders you need.
To simplify filtering, use Orders List View Modes to group statuses. (For example, the “Plan Routes” mode shows only orders which are ready for route planning or insertion.)
Choose a View Mode first, then apply additional filters to narrow down your selection.
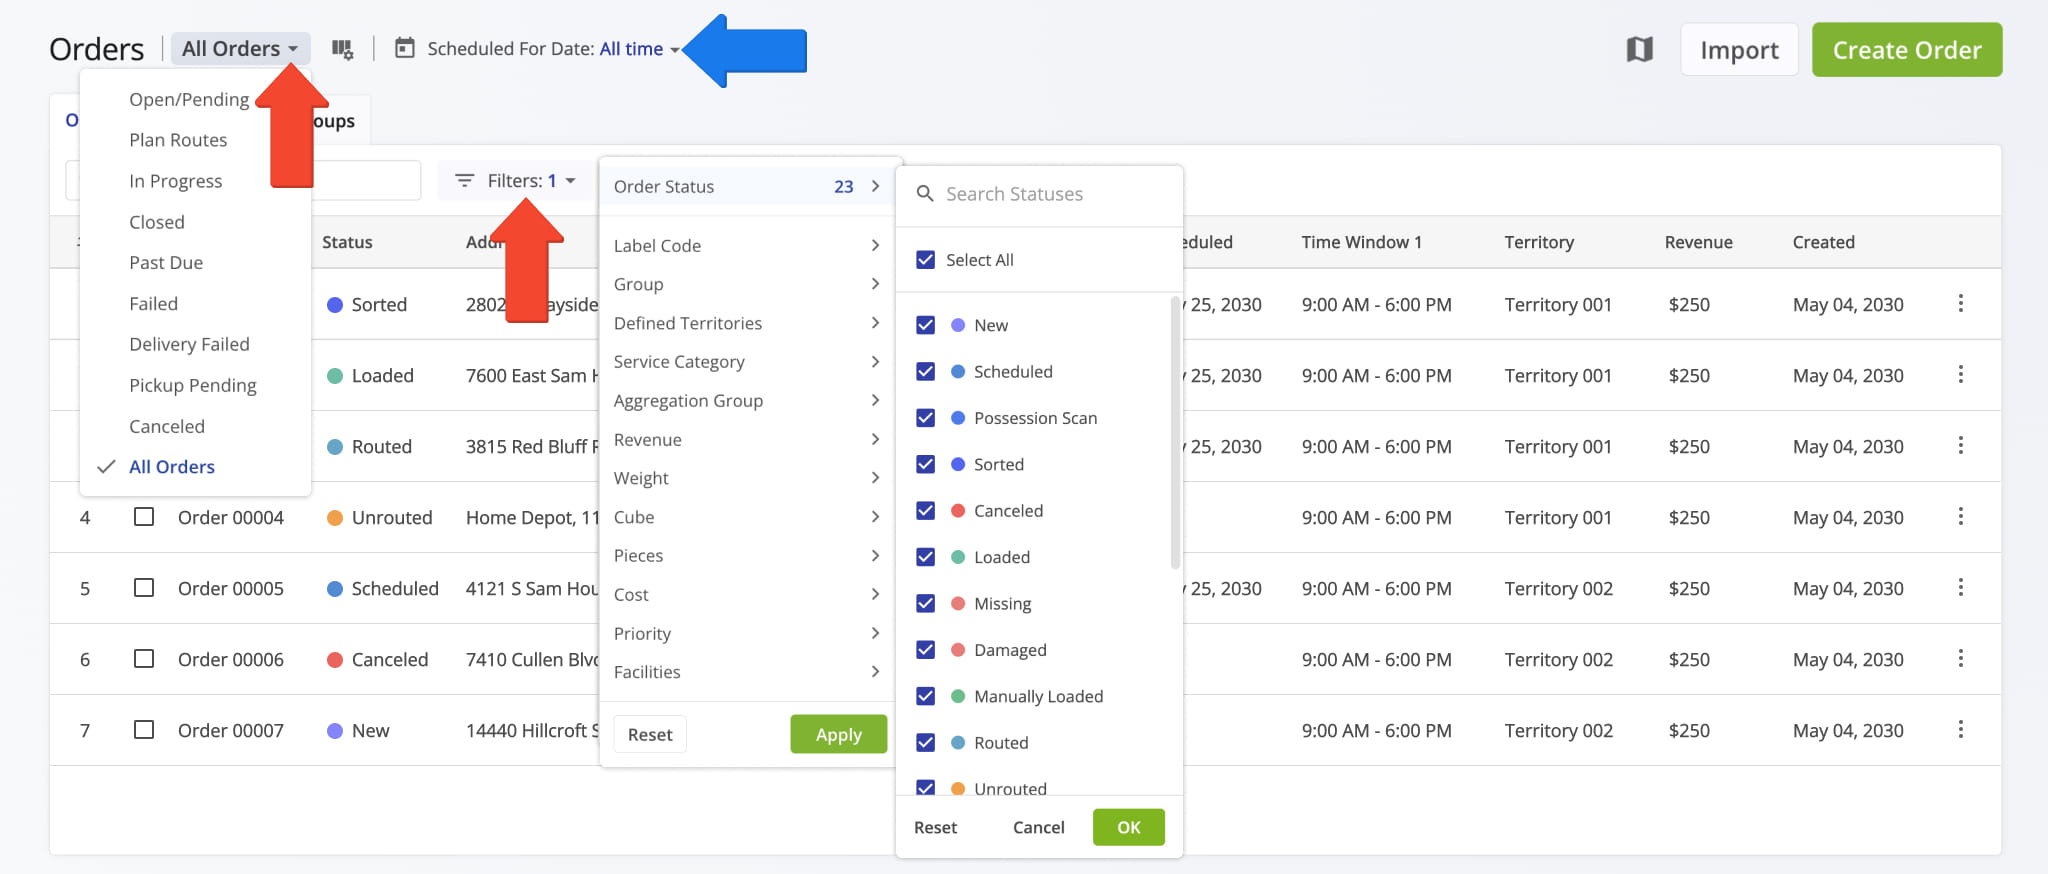
Each View Mode supports a specific set of filters. To filter orders, first select your preferred View Mode, then click the “Filters” button.
Alternatively, choose the “All Orders” View Mode to include every order and access filters for all statuses. To filter by date, click the calendar icon or the “Scheduled For Date” field to pick a specific date or date range.
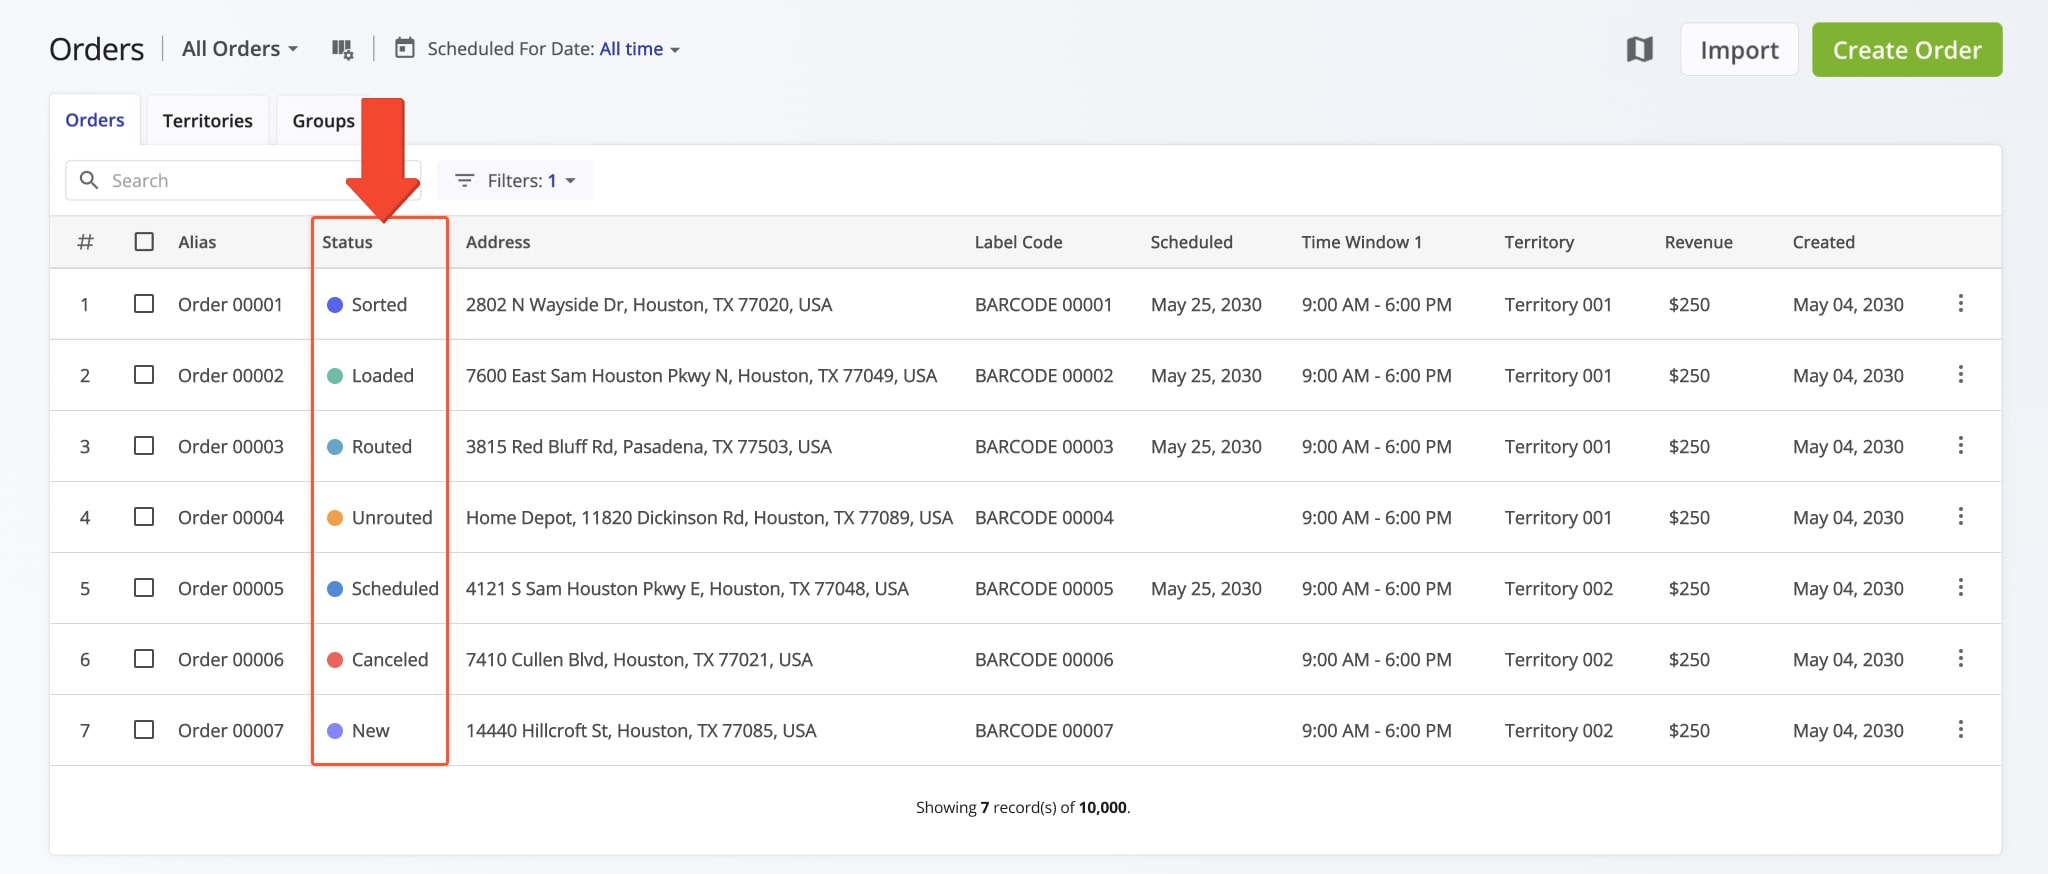
Order Statuses – List Of Order Lifecycle Statuses By Stage
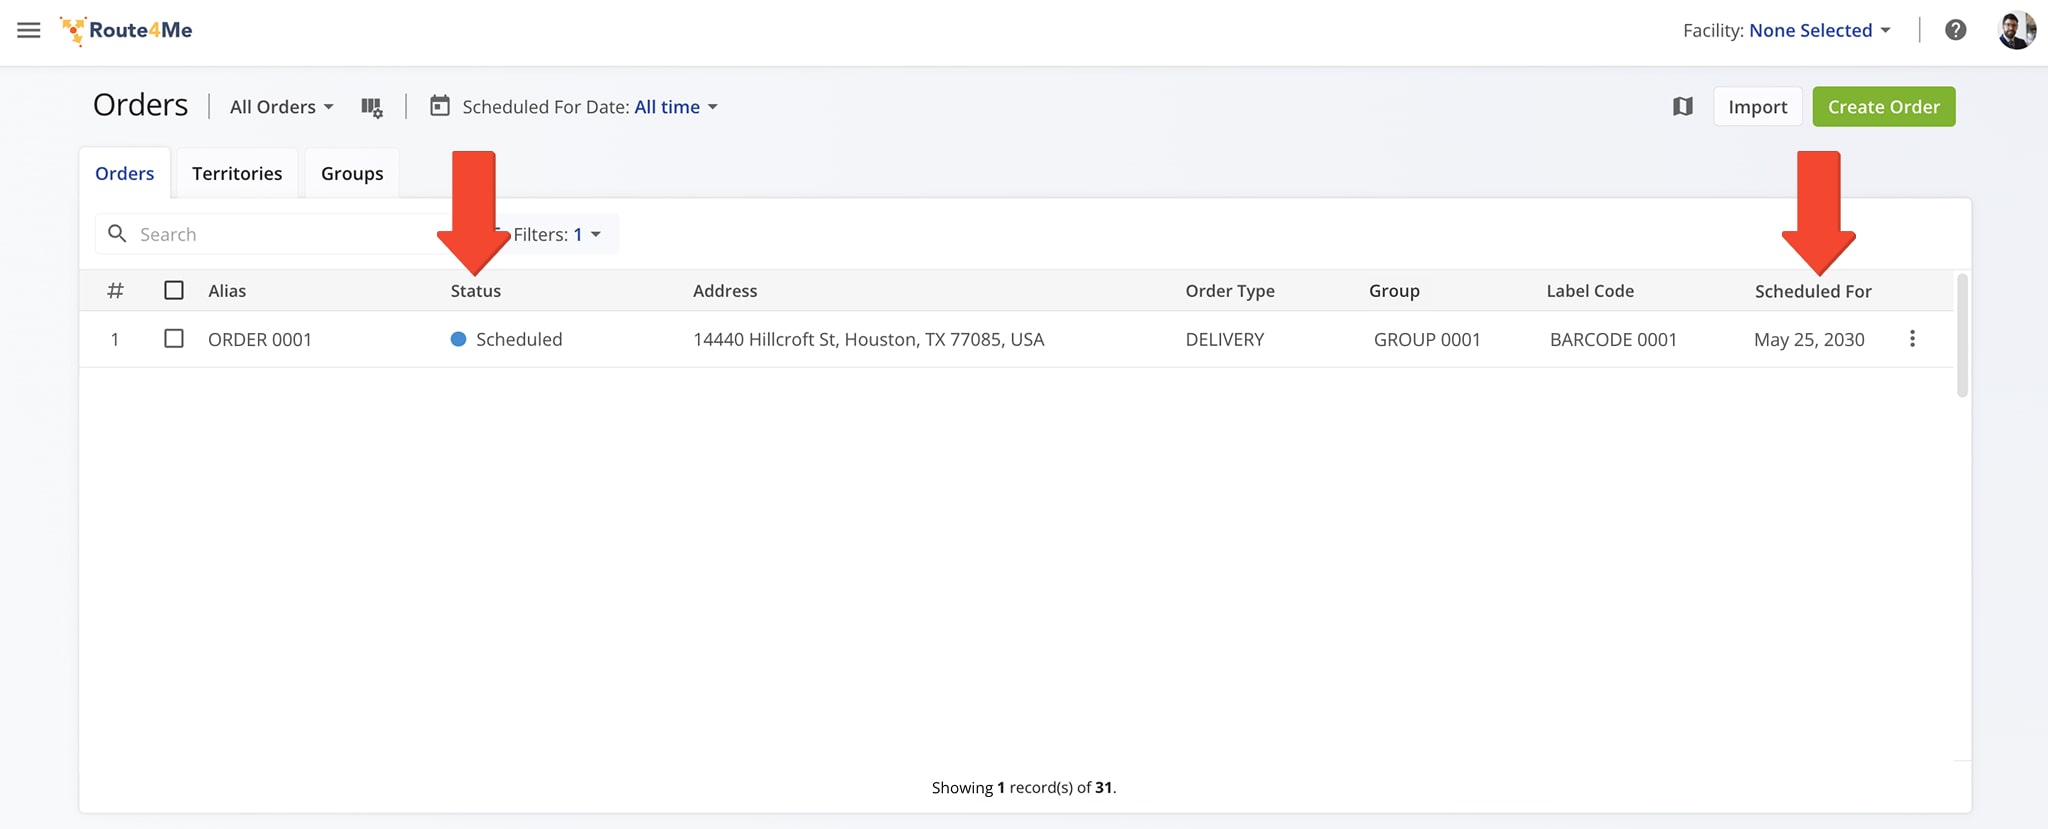
To view all order statuses, select the “All Orders” View Mode and choose your preferred “Scheduled For Date“. Each status reflects a specific stage in the order lifecycle.
NOTE: Access to orders and statuses may be limited based on your account settings and permissions. For questions or assistance, contact your Direct Manager or Route4Me Support.
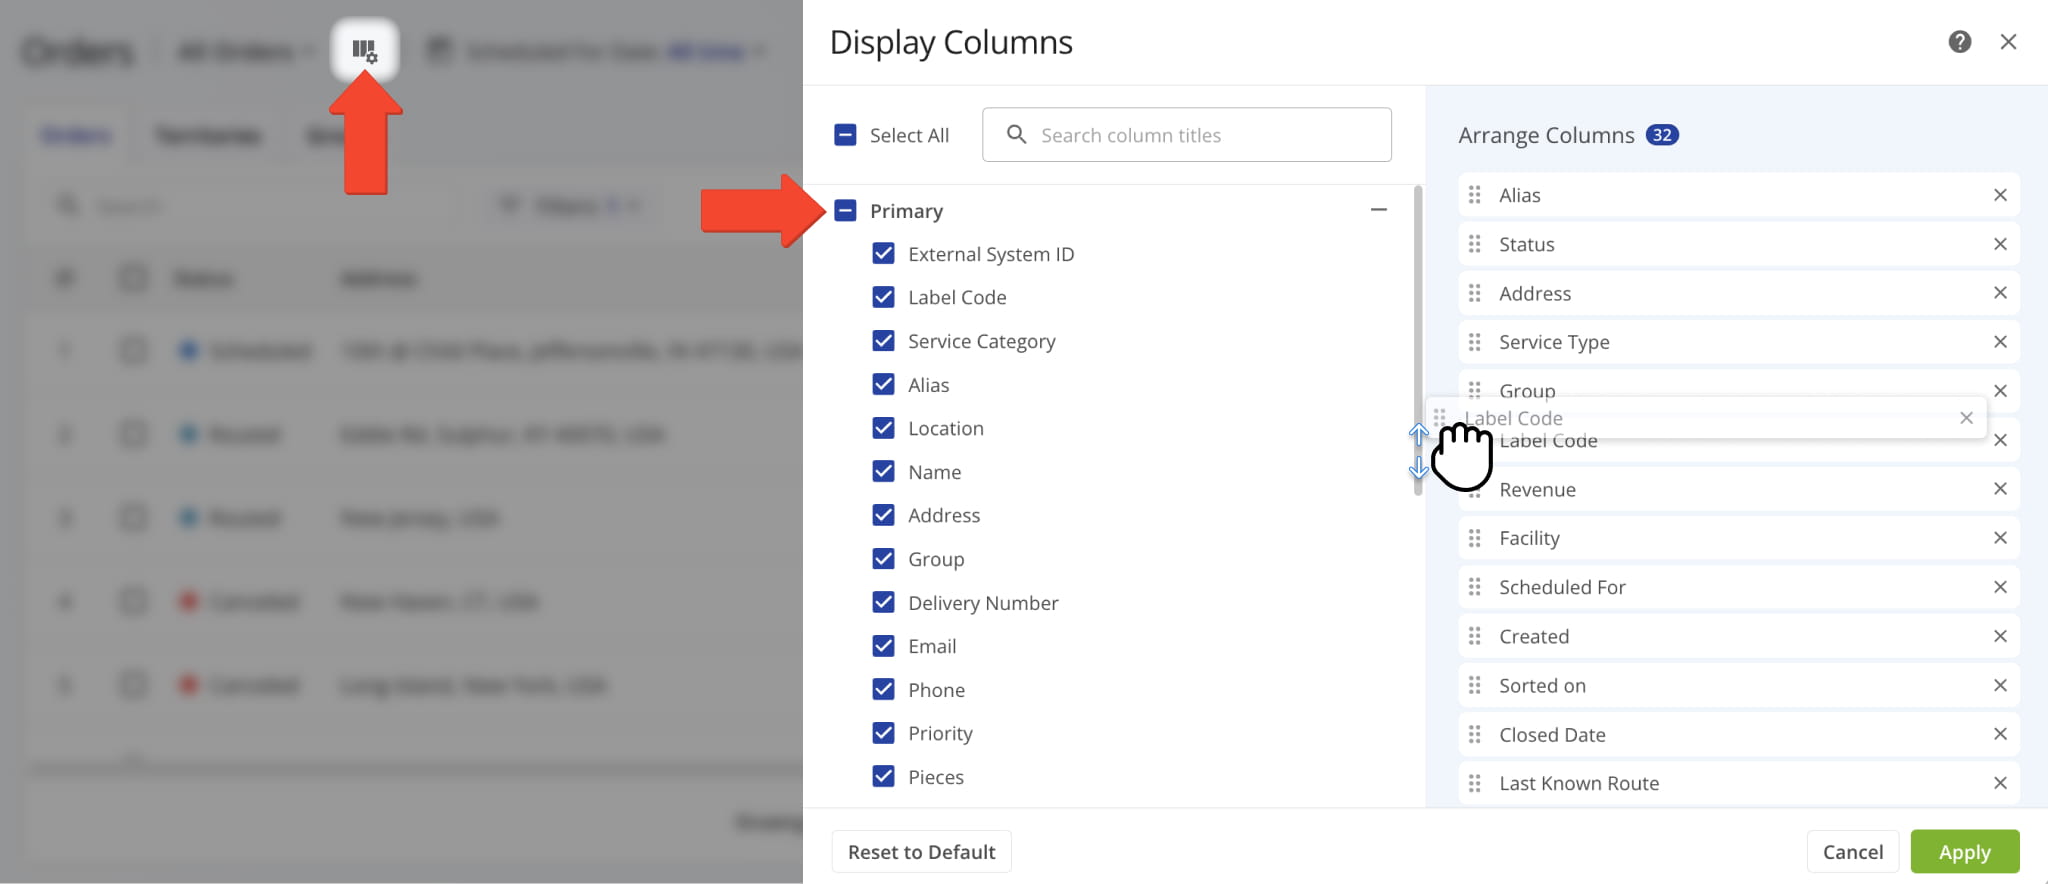
Configure Orders List – Add And Customize Orders List Columns
You can customize which data columns appear in your Orders List and arrange their order. Click the Display Columns Icon, check the boxes for the columns you want to show, then drag column names to reorder them.
Columns listed top to bottom will display left to right in the Orders List.
| Column Name | Description | |
|---|---|---|
| Primary | ||
| External System ID | A unique identifier assigned to the order by an external system, such as a CRM or ERP, used for integration and tracking purposes. | |
| Label Code | Custom order label code used when importing, uploading, and adding orders. The Route4Me Mobile App Barcode Scanner can read this code to verify orders, sort and schedule them, and scan barcodes to plan routes. | |
| Service Category | The primary classification of work to be performed at the order’s destination (e.g., Delivery, Pickup, Service, Visit). | |
| Alias | Сustom alias or name of the order. This name can be used to filter and find orders in the Orders List. | |
| Location | Location associated with the order, mapped from your Locations or Address Book and shown in the Orders List for easy identification. | |
| Name | Name of the customer associated with the order. This name can be used to filter and find orders in the Orders List. | |
| Address | Full address of the order. When planning routes with orders, this address is used as the destination address of the order’s corresponding destination on the route. | |
| Group | A Custom Order Group ID used to filter and organize orders with the same custom group identifier. Learn more about Order Groups for better order organization. | |
| Delivery Number | Reserved value. | |
| Email address of the contact or customer associated with the order. | ||
| Phone | Phone number of the contact or customer associated with the order. | |
| Priority | Higher priority orders are placed earlier on optimized route. The highest order priority is “1” with the lowest set at “65,535“. | |
| Pieces | Pieces optimization constraint value of the order. Learn more about the Pieces route optimization constraint. | |
| Weight | Weight optimization constraint value of the order. Learn more about the Weight route optimization constraint. | |
| Cube | Cube optimization constraint value of the order. Learn more about the Cube route optimization constraint. | |
| Revenue | Revenue optimization constraint value of the order. Learn more about the Revenue route optimization constraint. | |
| Cost | Cost of completing the order. You can add the “Cost” value when importing, uploading, and adding orders. | |
| Order ID | A unique internal identifier automatically generated by Route4Me for each order to track and manage it within the system. | |
| Assigned User | The Route4Me user or Driver assigned to complete the order, enabling route assignment and tracking. | |
| Facility | Last mile Facility associated with the Order. | |
| Required Skills | Driver Skills required to complete the Order or destination visit. | |
| Man-Hours | The estimated amount of labor time needed to complete the Order, measured in person hours. | |
| Customer | Customers associated with the Order. | |
| Service Type | Type of service required to complete the Order. | |
| Dates | ||
| Scheduled For | The date assigned to an order for completion. This date helps you organize orders and plan routes based on when they need to be fulfilled. Learn more about the Scheduled order status. | |
| Created | Date on which the order was created, uploaded, or imported in the system. Learn more about orders import, creation, and upload. | |
| Sorted on | Automatically generated timestamp when the order was sorted using Route4Me’s Mobile Barcode Scanner App. Learn more about scanning order barcodes and Sorted order status. | |
| Closed Date | Date when the driver completed the order by marking the destination as “Done” after completing all mandatory Order Workflow tasks. | |
| Last Known Route | The most recent route that included the order, such as in cases of “Failed” and “Skipped” orders. | |
| Possession Scan Date | Automatically generated timestamp when the order was scanned and assigned the “Inbound Scan” status. Learn more about scanning order barcodes and Inbound Scan order status. | |
| Time Window 1 | Start and end time of the first Time Window (working hours) within which the order’s address can be visited and serviced. Learn more about Route4Me’s Time Windows Route Optimization Constraint. | |
| Time Window 2 | Start and end time of the second Time Window (working hours) within which the order’s address can be visited and serviced. Learn more about Route4Me’s Time Windows Route Optimization Constraint. | |
| Accepted Time | The timestamp when a Driver or user accepts the assigned order or route, confirming their commitment to complete it. | |
| Service Time | The estimated amount of time required to complete the order at the destination. | |
| SLA Start | The timestamp when the Service Level Agreement (SLA) period begins for the order. | |
| SLA End | The timestamp when the Service Level Agreement (SLA) period is expected to be completed or expires. | |
| Elapsed Time | The amount of time that has passed since the SLA Start for the order. | |
| Remaining Time | The amount of time left until the SLA End based on the defined SLA timeframe. | |
| State/Status | ||
| Status | The current real-time lifecycle status of the order. Different Orders List View Modes support specific statuses. Learn more about Route4Me ERP Order Management System View Modes and Order Statuses. | |
| Territory | The name of the Order Territory containing the order’s address. Orders are linked to the Territory whose boundaries include their address. Learn how to Plan Routes Using Order Territories. | |
On your Orders List, you can manage orders according to your account-level permissions. This includes editing, rescheduling, exporting, and cancelling orders, viewing order history, and more.
To get started, filter orders by date and other criteria like status or barcode. Then, click the Three-dot Icon next to an order and choose the action you want to perform. NOTE: Learn more about all available actions.
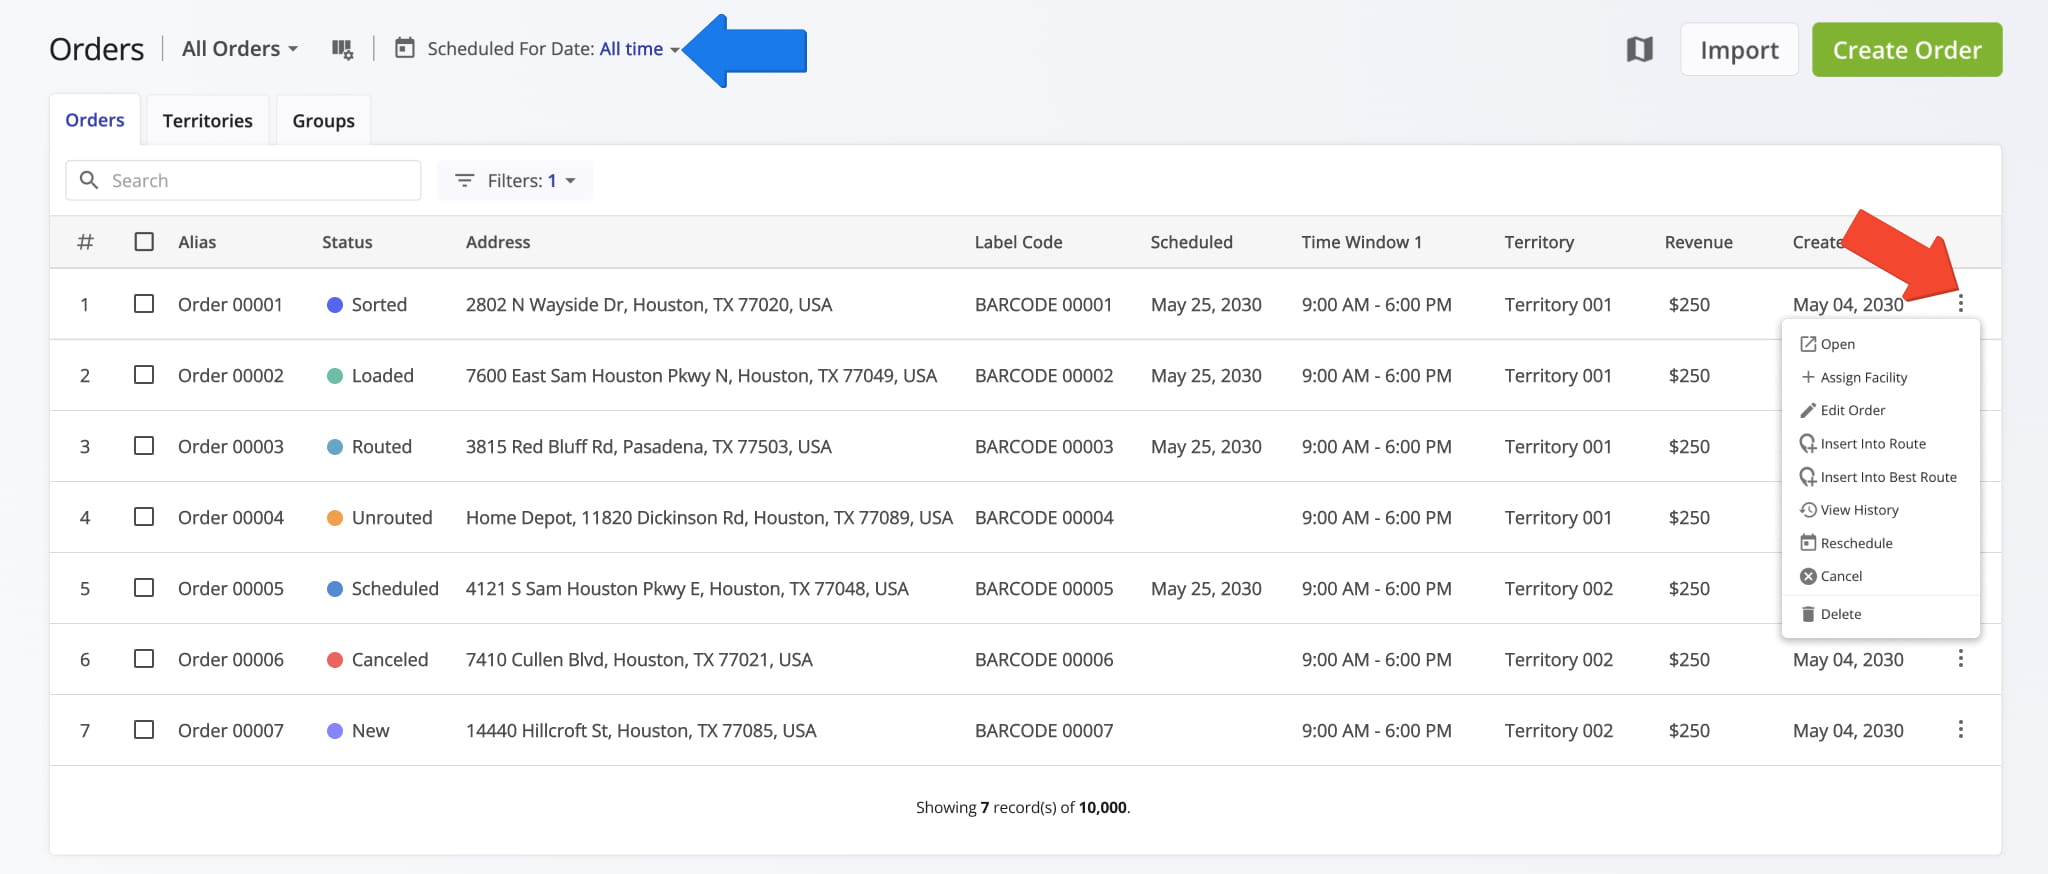
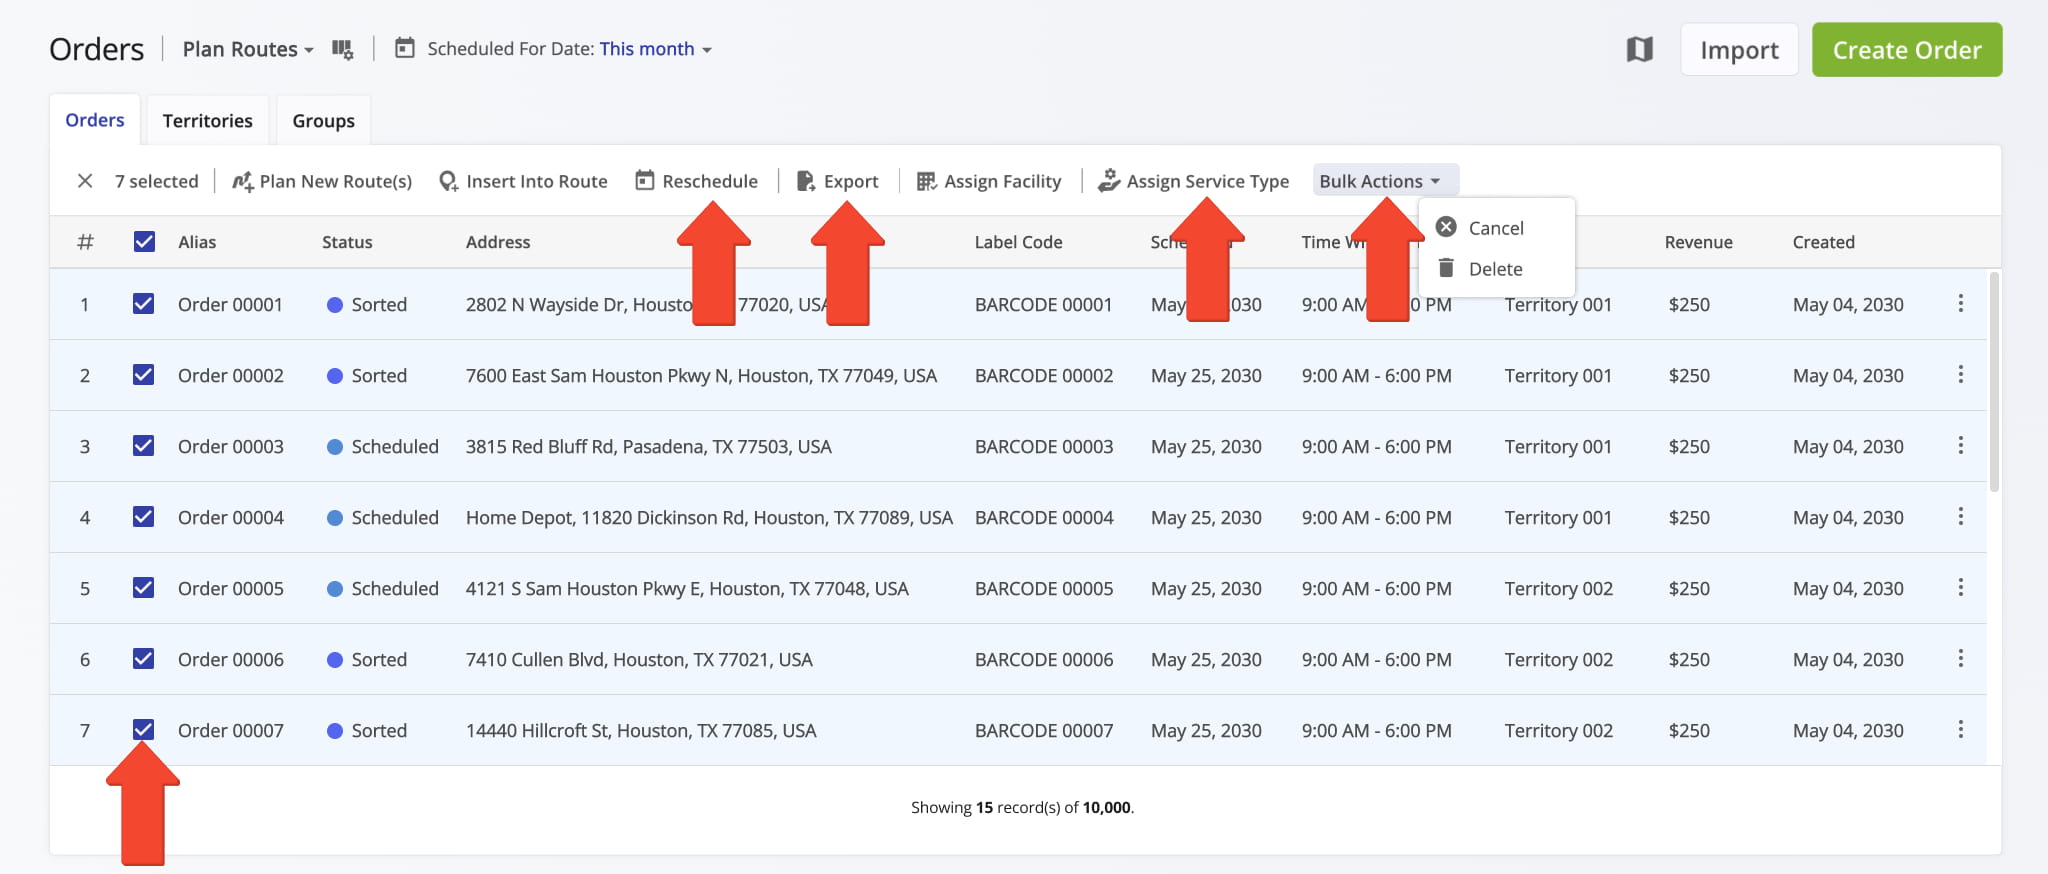
You can also manage multiple orders at once by selecting them with the check boxes, then choosing an action from the menu bar above the Orders List. These same actions are available for individual orders by selecting a single checkbox.
NOTE: Learn more about all available actions.
Export Orders – Download Orders Reports And Statistics In Spreadsheet
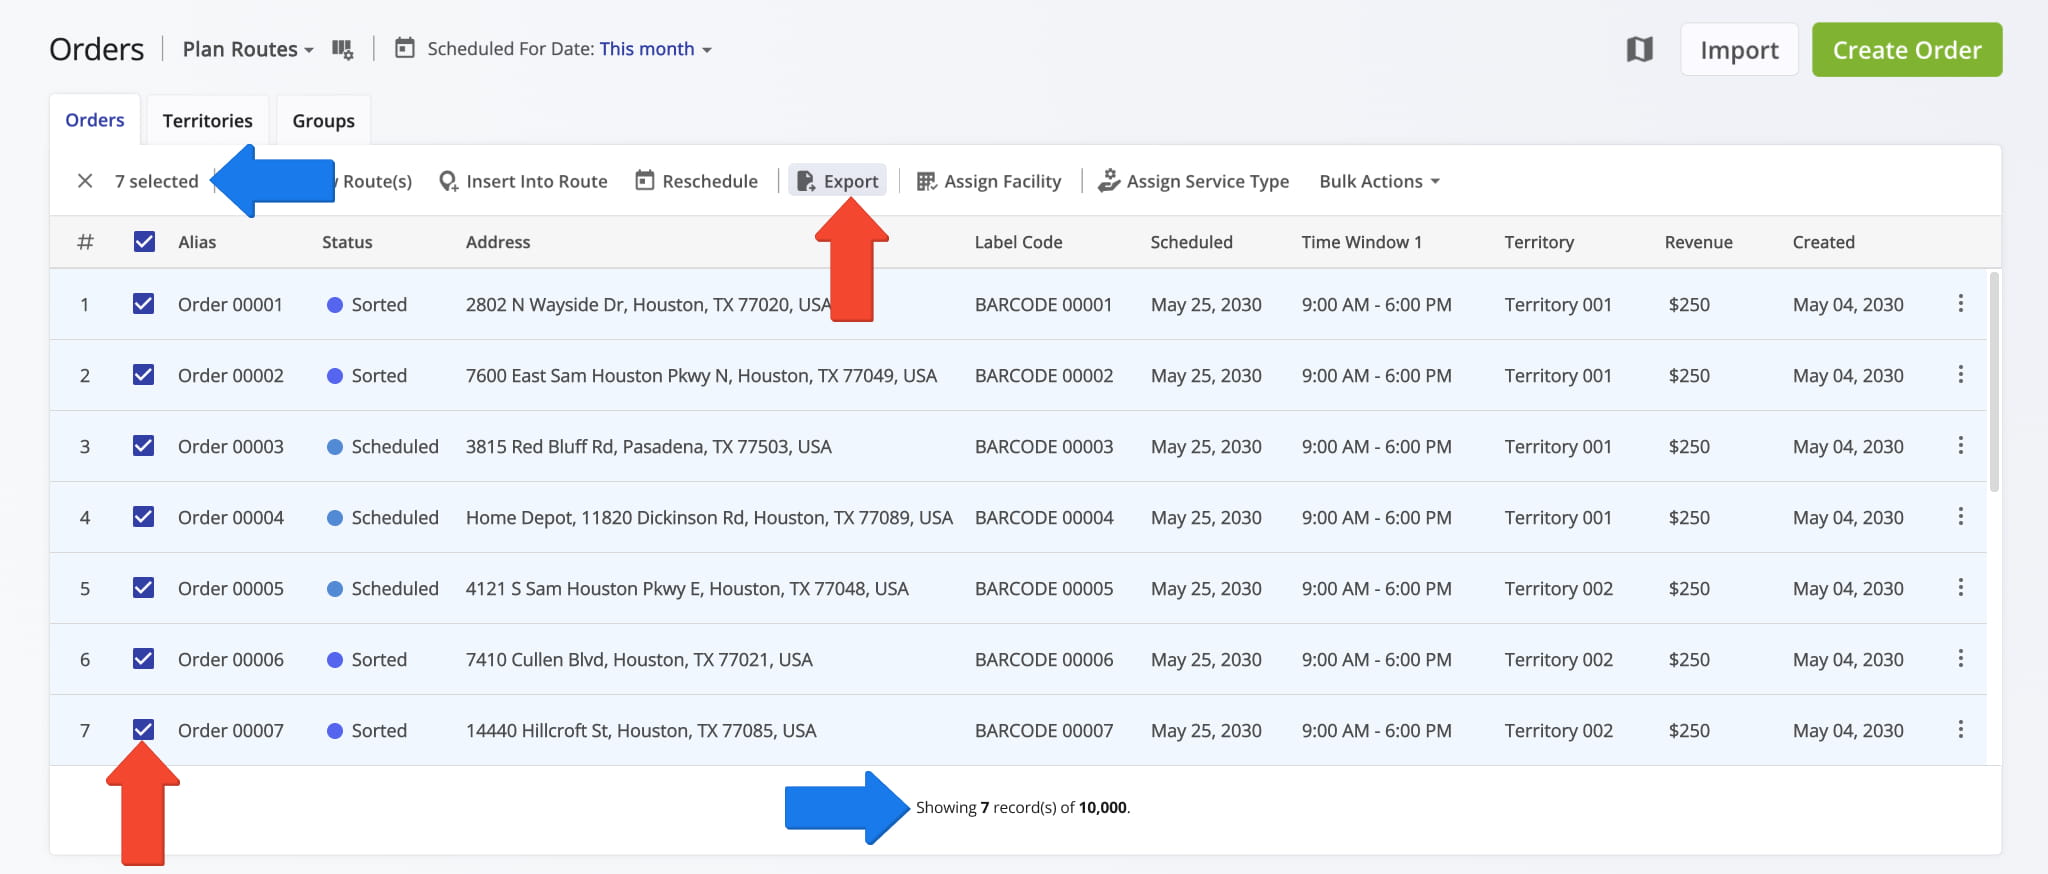
After applying filters, select the orders you want to export by checking the boxes next to them. To export all filtered orders, check the box at the top of the list, then click the “Export” button.
You can also see how many orders match your filters at the bottom of the Orders List.
Manage Orders From Route4Me’s Interactive Orders Map
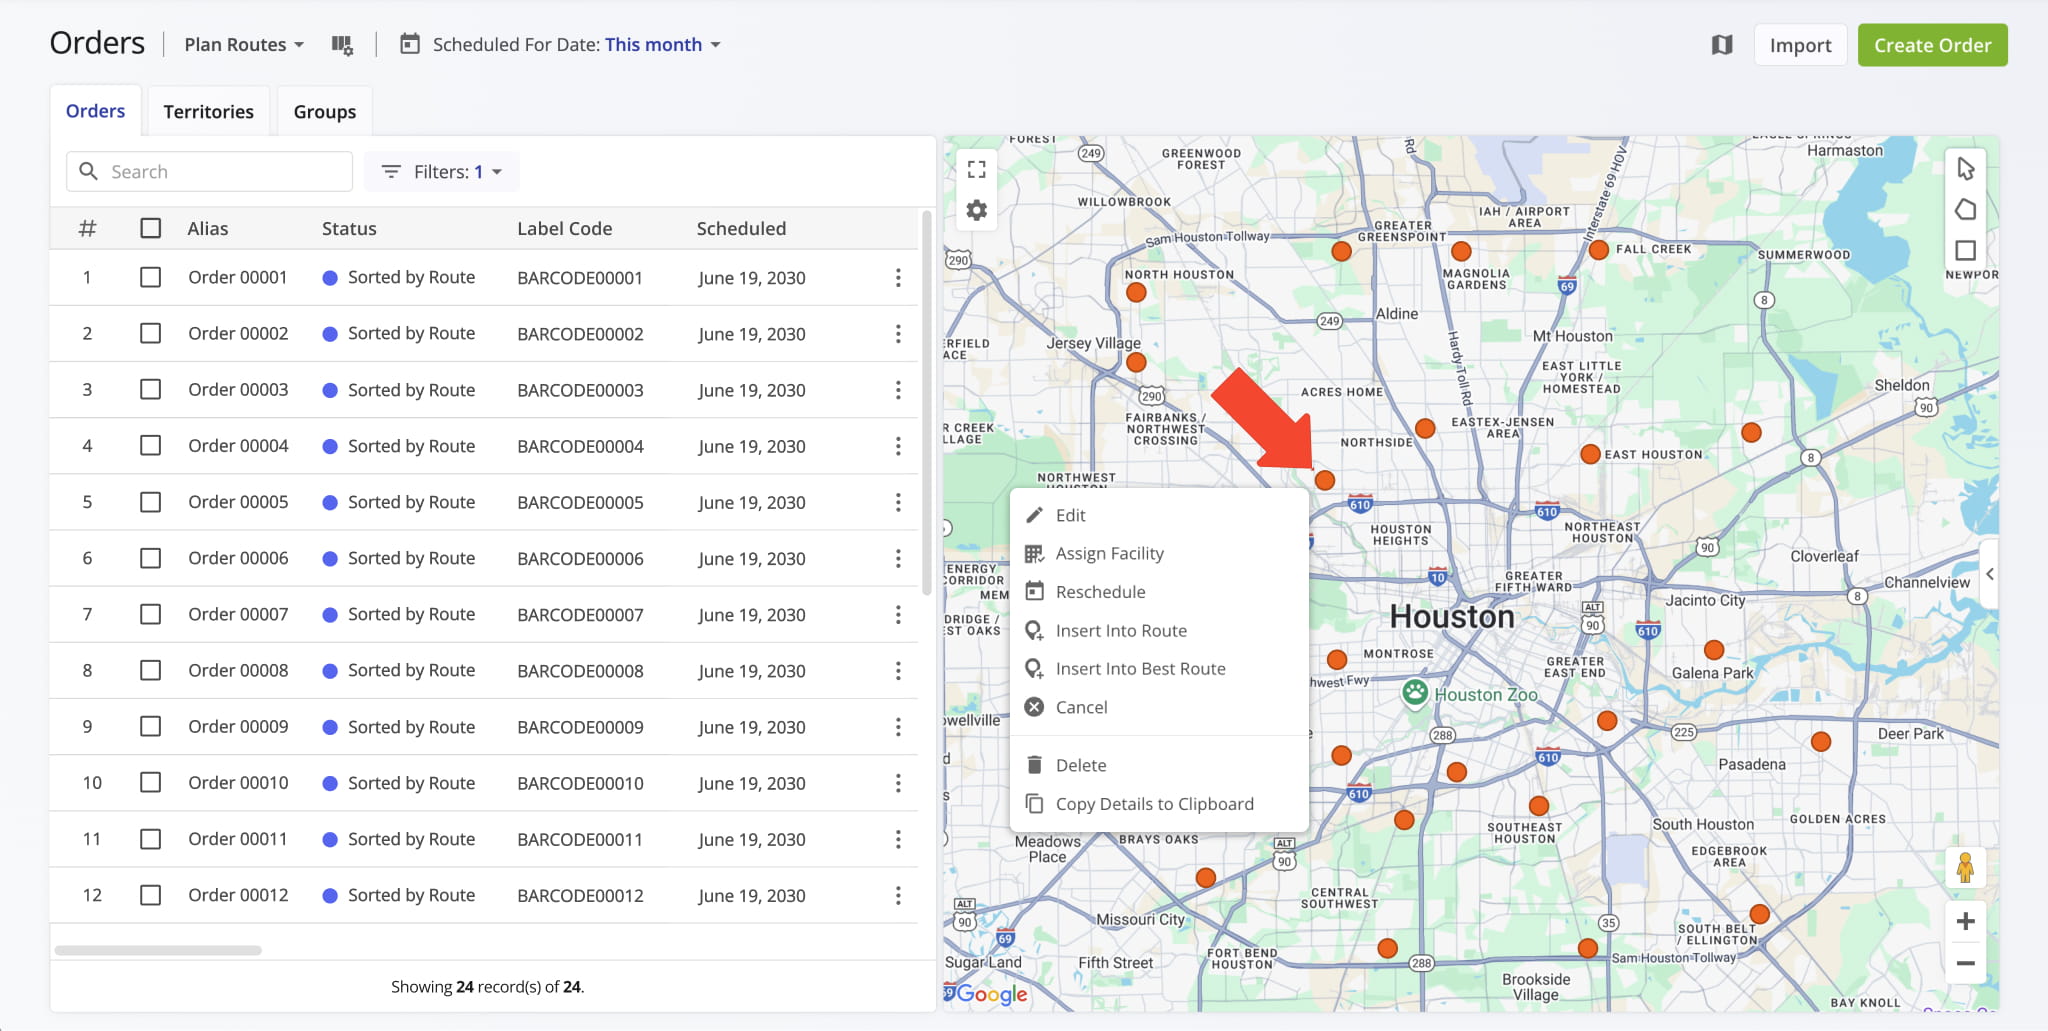
You can also manage orders directly from the dynamic Orders Map by right-clicking any order on the map and choosing an action from the menu. Details appear in the table below. NOTE: Learn more about all available actions.
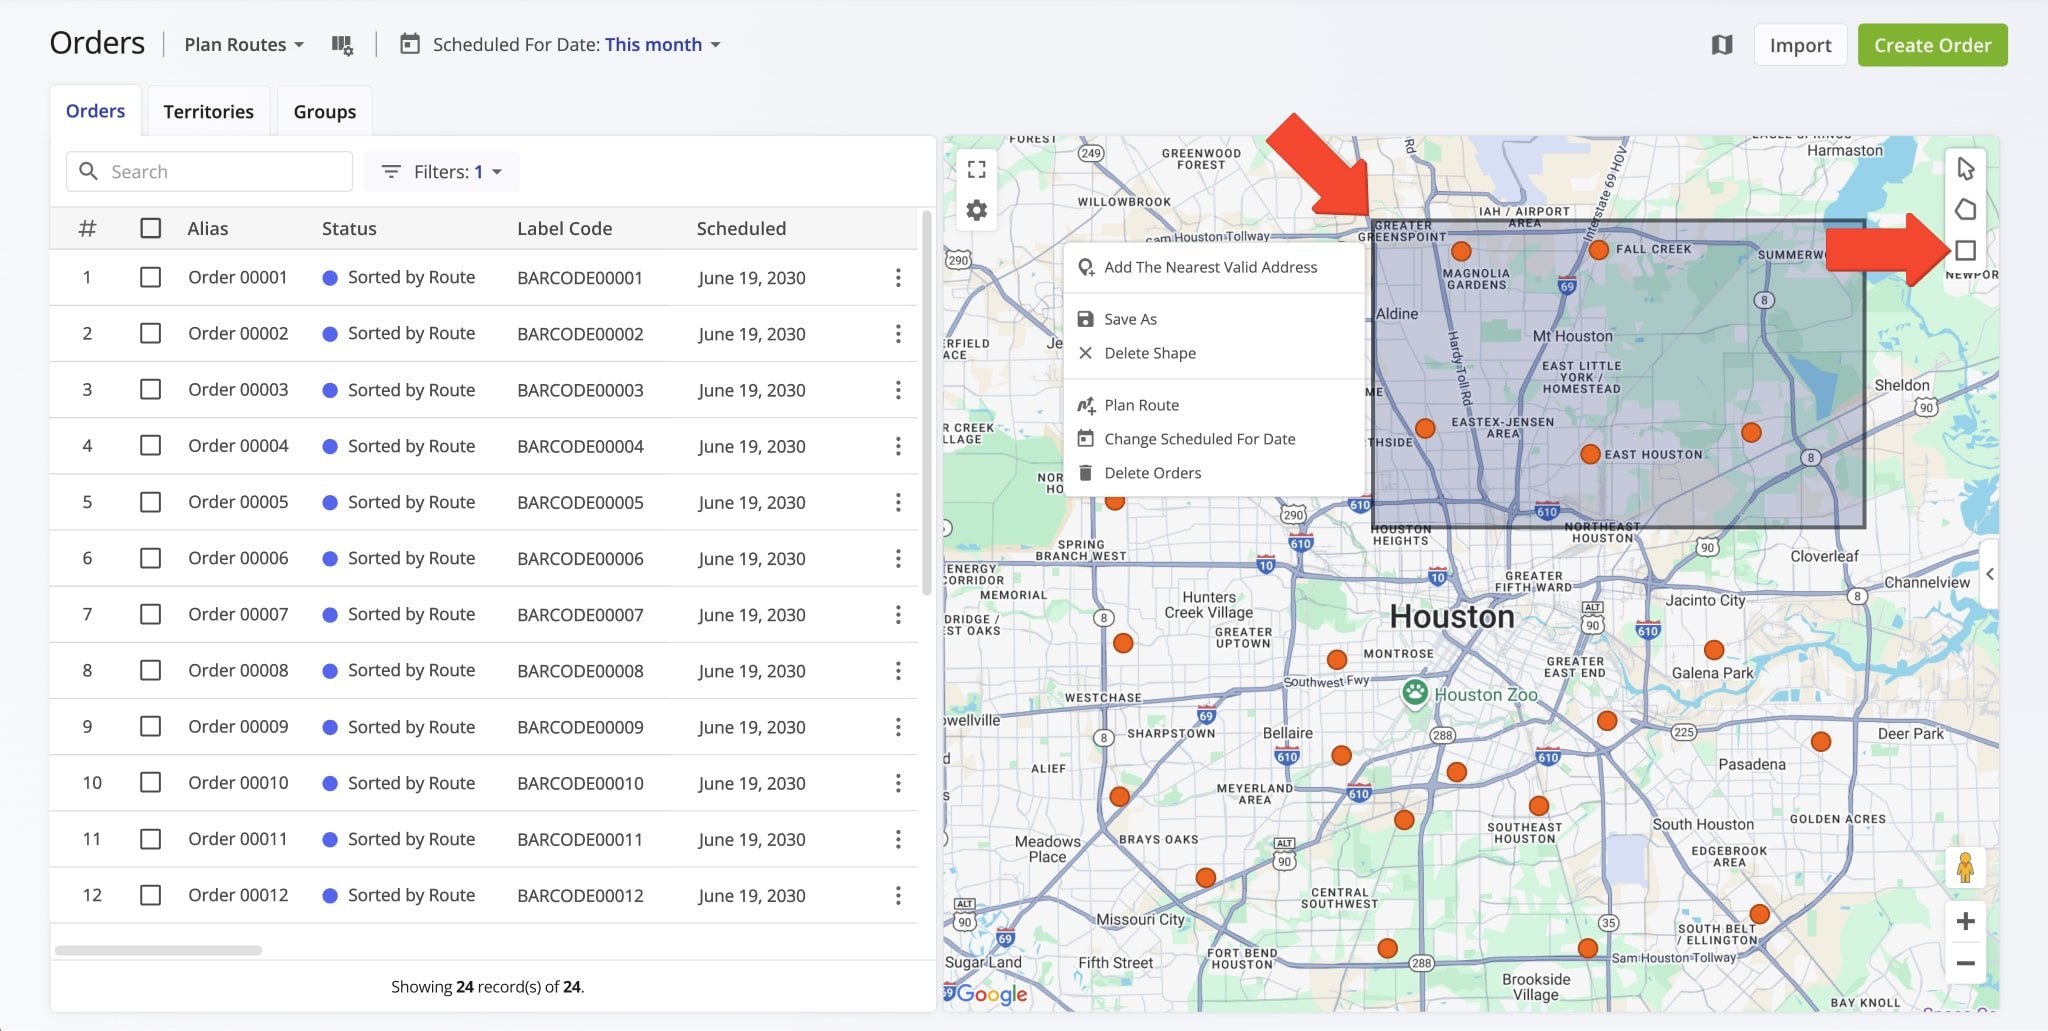
To manage multiple orders on the Orders Map, use the shape tools or right-click anywhere on the map and choose a shape. Then, draw around the orders you want to manage, right-click the shape, and select your preferred action from the menu.
NOTE: Learn more about all available actions.
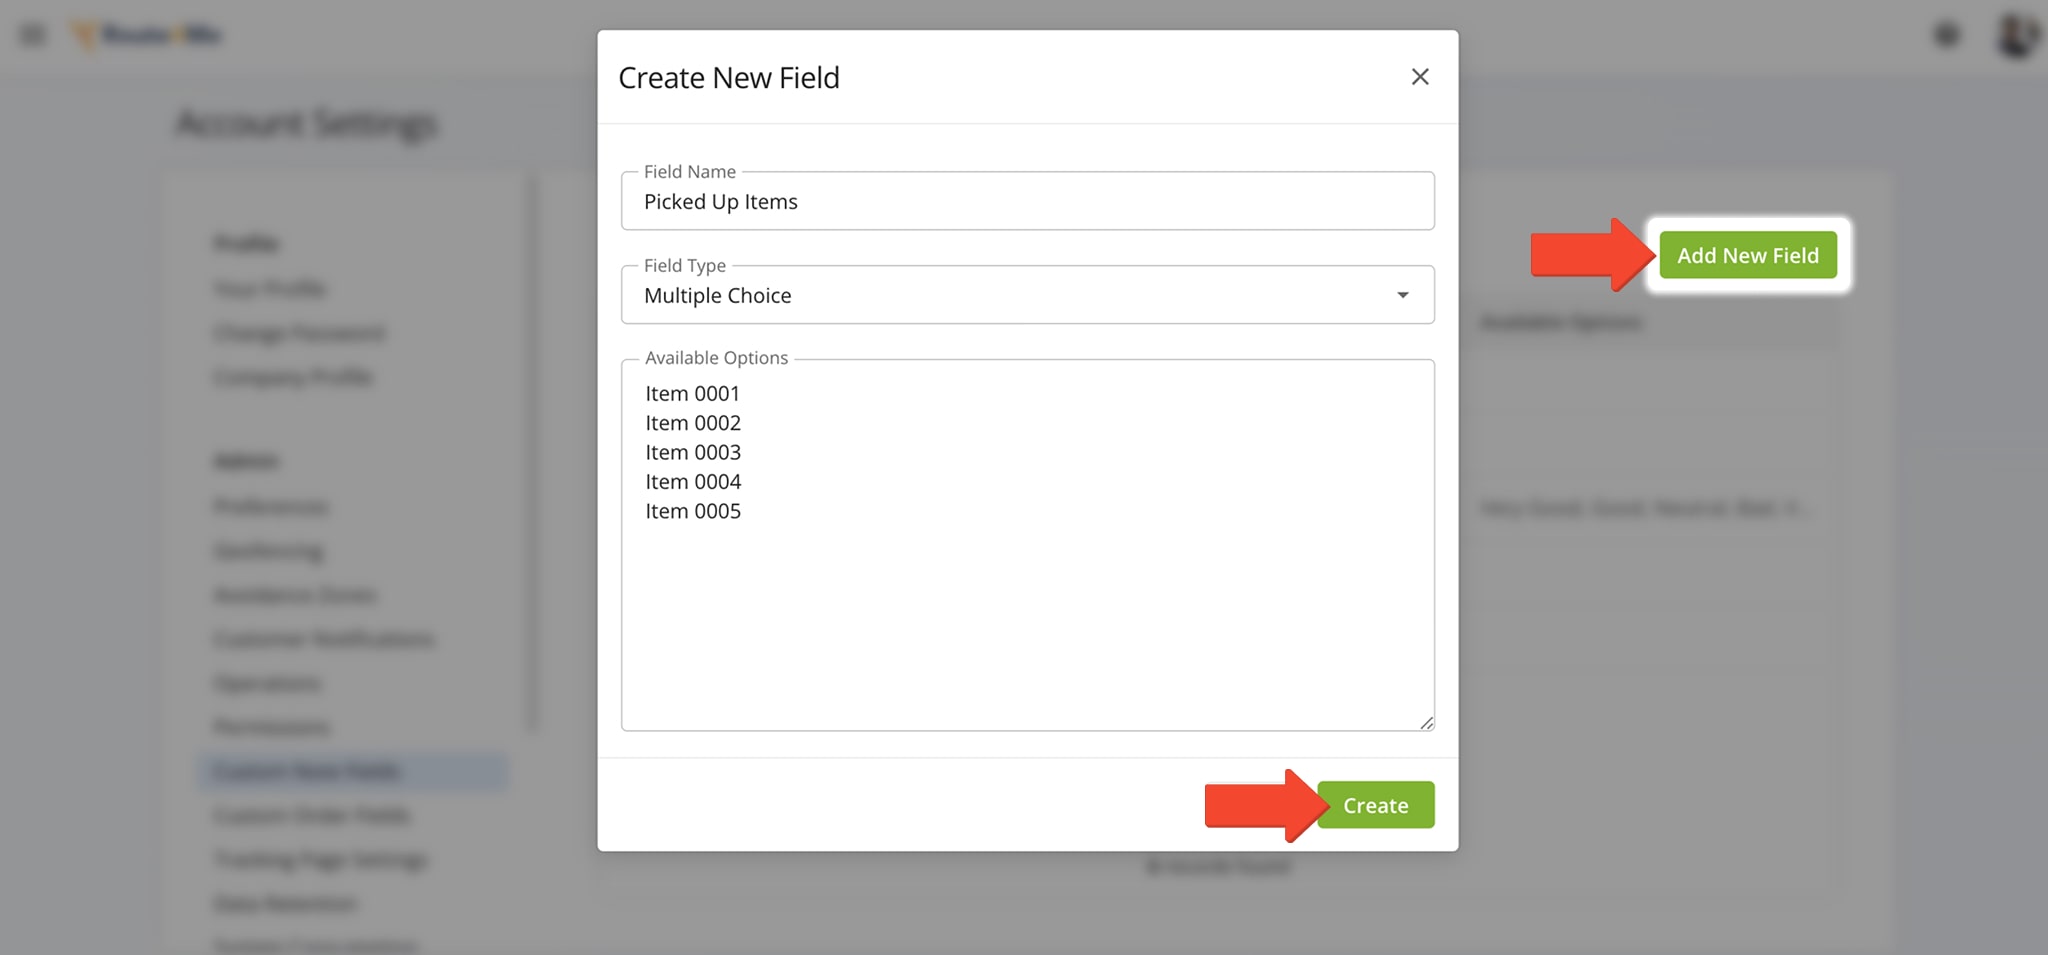
Custom Fields – Add Custom Fields And Custom Order Statuses To Orders
To boost productivity and stay organized, you can add Custom Order Fields as internal statuses to your imported or created orders, giving you more control and flexibility over the order routing process.
To set this up, go to “Settings” > “Organization Settings” in the Navigation Menu. Then, click “Custom Note Fields” followed by “Add New Field”.
Visit Route4Me's Marketplace to Check out Associated Modules:
- Operations
Advanced Team Management Add-On
- Operations
Custom Data Add-On
About author: Kristian Andreev
Kristian is a Technical Writer at Route4Me. With over a decade of experience in writing and localization, he's an expert at communicating complex technical data in a clear, concise, and user-friendly way. Passionate about bridging the gap between engineers and users, he specializes in creating documentation to streamline onboarding, enhance product usability, and support global teams on the path to success.