Workflows – Proof Of Delivery And Visit Driver Tasks
With Route4Me’s Proof of Visit Workflows, you can customize and streamline how field team members collect proof of delivery (POD) and service based on your unique routing and business needs. Specifically, you can create Workflows with custom optional and mandatory tasks for team members to complete at customer locations, such as capturing signatures, verifying IDs, and attaching receipt photos. In this guide, you can learn how to add and manage Workflows, customize driver tasks, and more.
Table of Contents
Quick Start – Custom Driver Tasks And Proof Of Visit Workflows
Route4Me Workflows consist of optional and mandatory tasks drivers must complete to mark destinations as “Done” or “Failed“. You can create multiple Workflows with unique tasks and assign them to specific addresses on your optimized routes. Setting up Workflows for your routes, drivers, and team is quick and easy.
- Create a custom Workflow with set mandatory and optional tasks.
- Enable the new Workflow for the preferred destinations on a new or existing optimized route.
- Drivers complete mandatory and optional Workflow tasks to assign destination statuses on the Mobile App.
You can enable Workflows for individual customer addresses or entire routes, with proof of visit settings synched to Route4Me’s Mobile App in real time. NOTE: When a destination has an associated Workflow, the assigned user must complete all mandatory tasks to update the destination status.
Add And Manage Workflows – Customize Proof Of Visit Driver Tasks
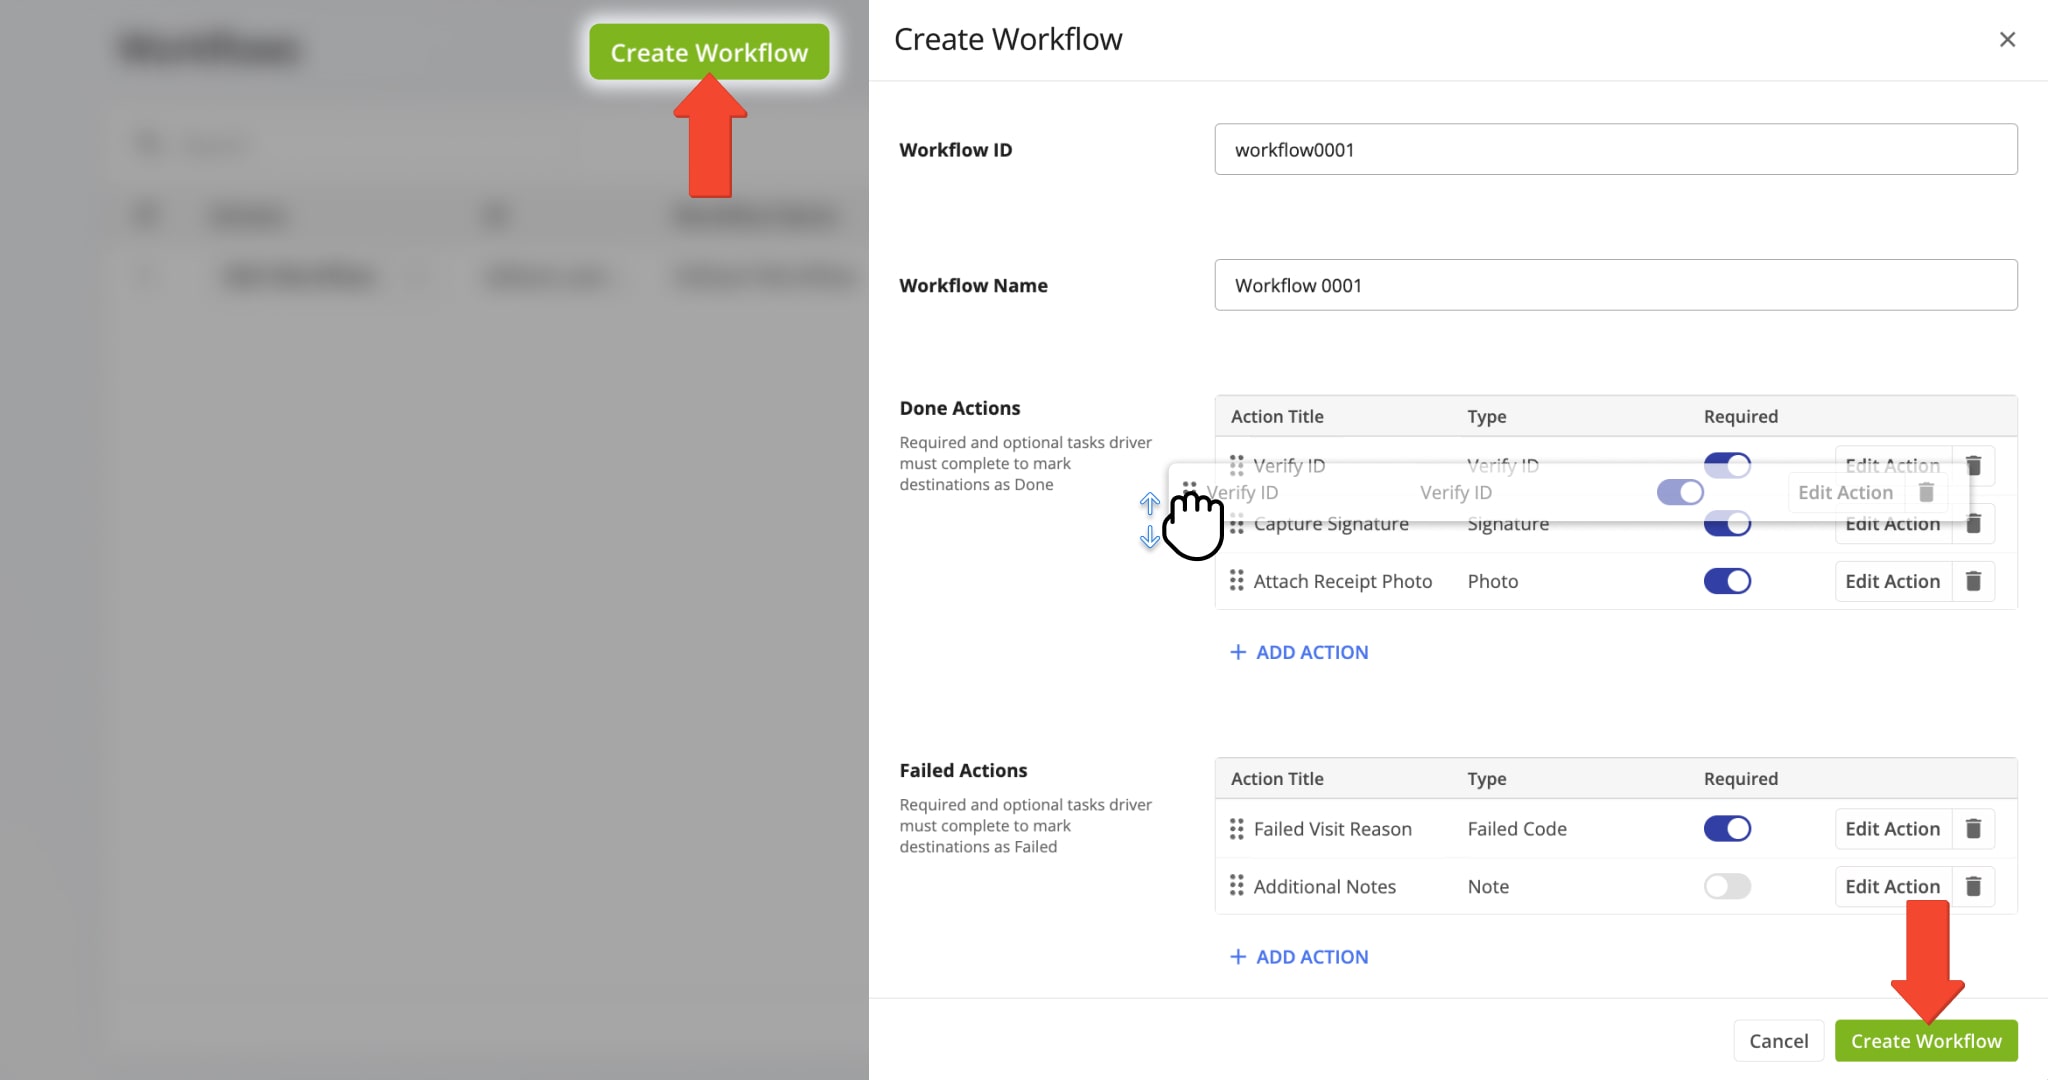
To create a new Workflow, go to “Business Operations” > “Workflows” from the Navigation Menu and follow these steps:
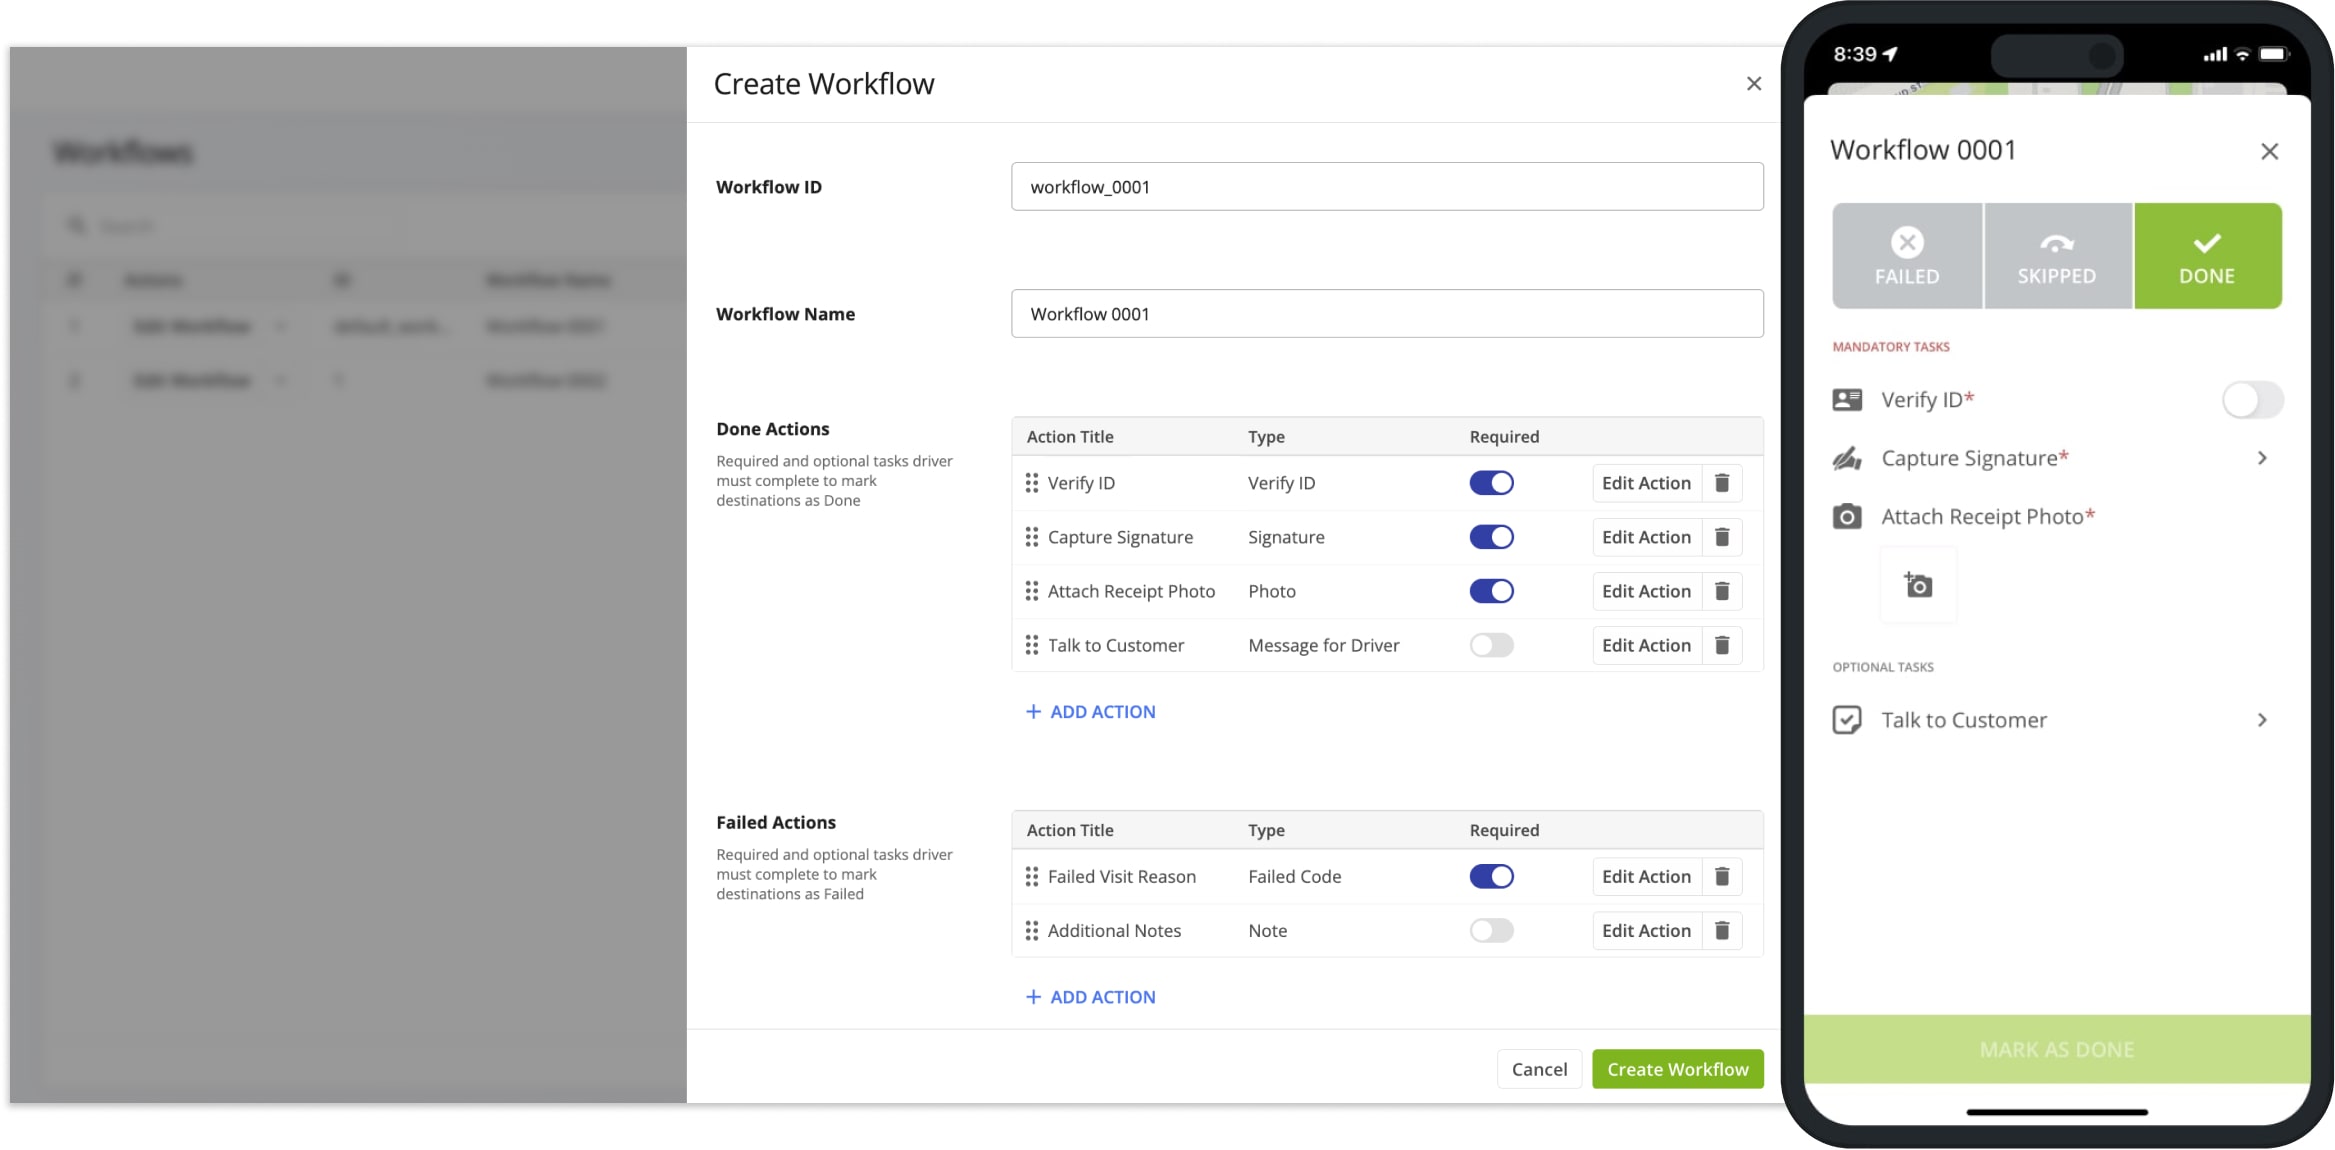
- Click the “Create Workflow” button.
NOTE: Your account has a default Workflow you can use as a template. - Enter a custom “Workflow Name” and “Workflow ID” in the respective fields.
- Select your preferred required and optional “Done Actions” and “Failed Actions” by clicking the “Add Action” buttons.
Click and drag actions to re-arrange them to change their order on the Mobile App. - Finally, click the “Create Workflow” button.
Then, you can add your new Workflow to destinations and orders before or after uploading them to your account. Keep reading to learn more about enabling workflows, supported action types, and Workflow management.
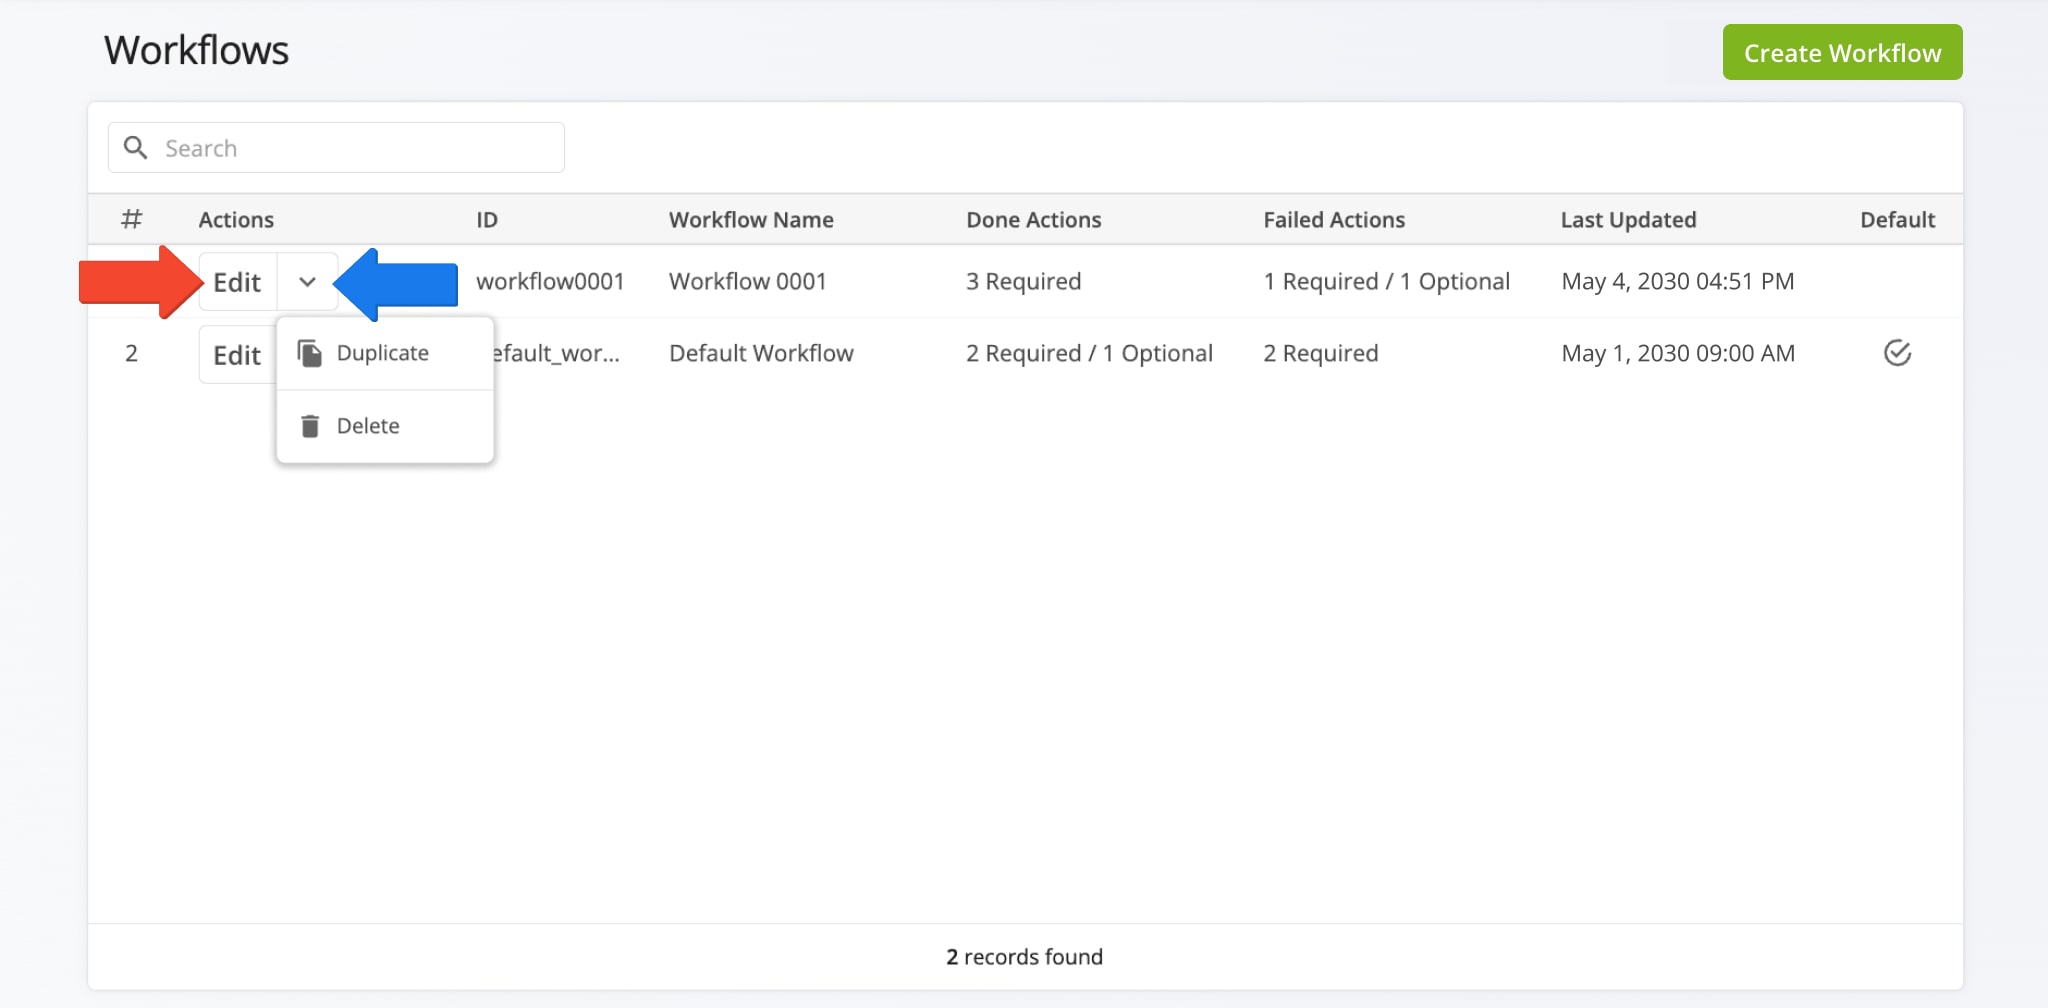
To modify the settings of an existing Workflow, simply click the “Edit” button. Additionally, click the Down Arrow to duplicate or delete existing workflows. You can duplicate Workflows to edit and use them as templates for creating new task sets. NOTE: Deleted Workflows can’t be restored.
Done And Failed Actions – Custom Driver Tasks For Assigning Status To Destinations
When you create and edit Workflows, you can customize “Done Actions” and “Failed Actions“. Accordingly, Done Actions are mandatory and optional tasks the driver has to complete to assign the “Done” status to destinations using the Mobile Route App. Correspondingly, Failed Actions are required for assigning the “Failed” status. To add and customize actions, follow the steps below. NOTE: For convenience, the process and interface for adding Done and Failed actions is the same.
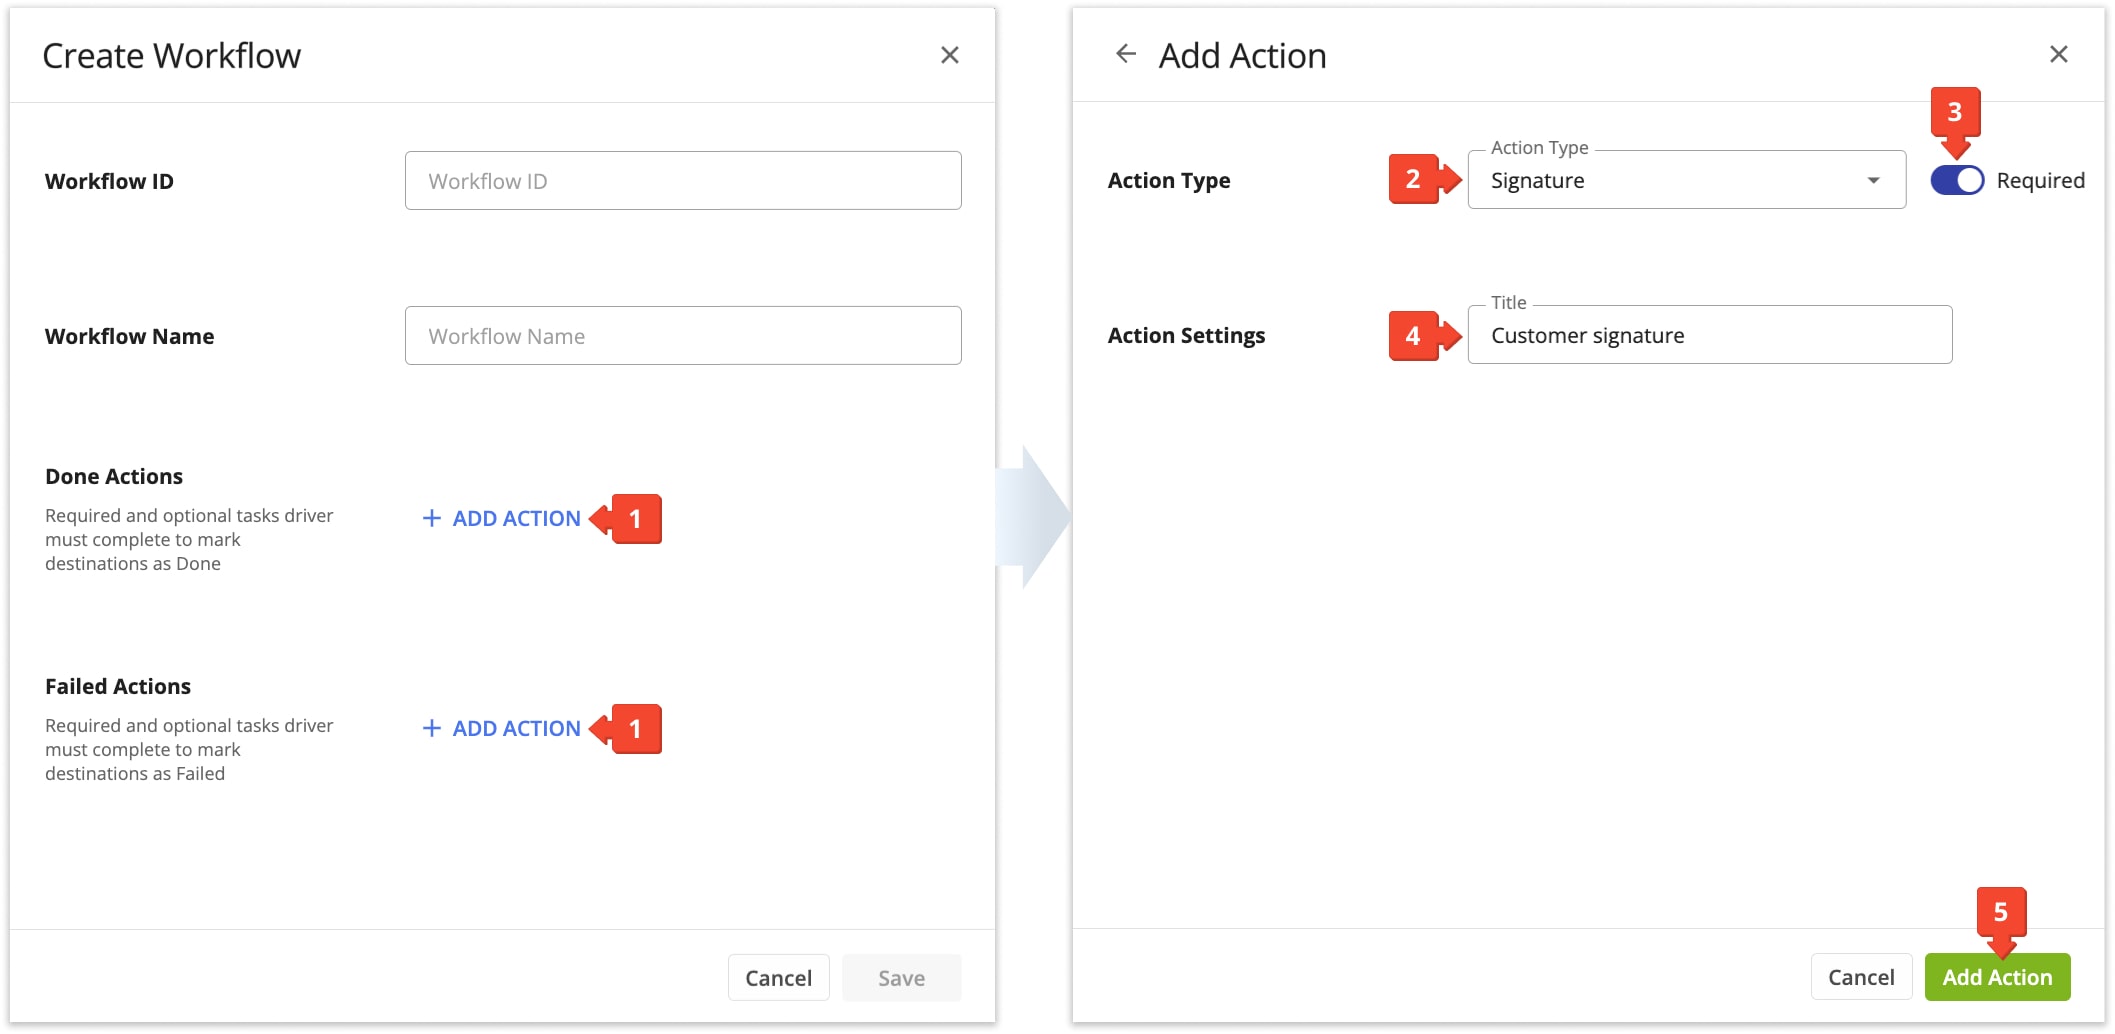
- On the “Create Workflow” or “Edit” panel, click the “+ Add Action” button.
- Use the “Action Type” dropdown menu to select the preferred action for your new Workflow Task.
- Optionally, click the “Required” toggle to make the new action mandatory for assigning the respective Destination Status. Any actions marked as “Required” will appear under “Mandatory Tasks” on the Mobile App.
- Enter your preferred “Action Settings” in the corresponding field.
NOTE: For most action types, the only field in the “Action Settings” section is “Title” where you can enter a name for the action that will appear on the Mobile Driver App. You can learn more about specific action types in the table below. - Click the “Add Action” button to add the action to the respective Workflow.
Depending on your unique last mile routing, business, and logistics needs, you need to collect specific types of proof of delivery, visit, and service. Route4Me’s trusted route planning software offers various Workflow task types, enabling you and your team to easily and securely collect necessary data while in the field. Furthermore, you can customize Workflow tasks for your specific requirements. Below, you can find the list of supported Workflow tasks.
| Task Type | Description | Done | Failed | Customizable | Limit per Stop |
|---|---|---|---|---|---|
| Note | Add a text note with custom text up to 1000 characters. | Unlimited | |||
| Photo | Take a photo and attach it to the route stop. | Unlimited | |||
| Signature | Capture an electronic signature from the signee and attach it to the route stop. | Unlimited | |||
| Question | Question for the driver to answer. You can add the following question types: Multiple choice, checkbox, or short answer. Accordingly, you can customize each question type and its additional entries. | Unlimited | |||
| Release Code | Select the completed delivery or visit status from the list. By default, you get a set of ready-to-use default Release Codes with predefined descriptions. Additionally, you can customize descriptions of your Release Codes based on your specific operating requirements. | 1 | |||
| Failed Code | Select the failed delivery or visit status from the list. By default, you get a set of ready-to-use default Failed Codes with predefined descriptions. Additionally, you can customize descriptions of your Failed Codes based on your specific operating requirements. | 1 | |||
| Delivery Scan | Scan the barcode on the respective delivery label. | 1 | |||
| Pick-Up Scan | Scan the barcode on the respective pick-up label. | 1 | |||
| Verify ID | Check the checkbox to confirm verifying the ID of the recipient. | 1 | |||
| Age Verification | Check the checkbox to confirm verifying the age of the recipient. | 1 | |||
| Message for Driver | Custom text message for the driver. Use the “{custom-data-field}” placeholder to automatically add to the Message Custom Data values related to the address. | Unlimited | |||
| Signee Name | Add the name of the signee as text. | Unlimited | |||
| Voice Recording | Record a voice recording and attach it to the route stop. | Unlimited | |||
| Video | Record a video and attach it to the route stop. | Unlimited | |||
| Driver’s License Scan | Scan and attach the user’s driver’s license to the destination. | 1 | |||
| Scan Label Code | Scan a label barcode on an order using the Mobile App Label Scanner. You can create custom-named scanning actions for your unique workflow requirements. | Unlimited | |||
| Numeric – Whole Numbers | Record a number value as an integer without decimals. | Unlimited | |||
| Numeric – Decimals | Record a number value with or without decimals. | Unlimited | |||
| Print Invoice | Print an invoice for the customer at the destination. | Unlimited | |||
| Unload Items | Unload multiple items with Route4Me’s ERP Order Unload functionality. | Unlimited | |||
| Customer Reference Number | Confirm the reference number associated with the customer at the destination. | Unlimited | |||
| Receipt Note | Issue a receipt note for the customer at the destination. | Unlimited |
Enable Workflows – Add Workflow IDs To Destinations On Final Mile Routes
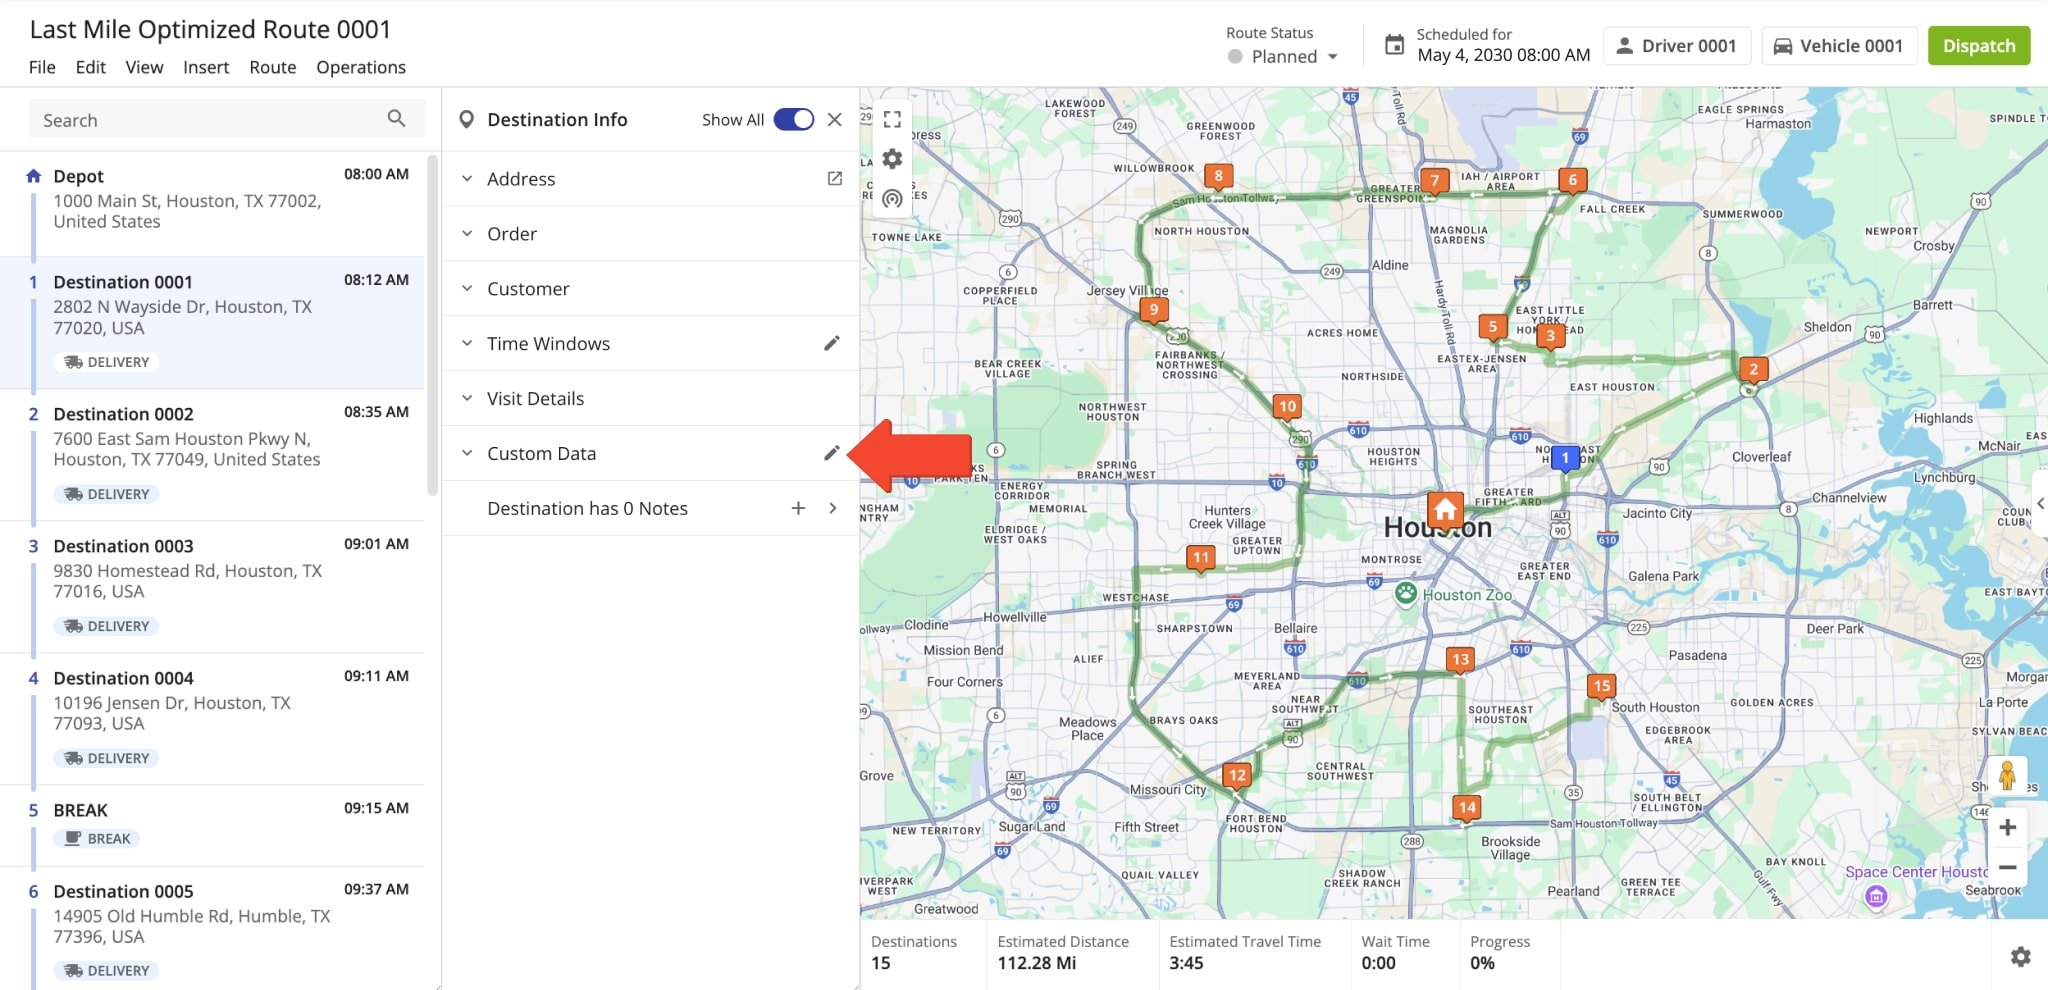
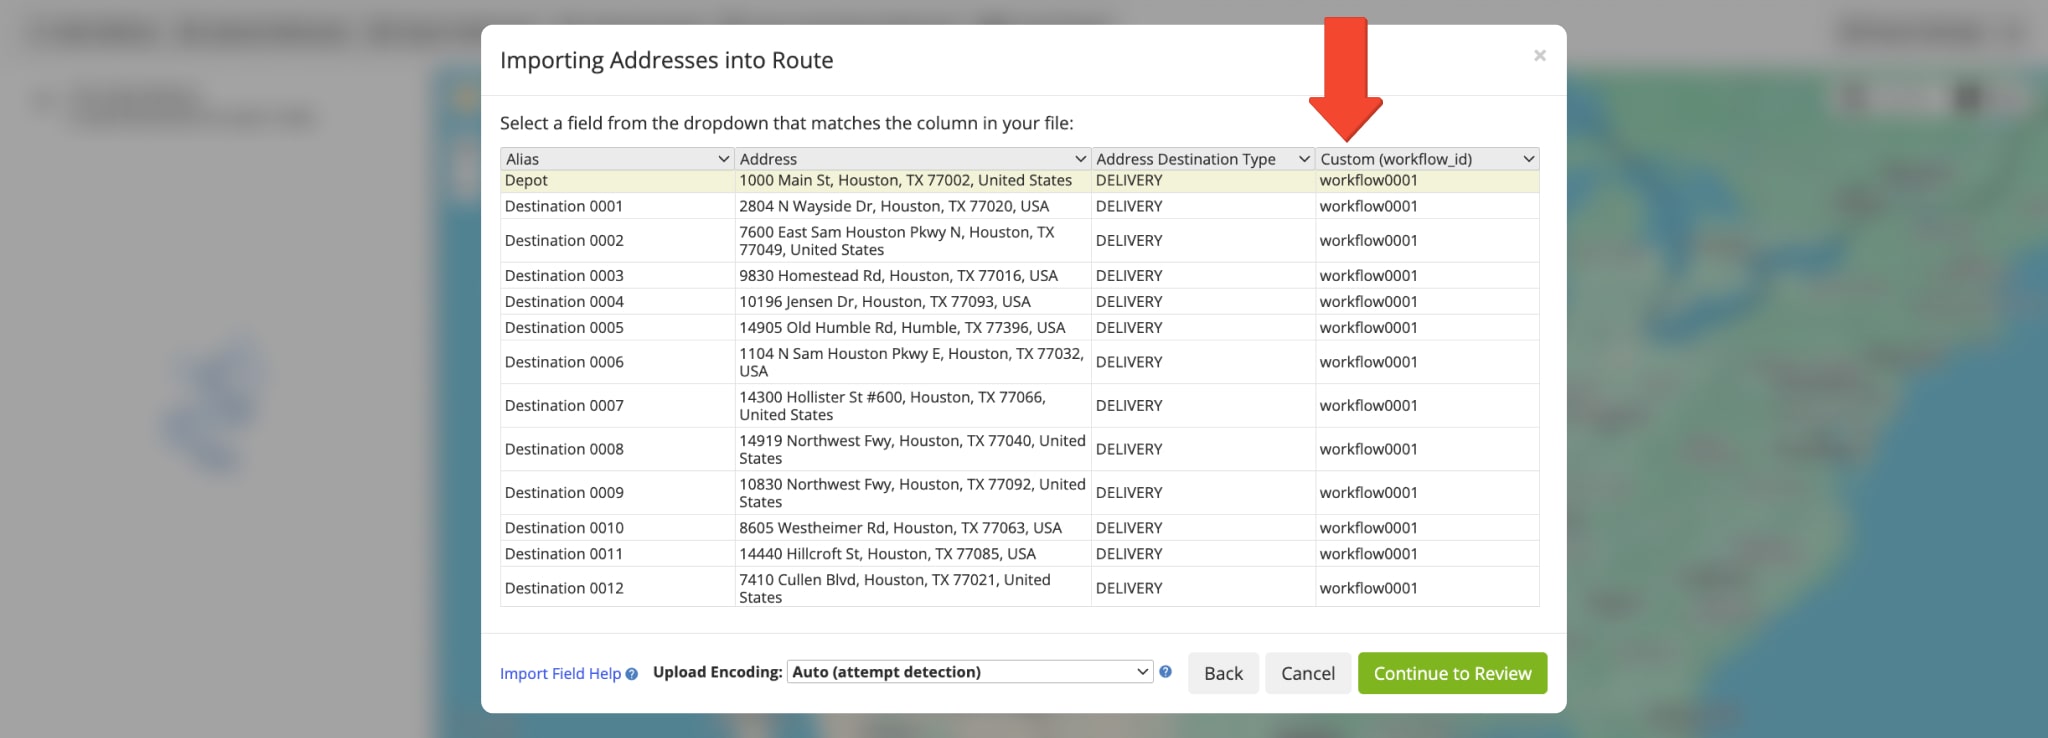
To enable and use Workflows, simply add Workflow IDs to the preferred destinations as Custom Data. For your convenience, you can add Workflow IDs to destinations and have different Workflows enabled for different addresses. To do so, open a route in the Route Editor. Next, click a destination to open its “Destination Info” panel, go to the “Custom Data” section, and click the Pencil Icon to add Custom Data.
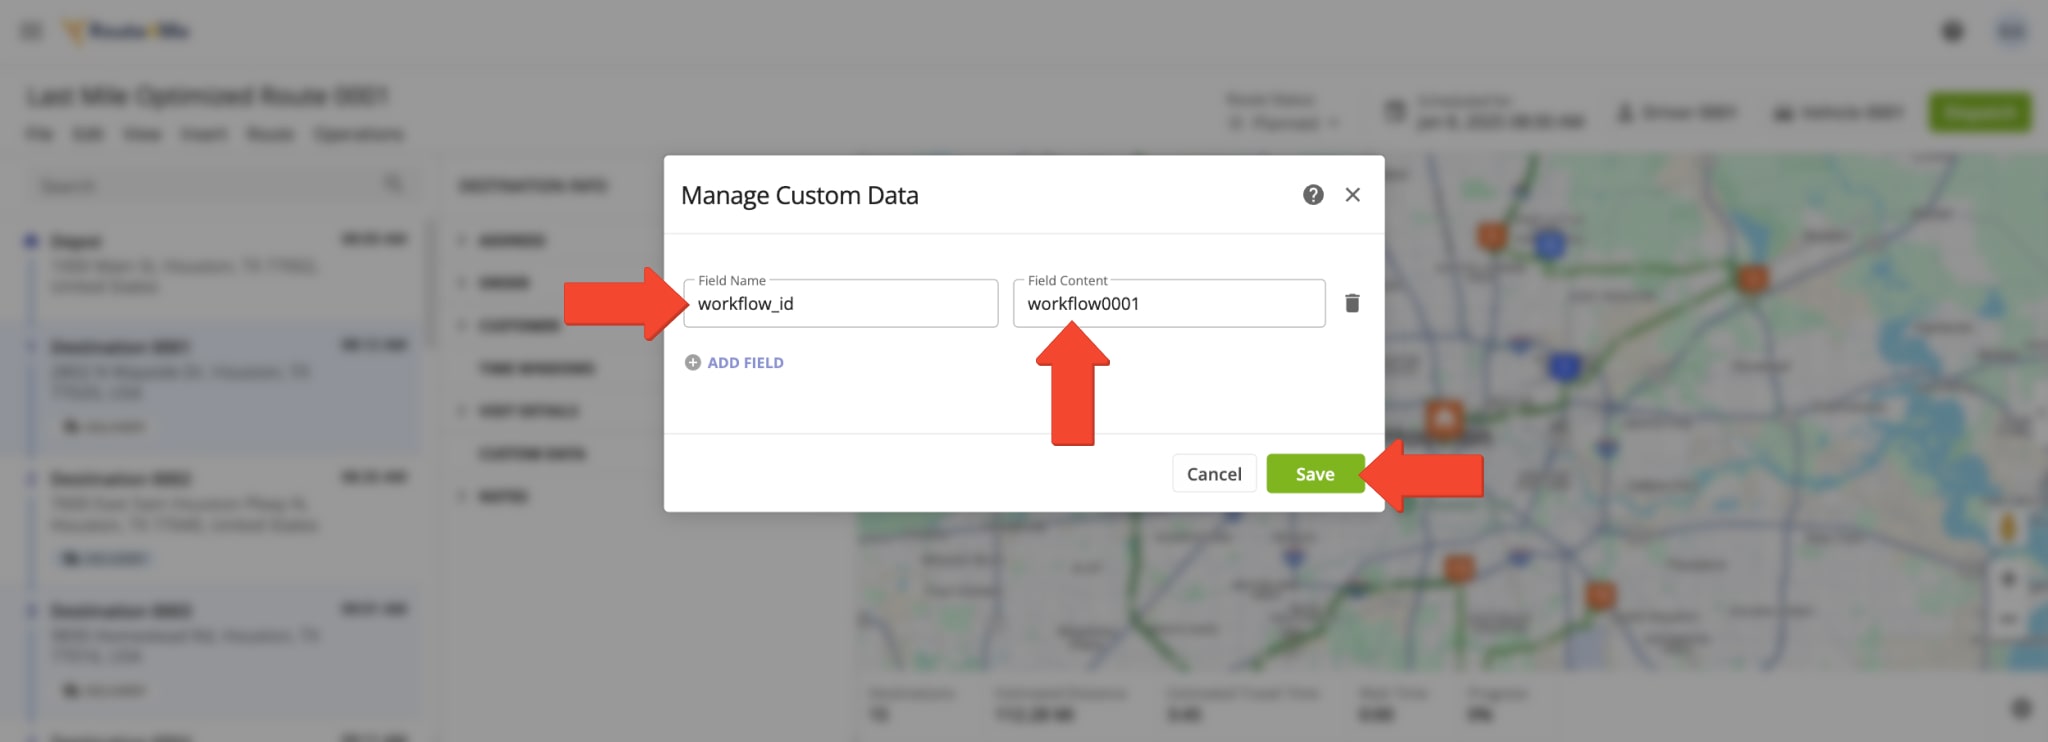
Then, add the “workflow_id” key in the “Field Name” field and then add your Workflow ID under “Field Content“. After that, click the “Save” button to save the added Custom Data entries and enable the Workflow for the given destination. (Learn more about Using and Managing Route Custom Data.) To disable the Workflow for the destination, simply remove the Custom Data entry with the respective Workflow ID.
You can also upload a spreadsheet to add Workflows to addresses when planning routes. To do so, add the “workflow_id” column to your spreadsheet. Next, populate this column with the same or different Workflow IDs for your destinations. Learn more about Route4Me’s Spreadsheets Formatting Requirements.
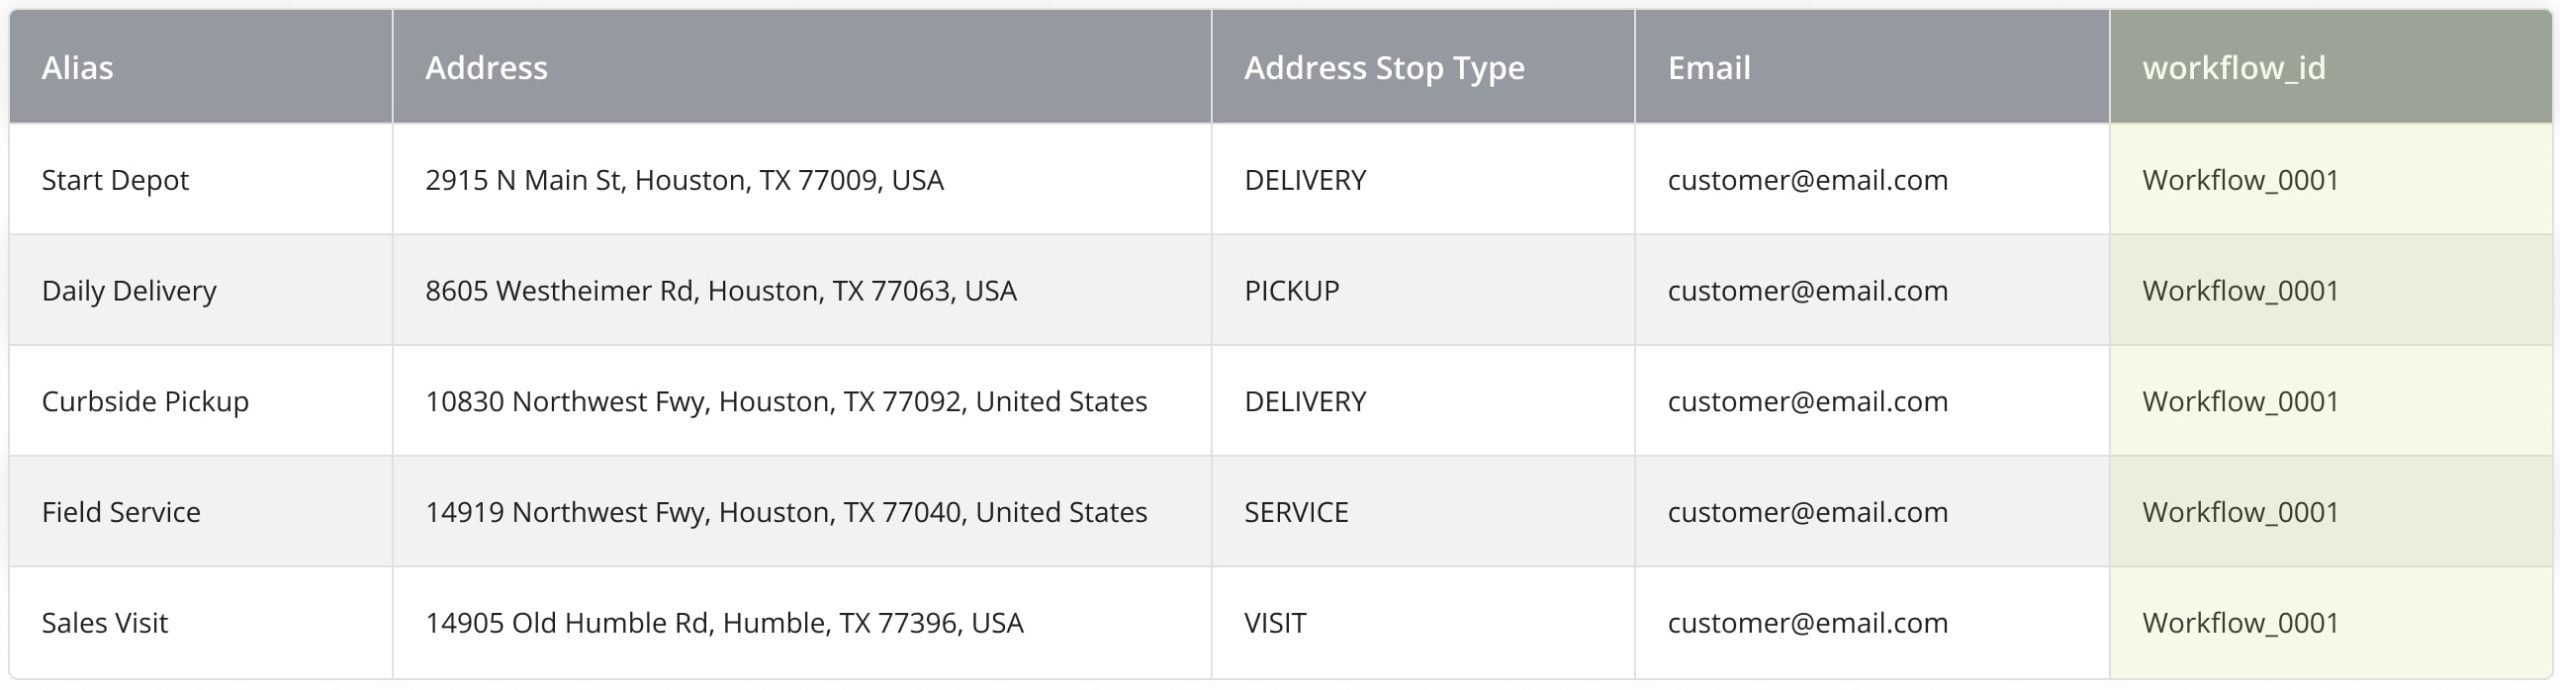
When you upload your spreadsheet with addresses and Workflow IDs, the “workflow_id” column will be automatically verified and added as Custom Data. Specifically, the “workflow_id” column will have the “Custom” column status.
Use Workflows To Collect Proof Of Delivery And Visit On Mobile Apps
After enabling Workflows and dispatching routes, your drivers start and navigate routes, arrive at a destination, complete tasks on Route4Me Mobile Apps, and set the Done or Failed status accordingly. Depending on the Workflow, a driver will be required to complete the respective set of mandatory or optional tasks.
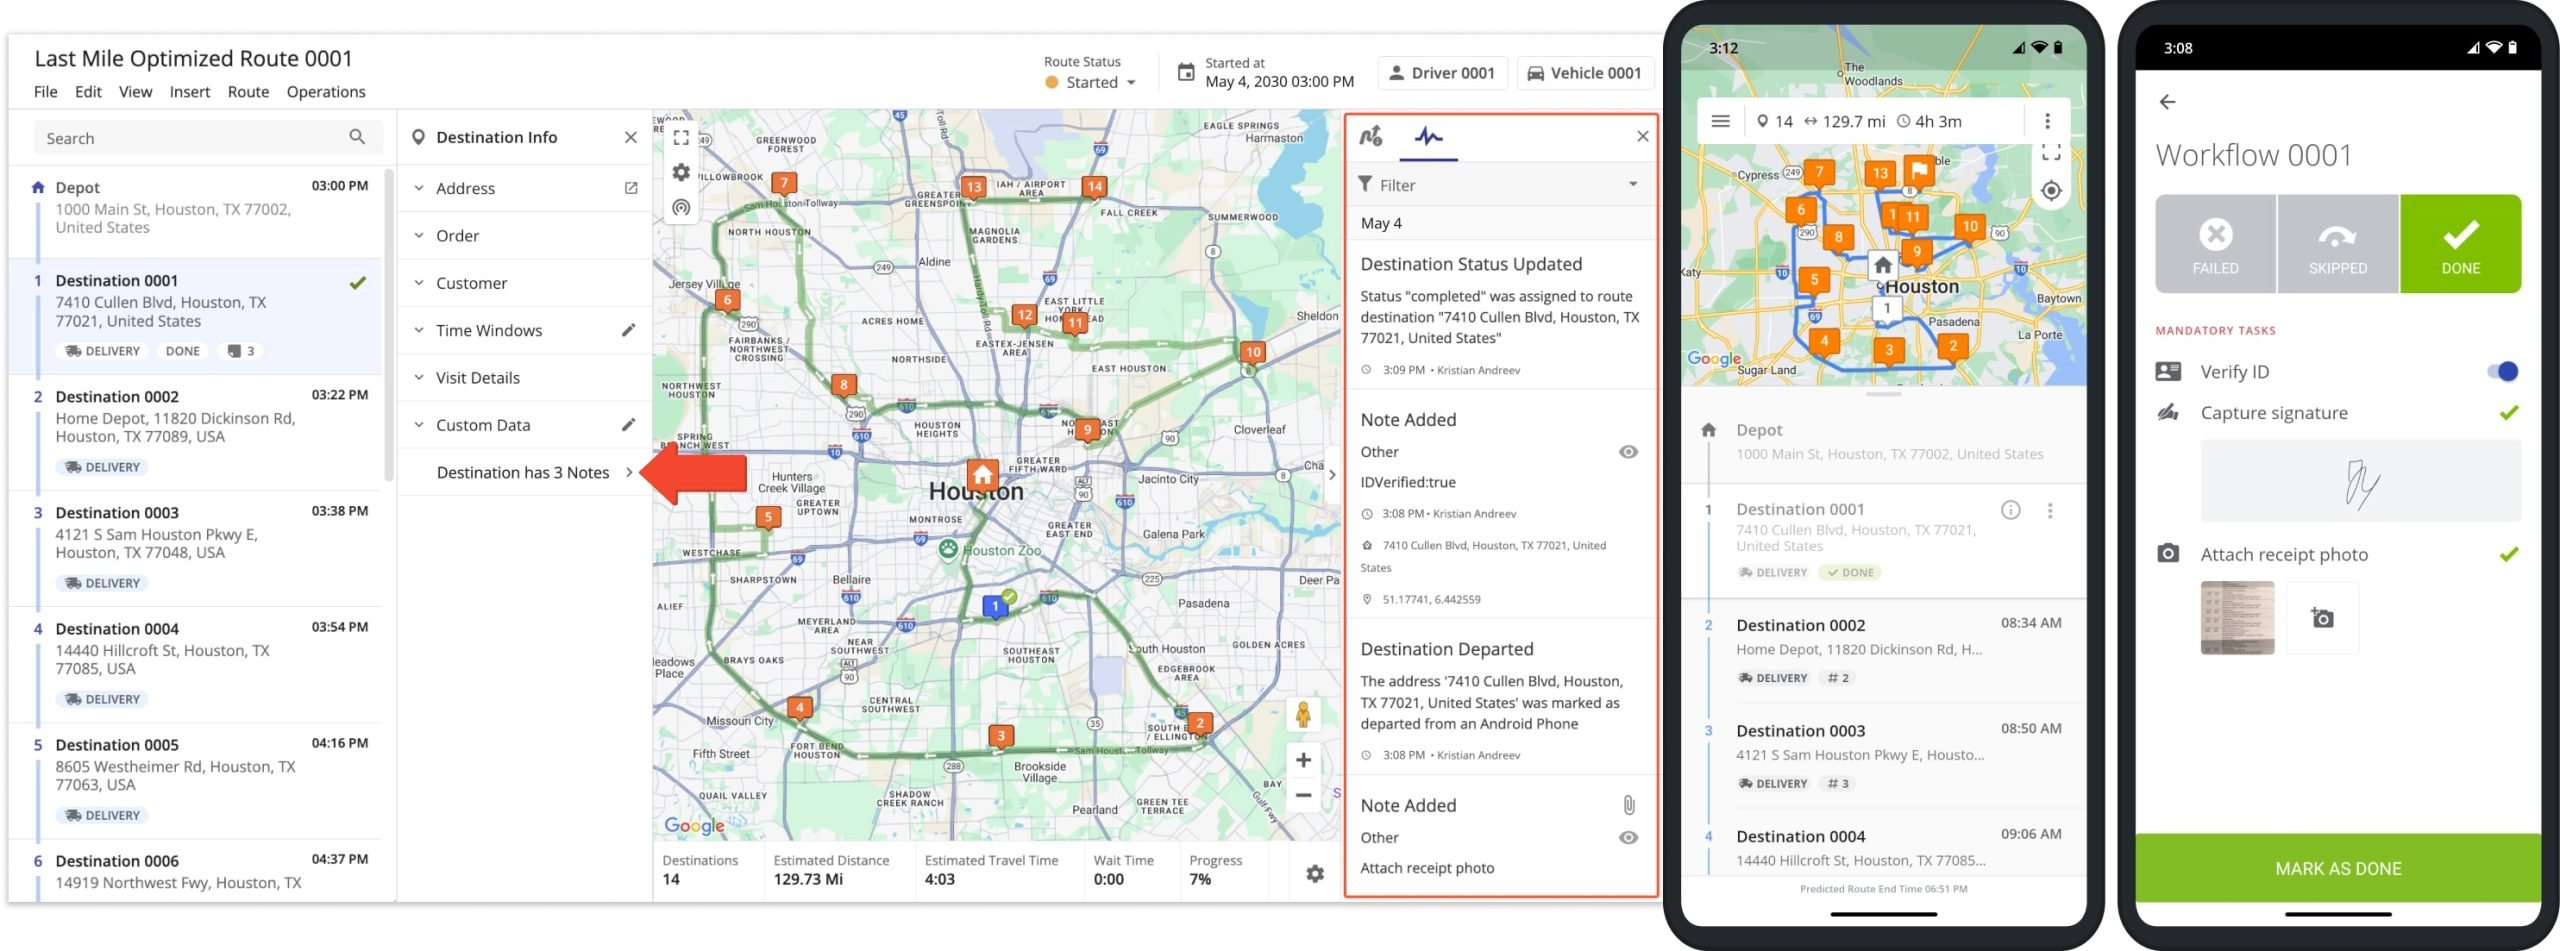
Conveniently, Route4Me provides seamless, instant route data synchronization. As drivers complete Workflow tasks, collect proof of delivery or visit, and add statuses using the Mobile App, all updates are automatically synchronized with Route4Me’s Web Platform in real time. You can click the Arrow in the Notes section of the Destination Info panel to open the respective destination’s Activity Feed and track workflow activity in real time.
First, the driver opens the dispatched route on the mobile app and then starts the route. Next, the driver can navigate to route stops using Route4Me’s In-App Voice-Guided Navigation, Google Maps, Waze, and other apps. After arriving at the route stop, the driver marks the stop as “Arrived” and then proceeds to complete the delivery, service, etc.
Learn more about how to Start, Navigate, and Complete Routes Using Route4Me’s iPhone Route Planner App. And how to Start, Navigate, and Complete Routes Using Route4Me’s Android Route Planner App.
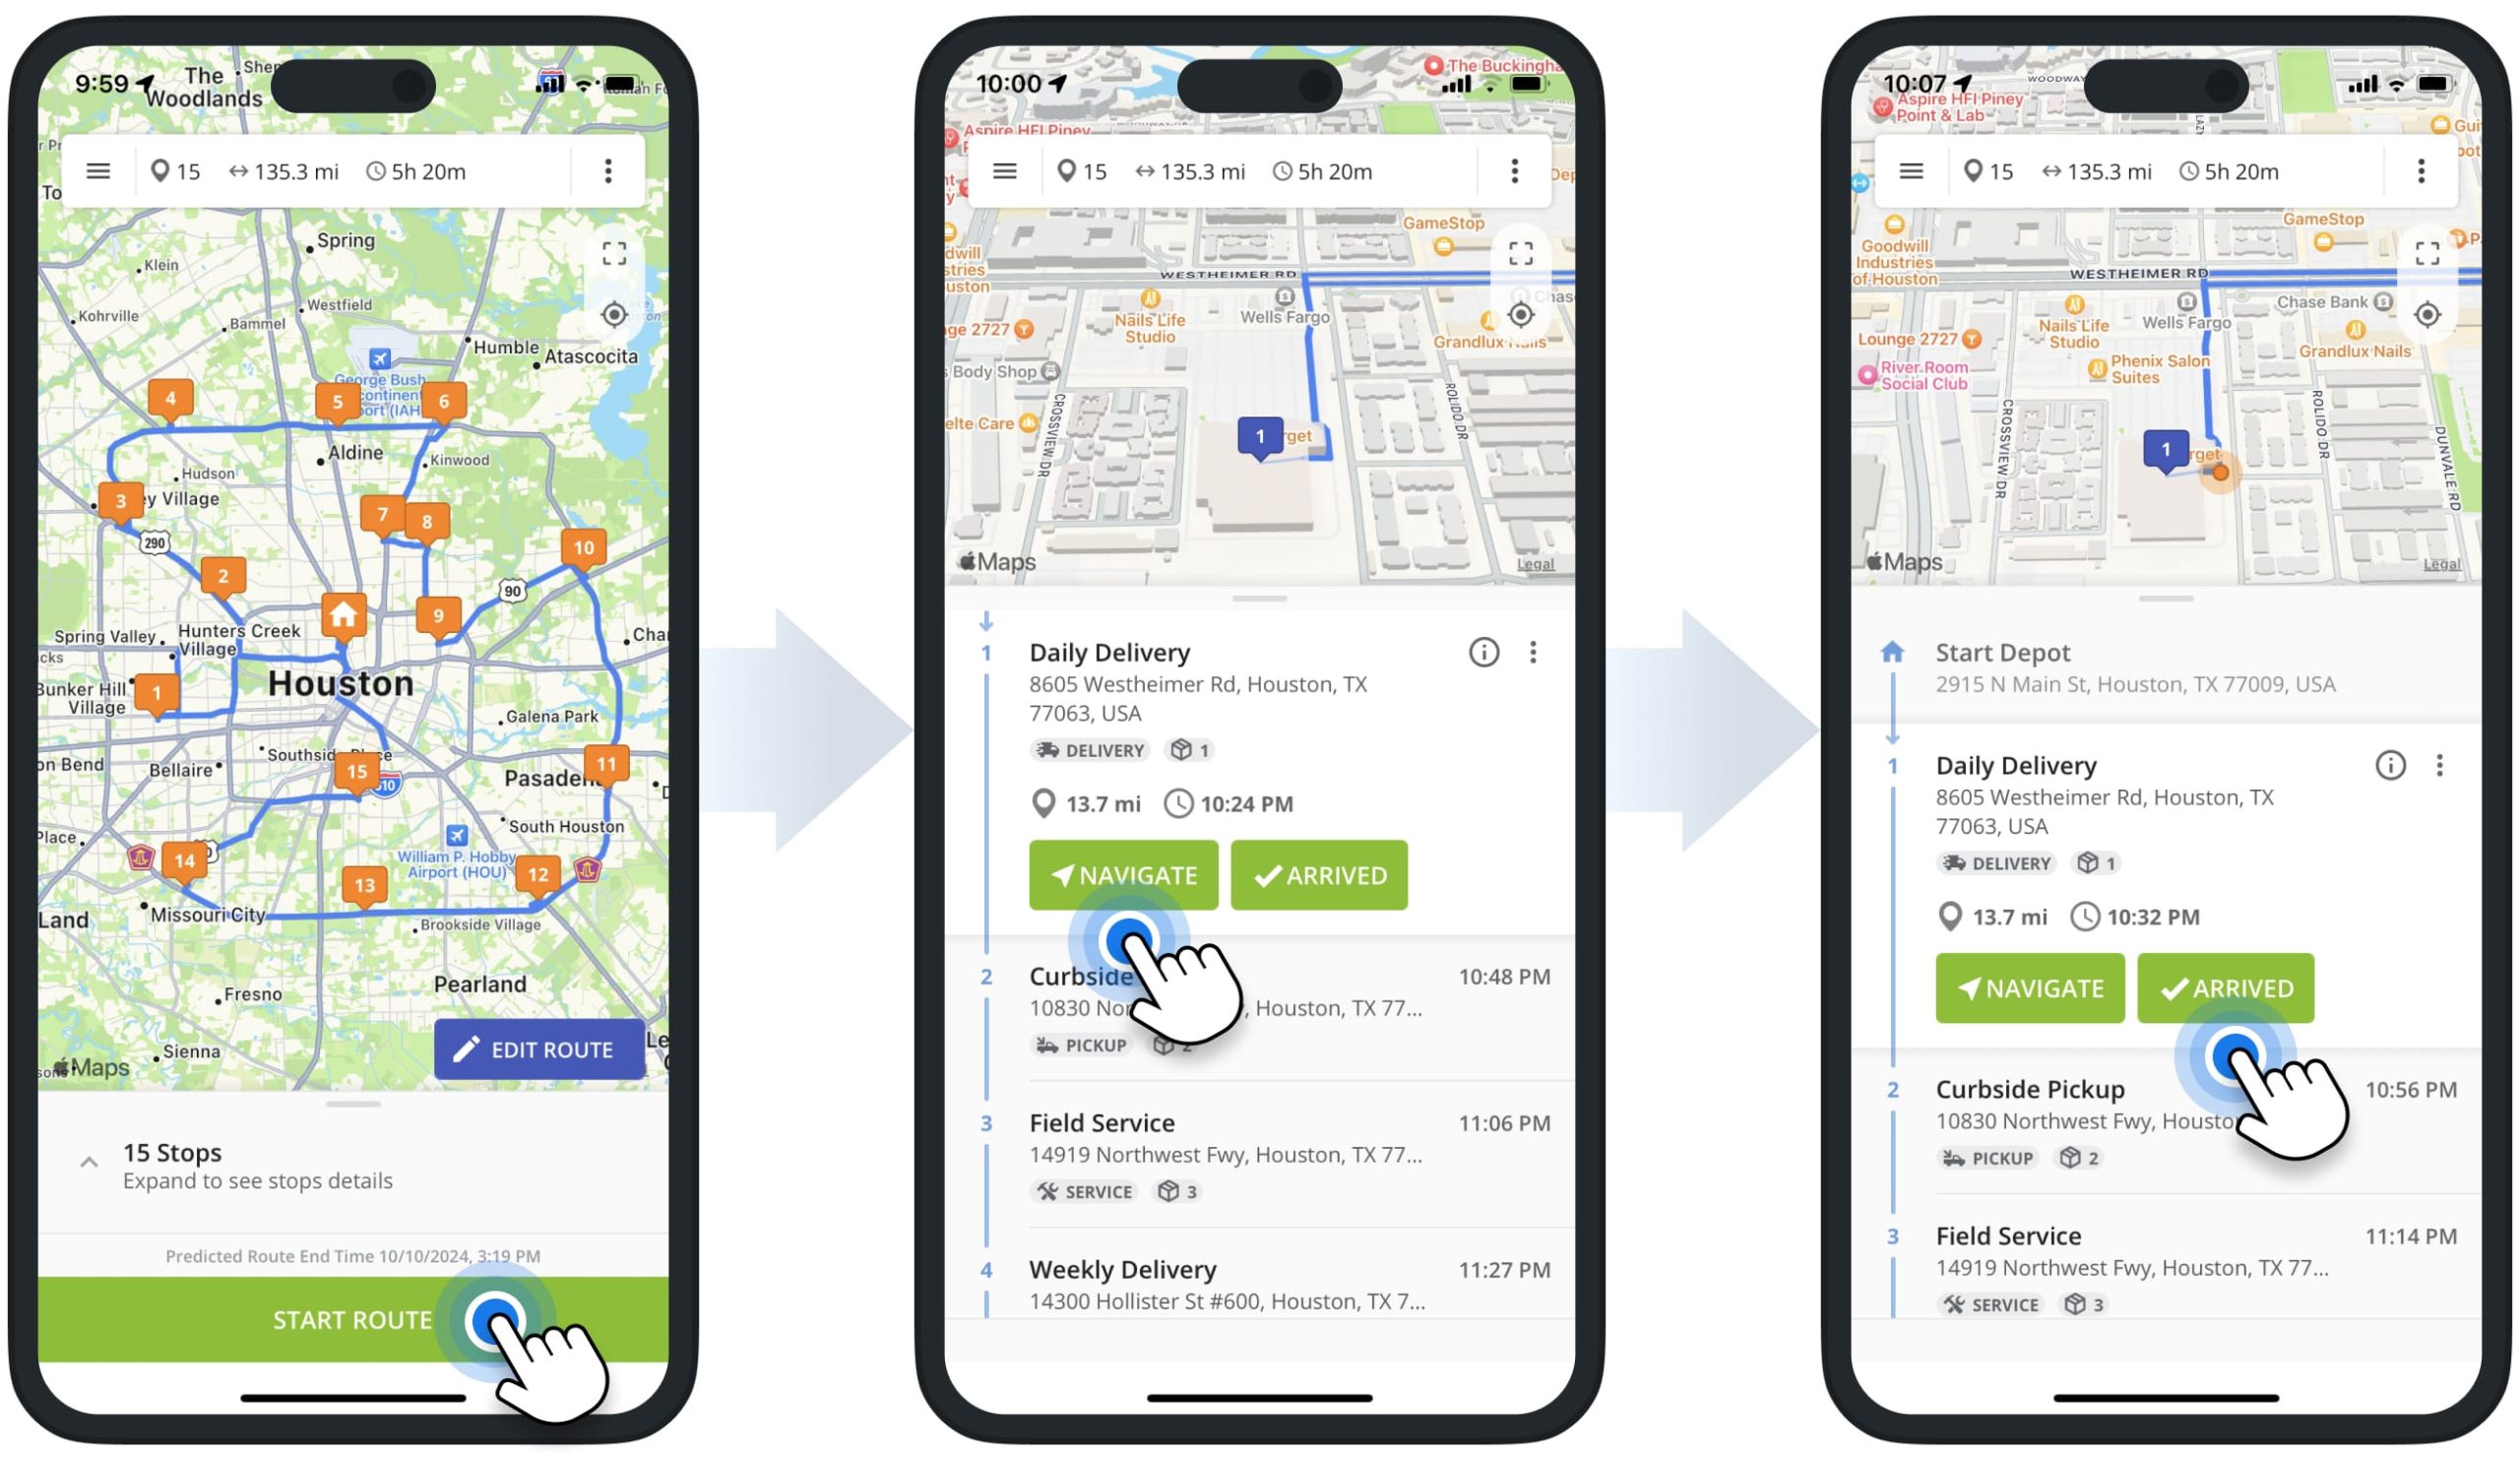
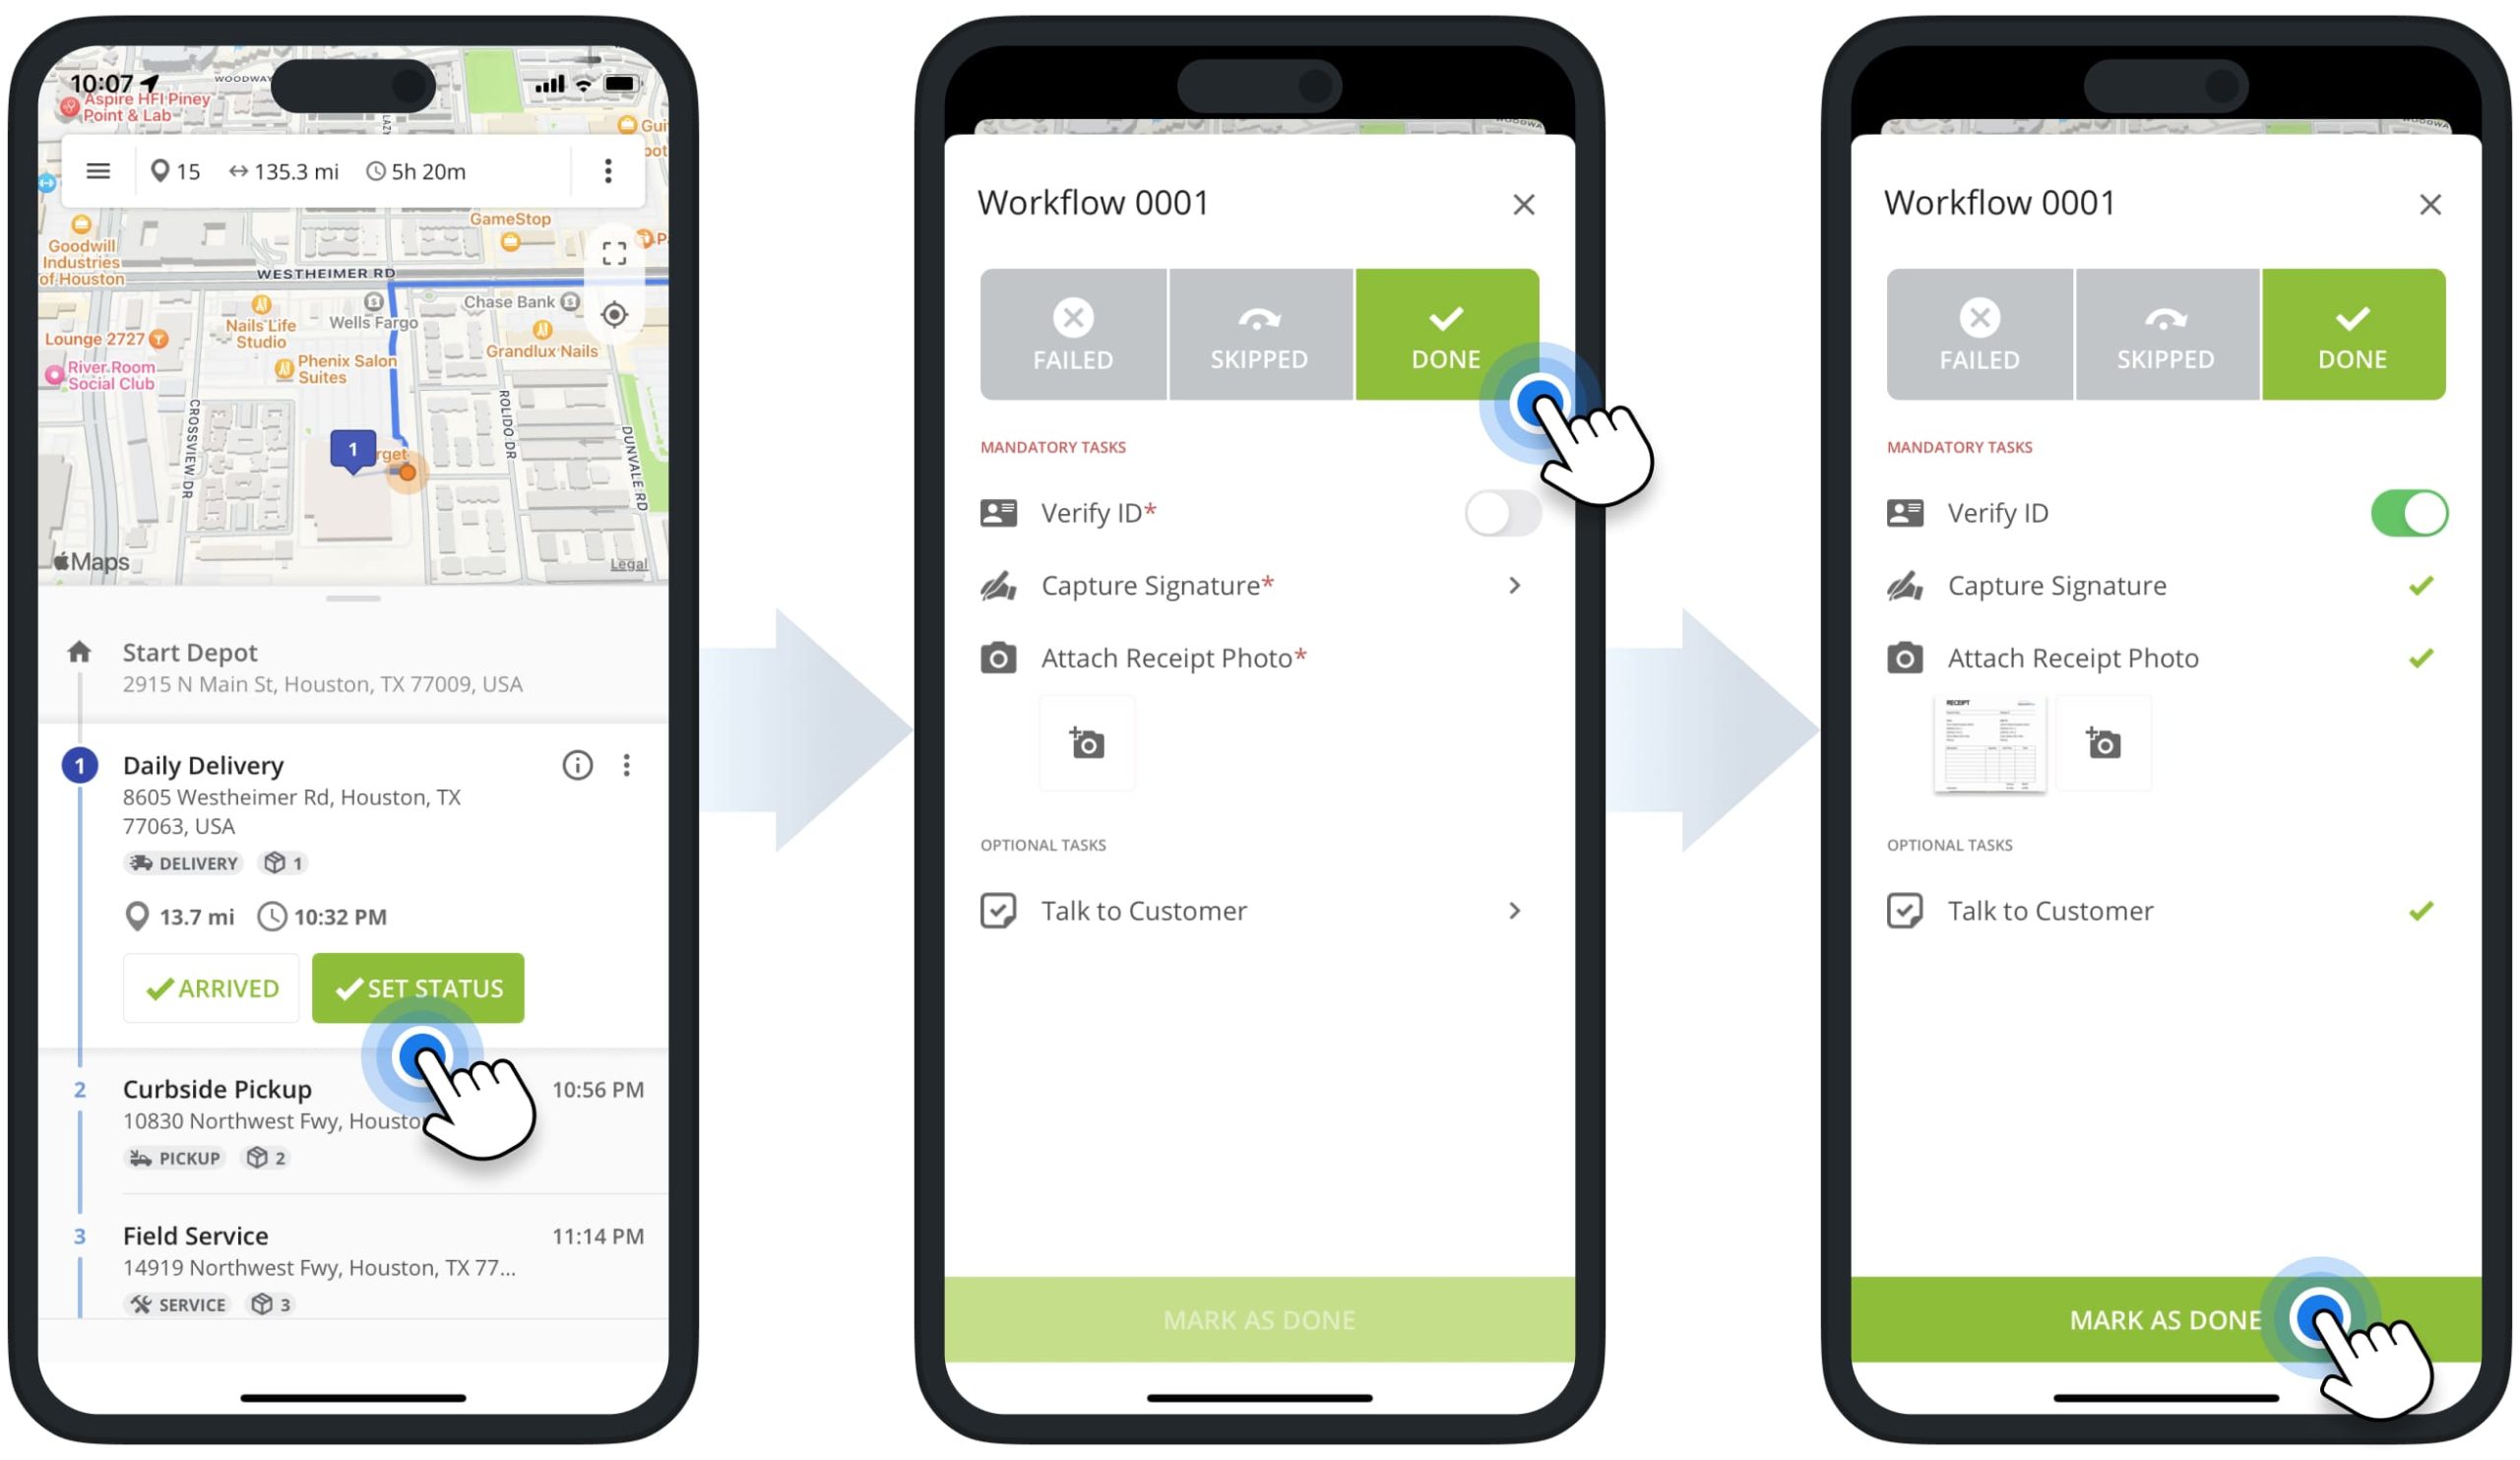
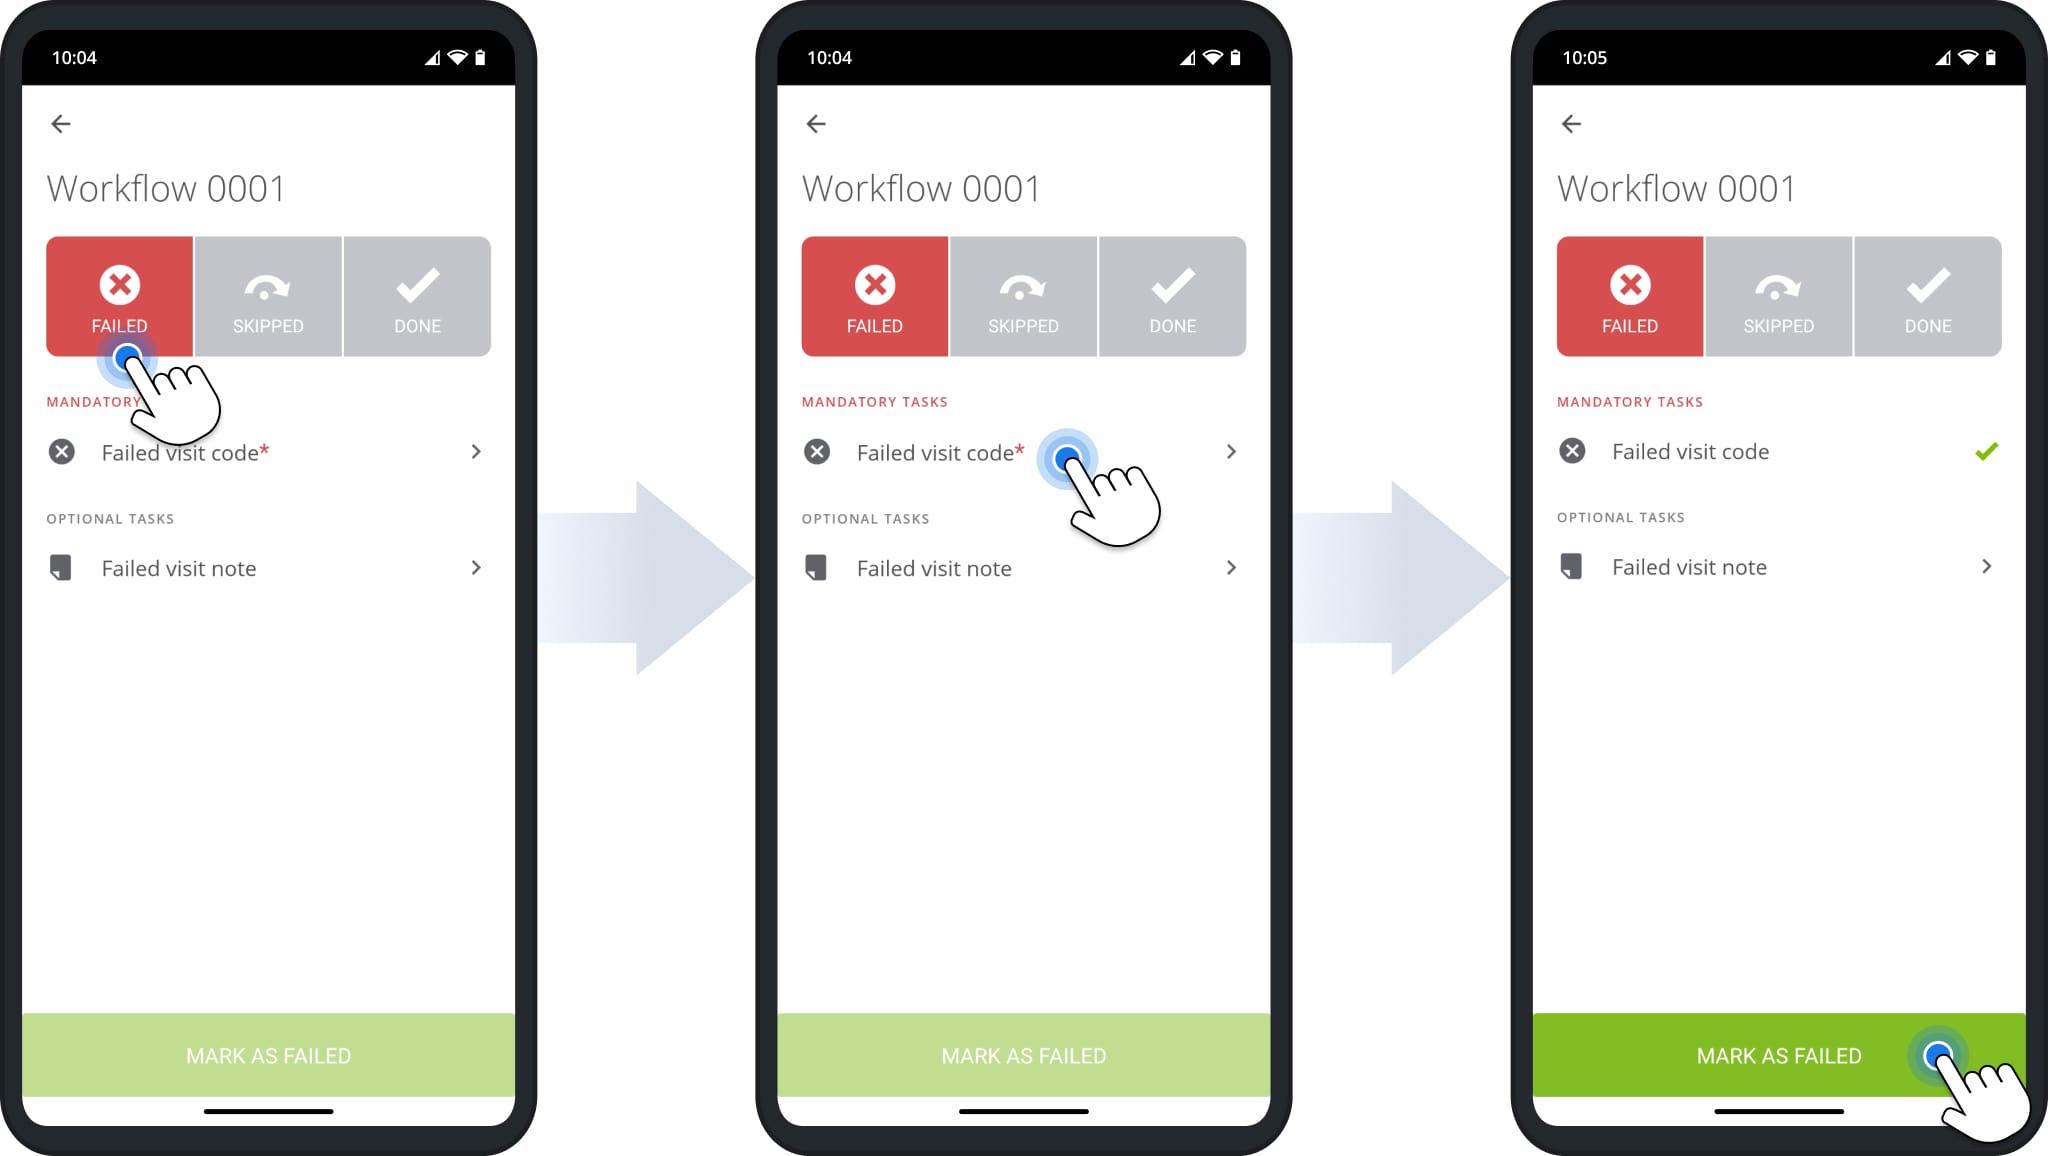
Next, the driver can assign the Done or Failed status to the destination. Accordingly, the driver is required to complete the respective set of mandatory or optional tasks before assigning the respective status to that destination.
To assign the Done status, the driver needs to tap the “Done” status button. Then, the app will show all Workflow tasks: verifying ID, capturing a customer signature, attaching a receipt photo, etc. After completing the required tasks, the driver can assign the Done status to the stop by tapping the “Mark as Done” button.
Similarly, to assign the “Failed” status, the driver needs to tap the “Failed” status button. Then, the app will show all Workflow tasks: providing the reason for not being able to complete the order or delivery, adding additional notes, etc. After completing the required tasks, the driver can assign the Failed status to the stop by tapping the “Mark as Failed” button.
Additionally, assigned users can edit and delete notes and note media if the corresponding permissions settings are enabled. Learn more about how you can manage user permissions.
Supported Workflow Actions For Done And Failed Destination Statuses
Below are examples of various supported actions and Driver Tasks you can add to your proof of delivery, visit, or service Workflows. To complete, each Action Type requires different input from the assigned User. A list of all supported done and failed Workflow Actions can be found earlier in this guide.
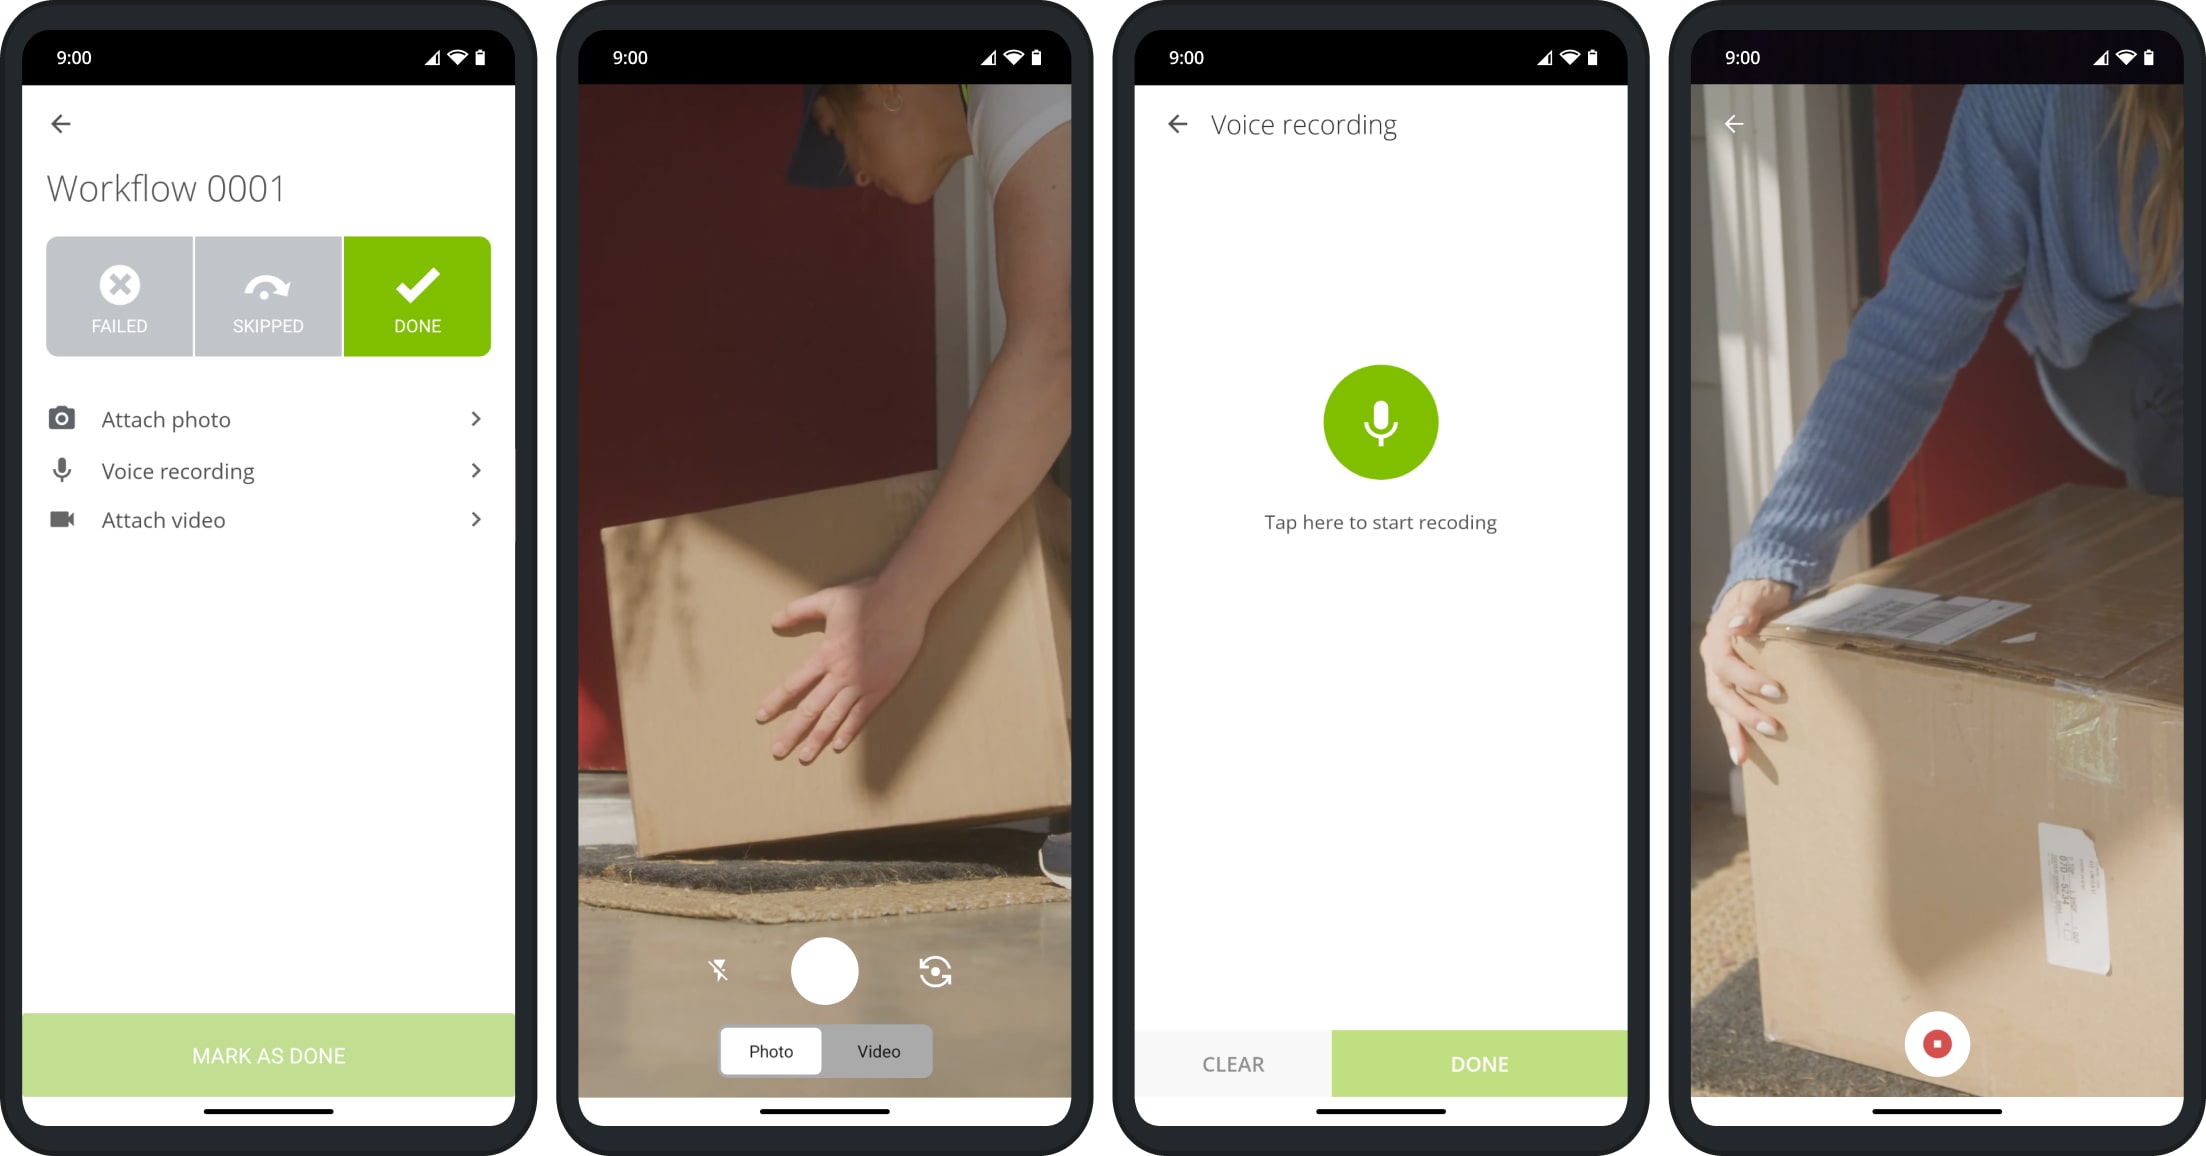
Record Media – Capture Photos, Videos And Voice Recordings
Route4Me enables your field team to capture photos, voice recordings, and videos at customer destinations.
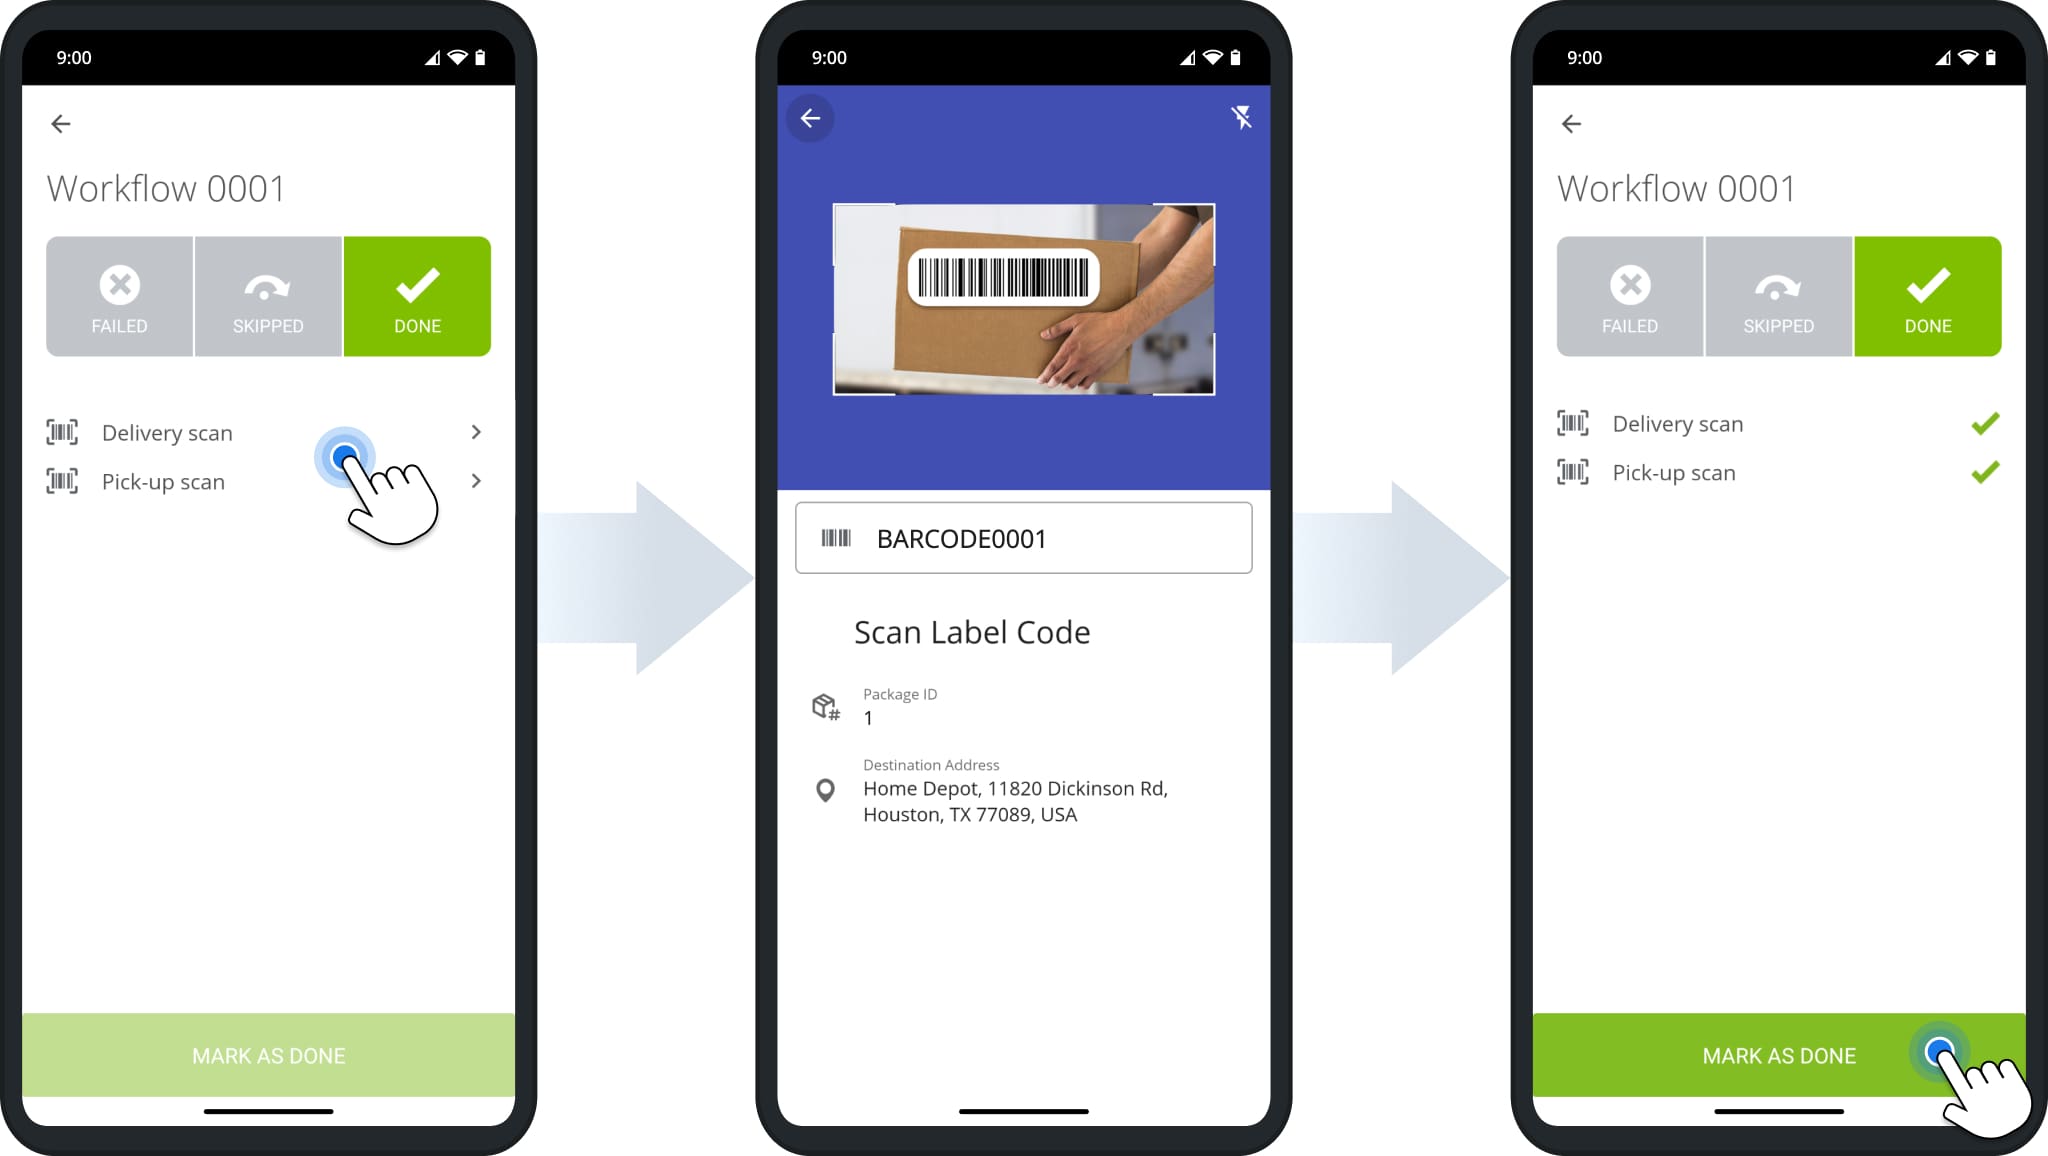
Scan Barcodes – Delivery And Pickup Label Code Scanner
Workflows are fully integrated with the Route4Me Label Scanner, enabling effortless and secure order completion.
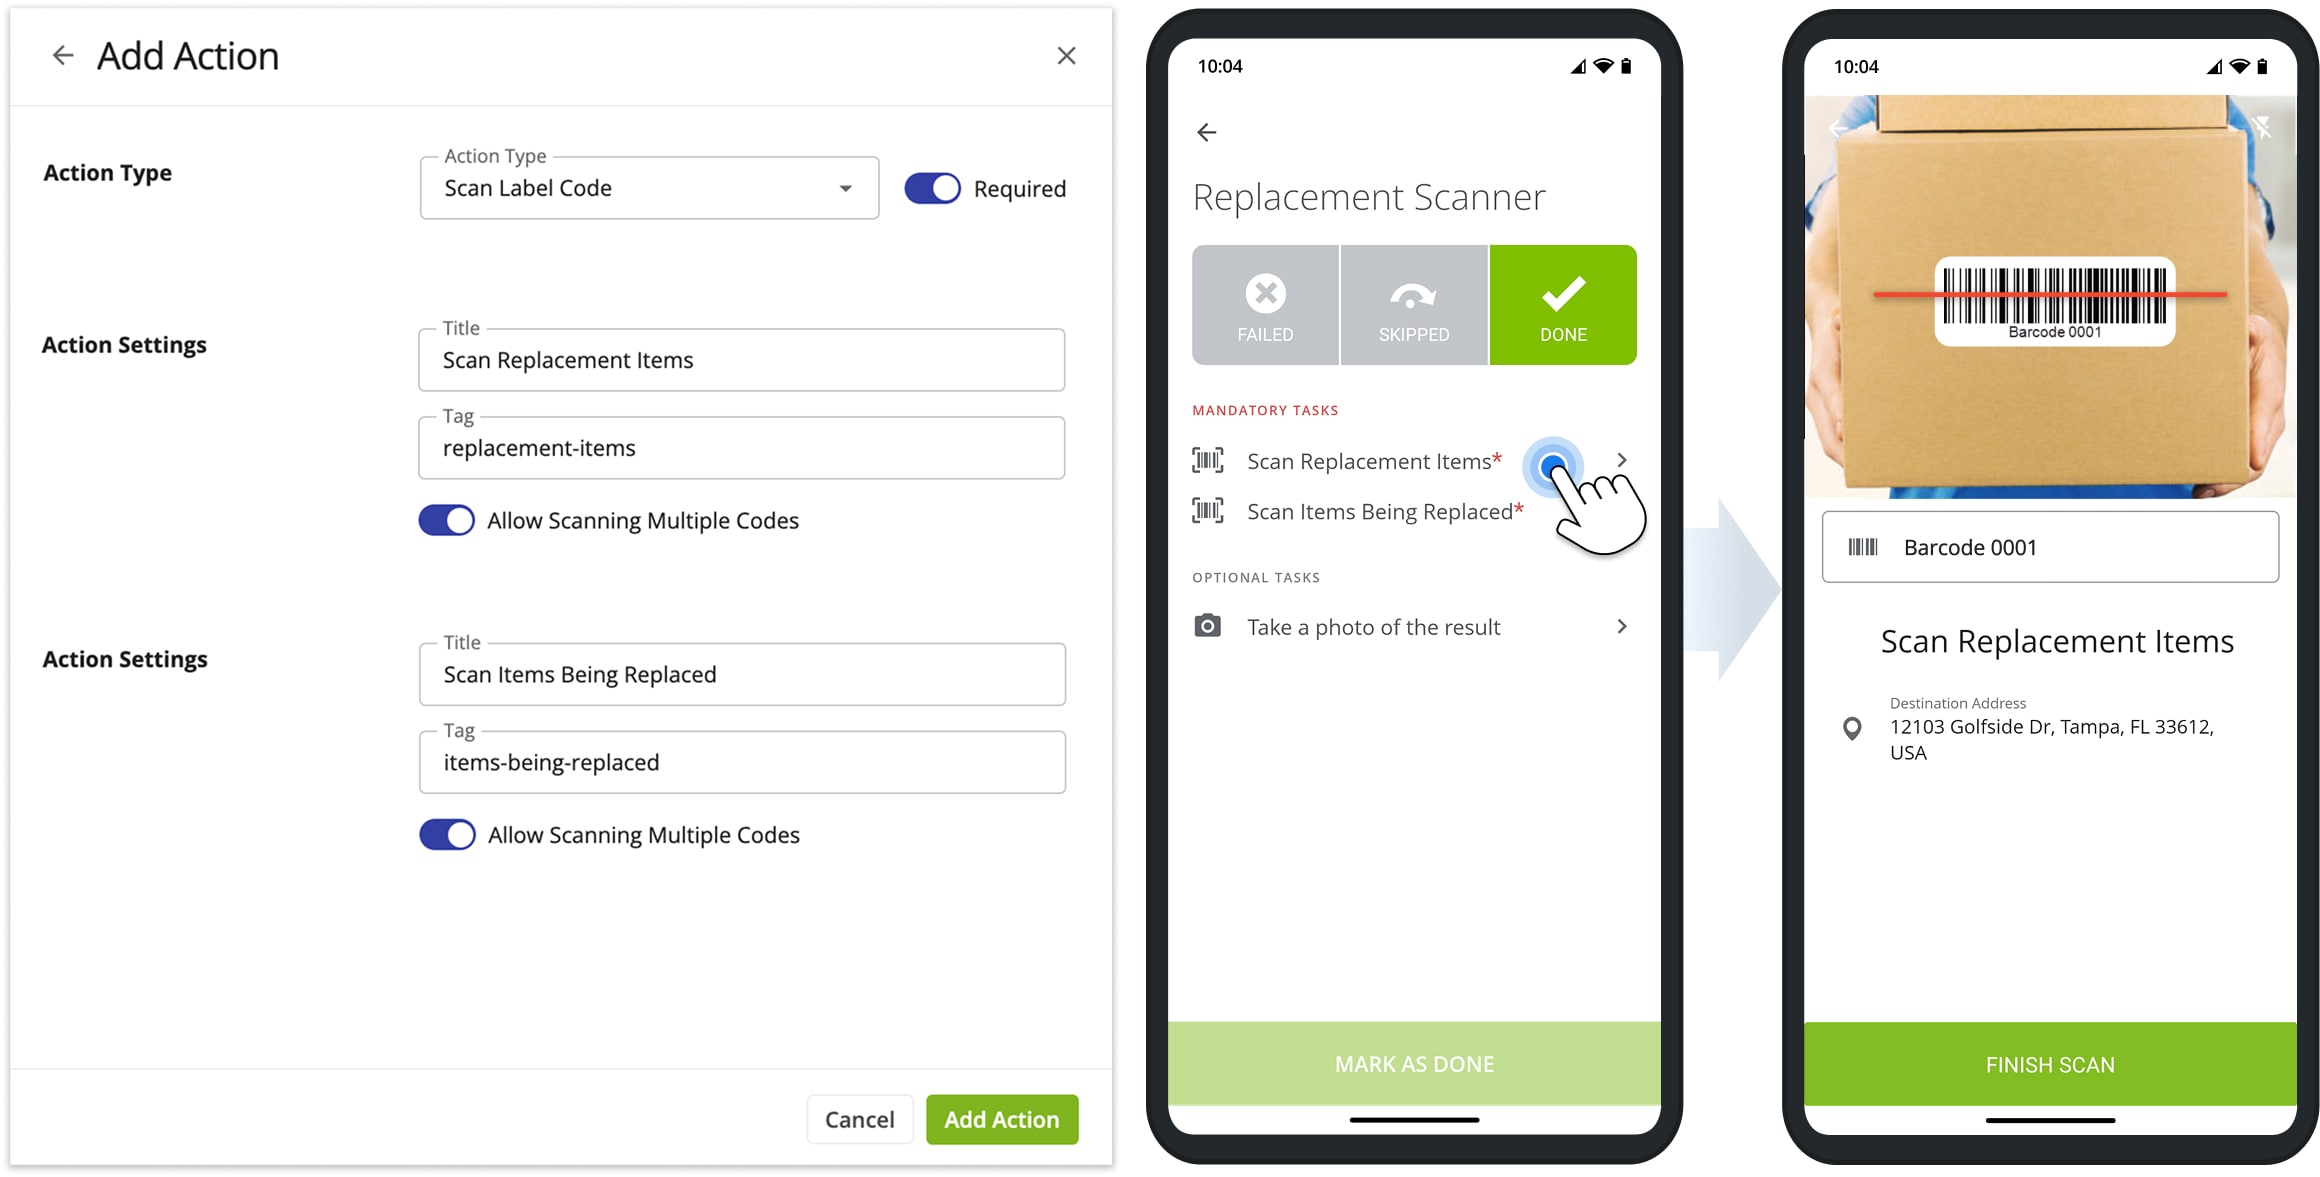
Additionally, the “Scan Label Code” action type enables you to create any number of custom scanning tasks. For example, if you’re replacing items, you can create scanning actions for the items being replaced and the replacement items like in the example below. This way, you can easily carry out virtually any action that requires scanning a barcode with full transparency and consistent record-keeping at every step of the process.
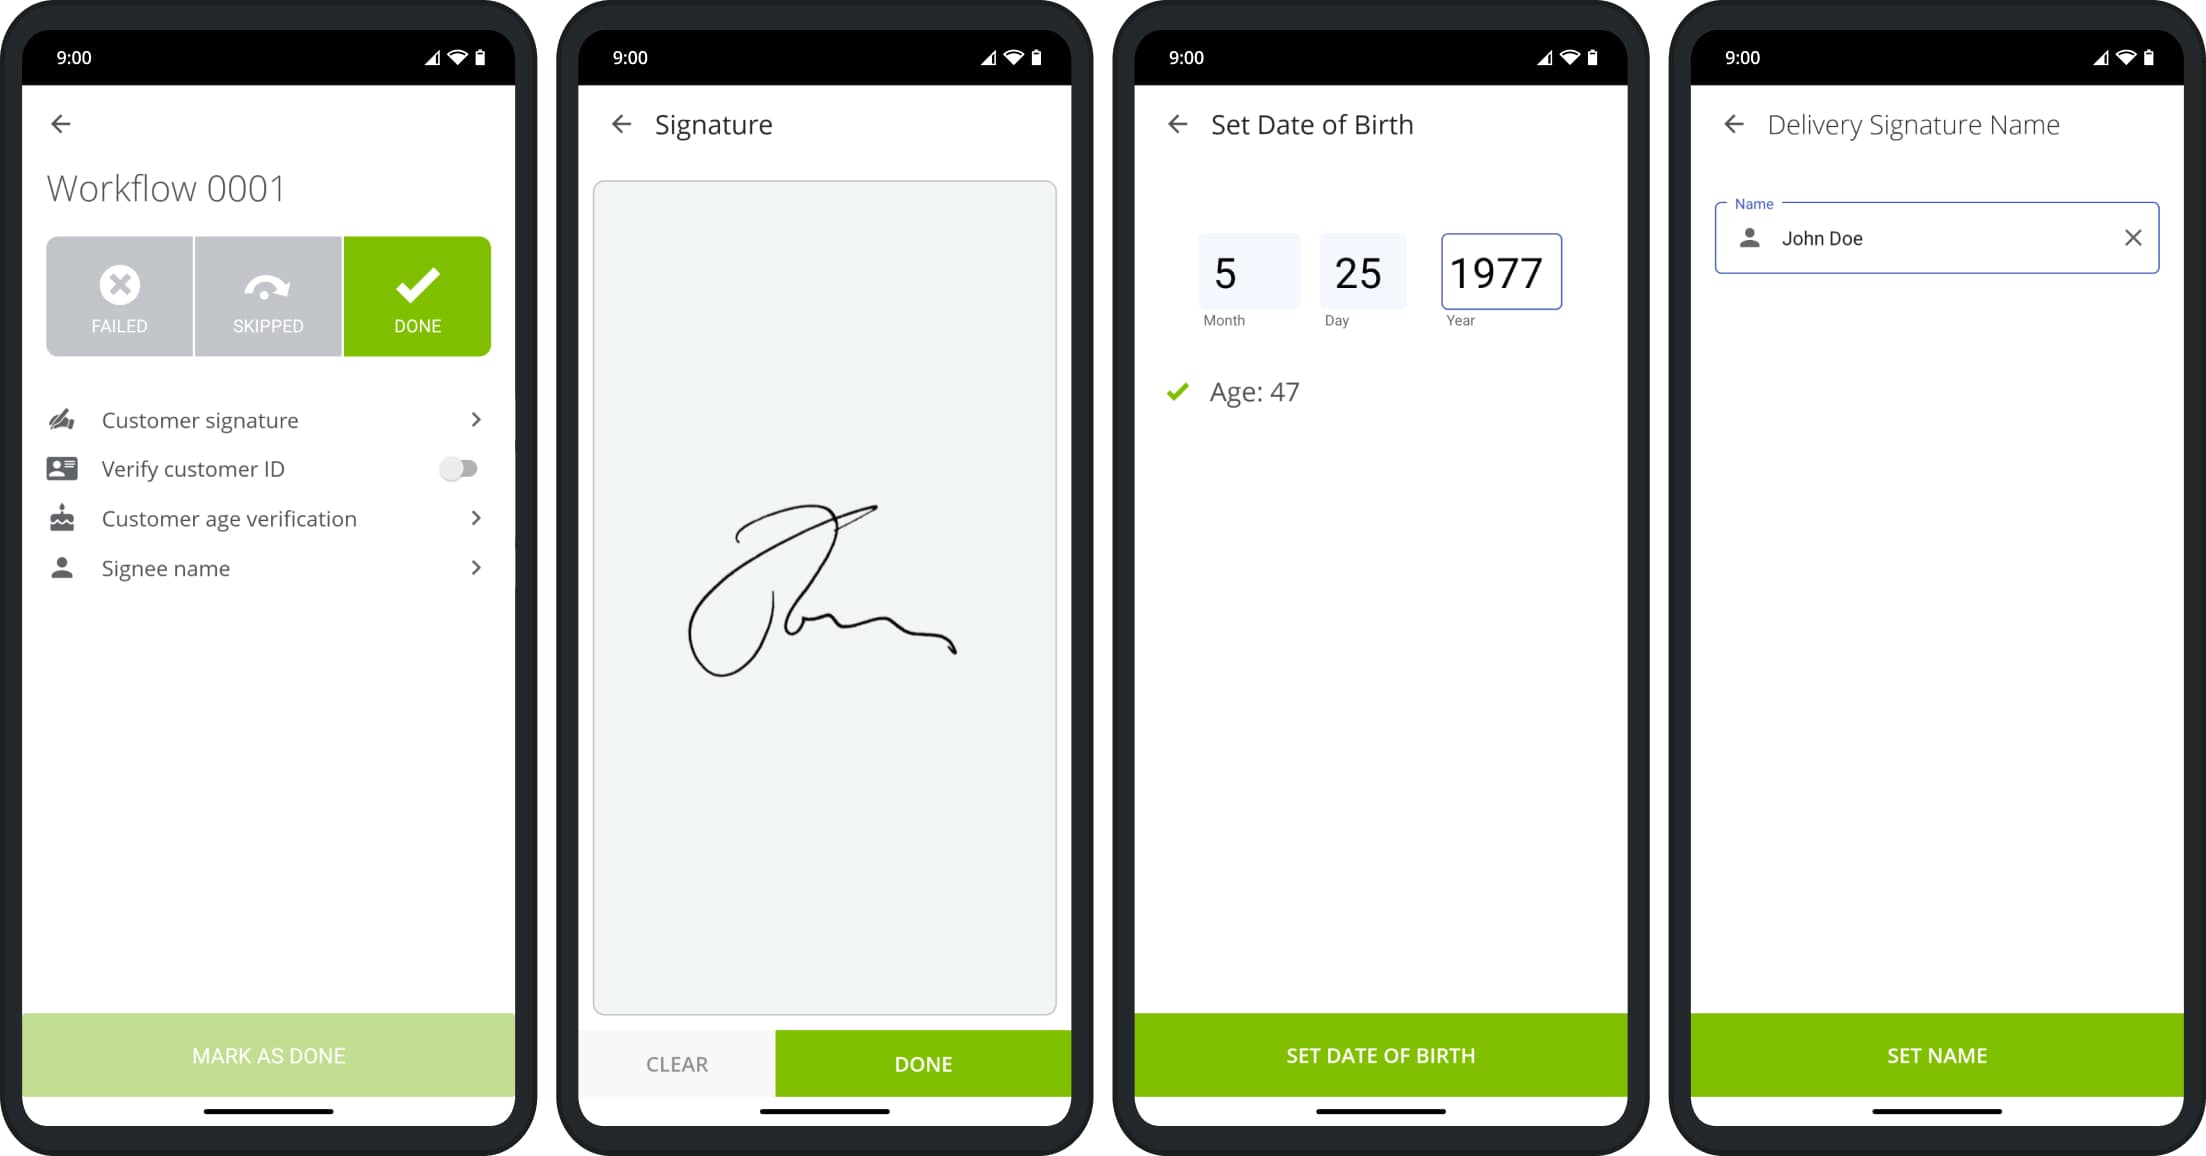
Customer Verification – Capture E-Signature, Verify Signee ID, Age And Name
You can easily capture e-signatures and confirm the personal and ID details of the signee or customer in seconds.
Code Confirmation – Set Delivery Code Or Fail Code
Whether a destination is successfully visited or not, your drivers can mark down the specifics through Route4Me’s customizable Release Codes and Exception Codes. This system enables you to easily implement your business confirmation codes into any of your Route4Me Workflows. To customize Done and Failed codes, contact Route4Me Support.

Release And Failed Codes
The table below lists the default Release and Failed Codes used in Route4Me Workflows:
| Code | Description | |
|---|---|---|
| Release Code | ||
| FDR | Delivered to the front door | |
| SDR | Delivered to the side door | |
| BDR | Delivered to the back door | |
| LBX | Delivered to the lockbox | |
| INR | Intended recipient | |
| NBR | Neighbor | |
| FTD | Front desk/receptionist | |
| FLR | Flower room | |
| CWK | Co-worker | |
| SEC | Security office | |
| EAR | Custom workflow setting | |
| OTH | Other | |
| Failed Code | ||
| SRP | Signature required package | |
| BDA | Bad address | |
| CLO | Business closed | |
| DAM | Damaged package on road | |
| EMG | Emergency conditions | |
| HOL | Holiday | |
| MOV | Moved | |
| UTL | Unable to locate | |
| RNI | Resident not in | |
| UTA | Unable to access | |
| DNA | Did not attempt | |
Visit Route4Me's Marketplace to Check out Associated Modules:
- Operations
Custom Data Add-On
- Operations
Advanced Team Management Add-On
About author: Kristian Andreev
Kristian is a Technical Writer at Route4Me. With over a decade of experience in writing and localization, he's an expert at communicating complex technical data in a clear, concise, and user-friendly way. Passionate about bridging the gap between engineers and users, he specializes in creating documentation to streamline onboarding, enhance product usability, and support global teams on the path to success.