Plan Multiple Routes With Multi-Stop Route Planner App
Route4Me’s Mobile Route Planner provides seamless continuity throughout the entire process of multi-stop route planning, optimization, navigating, and completing routes. With Route4Me, you can easily sequence fast and profitable routes. In this guide, you can learn how to plan multiple routes from a single set of addresses Specifically, how to set optimization constraints, sequence and schedule multi-address routes, and use the mobile route editor.
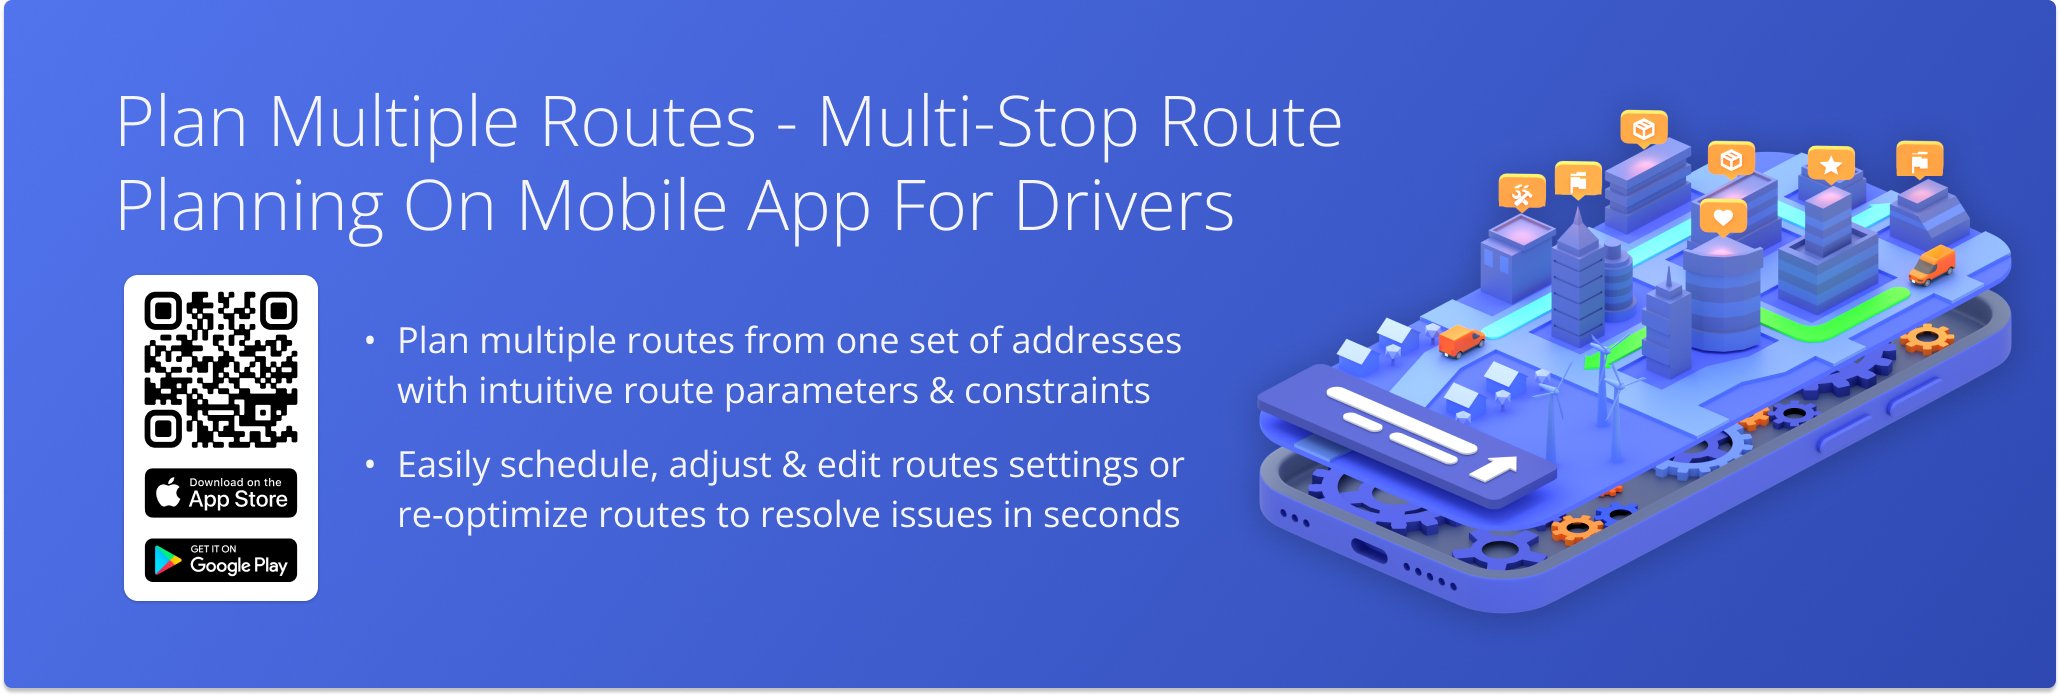
Table of Contents
Plan Multiple Routes – Route Settings And Optimization Constraints
To plan multiple routes on the mobile app, tap “Add New Route” from the main menu. Then, set your optimization constraints, tap “Continue“, and proceed with mobile route planning as usual by tapping “Enter Start Address“.
See the table below for a breakdown of route settings and optimization constraints.
Plan Multiple Routes With Multi-Stop Route Planner App
Route Name
Alias or name of the route. When planning multiple routes, each route will have a corresponding "(Part 00X)" number added to the Route Name.
Maximum Routes
Maximum number of routes to plan from added or imported addresses. The app will plan no more than the selected number of routes.
Maximum Destinations per Routes
Maximum number of addresses allowed in a route. The app will include no more than the selected number of addresses when planning routes.
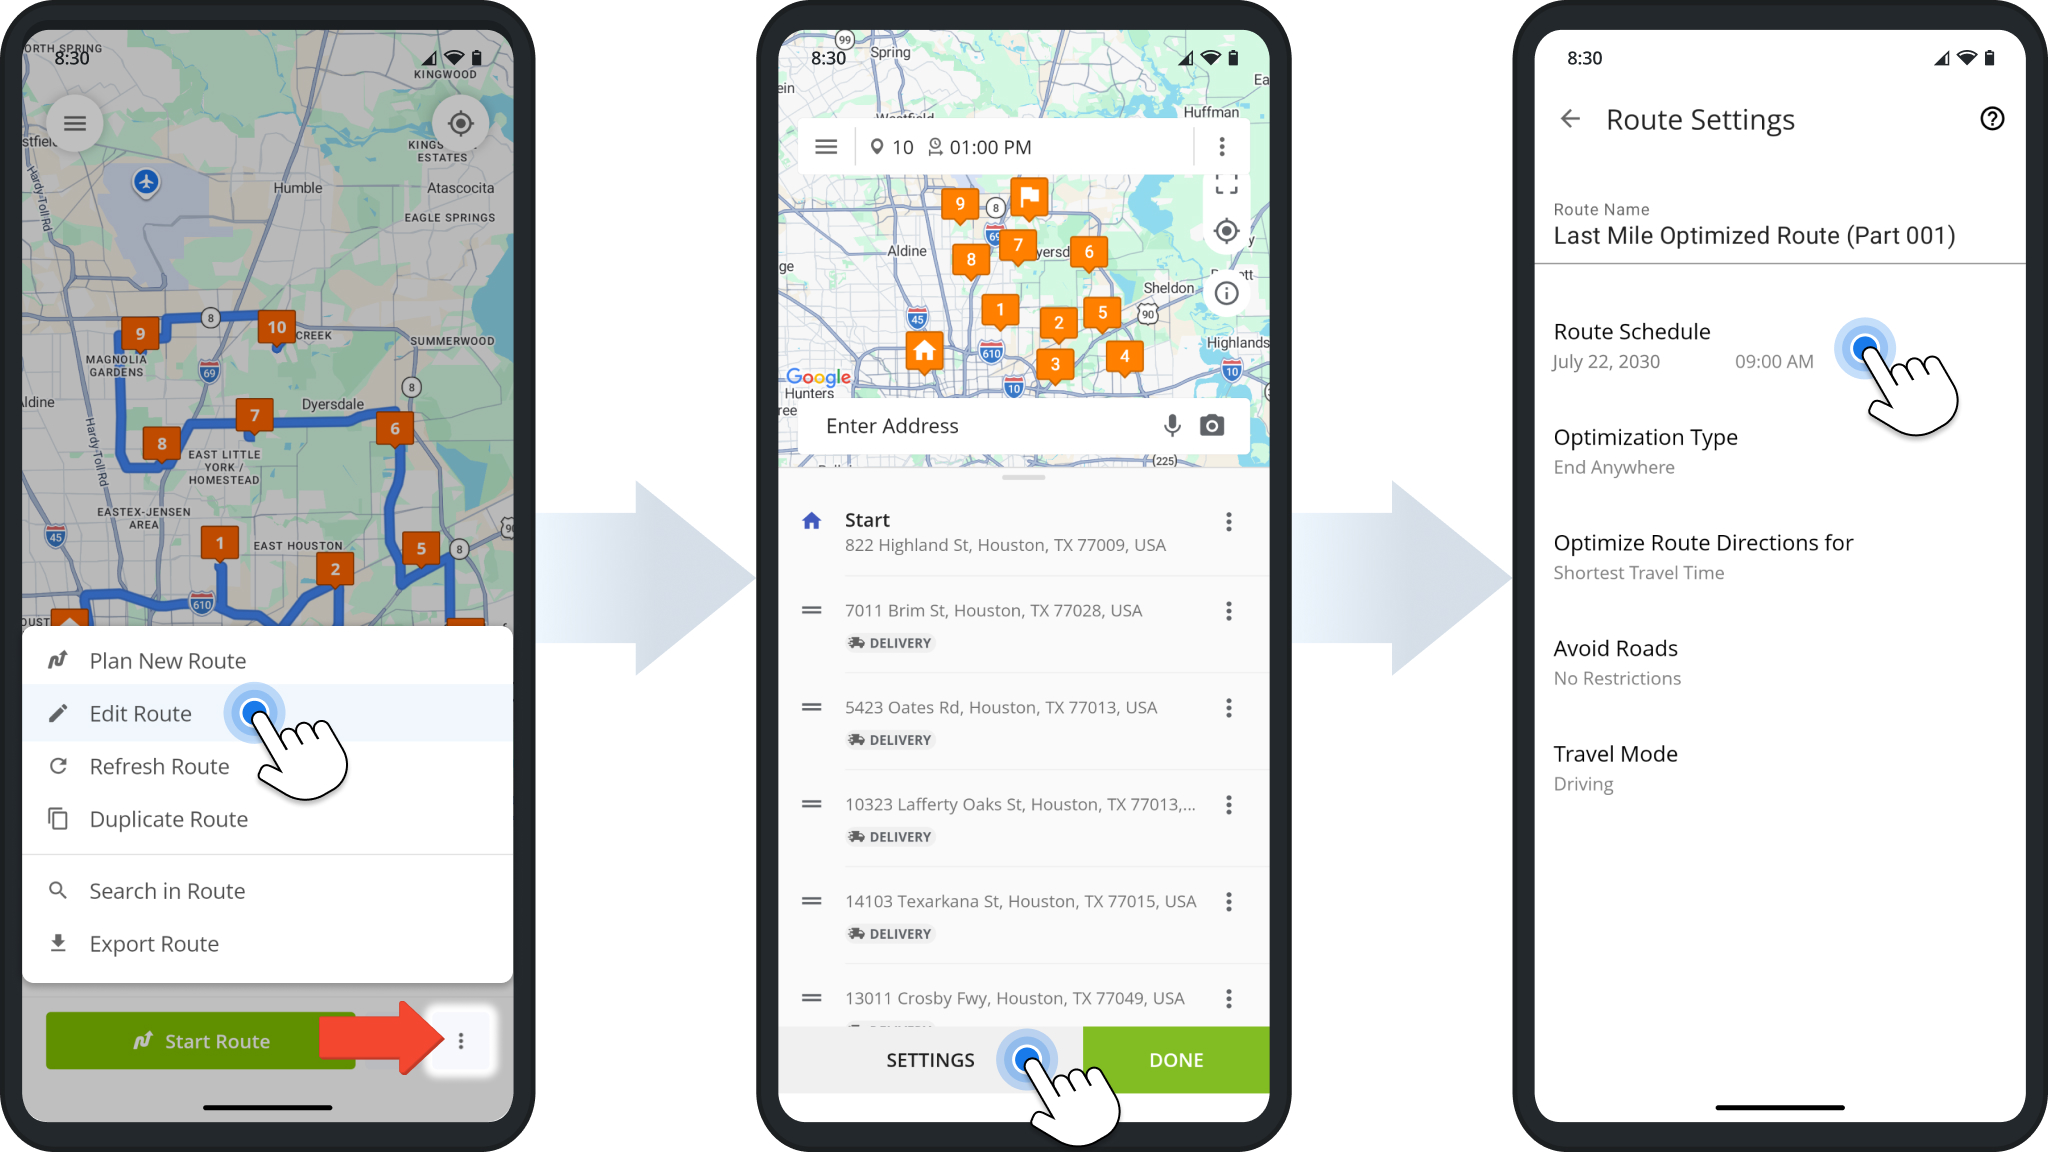
Route Schedule
Date and time when routes will be scheduled to begin. You can easily reschedule planned routes later.
Optimization Type
Select an optimization type which defines the final destination used to optimize routes.
Optimize Route Directions for
Select whether the app should prioritize the shortest overall travel time or account for current traffic.
Avoid Roads
Optionally enable Highway Avoidance or Toll-Road Avoidance to optimize routes which avoid those road types.
Travel Mode
Select whether to optimize directions for Driving Routes, Walking Routes, or Bicycling Routes.
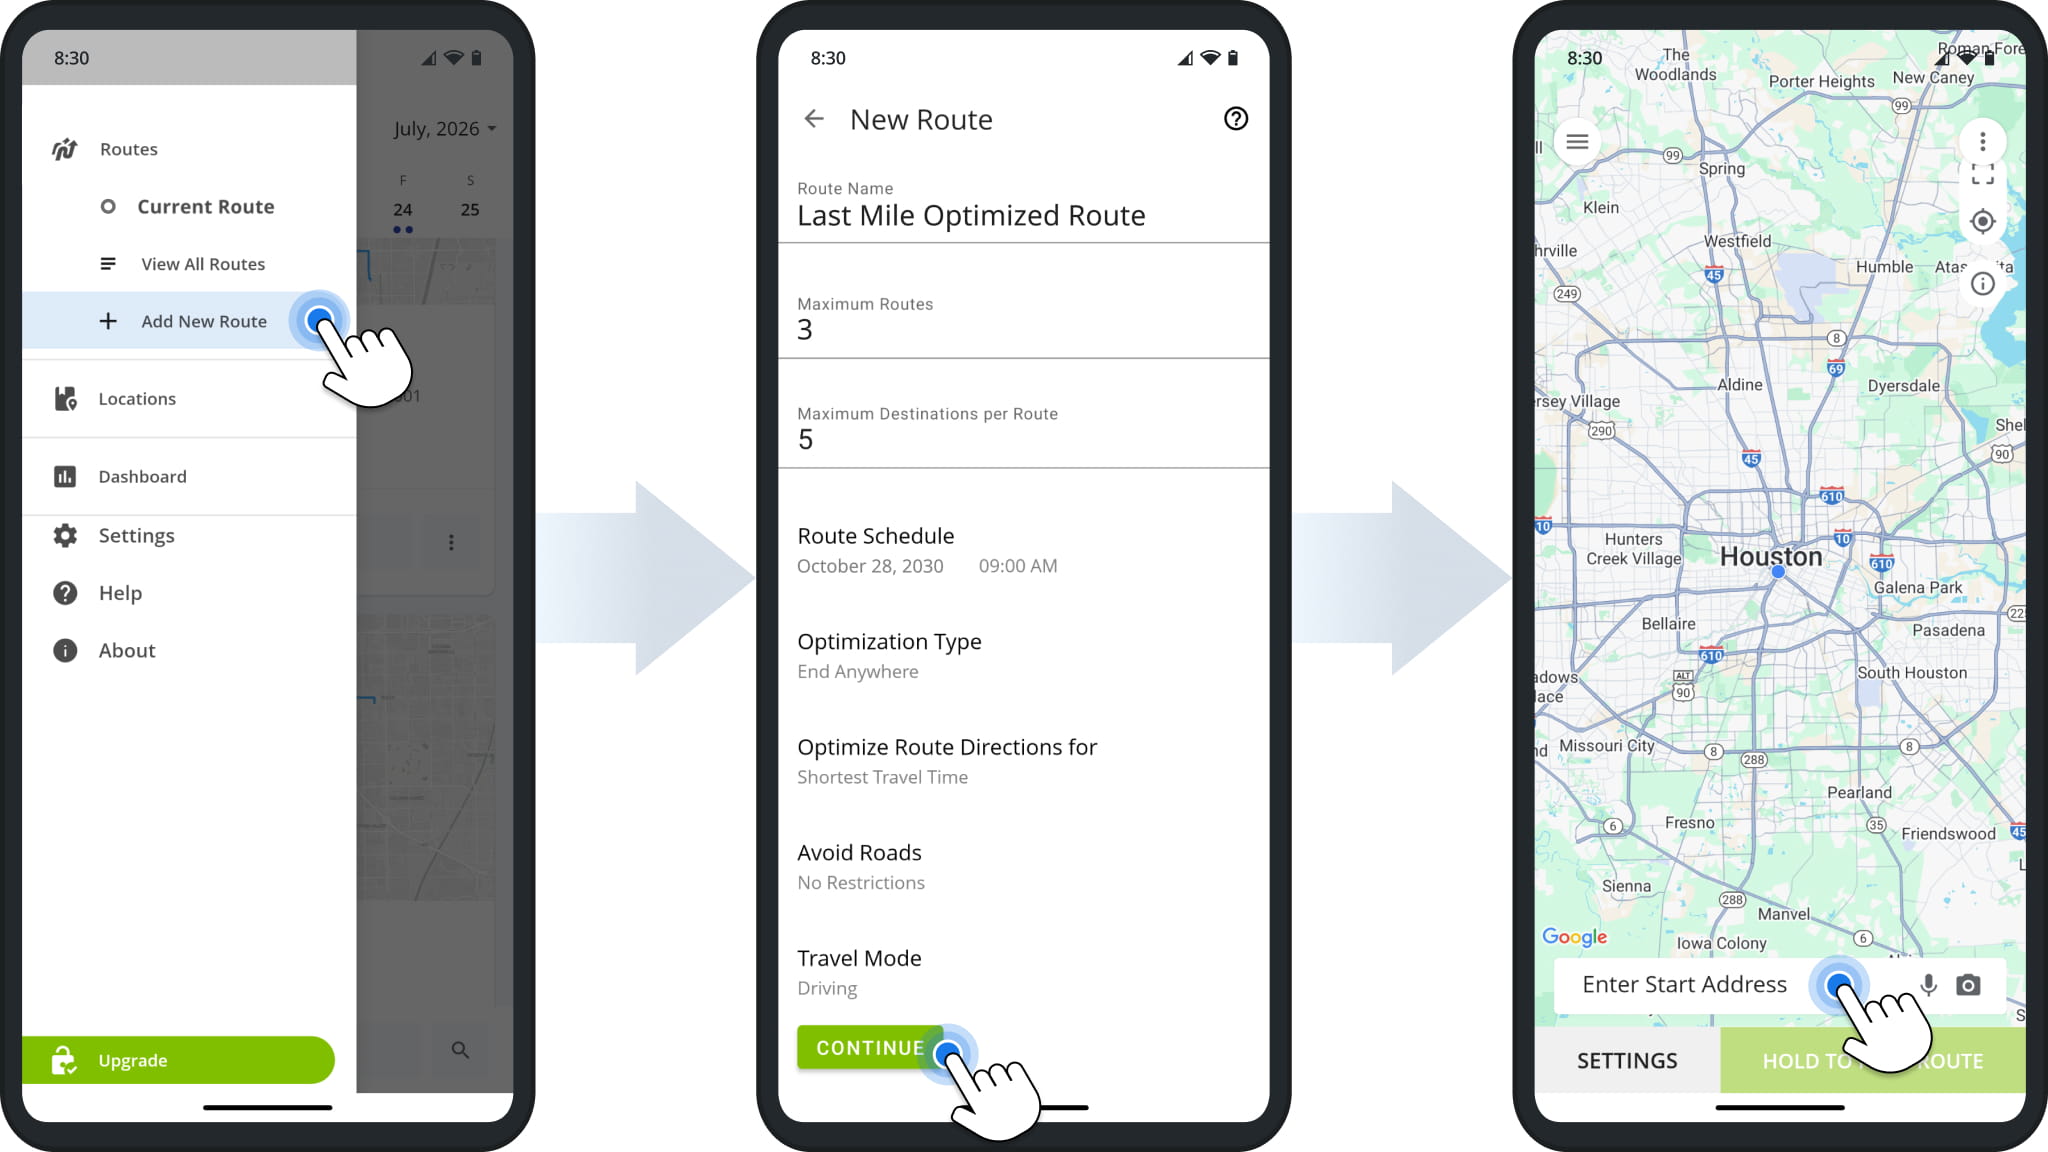
Select your current location or enter an address from which your routes will start. From there, add addresses on the app as usual and tap “Go To Route” when finished.
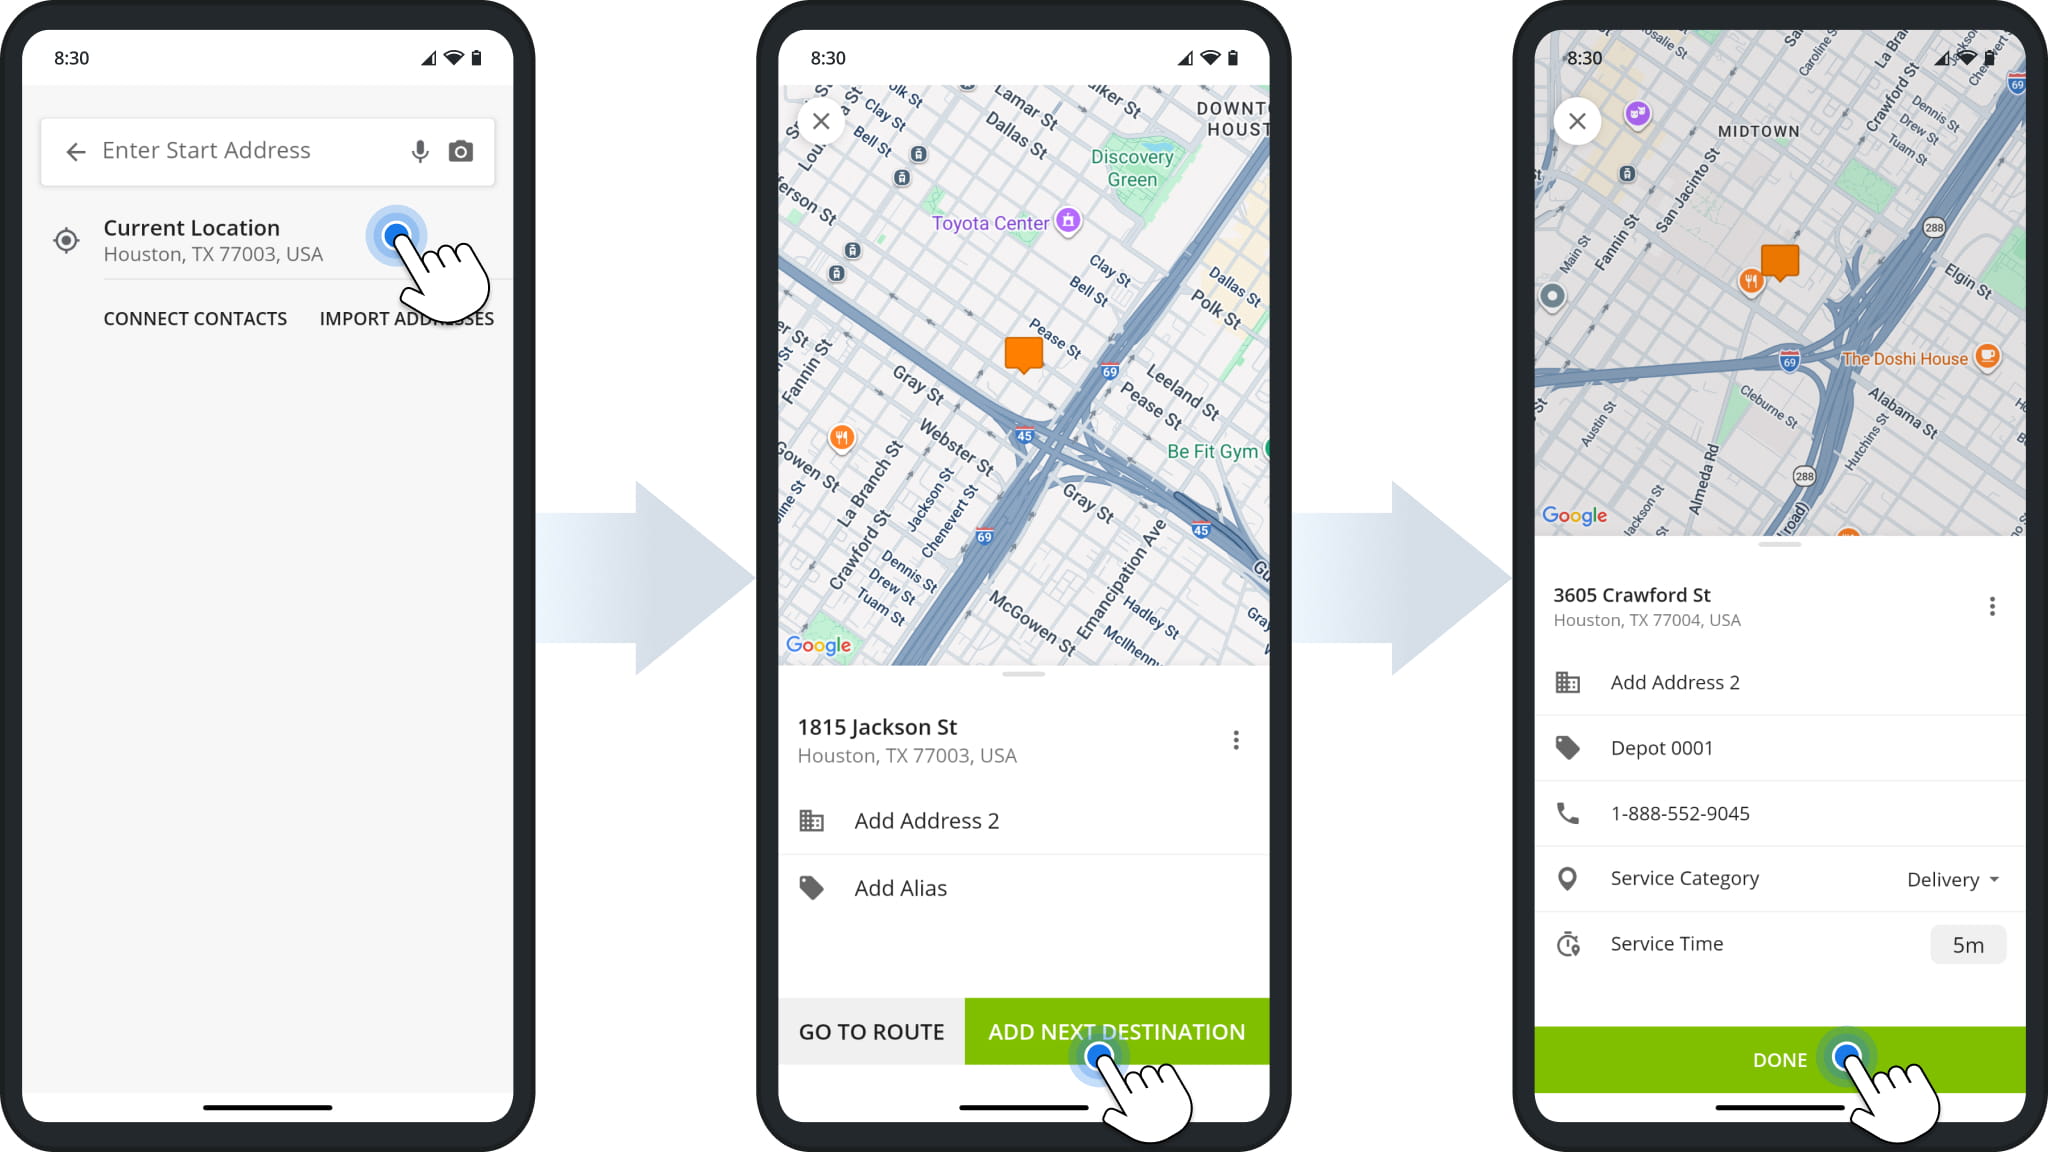
Tap “Hold To Plan Route“, and the app will automatically sequence the optimal number of routes and distribute addresses among them according to your settings. You can find the new routes in the Routes List.
When you plan multiple routes, they’ll be scheduled for the same date and time. Keep reading to learn how to reschedule routes.
Schedule Routes – Edit Route And Schedule Settings
To change the date and time when a route is scheduled to start, open the route, tap the Three-dot Button in the bottom-right, and select “Edit Route“. Then, tap “Settings” to see the same options as when planning routes.
Tap the “Route Schedule” field and input a new date and time. After that, go back and tap the “Done” button to save your changes.
Unrouted Destinations – Resolve Settings Conflicts And Re-Optimize
Depending on constraints like maximum routes and destinations per route, you may get Unrouted Destinations. These are addresses that couldn’t be included in an optimized route based on your settings. They appear as a route without directions or optimization in your Routes List. To resolve this conflict, you can:
- Plan routes with different settings that allow all your addresses to be included in optimized routes.
- Delete routes marked as “(Unrouted Destinations)” from your Routes List (not recommended).
- Use the Route Editor to adjust the “(Unrouted Destinations)” and optimize a new route as described below.
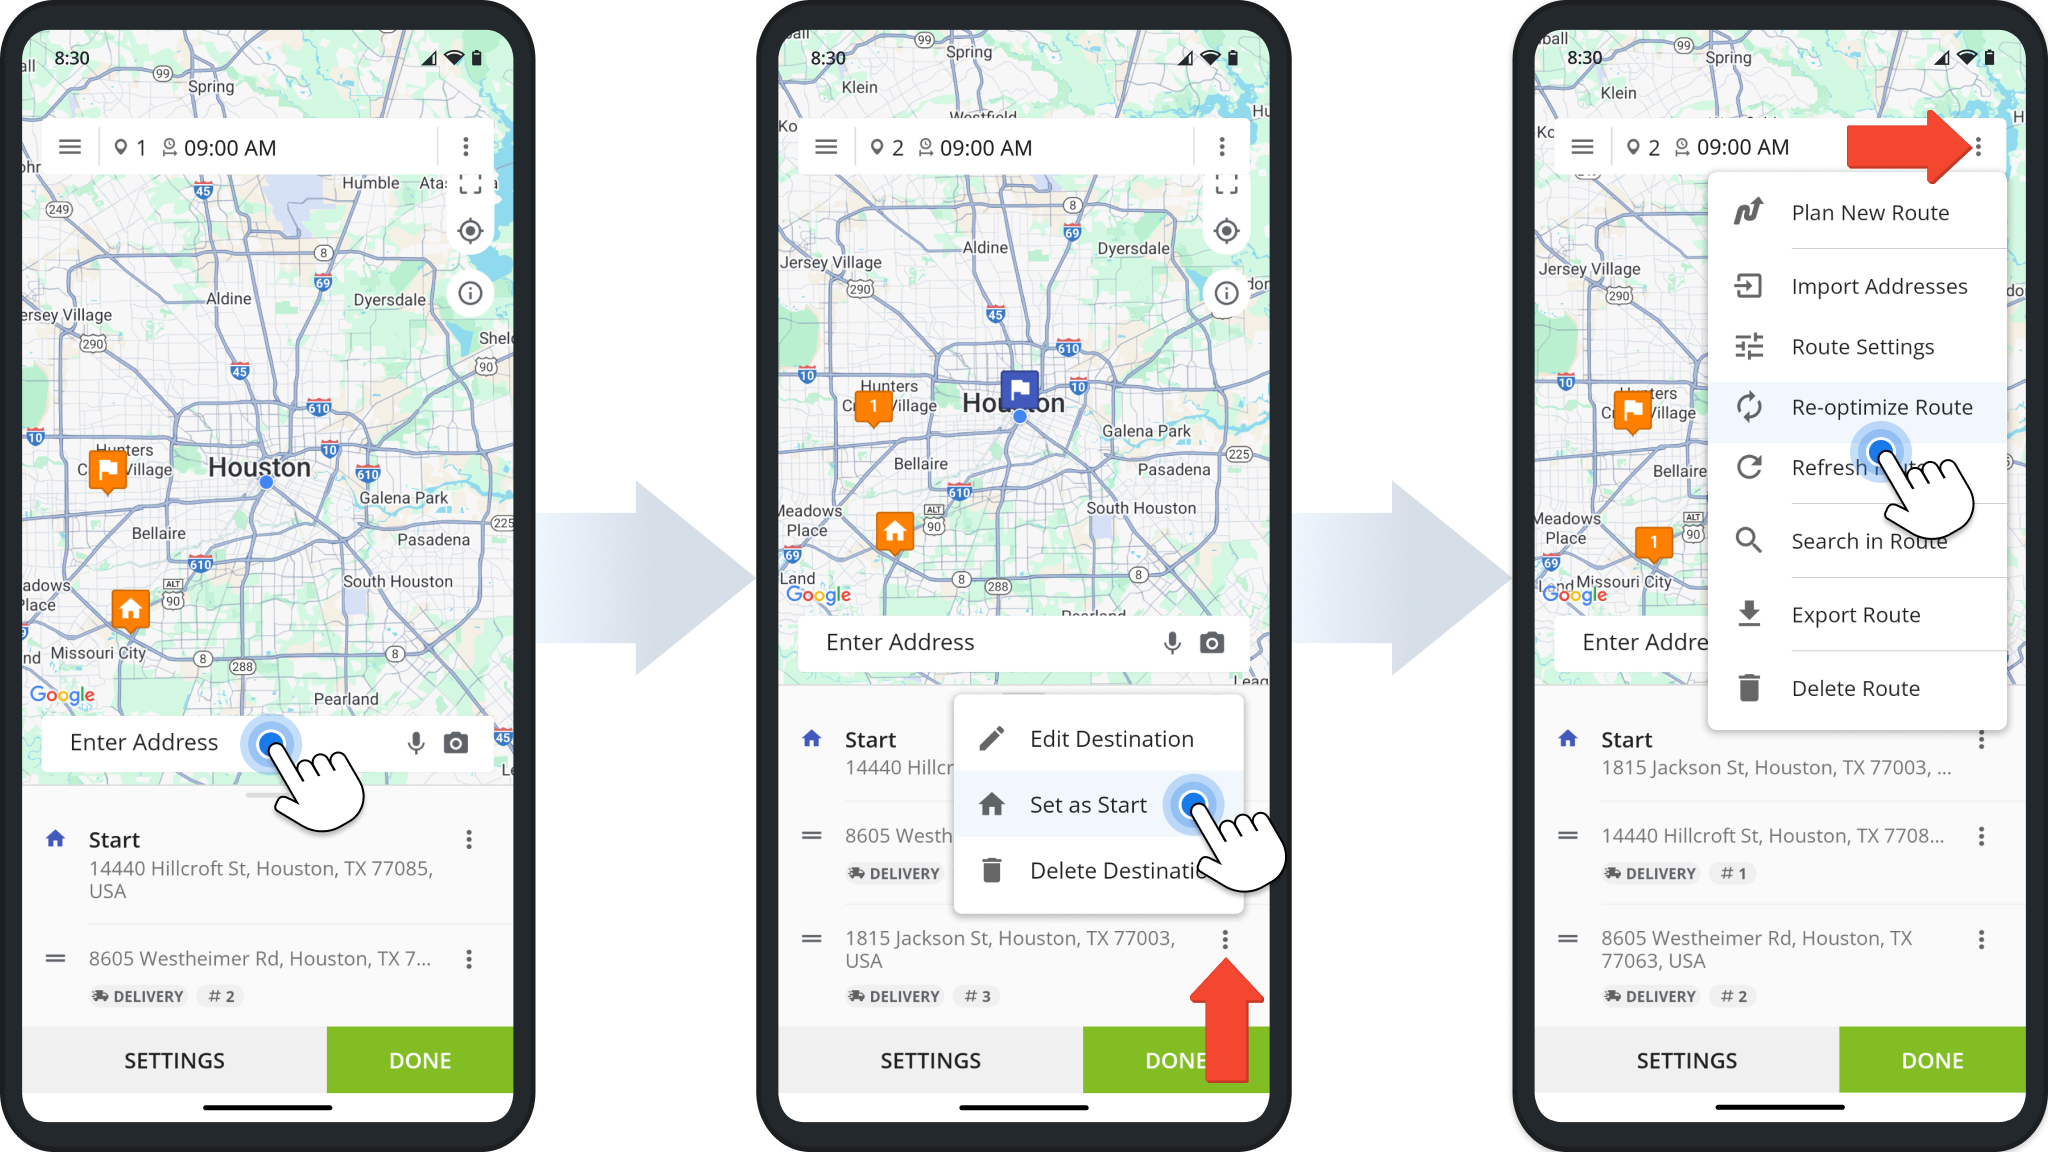
– To do so, first open and edit the Unrouted Destinations route as described above in the section on scheduling.
To avoid using an unrouted destination as the route start, tap “Enter Address” and add a new destination. Then, tap the Three-dot Icon next to it and select “Set as Start“. Finally, tap the Three-dot Icon in the top-right and select “Re-optimize Route“.
Free Android And iPhone Route Planner Unlimited Stops Test Drive
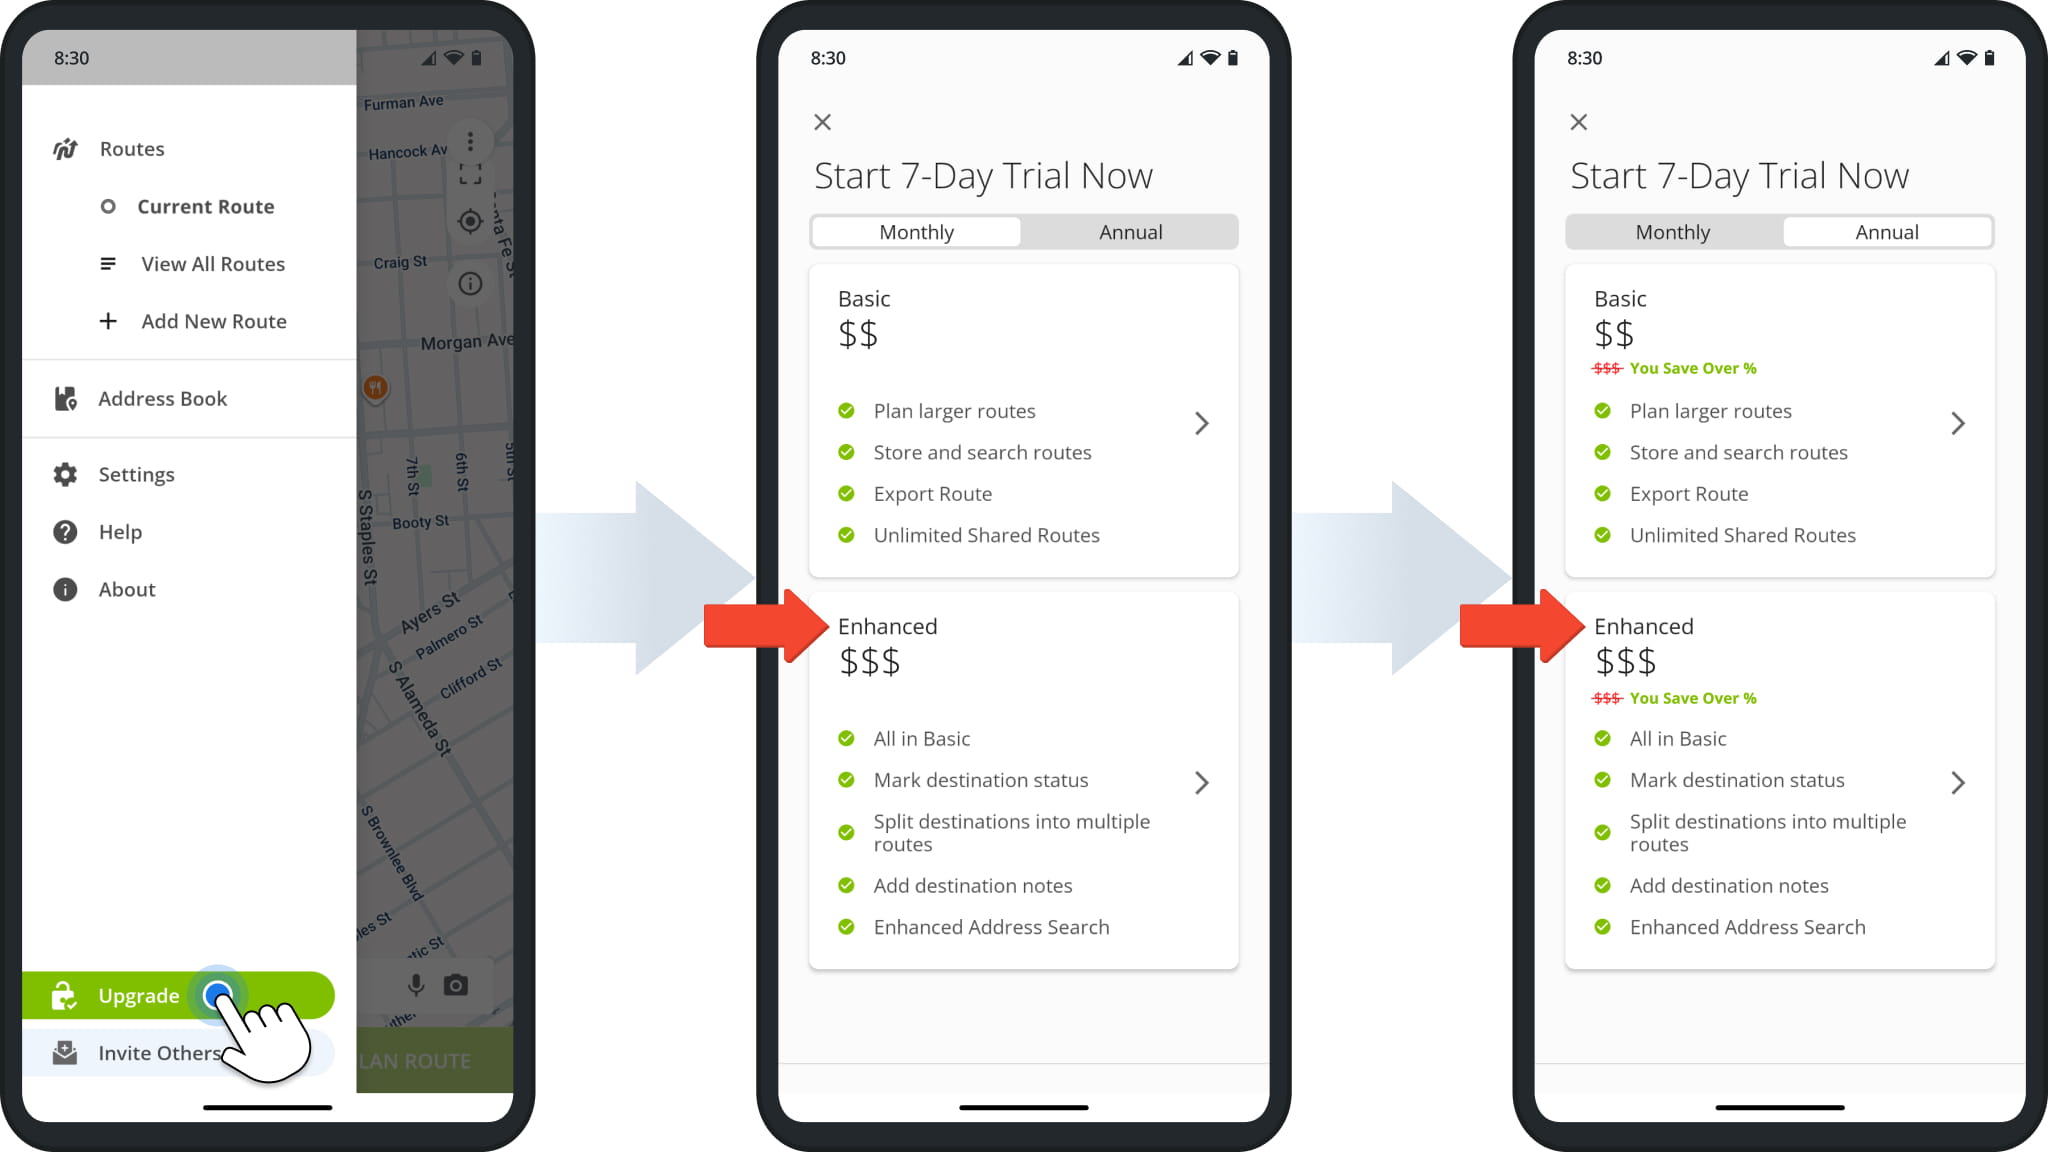
You can try out Route4Me before subscribing by starting a free route planner trial. For 7 days, you can enjoy a free route planner with unlimited stops, giving you a free test drive of all the app’s multi-stop route planning features.
To plan multiple routes for free during your 7-day test drive, pick the “Enhanced” package. You can choose between starting a monthly subscription after your trial is over or an annual subscription to reduce monthly costs.
Visit Route4Me's Marketplace to Check out Associated Modules:
- Operations
Custom Data Add-On
- Operations
Advanced Team Management Add-On
About author: Kristian Andreev
Kristian is a Technical Writer at Route4Me. With over a decade of experience in writing and localization, he's an expert at communicating complex technical data in a clear, concise, and user-friendly way. Passionate about bridging the gap between engineers and users, he specializes in creating documentation to streamline onboarding, enhance product usability, and support global teams on the path to success.