Assign Users to Routes – Dispatch Routes to Drivers And Team
Route4Me enables your large business or medium business to create an organized and easily manageable network of managers, route planners, dispatchers, drivers, and other team members. Depending on your last mile route optimization needs and unique business model, each user can have default or custom account-level permissions, route visibility, driver and vehicle access, and more. This way, you can easily delegate the right routes and work to the right team members. Once a user is assigned to a route, this route instantly becomes available in their Route4Me account in real-time. After that, the assigned driver or user can manage, edit, navigate and complete the route based on their permissions and role responsibilities.
On this page, you can learn how to assign users to routes from the Route4Me Route Editor, Routes List, and Routes Map. Additionally, learn how to dispatch routes from the Route4Me Business Route Software to Route4Me’s Mobile Route Planning Apps and vice versa. To learn about your current user limit or increase the user limit on your account, please Contact Route4Me Support.
Table of Contents
Assign Users to Routes Before Routes Are Planned and Optimized
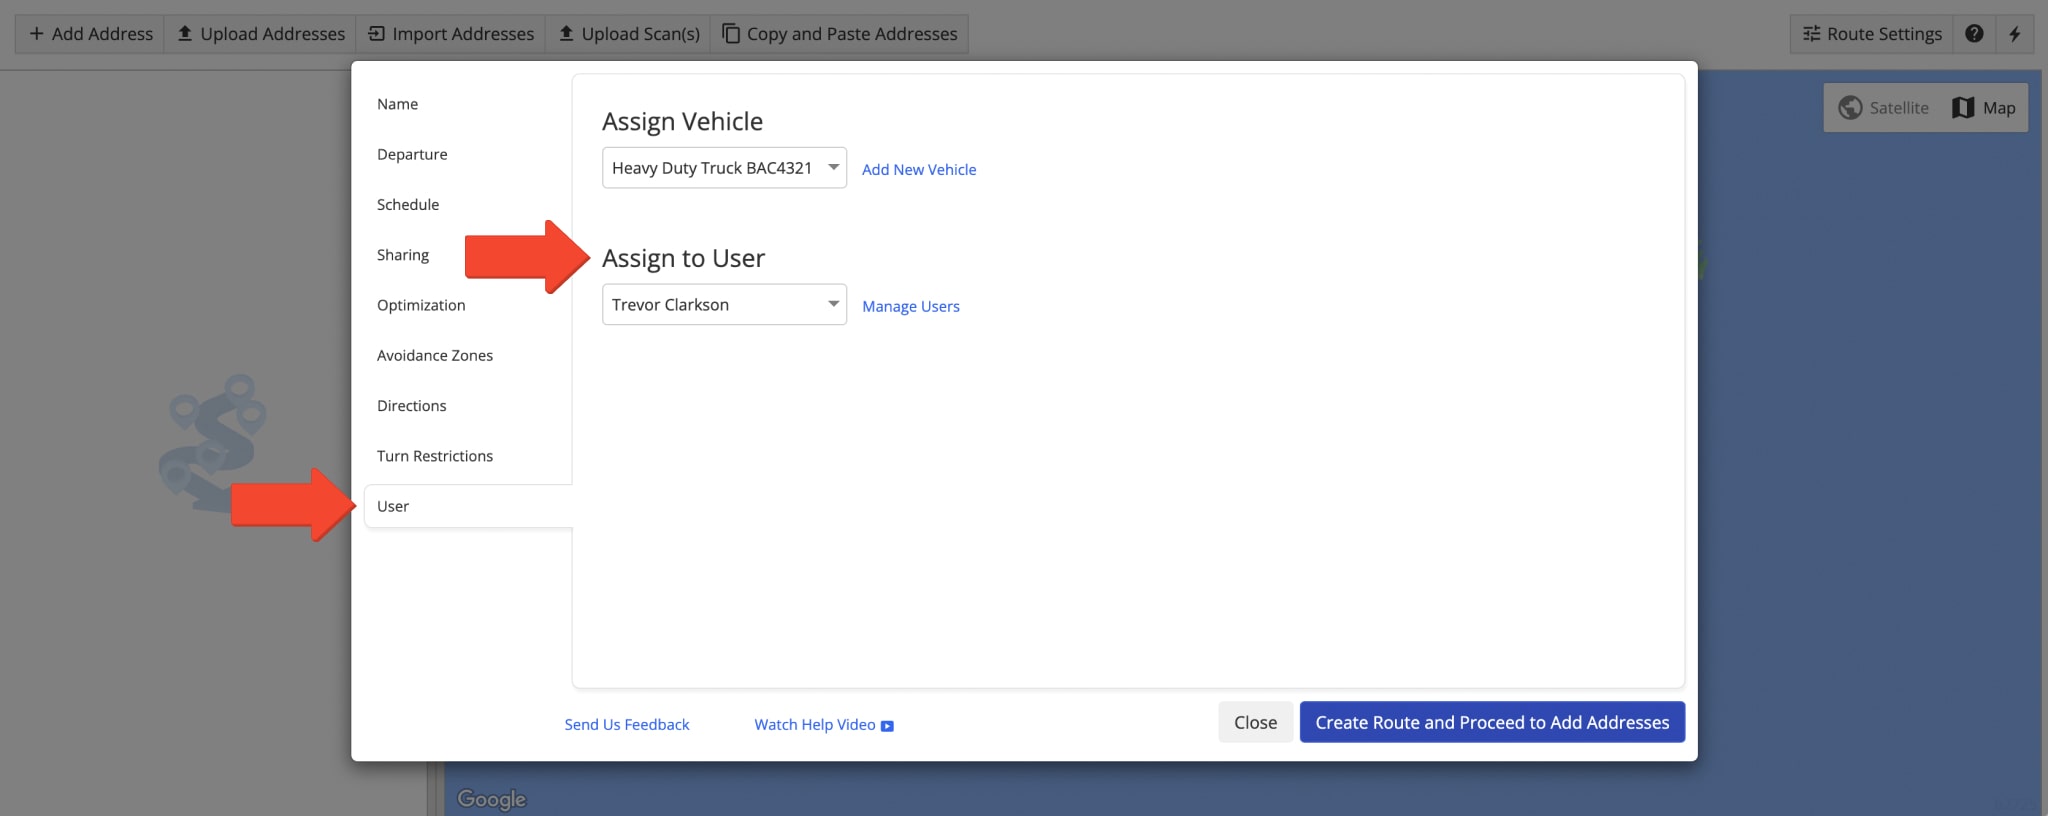
You can assign a driver, dispatcher, or any other user to routes before they are planned and optimized. To do so, start planning new routes by going to “Routes” and then “Plan New Route” from the Navigation Menu. After that, select the preferred route planning option. Next, go to the “User” tab and then select the preferred driver or user from the respective list. Accordingly, after the routes are planned and optimized, the selected driver or user will be automatically assigned to the given routes.
Depending on your optimization settings, the enterprise route optimizer can optimize multiple routes with the same set of addresses. Accordingly, the selected user will be assigned to all optimized routes. For example, you can optimize multiple routes that are assigned to a Dispatcher, and then the Dispatcher can re-assign and dispatch these routes to Drivers. Additionally, you can learn about re-assigning users to already planned routes further on this page.
Dispatch Planned Routes to Drivers and Users from the Routes Map
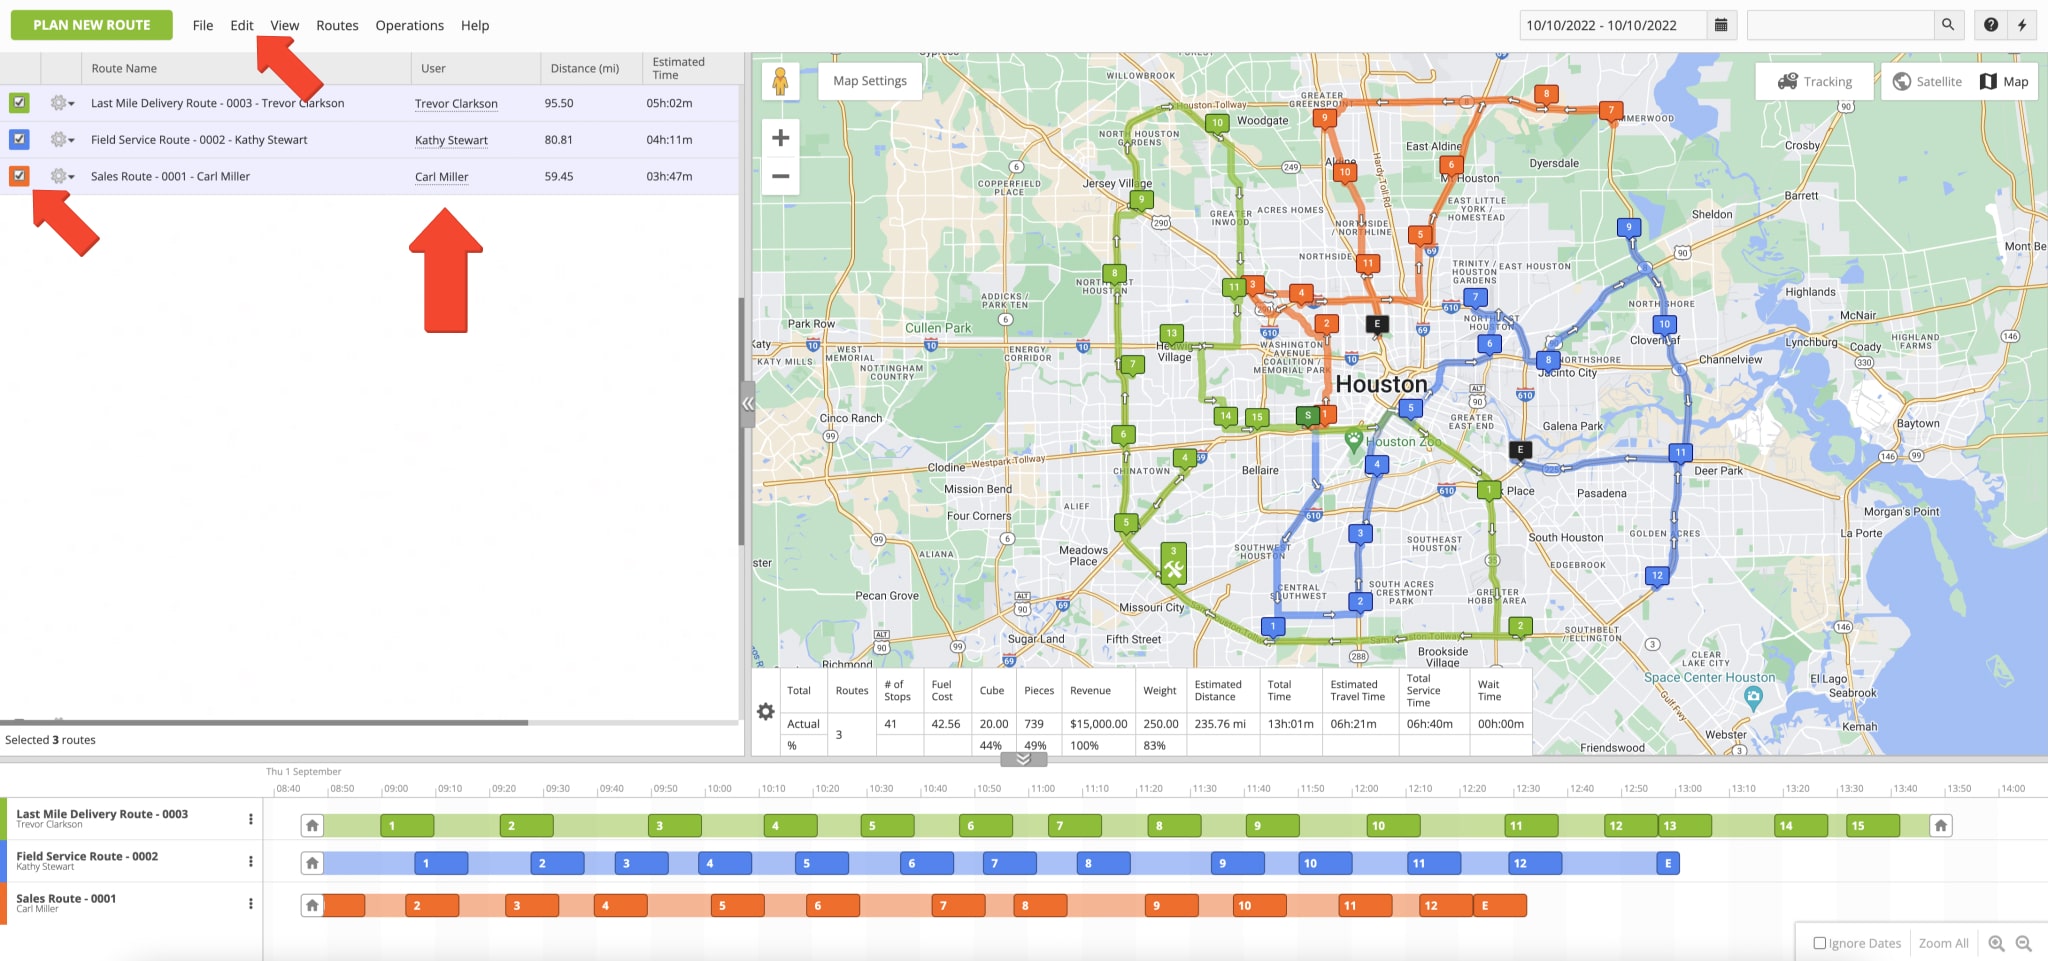
You can assign drivers and users to routes from Route4Me’s Routes Map, where you can simultaneously view and manage multiple routes at a time. To open the Routes Map, go to “Routes” and then “Routes Map” from the Navigation Menu. The assigned driver or user names are displayed in the “User” column, and their email addresses are displayed next to their routes.
To assign a user to a route, right-click on the route, select “Assign User” from the menu and then select the preferred user. To assign the same user to multiple routes at once, select the preferred routes by checking the boxes next to them. Next, go to “Edit” at the top of the screen, select “Assign User” from the menu, and then select the preferred driver or user from the list.
Accordingly, once a user is assigned to a route, the route becomes available on their trusted route software account in real-time. Next, the user can manage, edit, navigate, and complete the route based on their user type and account-level permissions.
Dispatch Planned Routes to Drivers and Users from the Routes List
You can assign drivers and users to routes from Route4Me’s Routes List, where you can view and manage routes available on your account. To open your Routes List, go to “Routes” and then “Routes List” from the Navigation Menu. Accordingly, the assigned driver or user names are displayed in the “User” column, and their email addresses are displayed next to their routes.
To assign a user to a route, right-click on the route, select “Assign User” from the menu and then select the preferred user. To assign the same user to multiple routes at once, select the preferred routes by checking the boxes next to them. Next, go to “Edit” at the top of the screen, select “Assign User” from the menu, and then select the preferred driver or user from the list.
Accordingly, once a user is assigned to a route, the route becomes available on their Route4Me account in real-time. Next, the user can manage, edit, navigate, and complete the route based on their user type and account-level permissions.

Auto Assign Users – Automated Route Dispatch to Multiple Drivers
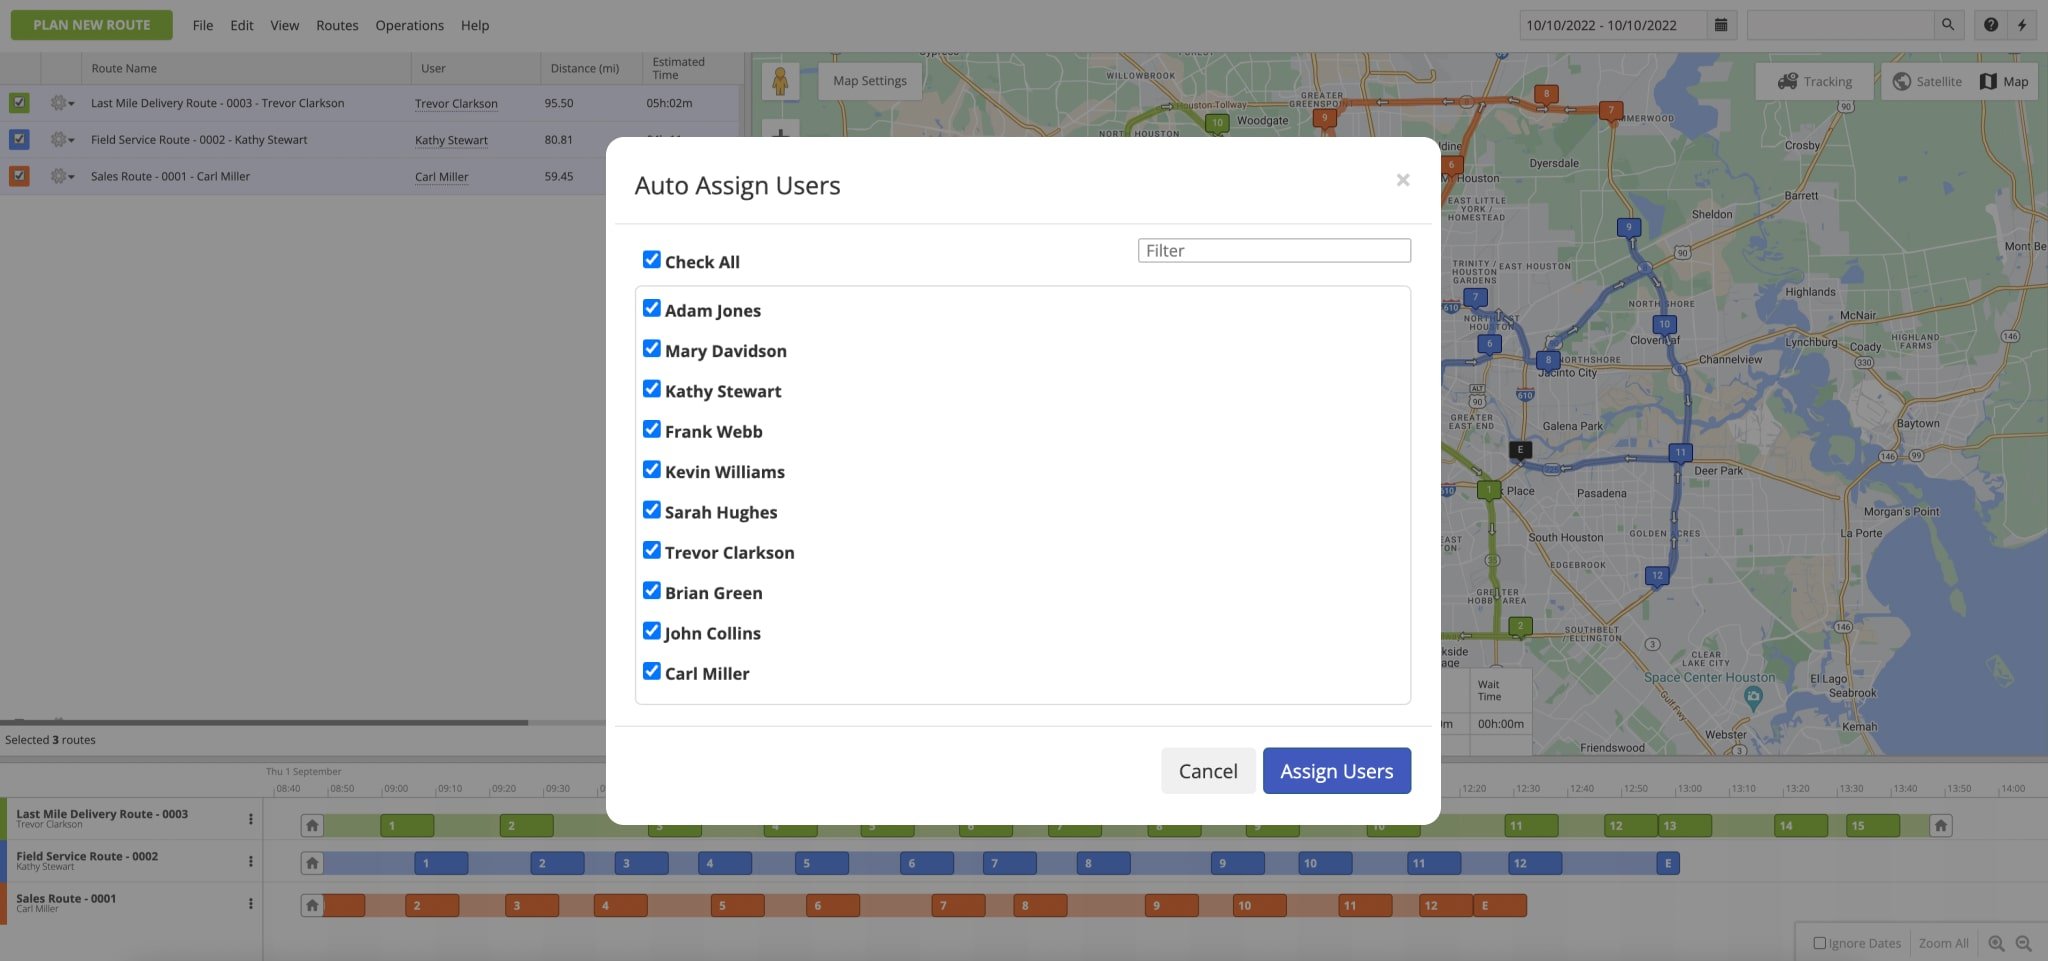
Furthermore, Route4Me can automatically distribute your available drivers among multiple selected routes. Specifically, you can auto-assign users to multiple routes from Route4Me’s Routes List or Routes Map. To do so, select the preferred routes by checking the boxes next to them, go to “Edit” at the top, and then select “Auto Assign Users” from the menu. Next, check the boxes next to the drivers and users you want to assign to the selected routes. After that, Route4Me will optimally distribute and automatically assign the selected drivers and users to the selected routes.
Equally important, you can select more routes than you have drivers, and Route4Me can assign the same driver to multiple routes. If you select fewer routes than drivers, Route4Me will pick the most optimal drivers to assign to the selected routes.
Accordingly, once users are assigned to routes, these routes become available on their Route4Me accounts in real-time. Next, the users can manage, edit, navigate, and complete their routes based on their user type and account-level permissions.
Dispatch Planned Routes to Drivers and Users from the Route Editor
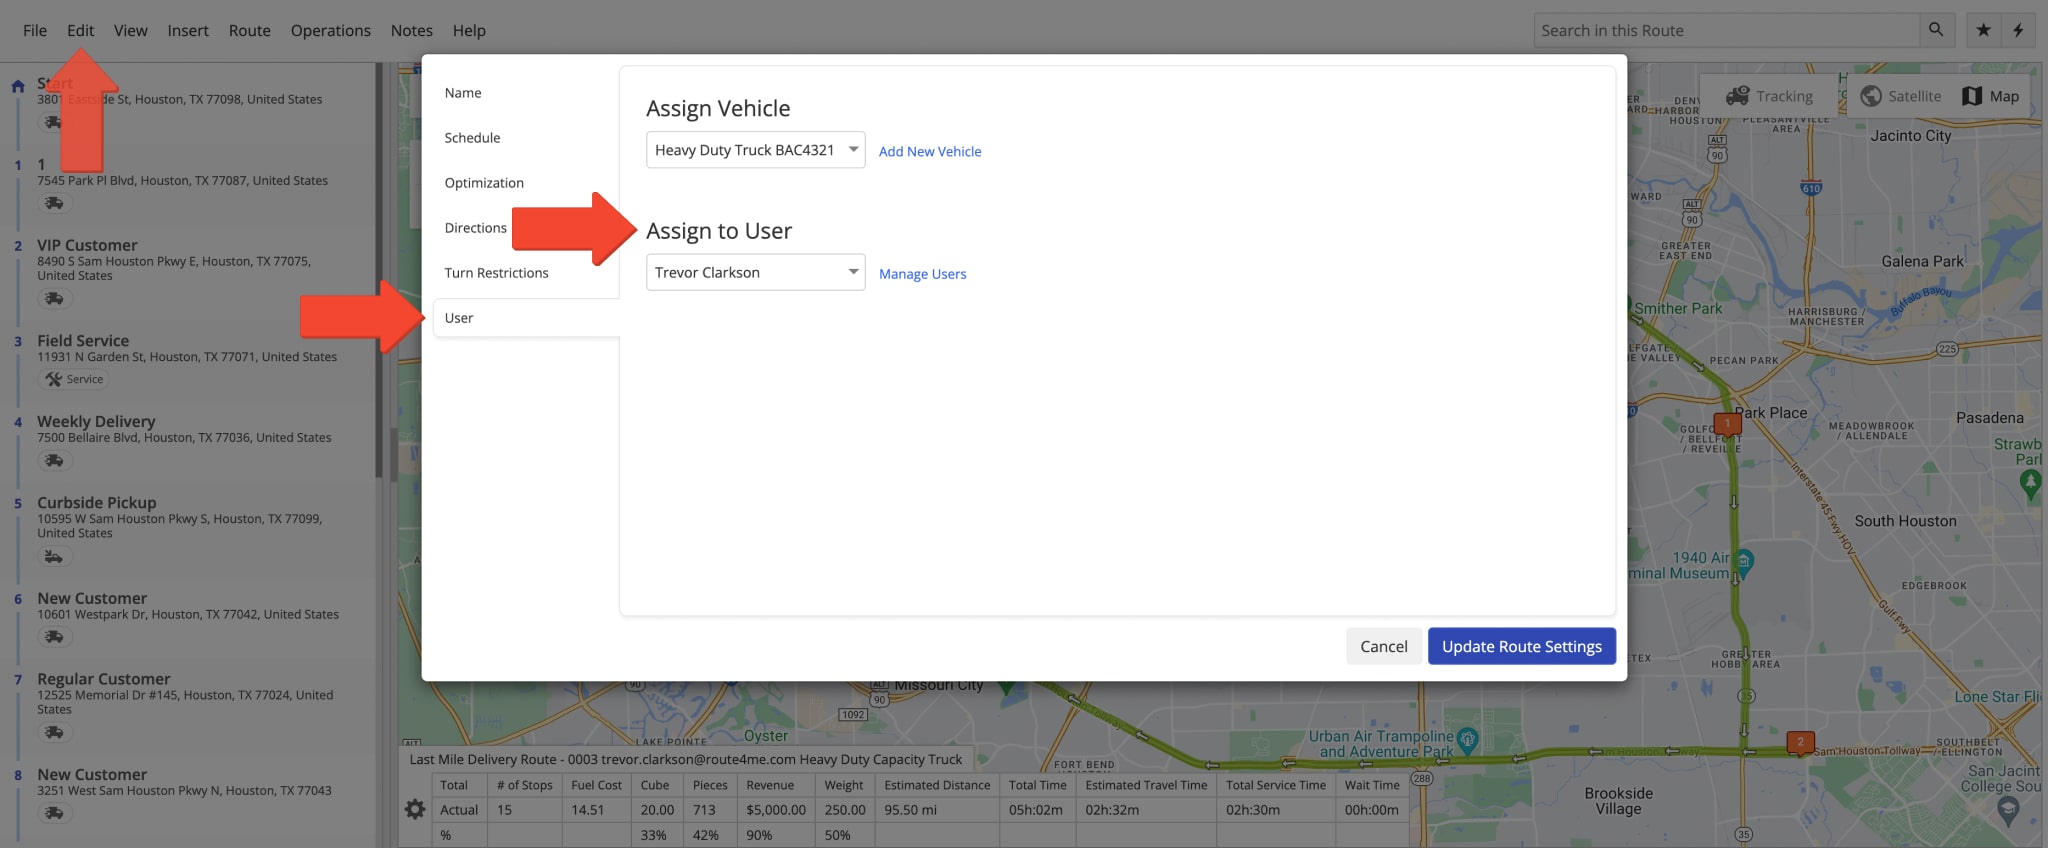
You can assign drivers and users to routes from Route4Me’s Route Editor where you can open and manage any route. To open a route in the Route Editor, go to “Routes” and then “Routes Map” or “Routes List” from the Navigation Menu. After that, right-click on the preferred route and then select “Open” from the menu.
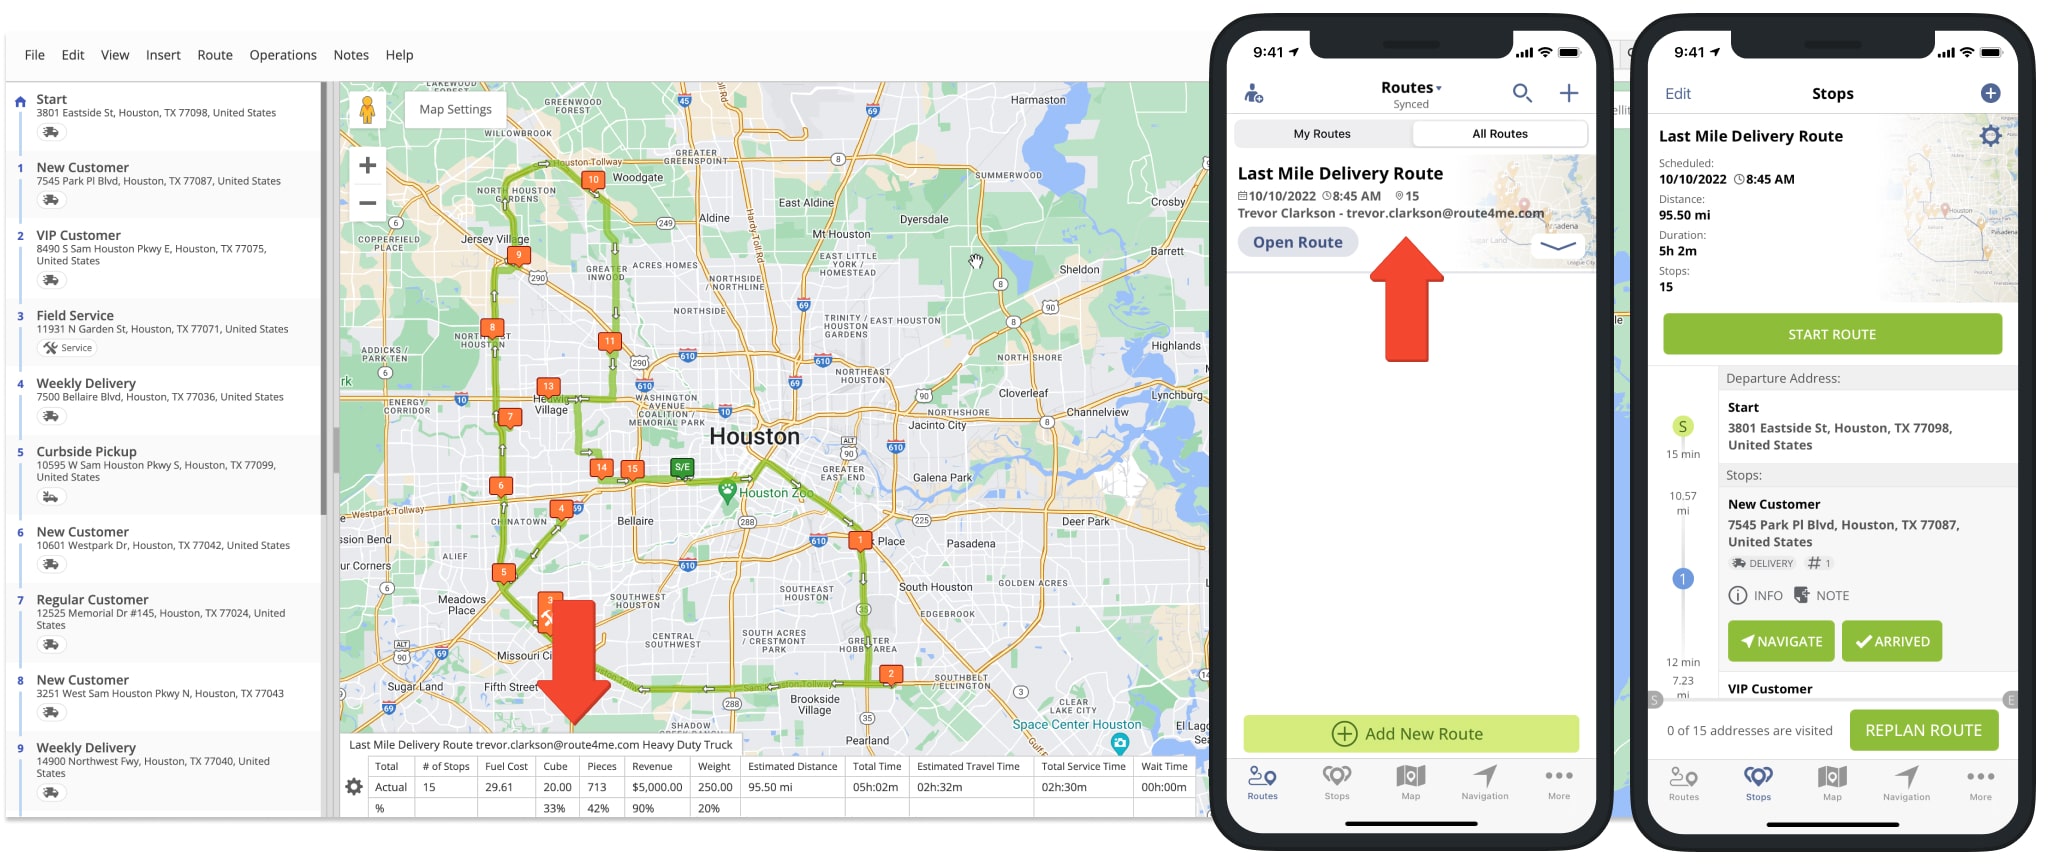
Next, go to “Edit” in the Route Editor’s toolbar, select “Assign User” and then select the preferred driver or user. Alternatively, go to “Edit” in the Route Editor’s toolbar and then select “Route Settings” from the menu. Then, go to the “User” tab and then select the preferred driver or user. After that, the assigned user email address will be displayed in the Route Editor’s Summary Table at the bottom of the map.
Accordingly, once a user is assigned to a route, this route becomes available on their Route4Me account in real-time. Next, the user can manage, edit, navigate, and complete their route based on their user type and account-level permissions.
Dispatch Routes from Route4Me Web Platform to Driver Mobile Apps
To dispatch a route from the Route4Me reliable Route Management Software to Route4Me’s Driver Mobile App, simply assign the preferred driver or user to the route. Once the driver or user is assigned to the route, they can access the given route from their Route4Me account in real-time. Accordingly, the assigned user can sign in to their account and access the dispatched route using the trusted route software, Route4Me’s Android Route Planning app, or iPhone Route Planning app. For example, a Driver can sign in to their Route4Me account on the Route4Me Mobile Driver App and then open, start, and navigate the routes assigned to them.
NOTE: Equally important, users can manage, edit, navigate, and complete their routes based on their user type and account-level permissions. Additionally, learn more about Route4Me’s User Types and Team Hierarchy, Route Visibility Settings, and Account Level Permissions.
Dispatch Routes to Drivers and Users from Route4Me’s Mobile Apps
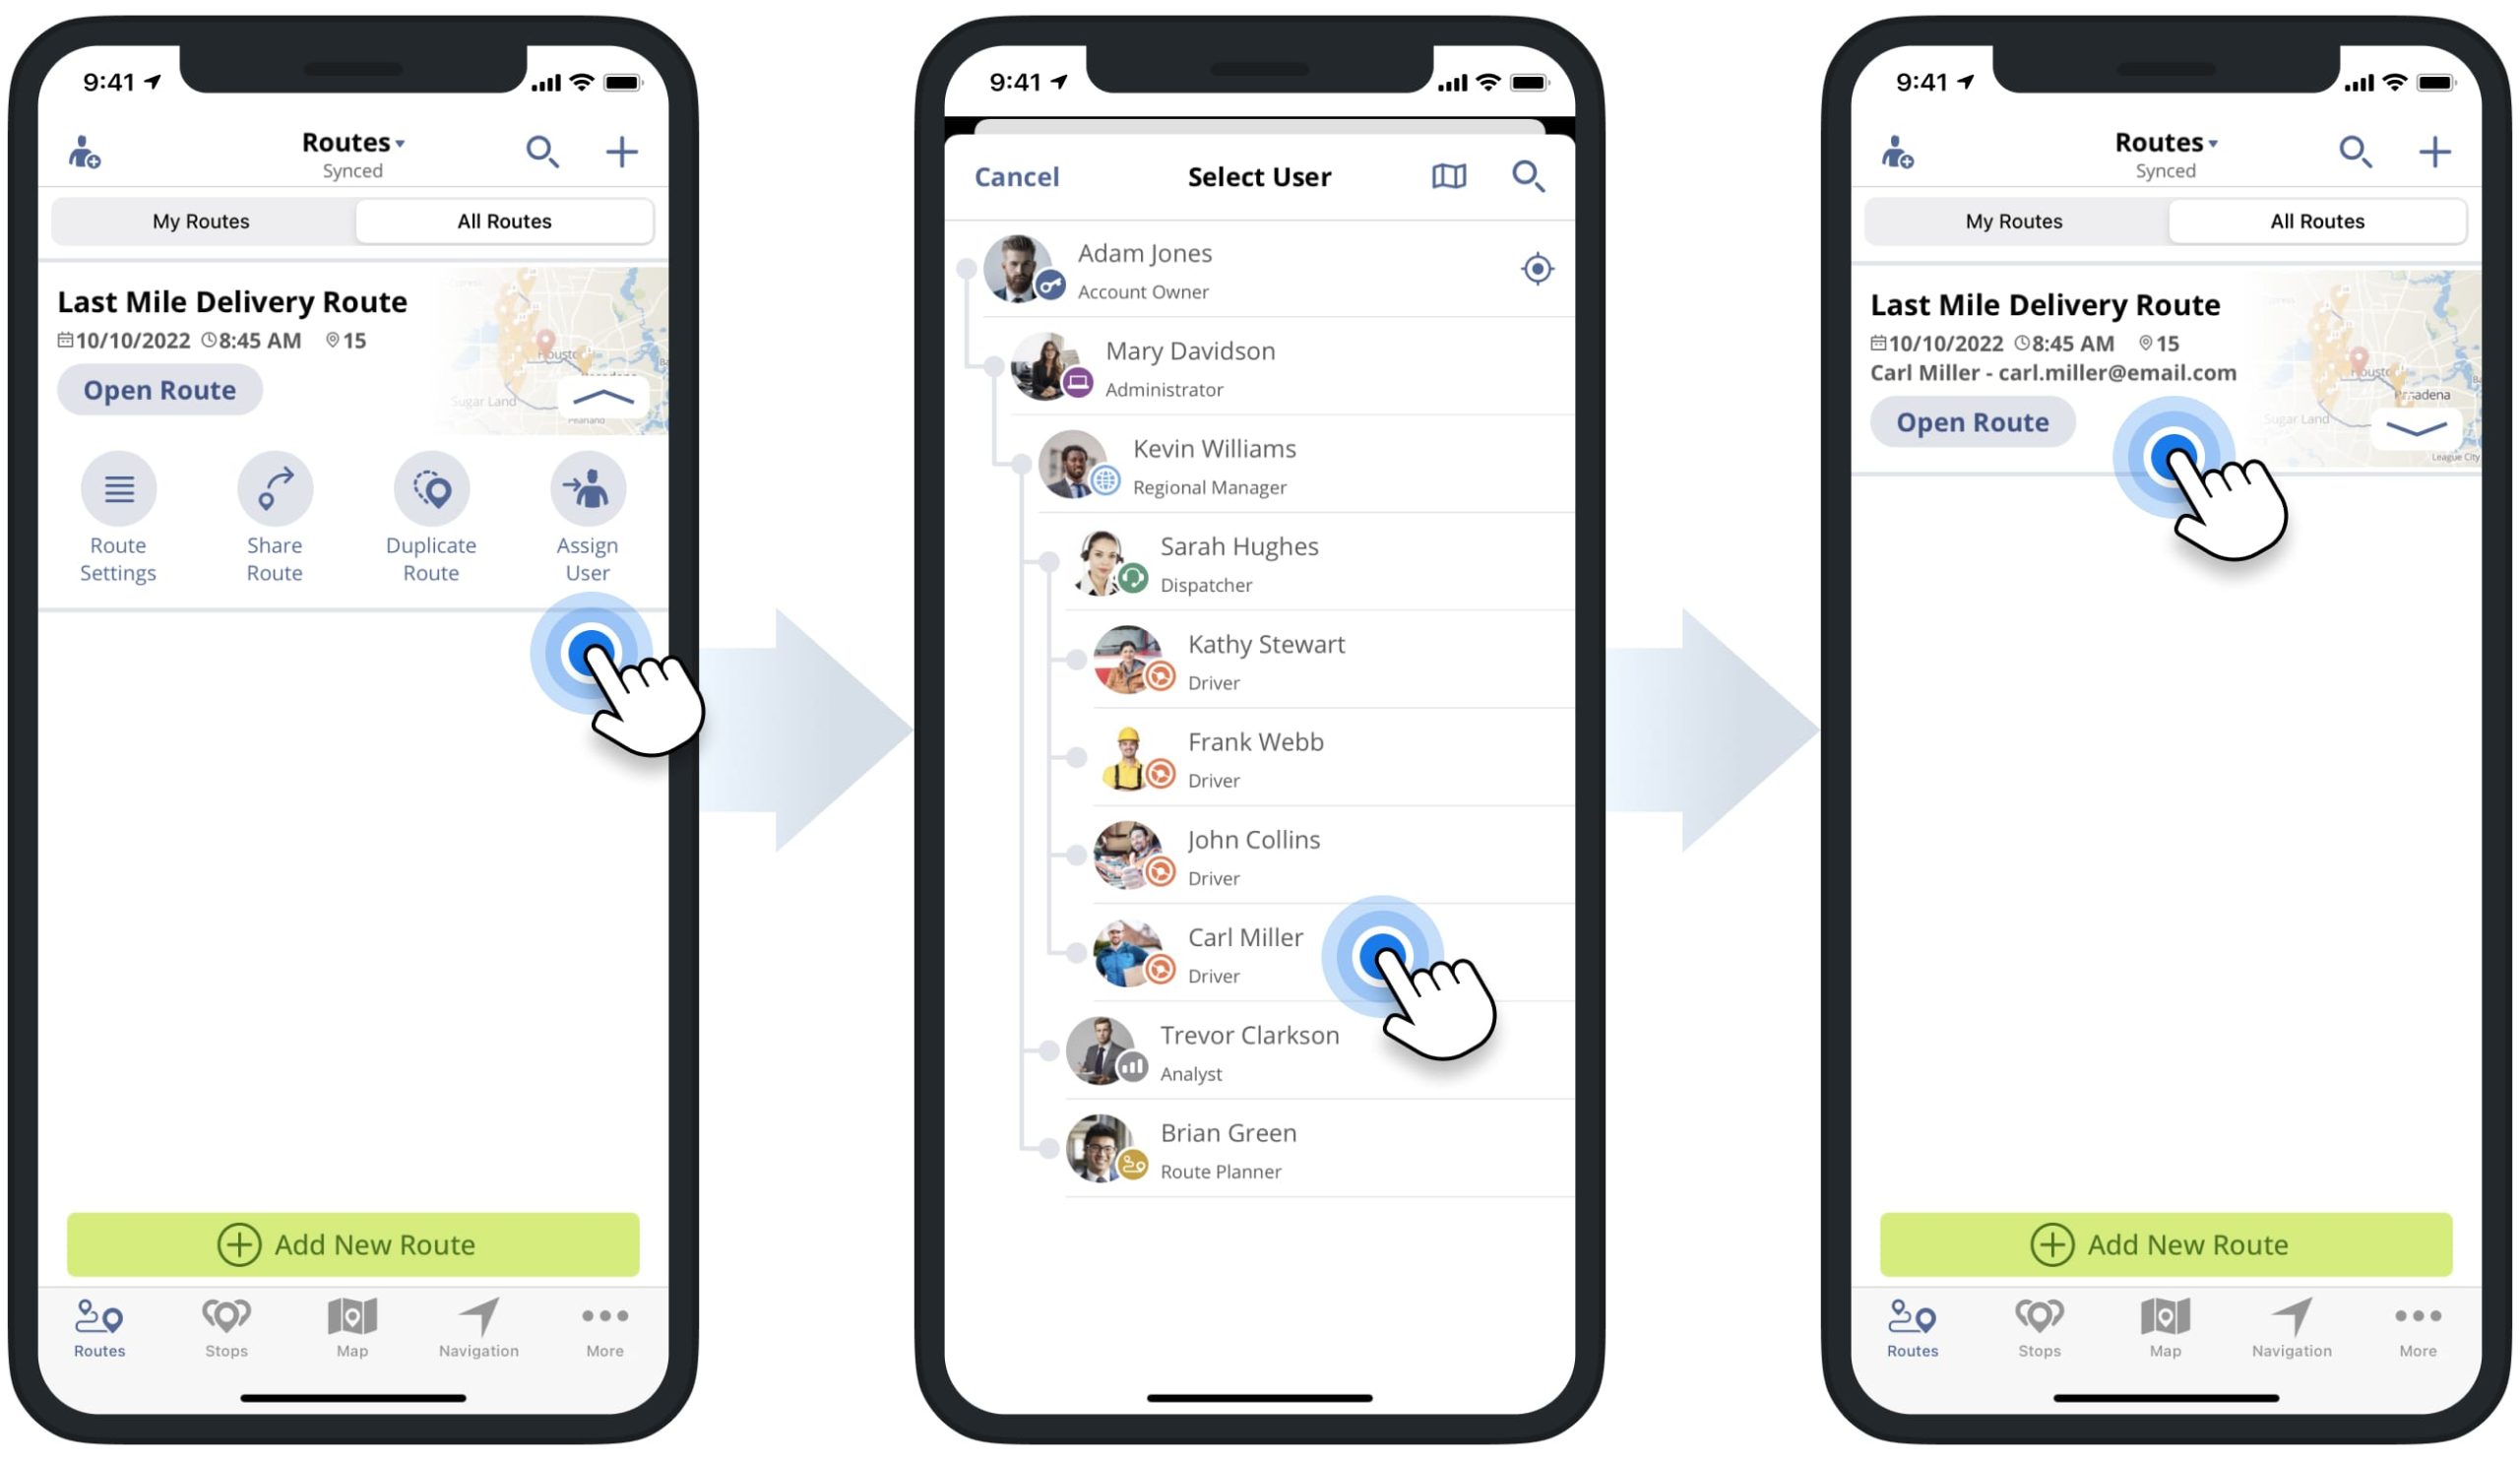
For your convenience and efficiency, you can dispatch routes to drivers and users using only your mobile device. Specifically, you can use Route4Me’s Android Route Planning App and iPhone Route Planning App to assign users and drivers to routes. To do so, go to your Routes List on the mobile app and then tap on the menu icon next to the preferred route. Next, tap on the “Assign User” button and then select the preferred driver or user.
After that, the email of the assigned driver or user will be displayed next to the route’s name in your mobile app’s Routes List. Accordingly, once a driver or user is assigned to a route, the given route becomes available on their Route4Me account in real-time. Additionally, learn how to dispatch routes to drivers from Route4Me’s Android Route Planning App and how to dispatch routes to drivers from Route4Me’s iPhone Route Planning App.
Visit Route4Me's Marketplace to Check out Associated Modules:
- Operations
Advanced Team Management Add-On
- Operations
Audit Logging and Activity Stream