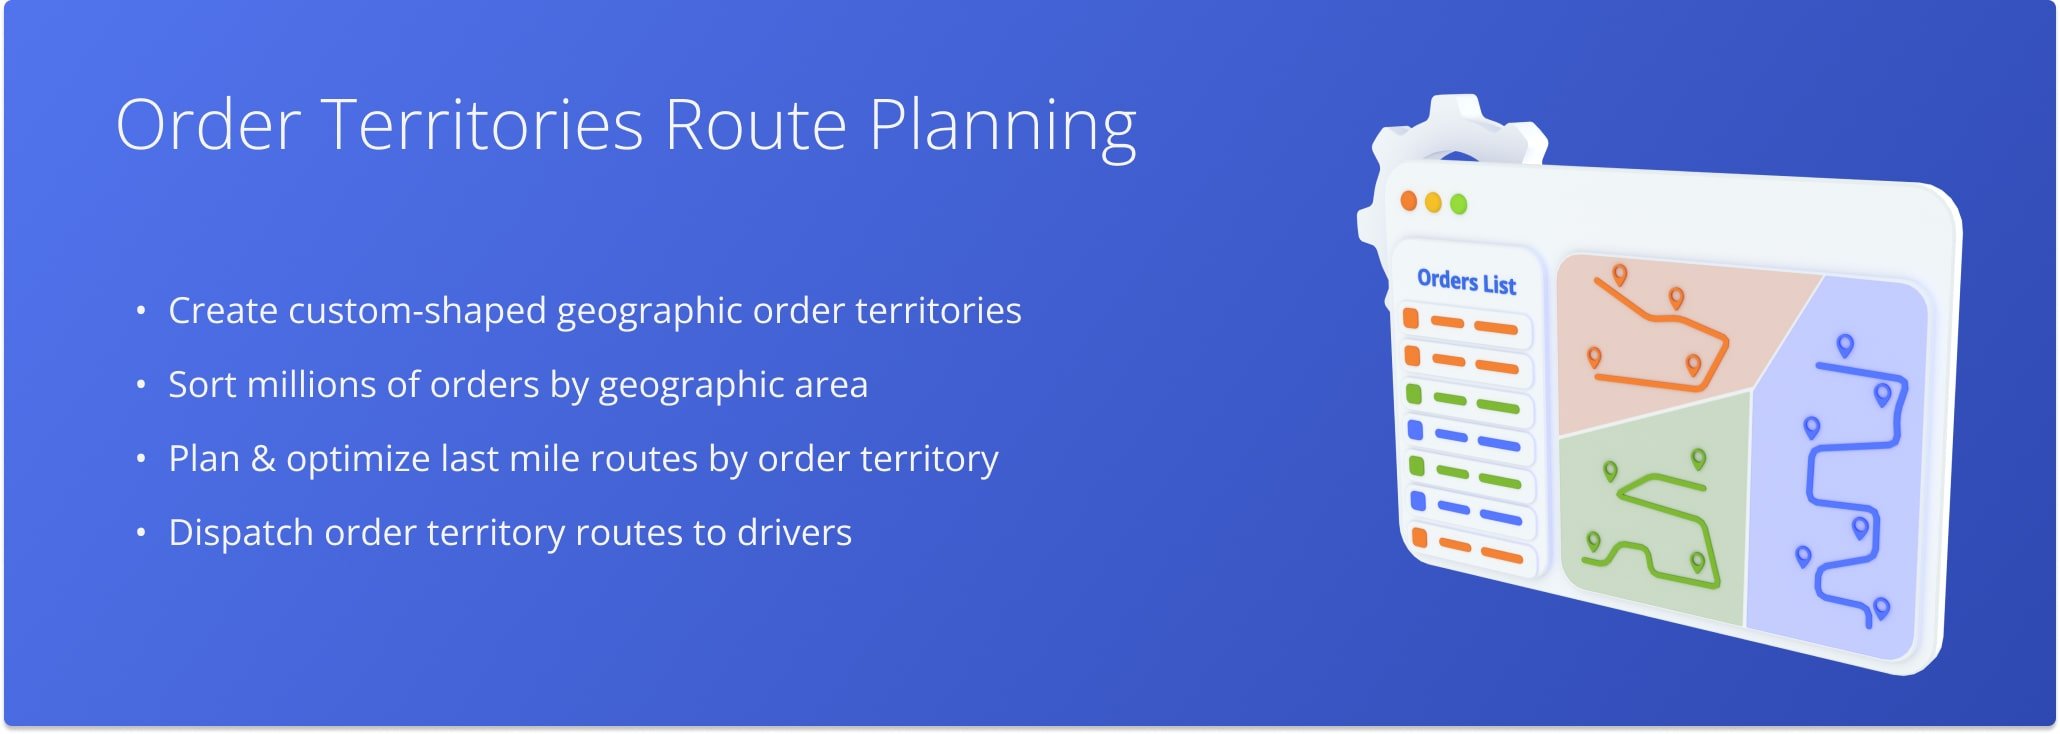
Order Territory Management And Routing – Plan Routes With Orders In Customer Address Territories
Route4Me’s ERP Order Management and Routing Software helps medium and large businesses import, sort, and schedule millions of orders from CRMs and other systems. You can organize orders into custom-shaped geographical territories to match your routing and business needs, then use them to optimize multi-driver and multi-vehicle last mile routes. This guide covers managing Order Territories, filtering orders by territory and status, and using them to plan routes. It also explains planning routes from the Orders List, routing Order Groups, creating Orders Map routes, and scanning barcodes to plan order routes.
NOTE: Depending on your account configurations, you may have different features enabled. To enable or disable specific features, please contact your Routing Expert or Route4Me’s Support Team.
Table of Contents
Open And Manage Order Territories
A Route4Me Territory is a custom-shaped geographical area you draw on the map. Orders with addresses inside a Territory’s boundaries are automatically associated with it. NOTE: Lean more about how to create and manage Territories.
Open Your Address Book Territories Map
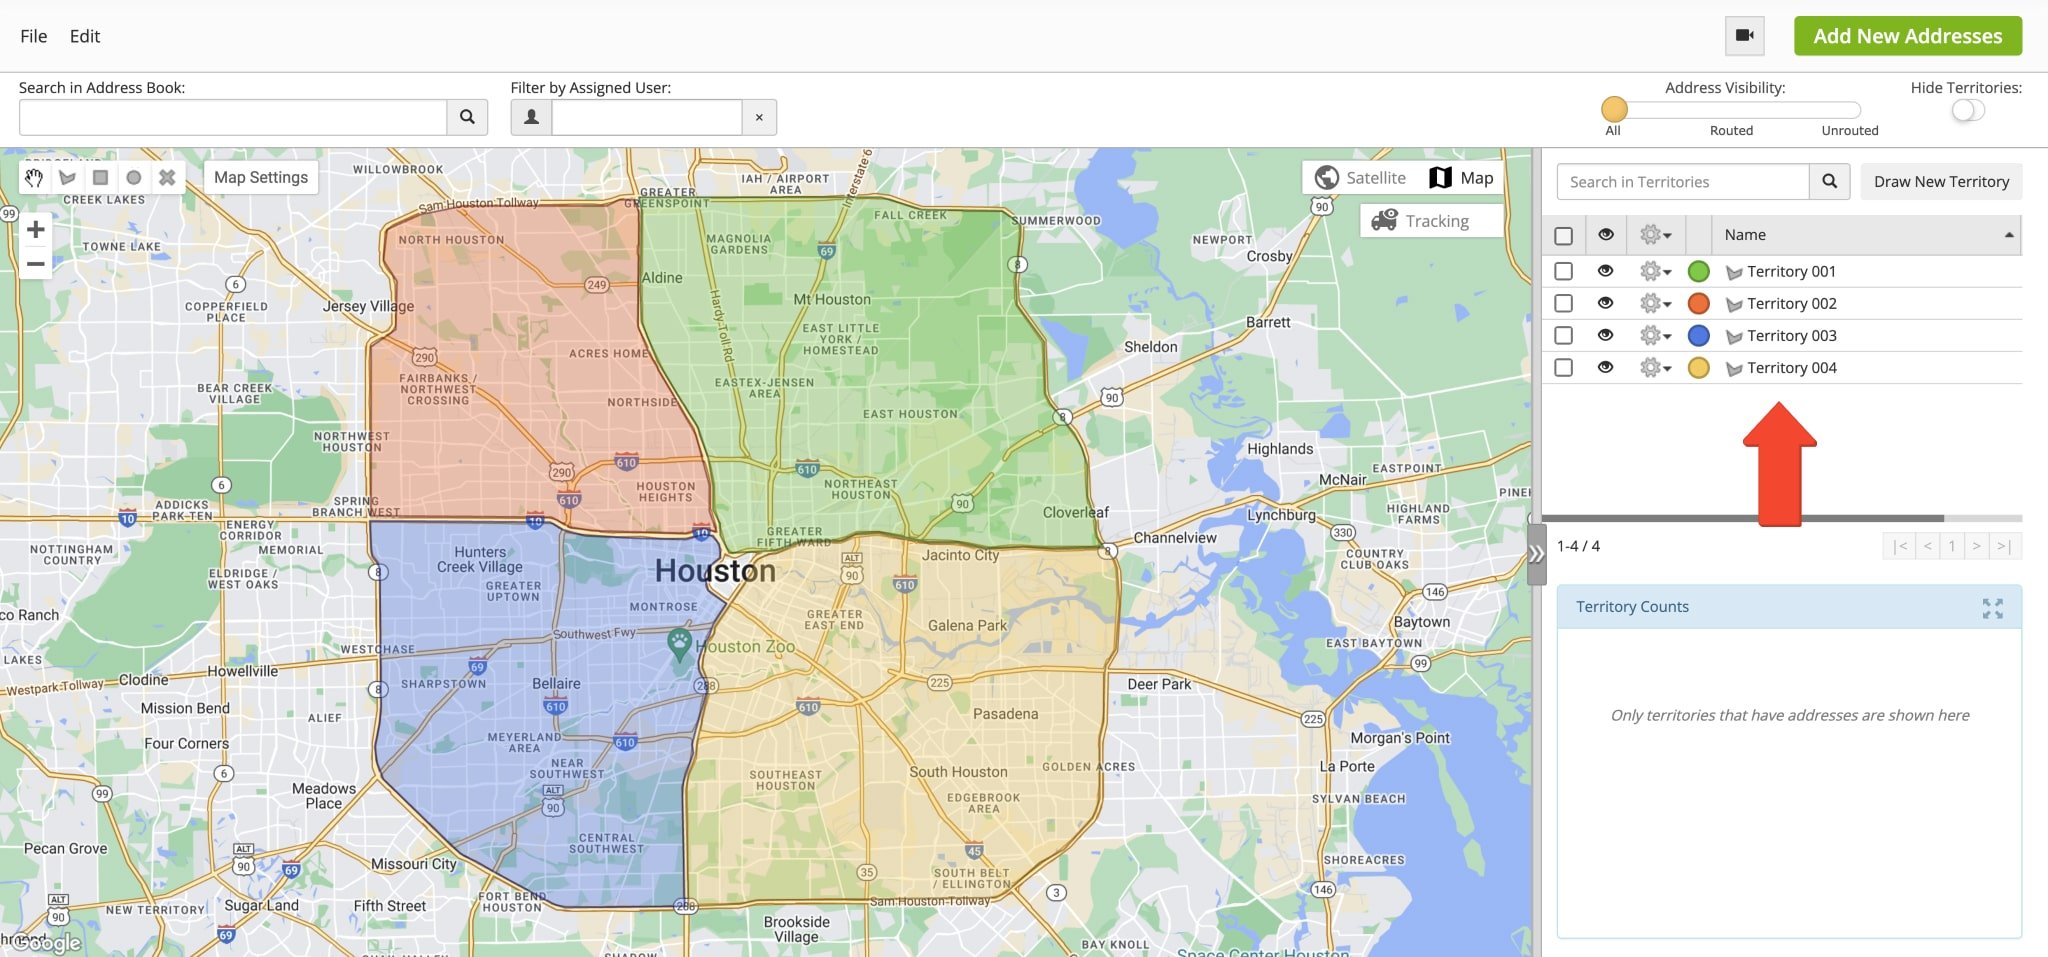
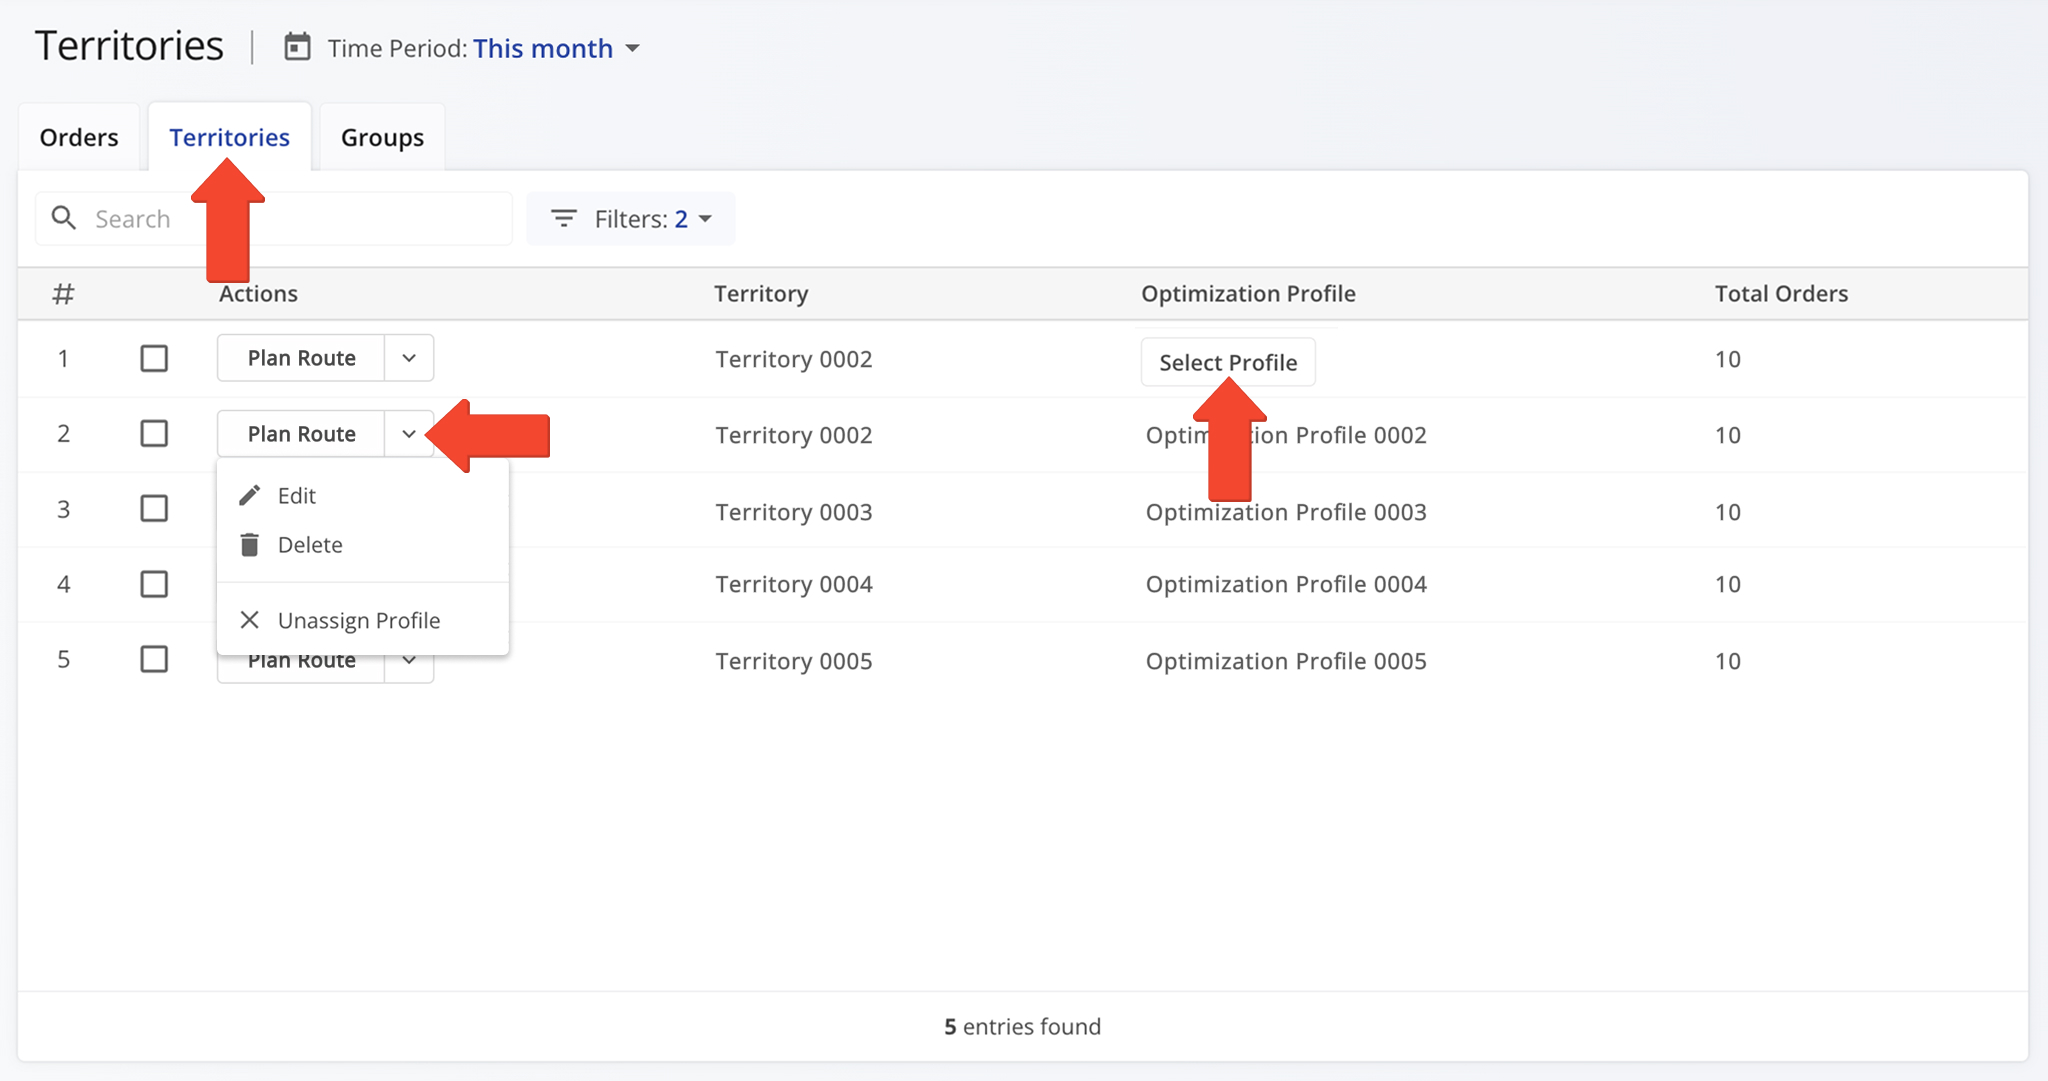
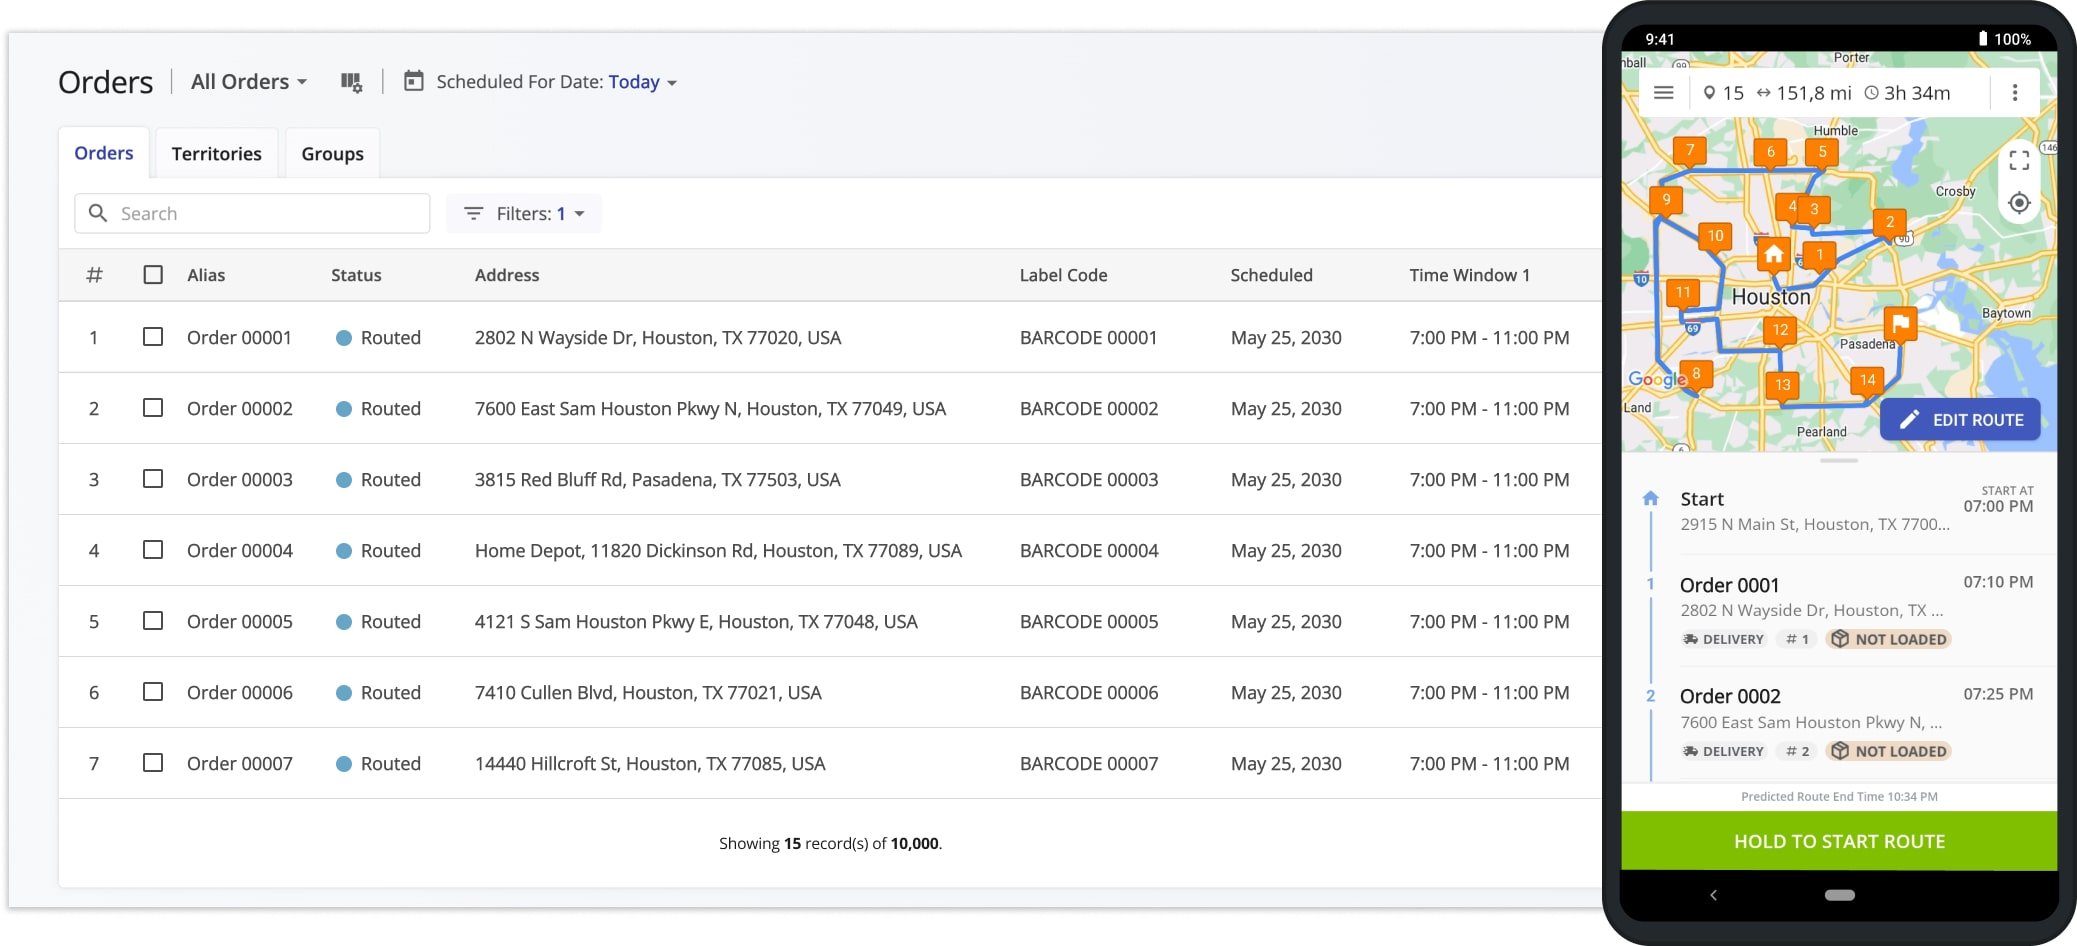
To access your Orders Territories List, click “Business Operations” > “Orders” in the Navigation Menu. From the Orders Page, open the “Territories” tab. To edit or delete a Territory, click the Down Arrow button next to it.
You can also assign a custom Optimization Profile to each Territory. When planning routes for that Territory, the selected Profile’s route settings and optimization constraints are automatically applied.
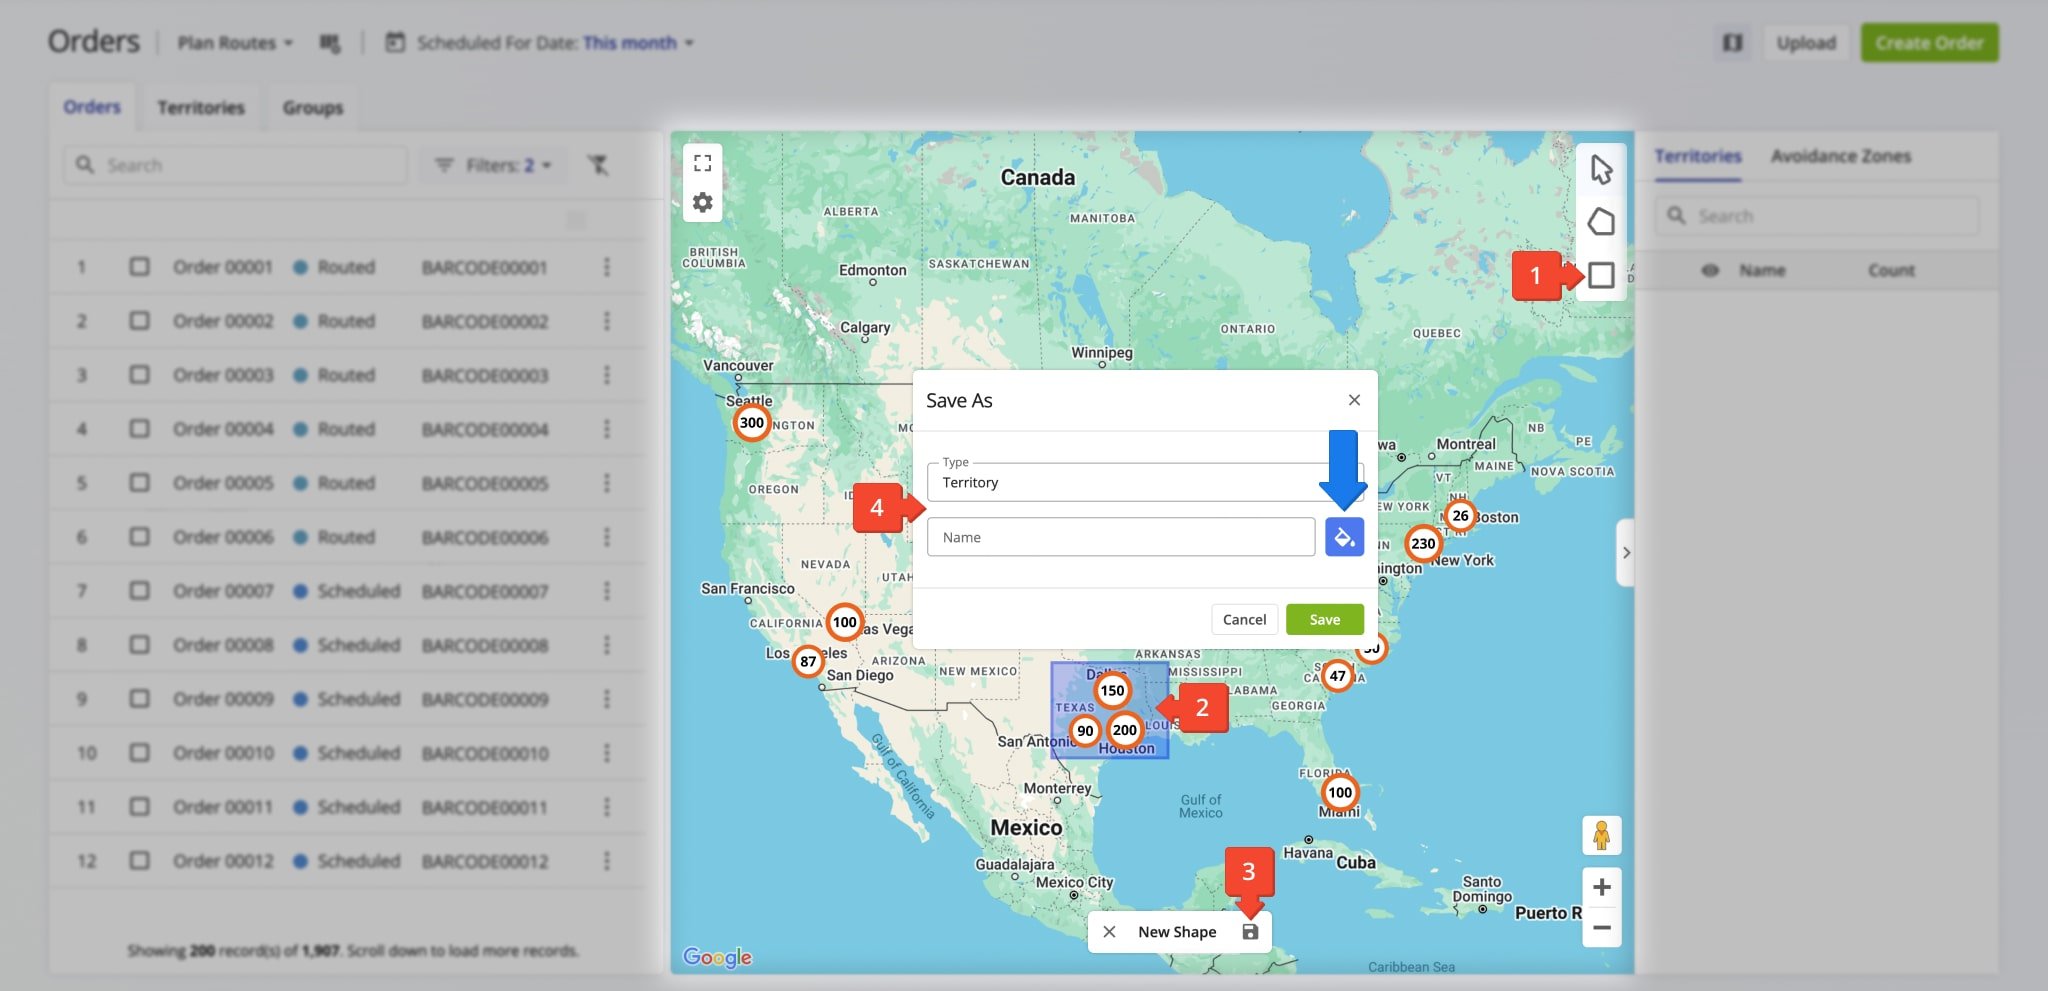
Orders Map Territories – Create And Manage Territories On The Orders Map
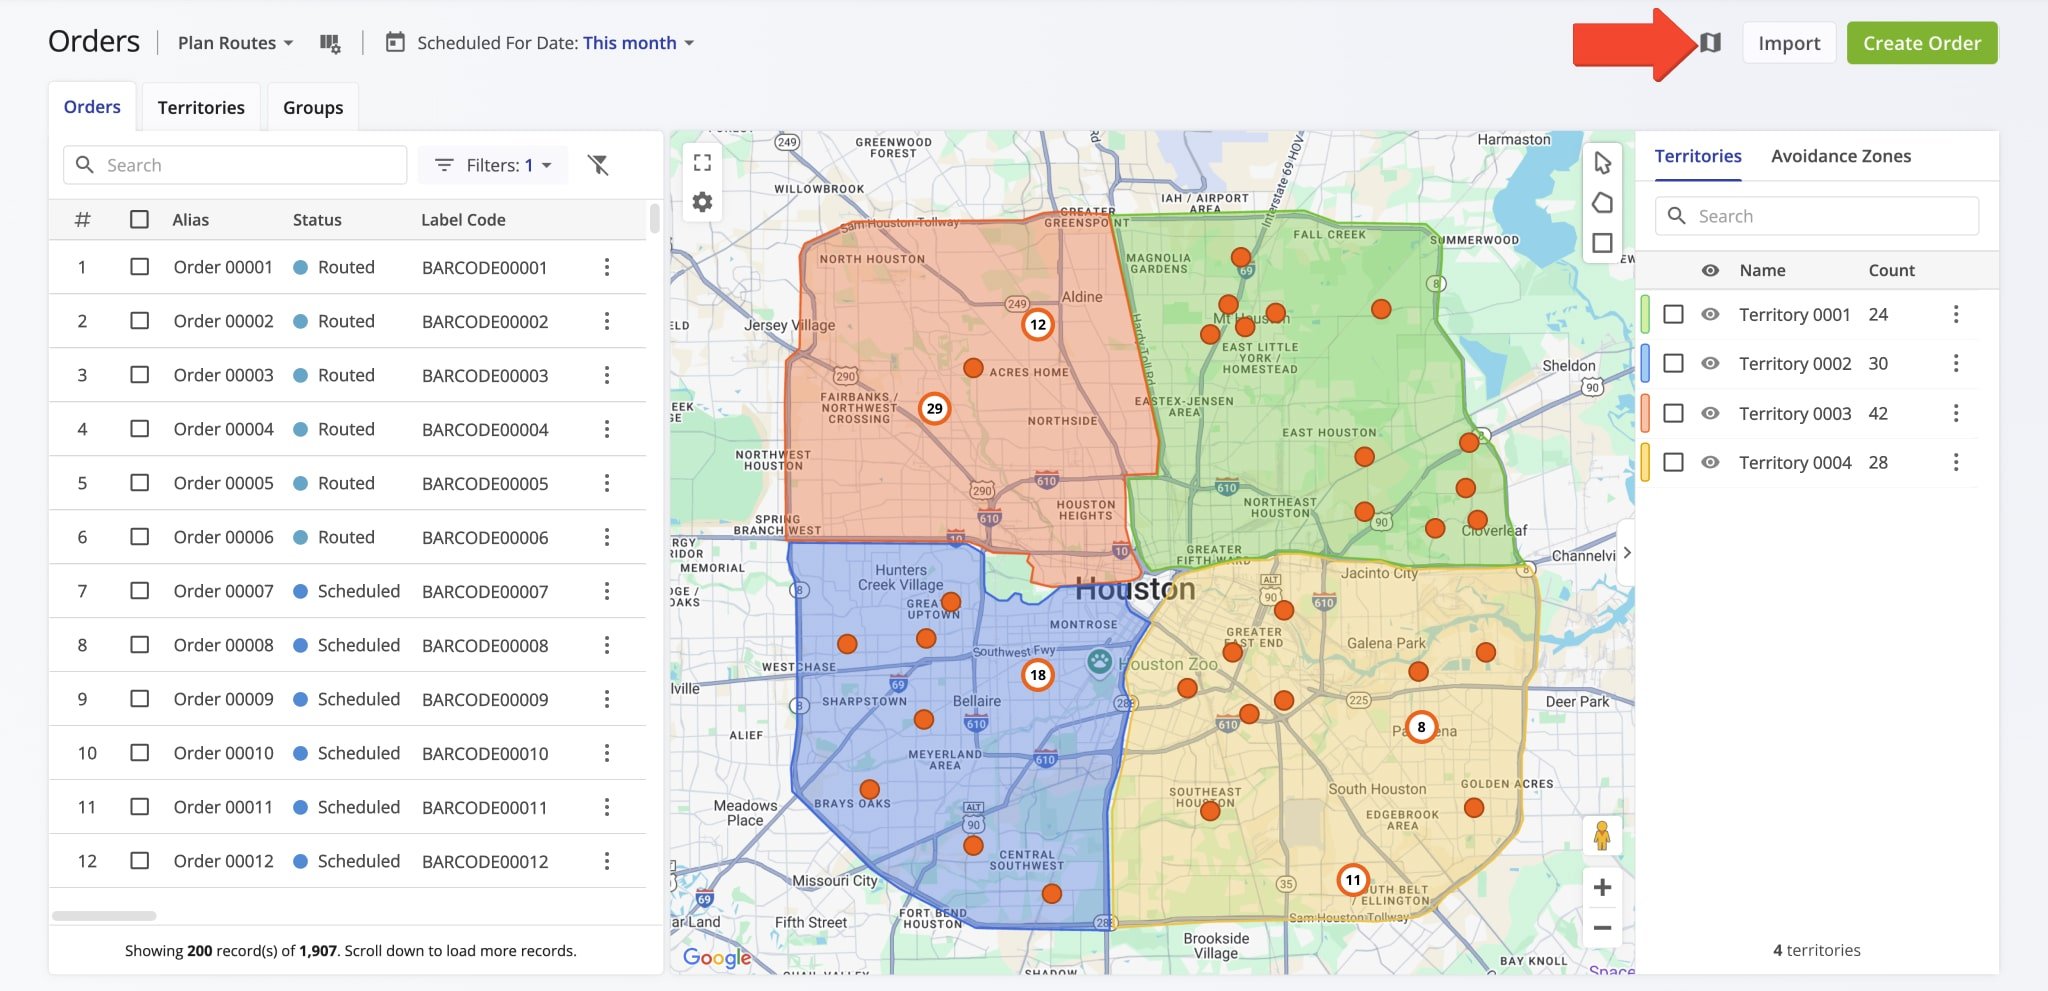
You can also create Order Territories directly from the Orders Page using the interactive Orders Map. To open it, click the Orders Map Icon in the top-right corner of the Orders Page.
Then, create and manage Order Territories on the Orders Map by following these steps:
- Click the Polygon or Rectangle button in the top right of the Orders Map, or right-click on the map to select a drawing option.
- Draw your preferred shape by clicking and dragging for a rectangle, or clicking to add points for a polygon.
- Click the Save Icon next to “New Shape“.
- Select “Territory” in the “Type” field, enter a unique name, and use the Paint Bucket Button to choose a color. Click “Save” to finalize.
You can quickly find a territory by name using the search bar in the “Territories” or “Avoidance Zones” panel. NOTE: Learn more about using the interactive Orders Map.
Plan And Optimize Routes Using Customer Order Territories
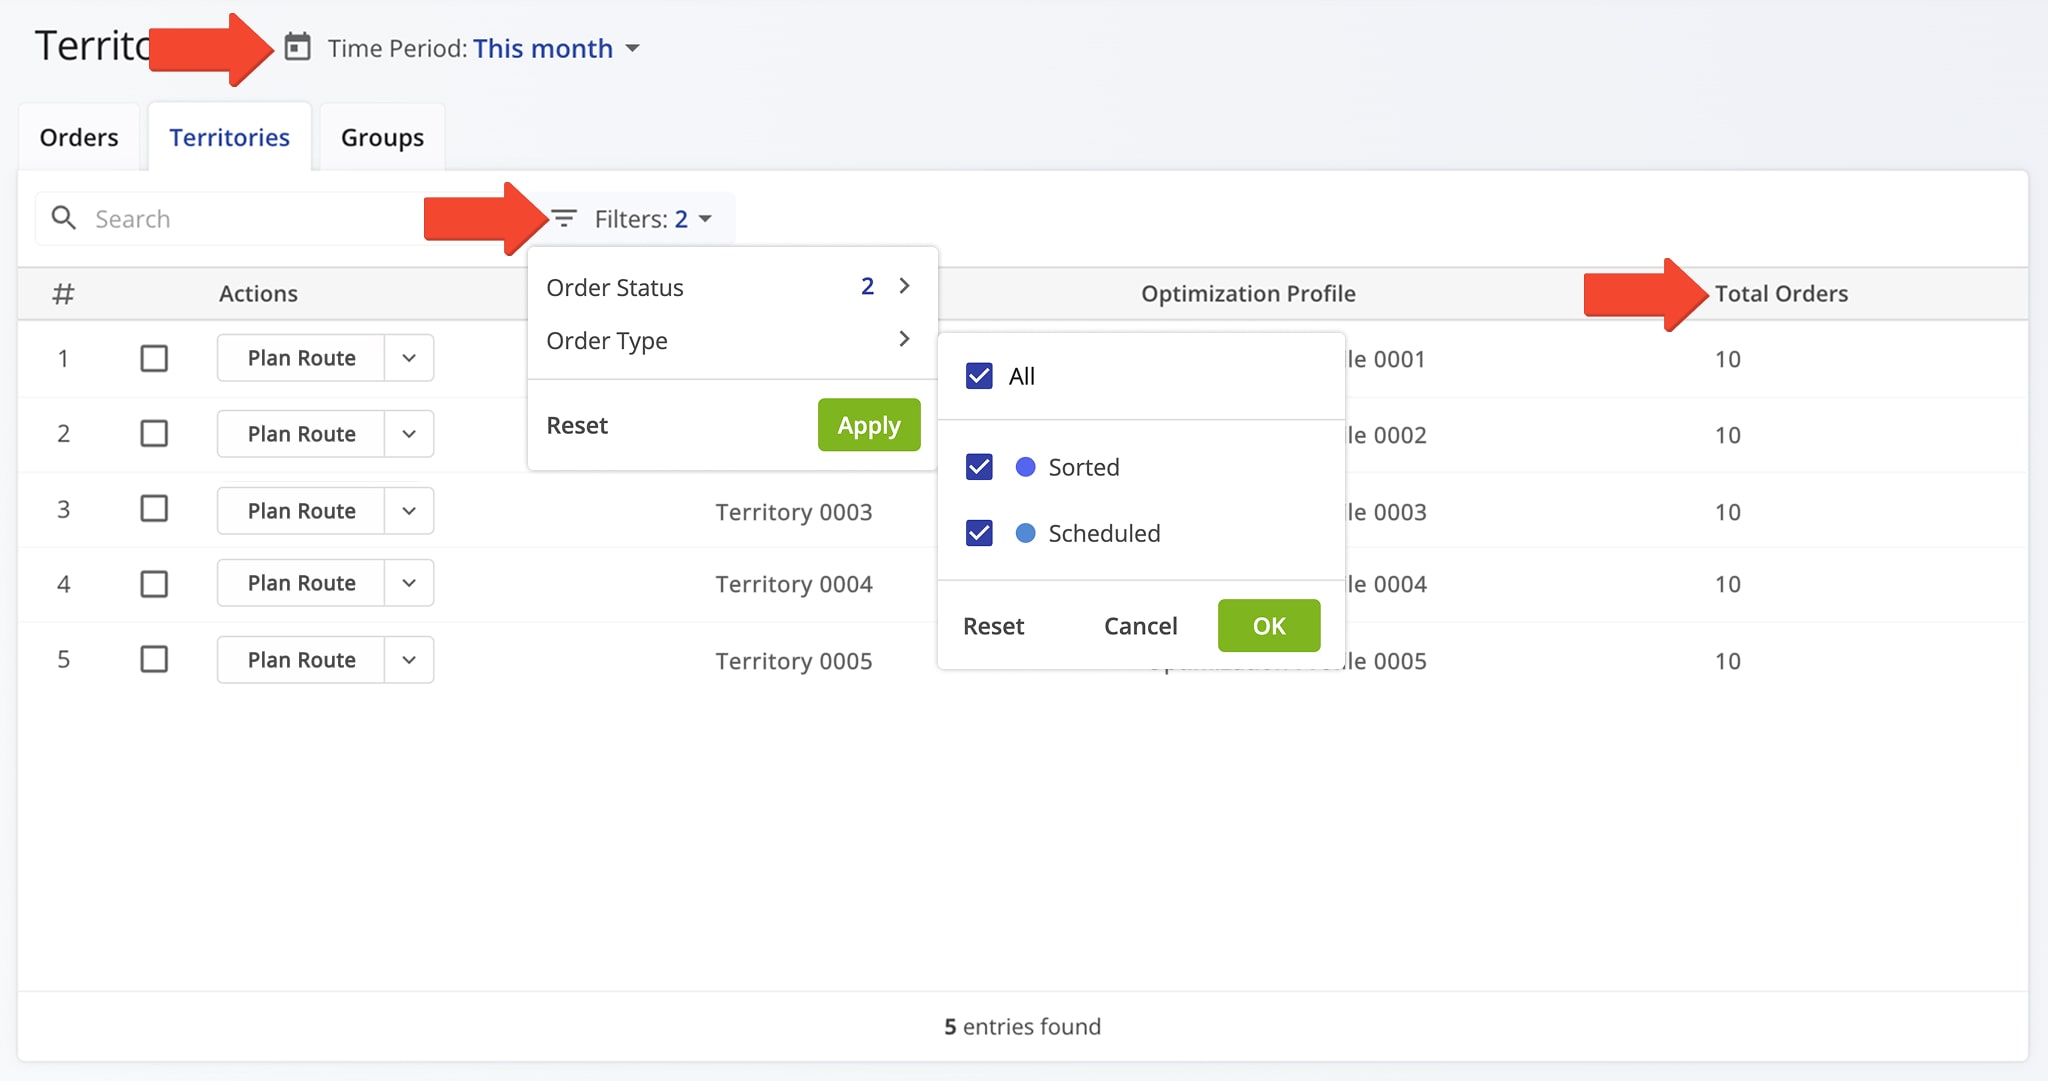
To plan routes with Order Territories, filter orders by date or date range using the “Time Period” field. Then, filter by “Order Type” (e.g., Delivery, Pickup) and “Order Status“. Only Sorted and Scheduled orders can be used for route planning.
The “Total Orders” column will show how many orders within a Territory match your filters and are scheduled for the selected dates. You can then select one or multiple Territories to plan combined or separate routes.
NOTE: Learn more about Route4Me’s Order Management System Order Statuses.
Additionally, you can plan Territory routes on the Orders Map. The “Territories” tab on the Orders Page is best for managing and routing multiple Territories, while the Orders Map is ideal for quickly managing and routing individual Territories.
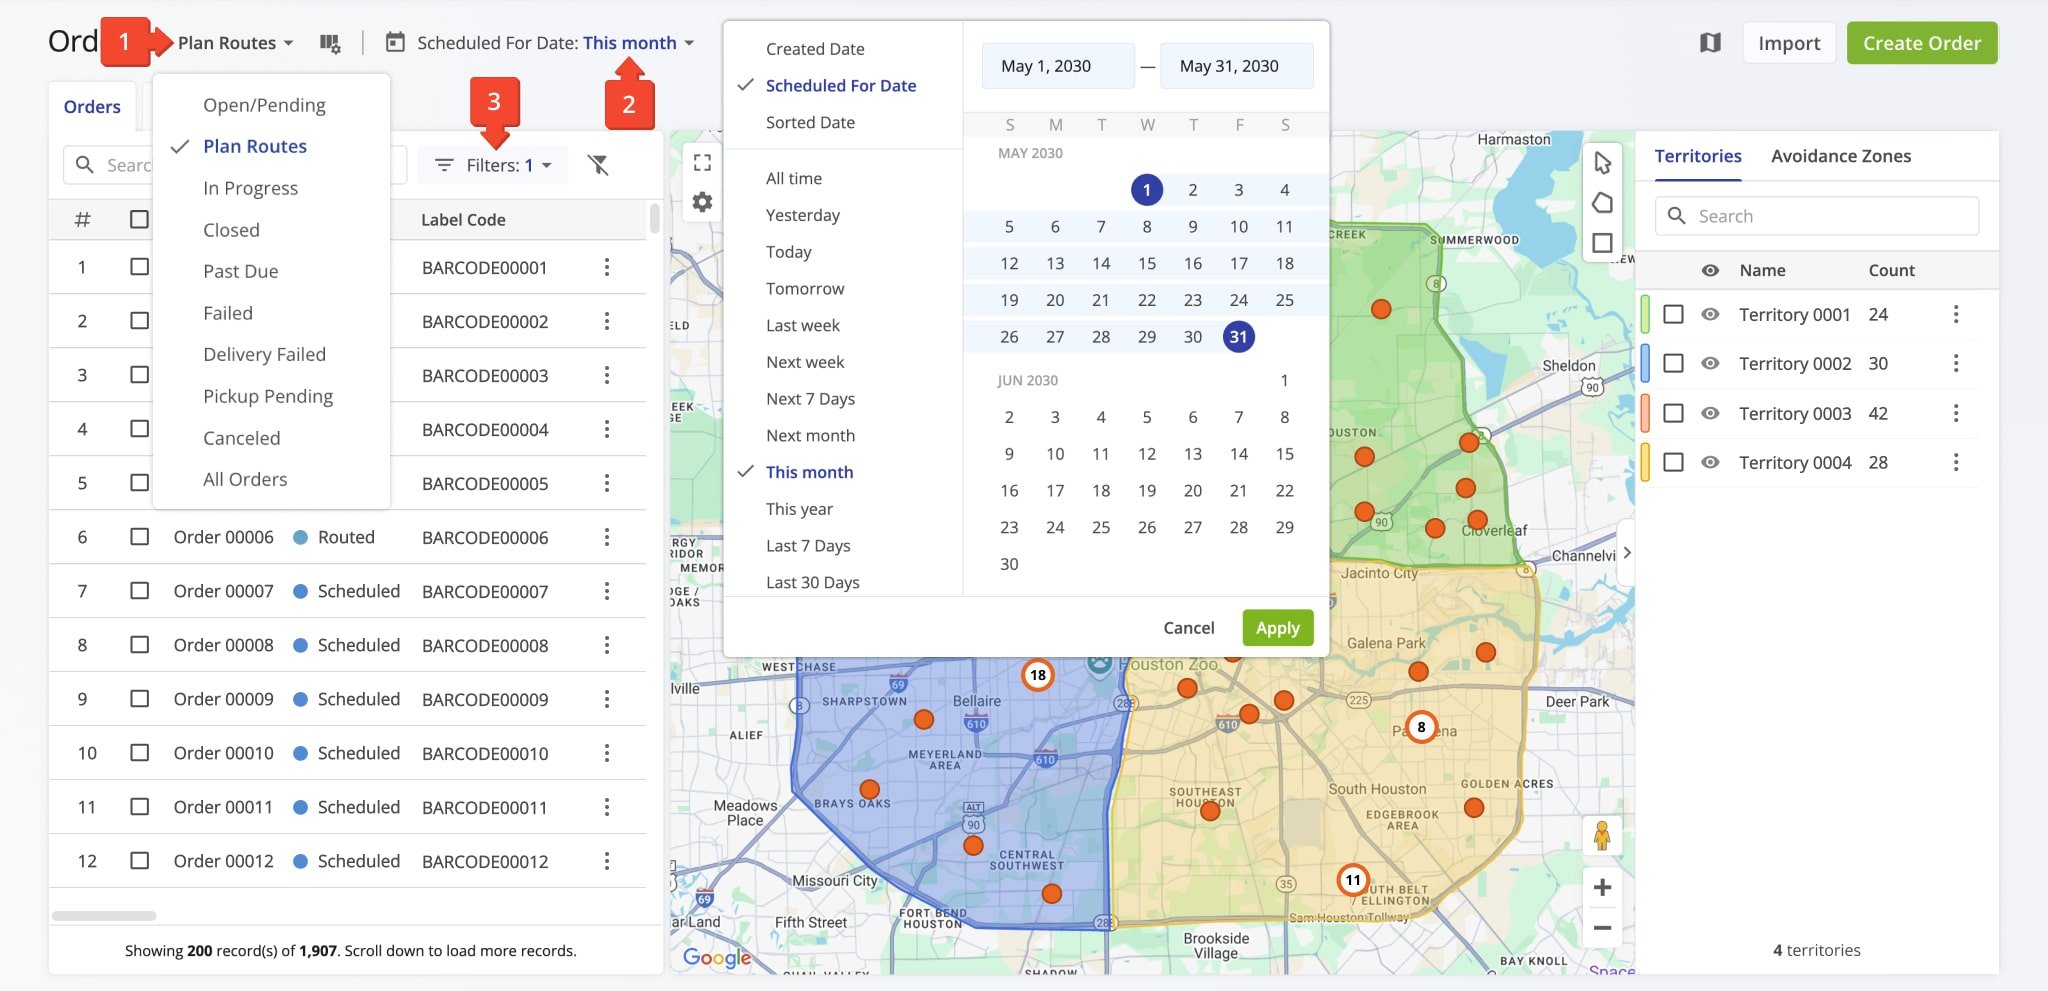
To show only orders relevant to your routing needs on the Orders Map:
- Open the View Mode menu by clicking “Plan Routes” above the Orders List and select the preferred Orders Page View Mode.
- Open the calendar by clicking “Scheduled For Date” and select the date range type and range.
- Click “Filters” to filter orders by specific attributes or details.
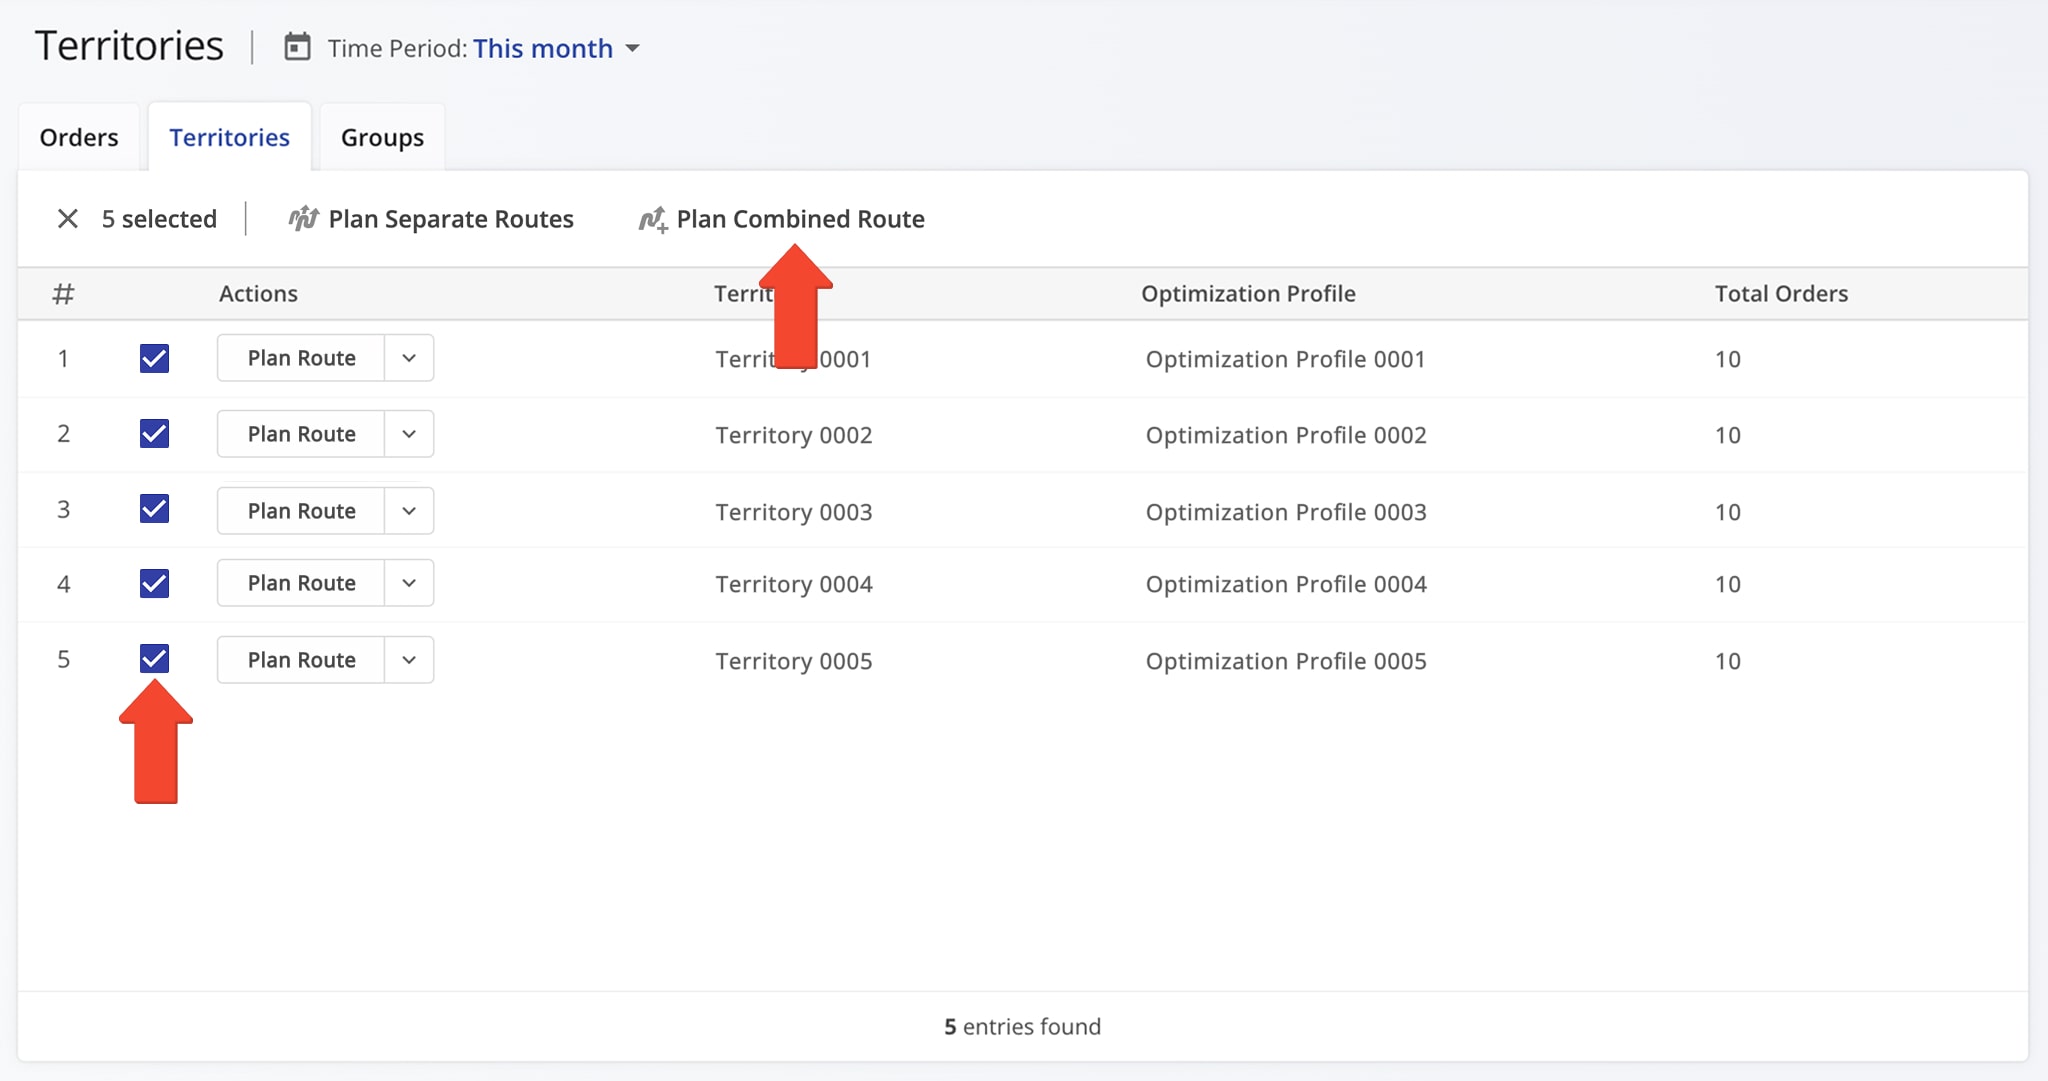
Plan Combined Route – Optimize Single Route With All Orders
The “Plan Combined Route” option lets you plan a single route with all orders from all selected Territories. To use this option, check the boxes next to the desired Territories, then click “Plan Combined Route“.
Next, schedule the route start date from the calendar and select the desired Optimization Profile to optimize the route. Click the “Continue” button to generate the route.
Route4Me will then create a single route with all orders from the selected Territories. The route will follow the selected Optimization Profile settings and be scheduled for the chosen date. Once planned, it will automatically open in the Route Editor.
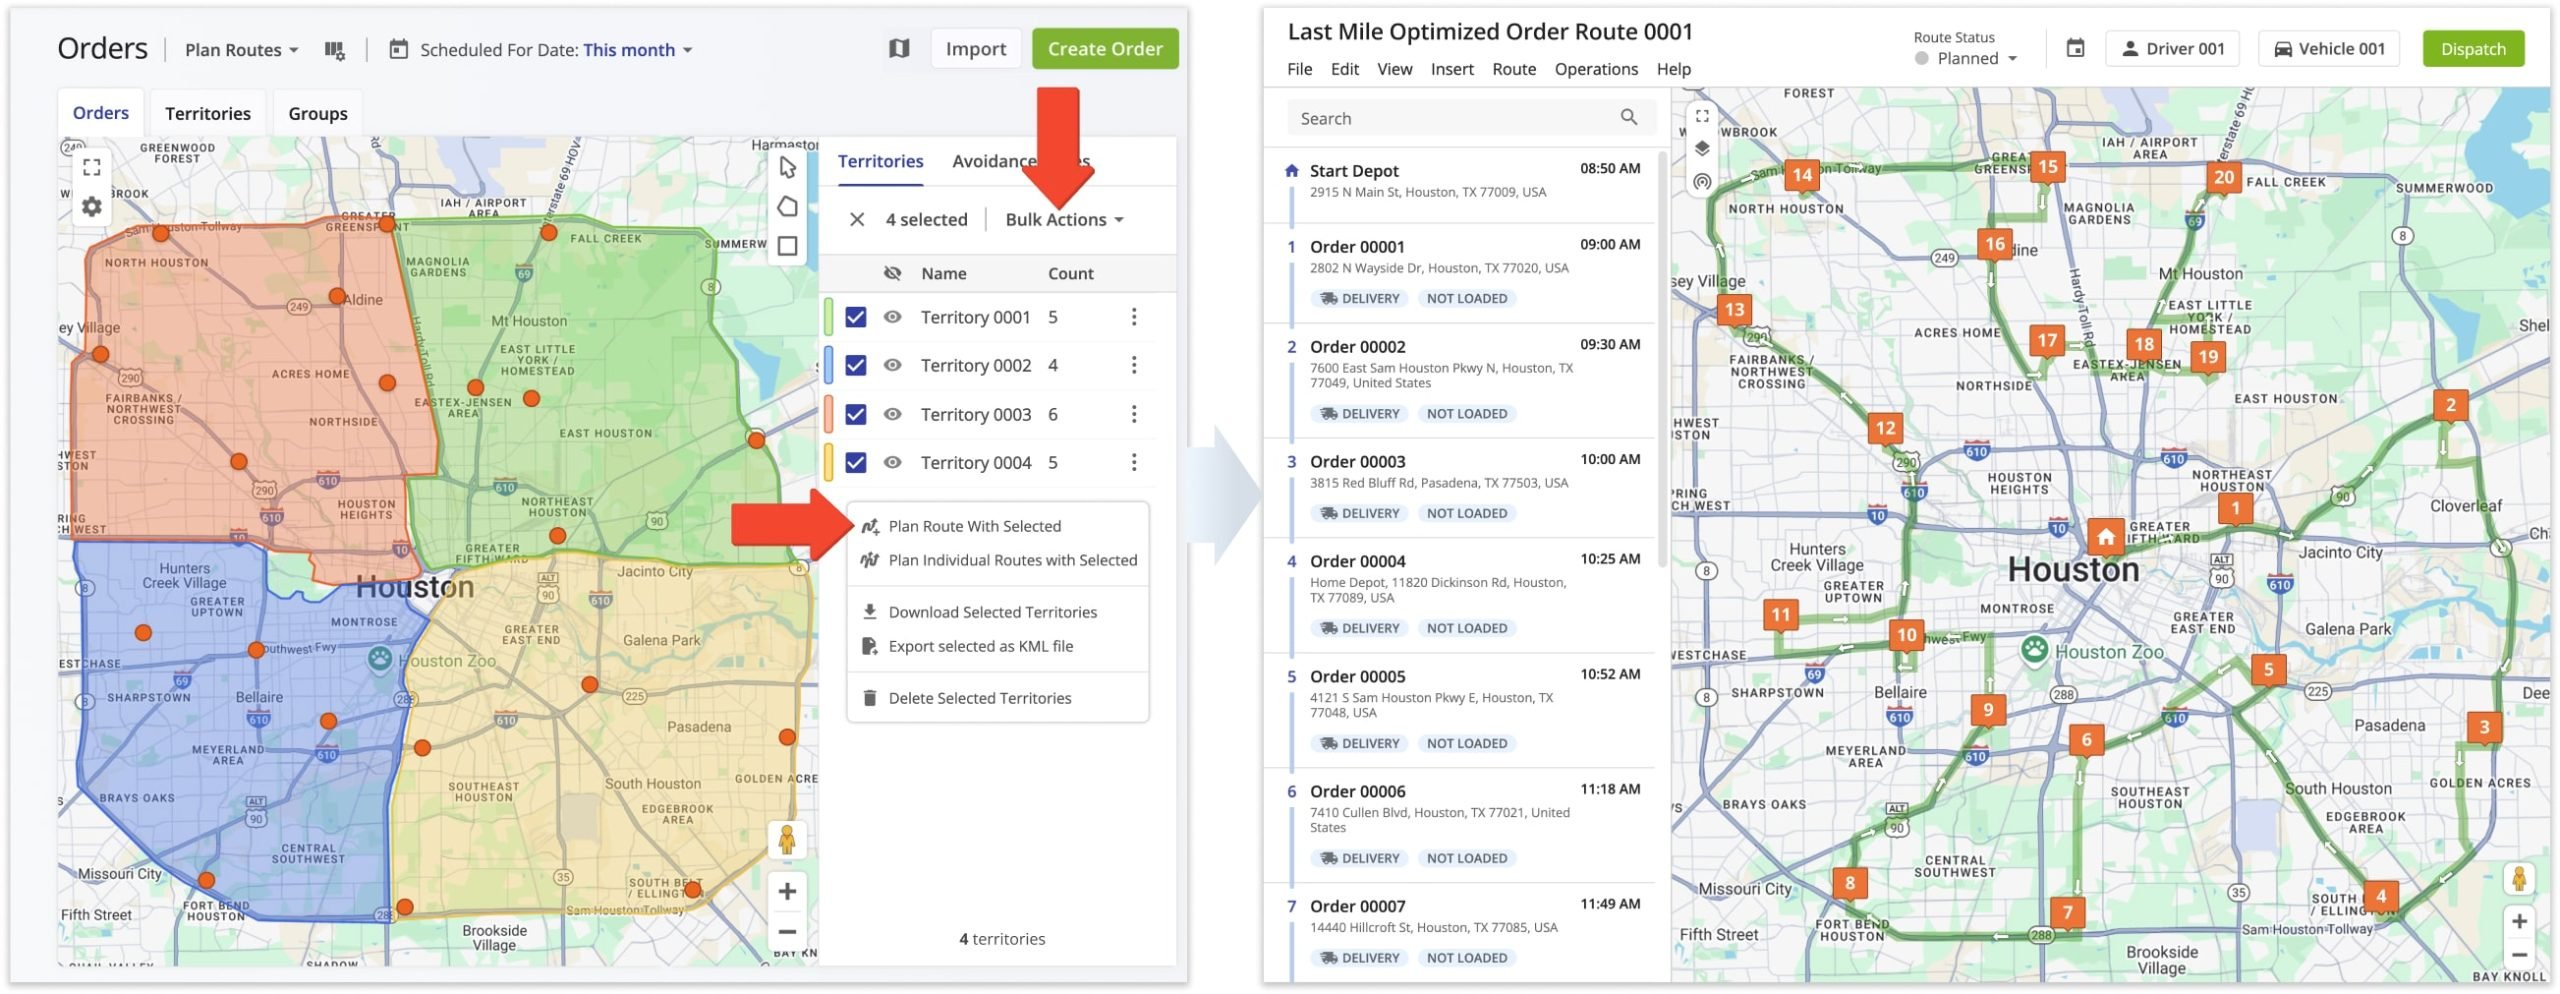
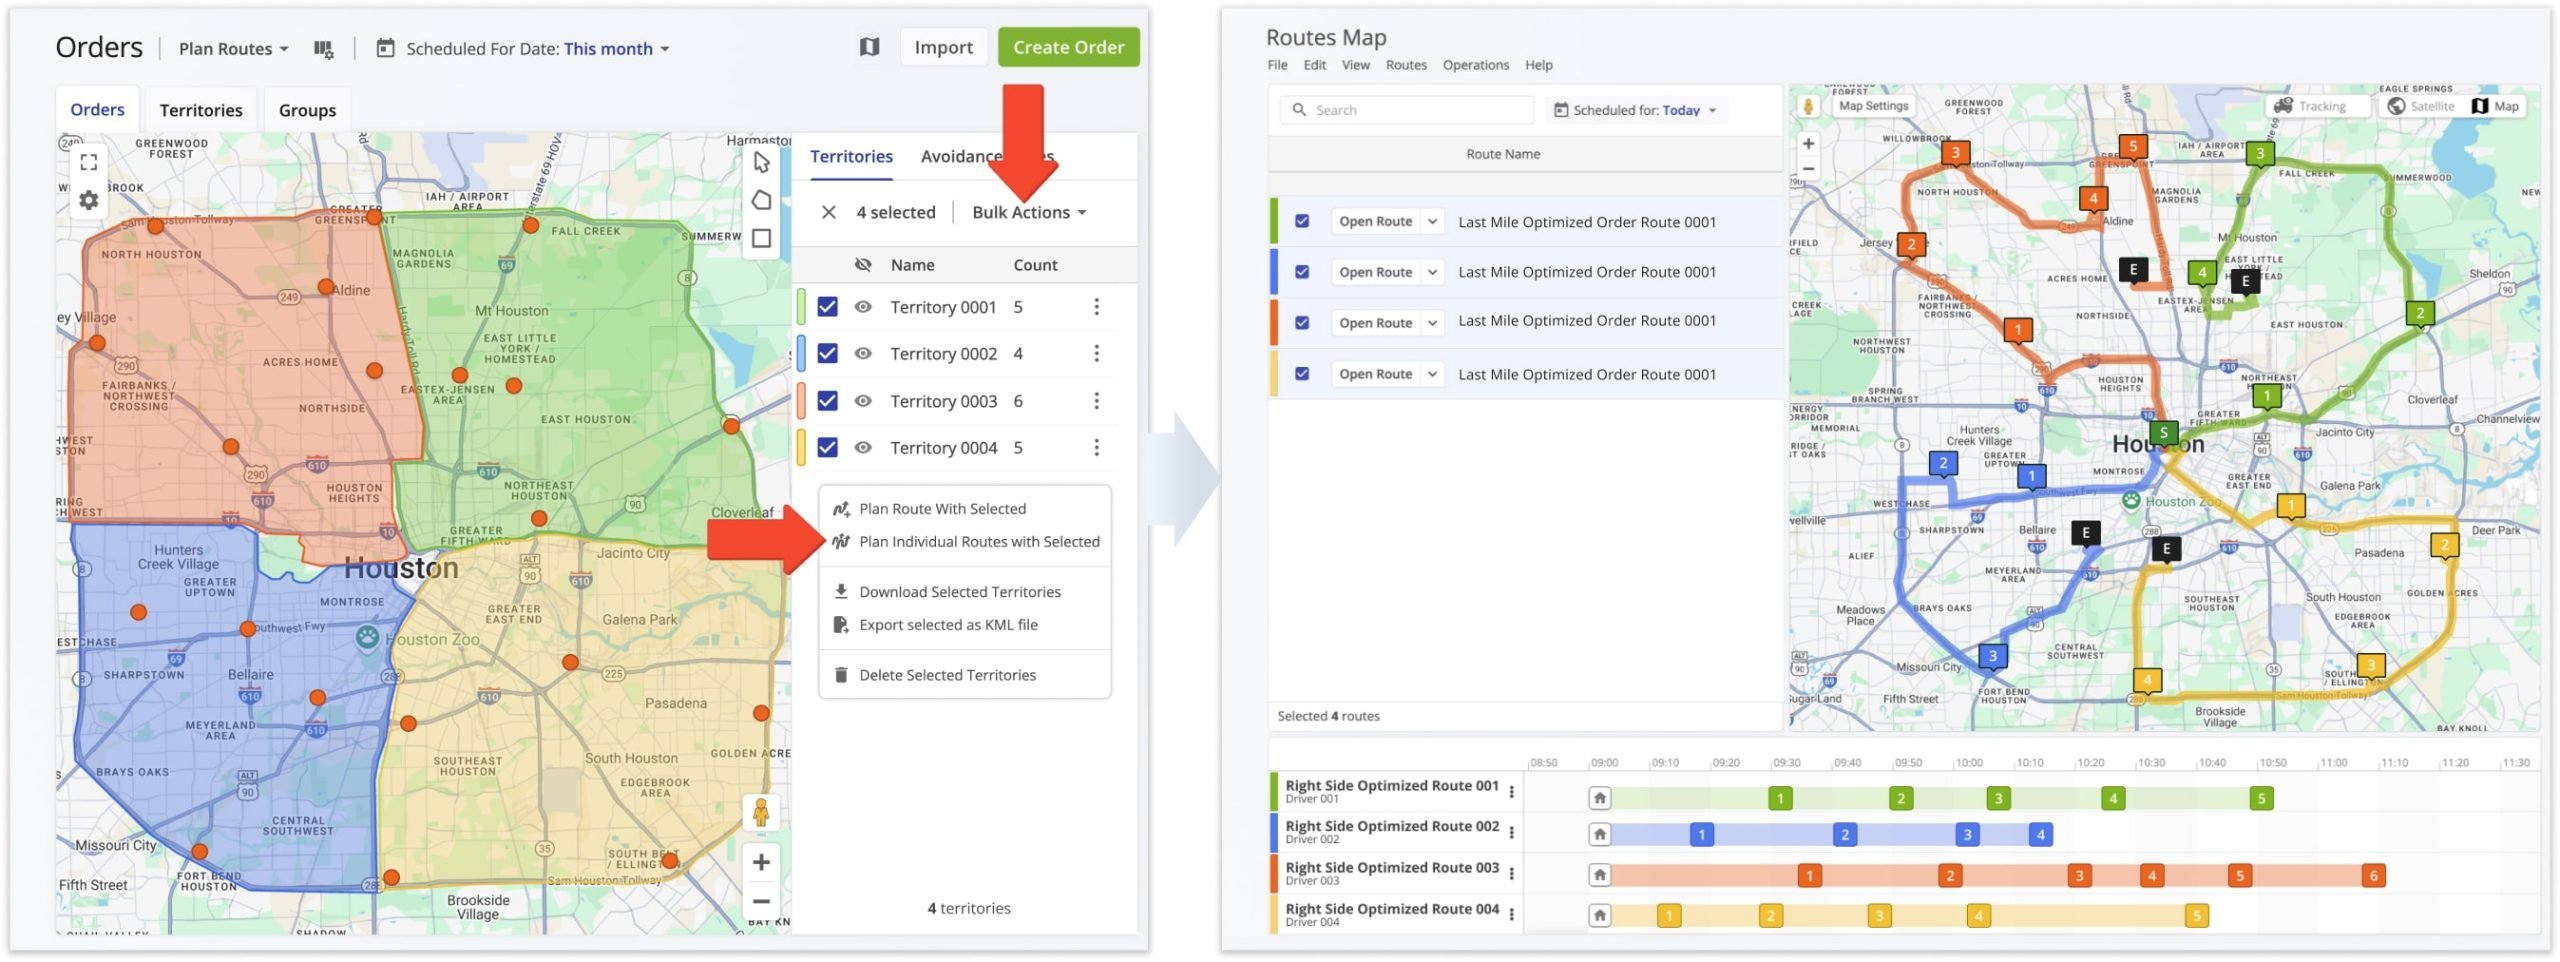
Alternatively, you can plan a single route with orders from multiple Territories directly from the Orders Map. To do this, select the desired Territories by checking their boxes, click the “Bulk Actions” button, and choose “Plan Route With Selected“.
Route4Me will then open the Route Planning page, import the selected orders, and open the new route in the Route Editor.
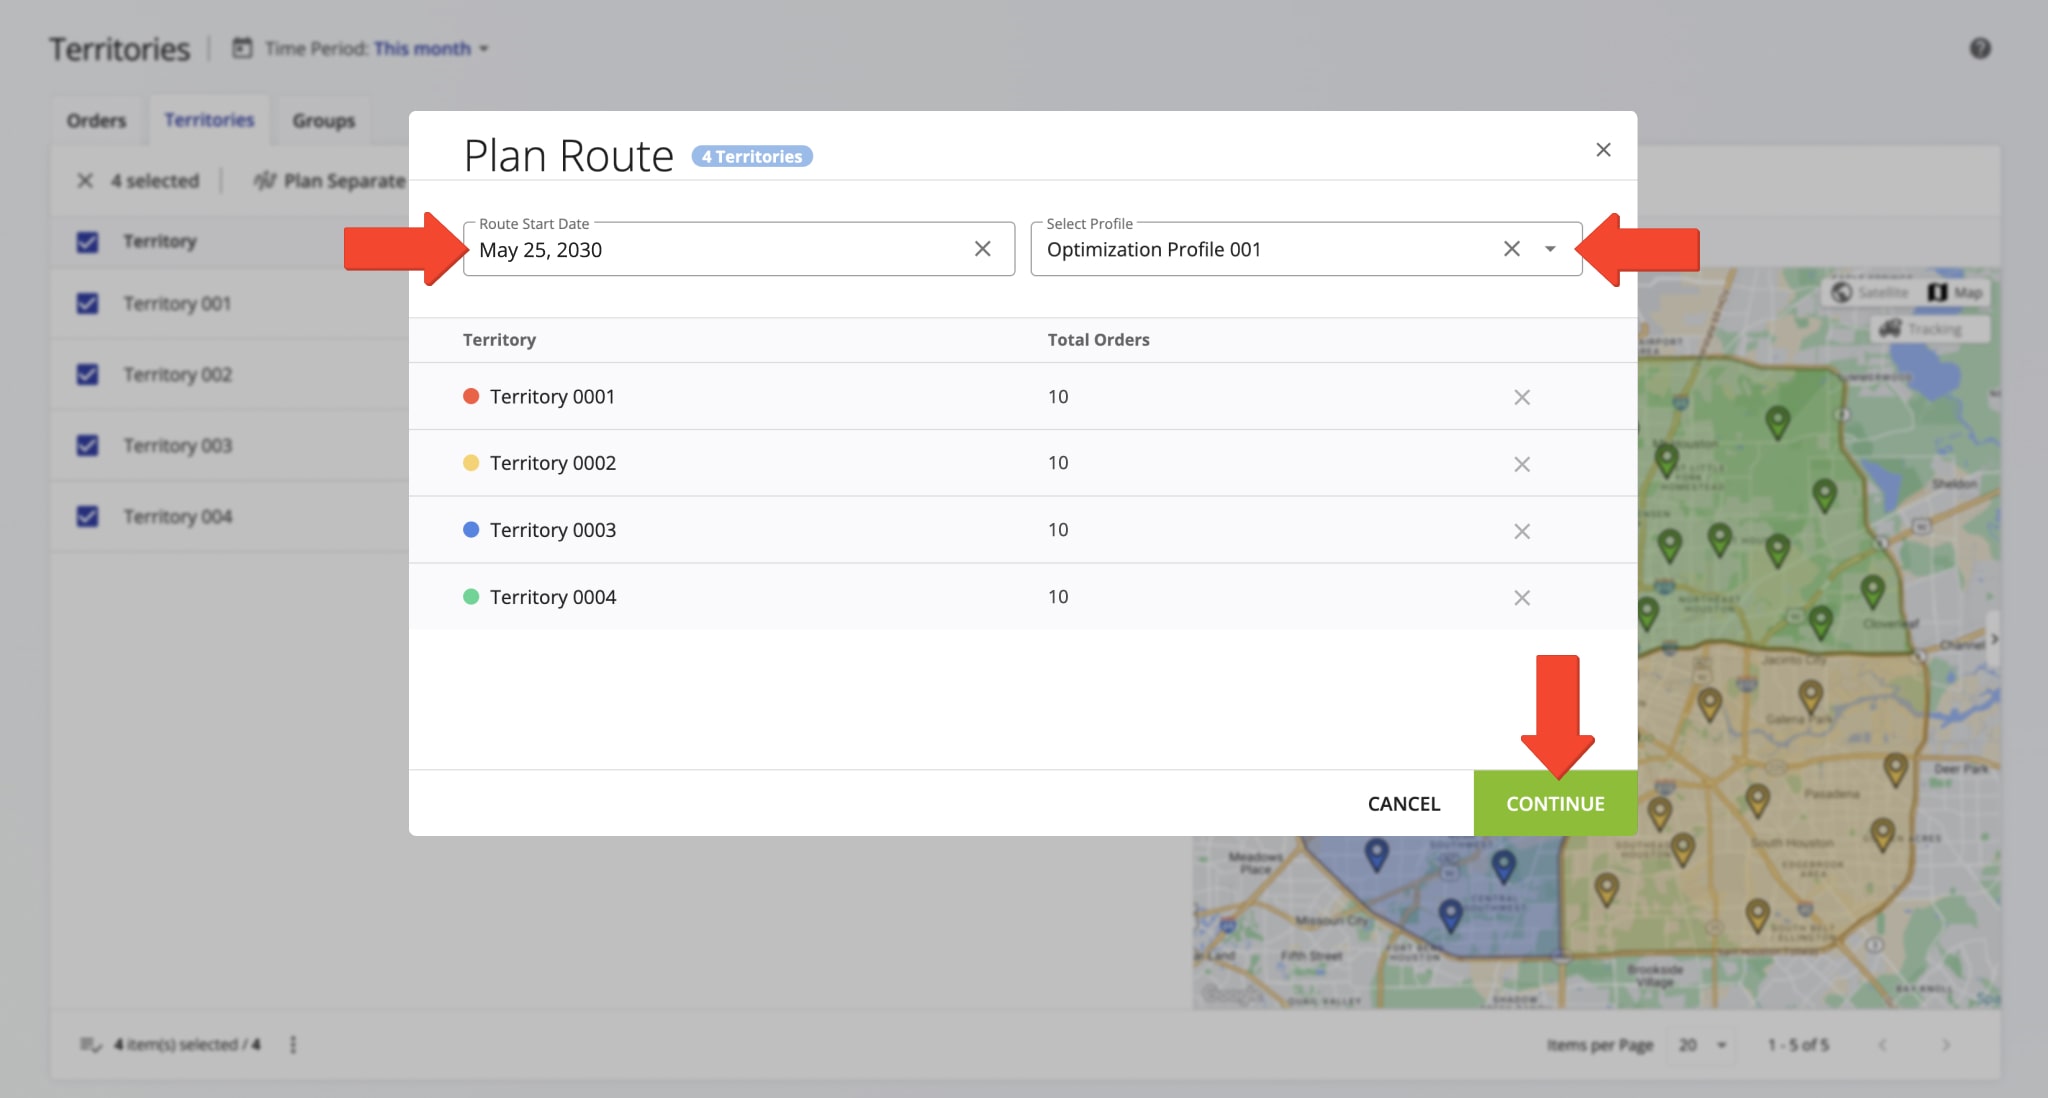
Plan Separate Routes – Optimize Routes With Separate Territories
The “Plan Separate Routes” option lets you plan individual routes for each selected Territory without overlapping others. To use this option, select one or more Territories by checking the boxes, then click “Plan Separate Routes“.
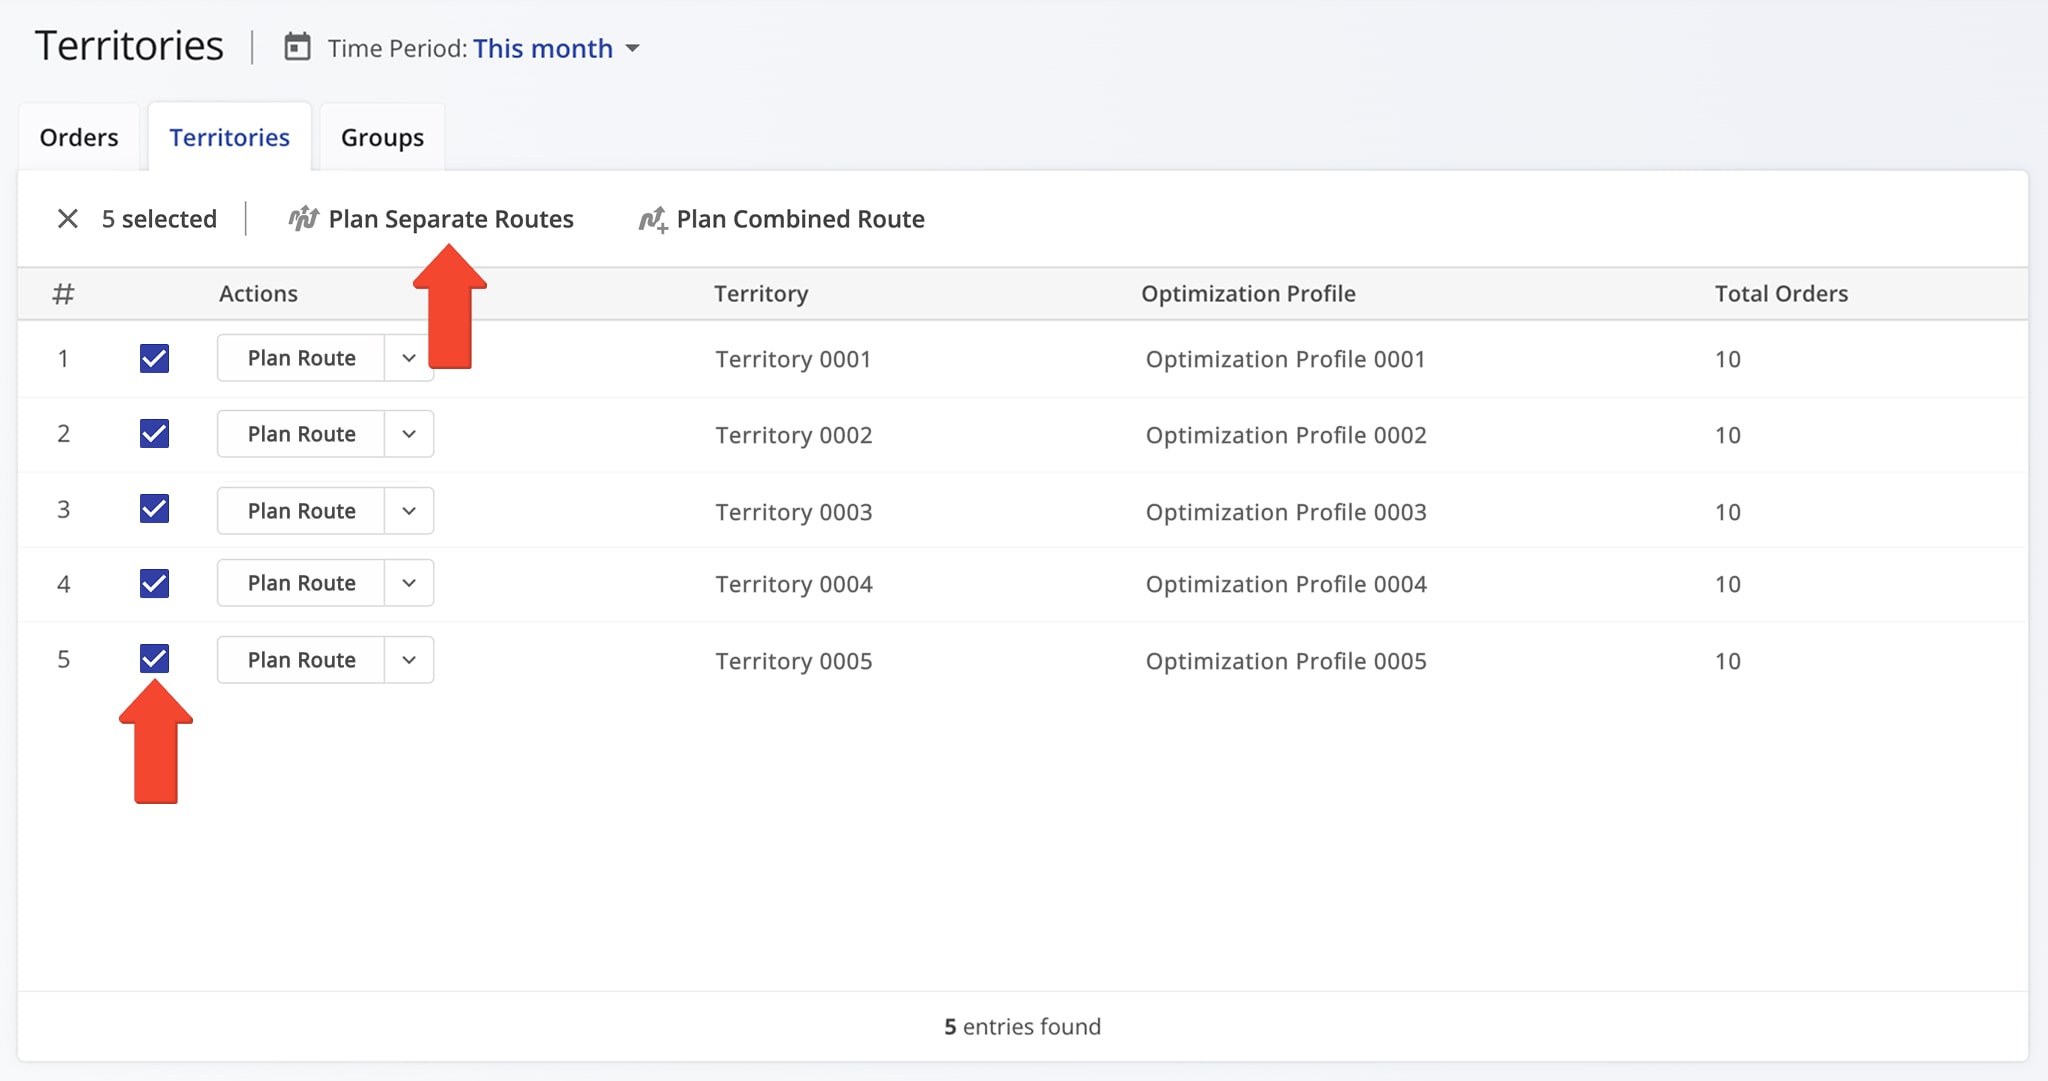
Next, schedule all routes by selecting the preferred date in the “Route Start Date” calendar. You can change or keep the assigned Optimization Profile for each Territory and remove any Territory by clicking on the X icon. Click “Continue” to optimize the routes.
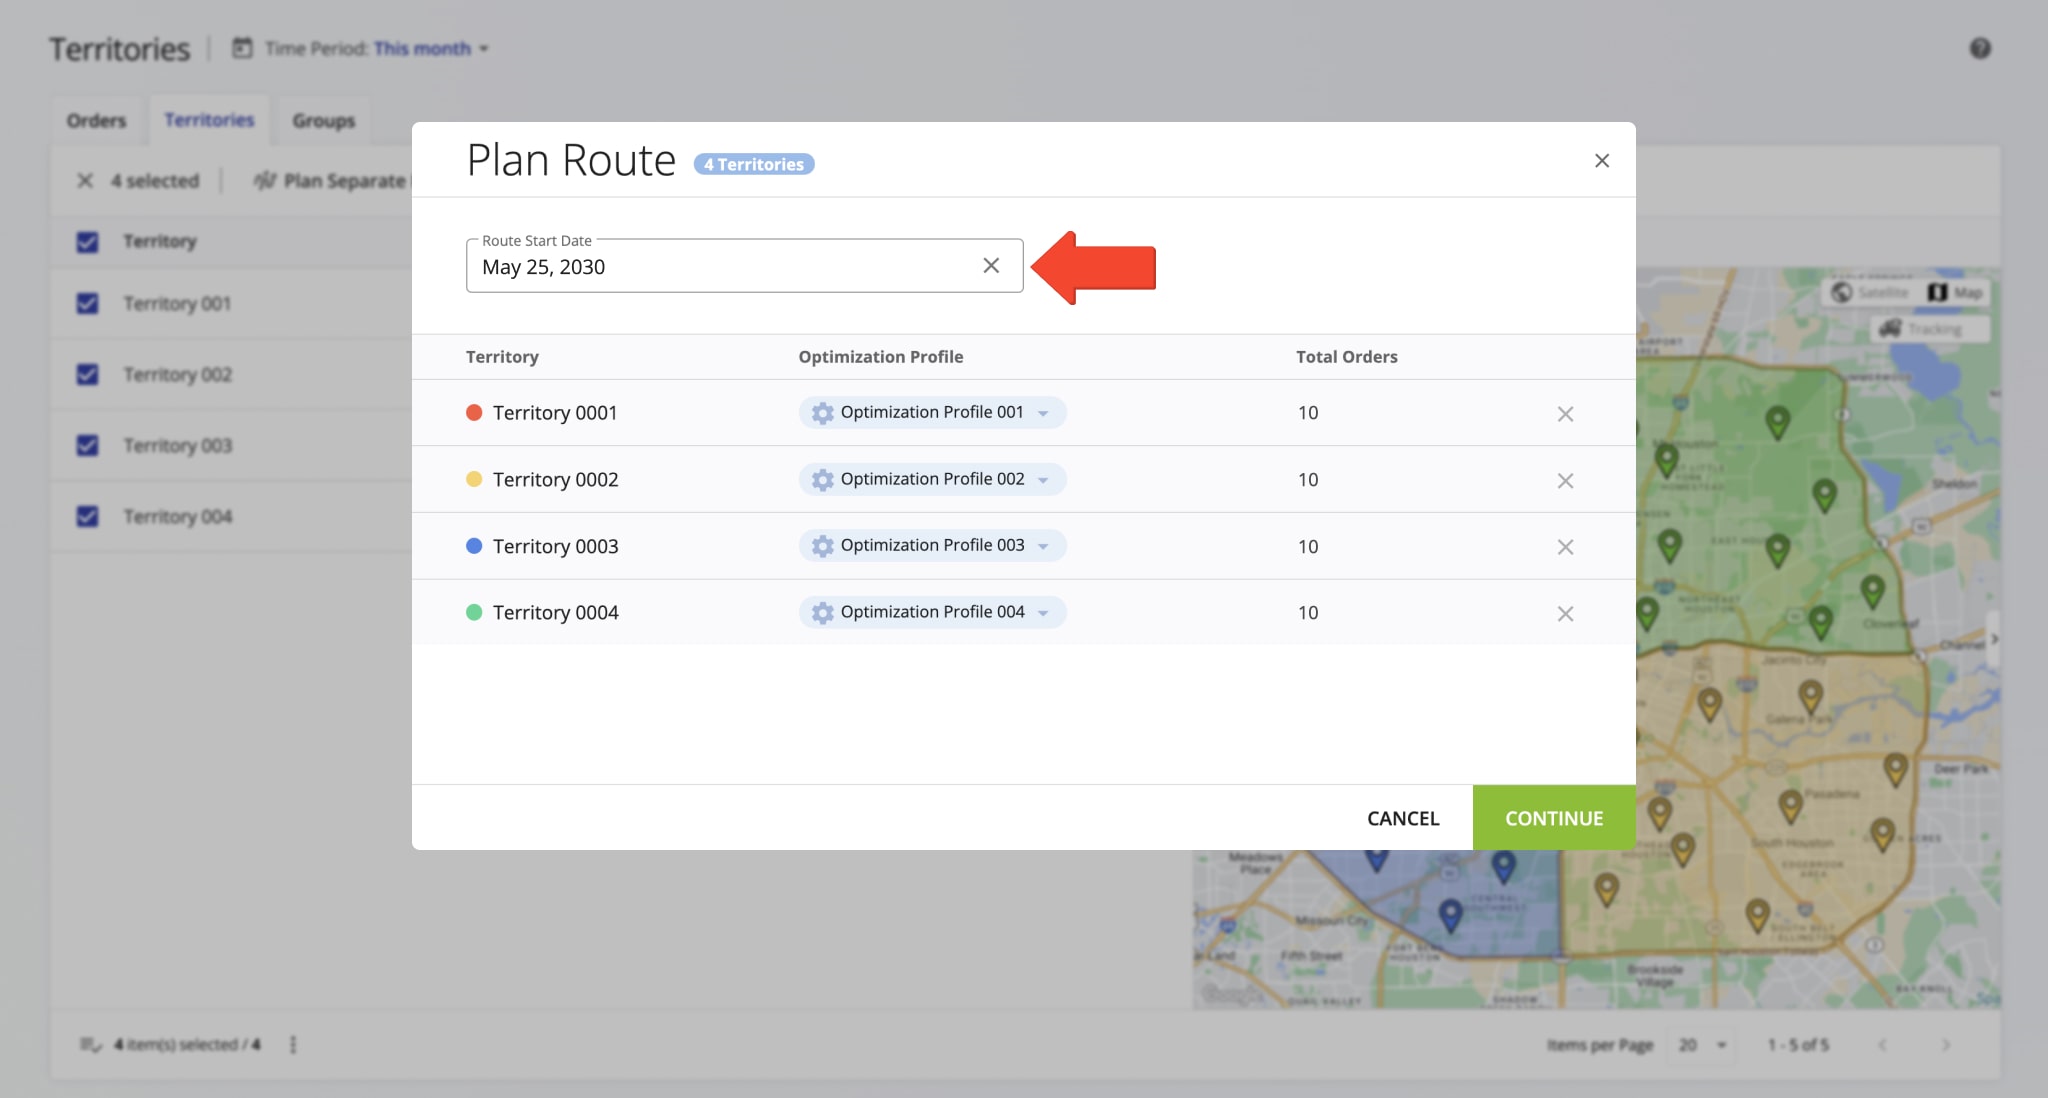
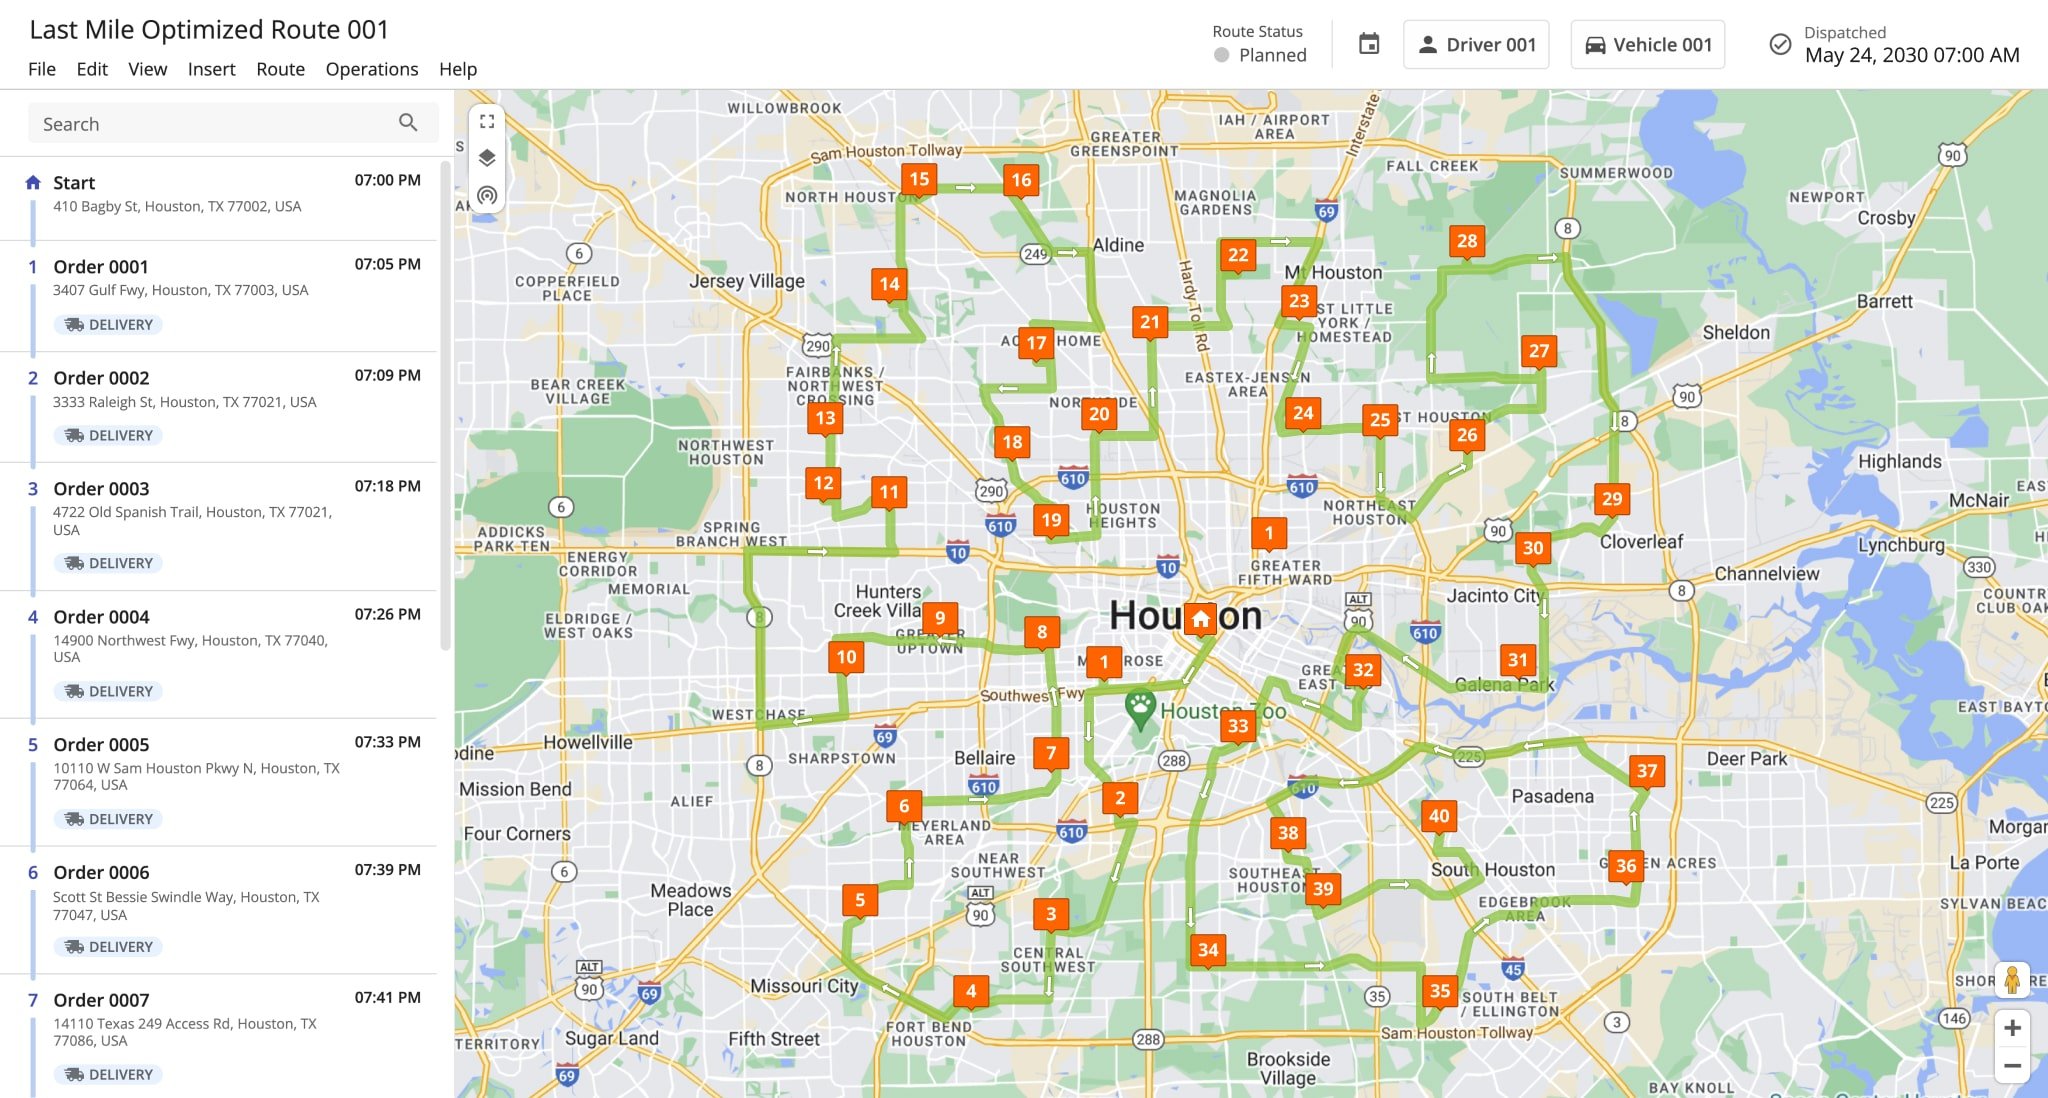
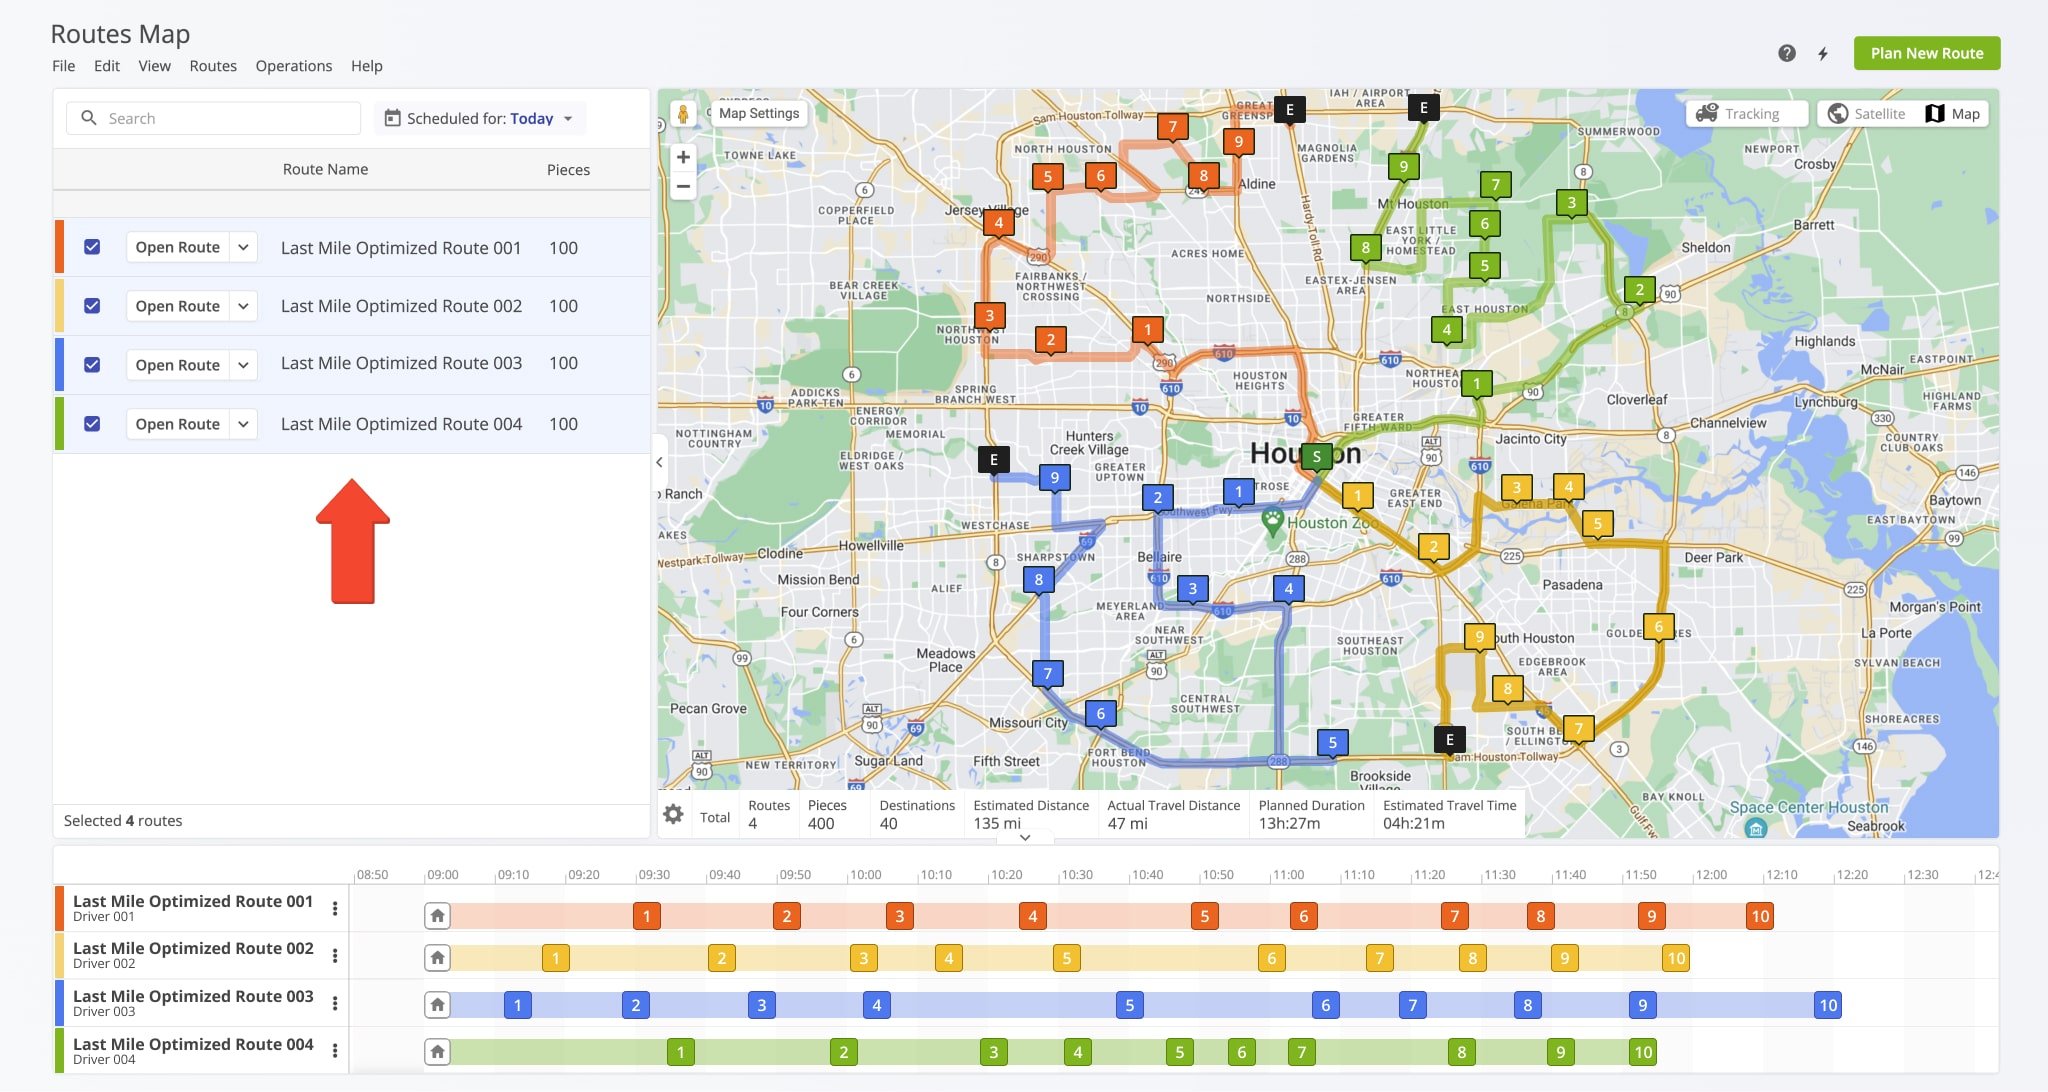
Route4Me will then optimize one or multiple routes for each selected Territory without overlapping borders. Routes are planned according to each Territory’s assigned Optimization Profile.
Depending on the Profile, the system may plan one or several routes per Territory. When multiple routes are optimized, they automatically open on Route4Me’s Routes Map, where you can simultaneously view and manage them.
The Orders Map also lets you plan routes for multiple Order Territories without crossing borders. To do this, select the desired territories by checking their boxes, click the “Bulk Actions” button, and choose “Plan Individual Routes With Selected“.
Route4Me will then open the Route Planning page, import the orders, and create separate optimized routes for each Territory. Once planned, these routes open automatically on the Routes Map.
Dispatch Routes To Drivers And Track Order Progress
You can dispatch optimized routes automatically or manually. When using Optimization Profiles, the assigned driver and vehicle are automatically assigned to a route. To dispatch manually, assign a driver and/or vehicle to the route.
Once assigned, the driver can complete the route using Route4Me’s Android Route Planning App or iPhone Route Planning App, with order statuses updating in real time as the driver progresses.
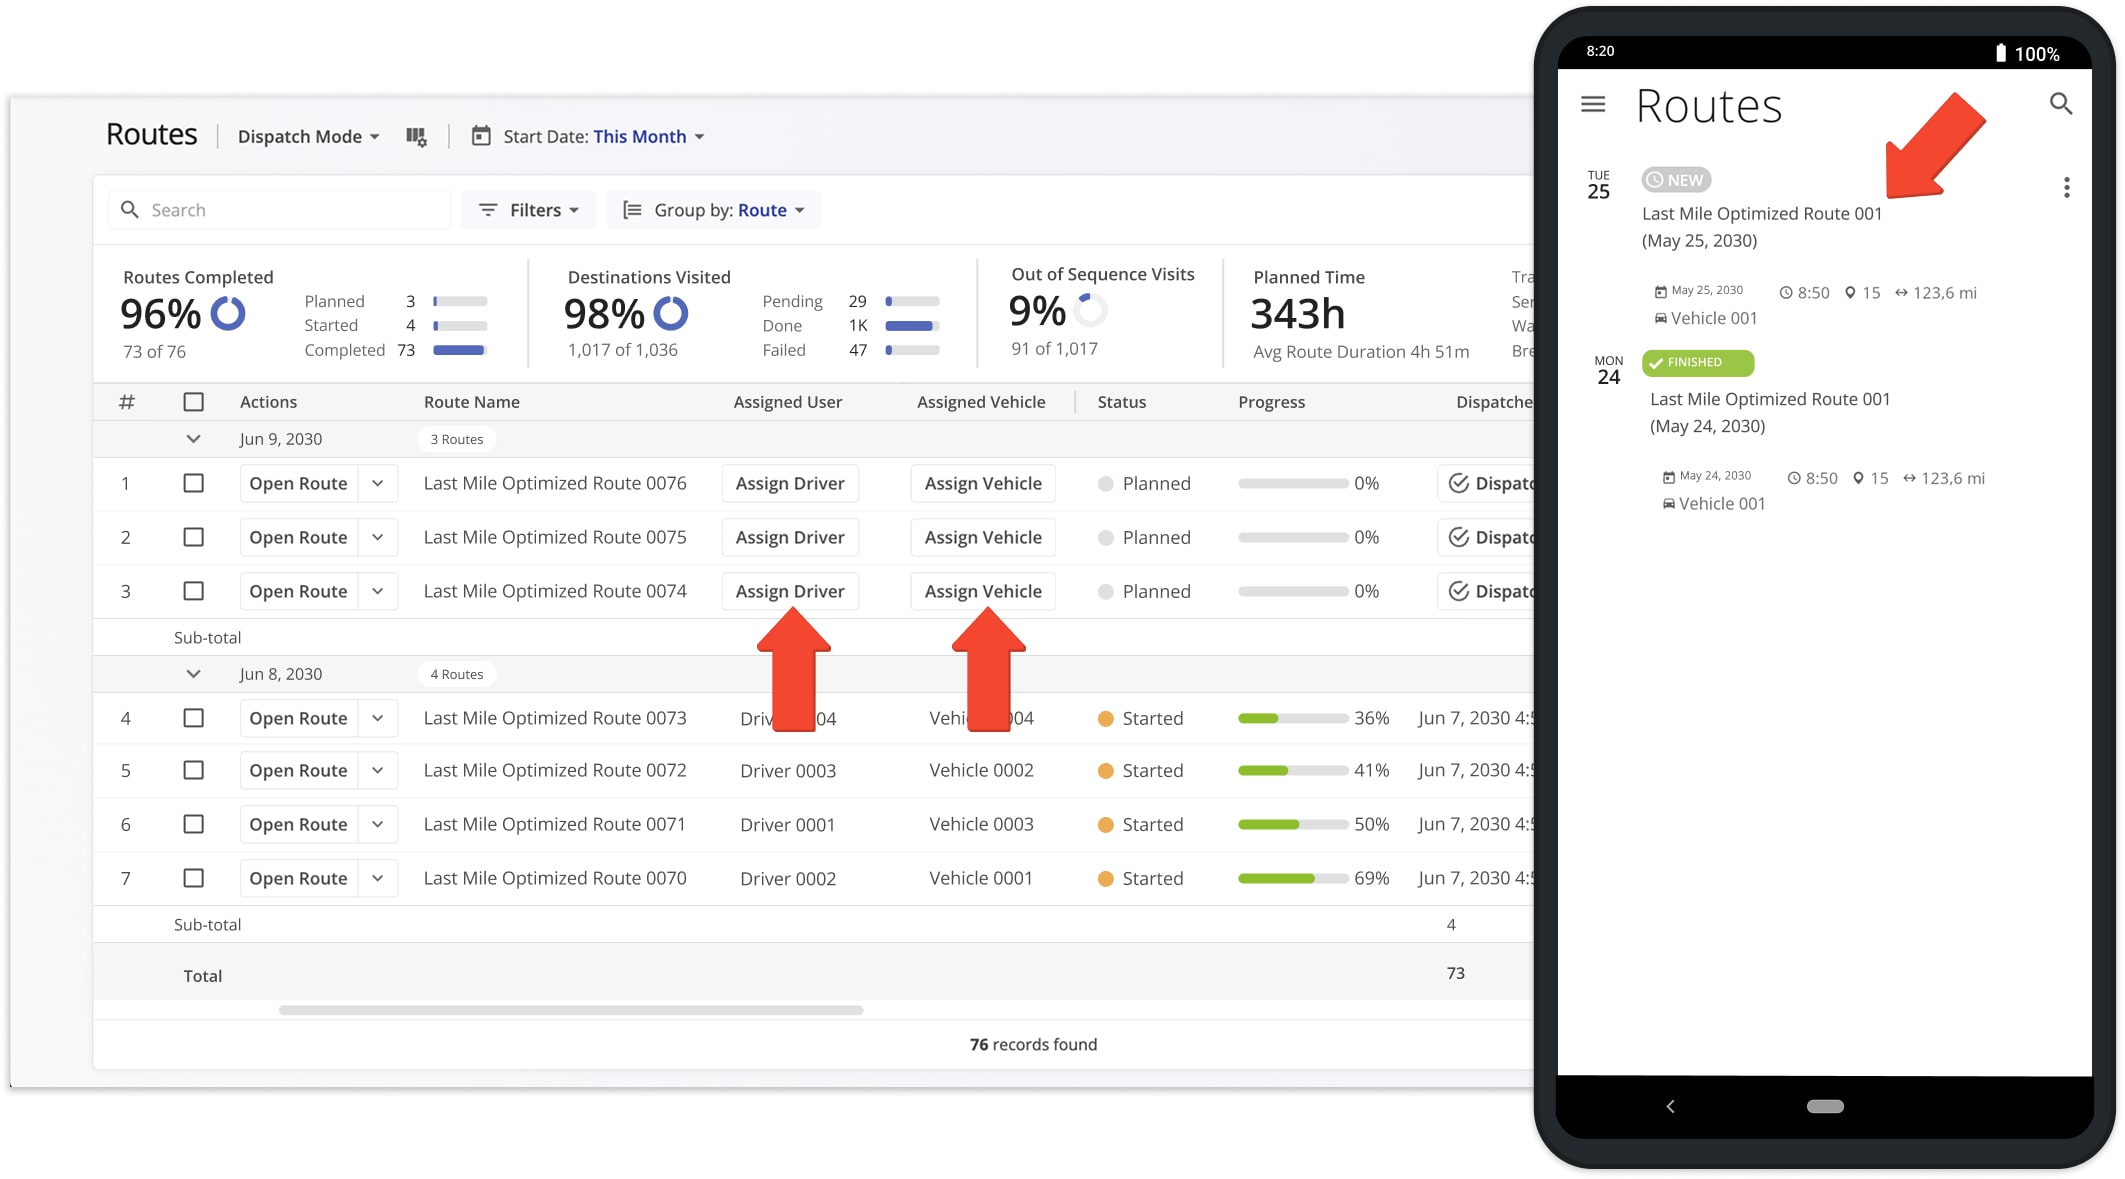
Once an order is added to a route, the route is dispatched to the driver, who uses Route4Me’s Mobile Driver App to load, deliver, and complete the order.
Each status update made by the driver automatically updates both the route progress and the order’s status in your Orders List. Completed orders are assigned the “Done” status.
NOTE: Learn more about Route4Me’s Delivery System Order Statuses and Order Lifecycle.
Visit Route4Me's Marketplace to Check out Associated Modules:
- Operations
Advanced Team Management Add-On
- Operations
Custom Data Add-On
About author: Kristian Andreev
Kristian is a Technical Writer at Route4Me. With over a decade of experience in writing and localization, he's an expert at communicating complex technical data in a clear, concise, and user-friendly way. Passionate about bridging the gap between engineers and users, he specializes in creating documentation to streamline onboarding, enhance product usability, and support global teams on the path to success.