Plan Routes – Multi-Stop Route Planner App For Independent Drivers
Route4Me’s multi-stop route planner app for iOS and Android helps you quickly plan, optimize, and complete routes. You can add or import addresses, schedule stops, and apply optimization settings to build faster, more cost-efficient routes for deliveries, field service, or sales. The app also tracks progress in real time, captures proof of delivery or service, and offers detailed KPIs to measure performance. With built-in voice-guided navigation, you’ll manage every route smoothly from start to finish.

NOTE: Features may vary between iPhone and Android devices depending on your account settings. Contact Route4Me Support to enable specific features, and review your subscription type to see all supported functions.
Table of Contents
Configure Route Settings, Optimization Types, And Travel Modes
To start planning a new route, set your route and optimization preferences. Adjust settings and re-optimize the route at any time.
Schedule A Multi-Stop Route – Route Start Time And Date
To schedule a new route, tap “Add New Route” in the main menu. You can also go to “View All Routes” and select “Plan New Route“.
Next, enter a name for your route and complete all required fields. Then, to set a date and time, tap “Start Time” in the iOS app or “Route Schedule” in the Android app.

Optimization Settings – Sequence Stops And Plan Route
After naming and scheduling your route, you can enable or disable “Route Optimization“, which automatically sequences your addresses. To enable it, tap “Route Optimization” and switch on the “Enable Route Optimization” toggle.
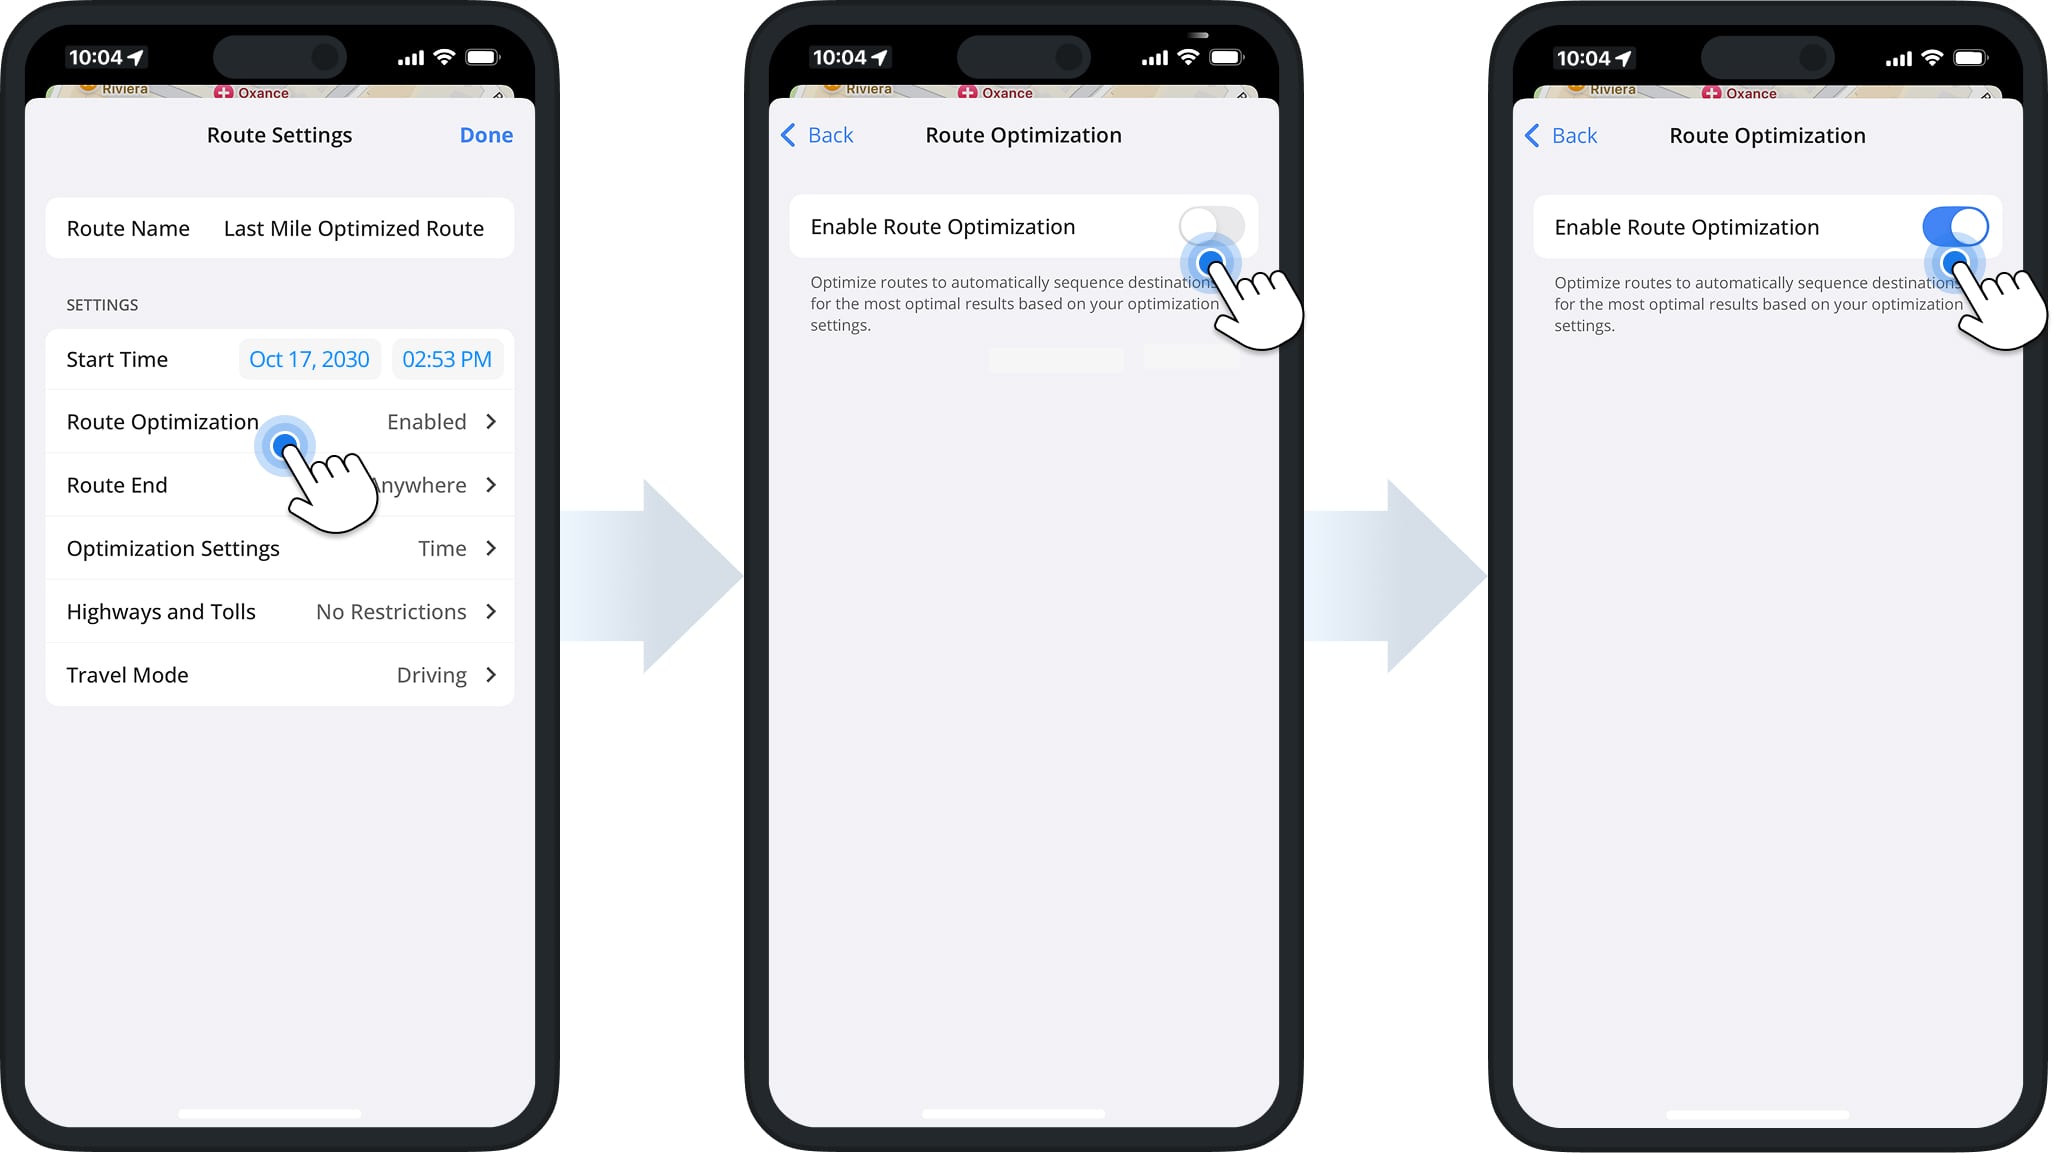
When you enable Route Optimization, Route4Me automatically arranges your addresses in the most efficient visitation order based on your selected optimization setting.
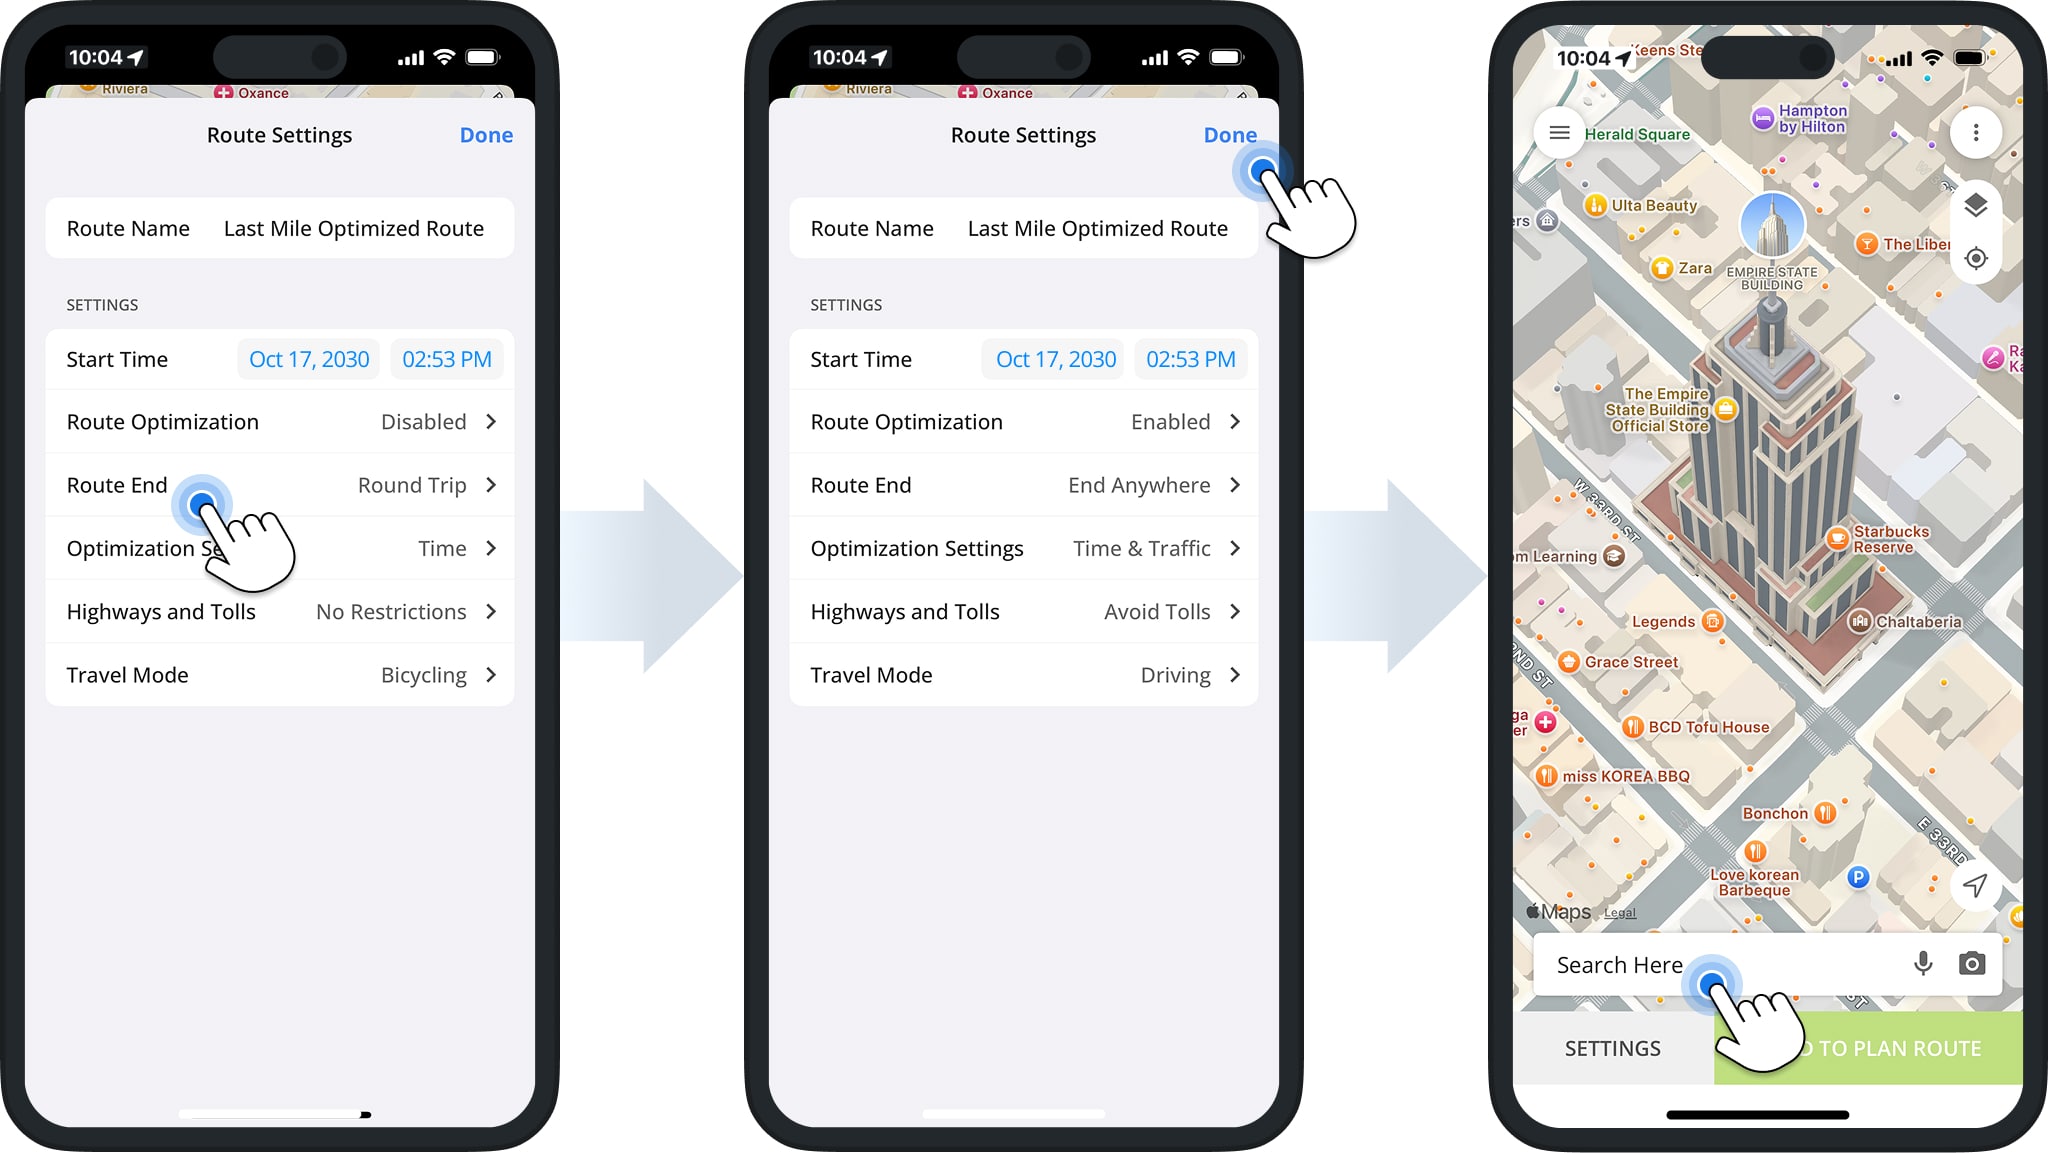
After enabling Route Optimization, select your preferred Route End option, Optimization Settings, Highway and Toll restrictions, and Travel Mode. When finished, tap “Done” in the top-right corner to proceed with adding addresses and stops.
Below, you can learn more about available optimization settings and travel modes.
Plan Routes – Multi-Stop Route Planner App For Independent Drivers
Round Trip
Sequence addresses for the most efficient round trip, starting and ending at the same address.
Travel directions follow the order stops were added, starting and ending at the same address.
End Anywhere
Sequence addresses for optimal order and end at the most efficient stop.
Travel directions follow the order stops were added, ending at the last added stop.
Lock Last Destination
Sequence addresses for optimal order, ending at the last added stop.
Travel directions follow the order stops were added, ending at the last added stop.
Shortest Time
Sequence addresses to minimize travel time, not accounting for current traffic.
Travel directions follow the order stops were added, calculating travel time not accounting for current traffic.
Shortest Travel Time with Traffic
Sequence addresses to minimize travel time, accounting for current traffic.
Travel directions follow the order stops were added, calculating travel time accounting for current traffic.
Avoid Highways
Sequence addresses while avoiding highways wherever possible.
Travel directions follow the order stops were added, without avoiding highways.
Avoid Tolls
Sequence addresses while avoiding toll roads wherever possible.
Travel directions follow the order stops were added, without avoiding toll roads.
Avoid Highways & Tolls
equence addresses while avoiding both highways and toll roads.
Travel directions follow the order stops were added, without avoiding highways or tolls.
No Restrictions
Sequence addresses with no restrictions on highways or tolls.
Travel directions follow the order stops were added, with no restrictions.
Driving
Generate driving directions, regardless of stop sequence.
Generate driving directions, regardless of stop sequence.
Bicycling
Generate bicycling directions, regardless of stop sequence.
Generate bicycling directions, regardless of stop sequence.
Walking
Generate walking directions, regardless of stop sequence.
Generate walking directions, regardless of stop sequence.
Add Or Import Addresses – Plan And Sequence Multi-Stop Routes
After setting your route and optimization preferences, you can start adding addresses individually or import them in bulk. You can also at any time add or import additional addresses into routes that have already been planned or optimized.
Current Location – Use Your Location As Route Start Or Route Stop
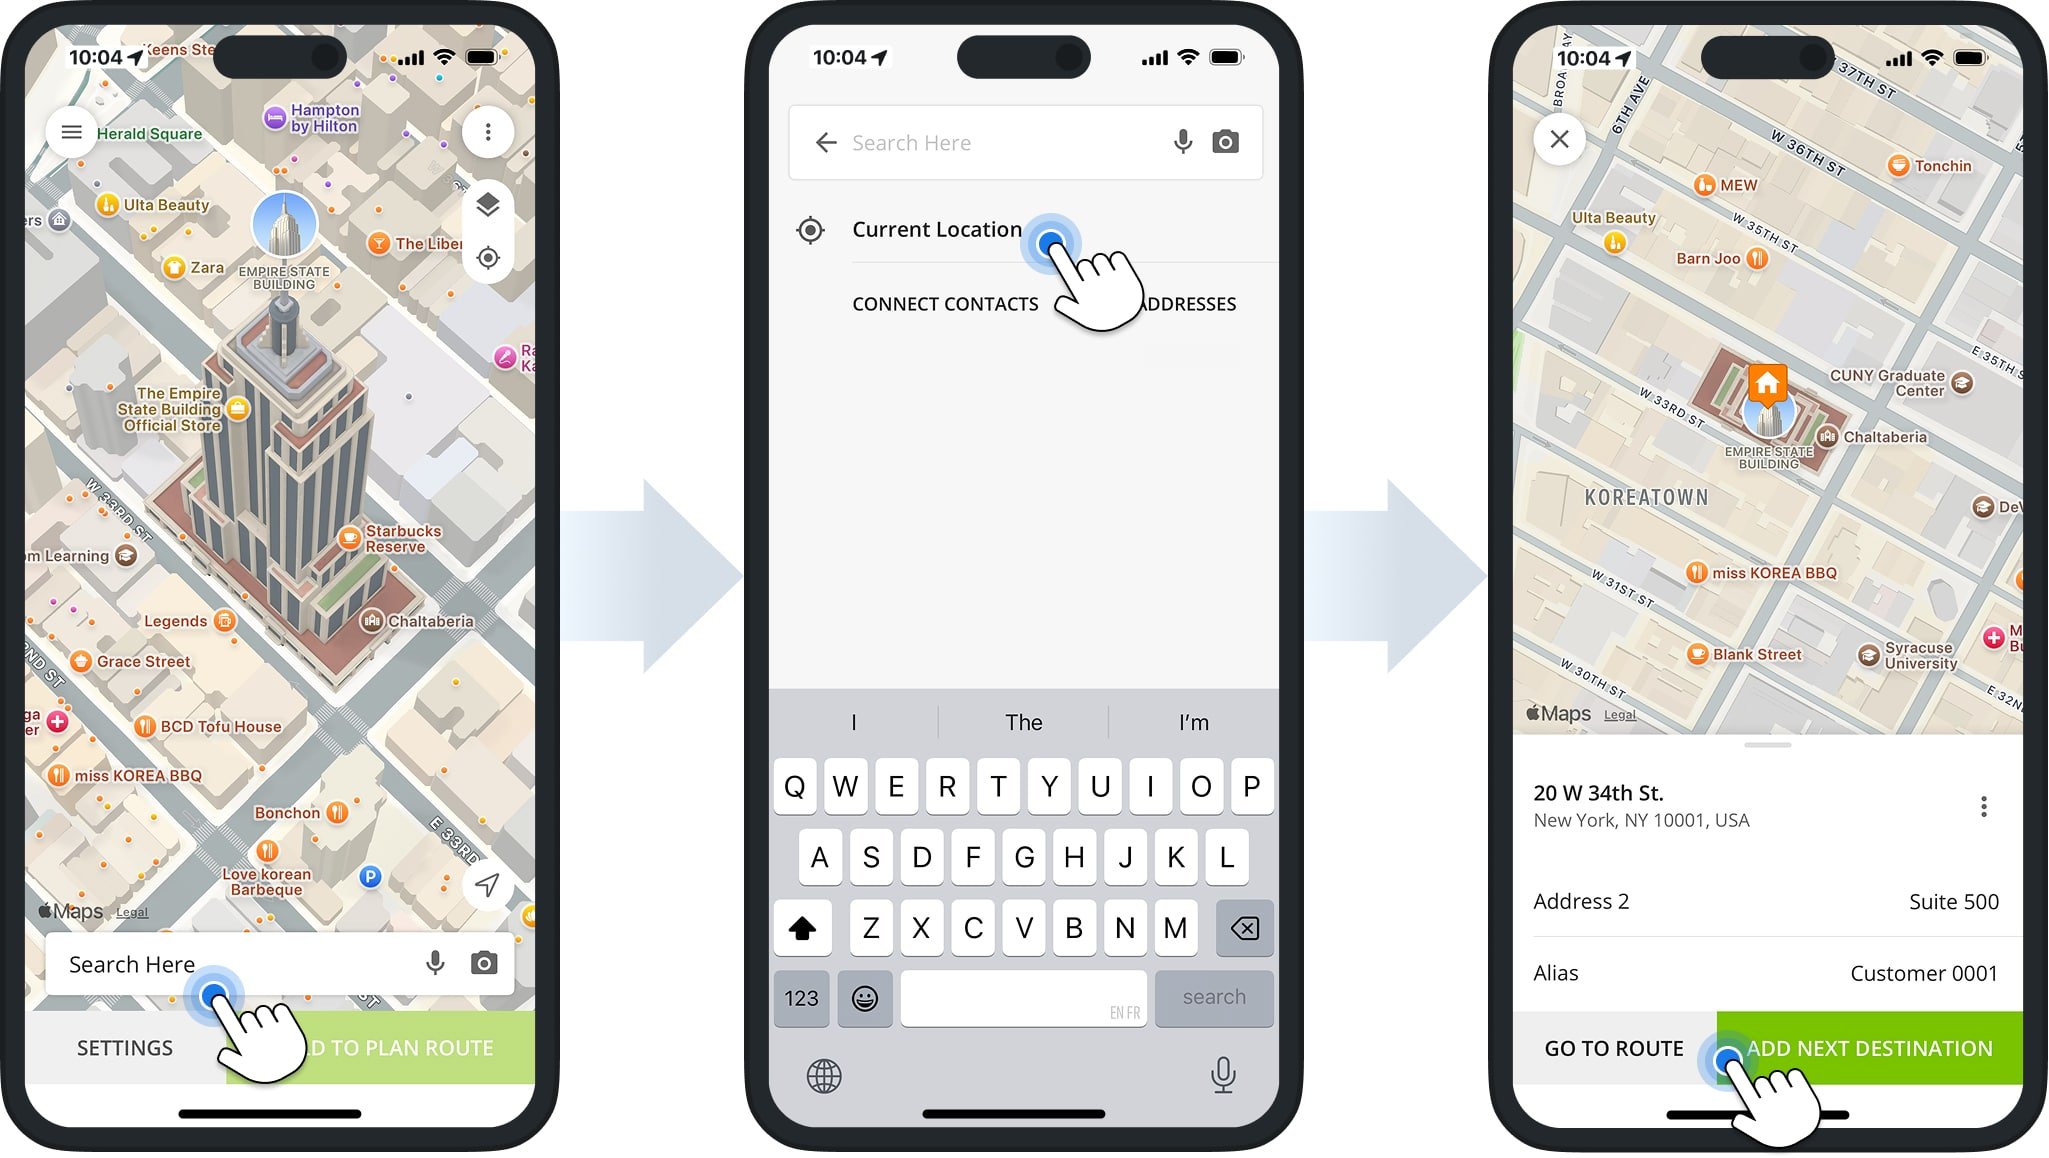
You can add your current location as the route’s start point. To do this, tap the “Search Here” field, then select “Current Location“. Choose the suggested address and add a custom Alias. Click “Add Next Destination” to continue.
Address Autocomplete – Enter Addresses With Autocomplete And Address Geocoding
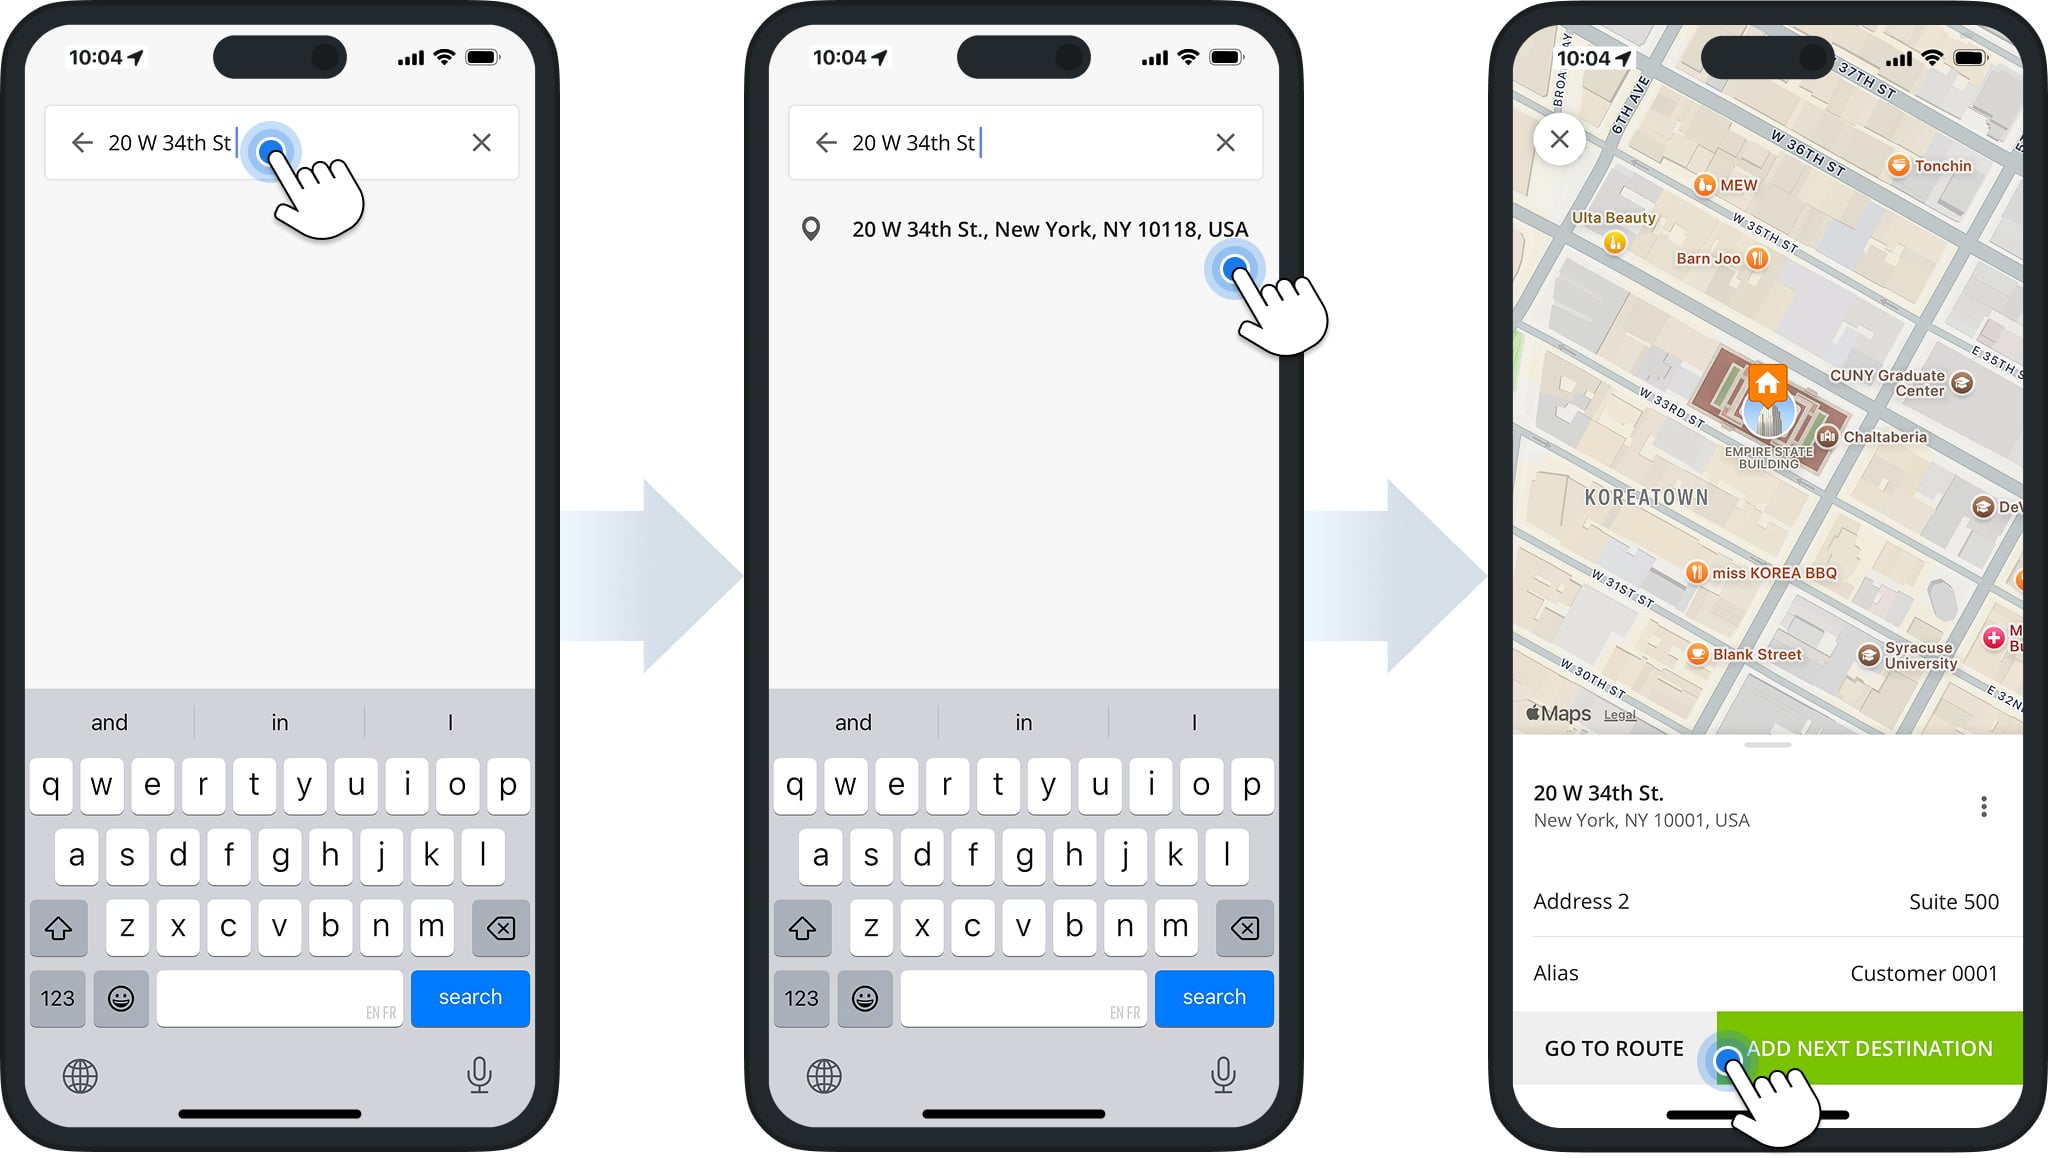
To manually add an address, tap the “Search Here” field and start typing a full or partial address. Route4Me will automatically validate your entry and suggest autocompleted and geocoded options.
After selecting the preferred address, you can add additional stop details, such as a floor or apartment number, the stop’s Alias, the Phone Number, the Destination Type, and the Visit Duration (Service Time).
Voice Dictation – Add Route Stops Using Speech-To-Text
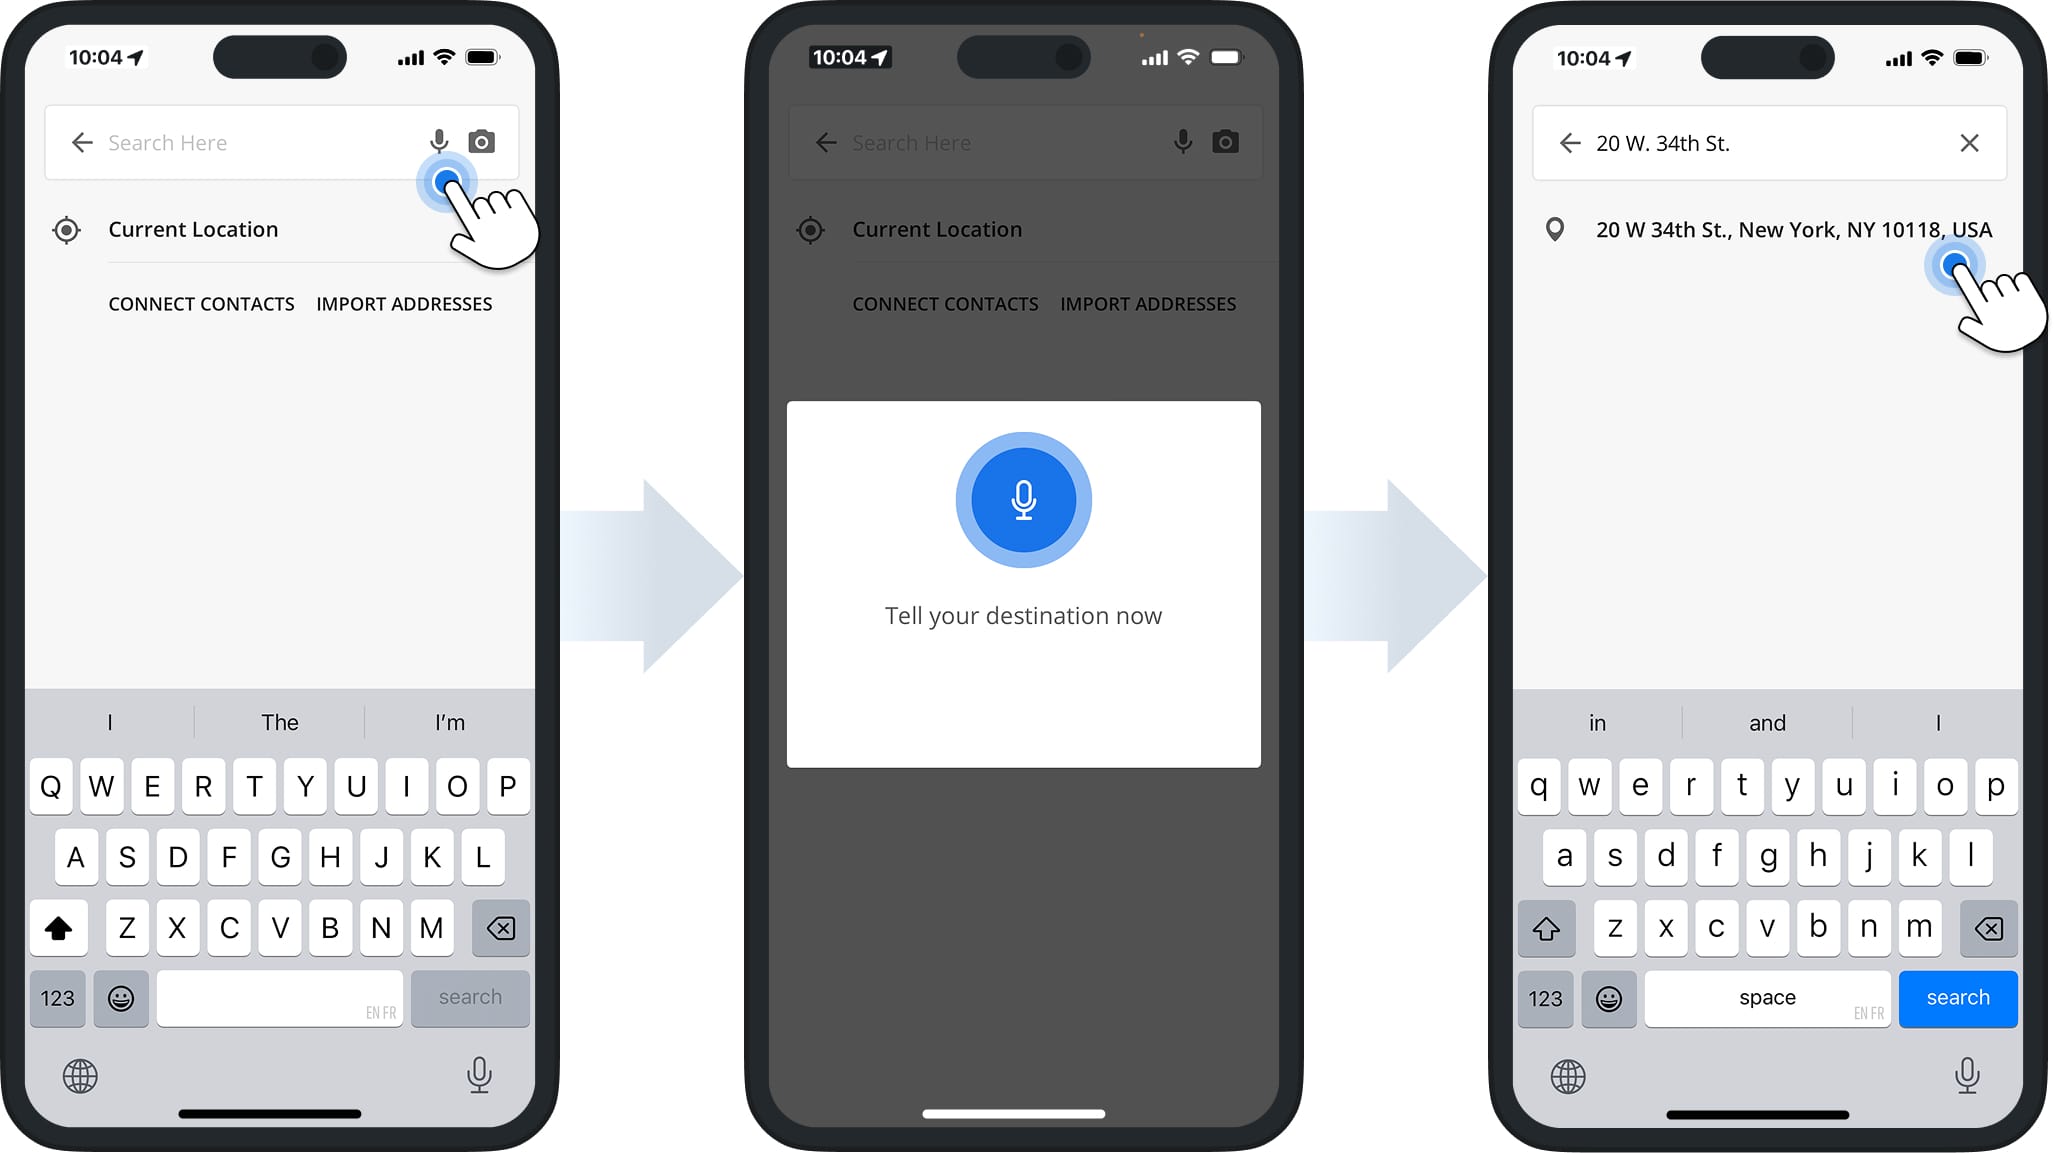
To add addresses using voice dictation, tap the Microphone Icon in the “Search Here” field. Then, dictate a full or partial address, and Route4Me will automatically suggest autocompleted and geocoded options.
After selecting the preferred address, you can add additional stop details, such as a floor or apartment number, the stop’s Alias, the Phone Number, the Destination Type, and the Visit Duration (Service Time).
OCR Address Scanner – Scan Address With Optical Character Recognition Scanner
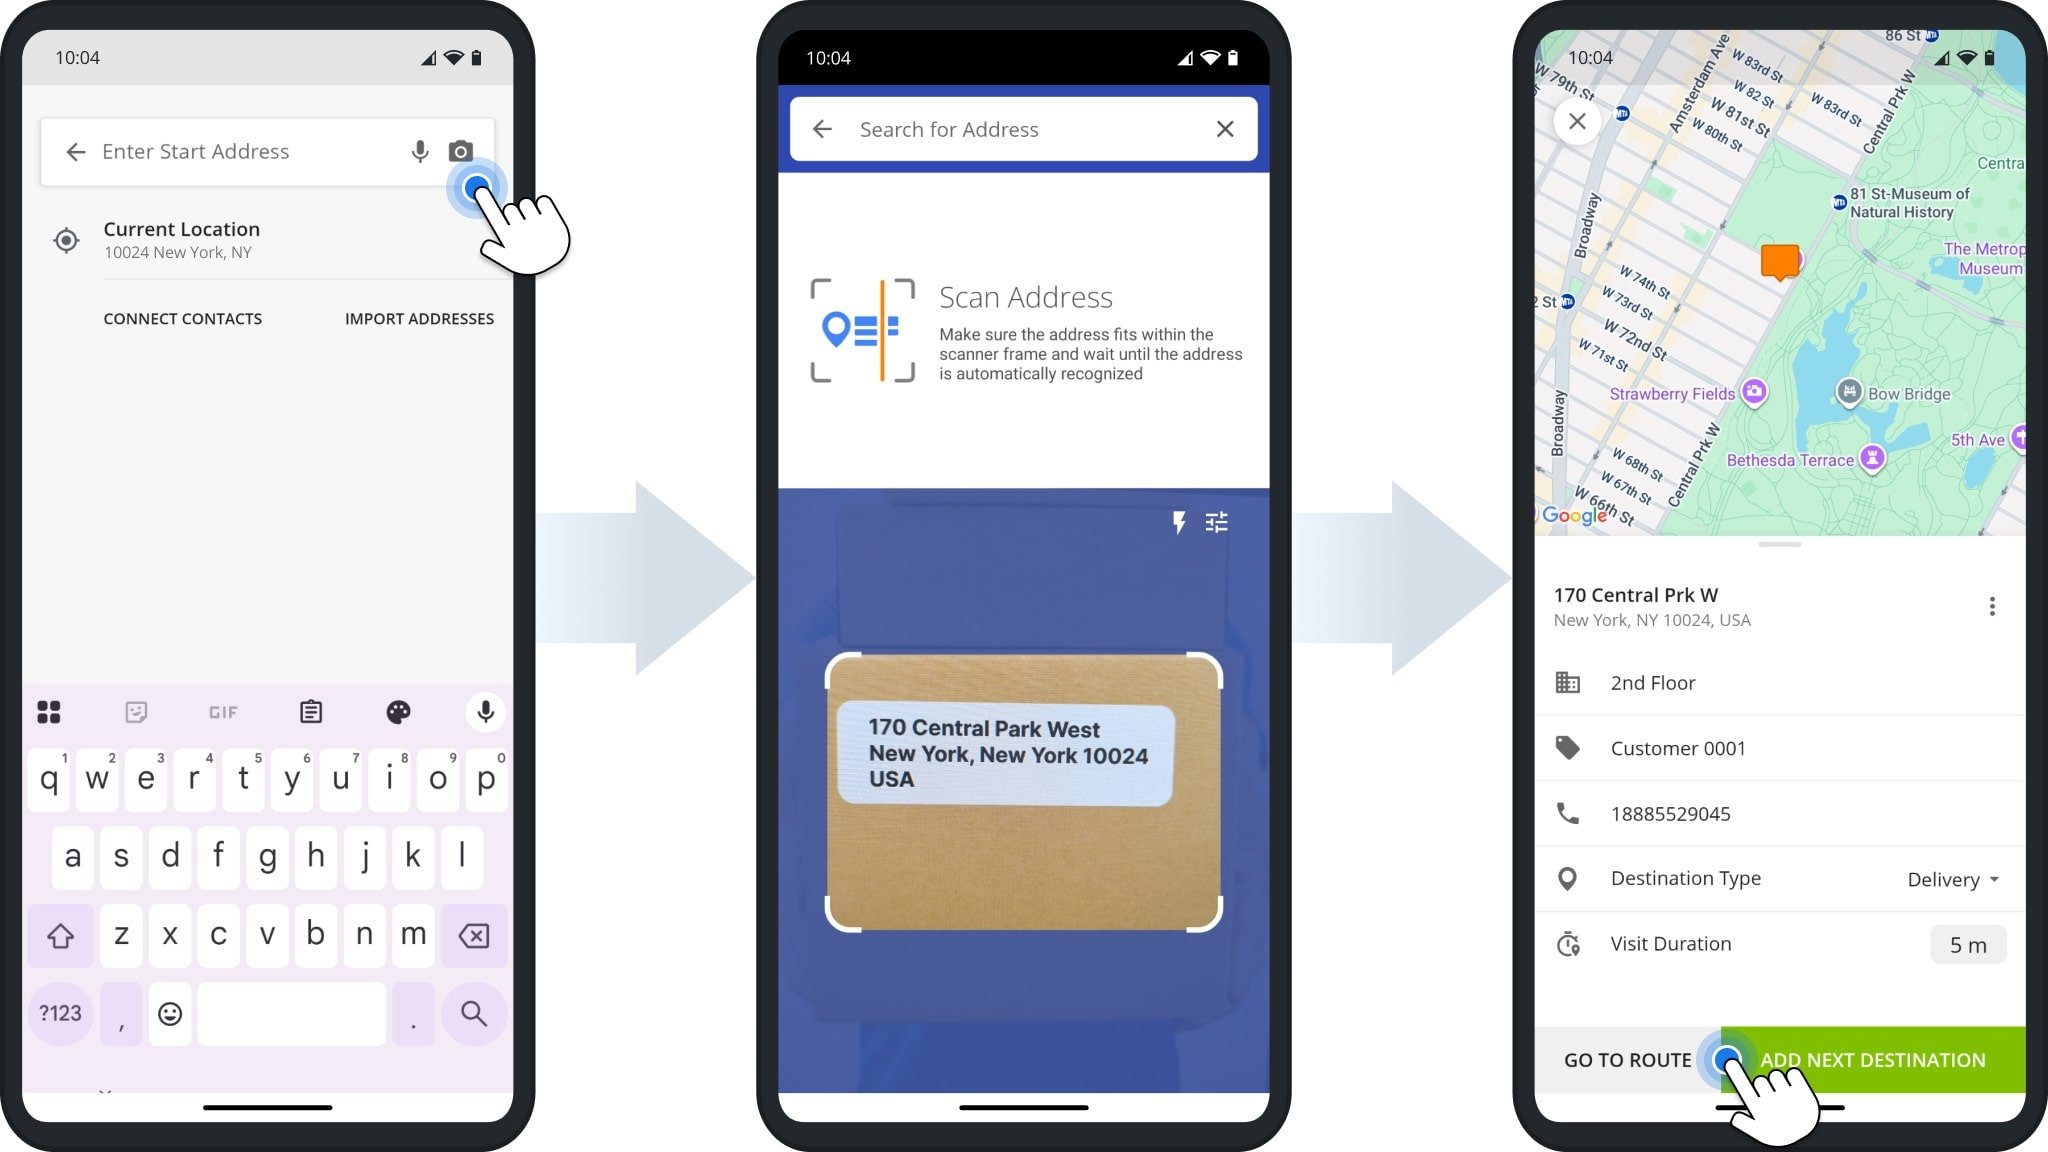
To quickly add addresses without typing, tap the Camera Icon in the “Search Here” field (iOS) or “Enter Address” field (Android). Point your camera at the address to capture it using Route4Me’s OCR Address Scanner.
After capturing the address, you can add additional stop details, such as a floor or apartment number, the stop’s Alias, the Phone Number, the Destination Type, and the Visit Duration (Service Time).
Phone Contacts – Add Route Addresses Using Contacts
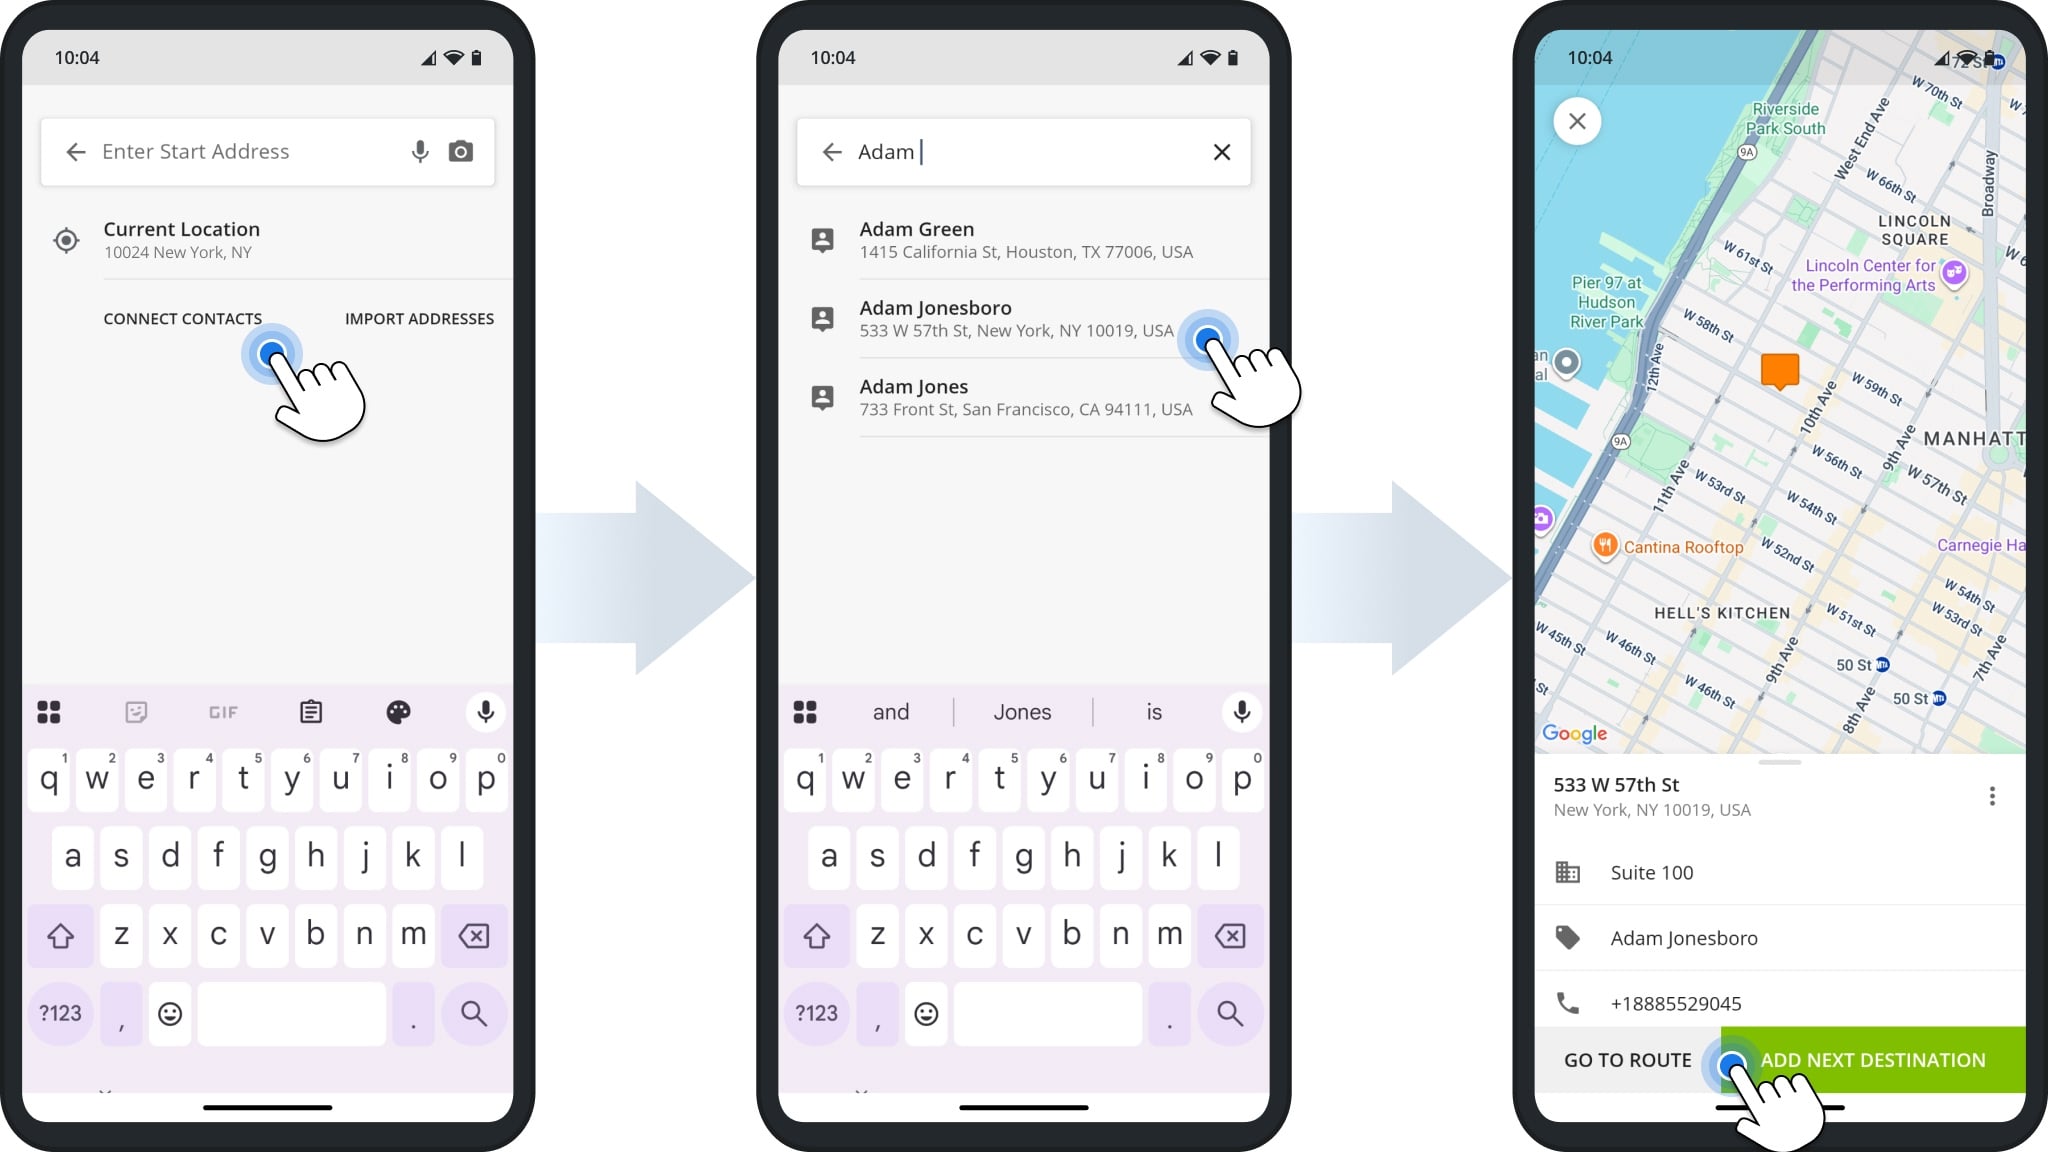
To add addresses from your device’s contacts, tap the “Search Here” field (iOS) or “Enter Address” field (Android), then “Connect Contacts“. As you type an address or contact name, Route4Me will automatically suggest available options.
After selecting a contact, the app will automatically add the contact’s Address, Alias, and Phone Number. You can also add additional stop details such as the Destination Type and Visit Duration (Service Time).
Import Addresses – Upload Spreadsheets From iPhone, iCloud, Google Drive, Dropbox
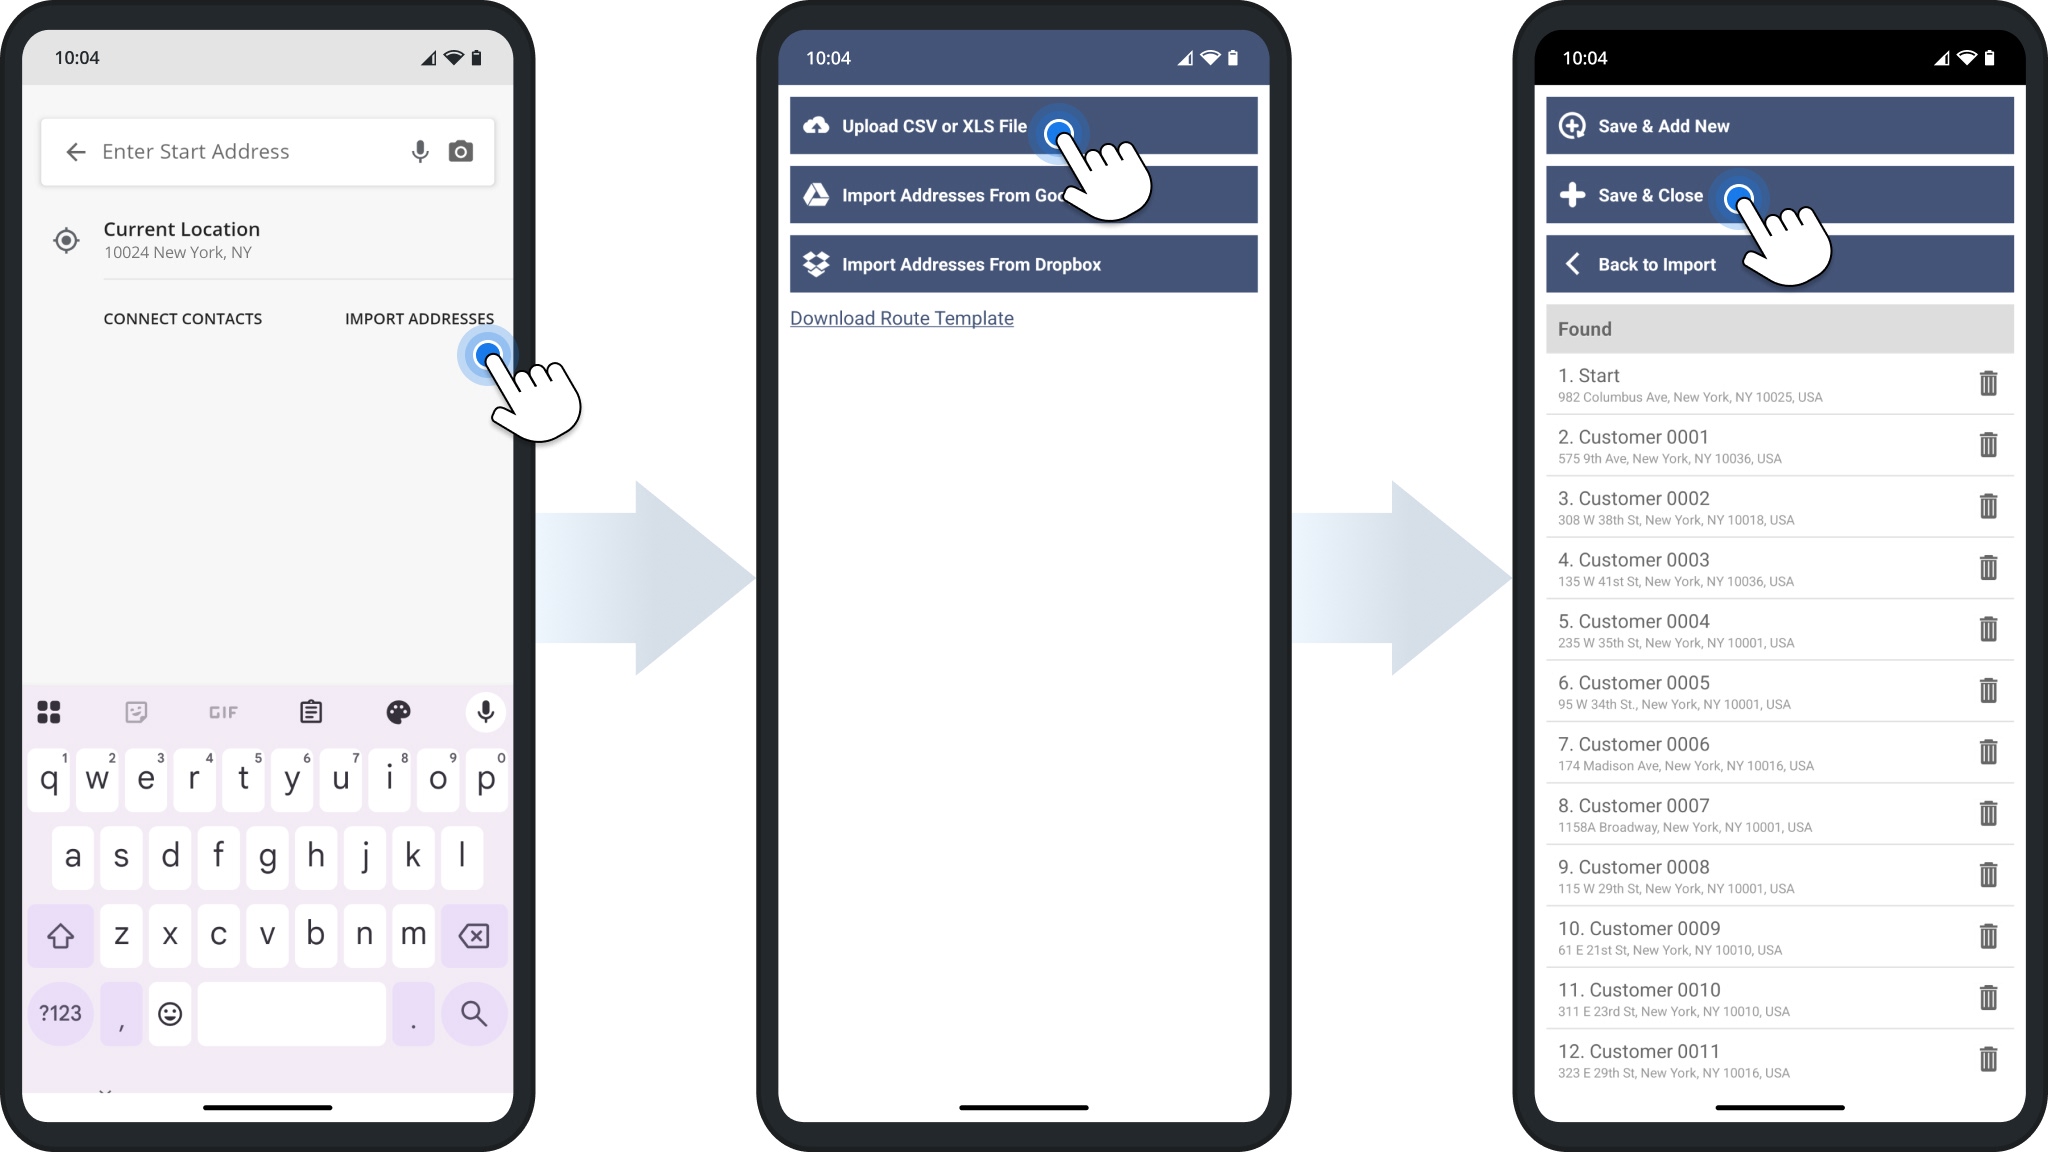
To quickly add multiple addresses, upload a CSV or XLS spreadsheets. Tap the “Search Here” field (iOS) or “Enter Address” field (Android). Then, select “Import Addresses” and choose a spreadsheet from your device, iCloud, Google Drive, or Dropbox.
Once imported, Route4Me will automatically geocode and autocomplete the addresses. Tap “Save & Close” to add them to your route. NOTE: To ensure successful spreadsheet import, see Route4Me’s Spreadsheet Formatting Requirements.
Plan Route And Sequence Added Or Imported Route Addresses
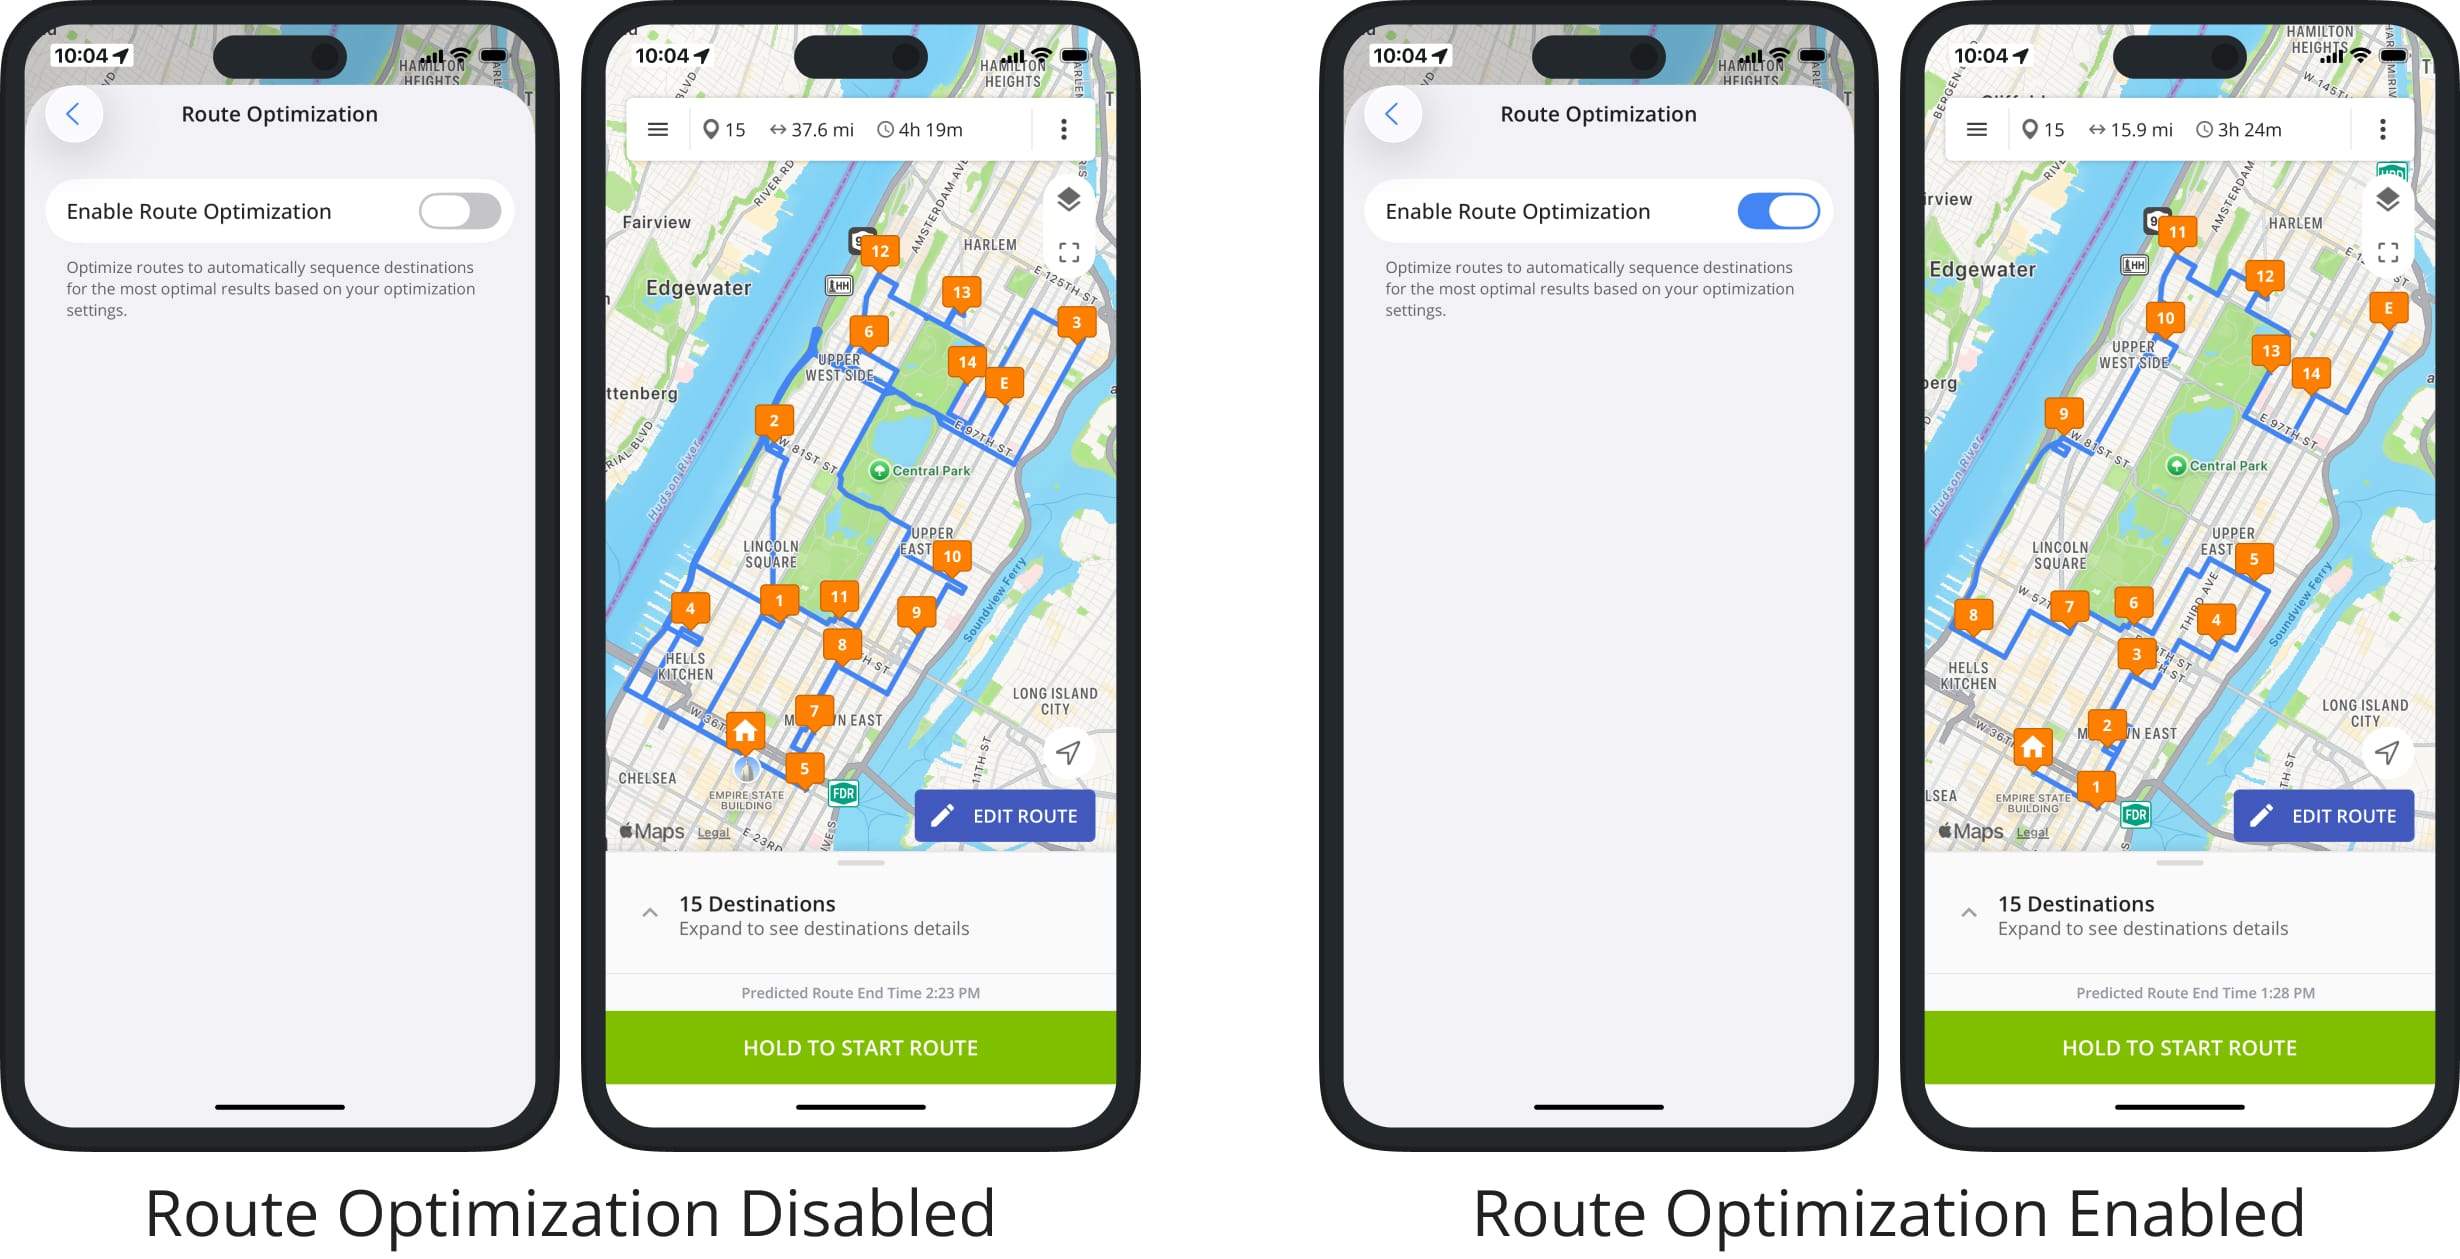
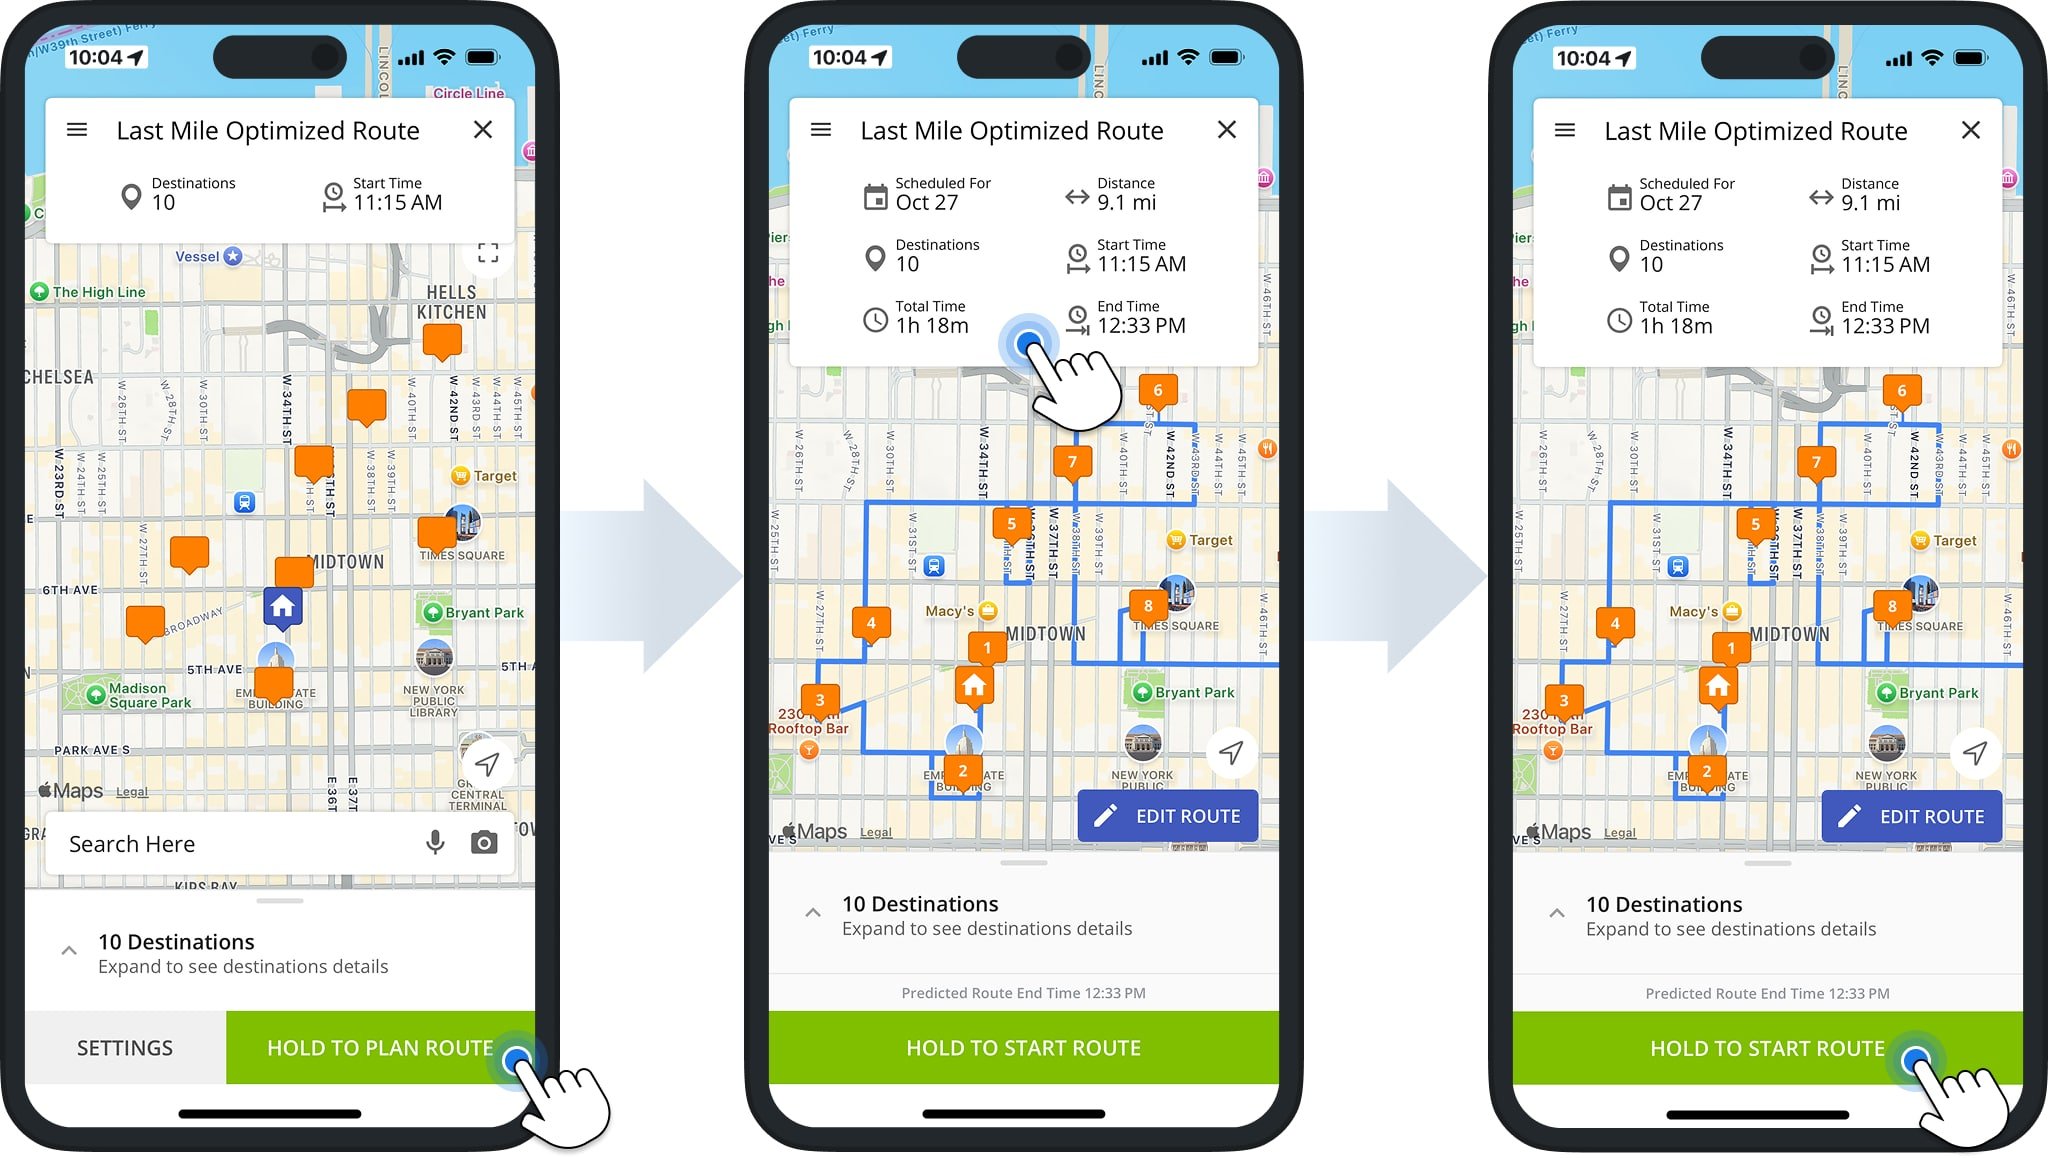
To plan or optimize a route, tap the “Hold To Plan Route” button. If Route Optimization is enabled, Route4Me will automatically sequence all addresses based on your settings. If disabled, the route will follow the order in which addresses were added.
After planning or optimizing, tap the route header to view details such as route duration, distance, and number of stops. You can then start, navigate, and complete the route.
Start, Navigate, And Complete Multi-Address Routes
After planning and optimizing your route, you can start, navigate, and complete it via Route4Me’s integrated GPS voice-guided navigation. Or, if you prefer, you can navigate your route using a third-party GPS app.
While navigating, you can update stop statuses to track progress and completion. You can also attach signatures, photos, notes, and other data to stops as proof of visit, delivery, or service.
Start And Navigate Multi-Address Routes – Using In-App Or Third-Party Navigation
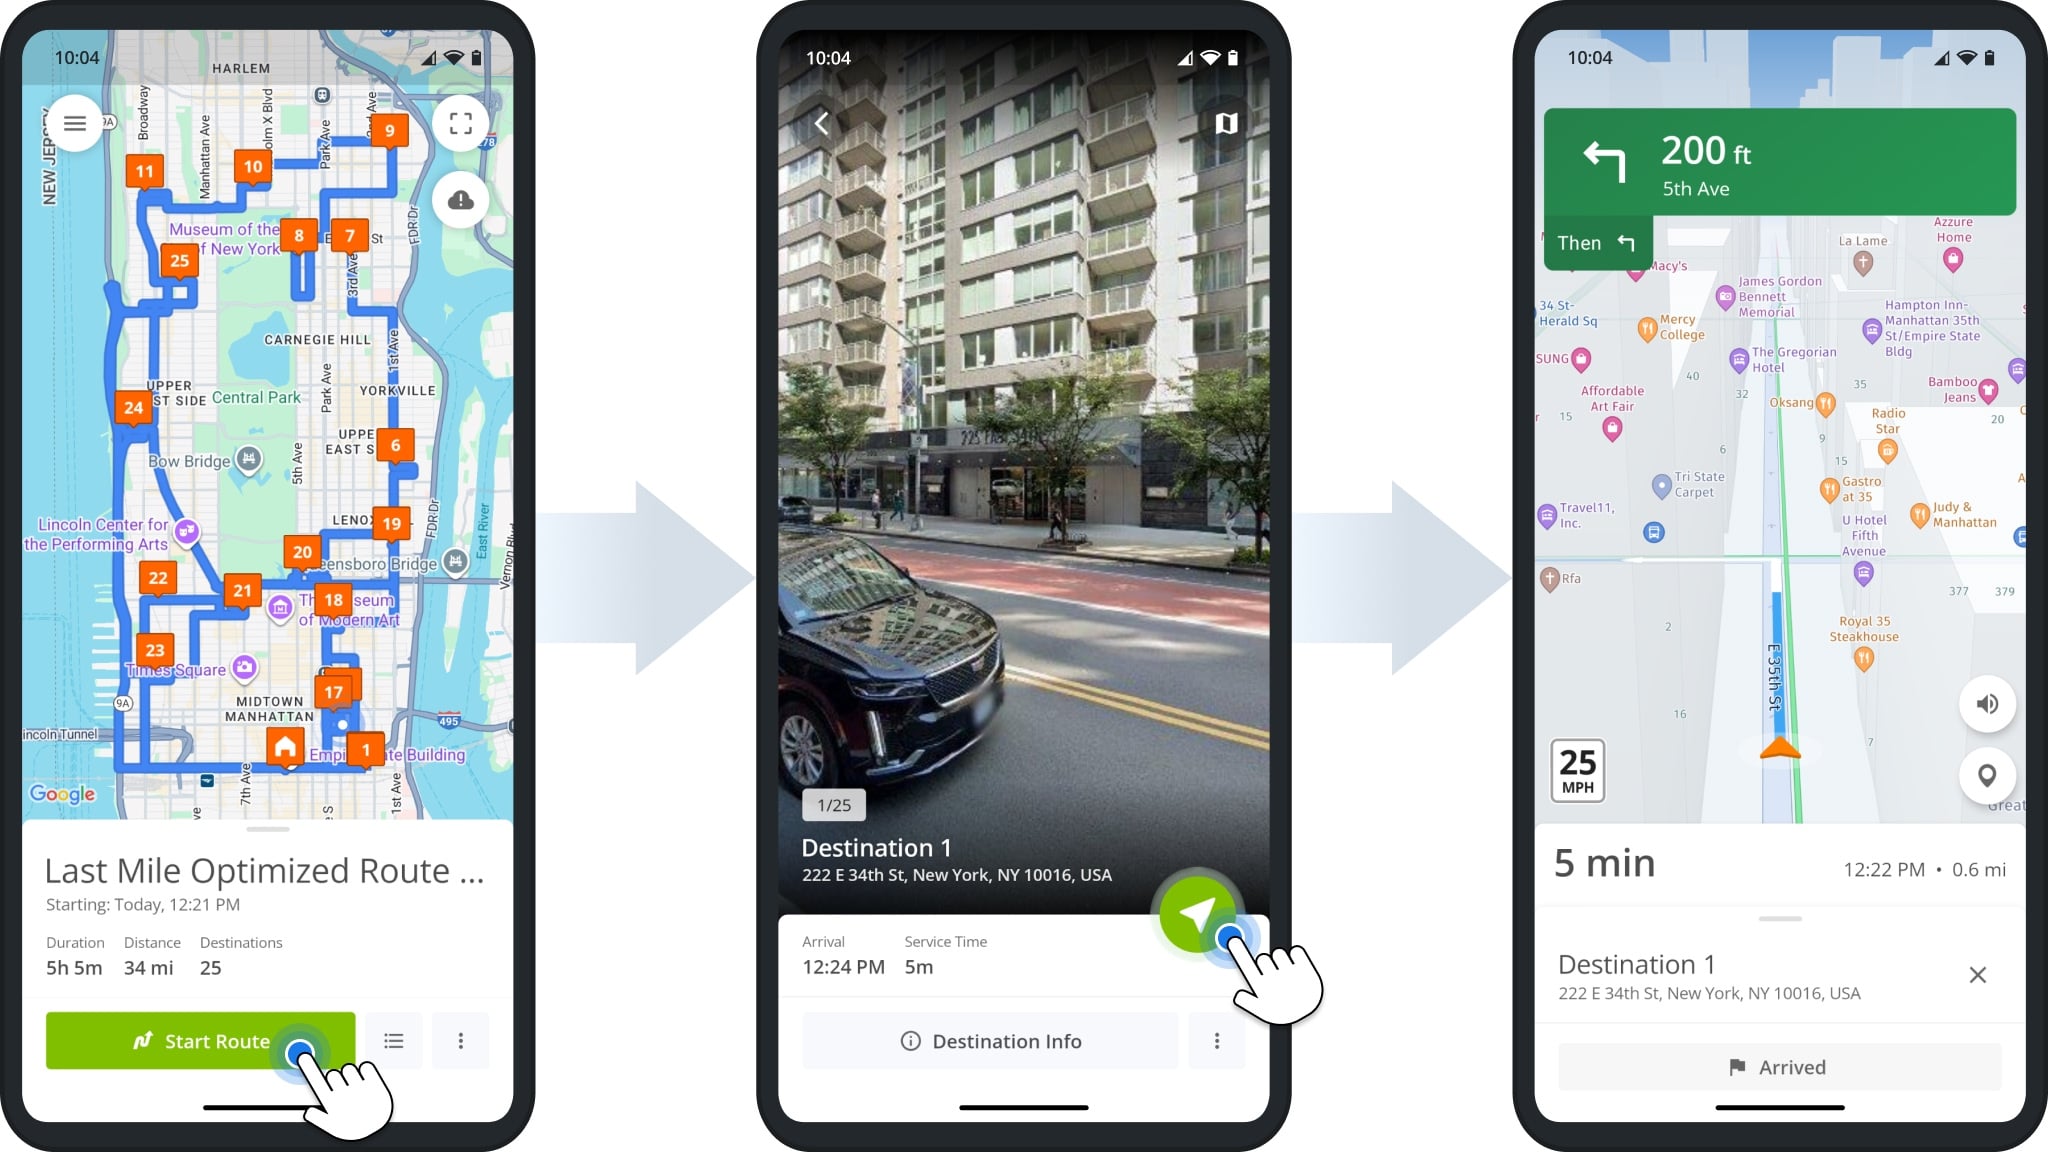
To start your route, tap and hold the “Start Route” button. Then, tap “Navigate” or the Navigate Icon next to the stop where you want to begin.
From your Route Settings, be sure to select “In-App Navigation” to use Route4Me’s integrated voice-guided GPS. Or, if you prefer, choose a third-party navigation app such as Google Maps, Apple Maps, Waze, CoPilot, or Uber.
Use Apple Maps GPS Navigation On Route4Me-Sequenced Routes
To navigate a route using Apple Maps, tap “Navigation App” in the “Default Navigation App” settings. Then, select “Apple Maps“. The app will automatically send the stop’s address to Apple Maps, where you can preview the route and start navigation.

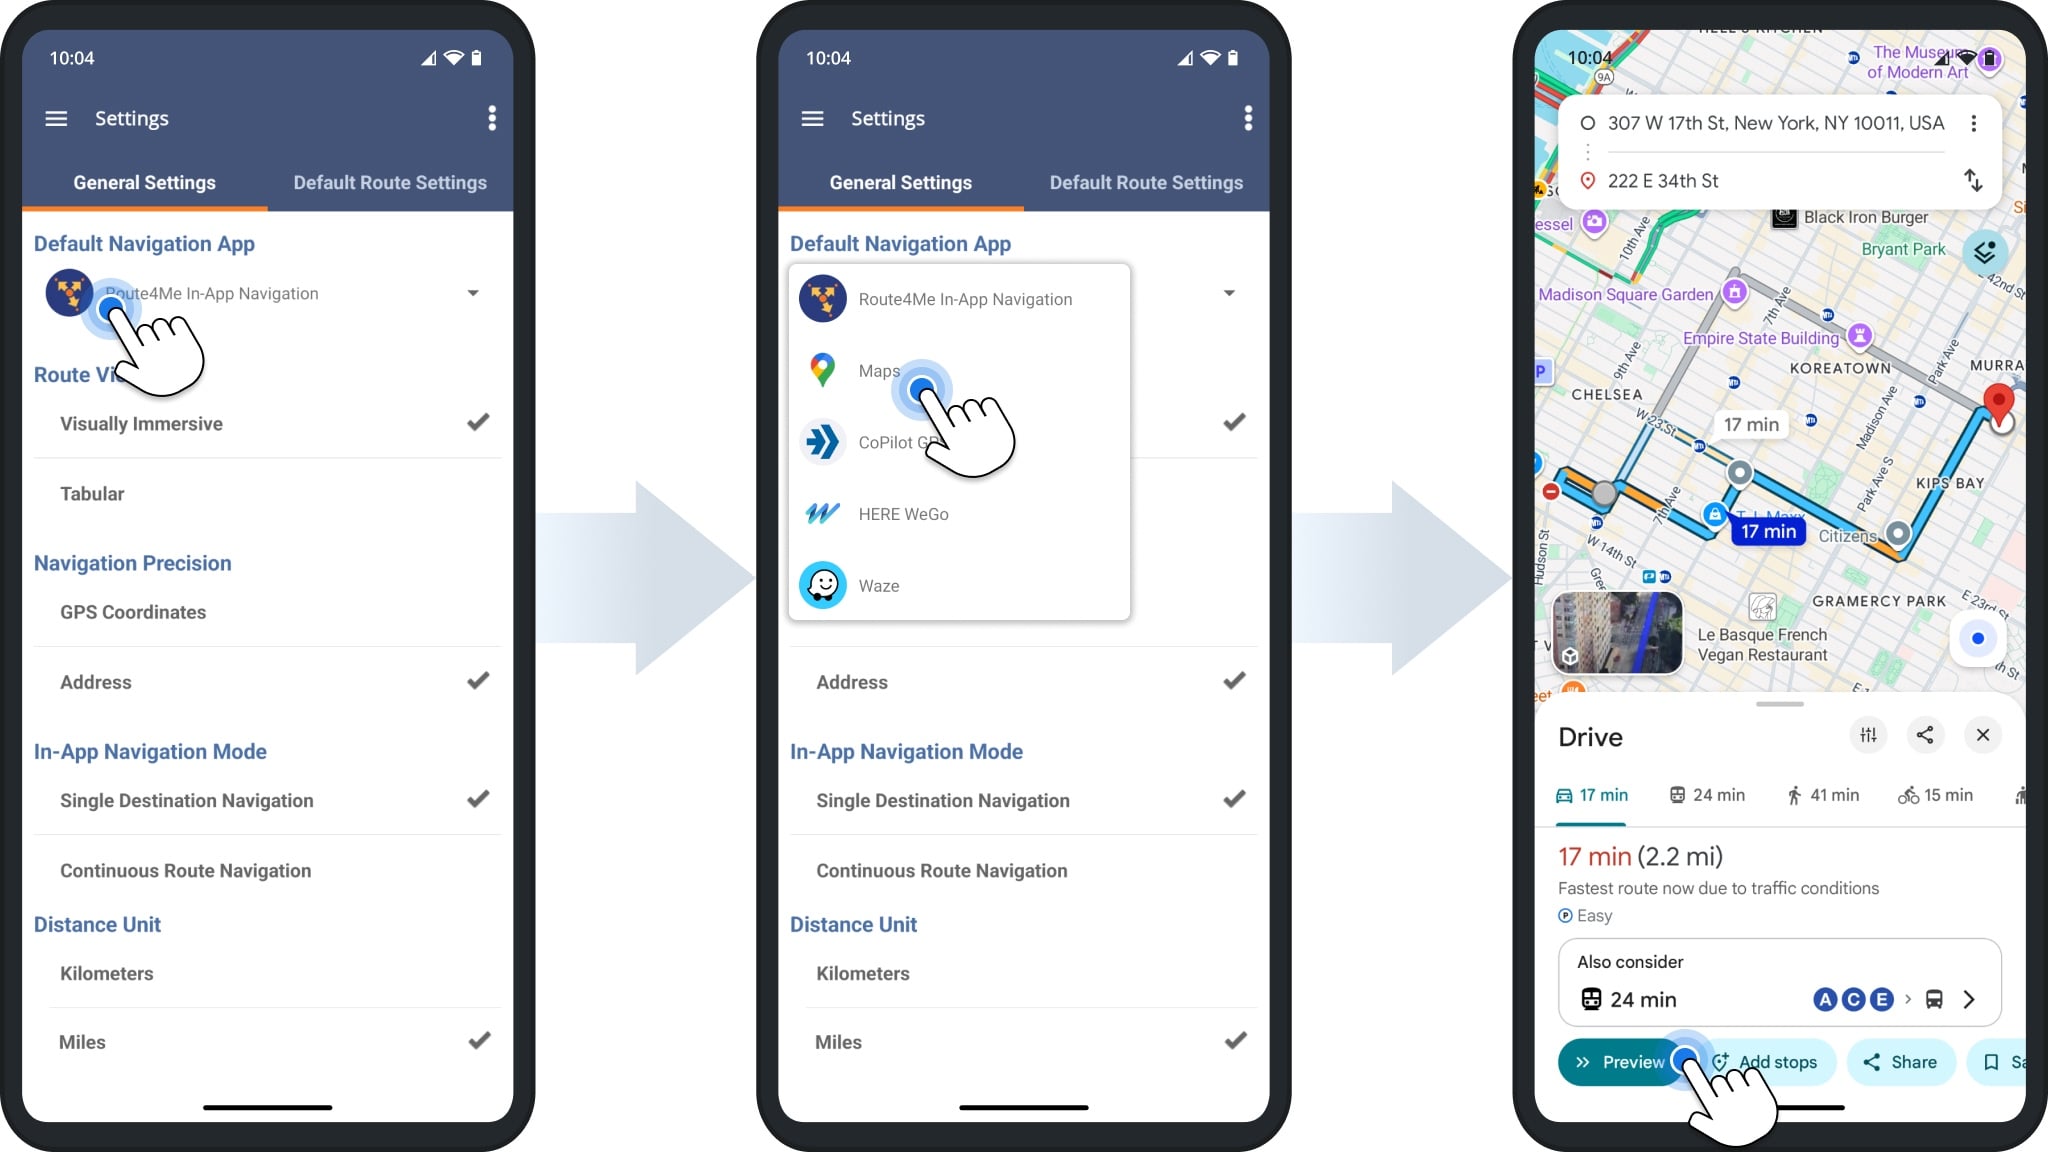
Use Google Maps GPS Navigation On Route4Me-Sequenced Routes
To navigate using Google Maps, go to “Default Navigation App” in General Settings. Then, select “Maps” next to the Google Icon. The app will automatically send the stop’s address to Google Maps, where you can preview the route and start navigation.
Set Stop Statuses – Collect Proof Of Visit, Delivery, And Service
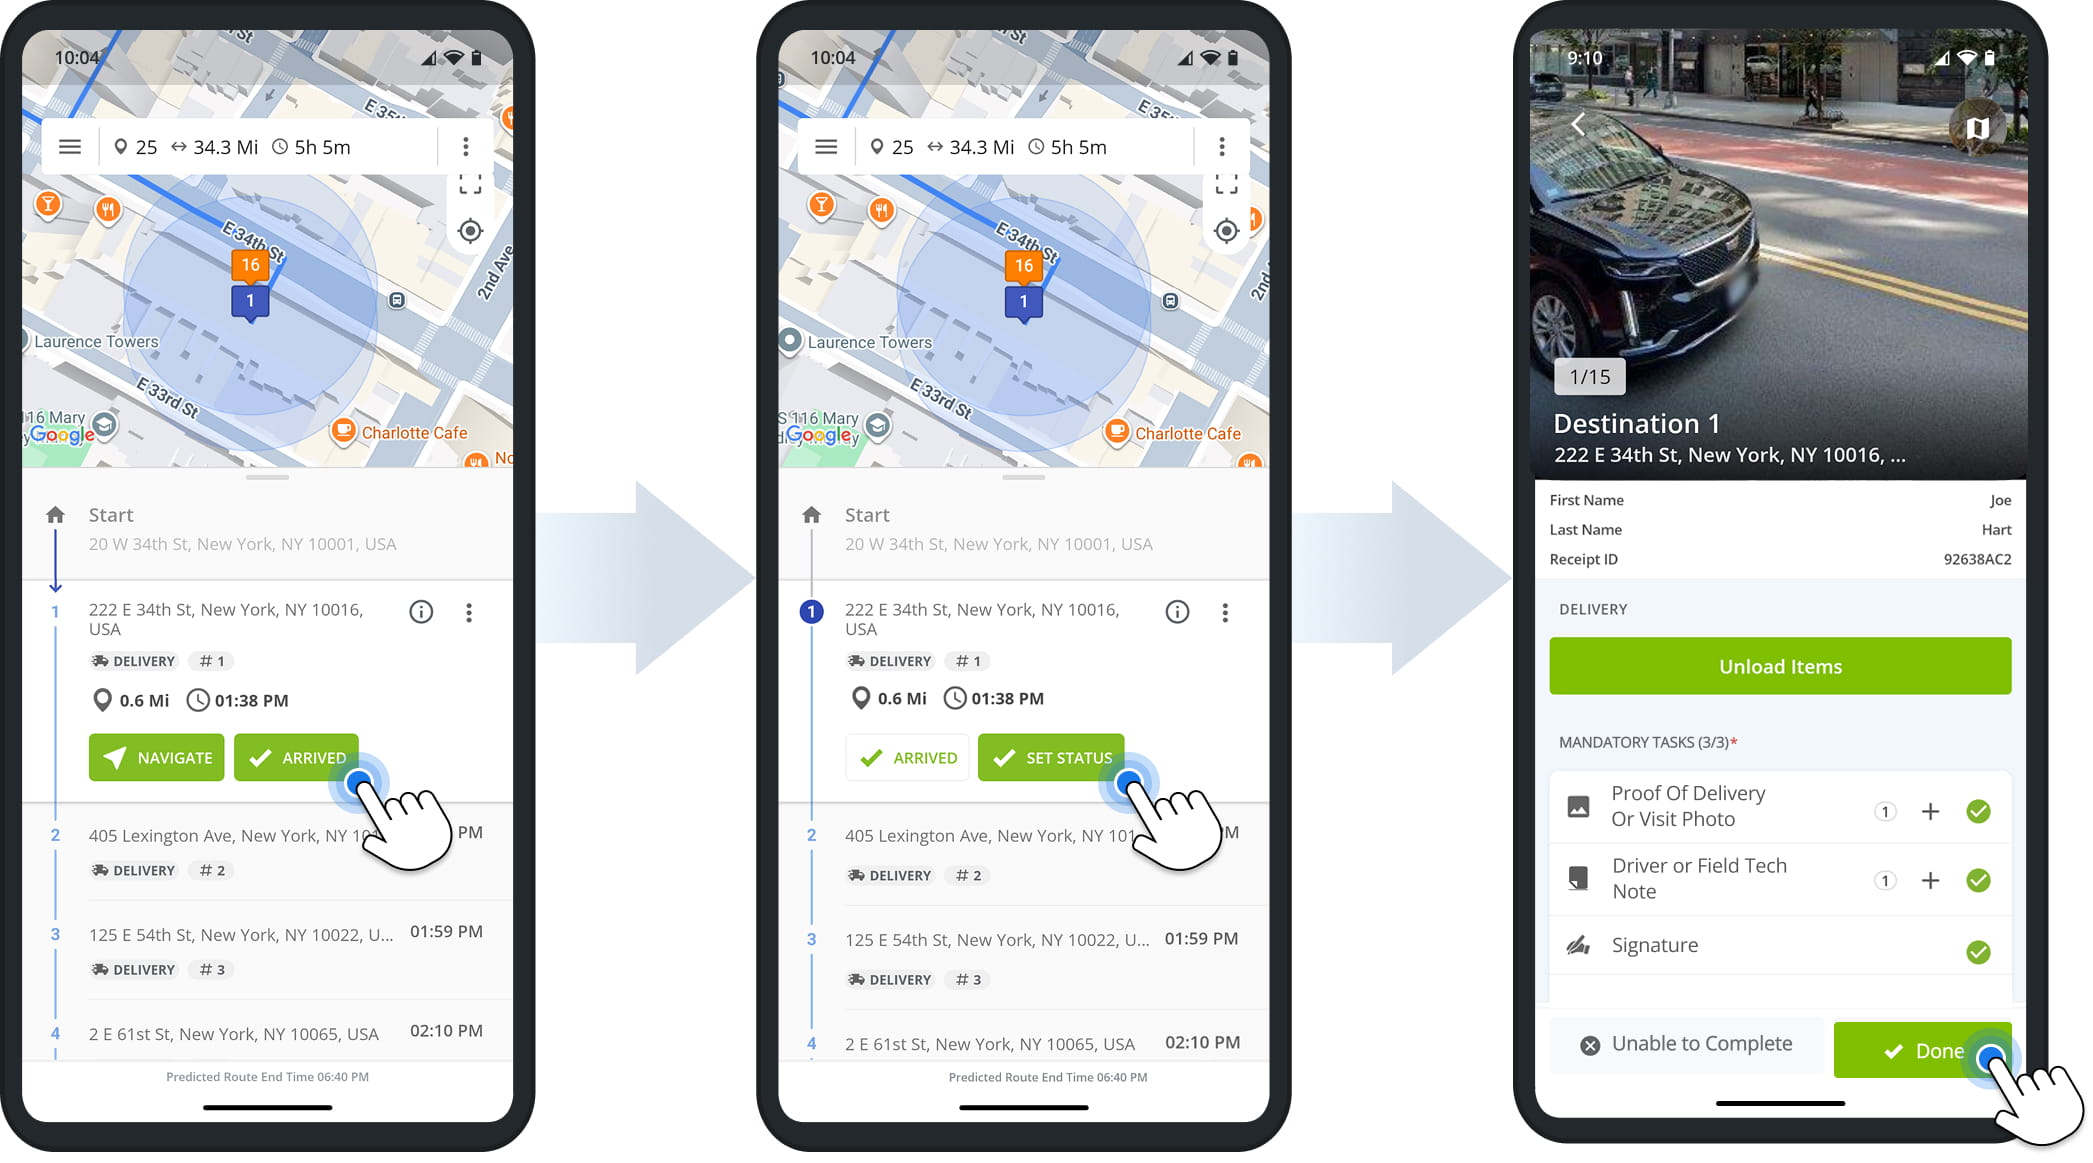
As you navigate your route and arrive at stops, you can update stop statuses and collect proof of visit, delivery, or service.
Tap the “Arrived” button, then select “Set Status” next to the stop. From there, choose the appropriate status and attach any relevant data, such as an electronic signature, photo, video, or text note.
Complete Route – End Route And View Route Statistics And KPIs
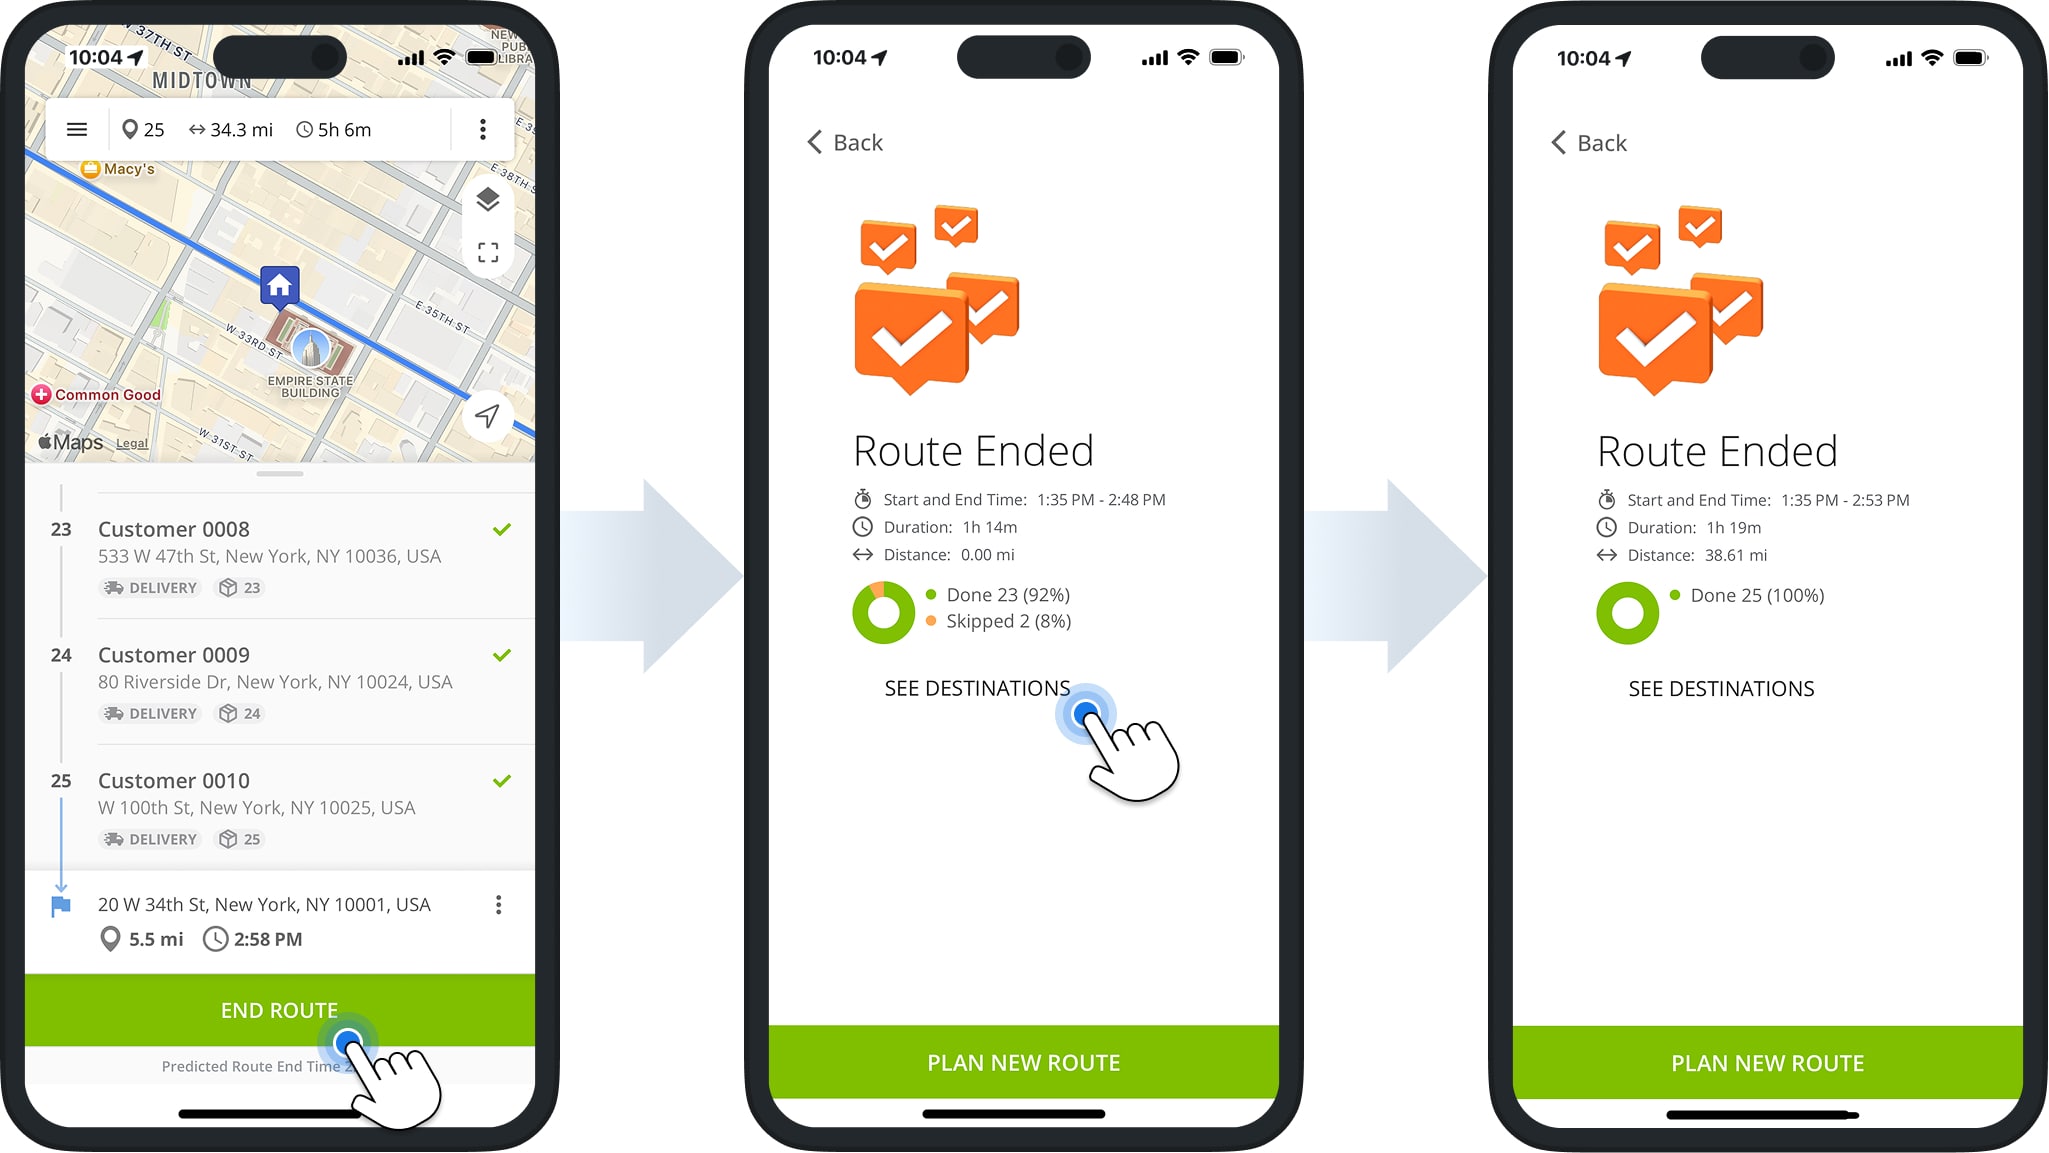
After you’ve visited all stops, Route4Me automatically prompts you to end the route. To finish, tap “End Route“. If any stops remain unvisited, tap “See Destinations” to open your stop list and update their statuses before ending the route.
Once you’ve completed the route, the app provides a detailed summary with performance KPIs, including total route duration, distance traveled, actual start and end times, and the ratio of completed to missed stops.
Route4Me’s iOS Free Route Planner Unlimited Stops Test Drive
Start a free route planner trial to experience Route4Me before subscribing. For 7 days, you can enjoy a free route planner with unlimited stops and unlimited tasks, giving you a full test drive of all the app’s multi-stop route planning features.
Visit Route4Me's Marketplace to Check out Associated Modules:
- Operations
Custom Data Add-On
- Operations
Advanced Team Management Add-On
About author: Daniel Archer
With a background in pedagogy and writing instruction, Daniel is a former tenured English Instructor who, after nearly 20 years of teaching, transitioned into content strategy and leading writing teams for global brands. Now, as Technical Documentation Manager at Route4Me, he translates complex logistics technology into clear, accessible content that empowers users.