Customer Portal – Online Order Tracking Page Link In SMS And Email
Route4Me’s Online Order Tracking Page enables you to offer track and trace possibilities to your customers. On the Online Order Tracking Page, you can track shipments, order statuses, delivery dates, tracking updates, and more. With the Online Order Tracking Page, you can effortlessly enable tracking the status of orders without having to invest valuable resources doing all this work manually. You can also enable automated delivery notifications and tracking alerts. Your customers will benefit from a similar package tracking experience as they would if using USPS tracking, UPS tracking, or FedEx tracking. The only thing they need to do to see the transit status of their delivery or service is to insert their tracking number in the order tracking portal. No more “Where is my package?” calls to customer service.
Open Online Order Tracking Page
![]()
Table of Contents
Open Online Order Tracking Page – Access Tracking Page For Customers
Your customers can use the Tracking Page Link to access the Online Order Tracking Page. Additionally, you can access the Online Tracking Portal via link sent by Email or SMS. On the Tracking Page, they can use their unique tracking number or tracking ID to see the status of their order or service. To do so, input the tracking number or package tracking code into the corresponding field and click the Continue button.
![]()
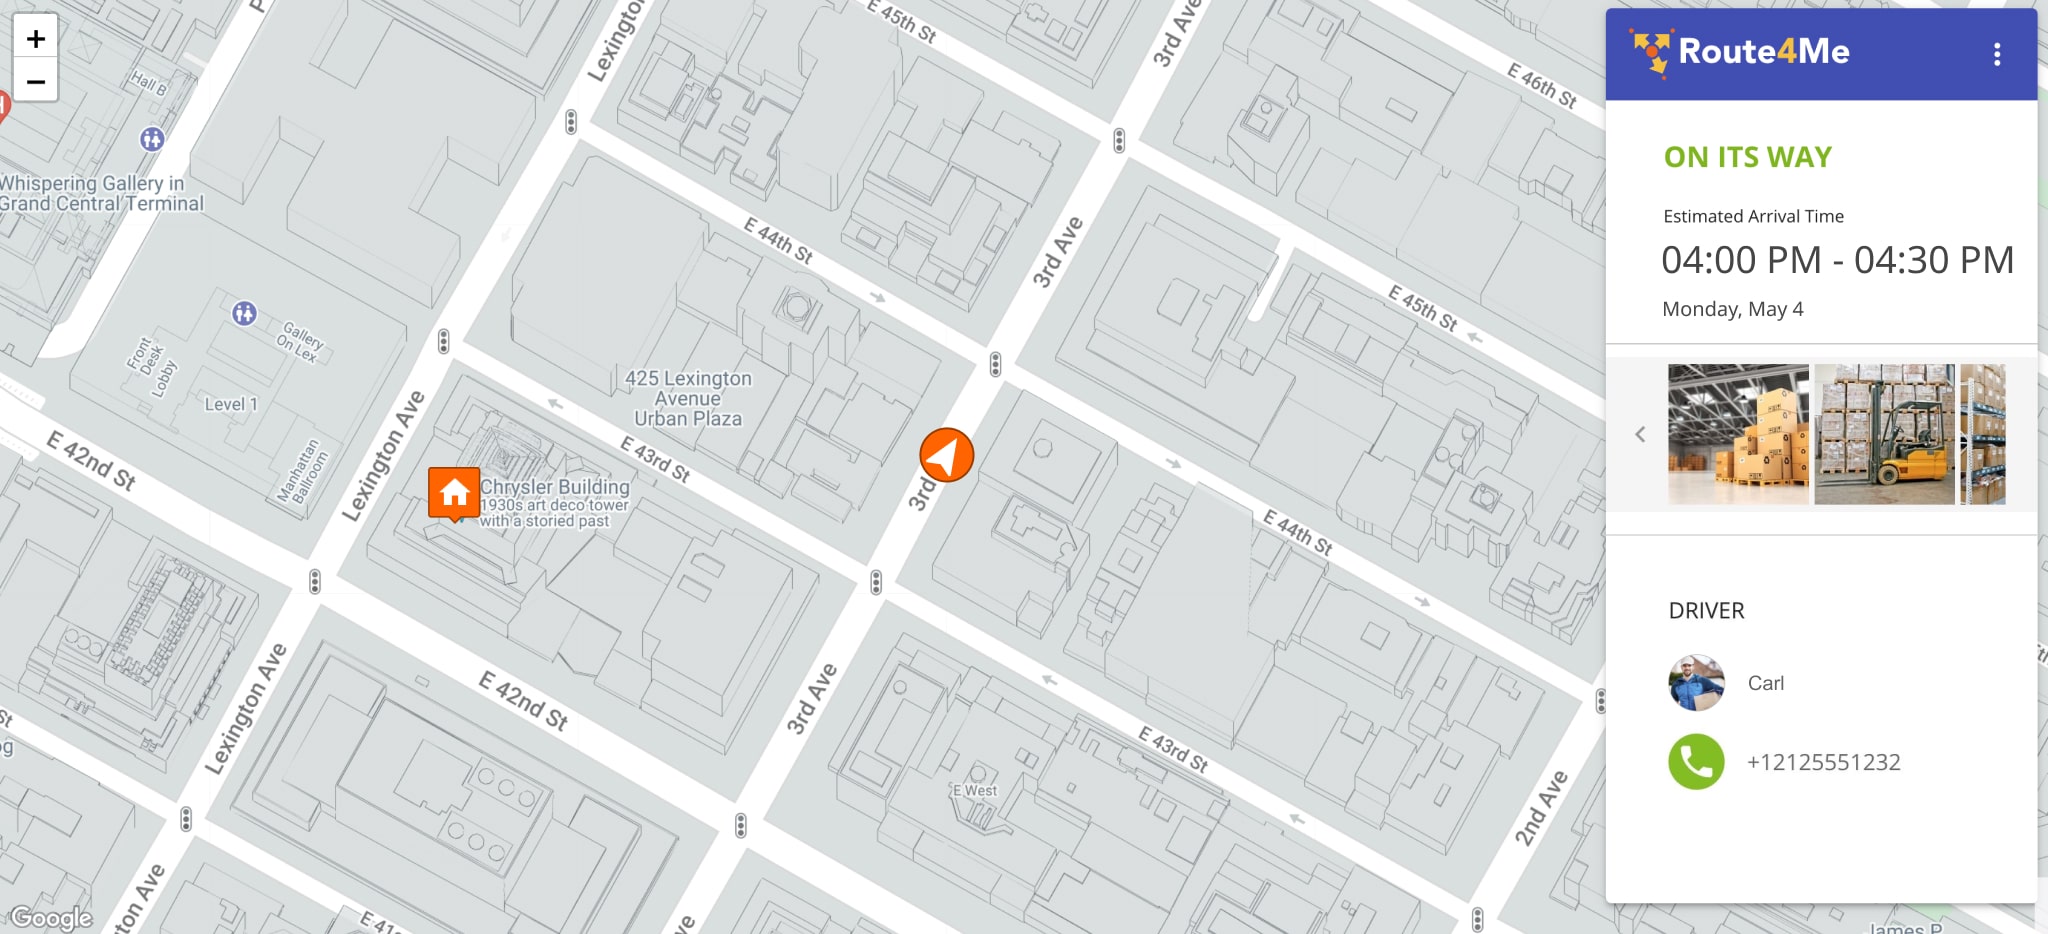
After inputting the tracking code, a customer is automatically taken to your customized Online Tracking Portal, where they can see the status of their order or service, and the driver’s location on the tracking map, and more.
Tracking Link And Number – Send Tracking Data To Customers By Email And SMS
Furthermore, the tracking number and tracking link are automatically generated for every route destination. The tracking number and tracking link are available in the “Order” section of the “Destination Info” for every respective route destination. You can go directly to the Tracking Page by clicking the Direct Link icon or copy the Tracking Page URL by clicking the Copy Icon. Specifically, you can use the Tracking Page URL to check how an order is viewed by the corresponding customer on the Order Tracking Page.
![]()
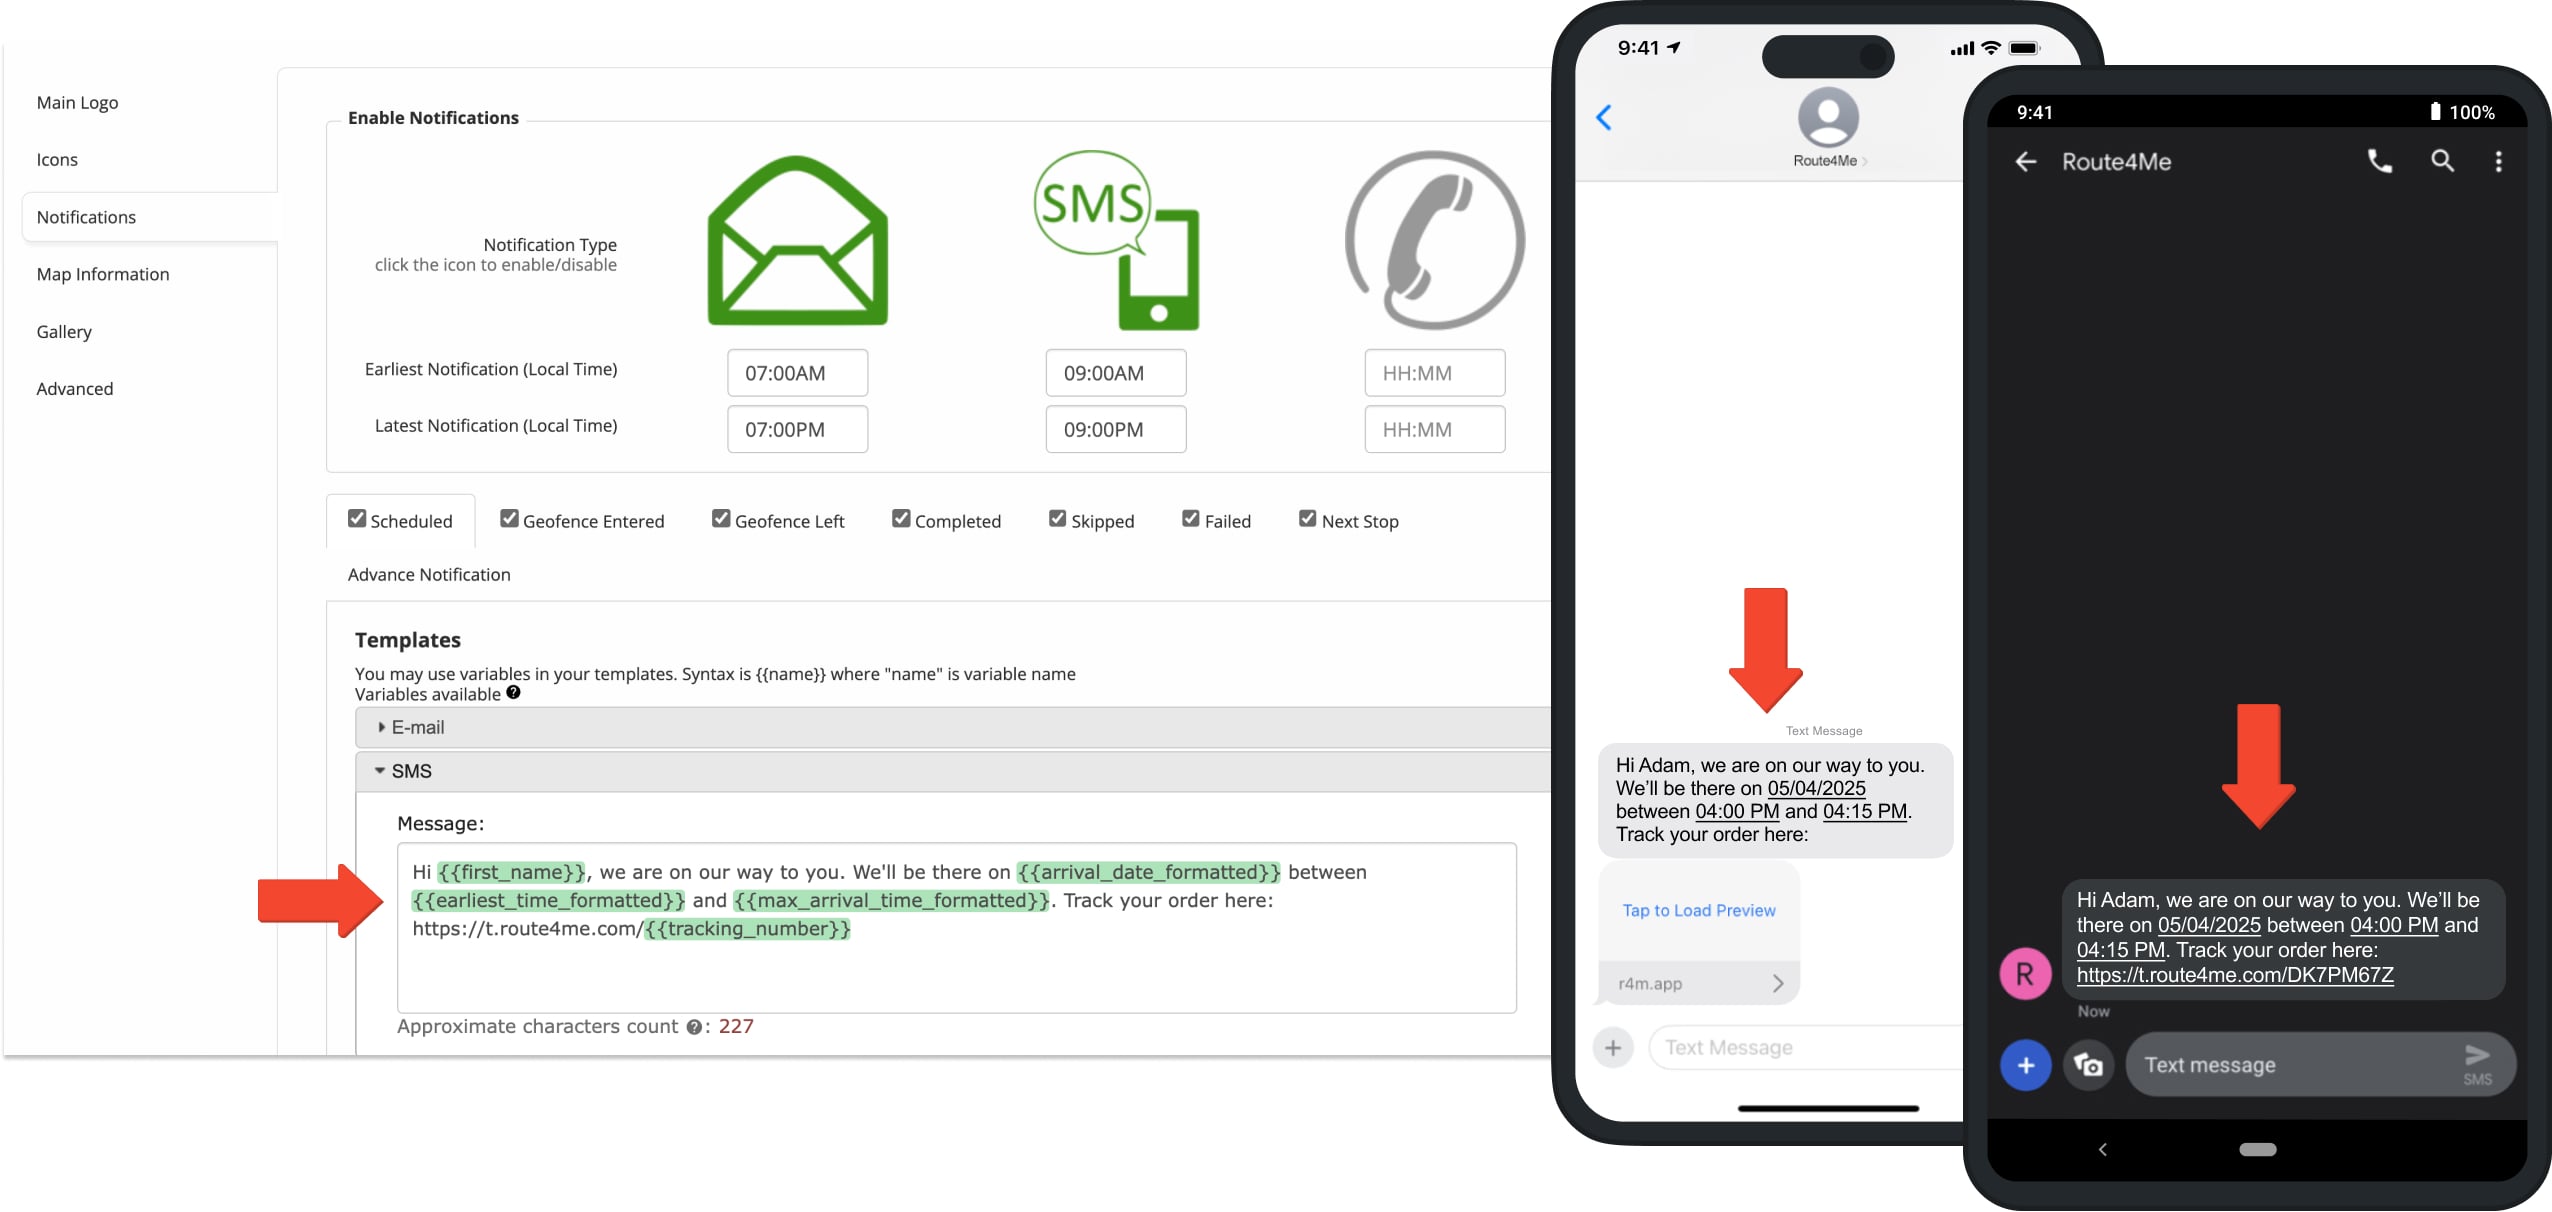
You can share the parcel tracking number via customizable SMS messages or using custom template email order notifications for delivery alerts. Moreover, you can use Notifications Placeholders to automatically insert the order tracking page link and unique customer order number into the SMS Messaging and Email notifications. To do so, simply include the {{tracking_number}} placeholder variable in the text of your SMS or Email notifications. Additionally, learn more about how to use Notification Placeholders. NOTE: Notifications can only be sent for routes that are dispatched in the Route Editor.
When a customer opens a tracking link on an Android device, they’re redirected to download the Route4Me app for faster, more efficient, and reliable tracking. Specifically, opening a tracking link on an Android device will prompt the customer to open the tracking link in the app. Tapping the “Open In App” button will open the Google Play store page for Route4Me’s Android App.
![]()
Then, when the user installs the app, it will automatically open and load the respective tracking data with no additional action required from the customer. All future links will automatically open the app for easy order tracking.
![]()
Custom Logo – Add Your Logo To Online Order Tracking Page
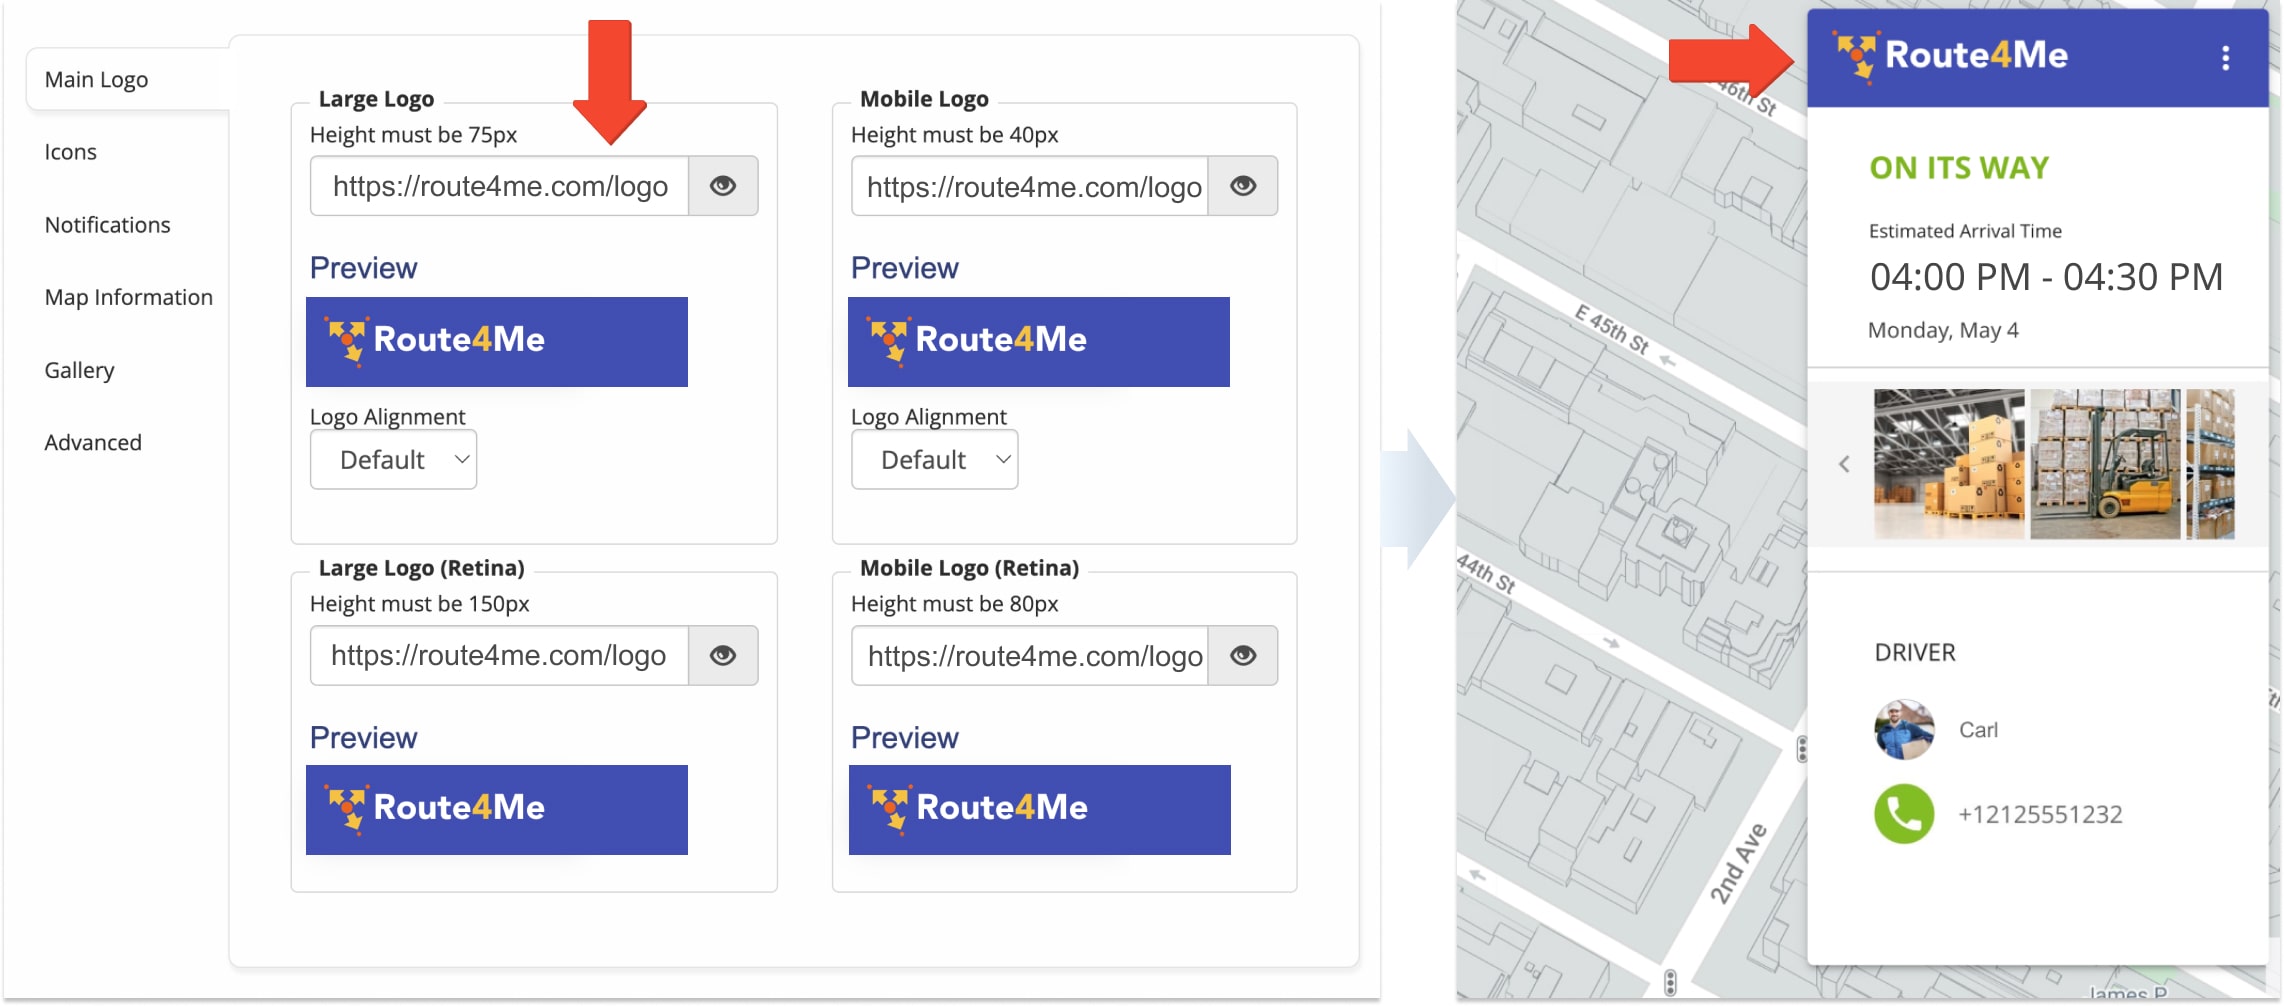
You can personalize and rebrand how your Online Tracking Page for Customers looks and how your customers interact with it. Specifically, you can add your company logo or any other preferred branding imagery to the Online Order Tracking Page. To customize your Order Tracking Page, go to “My Account” and then “Notification Settings” from the Navigation Menu. Then, go to “Main Logo” and insert the URL of your image file into the corresponding fields. Once your URL is added, your image will be displayed at the top of the Order Manifest or Order Status window. NOTE: Please ensure that the image you want to use is hosted on a valid domain with a valid public URL that can be opened in your web browser.
Destination And Driver Icons – Add Custom Icons For Drivers And Destinations To Tracking Map
Additionally, you can also customize how drivers and customer destinations are represented on the map on the Online Tracking Portal for Customers. To upload customized icons for your driver and customer locations, go to “My Account” and then “Notification Settings” from the Navigation Menu. Then, go to “Icons” and insert the URLs of your icons into the corresponding fields. You can have a different icon for customer locations before and after they are marked as visited. Furthermore, you can preview your driver and destination icons after the icon image URLs are added. To adjust icon placement on the Customer Tracking Page map, use the “Icon Width” and “Icon Anchor” fields or move the pin over the icons in the Preview. On the Order Tracking Page, you can see the customer location and the location of the driver (based on the specified settings) as the corresponding icons on the order tracking map. NOTE: The red pin used to adjust icon positioning corresponds to the exact GPS coordinate of the respective icon type.
![]()
Map Settings – Custom Map View For Tracking Portal
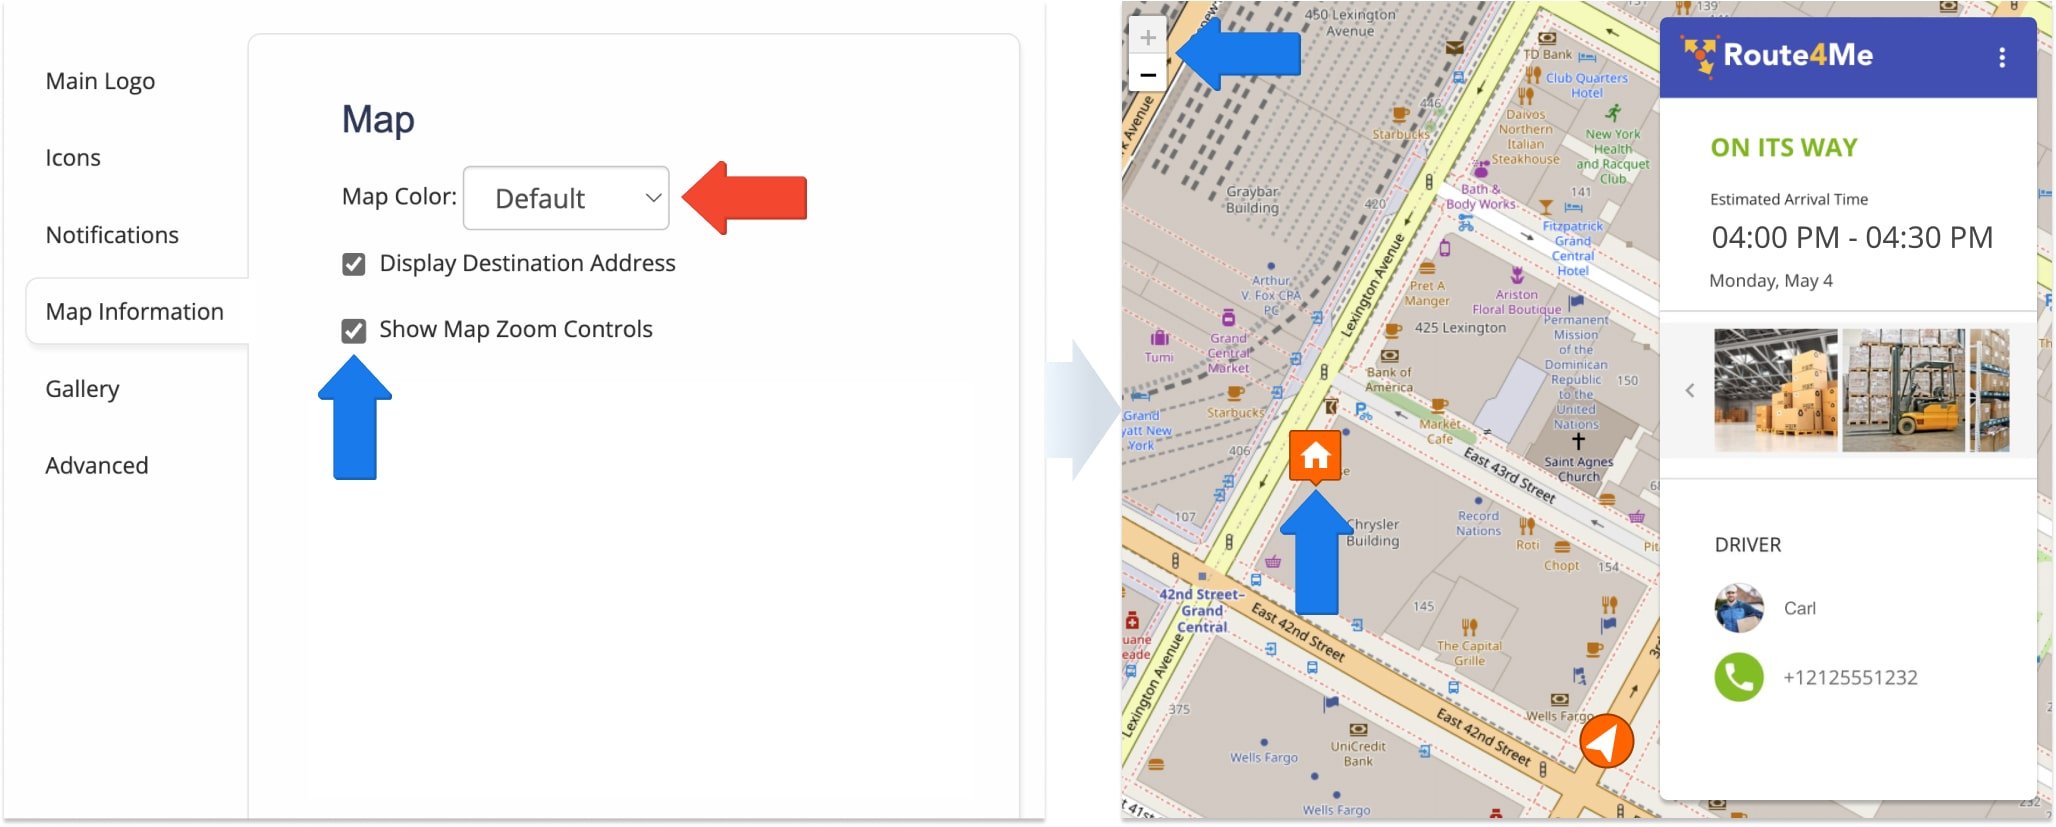
For more convenience, you can select the preferred Package Tracking Map view for your Online Customer Tracking Page. To select a map type, go to “My Account” and then “Notification Settings” from the Navigation Menu, and then go to “Map Information“. To use the grayscale map view for your Tracking Page, select “Grayscale” in the Map Color list. Alternatively, to use the Default package tracking map view for your Tracking Page, select “Default” in the Map Color list.
Driver Details – Show Driver Information On Online Order Tracking Map
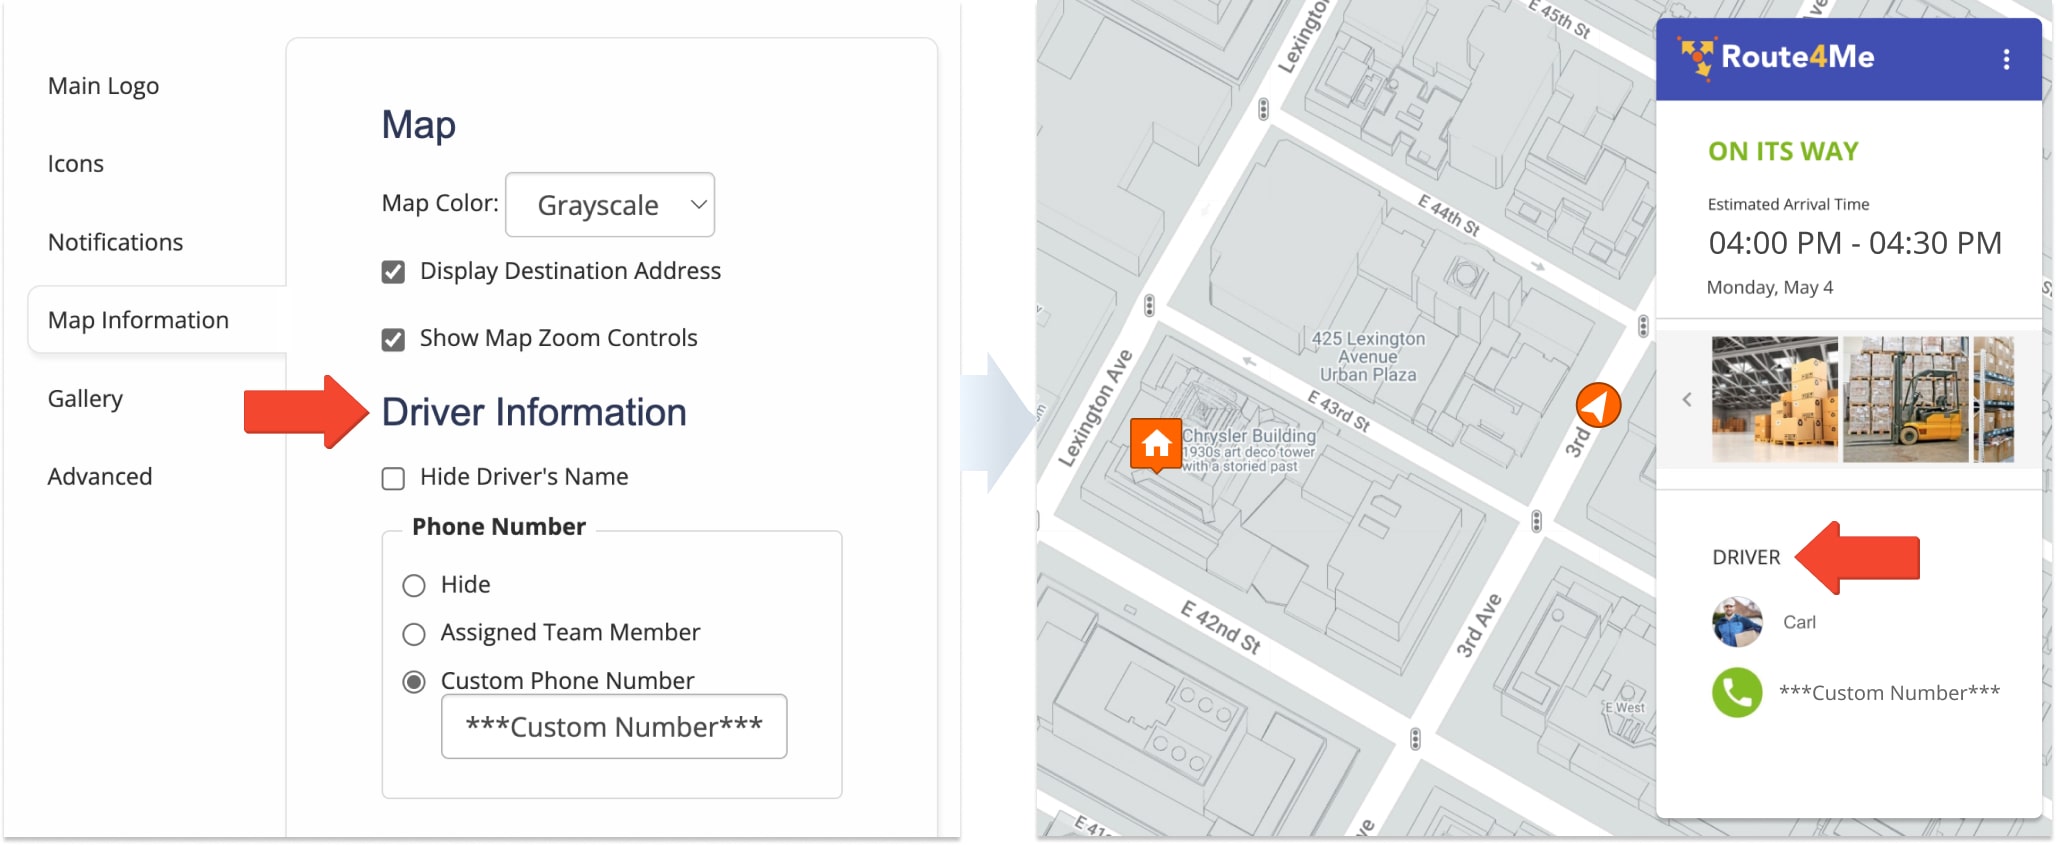
Additionally, you can select what Driver Information to hide or display on the Online Order Tracking Map so that the customer can see who will be completing their order and contact the driver for additional details if needed. Specifically, in the “Driver Information” section of the “Map Information” screen, you can hide the driver’s name by checking the “Hide Driver’s Name” box and adjusting the displayed phone number in the “Phone Number” section. The details of the assigned driver will then be displayed in the Driver section on the Tracking Page.
Order Details – Show Detailed Order Information On Online Tracking Page
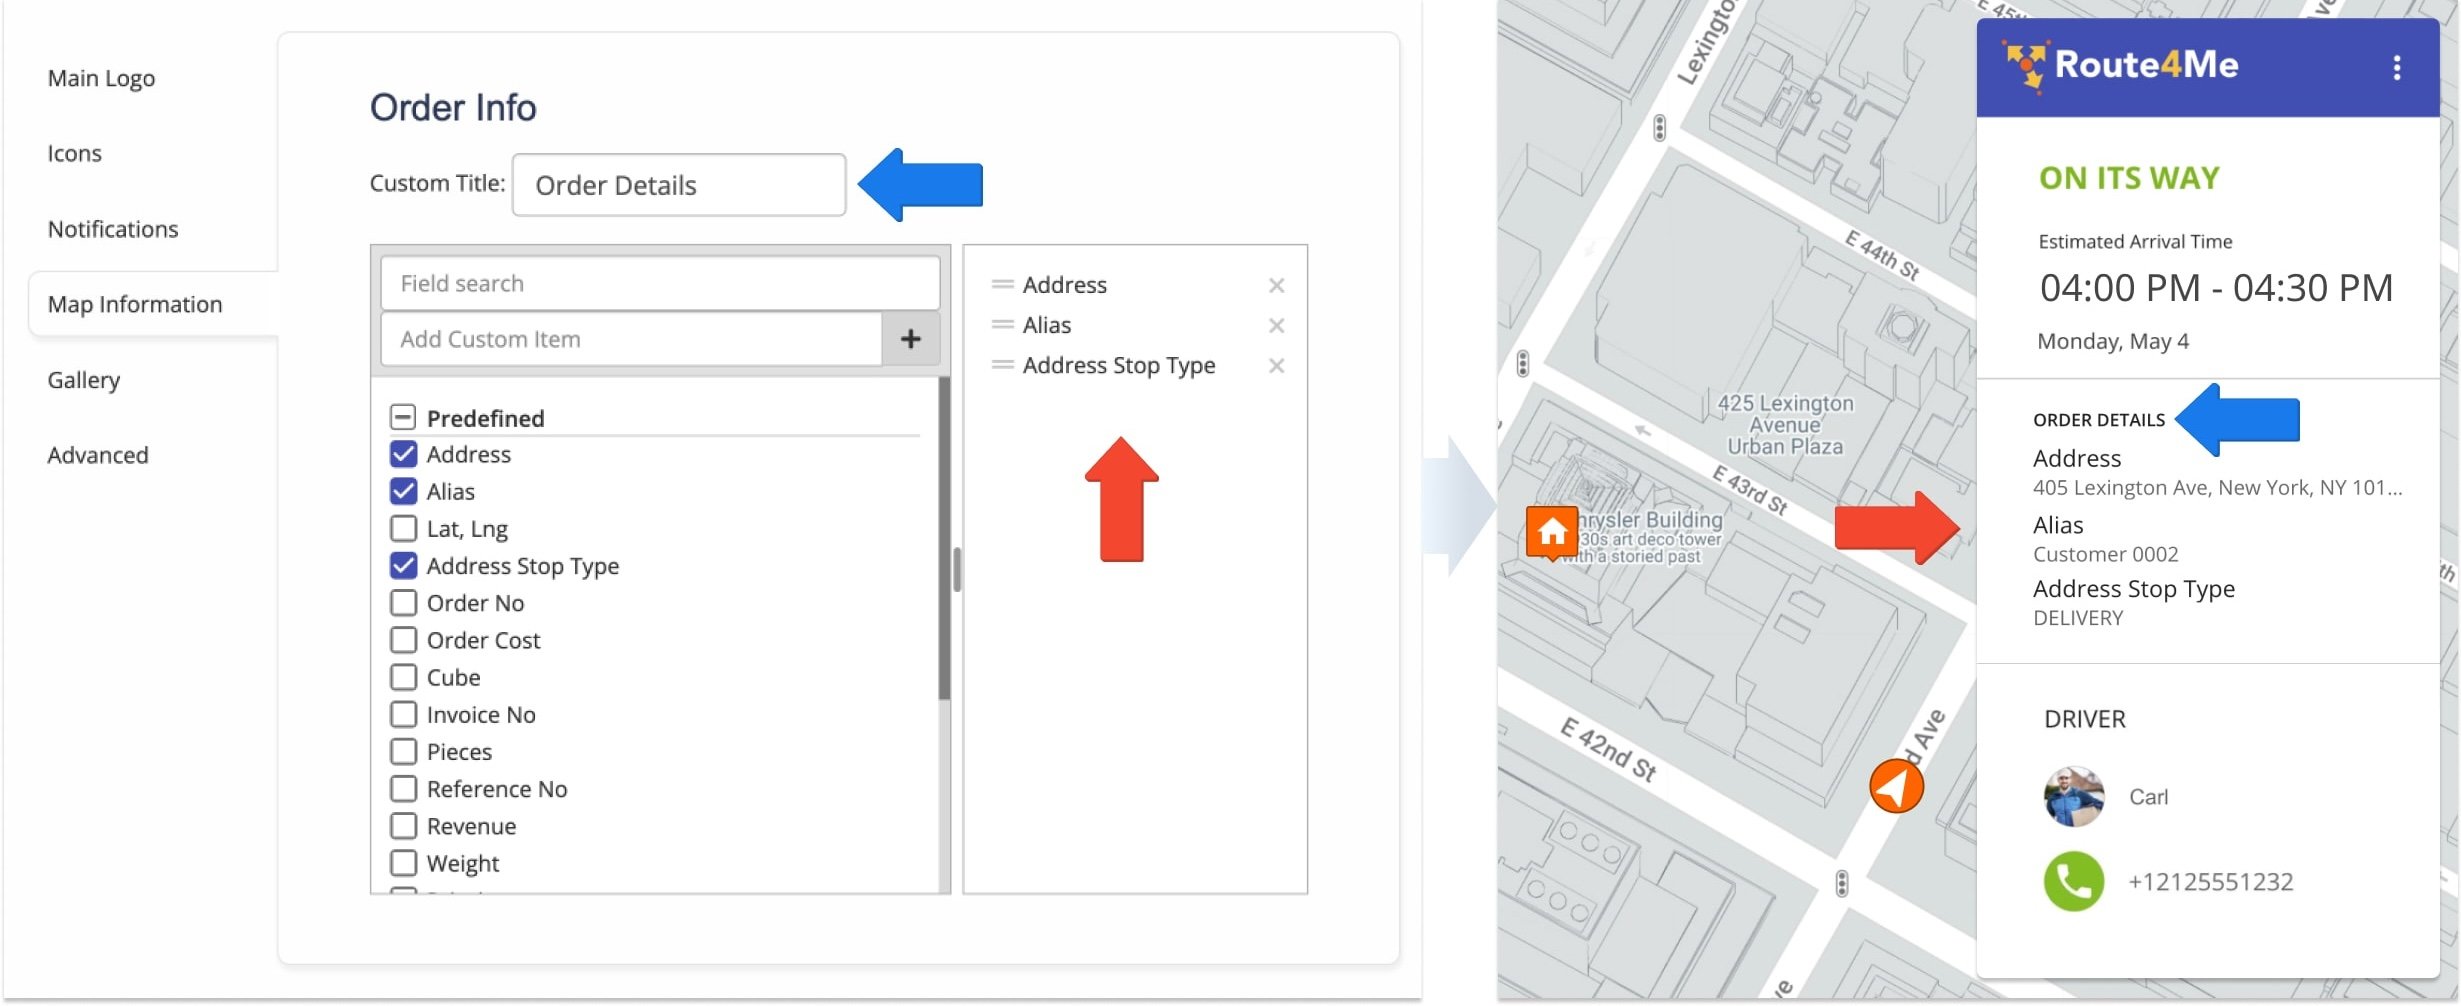
Furthermore, you can customize what Order Info is displayed on the Online Order Tracking Map. Specifically, in the “Order Info” section of the “Map Information” screen, you can select which attributes will be displayed to customers by checking the boxes next to the preferred attributes. For example, you can select to display the “Address” and “Service Time” of a customer destination or any combination of attributes. Additionally, you can display any destination or order Custom Data by typing out the preferred data in the “Add Custom Item” field and clicking the Plus Icon. Furthermore, you can add a custom title to your displayed “Order Info” by writing the preferred title in the “Custom Title” field.
Gallery Settings – Adjust Note Gallery Settings For Online Order Tracking Page
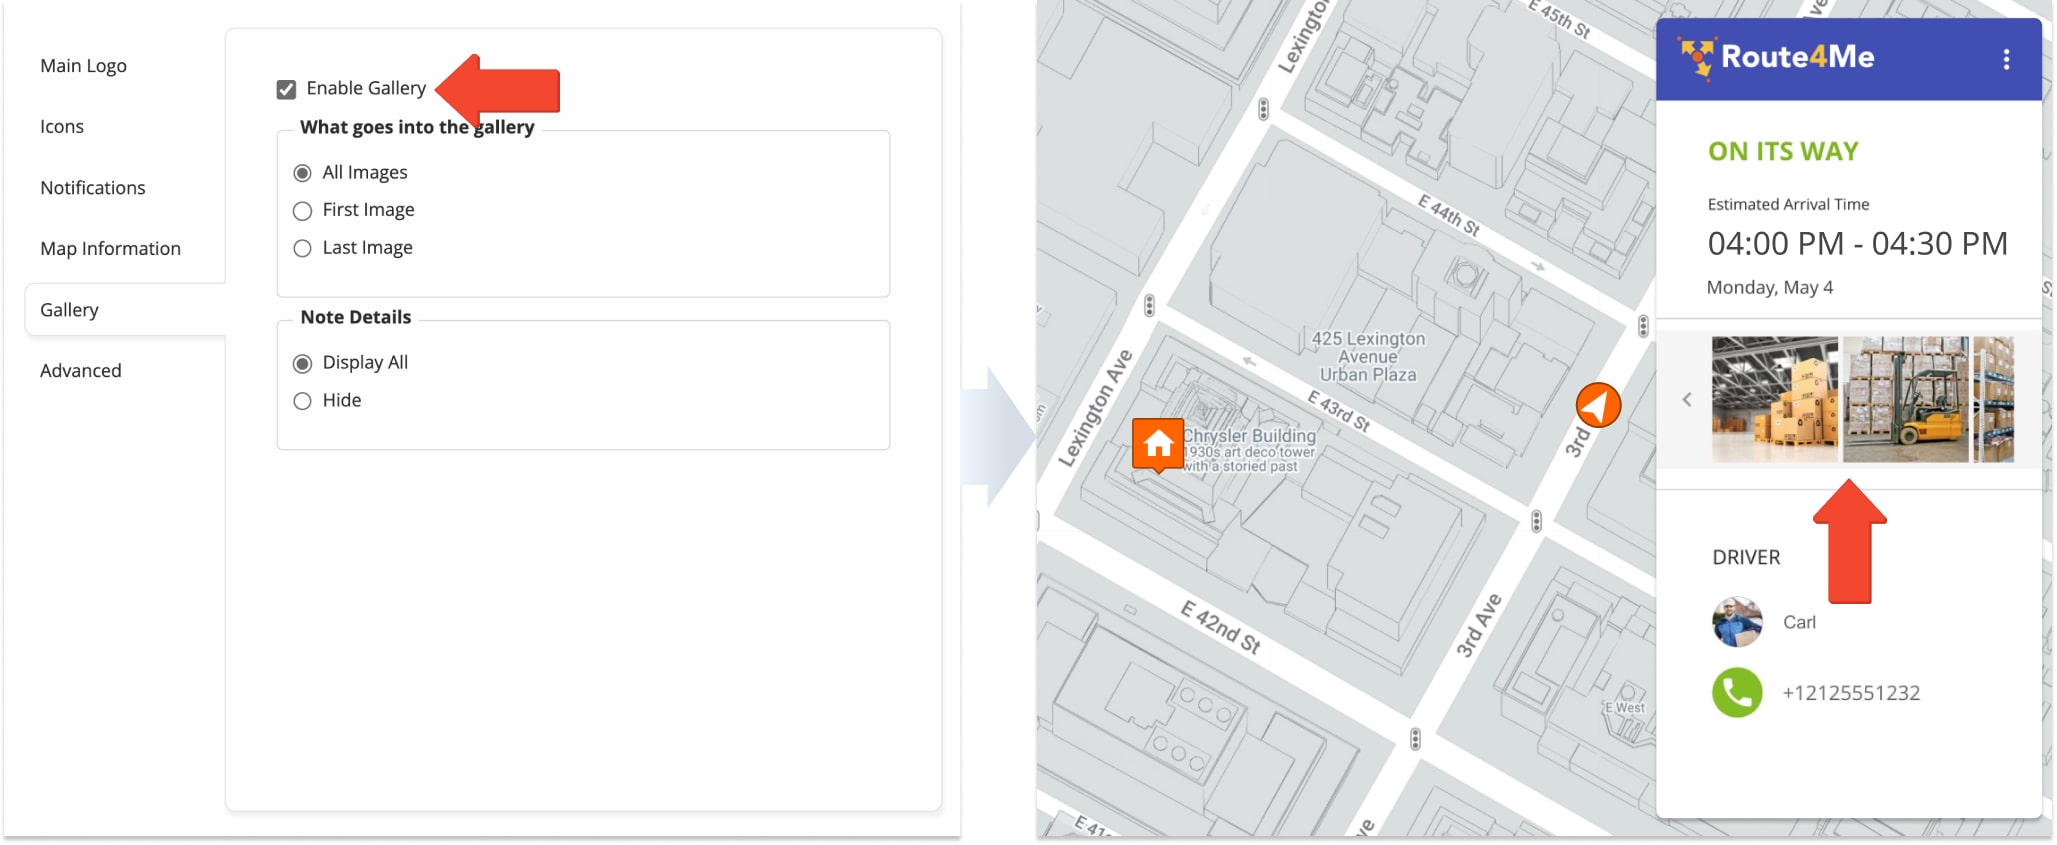
Additionally, the Gallery allows you to show note images and note data added to the given route destinations from Route4Me’s Mobile Apps or Web Platform. For example, you can attach proof of delivery (POD) images to a given route address, and the associated customer will be able to access the attached POD from the Tracking Page when tracking their order or service. To enable the Gallery for the Online Order Tracking Page, go to “My Account” and then “Notification Settings” from the Navigation Menu, and then go to “Gallery“. Then, check the “Enable Gallery” box. Furthermore, you can customize which note media is displayed in the Gallery on the Online Order Tracking Page by selecting the preferred options in the “What goes into the gallery” and “Note Details” sections. Additionally, images can be attached to notes that are added to route stops from Route4Me’s mobile iOS and Android Route Planner apps, as well as the business delivery routing software.
| Note Gallery Options | Description | |
|---|---|---|
| What goes into the gallery | ||
| All Images | The Gallery will show all images attached to all notes that were added to the given destination. | |
| First Image | The Gallery will show only the first image of all images attached to all notes that were added to the given destination. | |
| Last Image | The Gallery will show only the last image of all images attached to all notes that were added to the given destination. | |
| Note Details | ||
| Display All | The Gallery will show all details of the associated note, including all note text updates. | |
| Hide | Details of the associated note will be hidden in the gallery, and only the preferred images will be shown. | |
Order Status – Status Updates For Online Tracking Page
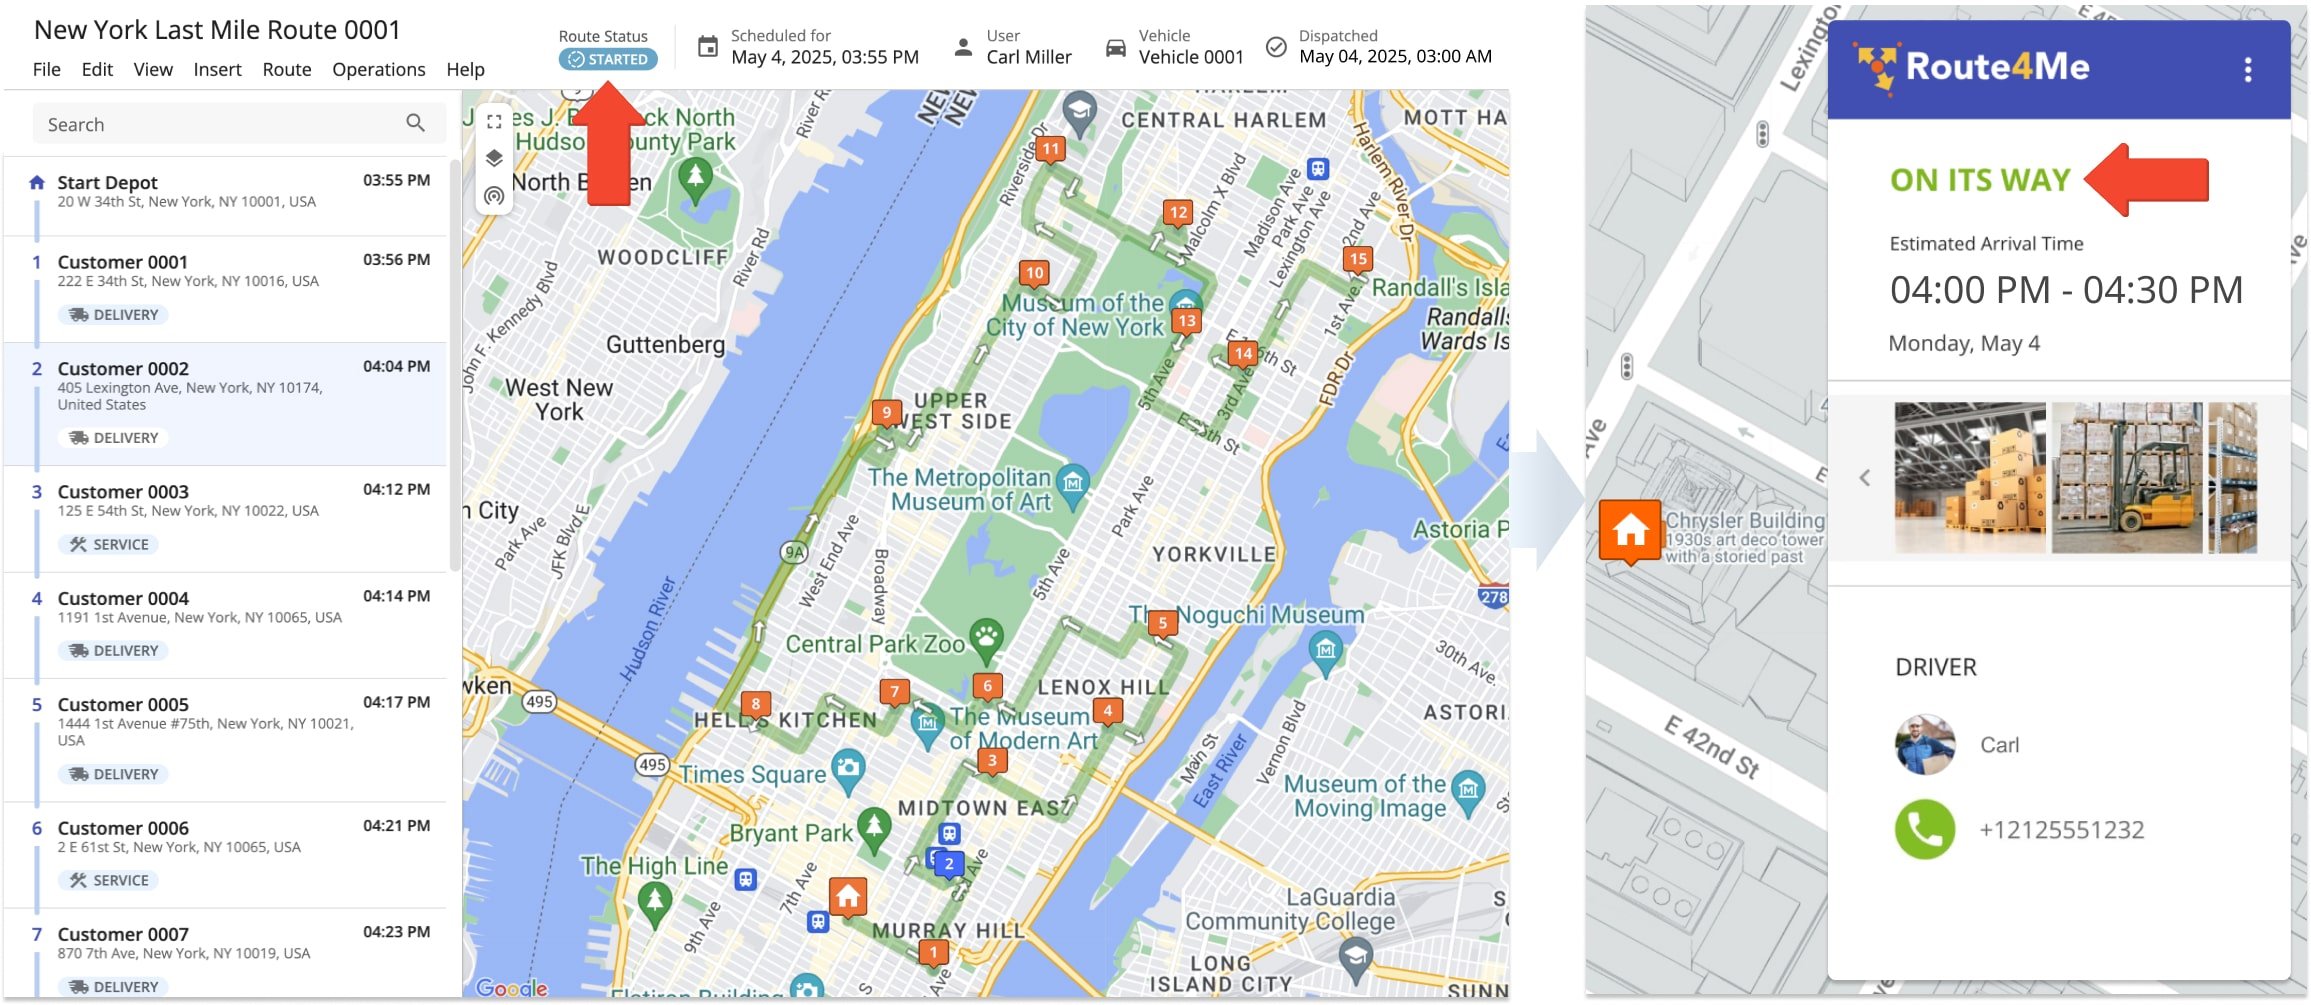
Furthermore, there are three order statuses displayed on the Online Order Tracking Page that change depending on the assigned driver’s location. The “Preparing” order status is displayed when the planned route hasn’t started. To start the route, dispatch route to driver, and the driver can start routes on mobile app. 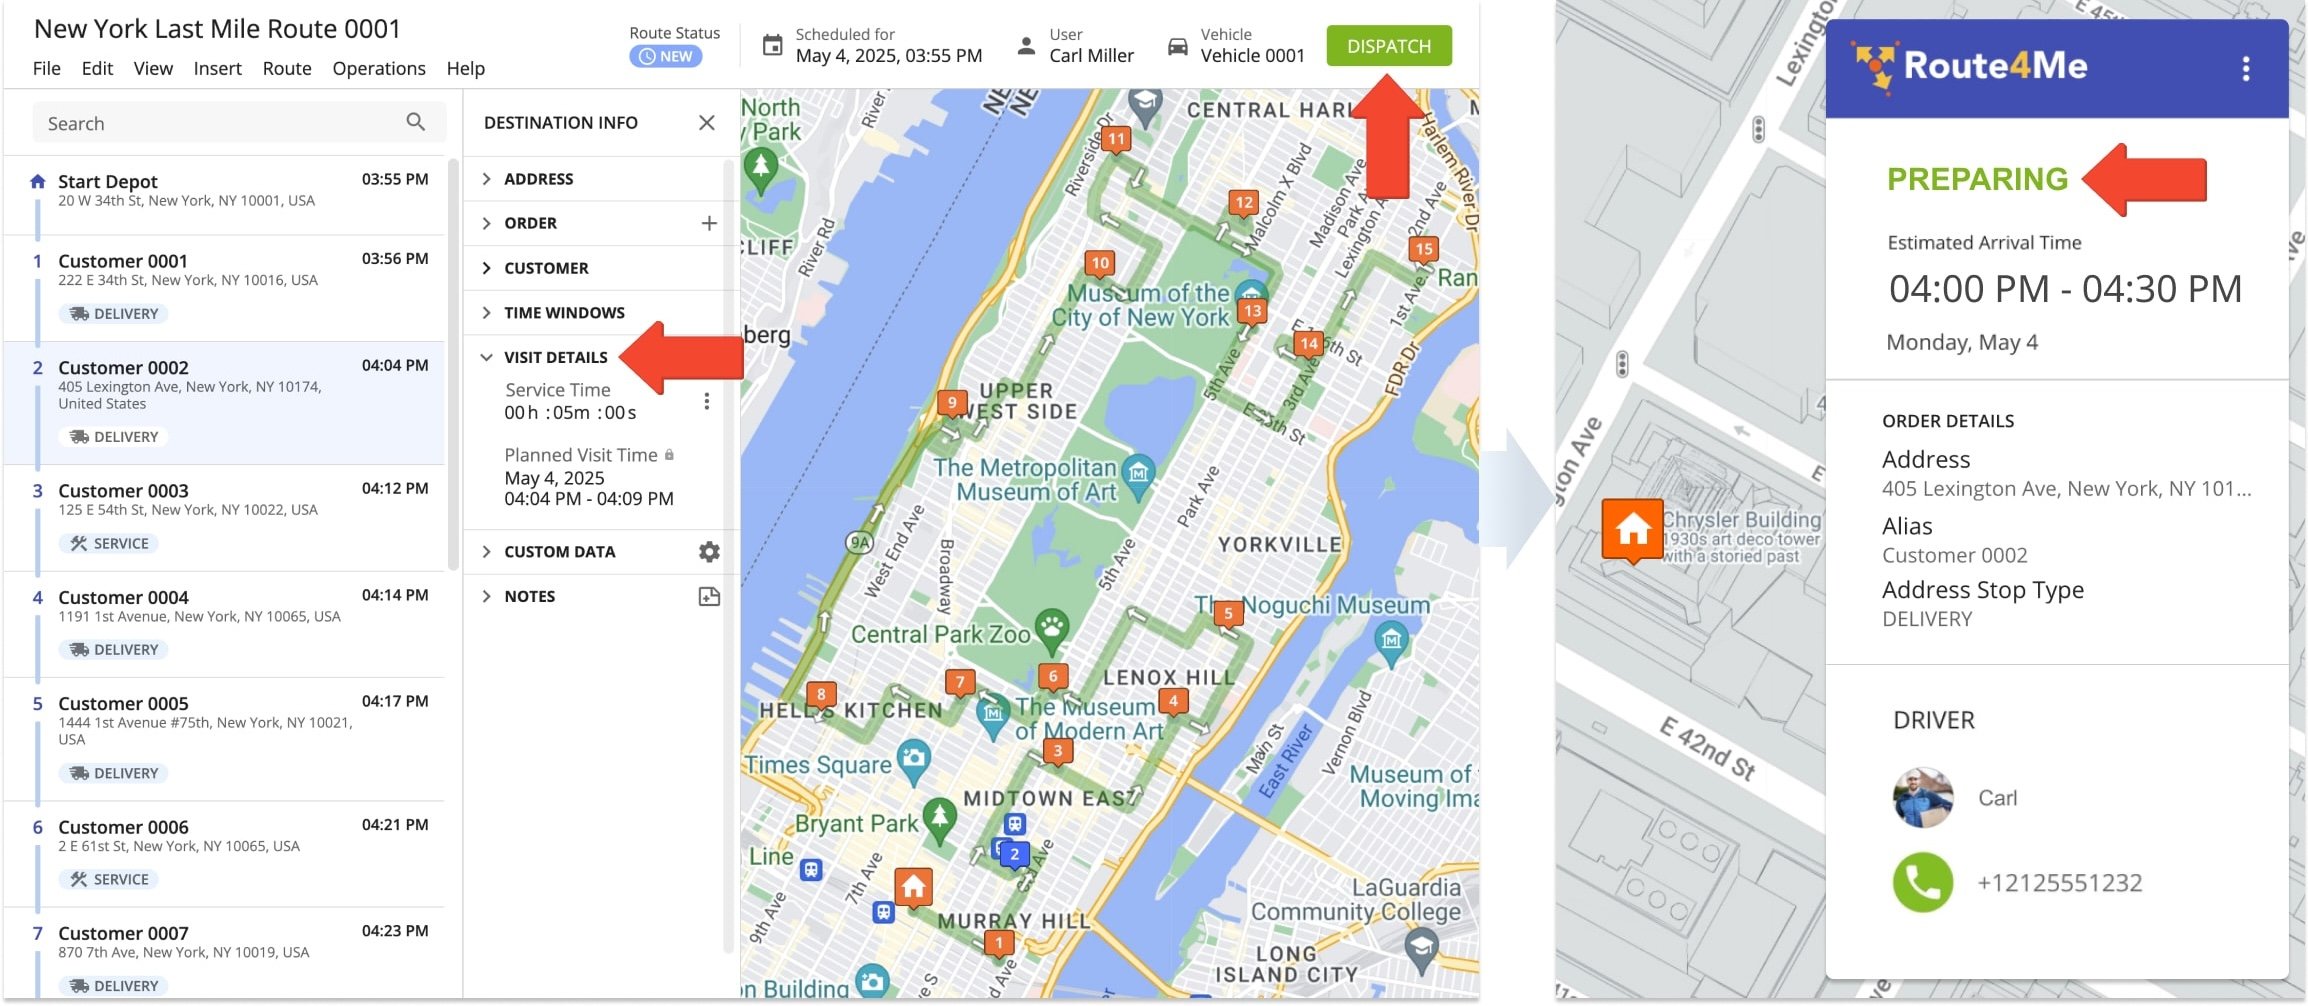
The “On Its Way” order status is displayed when the assigned driver starts the route on the Mobile Route Planner App.
The “Done” order status is displayed when the assigned driver has marked the customer’s address as visited using the iOS Route Planner App or Android Mobile Route Planner.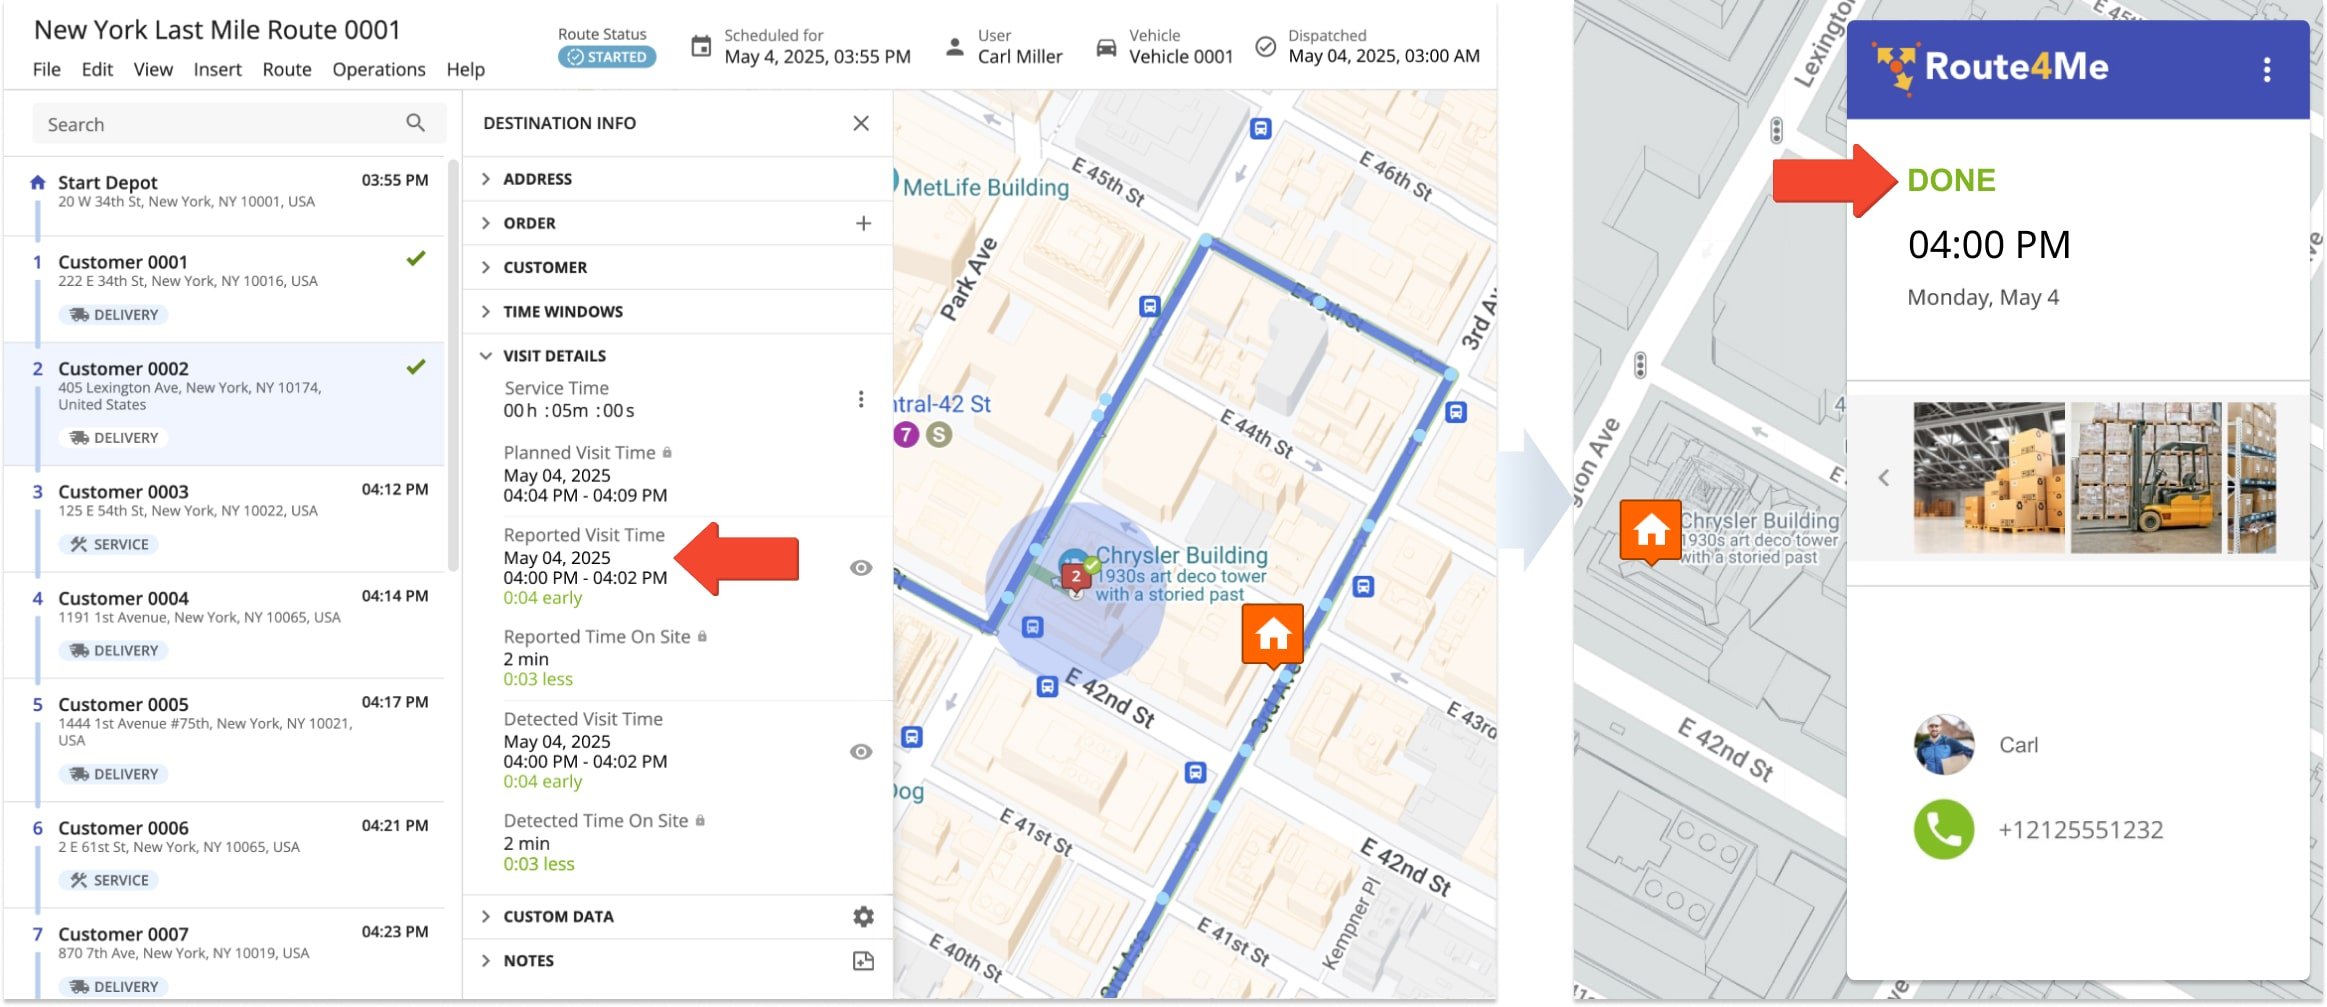
Advanced Settings – Schedule Format And Time Window Settings
Additionally, the Advanced Notification Settings allow you to adjust the visibility timing of different elements of the Online Order Tracking Page. For example, you can adjust when tracking information will be hidden from the Online Order Tracking Page, the date and time format, when a driver will appear on the map and more. To adjust Advanced Online Order Tracking Page settings, go to “My Account” and then “Notification Settings” from the Navigation Menu, and then go to “Advanced“. The following settings are available in the “Advanced” section of the Notification Settings.

| Advanced Settings | Description |
|---|---|
| ETA Padding (HH:MM) | If set, this field expands your arrival time window from the planned arrival time. |
| Tracking Page Expiration (Hours) | Hide order information on the Tracking Page after the specified number of elapsed hours. The countdown starts after the respective route destination is marked “Visited” by the driver or courier. By default, the Tracking Page Expiration Time is not set up, and the order information stays visible on the Tracking Page. |
| Hide Customer Location After (Hours) | Hide the customer’s address or location on the Tracking Page after the specified number of elapsed hours. The countdown starts after the respective route destination is marked “Done” by the driver or courier. |
| Time to Arrival to Show Driver on Map (HH:MM) | Driver will appear on map only when ETA is less than this value. |
| Date Format | Choose the format in which the delivery, service, or visit date is displayed from a variety of options. |
| Time Format | Choose the format in which the delivery, service, or visit time is displayed from a variety of options. |
| Service Providers | Select the service provider for Email and SMS Messaging notifications. NOTE: It is recommended not to change these from their default values. |
| Service Provider Configurations | Configuration options for Email and SMS Messaging notifications. NOTE: It is recommended not to change these from their default values. |
Switch Between Planned And Predicted ETA For Customer Order Tracking Page
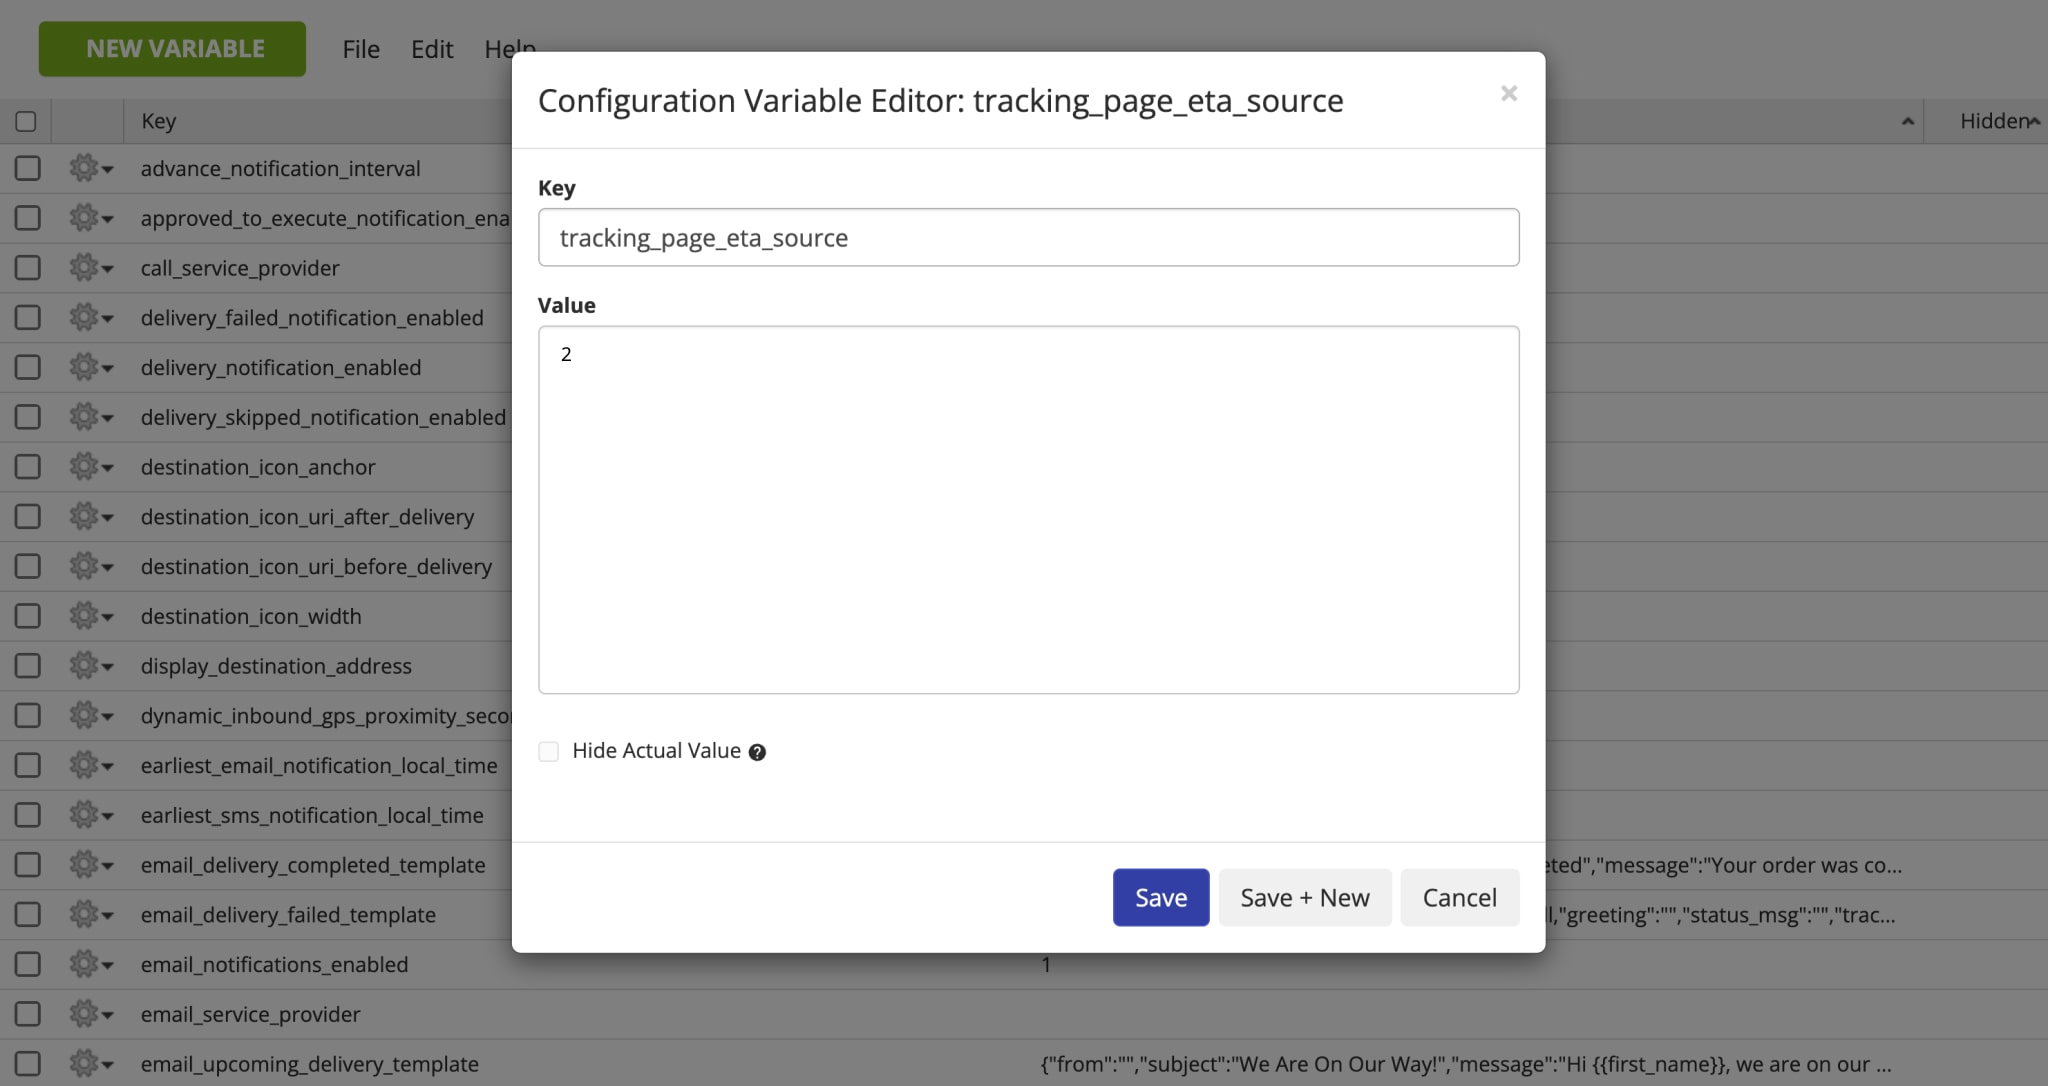
To provide the most accurate ETAs and make sure you’re always on the same page, you can choose between displaying Planned ETA and Predicted ETA on the Online Order Tracking Page. To switch between the Planned ETA and Predicted ETA on the Tracking Page, use the “tracking_page_eta_source” advanced configuration. To add this configuration to your account, use Route4Me’s Advanced Configuration Editor, which allows you to add custom account configurations. NOTE: To enable the Advanced Configuration Editor for your account, please contact the Route4Me Support Team.
| Configuration Key | Display Planned ETA Value | Display Predicted ETA Value |
|---|---|---|
| tracking_page_eta_source | 1 | 2 |
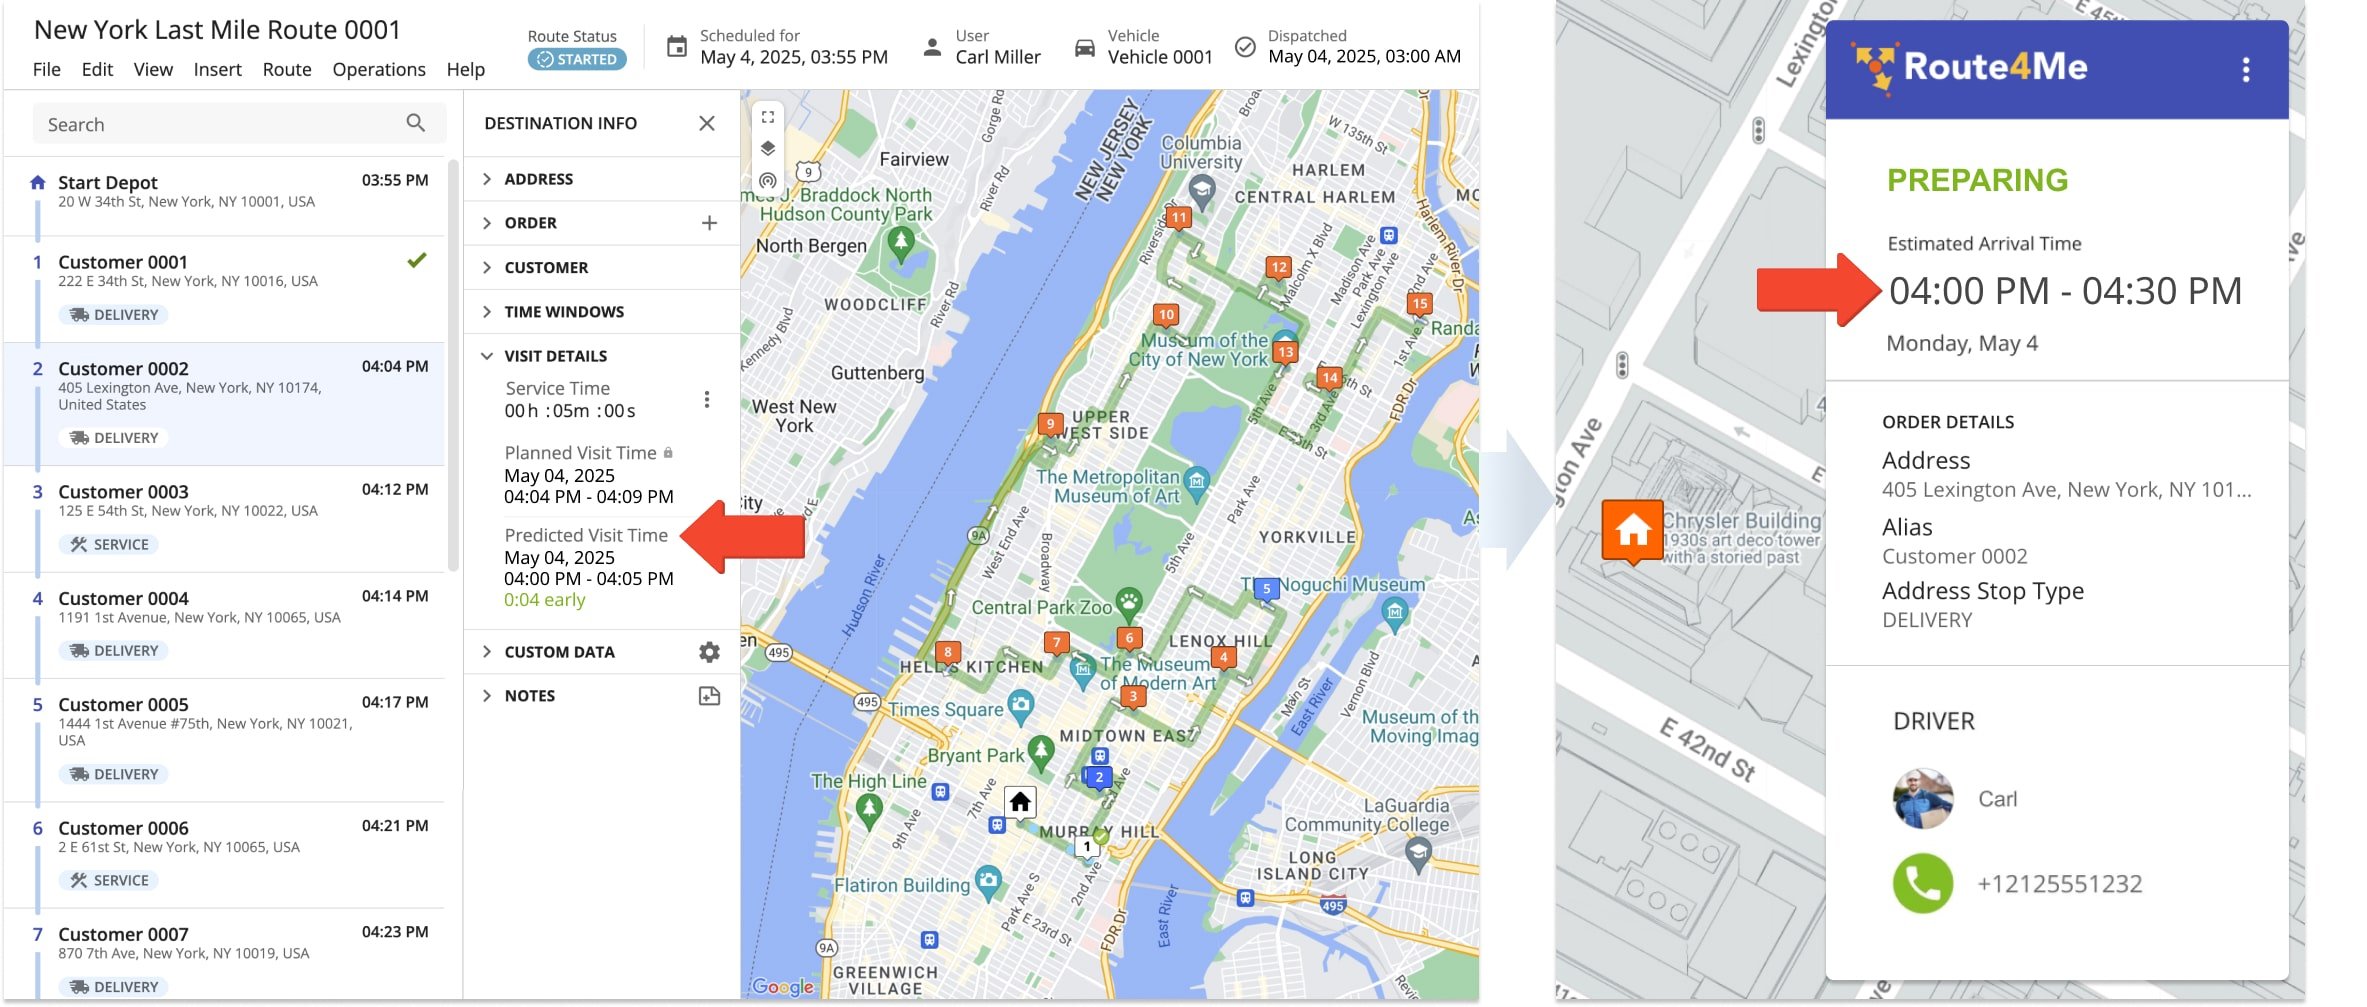
The Planned ETA is the time when the assigned driver is expected to arrive at the given address based on the planned business route software estimation. By default, the Tracking Page displays the Planned ETA.
The Predicted ETA is the dynamic estimated arrival time the driver is expected to arrive at the given route address based on the time of the previously visited destination. The Predicted ETA of a given destination changes dynamically based on the time the previous address was Marked as Visited or Geofence Detected as Visited and the distance from the previous address to the given destination. Thus, the Planned ETA and Predicted ETA of the same destination can be different based on the dynamic route progression.
Visit Route4Me's Marketplace to Check out Associated Add-Ons:
- Notifications & Alerts
Route Scheduled
- Notifications & Alerts
Geofence Entered
- Notifications & Alerts
Geofence Departed
- Notifications & Alerts
Visit Completed
- Notifications & Alerts
Notify Next Customer