SendGrid White-Labeled Email Templates For Customer Notification
Route4Me’s Customer Alerting and Notification Module is designed to help you raise your customers’ satisfaction, automate the process of notifying your customers about the status of their orders, and more. Depending on your particular business model or specific business requirements, you may need to customize the way your Email notifications look and how your customers interact with them. For example, you may want to use your company logo, attach a link to your website, add a button for a customer survey, etc. To make sure your notifications are sent in accordance with your unique business concept, Route4Me allows you to add white-labeled designs and functionalities to your Email notifications using SendGrid templates. In addition to custom styling, you can also use Route4Me’s placeholders that allow you to automatically attach various routing, customer, and order data to your notifications. Using white-labeled SendGrid Email templates is as easy as adding your SendGrid API key and the preferred Template ID to your Route4Me Notifications Module.

Table of Contents
Checklist For Setting Up And Using SendGrid Templates
To set up your white-labeled SendGrid templates and use them with your Route4Me Alerting and Notifications Module, follow the checklist below:
- Ensure you’ve activated the preferred Route4Me Alerting and Notifications Add-Ons (i.e., Geofence Entered, Geofence Left, etc.).
- Log into your SendGrid account.
- Create a new SendGrid Dynamic Template.
- Make sure your SendGrid templates contain all the necessary elements for your Email notification not to go to your recipients’ spam inboxes.
- Create a new SendGrid API Key specifically for your Route4Me Notifications.
- Go through the Sender Authentication process (Single Sender Verification and Domain Authentication).
- Copy the Template ID of the preferred SendGrid Email template from your SendGrid account and insert it into the corresponding field in your Route4Me Notifications Module.
- Copy the preferred API Key from your SendGrid account and insert it into the corresponding field in your Route4Me Notifications Module.
- Make sure that your Route4Me Notifications are sent from an Authenticated Domain or a Verified Single Sender Email address.
Create A New SendGrid Dynamic Email Template
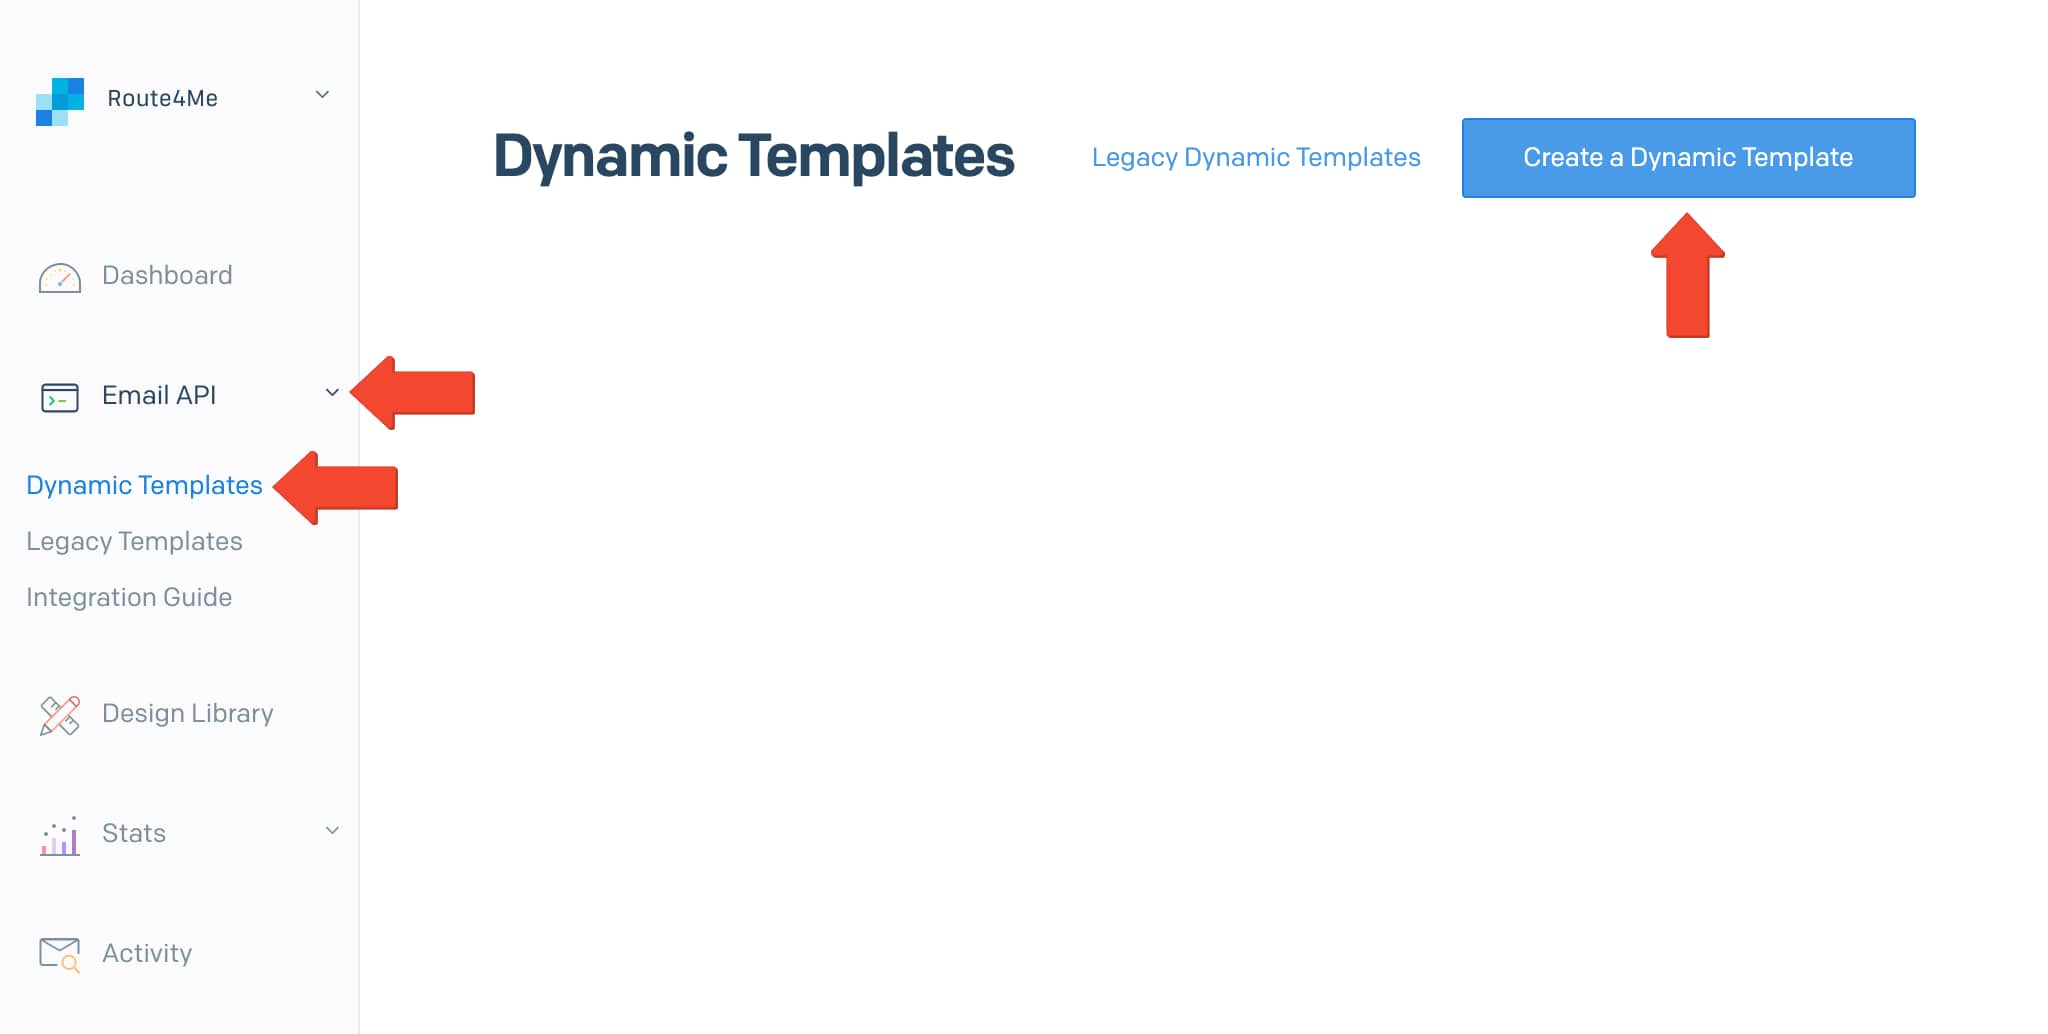
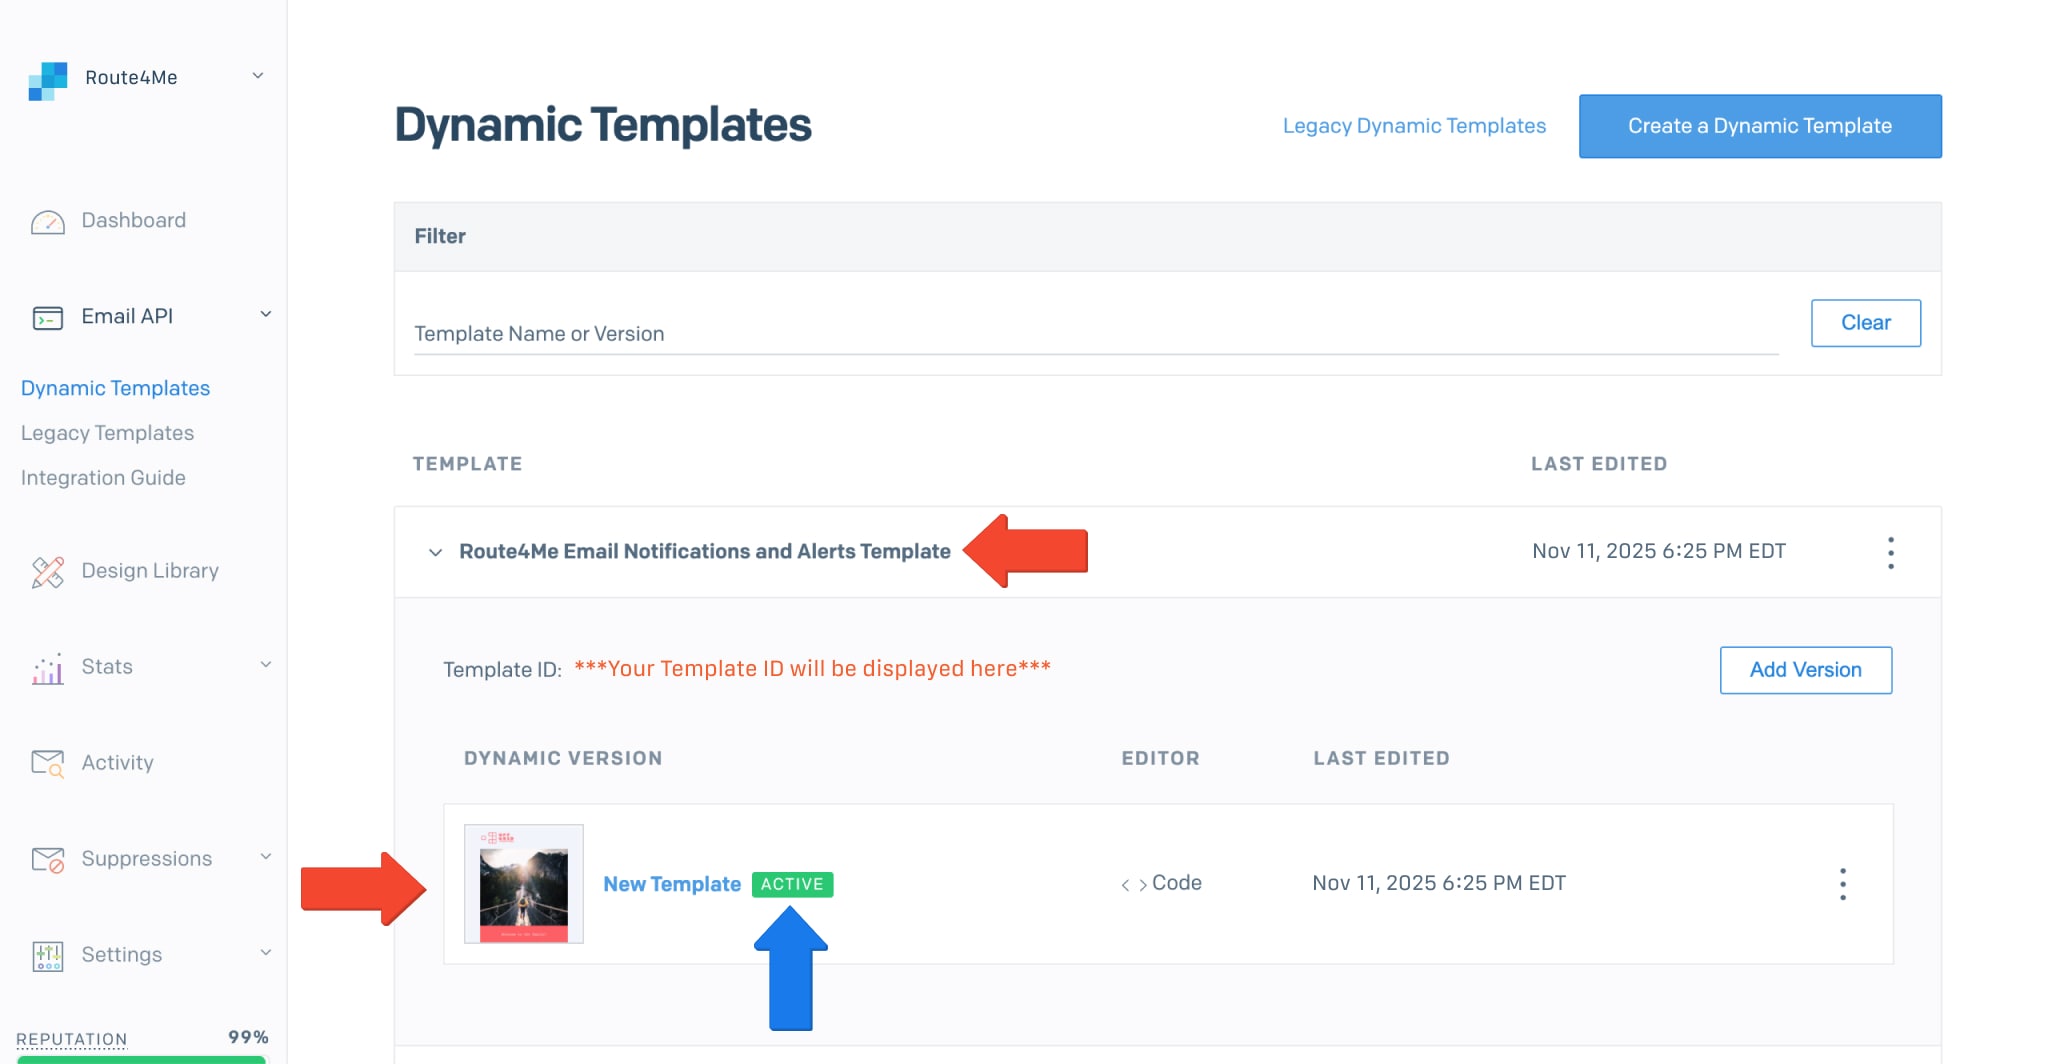
To create a new SendGrid Dynamic Email Template, first, go to Email API from the navigation menu and then select Dynamic Templates from the list. Next, click the “Create a Dynamic Template” button to create a new template.
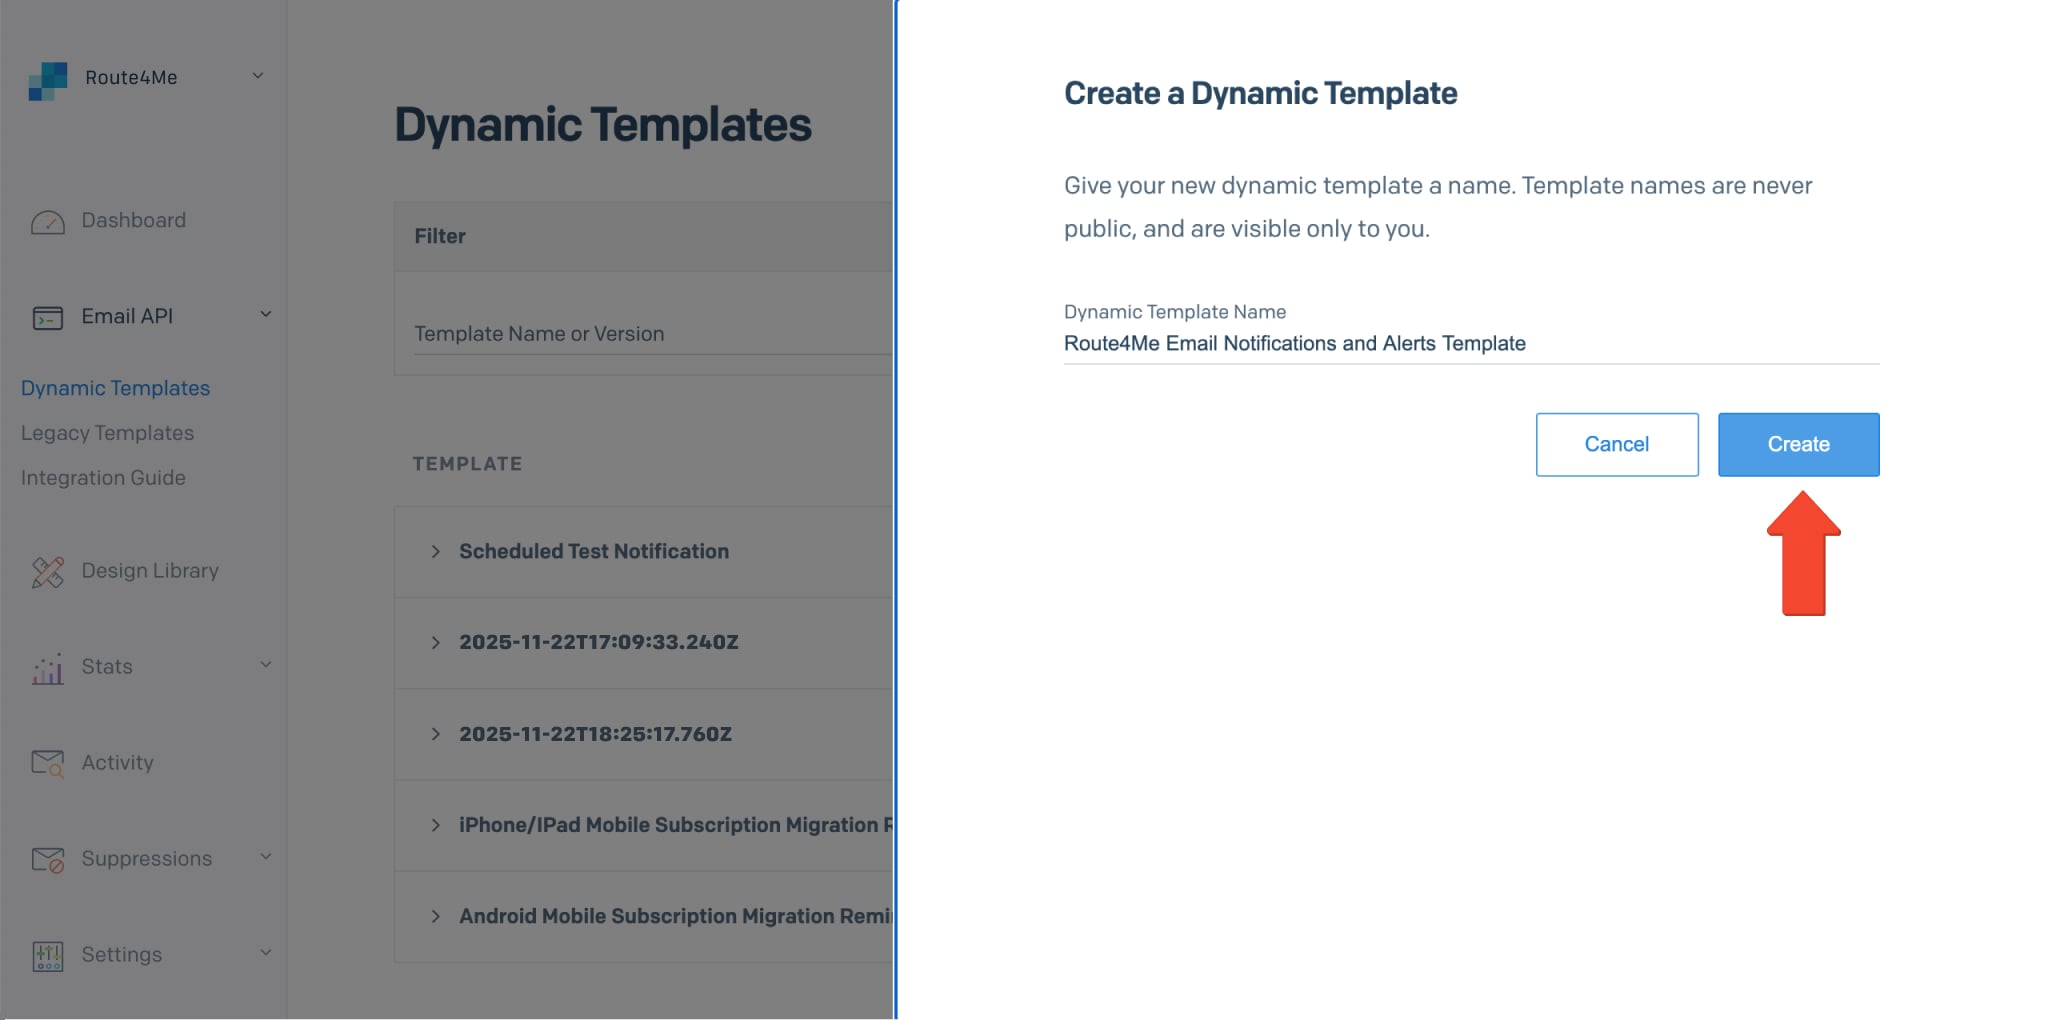
After that, input the name of the new SendGrid Email template into the corresponding field and click the “Create” button to proceed.
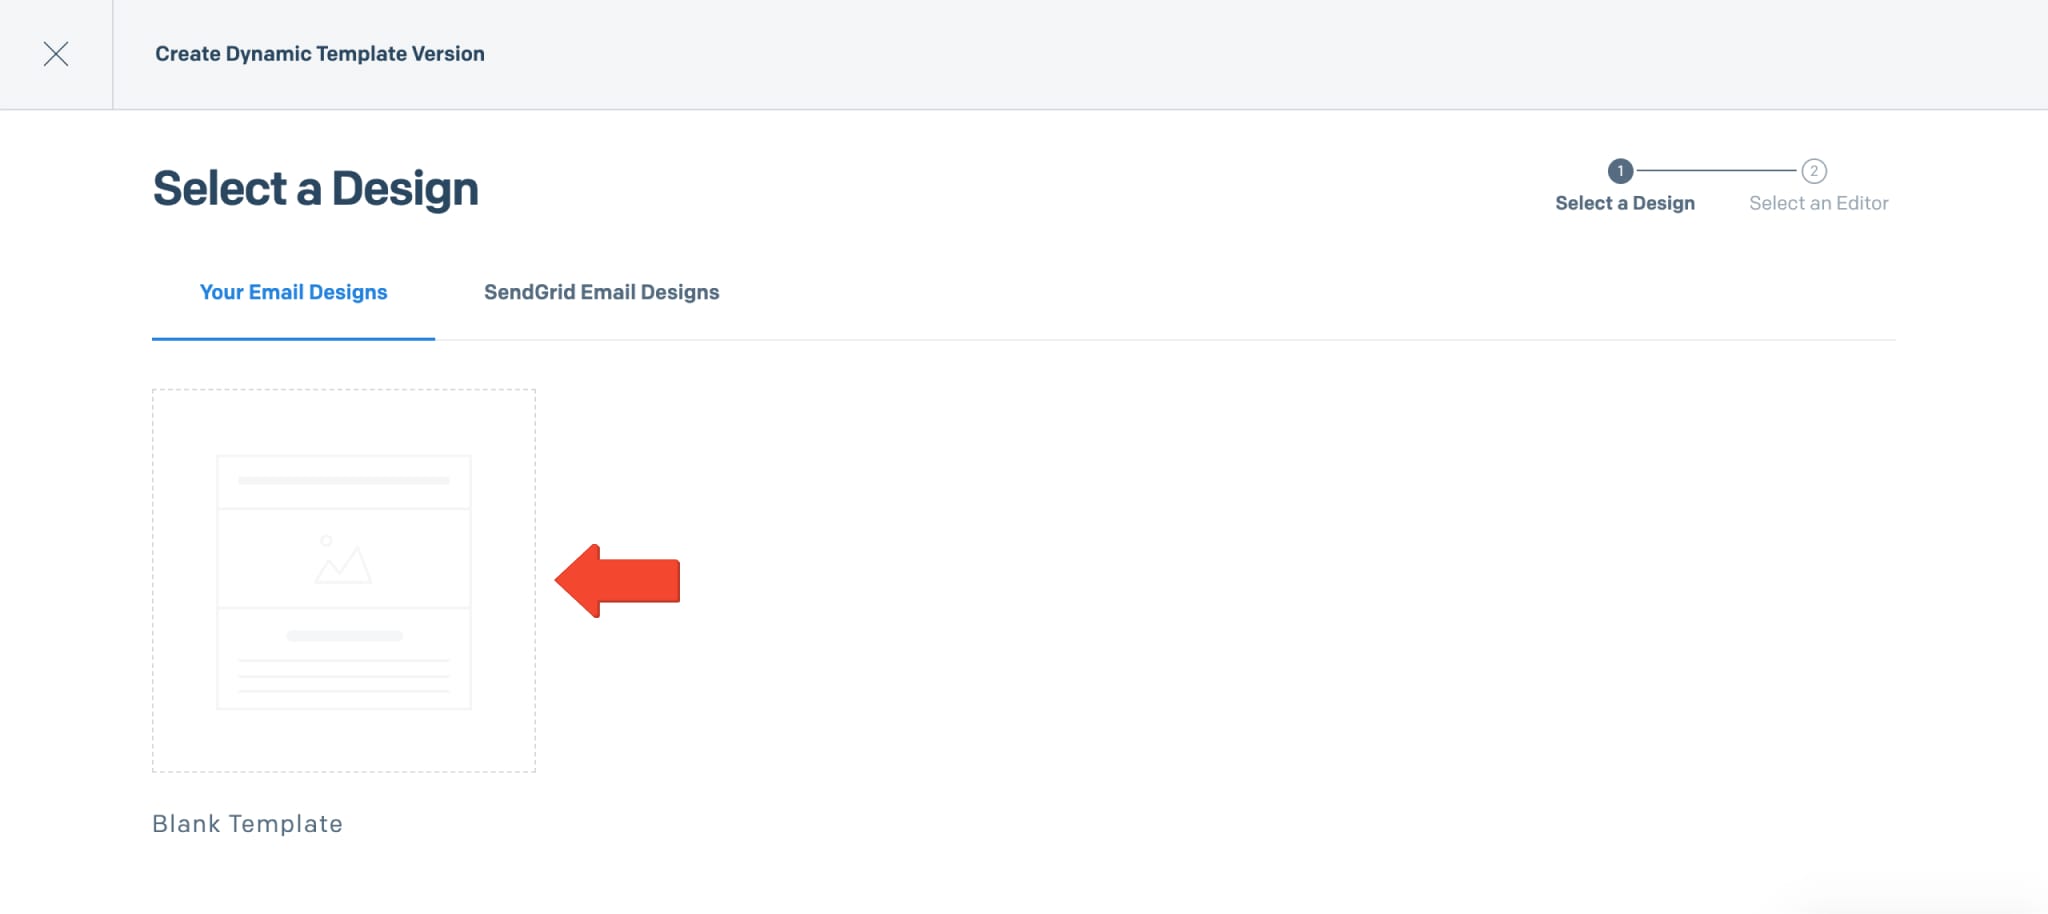
Next, click the new template’s name and create a new version of the template. To create a new version of the template, click the “Add Version” button.

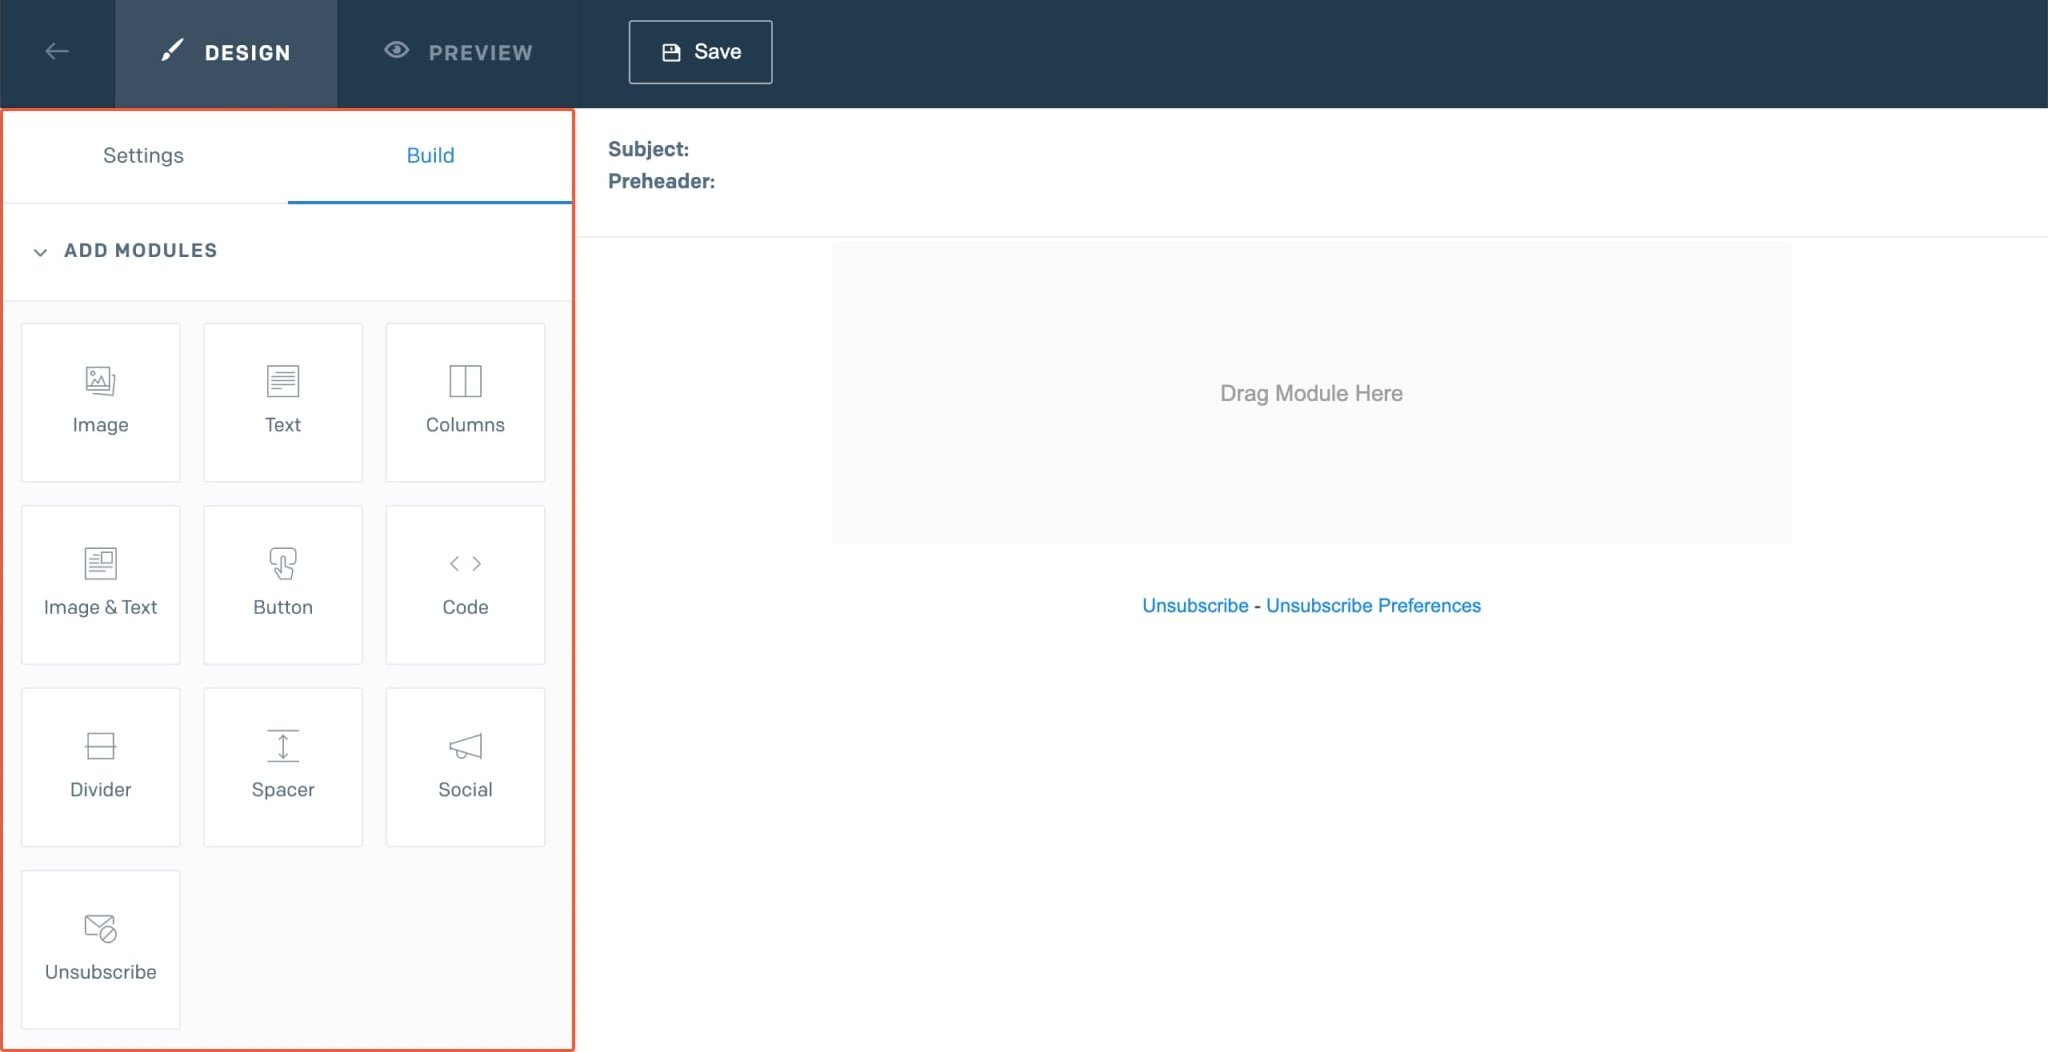
After that, to create a new custom Email template, go to the “Your Email Designs” tab and then click the “Blank Template” tab.
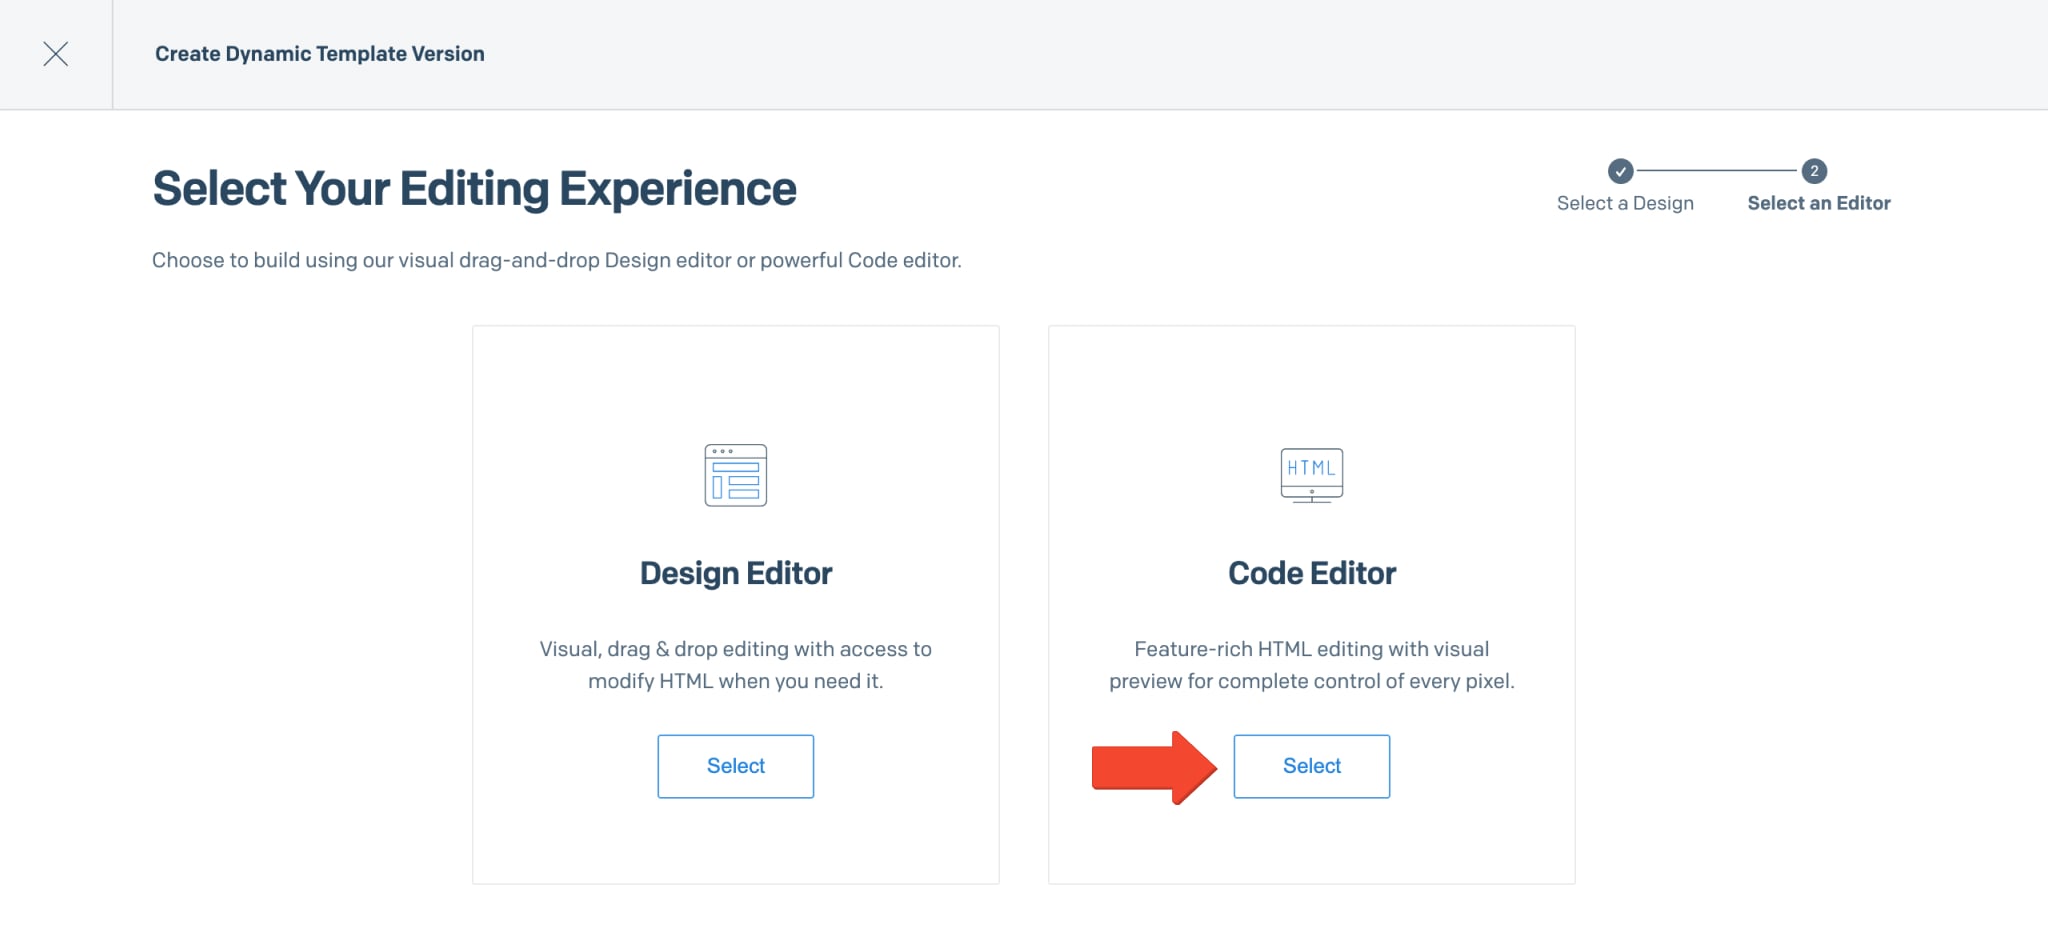
To use the visual editor, select the “Design Editor” on the “Select Your Editing Experience” page.
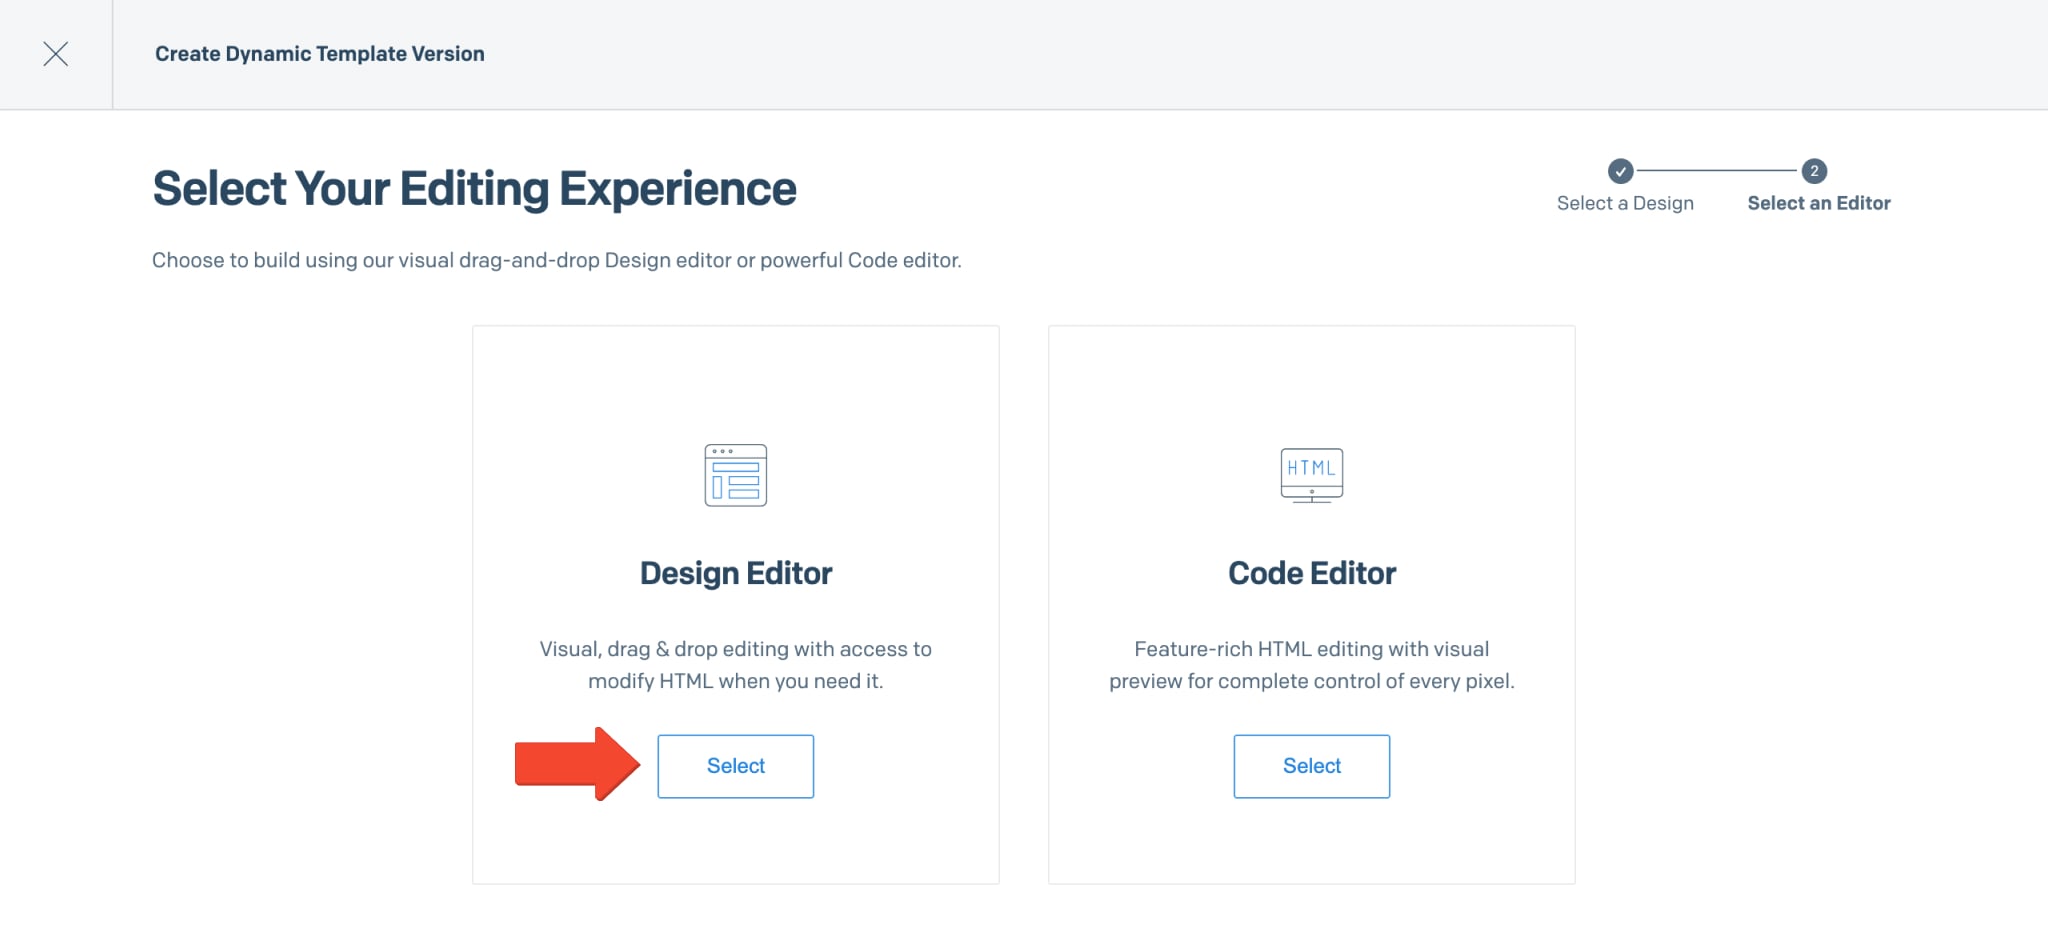
The Design Editor provides a visual editing experience, allowing you to drag and drop visual or text elements into the template, move them inside the template, change their color, add images, etc. You can use the Design Editor as the alternative to the Code Editor which requires using HTML for adding styling and functionality to your templates. The Design Editor also allows you to view and edit the HTML of the given template.
To create customized SendGrid Email templates using HTML, select the “Code Editor” on the “Select Your Editing Experience” page.
Next, use the Code Editor on the left to customize the Email template. On the right side of the screen, you can preview how your Email template will look when opened on desktop and mobile devices. The Code Editor allows you to use HTML code to create a custom structure and functionality for your Email templates.
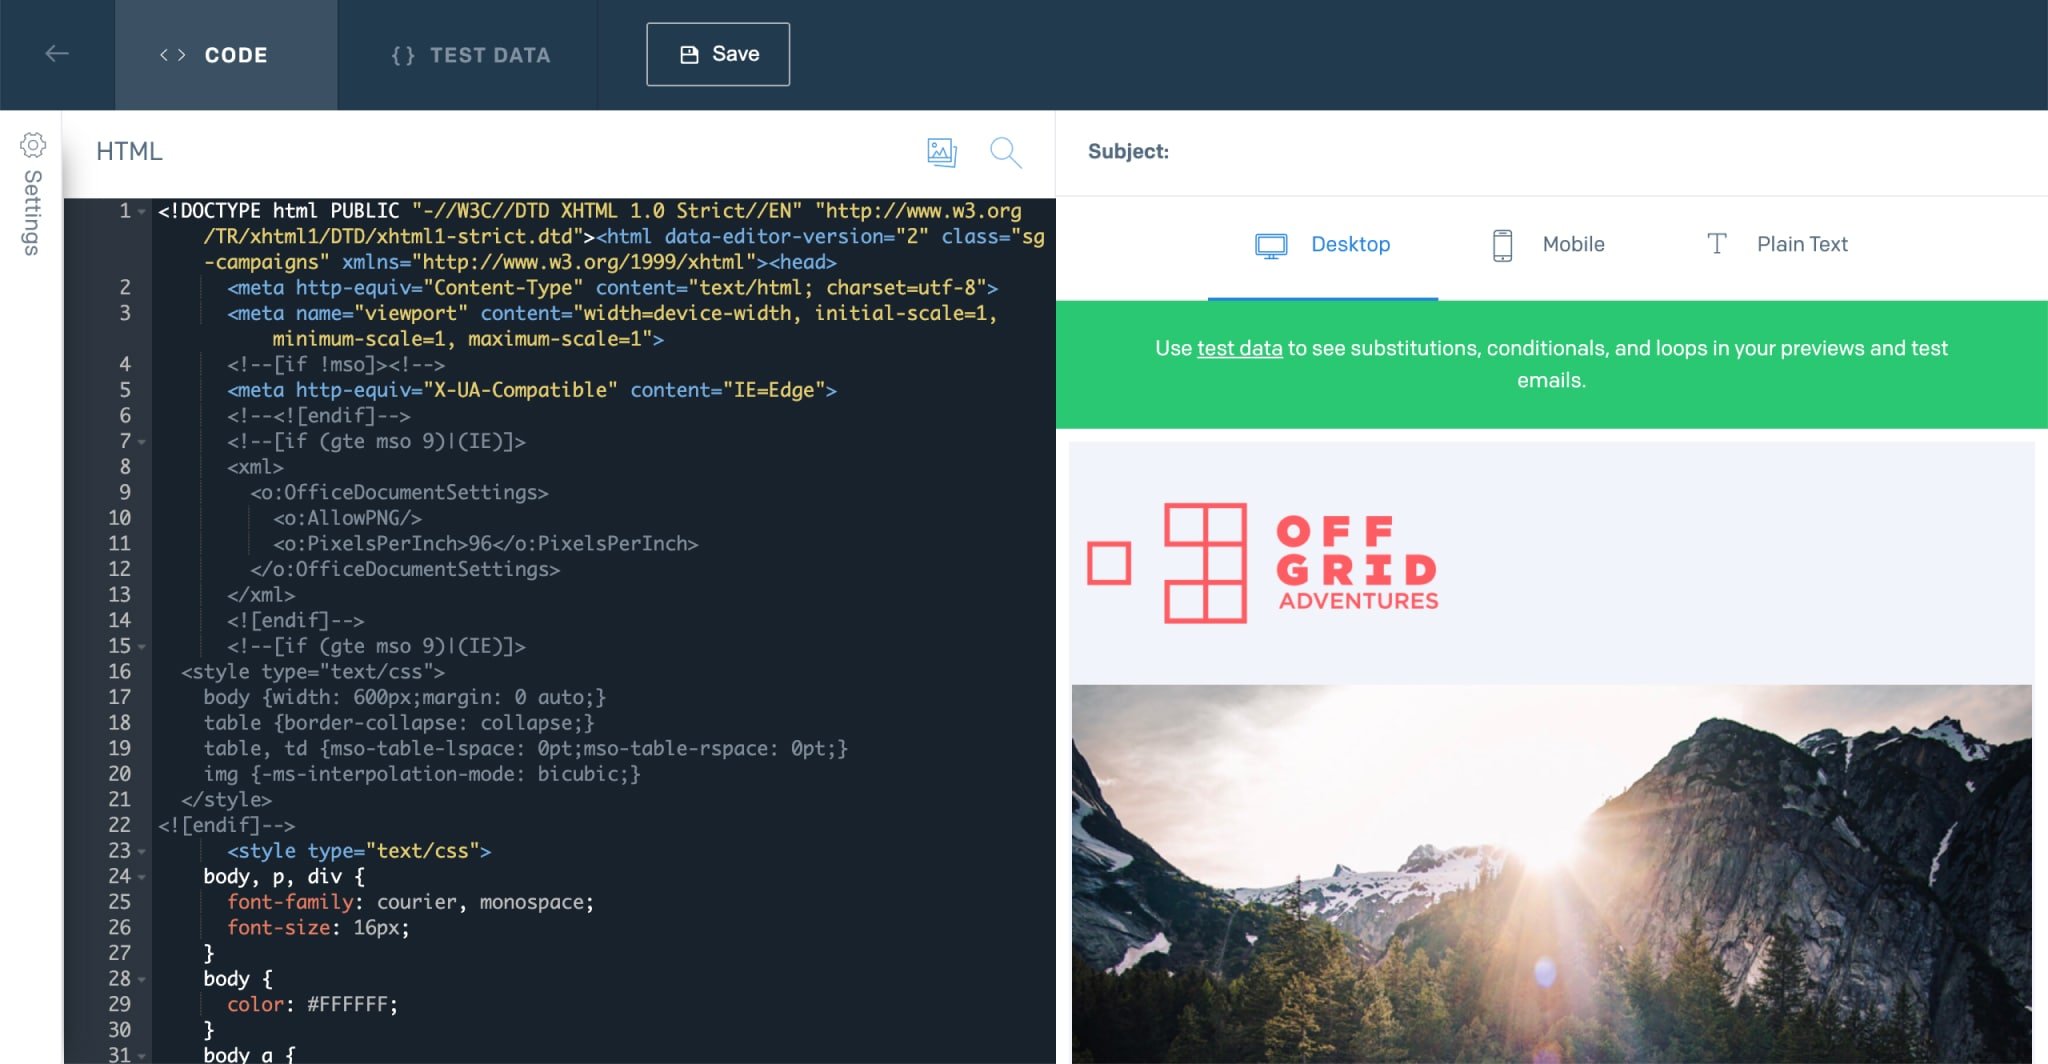
Furthermore, you can use the Code Editor to add Route4Me’s data placeholders that allow you to use customer names, tracking numbers, ETAs, and other types of dynamic data from your Route4Me routes and insert this data into your notifications. Additionally, learn more about how to use Route4Me’s Notification Placeholders and what routing data can be automatically attached to your custom Email notifications.
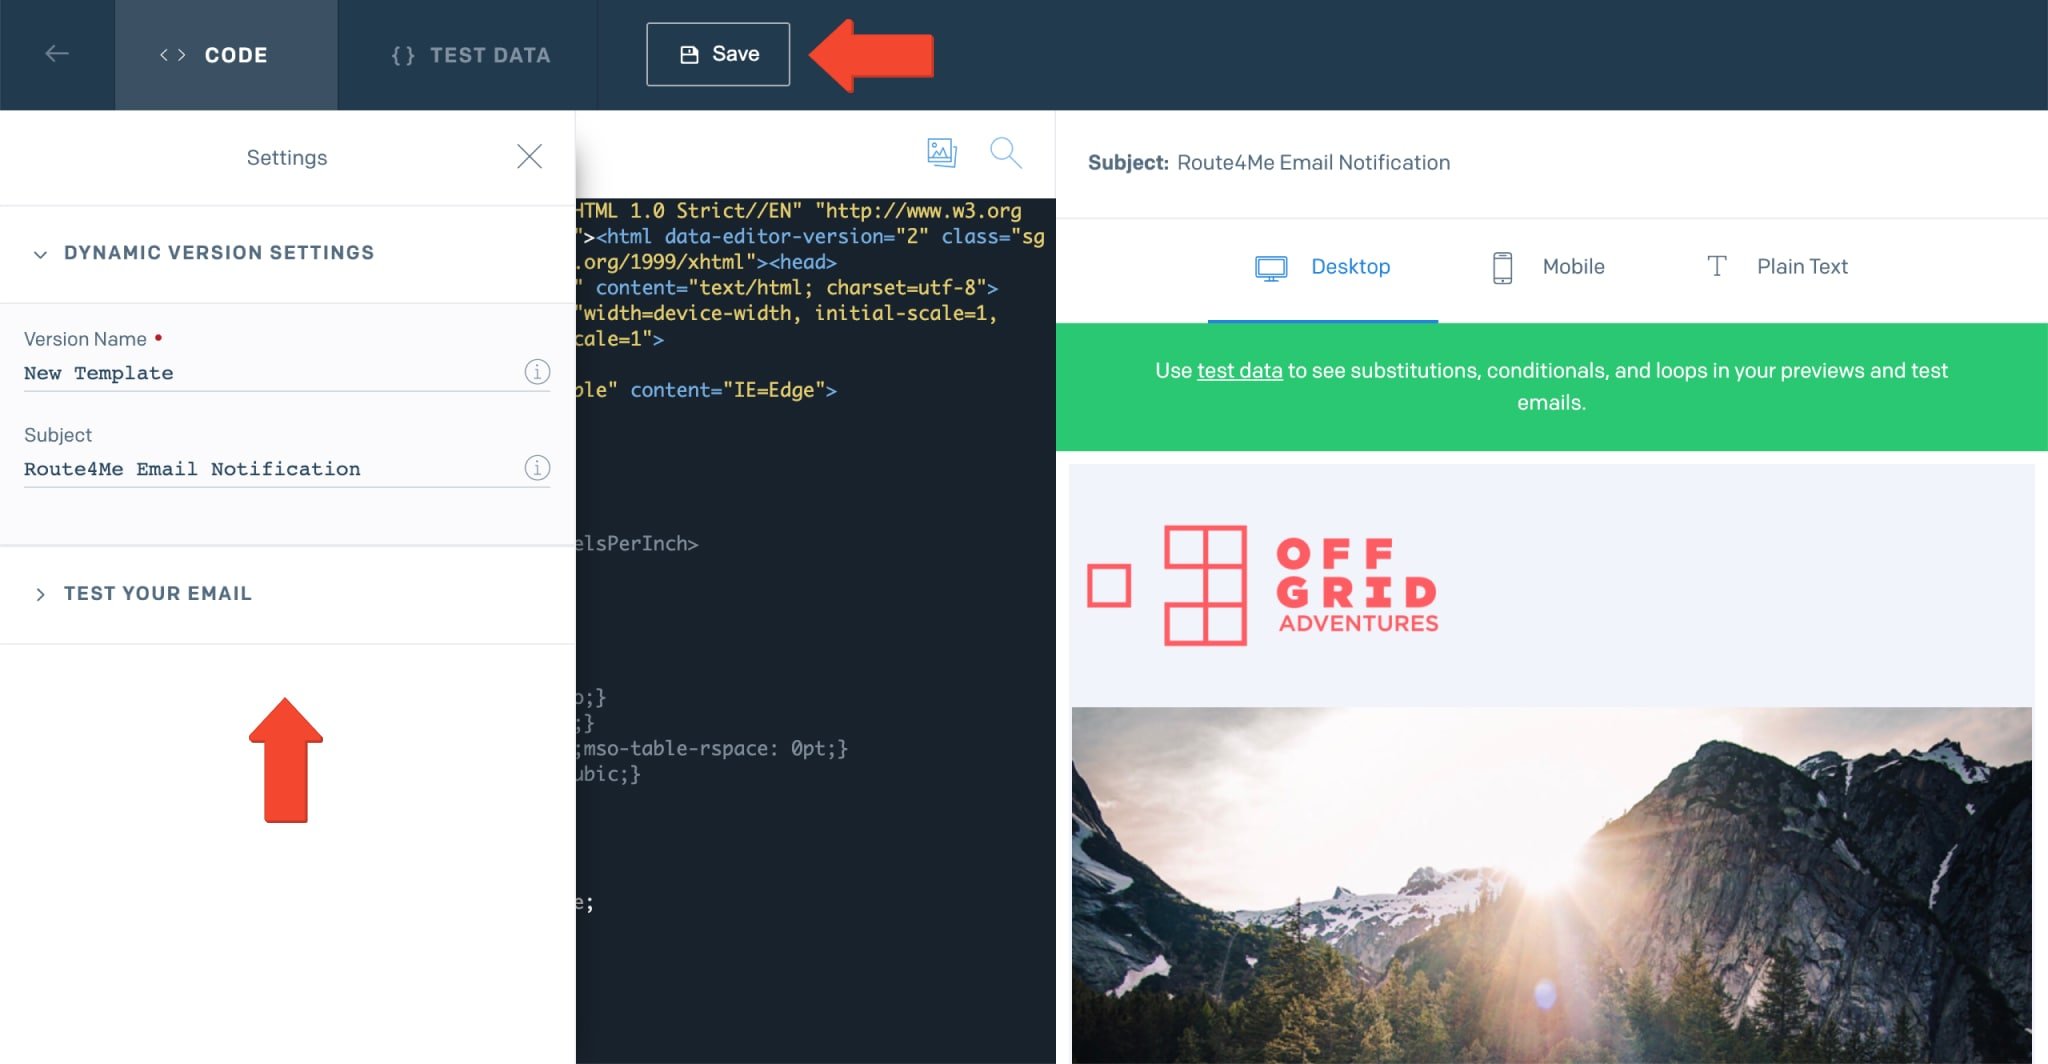
After creating and testing the given version of the template, adjust the template’s version settings, and then click the “Save” button to save this template version.
Once the new version of the template is created, you can view and manage it in the template’s menu. If you want to use a specific version of a particular Email template, make sure that this template version is Active. When a template version is Active, it has the green Active Icon displayed next to it.
Create A New SendGrid API Key For Your Route4Me Notifications
To use your SendGrid custom Email templates with Route4Me’s Customer Notifications, you need to use your SendGrid API key in your Route4Me Notifications Module. To create a new SendGrid API key for your Route4Me Notifications, go to “Settings” in the Navigation Menu and select “API Keys” from the list. The, click the “Create API Key” button.
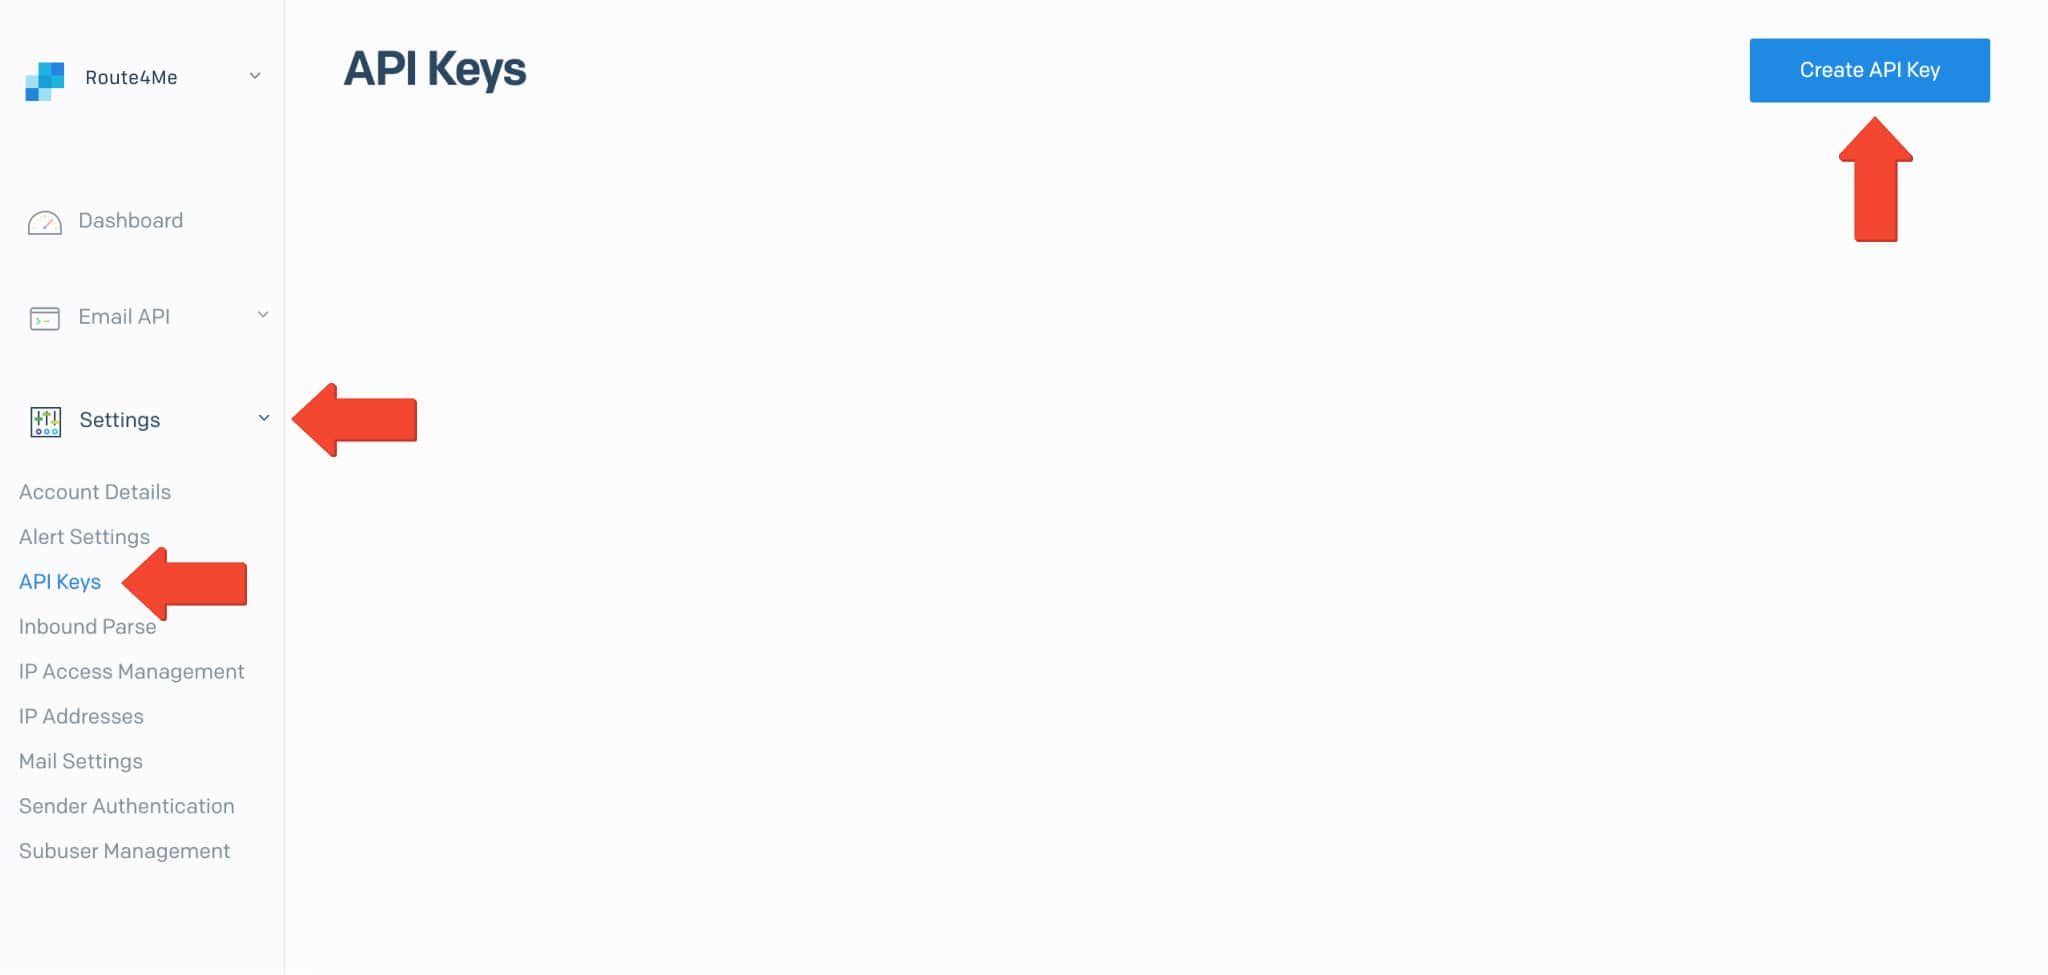
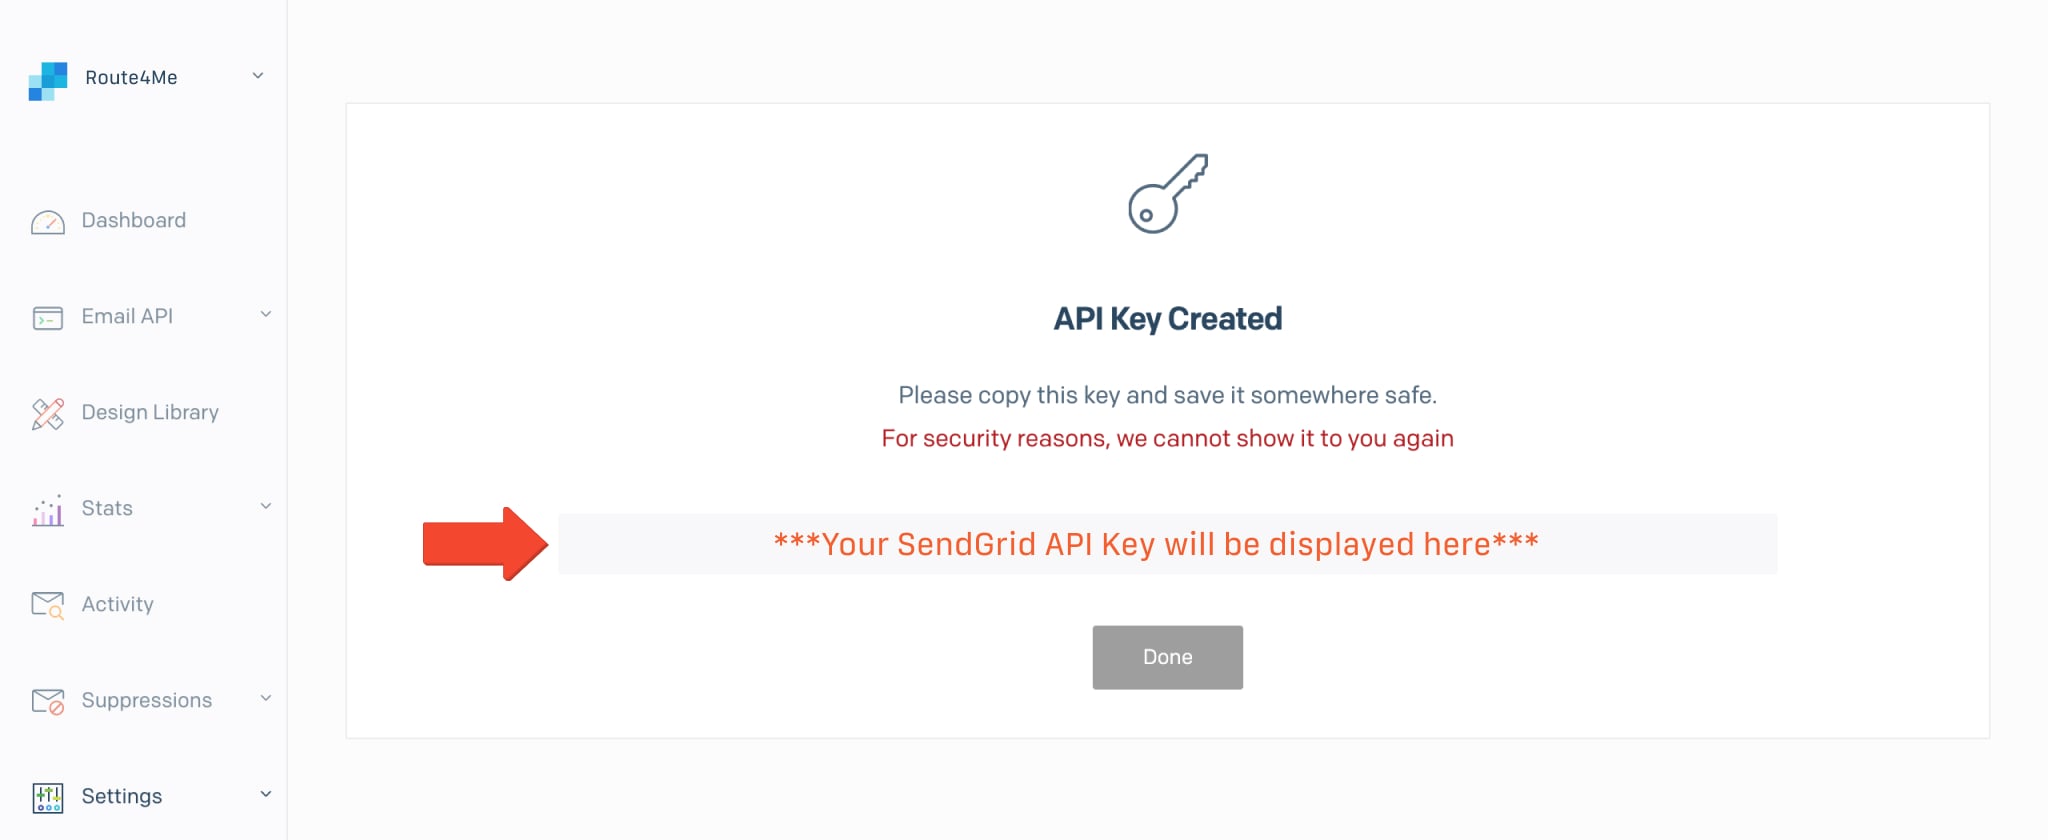
Next, select and then adjust the preferred permissions for the given API key and then click the “Create & View” button to save this new API key.

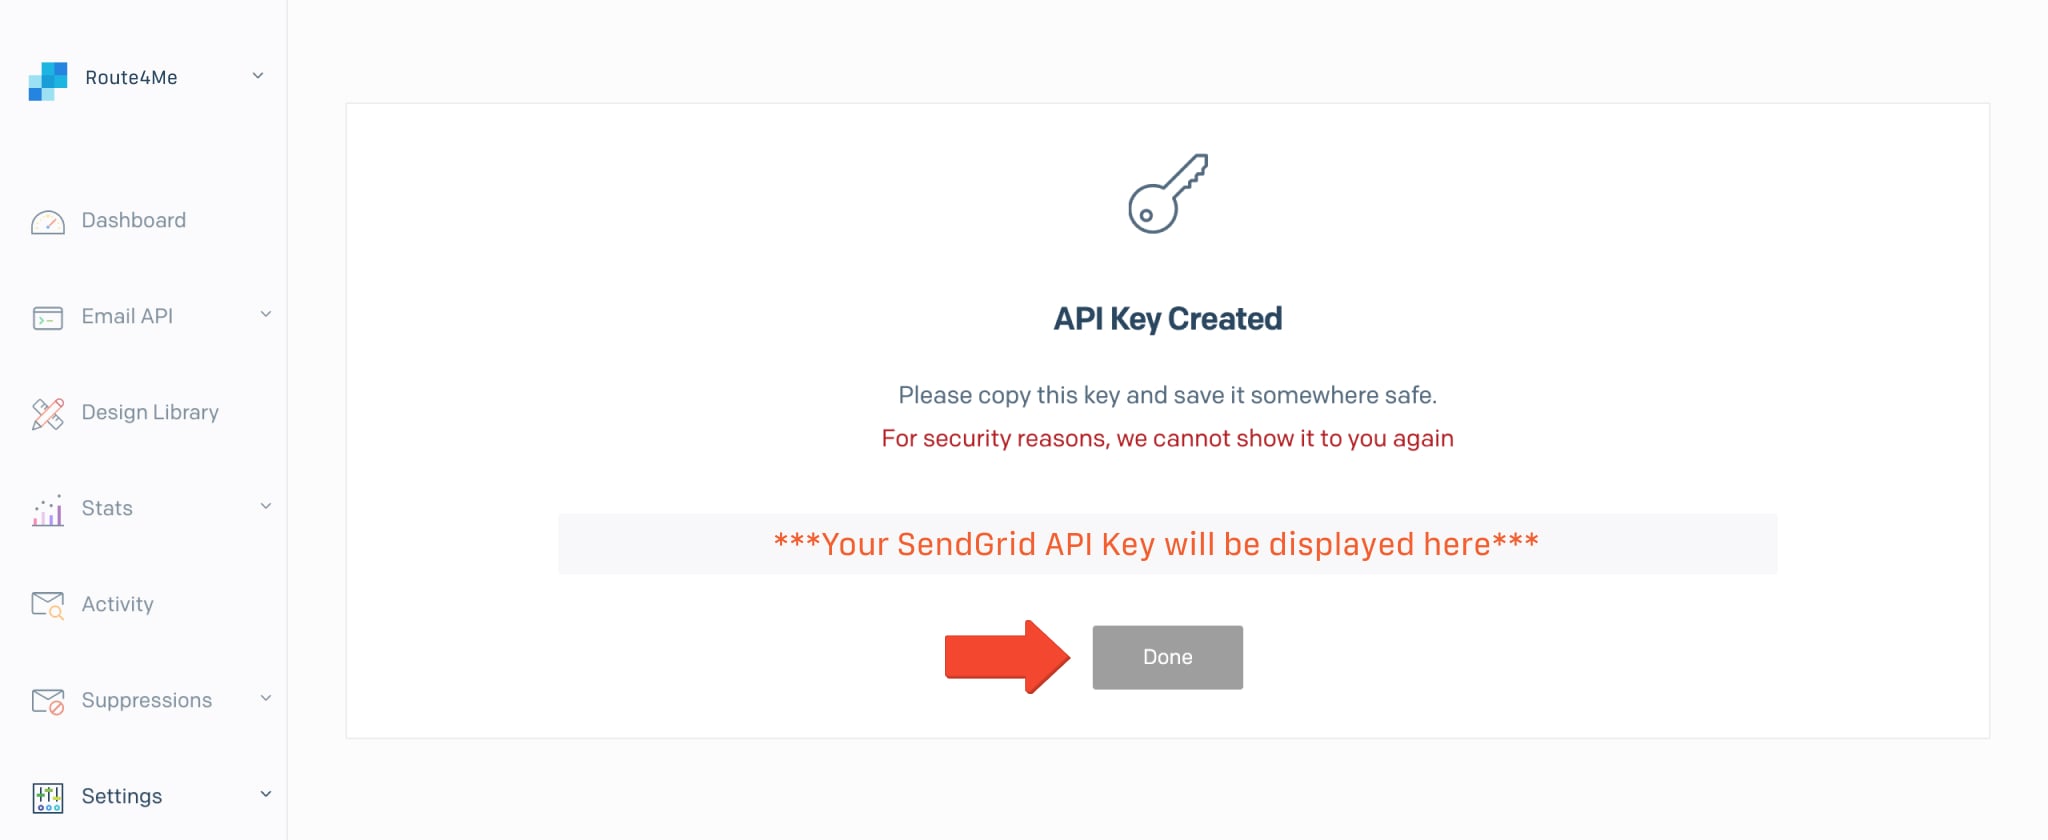
After that, make sure you save your SendGrid API key. NOTE: Your SendGrid API key is shown in your SendGrid account only once right after you’ve created it. Make sure that you copy your SendGrid API key before clicking on the Done button. If you lose your SendGrid API key, you can create a new one following the steps above.
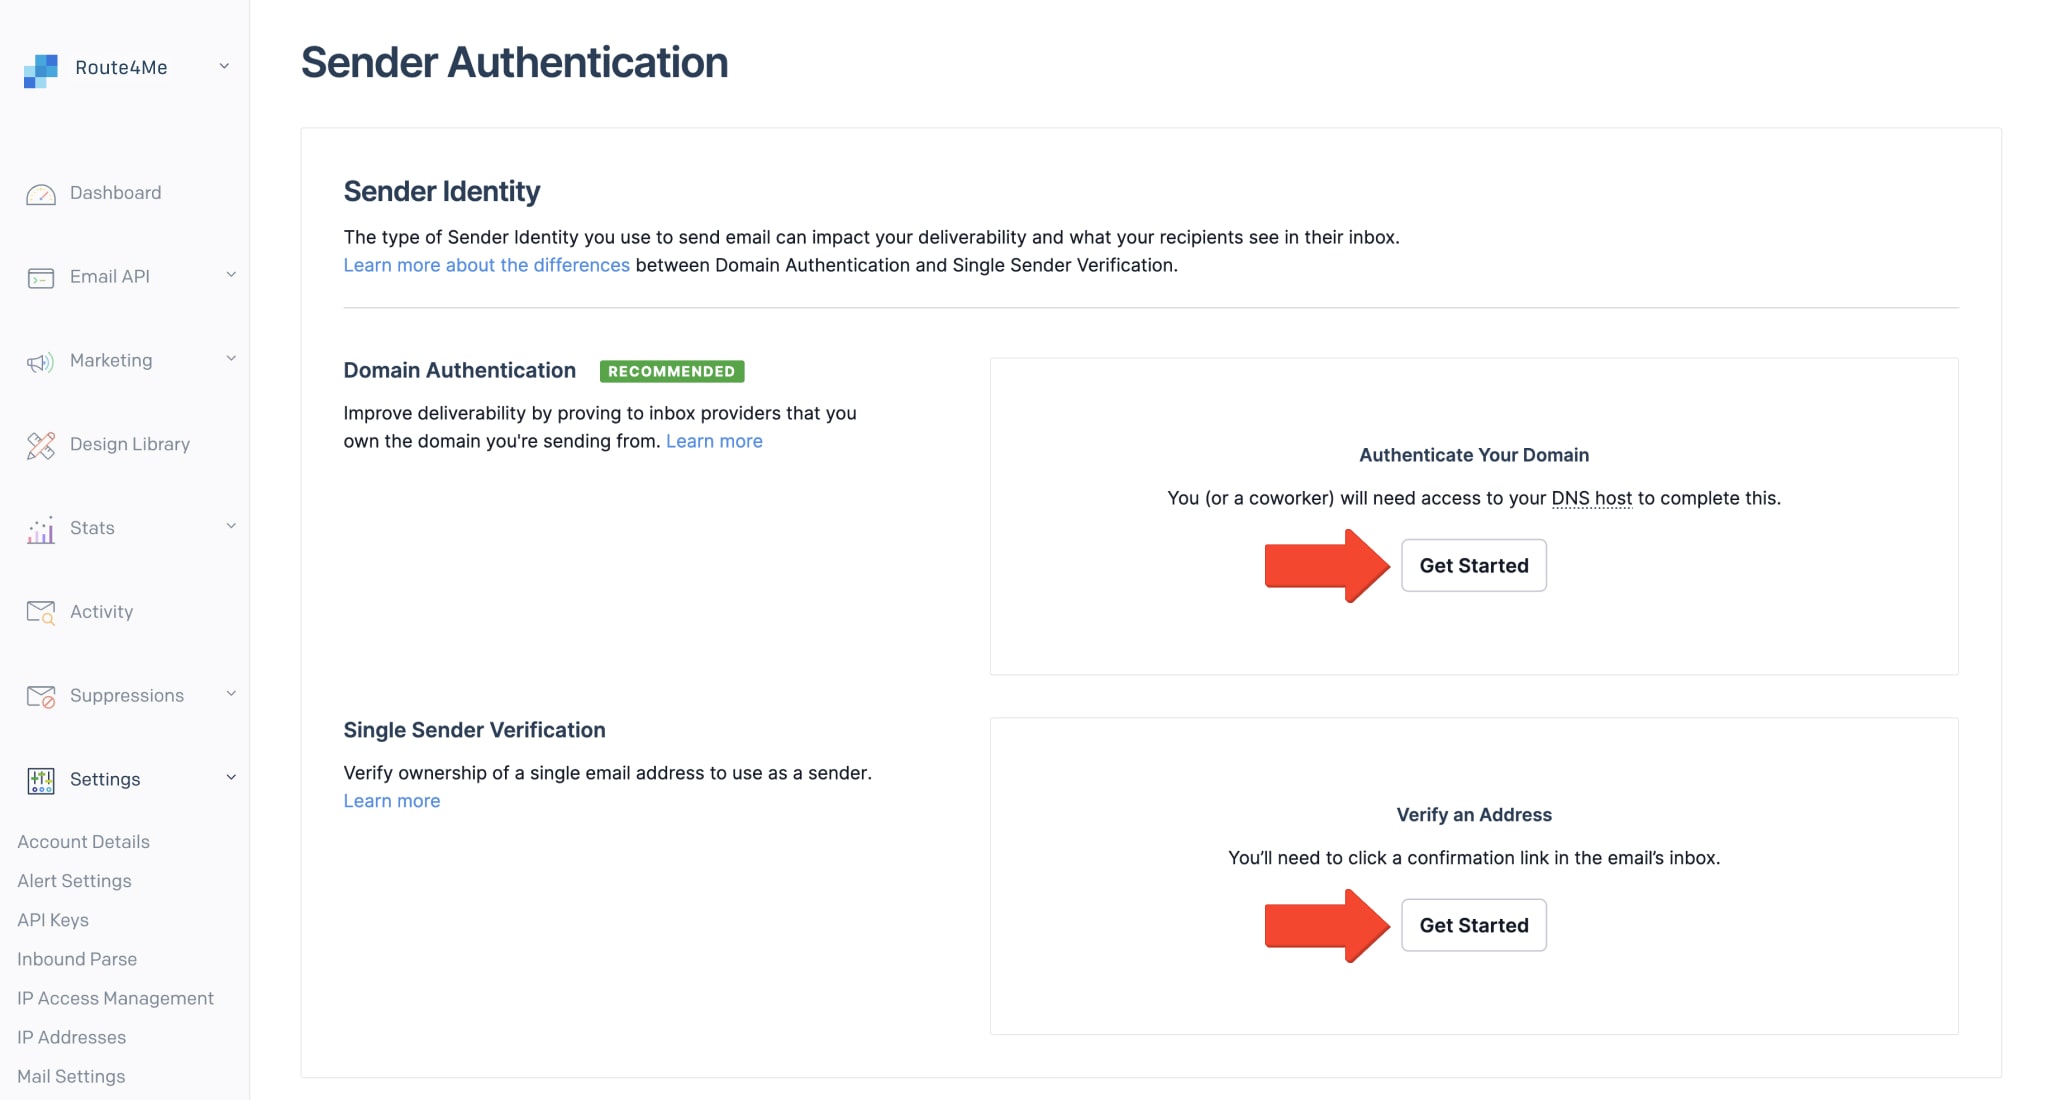
Setting Up SendGrid Sender Verification
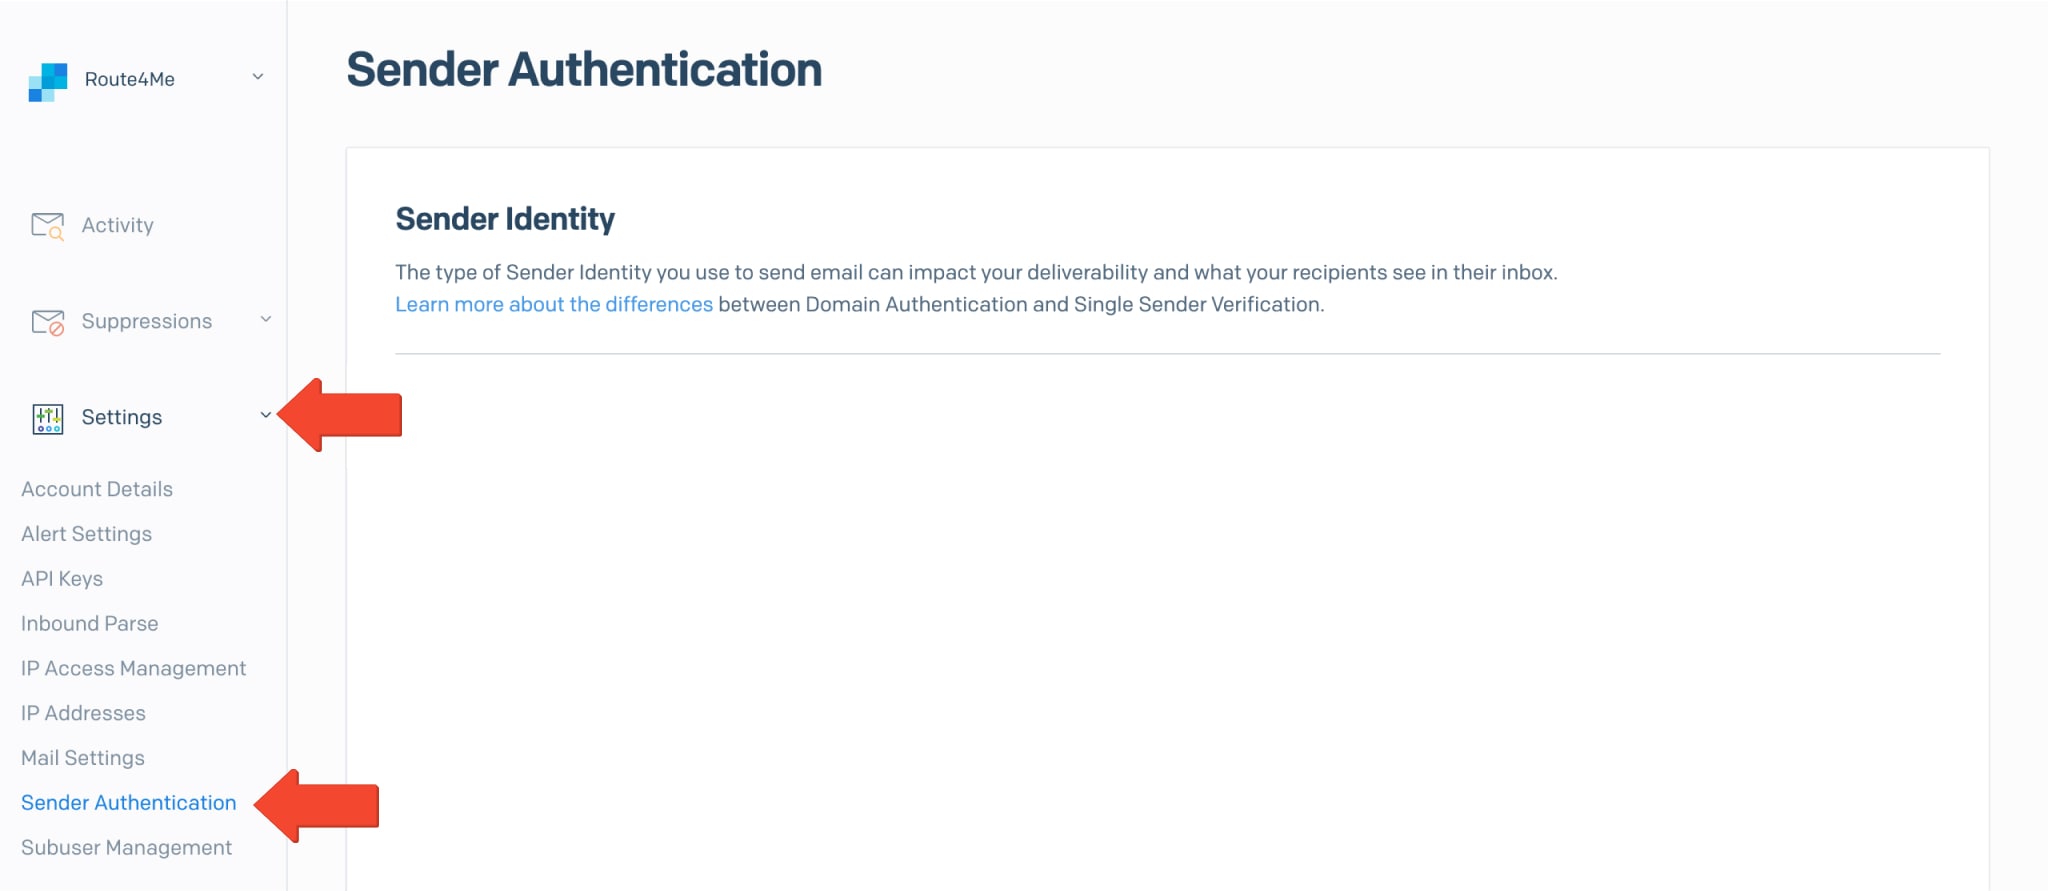
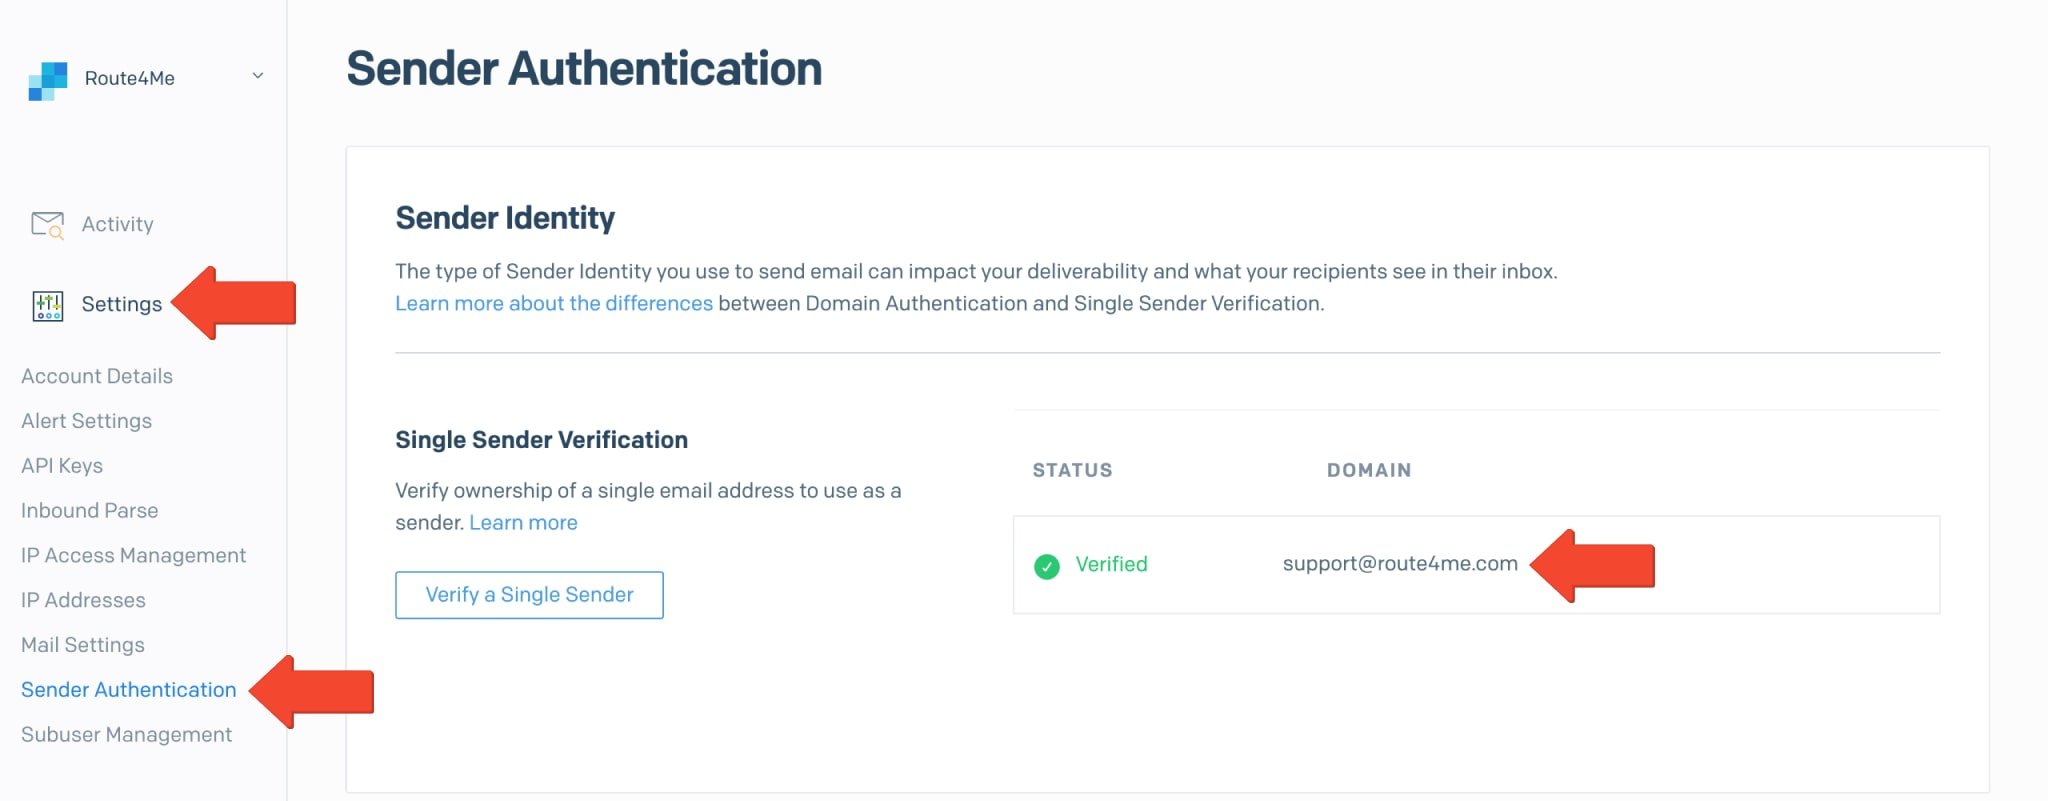
To make sure your Route4Me Notifications with white-labeled SendGrid templates don’t go to the spam inbox of your recipients, it’s recommended to Authenticate the Sender of your Email notifications. To do so, go to “Settings” from the Navigation Menu and then select “Sender Authentication” from the list.
In the “Domain Authentication” section, you can set up domain authentication that will allow showing Email providers that SendGrid has permission to send Emails on your behalf. Authenticating your domain will have a positive impact on your reputation as a sender and your Email deliverability. To learn more about Authenticating Your Domain, visit the SendGrid support page.
In the “Single Sender Verification” section, you can verify ownership of a single Email address that you want to use as a sender of your Route4Me Email notifications. To learn more about Verifying a Single Sender Email Address, visit the SendGrid support page. NOTE: You can send your Route4Me Email notifications only from verified Email addresses.
Use Custom SendGrid Email Templates With Route4Me Notifications
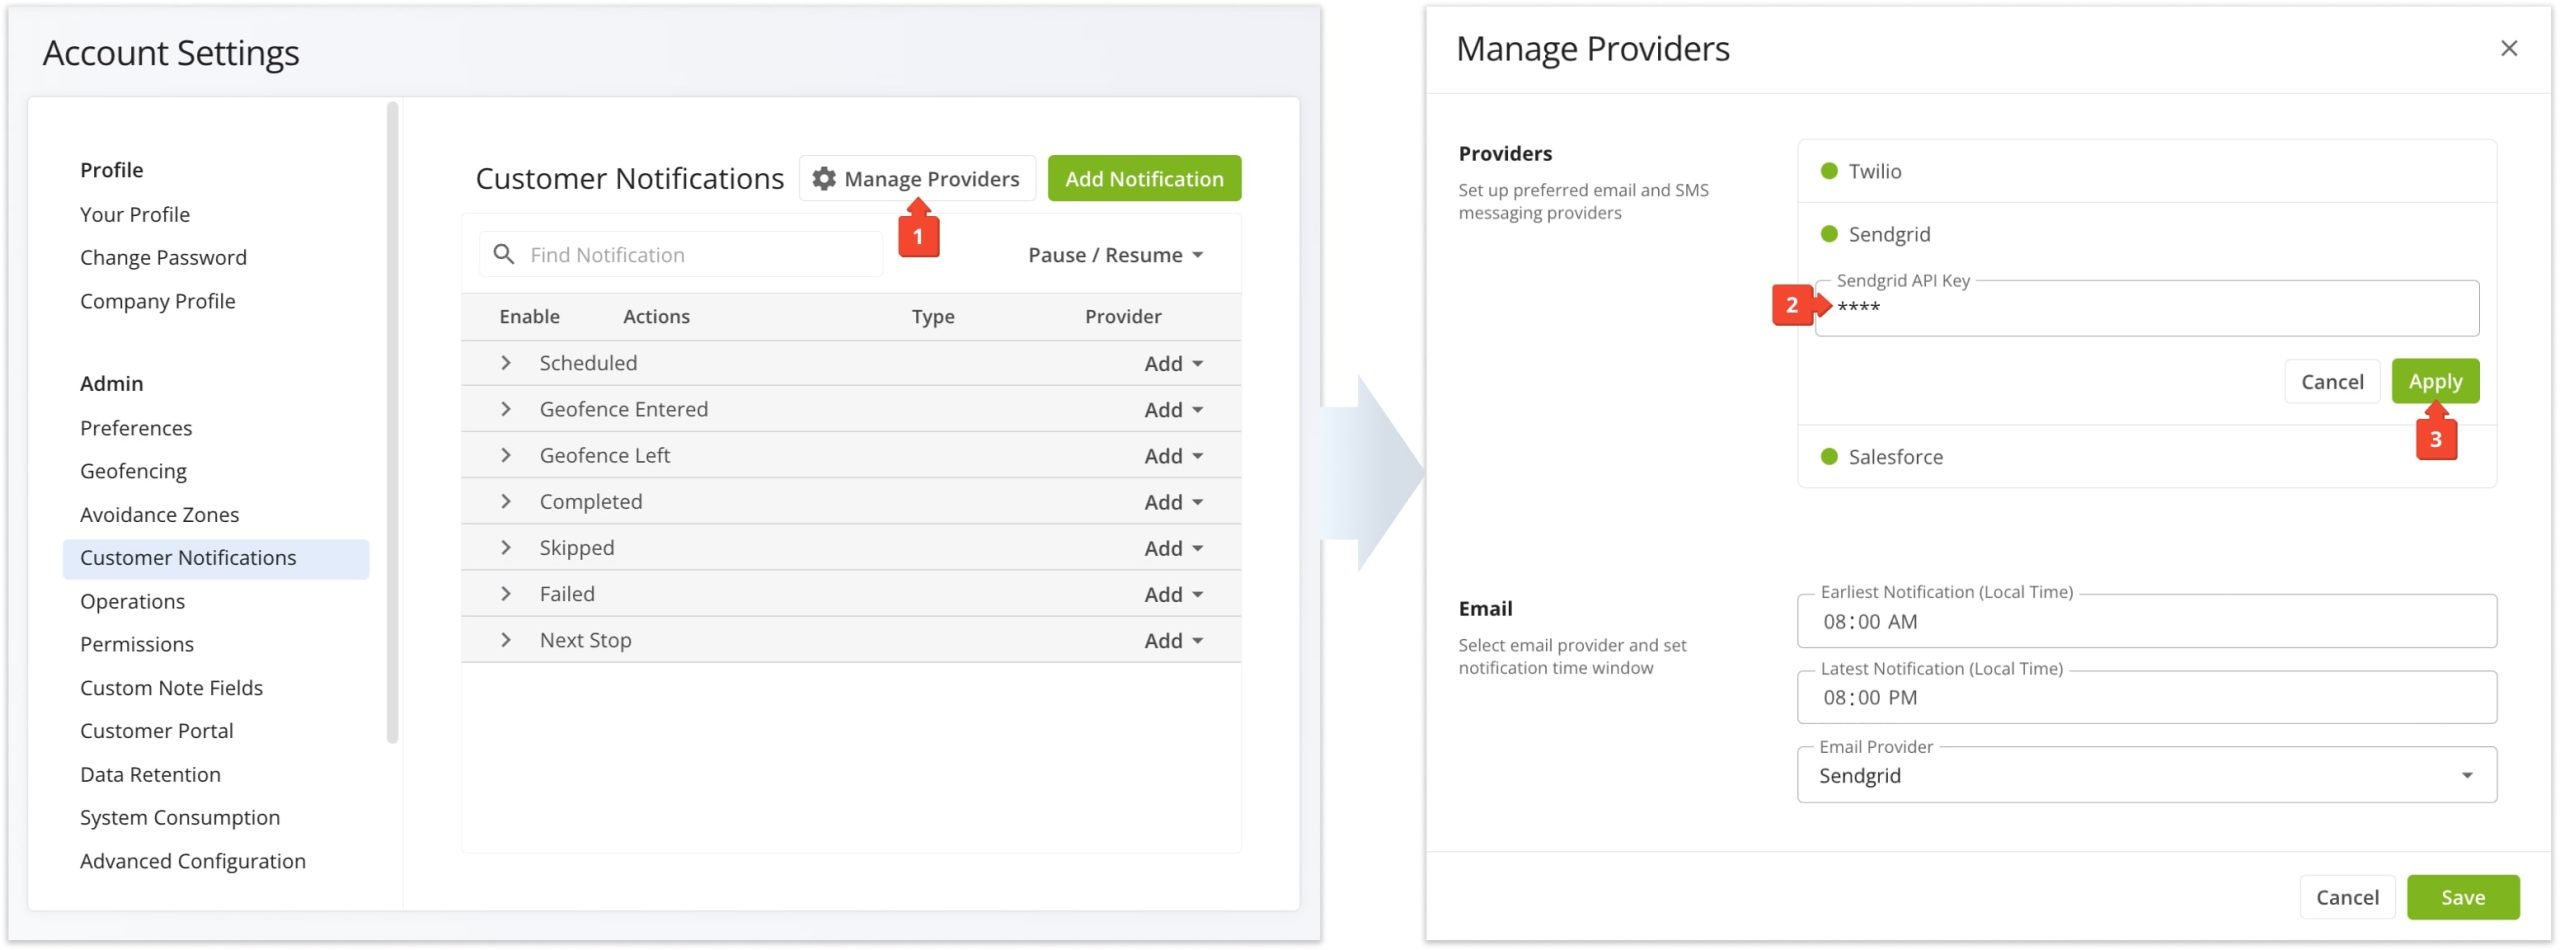
To use your custom SendGrid Email templates with your Route4Me Notifications, you need to specify your SendGrid API key and the preferred SendGrid Template ID in your Route4Me Notifications Module. NOTE: Ensure that you use your SendGrid API key that is shown right after you’ve created it. If you use the ID of your SendGrid API key (API Key ID), the system will not be able to read it, and your notifications will not be sent.
Then, click “Manage Providers” in your Route4Me Notifications Settings and insert the copied SendGrid API key into the corresponding field.
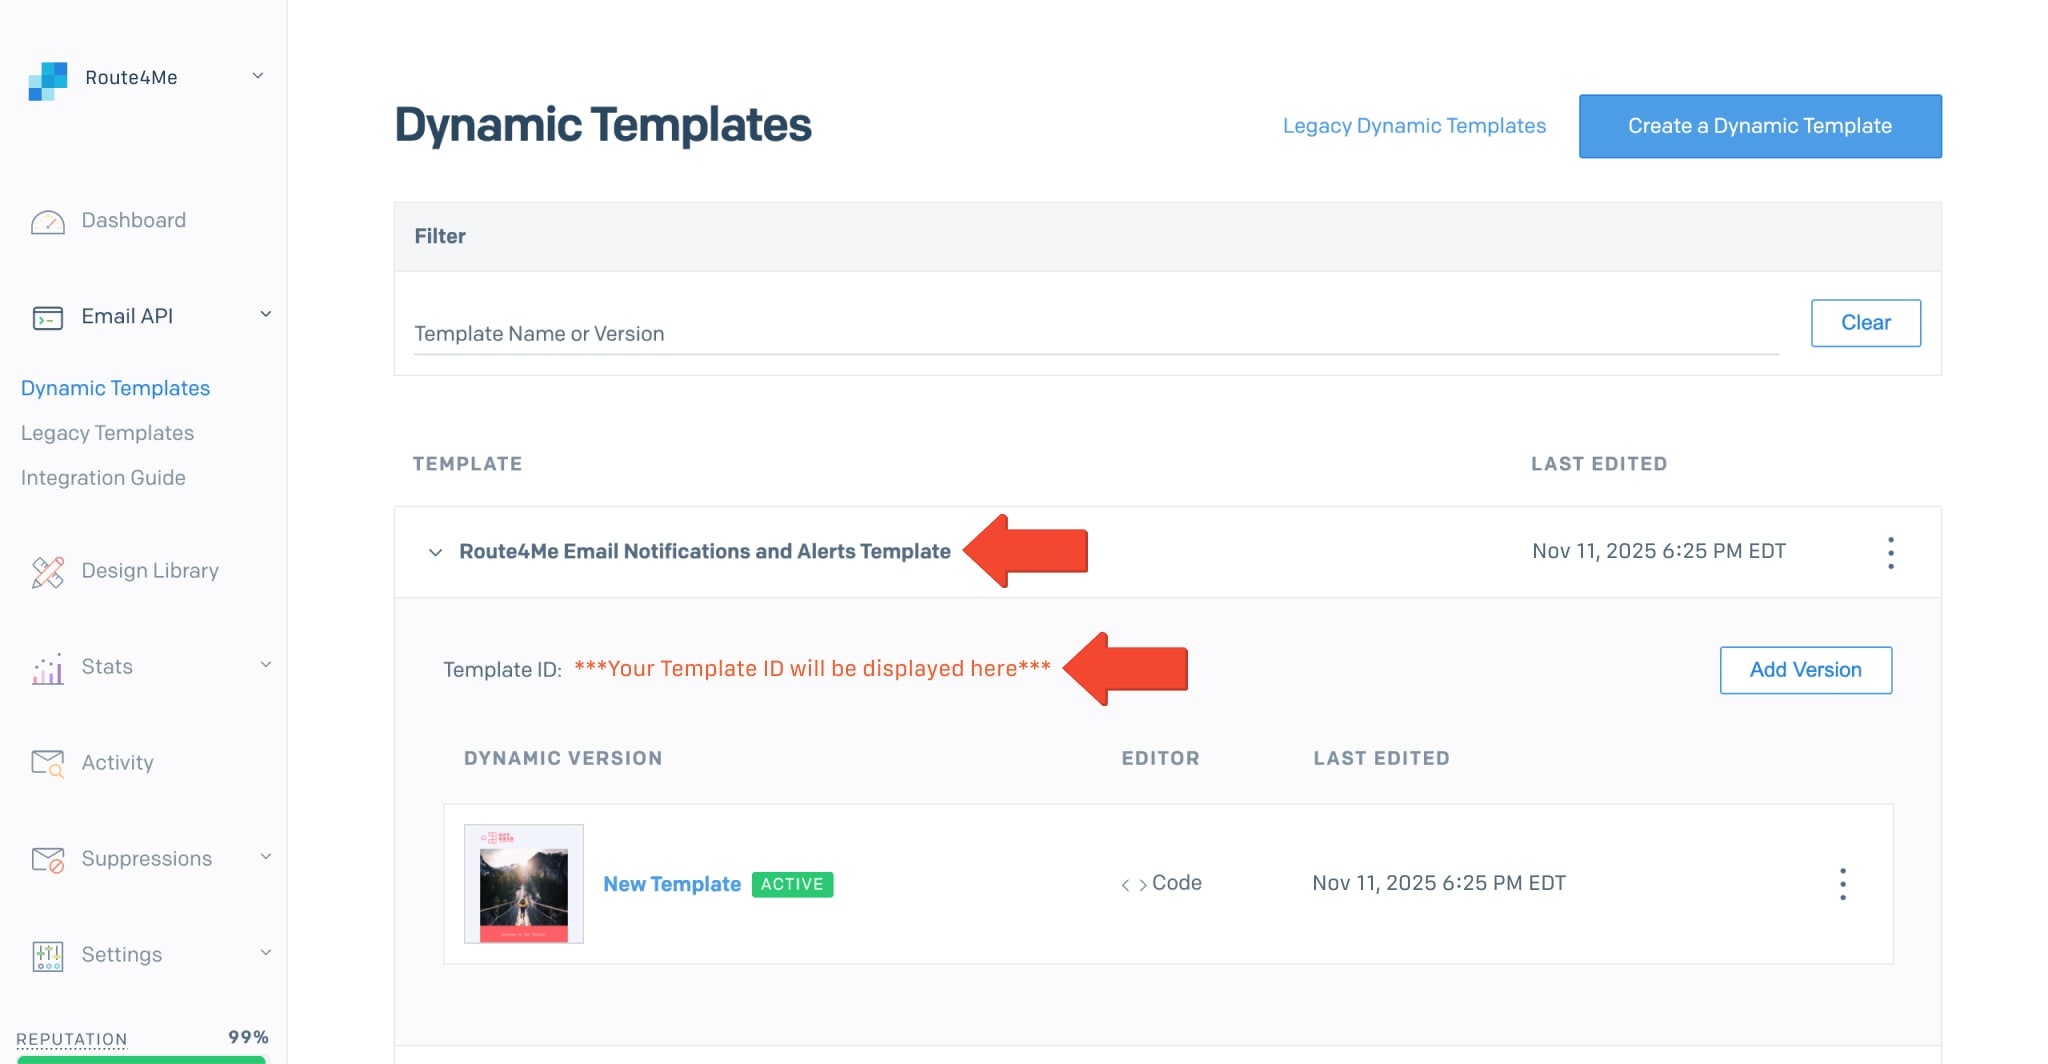
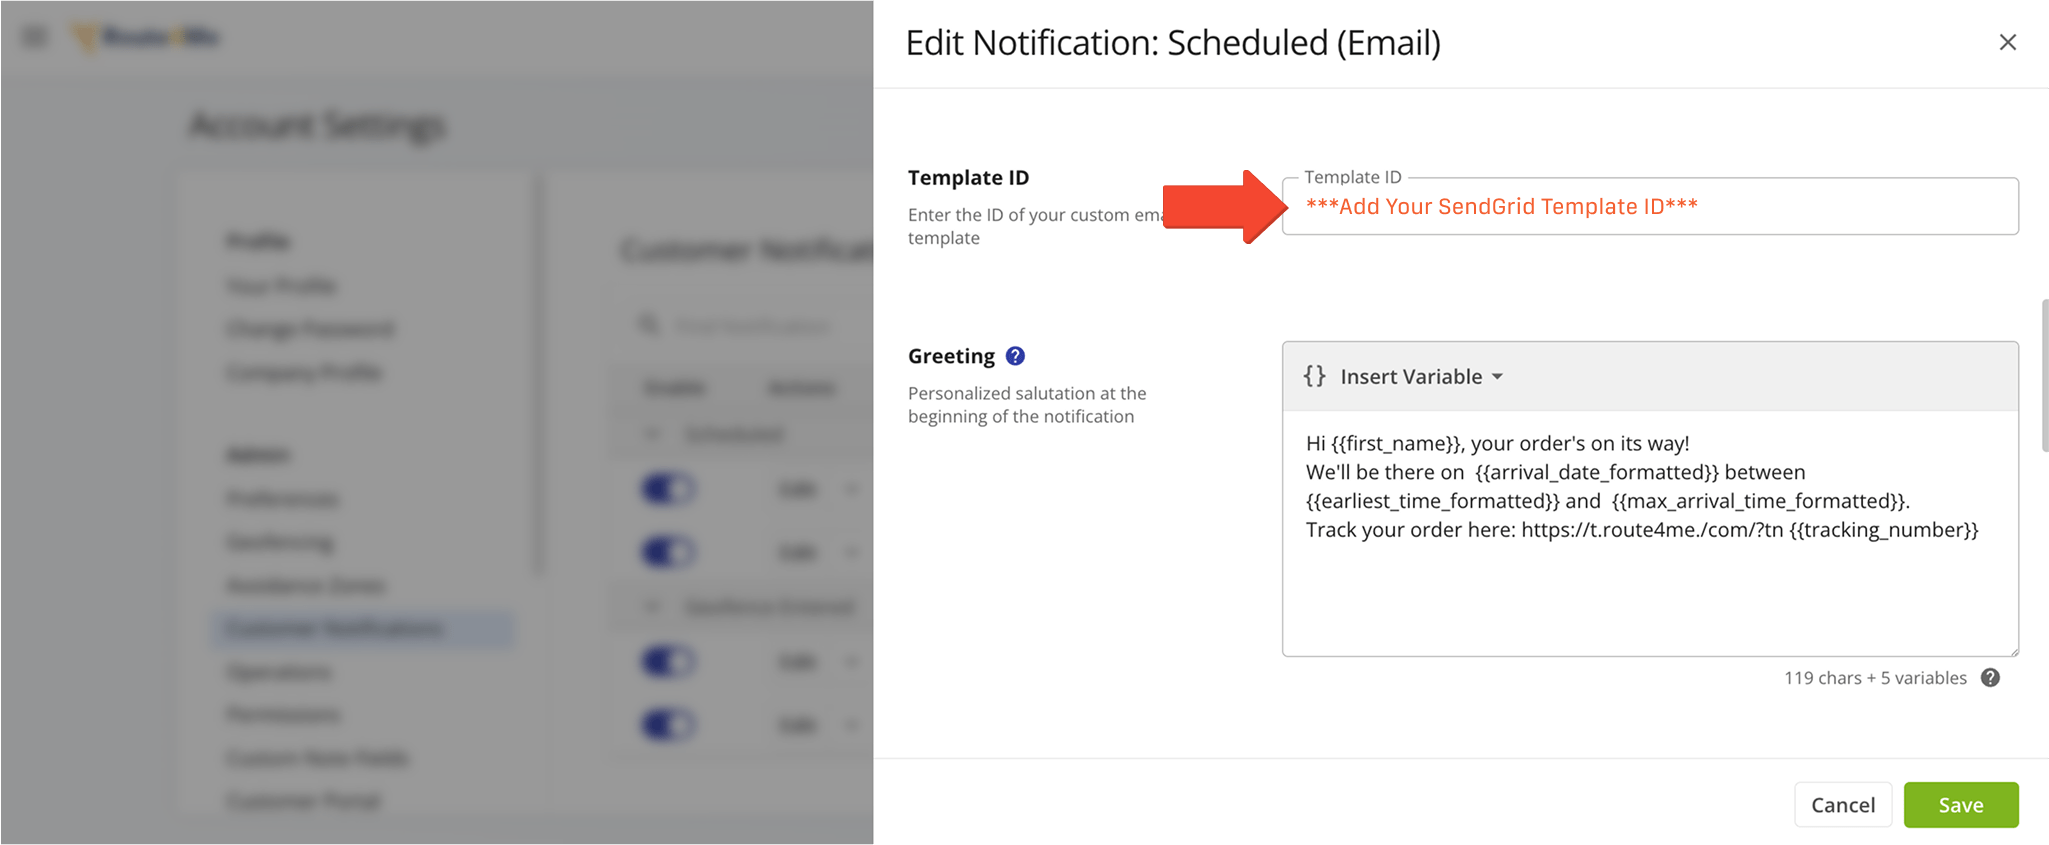
To copy the preferred SendGrid Template ID, go to “Email API” from the Navigation Menu in your SendGrid account, select “Dynamic Templates” from the list, and then copy the corresponding “Template ID” number. NOTE: Make sure that the template version you want to use is Active.
Next, go to your Route4Me Notifications Settings and insert the copied Template ID into the “Template ID” field.
Adjust The Sender Of Your Route4Me Notifications
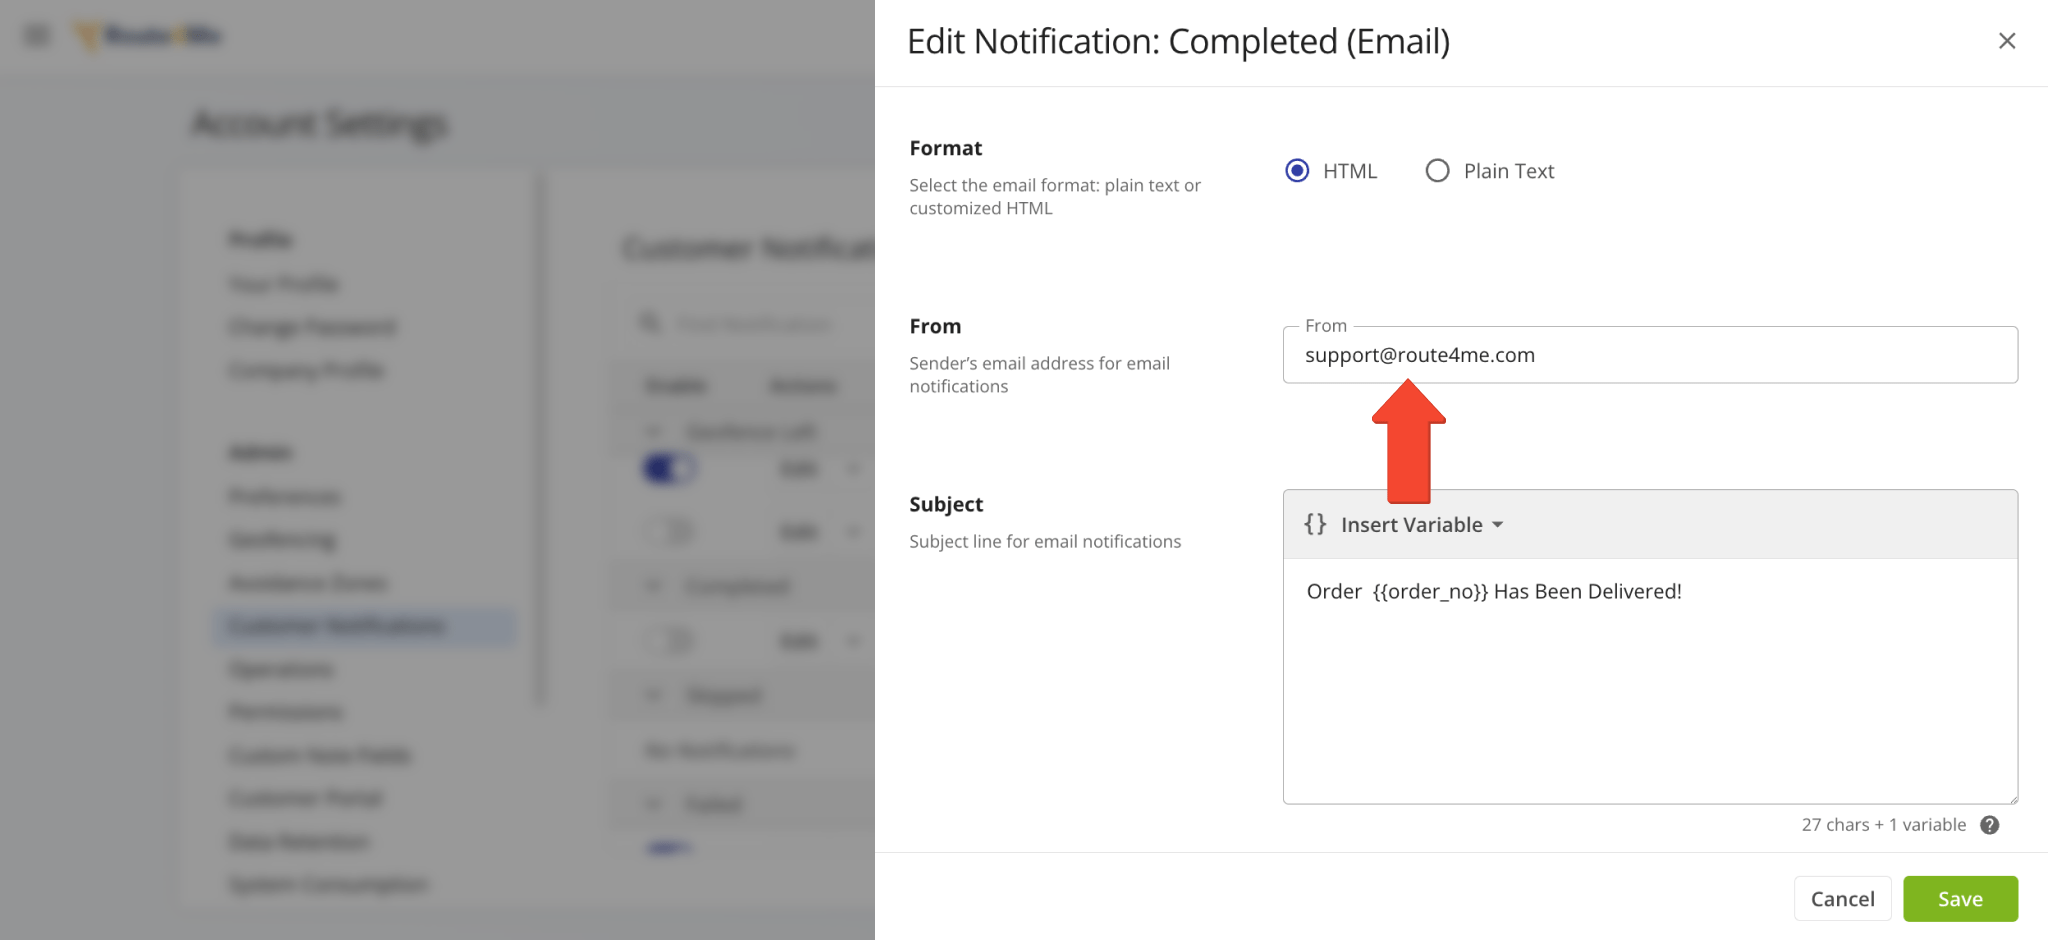
To adjust the sender of your Route4Me Email notifications, go to the “Notifications” tab and input the preferred Email address into the “From” field in each preferred Notification Type (i.e., “Scheduled“, “Completed“, etc.). NOTE: Make sure that your Route4Me quickest route dispatch software Notifications are sent from the Email address that is verified in your SendGrid account. If you use a different Email address, your notifications may not be sent.
To check what Email address or multiple Email addresses are verified to be used as a sender of your Route4Me Notifications, go to “Settings” from the Navigation Menu, and select “Sender Authentication” from the list.
Visit Route4Me's Marketplace to Check out Associated Add-Ons:
- Notifications & Alerts
Route Scheduled
- Notifications & Alerts
Geofence Entered
- Notifications & Alerts
Geofence Departed
- Notifications & Alerts
Visit Completed
- Notifications & Alerts
Notify Next Customer
About author: Alex Yasko
Alex Yasko is the Go-to-Market Product Manager and Information Architecture Manager at Route4Me. With thousands of hours of experience, Alex specializes in breaking down complex last-mile optimization and routing scenarios into simple, actionable instructions, helping last-mile businesses streamline their operations effortlessly.