
Location Search Groups – Reusable Rule-Based Custom Location Filters
Location Search Groups are custom rule-based filter profiles for your Locations Page. They show only the Locations matching their respective rules. Rules are based on Location details, such as address, alias, created time, custom data, etc. With Search Groups, you can switch between service areas, ZIP codes, or customer segments in one click instead of rebuilding filters.
New Locations that match a group’s rules are included automatically, and you can apply multiple Search Groups at once to see their combined results on the Locations List and Map. Keep reading to learn how to create, apply, and manage Search Groups.
Table of Contents
Create Location Search Groups With Custom Filter Rules
To open the Search Groups panel, go to your Locations Page and click the “Search Groups” toggle. The panel lists all Search Groups on your account. The number next to each Search Group shows how many Locations match its rules.
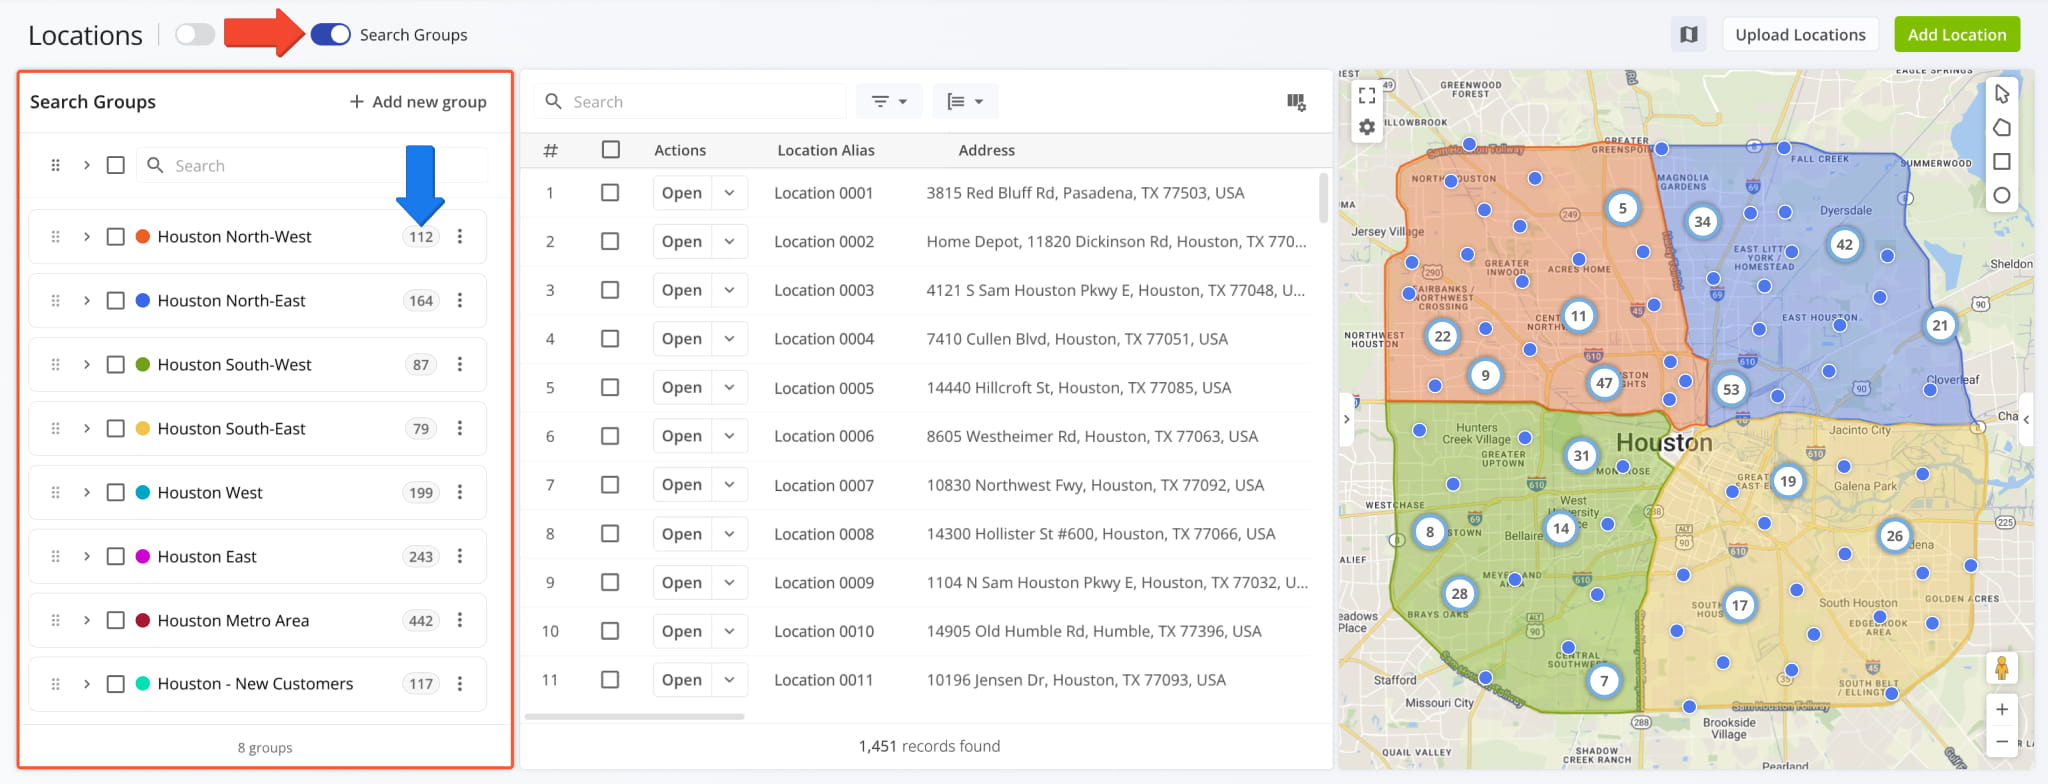
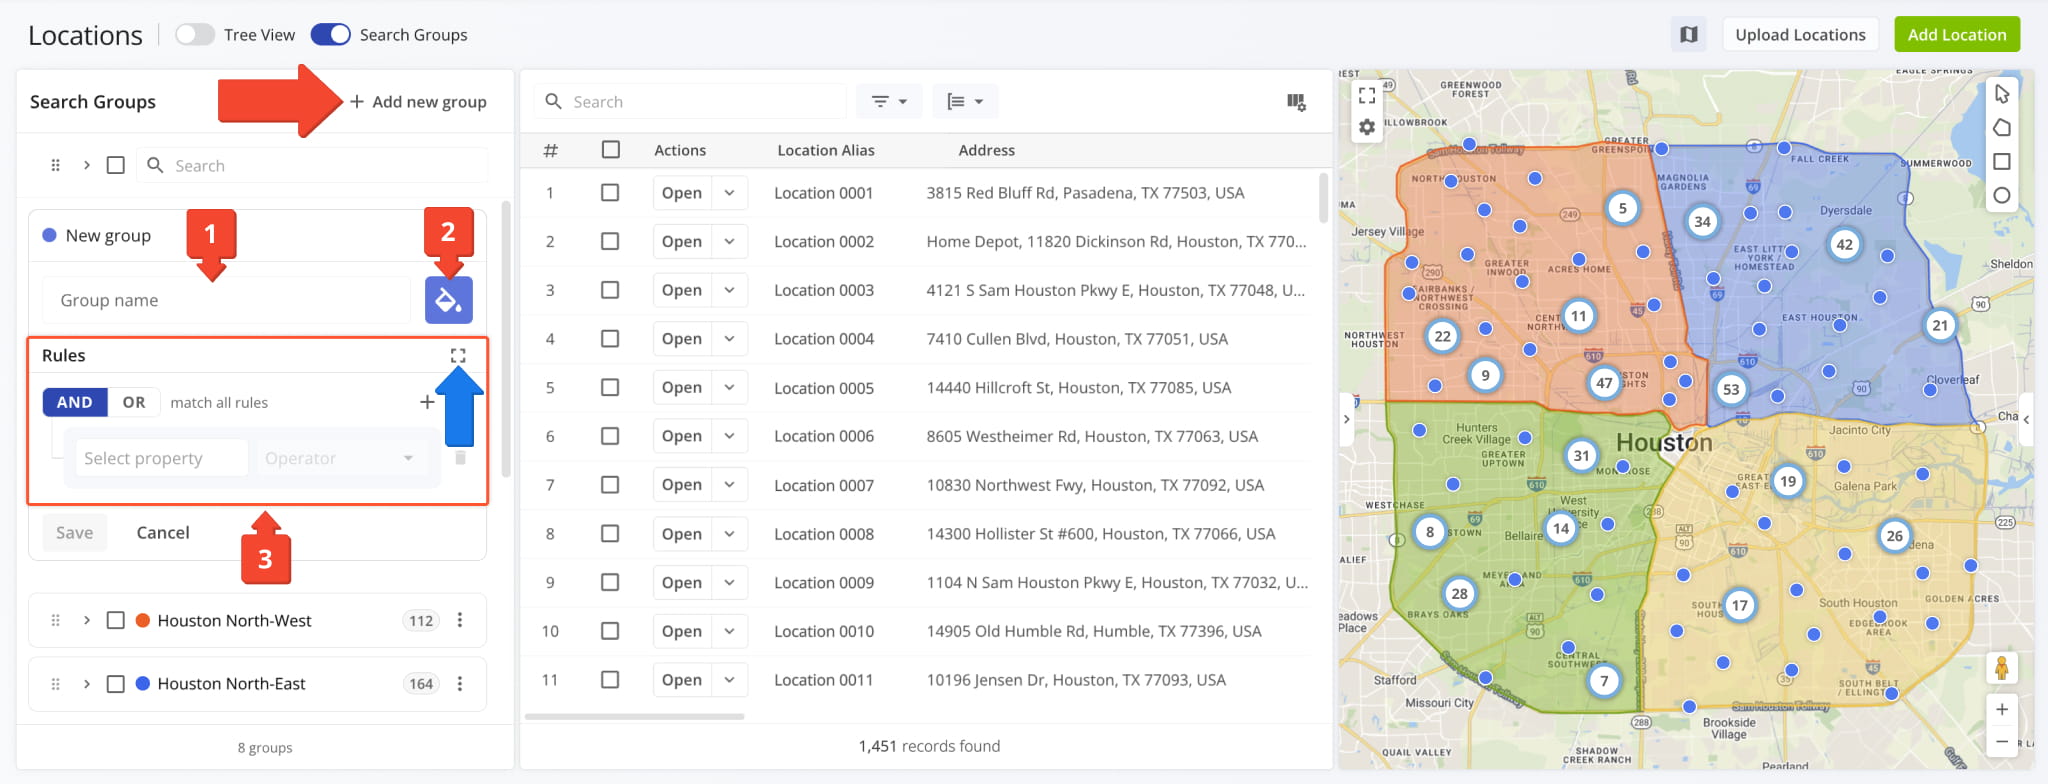
To create a Search Group, click “+ Add new group” in the Search Groups panel. Then:
- Enter a name for the Search Group in the “Group name” field.
- Click the Color Icon and choose a color to tell the group apart from others.
- Add the rules that define which Locations belong to the group, then click “Save“.
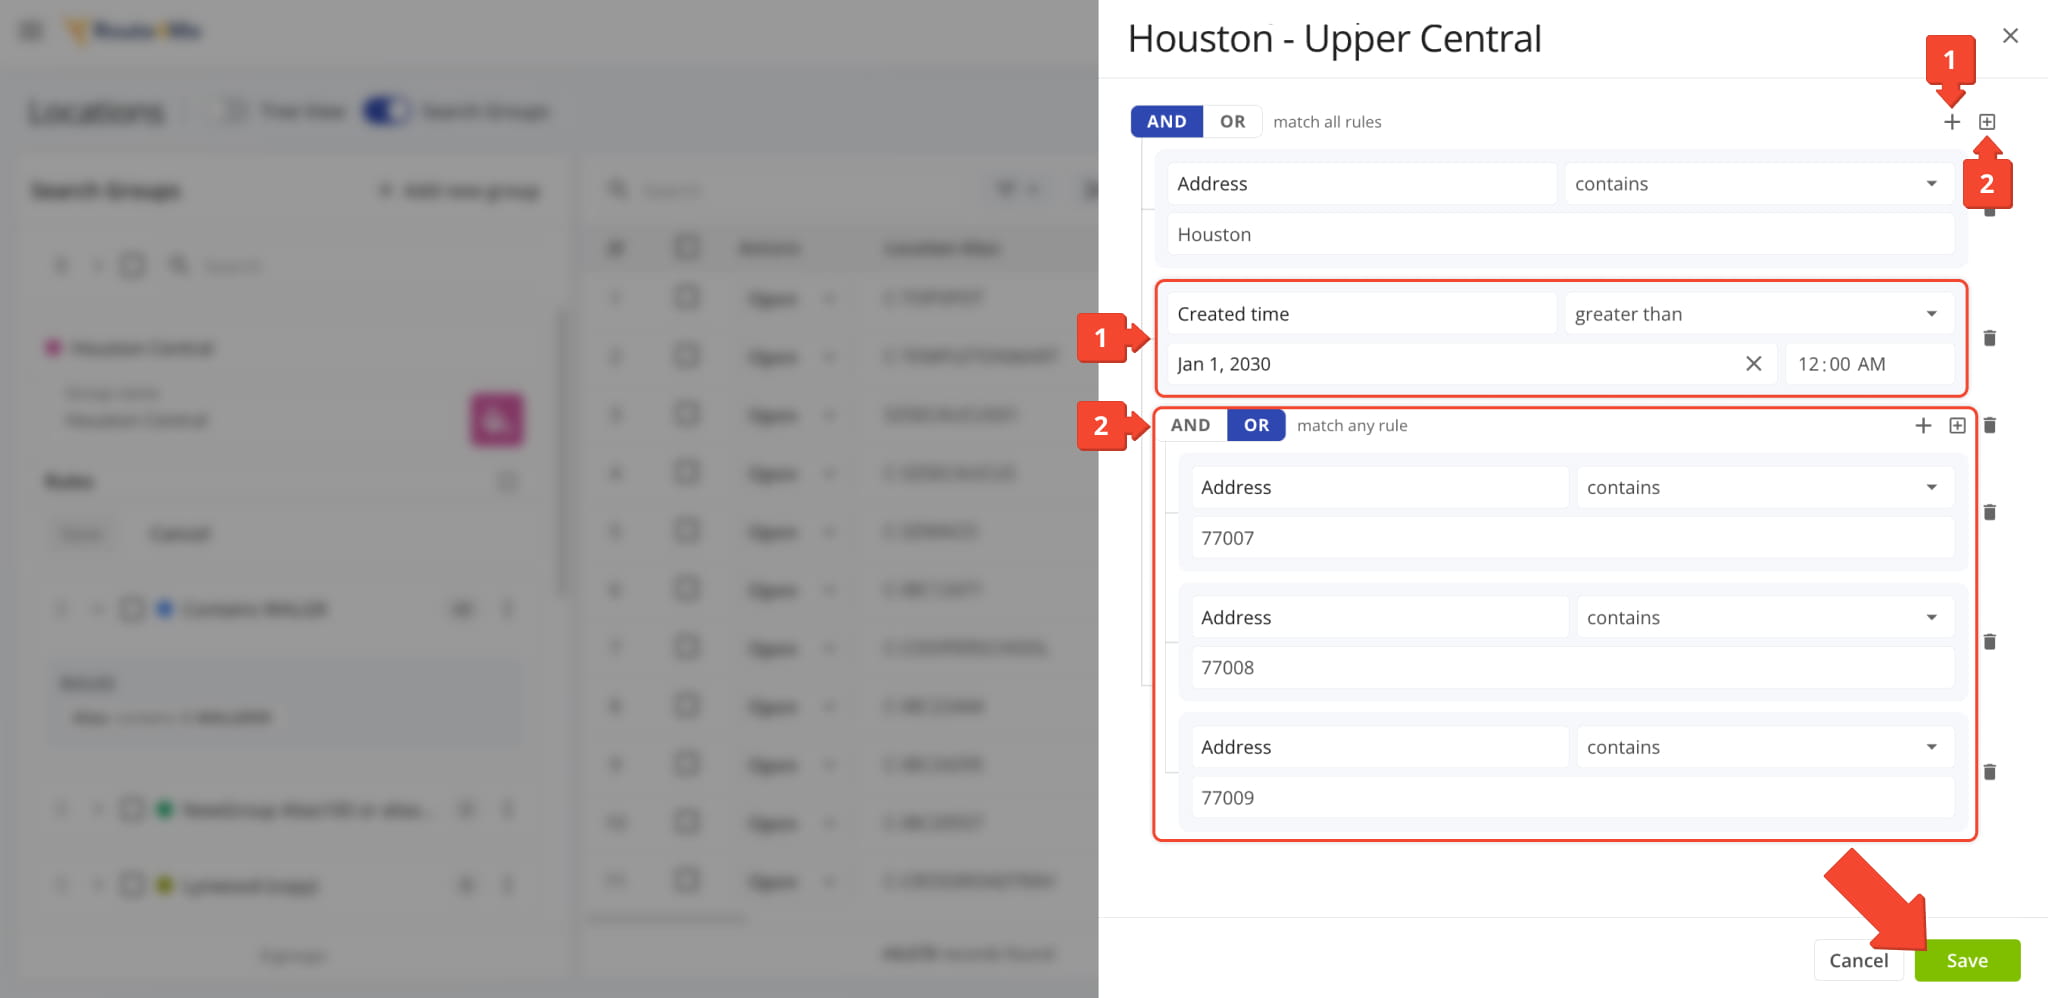
To configure rules in a larger editor with more visibility, click the Expand Icon in the “Rules” section.
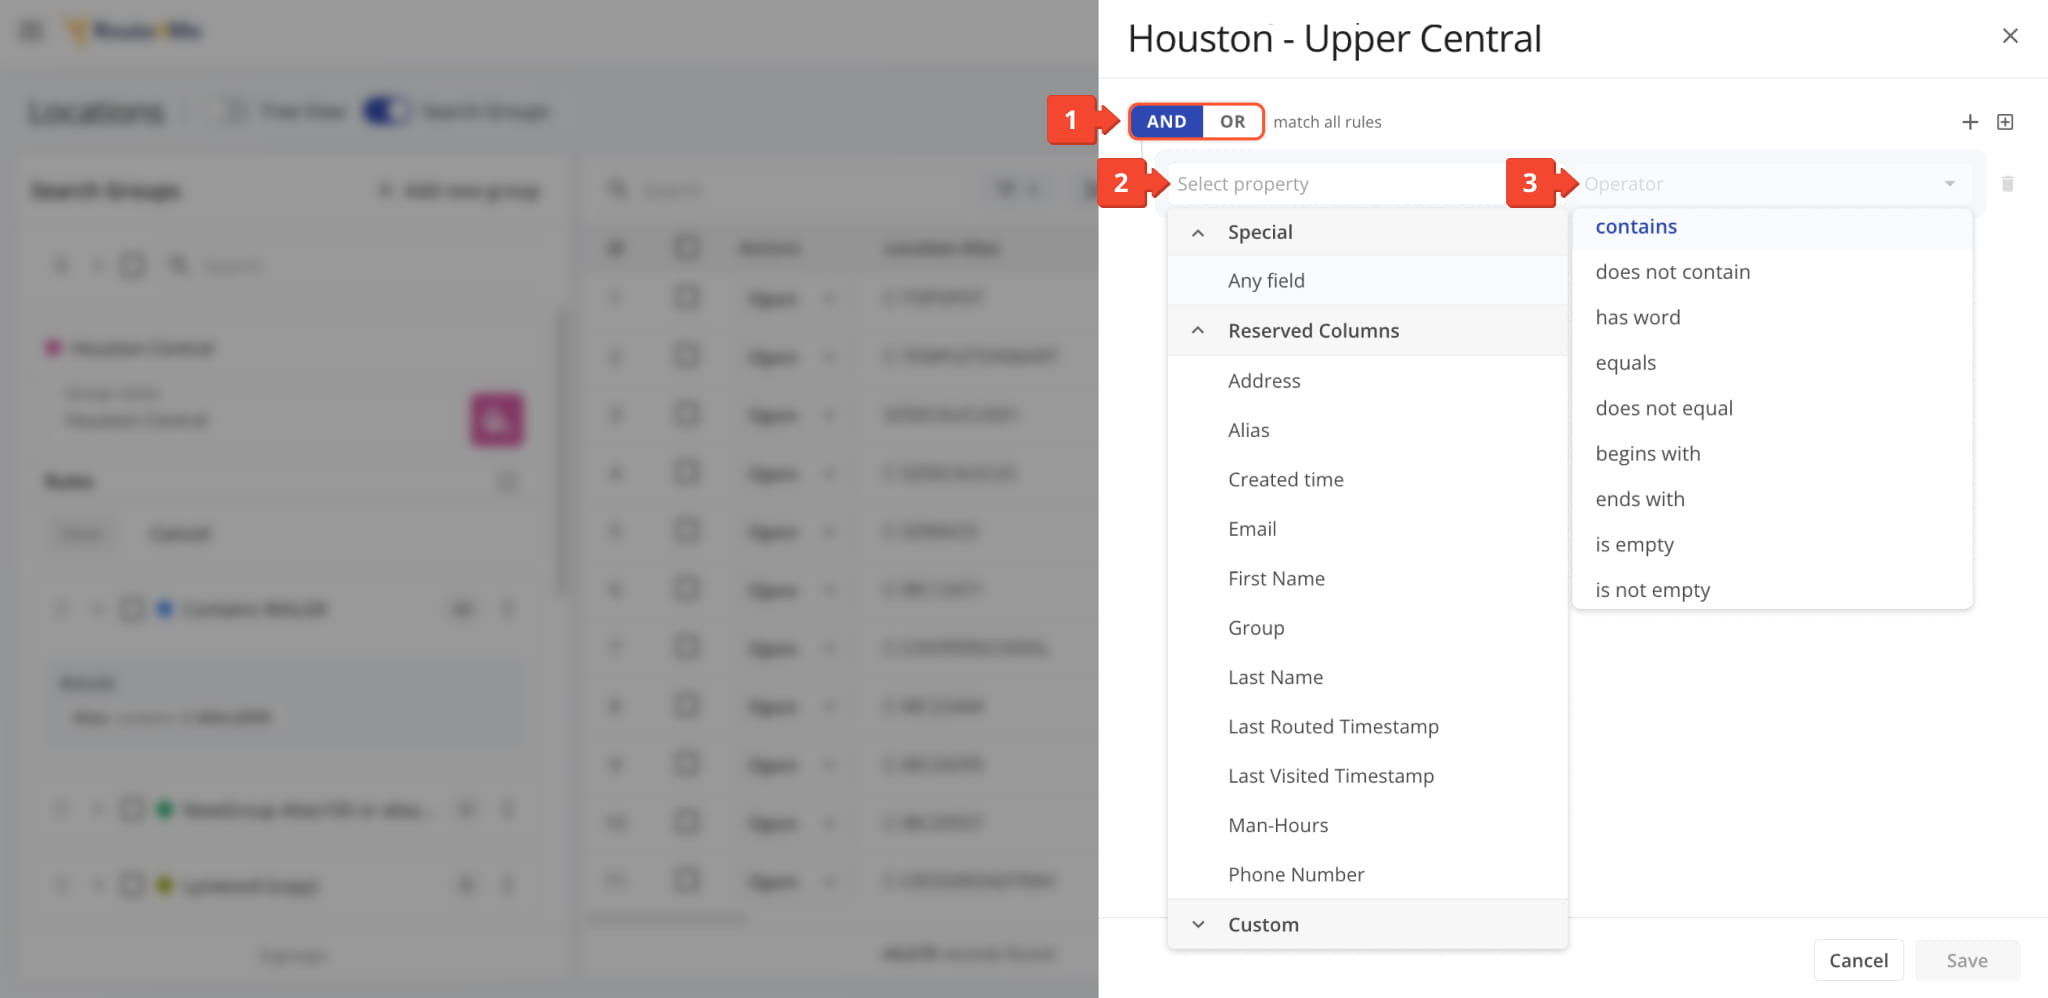
Each Search Group filters Locations according to rules and rule groups that check Location details. To configure a rule, select:
- Match type: Select “AND” to show Locations that match all rules or “OR” to show Locations that match any rule.
- Properties: Select a Location Property the rule will check using the operator.
- Operator: Select the condition used by the rule to determine if a Location is a match.
For example, if you select “Address” and “contains” and enter “Houston“, the rule will match Locations with “Houston” in their address. NOTE: All rules and rule groups sit inside the top-level group, so its AND/OR setting decides how they combine.
You can combine multiple rules and rule groups to build more specific filters:
- Click the Plus Icon to add another rule.
- Click the Add Group Icon to add a nested rule group with its own AND/OR setting.
You can use the Delete Icon to remove rules from the configuration. When you’re done, click “Save“. For example, the Search Group in the image shows Locations in Houston created after Jan 1, 2030, that are in the 77007, 77008, or 77009 ZIP codes.
Manage Location Search Groups
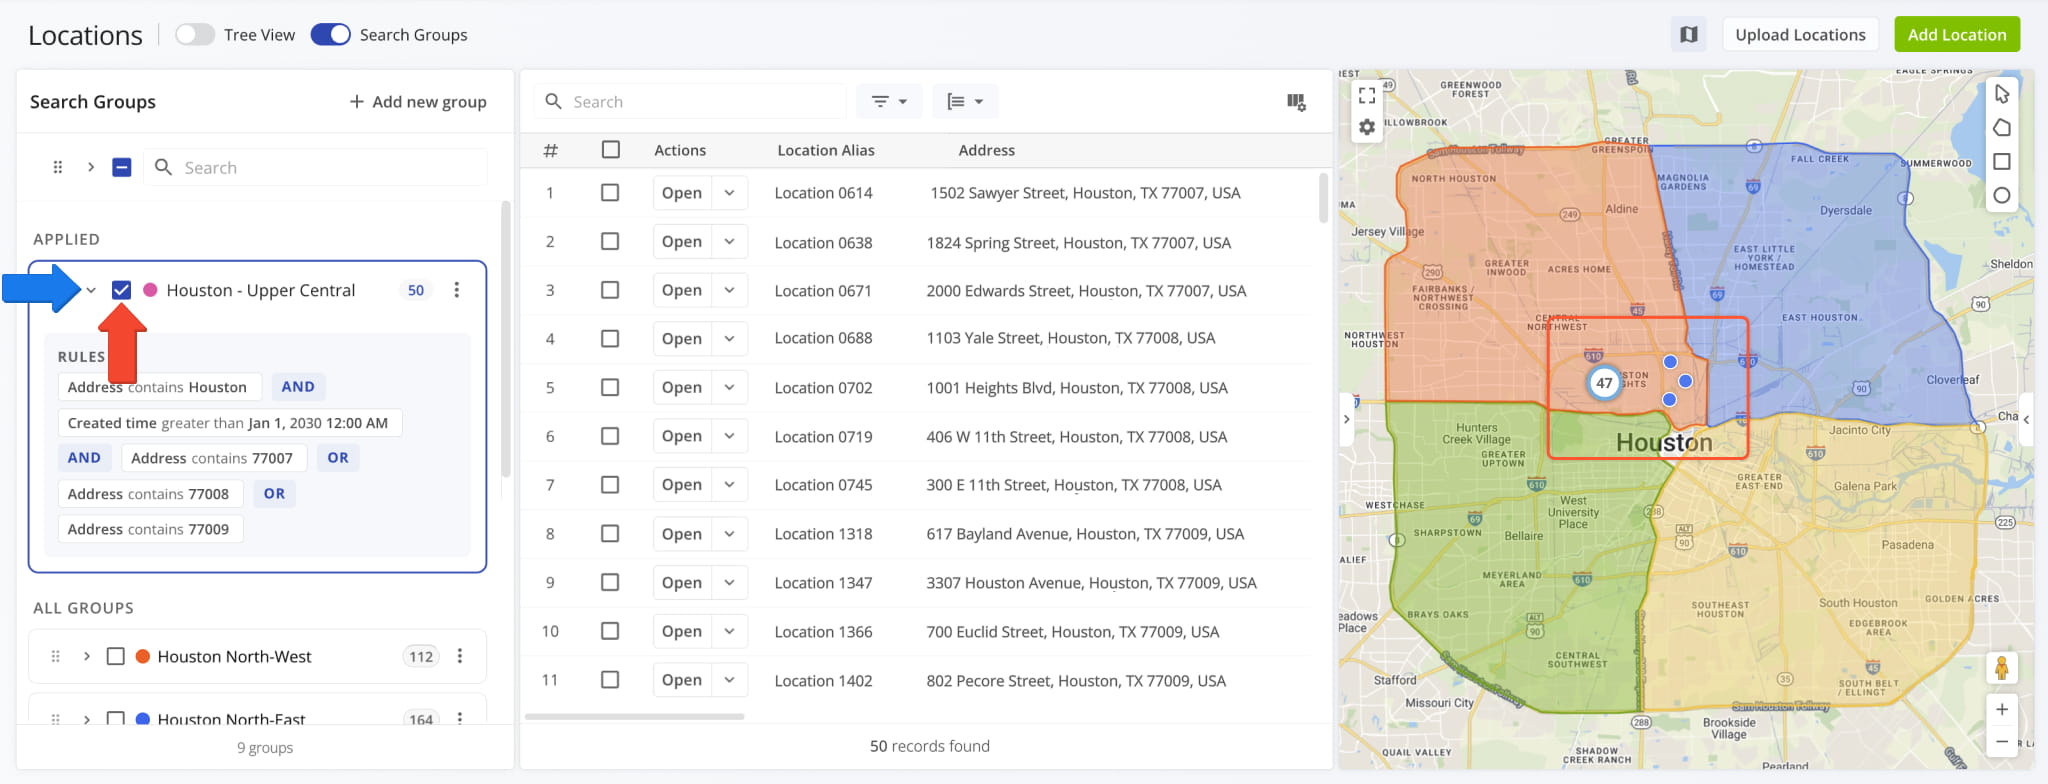
To apply a Search Group, check the box next to it. Applied Search Groups move to the “Applied” section at the top of the panel, and the Locations List and Map show only matching Locations. To see a Search Group’s rules, click the Arrow next to it.
You can also apply multiple Search Groups at once, and the Locations Page shows their total combined results.
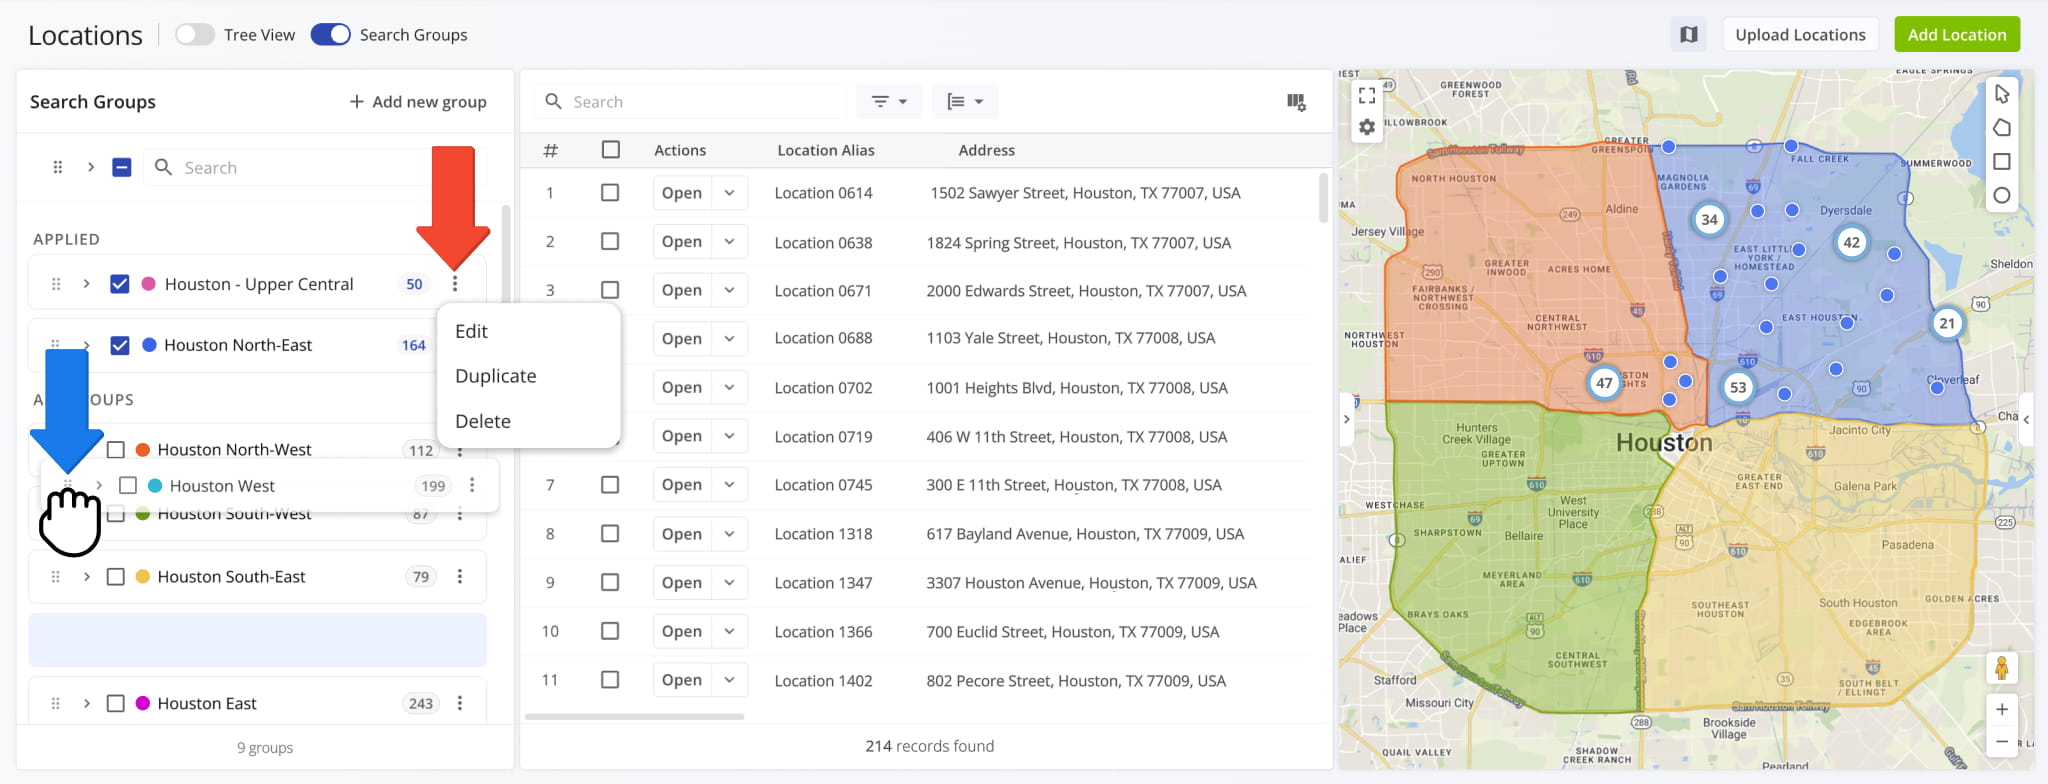
To manage a Search Group, click the Three Dots Icon next to it and select one of the following:
- “Edit” to change the group’s name, color, or rules.
- “Duplicate” to copy the group and use it as a starting point for a similar group.
- “Delete” to remove the group.
To reorder your Search Groups, drag and drop them by the Drag Handle.
Use Location Search Groups To Plan Routes And Manage Locations
Search Groups make it quick and easy to find a specific set of Locations and perform operations with them using Bulk Actions. Simply apply a Search Group, select the Locations you need, and choose what to do with them.
Plan Routes With Search Groups
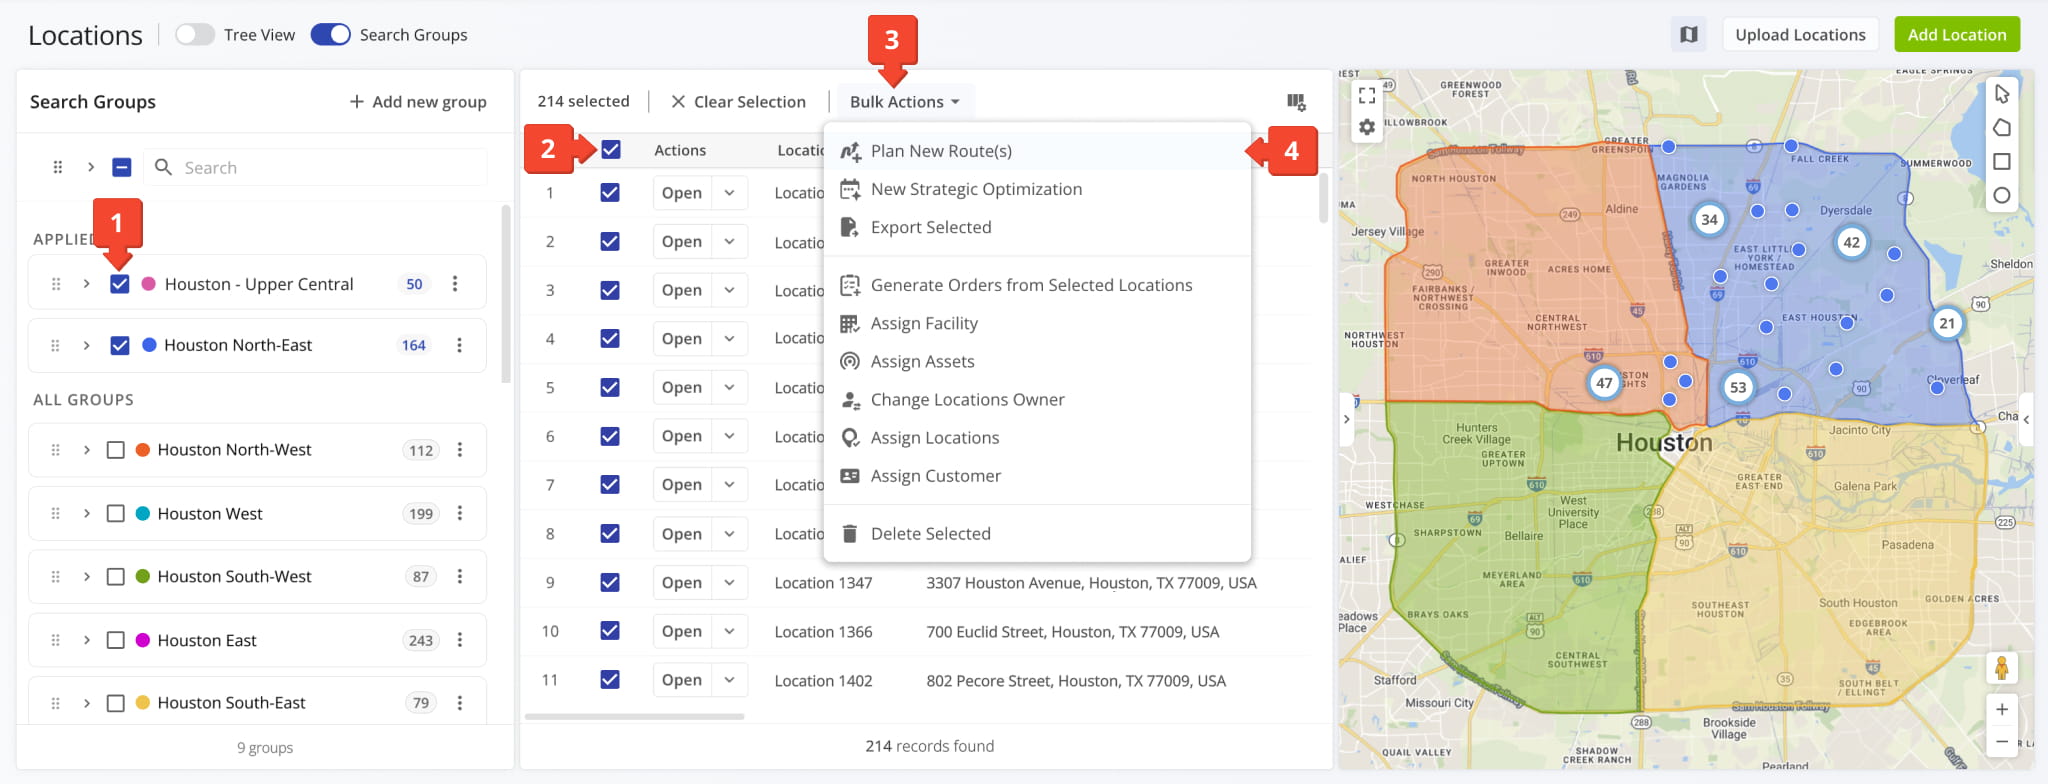
With Search Groups, you can plan routes for a specific service area, ZIP code, or customer segment without selecting its Locations one by one. To plan routes with Locations from specific Search Groups:
- Check the boxes next to the Search Groups you want to apply
- Check the boxes next to the Locations you want to route.
- Click “Bulk Actions” to open the list of actions that can be applied to multiple Locations.
- Select “Plan New Route(s)” to plan optimized routes with the selected Locations.
Strategic Routing With Search Groups
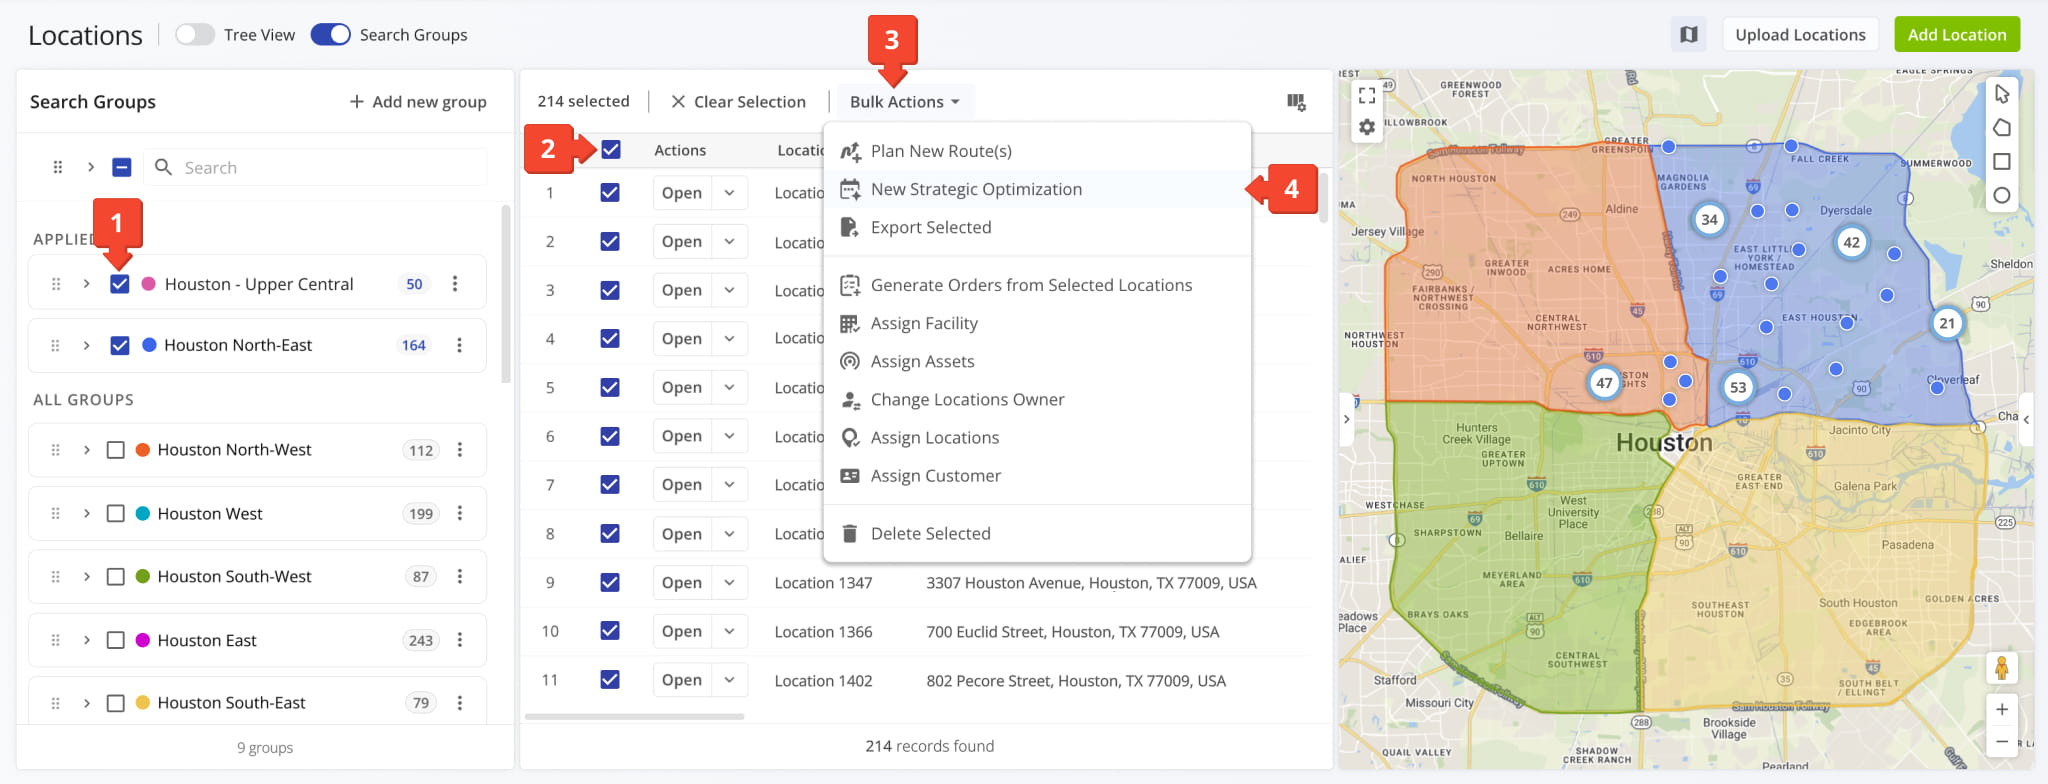
Search Groups make it easy to start Strategic Optimizations with exactly the Locations you want to plan for, such as a single region or a group of new customers. To optimize complex long-term strategic routes with Locations:
- Check the boxes next to the Search Groups you want to apply
- Check the boxes next to the Locations you want to export.
- Click “Bulk Actions” to open the list of actions that can be applied to multiple Locations.
- Select “New Strategic Optimization” to create a Strategic Optimization with the selected Locations.
Export Search Group Locations
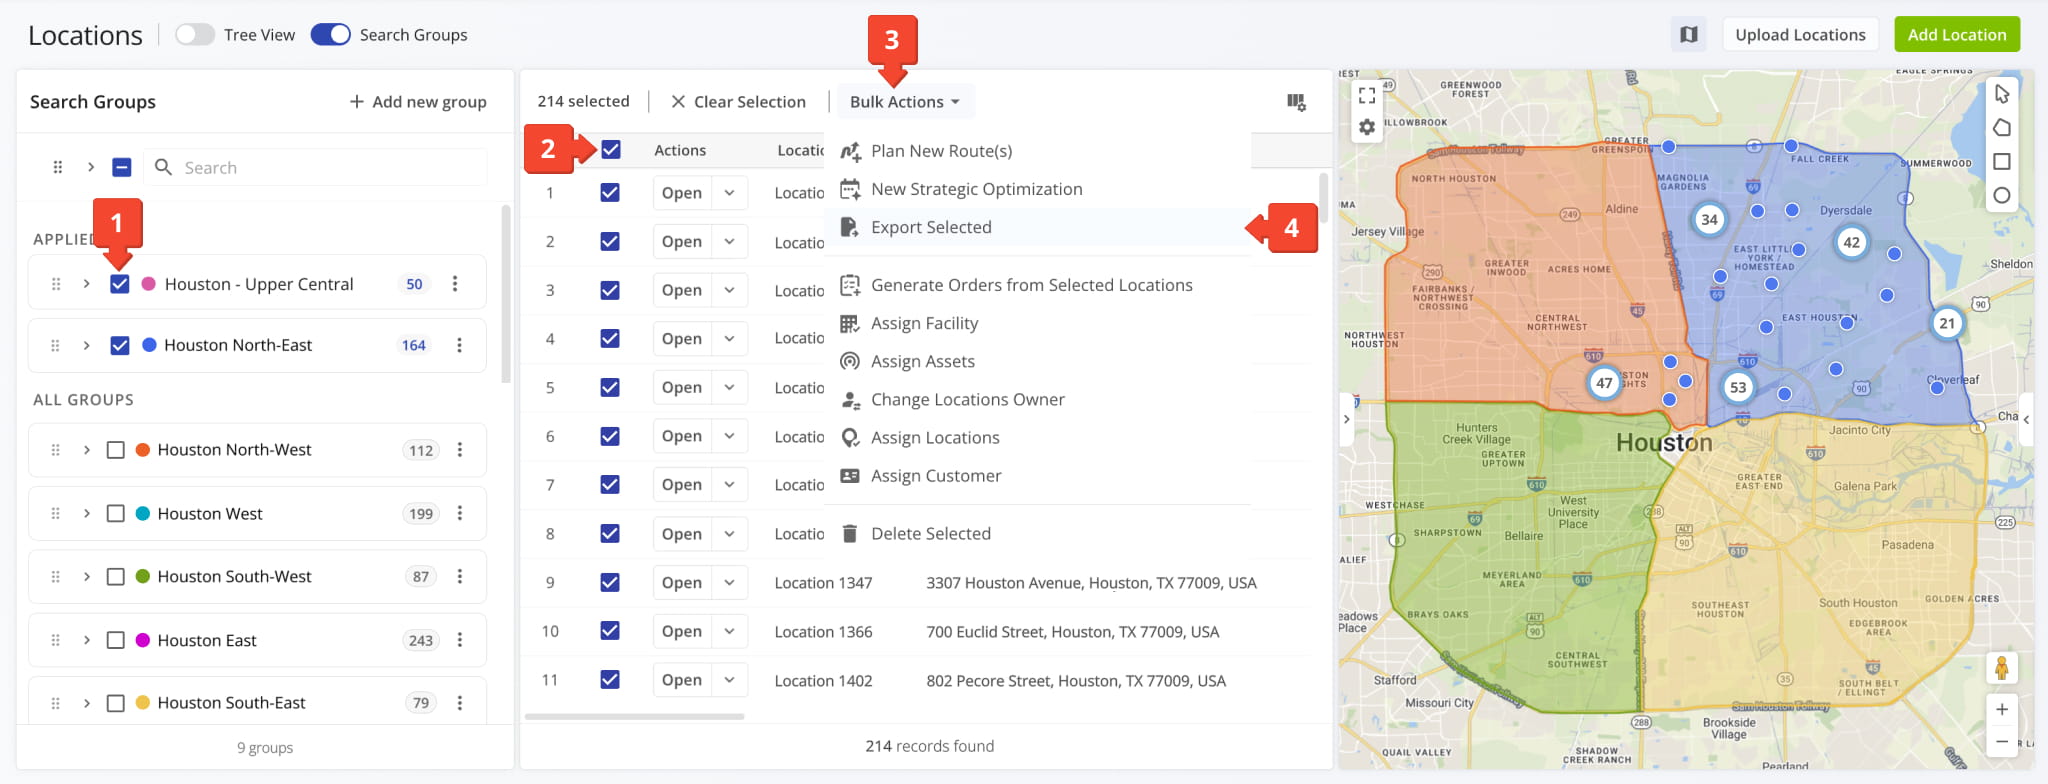
Exporting Search Group results gives you a spreadsheet of a specific Location segment that you can share or analyze outside Route4Me. To download Locations data using Search Groups:
- Check the boxes next to the Search Groups you want to apply
- Check the boxes next to the Locations you want to route.
- Click “Bulk Actions” to open the list of actions that can be applied to multiple Locations.
- Select “Export Selected” to download a spreadsheet with the selected Locations and their data.
Visit Route4Me's Marketplace to Check out Various Modules and Add-Ons:
- Route Optimization
Time Windows
- Operations
Advanced Team Management Add-On
About author: Kristian Andreev

