
Start And Complete Routes – Navigate Stops, Confirm Arrivals, And Update Statuses
Route4Me’s route navigation app gives drivers everything they need to start, navigate, and complete last mile routes from their mobile device. From opening and starting a route to navigating stops, assigning destination statuses, and collecting proof of delivery, it’s all available directly from the app. With everything in one place, Route4Me’s intuitive interface keeps the process straightforward every step of the way.
Table of Contents
Open And Start Routes – Find, Select, And Launch Your Routes
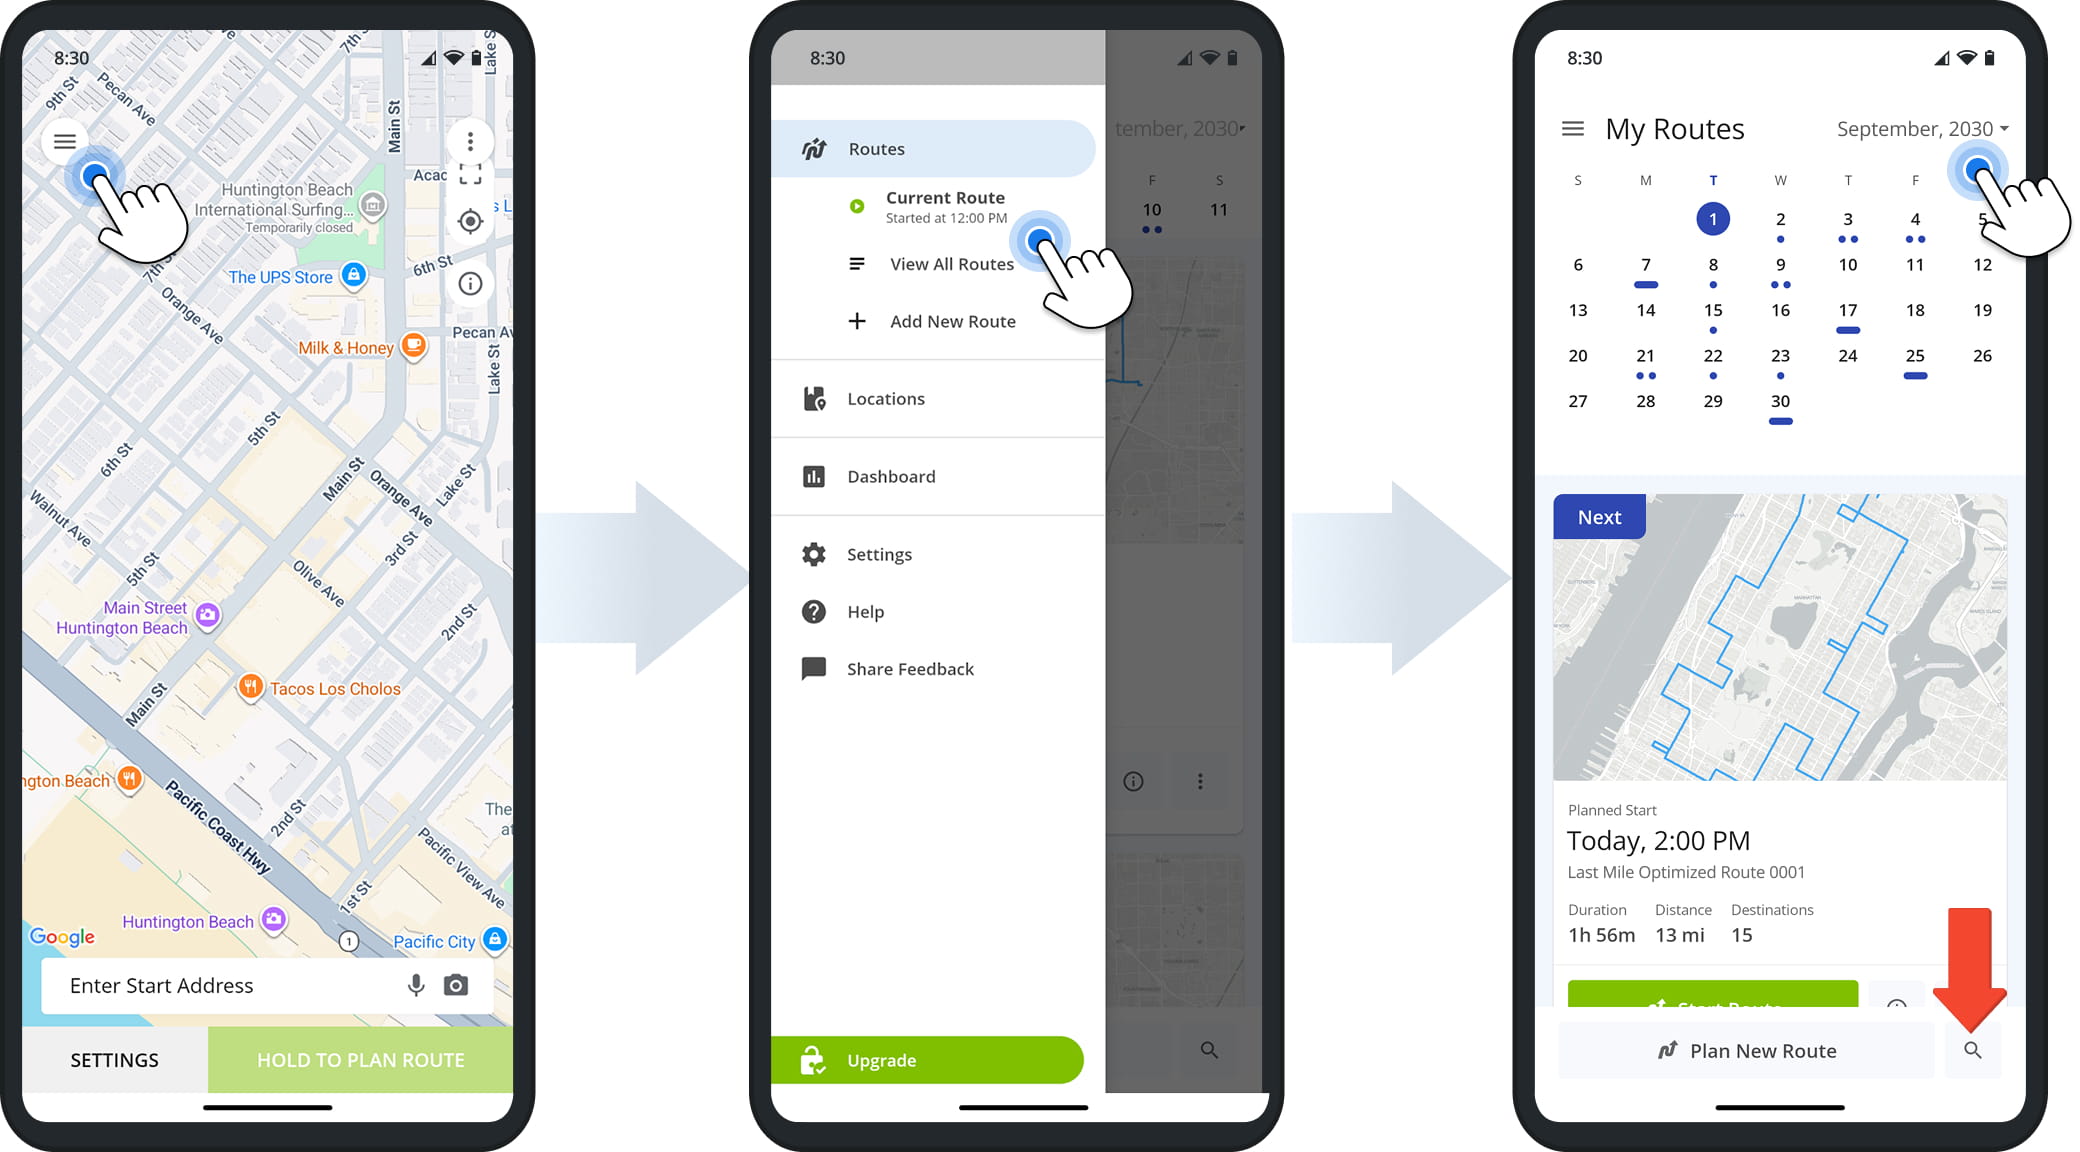
After signing in to the Route4Me app, tap the Menu Button in the top-left corner, then select “Current Route“.
To browse more broadly, tap “View All Routes” to open your Routes List. From there, tap the calendar to see all routes scheduled for the month, or tap a date to view all routes scheduled for that day.
You can also use the Search Icon at the bottom of your Routes List to look up a specific route by name.
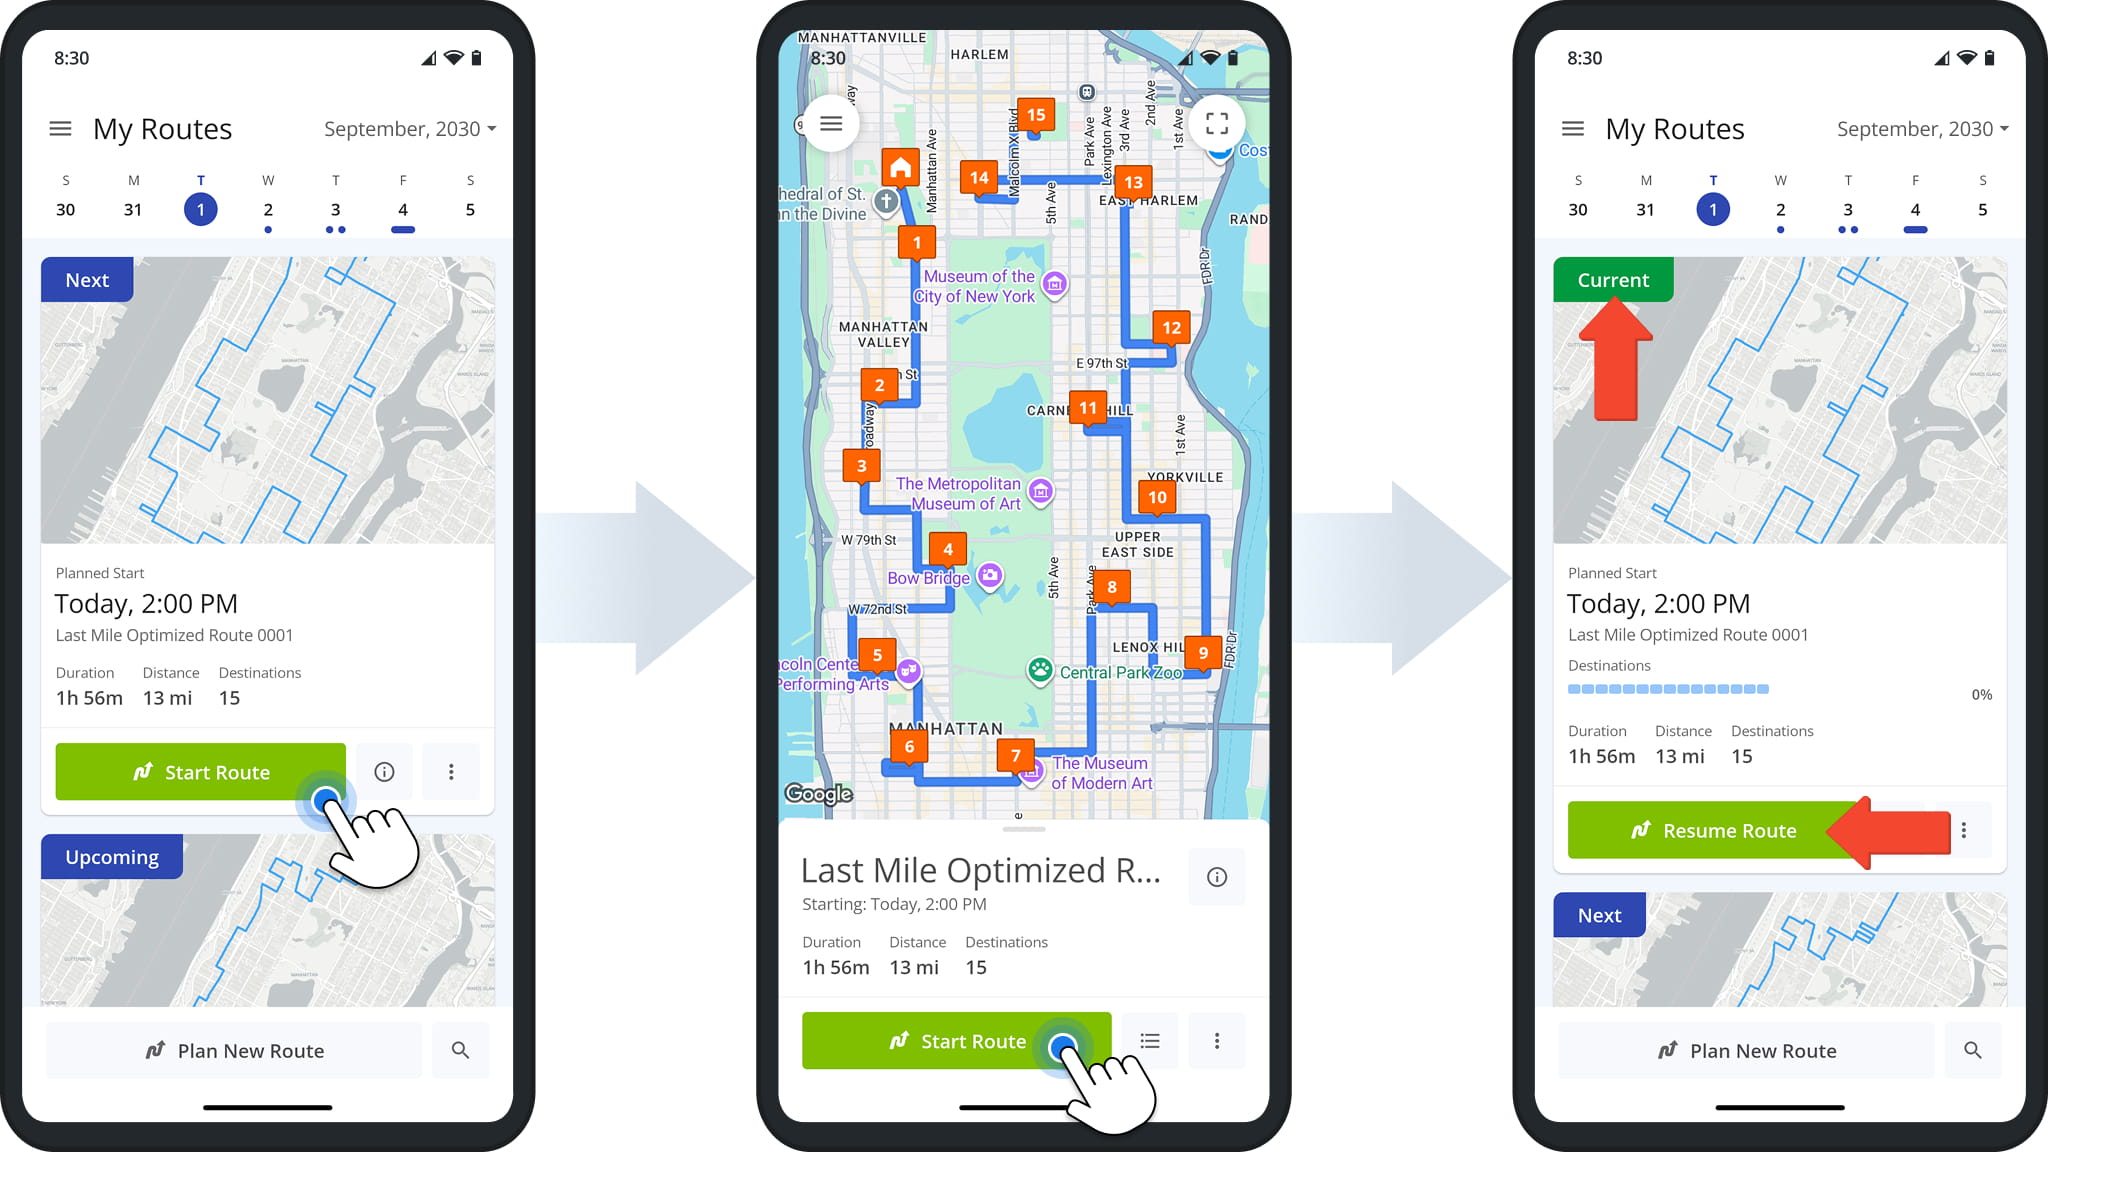
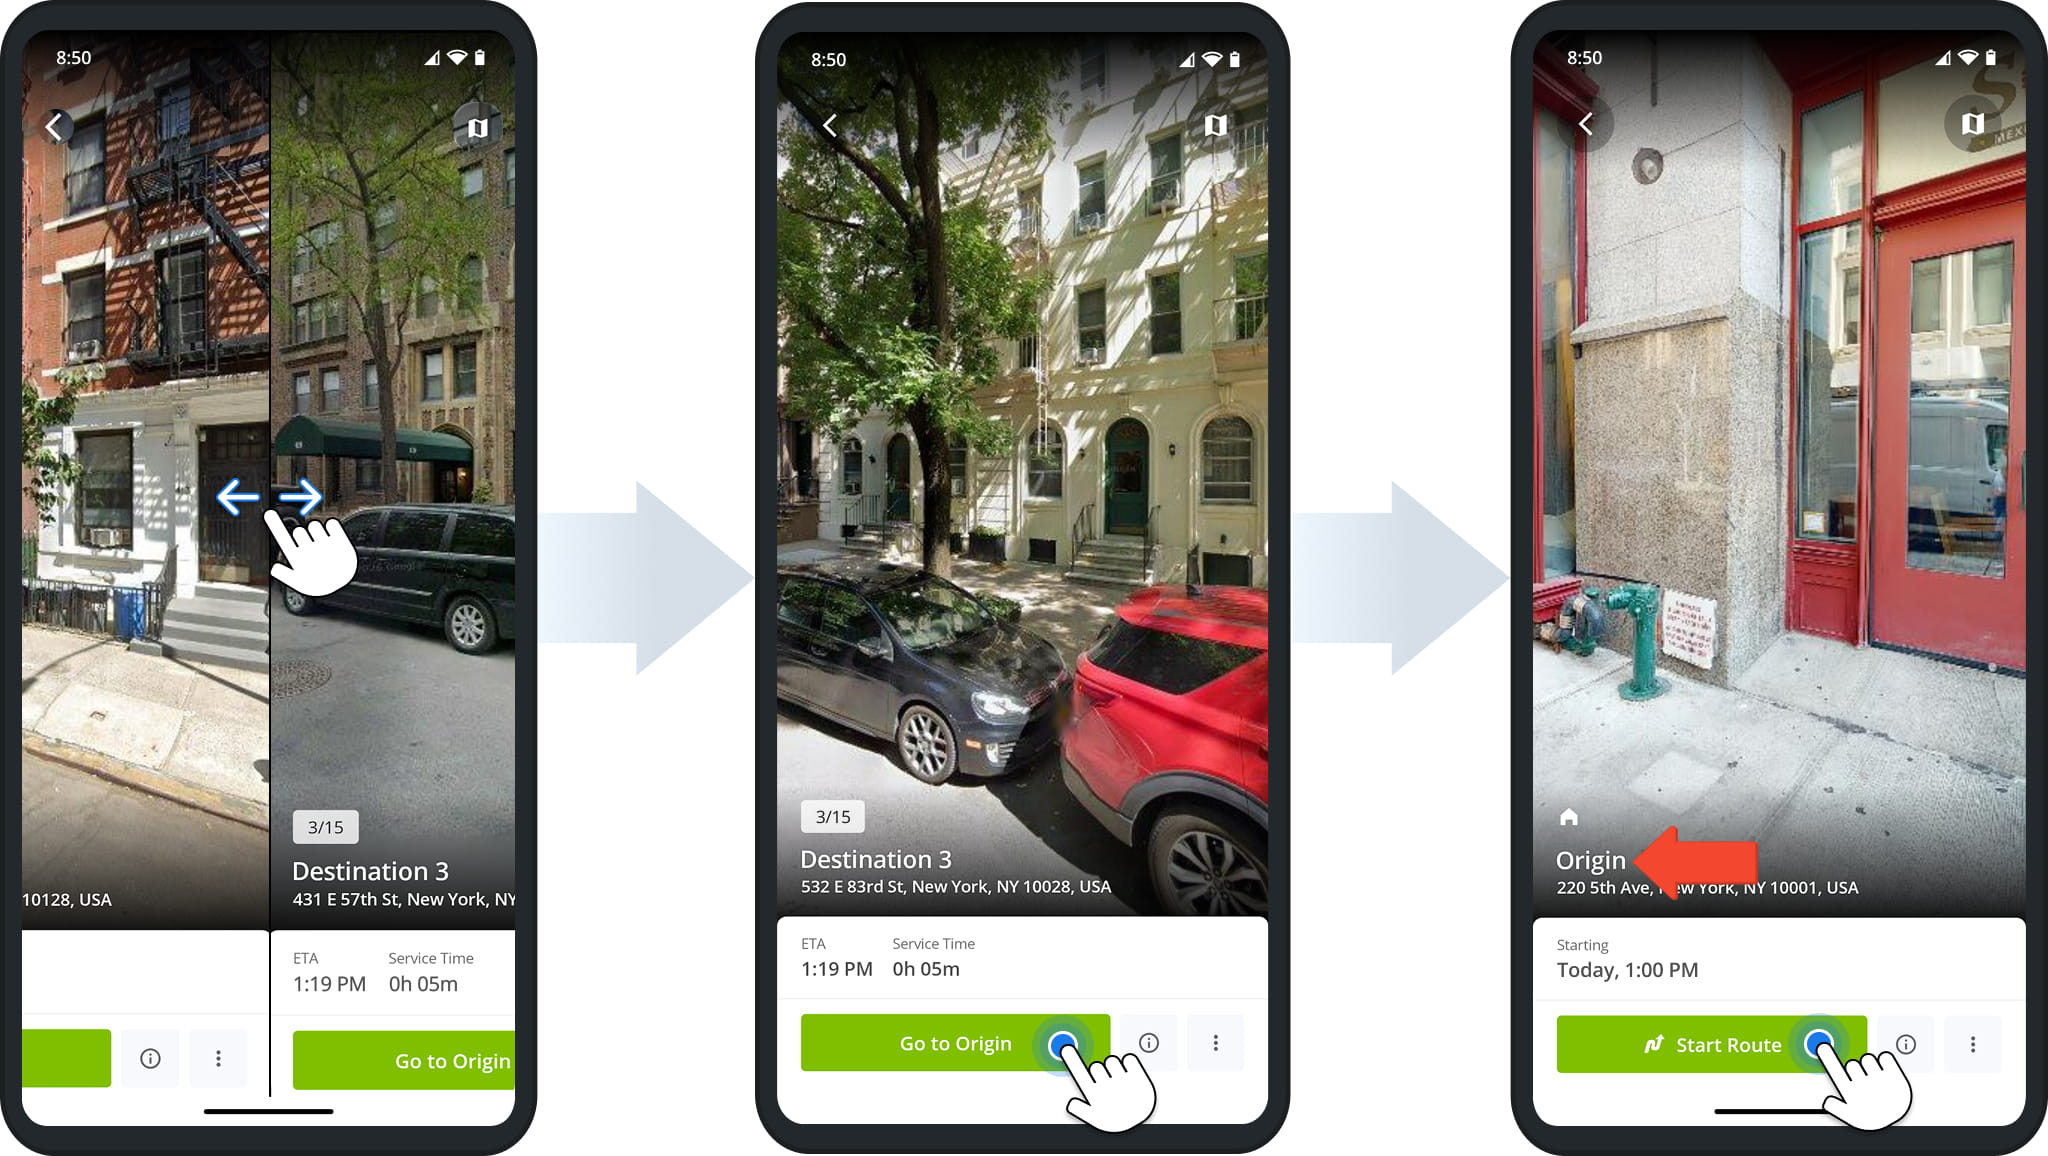
Tap “Start Route” to open a route, then tap “Start Route” again to open the first destination and set the route’s status to “Current“.
Once a route is marked “Current“, its “Start Route” button in the Routes List changes to “Resume Route“.
Open And Browse The Destinations List – View Stop Details
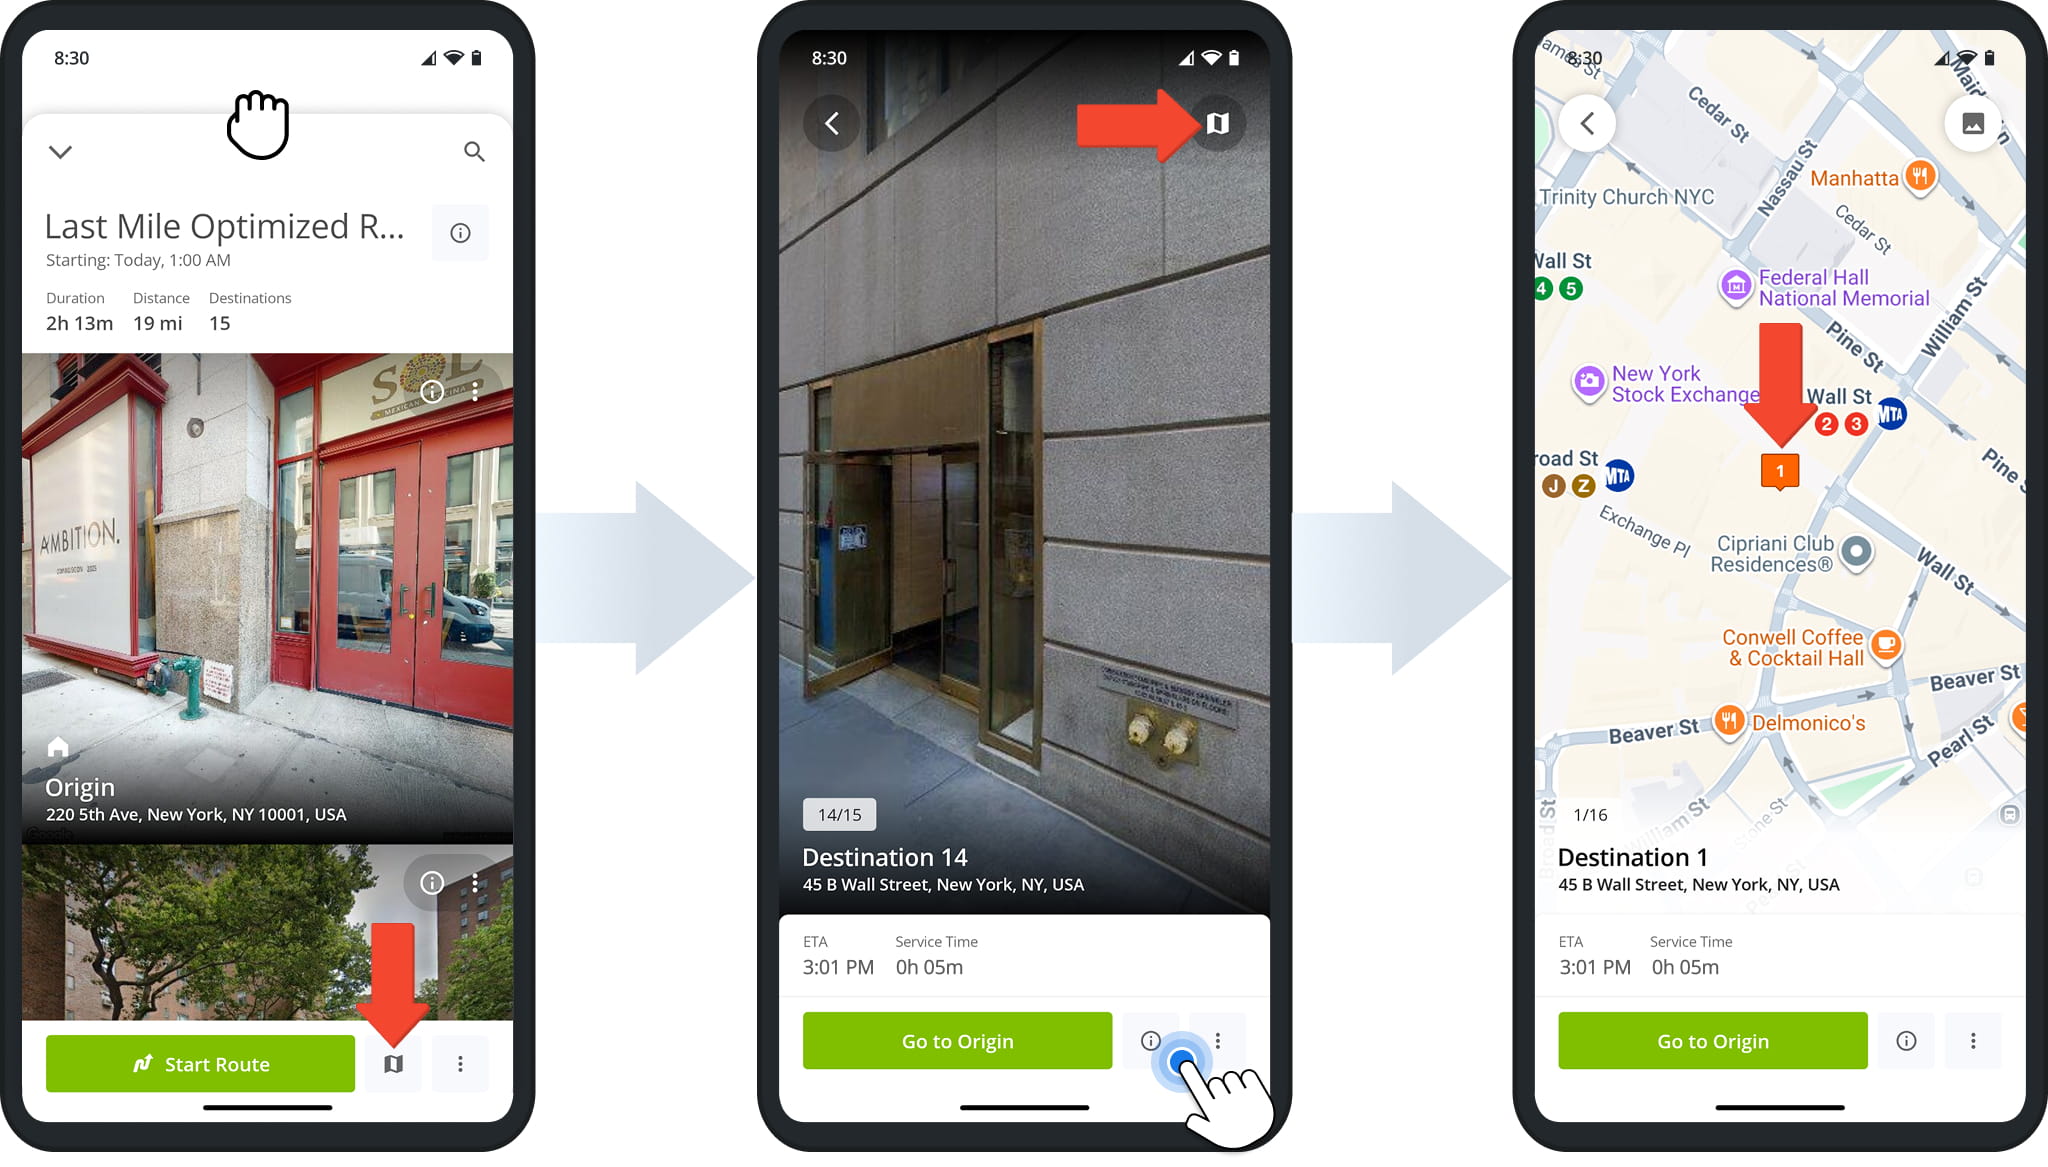
To open the Destinations List, drag the route information panel upward, or tap the List Button in the bottom-right corner.
From the list, tap any destination to open it. Once open, tap the Destination Information Button to view its full details, such as address, notes, or delivery instructions.
To see exactly where that destination is located, tap the Map Icon in the upper-right corner to pin its address on the map.
To move between destinations, swipe sideways to open the previous or next one in the list. If you open a destination other than the next scheduled stop, tap “Go to Origin” to return to it.
If the route hasn’t started yet, the first destination defaults to the route’s Origin. From there, tap “Start Route” to open the first scheduled destination. This will update the route’s status to “Current.”
After starting a route, tap the Three-Dot Icon in the bottom-right corner to open the Actions Menu for the current destination.
This menu gives you quick access to additional actions – such as starting navigation and sharing your ETA – detailed in the table below.
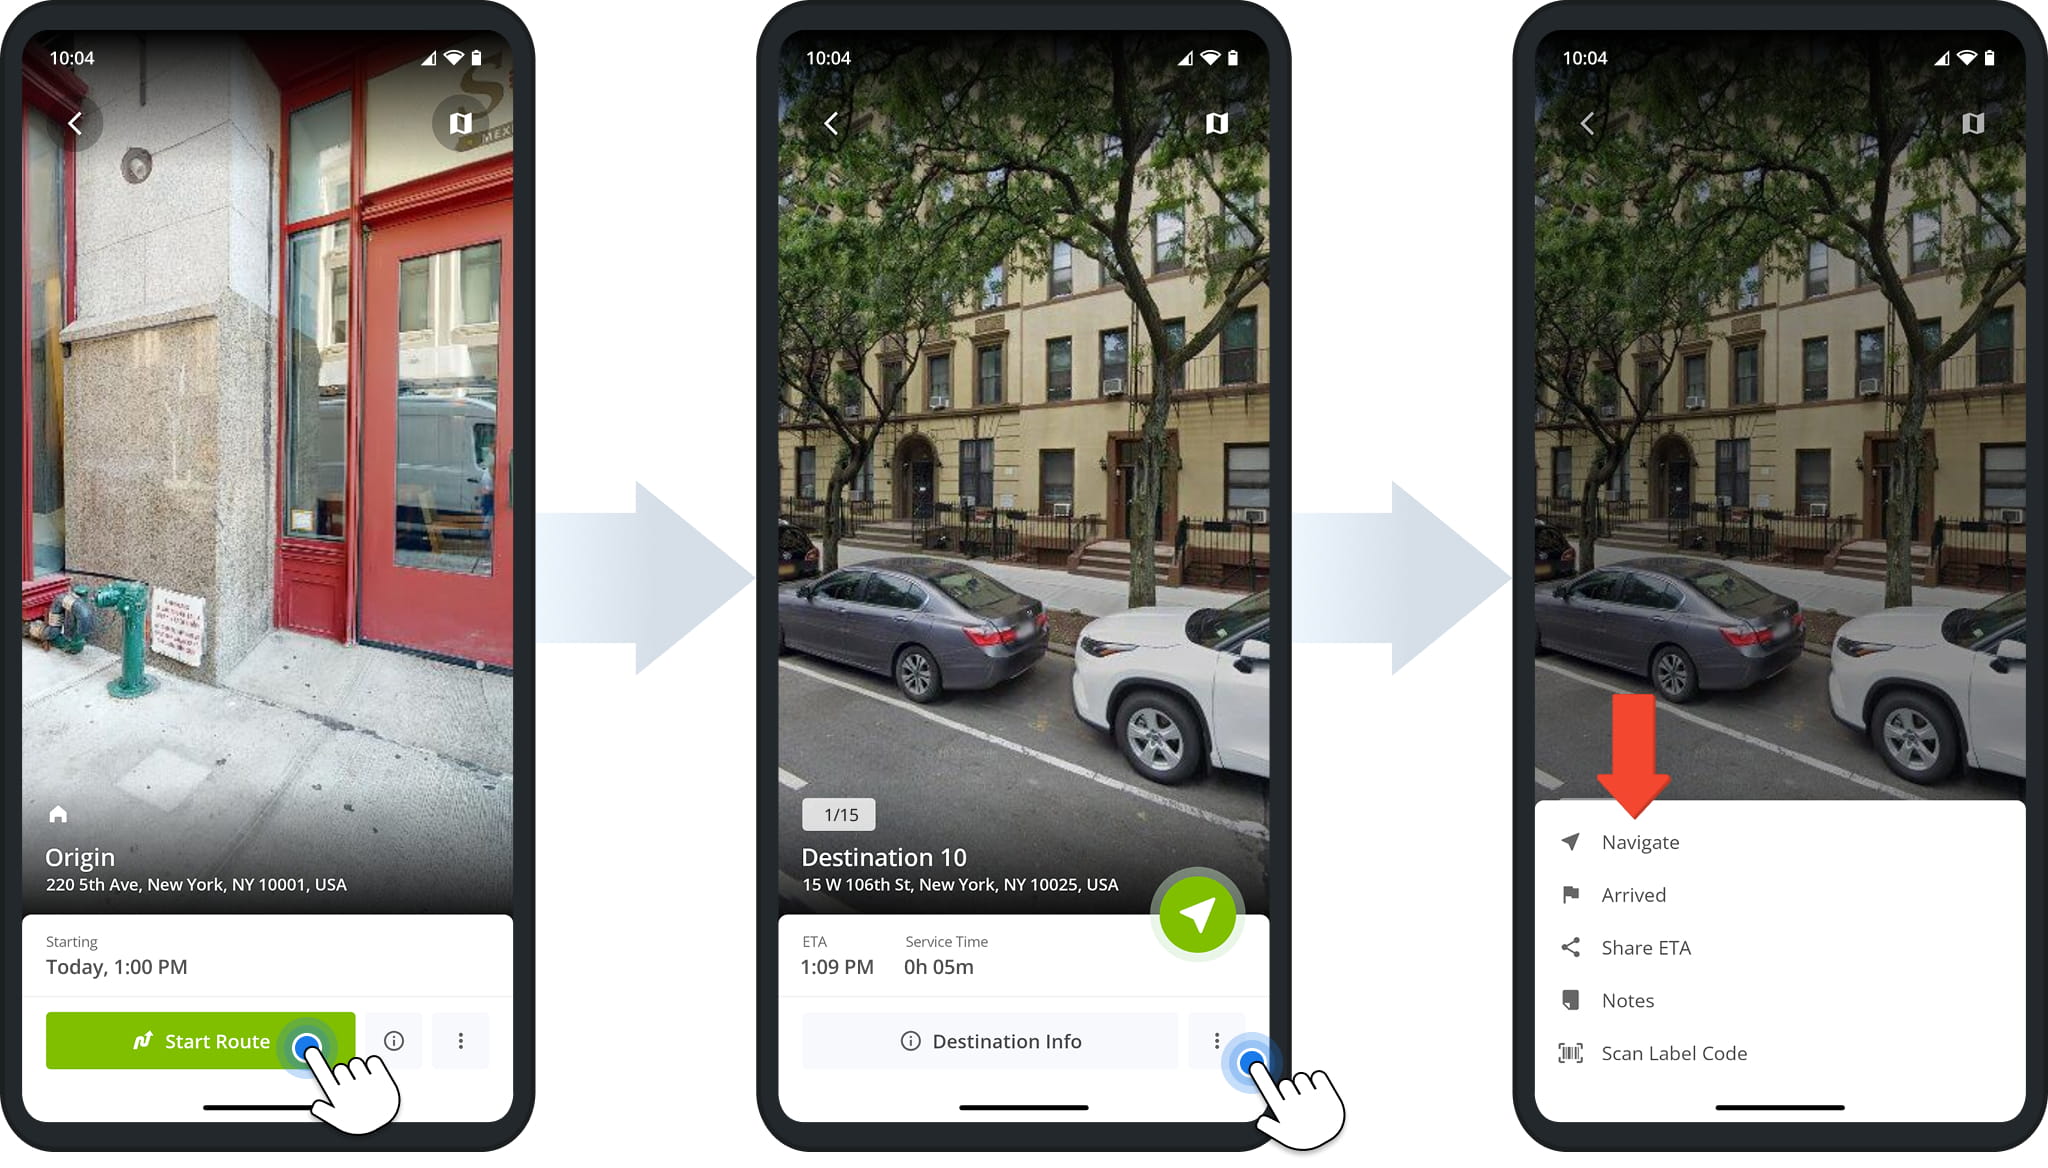
Destination Actions Menu
Navigate Routes – Turn-By-Turn Directions And Voice-Guided GPS
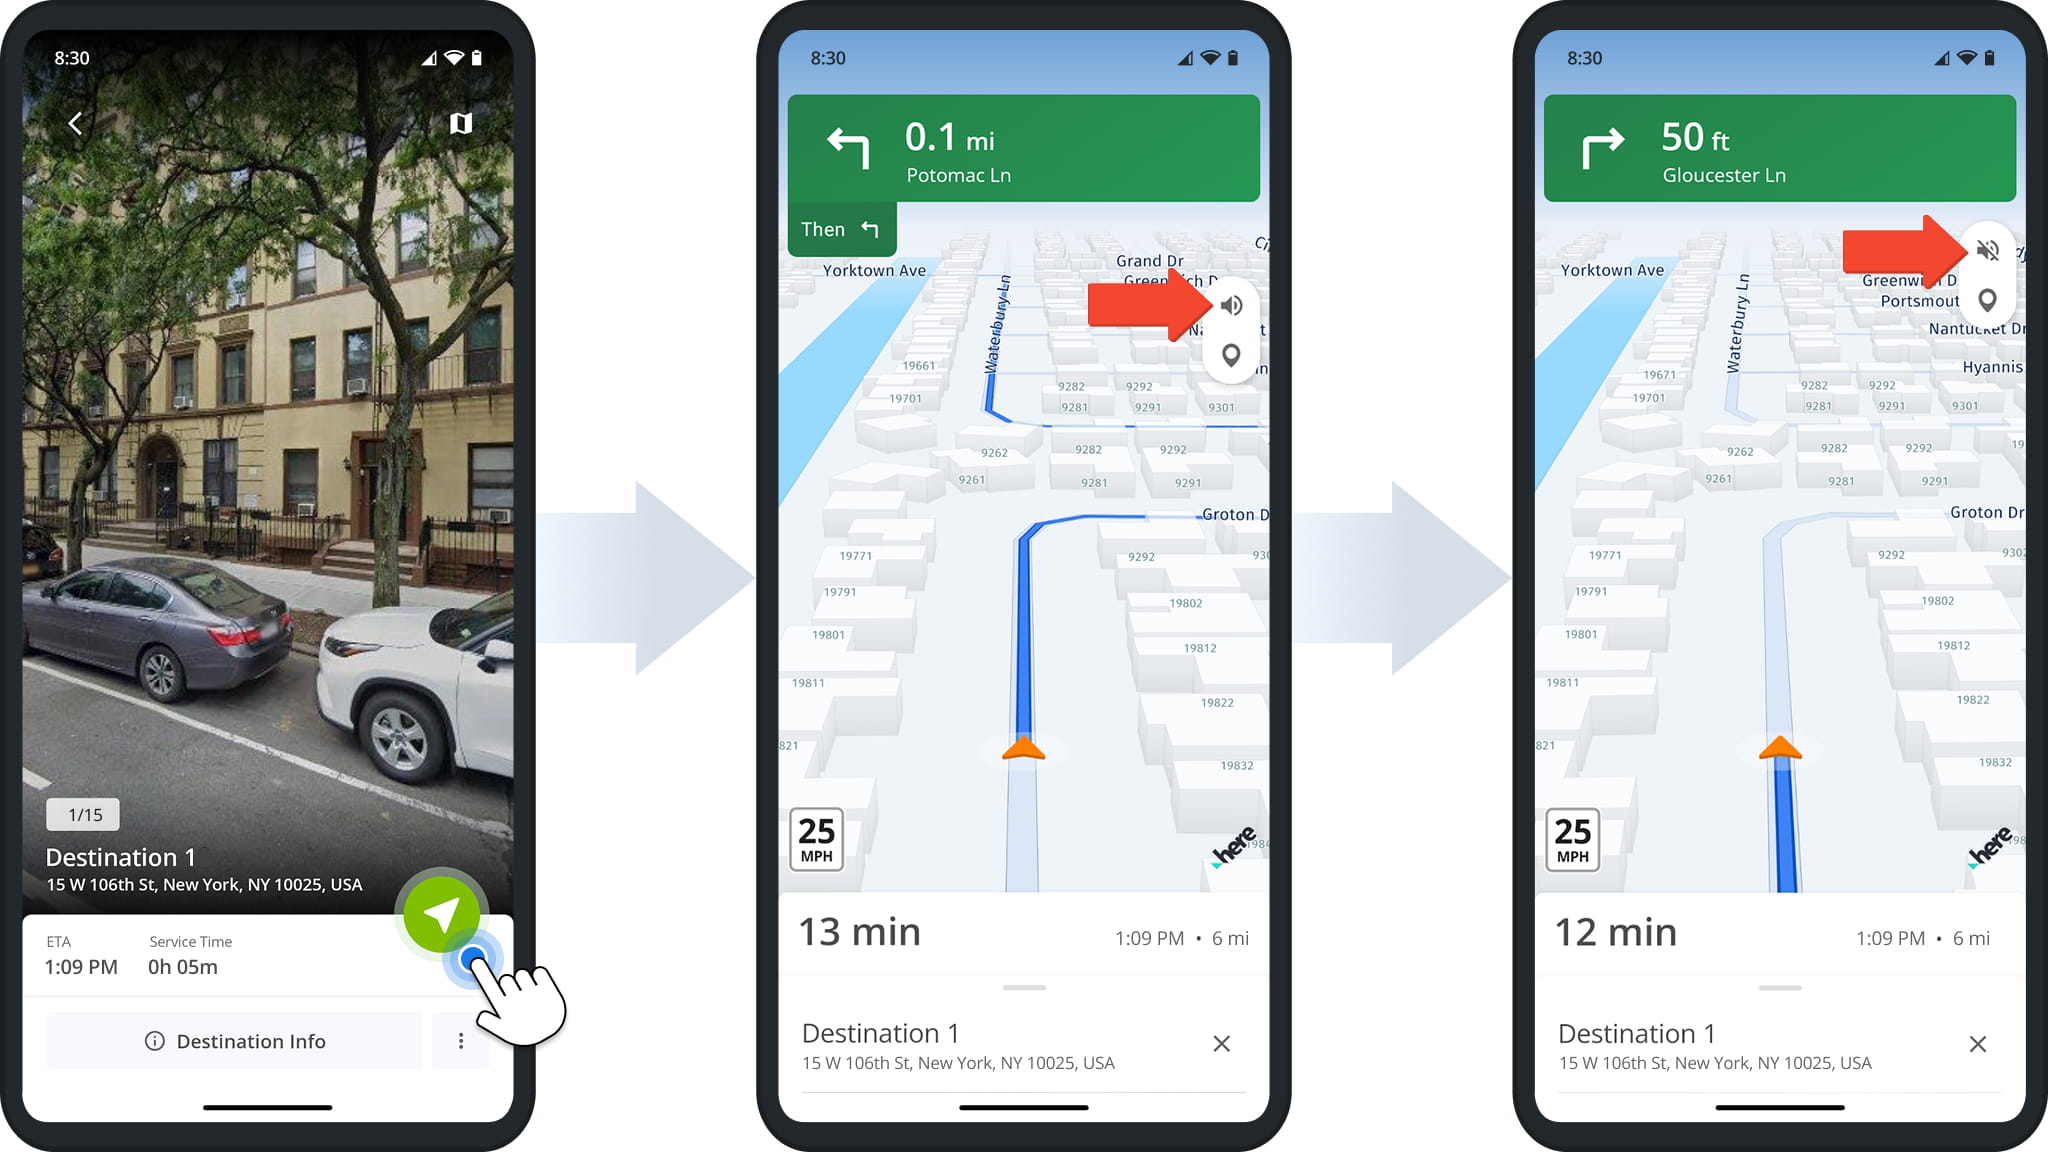
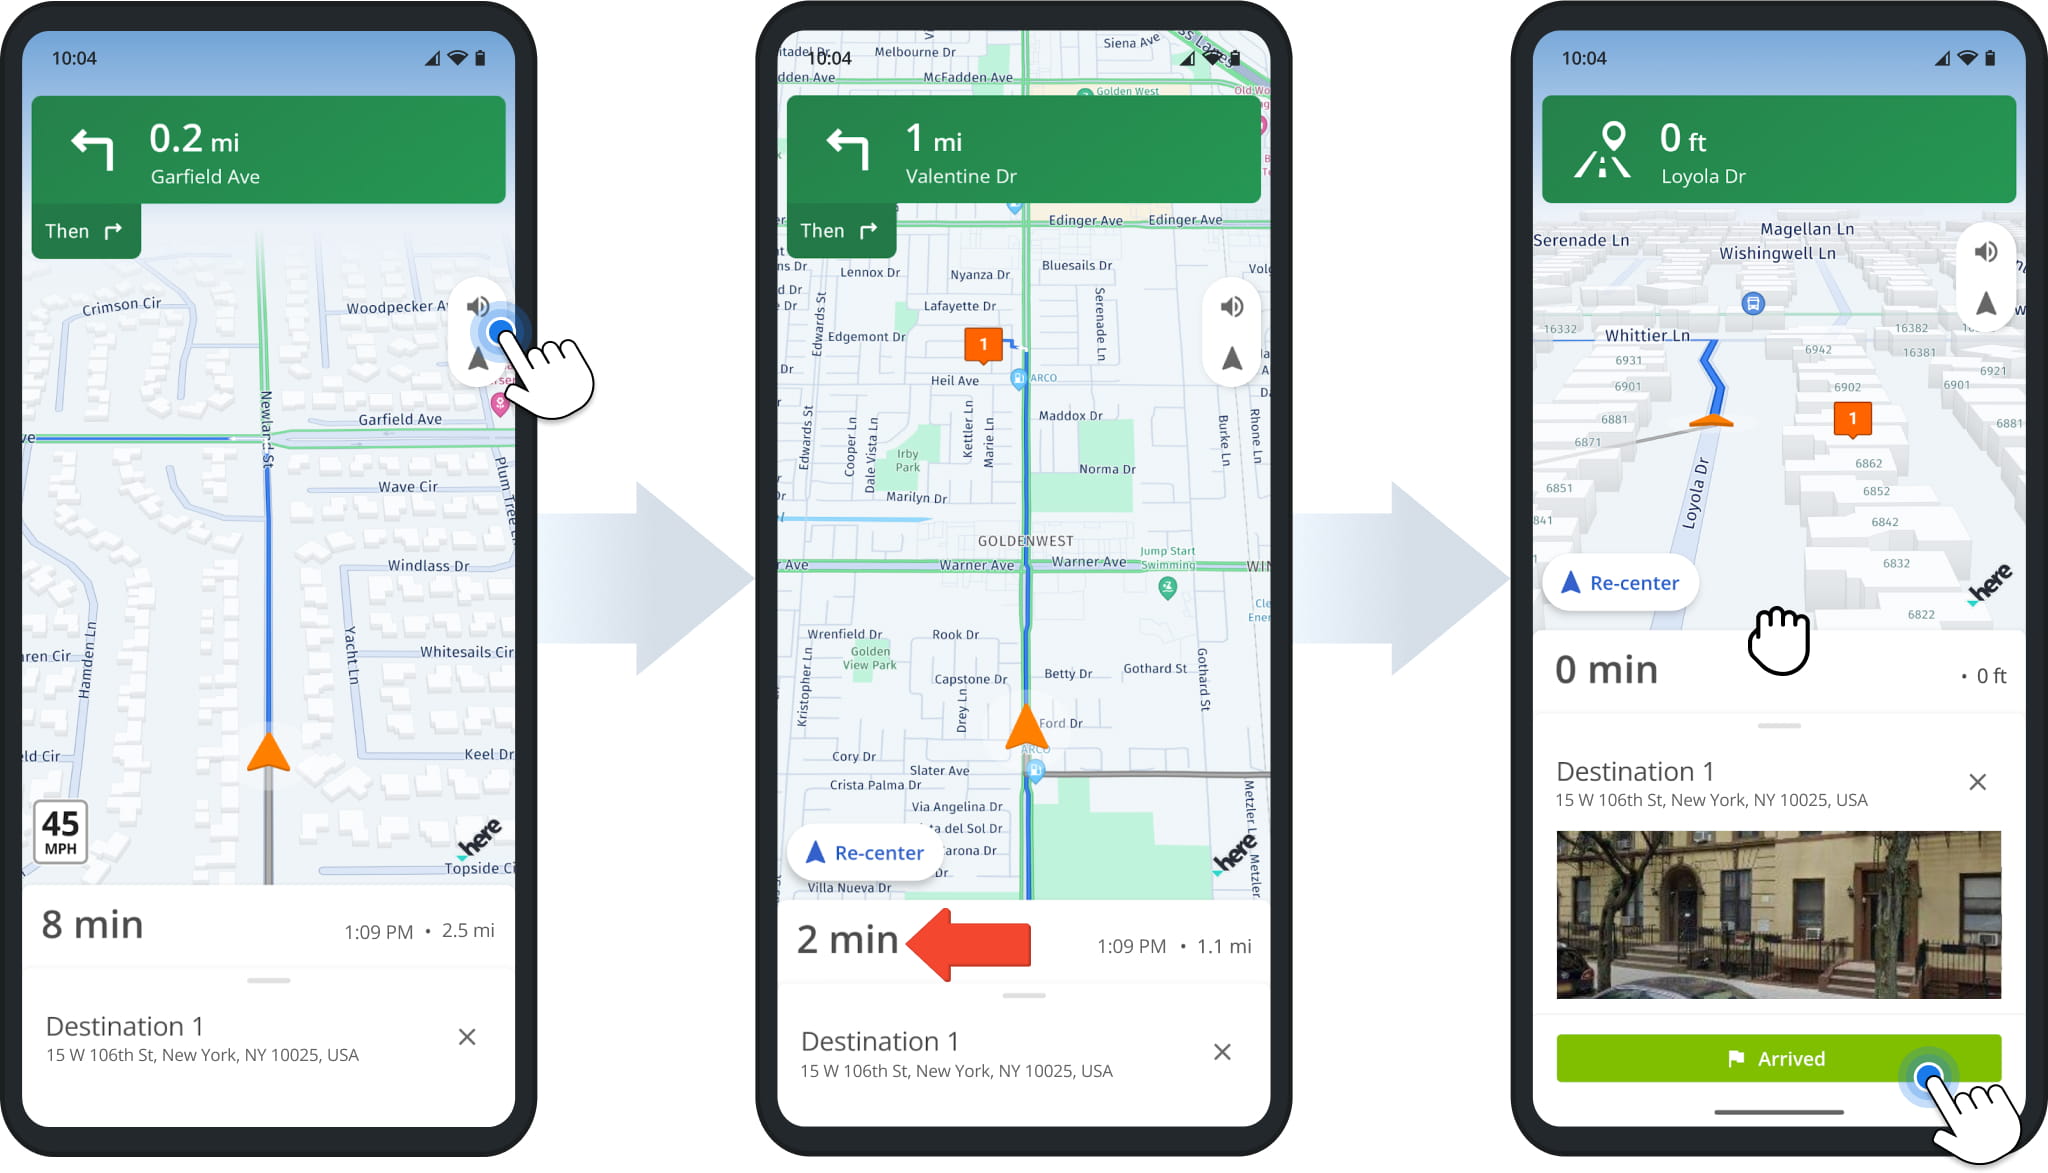
Once you’ve started a route, the next destination in the sequence displays automatically. Tap the Navigation Arrow Icon to begin turn-by-turn navigation.
If you’re using Voice Guided Navigation, make sure the speaker is turned on. A slanted line through the Speaker Icon means it’s muted. Tap the Icon to remove the line and turn sound back on.
NOTE: You can choose between Single Destination Navigation and Continuous Route Navigation, depending on whether you want to navigate one stop at a time or follow the full route without interruption. Learn more about navigation modes.
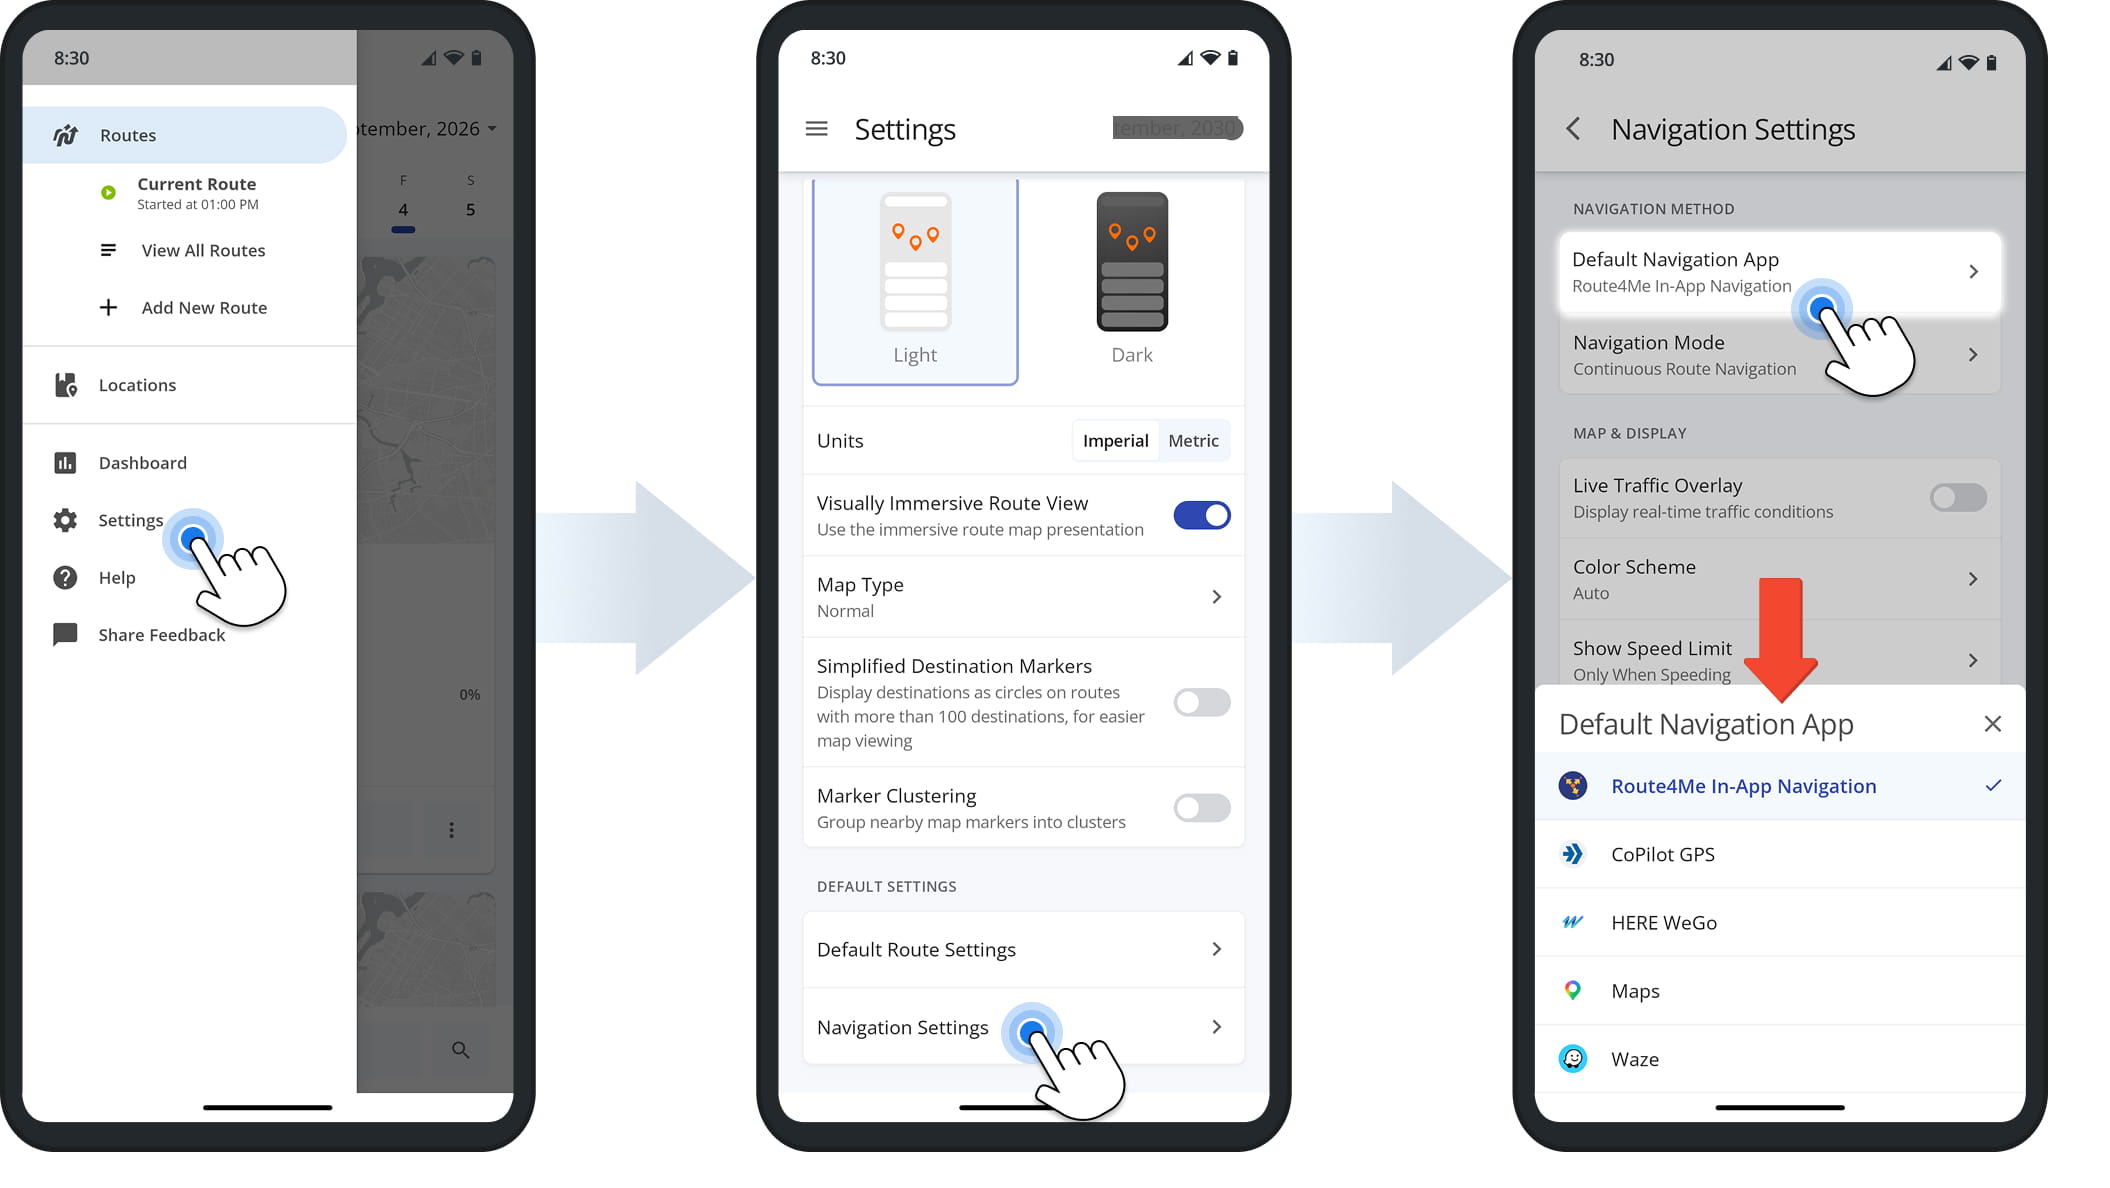
To select or change your navigation app – or to use Route4Me’s built-in Voice-Guided GPS Navigation – select “Settings “, then tap “Navigation Settings“.
From there, tap “Default Navigation App” and make your selection. Choose from the following options: Route4Me In-App Navigation, Google Maps Route Navigation, Waze Navigation App, Here WeGo Navigation App, or CoPilot GPS Navigation App.
NOTE: Route4Me’s Route Planner App enables you to navigate routes even if your internet connection is unstable or lost. Learn more about navigating routes while offline.
Route4Me’s In-App Navigation offers voice-guided driving directions, adjustable maps, live traffic updates, and real-time ETAs.
While navigating, use pinch gestures to zoom in and out, or to adjust the map’s angle. Tap the Speaker Button to mute or unmute voice directions.
At the bottom of the screen, you’ll see a dynamic ETA that updates automatically based on live traffic and other conditions.
Arrive At Destinations – Confirm Arrival And Complete Visits
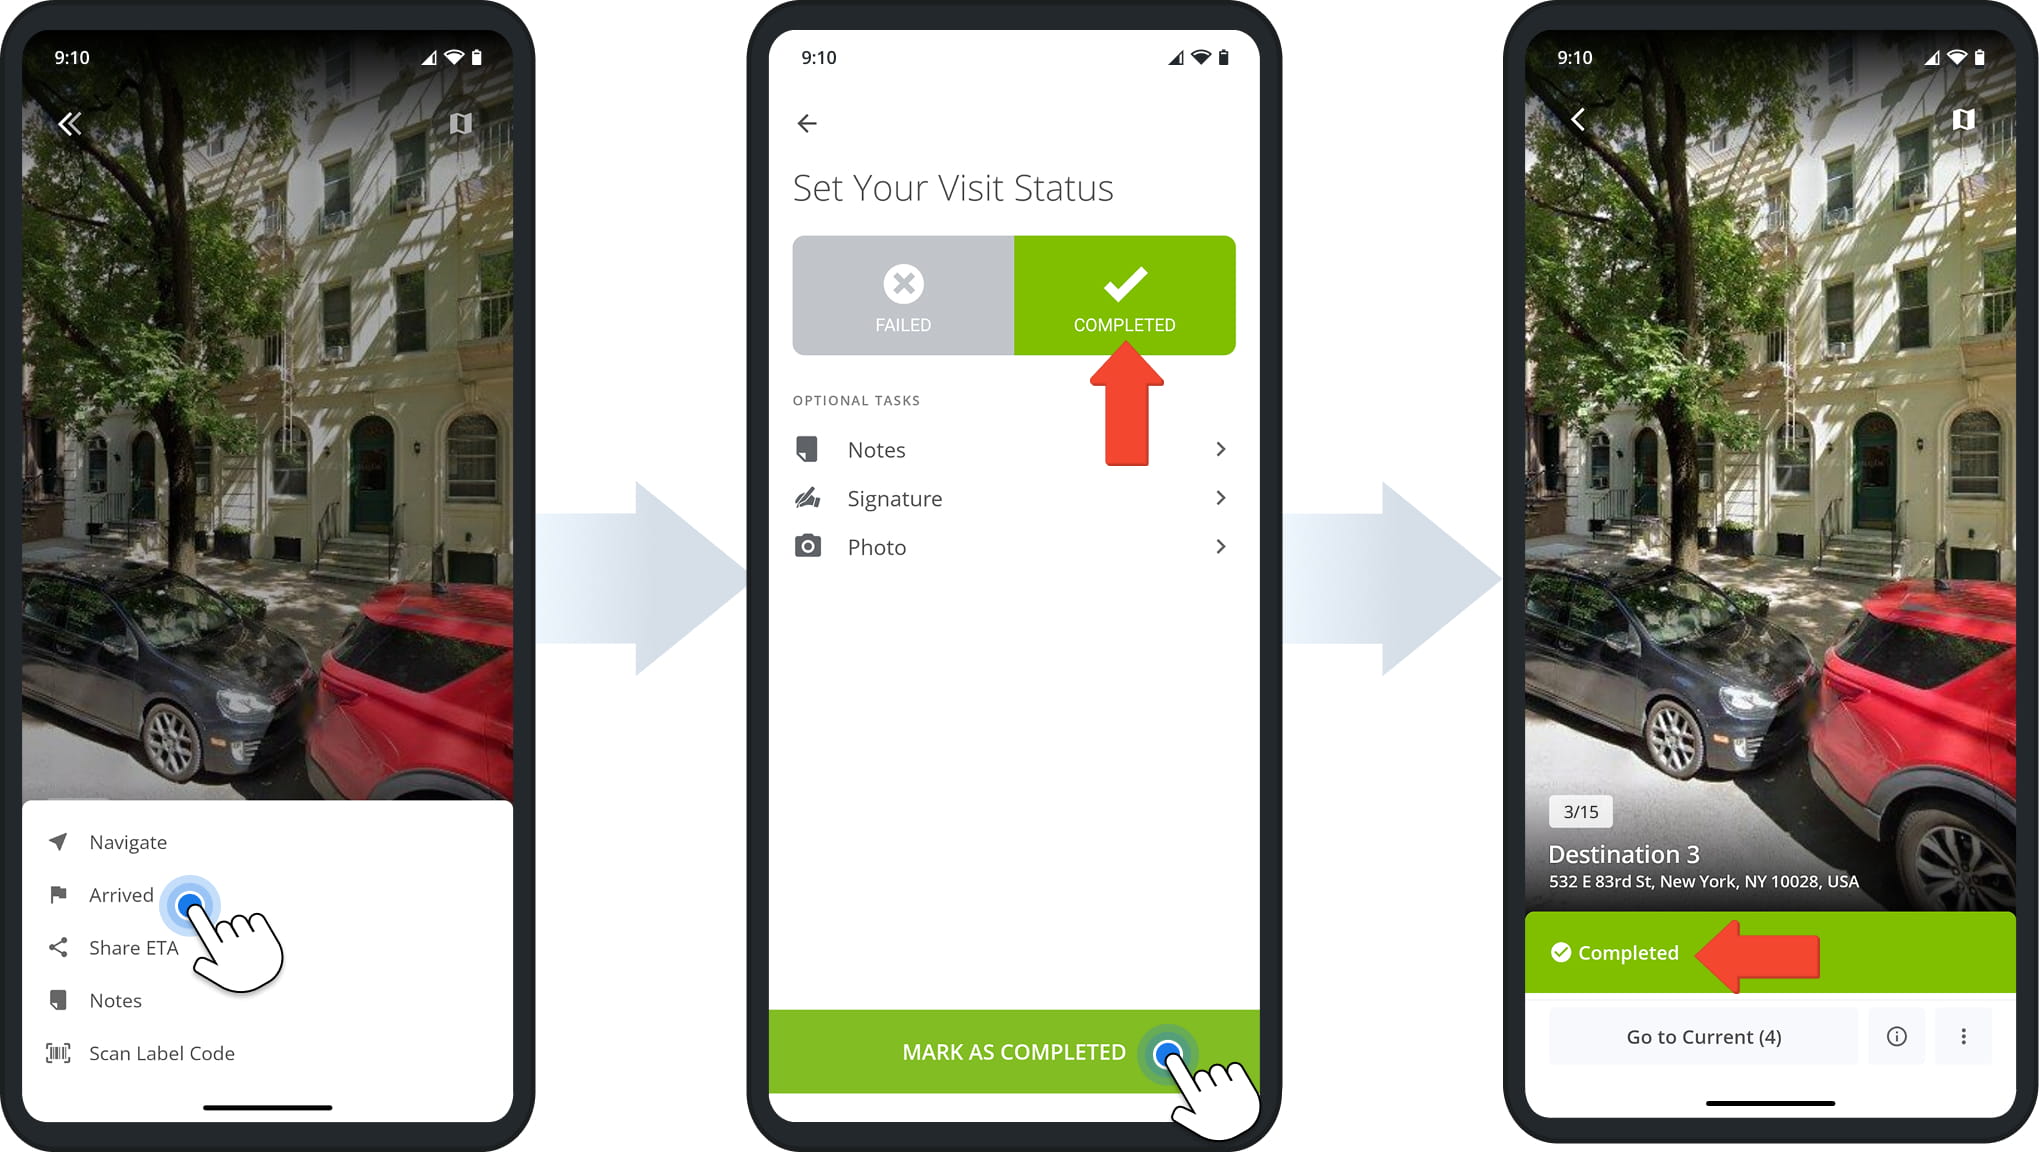
When you reach a destination, the app automatically displays the navigation info panel. Tap “Arrived” to confirm your arrival.
The app will then open the “Set Your Visit Status” screen, where you can confirm a visit was completed before tapping “Mark As Completed” to continue on to the next destination.
Collect Proof Of Visit – Document Stop Visits And Confirm Deliveries
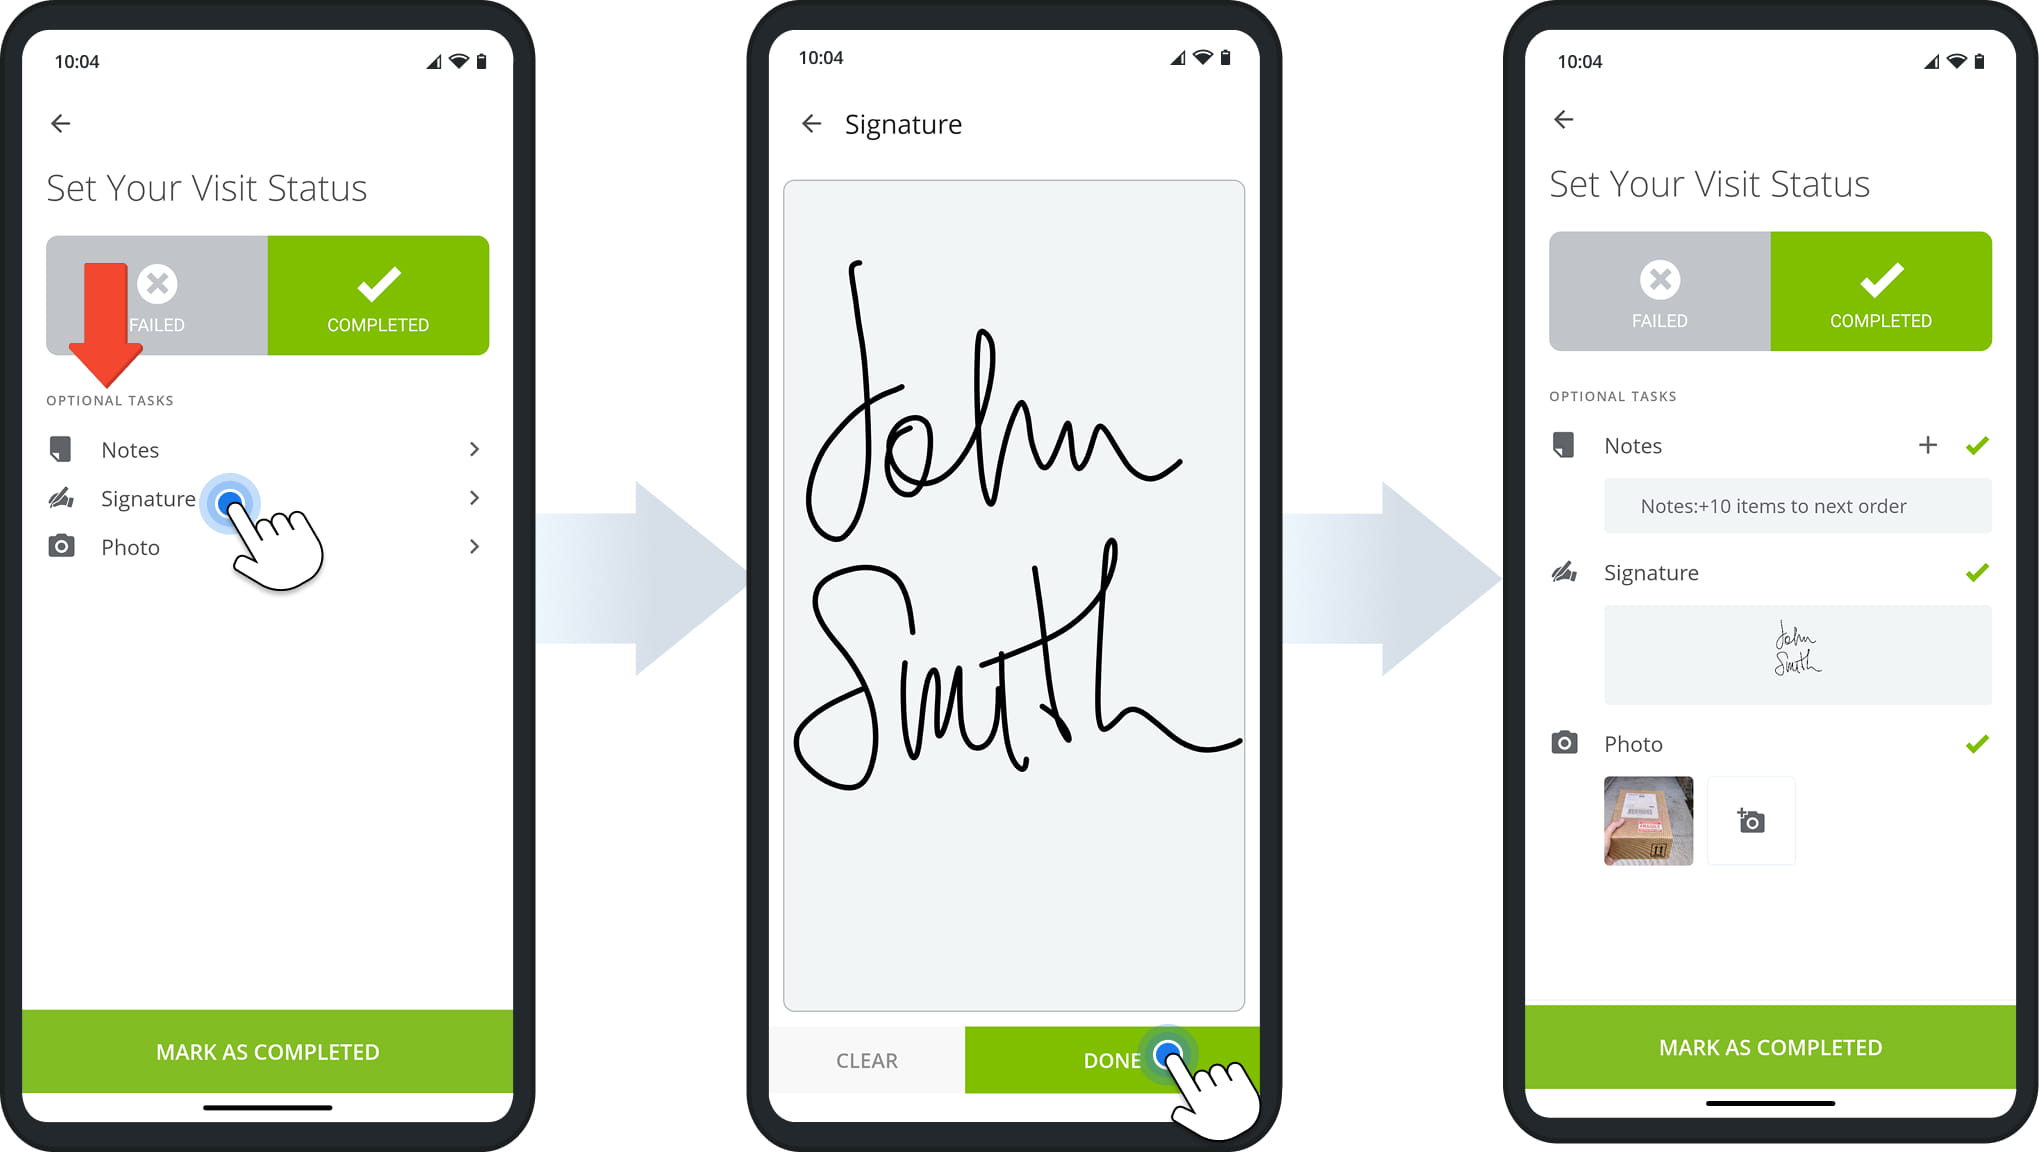
Proof of visit creates a verified record of each stop, useful for confirming deliveries, resolving disputes, and keeping accurate records.
To collect proof of visit, follow the on-screen instructions that appear after marking a stop as “Arrived“. Tasks may include capturing photos or videos, adding notes, or collecting signatures.
Learn more about collecting proof of visit and delivery from your Route4Me mobile driver app.
Complete Routes – End Your Route And Review Completed Stops
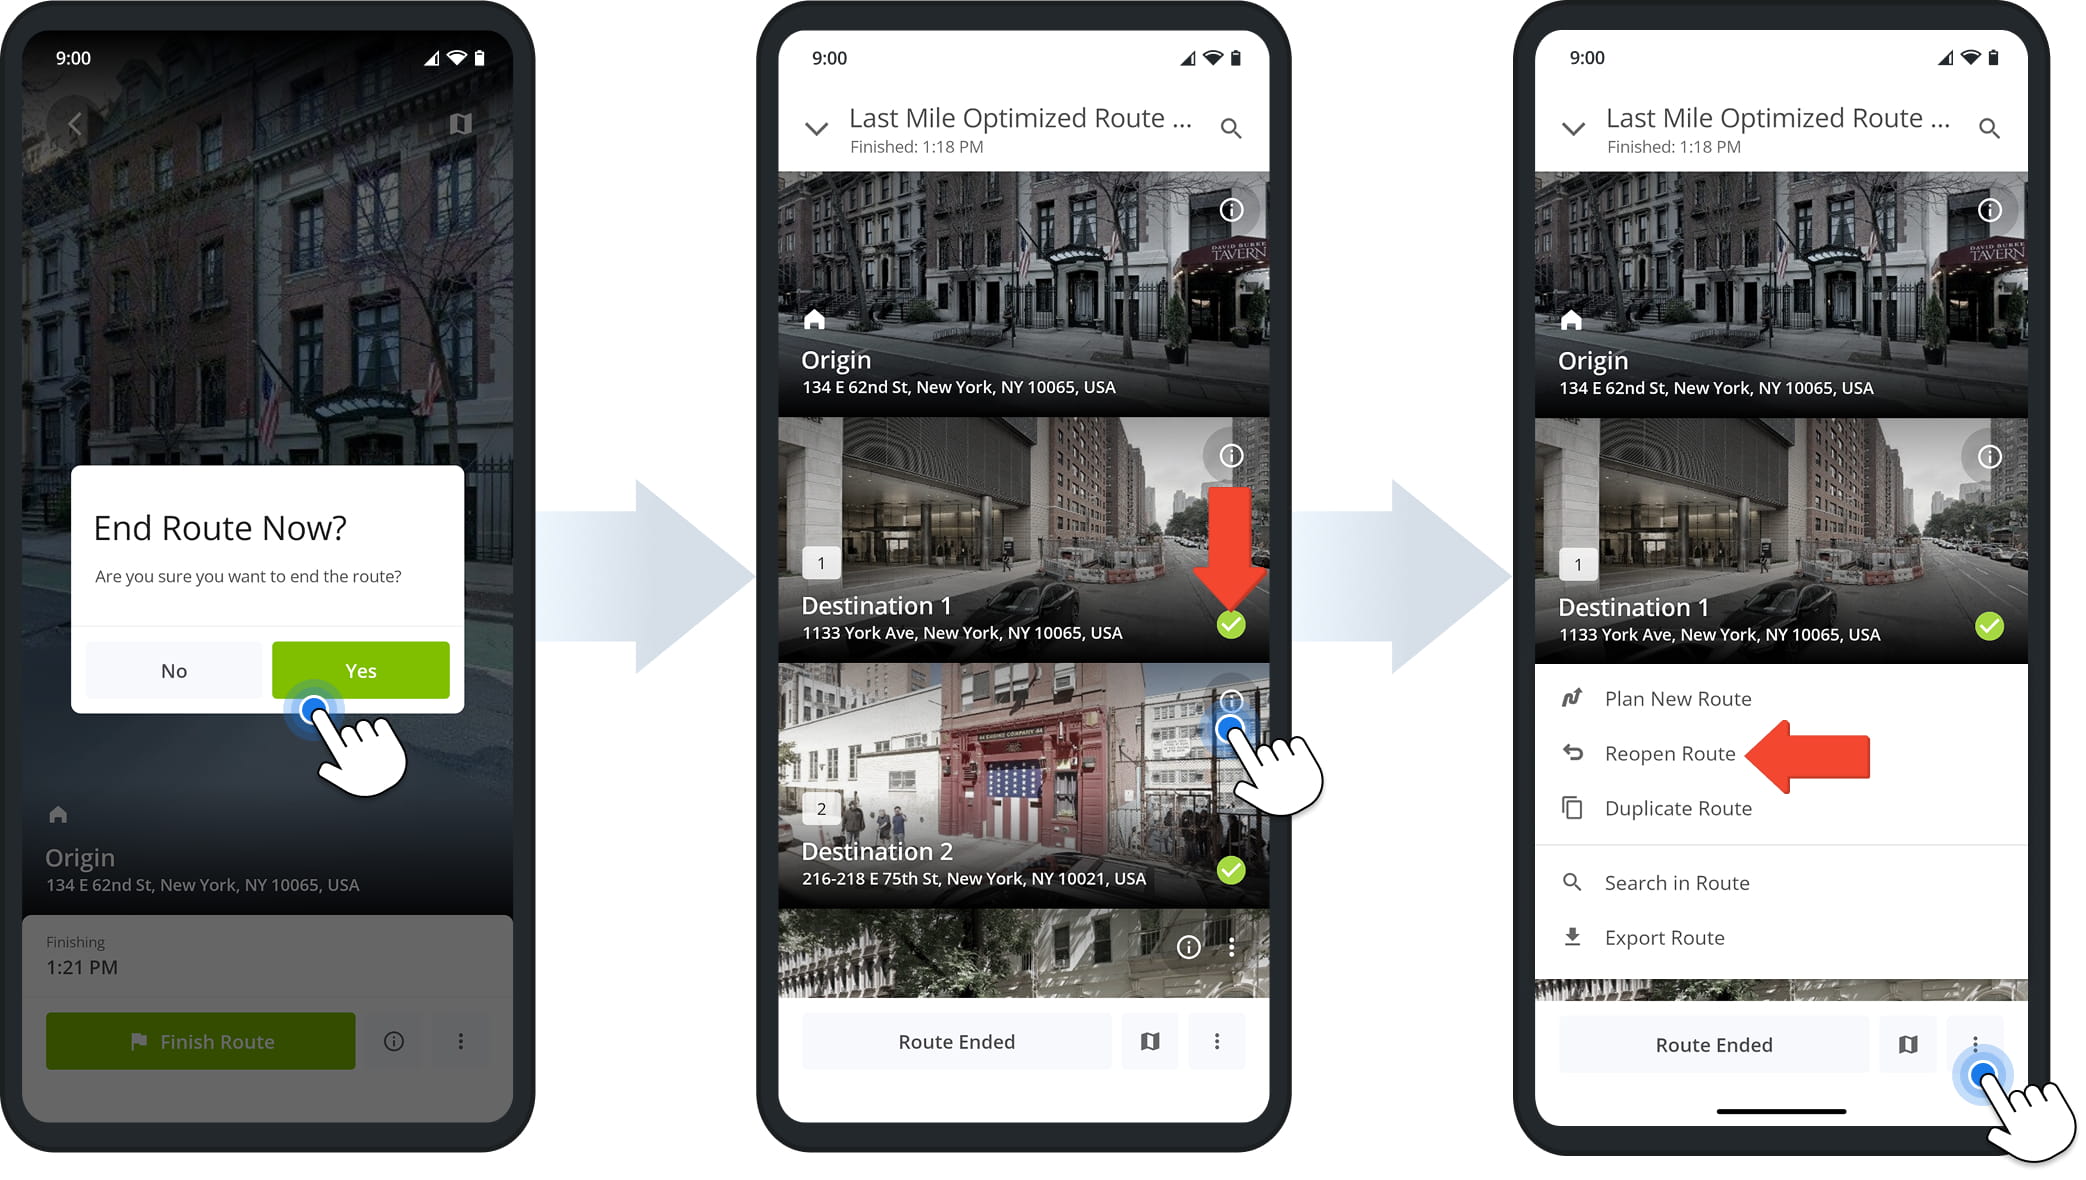
Once a status has been set for each destination, the app asks if you want to end the route. Tap “Yes” to confirm.
This automatically opens the route’s Destinations List, where green checkmarks indicate which stops have been completed. Tap the Information Icon on any destination to review its details, including order and visit information.
If you need to reopen the route (for example, if a stop was marked completed by mistake or you want to add additional proof of visit notes), tap the Three-Dot Icon at the bottom of the screen, then tap “Reopen Route“.
Visit Route4Me's Marketplace to Check out Associated Modules:
- Operations
Custom Data Add-On
- Operations
Advanced Team Management Add-On
About author: Daniel Archer

