Route Planning Regions – Create & Manage Regional Hierarchies
Regions allow you to define and organize your service territories into a structured hierarchy, giving your team a clear framework for managing coverage areas at every level, from broad top-level markets down to specific neighborhoods or districts. This is especially useful for route planning and optimization, as well as assigning the right resources to the right areas. This guide walks you through everything you need to configure, manage, and visualize your Regions on a map.

Table of Contents
Add Regions – Configure Regional Hierarchies
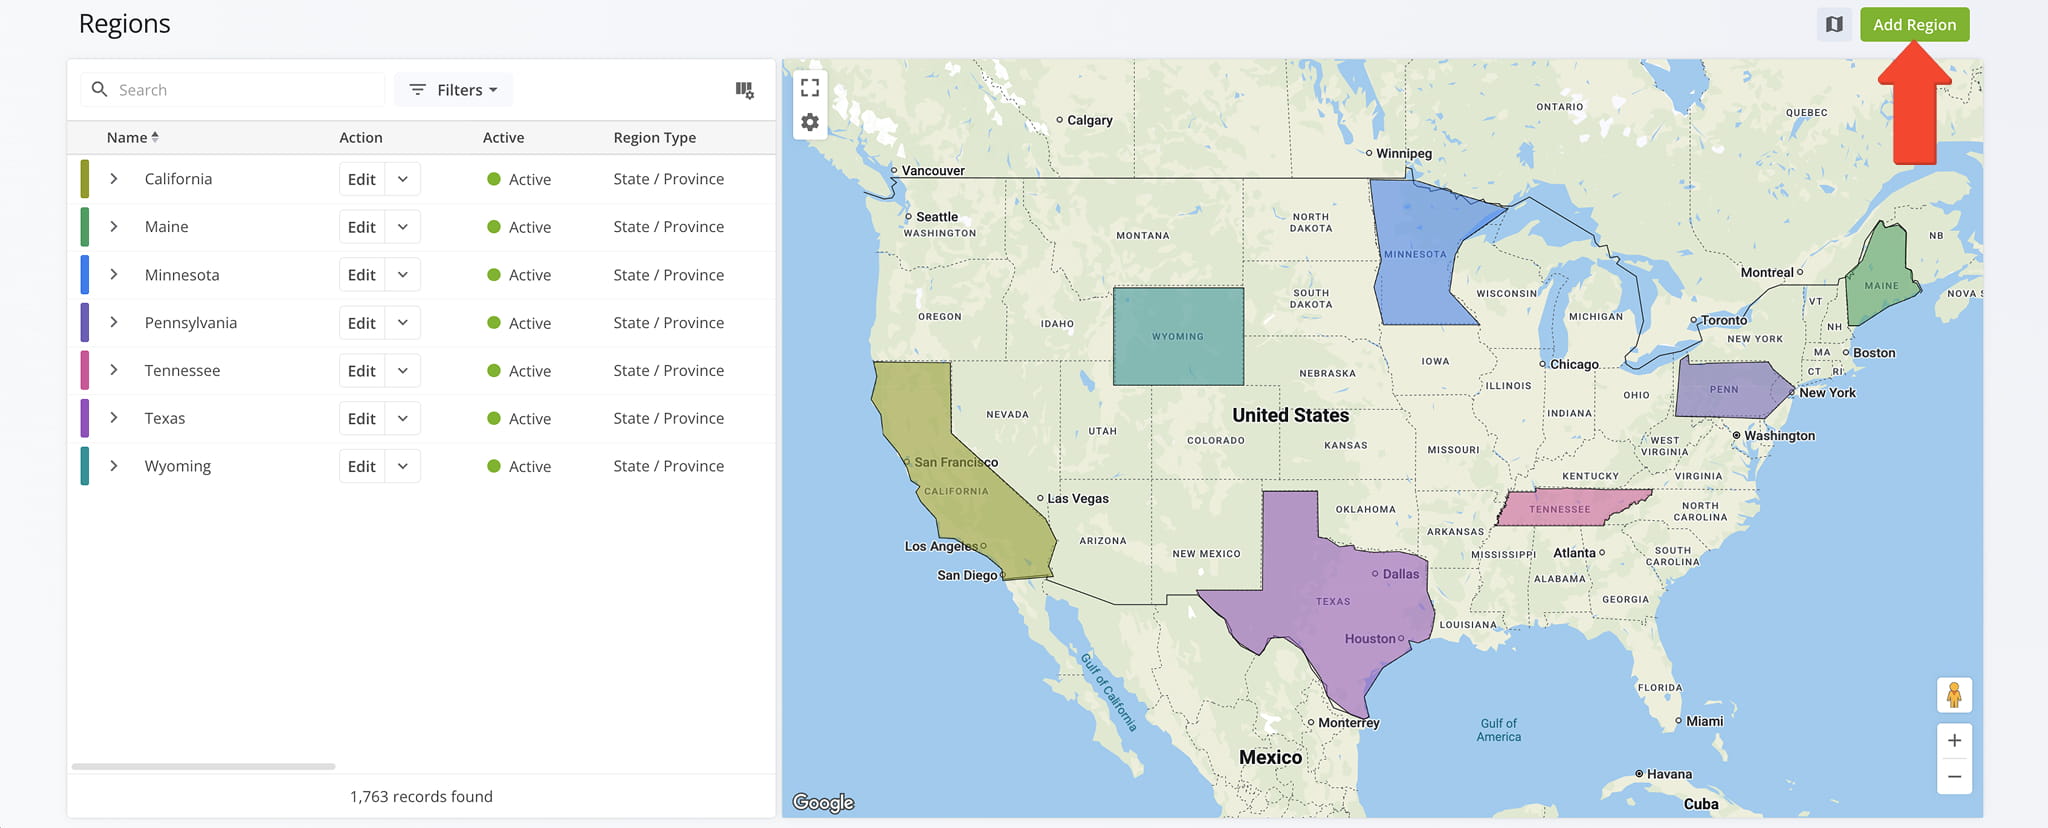
To create a new Regions, go to “Database” > “Regions” from the Navigation Menu and click the “Add Regions” button, then follow the steps described below.
Create A Top-Level Region
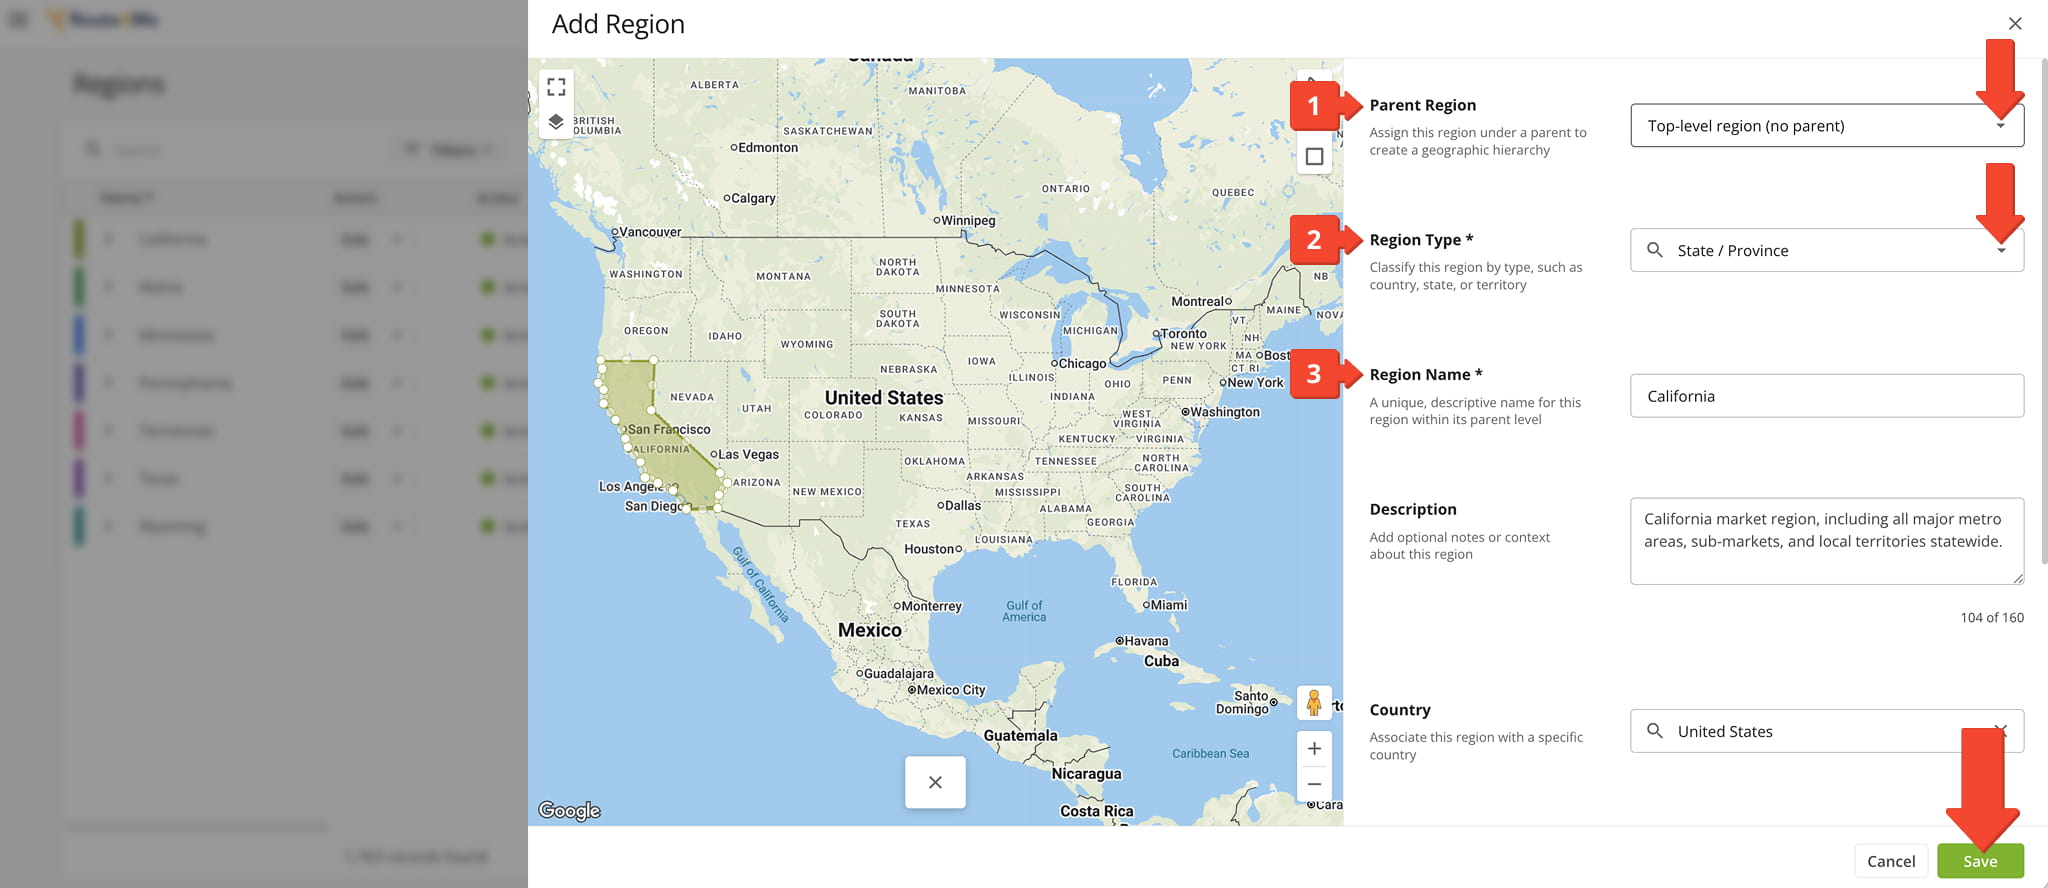
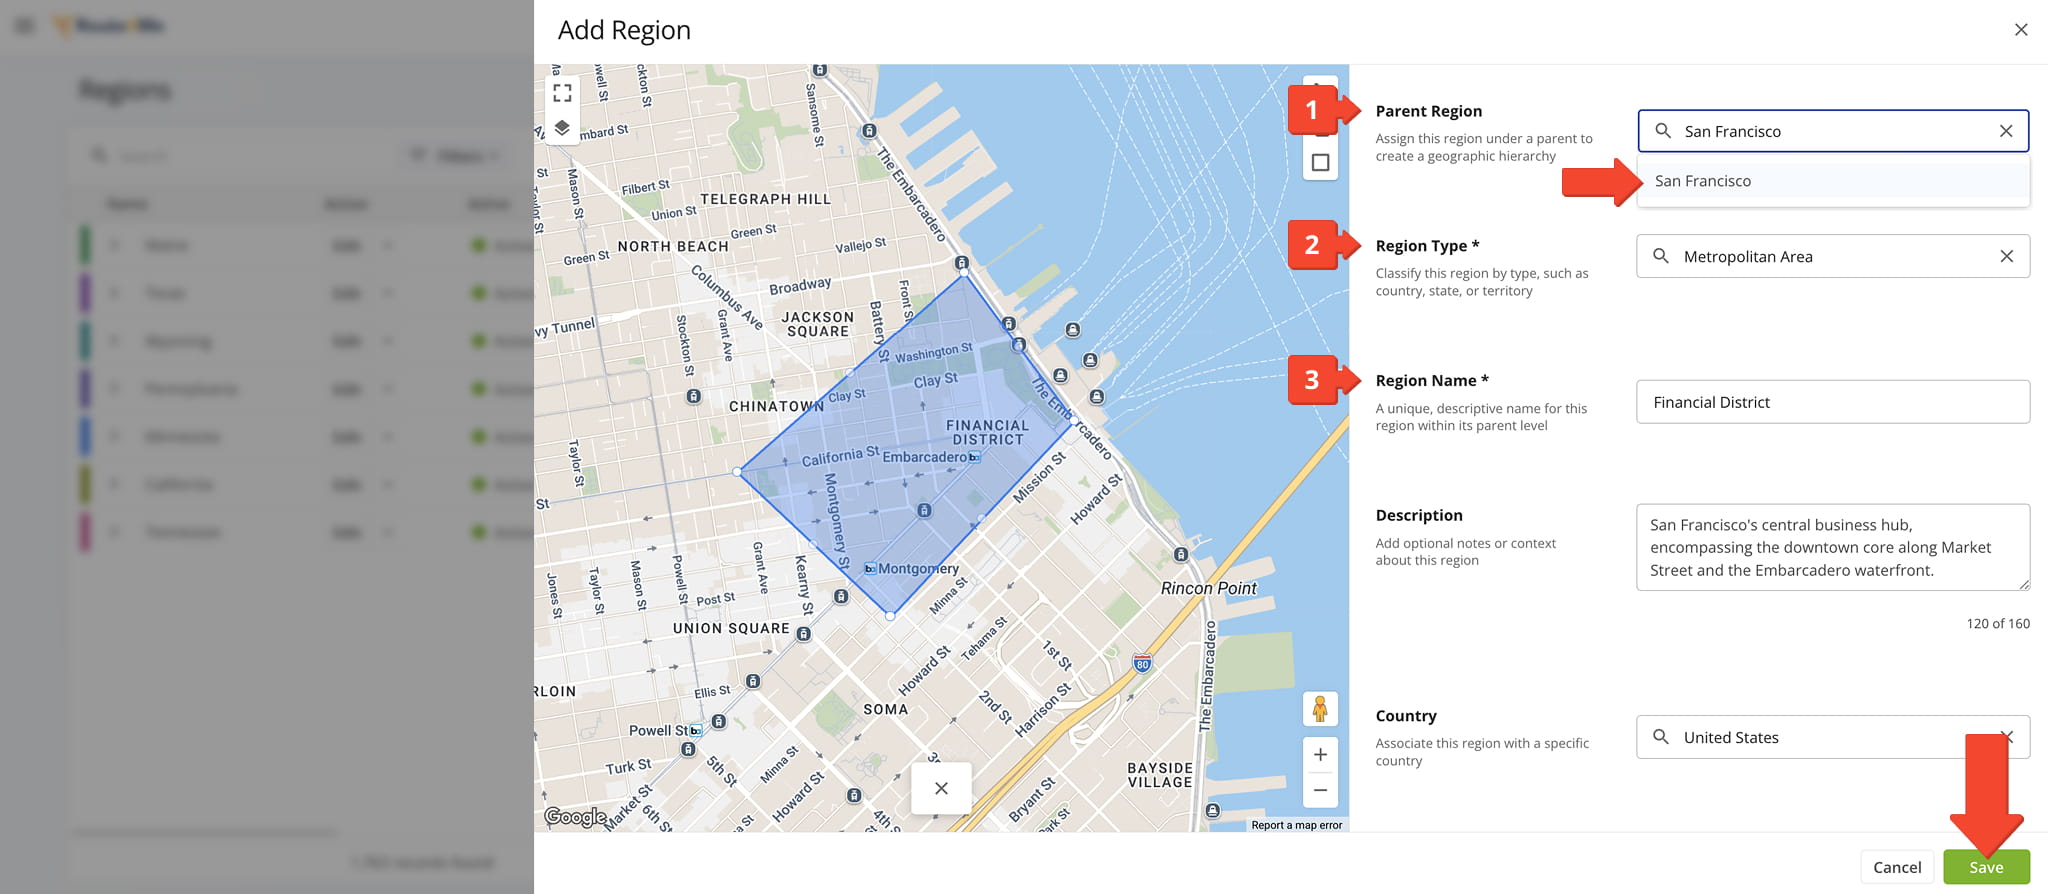
Start by creating a Top-Level region. To do this, complete all mandatory fields:
- From the “Parent Region” field, select “Top-Level region (no parent)” from the pull-down menu.
- From the “Region Type Field“, select the Region type from the pull-down menu.
- In the “Region Name” field, enter a name for the Top-Level Region so it’s easily identifiable in your list.
Optionally, complete any additional steps described in the table at the end of this section, then click “Save” to finish.
Create A Sub-Region
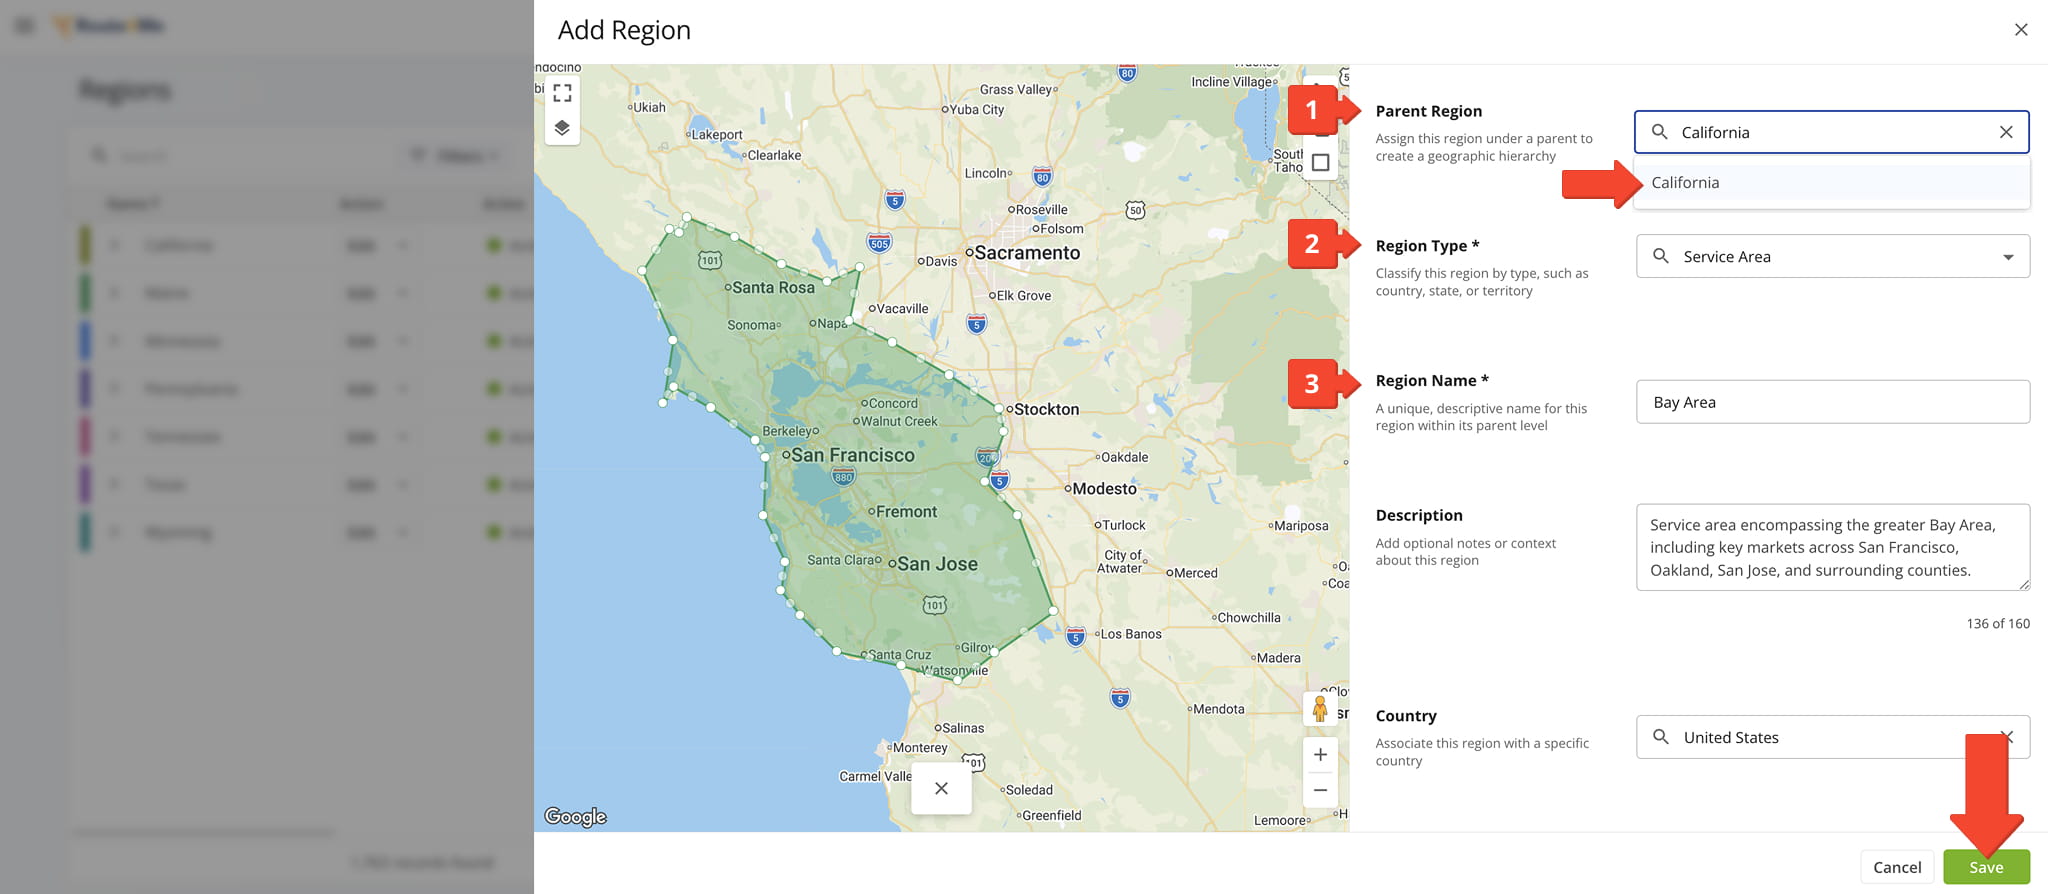
Next, create one or more Sub-Regions for the Top-Level Region. Again, complete all mandatory fields:
- From the “Parent Region” field, select the Top-Level Region this Sub-Region belongs to.
- From the “Region Type Field“, select the Region type from the pull-down menu.
- In the “Region Name” field, enter a name for the Sub-Region so it’s easily identifiable in your list.
Optionally, complete any additional steps described in the table at the end of this section, then click “Save” to finish.
Create A Sub-Region (Level Three)
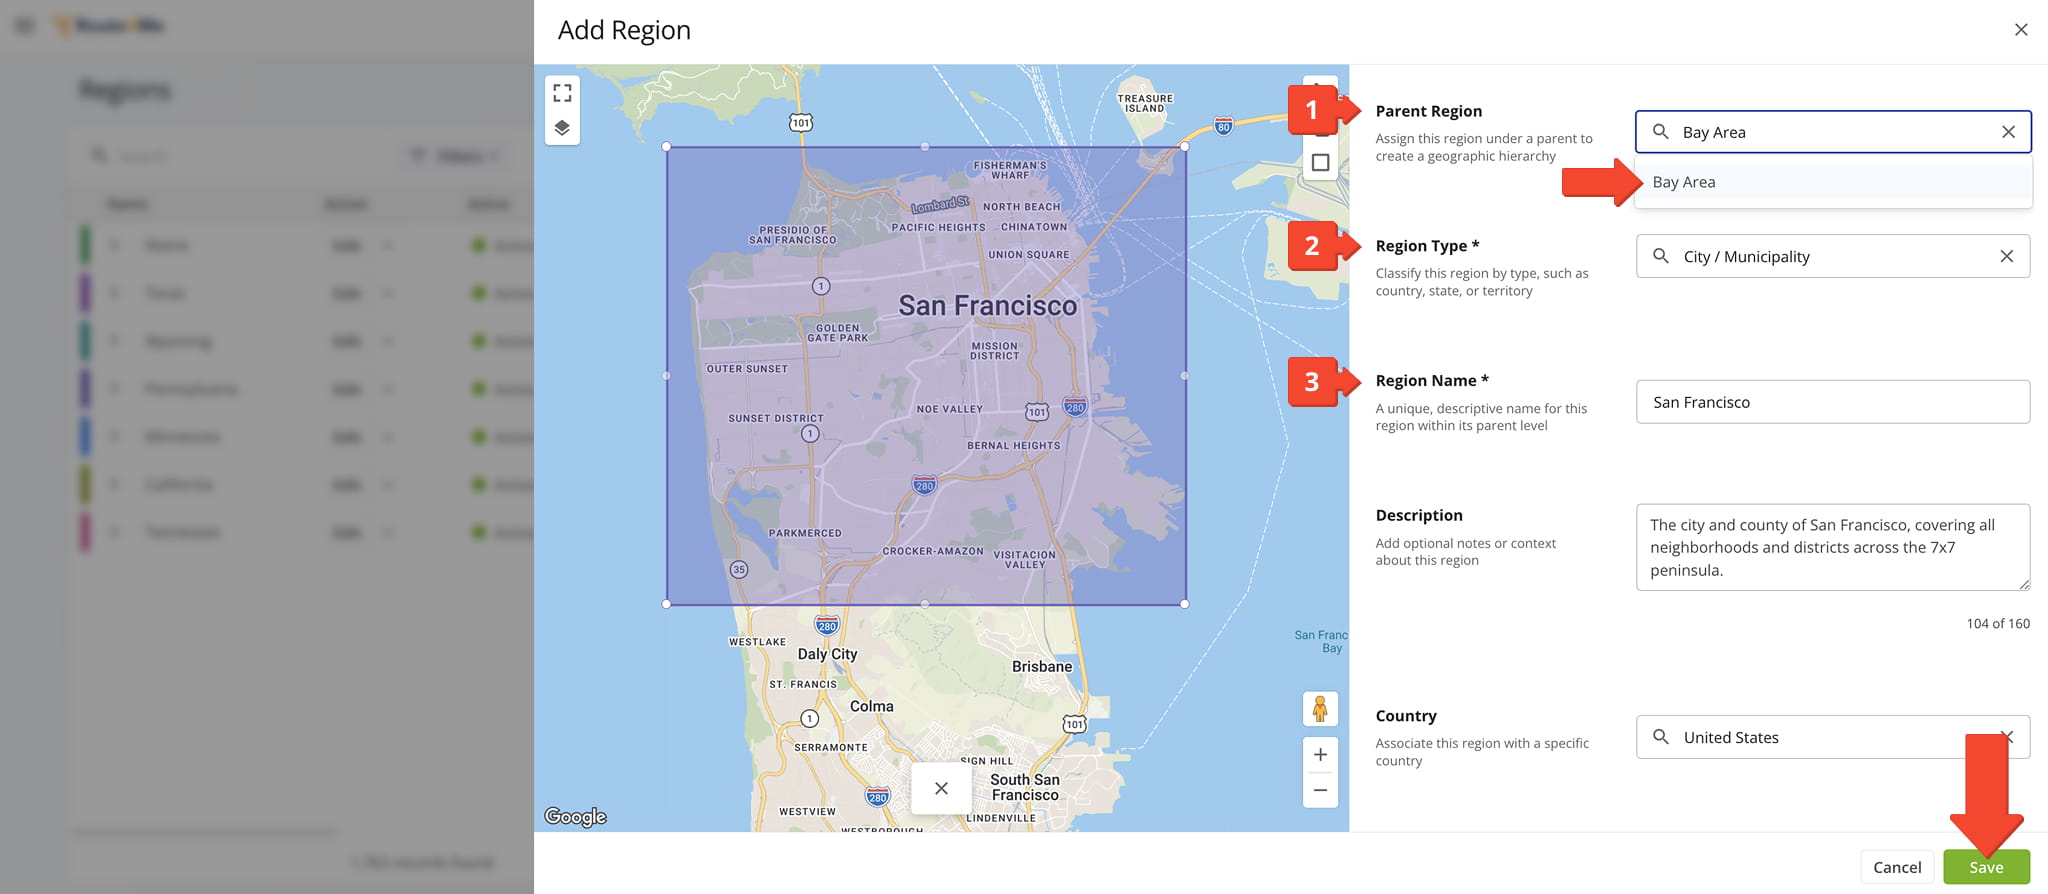
You can also create Sub-Regions (Level Three) for each Sub-Region:
- From the “Parent Region” field, select the Sub-Region this Sub-Region (Level Three) belongs to.
- From the “Region Type Field“, select the Region type from the pull-down menu.
- In the “Region Name” field, enter a name for the Sub-Region (Level Three) so it’s easily identifiable in your list.
Optionally, complete any additional steps described in the table at the end of this section, then click “Save” to finish.
Create A Sub-Region (Level Four)
Finally, you can create Sub-Regions (Level Four) for each Sub-Region (Level Three):
- From the “Parent Region” field, select the Sub-Region (Level Three) this Sub-Region (Level Four) belongs to.
- From the “Region Type Field“, select the Region type from the pull-down menu.
- In the “Region Name” field, enter a name for the Sub-Region (Level Four) so it’s easily identifiable in your list.
Optionally, complete any additional steps described in the table at the end of this section, then click “Save” to finish.
Region Configuration – Field Reference Table
Parent Region
Mandatory. Assigns the Region under a parent to establish a geographic hierarchy. Select "Top-level region (no parent)" to create a top-level Region, or select an existing Region to nest this Region beneath it.
Region Type
Mandatory. Select the type of Region from the pull-down menu. Options include county, market segment, metropolitan area, sales territory, and many others.
Region Name
Mandatory. Enter a unique, descriptive name for the Region to make it easily identifiable within its parent level.
Description
Optional. Add a note or context about the Region for reference.
Country
Optional. Associate the Region with a specific country.
Color
Optional. Choose a color to visually distinguish the Region on the map. Use the square or pentagon shape tools on the Map to draw and define the Region's boundaries, then apply your selected color.
External ID
Optional. Provide an identifier used to link this Region to a corresponding record in an external system.
Active
Optional. Check this box to mark the Region as active. Inactive Regions are excluded from route planning and reporting.
Manage Regions – Organize And Maintain Regional Data
Once your Regions are set up, you can search and update Region details, configure how data is displayed, and visualize territories directly on the map.
View And Edit Regions – Search, Filter, And Edit Region Details
To view and edit Region details and data:
- Use the “Search” field and Filters options, described in the table below, to locate specific Regions.
- Click the Arrow next to a Top-Level Region to view all of its associated Sub-Regions.
- Click “Edit” to modify a Top-Level or Sub-Region’s details.
- Click the Down Arrow to delete an entry.

Region Type
Search by Region Type name to locate Regions with a matching Region Type.
Parent Region
Search Parent Regions by name or description to locate matching Regions.
Depth
Filter Regions by hierarchy level (e.g., Level 0, Level 1, Level 2, Level 3, and so on).
Country
Enter a country name to display all Regions associated with that country.
Active
Filter Regions by active status. Select "Yes" to show active Regions, "No" to show inactive Regions, or "Select All" to display both.
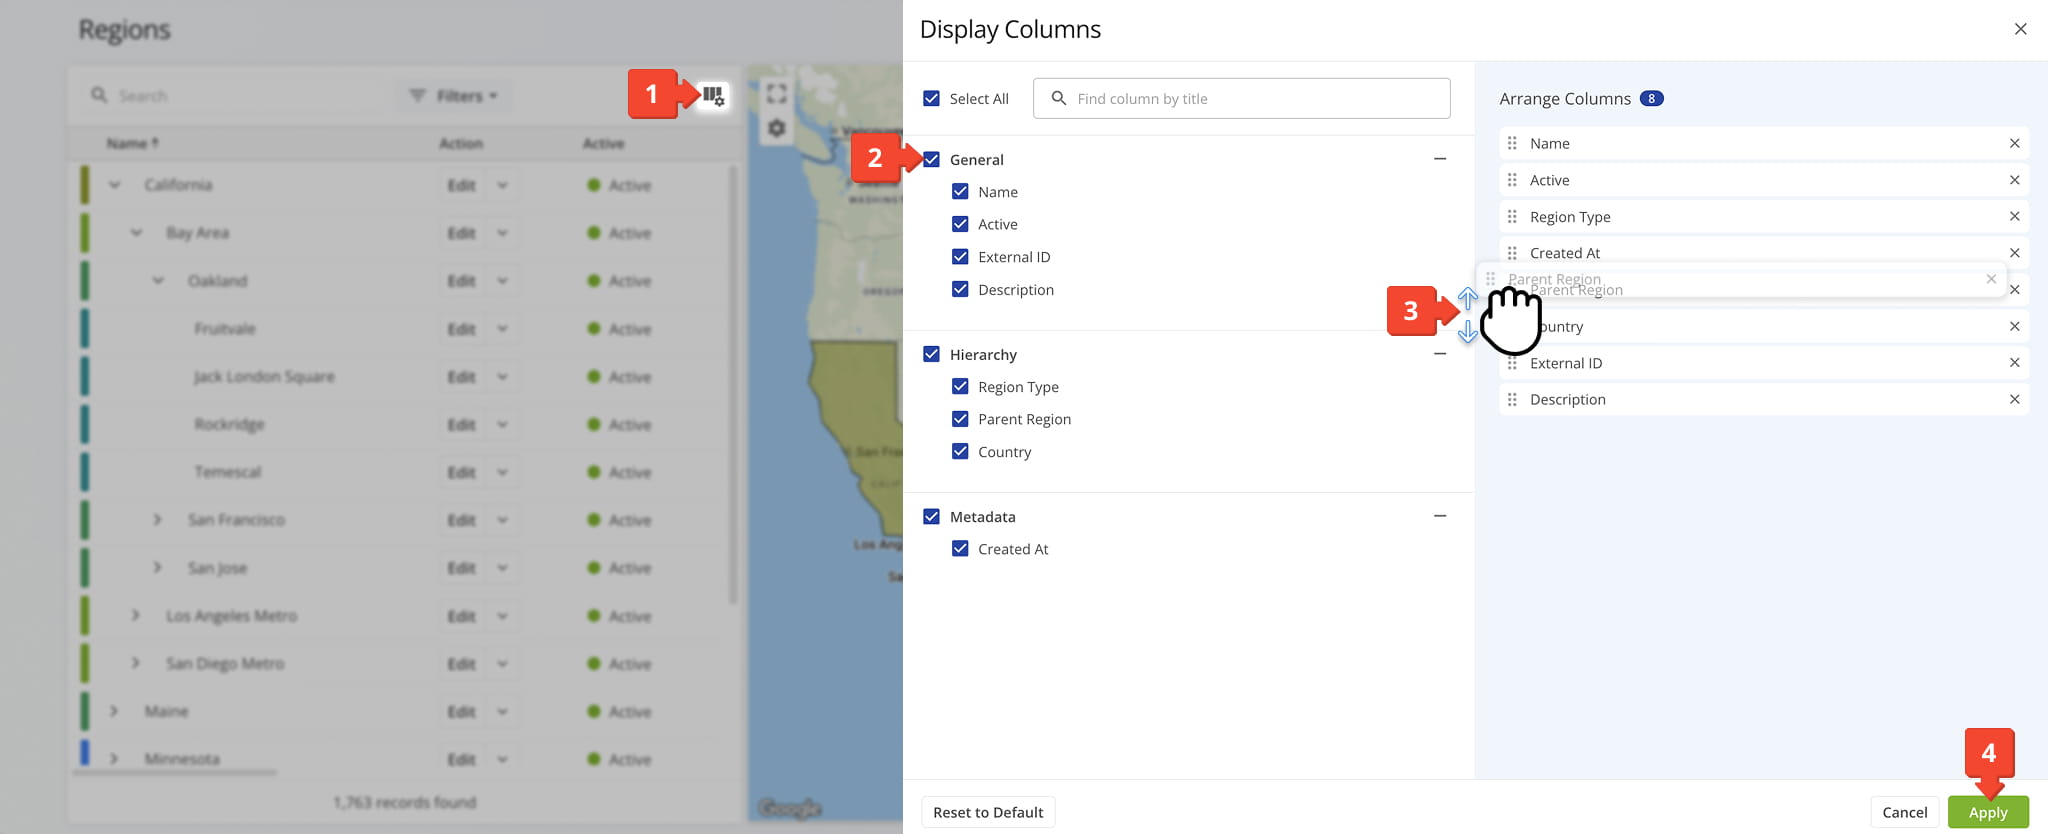
Customize Region Data Columns – Manage Data Table Layout
To view Regions data and customize the Data Table:
- Click the Columns Icon in the upper-right corner.
- Check the boxes next to the Data Columns you wish to view. Data Columns are described in the table below.
- Drag the Data Columns into your preferred order
- Click “Apply” to save.
Name
Displays the name of the Region.
Active
Displays whether the Region is currently active or inactive.
External ID
Displays the external identifier used to link the Region to a record in an external system.
Description
Displays any notes or context added about the Region.
Region Type
Displays the type assigned to the Region (e.g., county, market segment, metropolitan area, sales territory).
Parent Region
Displays the parent Region this Region is nested under within the hierarchy.
Country
Displays the country associated with the Region.
Created At
Displays the date and time the Region record was created.
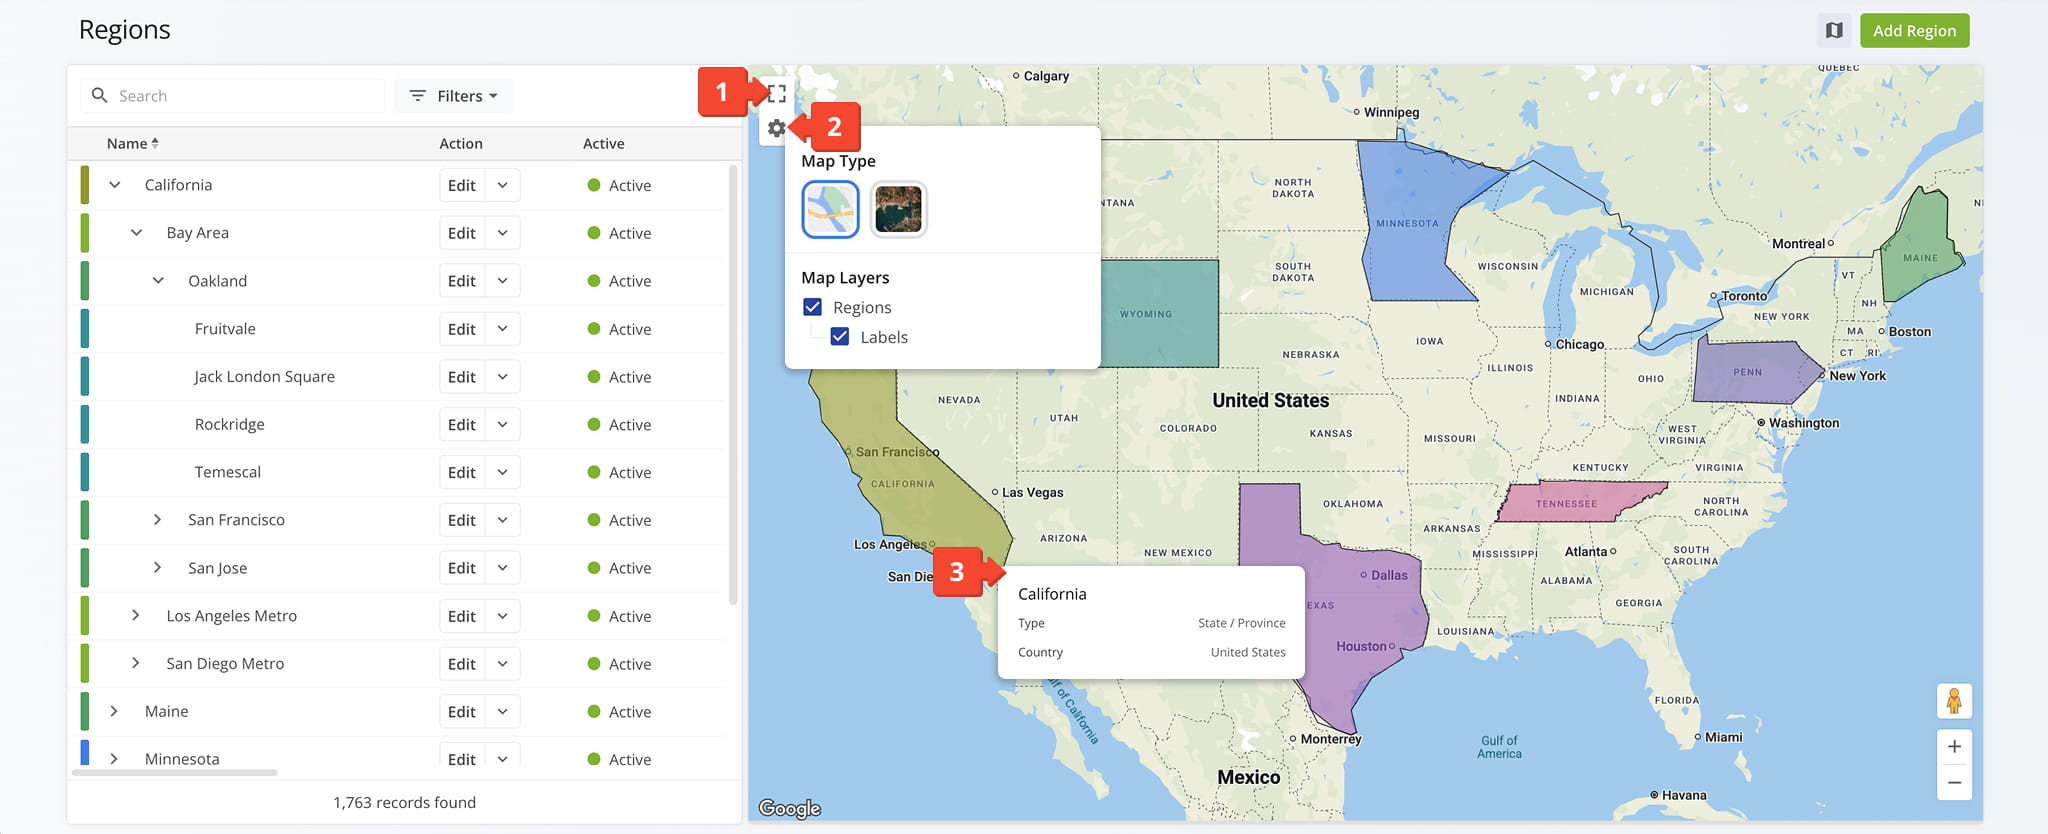
Visualize Regions On A Map – Explore Territories With The Regions Map
Click the Map Icon to open the Regions Map, from which you can:
- Click the Full Screen Icon to enlarge the Map View
- Click the Gear Icon to select the Map Type and Map Layers you wish to see.
– Select “Regions” to view color-coded territories. Top-Level Regions are shown by default. Click on a Sub-Region to display it instead.
– Select “Labels” to view details about the Top-Level Region (i.e., its associated Sub-Regions, ZIP codes, Regions Types, and more). - Right click on a Region to view additional details about it.
Visit Route4Me's Marketplace to Check out Associated Modules:
- Operations
Custom Data Add-On
- Operations
Advanced Team Management Add-On
About author: Daniel Archer
With a background in pedagogy and writing instruction, Daniel is a former tenured English Instructor who, after nearly 20 years of teaching, transitioned into content strategy and leading writing teams for global brands. Now, as Technical Documentation Manager at Route4Me, he translates complex logistics technology into clear, accessible content that empowers users.