
Orders Map Guide – Create And Manage Orders, Order Territories And Avoidance Zones On Interactive Map
Route4Me’s ERP Order Management and Routing Software enables medium and large last mile businesses to automatically import orders from CRMs and other systems, add, upload, scan, sort, and schedule millions of orders effortlessly. The integrated Orders Map provides a visual overview of all customer orders and enables you to seamlessly plan order routes. You can also use the interactive Orders Map to add orders directly from the map, create Order Territories, add Avoidance Zones, and more.
NOTE: Some features described in this guide may not be available on your account, depending on your account configuration. To enable or disable specific features, contact your Routing Expert or Route4Me’s Support Team.
Table of Contents
Orders Map Overview – Open And Navigate The Interactive Orders Map
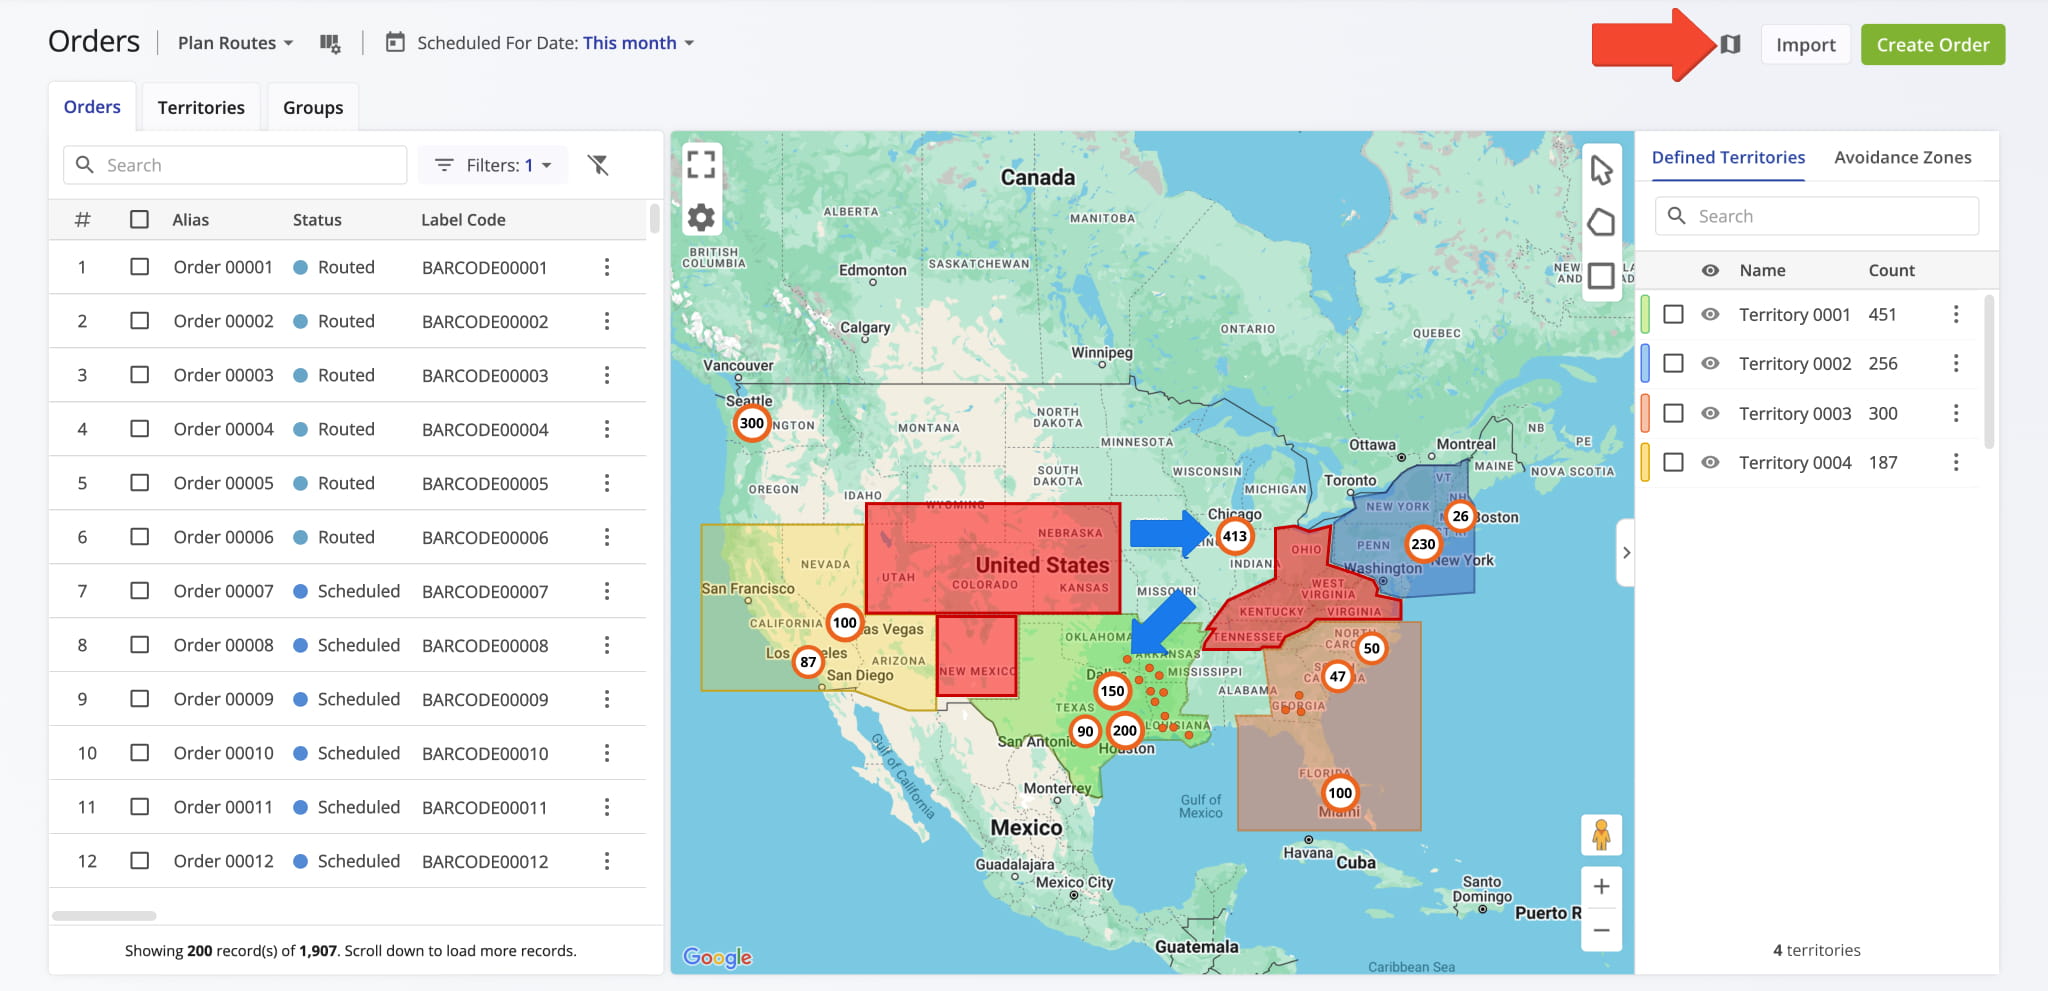
The interactive Orders Map is integrated into the Orders Page. To open it, go to “Business Operations” > “Orders” from the Navigation Menu, then click the Orders Map icon.
The map shows all orders visible on the Orders Page, along with any Order Territories and Avoidance Zones on your account. Individual orders appear as orange dots, while clusters appear as white circles labeled with the number of orders in each cluster.
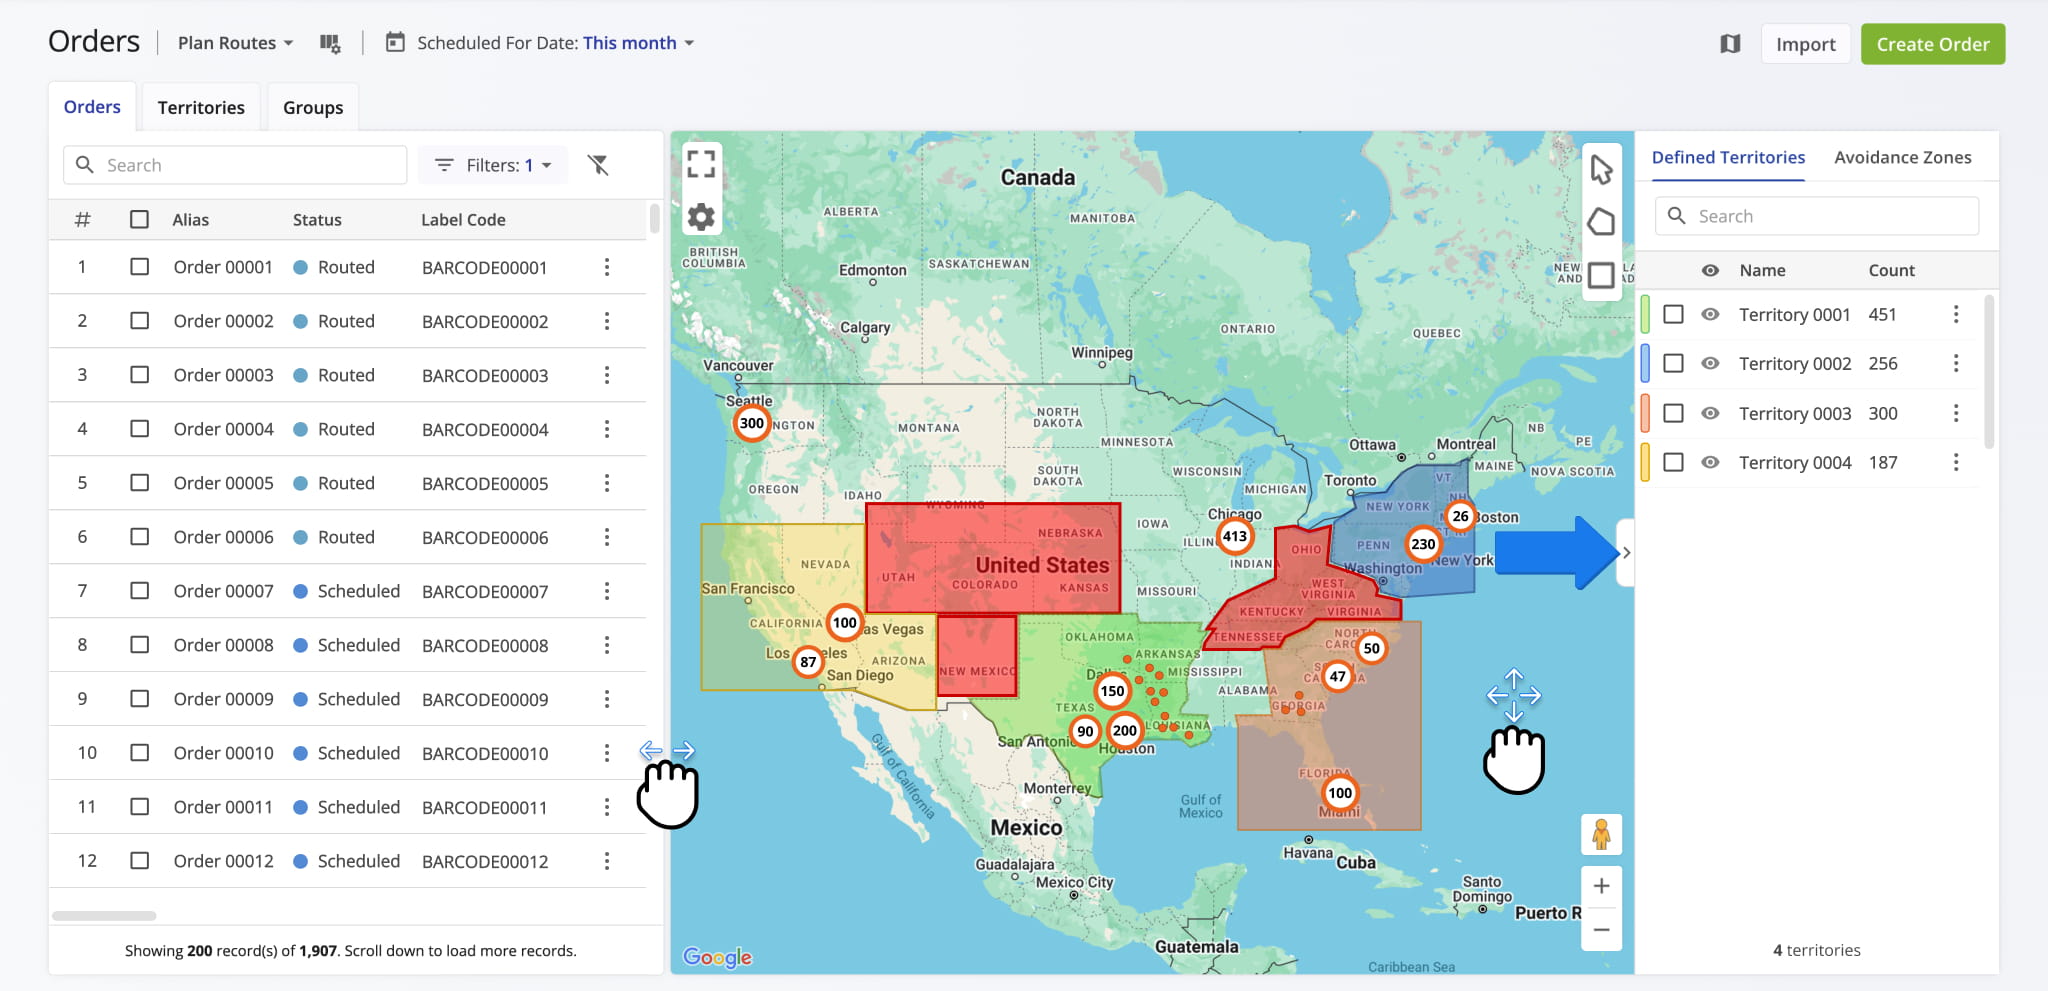
The Orders Map uses the same controls as Google Maps. You can click and drag to pan the map, or scroll or pinch to zoom.
You can also resize the map by dragging the divider between the map and the Orders Page. To hide the Territories and Avoidance Zones panel, click the arrow button next to it.
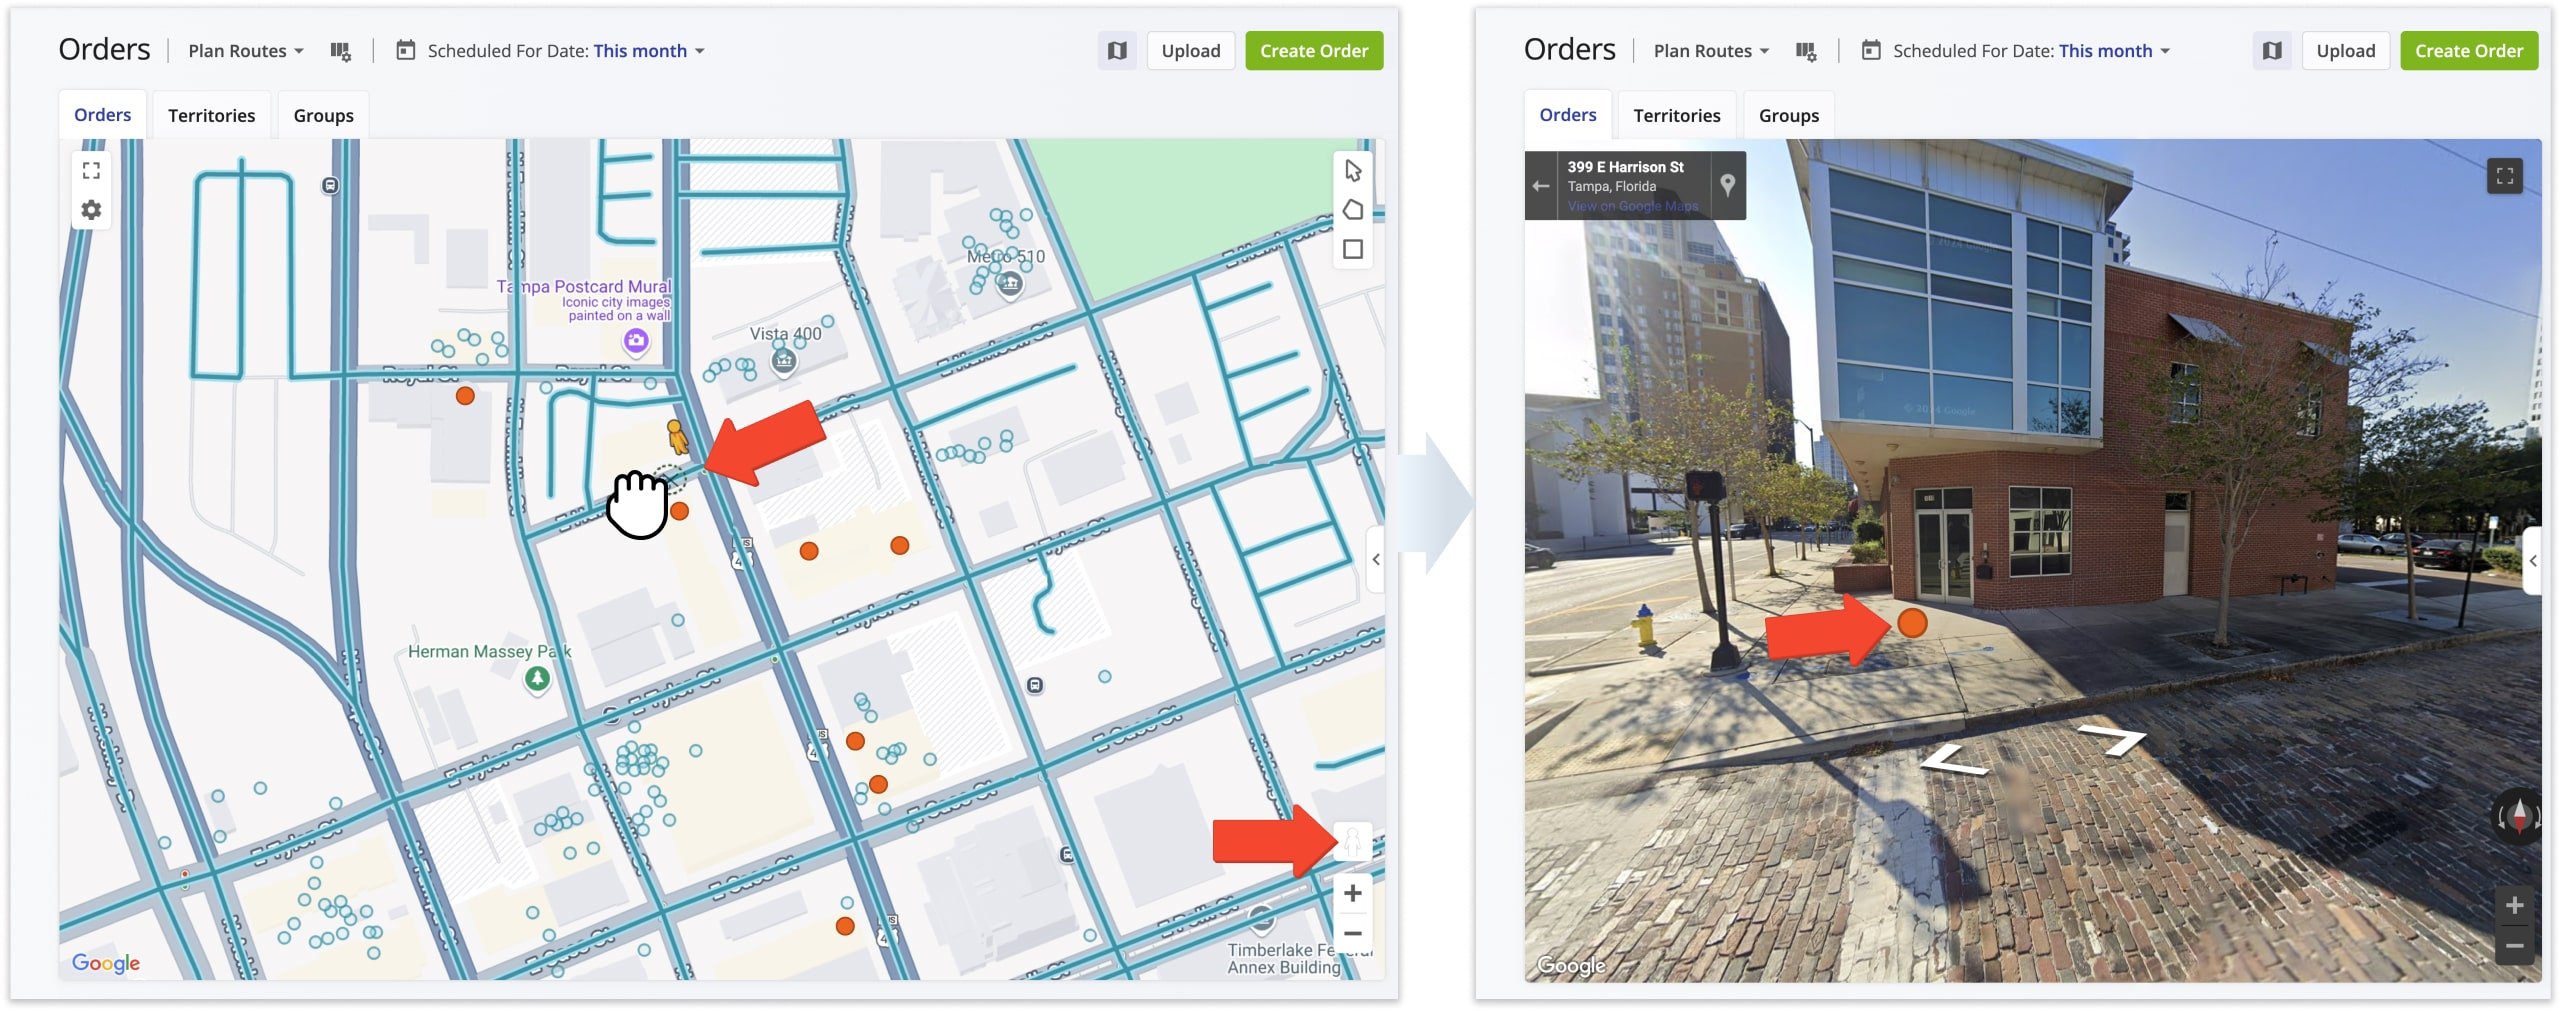
You can also use Google Street View to see the exact location of order destinations and check if any special considerations need to be made to complete customer orders.
Drag the Pegman (yellow person icon) onto the desired street to open Street View. The orange order marker will show the exact coordinates of the destination.
Add Orders – Create New Orders From Interactive Orders Map
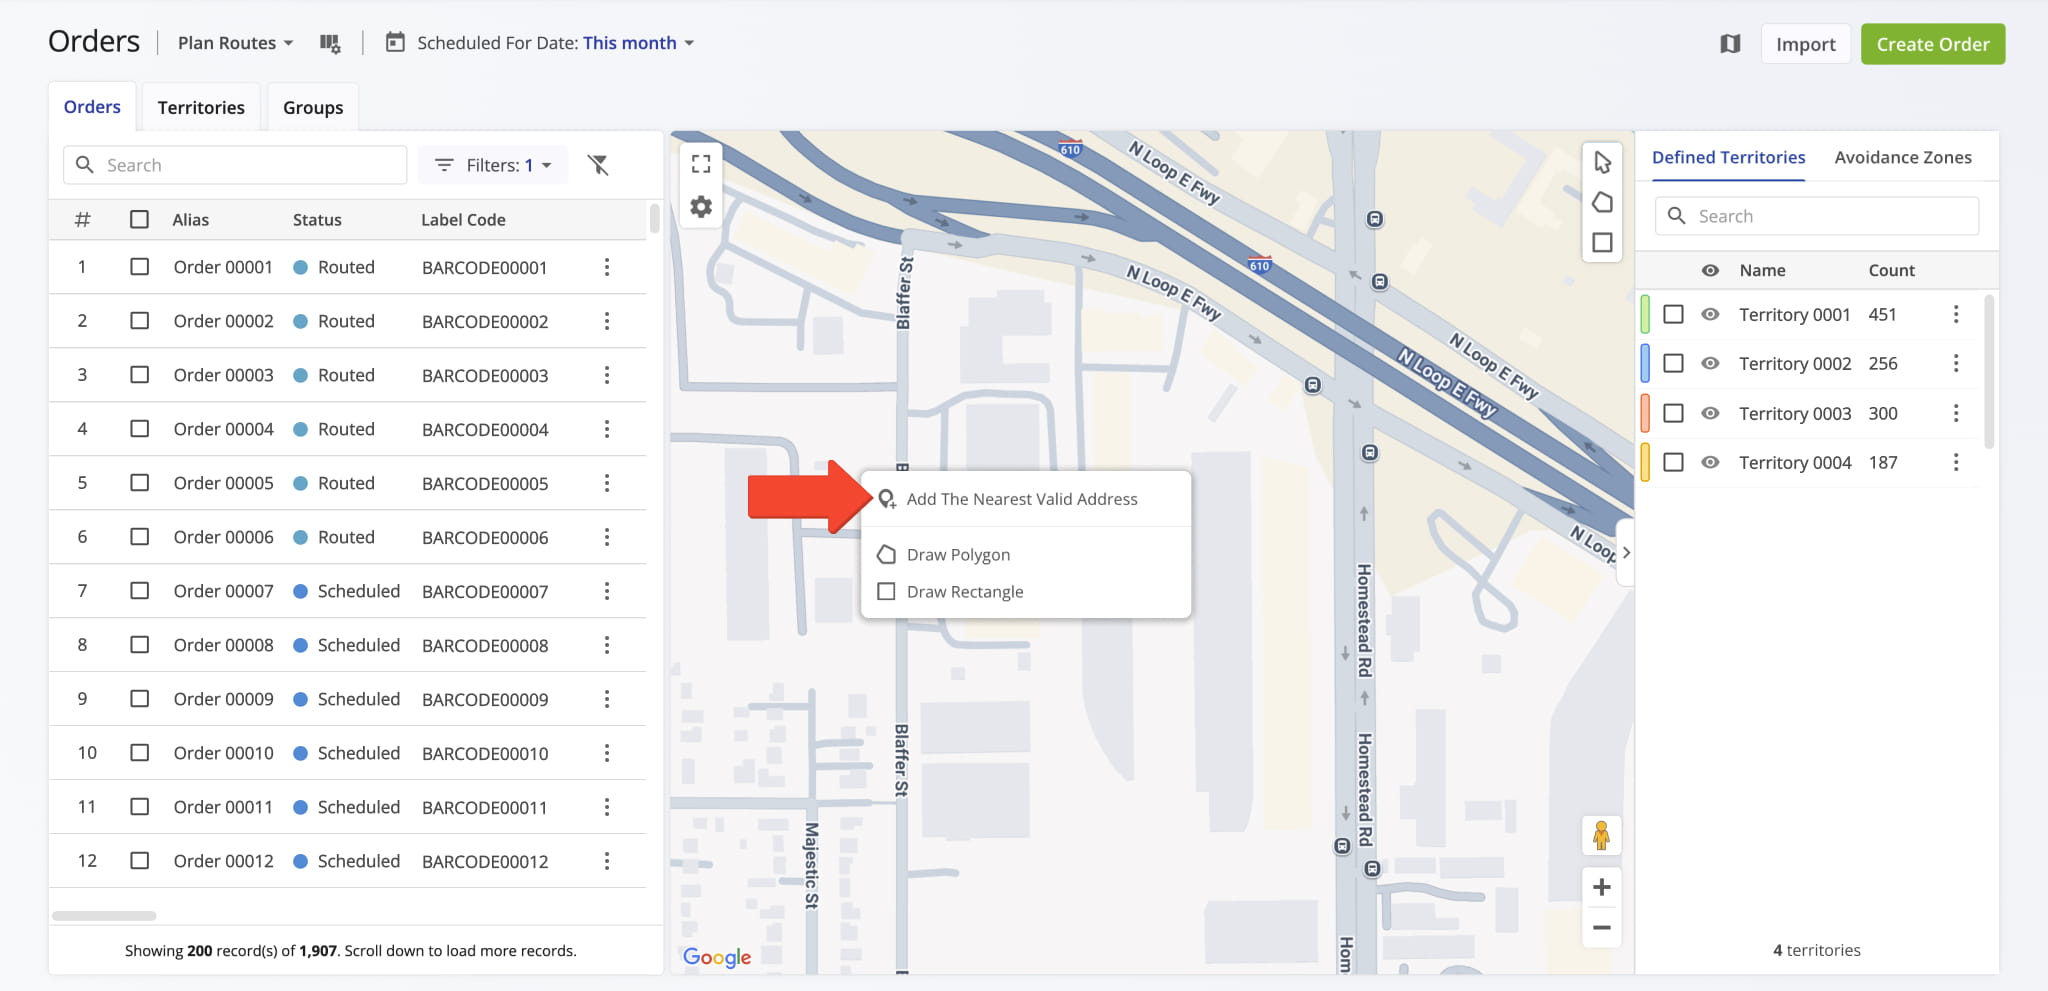
The interactive map not only provides a visual overview of customer orders but also lets you create new ones directly. Right-click near the desired address and select “Add The Nearest Valid Address“. This opens the Create Order window.
Enter the address, order details, and other requested information. By default, the current date is entered in the Scheduled For field, but can be adjusted. All orders added from the map are automatically assigned the Scheduled status.
NOTE: Learn more about creating orders with Route4Me’s enterprise routing software.
Filter And Sort Order To Display On The Orders Map
The Orders Map displays only the orders that match your Orders Page filters and view modes.
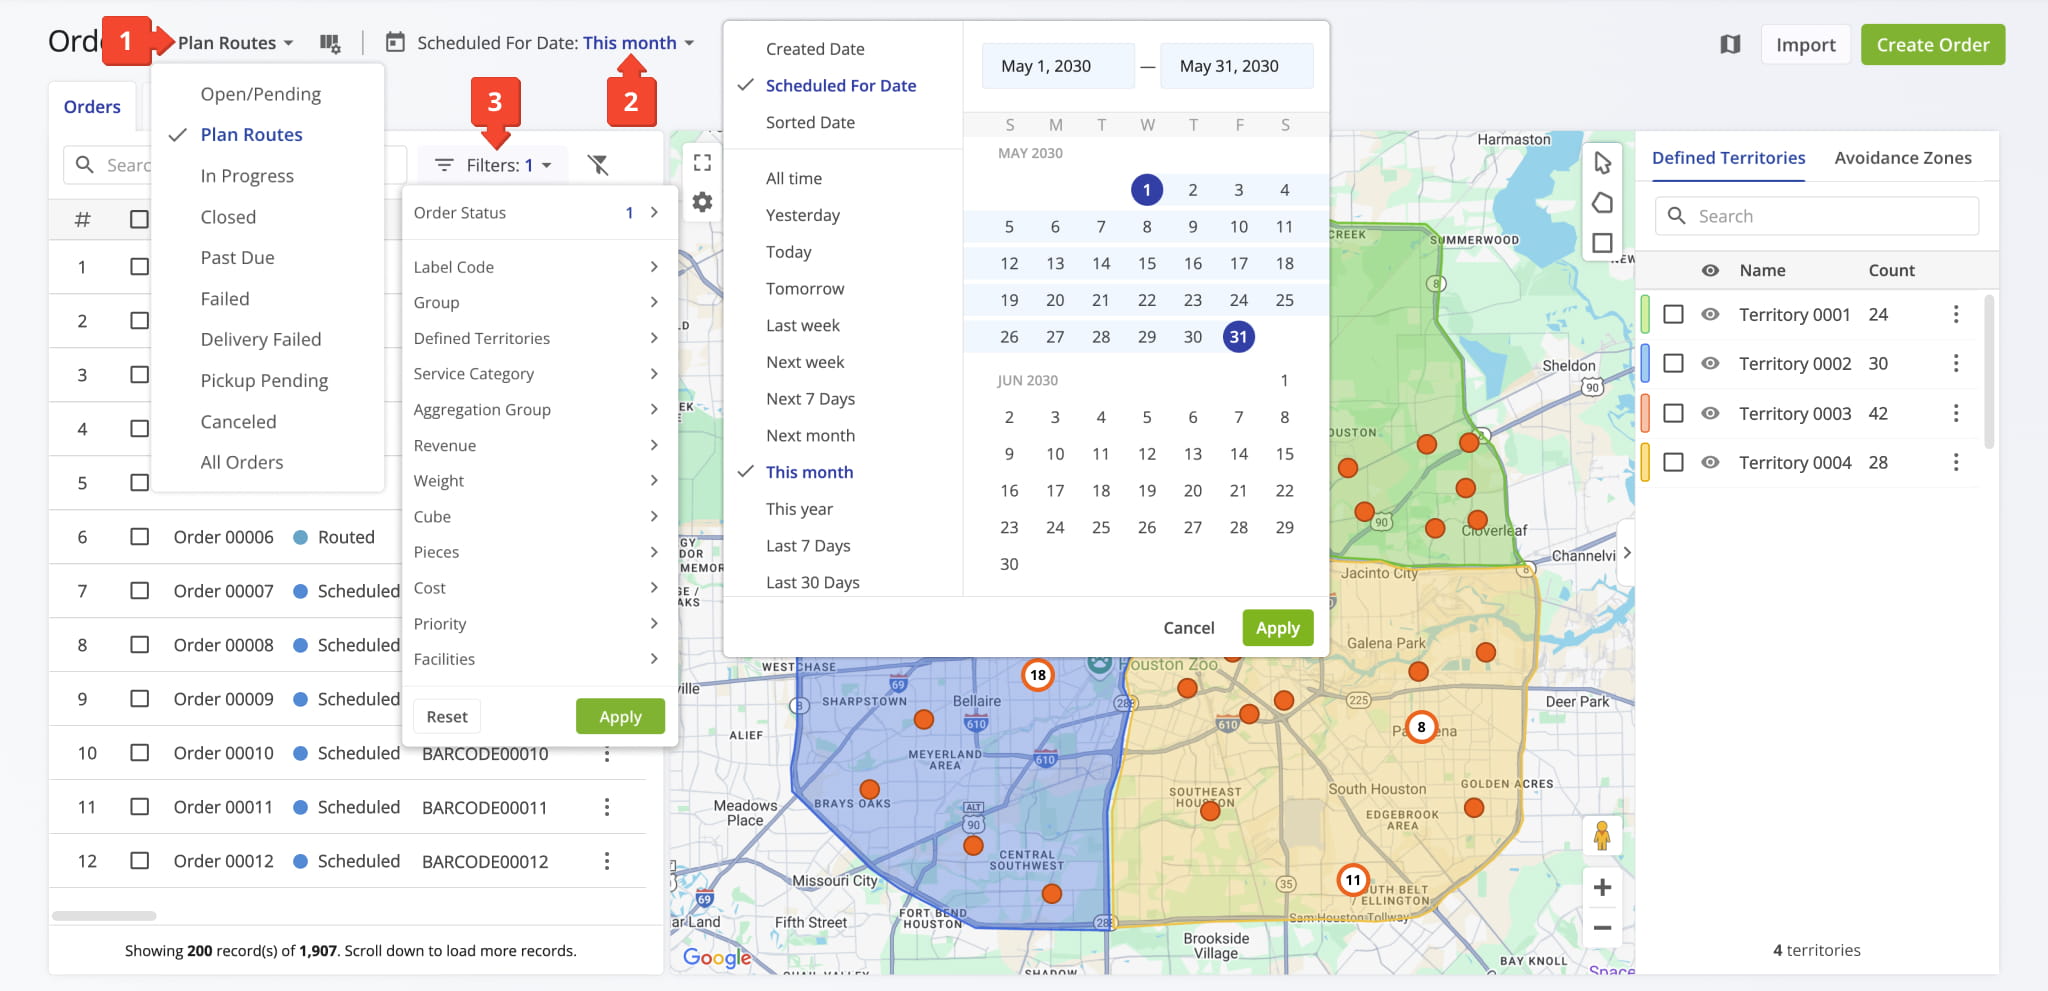
Filters can include address, scheduled date, customer name, email, or label code. View Modes group order statuses by purpose. For example, the “Plan Routes” mode shows orders available for planning order routes or insertion into existing routes.
To filter orders:
- Click “Plan Routes” above the Orders List and select a View Mode.
- Click “Scheduled For Date” and choose the desired date range type and range.
- Click “Filters” and apply filters based on specific order attributes or details.
Orders List - Filter Options
Create And Manage Order Territories On The Orders Map
You can also create and manage Order Territories on the Orders Map:
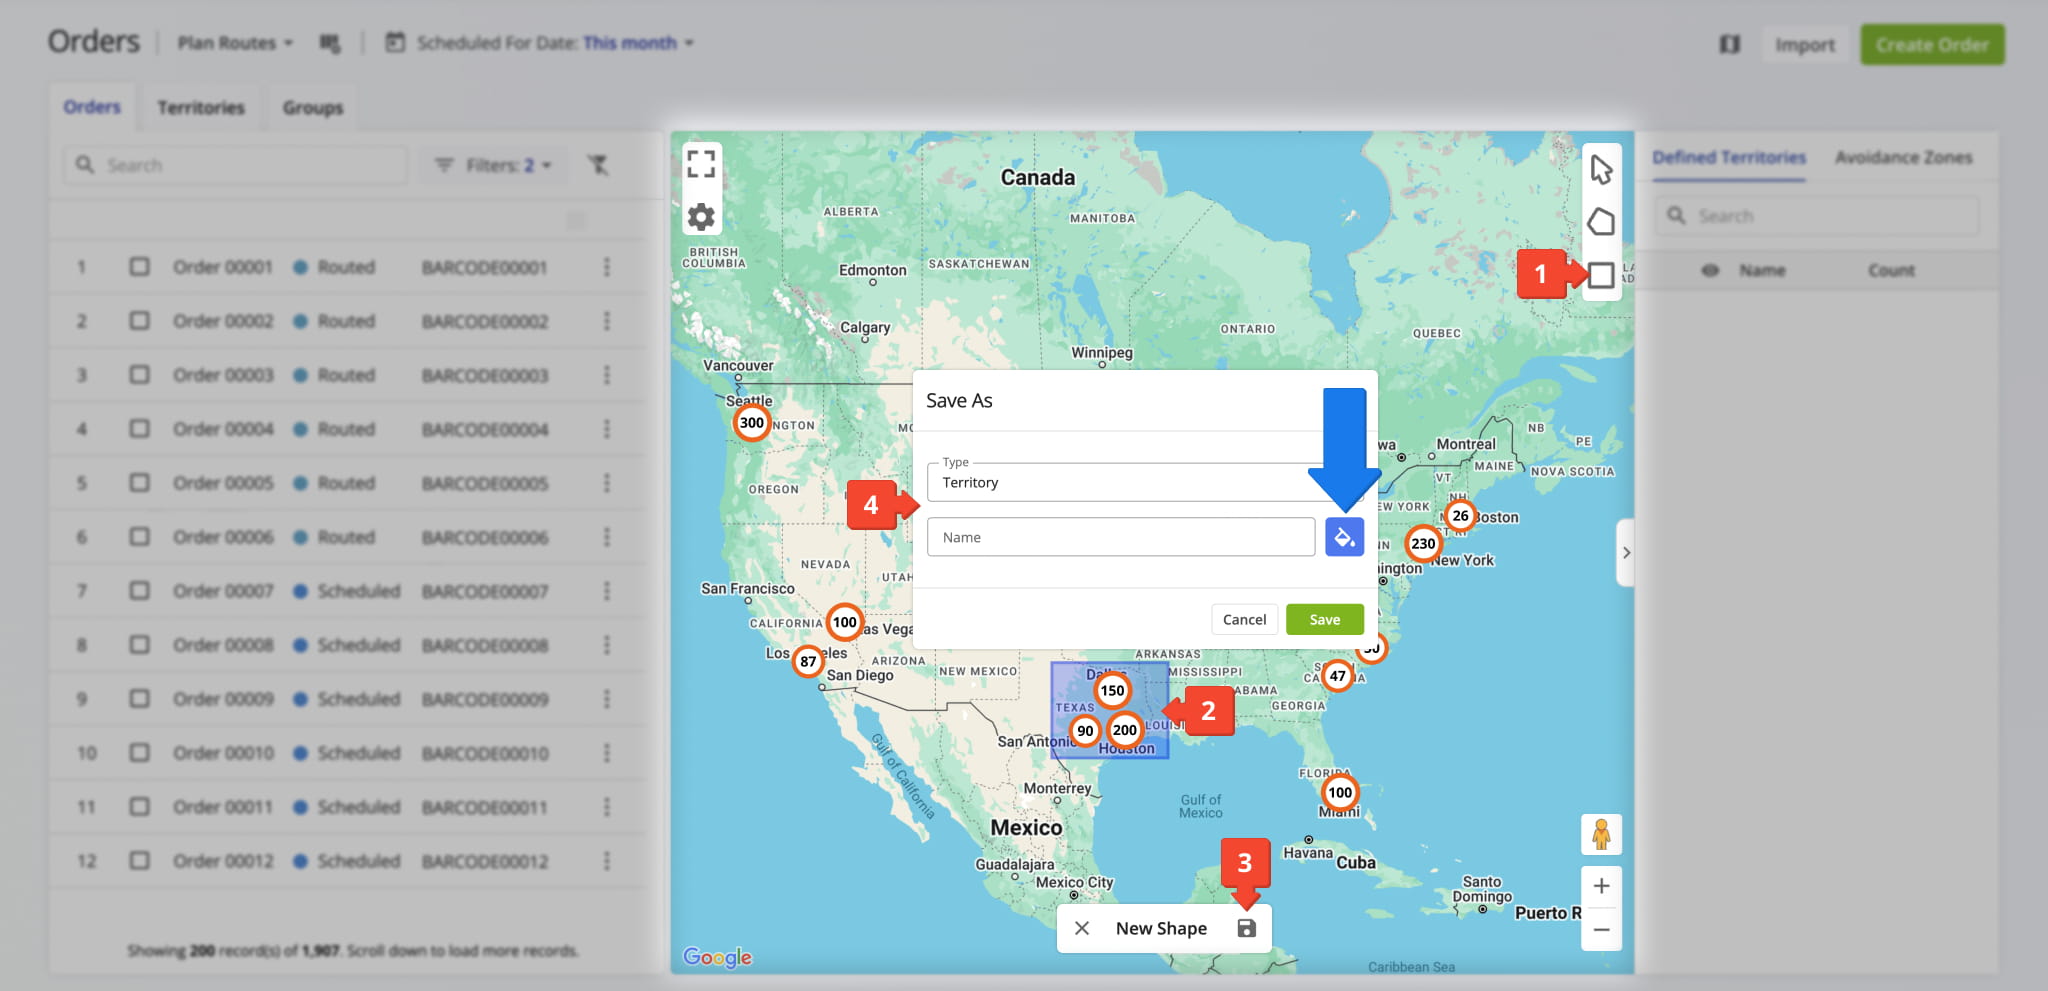
- Click the Draw Polygon or Draw Rectangle button in the top-right corner of the map, or right-click the map and choose a shape option.
- Click and drag to draw a rectangle, or click to add points for a polygon.
- When finished, click the Save icon next to “New Shape“.
- Select “Territory” in the “Type” field, enter a unique name in the “Name” field, and use the Paint Bucket button to choose a color. Click Save to create the territory.
The territory name can be searched in the Territories and Avoidance Zones panel. All orders within the territory will be associated with it and can be used for territory-based route planning if they have the appropriate statuses.
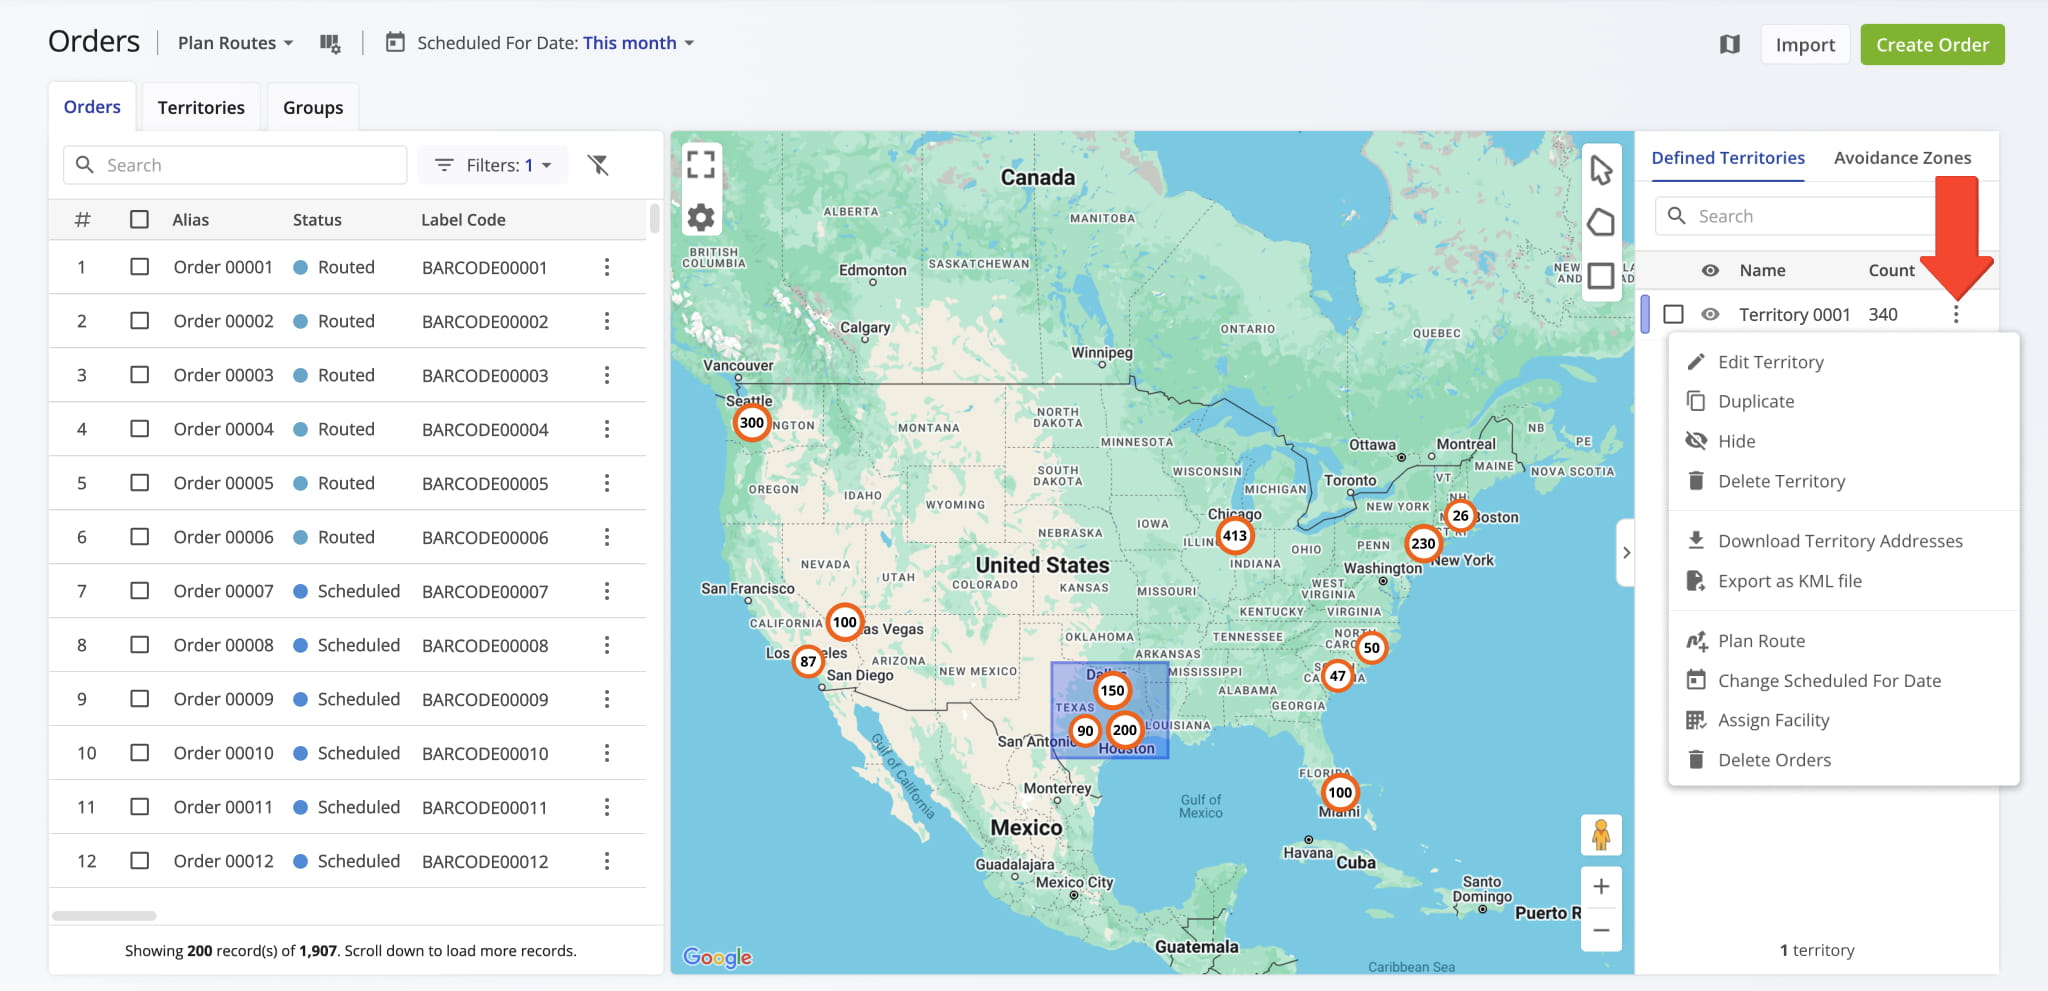
To manage a territory, click the Three-dot Icon next to it or right-click the territory on the map and choose an option from the menu. To manage multiple territories, check their boxes in the list, click “Bulk Actions” and choose an option.
More details on managing Order Territories on the Orders Map are provided below.
Territory Management Actions
Create And Manage Avoidance Zones On The Orders Map
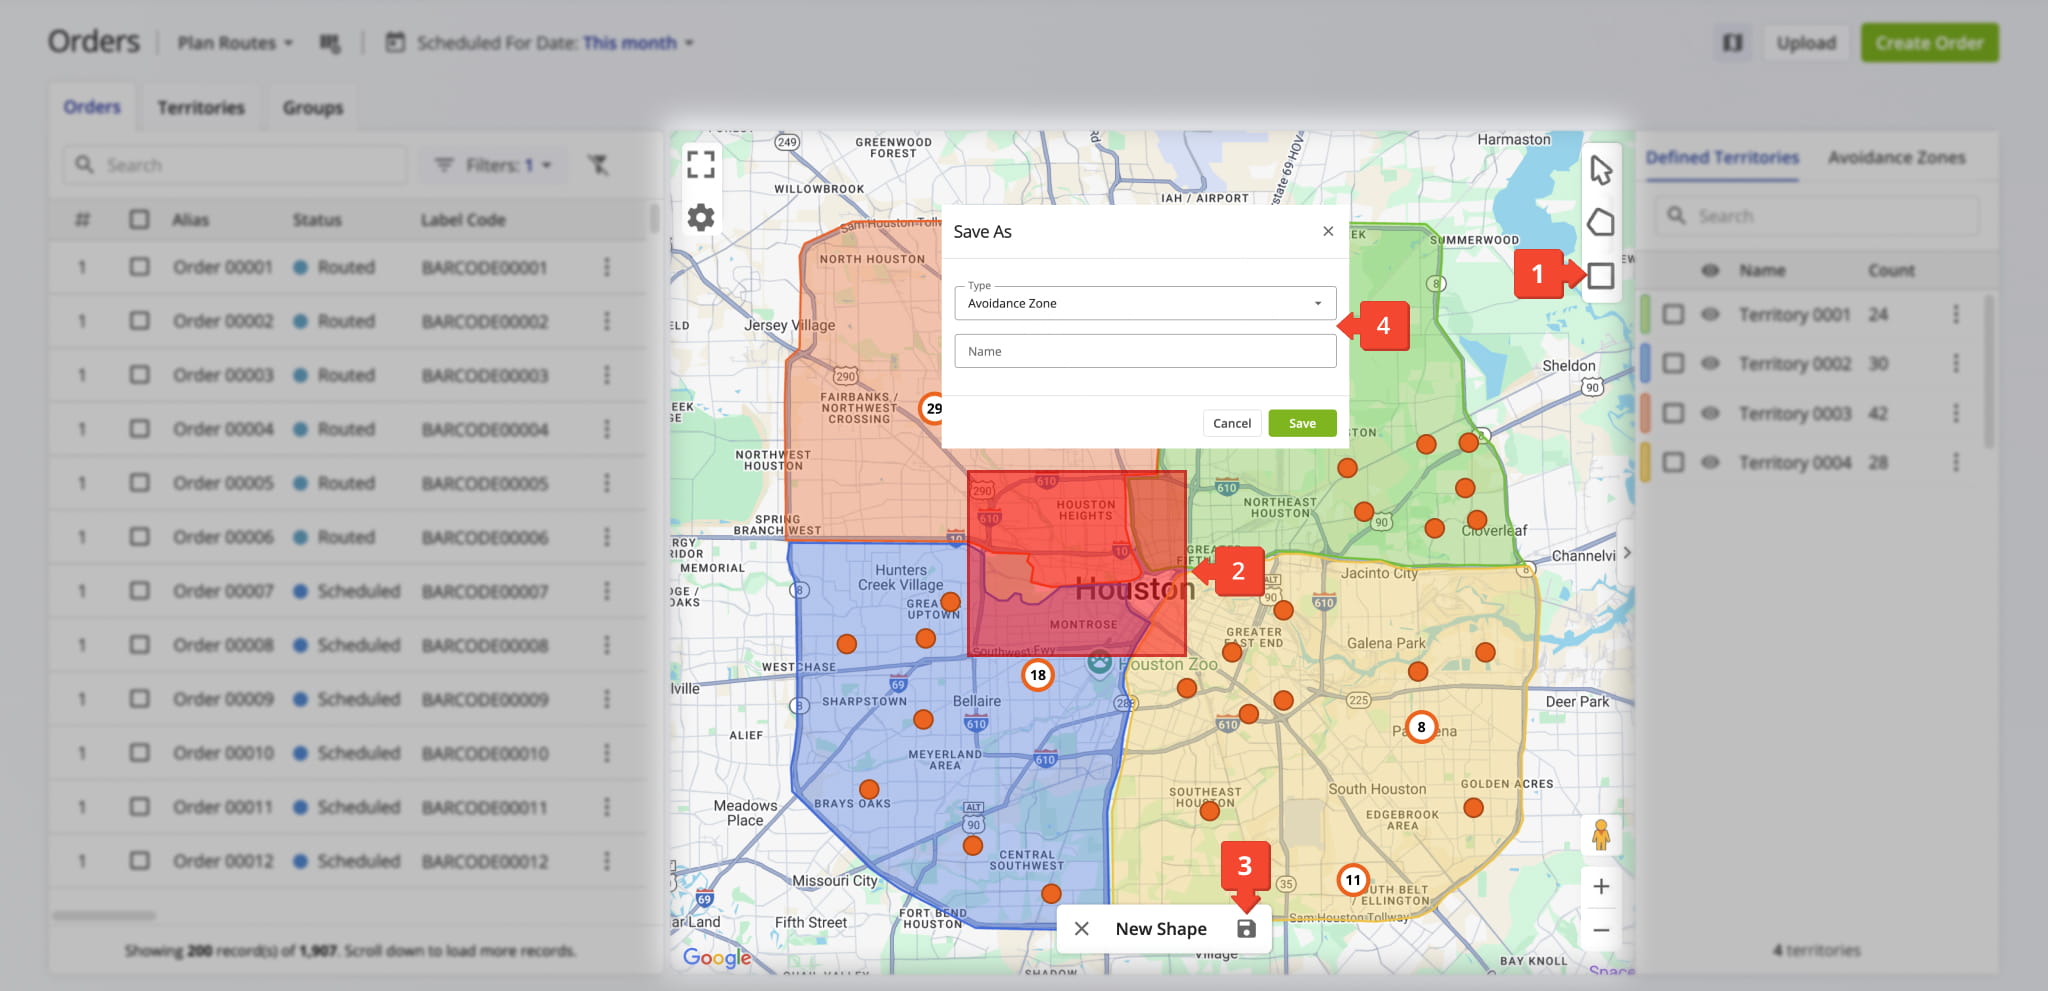
You can also create and manage Avoidance Zones directly on the Orders Map:
- Click the Draw Polygon or Draw Rectangle button in the top-right corner of the map, or right-click the map and choose a shape option.
- Click and drag to draw a rectangle, or click to add points for a polygon.
- When finished, click the Save icon next to “New Shape“.
- Select “Avoidance Zone” in the Type field, enter a unique name in the Name field, and click “Save“.
You can search for zones by name in the “Territories” and “Avoidance Zones” panel. NOTE: Avoidance Zones are excluded from route planning. Orders within these zones will not be included in planned routes.
To manage an Avoidance Zone, click the Three-dot Icon next to it or right-click the zone on the map and select an option from the menu. To delete multiple zones, check their boxes, then choose “Delete Selected Avoidance Zones” from “Bulk Actions“.
The table below describes all available Avoidance Zone management options.
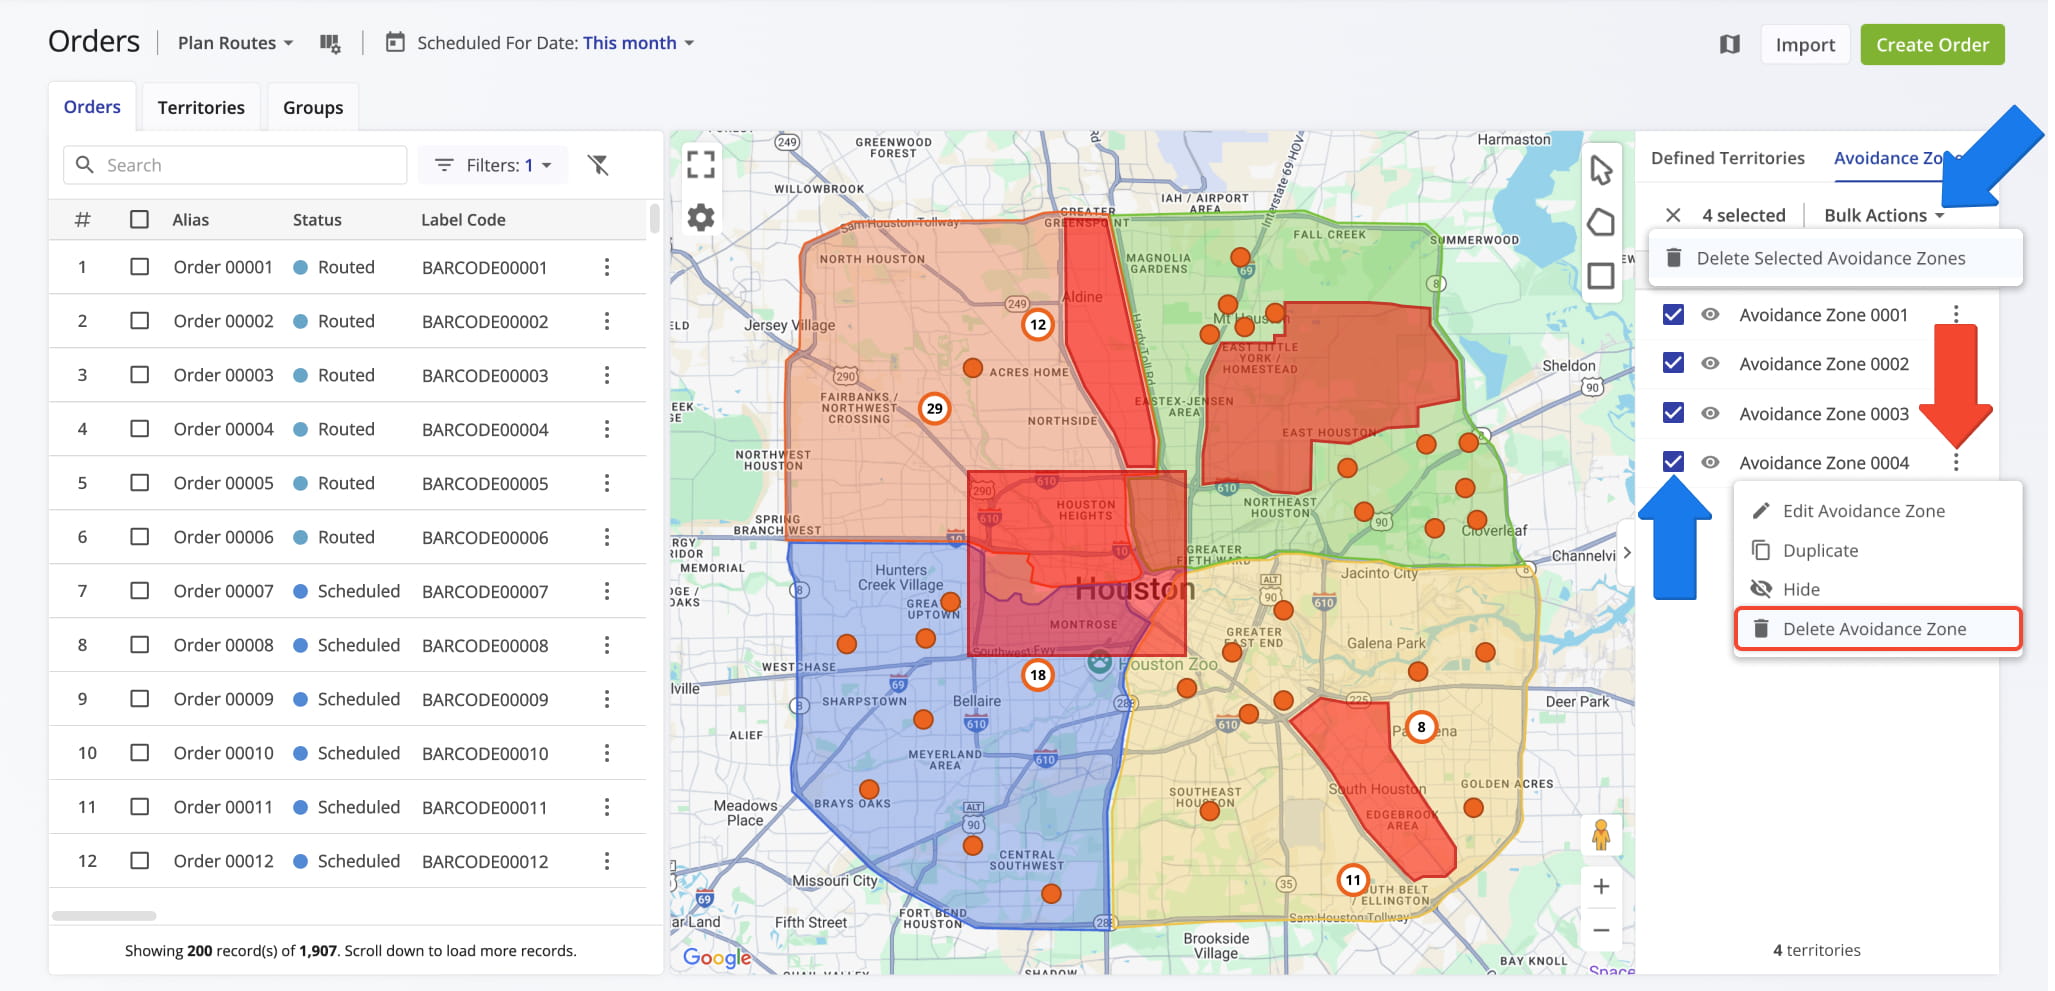
Avoidance Zones Management Actions
Plan Routes With Customer Orders On The Route Planning Orders Map
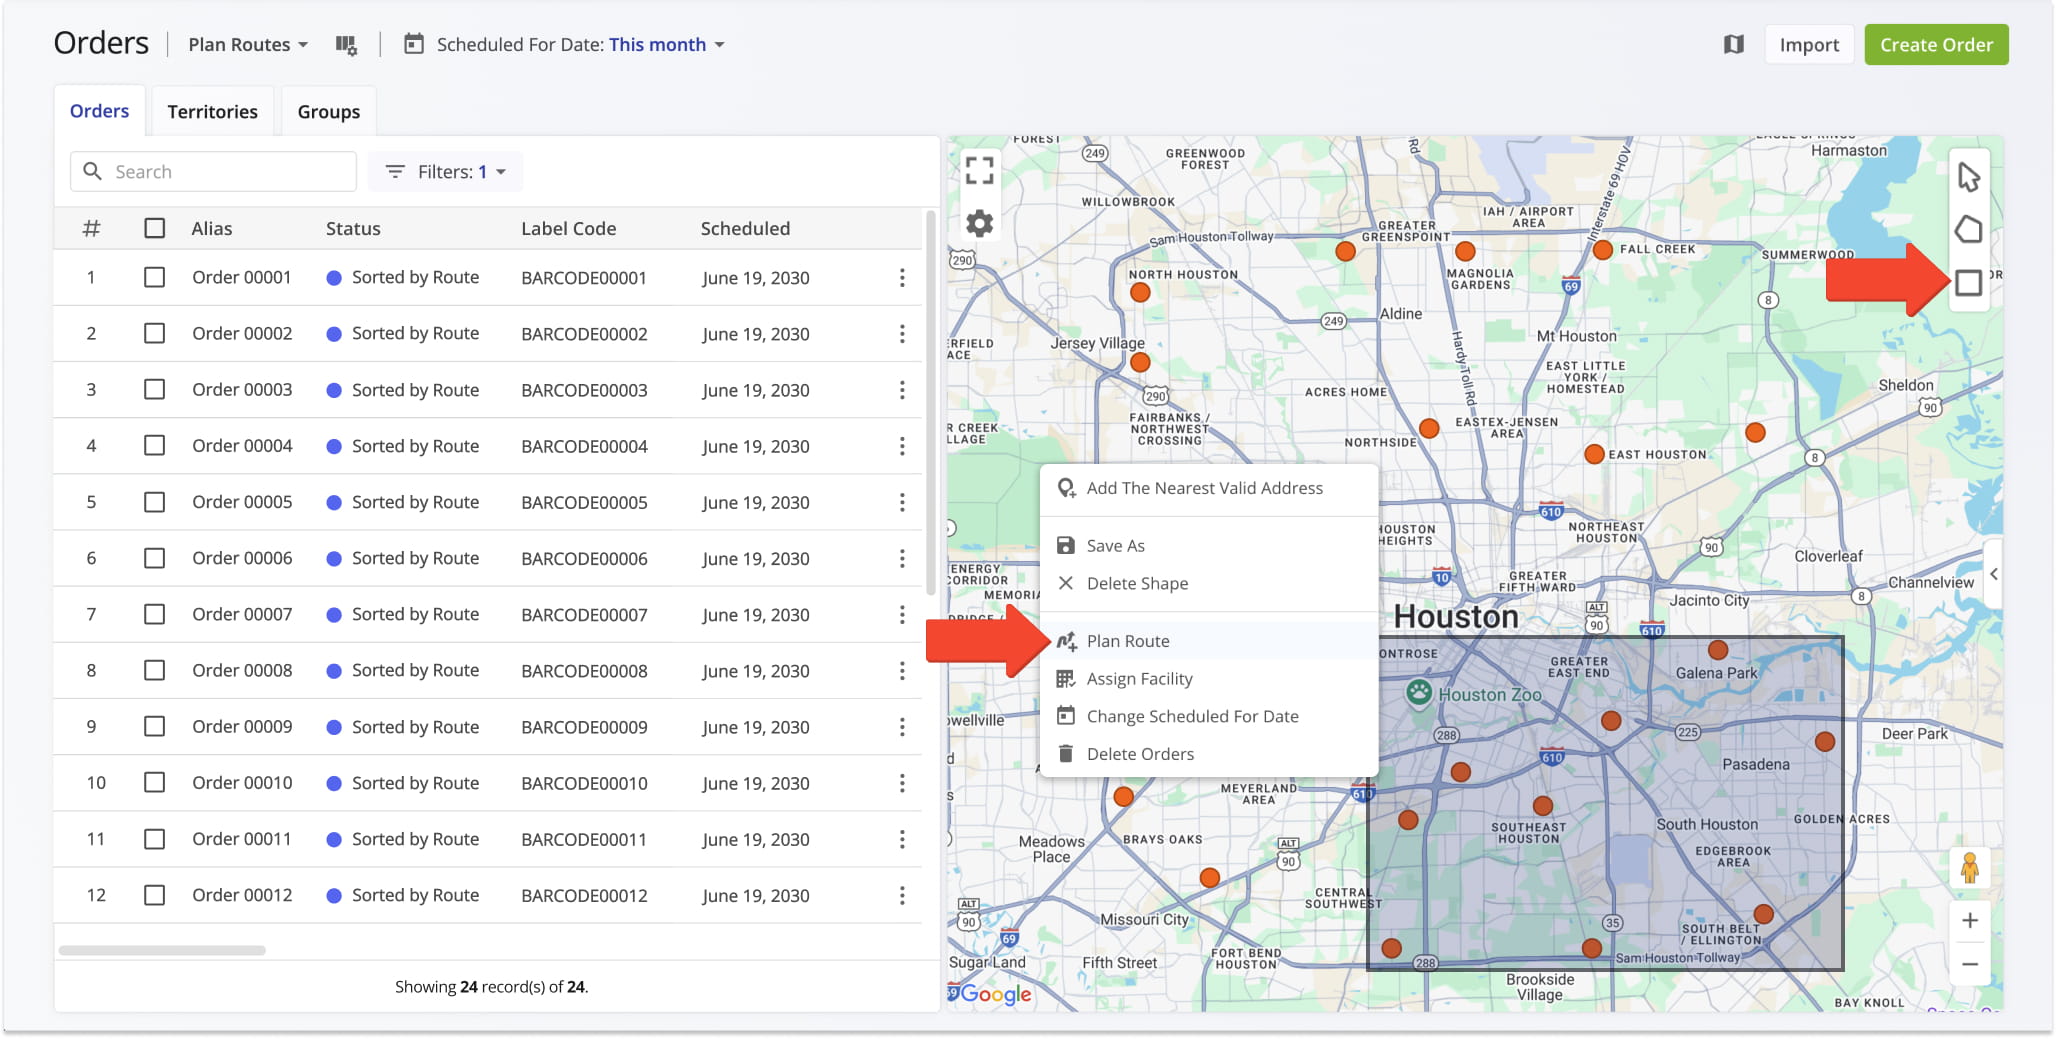
You can plan order routes directly on the map. Start by clicking the Draw Polygon or Draw Rectangle button in the top-right corner, or right-click the map and choose a shape option.
Draw a shape around the orders you want to include, then right-click the shape and select “Plan Route“. The Route Planning screen will open and automatically import the selected orders into a new route.
Manage Orders From Route4Me’s Interactive Orders Map
You can also directly manage orders from your dynamic Orders Map. Right-click any order on the map and select the preferred option from the menu, detailed in the table below.
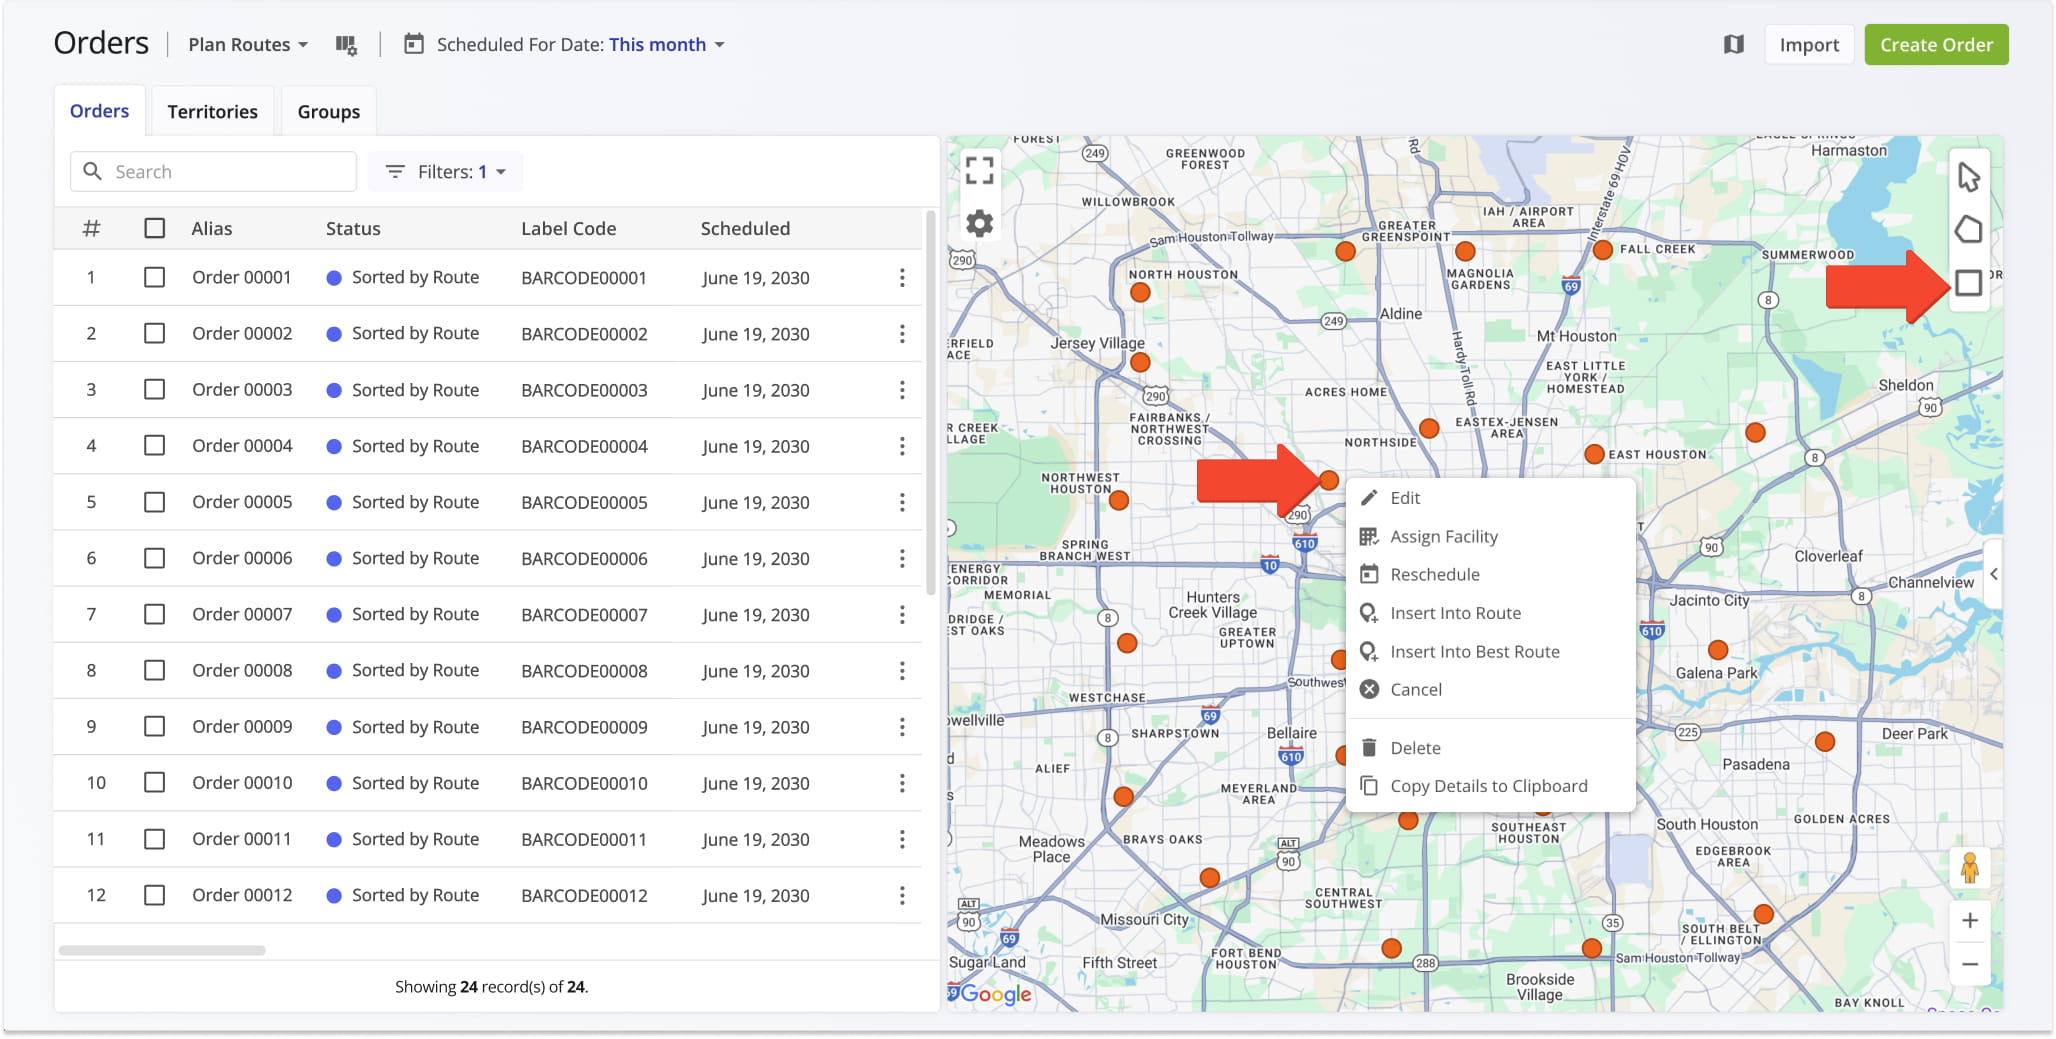
Order Management Actions
To manage multiple orders, click the Draw Polygon or Draw Rectangle button in the top-right corner of the Orders Map, or right-click the map and choose a shape option.
Draw a shape around the orders you want to manage, then right-click the shape and select an option from the menu. The table below lists the available multiple-order management options.
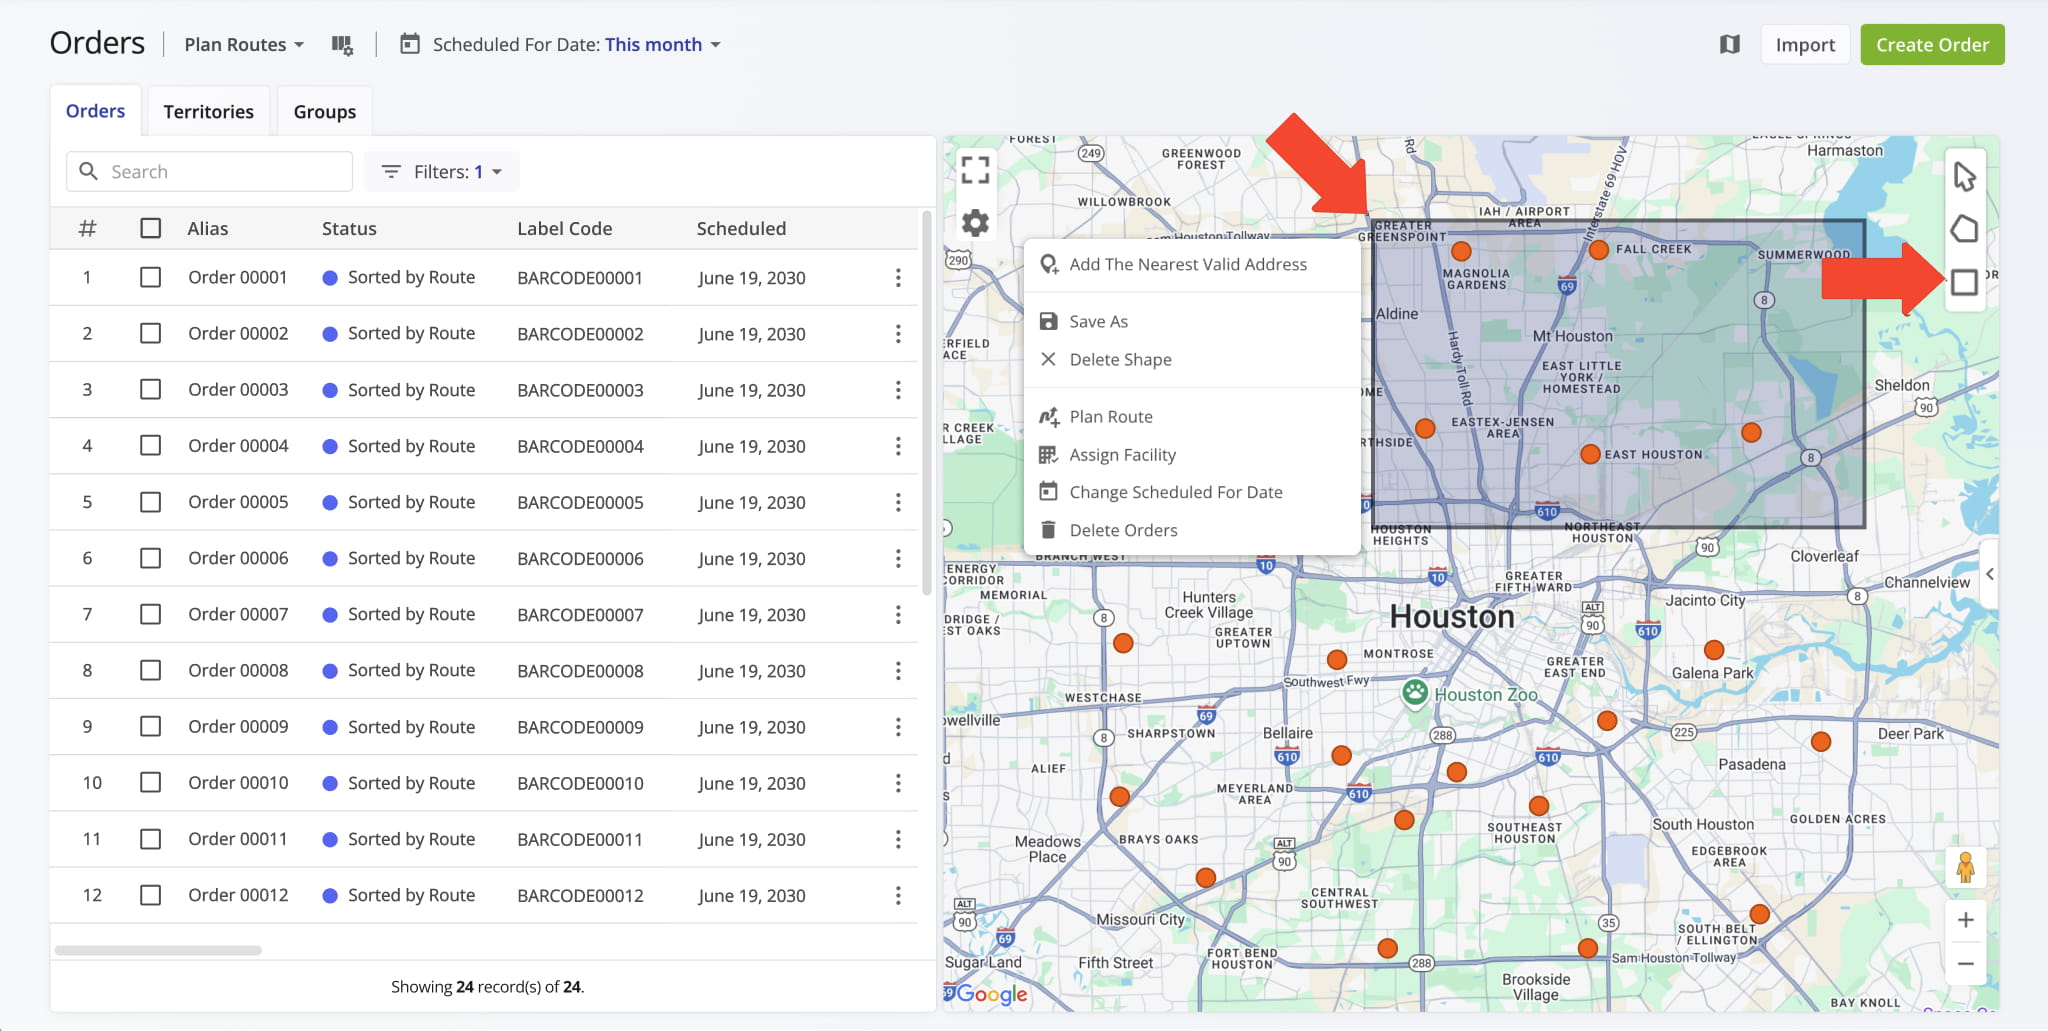
Multi-Order Management Actions
Orders Map Settings – Map View Modes, Order Clustering And More
You can also adjust map settings on the Orders Map. Click the Gear Icon in the top-left corner to open the Map Settings menu, where you can change view modes and enable map layers. The table below describes the available Map Settings options.
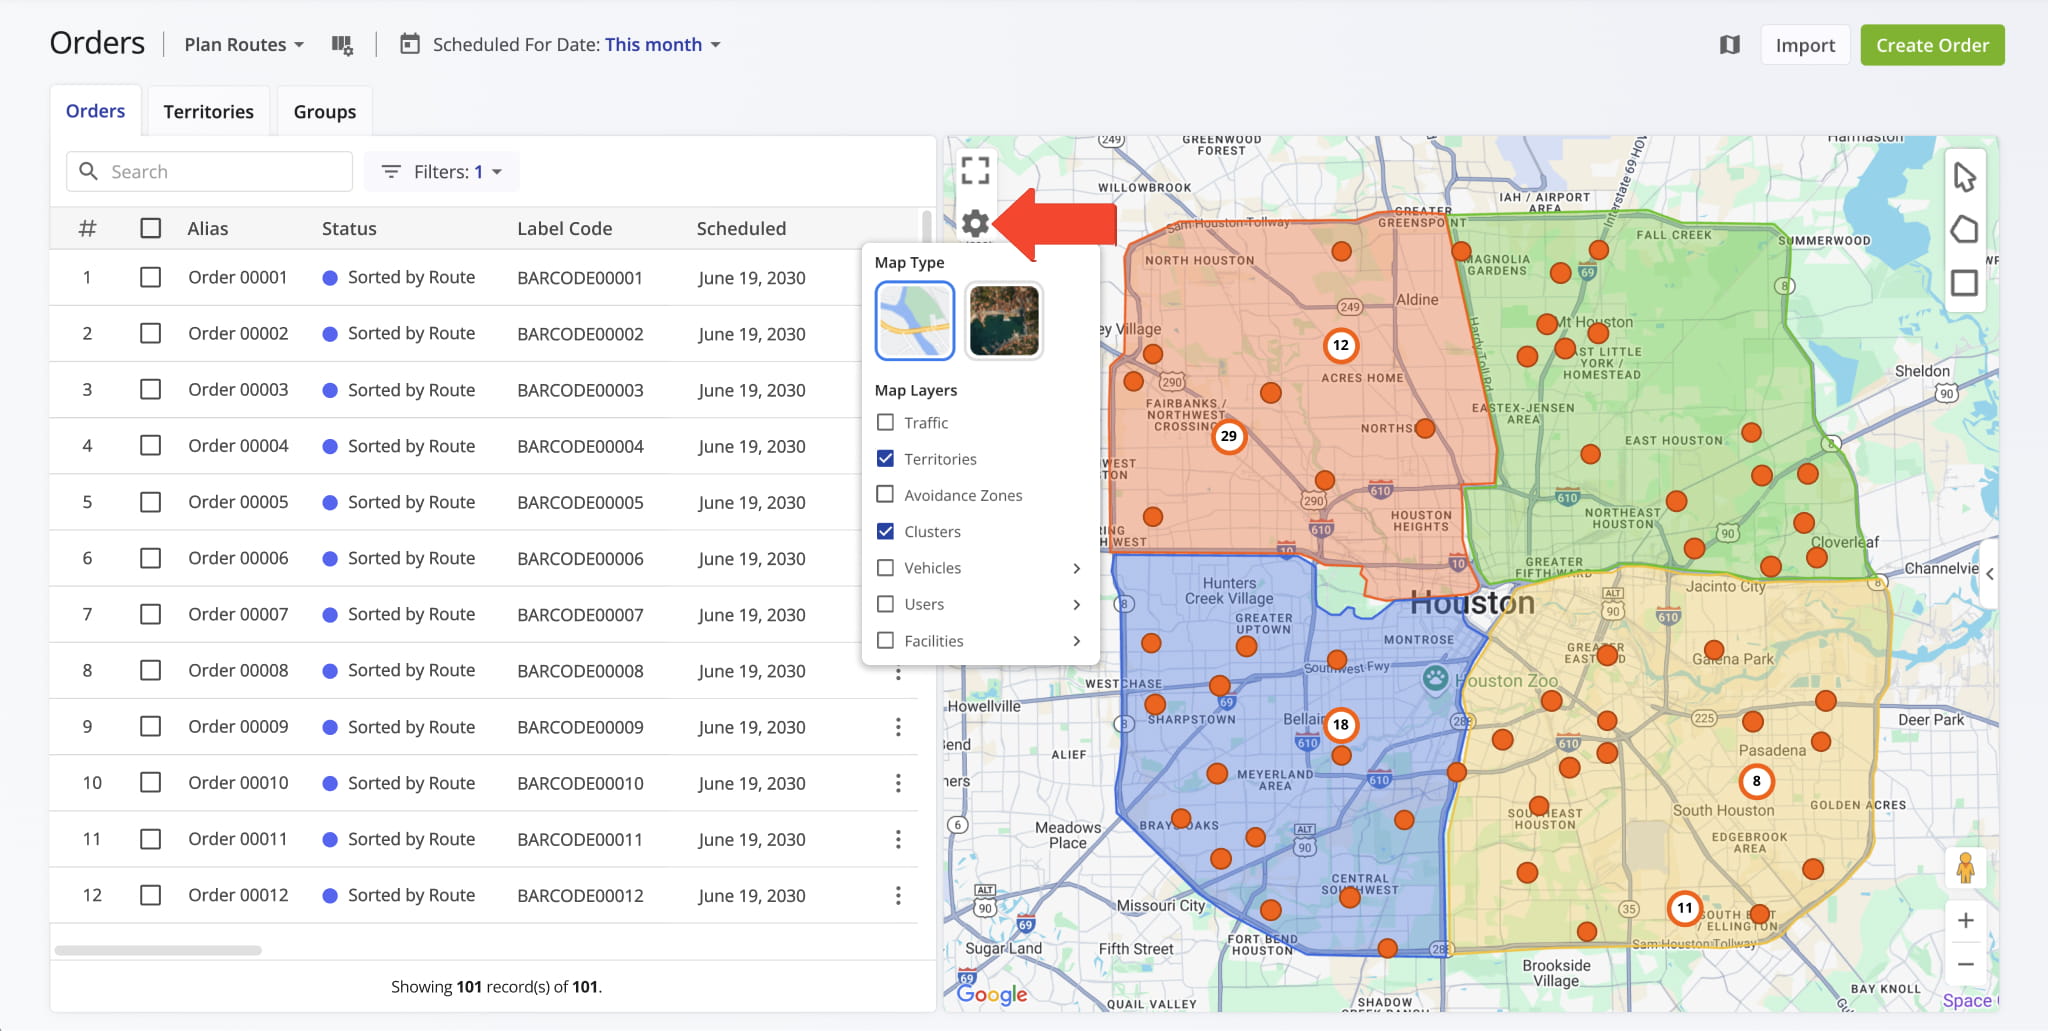
Orders Map Settings
Visit Route4Me's Marketplace to Check out Associated Modules:
- Operations
Advanced Team Management Add-On
- Operations
Custom Data Add-On
About author: Kristian Andreev

