
Telematics Integrations – Import Vehicles And Connect GPS Vehicles From Telematics Vendors (Telematics Gateway)
With Route4Me’s final mile routing optimization and fleet management software, you can manage cars, vans, trucks, trailers, semis, heavy equipment, and more. You can add vehicle parameters, track GPS vehicles in real time, view tracking history, and dispatch routes across your fleet. In addition to manually adding vehicles, Route4Me lets you connect telematics vehicles from supported vendors. These include Verizon Connect, Geotab, Samsara, Azuga, Fleet Complete, and many others. In this guide, you’ll learn how to set up telematics connections, import and link vehicles, dispatch routes, and manage vehicles manually.
Table of Contents
Add And Manage Route4Me Telematics Connections
Open Your Telematics Connections
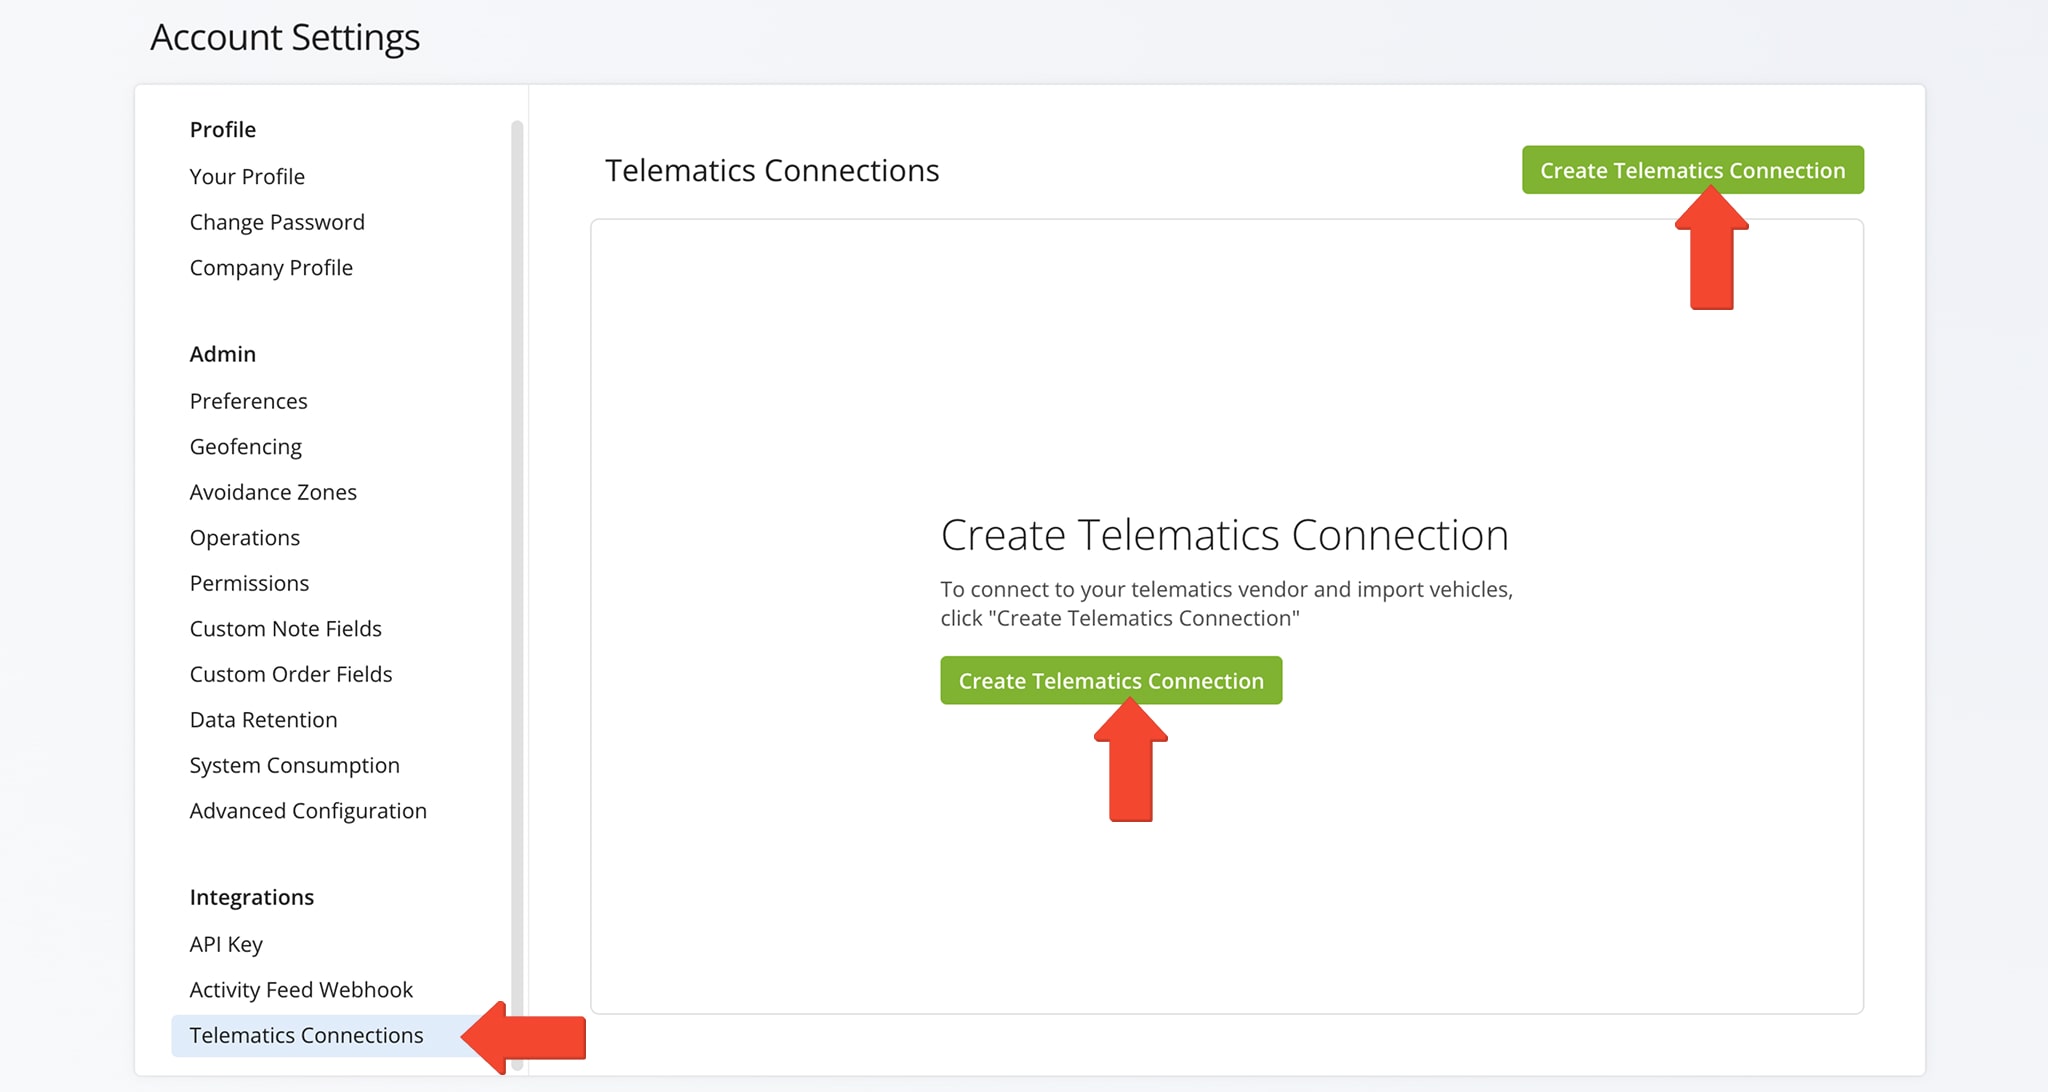
To add a telematics connection in Route4Me, go to “Settings” > “Organization Settings” in the Navigation Menu. Then, under the “Integrations” tab, click “Telematics Connections“, followed by “Create Telematics Connection“.
Enter your preferred telematics vendor into the “Telematics Vendor” field, then complete all subsequent fields. NOTE: Required fields will vary by vendor. When finished, click “Create Connection” to finalize.
To see which vendors are supported, explore our Telematics Vendor Integrations. If your vendor isn’t listed, contact our Customer Success Team to request an integration.
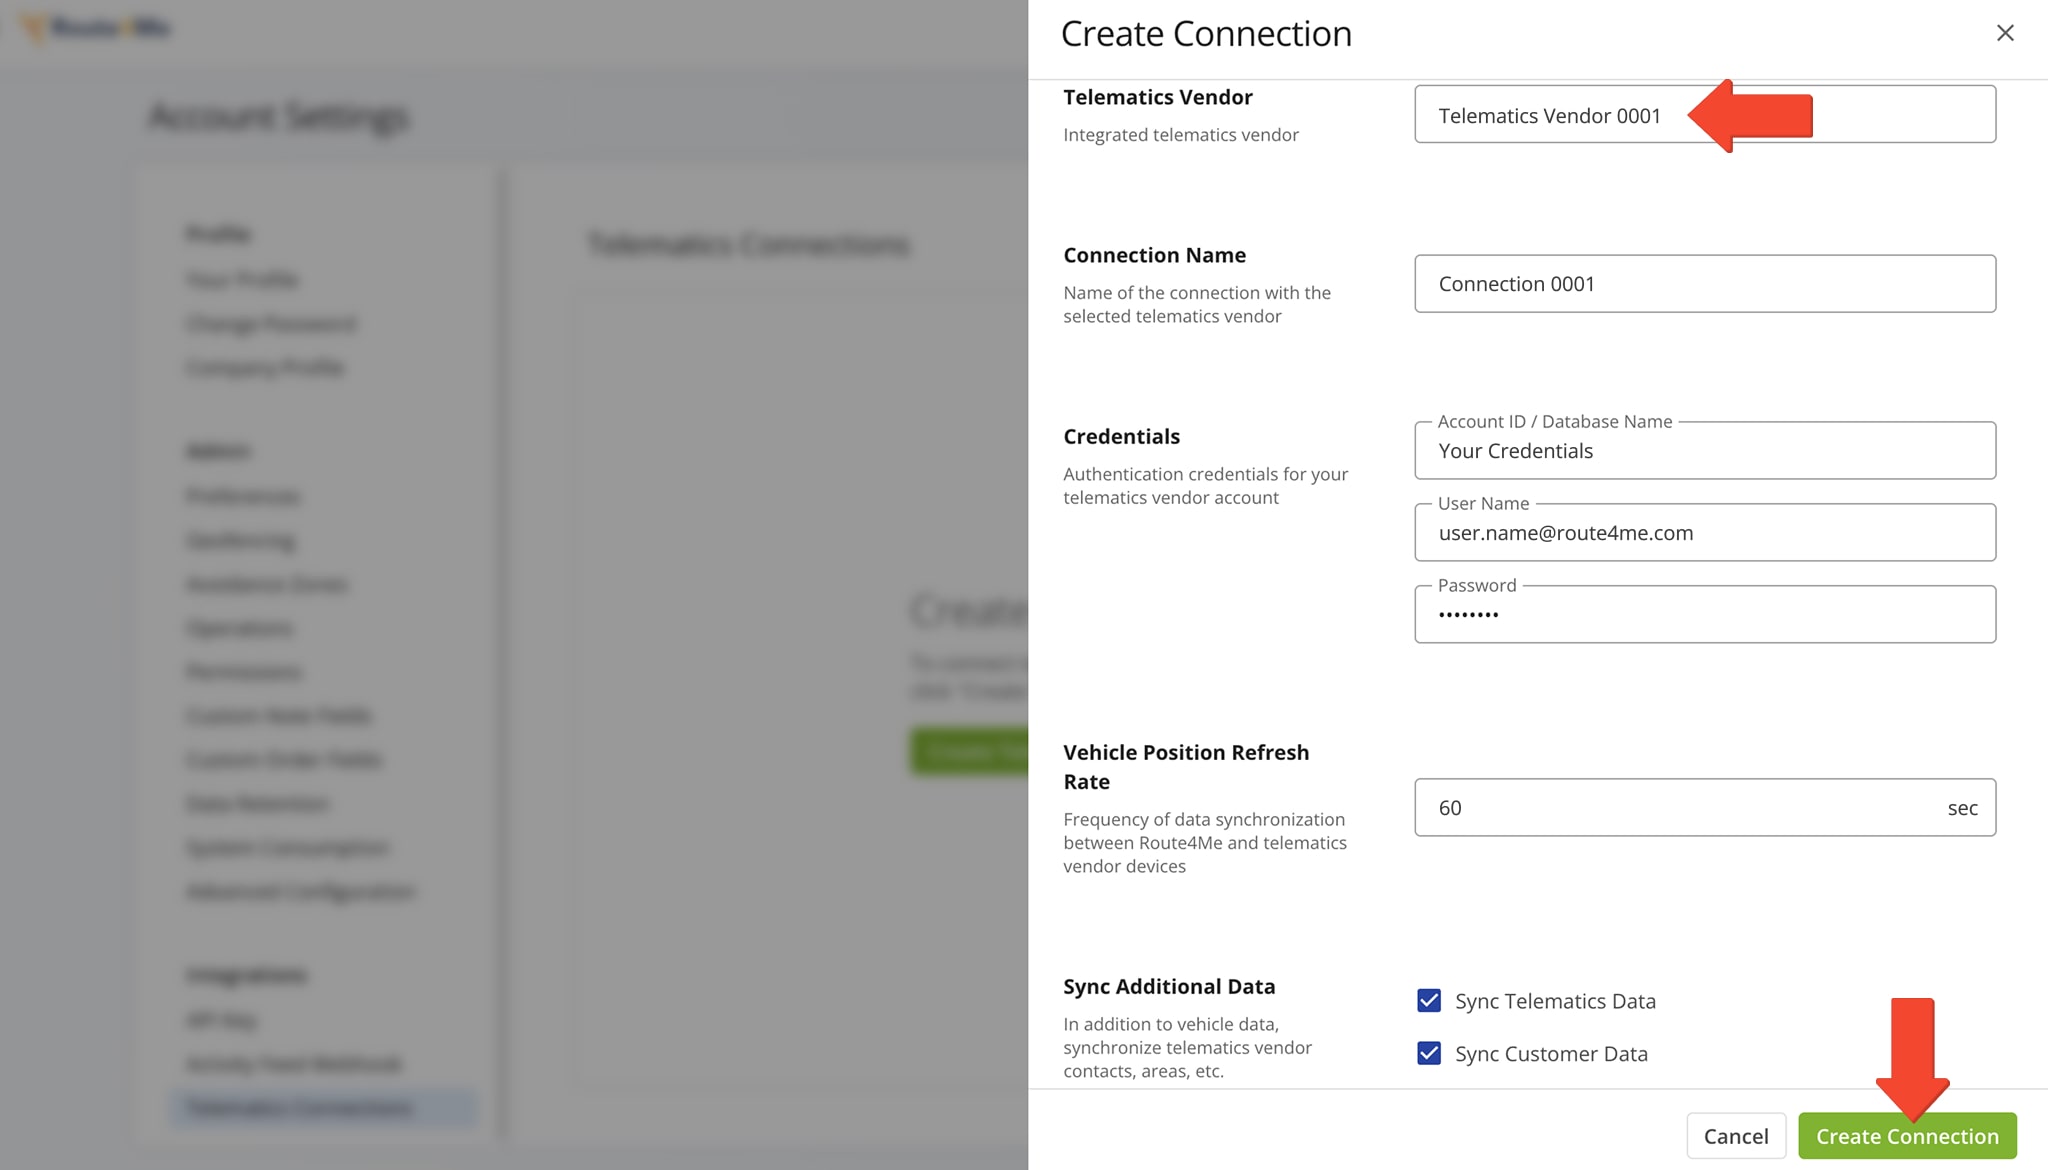
Create Connection Fields
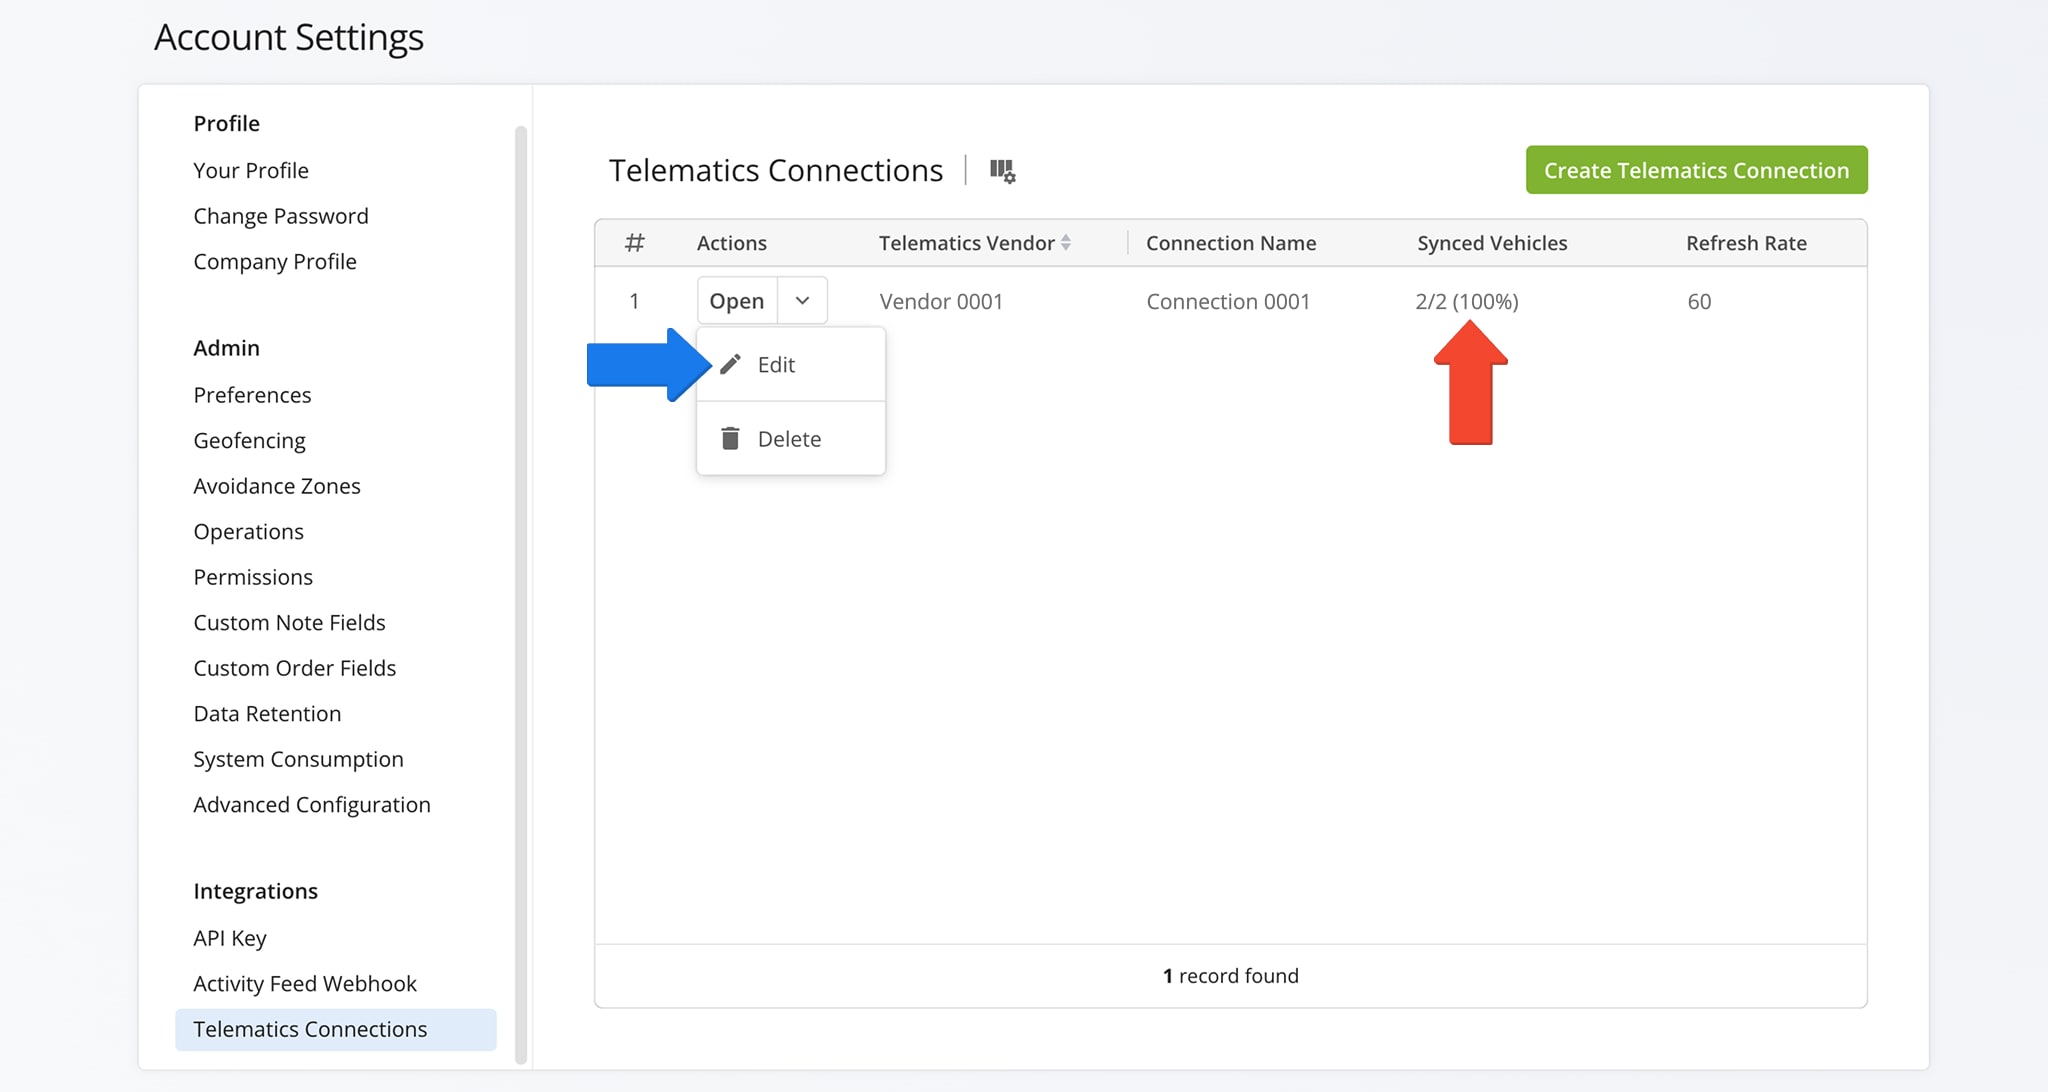
Once connected, Route4Me automatically syncs and imports vehicles and data from your telematics vendor. Synced vehicle details appears in the “Synced Vehicles” column.
To make changes, click the Down Arrow button next to the Connection Name and select “Edit“.
To customize the display columns shown in your Telematics Connections list, click the Columns Icon, then check the boxes for the fields you want to display.
To reorder column, drag them up or down. This controls their left-to-right layout in your Telematics Connections list.
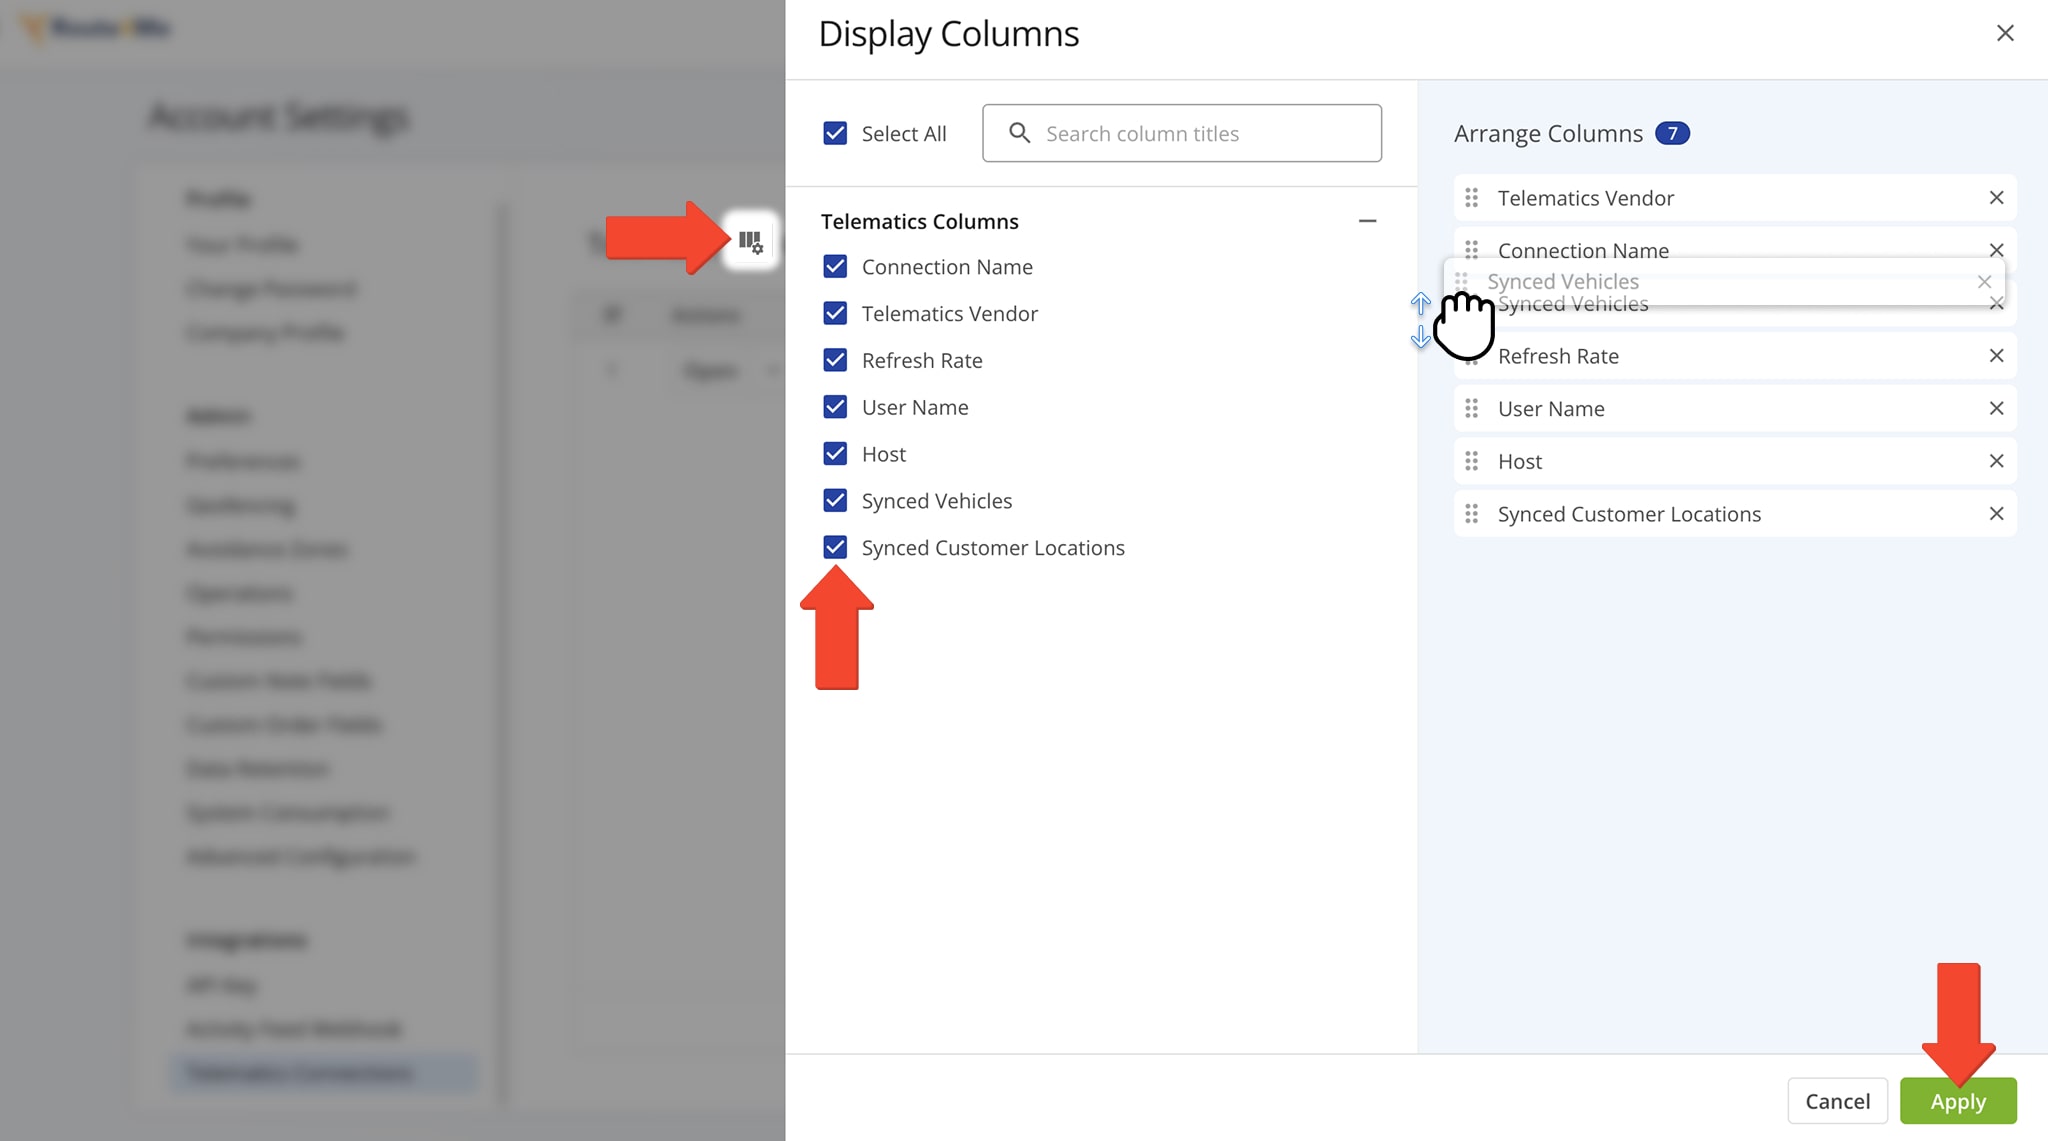
Integrations Data Columns
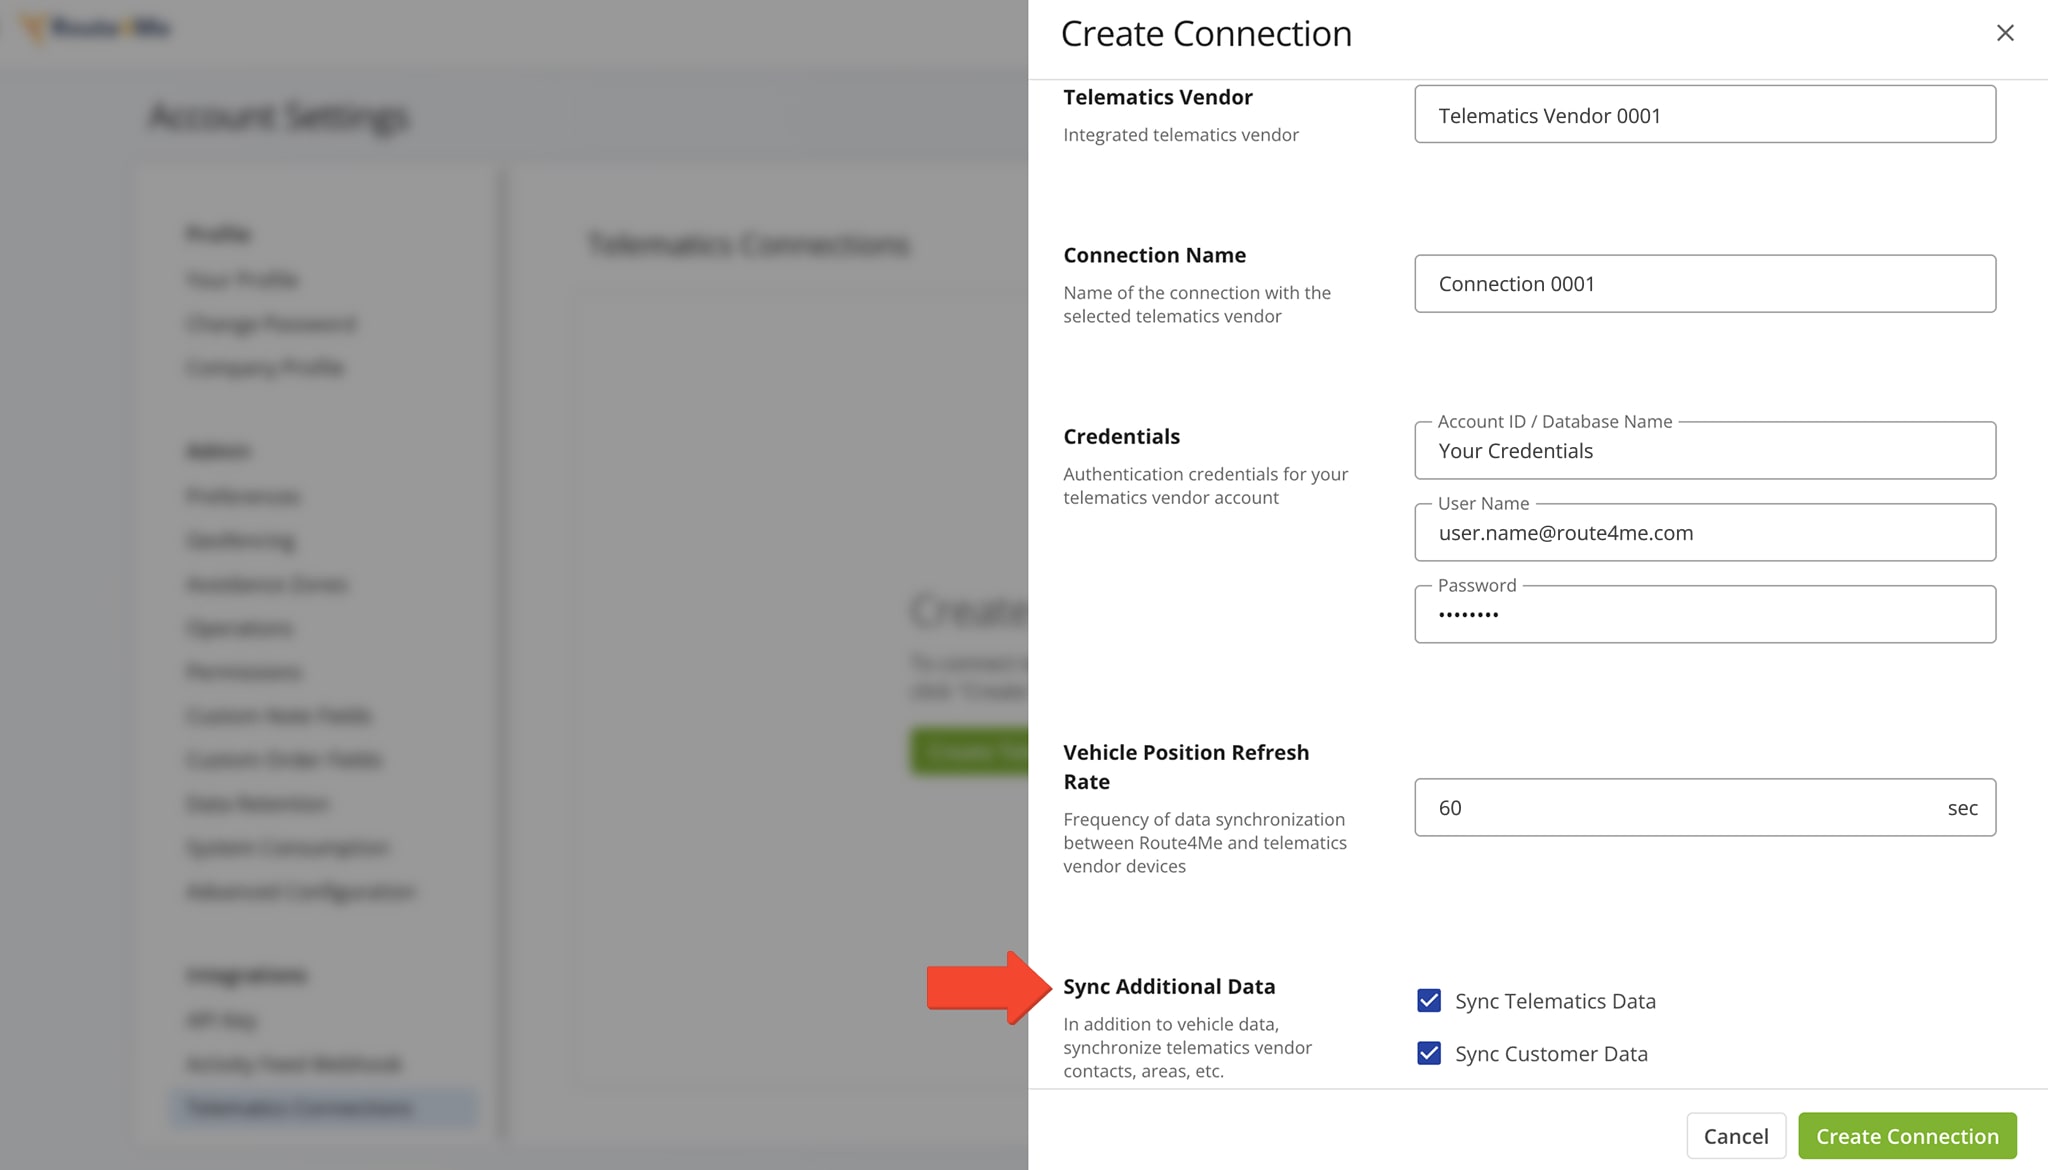
Sync Additional Data – Telematics And Customer Data
When adding a new connection, your telematics data is automatically synced. Your vehicles are imported and re-synchronized with your Route4Me account. You can also choose to sync customer data, including Customer Zones and related custom data.
NOTE: This option is currently only available for Geotab and Samsara. If you need it for another vendor, please contact Route4Me’s Support Team. Learn more about telematics data synchronization.
Activate And Connect Imported Telematics Vehicles
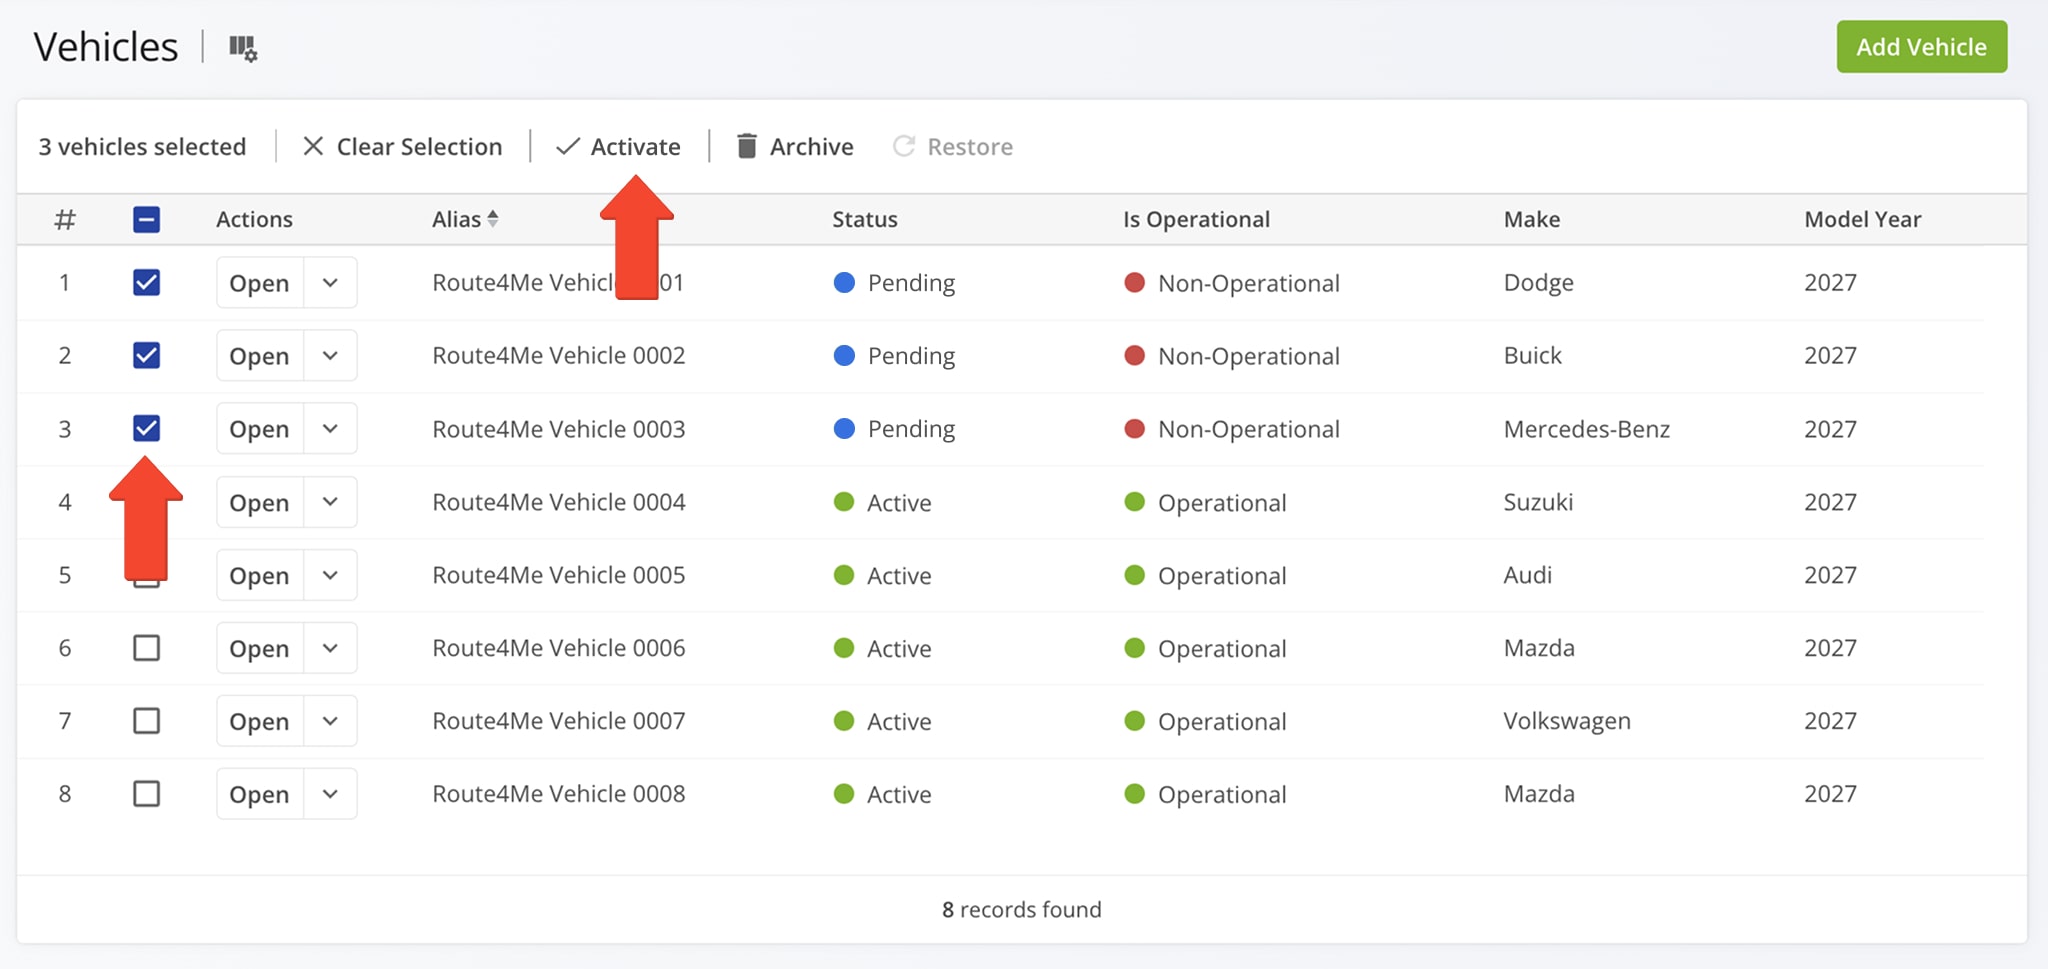
After establishing a telematics connection, Route4Me automatically imports your telematics vehicles and their data. To activate these vehicles, go to “Team & Equipment” > “Vehicles” in the navigation menu.
Recently imported vehicles appear as “Pending” and “Non-Operational” in your Vehicles List. To update their status, check the box next to each vehicle and click the “Activate” button.
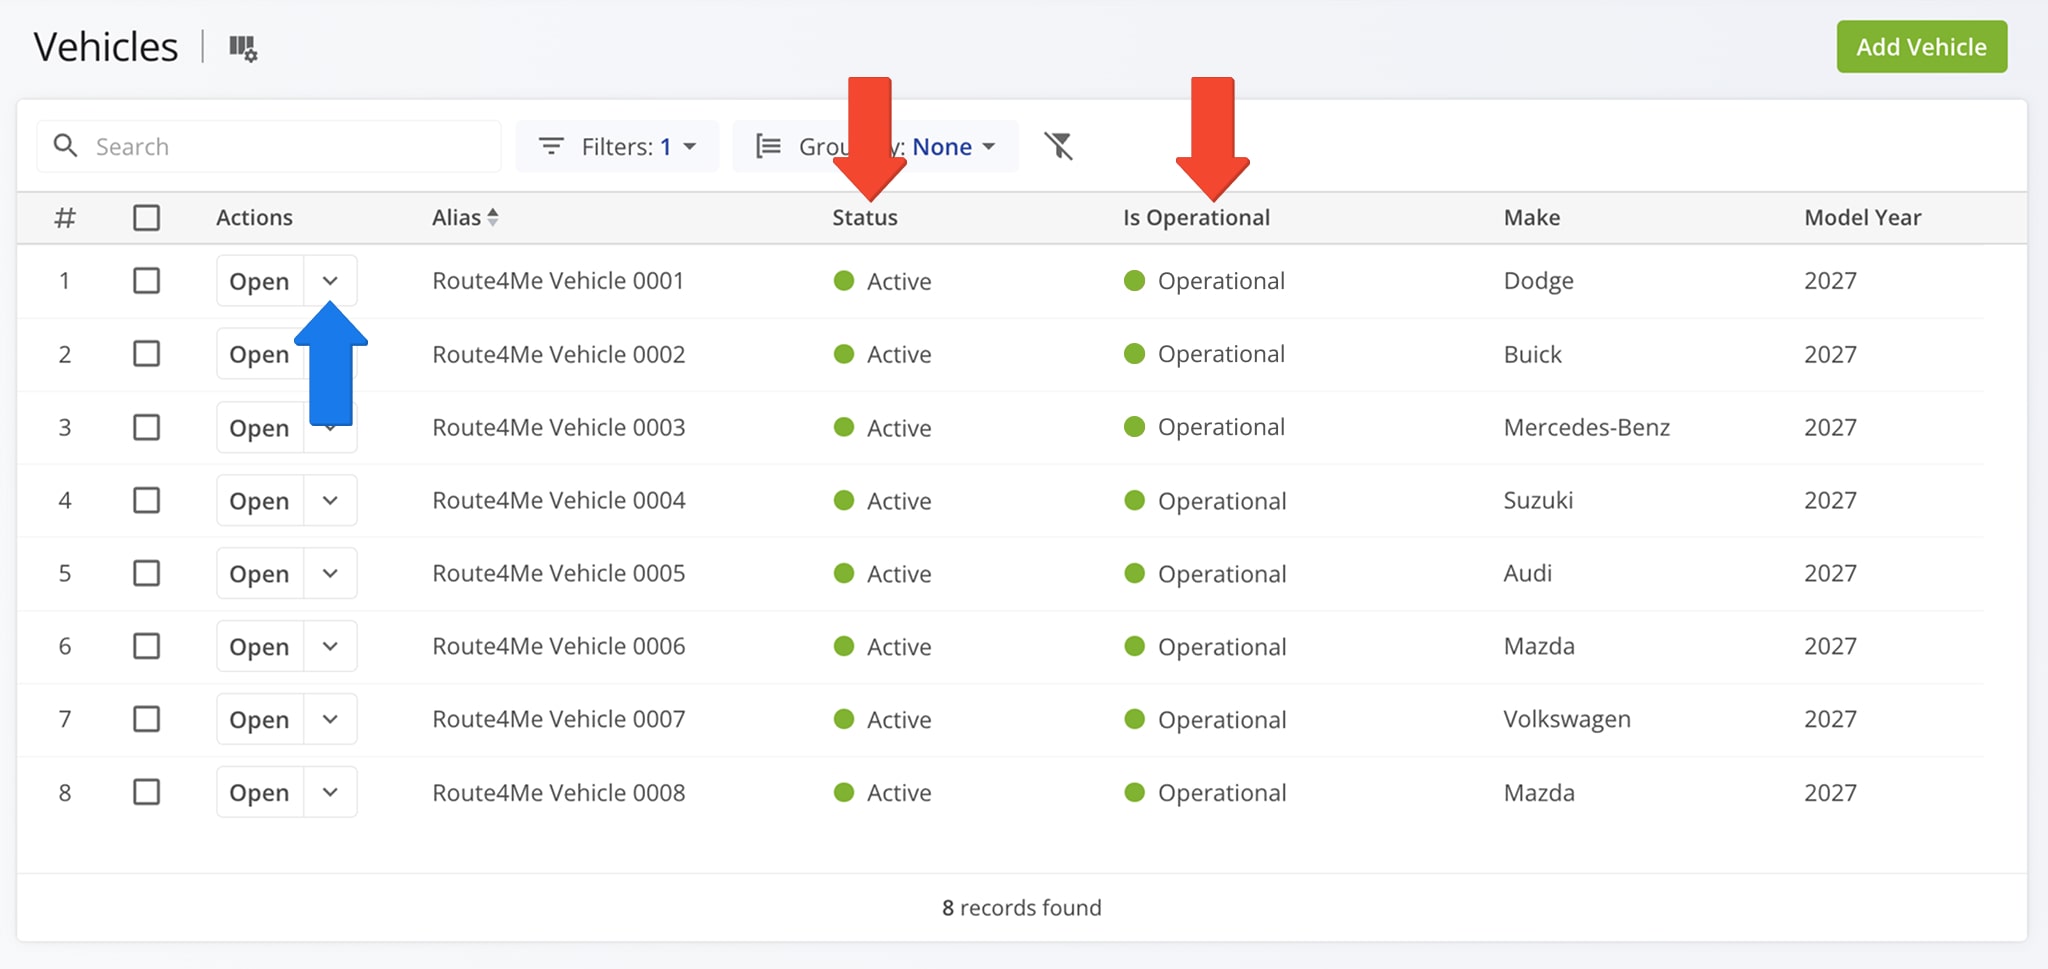
Once activated, they appear as “Active” and “Operational”. You can now assign these vehicles to routes. If you don’t wish to make them operational, click the Down Arrow button and select “Edit” to remove their “Is Operational” status.
Dispatch Routes To Vehicles – Assign Telematics Vehicles To Routes
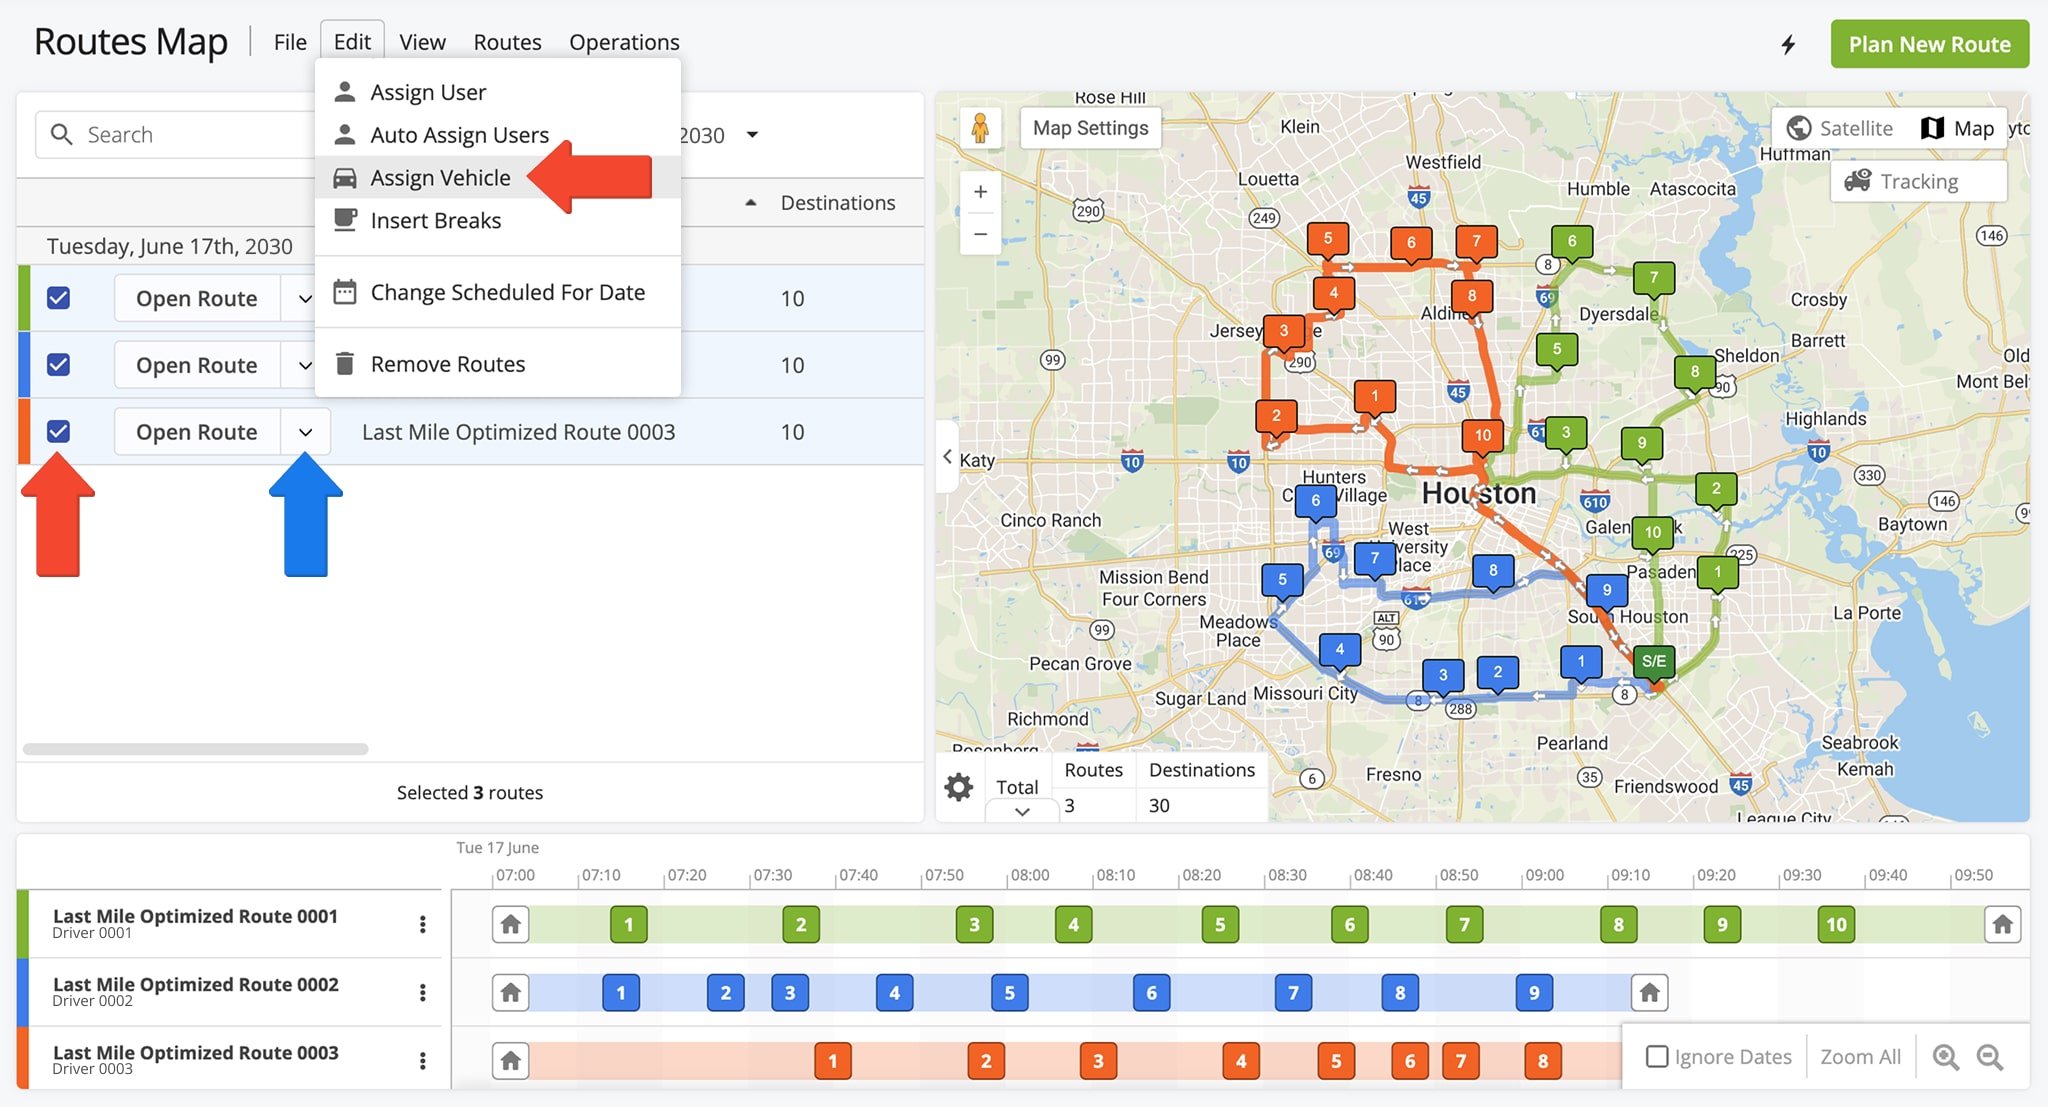
To dispatch a route to a telematics vehicle, assign the vehicle to that route, which you can do from the Routes Map or Routes List.
From the Routes Map, click the Down Arrow button next to a route and select “Assign Vehicle” from the menu. Then, choose the vehicle you wish to assign. To assign the same vehicle to multiple routes, check the boxes next to those routes, and click “Edit” in the Toolbar. Then, select “Assign Vehicle” and choose the vehicle.
Once the vehicle is assigned, the route is dispatched to it in real-time. Learn more about assigning vehicles to routes.
GPS Vehicle Tracking – Track Telematics Route Vehicles
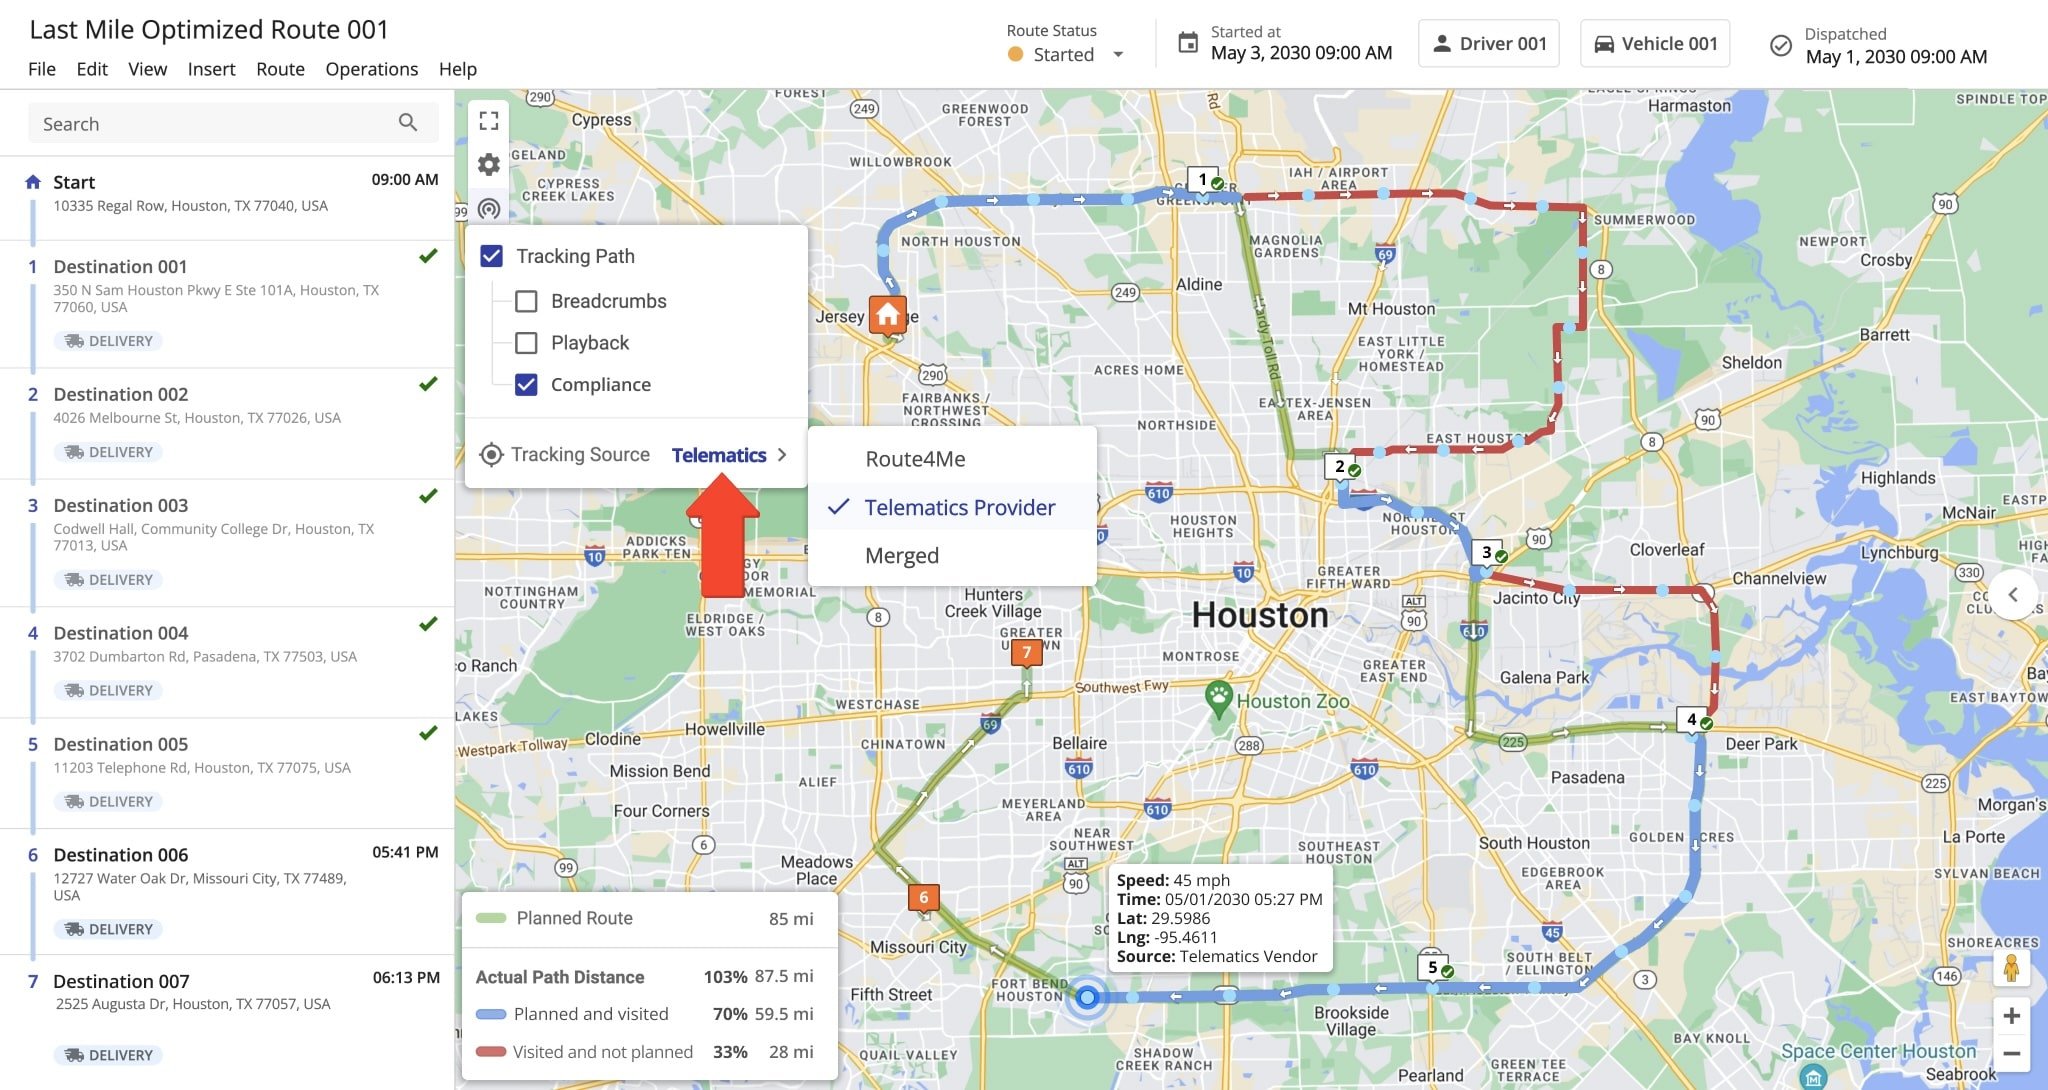
Once a route is dispatched to a vehicle, you can track the vehicle’s real-time location on the map and view its route history. Route4Me automatically collects GPS data from the telematics devices installed on your vehicles and displays it on the map.
You can track manually created vehicles if the driver uses Route4Me’s Mobile App.
Request Telematics Integration – Route4Me Telematics Integration With New Vendors
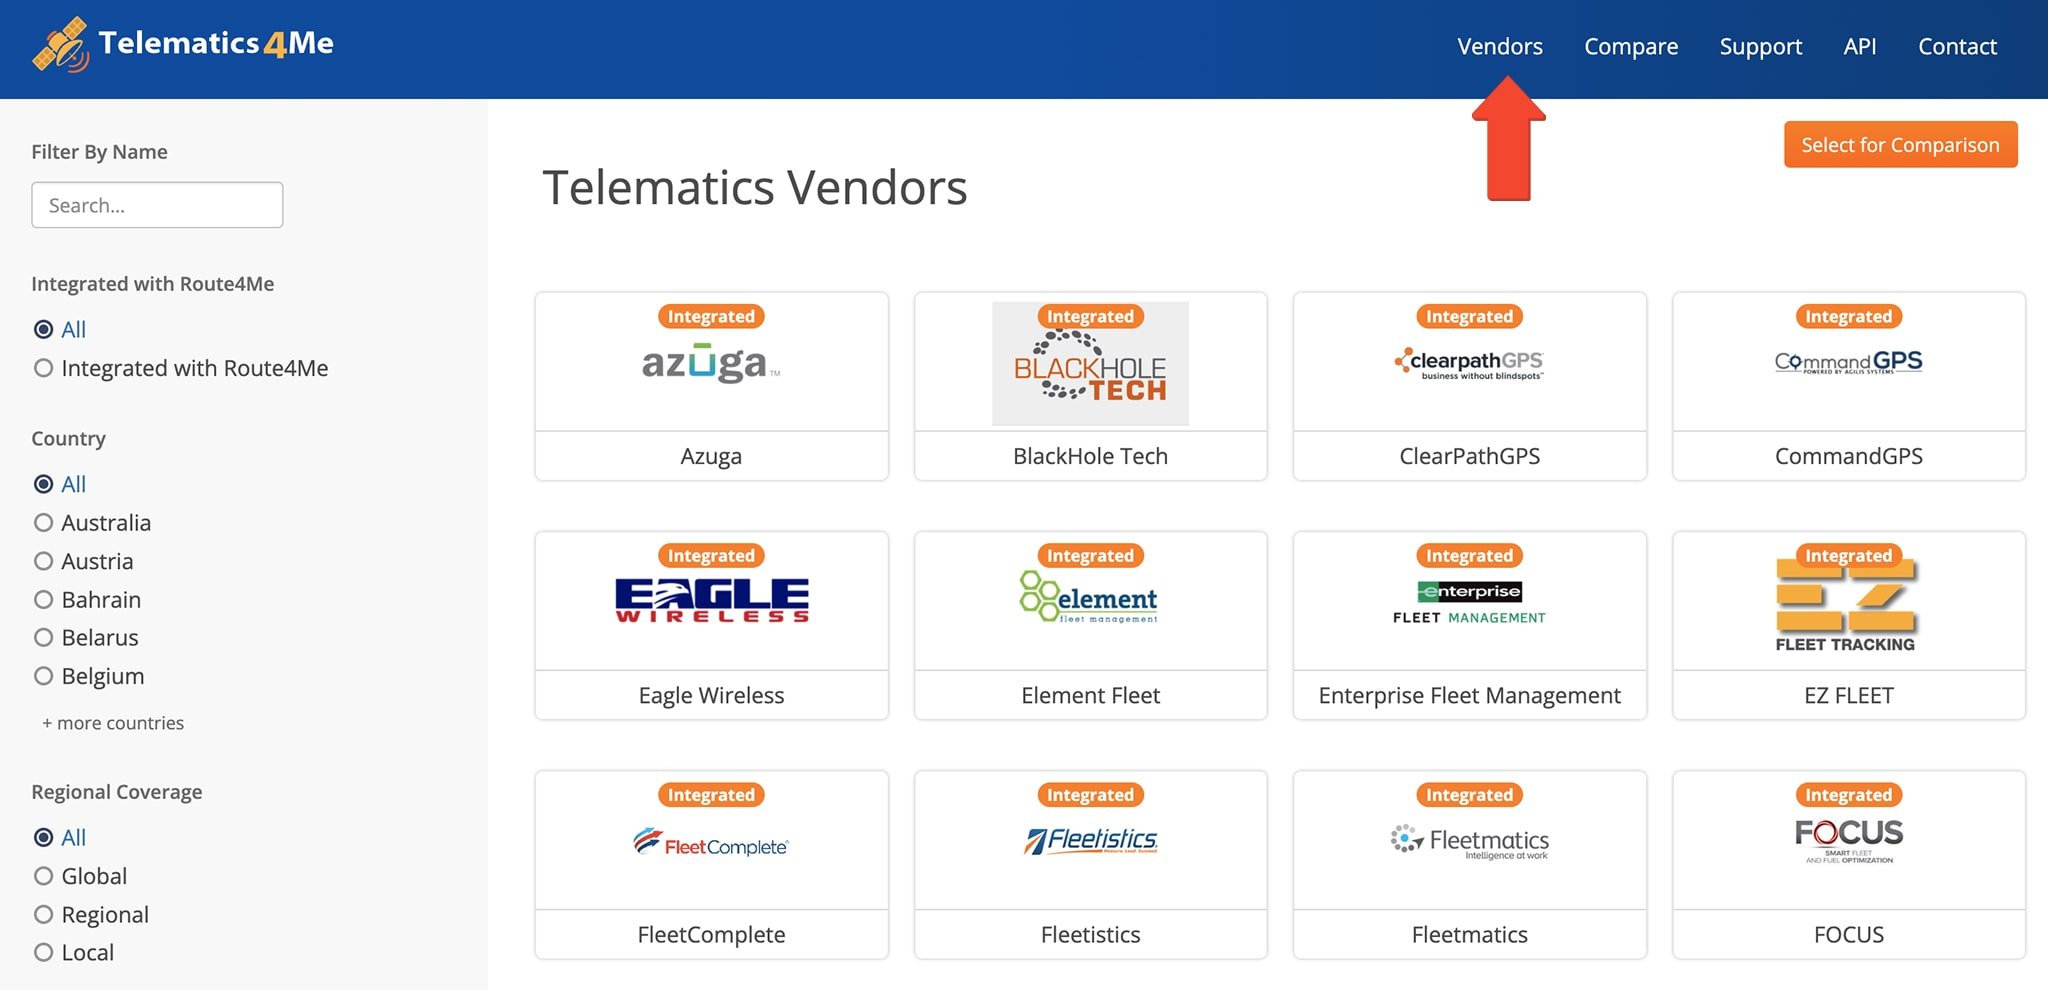
If the telematics vendor you currently work with or plan to work with isn’t yet integrated with Route4Me, you can request an integration through the Telematics Gateway.
Just click “Vendors” to open the Vendors List, click your desired vendor, then make your request from their vendor page.
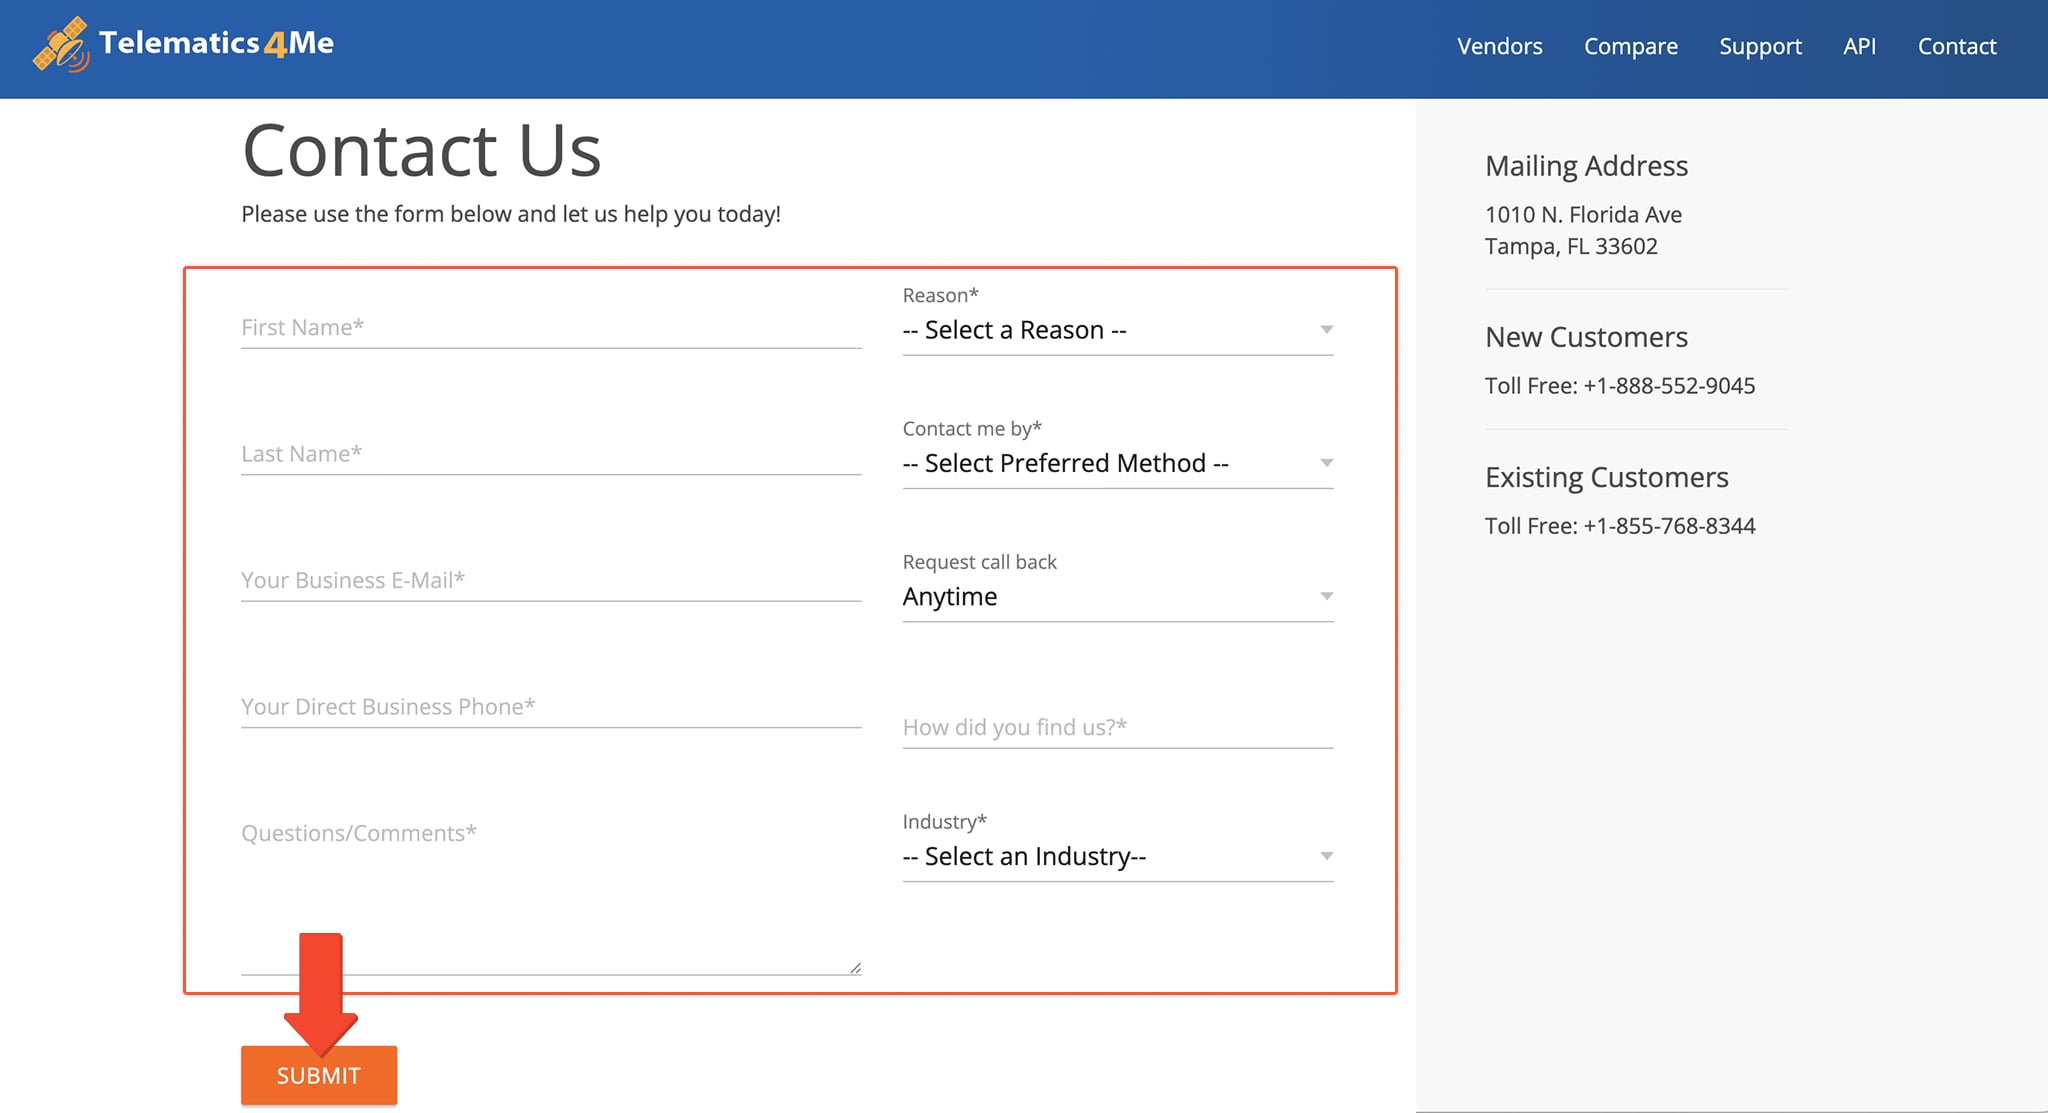
To make your request, scroll to the bottom of the vendor’s page to access the contact form. Fill out all required fields, including the reason for your request, then click “Submit“. A customer success representatives will follow up with you shortly.
Route4Me Integrated Telematics Vendors List
Route4Me’s Telematics4Me Gateway lists all available fleet telematics vendors worldwide. There, you can search, filter, and compare vendors.
All available telematics vendors appear below. If you don’t see that your current or planned vendor is integrated with Route4Me, you can easily request a telematics integration and we’ll help you get set up.
Telematics Vendor List
BlackHole Tech
Eagle Wireless
Element Fleet
Enterprise Fleet Management
FleetComplete
Fleetistics
Fleetmatics
FOCUS
GoFleet
GoGPS
GPS insight
GPS Tracking Canada
Gurtam
LB TECHNOLOGY INC
Linxup
MiX Telematics
Motive
Netradyne
Networkfleet
Traxxis GPS Solutions
USA Fleet Solutions
Webfleet Solutions
3D Tracking
4GFlota
Acron
ActSoft
Advanced Fleet Management
Advantage Asset Tracking
Agile Tracking Solutions
Agilis Systems
Airbiquity
Akquinet
Al Aziz Communications
All 4 Car
Almaks
Amber Connect
AncisTrack
Apex Telesoft
Areal Control
ART Security
ASP security systems
AssetTrackr
Assured Telematics
Astrata
Astus
AT&T Fleet Complete
Atic
Atlantis Global System
Atrom
ATTI
Auto 3P
Auto Awacs
Automile
AutoVision Wireless
AVL Track
AVLView
AwareGPS
Badger Fleet Solutions
Beame
Betaar3
BFS
BigChange
BigRoad
Blue Tree Systems
Blue-Bird
BlueArrow
Bornemann
BOX Telematics
Brick House Security
BSM Technologies
Btracking
BudgetGPS
Business Vehicle Tracking
CAARMO
CalAmp
CAN Telematics
Can-Am IT Solutions
Cargo Track
Carmine
Cartrack Nigeria
CarTracker
CDL
CDS
Clever GPS
ClickSoftware
CloudFleet
CMA
Cognid
Collective Data
Company Mileage
Coordina
CoPilot GPS
Copilot Pro
Dako
Datcom
De De Net
DigiTrack
Dispatch me
Dispecer
Docuvi
Dogma Guardian
DriverLocate
DSB-Tracking
E-Drive Technology
E-localiza
Easy Track
Easy Track India
Easy Tracker
easyFleet.net
EasyTracGPS
Eco GPS
Ecomotive
EcoTelematics Group Oy
EcoTrack Fleet Management
Efectivus
Ekoio
Electric Compass
EnVue Telematics
Eteria SRLS
Eufleet
EuroGPS
Europe Track
Evo GPS
EziTrack
FAMS
Field Logix
Find and Follow
Fleet Board
Fleet Commander
Fleet Genius
Fleet GO
Fleet Harmony
Fleet Nav Systems
Fleet Smart
Fleet Tec
Fleet Tracking
FleetBoss
Fleetilla
Fleetinsight
Fleetio
FleetJack
Fleetlog
FLEETLOGIC Asia
FleetLynx
FleetMaster
Fleetminder
FleetRobo
FleetSharp
Fleetshield
FleetTrackGPS
FleetTrax
Flota Online
Flotman
Flotta Web
FMS
Frame Logic
Frotcom
FTS
Gannet
Garmin
Gately
Geodynamics
Geonavi
Geooco
GEOS Telecom
GEOTAB AFRICA
GeoTelematic Solutions
Geothentic
Global Tracking Technology
GoGPS Australia
GOHOMEGPS
GoldStar CMS
GoTrack
GPS Fleet Consulting
GPS infonet
GPS Leaders
GPS Mobile Solutions
GPS Outfitters
GPS Police
GPS RAPAS
GPS Tracking NZ
GPS-Server
GPS-Trace
GPS-Tracker
GPSCarTracking
GpsGate
GPSTrackit
GPSWOX
Hawkeye Electronic Security
HiD Global
Hubio Fleet
iCON telematics
Imarda
Infosat
Infotrack
Innovative Maintenance Systems
InstaMapper
Intelligent Telematics
IntelliTrack
InTouch GPS
IoTab
Isotrak
iSpot
ISR FleetTrack
ISR Transit
iTrack
iTrack India
Key Fleet Services
LaceUp Solutions
LiveViewGPS
Localizador Sherlog
Locate A
Locator
Locus GPS
Map&Track
Mapon
Masternaut
Matrix
Maverik Fleet
Mileage Ace
MileIQ
MileTrackGPS
Mio
Mobi
MonitoringGPS
Motus
Movildata
Movin'ON GPS
National Fleet Tracking
Navixy
Navotar
NEMT Cloud Dispatch
Nero Global Tracking
Neurored
NextPoint GPS
NFC Group
Northern Business Intelligence
OASA
Ocean
Olathe Ford Commercial
OneTrack
OnPoint
Onstar
ORBCOMM
Ovelan
Panache Telematics
Pantonium
PassTime GPS
PC Miler
PGT Technologies
Phantom
Phoenix Direct
PinPointers
Plug N Track GPS
Position Logic
ProfGPS
Quartix
RAM track-and-trace
RAM Tracking
Raxel Telematics
ReadyTrack
Redtail Telematics
Revelation Tracking
Rhino Fleet Tracking
RMJ Technologies
RMT Tracking
Road Point India
Roadside Systems
Ron Turley Associates
Routematic
RouteWare
RSA
Runzheimer
SafeFleet
Satcop
SatCorp
SatData
ScorpionTrack
Scout
Select Auto Systems
Selftrack
Sensel Telematics
Shaw Tracking
SilverStar
SituAction
Skywatch
SmartFleet
SMP Solutions
Somatec
Spidertracks
Spireon
Stremcom Track
STW Technic
Suivo
Synx
Tantalum Corporation
TechnoPurple
Telematics UK
TeleNav
Telogis
The Floow
Tierra Telematics
Tigtrack
Titan GPS
TM Fleet
TMS2
Topaz Tracking
Touchworld
Traccar
Track My Ride
Track my vehicle
Track My Workforce
Track Unit
Track-iT Zimbabwe
Trackem
Tracker
Tracker UK
Trackerfit
Trackgenix
Tracking Genie
Tracking My Car
Tracking System
TrackIt
Trackit Solutions
Trackmatic
TrackYourTruck
Traffilog
Trakm8
Trans.EU
Transics
Trimble
Trinetra Wireless
TripLog
Ukrastra
ULU
UniGuard
V Zone Track
v2track
Vehicle Direct Tracking
Vehicle Tracking Tech
VehiclePath
Verilocation
Vezma
Virtual Fleet Supervisor
Visteon
VTLIVE
VTS itrak
VW Car-Net
WebEye
Webfleet
Webtech Wireless
WEX
Wireless Links
WirelessCar
Xemplar
XOOM GPS Tracking
Your Tracker
Zenithal
Zonar systems
Zubie
Data Catalog – Quick Reference For Available Telematics Data
For your convenience, the table below offers a quick, at-a-glance reference for all data fields available across your telematics integrations, making it easy to identify which data points each vendor supports.
Integrations Data Columns
Visit Route4Me's Marketplace to Check out Associated Modules:
- Operations
Audit Logging and Activity Stream
- Operations
Custom Data Add-On
- Operations
Advanced Team Management Add-On
About author: Kristian Andreev

