Web Platform Troubleshooting – Route Optimization Support Guide
Route4Me is an enterprise route planner designed for last mile route optimization, bringing route planning, tracking, and management into a single platform. This support guide provides answers to frequently asked questions about using the web platform, helping you troubleshoot common issues and complete key tasks more efficiently. Use it to find instant, clear, step-by-step guidance when you need it.
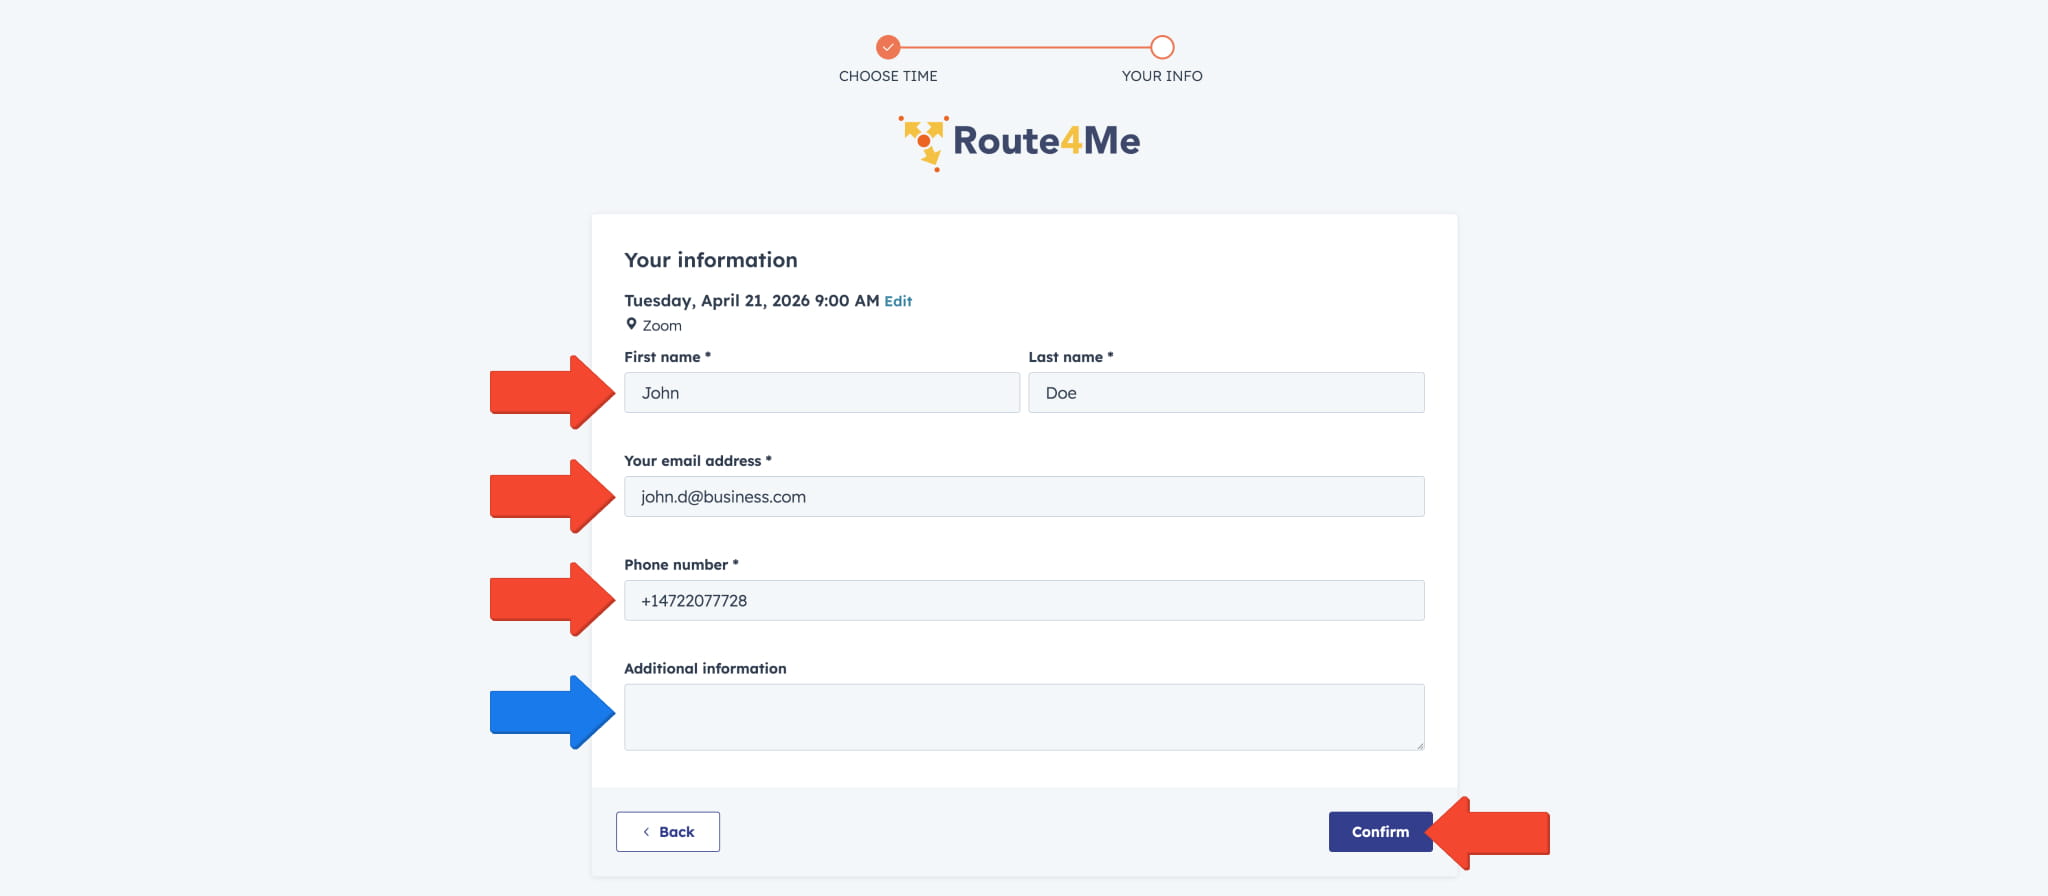
Use the Route4Me Onboarding Calendar to schedule a training session. Select a date, session length, and available time slot.
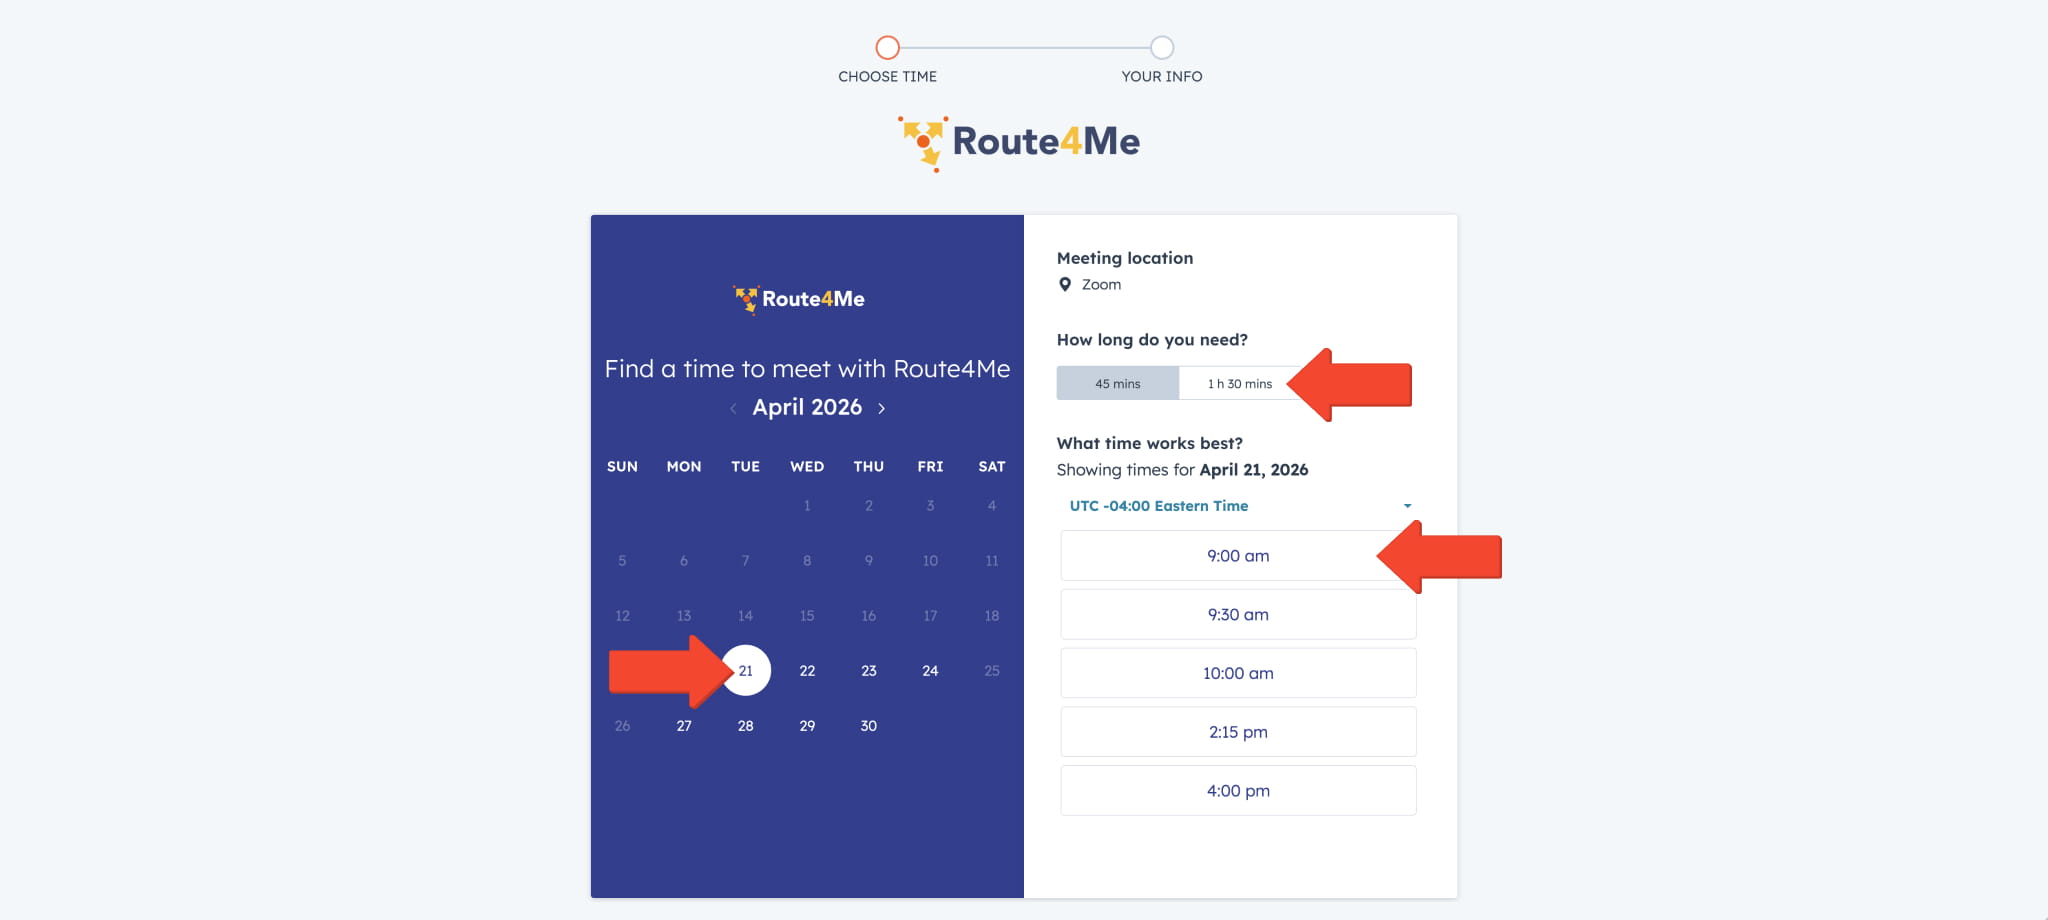
Then, enter your contact information so we can send your training session details.
Optionally, use the “Additional Information” field to share helpful details or resources, such as questions, routing goals, or an address spreadsheet URL to review during the session.
Click “Confirm” to complete the booking.
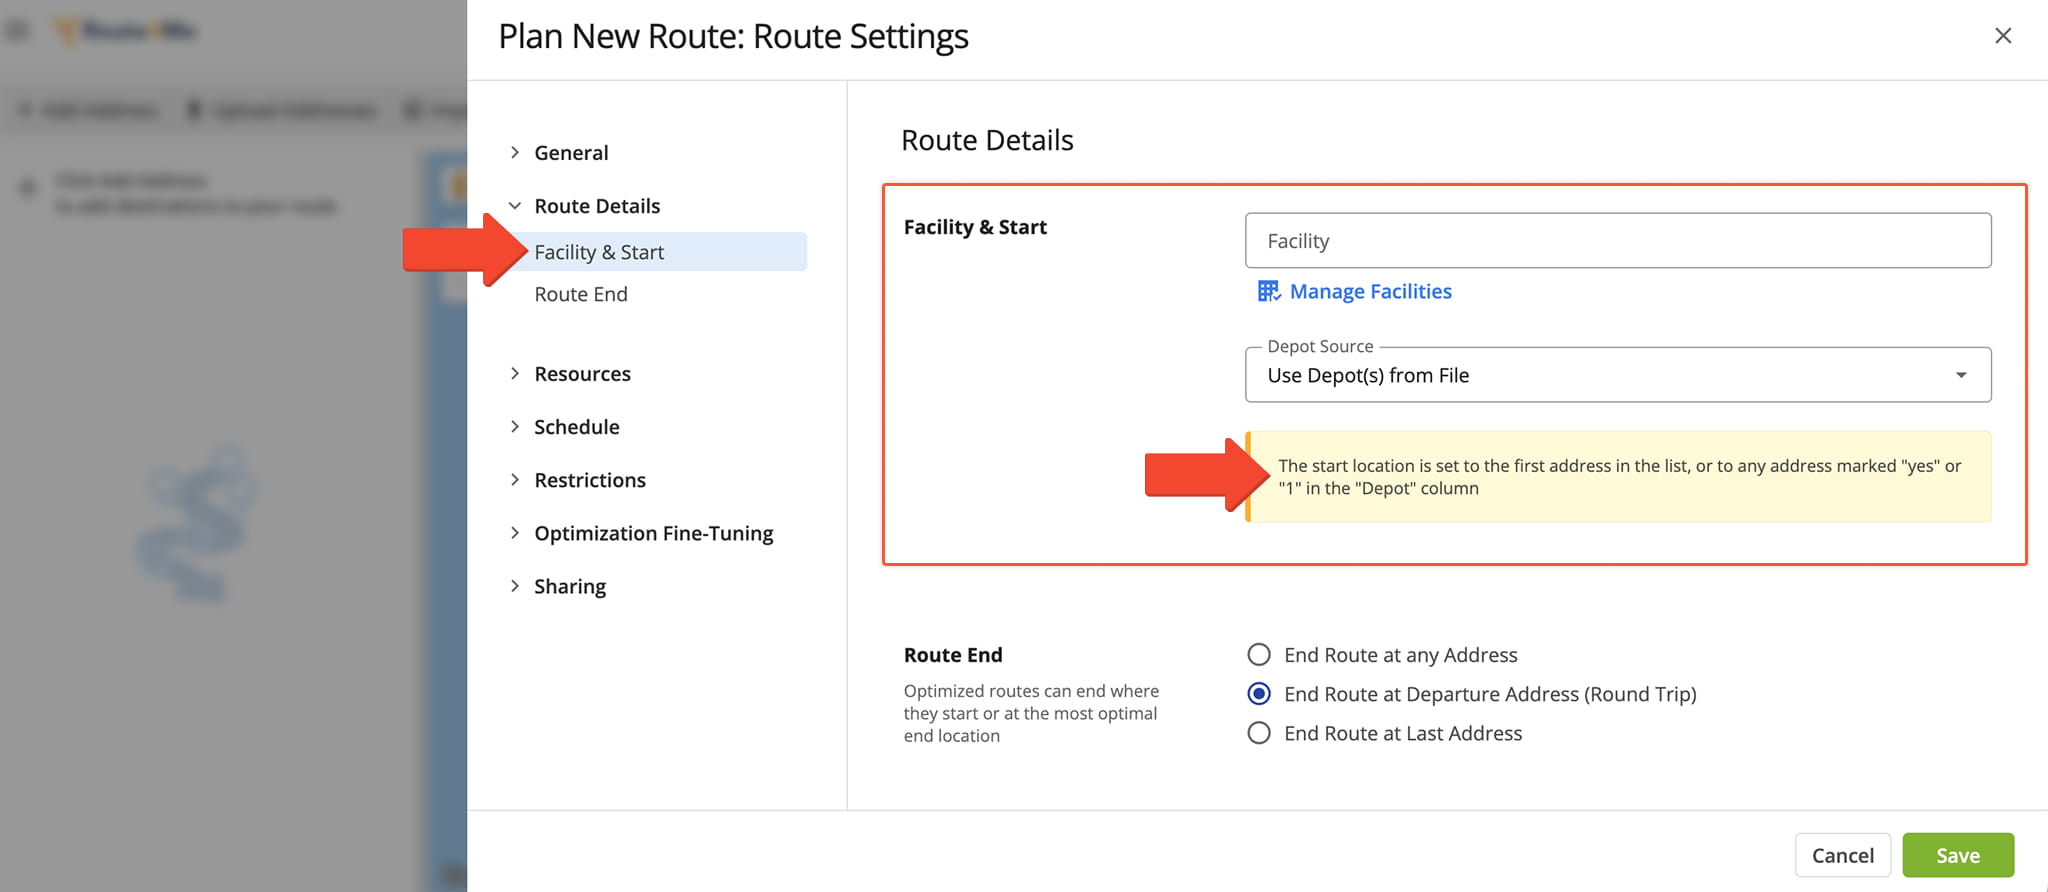
The first address you add to a route will typically be used as its starting point.
To select a different route origin when creating a route, go to “Route Details” > “Facility & Start” in the Optimization Settings. Then, use the “Depot Source” field to select where the route should start.
To change a planned route’s end type, open it in the Route Editor. Click “Edit” in the top menu bar and select “Open Route Settings“. Then, go to “Optimization” > “Round Trip“.
Select the option that matches how you want the route to behave. Once you update this setting, the route will automatically re-sequence destinations based on your selection.
NOTE: If needed, re-optimize the route to apply the updated configuration.

Track Drivers On The Routes Page Map
To track your drivers on the Routes Page Map, follow these steps:
1. Click the Routes Map button in the top-right to open the map.
2. Click the Eye Icon to enable the routes you want to monitor on the map.
3. Click the Gear Icon to open Map Settings, then select Vehicles and Users to show on the map.
Drivers will appear as markers on the map that update as they move along their routes. Click on any driver or route to view current progress and basic route details.
![]()
Track Drivers In The Route Editor
To track your drivers in the Route Editor and click the Tracking Icon in the upper left corner of the map to access live tracking tools. From here, you can view the driver’s real-time location on the map.
Within the tracking view, you can enable additional tracking layers for more detail:
- Tracking Path: Shows the actual route the driver traveled
- Breadcrumbs: Displays timestamped location updates and tracking history
- Playback: Shows an animation of the route taken by the user
- Compliance: Compares planned and actual routes while highlighting deviations
![]()
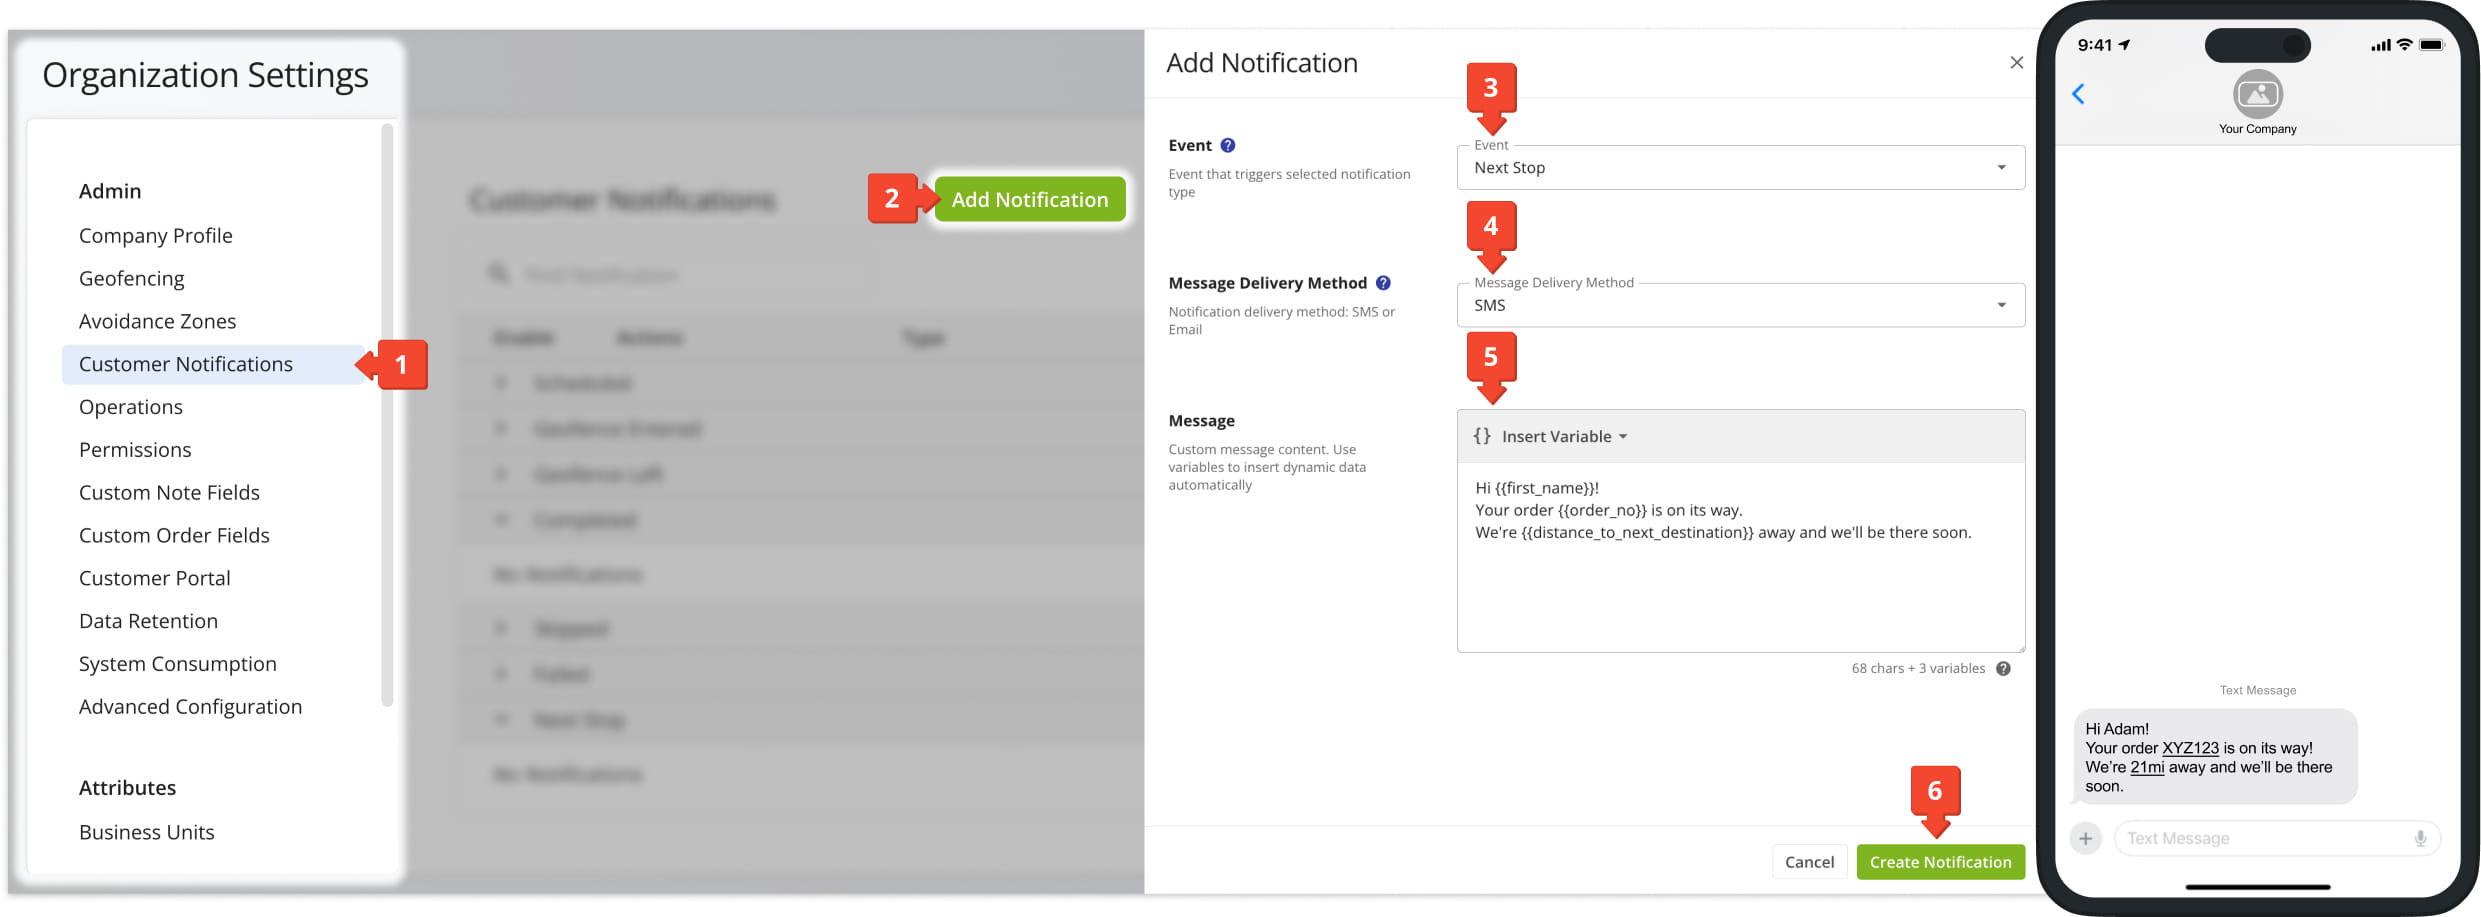
To send automatic notifications to customers when their stop is next on a route, open your Route4Me Organization Settings from the Navigation Menu and follow these steps:
- Go to the “Customer Notifications” tab.
- Click the “Add Notification” button.
- In the “Event” field, select “Next Stop“.
- Select your preferred “Message Delivery Method“.
- Enter the notification message text customers will receive in the “Message Field“.
- Click the “Create Notification” button.
After setup, customers will automatically be notified when the user assigned to the route completes the last stop before their address.
To send automatic notifications to customers when an order is delivered, open your Route4Me Organization Settings from the Navigation Menu and follow these steps:
- Go to the “Customer Notifications” tab.
- Click the “Add Notification” button.
- In the “Event” field, select “Completed“.
- Select your preferred “Message Delivery Method“.
- Enter the notification message text customers will receive in the “Message Field“.
- Click the “Create Notification” button.
After setup, customers will automatically be notified when their stop is marked as completed on the route.

To get proof of delivery in Route4Me, you need to create a workflow that defines the tasks drivers must complete at each stop. From the Navigation Menu, go to “Business Operations” > “Workflows”. Then click “Create Workflow”.
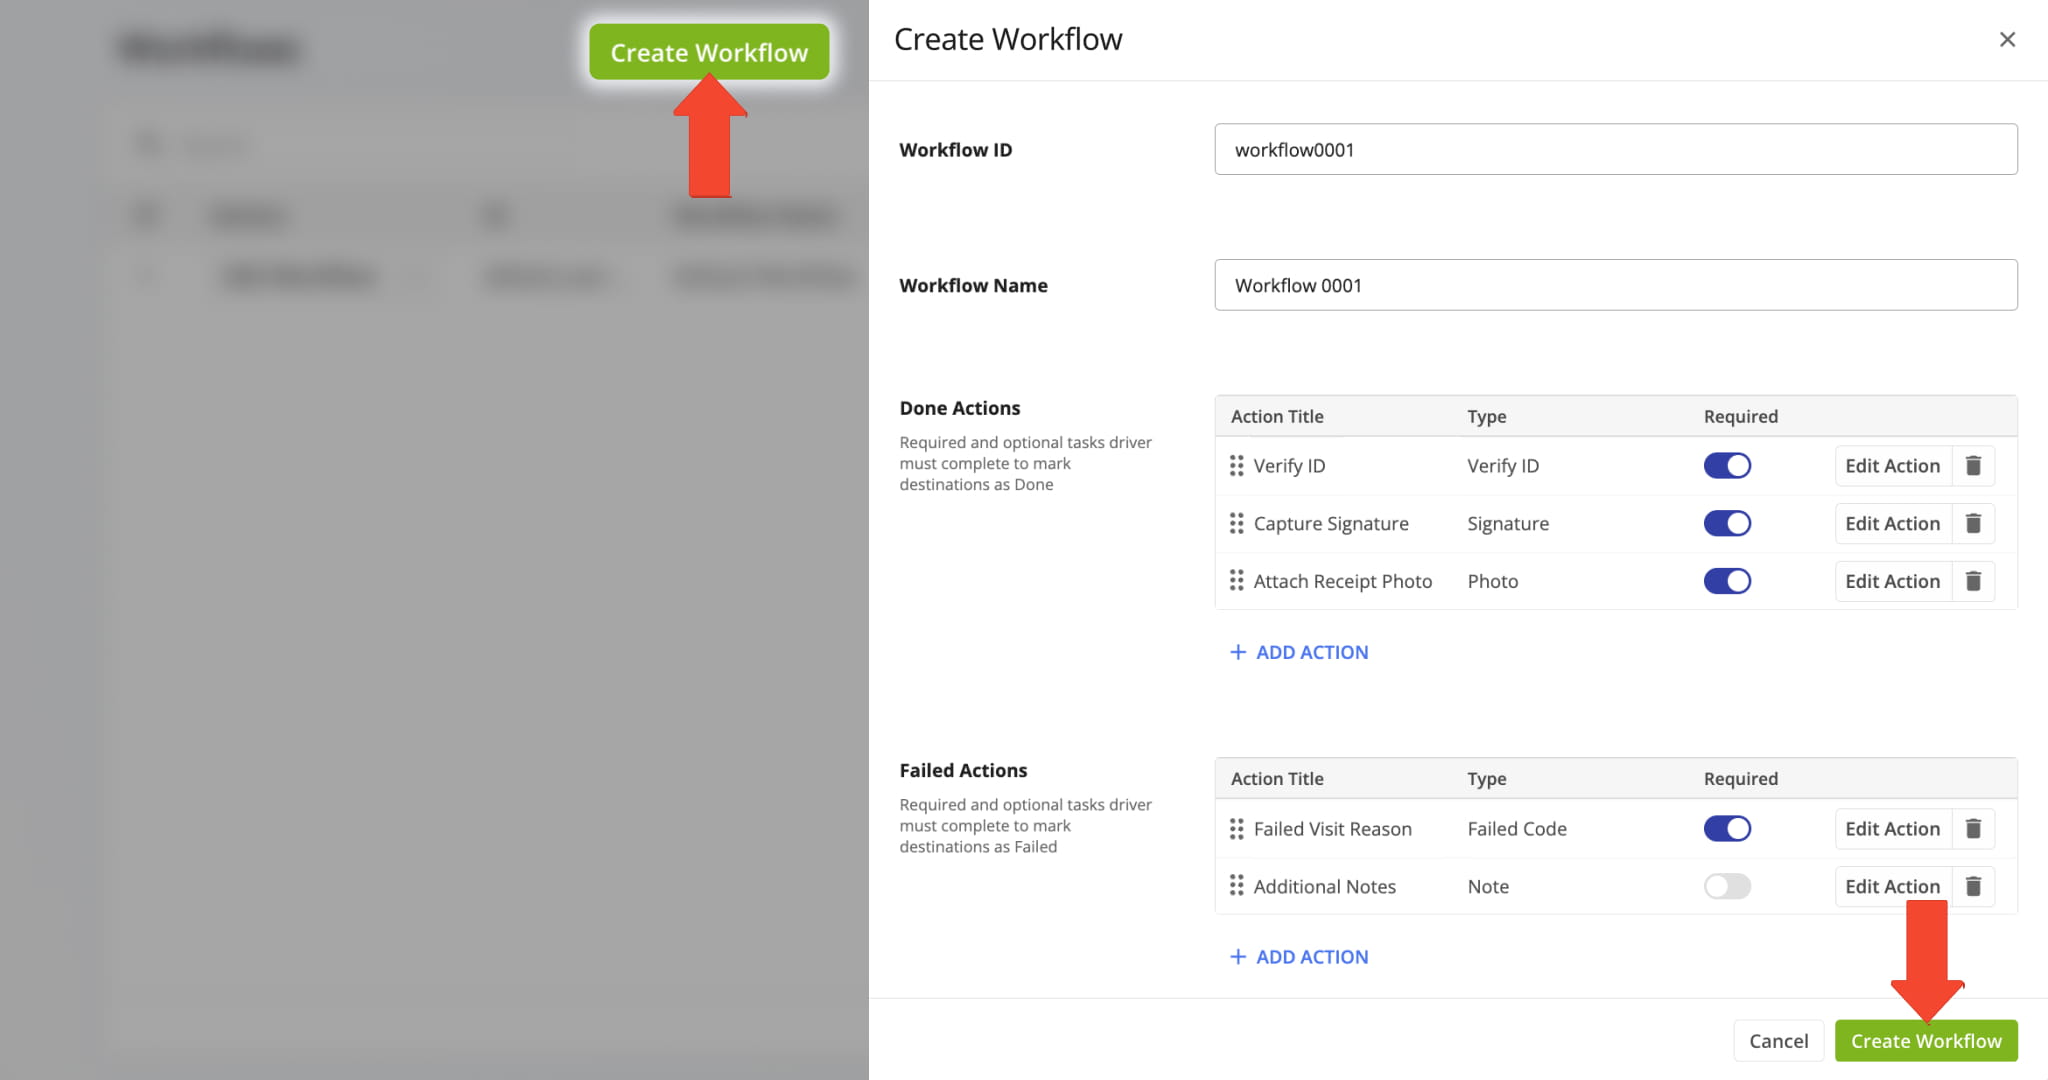
Use the “Action Type” dropdown menu to select preferred actions for each workflow type. For example, you may want the driver to capture signatures, upload photos or notes, or provide other forms of verification, depending on what you need.

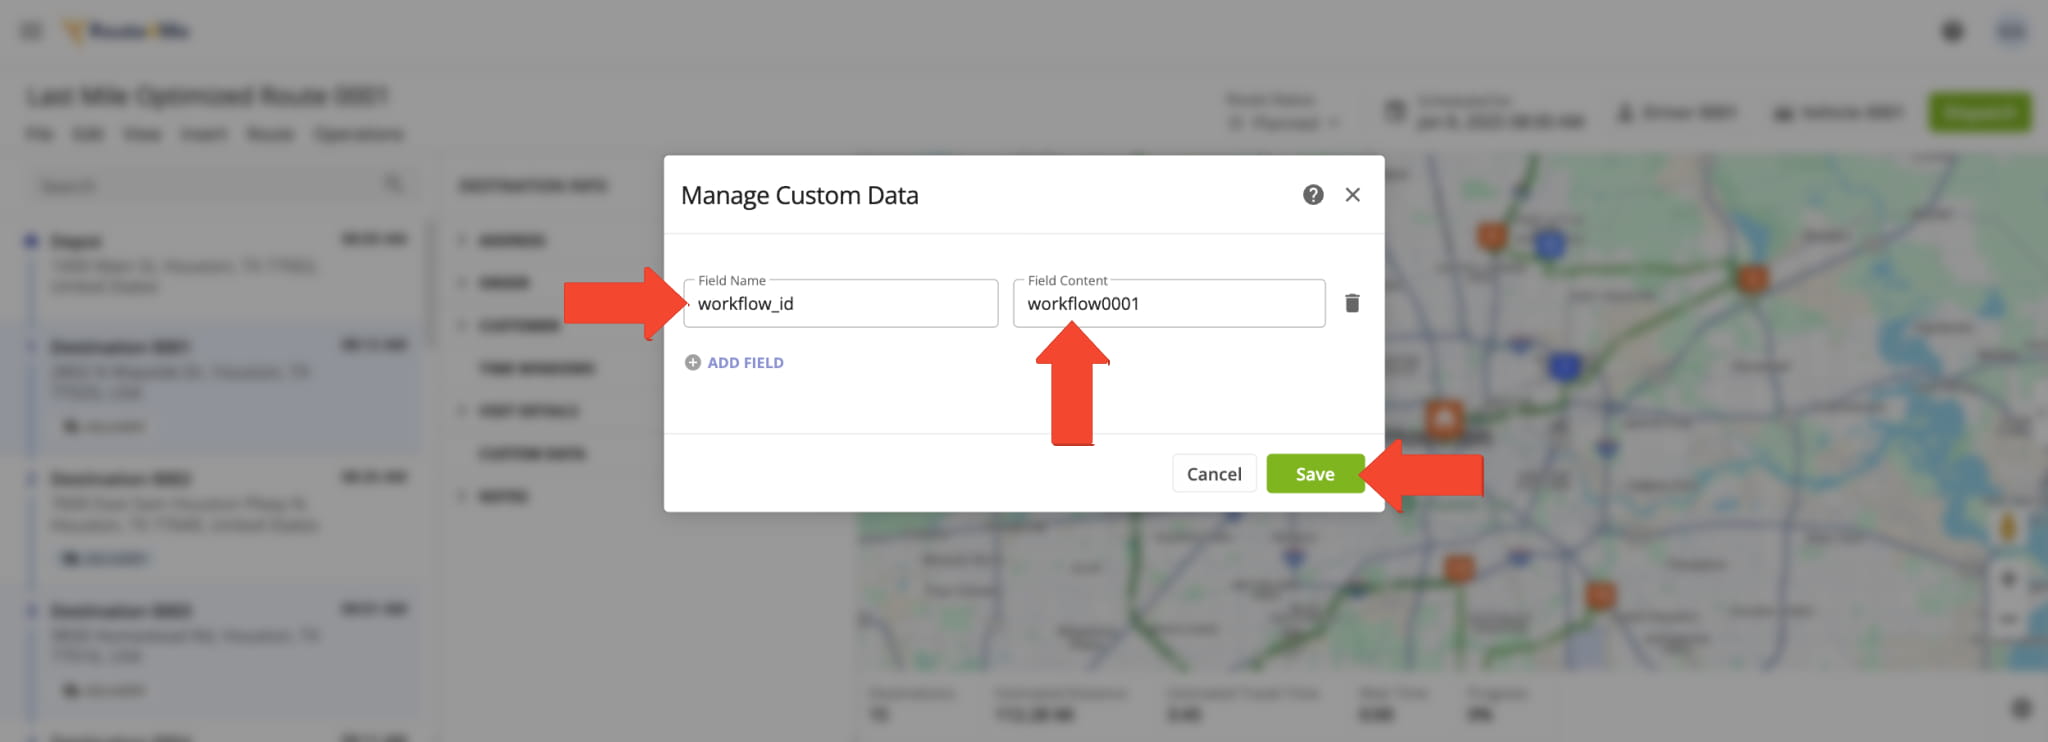
To enable workflows for specific stops, open the route in the Route Editor and select the destination where you want the workflow applied. In the “Destination Info” panel, go to the “Custom Data” section and click the Pencil Icon.
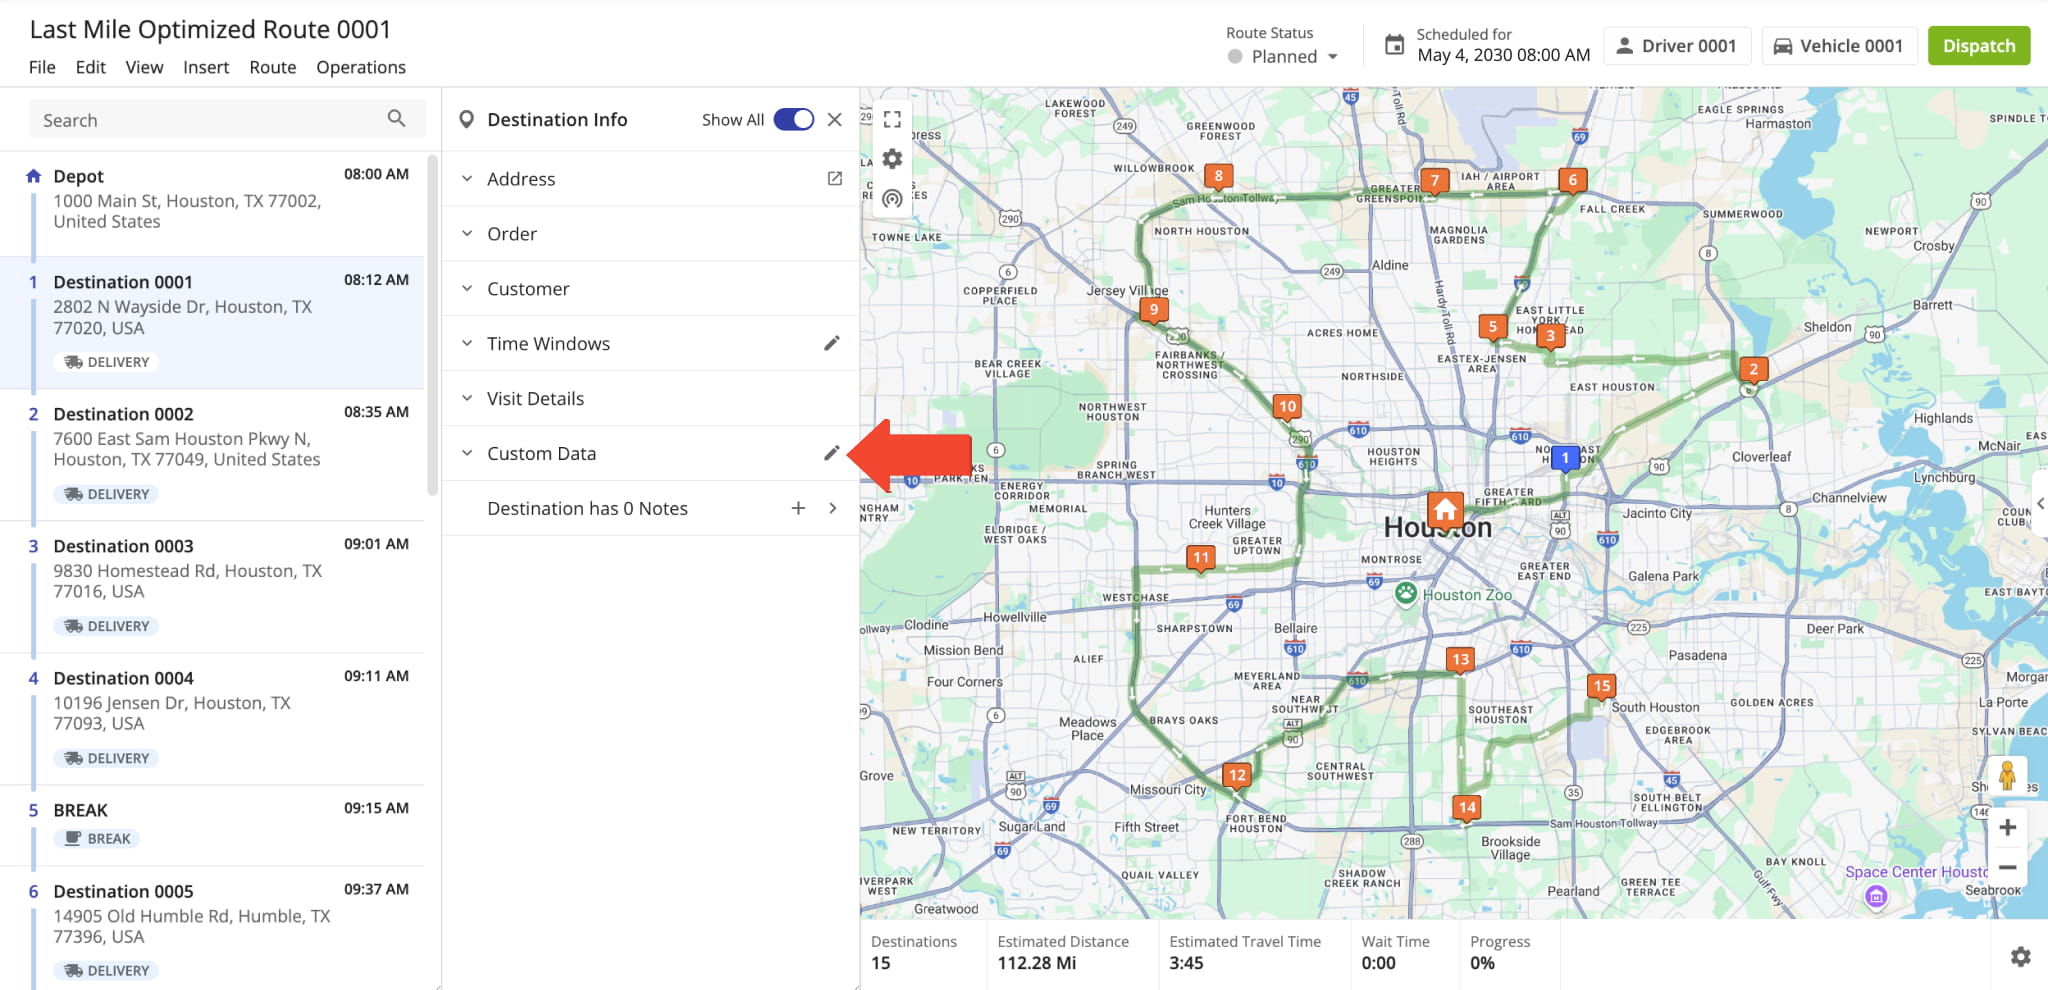
Add a new field with the “workflow_id” key, and enter the Workflow ID in the value field.
Once workflows are enabled and the route is dispatched, drivers navigate their routes in the Route4Me mobile app. When they arrive at a destination, they are automatically prompted to complete the mandatory workflow tasks for that destination.
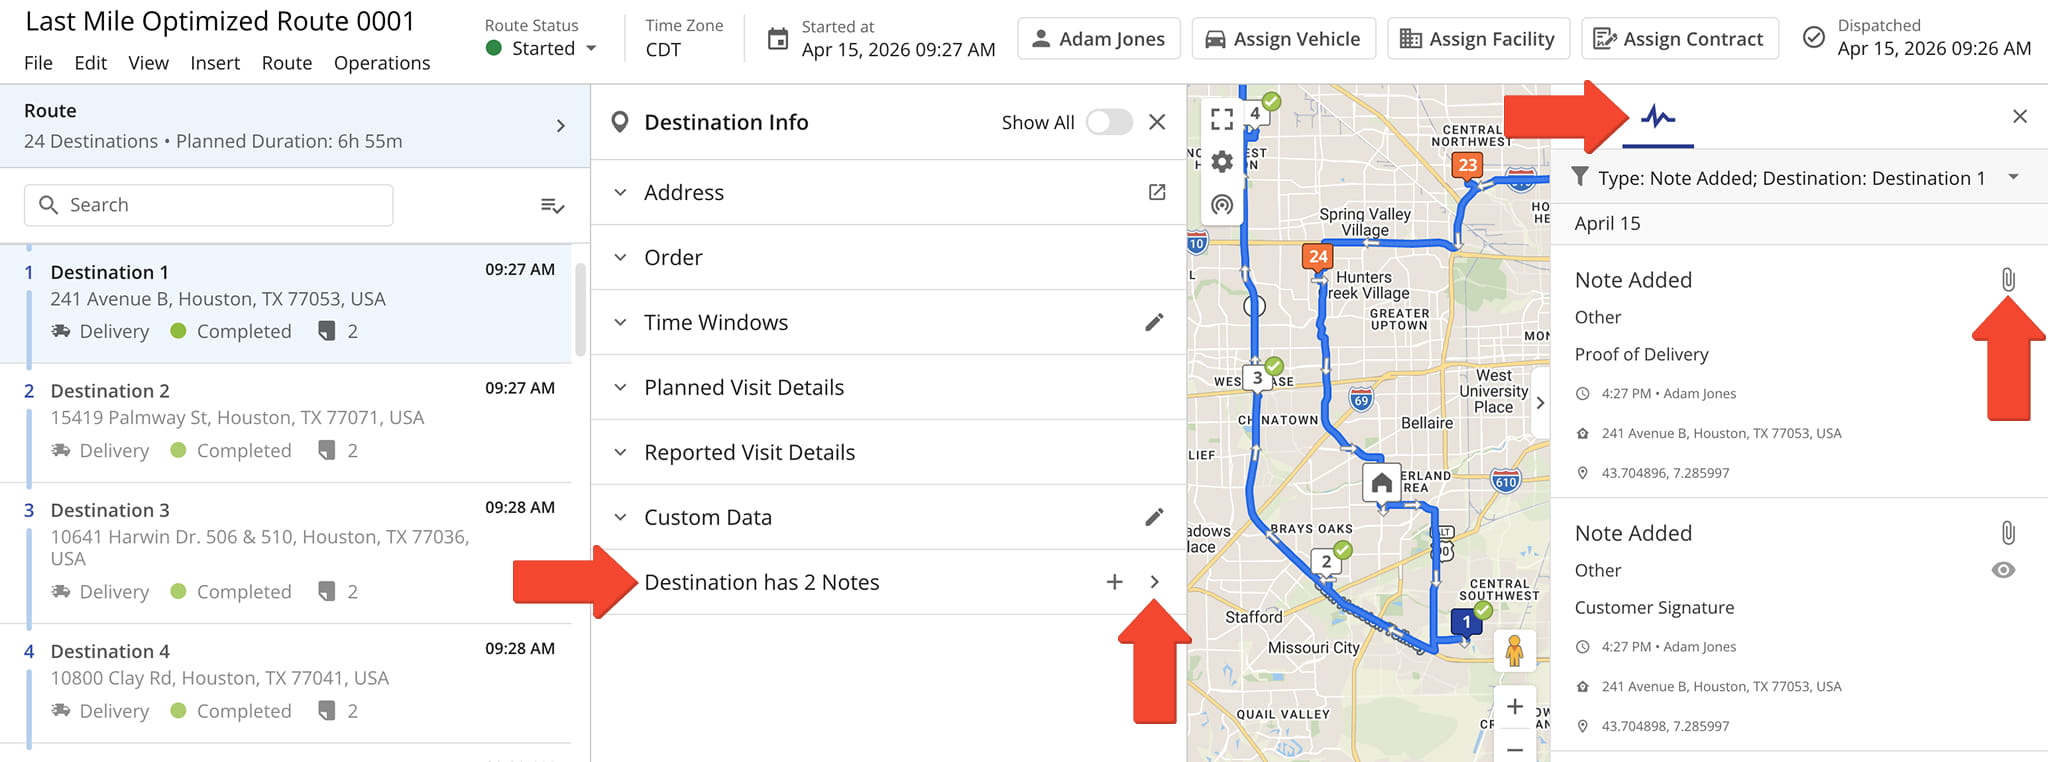
Open the route in the Route Editor and click a specific stop in the Routes List to open its “Destination Info“. Scroll to the bottom and click the arrow to open the Notes panel.
From the Notes panel, click the Paperclip Icon to view all attached items, including text notes, images, and signatures captured at the destination by the assigned user.
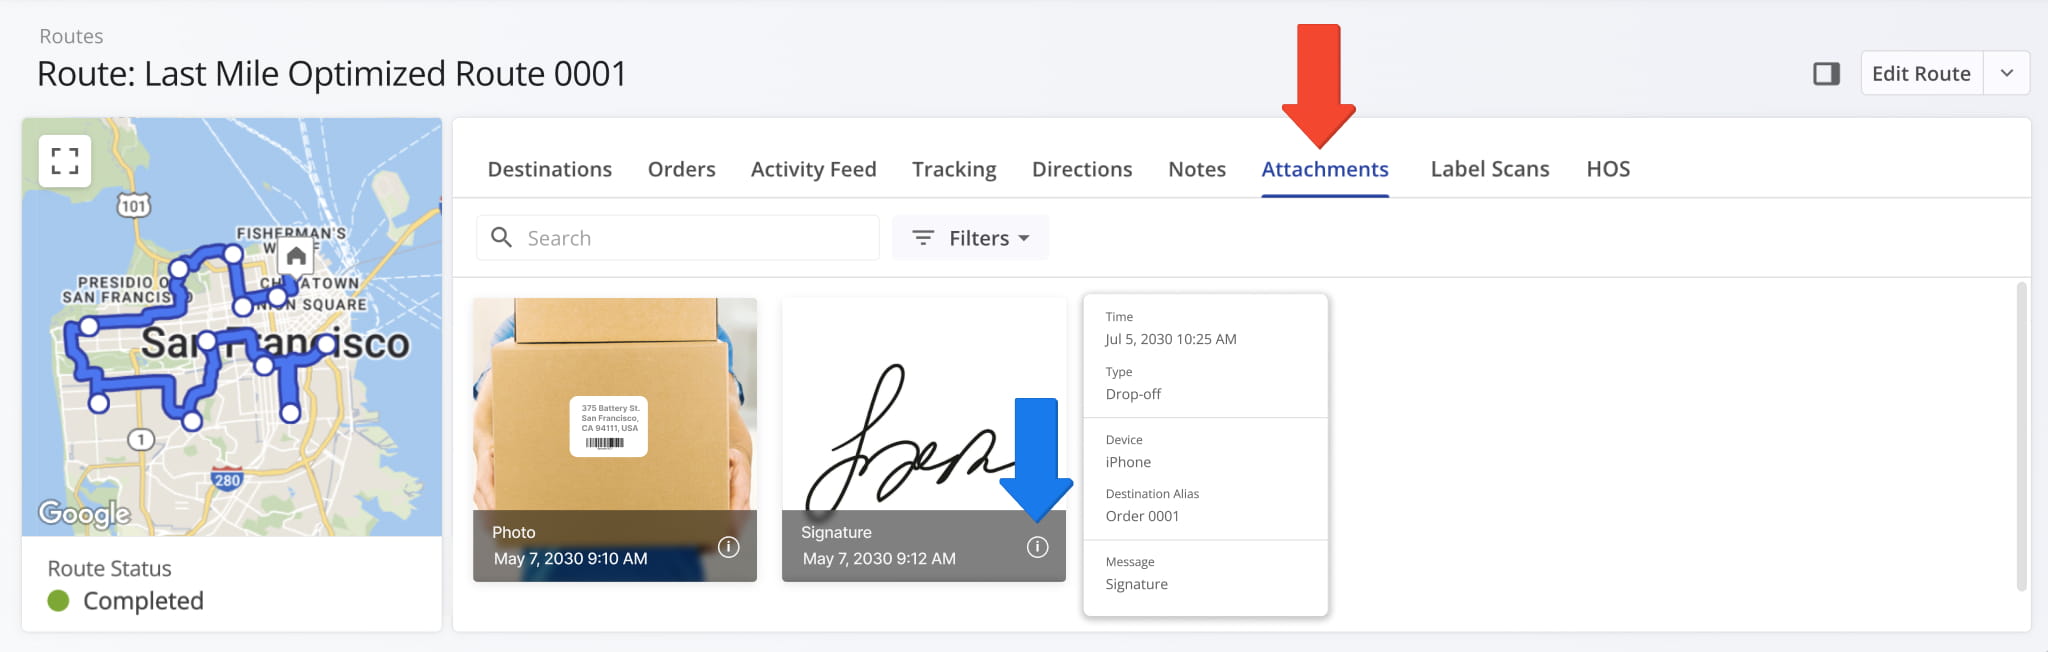
You can also view destination notes in Route Snapshots and Destination Snapshots. Go to the “Notes” tab and hover over the icons in the “File” and “Attachment” columns to preview attachments.
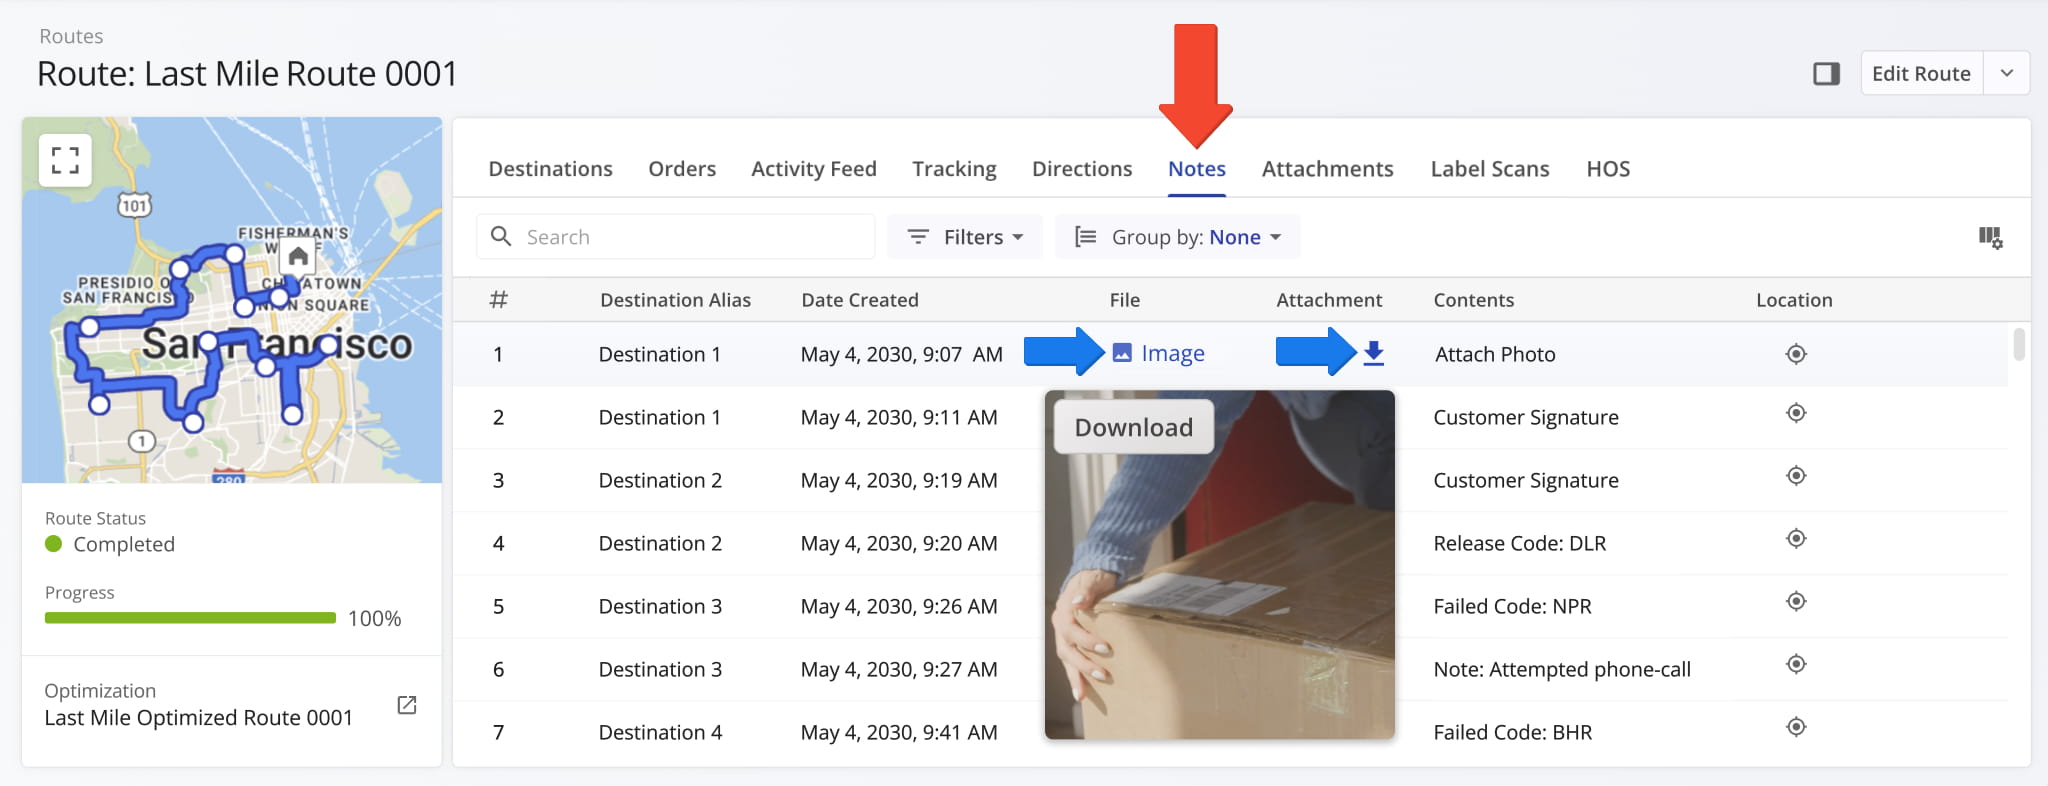
The “Attachments” tab in Route and Destination Snapshots provides an overview of all attachments, including timestamps and additional details when you hover over the information icon.
To ensure compliance and transparency, notes cannot be edited on the Route4Me web platform. They can only be viewed, exported, or deleted after creation.
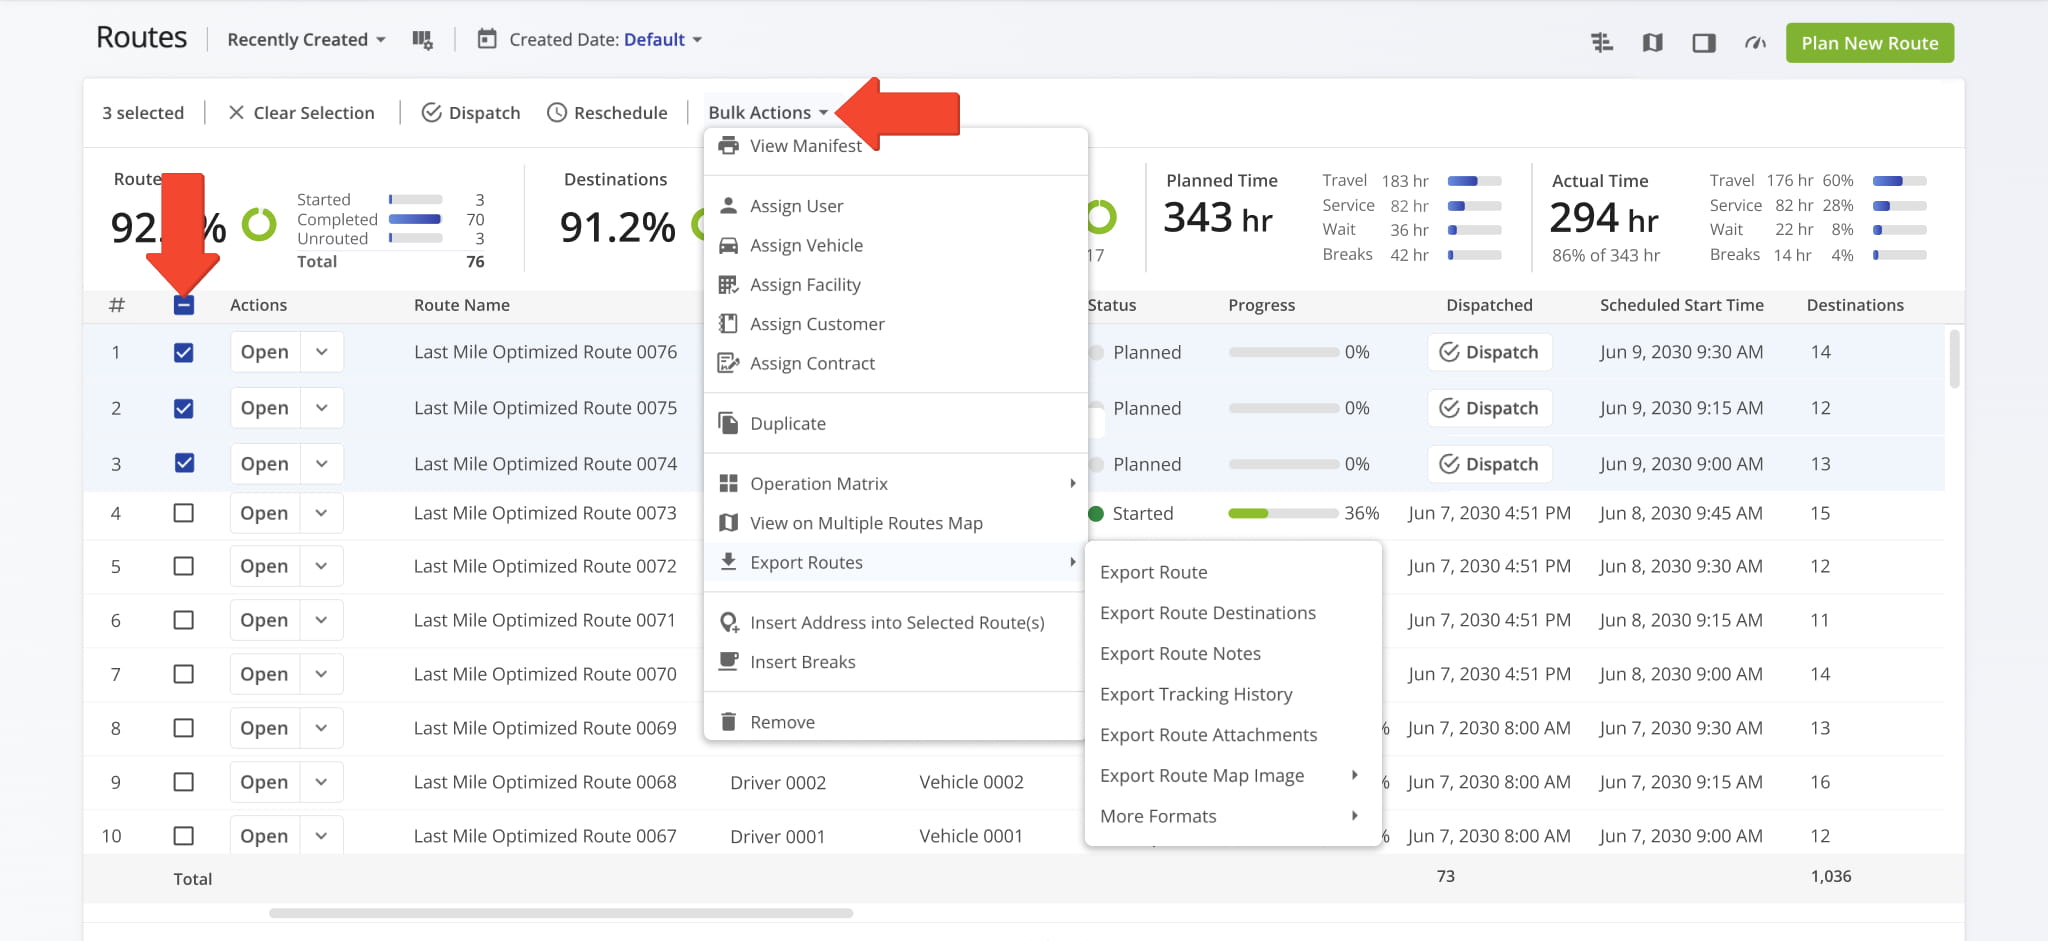
Export A Route From The Routes Page
To export a route from the Routes Page, click the Down Arrow next to the route, hover over “Export Route”, and select your preferred export option.
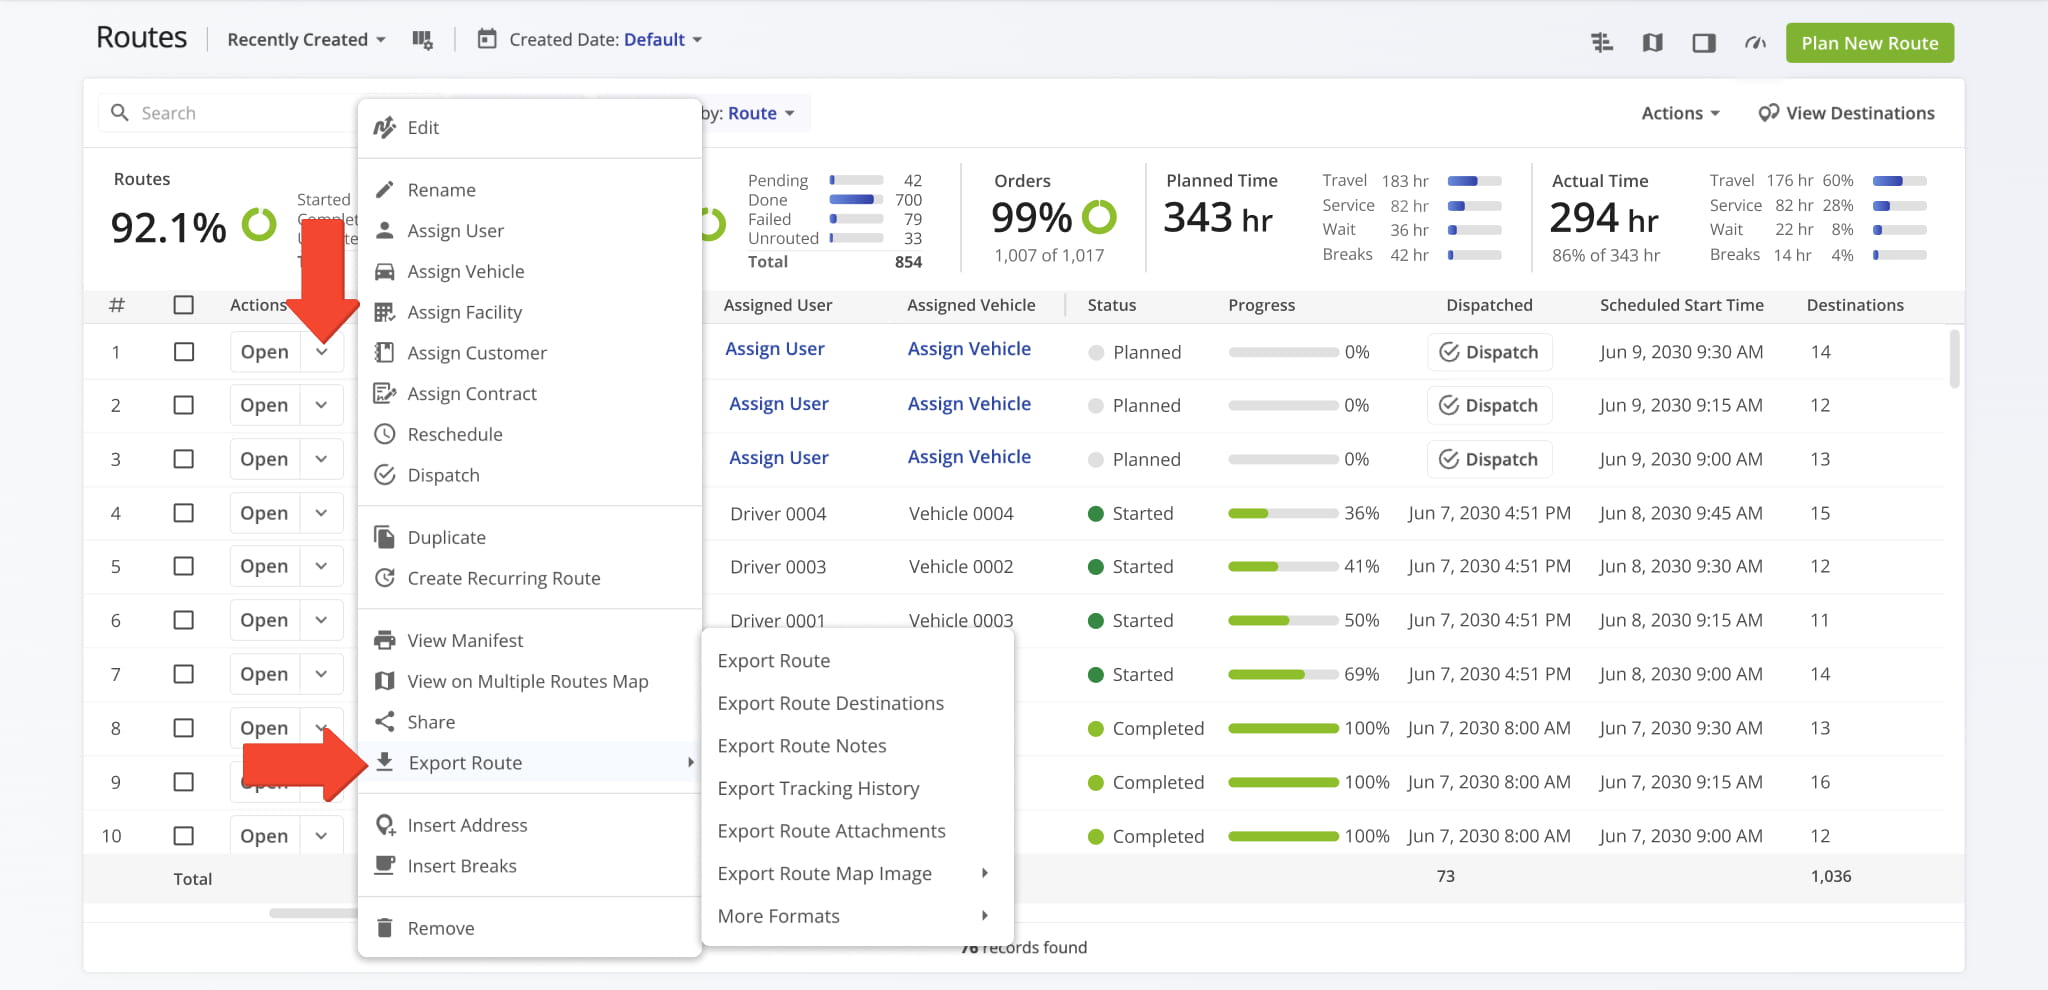
To export data for multiple routes, select the routes you want to export. Click “Bulk Actions”, hover over “Export Routes”, and choose an export option.
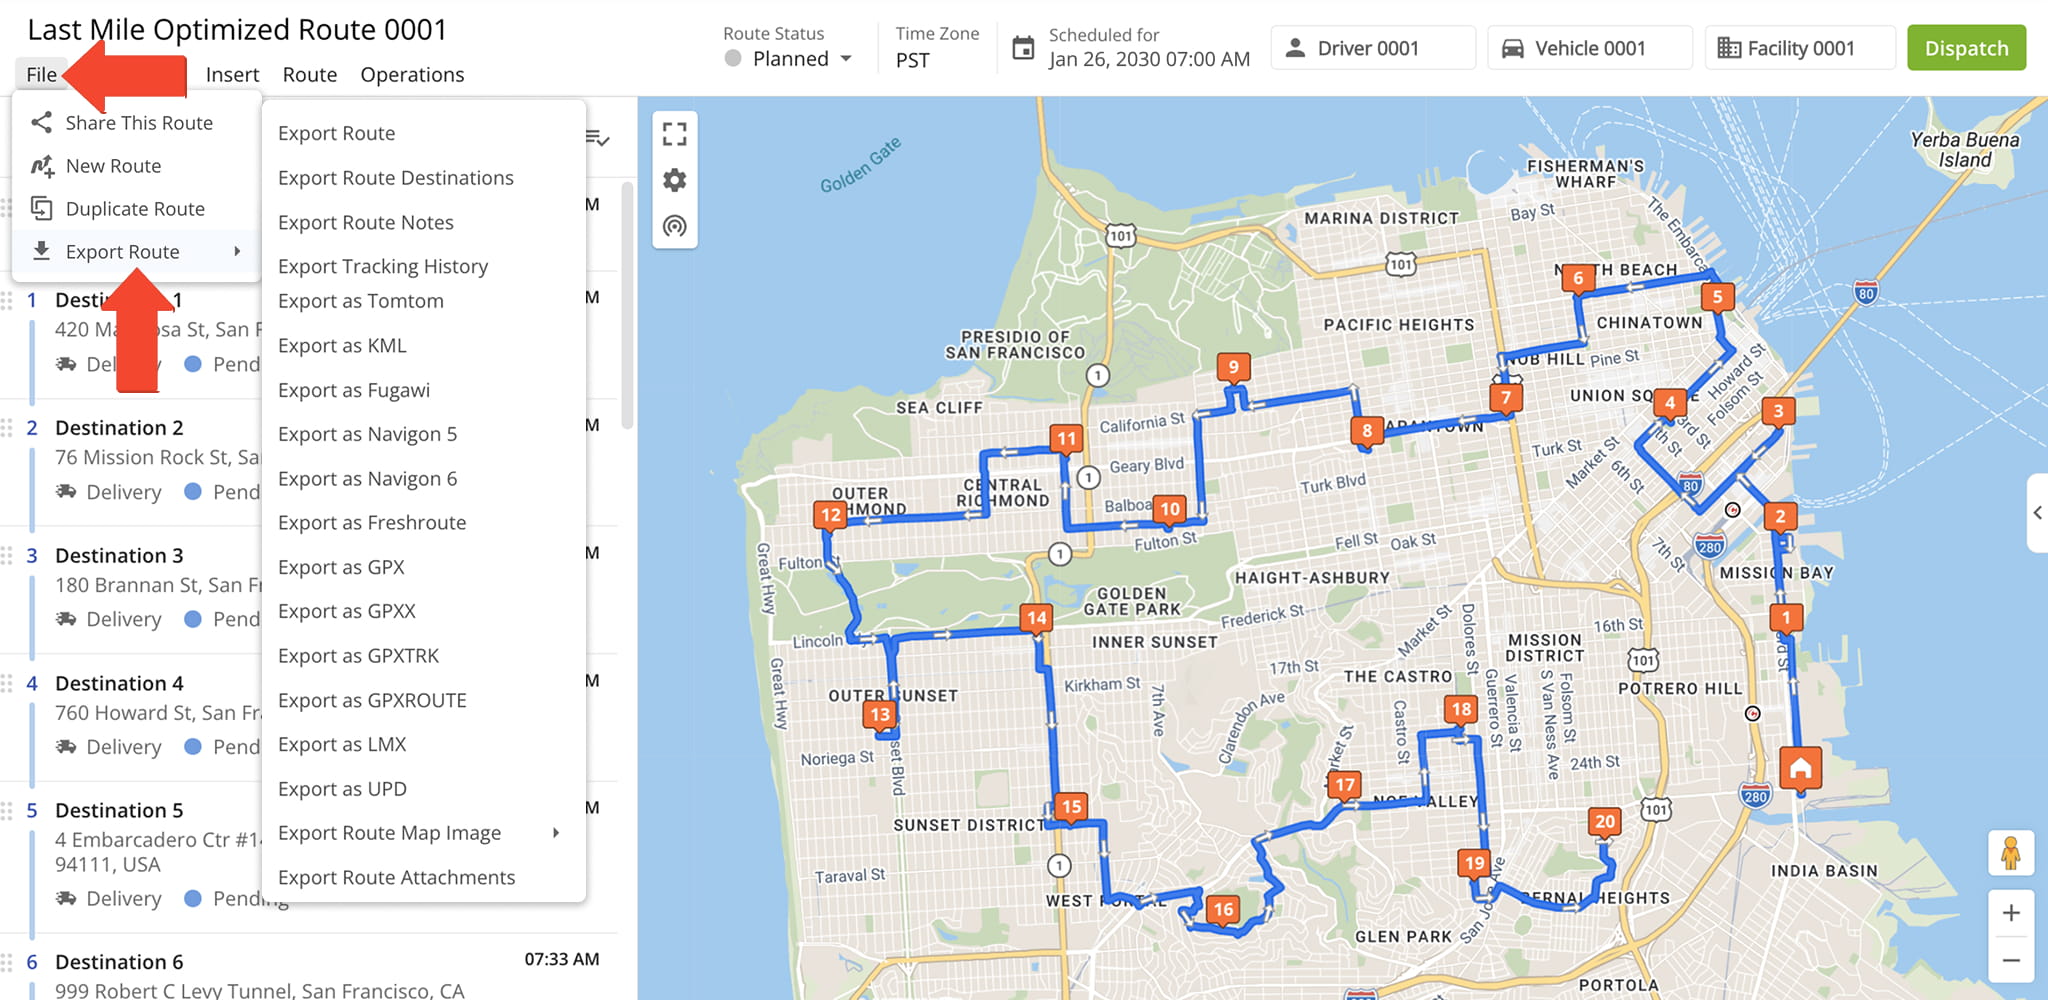
Export A Route From The Routes Editor
From the Route Editor, click “File” in the top menu bar, hover over “Export Route”, and choose an export format.
You can export the route as a CSV file, map image, tracking data, or other available formats, and customize the data included such as destination details, schedule information, notes, or tracking details.
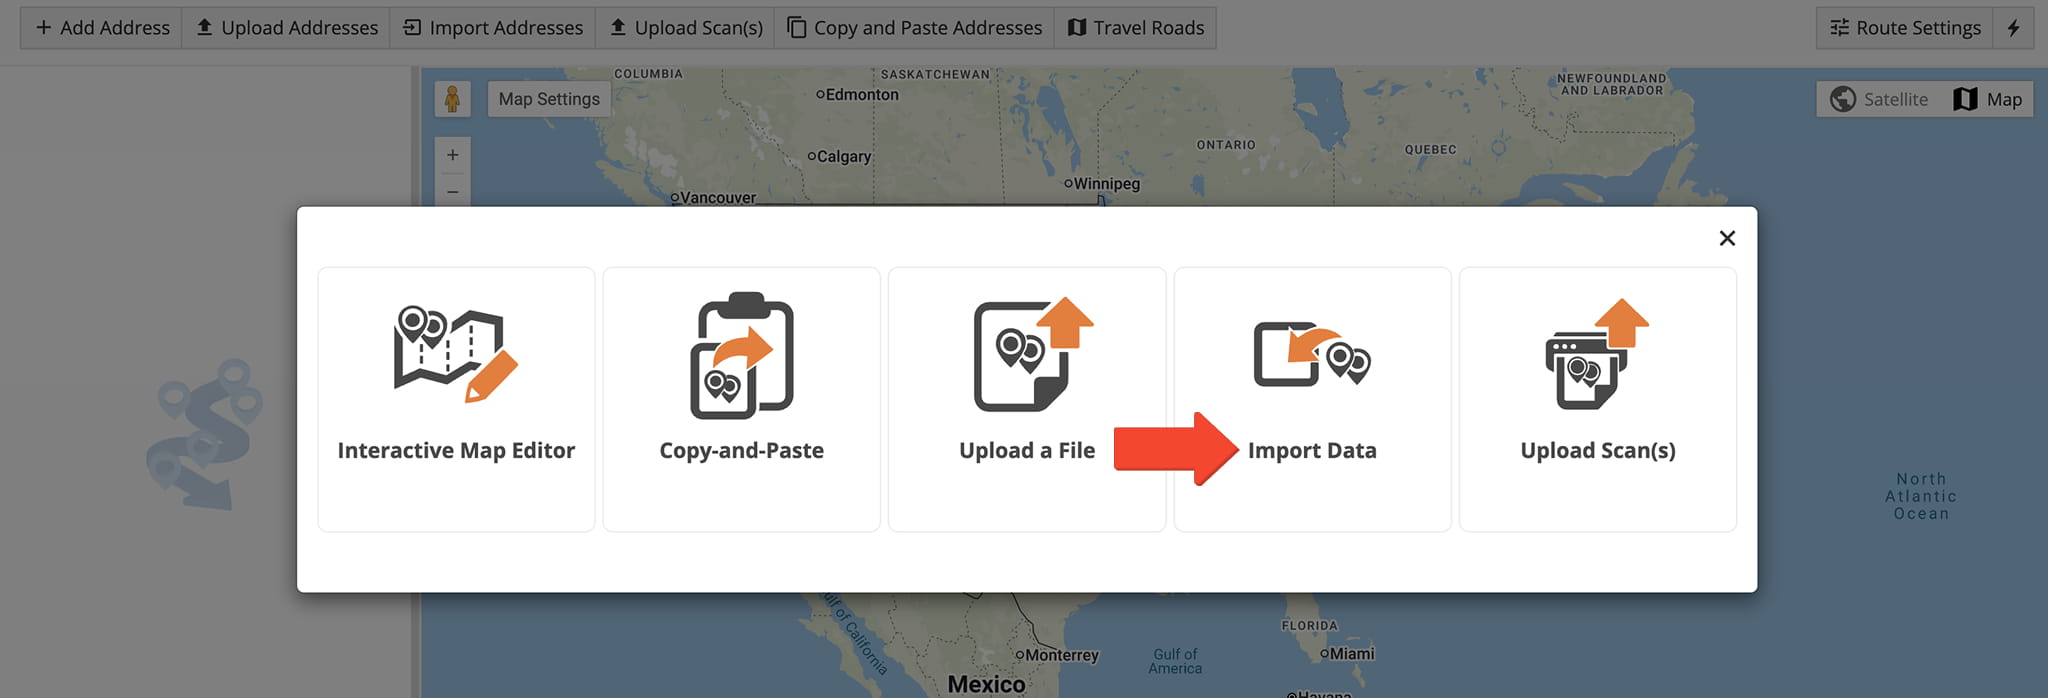
To upload addresses from Google Drive, start by creating a new route and selecting an address import method. Click “Import Data“.
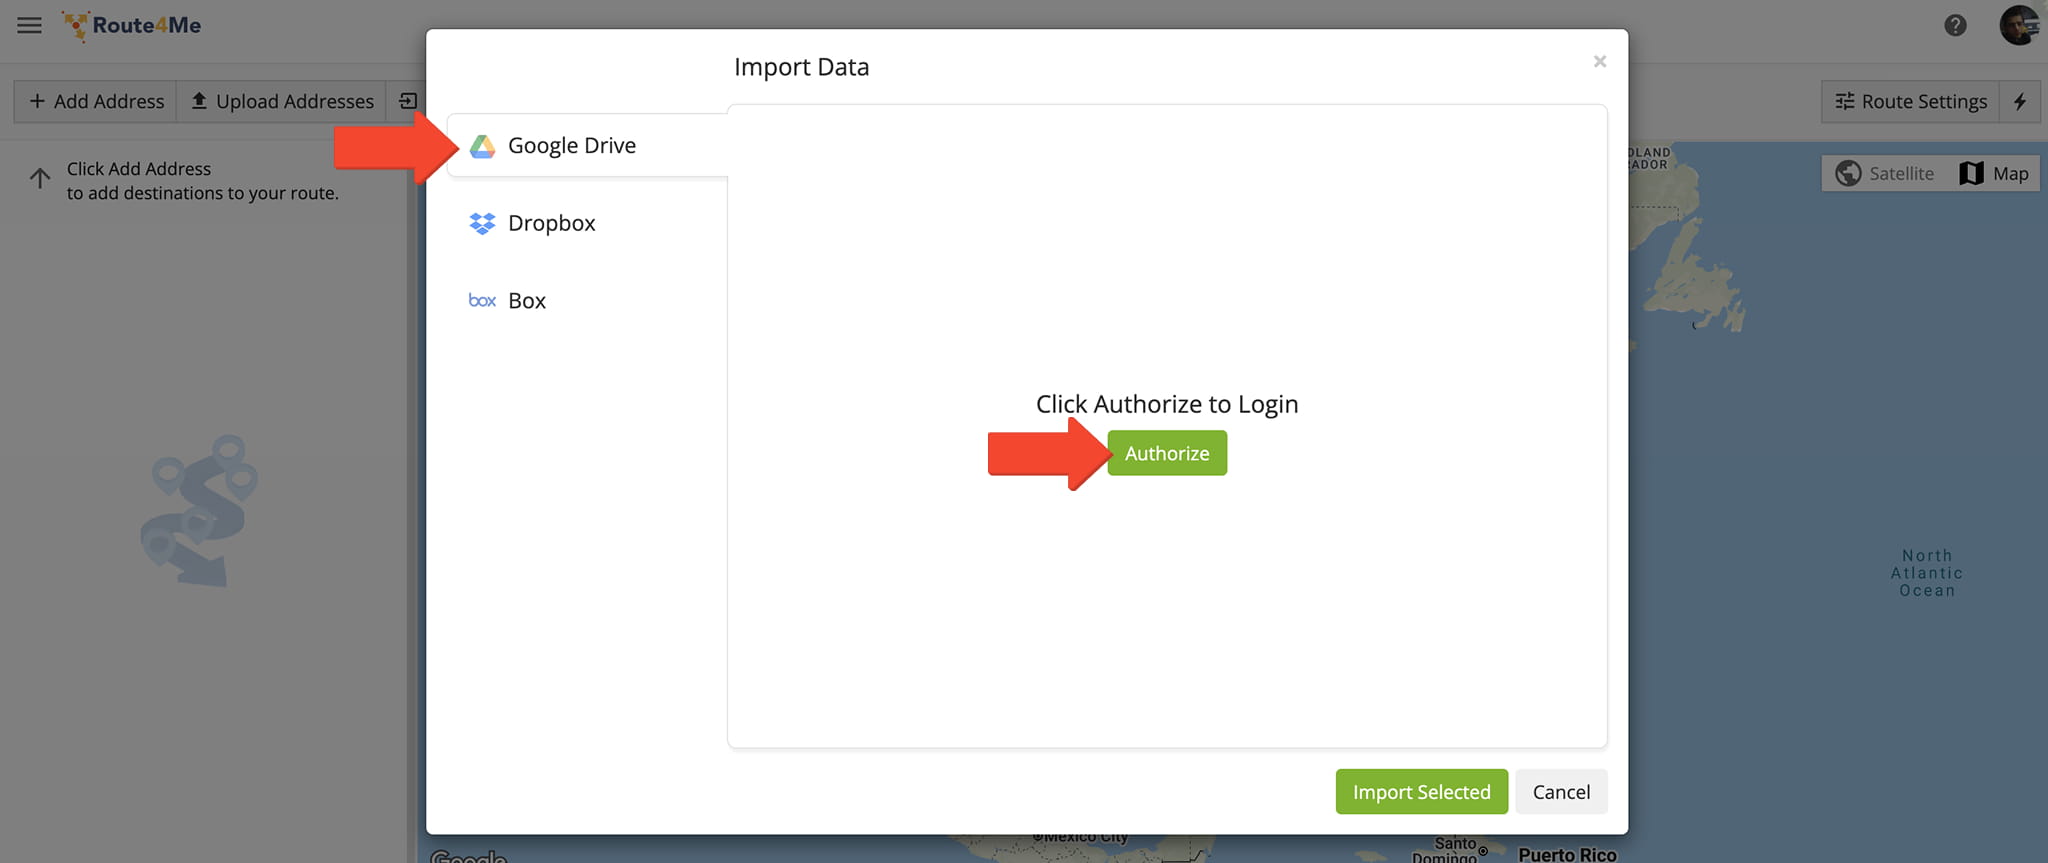
Then go to the “Google Drive” tab. Click “Authorize” and follow the prompts to connect your Google Drive account to Route4Me.
Once connected, select the file you want to upload and click “Import Selected“. Route4Me will sync the addresses from your file so you can review them before finalizing the import.
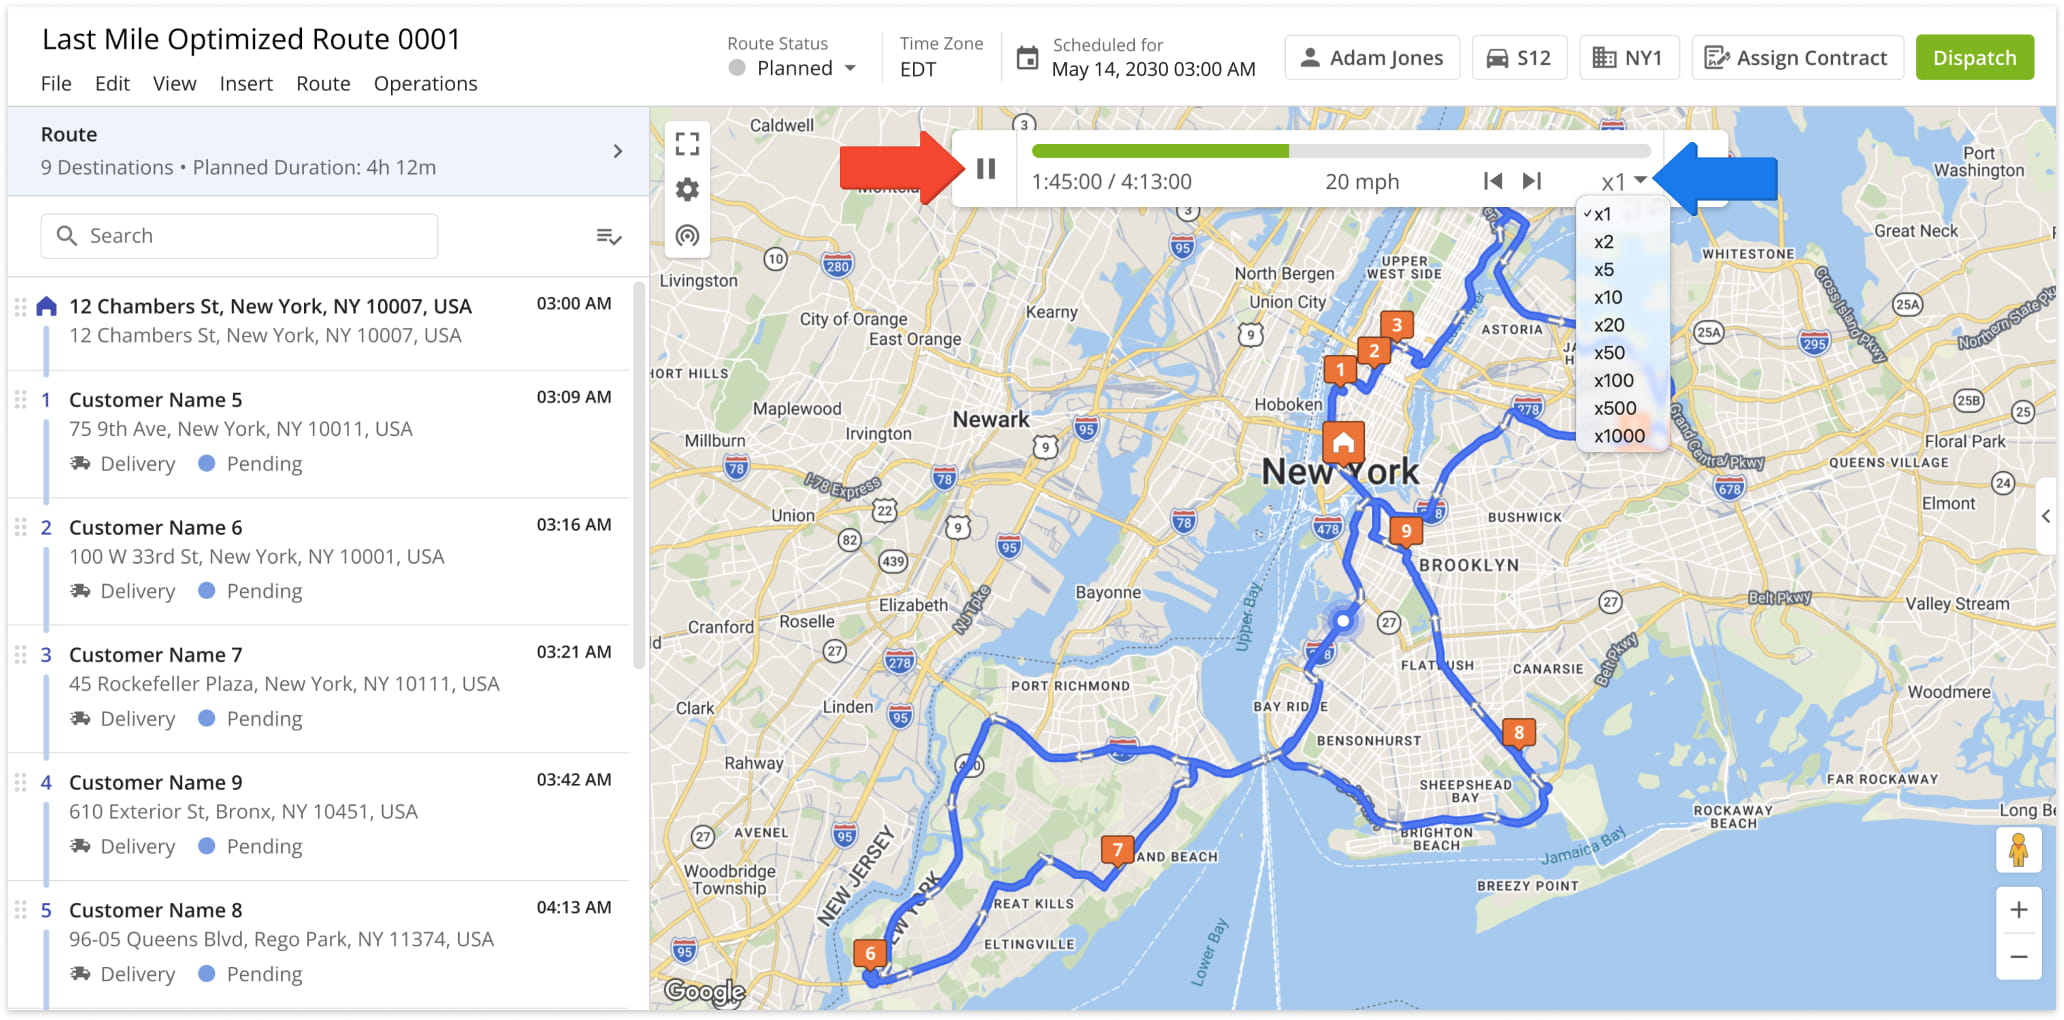
To view a route simulation in Route4Me, open the route in the Route Editor and navigate to “View” > “Simulation Tool” in the top menu. This will launch the route simulator.
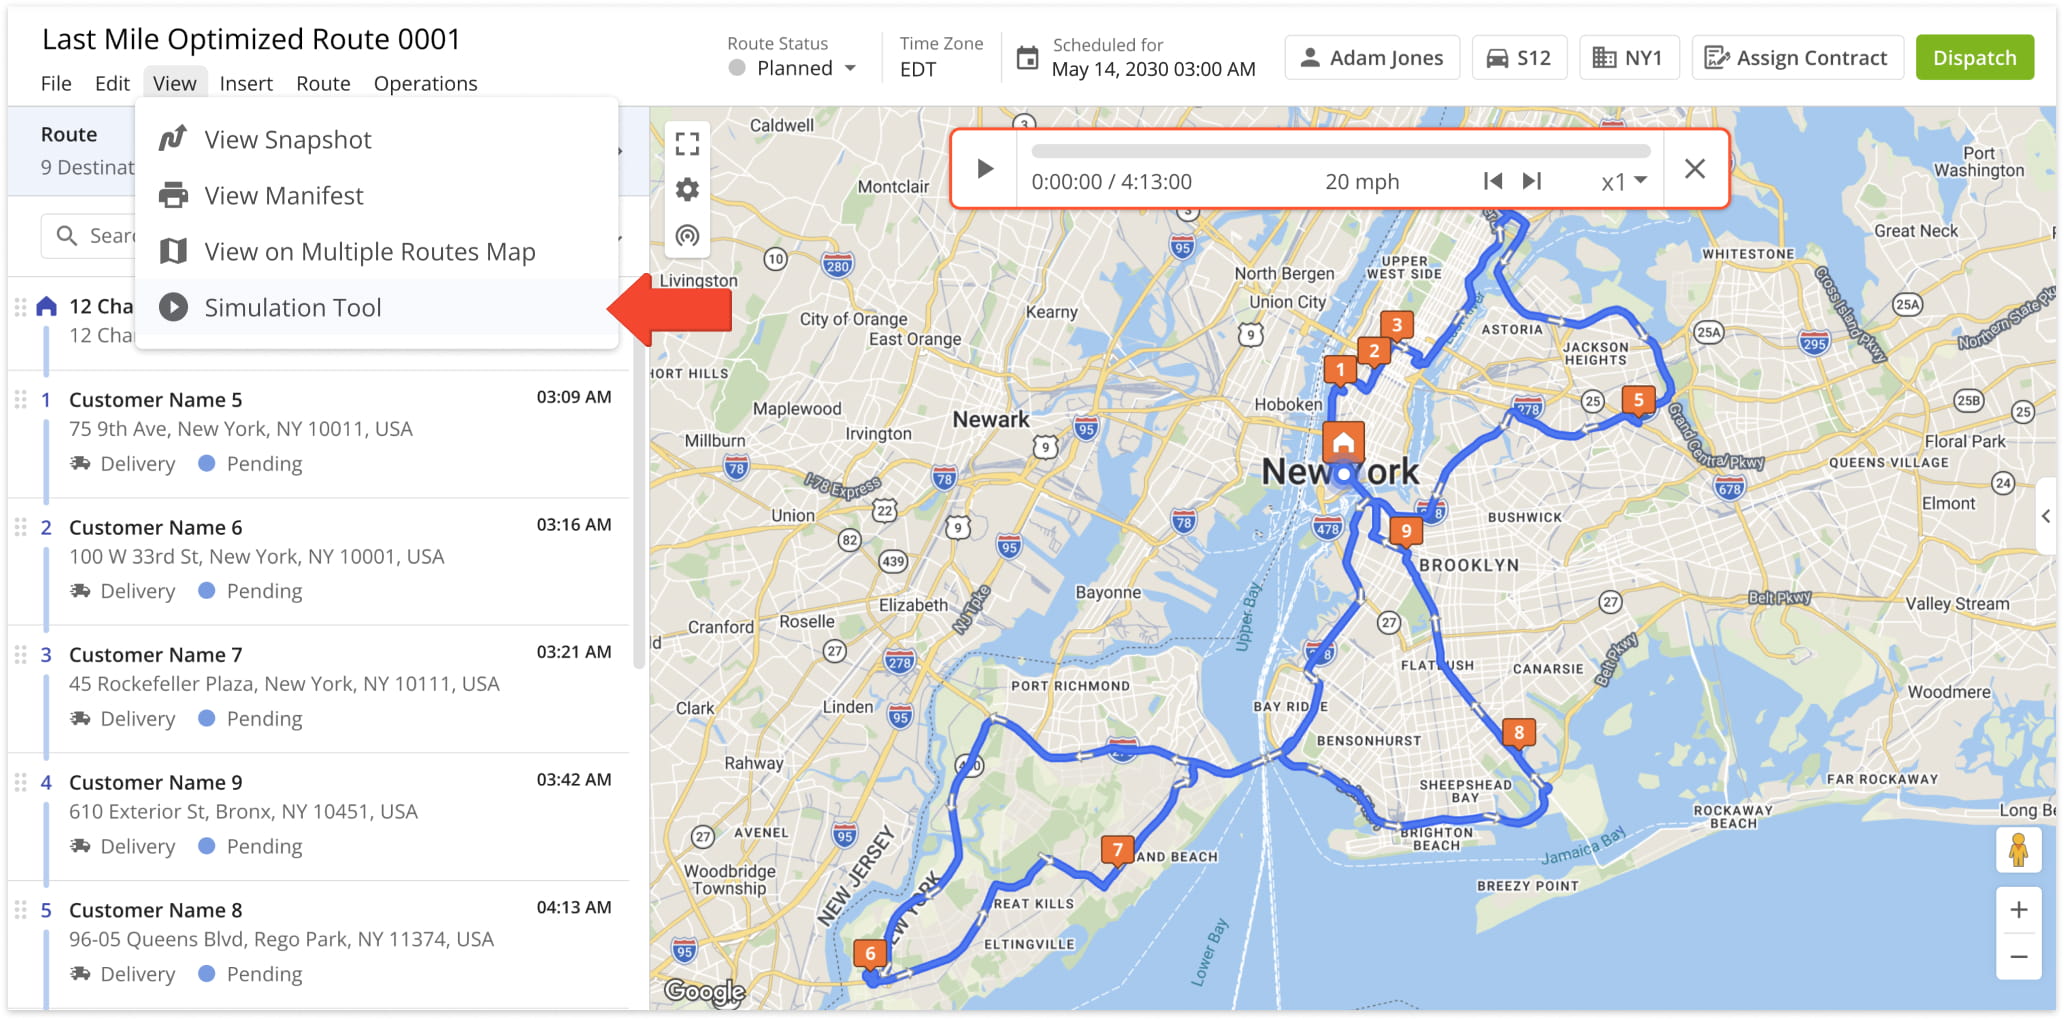
Click the “Play” button to start the animation of the route. You can adjust the playback speed using the Multiplier Menu on the right side of the screen.
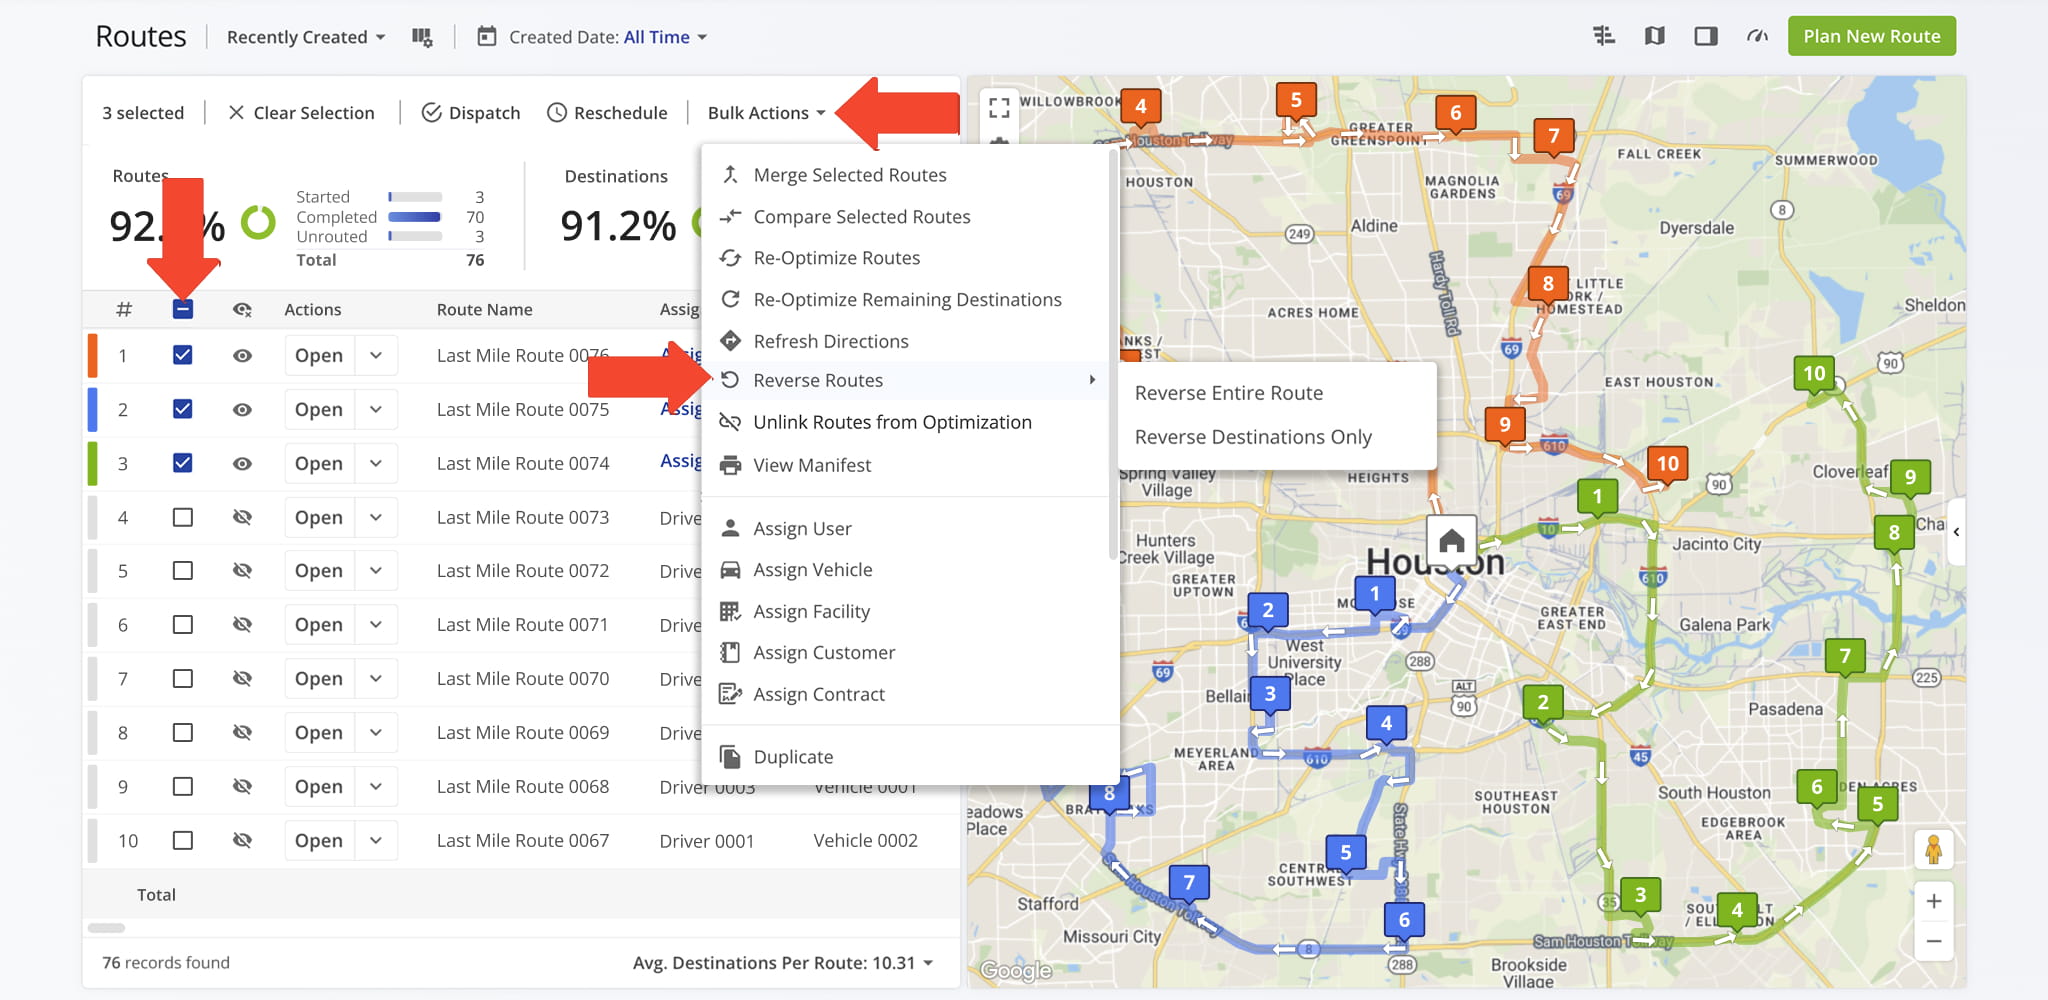
Reverse Routes From The Routes List
To reverse routes from the Routes List, select the route or routes you want to reverse, click “Bulk Actions“, and choose “Reverse Routes“. You will then see the following reversal options:
- Entire Route: Reverses the full route, including the start and end points
- Destinations Only: Reverses all stops while keeping the original start location
Select the option that best matches your needs. The route will update automatically.
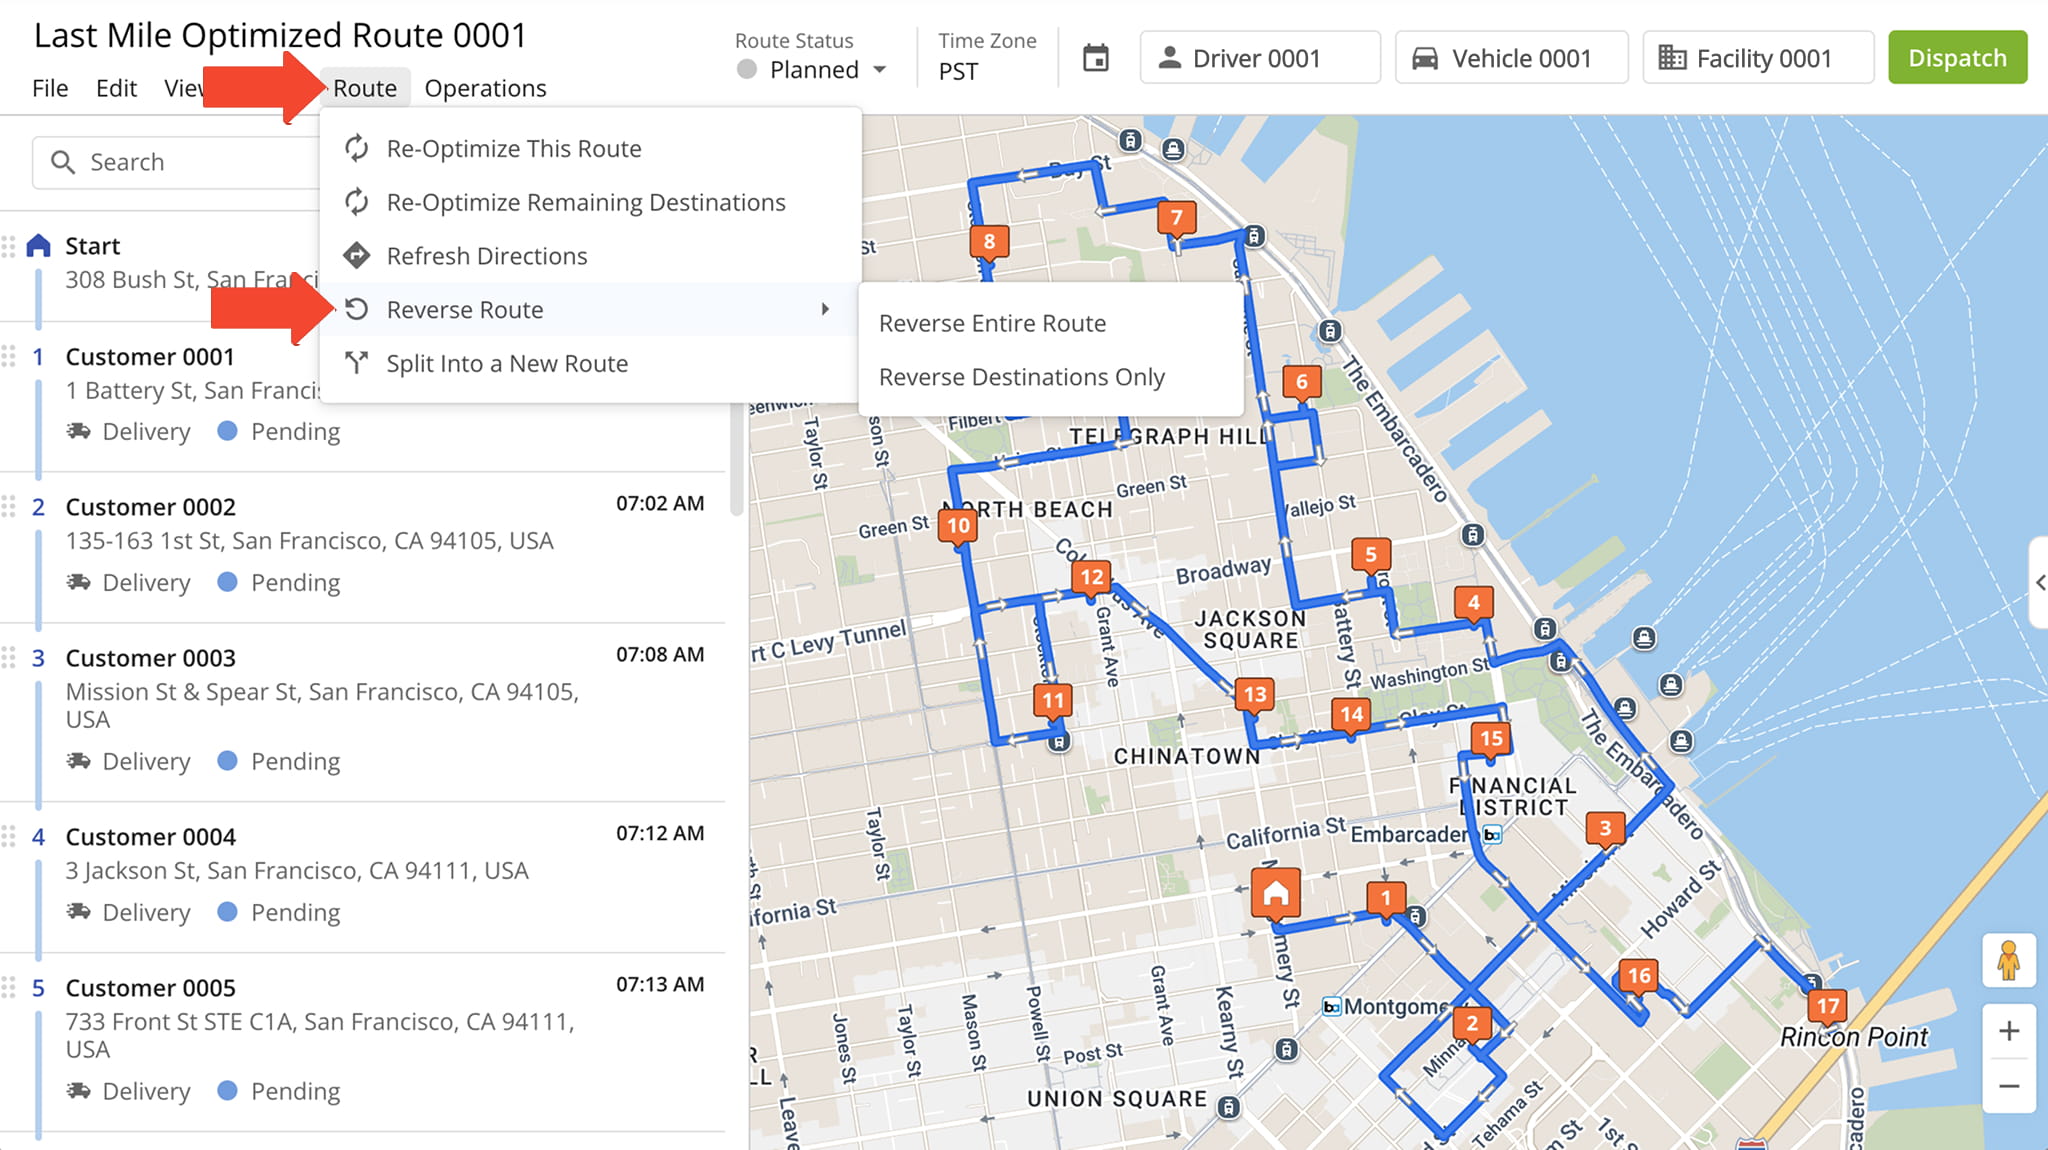
Reverse A Route In The Route Editor
To reverse a route in the Route Editor, click “Route” in the top menu bar, then select “Reverse Route“. You will then see the following reversal options:
- Entire Route: Reverses the full route, including the start and end points
- Destinations Only: Reverses all stops while keeping the original start location
Select the option that matches your needs. The route will automatically update with the new sequence in both the list of stops and the map.
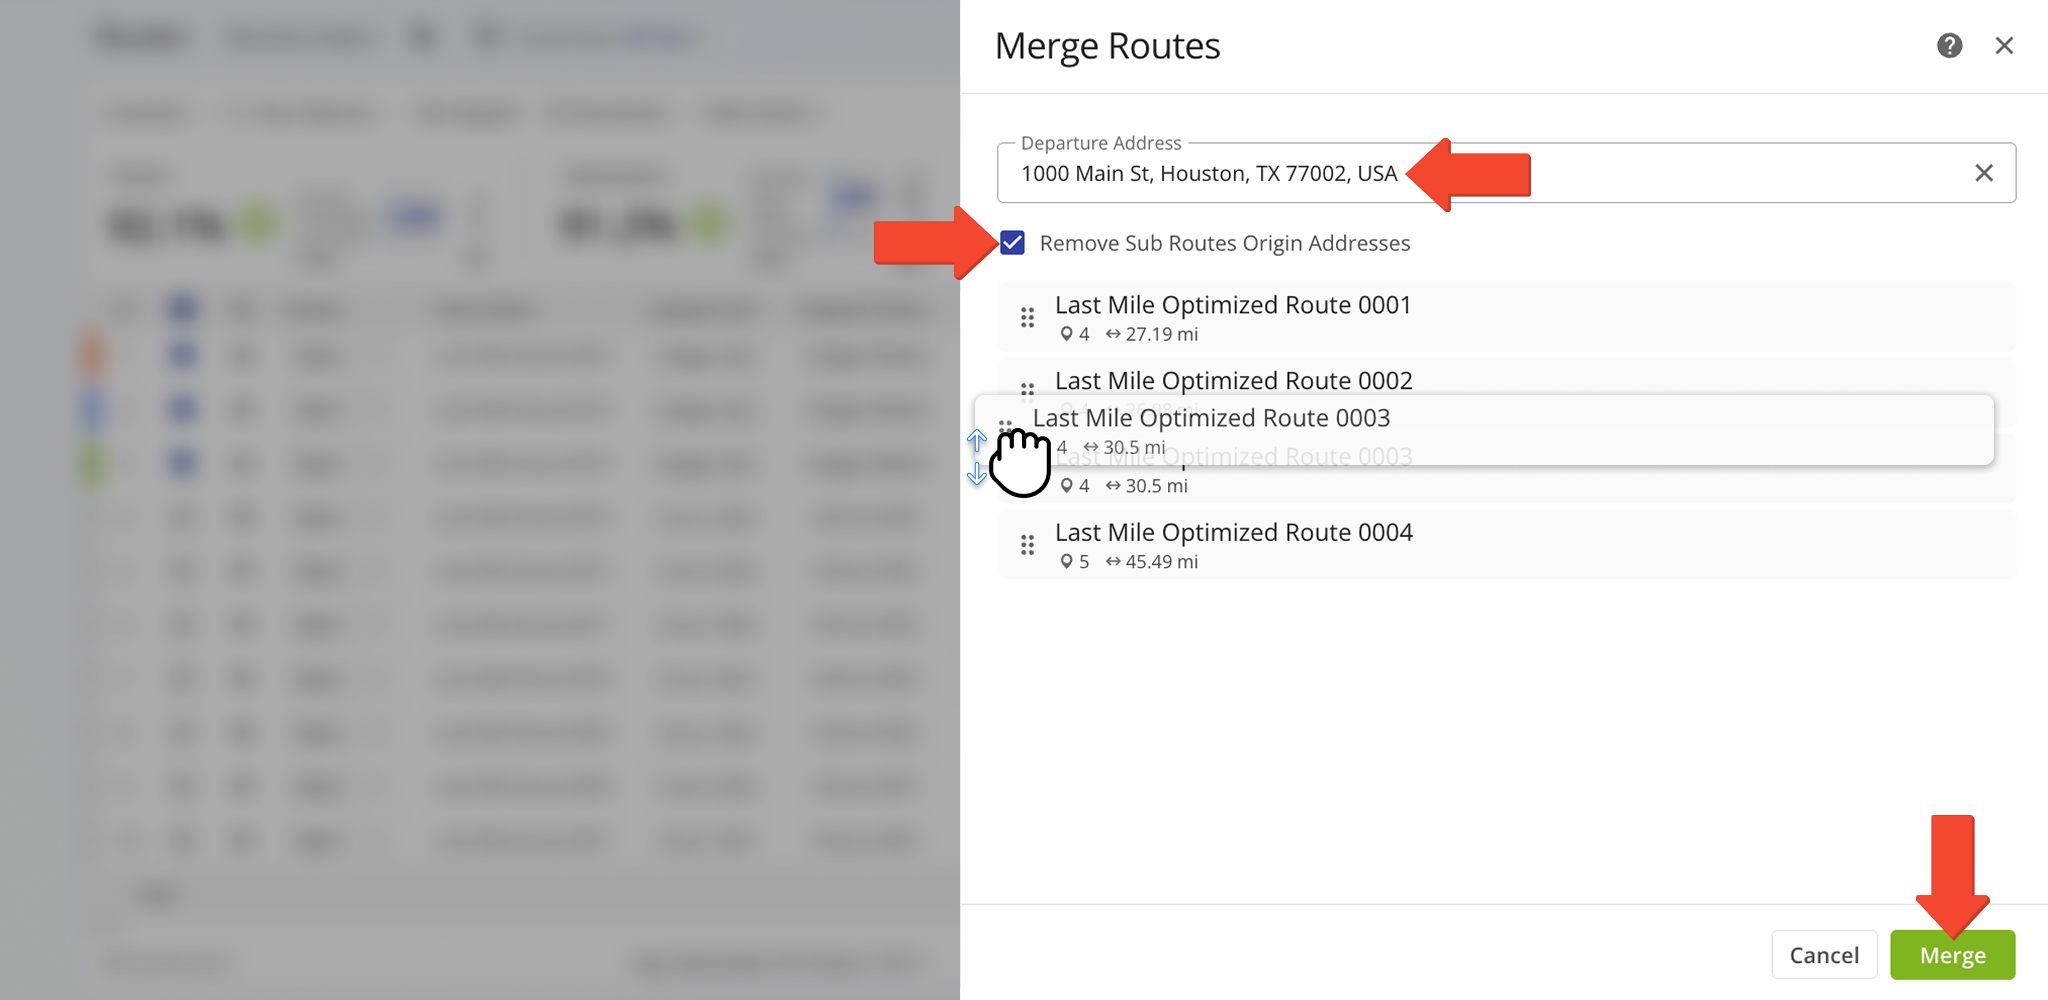
To combine routes, go to your Routes List and select the routes you want to merge. Click “Bulk Actions“, then select “Merge Selected Routes“.
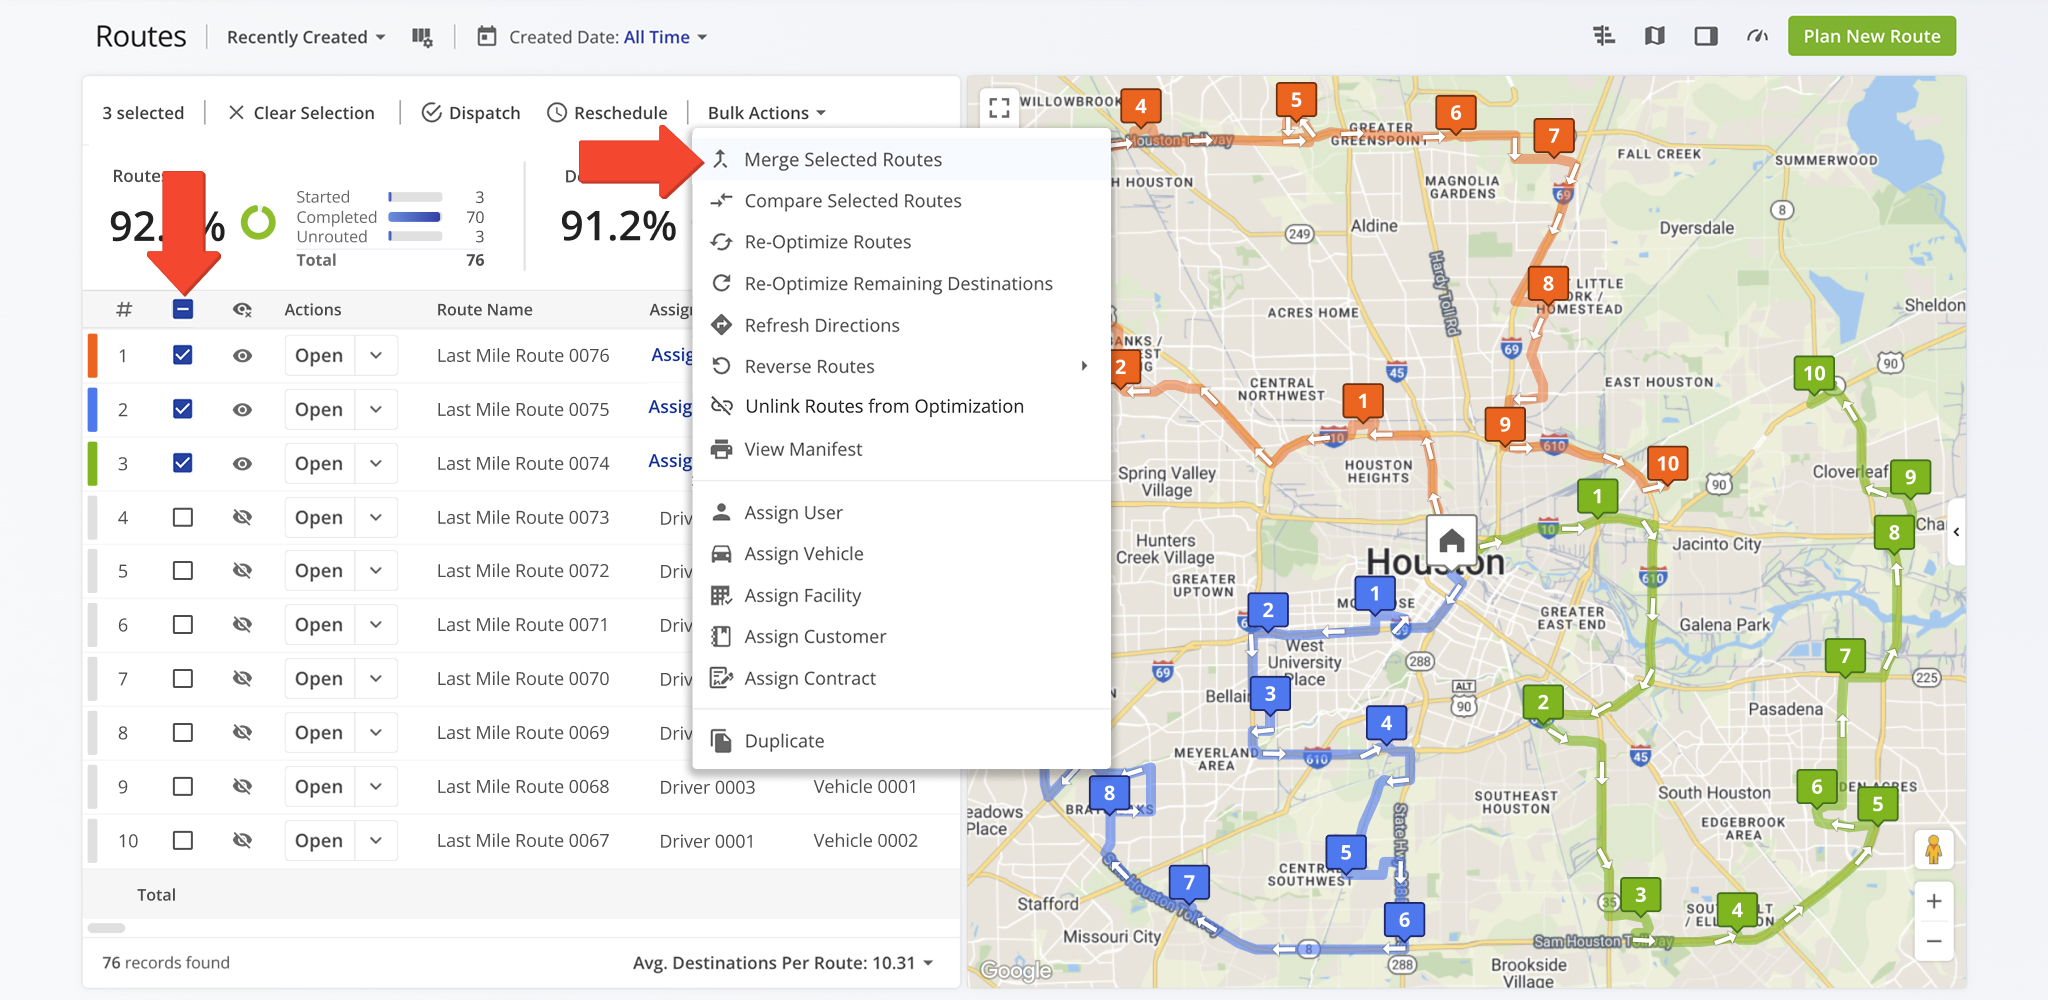
You can set a departure address for the new route. If no departure address is entered, Route4Me will use the departure address of the first sub-route. To use a different origin, drag the desired sub-route to the top of the list.
Click “Merge” to create a new optimized route combining all selected routes while keeping the original routes unchanged.
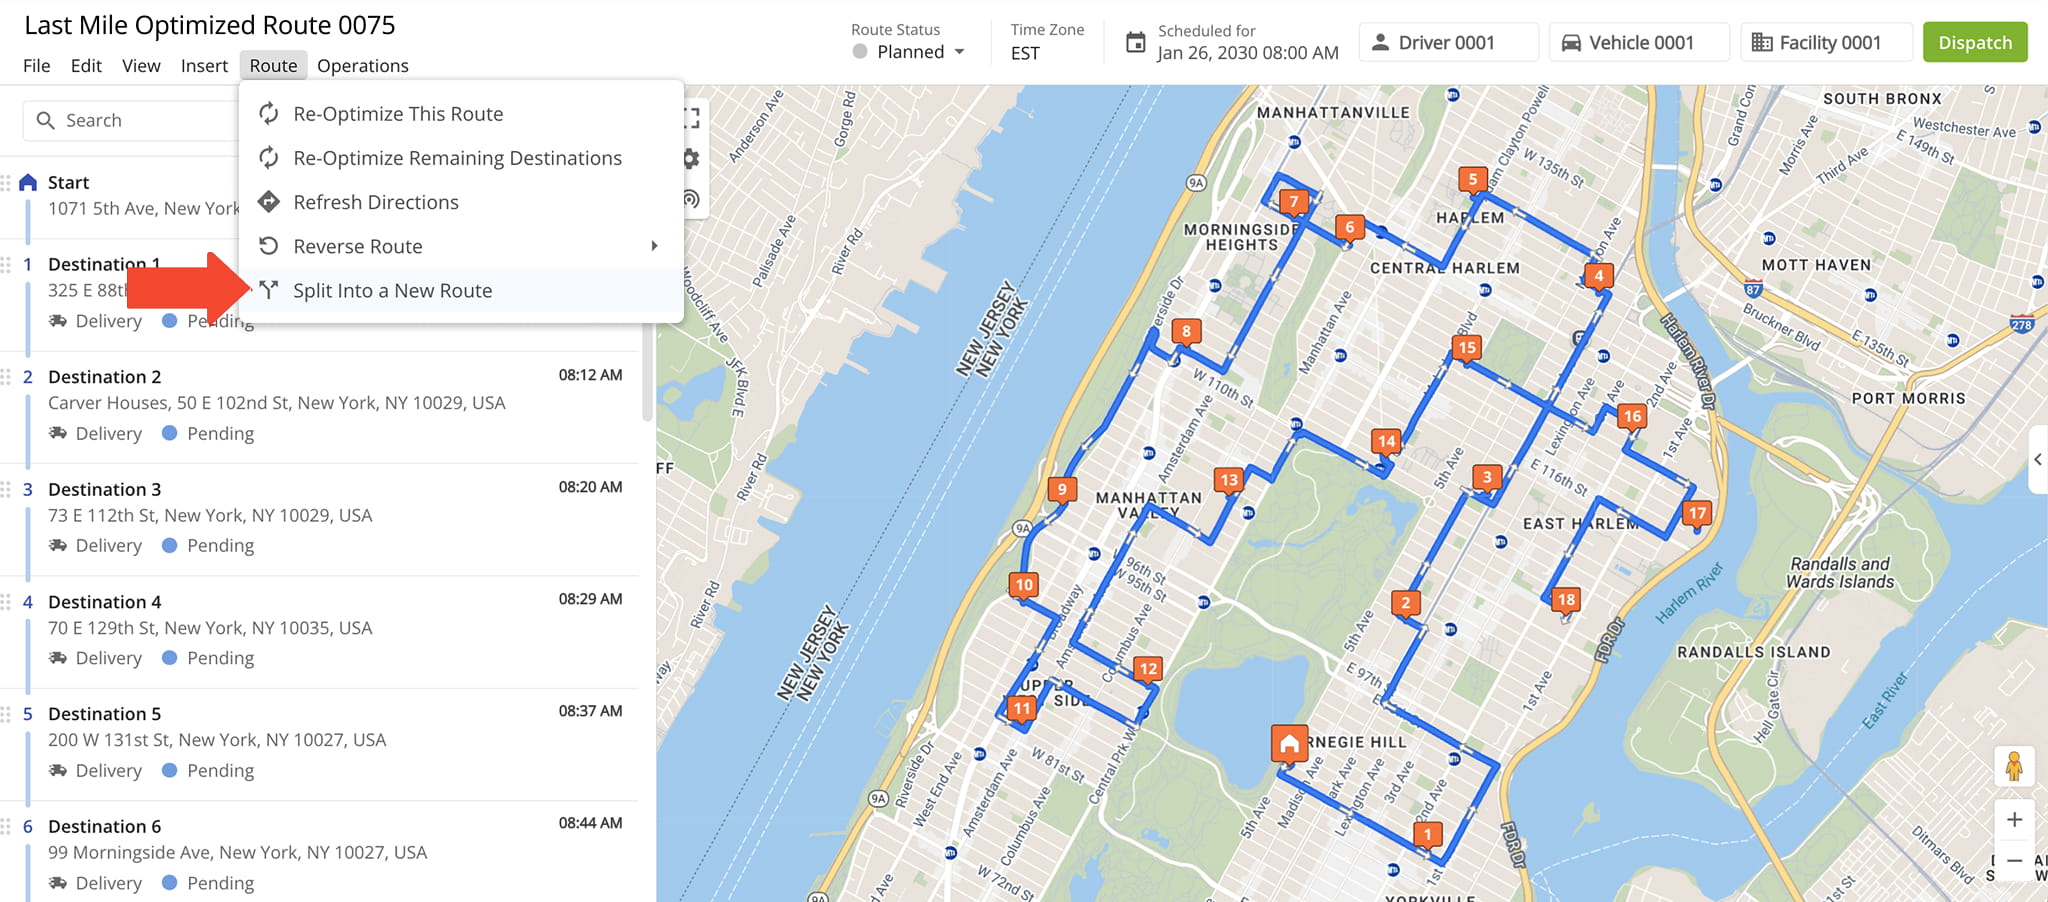
To split route addresses, open the route in the Route Editor. From the top menu, select “Route“, then click “Split Into a New Route“.
Next, select the stops you want to move by checking the boxes next to them.
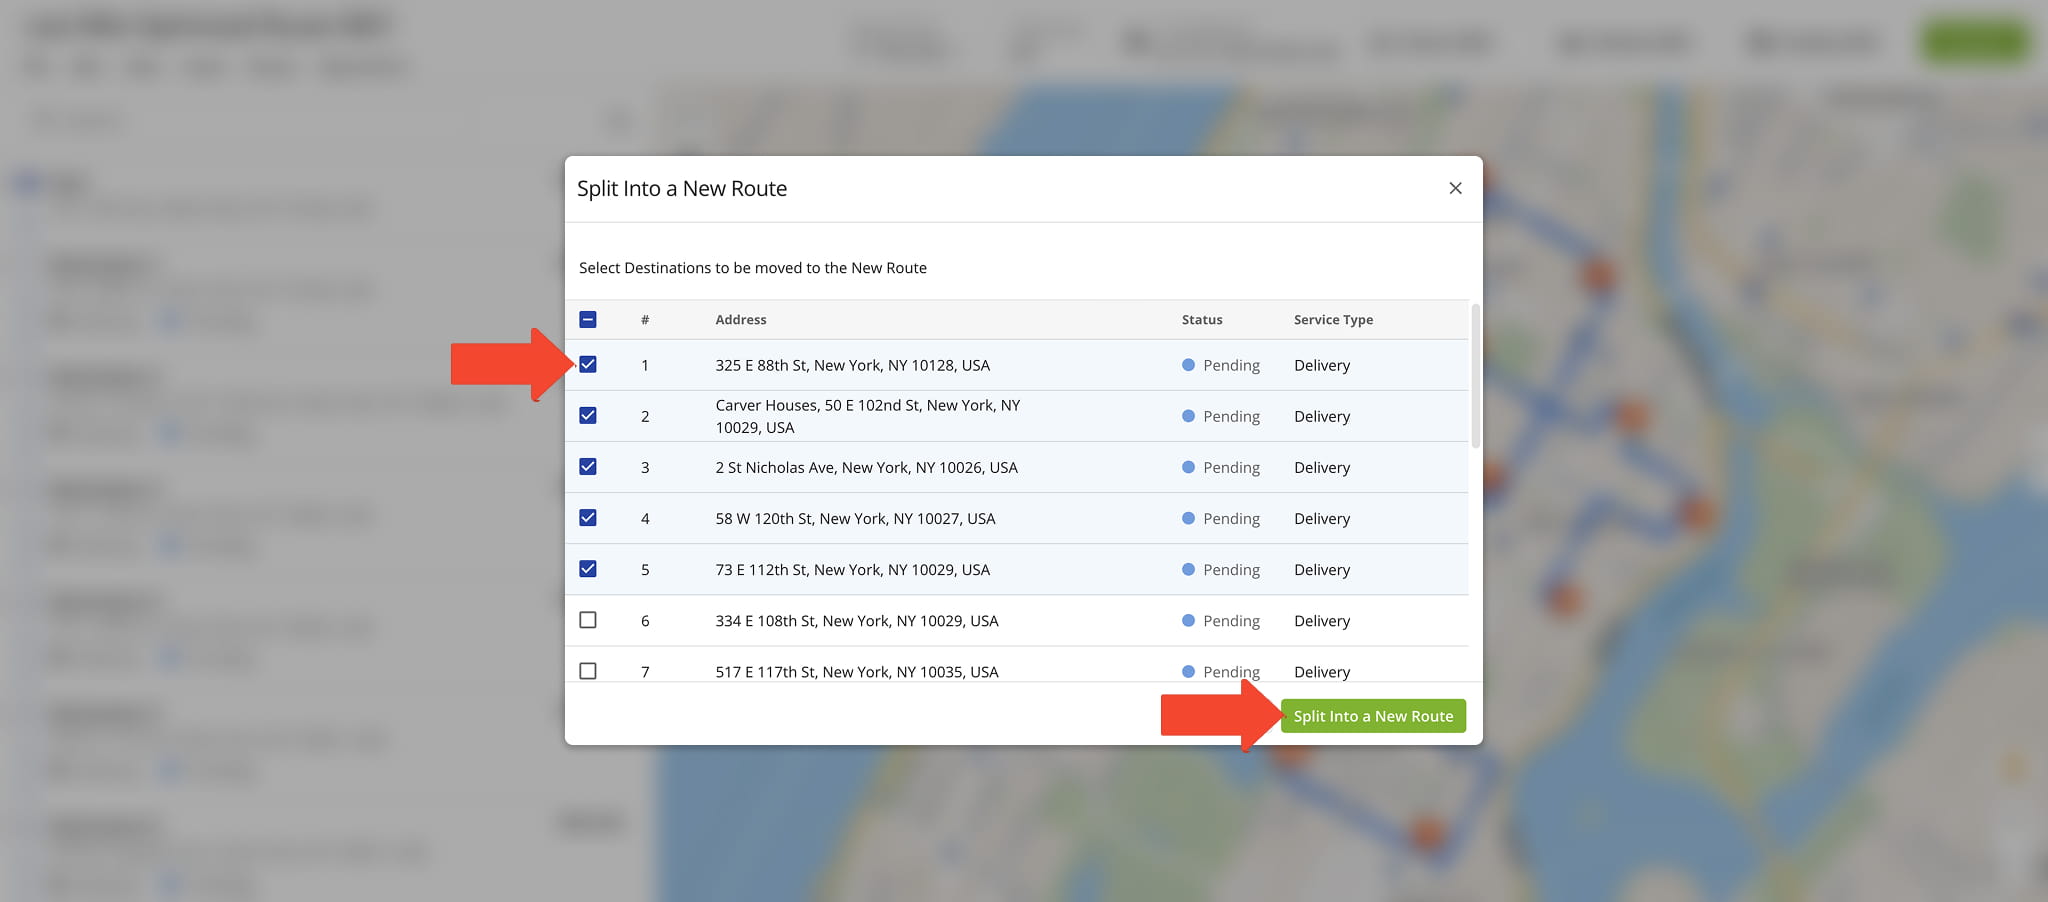
Route4Me will create a new route using those stops and automatically remove them from the original route. You can rename the new route and assign a new User and Vehicle to it.
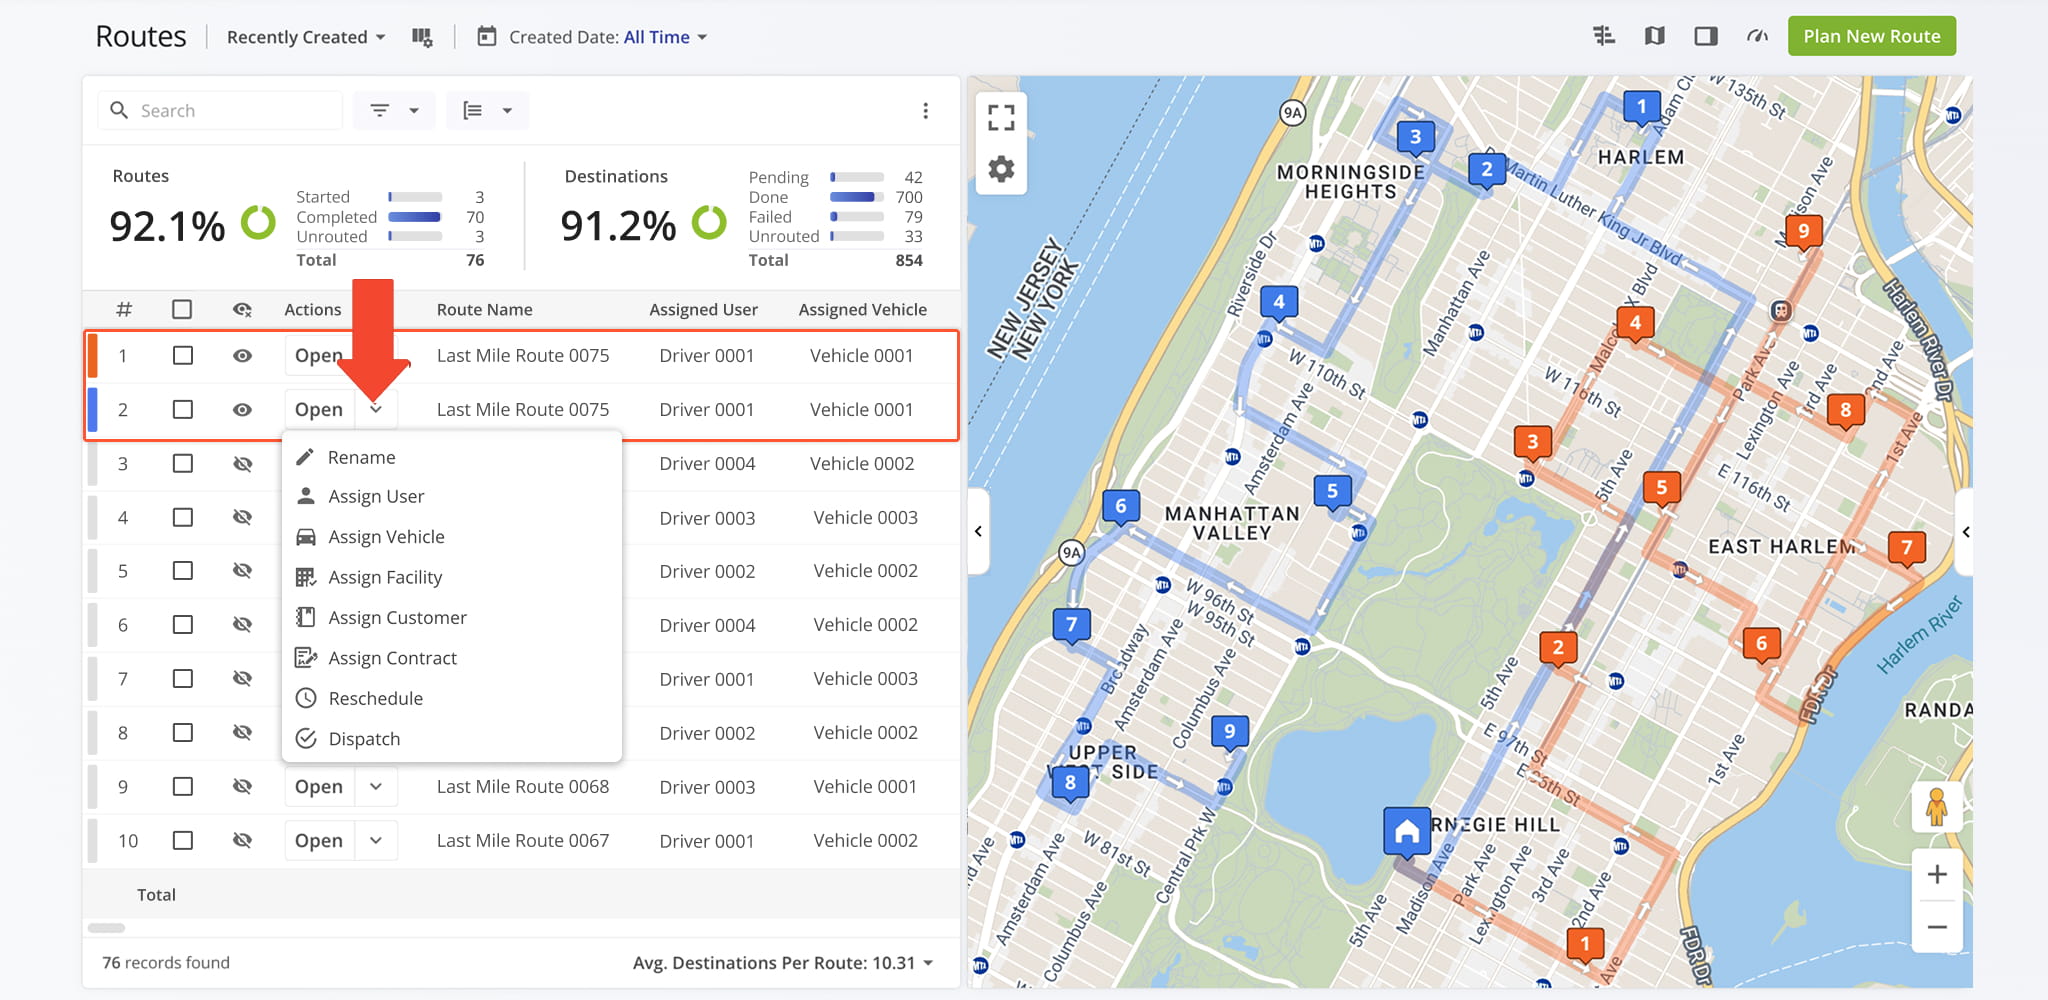
Share Routes Before Optimization
To share a route via email when planning it, go to “Route Settings” > “Sharing” and enter the email addresses you want to share the route with, separated by commas.
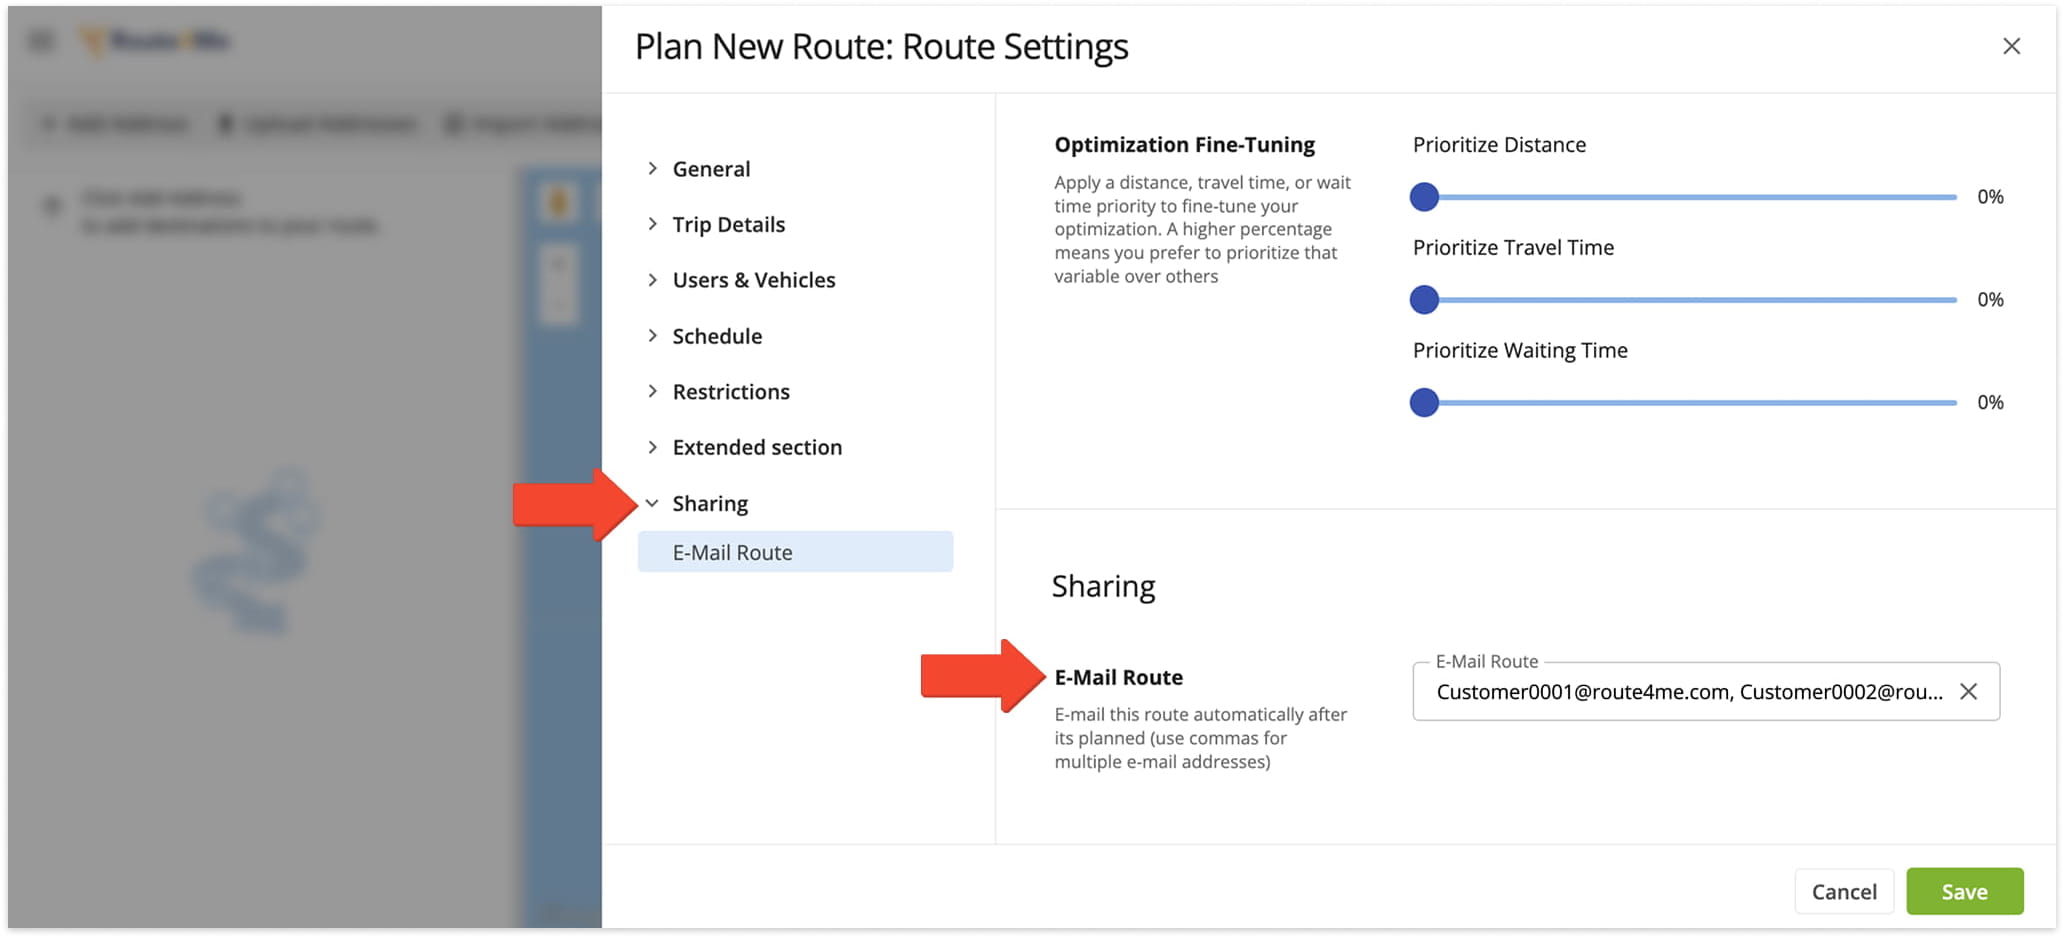
Share Routes After Optimization
To share an already planned route from your Routes List, locate the route you want to share, click the Down Arrow next to it, and select “Share“. Then choose the users you want to send the route link to from the dropdown menu.
If you don’t have an email address for a recipient, select “Copy Link” to generate a read-only link that can be sent via email.
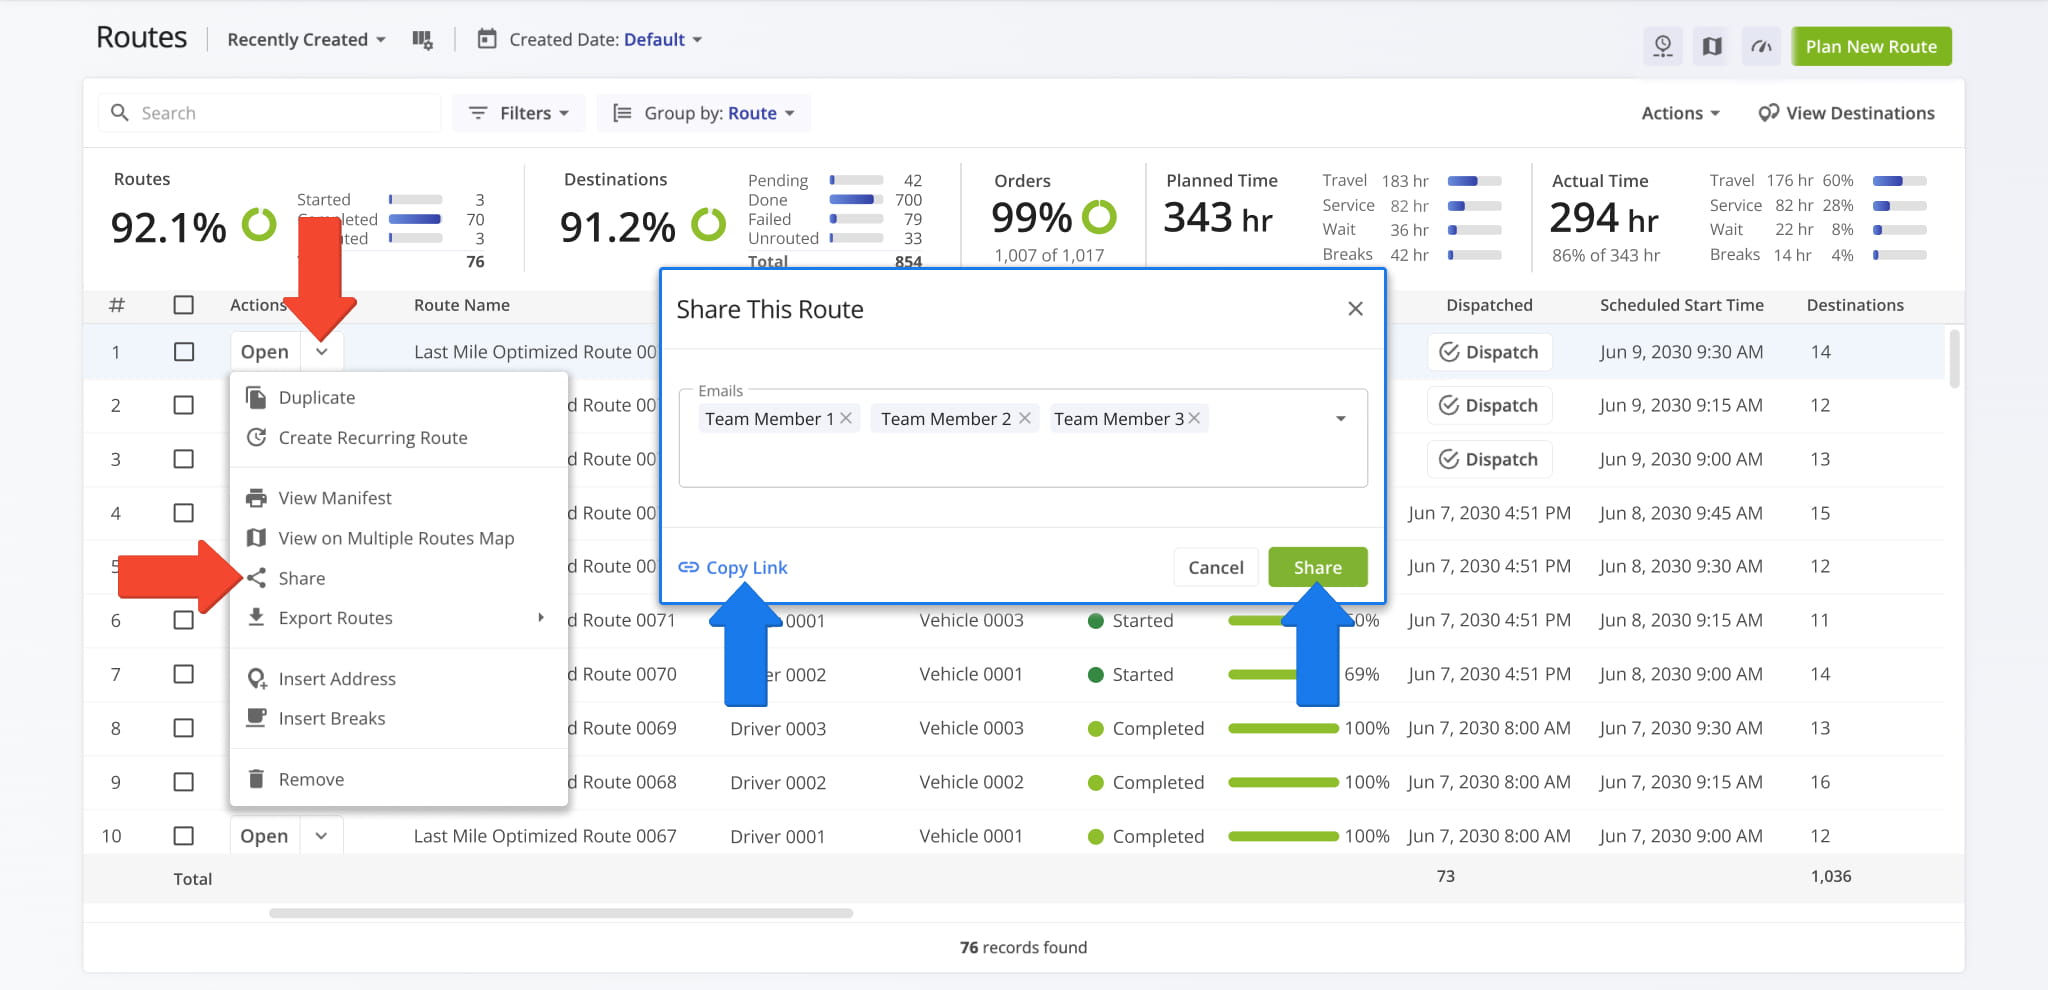
To share an already planned route from the Route Editor, click “File”, then select “Share This Route”. Choose the users you want to share it with and click “Share” to finalize.
To share with external users, click “Copy Link” to generate a read-only URL that can be sent via email.
You can access your Route4Me account on the web using the same login as the mobile app. However, web functionality is limited compared to the mobile app.
Visit Route4Me's Marketplace to Check Out More Add-Ons and Modules:
- Route Optimization
Address Book and Territories Planning
- Operations
Custom Data Add-On
About author: Daniel Archer
With a background in pedagogy and writing instruction, Daniel is a former tenured English Instructor who, after nearly 20 years of teaching, transitioned into content strategy and leading writing teams for global brands. Now, as Technical Documentation Manager at Route4Me, he translates complex logistics technology into clear, accessible content that empowers users.