
Accept & Manage Dispatched Routes & Destinations
The Route4Me App provides seamless continuity throughout the entire process of planning and sequencing routes, as well as navigating and completing routes. You’ll automatically receive routes dispatched to you on the app. In this guide, you’ll learn how to manage routes. Specifically, how to access routes dispatched to you and your team, edit routes and destinations, change route settings, insert and delete addresses, reschedule routes, and more.
NOTE: Depending on your account settings and permissions, different features may be available on the Mobile Route App. Contact your direct manager if you experience issues with features described in this guide or if features you need aren’t available.
Table of Contents
Routes List – Find And Open Dispatched Routes
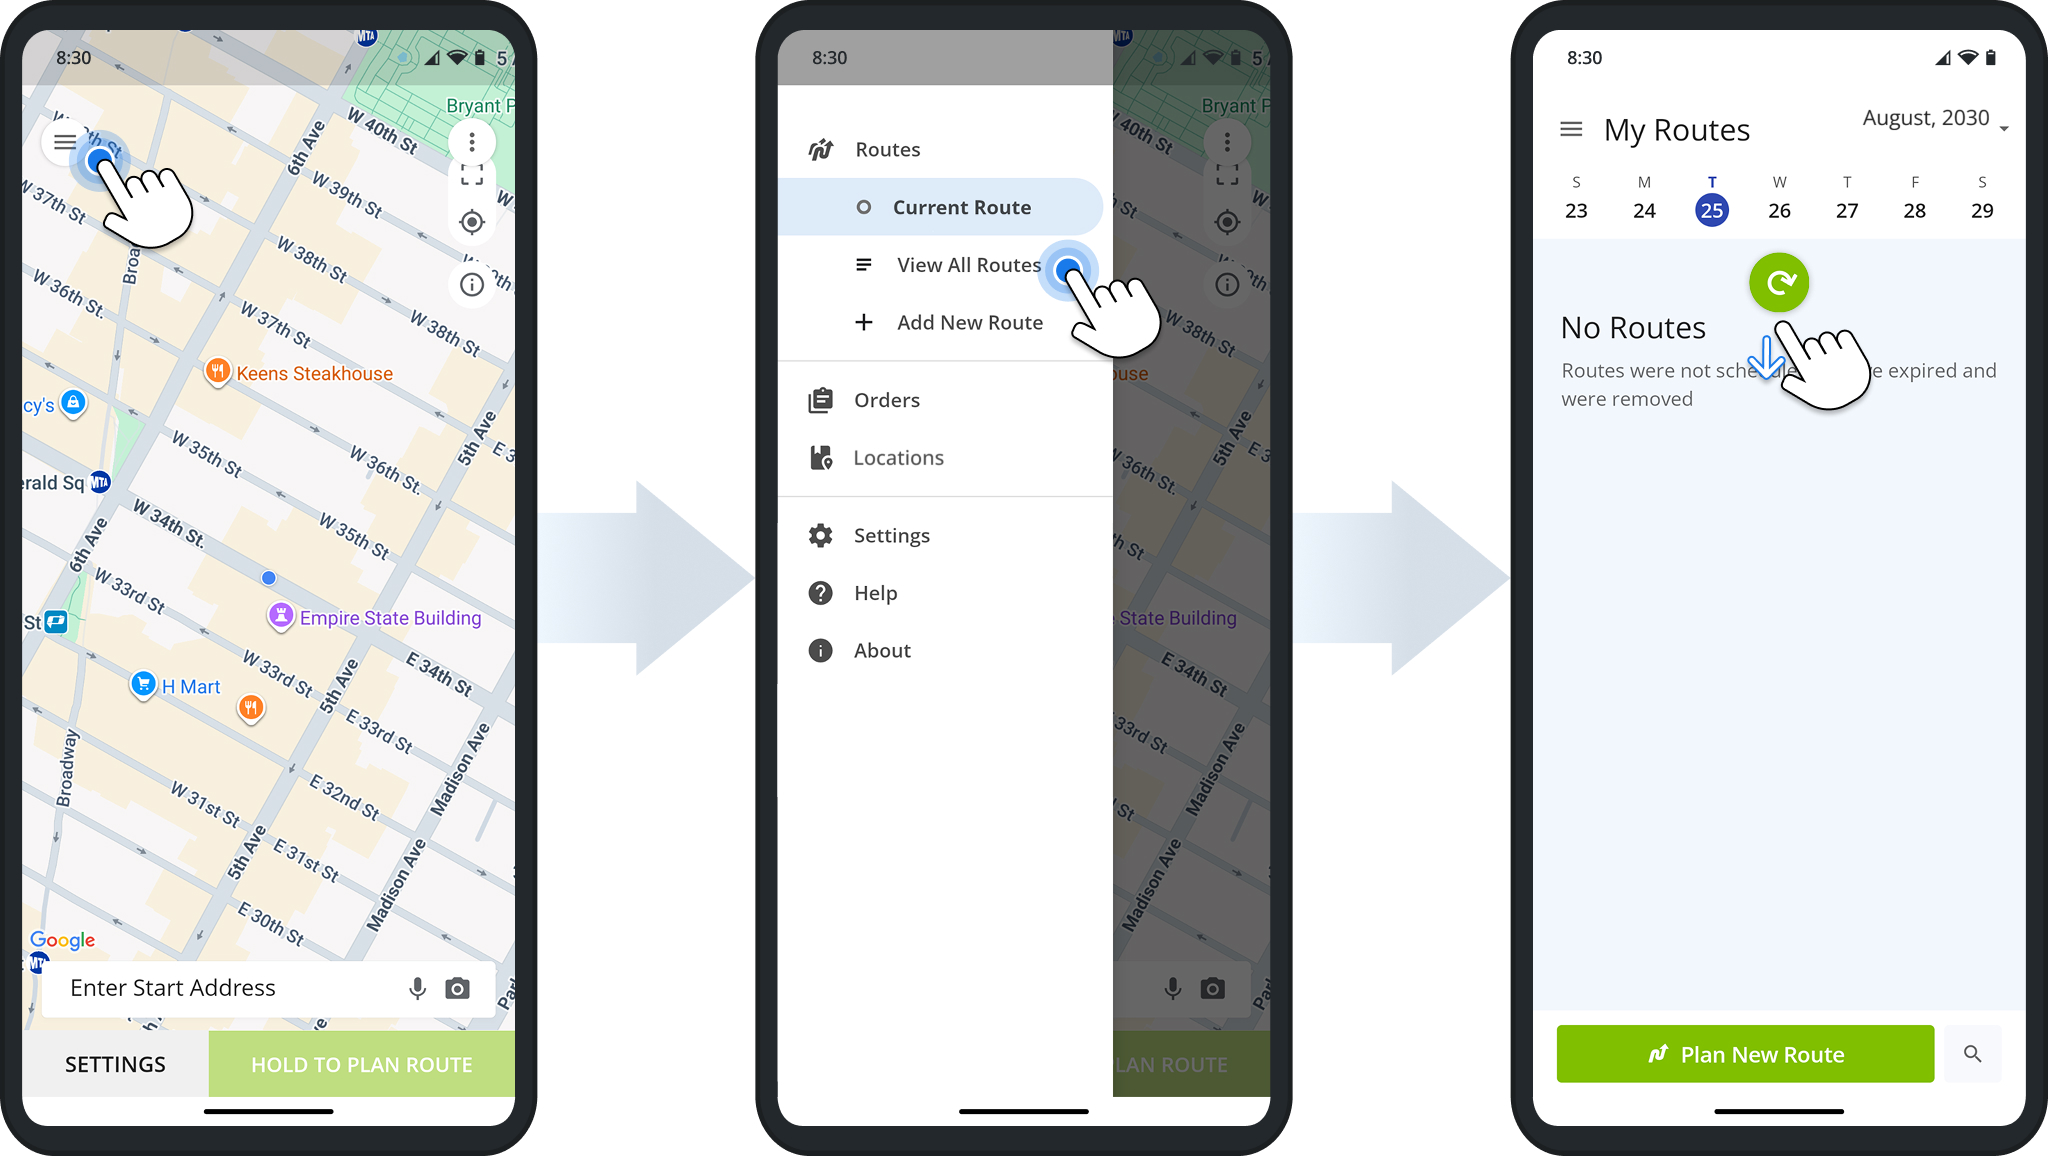
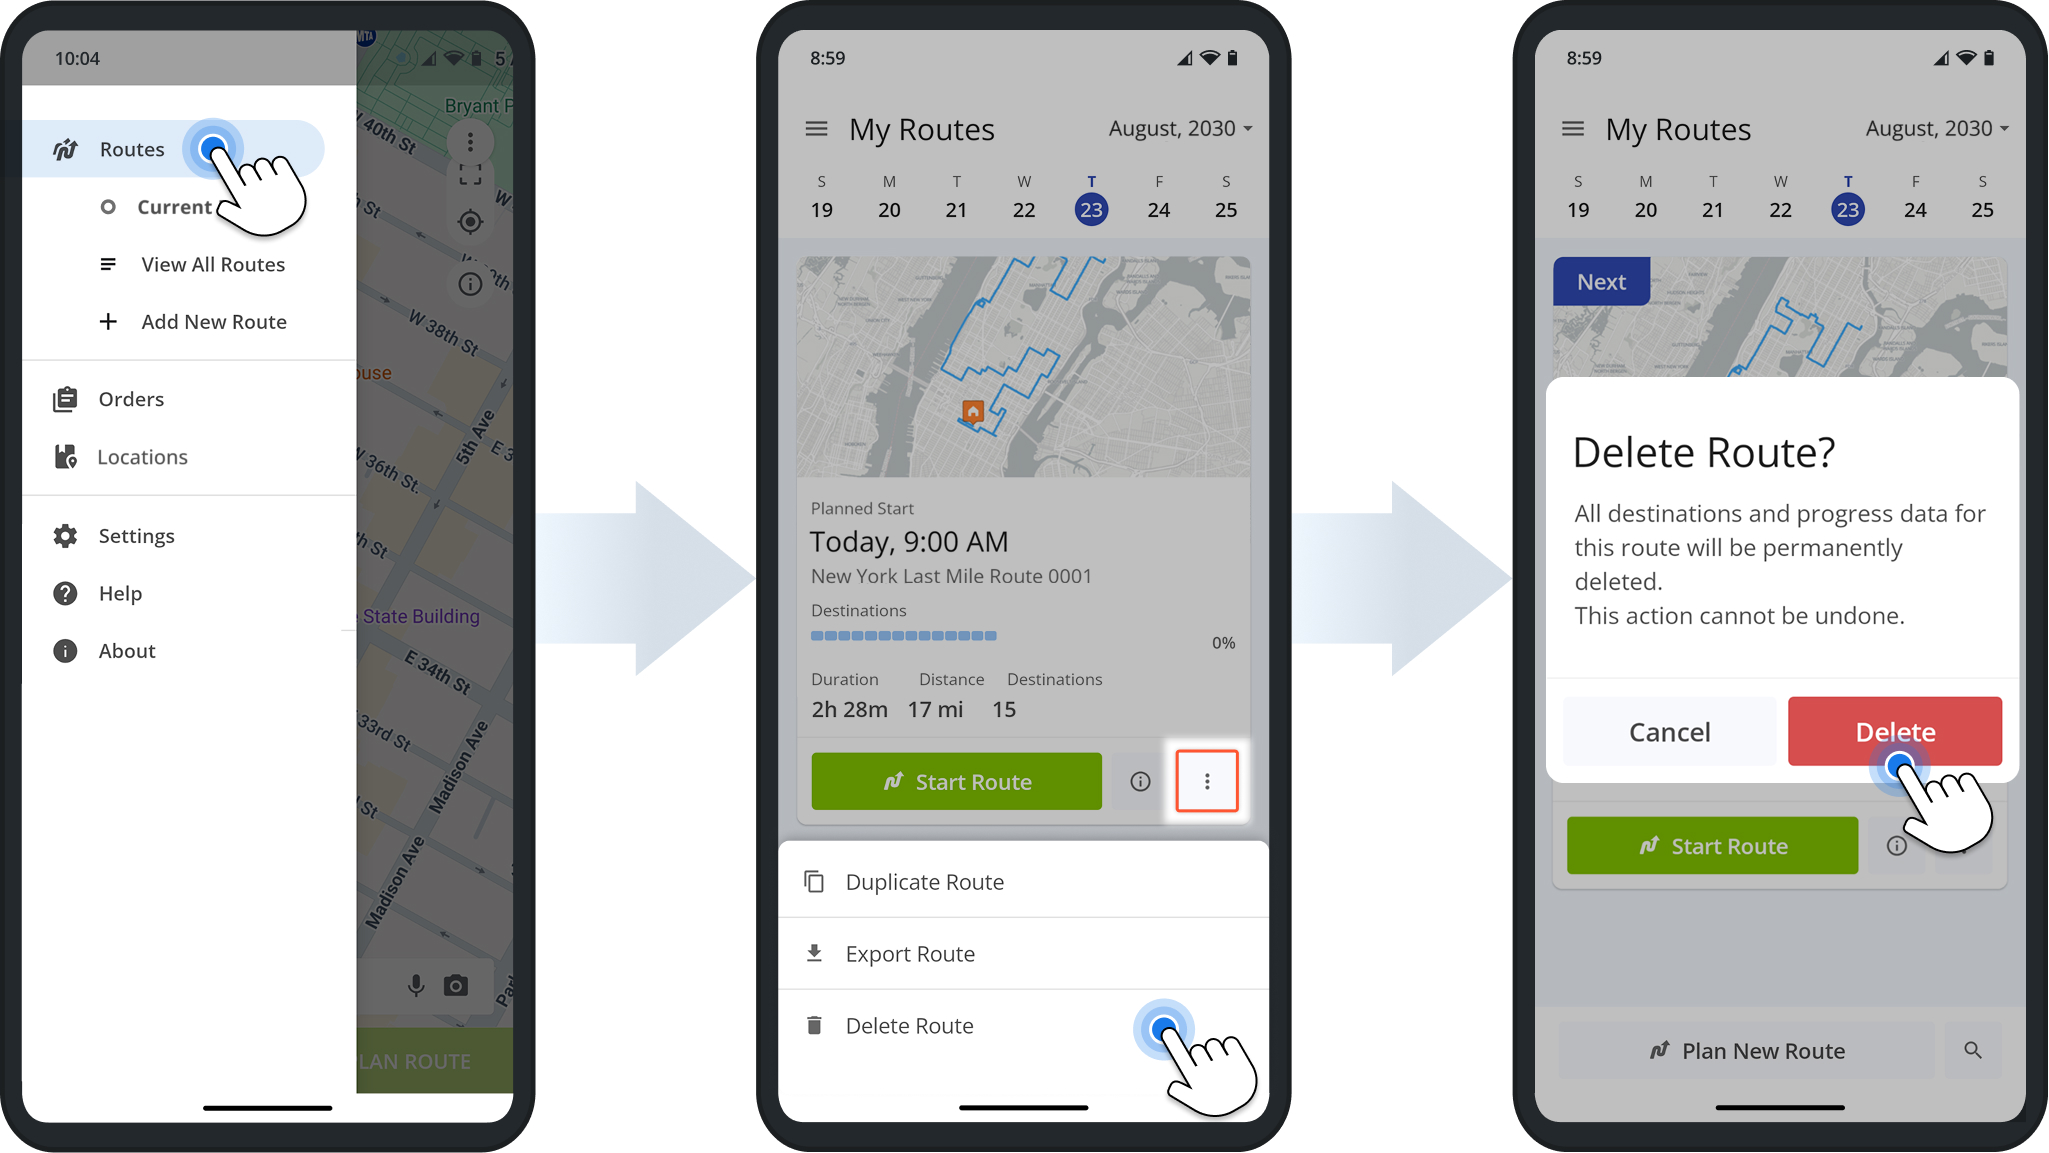
After signing in to the Route4Me app, tap the Menu Button in the top-left, then tap “Routes” or “View All Routes” to open the Routes List. You’ll automatically see routes dispatched to you. Swipe down on the Routes List to load the most recent data.
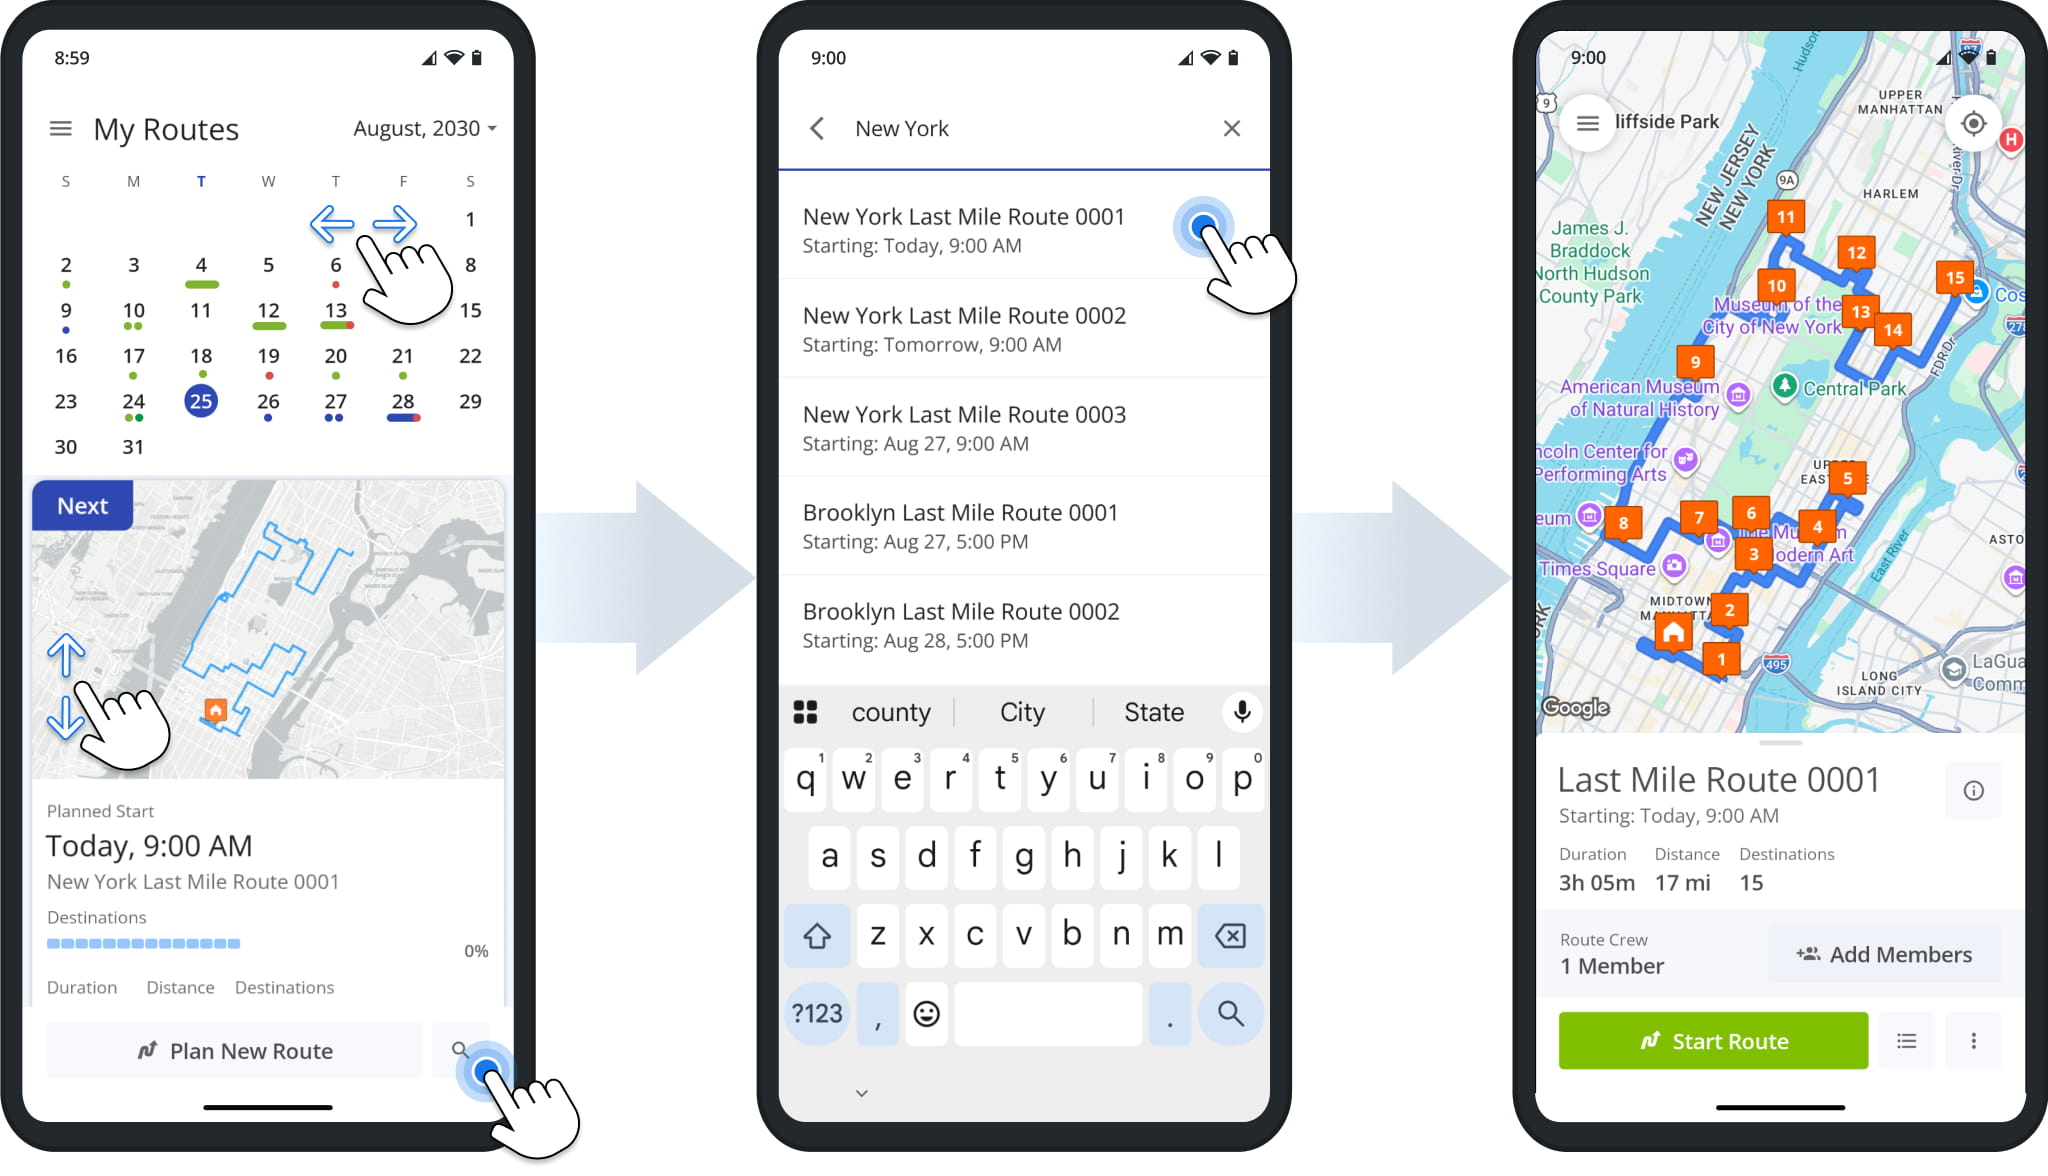
The top of the “My Routes” page is a calendar you can open and scroll horizontally. Dates with scheduled routes will have colored indicators showing route statuses. You can scroll the Routes List vertically to see all routes scheduled for the selected date.
To find specific routes using the Search Field, tap the Search Icon. At any time, you can tap on a route to open it.
Manage Planned, Dispatched, Started And Completed Routes
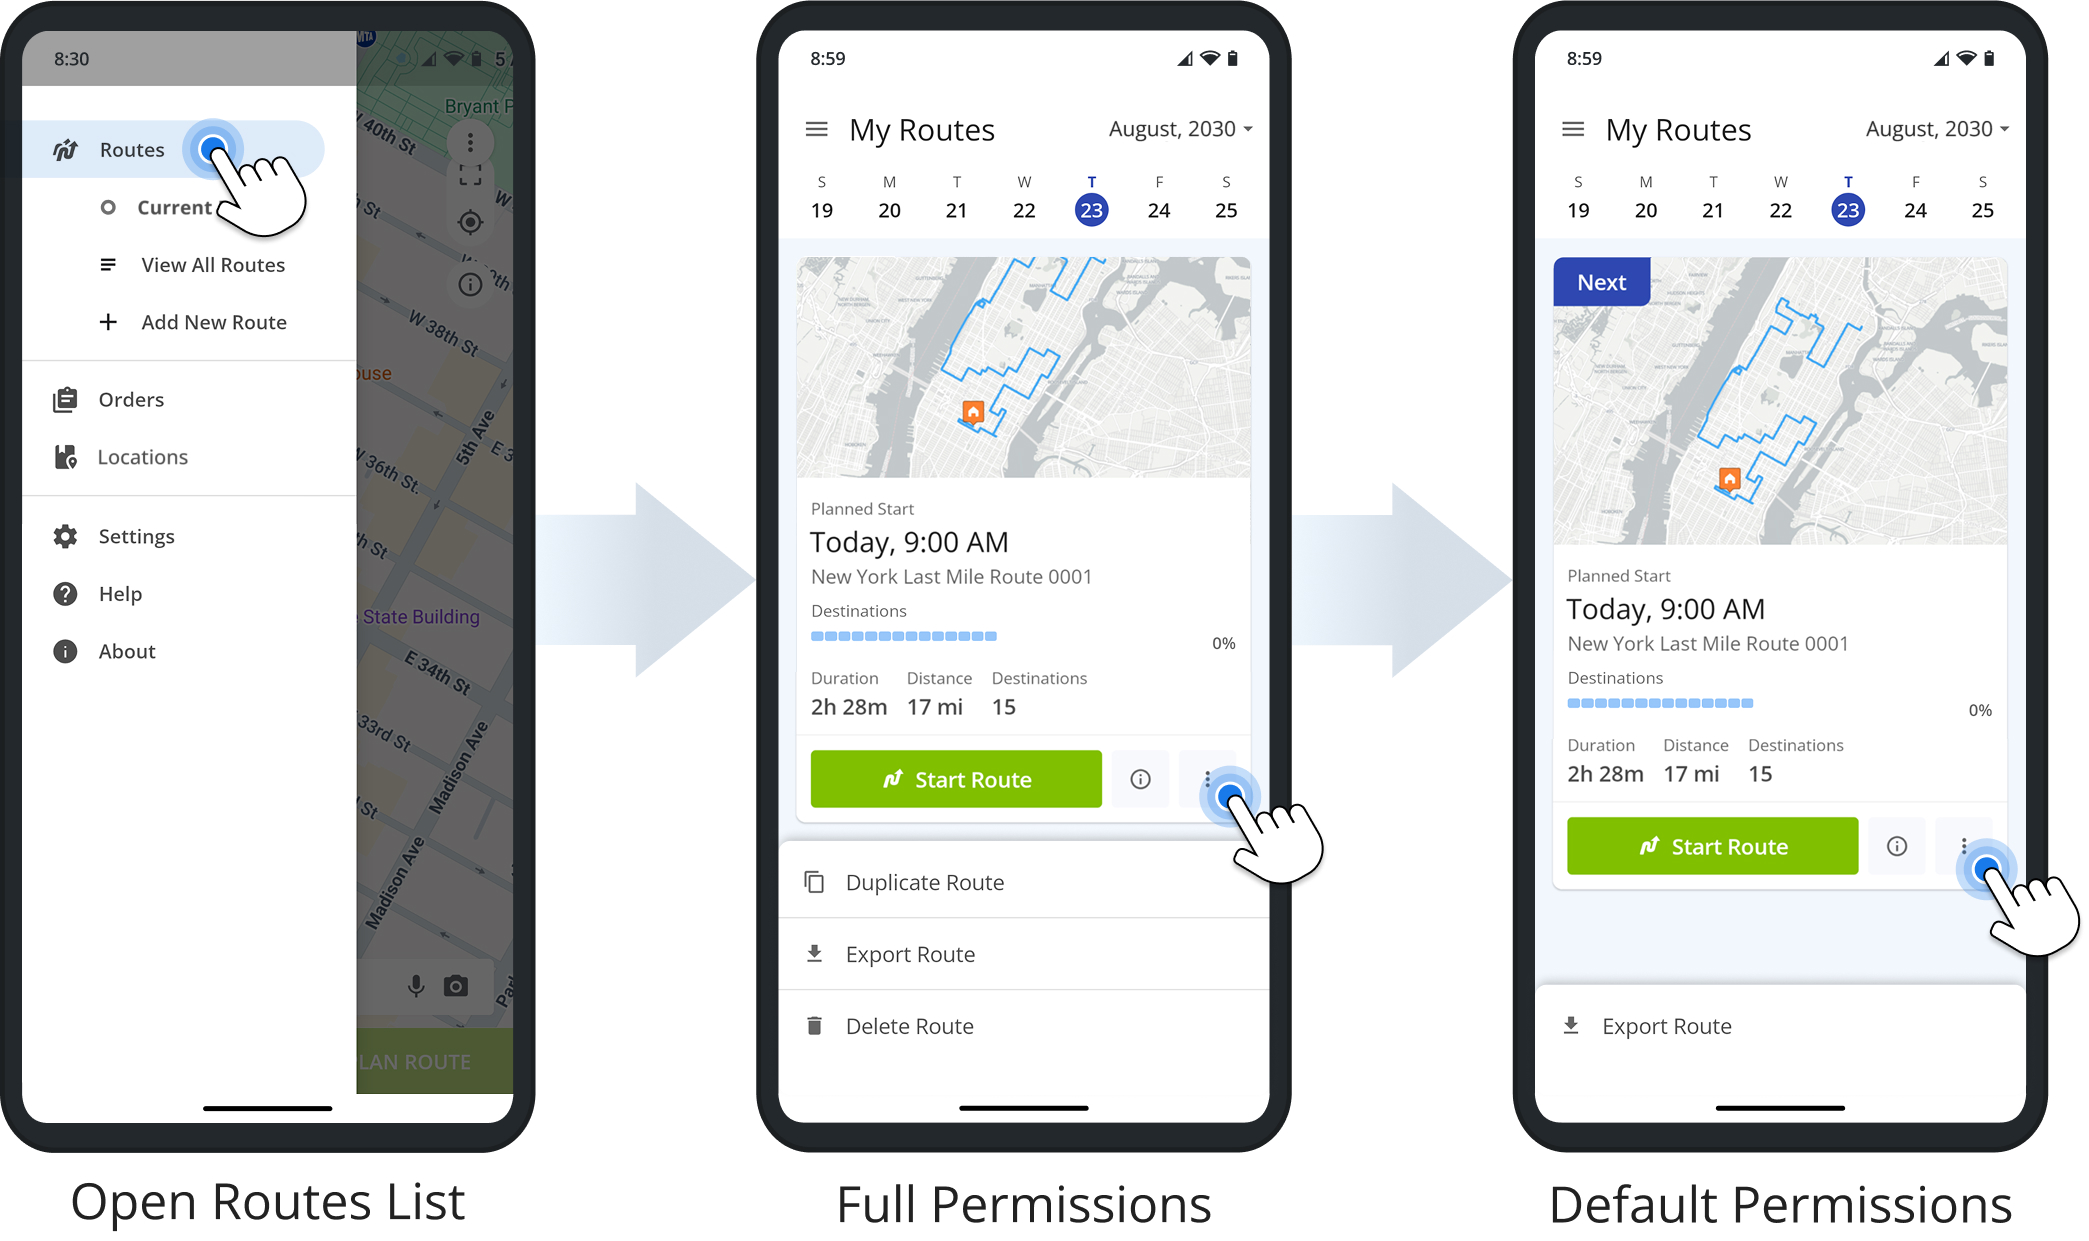
Mobile route management is easy with the Route4Me Mobile Route Planner App. Basic route actions are available right from the Routes List. Go to “Routes“, tap the Three-dot Icon next to a route to see your available actions.
You can find a list of actions in the table below. NOTE: Different route management actions may be available on your account based on account settings and permissions. Contact your direct manager if you have any questions or encounter issues.
Route Management Actions - App Routes List
For more in-depth management options, tap a route to open it, then tap the Three-dot Icon to access different route management actions depending on the route’s current status.
You can find a full list of route management actions available to drivers in the table below. NOTE: Actions depend on your account settings and permissions. Contact your direct manager if you have any questions.
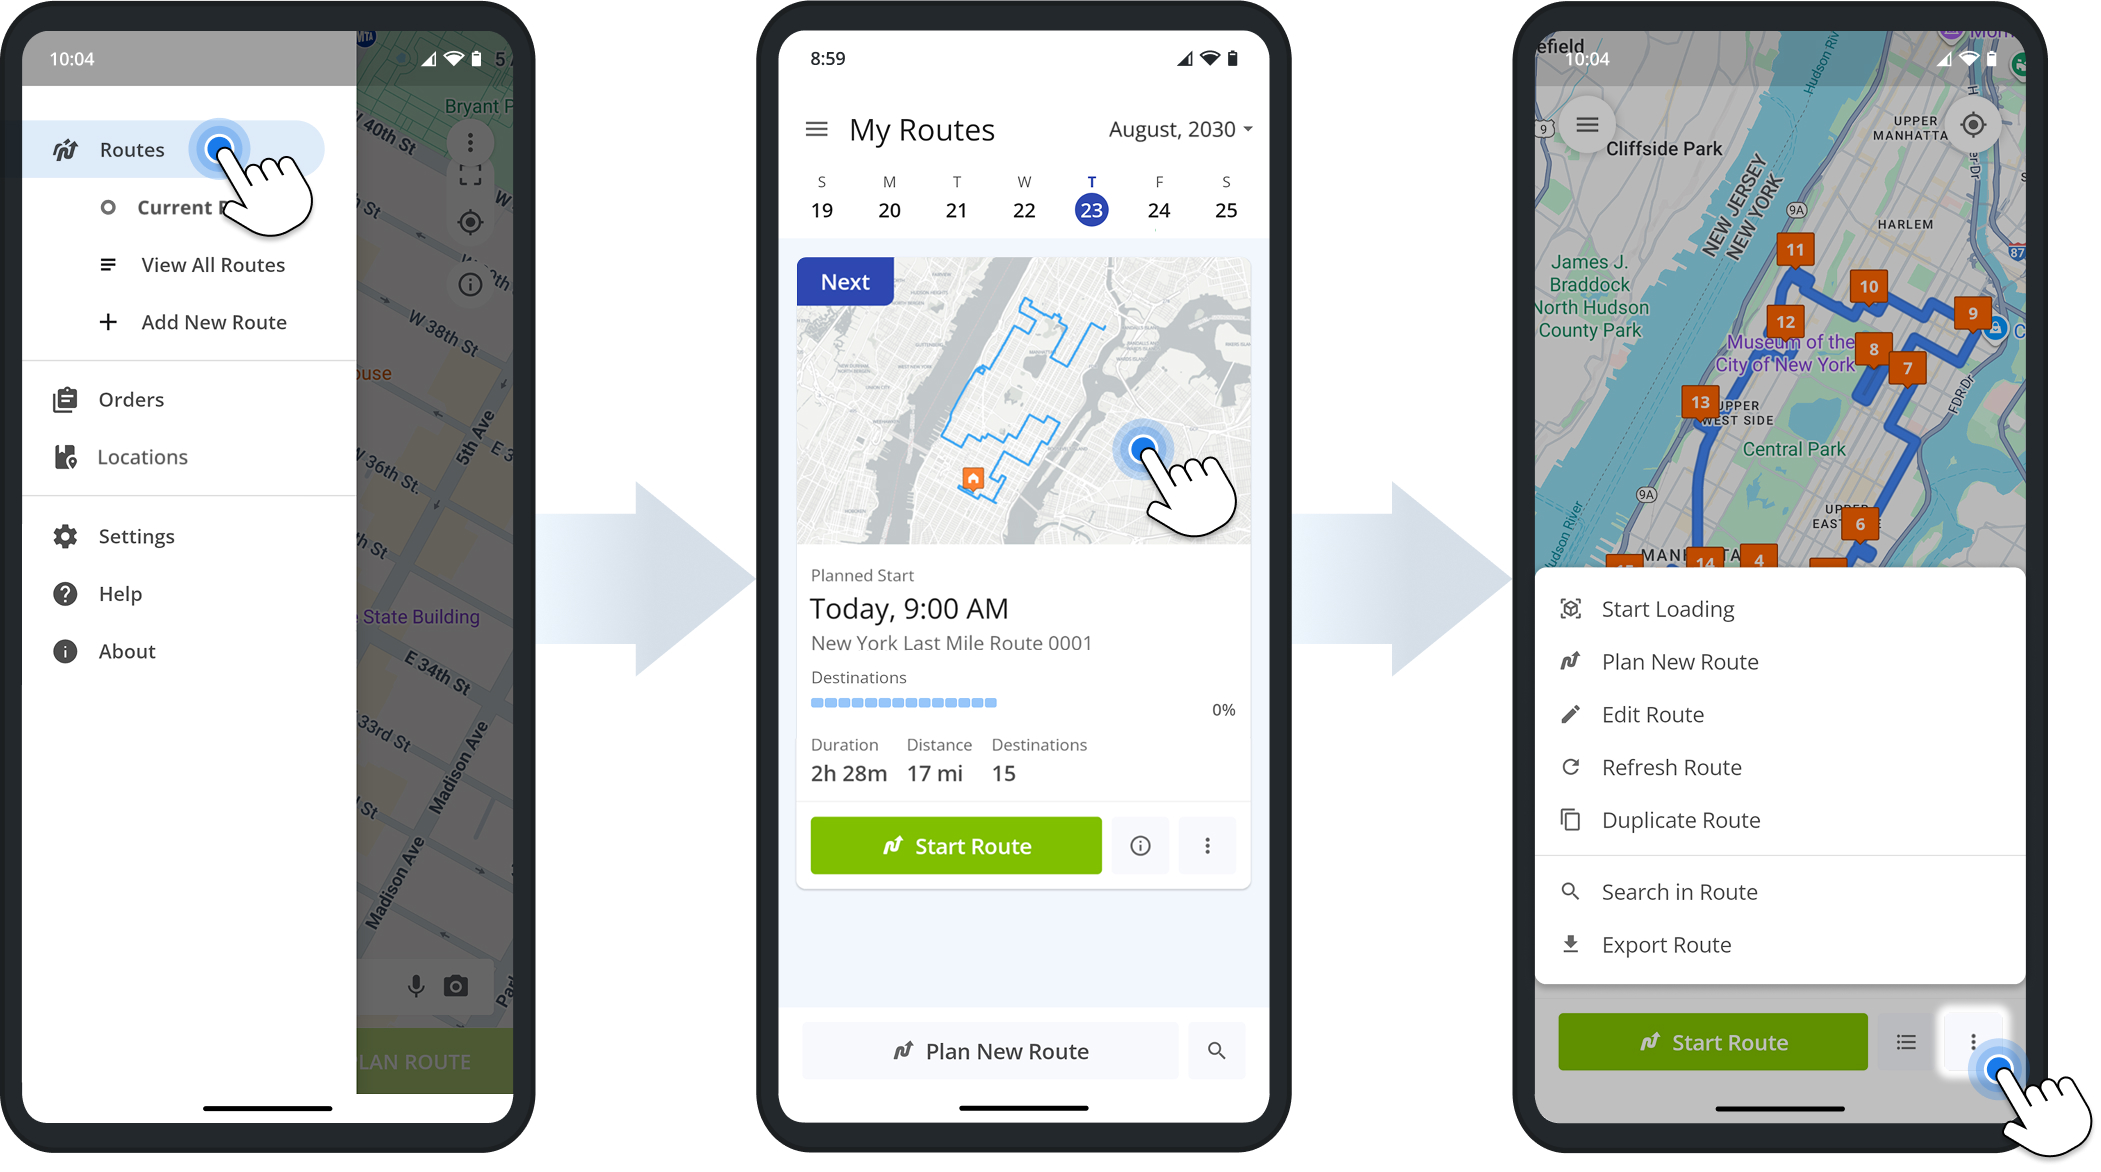
Route Management Actions - Open Route
Edit Routes – Change Destination Sequence And Route Settings
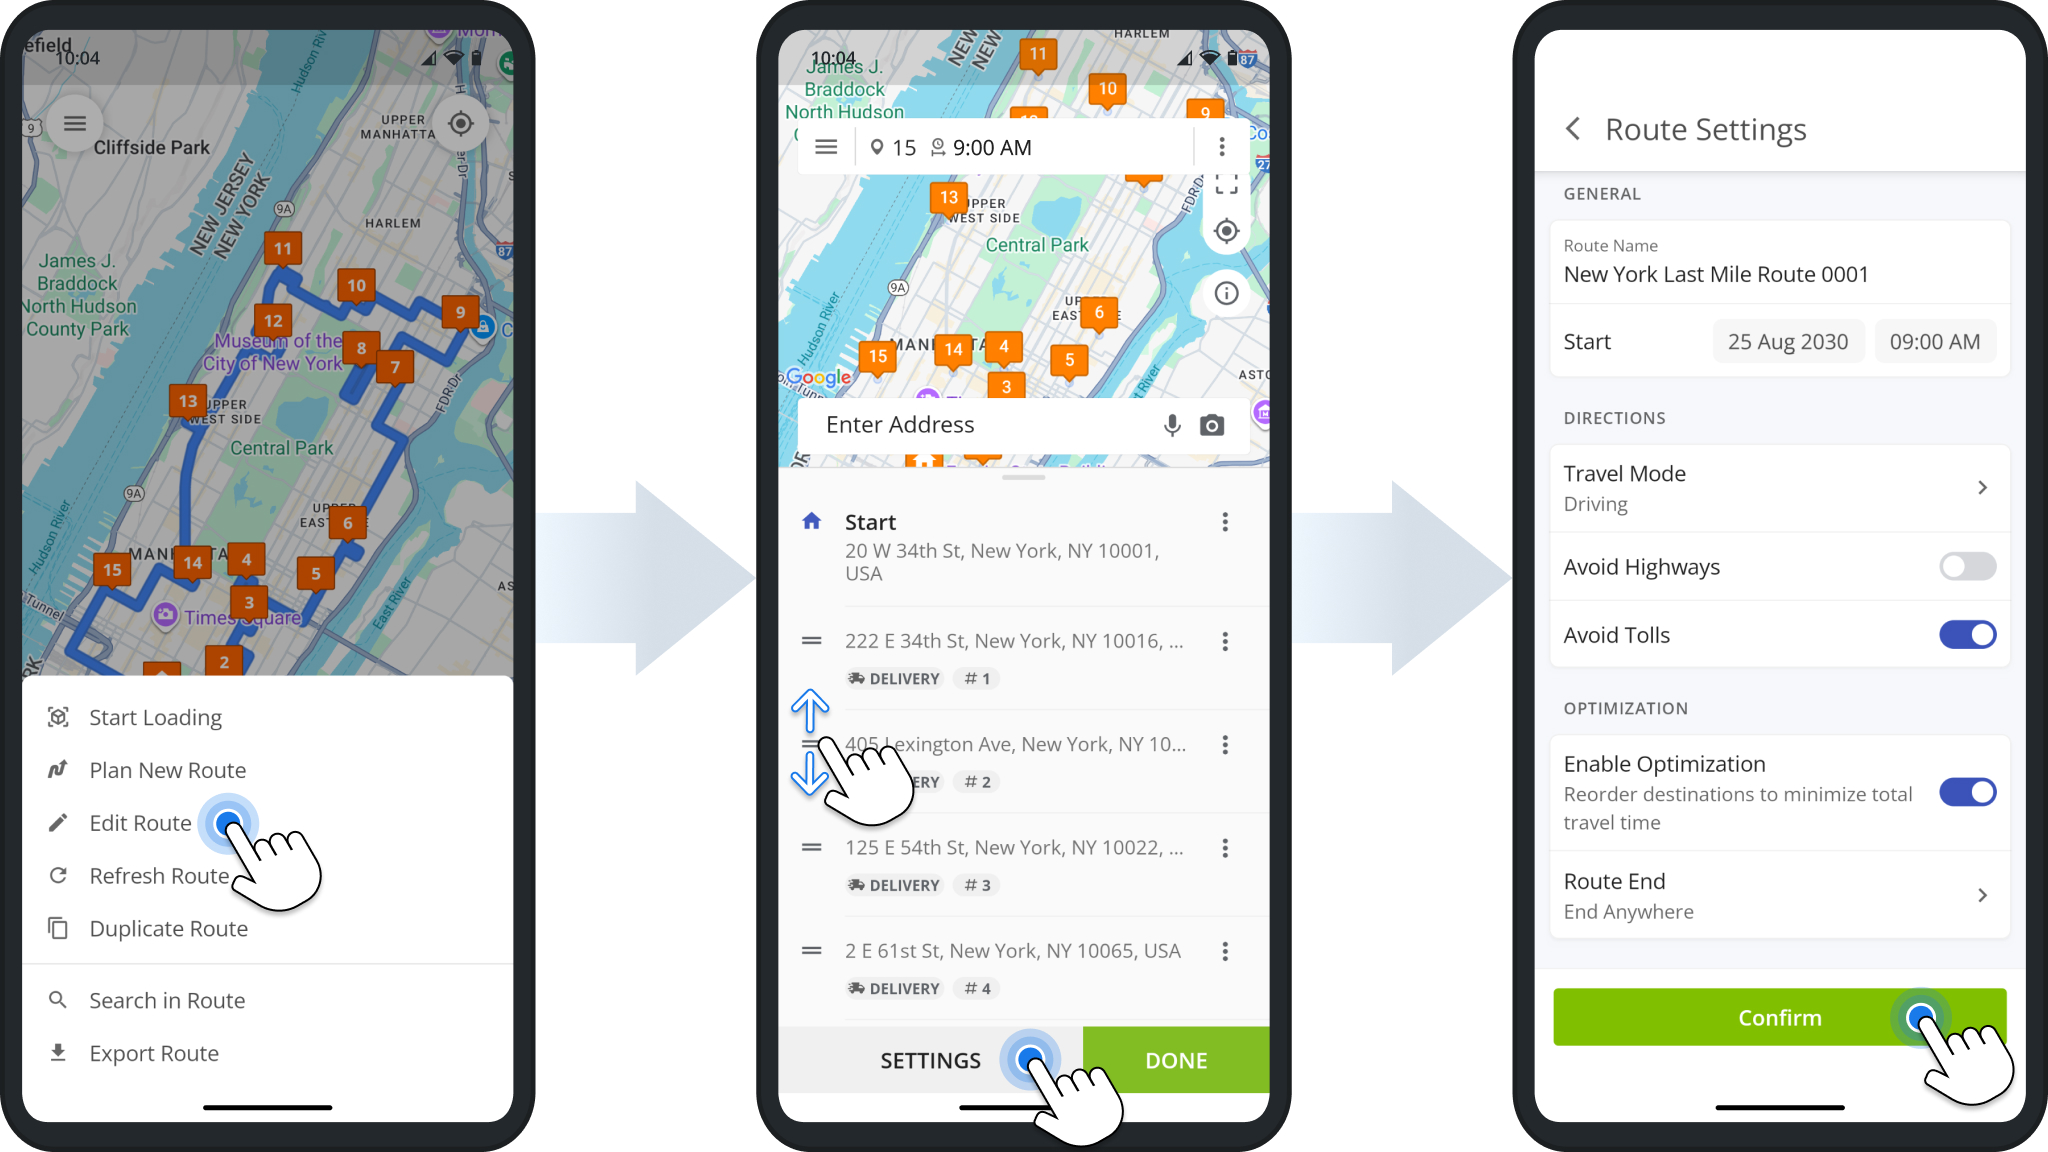
To change the destination sequence and settings of a route, tap “Edit Route“. Then, you can drag destinations up or down to change the planned visit sequence.
Tap “Settings” to access more in-depth options such as the route’s name and schedule, optimization type, avoidance settings, and travel mode. To save your changes, tap the “Done” button.
Duplicate Routes – Copy Routes From The Mobile Route Planner App For Drivers
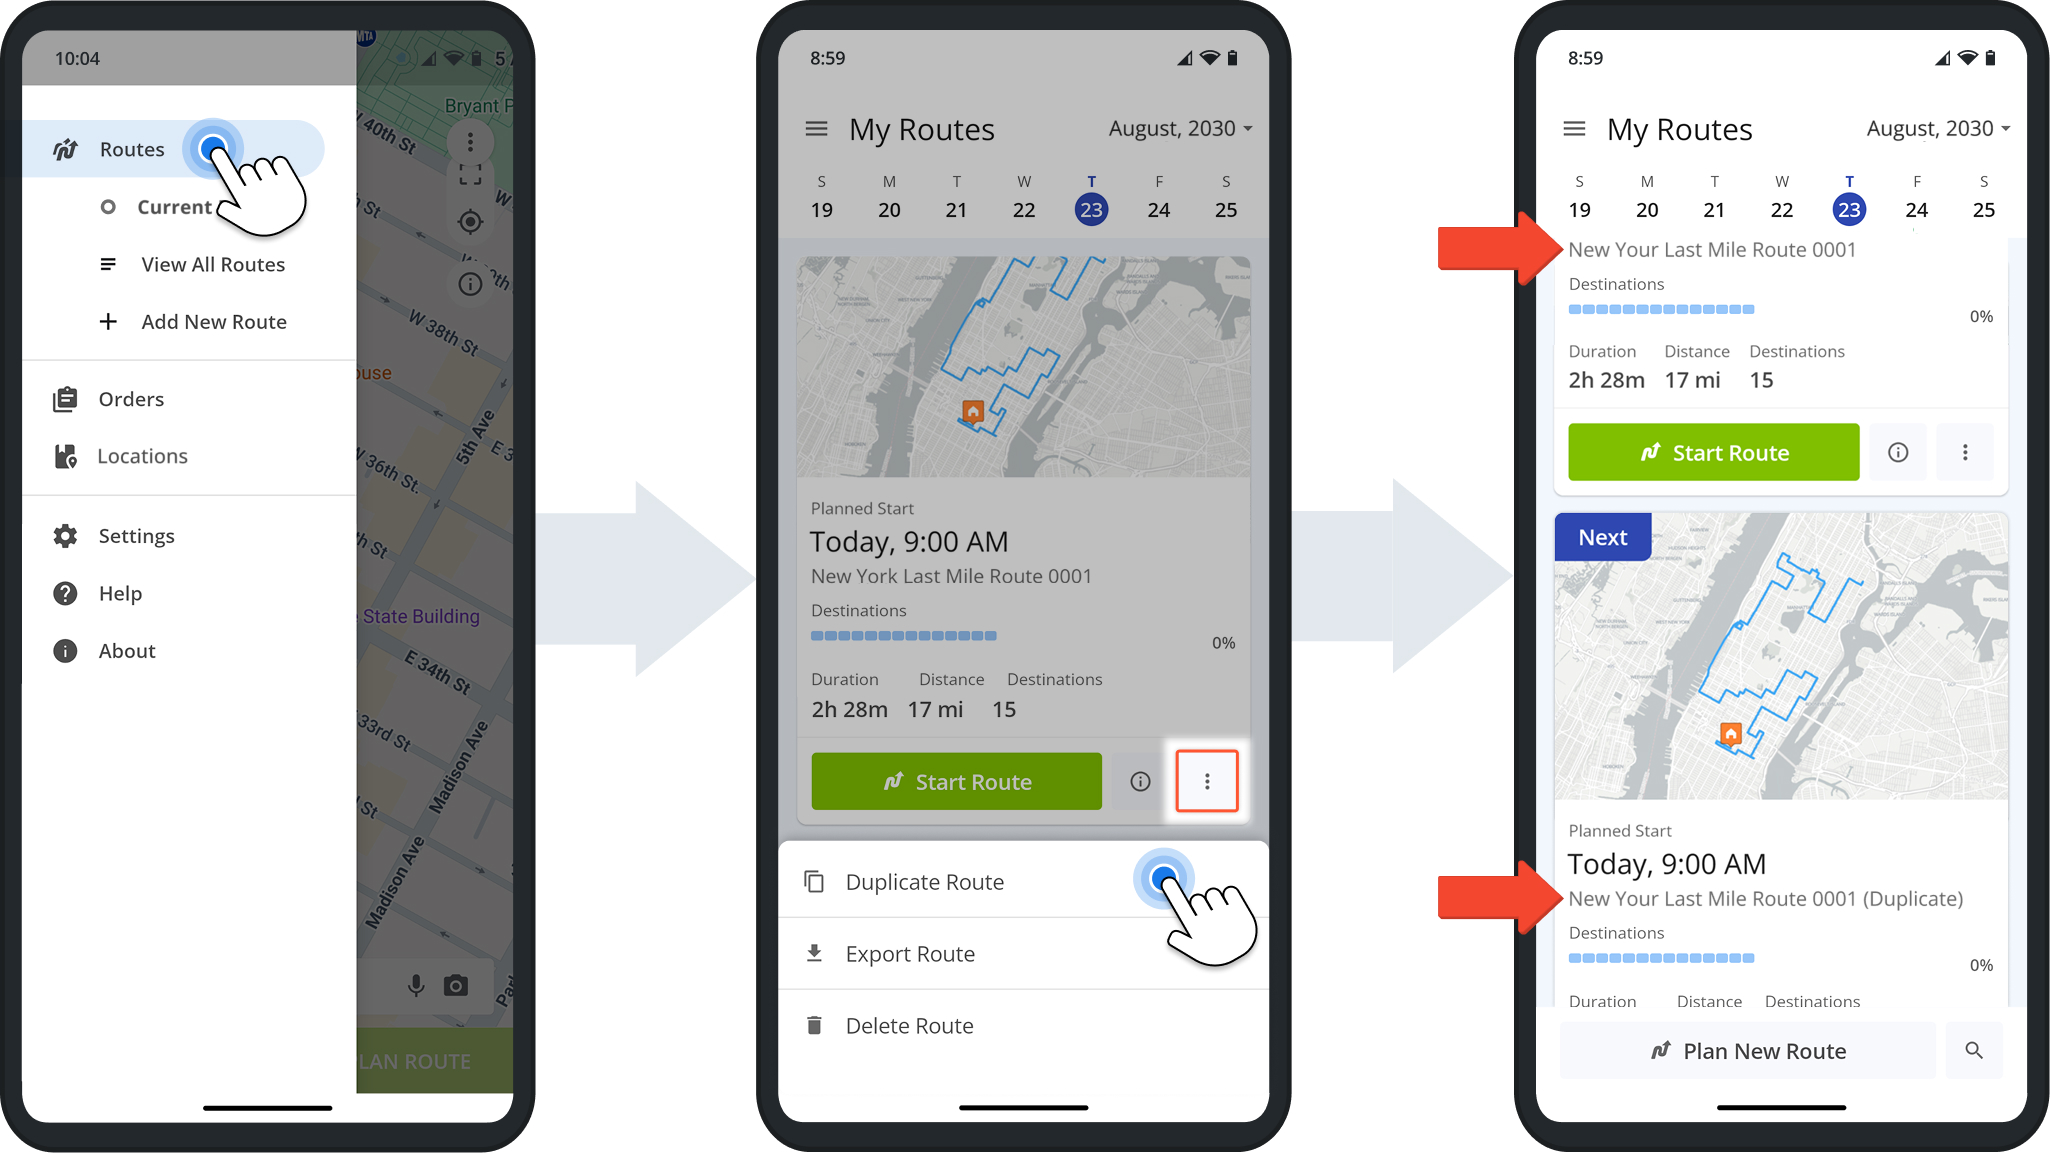
You can easily copy routes directly from the Routes List. Go to “Routes” from the main menu, tap the Three-dot Icon next to the route you want to copy, and select “Duplicate Route” from the menu.
This option creates a copy of the route scheduled for the same time and date as the original. The new route will have “(Duplicate)” added to its name, making it easy to identify in the Routes List.
Export Routes – Download Route And Destination Data Spreadsheet
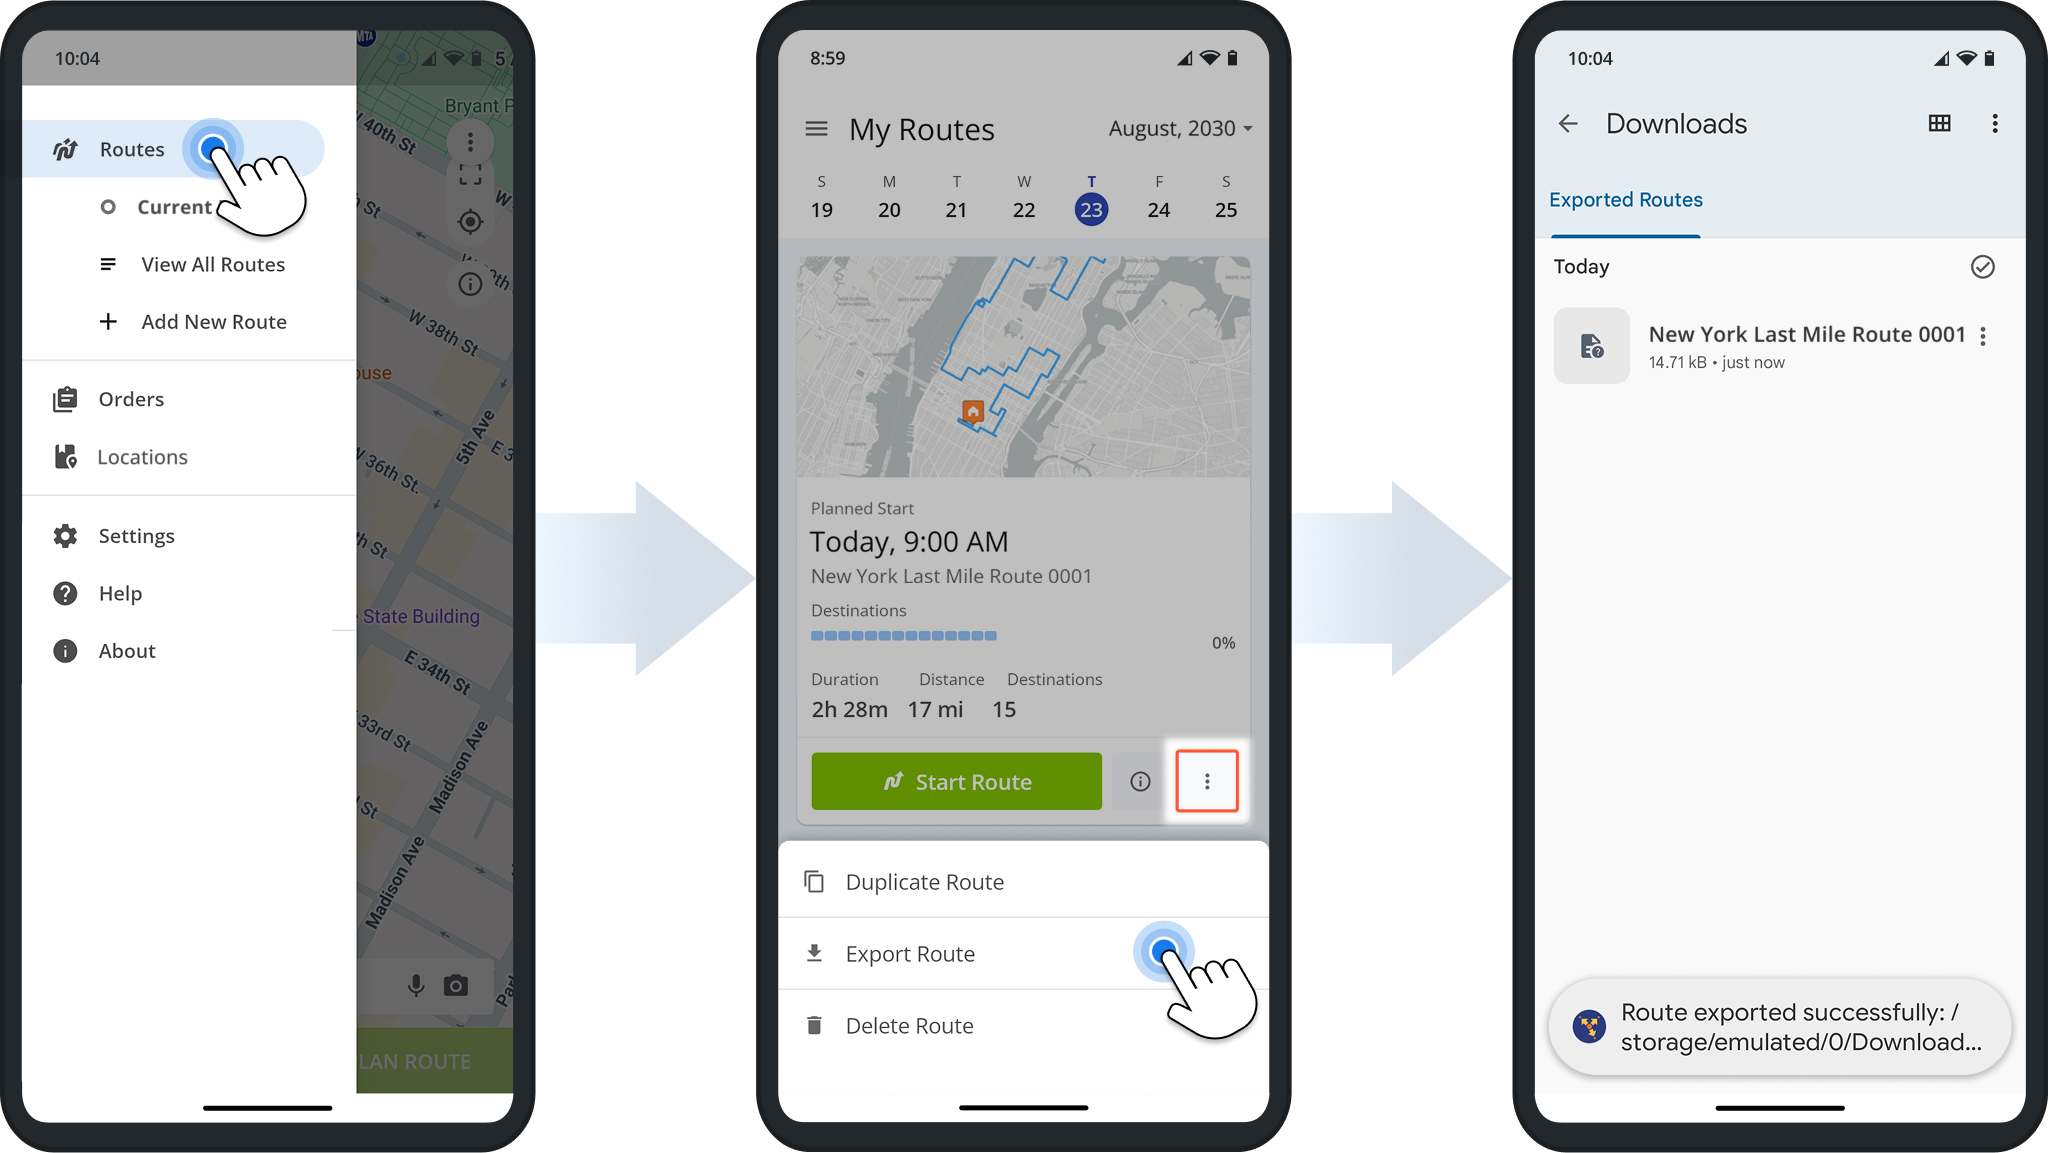
To download a CSV file with the route’s destinations and their associated data, go to “Routes” from the main menu. Then, tap the Three-dot Icon next to the route you want to download, and select “Export Route” from the menu.
You’ll see a “Route exported successfully” confirmation. The CSV file is saved to the default “Downloads” folder on your device.
Delete Routes – Remove Routes From The Route4Me Mobile Route Planner
To remove a route, go to “Routes” from the main menu, tap the Three-dot Icon next to the route you want to delete, and select “Delete Route“. Confirm by tapping “Delete” when prompted.
NOTE: It’s not possible to restore a deleted route from the mobile app.
Manage Route Destinations With Route4Me’s Last Mile Driver App
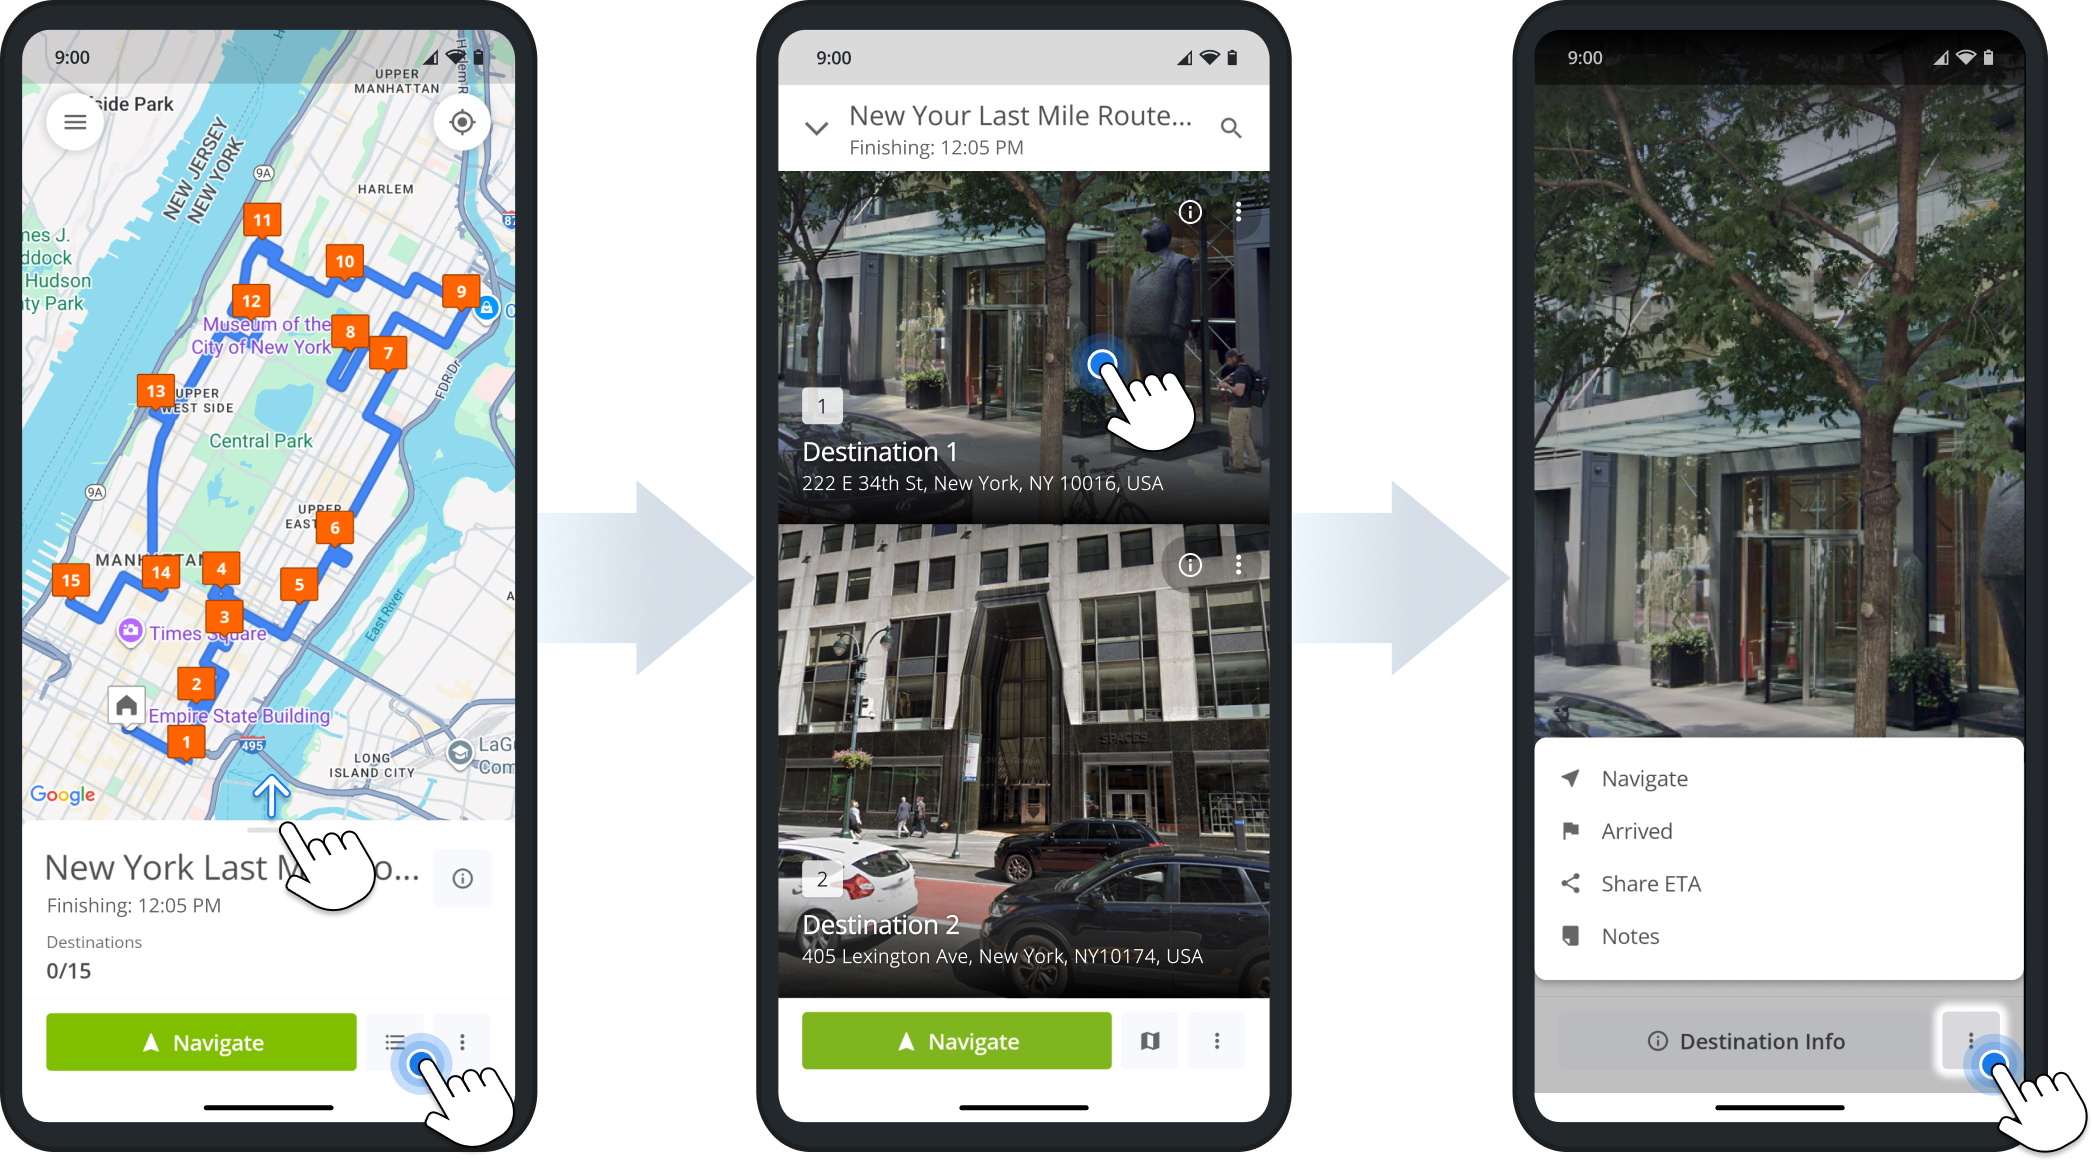
Mobile destination management is easy with the Route4Me Mobile Route Planner App. You can access basic destination actions from the Destinations List for started routes. To do so, on the route screen, swipe up or tap the List Button in the bottom-right. Then, tap a destination to open it and tap the Three-dot Button in the bottom-right.
From this menu, you’re able to start route navigation to the destination, mark it as “Arrived” to set a status and collect proof of visit, share ETA via SMS, and view any previously-collected notes.
Add New Destinations – Insert Addresses Into Planned Routes As New Destinations
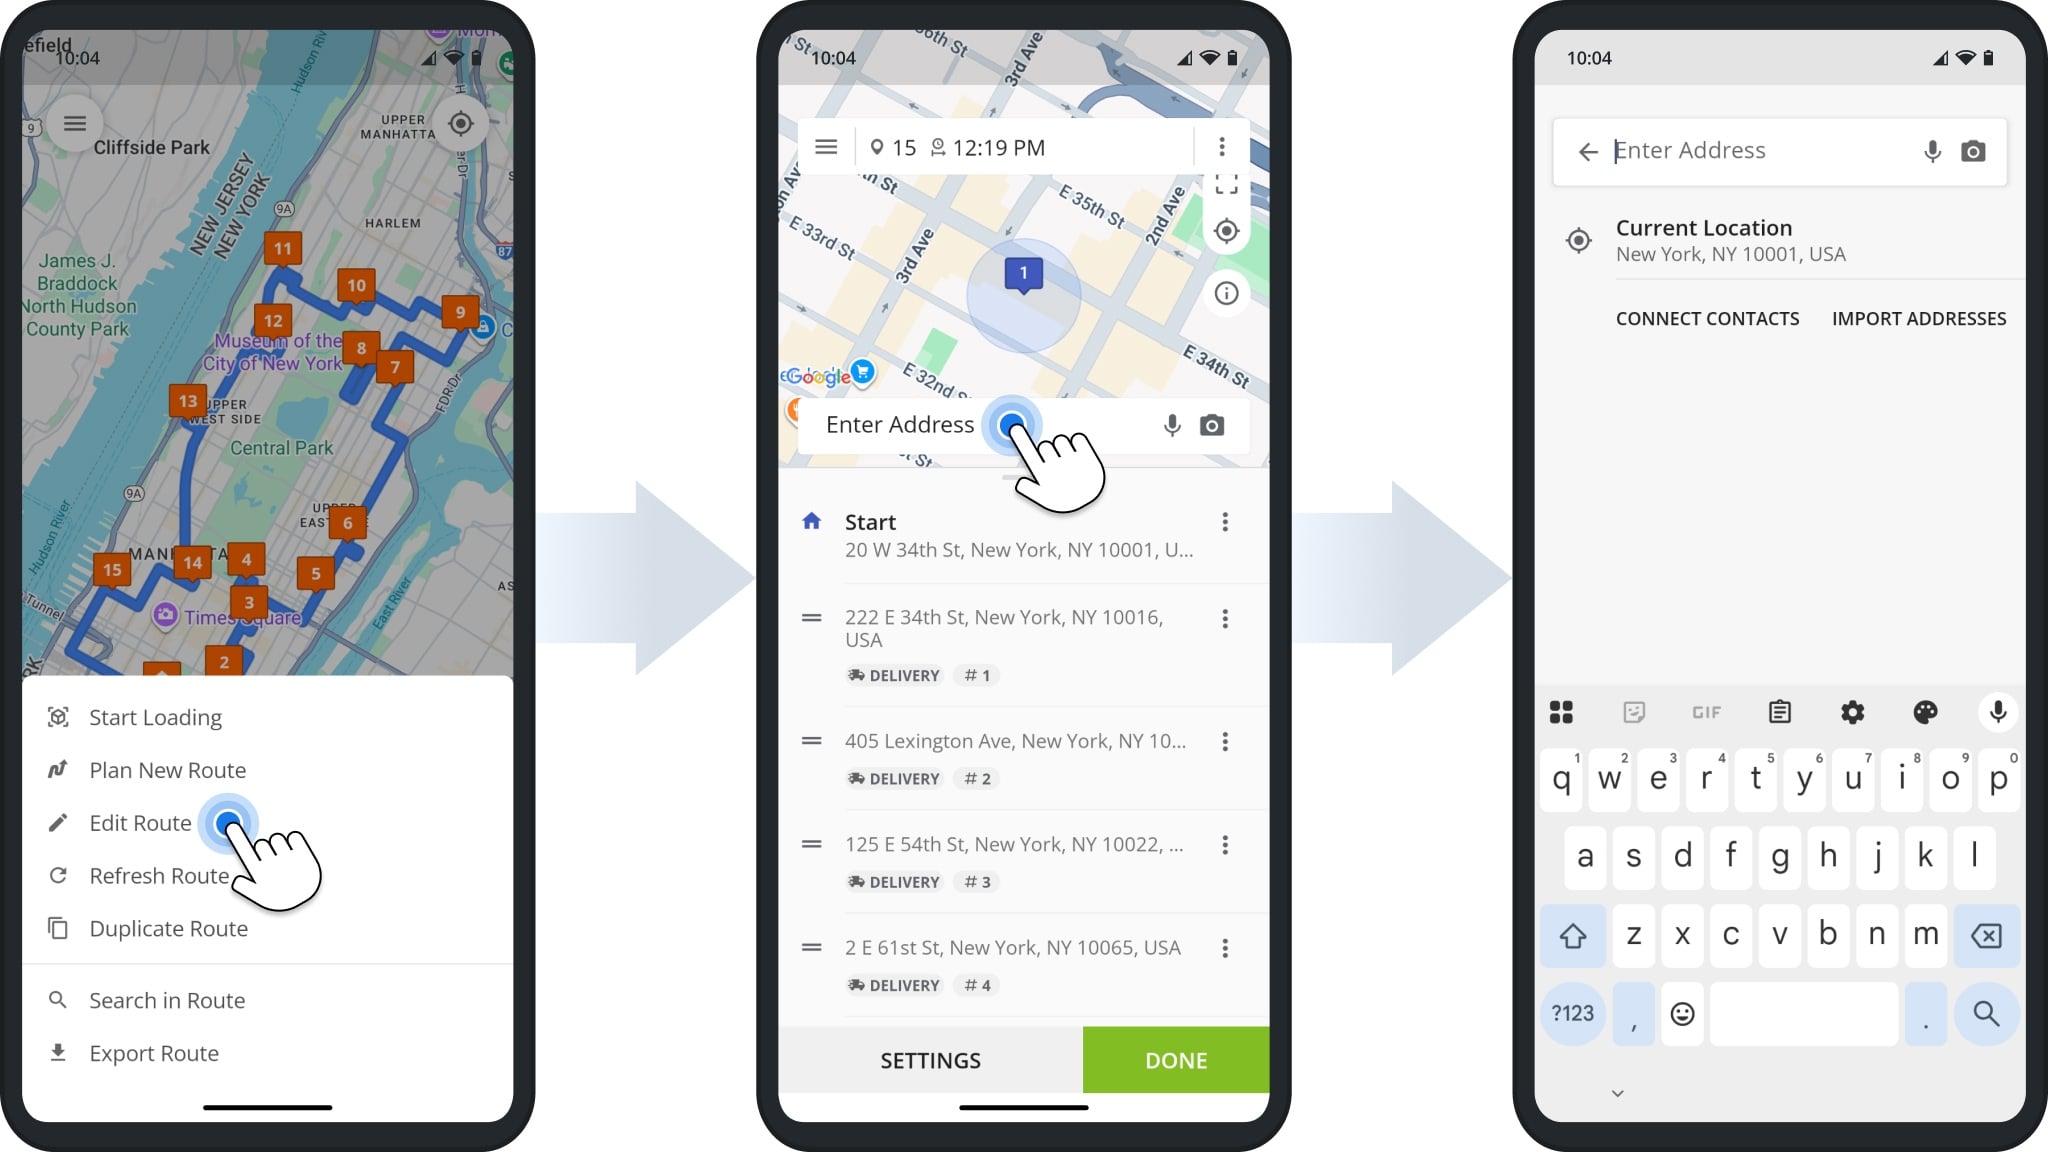
To add new destinations to a route, first open the Mobile Route Editor as described earlier in this guide. Next, tap the “Enter Address” field. Then, you can follow the same steps as usual when adding addresses to plan routes on the mobile app.
Edit Destinations – Change Destination Settings And Details
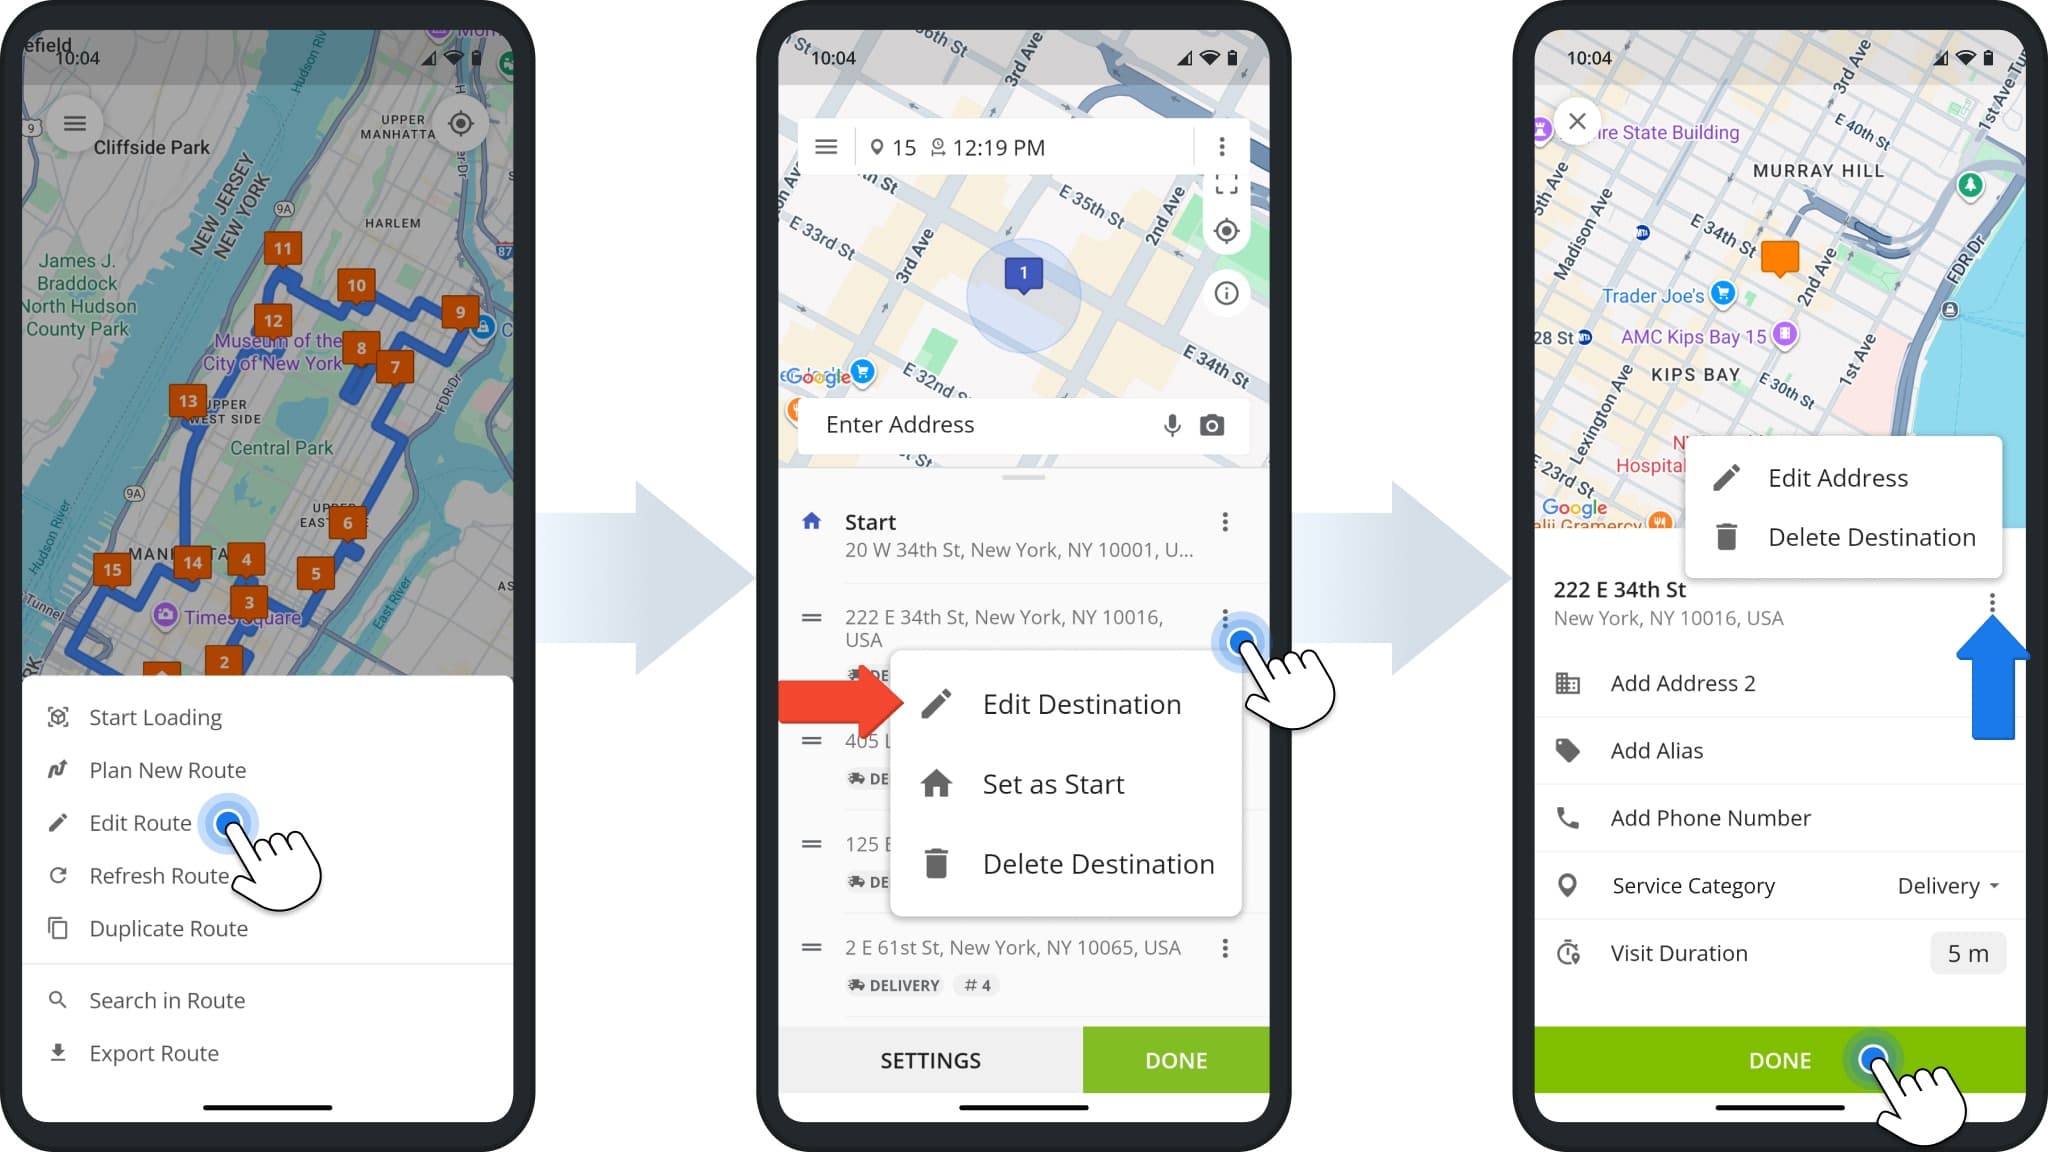
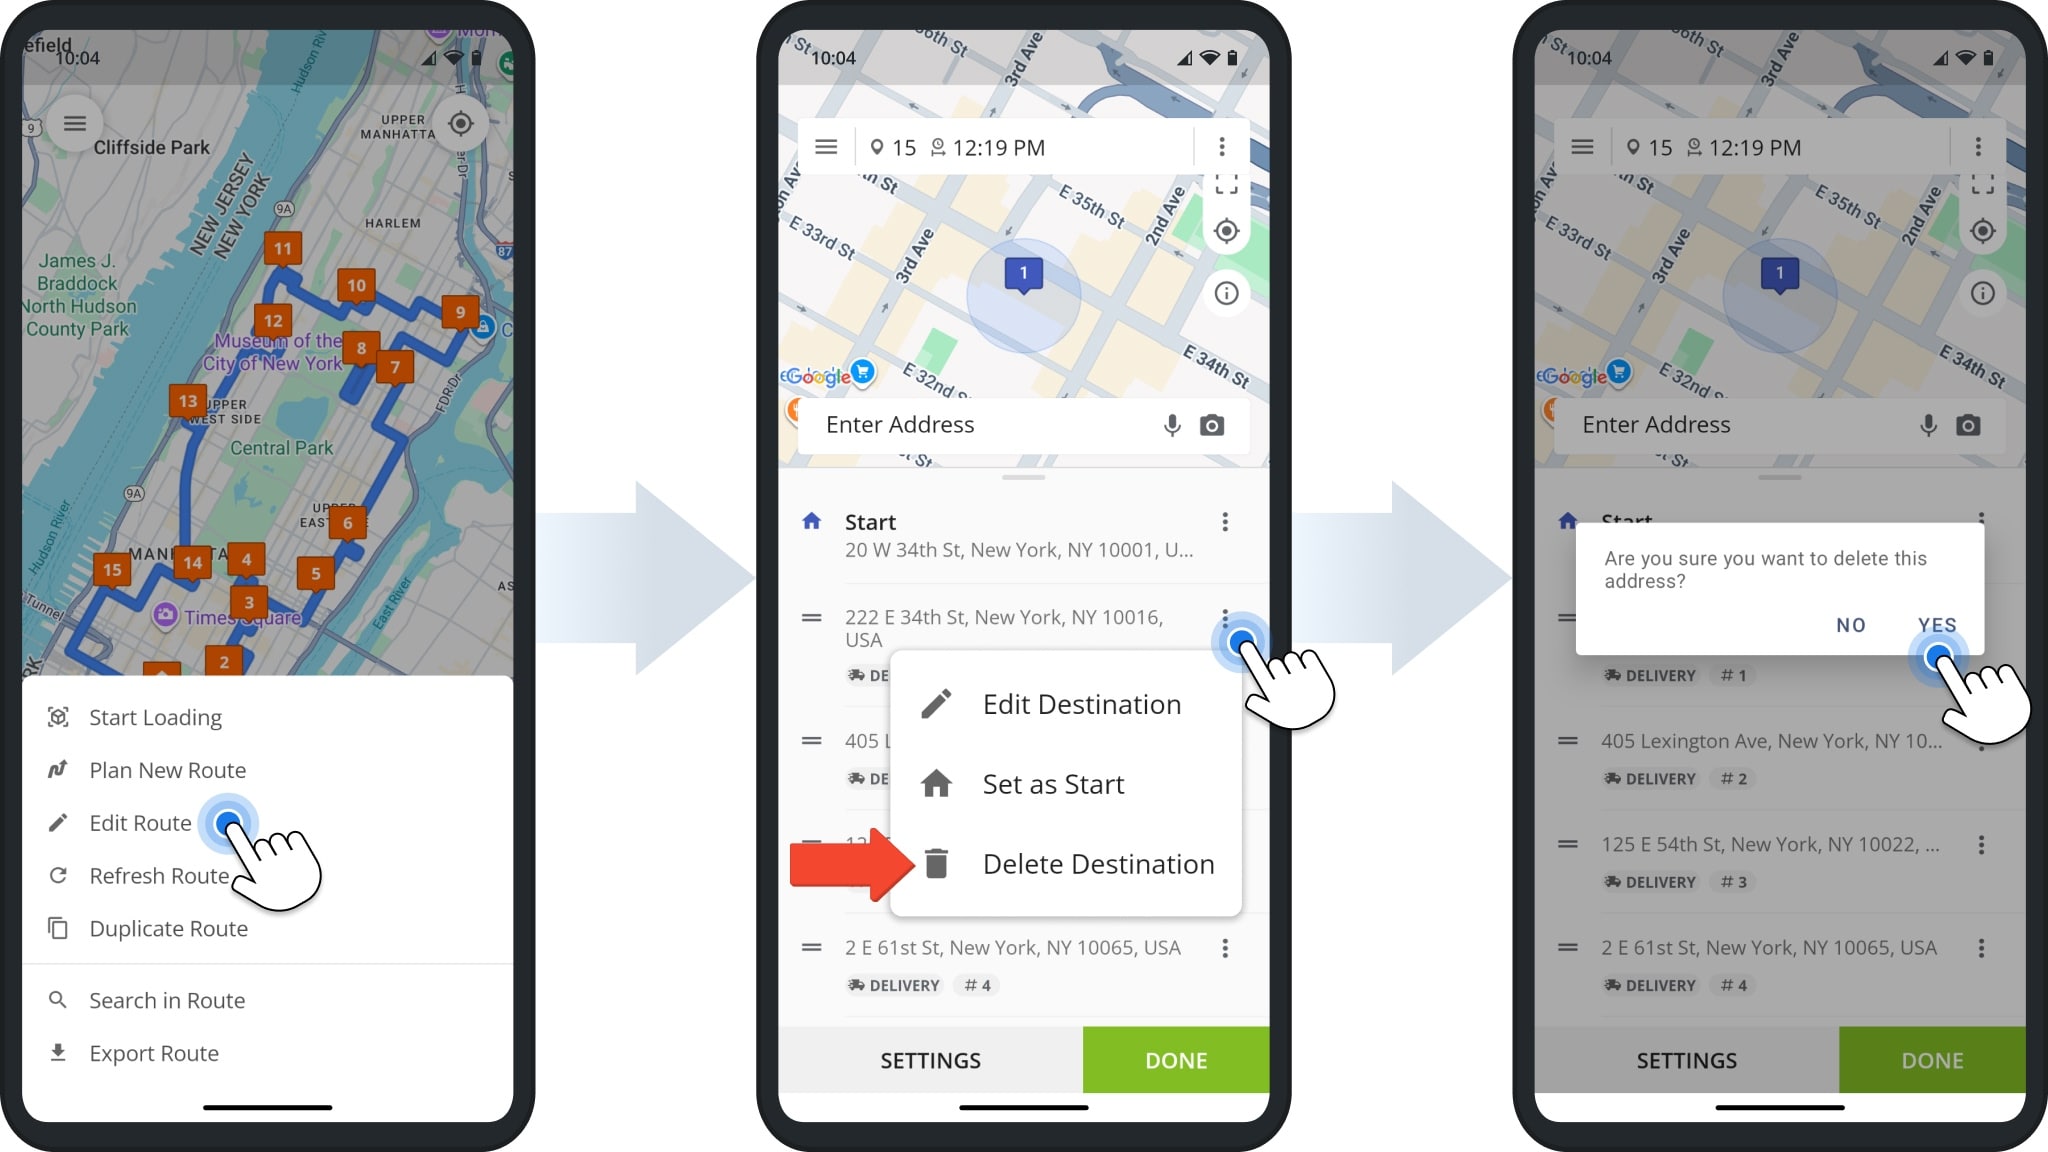
To directly edit a destination and its associated data, first open the Mobile Route Editor as described earlier in this guide. Then, tap the Three-dot Icon next to a destination you want to edit, and select “Edit Destination” from the menu.
You can add further contact details, change a destination’s type and its visit duration. To change the destination’s address or delete it, tap the Three-dot Icon next to the address. Tap “Done” when you’ve finished making changes.
Delete Destinations – Remove Stops From Routes On Mobile Route Planner
To remove a destination, first open the Mobile Route Editor as described earlier in this guide. Then, tap the Three-dot Icon next to a destination you want to delete and select “Delete Destination” from the menu. Confirm by tapping “Yes” when prompted.
NOTE: It’s not possible to restore a deleted destination from the mobile app.
Visit Route4Me's Marketplace to Check out Associated Modules:
- Operations
Custom Data Add-On
- Operations
Advanced Team Management Add-On
About author: Kristian Andreev

