
Recurring Route Snapshot – Review And Manage Recurring Routes
Enterprise businesses that rely on last mile route optimization often have to plan the same routes again and again. Recurring routes remove repeated planning by automatically creating routes on a schedule from a saved template. The Recurring Route Snapshot brings everything about a recurring route into one view, from its configuration to the routes and destinations it has created, so you can review and fine-tune it efficiently.
Table of Contents
Open Recurring Route Snapshot – Recurring Route Analytics Overview
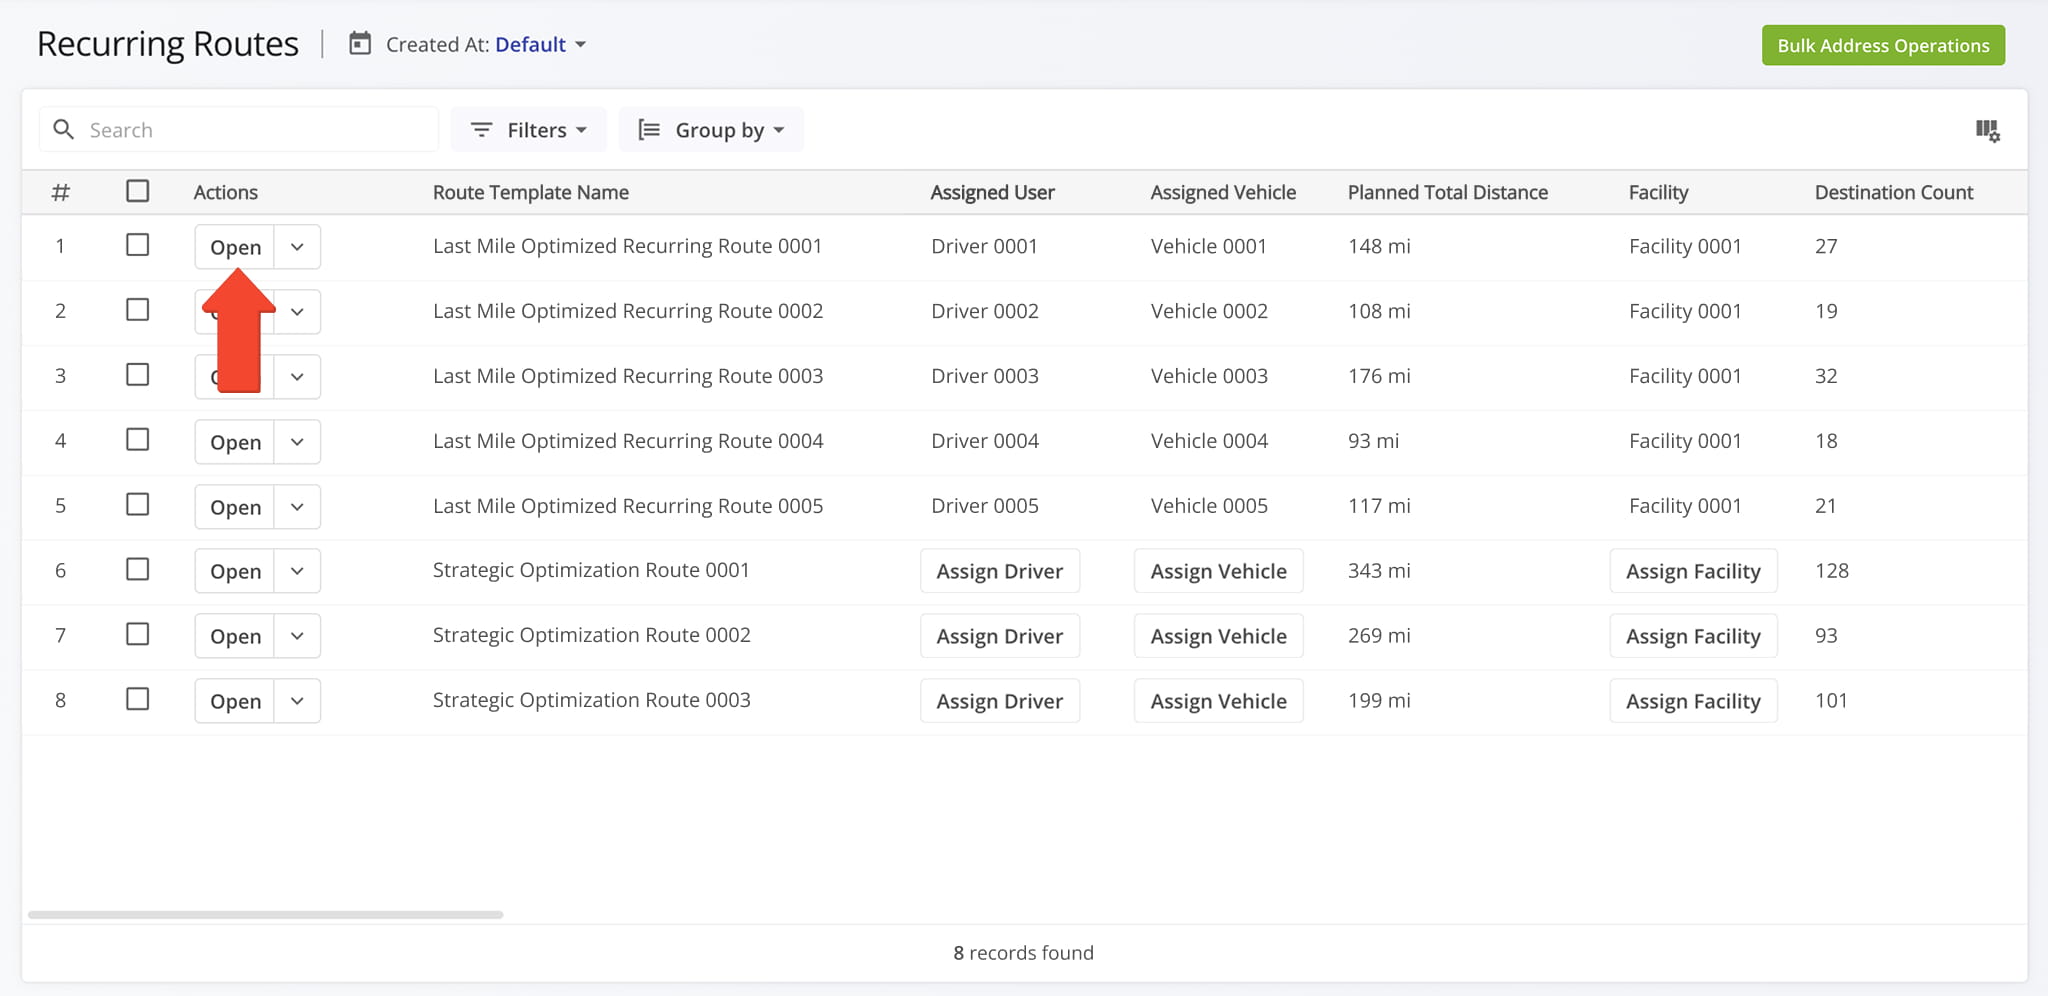
To open a Recurring Snapshot, go to “Strategic Routing” > “Recurring Routes” from the Navigation Menu. Then, from the Recurring Routes Page, click the “Open” button next to the desired Route Template.
Open Your Recurring Routes Page
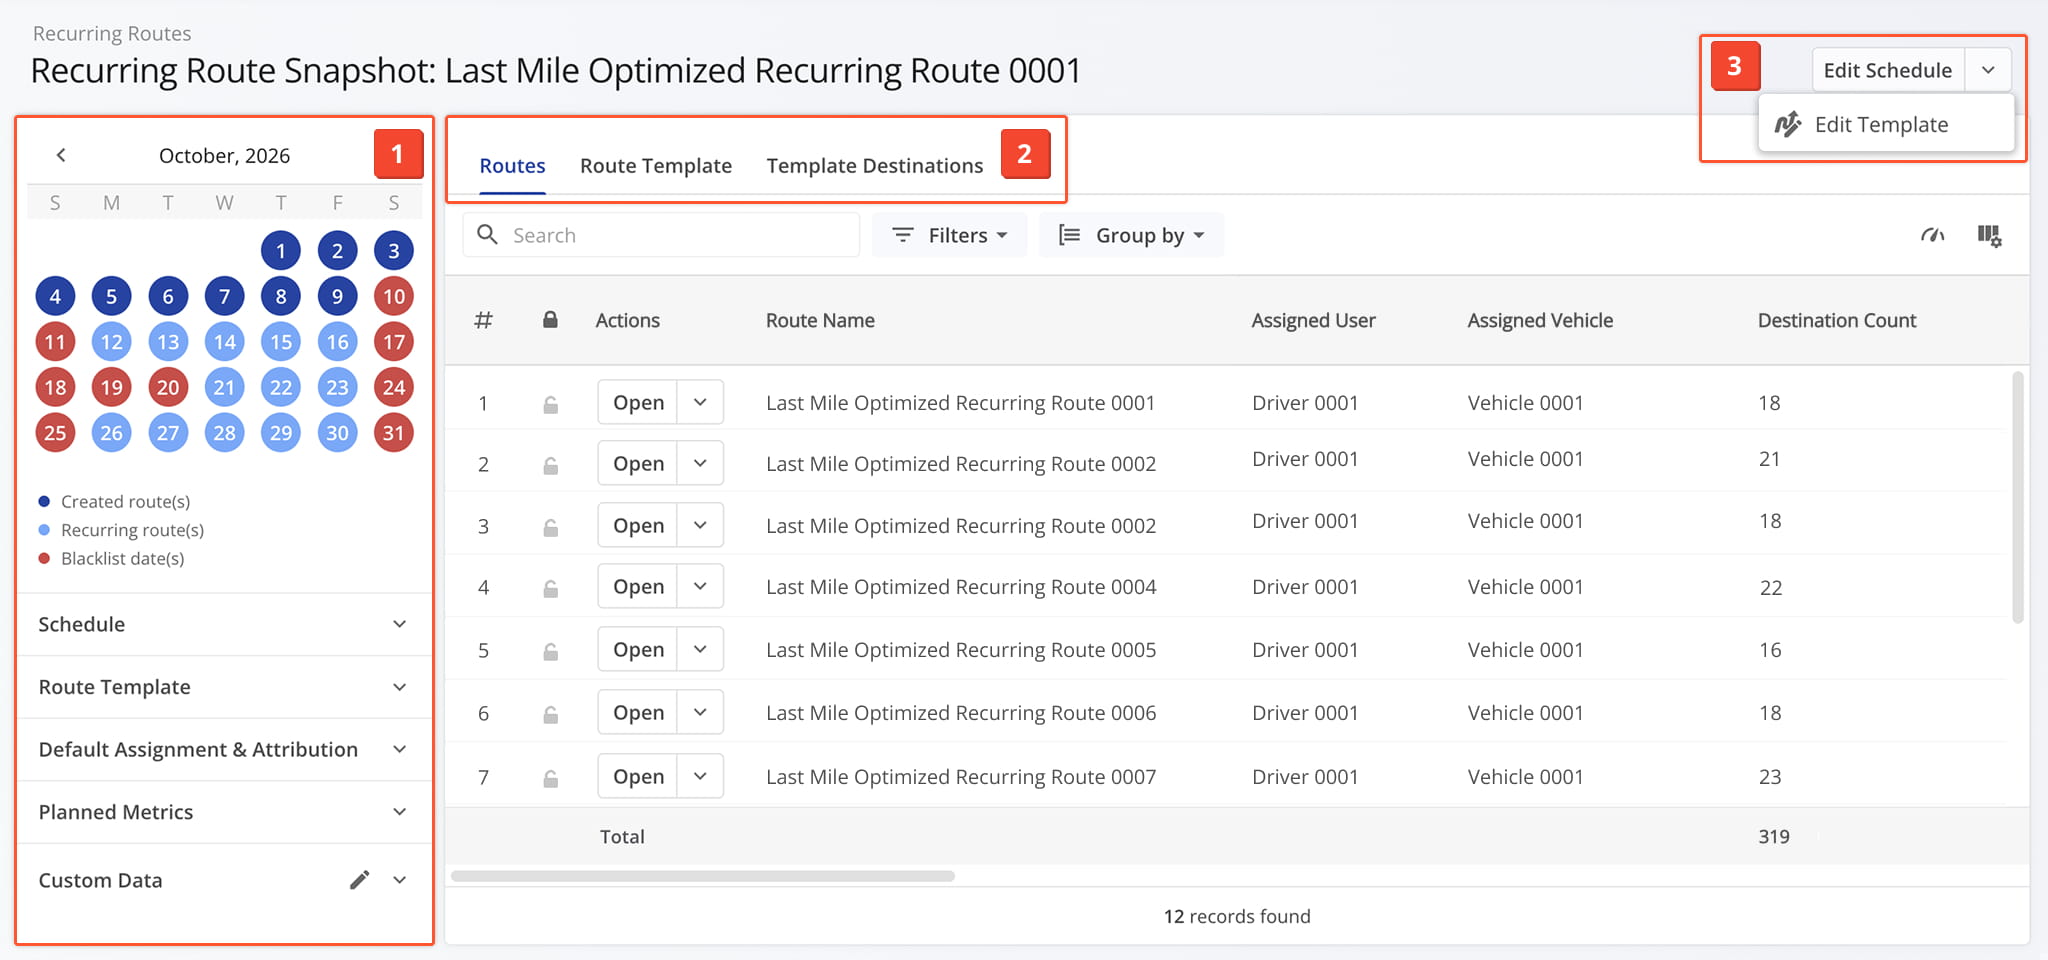
One the Snapshot is opened, you’ll see a detailed interface designed to help you review and manage all Recurring Route data:
- Summary Panel: A quick overview of essential information related to the Recurring Route Schedule, Route Template, and more.
- Data Tabs: Switch between “Routes“, “Route Template“, and “Template Destinations” to explore Recurring Route data.
- Edit Controls: Click “Edit Schedule” to adjust the schedule or “Edit Template” to modify the template in the Route Editor.
All data is centralized and accessible, making it easier to analyze Recurring Route information and plan accordingly.
Recurring Route Summary Panel – Recurring Route Settings And Details
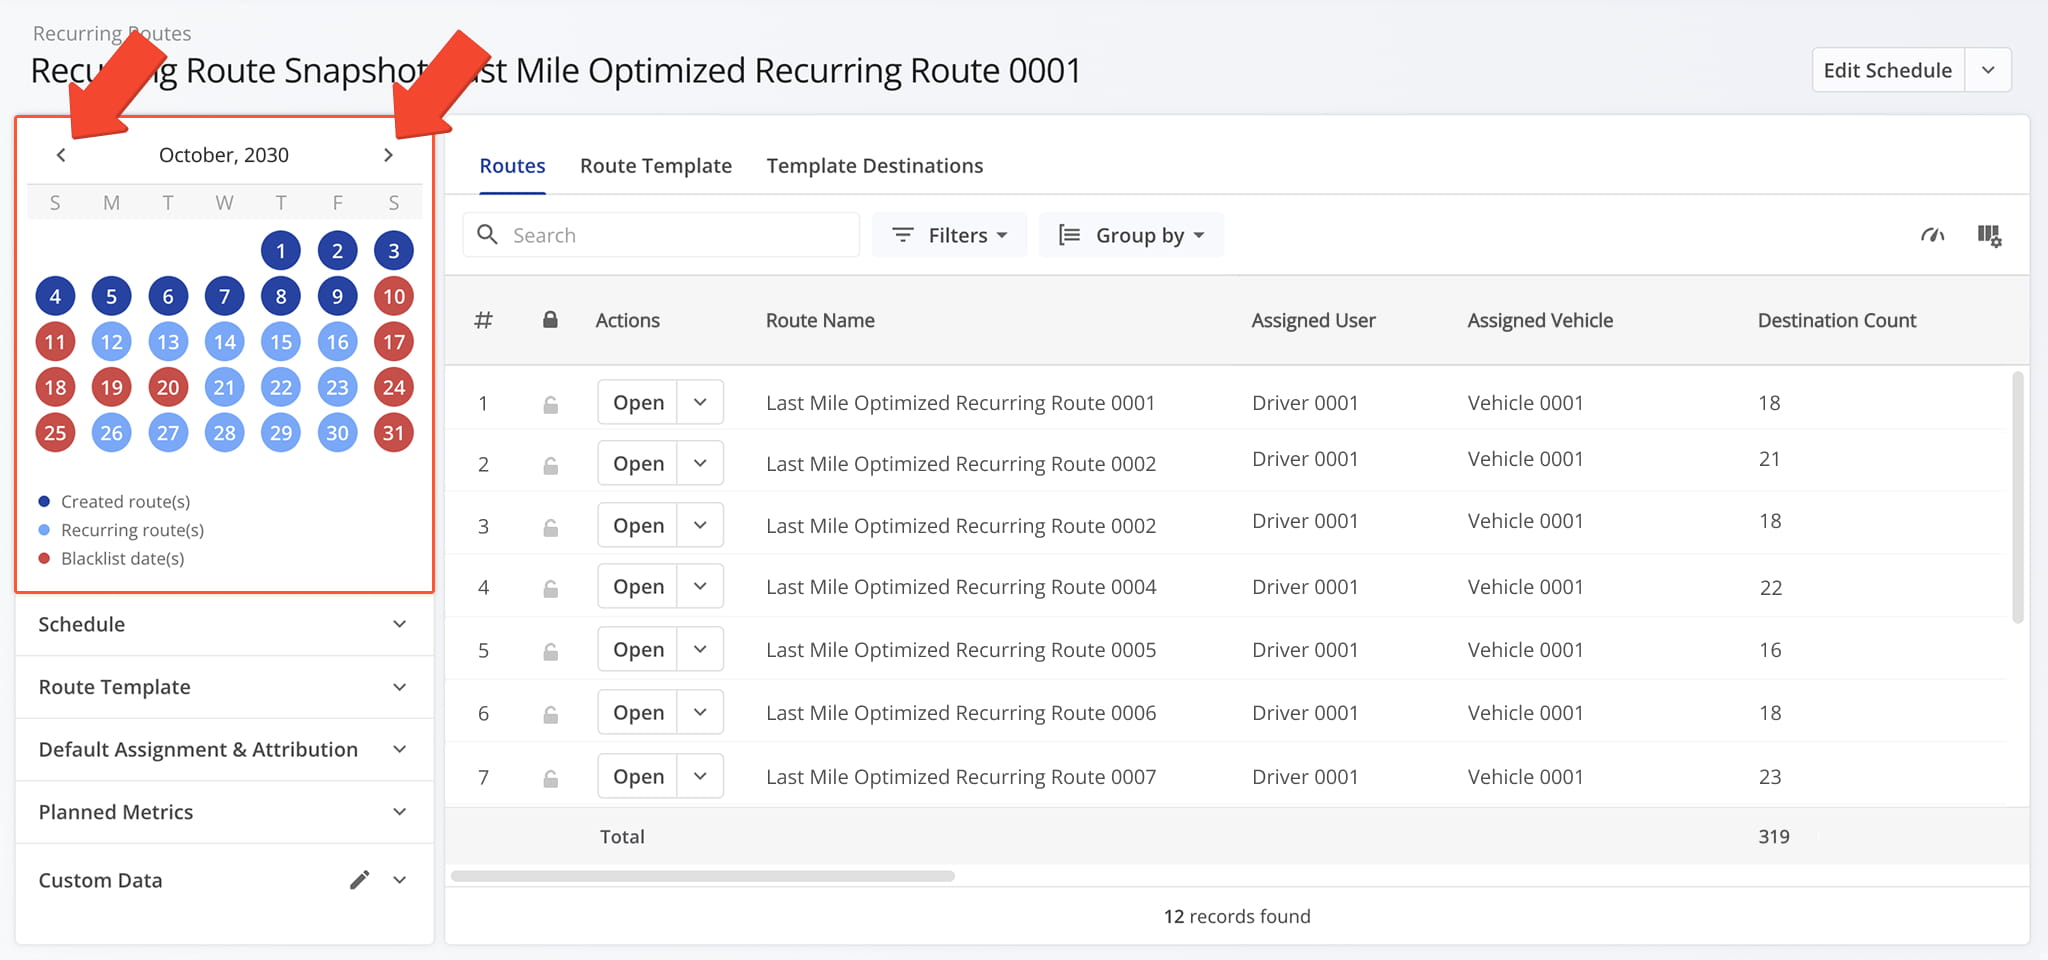
Routing Calendar – Calendar View Of Created And Recurring Routes
The Summary Panel displays key details about the Recurring Route, starting with a calendar view of all created and recurring routes, as well as blacklist dates. Click an arrow to view other months.
Schedule Summary – Rules, Scheduled Start Times, Exceptions, And More
Open the “Schedule” section to access an overview of key Recurring Route schedule details and quickly confirm that a Recurring Route is set up the way you intended. See the table below for a breakdown of each field in this section.
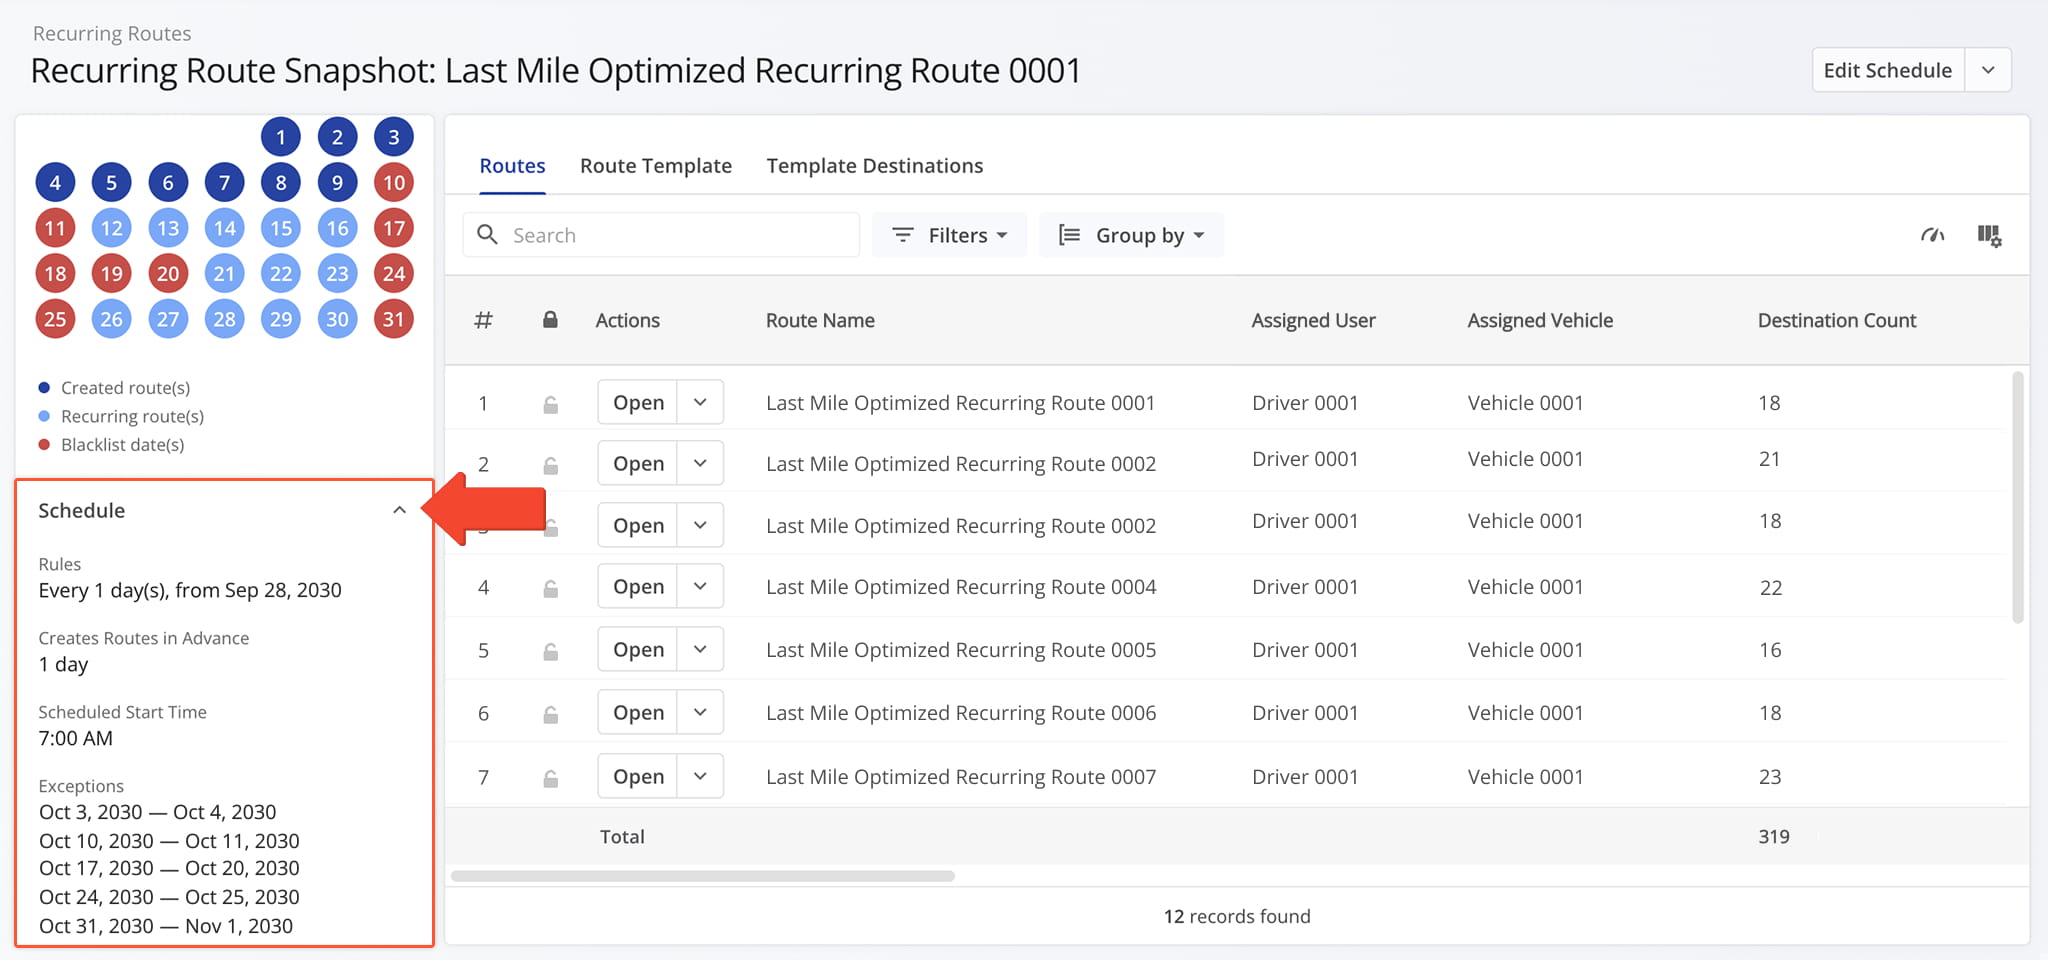
Recurring Route Schedule
Route Template – Optimization, Creation Date, Destination Count, And More
Open “Route Template” to access an overview of the template behind your Recurring Route. Use it to confirm the template is set up the way you intended. See the table below for a breakdown of each field.
Click the icon next to “Optimization” to view its Optimization Snapshot. Click the icon next to “Created On” to view the template in the Routes List.
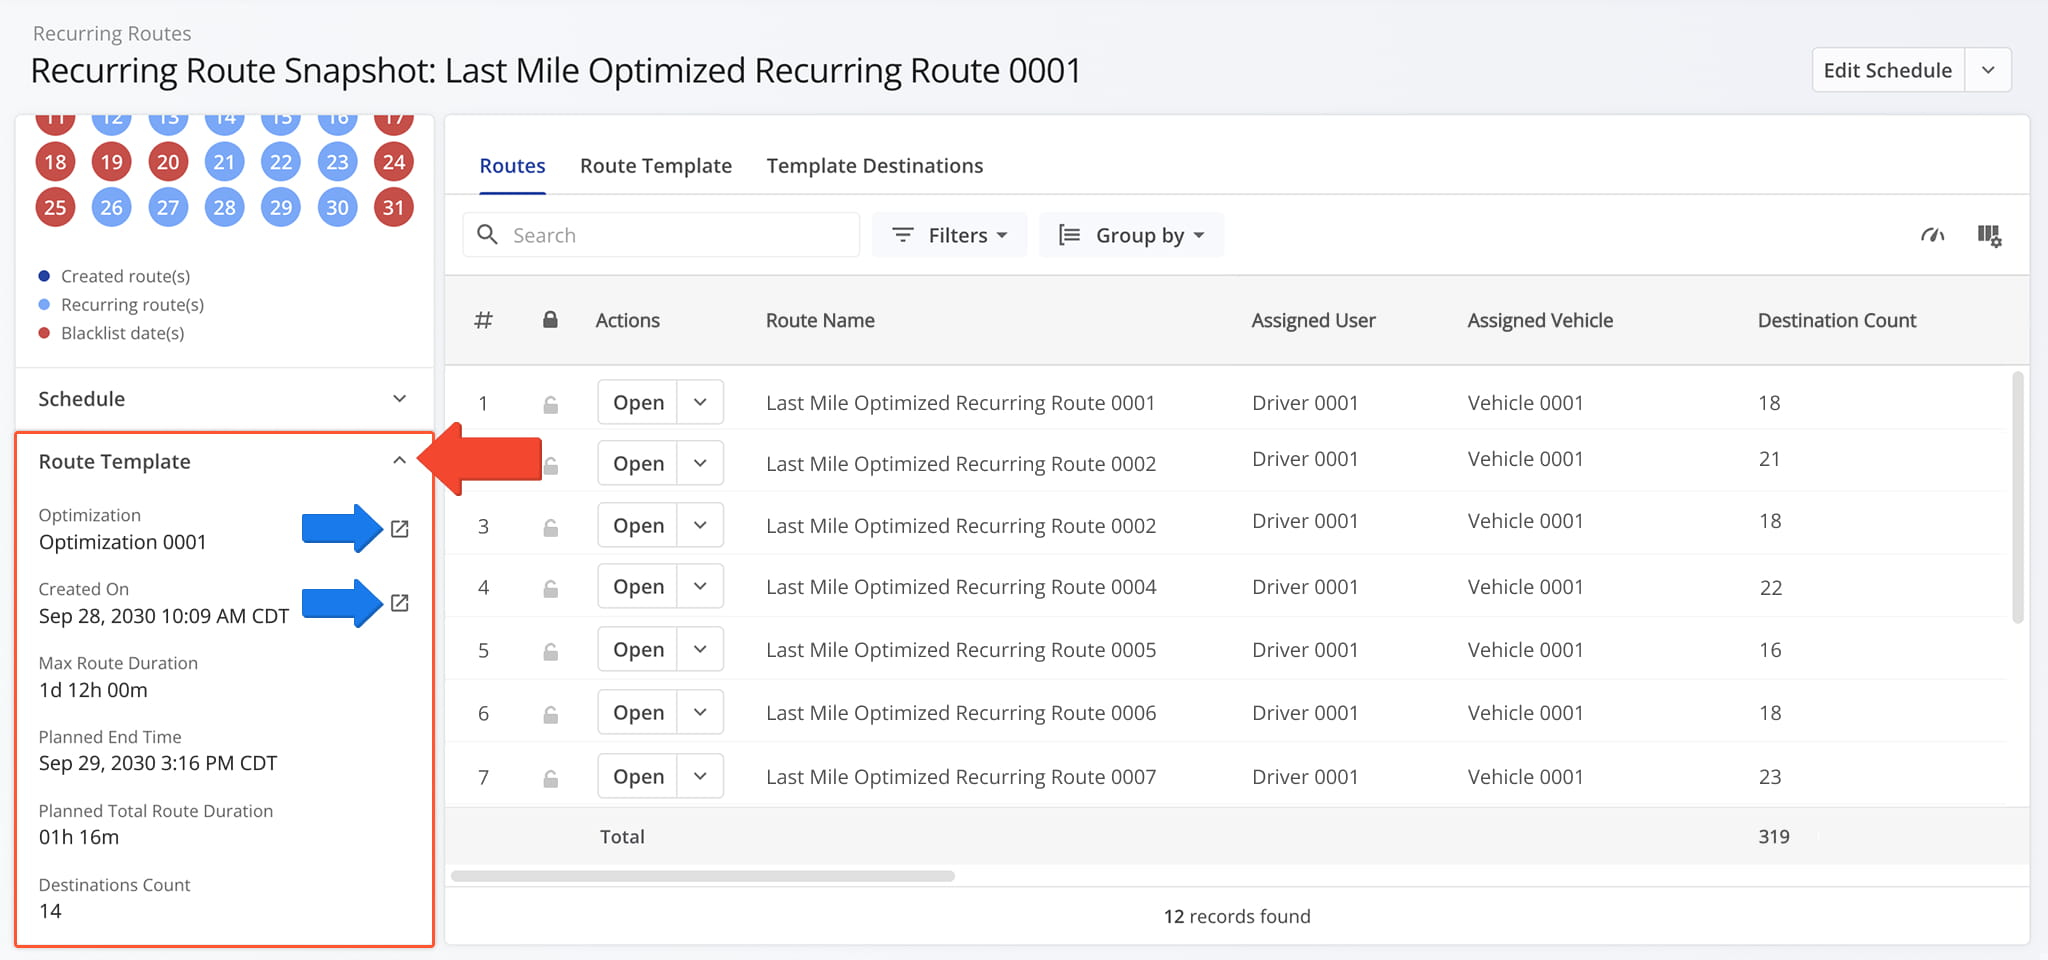
Route Template Details
Default Assignment And Attribution – Assigned User, Crew, Vehicle, Facility, And More
Open “Default Assignment & Attribution” to see what each new route is assigned and attributed to by default. See the table below for a breakdown of each field.
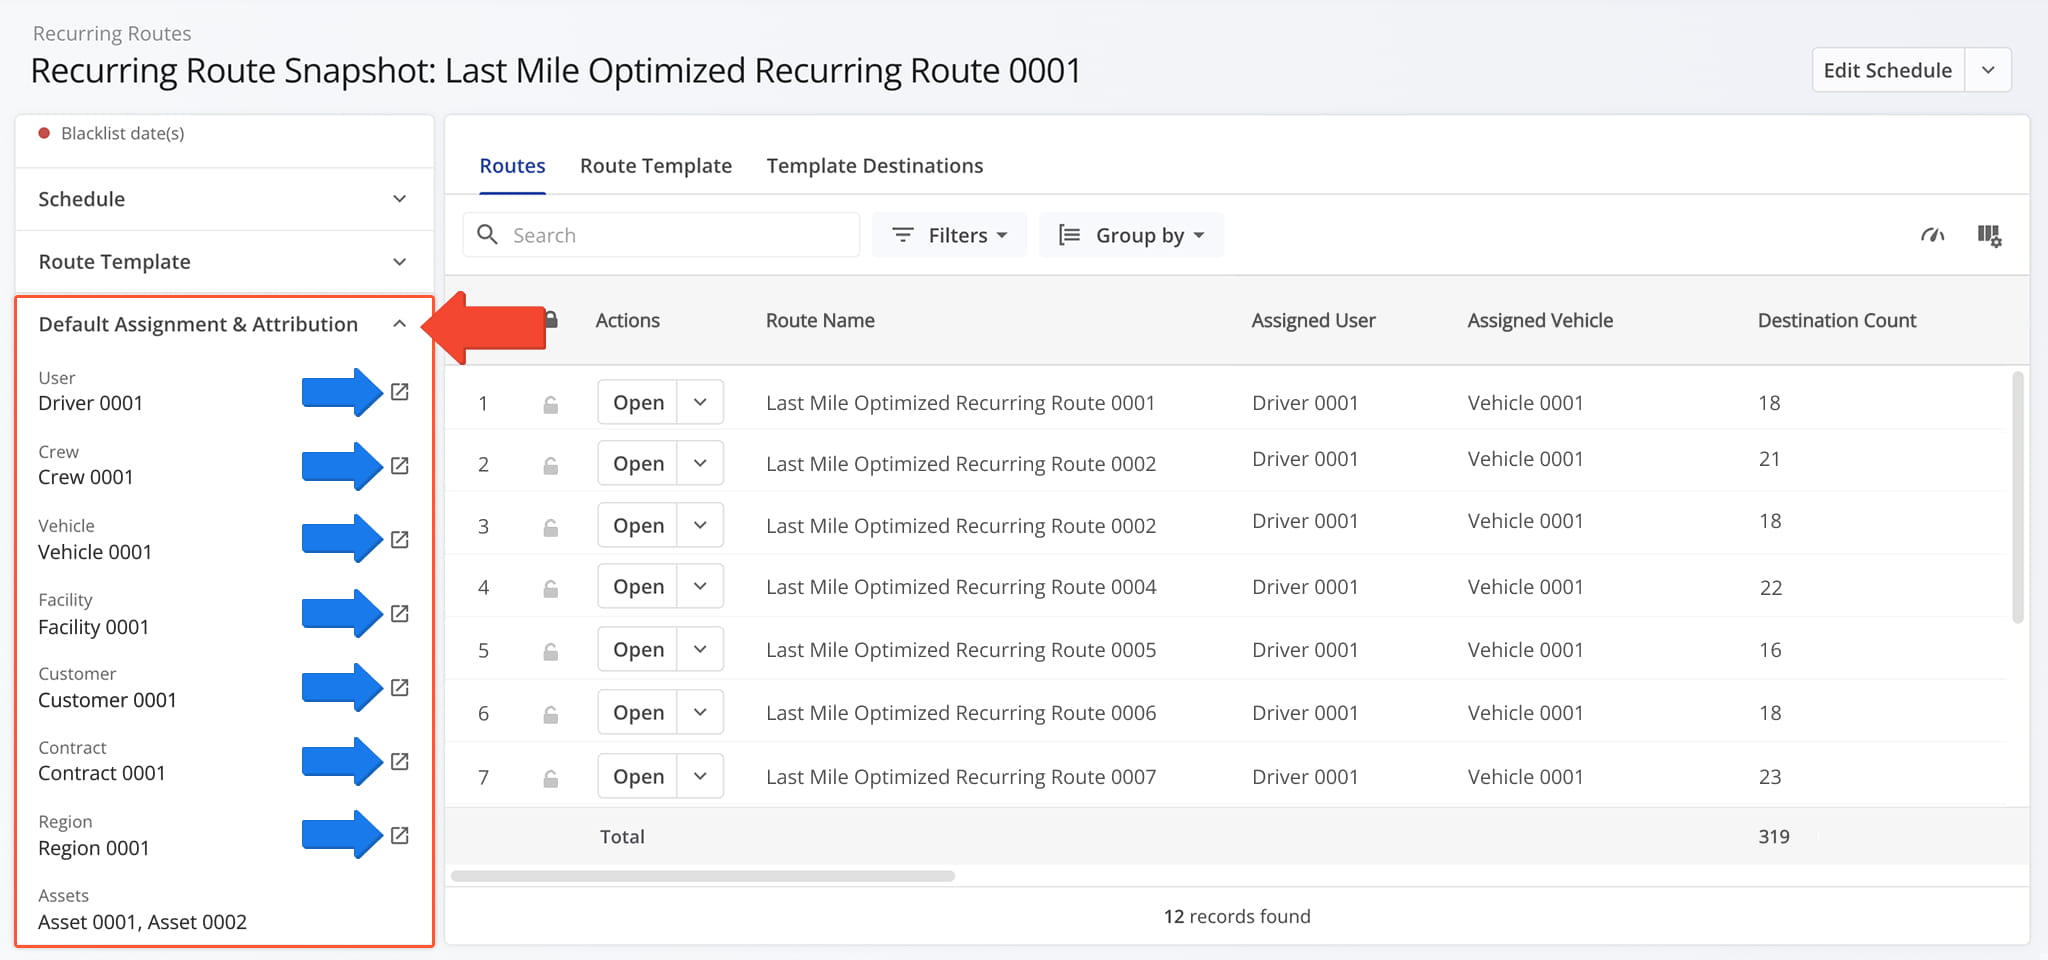
Default Assignment & Attribution
Planned Metrics – Destination Count, Distance, Duration, And More
Open “Planned Metrics” to view the expected totals for each route this Recurring Route creates. Use it to see how long a route is expected to take and how that time is allocated. The table below describes each metric in detail.
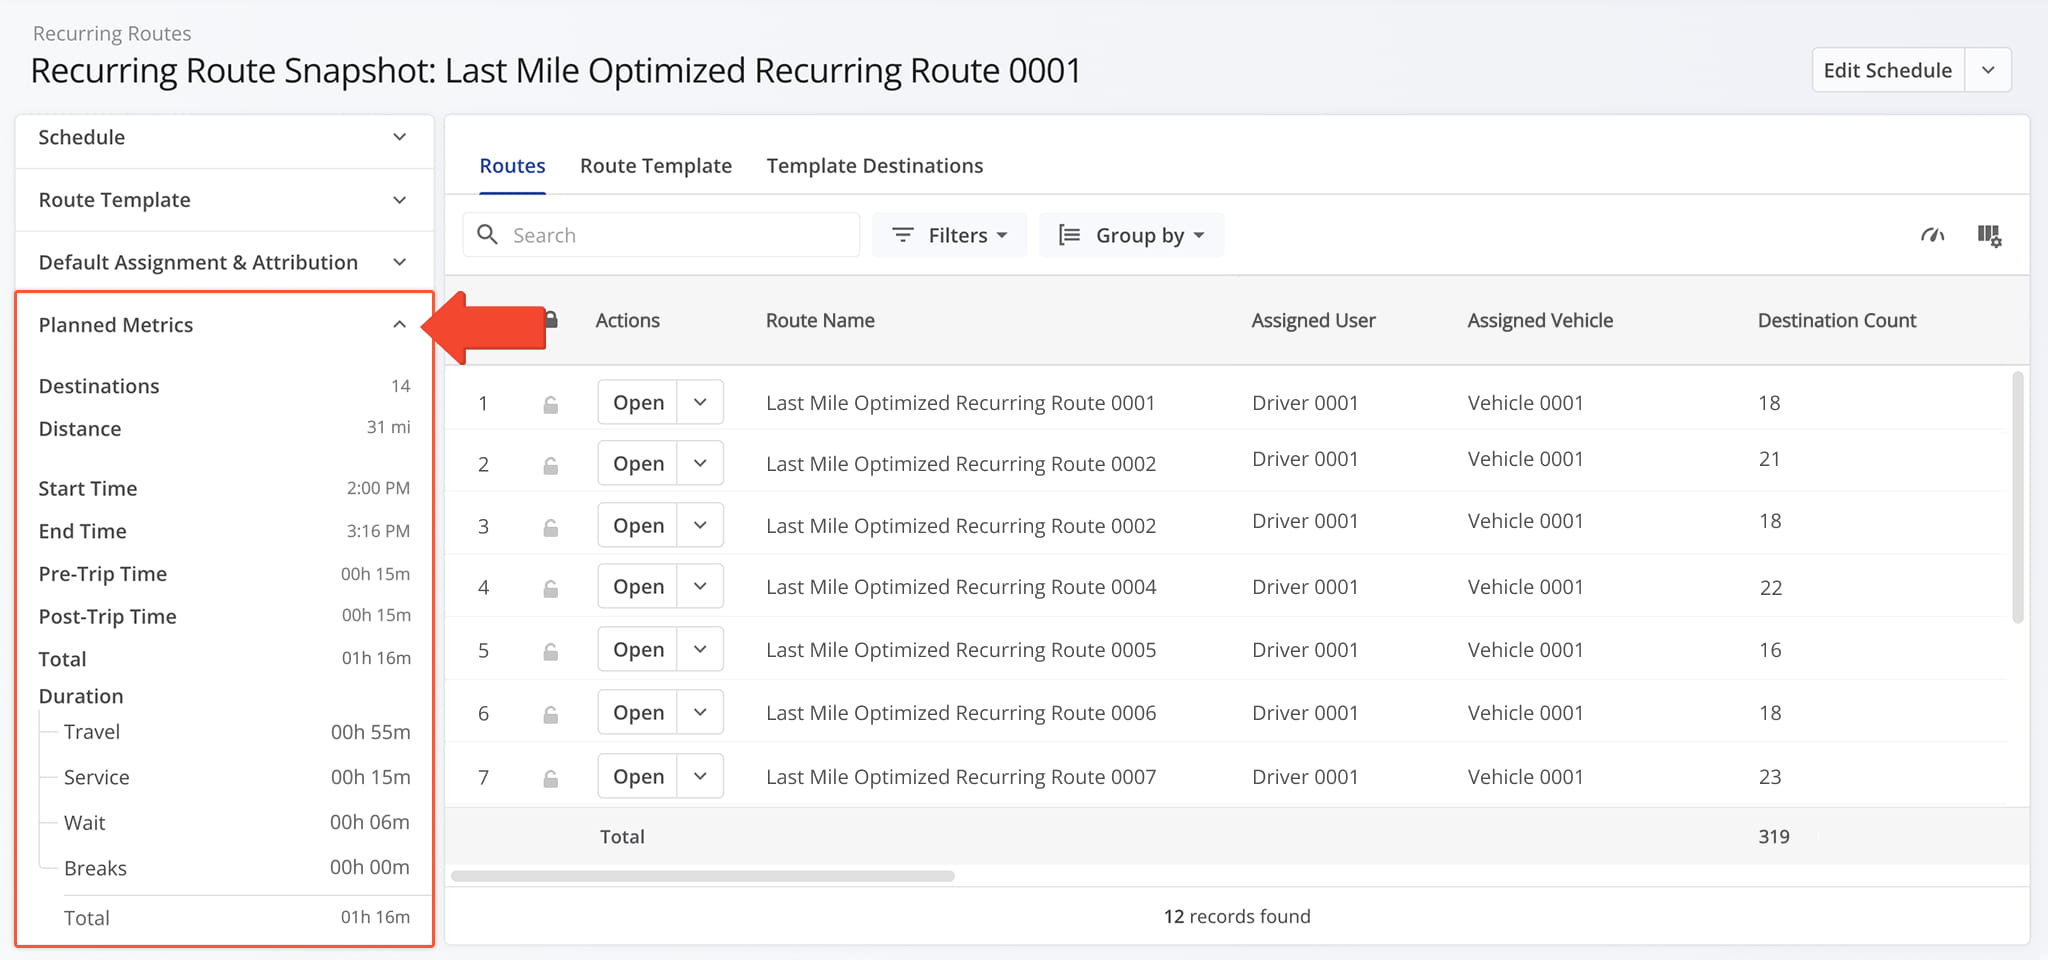
Planned Metrics
Custom Data – Custom Fields And Values
Open “Custom Data” to view the custom fields and values saved to this Recurring Route. Use it to view details unique to your operation that standard fields don’t cover.
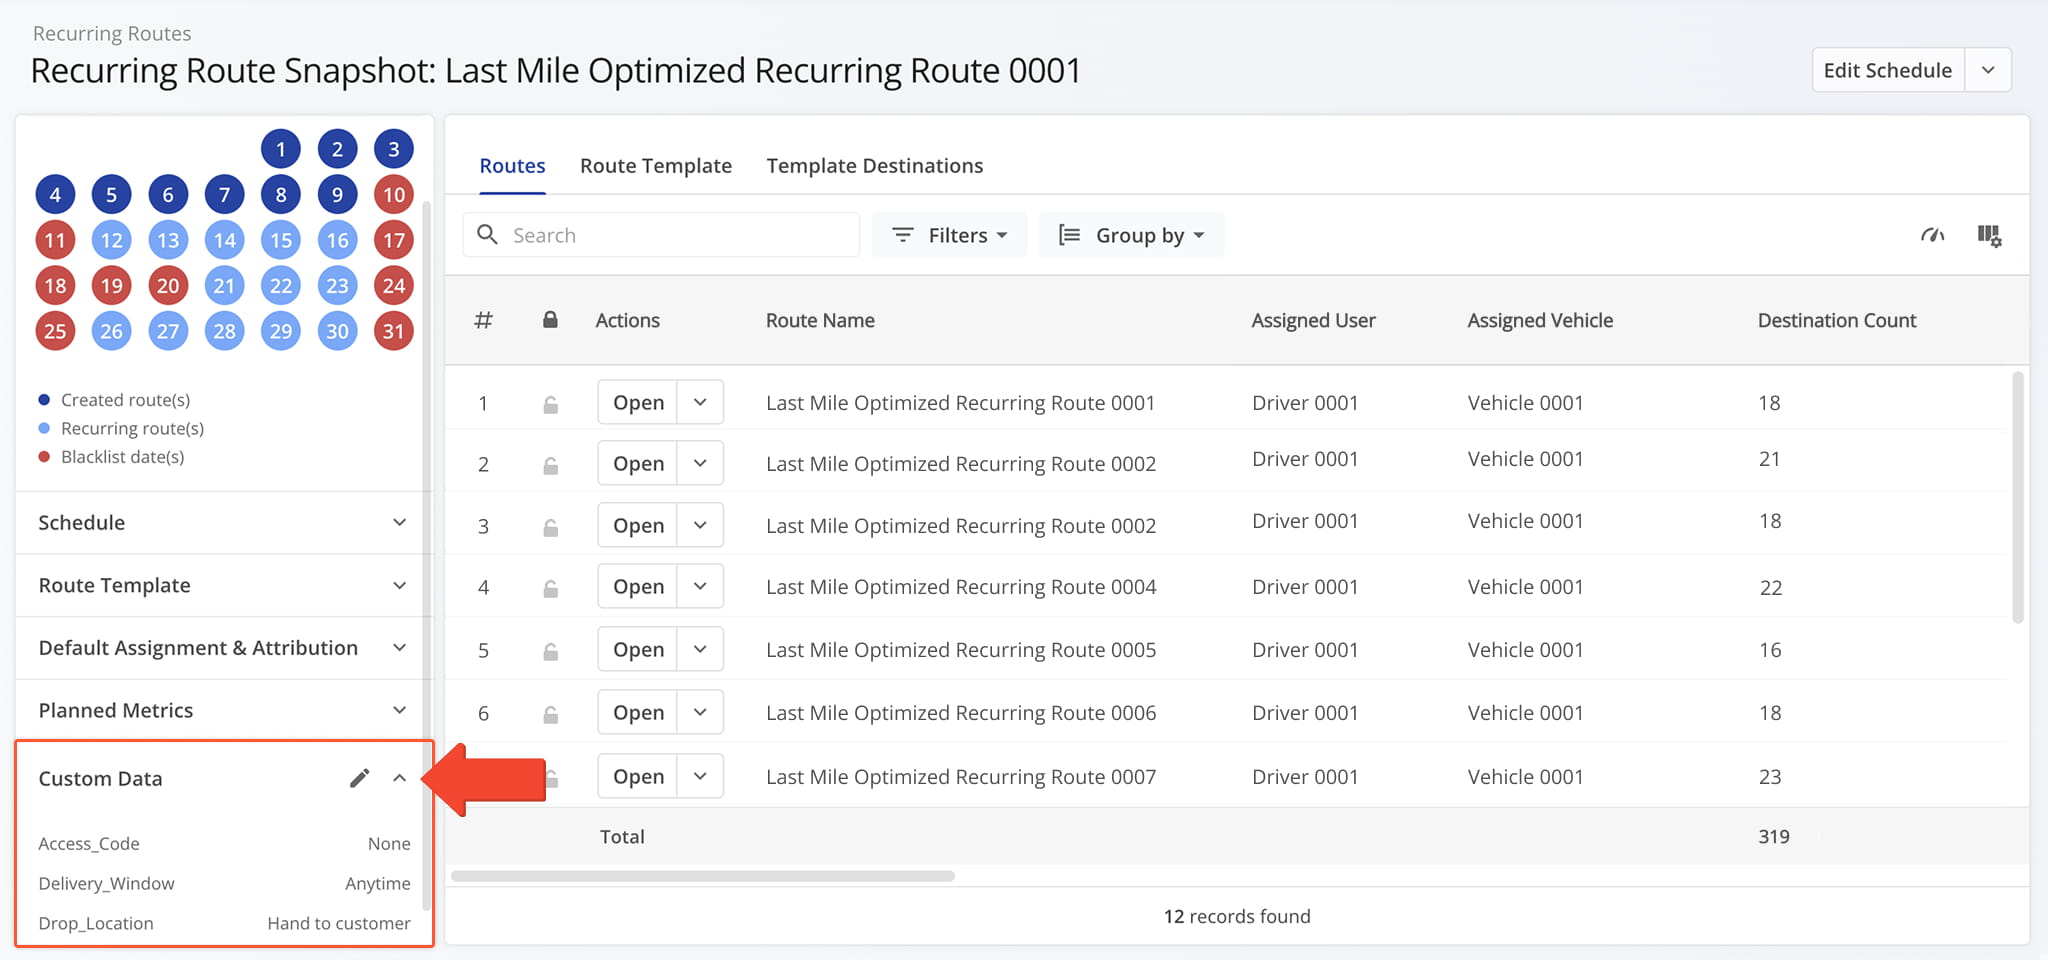
Recurring Route Data Categories – Review Routes And Template Data
Routes Tab – Search, Filter, And Open Linked Routes
By default, the Routes tab opens when you access a Recurring Route Snapshot, displaying all routes linked to the template in a customizable table. From this tab, you can:
- Use the Search field to locate routes associated with the Recurring Route template.
- Narrow down routes with filters, as described in the table below, or with Group By options.
- Click the Metrics Icon to review detailed route data in the Metrics Panel.
- Click “Open” to view a route’s corresponding Route Snapshot.
- Click the Down Arrow button to edit the route in the Route Editor.
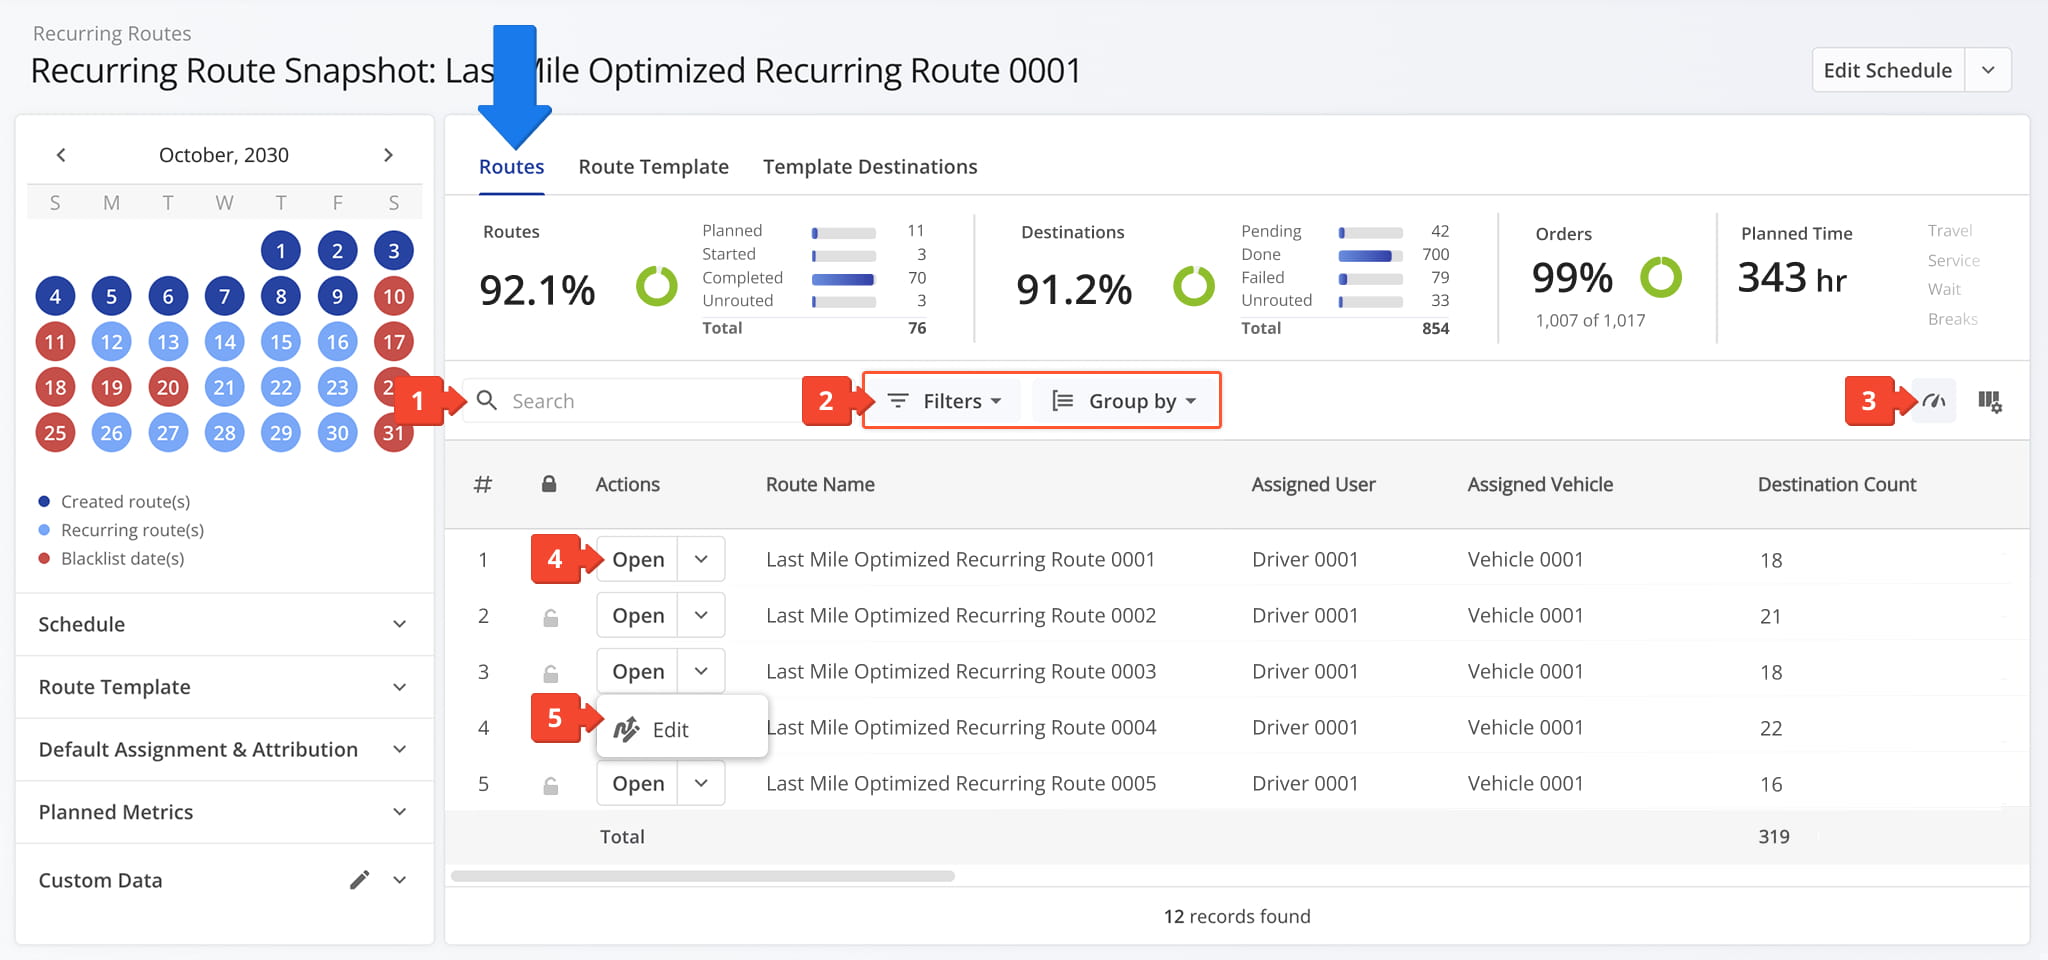
Routes Tab Filters
You can also customize the data displayed in the table. Click the Column Icon in the upper right corner to select which route data fields appear and adjust their order to suit your operational needs.
The table below provides an overview of all available data columns, which you can reorder by dragging them into place.
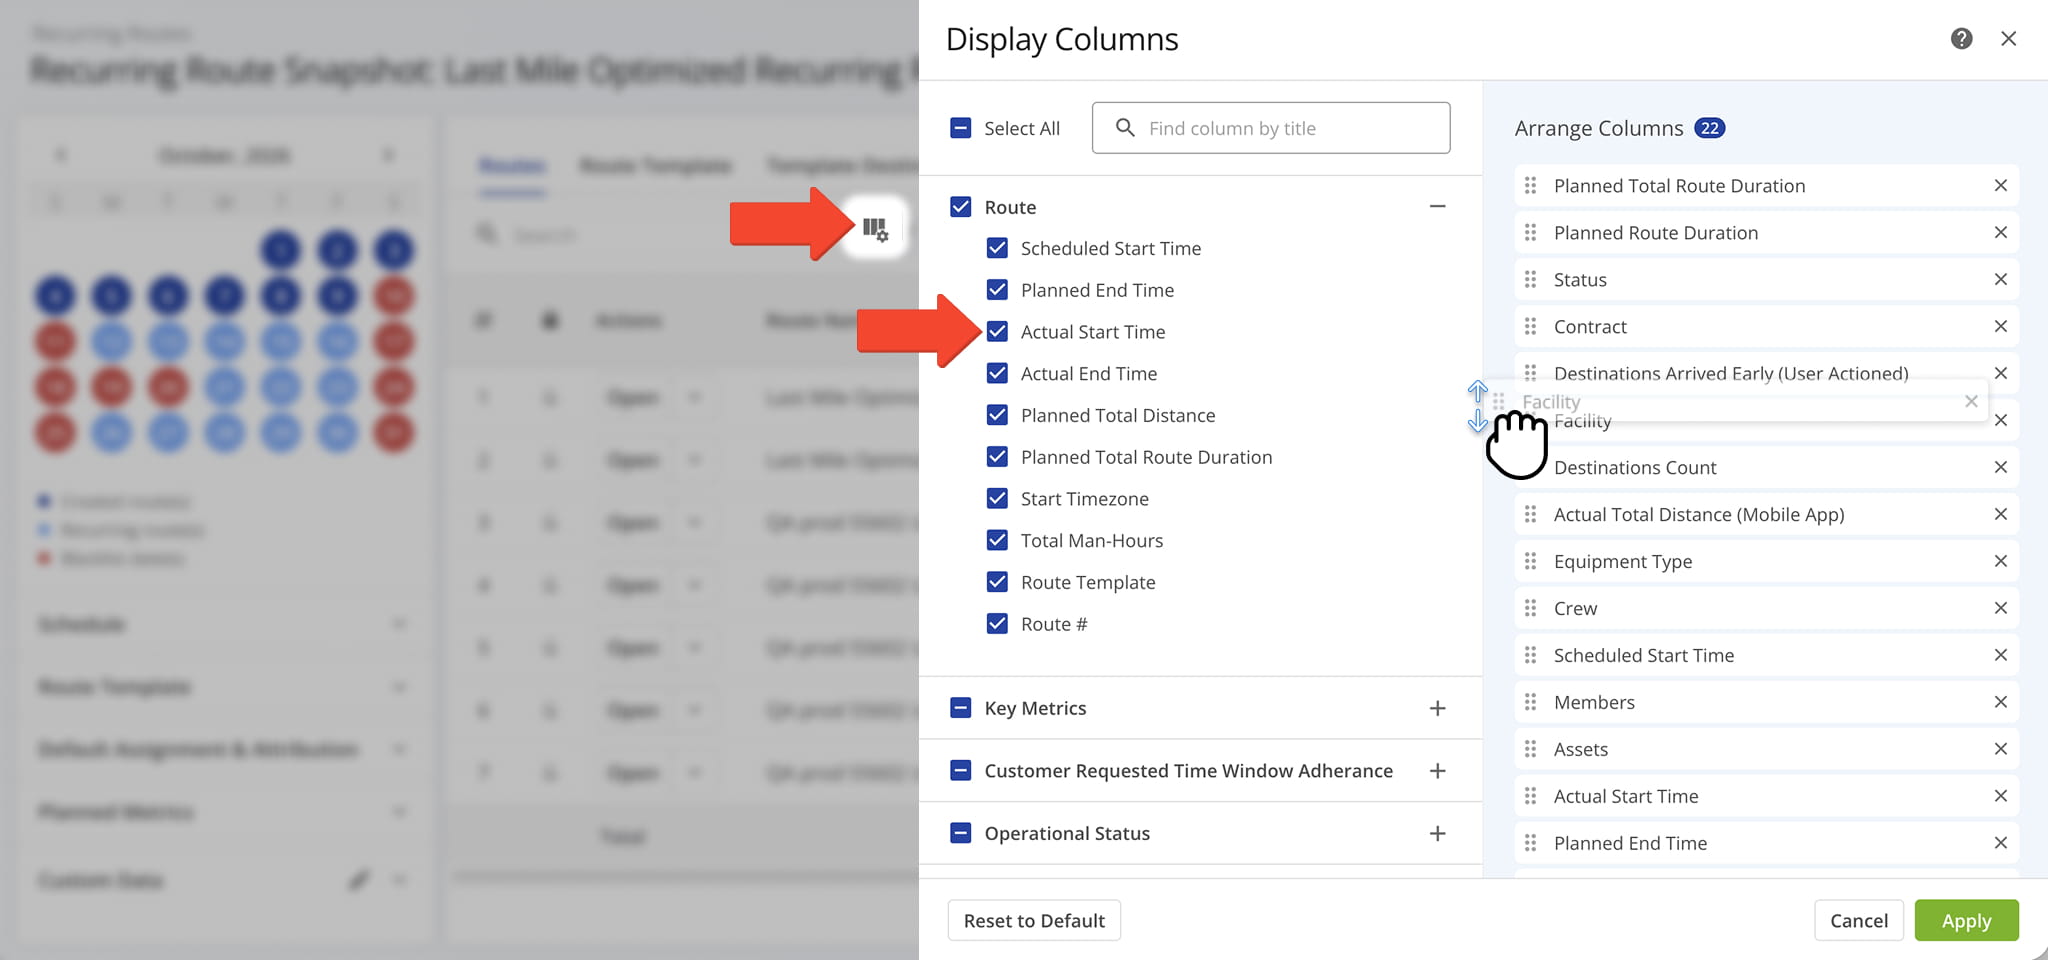
Route Tab Data Columns
Route Template Tab – Inspect Route And Destination Details On The Map
Click the blue “Route” box above the route list to review Route Properties. Toggle “Show All” to expand or collapse fields in each section. Click the Arrow Icon next to a section name to expand or collapse it. The table below details each section and their fields.
The map to the right displays the template’s planned route.
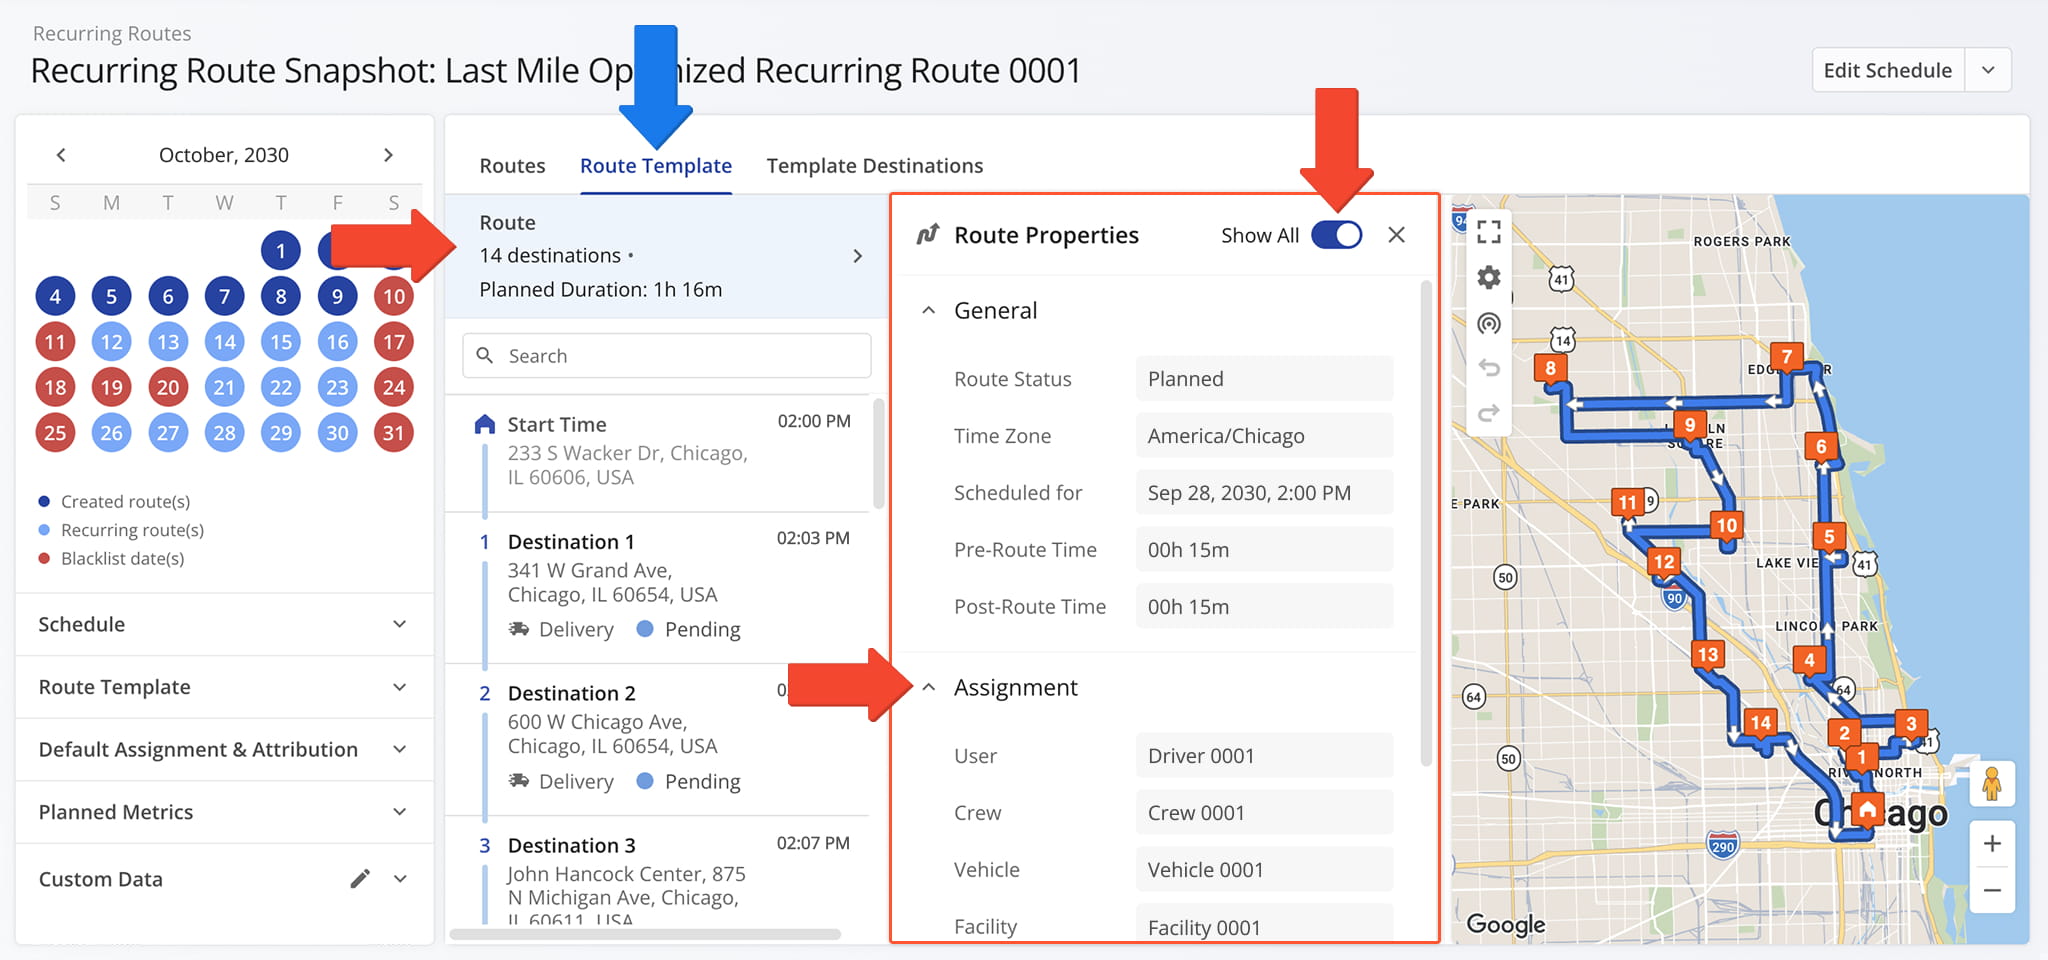
Route Properties
Click a destination in the Route List to open its Destination Info panel. The panel groups the destination’s details into sections, detailed in the table below.
Click a section name to expand or collapse it. Toggle “Show All” to expand or collapse fields within each section.
The map zooms in on that destination’s marker, so you can see exactly where it falls along the route.
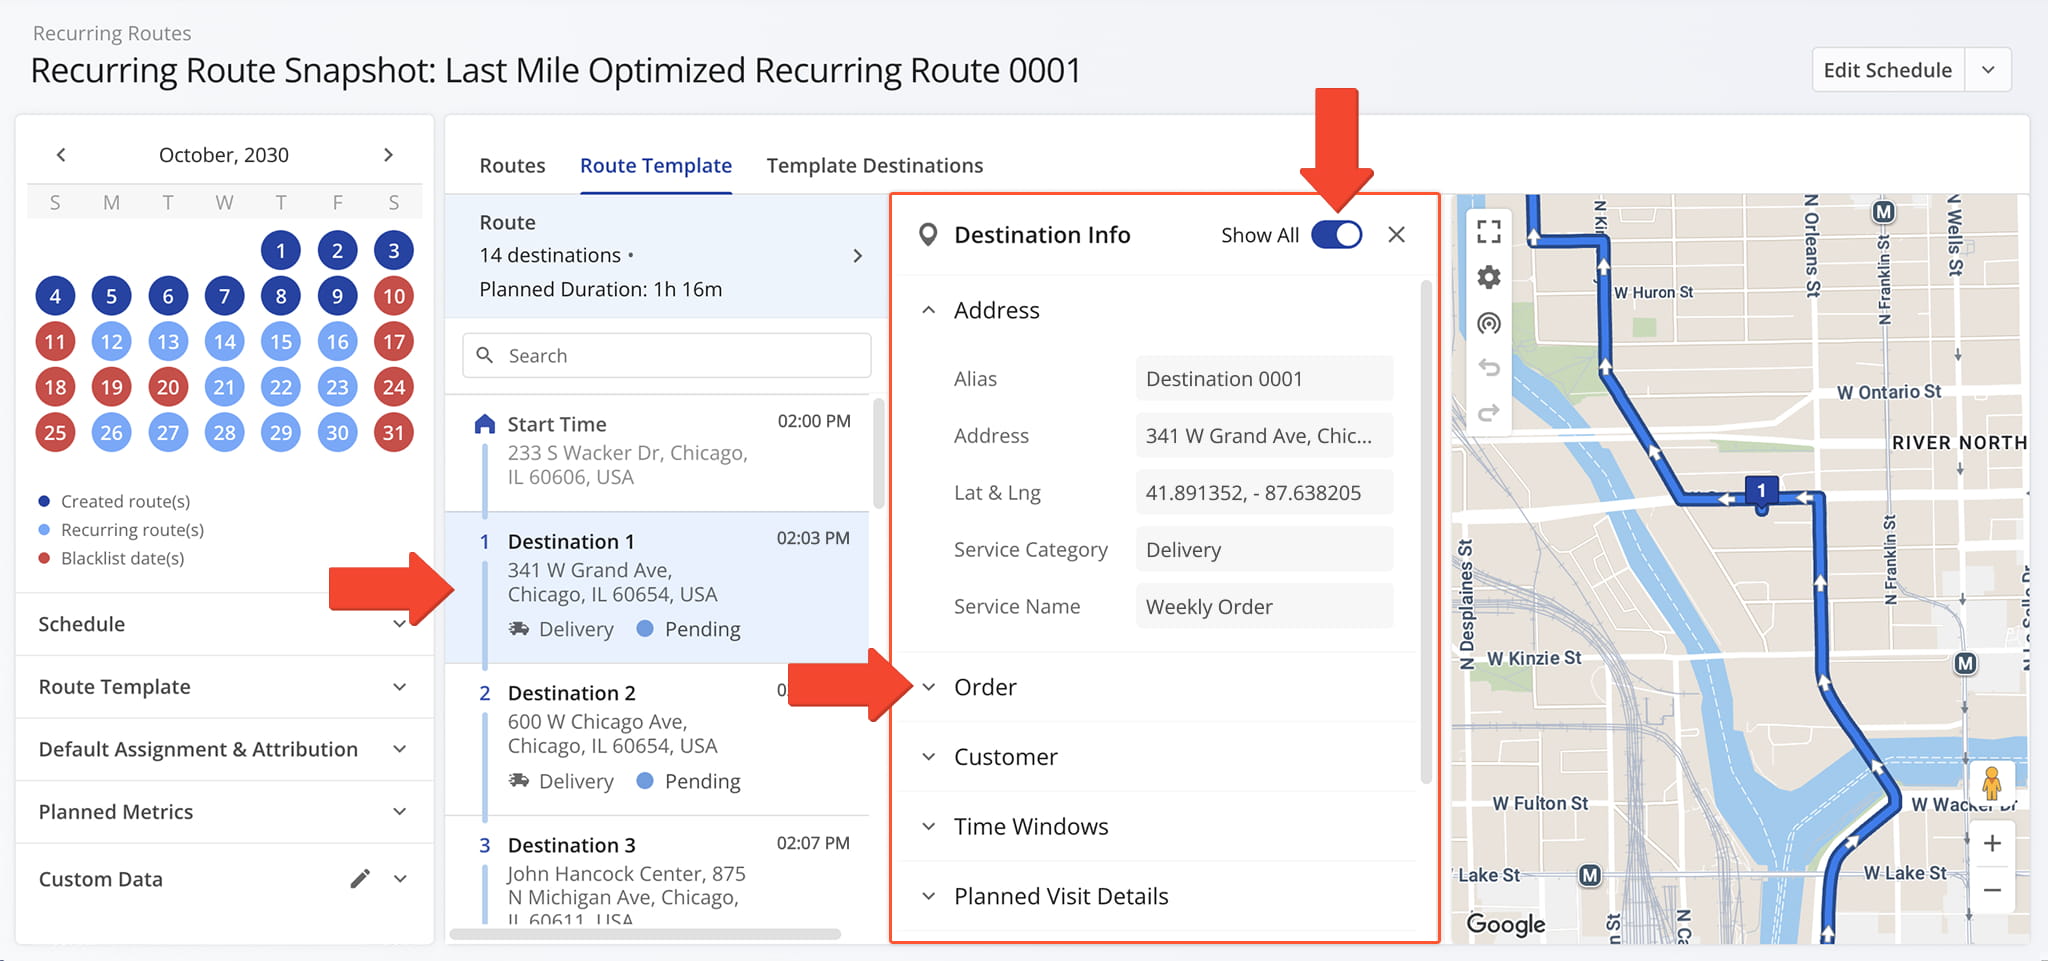
Destination Info Panel
Use the map controls to change how the route is displayed.
Use the control panel on the left side of the map to open it in full-screen view, adjust the map settings (described in the table below), view tracking information, and undo or redo your most recent changes.
In the bottom right corner, drag the Pegman Icon onto the map to open Street View, and use the Plus and Minus Buttons to zoom in and out.
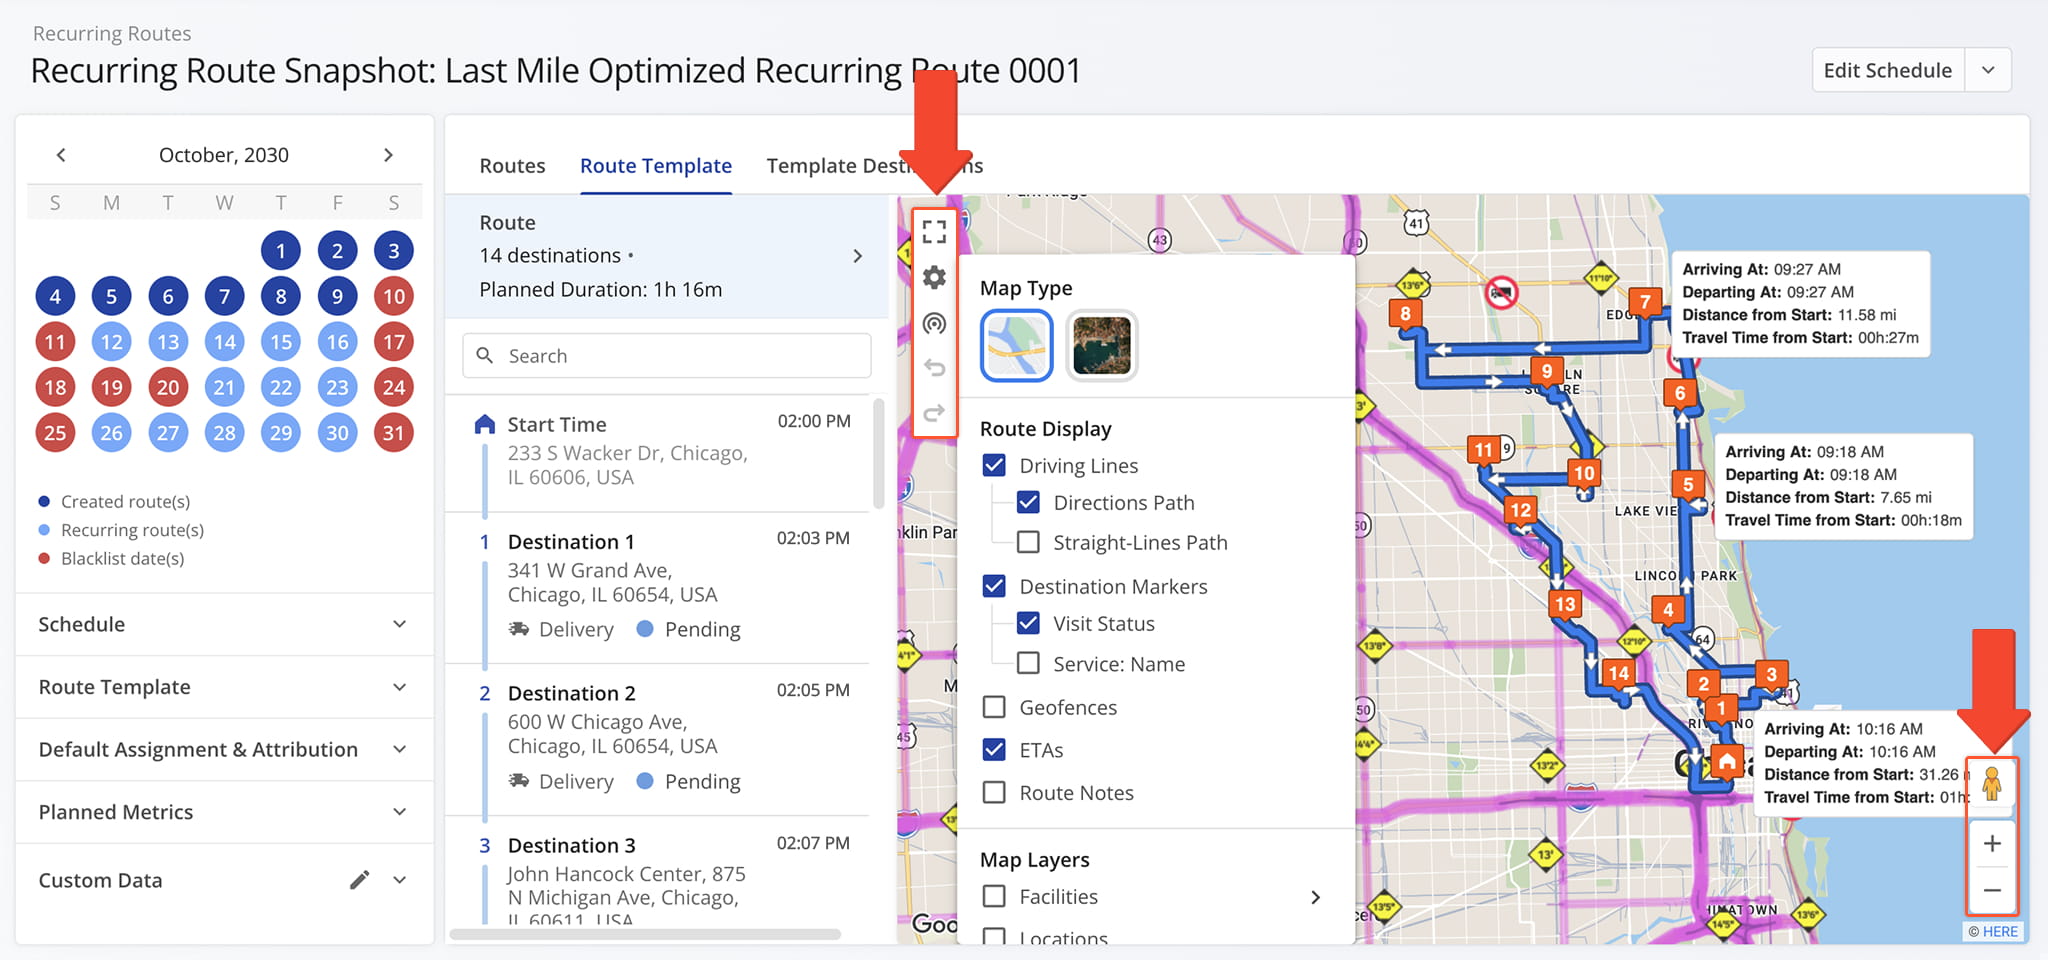
Map Settings
Template Destinations Tab – Review And Edit Every Template Destination
The Template Destinations tab lists every destination saved to the Recurring Route template in a customizable table. From this tab, you can:
- Use the Search field to locate destinations associated with the Recurring Route template.
- Narrow down destinations with filters, as described in the table below, or with Group By options.
- Click “Open” to view a route’s corresponding Destination Snapshot.
- Click the Down Arrow button to edit the destination or edit the route in the Route Editor.
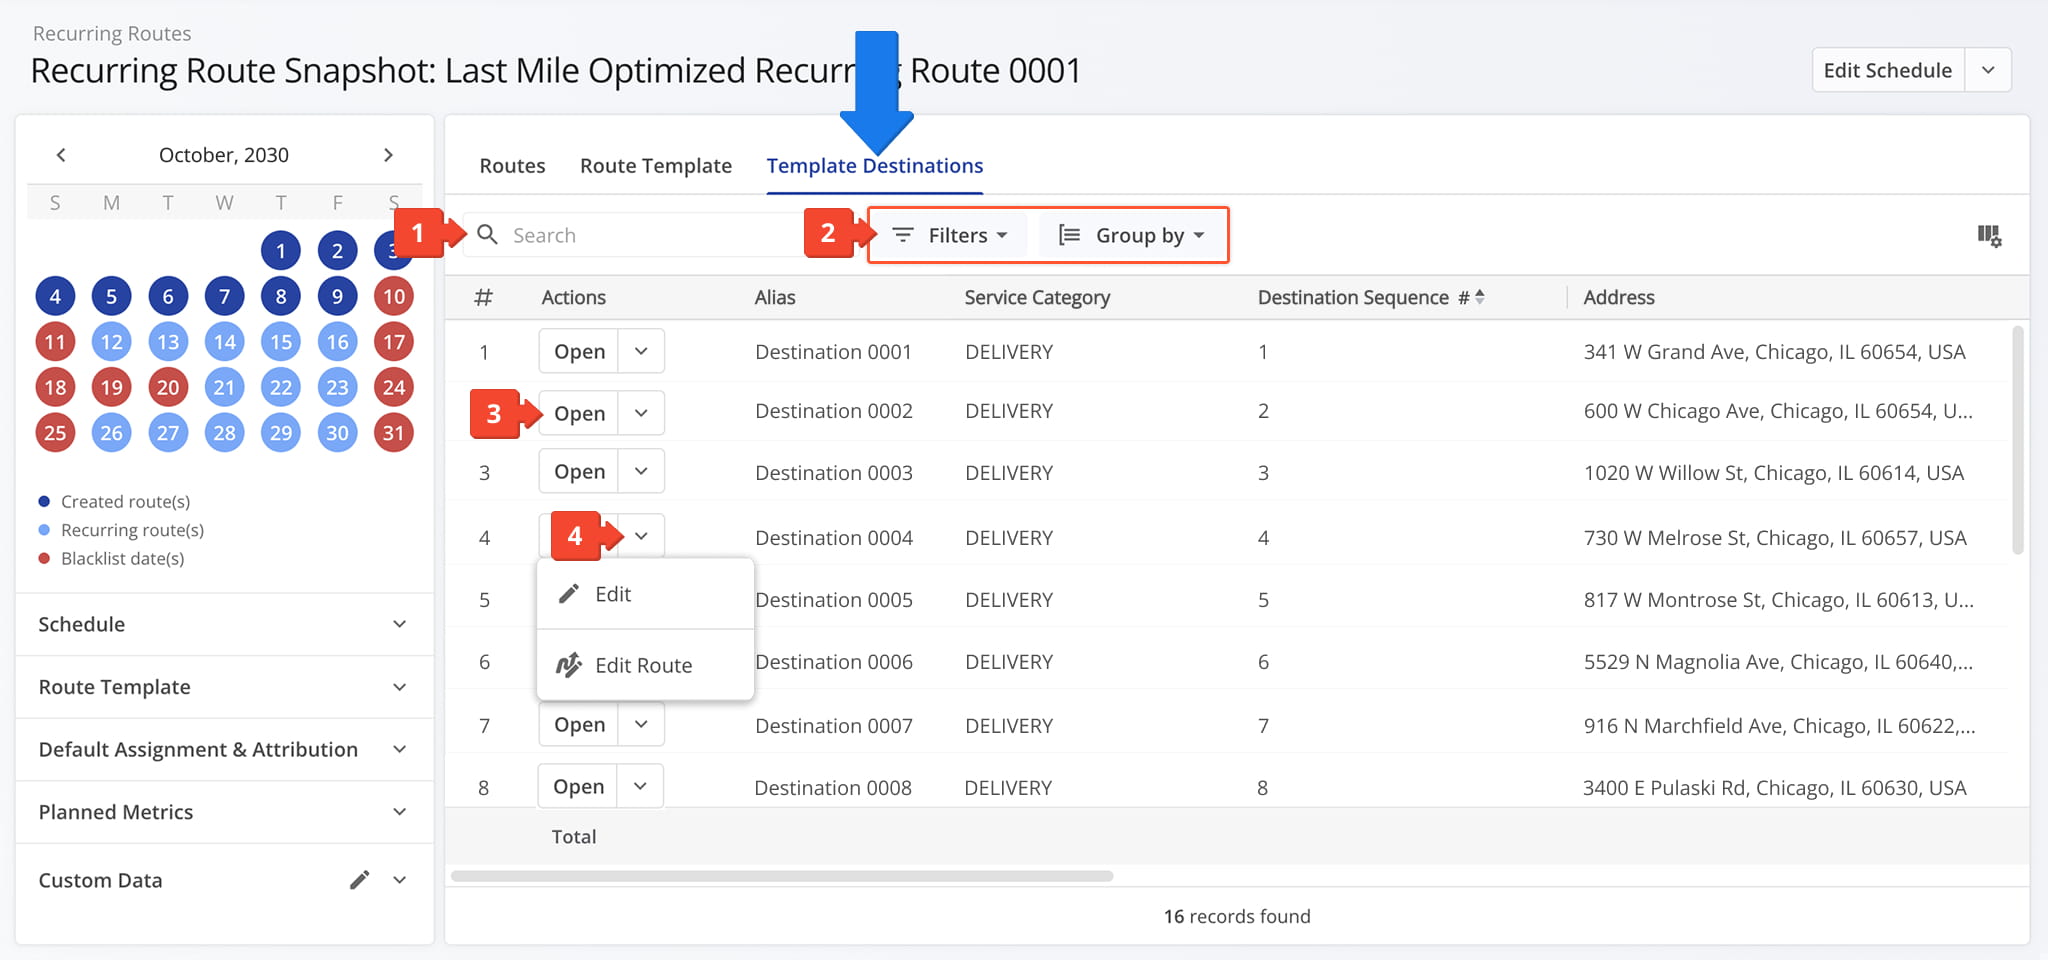
Template Destinations Tab Filters
You can also customize the data displayed in the table. Click the Column Icon in the upper right corner to select which route data fields appear and adjust their order to suit your operational needs.
The table below provides an overview of all available data columns, which you can reorder by dragging them into place.
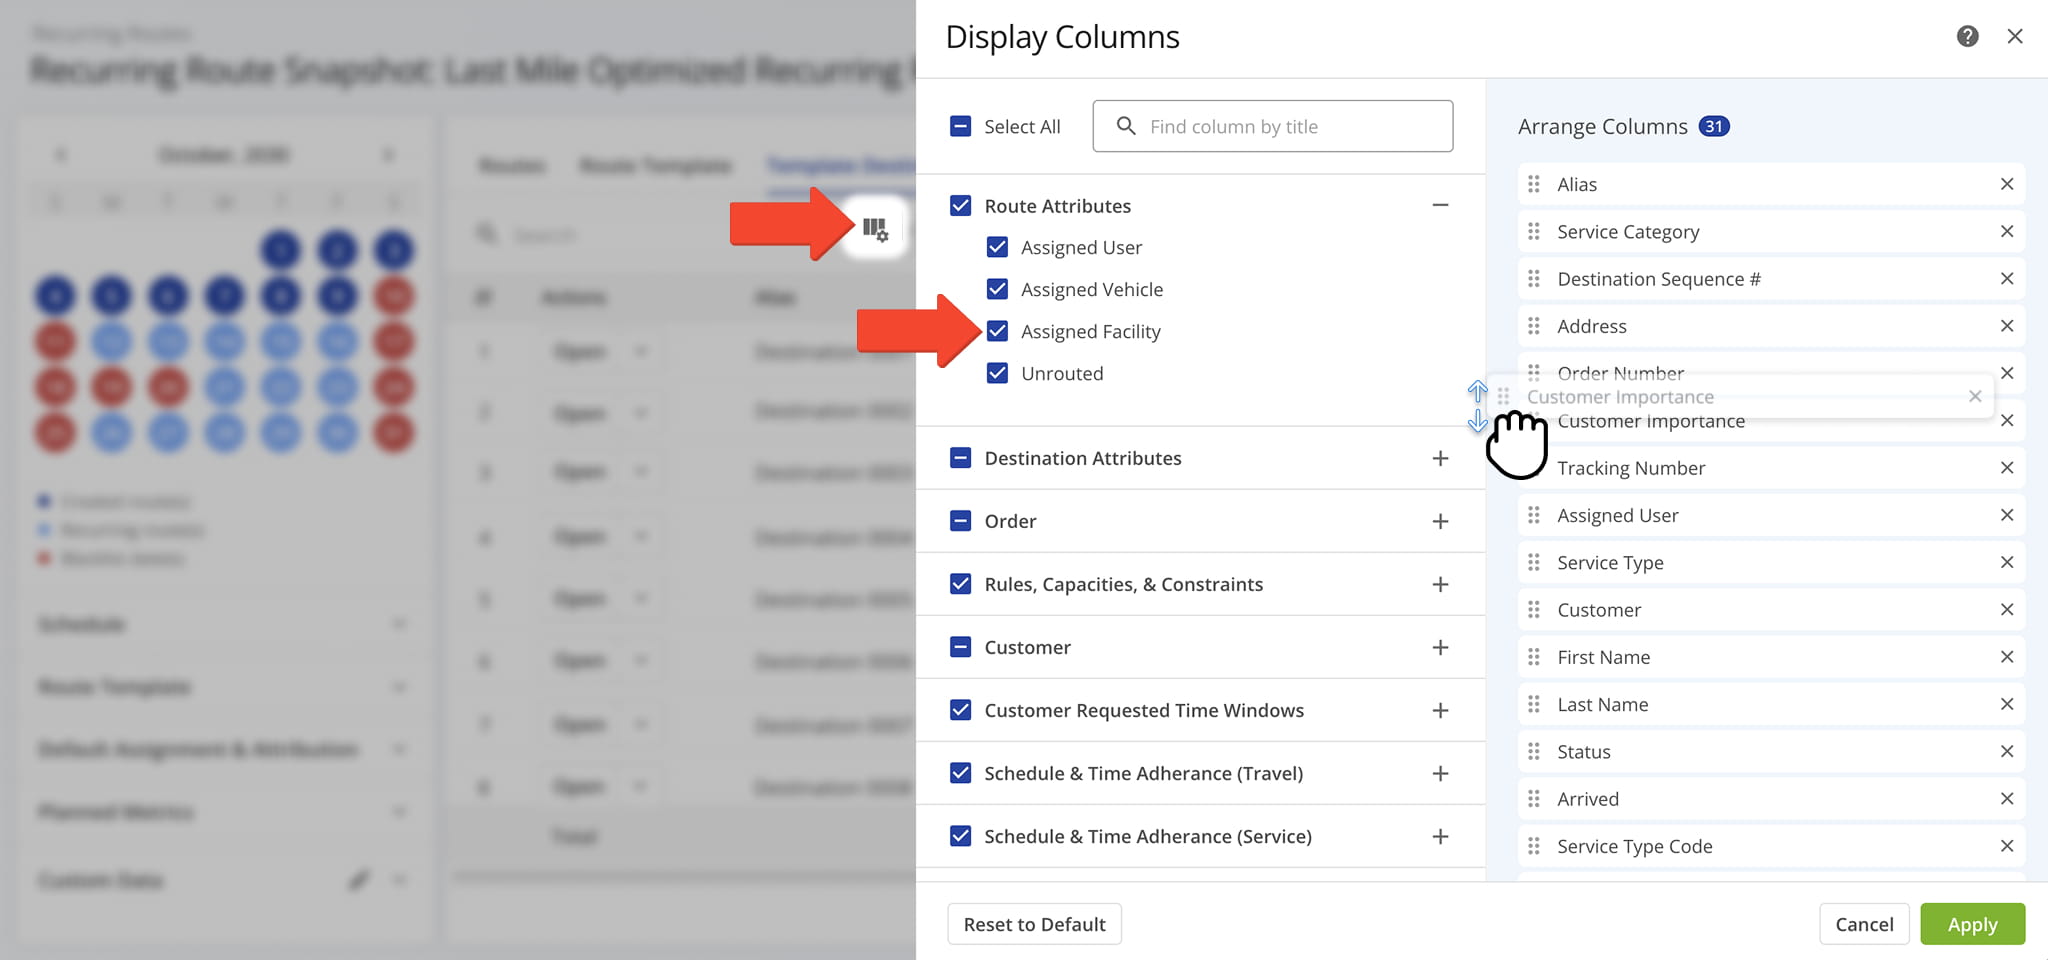
Template Destinations Tab Data Columns
Visit Route4Me's Marketplace to Check out Associated Modules:
- Operations
Audit Logging and Activity Stream
- Operations
Custom Data Add-On
- Operations
Advanced Team Management Add-On
About author: Daniel Archer

