
Add & Manage Vehicles – Route4Me Last Mile Fleet Management Guide
With Route4Me’s last mile route optimization and fleet management software, you can easily create and coordinate a fleet of cars, vans, trucks, trailers, semis, heavy equipment, and any other vehicles. Depending on your Route4Me account-level permissions, you can add vehicles manually, import telematics vehicles, dispatch routes to vehicles, and assign vehicle attributes and profiles. Use this guide to help you create and manage your last mile fleet vehicles.
Table of Contents
Add New Vehicles – Create Fleet Vehicle Profiles
To add vehicles to your Route4Me account, you can either manually enter individual vehicle details or import GPS data from your telematics providers.
For manual entry, simply fill out the required fields with each vehicle’s details. To add multiple vehicles simultaneously, import telematics data directly from your Telematics Provider, enabling seamless integration and fleet expansion.
Create Vehicles – Manually Add Individual Vehicles To Your Fleet
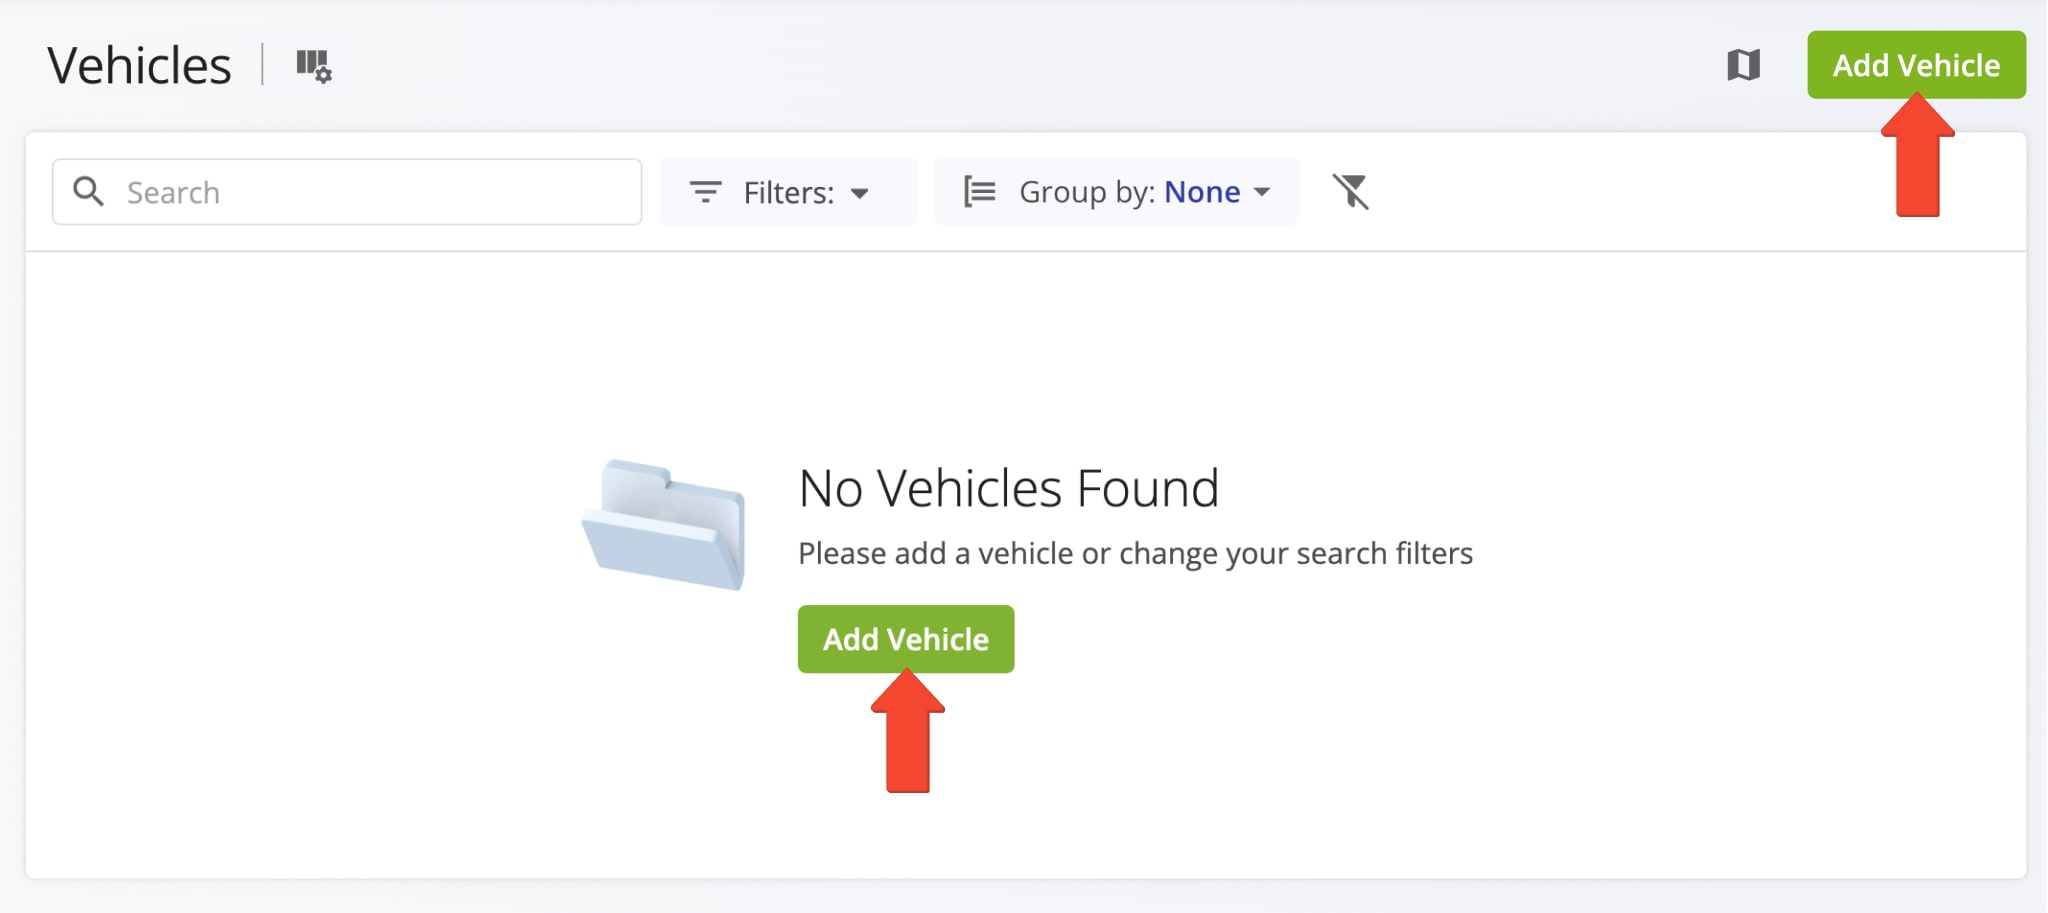
To manually add a Vehicle to your fleet, go to “Team & Equipment” > “Vehicles” in the Navigation Menu. Then, click “Add Vehicle”.
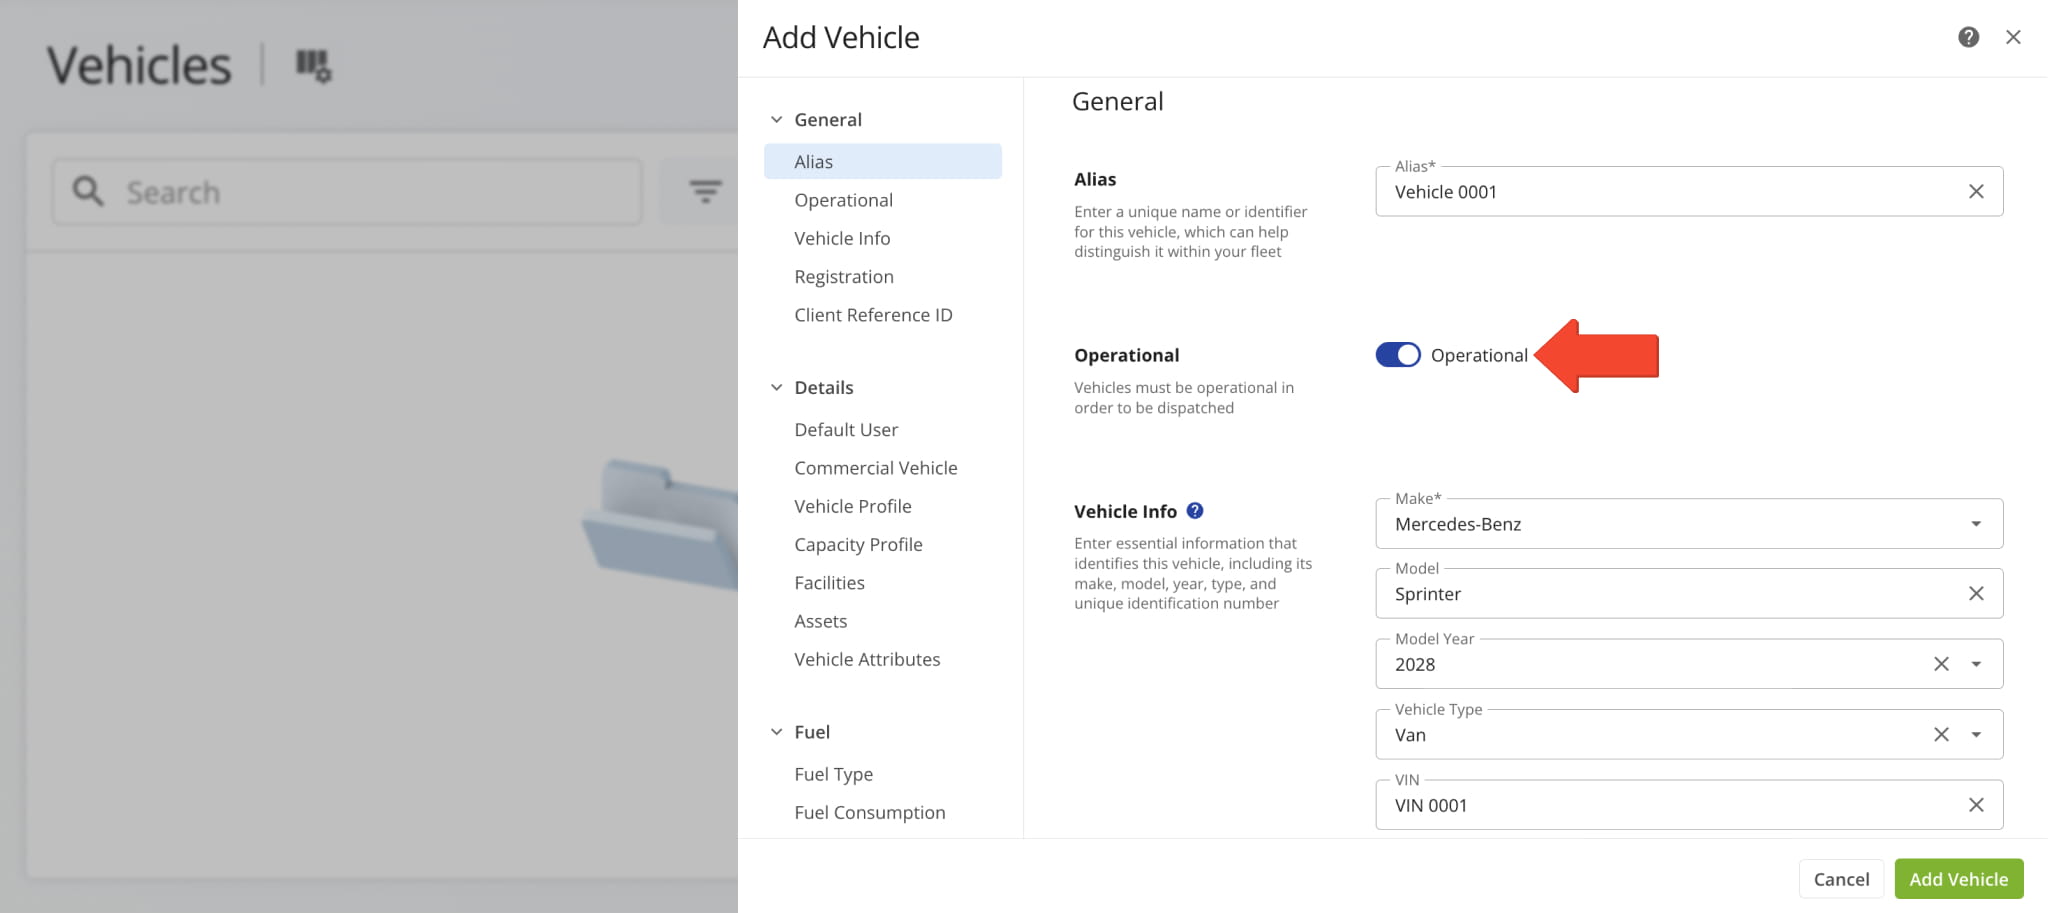
Ensure you set the new Vehicle’s status to “Operational” to make it available for route dispatch. When set to “Operational”, the vehicle appears in your list of assignable Vehicles for routes.
Below, you’ll find further guidance on completing the General fields, Vehicle details, and fuel parameters.
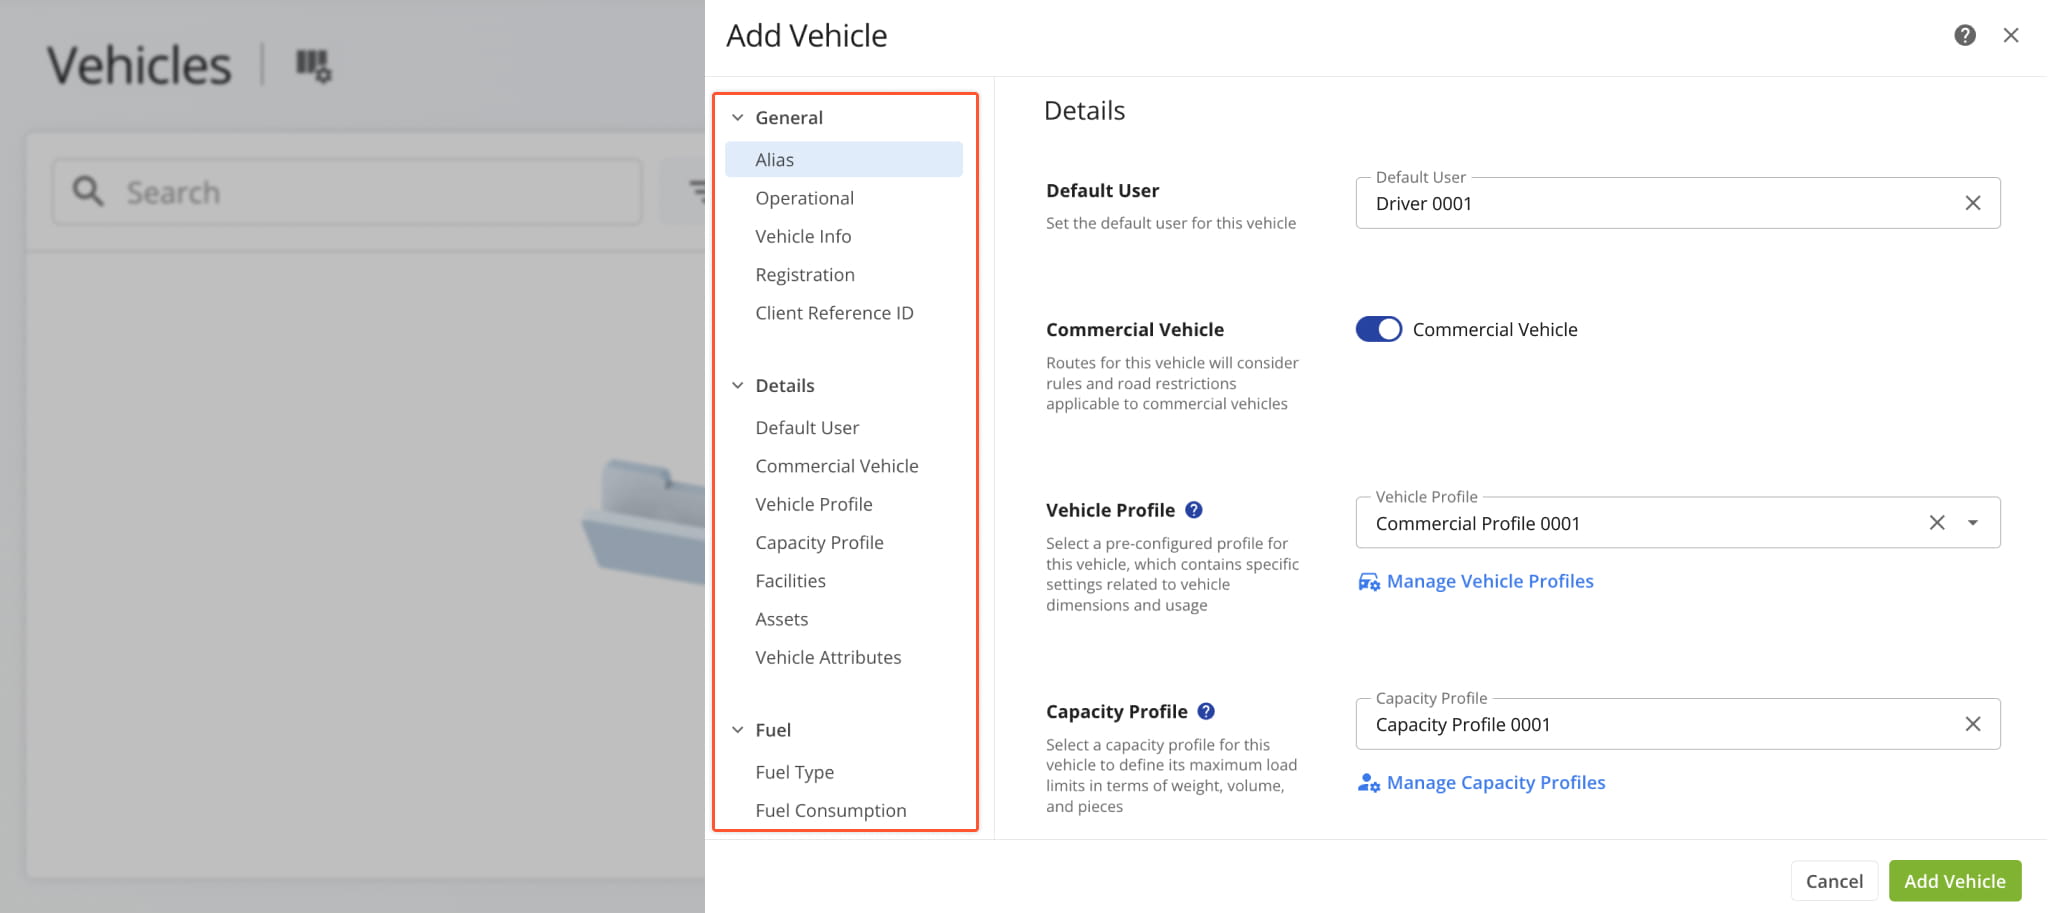
Next, define the Vehicle’s details, including any commercial parameters, assigned User and Facilities, Fuel Type and consumption, and custom attributes. These configurations ensure accurate and compliant route optimization.
For details about each field, see the table below.
Vehicle Details & Settings
Add Telematics Fleet Vehicles To Route4Me Via Telematics Gateway
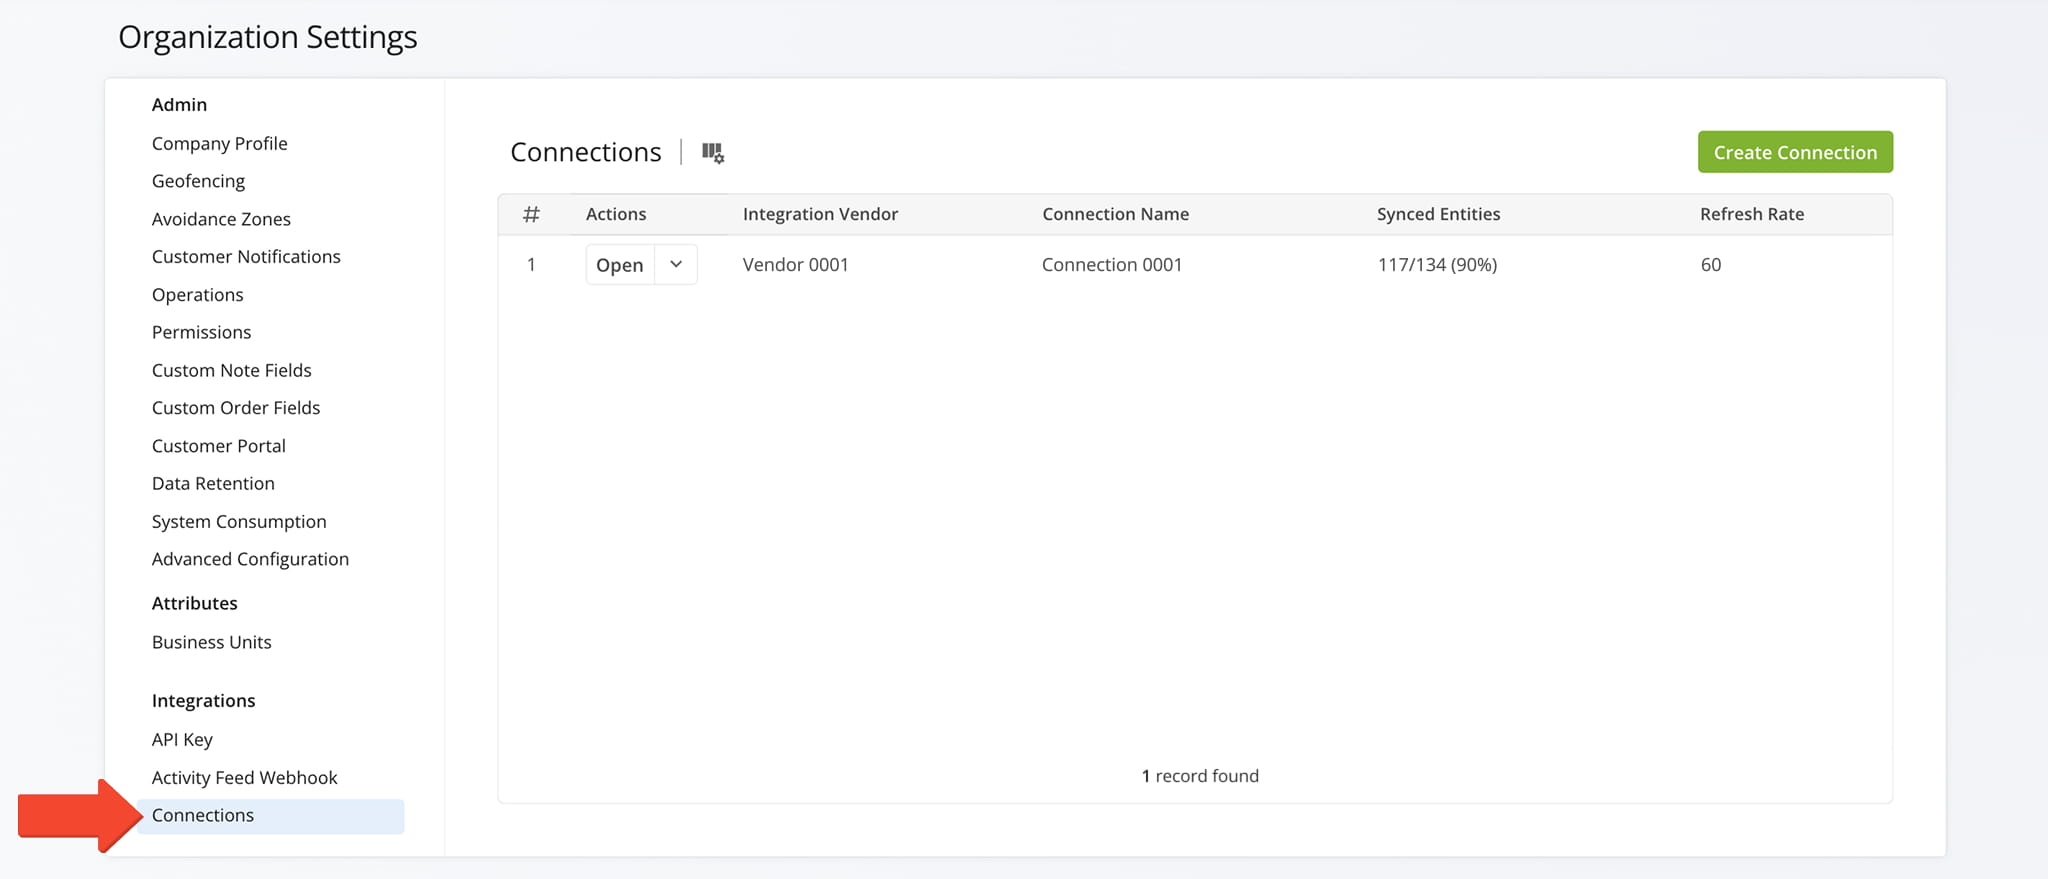
To import multiple Vehicles, start by establishing a Telematics Connection between your Telematics Vendor and your Route4Me account. To do so, go to “Settings” > “Organization Settings” from the Navigation Menu. There, you’ll find the “Connections” page.
Once you’ve added a connection, Route4Me will automatically sync your Telematics Vehicles and their data.
Open Your Connections Settings
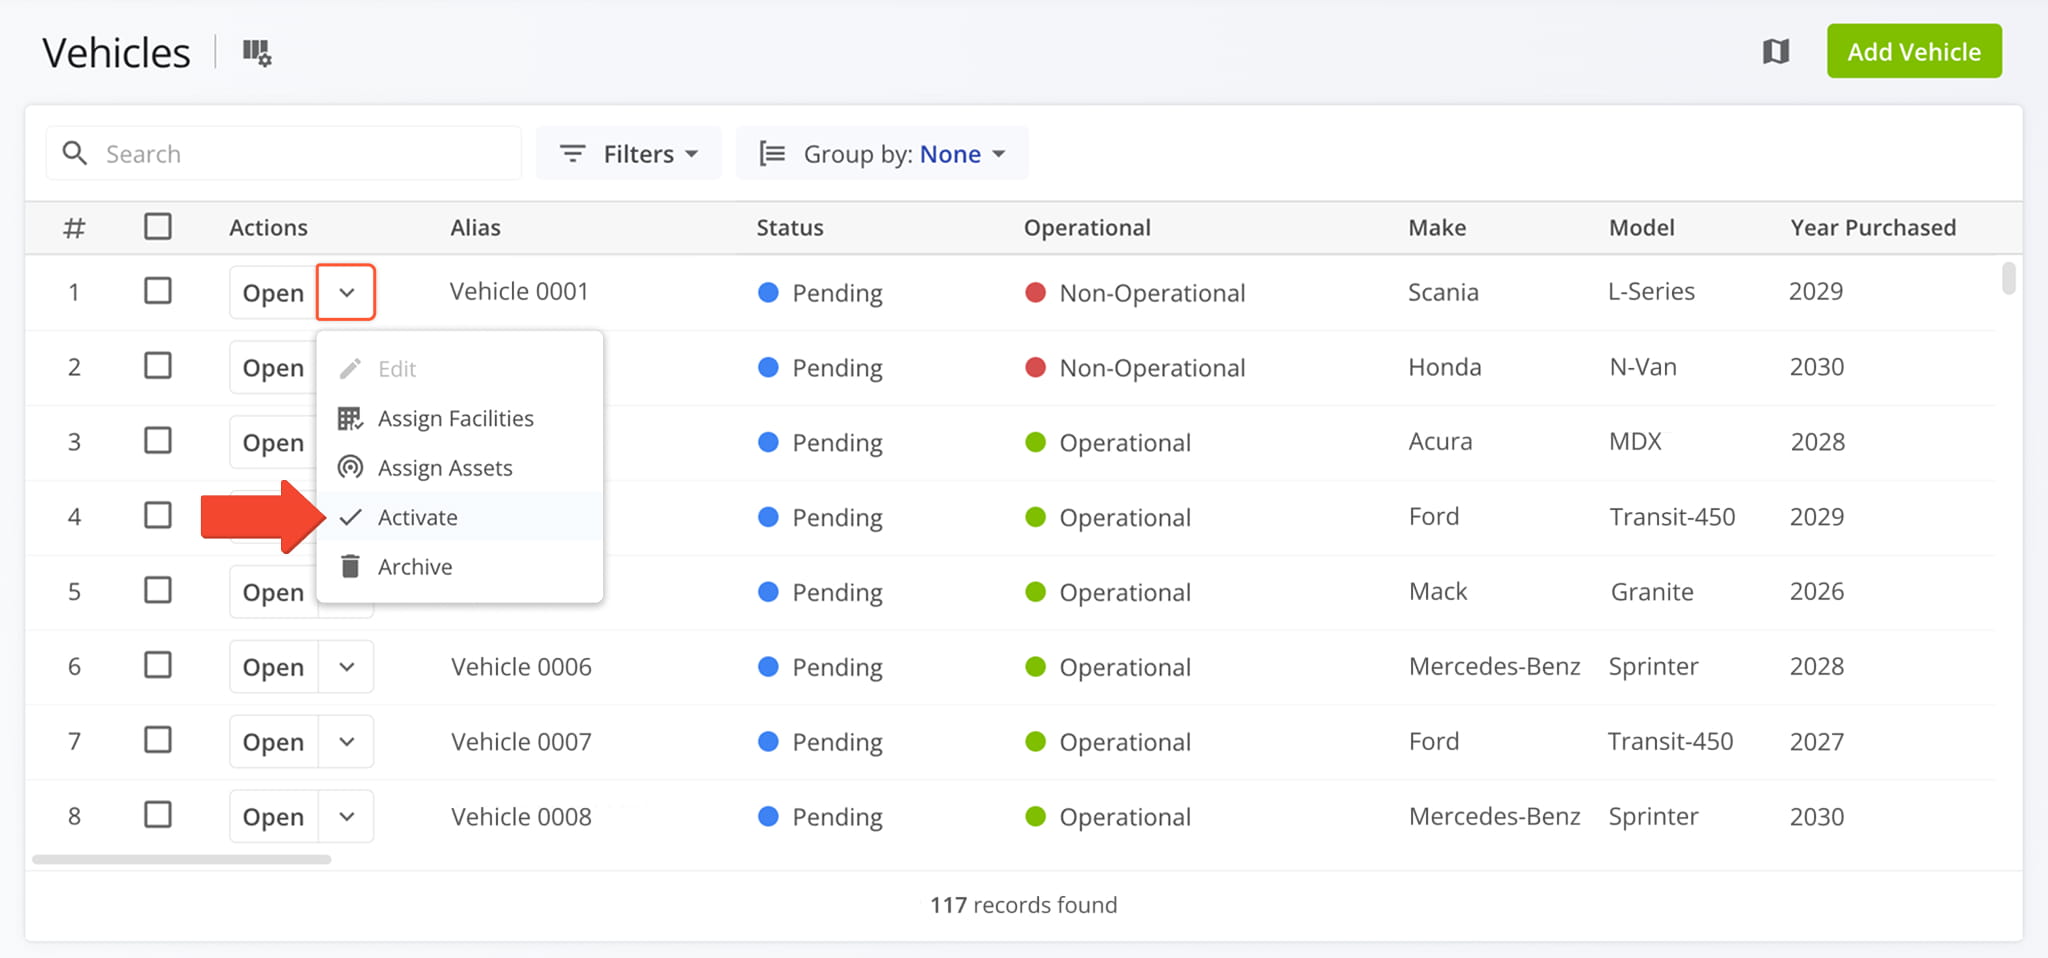
To activate imported Vehicles, go to “Team & Equipment” > “Vehicles” in the Navigation Menu. They will appear as “Pending” and “Non-Operational” in the Vehicles List. Click the Down Arrow next to a Vehicle and select “Activate“.
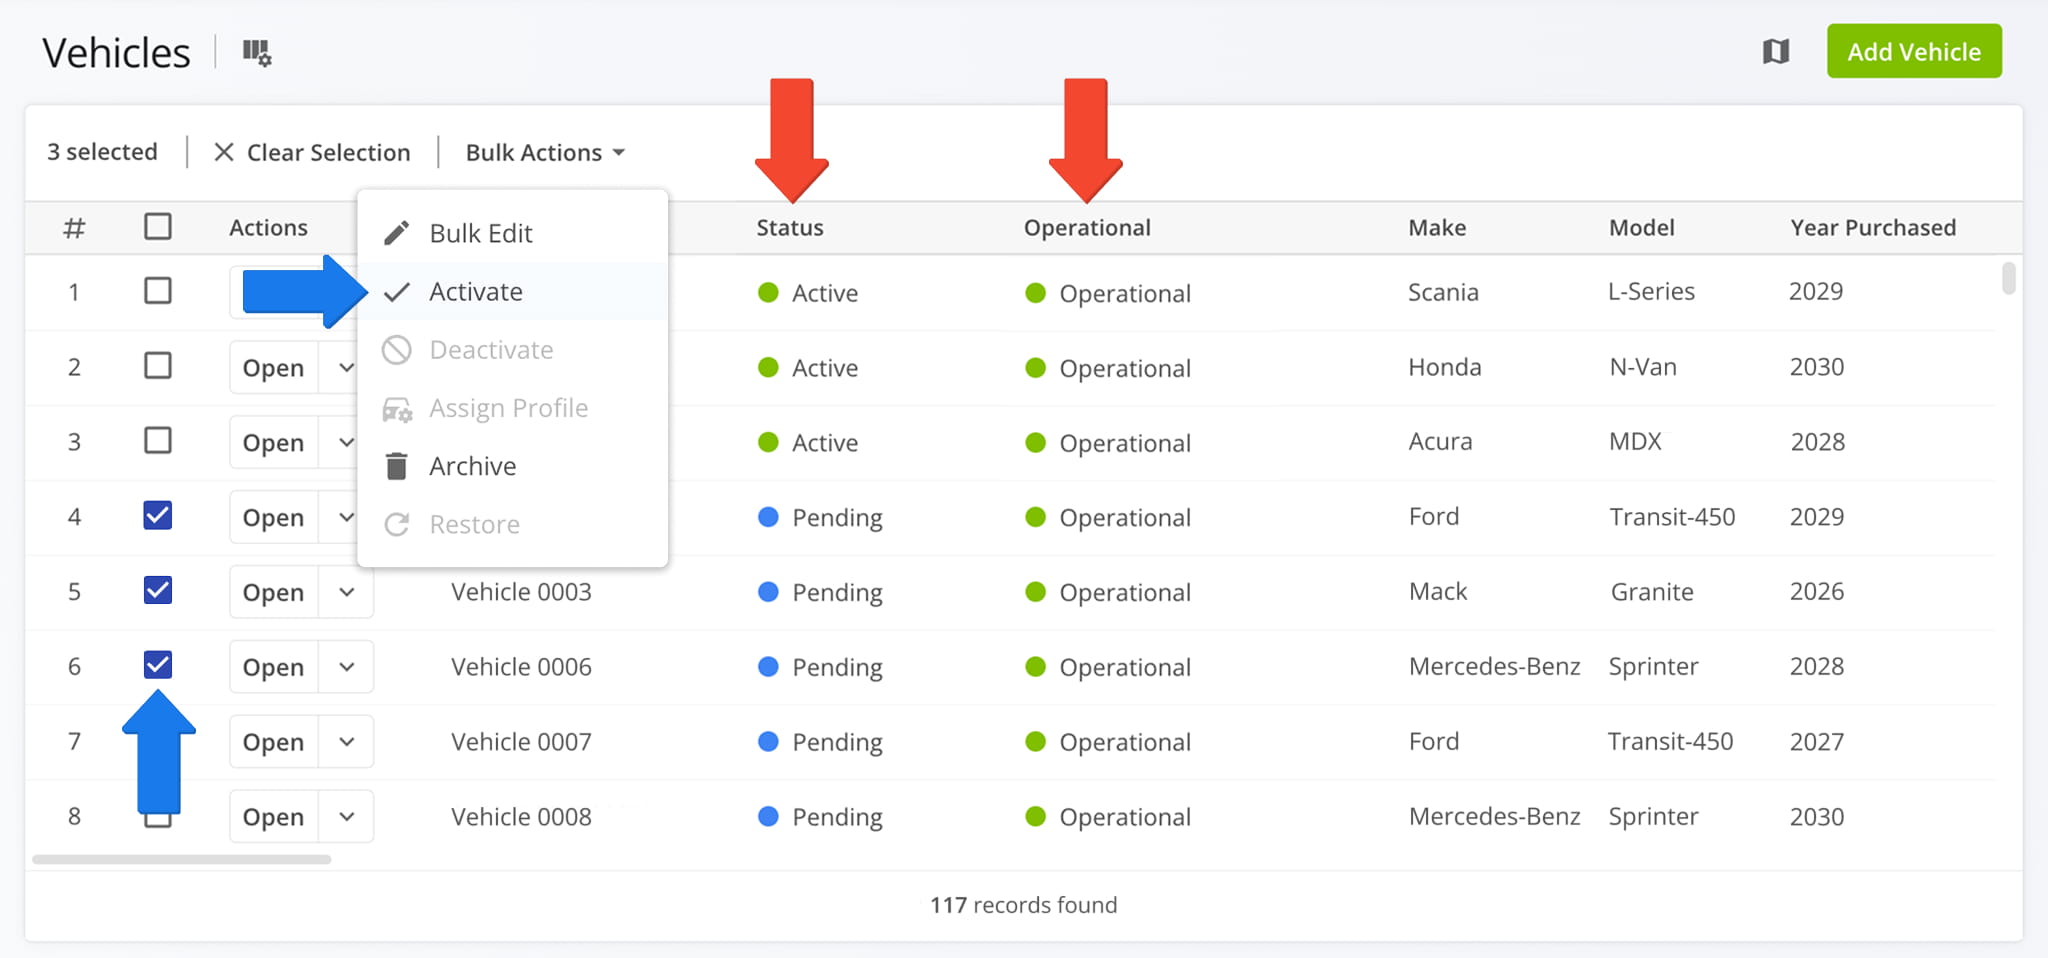
Once activated, Vehicles will appear as “Active” and “Operational”. You can also activate multiple Vehicles by checking the boxes next to them and selecting “Activate” from the “Bulk Actions” menu. Then, you can assign Vehicles to routes.
Assign Vehicles To Routes, Facilities And Assets
Route4Me seamlessly integrates last mile fleet management and enterprise resource planning by enabling you to associate Vehicles with Routes, Facilities, Assets, and more.
Assign Vehicles To Routes – Dispatch Routes To Vehicles
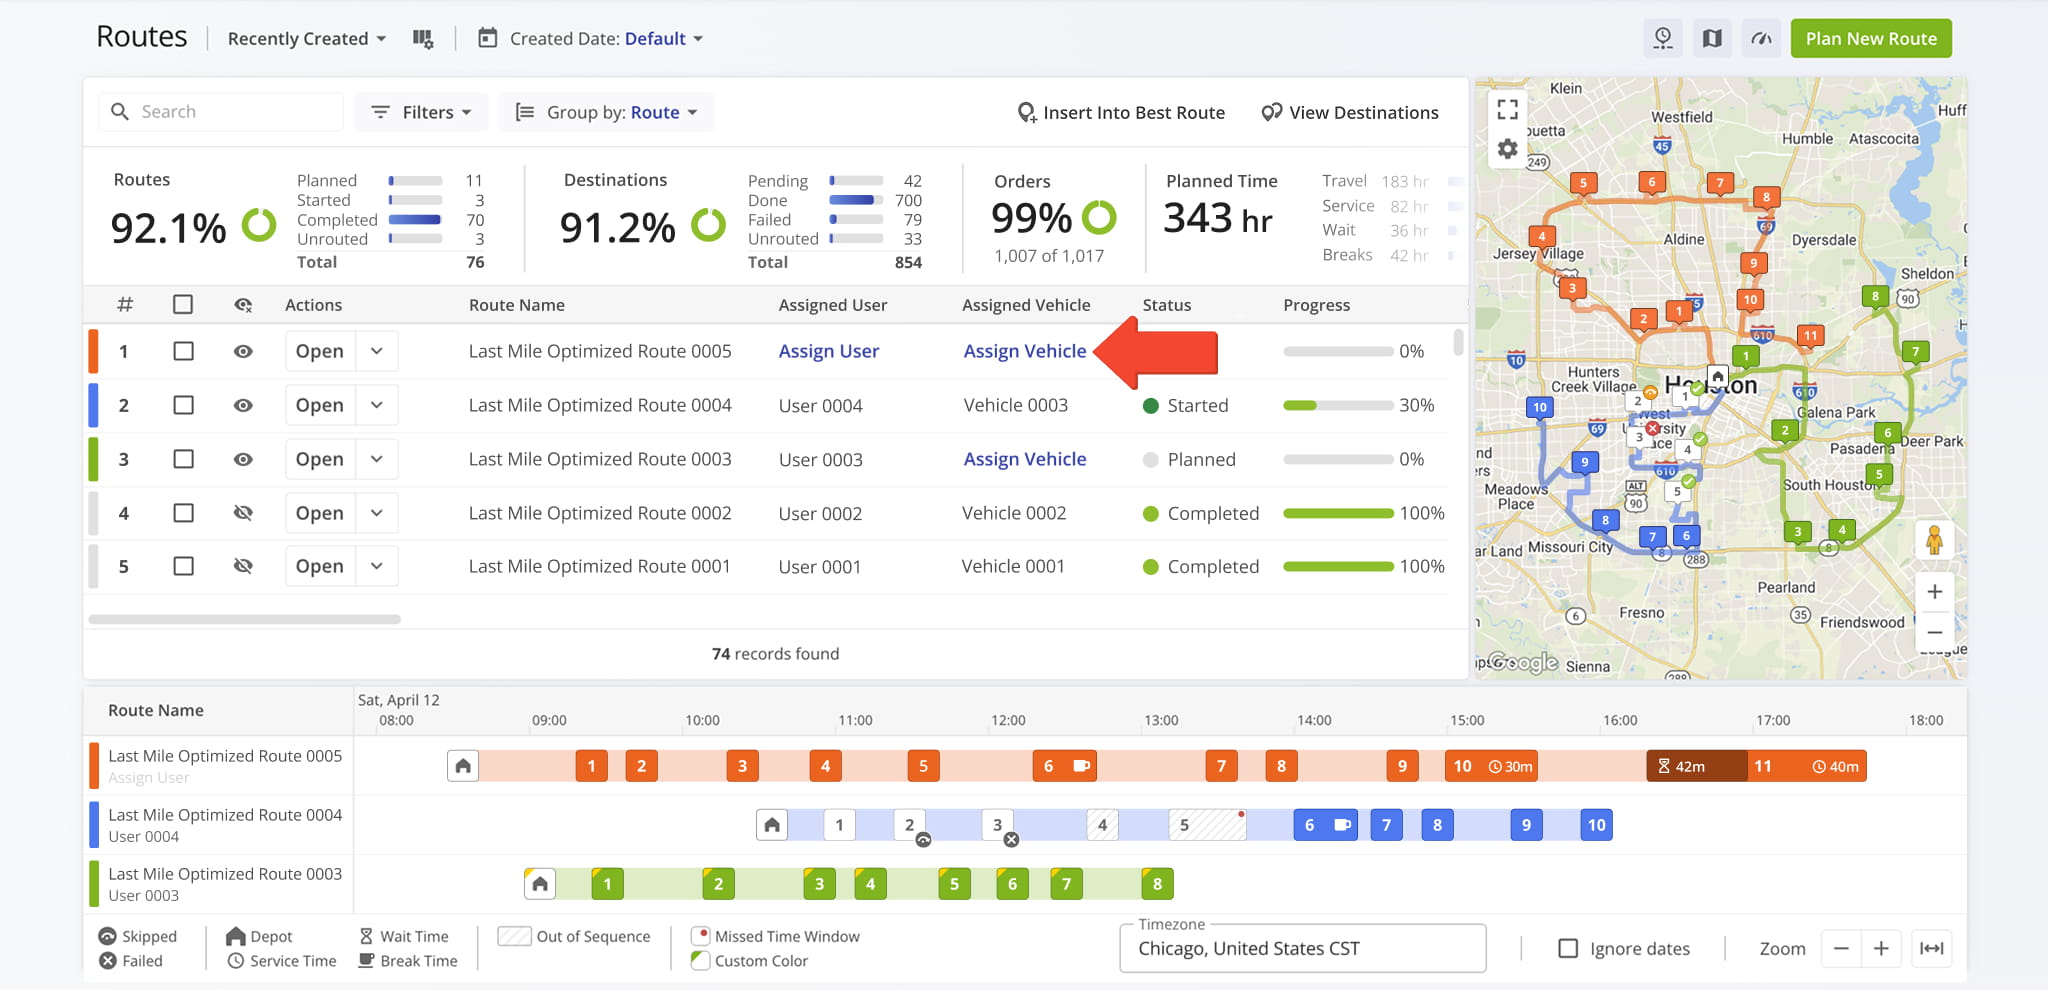
Once added to your account, you can assign Vehicles to routes. This can be done automatically when planning routes with Optimization Profiles or Route Settings, or you can manually assign Vehicles to routes from the Routes Page or Route Editor.
When you assign a Vehicle to a route, the route is automatically dispatched to the vehicle. After dispatching routes, you can track Vehicles in real-time and view their GPS route tracking history.
Assign Fleet Vehicles To Company Facilities
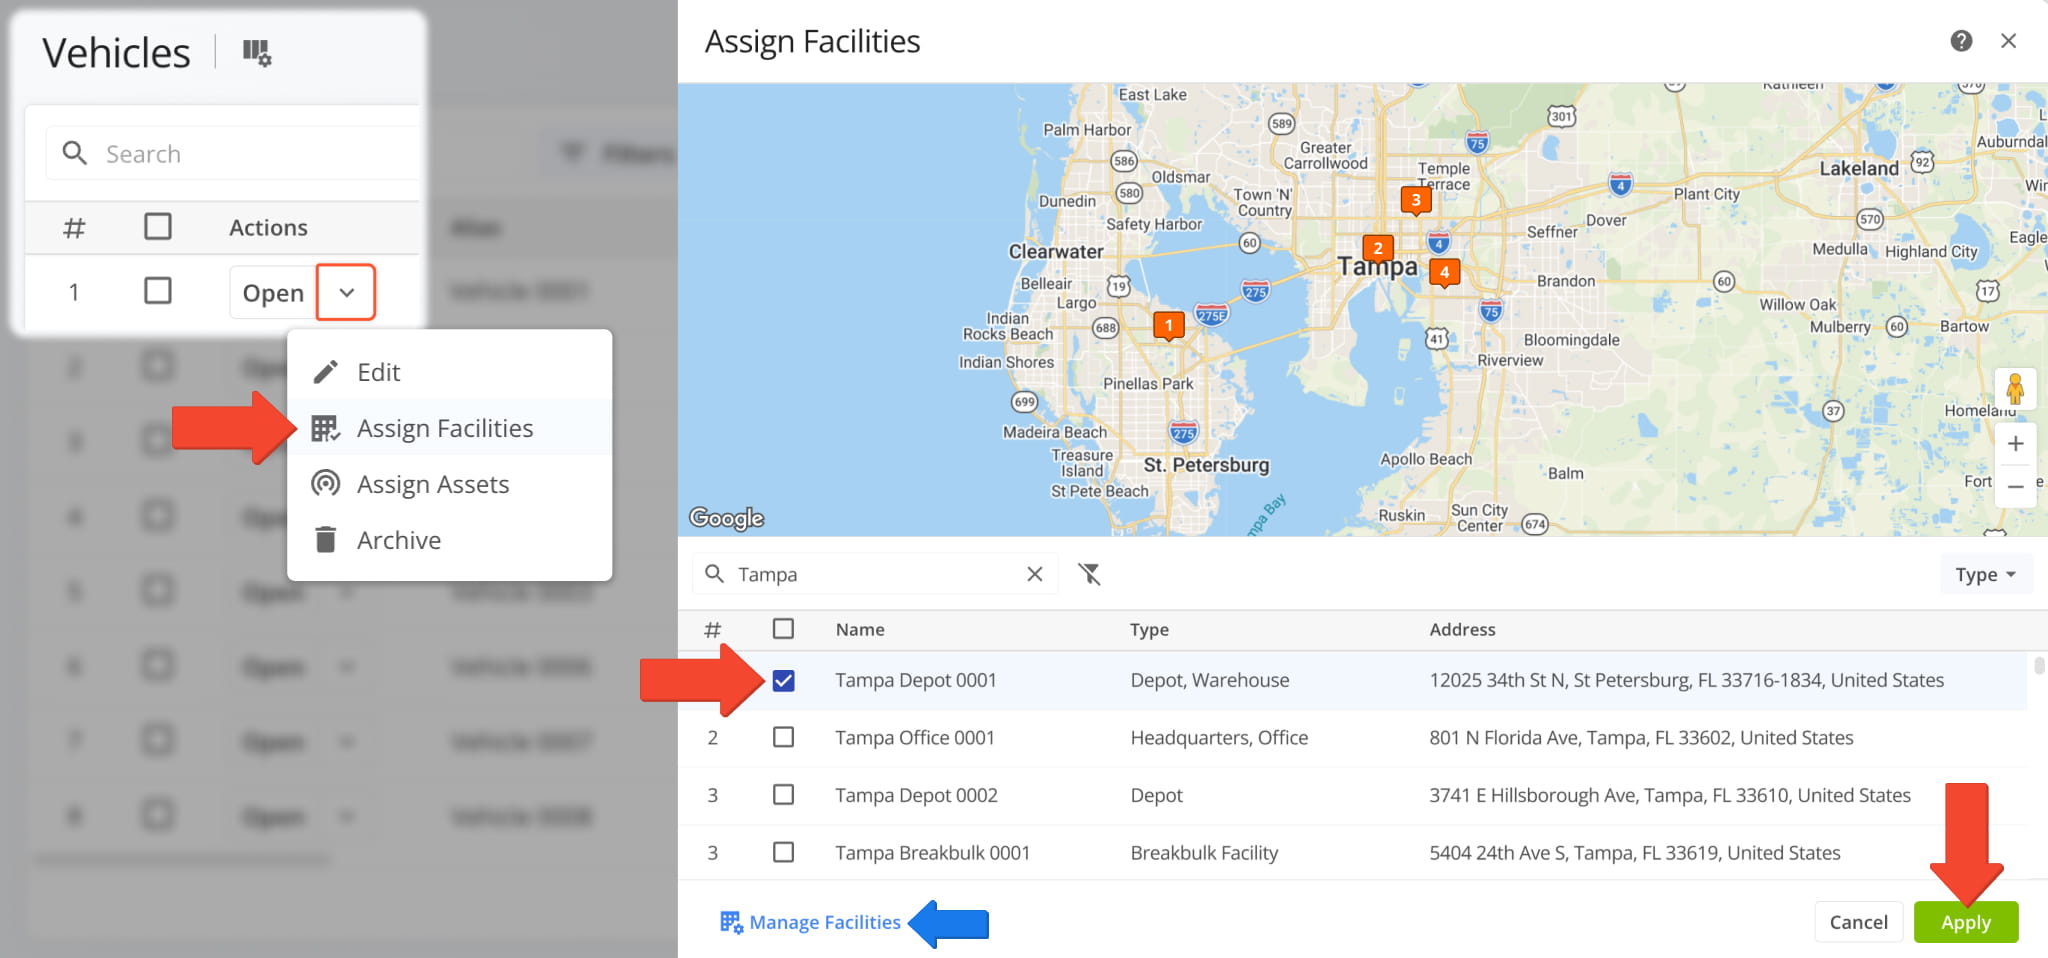
From the Vehicles Page, you can assign Vehicles to Facilities. To do so, click the Down Arrow and select “Assign Facilities“. Then, select the Facilities to which you’d like to assign the Vehicle and click “Apply” to finalize.
From here, you can also click “Manage Facilities” to open your Facilities Page.
Assign Fleet Vehicles To Company Assets
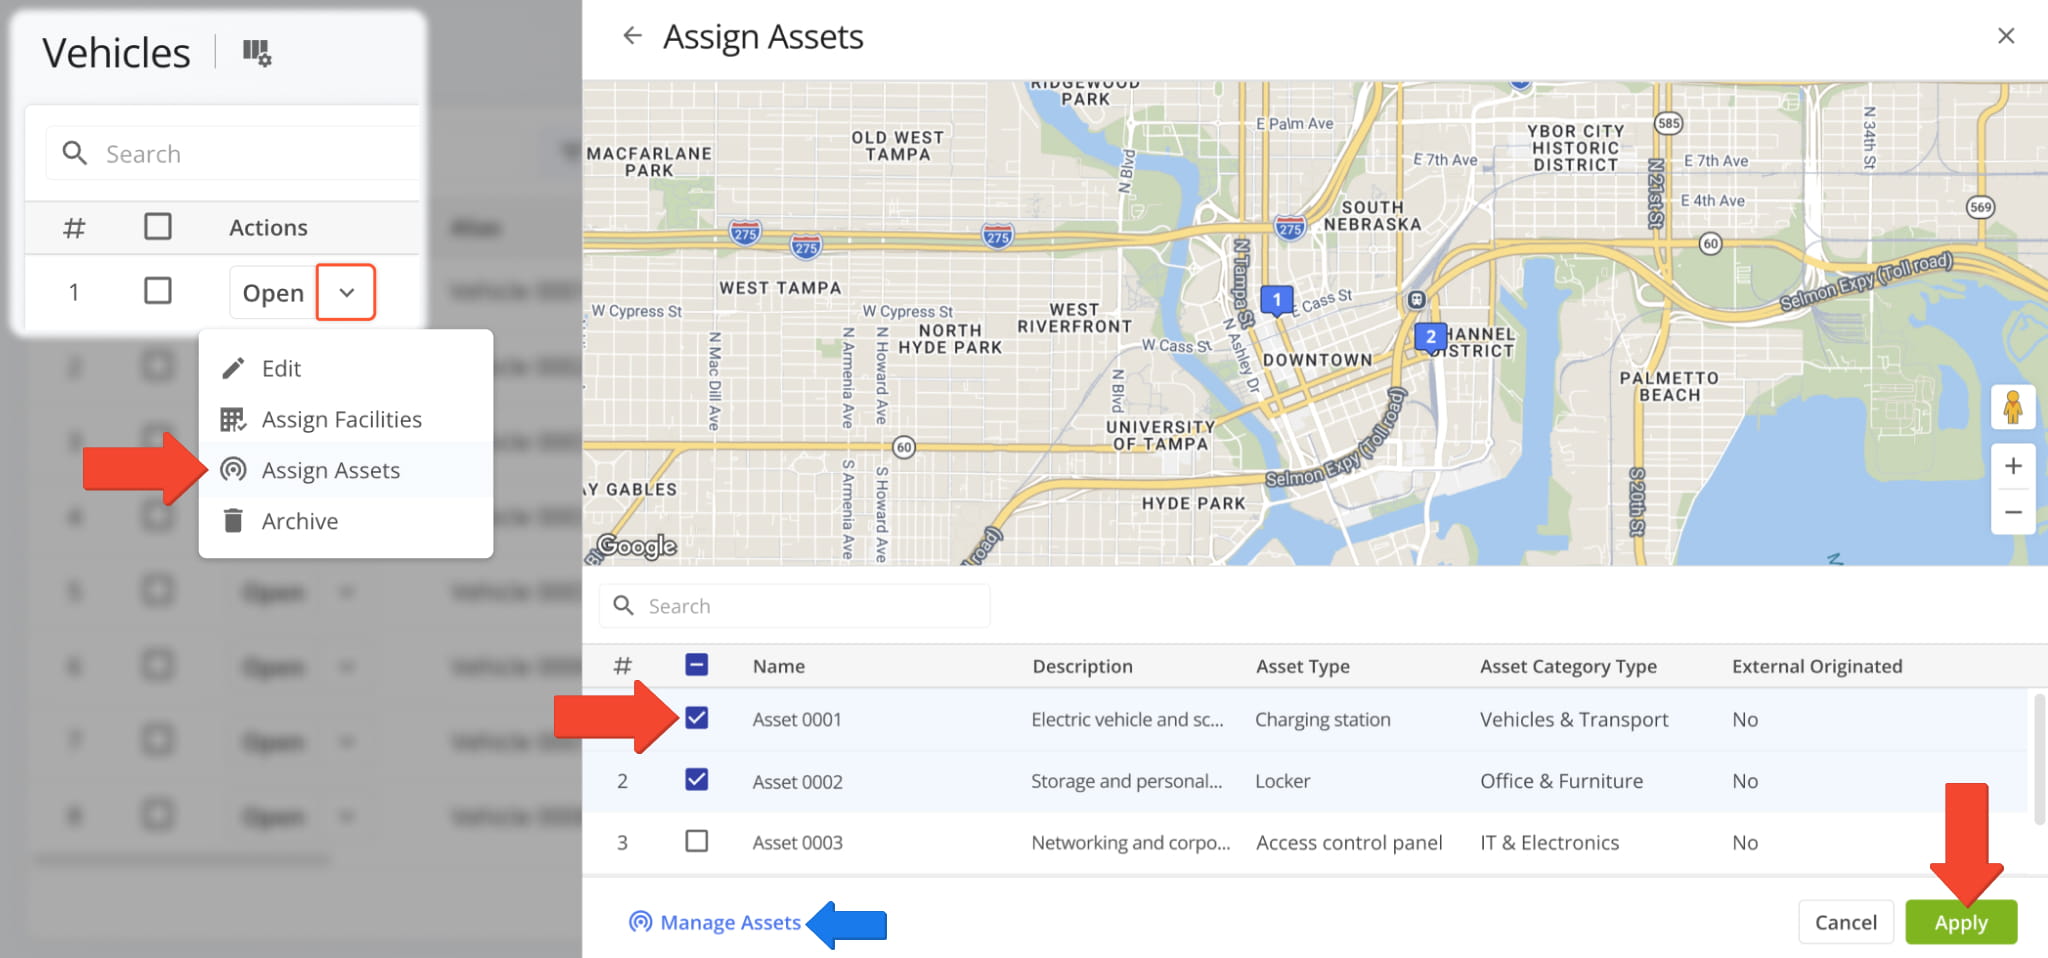
From the Vehicles Page, you can assign Vehicles to Company Assets. To do so, click the Down Arrow and select “Assign Assets“. Then, select the Assets to which you’d like to assign the Vehicle and click “Apply” to finalize.
From here, you can also click “Manage Assets” to open your Assets Page.
Vehicles Map – View Fleet Vehicles On Map With Live Location Updates
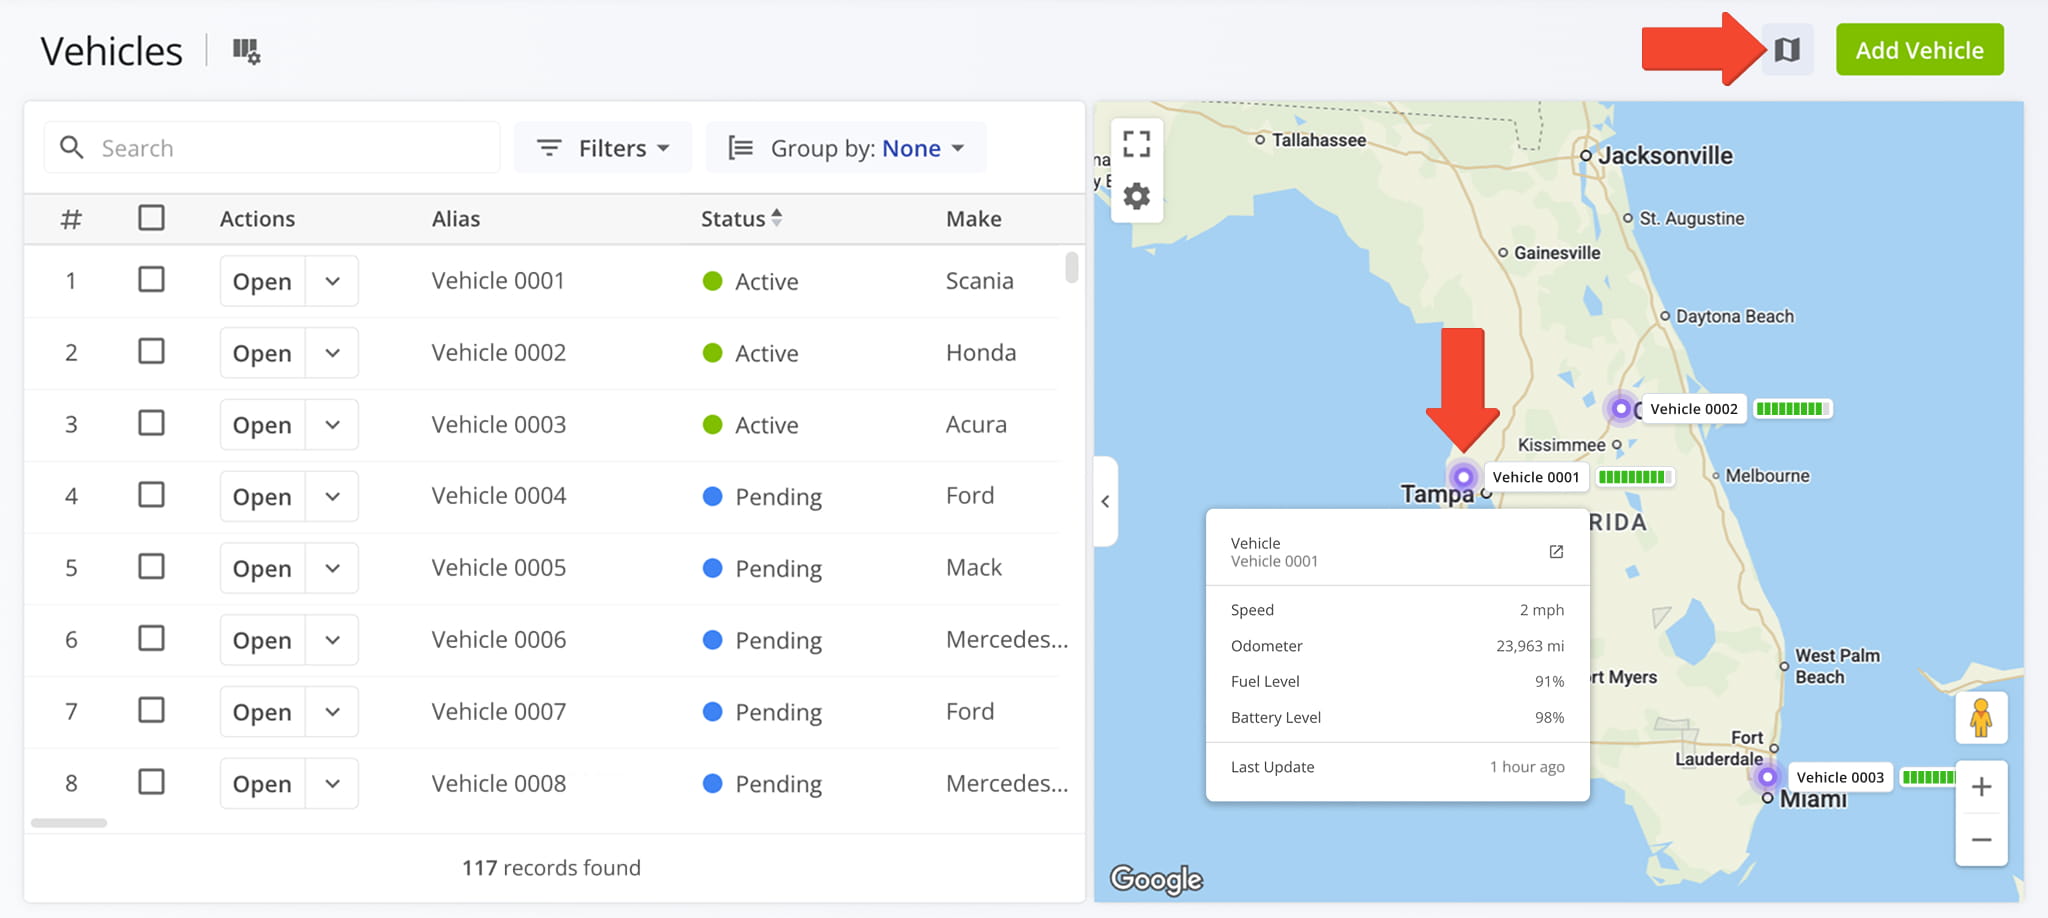
You can view active Vehicles on the map with live GPS updates. Click the Vehicles Map button in the top-right, then hover over a Vehicle location on the map to see its identity and when it last synced with Route4Me’s dispatch and tracking software.
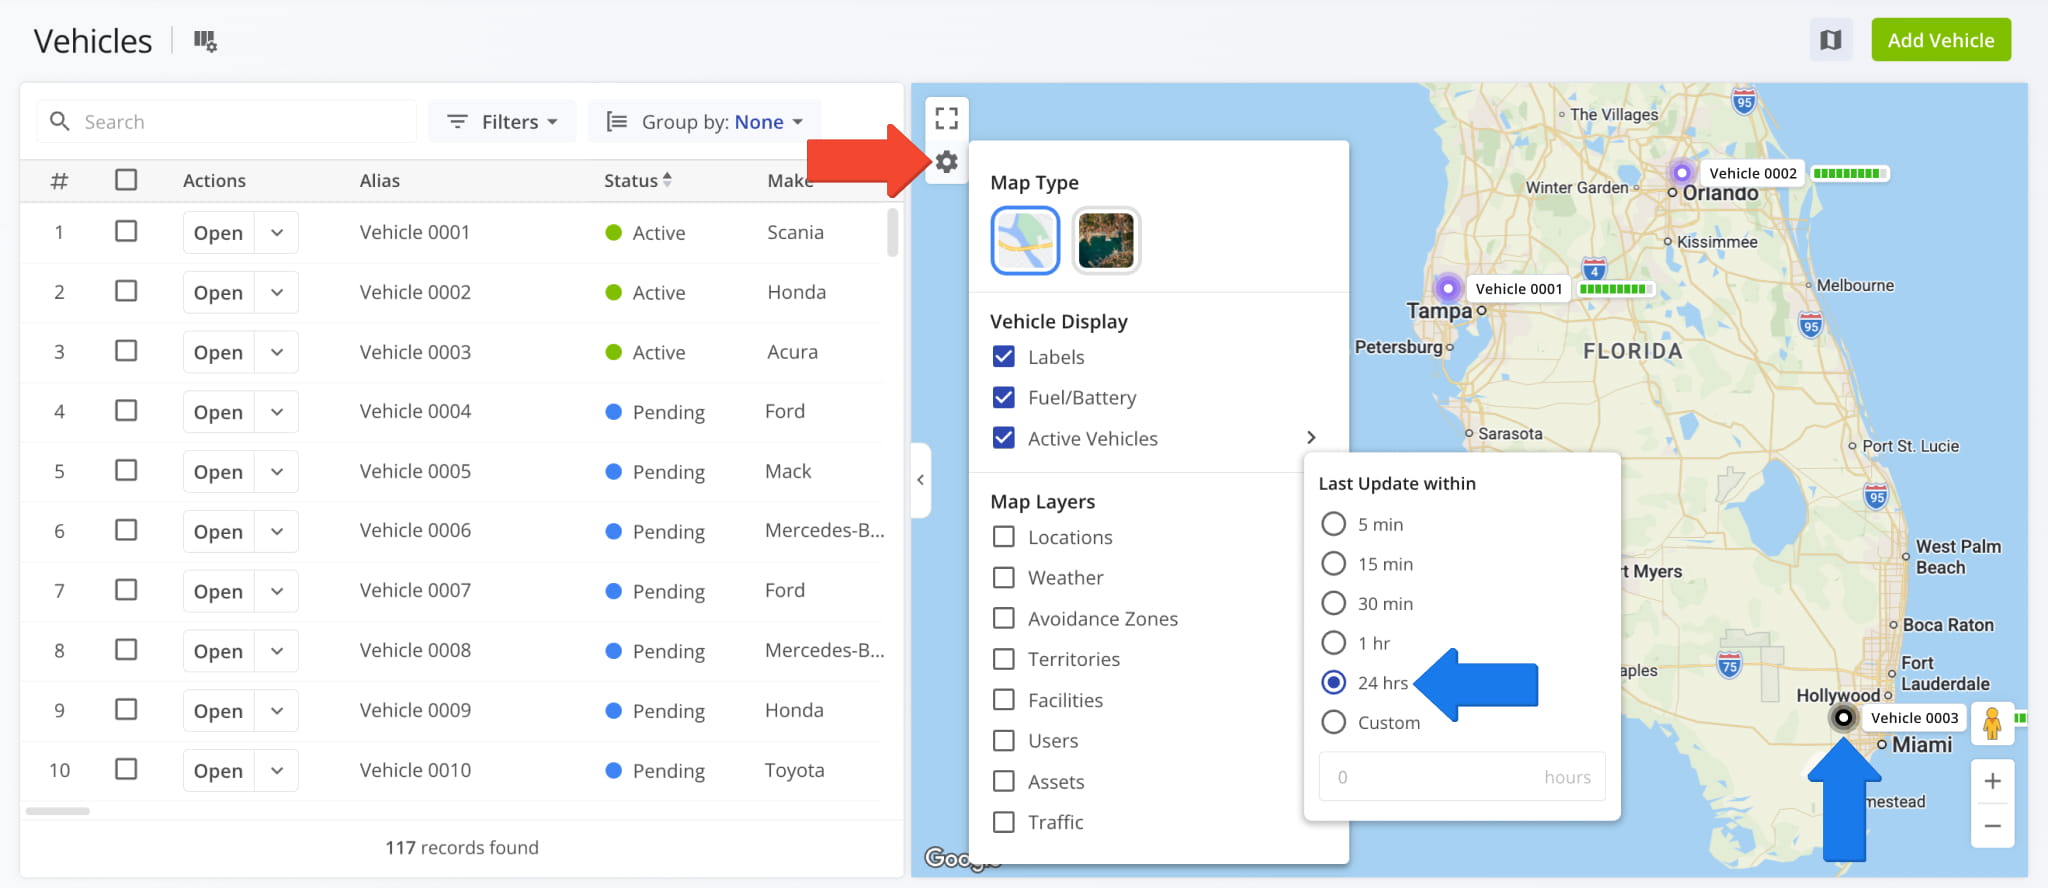
Click the Gear Icon to open the Vehicle Map Settings menu, where you can enable Vehicle Display options such as labels showing Vehicle names, dynamic fuel/battery levels, map overlays, and more. See the table below for a full list of options.
NOTE: When filtering “Active Vehicles” by update period, Vehicles with no updates in the defined period appear black on the map.
Vehicles Map Settings & Layers
Fleet Management – Manage And Edit Vehicles
To view and manage vehicles, go to “Team & Equipment” > “Vehicles” from the Navigation Menu. From here, you can:
- Click the “Open” button next to a Vehicle to open its corresponding Vehicle Snapshot.
- Click the Down Arrow next to a Vehicle to access the following management actions:
- Edit: Adjust the same Vehicle settings and parameters available when adding Vehicles.
- Assign Facilities: Associate one or more Company Facilities with the Vehicle.
- Assign Assets: Associate one or more Company Assets with the Vehicle.
- Archive: Remove the Vehicle from the list and set it as inactive and non-operational.
- Use the “Filters” menu to filter Vehicles by their attributes.
- Use the “Group by” menu to group vehicles by their attributes.
You can learn more about filters and grouping options in the table below. NOTE: Depending on your User Permissions, you may have access to different vehicles. Learn more about Vehicle Acces Permissions by User Type.
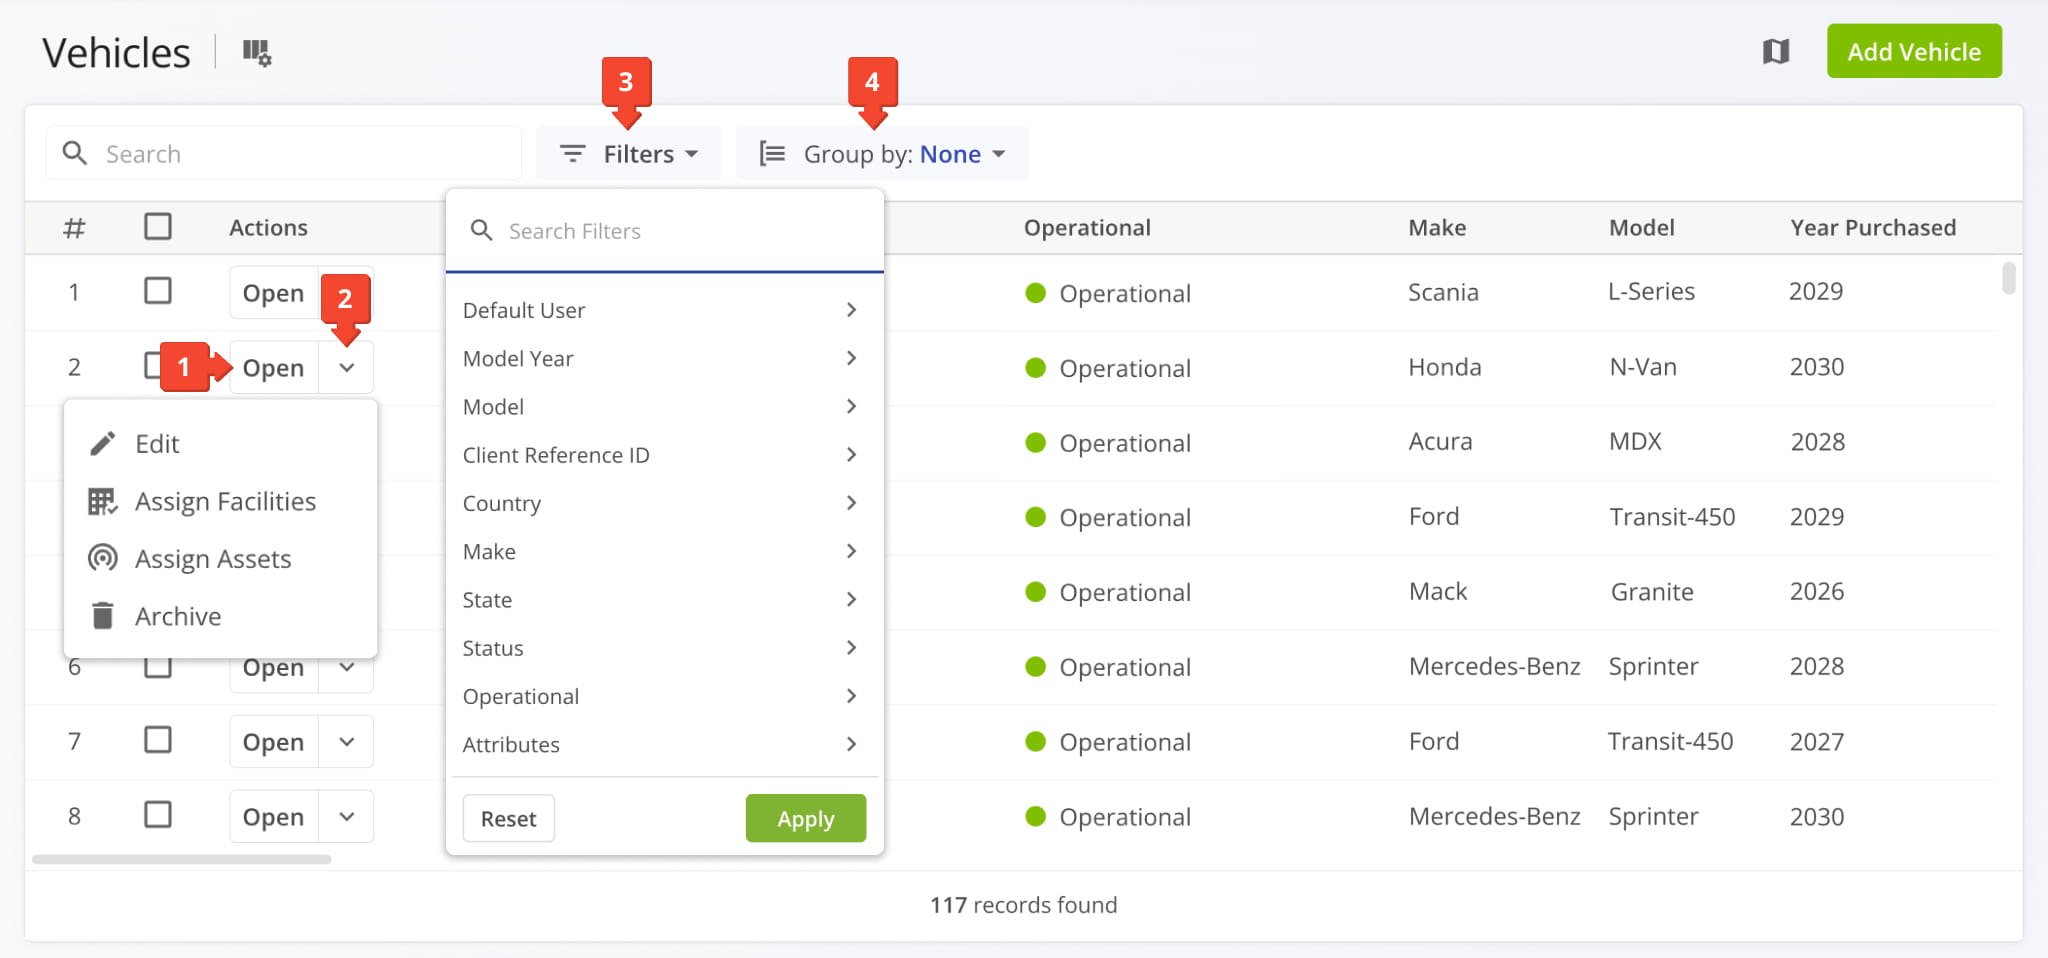
Vehicle Filters & Grouping Options
You can also manage multiple vehicles at the same time by selecting the checkboxes next to the vehicles you want to modify. Then, click “Bulk Actions” in the top menu to open the list of bulk management actions you can perform, described below.
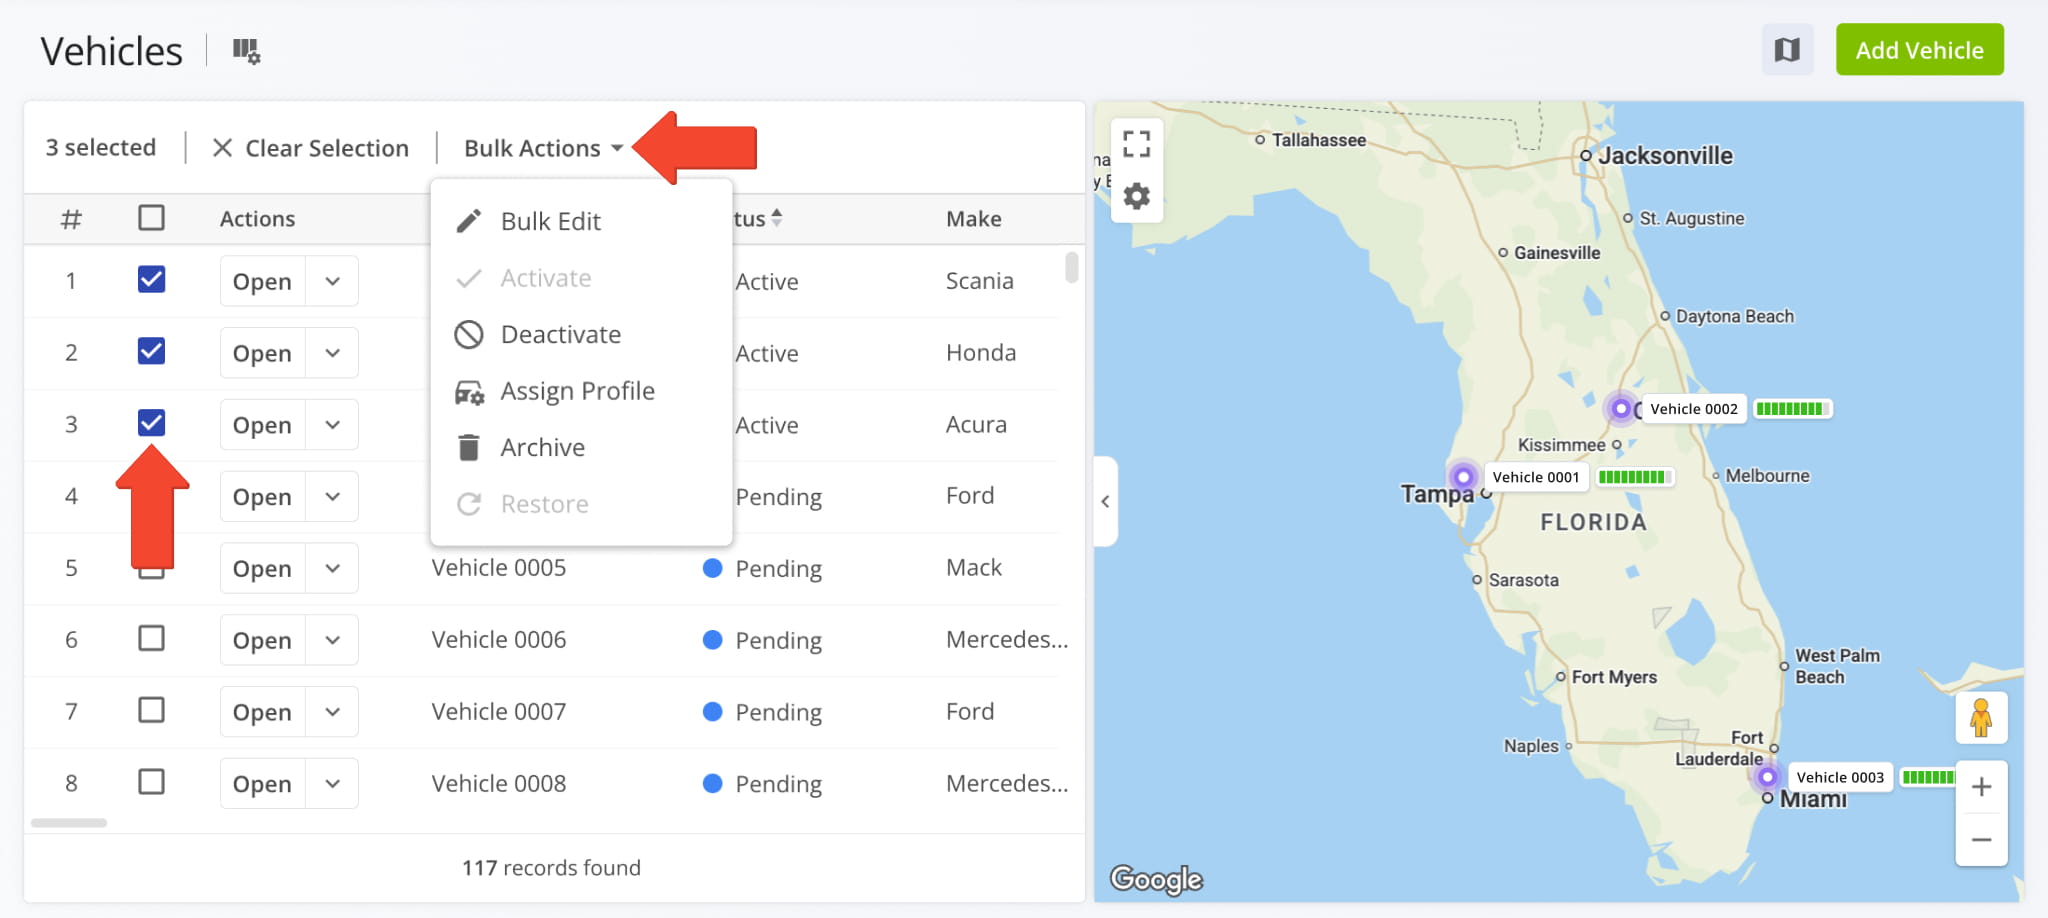
Bulk Management Actions
To customize the columns shown in your Vehicles List, click the Display Columns button in the top-left. Then, check the boxes next to the columns you want to enable.
You can rearrange columns on the right of the Display Columns panel by dragging column names. When ready, click “Apply” to save your Display Columns settings. Find more information about columns in the table below.
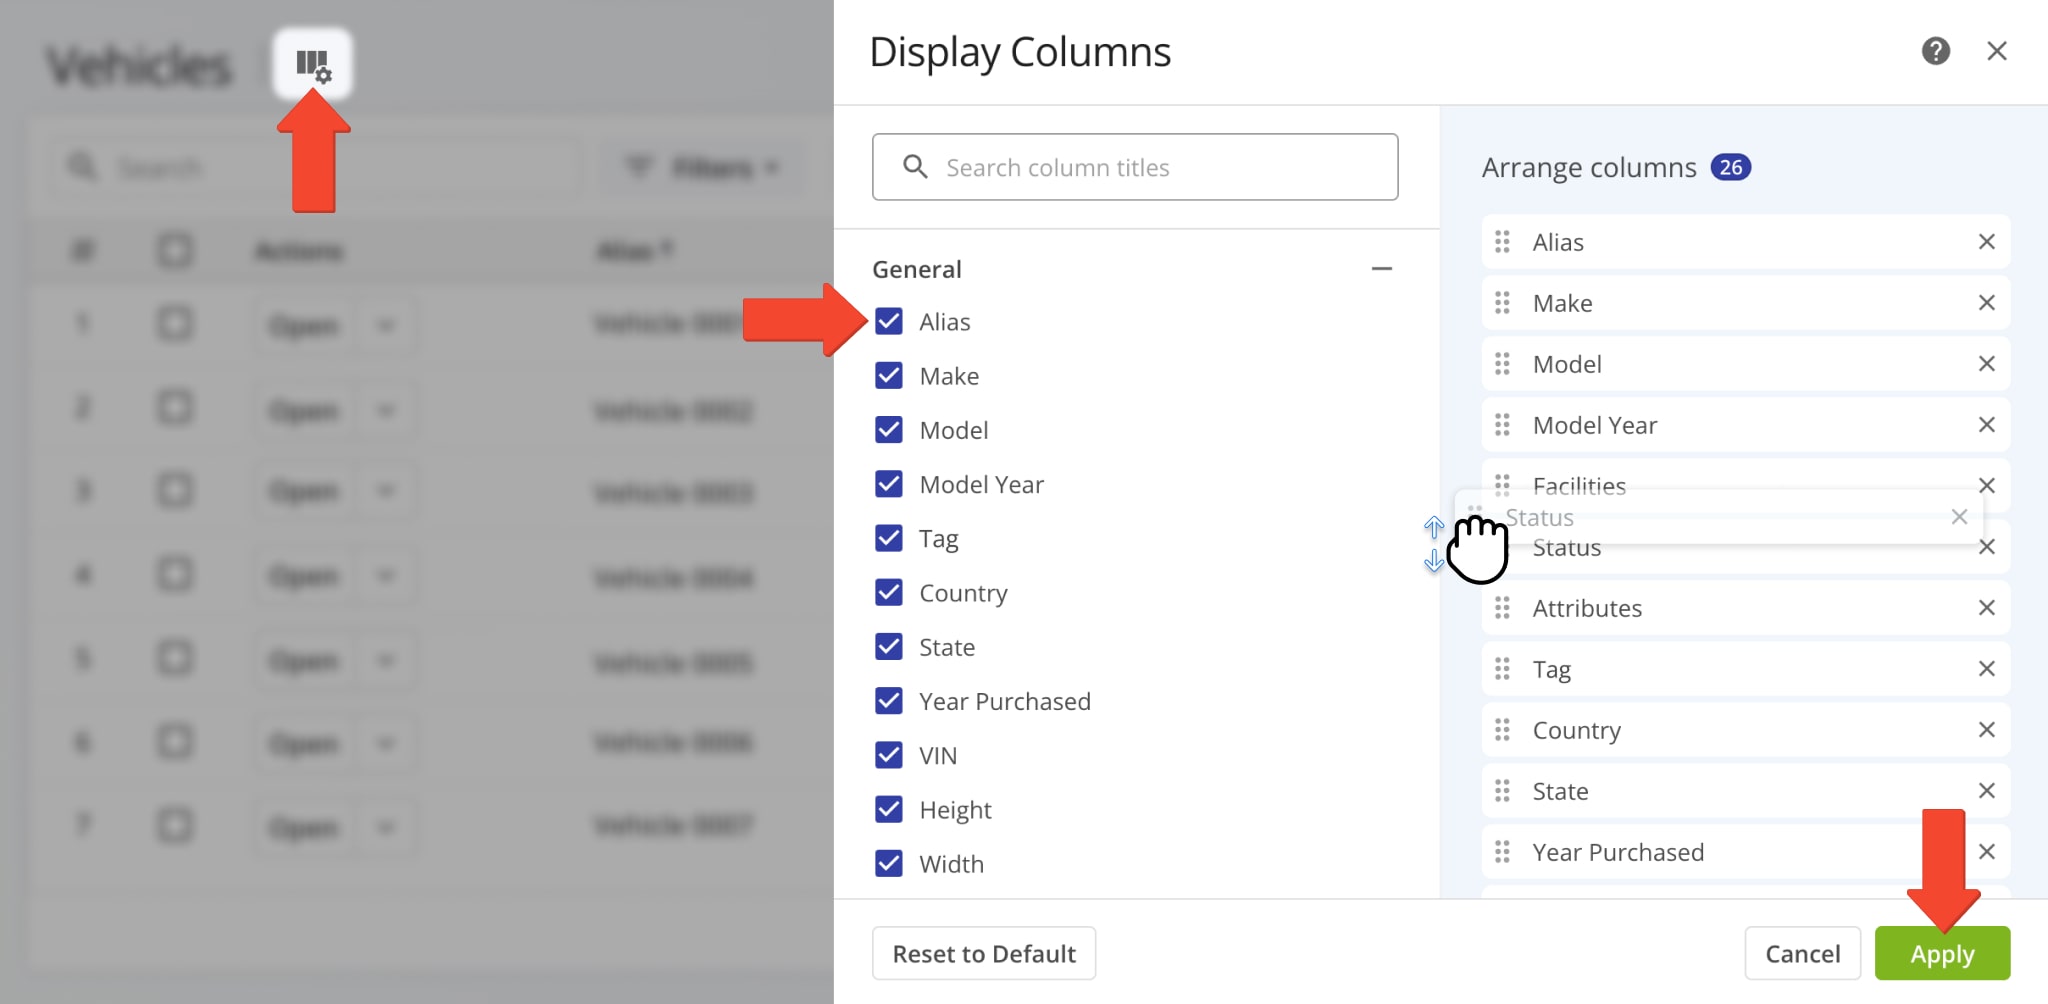
Vehicle Display Columns
Assign Vehicle Attributes And Profiles
Route4Me’s route optimization software includes powerful features like Vehicle Attributes, Commercial Vehicle Profiles, and Capacity Profiles for efficient, reliable, and compliant last mile route planning.
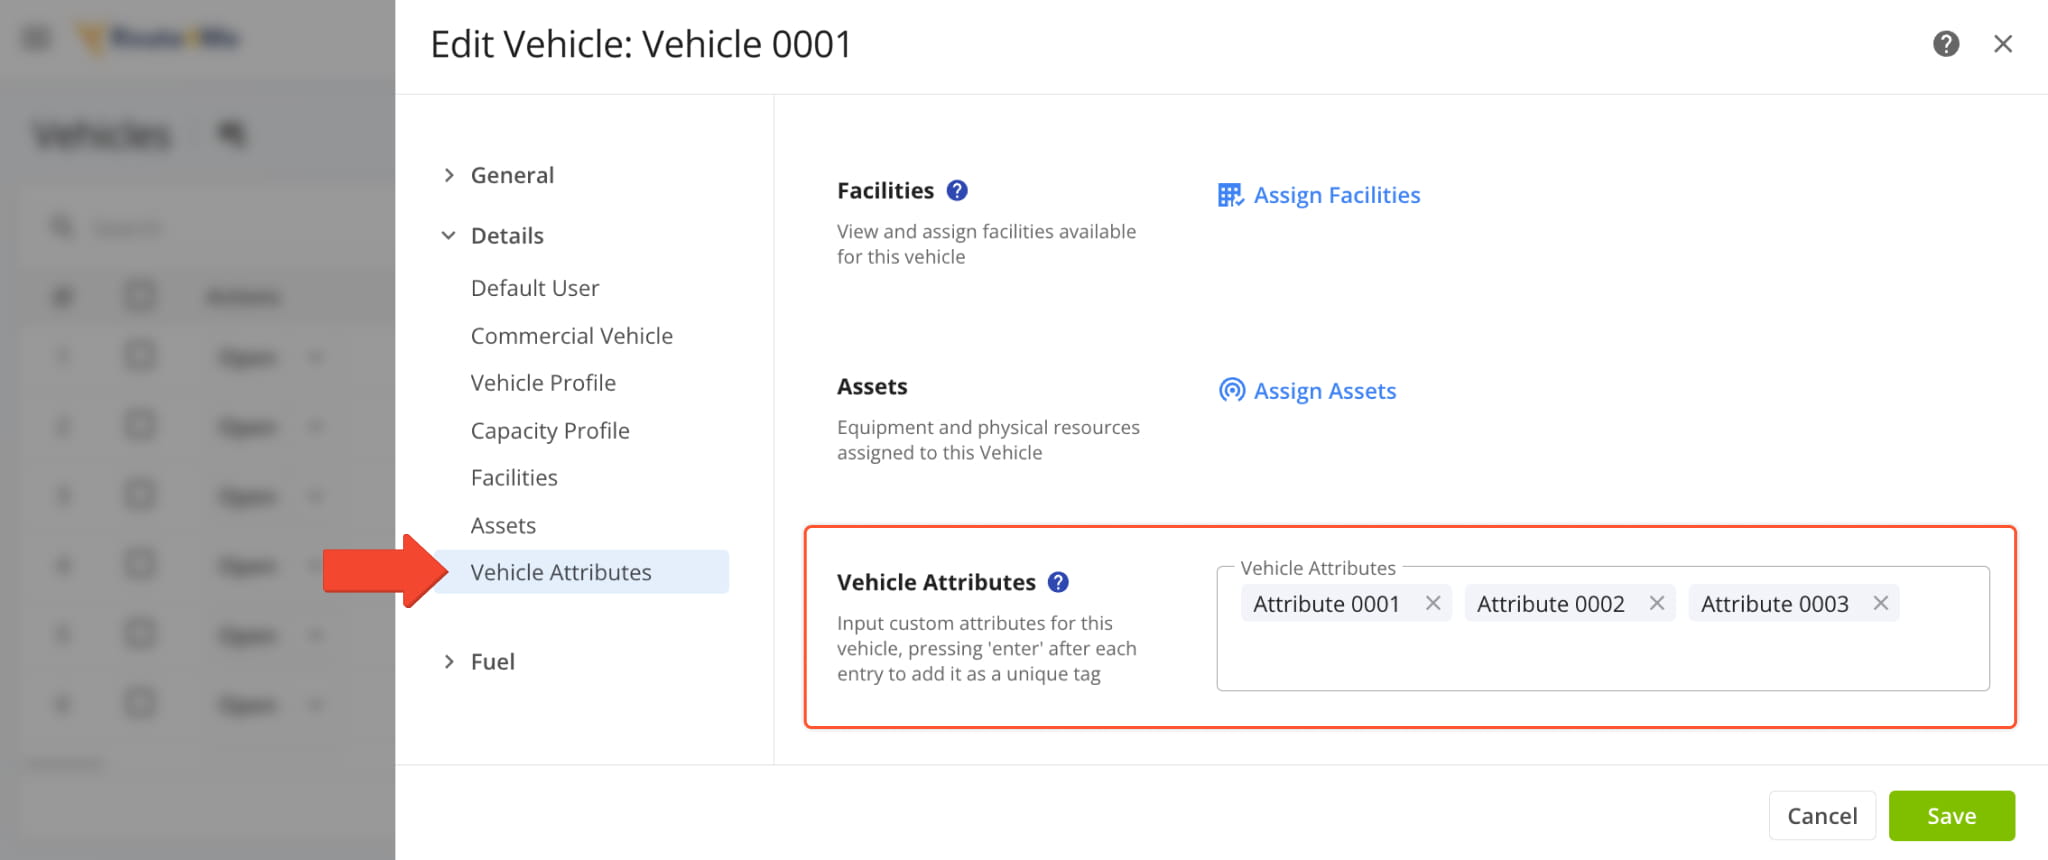
Vehicle Attributes – Add Vehicle Attributes For Drivers Skills Routing
Route4Me’s Driver Skills and Vehicle Attributes feature optimizes routes by matching employee skills and vehicle capabilities to each location’s requirements. You can ensure the right team member and vehicle are always assigned to the right destination.
You can assign Vehicle Attributes when adding a new vehicle or when editing an existing vehicle already in your Vehicle List. When the vehicle’s attributes match an address’s requirements, it can be automatically assigned to that address.
Learn more about adding Drivers Skills and Vehicle Attributes for improved Mixed Fleet Route Optimization.
Vehicle Profile – Add Commercial Vehicle Profile For Commercial Routing
Different countries and states enforce road restrictions for commercial vehicles, including limitations based on weight, size, hazardous materials, and bridge or tunnel access. Violating these rules can endanger public safety and result in hefty fines.
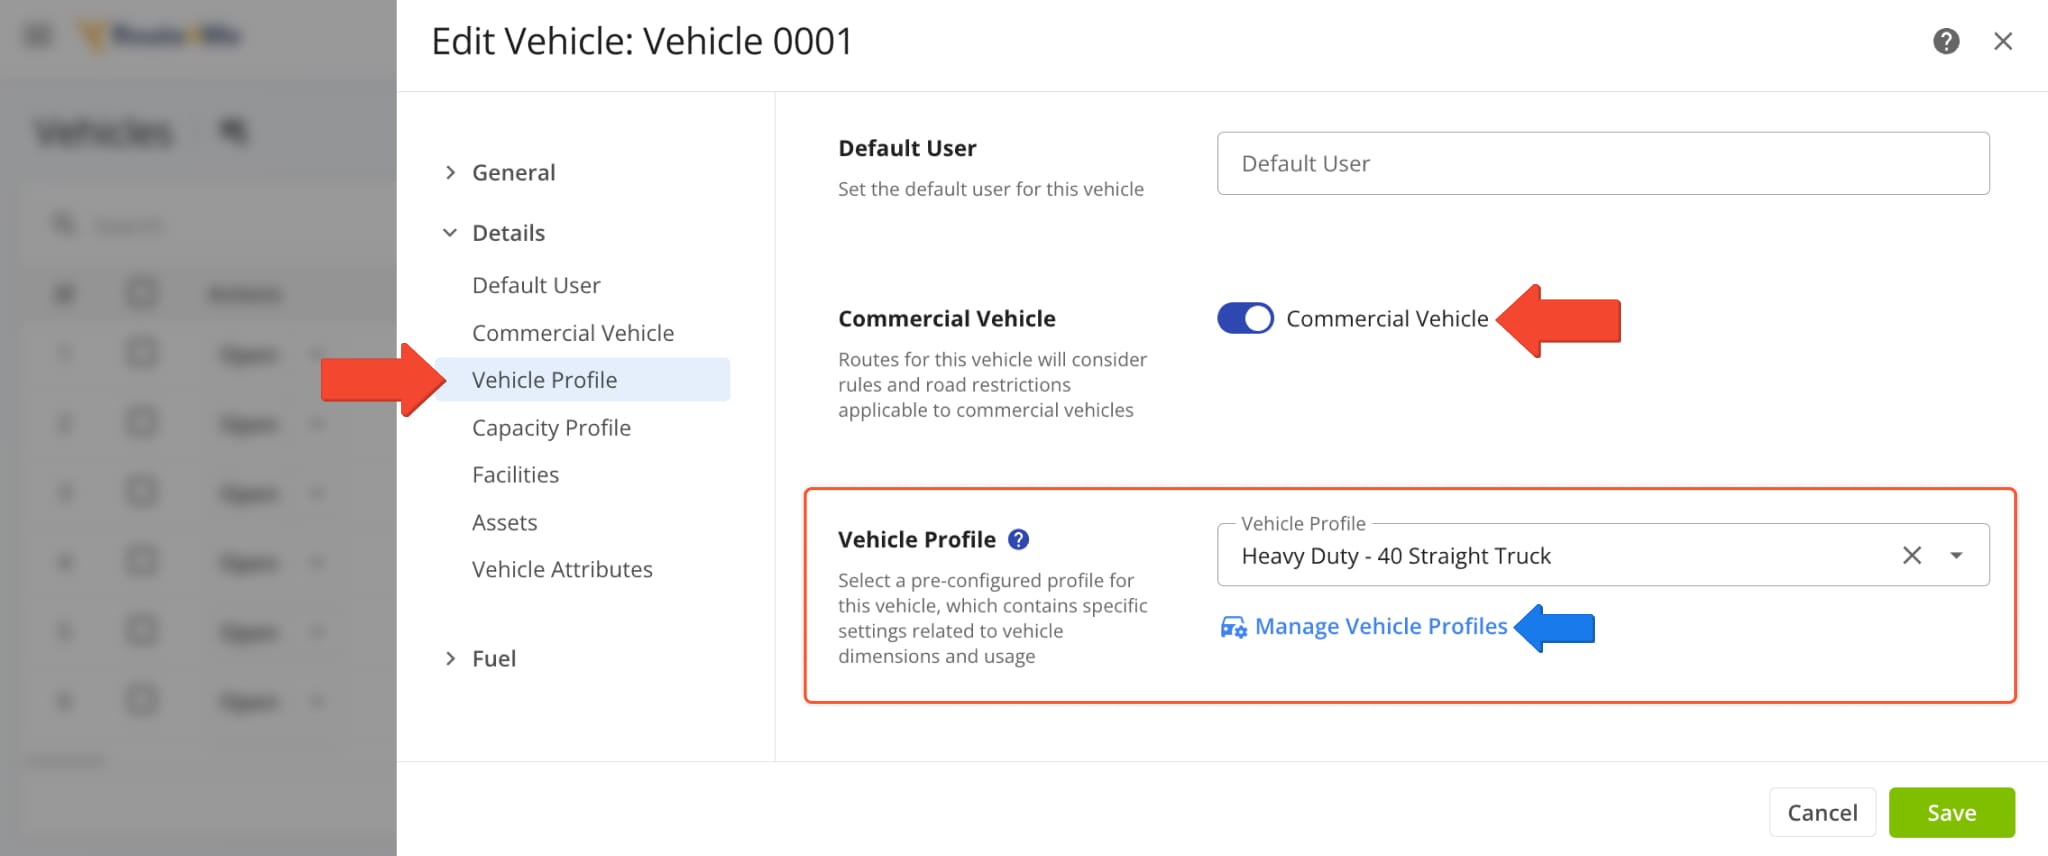
To mitigate risks and avoid inefficient commercial routing, you can configure a fleet with specific commercial parameters. When adding or editing a Vehicle, you can define a Commercial Vehicle Profile. First, enable the “Commercial Vehicle” toggle. Then, you can select a Vehicle Profile. Learn more about commercial vehicles and truck routing with Vehicle Profiles.
You can also click the “Manage Vehicle Profiles” link to go directly to your Vehicle Profiles Page.
Capacity Profile – Add Vehicle Capacity Profiles For Mixed Fleet Routing
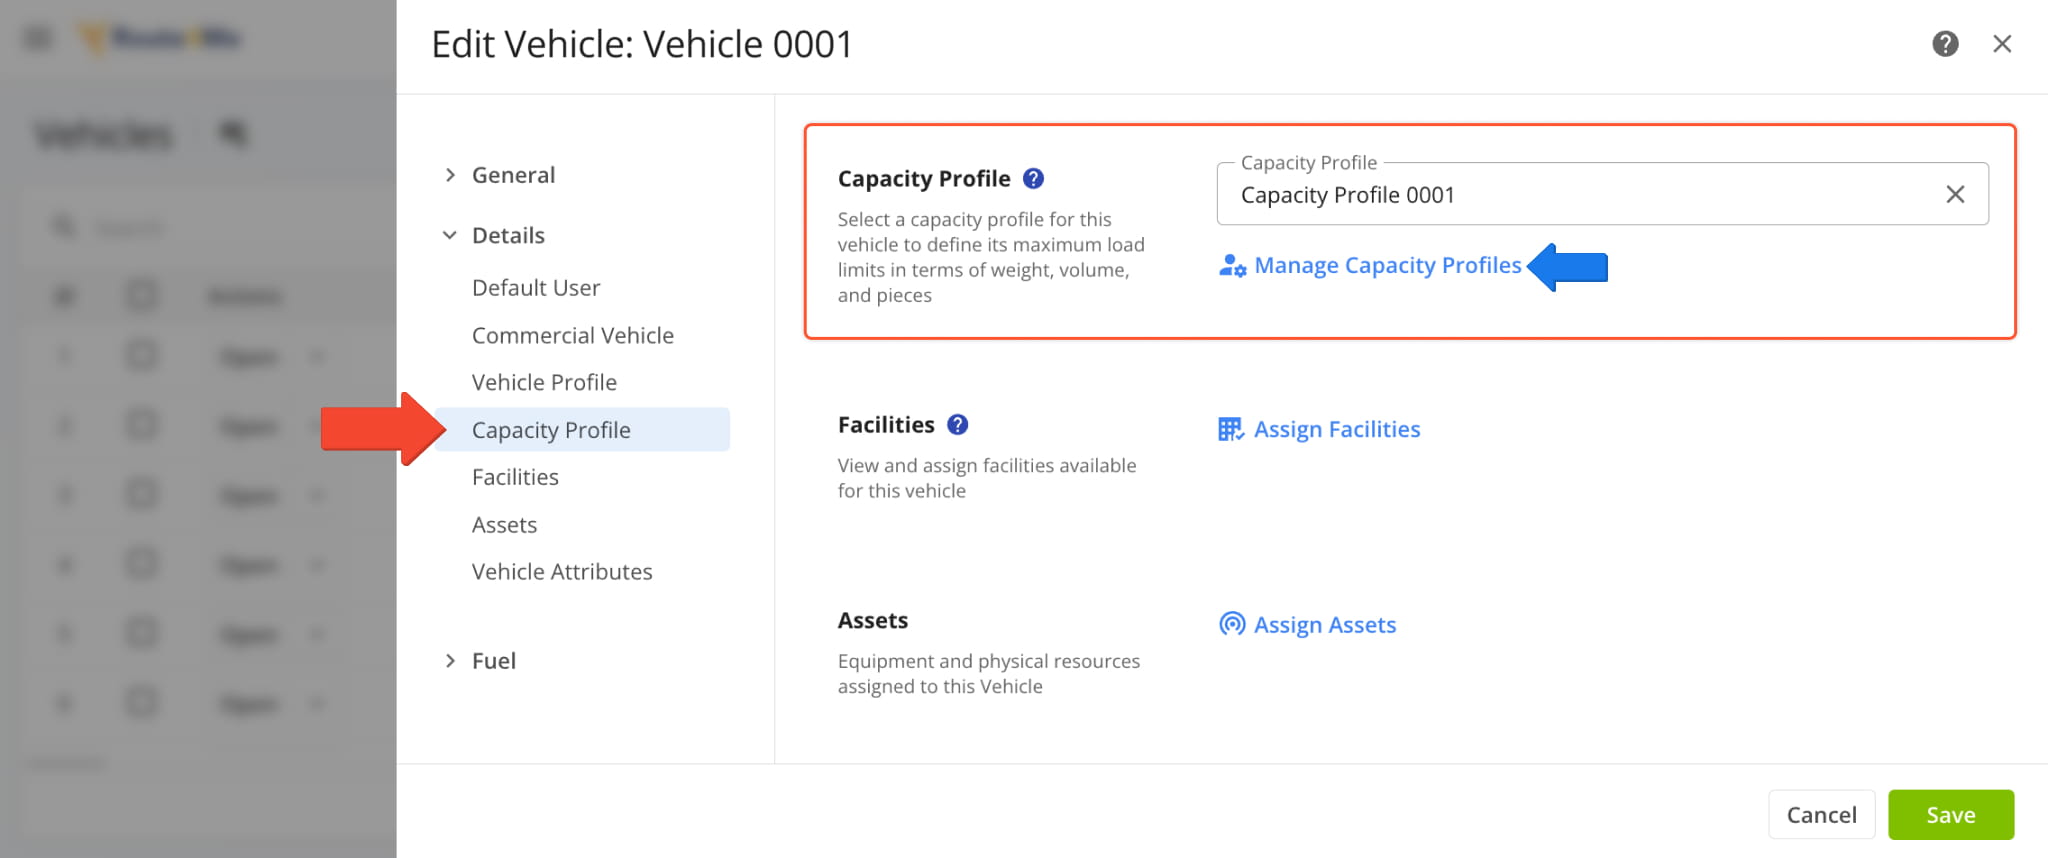
Last mile transportation enterprises use mixed fleets of cars, vans, and trucks to meet diverse routing needs. This makes defining Vehicle capacity essential for optimal mixed fleet routing. When adding or editing a Vehicle, you can select a predefined Capacity Profile based on the Vehicle’s load capacity for weight, volume, pieces (number of units), or maximum allowed revenue.
You can also click the “Manage Capacity Profiles” link to go directly to your Capacity Profiles Page.
Visit Route4Me's Marketplace to Check out Associated Modules:
- Route Optimization
Commercial Vehicle & Truck Routing
- Route Optimization
Mixed Vehicles Routing
- Route Optimization
Field-Services / Field-Marketing / Field-Sales Delivery Management
About author: Kristian Andreev

