2026 Release Notes – Route4Me Product Updates & Release Notes
Discover what’s new in Route4Me and stay up to date with the latest releases, improvements, and product updates. This page provides a comprehensive overview of our completed product update releases for 2026.
NOTE: If some features described on this page aren’t available on your account, Contact Route4Me Support.
April 2026
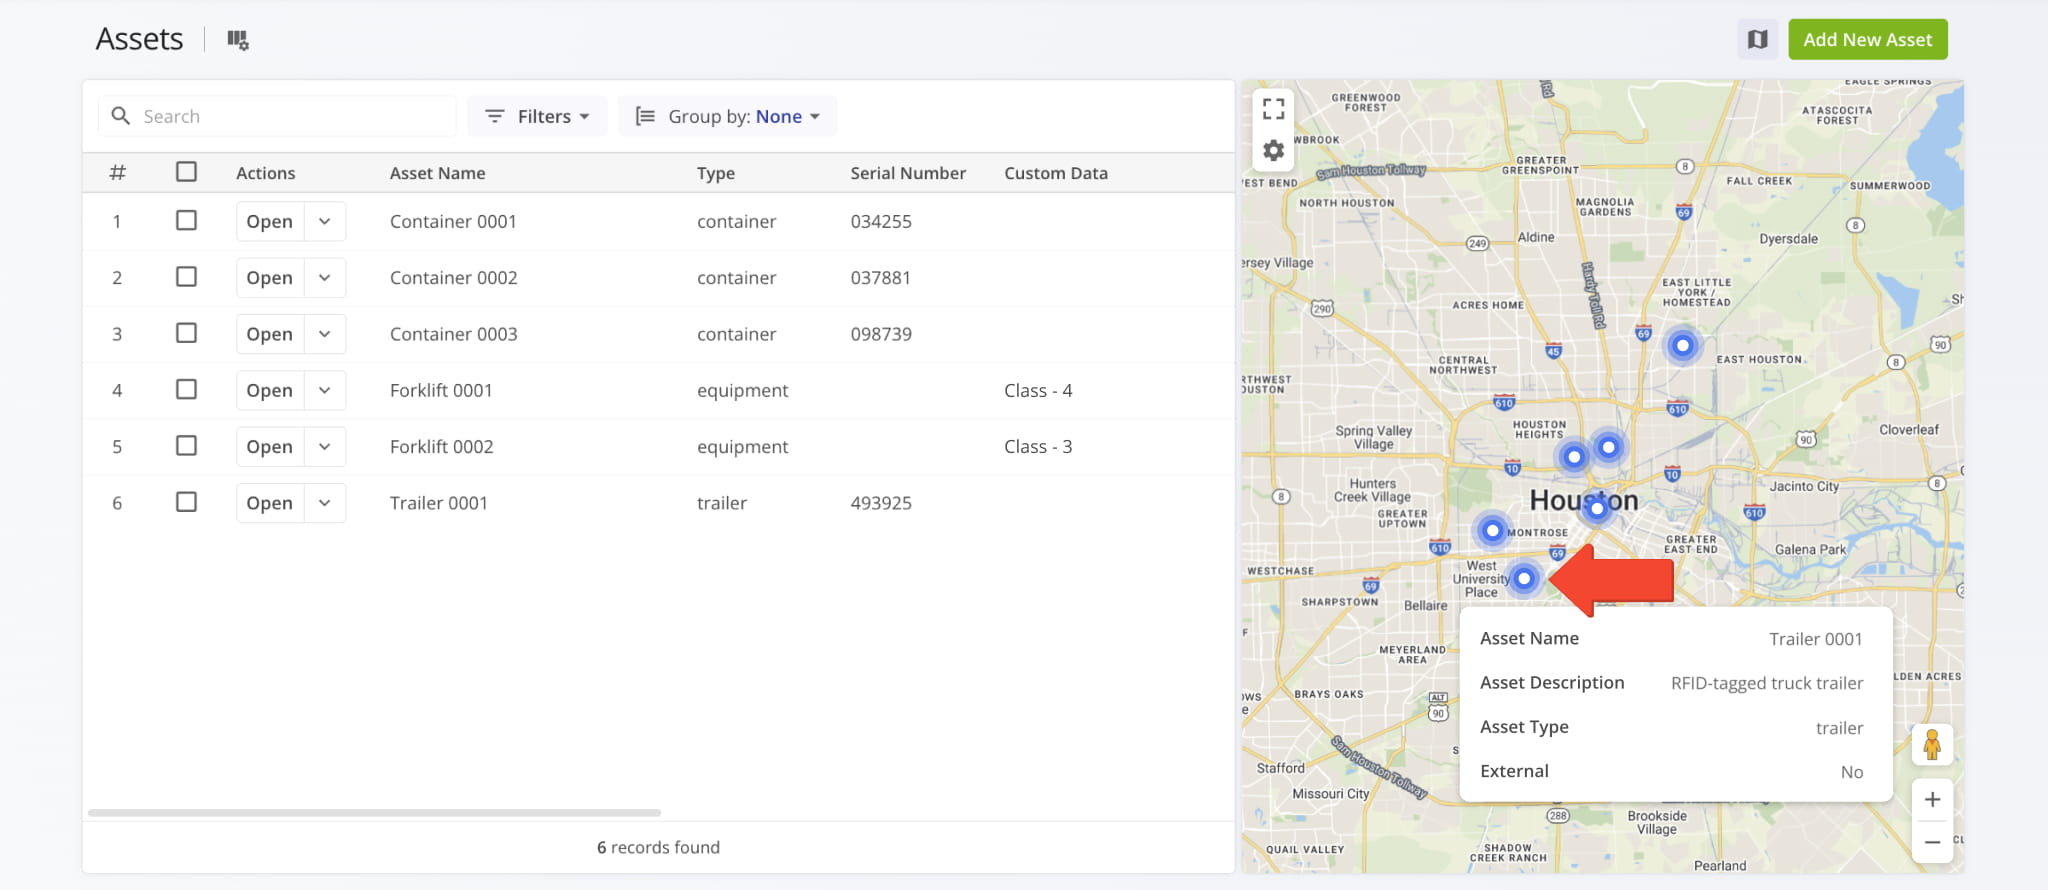
5You can now hover over Assets on the Assets Page Map and see tooltips that show Asset names, descriptions, types, and whether an Asset was imported from an external system.
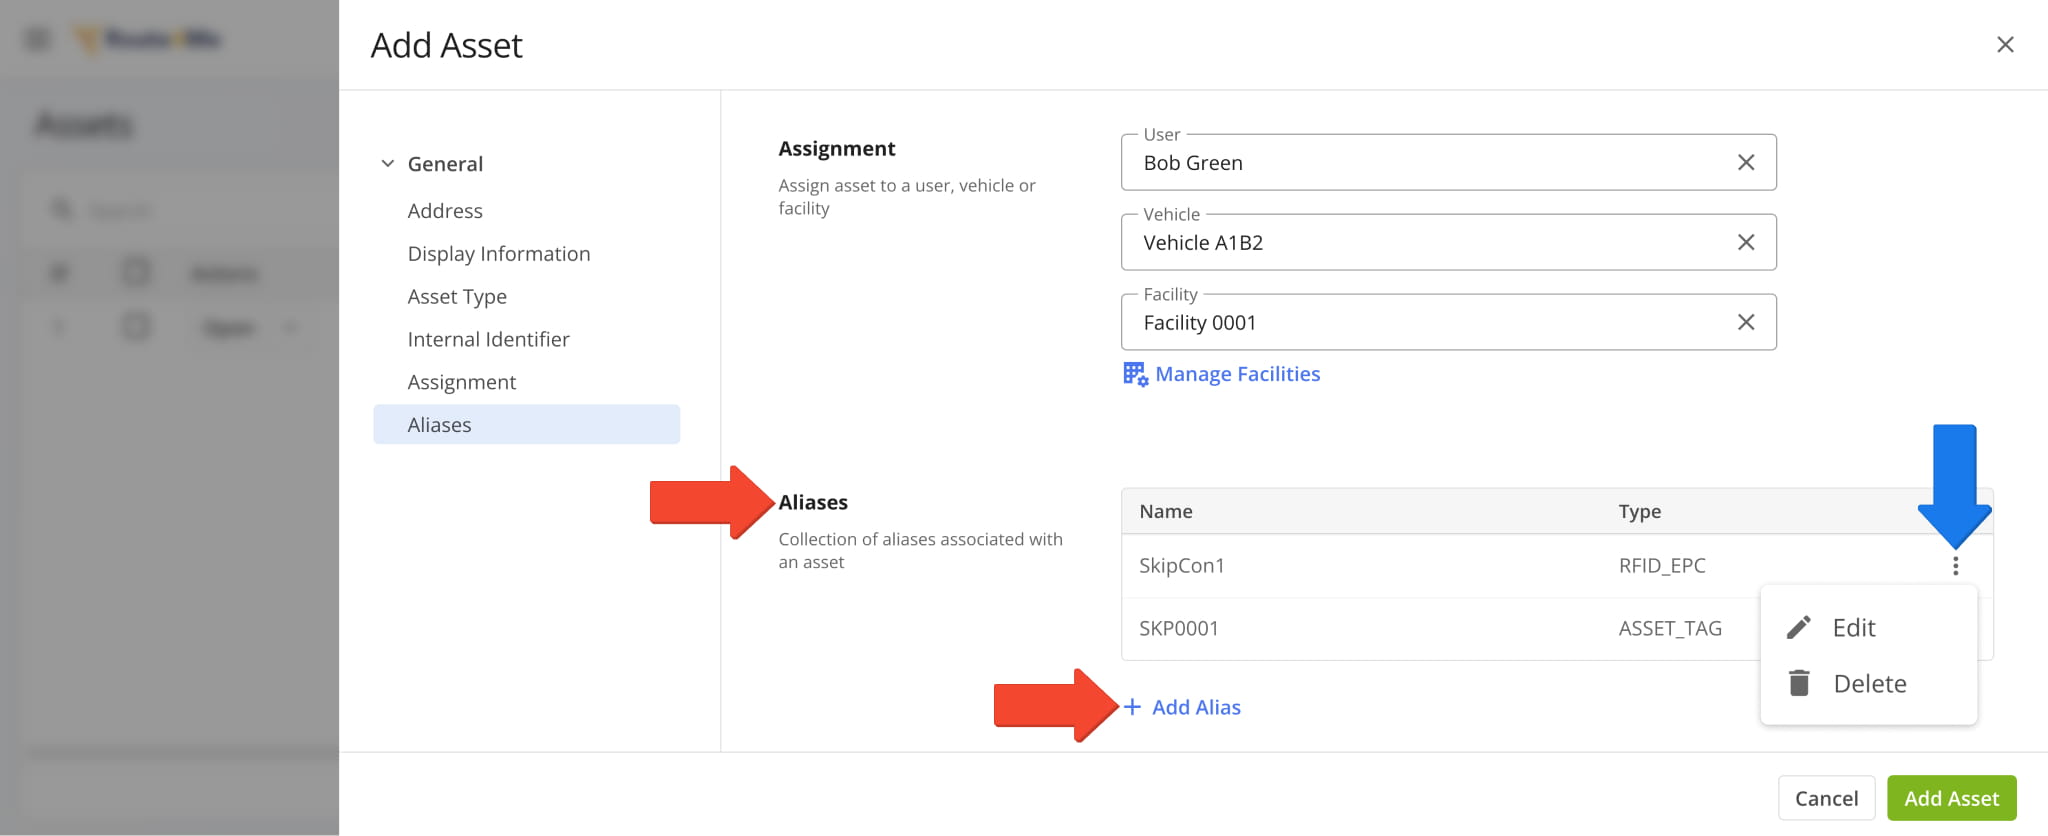
You can now add aliases to Assets. An Asset can have multiple aliases, and each alias has an associated name and type.
When you add or edit Assets, you can adjust alias settings in the new “Aliases” section. Click “Add Alias” to and set an alias name and type. You can also edit and delete Asset Aliases by clicking the Three-dot Icon.
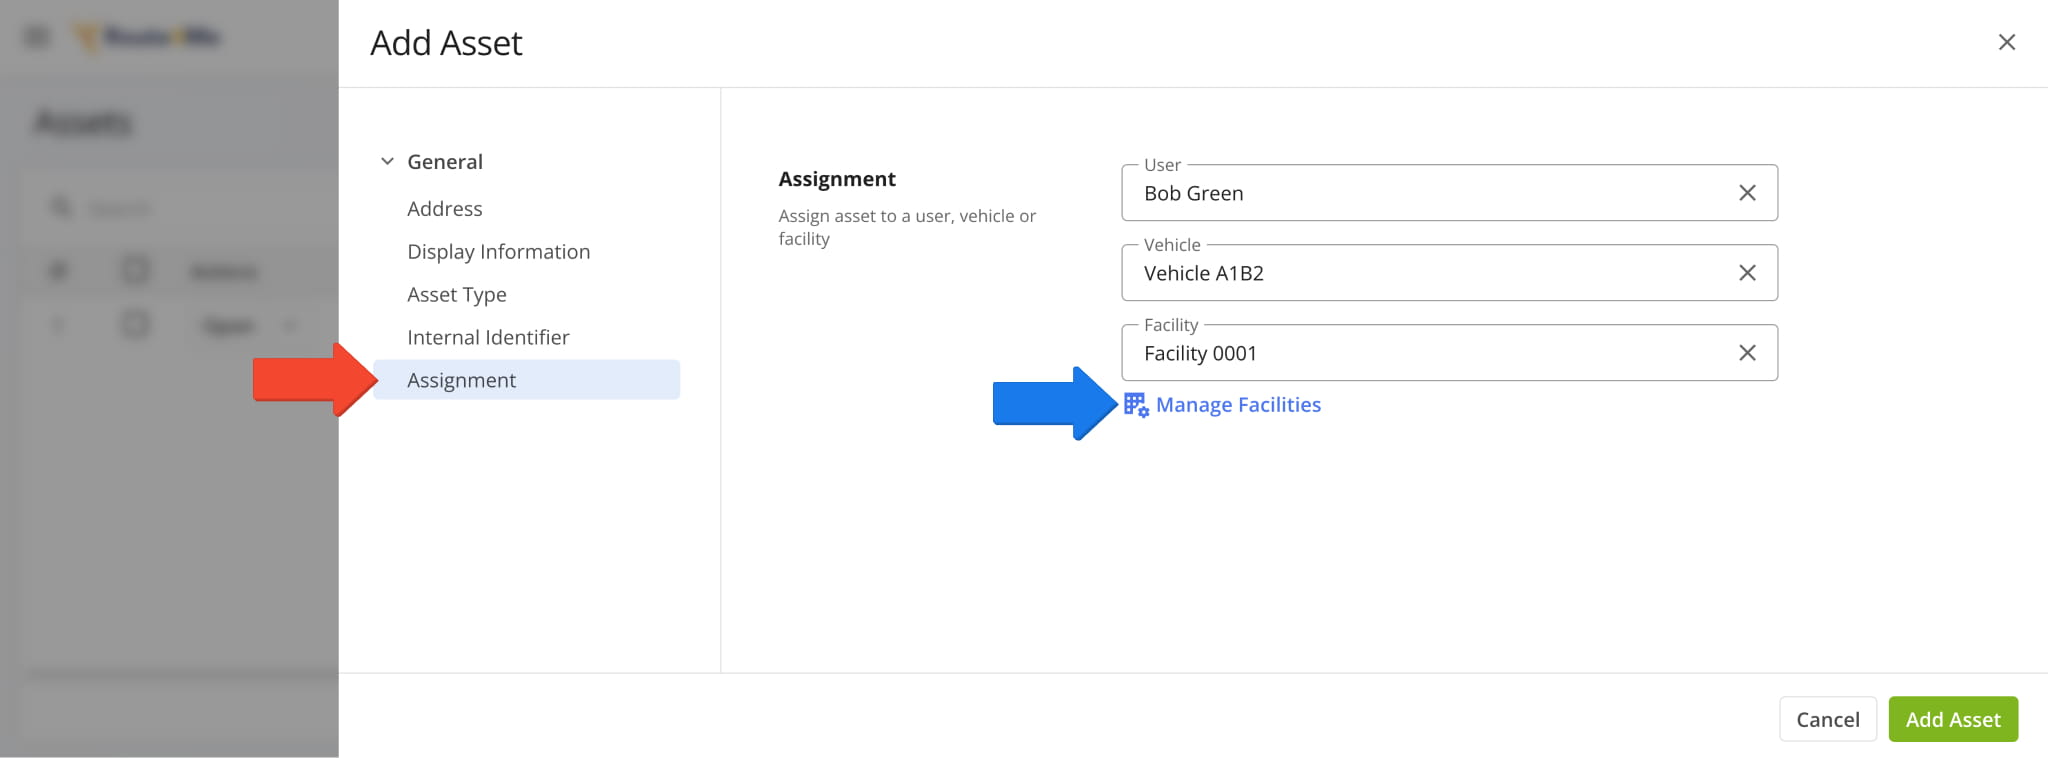
You can now assign Users, Vehicles, and Facilities when Adding Assets to your account. The new attribution fields are available in the “Assignment” section of the Asset settings panel.
Two following new route sequence adherence data fields were added to the Routes Page:
- Sequence Adherence (%): Shows the percentage of destinations that were visited in the planned order.
- Continuous Route Sequence Adherence (%): Shows the percentage of destinations that were visited in the correct sequence relative to each other, even if earlier stops were skipped or visited out of order.
For example, if a user visits Destinations 1 → 4 → 5, then 4 and 5 will count toward Continuous Adherence because they follow the correct sequence. Continuous Route Sequence Adherence will typically be higher than Sequence Adherence.
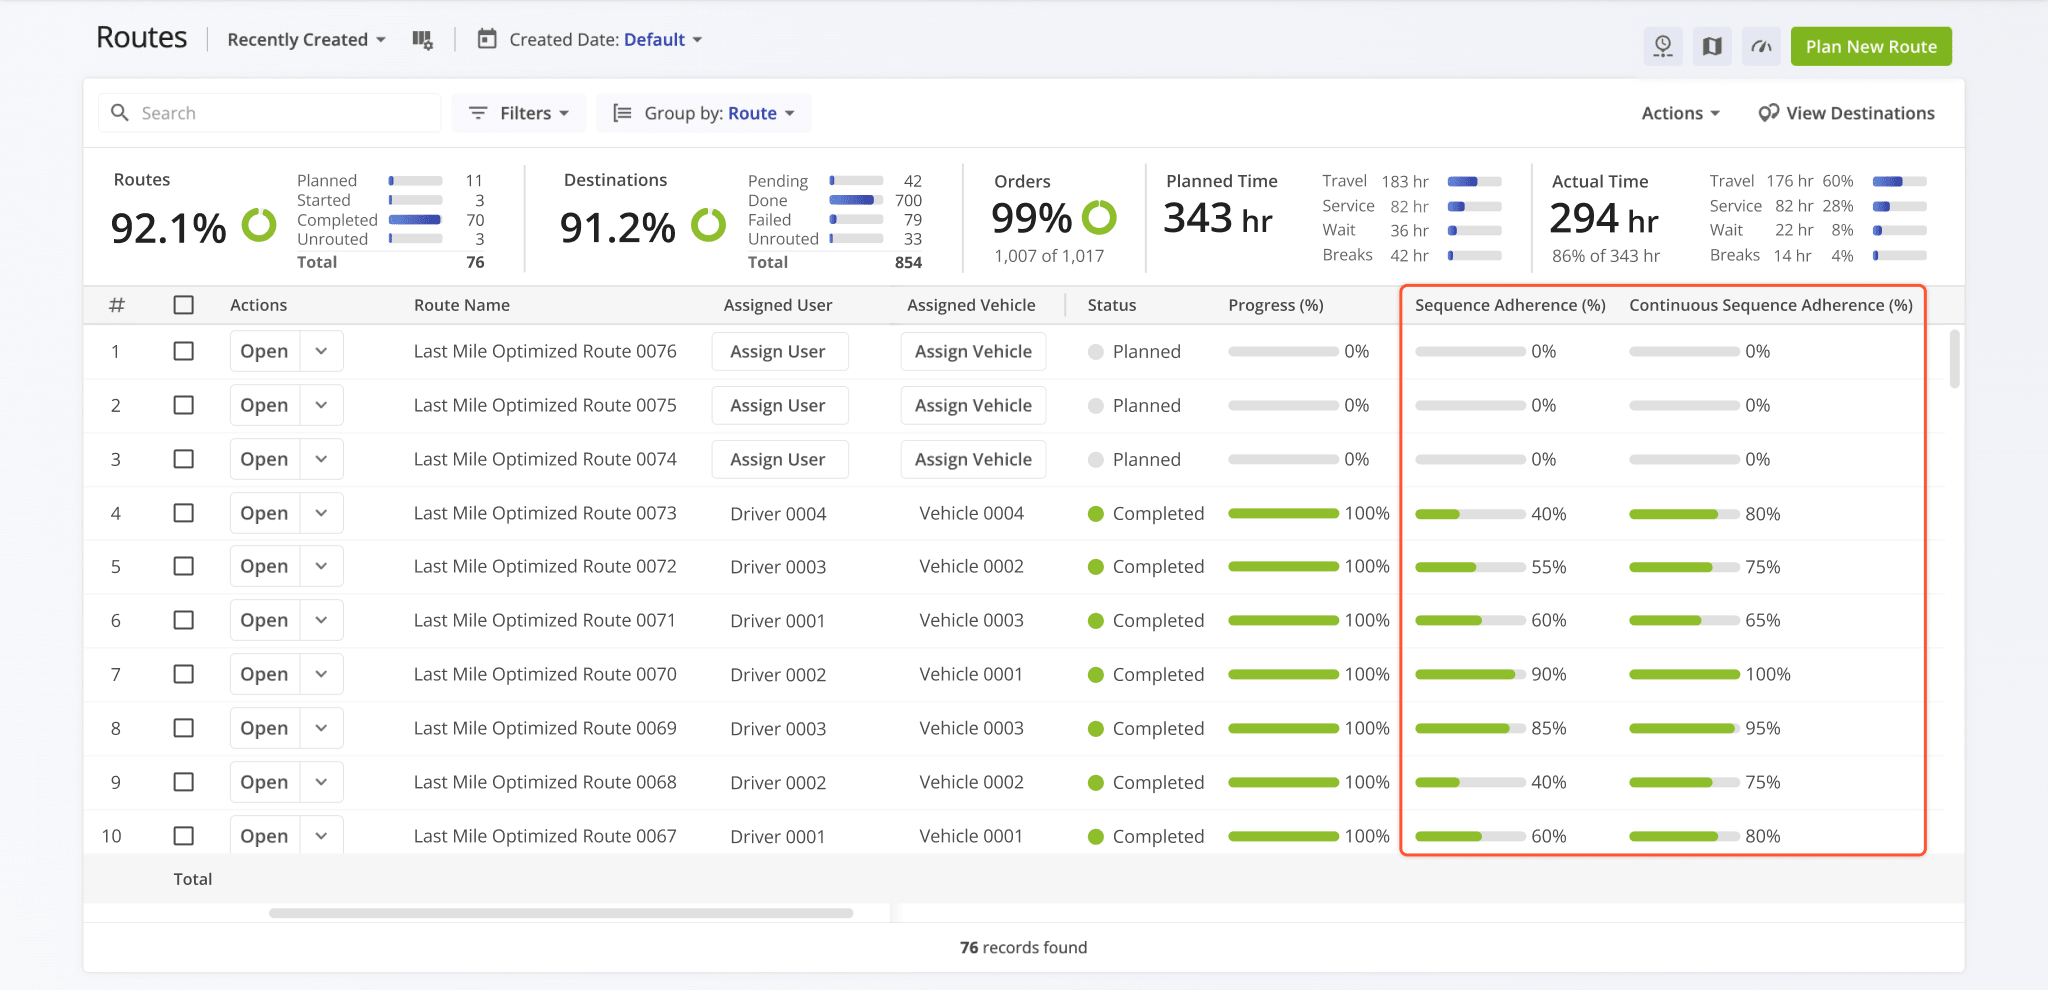
Both of the new data fields are also available in the “Progress Metrics” section when you Export Routes.

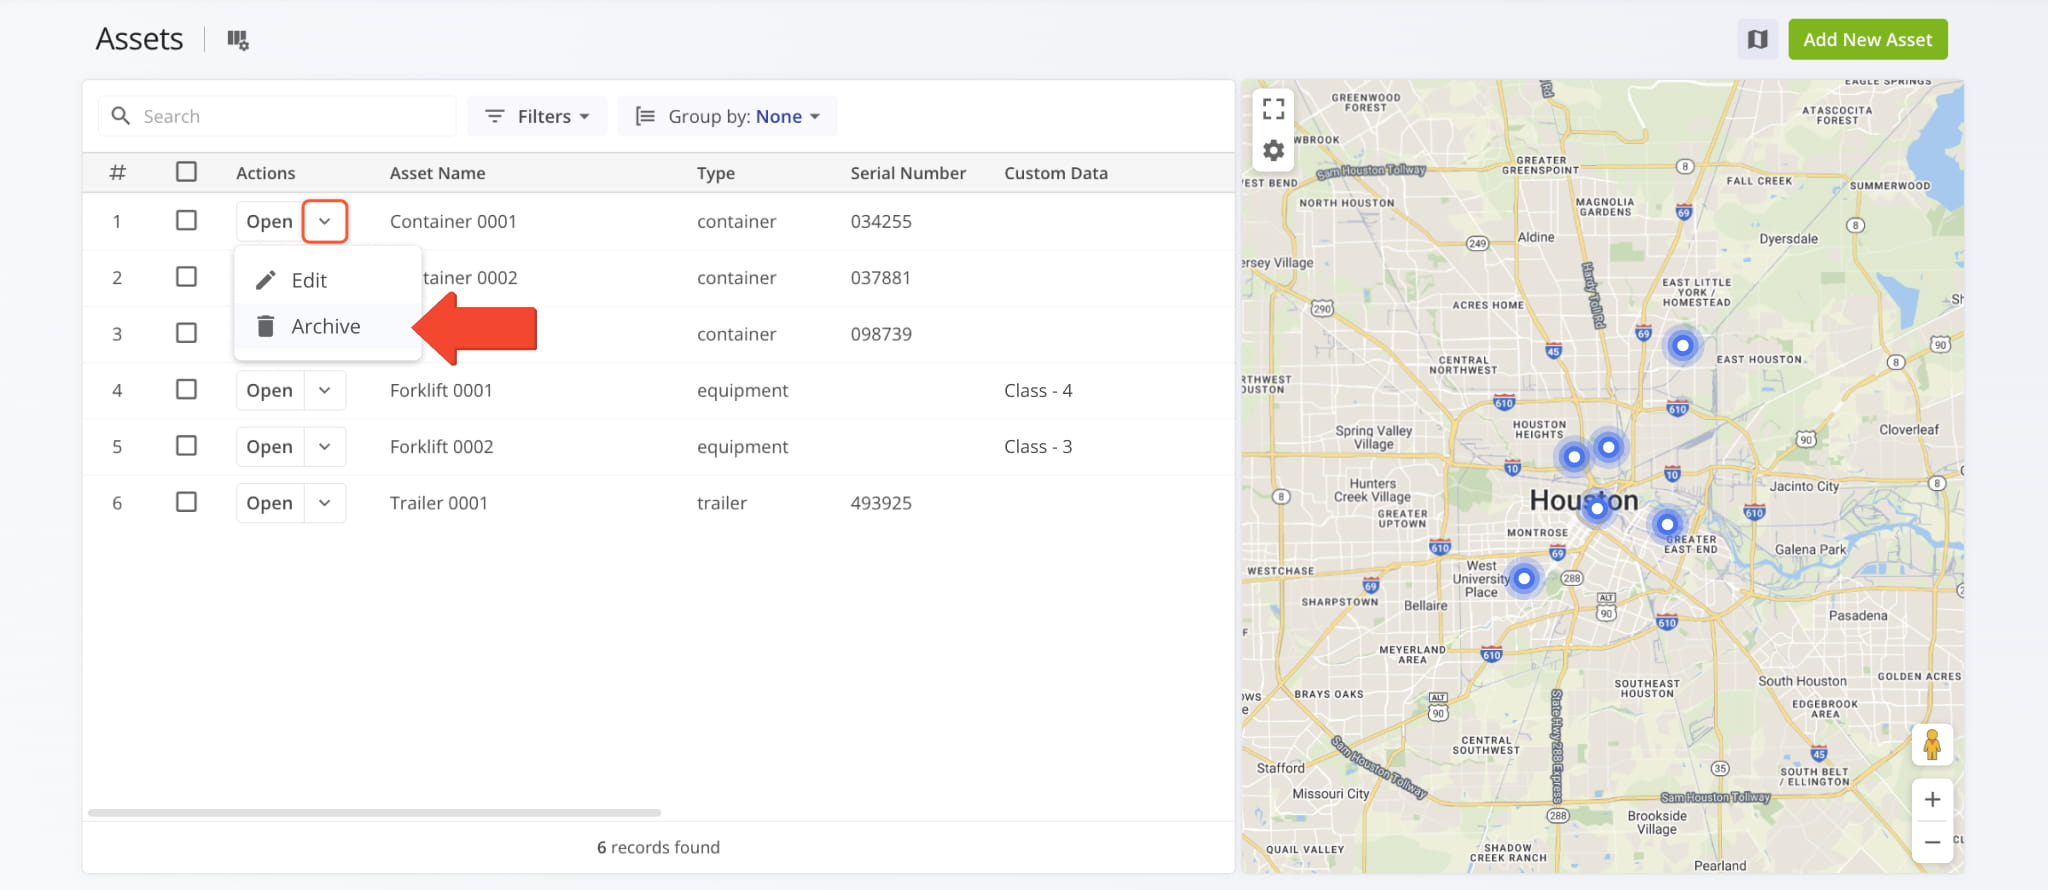
A new option to archive Assets was added to the Assets Page. Click the Down Arrow next to an Asset in the list and select “Archive“. Previously, you could only archive Assets using Bulk Actions.
March 2026
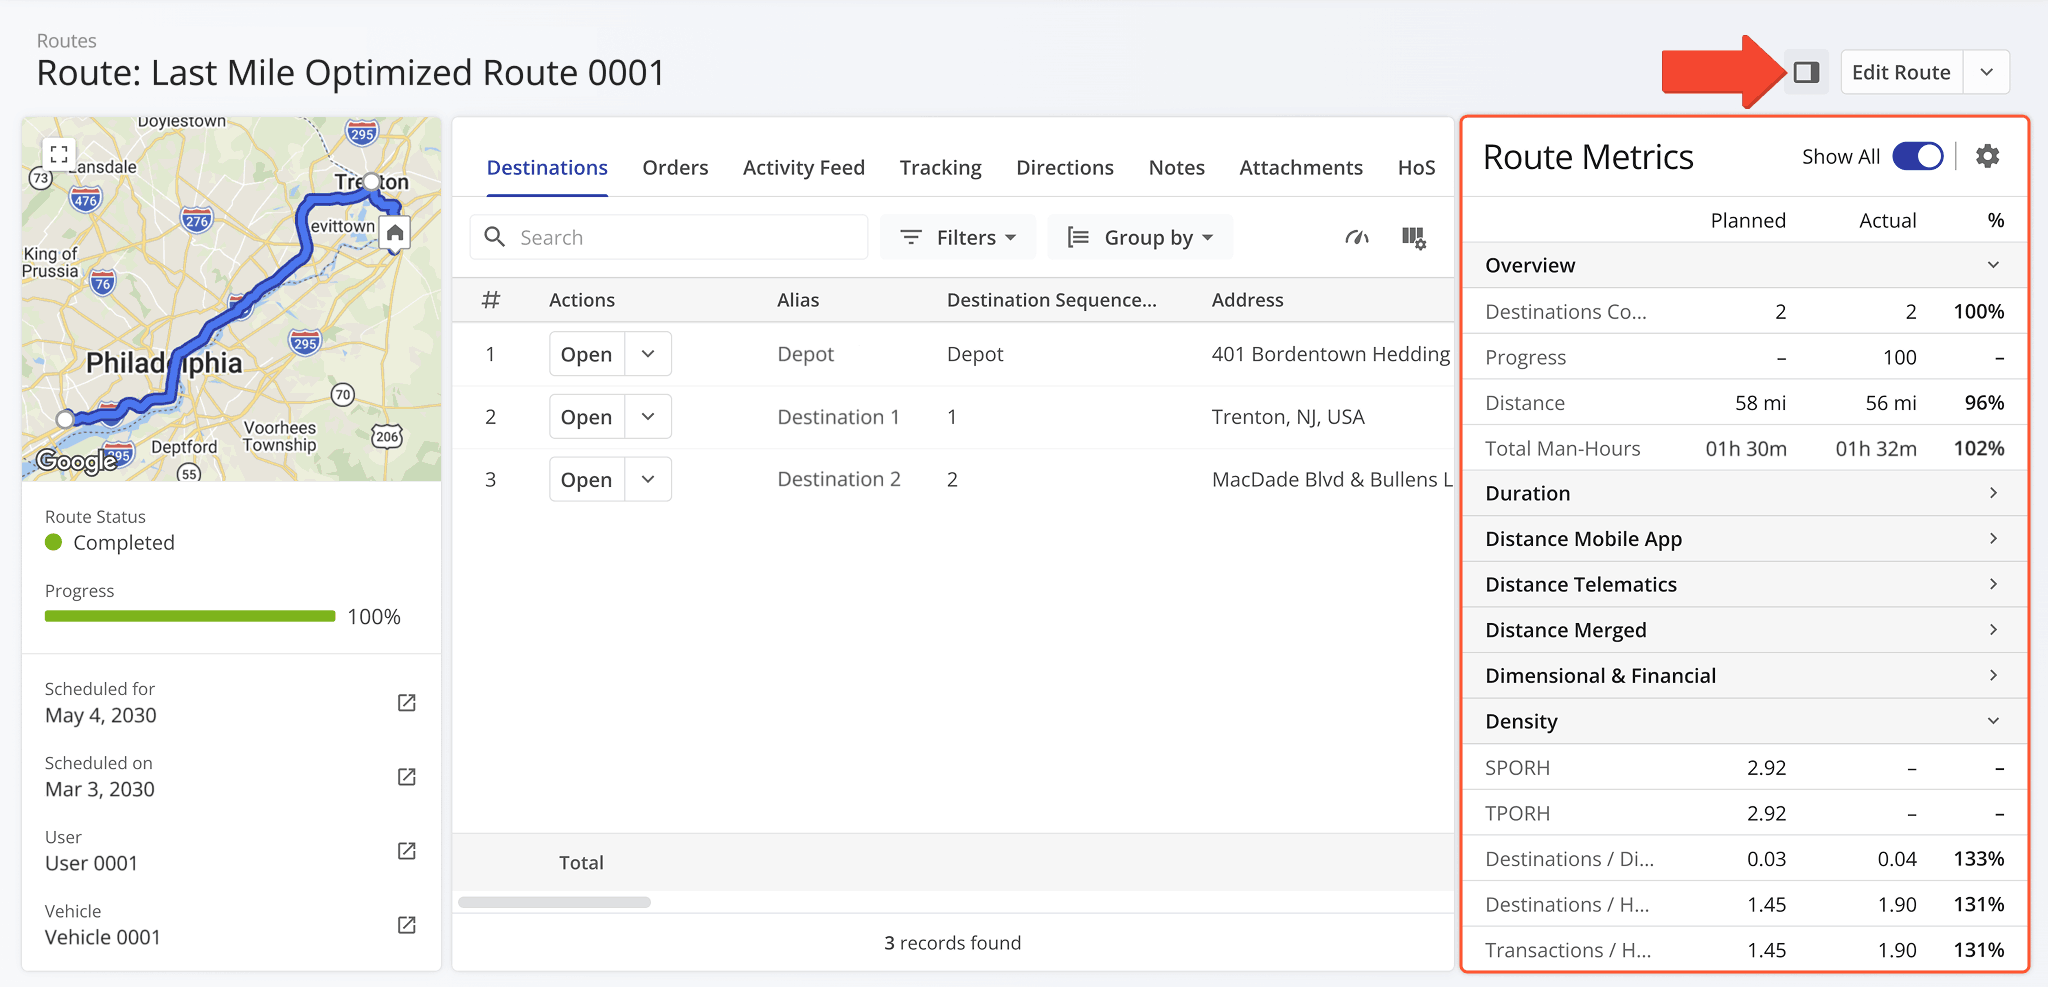
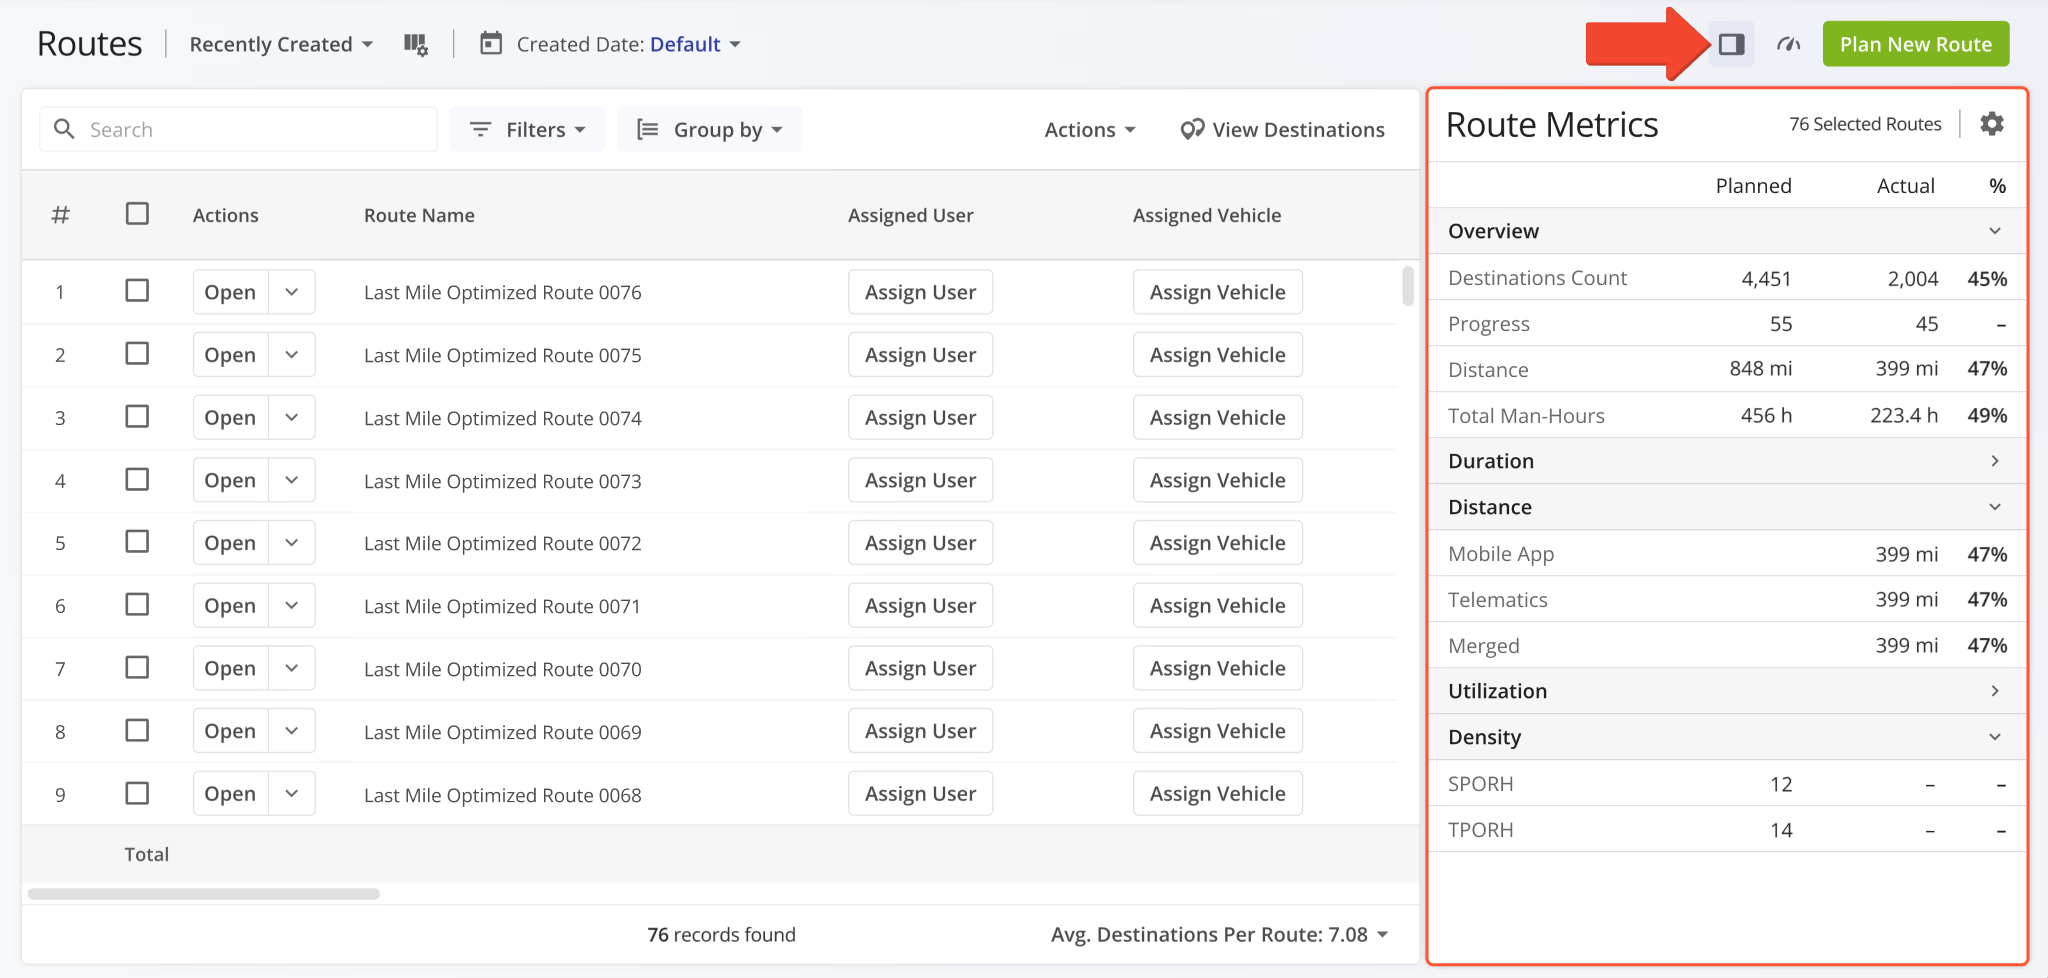
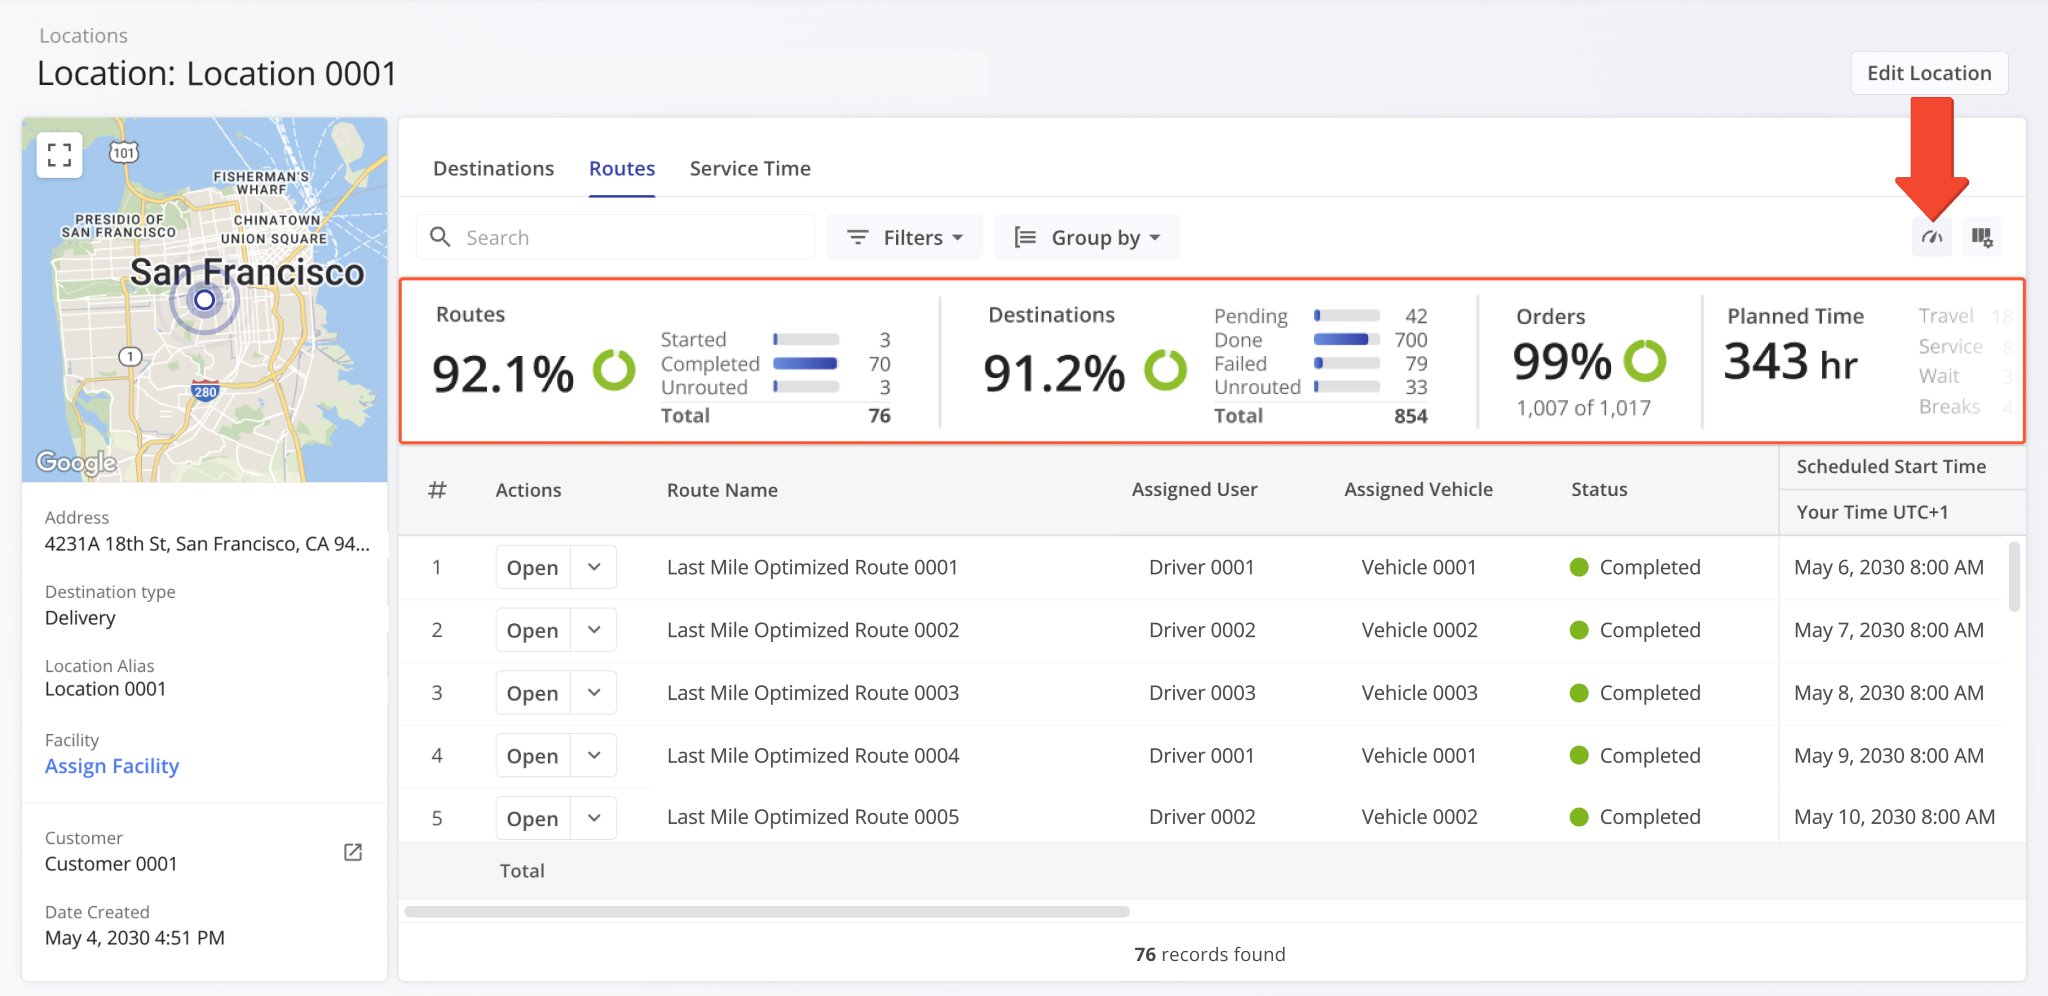
51The Route Metrics panel is now available in Routes Snapshots. It shows planned and actual route data and percentages.
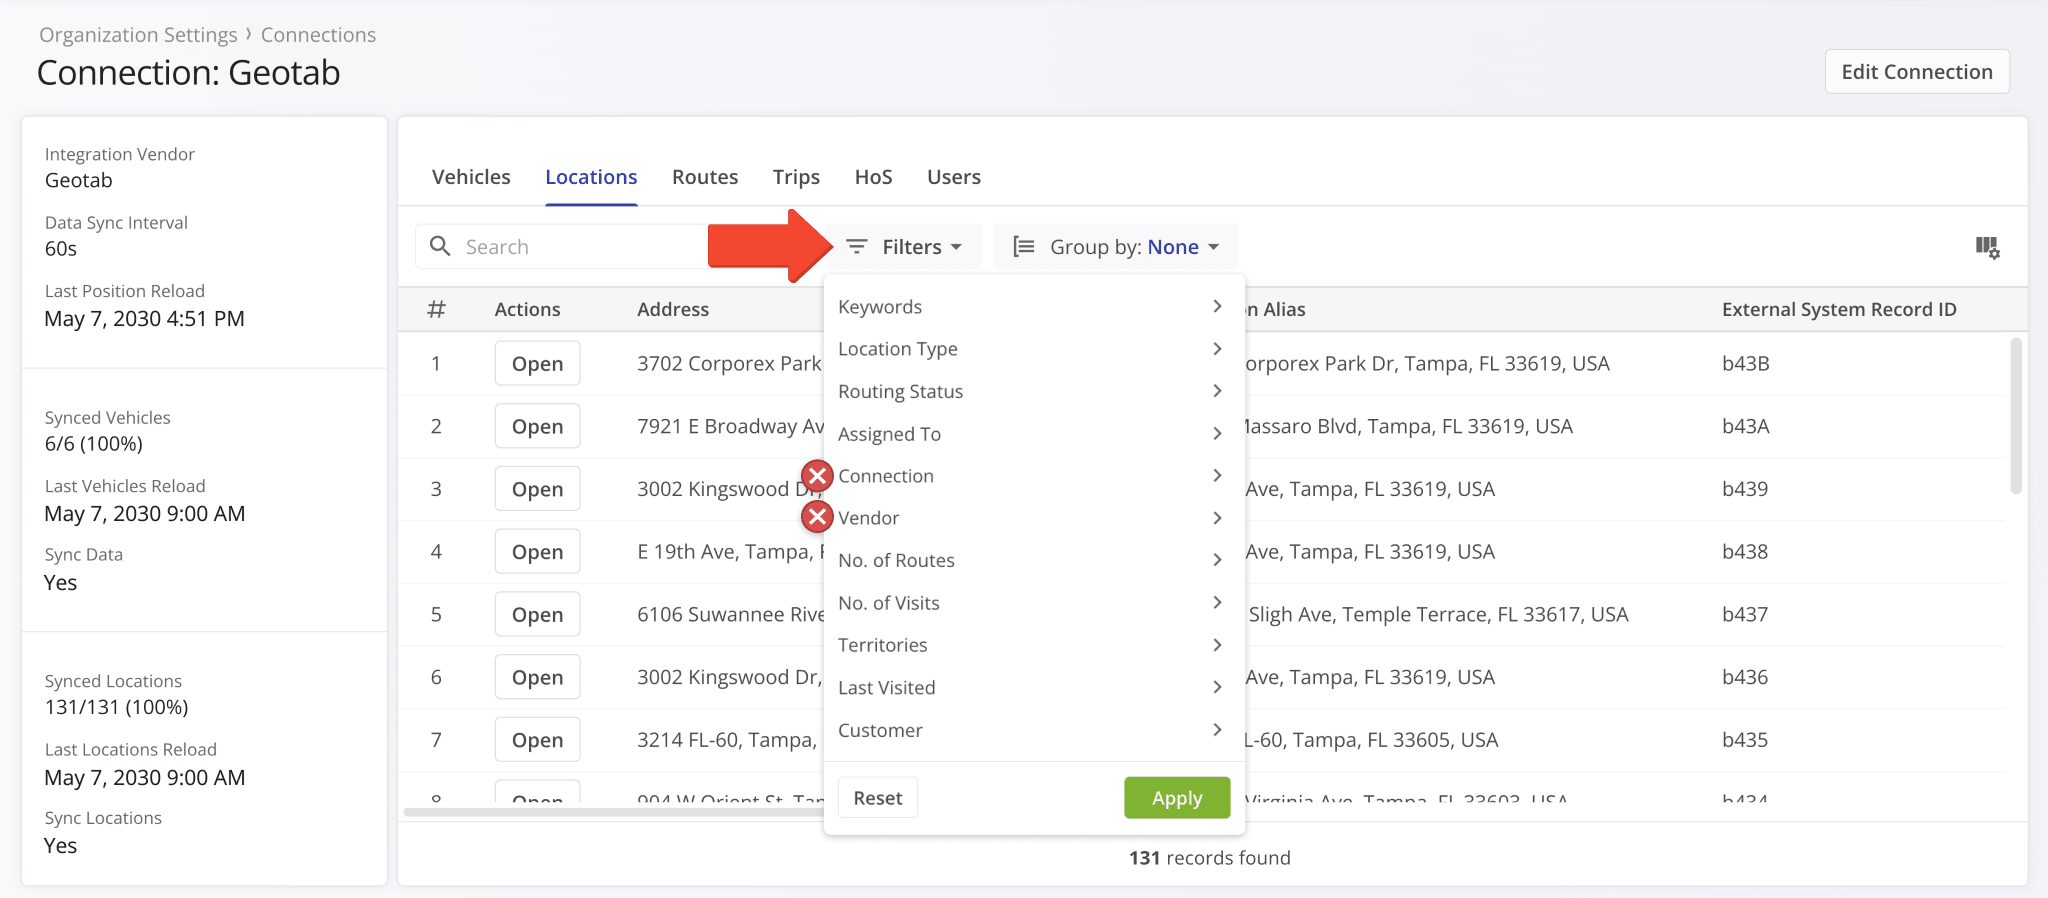
Two redundant filter options were removed from the “Locations” tab in Connection Snapshots. Specifically, the “Connection” and “Vendor” filters are no longer available.
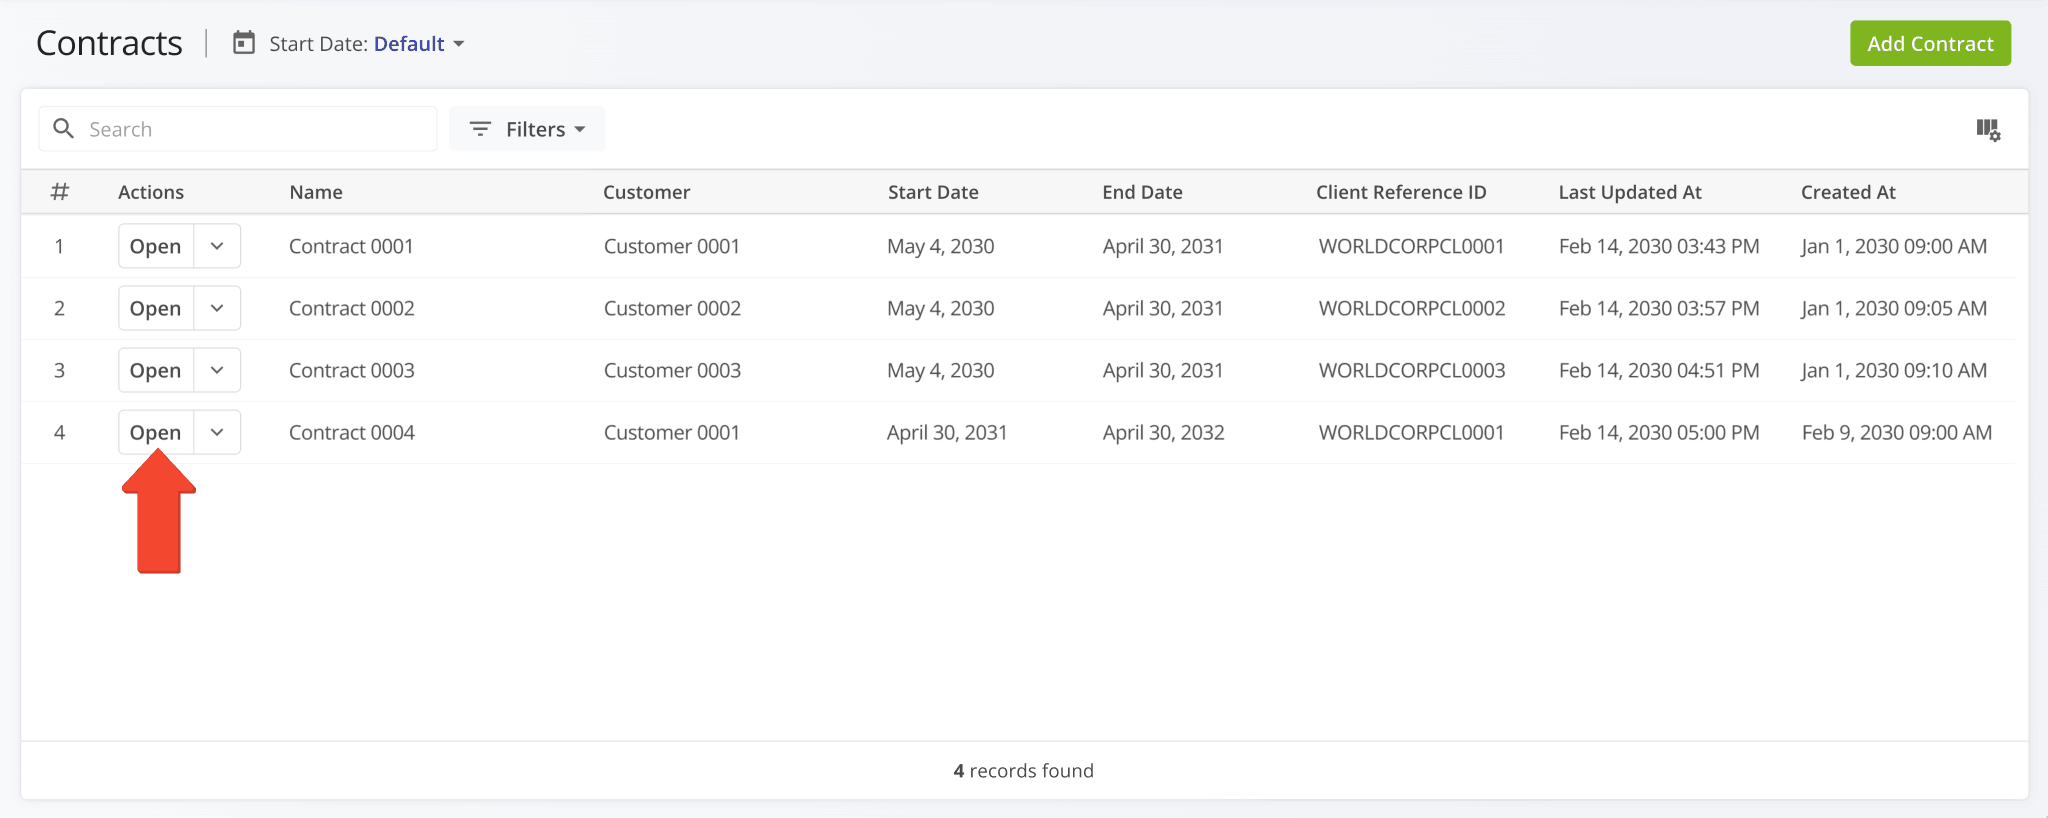
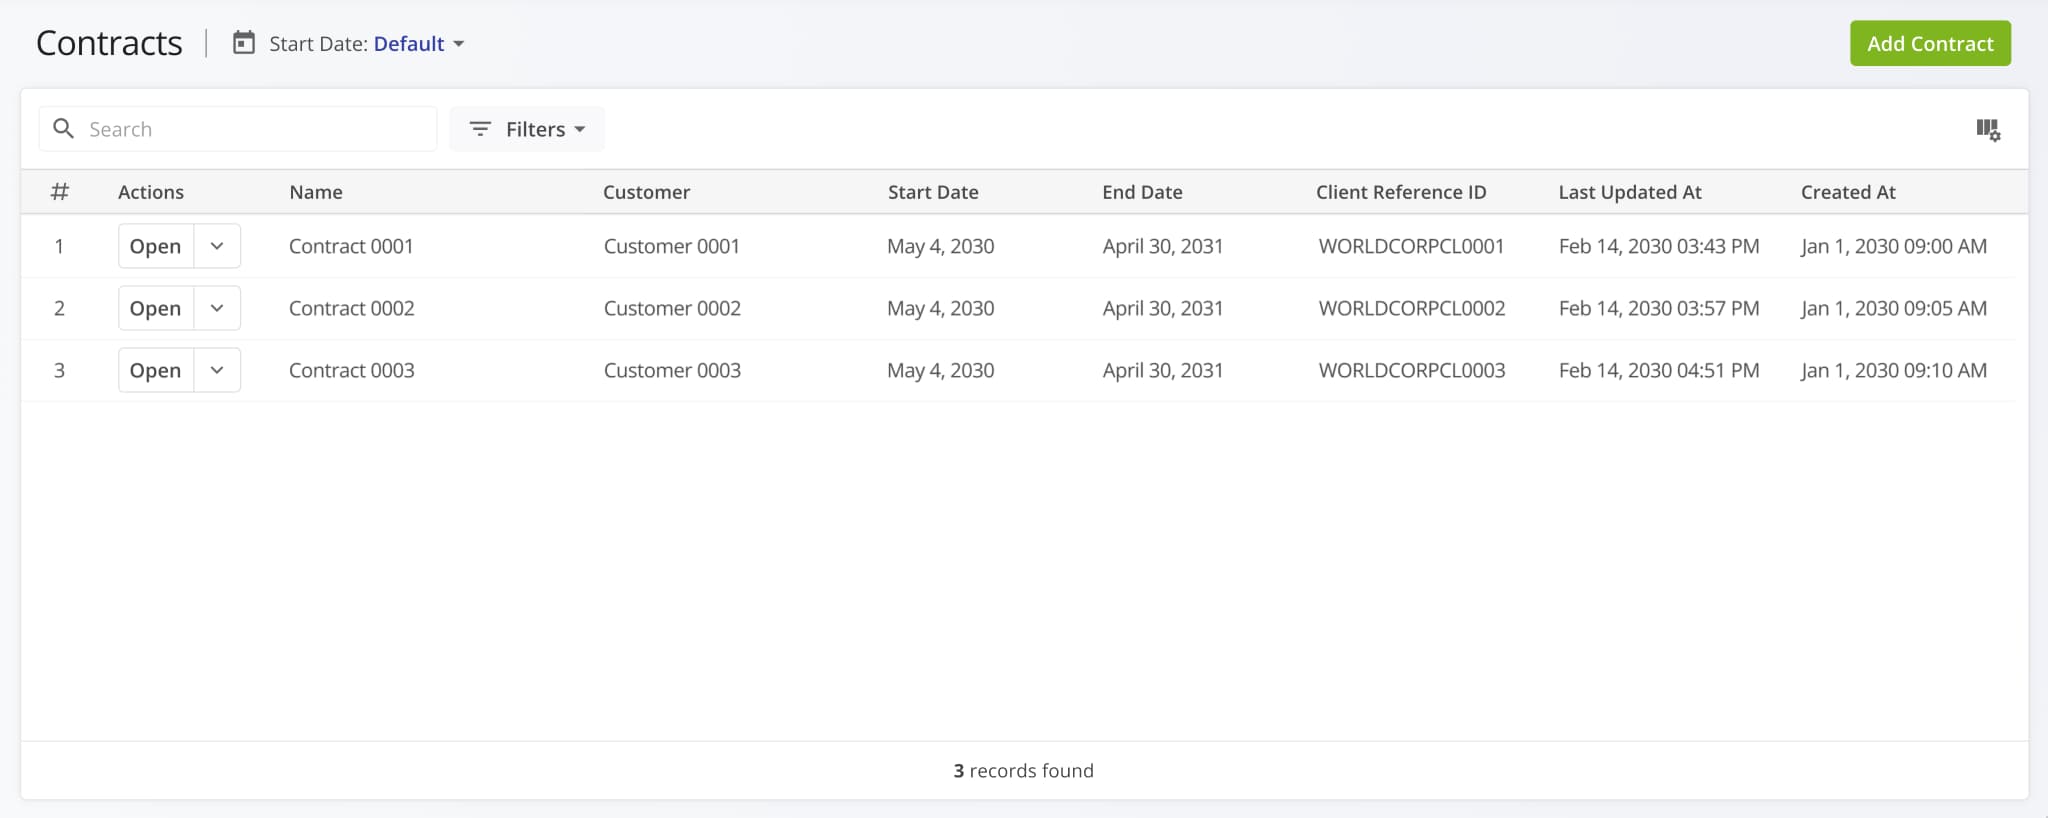
You can now open Contract Snapshots directly from the Contracts List by clicking the new “Open” button.
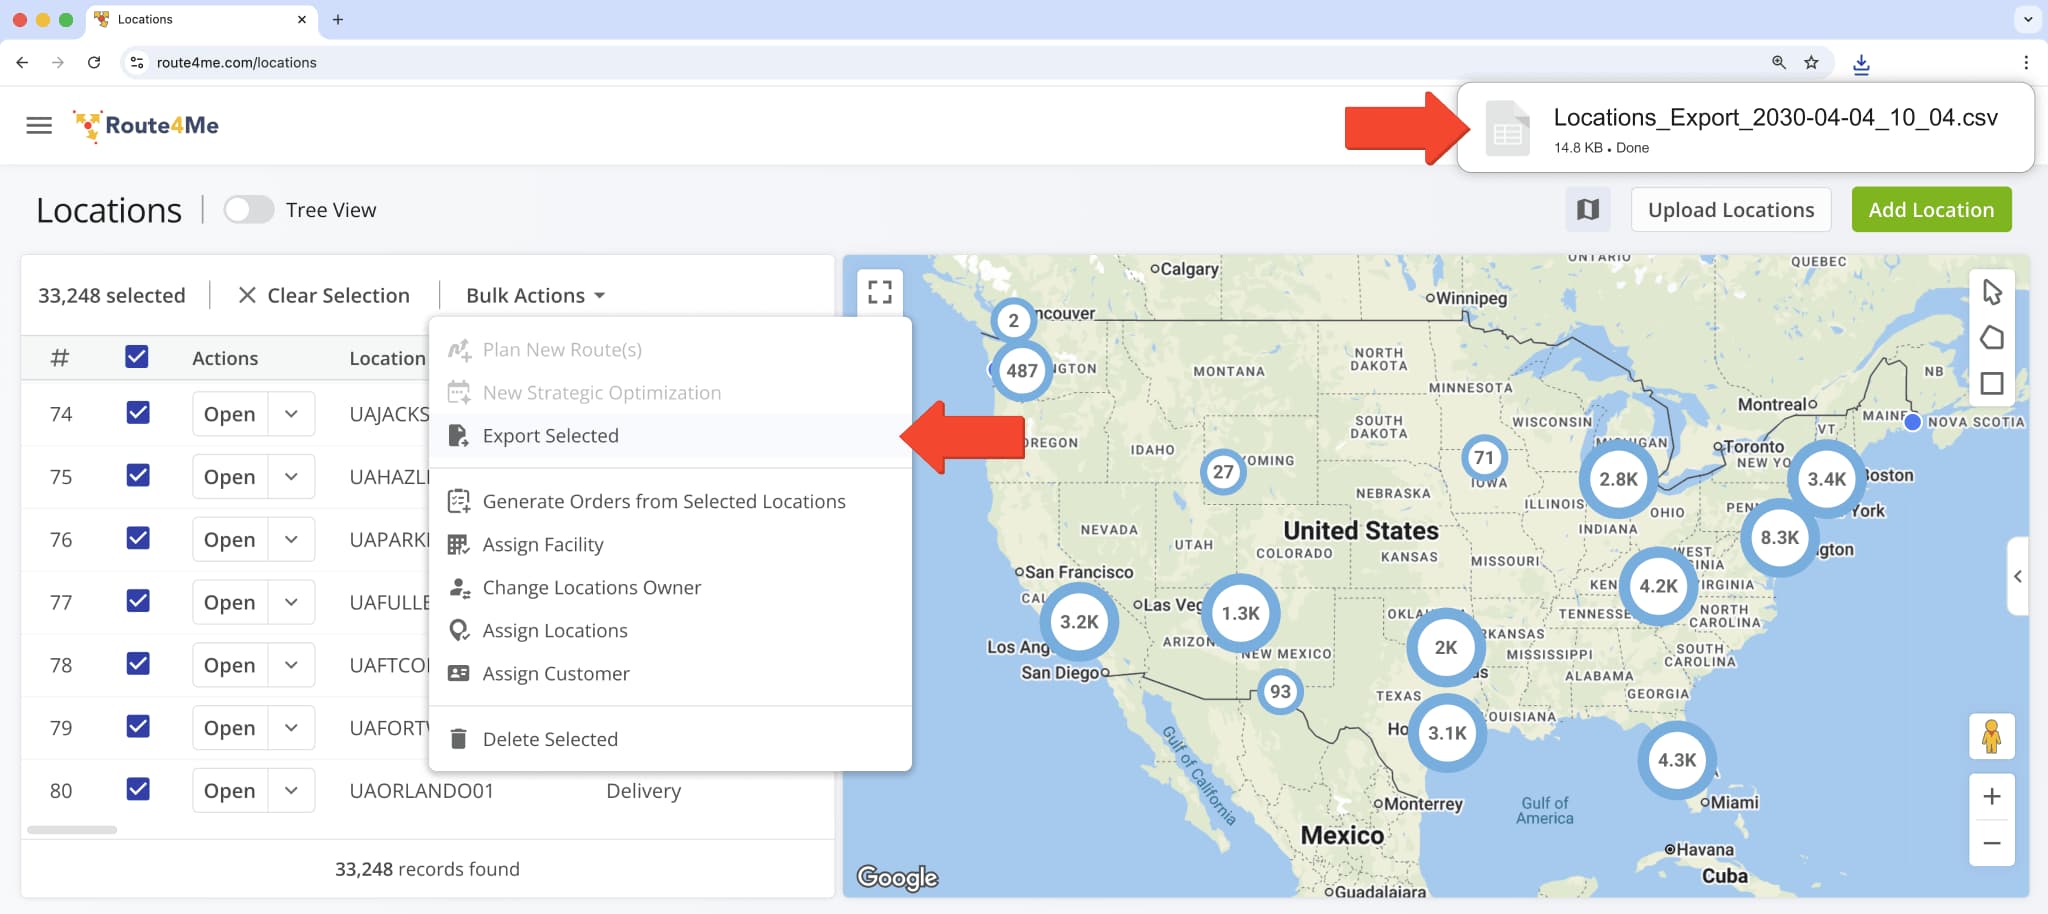
The name of the spreadsheet file downloaded when exporting Locations was updated to the following format:
- Locations_Export_year-month-date_hour_minute
For example: “Locations_Export_2030-04-04_10_04“
Previously, the filename prefix was “Customer_Locations” and was changed to “Locations“.
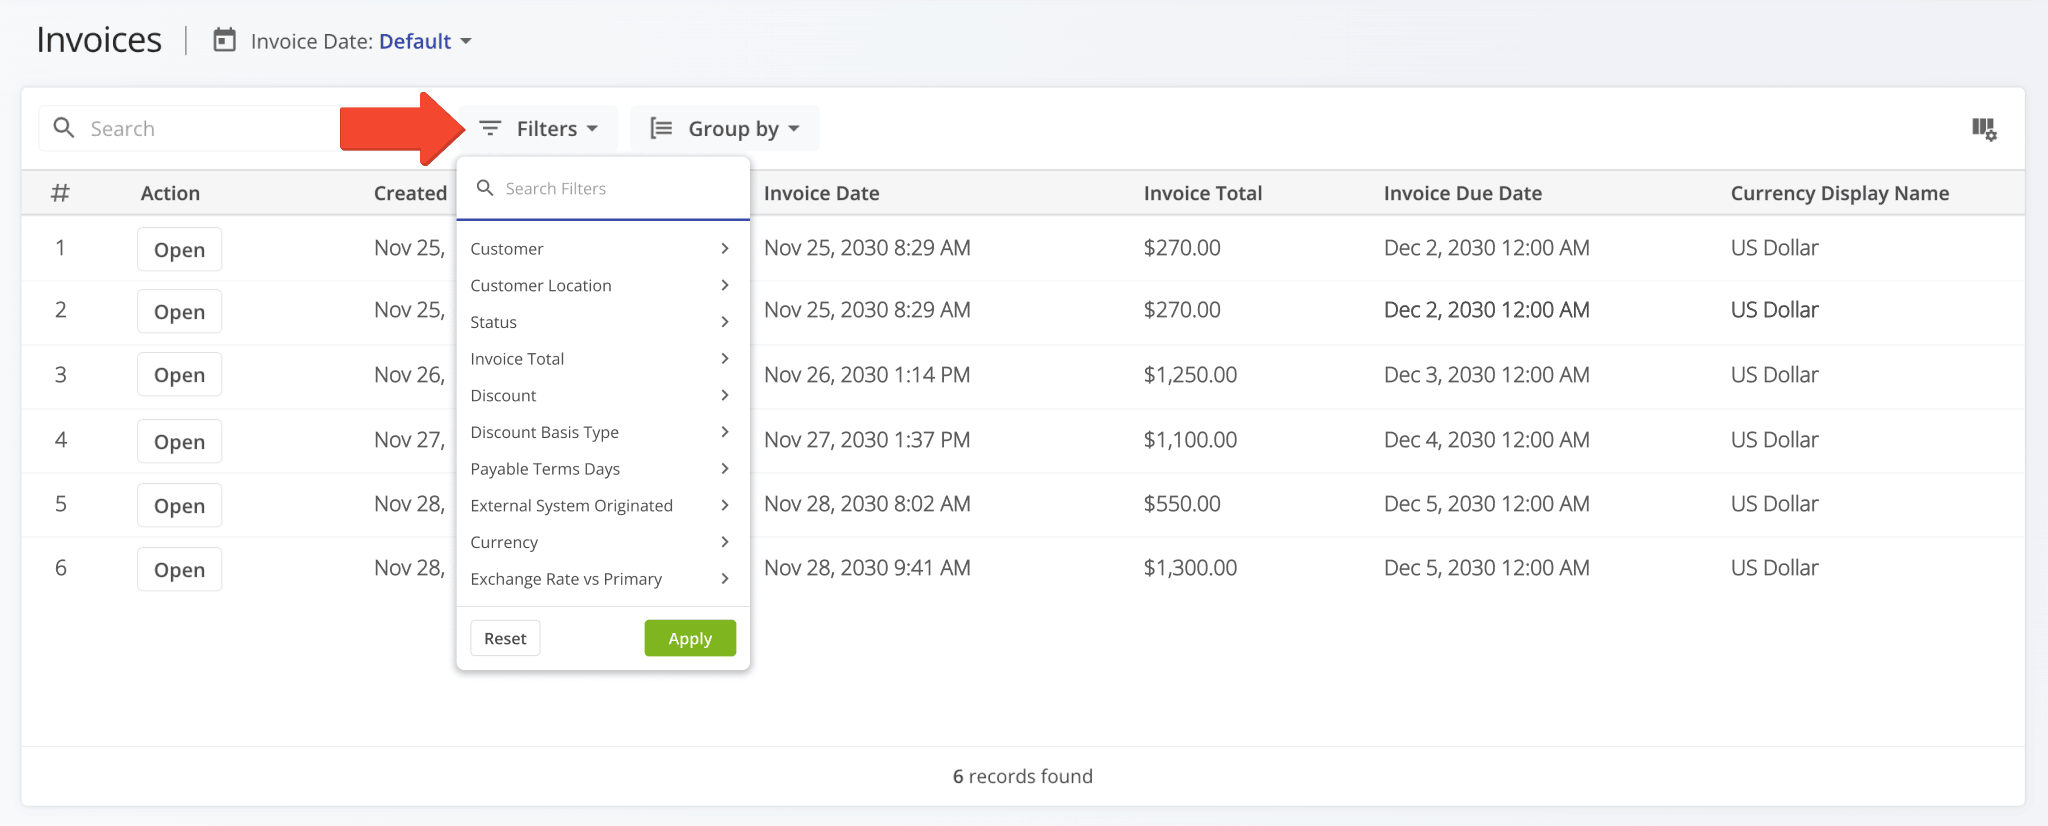
Filter options on the Invoices Page were revised, and a new “Customer Location” filter was added.
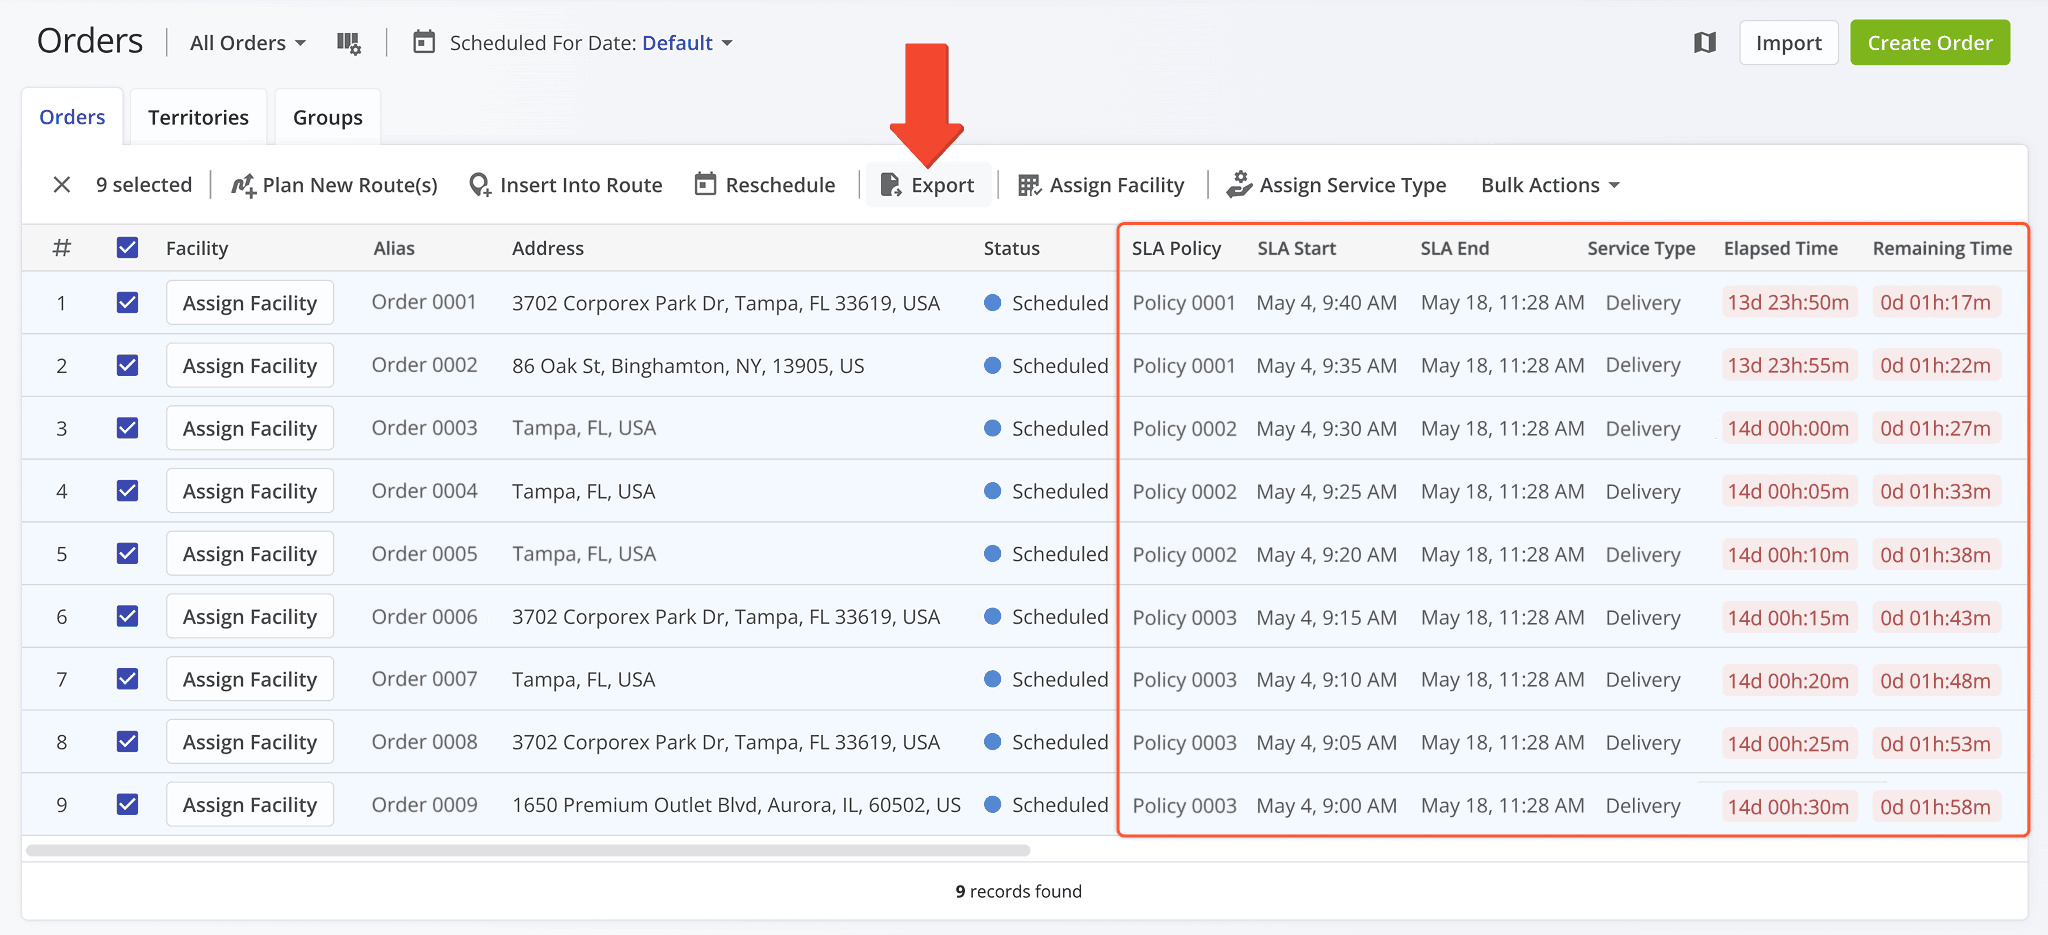
The following SLA (Service Level Agreement) columns have been added to the list of Order Export items:
- SLA Policy: Name or alias of the SLA Policy associated with an order.
- SLA Start: Date and time from which the SLA Policy associated with an order is active.
- SLA End: Date and time at which the SLA Policy associated with an order will conclude.
- Service Type: Type of service associated with an order.
- Elapsed Time: How much time has passed from the SLA Start time.
- Remaining Time: How much time is left until the SLA End time.
To export orders, simply check the boxes next to them and click “Export“.
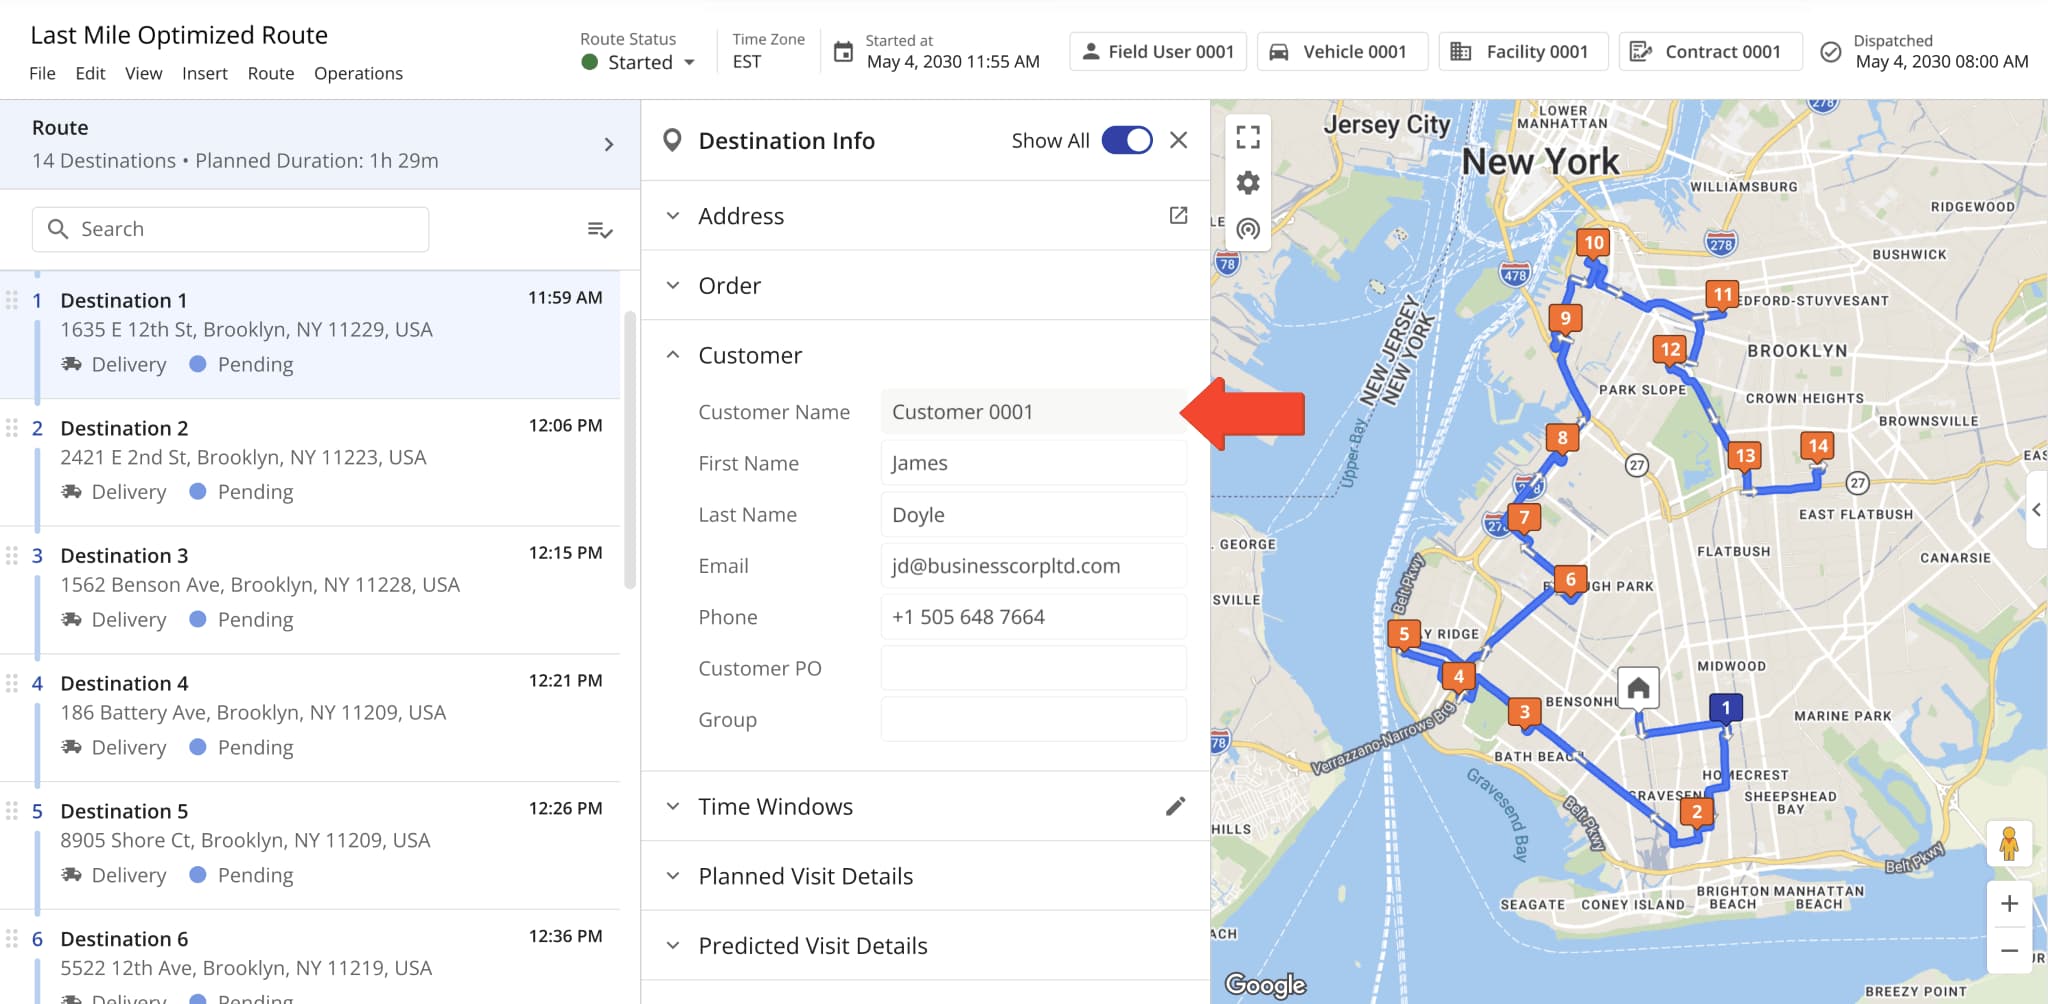
A new read-only “Customer Name” field was added to the Destination Info panel in the Route Editor. It shows the alias of a Customer and can’t be modified from the Route Editor.
A new Service Types page was added. You can use it to configure custom Service Types that can be associated with Locations and other entities in your Route4Me account. Click “Create Service Type” to start customizing a new Service Type.
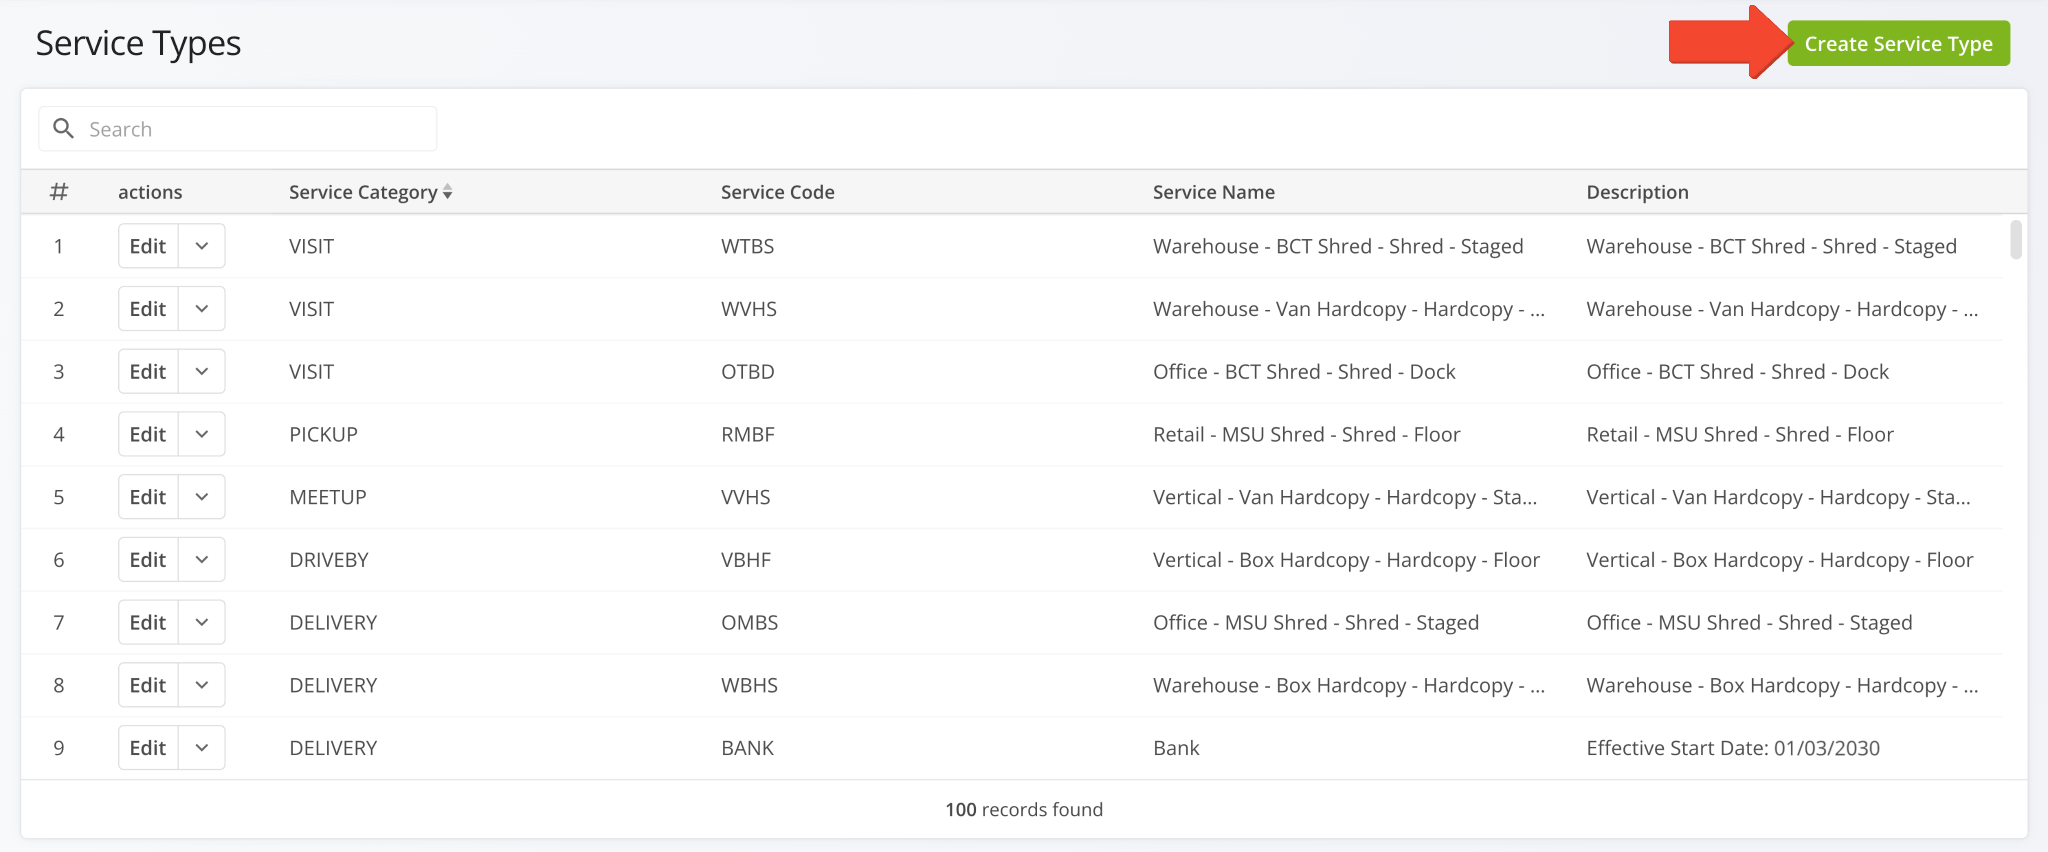
You can customize the following data fields when creating Service Types:
- Service Code: A unique ID used to automatically link this service type to destinations during data imports.
- Service Name: The label used to identify this type of work at specific destinations on a route.
- Service Category: A primary classification used to group related service types for better organization and high-level reporting.
- Description: Internal notes or specific requirements for this service category when assigned to destinations.

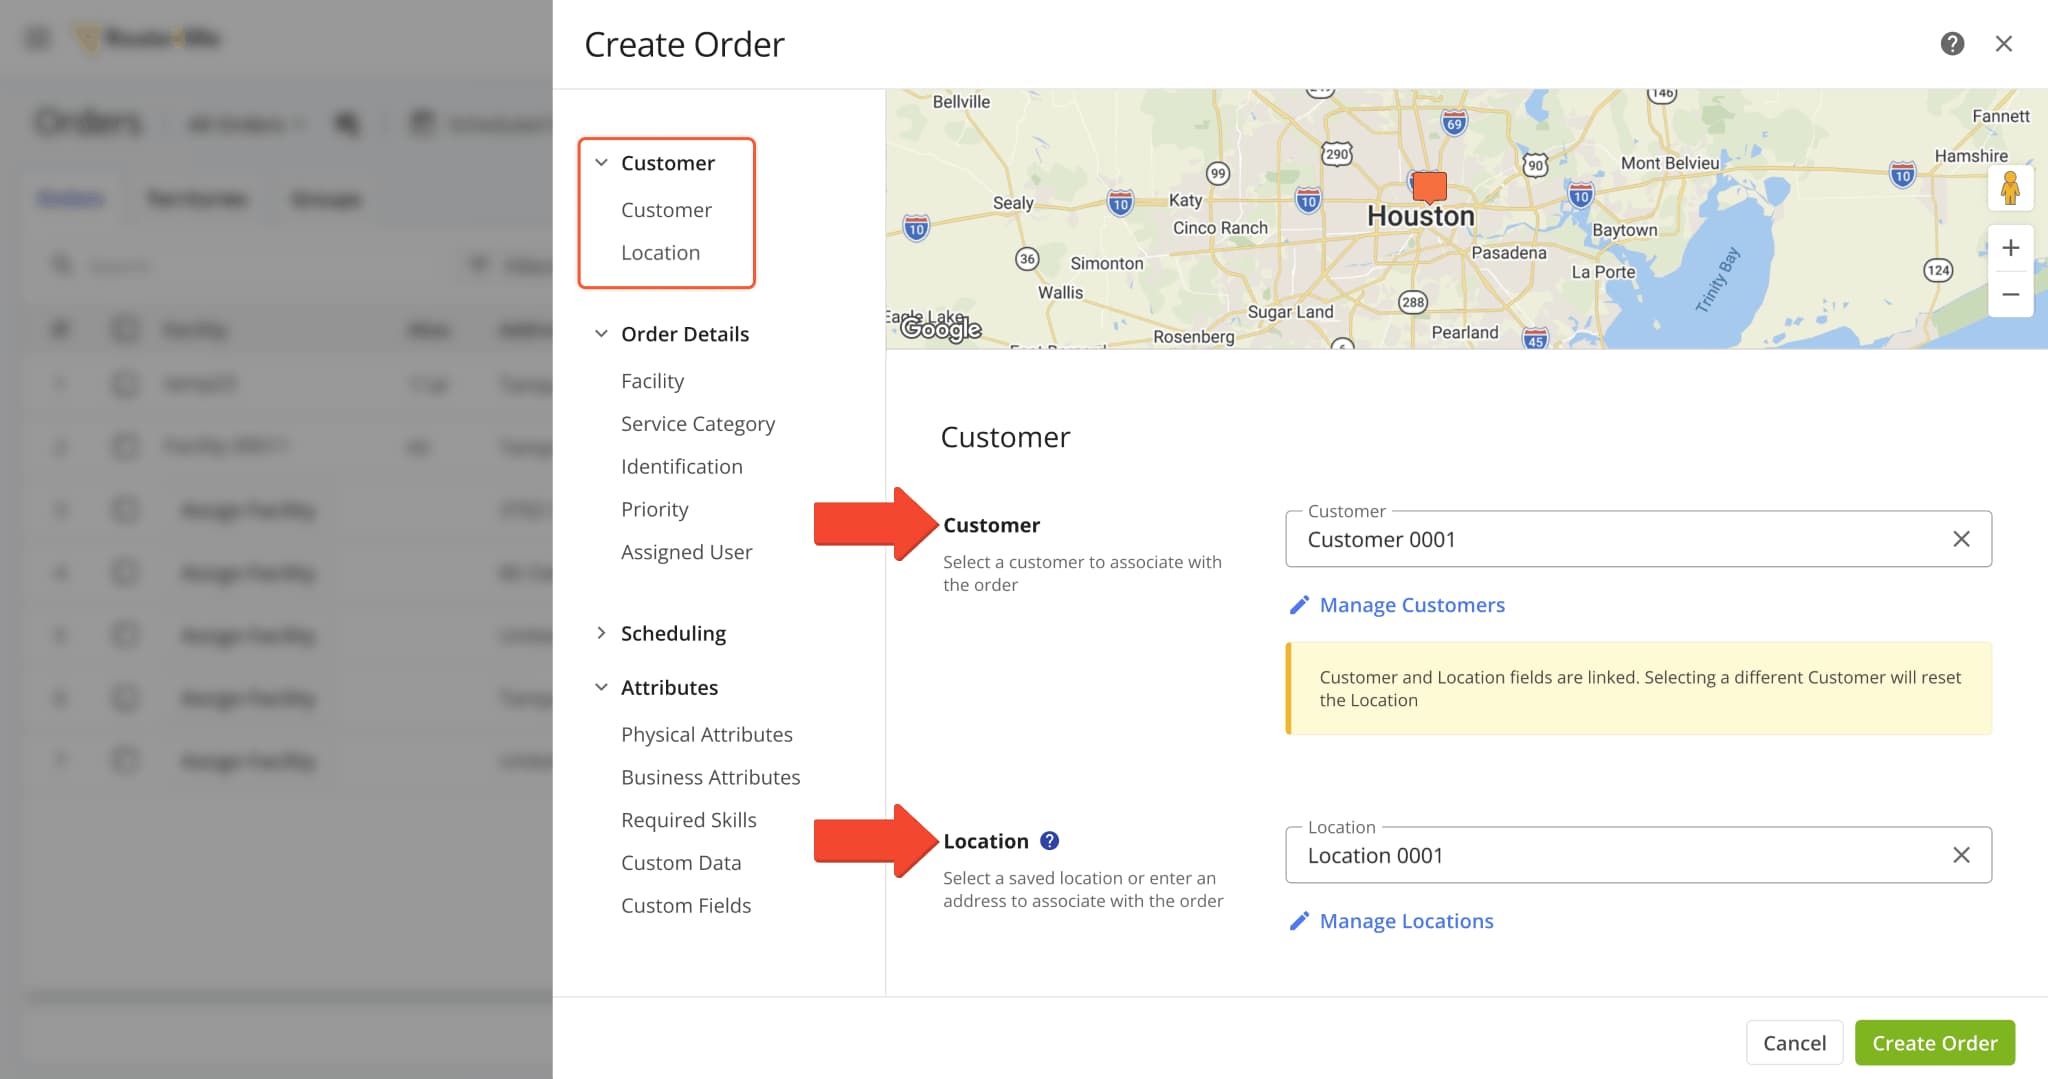
A new “Customer” section was added to the Orders System where you can assign a Customer and Location when creating an order. These new attribution fields are linked, and selecting a different Customer than the one already associated with a Location will reset the “Location” field.
This update introduces structured relationships between Orders, Customers, and Locations, improving data integrity and enabling more advanced, entity-based routing and reporting.
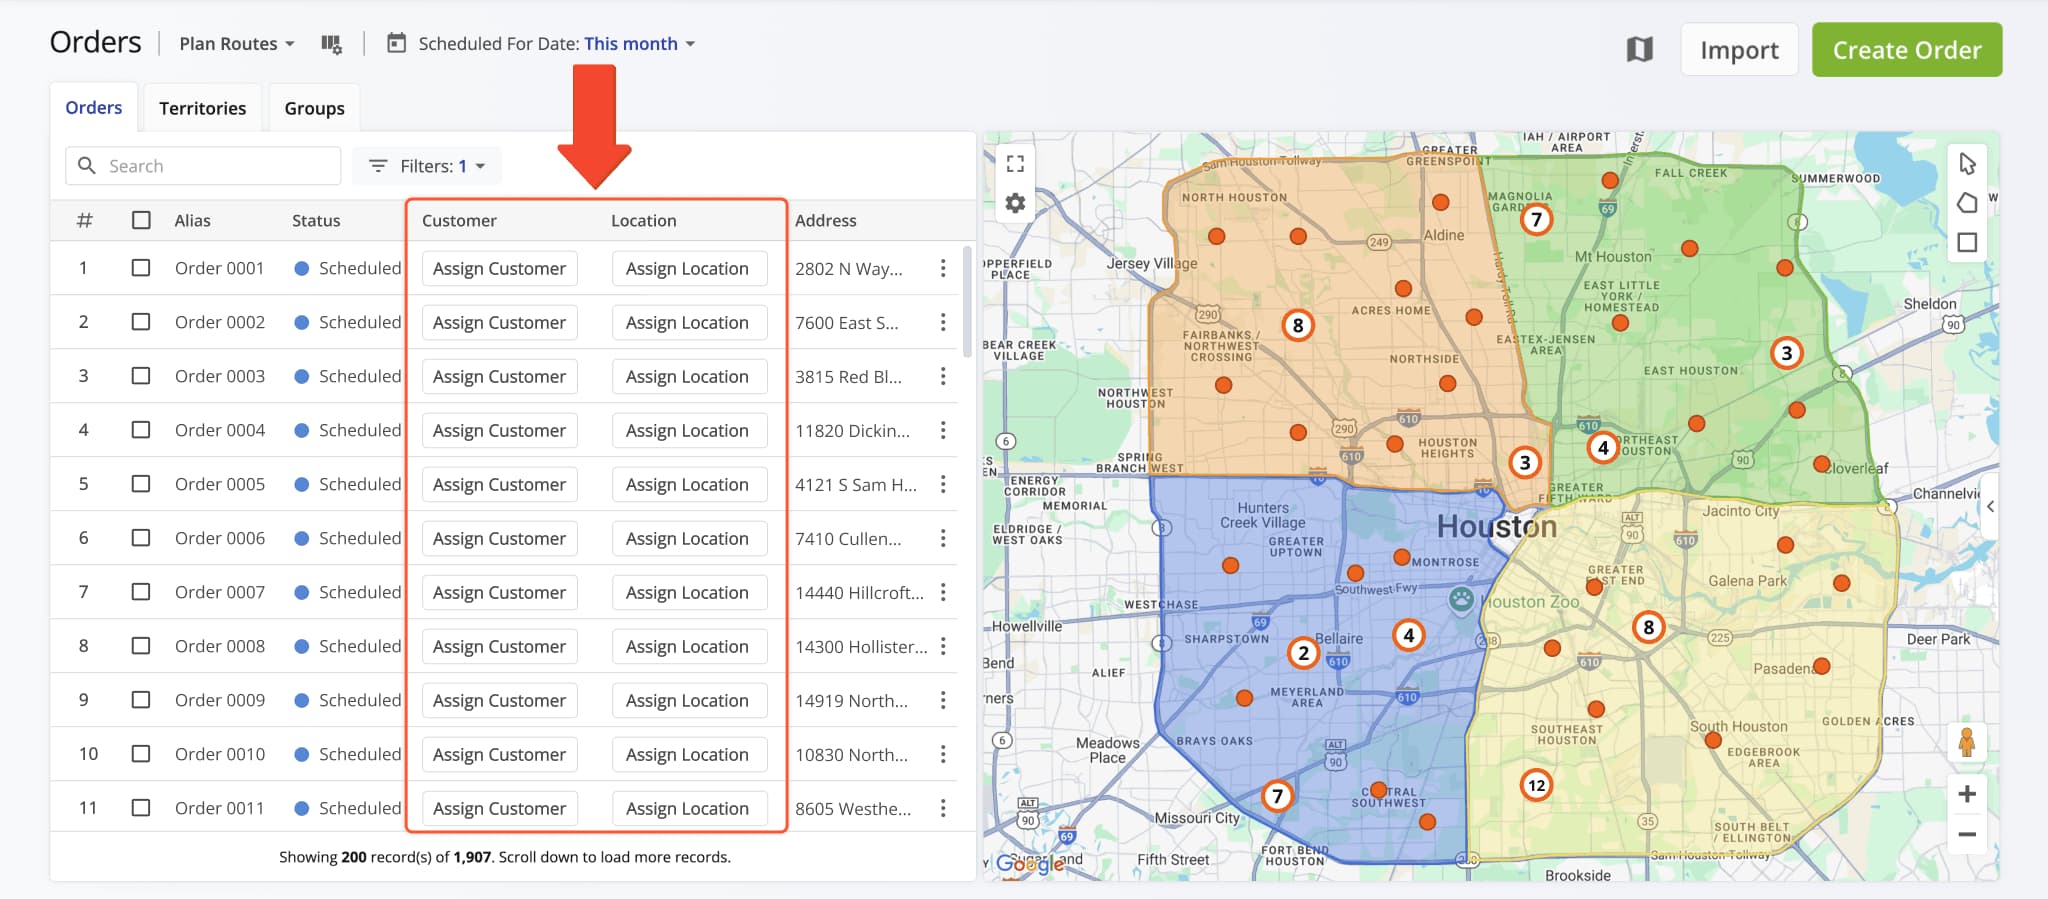
You can also directly assign Customers and Locations to Orders from the Orders List in the respective columns.
The Invoice Snapshots page was redesigned with a new financial data interface showing more detailed invoice information, customer and location attribution, and total values for all displayed invoice metrics.

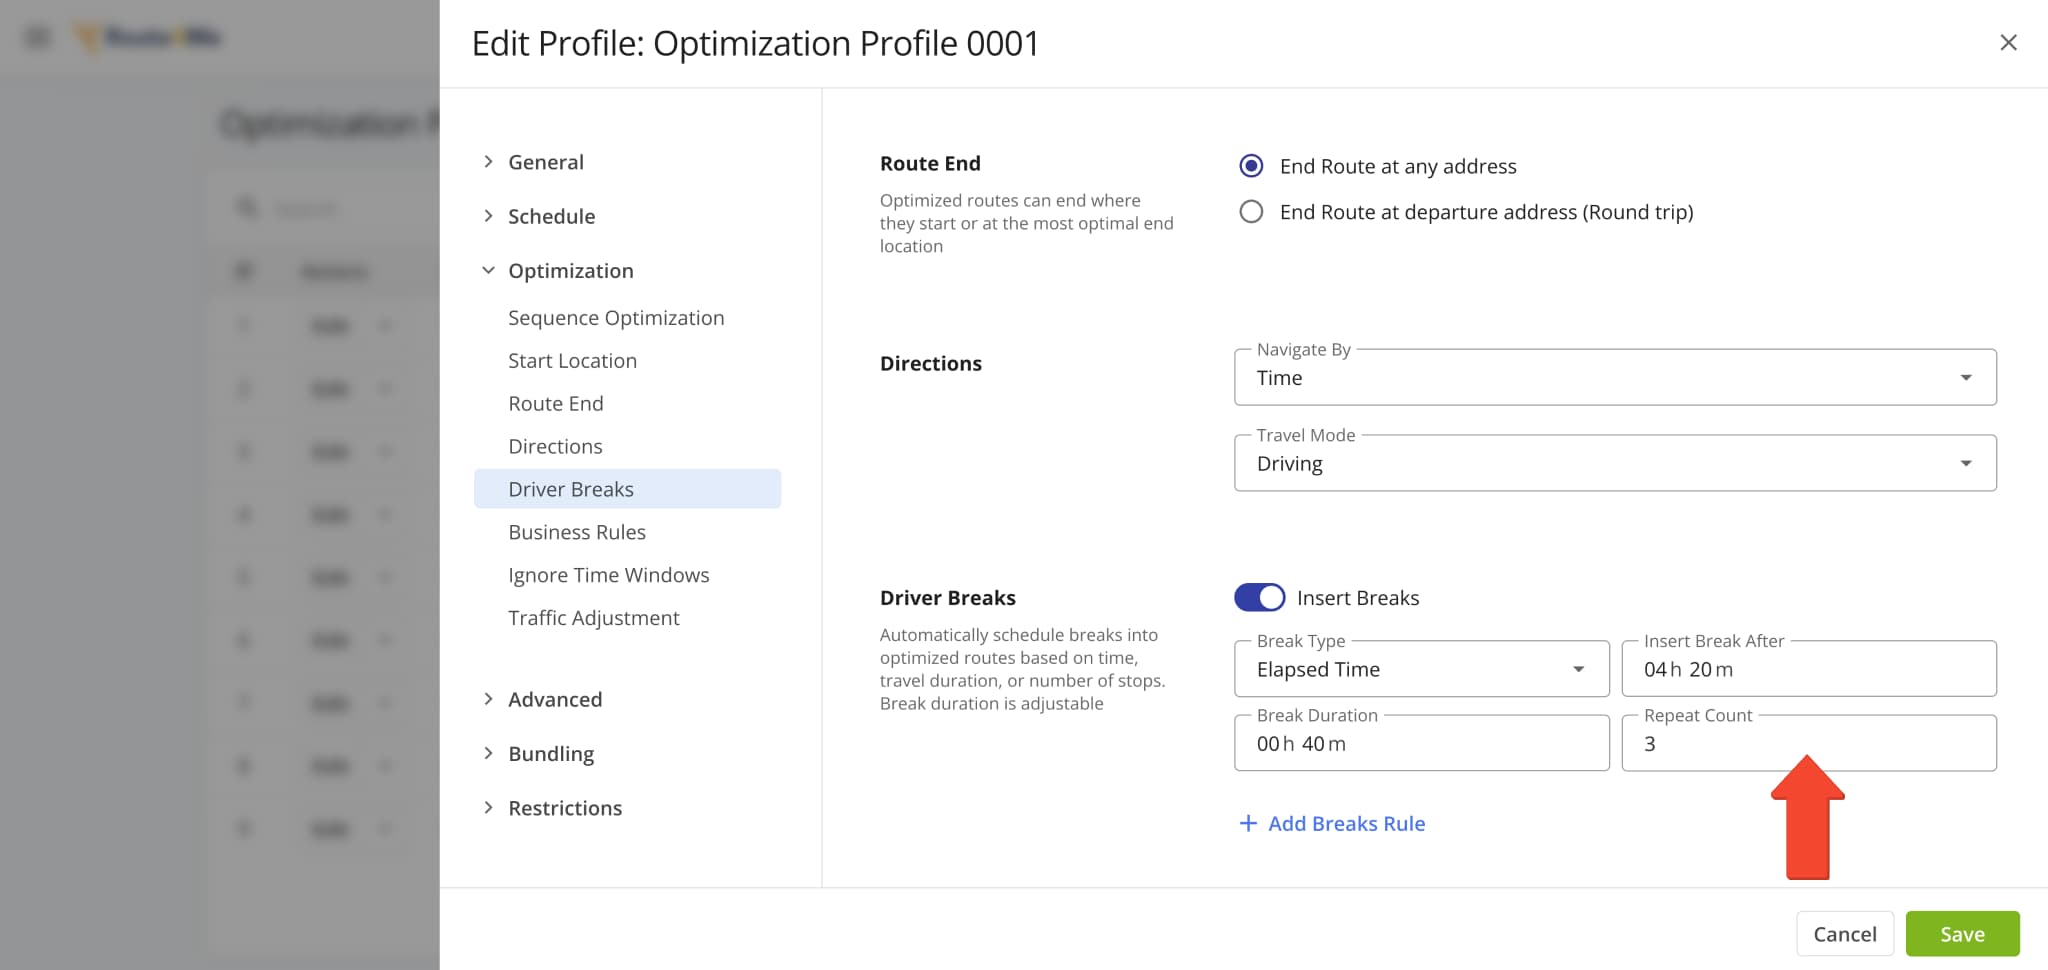
A new “Repeat Count” field was added when customizing Driver Breaks in Optimization Profiles and other interfaces. This new value defines how many times a specific Driver Break configuration will repeat when planning routes.
Open Your Optimization Profiles
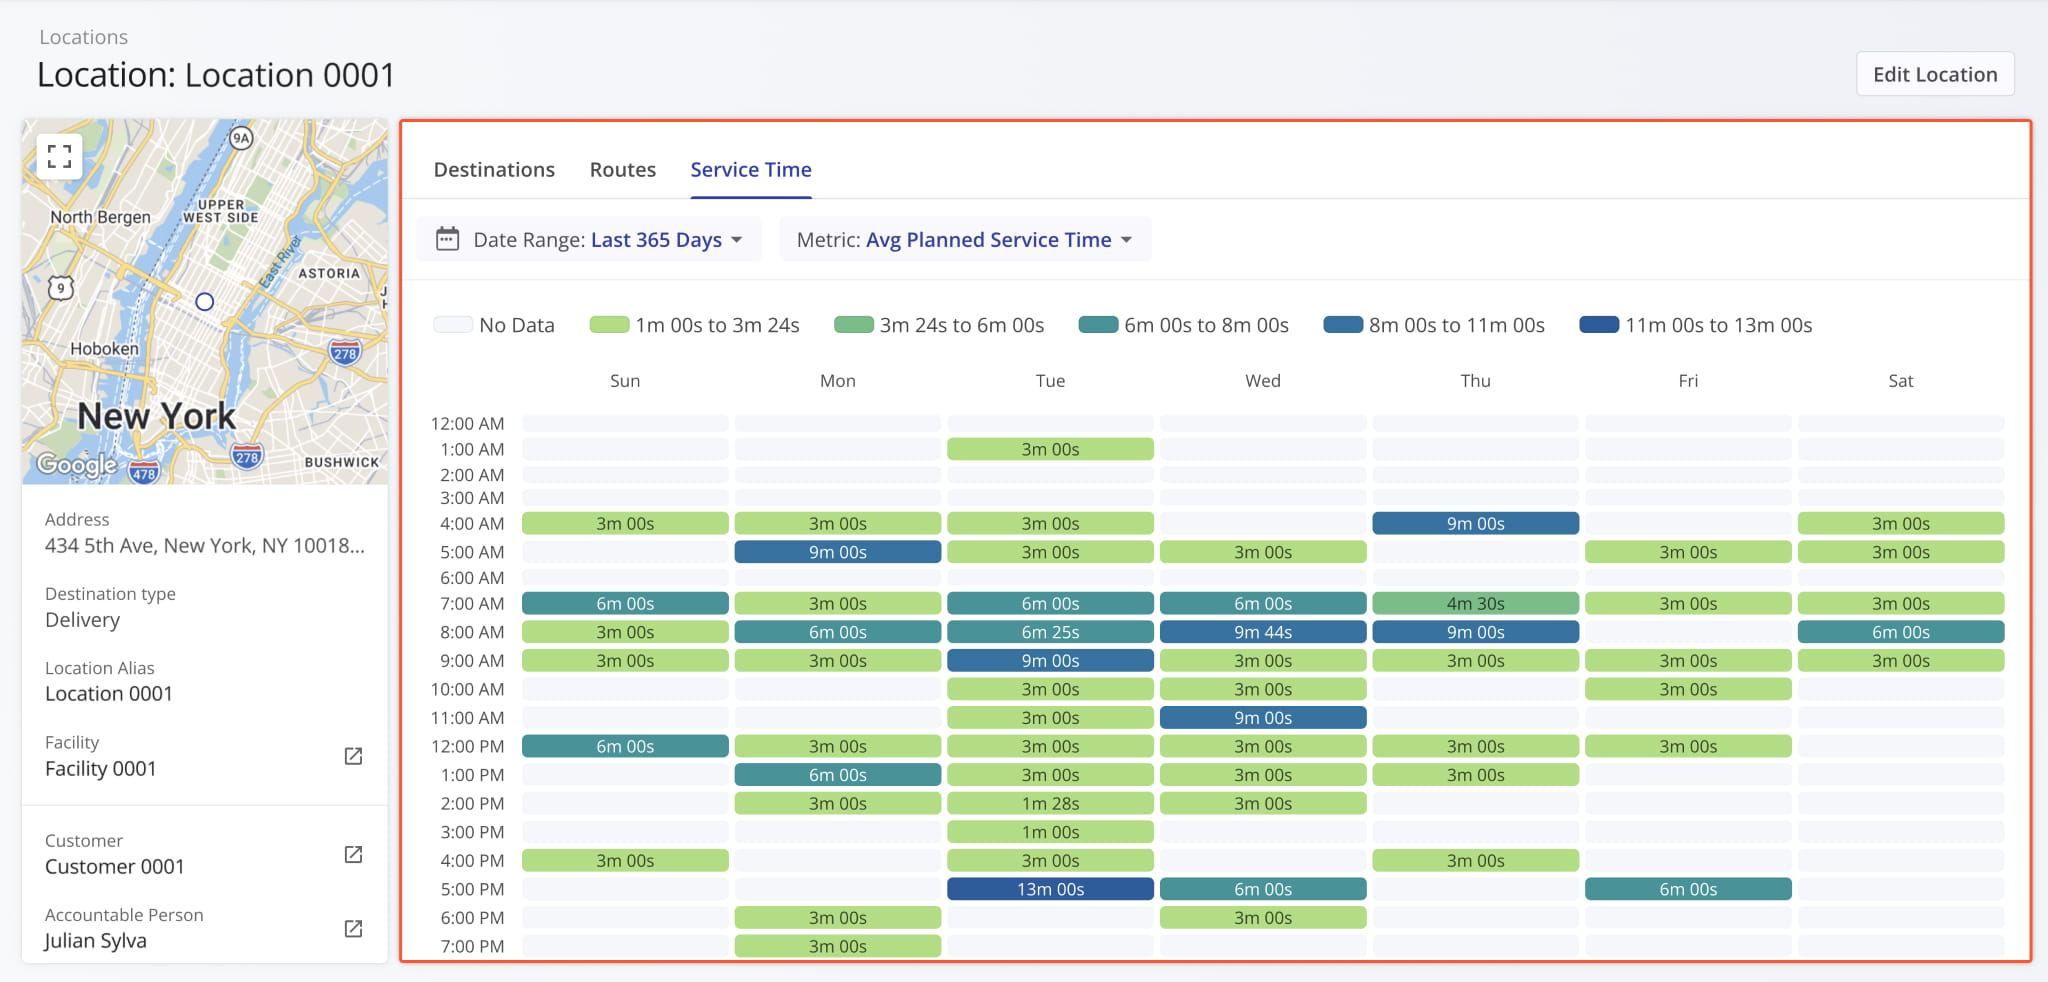
A new “Service Time” section was added to Destination Snapshots. It shows the distribution of Service Time at a destination across the days of the week over the specified period. This update enables you to get a clear overview of how the planned, reported, and detected Service Time at a destination is distributed.

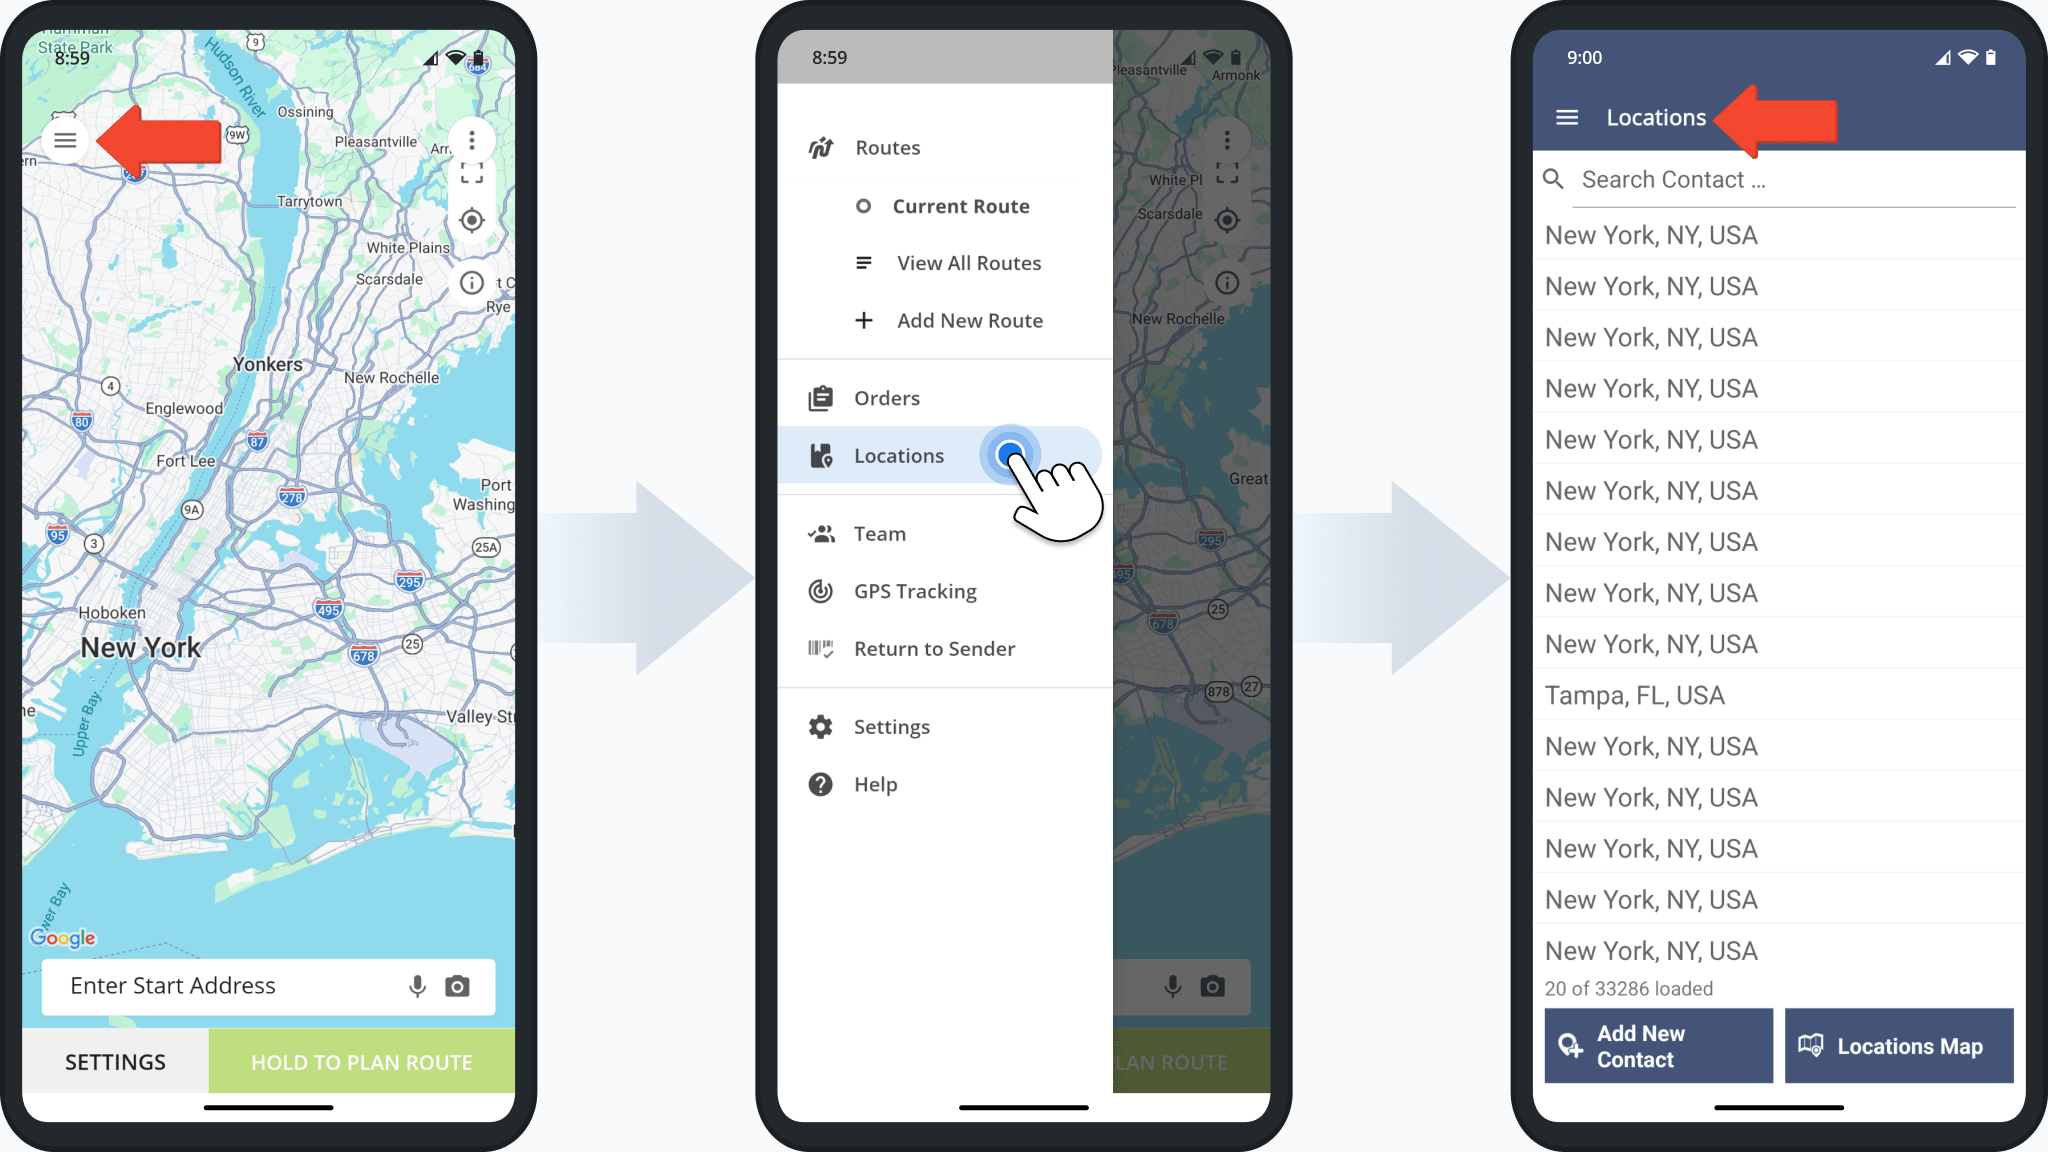
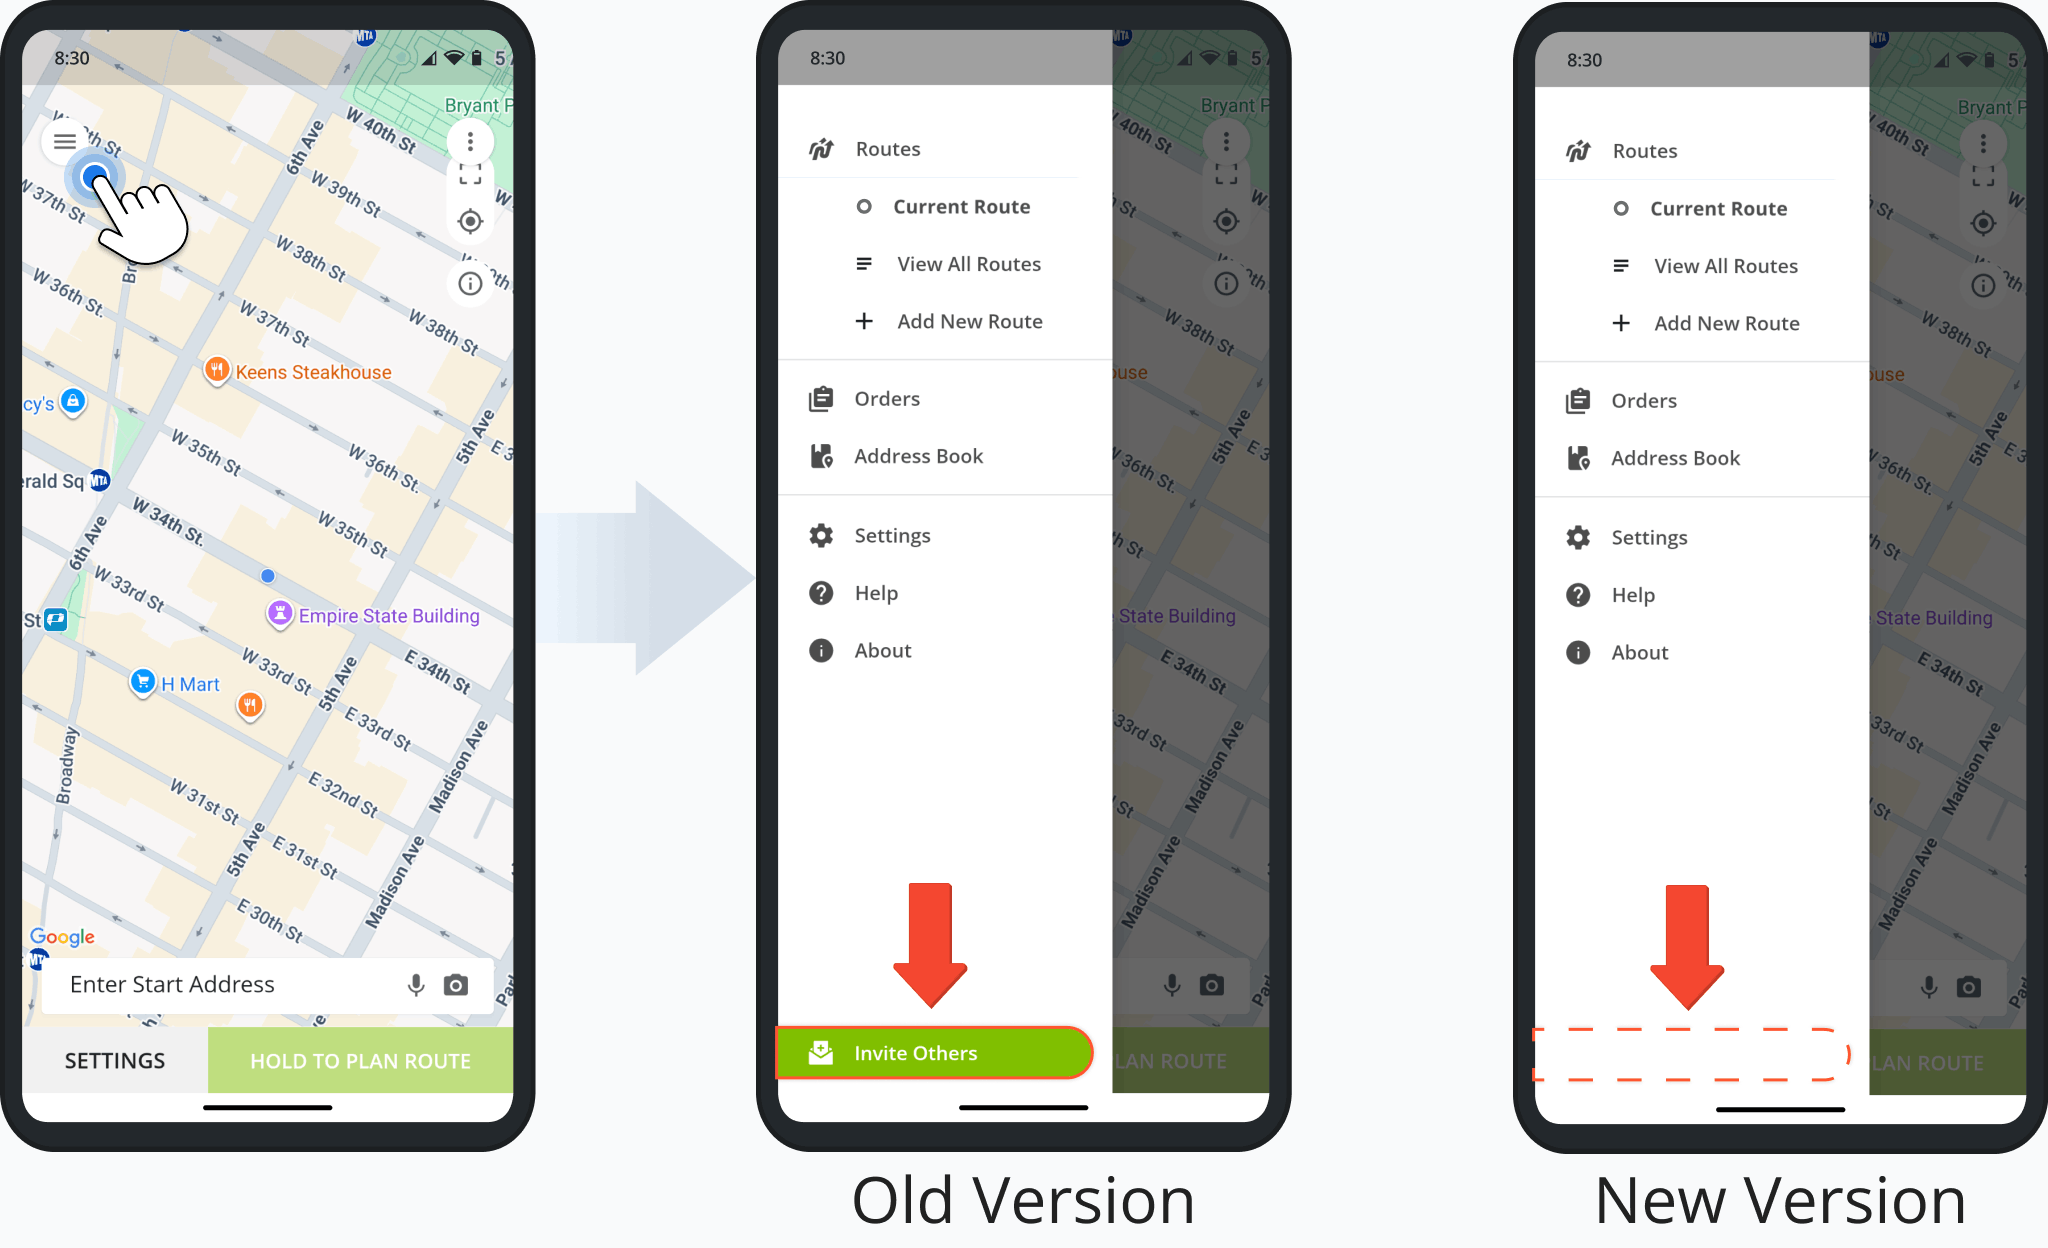
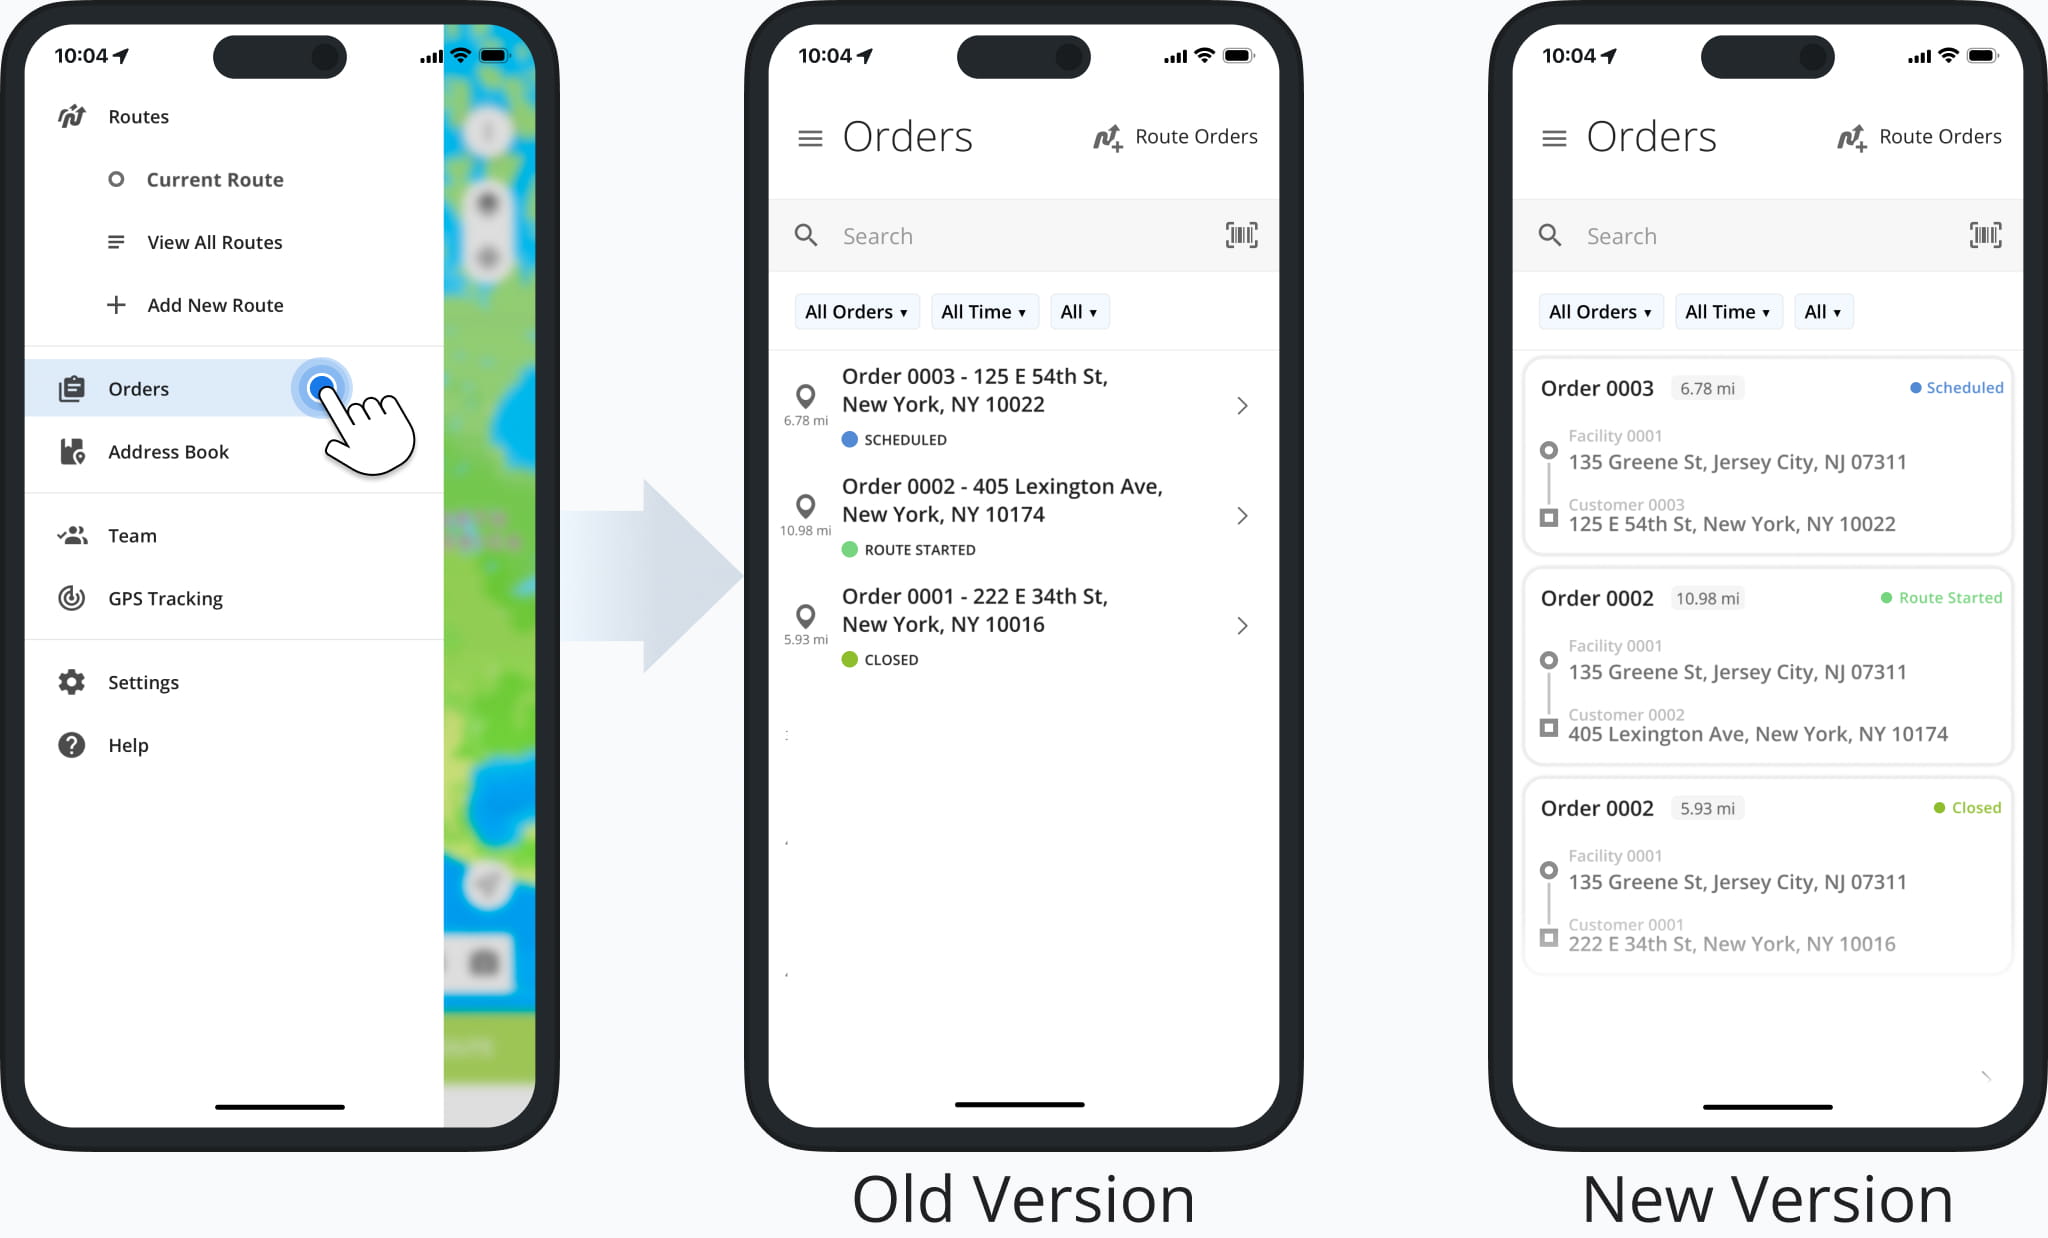
The Route4Me Android App Address Book has been renamed to “Locations”, providing a more unified way to access and manage Customer Locations directly from the mobile app. Users with the appropriate permissions can now view Customer Locations synced from the primary Route4Me account.
To access the updated feature, open the app menu and tap “Locations” to view the full Locations list.
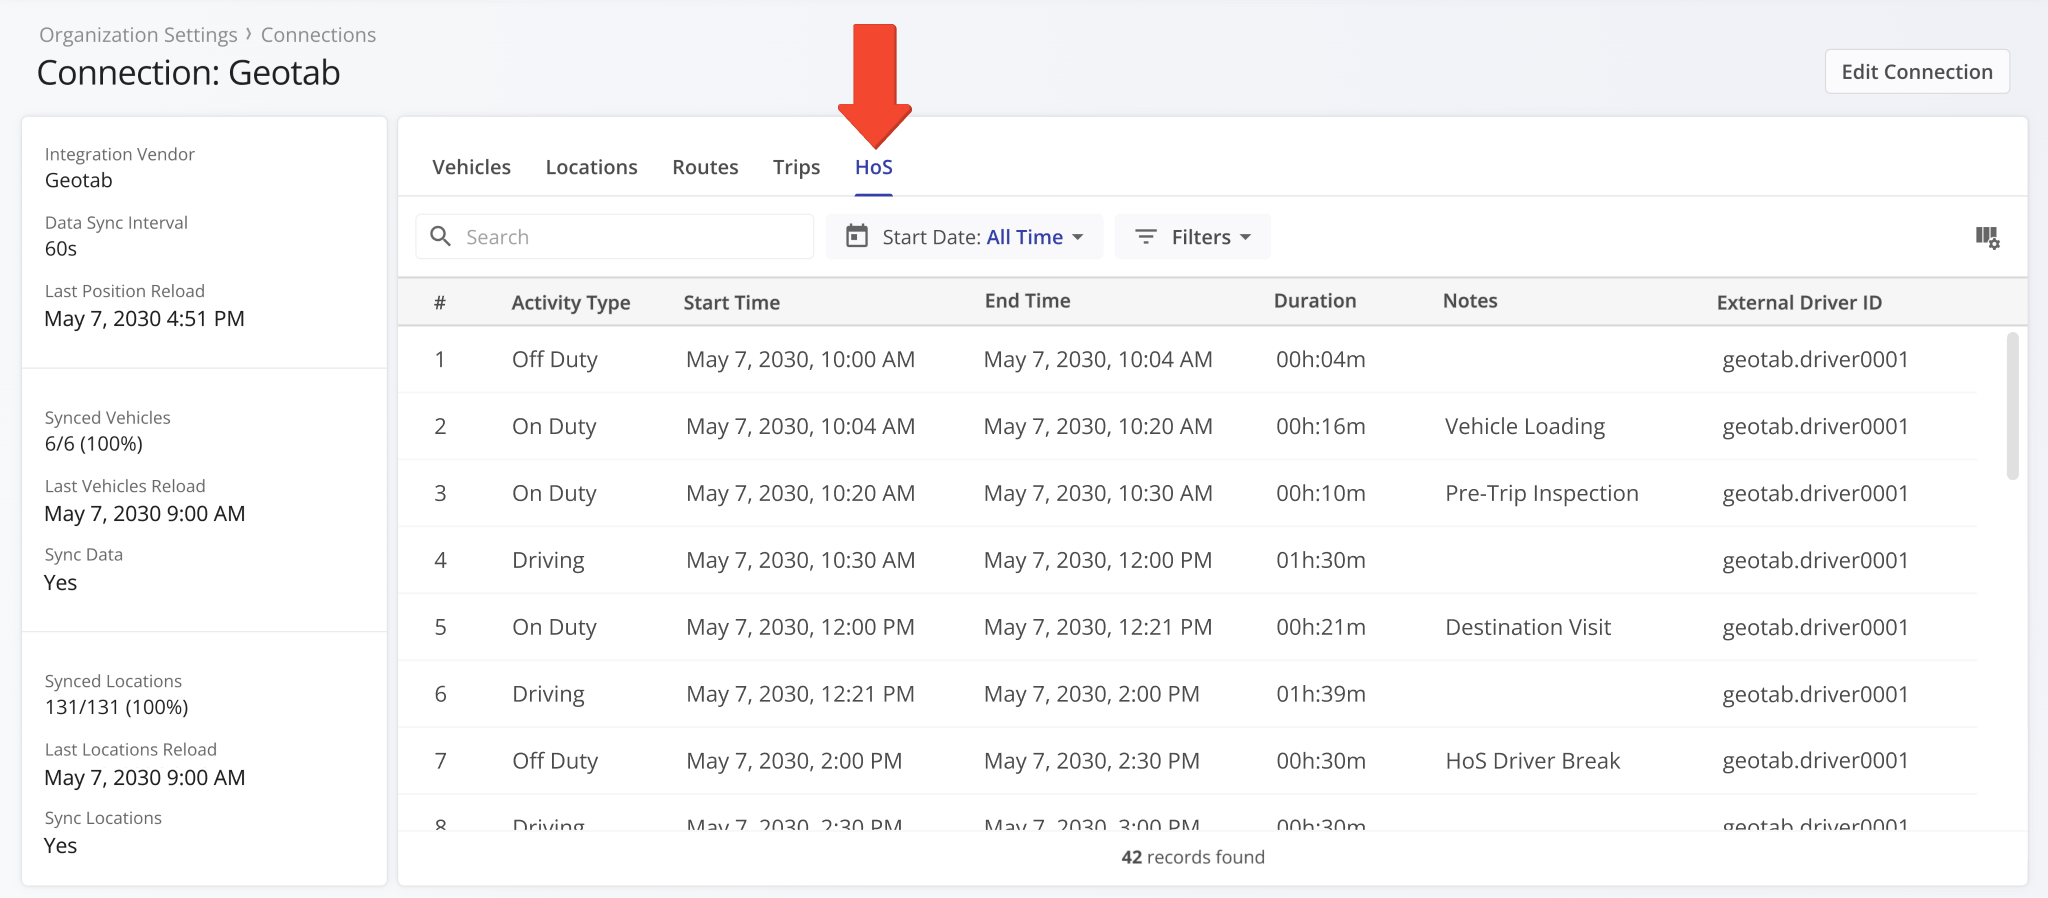
A new “HoS” section was added to Connection Snapshots. It shows synced hours of service events related to the vendor connection and its associated routes, assets, and users.
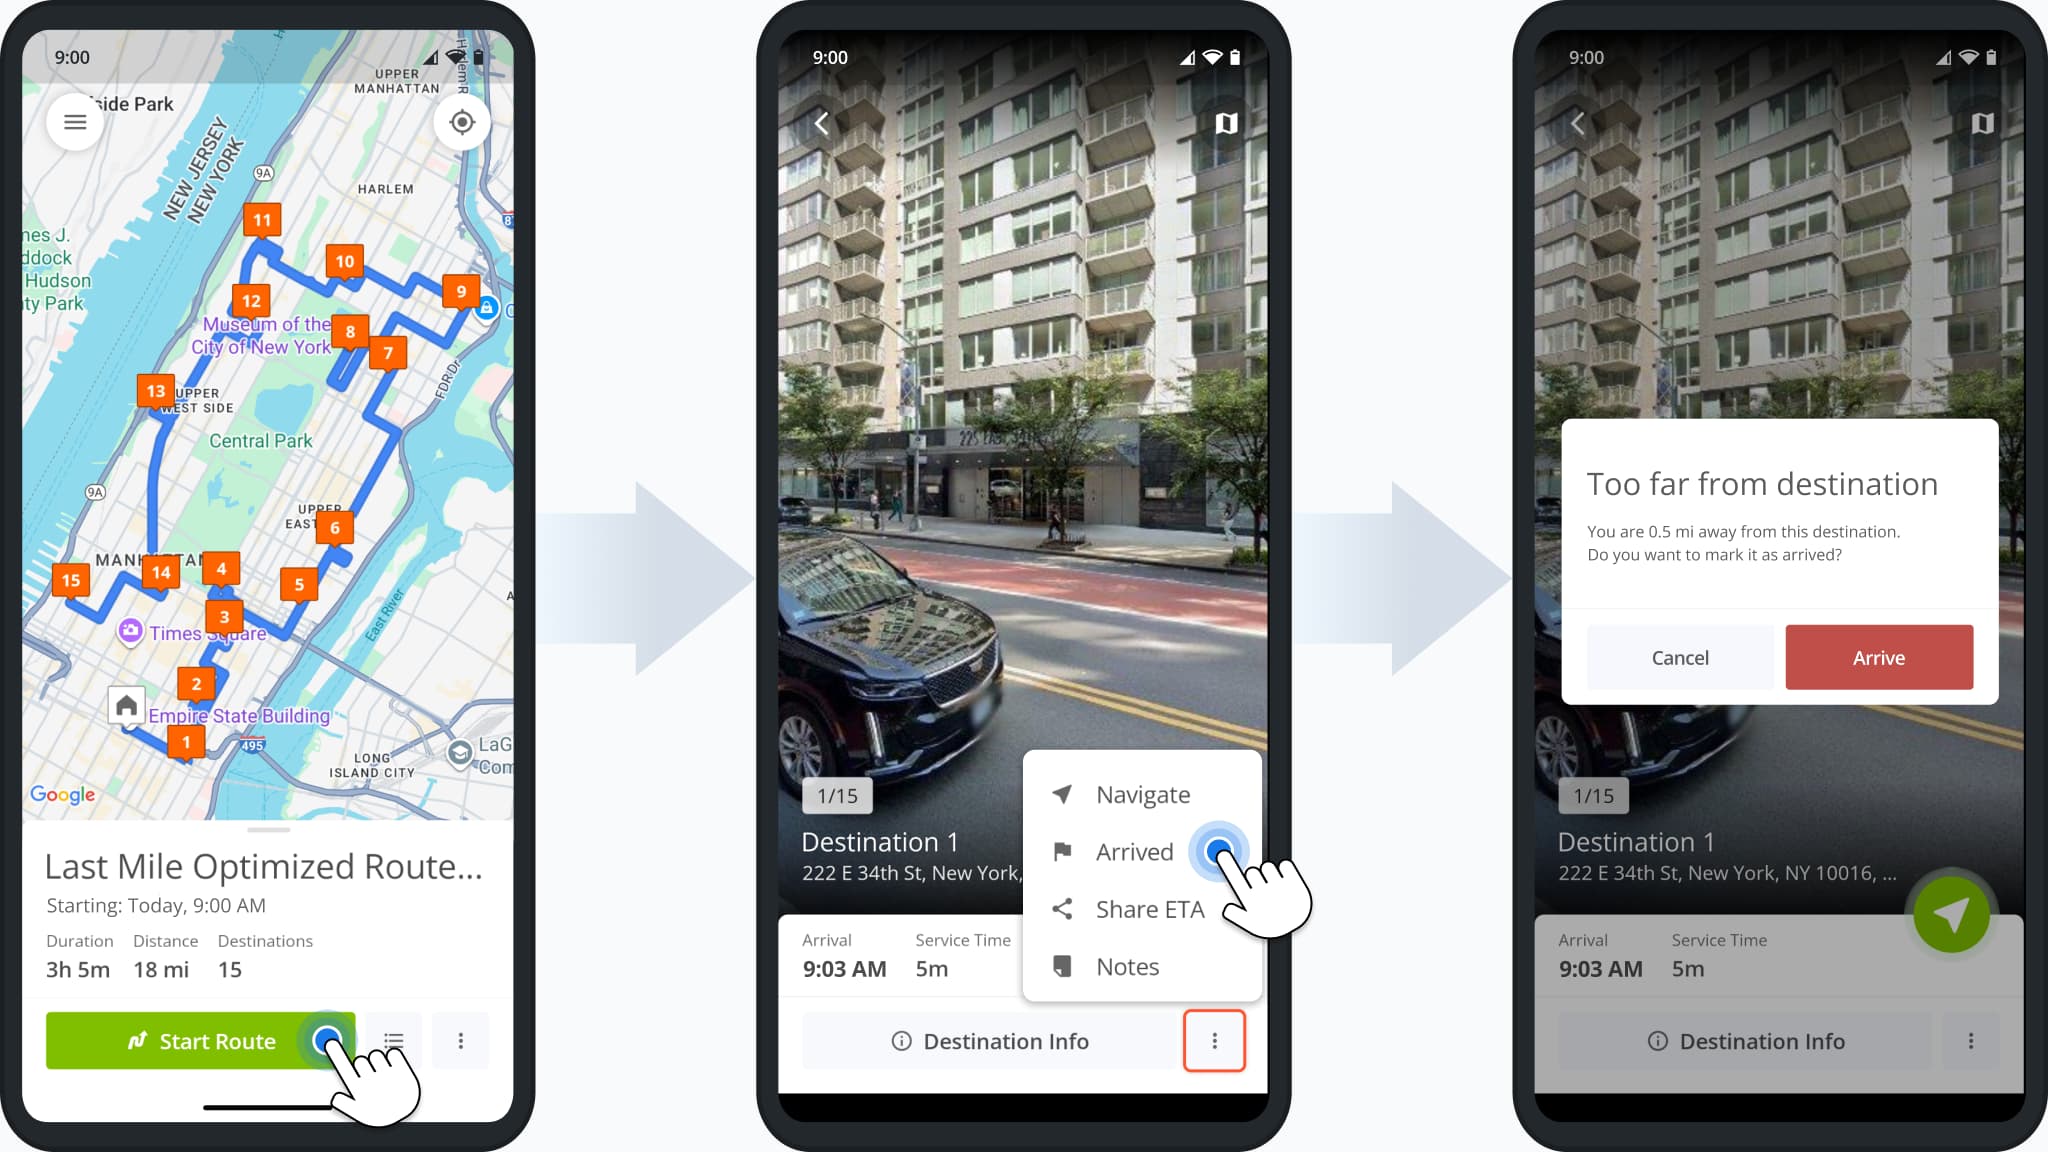
A new arrival distance alert was added to the Route4Me route planner app for Android. Users will see the alert shown in the image below when attempting to mark destinations as “Arrived” while not being close to the destination address.
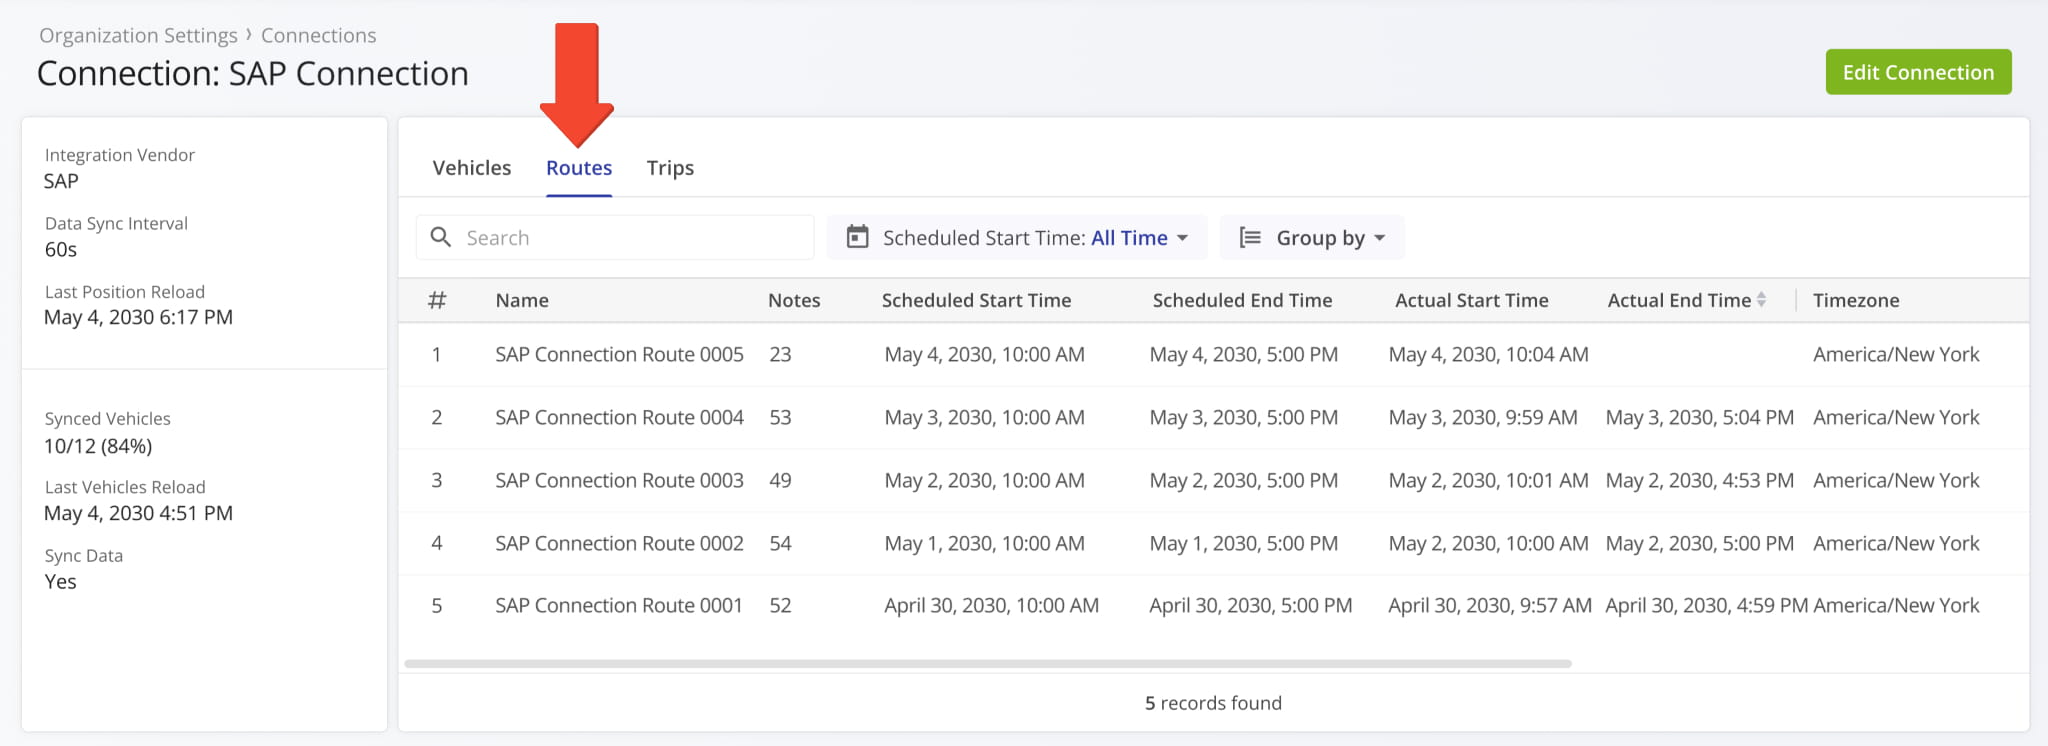
You can now open imported and synced routes in the “Routes” category of Connection Snapshots. To do so, simply click “Open” next to a connection vendor route.
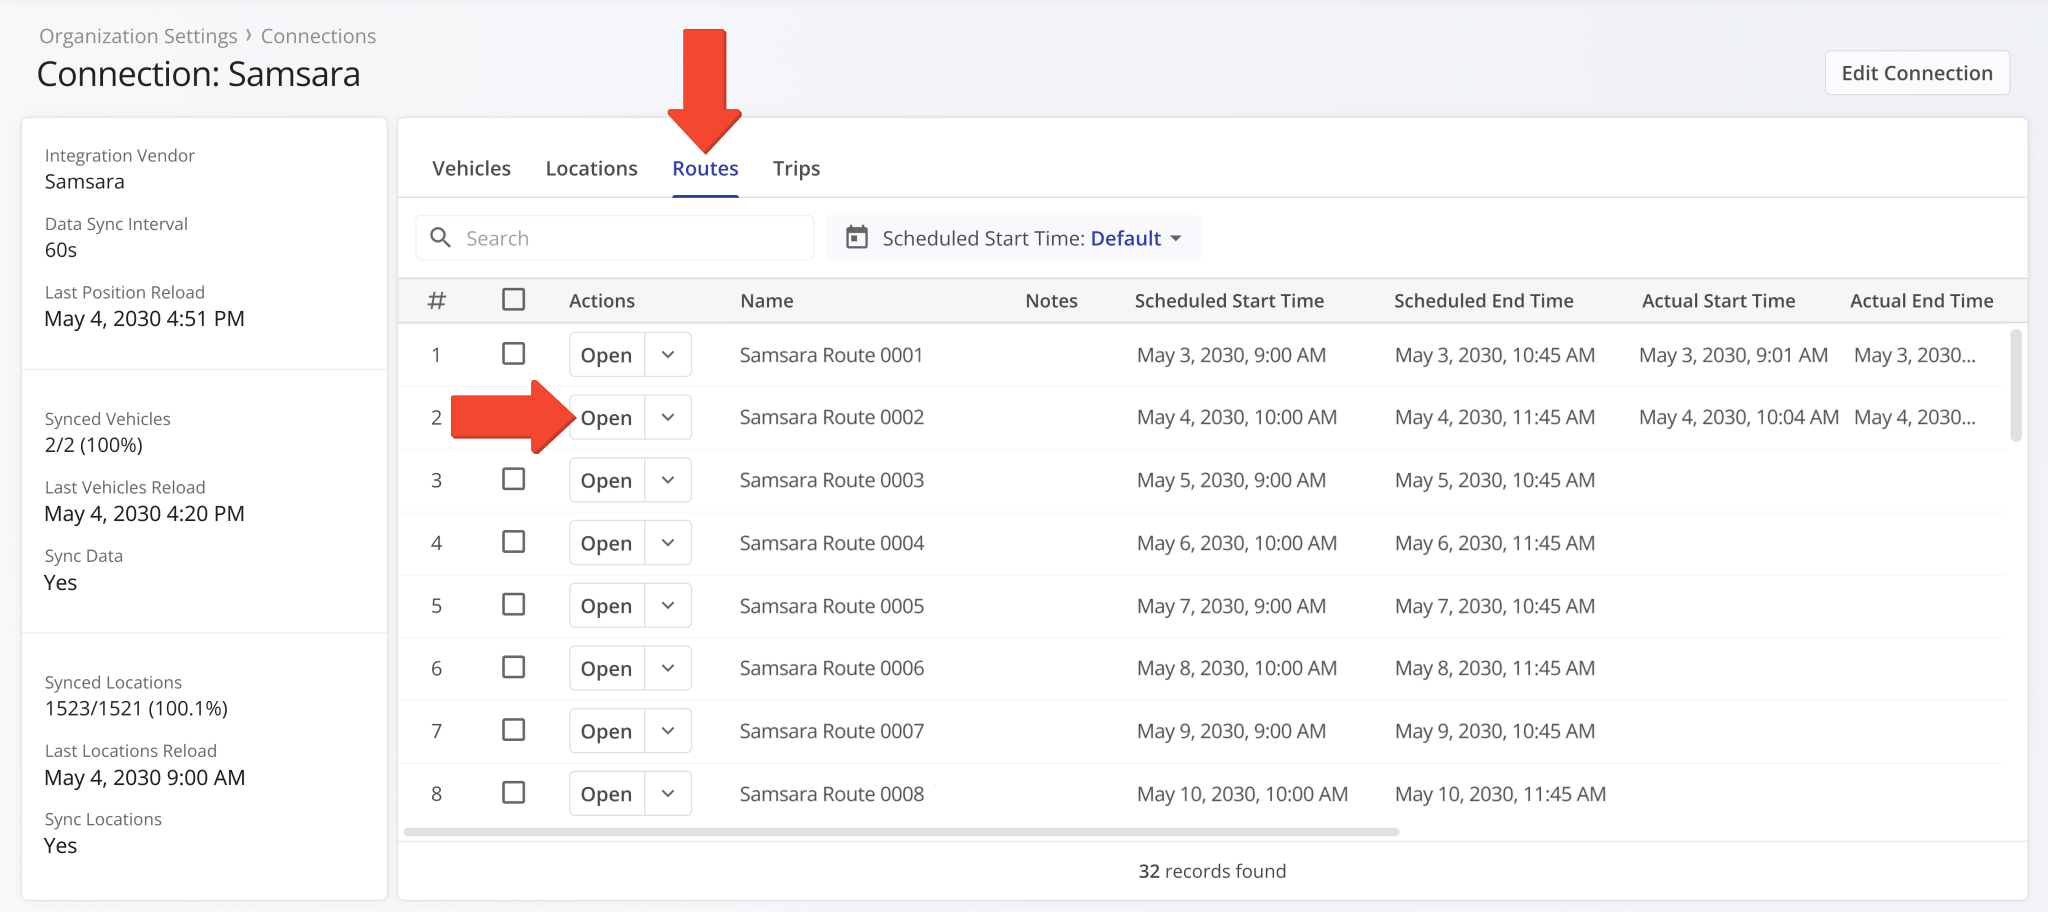
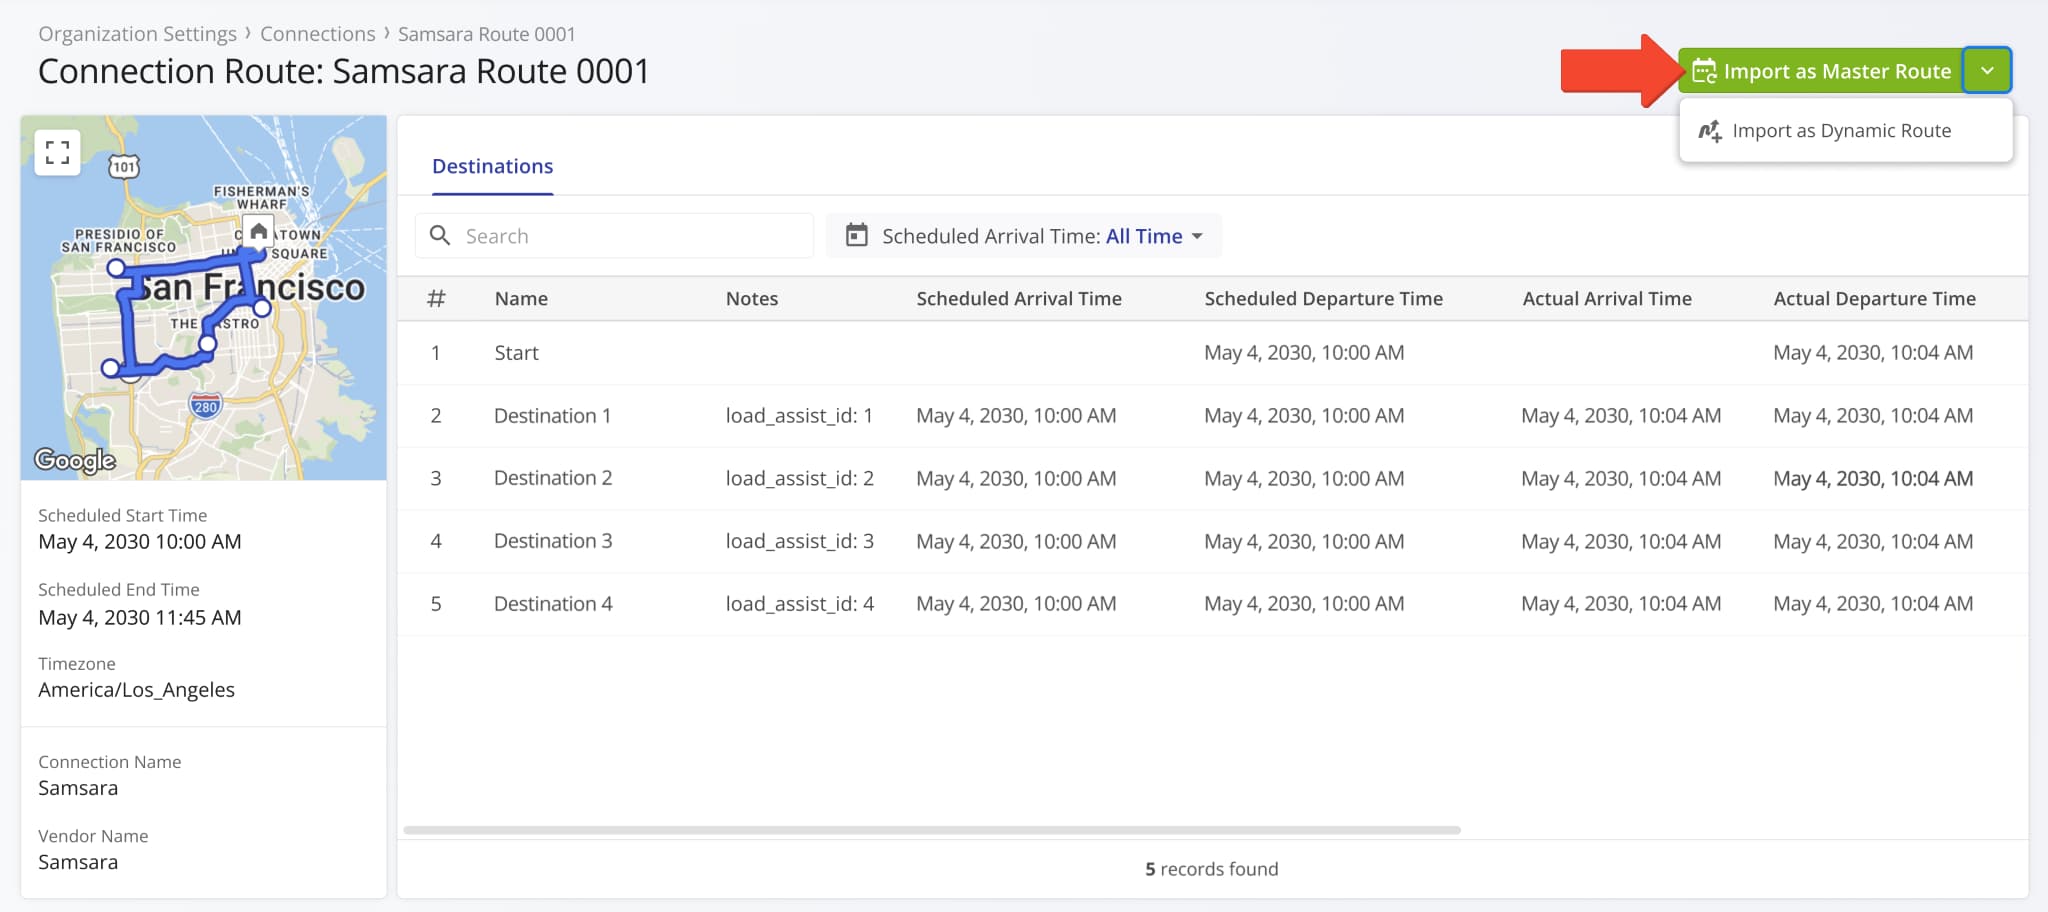
You’ll see a new Connection Route Snapshot which shows detailed destination data associated with the synced connection route. Vendor routes have to be imported before you can use them in Route4Me.
Click the “Import as Master Route” button to import a vendor route as a Master Route for Recurring Routing. Alternatively, click the Down Arrow and select “Import as Dynamic Route” to add a vendor route to your Routes List.
You can now open Telematics Trip Snapshots from the “Trips” category of Connection Snapshots. To do so, simply click “Open” next to a connection vendor trip.
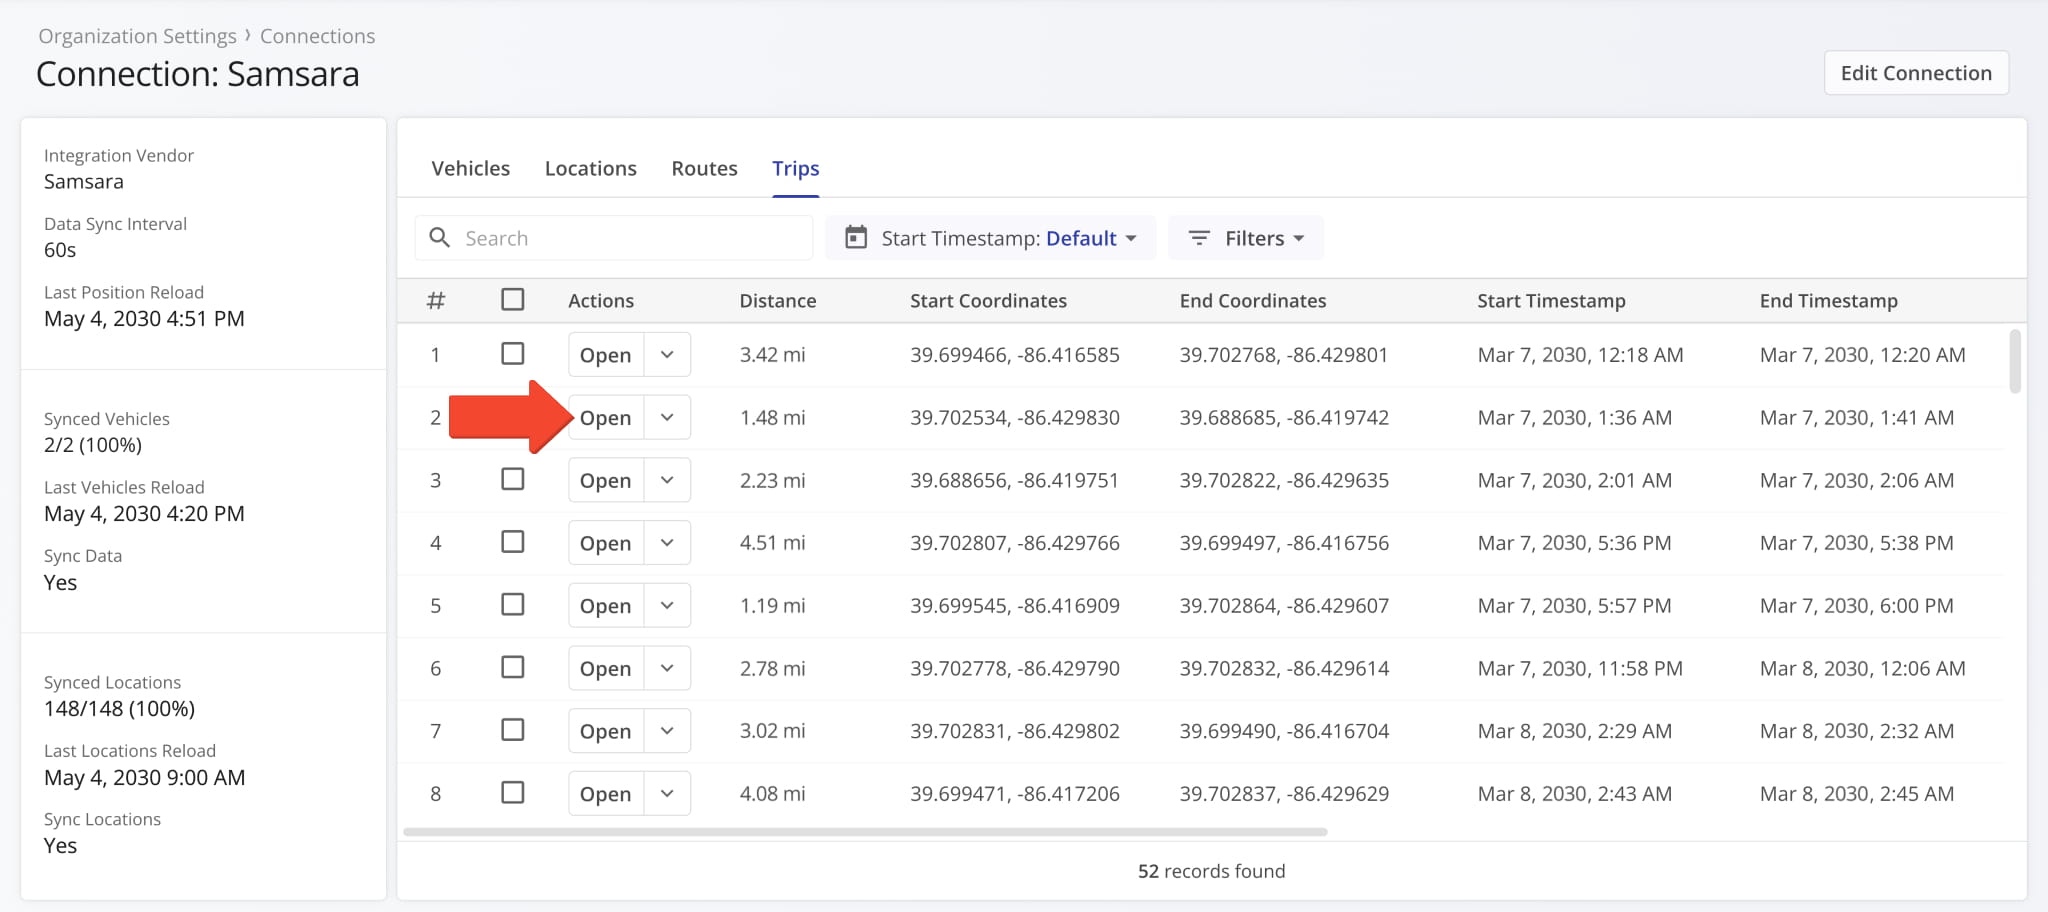
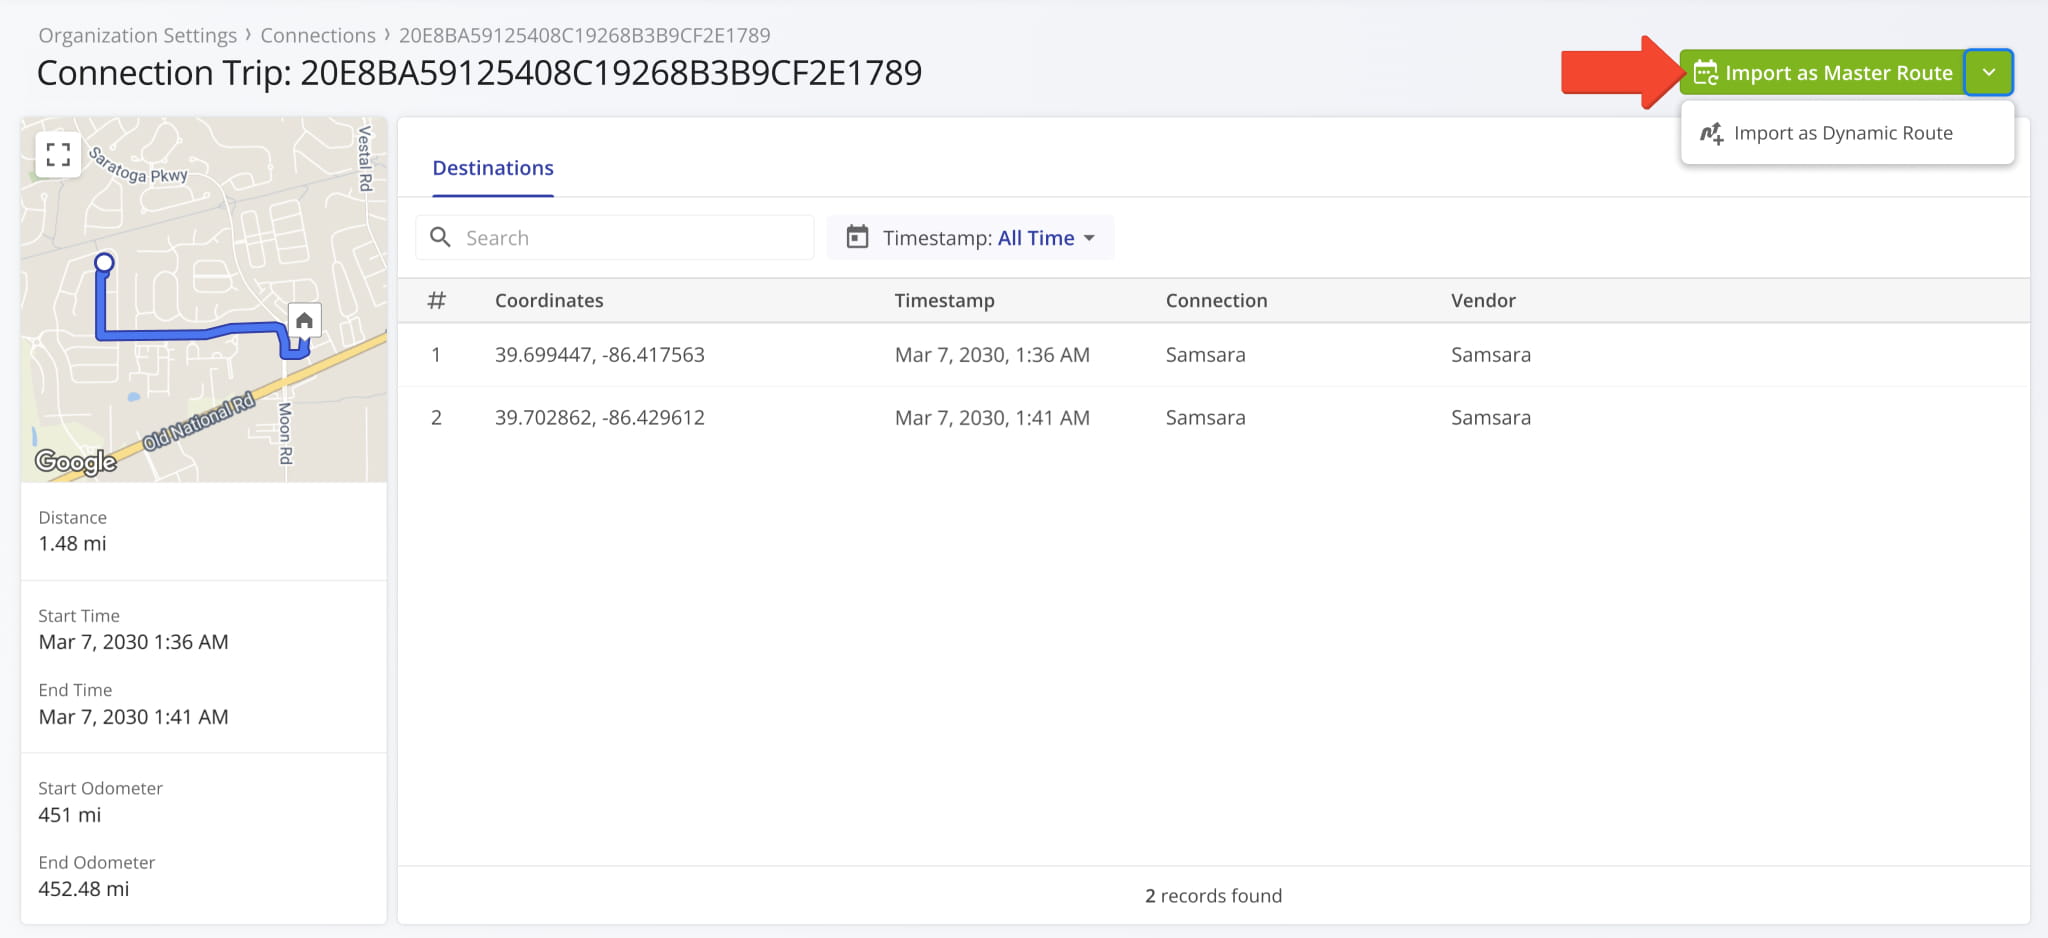
You’ll see a new Connection Trip Snapshot which shows the synched distance and directions traveled by a telematics vehicle according to your vendor settings. Trips can be imported and used as routes in Route4Me.
Click the “Import as Master Route” button to import a vendor trip as a Master Route for Recurring Routing. Alternatively, click the Down Arrow and select “Import as Dynamic Route” to add a vendor trip to your Routes List.
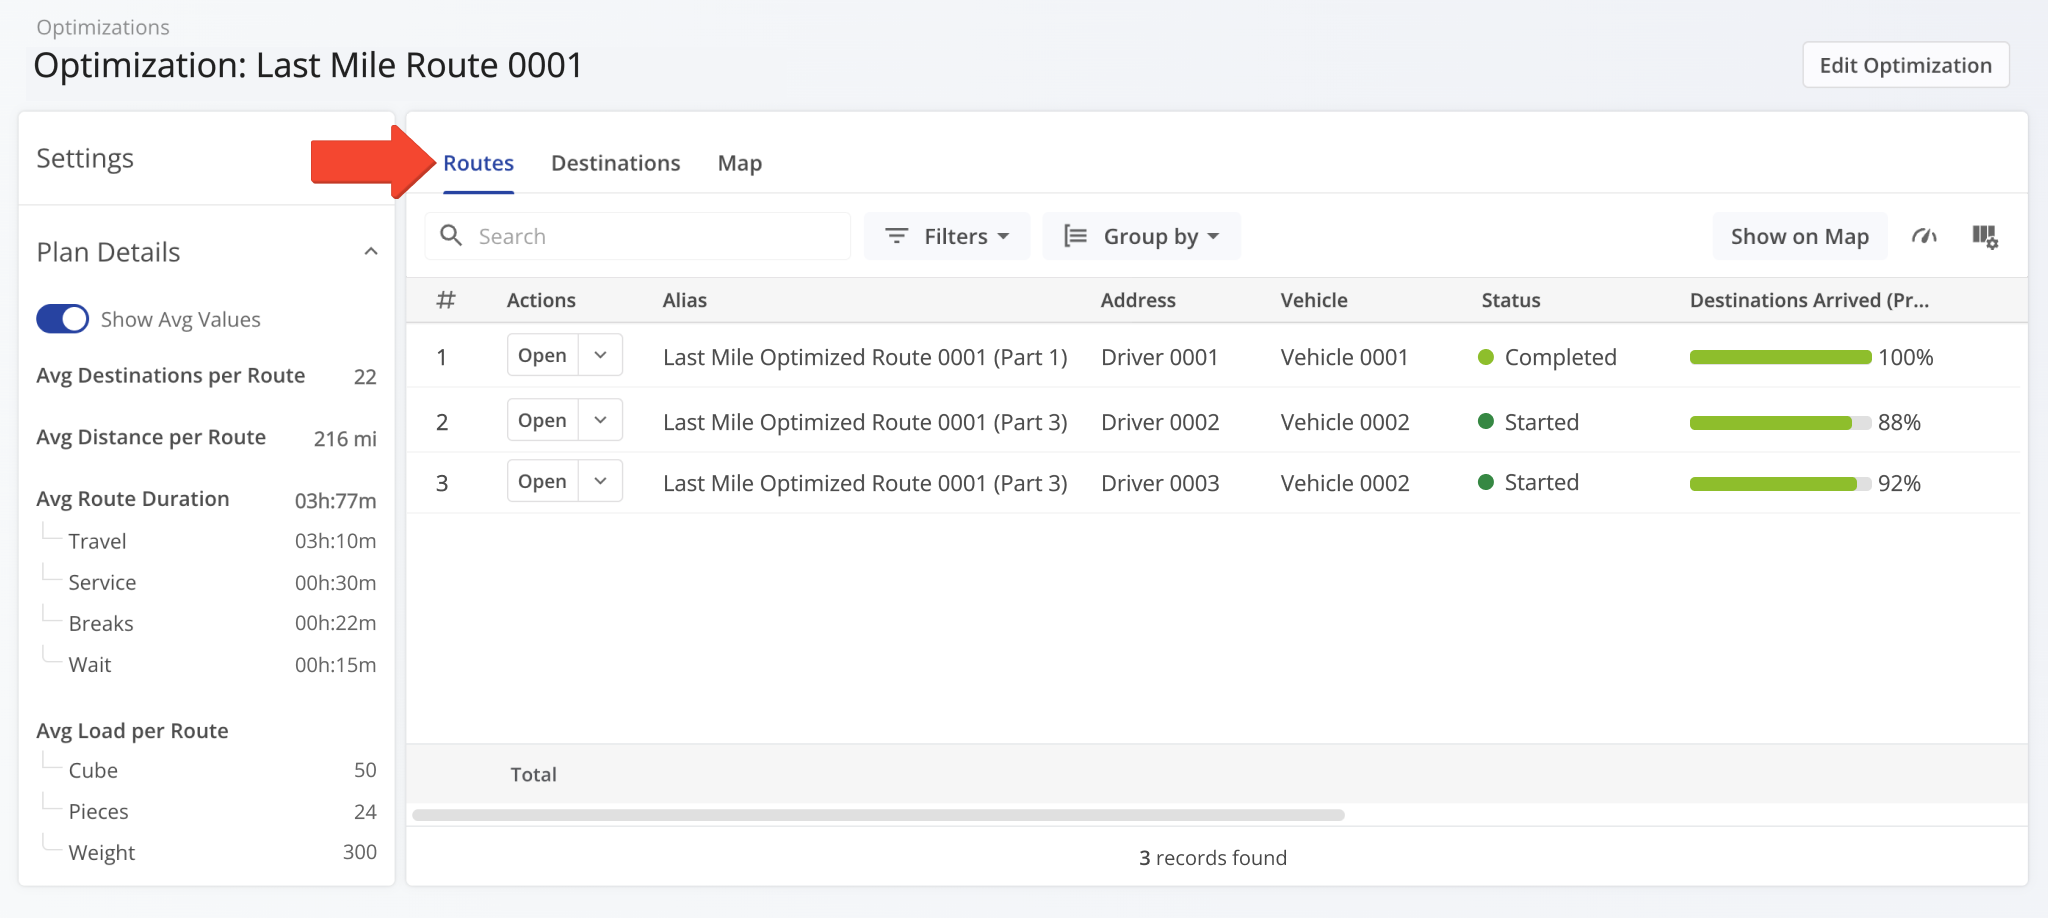
When you open an Optimization Snapshot, the “Routes” tab will be selected by default. Previously, the “Map” tab was selected by default. This update makes Optimization Snapshots consistent with other snapshot interfaces.
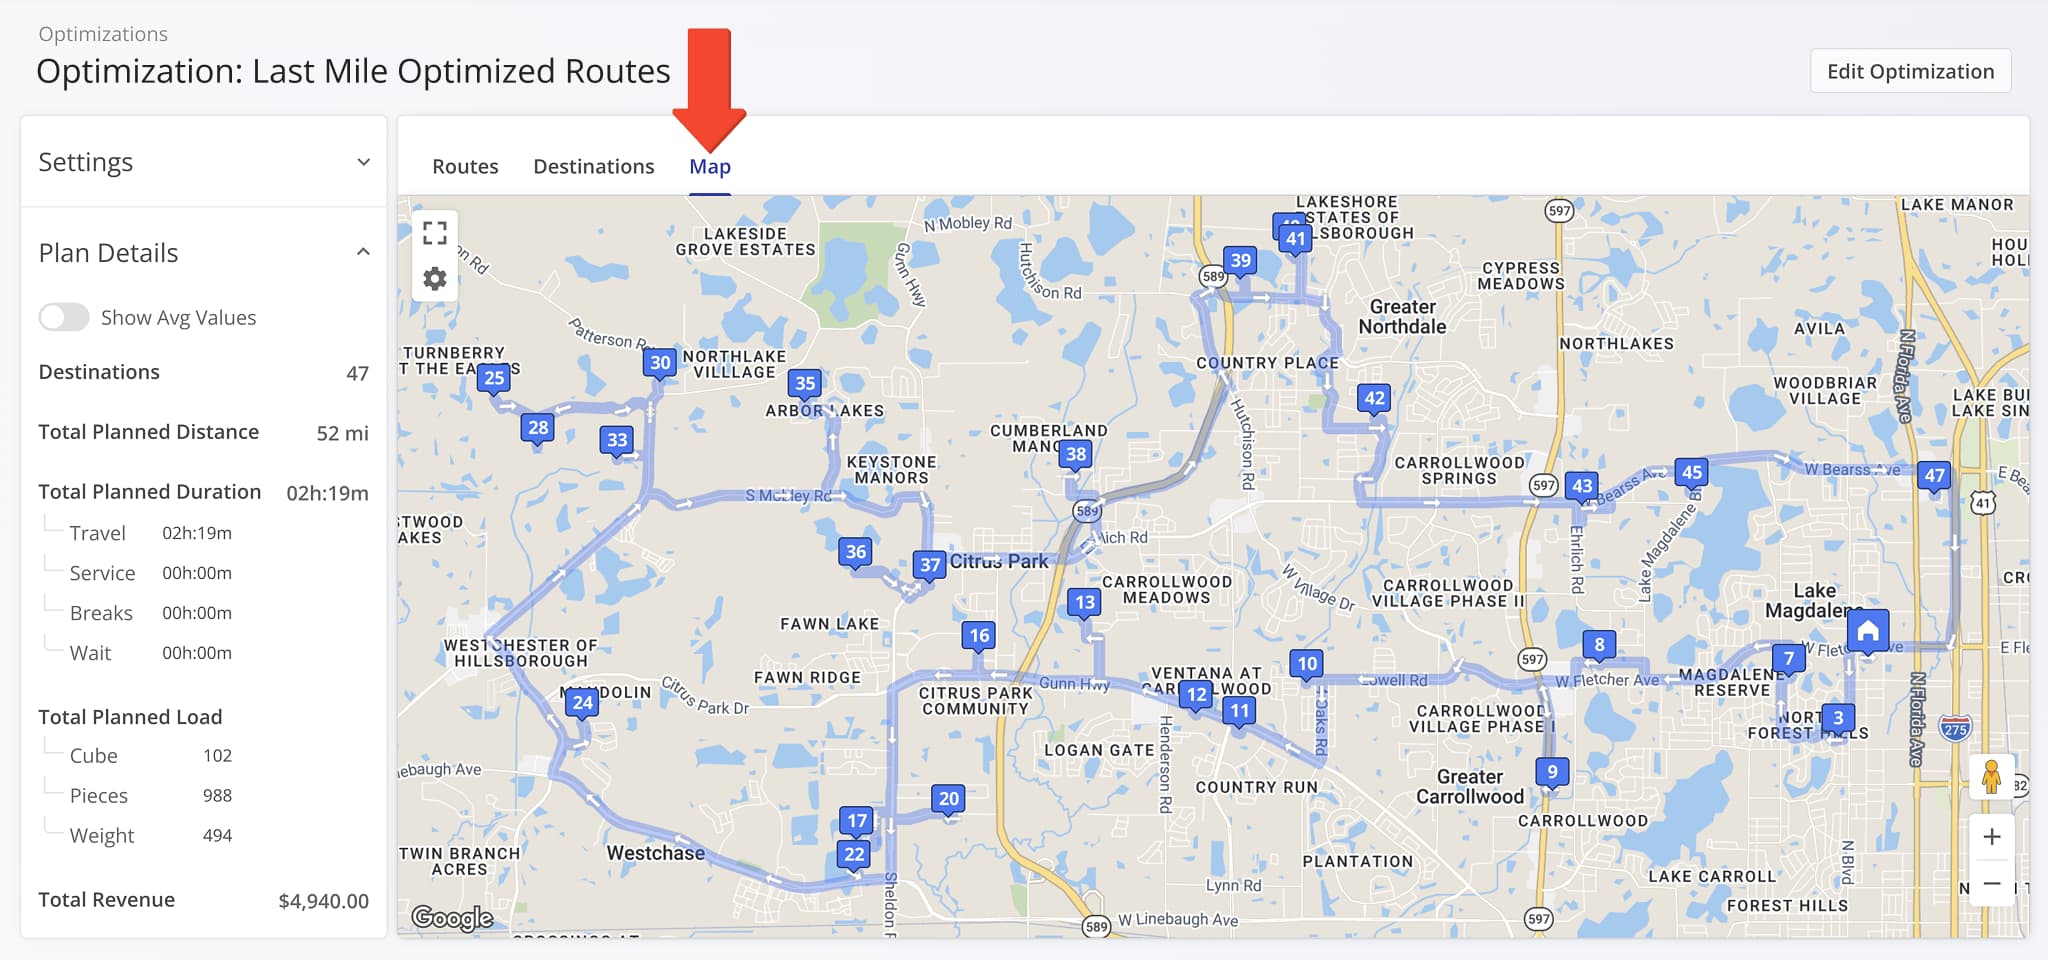
A new “Map” section was added to Optimization Snapshots showing route destinations and directions.
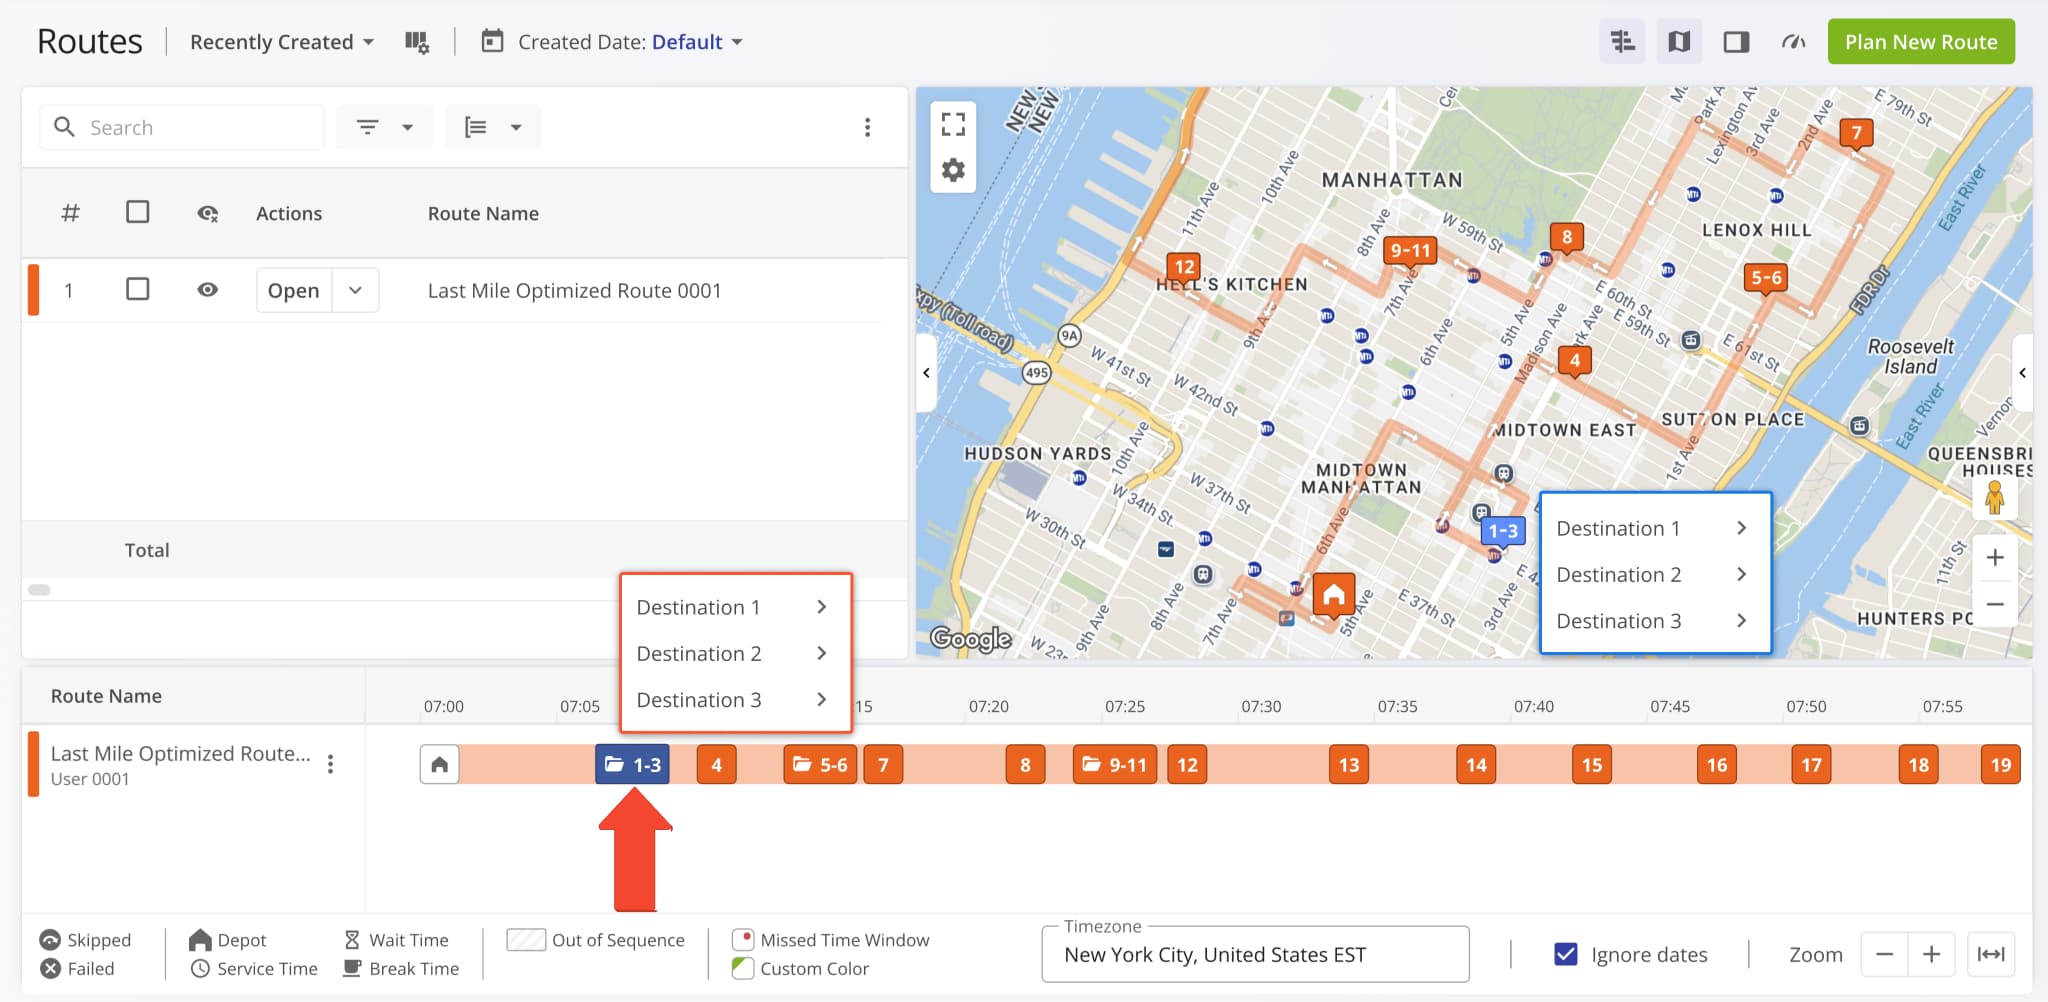
Grouped destinations in the Routes Timeline have been redesigned as a vertical list like on the Routes Map. Previously, hovering over grouped destinations on the timeline would show individual numbered icons instead of destination aliases.
Users can now see Avoidance Zones when navigating routes on the Android Route App.
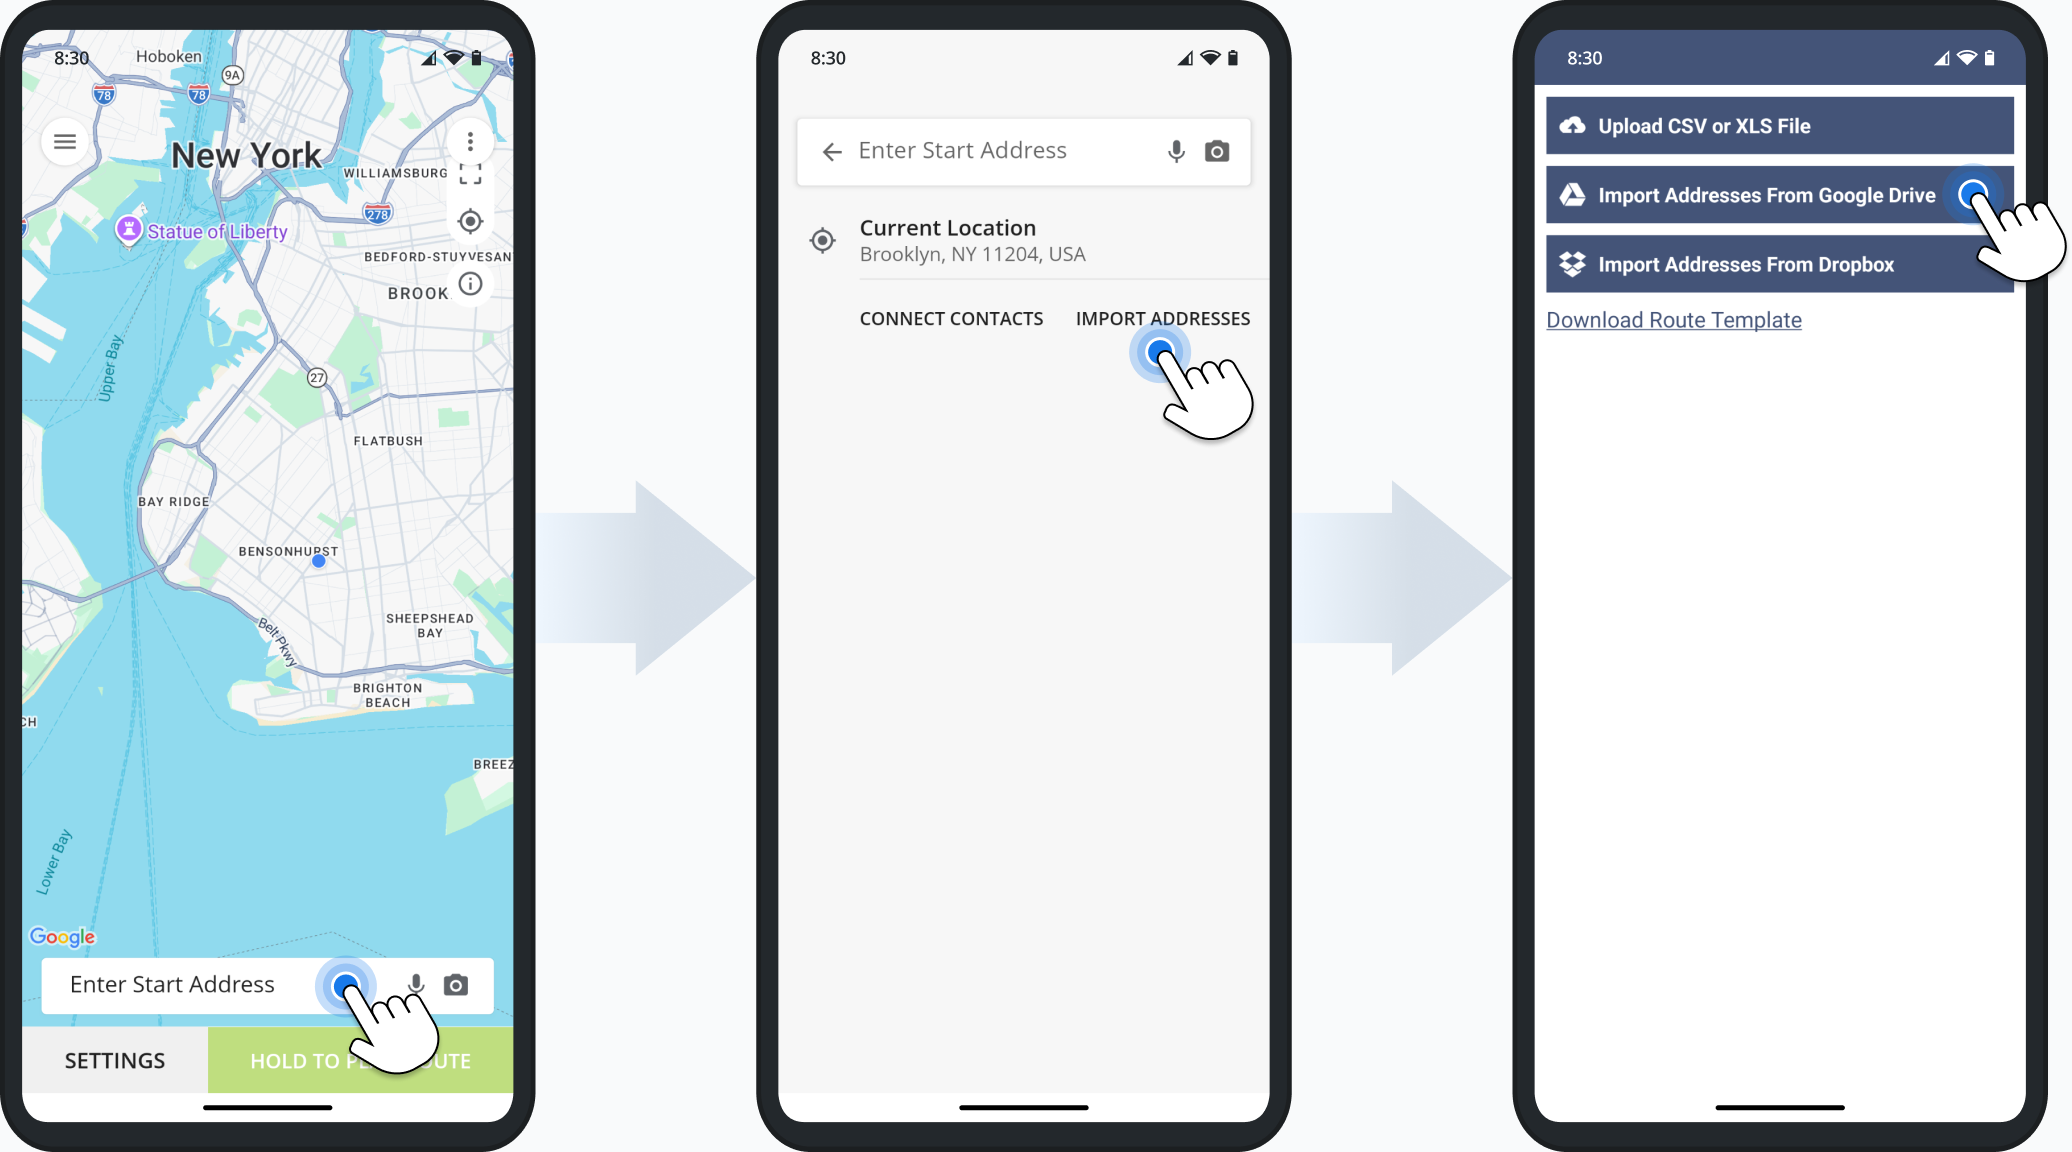
Users can now import addresses from Google Drive when using the mobile route planning app. To do so, simply start planning a route, tap “Import Addresses” and select “Import Addresses From Google Drive“.
You can now open, add, and manage Custom Route Data directly from the Route Editor. A new option was added to the “Route” action menu in the top menu bar. Click “Route” and select “View Custom Data“.

A new “Route Info” sidebar was added to the Route Editor. It shows planned and actual route data and percentages in a customizable vertical format. To open it, click the Sidebar Button to the right of the map and then click the Route Info icon.
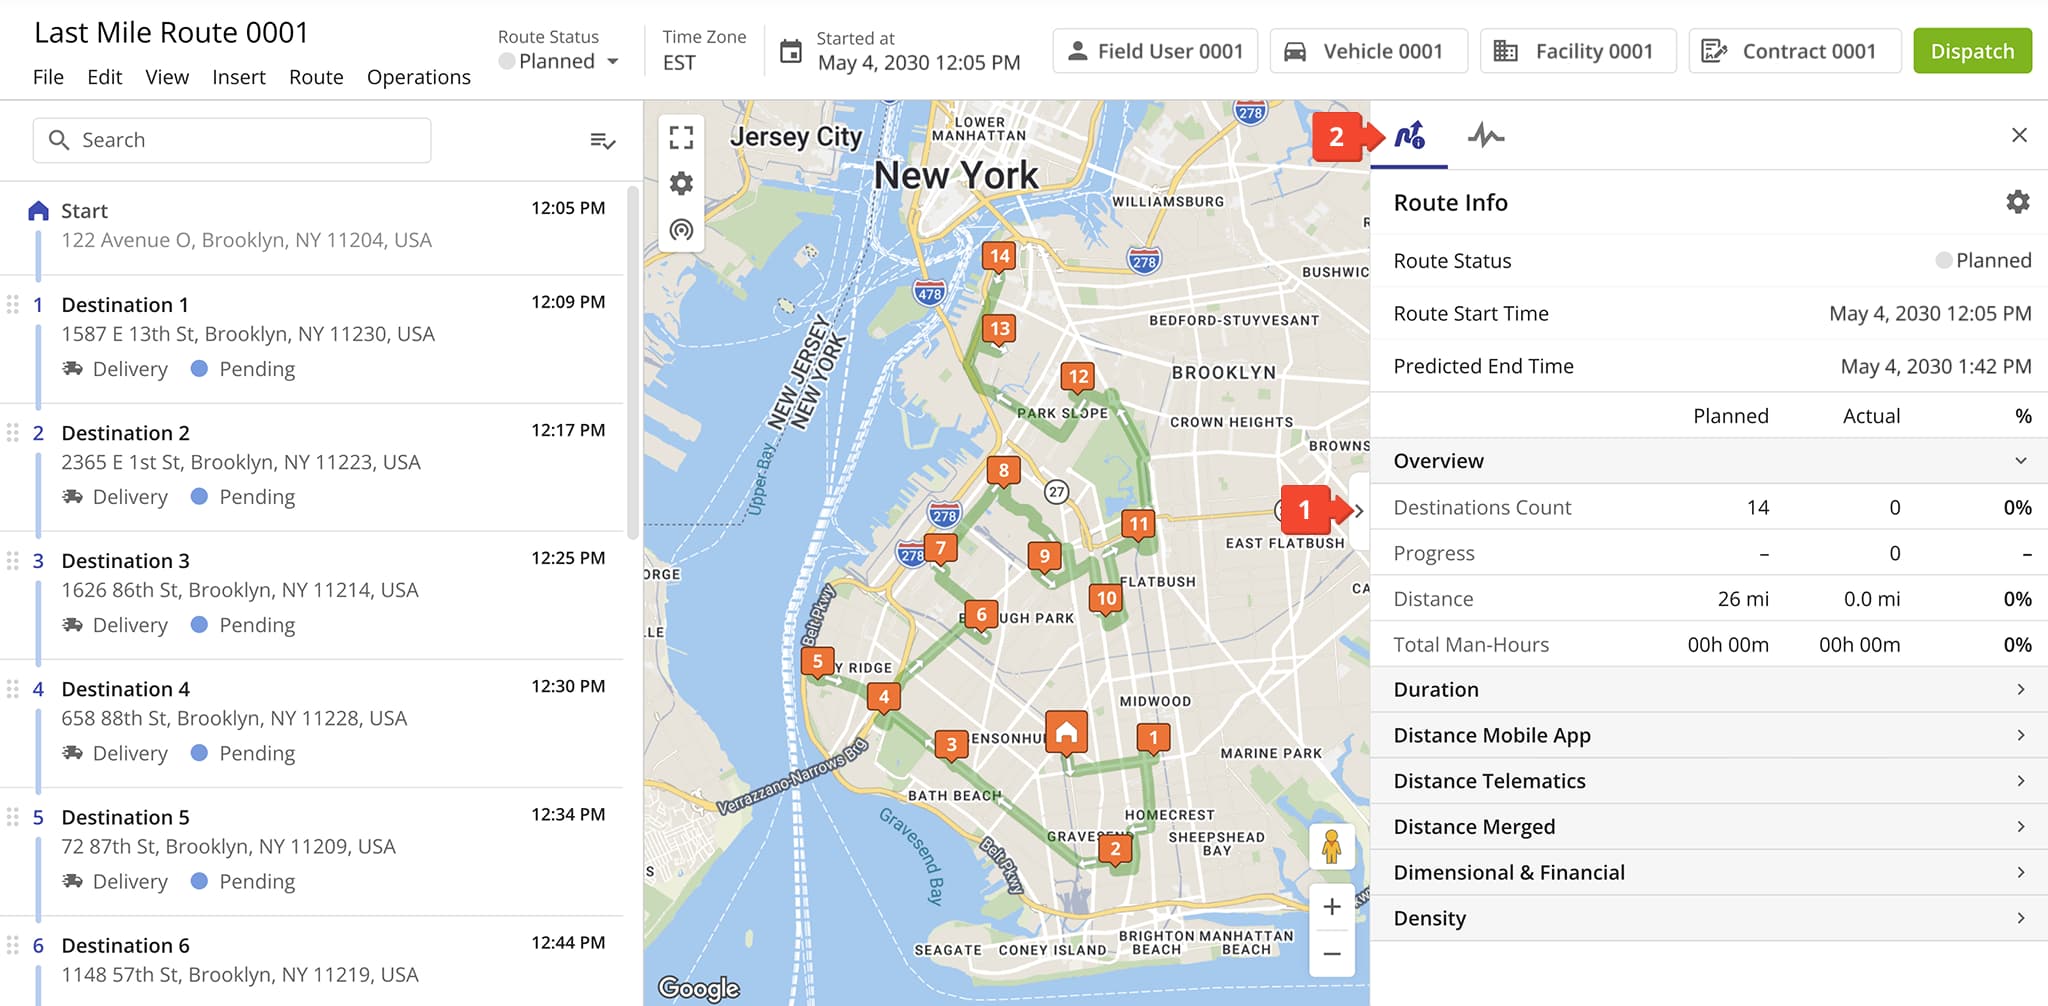
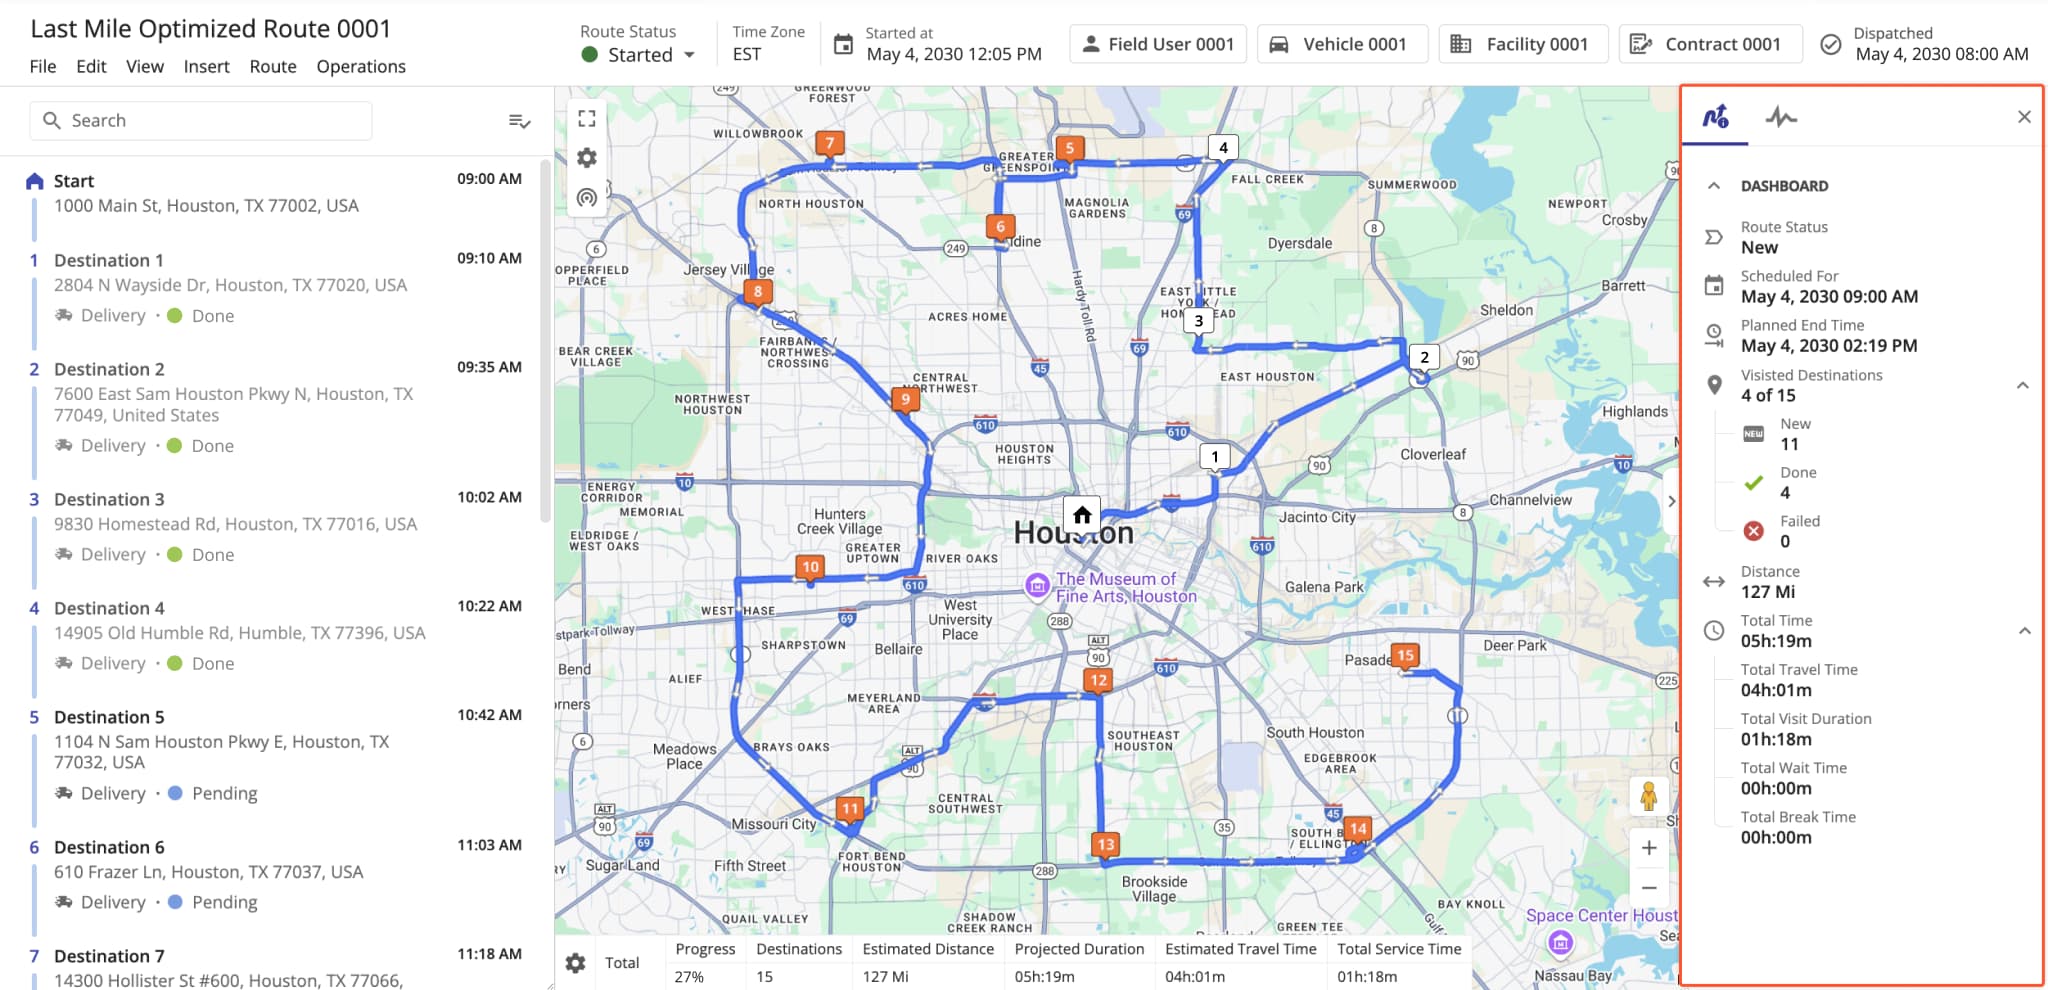
The dashboard sidebar in the Route Editor was removed and replaced with a customizable, real-time Route Info interface.
The image below shows the old dashboard that was removed and replaced with Route Info on March 16th, 2026.
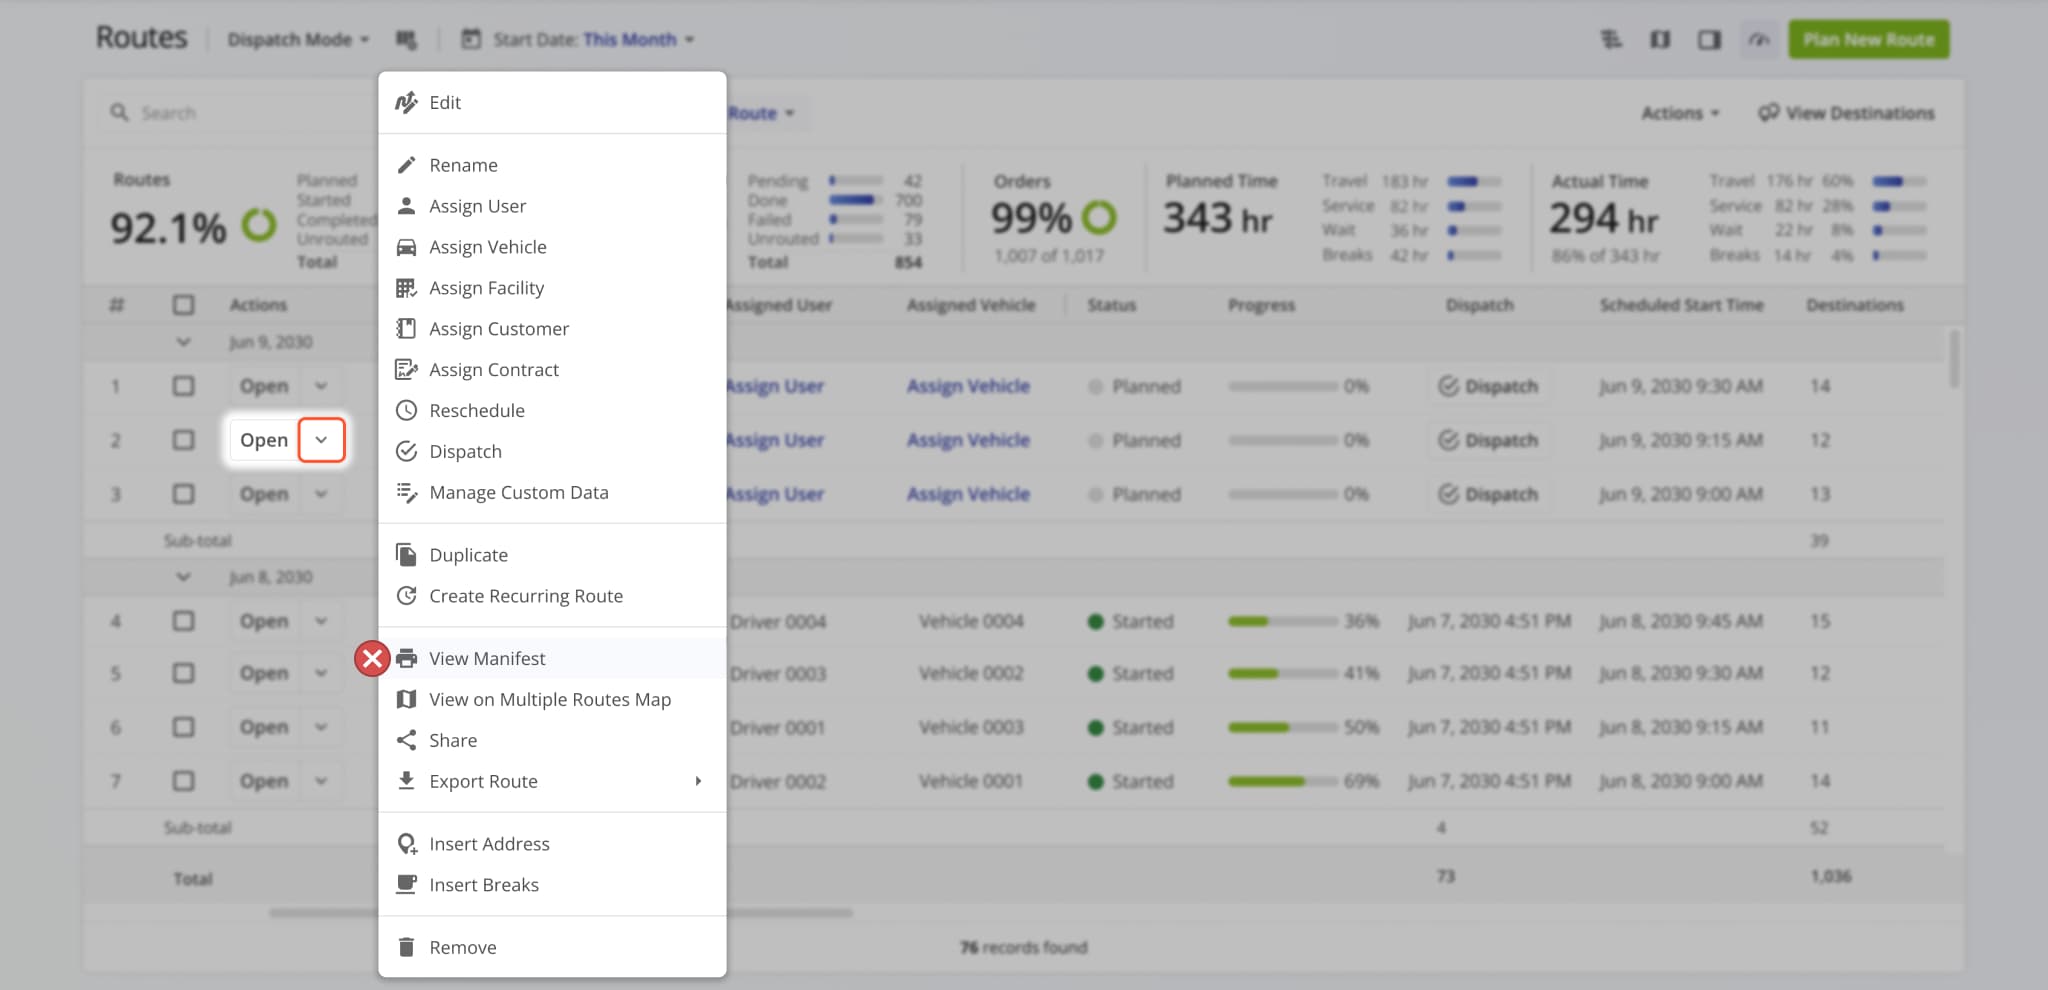
The Route Manifest page and route management action were removed from the Route4Me Transportation Management Software. Previously, the manifest was accessible from the Routes Page, Route Editor, and the original Routes Map.
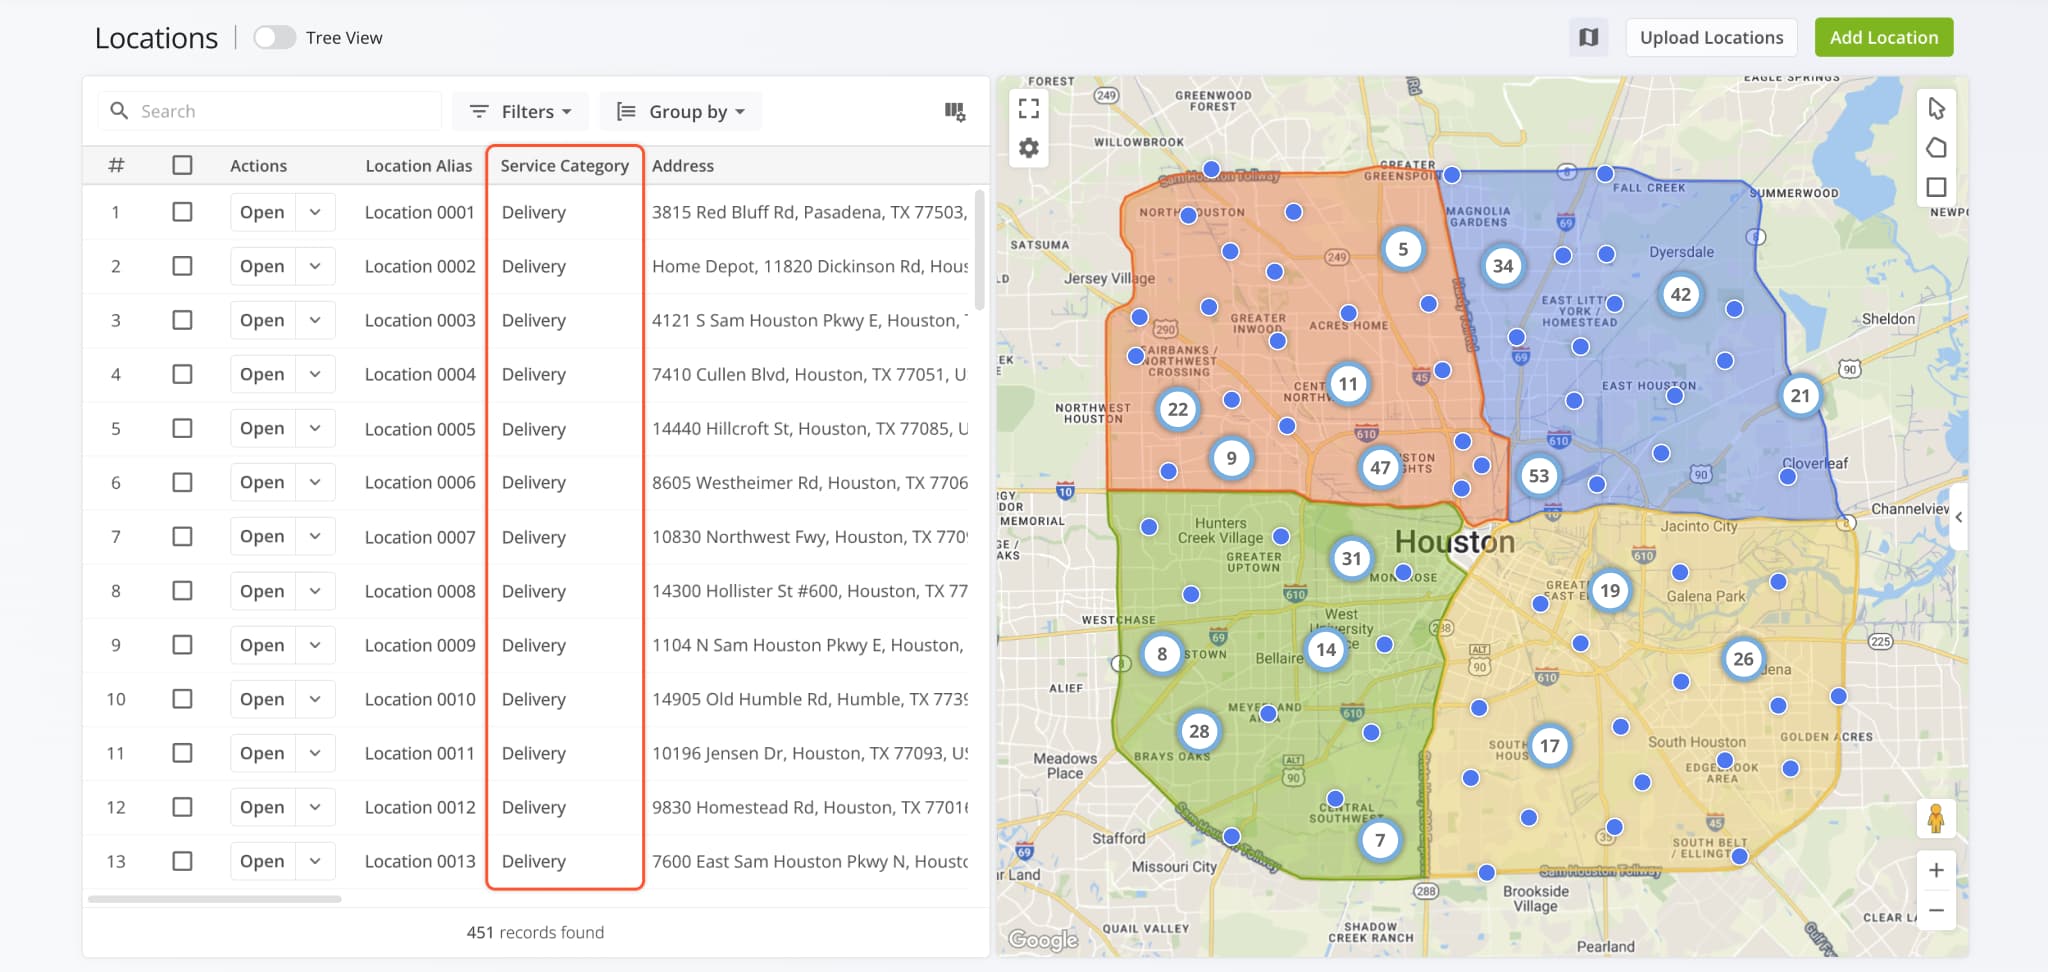
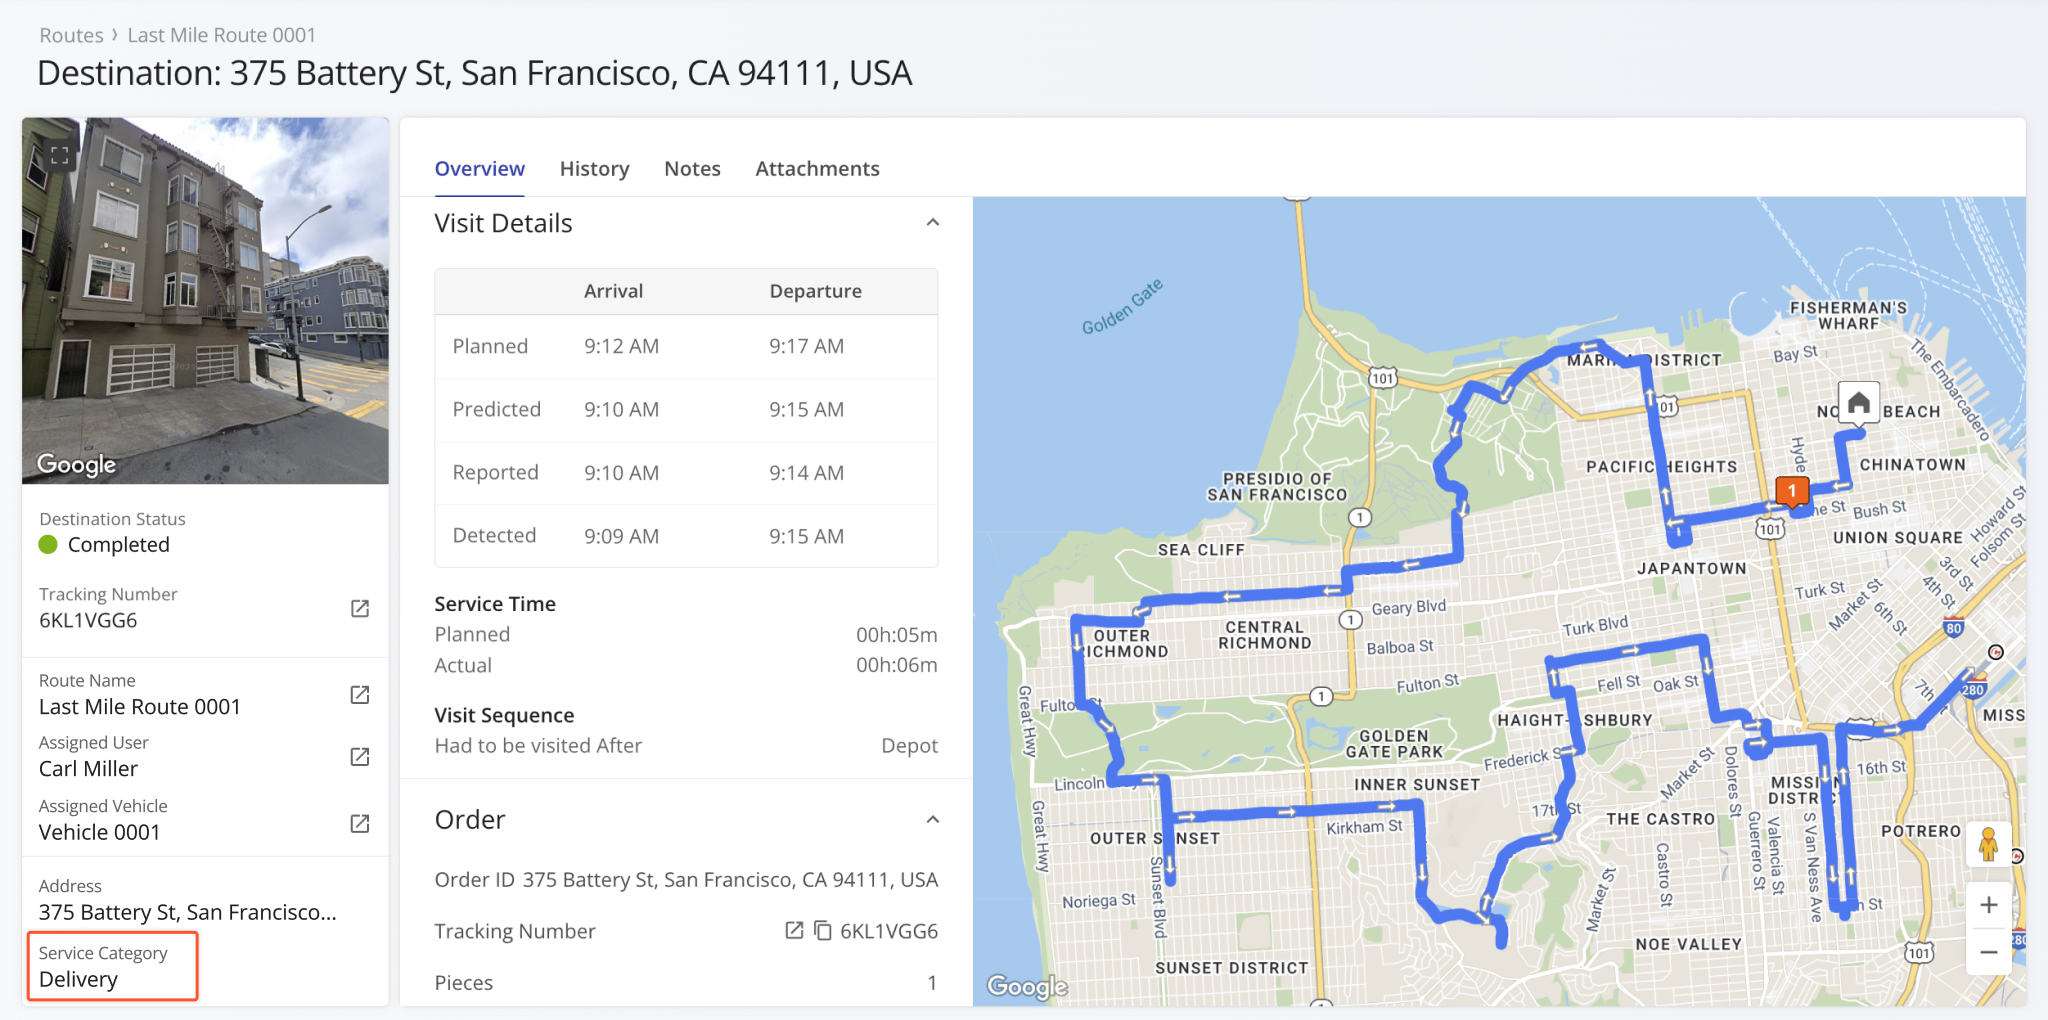
The “Address Destination Type” field and display column in the Locations page was renamed to “Service Category“.
This update improves parity and consistency across Route4Me’s various route management tools and pages.
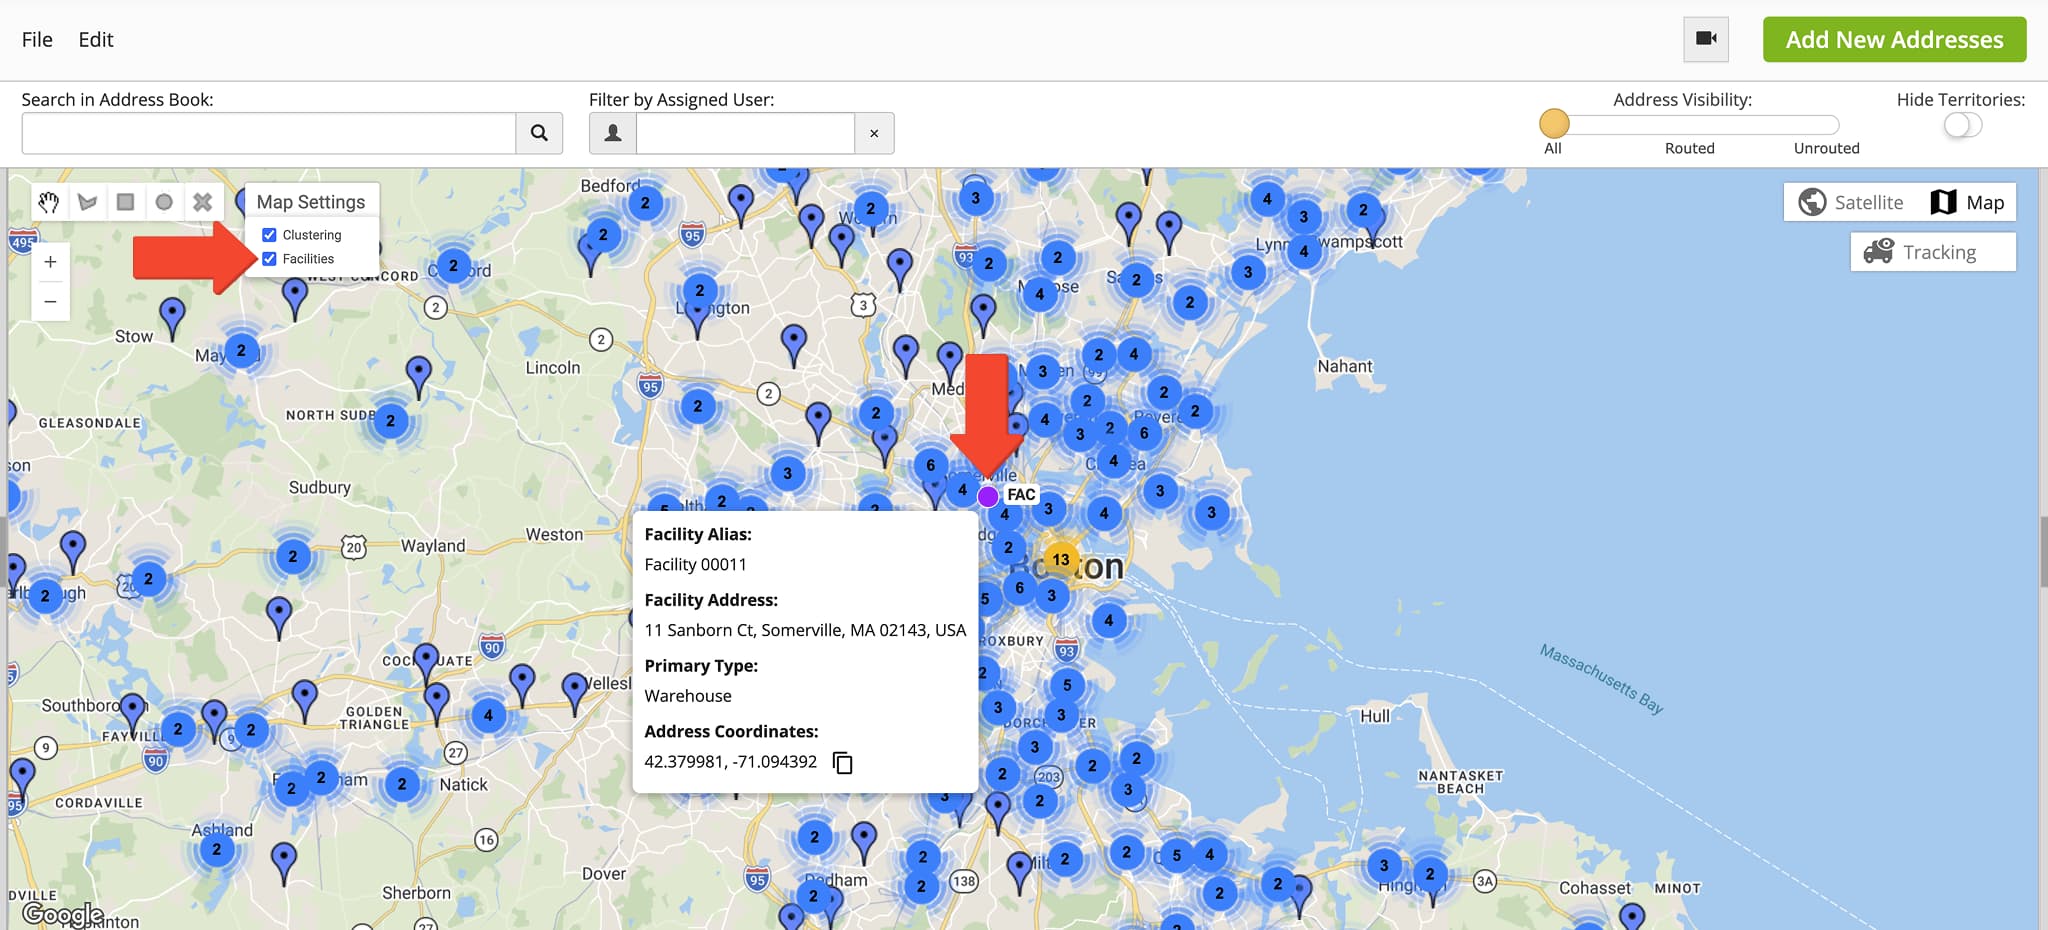
Facilities shown on the Address Book Map have a new map marker that improves their visibility. To see Facilities, click “Map Settings” and check the “Facilities” box. You’ll then see the new Facility markers on the map with name tags showing the first three characters of their respective aliases. You can also hover over Facilities on the map to see their details.
If you need access to the Address Book Map, contact Route4Me support.
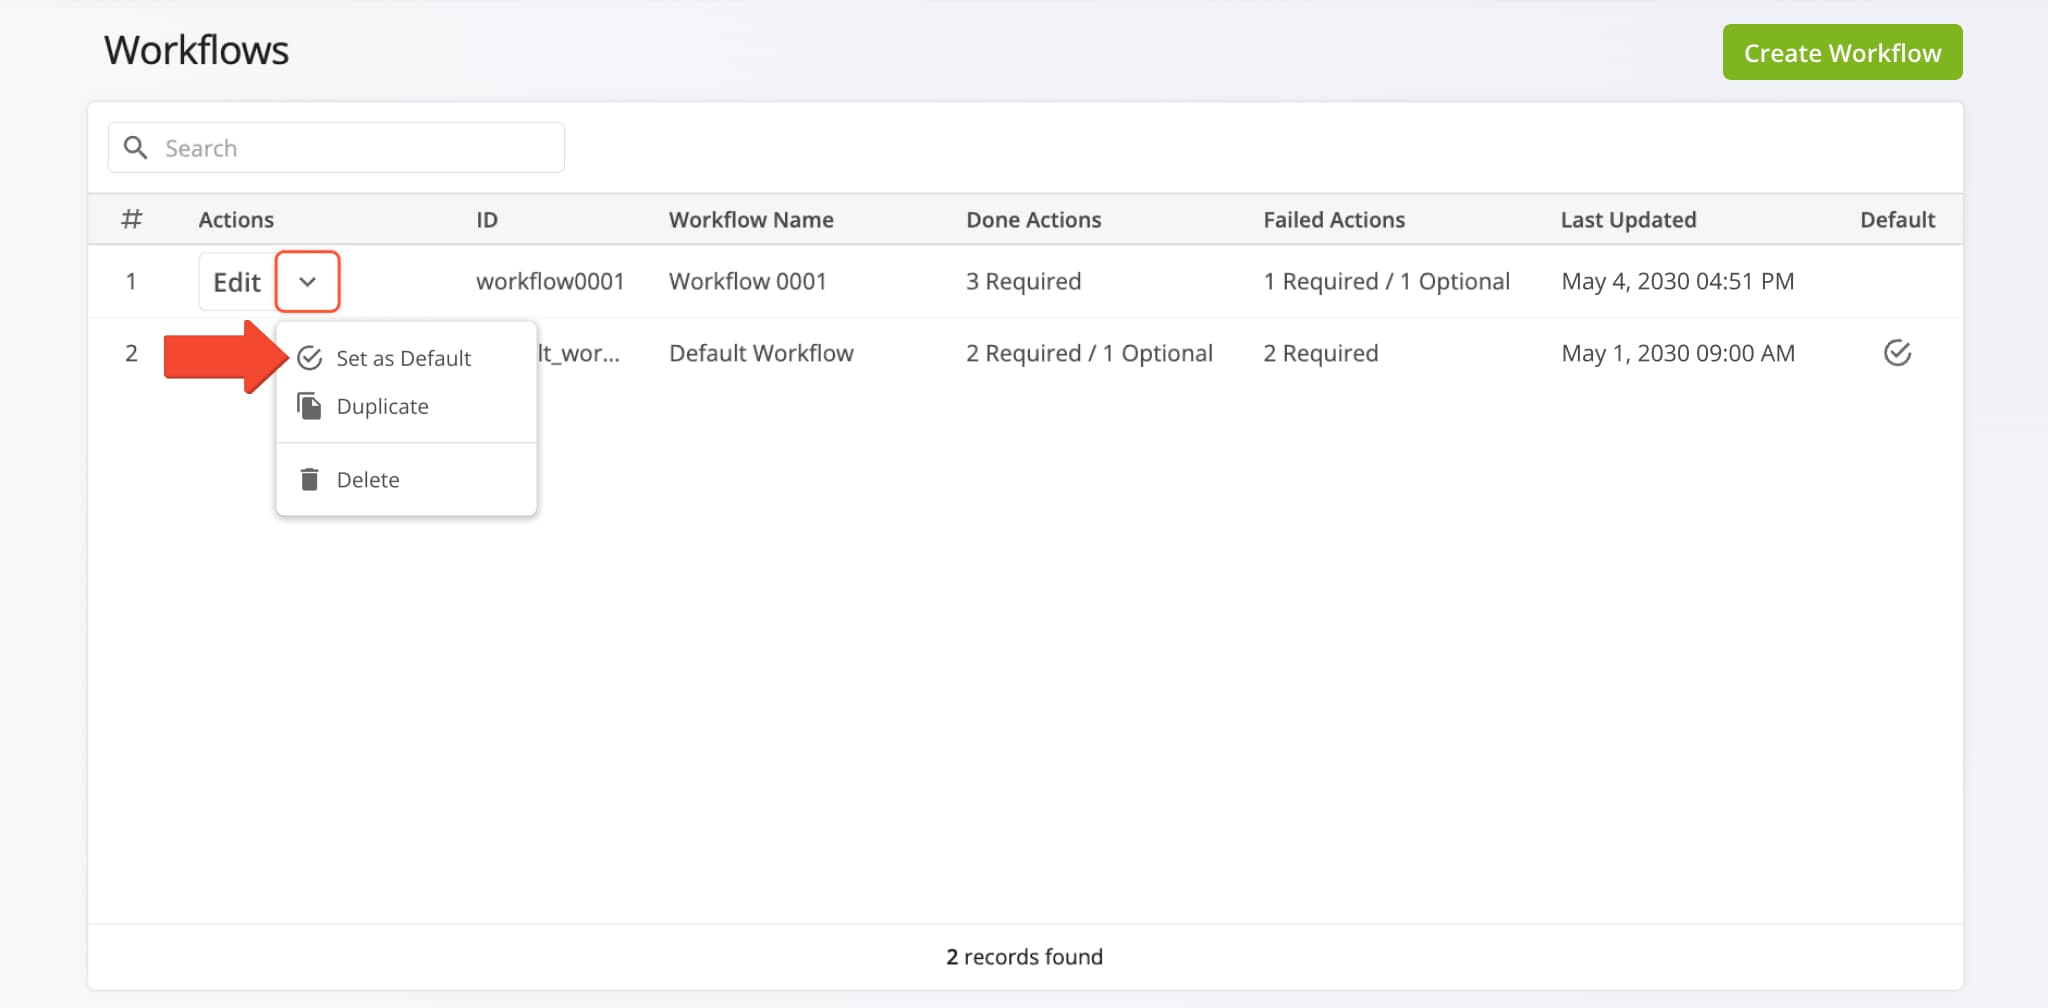
A new “Set as Default” option was added when you open the management actions by clicking the Down Arrow next to a Workflow. Selecting the new option will set the Workflow as the default when planning new routes.
Learn more about collecting proof of service.
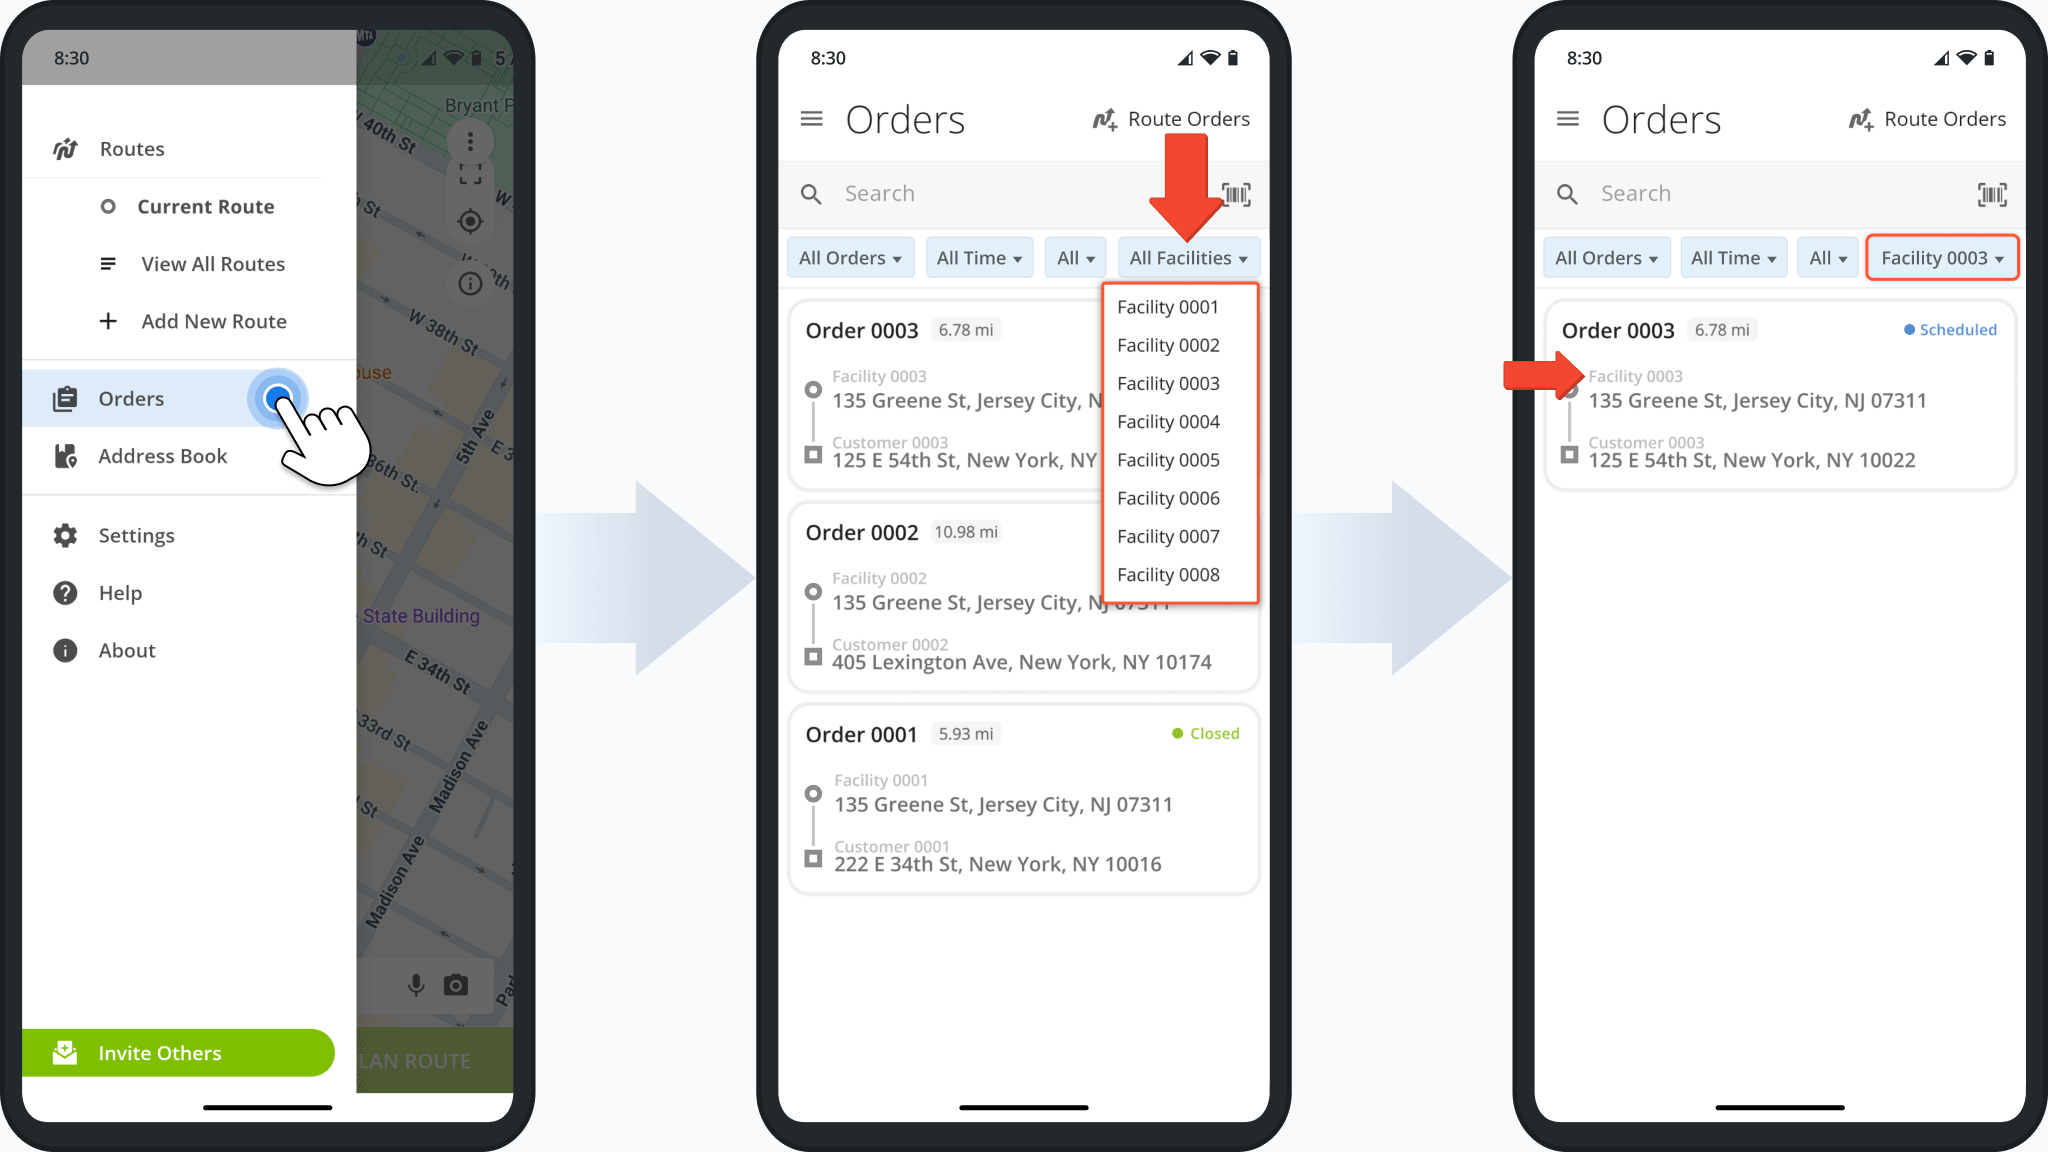
The Orders List on the Route4Me route planner app for Android was updated with a new Facilities filter. From the main menu, tap “Orders” and then “All Facilities” to select a specific Facility to use as a filter for your Orders List.
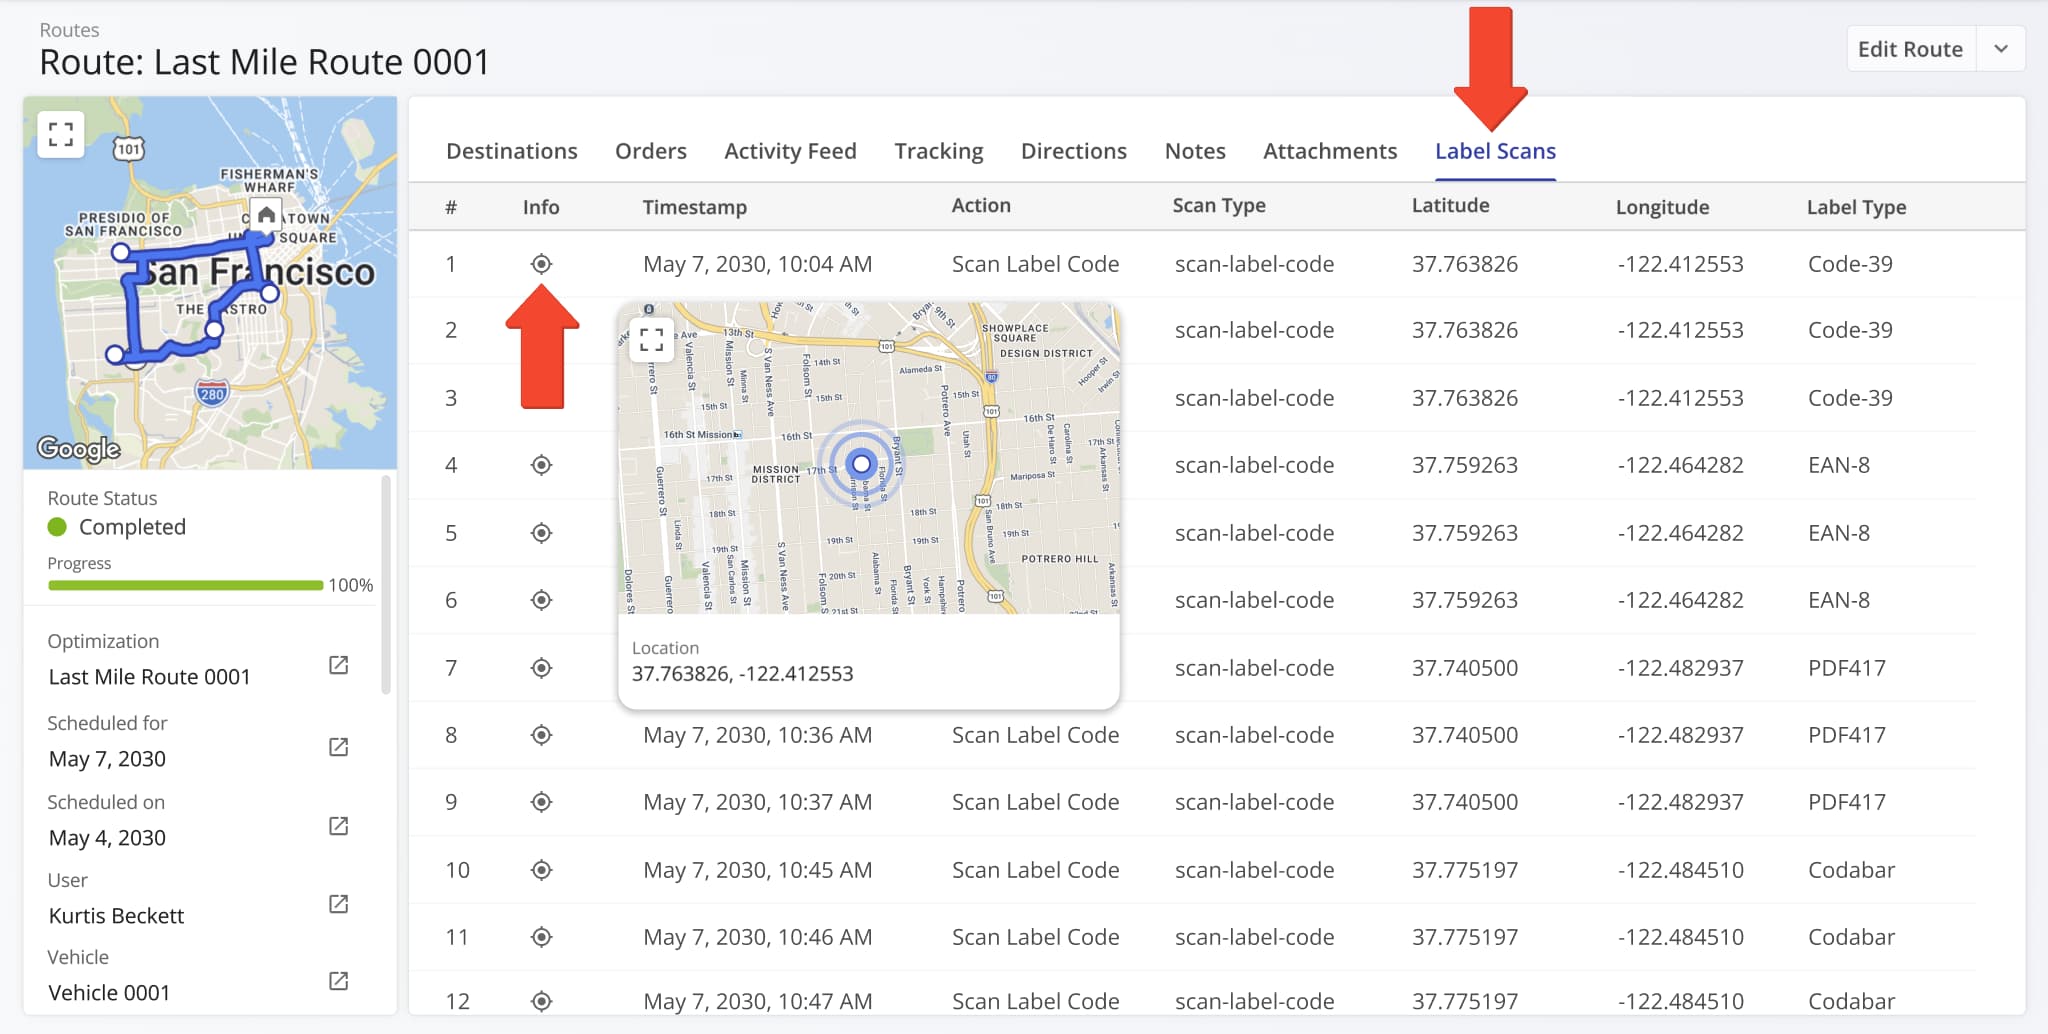
A new “Info” column was added to the “Label Scan” tab of Route Snapshots. You can hover over the Location Icon in the “Info” column to see a popover window showing where the label scan was performed on the map using its coordinates.
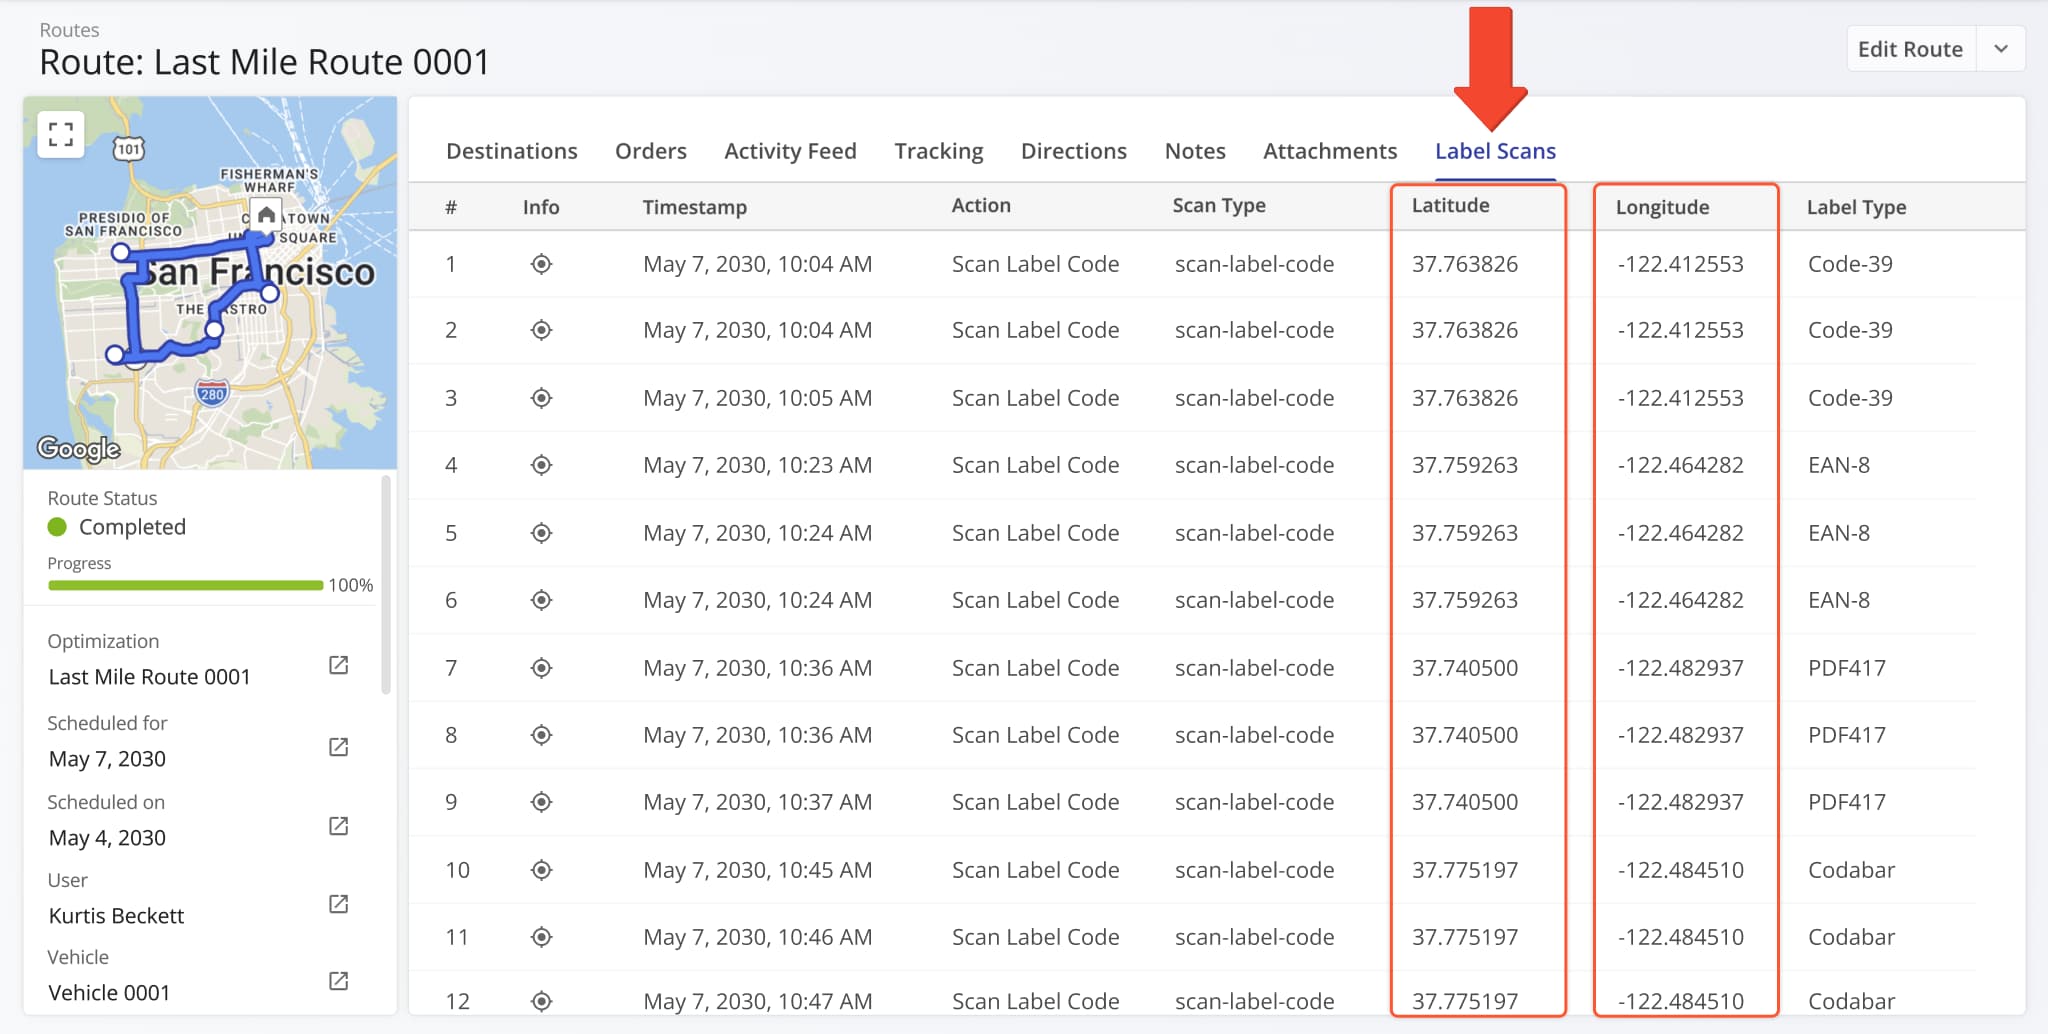
The “Location” column in the “Label Scan” tab of Route Snapshots was split into new “Latitude” and “Longitude” columns.
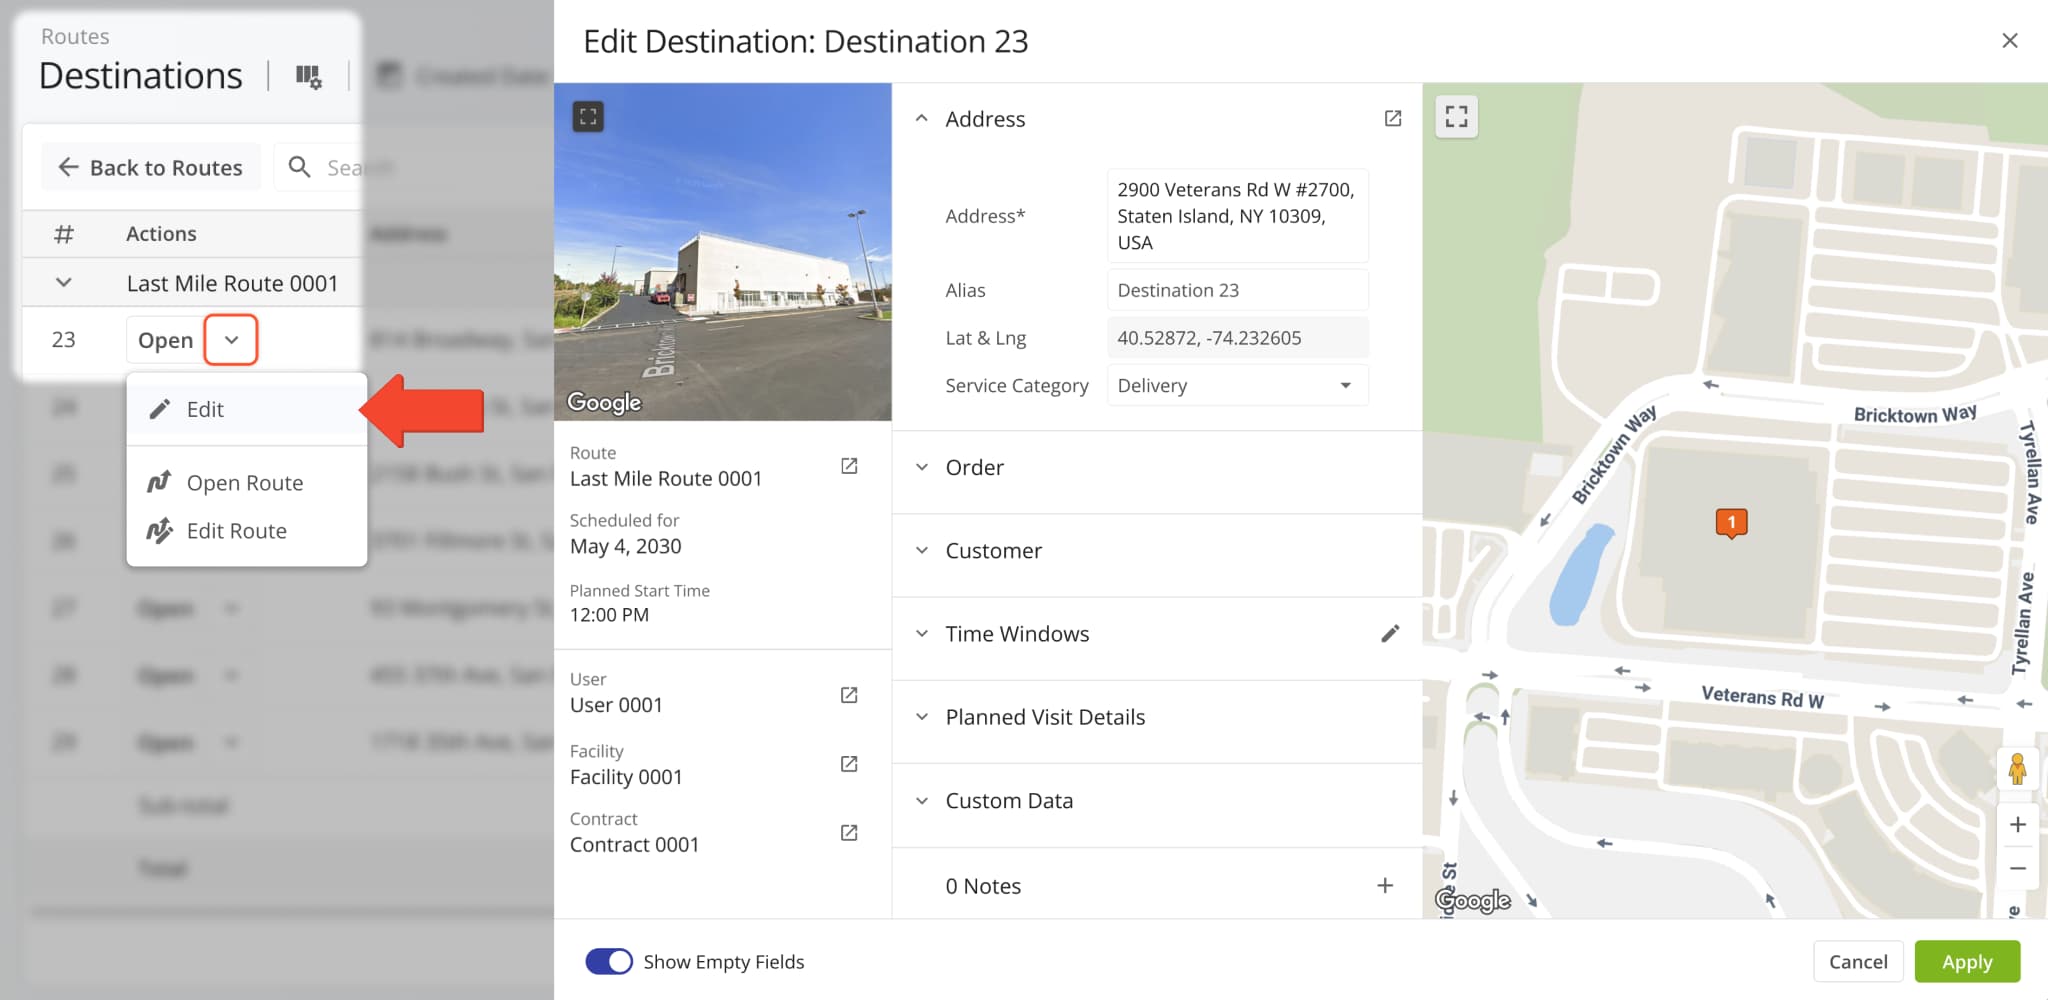
The “Edit Destination” panel, previously only accessible from the Routes Page, can now be opened directly from the Destinations List. Simply click the Down Arrow next to a Destination and select “Edit” to open the editor.
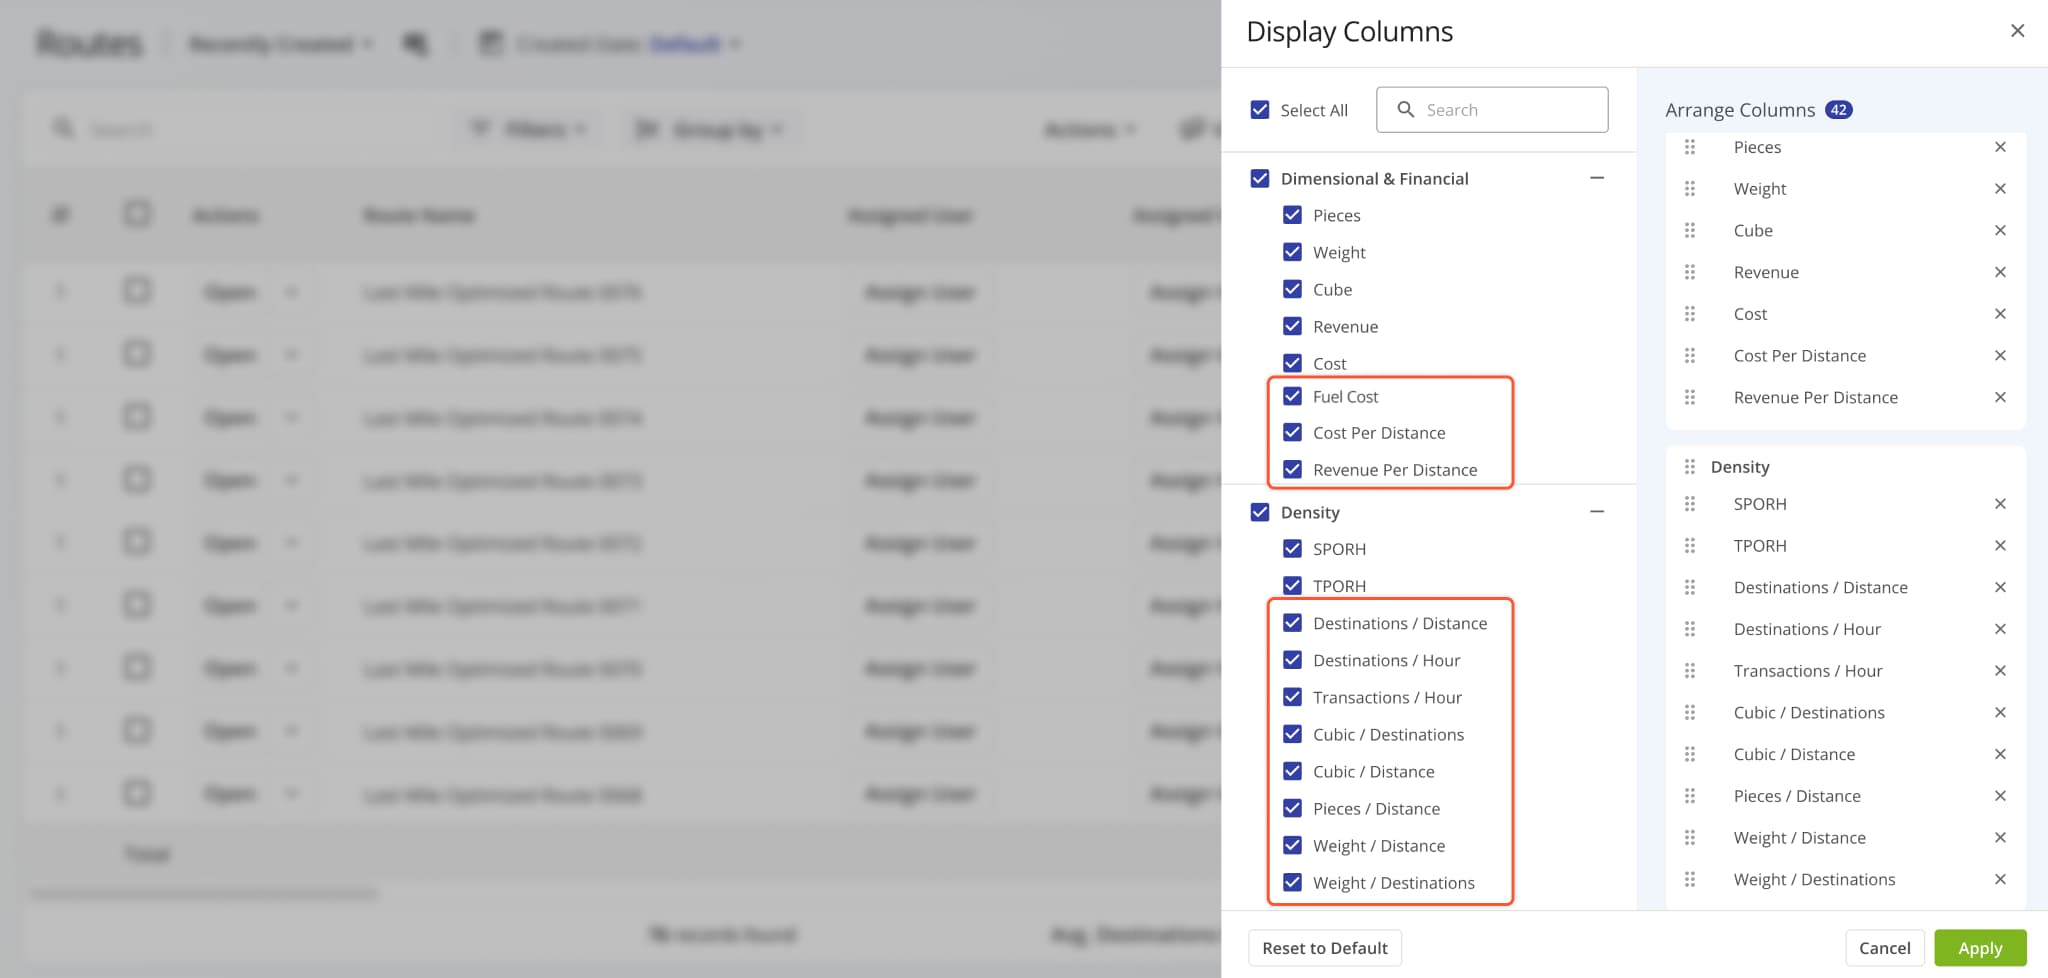
The Route Metrics interface on the Routes Page was updated with new data fields. After you open the Route Metrics, click the Gear Icon to customize the data fields shown in the metrics panel.
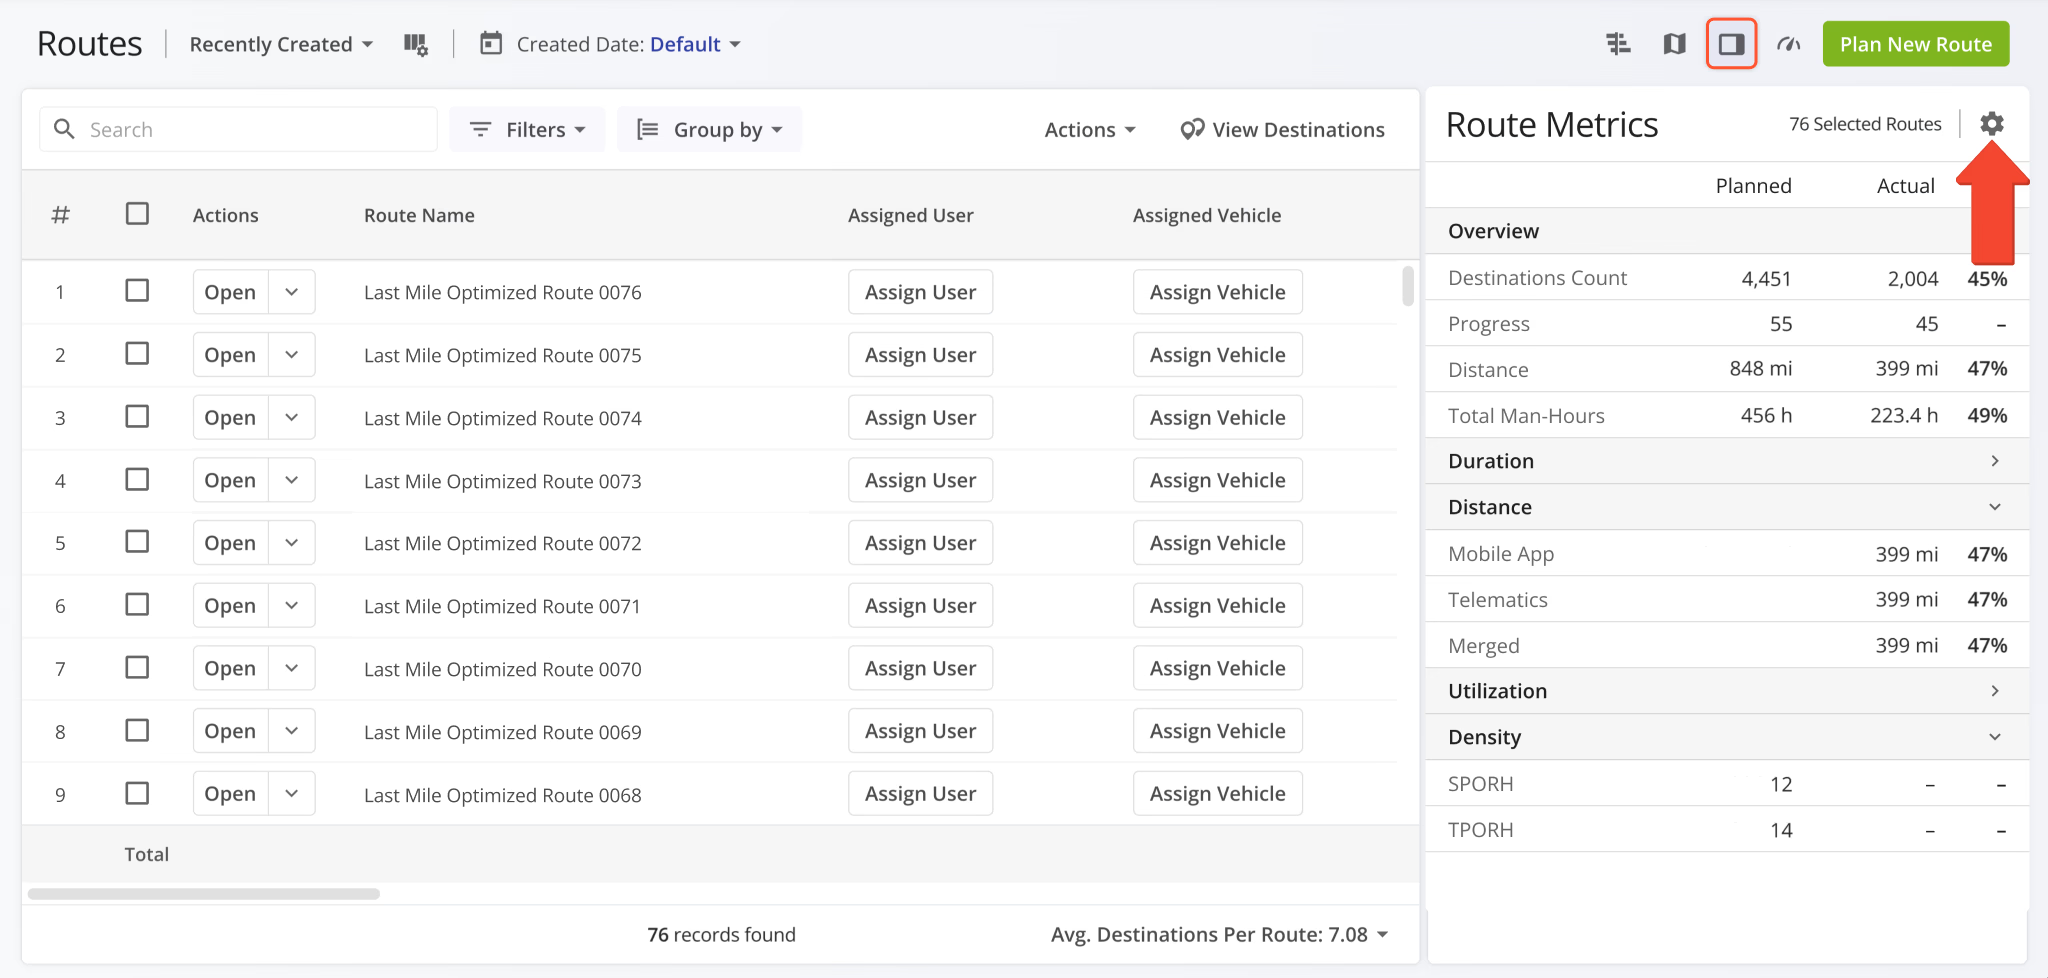
The distance data category was split into three new categories depending on the source of distance data (Mobile App, Telematics, or Merged). Additionally, new distance data items were added. Previously, you could only see planned and completed distance; now you can see different distance data metrics as percentages.
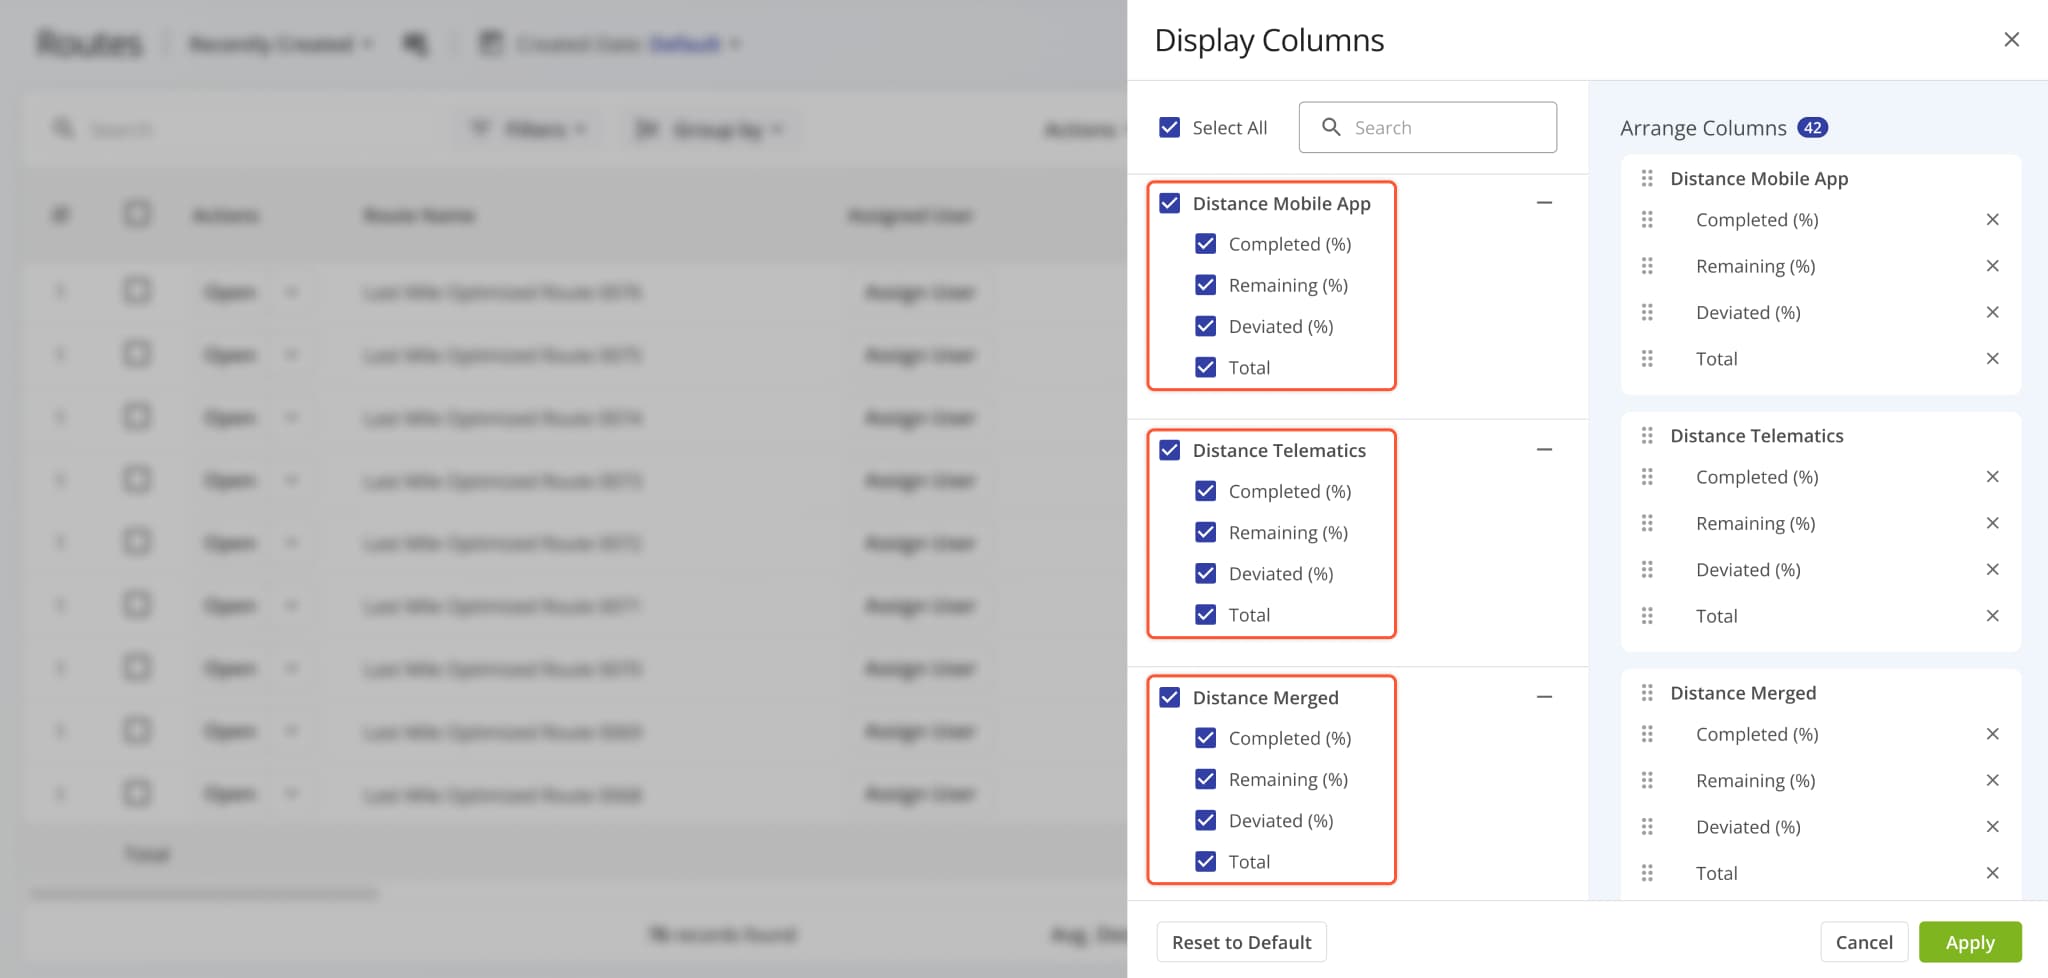
New fields were also added to the “Dimensional & Financial” and “Density” categories, as shown in the image below.
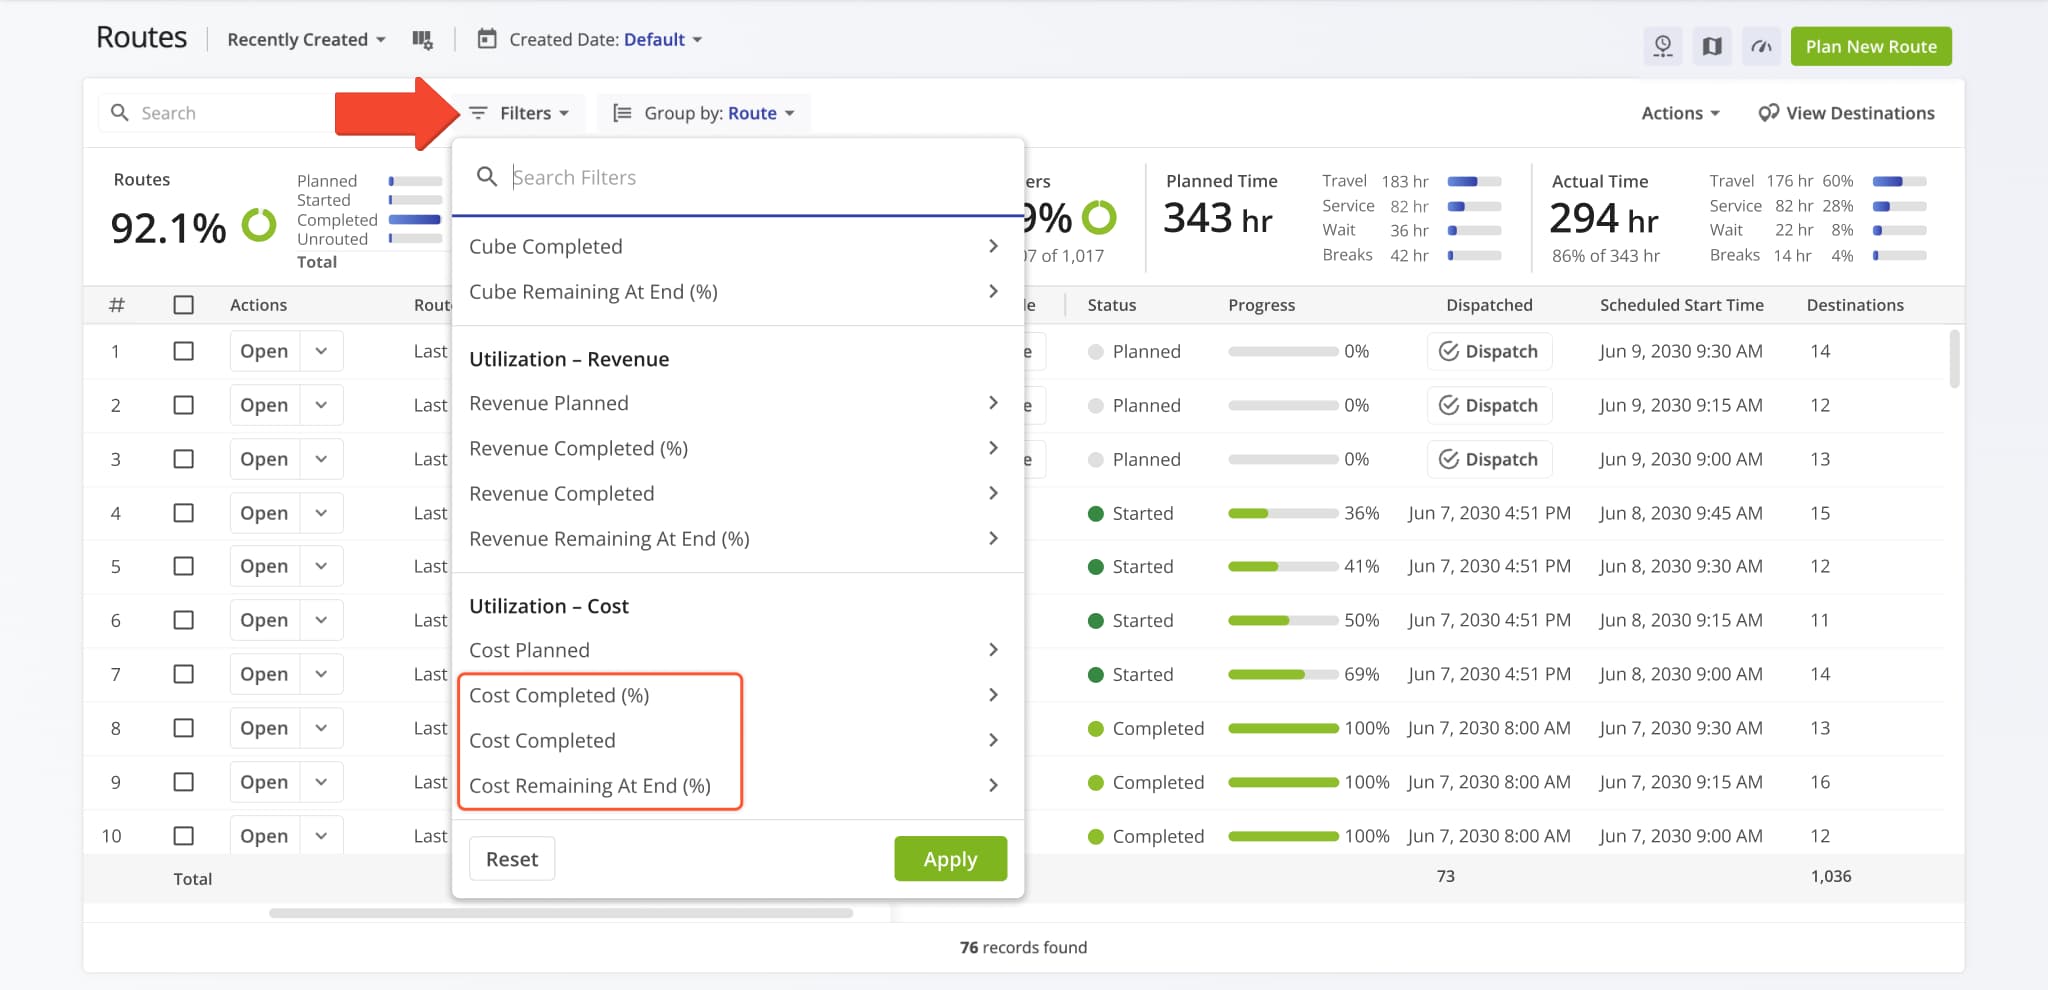
The “Utilization – Cost” filter category on the Routes Page was expanded with the following additional filter options:
- Cost Completed (%): Percentage of planned Cost value that’s been completed.
- Cost Completed: Total Cost value associated with completed destination visits.
- Cost Remaining At End (%): Percentage of planned Cost remaining (uncompleted) at the end of routes.
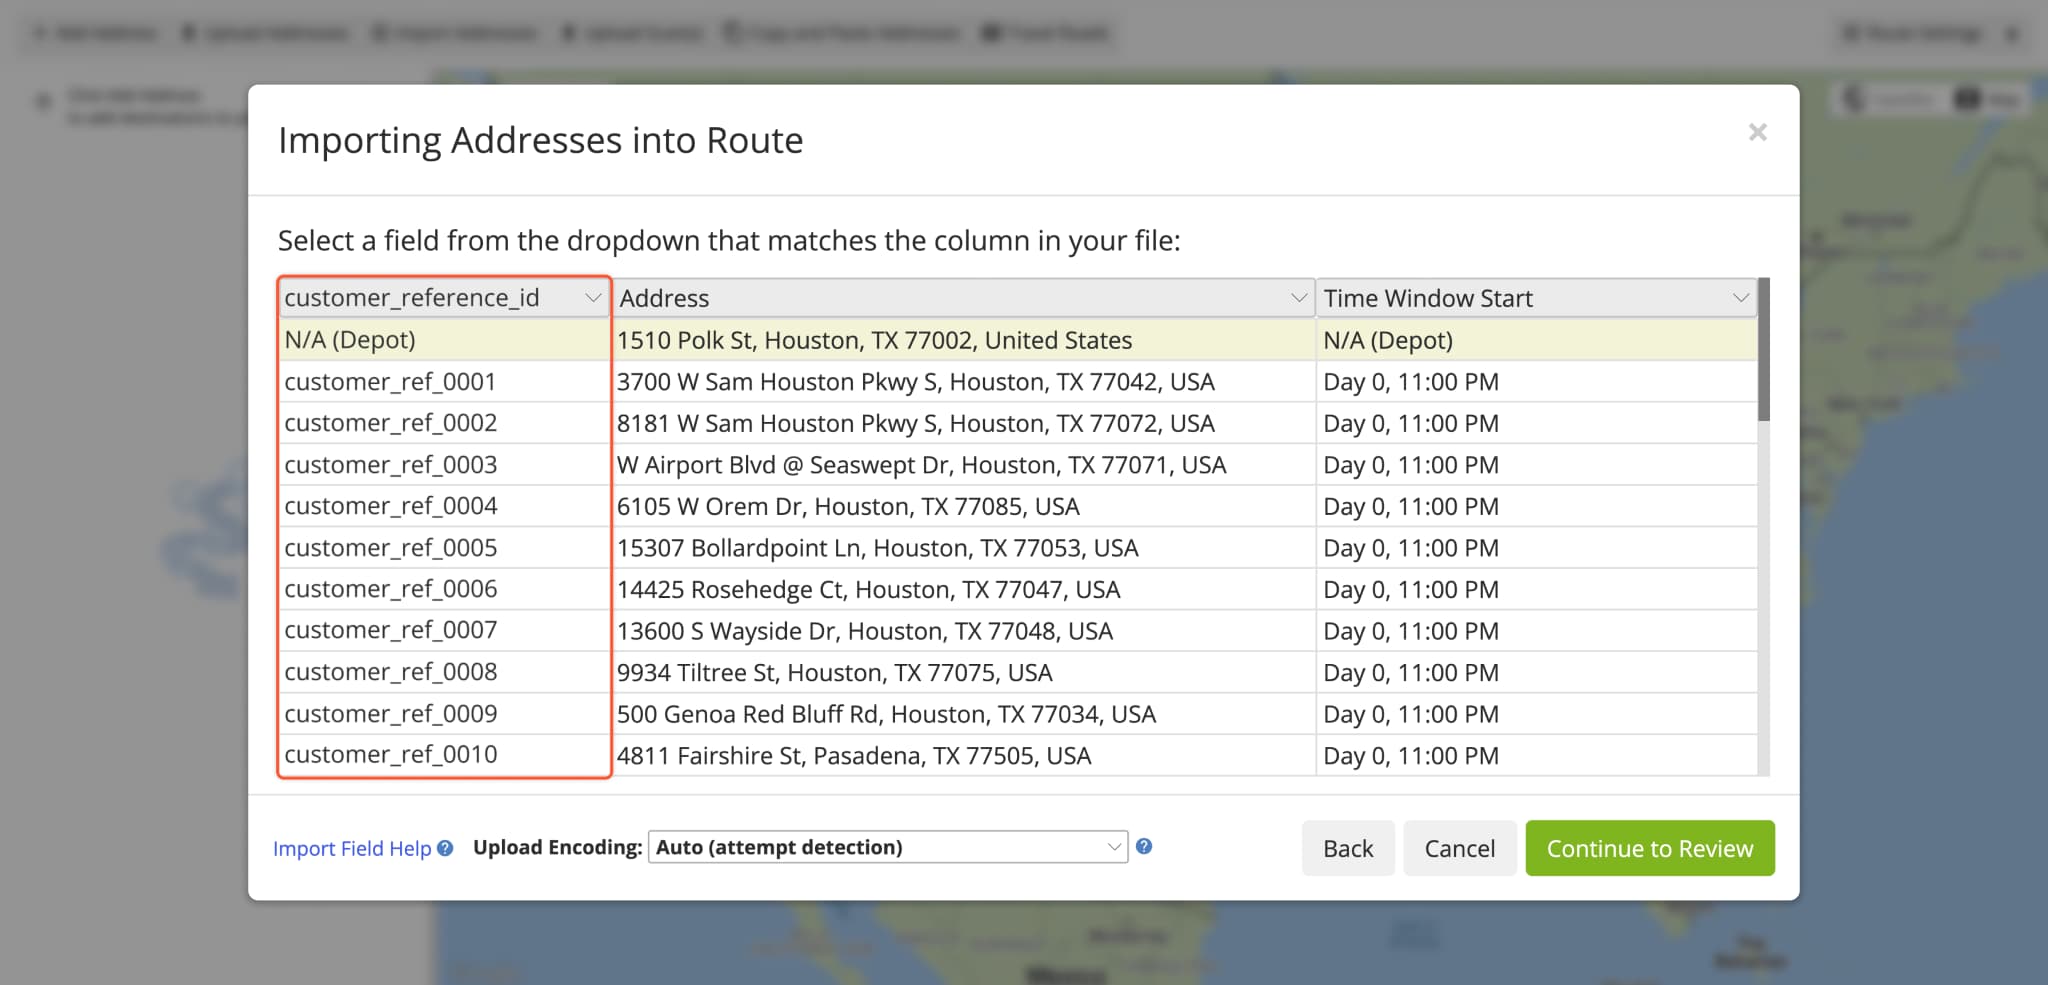
A new automatic data lookup function was added when you plan routes. You can now upload spreadsheets to plan routes that contain a single column with location reference IDs, and Route4Me will automatically fill all other applicable fields with Location Data from your account. Specifically, you can use the following reference ID types:
- address_id: Internal ID of a Location. You can find Location IDs in the “address_id” column when exporting Locations.
- client_reference_id: Unique client IDs associated with Locations set at creation or import.
- external_connection_object_id: Unique external system record IDs associated with imported Locations.
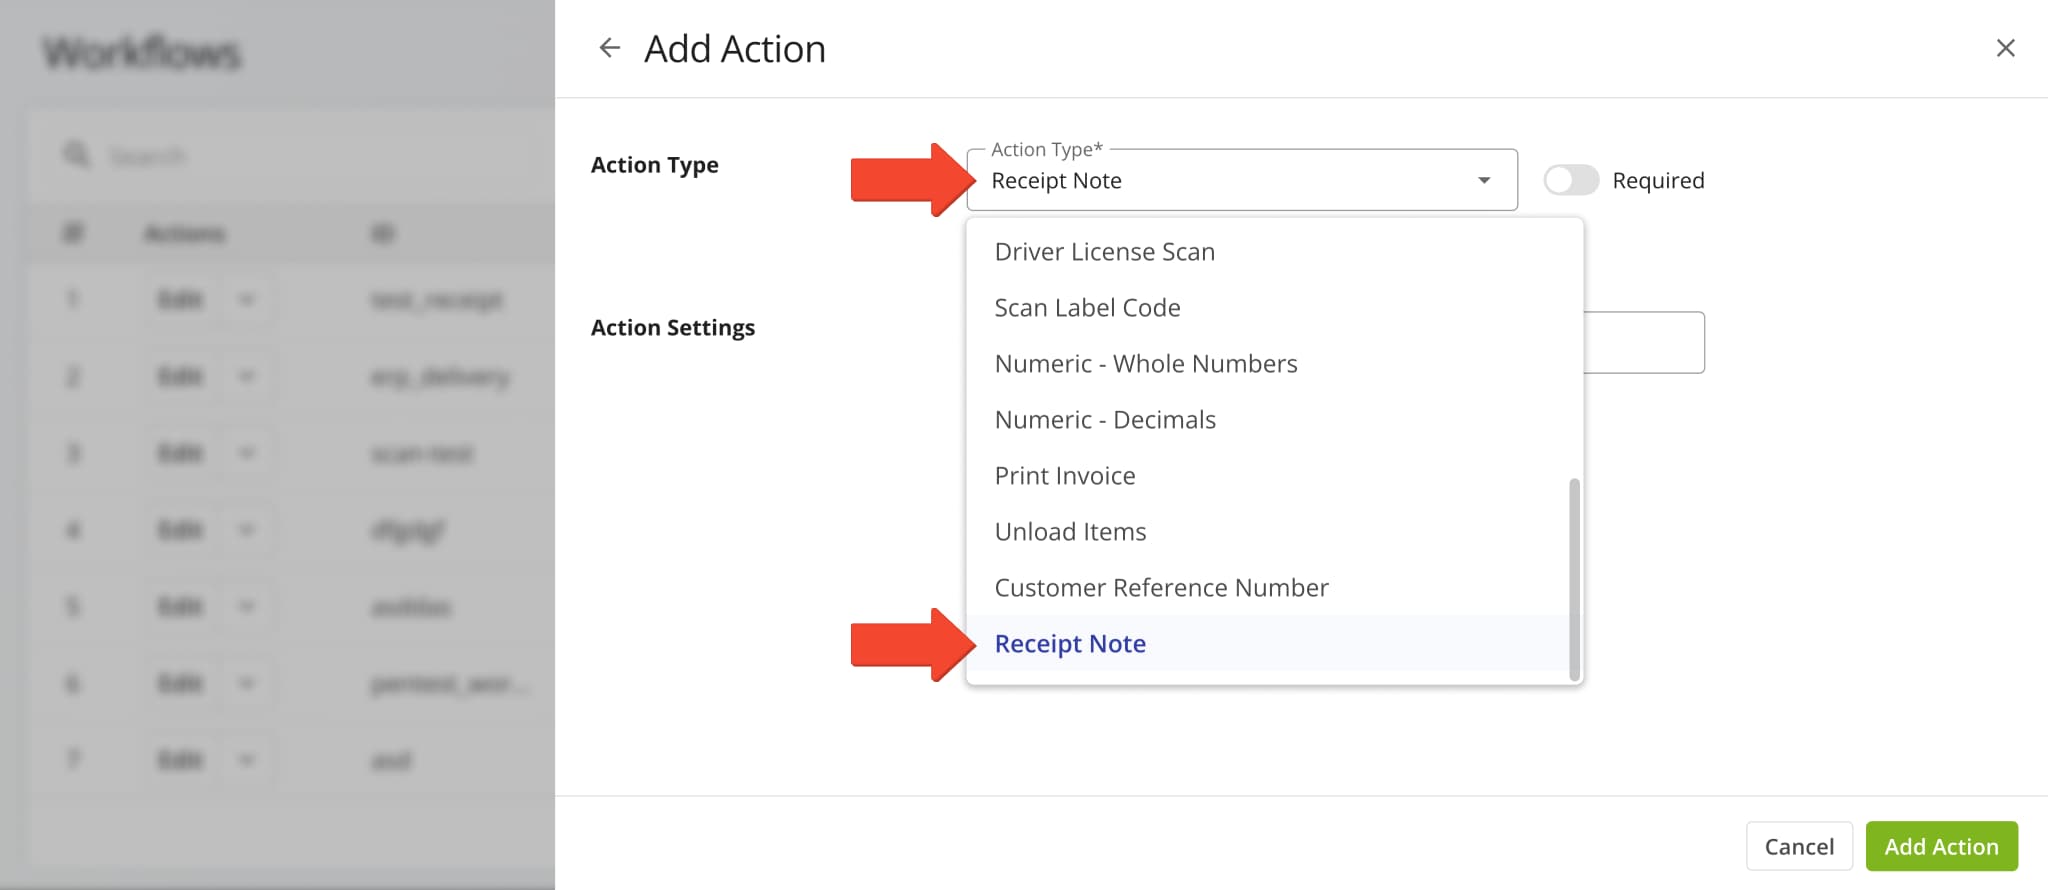
A new “Receipt Note” action was added to Workflows. With this new action type, assigned users can easily confirm the issuing or collection of receipt notes at destinations. Learn more about collecting proof of service.
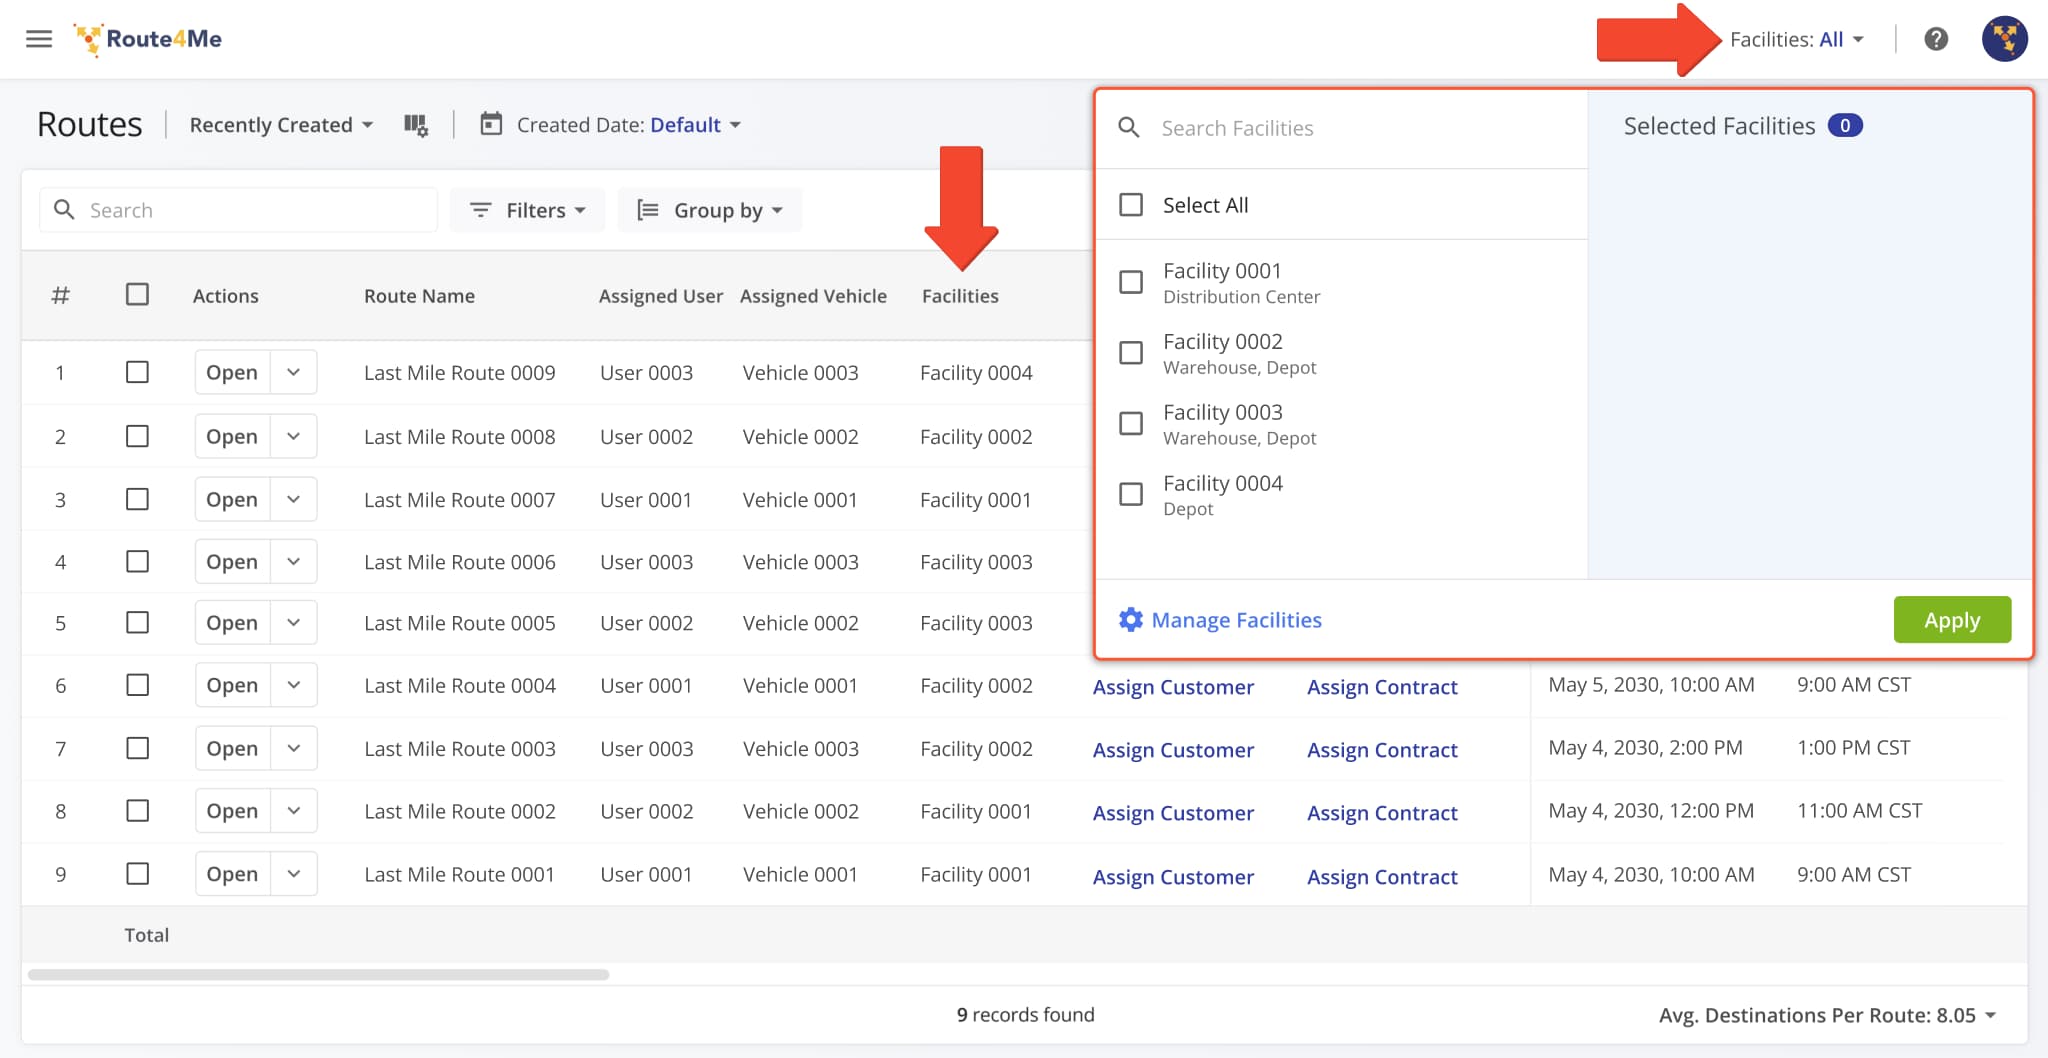
The “Facilities” field in the Route4Me Web Platform header was updated to show “All” when no Facilities are selected. This ensures consistent behavior by showing entities (Routes, Users, Vehicles, Locations, etc.) associated with all account Facilities when no specific Facilities are selected.
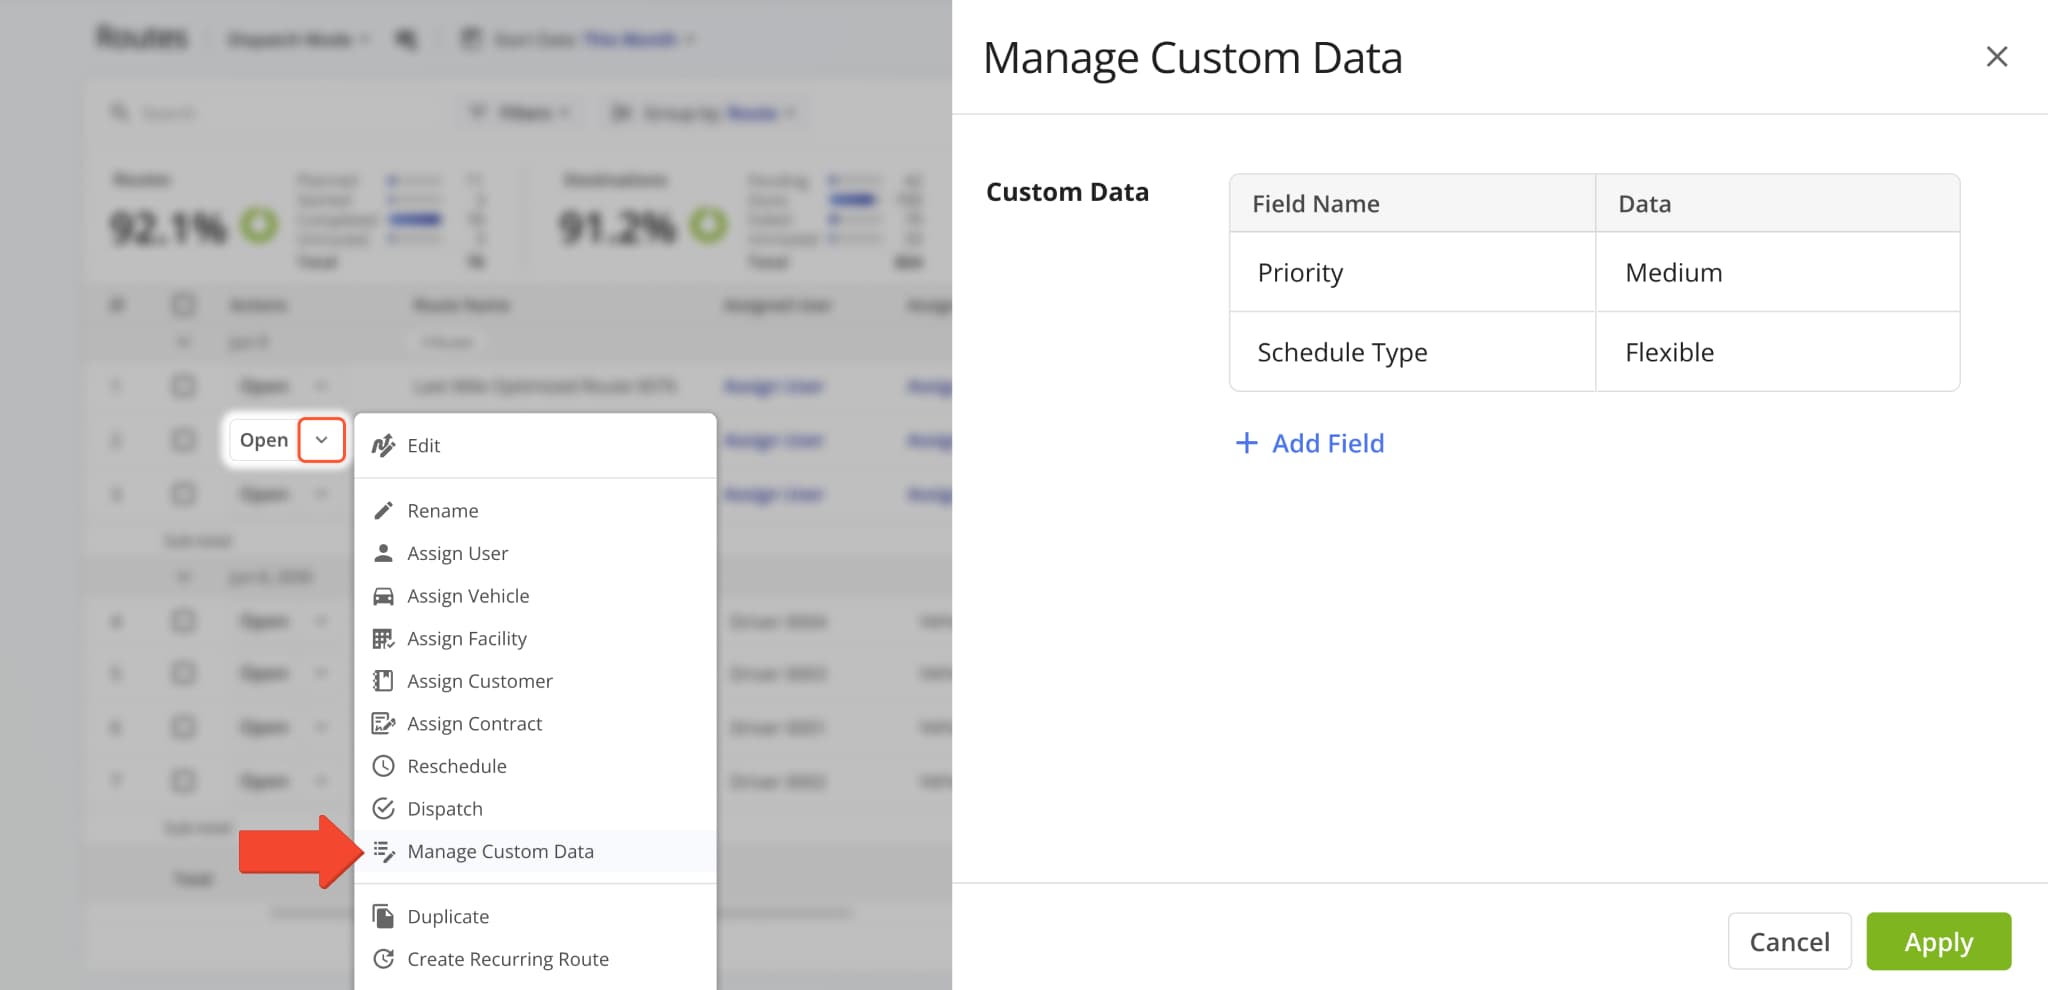
The “Manage Custom Data” interface on the Routes Page was changed from a popover to a full side panel. This update makes it easier to see and manage more Custom Route Data fields with better utilization of the available screen space.
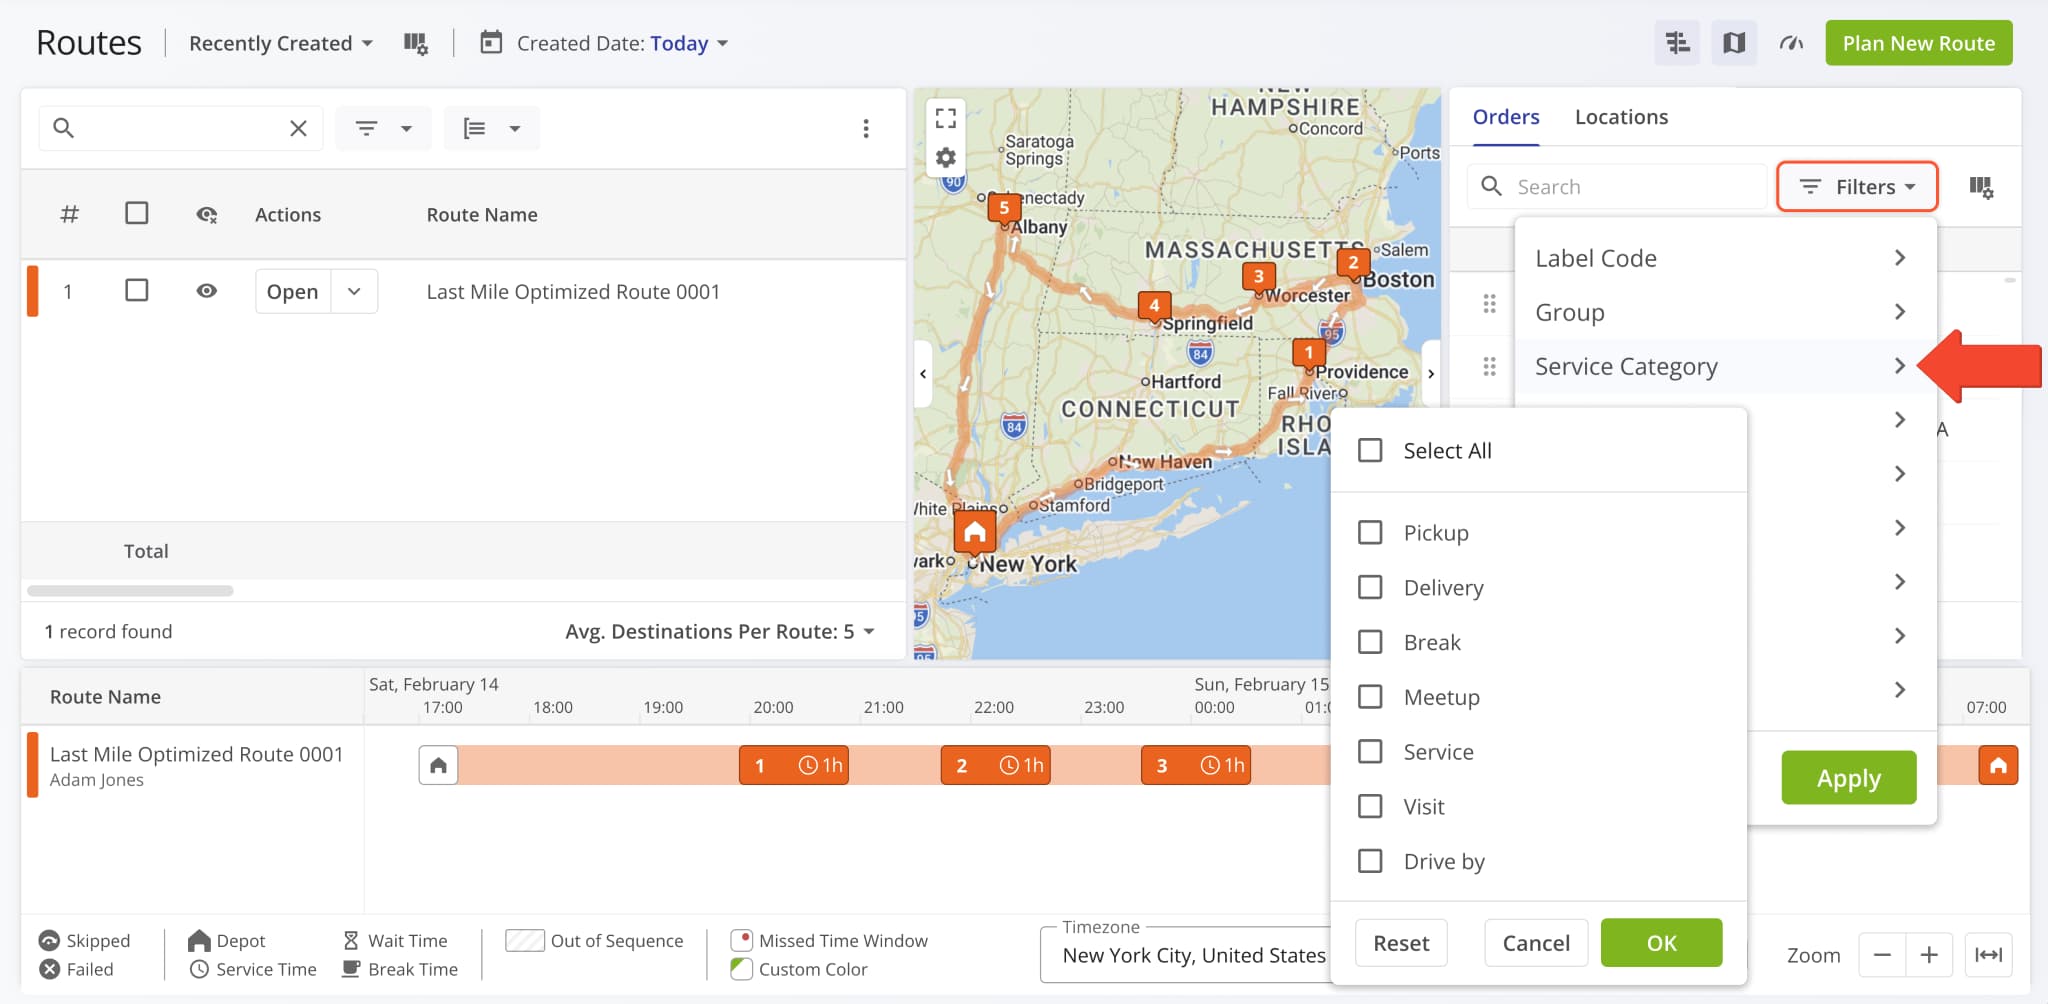
The “Order Type” filter and display column in the Routes Map sidebar was renamed to “Service Category“.
This update improves parity and consistency across Route4Me’s various route management tools and pages.
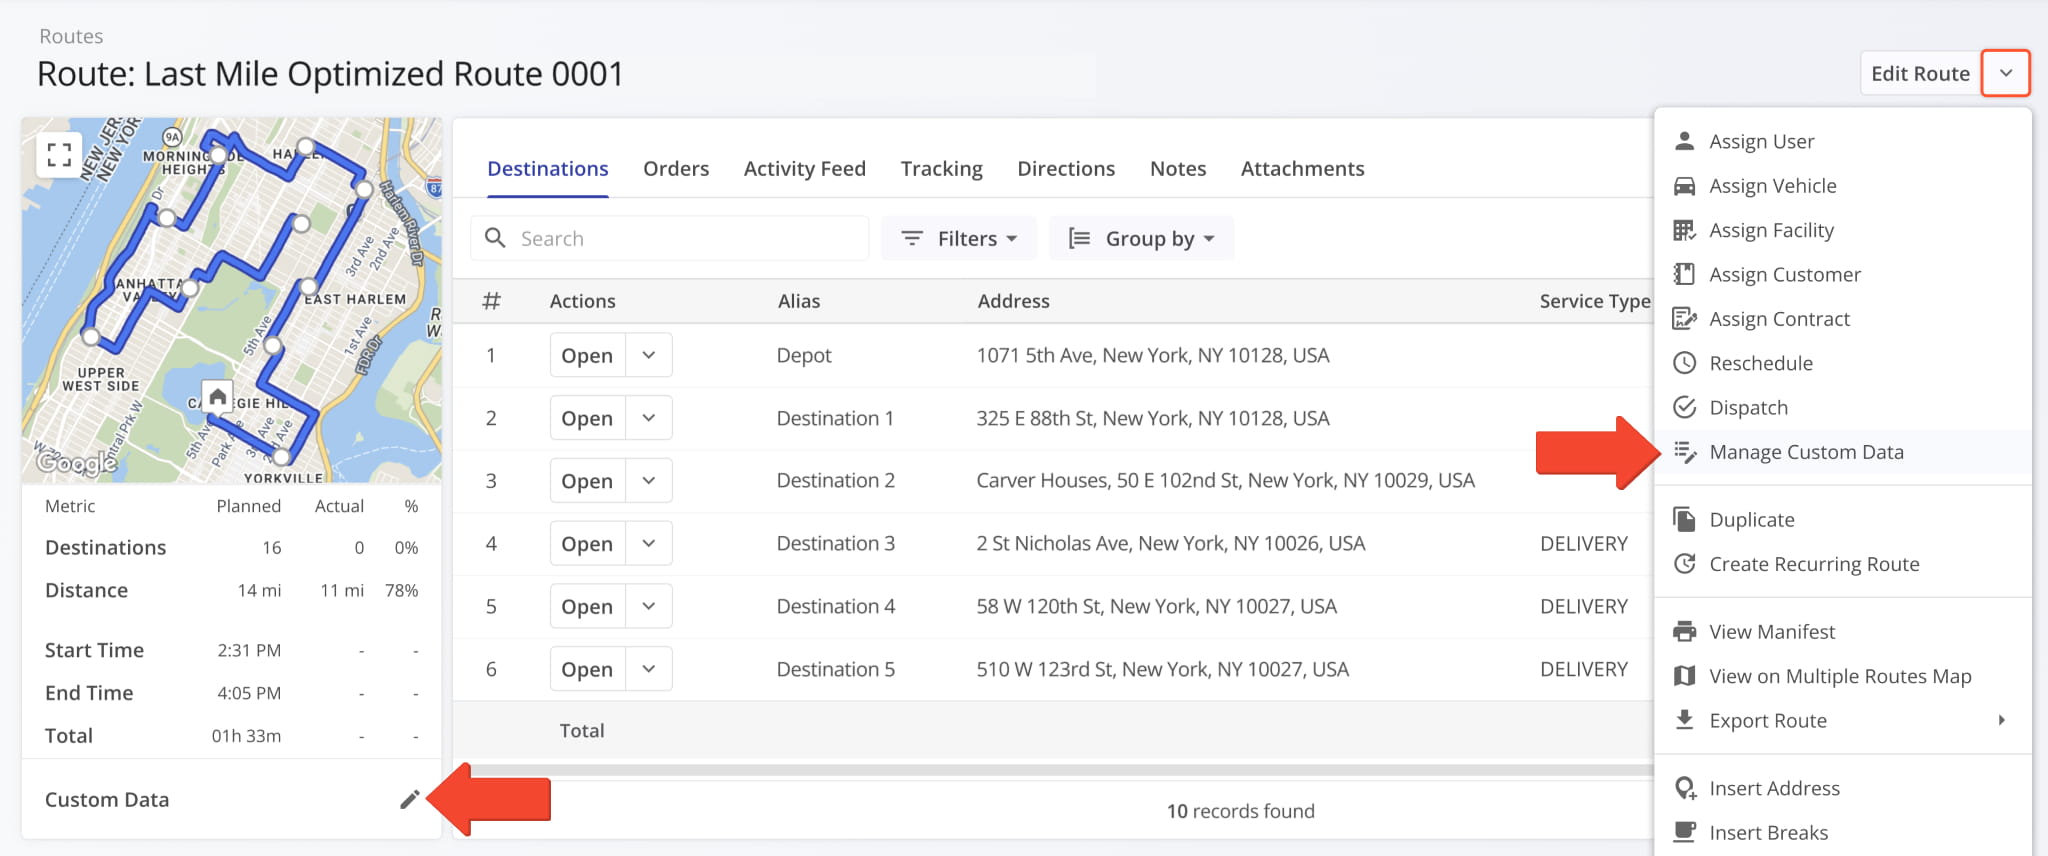
You can now add and manage Custom Route Data directly from an open Route Snapshot. A new “Manage Custom Data” option was added to the “Edit Route” menu.
You can also scroll to the bottom of the Route Summary and click the Pencil Icon next to “Custom Data“.
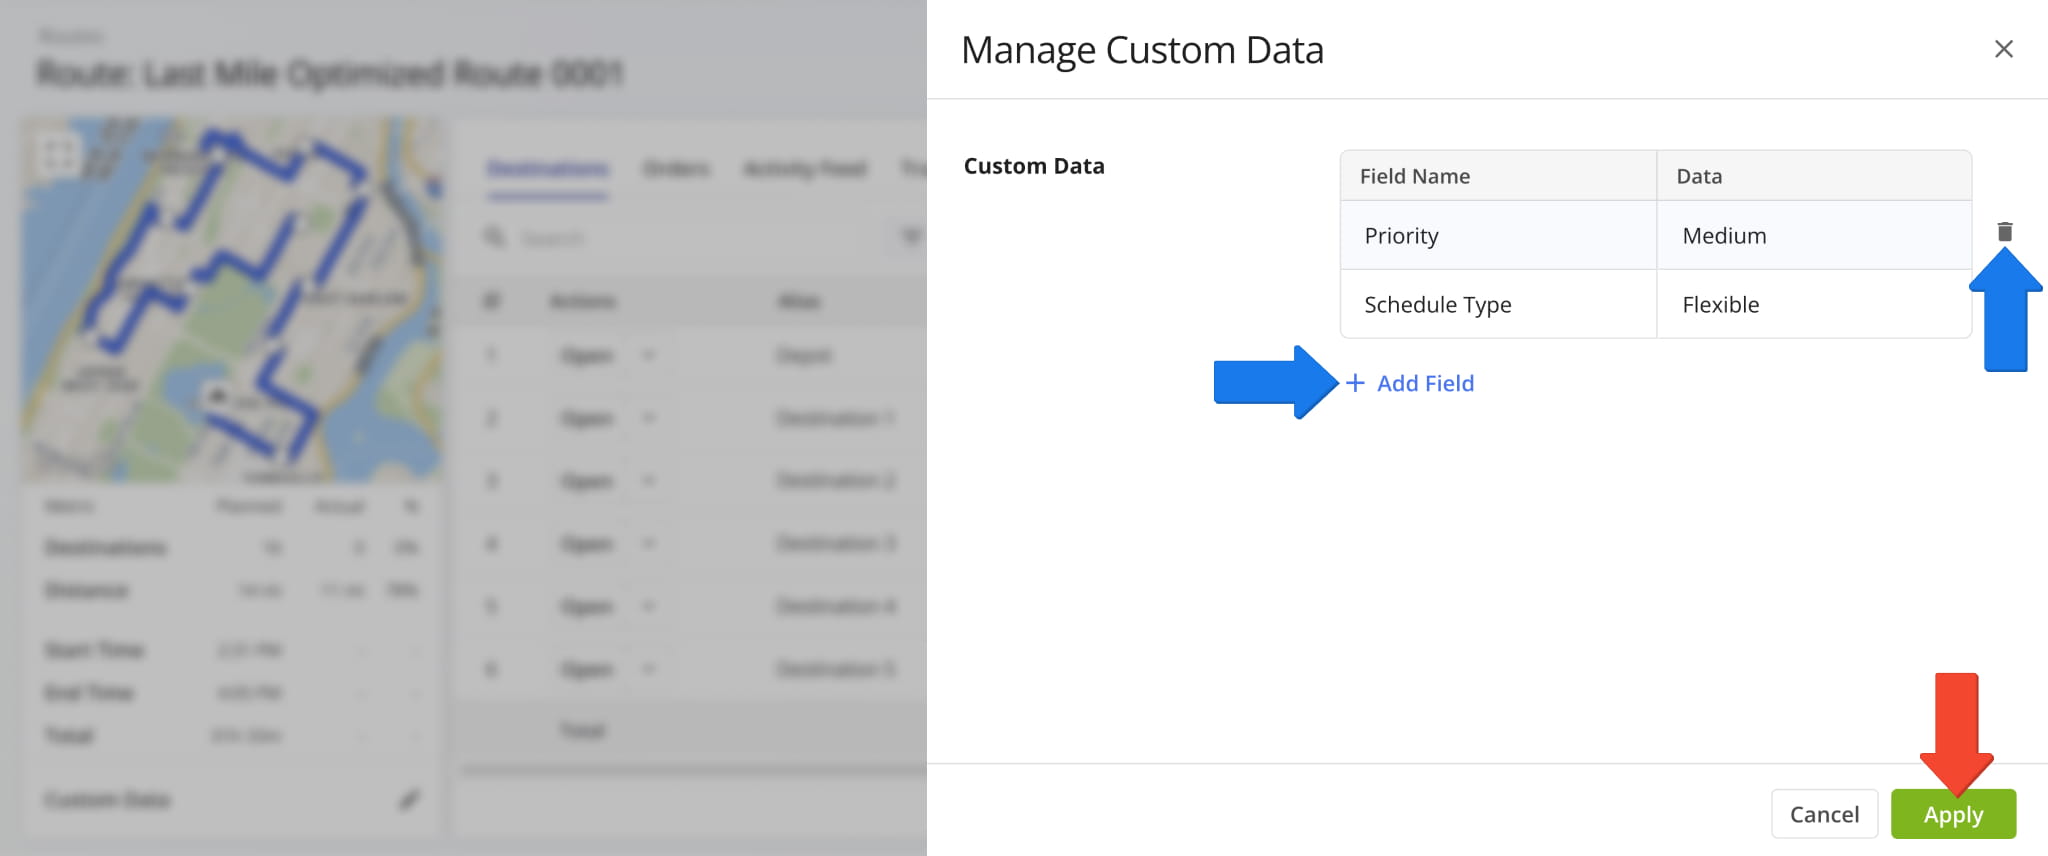
In the “Manage Custom Data” panel, you can see Custom Data associated with the route, add Custom Data fields with the “Add Field” button, and remove Custom Data by clicking the Delete Icon.
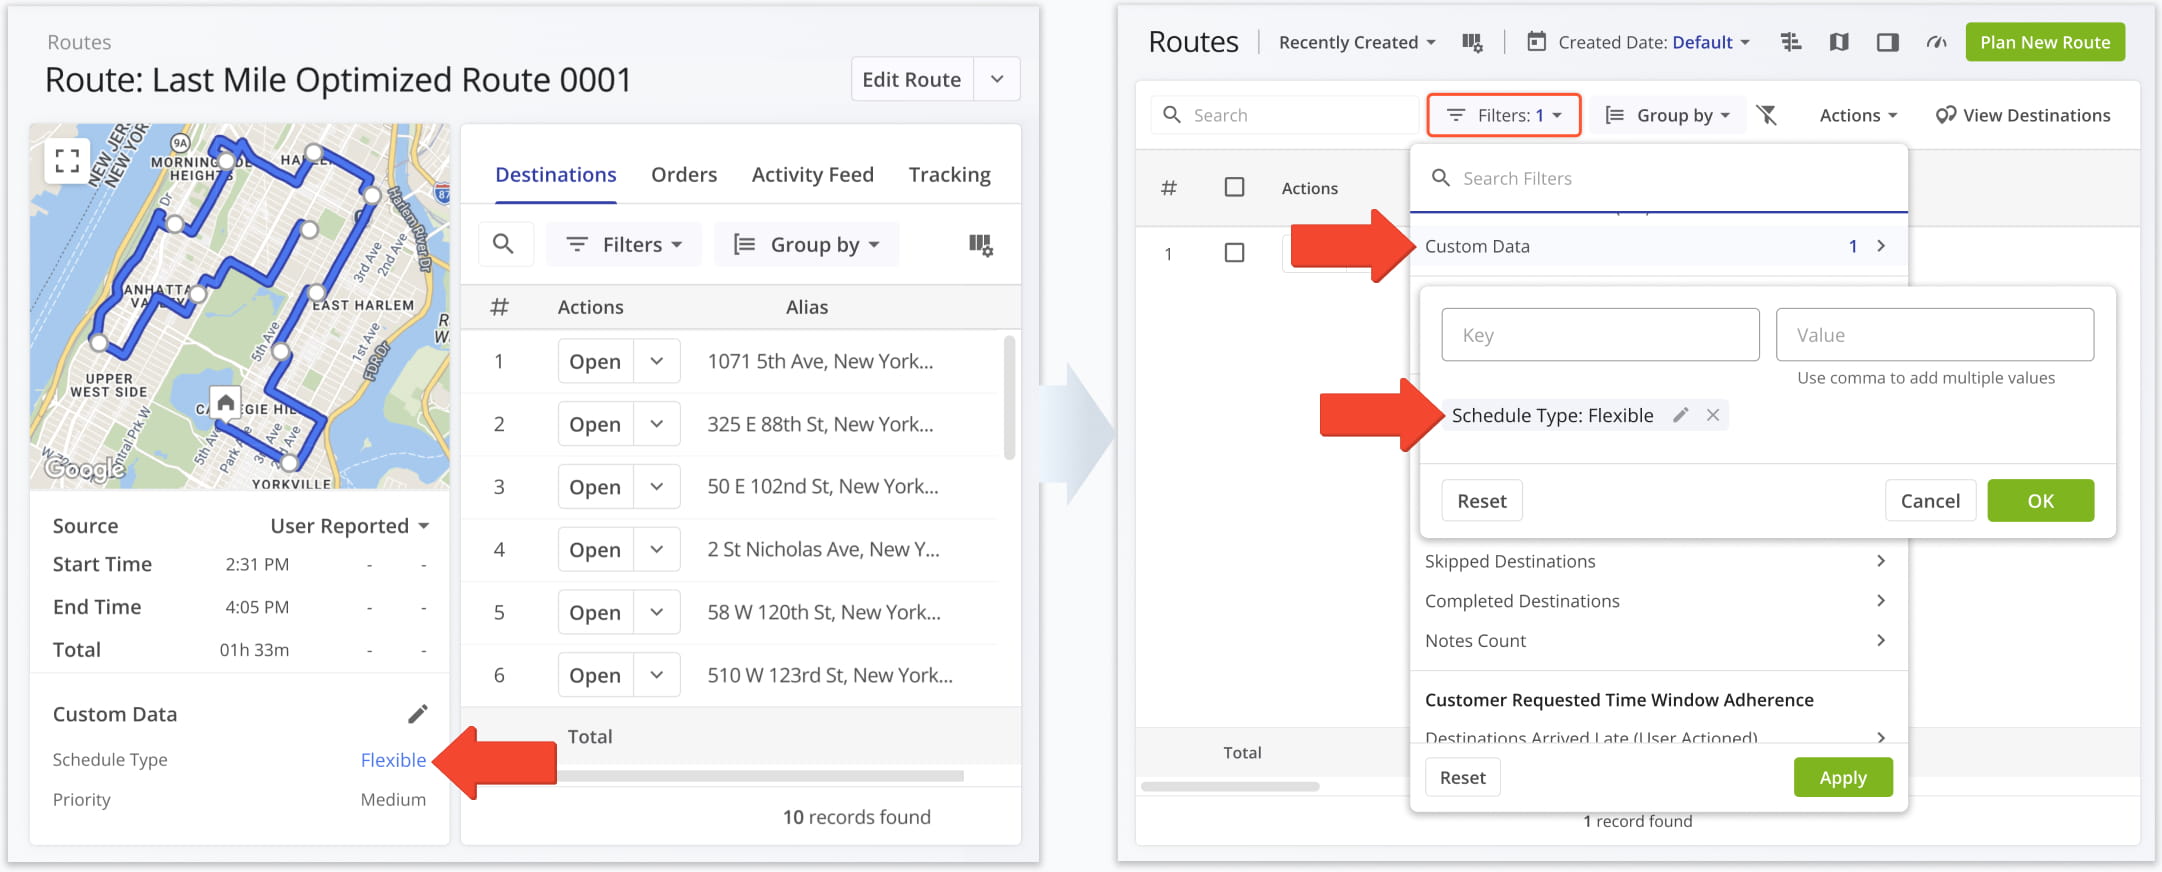
You can also click a Custom Data value in the Route Summary to open and automatically filter the Routes Page to show only routes with the corresponding Custom Data field and value.
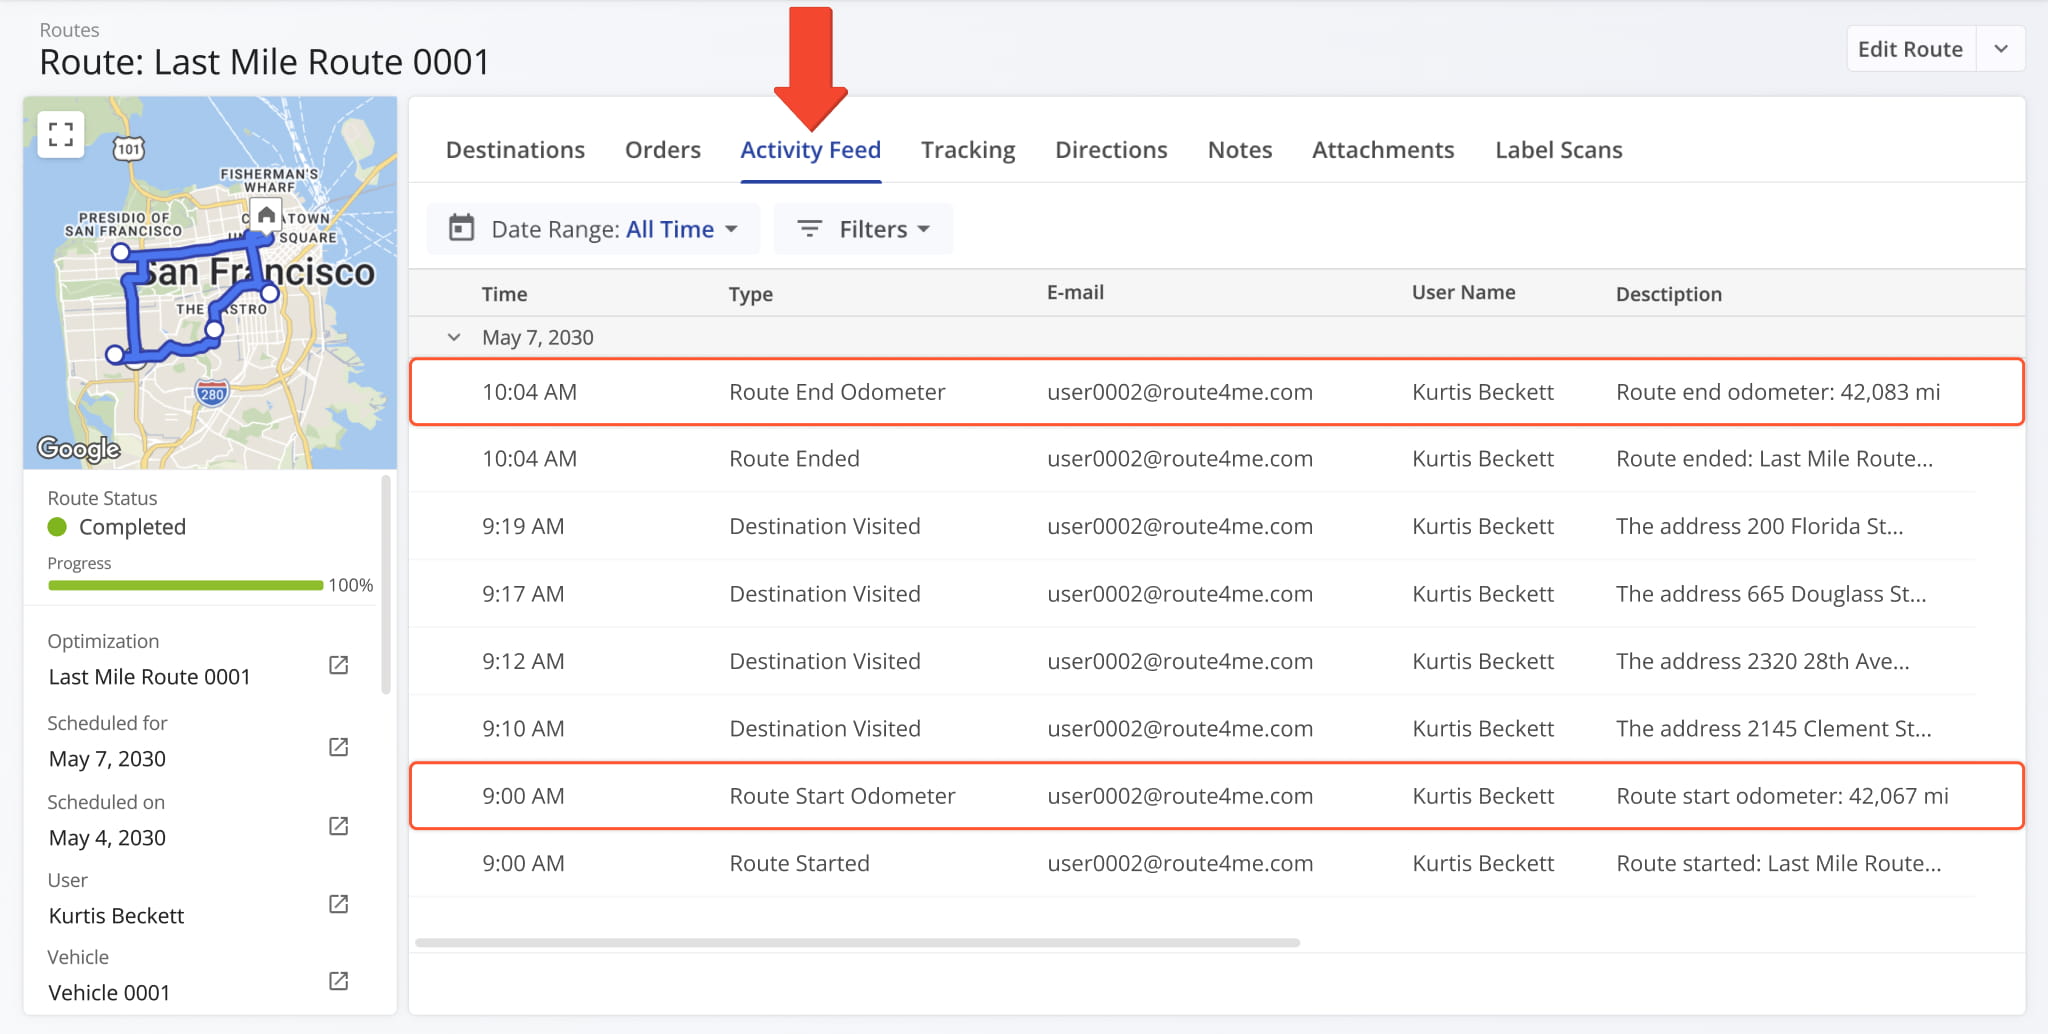
Vehicle odometer reading events were added to the “Activity Feed” section of Route Snapshots. Route4Me synchronizes imported vehicle odometer values at the start and end of routes.
Route start and end odometer synchronization are separate events that show the corresponding odometer readings.
A new “Cancel Requested” order status was added to the ERP Order Management System. Just like other statuses, it can also be used to filter your Orders List to show only orders with that status. Learn more about Route4Me Order Statuses.
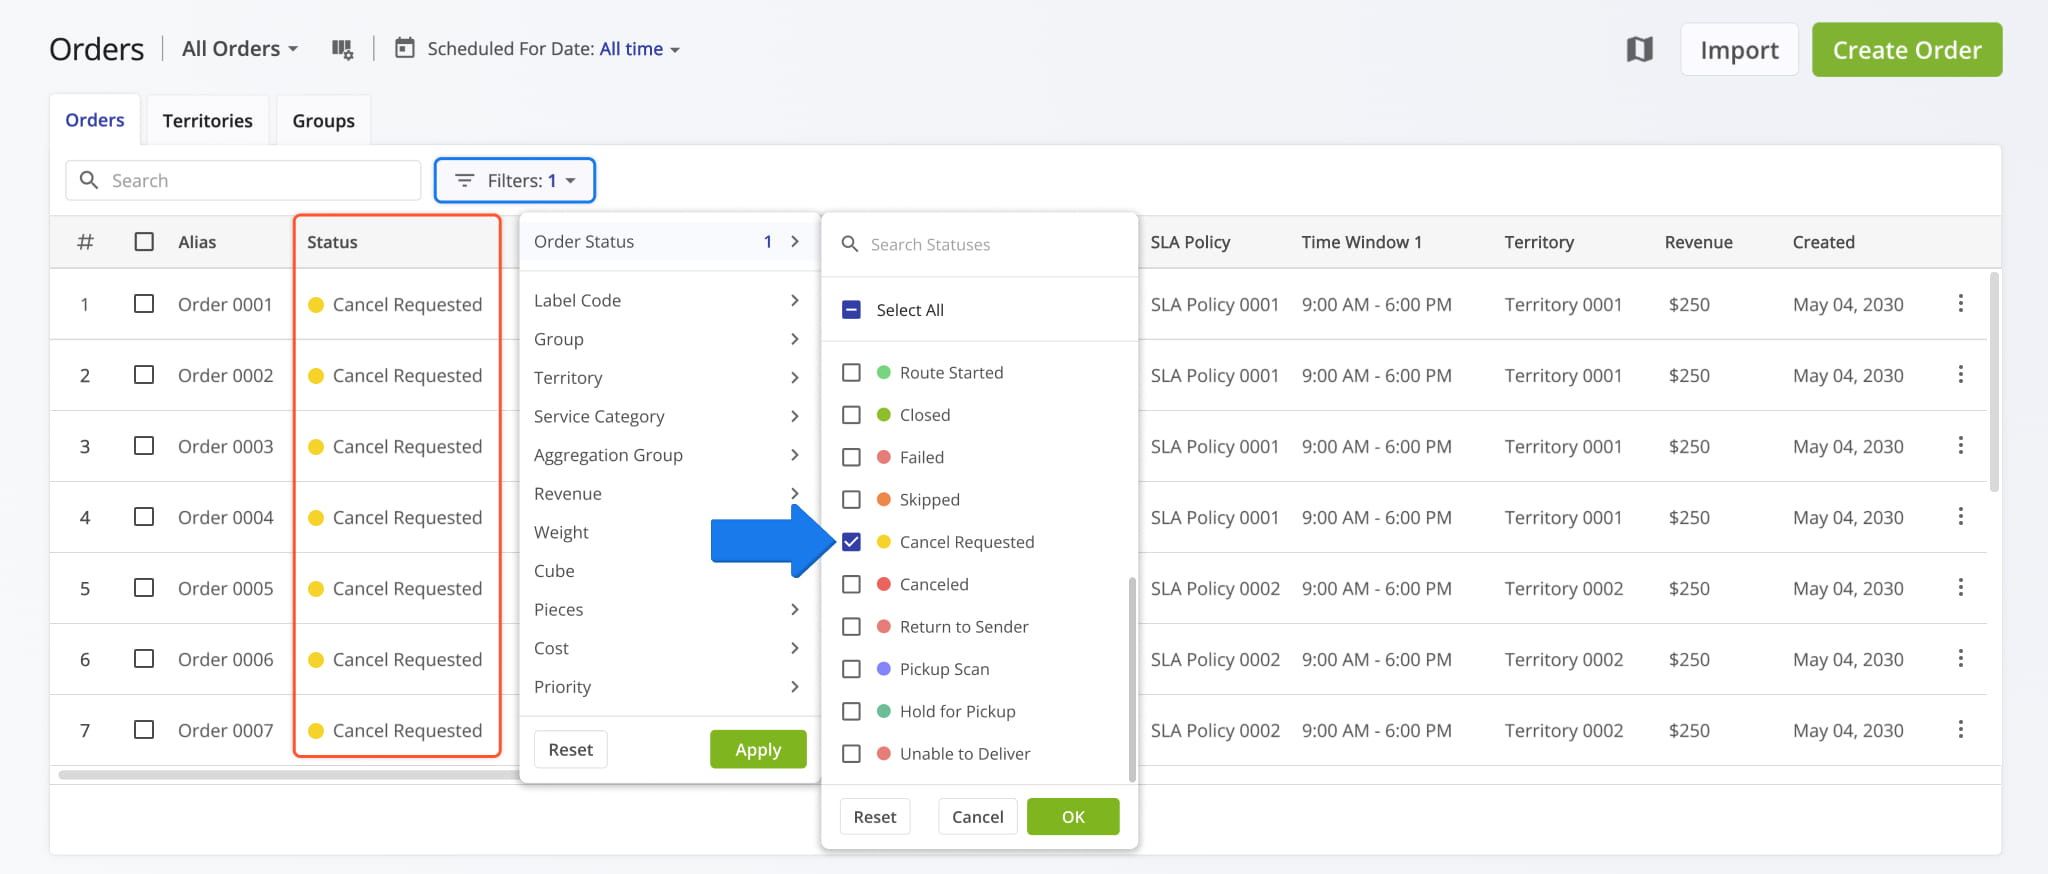
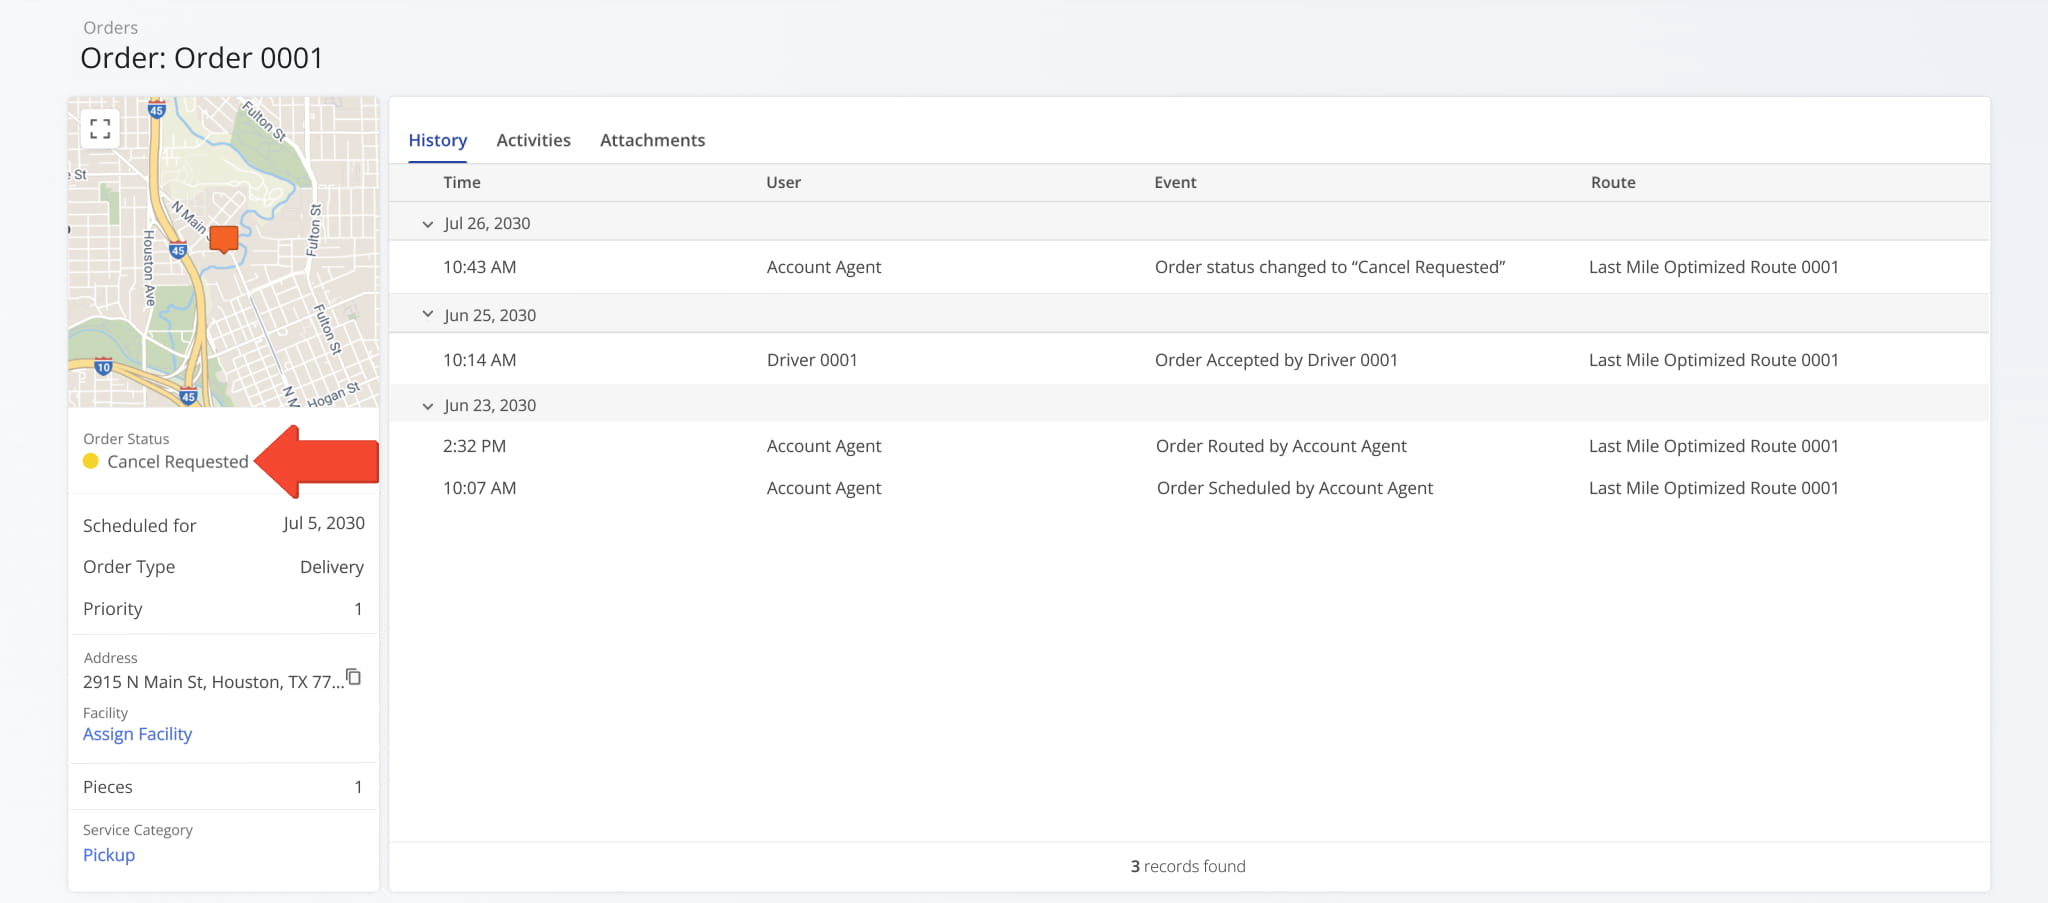
The new “Cancel Requested” order status is also visible in Order Snapshots.
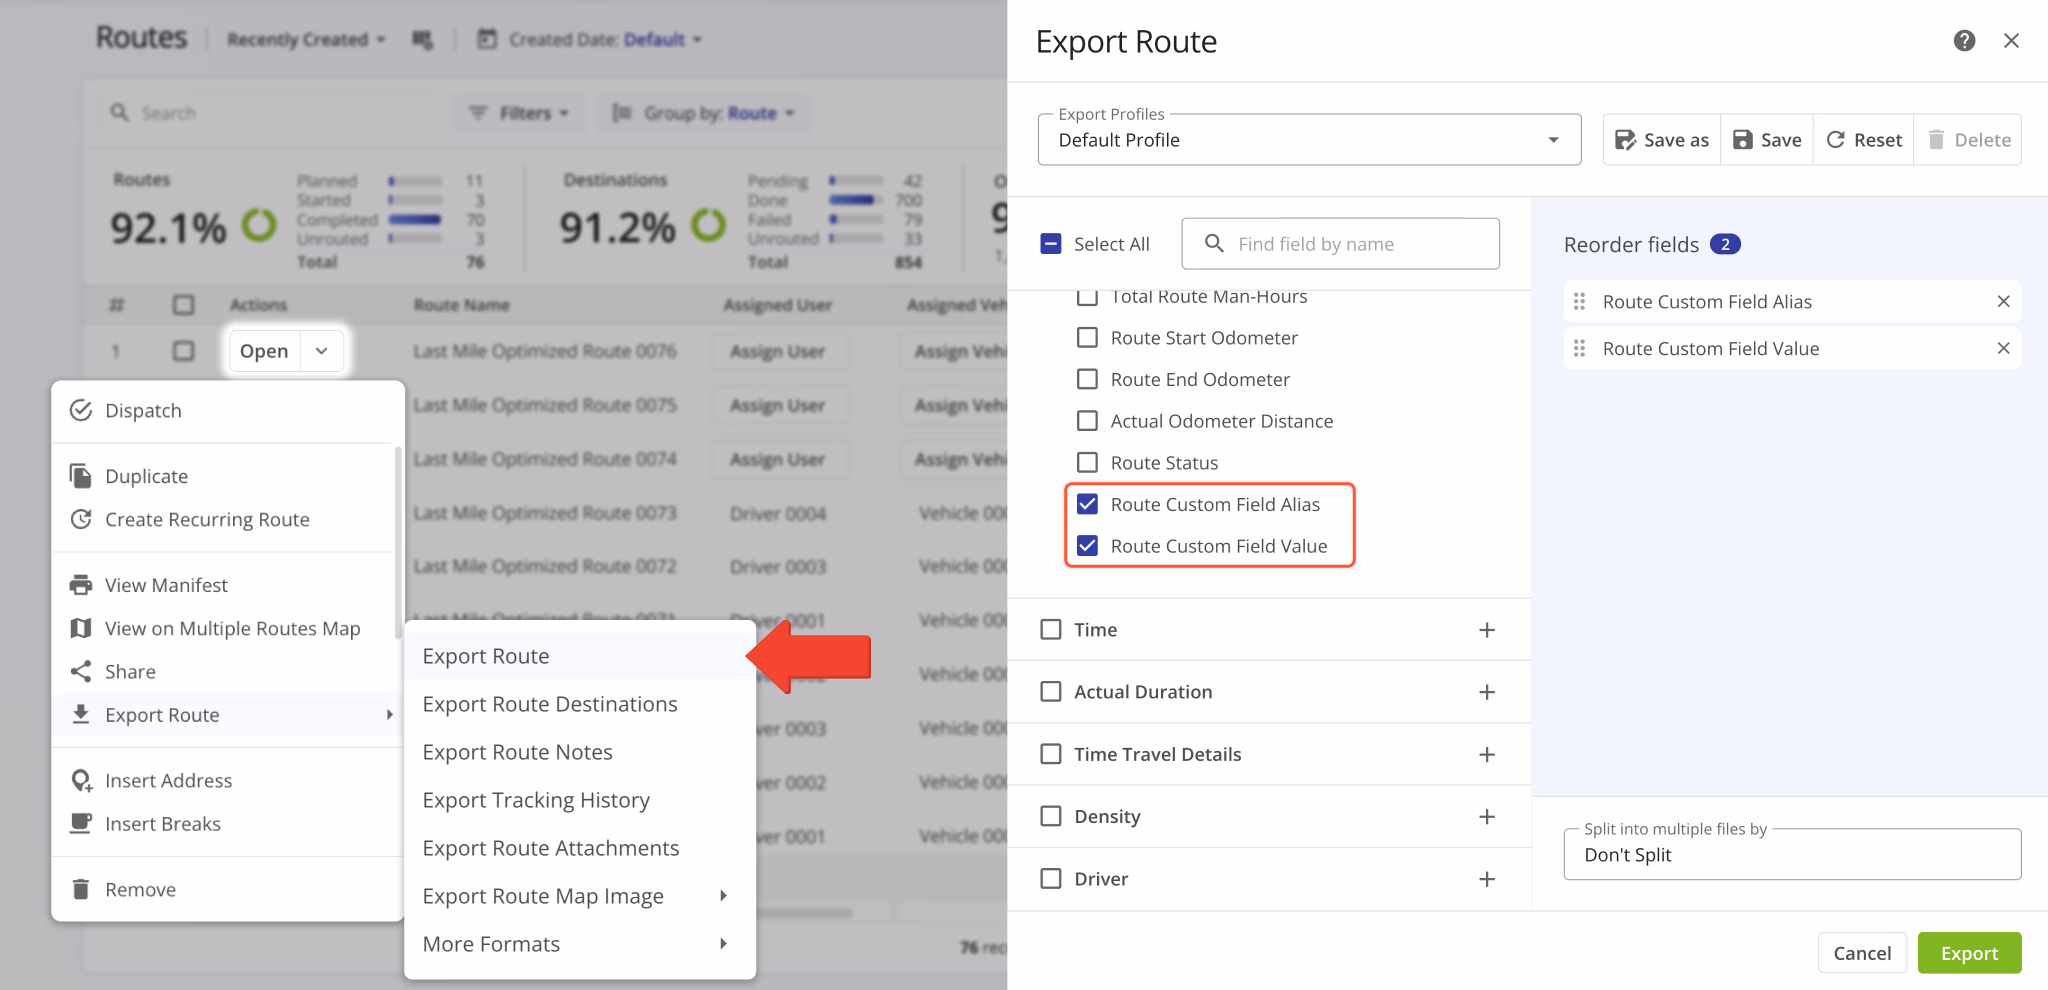
Two new Custom Data fields were added to the Route Export options. These new options enable you to include Custom Data field aliases and values as separate columns in exported route data spreadsheets.
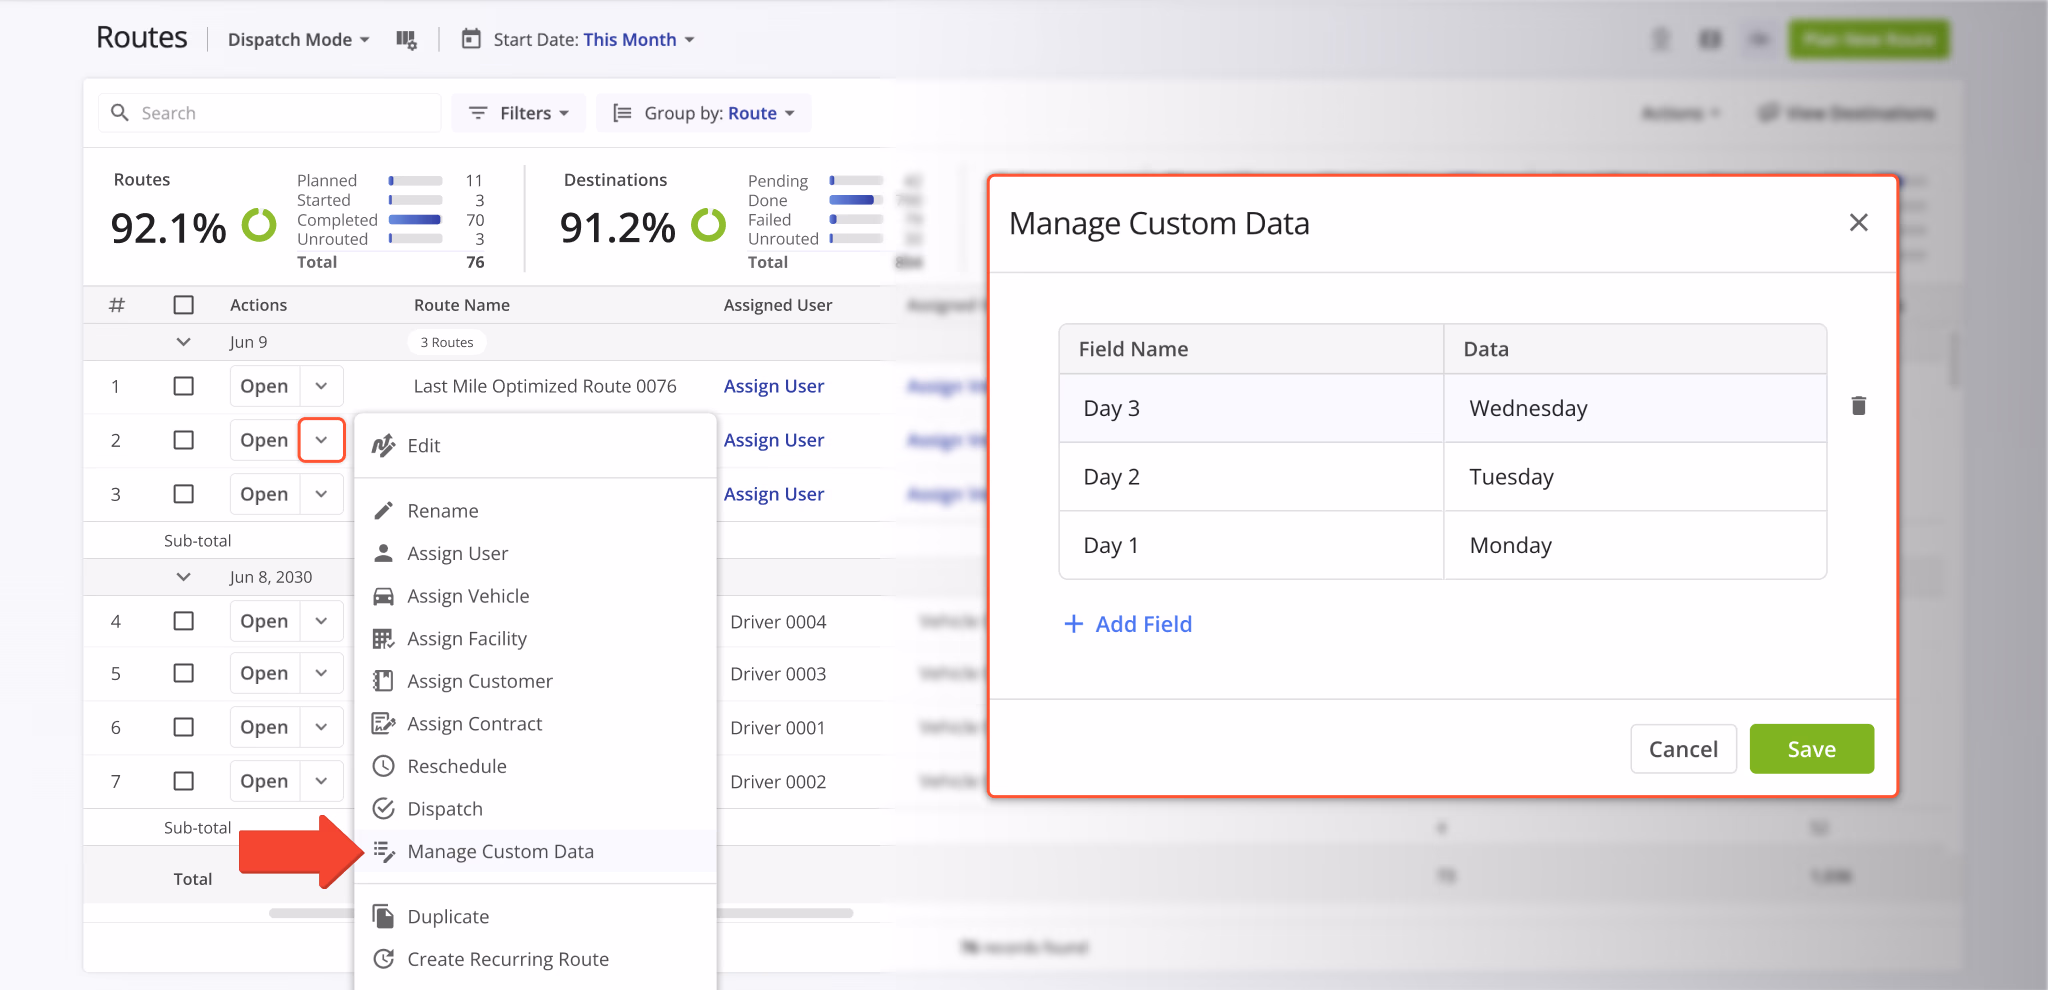
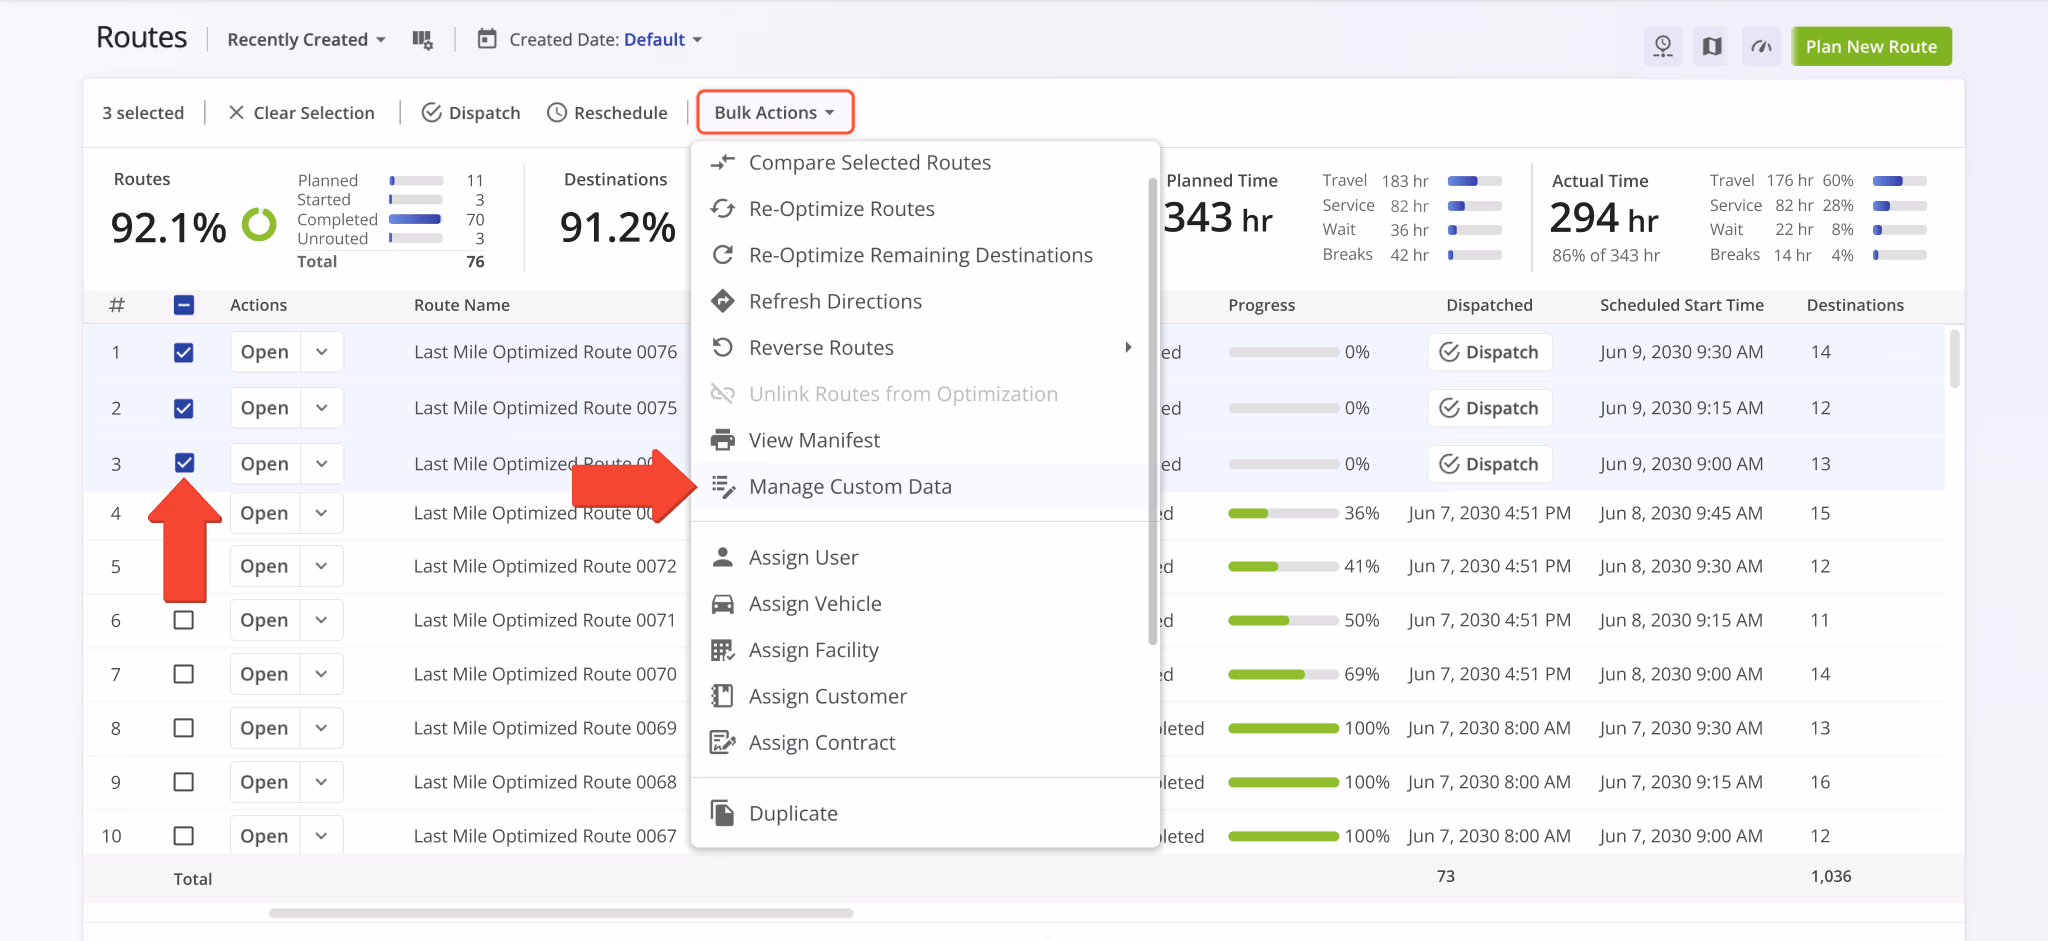
You can now open, add, and manage Custom Route Data directly from the Routes Page. A new option was added to the route action menu. Click the Down Arrow next to a route and select “Manage Custom Data“.
In the “Manage Custom Data” window, you can see Custom Data associated with the selected routes, add Custom Data fields with the “Add Field” button, and remove Custom Data by clicking the Delete Icon.
You can also manage Custom Data for multiple routes at the same time. Check the boxes next to routes to select them, click “Bulk Actions“, and select “Manage Custom Data” from the menu.
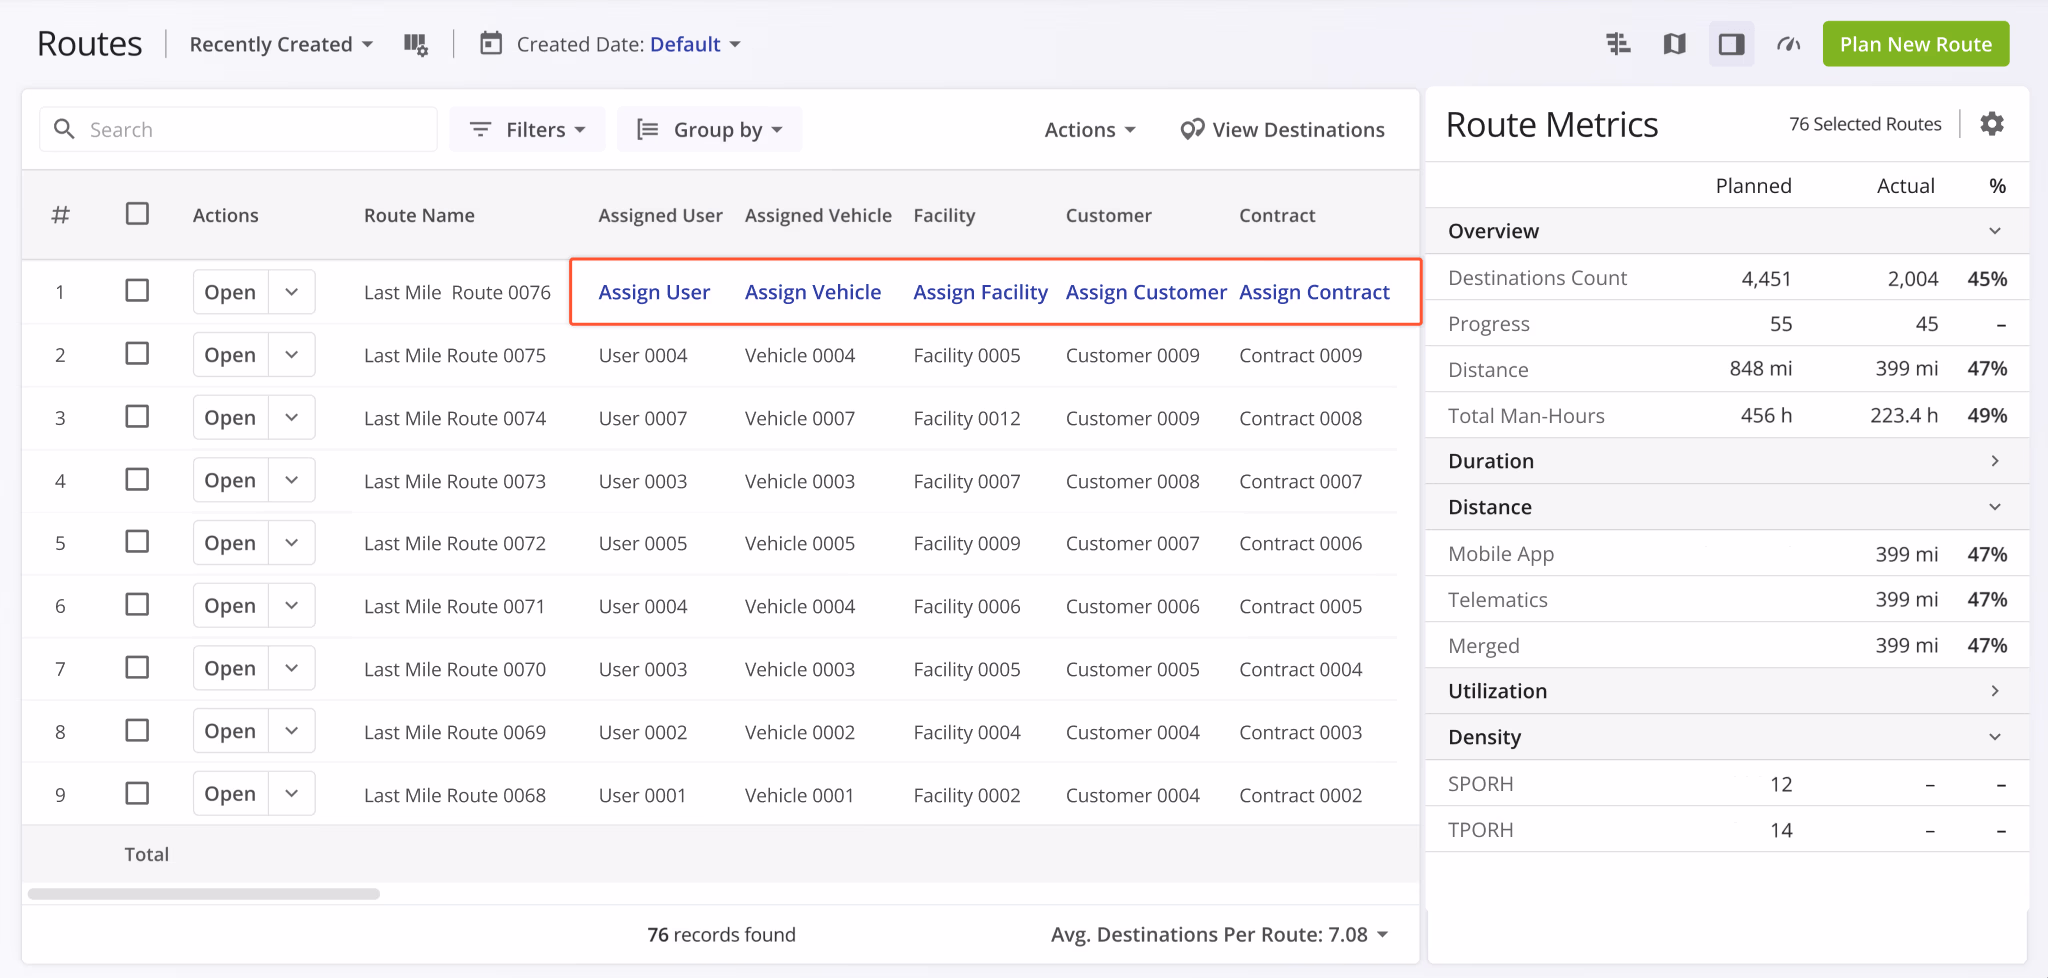
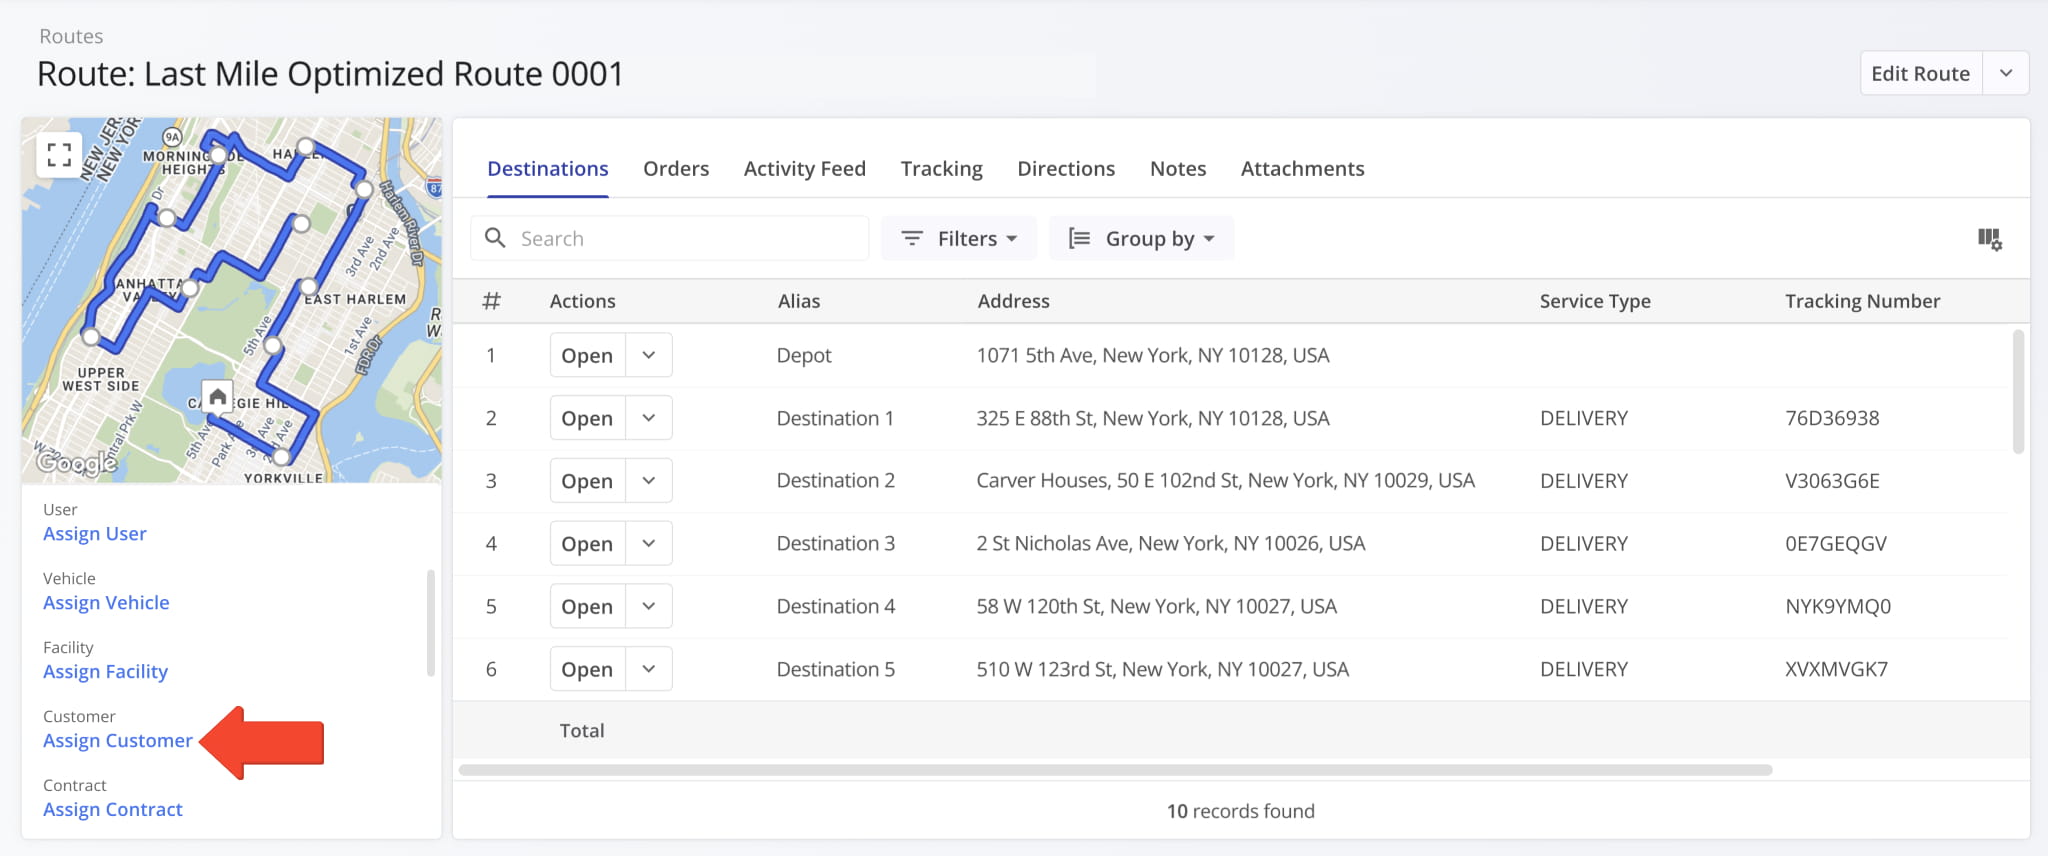
Assignment buttons for Users, Vehicles, Facilities, Customers, and Contracts on the Routes Page were redesigned to match the assignment buttons in other Route4Me interfaces. This change improves consistency and readability across the UI.
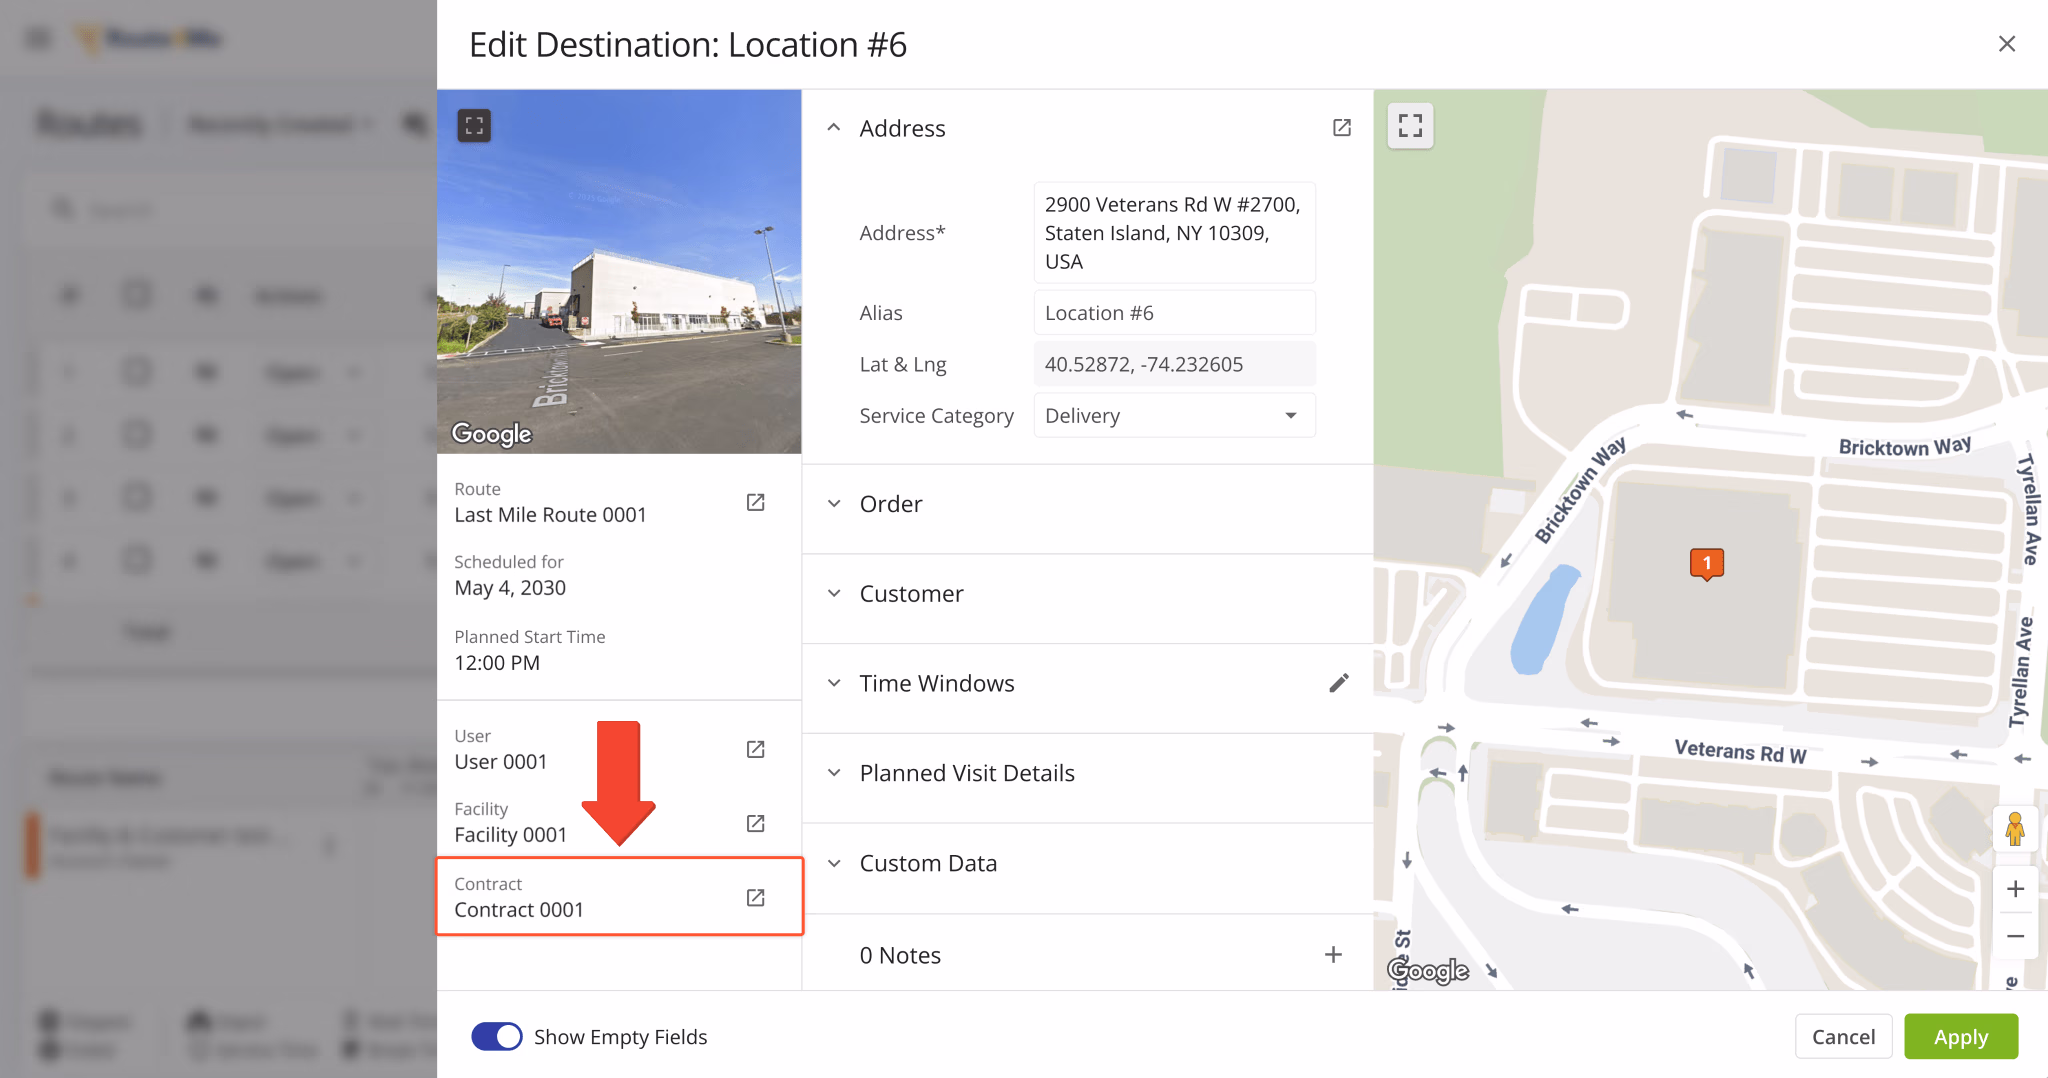
A new “Contract” field was added to the “Edit Destination” panel on the Routes Page.
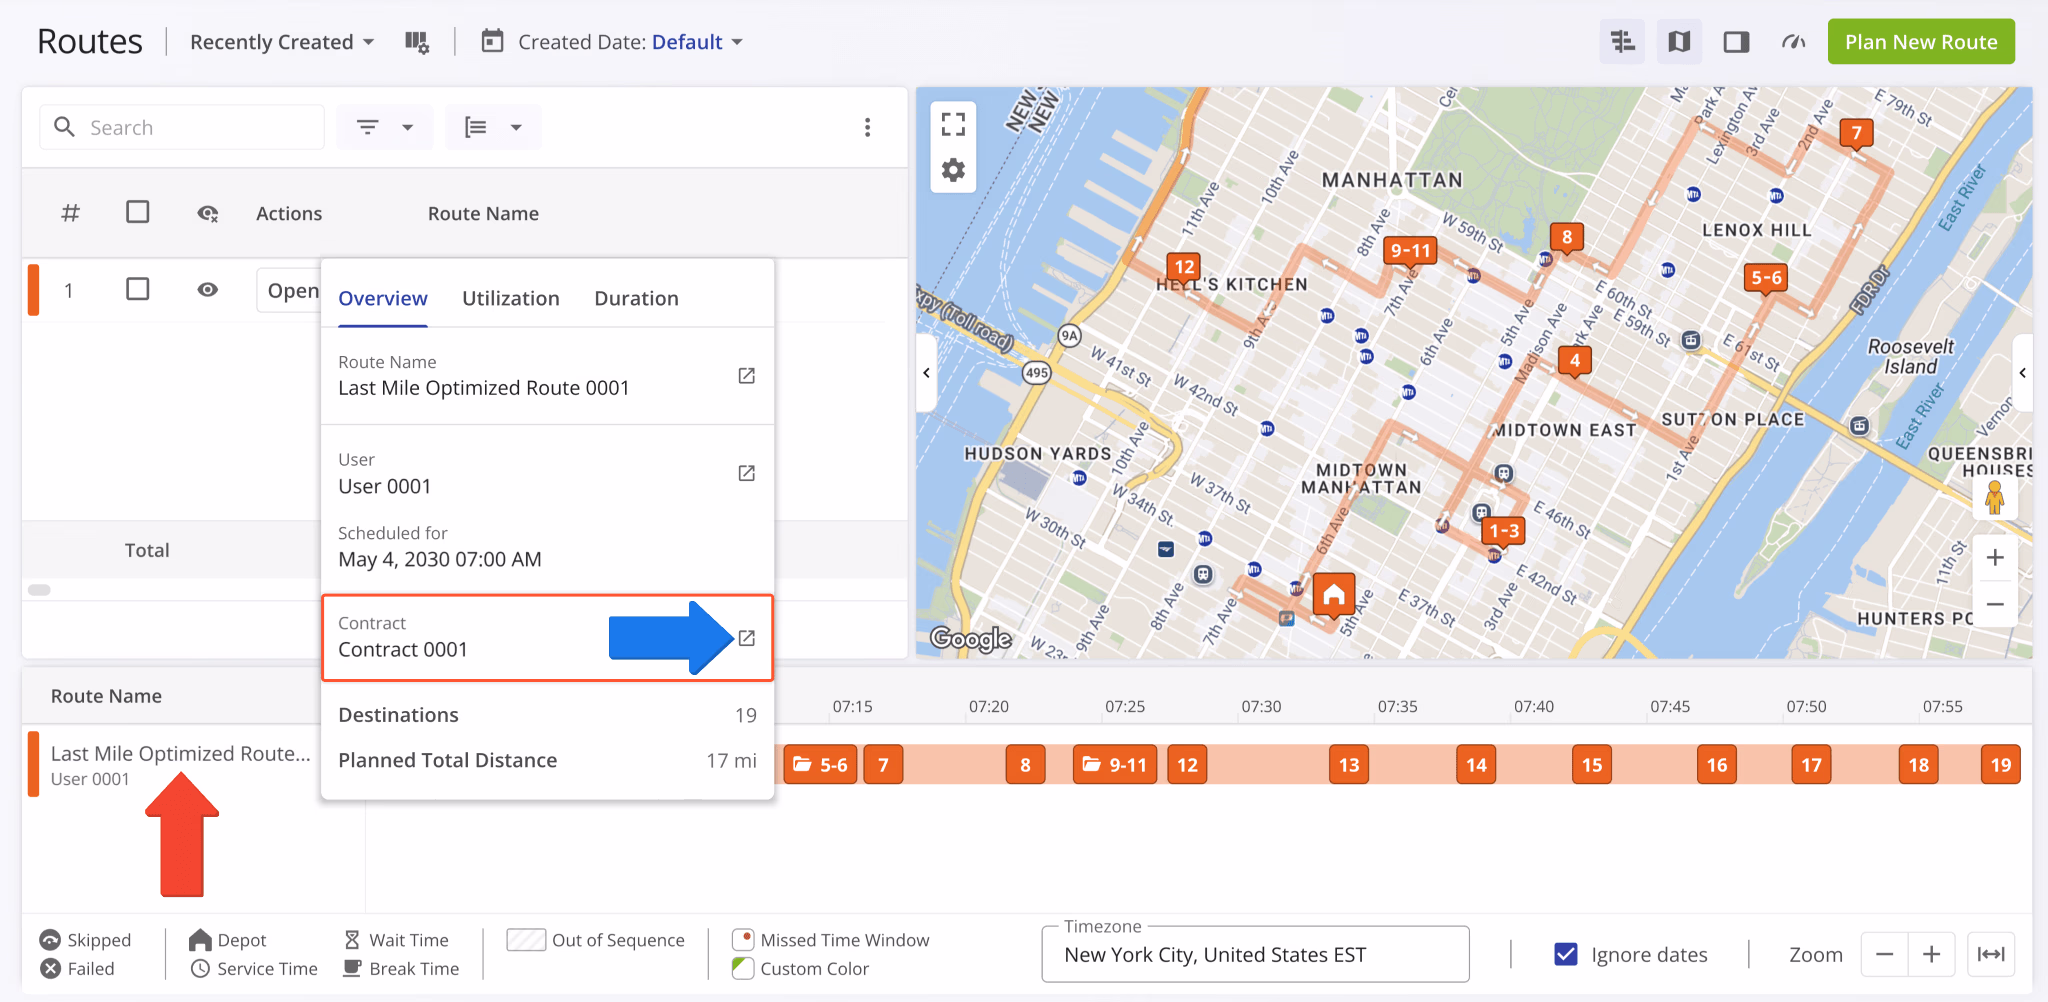
A new “Contract” field was added to the Route Summary popover when you hover over a route in the Routes Timeline.
You can also click the Open Button to go directly to the corresponding Contract Snapshot, similar to other Route4Me fields.
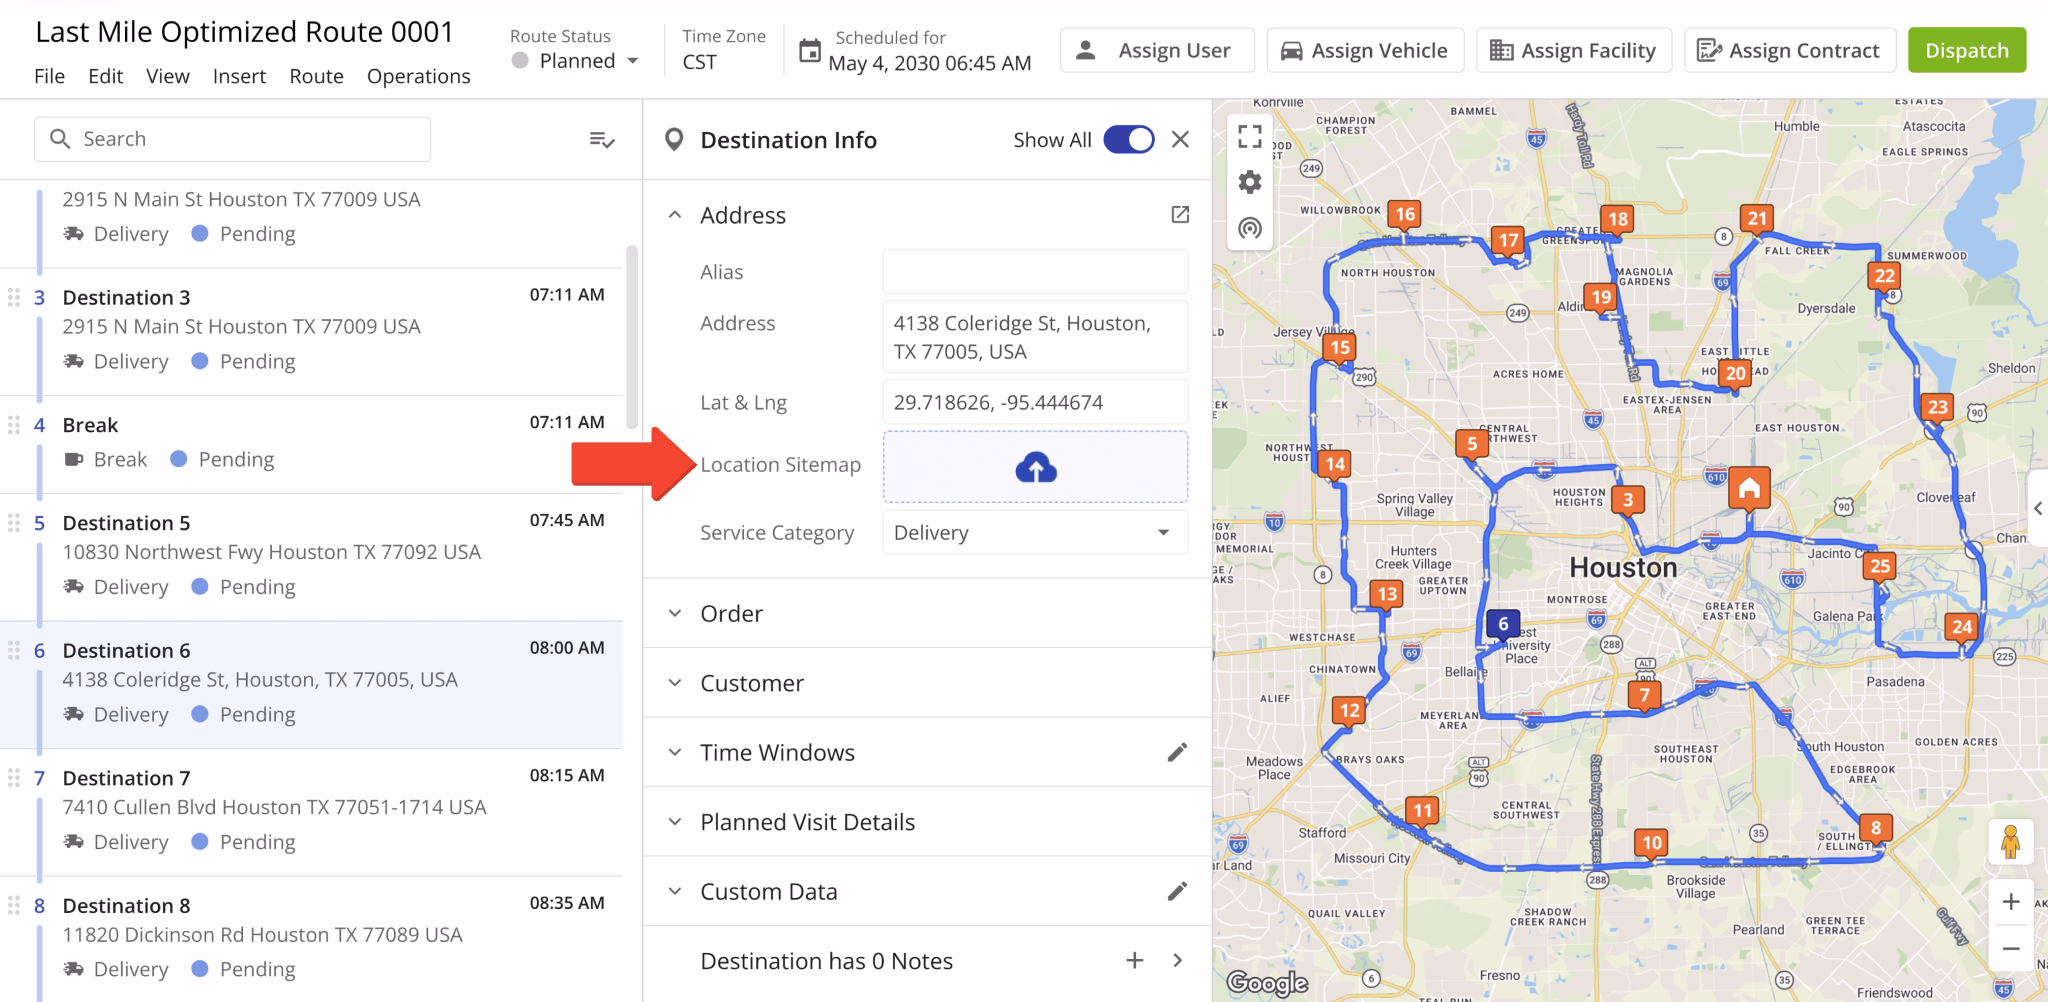
A new “Location Sitemap” Destination Info field was added to the Route Editor. When a destination is linked to a Location from your account, you can preview its associated sitemap directly from the Destination Info panel.

When a Location doesn’t have a sitemap, you can upload an image or PDF sitemap directly from the Route Editor.
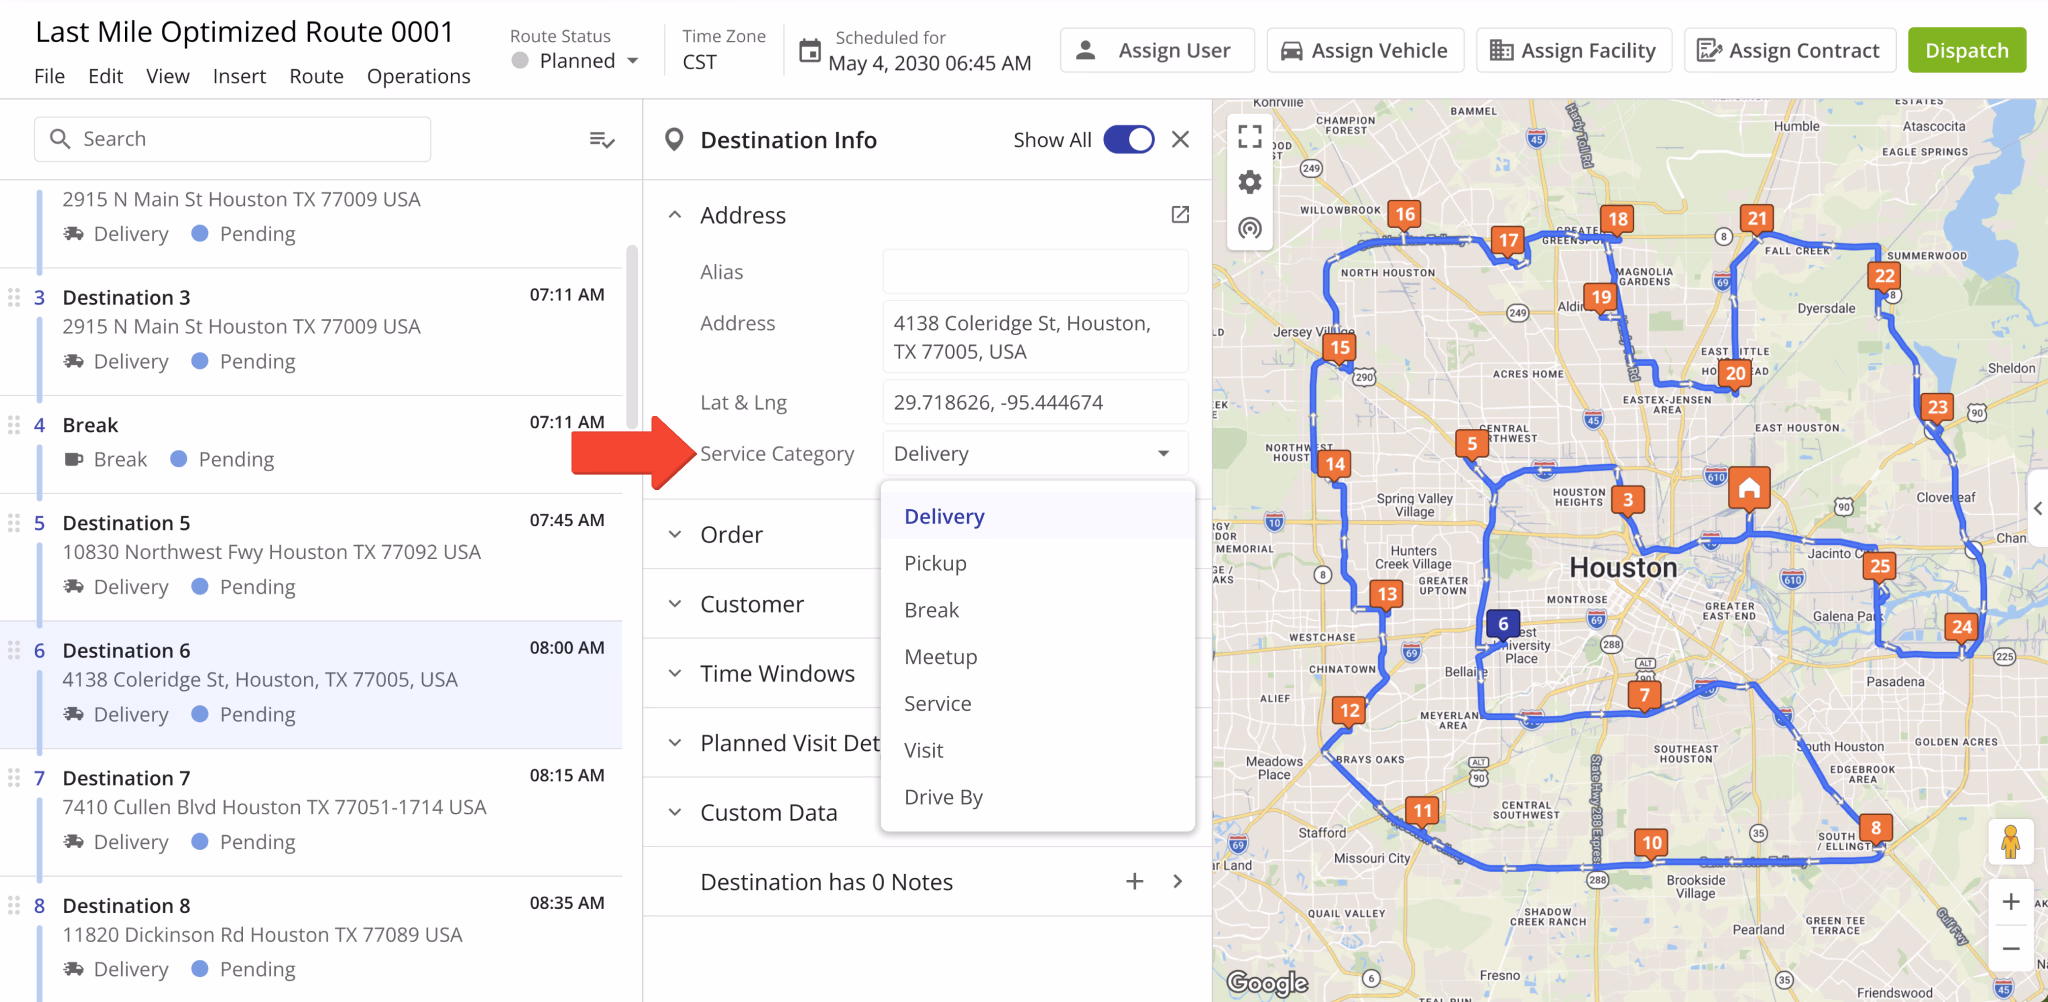
The “Destination Type” field in the Route Editor Destination Info interface was renamed to “Service Category“.
This update improves parity and consistency across Route4Me’s various route management tools and pages.
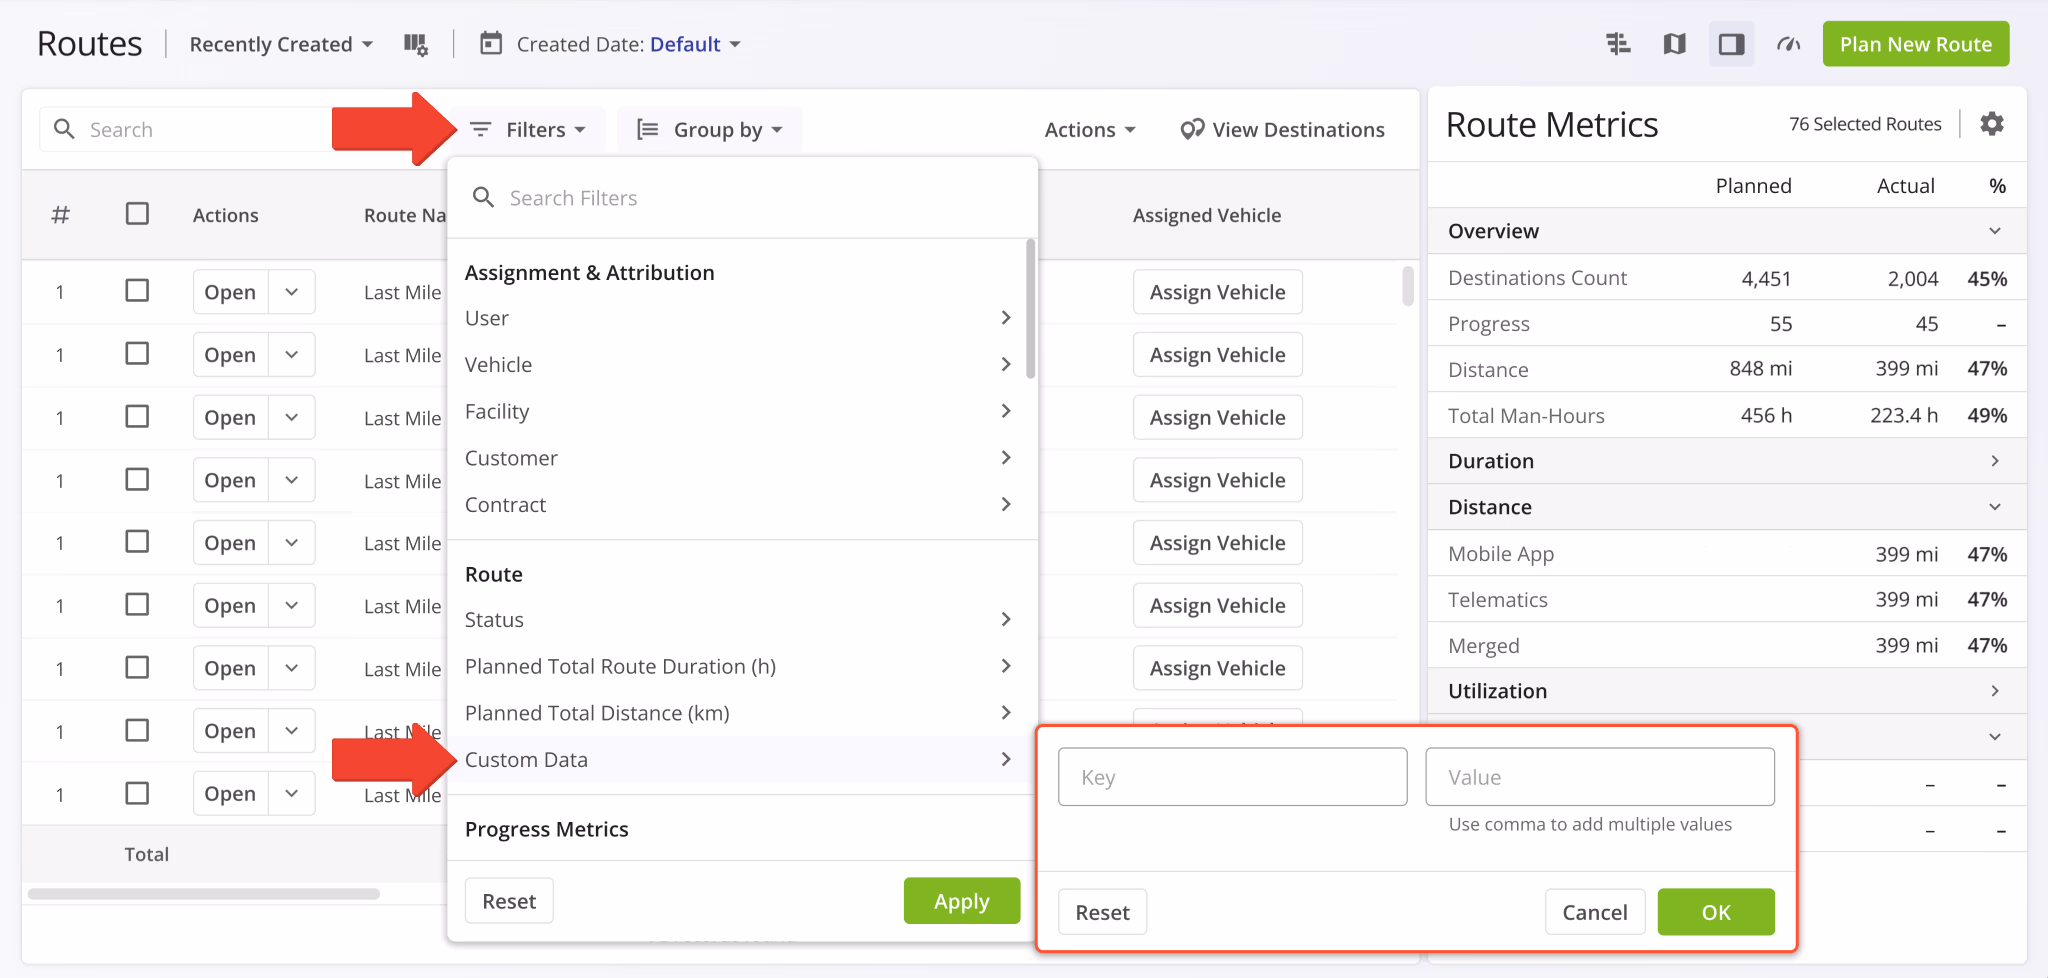
A new “Custom Data” filter was added to the Routes Page. You can now filter routes by their associated Custom Data.
February 2026
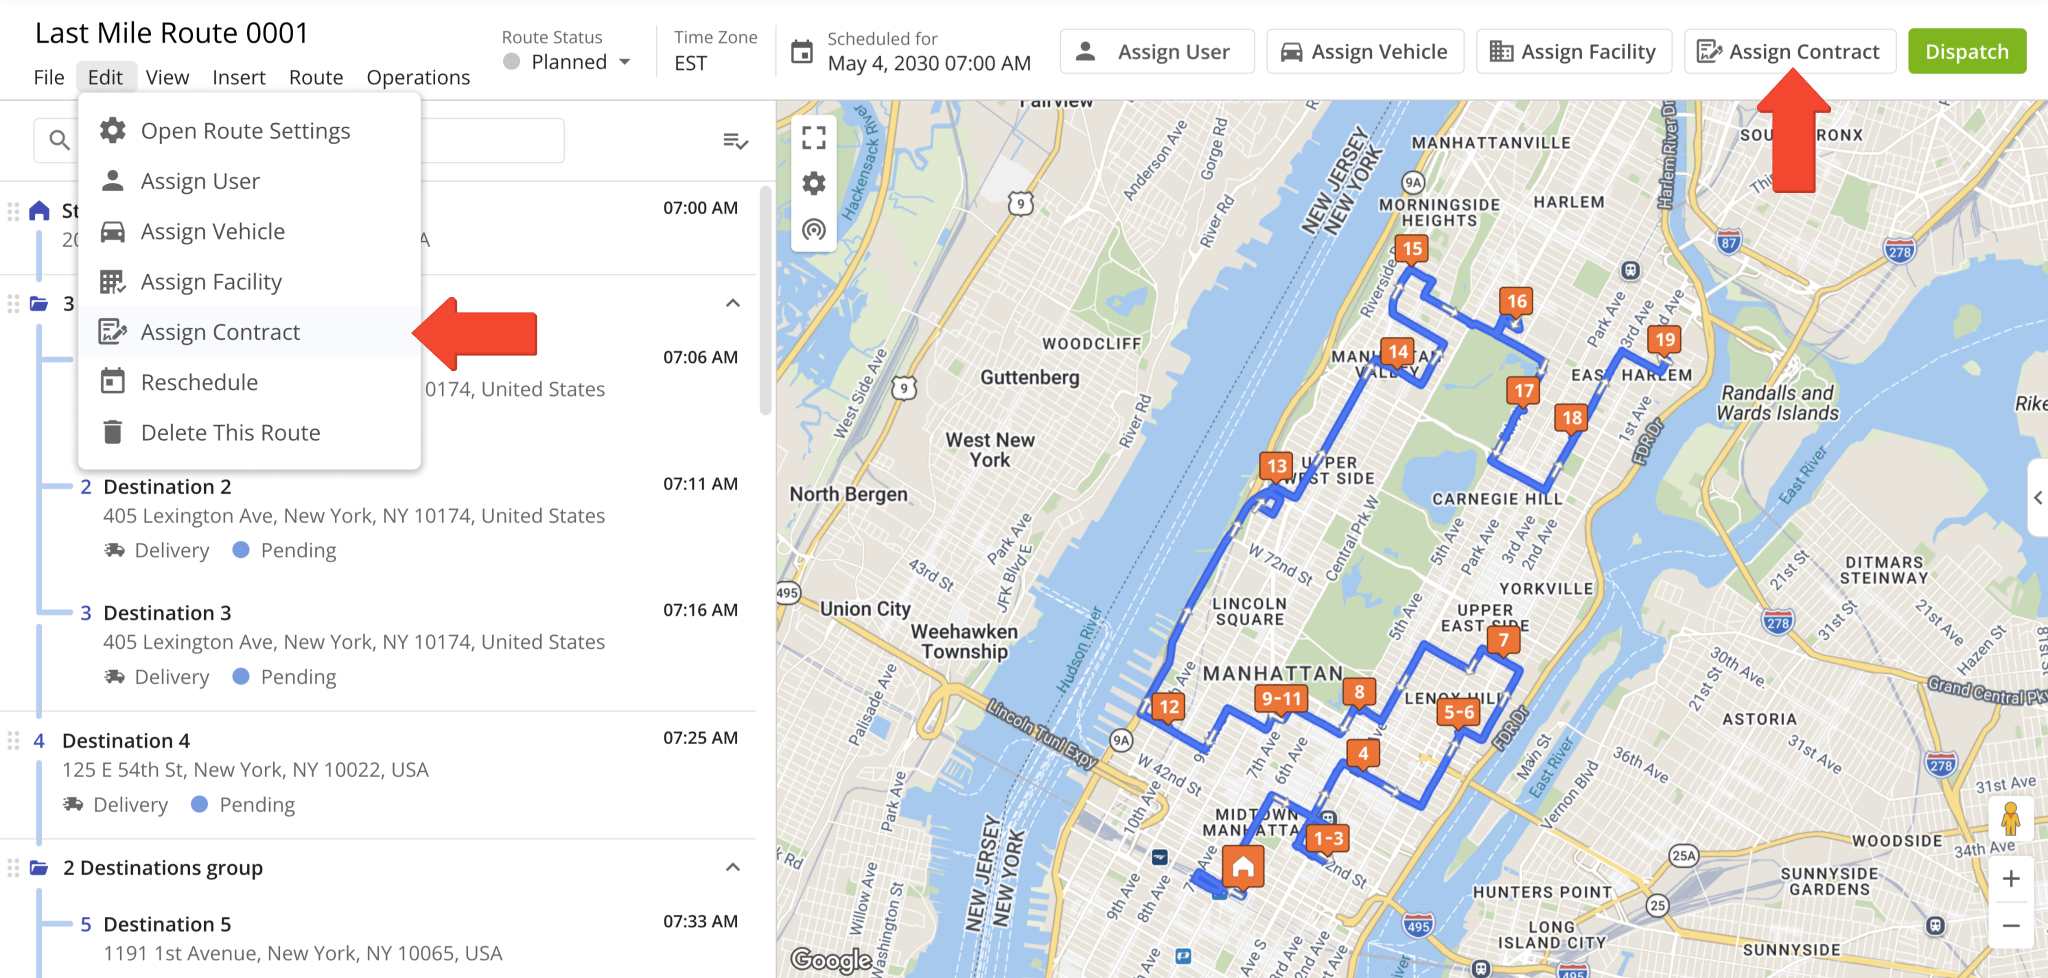
60You can now Assing Contracts to routes directly from the Route Editor. To do so, click “Edit” from the top menu bar and select “Assign Contract“. Alternatively, simply click the “Assign Contract” button in the top-right.
Previously, it wasn’t possible to manage contract attribution in the Route Editor.
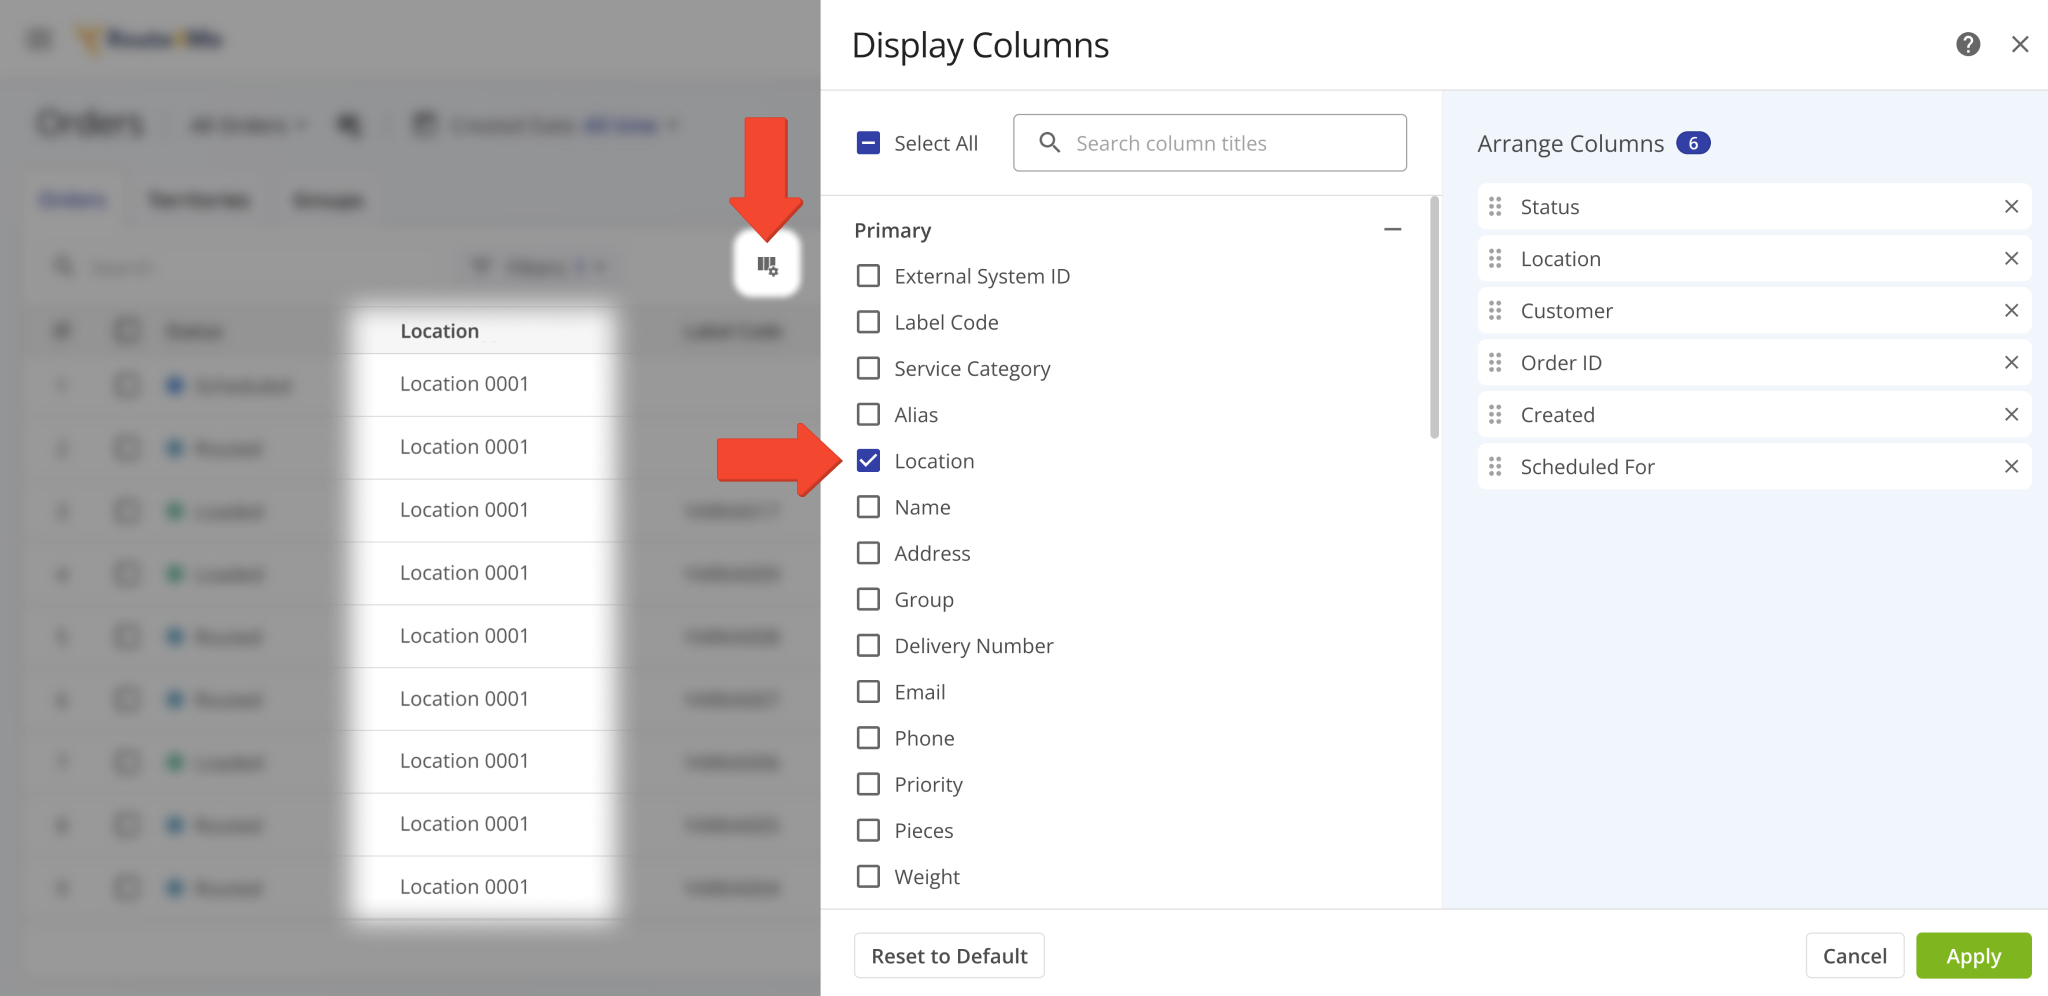
A new “Location” display column was added to the Orders Page. It shows the Customer Locations associated with orders.
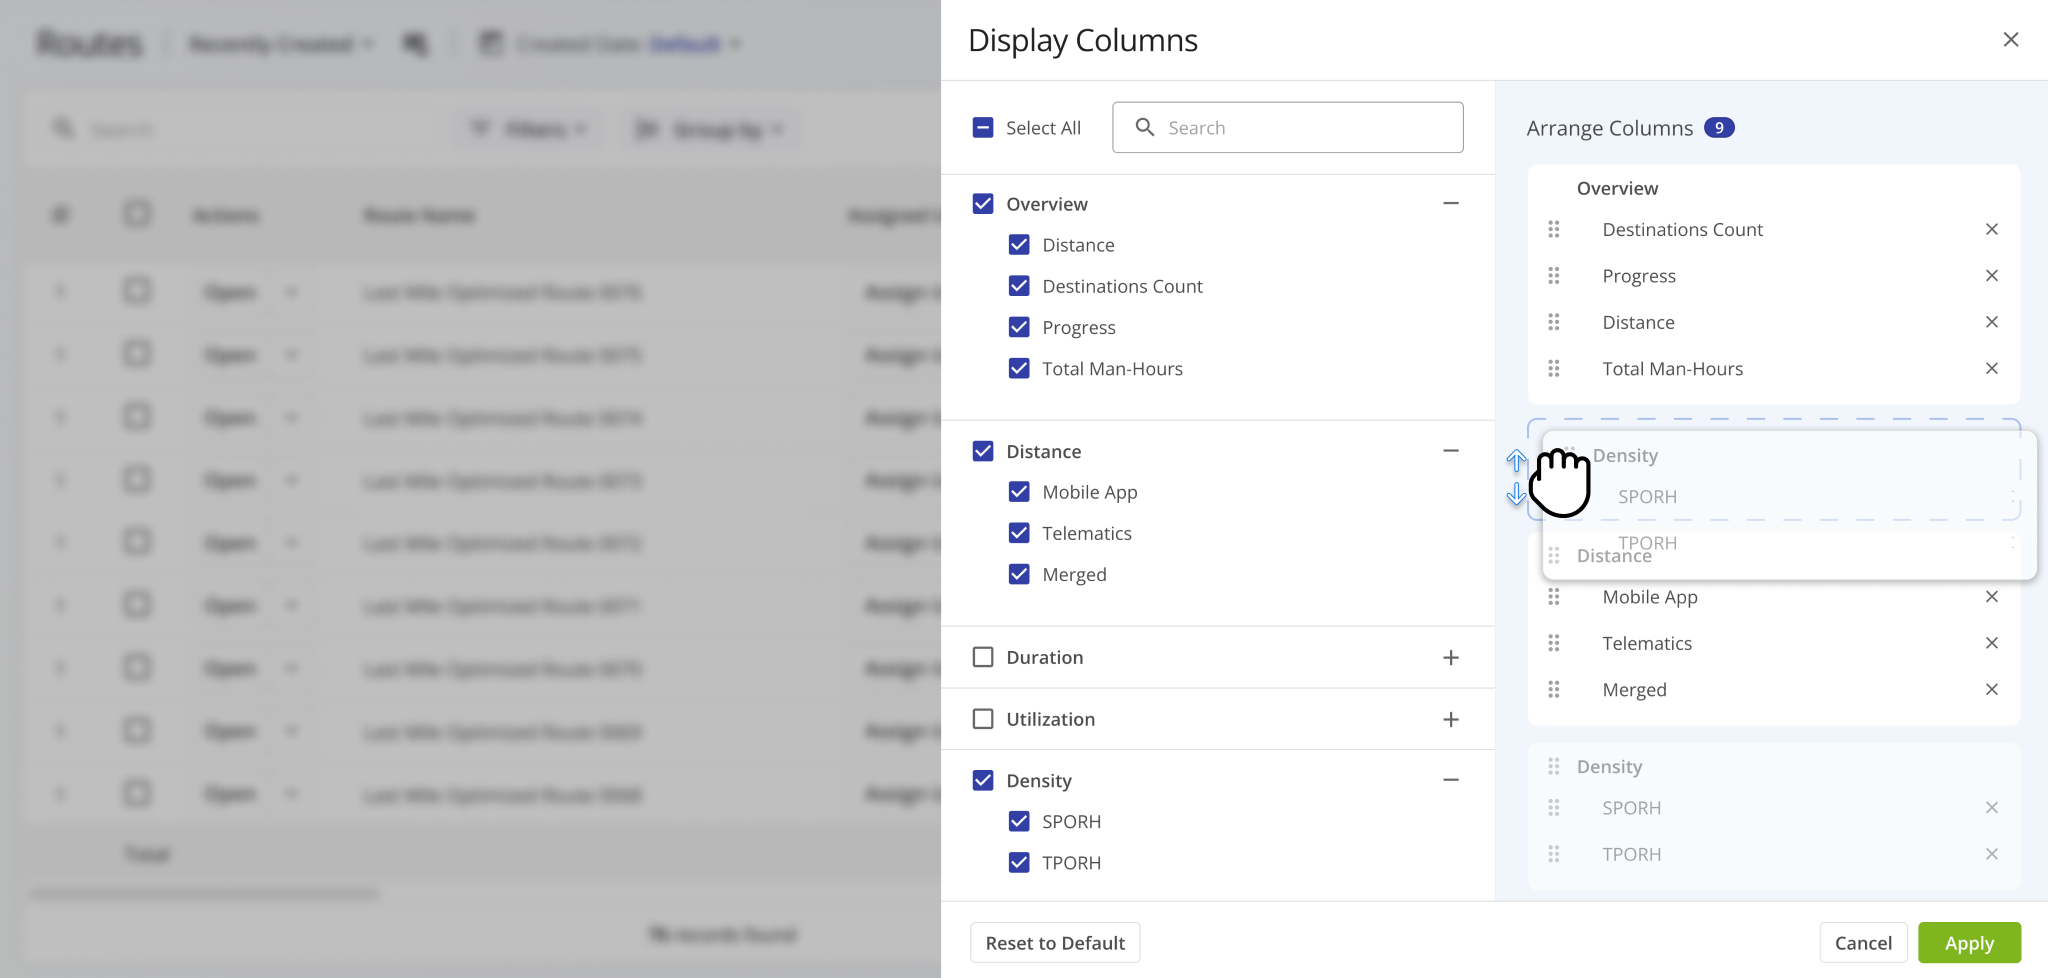
The Route Metrics interface on the Routes Page was updated with new data customization functionality. After you open the Route Metrics, click the Gear Icon to customize the data fields shown in the metrics panel.
You’ll see the Display Columns customizer. This update groups Route Metrics column on the right according to their data categories. This enables you to click and drag category names to arrange entire groups relative to each other. Previously, you could only arrange individual columns. Learn more about supported route data in the Routes Page Data Catalog.
The “Service Type” field in Snapshot data summaries and filters has been renamed to “Service Category“. Affected pages:
- User Snapshot
- Order Snapshot
- Route Snapshot
- Facility Snapshot
- Location Snapshot
- Destination Snapshot
- Optimization Snapshot
- Strategic Route Snapshot
- Strategic Location Snapshot
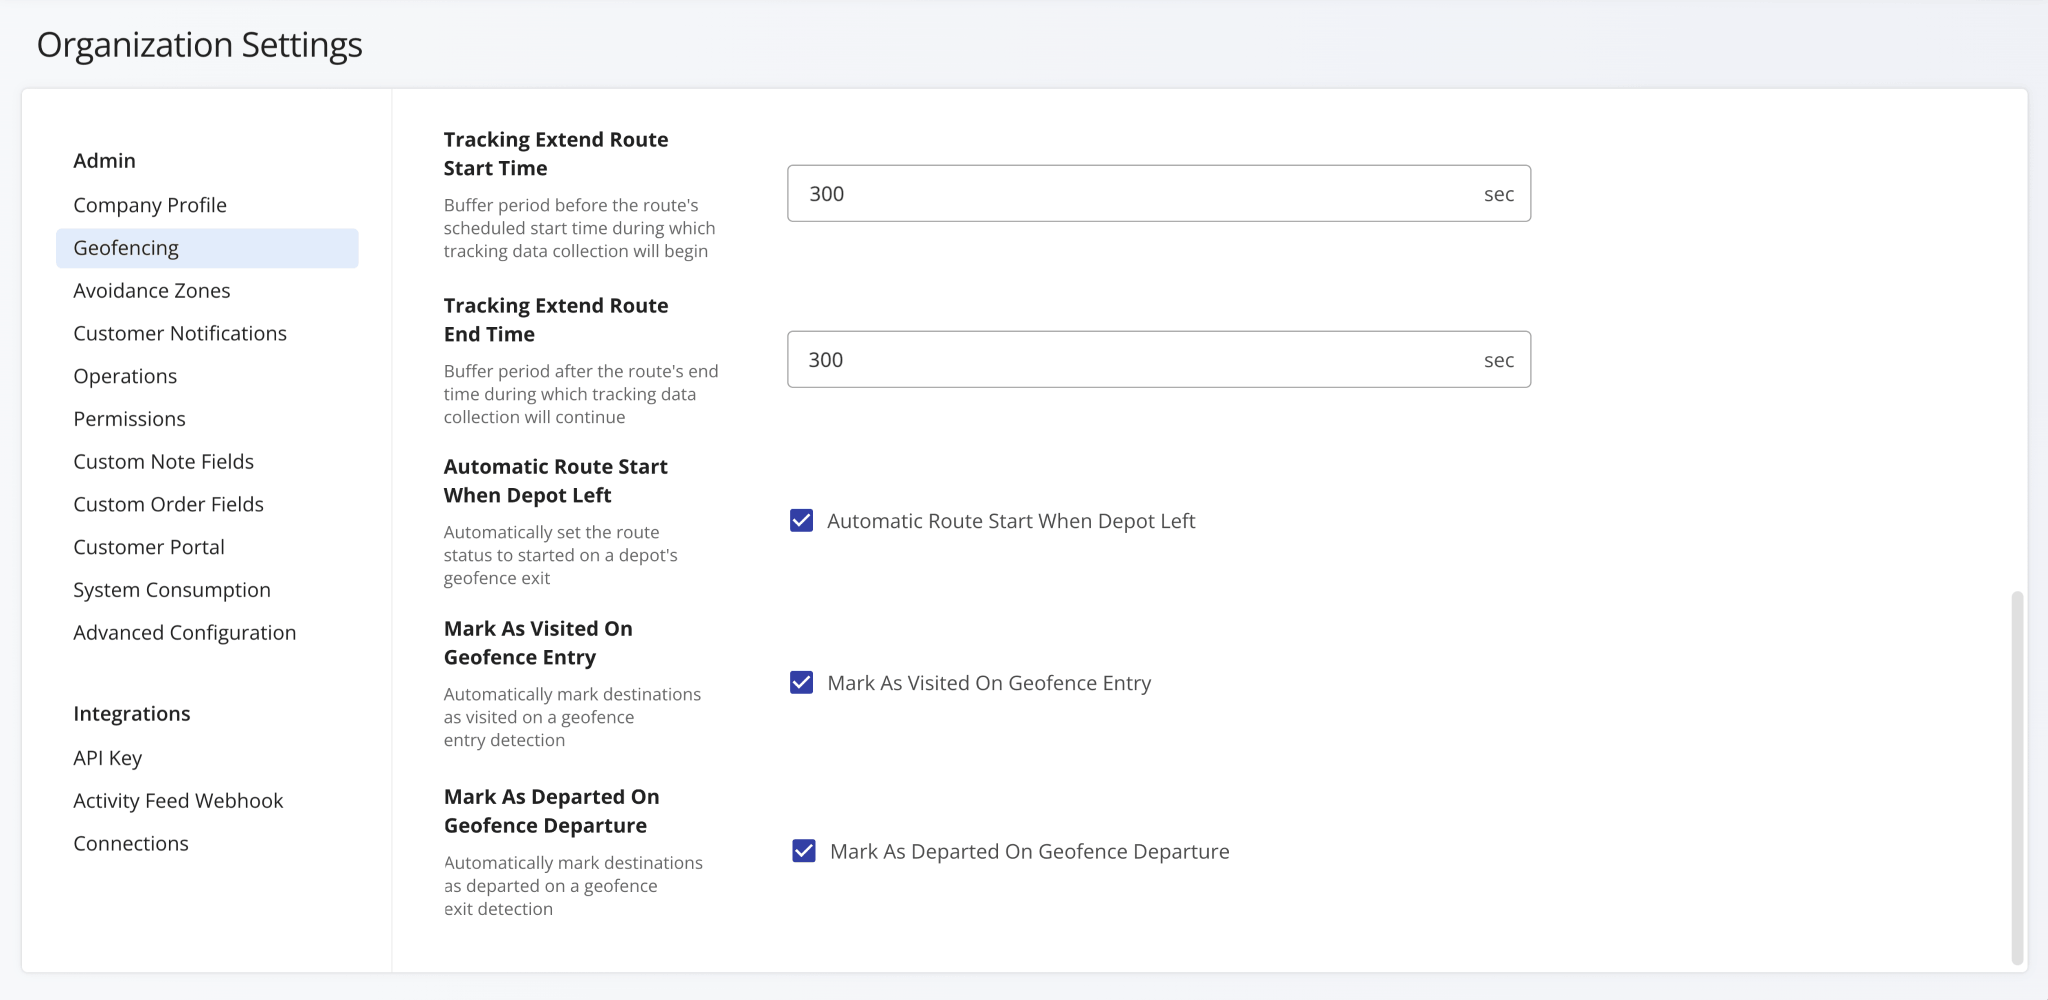
Additional Geofencing Settings were added to the Organization Settings page. The following options were added:
- Tracking Extend Route Start Time: Add a period before routes start (scheduled) during which tracking data is collected.
- Tracking Extend Route End Time: Add a period after routes end during which tracking data is collected.
- Automatic Route Start When Depot Left: Automatically set routes to “Started” when assigned users leave depot geofences.
- Mark As Visited On Geofence Entry: Automatically mark destinations as visited when assigned users enters geofences.
- Mark As Departed On Geofence Departure: Automatically mark destinations as departed when assigned users leave geofences.
Previously, these settings were only available as Advanced Account Configurations.
Open Your Organization Settings
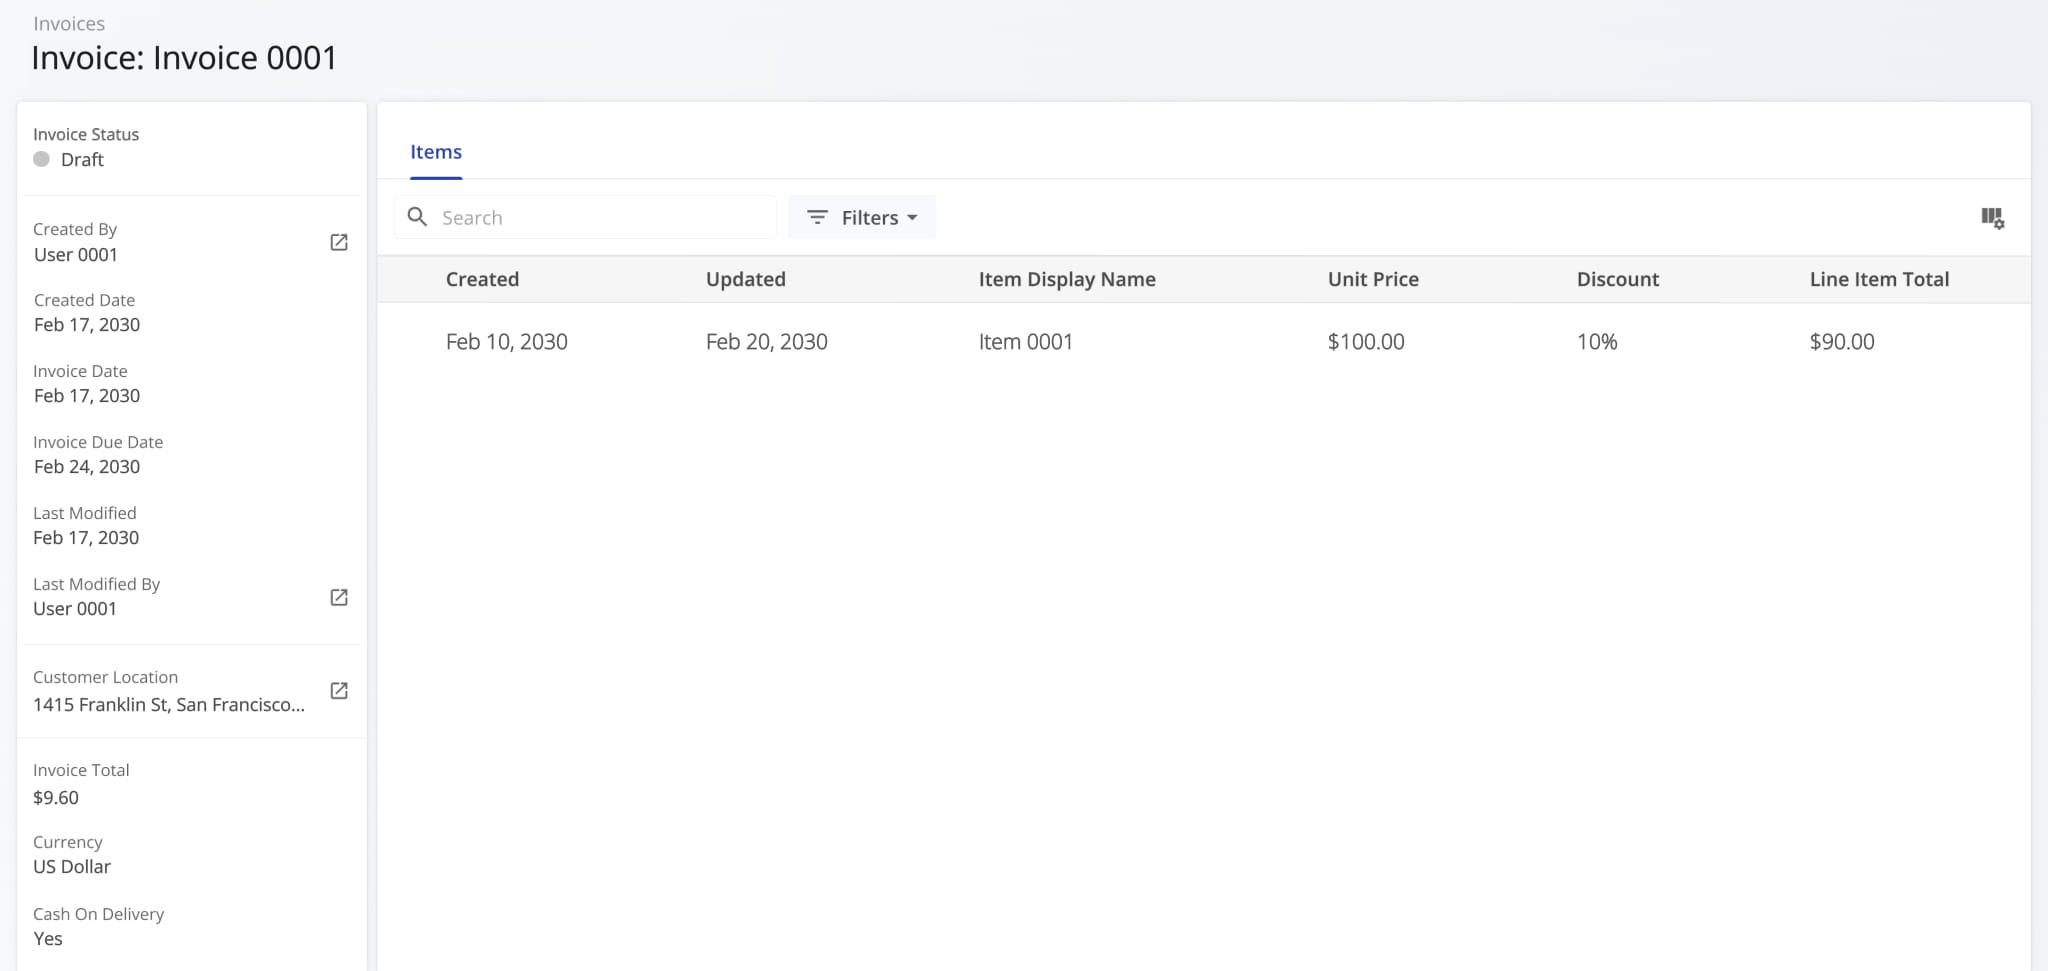
You can now open Invoice Snapshots from your Invoices Page. To do so, click the “Open” button.

Invoice Snapshots provide enterprise business users with a centralized view of detailed invoice data from your ERP system. You can quickly review line items, track amounts, and analyze totals, discounts, and taxes in one place.
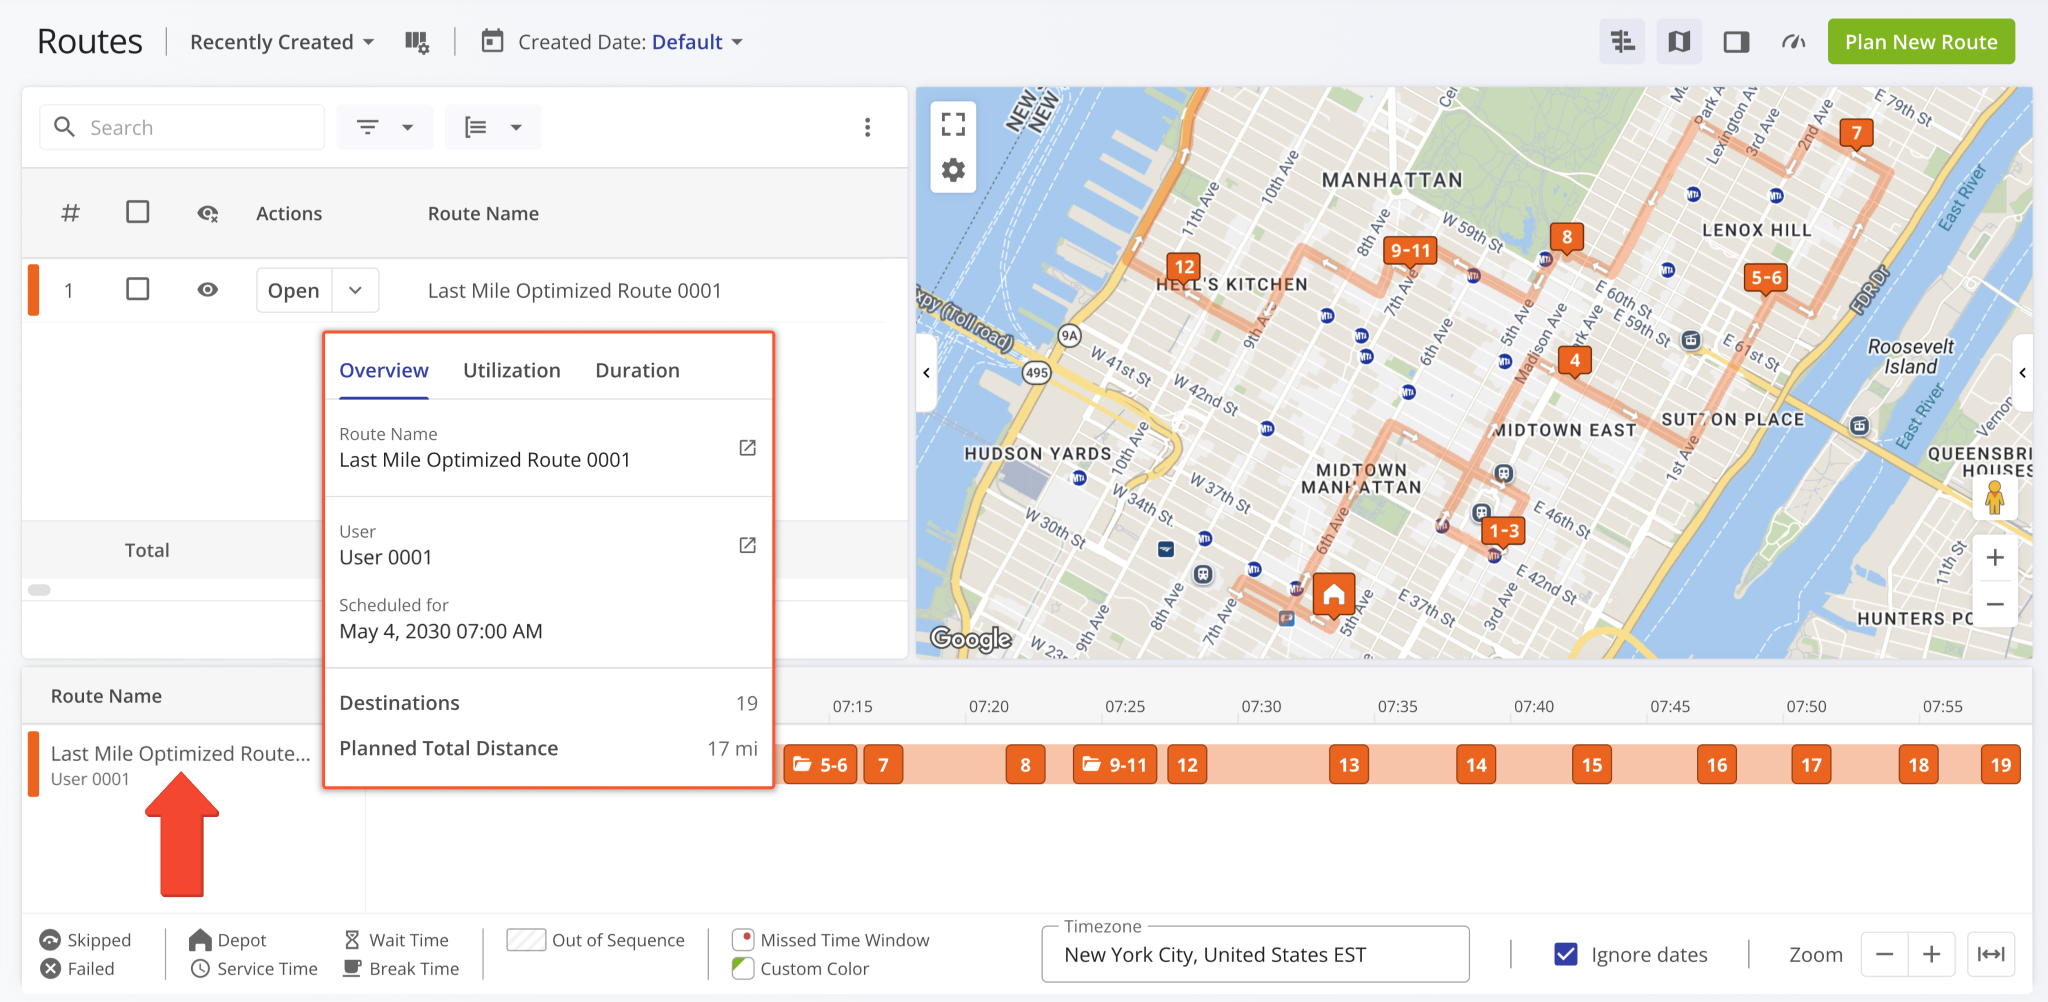
An interactive route summary popover was added to the Routes Timeline. Now, when you hover a route’s name, you’ll see a dynamic summary of its most important information, including utilization and duration metrics.
This update makes it easy to see key route info right in the timeline. This was previously only possible by using other Routes Page features such as the Routes List data table or Performance Insights alongside filters.
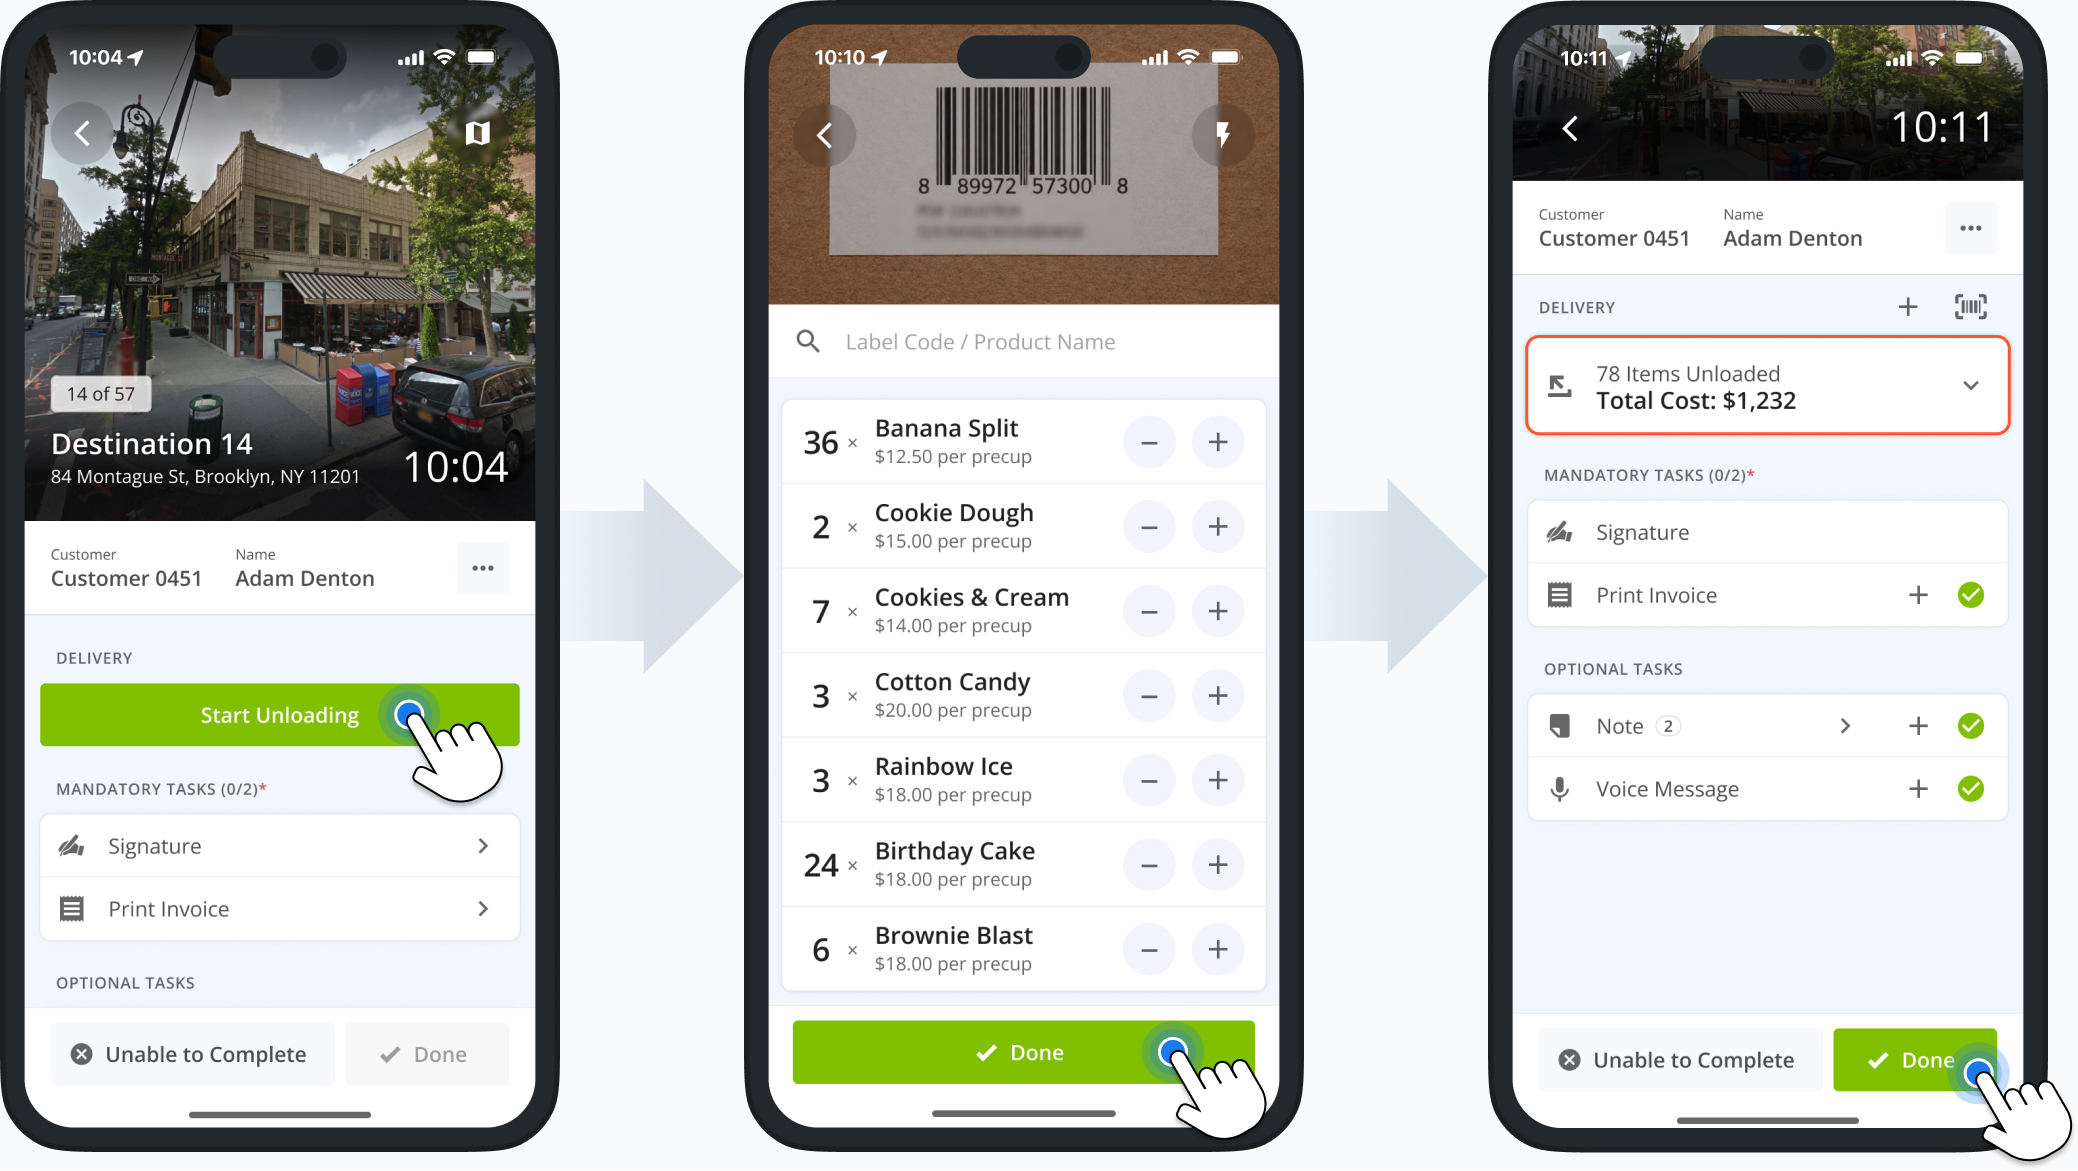
The Route4Me Mobile App now supports unloading multiple items at destinations with customizable item types and amounts. Additionally, the app will show price values and totals when unloading items synced with your Price List.
Just like before, users can scan and unload items using their device camera or a third-party scanner. Previously, users had to scan each item when unloading. The new unloading functionality streamlines and speeds up ERP delivery operations.
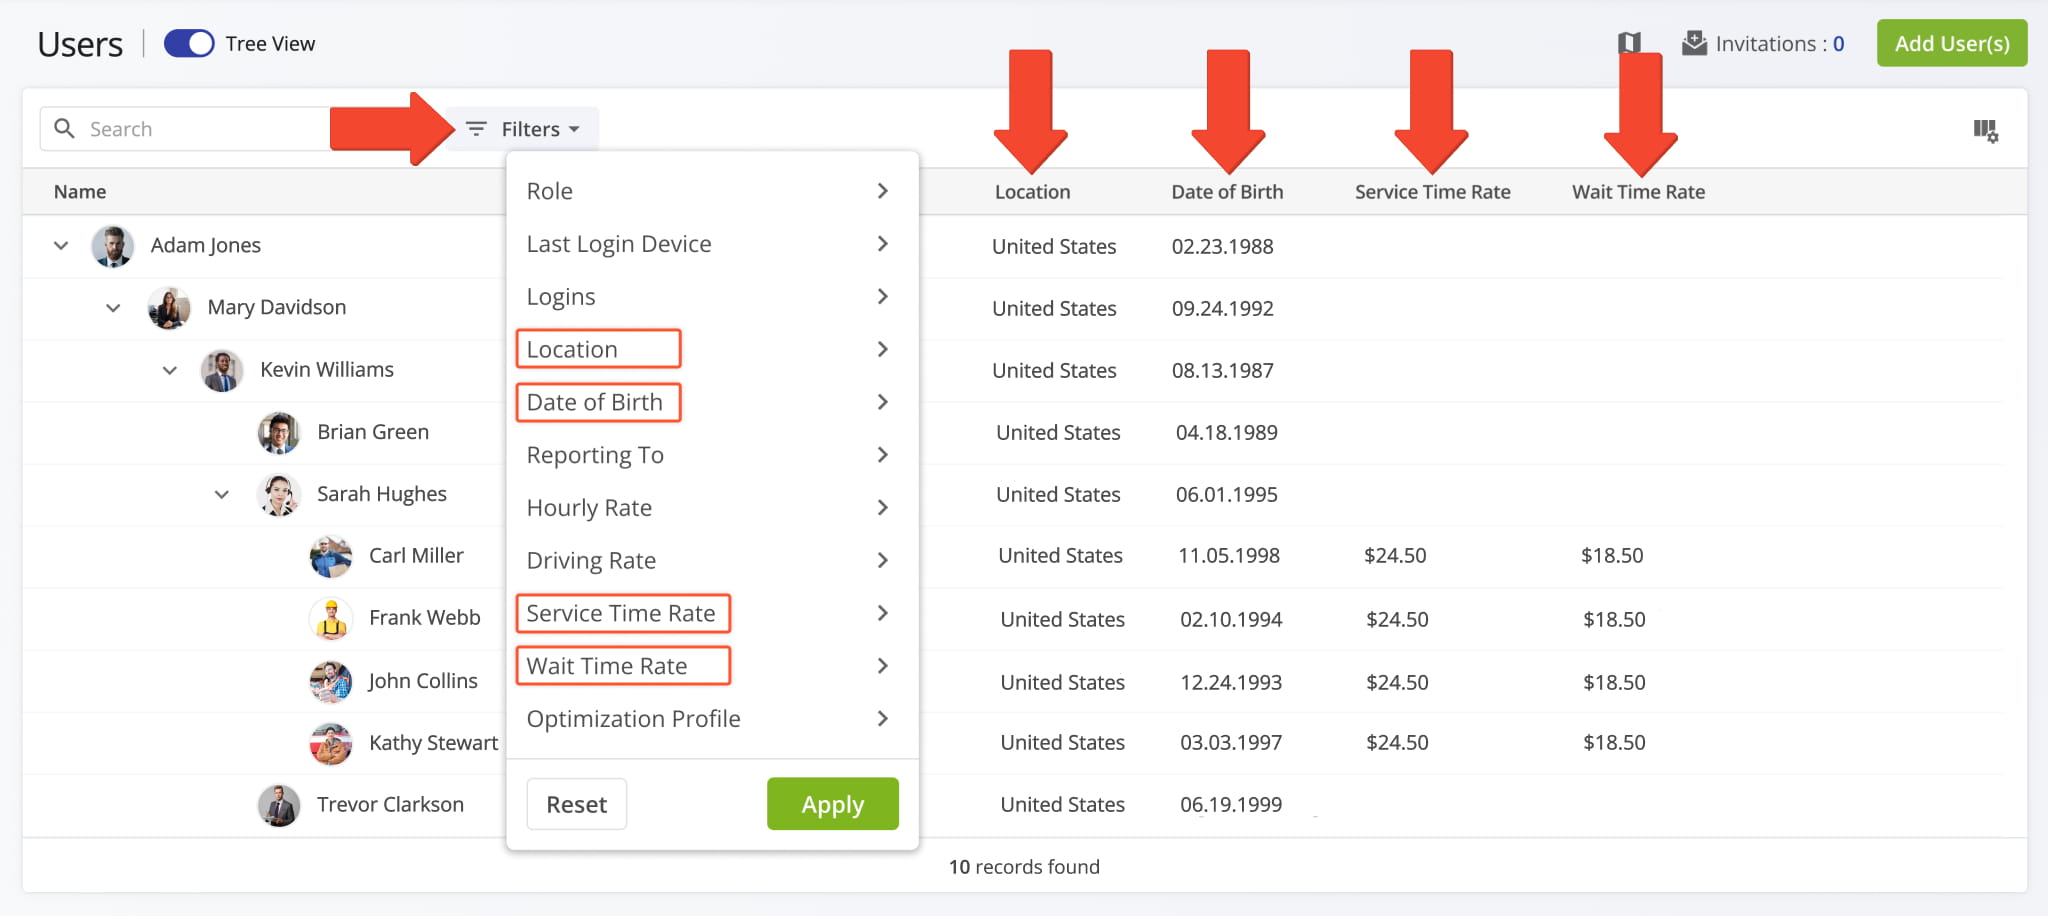
Several filters on the Users Page now have the same names as their corresponding data columns. Consistent filter names make finding users and navigating user data quicker and easier. The image below shows the affected filter options.
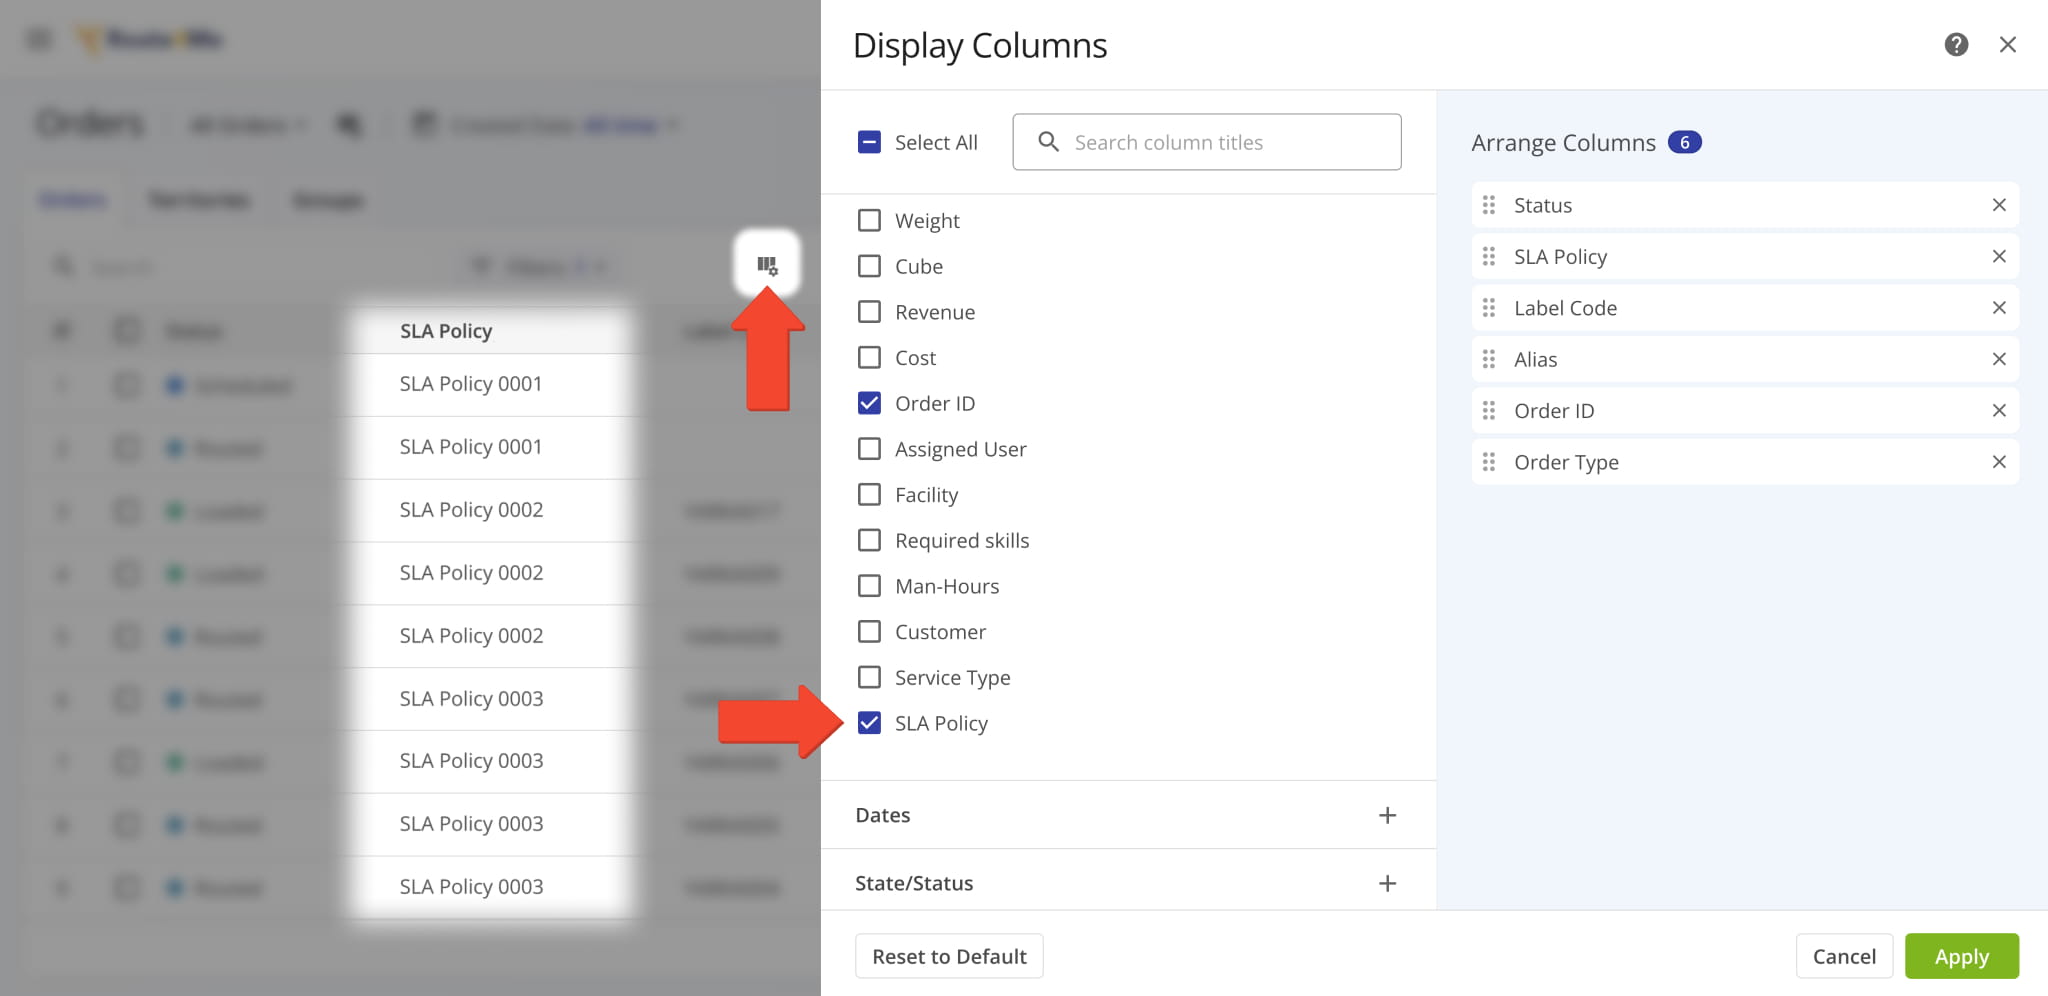
A new “SLA Policy” display column was added to the Orders Page. It shows the agreement policies associated with orders.
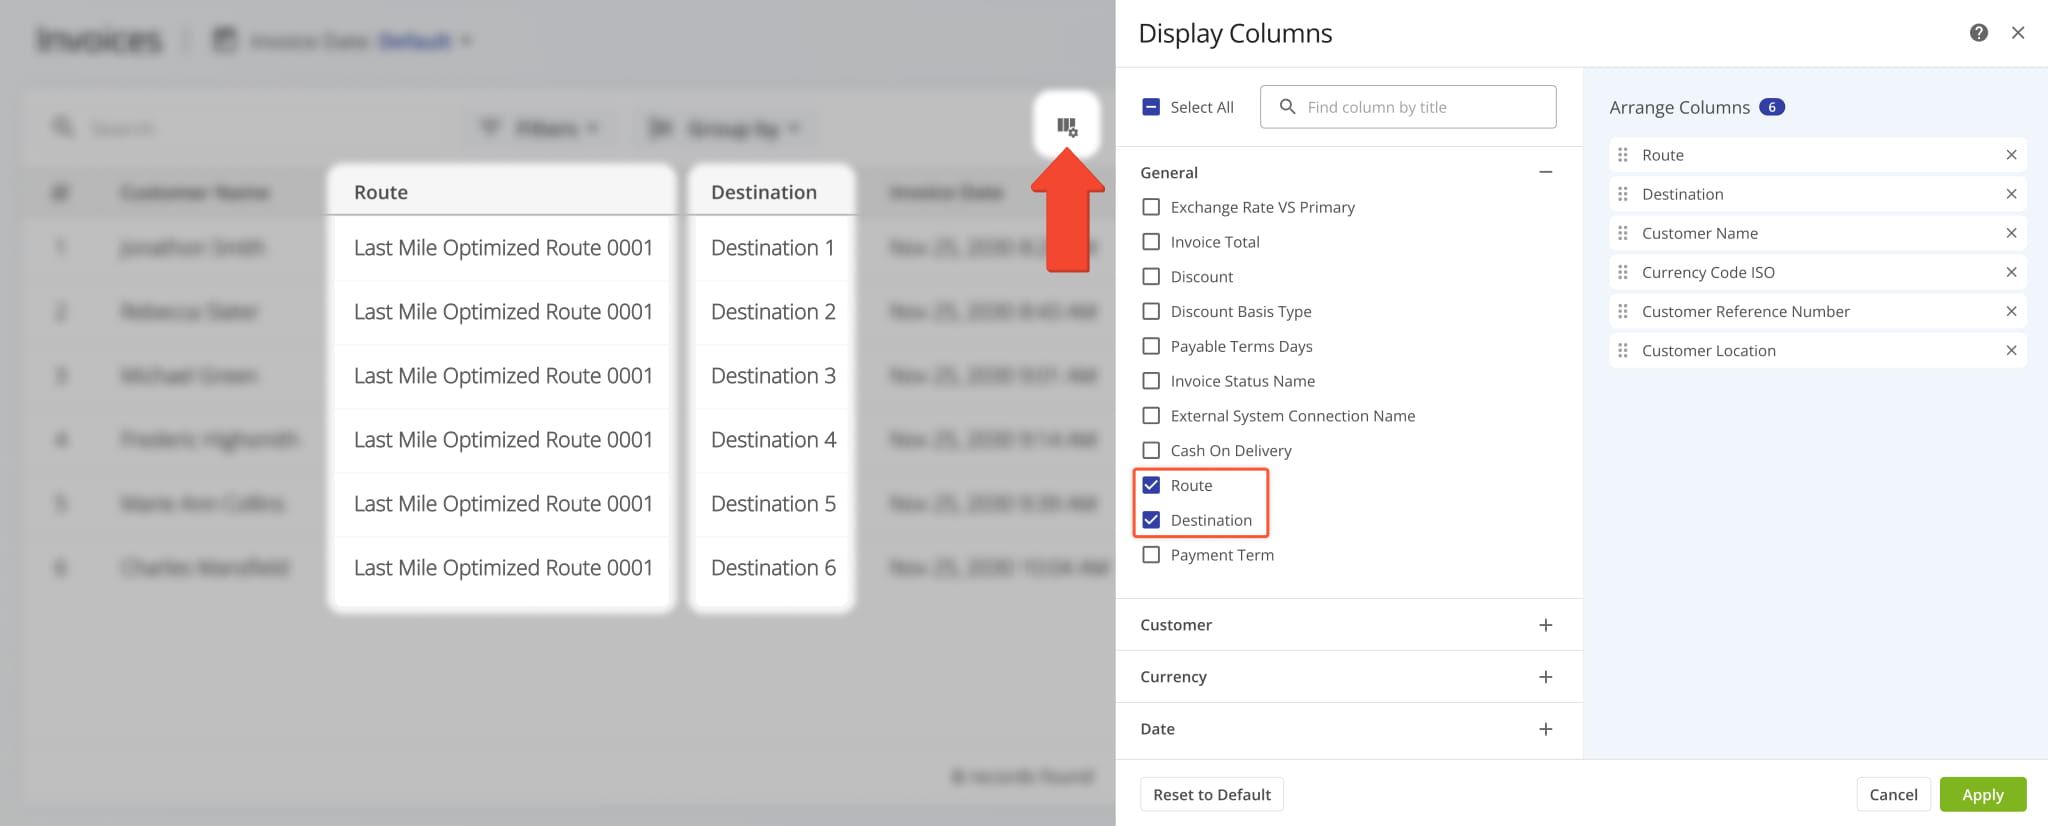
Two new Display Columns were added to ERP Invoices. They show the routes and destinations your invoices are associated with. Additionally, you can open Route Snapshots and Destination Snapshots directly from the new columns.
Snapshot functionality was added for Strategic Optimization Locations. To open a Strategic Location Snapshot, open a Strategic Optimization, go to the “Locations” tab, and click “Open” next to a Location.
Open Your Strategic Optimizations
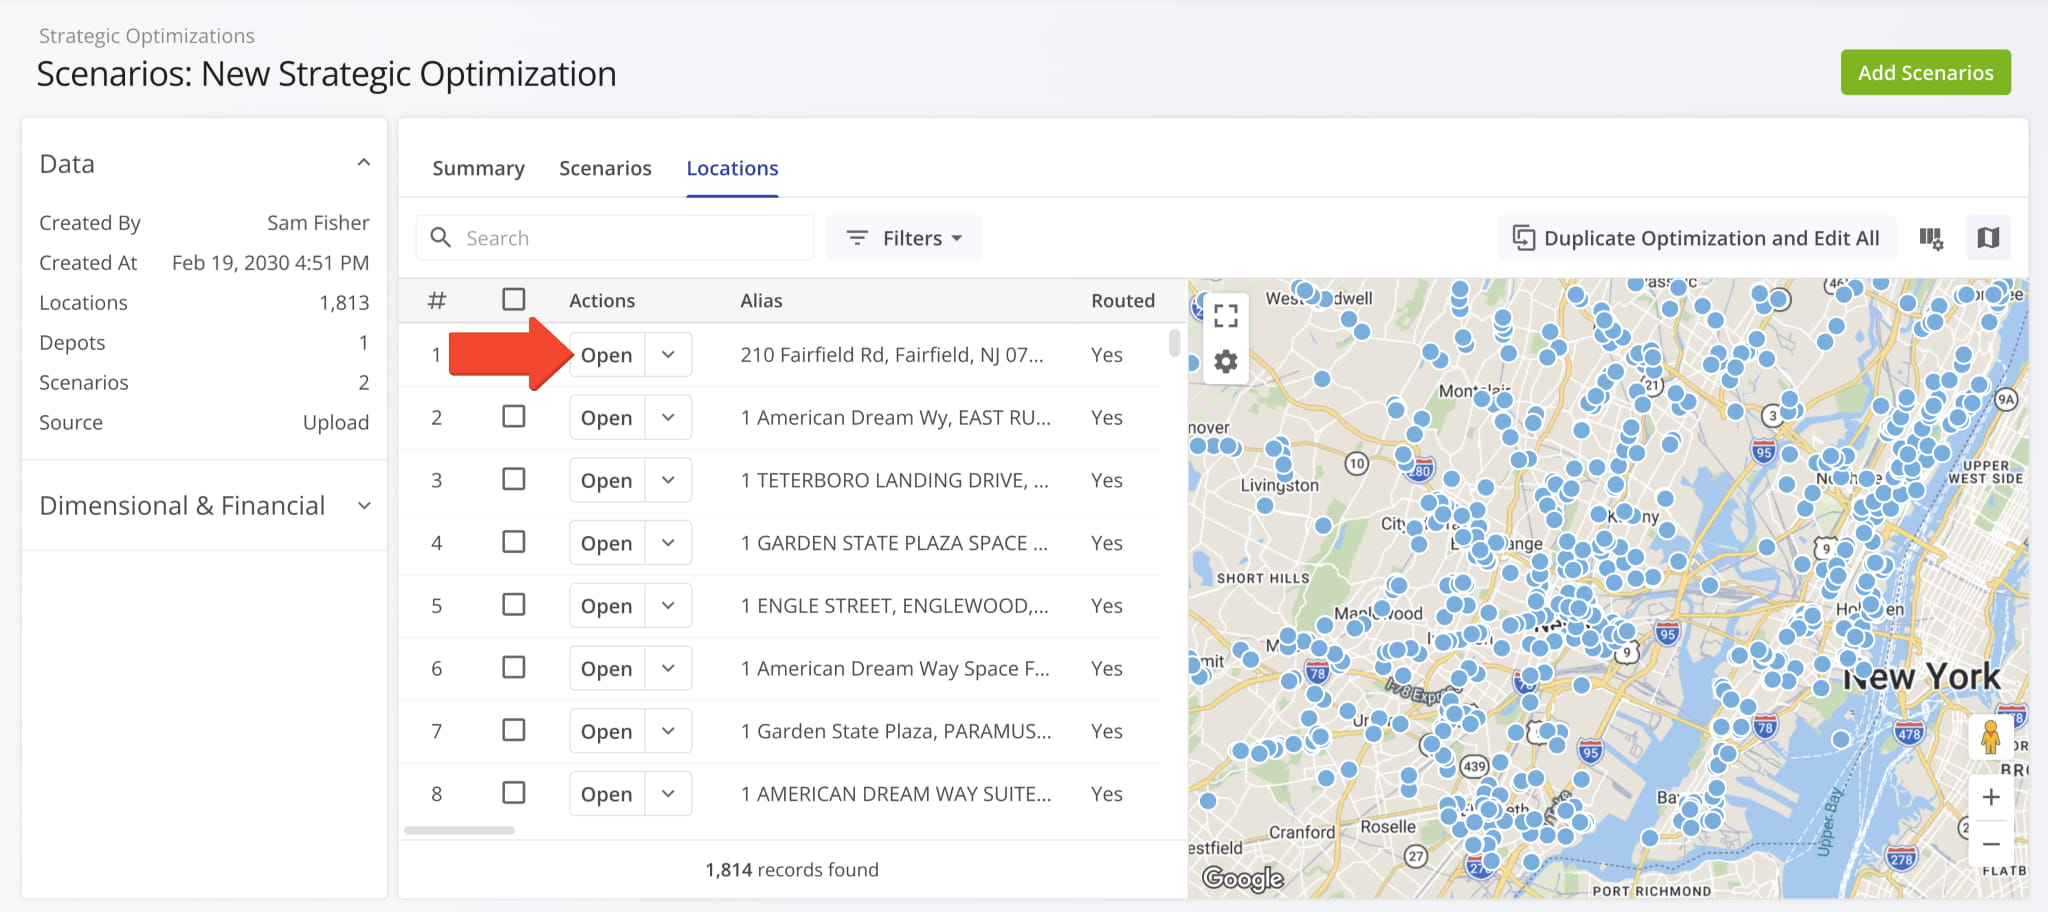
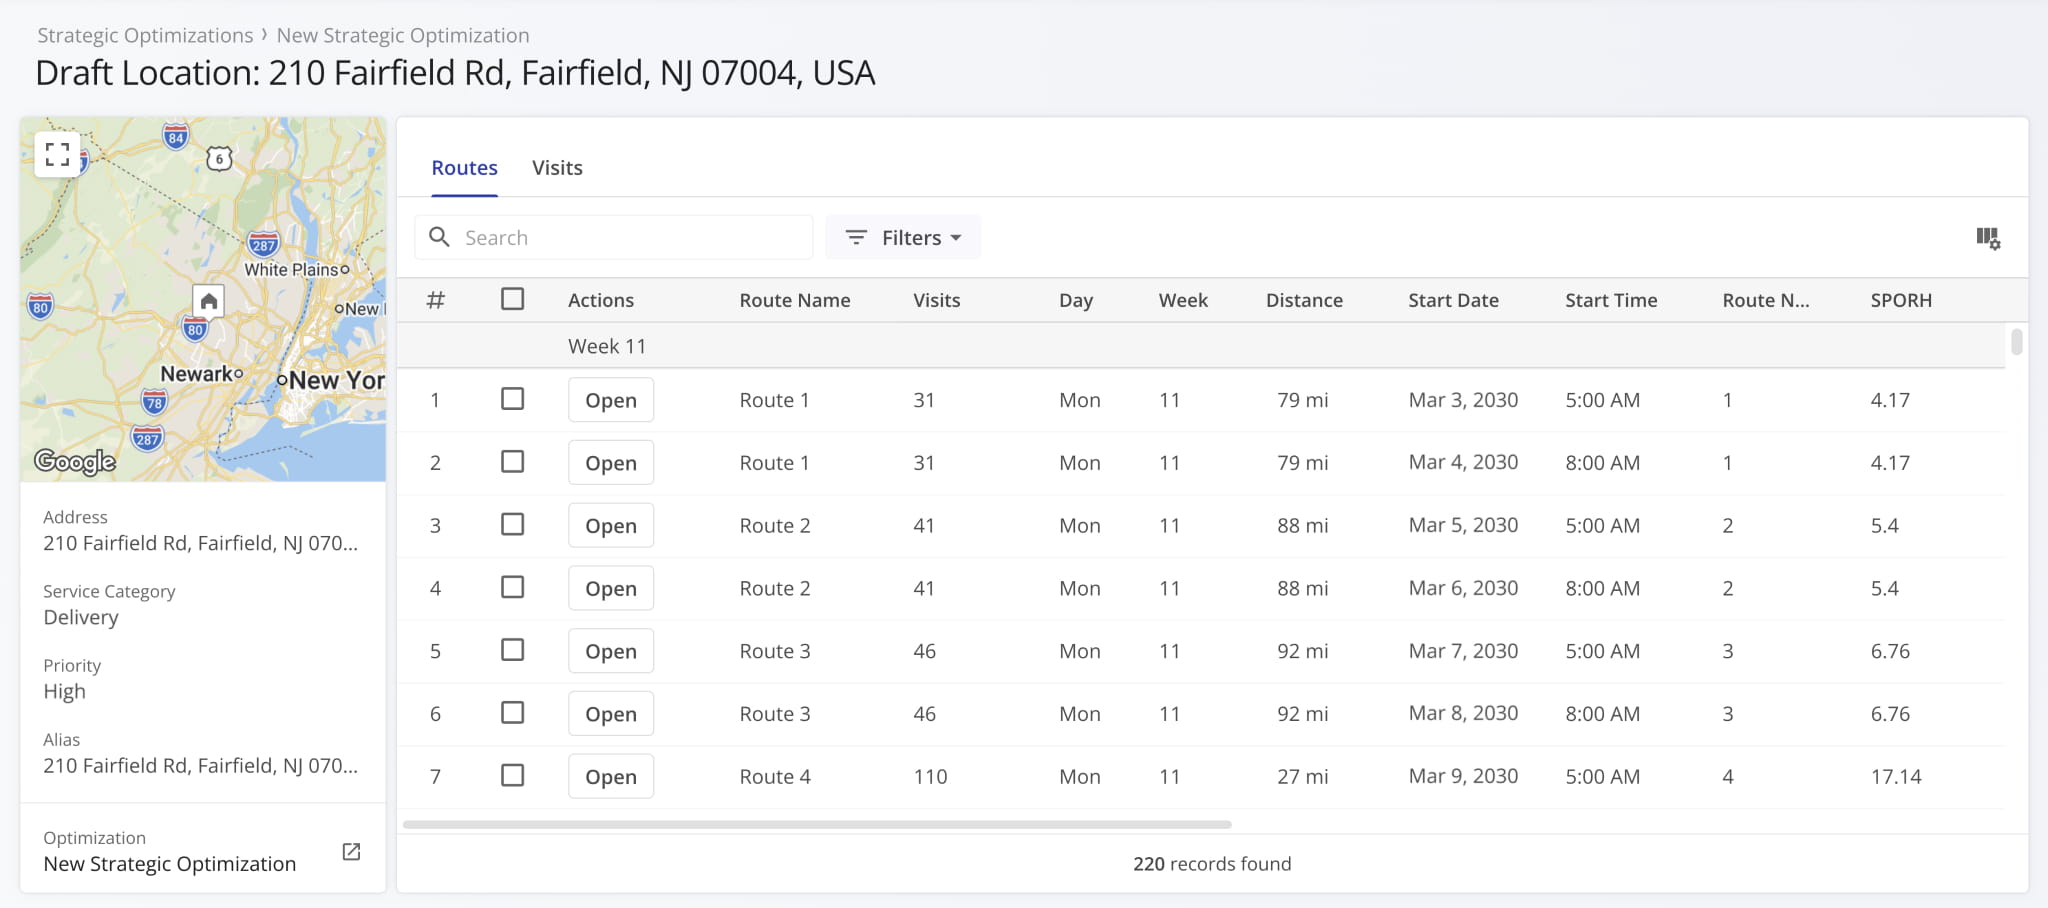
Strategic Location Snapshots show visit and route data for a location with customizable columns, filters, and more.
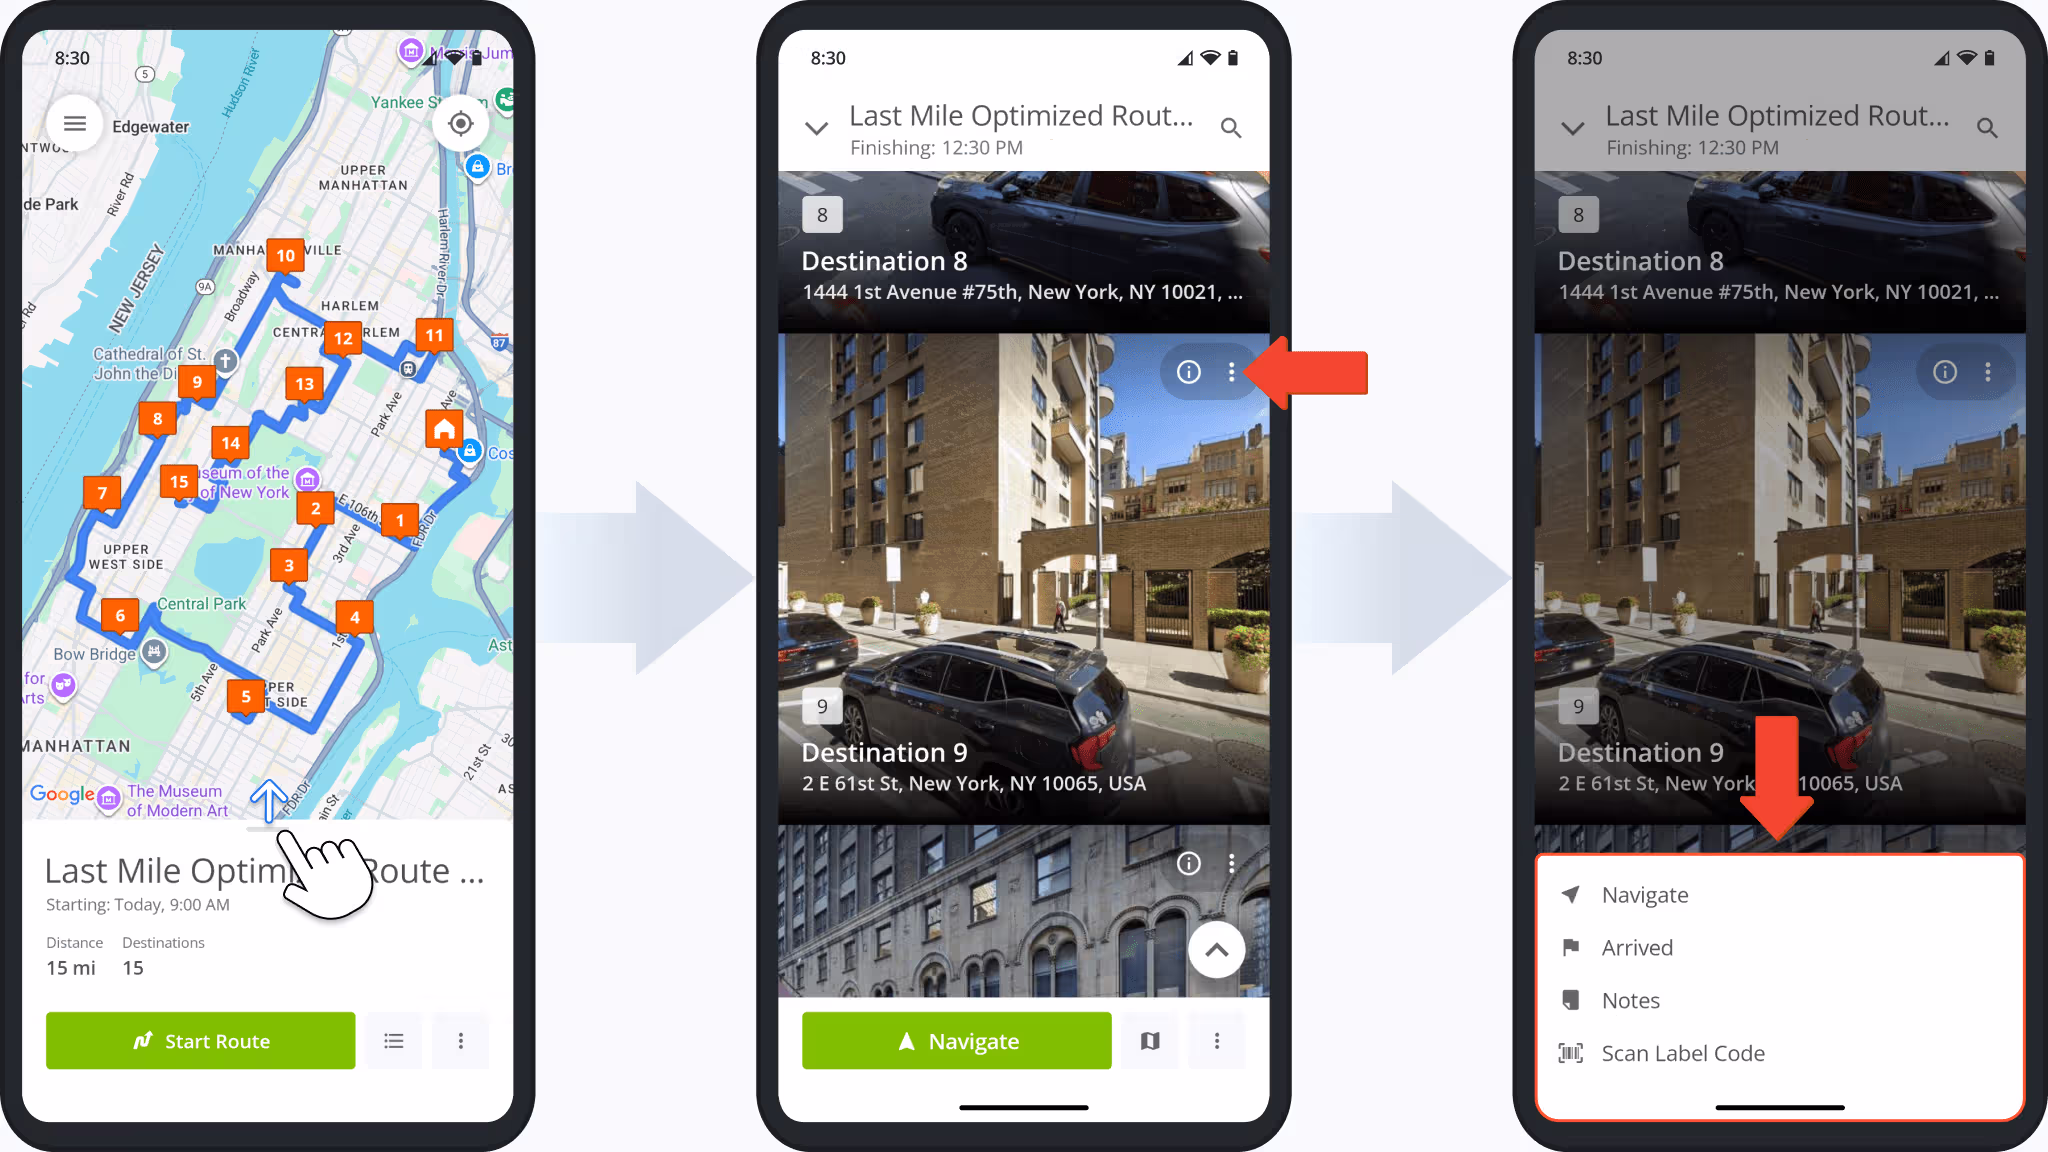
A new button was added to the Destinations List on the Route4Me App. Open a route and swipe up; you’ll find the new Three-dot Button next to the Information Icon. Tap it to see actions available for the destination.
Routes need to be started for destination actions to be available. Learn more about starting and navigating routes.
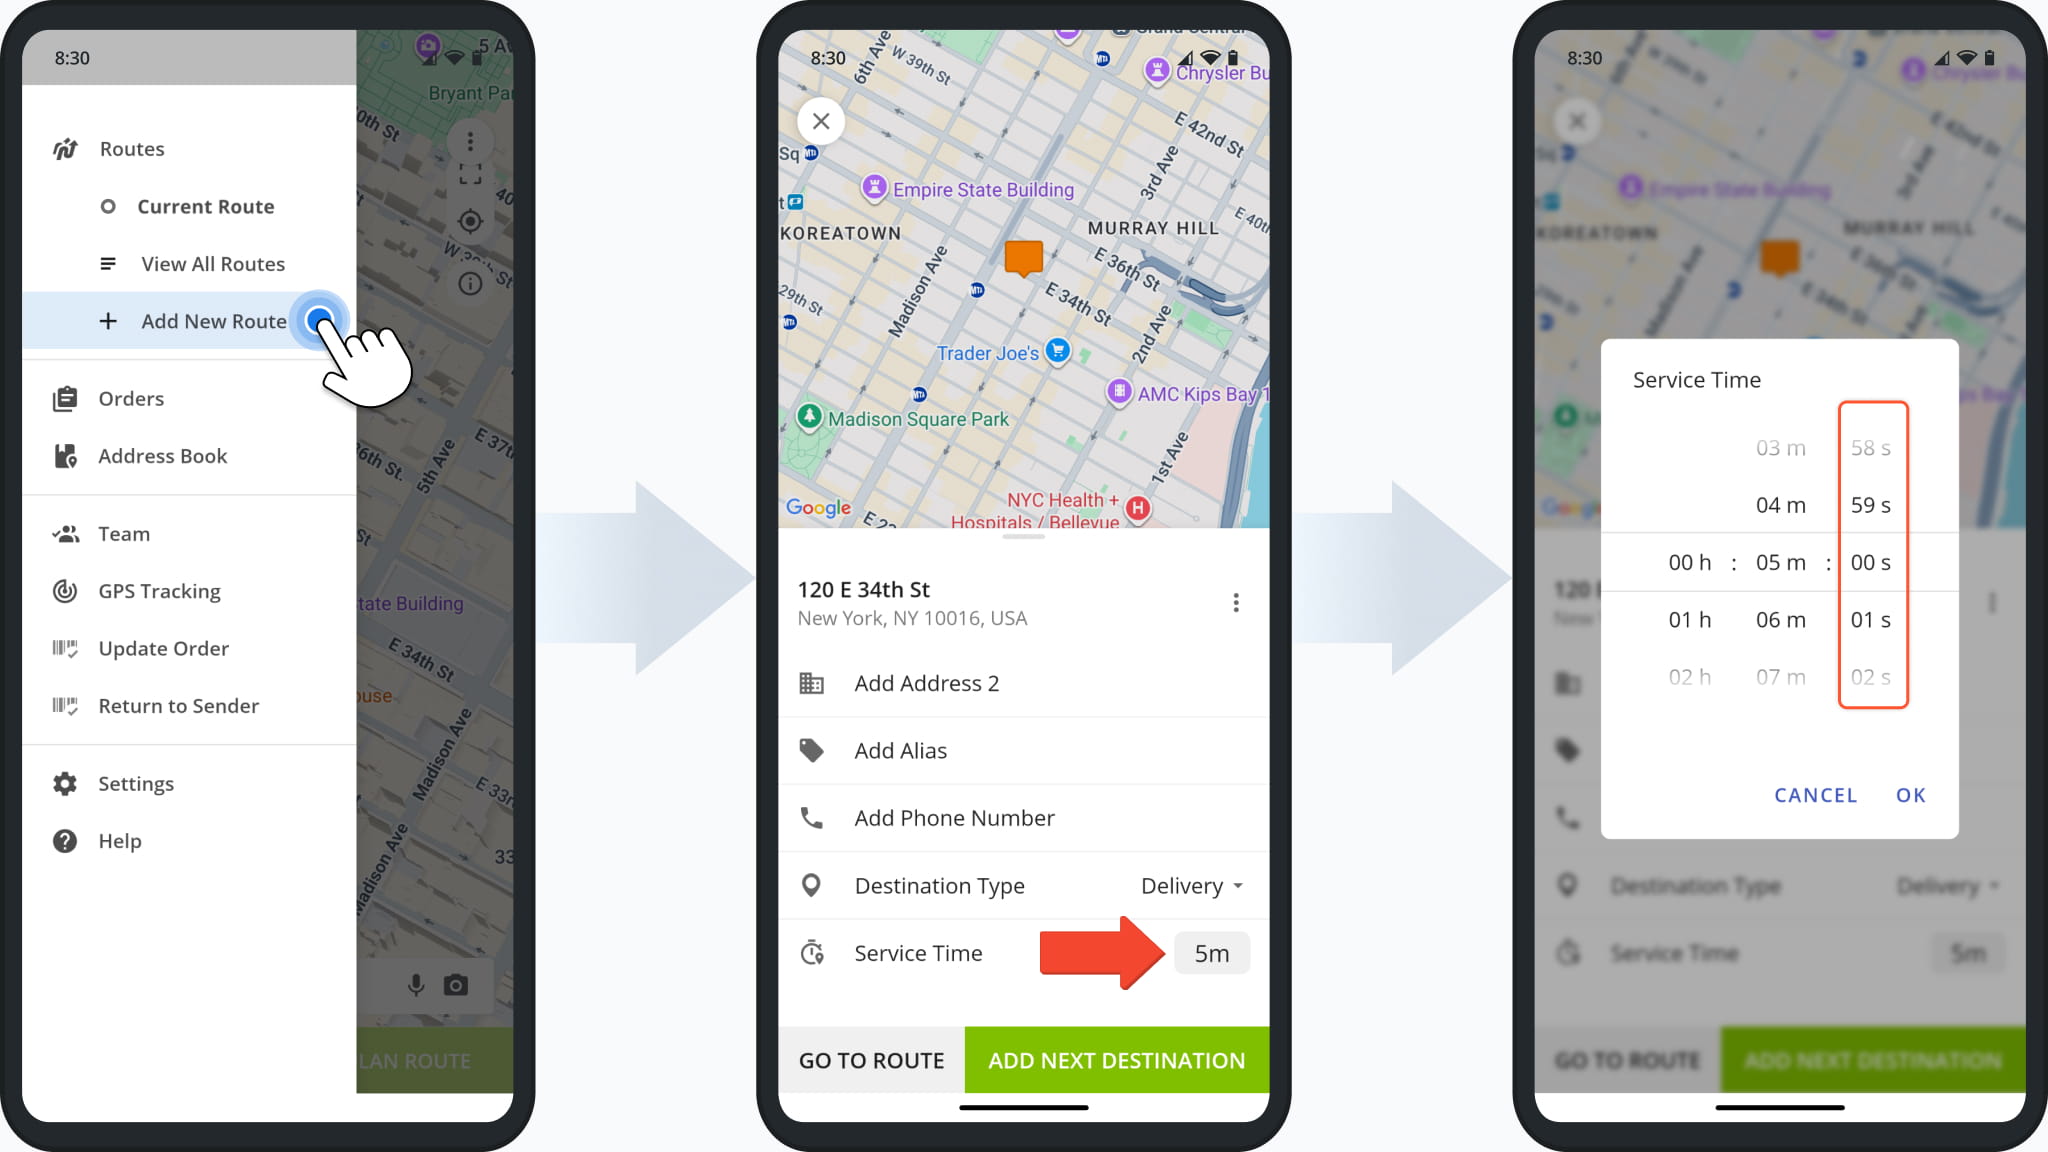
When planning routes on mobile with the Route4Me App and adding Service Time to a destination, you can now specify the exact seconds value in addition to hours and minutes. Previously, the Service Time selector did not support seconds.
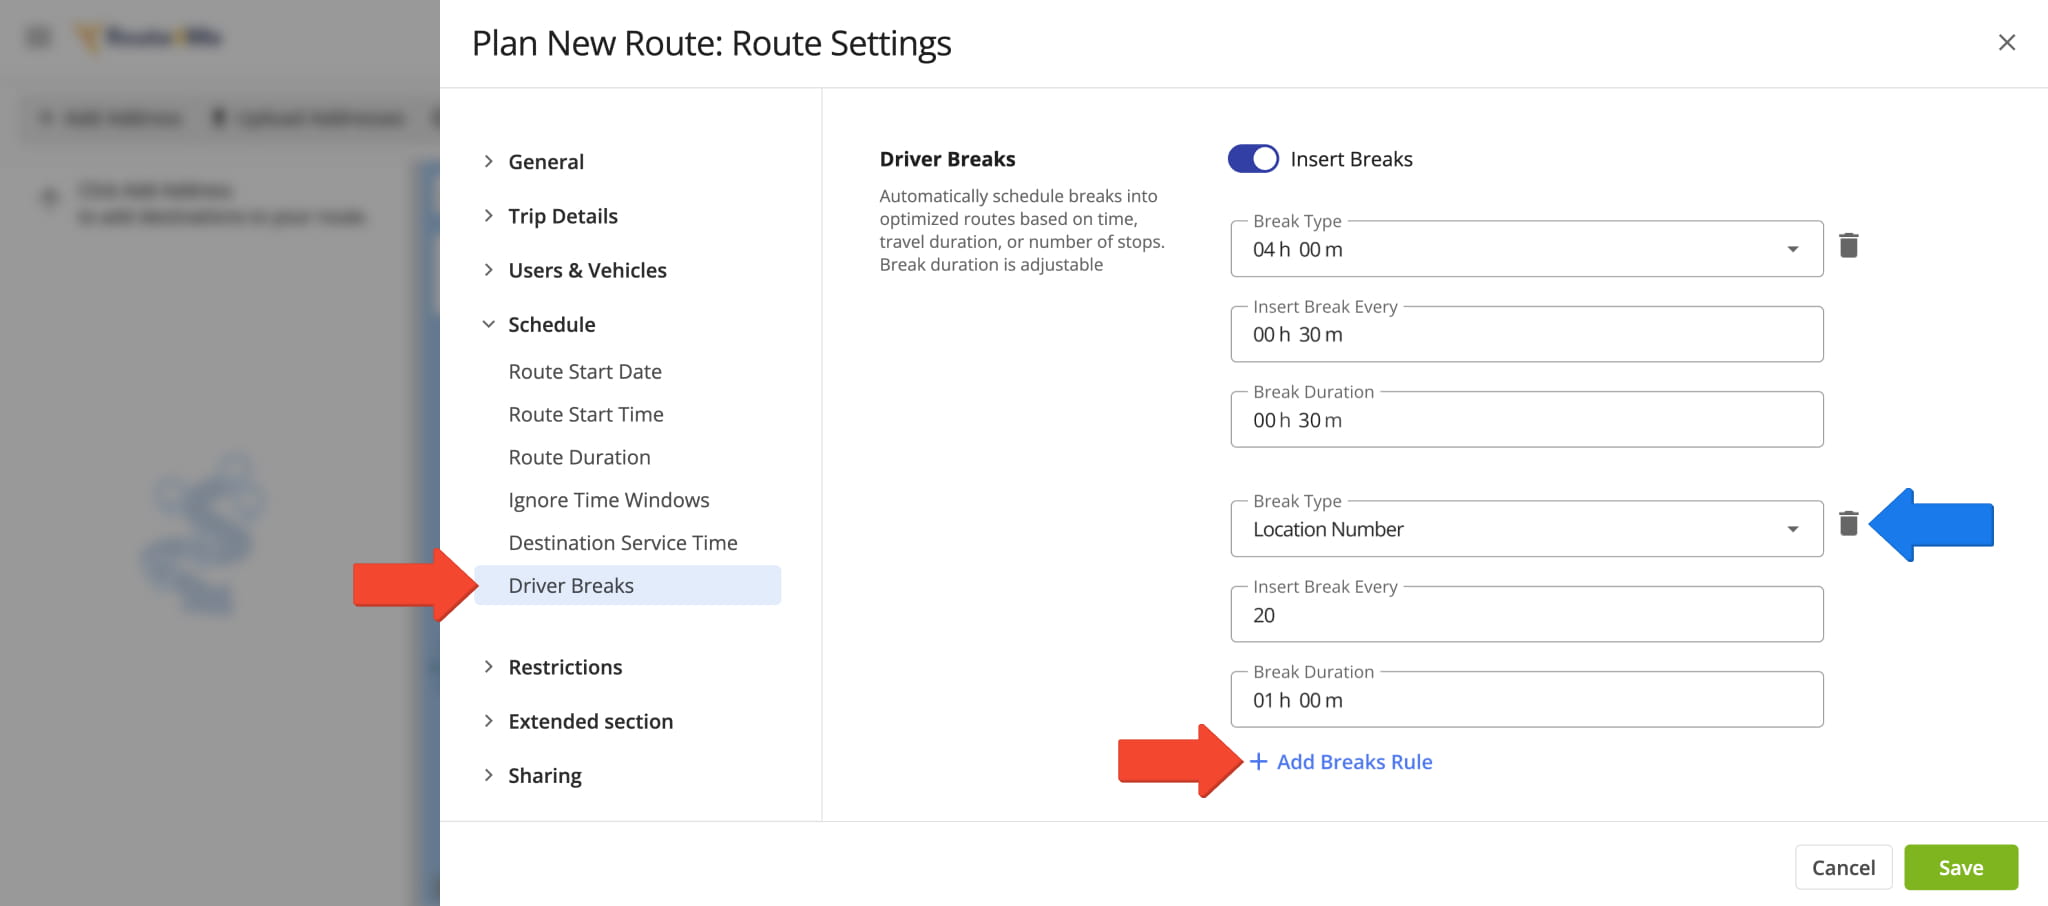
You can now insert multiple hours of service (HOS) breaks when planning routes or into already planned routes. Previously, you could only set a single HOS Driver Break rule per route and would have to manually insert additional break stops.
This update enables you to set multiple break rules with different trigger types and parameters directly in your manual route settings, Optimization Profiles, and when using the Strategic Cycle Route Planner.
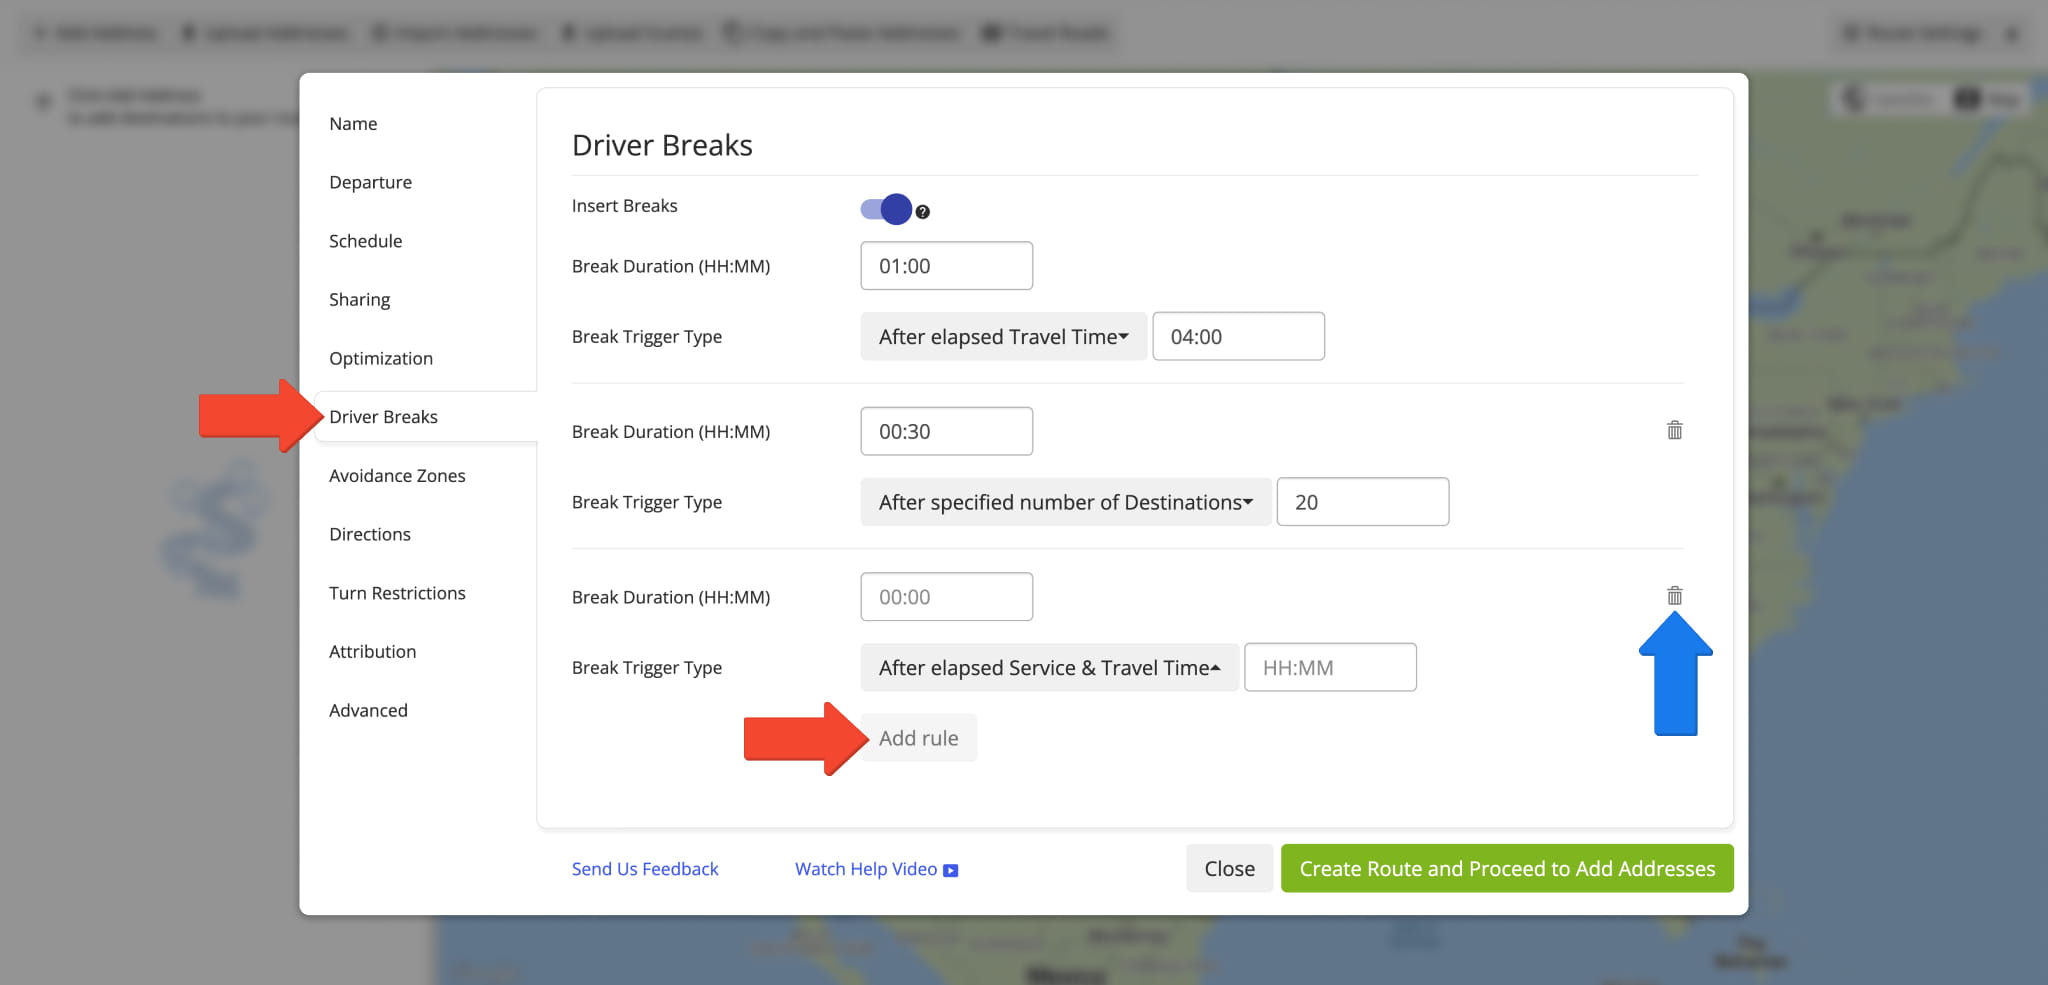
The same enhancement is also available in the original route settings interface. This ensures a consistent experience when adding Driver Breaks regardless of your account’s specific setup and enables features.
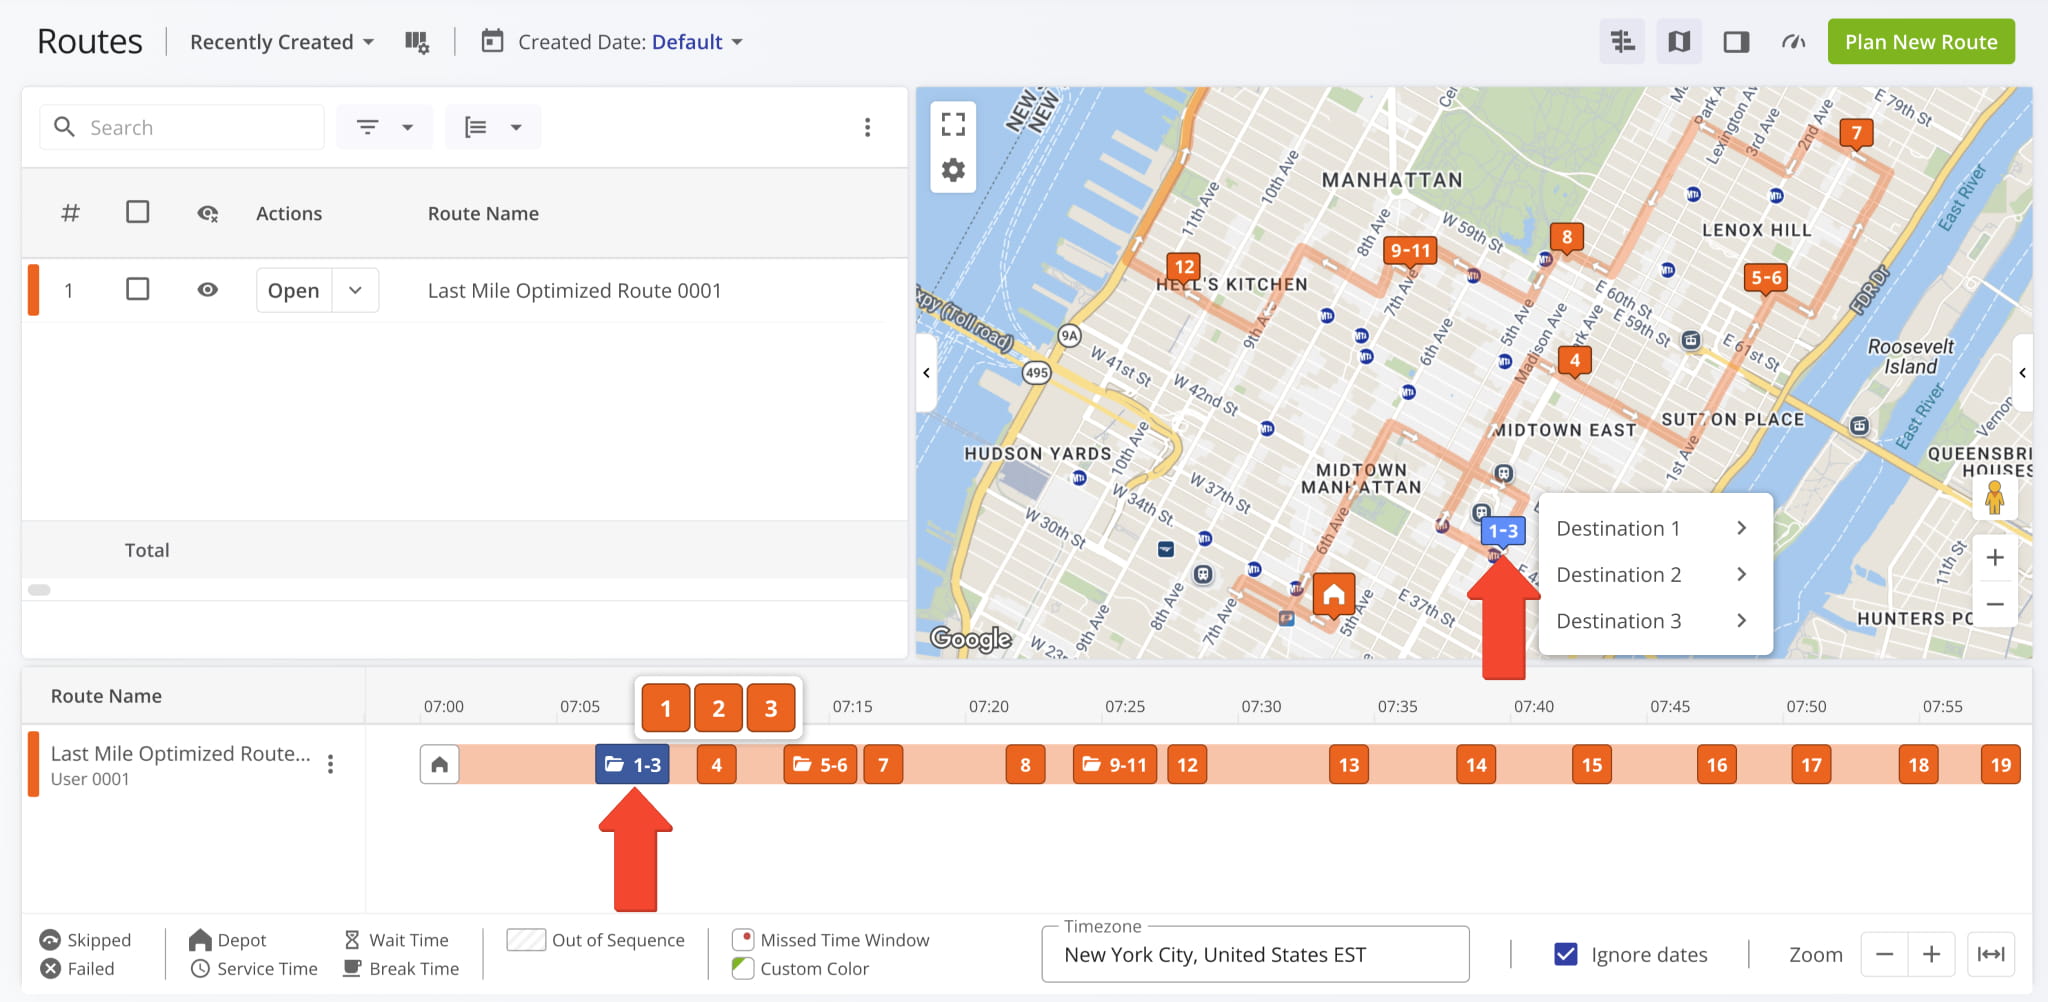
The Routes Timeline and Routes Map now show new Destination Groups for routes with Destination Bundling. To see on-hover destination info, simply hover over a group, and you’ll see the individual destinations it contains.
Previously, Destination Bundling created overlapping destinations at the same map location with different sequence numbers. This update highlights grouped destinations clearly, improving and streamlining complex route management.
A direct link to Contract Snapshots was added to the Customers Page in the “Contracts” column.

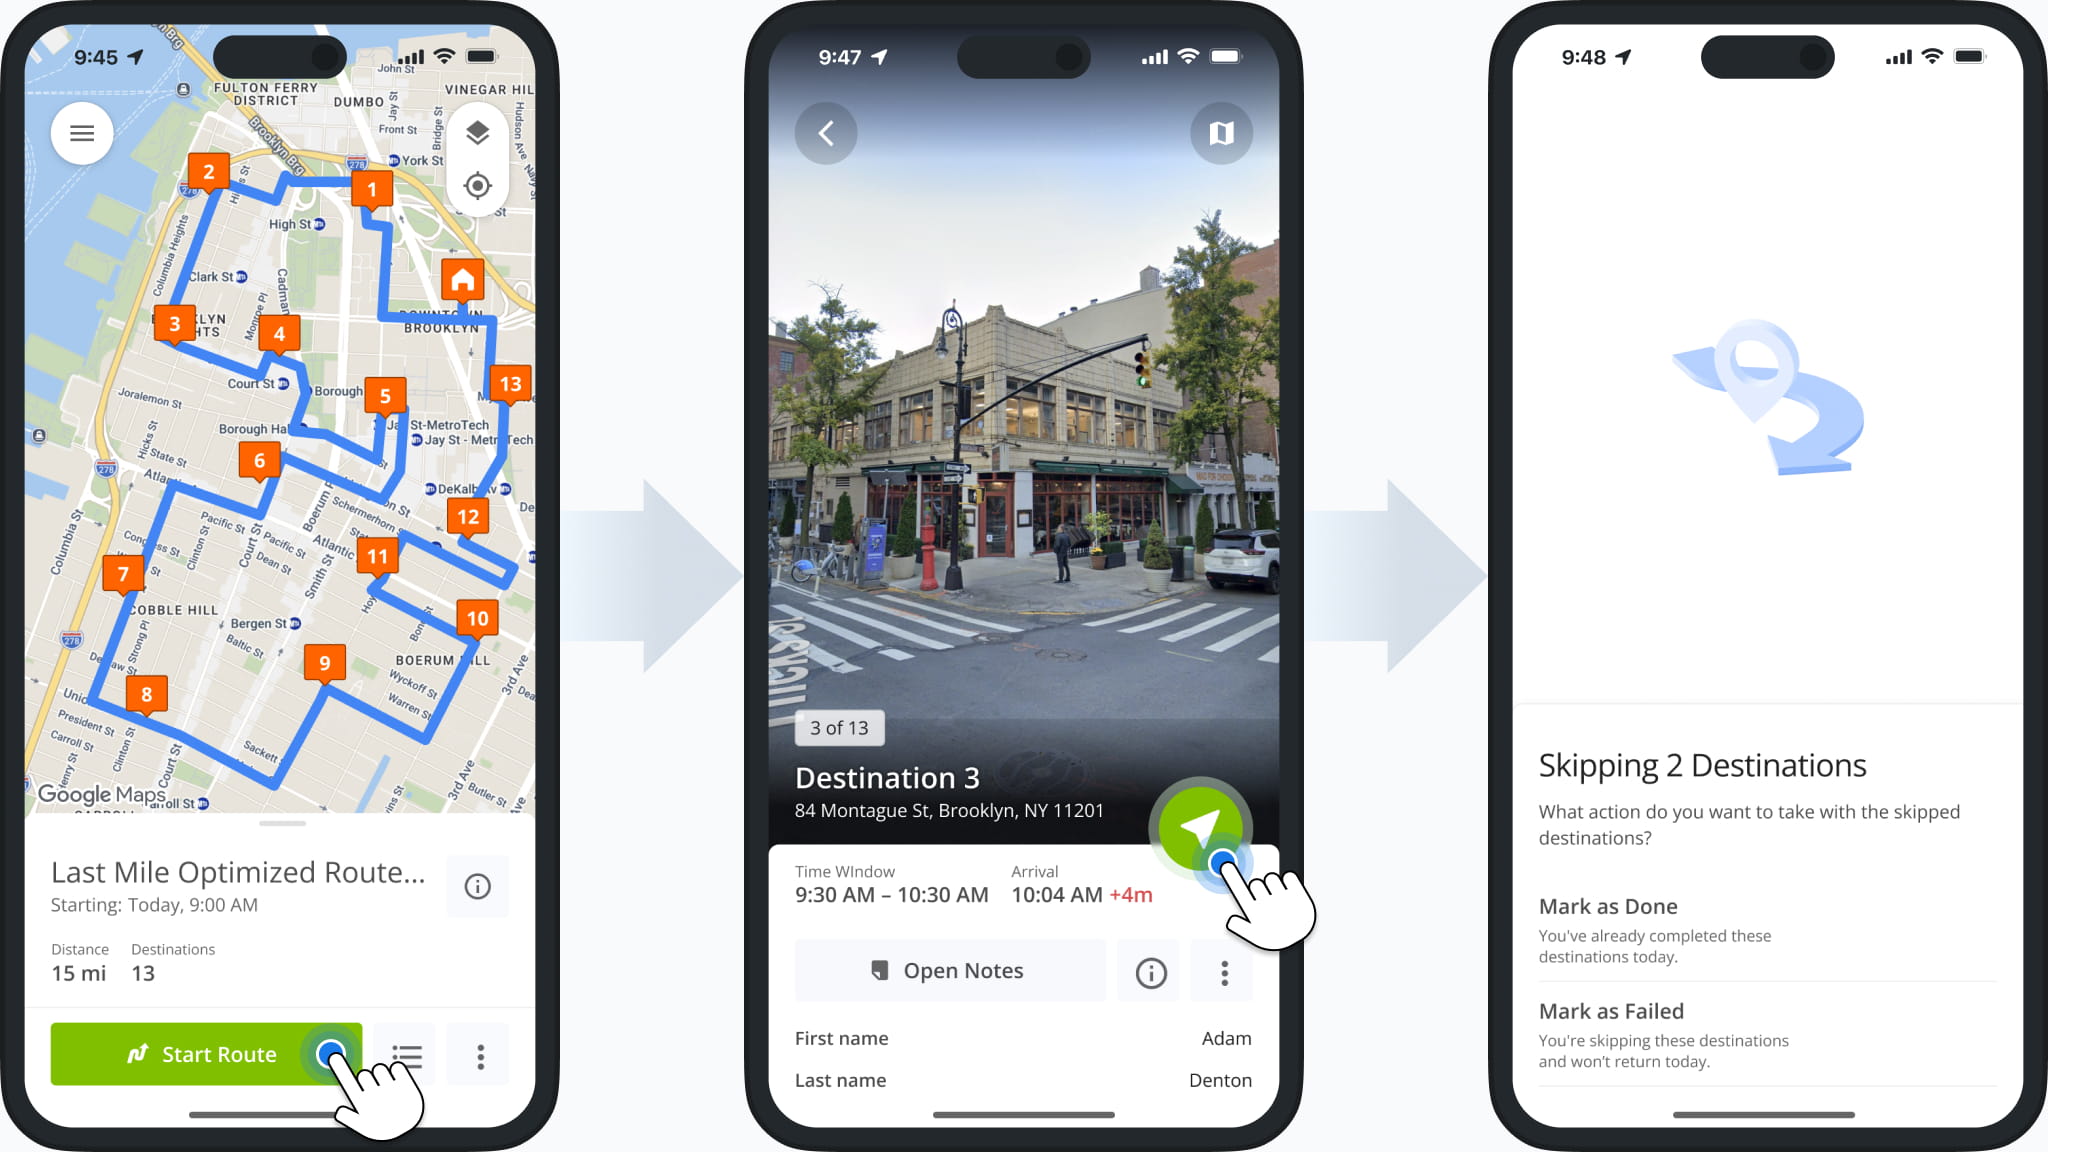
A new “Skip Destination” screen was added to the Route4Me App. When a user attempts to visit route destinations out of sequence, they’ll be prompted to resolve the unvisited destinations.
Depending on the enabled features and specific user permissions on your account, different options will be available.
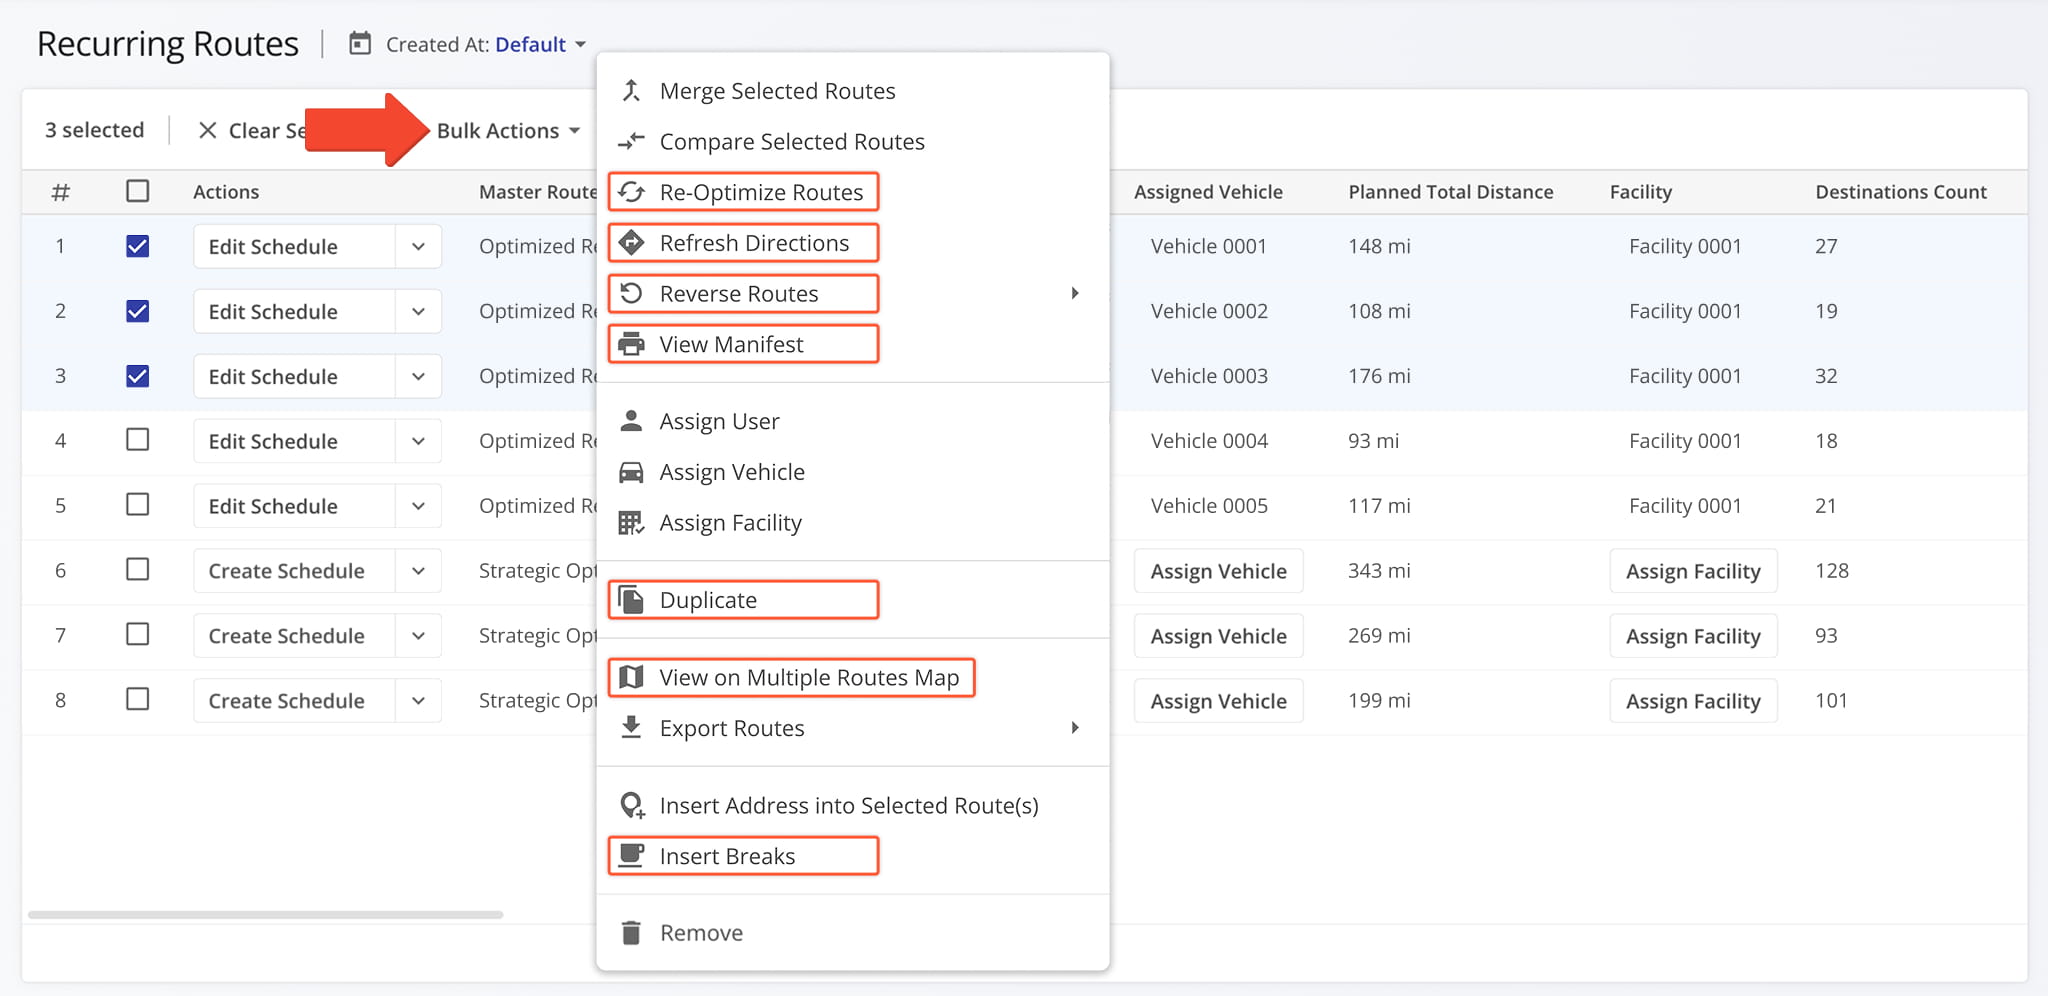
New options were added to the “Bulk Actions” menu for Recurring Routes. In addition to existing actions, you can now:
- Re-Optimize Routes: Recalculate route optimizations after making changes.
- Refresh Route Directions: Recalculate driving directions between route destinations.
- Reverse Routes: Reverse route sequences to invert visitation order.
- View Route Manifest: See detailed, print-friendly route metrics and data.
- Duplicate Routes: Create new copies of the selected routes.
- View on Multiple Routes Map: Open the selected routes in the Routes Map.
- Insert Driver Breaks: Add breaks to routes for hours of service compliance.
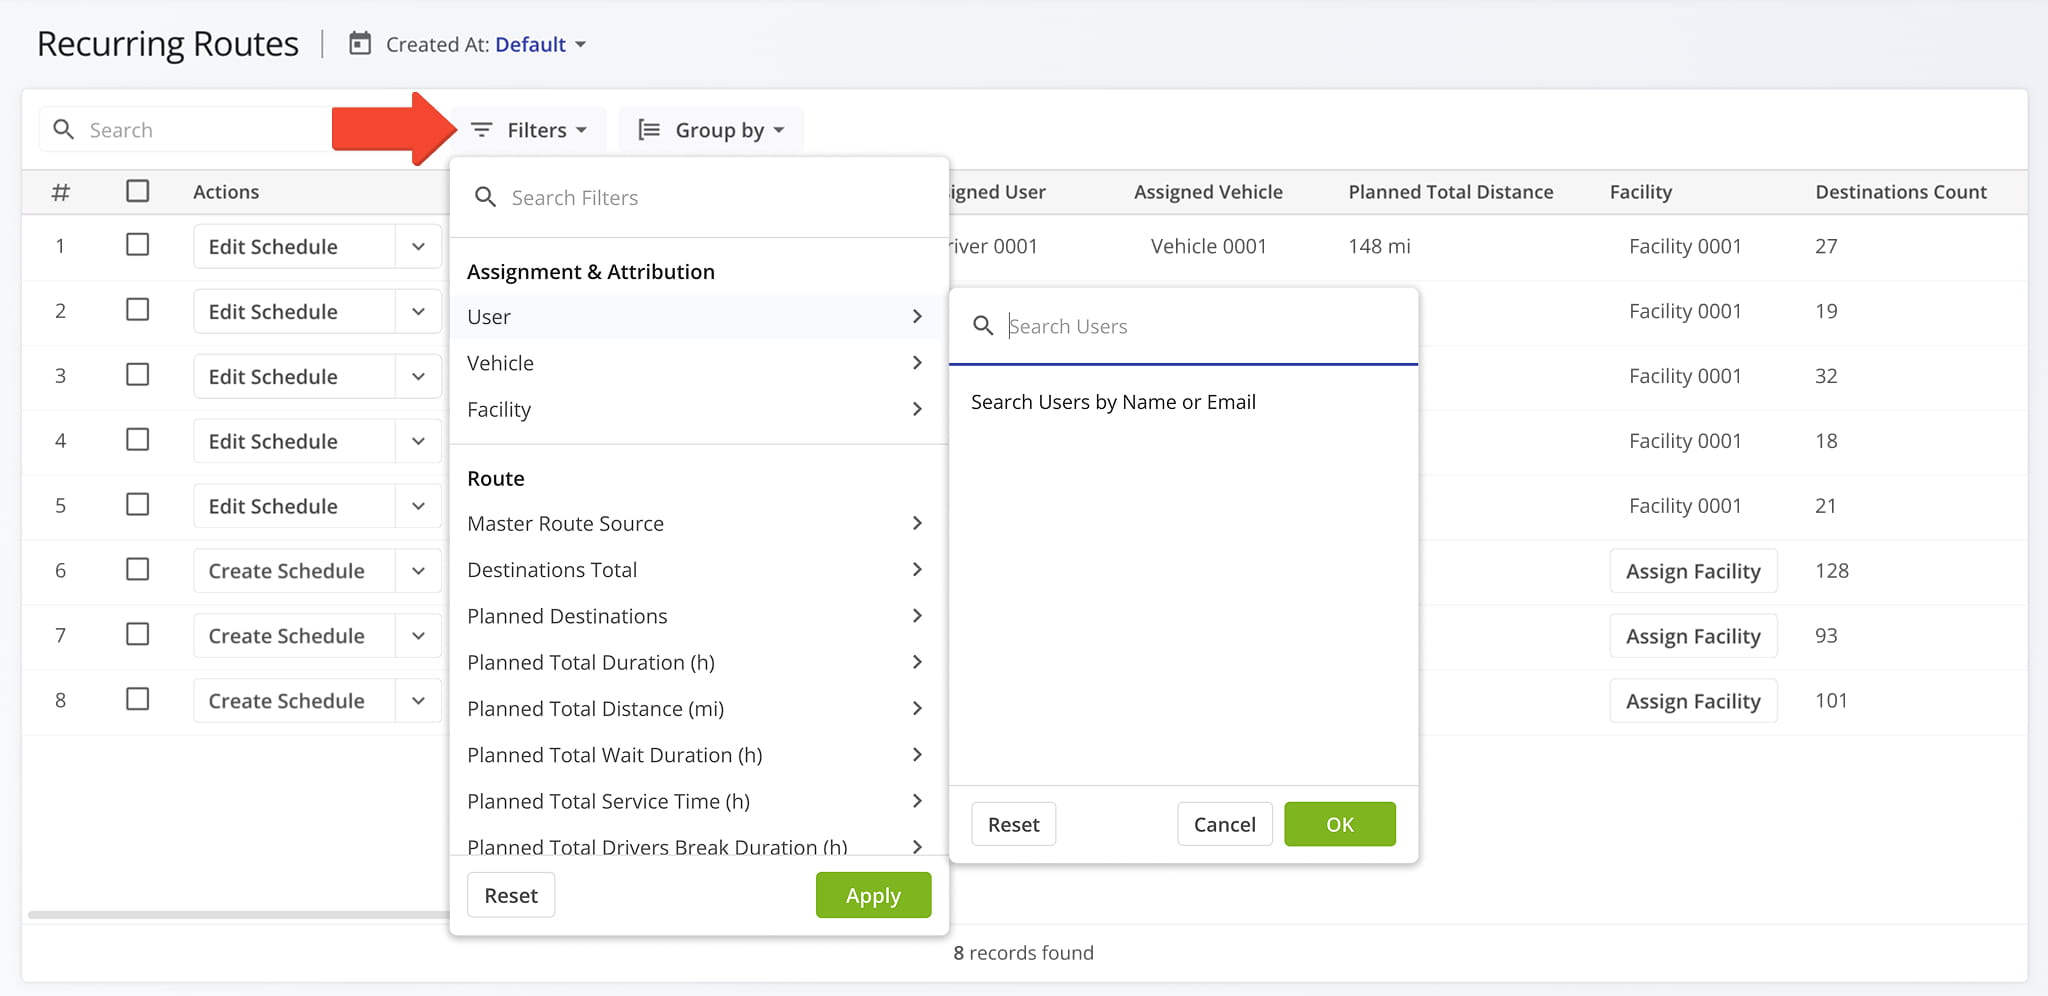
The filters for Recurring Routes were updated. The “Unassigned” checkbox was removed to streamline filter customization. Now, simply not selecting an entity to filter by will show any Recurring Master Routes with no such entity assigned.
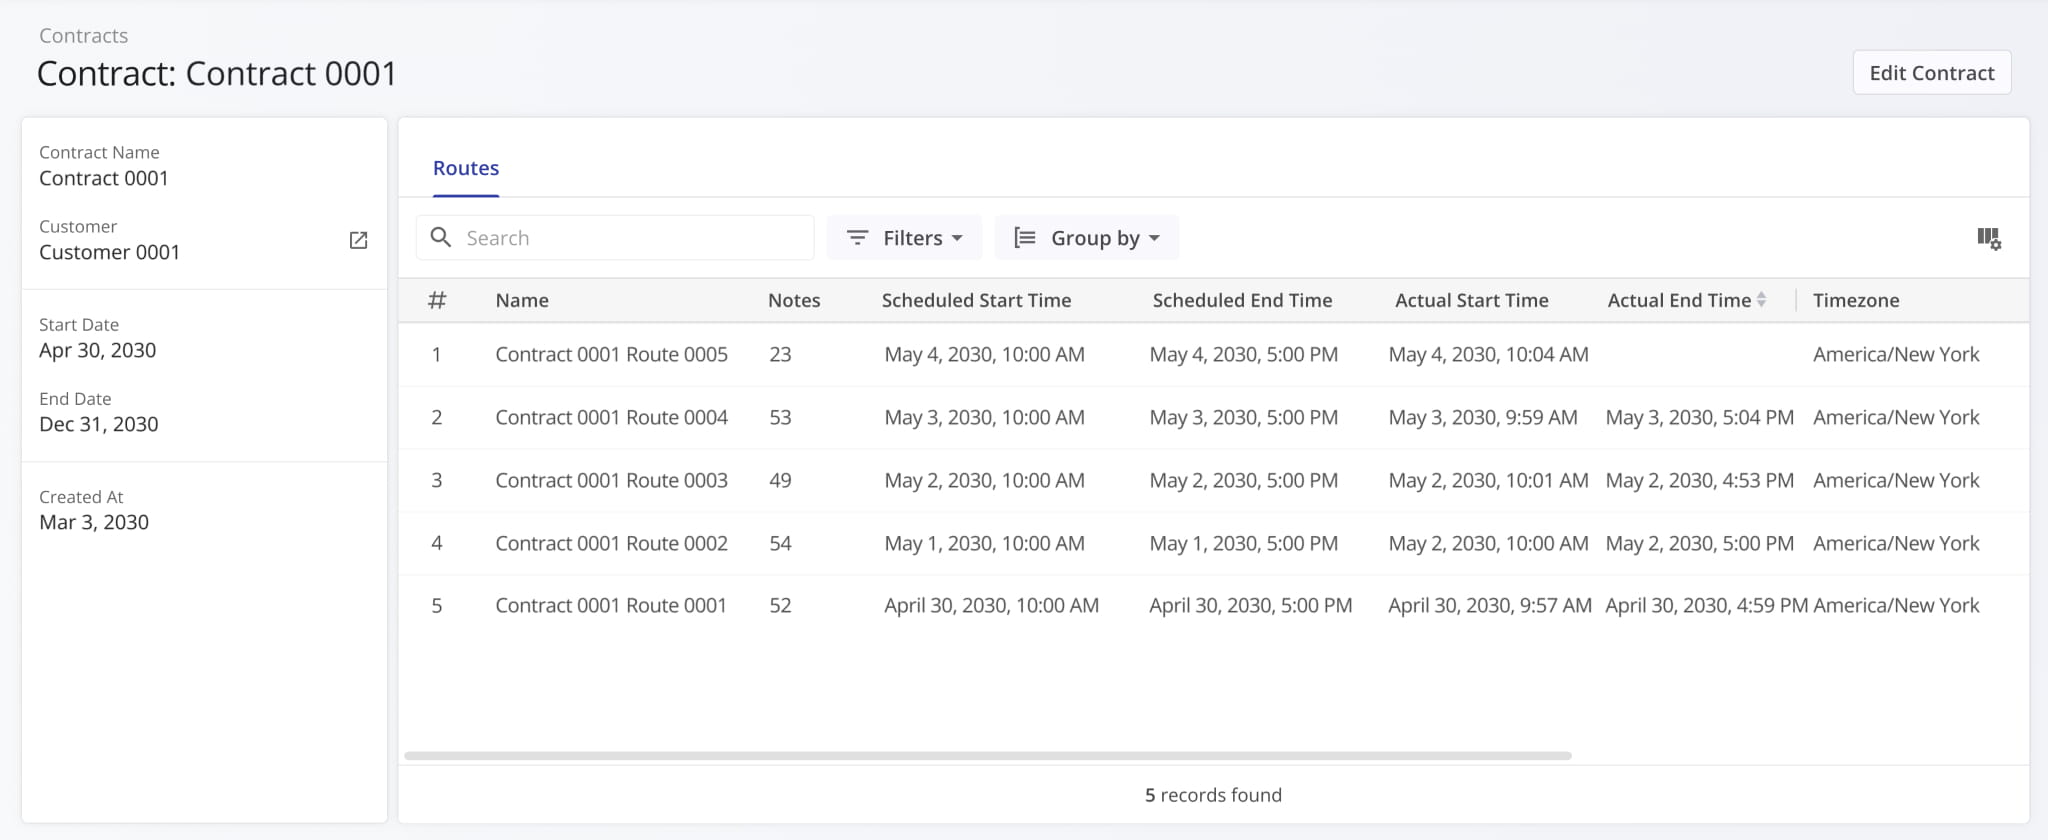
Contract Snapshots are now available for Contracts on your account. Just like other snapshots, the Contract Snapshot enables you to easily see data and activities associated with a specific entity on your account.
Currently, Contract Snapshots show the routes associated with a specific Contract.
A new “Cost Planned” filter was added to the Routes Page Filters in the “Utilization – Cost” section. This update enables you to filter routes by the total planned cost value associated with route orders and destinations.

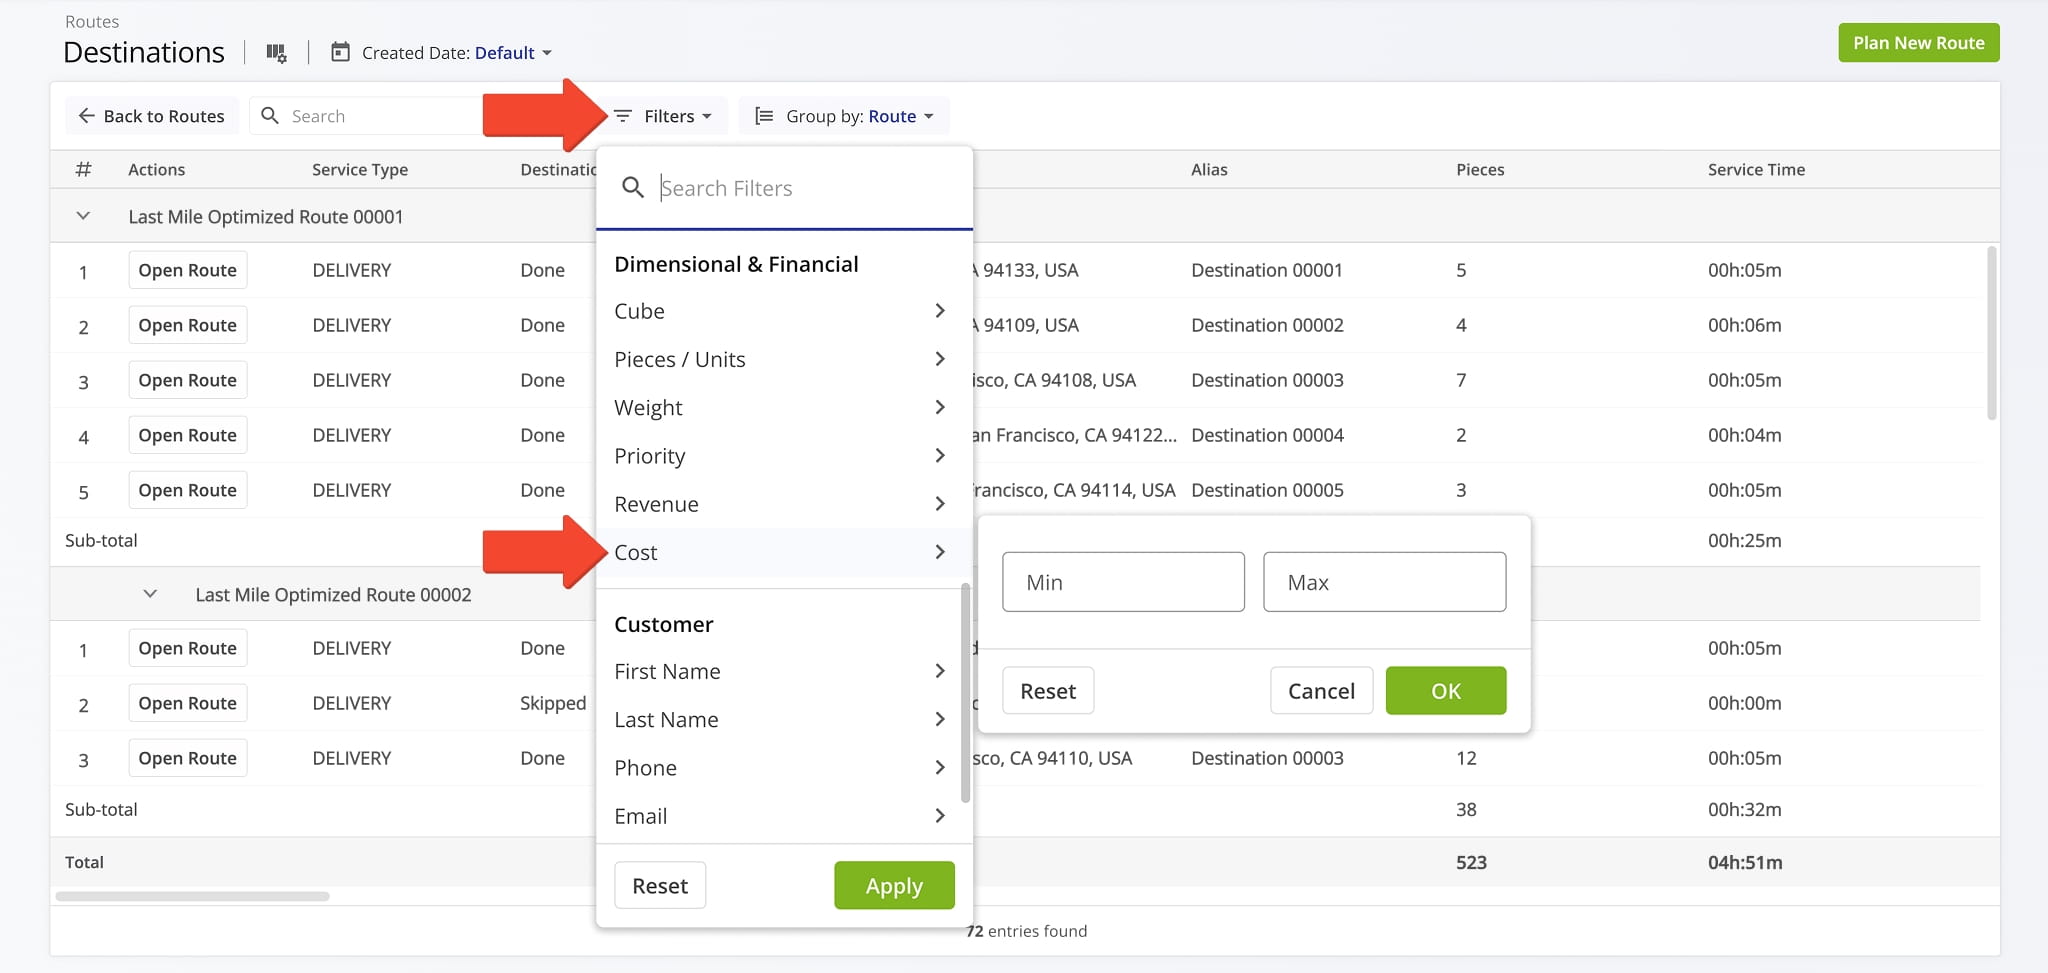
A new “Cost” filter was added to the Destinations List in the “Dimensional & Financial” section. This update enables you to filter destinations by their associated cost values.
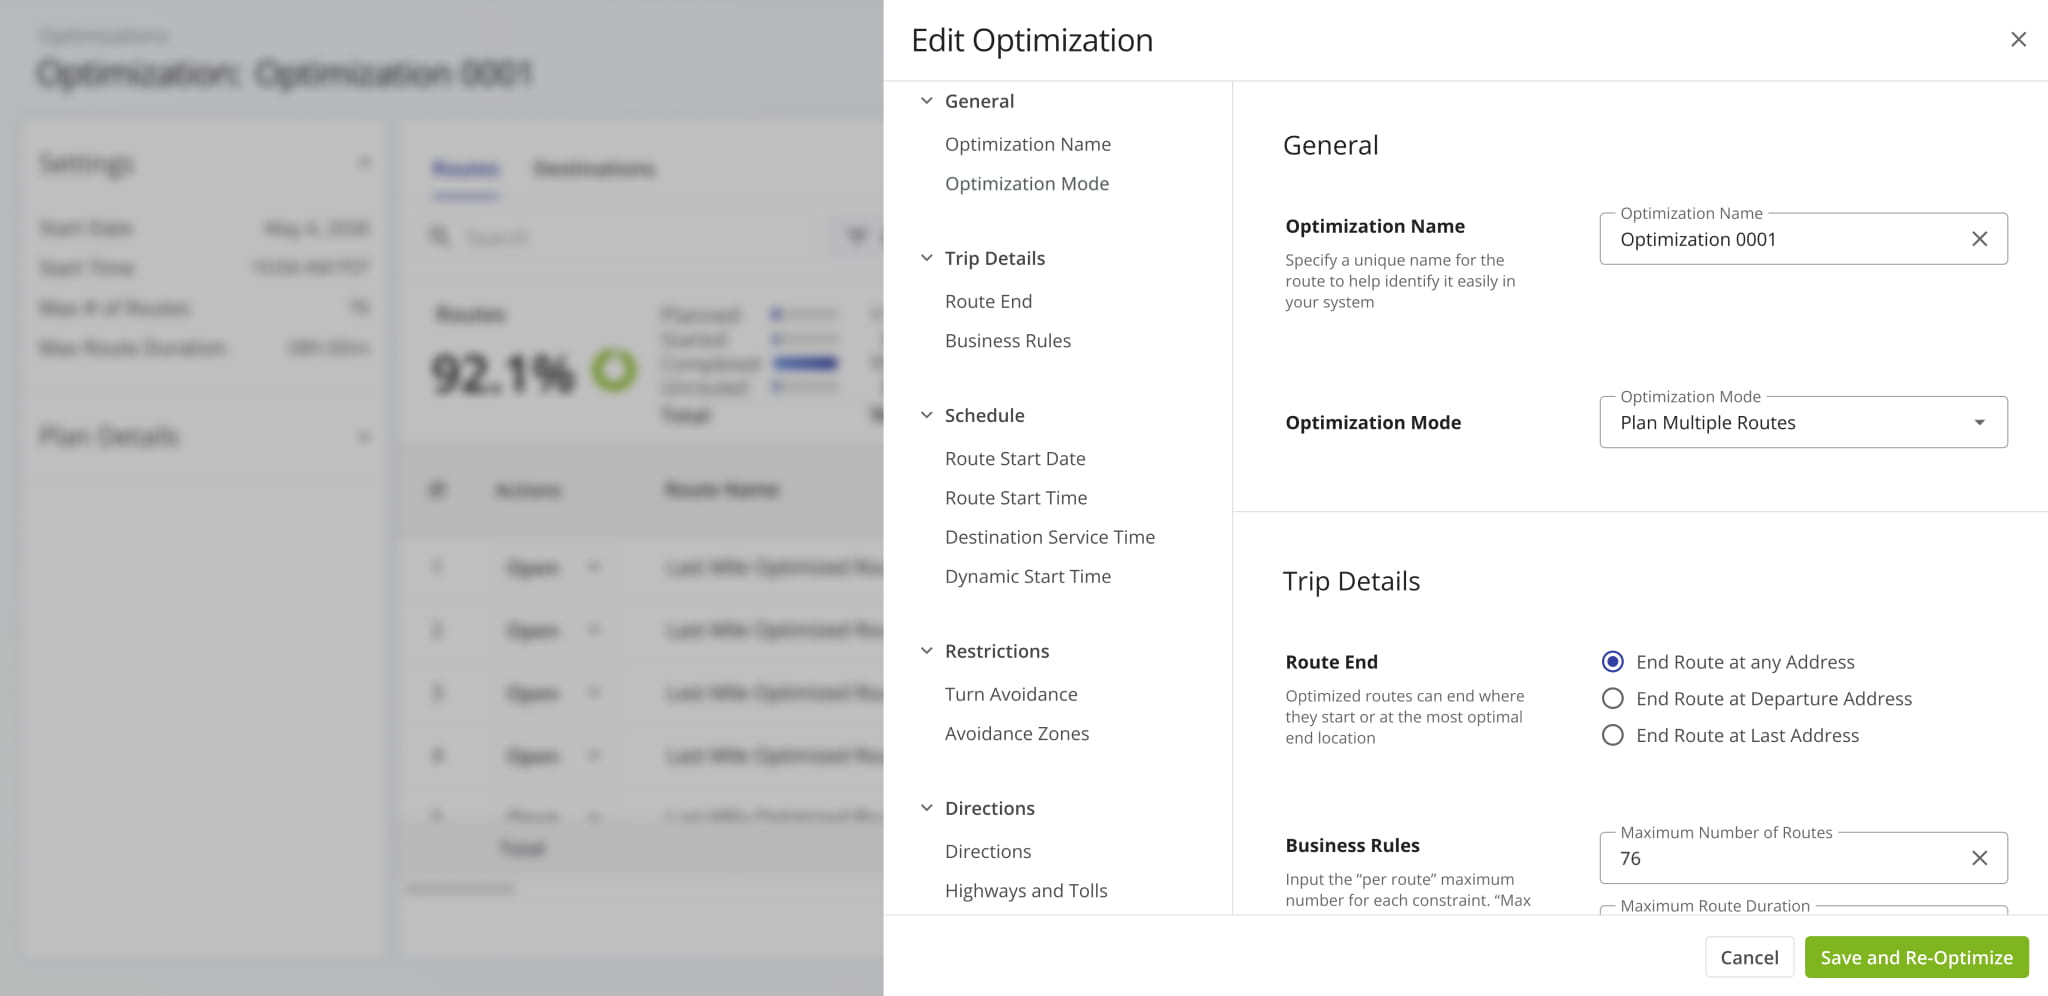
The “Edit Optimizations” function accessible from Optimization Snapshots was updated.
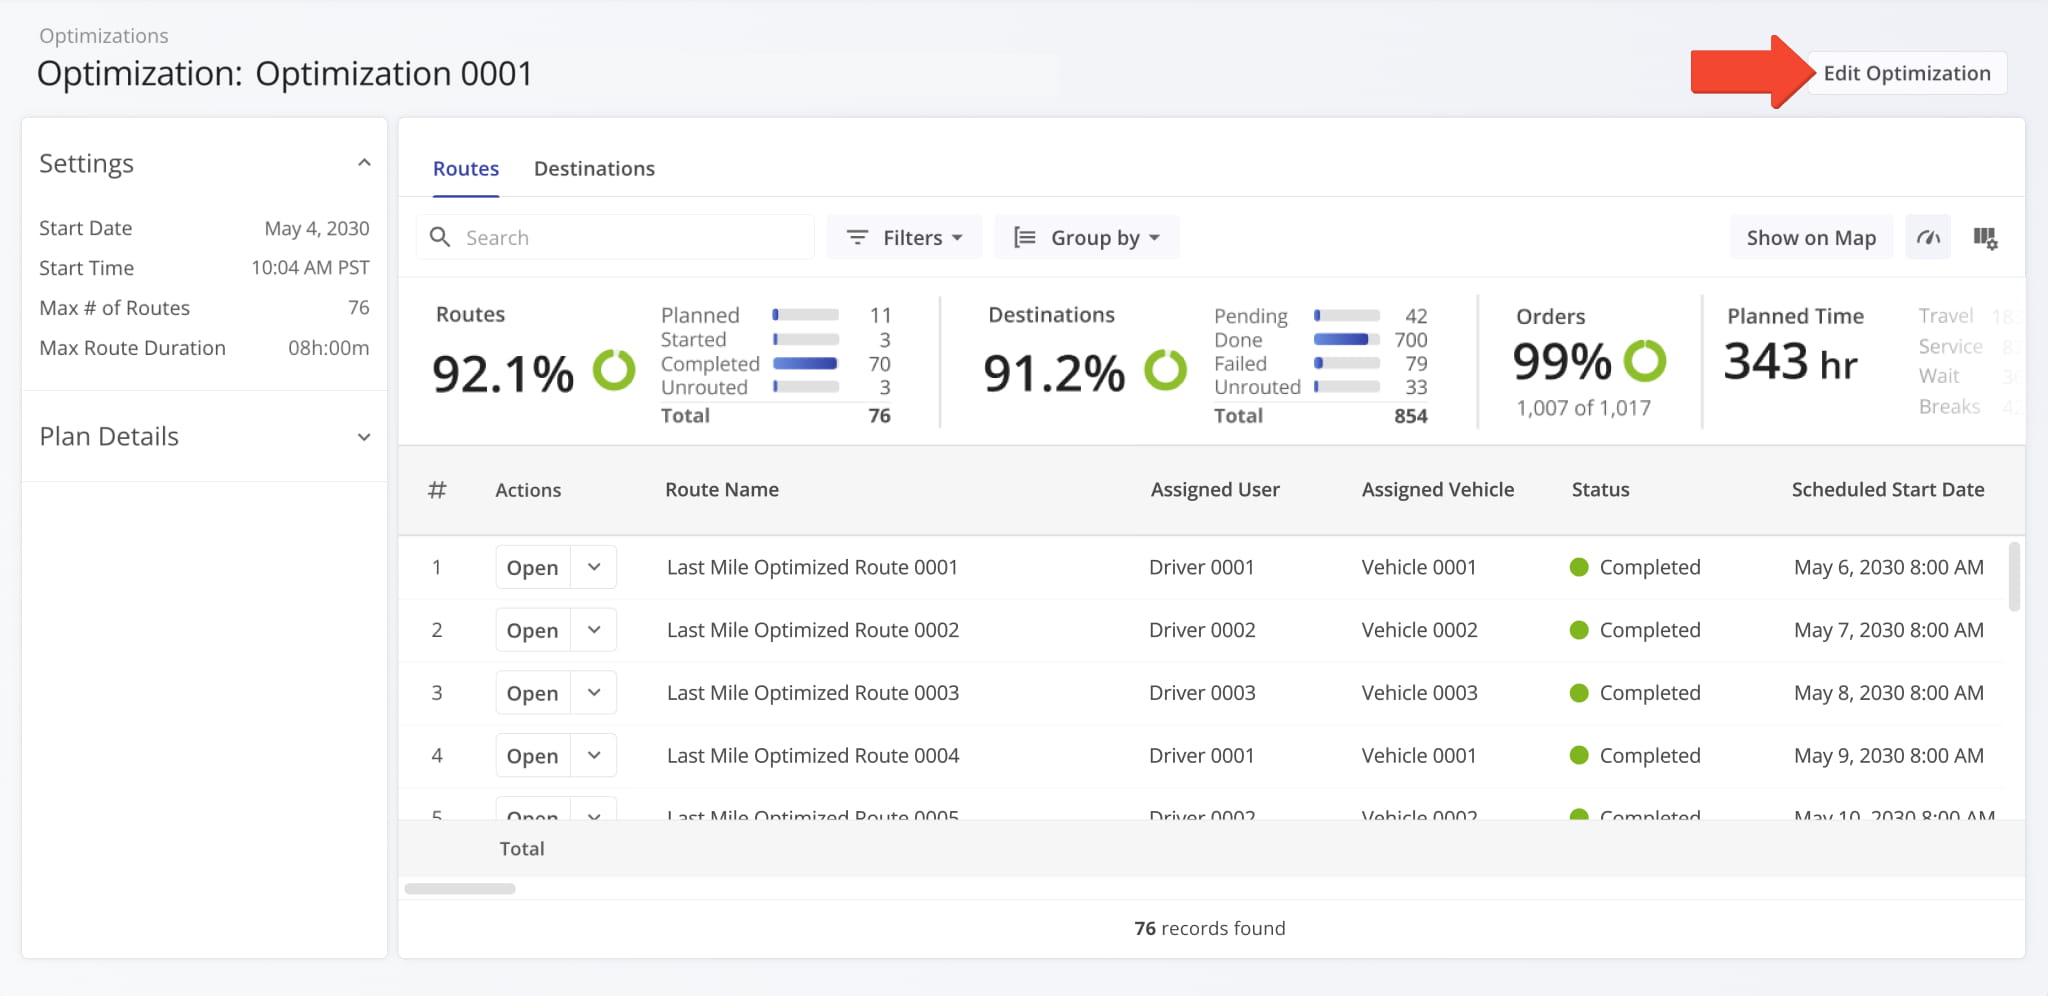
The new “Edit Optimization” panel supports all available Optimization settings. Previously, users could only access these settings in classic Optimizations (Original). This update makes them available in Optimization Snapshots.
The Route4Me App was updated to remove the “Invite Others” button from the main menu and disable invite functionality for user accounts. This update ensures only the main company account and authorized sub-users can send invitations.
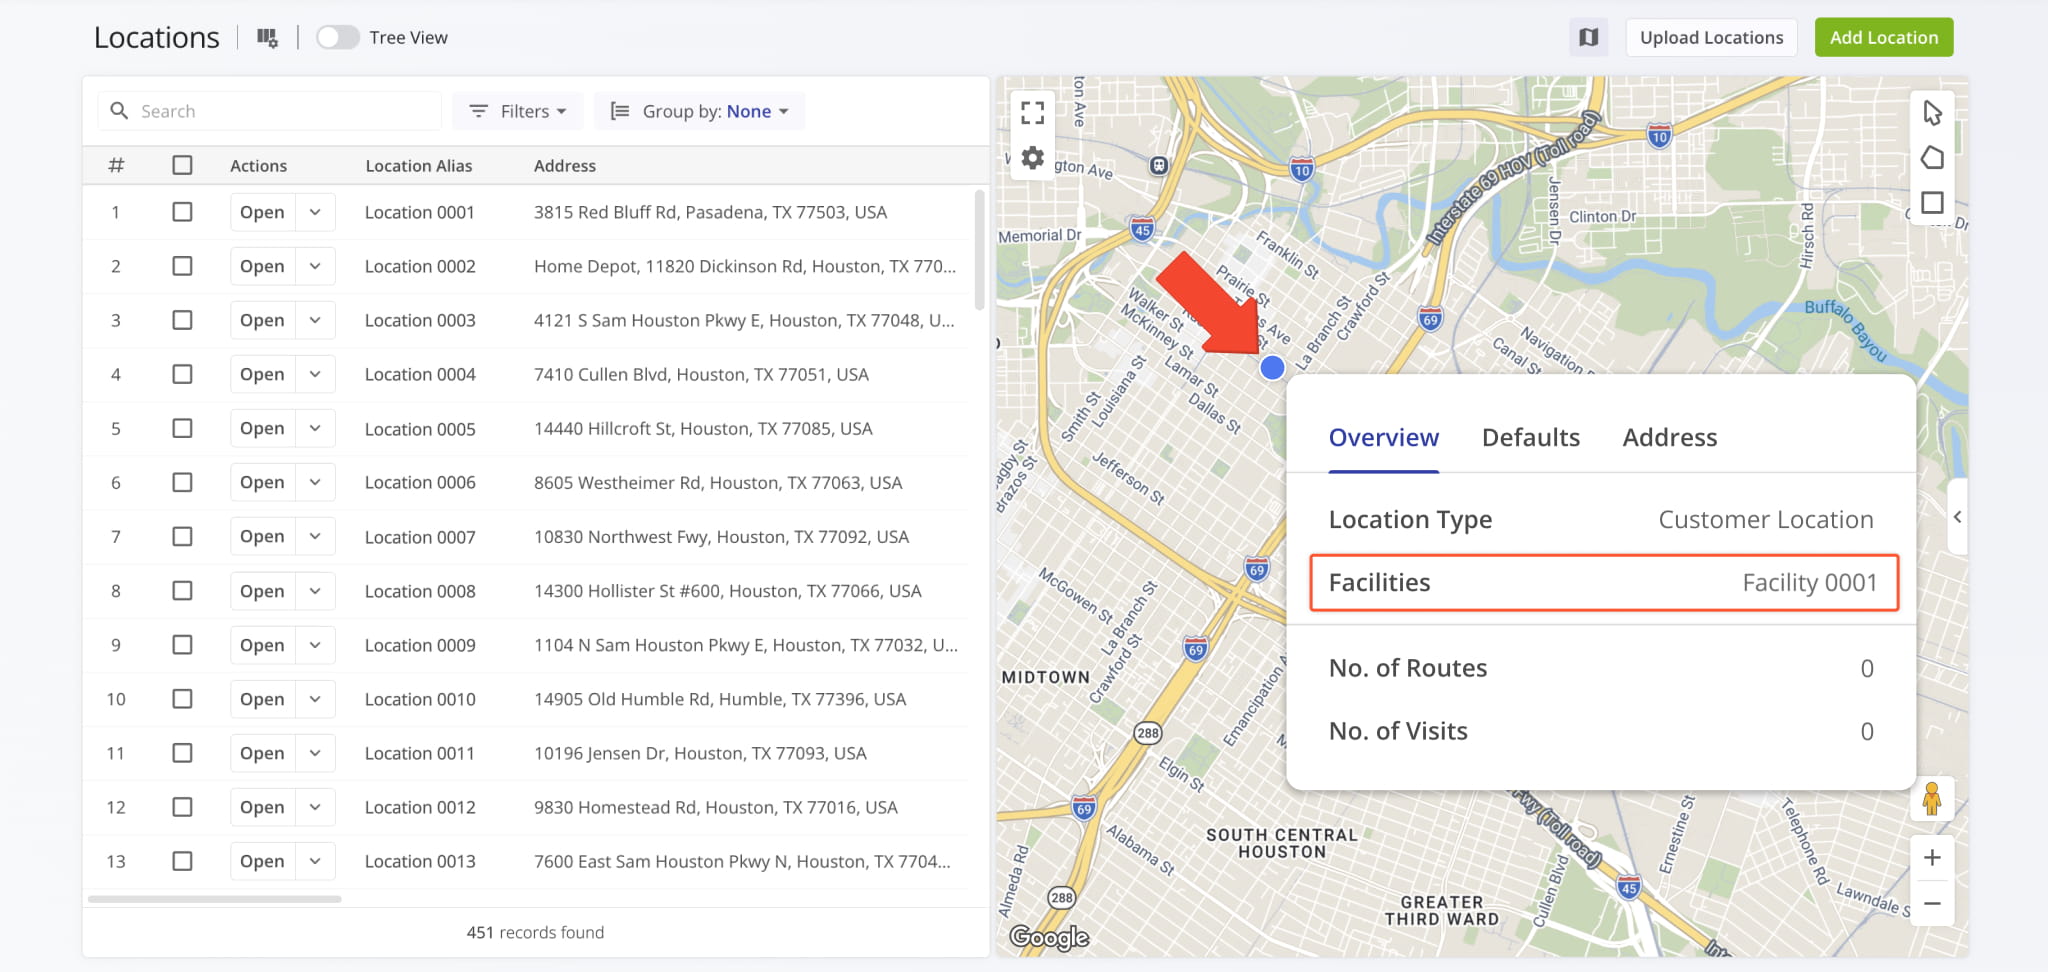
A facility attribution field was added to data pop-ups on the Locations Map, showing a Location’s assigned Facilities.
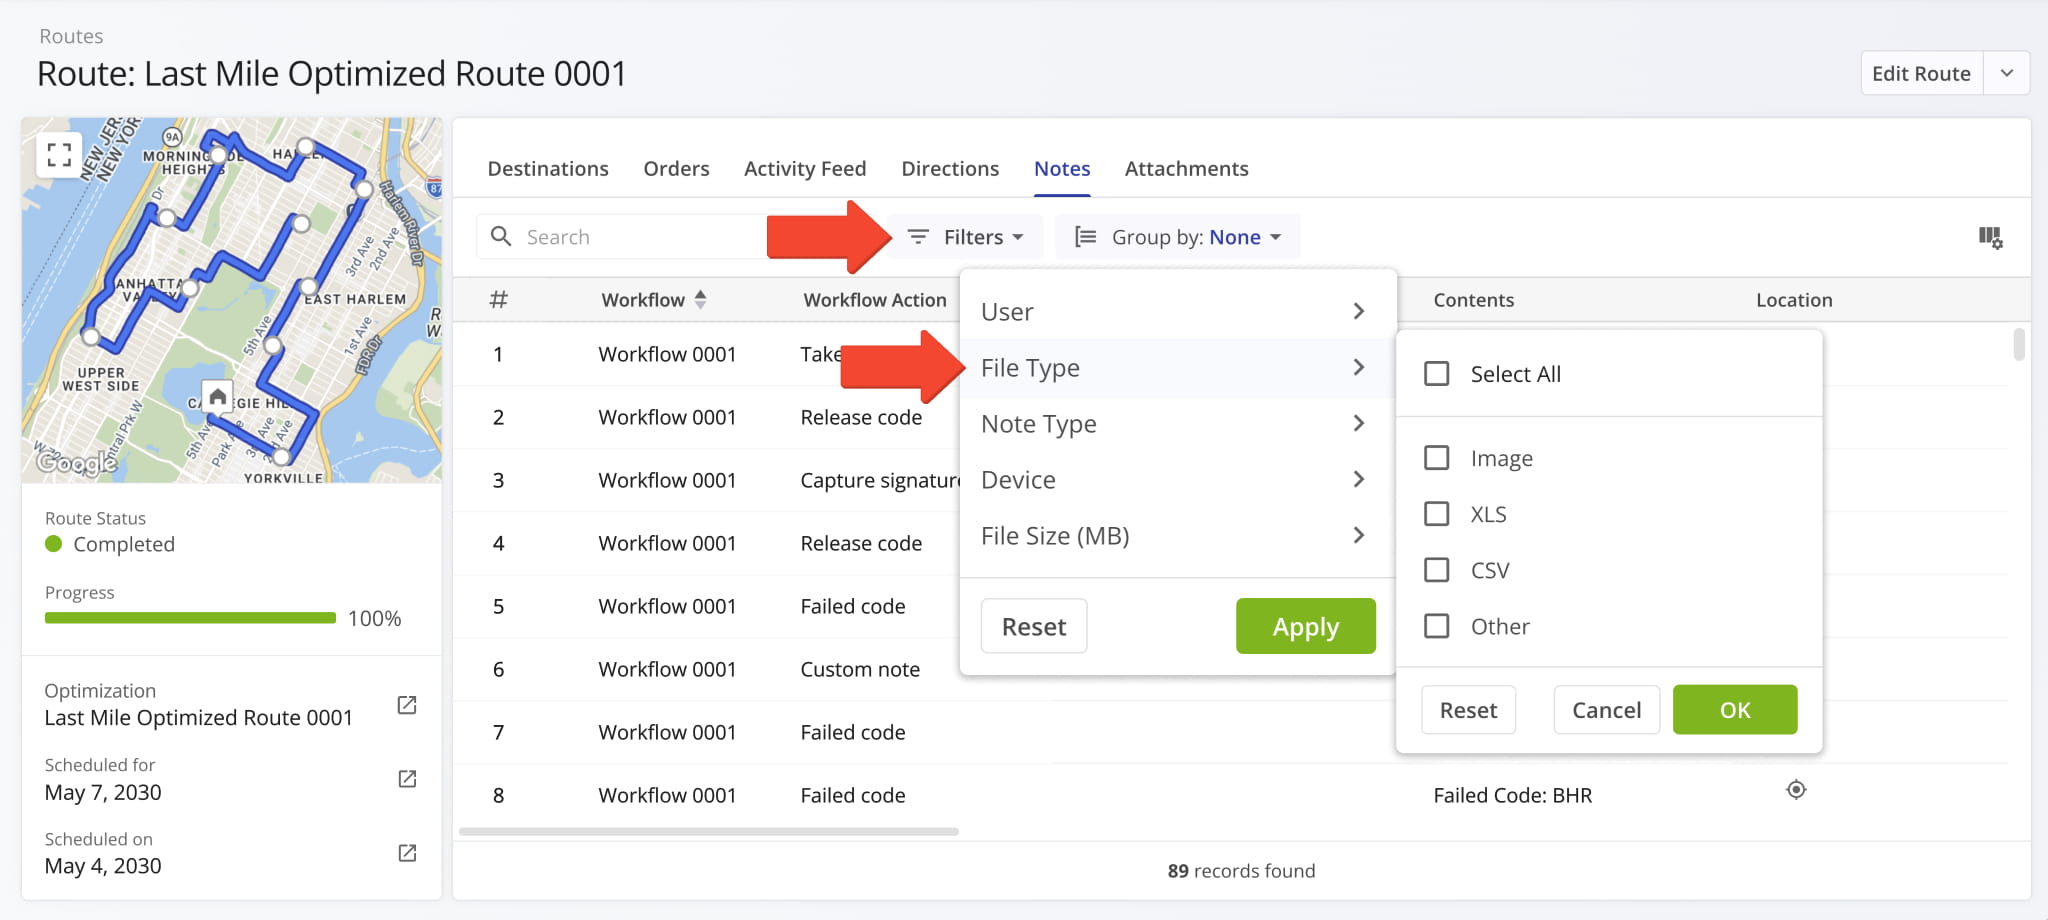
The “File Type” filter in the “Notes” tab of Route Snapshots and Destination Snapshots has been redesigned to provide more clarity. Now, you can more easily find the most important proof of service note attachments.
High-priority files such as images and data were put higher in the list. The previously-available ambiguous “File” option was renamed to “Other” for clarity. It filters for less common file types such as voice memos, videos, etc.
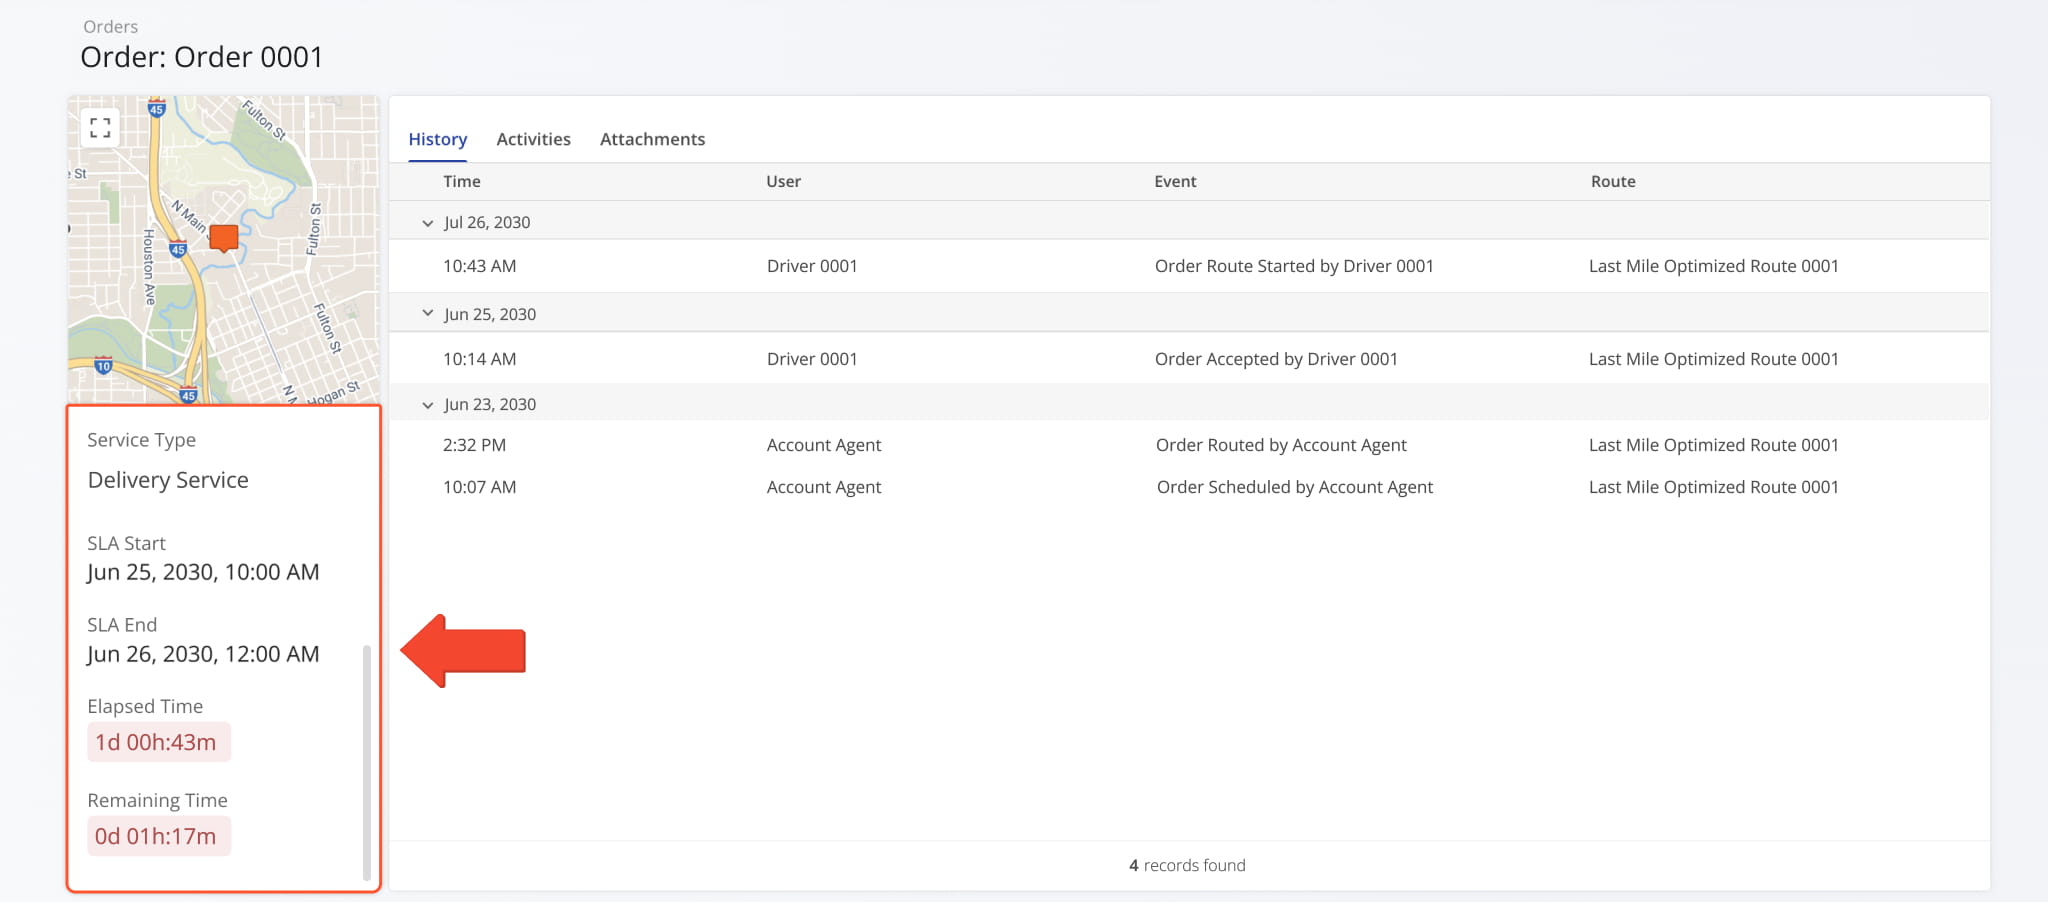
Information related to an Order’s associated Service Level Agreement (SLA) was added to Order Snapshots. You can see the new SLA info fields in the summary panel on the left. Previously, Order SLA data was only available as Display Columns.
A new “Service Time” category was added to Location Snapshots. It shows the distribution of Destination Service Time at a Location across the days of the week over the specified time period. This update enables you to get a clear overview of how the planned, reported, and detected Service Time at a Location is distributed.
Previously, you could only see specific Service Time values at route destinations but couldn’t track their distribution.
The Route4Me Geotab Add-In now syncs the status of vehicles and enrolled devices in real time. This enables you to use synced telematics vehicles right away without manually comparing and consolidating statuses between Geotab and Route4Me.
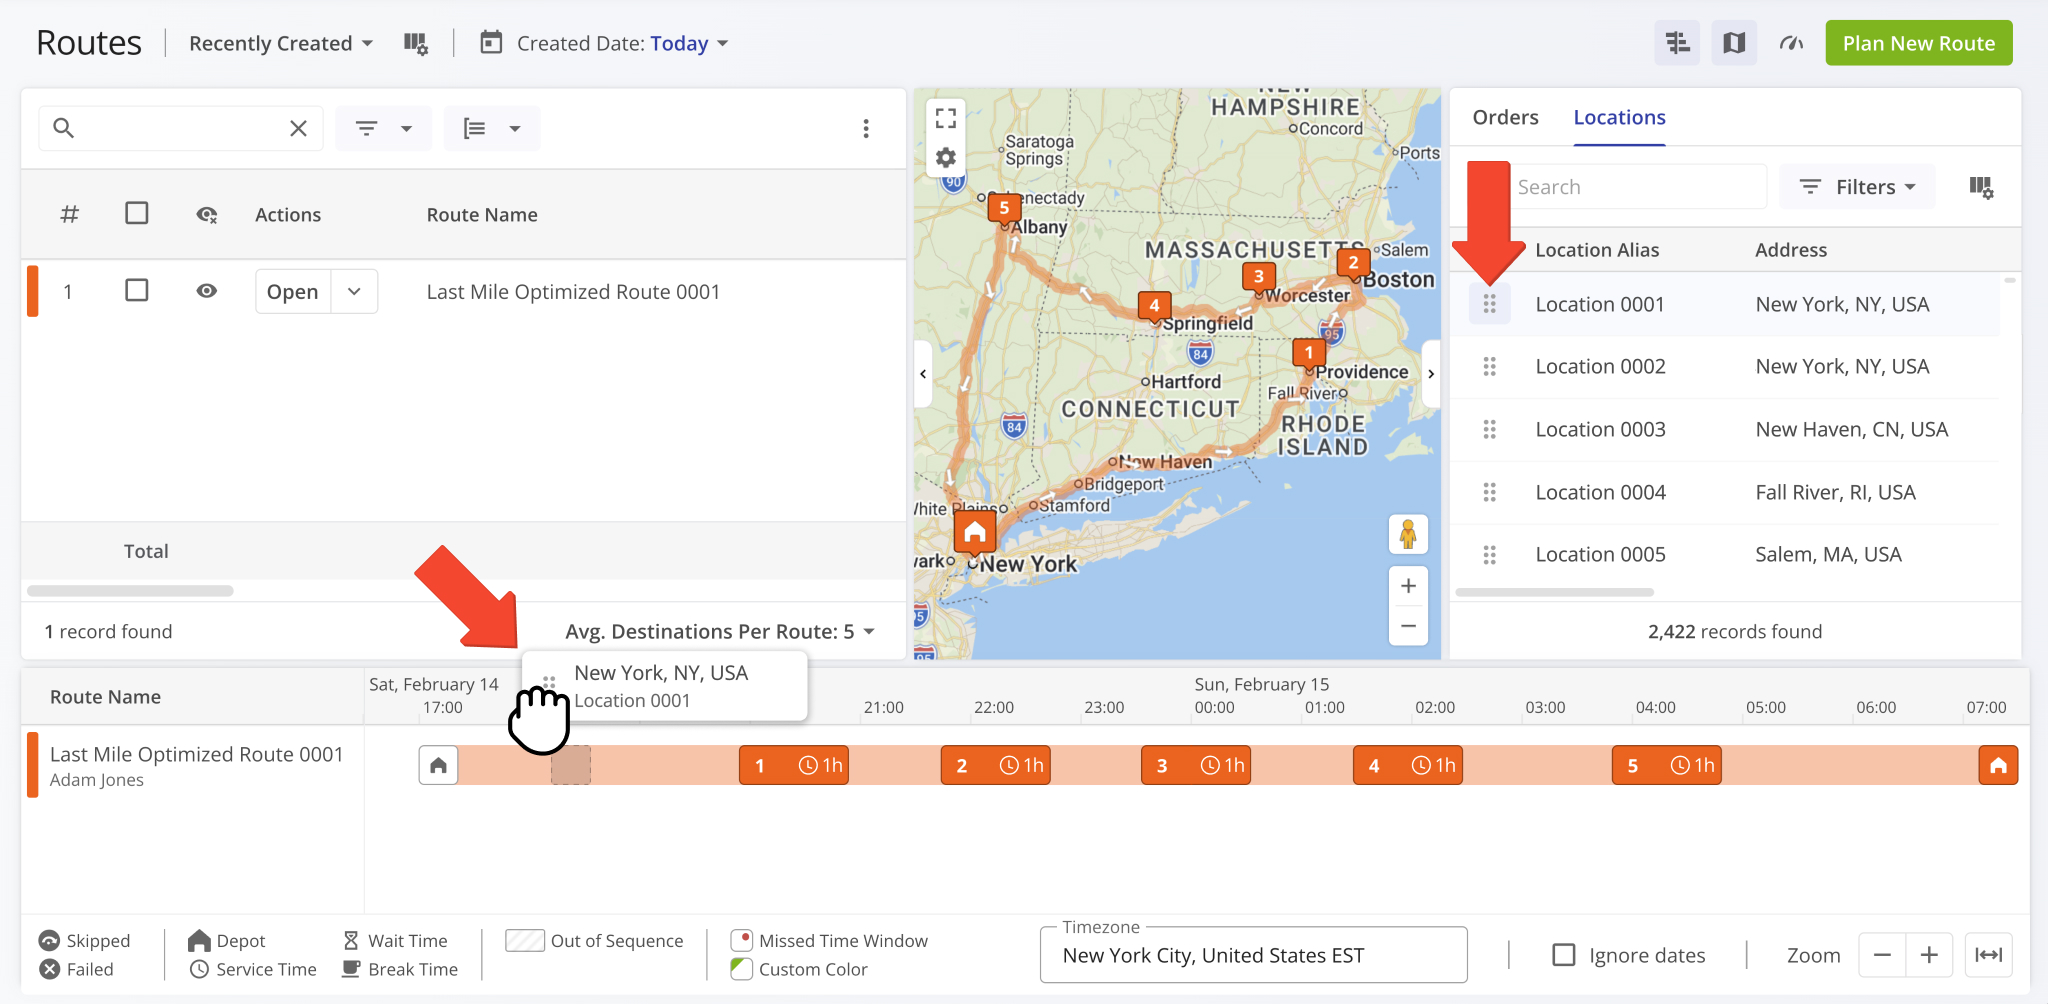
You can now drag and drop Orders and Locations from the Routes Map Sidebar directly onto the Routes Timeline to insert orders and locations into routes. Learn more about inserting orders into routes and inserting destinations into routes.
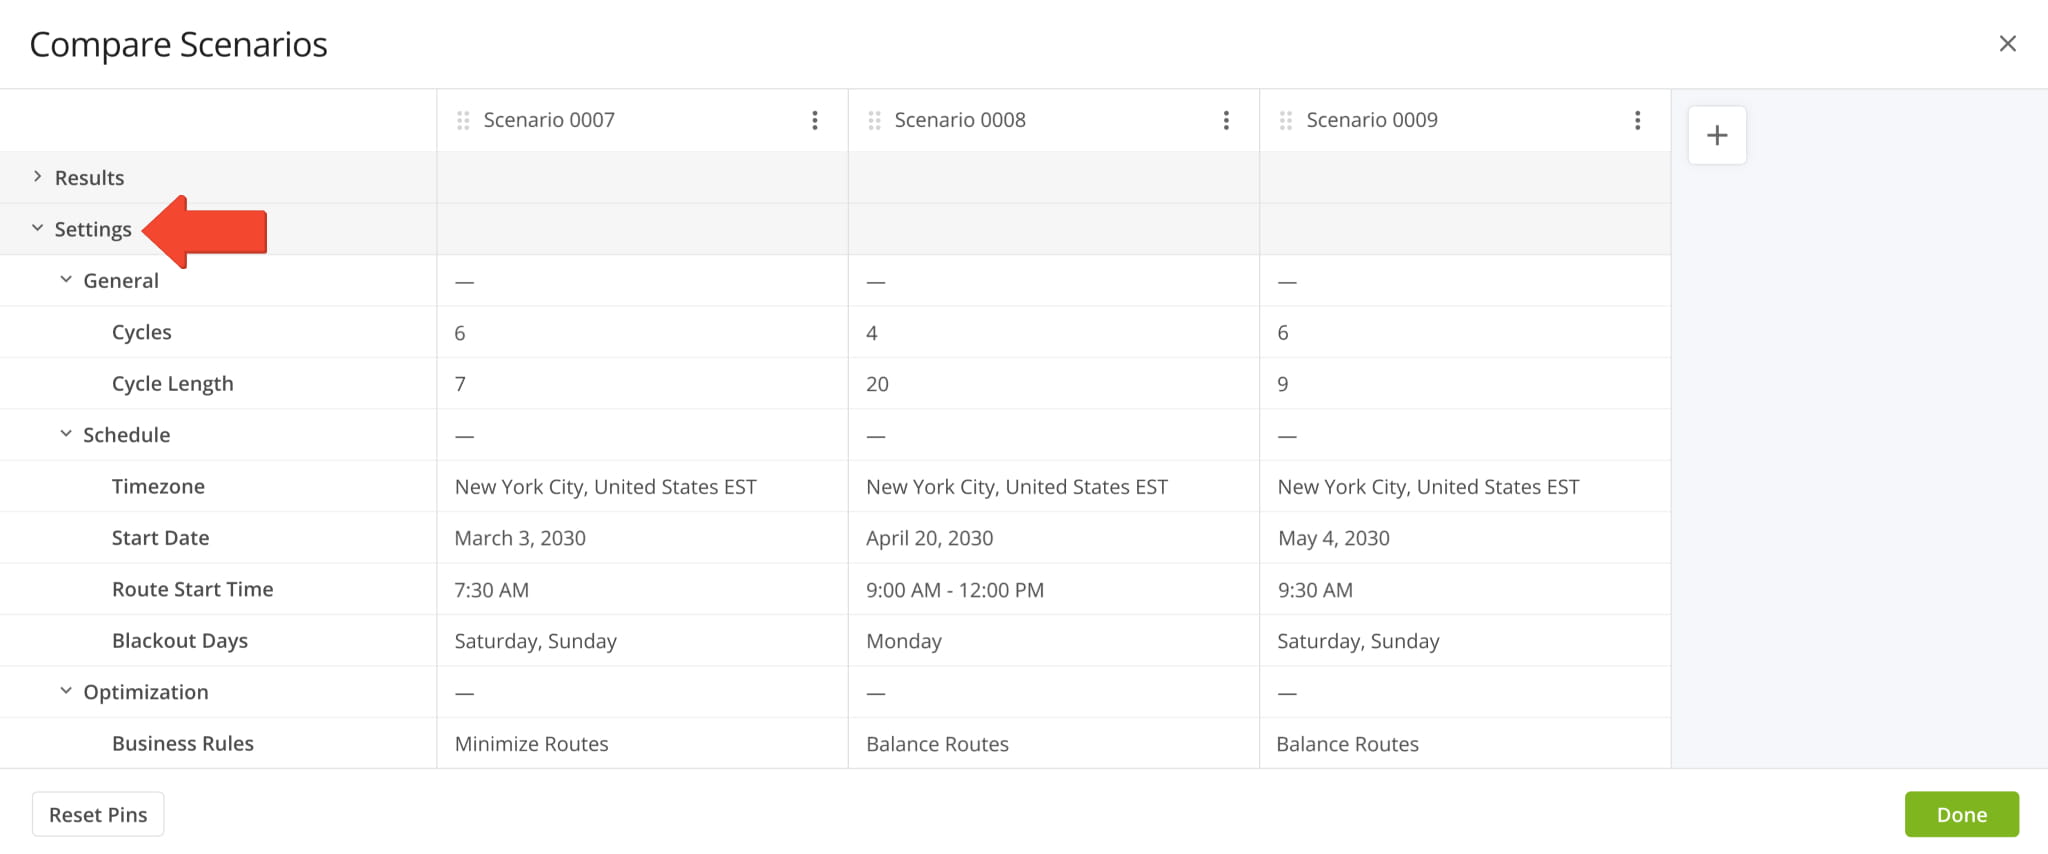
You can now see Strategic Scenario Settings when you compare Strategic Optimization Scenarios in addition to previously available data items, which are now grouped in the “Results” section.
Open Your Strategic Optimizations
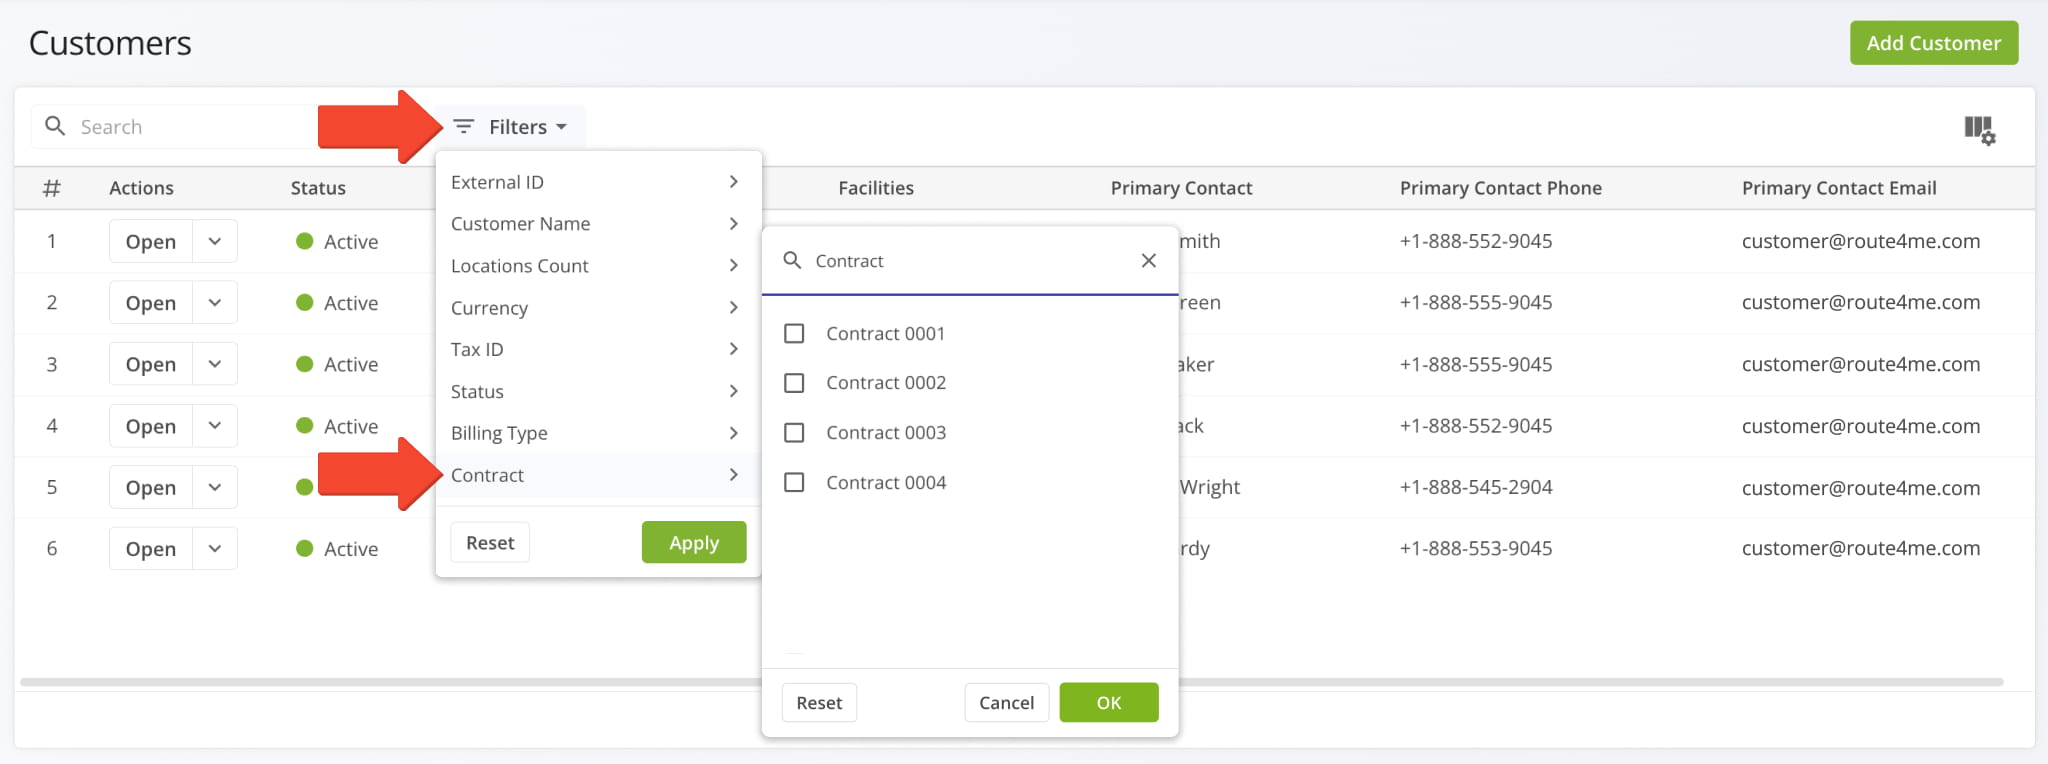
A new “Contracts” filter was added to the Customers Page, enabling you to filter Customers by their associated Contracts.
A new “Source” field was added to the route data summary in Route Snapshots. It enables you to select the source of the route data shown in the route summary on the left. The available data source options are:
- User Reported: Data based on Assigned User action events on the Route4Me Mobile App.
- Mobile App Detected: Automatically detected GPS data using Route4Me Geofencing.
- Telematics Detected: Automatically detected data using Route4Me Telematics Integrations.
These source settings correspond to those available for Route4Me’s GPS Route Tracking functionality.

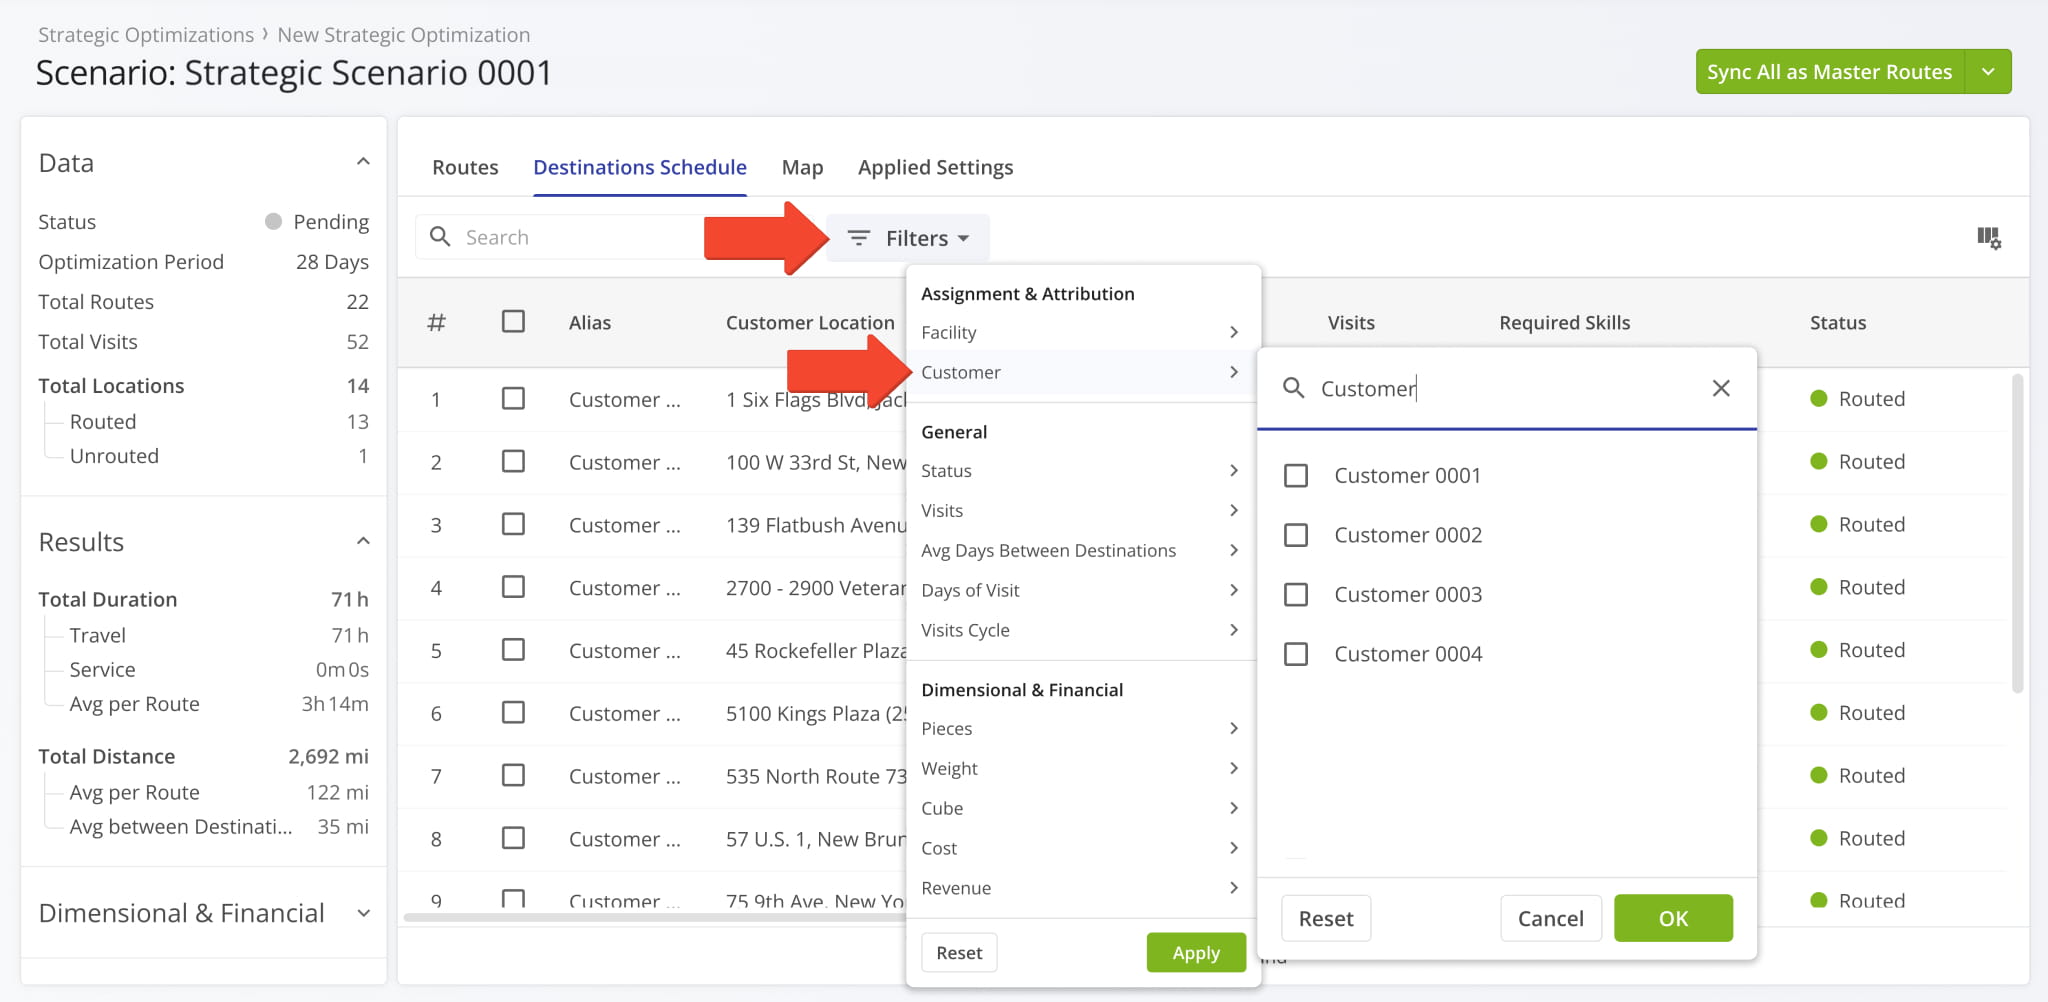
Two new “Assignment & Attribution” filters were added to the “Destinations Schedule” tab of an open Strategic Scenario. You can filter Scenario Destinations by their associated Facilities using the new multi-select filter.
Open Your Strategic Optimizations

You can also filter Scenario Destinations by their associated Customers with the same multi-select functionality.
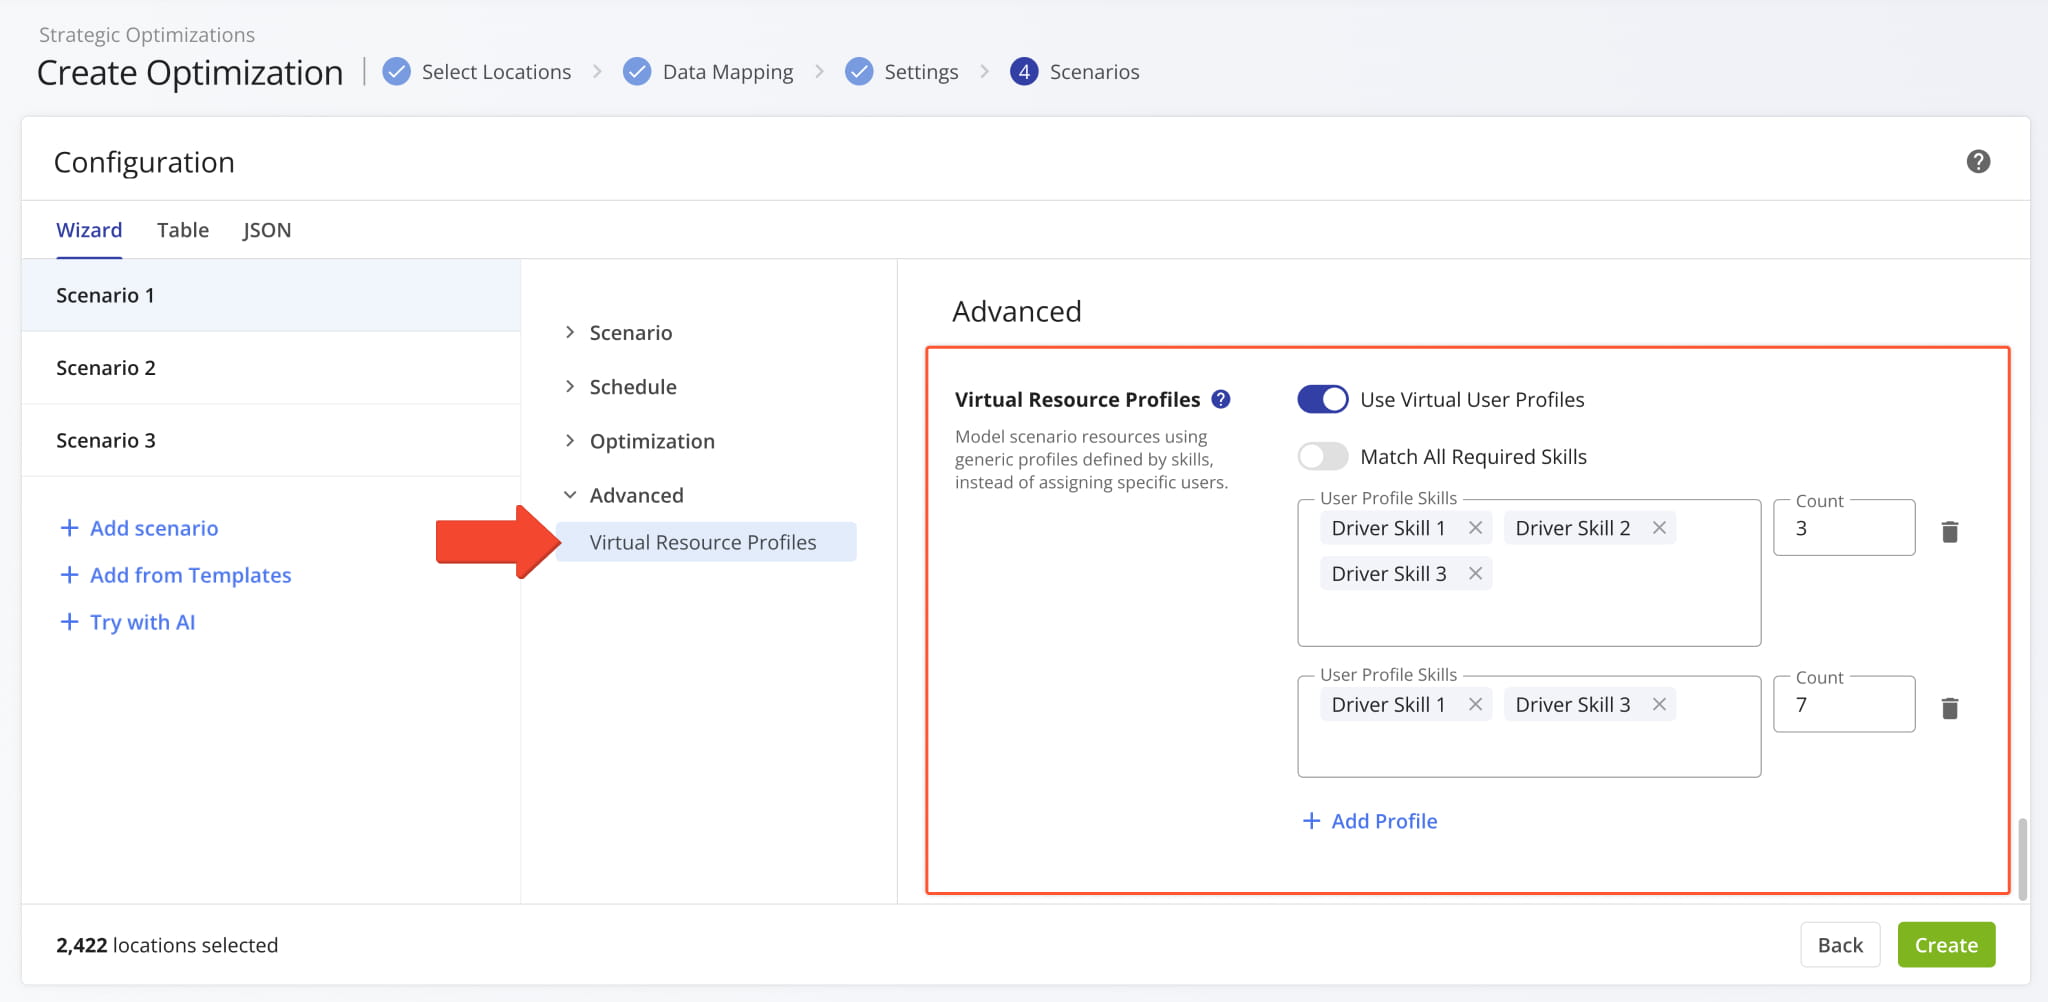
A new “Virtual Resource Profiles” option was added to the configurator when you Create Strategic Optimizations.
You can use virtual Driver Skills profiles to optimize scenarios using skill groups instead of team member profiles.
Open Your Strategic Optimizations
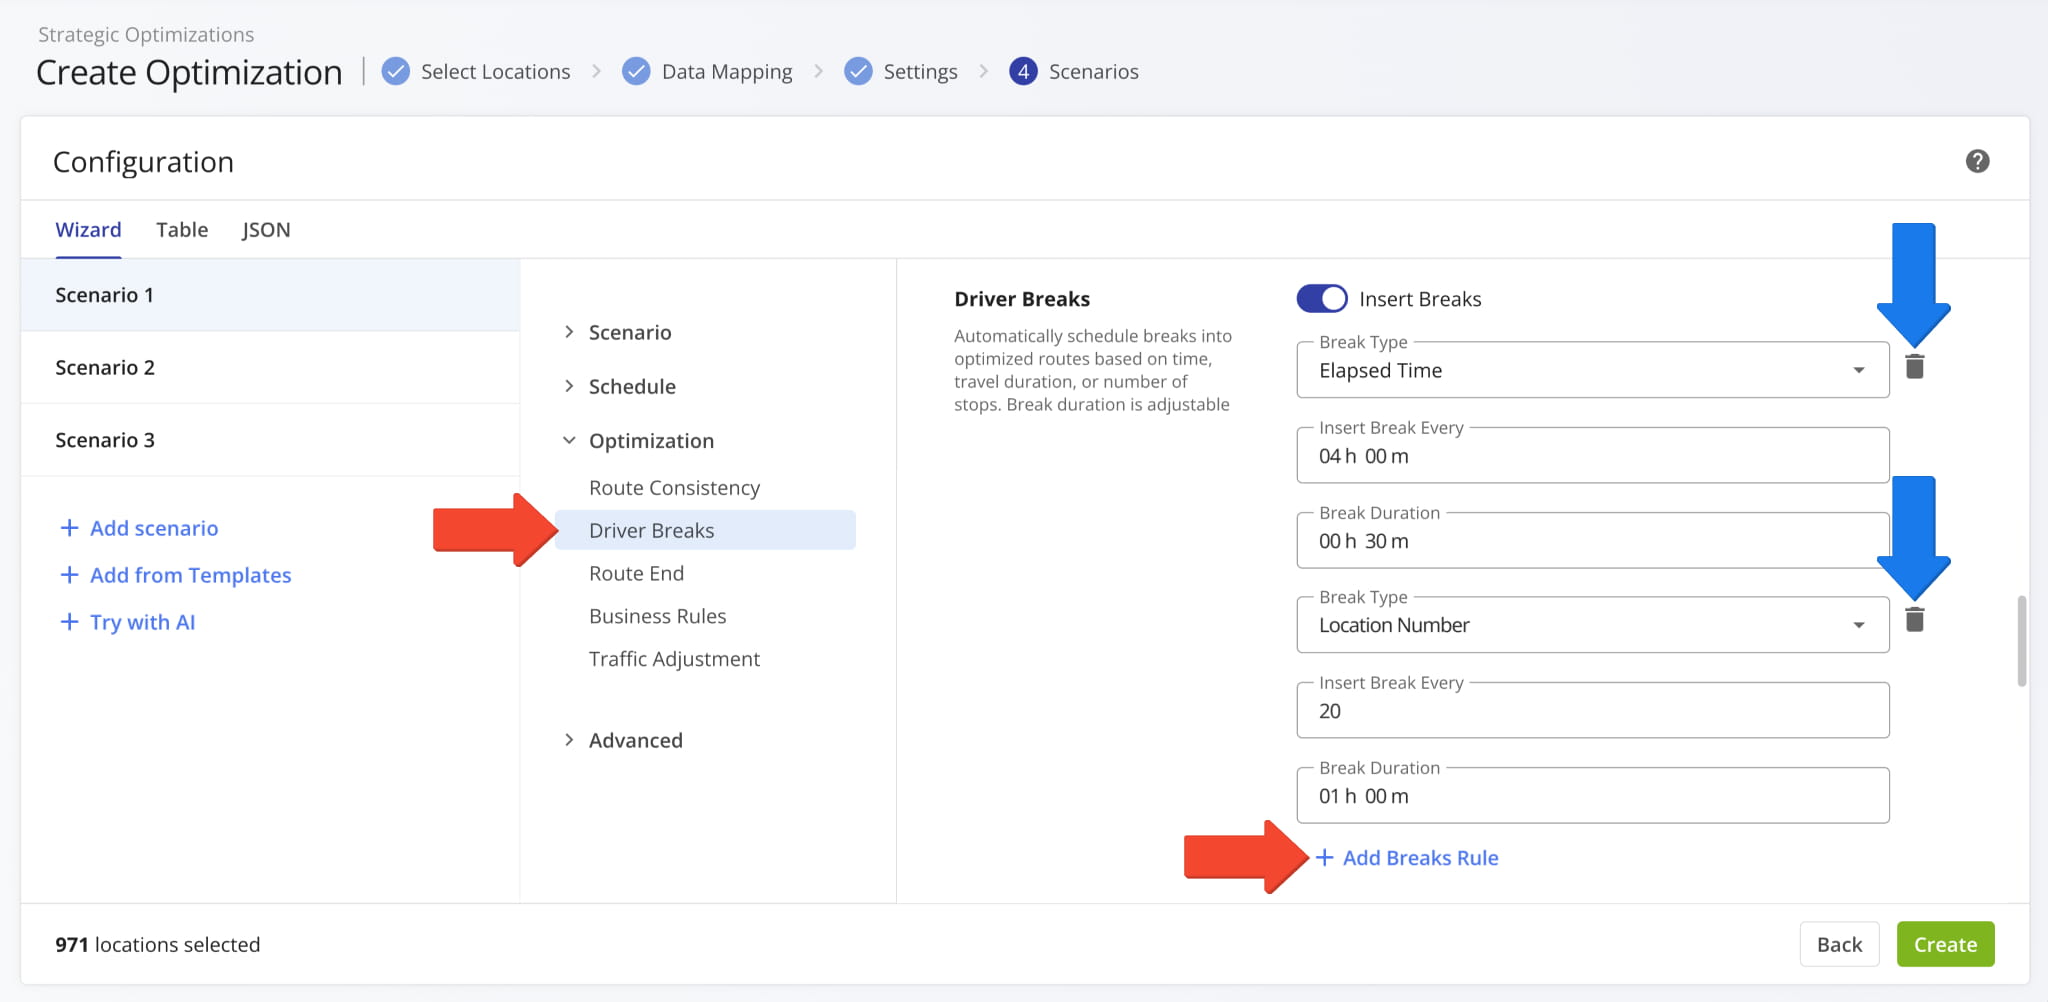
It’s now possible to add Driver Breaks to your Strategic Scenario optimization settings when you Create Strategic Optimizations. To help you optimize complex strategic cycle planning scenarios with multiple factors, this new functionality supports adding multiple different break types with the “+ Add Break Rule” button. You can also remove break types with the Delete Icon.
Open Your Strategic Optimizations
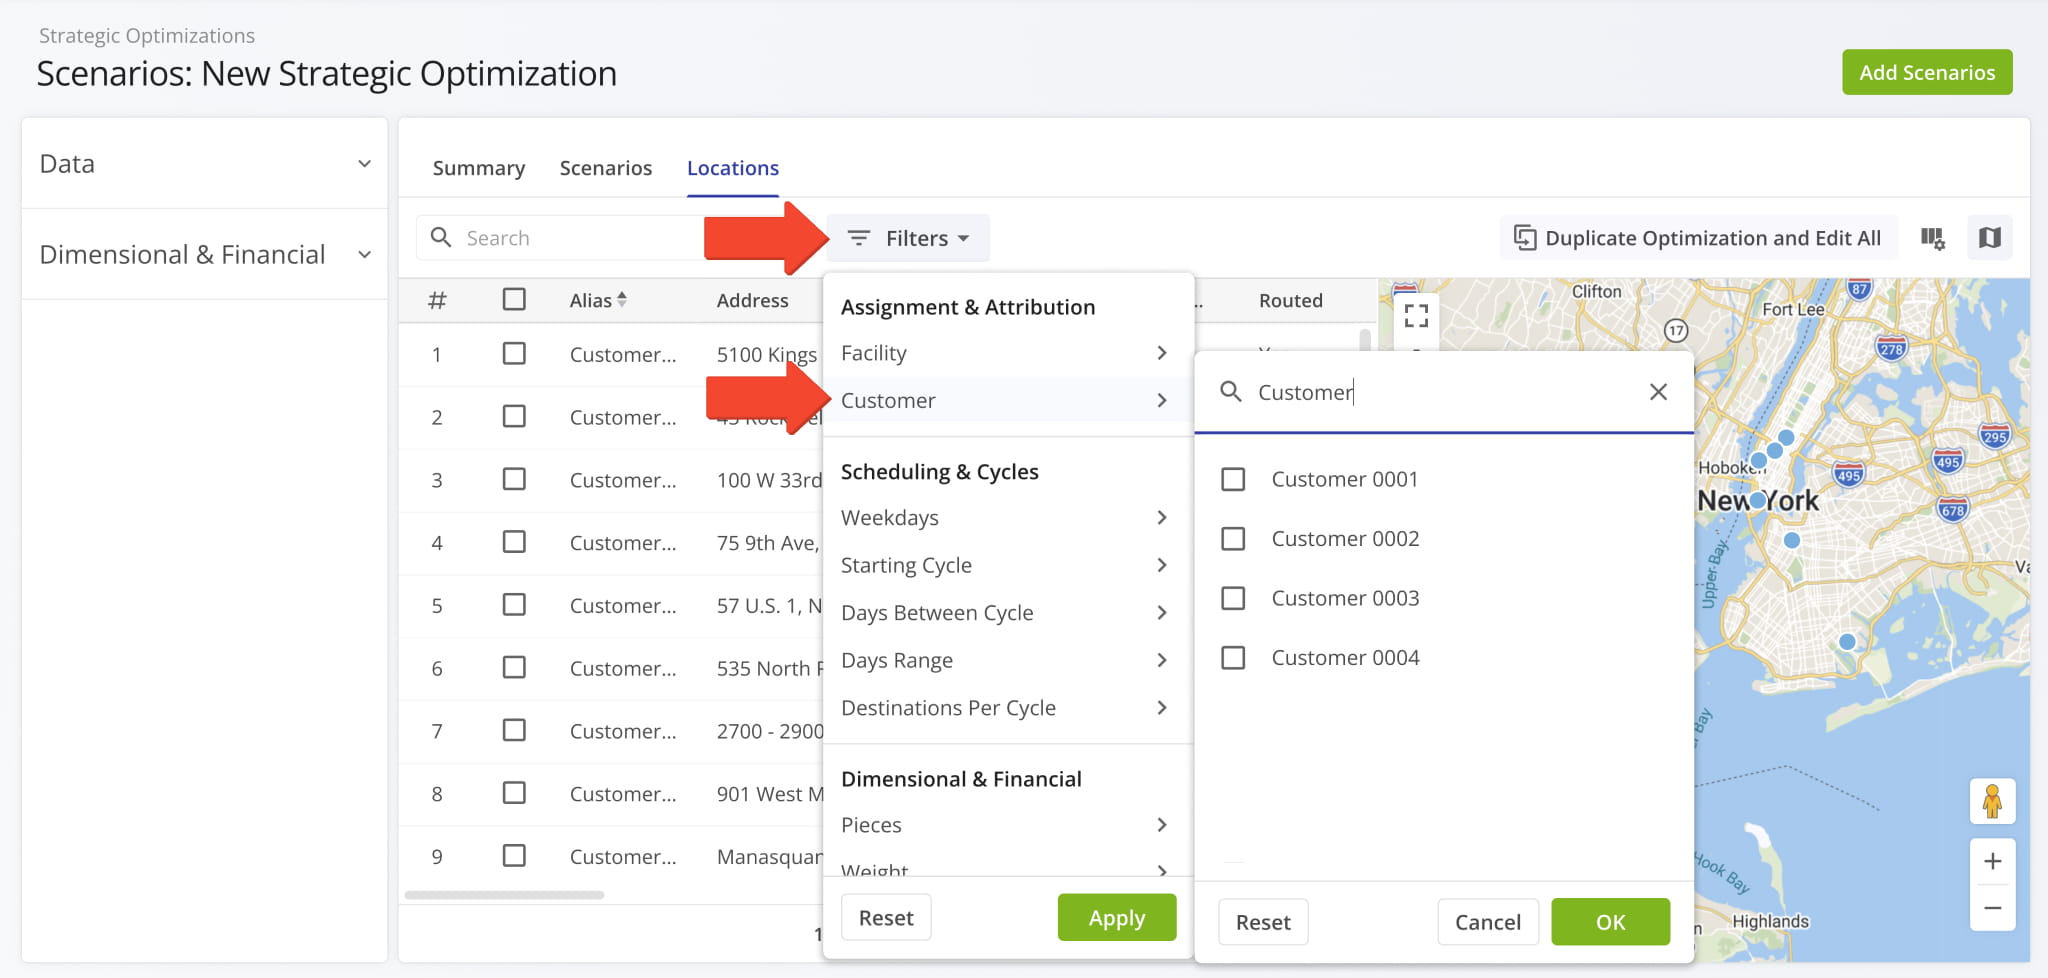
Two new “Assignment & Attribution” filters were added to the “Locations” tab of an open Strategic Optimization. You can filter an Optimization’s Locations by their associated Facilities using the new multi-select filter.
Open Your Strategic Optimizations
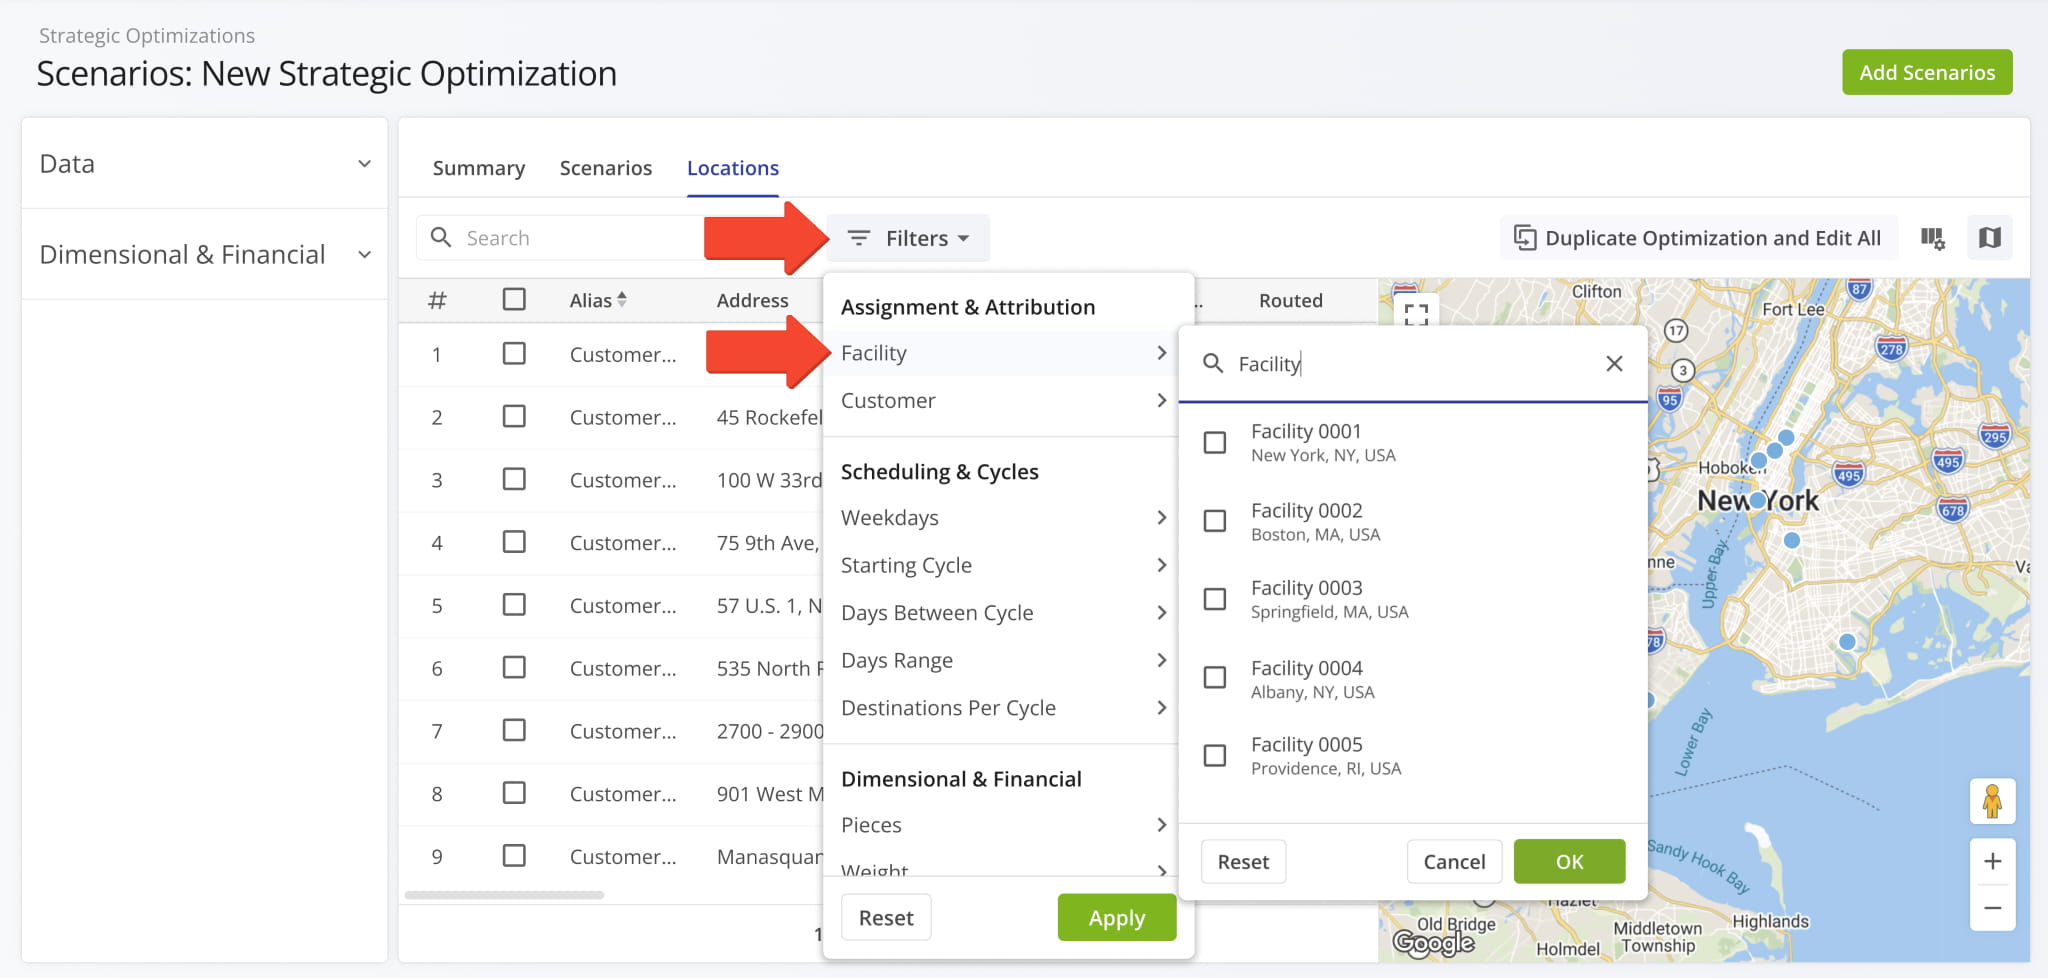
You can also filter Optimization Locations by their associated Customers with the same multi-select functionality.
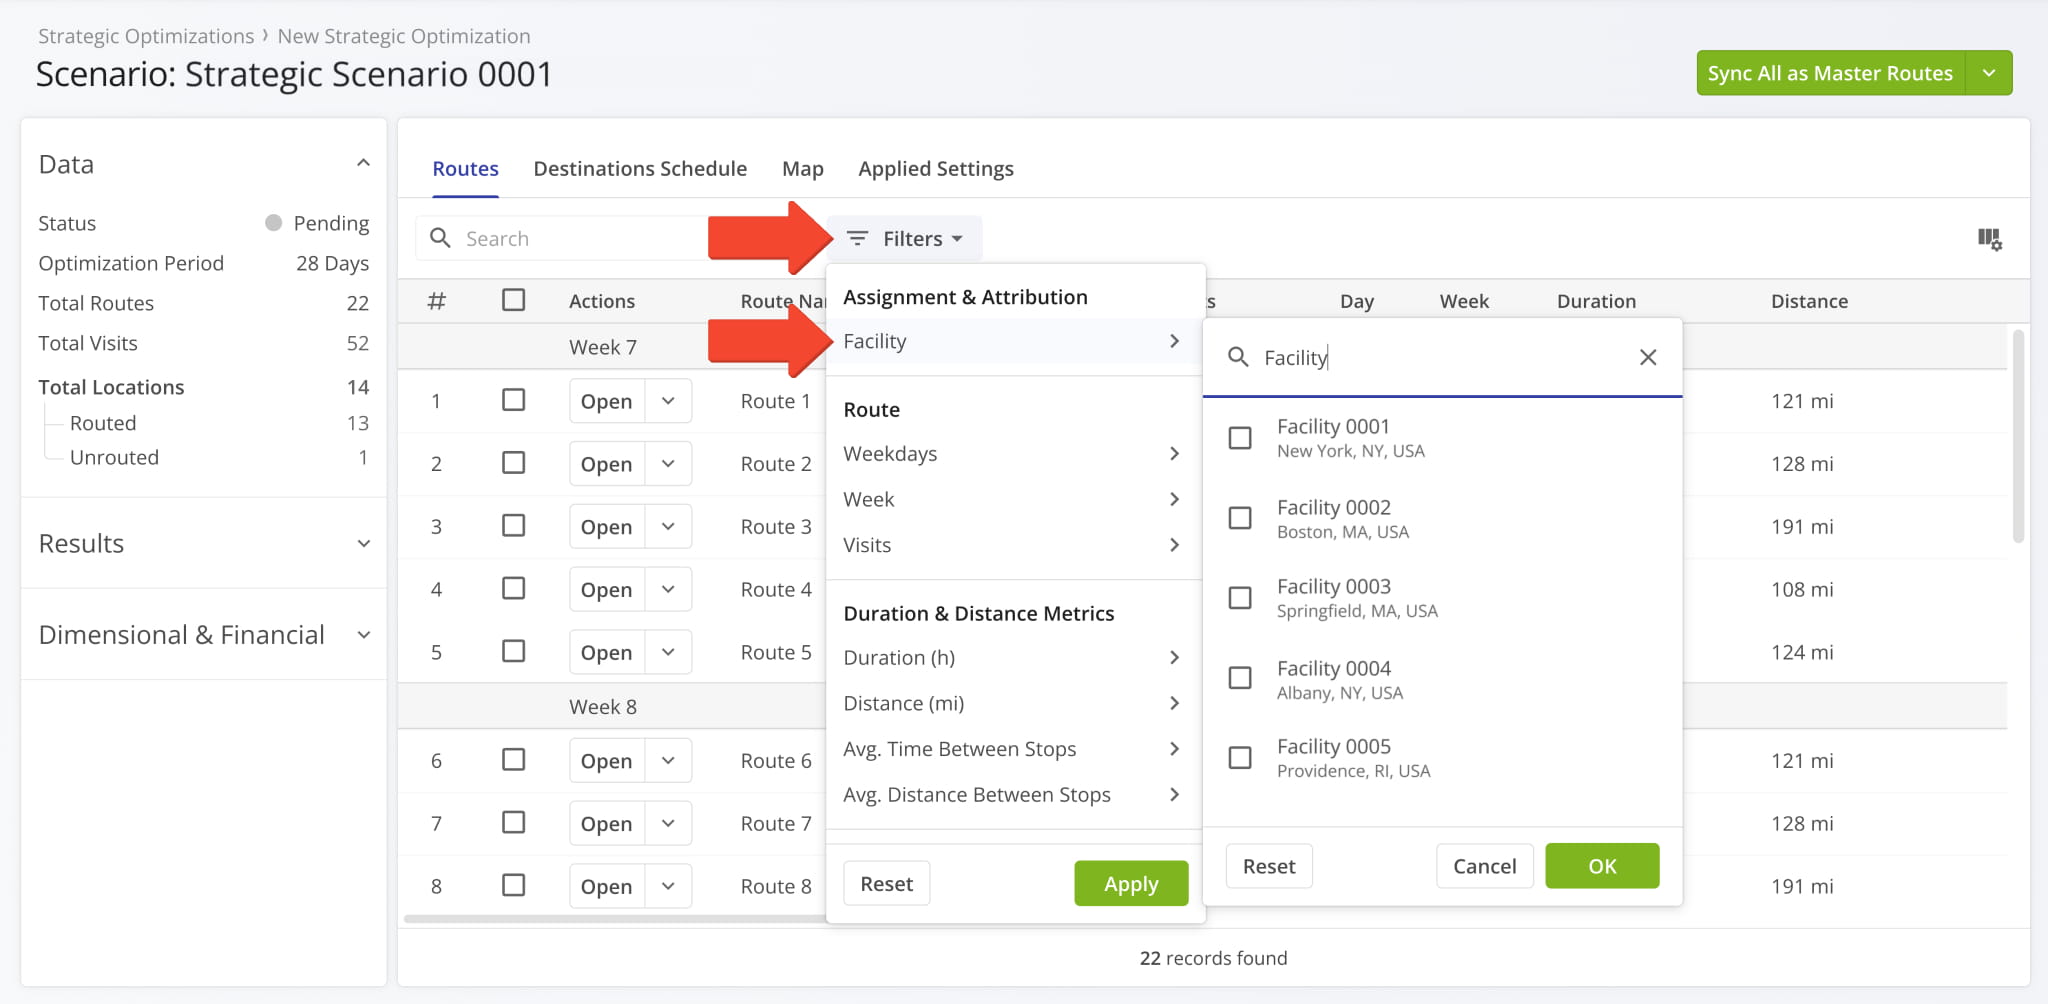
A new “Assignment & Attribution” filter was added to the “Routes” tab of an open Strategic Scenario. You can filter Scenario Routes by their associated Facilities using the new multi-select filter.
Open Your Strategic Optimizations
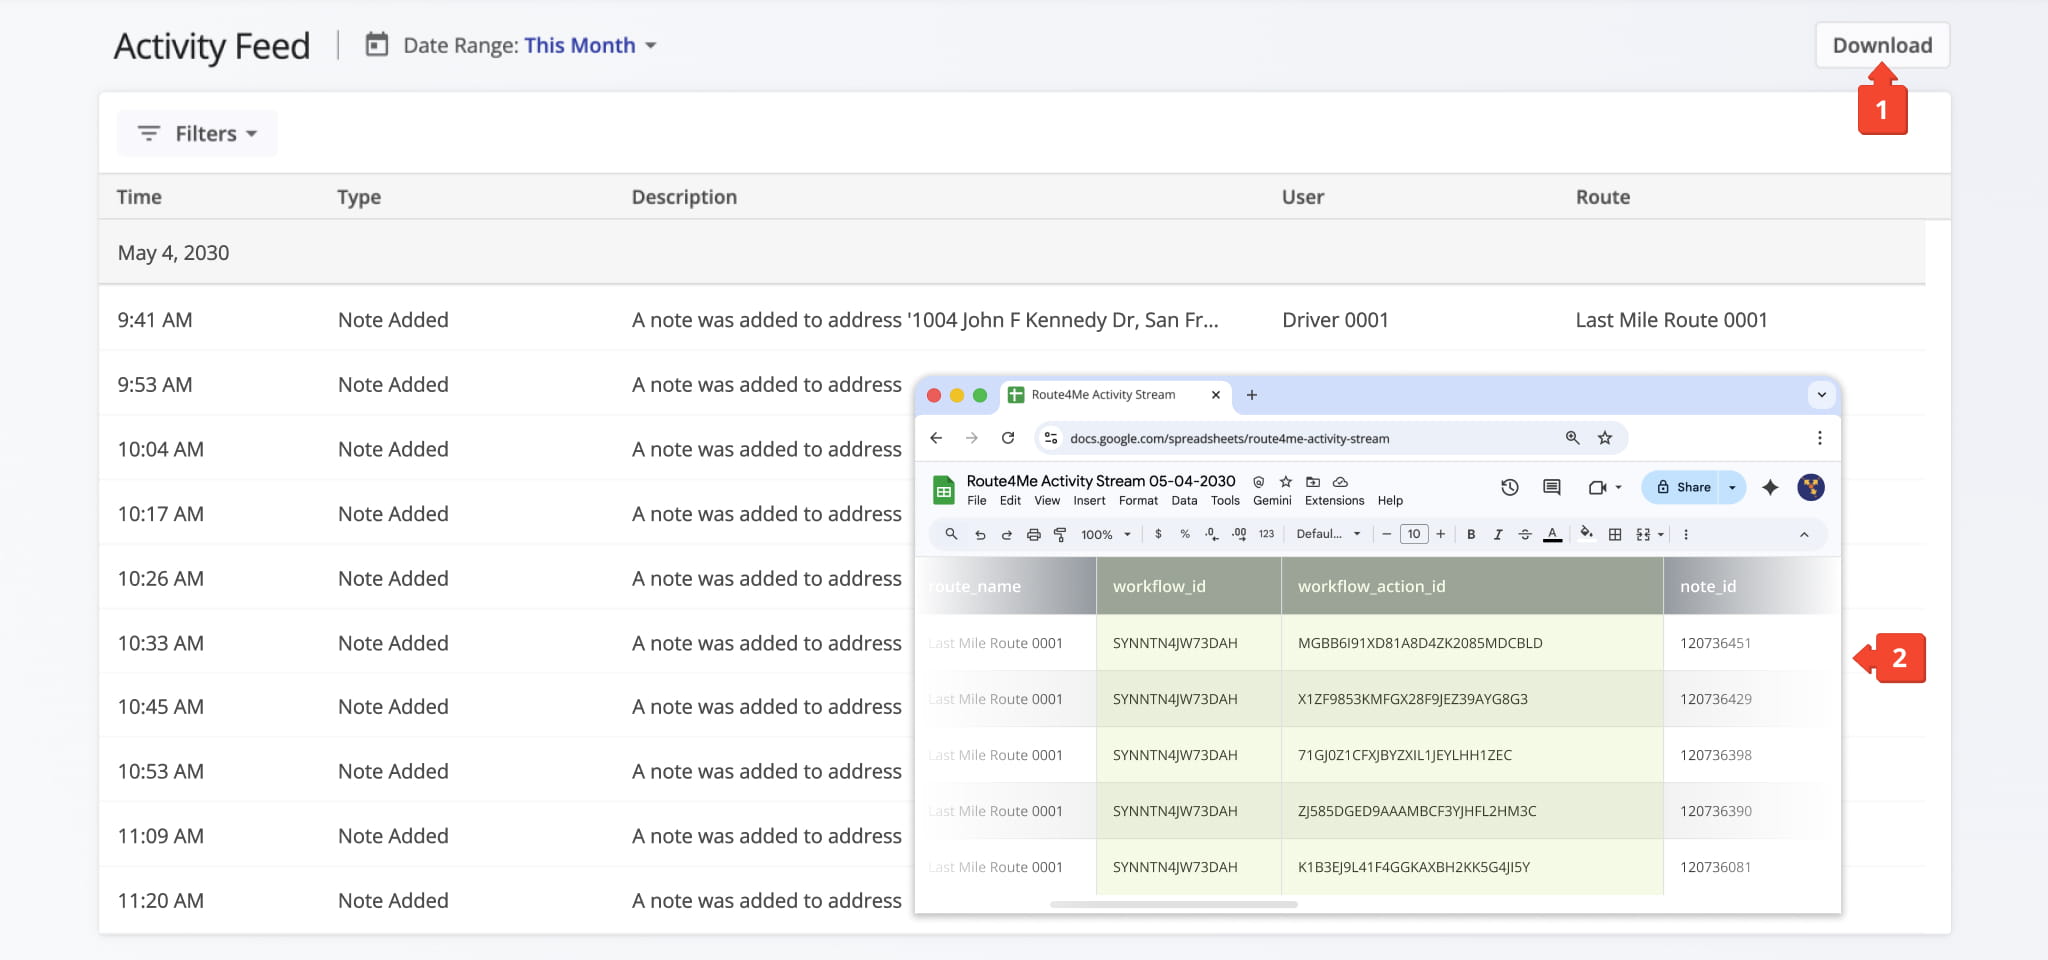
Your account’s Activity Feed now supports matching Workflow IDs and Workflow Action IDs to Destination Notes. Currently, the new data fields are visible when you export Activity Feed data by clicking the “Download” button.
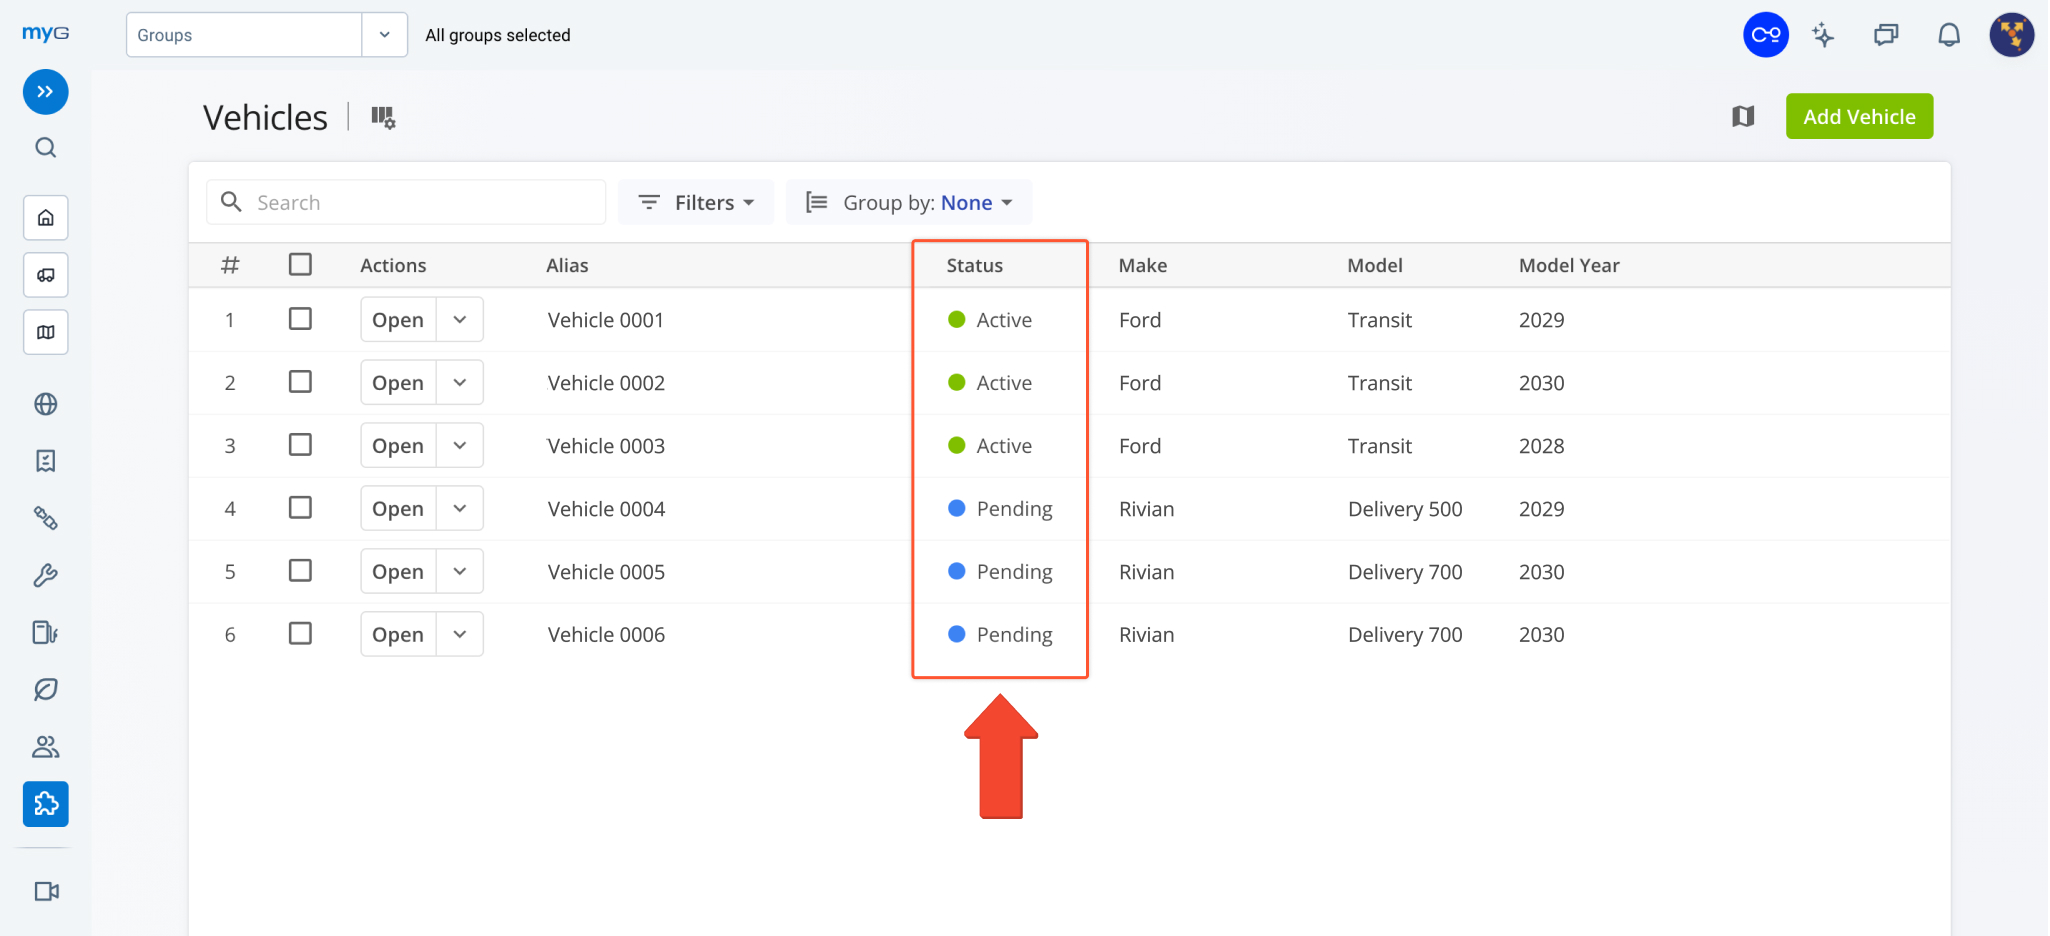
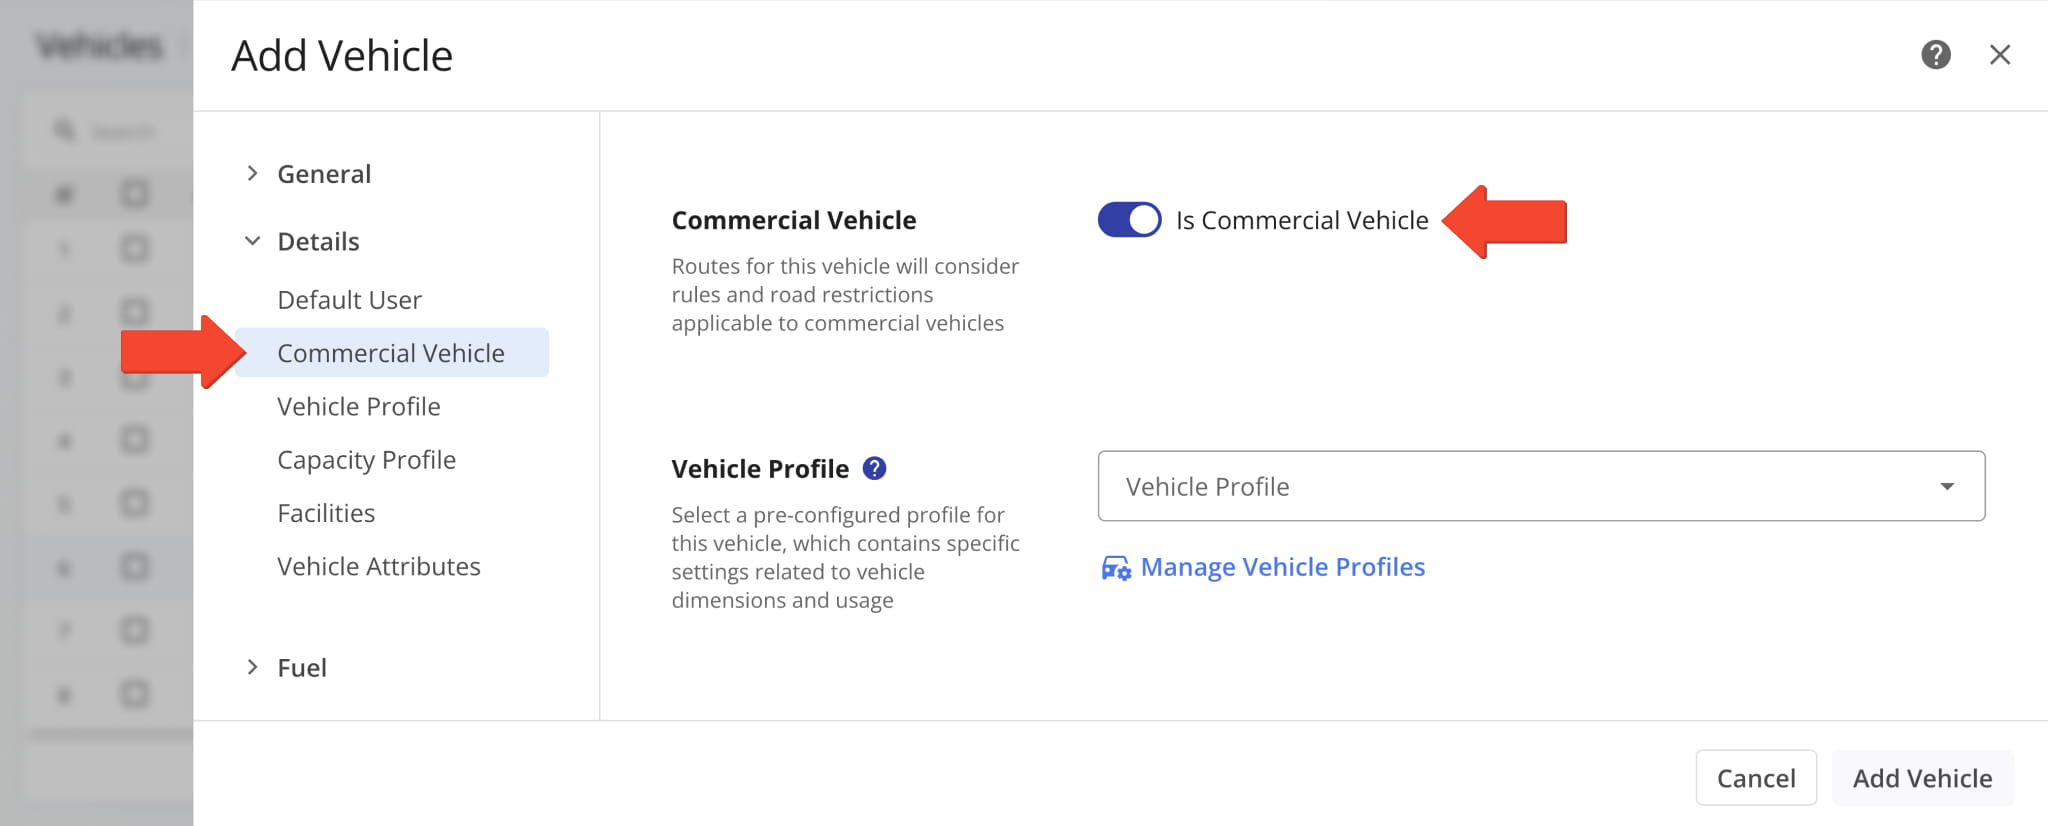
A new “Is Commercial Vehicle” toggle option was added to the “Details” section when you add and manage vehicles. When enabled, it allows you to select a Commercial Vehicle Profile in the “Vehicle Profile” field.
Previously, you’d select a vehicle type separate from Vehicle Profiles. The new toggle option streamlines the process of commercial vehicle management by reducing ambiguity and overlap between interfaces.
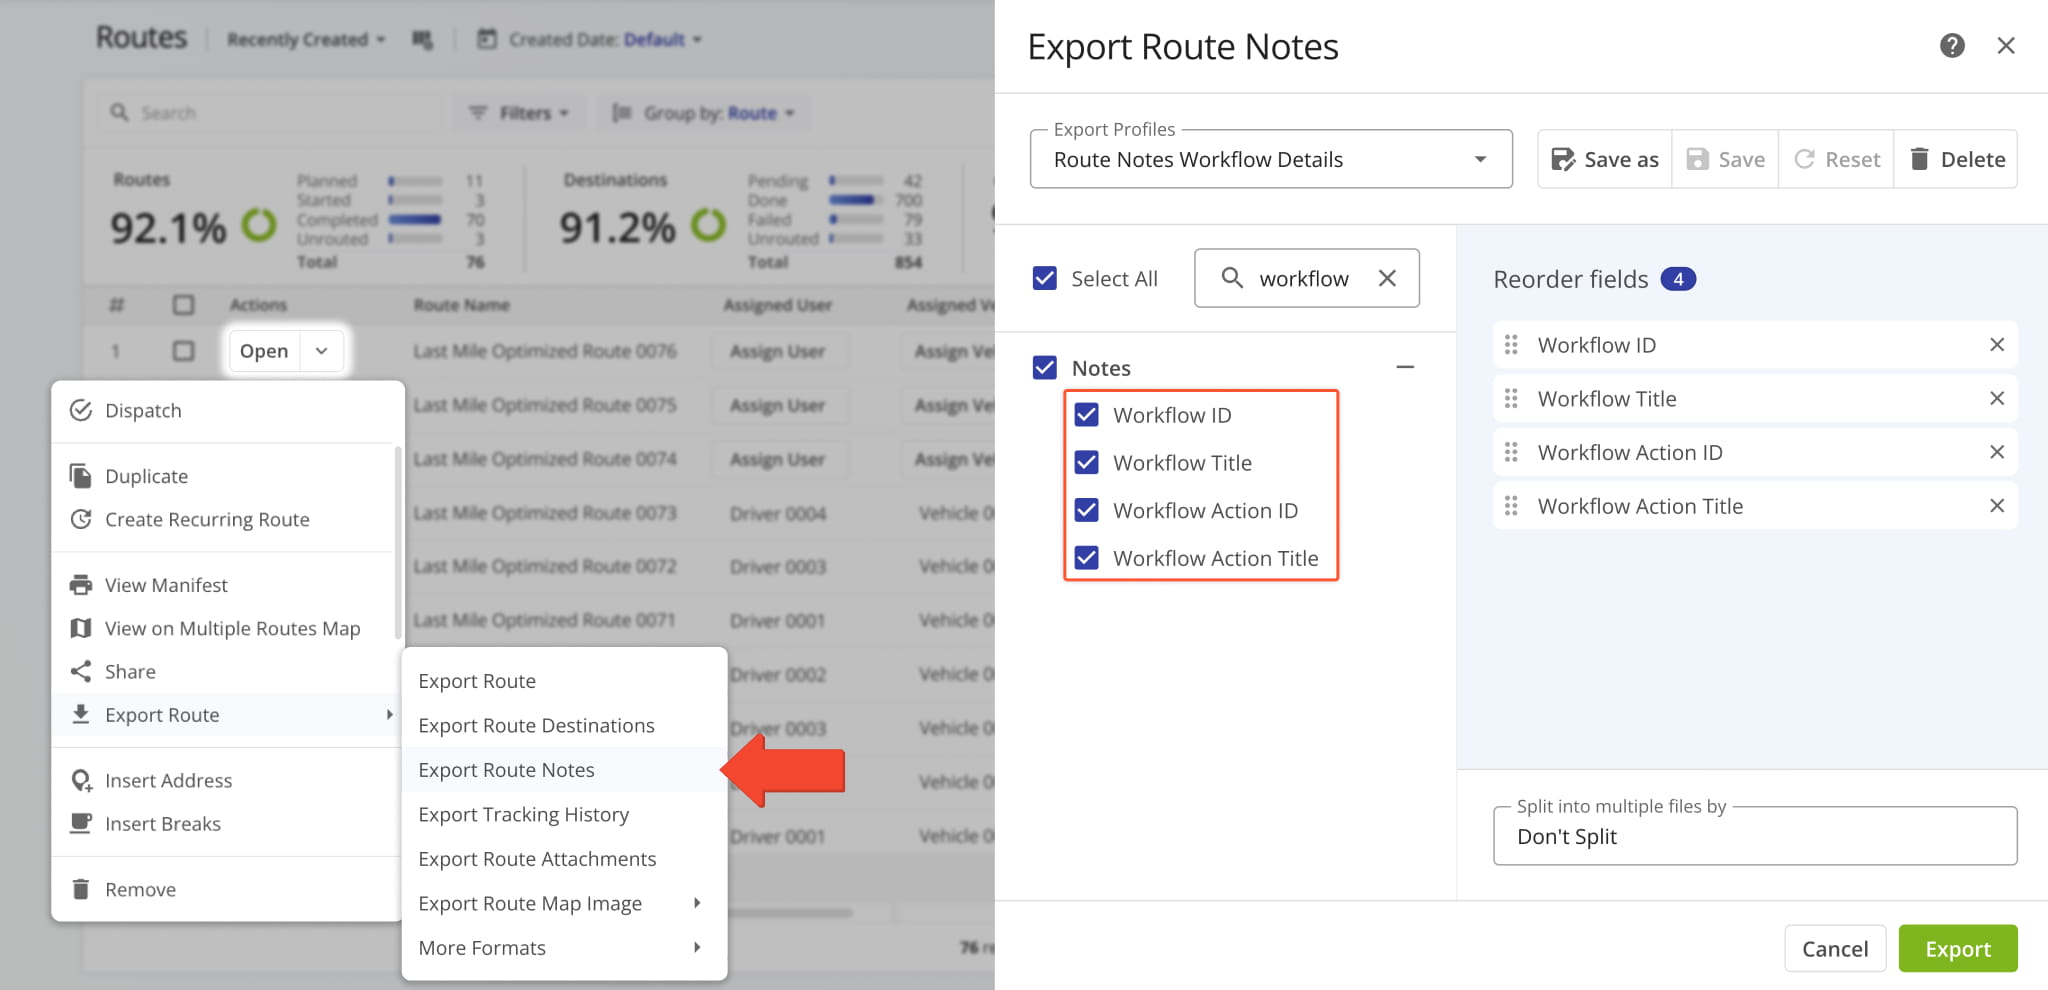
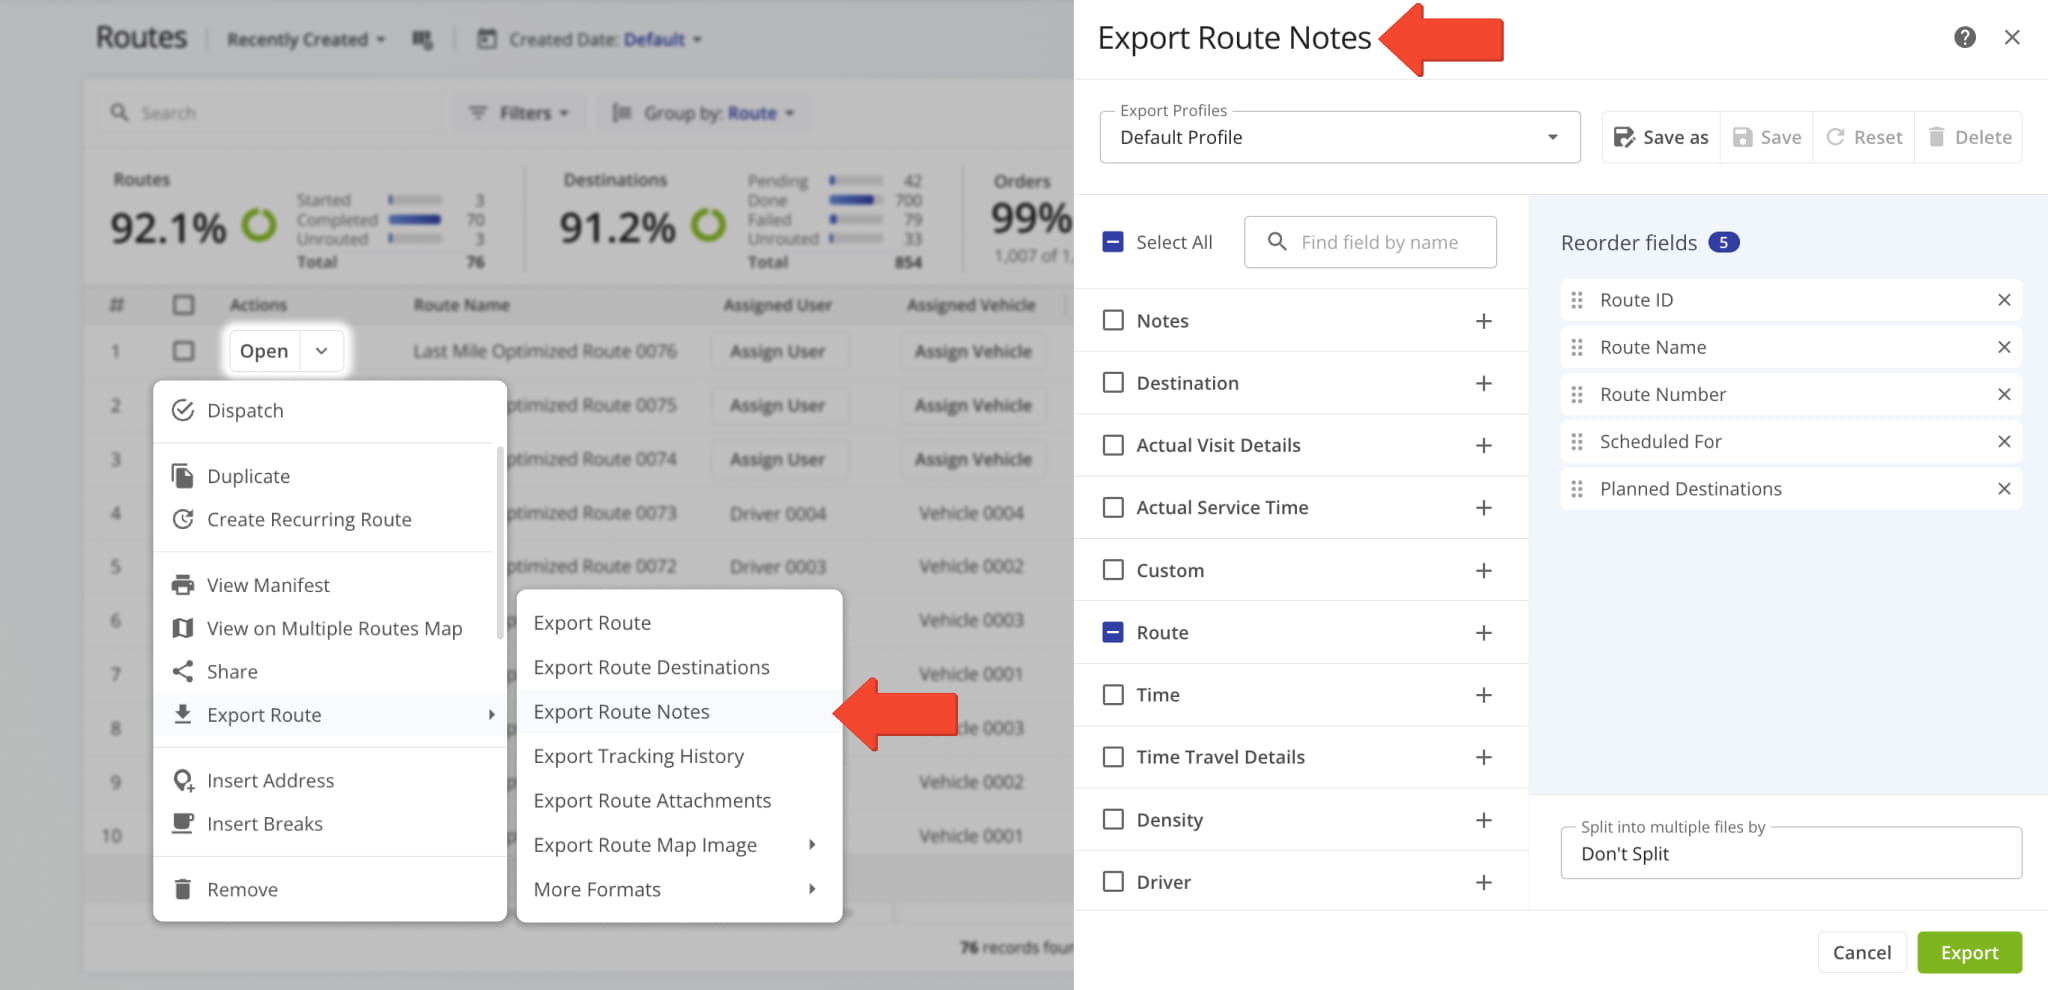
New Workflow data items were added to the “Export Route Notes” settings. They enable you to see the names and internal system IDs of Workflows and Workflow Actions associated with specific Destination Notes.
Previously, Workflow data wasn’t available when exporting Notes.
New “Workflow” and “Workflow Action” Display Columns were added to Route Snapshots in the “Notes” category.
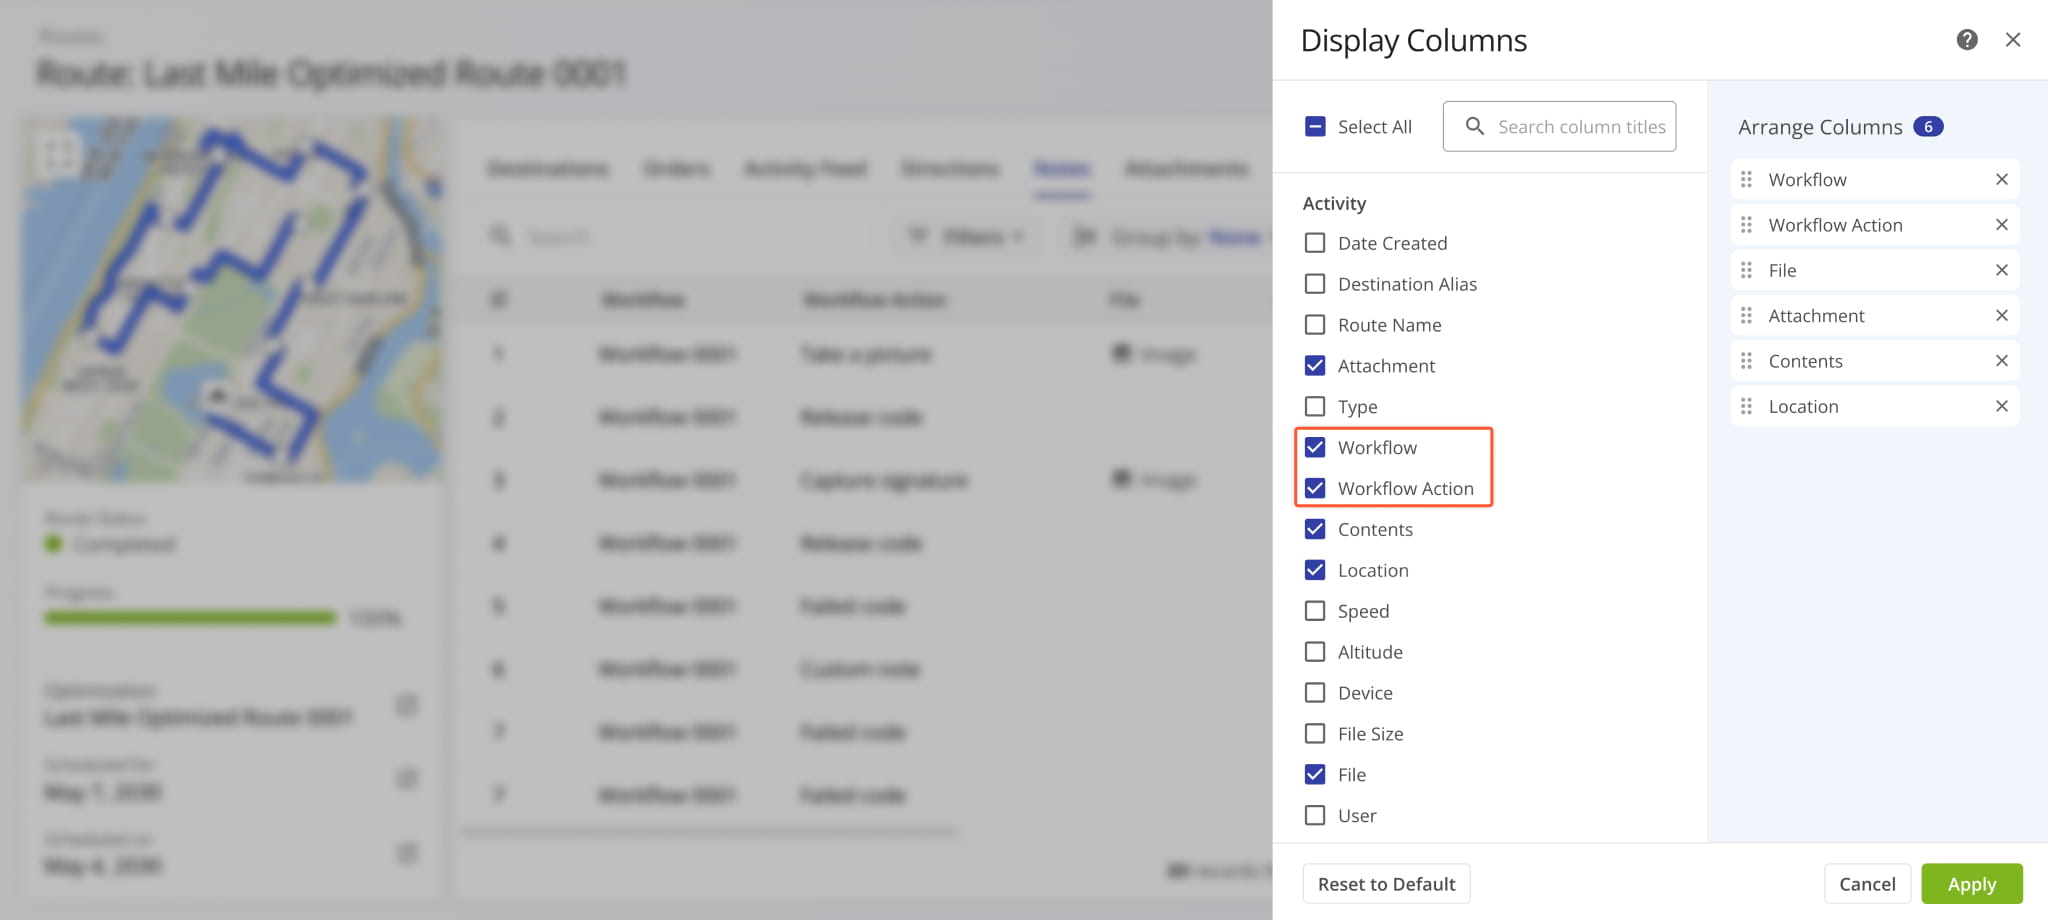
These new workflow data columns show which Workflow and action-specific Destination Notes are associated with. Additionally, just like most Route4Me Display Columns, you can click the column header to sort the entire data table accordingly.
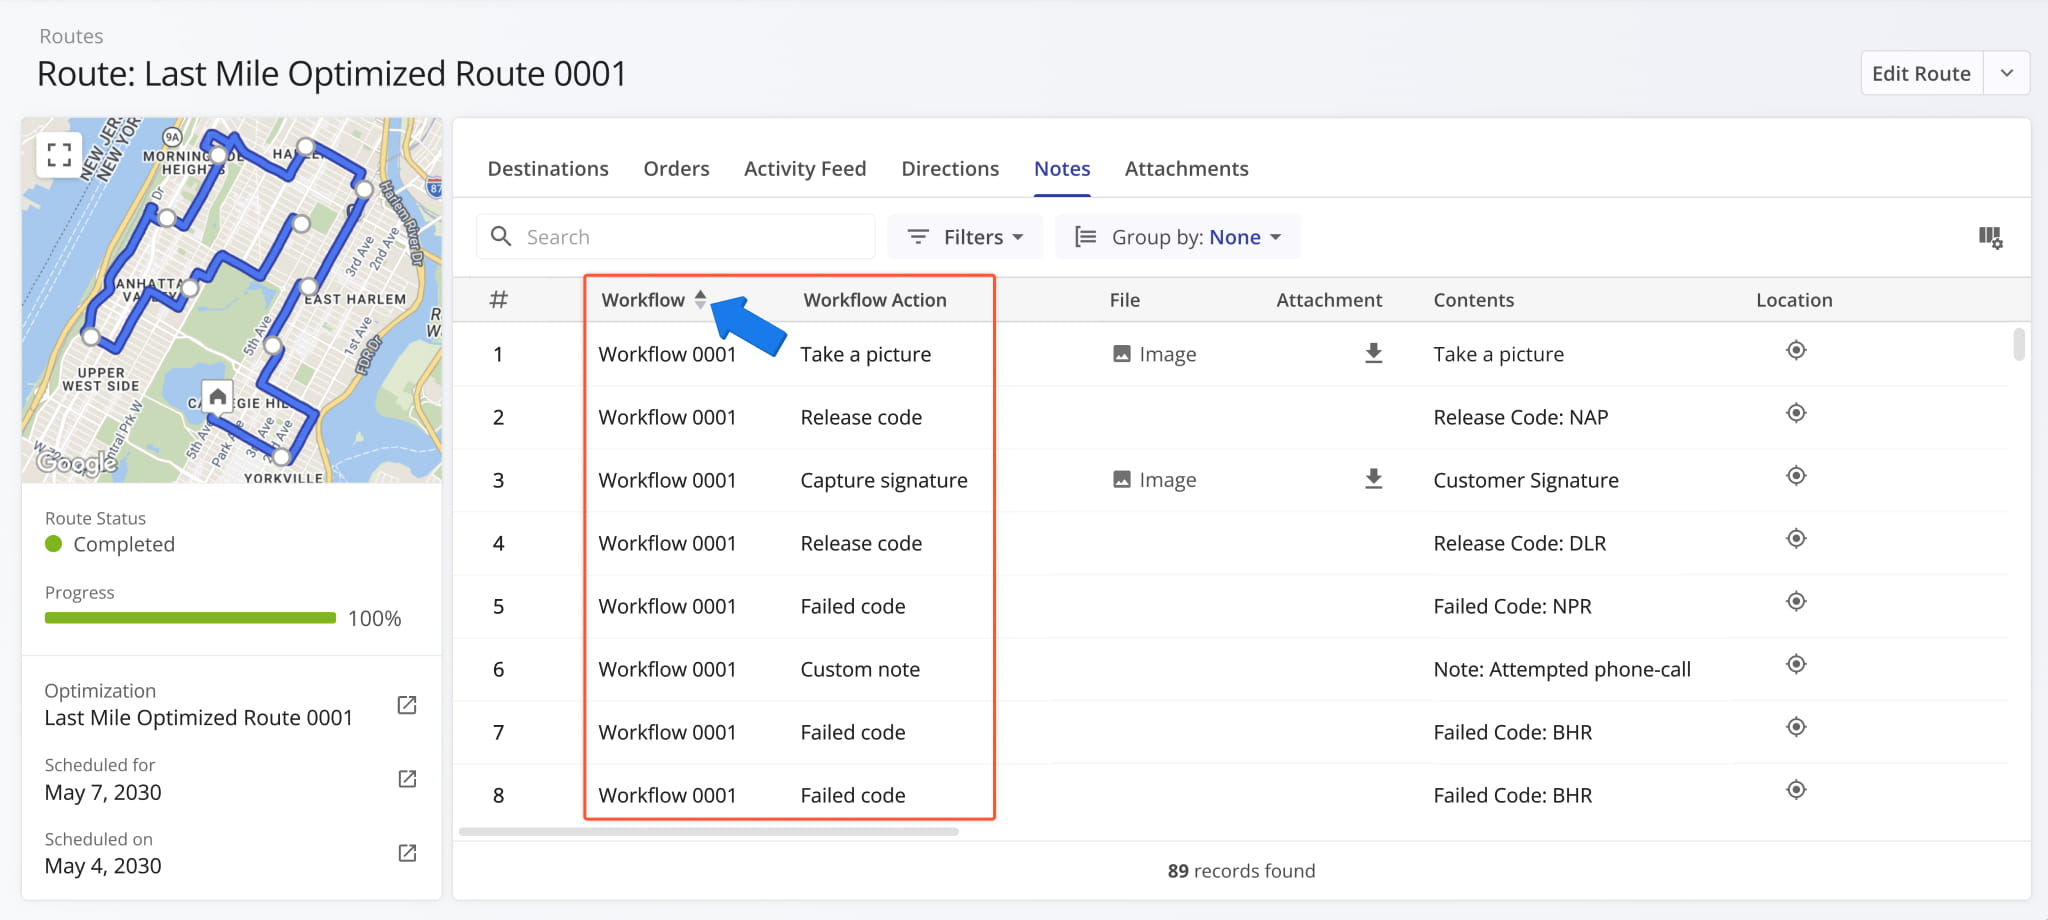
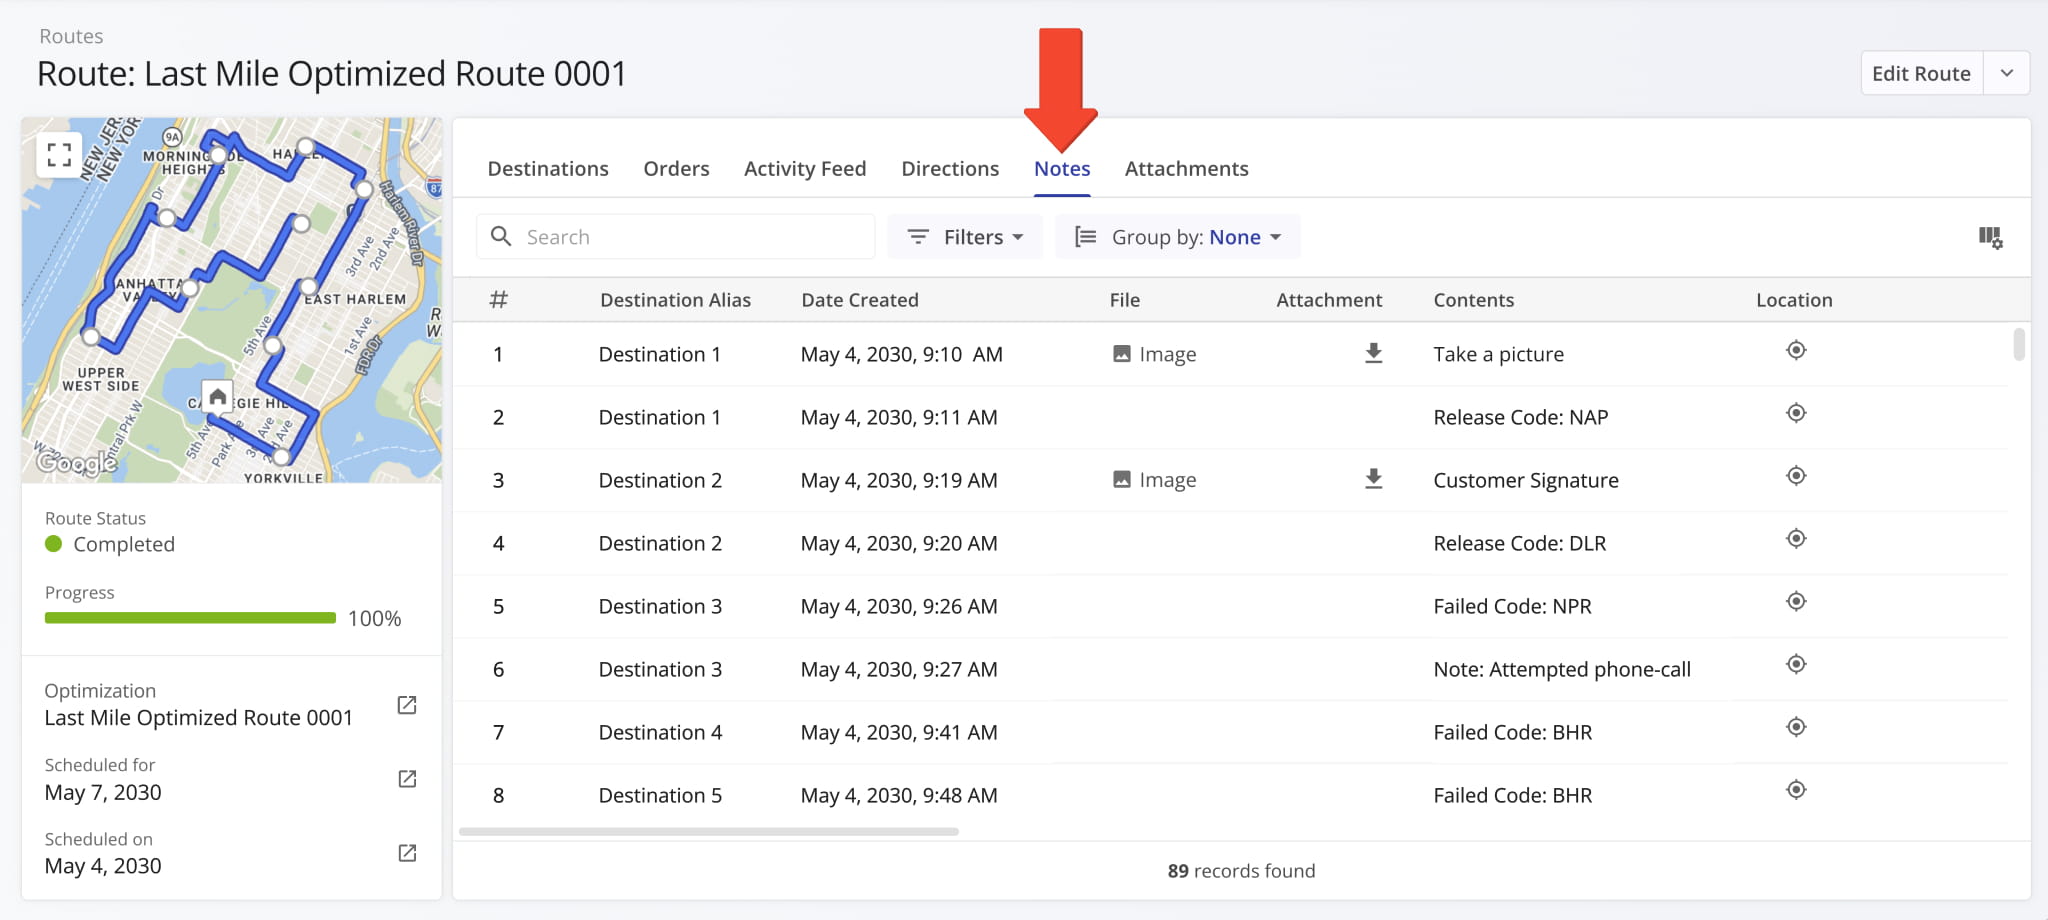
The “Notes” section of Route Snapshots was redesigned to match how Notes are displayed in Order Snapshots. This updated, unified interface enables you to easily find the Destination Notes you’re looking for, no matter which Route4Me tool you’re using.
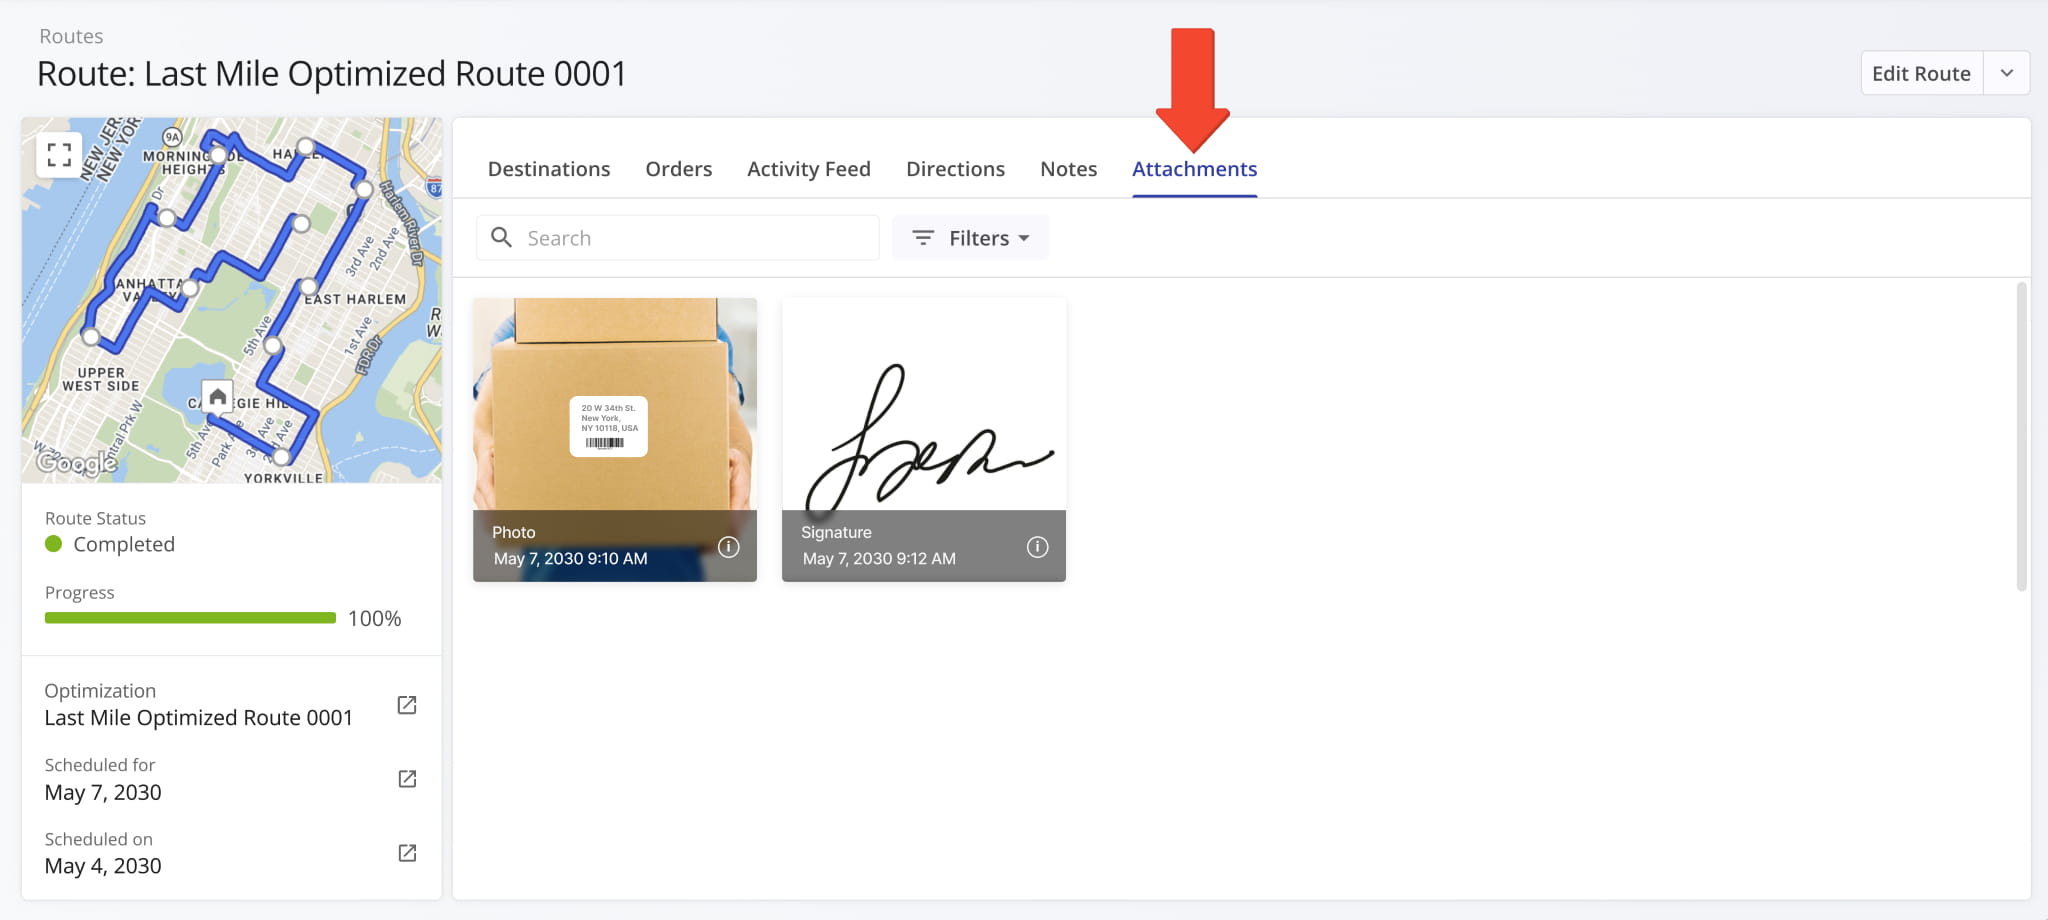
The “Attachments” section of Route Snapshots is now also standardized across different snapshots. Just like the “Notes” tab, this provides a unified experience, which helps you save time looking for the data you need.
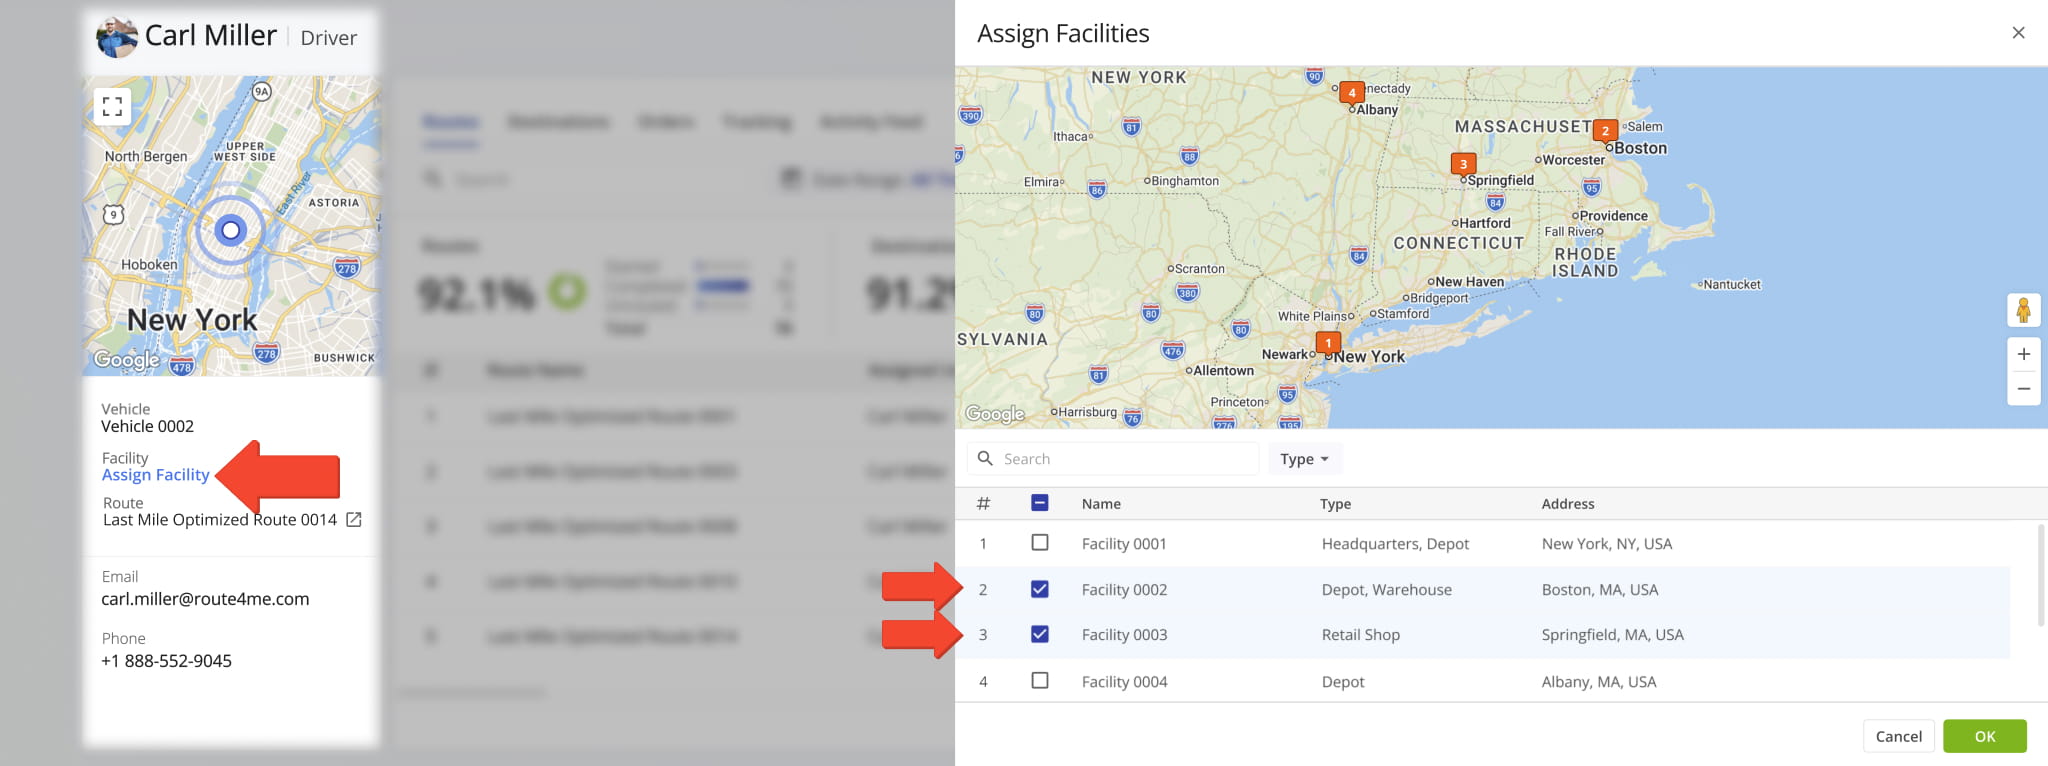
The “Assign Facility” button in User Snapshots now opens a new dynamic panel where you can assign multiple facilities to the respective user and see where those facilities are located on the map.
Previously, you could only assign facilities through a search field in the User Snapshot summary on the left.
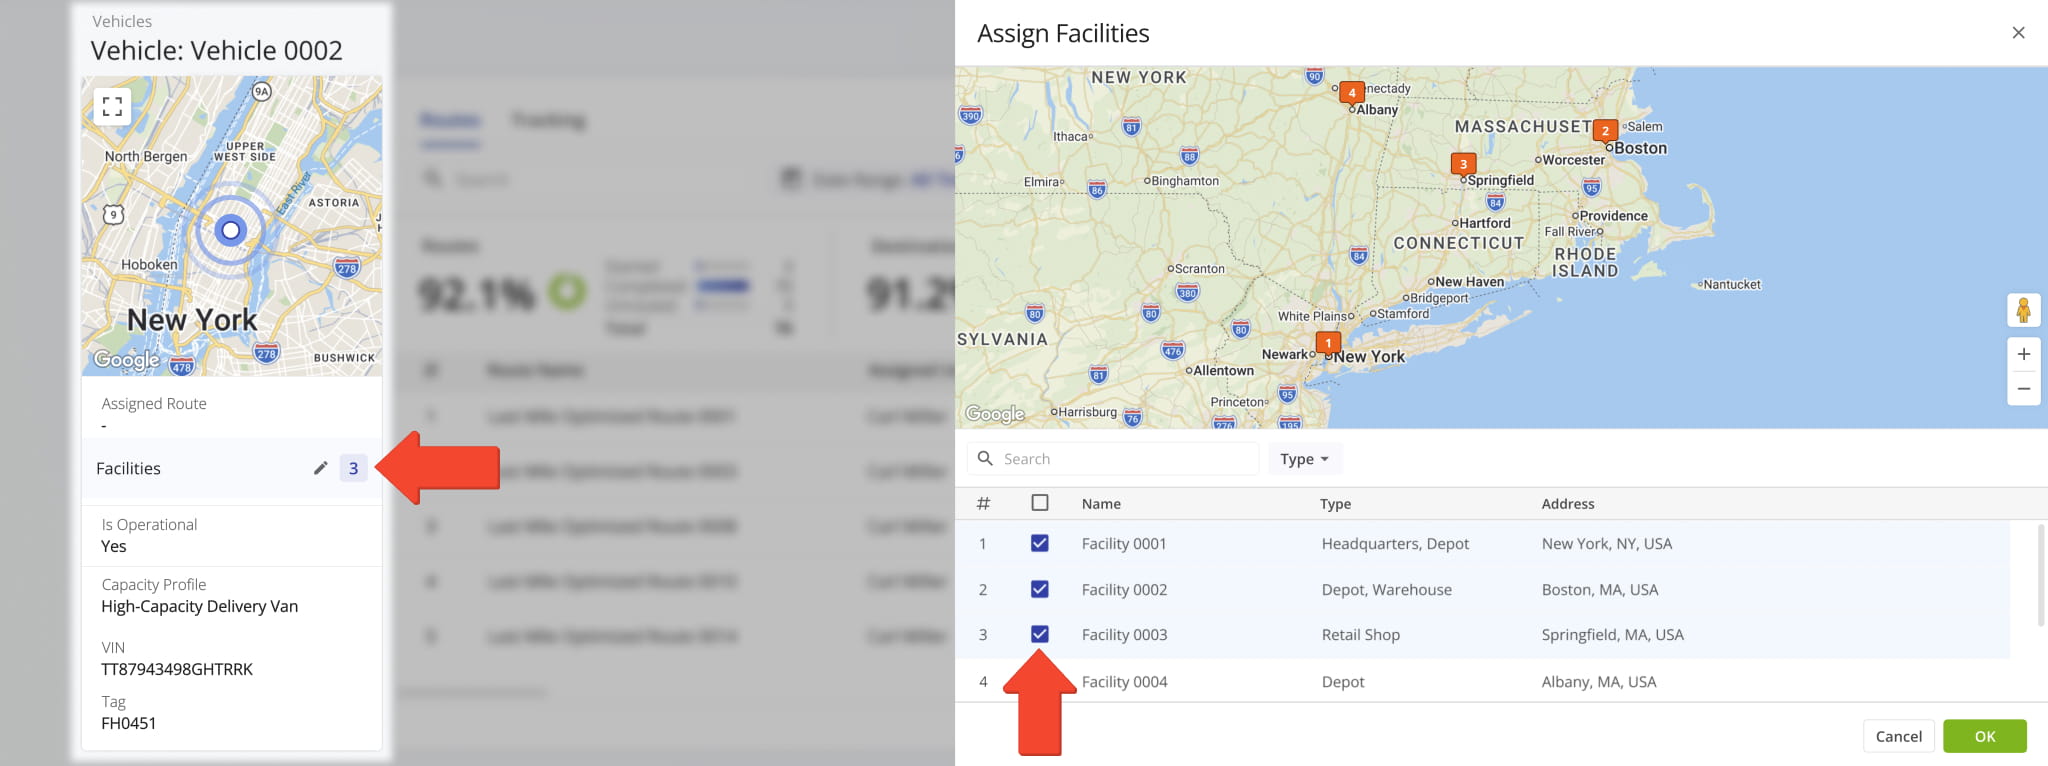
The “Assign Facility” button in Vehicle Snapshots now opens a new dynamic panel where you can assign multiple facilities to the respective vehicle and see where those facilities are located on the map.
Previously, you could only assign facilities through a search field in the Vehicle Snapshot summary on the left.
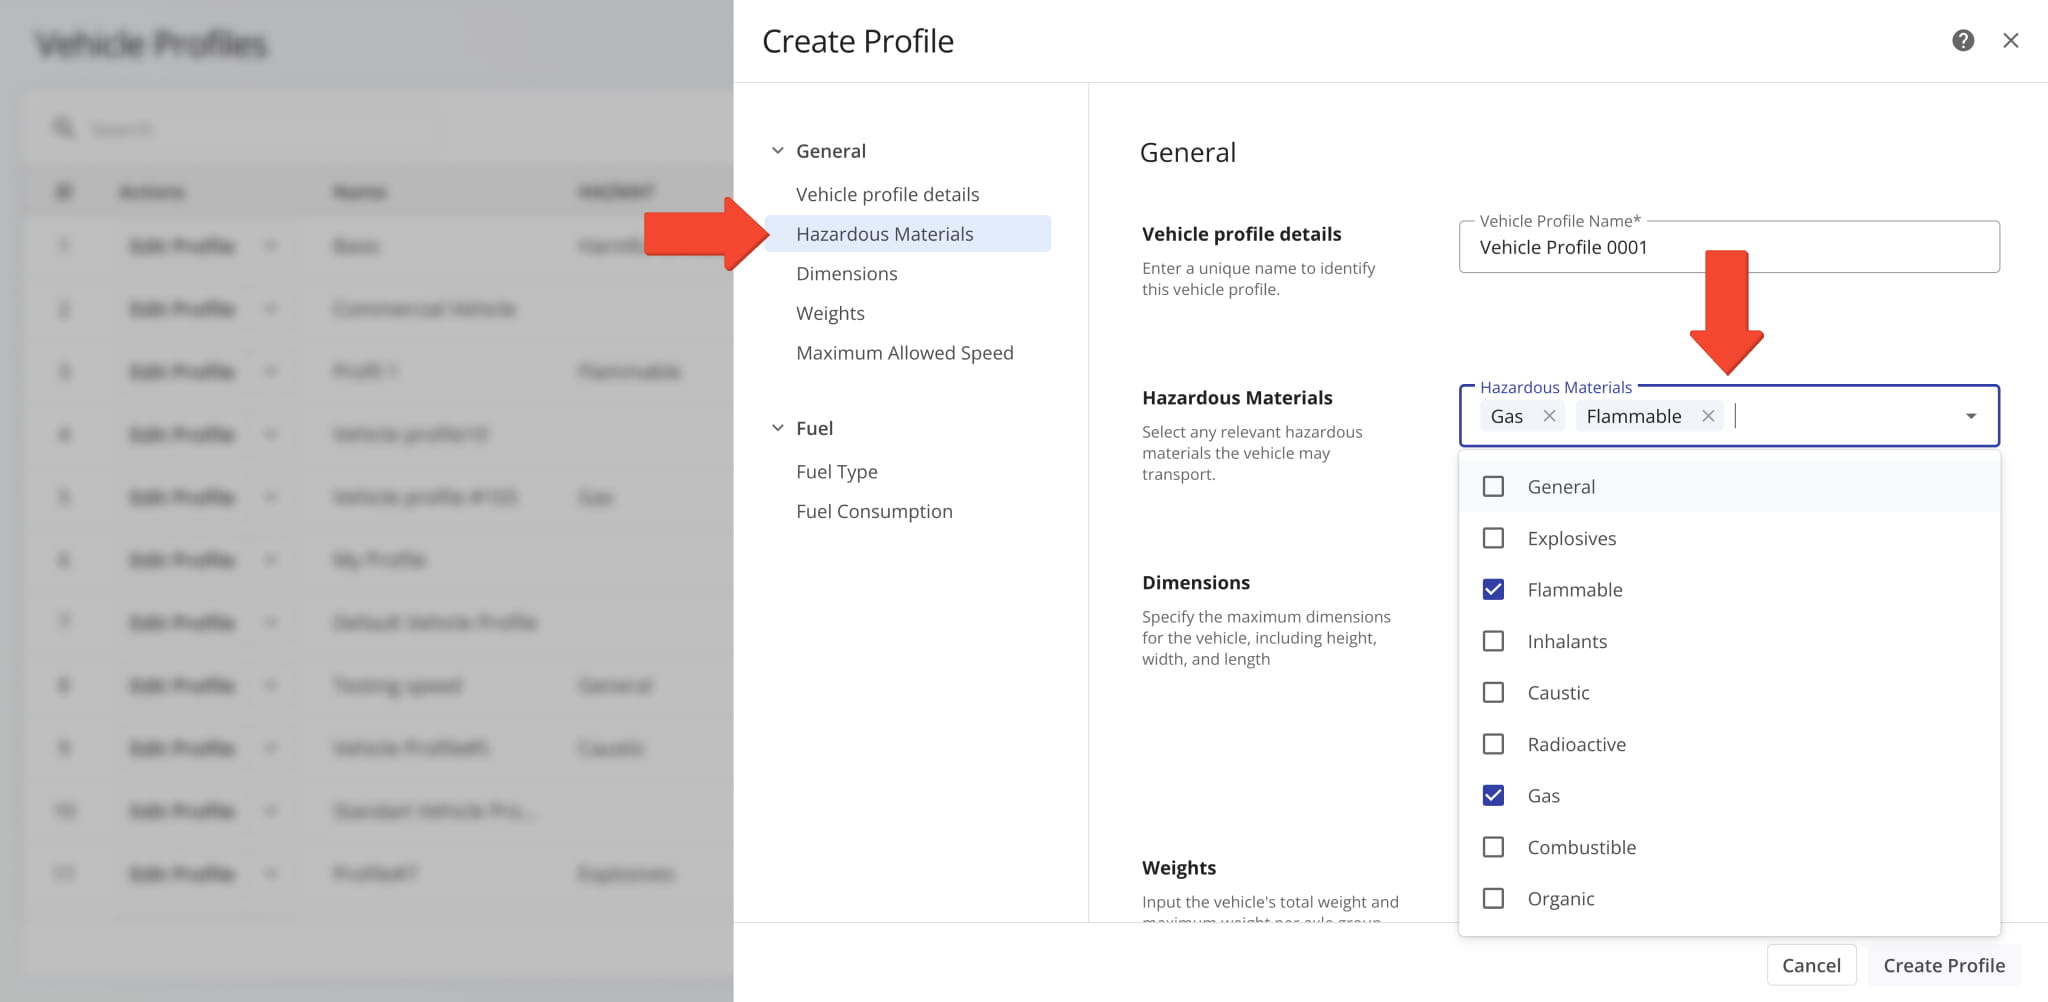
The “Hazardous Materials” field in Vehicle Profiles now supports multi-selection. Check the boxes next to options you want to include in a profile. This new functionality streamlines creating and managing profiles for commercial HAZMAT vehicles.
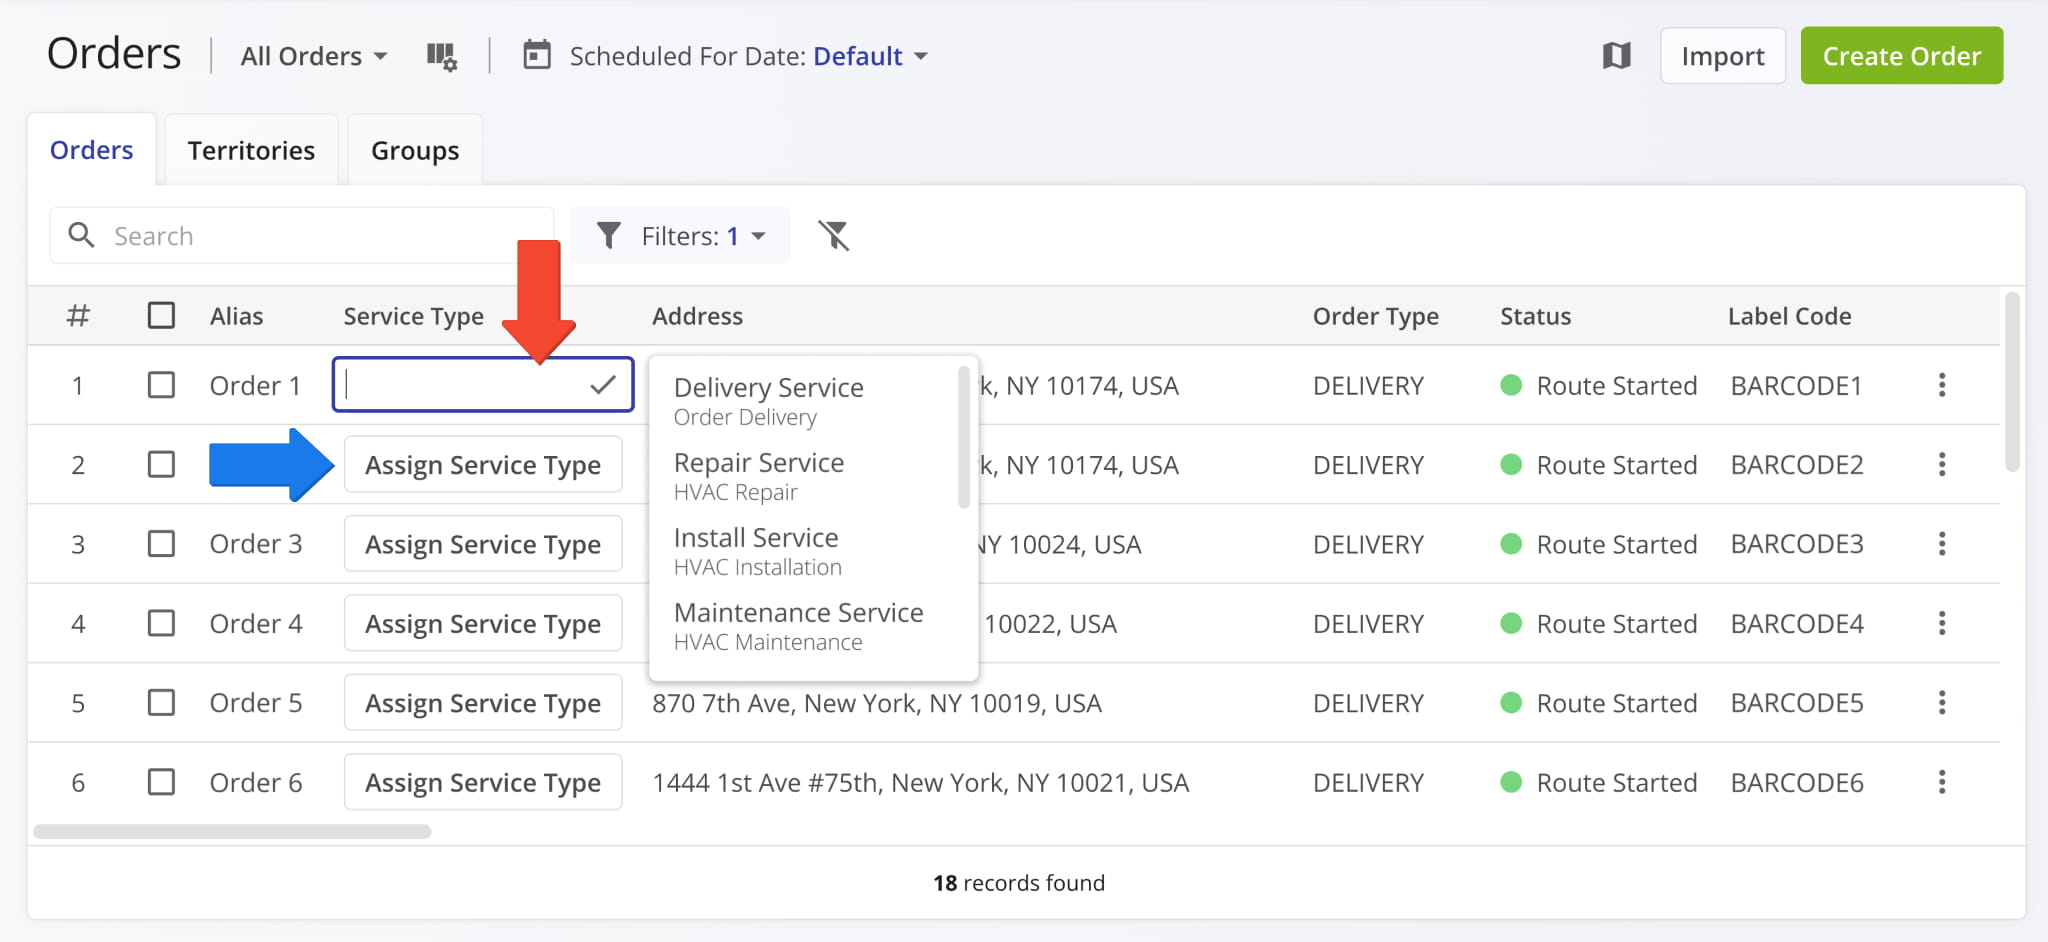
The “Service Type” column on the Orders Page now supports dynamic assignment. You can click the “Assign Service Type” button and find or select a service type for orders. To add or manage service types on your account, contact Route4Me support.
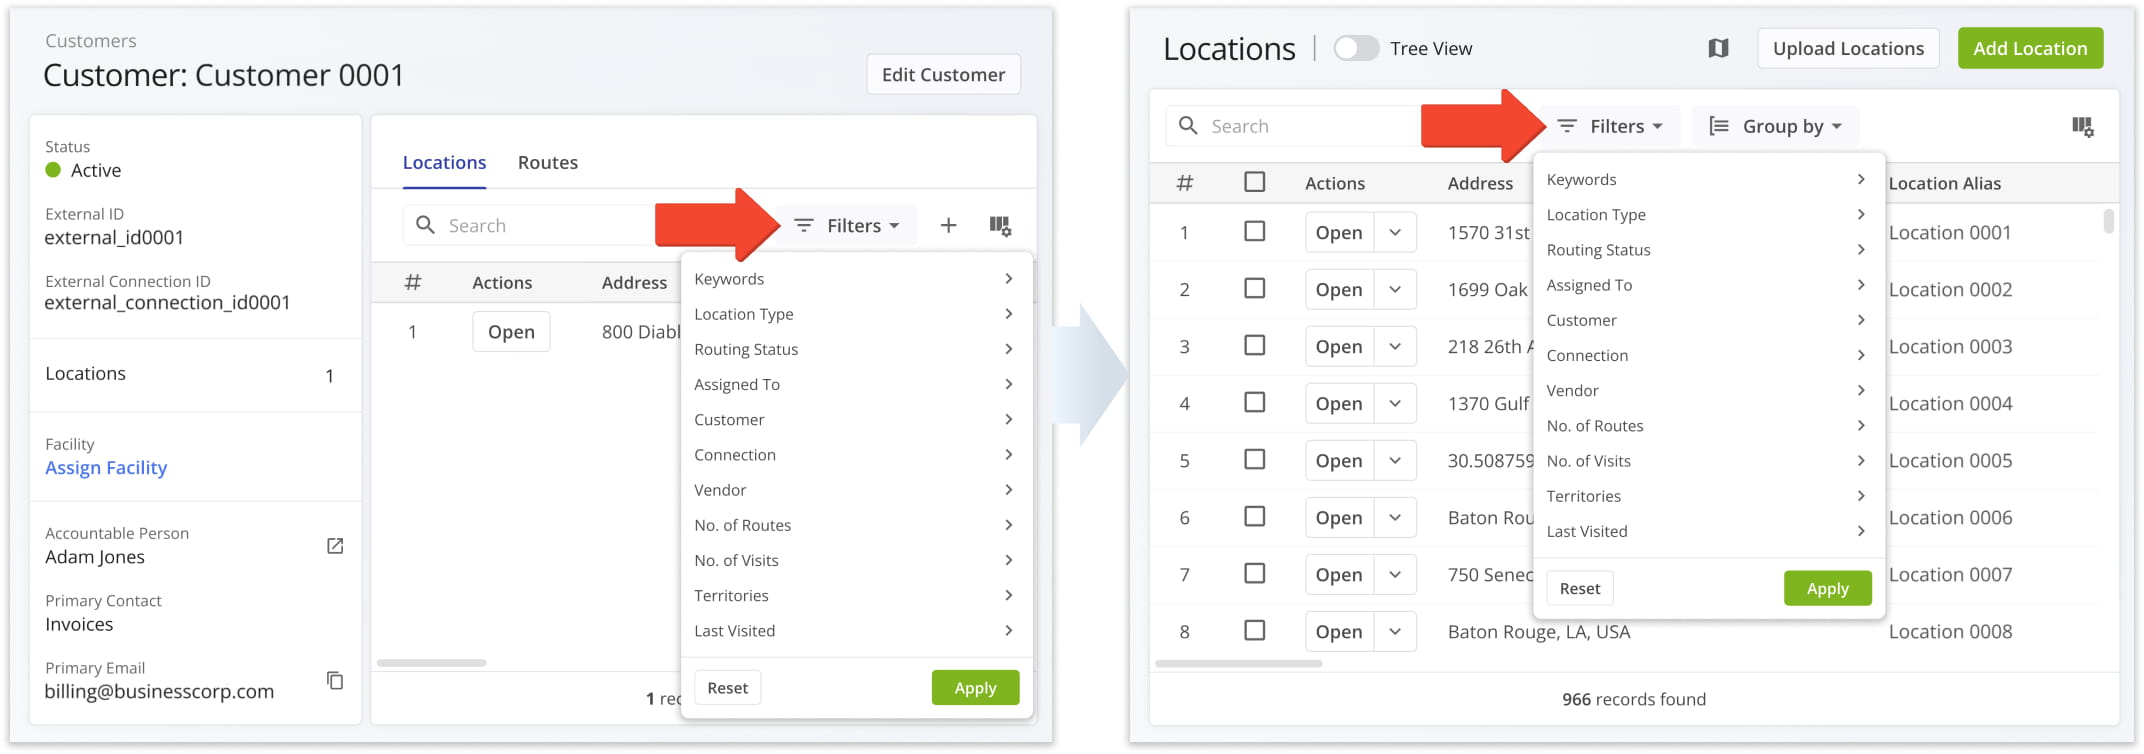
The available filters in the “Locations” section of Customer Snapshots now match the filters available on your Locations Page. Unified filters enable you to easily find Locations no matter which interface you’re using, improving consistency and efficiency.
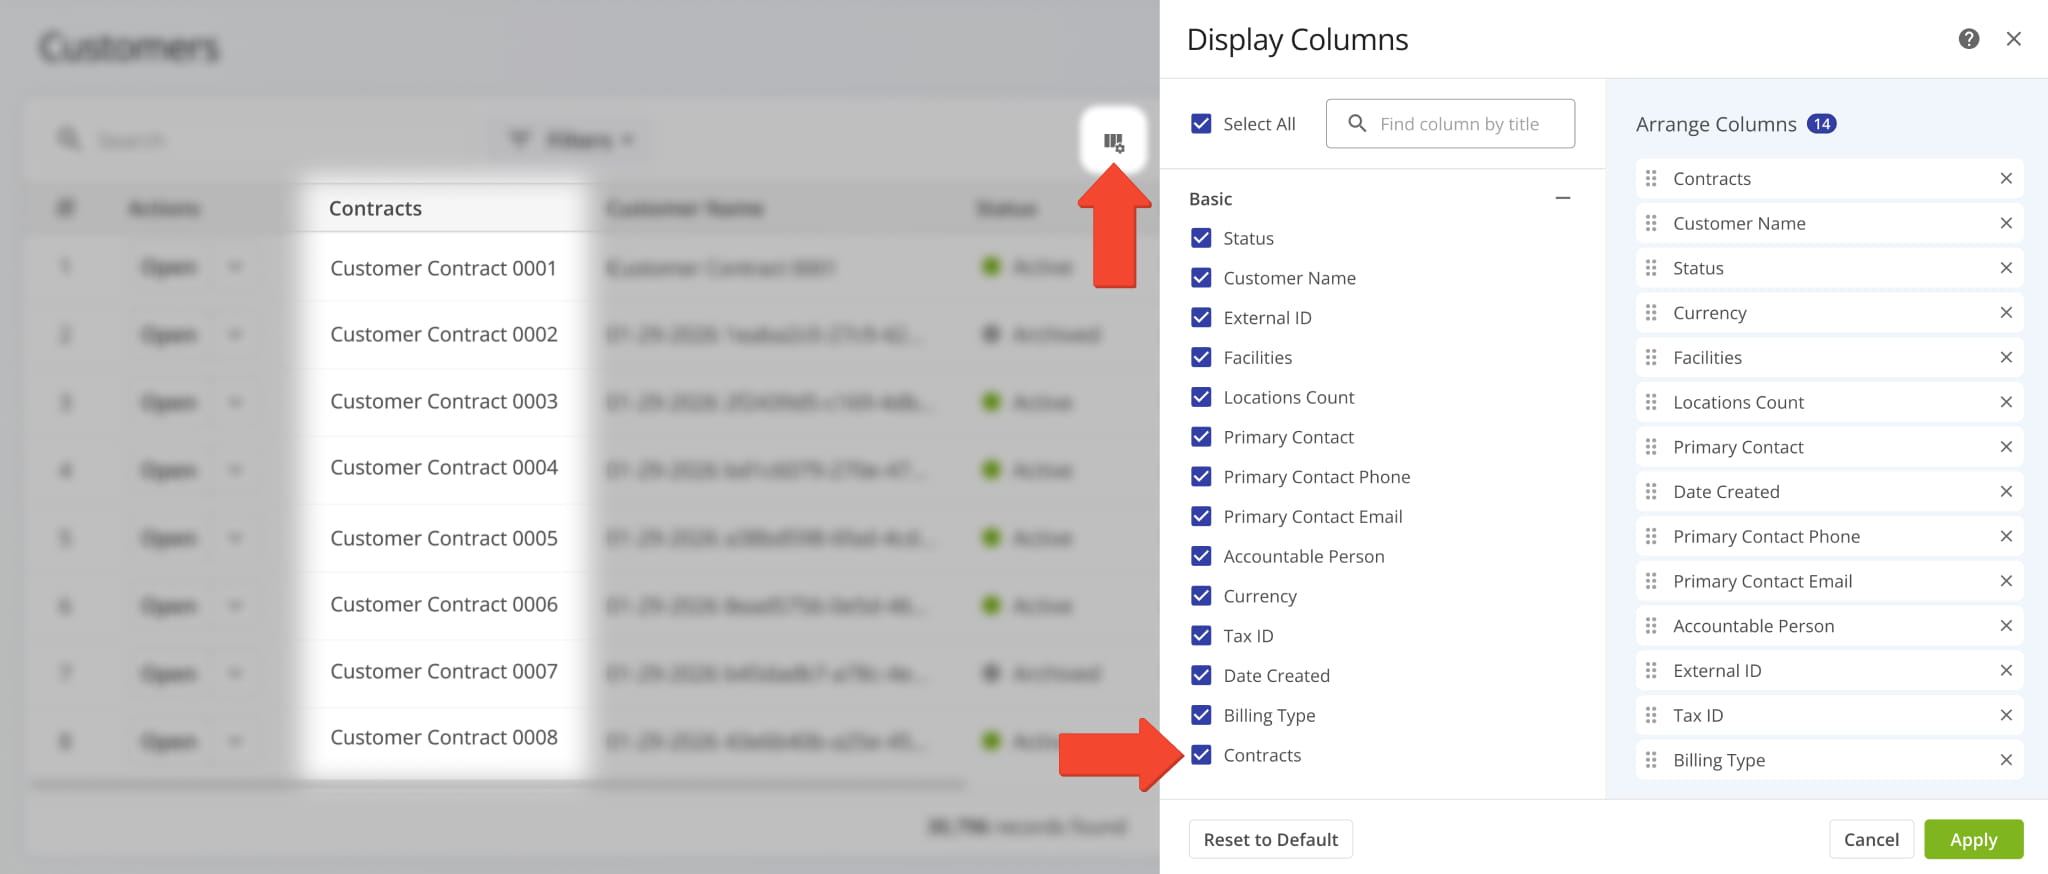
A new “Contracts” Display Column was added to your Customers Page. It shows the specific contracts associated with Customers.
A new “Trips” category was added to Connection Snapshots. It shows telematics vehicle data associated with the respective Vendor Connection, such as trip distance, timestamps, odometer readings, and more.

A new “Routes” category was added to Connection Snapshots. It shows route data associated with the respective Vendor Connection, such as route schedule data, actual timestamps, route destination notes, and more.
A new “Tracking” section was added to Route Snapshots. In the “Tracking” tab, you can see a list of location updates associated with a route. Each update corresponds to an instance when the assigned user or vehicle’s location was synced. Tracking updates contain timestamps, coordinate and location details, and detailed vehicle information if synced via Telematics Integration.
![]()
Additionally, you can hover over the Tracking Icon in the “Info” column to view a tracking summary for the respective location update. In detail, this will open a pop-up window that shows the location update’s associated coordinates, device timestamp, vehicle speed, odometer reading, and the assigned vehicle’s location on the map at the time of the location update.
![]()
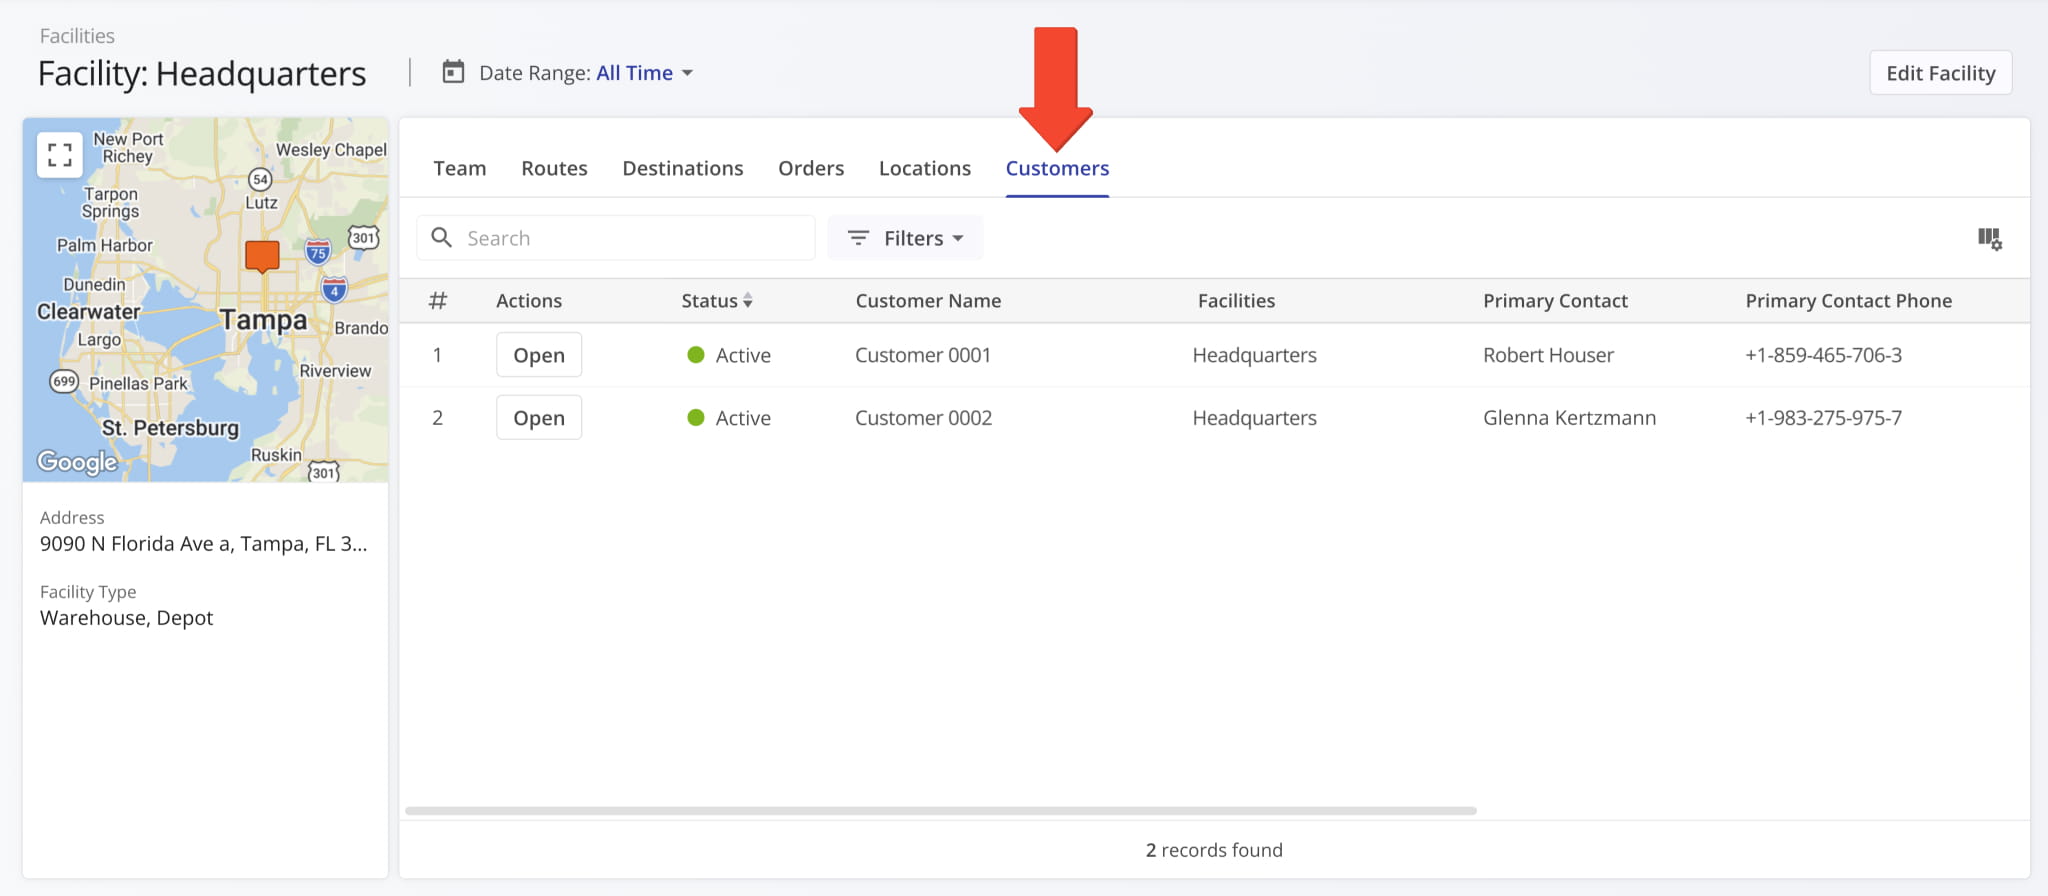
A new “Customers” data category was added to Facility Snapshots where you can see the Facility’s associated Customers.
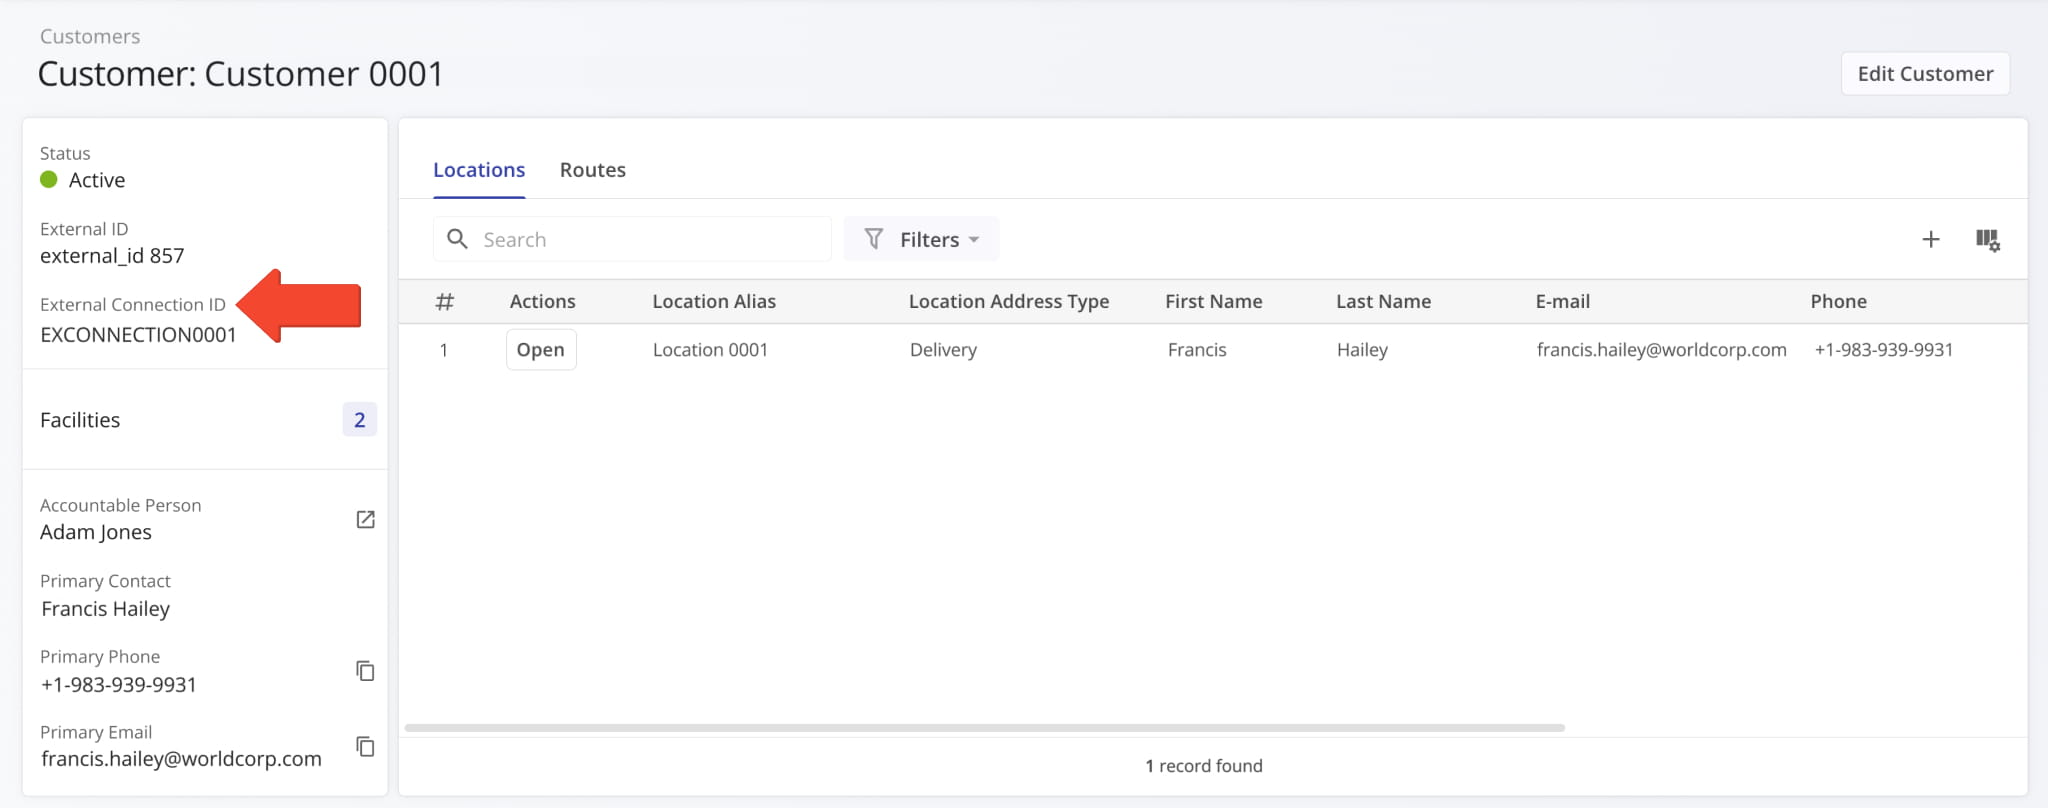
A new “External Connection ID” field was added to the Customer Snapshots in the summary on the left. It shows the unique ID of Customers imported through external vendor connections.
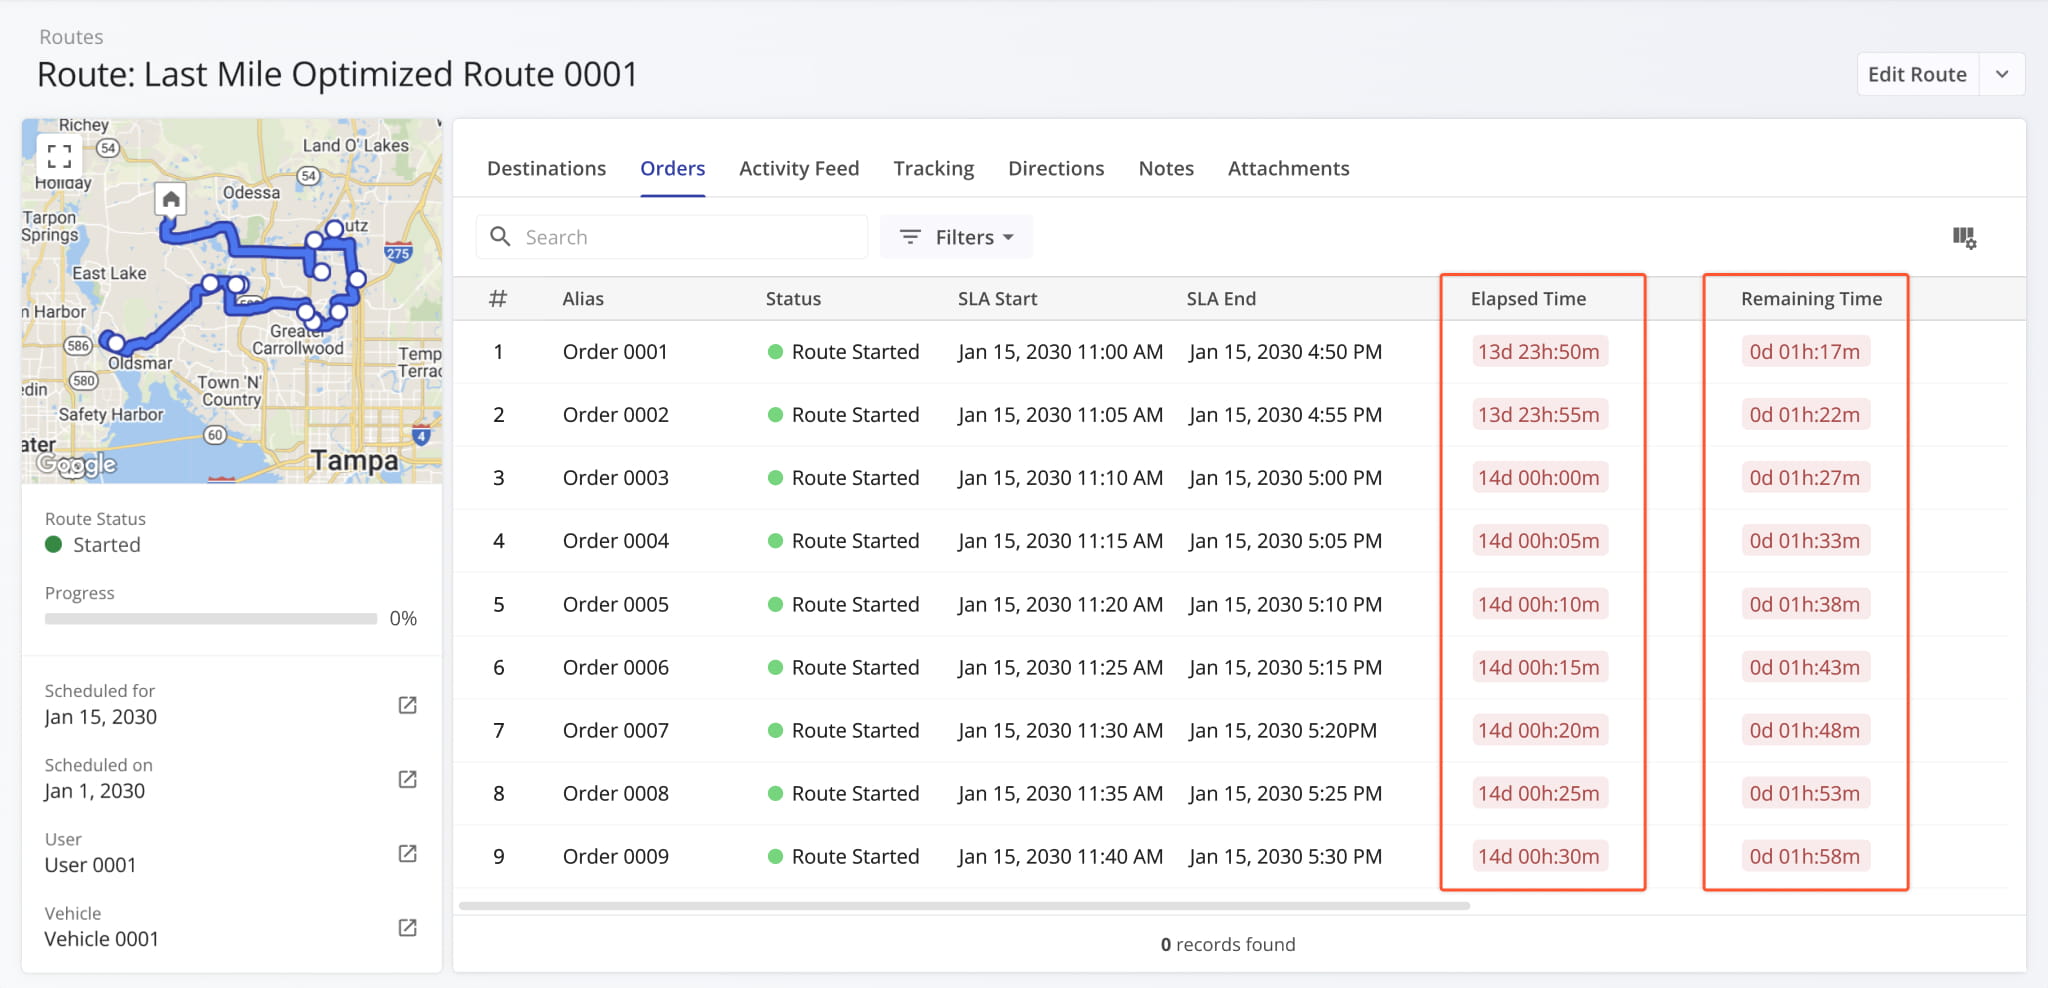
New “Elapsed Time” and “Remaining Time” columns were added to the “Orders” section of Route Snapshots. These new columns show dynamic timers tracking the following durations:
- Elapsed Time: Total time that has passed since the Order was created or imported.
- Remaining Time: Total time remaining until the Order’s scheduled completion.
Learn more about adding and importing Orders.
A new “Assign Customer” button was added to the summary panel on the left in open Route Snapshots. This enables you to seamlessly associate a Customer with a route directly from its snapshot.
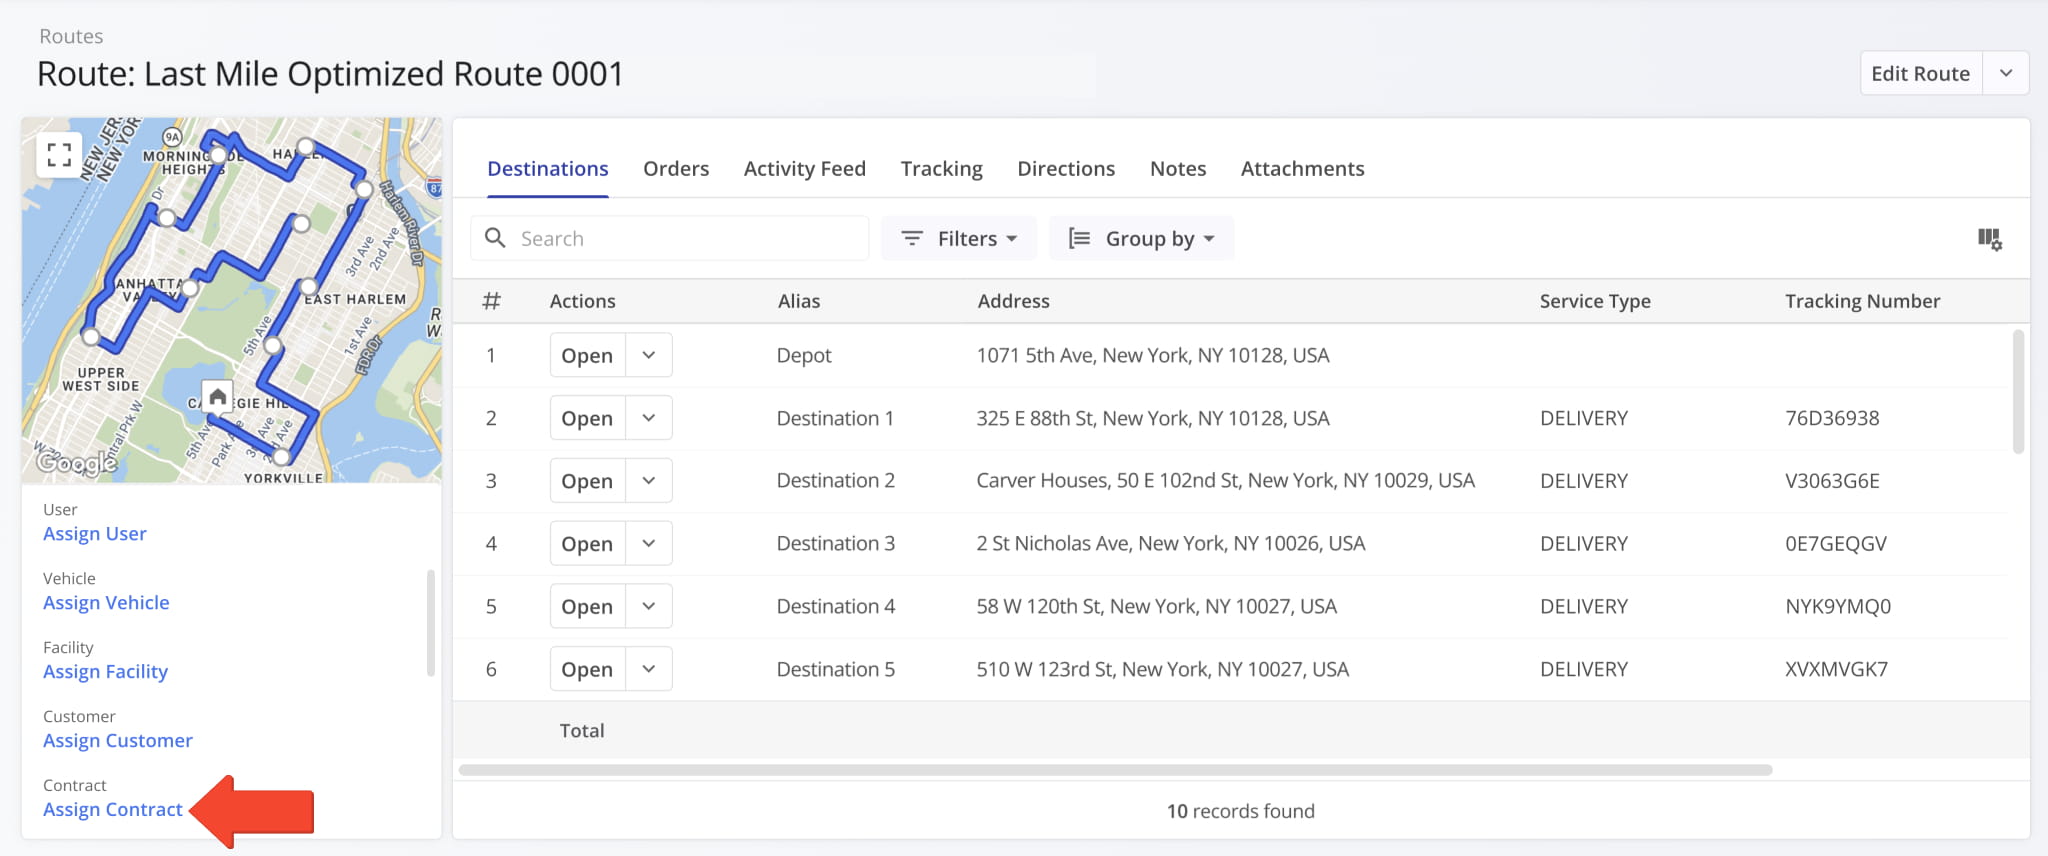
A new “Assign Contract” button was also added. This enables you to seamlessly associate a Contract with a route directly from its snapshot.
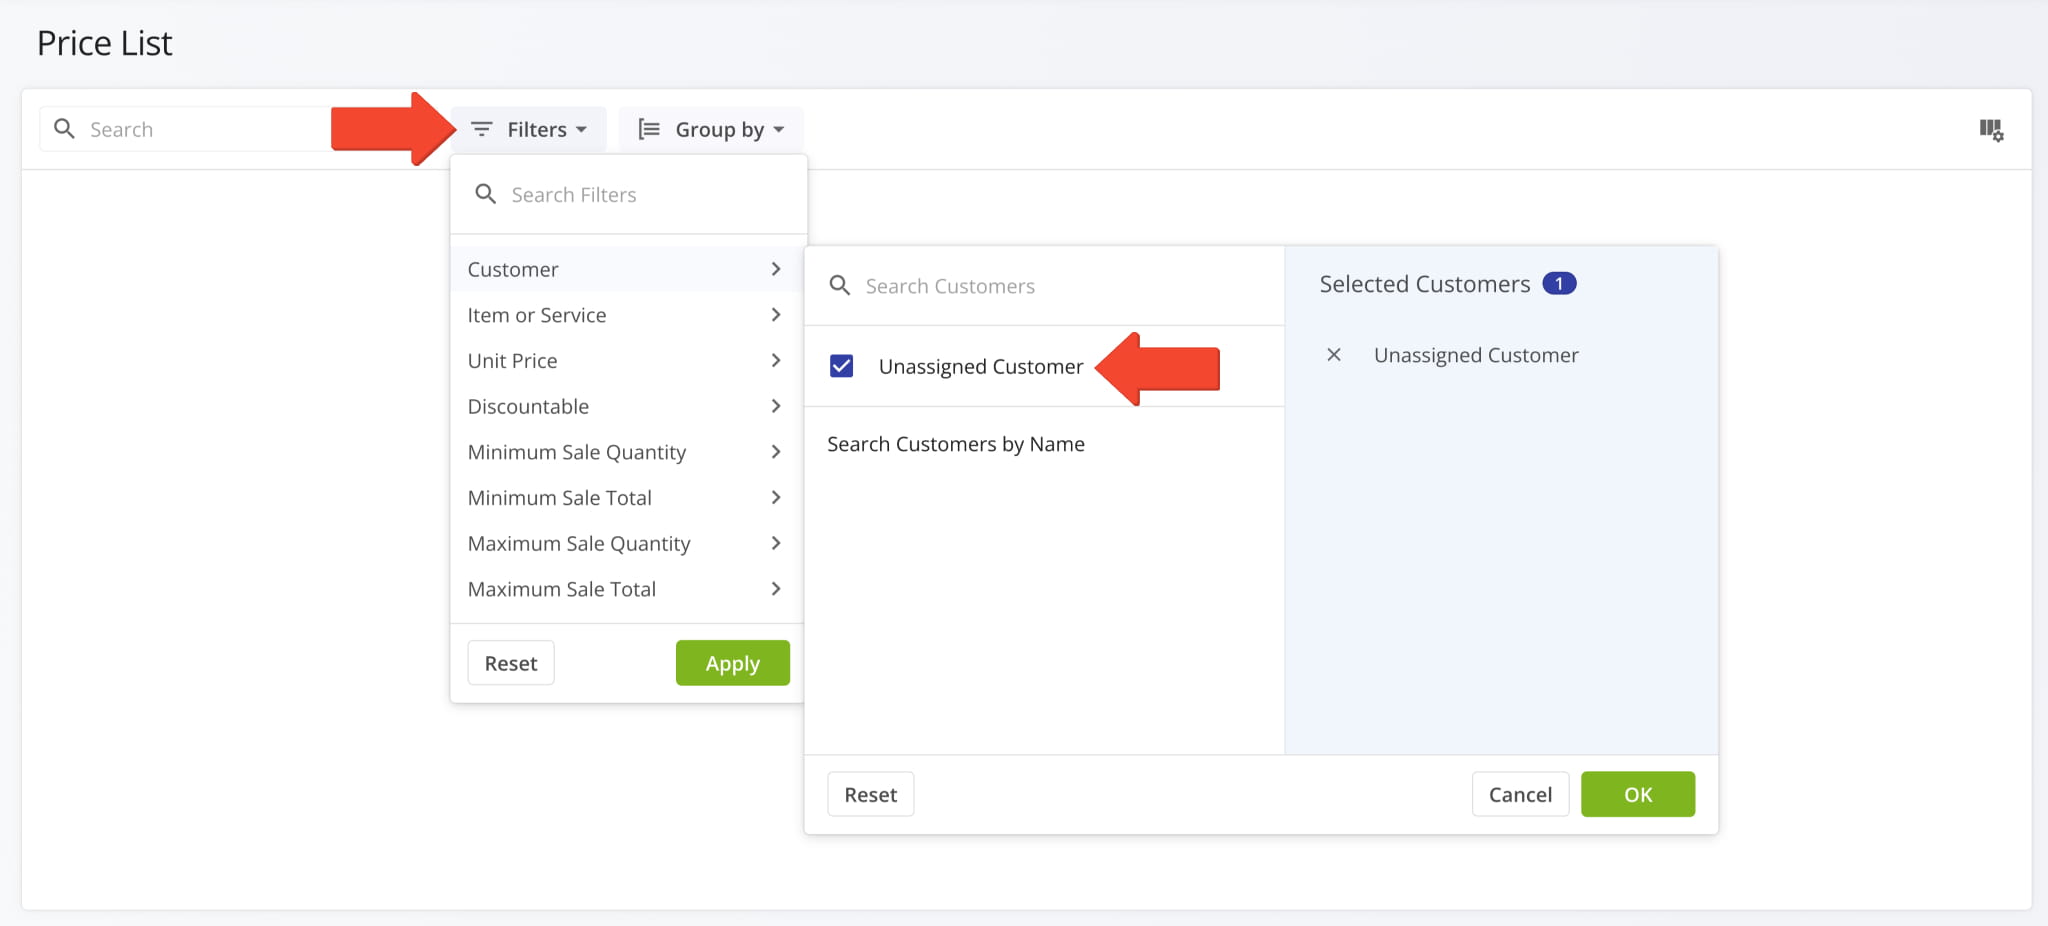
The ERP Price List can be filtered by the Customers associated with price entries. This update adds the option to select “Unassigned Customer” when filtering to see price entries with no associated Customer.
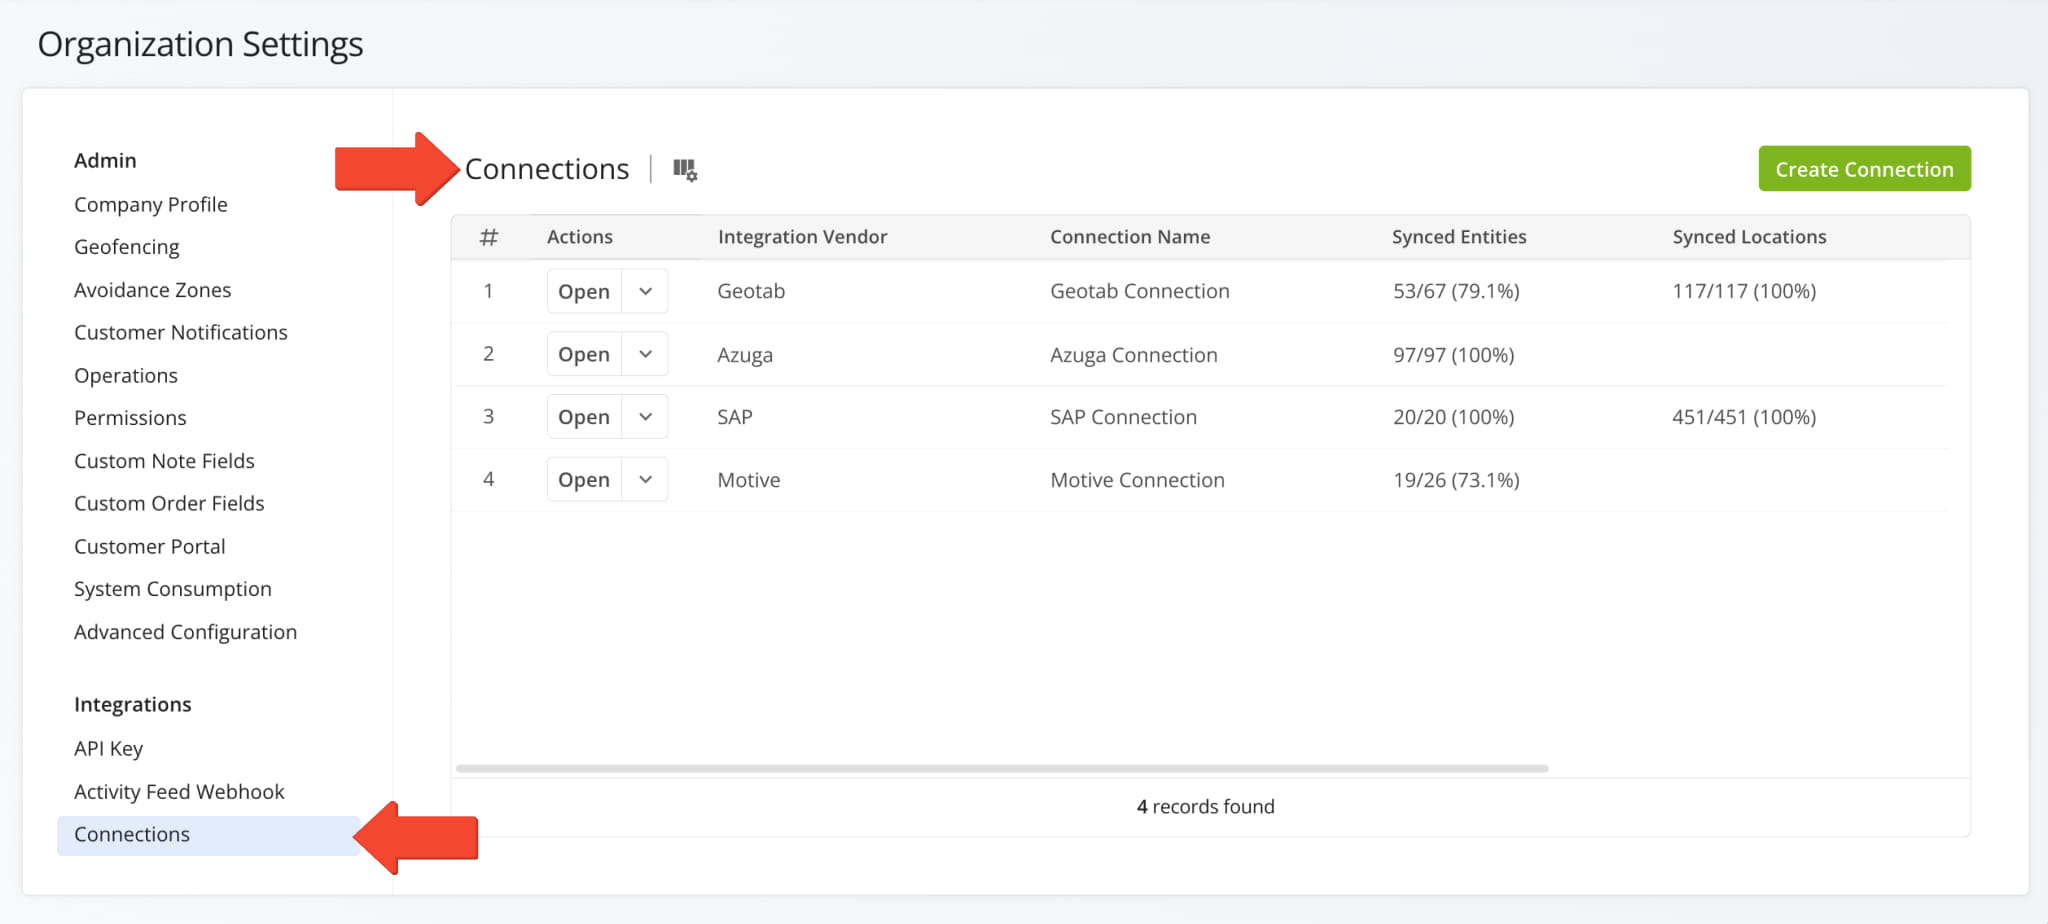
The “Telematics Connections” section of the Organization Settings page has been renamed to “Connections“. Accordingly, “Telematics Vendors” have been renamed to “Vendors“. This update reflects Route4Me’s expanded integration and connection functionality, enabling you to sync not just telematics vehicles to your account but also locations and other entities.
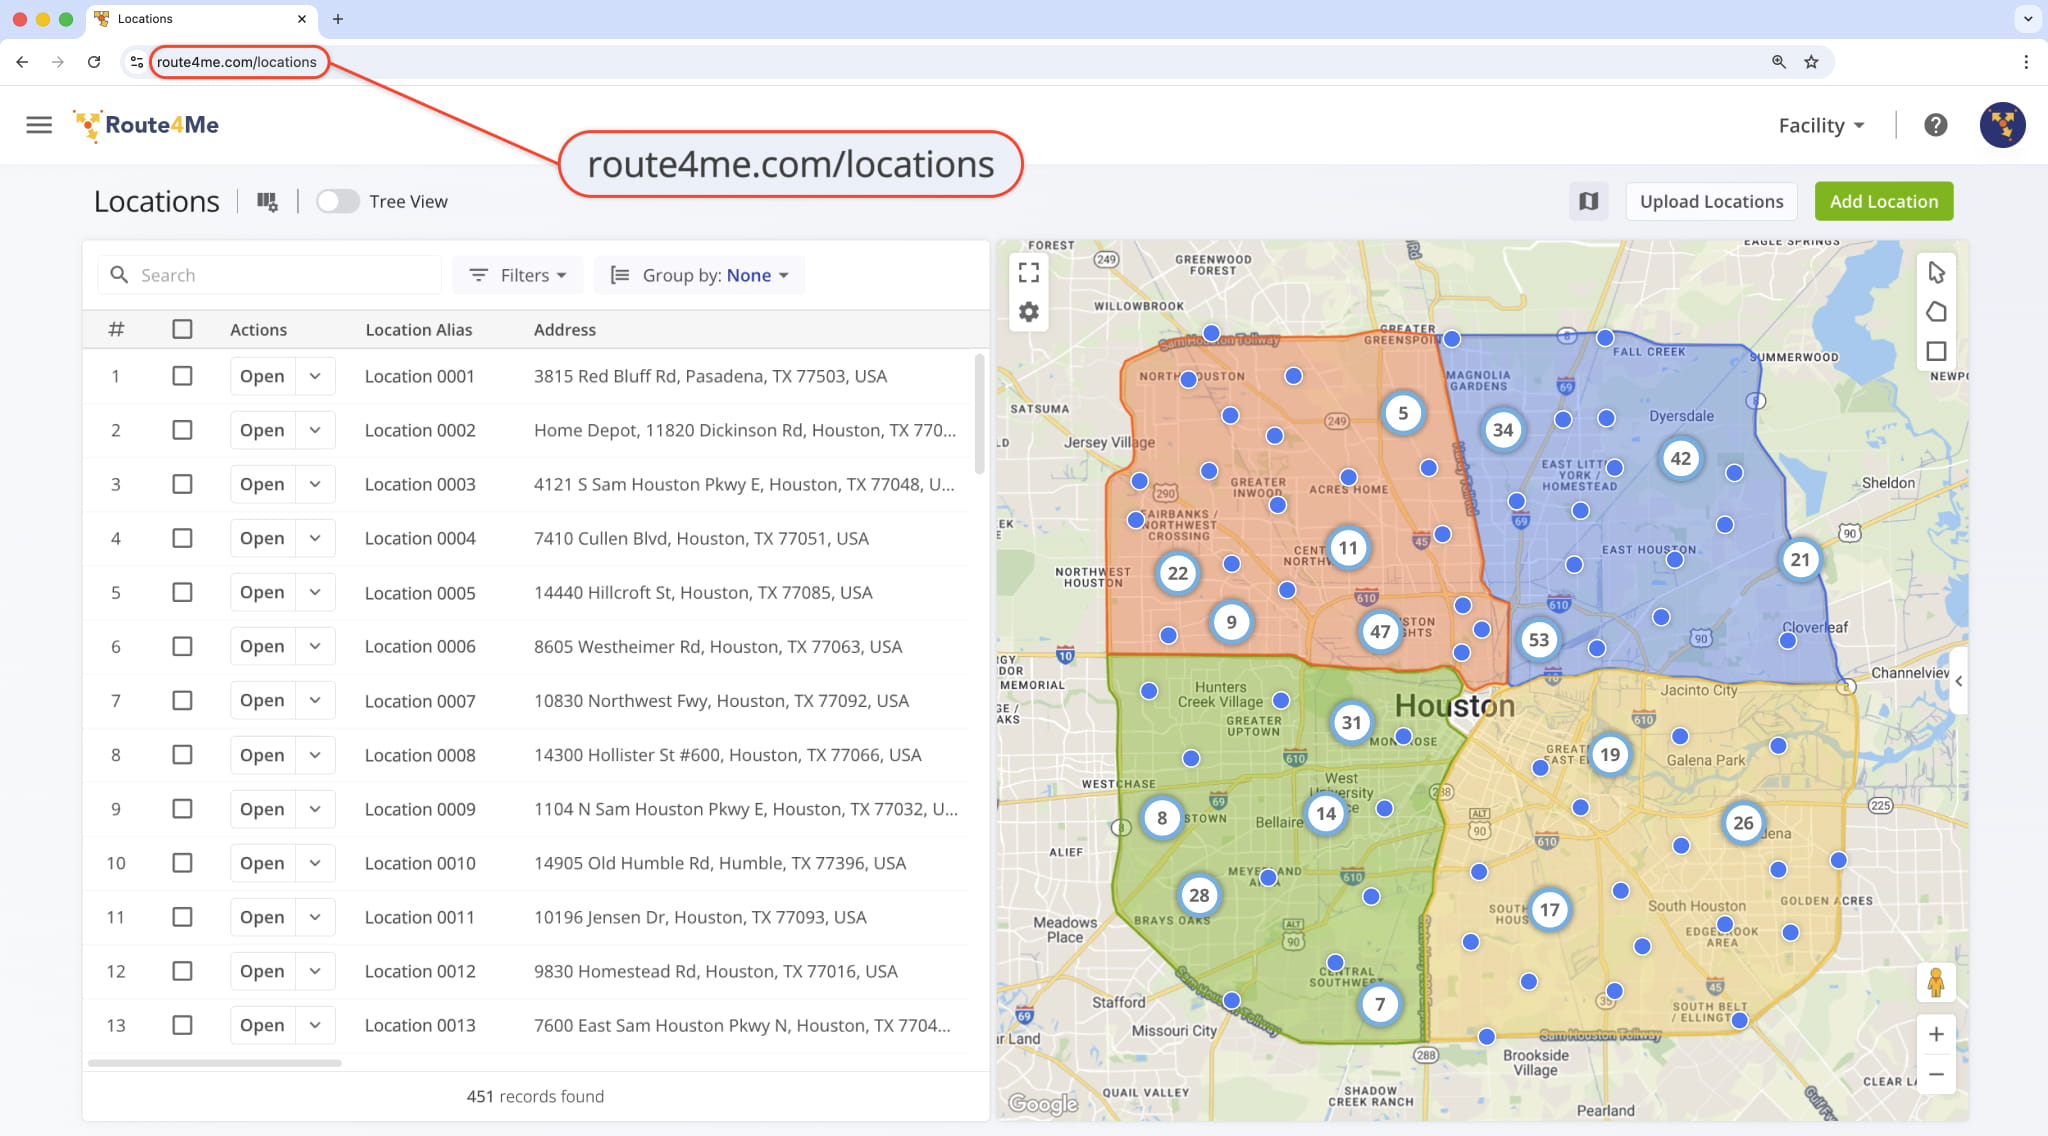
The URL of your Locations Page has been moved from “route4me.com/customer-locations” to “route4me.com/locations” to better align with Route4Me’s enterprise-grade transportation management software. Learn more about Locations.
January 2026
48A new “Route Metrics” panel was added to the Routes Page. It shows planned and actual route data and percentages similar to the existing Performance Insights. In comparison, the new Route Metrics show more structured, collapsible, and customizable data while Performance Insights offer a clear progress overview with intuitive visual graphs.
A new Contracts Page was added to Route4Me’s ERP and transportation management software. Contracts can be associated with customers and routes, enabling structured oversight of customer agreements, service periods, and more. Each Contract stores key details and external reference IDs for customer profiles imported from external vendors.
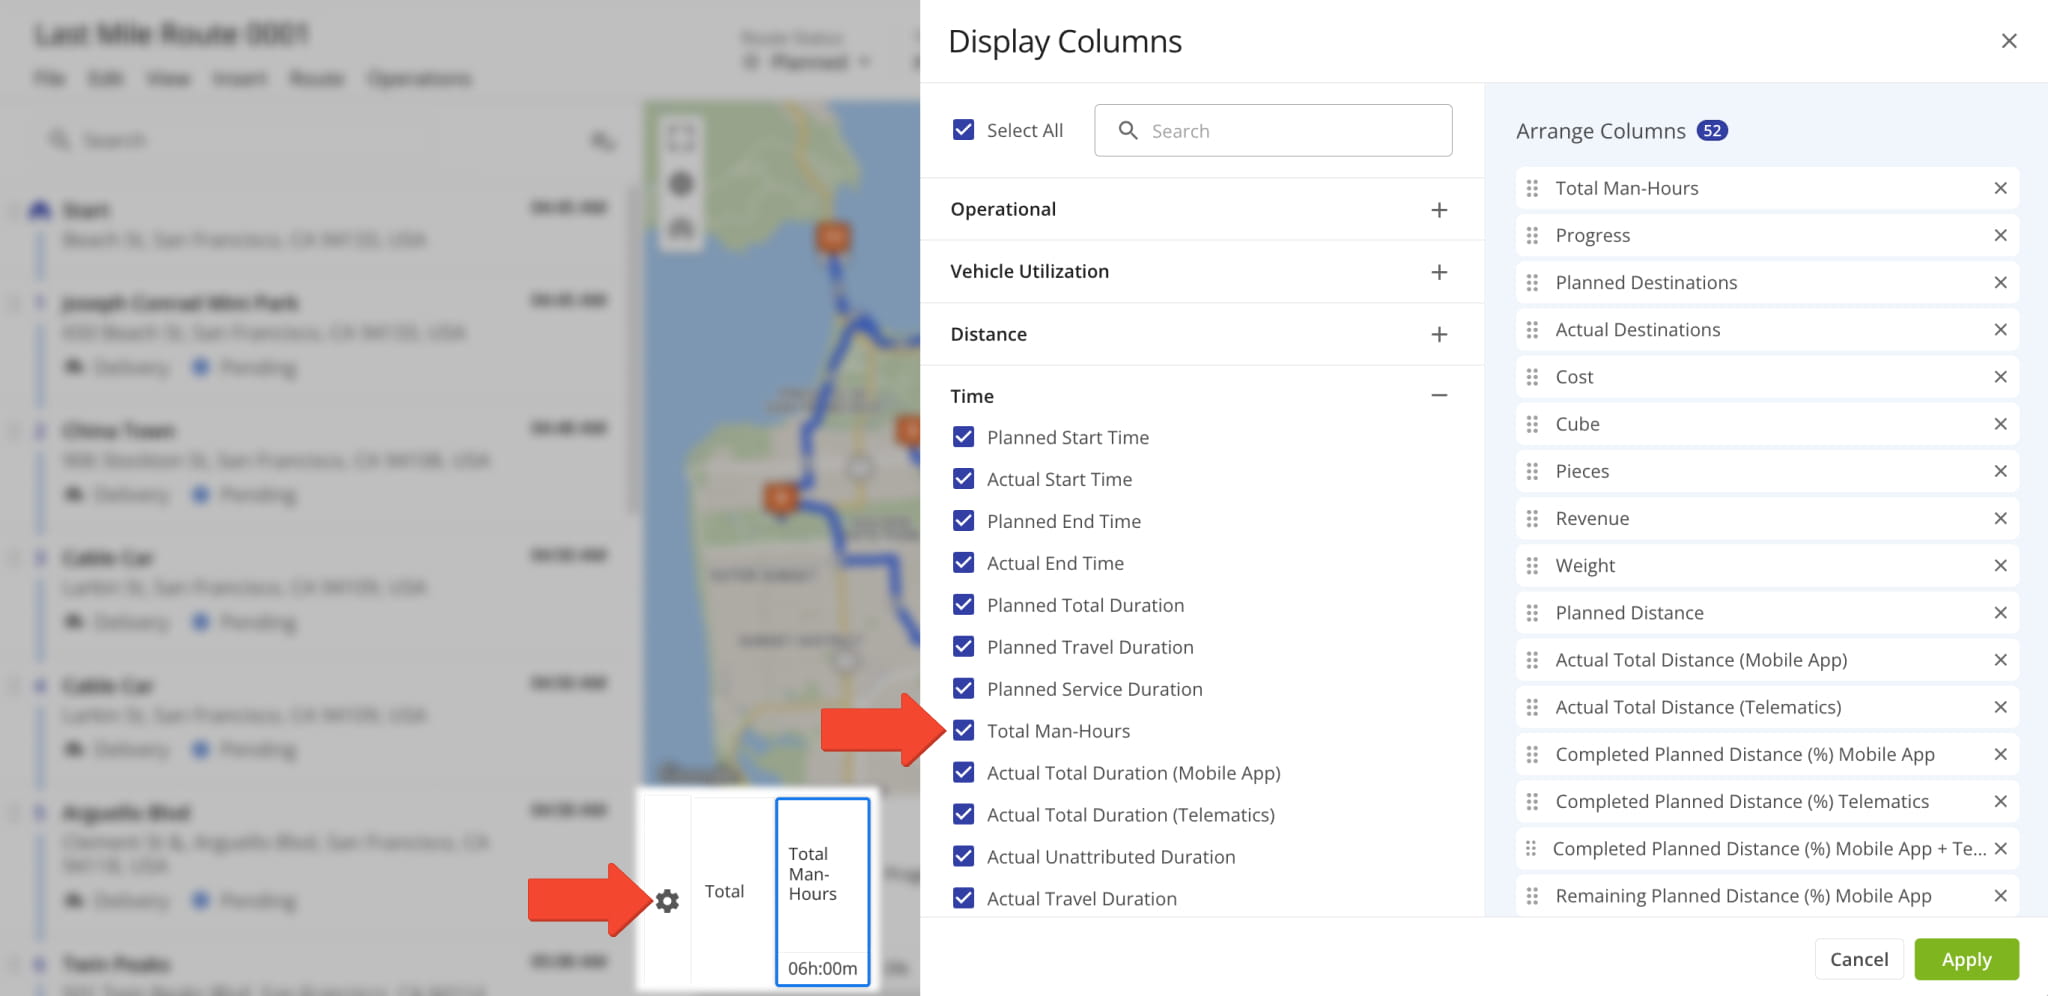
Man-Hours values associated with destinations can now be viewed in the Route Editor Destination Info panel.
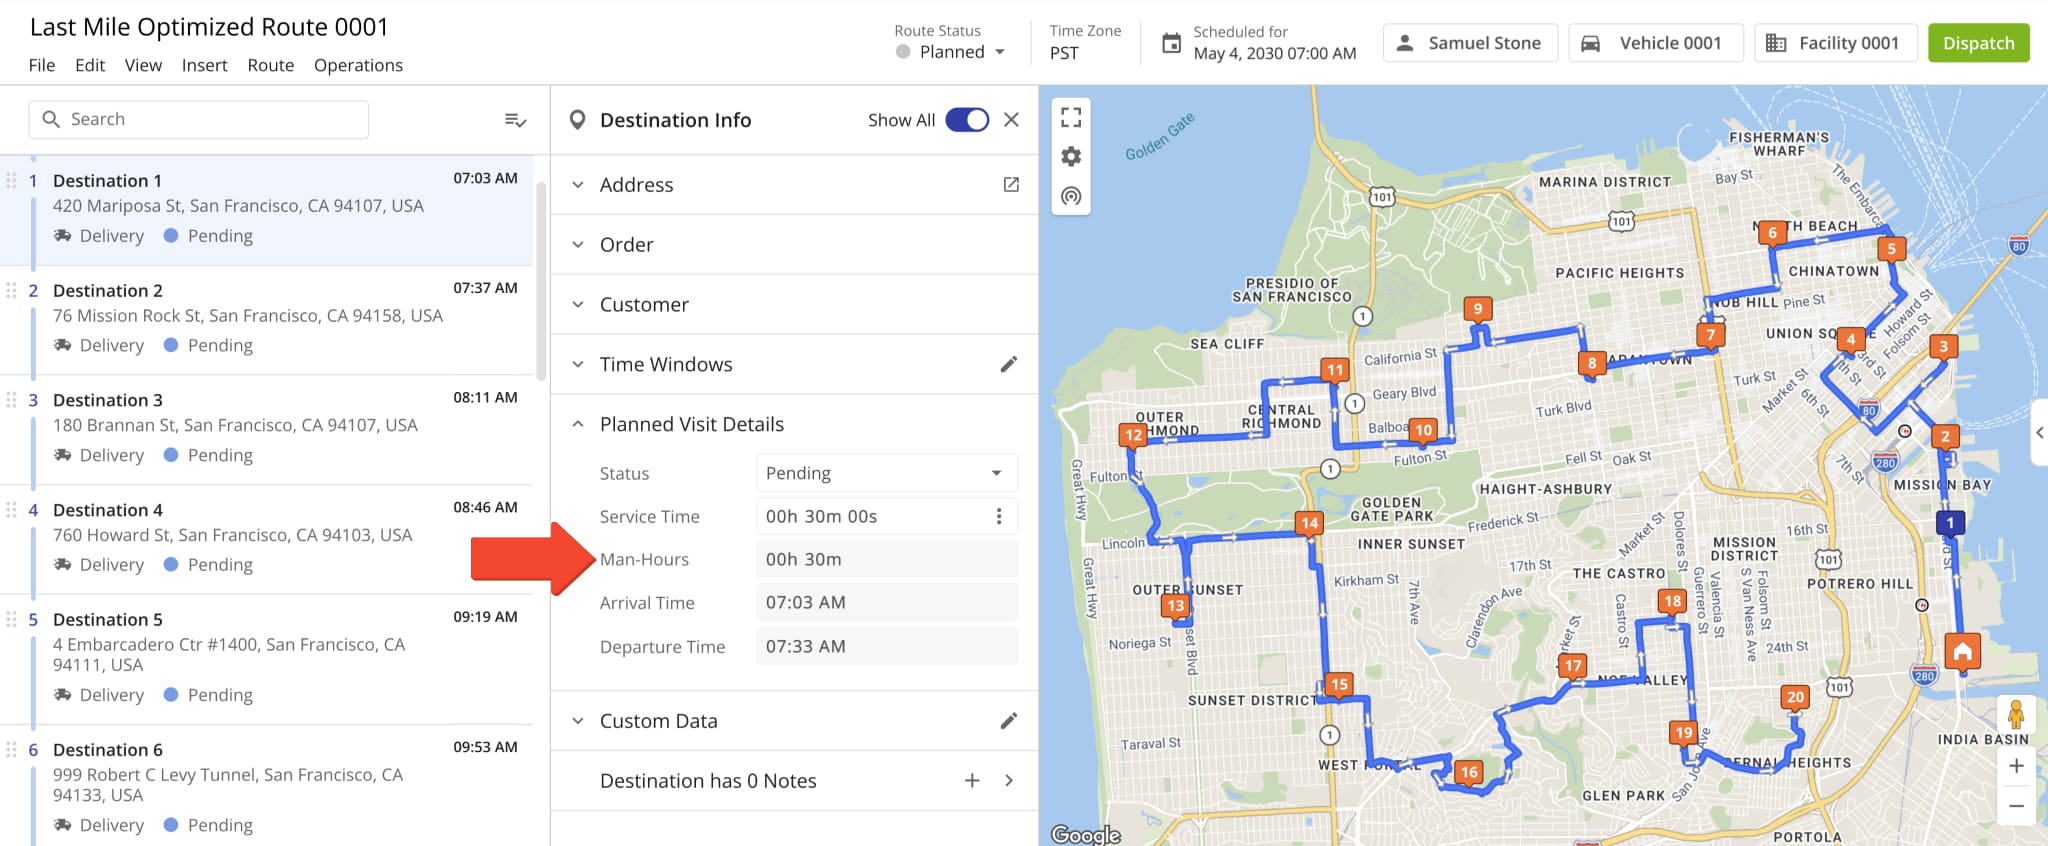
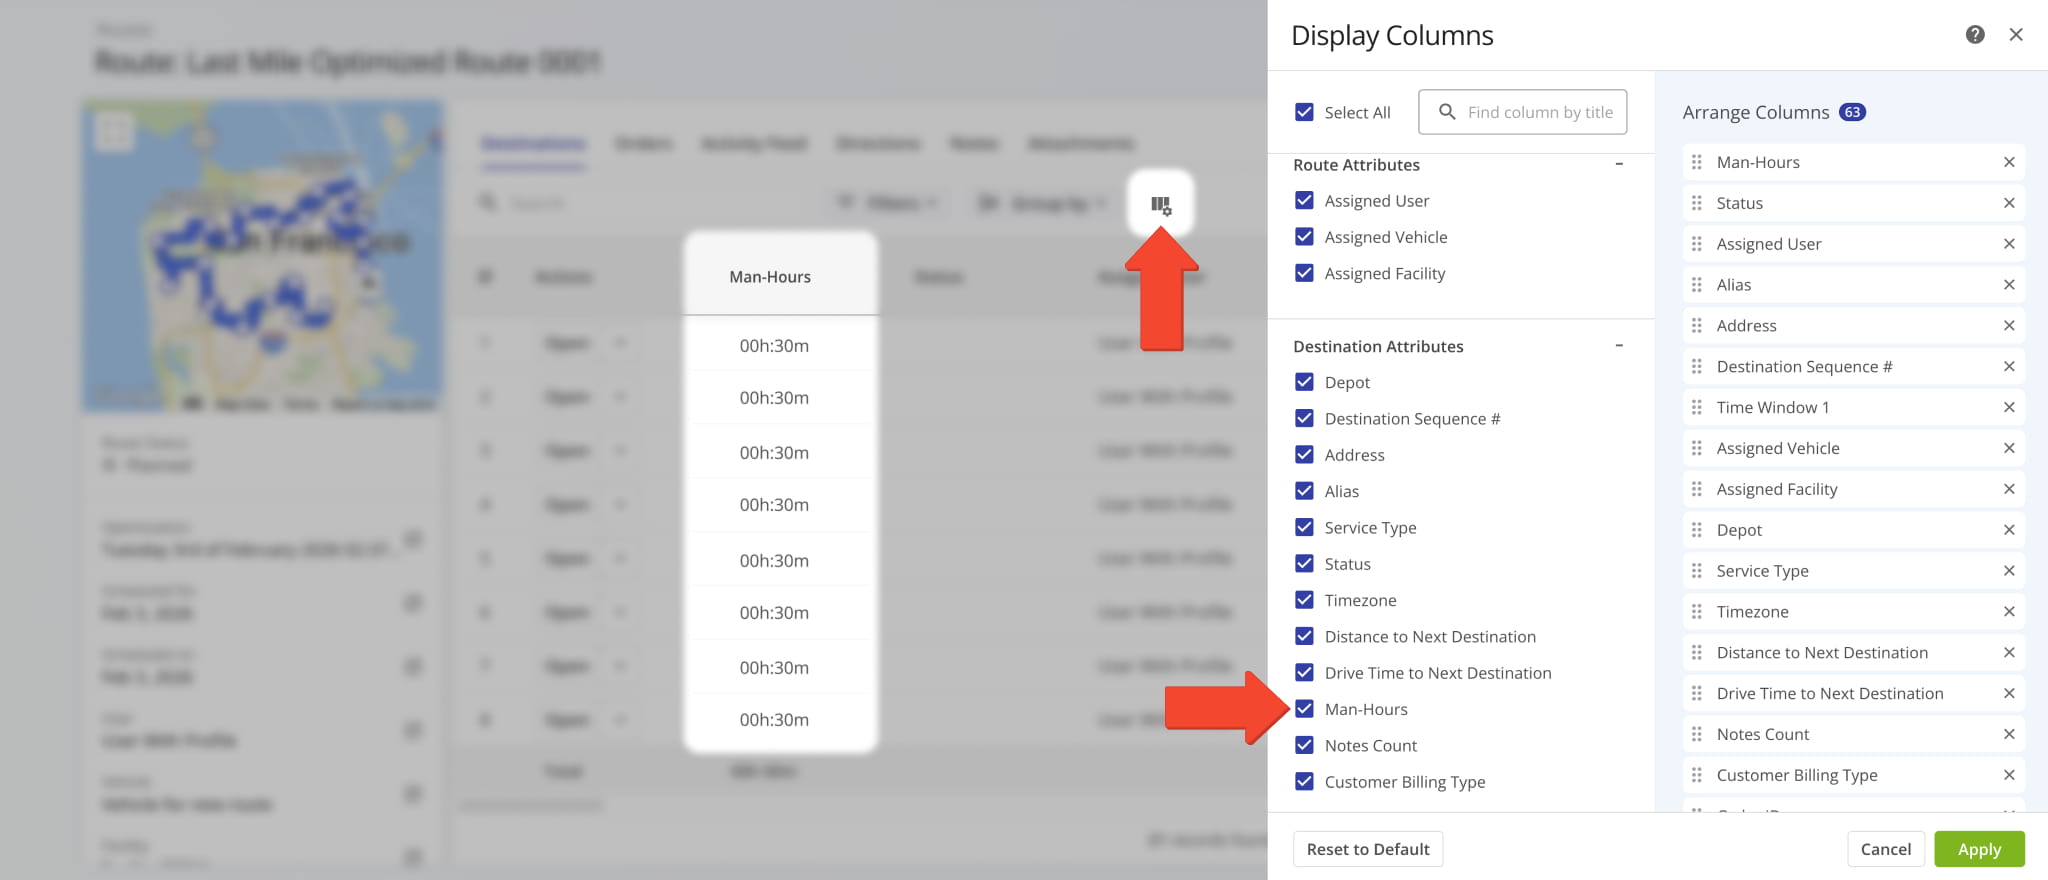
Additionally, the “Total Man-Hours” data column was added as an option in the Route Metrics Display Columns. It shows the combined “Man-Hours” values for all destinations on the opened route.
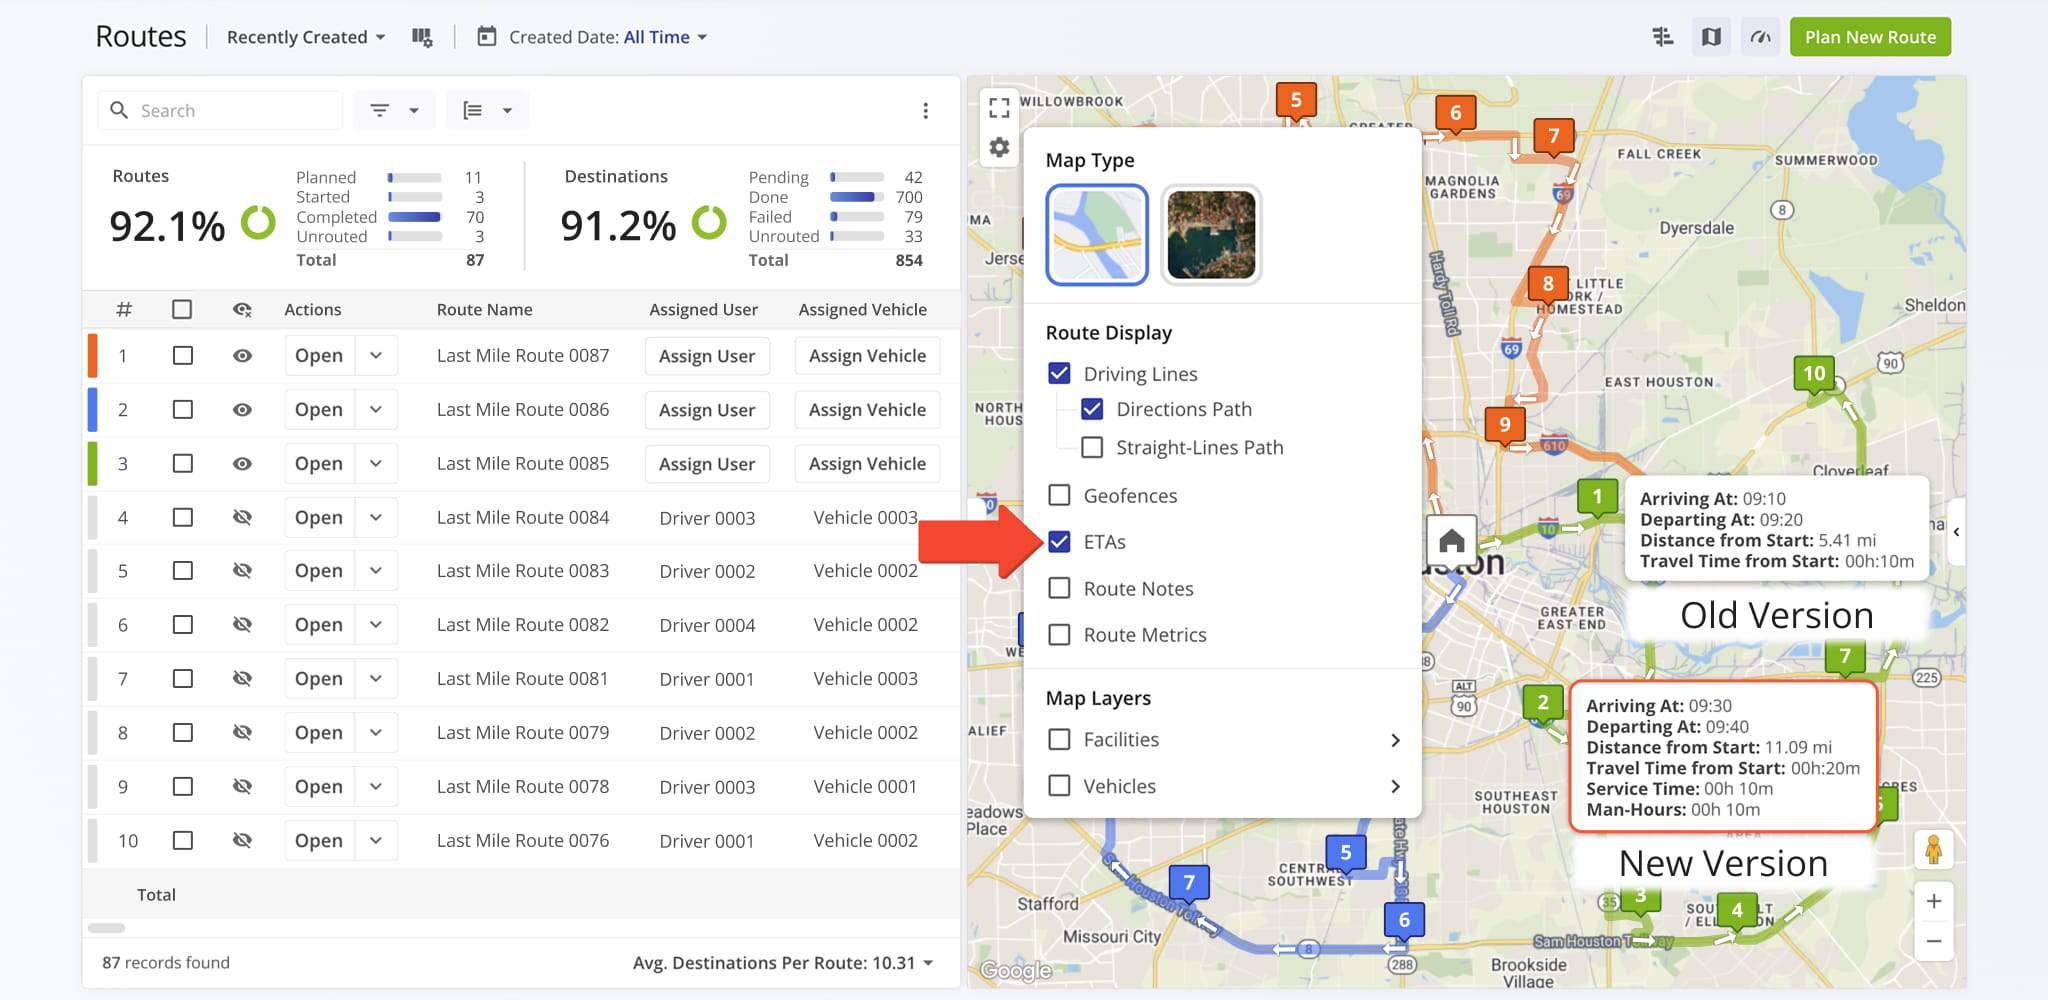
Destination ETAs on the Interactive Routes Map now show “Service Time” and “Man-Hours“. Previously, only four destination schedule fields were available. Now, our dynamic ETAs provide a more comprehensive overview of destination schedules.
To enable Destination ETAs, click the Gear Icon on the Routes Page Map and check the “ETAs” box.
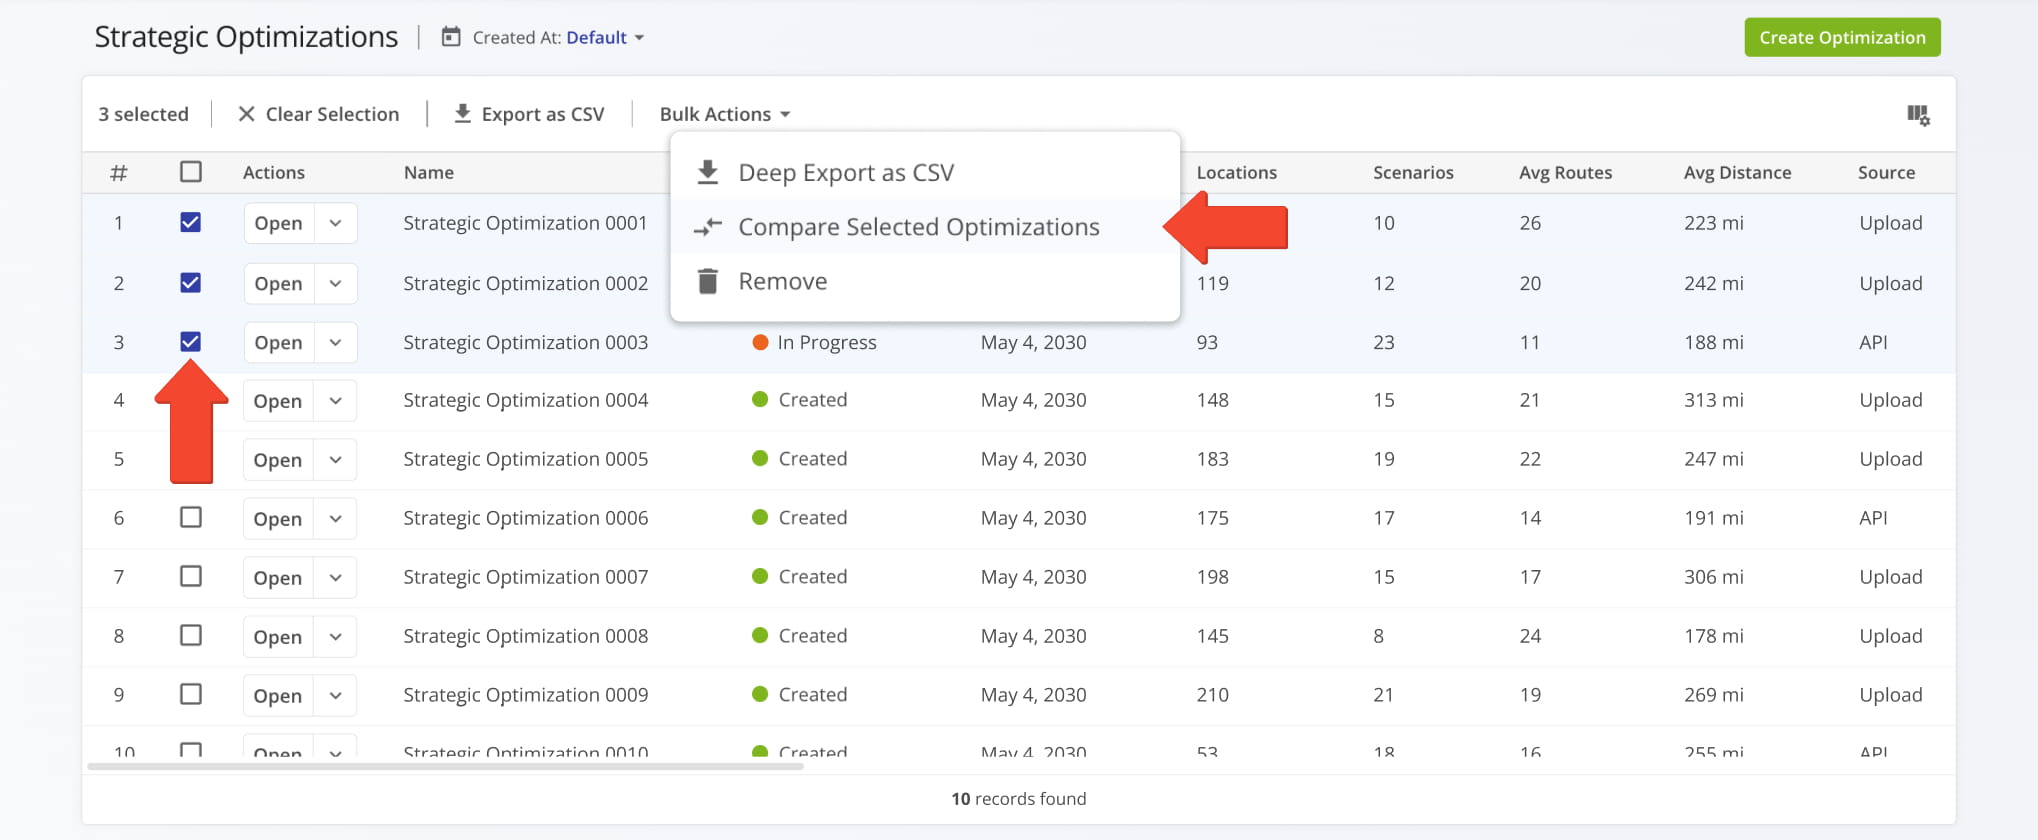
A new feature was added to the Strategic Optimizations interface that enables you to compare optimizations side by side. Simply check the boxes next to optimizations you want to compare, click “Bulk Actions” and select “Compare Selected Optimizations“.
Open Your Strategic Optimizations
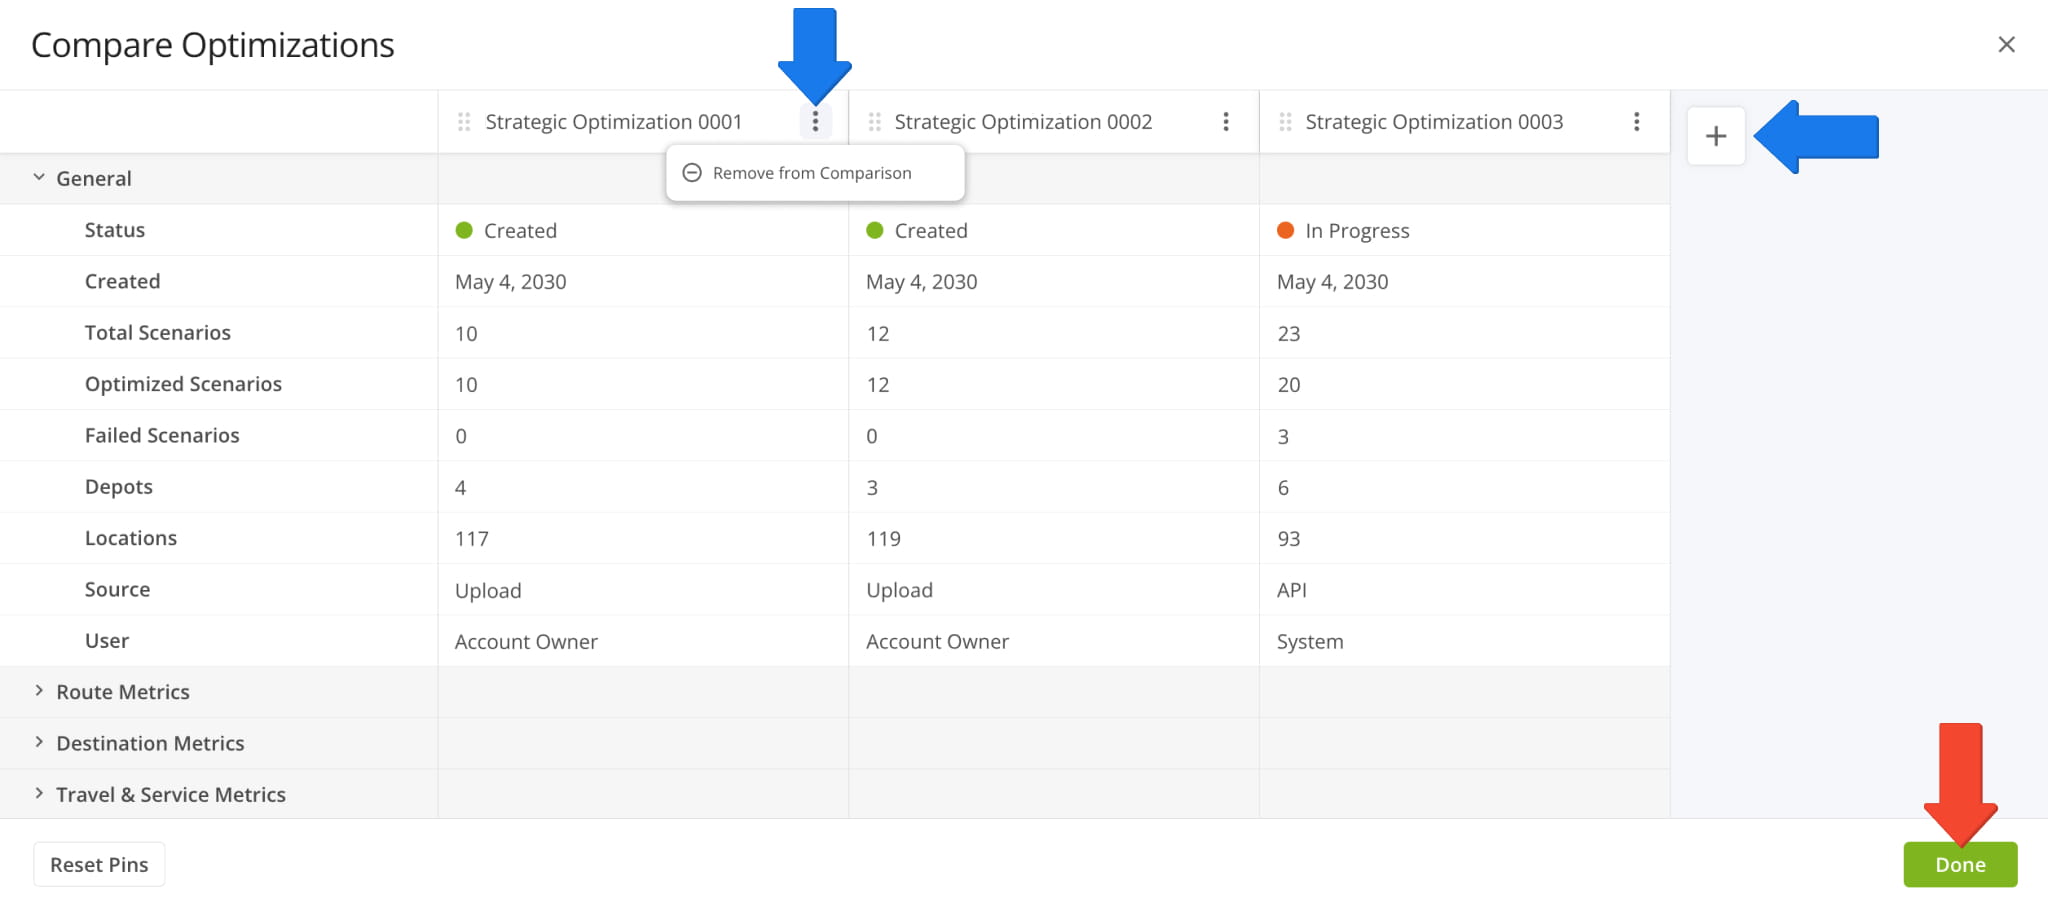
The “Compare Optimizations” interface will arrange your selected optimizations side by side. From there, you can add more optimizations by clicking the Plus Button or remove an optimization by clicking the Three-dot Button and selecting “Remove from Comparison“. When you’re finished comparing Strategic Optimizations, click the “Done” button to go back.
Learn more about Strategic Optimization Management.
Comparison functionality was also added to Strategic Scenarios in open Strategic Optimizations. Go to the “Scenarios” tab, check the boxes next to the scenarios you want to compare, click “Bulk Actions“, and select “Compare Selected Scenarios“.
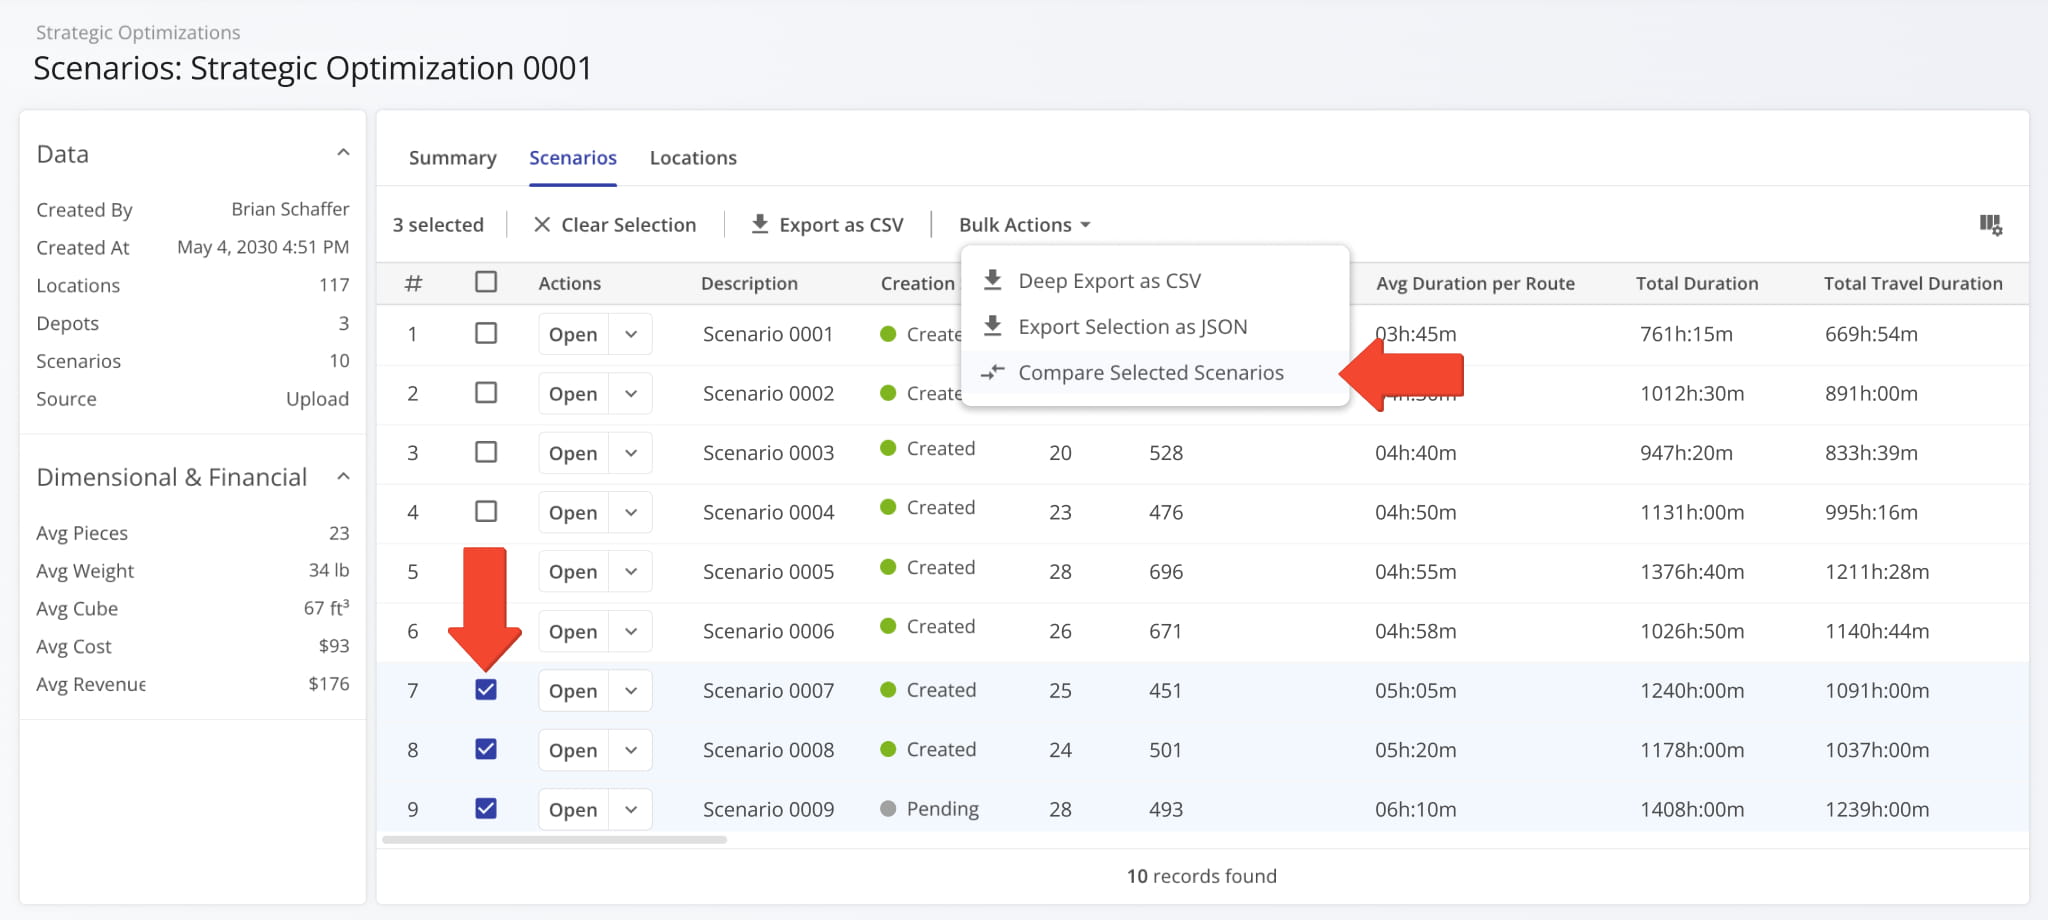
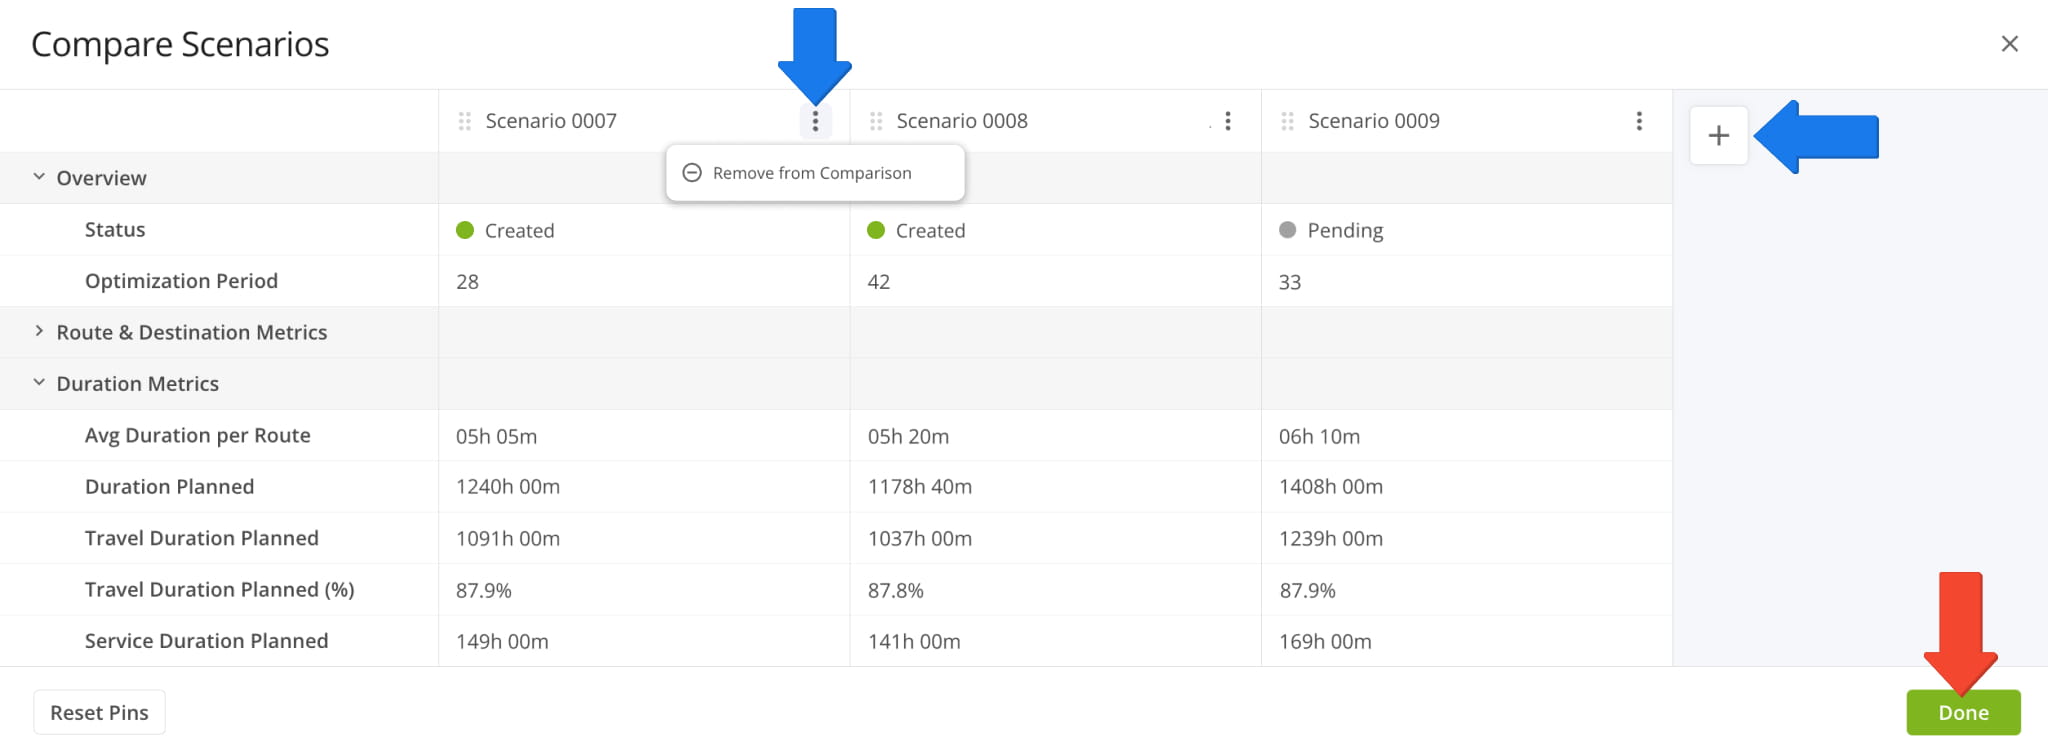
The “Compare Scenarios” interface will arrange your selected scenarios side by side. From there, you can add more scenarios by clicking the Plus Button or remove a scenario by clicking the Three-dot Button and selecting “Remove from Comparison“. When you’re finished comparing Strategic Scenarios, click the “Done” button to go back.
Learn more about Strategic Scenario Management.
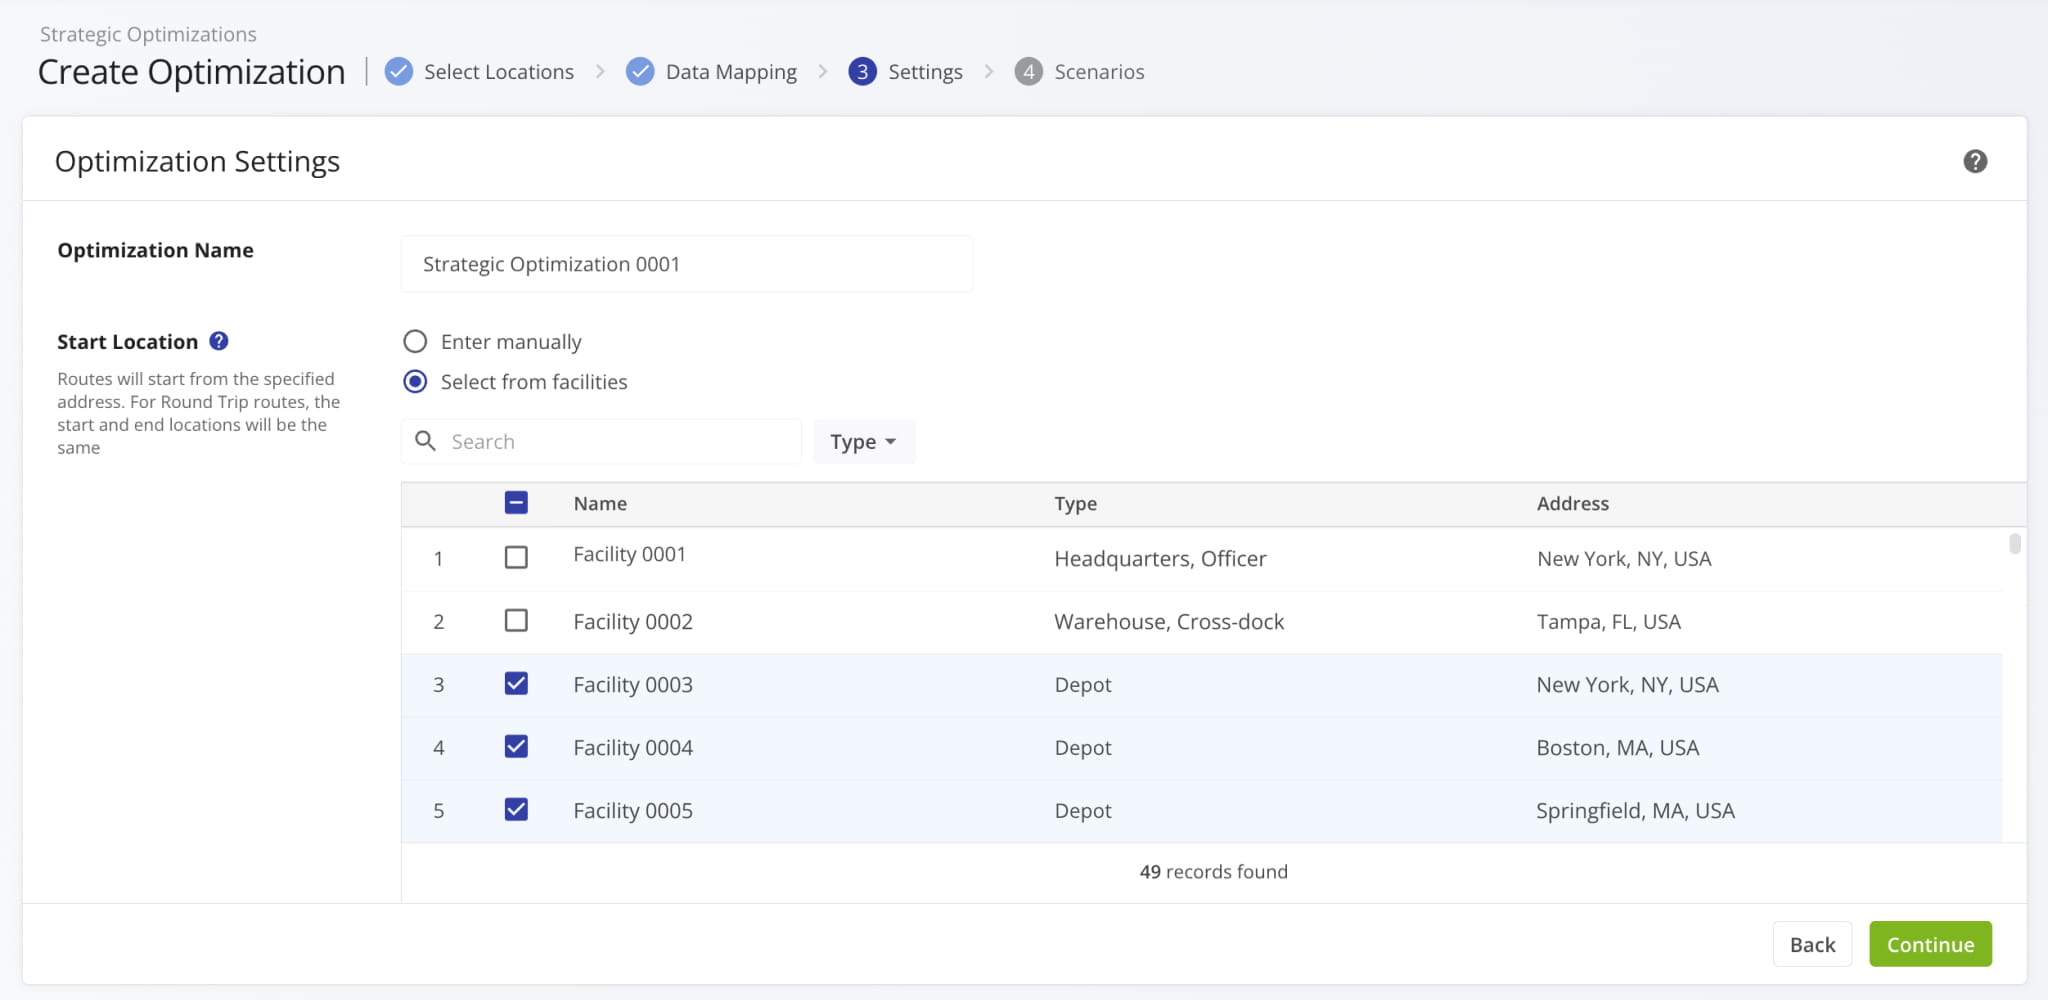
The “Start Location” section of the settings screen when you Create Strategic Optimizations was improved. A new dynamic map provides a visual overview of the start locations you’ve added. Additionally, you can now add start locations from your account Facilities or add addresses on the same screen by clicking the respective buttons.
Each button opens a new window with a set of filters and search options, making start location selection faster and easier.
Open Your Strategic Optimizations
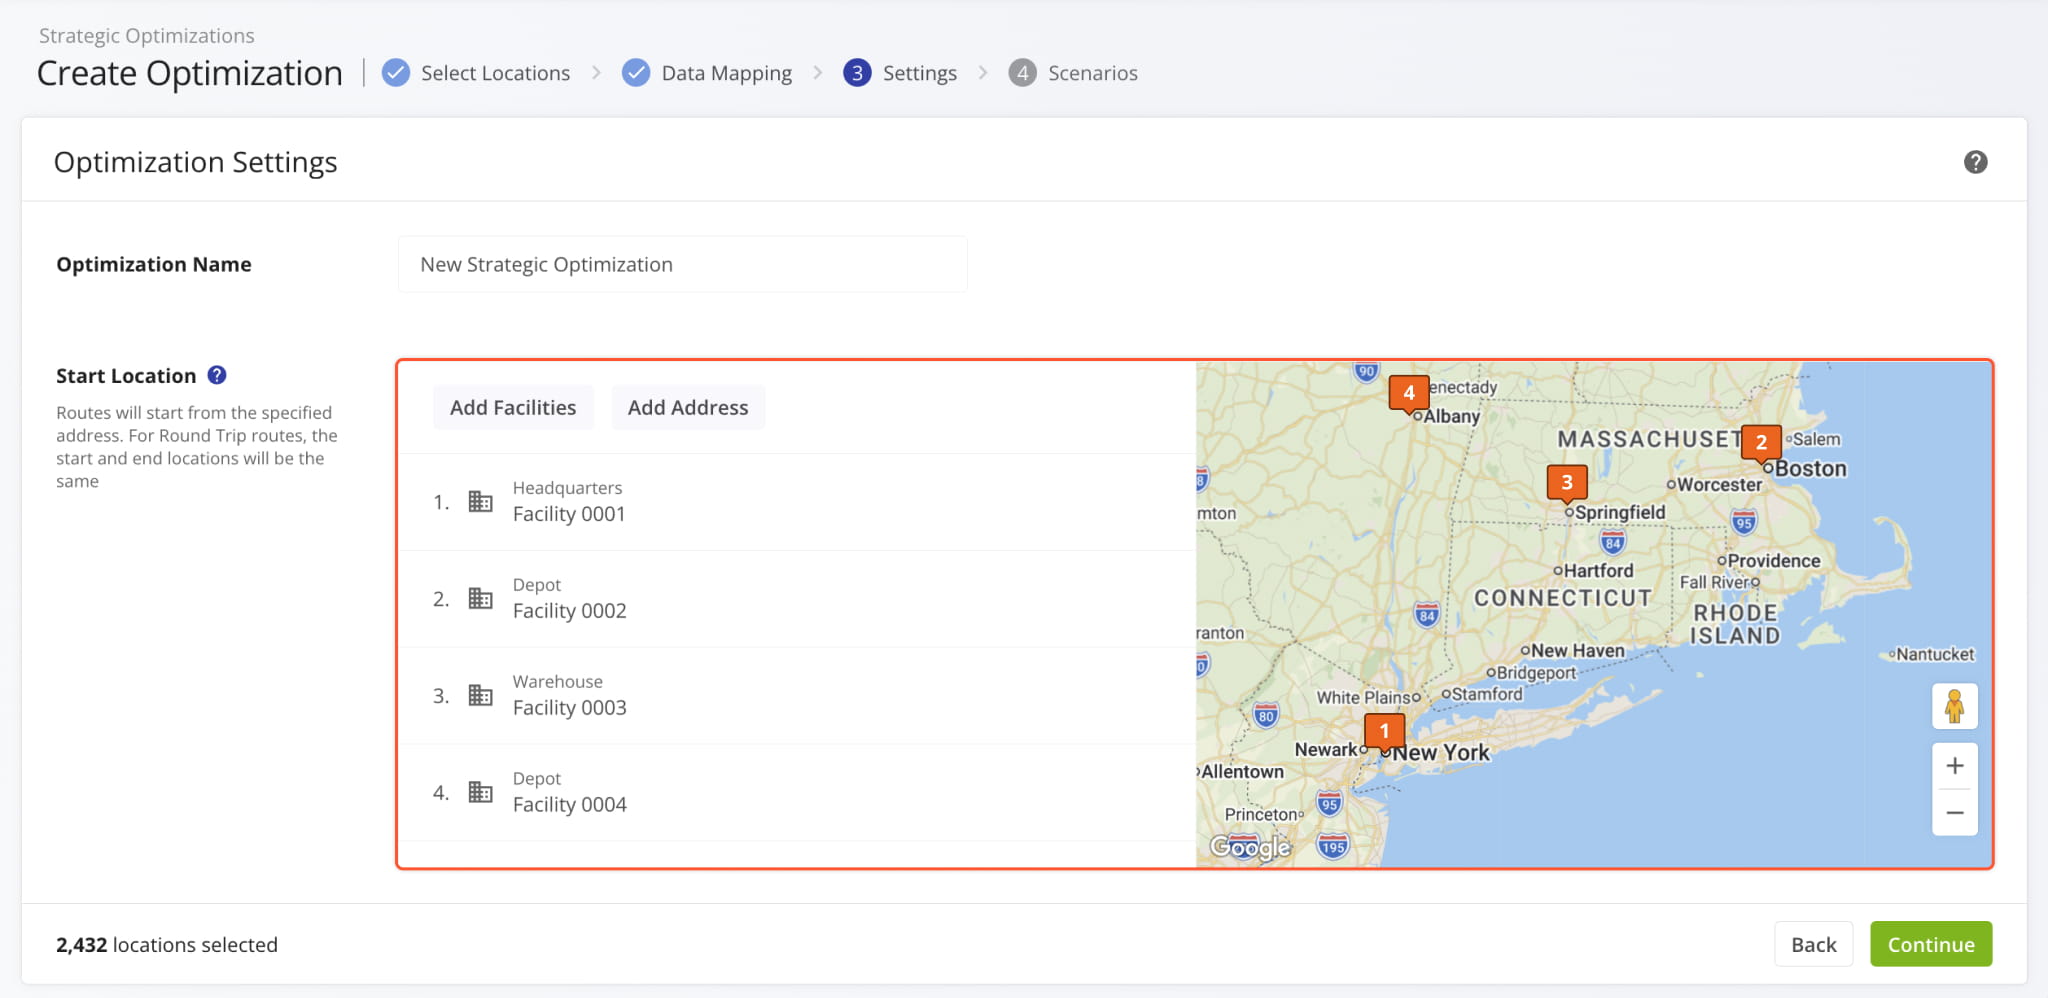
Previously, the map wasn’t available, and you had to switch between entering start location addresses manually or selecting start locations from your Facilities. The image below shows how “Optimization Settings” looked before the new update.
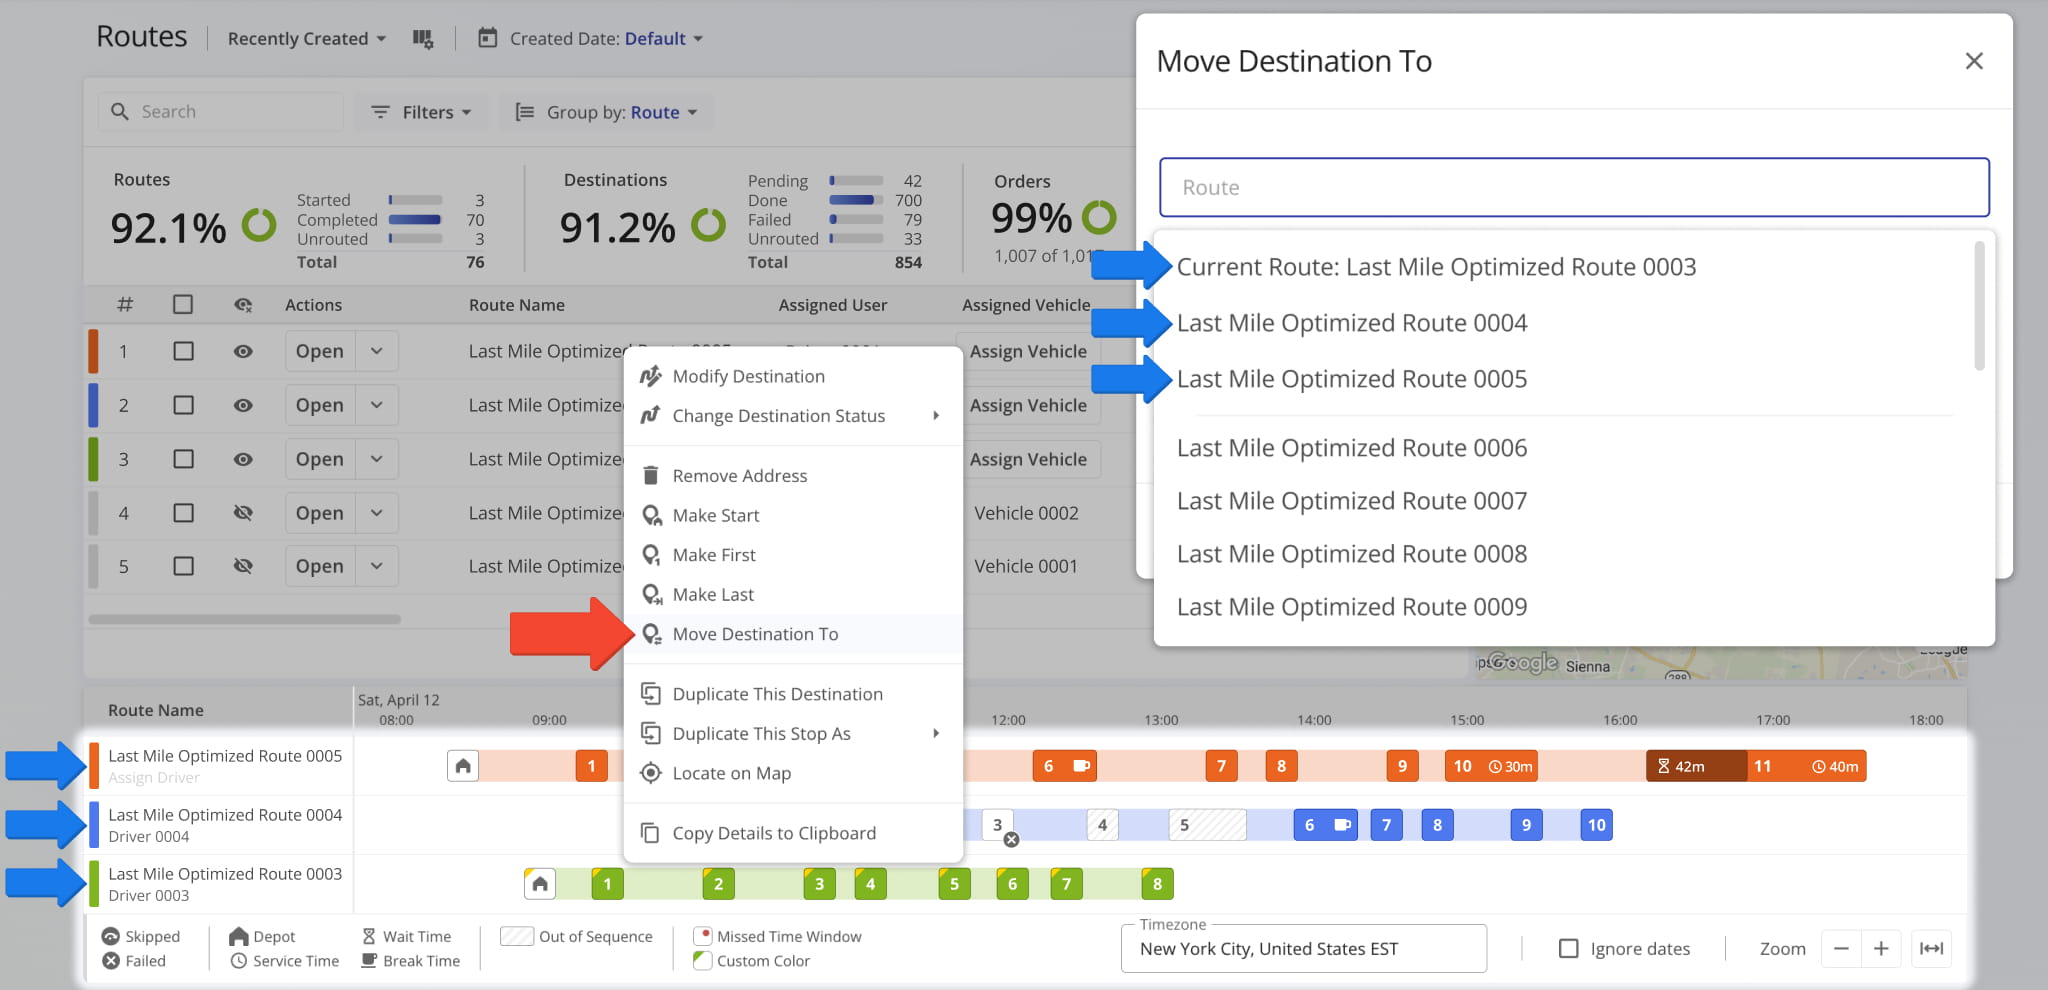
When you right-click a destination in the Routes Timeline, you can select “Move Destination To” to change its position in the sequence. Now, you’re also able to move it into a different route at any sequence position. The routes currently enabled in the timeline will be grouped at the top of the suggested routes list.
Previously, you could only move a destination to another sequence position in the same route.
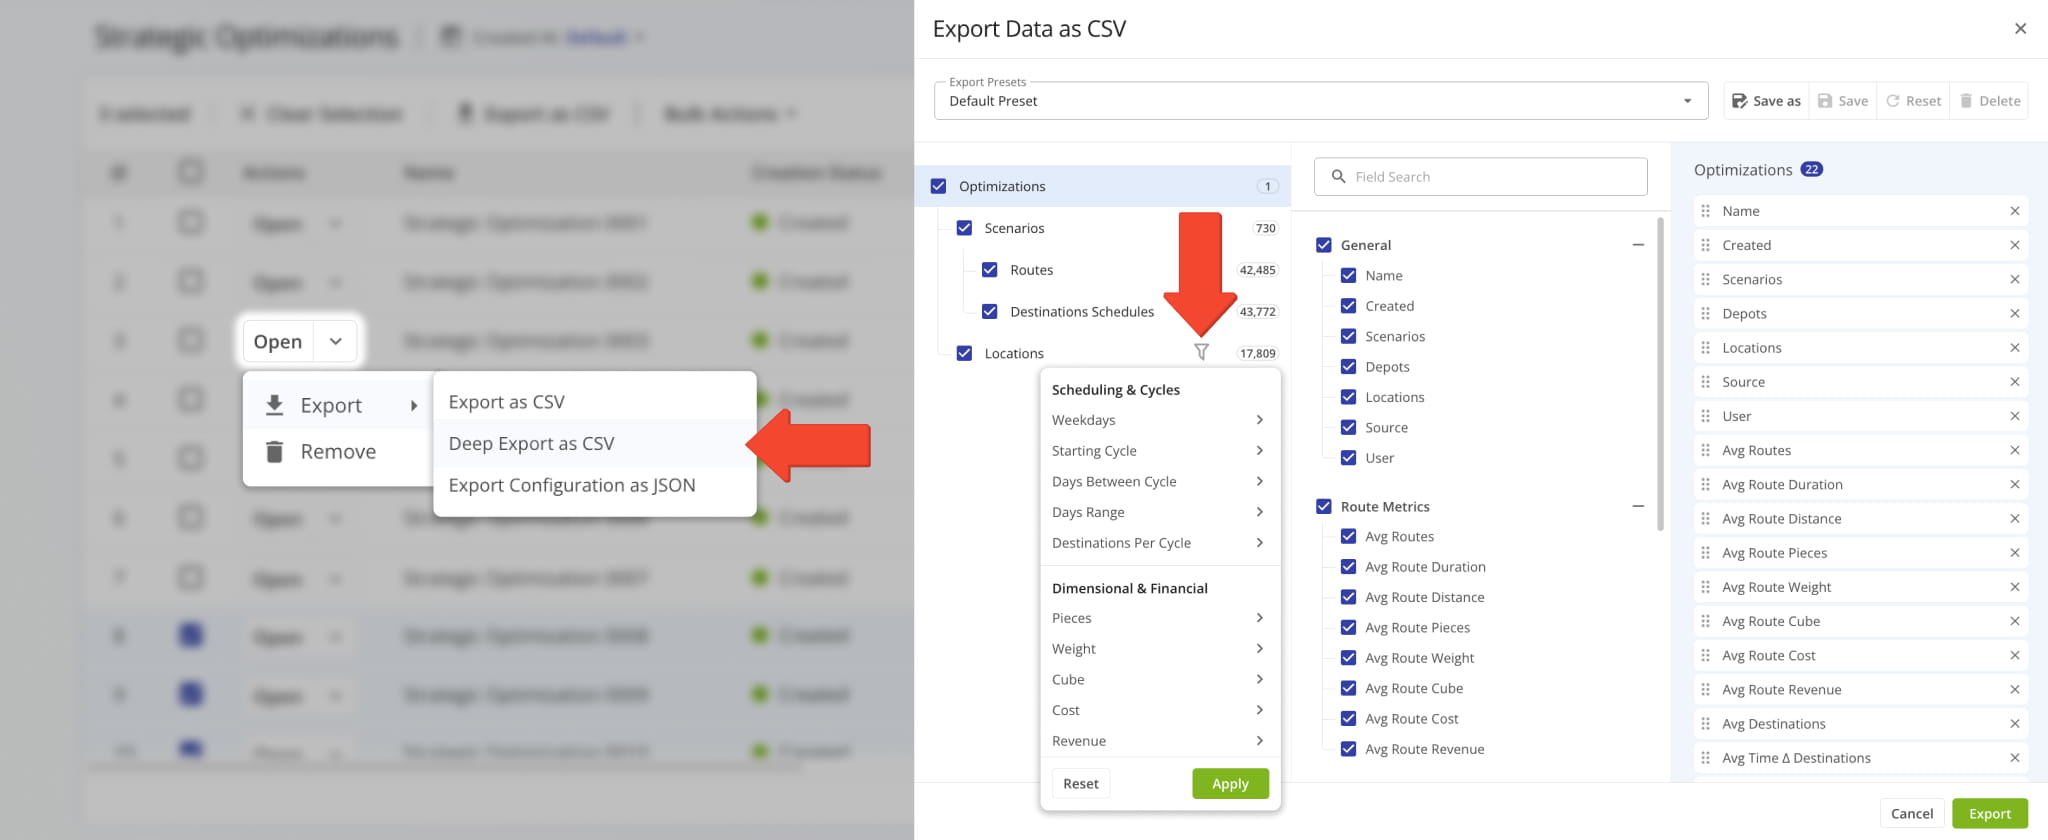
When you manage Strategic Optimizations and Strategic Scenarios, you have access to in-depth export customization through the “Deep Export” option. This update introduces dynamic filter options for optimization and scenario deep export. Additionally, new counters next to the Filter Button help you see exactly how many data items are available according to your settings.
Open Your Strategic Optimizations
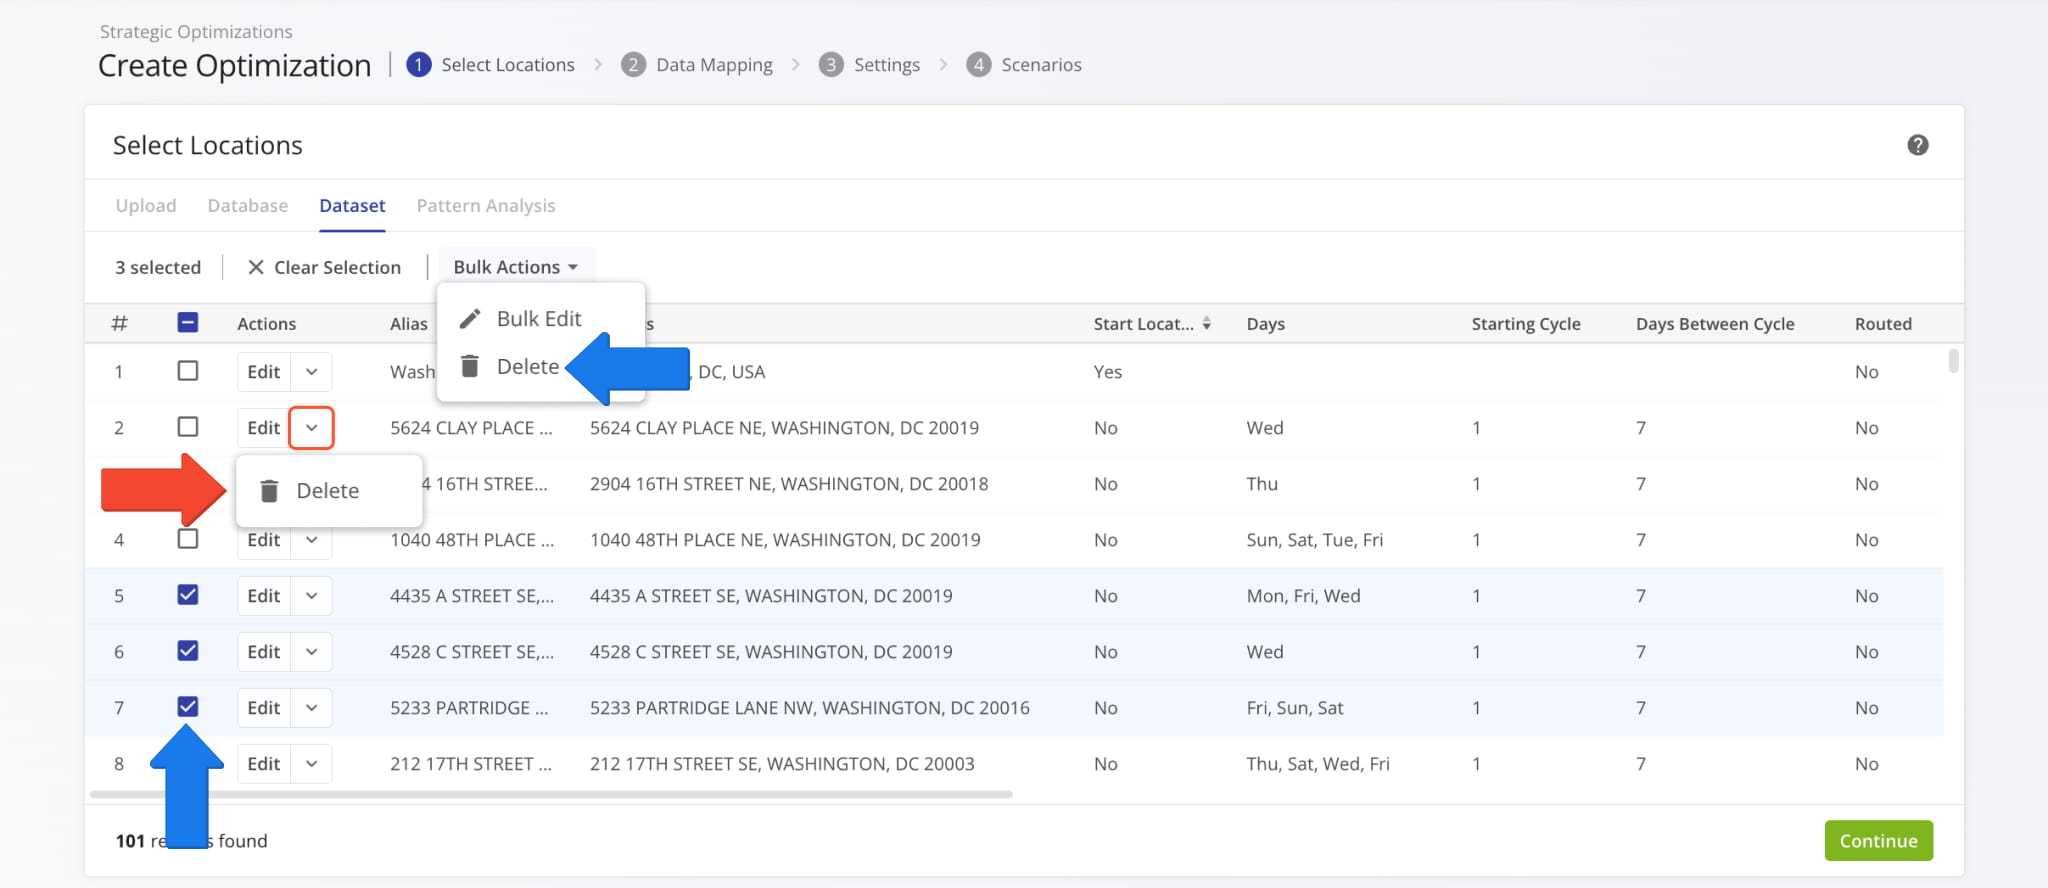
When you Manage Strategic Optimizations, you have the option to duplicate an optimization as a customizable draft. This update enables you to refine the Location Dataset of your duplicated draft by allowing the deletion of Locations.
Click the Down Arrow and select “Delete” to remove a Location. To delete multiple Locations, check the boxes next to them, click “Bulk Actions“, and select “Delete“. Previously, duplicated Strategic Optimization datasets couldn’t be customized.
Open Your Strategic Optimizations
Route4Me TMS now supports adding “Man-Hours” values to Routes, Orders, and Locations via upload or manual creation settings. The image below shows an example of adding “Man-Hours” to a Location manually. Learn more about Adding Locations.
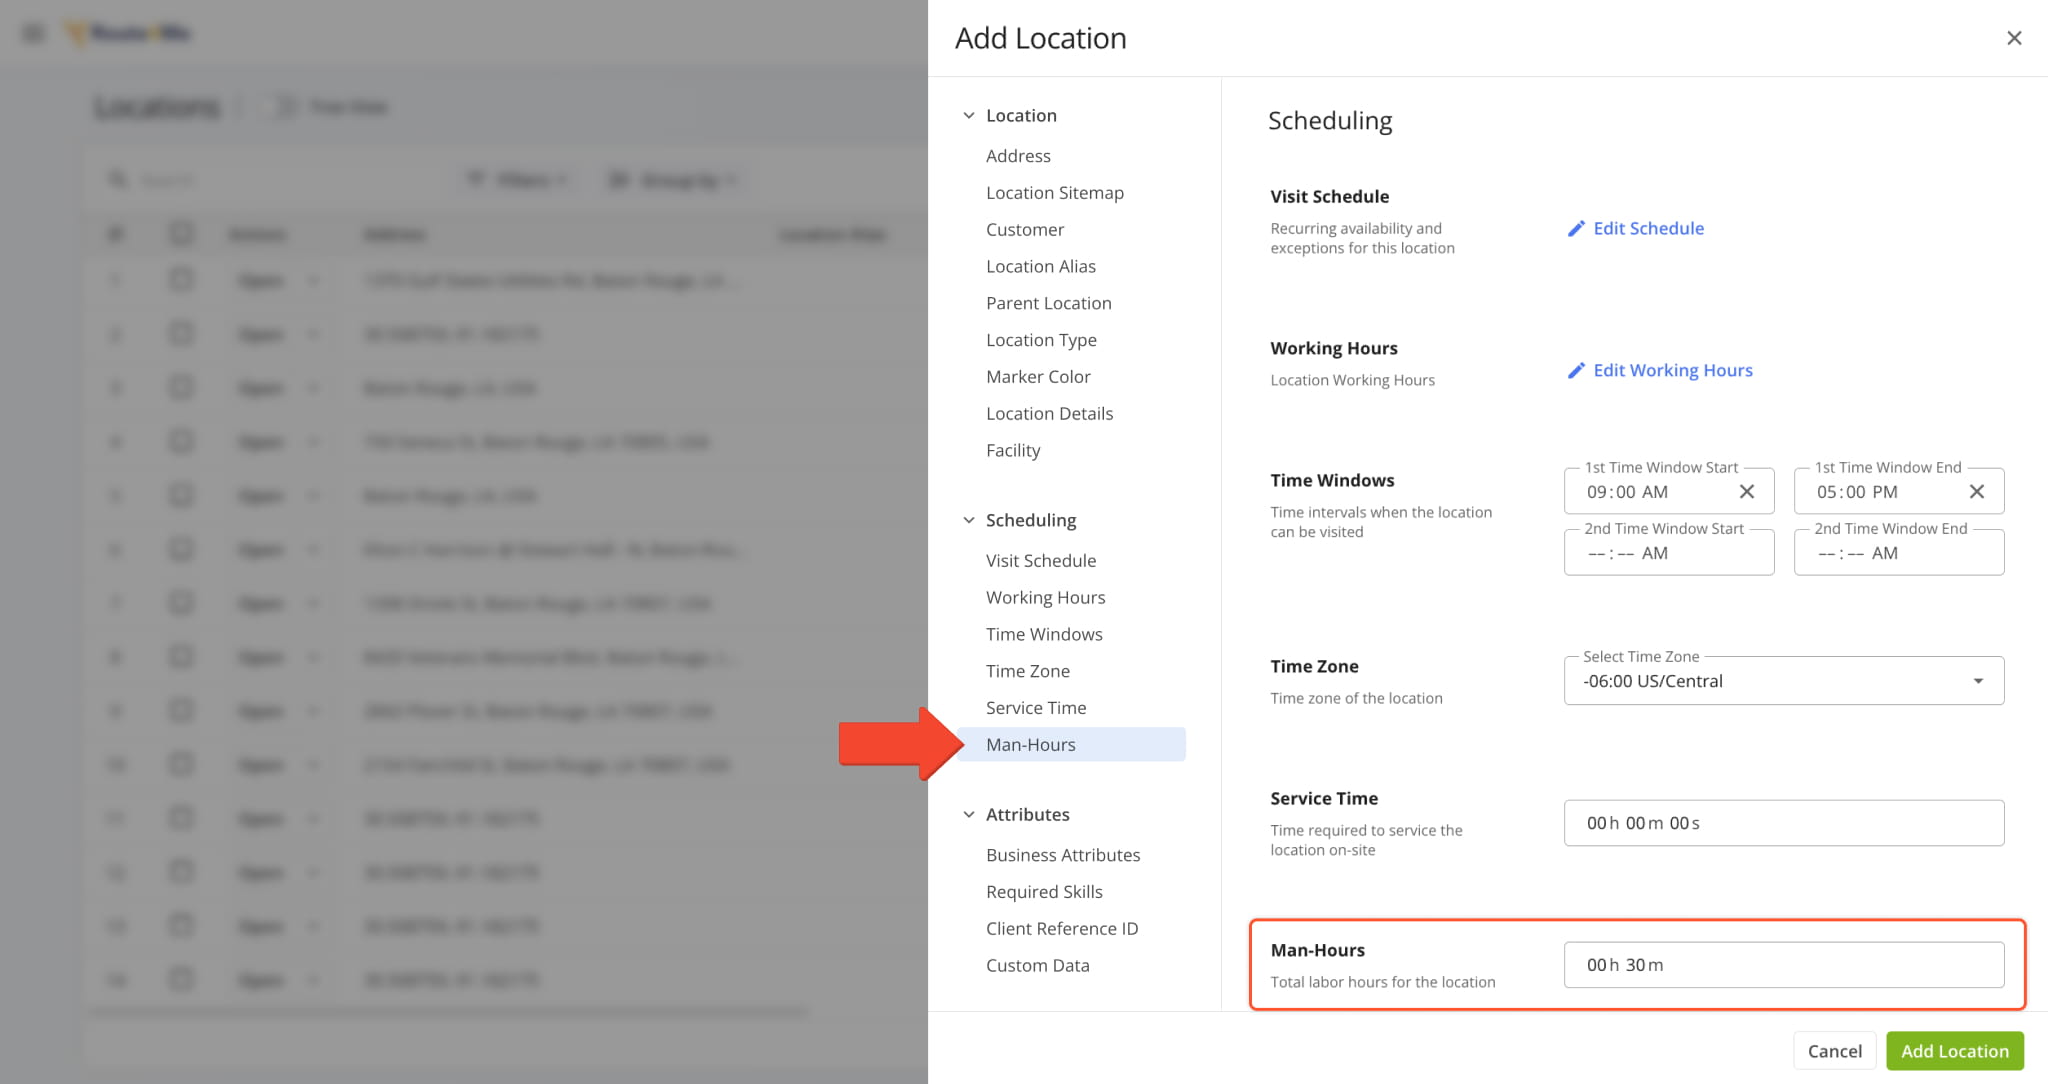
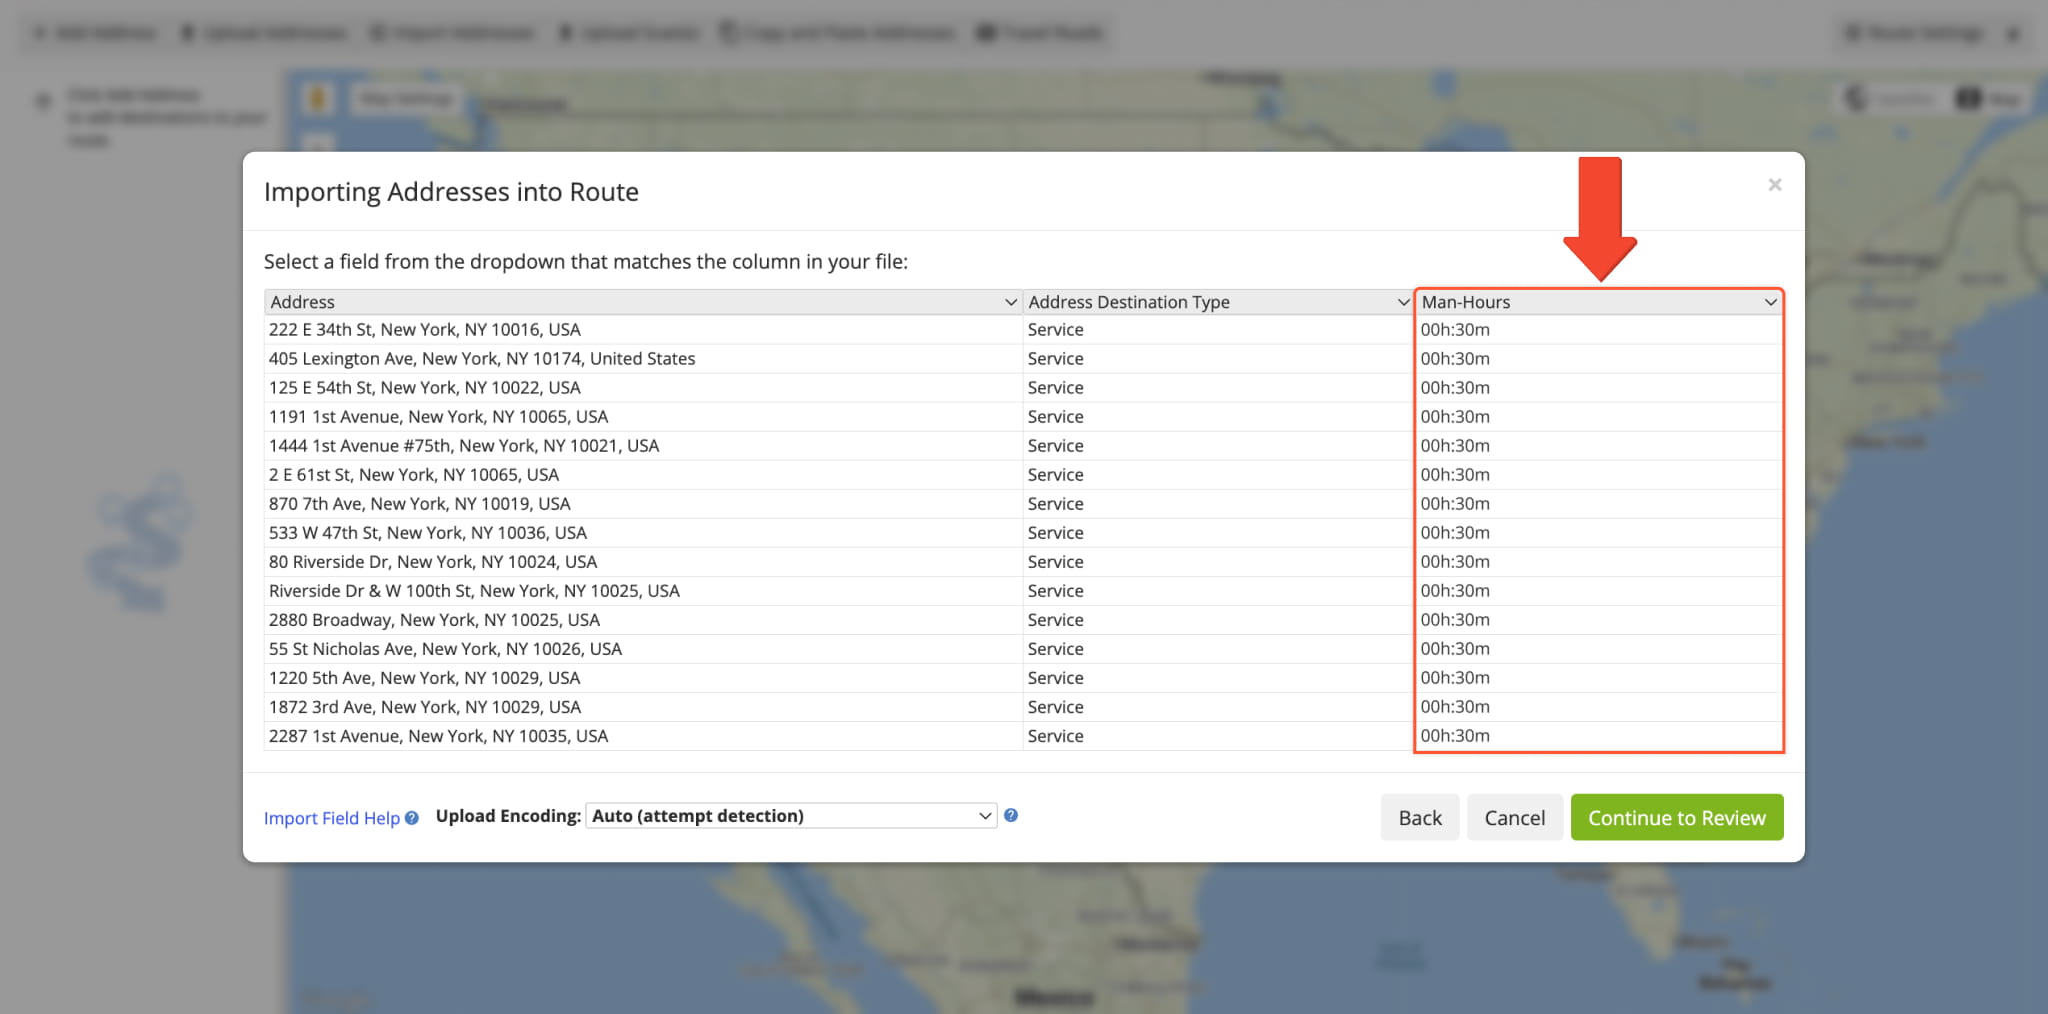
When you upload addresses to plan routes, you can add a “Man-Hours” column with time values for each address, and Route4Me will automatically validate your data and assign the corresponding man-hours values to each route destination.
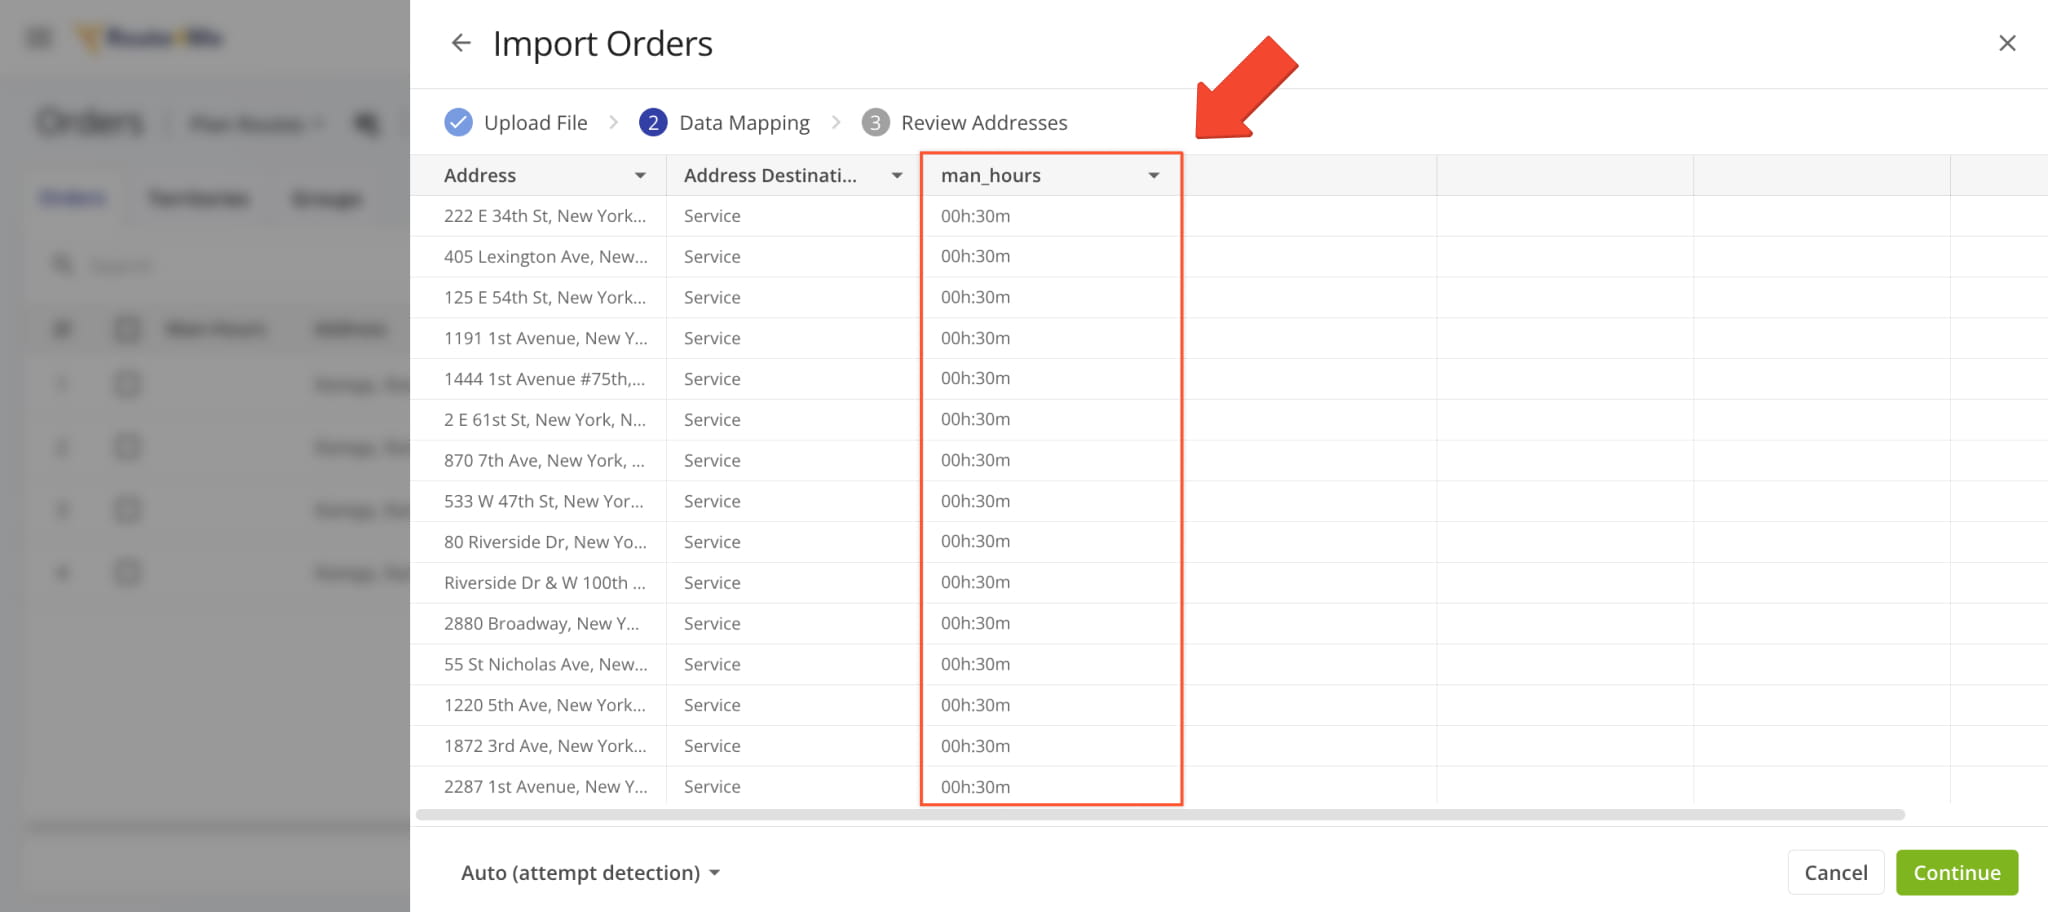
The same functionality is present when you Upload Orders and include the “man_hours” column with time values for each order. After importing, “Man-Hours” values will be applied to route destinations when planning routes with orders.
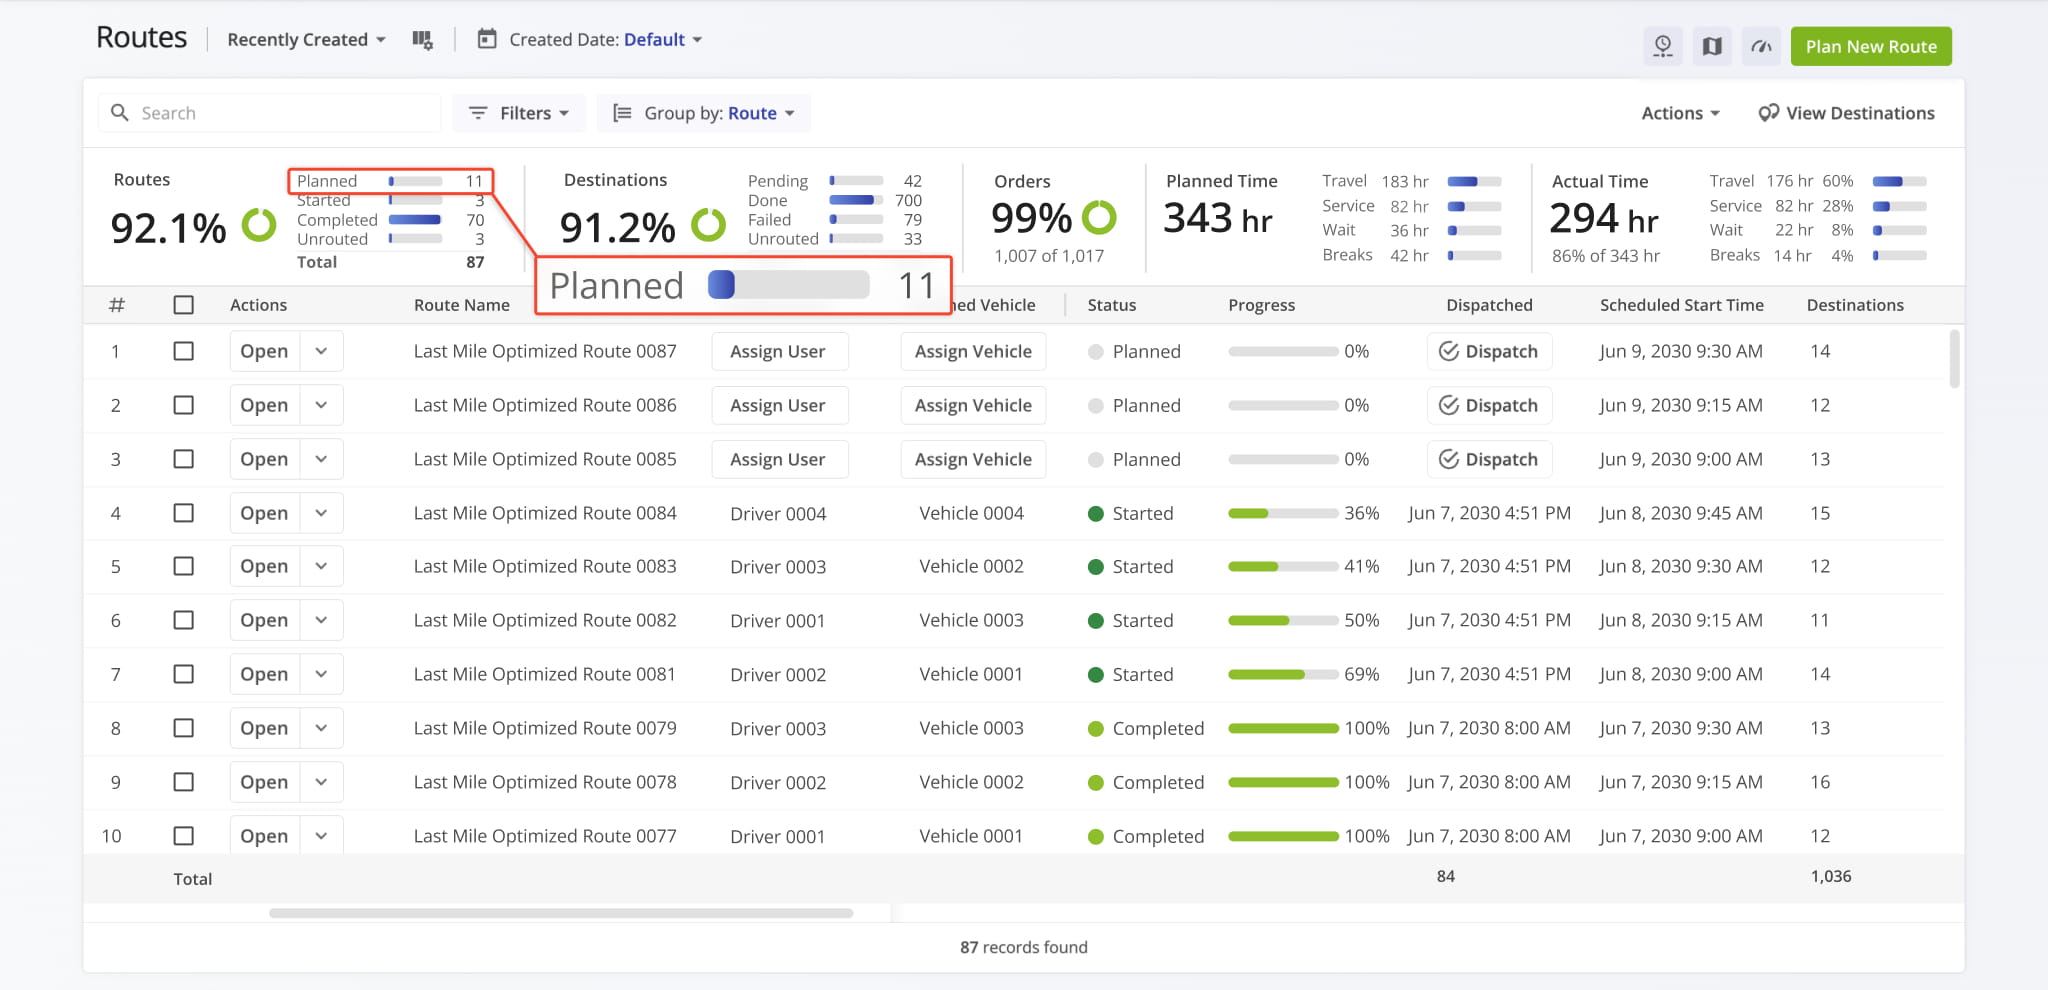
A new “Planned” field was added to the “Routes” section of the Route Performance Metrics dashboard. It shows the total number of filtered routes that have the “Planned” status (optimized and scheduled).
Previously, only three fields were available: “Unrouted“, “Started“, and “Completed“.
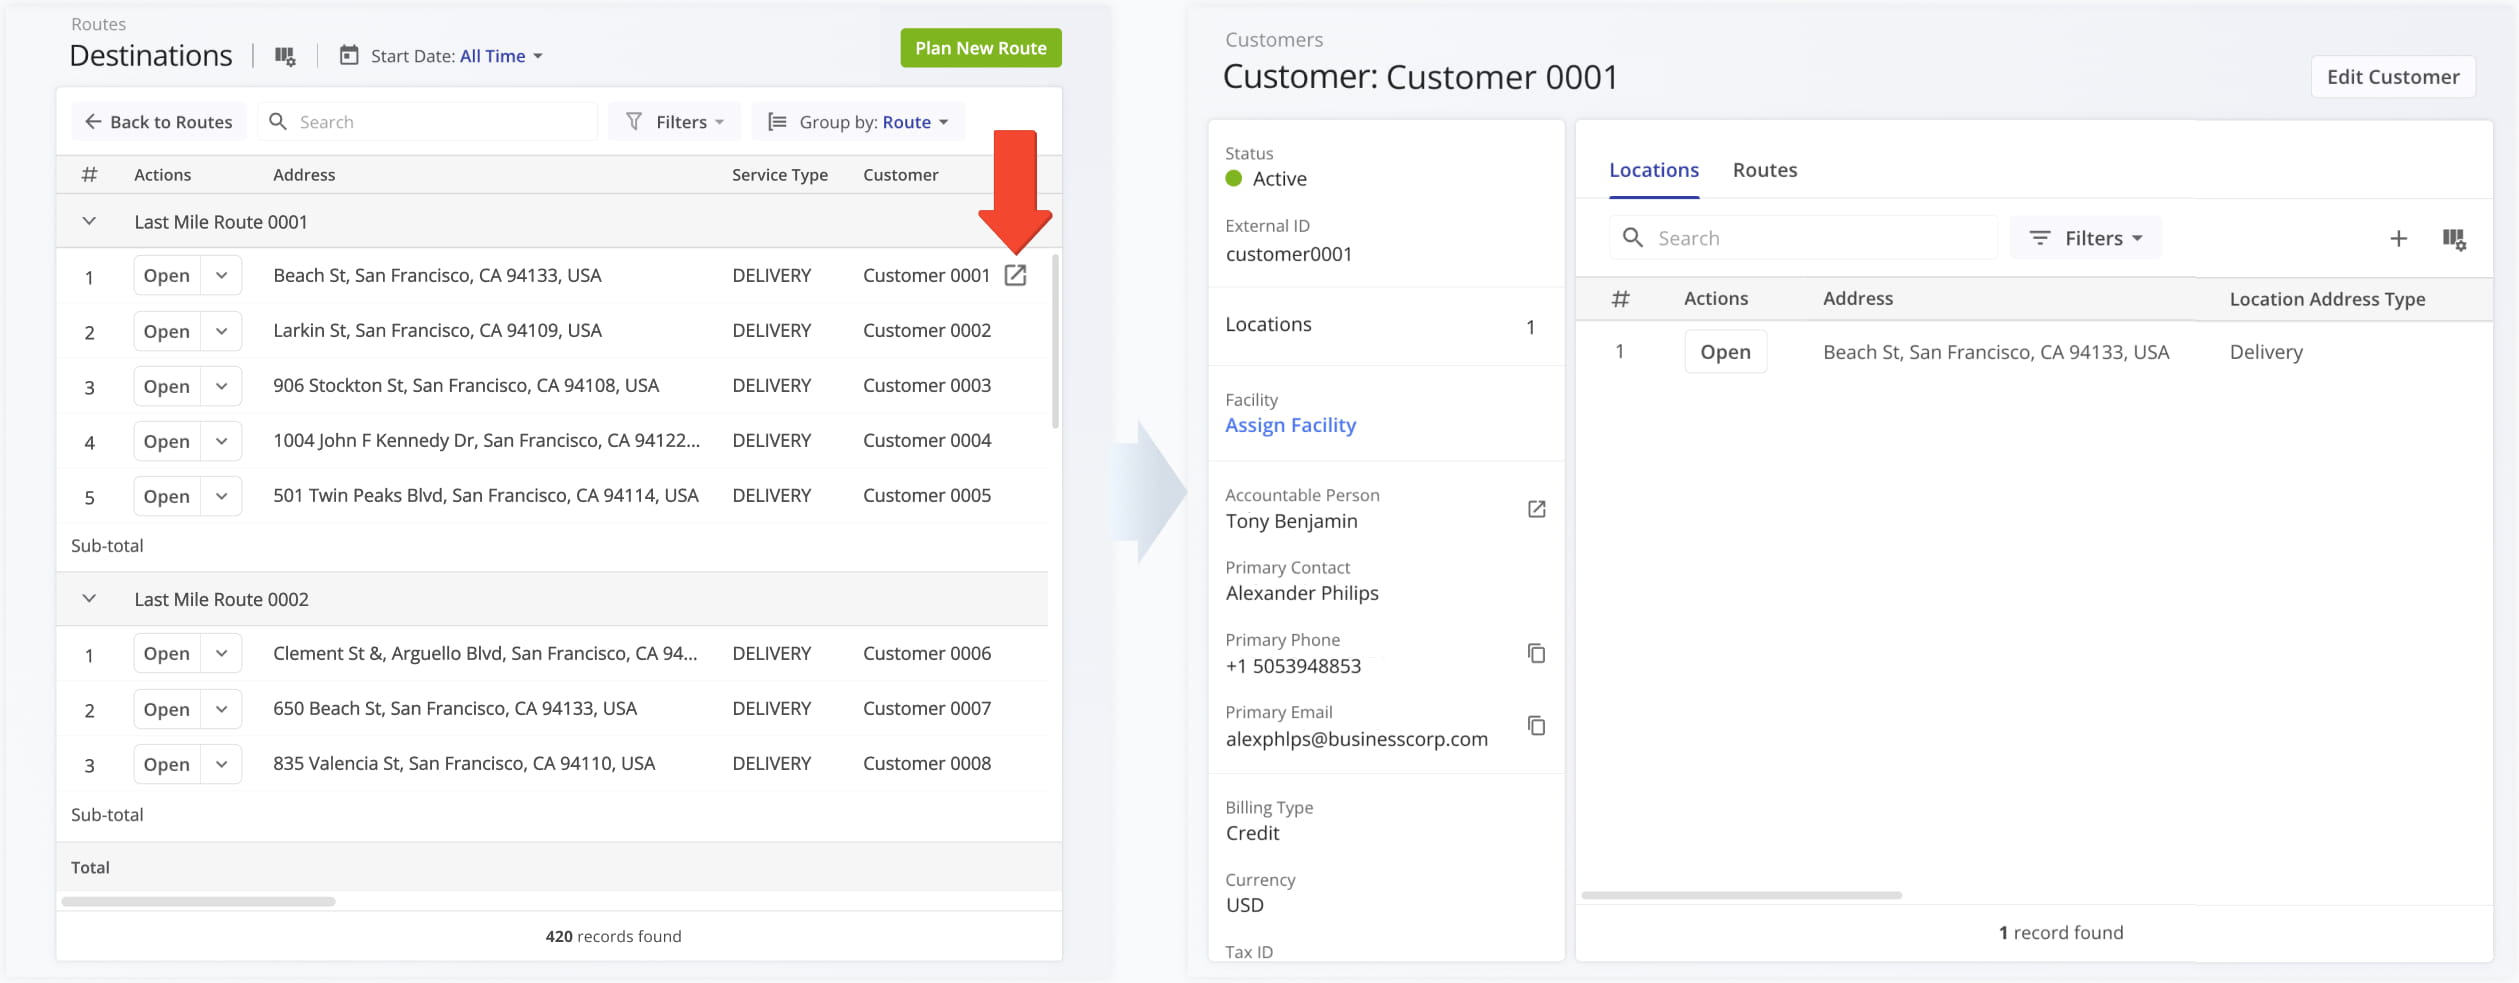
The Destinations Page “Customer” column was updated with new dynamic functionality. When you hover over a Customer, you’ll see a new button. You can click the new Open Button to go directly to the corresponding Customer Snapshot.
The Orders List in the Route4Me Mobile Driver App has been redesigned to show Facility Attribution and more order details. In addition to previously available information, you can see the name and address of an order’s associated facility and destination.
Previously, only order alias, distance, and status were available on the mobile app orders list.
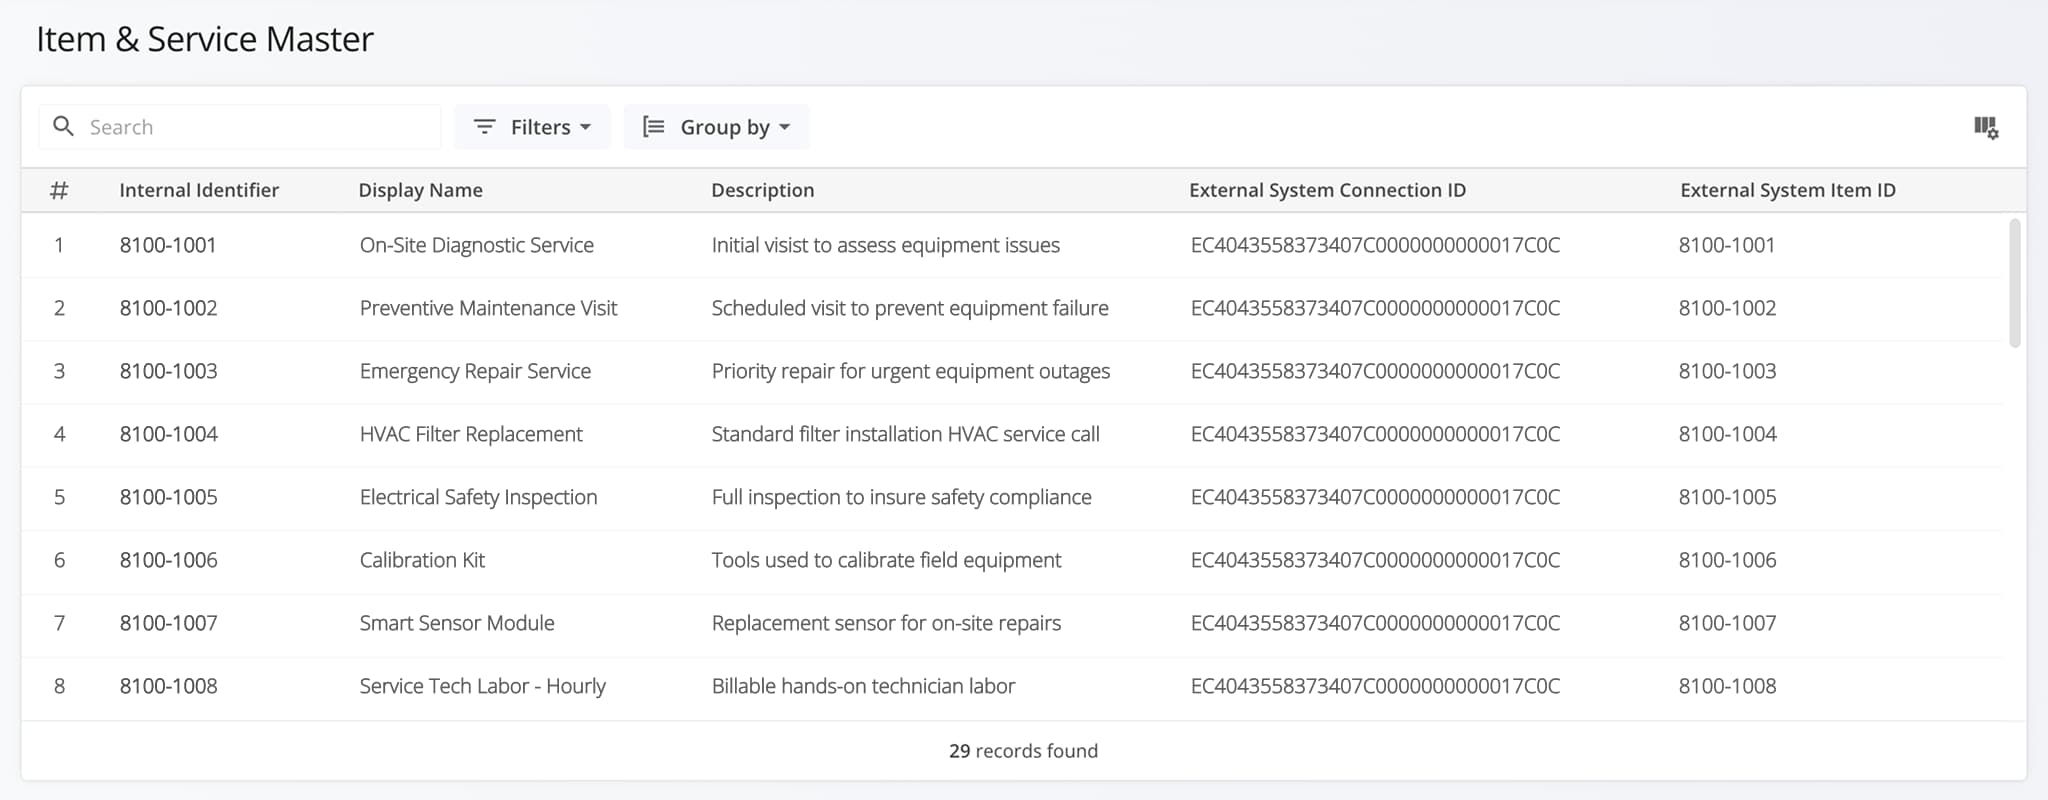
A new ERP Item and Service Master page was released. It provides enterprise business users with a centralized view of all Items and Services in their ERP system. From this page, you can review details, track status, and organize records.
Open Your Items & Service Master
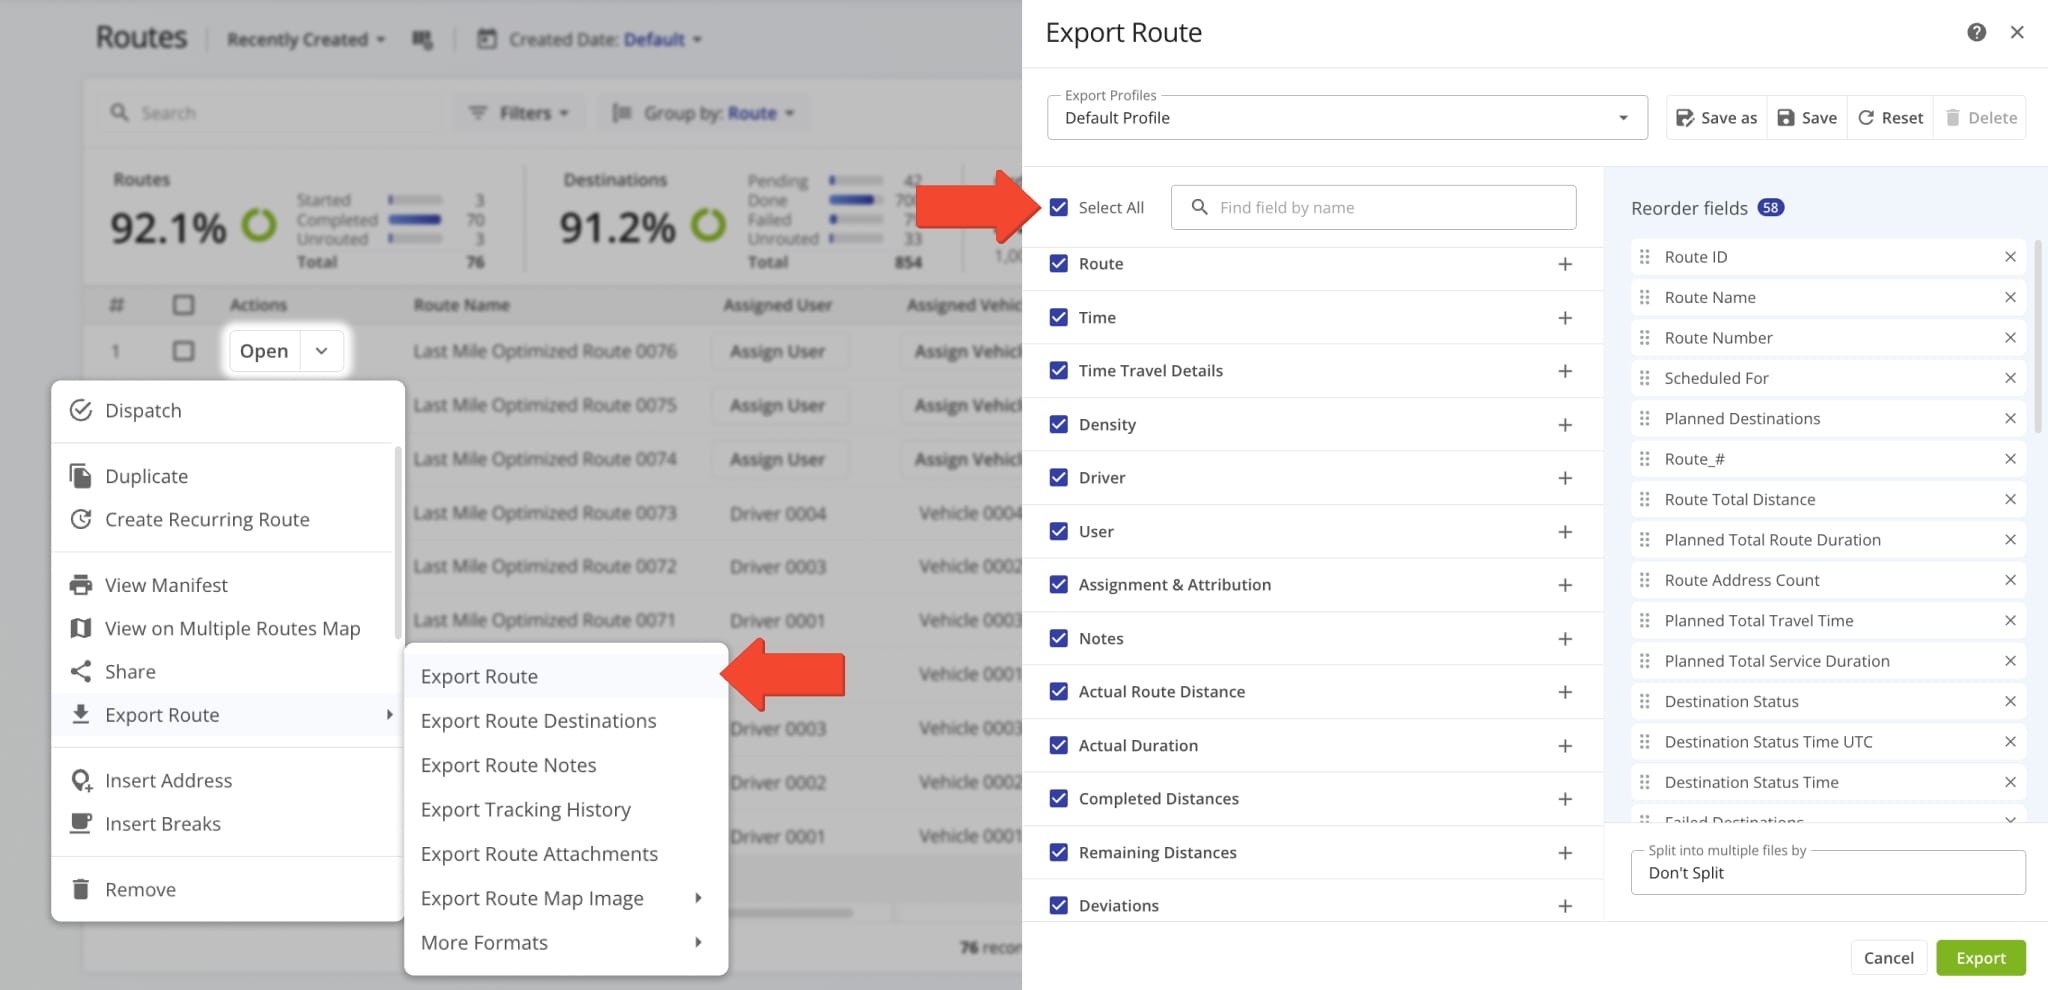
A new “Select All” option was added to the Route Export configurator. This enables you to select every available route data option for your export file with a single click, streamlining the process of downloading route data. Learn more about exporting routes.
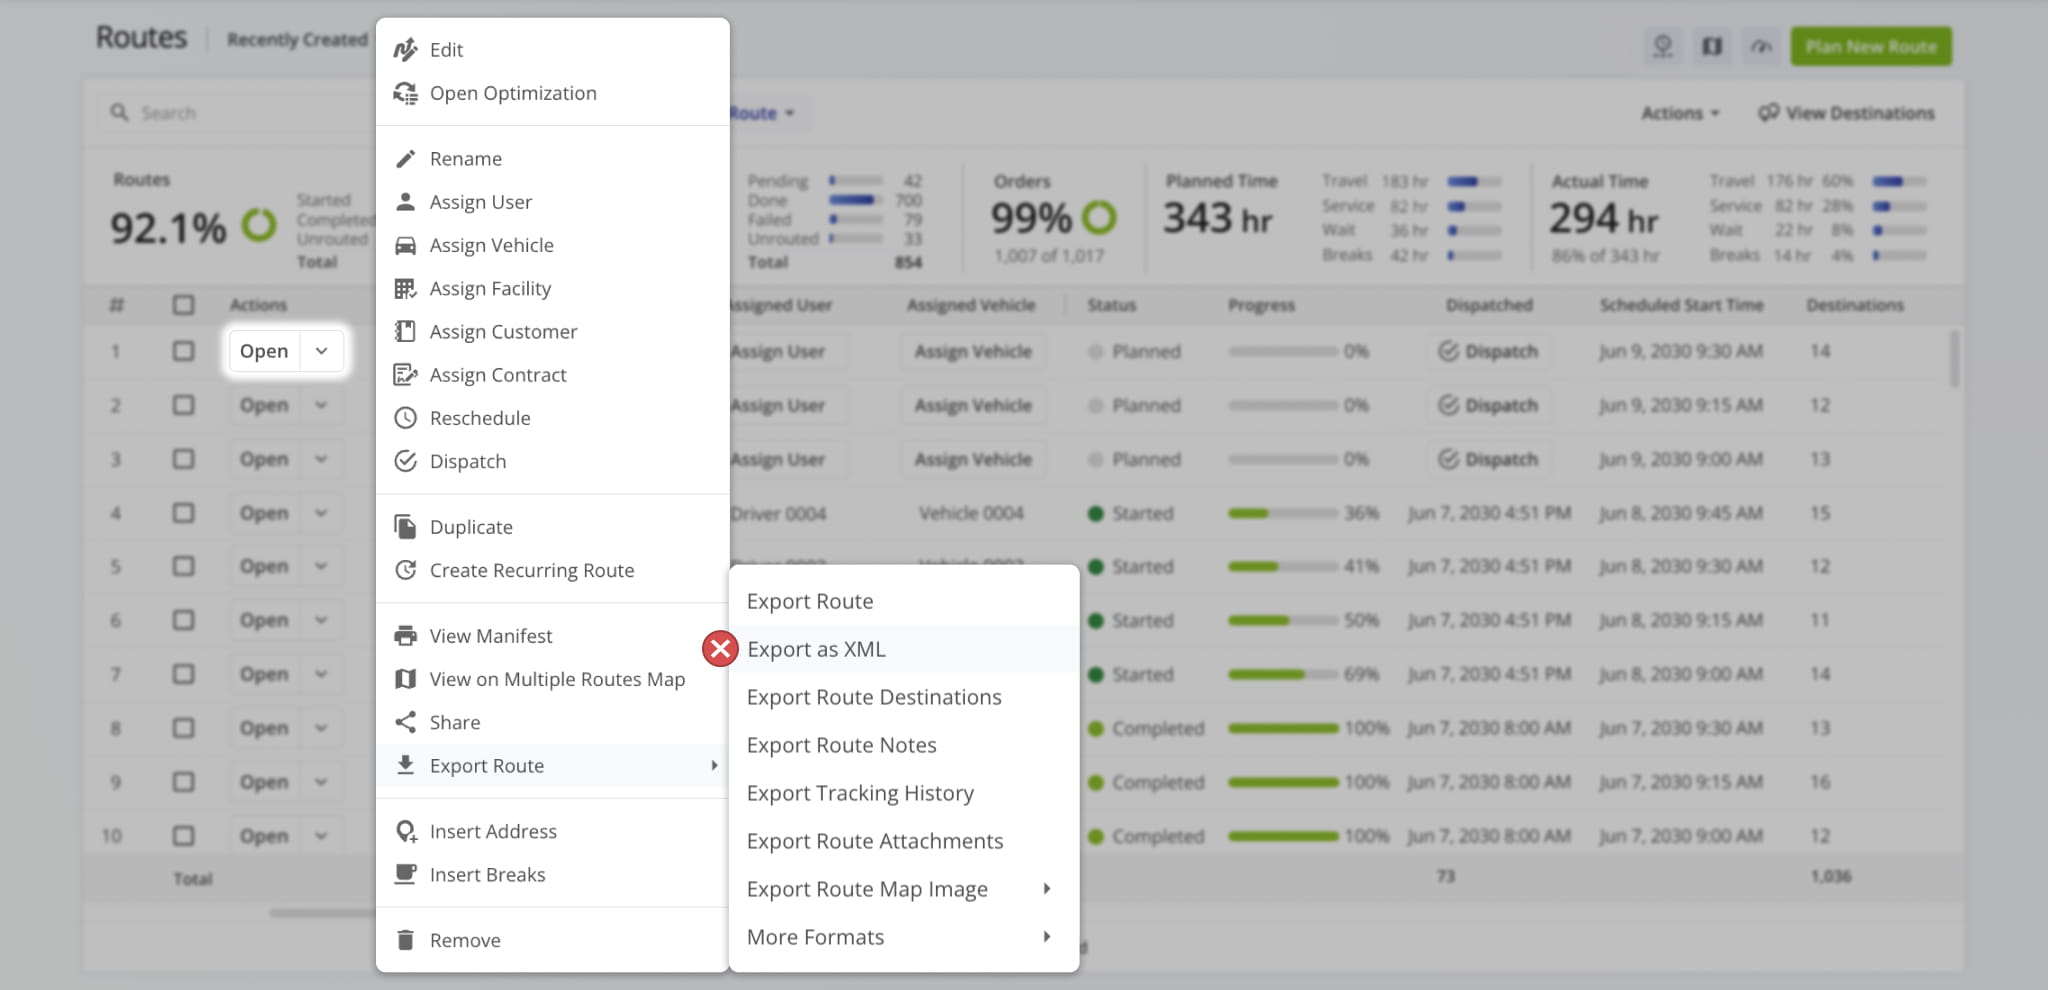
The XML file format is no longer supported for data export due to being outdated. Learn more about exporting routes.
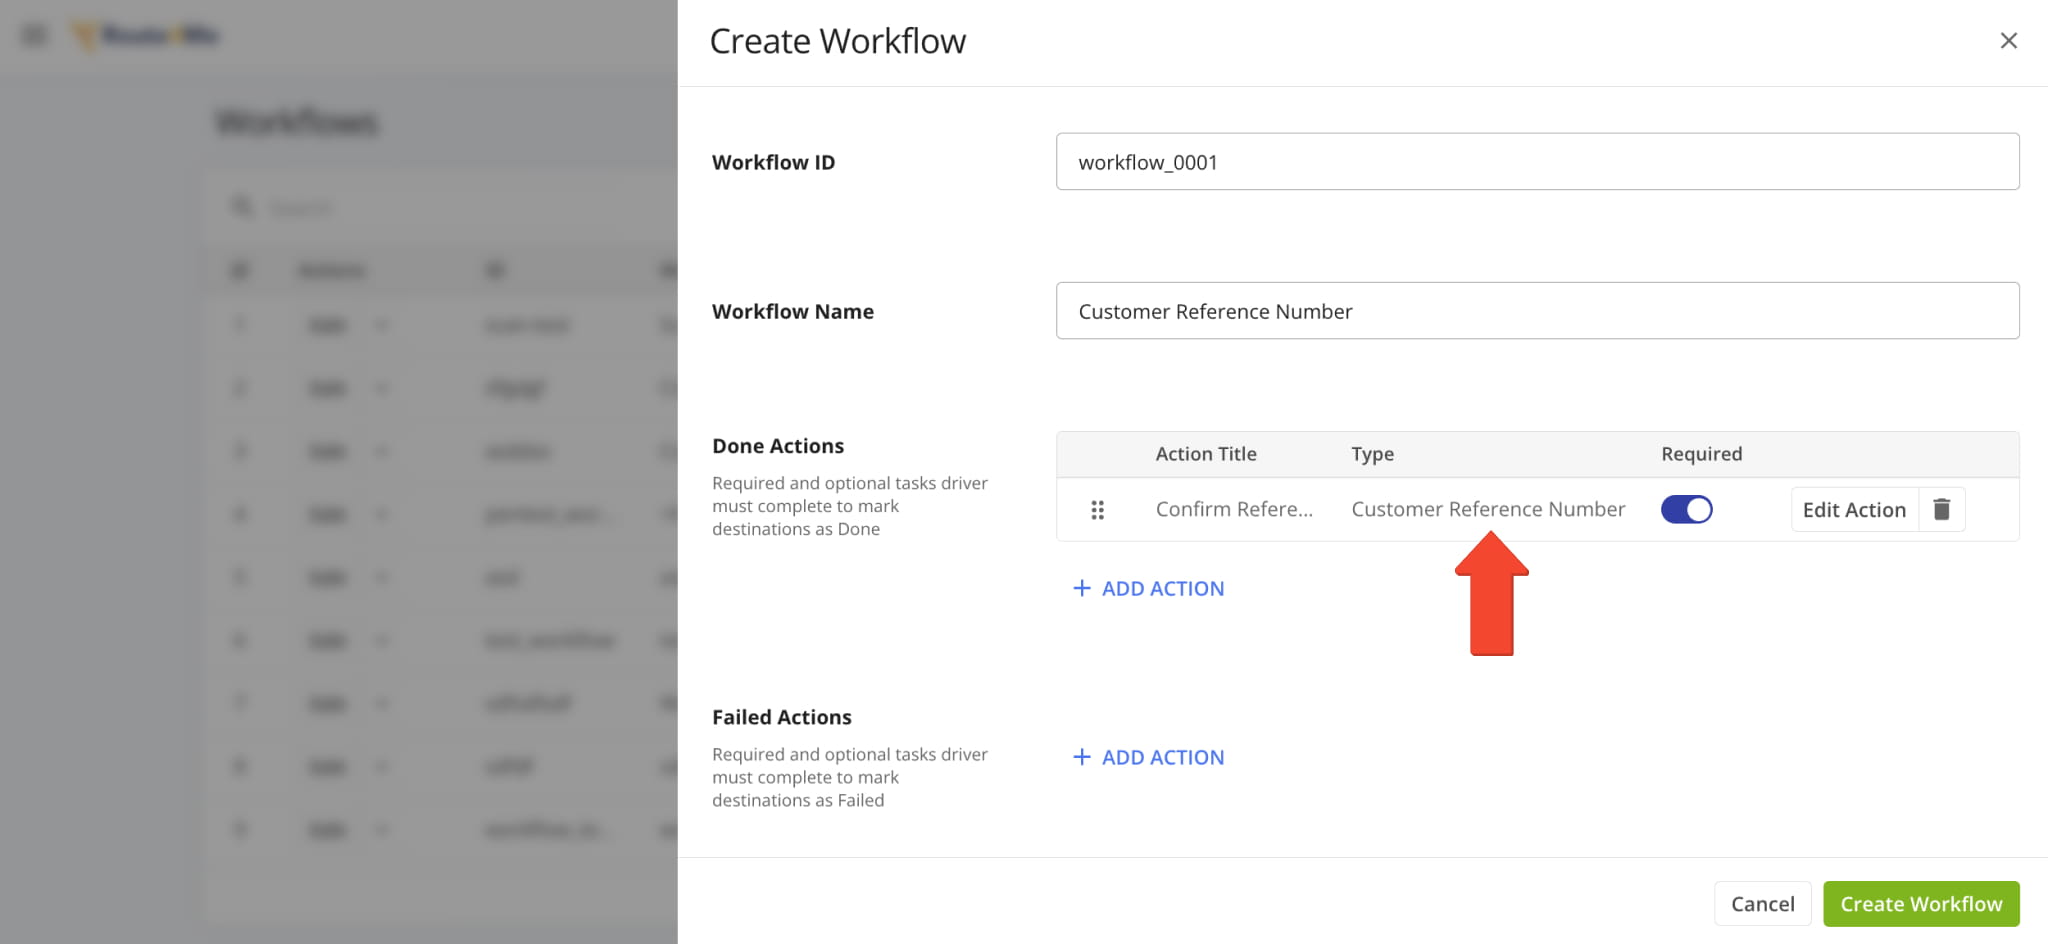
A new “Customer Reference Number” action was added to Workflows. With this new action type, assigned users can easily confirm a customer’s reference number when visiting route destinations. Learn more about collecting proof of service.
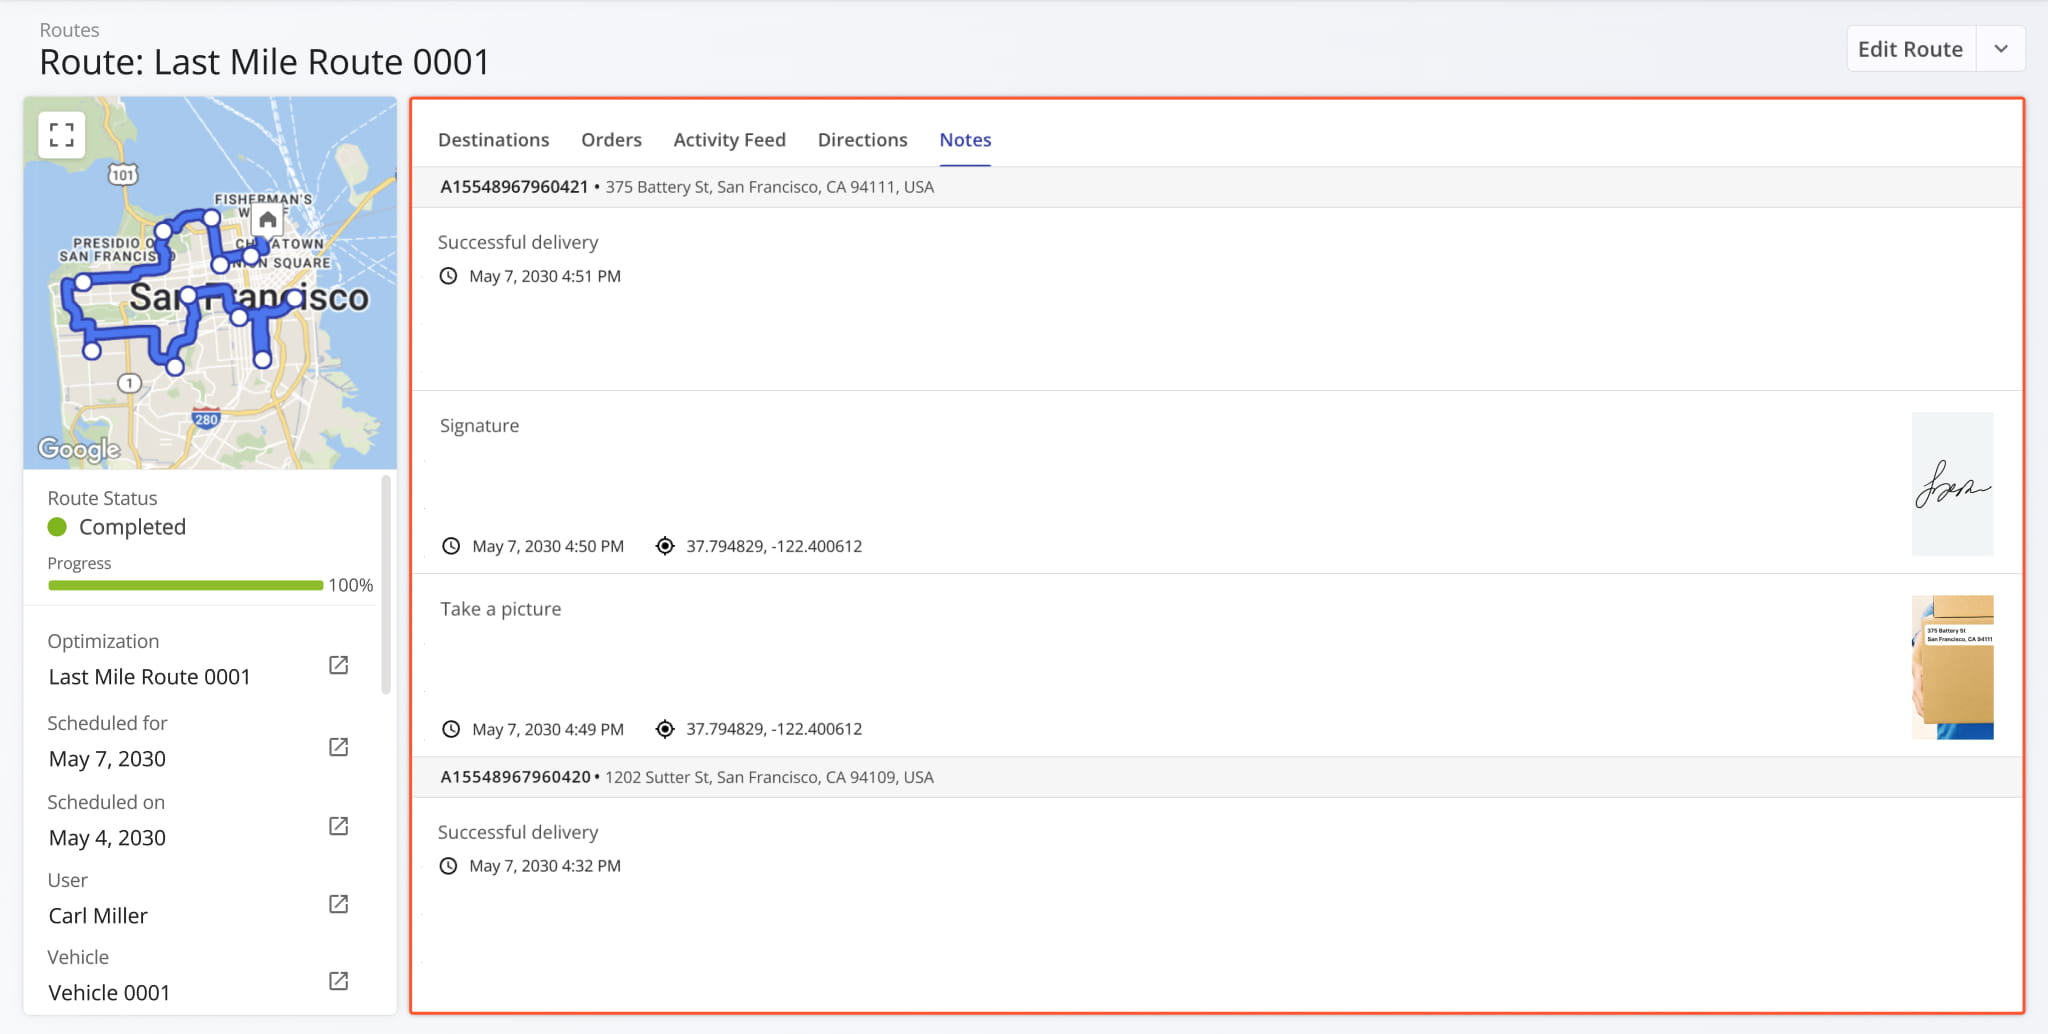
The “Notes” section of Route Snapshots has been redesigned. Previously, the “Notes” tab contained a simple data table showing Destination Note information. Now, each Note has additional context with its associated address and time always visible, as well as attachment media previews, timestamps, and more.
Additionally, you can click any image (photo, signature, etc.) to open it in full size in a new tab.
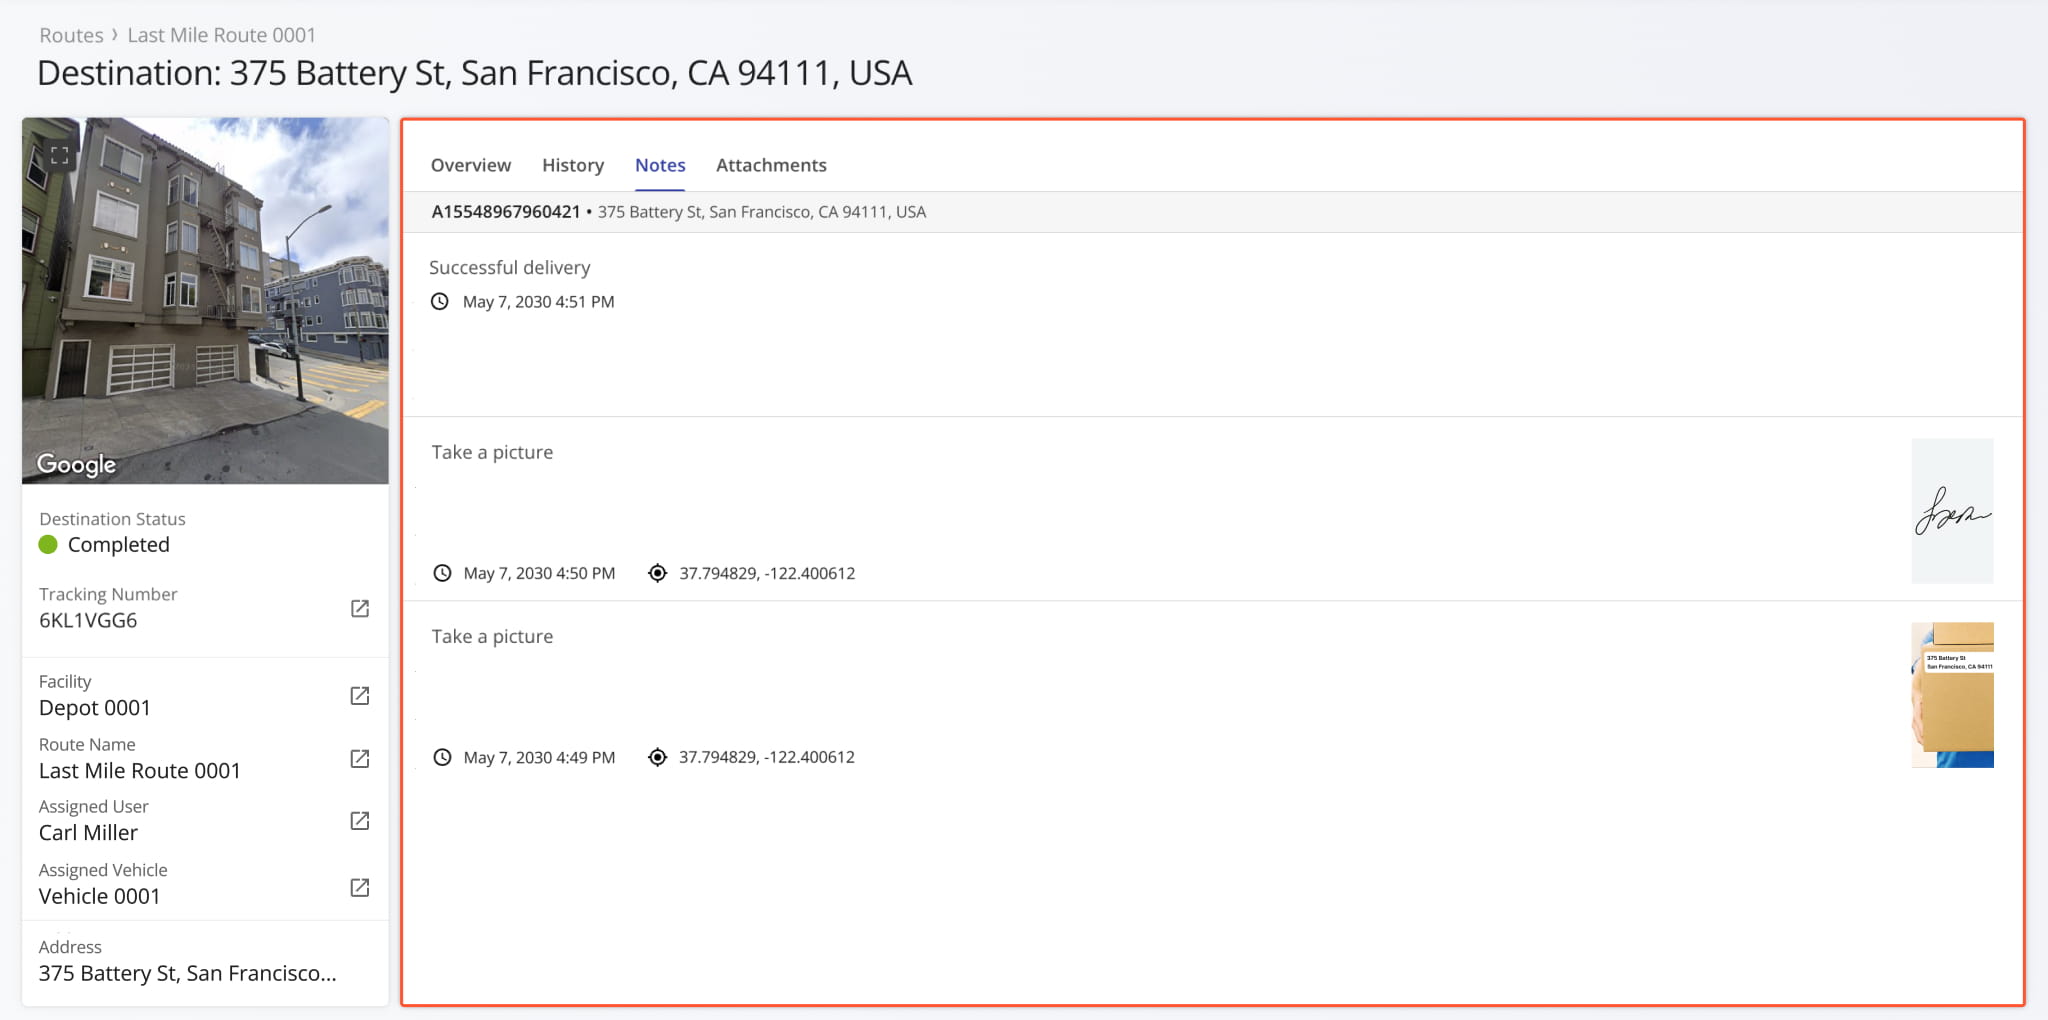
The “Notes” section of Destination Snapshots has been redesigned. Previously, the “Notes” tab contained a simple data table showing Destination Note information. Now, each Note has additional context with its associated address and time always visible, as well as attachment media previews, timestamps, and more.
Additionally, you can click any image (photo, signature, etc.) to open it in full size in a new tab.
The Route Performance Metrics feature was added to User Snapshots. The Performance Metrics panel provides a summary of the user’s planned and completed routes, destinations, orders, time distribution, etc. It enables you to monitor progress, track efficiency, and evaluate the operational performance of a user across your filtered routes with real-time data visualization.

The Route Performance Metrics feature was added to Vehicle Snapshots. The Performance Metrics panel provides a summary of the vehicle’s planned and completed routes, destinations, orders, time distribution, etc. It enables you to monitor progress, track efficiency, and evaluate the operational performance and vehicle utilization of your fleet with real-time data visualization.

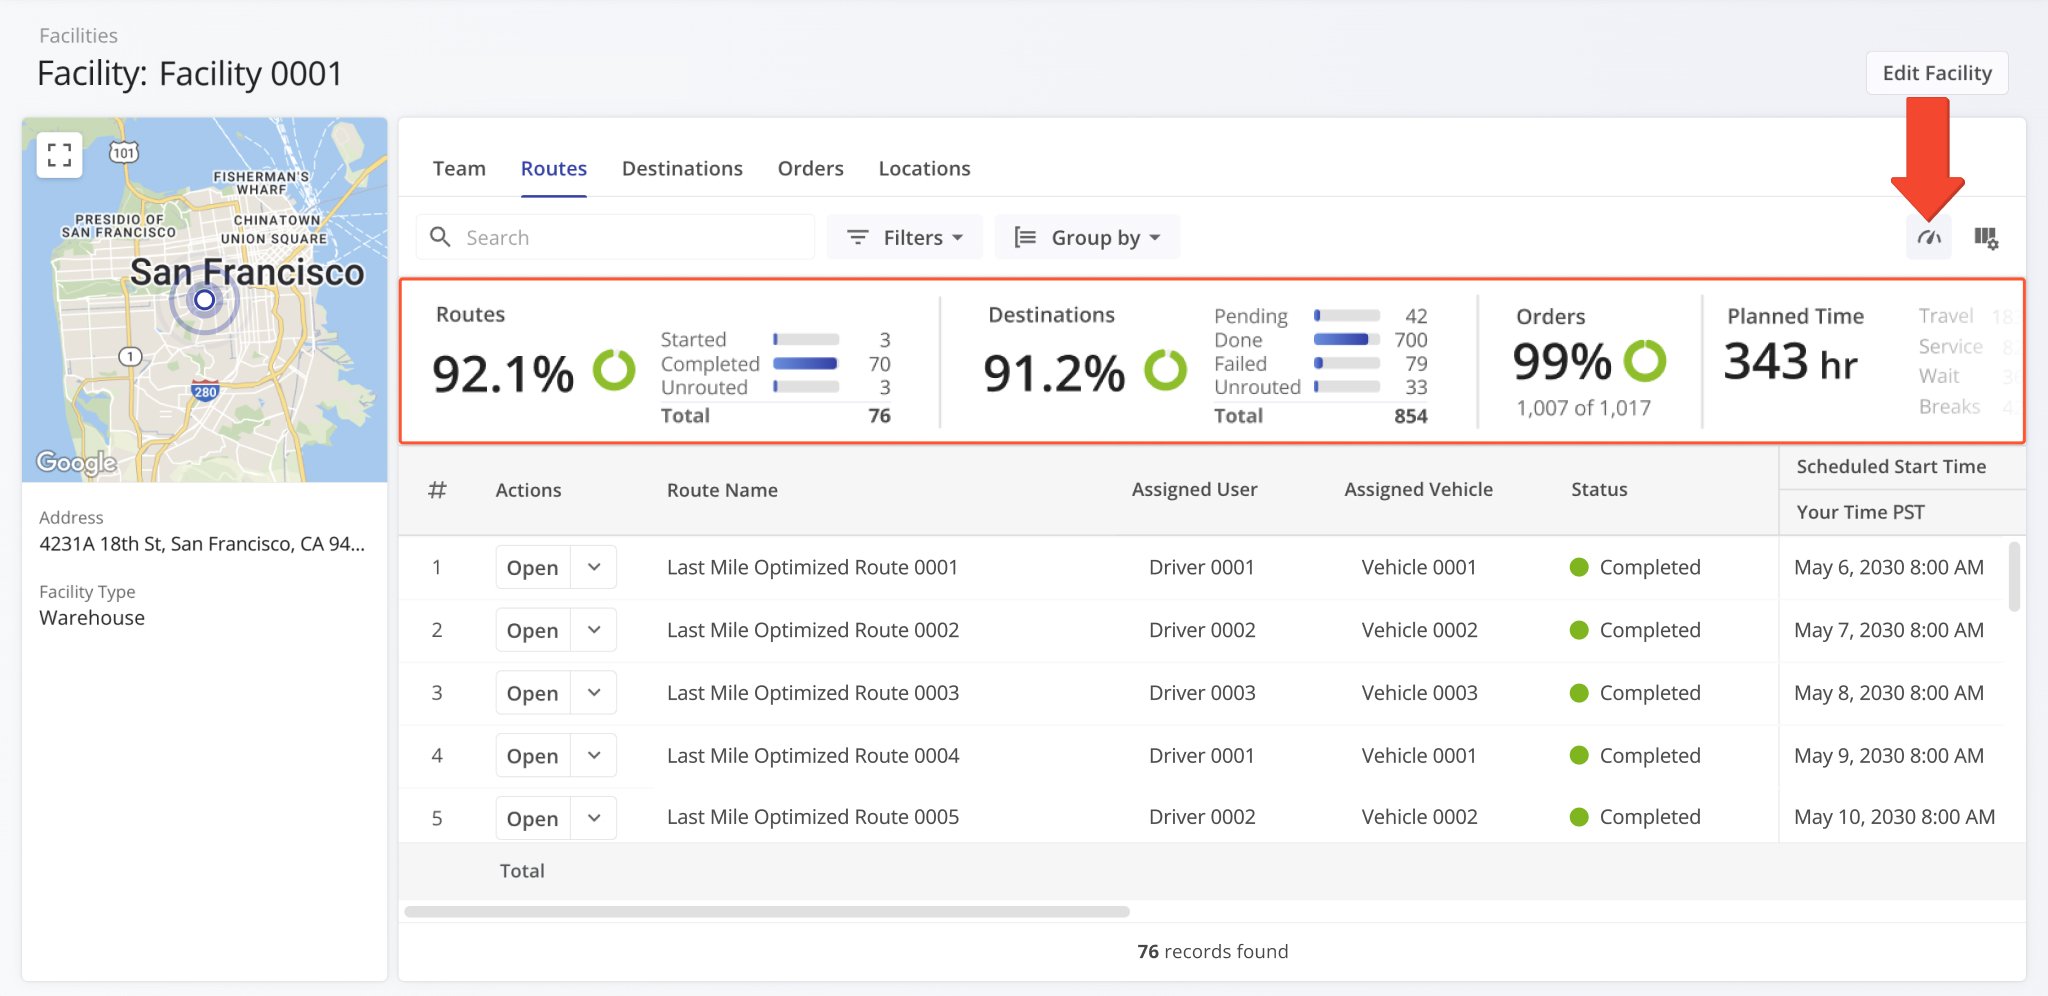
The Route Performance Metrics feature was added to Facility Snapshots. The Performance Metrics panel provides a summary of the facility’s associated planned and completed routes, destinations, orders, time distribution, etc. It enables you to monitor progress, track efficiency, and evaluate operational performance across your organization with clear data visualization.
The Route Performance Metrics feature was added to Location Snapshots. The Performance Metrics panel provides a summary of a location’s associated planned and completed routes, destinations, orders, time distribution, etc. It enables you to monitor progress, track efficiency, and evaluate operational performance at customer locations with clear data visualization.
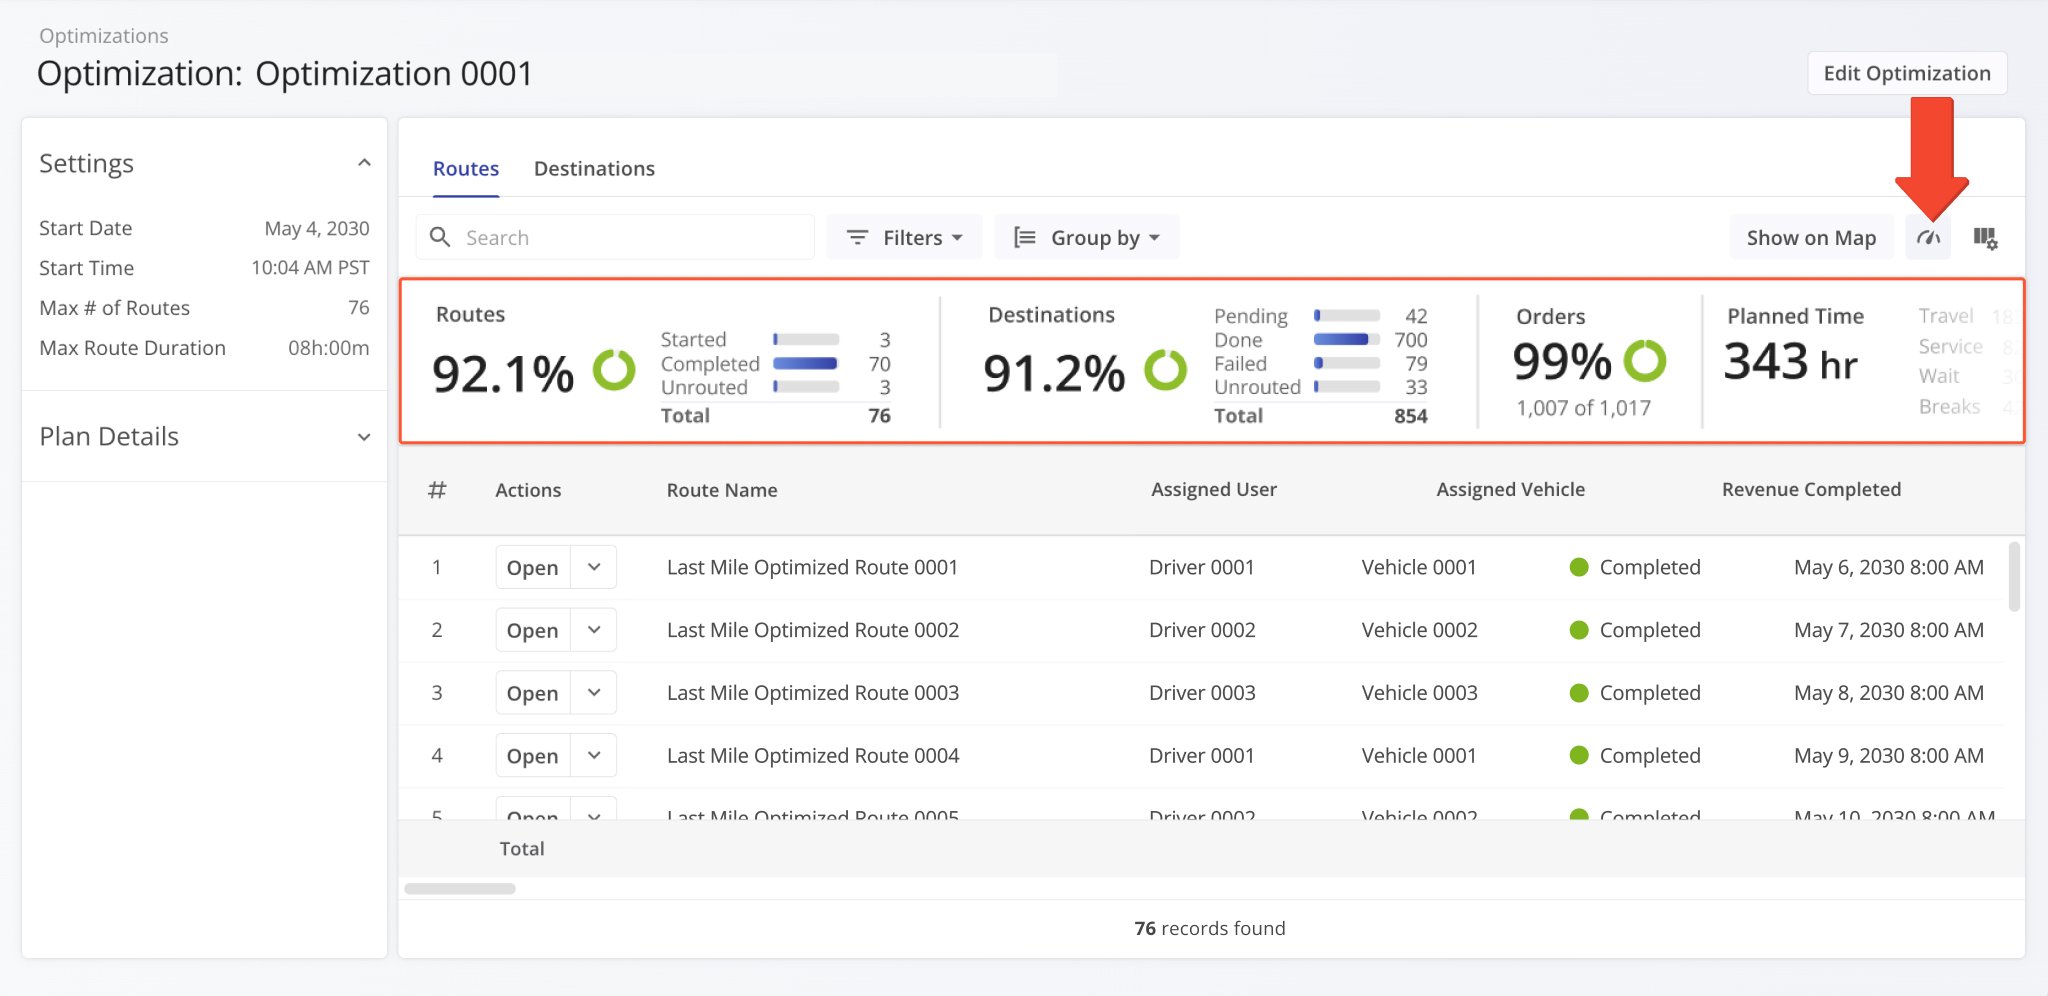
The Route Performance Metrics feature was added to Optimization Snapshots. The Performance Metrics panel provides a summary of an optimization’s associated planned and completed routes, destinations, orders, time distribution, etc. It enables you to monitor progress, track efficiency, and evaluate operational performance with clear data visualization.
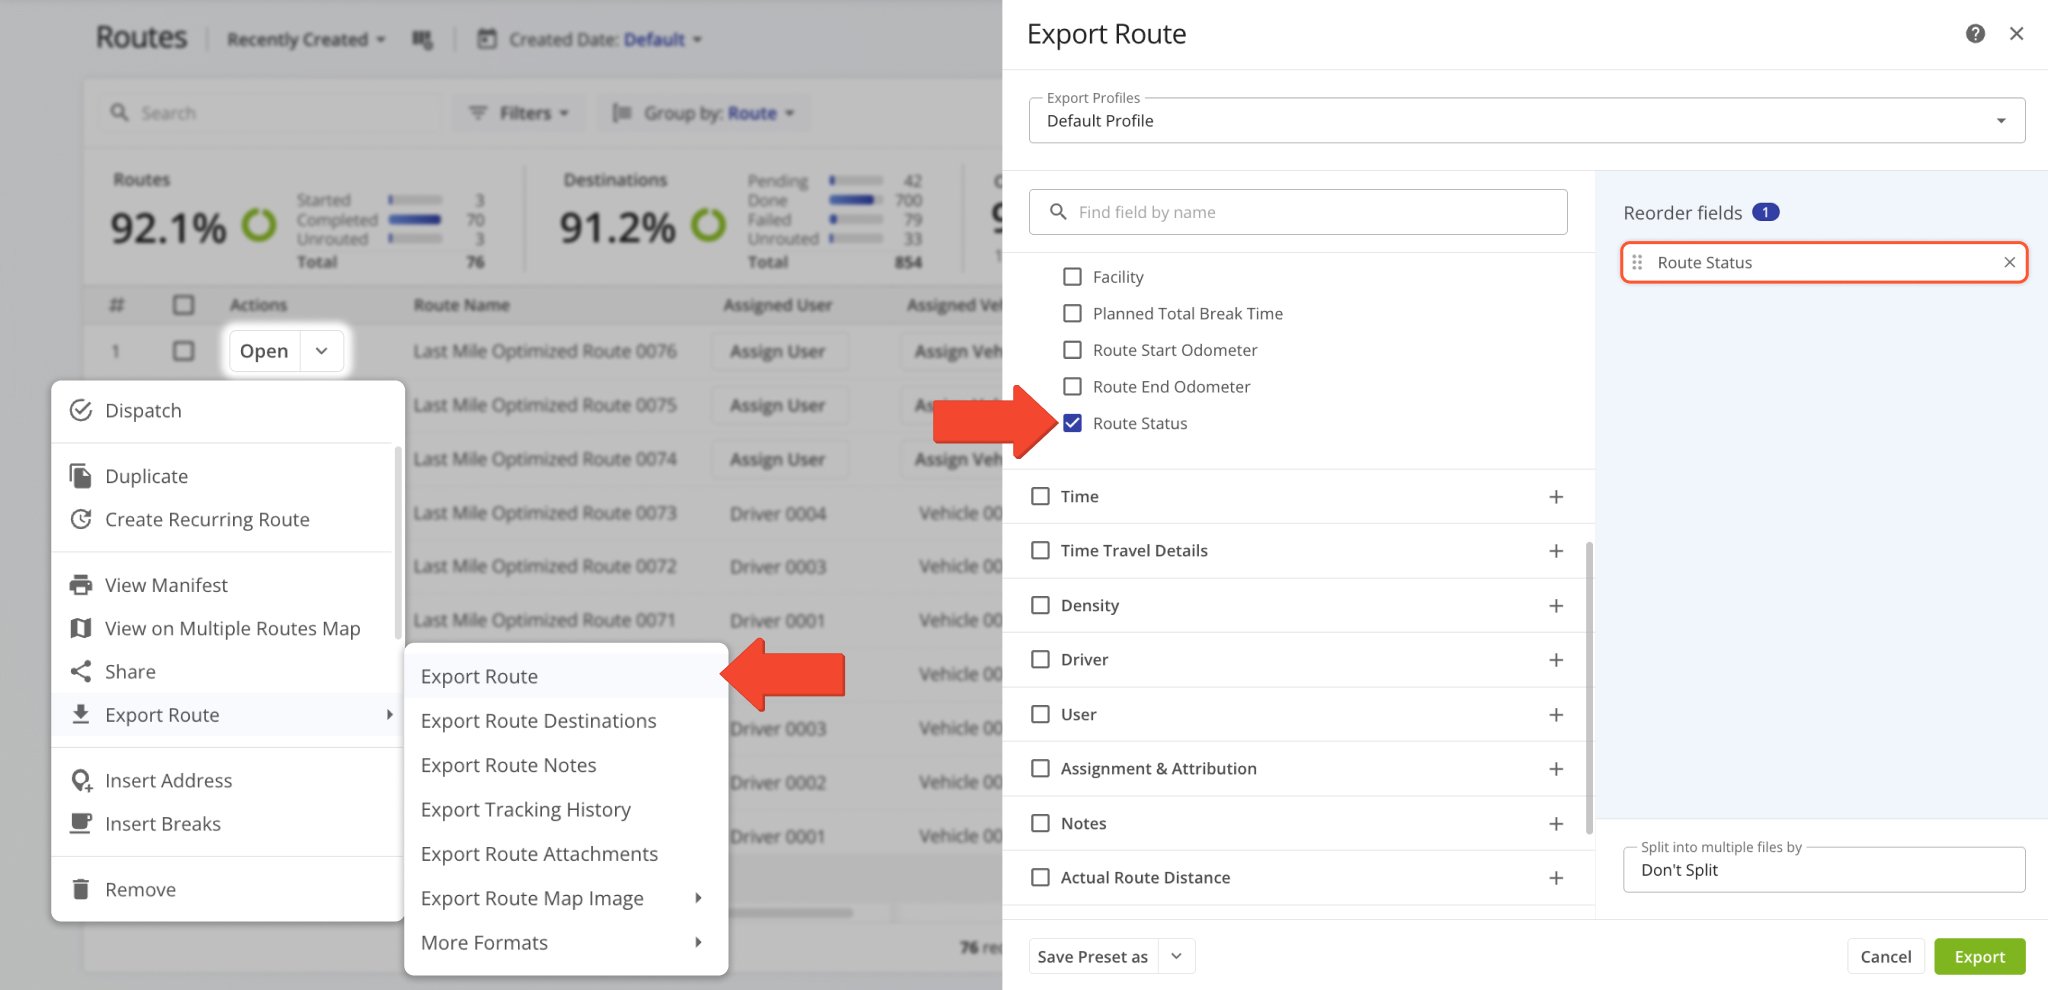
The “Route Status” data column was added to the Route Export customizer. This column shows the current status (“Planned“, “Started“, or “Completed“) of the route at the time of export. Learn more about exporting routes.
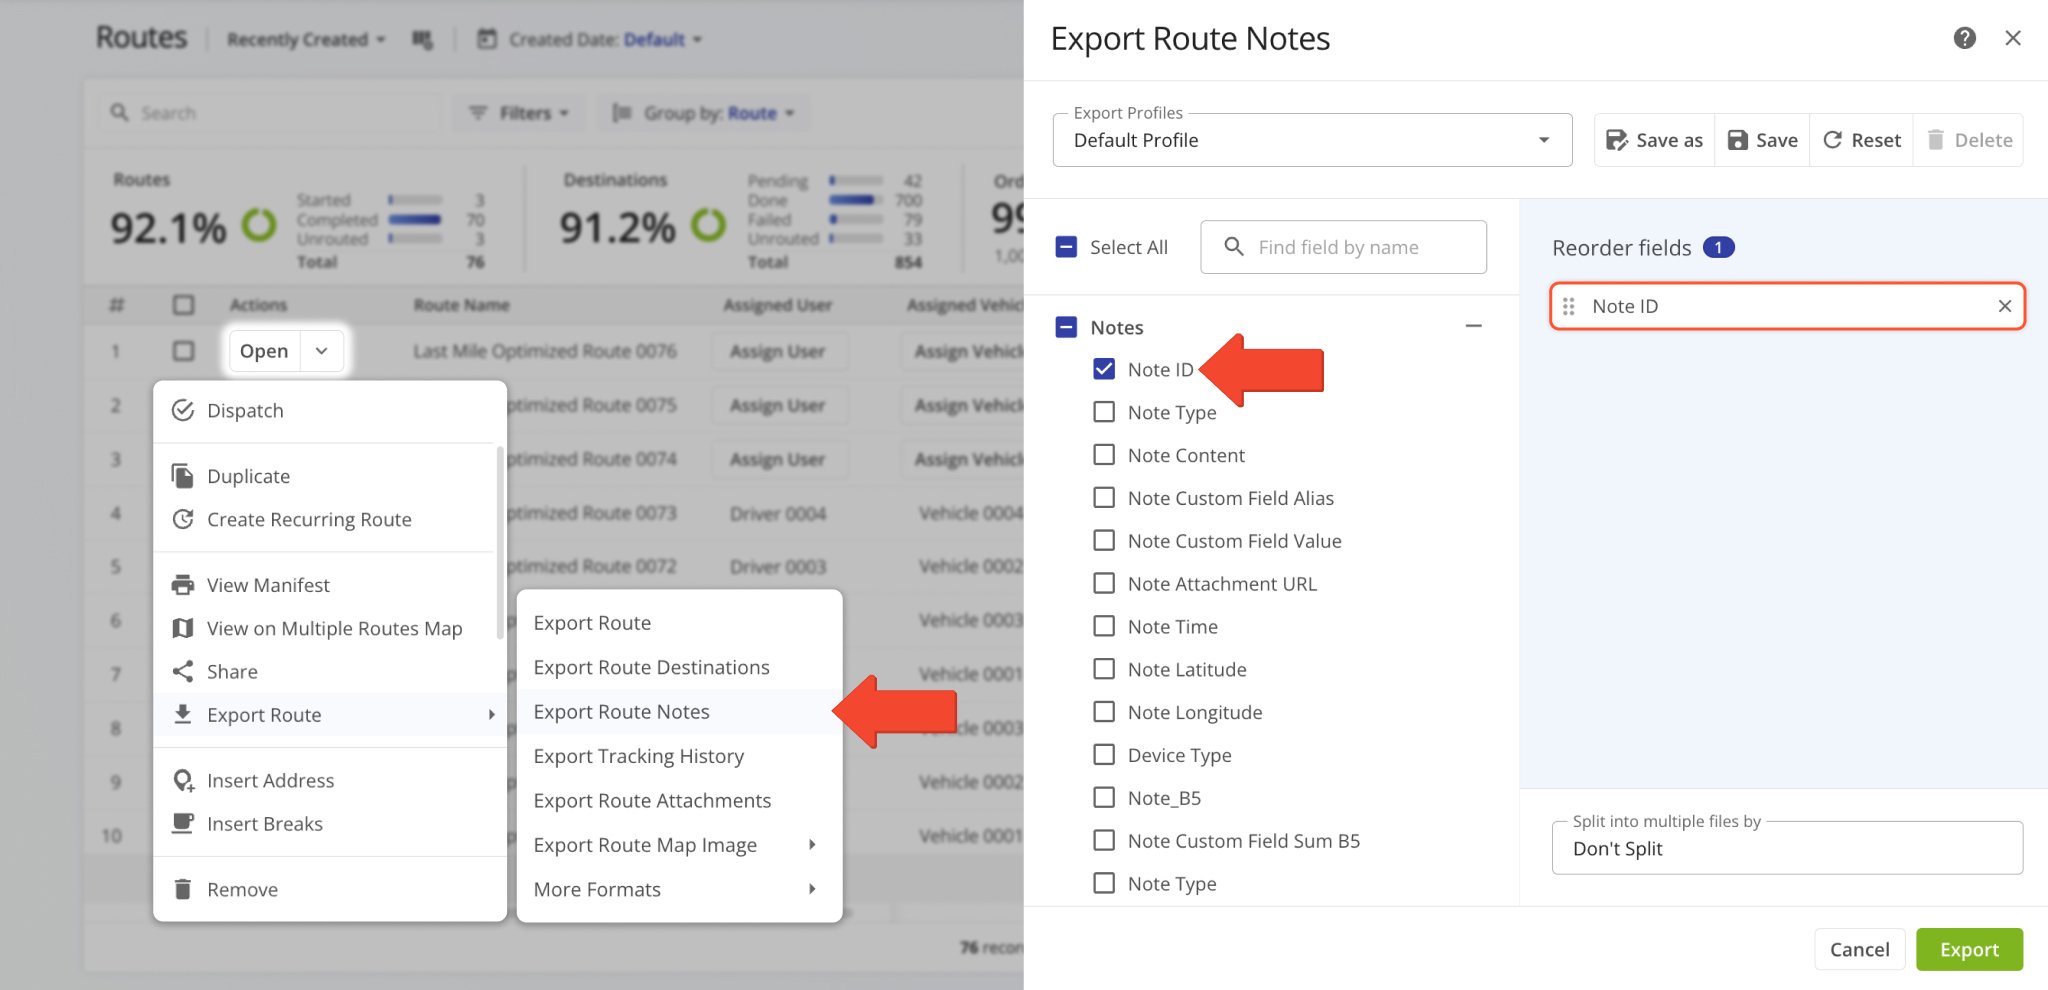
Additionally, the “Note ID” data column was added to the Route Notes Export customizer. This column shows the unique alphanumeric IDs Destination Notes on the route. Learn more about exporting routes.
A new “Tracking” section was added to User Snapshots. In the “Tracking” tab, you can see a list of location updates associated with a user. Each update corresponds to an instance when the user’s location was synced. Tracking updates contain timestamps, coordinate and location details, and detailed vehicle information if synced via Telematics Integration.
![]()
Additionally, you can hover over the Tracking Icon in the “Info” column to view a tracking summary for the respective location update. In detail, this will open a pop-up window that shows the location update’s associated coordinates, device timestamp, vehicle speed, odometer reading, and the user’s location on the map at the time of the location update.
![]()
A new “Tracking” section was added to Vehicle Snapshots. In the “Tracking” tab, you can see a list of location updates associated with a vehicle. Each update corresponds to an instance when the vehicle’s location was synced. Tracking updates contain timestamps, coordinate and location details, and detailed vehicle information if synced via Telematics Integration.
![]()
Additionally, you can hover over the Tracking Icon in the “Info” column to view a tracking summary for the respective location update. In detail, this will open a pop-up window that shows the location update’s associated coordinates, device timestamp, vehicle speed, odometer reading, and the vehicle’s location on the map at the time of the location update.
![]()
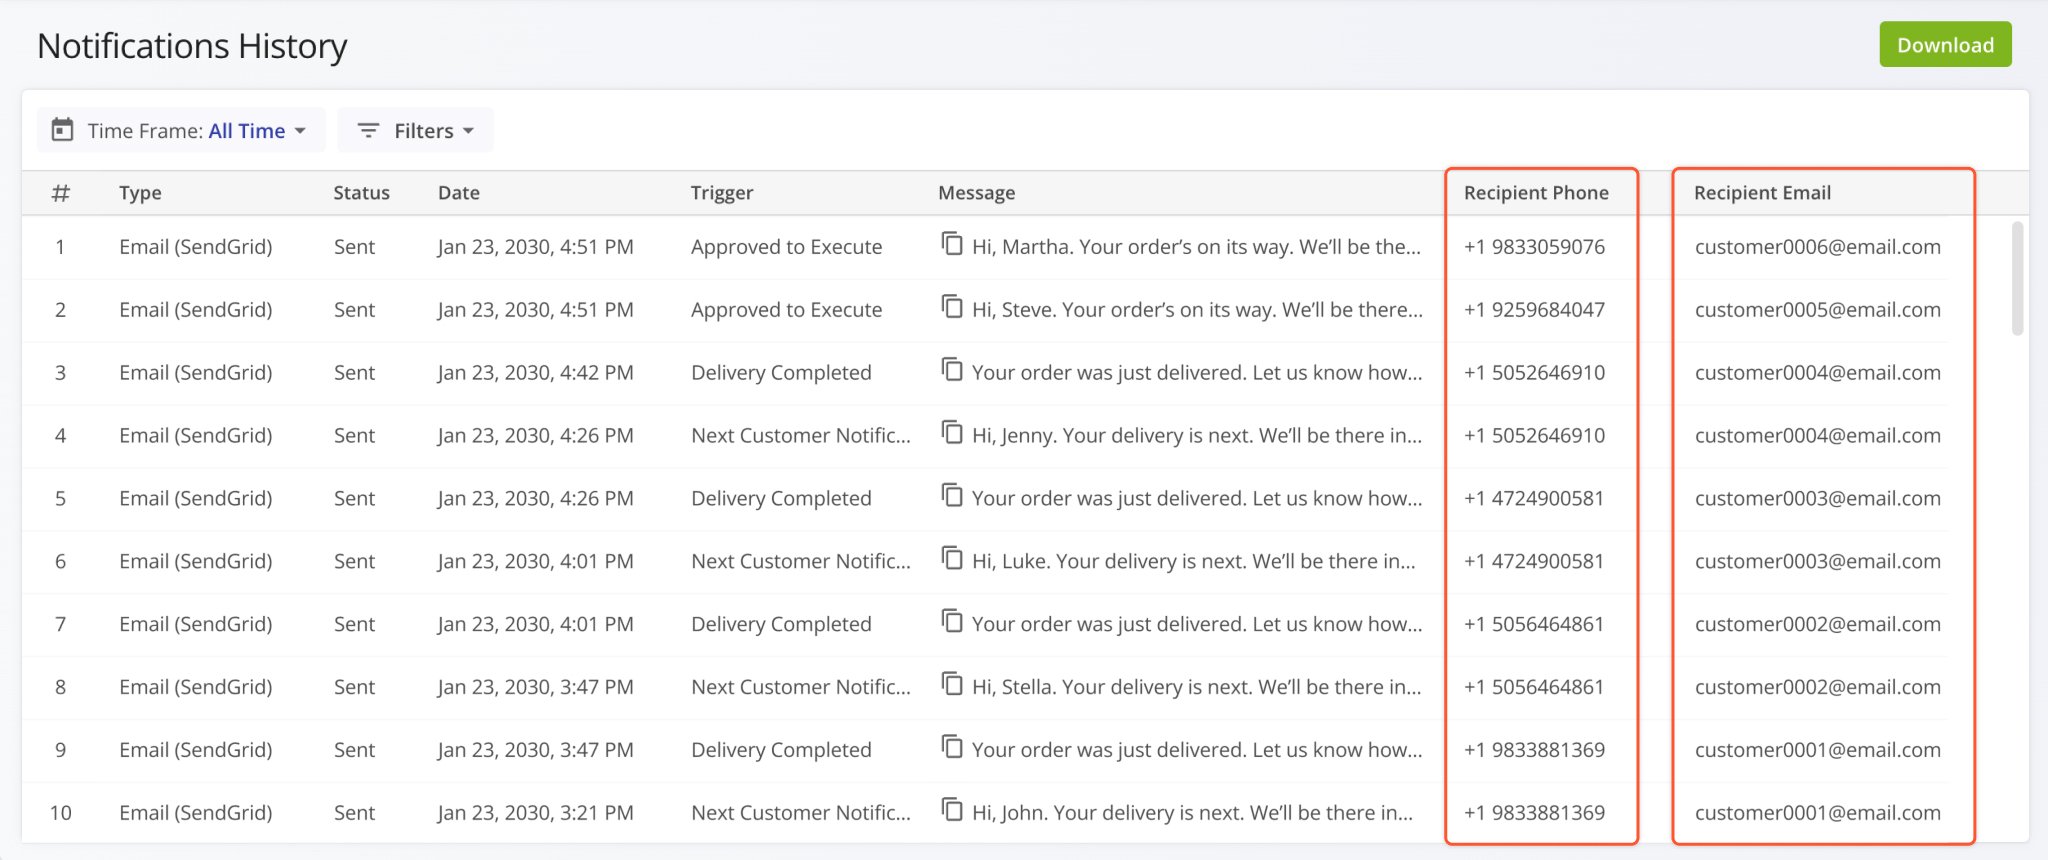
The “Recipient Phone” and “Recipient Email” columns were added to the Notifications History page. They show a contact person’s phone number and email address, respectively. This enables you to easily find the contact details associated with any of your customer notifications. Previously, only the timestamp, trigger, and message text were available.
Open Your Notifications History
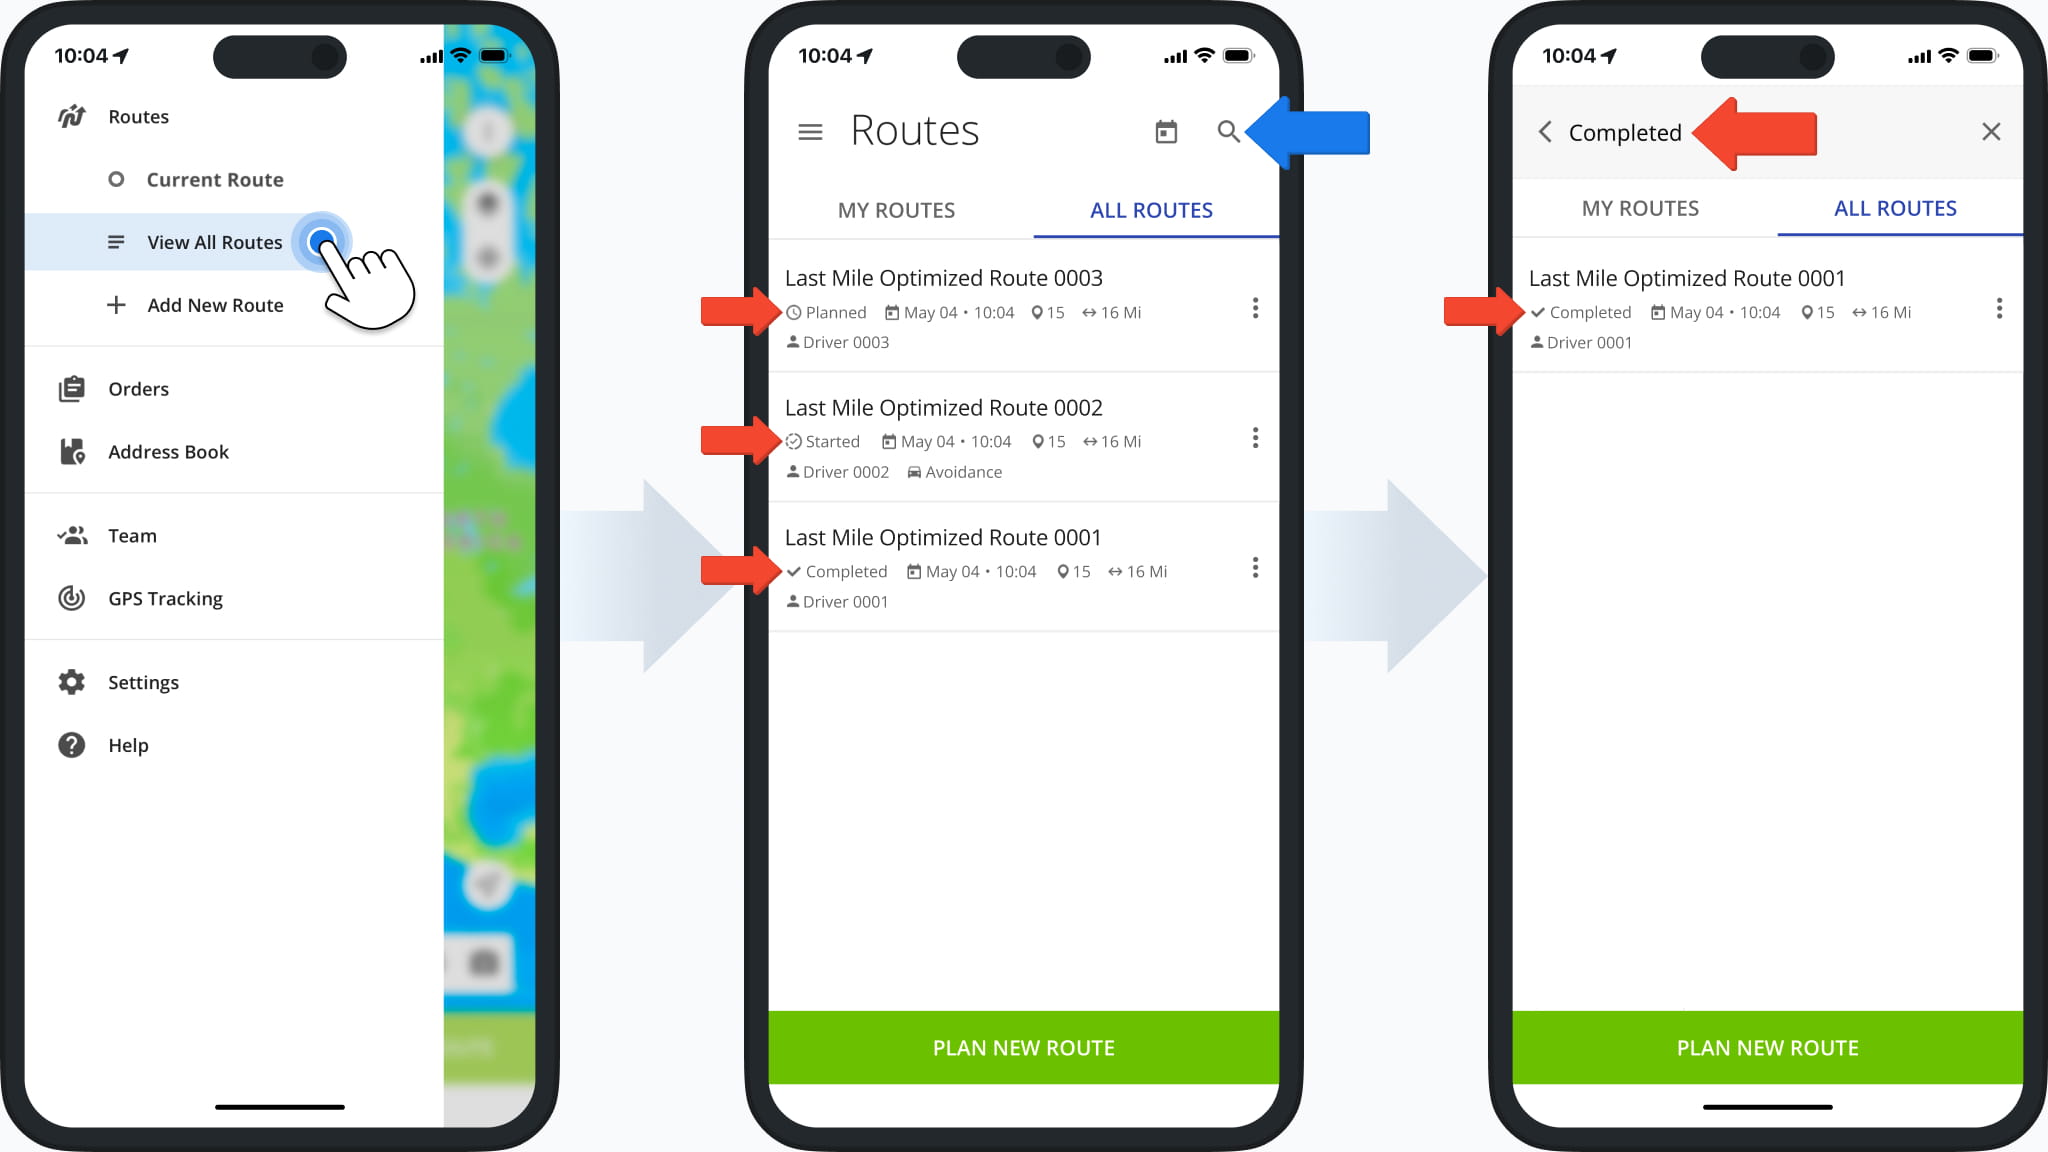
Route Status indicators were added to the Routes List in the Route4Me Mobile App. This enables users to easily see the current status (“Planned“, “Started“, or “Completed“) of routes. By tapping the Search Icon and inputting a status, users can easily find all routes visible to them with the corresponding route status. Learn more about Mobile Route Management.
A new “Export Route Notes” option was added to the Route Export menu. It enables you to export all destination notes associated with the selected routes with full export column customization functionality.
The route sequence display column “Route #” on the Routes Page can now be used to sort routes according to their optimization sequence. When you optimize multiple routes with one optimization, routes optimized earlier have a lower number than routes optimized later. When you optimize a single route, its “Route #” value will always be “1“.
Learn more about Route4Me Optimizations.

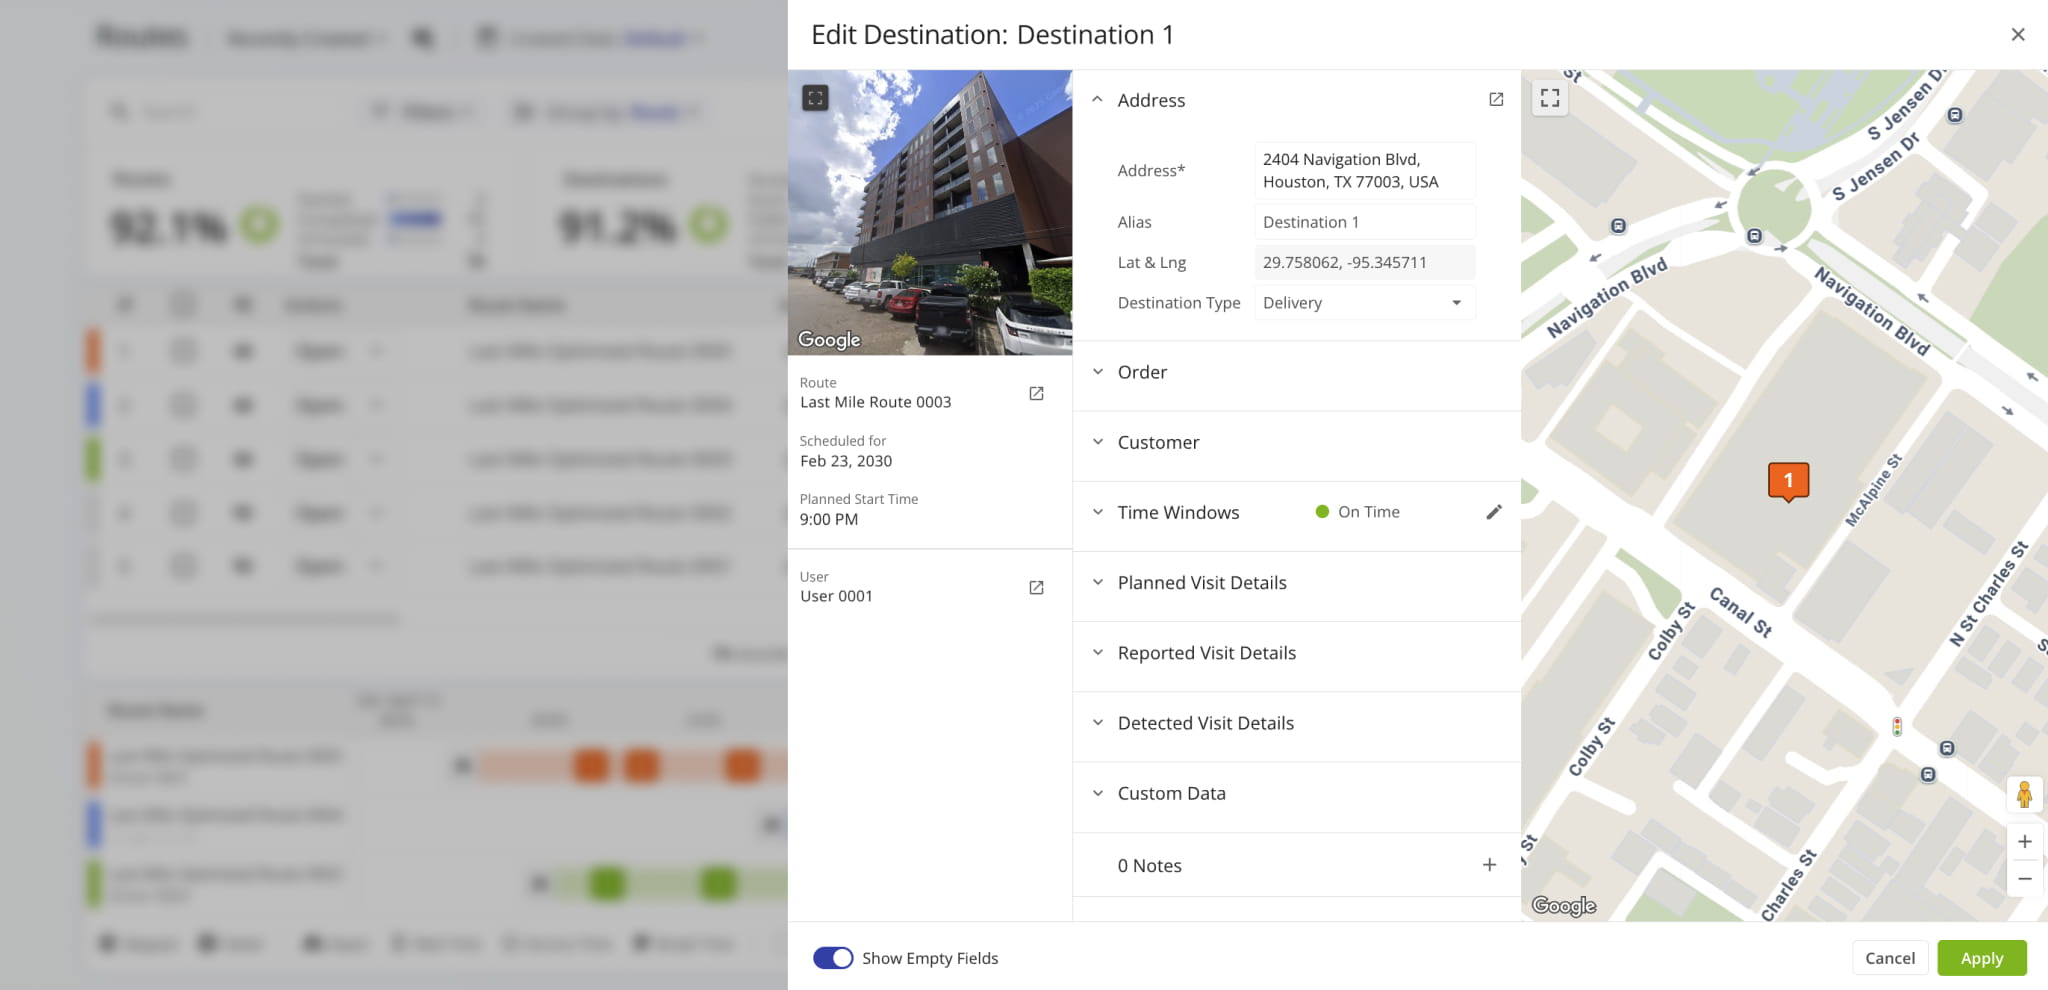
A new option to “Modify Destination” was added when you right-click a destination in the Routes Page Timeline.
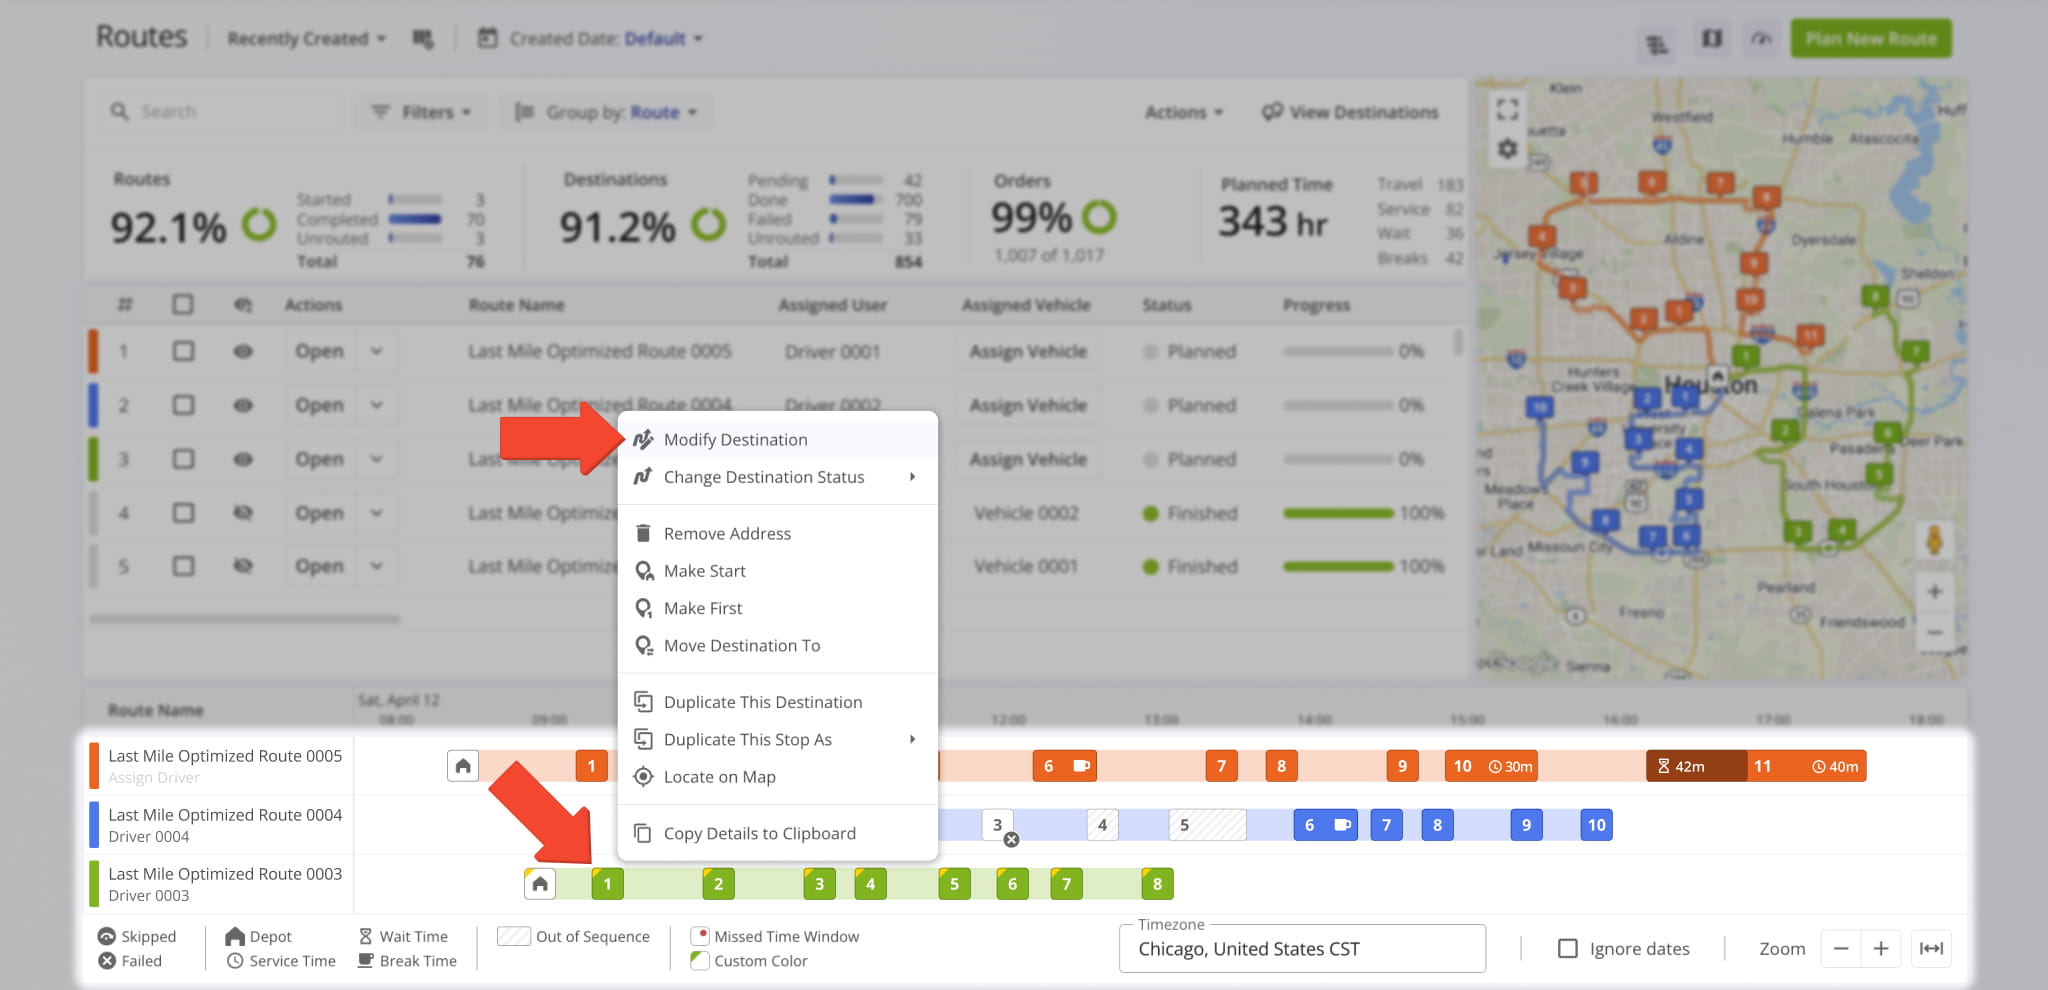
This opens the “Edit Destination” panel where you can see and modify destination details and open associated entities (route, user, etc.). The functionality of the “Edit Destination” interface is similar to the “Destination Info” in your Route Editor.
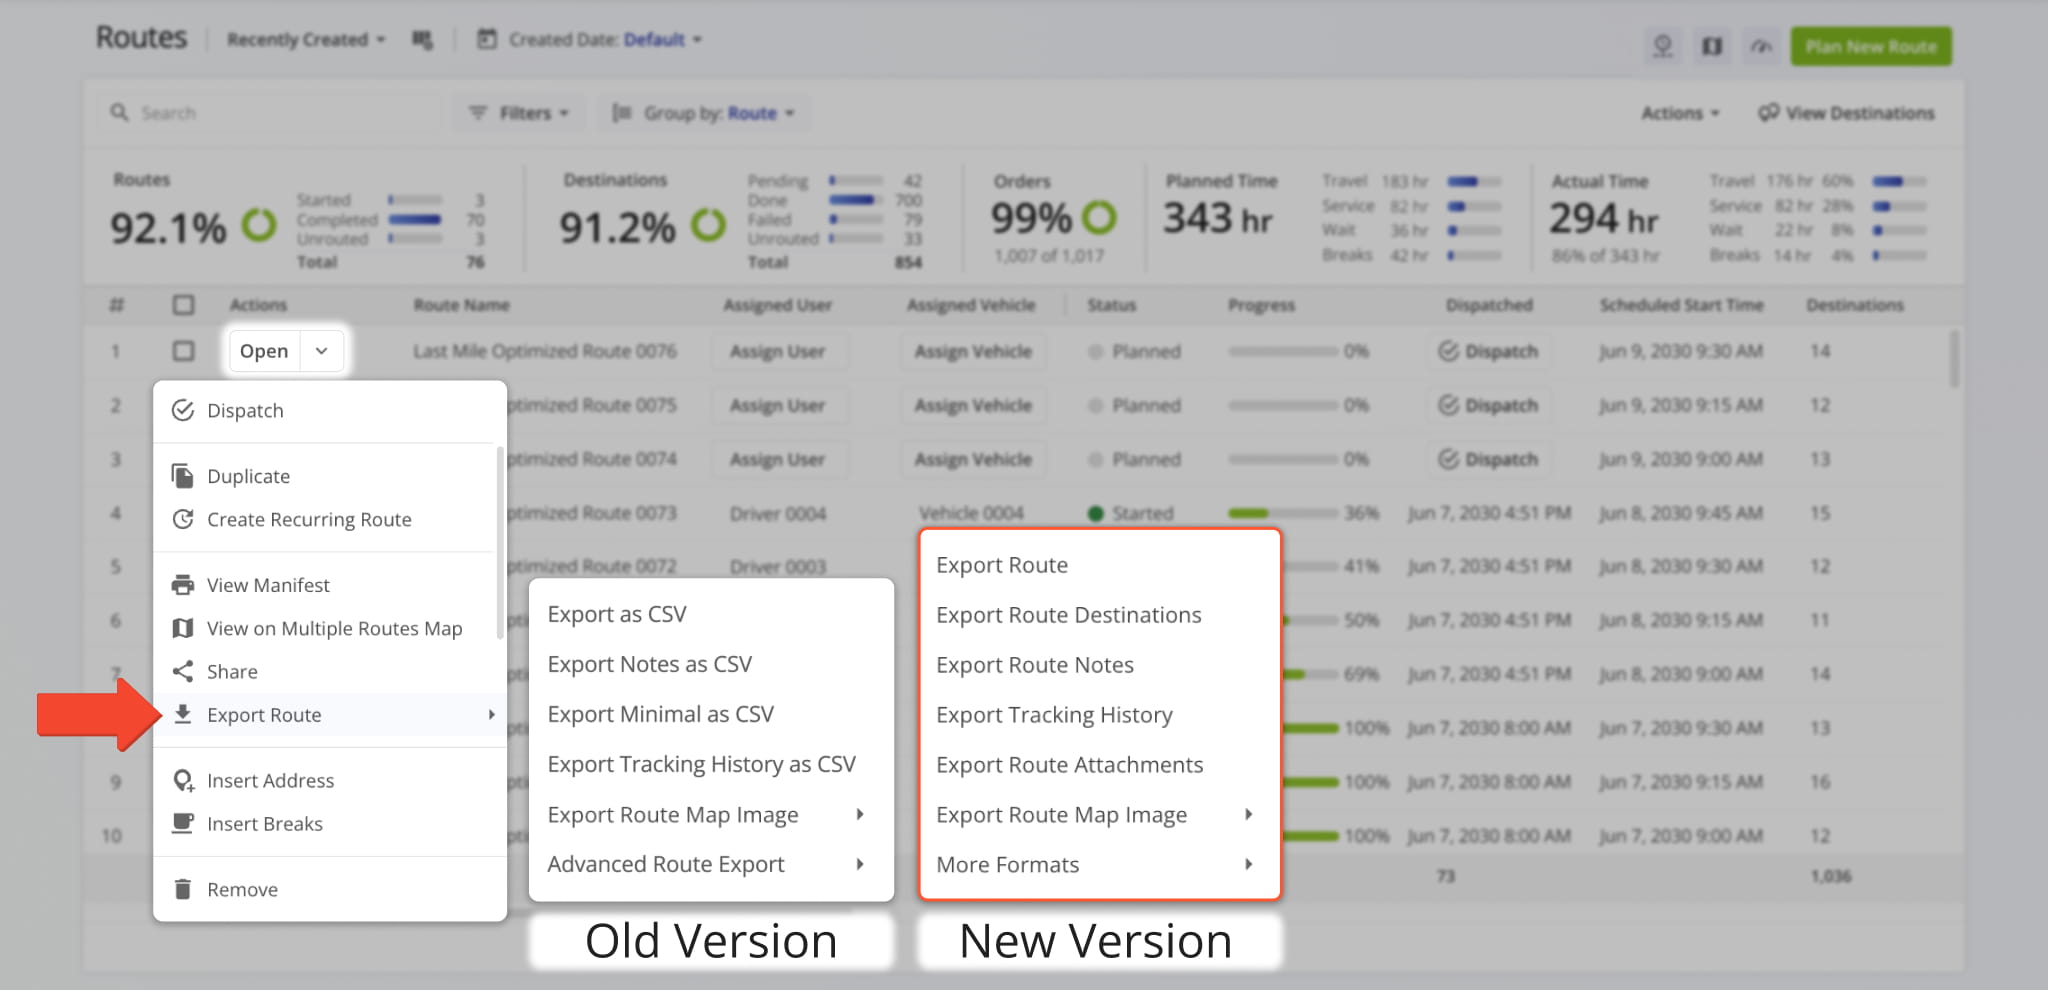
The available options in the “Export Route” menu have been renamed and resequenced to provide a more streamlined and efficient experience when you download routes. Learn more about exporting routes.
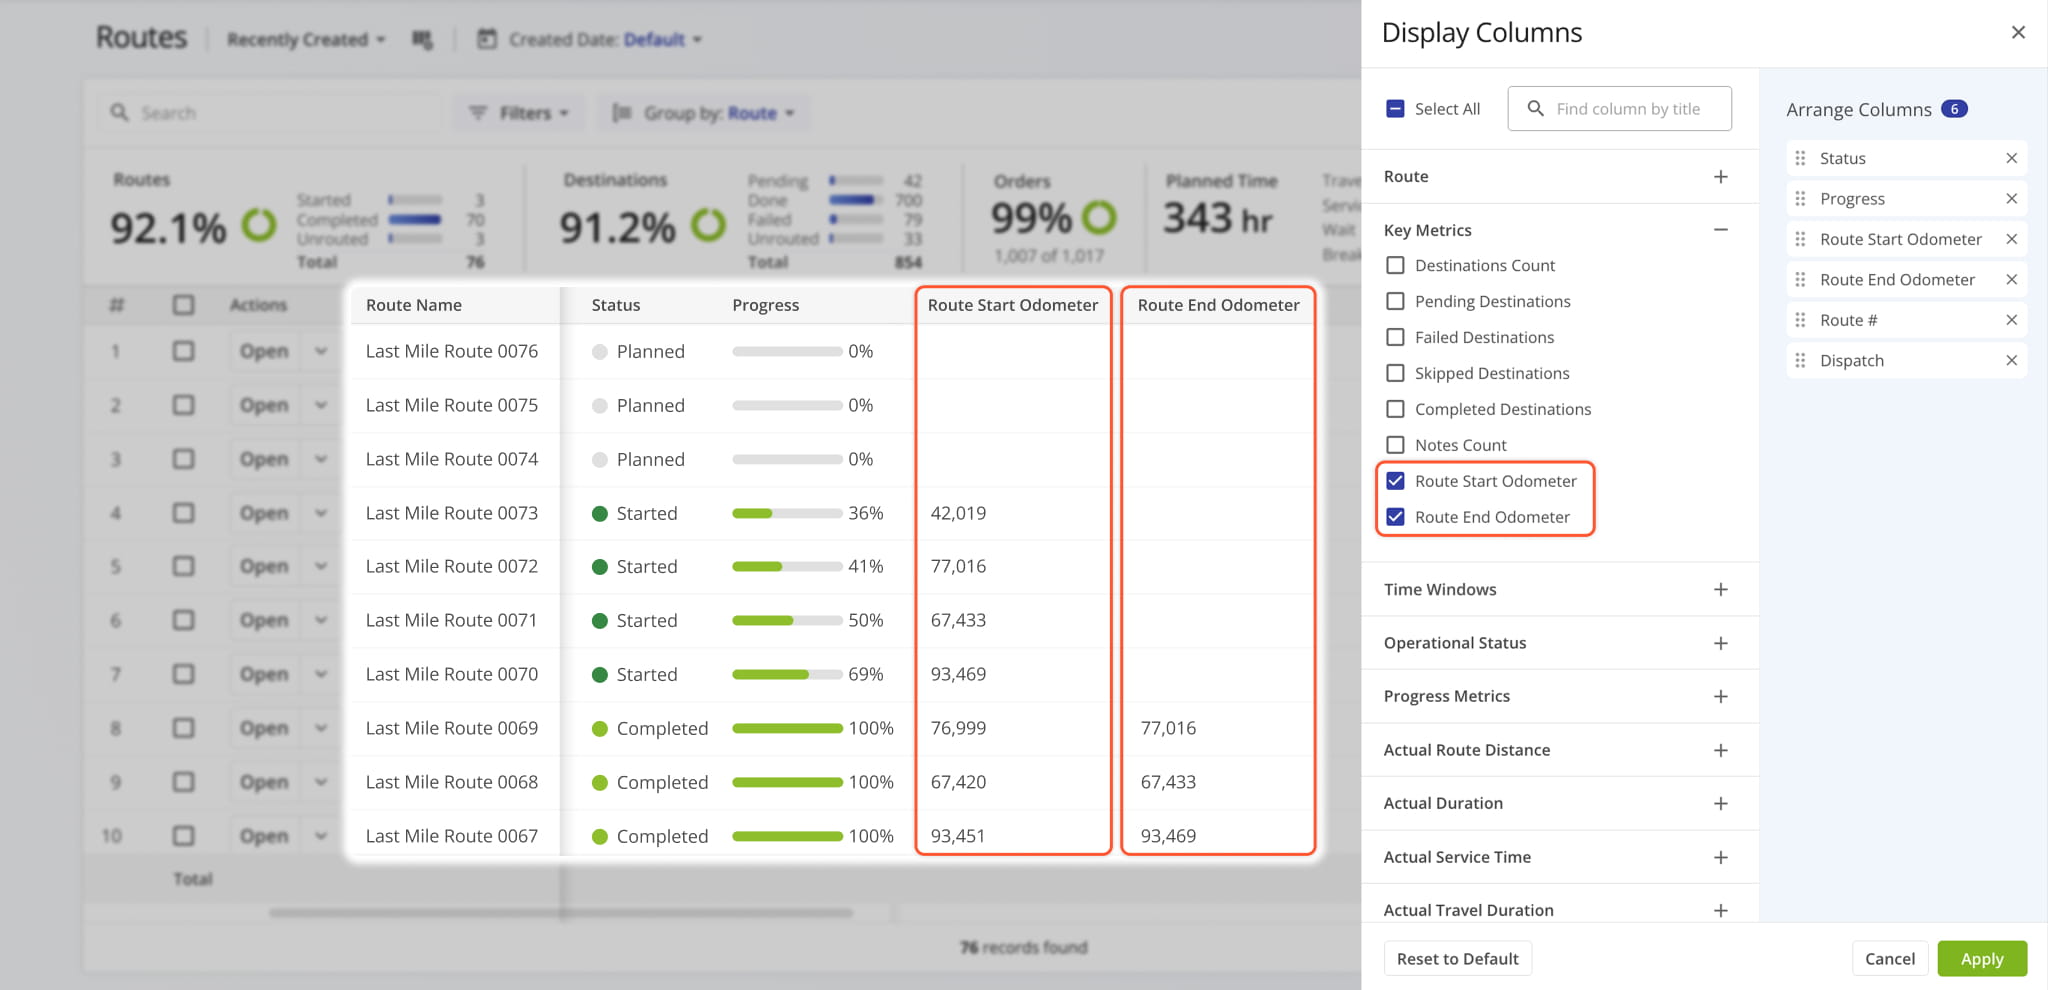
New vehicle odometer columns have been added to the Routes Page in “Display Columns” > “Key Metrics“.
The “Route Start Odometer” column shows the odometer reading of an Assigned Vehicle at the start of a route.
The “Route End Odometer” column shows the odometer reading of an Assigned Vehicle at the end of a route.
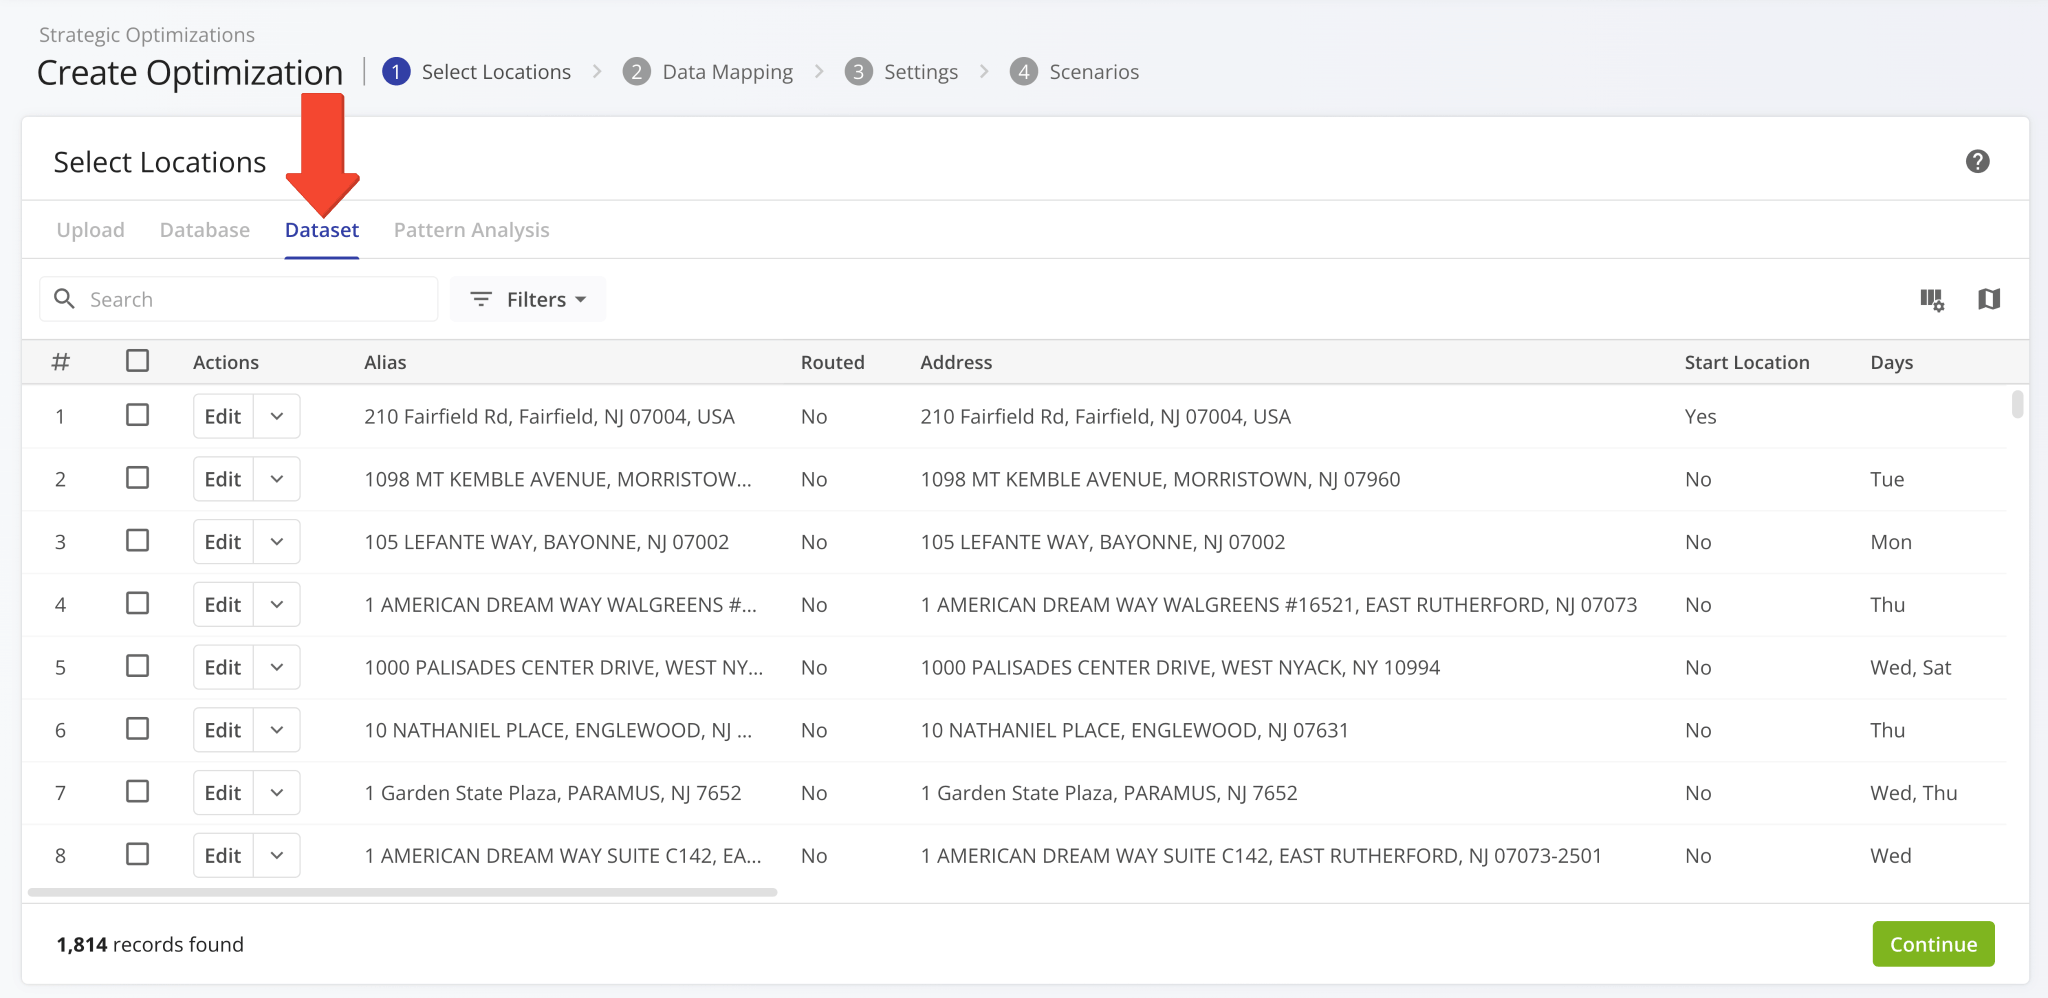
A new “Dataset” function was added when duplicating Strategic Optimizations. It enables you to select Locations from the original duplicated optimization for use in the new optimization.
Open Your Strategic Optimizations
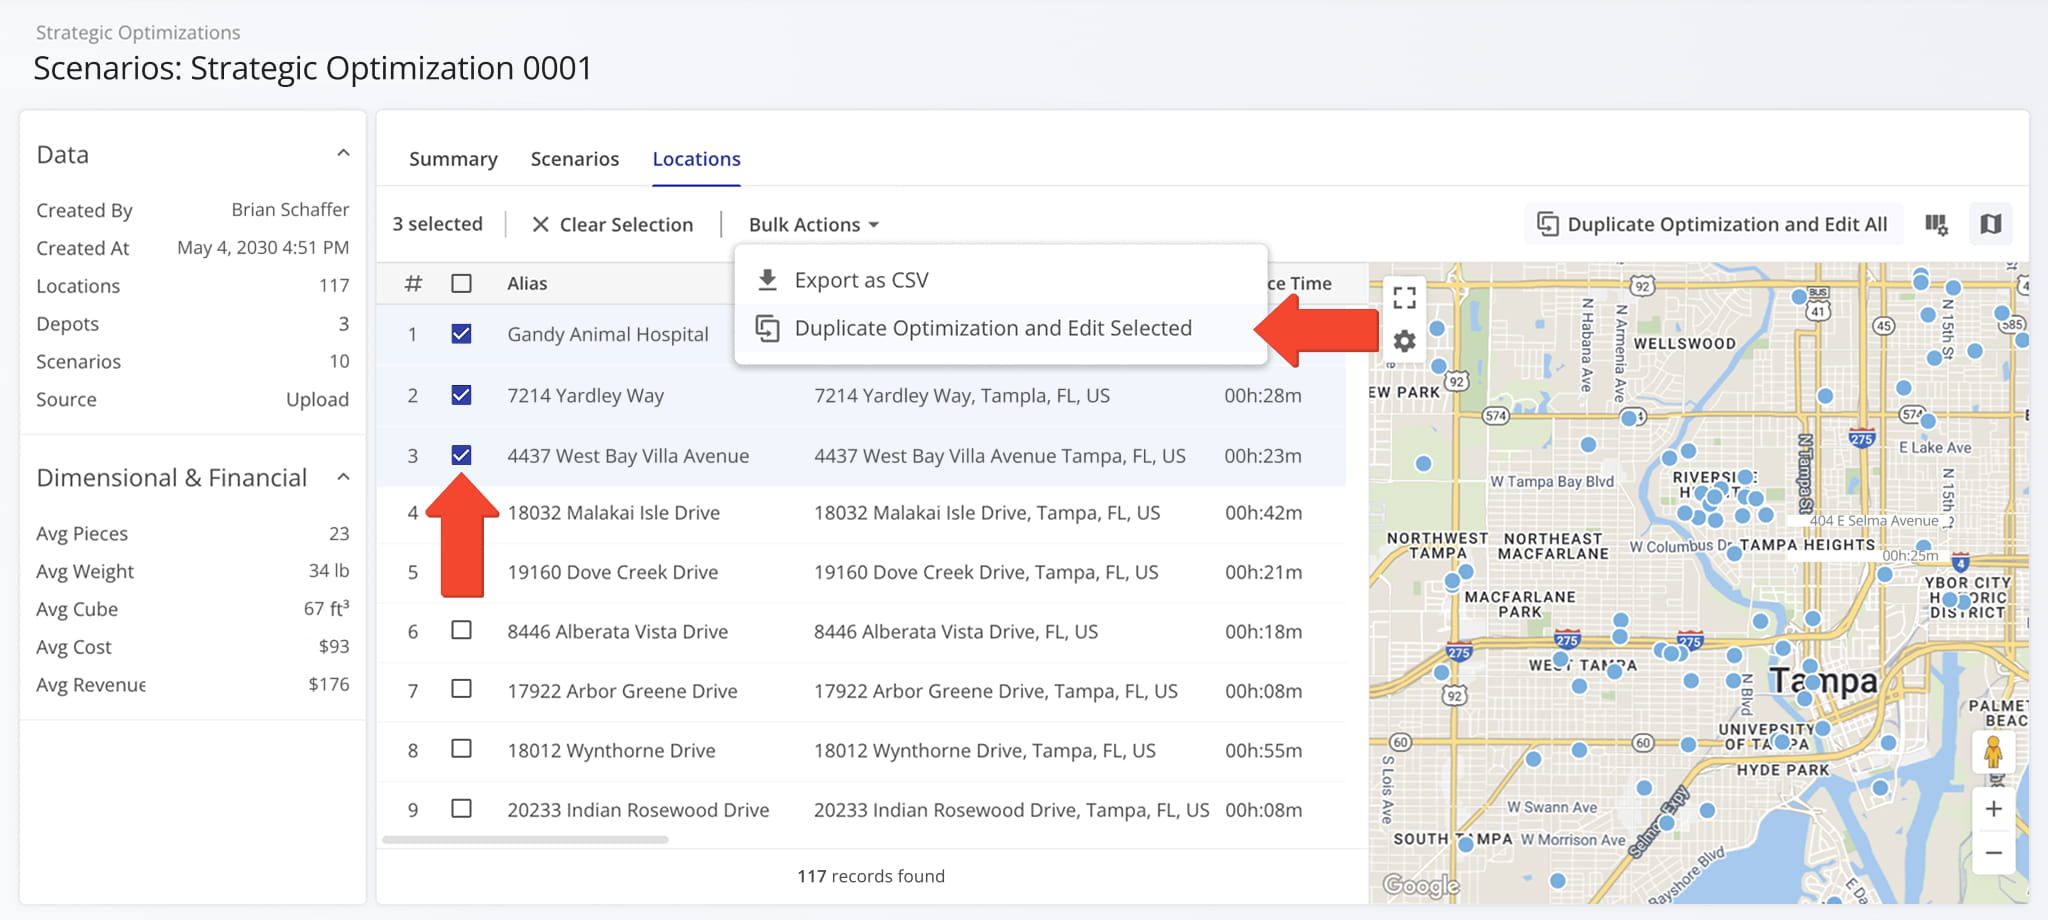
A new “Duplicate Optimization and Edit All” button was added to the “Locations” tab of open Strategic Optimizations. It enables you to create an editable draft based on the current optimization with all locations and scenarios.
Open Your Strategic Optimizations

You can also do the same with only specific locations by selecting them and clicking “Bulk Actions” to access the “Duplicate Optimization and Edit Selected” option to create an editable draft based on the current optimization with the selected locations.
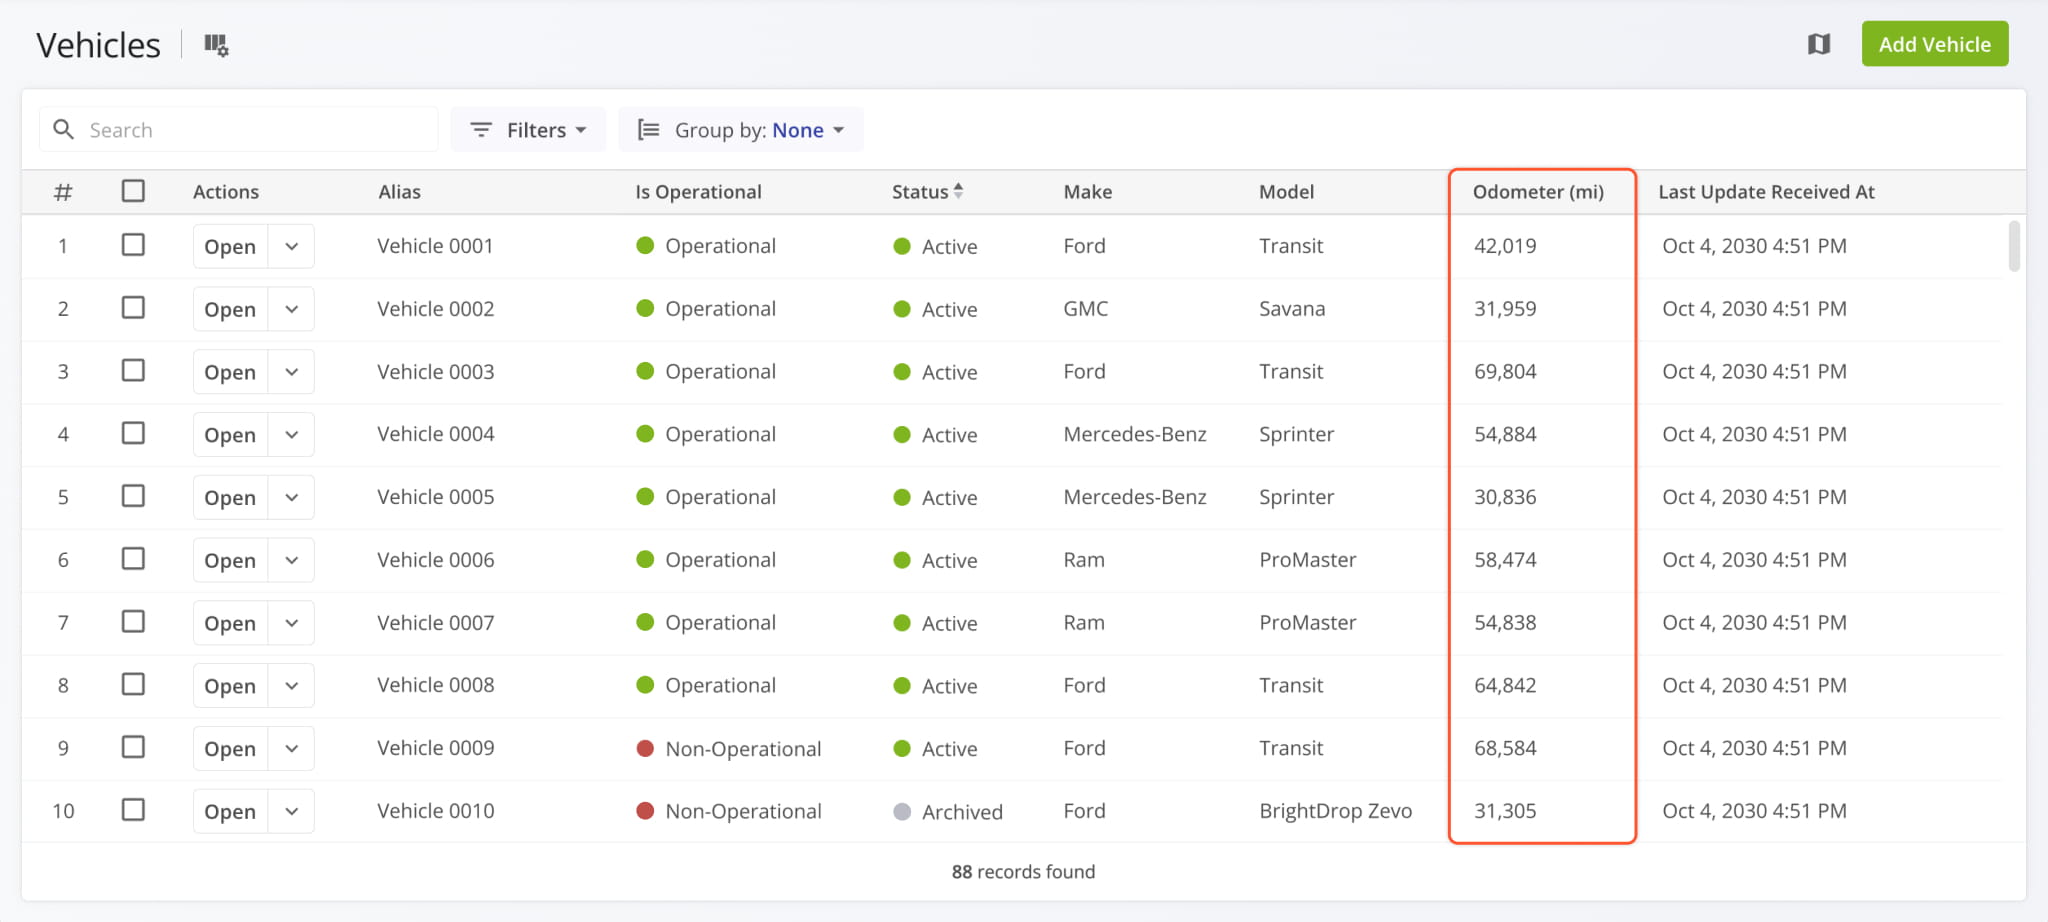
A new vehicle odometer column was added to the Vehicles Page in “Display Columns” > “Telemetry“.
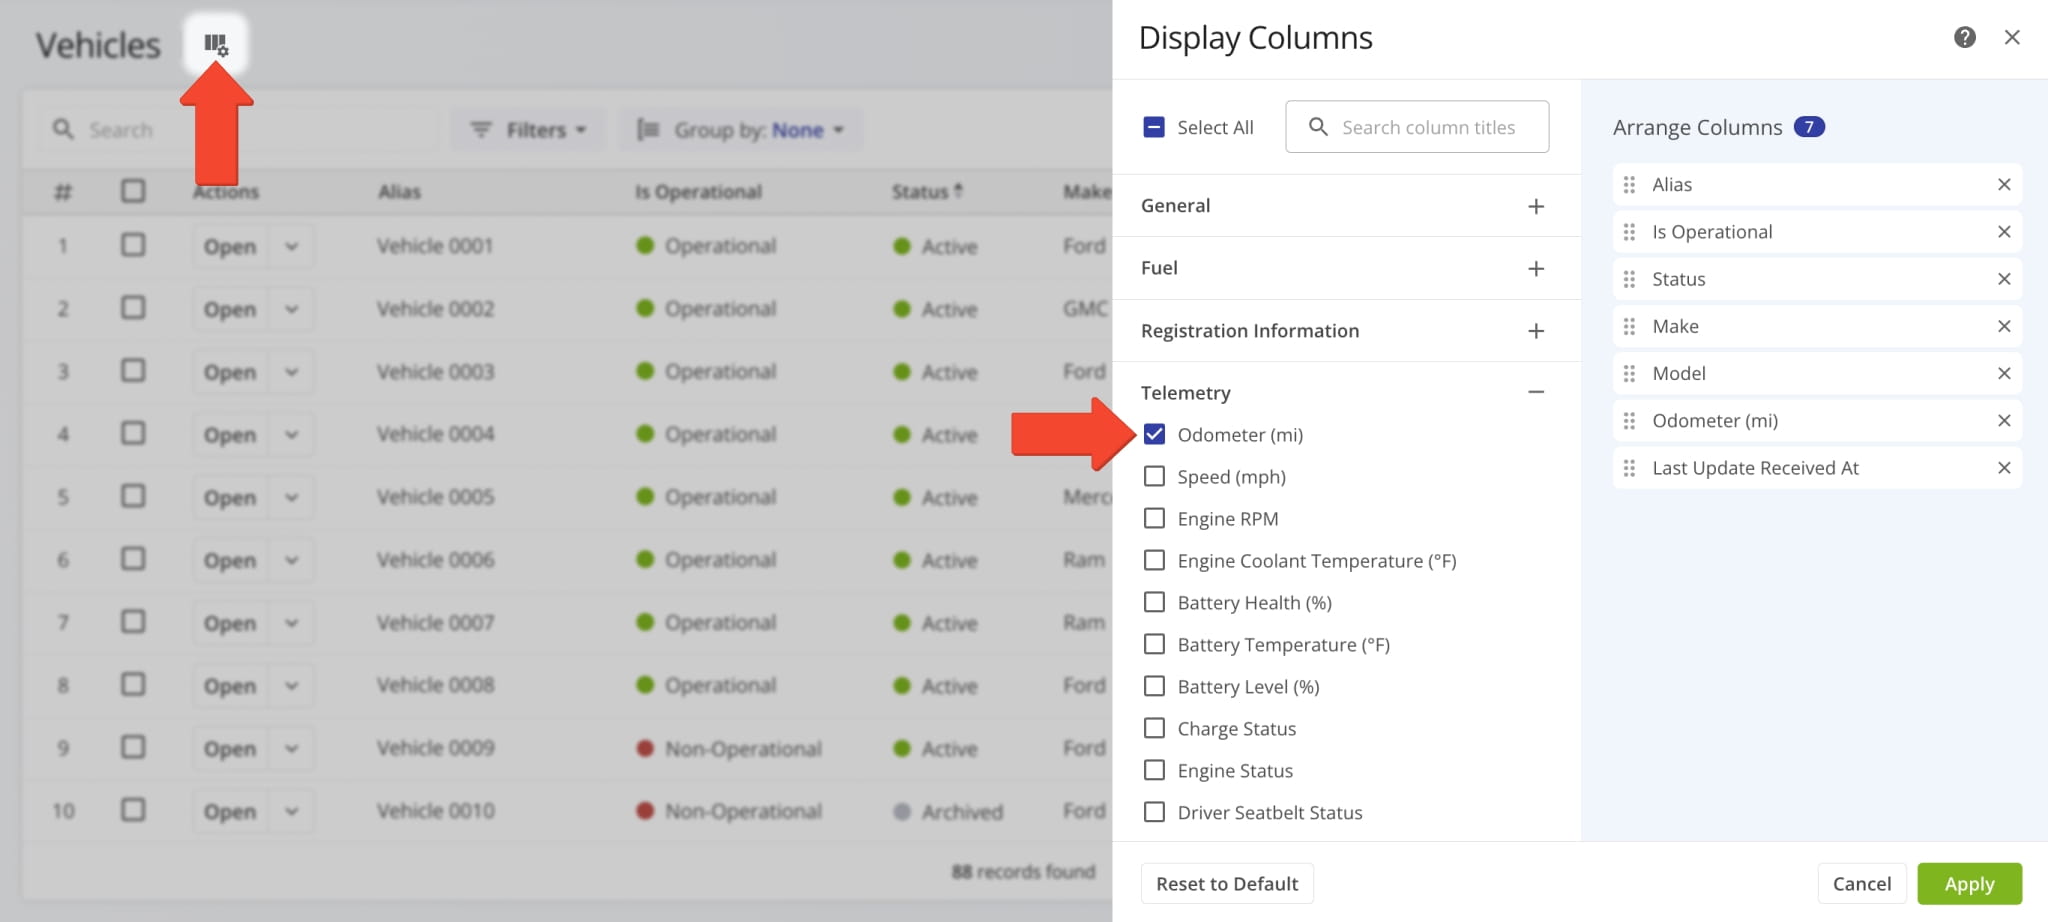
The “Odometer (mi)” column shows the most recent total mileage value of your fleet vehicles.
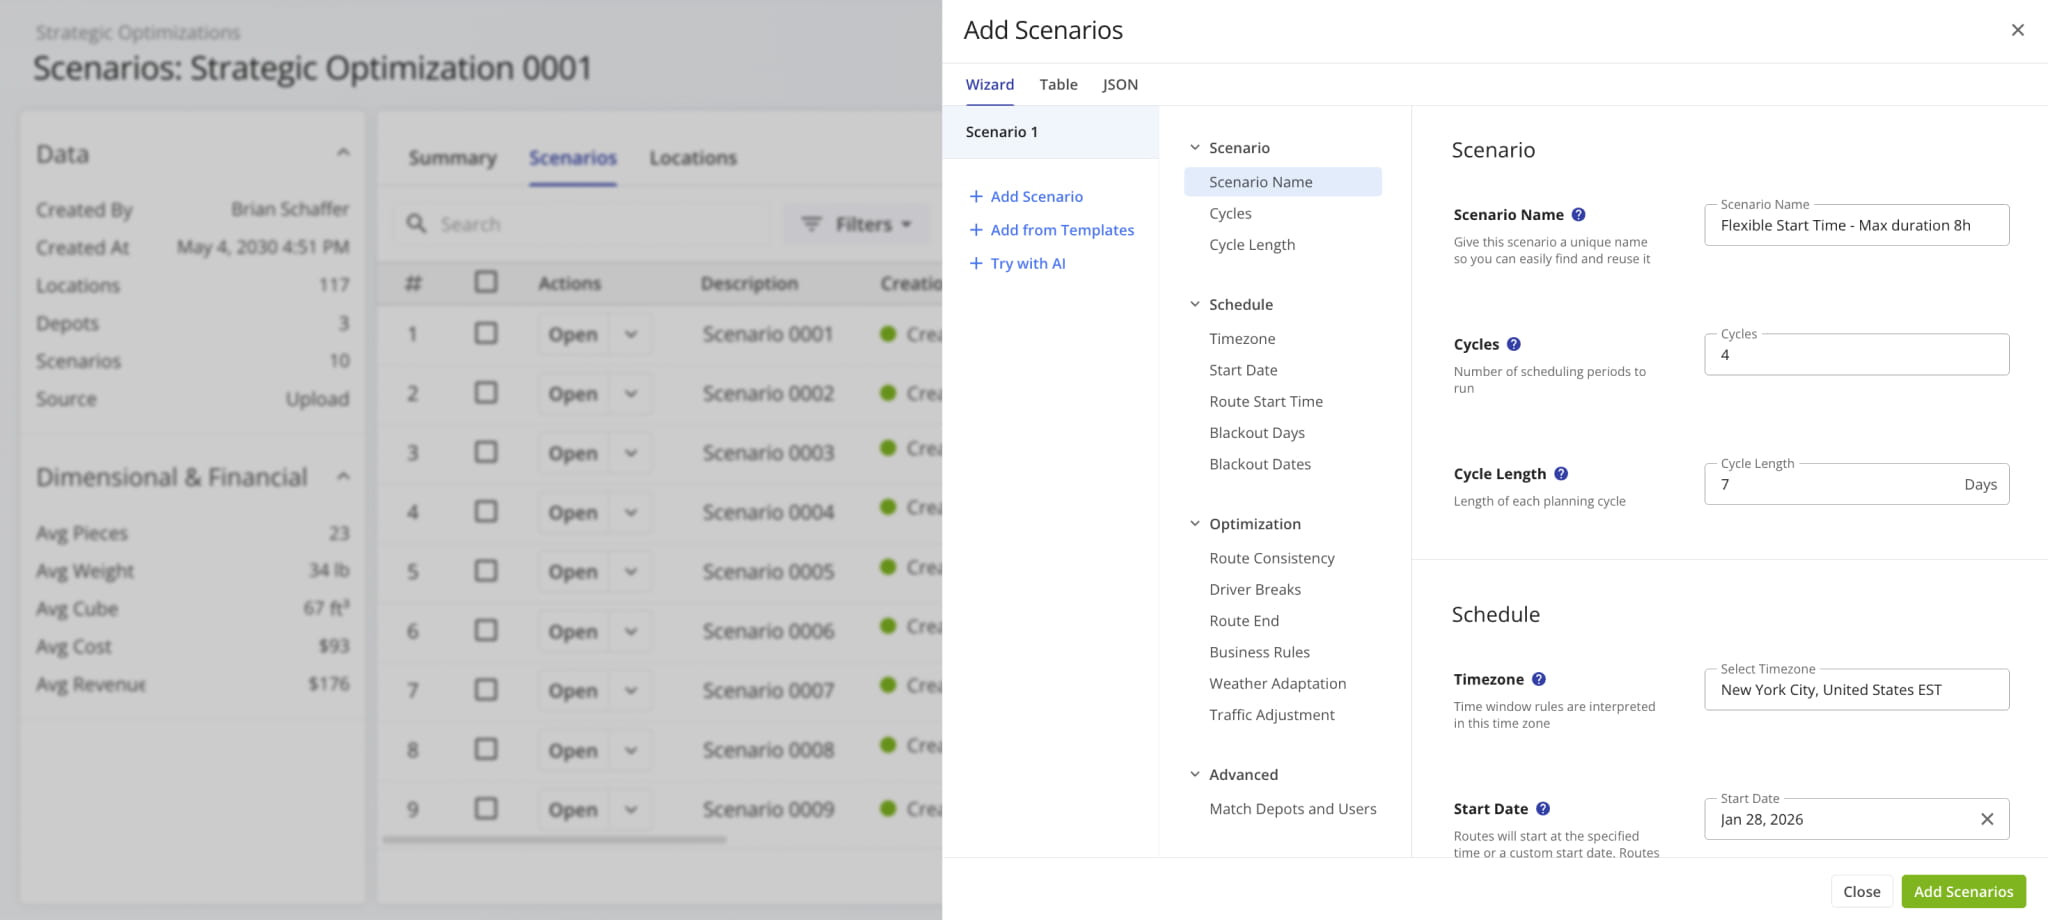
A new button was added to open Strategic Optimizations, which enables you to add scenarios to an optimization.
Open Your Strategic Optimizations
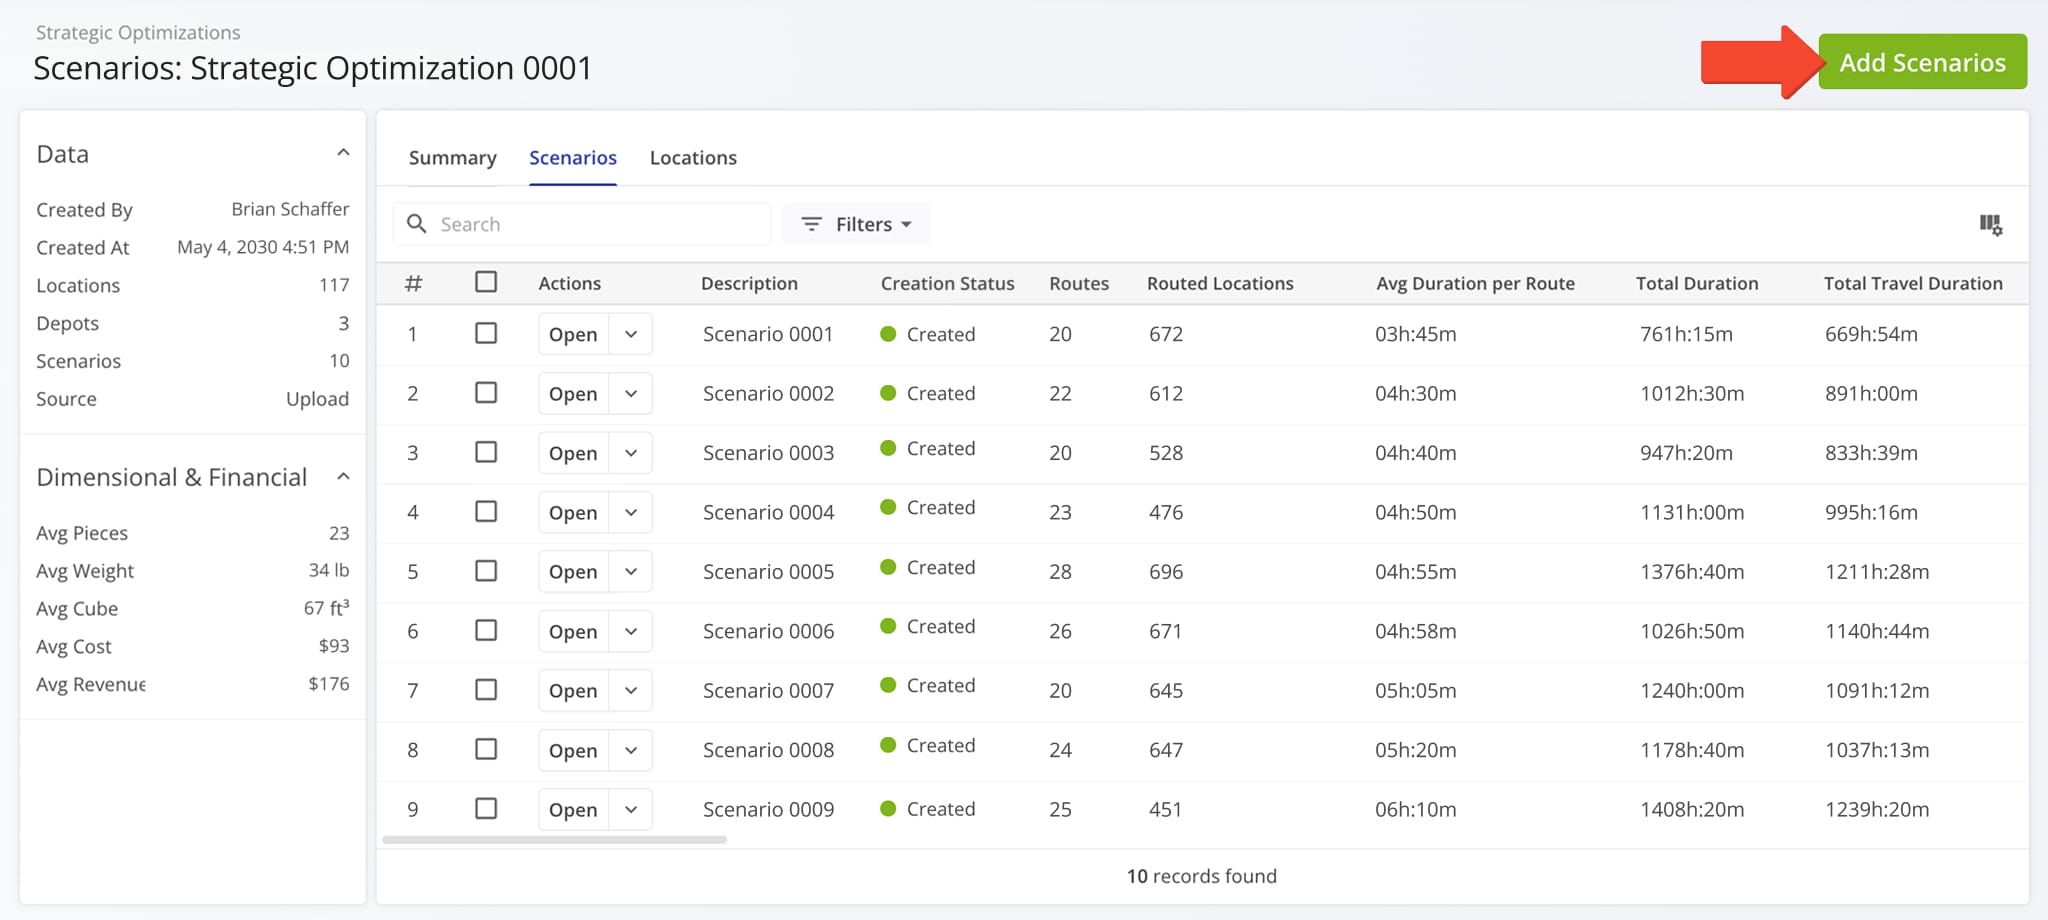
The “Add Scenarios” panel supports all the same options as creating strategic optimizations.
A new route edit action menu was added to Route Snapshots when you click the Down Arrow next to the “Edit Route” button in the top-right. This enables you to make quick edits to a route without opening the Route Editor.
See the list below to learn more about the new quick edit actions.
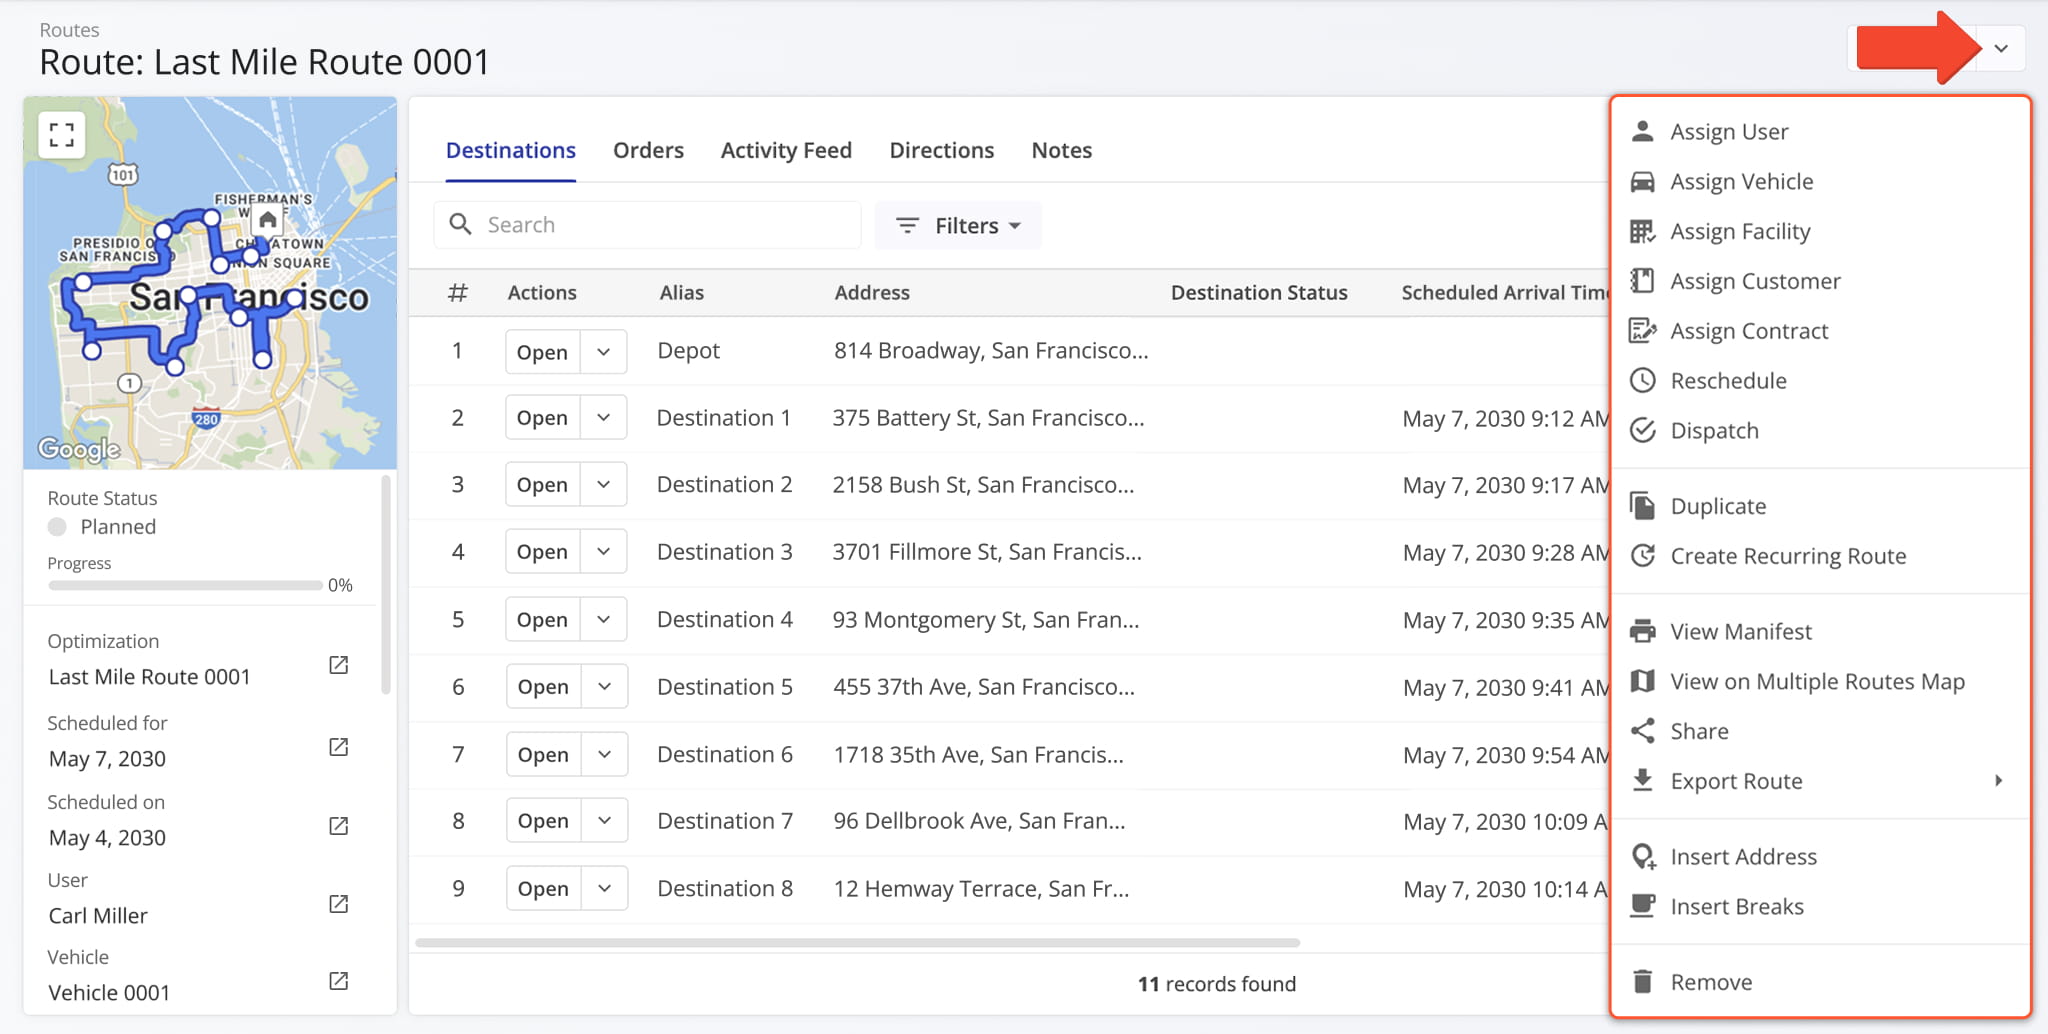
Assign User: Assign a driver or team member to the route.
Assign Vehicle: Assign a vehicle to the route from your homogeneous or mixed fleet of vehicles.
Assign Facility: Assign a specific facility to the route, linking it to a warehouse, depot, or other facility.
Assign Customer: Assign a specific customer to the route, ensuring that visits are accurately linked to the correct client.
Assign Contract: Assign a contract to the route to tie route activities to specific contractual obligations.
Reschedule: Change the date and time of the day the route is scheduled to start.
Dispatch: Dispatch the route to send automated SMS and Email customer notifications.
Duplicate: Create a copy of the route. The new route will have “(Duplicate)” added to the end of its name.
Create Recurring Route: Create a new Master Route for use when planning recurring schedule routes.
View Manifest: Download or print a detailed Route Manifest. This manifest includes all available route data.
View on Multiple Routes Map: Open the route on the Routes Map.
Share: Share the route with other Users by direct link or send a link via Email.
Export Route: Export route data as a CSV spreadsheet or navigation data file for import into navigation devices.
Insert Address: Insert an address into the route by typing or searching the address in the “Address” field.
Insert Breaks: Add driver breaks on the route with customizable break duration and break trigger type.
Remove: Permanently delete the route.
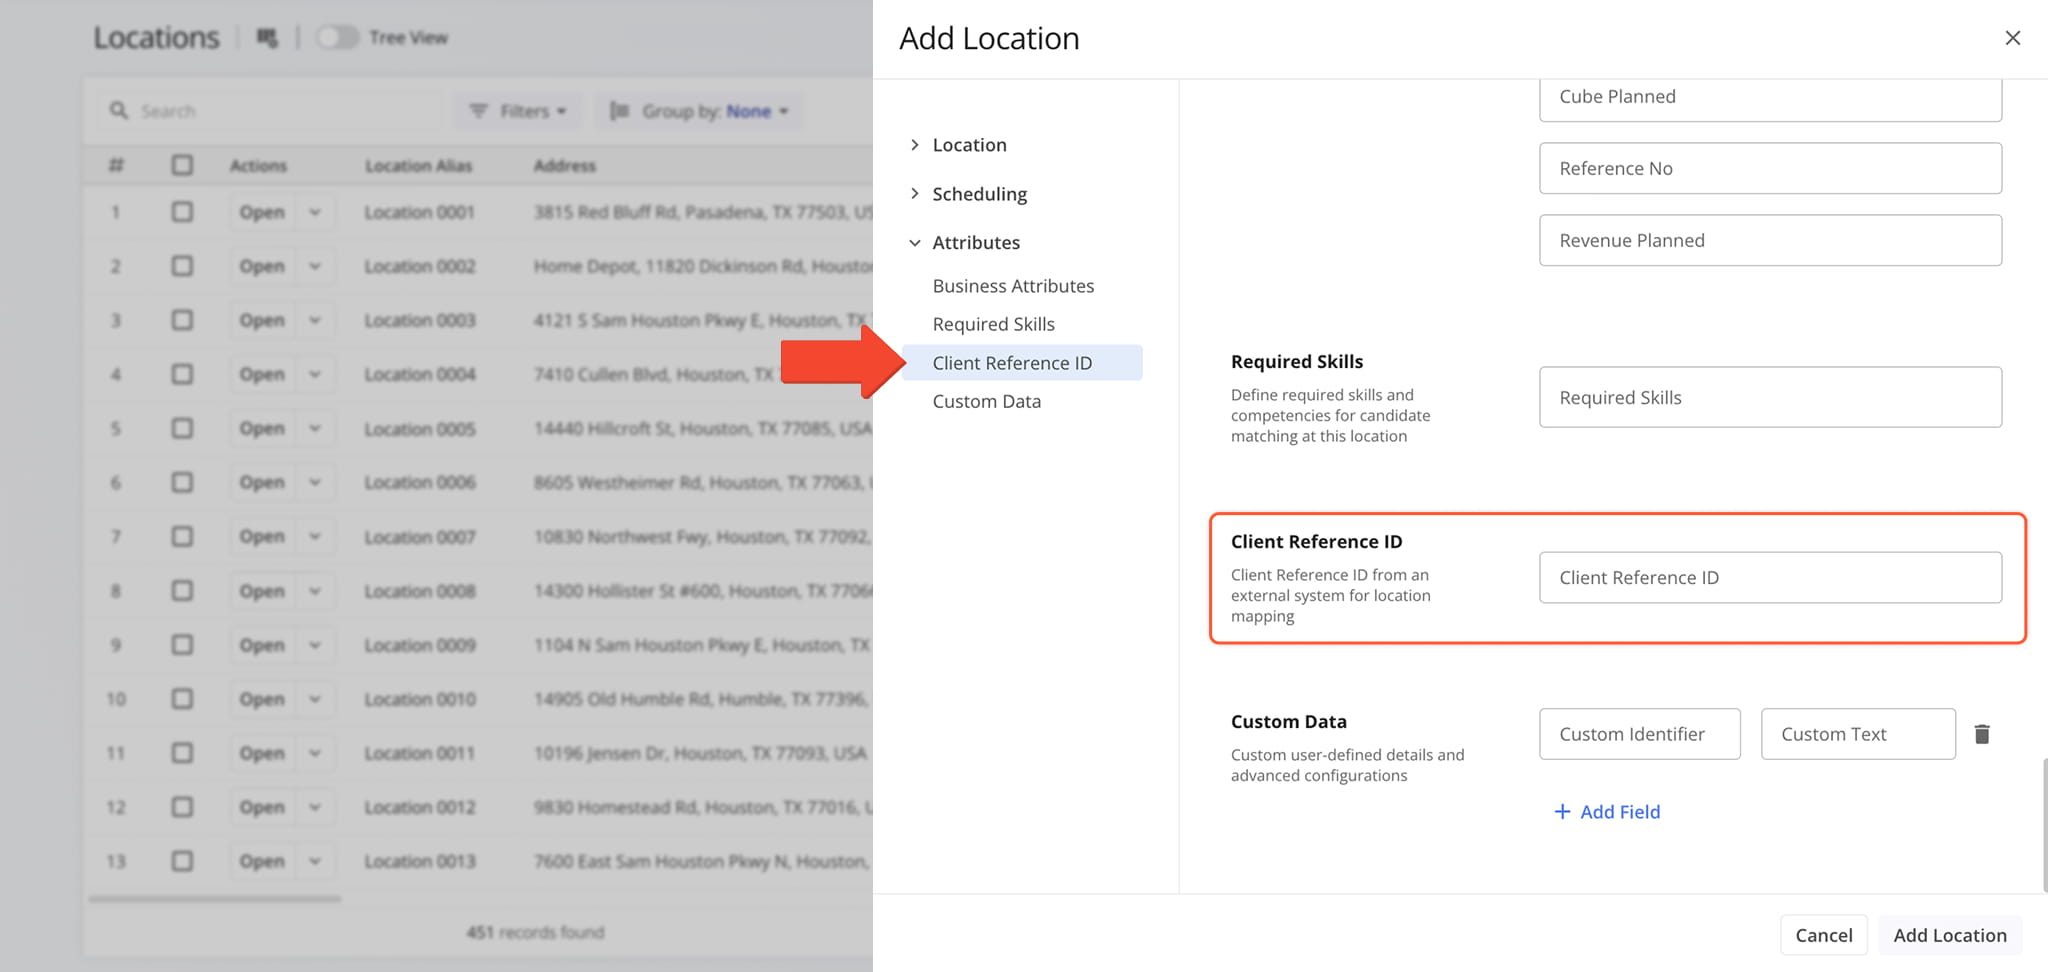
A new “Client Reference ID” field was added to the supported fields when adding and editing Customer Locations. This enables you to add Client Reference IDs from external systems to your locations for better integrated location mapping.
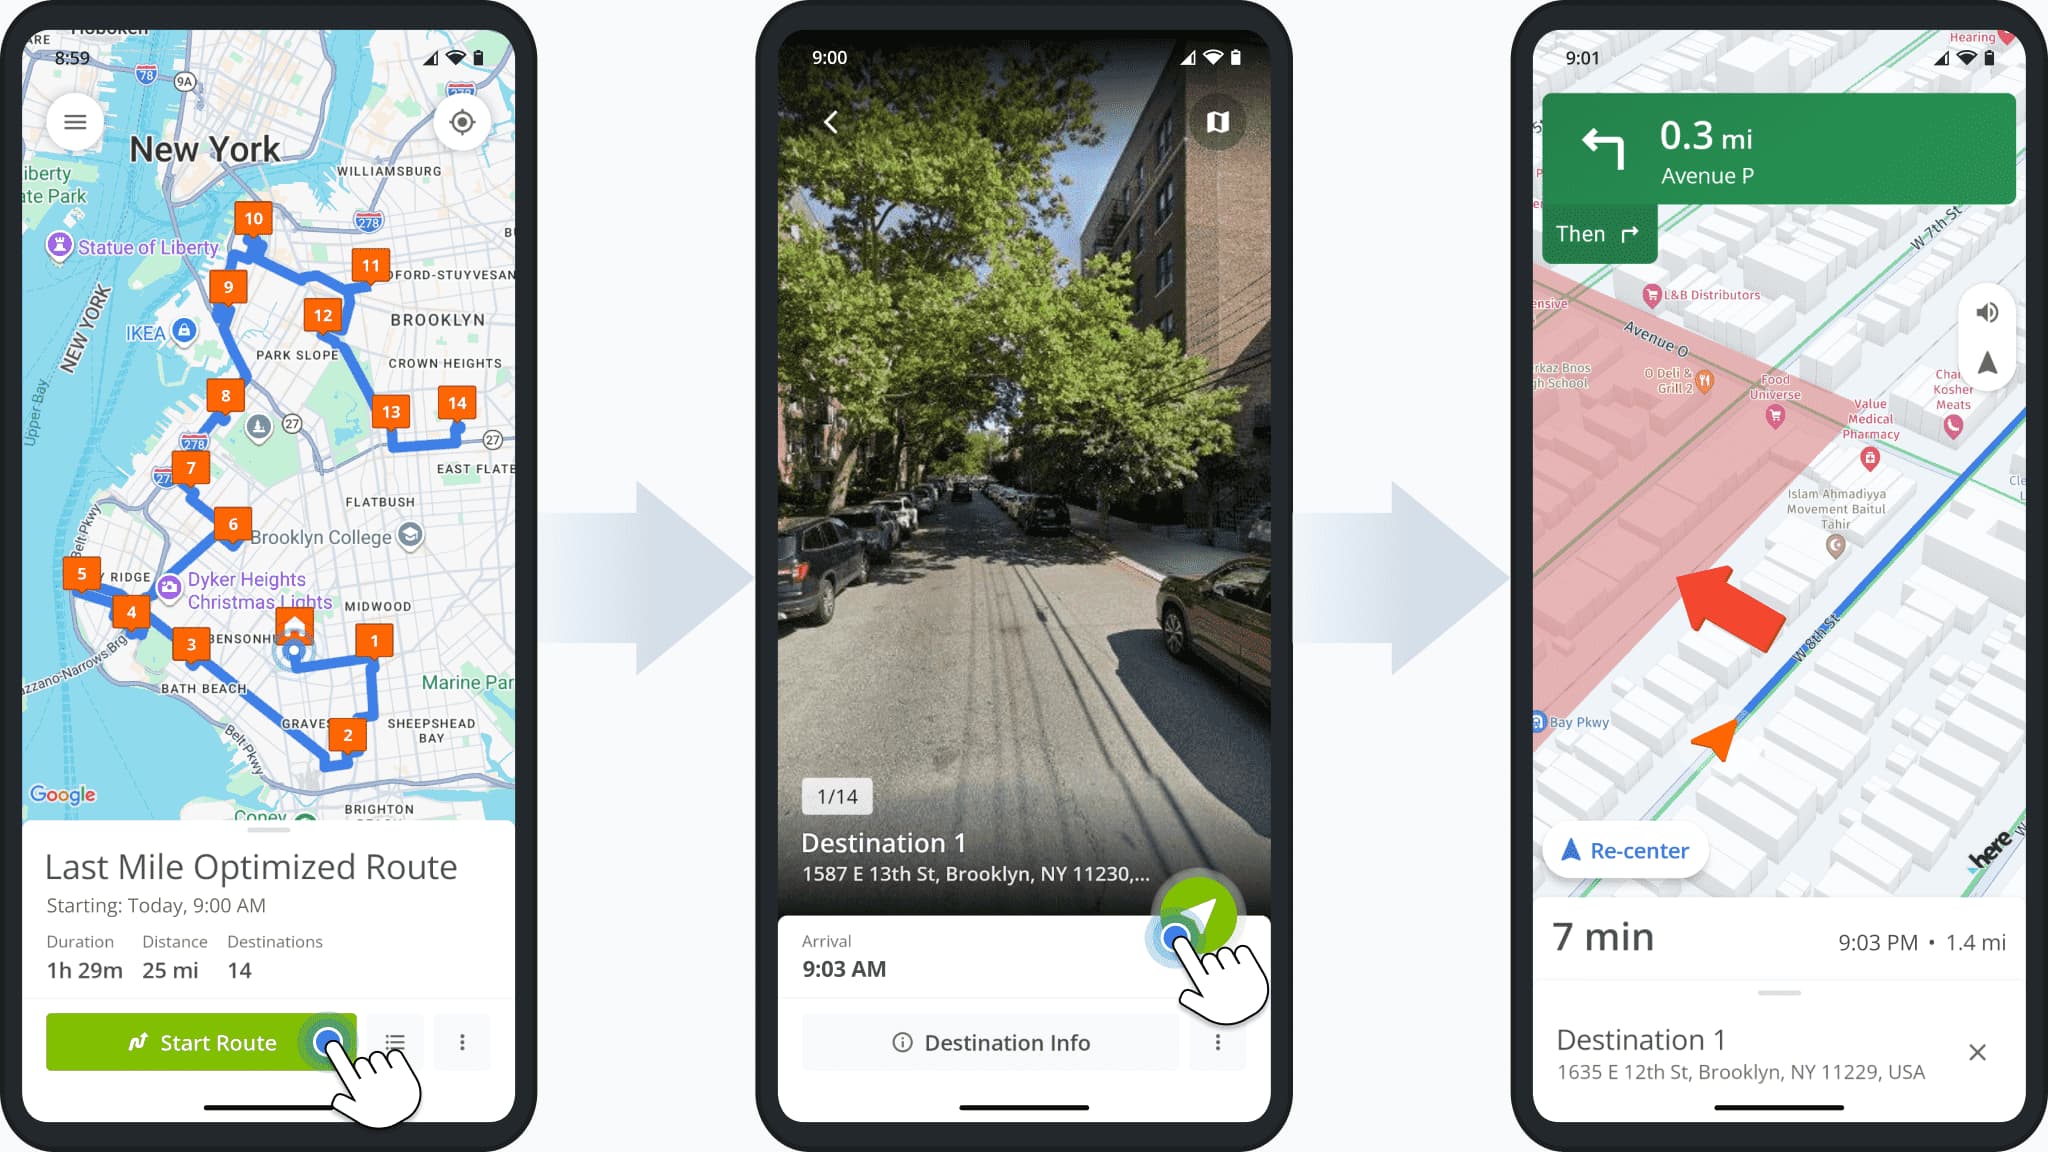
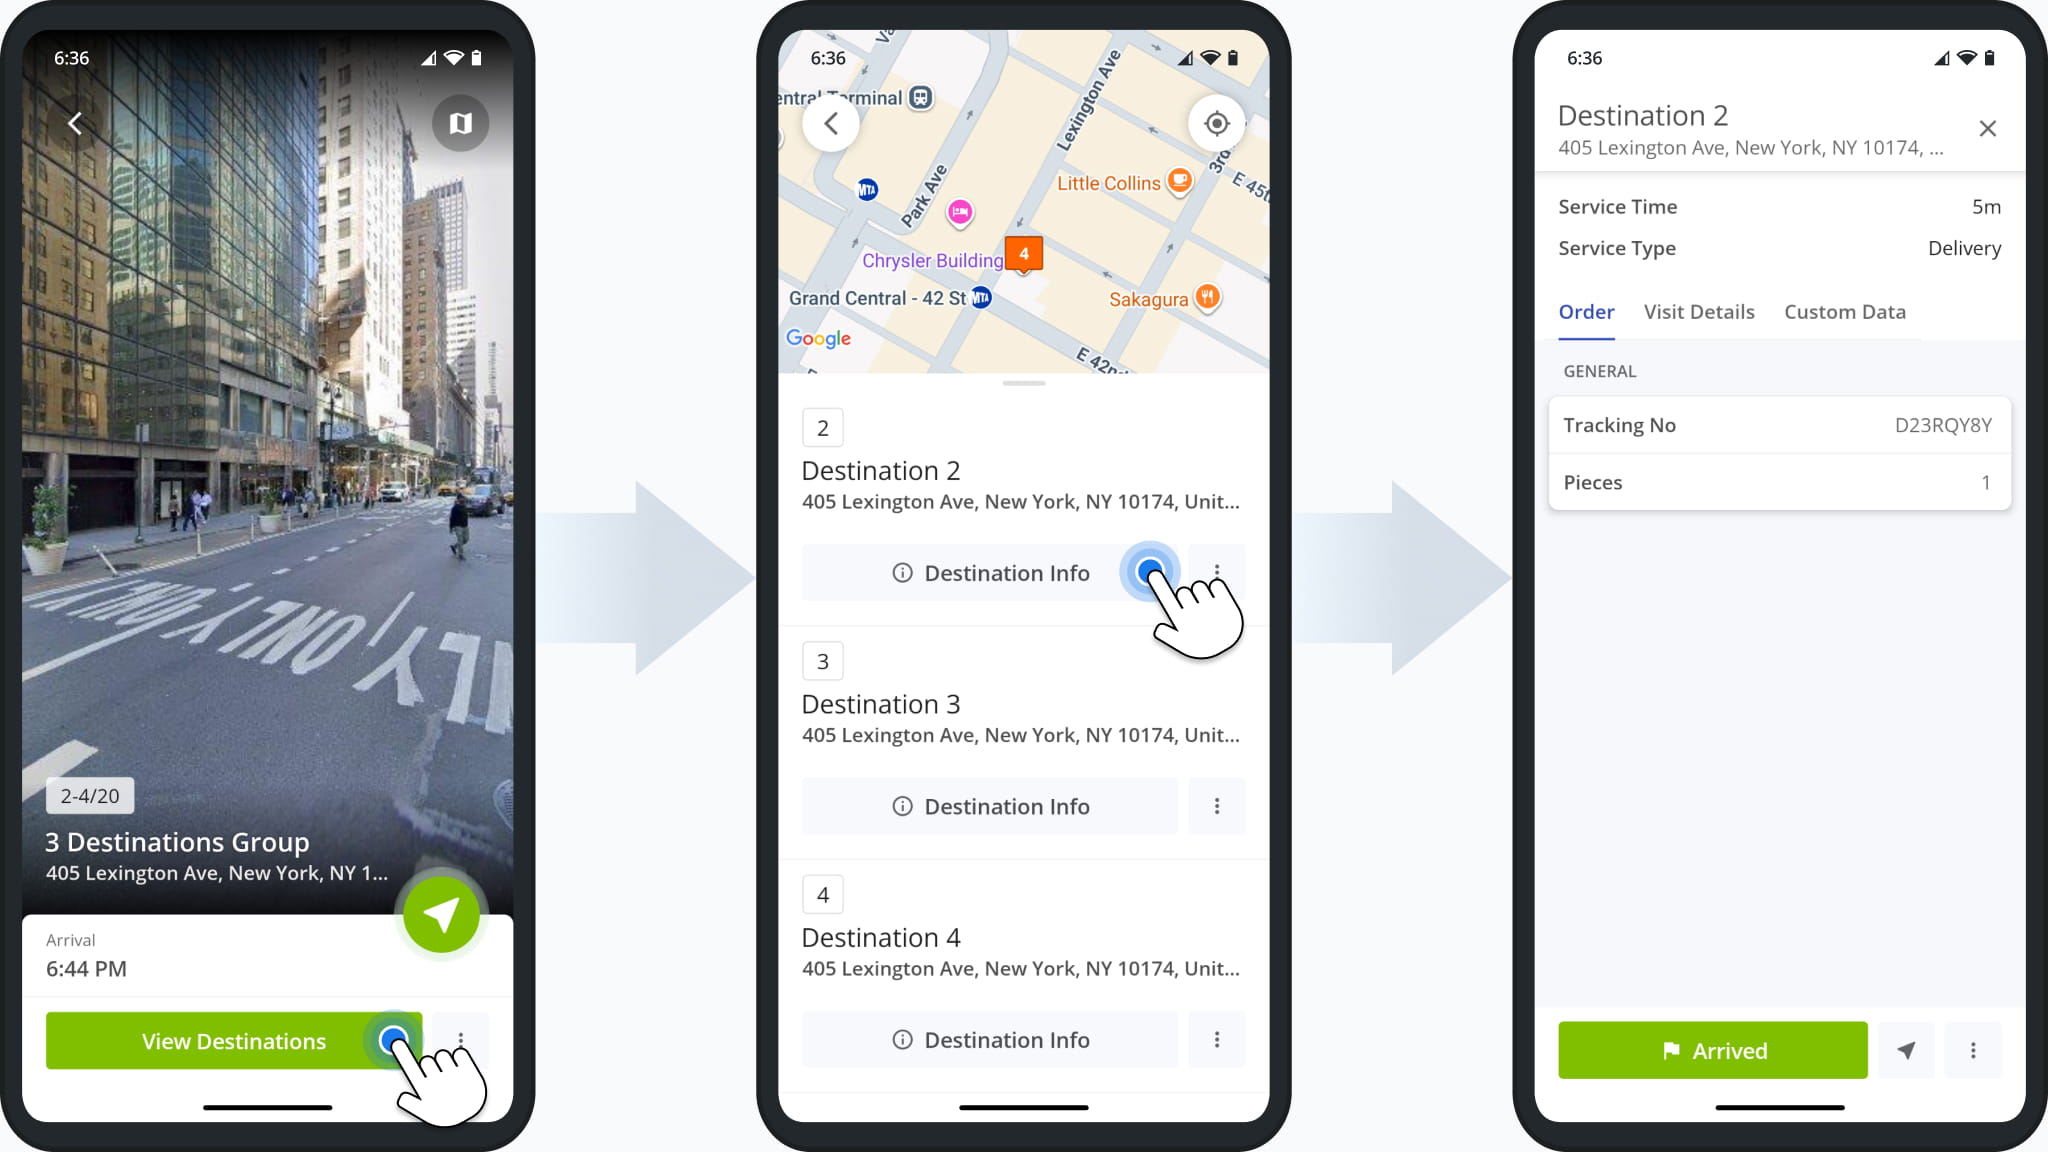
Route4Me’s Android App received multiple enhancements, including a redesigned Destination Info screen, Destination Groups in Visually Immersive Mode, new Routes List functionality, and the release of Visually Immersive Mode for Android tablets.
The image shows the new Destination Info screen. Previously, users would have to drag the information panel up to see all fields. The new Destination Info screen shows more information in a way that’s easier to read and navigate for users.
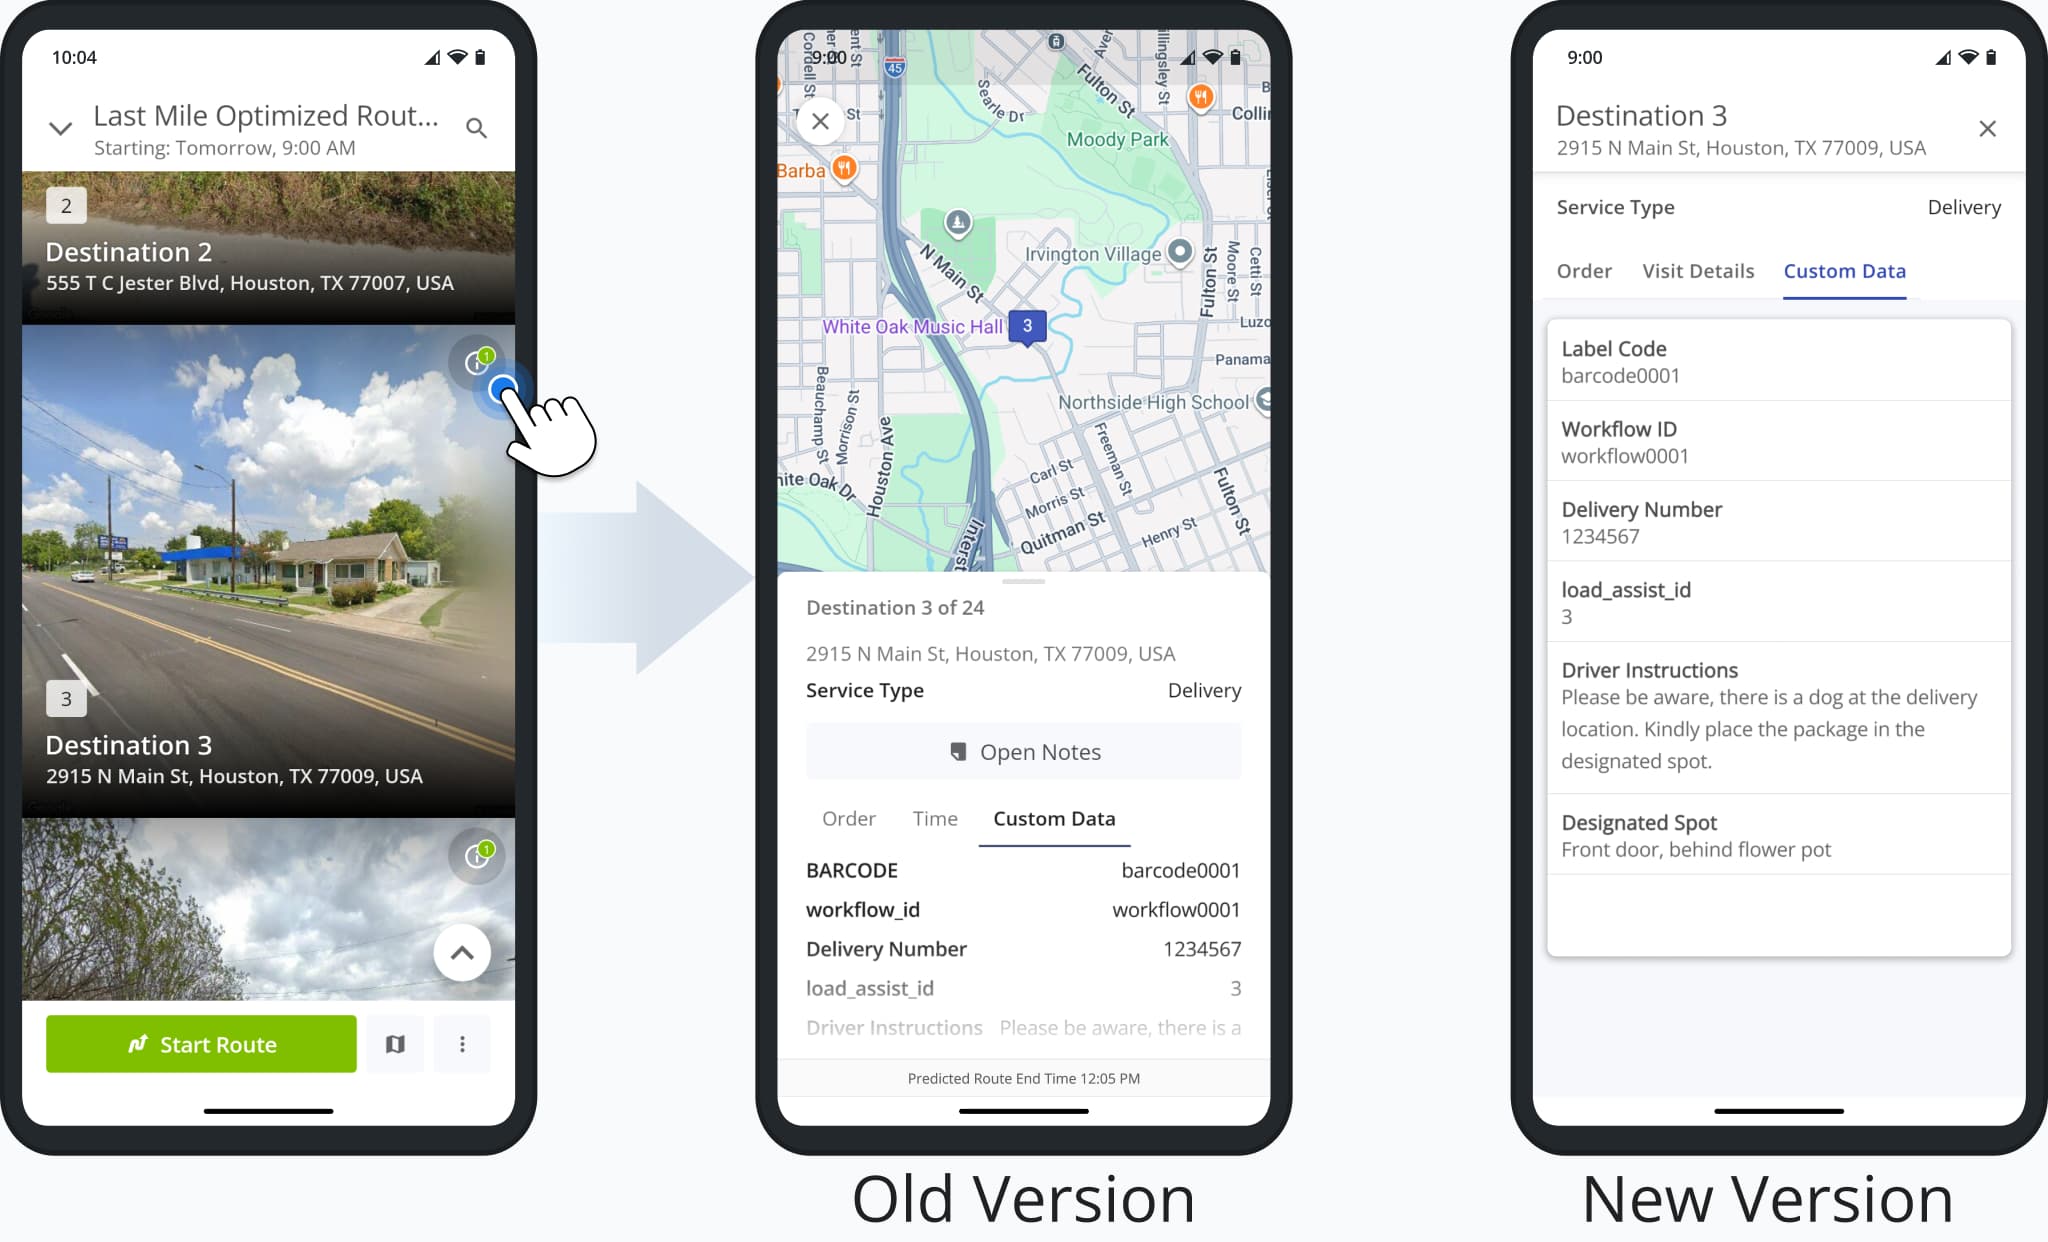
Additionally, Grouped Destinations are now available in Visually Immersive Mode, enabling users to access destination details when multiple destinations share a single address.
The “Destination Info” button in Destination Groups opens the updated Destination Info described above.
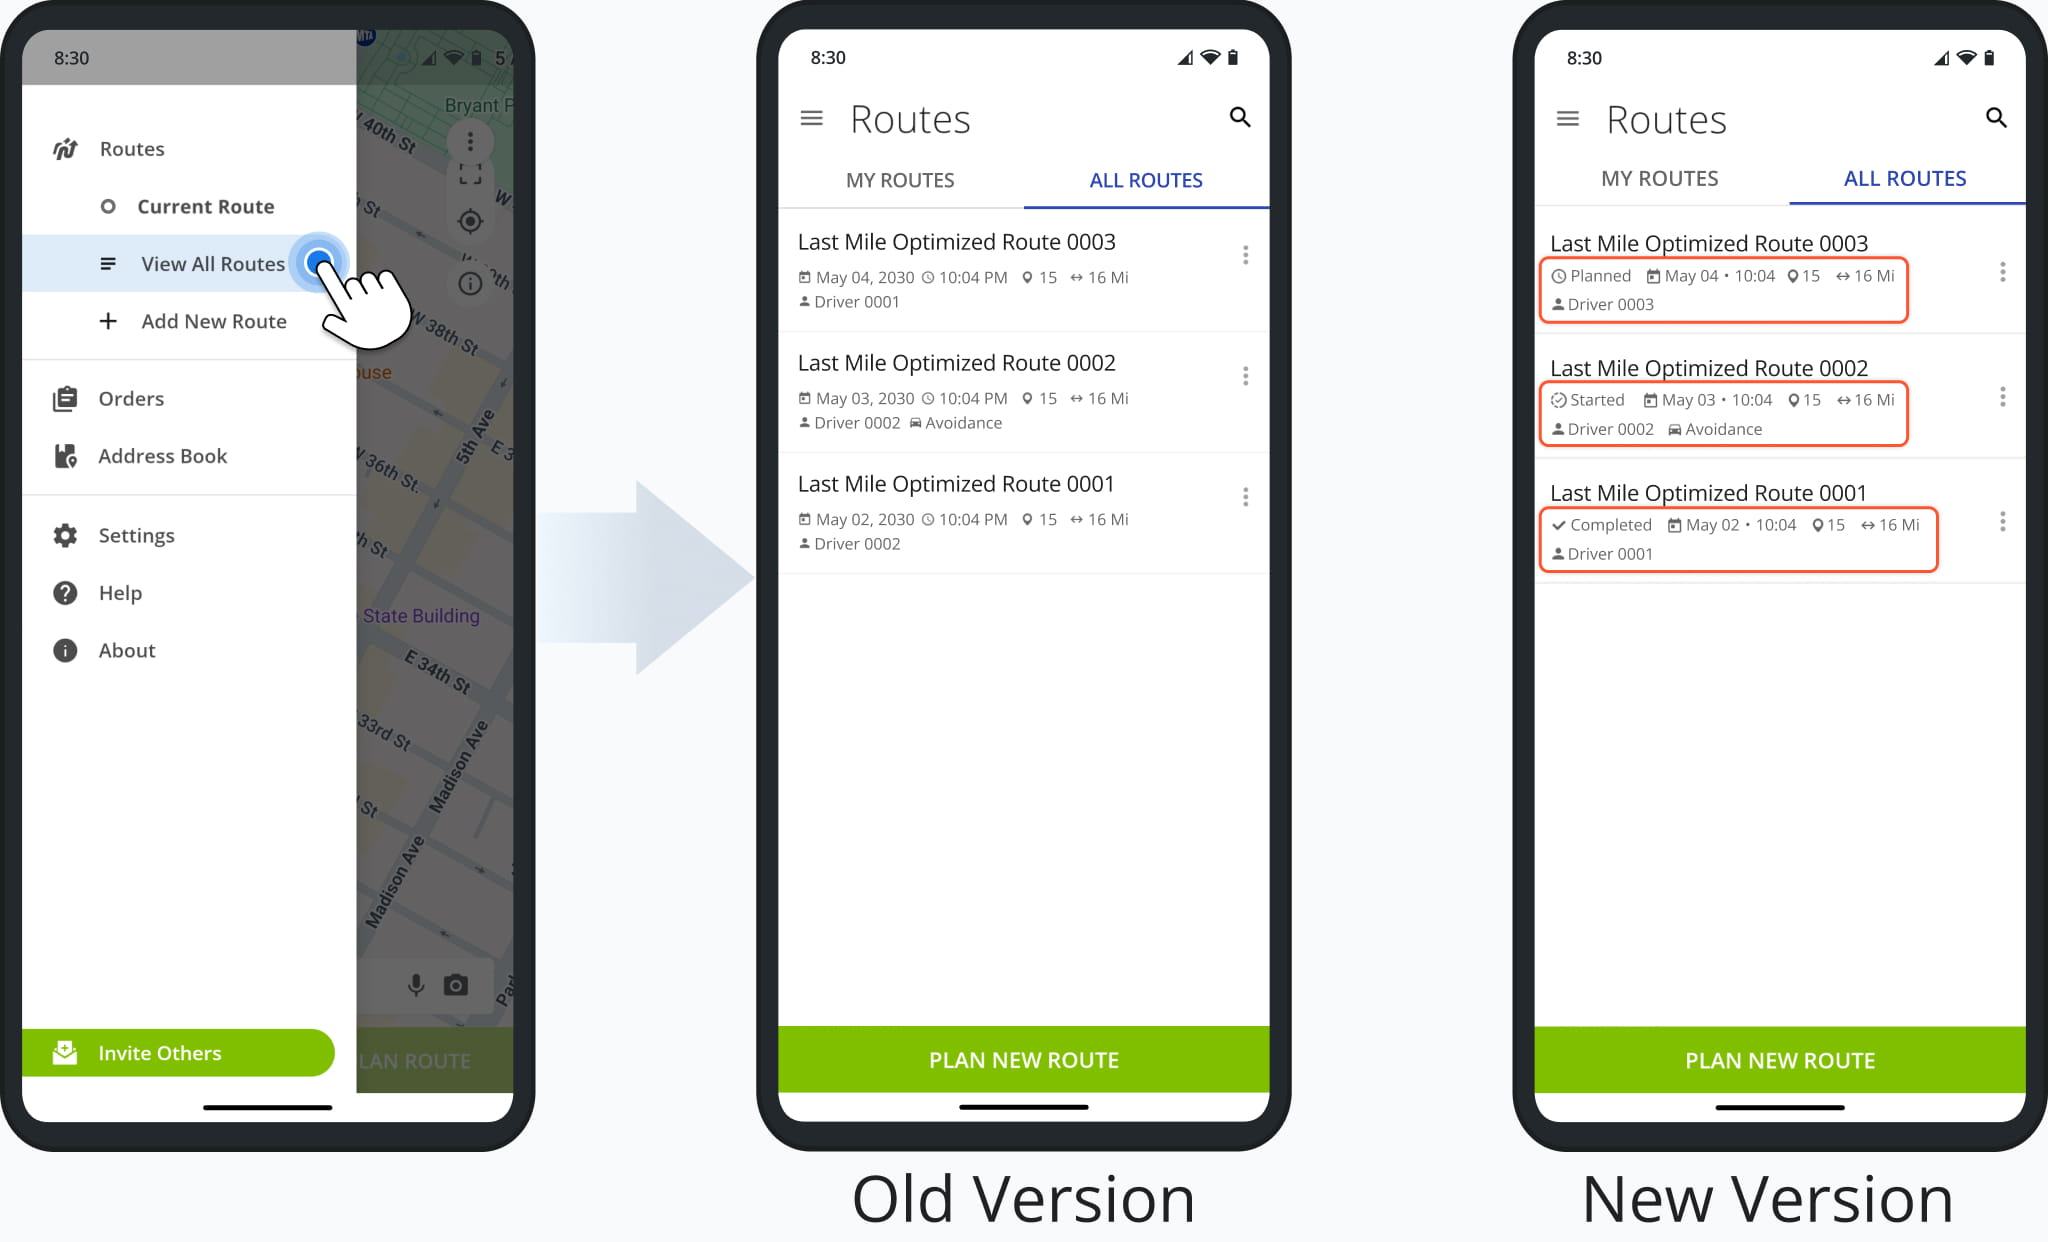
Furthermore, the Mobile Routes List on the Route4Me App has been updated to show route statuses and condensed schedule information. This makes it easier to see the current status of a route, and combining the scheduled date and time into one field makes it easier to see exactly when routes are scheduled to start.
This version of the Route4Me App brings Visually Immersive Mode to tablets for the first time. It enables users to get more context for destinations with immersive street views and streamlines starting, navigating, and completing routes.
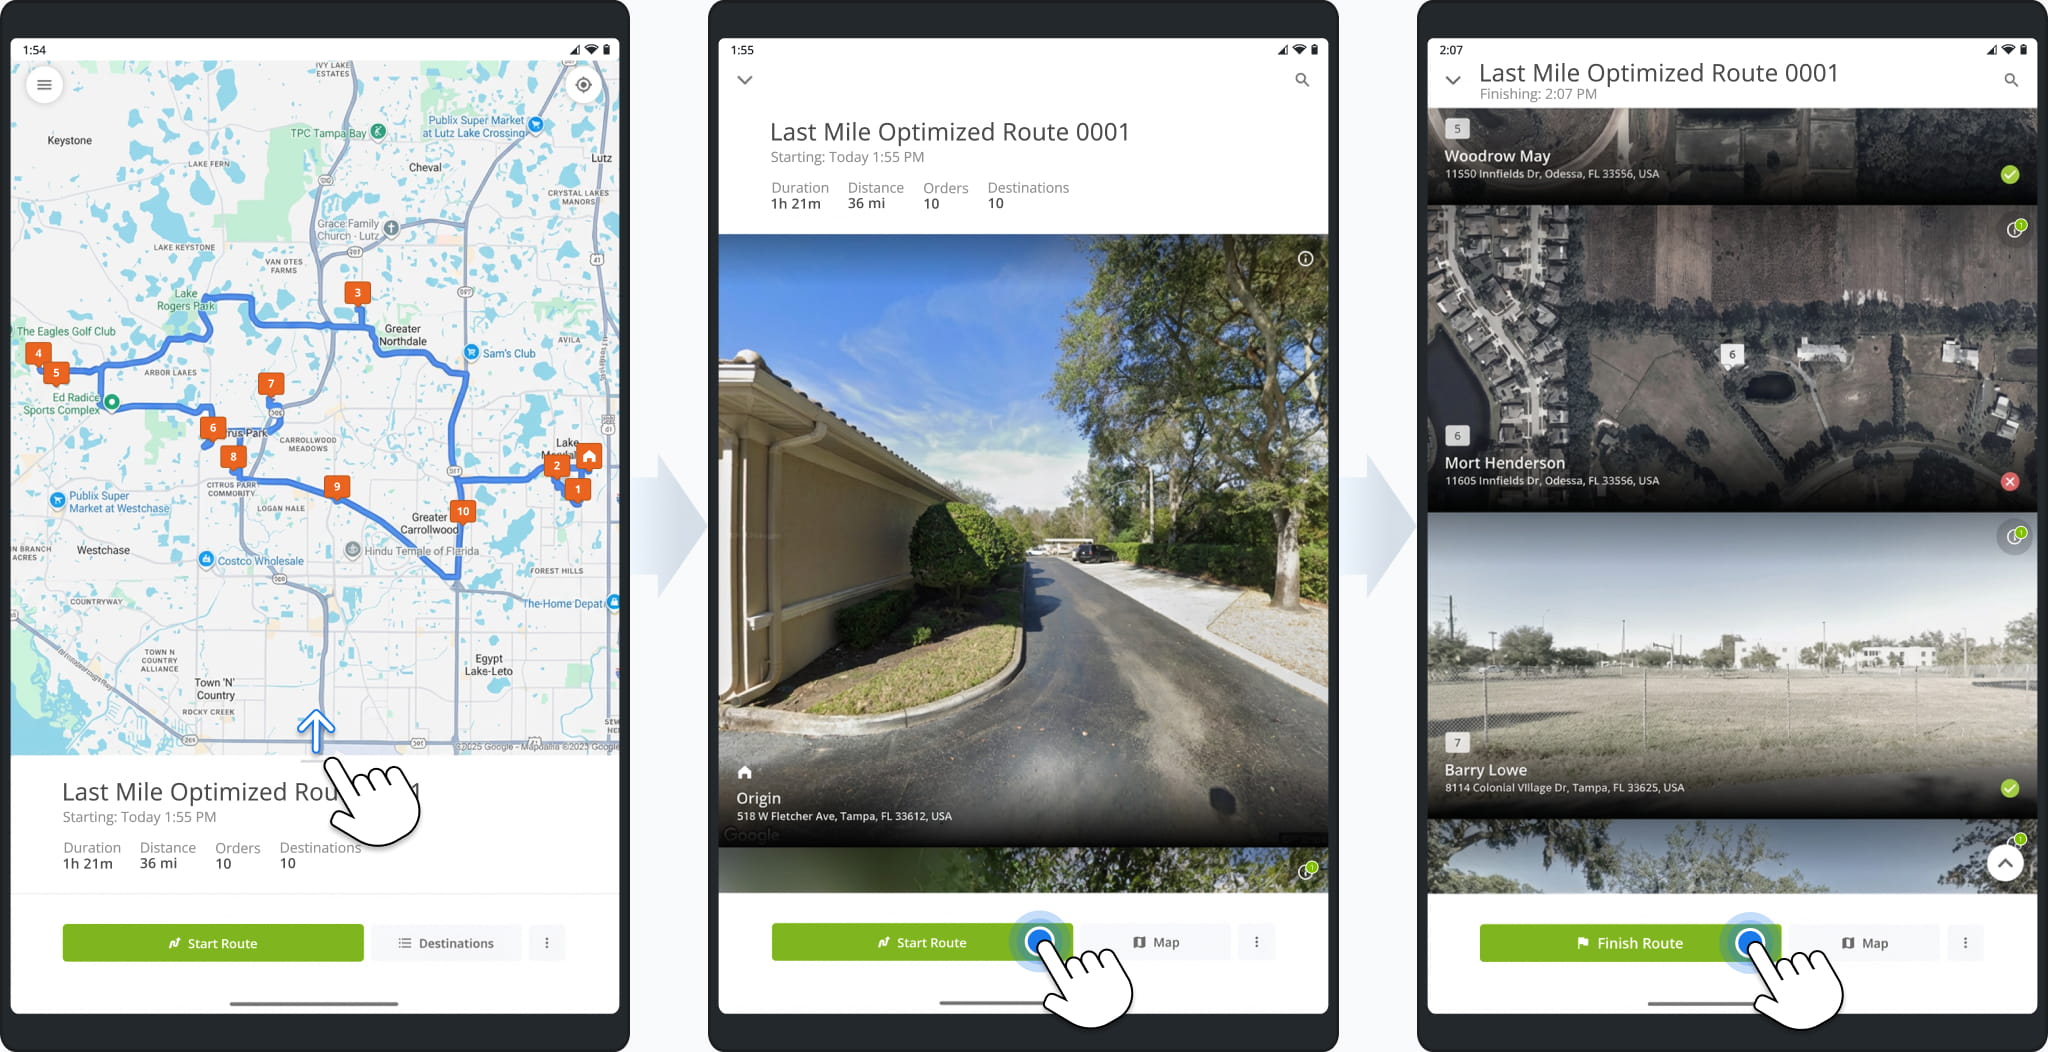
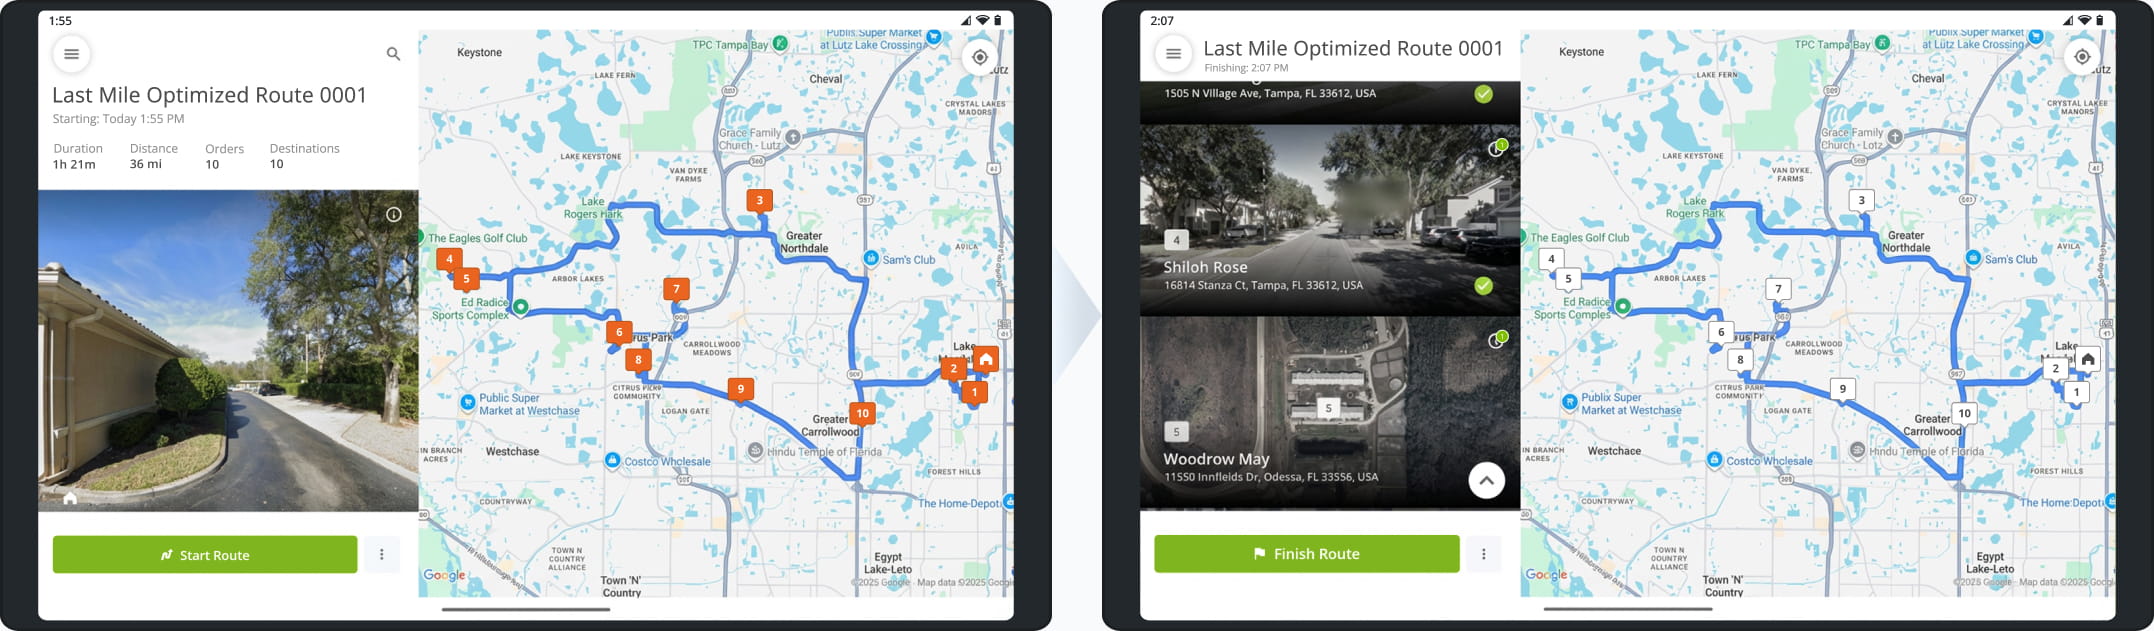
Landscape orientation is also supported and allows the app to display the immersive destinations list next to the route screen, providing more information and functionality than previous versions of the Route4Me tablet route planner app.
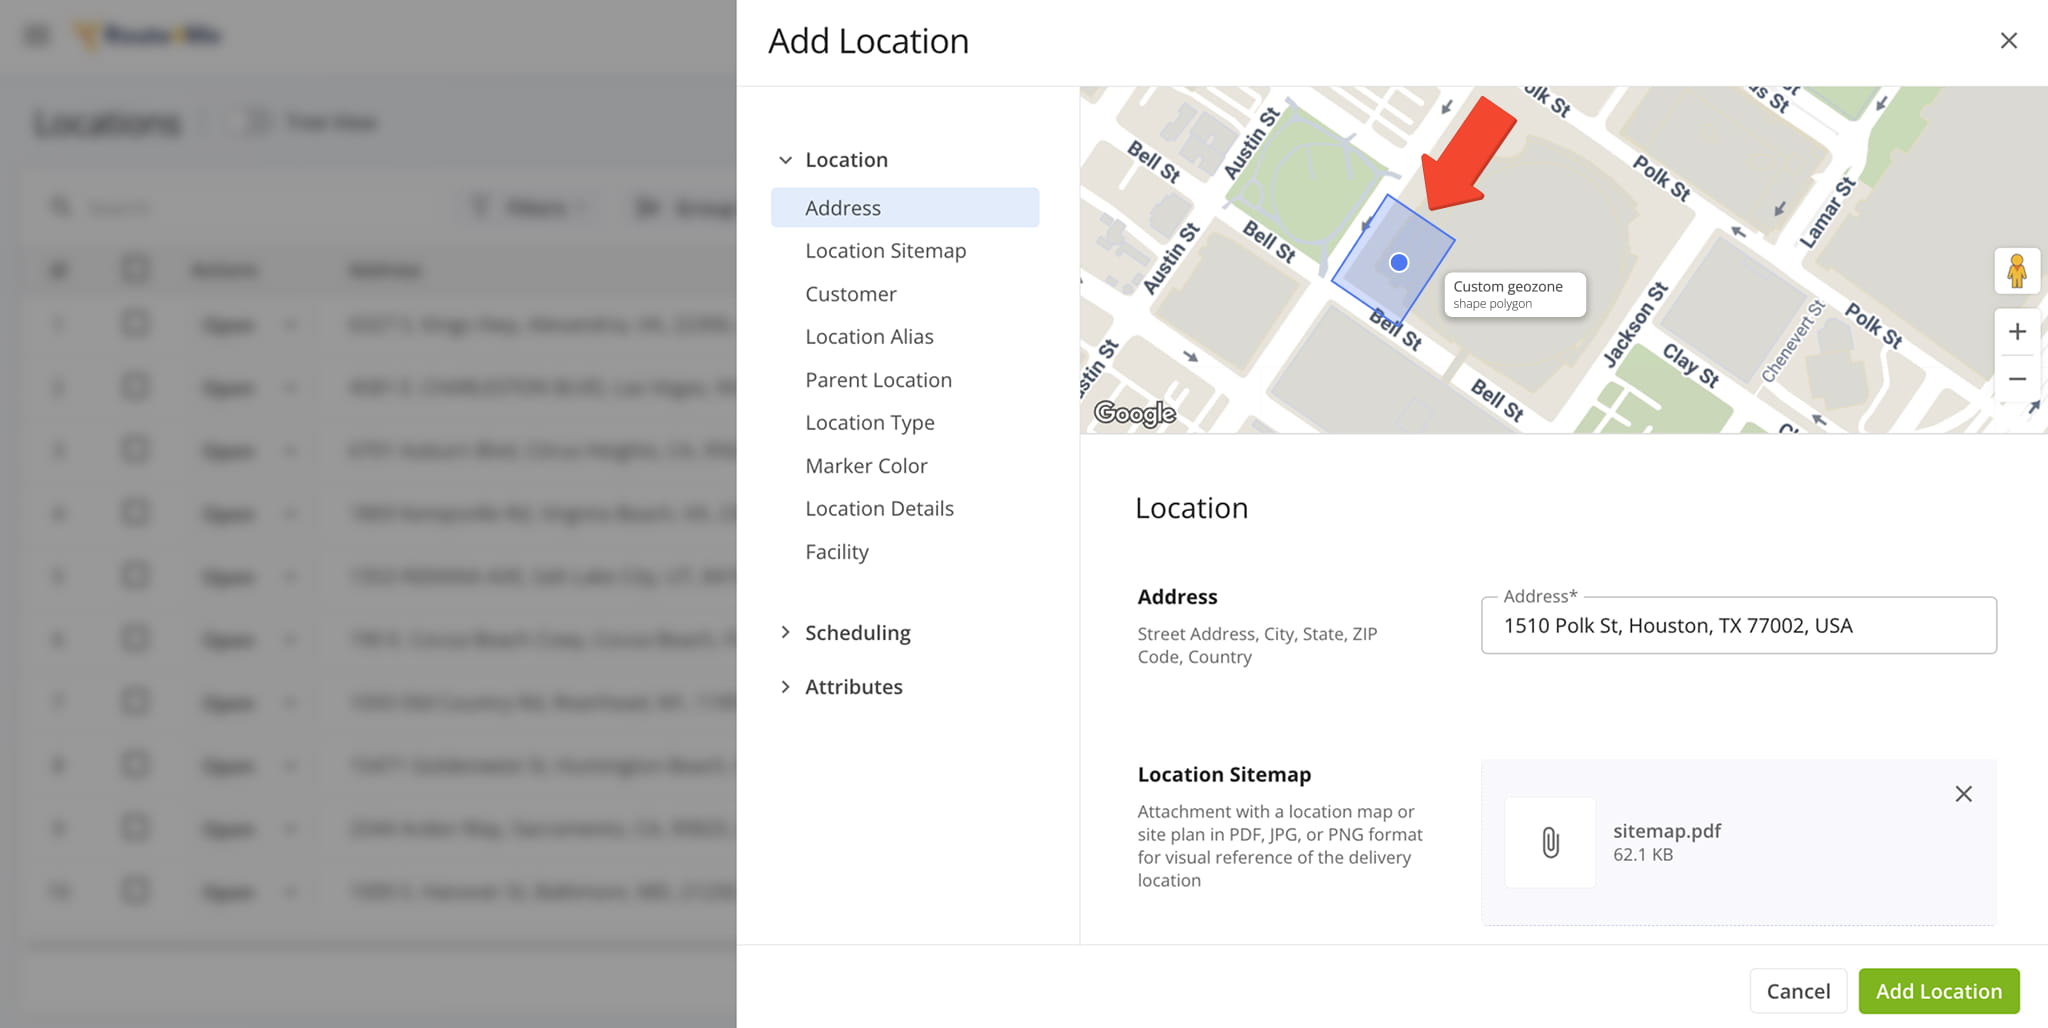
You can now define custom Geozones around Customer Locations to account for irregularly shaped buildings with difficult-to-find access areas and other potential issues. Geozones function as custom location-based Route4Me Geofences.
You can contact Route4Me support to set up custom geozones on your account.
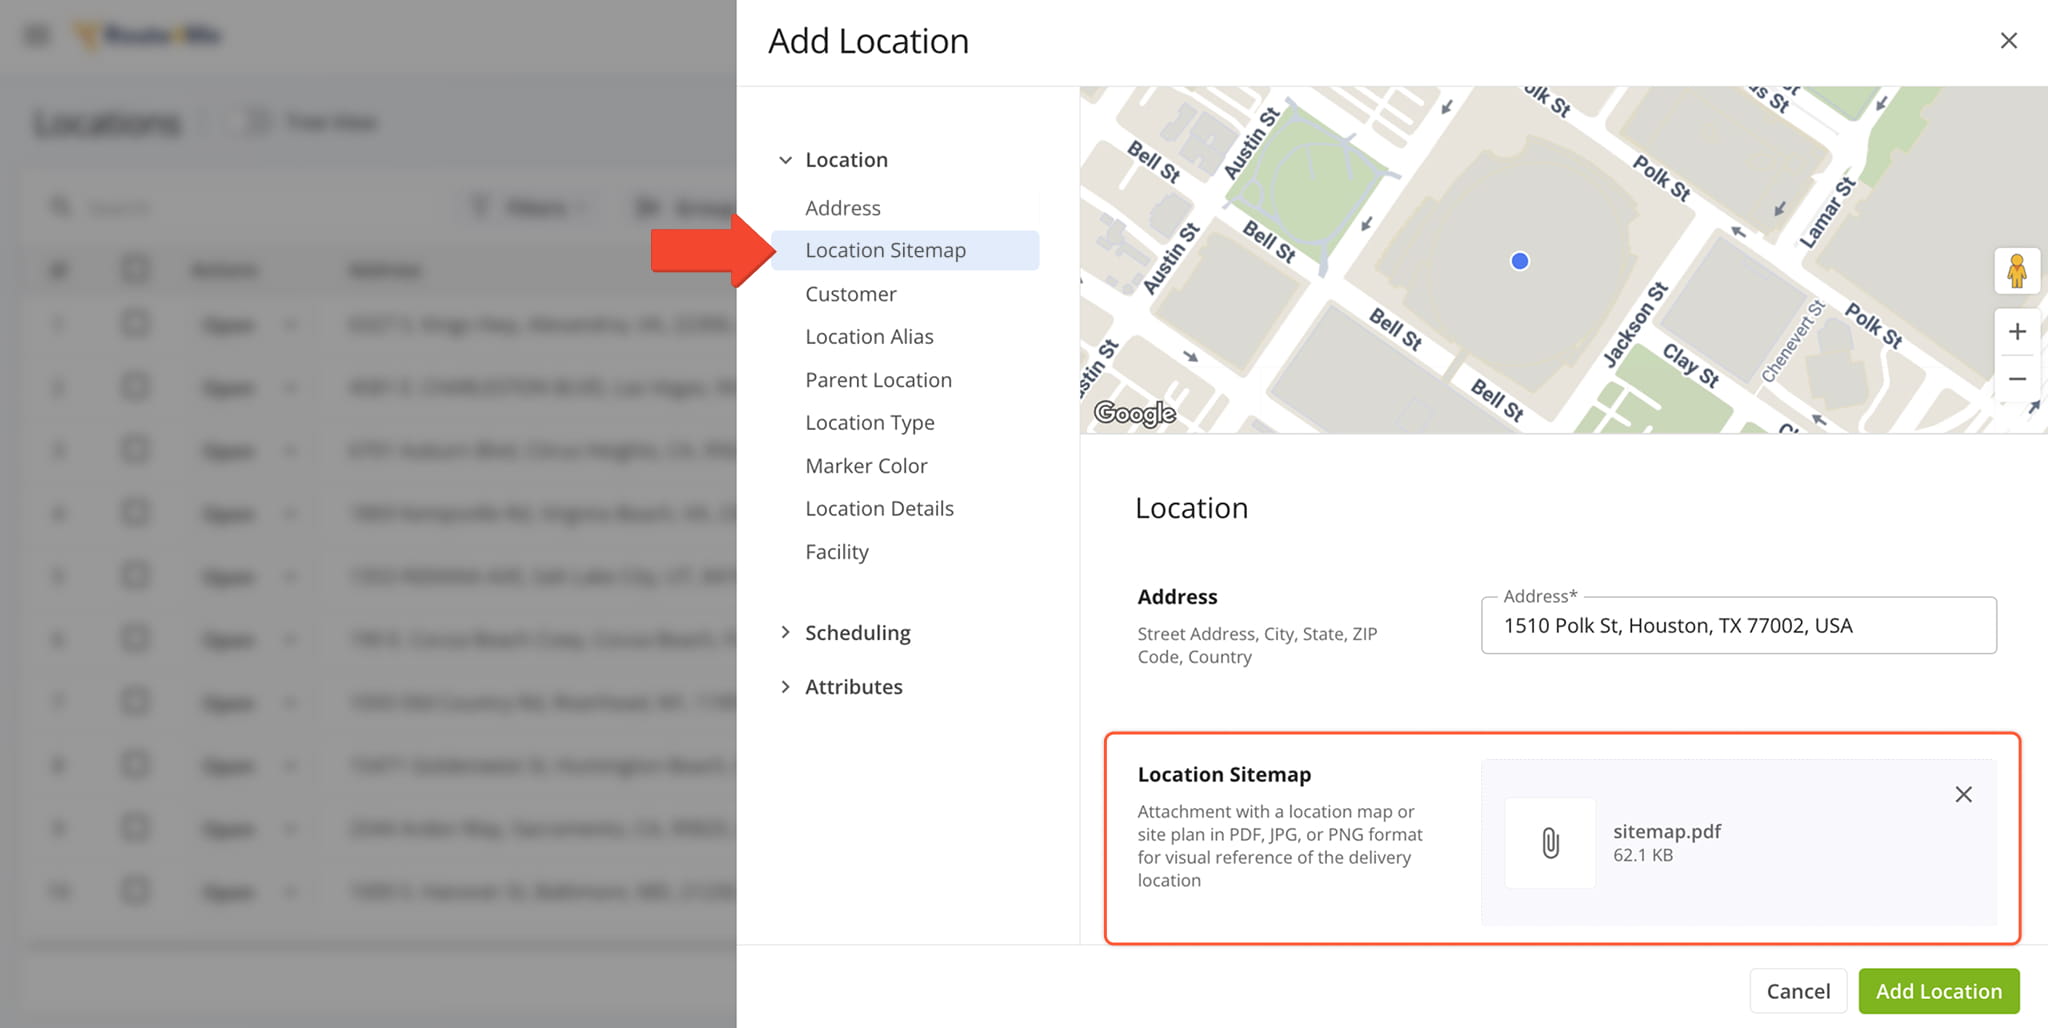
A new “Location Sitemap” field was added when you add and edit Customer Locations. It enables you to upload sitemap images for location previews that users assigned to routes can view on the mobile app.
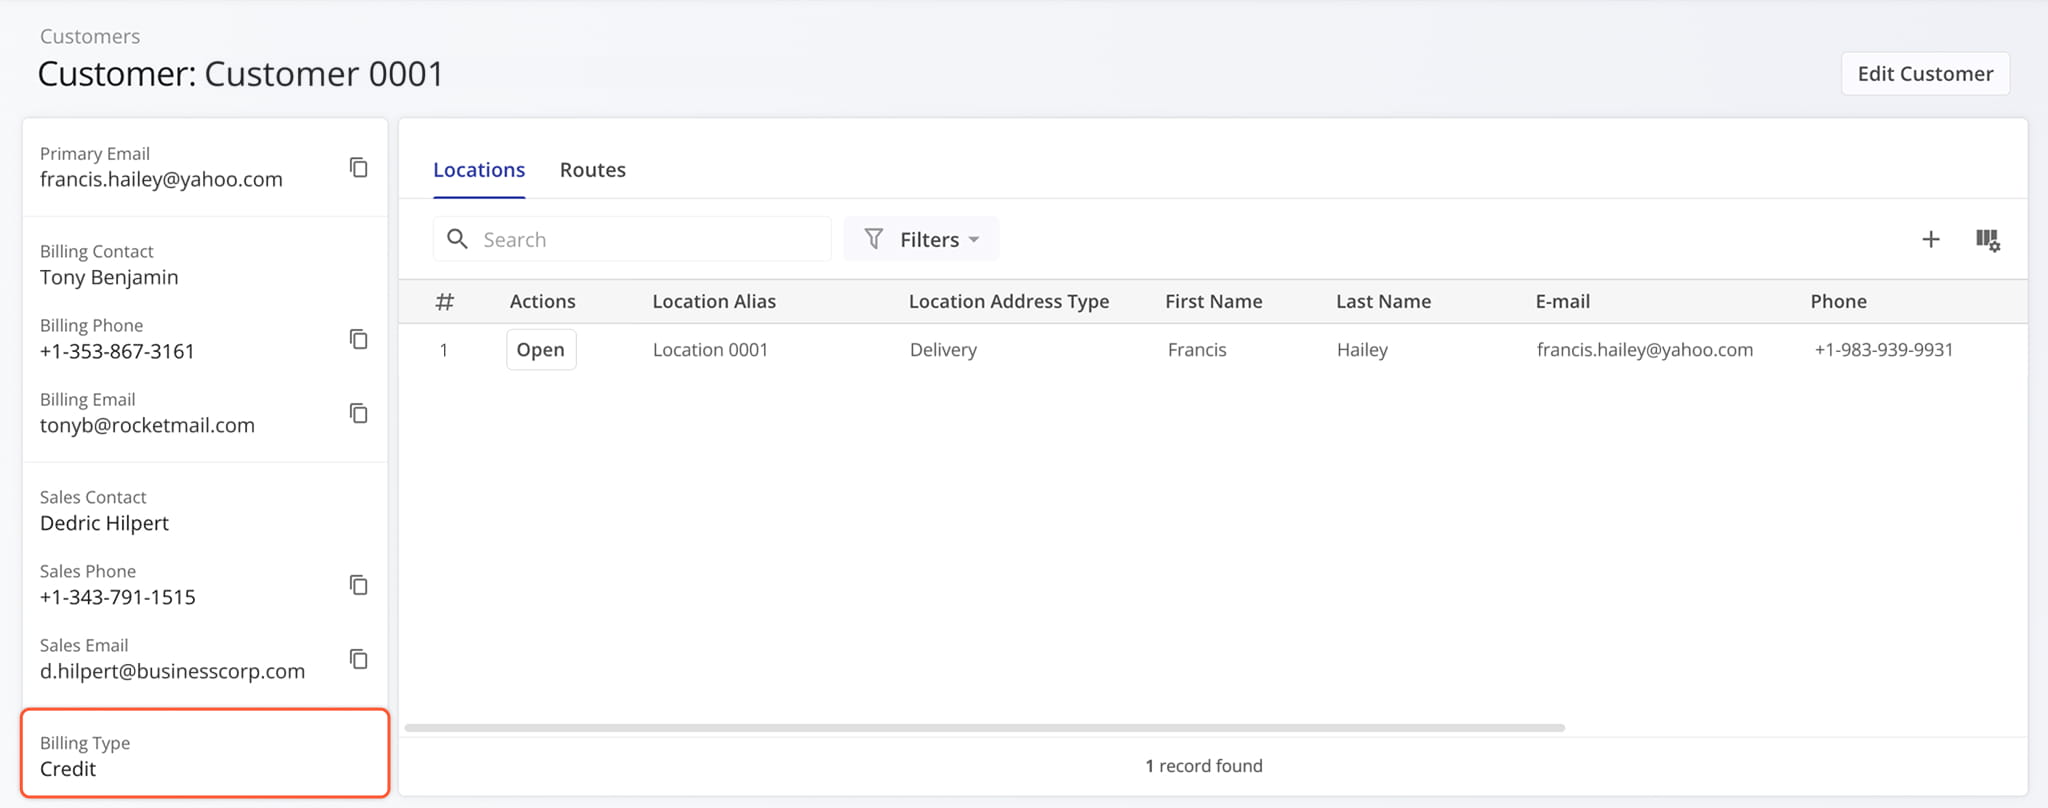
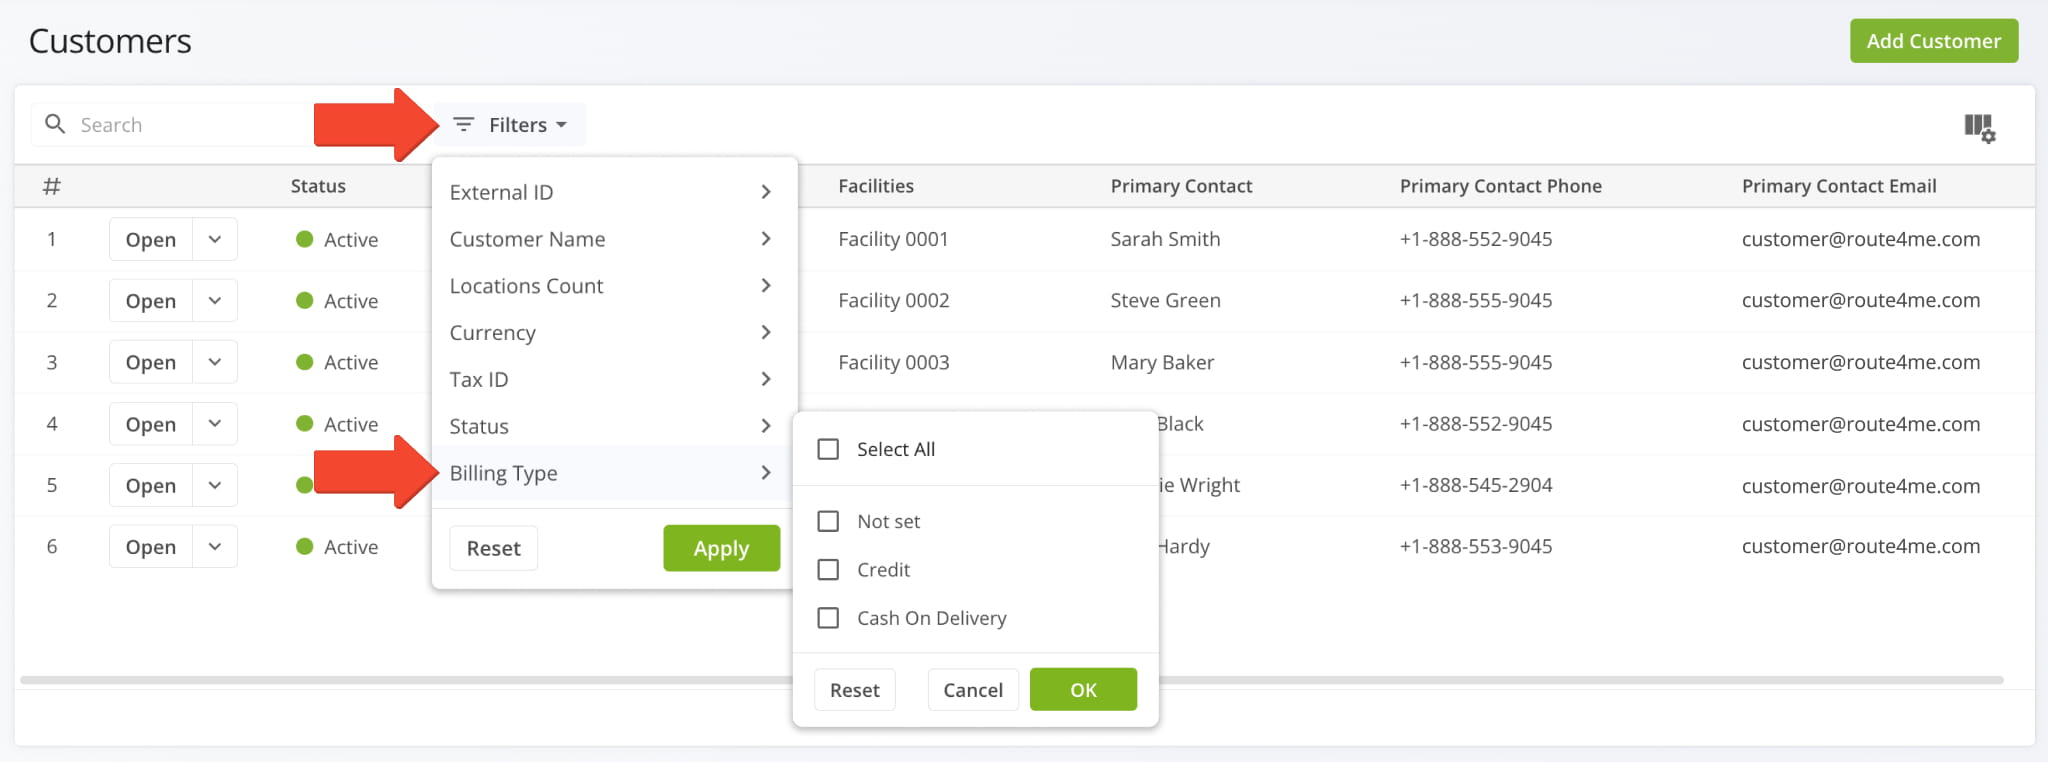
The new “Billing Type” customer data field was added to the summary panel in Customer Snapshots.
Billing Type information was added to the available customer data when creating or editing Customers on your account.
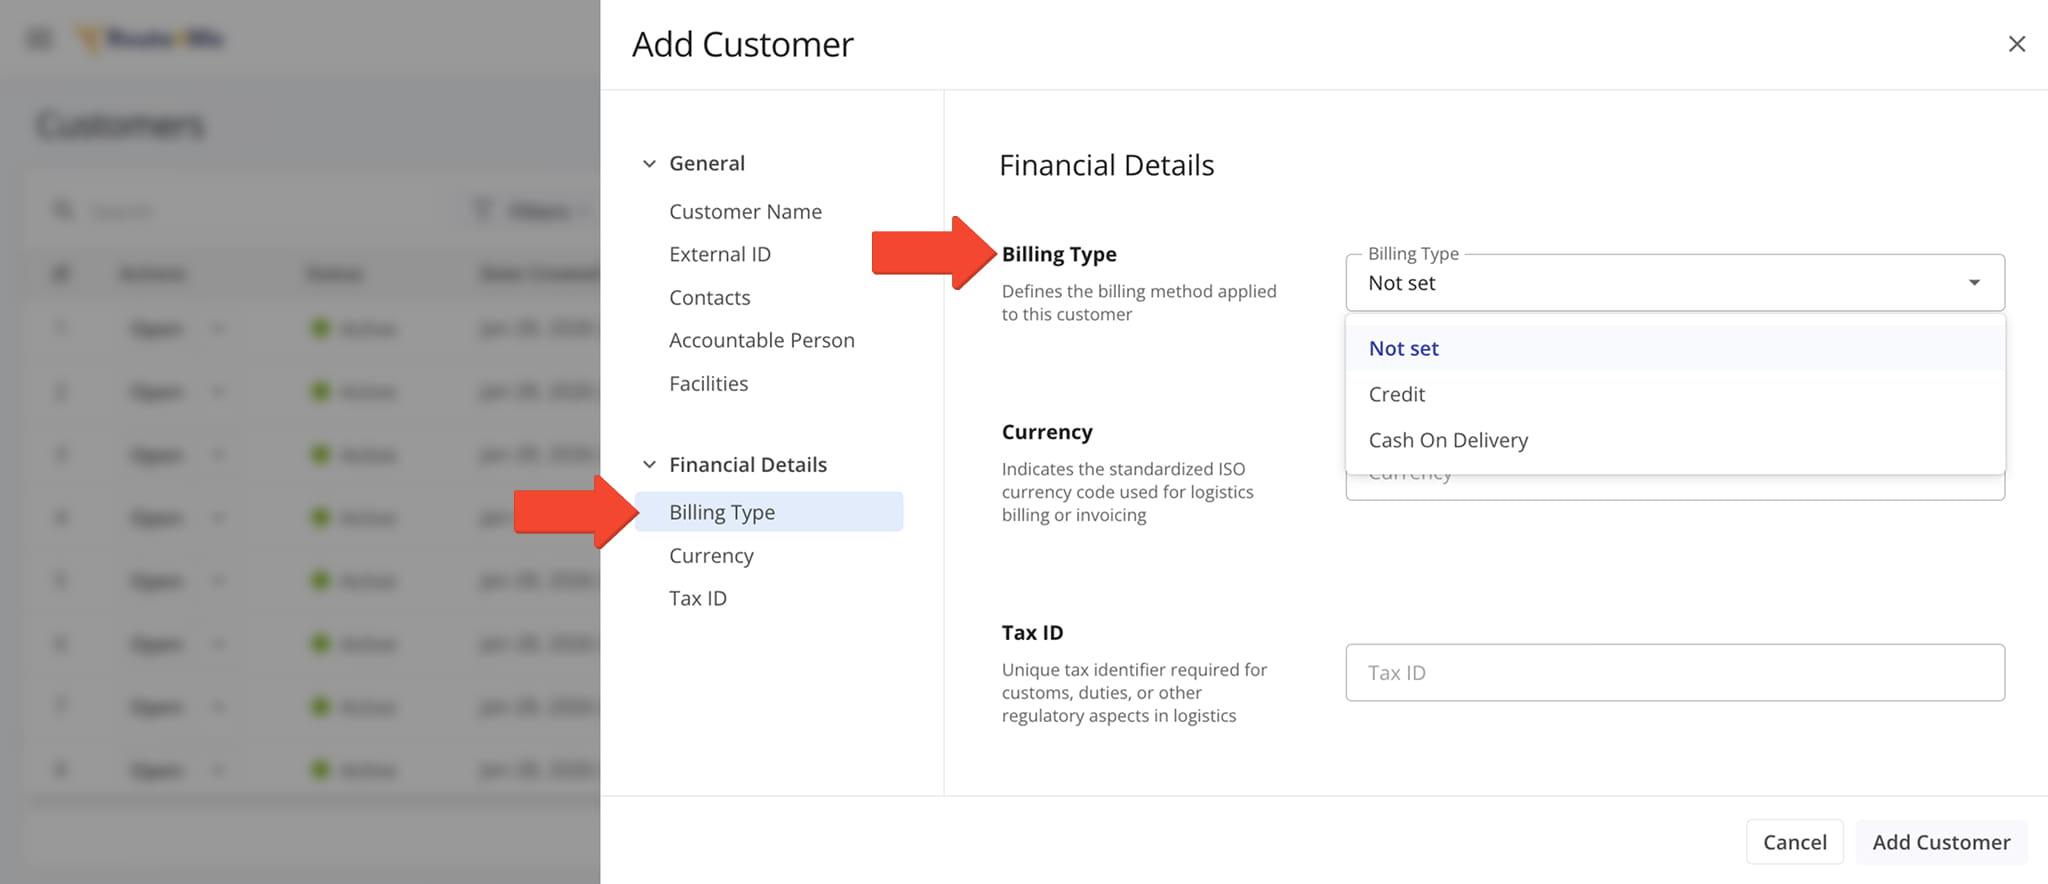
Additionally, Billing Type is also available as a filter on your Customers Page.
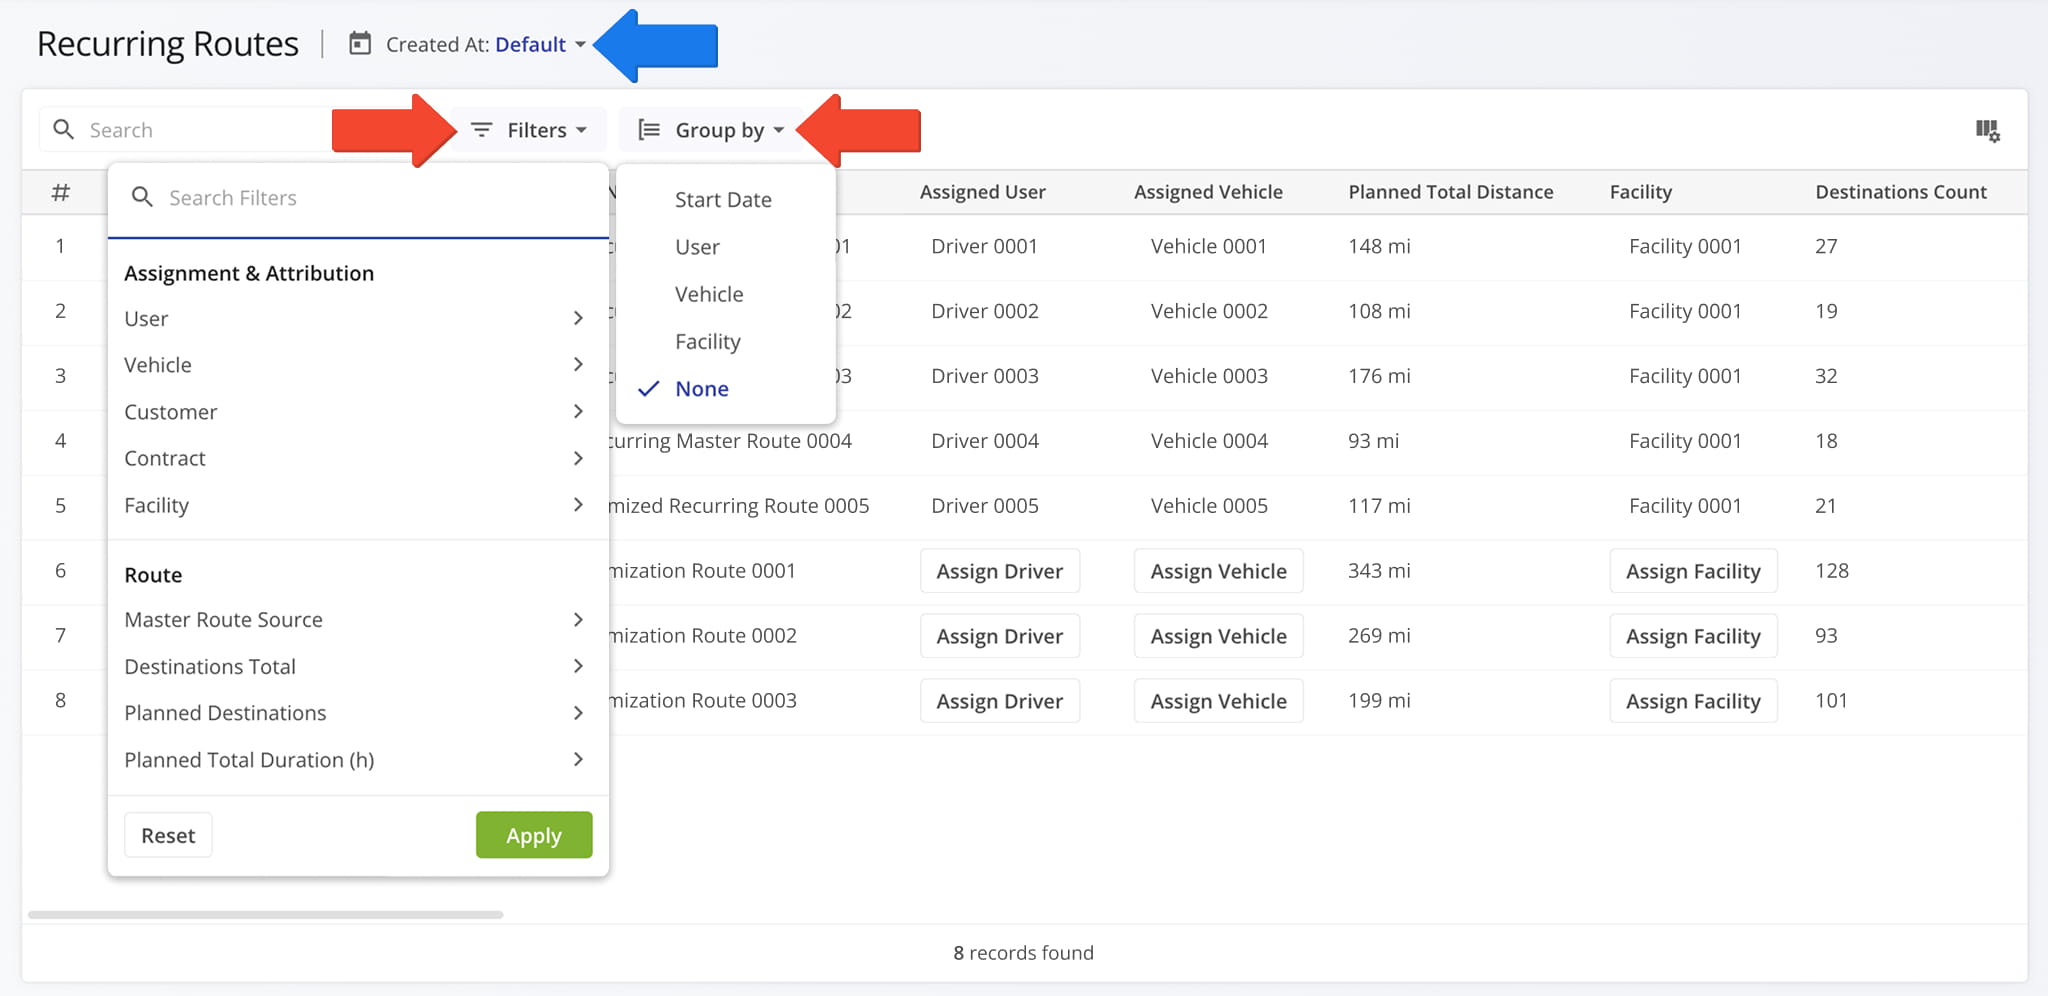
The Recurring Routes interface has been enhanced with new filters, grouping options, management actions, display columns, and column customization. This update brings the Recurring Routes page in line with the most recent Route4Me TMS releases and provides many more options for recurring routing management than before.
The image below shows the new filter options and grouping menu along with the newly added date filter.
For the first time, you can now customize the data columns available for your Recurring Routes. This new functionality helps you see only the data relevant to your needs. More columns have also been added, providing additional depth and detail to the information available for your Recurring Schedules and Master Routes.

A new management action menu was added to your Recurring Routes, enabling you to make quick edits to Master Routes without opening the Route Editor. You can also directly assign users, vehicles, facilities, customers, and contracts from the data table by clicking the corresponding field. See the list below to learn more about the new quick edit actions.
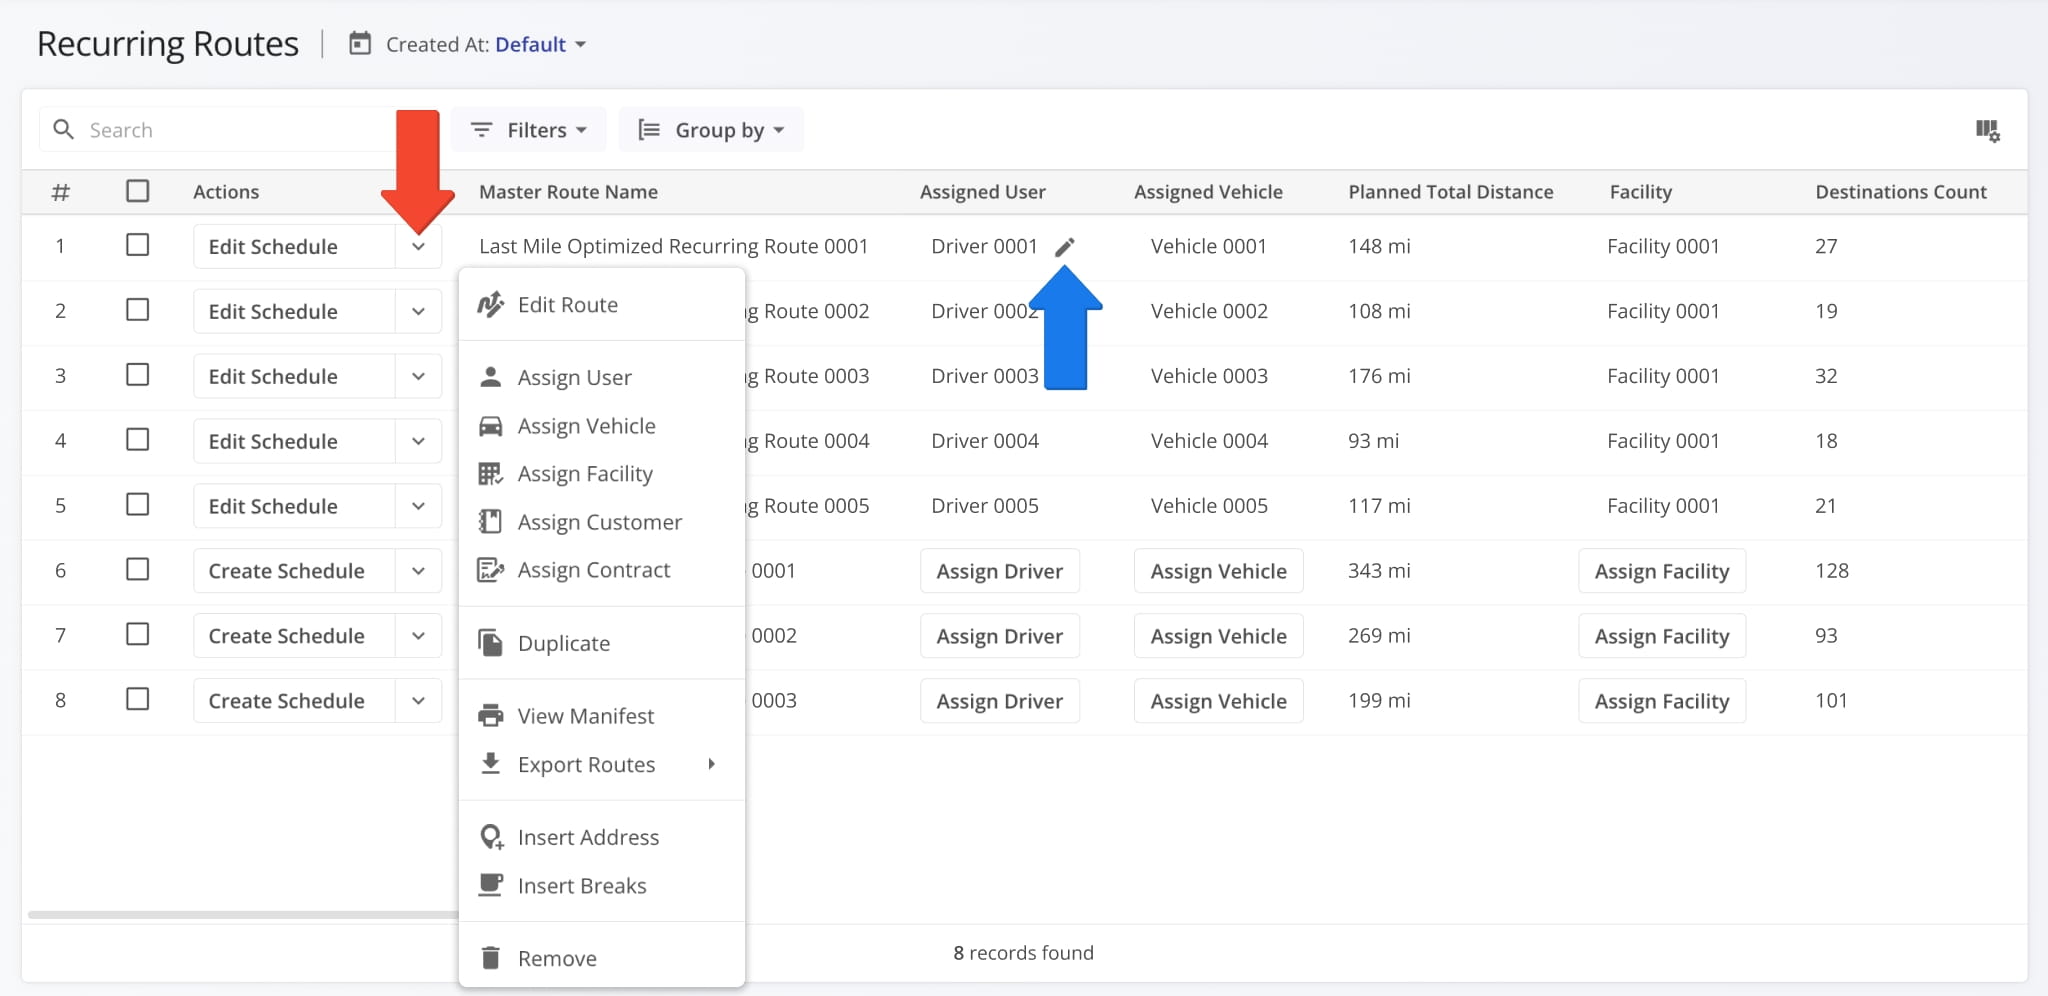
Edit Route: Open a master route in the Route Editor.
Assign User: Assign a driver or team member to the route.
Assign Vehicle: Assign a vehicle to the route from your homogeneous or mixed fleet of vehicles.
Assign Facility: Assign a specific facility to the route, linking it to a warehouse, depot, or other facility.
Assign Customer: Assign a specific customer to the route, ensuring that visits are accurately linked to the correct client.
Assign Contract: Assign a contract to the route to tie route activities to a specific contractual obligations.
Reschedule: Change the date and time of the day the route is scheduled to start.
Dispatch: Dispatch the route to send automated SMS and Email customer notifications.
Duplicate: Create a copy of the route. The new route will have “(Duplicate)” added to the end of its name.
Create Recurring Route: Create a new Master Route for use when planning recurring schedule routes.
View Manifest: Download or print a detailed Route Manifest. This manifest includes all available route data.
View on Multiple Routes Map: Open the route on the Routes Map.
Share: Share the route with other Users by direct link or send a link via Email.
Export Route: Export route data as a CSV spreadsheet or navigation data file for import into navigation devices.
Insert Address: Insert an address into the route by typing or searching the address in the “Address” field.
Insert Breaks: Add driver breaks on the route with customizable break duration and break trigger type.
Remove: Permanently delete the route.
You can also manage multiple Master Routes at the same time. Just like any other Route4Me interface, simply check the boxes next to them and use the “Bulk Actions” menu. See the list below to learn more about the new bulk actions.
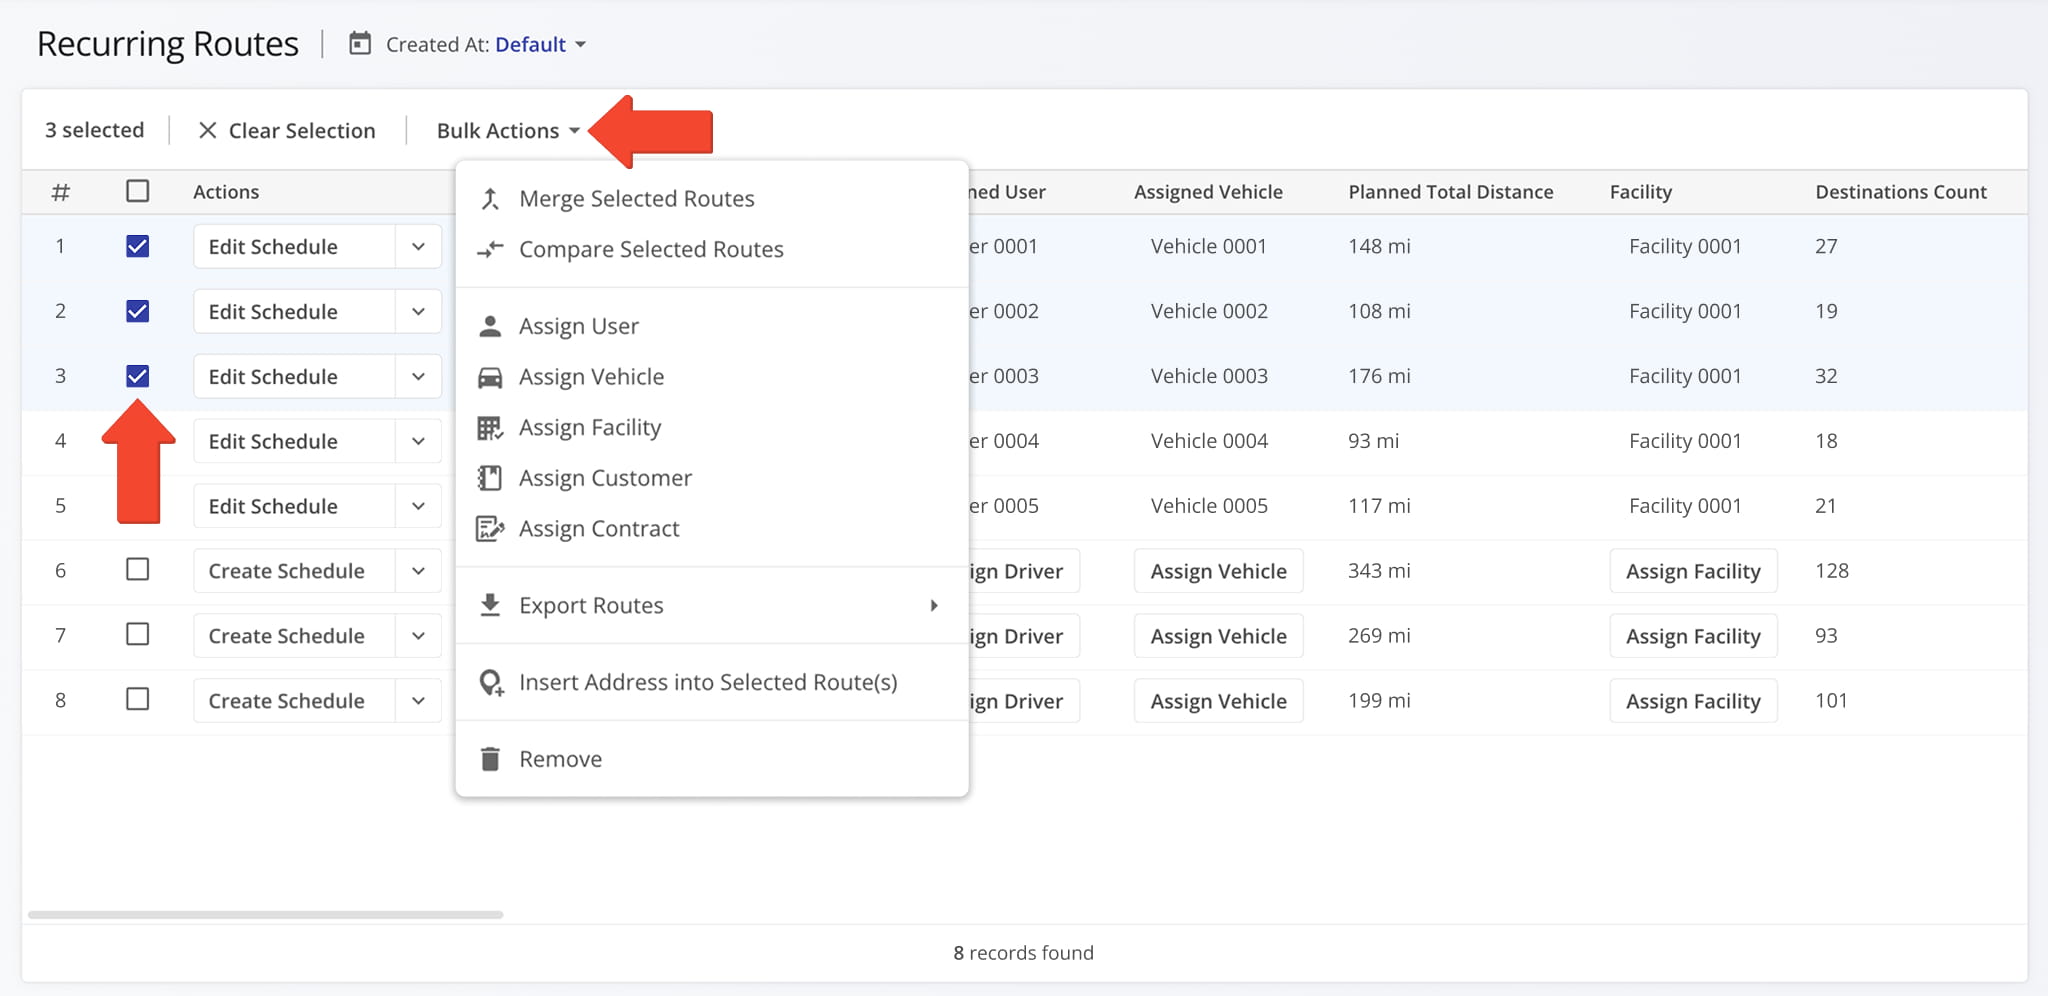
Merge Routes: Create a new, combined route while keeping the original routes intact.
Assign User: Assign a driver or team member to the routes.
Assign Vehicle: Assign a vehicle to the routes from your homogeneous or mixed fleet of vehicles.
Assign Facility: Assign a specific facility to the routes, linking them to a warehouse, depot, or other facility.
Assign Customer: Assign a specific customer to the routes, ensuring that visits are accurately linked to the correct client.
Assign Contract: Assign a contract to the routes to tie route activities to specific contractual obligations.
Export Routes: Export route data as a CSV spreadsheet or navigation data file.
Insert Address into Selected Route(s): Insert an address into the routes.
Remove: Permanently delete the selected Master Routes.
Man-Hours can now be enabled in Route Snapshots for the “Destinations” and “Orders” categories. These new data columns give you a clear overview of the person hours required at any specific destination or to complete any order on a given route.
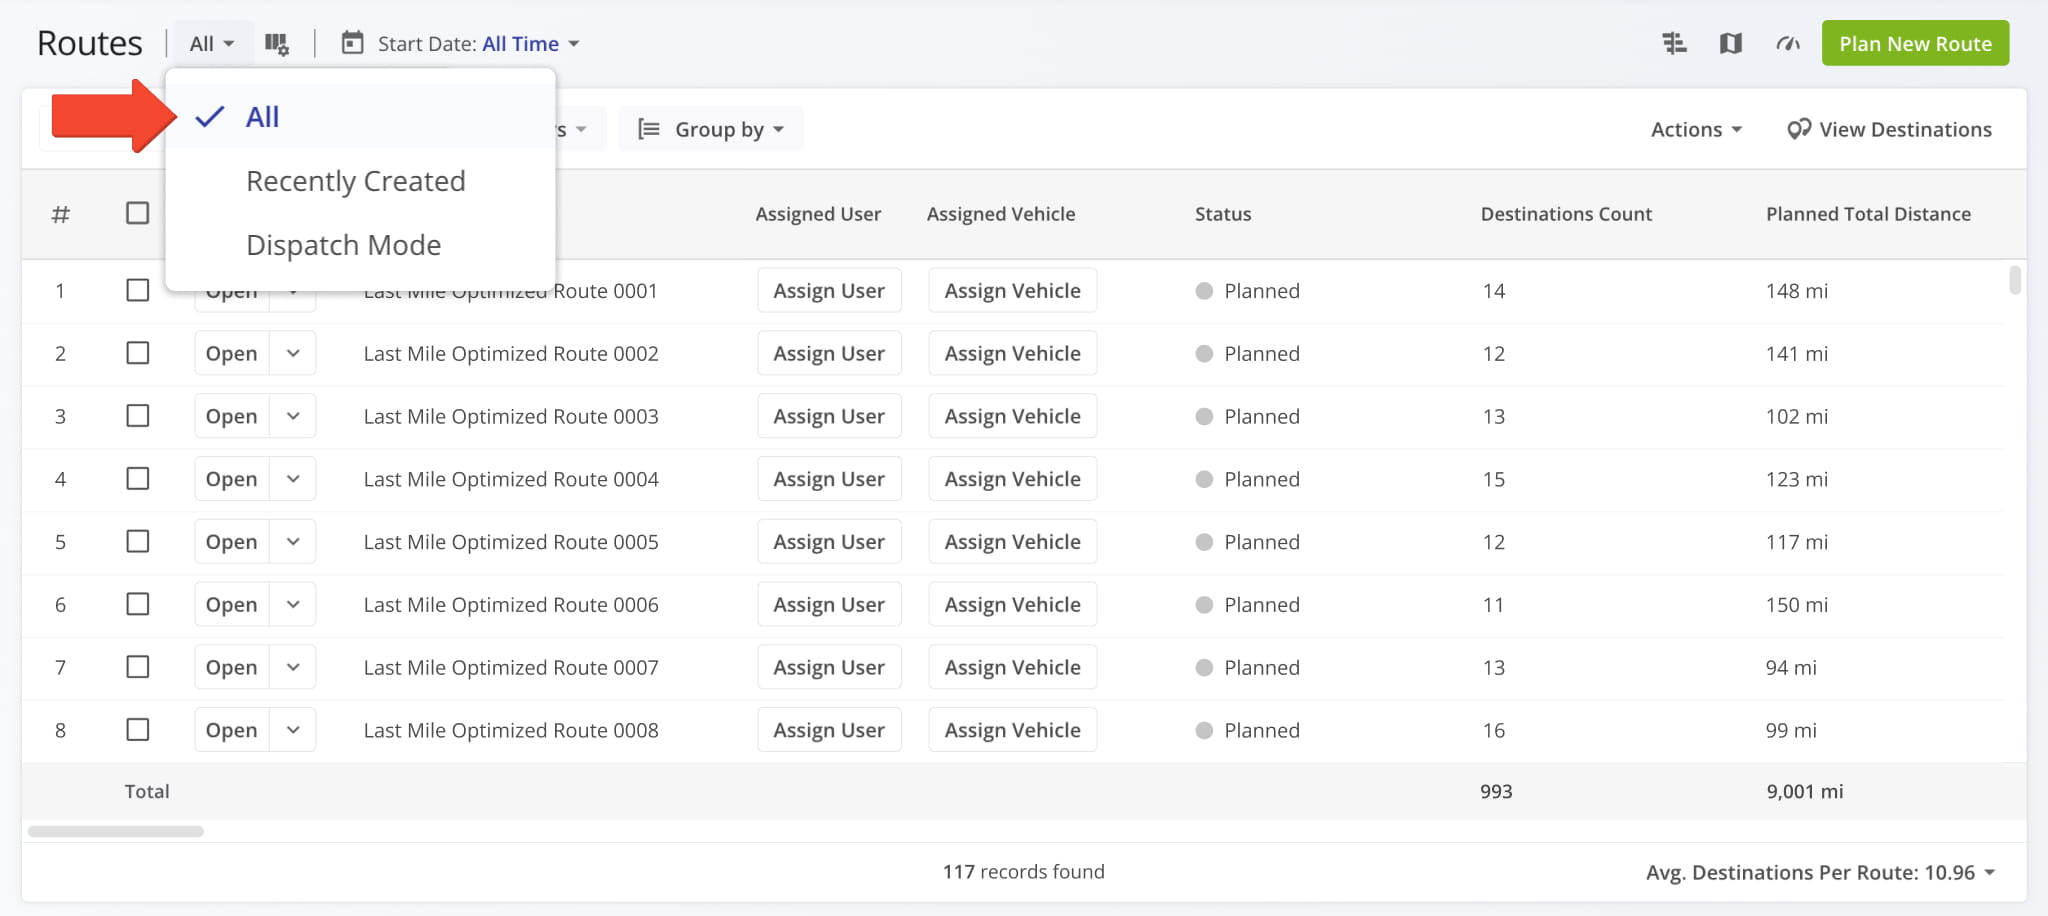
A new “All” View Mode was added to the Routes Page. When selected, it uses the “All Time” setting for the date filter and displays all routes on the account. Previously, only “Recently Created” and “Dispatch Mode” were available.
Route4Me Update Types And Release Notes Legend
Route4Me’s industry-leading transportation management software is continuously evolving, with new features and updates released regularly. The table below lists the types of updates described on this page.
| Release Type | Description |
|---|---|
| ⬤ Highlights | Highlighted releases are major updates and brand new features. Any of the release types listed below can be highlighted, and you can use the “Release Type” filter to add or exclude “Highlights” from the visible Release Notes. |
| ⬤ New Feature | Introduces brand-new functionality or tools. These updates expand the core capabilities of the platform, such as new optimization types and dedicated management modules. |
| ⬤ Enhancement | Improvements to existing features. This includes adding new data columns, advanced filtering options, or increasing the efficiency of current workflows. |
| ⬤ UI/UX Update | Visual and structural changes. These updates focus on redesigns and navigation improvements to make the software more intuitive and easier to navigate. |
| ⬤ System Update | Behind-the-scenes technical improvements. While not always visible, these updates enhance platform stability, security, and backend processing speed. |
| ⬤ Integration | Updates related to connecting Route4Me with external systems. This includes ERP and API integrations, Telematics providers, and third-party applications to ensure seamless data flow across your organization. |
| ⬤ Feature Removal | The retirement or deprecation of legacy tools. Features are removed to reduce complexity, replace outdated tech, streamline the user experience, and ensure you always have access to the most up-to-date Route4Me functionality. |
About author: Alex Yasko
Alex Yasko is the Go-to-Market Product Manager and Information Architecture Manager at Route4Me. With thousands of hours of experience, Alex specializes in breaking down complex last-mile optimization and routing scenarios into simple, actionable instructions, helping last-mile businesses streamline their operations effortlessly.