
Route Editor Guide – Open and Manage Planned Routes
The Route Editor is your primary tool for managing individual planned routes in Route4Me’s business routing software. From a single interface, you can track route progress, review route metrics and KPIs, update optimization settings, and manage last mile operations in real time. Any changes made in the Route Editor automatically sync with the Mobile Driver App, while User activity across the Web Platform and app can be monitored through the Activity Feed.
Table of Contents
Route Editor Overview – Open And Manage Routes In The Route Editor
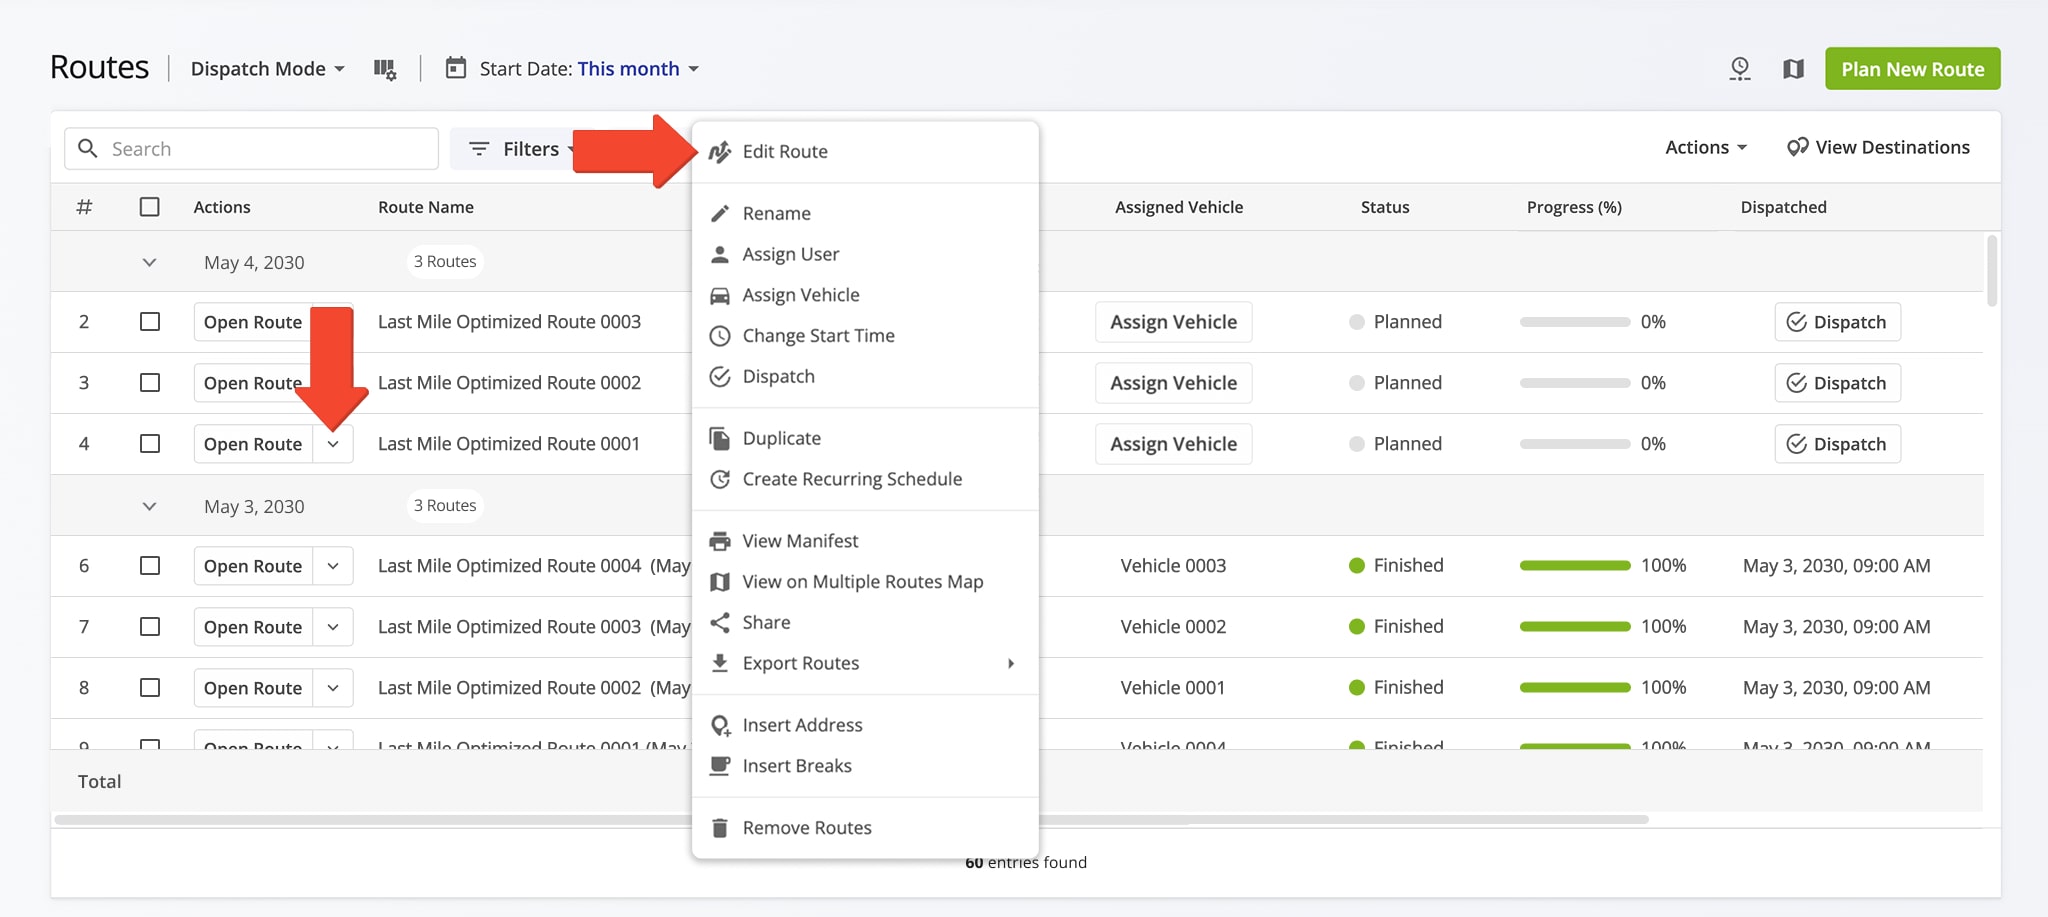
To open a planned route in the Route Editor, go to your Routes Page from the Navigation Menu. Then, right-click a route or click the Arrow Icon next to “Open Route” and select “Edit Route” from the menu.
Open Your Route4Me Routes Page
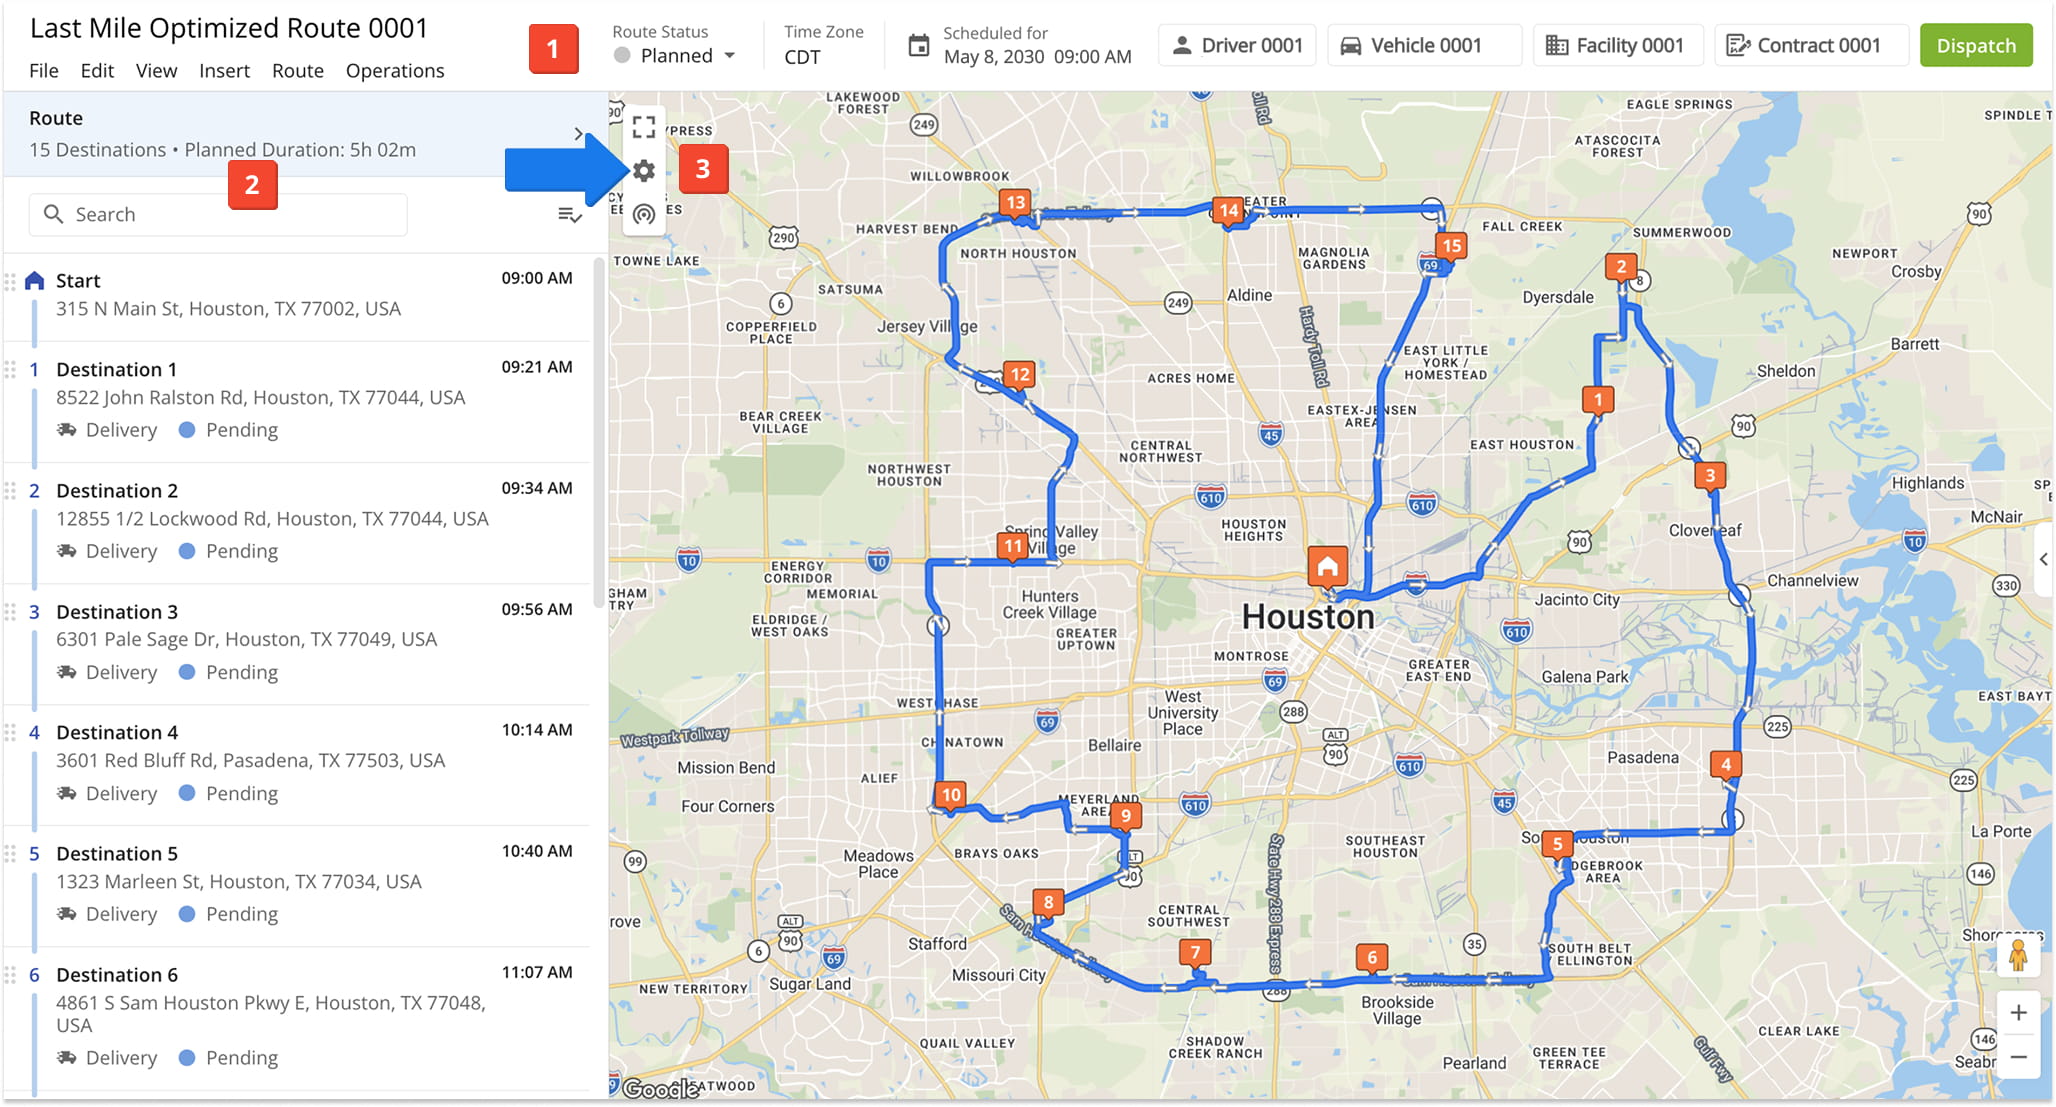
This will open Route4Me’s Route Editor which includes the following main sections:
- Route Settings Toolbar, located at the top of the screen, where you can change route and optimization settings, assign drivers, assign vehicles, dispatch route notifications, and perform other route management actions.
- Destinations List, located on the left, from which you can open and manage all Destinations on the route and access the Route Properties panel to view and edit key route settings.
- Interactive Map with which you can view and track a route, enable additional map overlays, access summarized route data from the Route Information Panel, and more. NOTE: Click the Gear Icon to open map settings. From there, you can select Road or Satellite Views and enable “Map Layers” such as live traffic, Avoidance Zones, and Territories and other map overlays, detailed in the table below.
Map Settings
Route Settings – Edit, Re-Optimize, Reschedule Routes And More
Route Editor Toolbar
The Route Editor Toolbar enables you to view the route’s current status and make quickly route updates, such as rescheduling a route, assigning vehicles and users, and dispatching route notifications. Click the corresponding button to make adjustments.
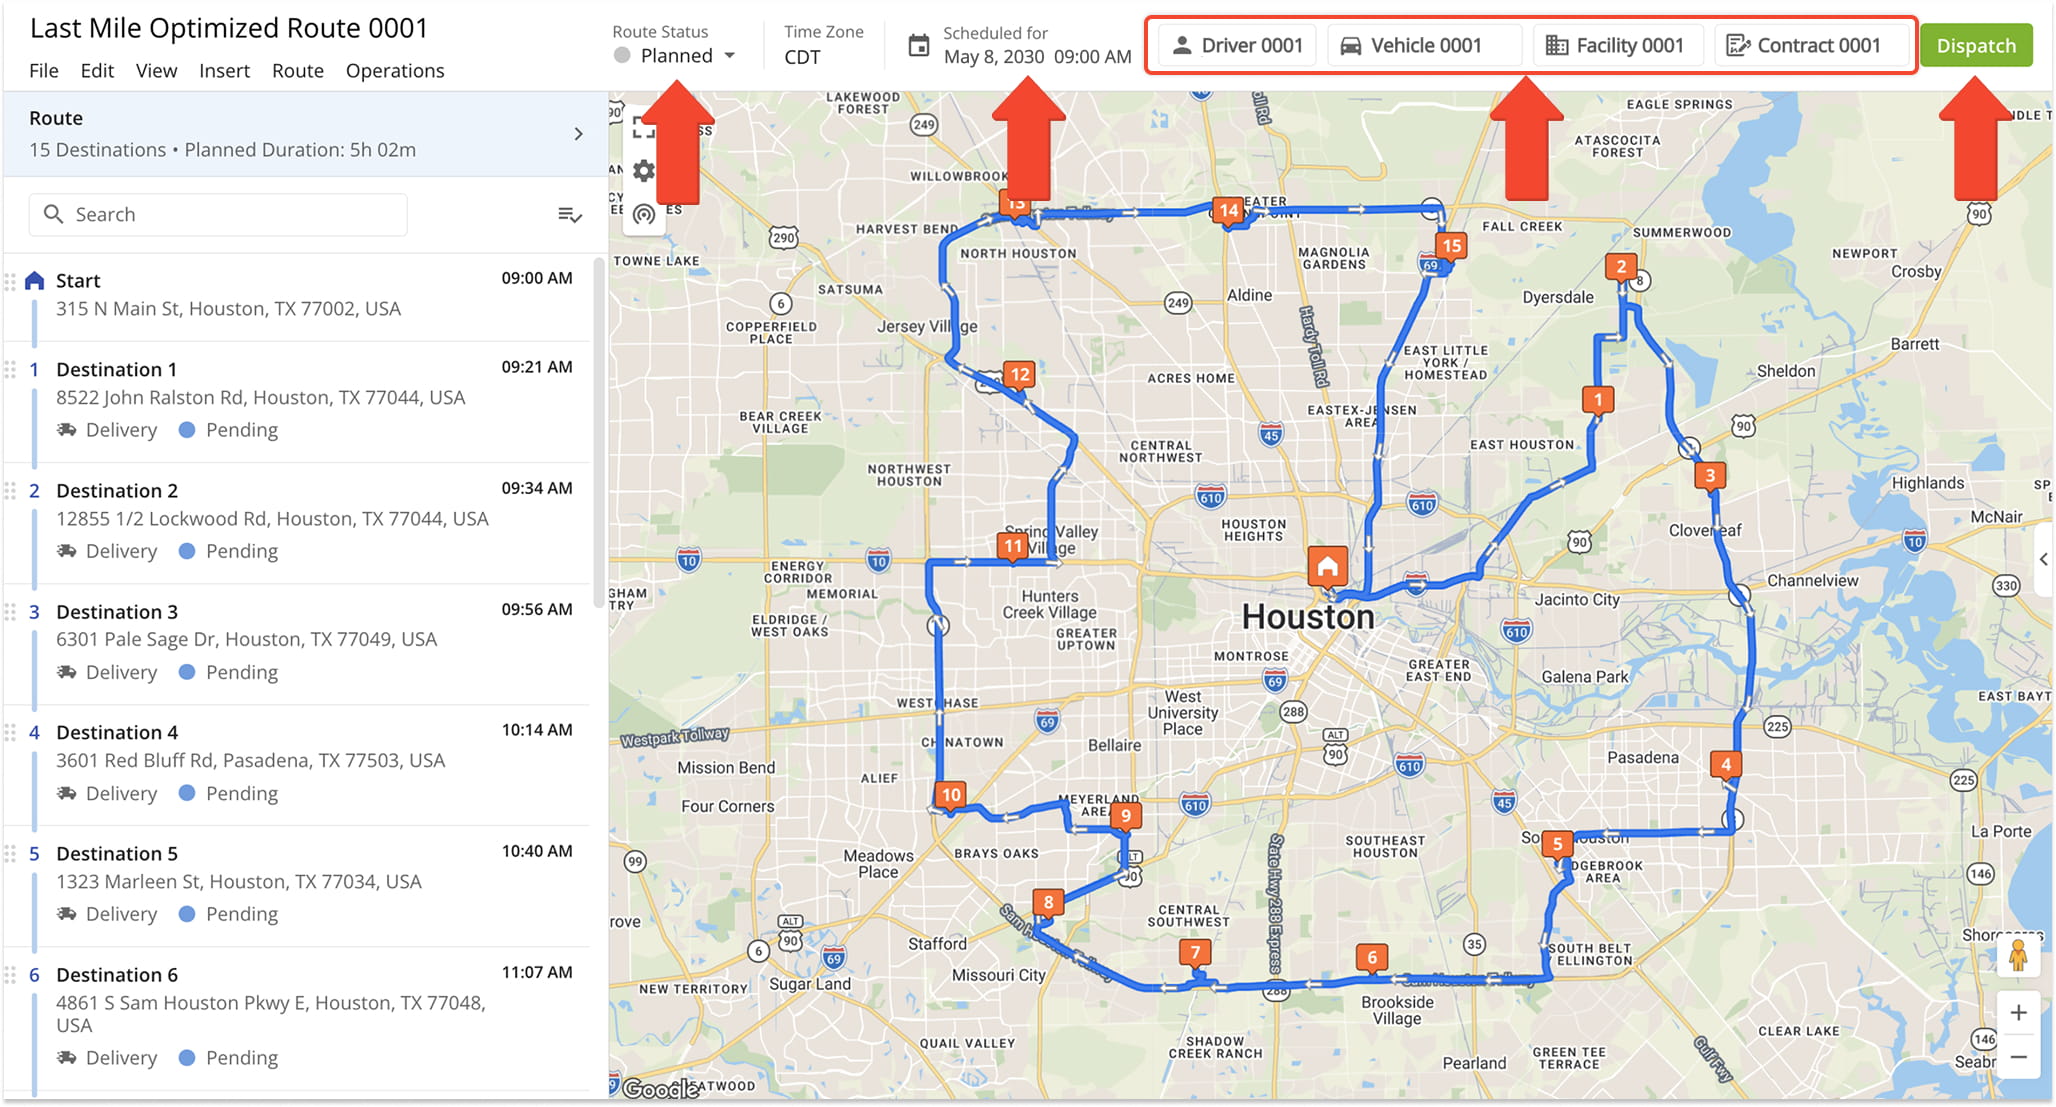
Top Menu Bar
You can also insert addresses and driver breaks, export route data, and perform other route management actions via the Top Menu Bar. See the table below for details.
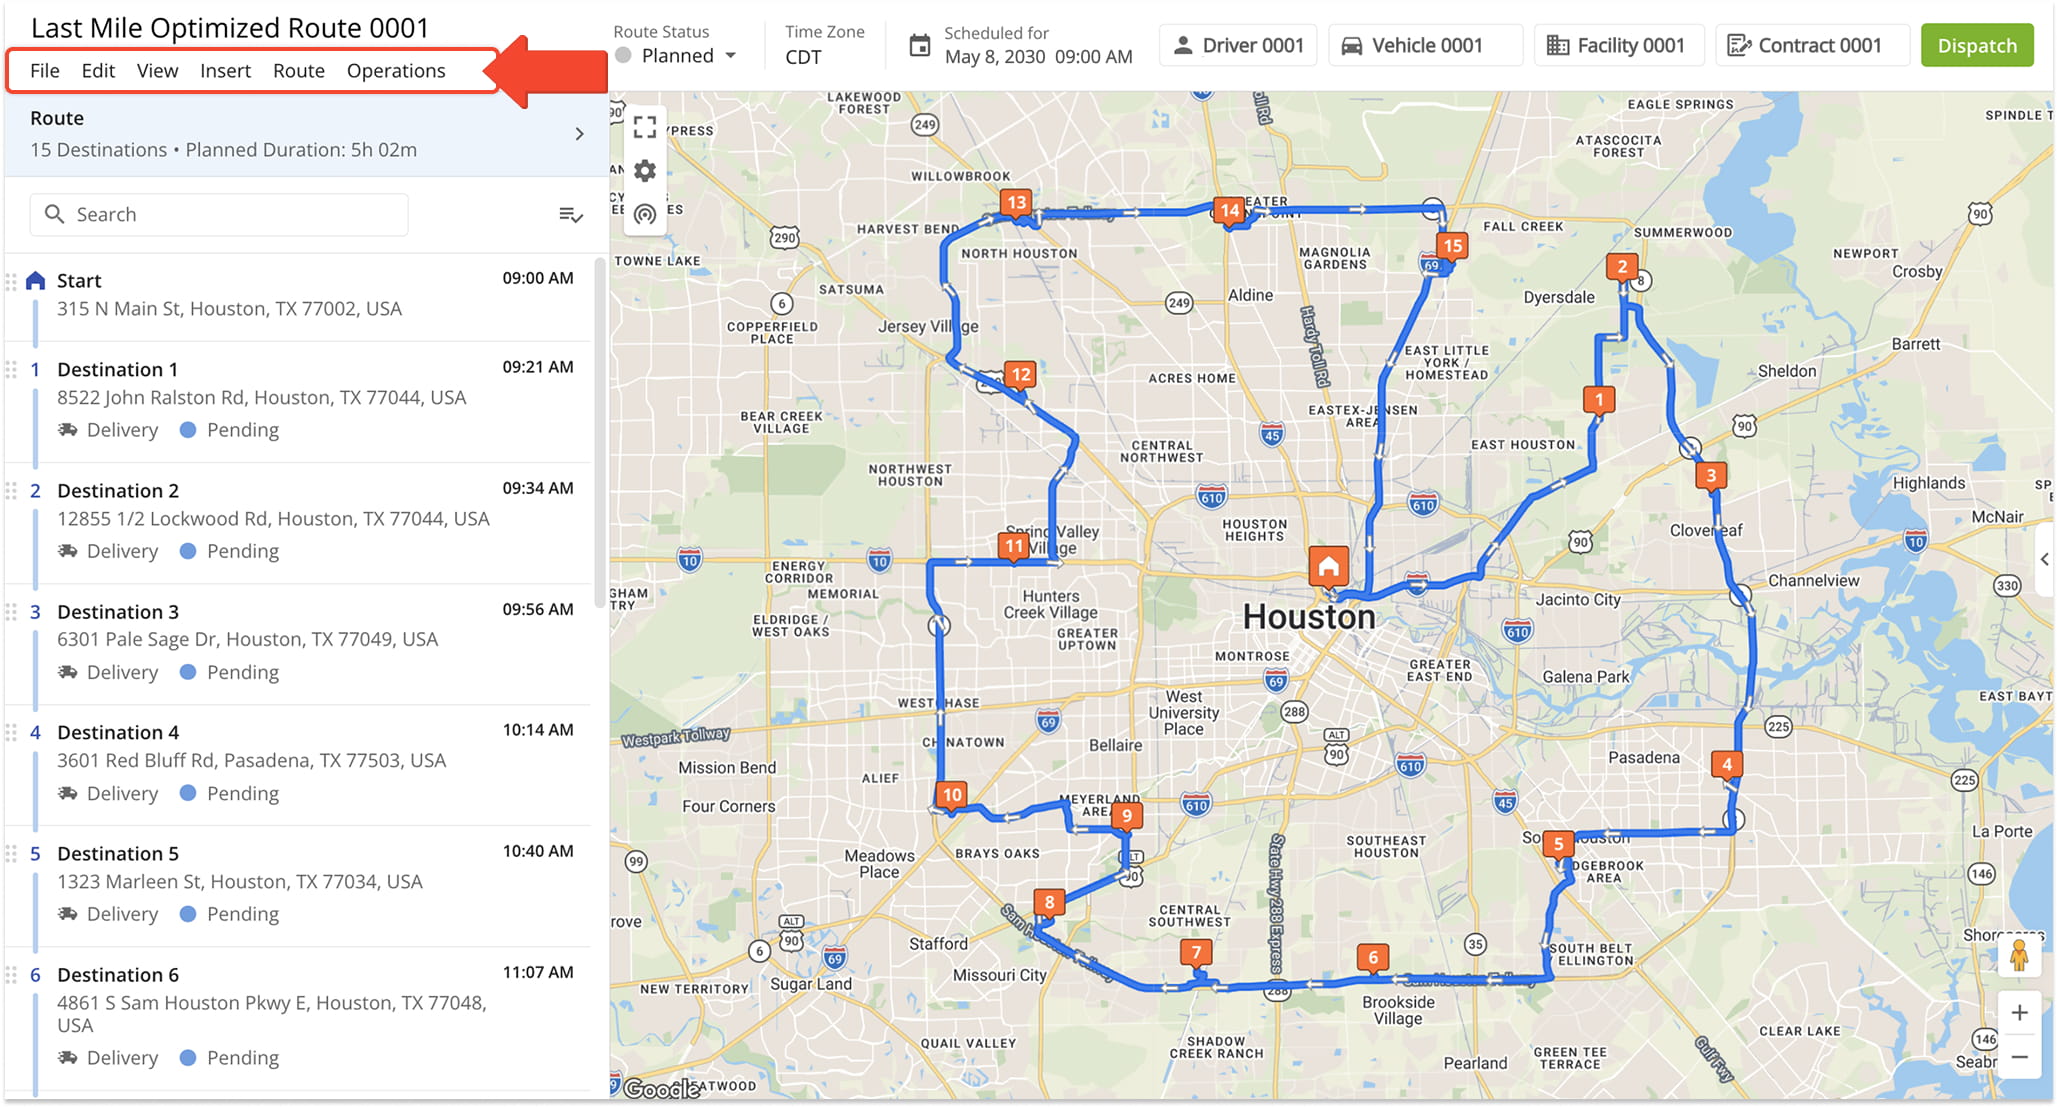
Route Management Actions
Route Properties Panel
The Route Properties panel provides a centralized view of the route’s key details and configuration settings, enabling you to review and update information such as route parameters, assigned resources, scheduling, and optimization preferences.
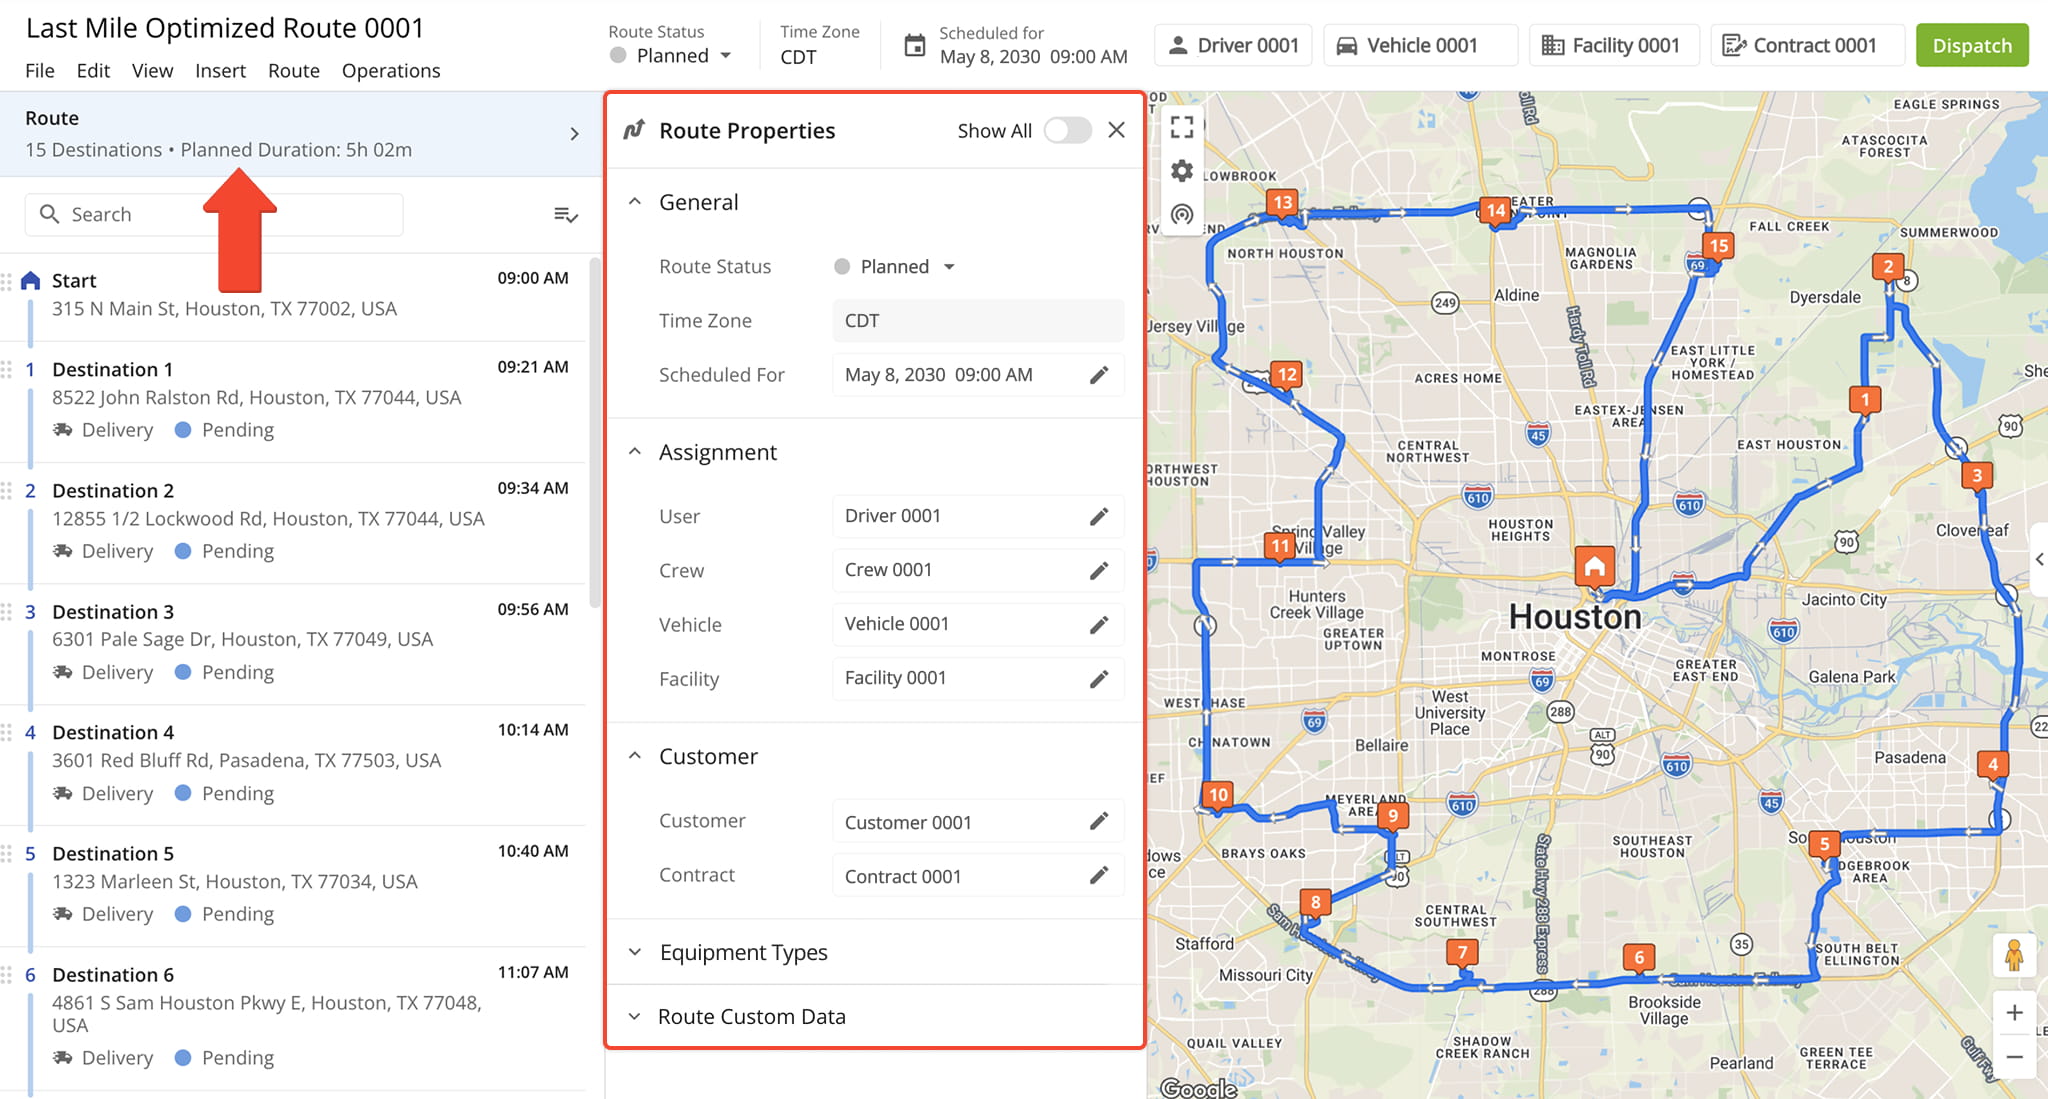
Route Settings Panel
You can access the Route Settings panel from the Top Menu Bar by clicking “Edit” and selecting “Open Route Settings“. Adjust settings as needed, then click “Save” to apply the changes. From the “General” section, you can access the following settings:
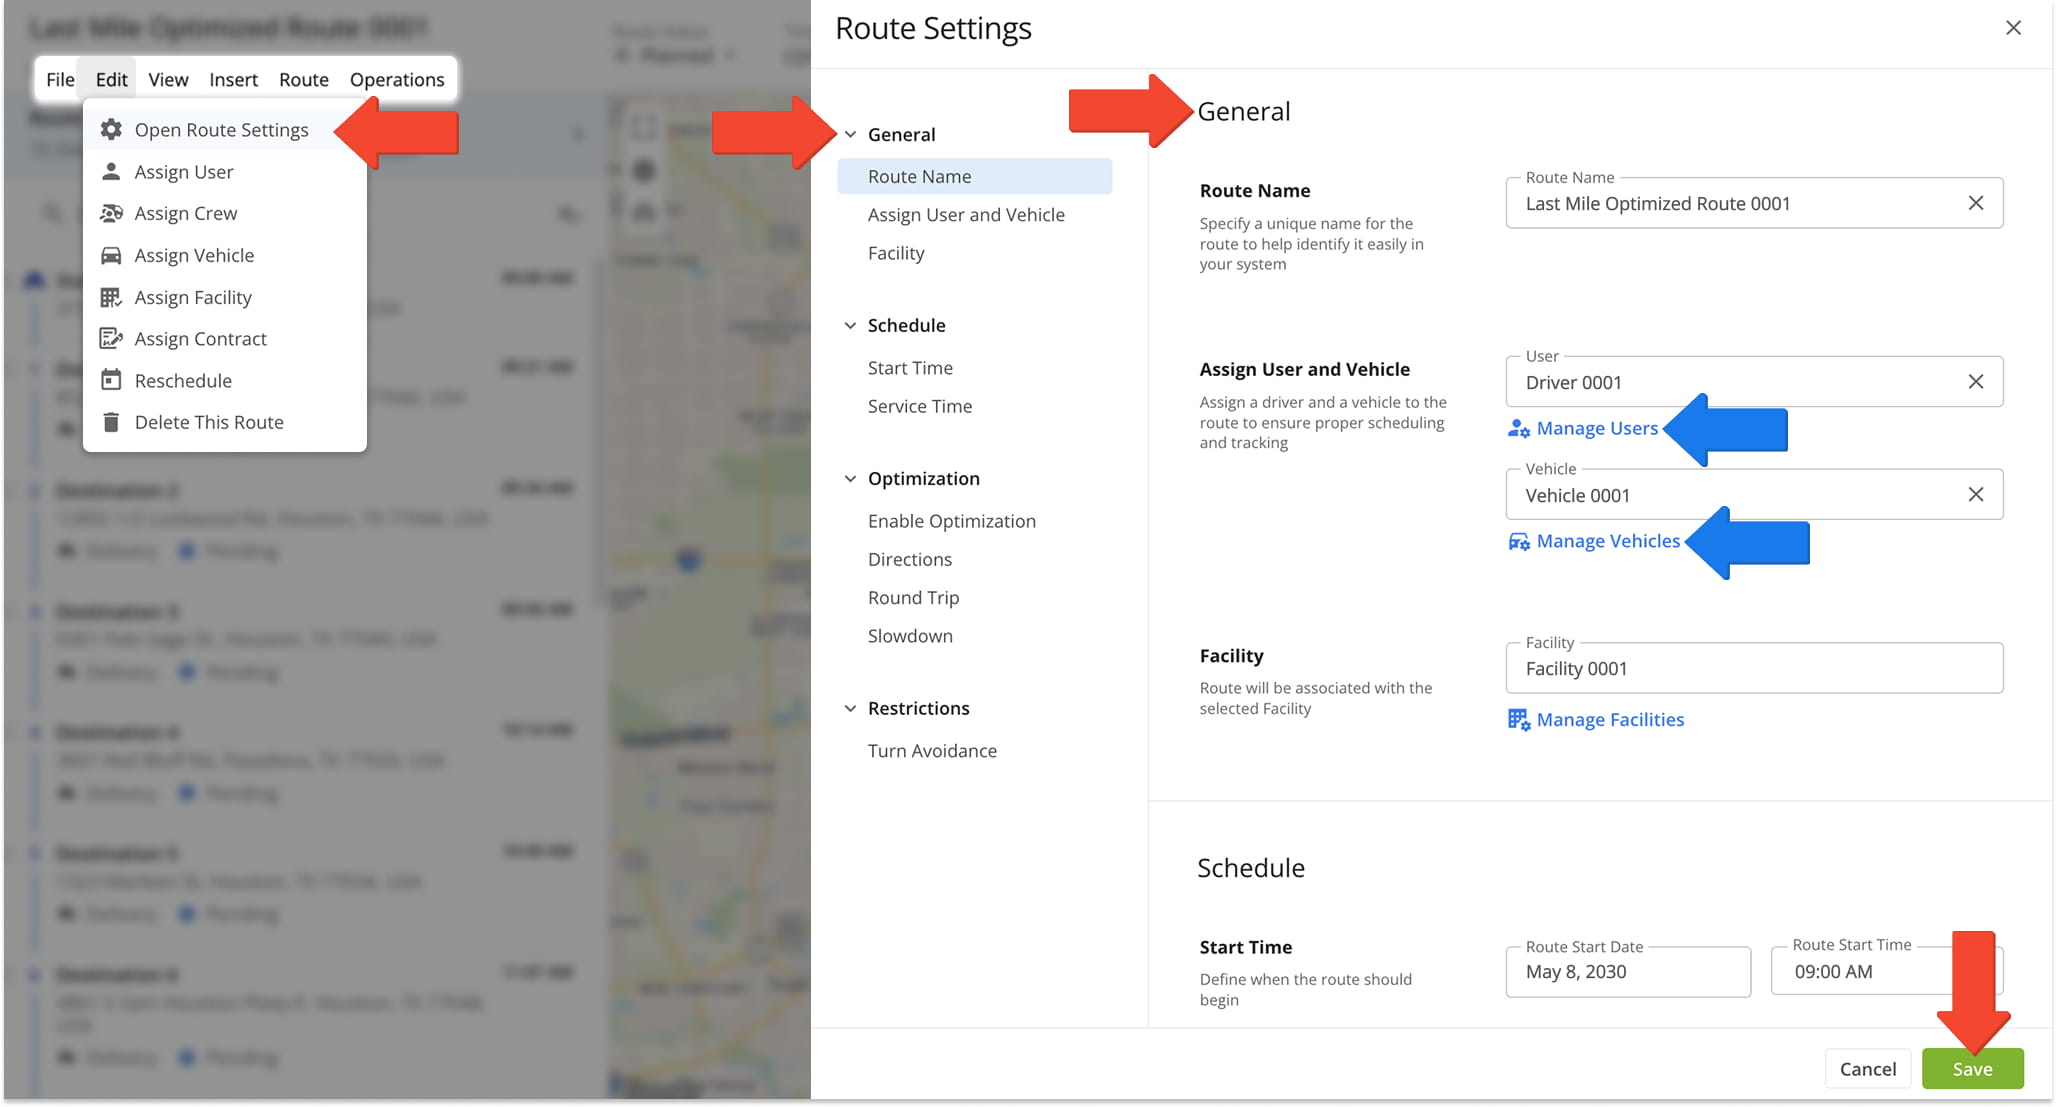
General Route Settings
The “Schedule” section enables you to adjust a route’s scheduled start date, start time, and Service Time. You can use the “Override service time” toggle to apply a new Service Time to all Destinations on the route. See the table below for details:
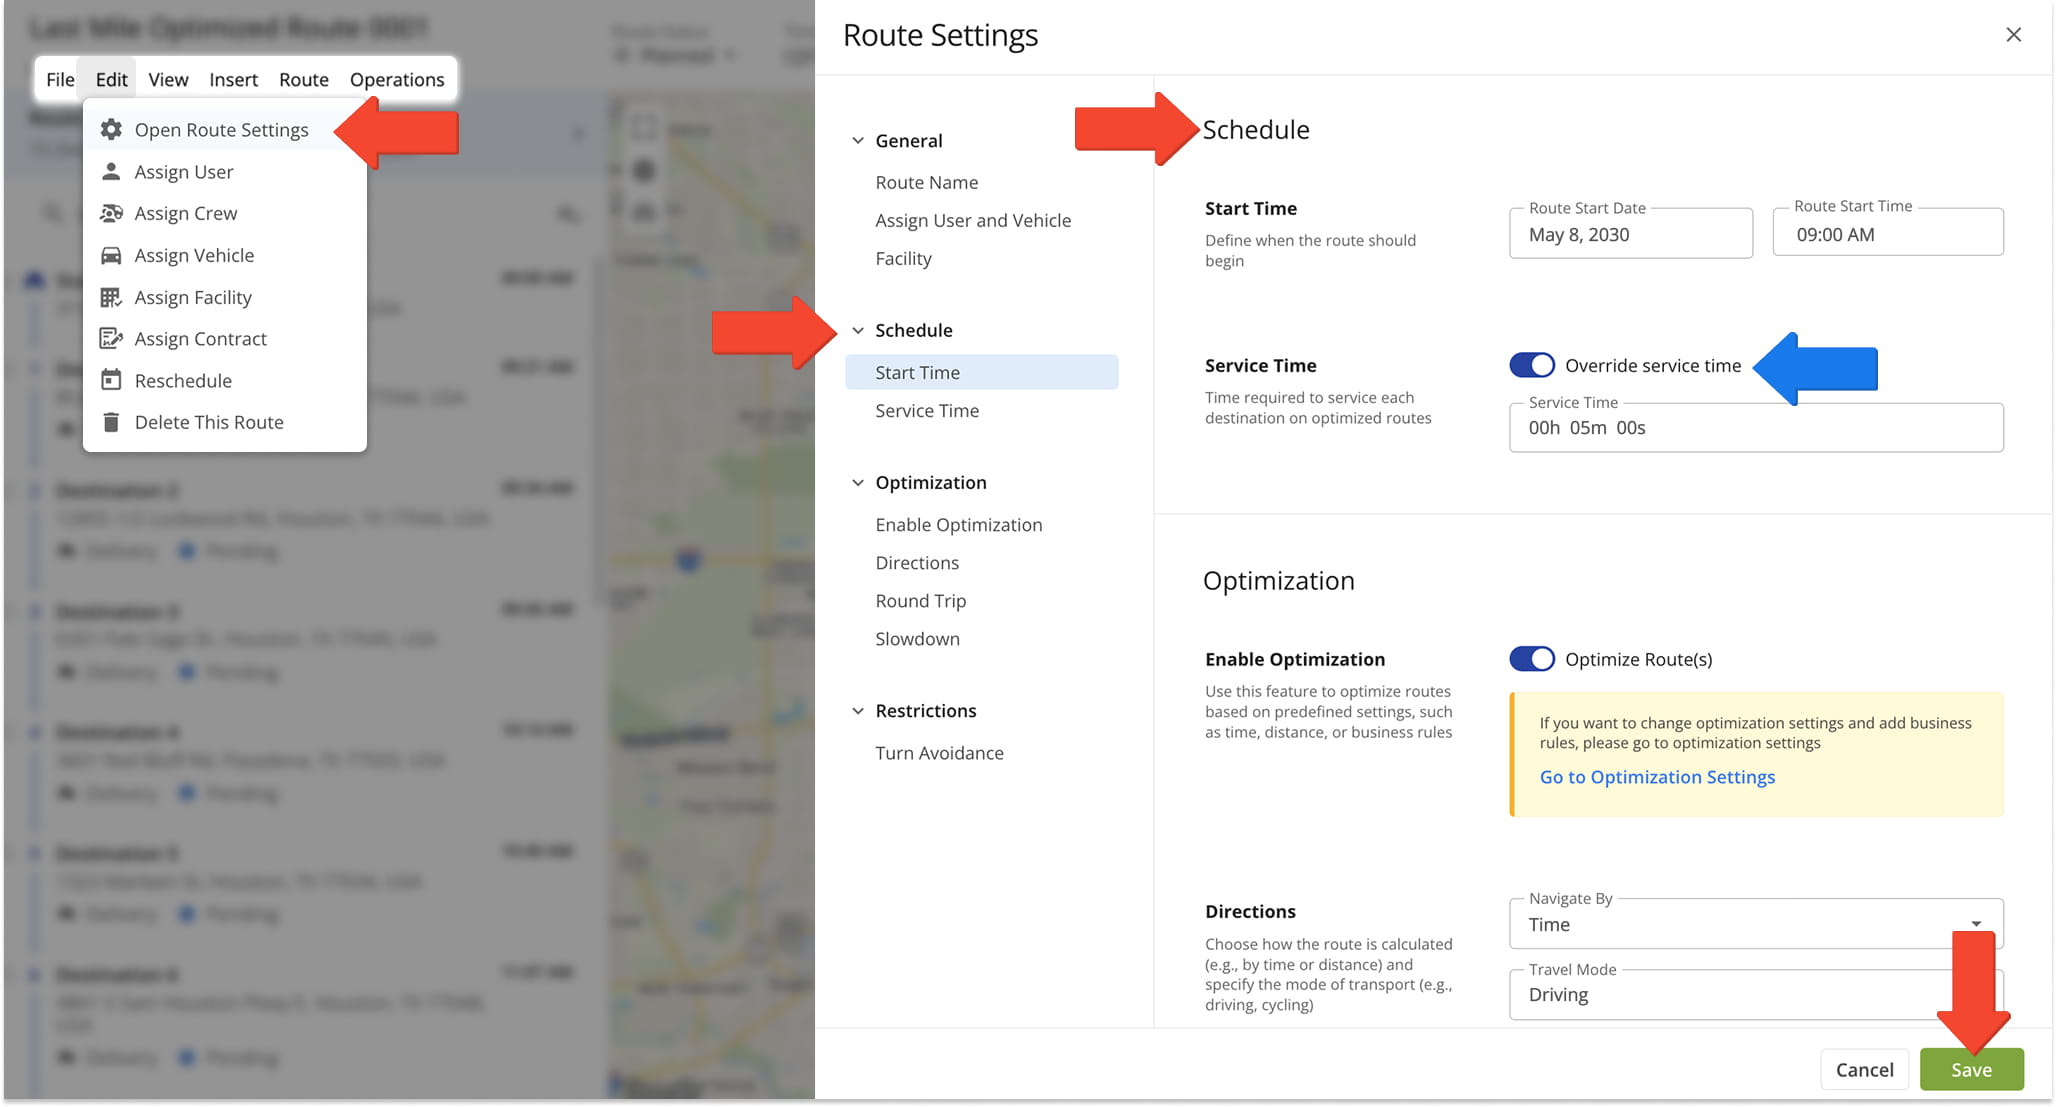
Route Schedule Settings
In the “Optimization” section, you can adjust settings like travel mode, final Destination type, Traffic Slowdown, and Service Time Slowdown. Learn more in the table below.
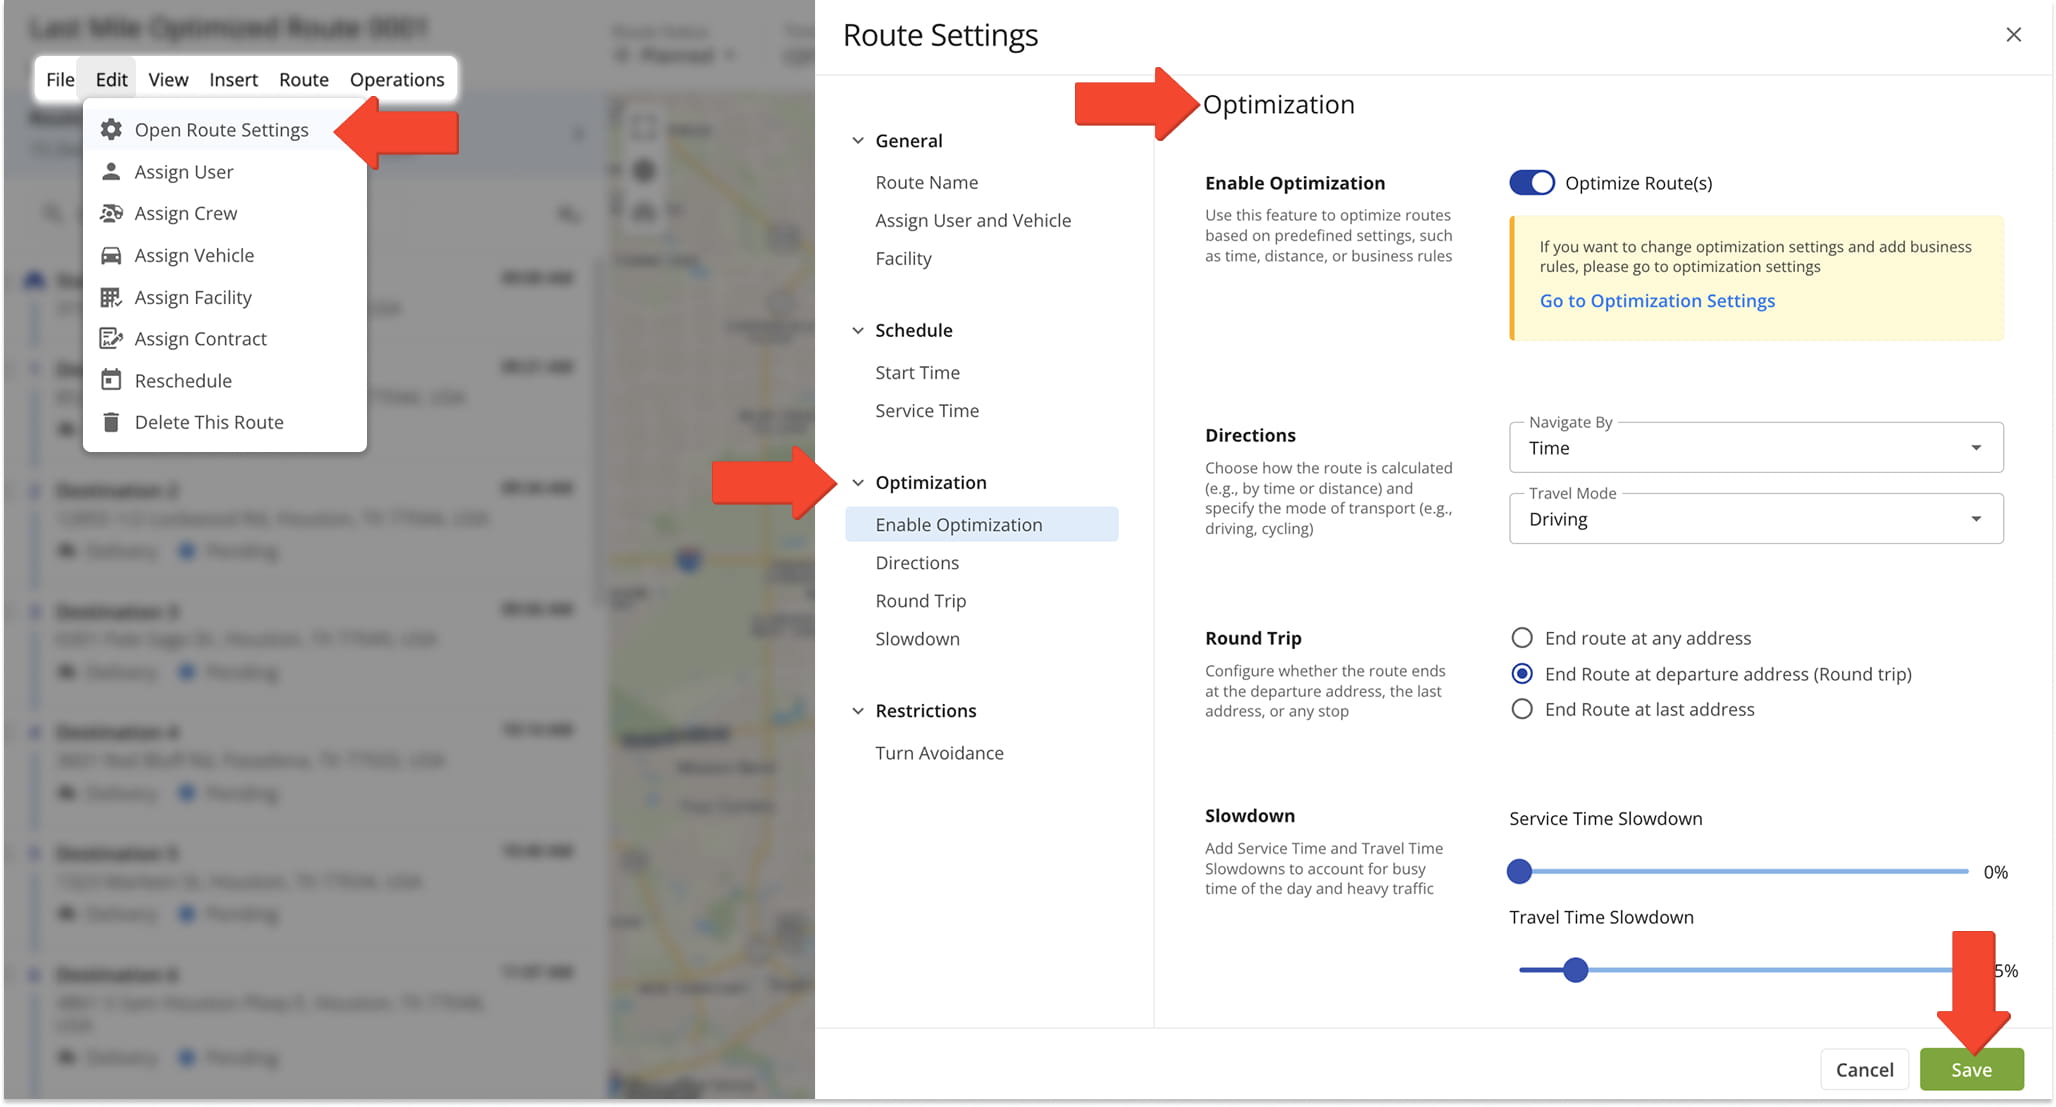
Route Optimization Settings
The “Restrictions” section helps you set route path limitations, such as avoiding left or right turns. See the below table for details on the restrictions.
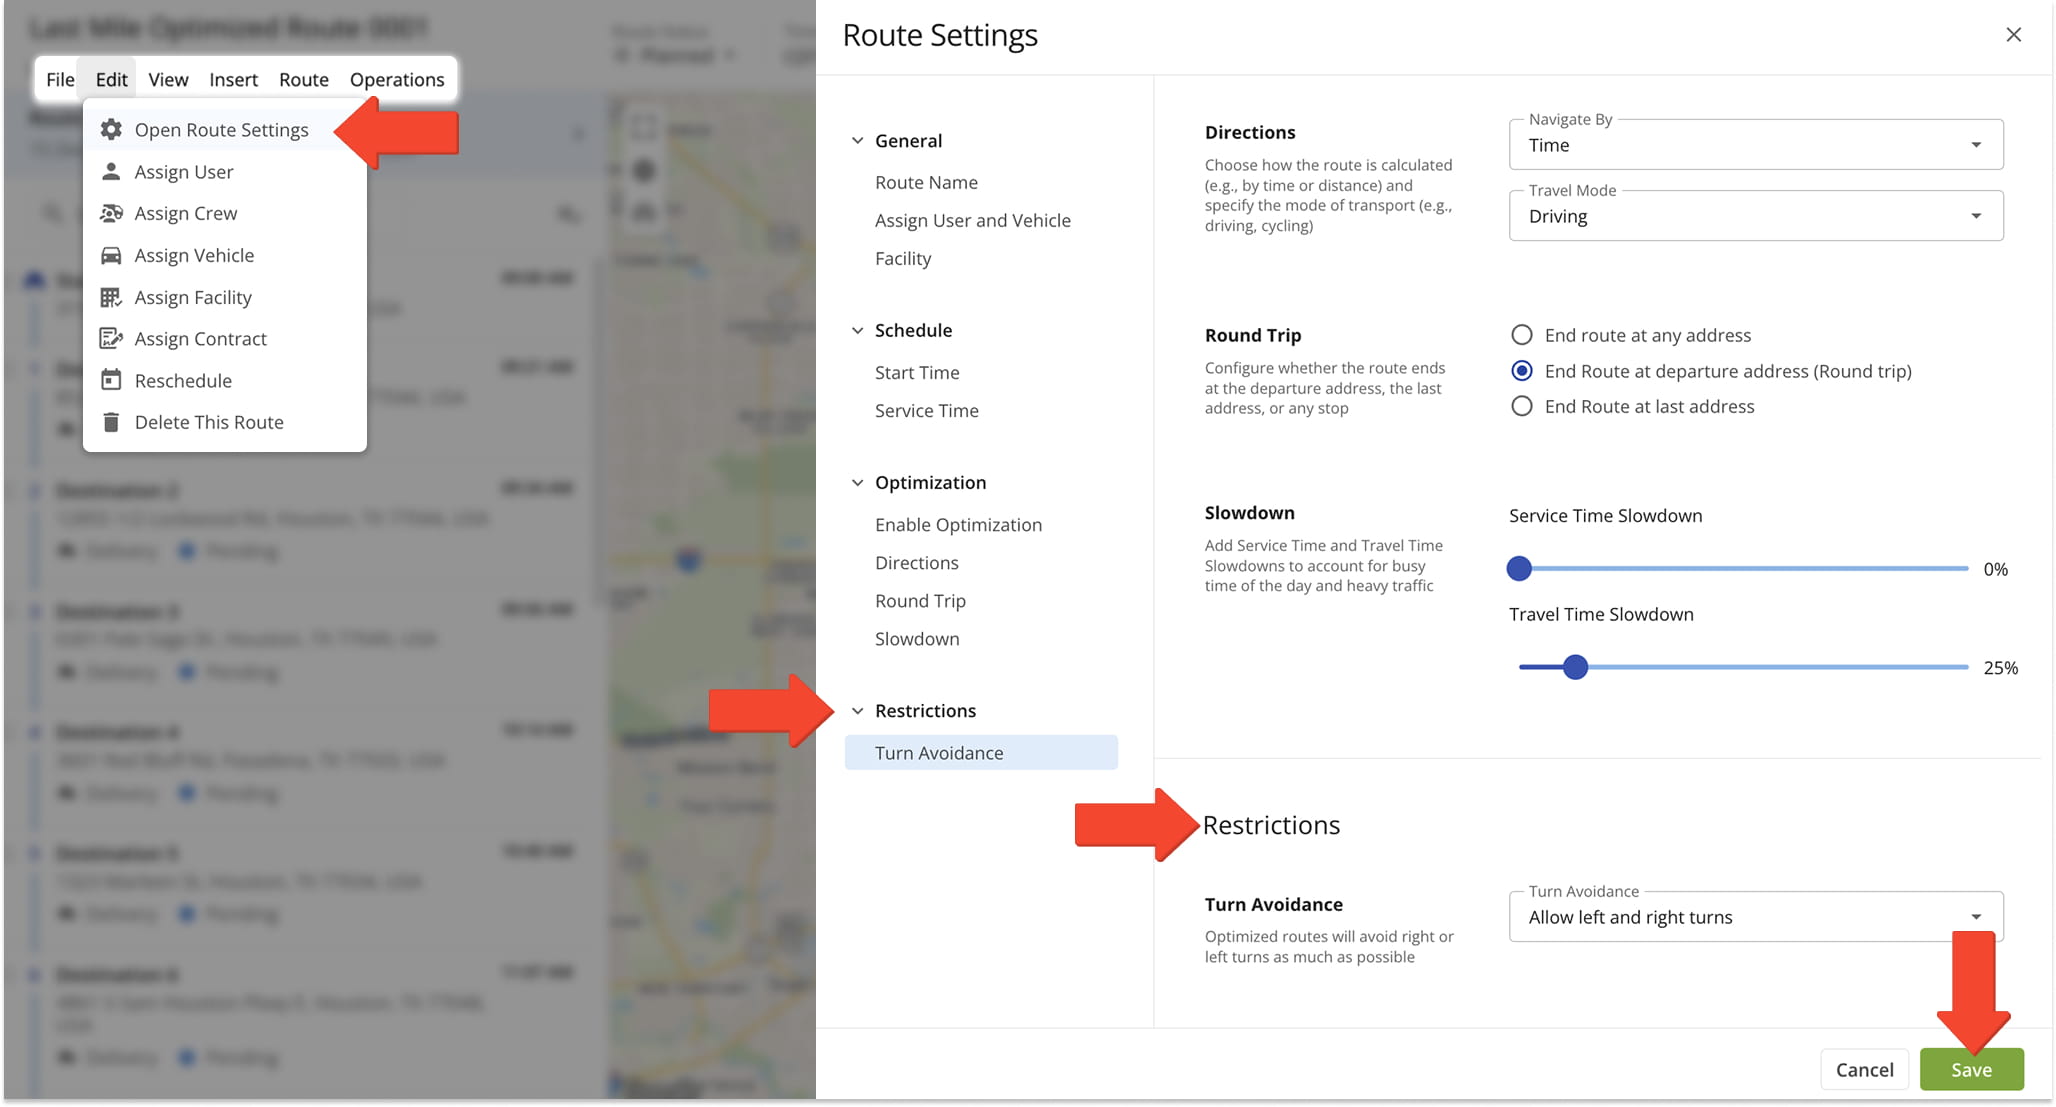
Route Restriction Settings
Manage Destinations – Edit Destinations And View Destination Info
From the Route Editor, you can move, copy, delete, and edit Destinations. To edit a Destination from the Destinations List, right-click on it and select an option from the menu. See the table below for a breakdown of available edit options.
From the Destinations List, you can also click on and drag Destinations to reorder them. The route will automatically update. NOTE: After making changes to Destinations or route settings, re-optimize the route to ensure the most efficient directions.
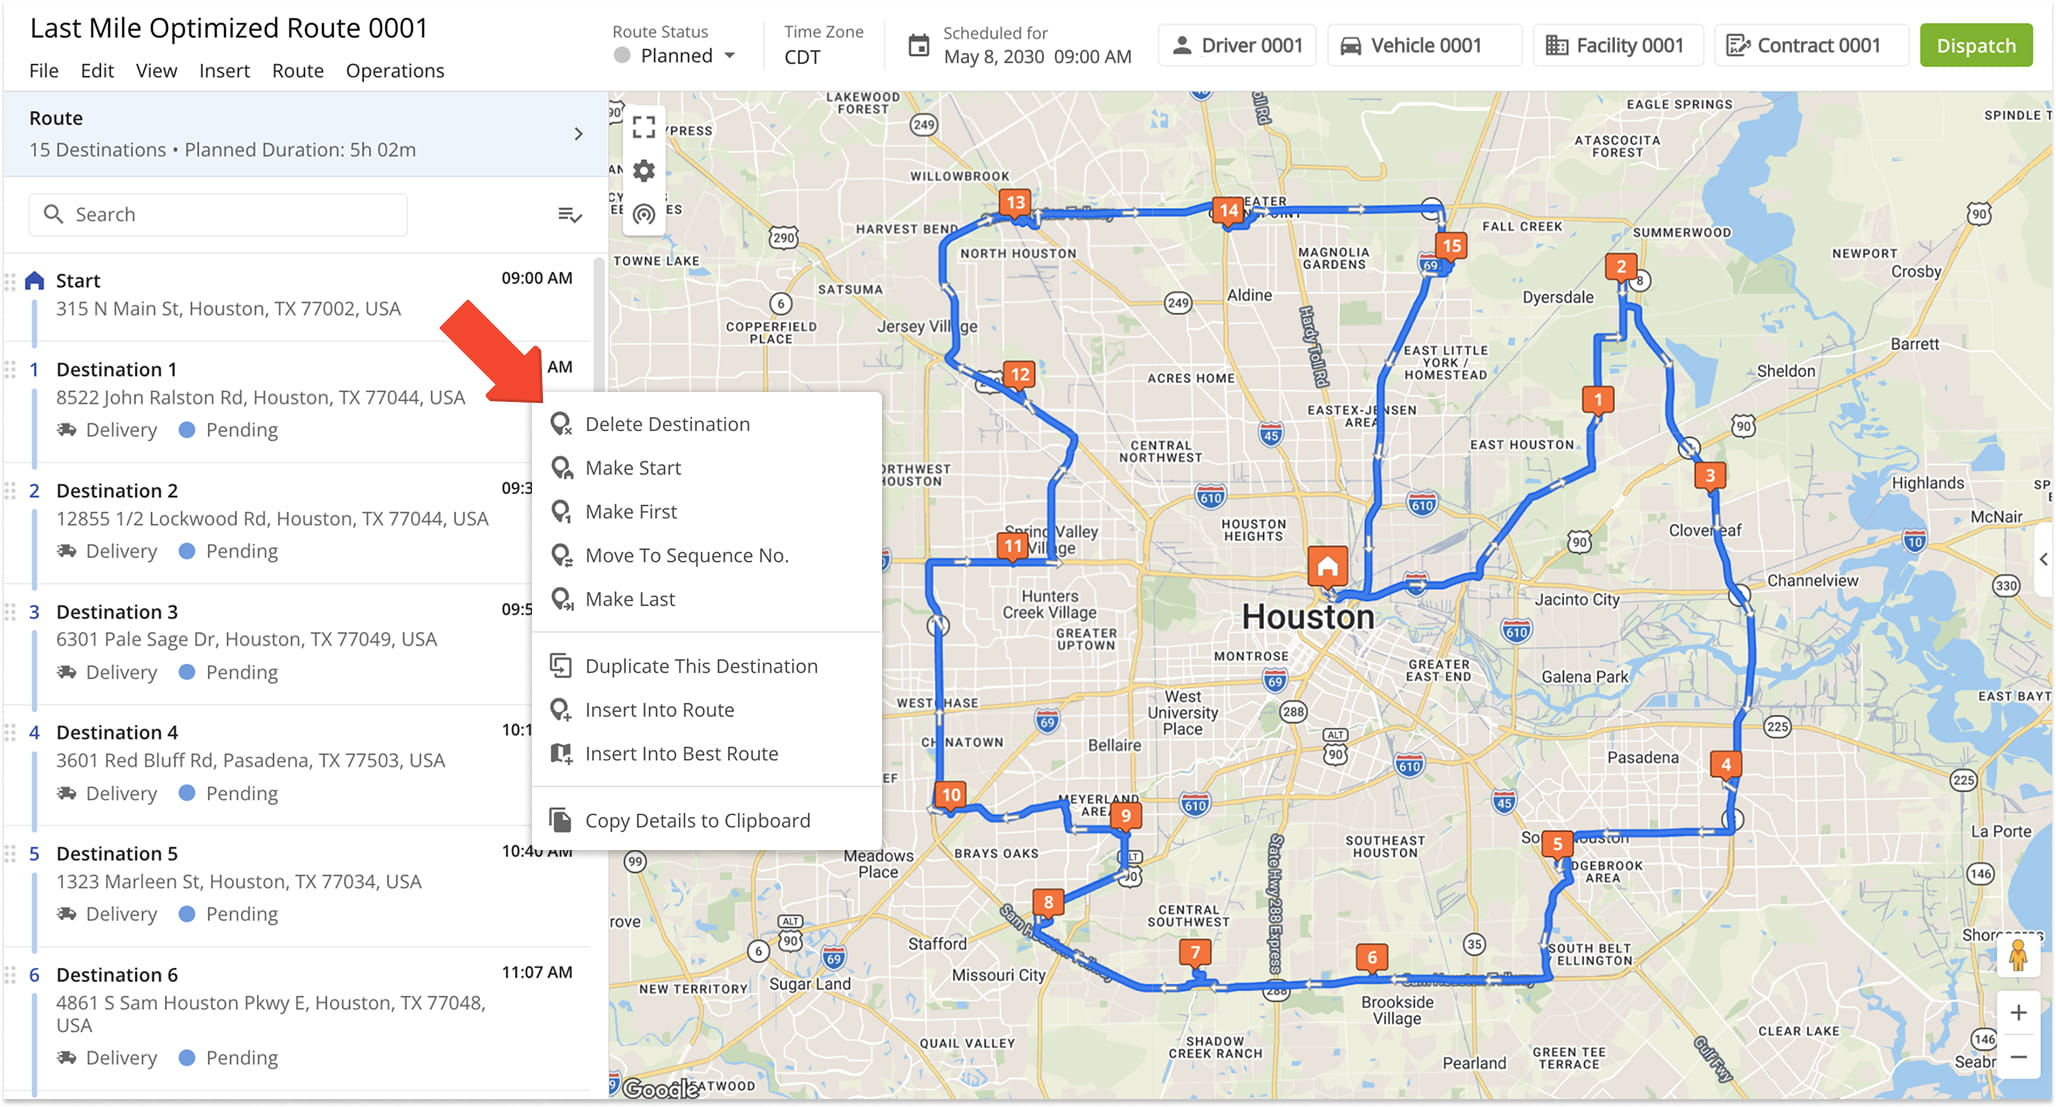
Destination Edit Options
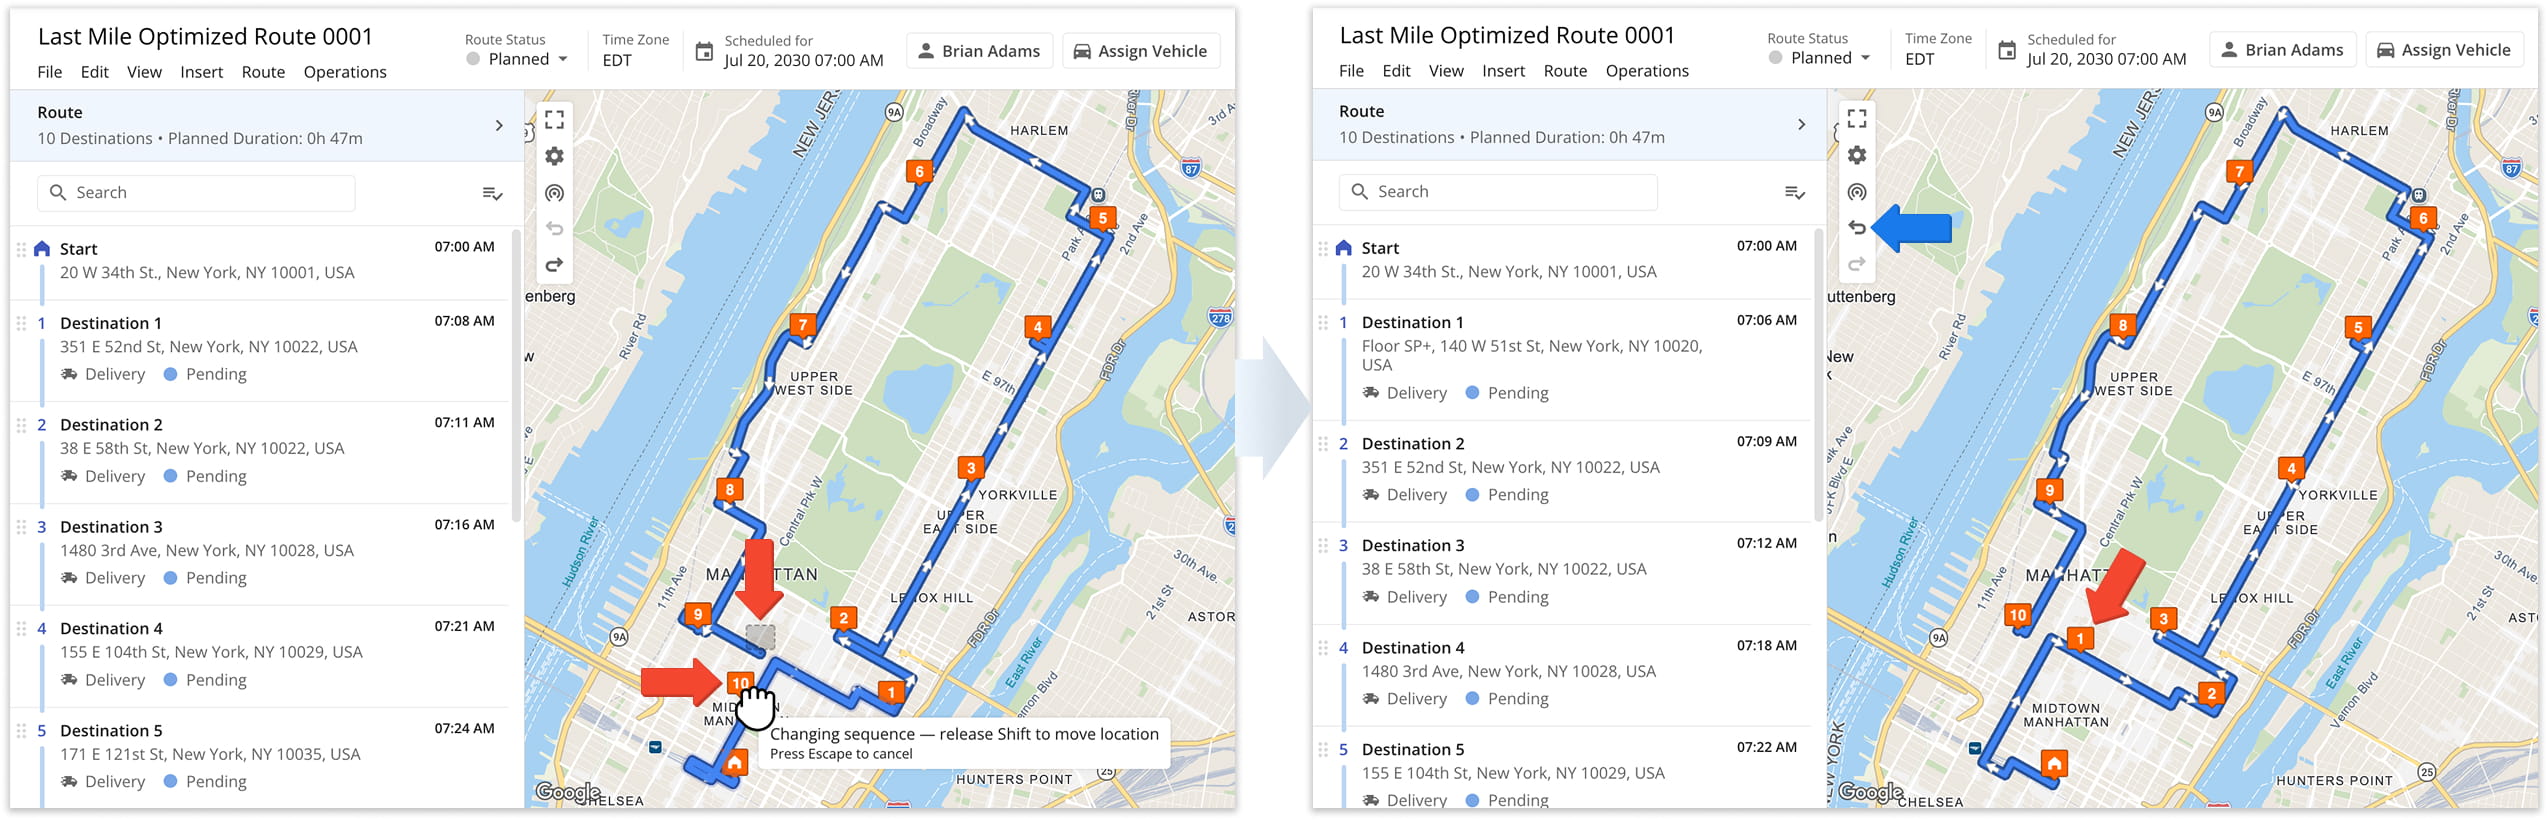
You can also re-sequence destinations directly from the Route Map. To do this, hold the Shift key and drag the destination to the position on the route where you want it to appear. Be sure to re-optimize the route afterward to ensure the most efficient directions.
If you drag and drop a destination without holding the Shift key, the system will move the destination to a different address instead of re-sequencing it. If this happens, click the Undo Icon in the Actions Menu at the upper-left of the map to reverse the change immediately.
NOTE: Undo history is cleared when the tab is closed or refreshed, so once you leave the page, the change can no longer be undone. For this reason, we recommend copying the route before editing.
To view and edit in-depth Destination information, left-click a Destination in the list or on the map to open its “Destination Info” panel. Fields with no associated information are hidden by default. To see all available fields, toggle “Show All“.
To edit or add information for the Destination, simply click a field and input the information you want to add. Learn more about the “Destination Info” fields in the table below.
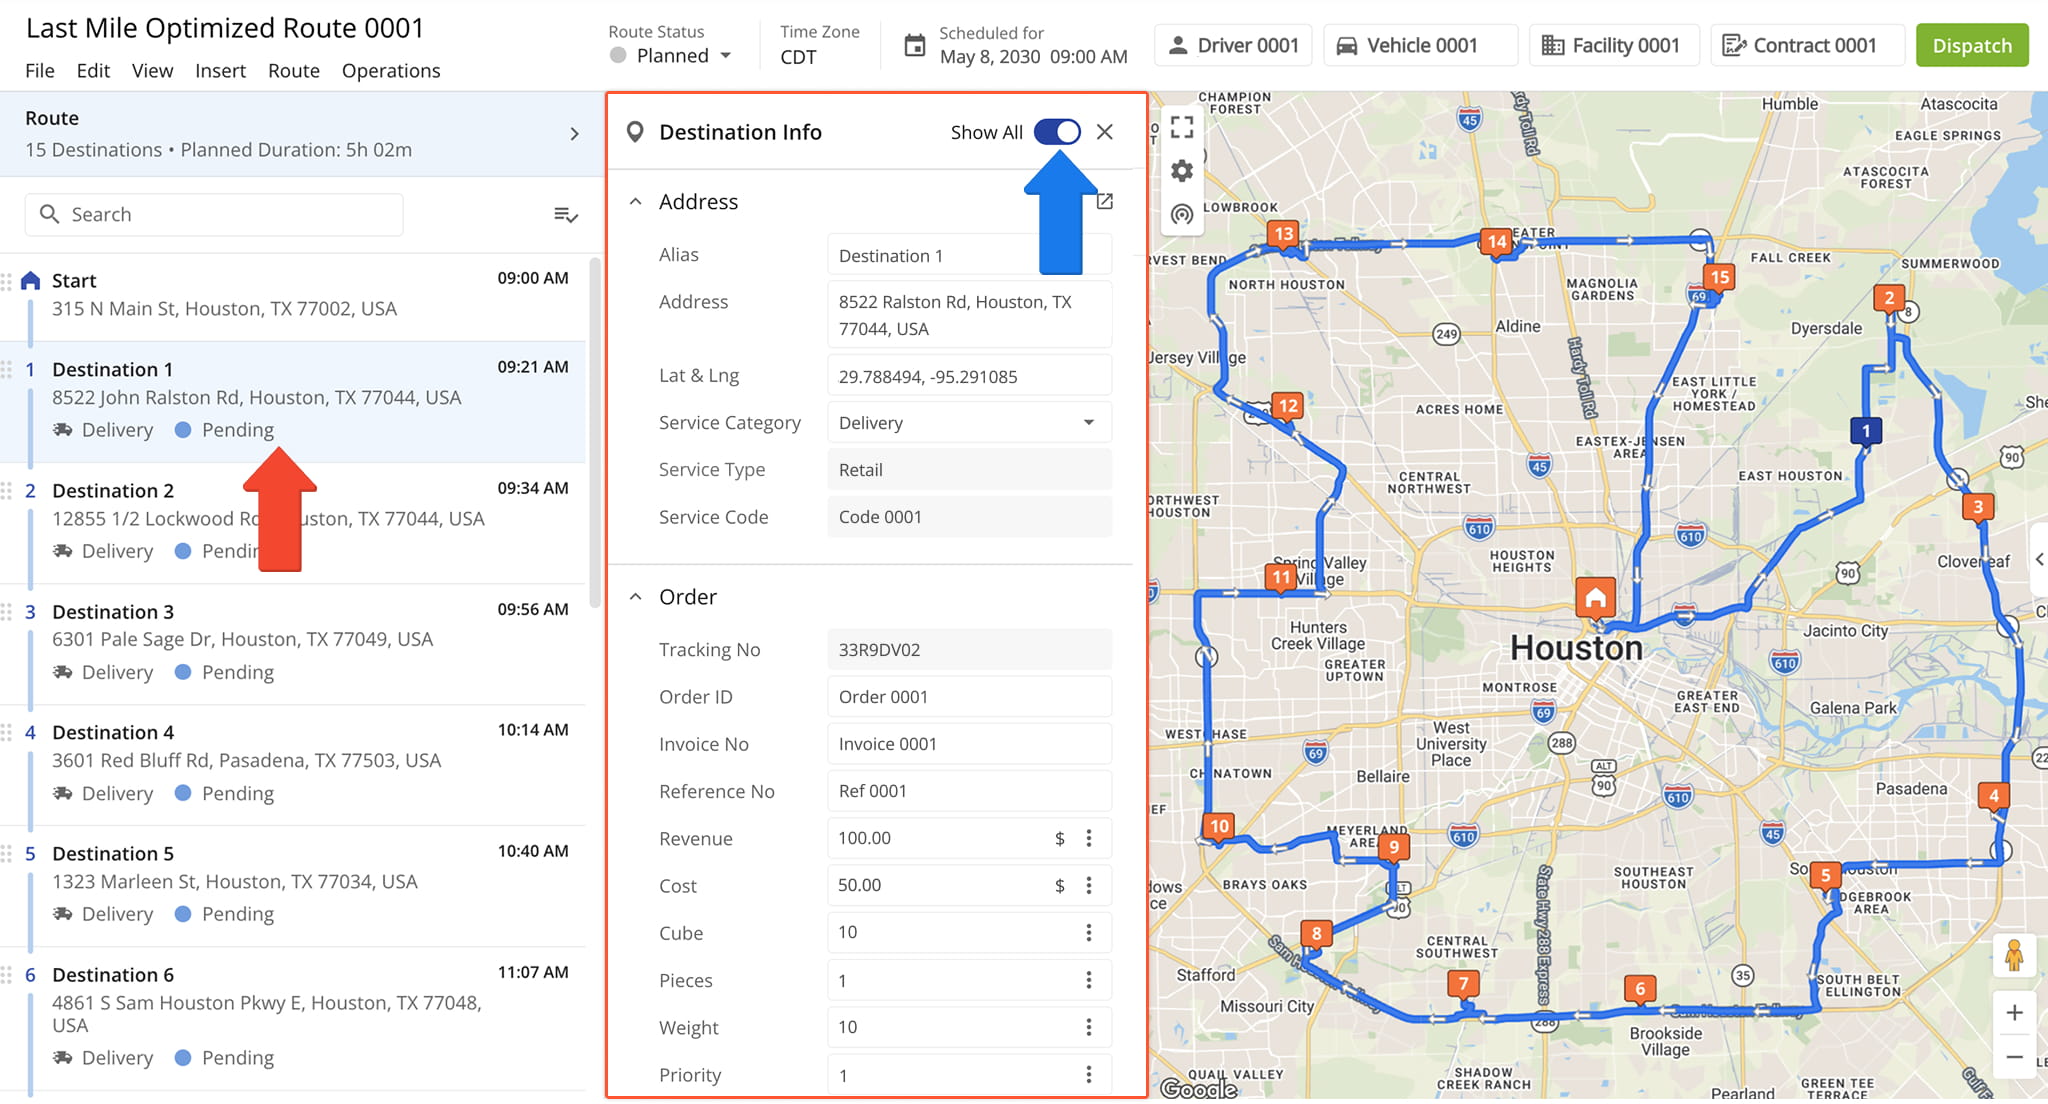
Destination Information Fields
Route Progress – Real-Time Statuses, ETAs And Progress Monitoring
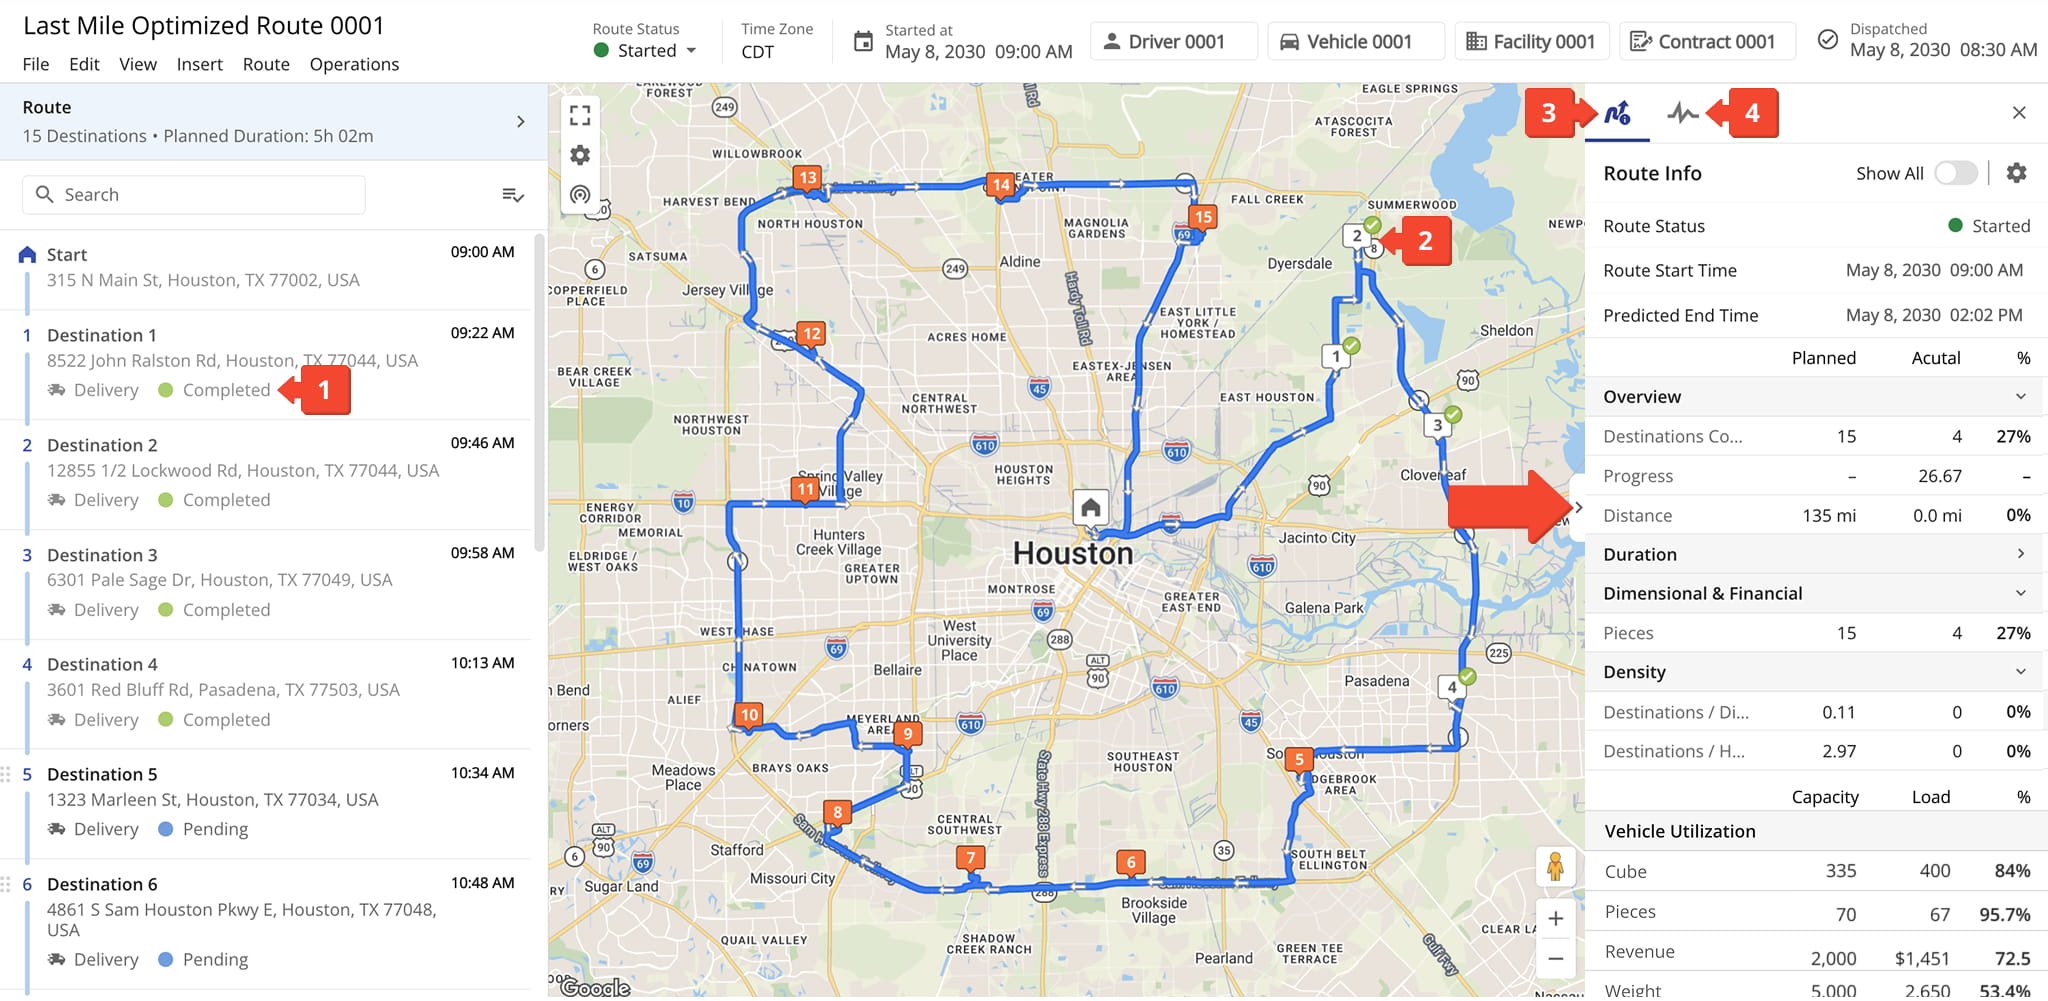
When the assigned User starts the route and completes Destination visits, the route’s progress is automatically updated in the system. You can use the following tools to track route progress in the Route Editor:
- Destinations List: You can easily see which destinations are marked as “Completed“, “Arrived“, or “Pending“.
- Interactive Map: Completed Destinations are marked a different color from pending ones, making it easy to quickly view route progress.
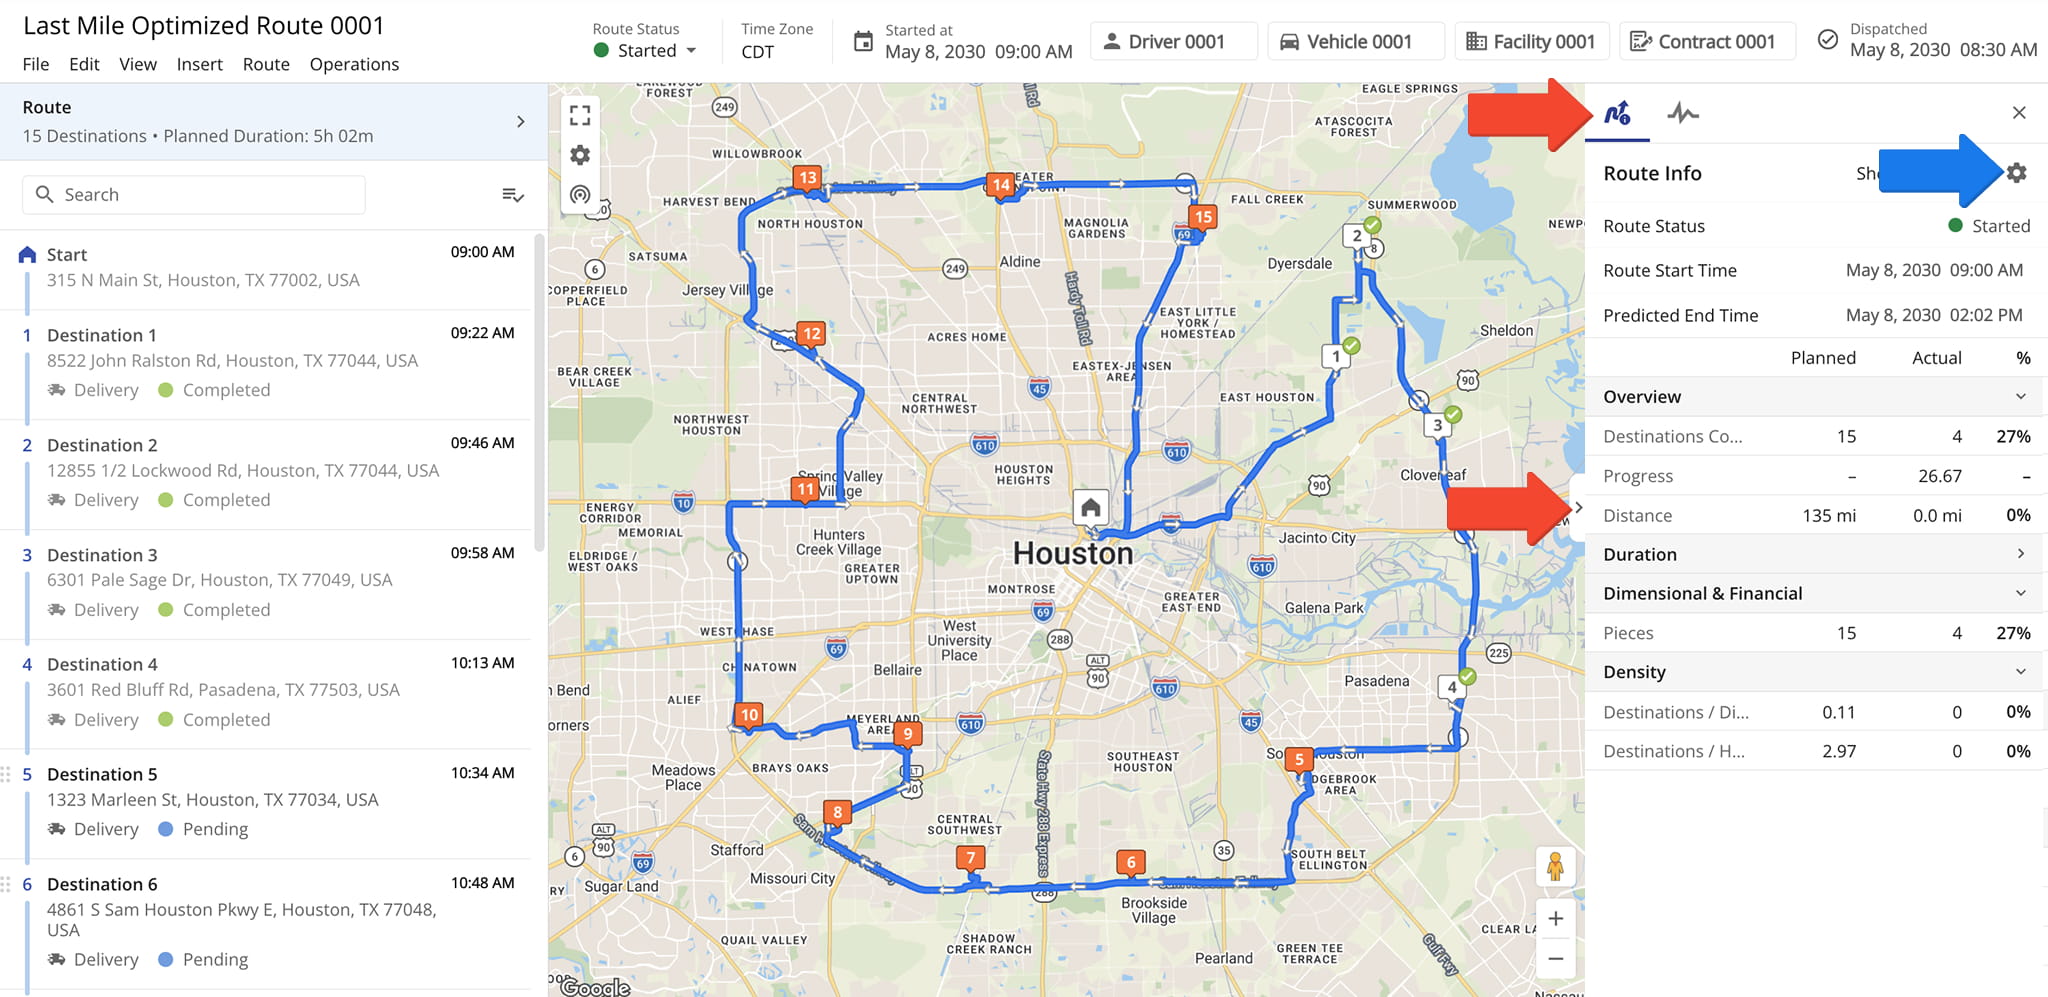
- Route Information Panel: Provides a detailed breakdown of planned and actual route data and percentages.
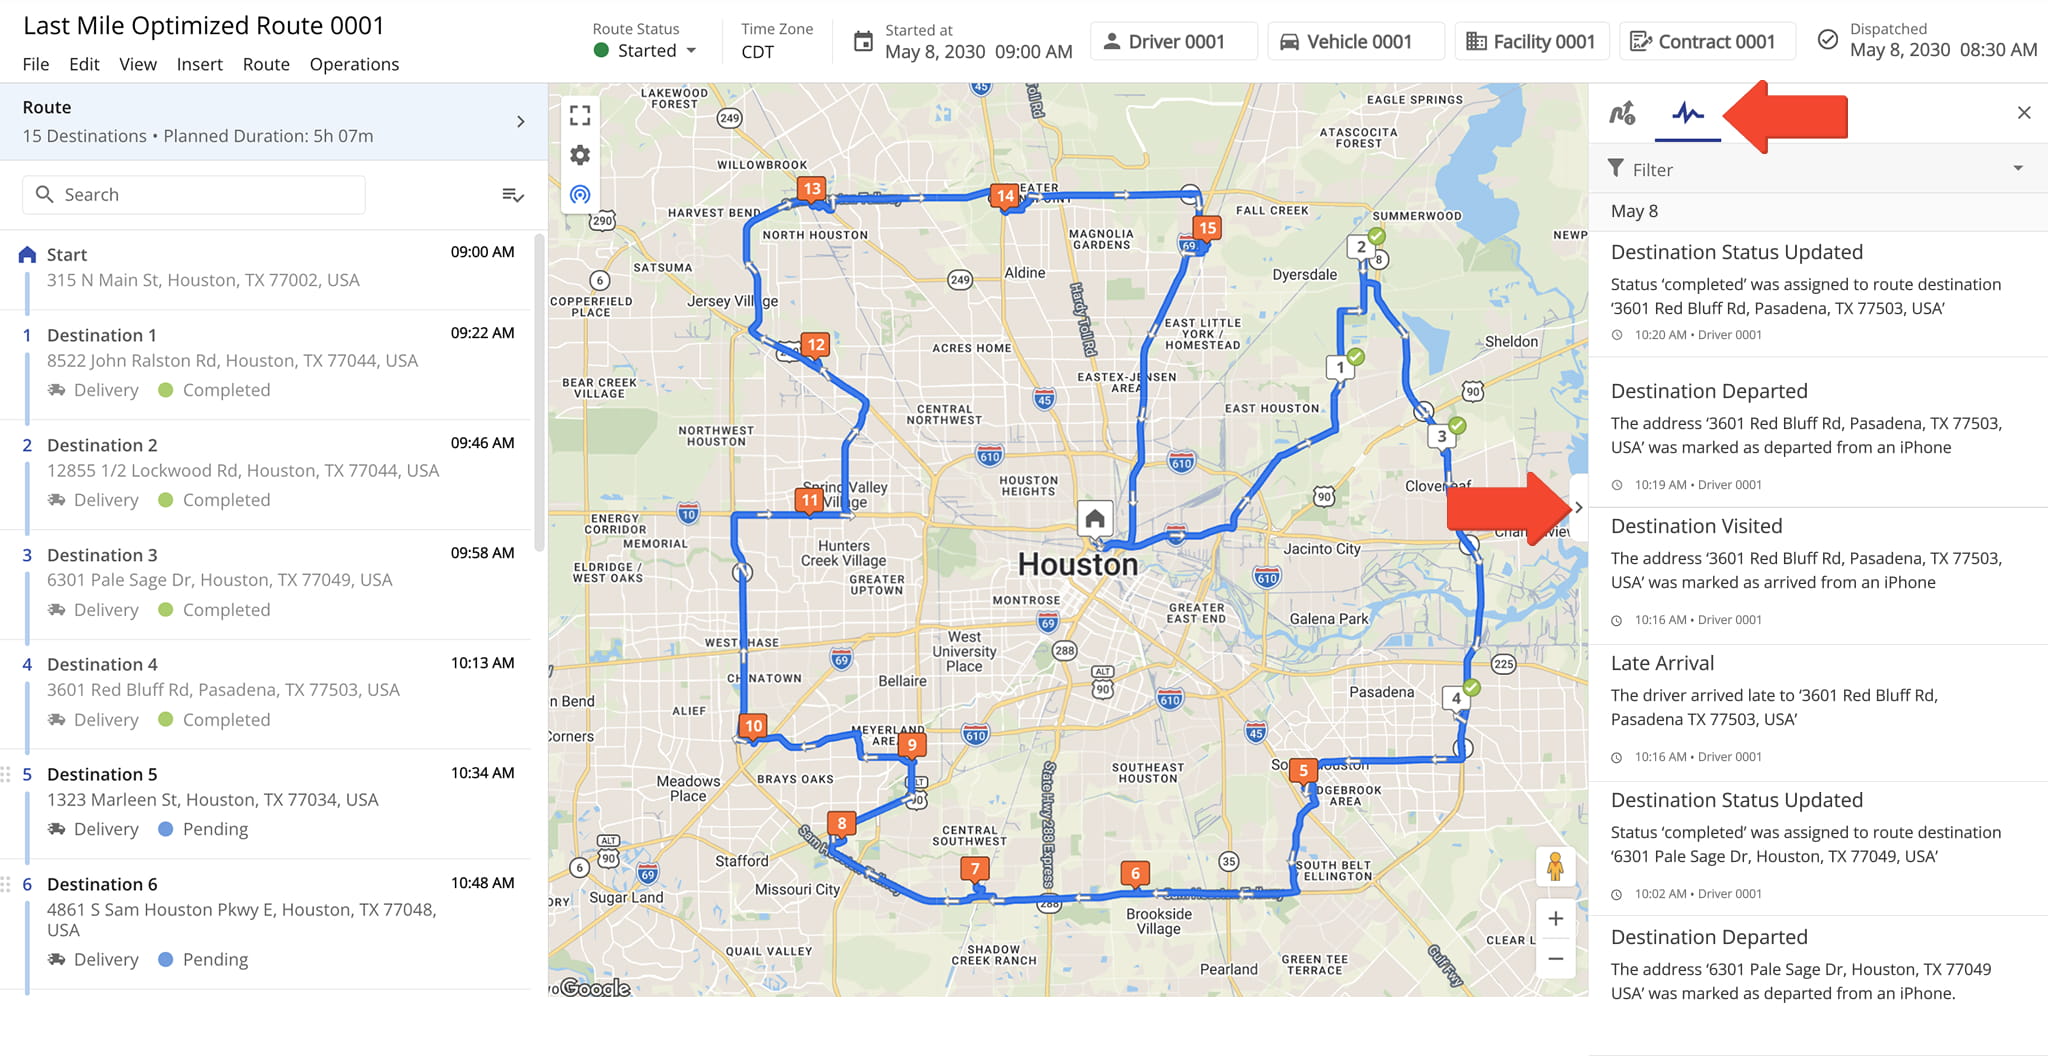
- Activity Feed: Provides a detailed breakdown of all route activity, including progress updates.
GPS Tracking – Real-Time Driver And Telematics Vehicle Tracking
The Route Editor offers advanced GPS tracking for drivers, vehicles, and assets. To enable tracking, click the Tracking button in the top-left corner of the map and check the “Tracking Path” and “Breadcrumbs” boxes.
Once enabled, the map will display a tracking path and Breadcrumbs (blue dots) for each location update. Hover over a Breadcrumb to view the tracking data for that point. See the table below for more on available tracking options.
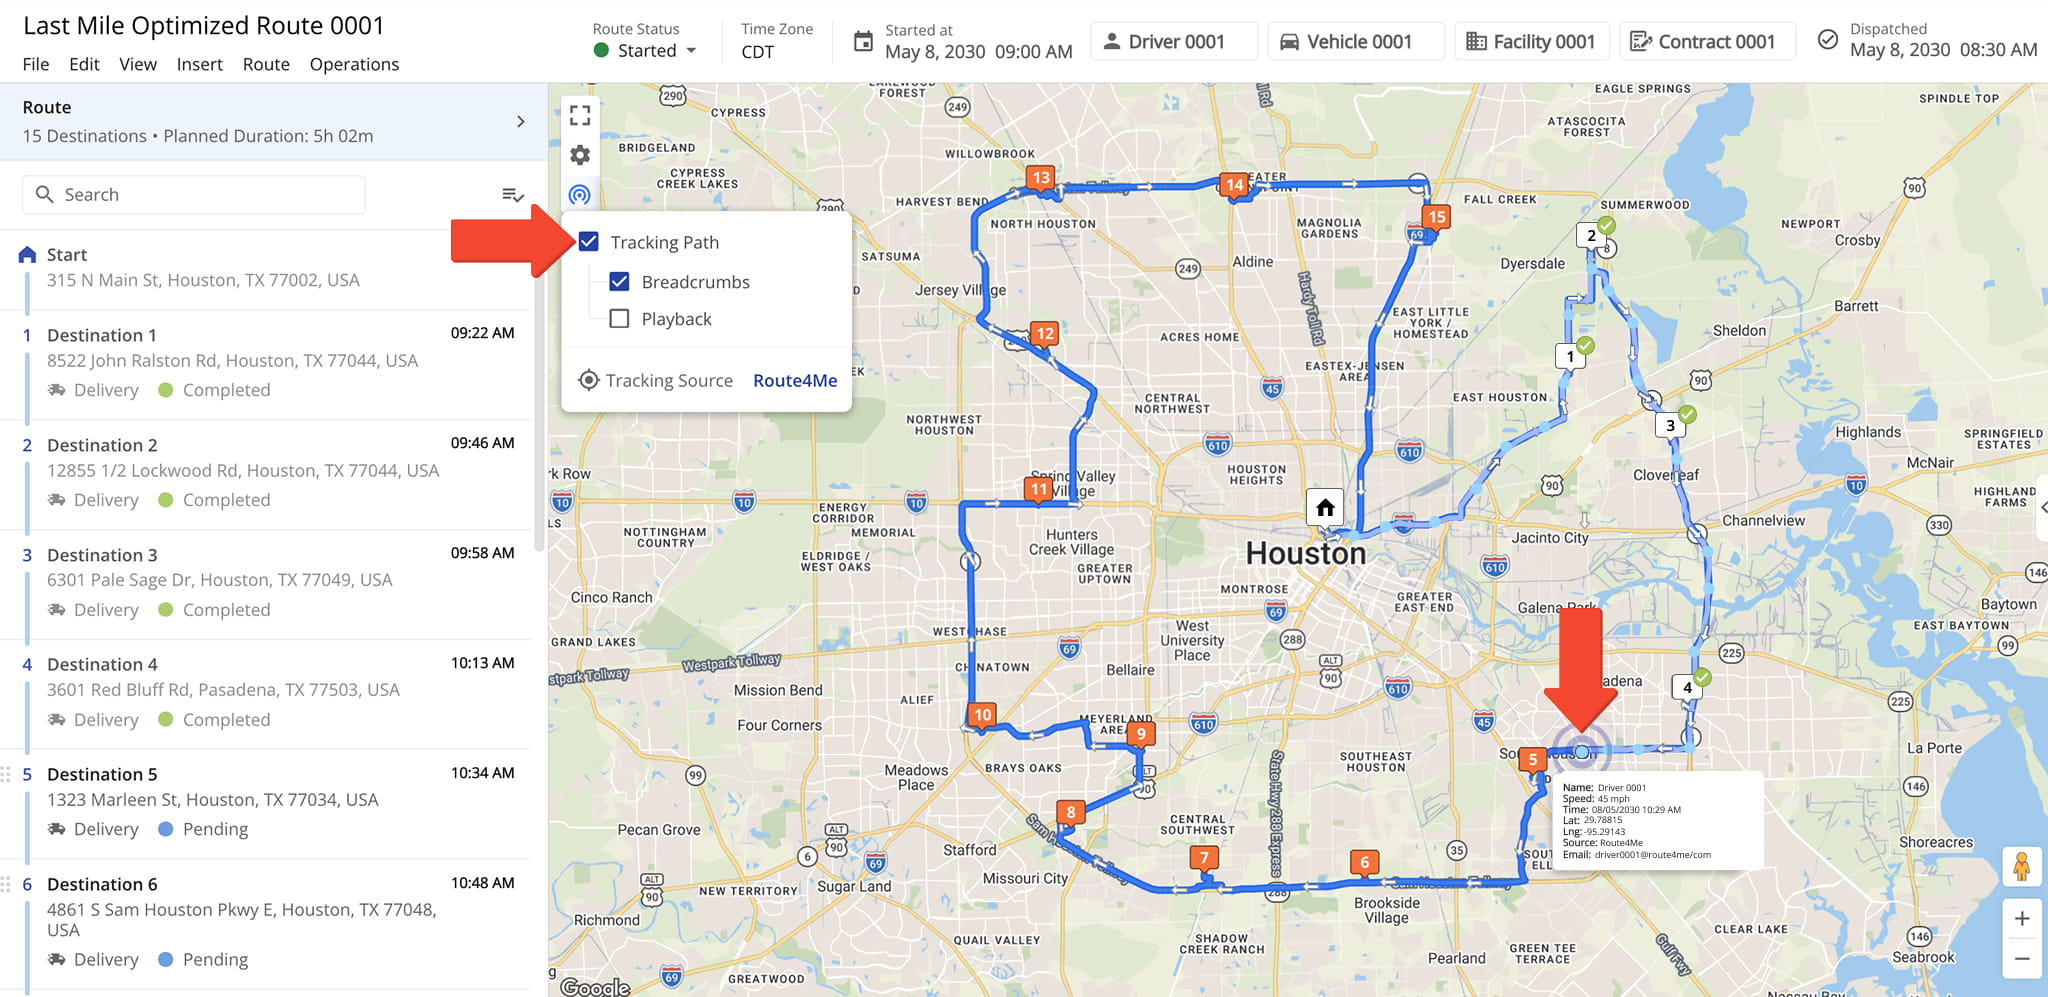
Tracking Options
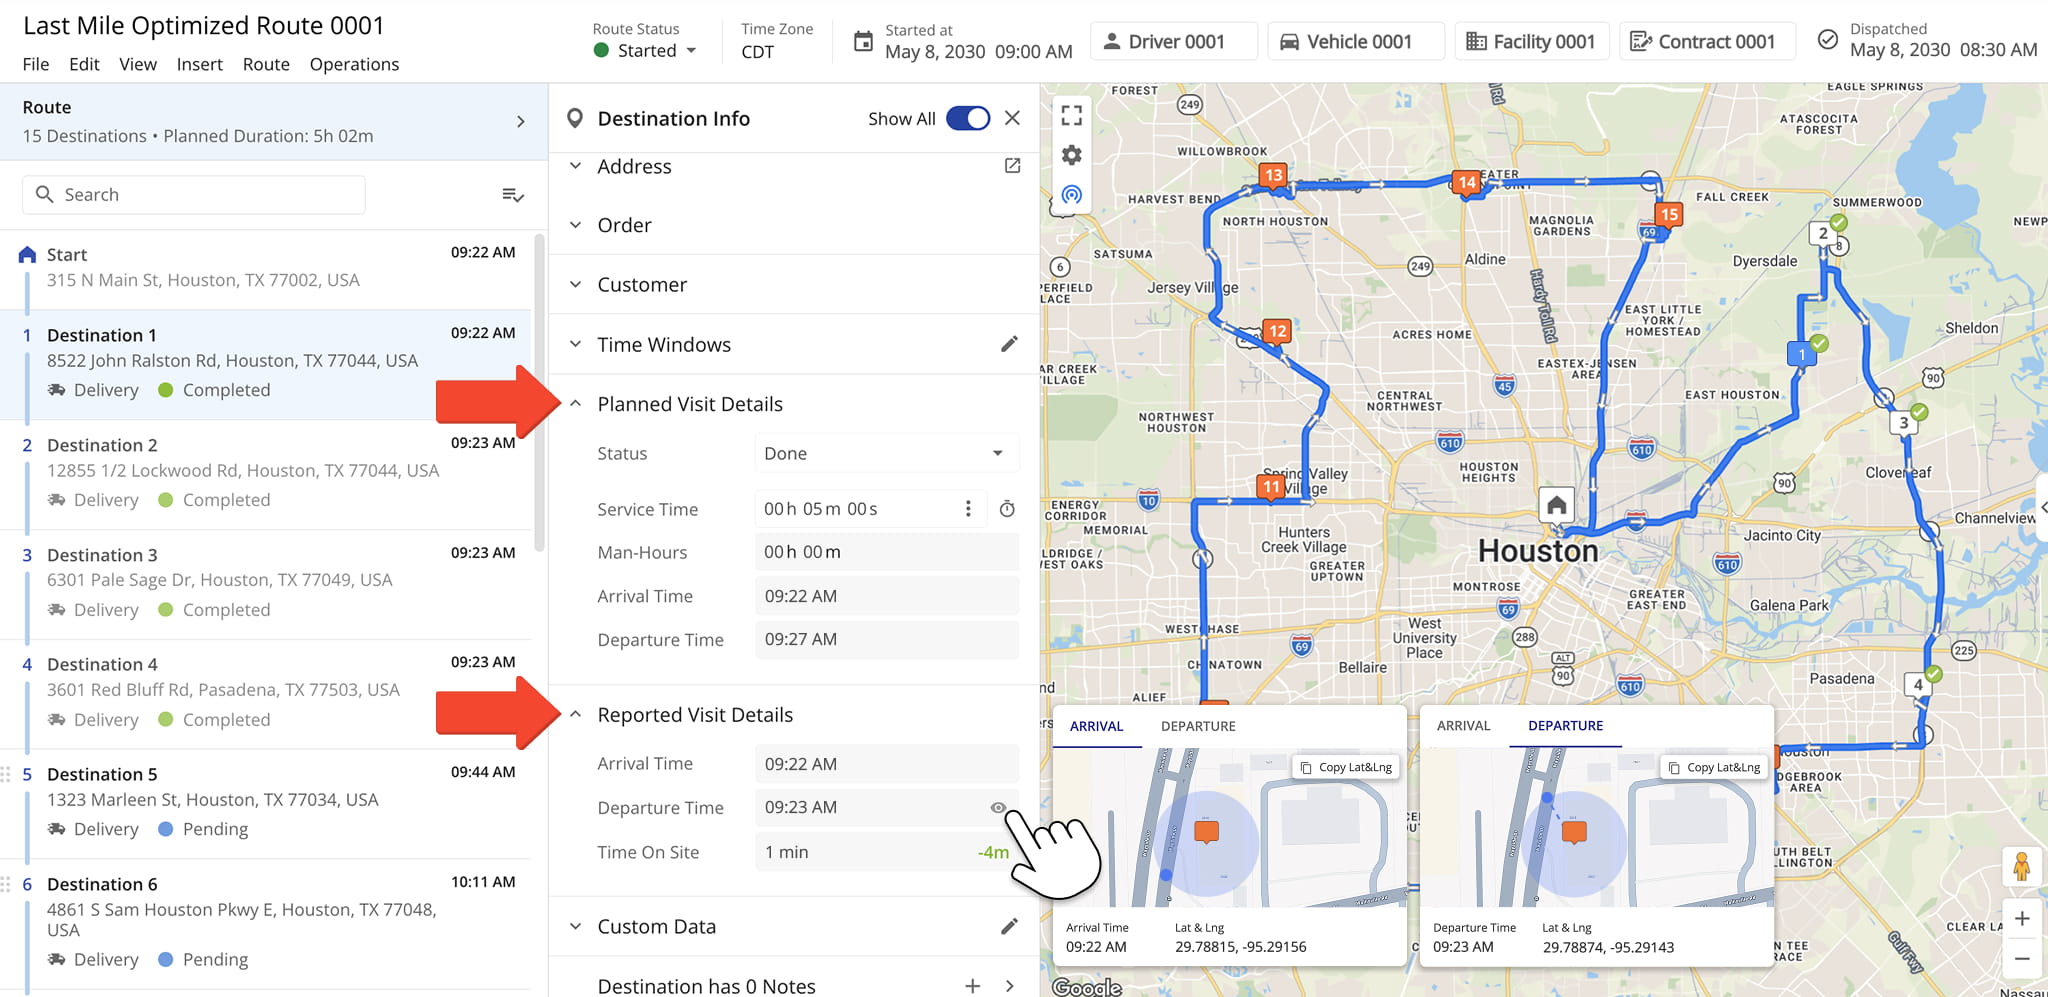
In addition to live tracking, you can view detailed visit data for each destination. Just click a Destination to open it’s “Destination Info” panel, then select the “Planned Visit Details” and “Reported Visit Details” sections.
Here, you ‘ll find both the initially planned visit and departure times and the actual automatically detected visit and departure times (based on geofence-triggered arrival and departure).
Hover over a timestamp to reveal the Eye Icon, then click it to view exact “Arrival” and “Departure” tracking data, including time and GPS coordinates.
Activity Feed – Real-Time Route Events, Activities, Completed Tasks
The Route Editor Activity Feed displays a chronological log of completed activities, tasks, and events on the route. To open it, click the Divider button on the right side of the map, then click the Activity Feed Tab.
The Feed shows when the assigned driver or User arrived at and left each Destination, added notes or proof of visit, and when route updates were made from either the Mobile app or your route planner software.
Route Information Panel – Customizable Route Data Display
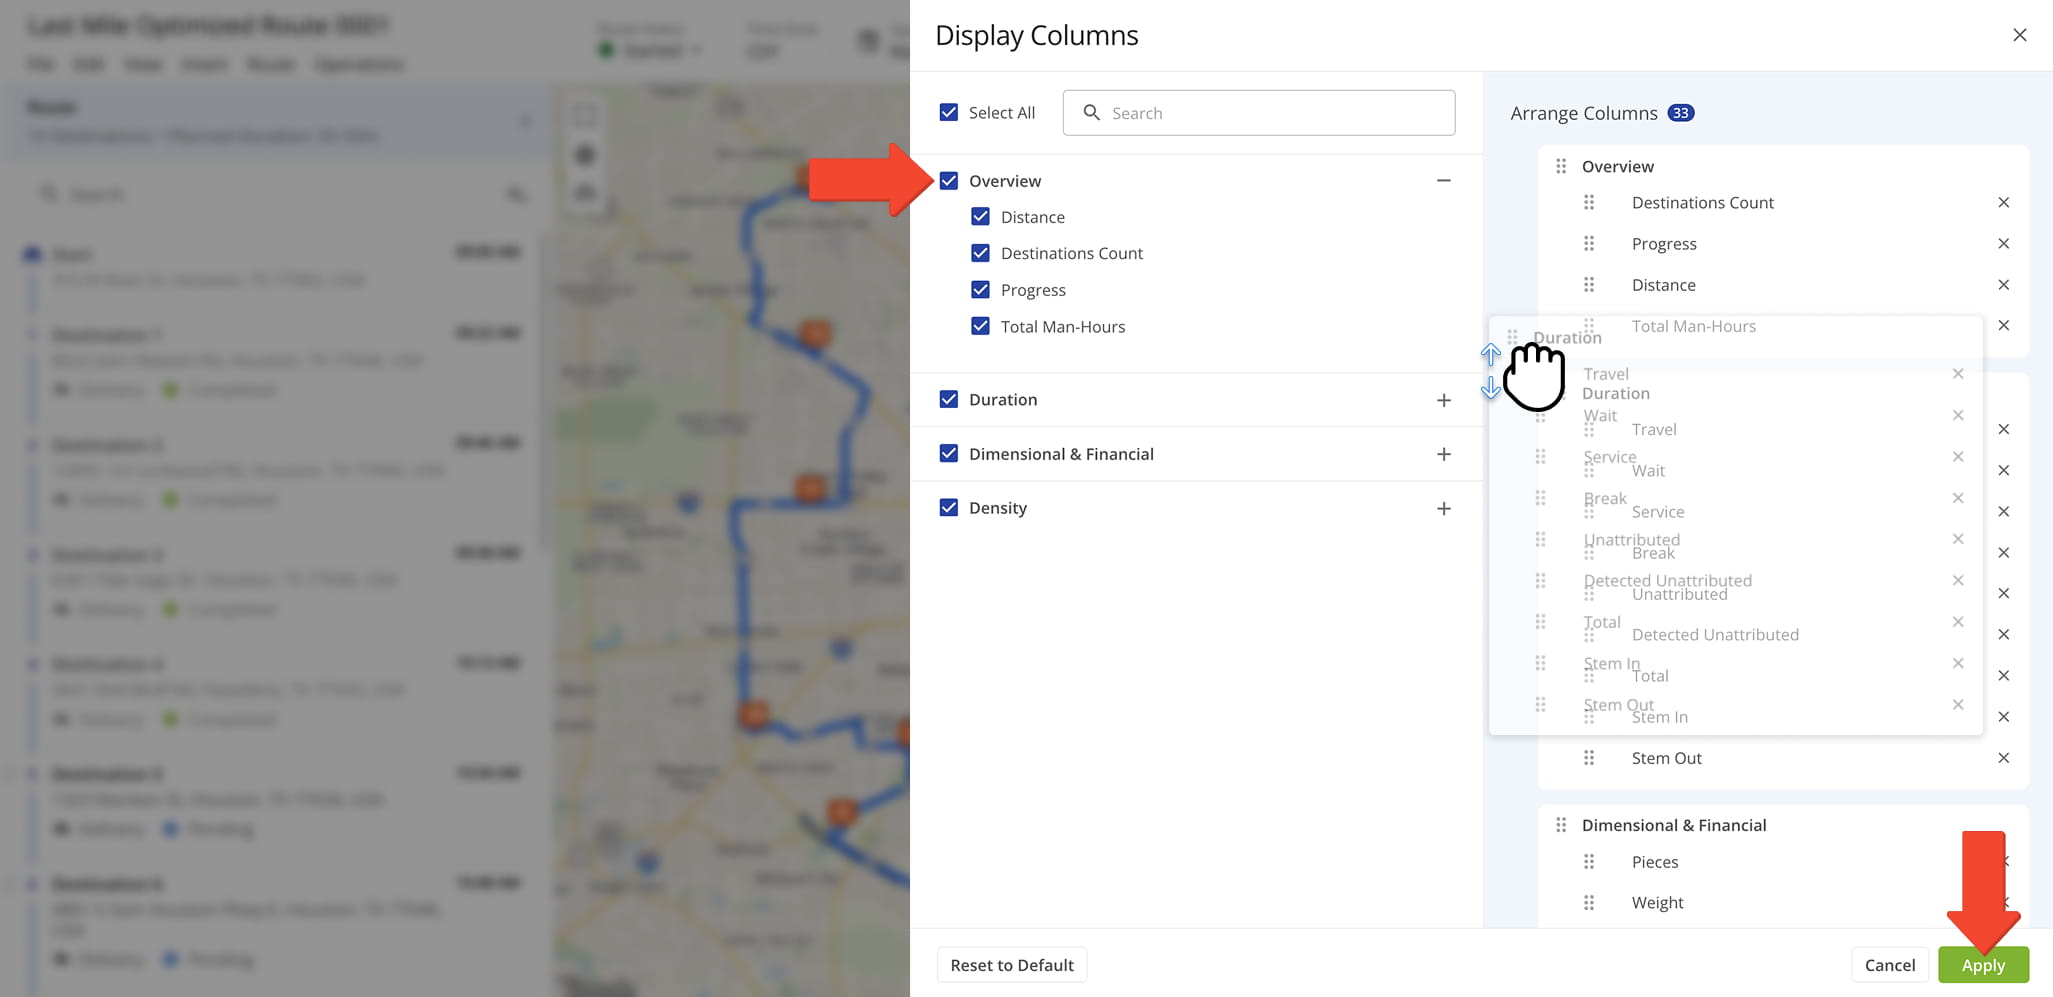
The Route Panel displays customizable, aggregated route data, helping you quickly view the metrics most relevant to your needs. To customize the Table, click the Gear Icon to open the “Display Columns” panel where you can select the data you wish to see.
Check the boxes next to the data columns you want to display. You can reorder entire data sections by dragging them into place, and rearrange individual data columns within each section via drag-and-drop.
When done, click “Apply” to save your changes. For descriptions of each data column, refer to the table below:
Information Panel Data Columns
Mobile App Sync – Real-Time Route Editor Mobile App Synchronization
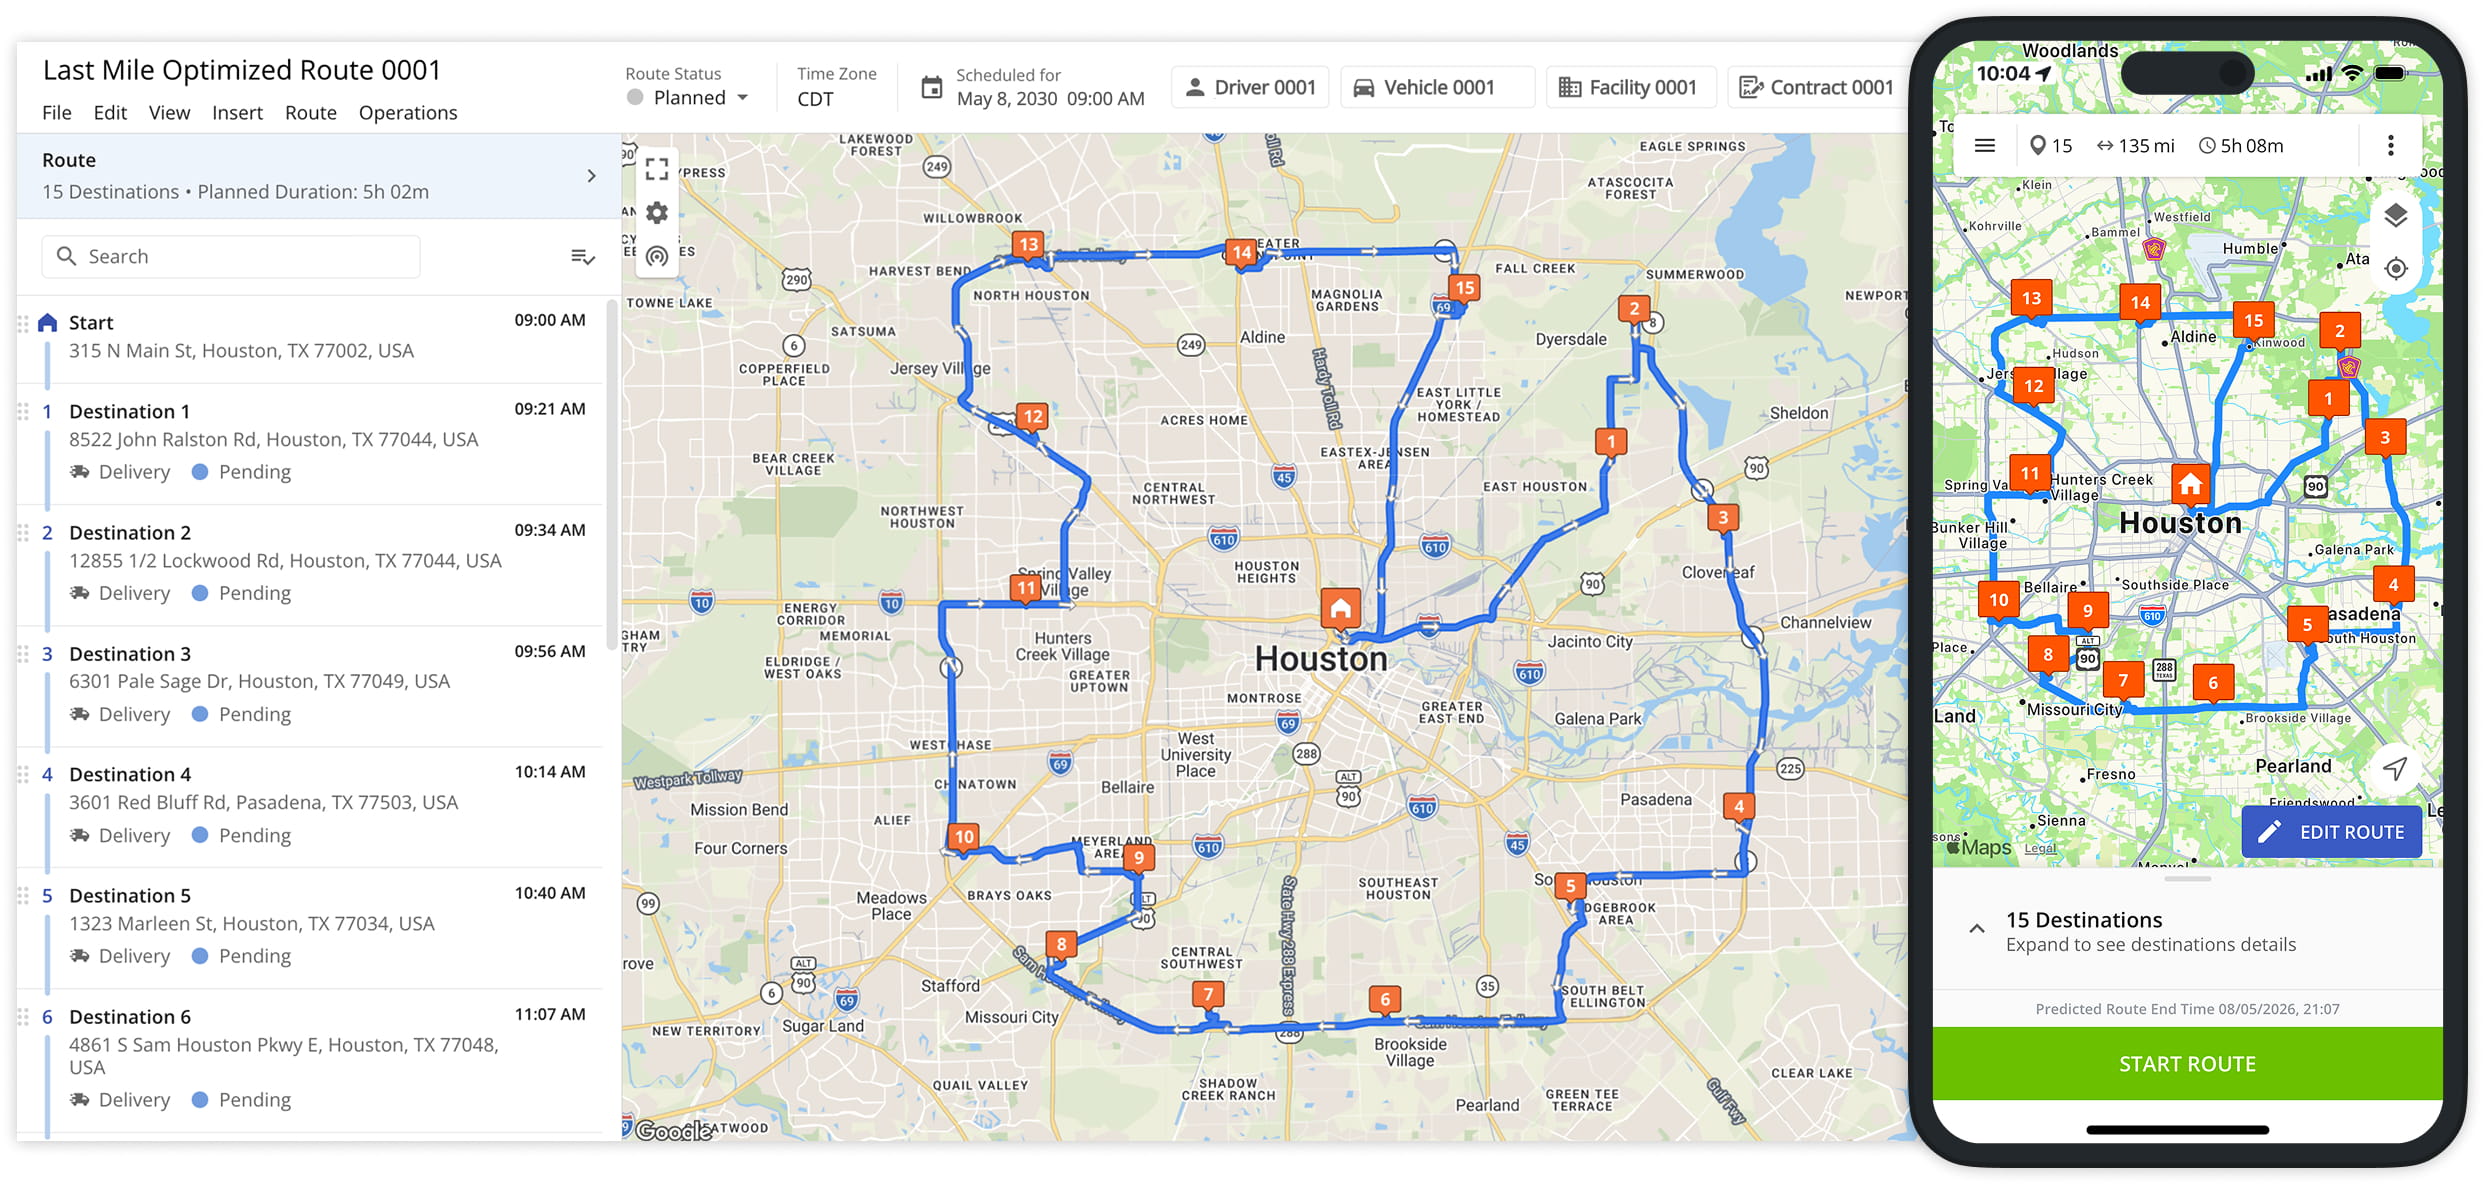
Route4Me delivers seamless, real-time synchronization between the Mobile Driver App and the Business Route Optimizer.
Drivers and field team members can use the iOS and Android Mobile Driver App to navigate routes, update destination statuses, attach proof of visit or delivery, and more. Any updates made in the mobile app are automatically synced with – and visible in – the Route Editor.
Likewise, managers, route planners, or dispatchers can use the Web Platform Route Editor to add or remove stops, re-sequence addresses, reschedule routes, and make other modifications. Updates are instantly reflected in the mobile apps, ensuring Drivers always have the latest route information.
Visit Route4Me's Marketplace to Check out Associated Modules:
- Operations
Custom Data Add-On
- Operations
Advanced Team Management Add-On
- Route Optimization
Time Windows
About author: Kristian Andreev

