Account Settings – Profile And Company Details, Units, Time Zone, Sign-In Credentials
In this guide, you can learn how to check and update your Route4Me Account Settings with Route4Me’s best route management software. Specifically, manage your profile, contact and company details, sign-in credentials, distance units, language, time zone, connect to telematics vendors, and more. Additionally, learn more about Route4Me’s Team Hierarchy and User Types and how to manage the account settings of other users and team members at your last mile enterprise business.
NOTE: Depending on the add-ons and features enabled on your specific Route4Me account, you can have additional settings available in your Account Settings. For example, Geofencing Settings, Activity Feed Settings, etc.
Table of Contents
Account And Company Details – Set Account And Company Name, Industry, Contact Details And Password
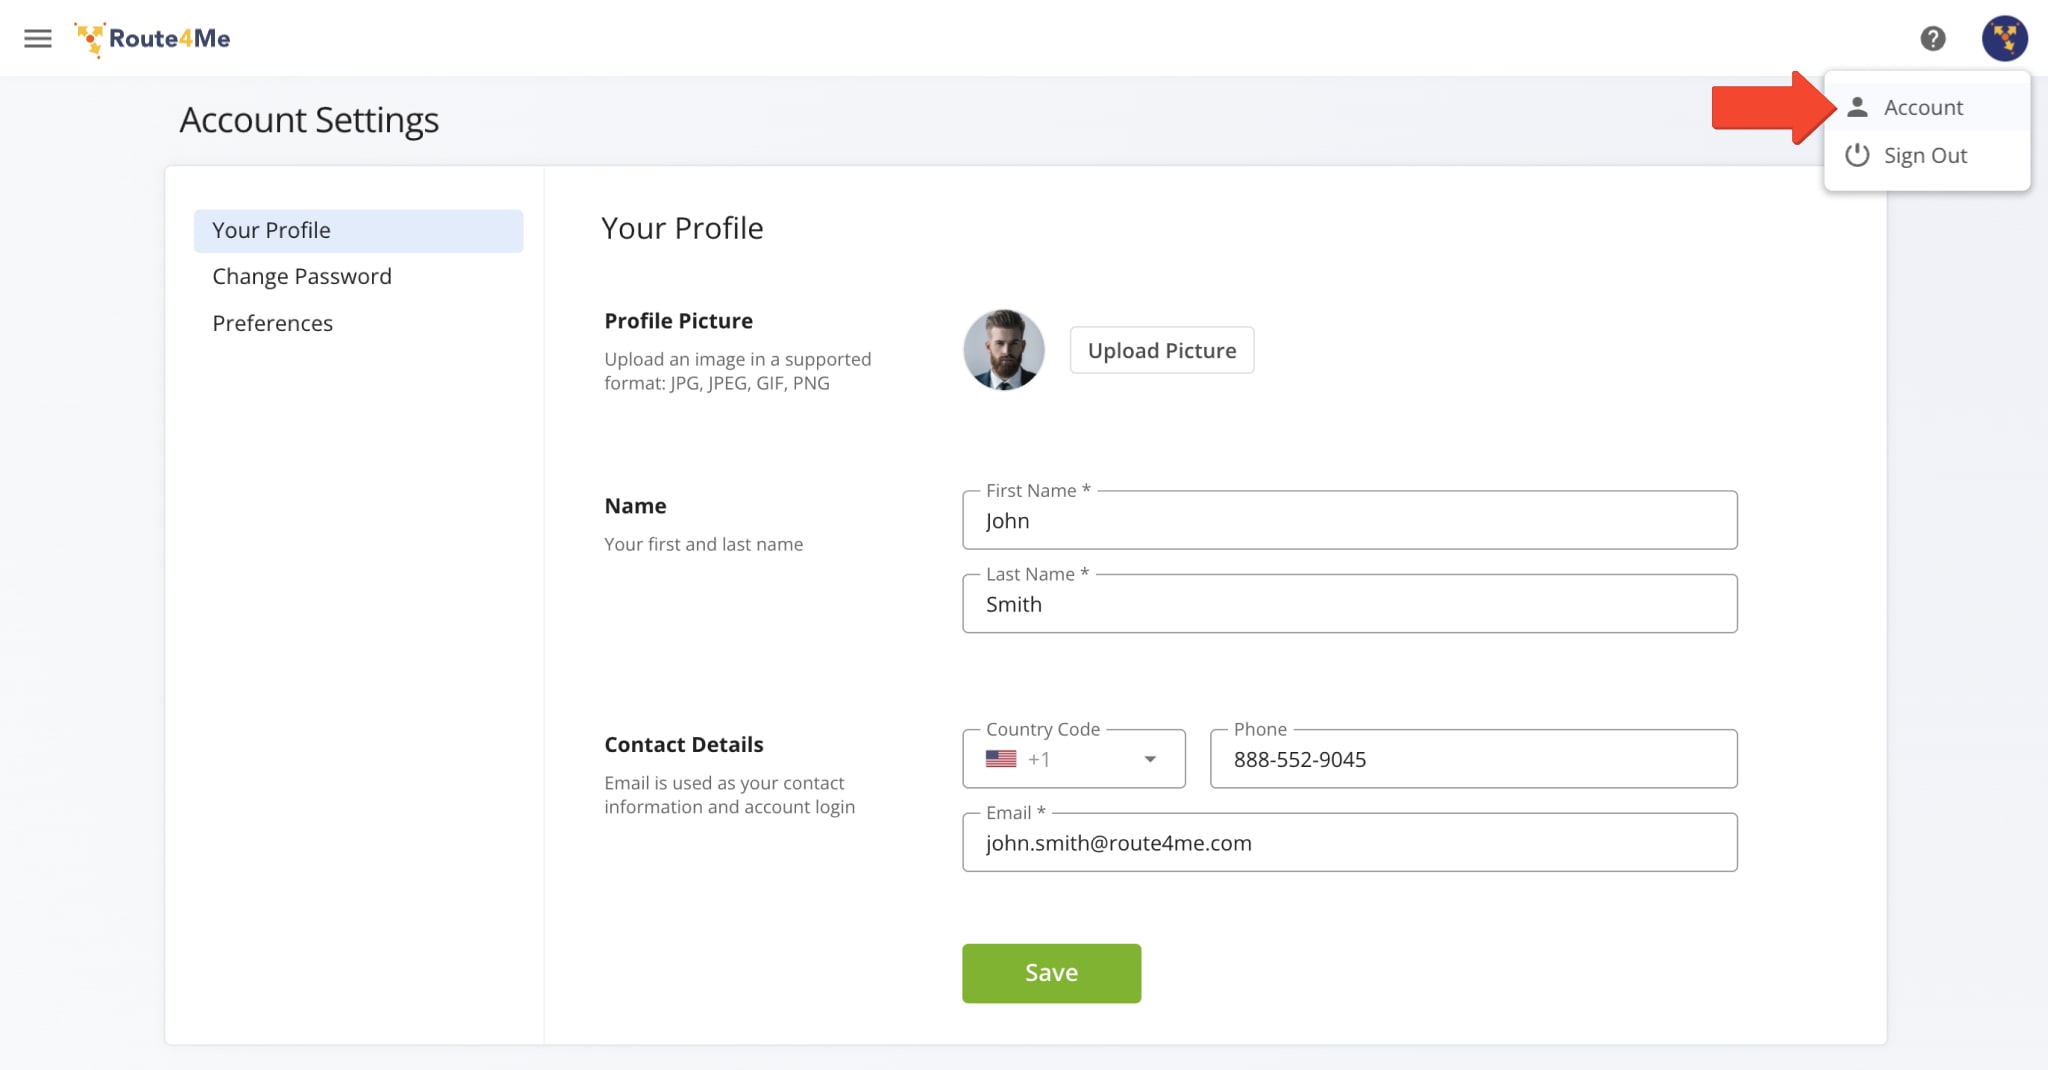
To adjust your Route4Me account settings and preferences, go to “Account” and “Account Settings” from the Navigation Menu. In the “Profile” section, you can check and update your Route4Me account details and the details of your company profile.
Your Profile – Picture, Name And Contact Details
To change the personal and contact details associated with your Route4Me account, click the “Your Profile” tab. Specifically, you can change your profile picture (avatar), first and last name, contact and sign-in email address, and phone number.
Change Password – Set New Route4Me Account Password
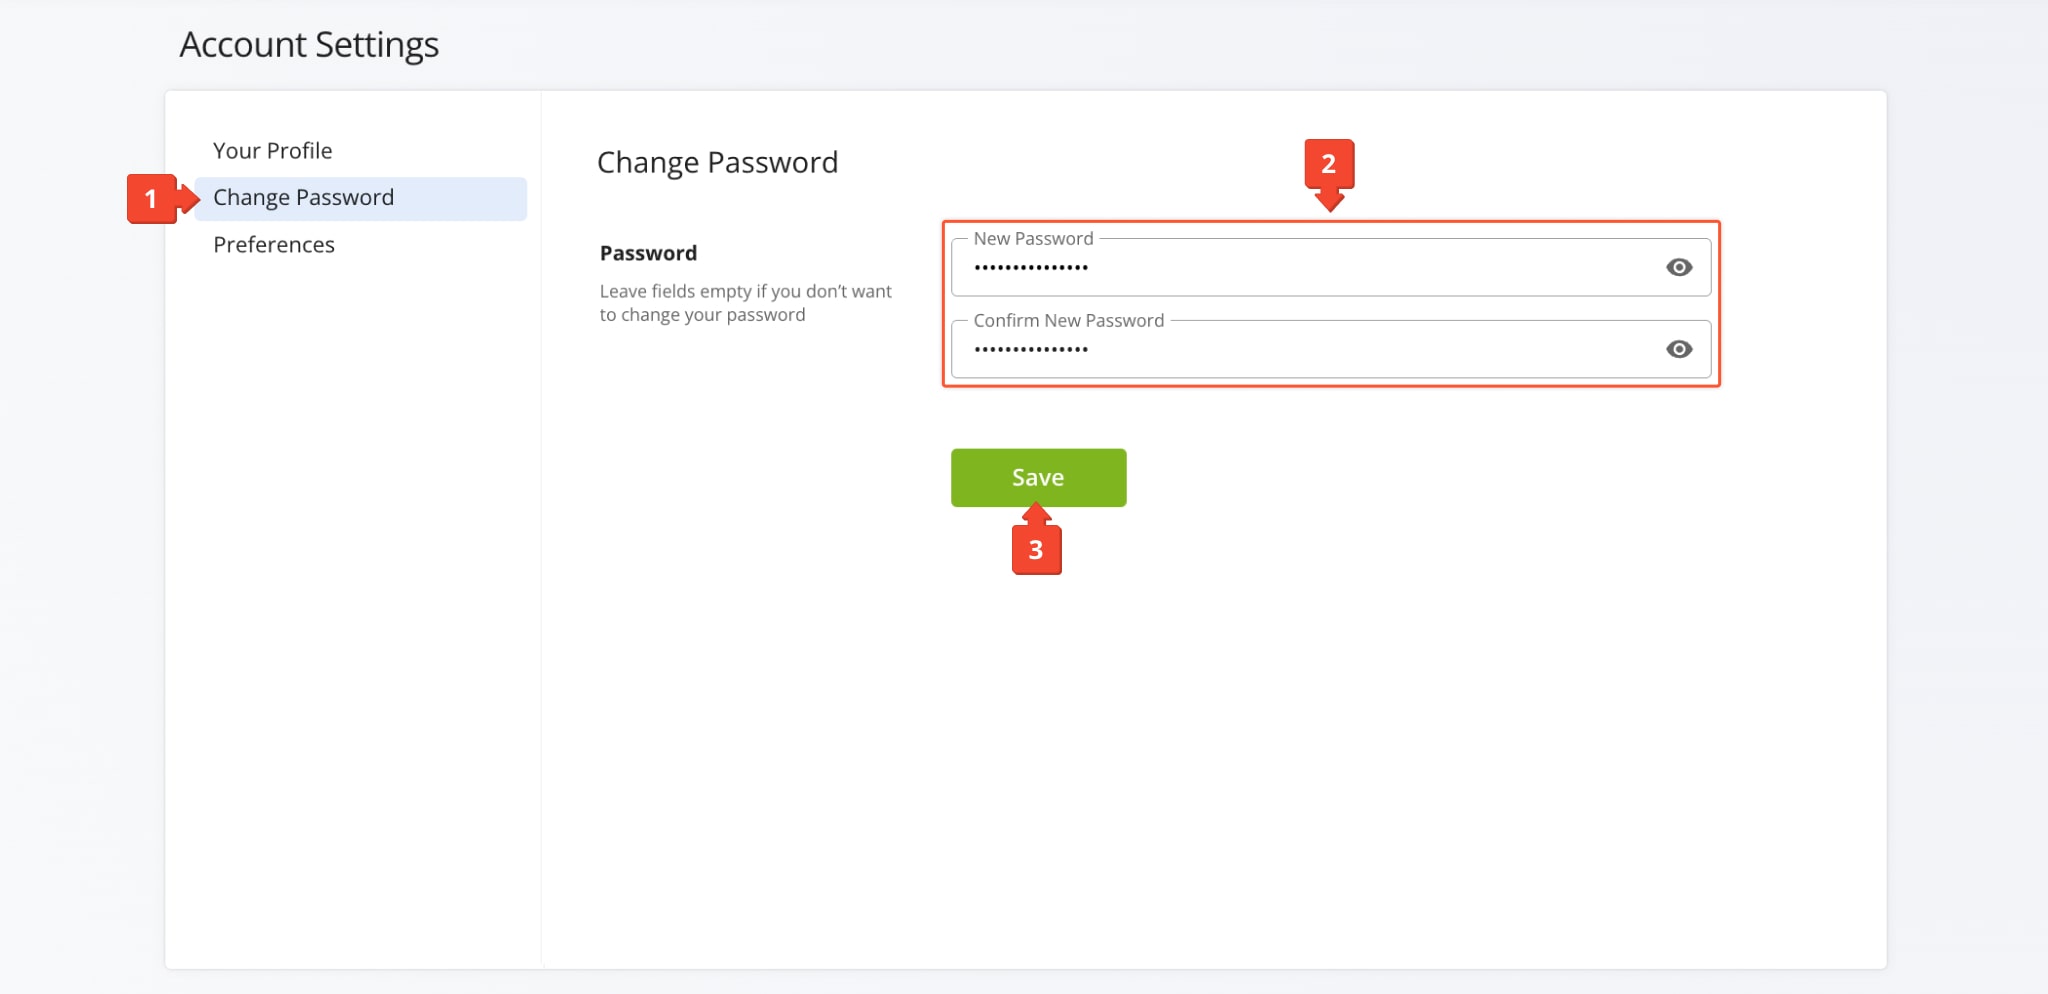
You can quickly and easily modify your account password by clicking the “Change Password” tab, entering a new preferred password, and confirming it.
Company Profile – Company Name, Industry, Size And ZIP Code
Go to the “Company Profile” tab to adjust the details of your last mile business. In detail, you can set your company size, the industry in which your business operates, the size of your company, and add the ZIP code of your company’s location.
Admin Settings – Language, Distance And Fuel Units, Time Zone, Notifications, Permissions And More
The “Admin” section of the Account Settings page is where you can adjust your account preferences, geofencing settings, operations and notification settings, and whether route and destination statuses can be changed on Route4Me’s final mile software web platform.
Preferences – Set The Language, Units And Time Zone Of Your Route4Me Account
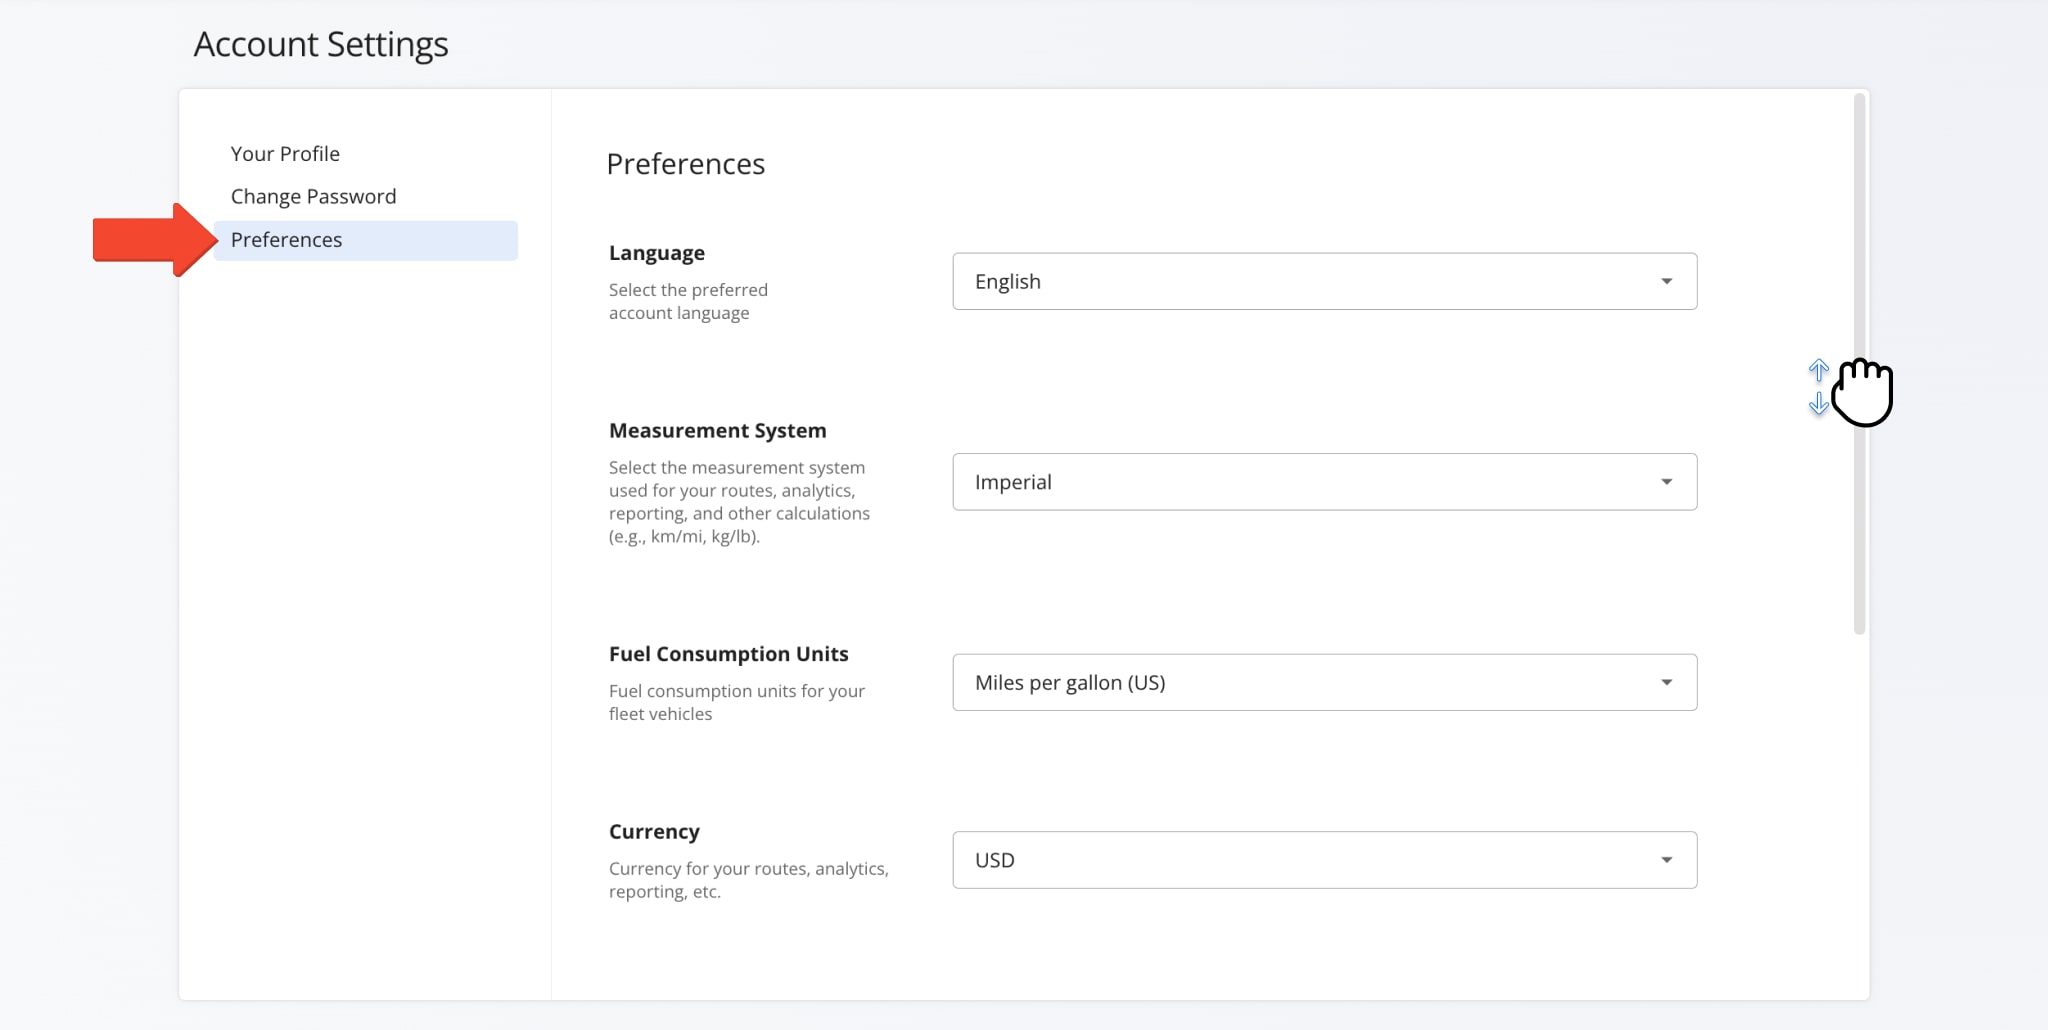
To adjust the language of your Route4Me account, measurement unit preferences, and time zone in which your business operates, go to the “Preferences” tab of the “Admin” section in your Route4Me Account Settings.
Language | Preferred account language. Additionally, learn more about Route4Me’s Supported Languages. |
---|---|
Distance Units | Distance measurement units: miles and kilometers. Accordingly, planned routes, optimization settings, and other distance unit-related attributes in your account are automatically converted to and displayed in the selected units. |
Fuel Consumption Units | Vehicle fuel consumption units: miles per gallon (US), miles per gallon (UK), liters per 100 kilometers, kilometers per liter, and miles per liter. Accordingly, when creating and managing vehicles, you can specify the preferred fuel consumption of the vehicle in the selected units. |
Time Zone | Time zone in which your operations take place. Accordingly, route start time, scheduled orders, and other time-related attributes will be automatically converted to and displayed in the time of your time zone. |
Geofencing – Adjust Customer Geofence Shape, Size And More
In addition to planning routes, Route4Me enables you to create geofences around customer addresses. A geofence is an area around an address which allows Route4Me’s route mapping software to detect when a user or vehicle arrives at or departs from a destination. If customer geofencing is enabled on your account, you can click on the “Geofencing” tab in the “Admin” section of your Account Settings to customize your address geofences. Specifically, you can set geofence shape, size, required time on site, and maximum allowed speed for a geofence to be considered as entered.
Operations – Automatically Dispatch Started Routes, Send New Route Notifications, Destinations Statuses And More
In the “Operations” tab, you can enable automatic email notifications when a new route is created, automatically dispatch started routes, hide default destination statuses, and access the page where you can create custom destination statuses. You can find more detail about these settings in the table below.
Settings | Description |
---|---|
New Route Notifications | When enabled, you will receive a notification to your account email address about every route created by you and your sub-users. Additionally, learn more about Route4Me’s Team Hierarchy and User Types. |
Dispatch Started Routes | Routes started on Route4Me’s Mobile Route Navigation App are automatically dispatched. In detail, when you dispatch a route, Route4Me’s dispatch management software will automatically notify customers of their order statuses. Additionally, learn more about Customer Notifications. |
Default Destination Statuses | Hide default destination statuses. To accommodate the particular needs of your business or unique business model, Route4Me also allows you to create custom destination statuses so that your team members can capture more accurate and relevant data when out in the field. |
Custom Destination Statuses | Click “Manage Custom Note Fields” to create and manage custom destination statuses. |
Permissions – Change Route And Destination Statuses On Route4Me’s Web Software
In the “Permissions” tab of the “Admin” section of your Account Settings, you can check the “Change route and destination statuses on the web platform” box. This option enables users with route planning permissions to change the statuses of routes and destinations manually in the Routes List and Route Editor.
Integrations – Access Your Route4Me API Key And Set Activity Feed Callback URL
Route4Me provides powerful and flexible solutions to automate route planning and optimization operations for last mile and logistics-intense businesses in 2024. The “Integrations” section of your Account Settings is where you can access your unique Route4Me API key and enter your callback URL to receive activity feed notifications outside your route optimizer software.
API Key – Access Your Route4Me API Key
To access and copy your Route4Me API Key, click the “API Key” tab. Then, click the Copy Icon to copy your Account API Key. Additionally, learn more about the Route4Me API and SDK.
Activity Feed Webhook – Send Real-Time Activity Feed Notifications To Callback URL
Route4Me’s Webhooks enable third-party systems to receive automated real time notifications for various system, user, vehicle, and app events. For example, you can receive notifications when users plan routes, edit routes, visit destinations, complete deliveries, collect proof of delivery, and much more. Simply enter your webhook URL (postback URL) into the “Callback URL” field and then click on the “Save” button. Additionally, learn more about Route4Me Webhooks and the Route4Me Activity Feed.
Telematics Connections – Import And Connect GPS Vehicles From Telematics Vendors
With Route4Me’s fleet management software, you can easily create a fleet of cars, vans, trucks, trailers, and any other vehicle. Route4Me supports telematics vendor integrations with Verizon Connect, Geotab, Samsara, Azuga, Fleet Complete, and many more. The “Telematics Connections” tab of your Account Settings enables you to add new telematics connections, manage existing connections, and see the percentage of synchronized GPS vehicles from your telematics provider.
Visit Route4Me's Marketplace to Check out Associated Modules:
- Operations
Custom Data Add-On
- Operations
Advanced Team Management Add-On