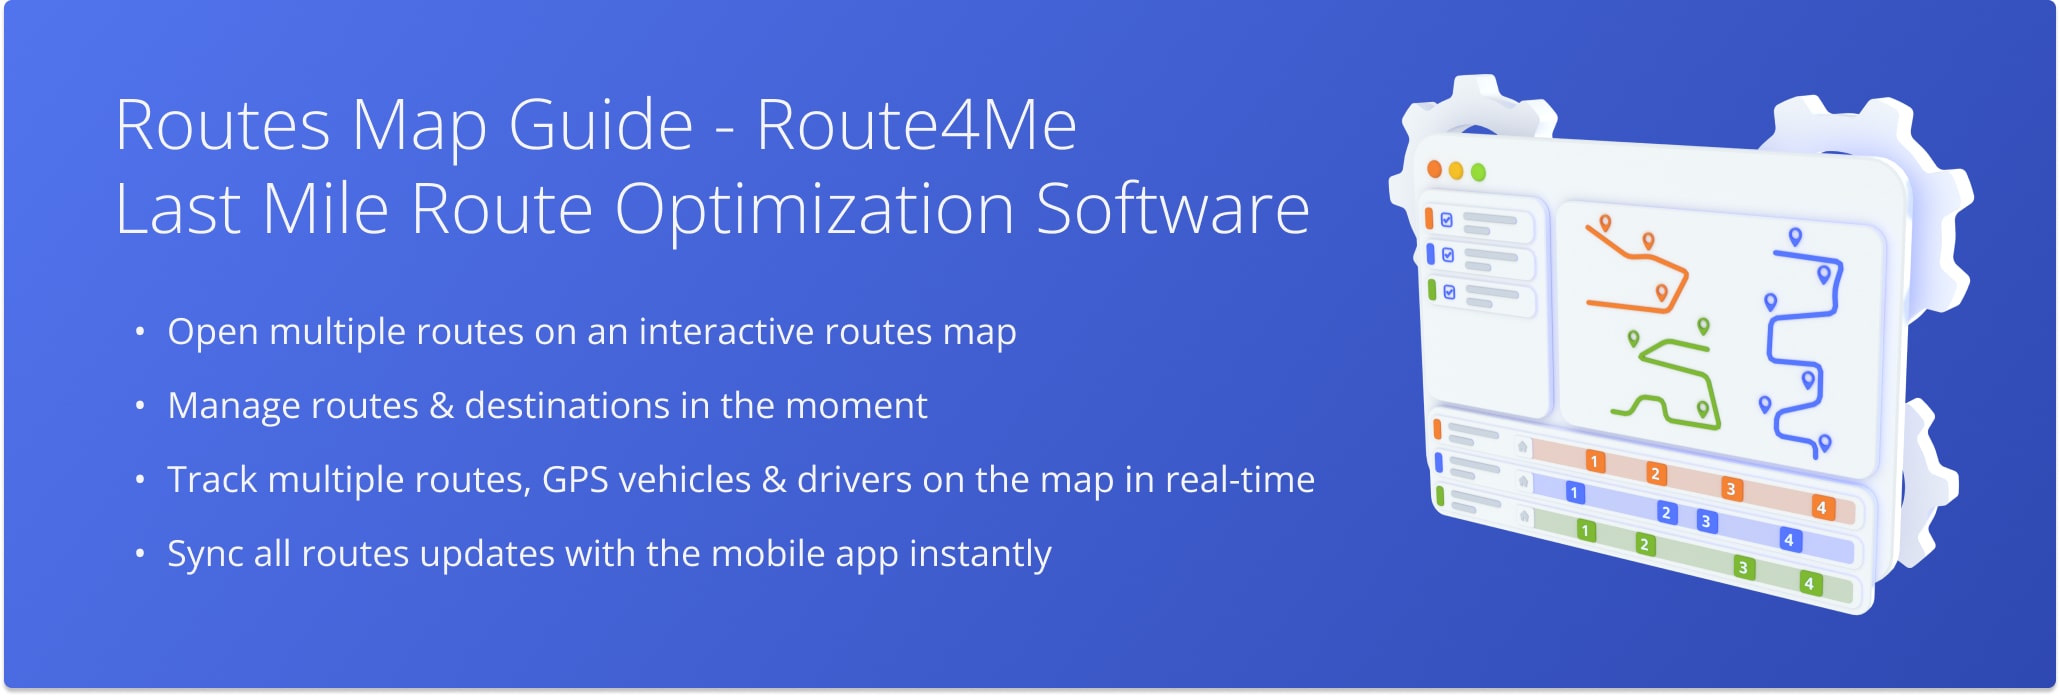
Route Map (Original) – Multiple Route Management On Interactive Map
Route4Me’s dynamic routing system creates time-efficient multi-destination routes, putting route planning and enterprise route optimization software on autopilot. The Routes Map provides a clear visual overview of multiple optimized routes and lets you quickly add, remove, or move destinations between them. It also allows real-time tracking of your field team with GPS and synchronized updates between the Routes Map and the Mobile Driver App. In this guide, you’ll learn how to use the Routes Map to manage multiple routes and destinations at once.
NOTE: The Classic Routes Map will be removed for all new accounts. Existing customers will not be affected.
Table of Contents
Open Routes Map – View Multiple Routes Simultaneously On Interactive Map
To open your Route4Me Routes Map, go to “Dynamic Routing” > “Routes Map” in the Navigation Menu.
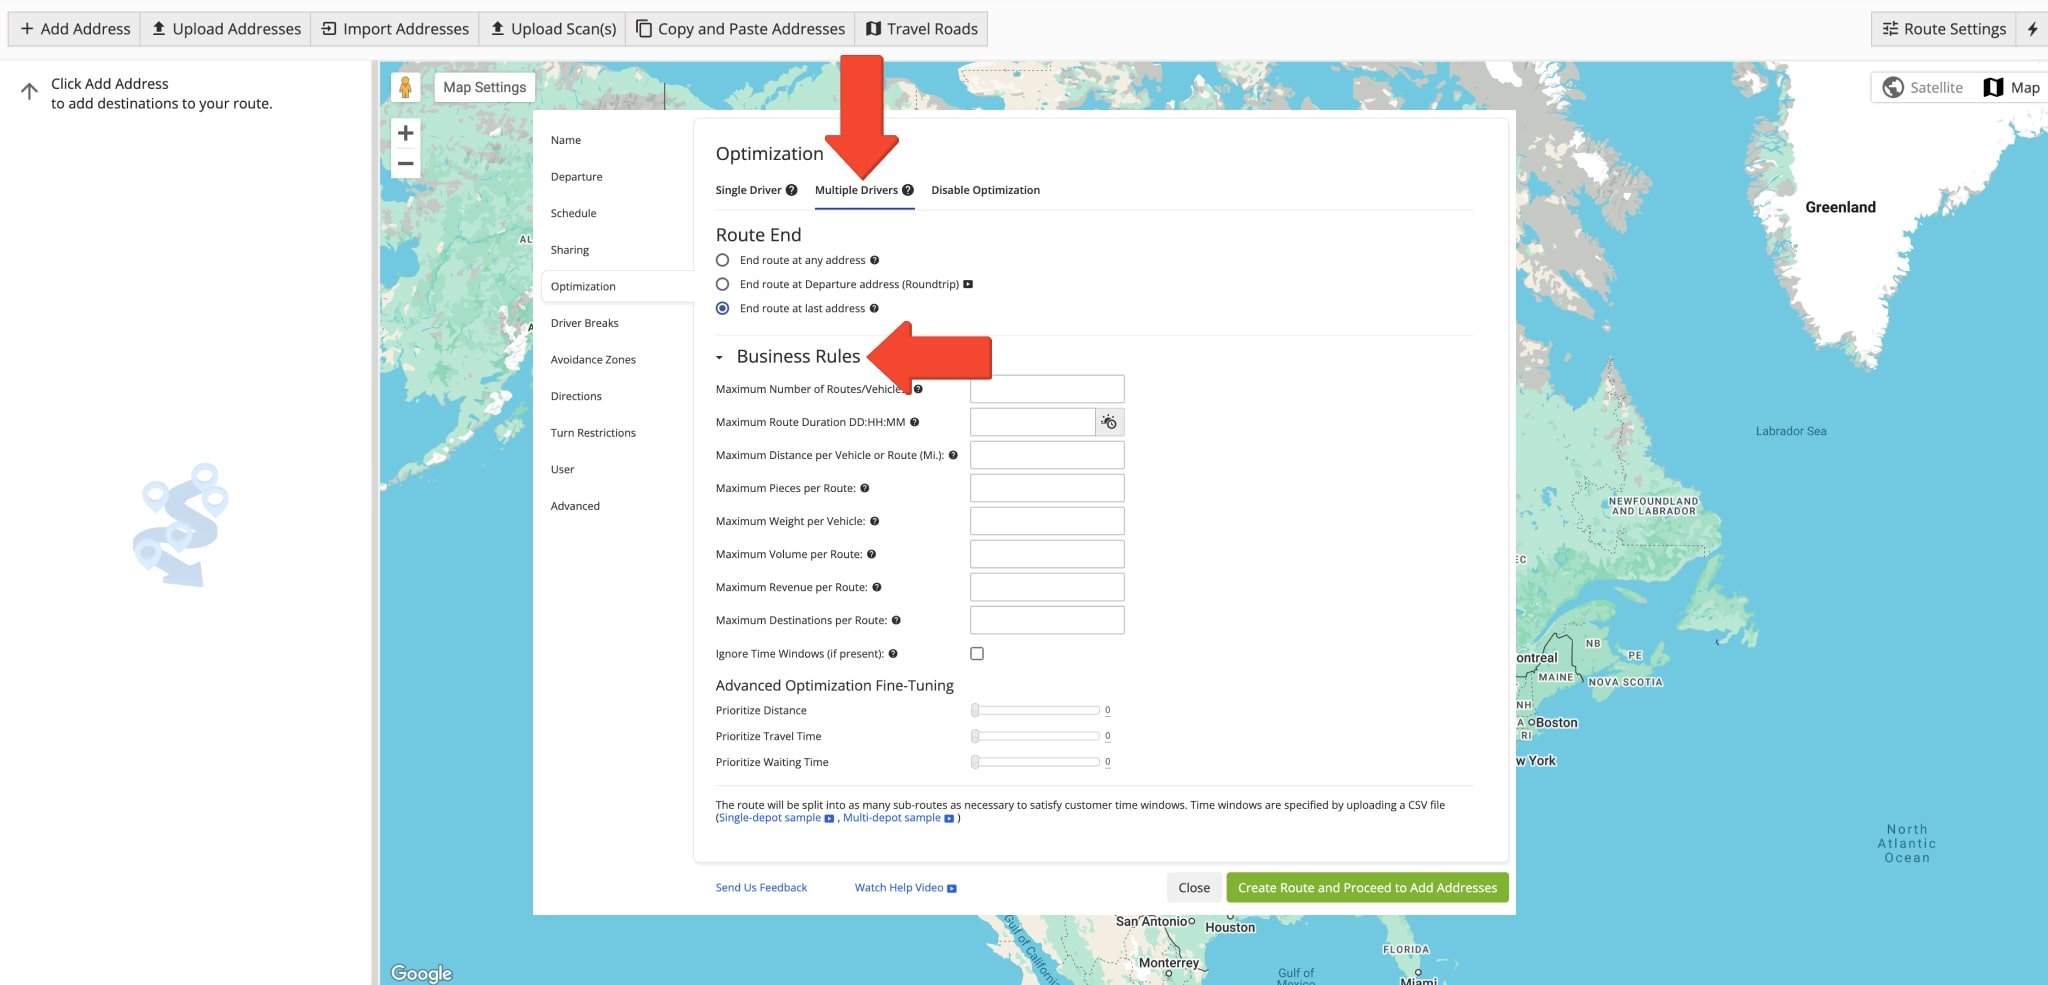
NOTE: When you plan multiple routes simultaneously with business rule constraints like Max Destinations, Max Distance, Max Duration, Pieces, Weight, Cubic Volume, and Revenue, they will open automatically in the Routes Map.
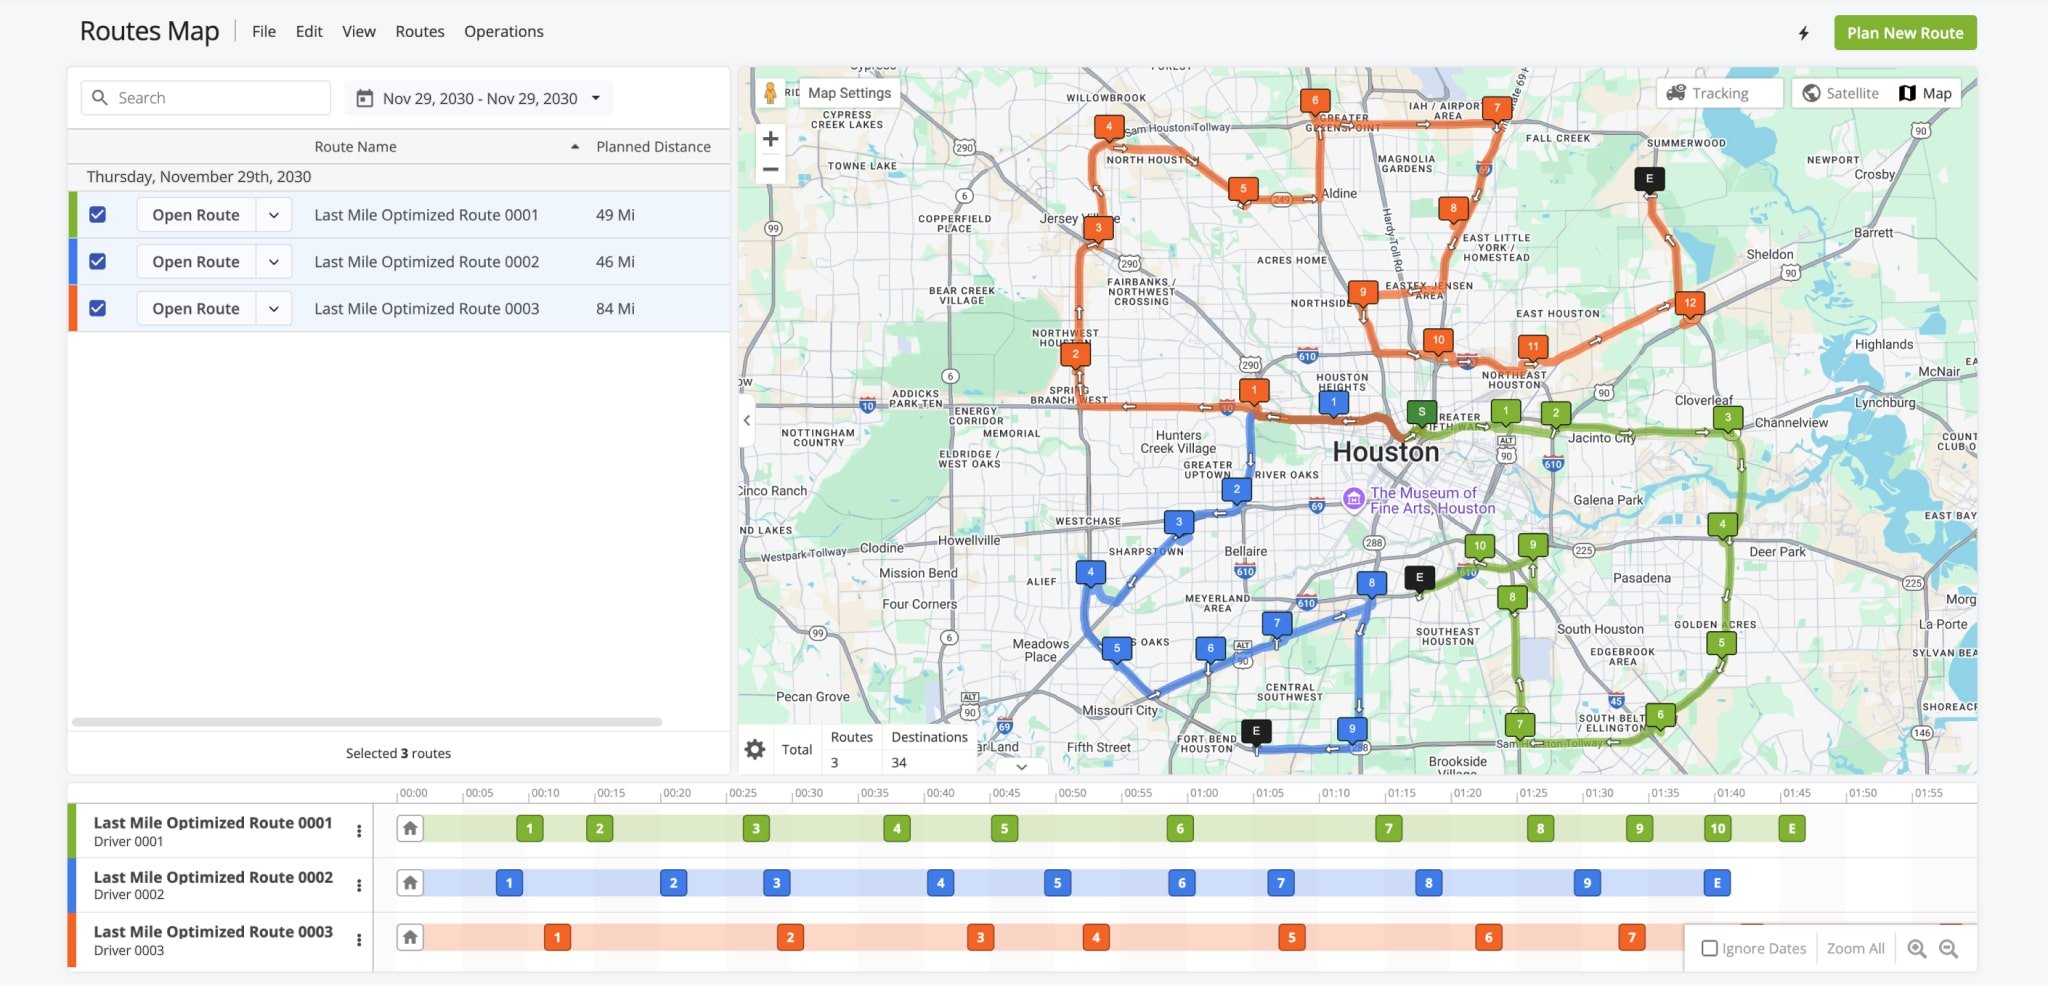
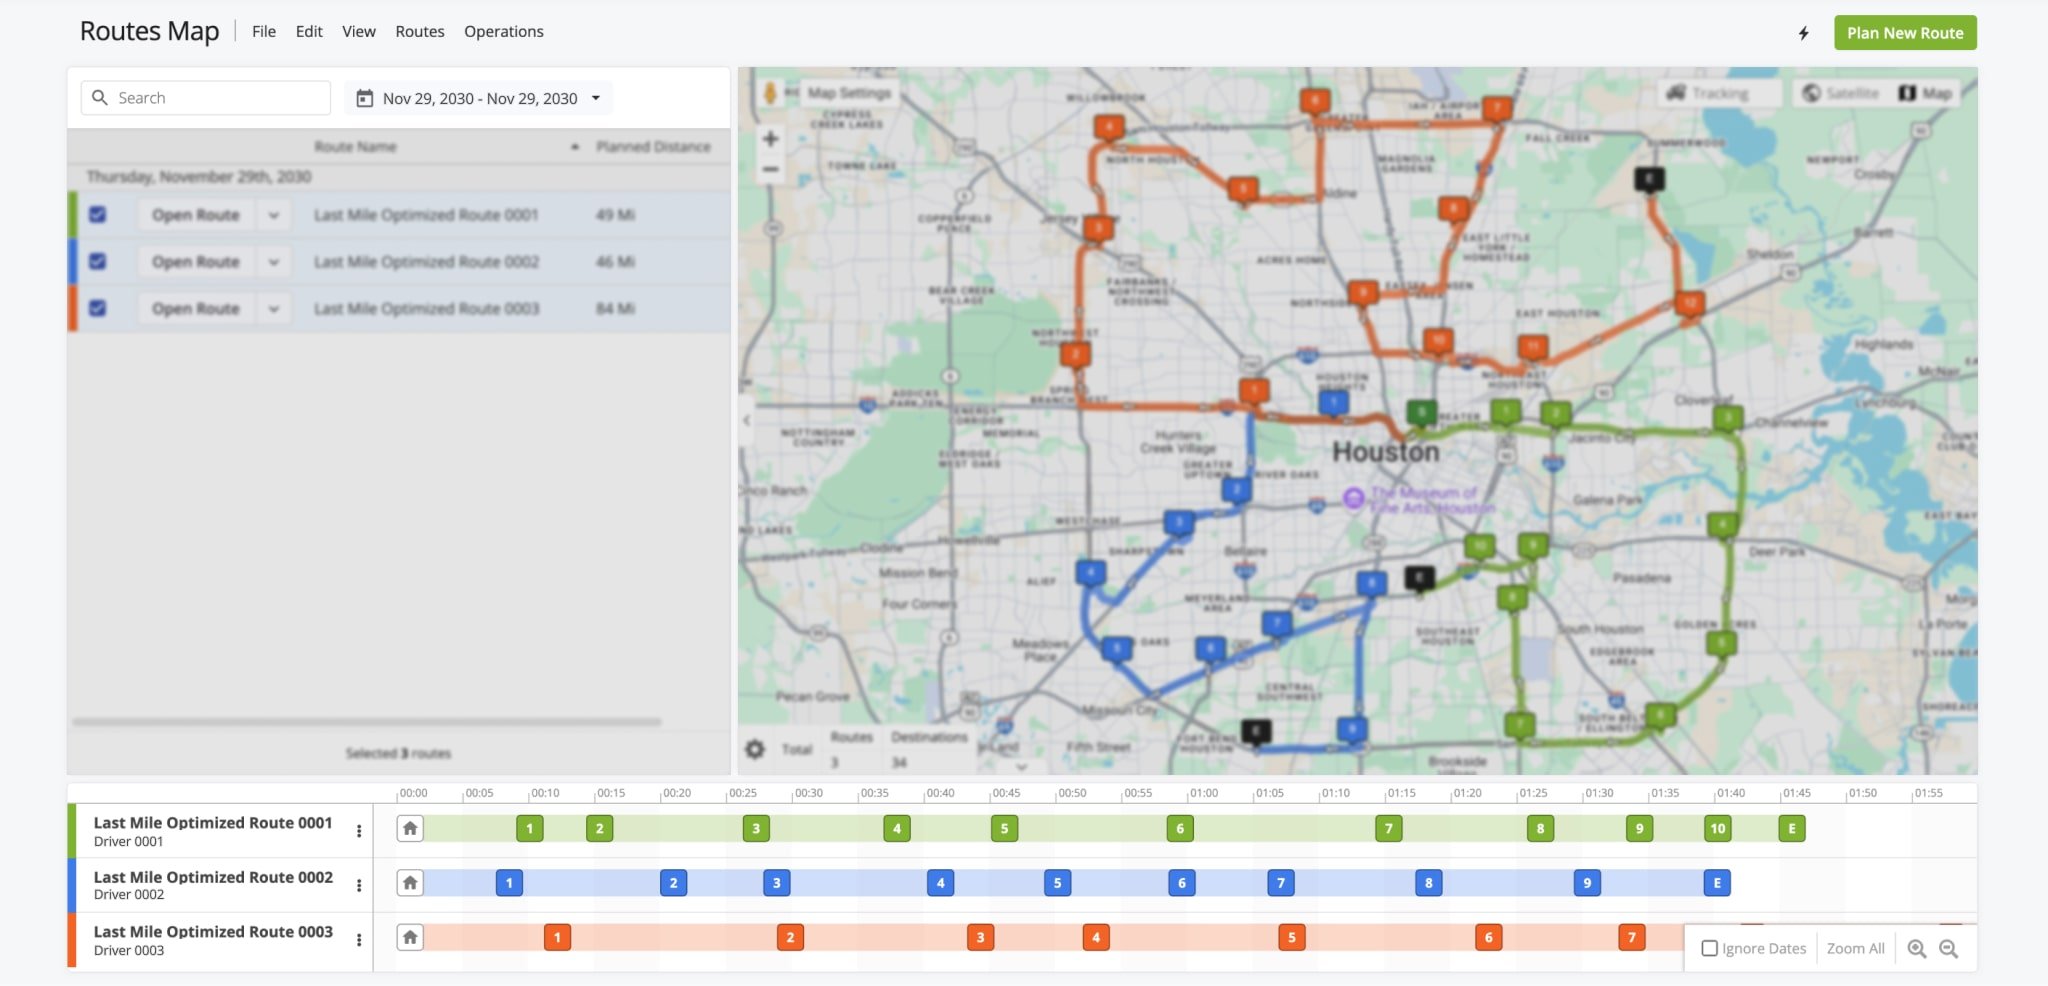
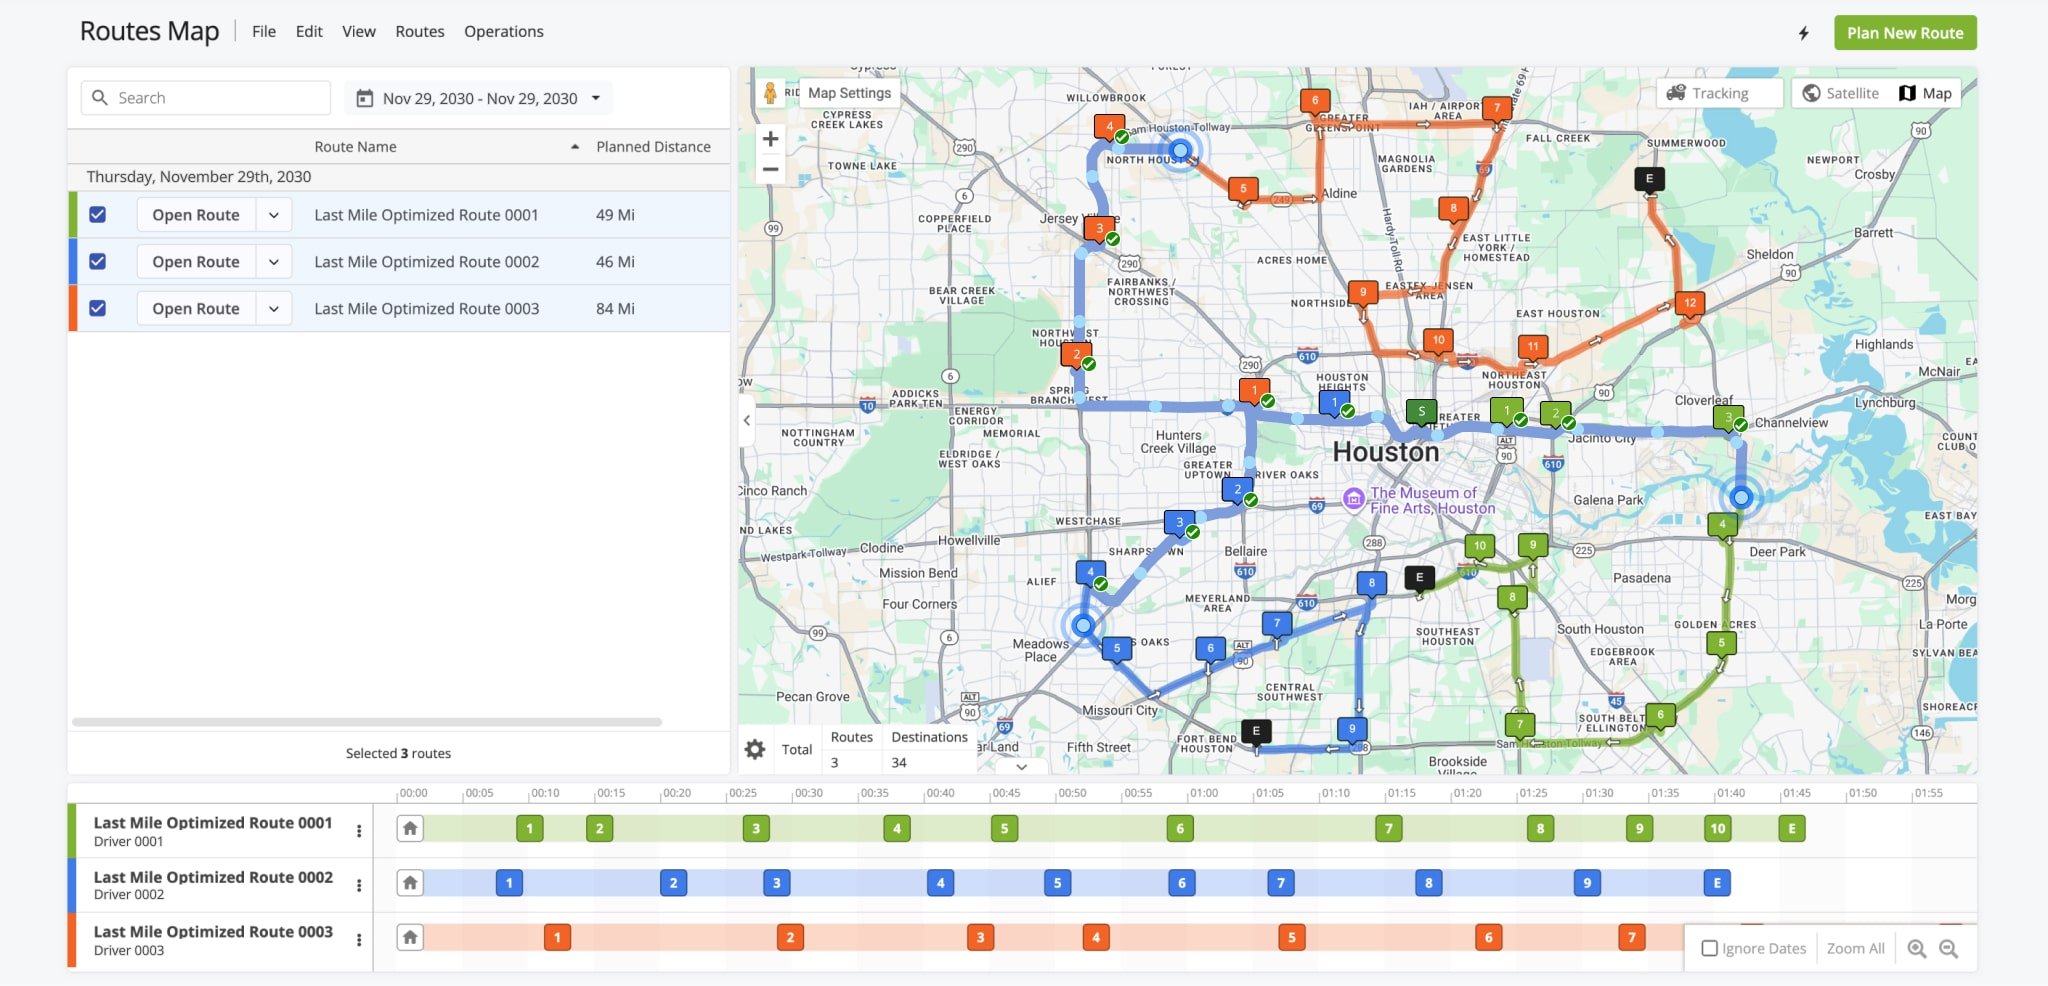
Routes Map Overview – Routes Map List, Interactive Map And Routes Time Line
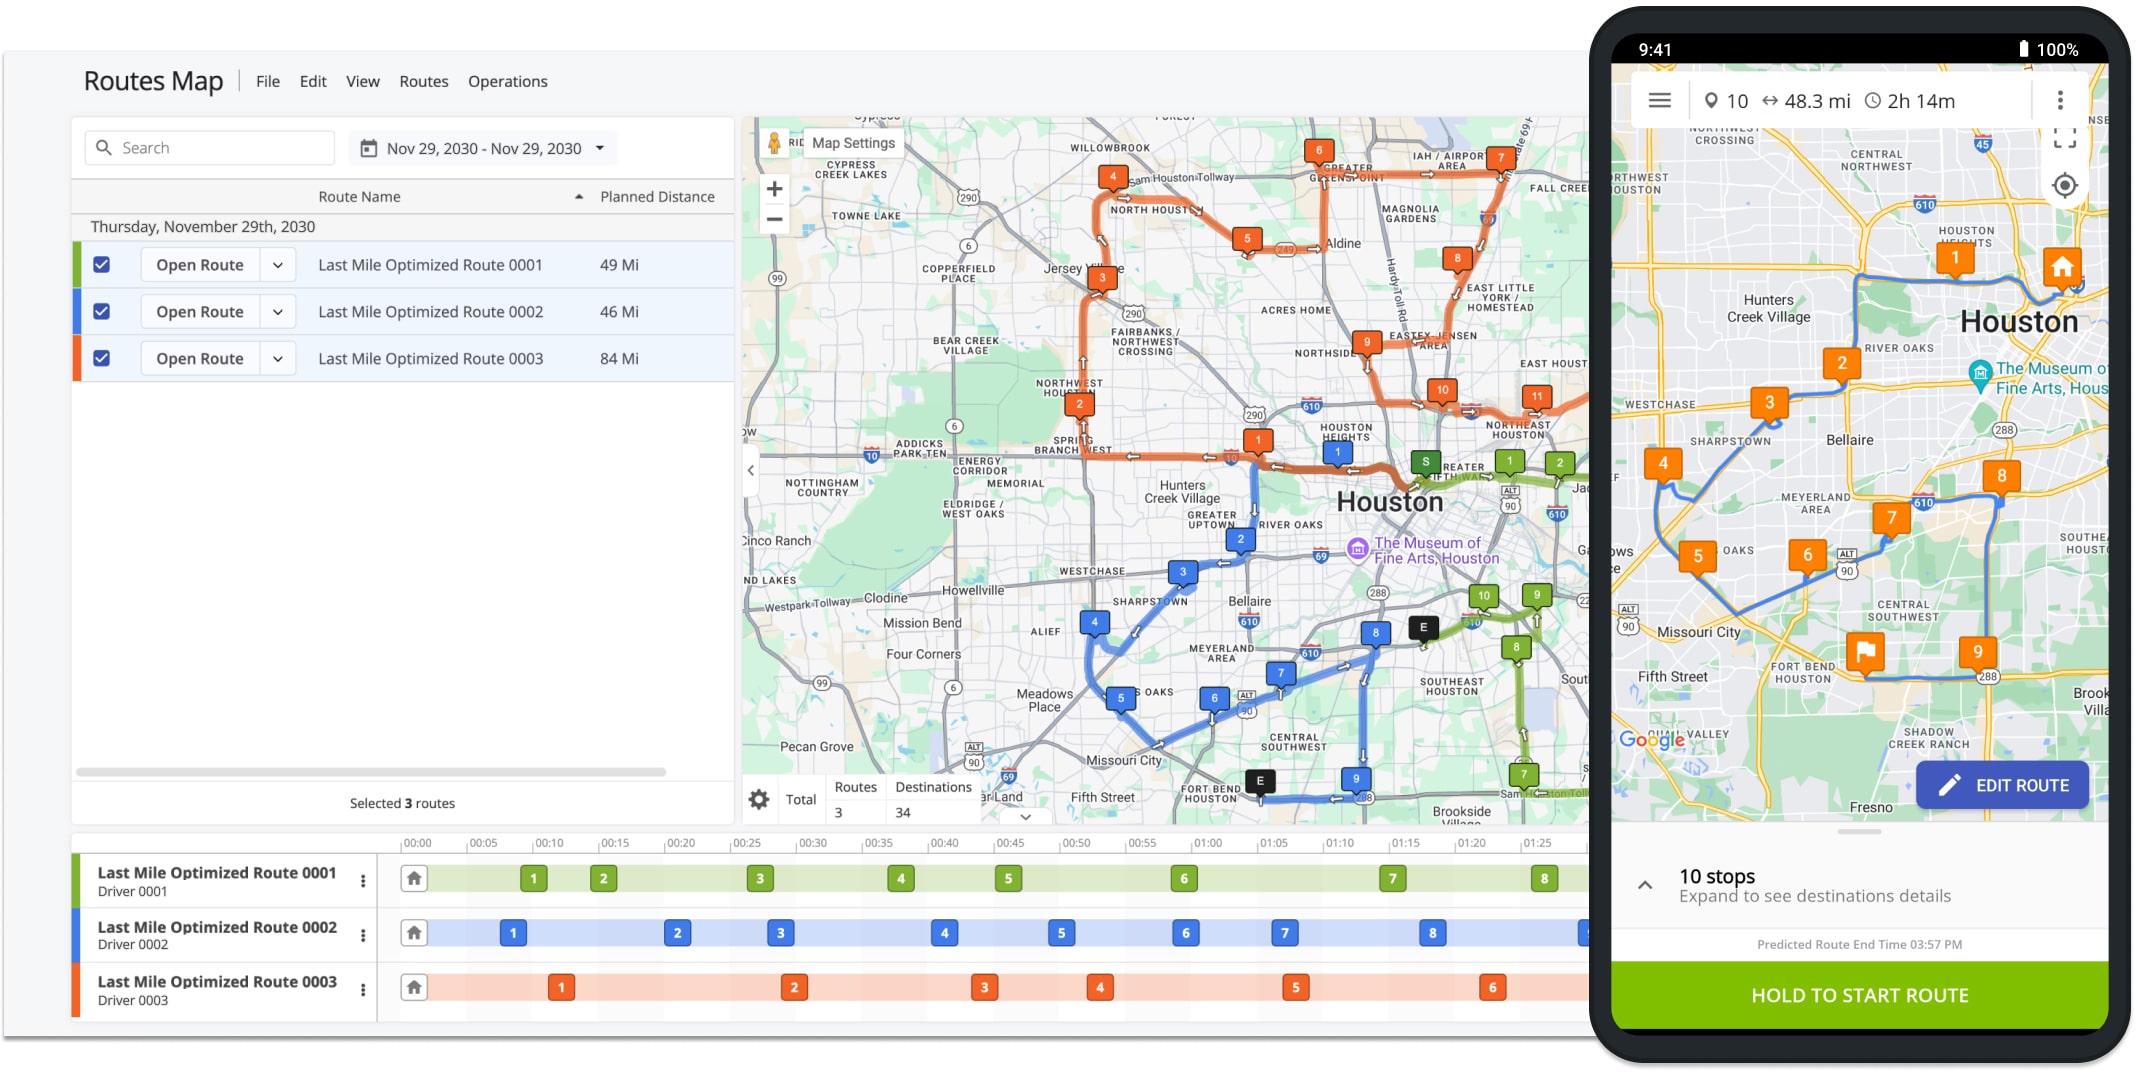
The Routes Map page is divided into three sections, each with their own functions. For effortless route and destination management, some options are available in multiple sections.
From the Routes Map List, you can open routes on the map, manage routes, and view data in the customizable Route Data Table.
The Interactive Map displays routes enabled in the Routes Map List, showing their respective destination sequences.
From the Interactive Map, you can customize map settings, enable user tracking, and access time-specific route data. You can also view aggregate route data via the customizable Summary Table.
The Routes Time Line below the Routes Map List and Interactive Map enables you to view destination sequences for selected routes according to their schedules.
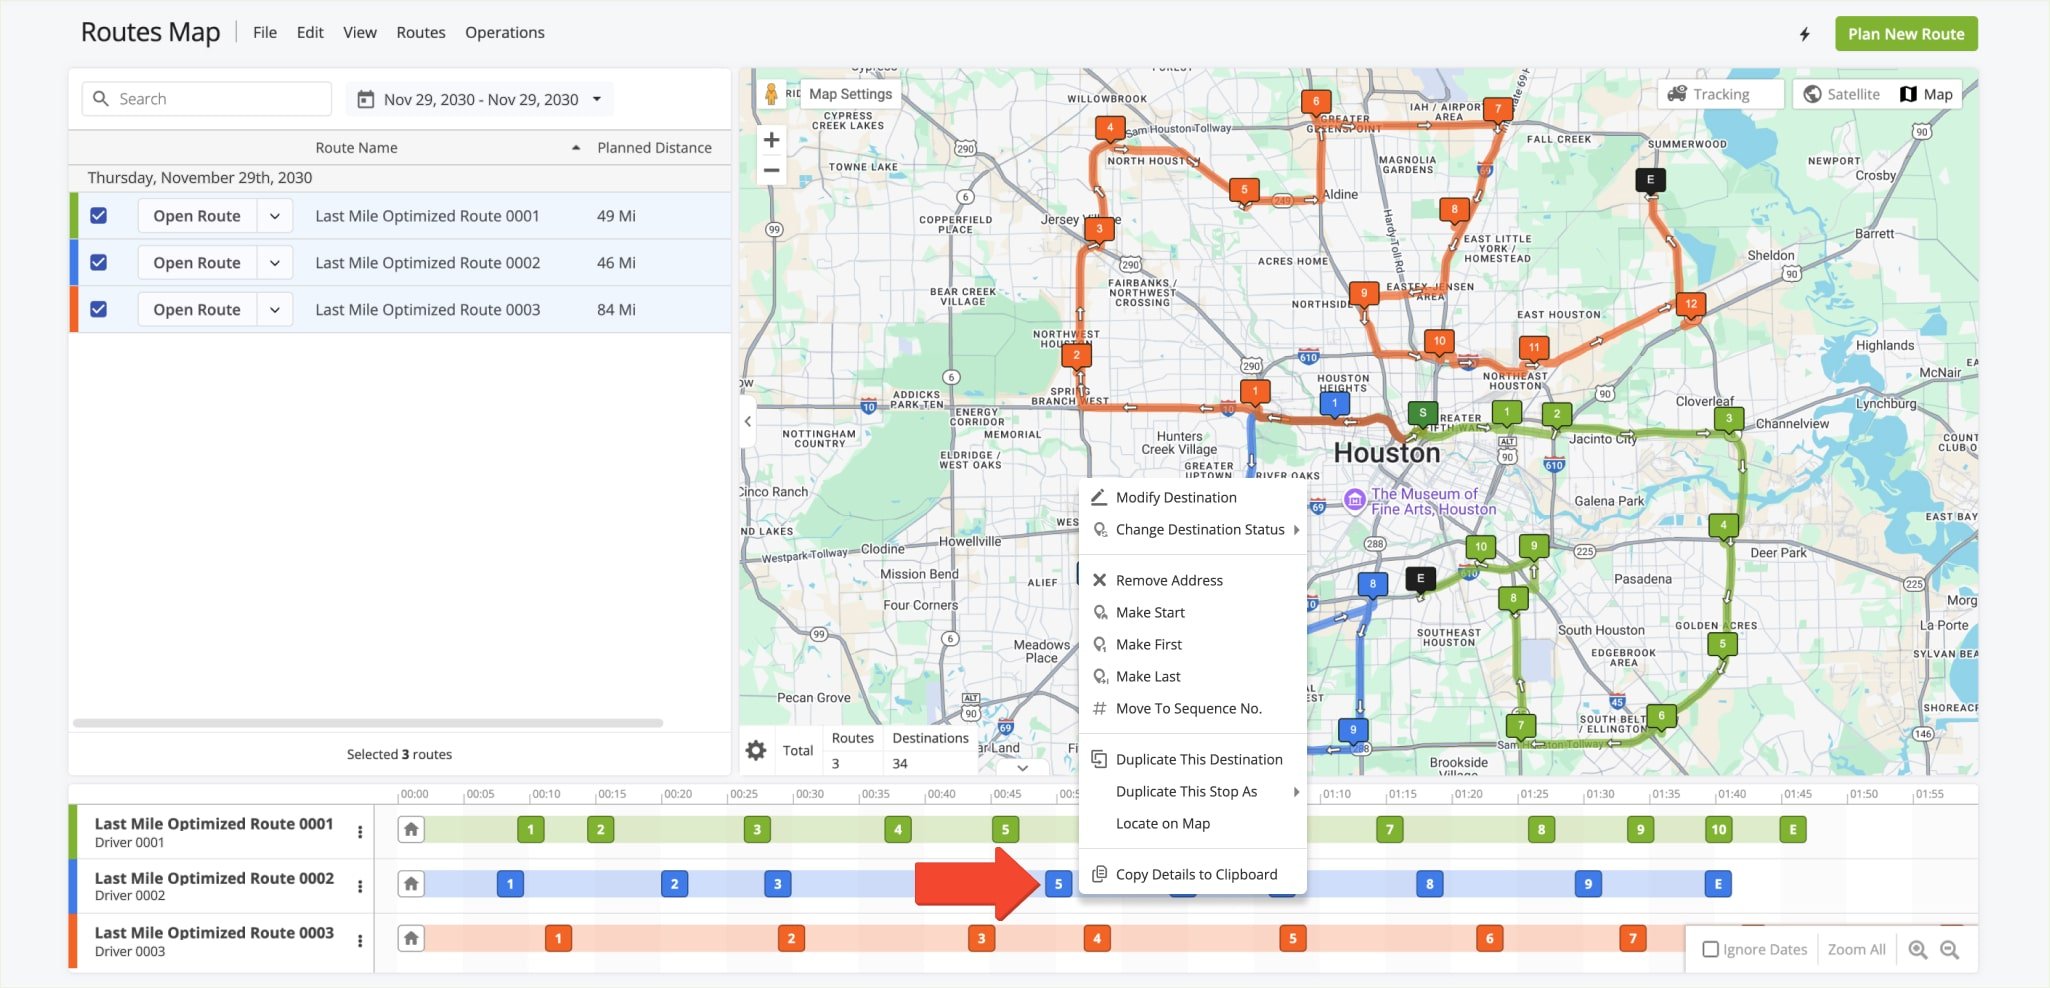
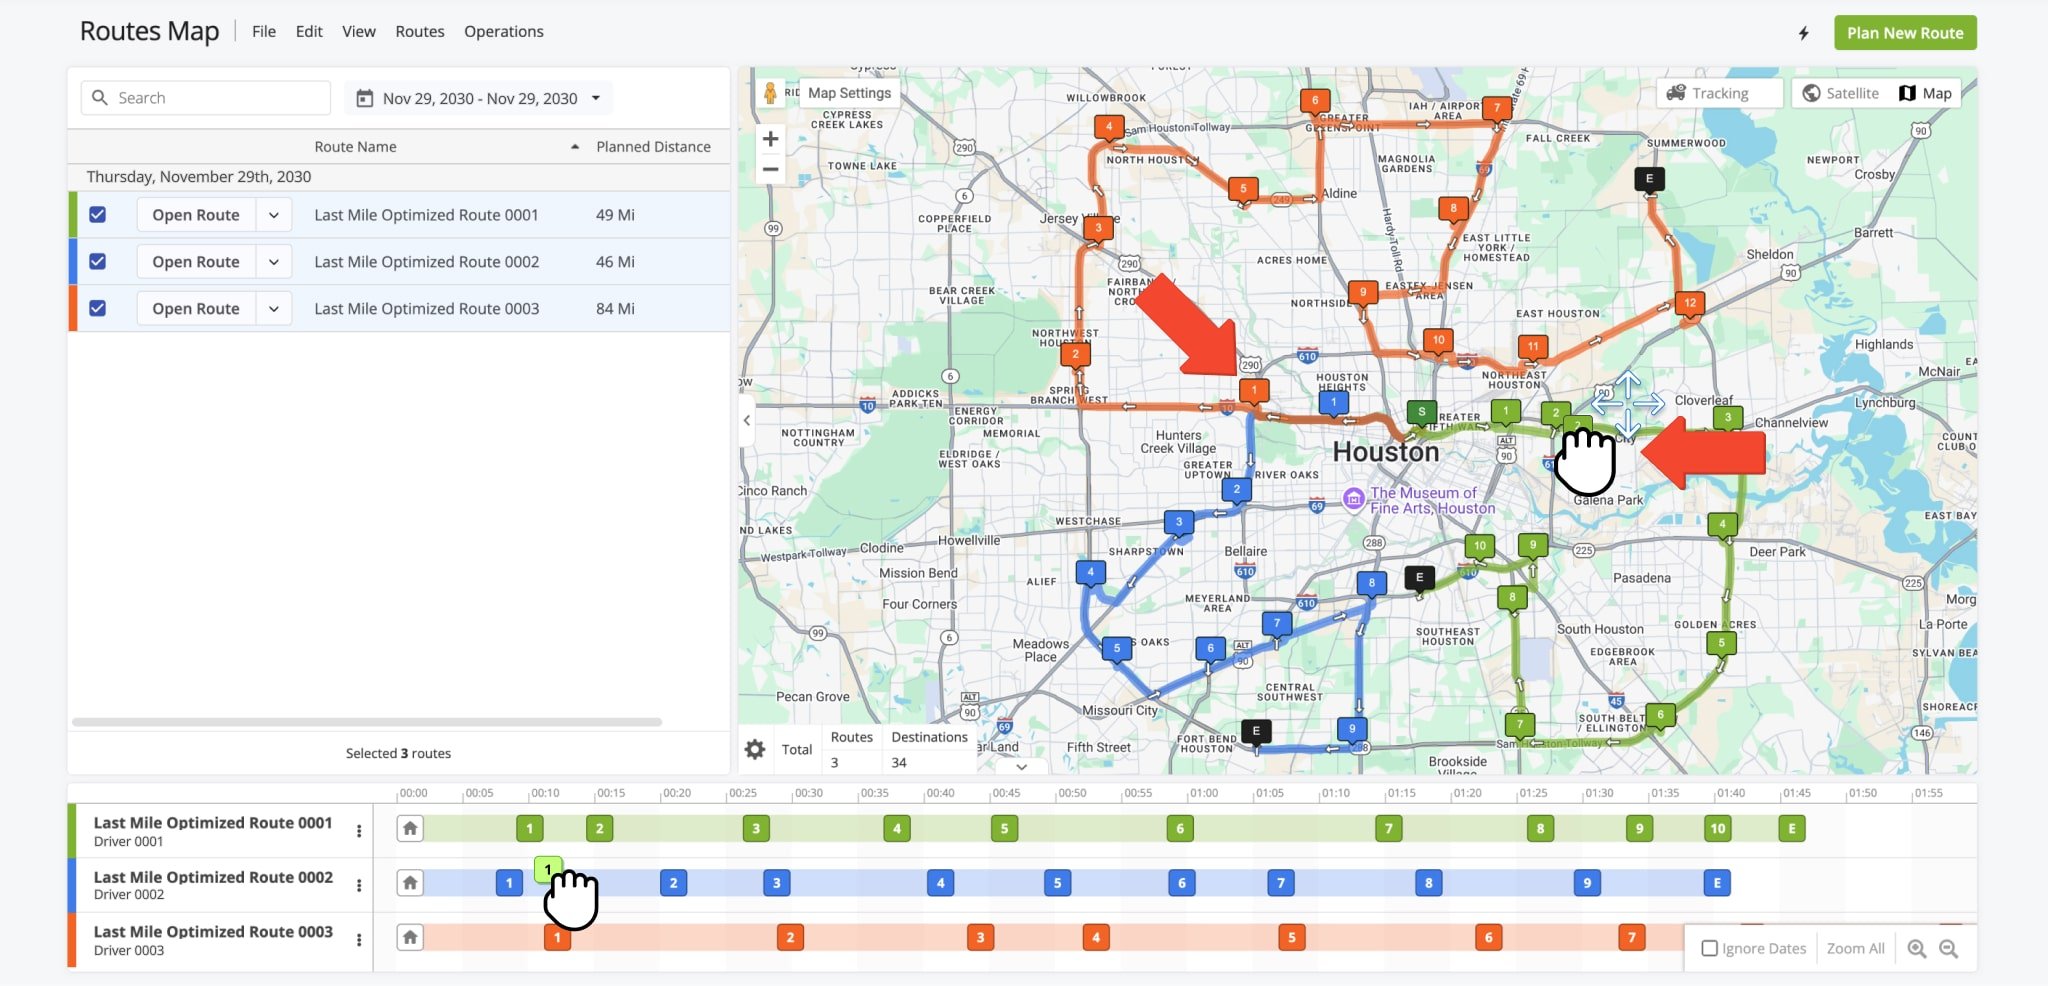
From the Routes Time Line, you can view specific destination information, manage destinations, move a destination within its given route or even move it to a different route.
Routes Map Columns – Customize Route Data On The Routes Map
With the Routes Map, you can easily filter and view route data. The Routes Map List includes a customizable table of route parameters.
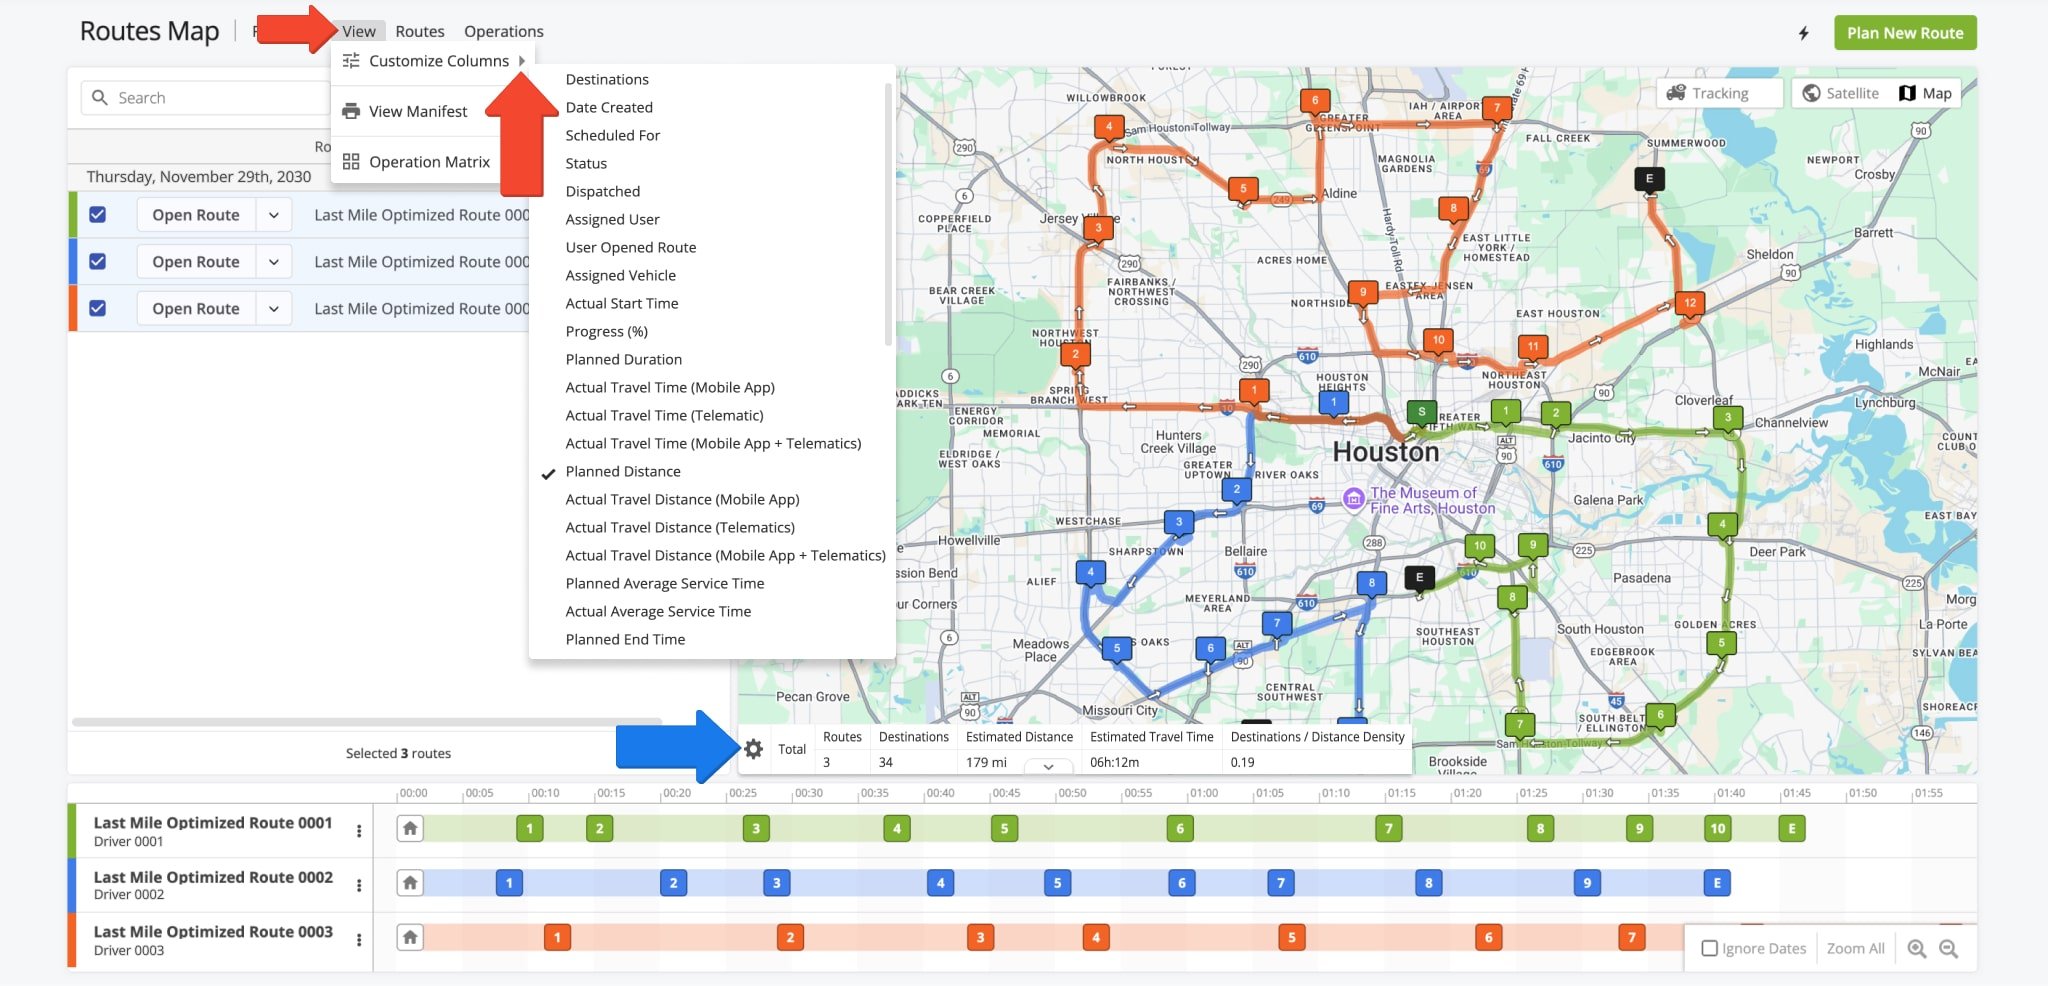
To customize the data items that appear in your Routes Map List, click on “View” in the Tool Bar. Then, hover over “Customize Columns” and select the data items you wish to see in the Routes Map List. See the table below for the complete list of available data items.
You can also find aggregated data for selected routes in the customizable Summary Table located on the lower left of the Interactive Map.
| Column Name | Column Description | |
|---|---|---|
| Route | ||
| Scheduled For | Time and date when the route is scheduled to start. | |
| Date Created | Date when the route was created. | |
| Planned End Time | Time when the route is estimated to end based on its associated optimization. Planned Route End Time = Scheduled Start Time + Planned Route Duration | |
| Planned Distance | Total planned travel distance of the route. | |
| Planned Duration | Total planned route time duration. Total Planned Route Duration = Total Travel Time + Total Service Time + Wait Time + Breaks. | |
| Assigned User | Name of the Driver to whom the route has been assigned. | |
| Assigned Vehicle | Details about the Vehicle assigned to the route (i.e. make, model, vehicle type). | |
| Destinations | ||
| Destinations | Number of addresses included in the route, excluding the route’s start address or depot and including the route’s final destination. | |
| Visited Destinations | Total number of destinations visited by the assigned User. Destinations can be manually reported as visited via the Route4Me Mobile App or automatically detected as visited after entering a Geofence. | |
| Out of Sequence Destinations | Number of destinations visited out of sequence on the route. | |
| Destinations Arrived On Time | Number of destinations visited within 90 seconds before or after the Planned Visit Time. | |
| Destinations Arrived Early | Number of destinations visited before the Planned Visit Time. A destination is considered as being arrived at early when it’s marked as “Arrived” on the Route4Me Mobile App earlier than and up to 1 second before the Planned Visit Time. | |
| Destinations Arrived Late | Number of destinations visited 90 seconds or more after the Planned Visit Time. | |
| Planned Average Service Time | Average planned service time of all planned destinations on the route. | |
| Actual Average Service Time | Average actual Service Time of visited destinations only, calculated based on the reported and Geofence-detected Time On Site. Works only for visited destinations. | |
| Planned Destinations | Number of destinations planned on the route. This value is equal to the total number of destinations that have not yet been assigned a status through the Route4Me Mobile App. | |
| Failed Destinations | Number of destinations on the route marked as “Failed” by the driver or field employee. | |
| Skipped Destinations | Number of destinations on the route marked as “Skipped” by the driver or field employee. | |
| Done Destinations | Number of destinations on the route marked as “Done” by the driver or field employee. If Client-Side Geofencing is enabled, destinations are marked as “Done” via Geofences. | |
| Notes | Total number of notes (e.g. photos, signatures, forms, etc.) attached to destinations across the route. | |
| Cost | Average cost per destination. The cost of all destinations on the route divided by the number of destinations. | |
| Progress | ||
| User Opened Route | Date and time when the route was first opened by the assigned driver on the Route4Me Mobile App. Applies only to the “Driver” User Type. | |
| Status | Current status of the route. Specifically, routes can have one of the following statuses: “Planned“, “Scheduled“, “Started“, or “Finished“. When a route is optimized, it’s assigned the Planned route status. Next, the route can get the Started and Finished statuses from the assigned driver or team member from their connected Route4Me Mobile App. | |
| Actual Start Time | Date and time when the driver or field employee started the route on the Route4Me Mobile App. | |
| Dispatched | Allows marking routes as “Dispatched” and shows when routes were marked as “Dispatched“. Dispatch routes to send automated SMS and Email notifications to customers on the route. Additionally, routes can be dispatched and sent to the connected telematics vendors. | |
| Progress (%) | Shows how many destinations have been visited by the assigned driver. Specifically, when a destination is marked as Arrived by the assigned driver from their connected mobile app, the route’s progress is automatically updated on your Routes List in real-time. Furthermore, route progress can be updated when destinations are Detected as Visited via Geofences. | |
| Actual Travel Distance (Mobile App) | Actual distance traveled by the assigned User, calculated based on the received Mobile App GPS data. | |
| Actual Travel Distance (Telematics) | Total travel distance on the route detected by an installed telematics device from a Telematics Provider on a GPS vehicle. | |
| Actual Travel Distance (Mobile App + Telematics) | Total GPS travel distance on the route detected by the Mobile App and telematics device. This value reflects the total travel distance, including segments where only the Mobile App or the telematics device was in use. NOTE: When both the Mobile App and the telematics device are used simultaneously, the distance is detected only once to avoid duplication. | |
| Actual Travel Time (Mobile App) | Total time duration on the route detected by the Route4Me Mobile App. This value is the duration between the first and last detected tracking coordinates and includes the total travel and service time of the route. | |
| Actual Travel Time (Telematics) | Total time duration on the route detected by an installed telematics device from a Telematics Provider on a GPS vehicle. This value is the duration between the first and last detected tracking coordinates and includes the total travel and service time of the route. | |
| Actual Travel Time (Mobile App + Telematics) | Total actual time on the route detected by the Mobile App and telematics device. This value reflects the total travel time, including segments where only the Mobile App or the telematics device was in use, and is the duration between the first and last detected tracking coordinates, and includes the total travel and service time of the route. NOTE: When both the Mobile App and the telematics device are used simultaneously, the time is detected only once to avoid duplication. | |
| Completed Planned Distance % (Mobile App) | Percentage of the total planned route distance that was traveled by the field employee, as tracked by the Route4Me Mobile App. | |
| Completed Planned Distance % (Telematics) | Percentage of the total planned route distance that was traveled by the vehicle, as tracked by your Telematics Provider. | |
| Completed Planned Distance % (Mobile App + Telematics) | Percentage of the total planned route distance that was traveled, as tracked by the Mobile App and telematics device. This value reflects the total planned and completed distance percentage, including segments where only the Mobile App or the telematics device was in use. NOTE: When both the Mobile App and the telematics device are used simultaneously, the distance is detected only once to avoid duplication. | |
| Remaining Planned Distance % (Mobile App) | Percentage of the total planned route that was not traveled by the field employee, as tracked by the Route4Me Mobile App. | |
| Remaining Planned Distance % (Telematics) | Percentage of the total planned route distance that was not traveled by the field employee, as tracked by your Telematics Provider. | |
| Remaining Planned Distance % (Mobile App + Telematics) | Percentage of the total planned route distance that wasn’t traveled, as tracked by the Mobile App and telematics device. This value reflects the total planned and not completed distance percentage, including segments where only the Mobile App or the telematics device was in use. NOTE: When both the Mobile App and the telematics device are used simultaneously, the distance is detected only once to avoid duplication. | |
| Deviated From Planned Distance % (Mobile App) | The total distance traveled not on the planned route, expressed as a percentage of the total planned distance, as tracked by the Route4Me Mobile App. | |
| Deviated From Planned Distance % (Telematics) | The total distance traveled not on the planned route, expressed as a percentage of the total planned distance, as tracked by your Telematics Provider. | |
| Deviated From Planned Distance % (Mobile App + Telematics) | The total distance traveled not on the planned route, expressed as a percentage of the total planned distances tracked by the Mobile App and telematics device. This value reflects the total traveled and not planned distance, including segments where only the Mobile App or the telematics device was in use. NOTE: When both the Mobile App and the telematics device are used simultaneously, the distance is detected only once to avoid duplication. | |
| Utilization – Pieces | ||
| Pieces Planned | Total planned Pieces amount of all destinations on the route. Additionally, learn more about setting maximum pieces per route. | |
| Pieces Completed | Total Pieces amount that has been completed. Destinations are completed when manually marked as “Done” via the Route4Me Mobile App. | |
| Pieces Completed (%) | Percentage of the total planned Pieces amount that has been completed. Destinations are completed when manually marked as “Done” via the Route4Me Mobile App. | |
| Pieces Remaining At End (%) | Percentage of the total planned Pieces amount that remains not completed at the end of the route. Destinations are completed when manually marked as “Done” via the Route4Me Mobile App. | |
| Utilization – Weight | ||
| Weight Planned | Total planned Weight amount of all destinations on the route. Additionally, learn more about setting maximum Weight per route. | |
| Weight Completed | Total Weight amount that has been completed. Destinations are completed when manually marked as “Done” via the Route4Me Mobile App. | |
| Weight Completed (%) | Percentage of the total planned Weight amount that has been completed. Destinations are completed when manually marked as “Done” via the Route4Me Mobile App. | |
| Weight Remaining At End (%) | Percentage of the total planned Weight amount that remains not completed at the end of the route. Destinations are completed when manually marked as “Done” via the Route4Me Mobile App. | |
| Utilization – Cube | ||
| Cube Planned | Total planned Cube amount (volume) of all destinations on the route. Additionally, learn more about setting maximum volume per route. | |
| Cube Completed | Total Cube amount (volume) that has been completed. Destinations are completed when manually marked as “Done” via the Route4Me Mobile App. | |
| Cube Completed (%) | Percentage of the total planned Cube amount (volume) that has been completed. Destinations are completed when manually marked as “Done” via the Route4Me Mobile App. | |
| Cube Remaining At End (%) | Percentage of the total planned Cube amount (volume) that remains not completed at the end of the route. Destinations are completed when manually marked as “Done” via the Route4Me Mobile App. | |
| Utilization – Revenue | ||
| Revenue Planned | Total planned Revenue amount of all destinations on the route. Additionally, learn more about setting maximum Revenue per route. | |
| Revenue Completed | Total Revenue amount that has been completed. Destinations are completed when manually marked as “Done” via the Route4Me Mobile App. | |
| Revenue Completed (%) | Percentage of the total planned Revenue amount that has been completed. Destinations are completed when manually marked as “Done” via the Route4Me Mobile App. | |
| Revenue Remaining At End (%) | Percentage of the total planned Revenue amount that remains not completed at the end of the route. Destinations are completed when manually marked as “Done” via the Route4Me Mobile App. | |
Manage Routes – Open And Manage Routes And Route Data
The Routes Map makes it easy to open and manage multiple routes simultaneously. You can filter routes by name or schedule, open routes for specific dates, and use a variety of tools to edit, view, or export route data for efficient route management.
Open Routes – Filter And View Multiple Routes Side By Side On Routes Map
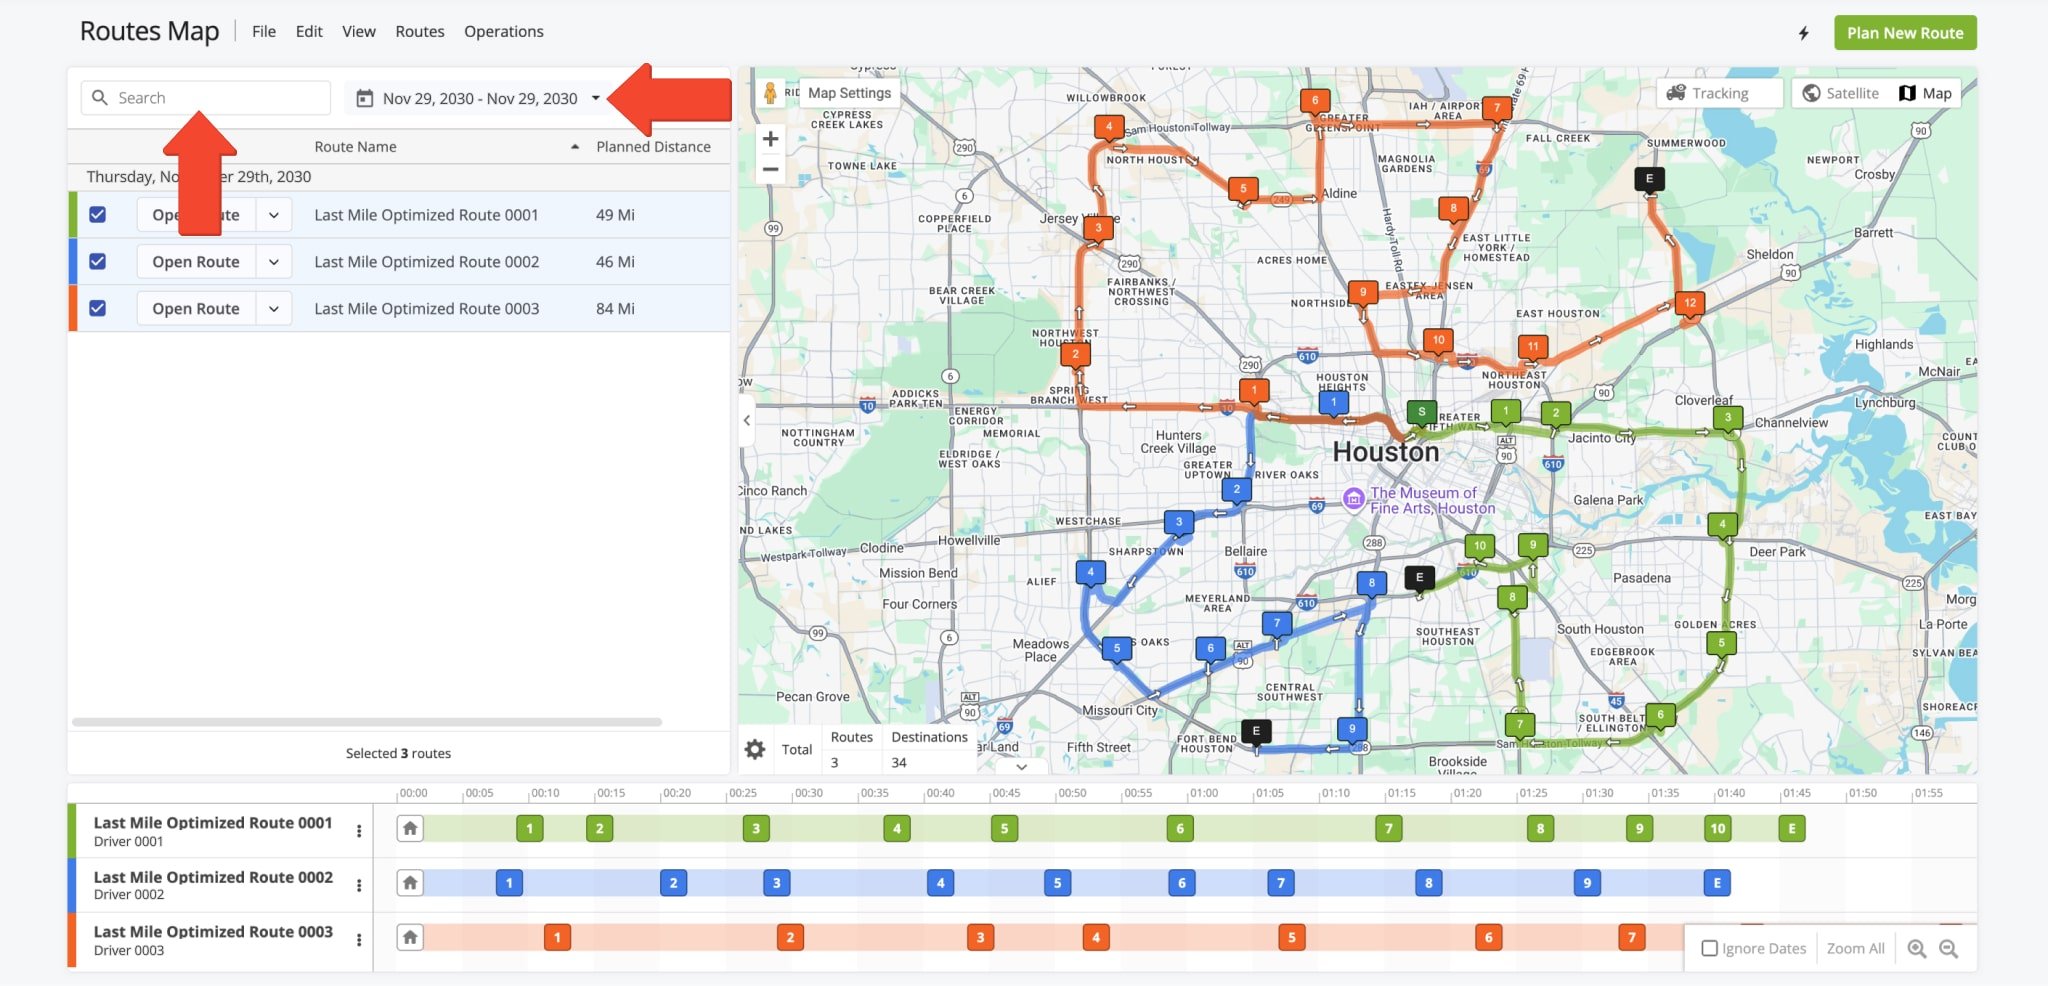
To open routes directly from the Routes Map, go to “Operations” in the Navigation Menu, then click “Routes Map“. Use the Calendar Icon to filter routes by date. They will be displayed in the Routes Map List.
To refine your filter criteria further, use the Search Bar to display specific route details. Only routes with those details, scheduled for the selected date range, will appear in the Routes Map List.
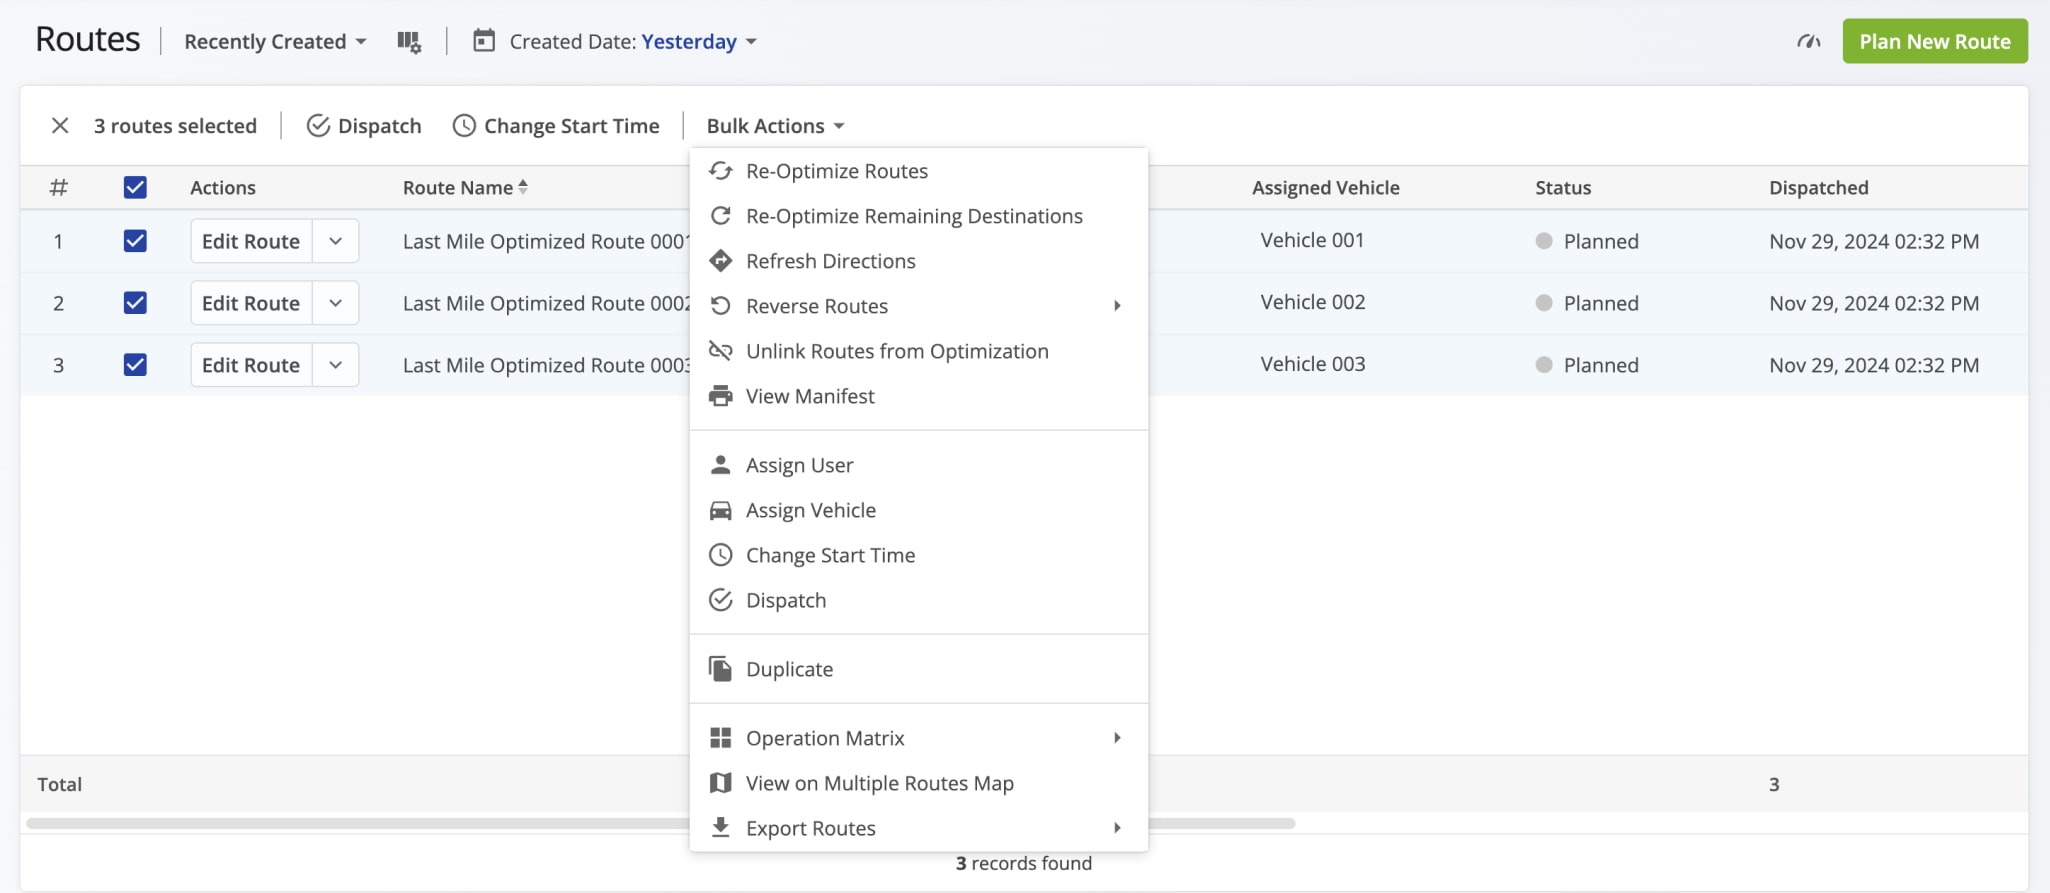
Alternatively, to open previously planned routes on the Routes Map, go to “Dynamic Routing” > “Routes” in the Navigation Menu to access your Routes List.
Select desired routes by checking their boxes, click “Bulk Actions” in the top menu bar and, then, choose “View on Multiple Routes Map“.
Additionally, when you plan multiple routes from a single set of addresses with constraints such as Max Destinations, Max Distance, Max Duration, Pieces, Weight, Cubic Volume, and Revenue, these routes are automatically opened on the Routes Map.
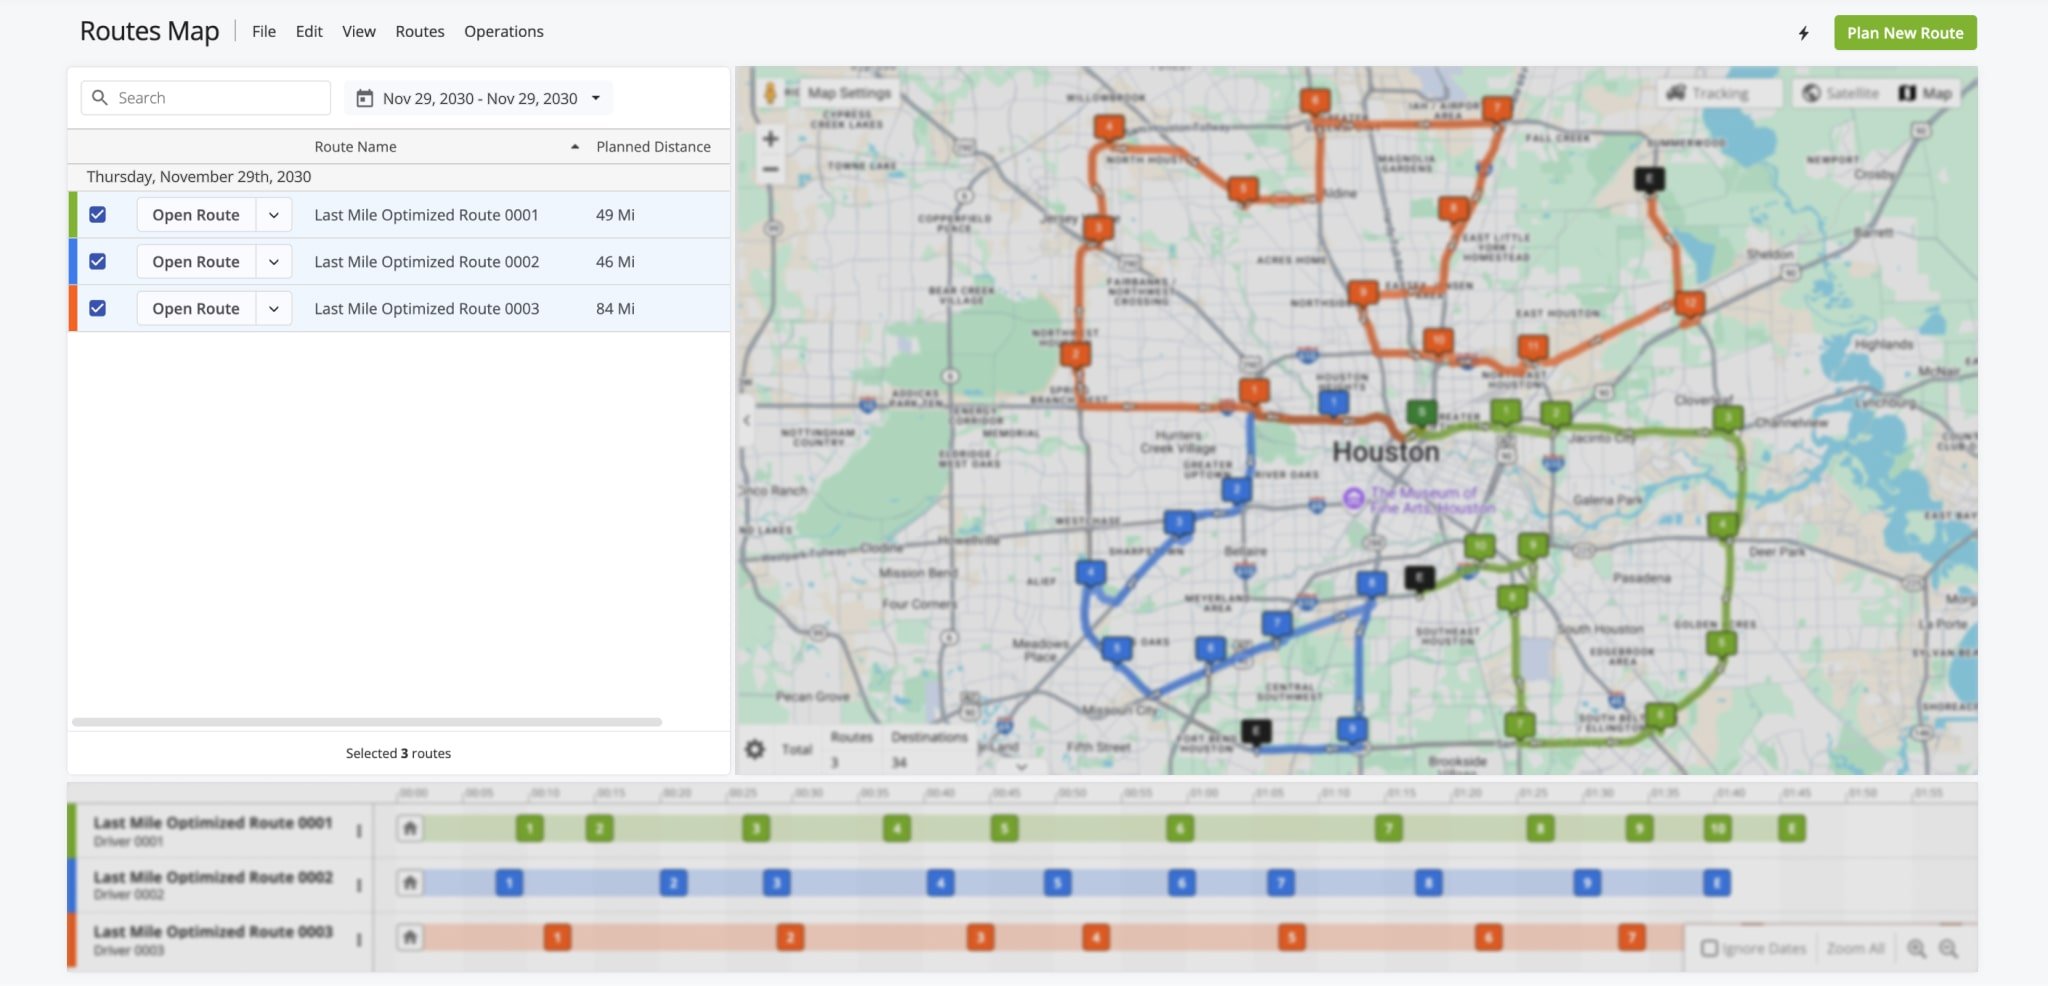
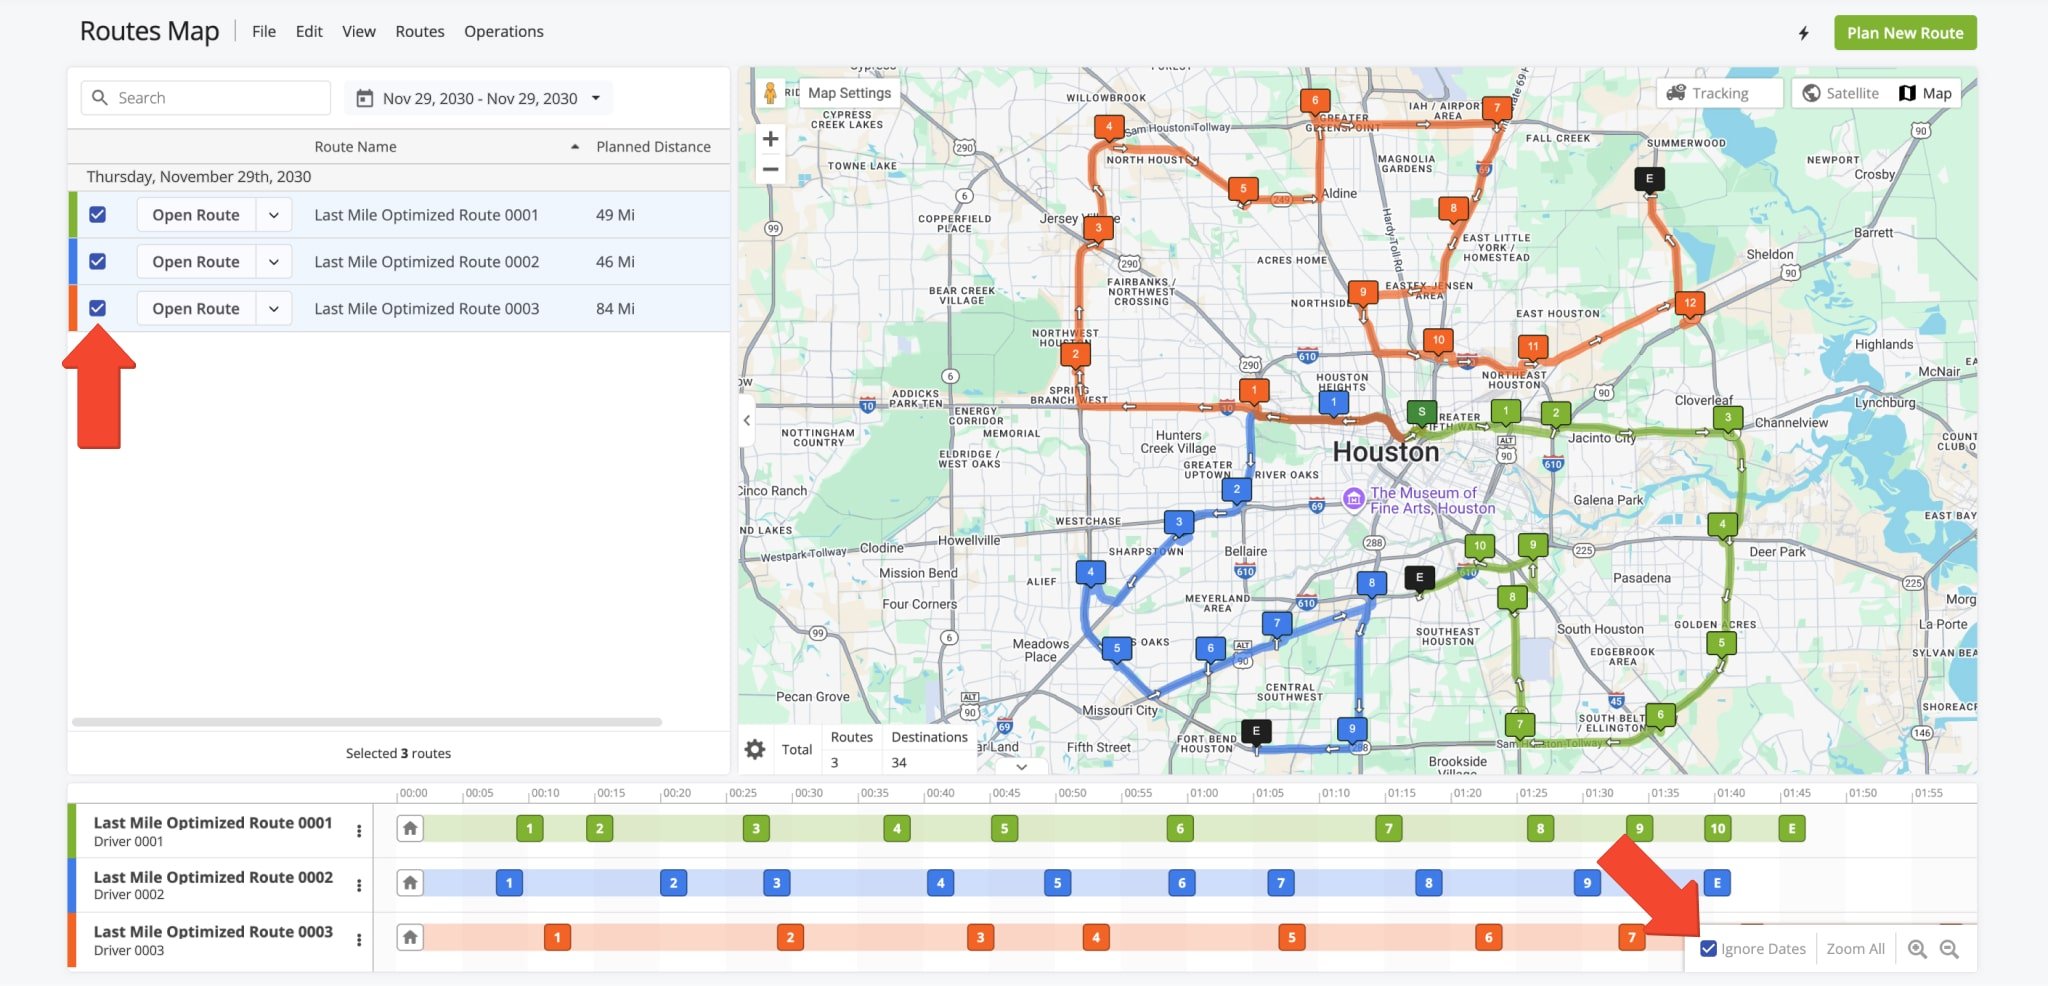
To display routes on the map, select the desired routes by checking their boxes in the Routes Map List.
Unchecking them hides the routes. If routes are scheduled for different dates, check the “Ignore Dates” box in the Time Line controls. This will align all selected routes’ timelines for easier cross-route destination management.
Manage Routes – Insert Addresses, Re-Optimize Routes, Adjust Schedules And More
The Routes Map offers various tools to manage your routes effectively.
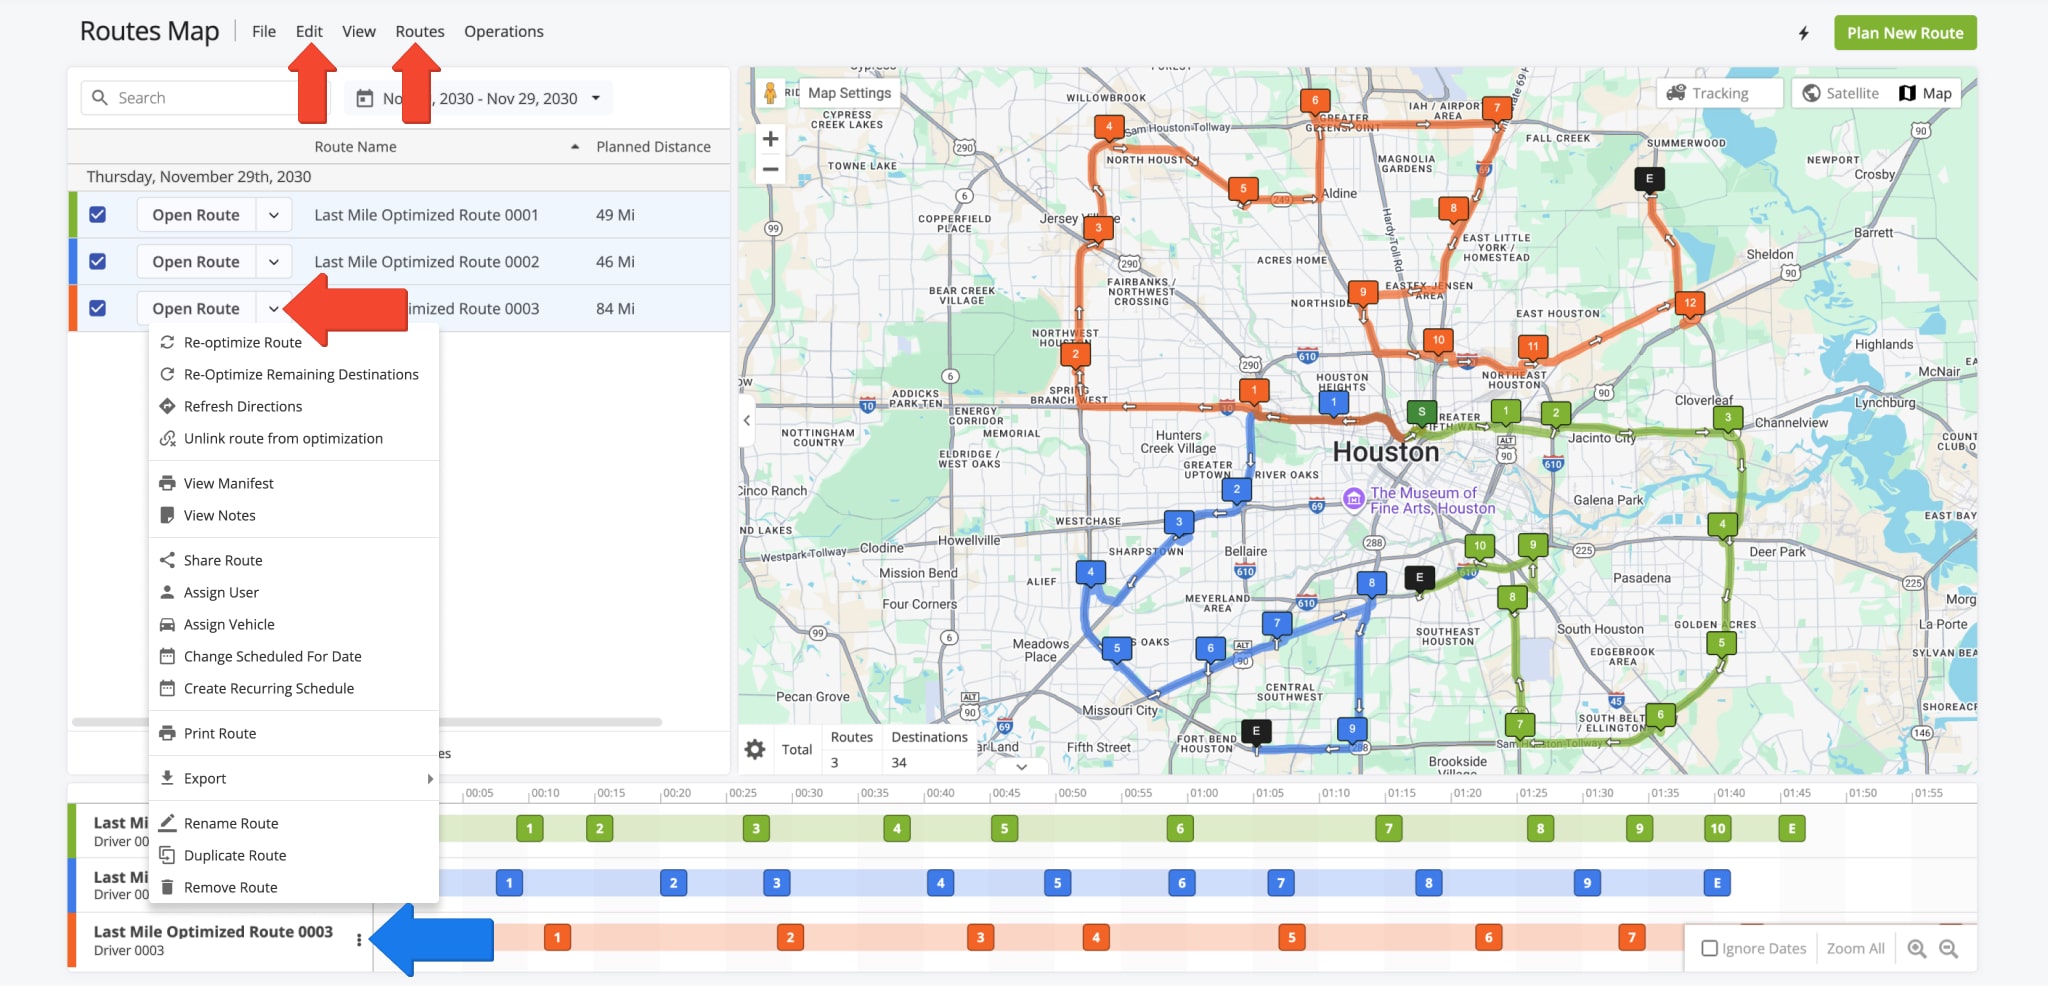
From the top menu bar, you can assign users and vehicles from the “Edit” menu, and insert addresses and re-optimize routes from the “Routes” menu. You can also click on a Down Arrow Button in the Routes Map List or a Three-dot Icon in the Time Line to individually manage a specific route.
| Options | Description |
|---|---|
| Open Route | Open the selected route in the Route Editor. |
| Re-Optimize Route | Optimize the route again. You should re-optimize your routes after making changes to them to incorporate those changes in the most optimal way. |
| Re-Optimize Remaining Destinations | Perform optimization for remaining destinations after the route has been started. It’s recommended that you re-optimize your routes after making changes to them to incorporate those changes in the most optimal way. |
| Refresh Directions | Recalculate the optimal path between the destinations without changing their sequence. Make sure to always refresh directions after adding Turn Avoidance to an existing route. |
| Unlink route from optimization | Each route is linked to a corresponding optimization in the system. When making changes to routes that exceed or do not match the respective optimization settings, unlink the route from its optimization and re-optimize. |
| View Manifest | Open the customizable, dynamic Route Manifest to view a detailed overview of your route metrics, order details, required and remaining capacity, driving directions, stop visitation progress, logistics KPIs, and more. |
| View Notes | Open the corresponding Notes and their respective attached media for all destinations on the selected route. |
| Share Route | Send the selected route to another person via link, Email, or SMS link. |
| Assign User | Assign a driver to the selected route. NOTE: Manually dispatching a route to a specific driver will override the optimized driver assignment if Driver Skills routing is used. |
| Assign Vehicle | Assign a vehicle to the selected route. NOTE: Manually dispatching a route to a specific vehicle will override the optimized vehicle assignment if Driver Skills and Vehicle Attributes routing is used. |
| Change Scheduled For Date | Edit the date the selected route is scheduled for. |
| Create Recurring Schedule | Create a recurring schedule template for the selected route to repeat the route in a set interval or schedule. |
| Print Route | Open the customizable, printable Route Manifest to print or download a detailed overview of your route metrics, order details, required and remaining capacity, driving directions, stop visitation progress, logistics KPIs, and more. |
| Export | Export a route as a CSV spreadsheet or as navigation data for use with GPS navigation devices. |
| Rename Route | Change the name of the selected route. For your convenience, you can use route names to easily find your route using any of Route4Me’s route planning and management tools. |
| Duplicate Route | Create a copy of the selected route. This new route will have “(Duplicate)” appended to its name. Duplicating routes is a convenient way of creating route backups or variants. |
| Remove Route | Delete the selected route. |
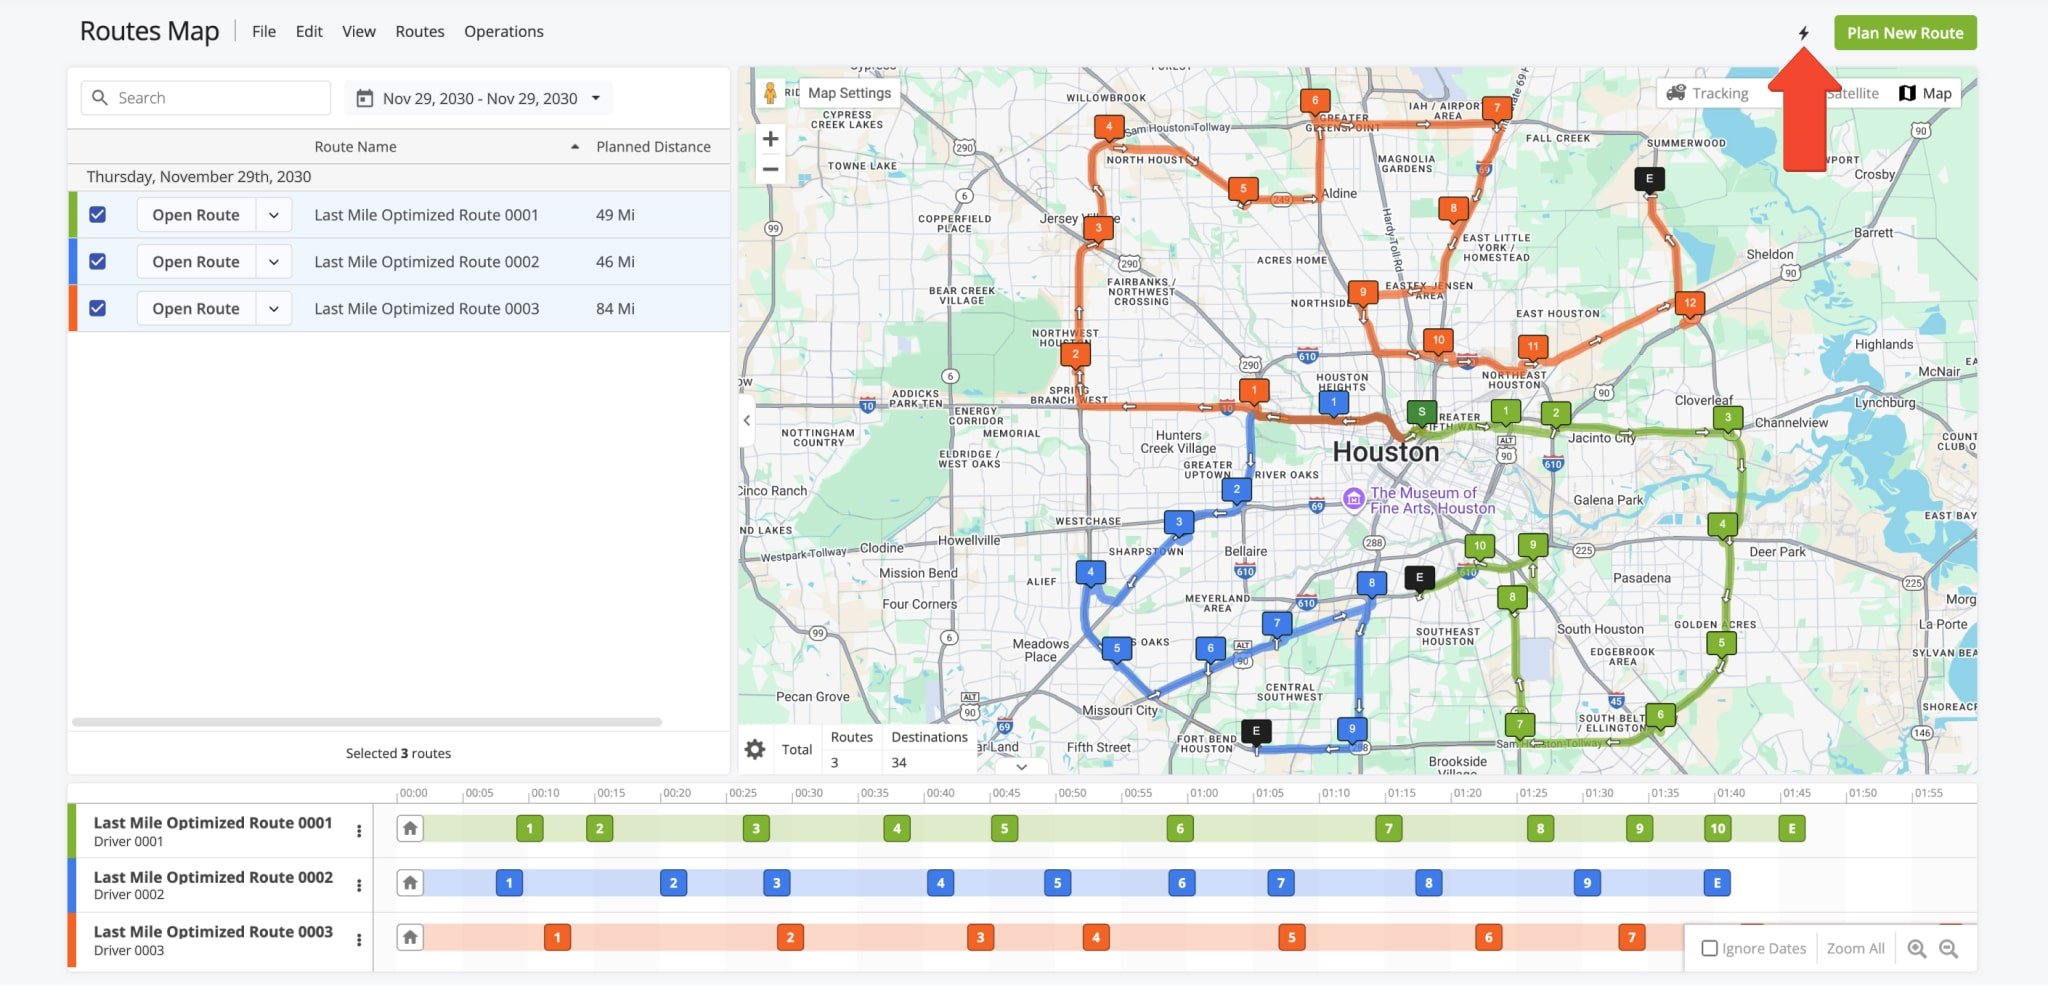
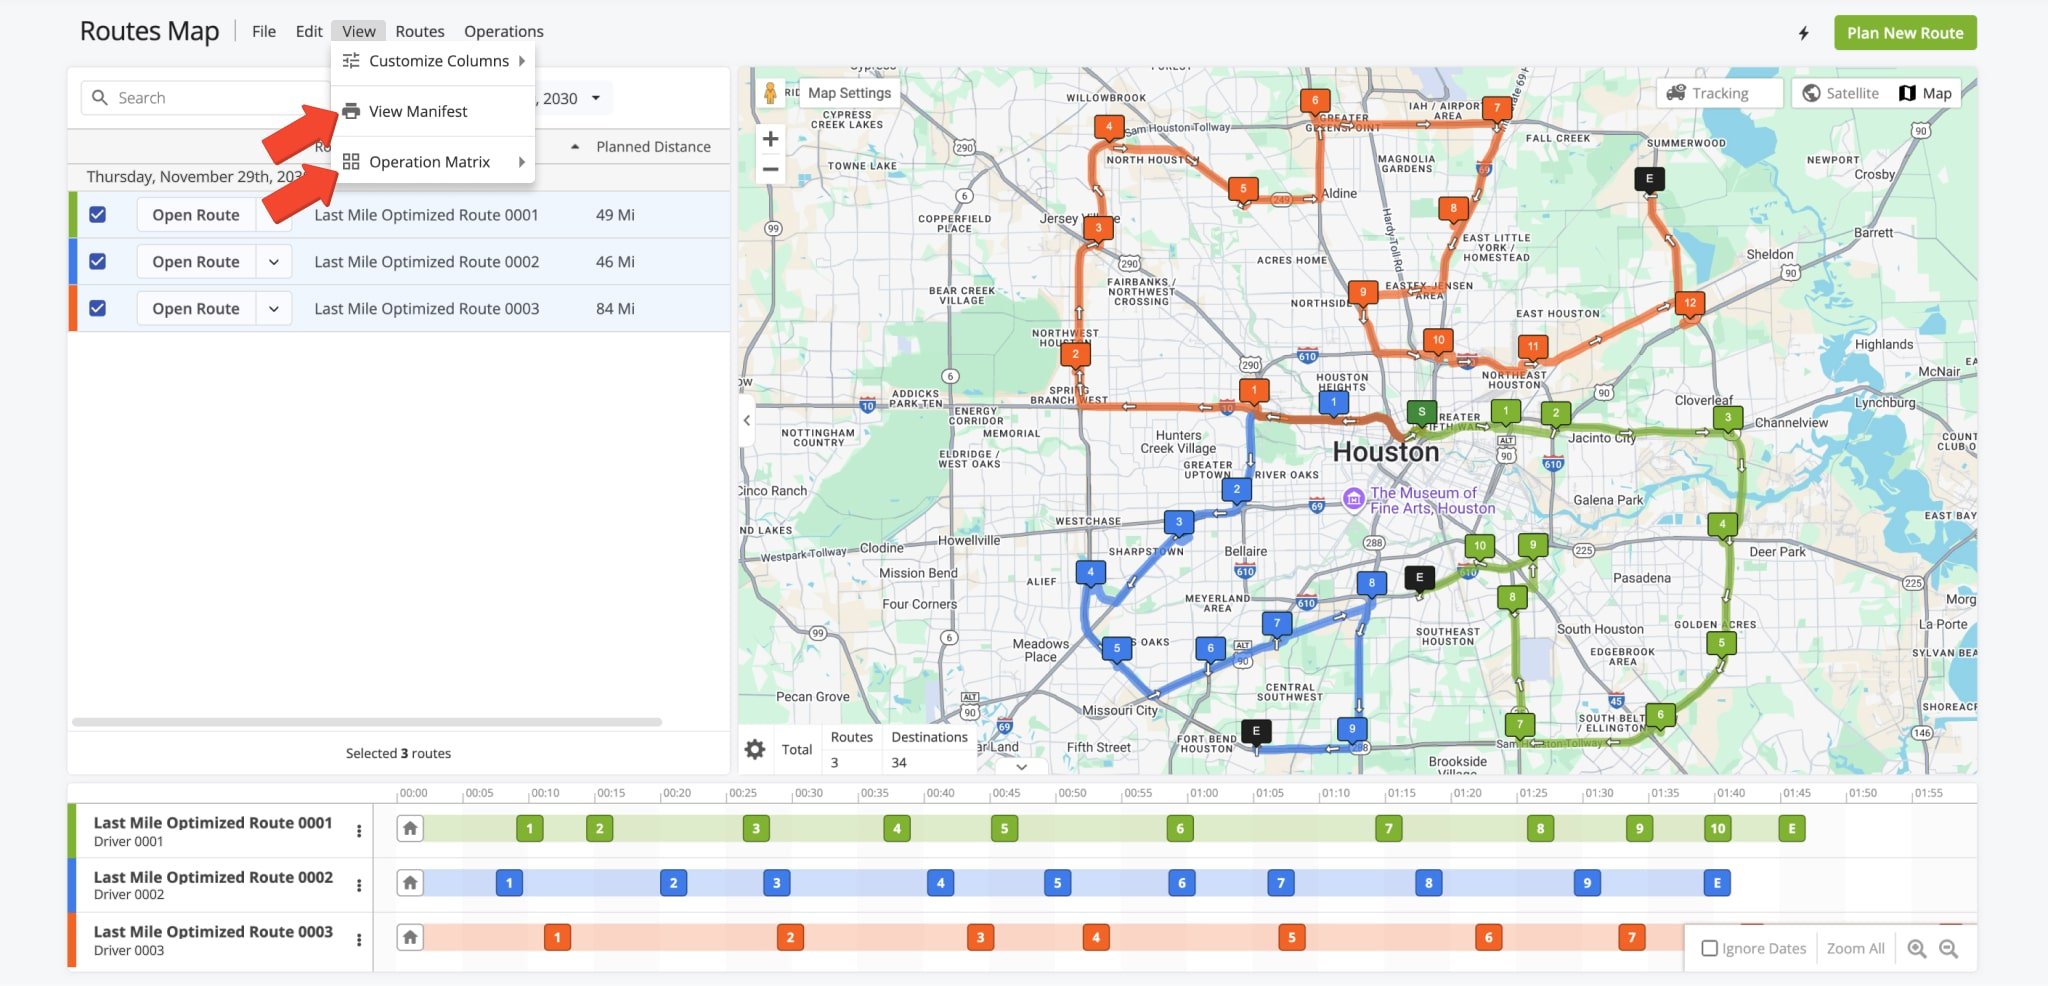
For added convenience, you can click on the Lightning Bolt Icon above the Interactive Map to access a variety of Quick Actions, Commands, and Help options.
To access detailed route data, click “View” in the Tool Bar, then “Route Manifest” to open your customizable, dynamic Route Manifest.
To view a comprehensive visual overview of real-time route progress, click on “Operation Matrix“, also located under “View” in the Tool Bar. The Operation Matrix displays selected routes side by side, enabling you to view in real time each route’s visitation progress via color-coded metrics.
Interactive Map – Map Settings, Route Data Summary Table And Live Tracking
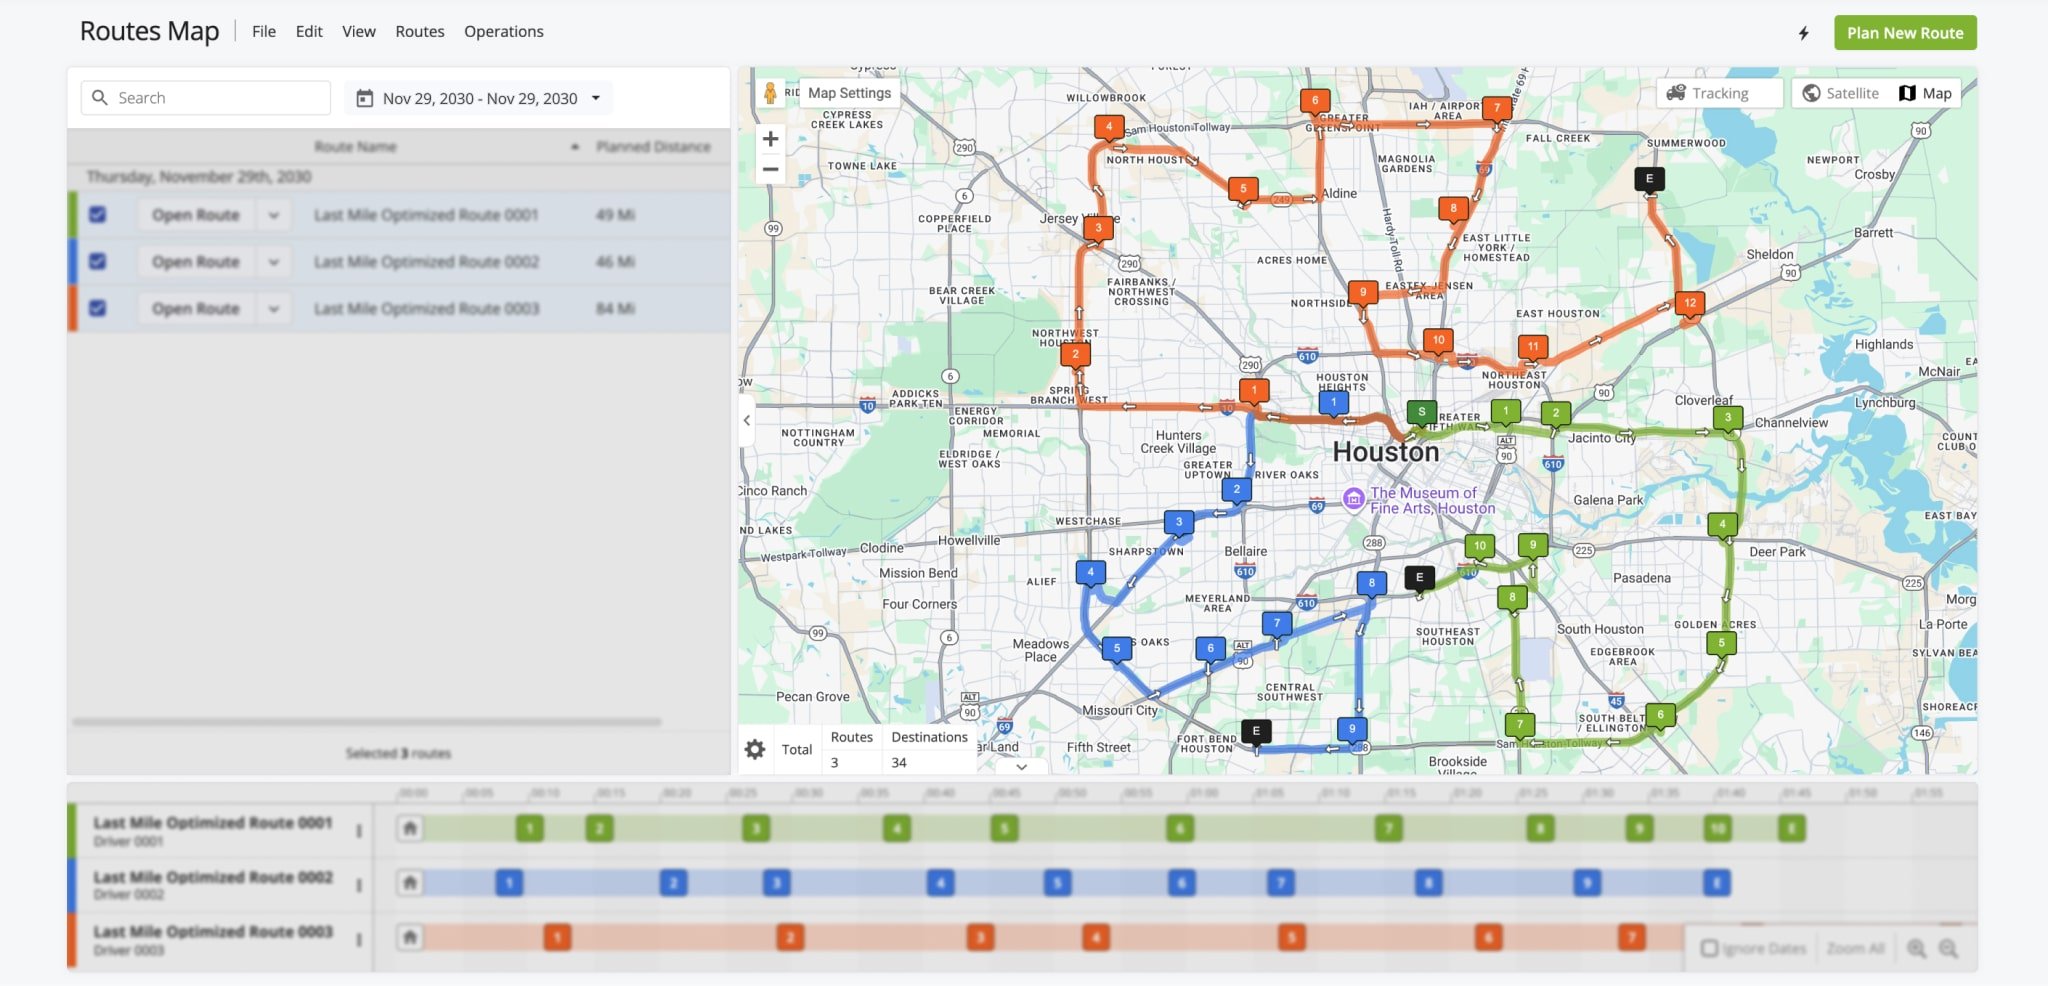
When you select routes in the Routes Map List, they appear on the Interactive Routes Map along with their destination sequences. In addition, the Interactive Map provides a summary of all selected routes, user and driver tracking capabilities, and customizable map settings for a tailored view.
Map View – Map Controls And Map Modes On Route4Me’s Routes Map
To navigate the Interactive Map, drag the map to move it and use scroll, pinch gestures, or the Zoom In or Zoom Out buttons to adjust the zoom level. For a tailored display, switch between “Satellite” and “Map” views using the respective buttons.
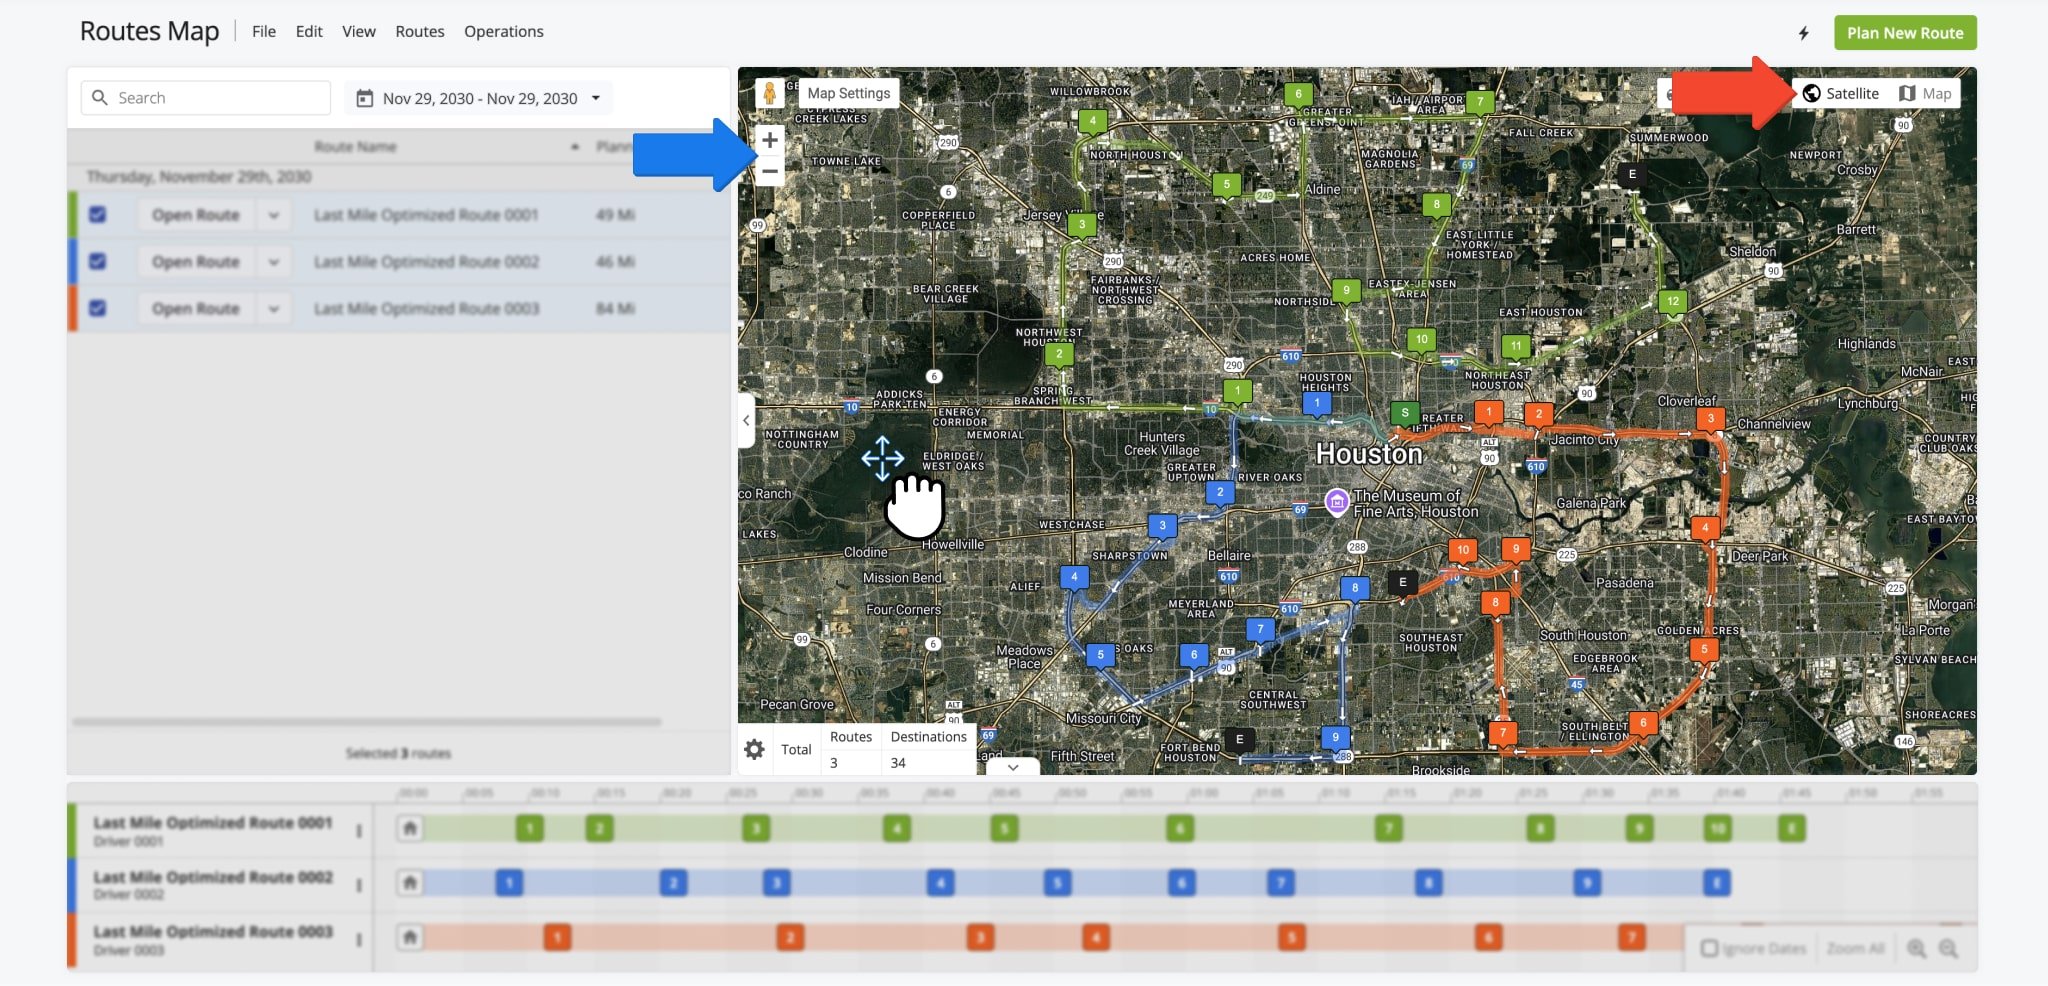
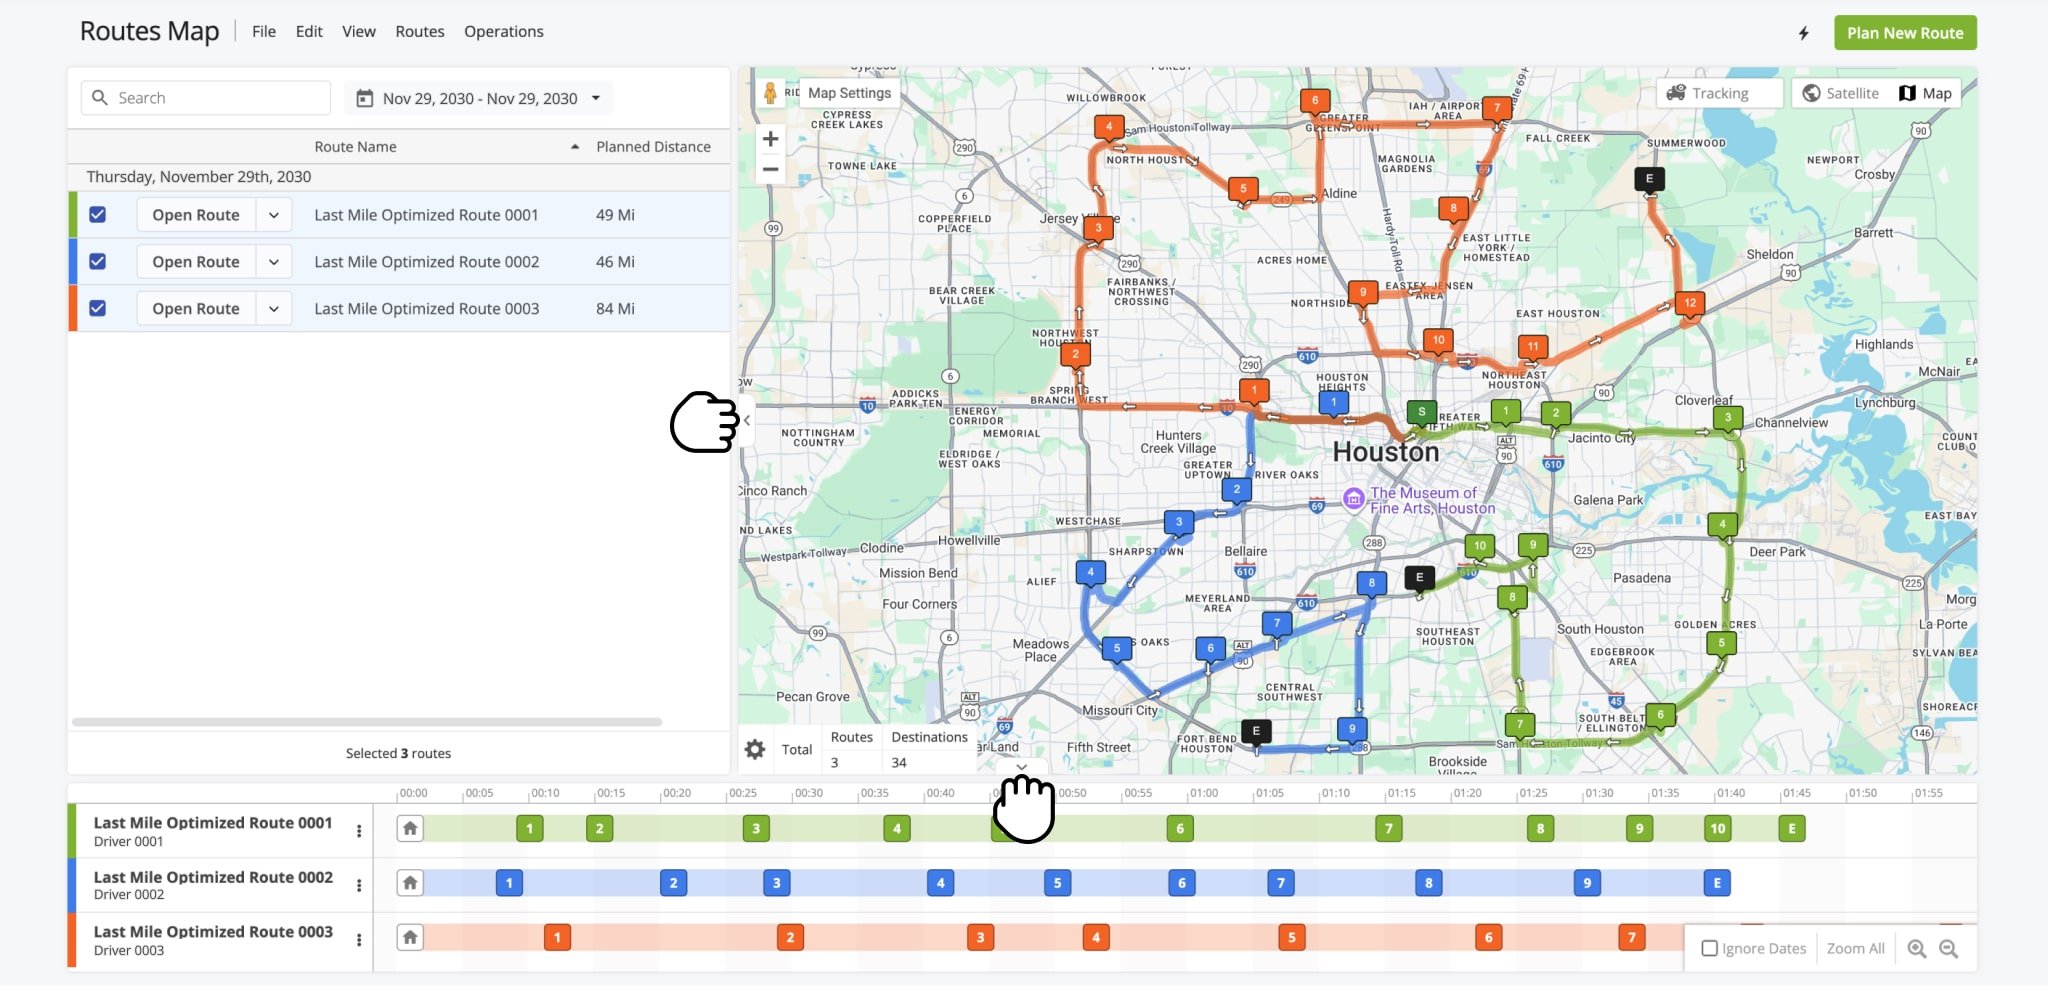
To resize the Interactive Map in relation to the Routes Map List and Time Line, click and drag the panel separators to adjust the layout. Clicking and dragging a separator minimizes the corresponding panels, allowing you to maximize the panels you wish to focus on at any given time.
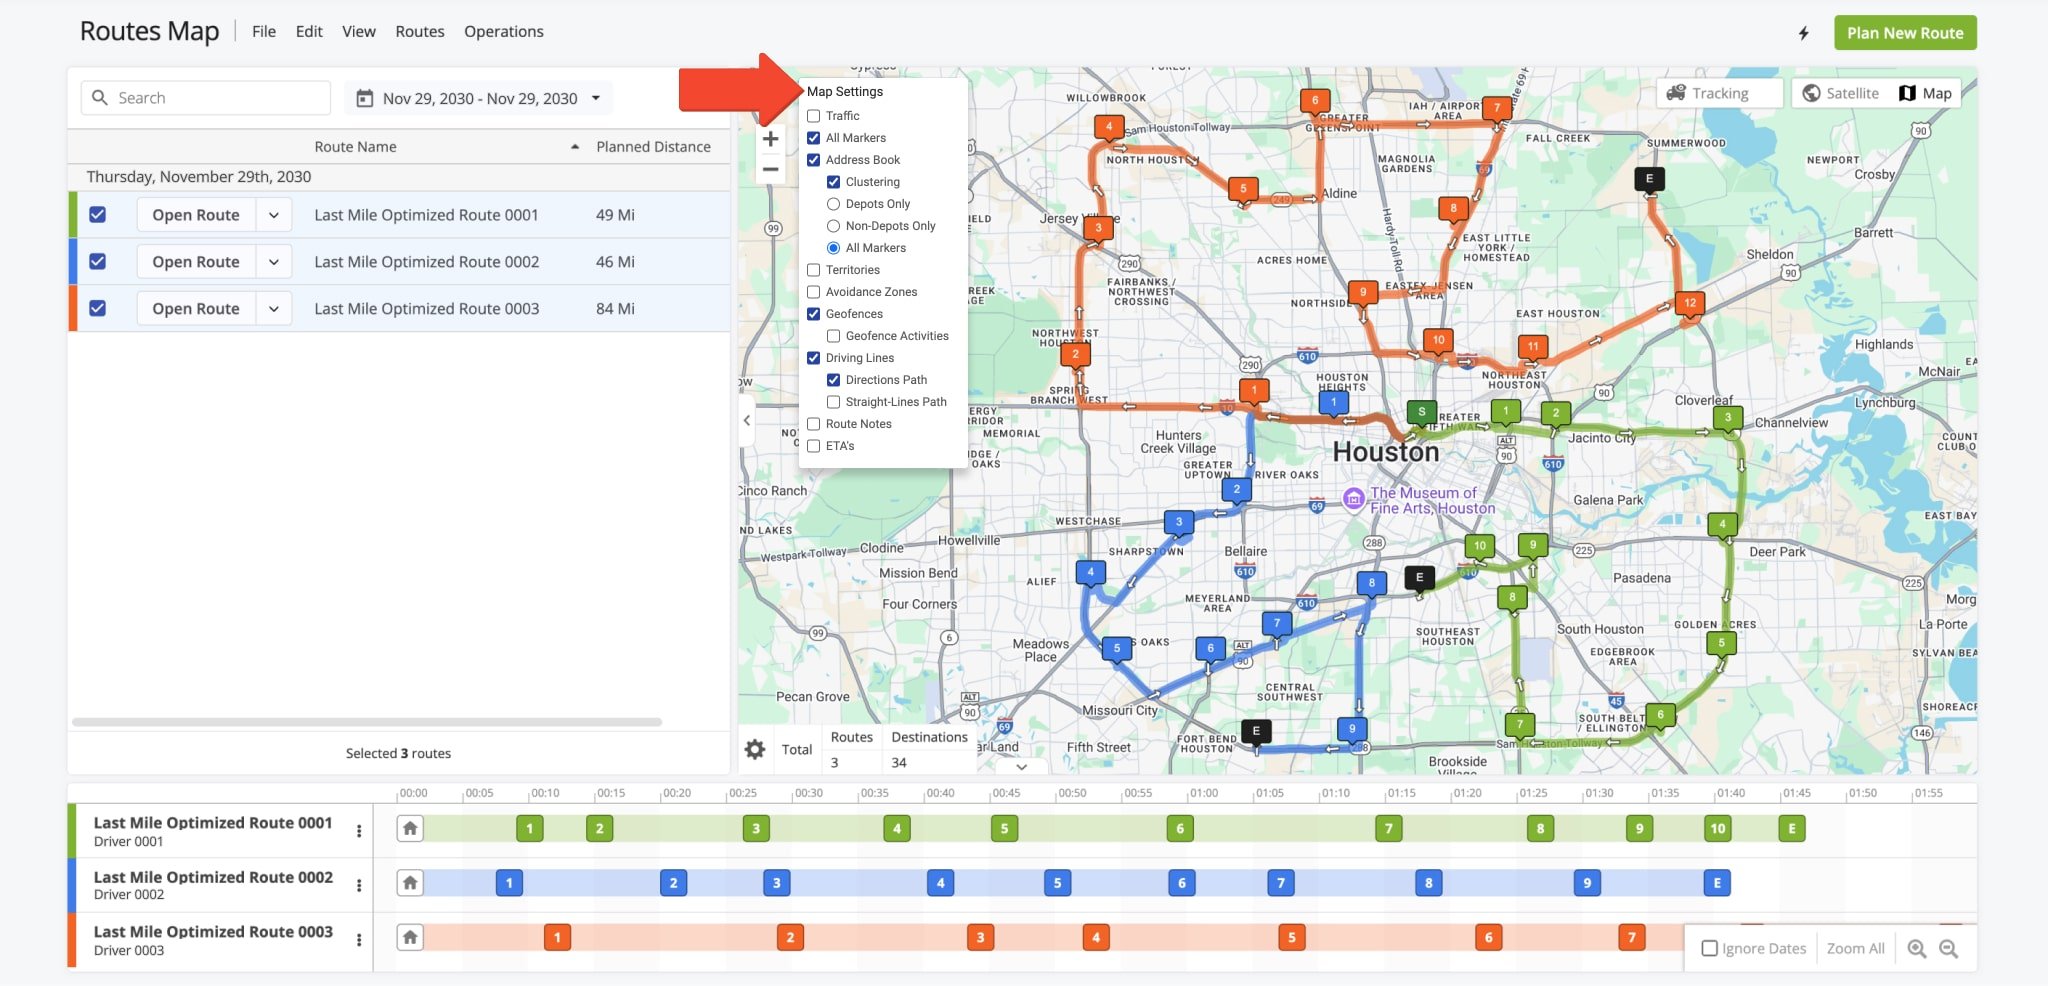
Map Settings – Enable Territories, Geofences, ETAs And More On Routes Map
In addition to basic view options and map controls, the Interactive Map enables you to view various routing items like Territories, Geofences, and more. Click the “Map Settings” button to access the below options:
| Options | Description |
|---|---|
| Traffic | Display a current road traffic density on the Interactive Map. |
| All Markers | Display the destination markers for all enabled routes. When this option is disabled, only the destination markers of the most recently enabled route will be displayed. |
| Address Book | Enable Address Book grouping and clustering options. |
| Clustering | Enable clustered SmartZone grouping for the below options. |
| Depots Only | Cluster depots on the Interactive Map. |
| Non-Depots Only | Cluster non-depot locations on the Interactive Map. |
| All Markers | Cluster all locations on the Interactive Map. |
| Territories | Display Address Book Territories on the Interactive Map. |
| Avoidance Zones | Display Avoidance Zones on the Interactive Map. |
| Geofences | Display Geofences on the Interactive Map. This highlights the corresponding geofenced area of each destination. |
| Geofence Activities | Display icons displayed at the location where each destination’s corresponding Geofence was detected as entered and detected as departed. |
| Driving Lines | Display path lines between destinations, either accurate road driving lines or straight-line paths. |
| Directions Path | Display the driving path of each route as a colored line, matching the road directions of the route. |
| Straight-Lines Path | Display the straight-line path between each destination, ignoring road directions. |
| Route Notes | Enable the Route Notes icon, which appears next to any destination with an associated note Click the icon to view the note for that destination, including any associated media. |
| ETA’s | Display an ETA panel next to each destination to view “Arriving At” and “Departing At” times, “Distance From Start“, and estimated “Travel Time From Start“. |
User Tracking – Live Multiple Driver Tracking On The Route4Me Routes Map
The Interactive Routes Map enables you to track users and drivers. Hover over the “Tracking” button to access the tracking menu. From there, hover over “Routes” to filter routes by date or click “Users” to open the user tracking panel. You can use the “Search in Users” field to filter users by name.
Optionally, by checking the Connection box, you can display only currently active users. Currently connected users will have a green Connection Icon next to their names; those who aren’t will have a red Connection Icon. Learn more about Route4Me’s customizable enterprise route management software User Types and Hierarchy.
Hovering over a user’s name will give you access to additional options. For instance, you will be able to locate their position on the Interactive Map in real time. You can select “Open Last Known Route” to view in the Route Editor the last route executed by the user.
You can also select “Show Activity Feed” to open a dynamic Activity Feed which displays a list of actions performed by the user. Learn more about Route4Me’s Dynamic Activity Feed.
![]()
Users with the Mobile Route Planner App installed and location services enabled on their mobile devices will appear on the Interactive Map if they meet your filters.
Once a driver begins a route in the the Mobile Route Planner App, their progress is displayed as a blue trail on the Routes Map. This trail consists of GPS breadcrumbs, marking points where their devices updated and synchronized GPS coordinates with the Route4Me business route software.
Time Line View – Routes Map Route View Options And Time Line Controls
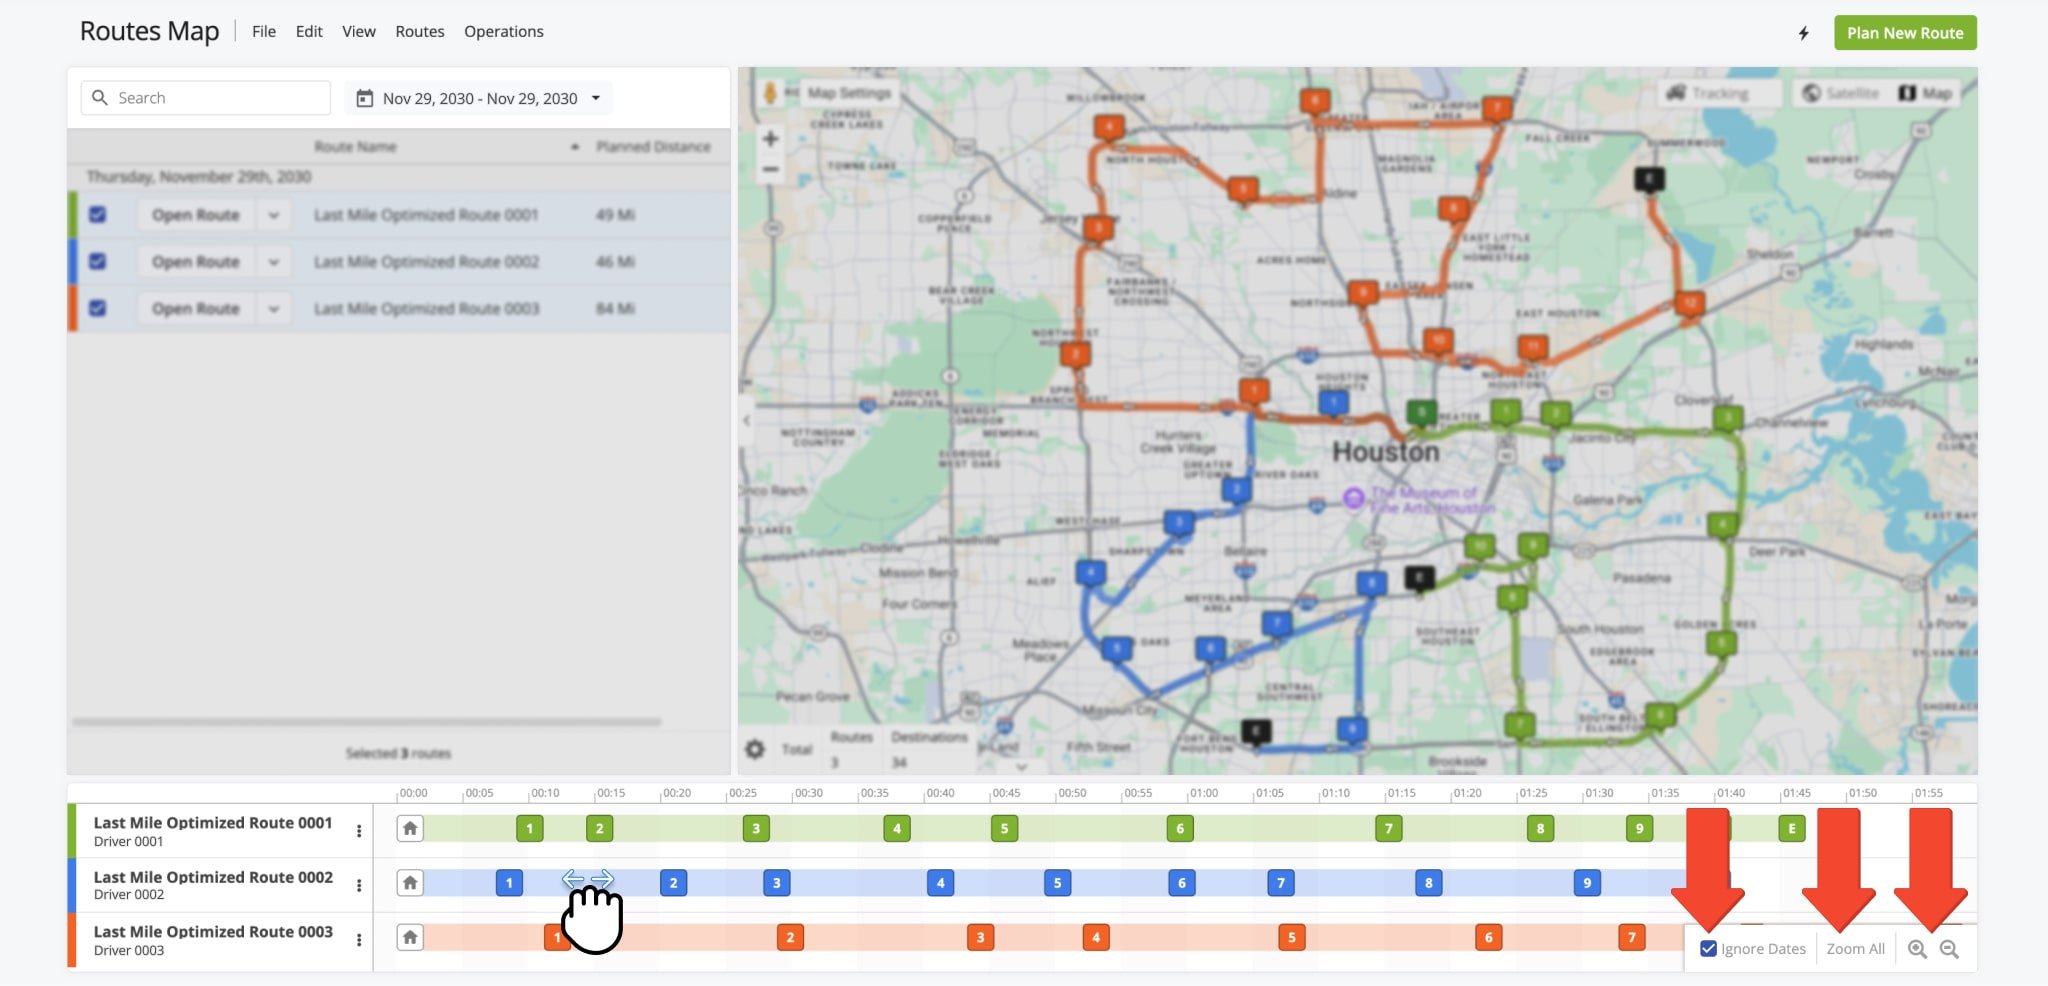
The Time Line displays routes according to their scheduled start times relative to each other.
You can click and drag to navigate left or right or use the Zoom In or Zoom Out buttons to adjust the scale. To display on the same time line routes scheduled for different dates, check “Ignore Dates“.
Alternatively, clicking “Zoom All” expands the view to show the maximum number of destinations possible, regardless of their schedule.
To ensure routes are optimized for maximum efficiency, re-optimize them after making changes.
To do so, click the Three-dot Icon next to the modified route on the Time Line, the Down Arrow button in the Routes Map List, “Routes” from the top menu bar, or click the Thunderbolt Icon above the Interactive Map. Then, select “Re-Optimize Route” or “Re-Optimize Remaining Destinations” for routes that have already started.
NOTE: The “Re-Optimize Routes” option available from the “Routes” menu on the top menu bar will re-optimize all routes selected on the Routes Map List. Route with visited destinations will not be re-optimized, use “Re-Optimize Remaining Destinations” to re-optimize started routes with visited destinations.
![]()
Sync Routes Map Updates To Mobile Driver App In Real Time
Route4Me seamlessly syncs all updates made on the Routes Map with the Mobile Route Planner in real-time.
Changes to routes or destinations, as well as updates from field teams via mobile driver apps such as destination statuses, visit notes, and proof of delivery are instantly reflected on Route4Me’s enterprise route software Routes Map.
This ensures your field teams remain informed of any adjustments, supporting efficient route execution, while providing accurate, up-to-date information from the field to enhance overall coordination.
Visit Route4Me's Marketplace to Check out Associated Modules:
- Operations
Custom Data Add-On
- Operations
Advanced Team Management Add-On
About author: Daniel Archer
With a background in pedagogy and writing instruction, Daniel is a former tenured English Instructor who, after nearly 20 years of teaching, transitioned into content strategy and leading writing teams for global brands. Now, as Technical Documentation Manager at Route4Me, he translates complex logistics technology into clear, accessible content that empowers users.