Address Book – Add, Upload, Edit, Plan Routes, Insert Into Best Routes And Download Addresses
Your Route4Me Address Book is a centralized and synchronized database where you easily store and manage hundreds of thousands of addresses and customer locations. Moreover, you can synchronize your addresses across multiple users, accounts, and devices. Furthermore, you can easily plan and optimize last mile routes with custom address selections and optimization settings. In this guide, you can learn how to create new addresses, upload addresses using spreadsheets, plan routes with addresses, insert addresses into routes, export addresses, delete addresses, and more.
NOTE: Your Address Book database is shared with your Address Book Map. Accordingly, addresses in your Addresses Book and Address Book Map are the same. When you add new addresses or edit existing addresses in your Address Book, new addresses and address updates are automatically synchronized with your Address Book Map, and vice versa.
Table of Contents
Address Book Overview and Settings
To open your Route4Me Address Book List, go to “Address Book List” from the main navigation menu. To switch between the tile view and list view in the Address Book, click on the preferred view mode icon in the top right corner of the screen. Accordingly, in the tile view, you can view entries in the Address Book as tiles or cards with the respective information.
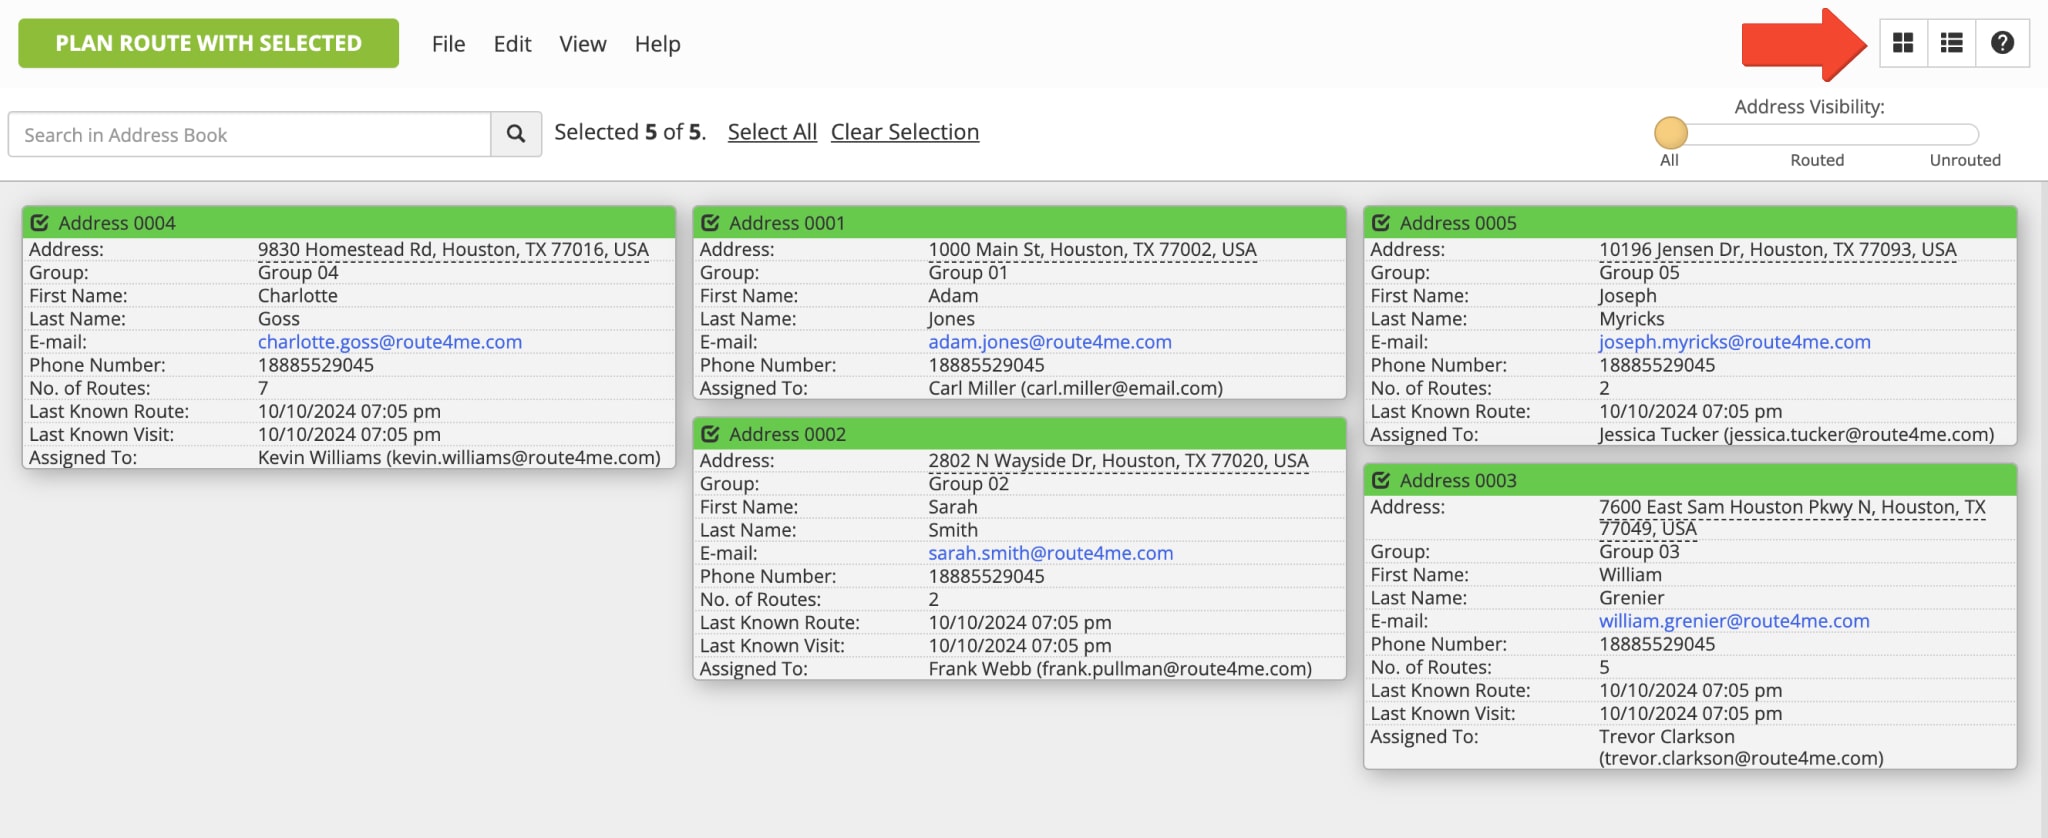
Additionally, you can adjust what data to display in your Address Book when it’s in the list view mode. To do so, right-click on the header and then select the preferred column names in the menu. Below, you can learn more about the available Address Book header columns.

| Column Name | Description |
|---|---|
| First Name | First name of the customer or point of contact associated with the address. |
| Last Name | Last name of the customer or point of contact associated with the address. |
| Phone | Phone number of the customer or point of contact associated with the address. |
| Email address of the customer or point of contact associated with the address. | |
| Group | Custom Group ID associated with the address. Accordingly, you can create and assign custom Group IDs to specific address groups and then filter addresses with the same IDs for planning routes, export, etc. |
| Assigned To | The name of the team member the address is assigned to. Accordingly, when you assign an address to a team member, this address becomes available on that member’s Route4Me account, and they can use the address for planning routes, edit the address, etc. Further, you can learn more about assigning addresses to users. |
| No. of Routes | The number of times the address has been used for planning new routes and inserted into already planned routes. Further, you can learn more about planning new routes with Address Book addresses and inserting addresses into the best route. |
| No. of Visits | The number of times the Address Was Marked as “Visited“ using Route4Me’s Mobile Route Planner Apps for Drivers. |
| Last Known Visit | Automatically generated timestamp of the last instance when the Address Was Marked as “Visited“ using Route4Me’s Mobile Route Planner Apps for Drivers. |
| Last Known Route | Automatically generated timestamp of the last instance when the address was used for planning a new route or inserted into a planned route. Further, you can learn more about planning new routes with Address Book addresses and inserting addresses into the best routes. |
Additionally, you can search and filter addresses in your Address Book by Address, Alias, Group ID, First and Last Name, Email, Phone, Customer PO, and even Custom Data. To do so, enter the preferred address attribute into the search field in the top left corner of the screen.
Further, you can use the “Address Visibility” toggle to display routed and not route addresses. In detail, “Routed Addresses” are the addresses that have already been used for planning routes or were inserted into planned routes at least once. Accordingly, “Unrouted Addresses” are the addresses that haven’t been used for planning new routes and haven’t been inserted into any planned routes.

Add Addresses – Create Addresses and Contacts in Address Book
To add a new address in your Address Book, go to “File” at the top of the screen and select “Add Address” from the menu.

Next, you can enter a full or partial address into the respective address field. After that, Route4Me will automatically verify and autocomplete the address and suggest one or multiple geocoded and validated address choices. Accordingly, you can then select the preferred valid address option. Additionally, in the “Location” tab, you can add the following details:
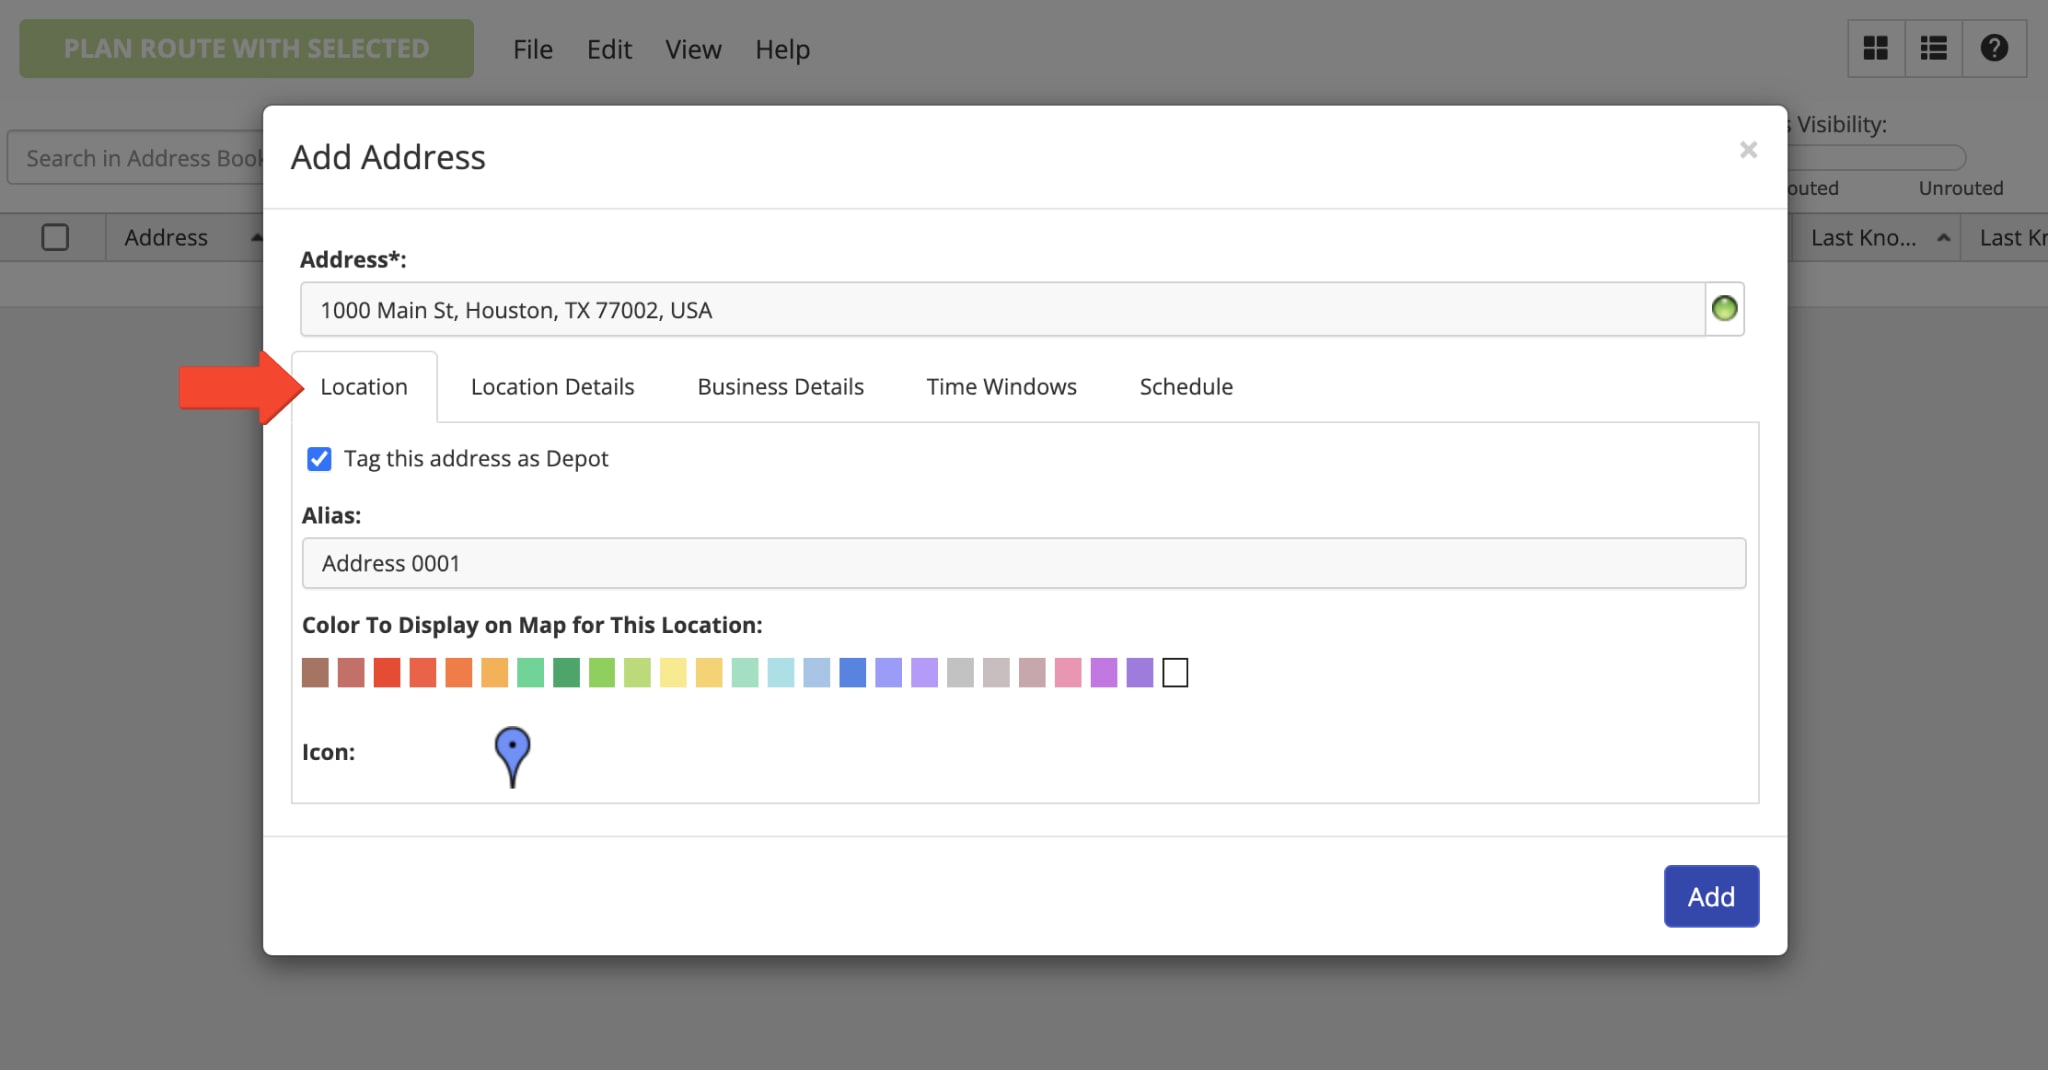
| Address Attribute | Description |
|---|---|
| Tag This Address as Depot | You can tag addresses as depot and then filter addresses by depot on the Routes Map. |
| Alias | Custom address alias or name that can be used for searching for the address in the Address Book List or Map. Additionally, the Address Alias is copied to the Route Stop Alias when the address is used for planning new routes or inserted into planned routes. |
| Color | Select the preferred color for displaying the icon of the address on the Address Book Map, Route Editor, and Routes Map. |
| Icon | Select the preferred icon for displaying the address on the Address Book Map. |
In the “Location Details” tab, you can add such custom contact details as First Name, Last Name, Email, Phone Number, and Customer Purchase Order (PO) Number. Additionally, you can add a custom Group ID and then filter addresses by the same Group ID for route planning, address export, and other purposes.
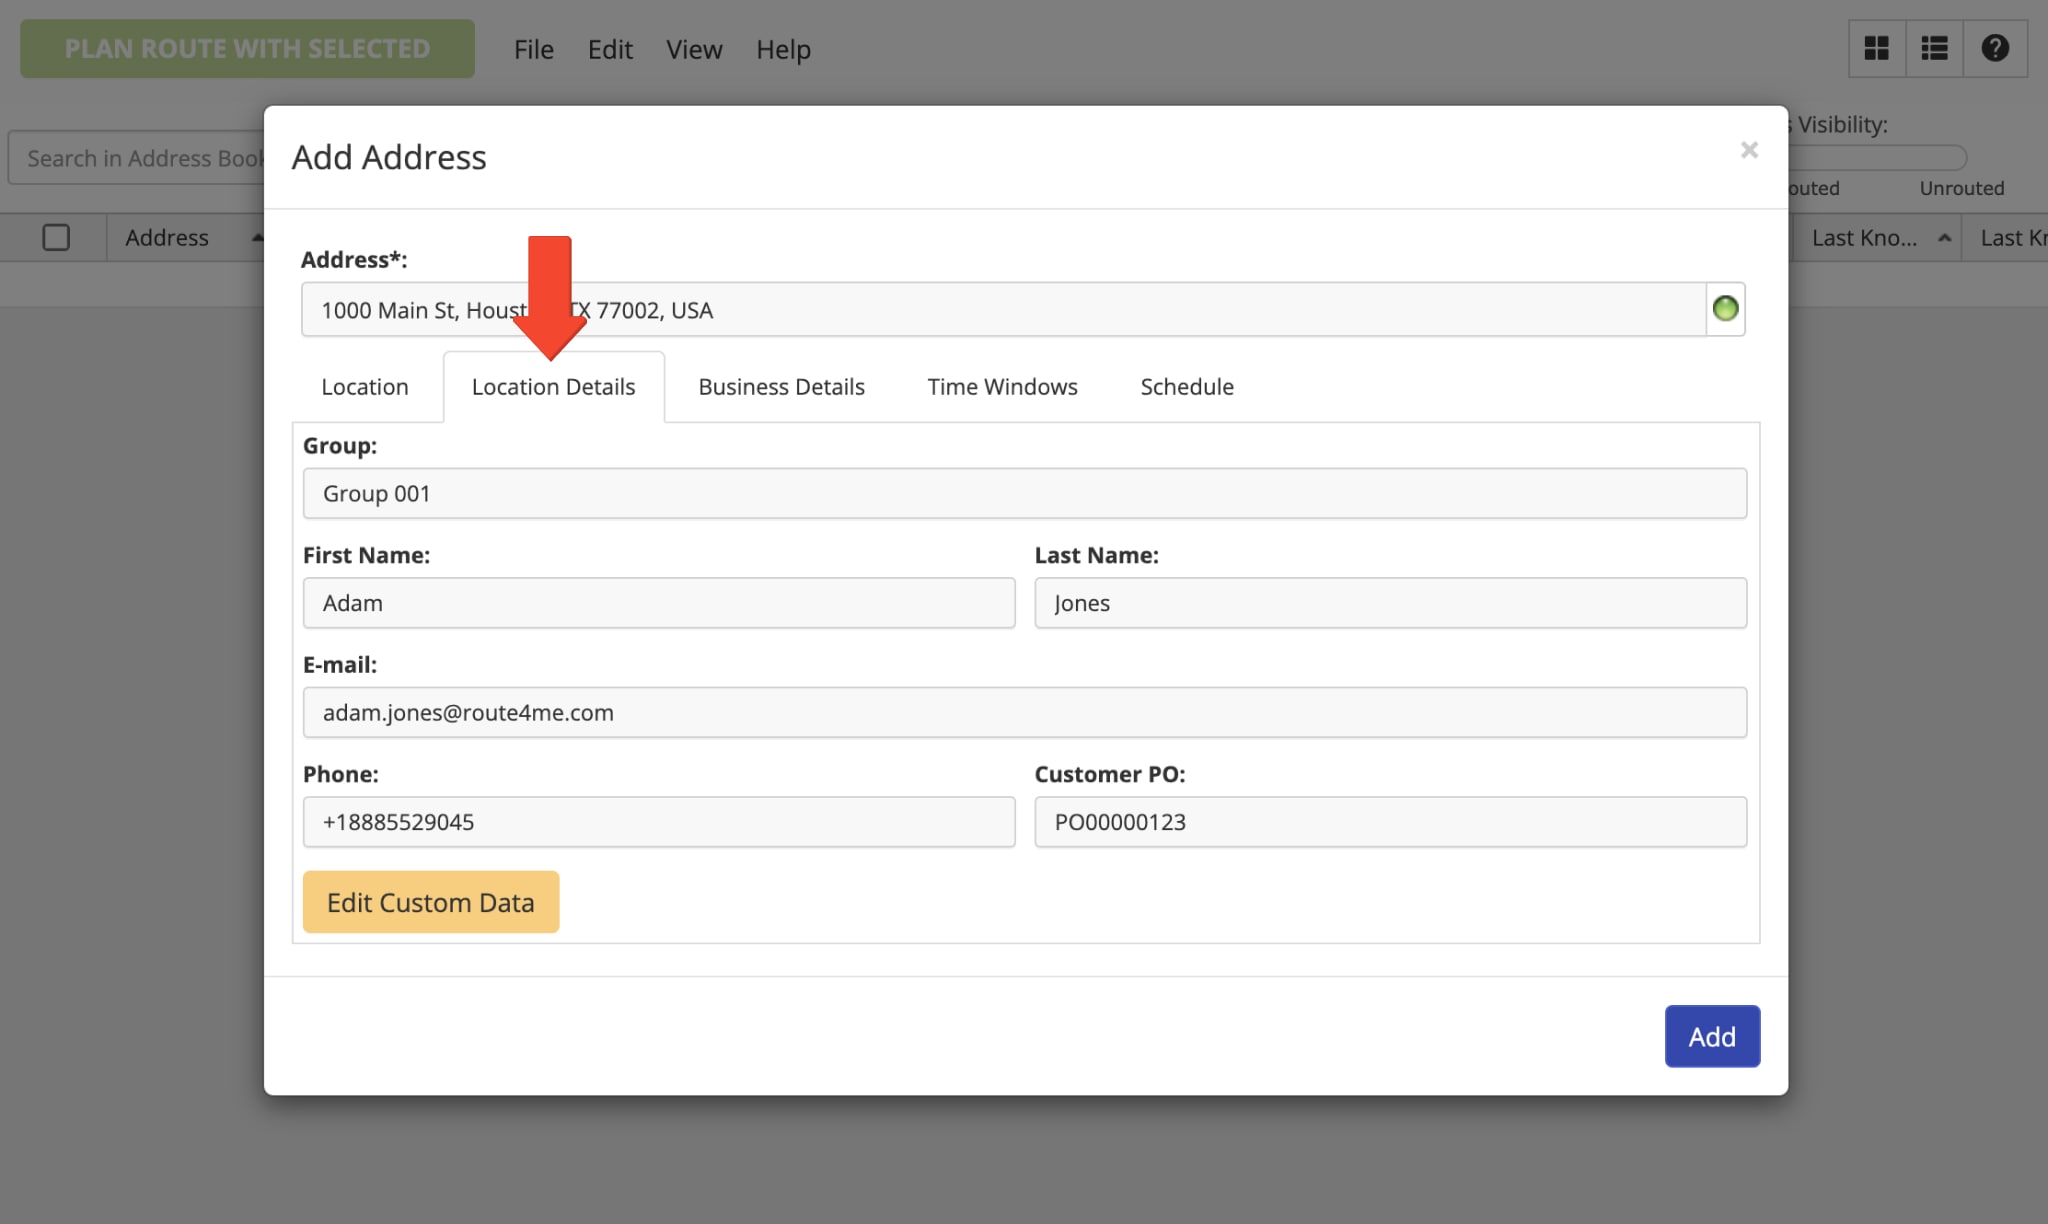
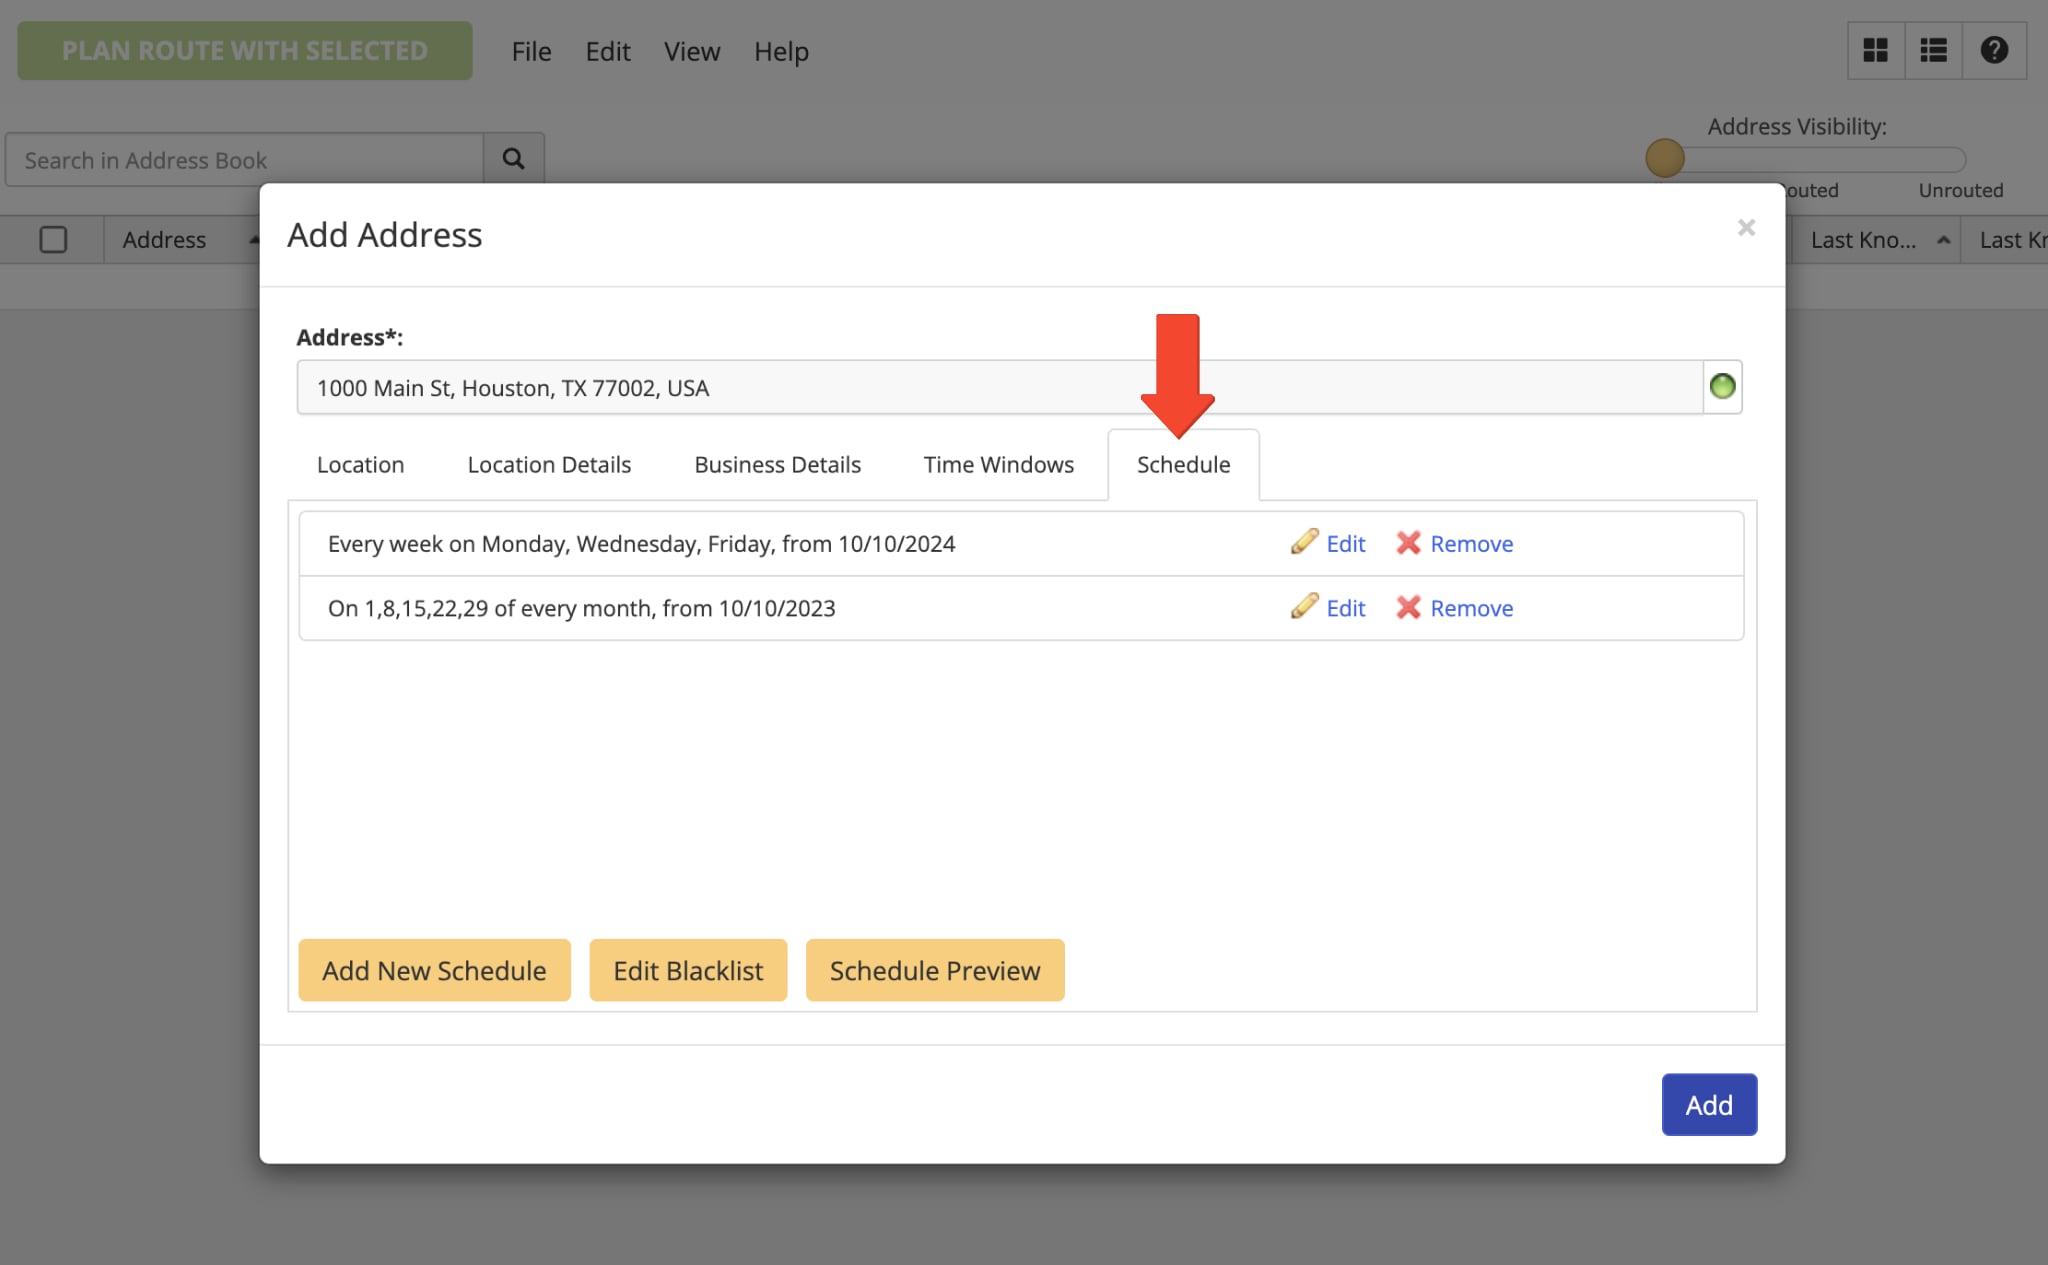
Furthermore, you can add additional details to the address that don’t fit into the available fields using the Custom Data. Moreover, you can Use Custom Data to Enable Advanced Configurations. To do so, click on the “Edit Custom Data” button and then create new Custom Data entries. Additionally, learn more about Route4Me’s Custom Data Add-On.
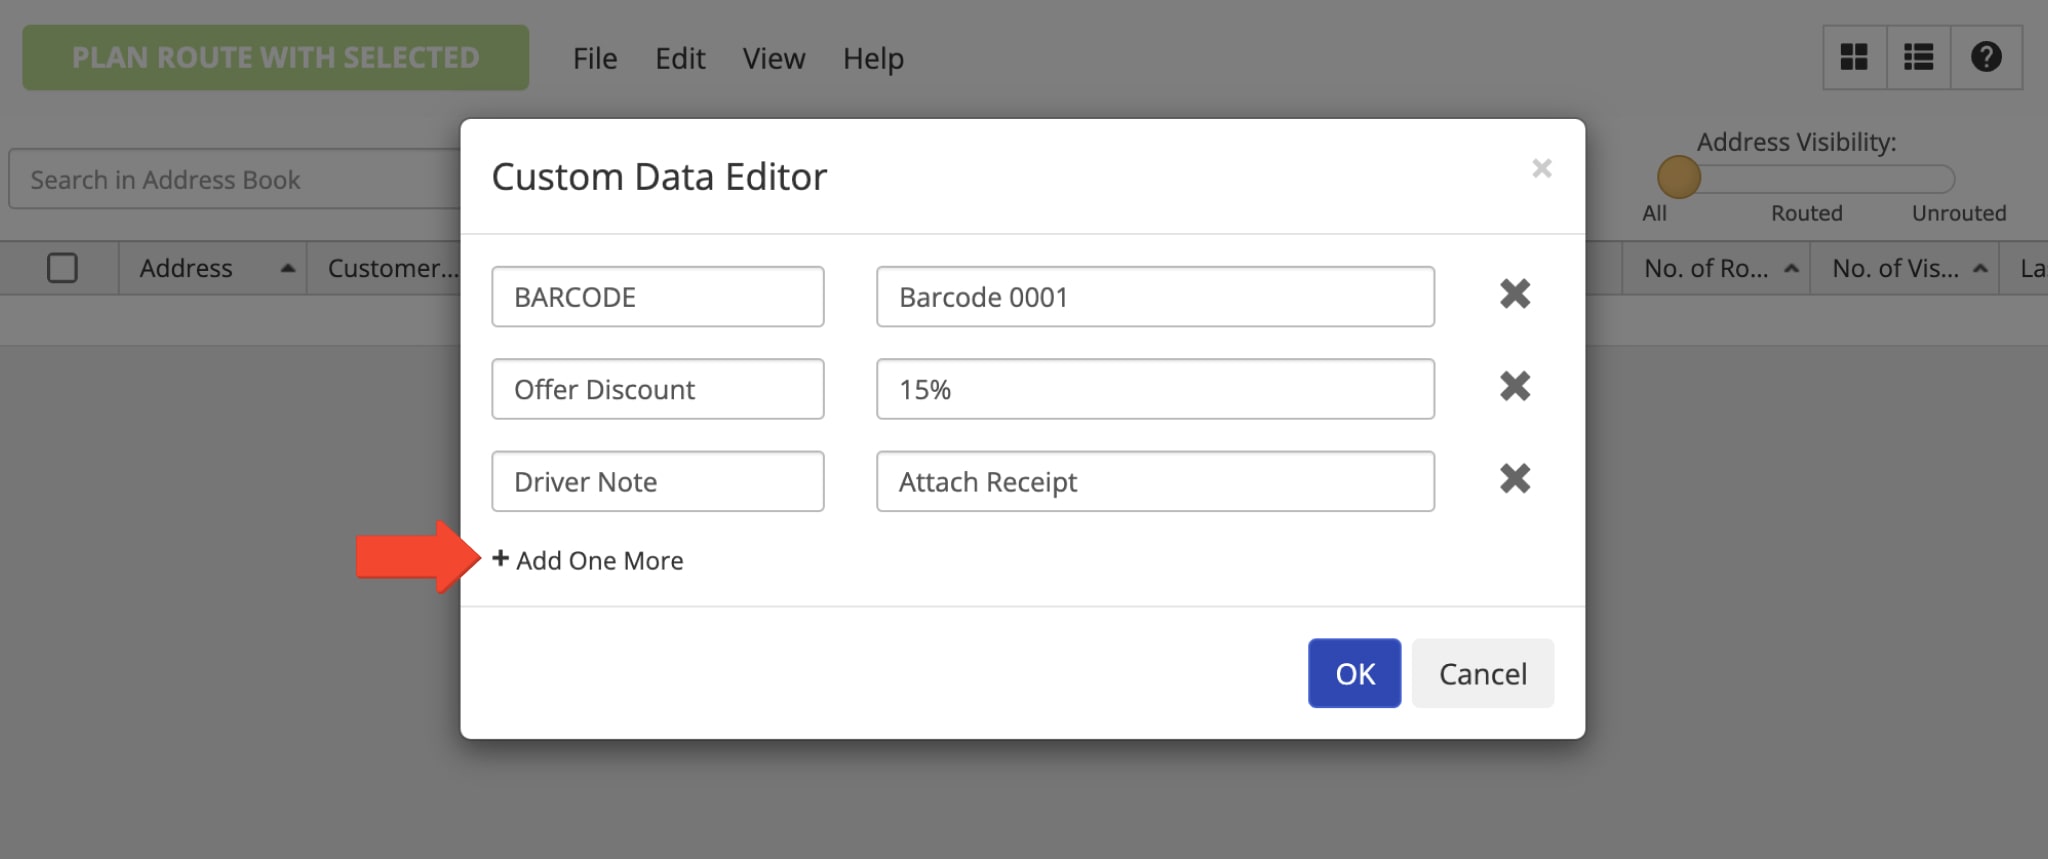
In the “Business Details” tab, you can add such order details as Pieces, Weight, Cube, Revenue, and Reference Number. Equally important, these details will be used as Max Pieces per Route, Max Weight per Route, Max Cube per Route, Max Revenue per Route Business Rules or Route Optimization Constraints when you use this address for planning routes.
Next, you can add custom Priority for prioritizing the visit of this address on a planned route. Additionally, you can select the preferred Address Stop Type for the address. Accordingly, when the address is used for planning routes or inserted into planned routes, it will have the respective selected stop type.
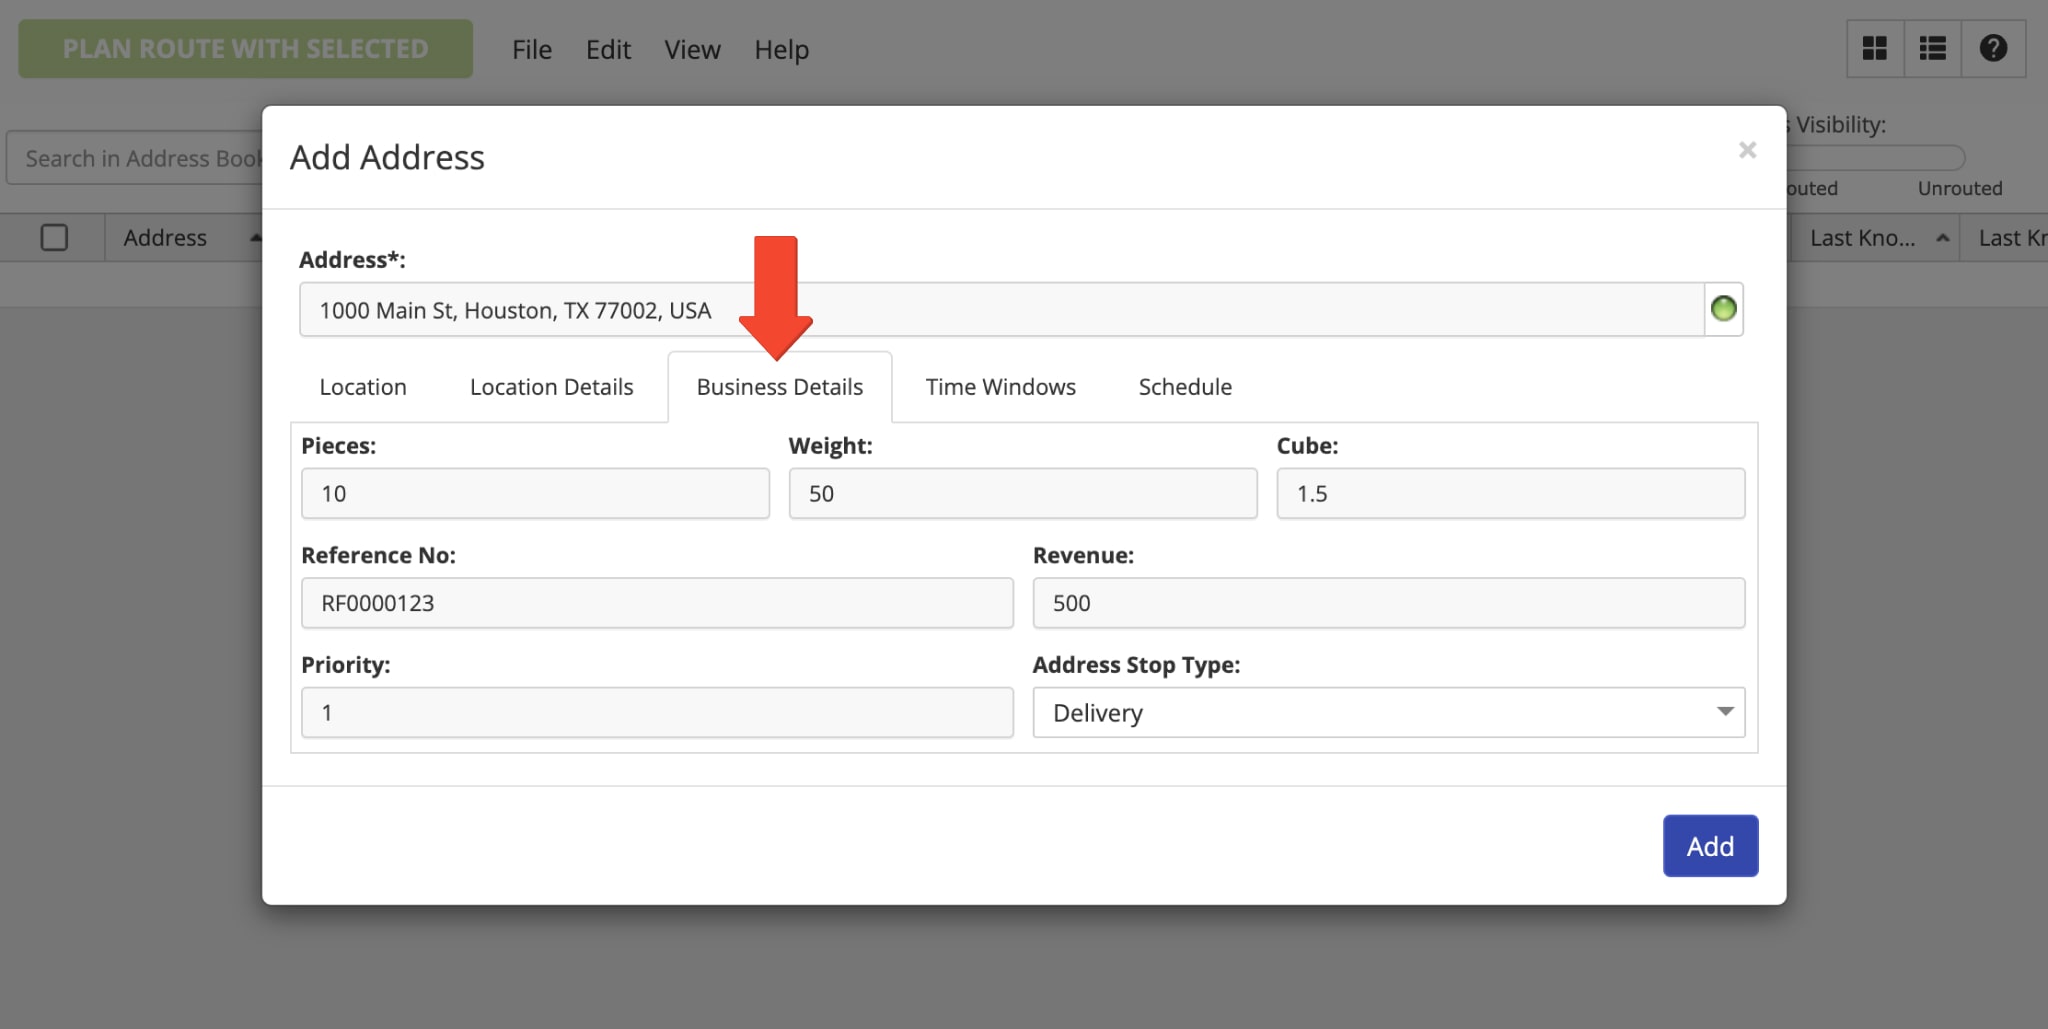
In the “Time Windows” tab, you can specify the preferred Time Windows for the address. In detail, a Time Window is a time interval within which the address can be visited. Accordingly, you can add 2 Time Windows for the same address that can start on different days. Additionally, you can learn more about Route4Me’s Time Windows Route Optimization Constraint. Moreover, you can Add Custom Service Time for the address and select a Time Zone within which the address should be visited.
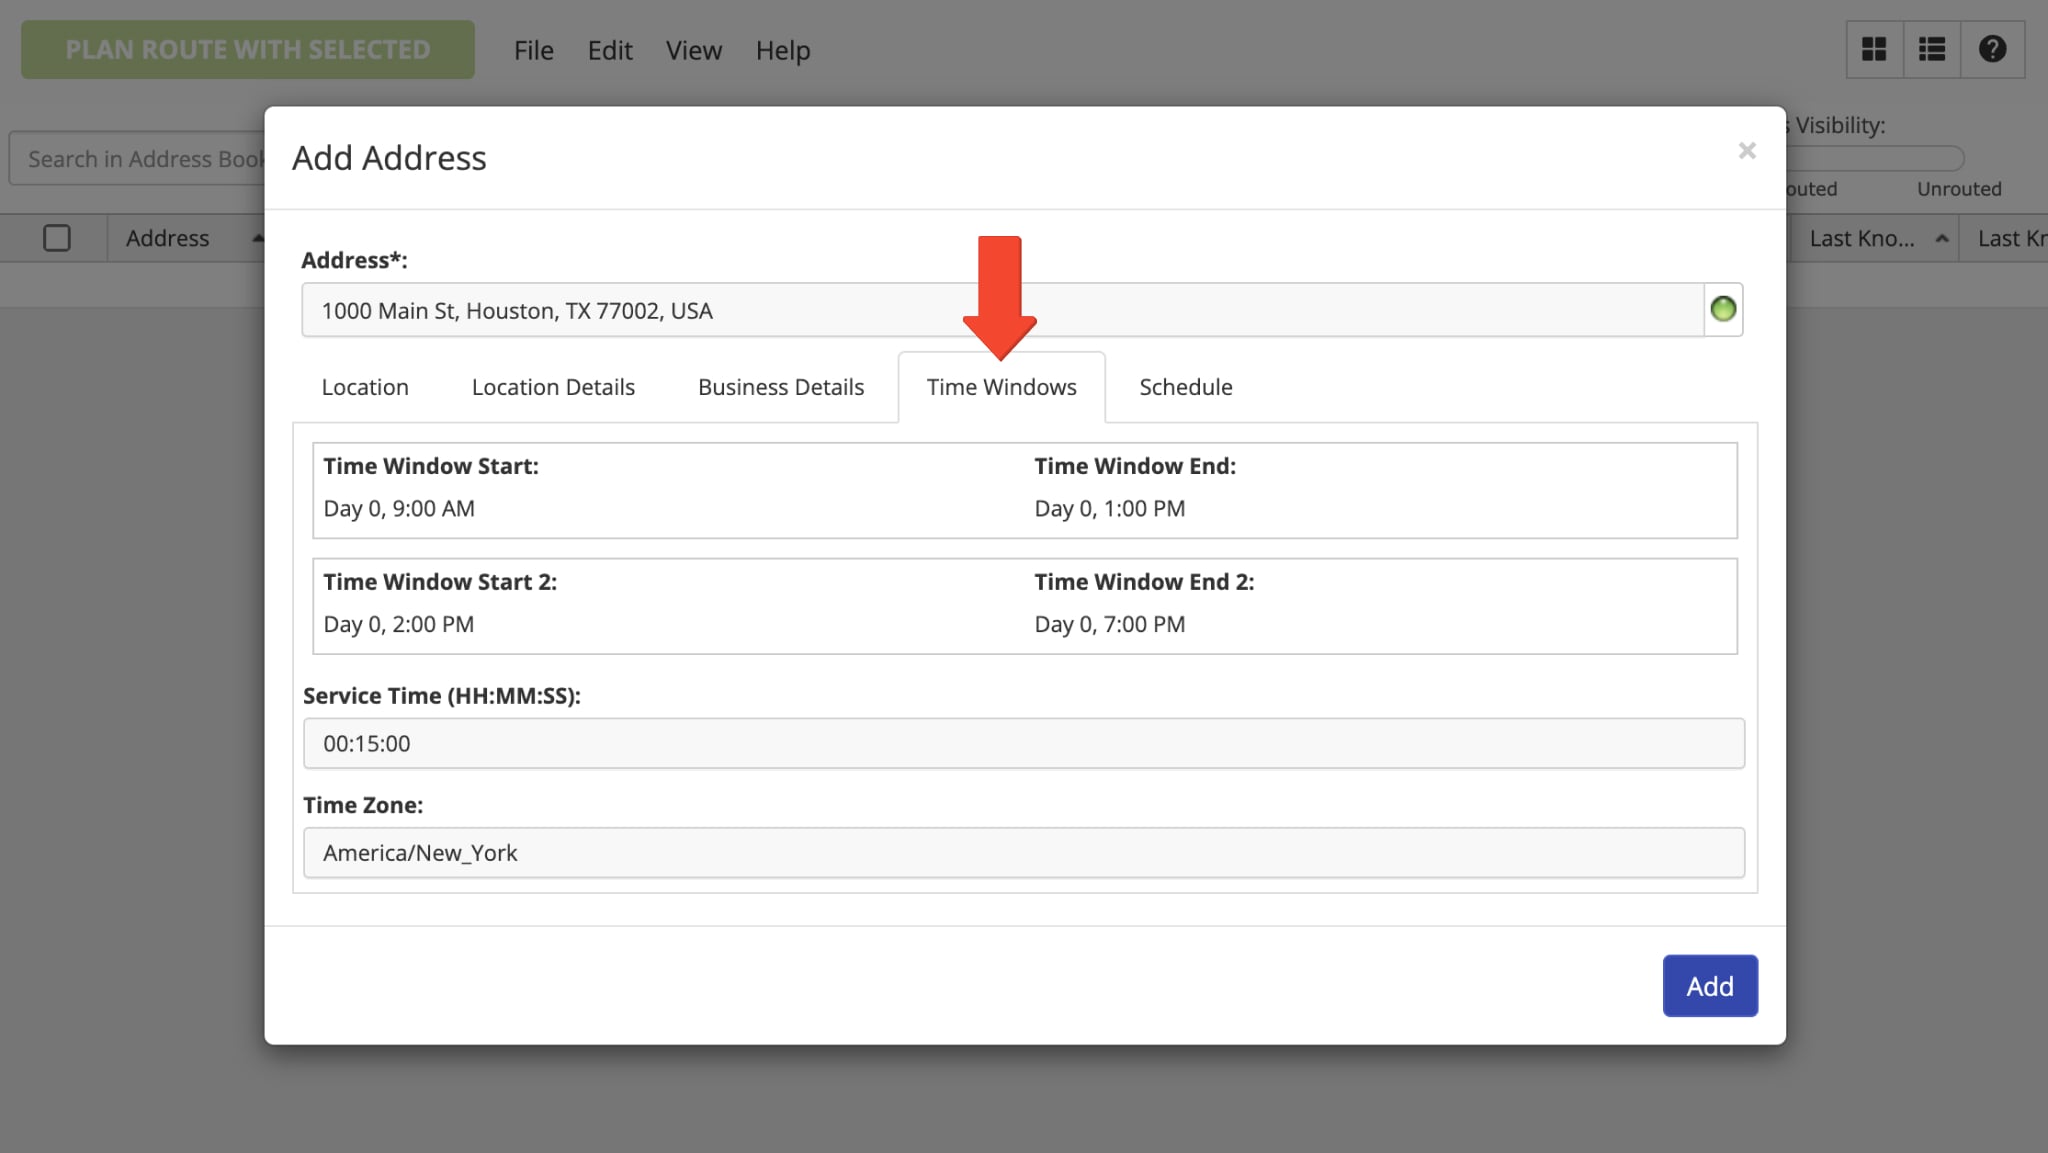
In the “Schedule” tab, you can add one or multiple schedules to the address for recurring visitations. Accordingly, you can use Route4Me’s Routing Calendar to check when the address is scheduled to be visited based on its recurring schedules. Additionally, you can schedule the address and then use Route4Me’s Hybrid Route Planner to plan routes with addresses scheduled for the same date.
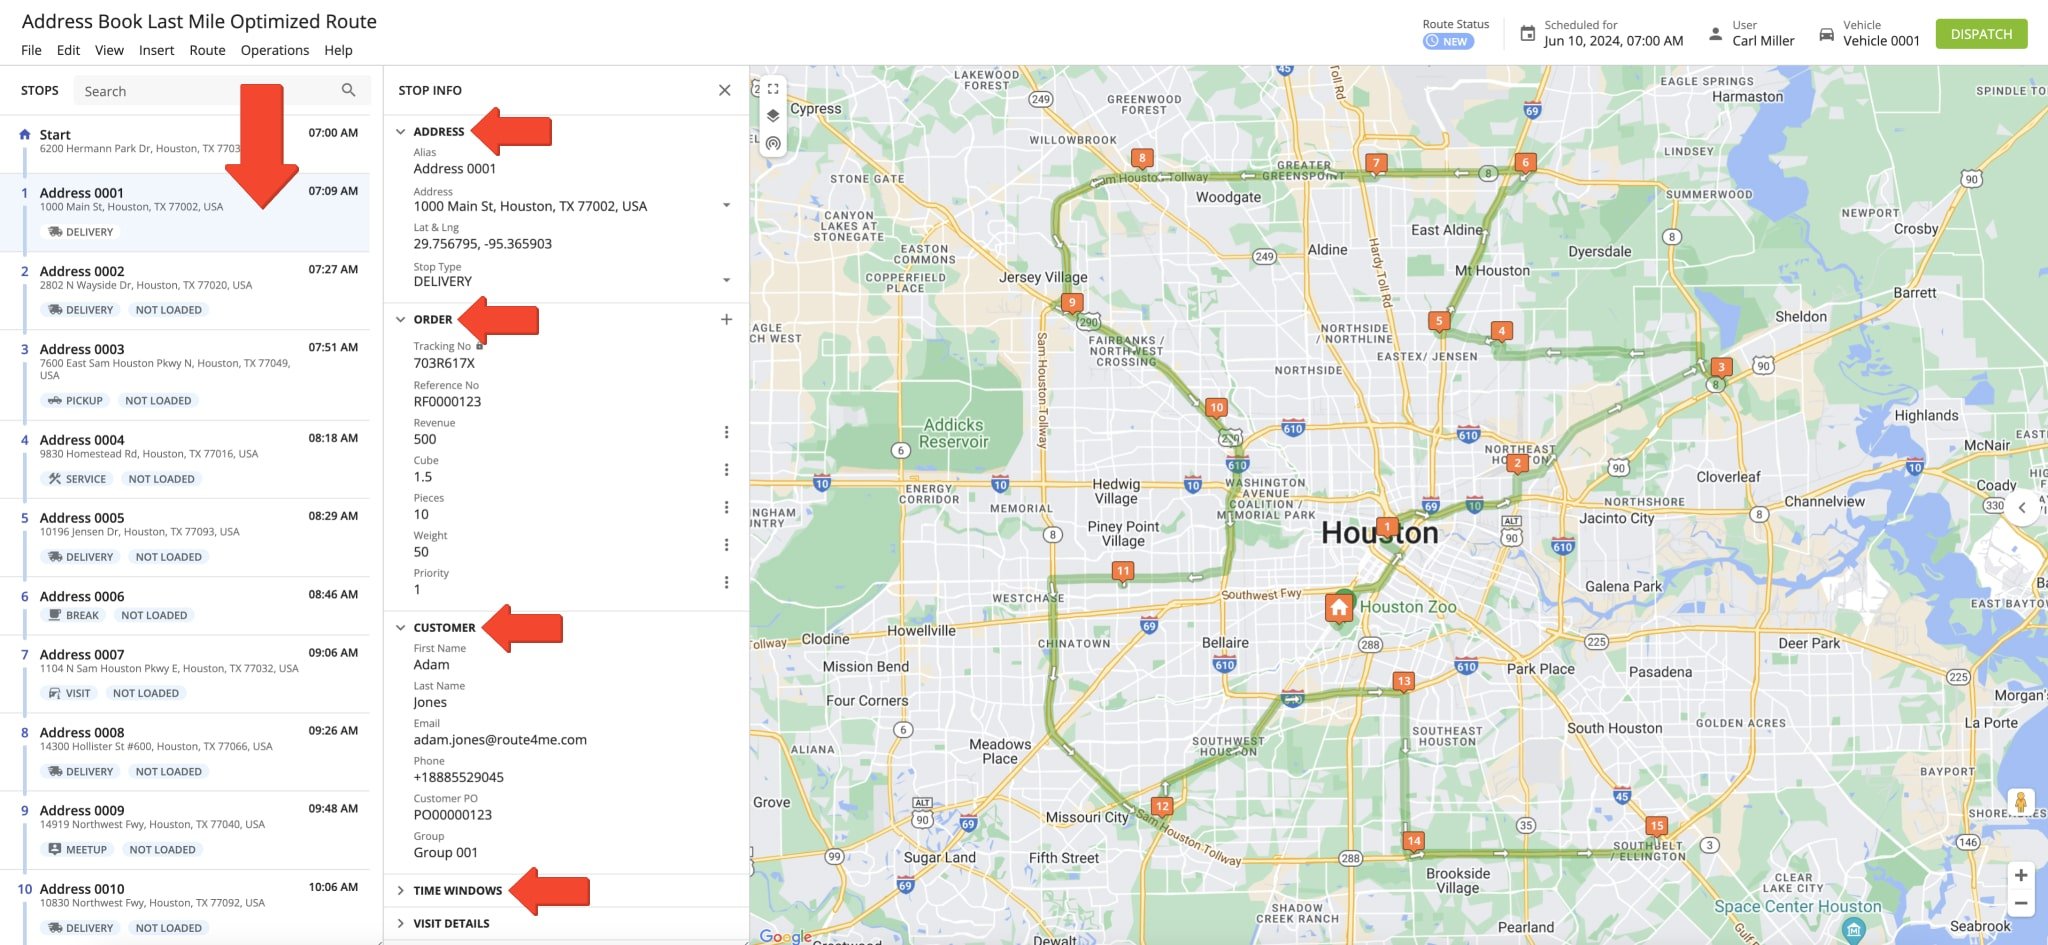
Accordingly, when you use the address from the Address Book List for planning new routes or insert the address into planned routes, it will be added as a new route stop with the exact same details. Specifically, the respective route stop will inherit the same address, customer information, order details, Custom Data, Time Windows, and all other details associated with the address. Equally important, the address will remain without any changes in your Address Book and can be re-used for planning more routes. Further, you can learn more about planning routes with Address Book addresses.
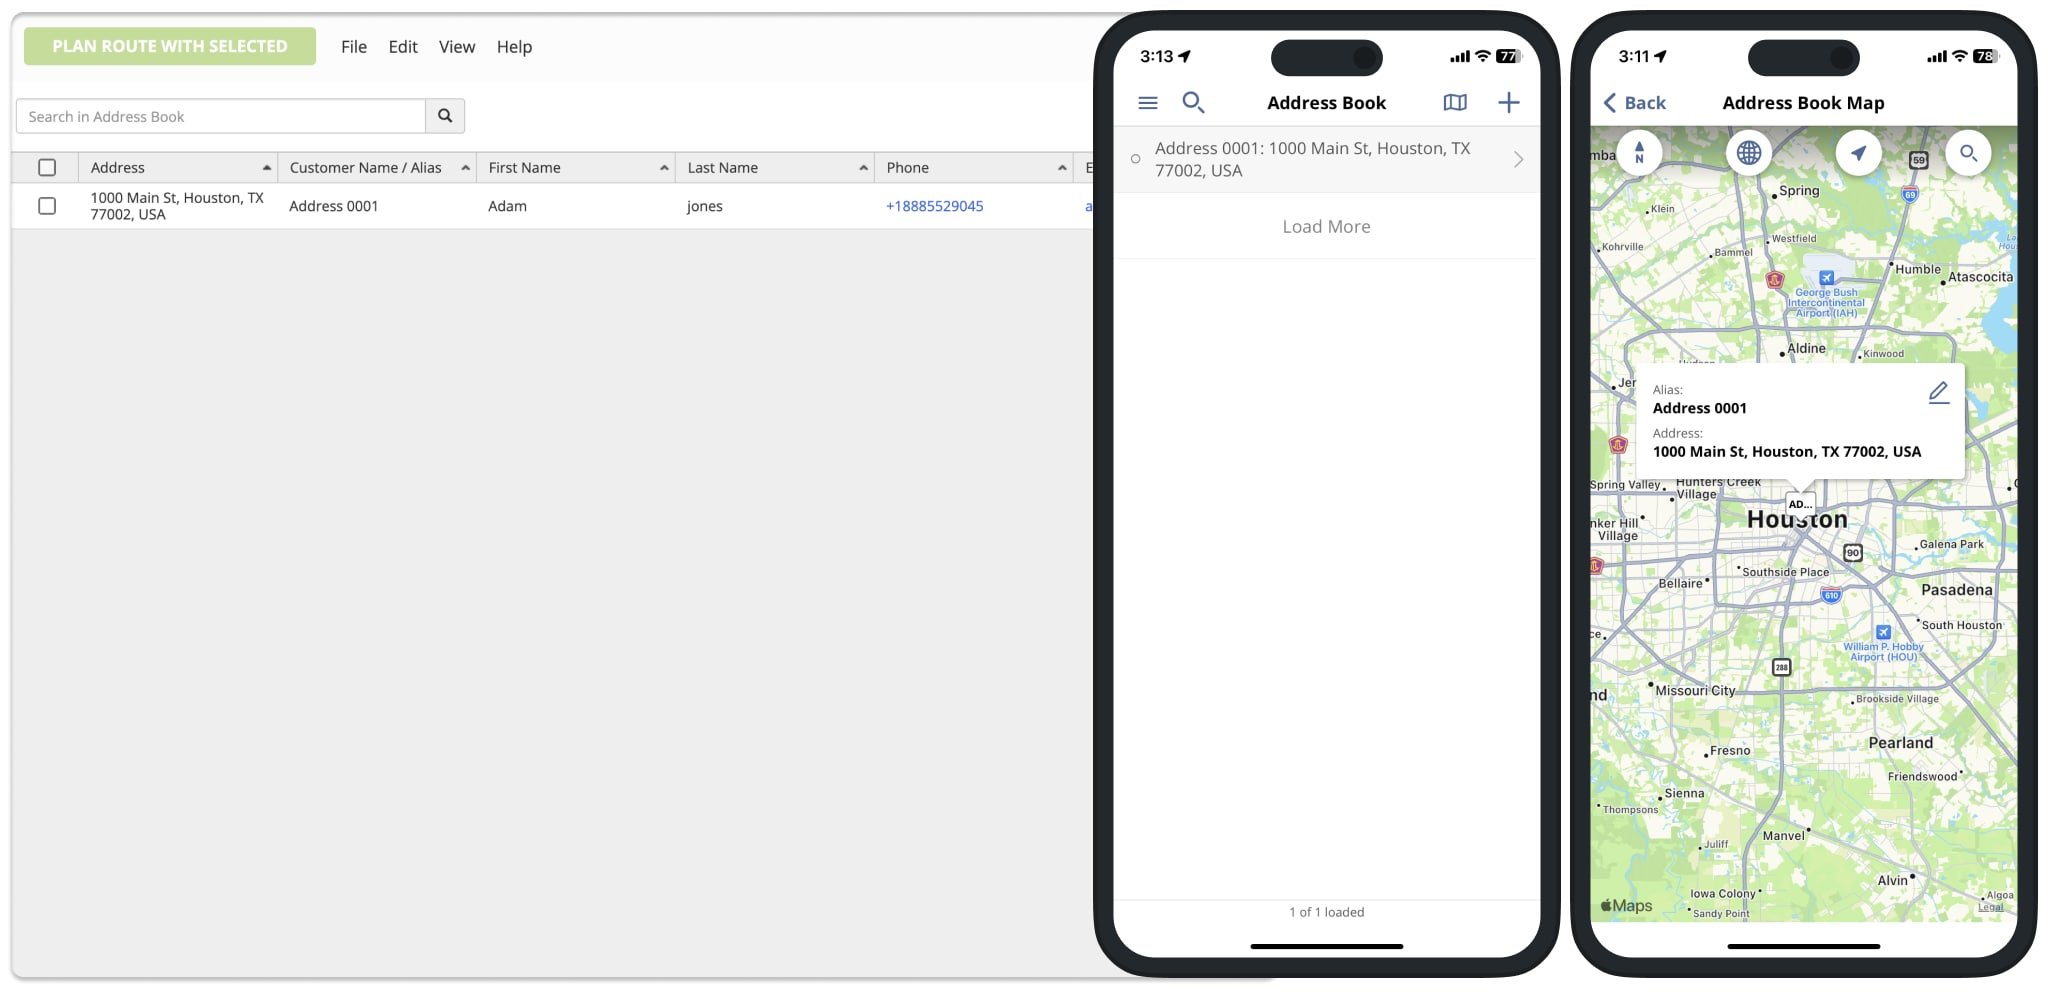
Route4Me Mobile Driver and Route Planner Apps Address Book Synchronization
Furthermore, Route4Me’s Synced Address Book allows you to seamlessly synchronize your addresses between Route4Me’s Web Platform and Route4Me’s Mobile Route Planning Apps. Specifically, when you create new addresses or edit existing addresses using Route4Me’s fastest Route Optimizer, you can automatically synchronize new addresses and address updates across all connected accounts and devices in real-time, including Route4Me’s Mobile Apps.
Additionally, you can learn more about Route4Me’s User Types and Account-Level Permissions. Also, you can learn more about using Route4Me’s iOS iPhone Route Planner App Address Book and Android Route Planner App Address Book.
Upload Addresses into Address Book Using CSV and XLSX Spreadsheets
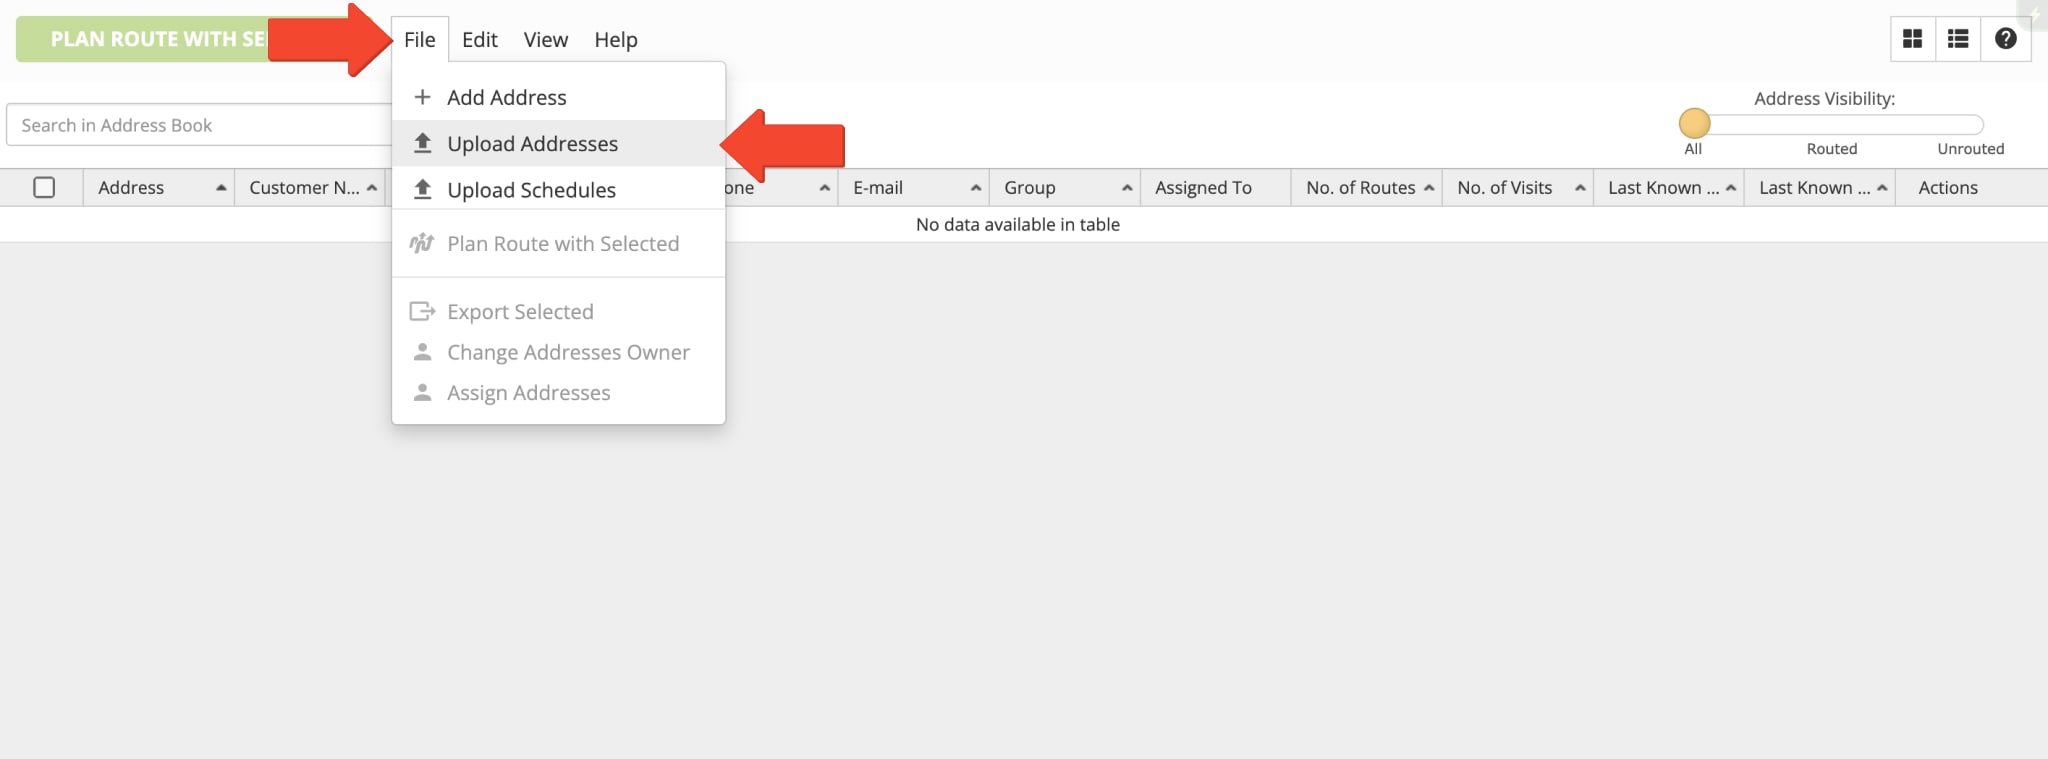
For your convenience, you can easily upload hundreds of thousands of addresses into your Address Book using spreadsheets. To do so, go to “File” at the top of the screen and then select “Upload Addresses” from the menu. Next, upload your spreadsheet with addresses and additional details in the CSV, XLS, or XLSX file format.
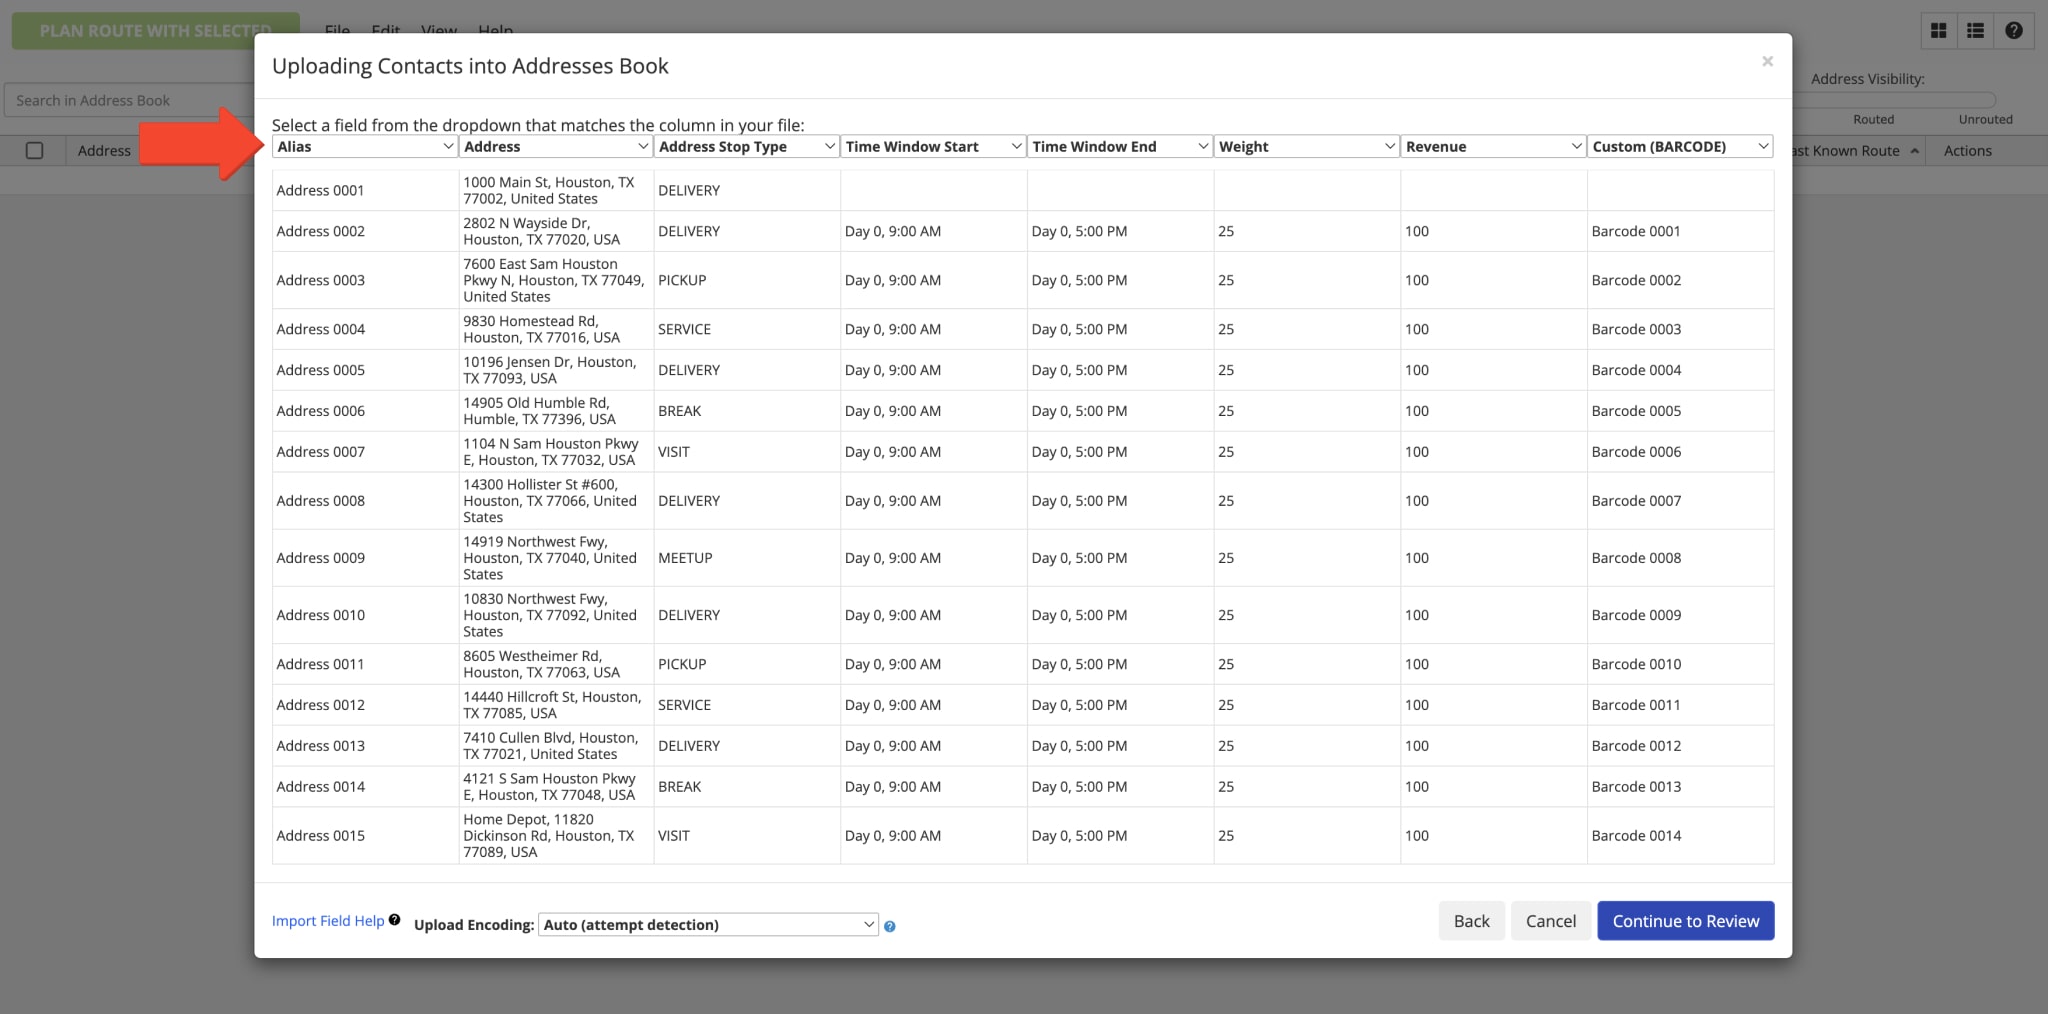
To include addresses, order information, customer details, and other data in your spreadsheet, add the corresponding column names to the spreadsheet’s header. For example, to add a column for addresses, add the “Address” column name to the header and then populate the following rows in this column with addresses. Below, you can find the list of available column names that can be added to your spreadsheets for uploading addresses and address data.
After uploading your spreadsheet, Route4Me will automatically map column titles from the spreadsheet to the valid address attributes in the system. Additionally, you can learn more about Route4Me’s Requirements for Formatting and Uploading Spreadsheets. Equally important, to be able to use specific column names, you need to have the respective Add-Ons or Modules Enabled on Your Account.
| Address Attribute | Attribute Description | Valid Column Names (Headers) | |
|---|---|---|---|
| ↓ ADDRESS DETAILS | |||
| Alias | Сustom alias or name of the address. You can assign aliases to addresses for faster and easier search or other operating requirements. | alias, customeralias, customer, name, nickname, address_alias | |
| Address | Address of the Address Book entry (customer address, business location, visit address, etc.). The Address column is the only mandatory spreadsheet column for optimizing routes, creating Address Book addresses, etc. Accordingly, other columns can contain the data you want to assign to imported addresses. | address, address 1, address_1, address1, addr1, destination_name, customer_address, street address, street_address, street address 1, street_address_1, street address 1 (shipping), street address 1(shipping) | |
| City | The City part of the address. You can add full addresses or split them into multiple columns: City, State, ZIP Code, and Country. | city, city_name, address_city, cityname, town, city (shipping) | |
| State | The State part of the address. You can add full addresses or split them into multiple columns: City, State, ZIP Code, and Country. | state, state_name, address_state | |
| ZIP Code | The ZIP Code part of the address. You can add full addresses or split them into multiple columns: City, State, ZIP Code, and Country. | zip, zipcode, addresszip, addresszipcode, address_zip, postal code, postal, postal_code, postcode, postal code (shipping) | |
| Country | The Country part of the address. You can add full addresses or split them into multiple columns: City, State, ZIP Code, and Country. | country, country_name, countryname, nation | |
| Latitude | Rooftop latitude coordinates (decimal form) of the location. Instead of adding the address of a location, you can add its latitude and longitude coordinates. | dst_lat, lat, latitude, address_latitude, cached_lat, destination latitude | |
| Longitude | Rooftop longitude coordinates (decimal form) of the location. Instead of adding the address of a location, you can add its latitude and longitude coordinates. | dst_lng, lng, long, longitude, address_longitude, cached_lng, destination longitude | |
| Curbside Latitude | Curbside latitude coordinates (decimal form) of the location. Instead of adding the address of a location, you can add its curbside latitude and longitude coordinates for curbside routing. | curb_lat, curb_latitude, curbside_latitude, curbside_lat, destination’s curbside latitude | |
| Curbside Longitude | Curbside longitude coordinates (decimal form) of the location. Instead of adding the address of a location, you can add its curbside latitude and longitude coordinates for curbside routing. | curb_lng, curb_longitude, curbside_longitude, curbside_lng, destination’s curbside longitude | |
| Color | Color code of the address. You can color code addresses in your Address Book for Advanced Search Groups filters, indicating particular sales stages, client statuses, location types, visitation priorities, and more. To do so, add preferred colors in the Color column as hexadecimal values (hex values, such as #FF0000 (red), #00FF00 (green), #FFA500 (orange), etc.). | color, address_color | |
| Icon | Custom icon of the address. You can assign different icons (emojis) to your addresses for your specific business and operating needs. To assign icons to addresses, add icons (emojis) as HTML entities in the Icon column next to addresses in your spreadsheet. | address_icon, icon | |
| ↓ LOCATION DETAILS | |||
| First Name | First name of the contact or customer associated with the address. | first_name, firstname, first name, first, customer_first_name | |
| Last Name | Last name of the contact or customer associated with the address. | last_name, lastname, last name, last, customer_last_name | |
| Email address of the contact or customer associated with the address. | email, e-mail, email_address, emailaddress, customer_email, order_email, address_email | ||
| Phone Number | Phone number of the contact or customer associated with the address. | phone, phonenumber, telephone, phone_1, address_phone, phone 1, address_phone_number | |
| Customer PO | Purchase order (PO) of the contact or customer associated with the address. | customer po, customer_po, customerpo, customer_purchase_order, purchase_order, po_number, cust po | |
| Group | Assign a custom Address Book Group ID to the address. | group, address_group, destination_group | |
| ↓ BUSINESS DETAILS | |||
| Weight | Weight route optimization constraint. Total weight expected to be delivered to or picked up at the route stop (address). | weight, pounds, kilograms | |
| Pieces | Pieces route optimization constraint. Total number of items or pieces expected to be delivered to or picked up at the route stop (address). | pcs, pieces | |
| Cube | Cube route optimization constraint. Total cubic volume expected to be delivered to or picked up at the route stop (address). | dimensions, cube, cubic, volume | |
| Revenue | Revenue route optimization constraint. Total revenue expected to be generated from the route stop (address). | revenue, income, earnings | |
| Priority | Visitation priority of the route stop (address). The highest stop priority is 1 and the lowest stop priority is 999999. Accordingly, route stops (addresses) with higher priority are visited earlier on the route. | priority, importance | |
| Reference Number | Custom reference number of the order associated with the route stop (address). | reference no, reference_no, ref_no, reference_number, ref_number, ref num | |
| Stop Type | You can add the following stop types (location types) to your Address Book and then use them for optimizing routes: PICKUP, DELIVERY, BREAK, SERVICE, MEETUP, and VISIT. NOTE: When adding stop types to your spreadsheets, make sure that they are added in upper case only. | address stop type, address_type, address_stop_type, stop_type, delivery_type, location_type, type | |
| ↓ TIME WINDOWS | |||
| Time Window Start | Start time of the time window (working hours) when the address can be visited and serviced (Day 1, + HH:MM:SS or military time. For example: “Day 1, 9:00 AM”). Learn more about Route4Me’s Time Windows Route Optimization Constraint. | time_window_start, window_start, window_open, start_time, time_start, time window start, time window start 1, time_window_start_1, local_time_window_start, local_time_window_start_1 | |
| Time Window End | End time of the time window (working hours) when the address can be visited and serviced (Day 1, + HH:MM:SS or military time. For example: “Day 1, 5:00 PM”). | time_window_end, time_window_close, window_end, window_close, end_time, time_end, time window end, time window end 1, time_window_end_1, local_time_window_end, local_time_window_end_1 | |
| Time Window Start 2 | Start time of the Second Time Window (working hours) when the address can be visited and serviced (Day 2, + HH:MM:SS or military time. For example: “Day 2, 9:00 AM”). | time_window_start_2, window_start_2, window_open_2, start_time_2, time_start_2, time window start 2, time_window_start_2, local_time_window_start_2 | |
| Time Window End 2 | End time of the Second Time Window (working hours) when the address can be visited and serviced (Day 2, + HH:MM:SS or military time. For example: “Day 2, 5:00 PM”). | time_window_end_2, time_window_close_2, window_end_2, window_close_2, end_time_2, time_end_2, time window end 2, time_window_start_2, local_time_window_end_2 | |
| Timezone | Time zone in which the address operates. When an address has Time Windows, you can add the time zone in which these time windows operate. Accordingly, when using addresses with different Time Windows in different Time Zones, Route4Me automatically accounts for the difference in time and sequences addresses in the most optimal visitation order. | local_timezone_string, timezone, local_timezone | |
| Service Time | Service Time (integer minutes or HH:MM:SS) required to service the address. | time, service_time, minutes, servicetime, service time | |
| ↓ SCHEDULE | |||
| Schedule | Recurring visitation schedule of the address. To add address schedules to your spreadsheet, use the respective JSON code snippets in the Schedule column. | schedule | |
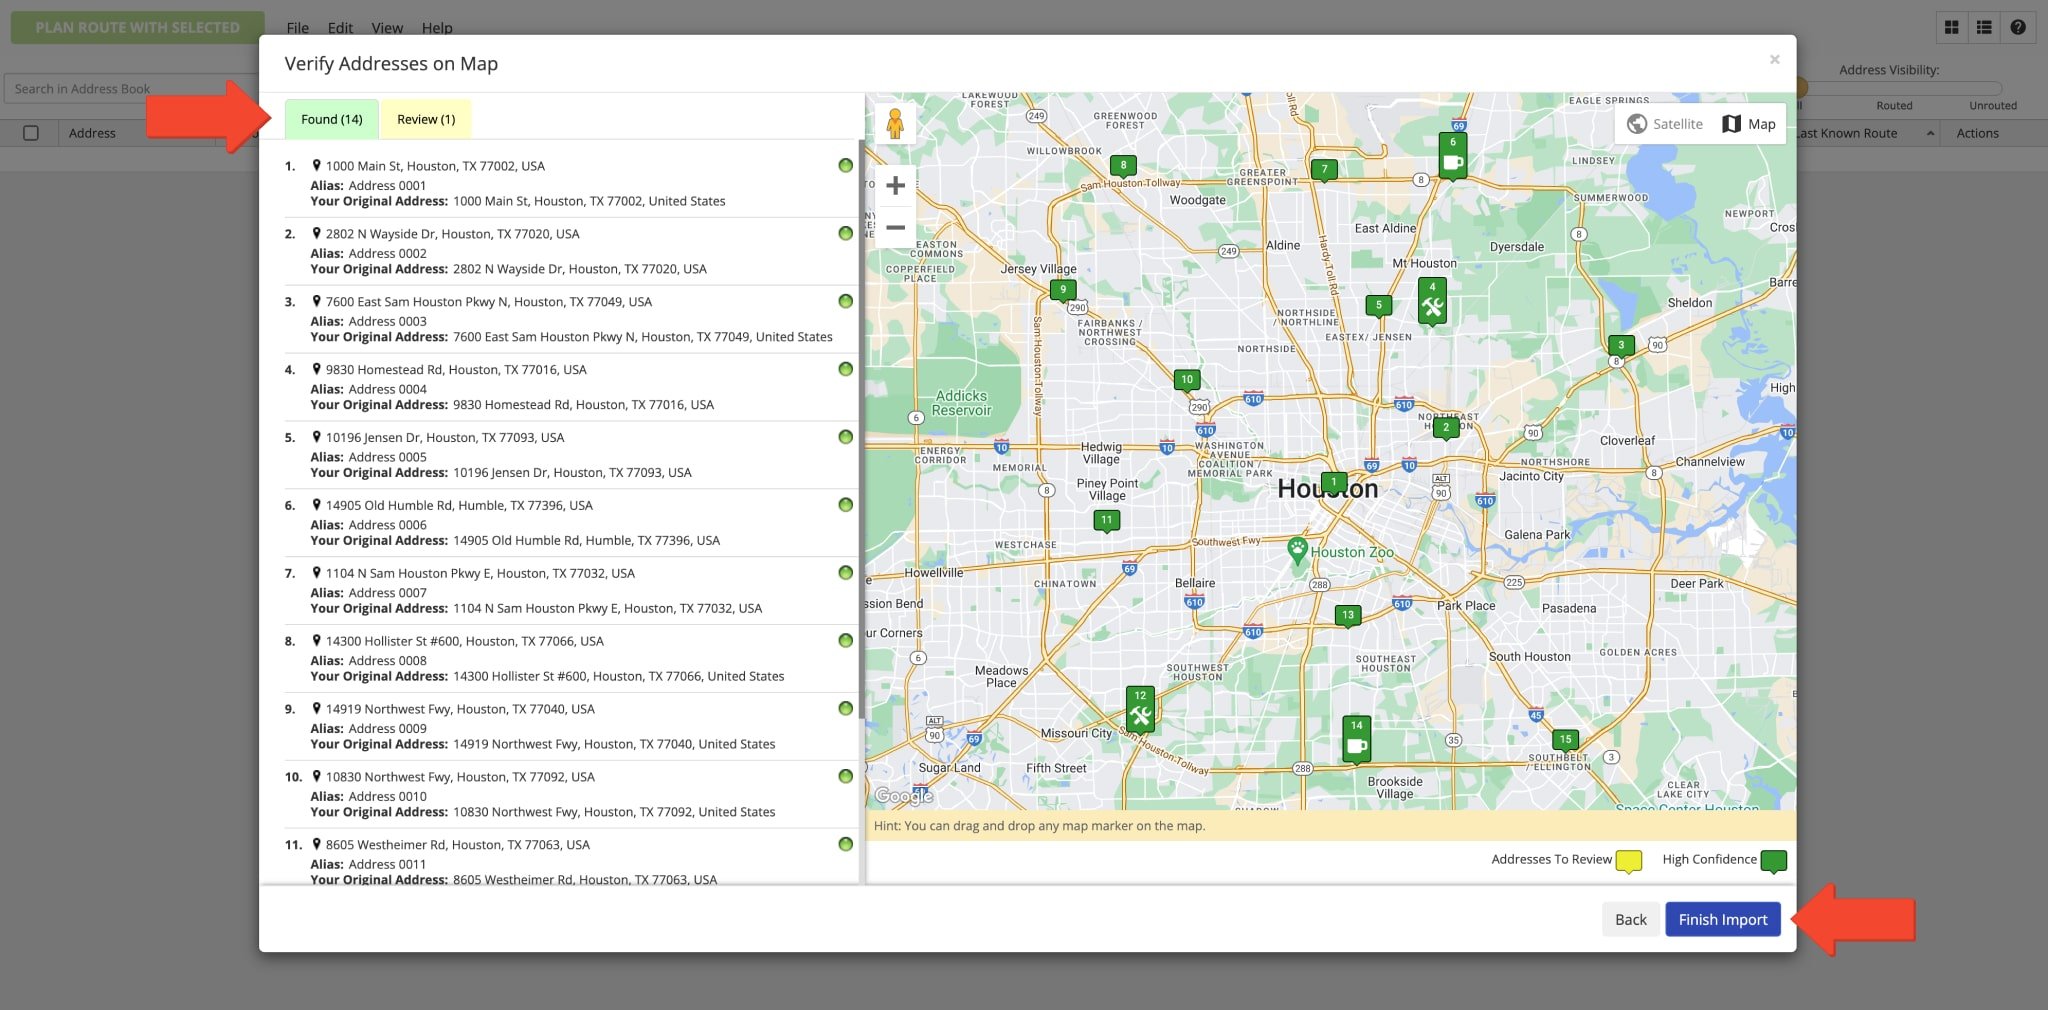
After uploading and verifying your spreadsheet with addresses, Route4Me’s best delivery routing software will automatically geocode and autocomplete your addresses and display them on the interactive map. A green indicator next to an address shows that the address was geocoded and autocompleted with high confidence. Accordingly, addresses with a yellow or red indicator require your review and confirmation.
Assign Addresses to Users and Change Address Owner
Each address in the Address Book has an owner, where the user who created the address is its owner. Accordingly, the address can be viewed and managed by its address owner and by the owner of the address owner. For your convenience, you can change the owner of the address and assign the address to other users. Equally important, the address owner can be changed only by the owner of this address and by the owner of the address owner. Additionally, you can learn more about Route4Me’s User Types Hierarchy and Permissions.
When you change the owner of the address, the address becomes available on the Route4Me account of the new owner. When you assign the address to a user, this user becomes the owner of this address for the specified timeframe. Additionally, you can filter addresses in the Address Book Map by the assigned user. To change the address owner or assign the address to another user, right-click on the address, and then select the preferred option. Alternatively, you can select multiple addresses by checking the boxes next to them, go to “File” at the top of the screen, and then select the preferred option.
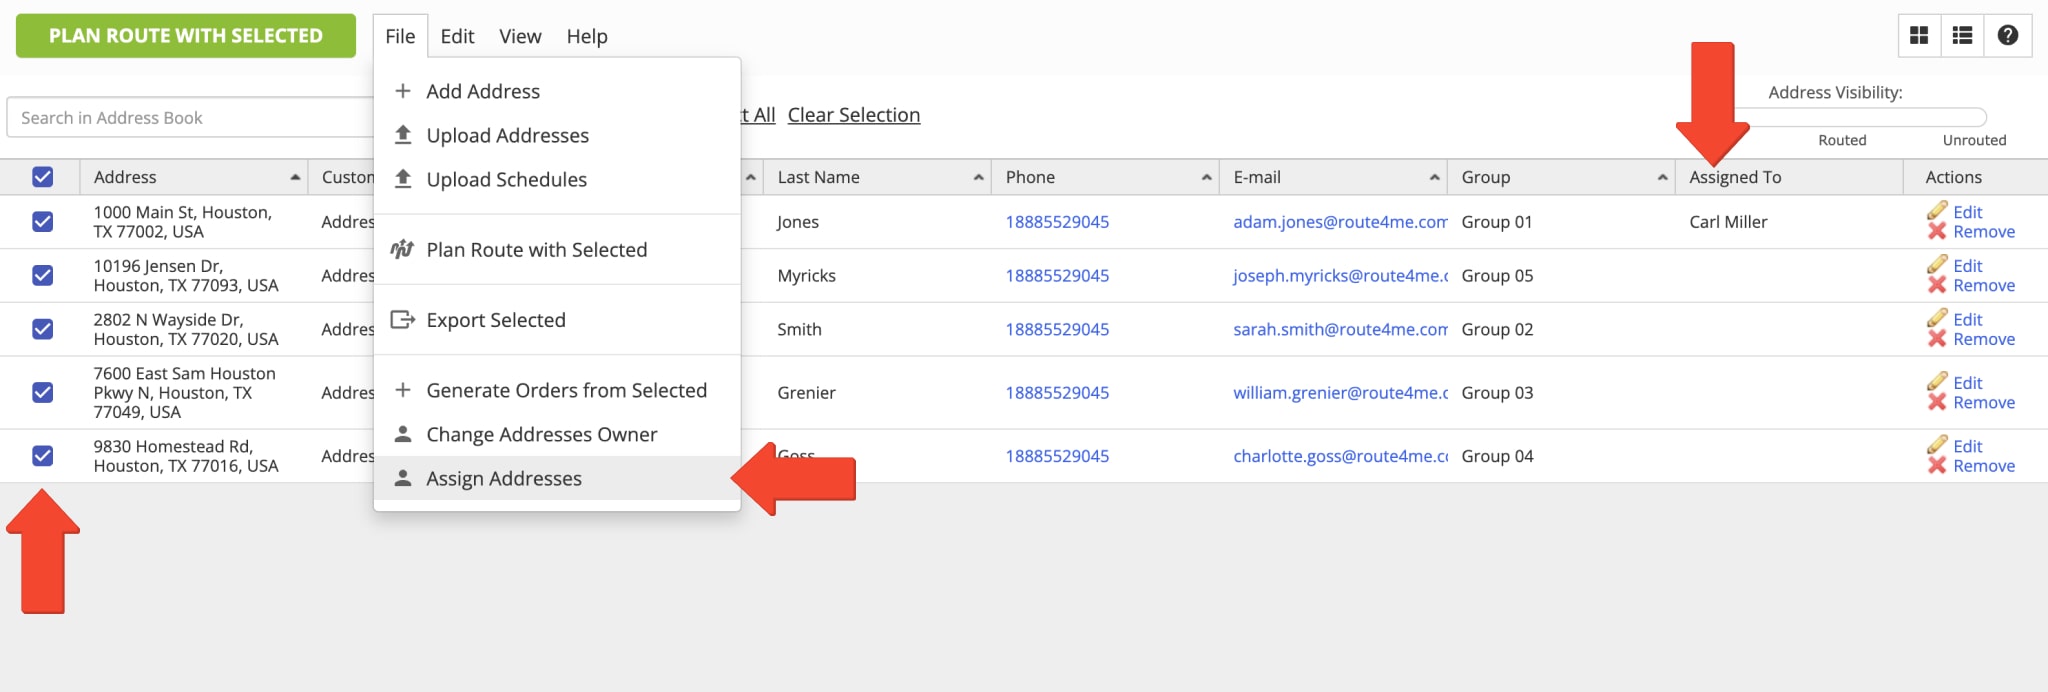
When you assign the address to another user, you can specify the preferred expiration date. Accordingly, once the expiration date ends, the address will automatically return to its original owner or the owner of the user the address was assigned to.

Address Management – Edit Addresses in the Address Book
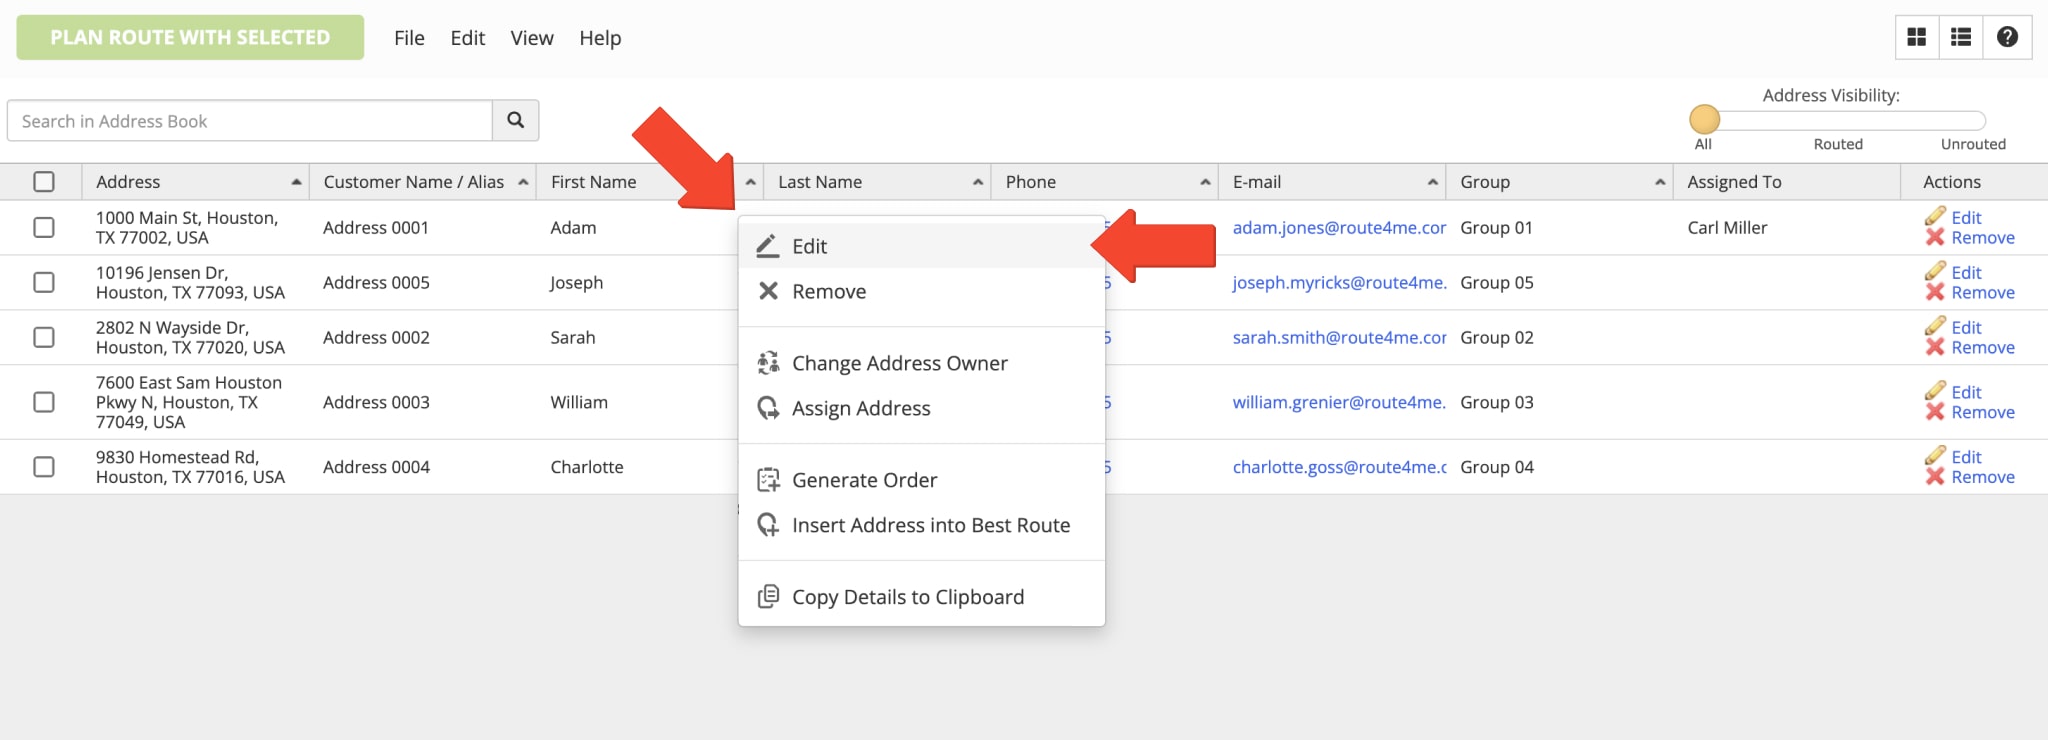
To edit the details of an address, right-click on the preferred address and then select “Edit” from the menu. Alternatively, click on the “Edit” button next to the preferred address in the “Actions” column.
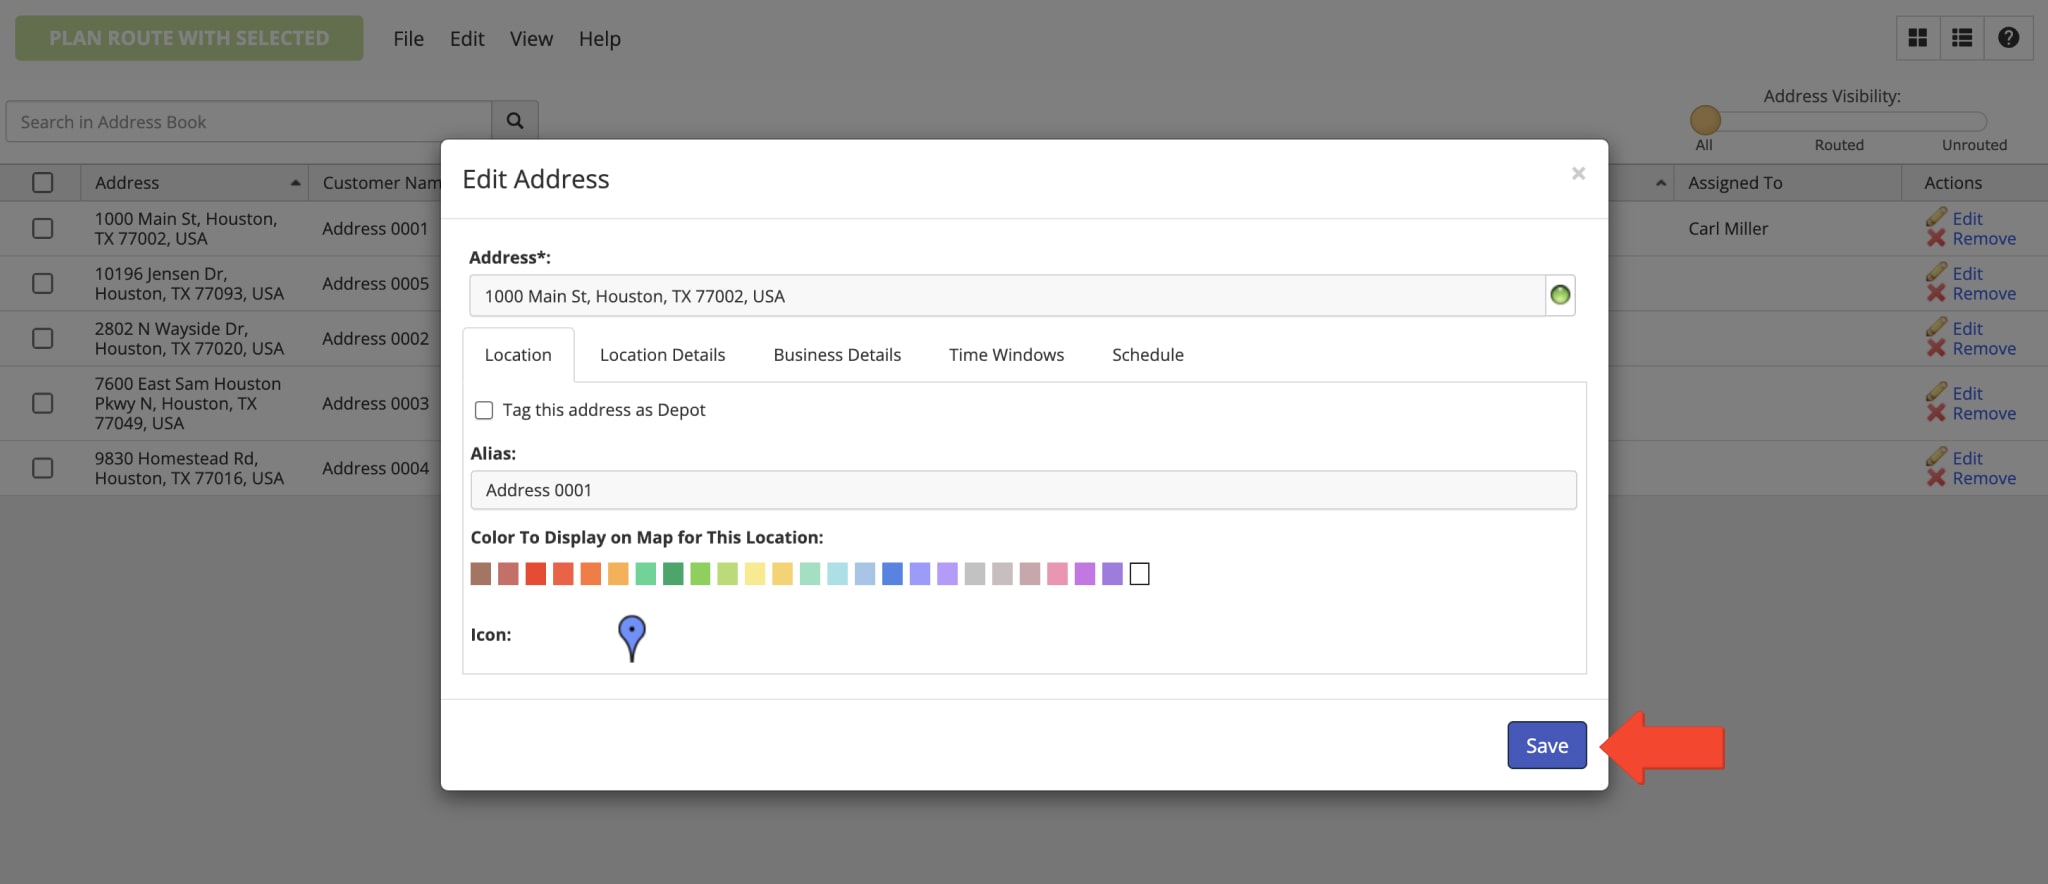
After that, you can make the preferred edits and then click on the “Save” button to apply the changes. When editing an address, you can change the same details as when you create a new address. You can learn more about editable details in the section about adding new addresses above in this guide.
Plan Routes with Addresses in the Address Book
With Route4Me’s Address Book, you can easily plan and optimize new dynamic routes with the same addresses instead of uploading or adding addresses every time. Furthermore, you use different address selections and specify custom optimization settings to account for business changes, driver availability, or any other specific requirements.
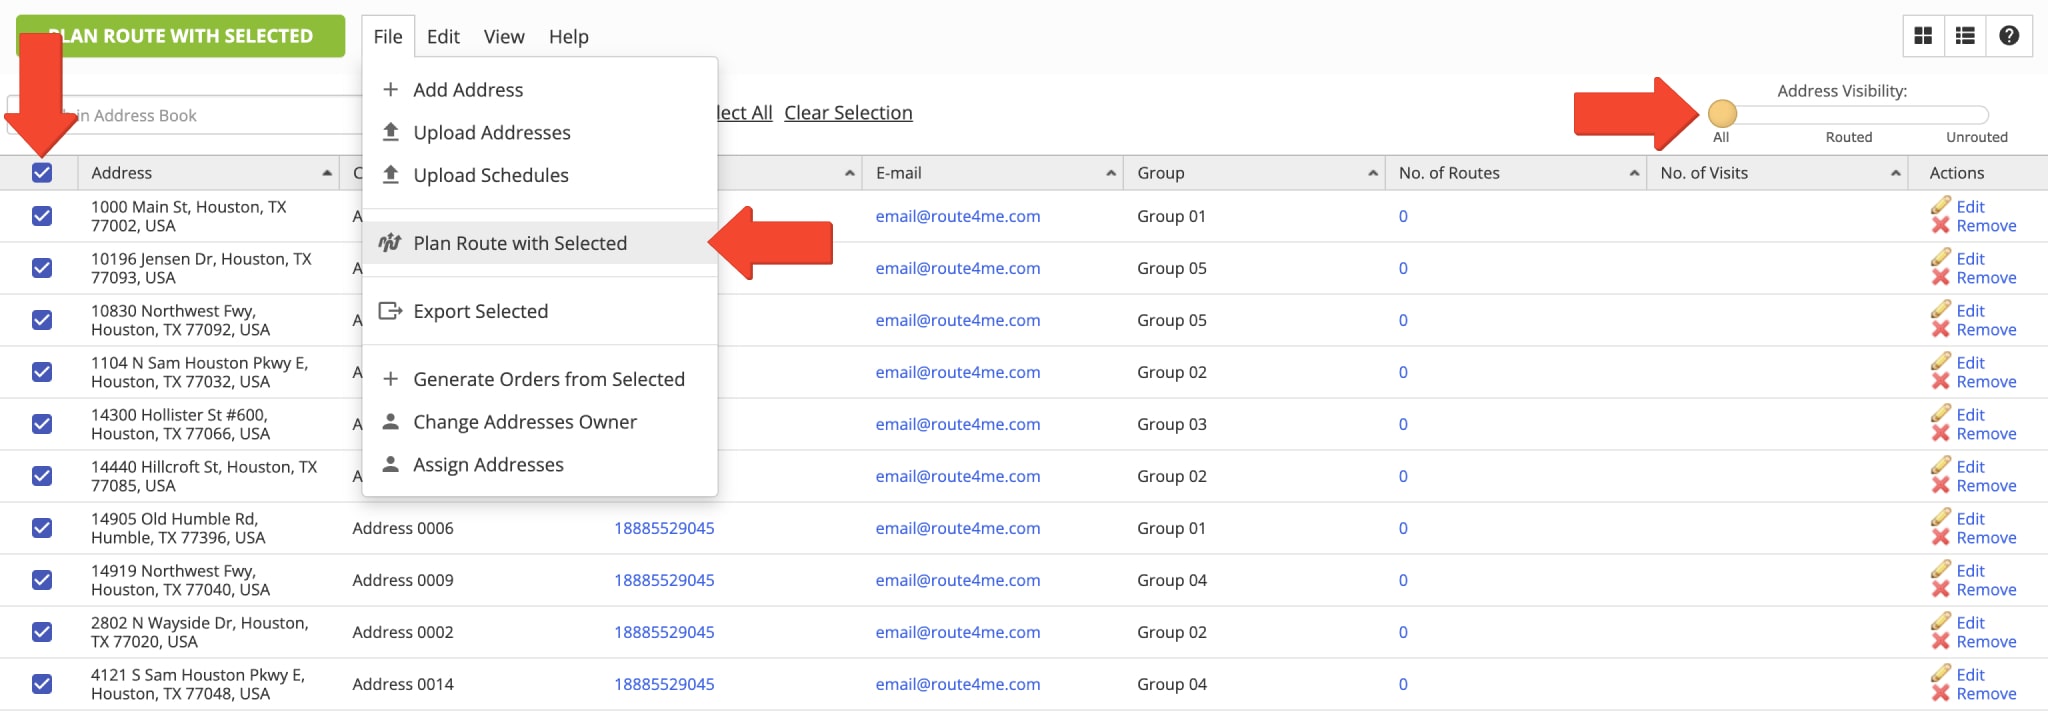
First, you can filter your addresses by Routed and Not Routed Addresses using the respective toggle in the top right corner of the screen. Next, select the addresses you want to use for planning routes by checking the boxes next to them. After that, go to “File” at the top of the screen and then select “Plan Route with Selected” from the menu.
Next, you can select a ready-to-use Optimization Profile with predefined route and optimization settings. To use an Optimization Profile, simply select the preferred profile and then click on the “Continue” button to proceed. Additionally, you can learn more about Creating and Using Route4Me’s Optimization Profiles.

Alternatively, you can skip selecting an Optimization Profile and manually customize your route and optimization settings. To do so, click on the “Skip” button and then specify the preferred route and optimization settings. You can schedule your route, plan one or multiple routes, assign a driver and vehicle, select where the route will start, and more.
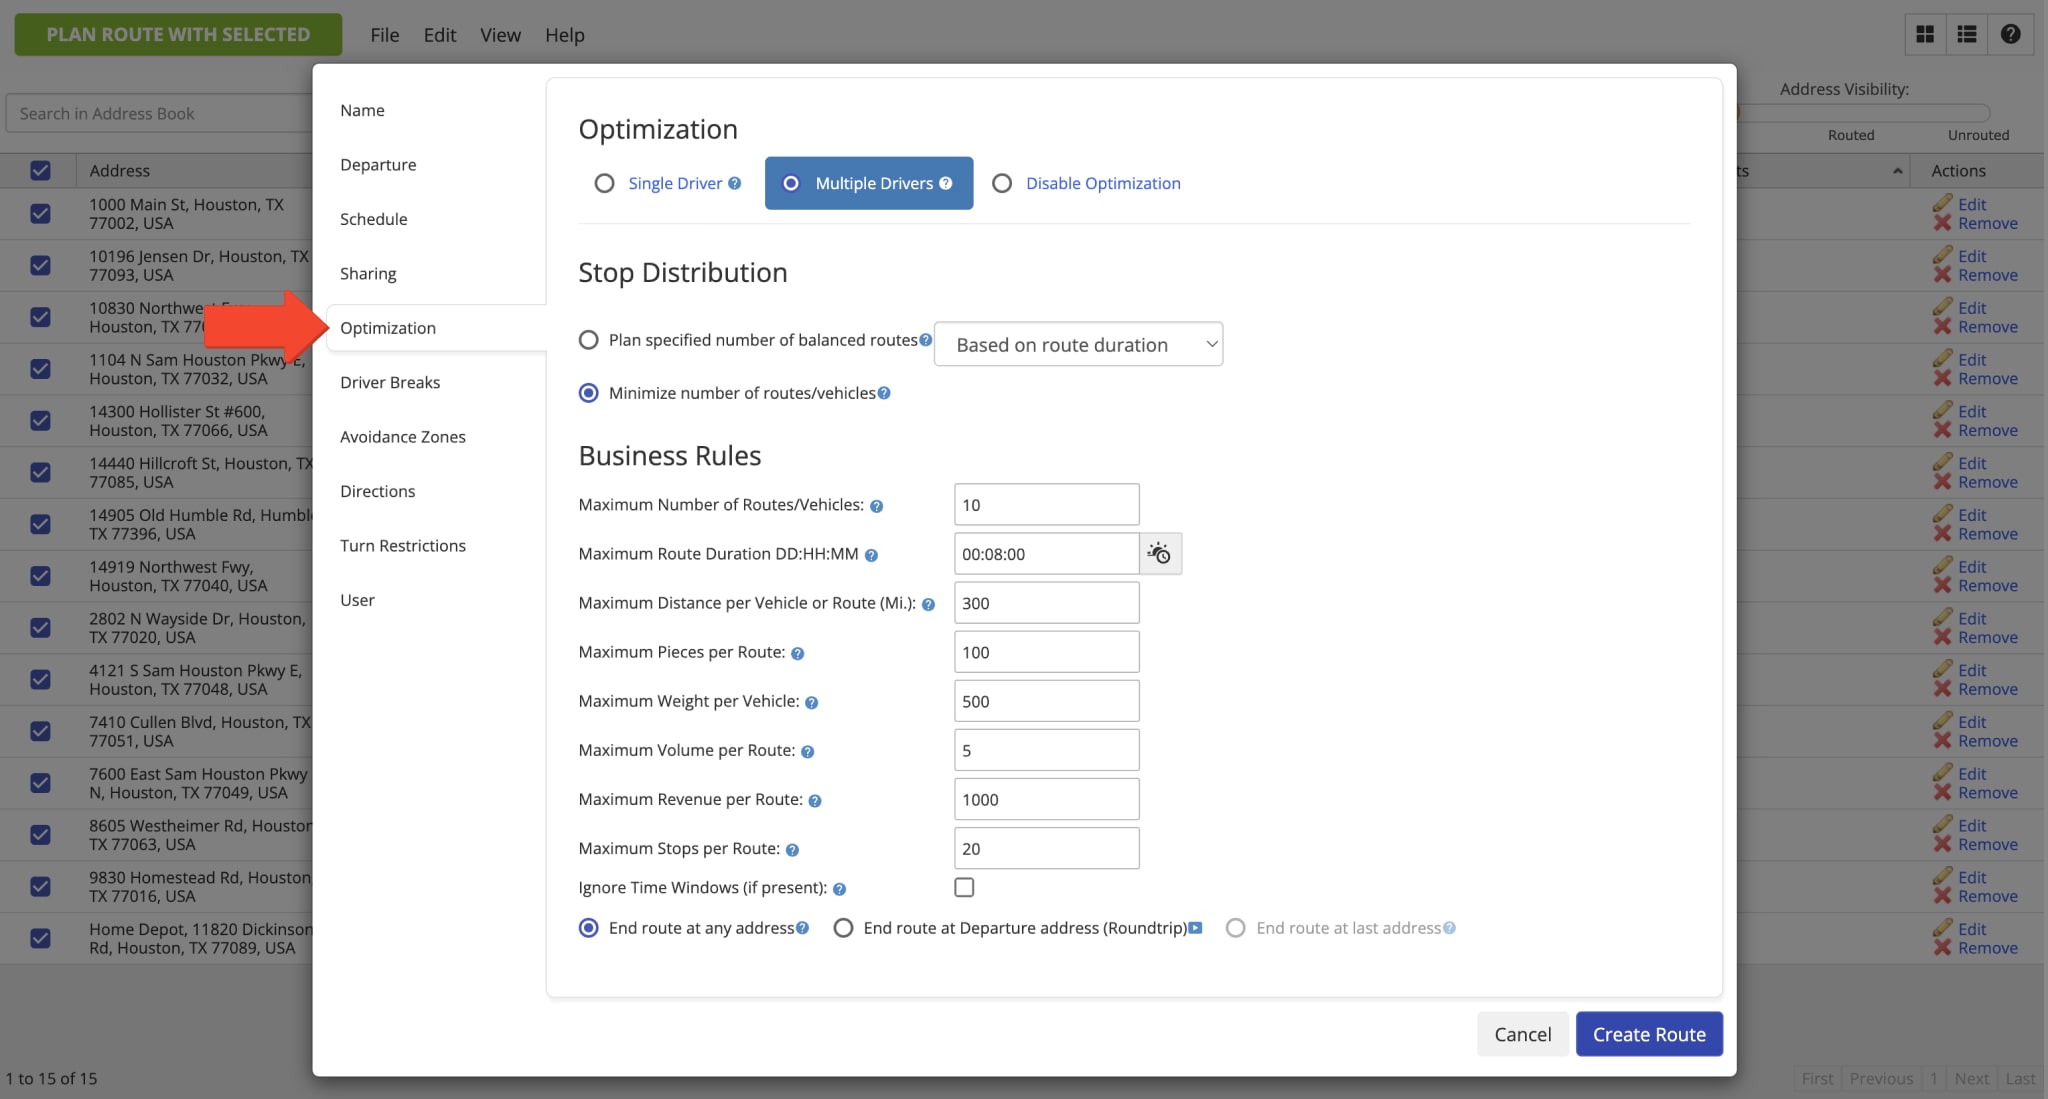
In the “Optimization” tab and “Business Rules” section, you can specify custom Business Rules and Route Optimization Constraints. Specifically, you can specify such optimization constraints as Max Pieces per Route, Max Weight per Route, Max Cube per Route, and Max Revenue per Route. Accordingly, Route4Me will automatically account for the respective Pieces, Weight, Cube, and Revenue values of each selected address to optimize the most optimal route. Additionally, you can learn more about Customizing Your Route and Optimization Settings.
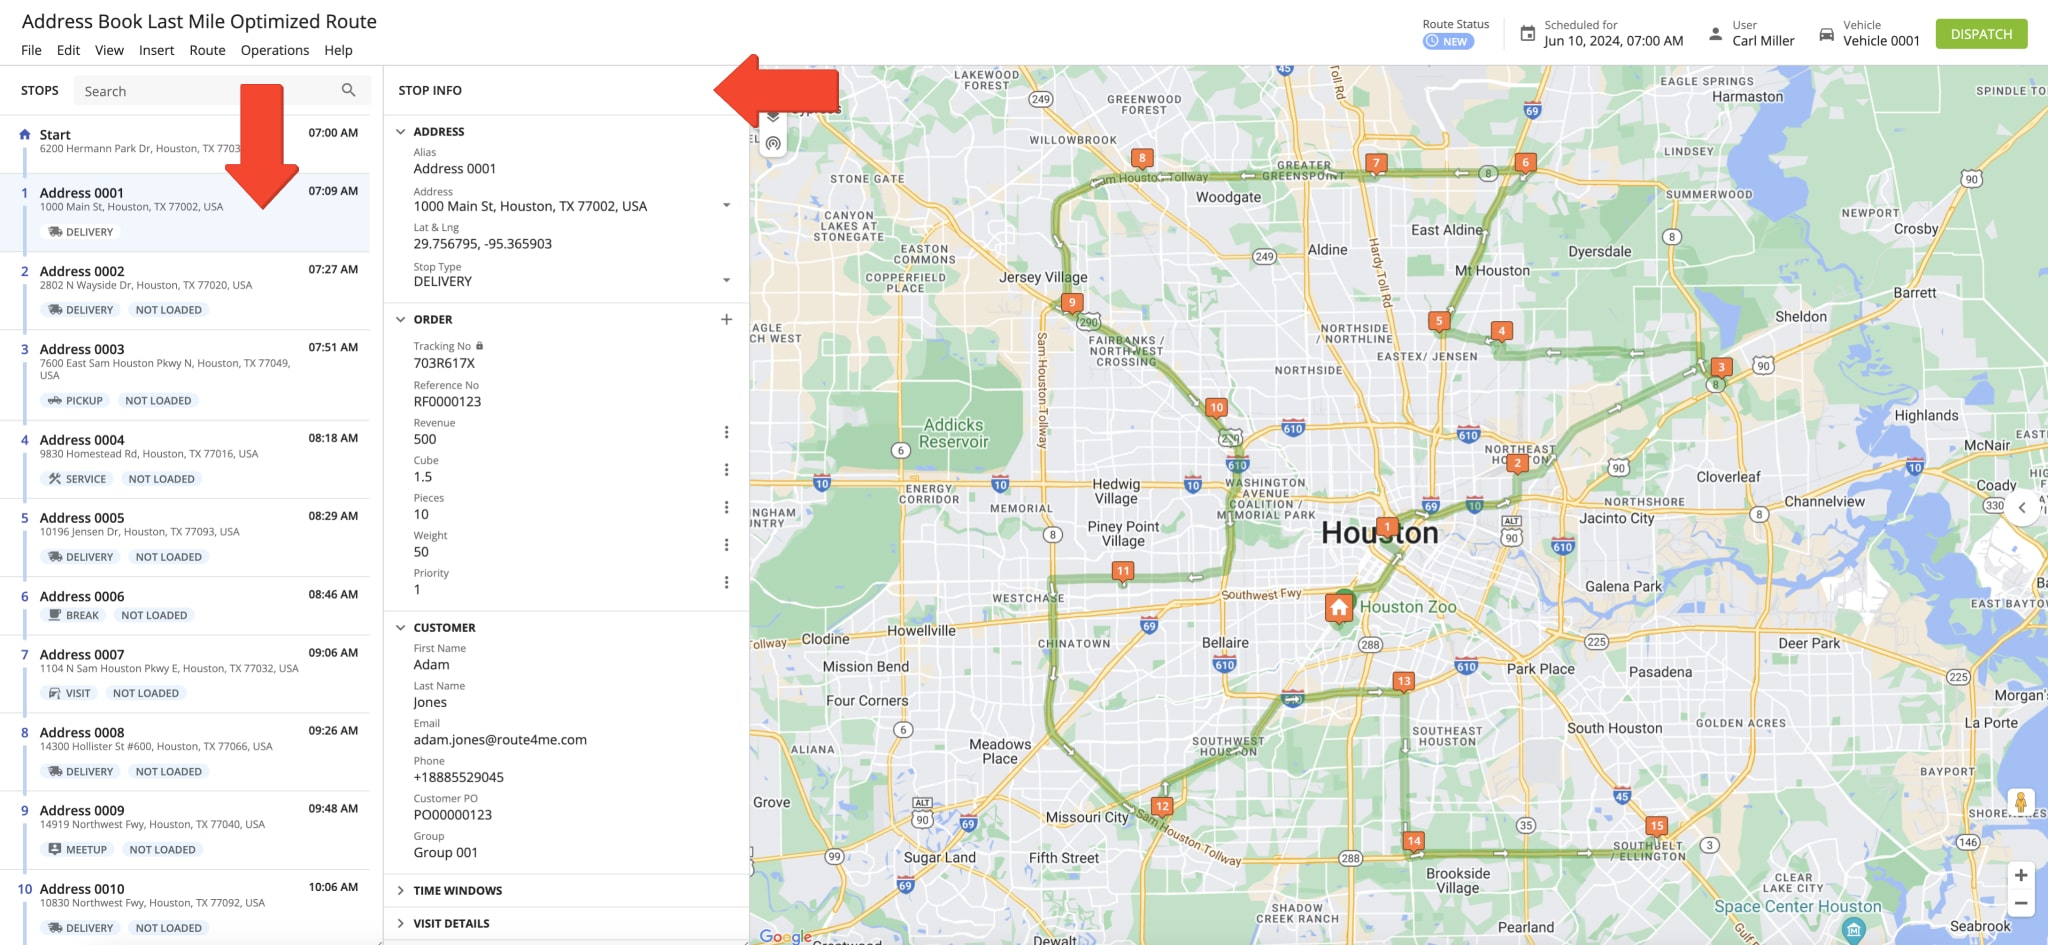
Depending on the specified route optimization settings, the number of the selected addresses, details of each address, and other variables, Route4Me can plan a single or multiple routes. When you plan a single route, Route4Me automatically opens the route in the Route Editor. To check the details of an address used as a route stop in the Route Editor, simply open the preferred route and click on the respective stop. Next, you can open the preferred section of the stop’s manifest to check its details.
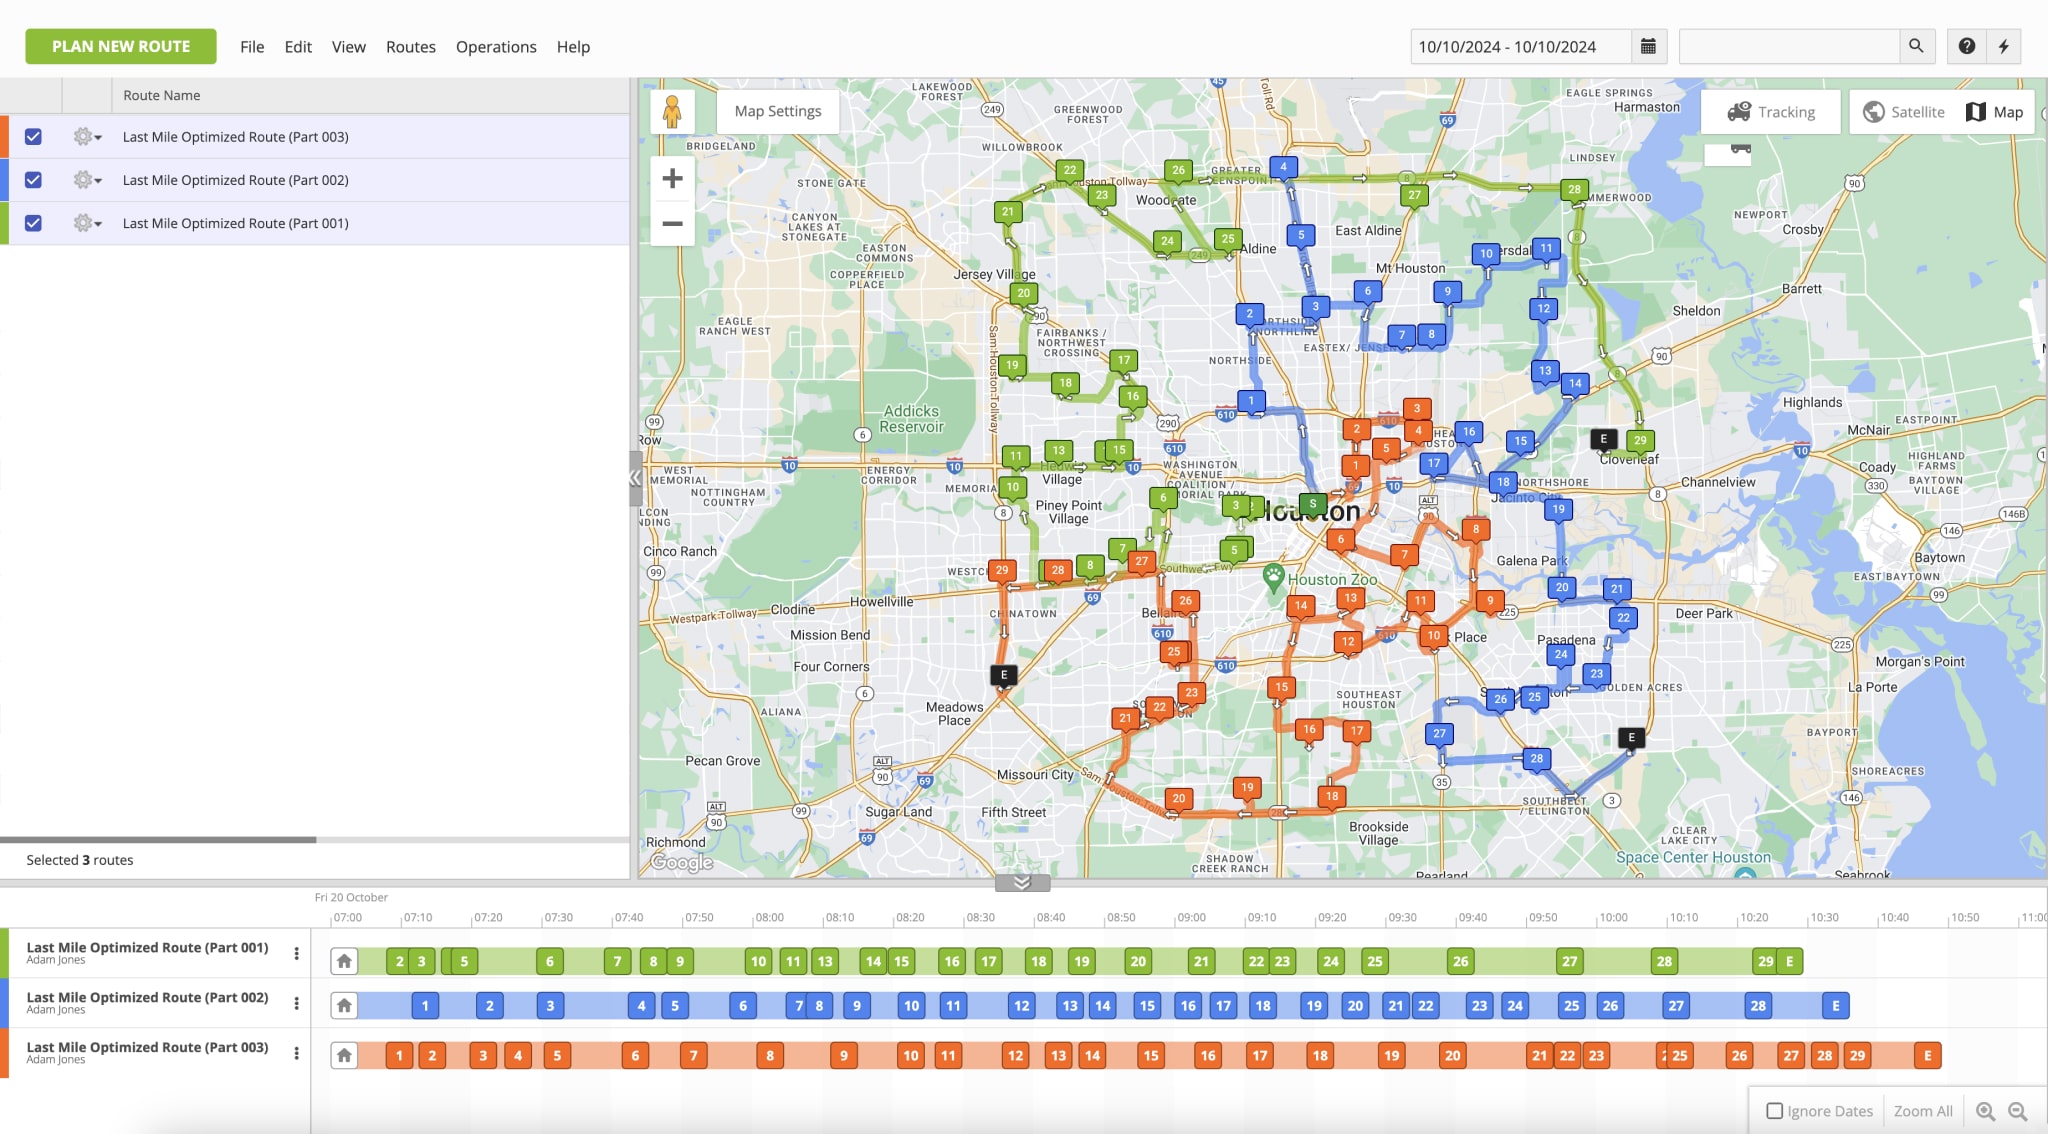
Accordingly, when you plan multiple routes, Route4Me automatically opens the planned routes on the Routes Map. Additionally, you can learn more about Opening and Managing Multiple Routes on the Routes Map.
Insert Address into the Best Route from the Address Book
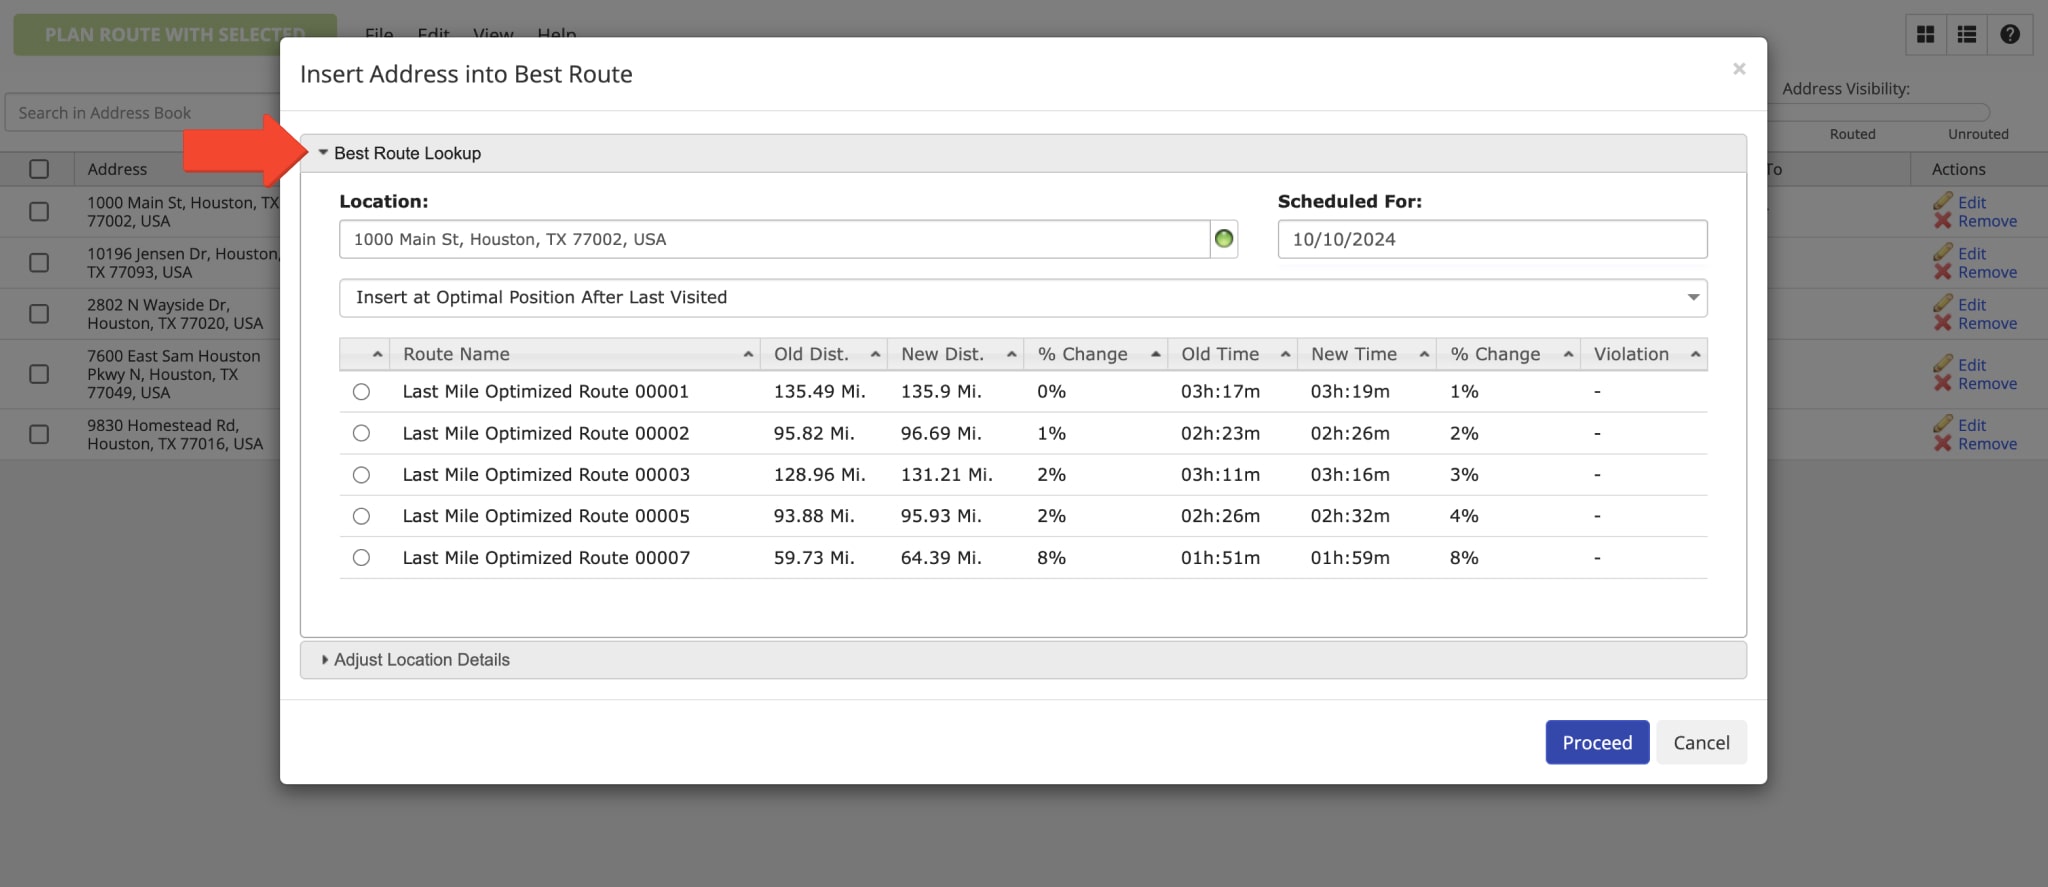
With Route4Me, you can quickly and easily insert addresses into already planned routes. This way, you can dynamically account for last-minute route changes, add new orders, etc. Furthermore, Route4Me will automatically suggest the most optimal routes for inserting the address, showing you how it will impact the route’s distance and time. First, right-click on the preferred address and then select “Insert Address into Best Route” from the menu.

In the “Best Route Lookup” tab, you can adjust the address insertion settings. First, use the “Scheduled For” filter to show the routes scheduled for the preferred date. Next, select the preferred place on the route for inserting the address. Below, you can learn more about the available address insert options. After that, you can check all routes scheduled for the selected date and the impact the inserted address will have on each of these routes. Specifically, how the inserted address will change the route’s travel distance and travel time. Additionally, in the “Adjust Location Details” tab, you can modify and add more details to the address.
| Option | Description |
|---|---|
| Insert at Optimal Position | Automatically insert the address at the most optimal sequence position on the selected route. |
| Insert at Optimal Position After Last Visited | Automatically insert the address at the most optimal sequence position on the selected route after the last address that was marked as “Visited“. |
| Insert at End of Route | Insert the address as the last stop on the selected route. Accordingly, if the selected route ends at the same location where it starts, the address will be inserted as the last stop before the route’s return location. |
| Insert at Beginning of Route | Insert the address as the first stop on the selected route (after the route’s Start Address). |
Generate Orders Using Addresses in the Address Book
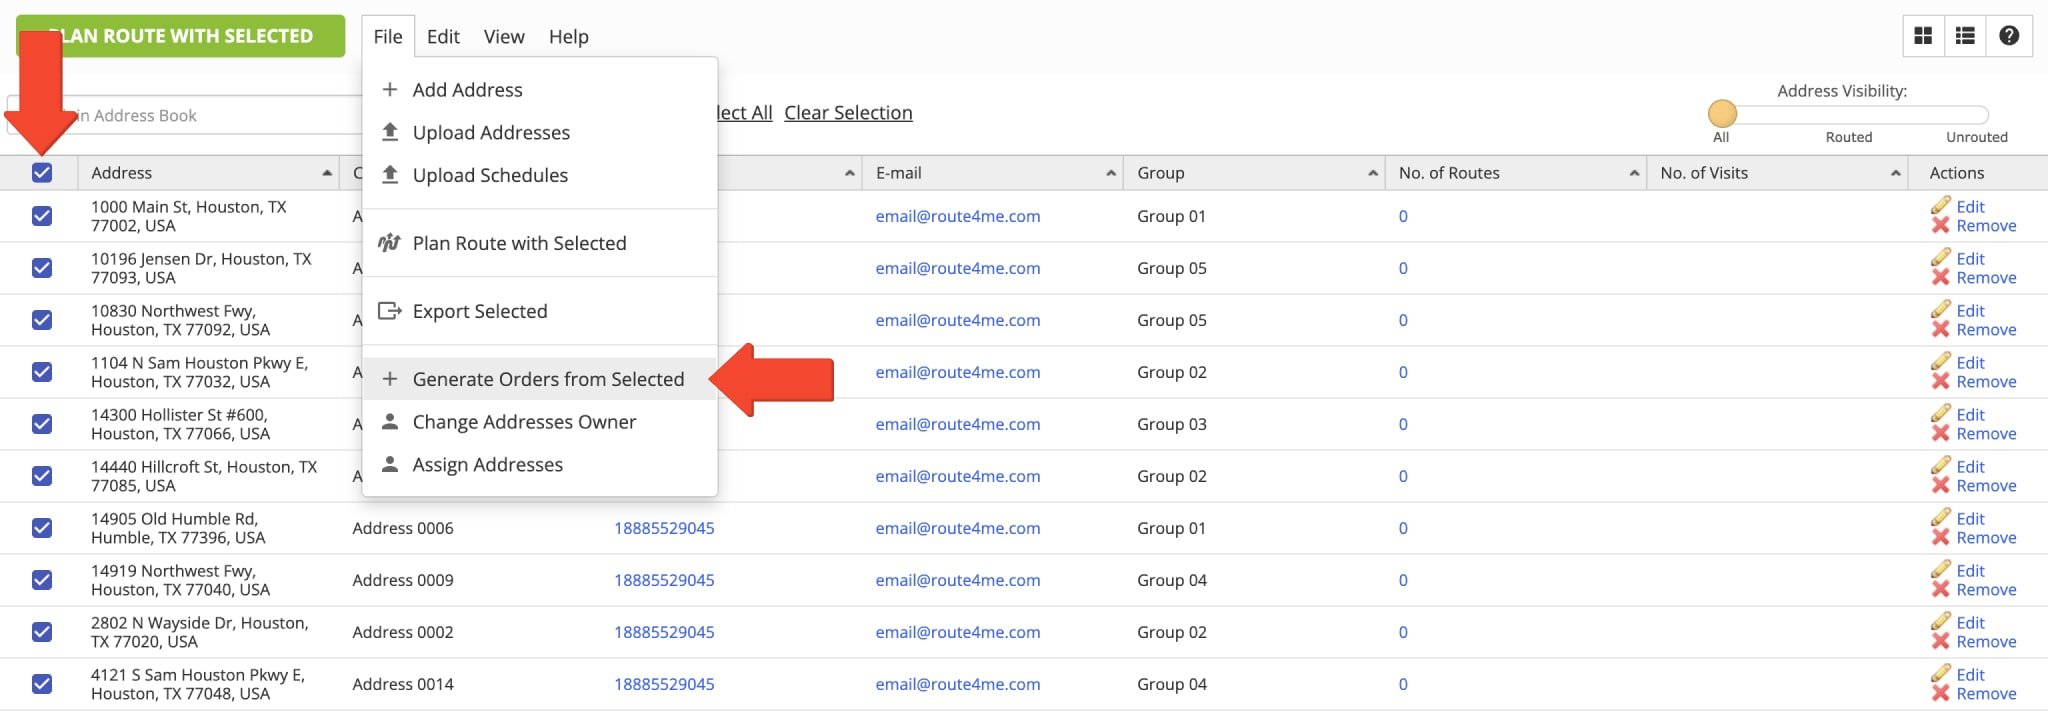
Additionally, you can generate orders from addresses in your Adress Book. To do so, right-click on the preferred address and then select “Generate Order” from the menu. To generate multiple orders from multiple addresses, select the preferred addresses by checking the boxes next to them, go to “File” at the top of the screen, and then select “Generate Orders from Select” in the menu.
Next, you can schedule orders for the preferred date. Once you generate the orders, these orders will become available in your Orders List. Additionally, you can learn more about Managing Orders in the Orders List.
Download Addresses – Export Address Data from Address Book
You can easily export hundreds of thousands of addresses in a single spreadsheet from your Route4Me account. Exported files contain addresses and customer, order, and other details associated with addresses that can be used for reporting, analytics, route planning, and other purposes. First, select the preferred addresses by checking the boxes next to them. To select all addresses in your Address Book, check the box in the header, in the top left corner of the screen.
Next, go to “File” at the top of the screen and then select “Export Selected” from the menu. After that, once your file is ready for download, click on the “Click Here to Download” button in the respective popup message.

Delete Addresses – Remove Addresses from Address Book
To delete an address from the Address Book, right-click on the address and then select “Remove” from the menu. Alternatively, simply click on the “Remove” button next to the address in the “Actions” column.
Additionally, you can delete multiple addresses at a time. First, select the addresses you want to delete by checking the boxes next to them. To select all addresses in your Address Book, check the box in the header, in the top left corner of the screen. Next, go to “Edit” at the top of the screen and then select “Remove Selected” from the menu. NOTE: Deleting addresses can’t be undone, and the deleted address will be permanently erased from your account.

Visit Route4Me's Marketplace to Check out Associated Modules:
- Route Optimization
Address Book and Territories Planning
- Operations
Custom Data Add-On
Last Updated: