Address Book Map – Add, Import, Edit, Plan Routes, Insert Into Best Routes And Export Addresses
Your Route4Me Address Book Map is a centralized and synchronized database where you can easily save and manage hundreds of thousands of customer addresses and locations on an interactive map. Furthermore, you can synchronize your addresses across multiple users, accounts, and devices in real-time. Moreover, you can easily select addresses on the map for planning and optimizing last mile routes. In this guide, you can learn how to pick and save addresses from the map, custom address details, upload addresses using spreadsheets, plan multi-stop routes with addresses on the map, download addresses, etc.
NOTE: Your Address Book Map database is shared with your Address Book List. Accordingly, addresses in your Addresses Book Map and Address Book List are the same. When you add new addresses, edit existing addresses, or delete addresses in your Address Book Map, new addresses, address updates, and removed addresses are automatically synchronized with your Address Book List, and vice versa.
Table of Contents
Address Book Map Overview and Map Settings
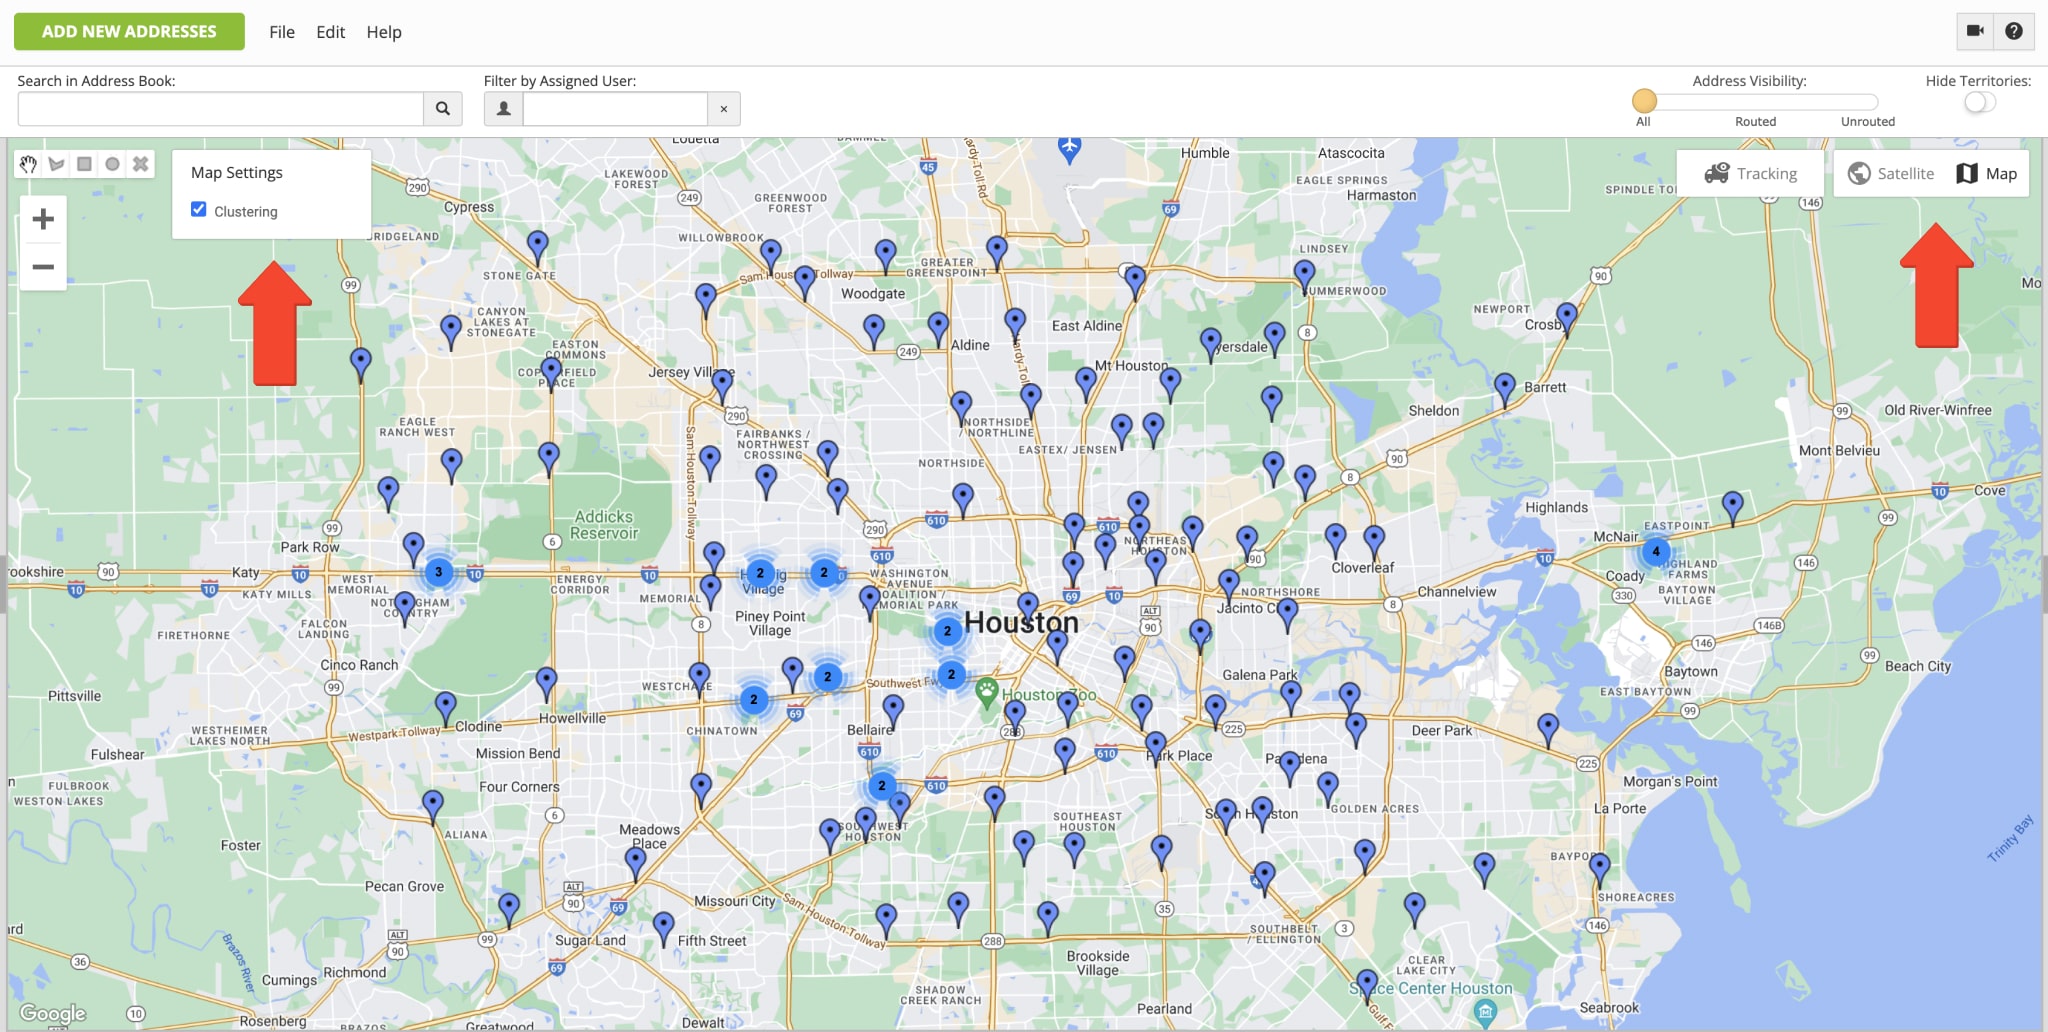
To open your Route4Me Address Book Map, go to “Address Book Map” from the main navigation menu. Next, you can enable or disable address clustering on the map by going to “Map Settings” in the top left corner and checking or unchecking the “Clustering” box. Accordingly, when the Address Clustering is enabled, addresses in close proximity to each other are displayed in numbers instead of separate pins or icons. Additionally, you can switch between the regular and satellite map view by selecting the preferred map type in the top right corner of the map.
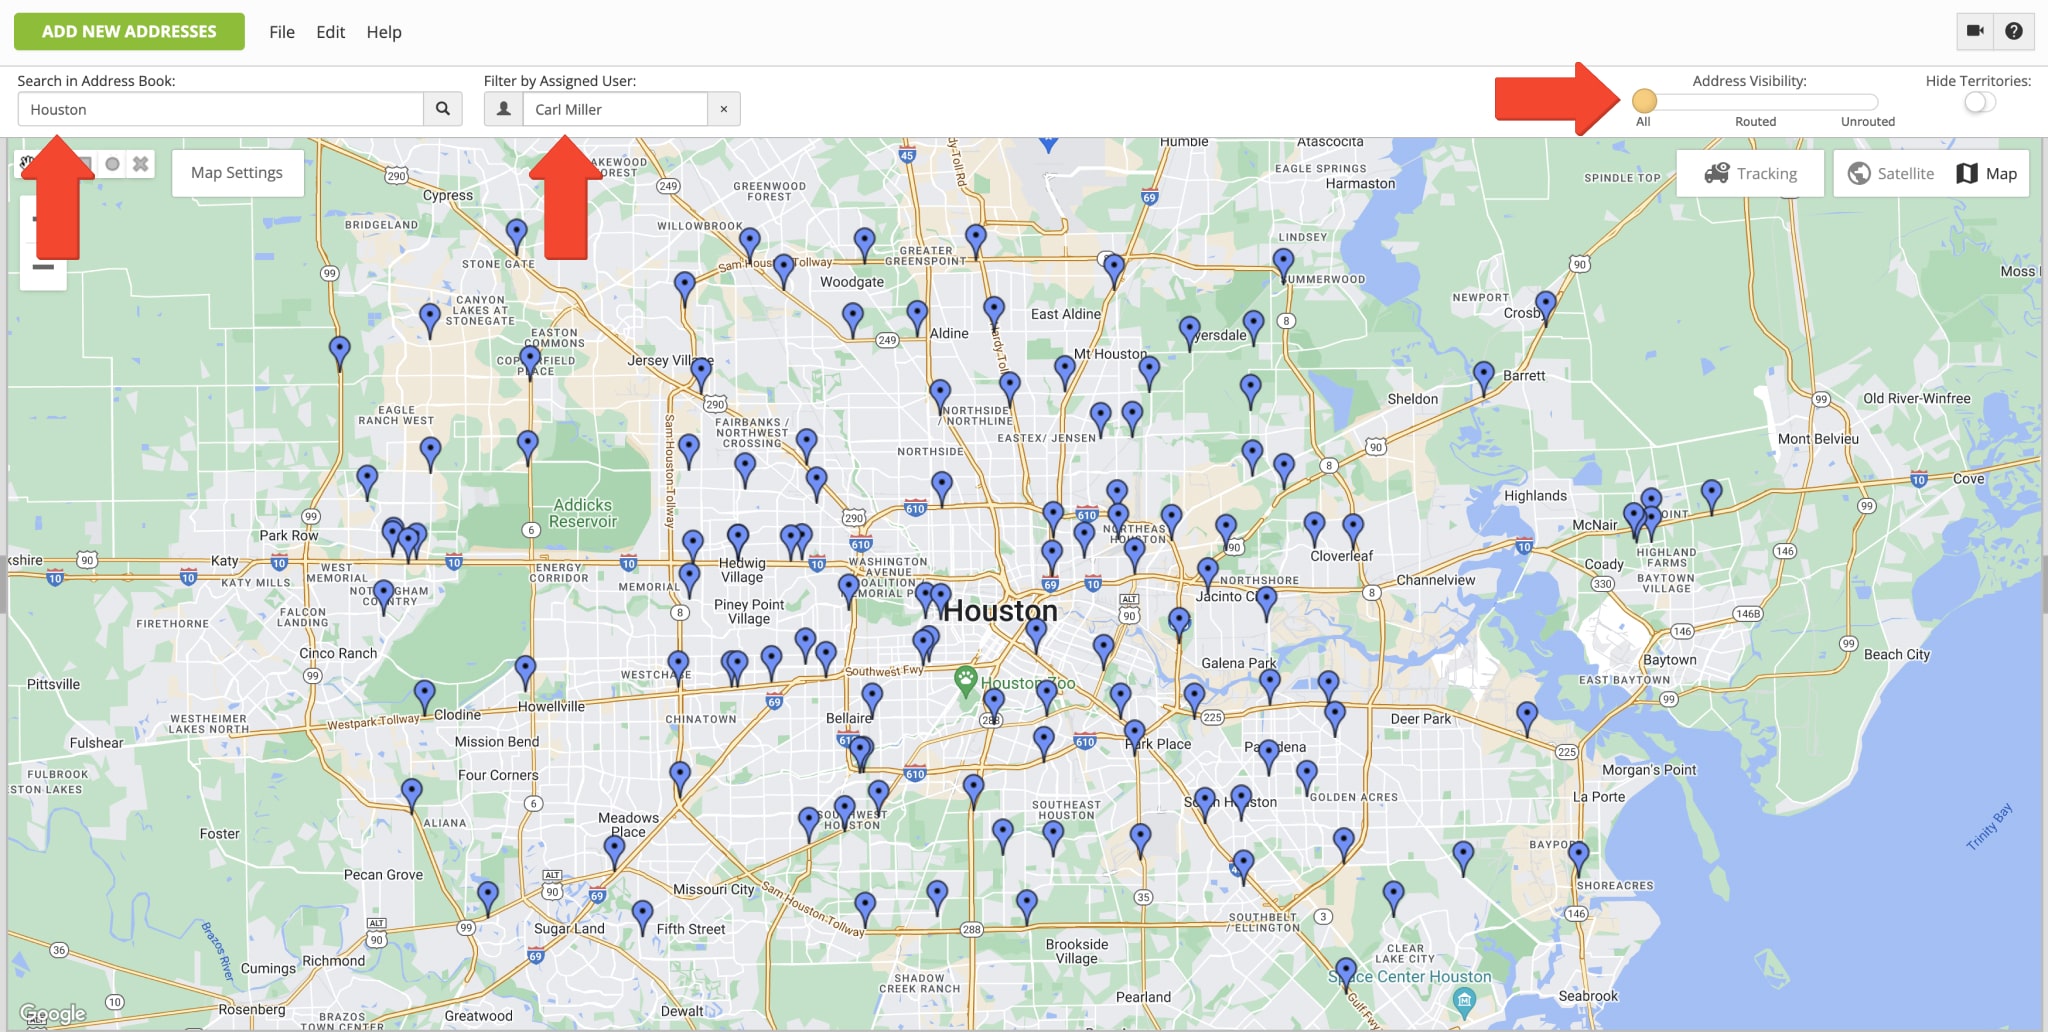
Next, you can search and filter addresses on your Address Book Map by Address, Alias, Group ID, First and Last Name, Email, Phone, Customer PO, and even Custom Data. Accordingly, when you search by a specific keyword, the map will display all addresses that have the respective attribute that contains the searched keyword. To do so, enter the preferred address attribute into the search in the top left corner of the screen.
Additionally, you can use the “Address Visibility” toggle in the top right corner of the map to display routed and not route addresses. Specifically, “Routed Addresses” are the addresses that have been used for planning routes or were inserted into planned routes at least once. Accordingly, “Unrouted Addresses” are the addresses that haven’t been used for planning new routes and haven’t been included into planned routes yet.
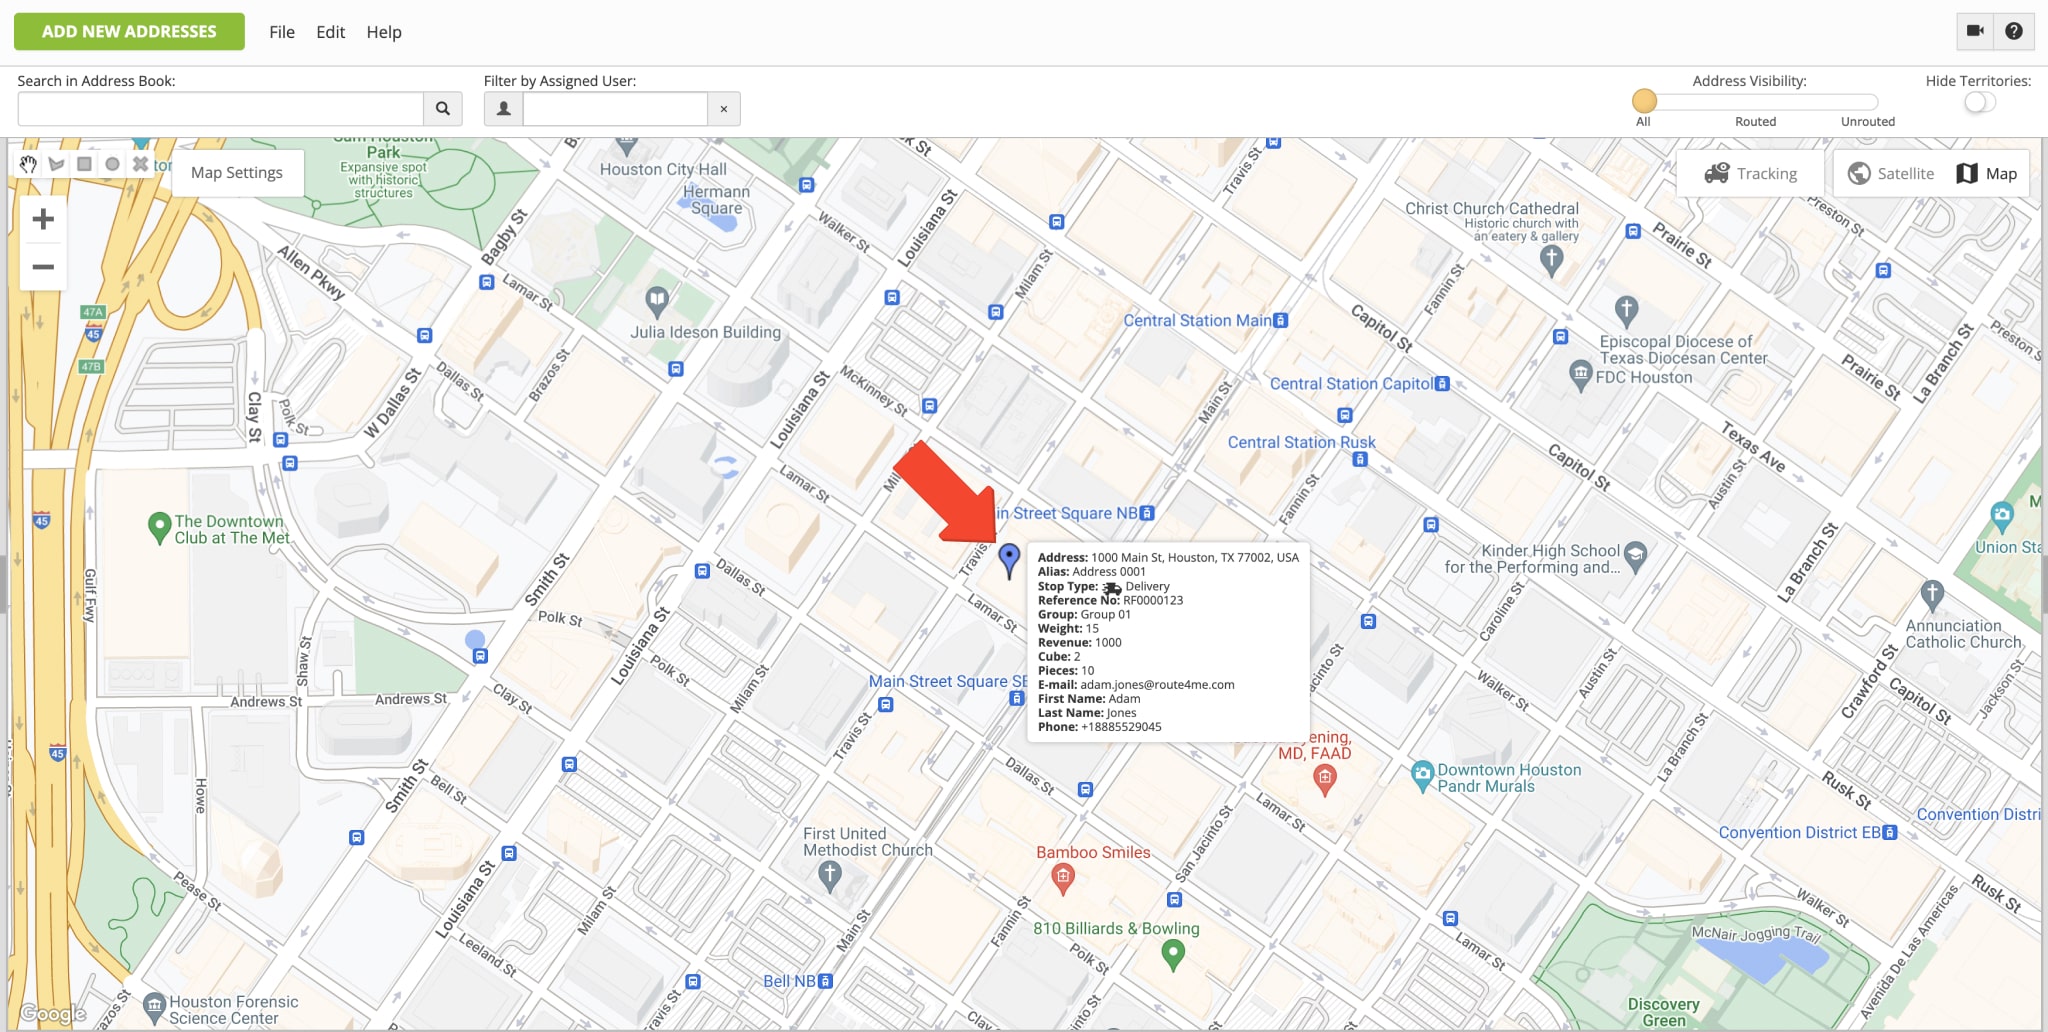
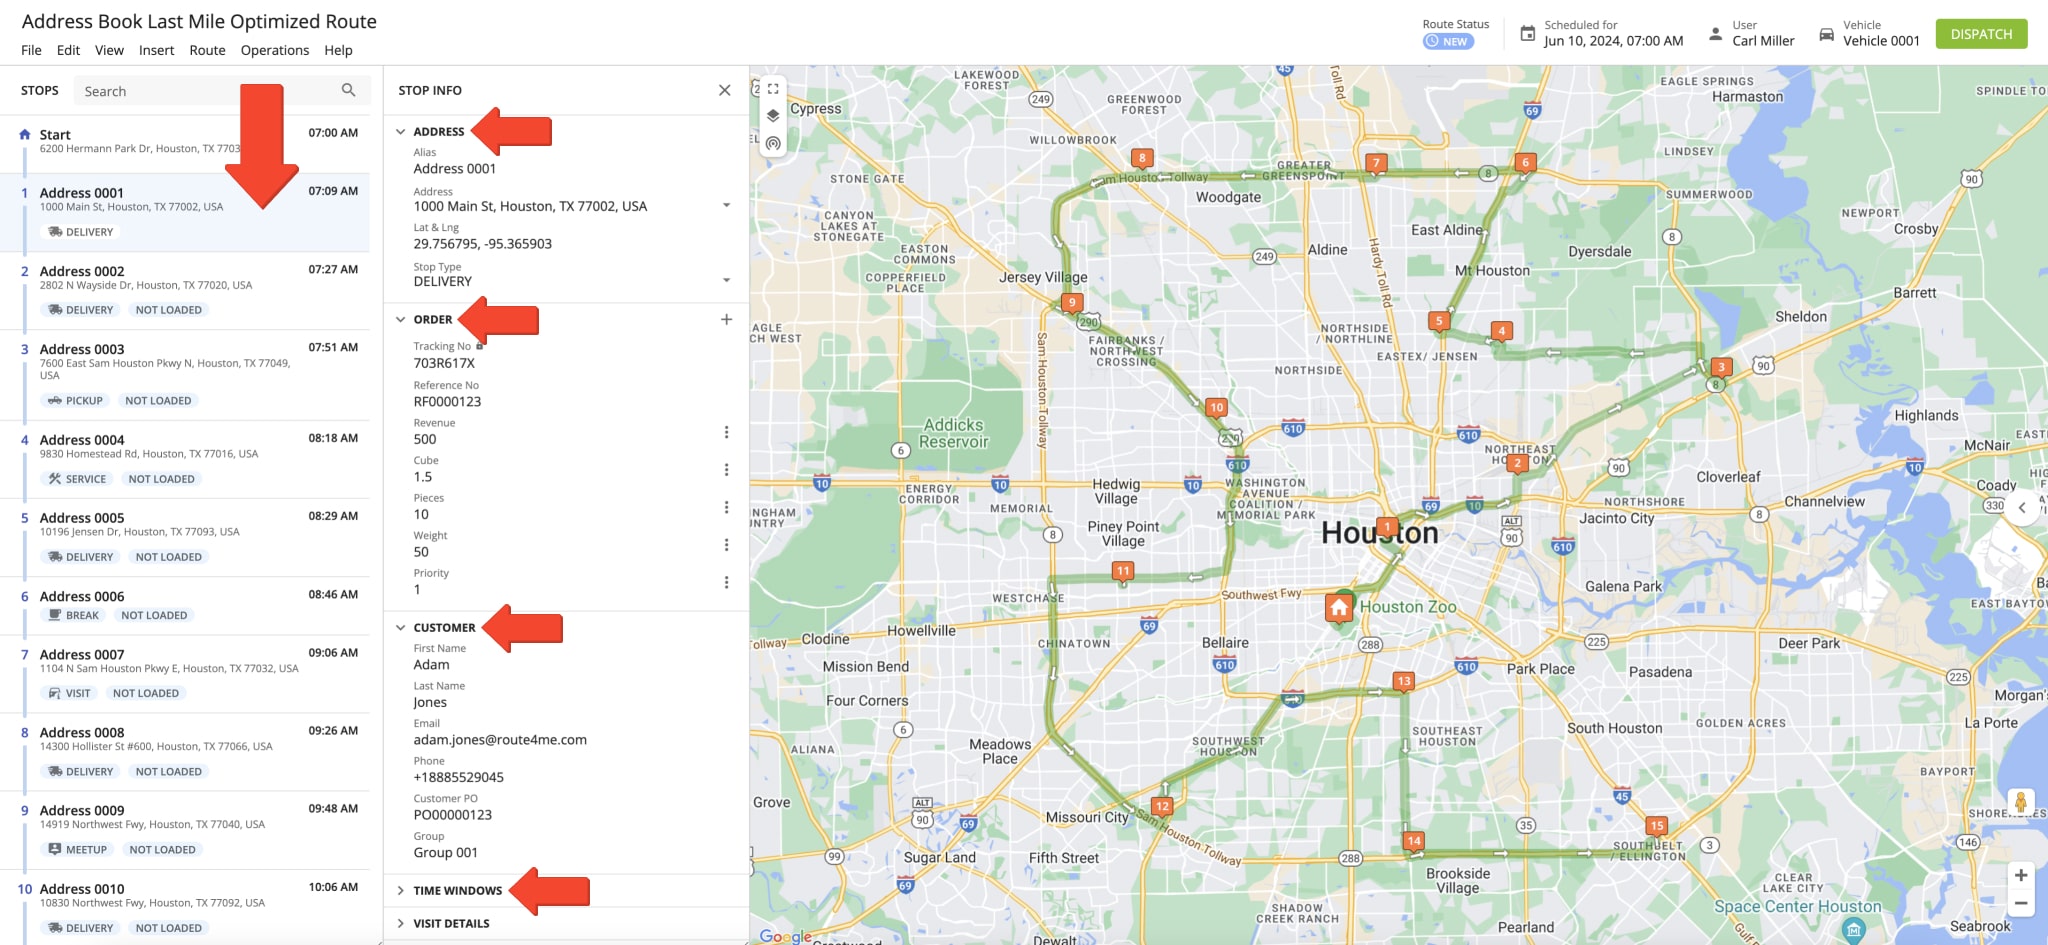
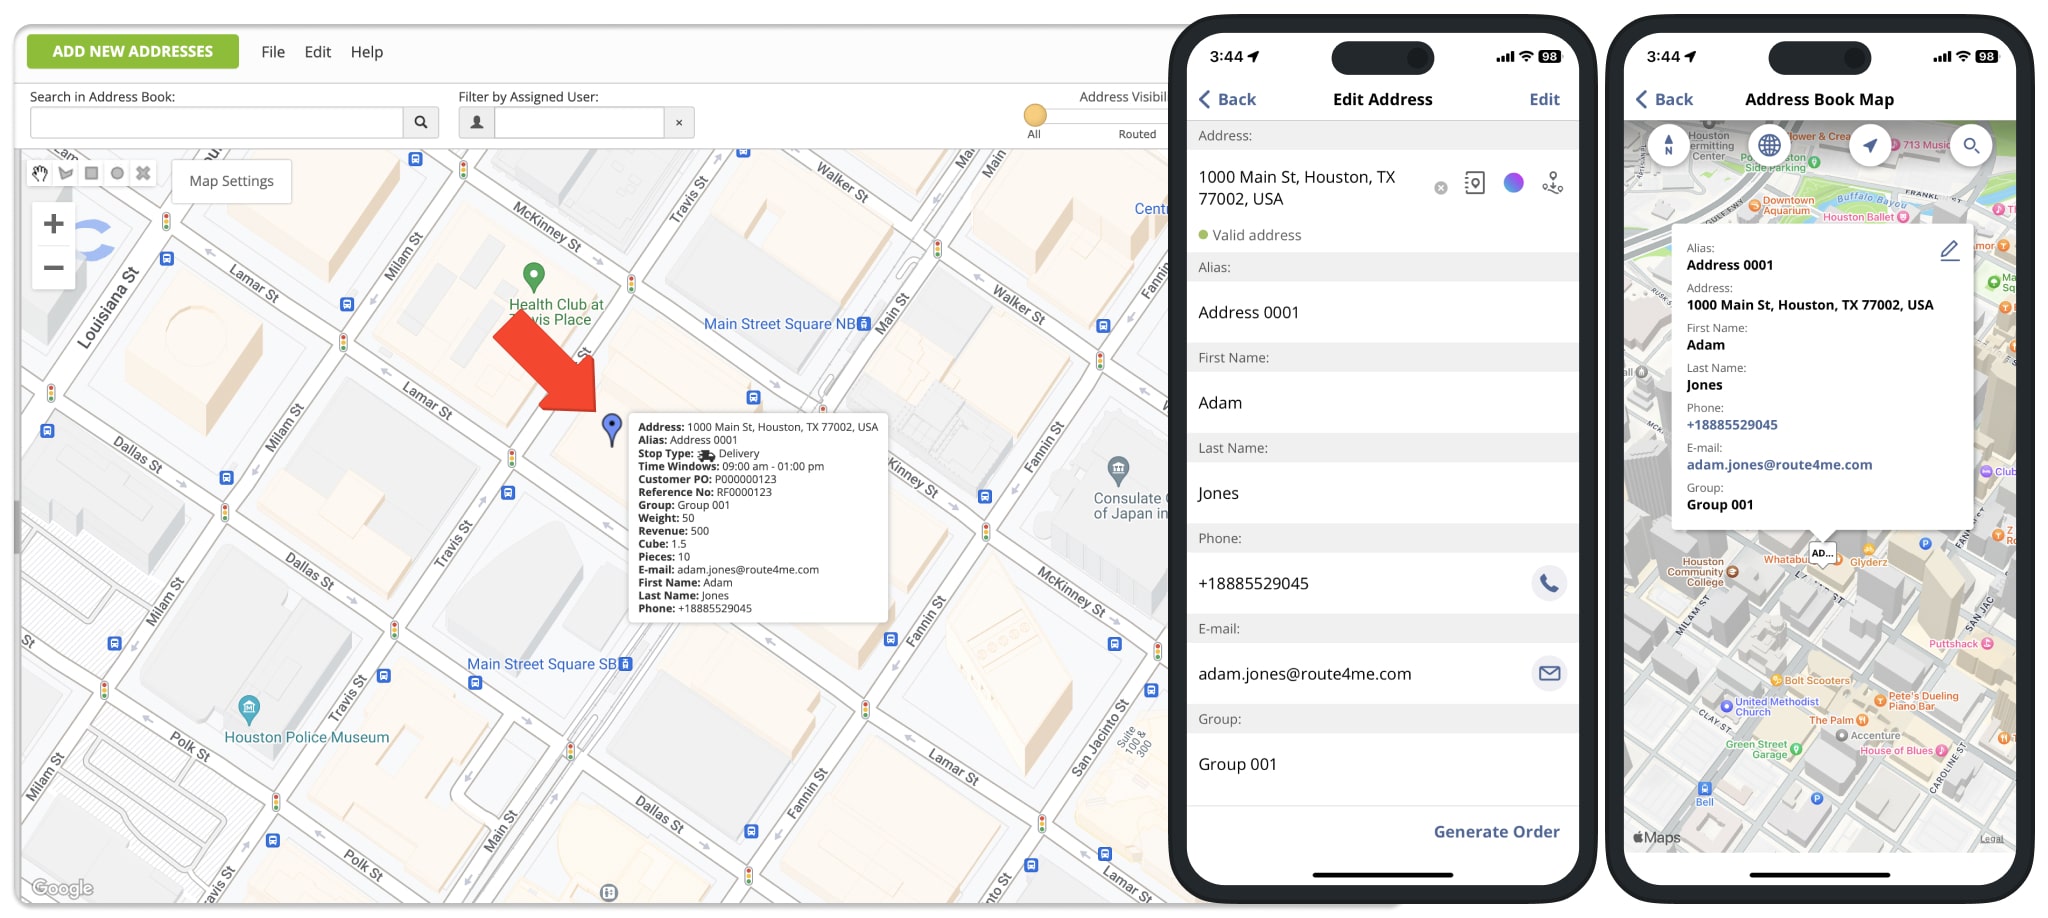
For your convenience, Route4Me’s trusted route planning software enables you to zoom out on the map to get a broader geographical context, see the relationship between different addresses, streets, and areas, etc. Similarly, you can zoom in on the map to explore and see more details of a specific area, get a closer view of streets, landmarks, and individual addresses, pick specific locations from the map and save them, etc. Additionally, you can click on address pins or icons on the map to view their details.
Add Addresses – Pick Addresses and Locations on Address Book Map
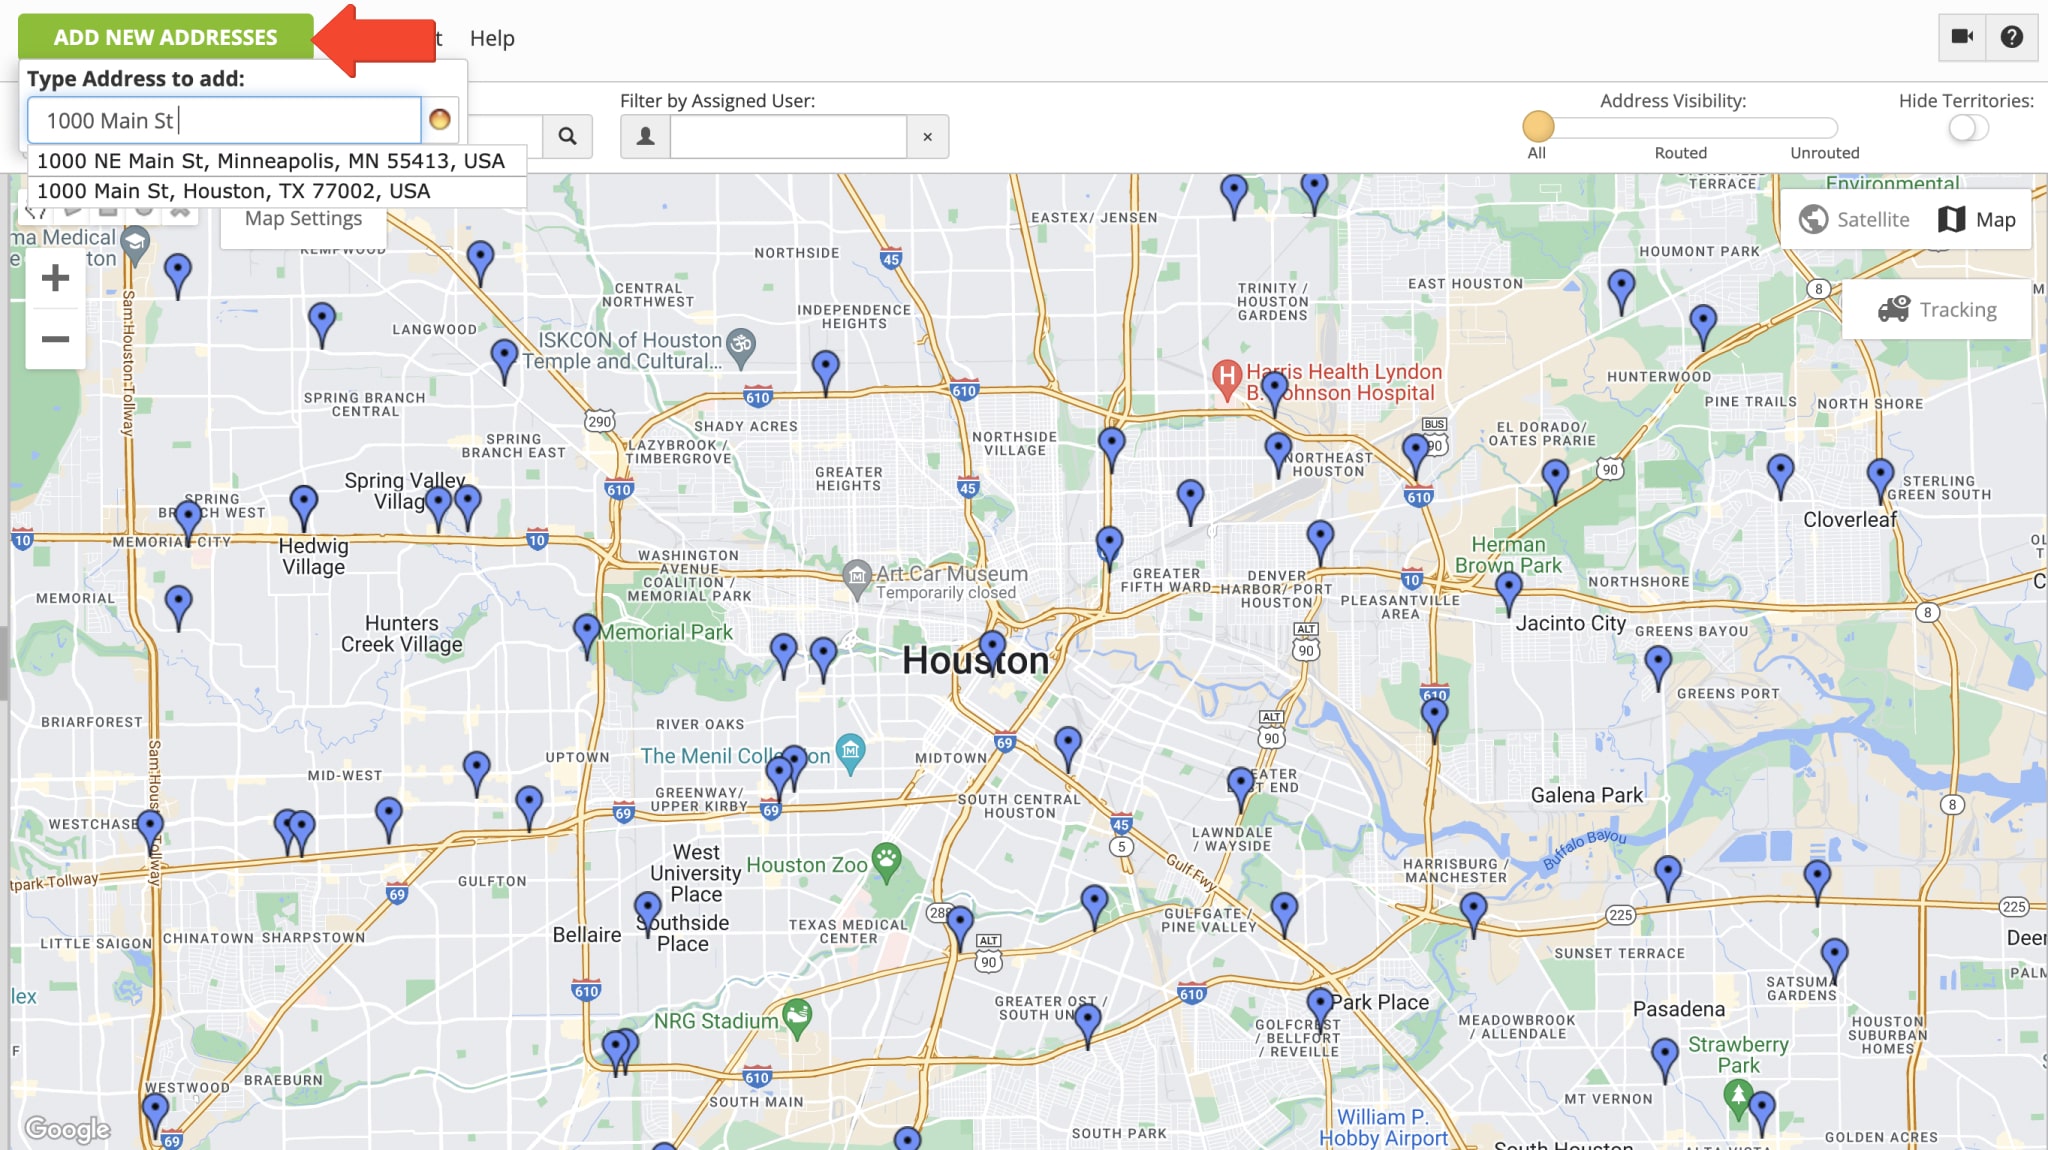
To quickly add an address to your reliable route optimizer Address Book Map, click on the “Add New Address” button in the top left corner of the screen. Next, enter a full or partial address, and Route4Me will automatically suggest the available geocoded and autocompleted address options. After you select the preferred address option, the address will be saved and will automatically appear on the Address Book Map as a pin.
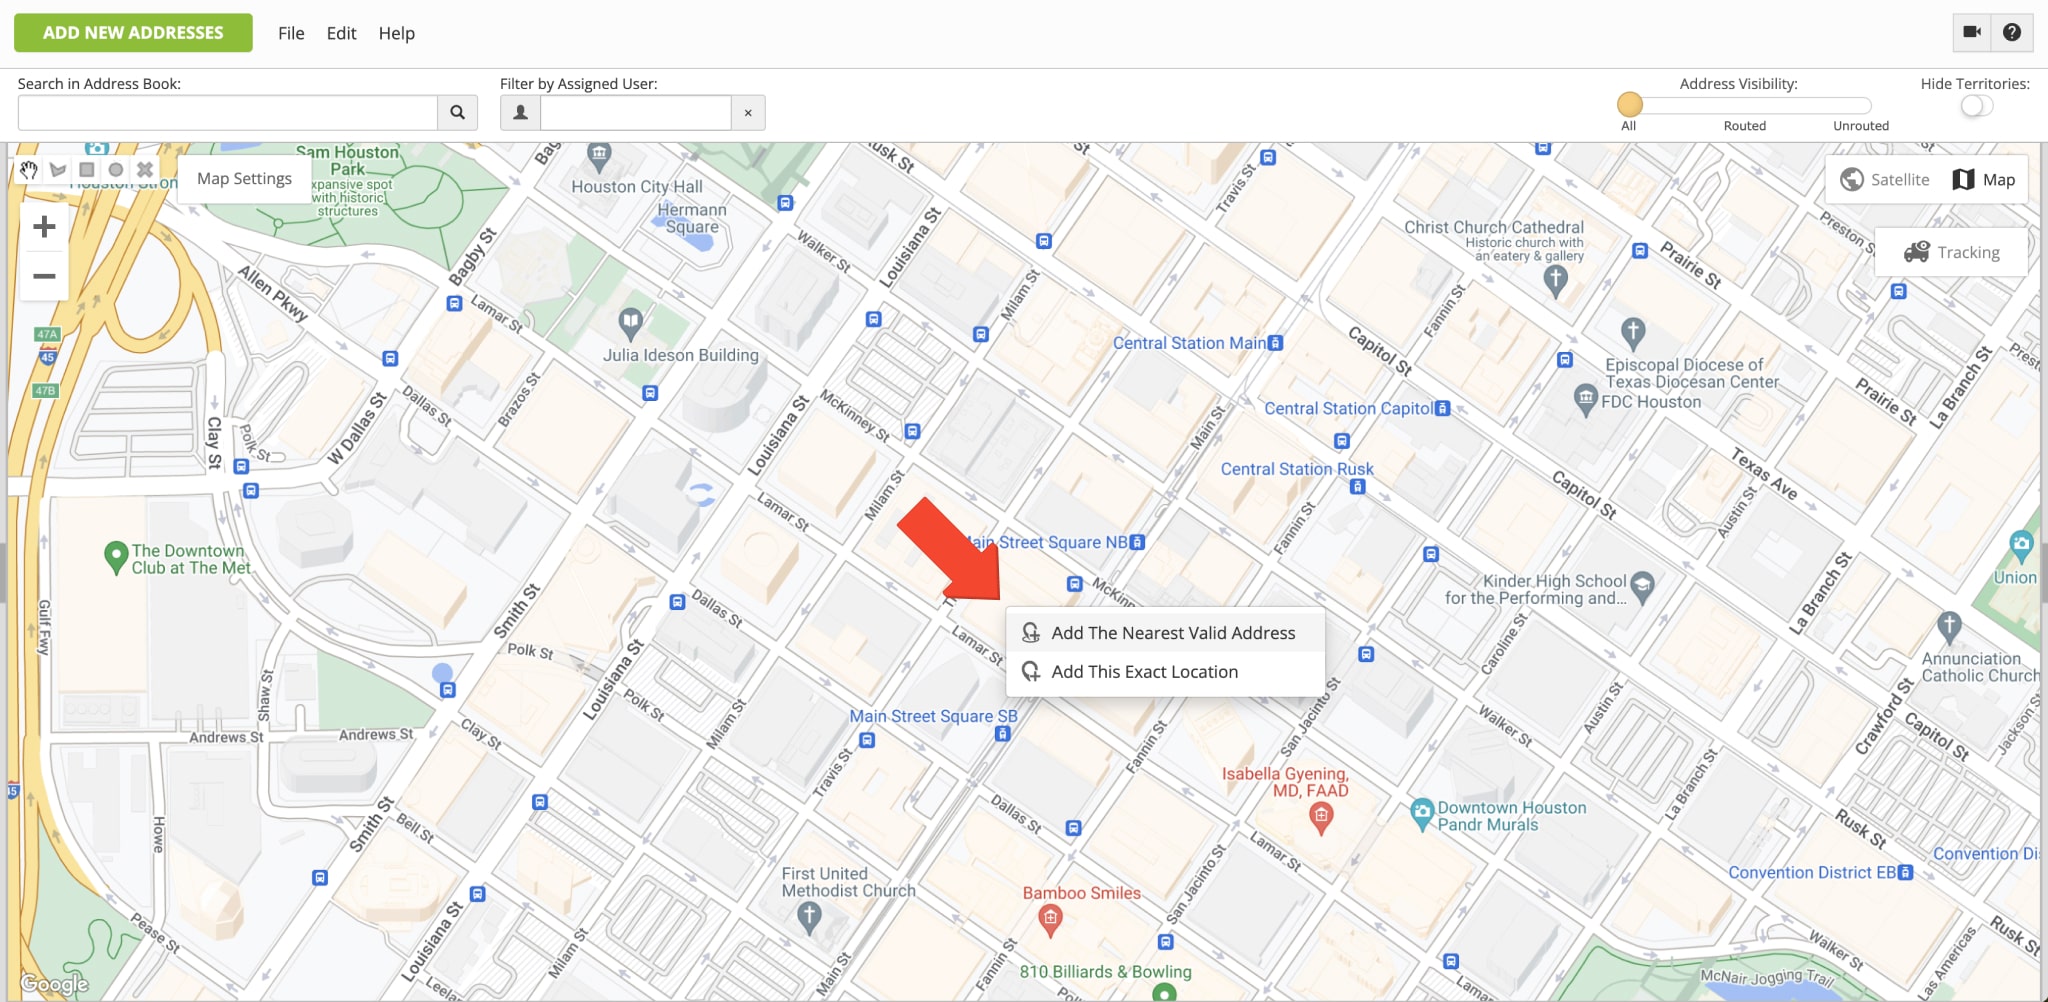
Furthermore, you can easily pick addresses and locations right from the map. First, zoom in on the preferred area and then right-click on the place on the map that you want to save. Next, you can select the “Add the Nearest Valid Address” option, and the fastest route software will automatically pick the nearest valid address next to the selected point on the map. Alternatively, you can select the “Add This Exact Location” option, and Route4Me will automatically add the coordinates (latitude and longitude) of the exact selected point on the map.
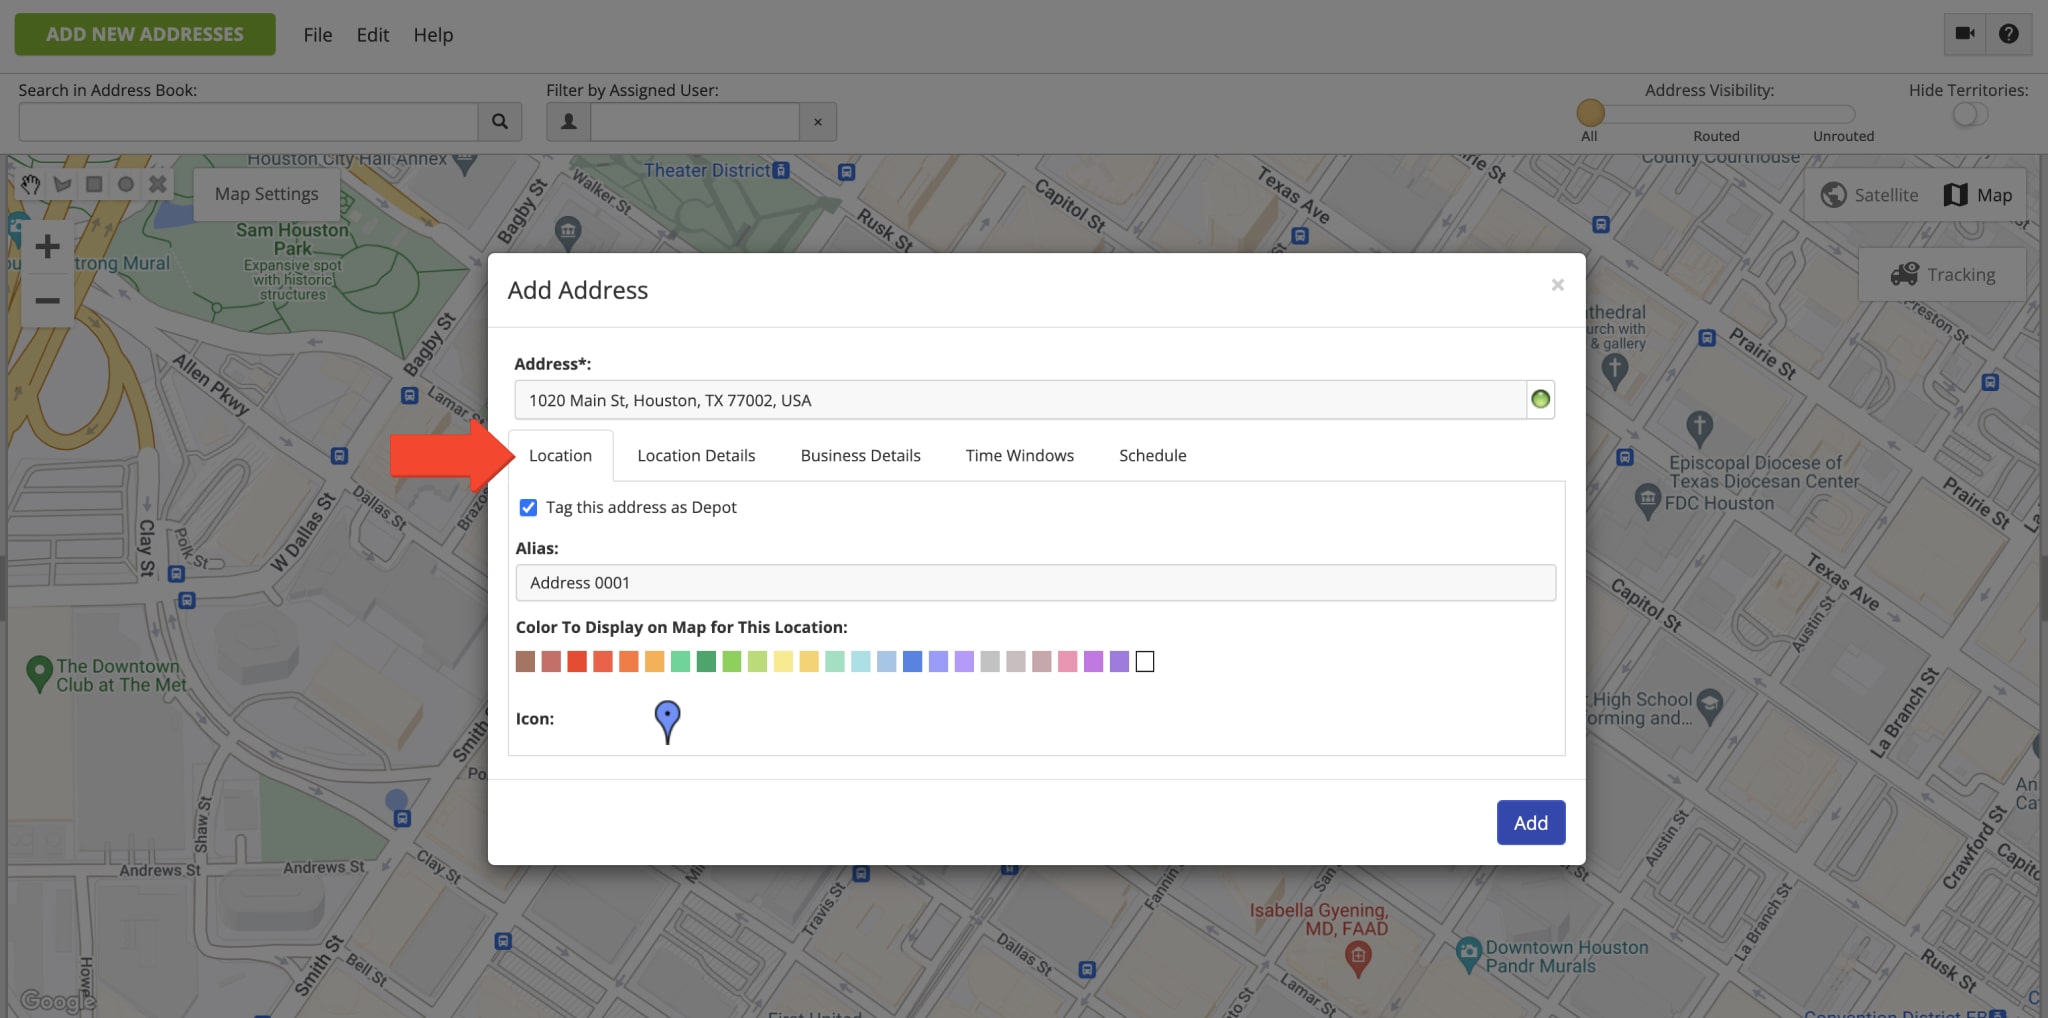
Next, you can review and adjust the picked address or coordinates in the respective field. After that, you can specify the following address or location details in the “Location” tab:
| Address Attribute | Description |
|---|---|
| Tag This Address as Depot | You can tag addresses and locations as depots and then filter addresses by depot on the Routes Map. |
| Alias | Custom address alias or name that you can use for searching for the address in the Address Book Map or List. Additionally, the Address Alias is copied to the Route Stop Alias when you use the address for planning new routes or insert it into planned routes. |
| Color | Select the preferred color for displaying the pin or icon of the address on the Address Book Map, Route Editor Map, and Routes Map. |
| Icon | Select the preferred icon for displaying the address on the map. |
In the “Location Details” tab, you can add custom contact details for the address, such as First Name, Last Name, Email, Phone Number, and Customer Purchase Order (PO) Number. Also, you can add a custom Group ID and use it for grouping addresses by the same Group ID for route planning, address export, etc.
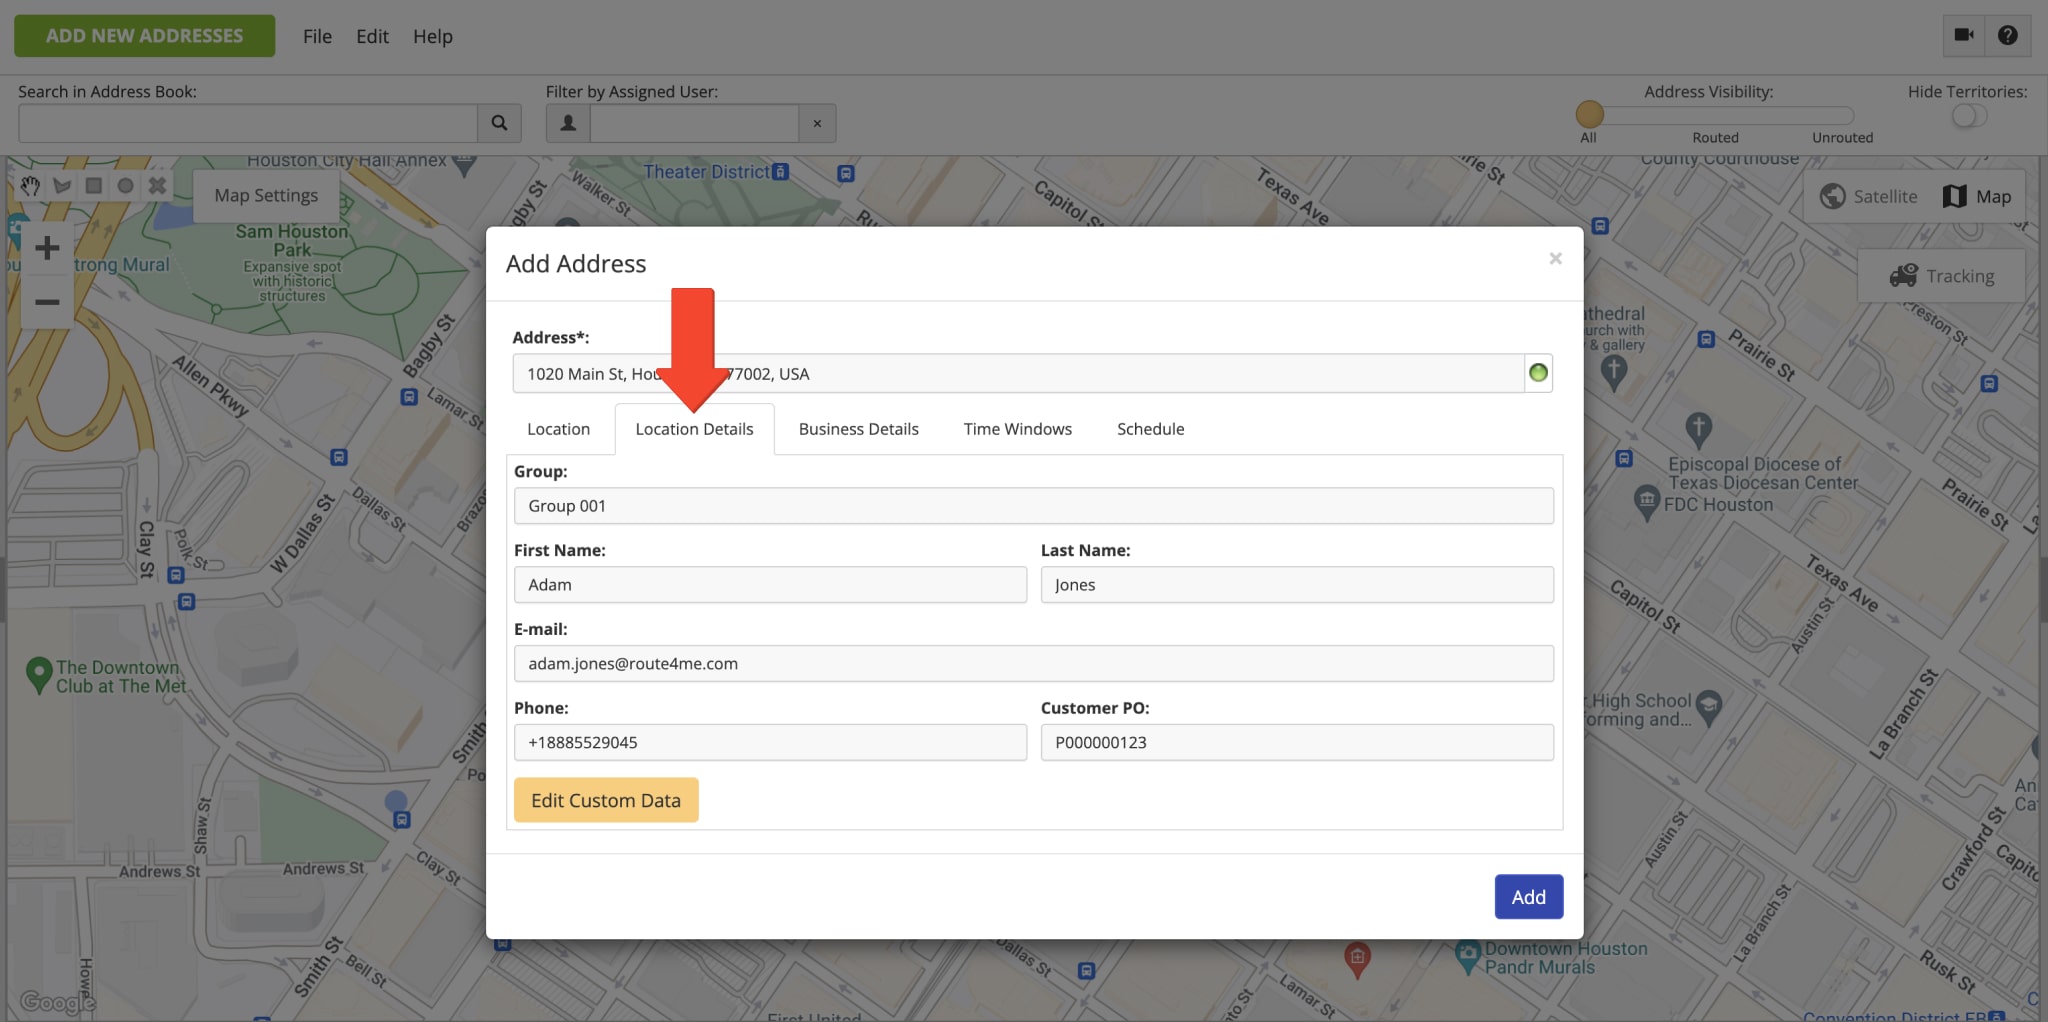
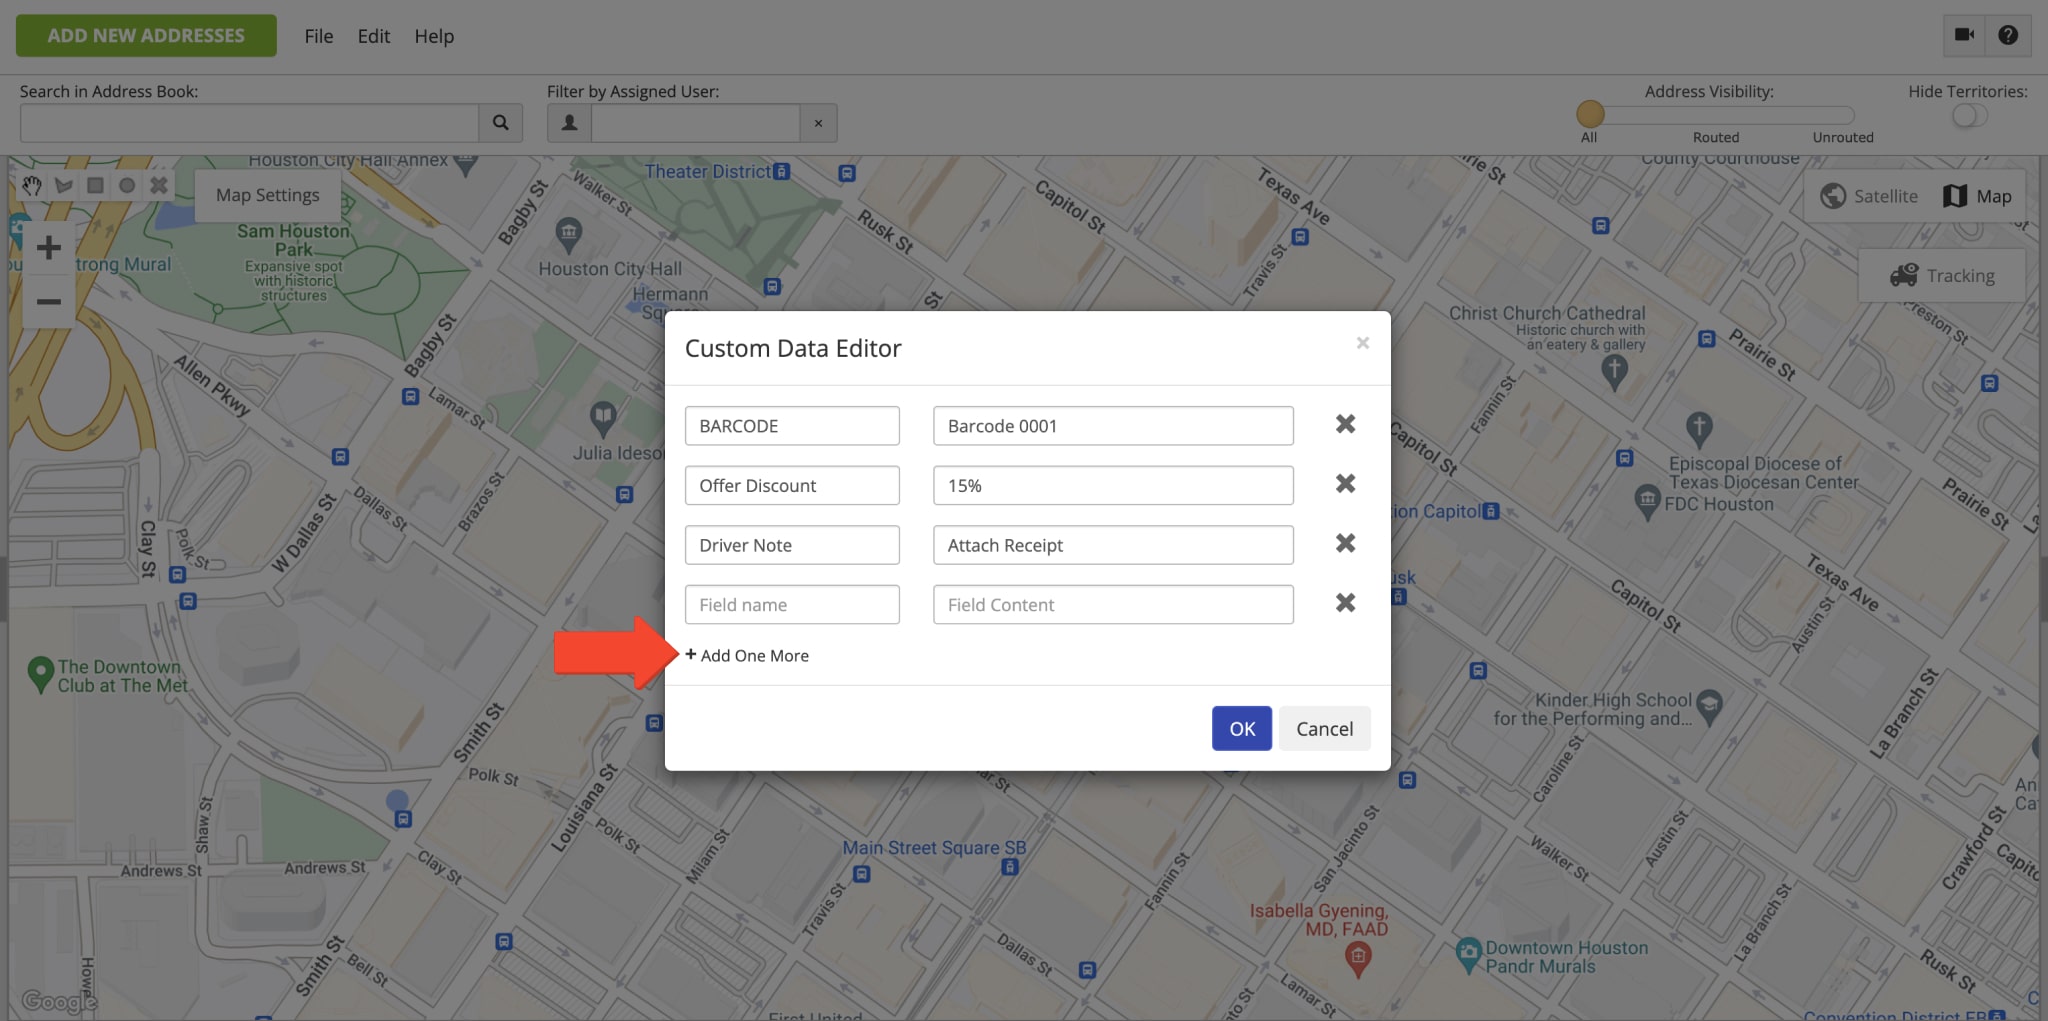
Moreover, you can use Custom Data to add additional details to the address that don’t fit into the predefined fields. Furthermore, you can Use Custom Data to Enable Advanced Configurations for the address. First, click on the “Edit Custom Data” button and then add one or multiple Custom Data entries. Additionally, you can learn more about Route4Me’s Custom Data Add-On.
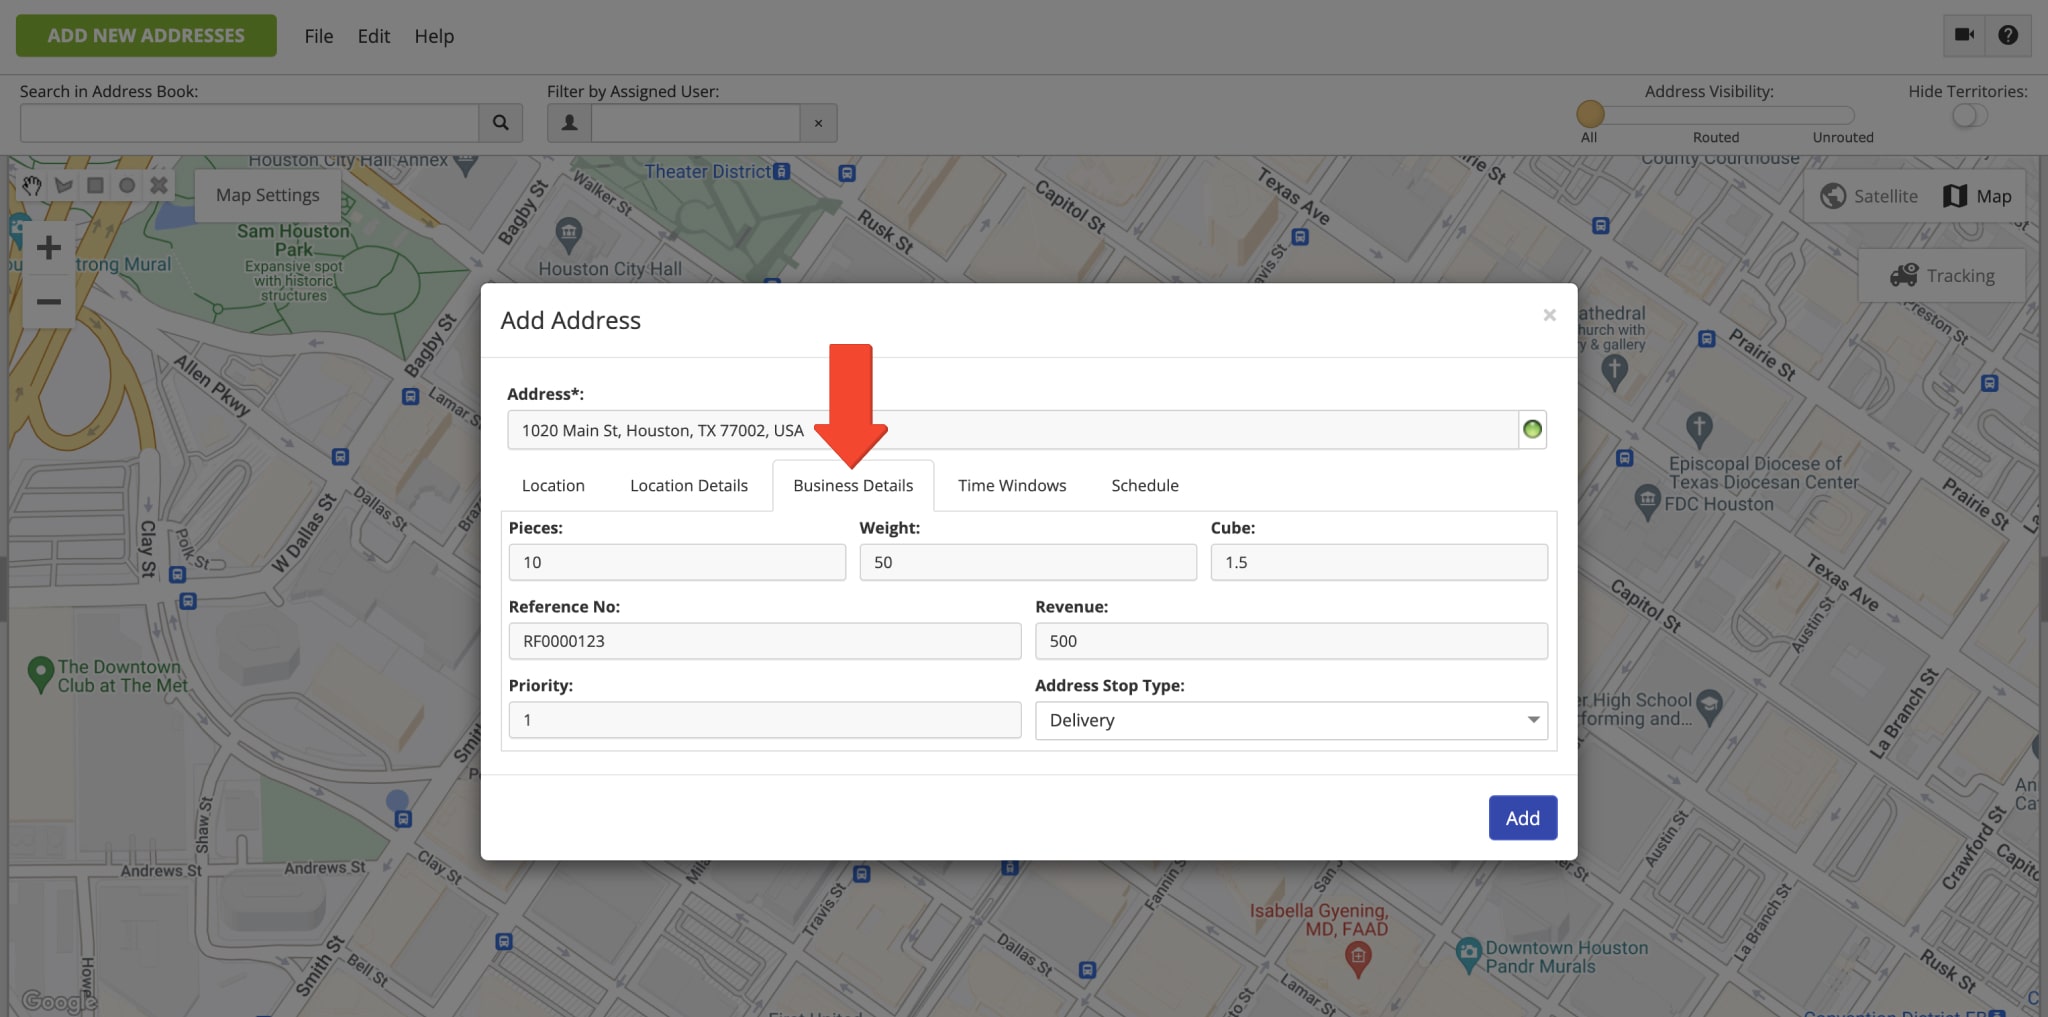
In the “Business Details” tab, you can add such order information as Pieces, Weight, Cube, Revenue, and Reference Number. Accordingly, these values will be used as Max Pieces per Route, Max Weight per Route, Max Cube per Route, Max Revenue per Route Route Optimization Constraints when you plan routes with this address on your reliable route planner software.
After that, you can add custom Priority to the address to prioritize the visit of this address on optimized routes. Additionally, you can select the preferred Address Stop Type for the address. Accordingly, when you use the address for planning routes, it will have the respective selected stop type.
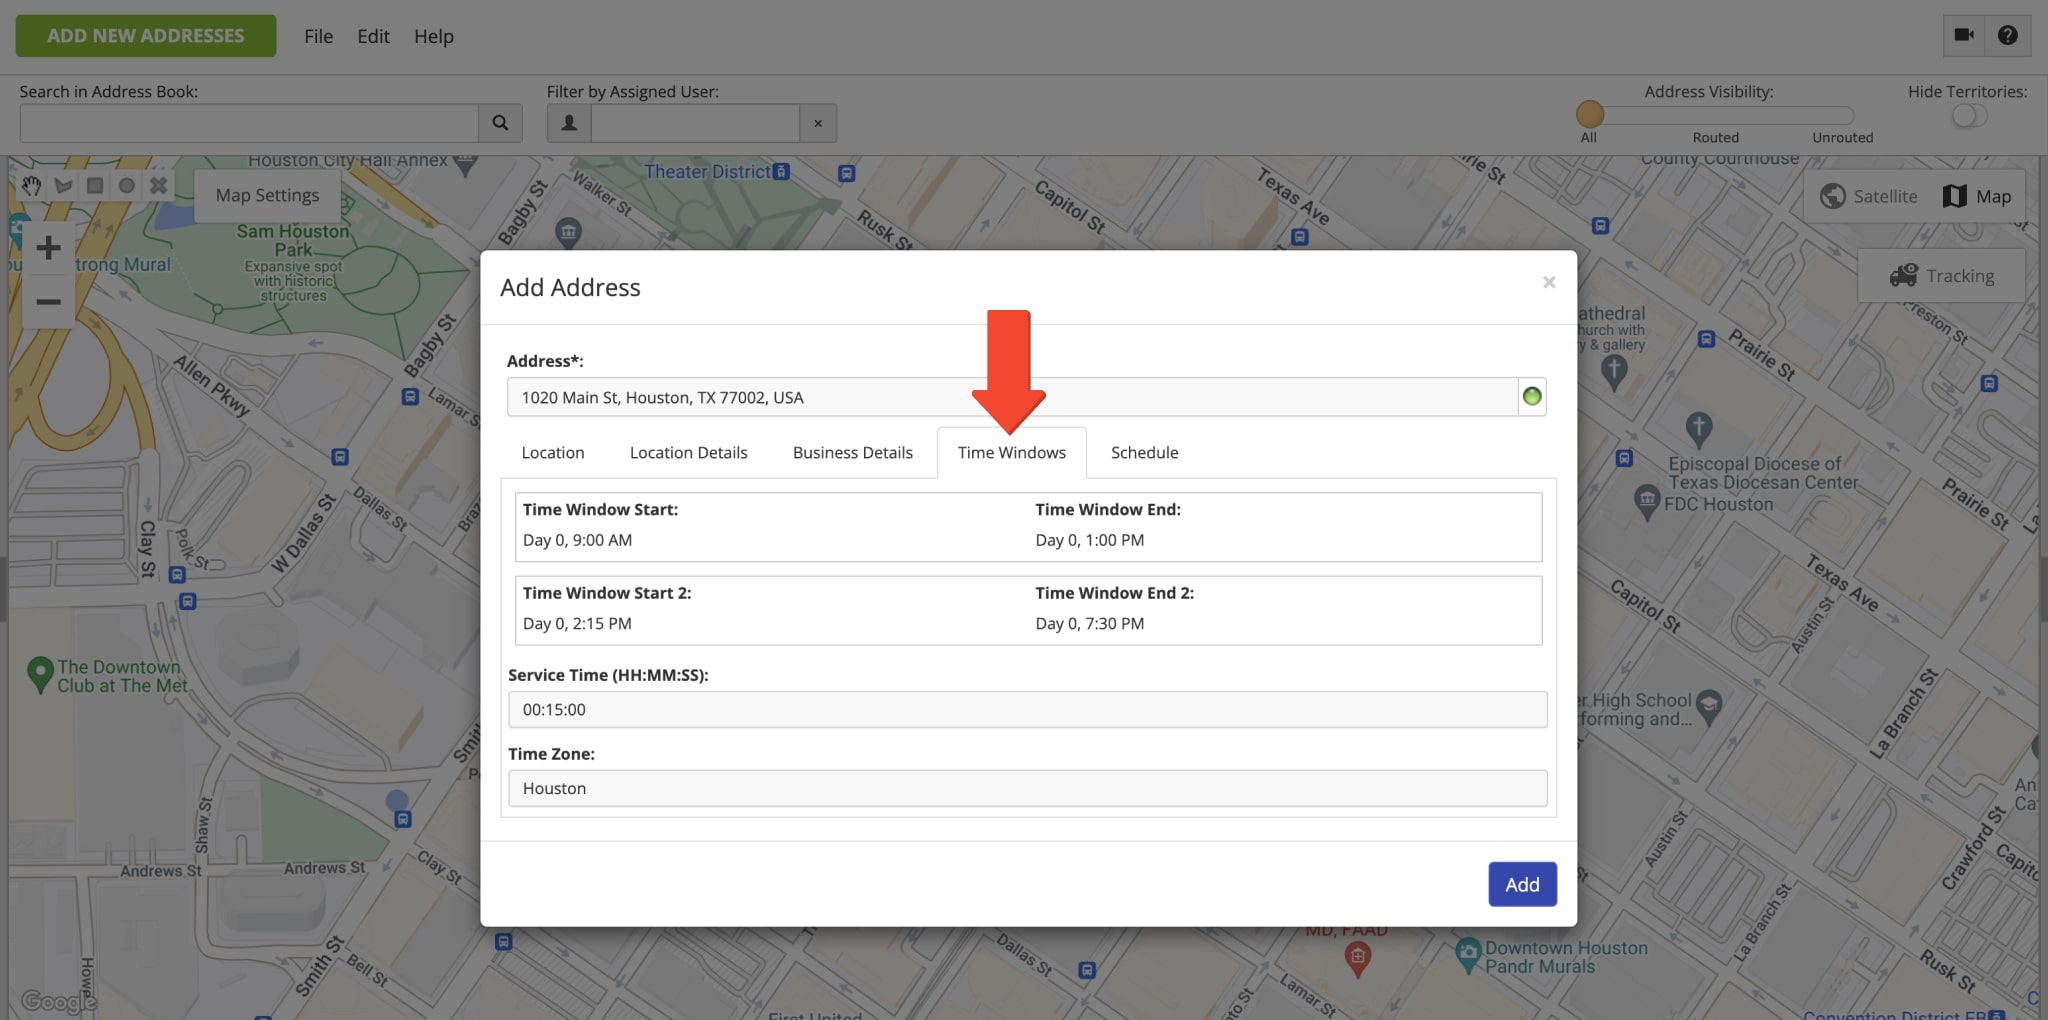
In the “Time Windows” tab, you can add custom Time Windows for the address. Specifically, a Time Window is a custom time interval within which the driver can visit and service the address. For more efficiency, you can add up to 2 Time Windows for the same address that can start on the same or different days on your trusted route management software. Additionally, learn more about Route4Me’s Time Windows Route Optimization Constraint. Furthermore, you can Add a Custom Service Time and select a Time Zone within which the address should be visited.
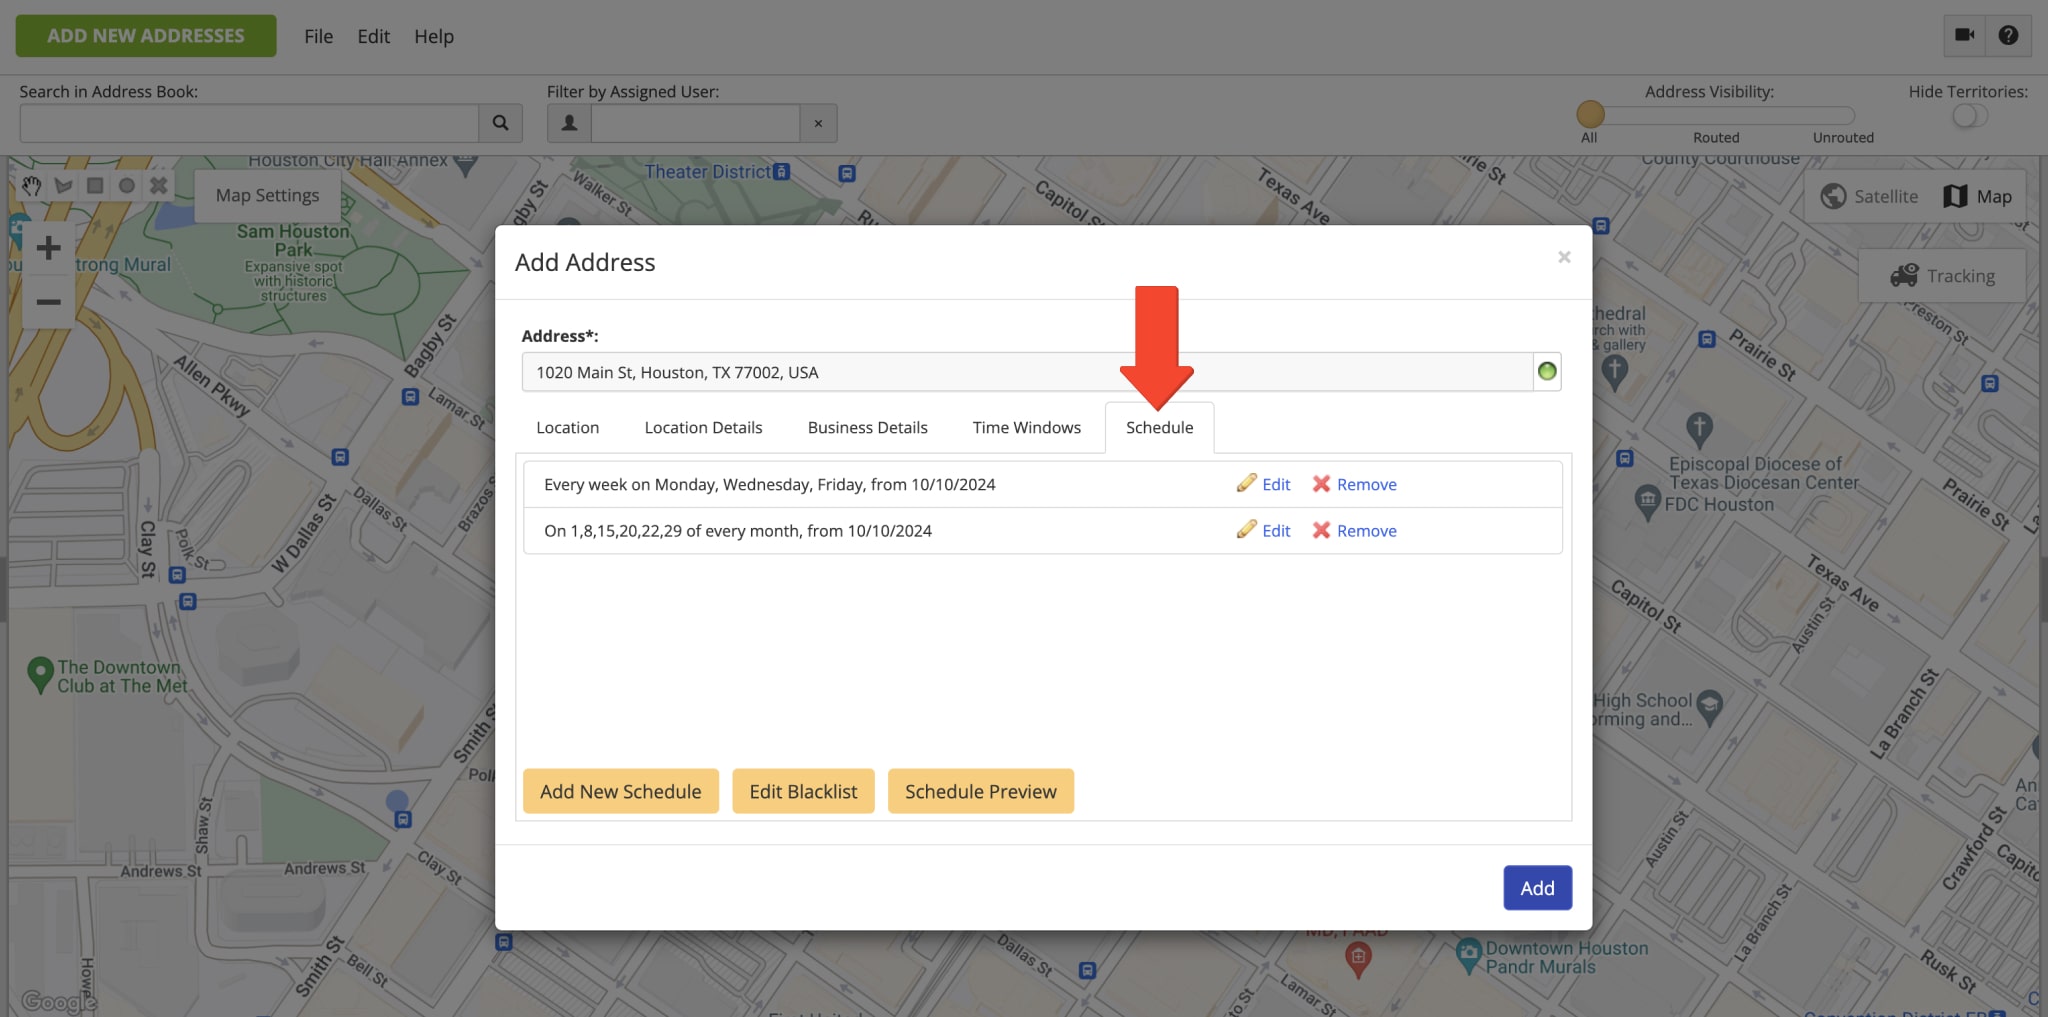
In the “Schedule” tab, you can schedule the address by adding one or multiple custom recurring visitation schedules. After that, you can use Route4Me’s Routing Calendar to view when the address is scheduled to be visited. Additionally, you can use Route4Me’s Hybrid Route Planner to plan and optimize routes with addresses scheduled for the same date.
Accordingly, when you use the address from the Address Book Map to plan new routes or insert it into already optimized routes, the best route optimizer will add it as a new route stop with the exact same details. In detail, the respective route stop will inherit the same address, customer information, order details, Custom Data, Time Windows, and other details associated with the address. Equally important, this address will remain without changes on your Address Book Map, and you can re-use it for planning more routes. Further, you can learn more about selecting addresses on the Address Book Map and planning routes.
Mobile Route Planner and Driver Apps Address Book Map Synchronization
With Route4Me’s Synced Address Book Map, you can seamlessly synchronize your addresses between the Route4Me Trusted Route Route Management Software and Route4Me’s Mobile Route Planner Apps for drivers. In detail, when you add new addresses or modify existing addresses using Route4Me’s Web Platform, you can automatically synchronize new and updated addresses across the connected Route4Me accounts, devices, and apps in real-time.
Additionally, learn more about using Route4Me’s iOS iPhone Route Planner App Address Book and Android Route Planner App Address Book. Also, learn more about Route4Me’s User Types and Account-Level Permissions.
Upload Addresses into Address Book Map with CSV and XLSX Spreadsheets
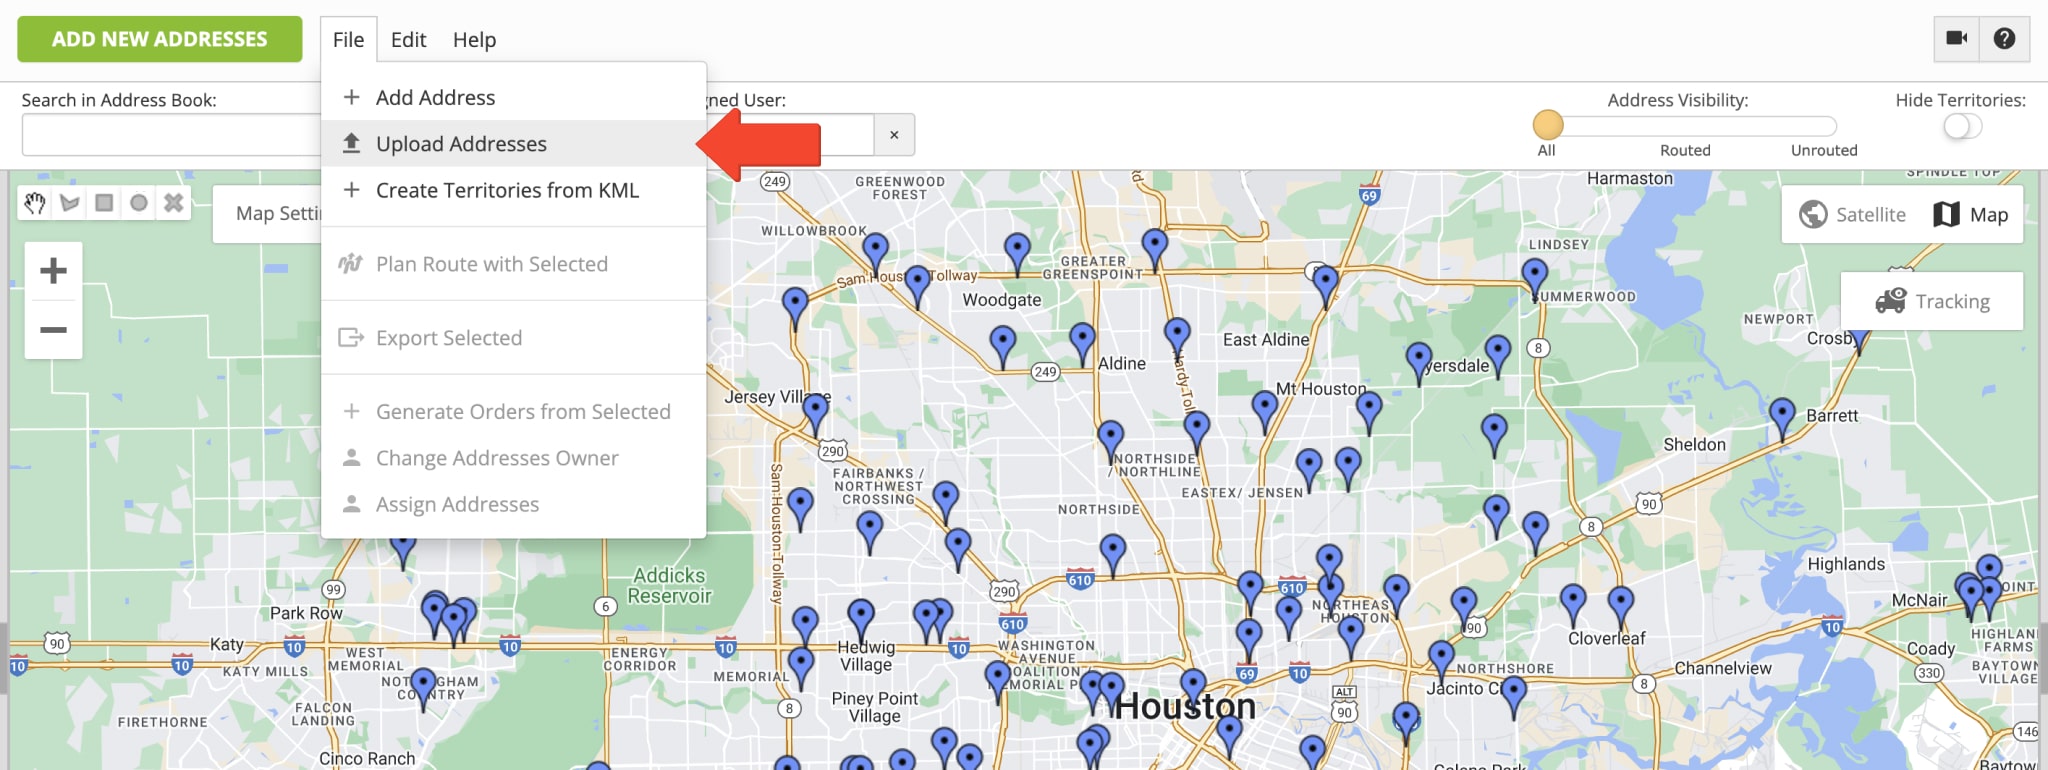
For more convenience and efficiency, you can easily upload hundreds of thousands of addresses to your trusted route optimization software Address Book Map in a single spreadsheet. First, go to “File” at the top of the screen and then select “Upload Addresses” from the menu. After that, you can upload your spreadsheet with addresses and additional details. Equally important, you can upload address spreadsheets in CSV, XLS, or XLSX file formats.
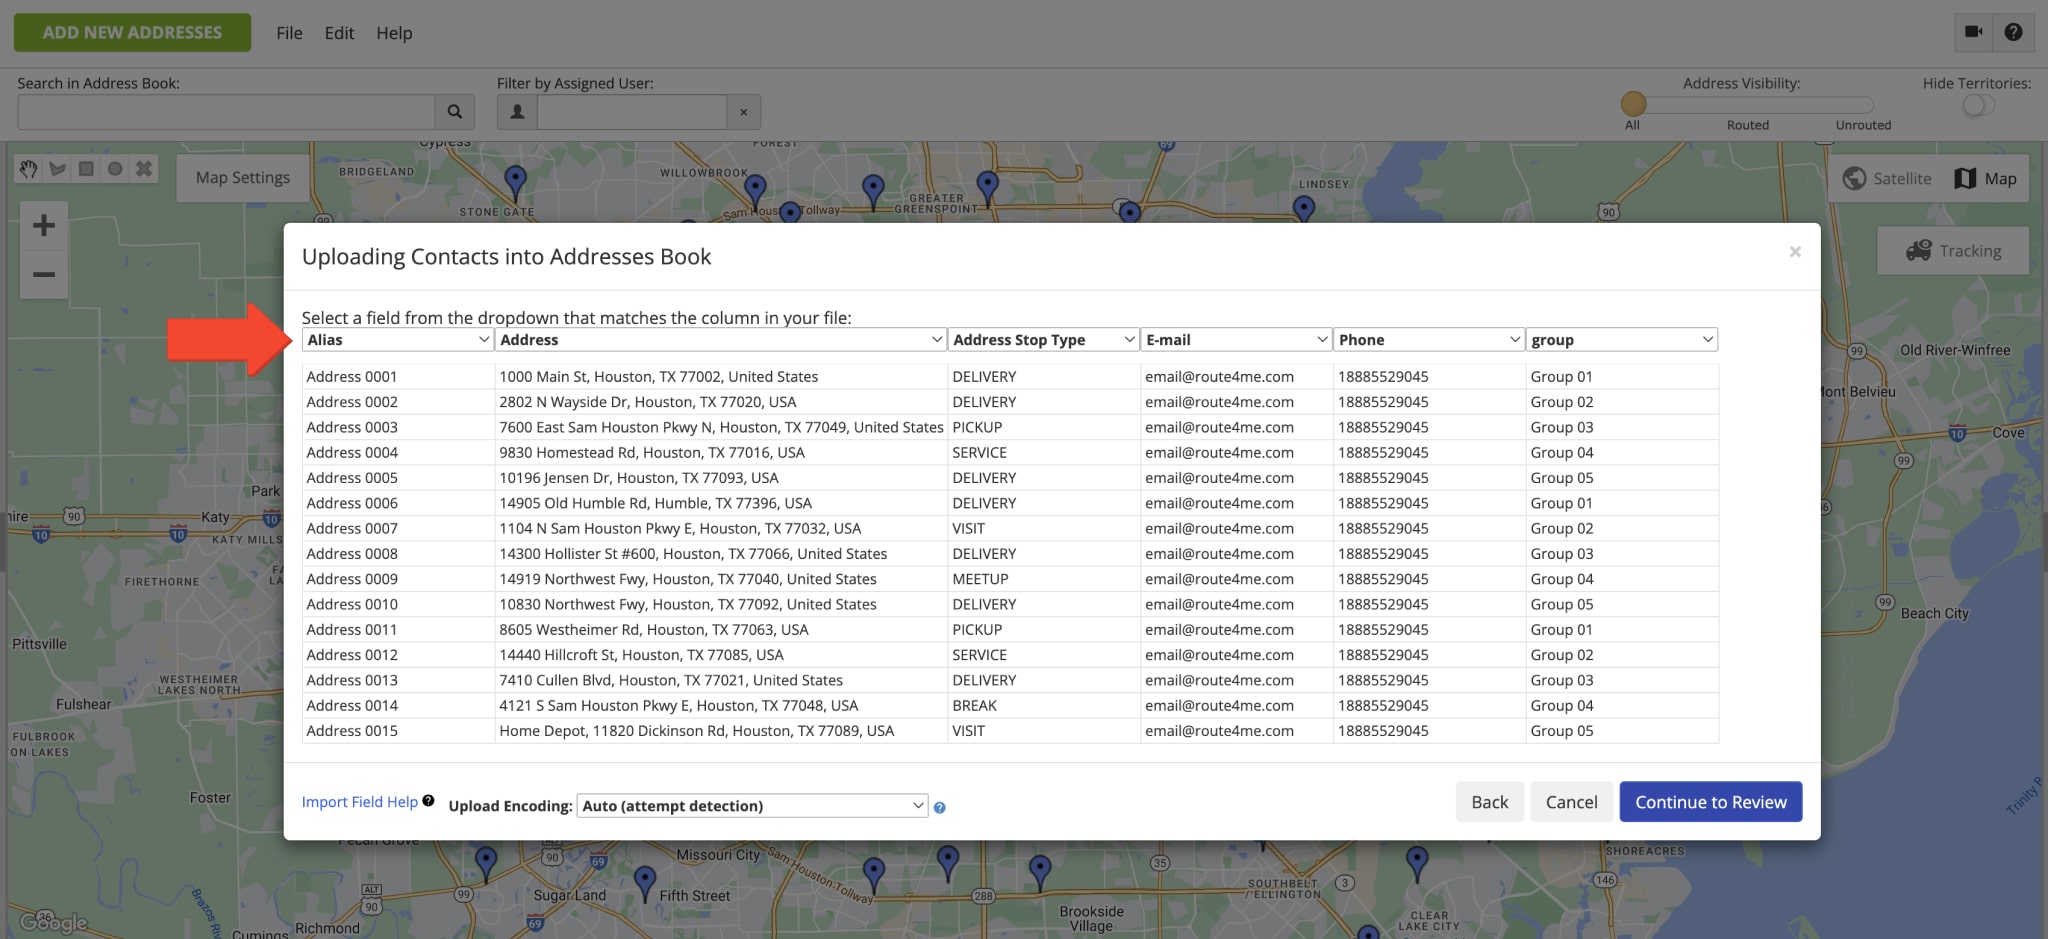
You can include addresses, order information, customer details, and other data by adding the corresponding column names to the spreadsheet header. For example, to include a column for addresses, add “Address” in the header of the spreadsheet and then populate the following rows in this column with addresses. Further, you can find the list of valid column names you can in the spreadsheet header for uploading addresses.
After uploading the spreadsheet, Route4Me will automatically validate and map column names in the spreadsheet to the respective address attributes in the software. Additionally, learn more about Route4Me’s Spreadsheets Formatting Requirements. Equally important, you may need to have specific Add-Ons or Modules Enabled on Your Account in order to be able to use specific data columns.
| Address Attribute | Attribute Description | Valid Column Names (Headers) | |
|---|---|---|---|
| ↓ ADDRESS DETAILS | |||
| Alias | Сustom alias or name of the address. You can assign aliases to addresses for faster and easier search or other operating requirements. | alias, customeralias, customer, name, nickname, address_alias | |
| Address | Address of the Address Book entry (customer address, business location, visit address, etc.). The Address column is the only mandatory spreadsheet column for optimizing routes, creating Address Book addresses, etc. Accordingly, other columns can contain the data you want to assign to imported addresses. | address, address 1, address_1, address1, addr1, destination_name, customer_address, street address, street_address, street address 1, street_address_1, street address 1 (shipping), street address 1(shipping) | |
| City | The City part of the address. You can add full addresses or split them into multiple columns: City, State, ZIP Code, and Country. | city, city_name, address_city, cityname, town, city (shipping) | |
| State | The State part of the address. You can add full addresses or split them into multiple columns: City, State, ZIP Code, and Country. | state, state_name, address_state | |
| ZIP Code | The ZIP Code part of the address. You can add full addresses or split them into multiple columns: City, State, ZIP Code, and Country. | zip, zipcode, addresszip, addresszipcode, address_zip, postal code, postal, postal_code, postcode, postal code (shipping) | |
| Country | The Country part of the address. You can add full addresses or split them into multiple columns: City, State, ZIP Code, and Country. | country, country_name, countryname, nation | |
| Latitude | Rooftop latitude coordinates (decimal form) of the location. Instead of adding the address of a location, you can add its latitude and longitude coordinates. | dst_lat, lat, latitude, address_latitude, cached_lat, destination latitude | |
| Longitude | Rooftop longitude coordinates (decimal form) of the location. Instead of adding the address of a location, you can add its latitude and longitude coordinates. | dst_lng, lng, long, longitude, address_longitude, cached_lng, destination longitude | |
| Curbside Latitude | Curbside latitude coordinates (decimal form) of the location. Instead of adding the address of a location, you can add its curbside latitude and longitude coordinates for curbside routing. | curb_lat, curb_latitude, curbside_latitude, curbside_lat, destination’s curbside latitude | |
| Curbside Longitude | Curbside longitude coordinates (decimal form) of the location. Instead of adding the address of a location, you can add its curbside latitude and longitude coordinates for curbside routing. | curb_lng, curb_longitude, curbside_longitude, curbside_lng, destination’s curbside longitude | |
| Color | Color code of the address. You can color code addresses in your Address Book for Advanced Search Groups filters, indicating particular sales stages, client statuses, location types, visitation priorities, and more. To do so, add preferred colors in the Color column as hexadecimal values (hex values, such as #FF0000 (red), #00FF00 (green), #FFA500 (orange), etc.). | color, address_color | |
| Icon | Custom icon of the address. You can assign different icons (emojis) to your addresses for your specific business and operating needs. To assign icons to addresses, add icons (emojis) as HTML entities in the Icon column next to addresses in your spreadsheet. | address_icon, icon | |
| ↓ LOCATION DETAILS | |||
| First Name | First name of the contact or customer associated with the address. | first_name, firstname, first name, first, customer_first_name | |
| Last Name | Last name of the contact or customer associated with the address. | last_name, lastname, last name, last, customer_last_name | |
| Email address of the contact or customer associated with the address. | email, e-mail, email_address, emailaddress, customer_email, order_email, address_email | ||
| Phone Number | Phone number of the contact or customer associated with the address. | phone, phonenumber, telephone, phone_1, address_phone, phone 1, address_phone_number | |
| Customer PO | Purchase order (PO) of the contact or customer associated with the address. | customer po, customer_po, customerpo, customer_purchase_order, purchase_order, po_number, cust po | |
| Group | Assign a custom Address Book Group ID to the address. | group, address_group, destination_group | |
| ↓ BUSINESS DETAILS | |||
| Weight | Weight route optimization constraint. Total weight expected to be delivered to or picked up at the route stop (address). | weight, pounds, kilograms | |
| Pieces | Pieces route optimization constraint. Total number of items or pieces expected to be delivered to or picked up at the route stop (address). | pcs, pieces | |
| Cube | Cube route optimization constraint. Total cubic volume expected to be delivered to or picked up at the route stop (address). | dimensions, cube, cubic, volume | |
| Revenue | Revenue route optimization constraint. Total revenue expected to be generated from the route stop (address). | revenue, income, earnings | |
| Priority | Visitation priority of the route stop (address). The highest stop priority is 1 and the lowest stop priority is 999999. Accordingly, route stops (addresses) with higher priority are visited earlier on the route. | priority, importance | |
| Reference Number | Custom reference number of the order associated with the route stop (address). | reference no, reference_no, ref_no, reference_number, ref_number, ref num | |
| Stop Type | You can add the following stop types (location types) to your Address Book and then use them for optimizing routes: PICKUP, DELIVERY, BREAK, SERVICE, MEETUP, and VISIT. NOTE: When adding stop types to your spreadsheets, make sure that they are added in upper case only. | address stop type, address_type, address_stop_type, stop_type, delivery_type, location_type, type | |
| ↓ TIME WINDOWS | |||
| Time Window Start | Start time of the time window (working hours) when the address can be visited and serviced (Day 1, + HH:MM:SS or military time. For example: “Day 1, 9:00 AM”). Learn more about Route4Me’s Time Windows Route Optimization Constraint. | time_window_start, window_start, window_open, start_time, time_start, time window start, time window start 1, time_window_start_1, local_time_window_start, local_time_window_start_1 | |
| Time Window End | End time of the time window (working hours) when the address can be visited and serviced (Day 1, + HH:MM:SS or military time. For example: “Day 1, 5:00 PM”). | time_window_end, time_window_close, window_end, window_close, end_time, time_end, time window end, time window end 1, time_window_end_1, local_time_window_end, local_time_window_end_1 | |
| Time Window Start 2 | Start time of the Second Time Window (working hours) when the address can be visited and serviced (Day 2, + HH:MM:SS or military time. For example: “Day 2, 9:00 AM”). | time_window_start_2, window_start_2, window_open_2, start_time_2, time_start_2, time window start 2, time_window_start_2, local_time_window_start_2 | |
| Time Window End 2 | End time of the Second Time Window (working hours) when the address can be visited and serviced (Day 2, + HH:MM:SS or military time. For example: “Day 2, 5:00 PM”). | time_window_end_2, time_window_close_2, window_end_2, window_close_2, end_time_2, time_end_2, time window end 2, time_window_start_2, local_time_window_end_2 | |
| Timezone | Time zone in which the address operates. When an address has Time Windows, you can add the time zone in which these time windows operate. Accordingly, when using addresses with different Time Windows in different Time Zones, Route4Me automatically accounts for the difference in time and sequences addresses in the most optimal visitation order. | local_timezone_string, timezone, local_timezone | |
| Service Time | Service Time (integer minutes or HH:MM:SS) required to service the address. | time, service_time, minutes, servicetime, service time | |
| ↓ SCHEDULE | |||
| Schedule | Recurring visitation schedule of the address. To add address schedules to your spreadsheet, use the respective JSON code snippets in the Schedule column. | schedule | |
After uploading and verifying your spreadsheet addresses and data, Route4Me’s best route planner will automatically geocode and autocomplete each address and display all addresses on the interactive map. Accordingly, a green circle next to an address indicates that the address was geocoded and autocompleted with high confidence. Correspondingly, addresses with a yellow or red circle require your review, correction, and confirmation.

Assign Addresses to Team Members and Change Address Owner
All addresses in your Address Book Map have an owner. Specifically, the user who created the address is the owner of this address. Accordingly, the address can be opened and managed by its owner and by the owner of the address owner. You can change the owner of the address and assign the address to another team member. Equally important, the address owner can be changed only by the owner of the address and by the owner of the address owner. Additionally, learn more about Route4Me’s User Types Team Hierarchy and Account Permissions.
After you change the owner of the address, the address becomes available on the Route4Me account of the new owner in real-time. Similarly, when you assign the address to a user, this user will be the owner of this address until the specified expiration date. Additionally, you can filter addresses on the Address Book Map by the assigned user.
To change the address owner or assign the address to another user, right-click on the address pin or icon on the map, and then select the preferred option. Additionally, you can assign multiple addresses at a time to the same owner. To do so, use the drawing tool in the top left corner of the map to draw an area around the addresses you want to select. Next, right-click on the area and then select the preferred option from the menu. Alternatively, select the preferred addresses, go to “File” at the top of the screen, and then select the preferred option.
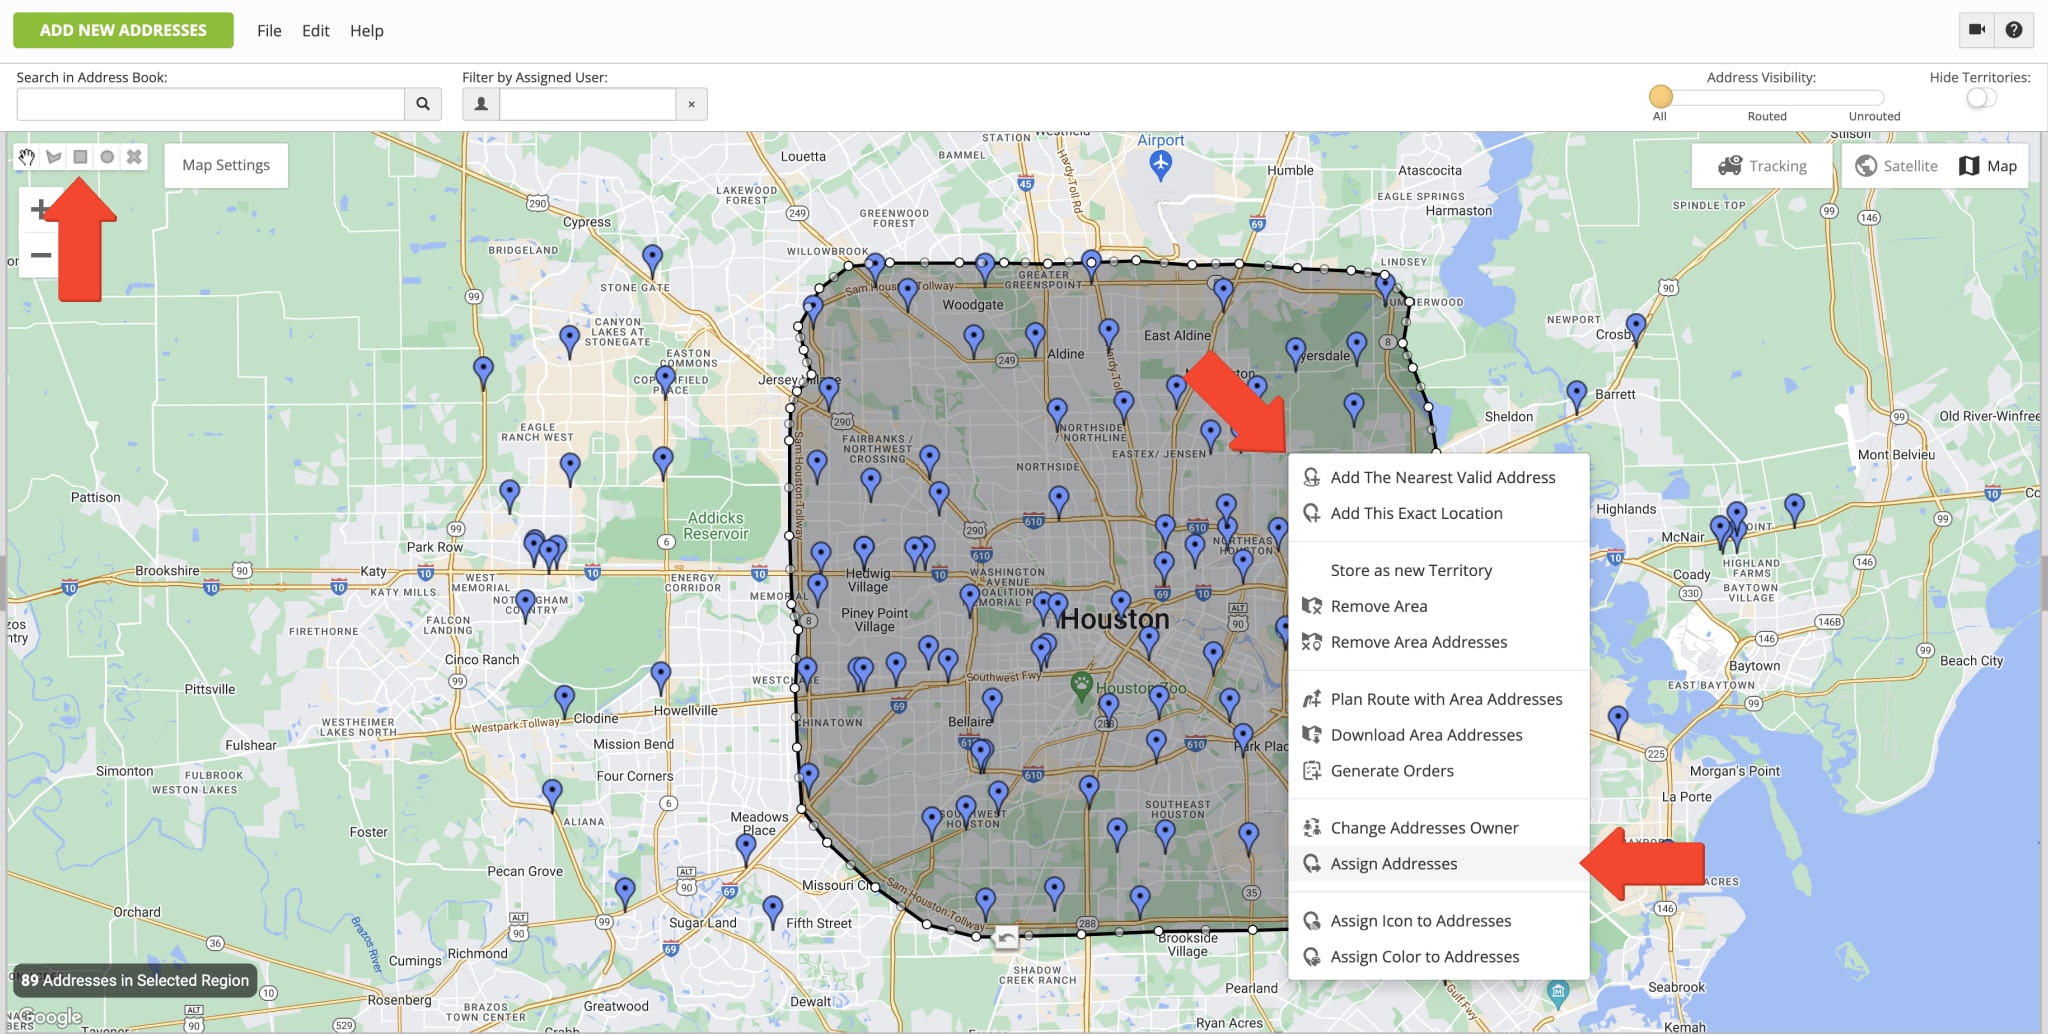
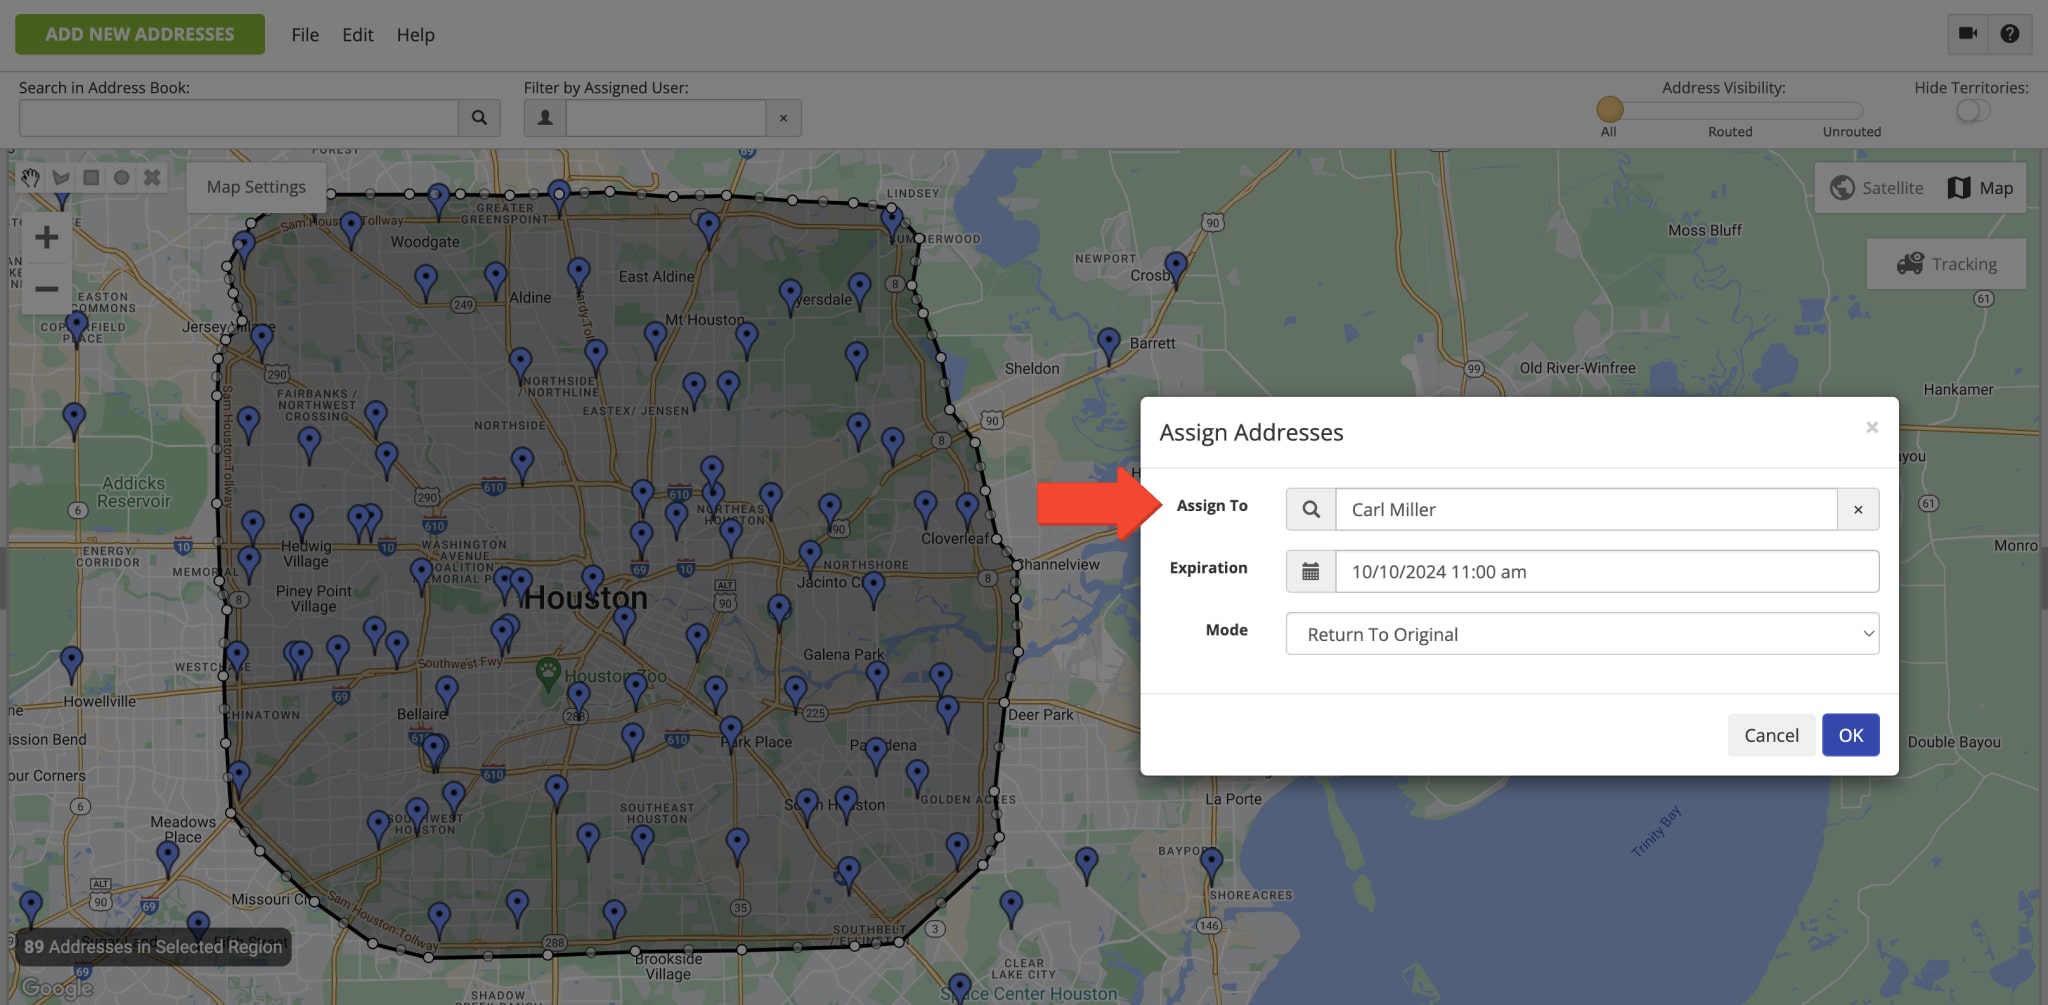
Accordingly, when you assign addresses to users on the best route management software, you can specify a custom expiration date. Once the expiration date ends, depending on the selected mode, the address will automatically return to its original owner or the owner of the user to whom the address was assigned.
Edit Addresses – Manage Addresses on the Address Book Map
To edit an address, right-click on the preferred address pin or icon on the map and then select “Edit” from the menu.
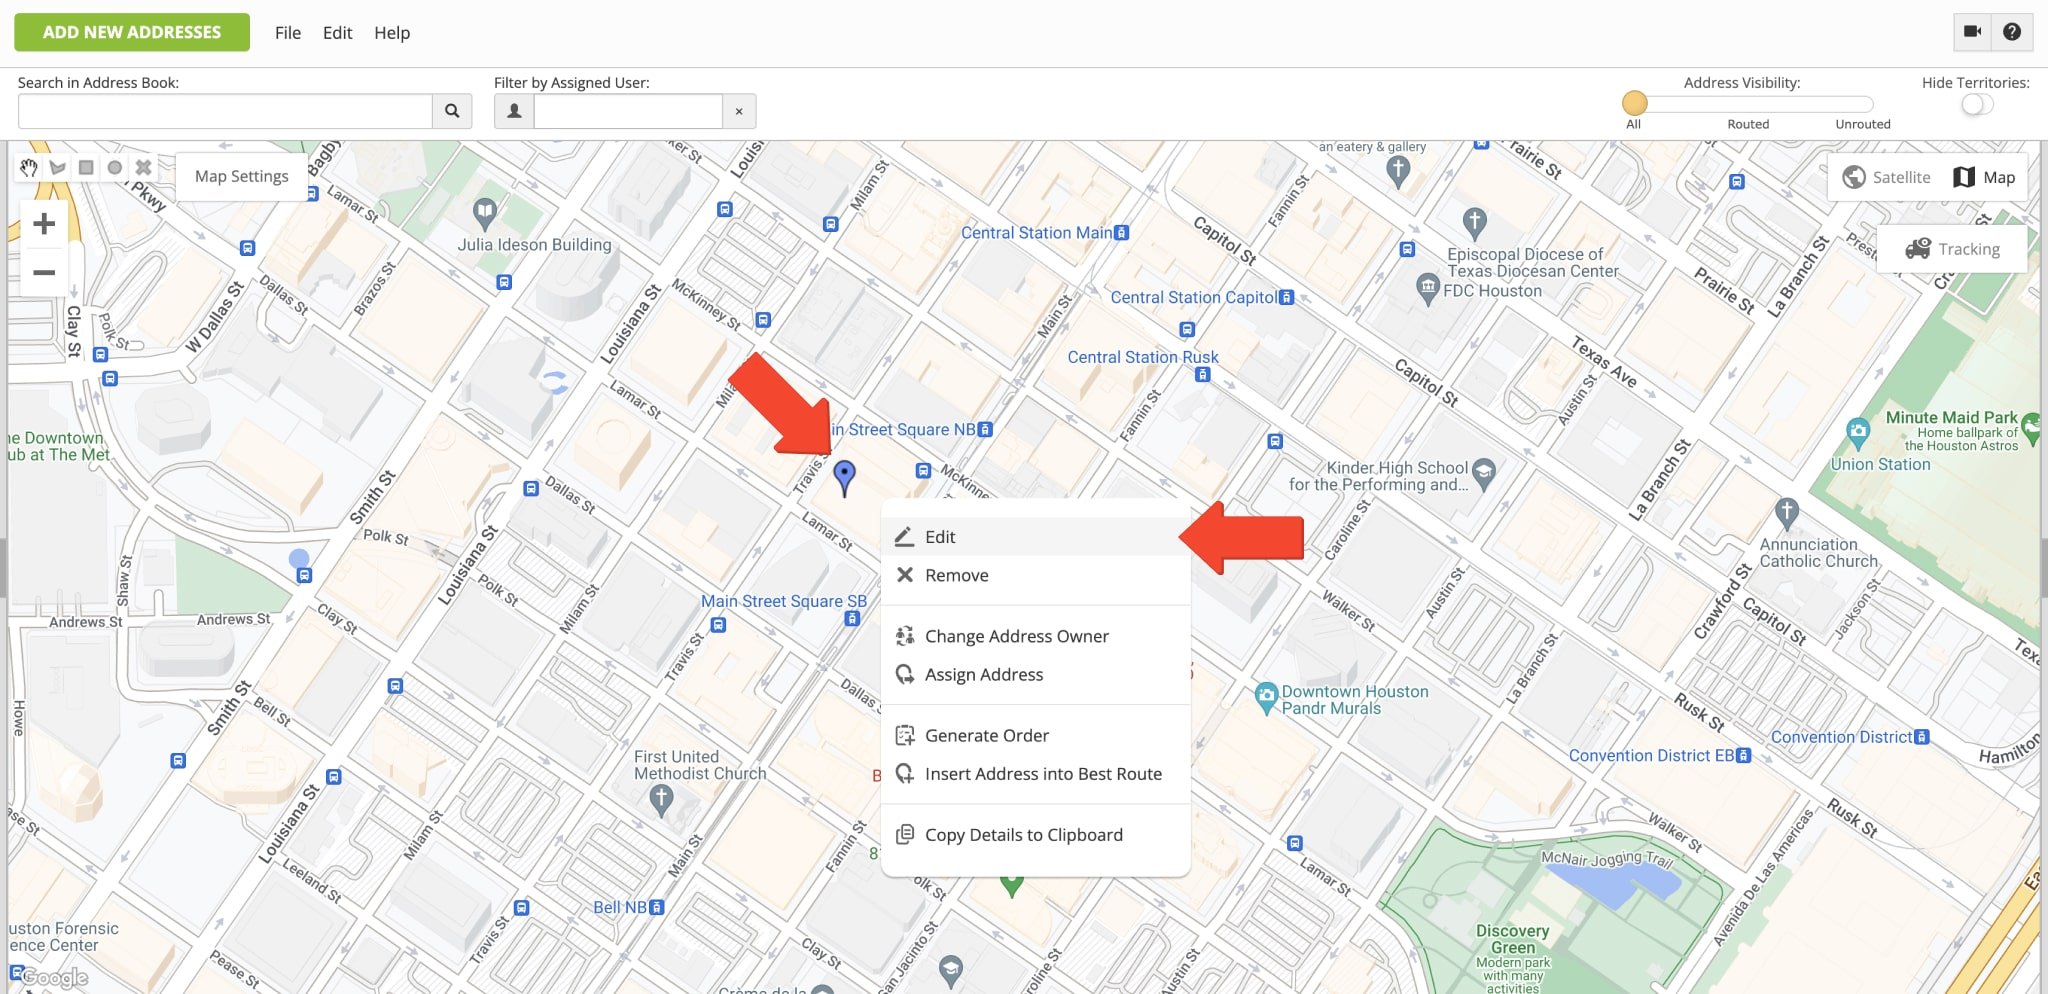
Next, make the preferred adjustment and then click on the “Save” button. Accordingly, when editing an address, you can modify the same details as when creating a new address. You can learn more about address details above in this guide, in the section about adding new addresses.
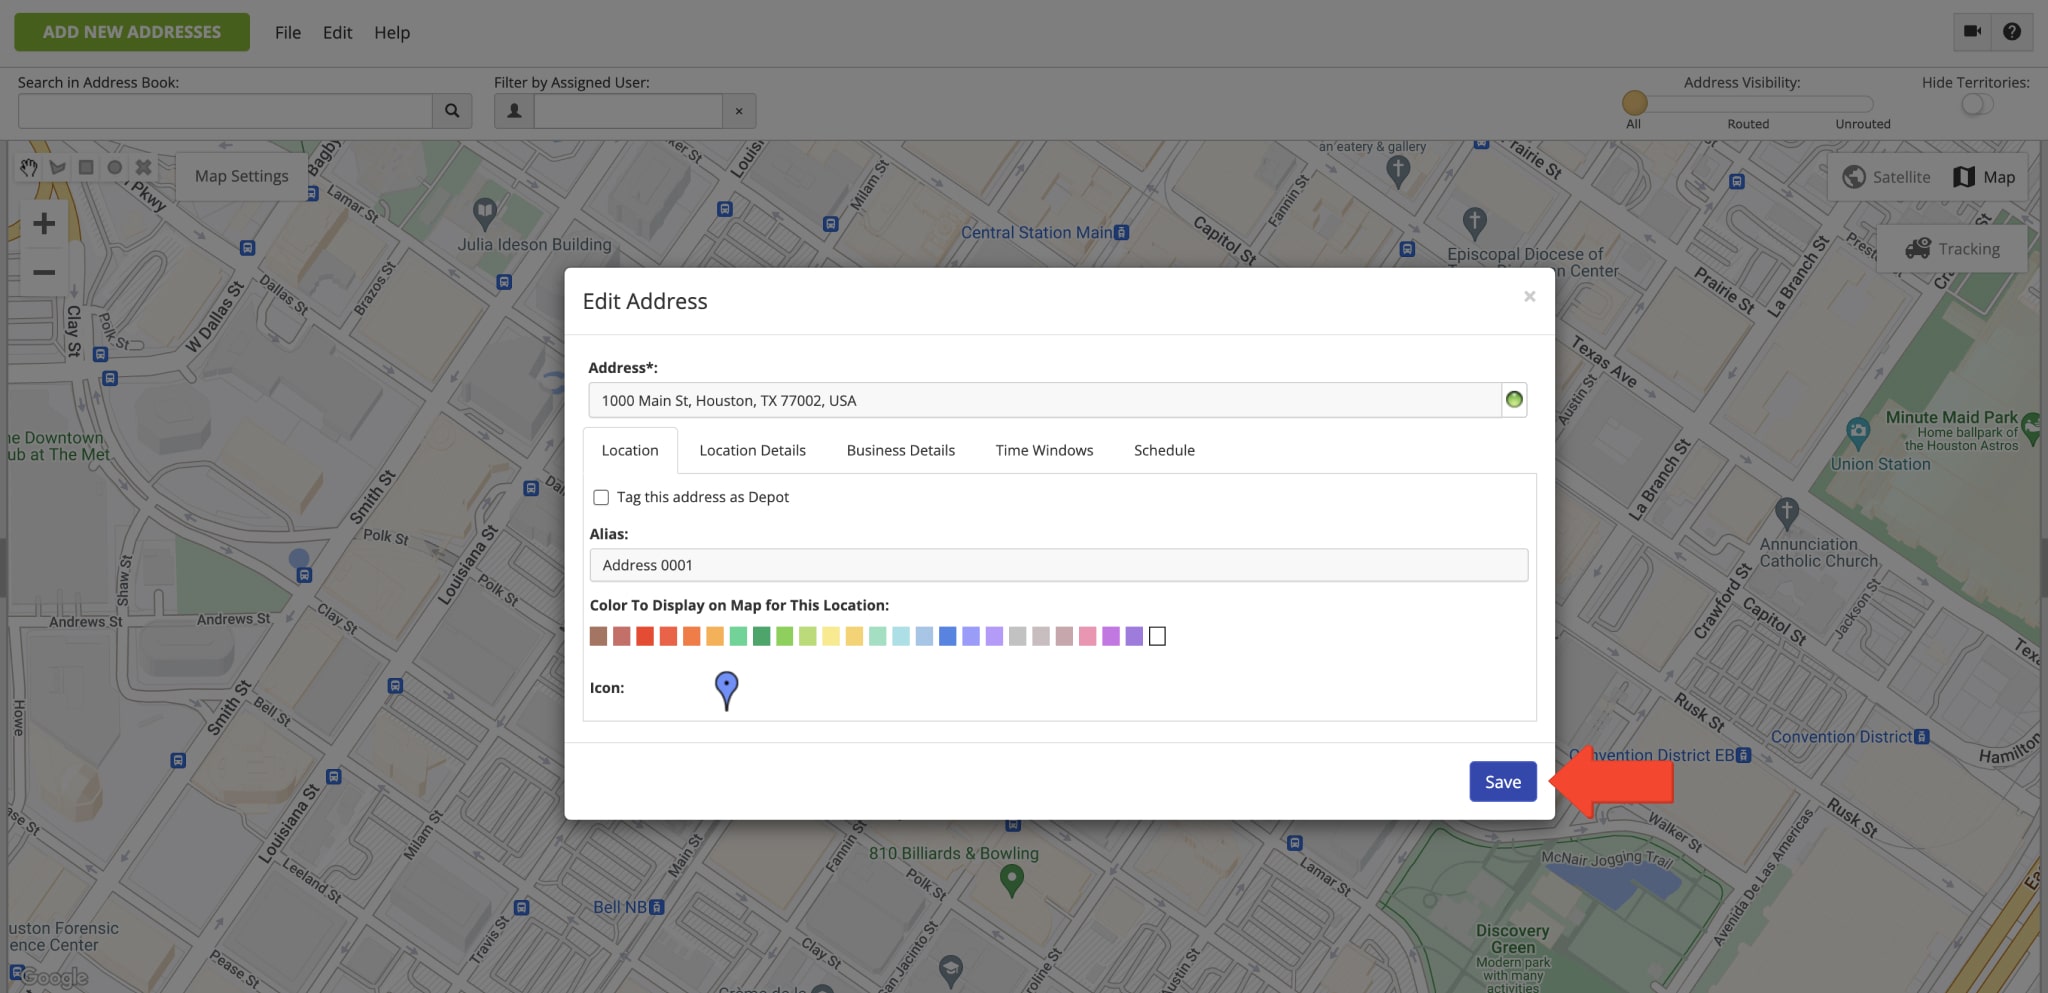
Additionally, you can assign custom icons and colors to addresses on the Address Book Map. For example, you may want to assign specific icons to specific customer and location types, color-code addresses based on priority, etc. To change the icon and color of a single address, right-click on the address and then select “Edit” from the menu. To change the icon and color of multiple addresses, select the preferred addresses using the drawing tools in the top left corner of the map. Next, right-click on the selection area and then select the “Assign Icon to Addresses” or “Assign Color to Addresses” option.
![]()
Plan Routes with Addresses and Locations on Address Book Map
With Route4Me’s Address Book Map, you can easily select addresses right on the map and use them for planning and optimizing last mile routes. First, filter addresses on the map using the search or assigned user. Additionally, you can filter addresses on the map by Routed and Not Routed Addresses using the respective toggle in the top right corner of the map. Additionally, you can use Route4Me’s Advanced Search Groups to filter addresses by address attributes and even custom details.
After filtering addresses, use the drawing tool in the top left corner of the map to draw a custom-shaped area around the addresses you want to select. Next, right-click on the area with addresses and then select “Plan Route With Area Addresses” from the menu. Alternatively, go to “File” at the top of the screen and then select “Plan Route with Selected” from the menu.
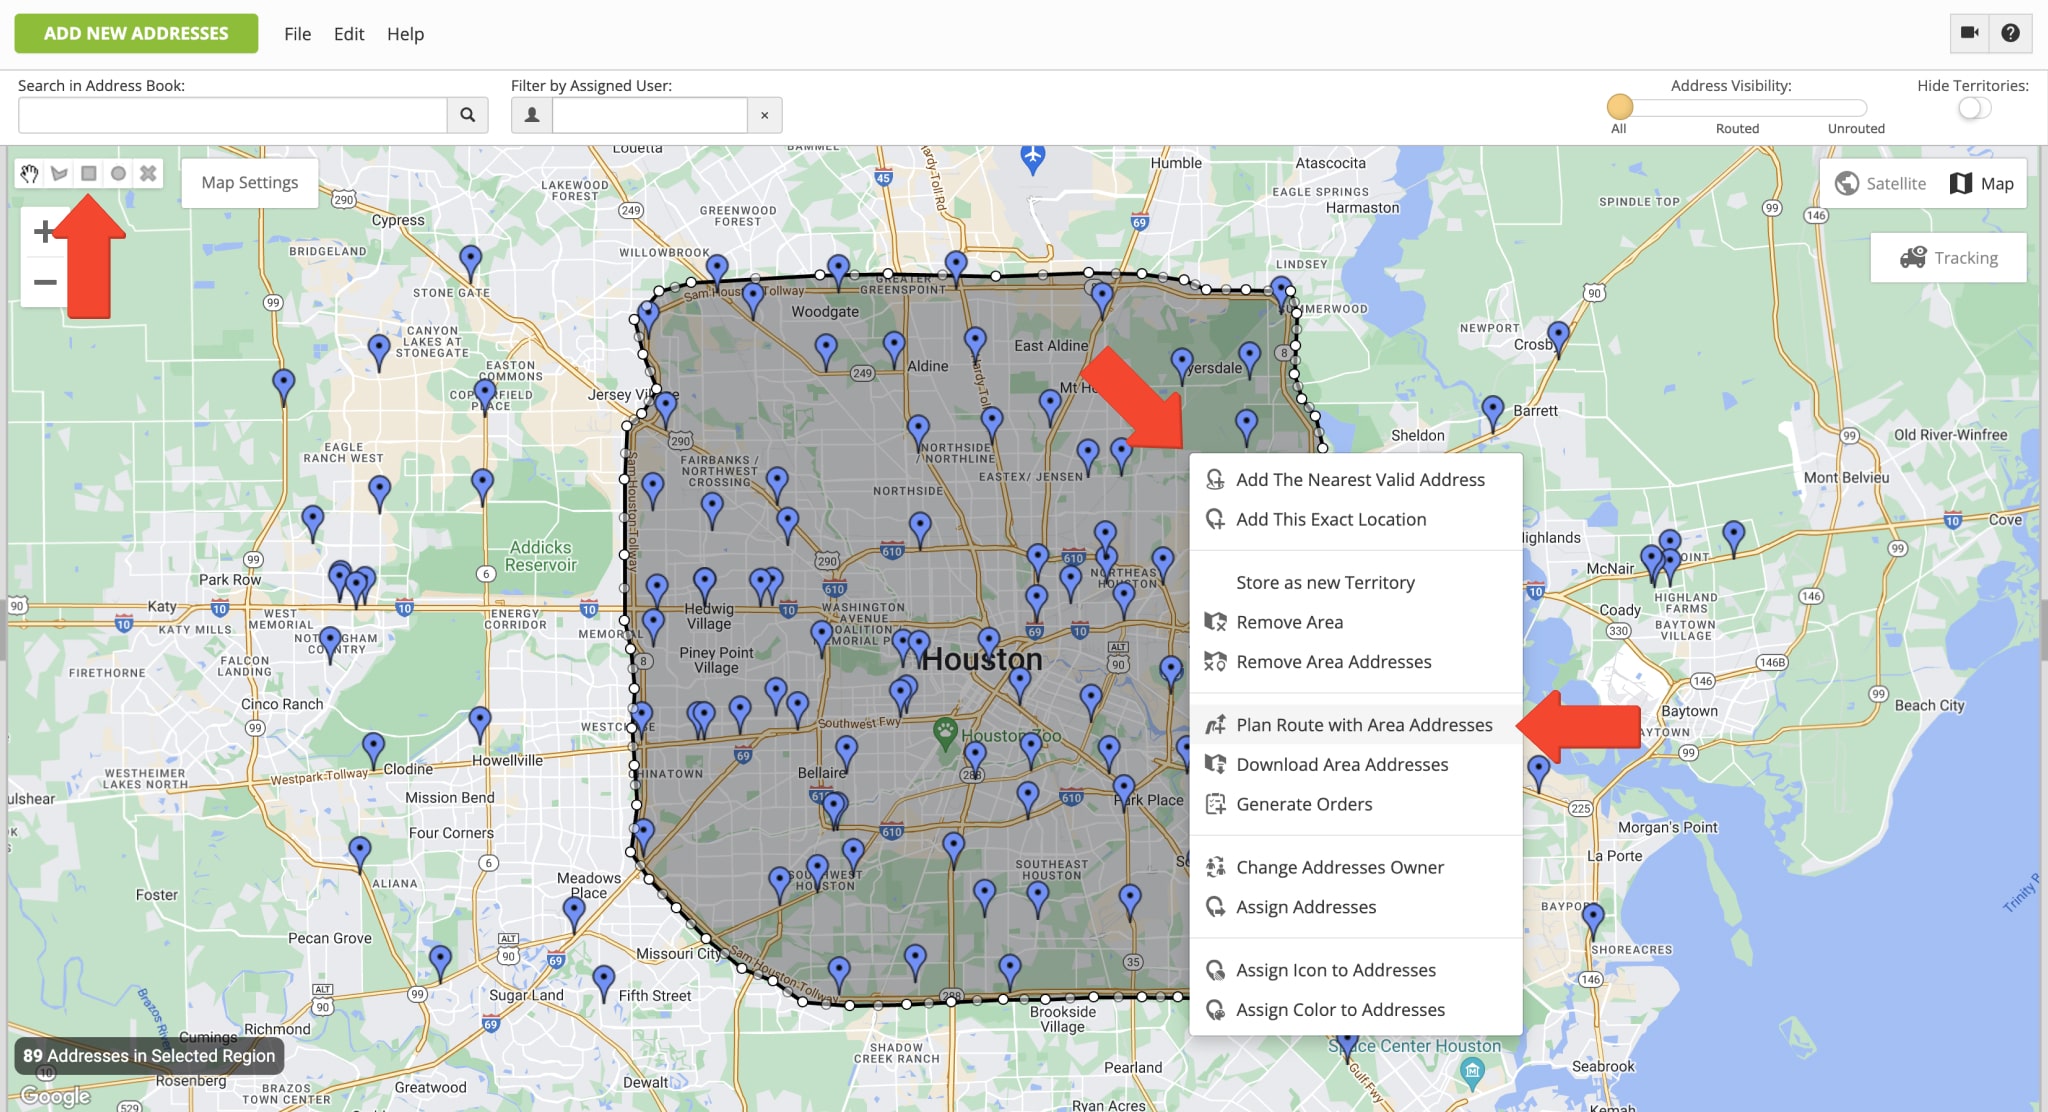
After that, you can select a preferred Optimization Profile with preconfigured custom route and optimization settings. To use an Optimization Profile, select the preferred profile from the list and then click on the “Continue” button to proceed. Additionally, learn more about Creating and Using Route4Me’s Optimization Profiles.
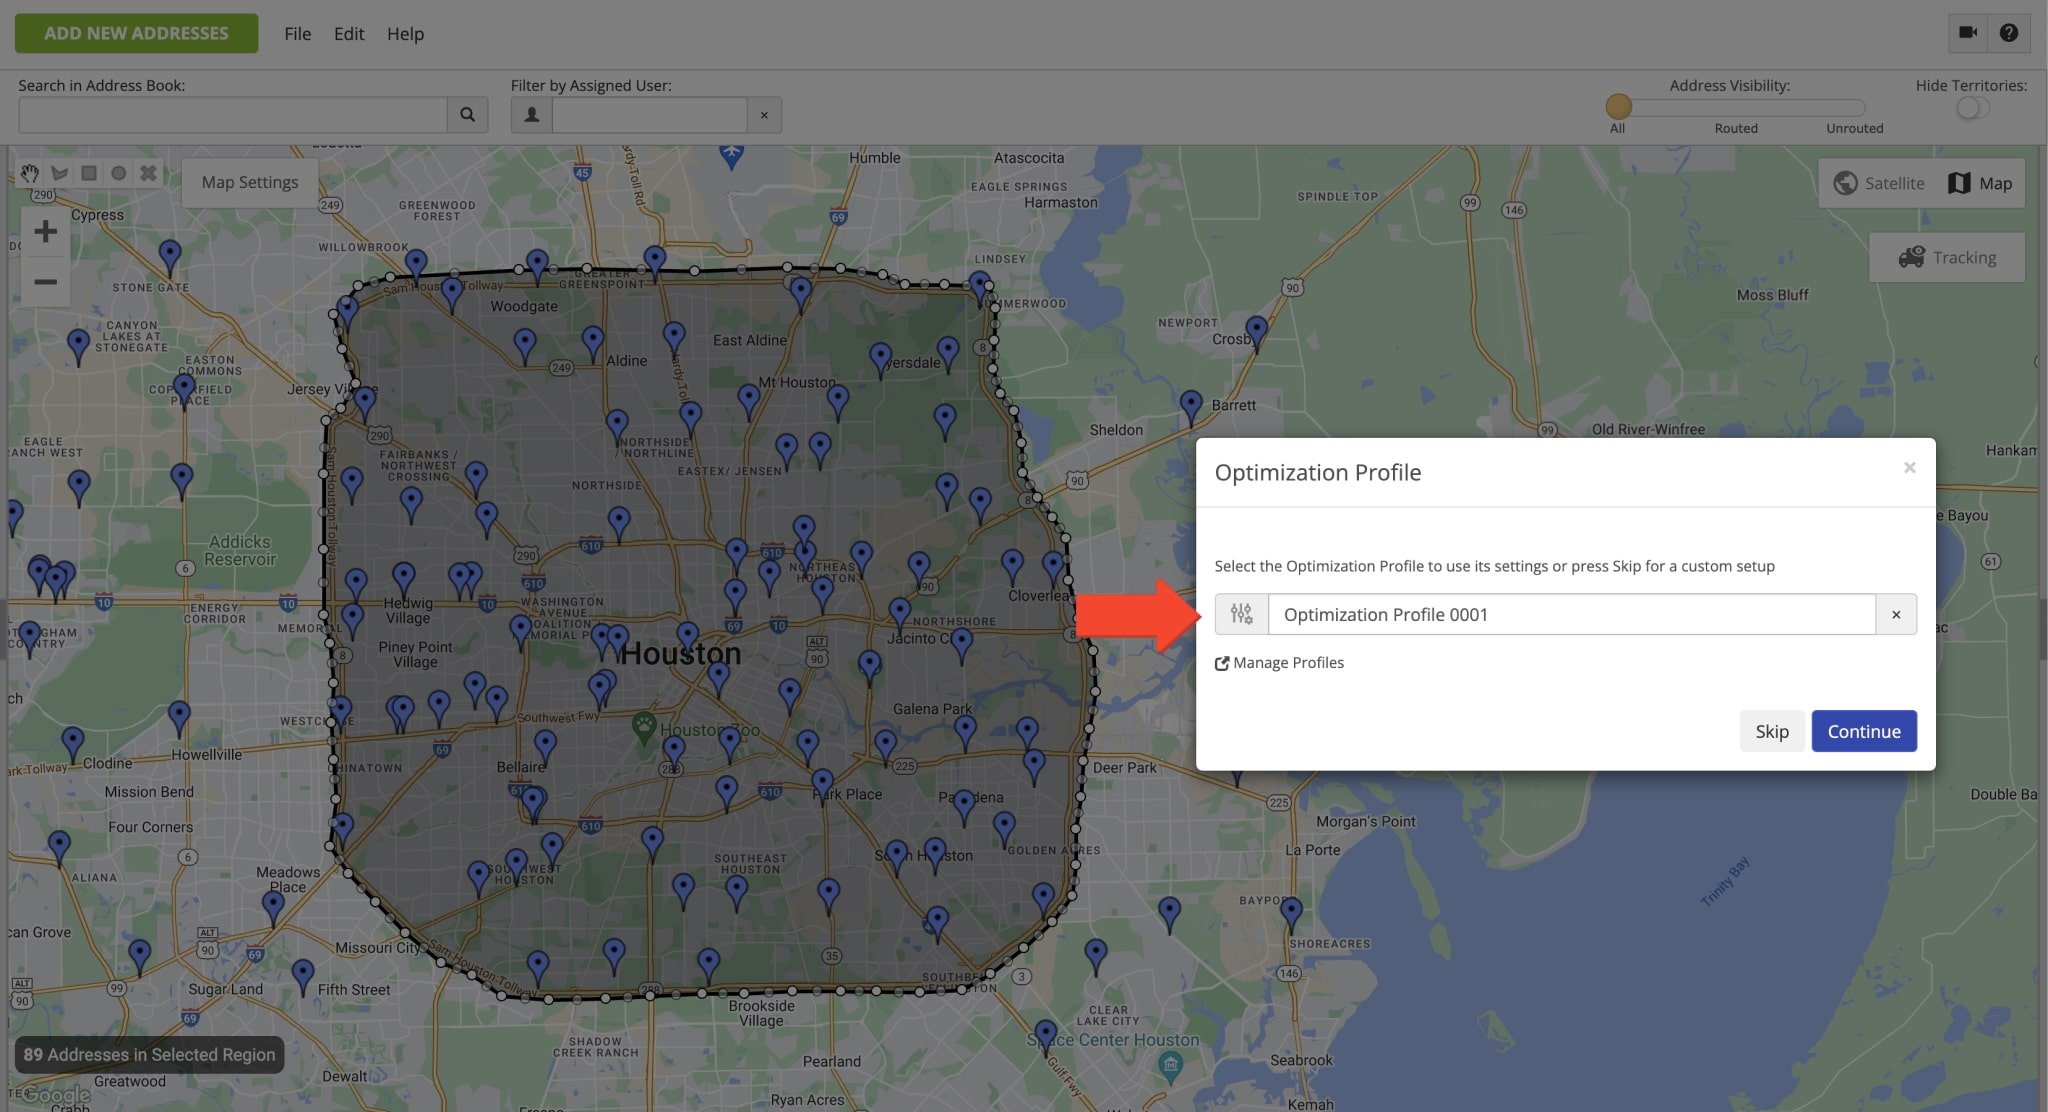
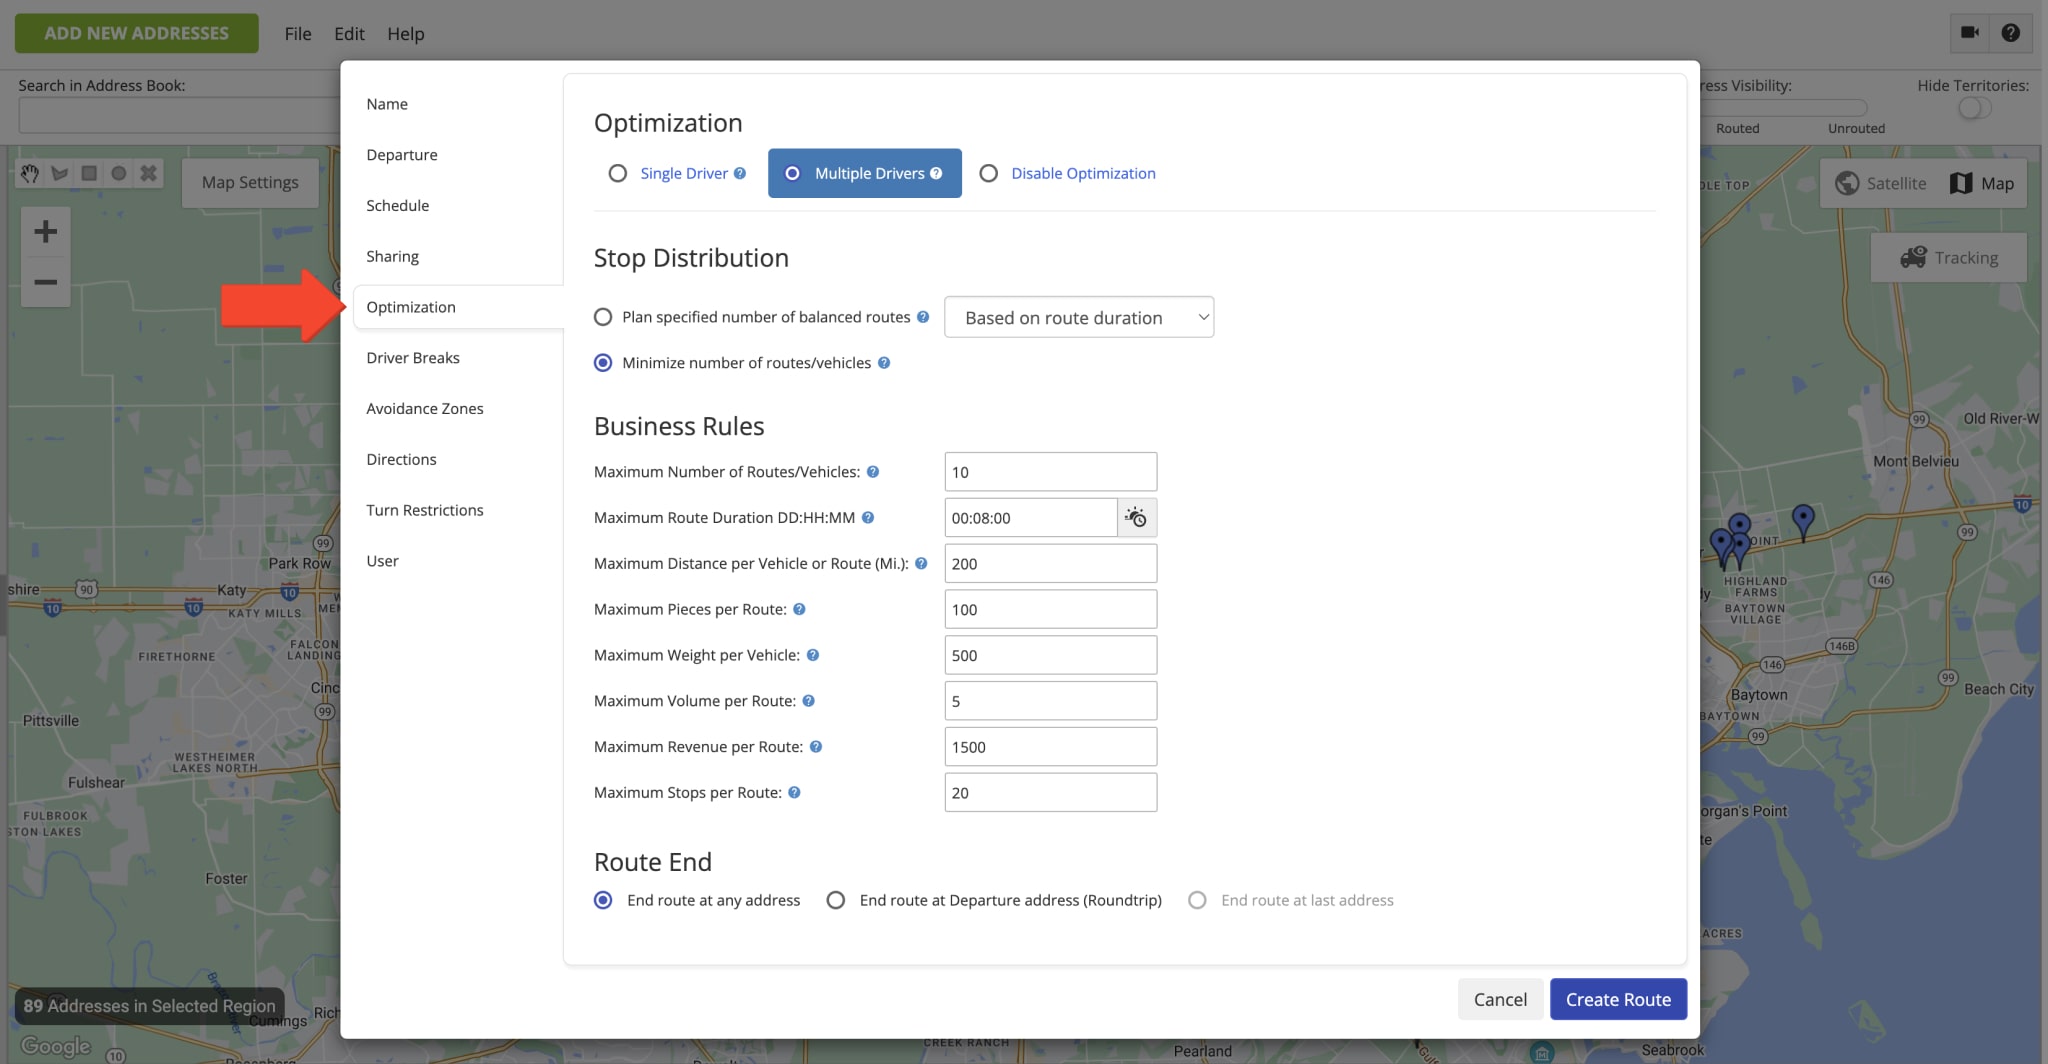
Alternatively, instead of selecting an Optimization Profile, you can manually customize your route and optimization settings. First, click on the “Skip” button instead of selecting a profile. After that, you can specify the preferred route and optimization settings in the respective tabs. In detail, you can schedule your route, plan one or multiple routes for multiple drivers and vehicles, assign a driver and vehicle, select the route’s start and end point, add custom Business Rules and Optimization Constraints, etc.
Accordingly, in the “Optimization” tab and “Business Rules” section, you can specify such optimization constraints as Max Pieces per Route, Max Weight per Route, Max Cube per Route, and Max Revenue per Route. Correspondingly, the system will automatically account for the respective Pieces, Weight, Cube, and Revenue values of each selected address to plan and optimize the most optimal routes. Additionally, learn more about Customizing Your Route and Optimization Settings.
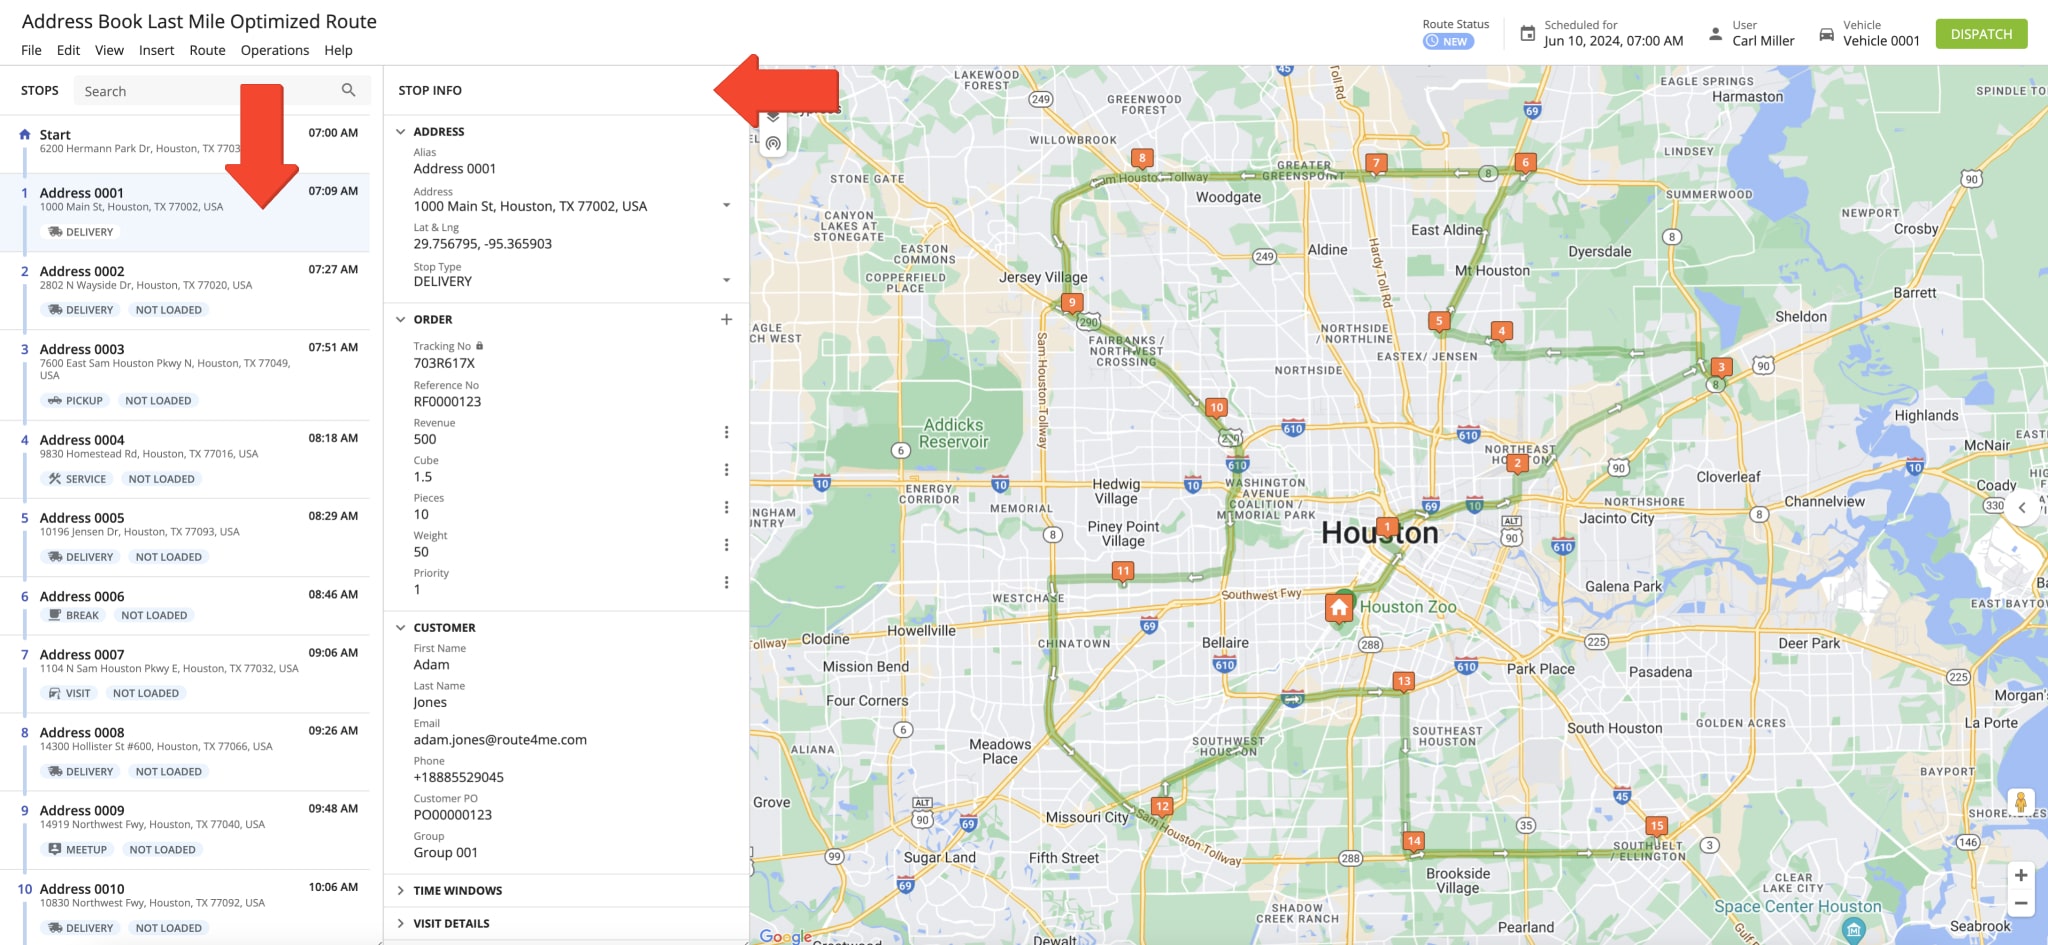
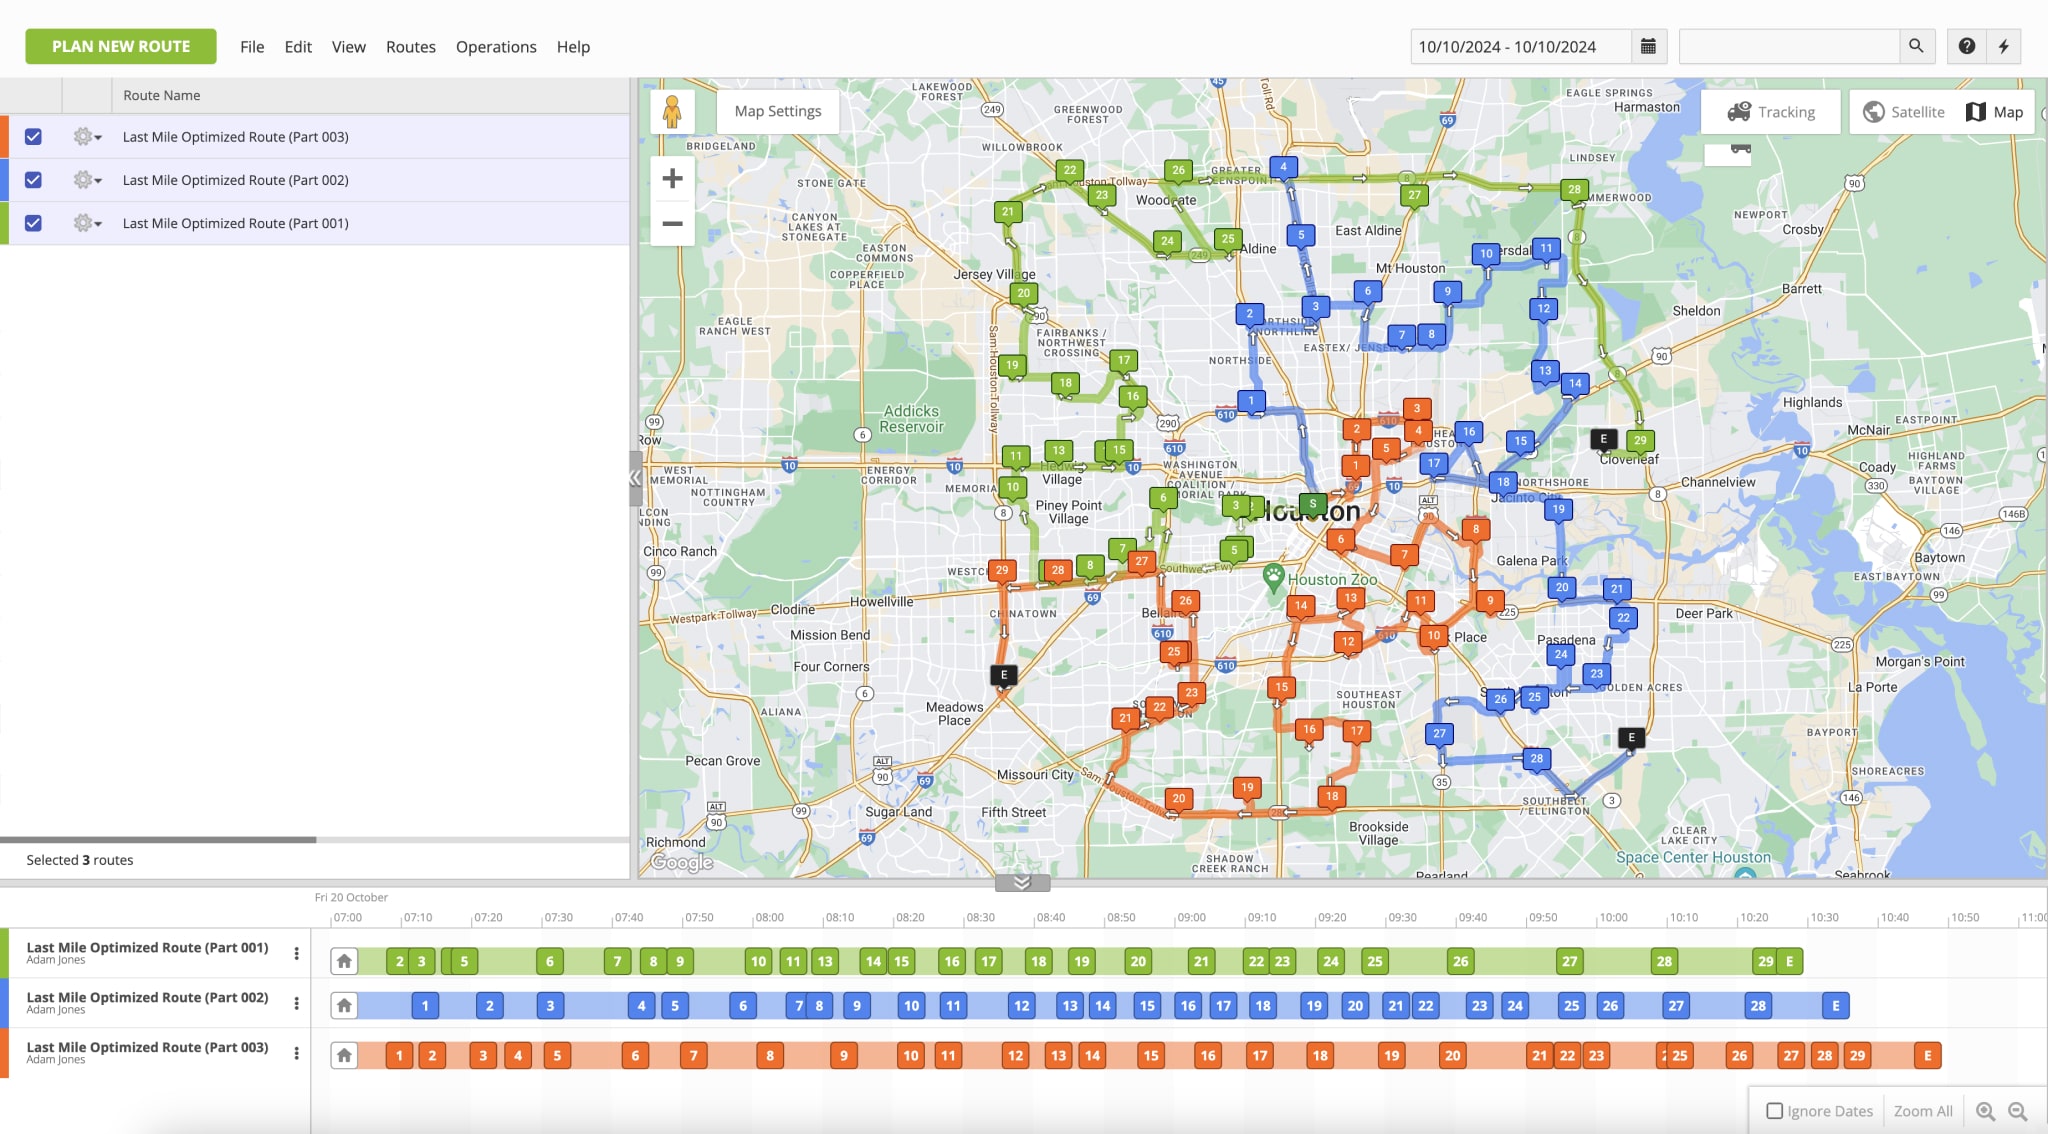
Next, Route4Me will plan single or multiple routes depending on the specified route optimization settings, the number of selected addresses, address constraints, and other variables. Accordingly, when Route4Me plans a single route, this route is automatically opened in the Route Editor. To check the details of a route stop in the Route Editor, simply click on the preferred stop and then open the preferred stop manifest section.
When Route4Me plans multiple routes, they are automatically opened on the Routes Map. Accordingly, to check the details of a specific route stop, simply click on this stop in the timeline. Additionally, learn more about how to Open and Manage Multiple Routes on the Routes Map.
Insert Addresses into the Best Routes from the Address Book Map
Route4Me’s Address Book Map enables you to quickly insert addresses into already planned and optimized routes. With Route4Me’s Dynamic Address Insertiocn, you can easily address last-minute orders and business changes, newly added customers and locations, and other variables.
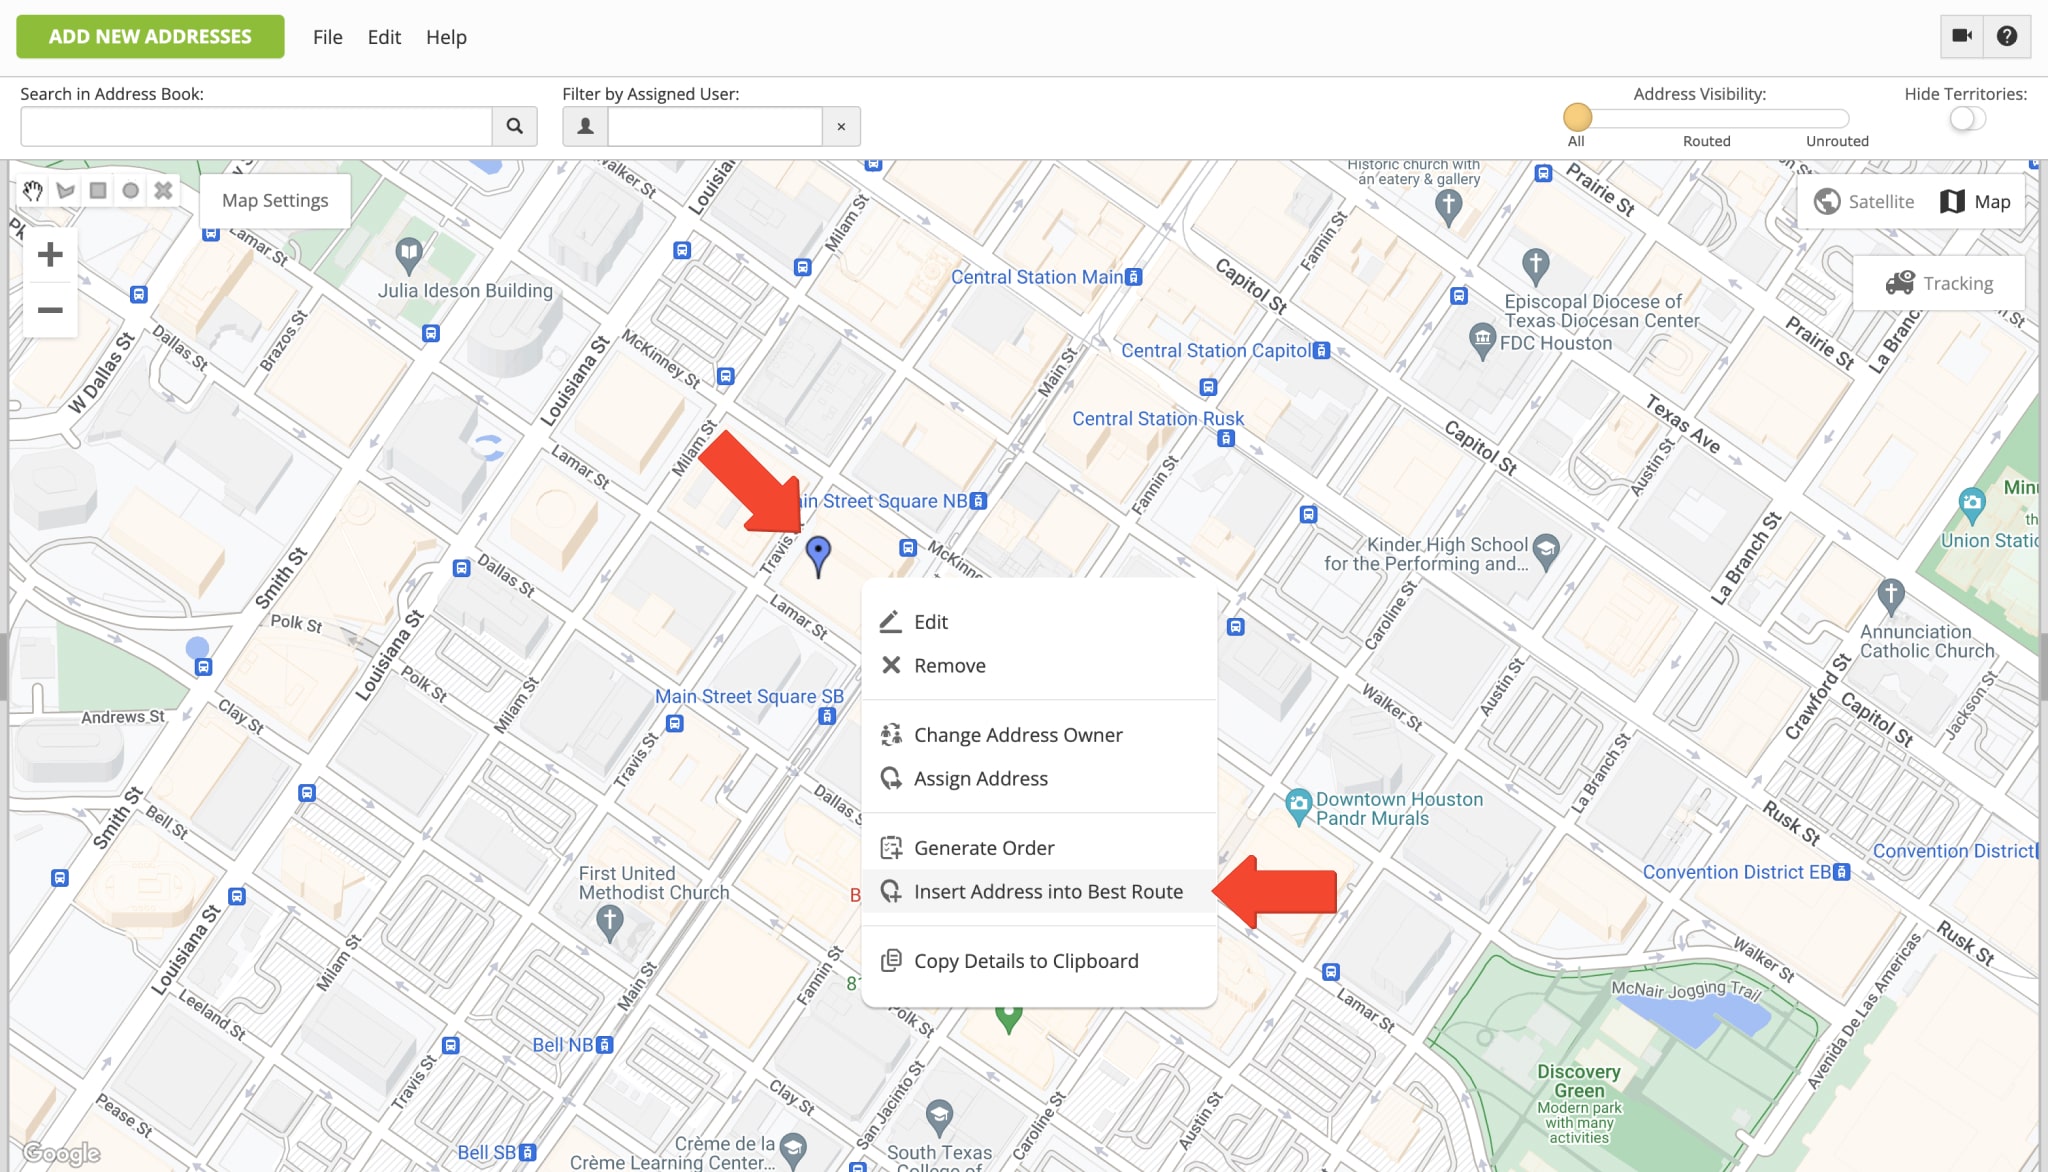
Furthermore, Route4Me automatically suggests the most optimal routes for inserting the selected address, showing you how the inserted address will impact the route’s driving distance and time parameters. First, right-click on the preferred address pin or icon on the map and then select “Insert Address into Best Route” from the menu.
Next, in the “Best Route Lookup” tab, you can adjust the address insertion settings. First, specify the preferred date in the “Scheduled For” filter to show all optimal routes scheduled for this date. After that, select the preferred position on the route for inserting the address. Then, you can check all routes scheduled for the selected date and the impact the inserted address will have on each route. In detail, how the address will influence the route’s travel distance and travel time. Furthermore, you can update and add more details to the address in the “Adjust Location Details” tab.

| Option | Description |
|---|---|
| Insert at Optimal Position | Automatically insert the selected address at the most optimal sequence position on the route. |
| Insert at Optimal Position After Last Visited | Automatically insert the selected address at the most optimal sequence position on the route after the last address that was marked as “Visited“ from the mobile app. |
| Insert at End of Route | Insert the selected address as the last stop on the route. Accordingly, if the route starts and ends at the same location, the address will be inserted as the last stop before the route’s return location. |
| Insert at Beginning of Route | Insert the selected address as the first stop on the route, after the route’s Start Address. |
Generate Orders Using Addresses and Locations on Address Book Map
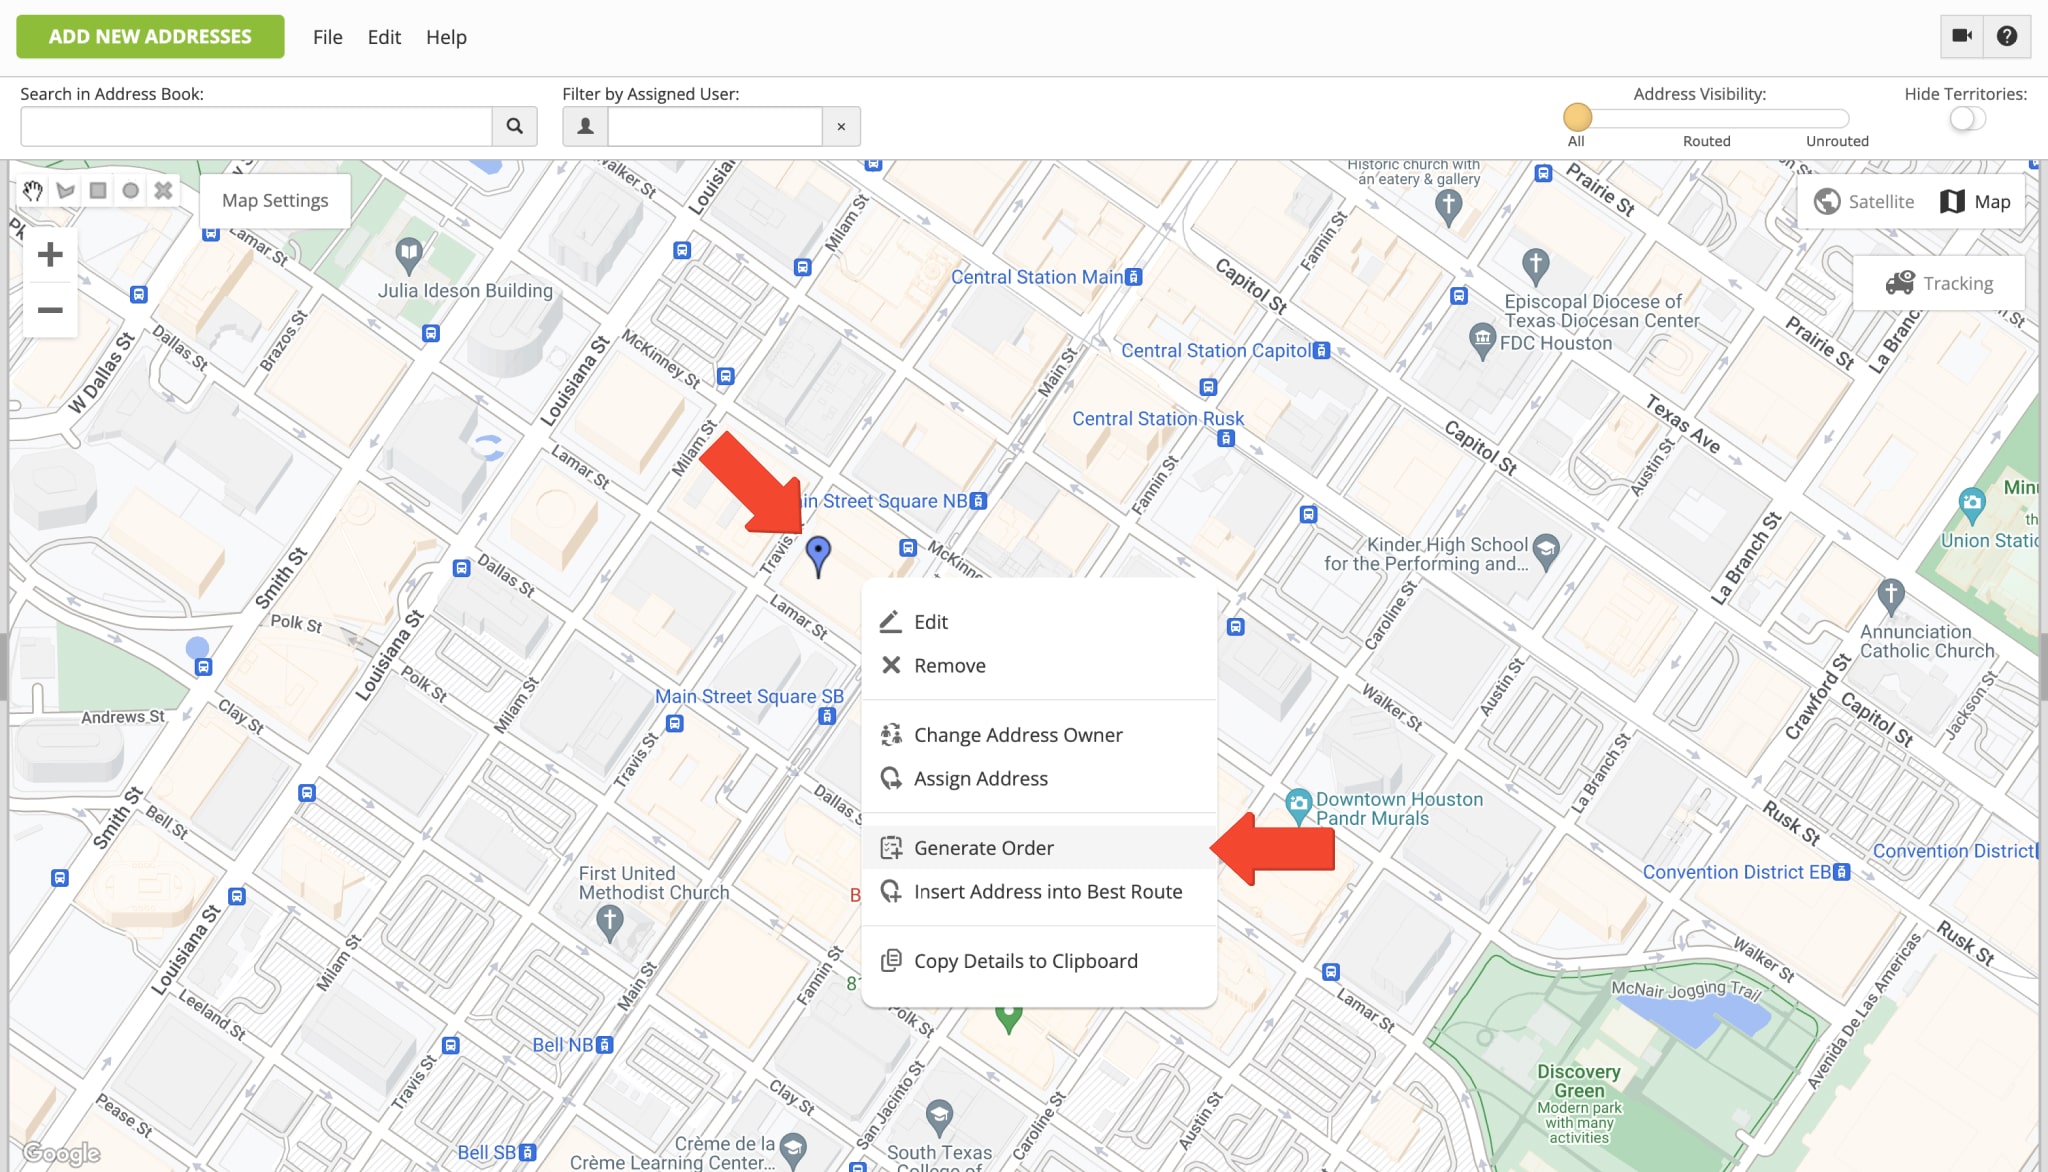
Furthermore, you can easily generate orders from addresses on your Address Book Map. First, right-click on the preferred address pin or icon on the map and then select “Generate Order” from the menu. To generate multiple orders from multiple addresses, use the drawing tool in the top left corner of the map to draw a custom-shaped area around the preferred addresses. Next, right-click on the area with addresses and then select “Generate Orders” from the menu. Alternatively, go to “File” at the top of the screen, and then select “Generate Orders from Selected” in the menu.
After that, you can schedule orders for the preferred date and add additional order fields. Next, your generated orders will become available in your Orders List in real-time. Additionally, learn more about Managing Orders in the Orders List.
Download Addresses – Export Address Data from Address Book Map
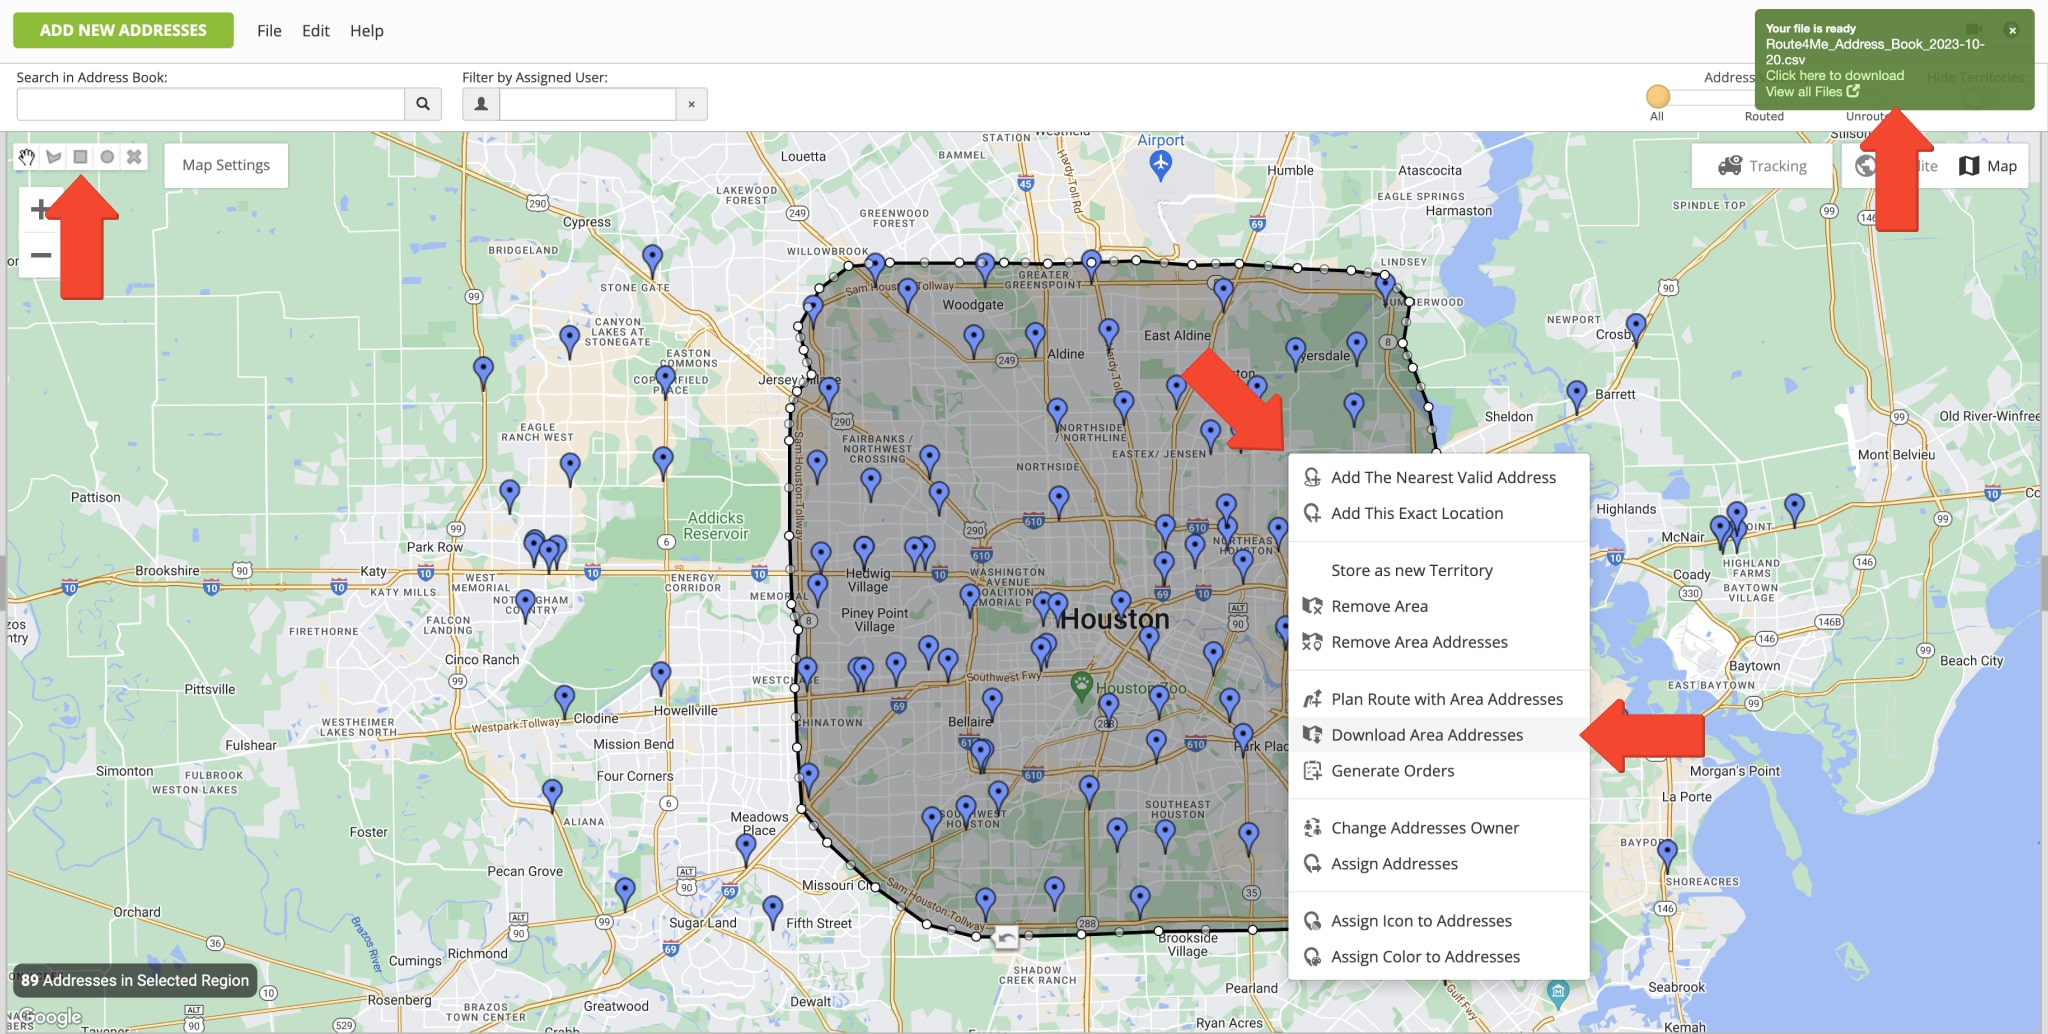
You can easily download hundreds of thousands of addresses in a single spreadsheet right from the map of the fastest route management software. Accordingly, the downloaded file will contain addresses, customer, orders, and other details you can use for reporting, analytics, route planning, etc. First, filter your addresses by Routed, Not Routed, or use Route4Me’s Advanced Search Groups. Next, use the drawing tools in the top left corner of the map to draw a custom-shaped area around the addresses that you want to select and download.
Next, right-click on the area with selected addresses and then select “Downalod Area Addresses” from the menu. Alternatively, go to “File” at the top of the screen and then select “Export Selected” from the menu. Once your file with address data is ready for export, click on the “Click Here to Download” button in the respective popup notification.
Delete Addresses – Remove Addresses from Address Book Map
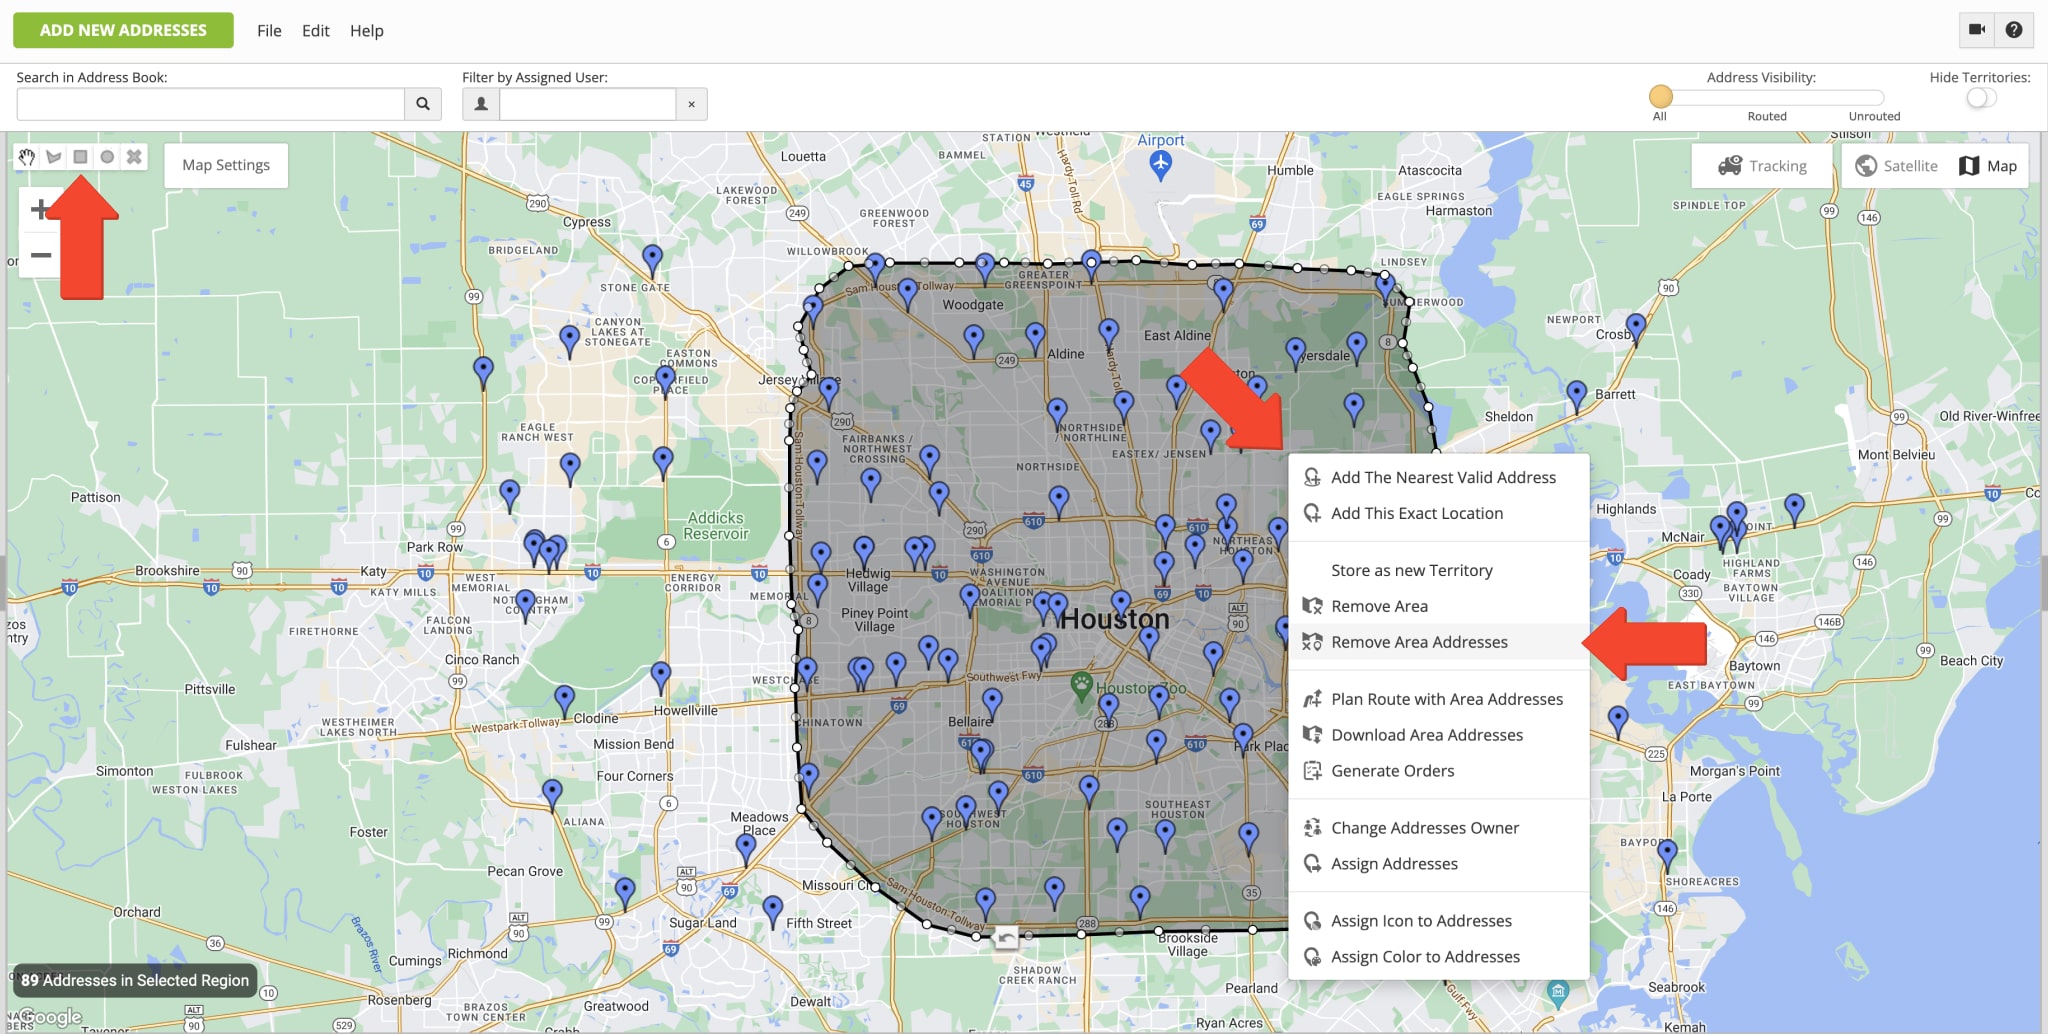
To delete an address from your Address Book Map, right-click the address pin or icon on the map and then select “Remove” from the menu. To delete multiple addresses, use the drawing tools in the top left corner of the map to draw a custom-shaped area around the addresses you want to delete. Next, right-click on the area and then select “Remove Area Addresses” from the menu. Alternatively, go to “Edit” at the top of the screen and then select “Remove Selected” from the menu. NOTE: Deleting addresses can’t be undone, and the deleted addresses will be permanently erased from your account.
Visit Route4Me's Marketplace to Check out Associated Modules:
- Route Optimization
Address Book and Territories Planning
- Operations
Custom Data Add-On
Last Updated:
About author: Alex Yasko
Alex Yasko is the Go-to-Market Product Manager and Information Architecture Manager at Route4Me. With thousands of hours of experience, Alex specializes in breaking down complex last-mile optimization and routing scenarios into simple, actionable instructions, helping last-mile businesses streamline their operations effortlessly.