Manage Strategic Scenarios – Automated Strategic Cycle Planning With Recurring Routing
Route4Me’s Strategic Routing simplifies recurring route planning with complex schedules over long planning periods. You add locations and schedules, configure optimization settings, and Route4Me’s enterprise routing engine automatically plans and optimizes Strategic Scenarios and routes according to your schedules, rules, and preferences. In this guide, you’ll learn how to open, filter, and manage your Strategic Scenarios, their associated routes, and how to sync draft routes for Recurring Routing.
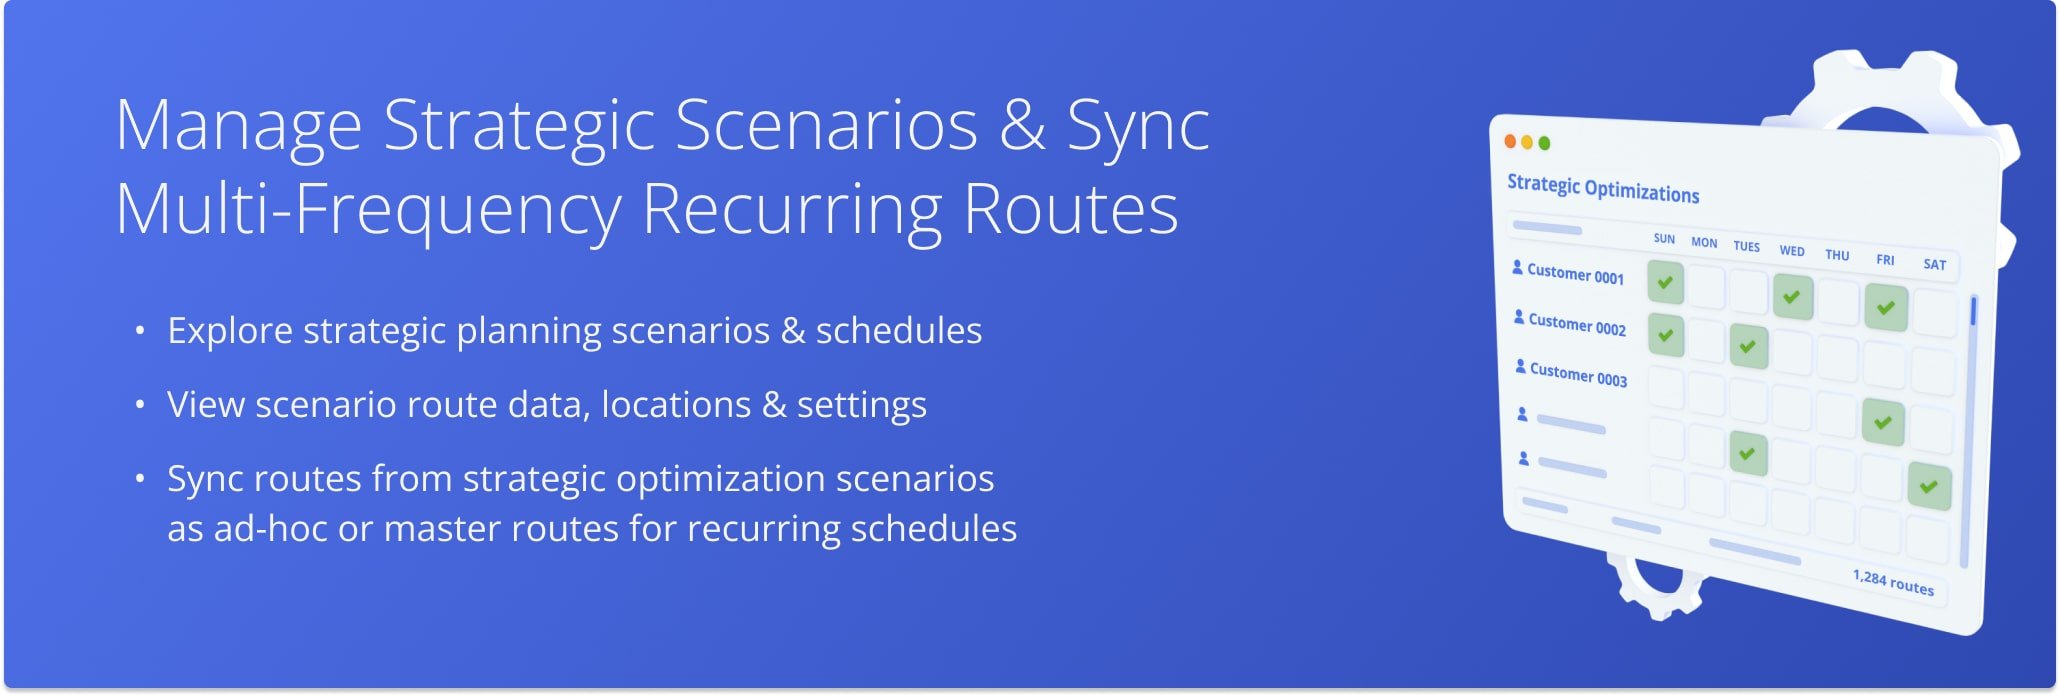
Table of Contents
Strategic Scenarios Overview – Open Scenarios To View Routes And Schedules
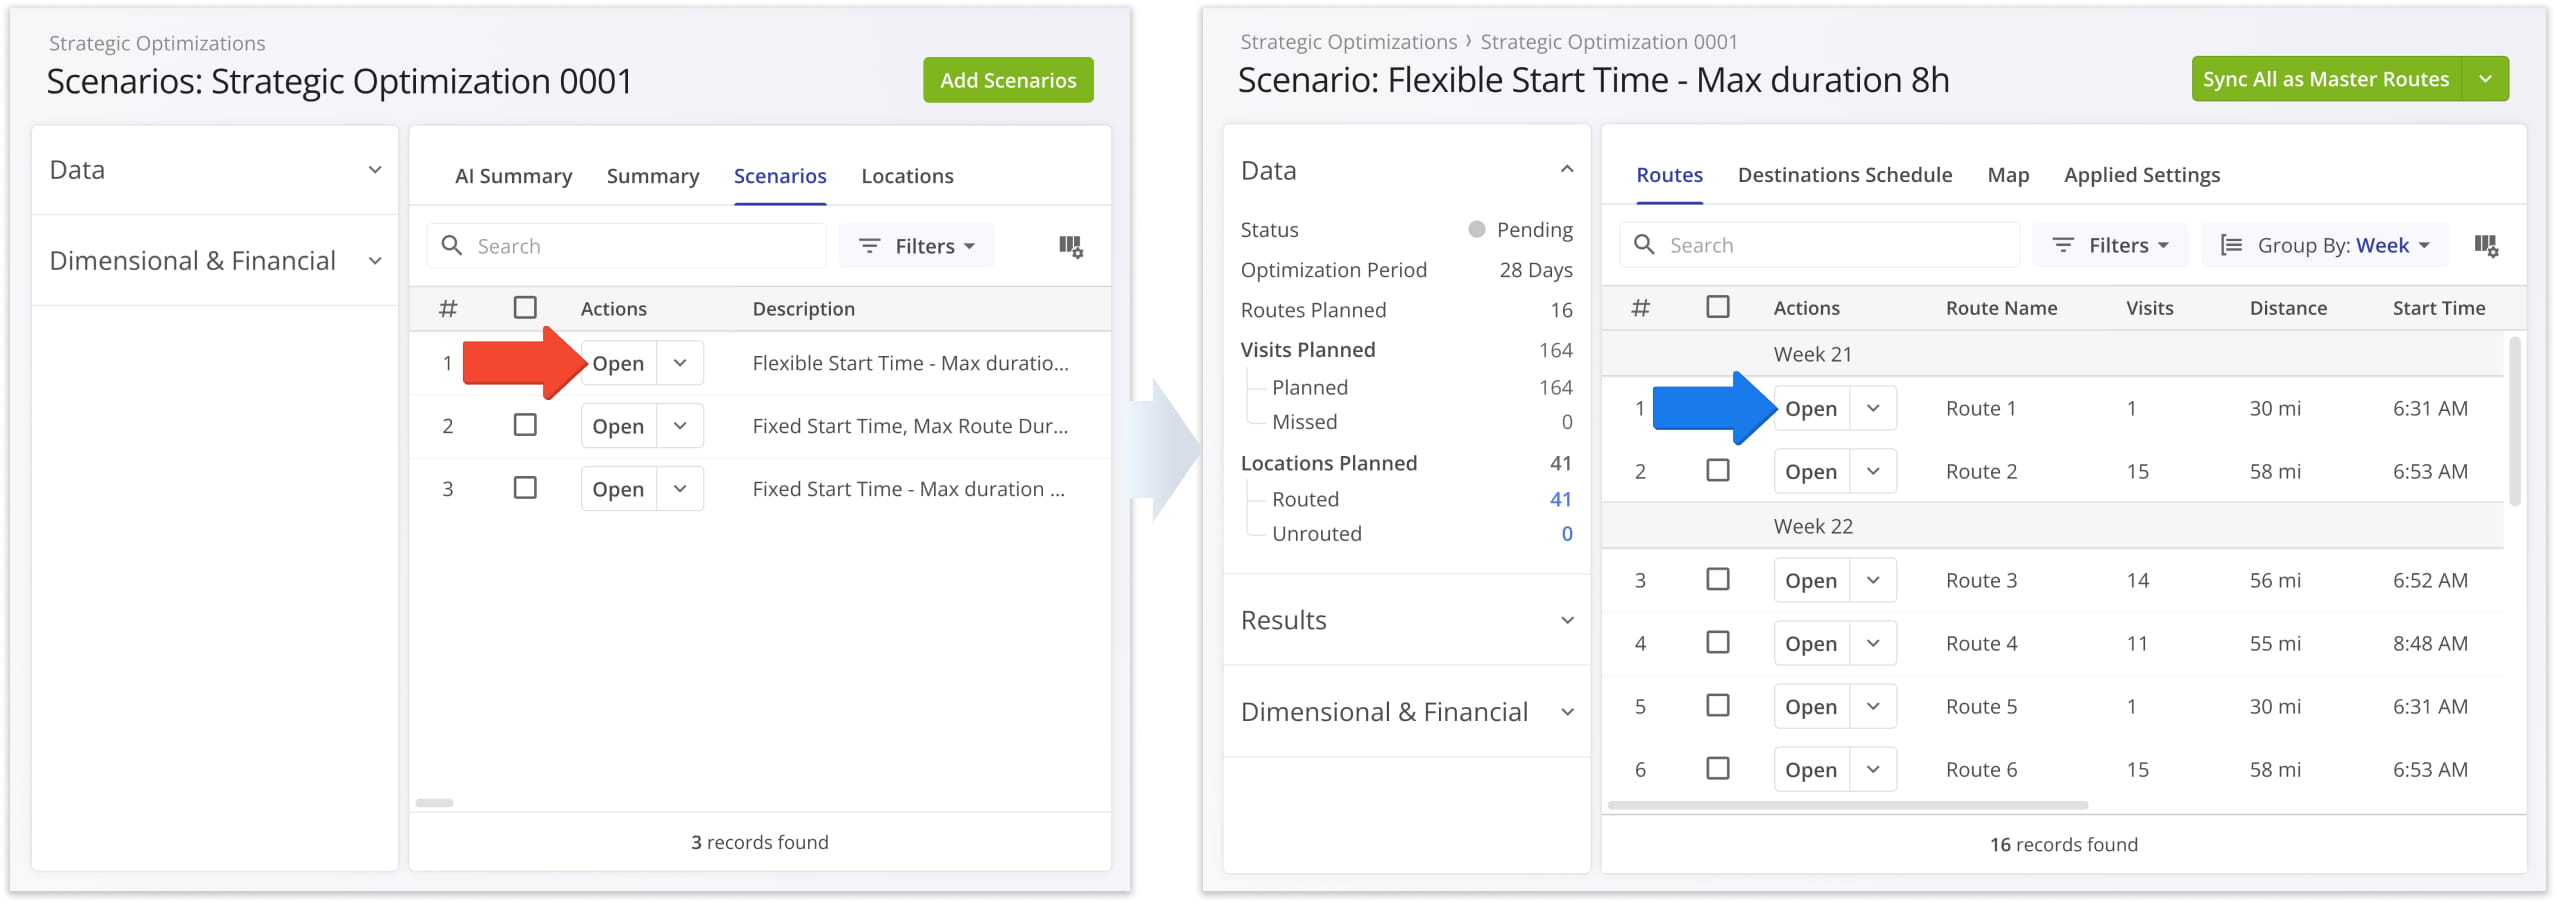
To see your Strategic Optimizations and open Scenarios, go to “Strategic Routing” > “Scenarios” from the Navigation Menu. Then, click “Open” next to a Scenario. On the Scenario’s page, you can click “Open” next to a route to see a Strategic Route Snapshot with a full breakdown of destination and route data.
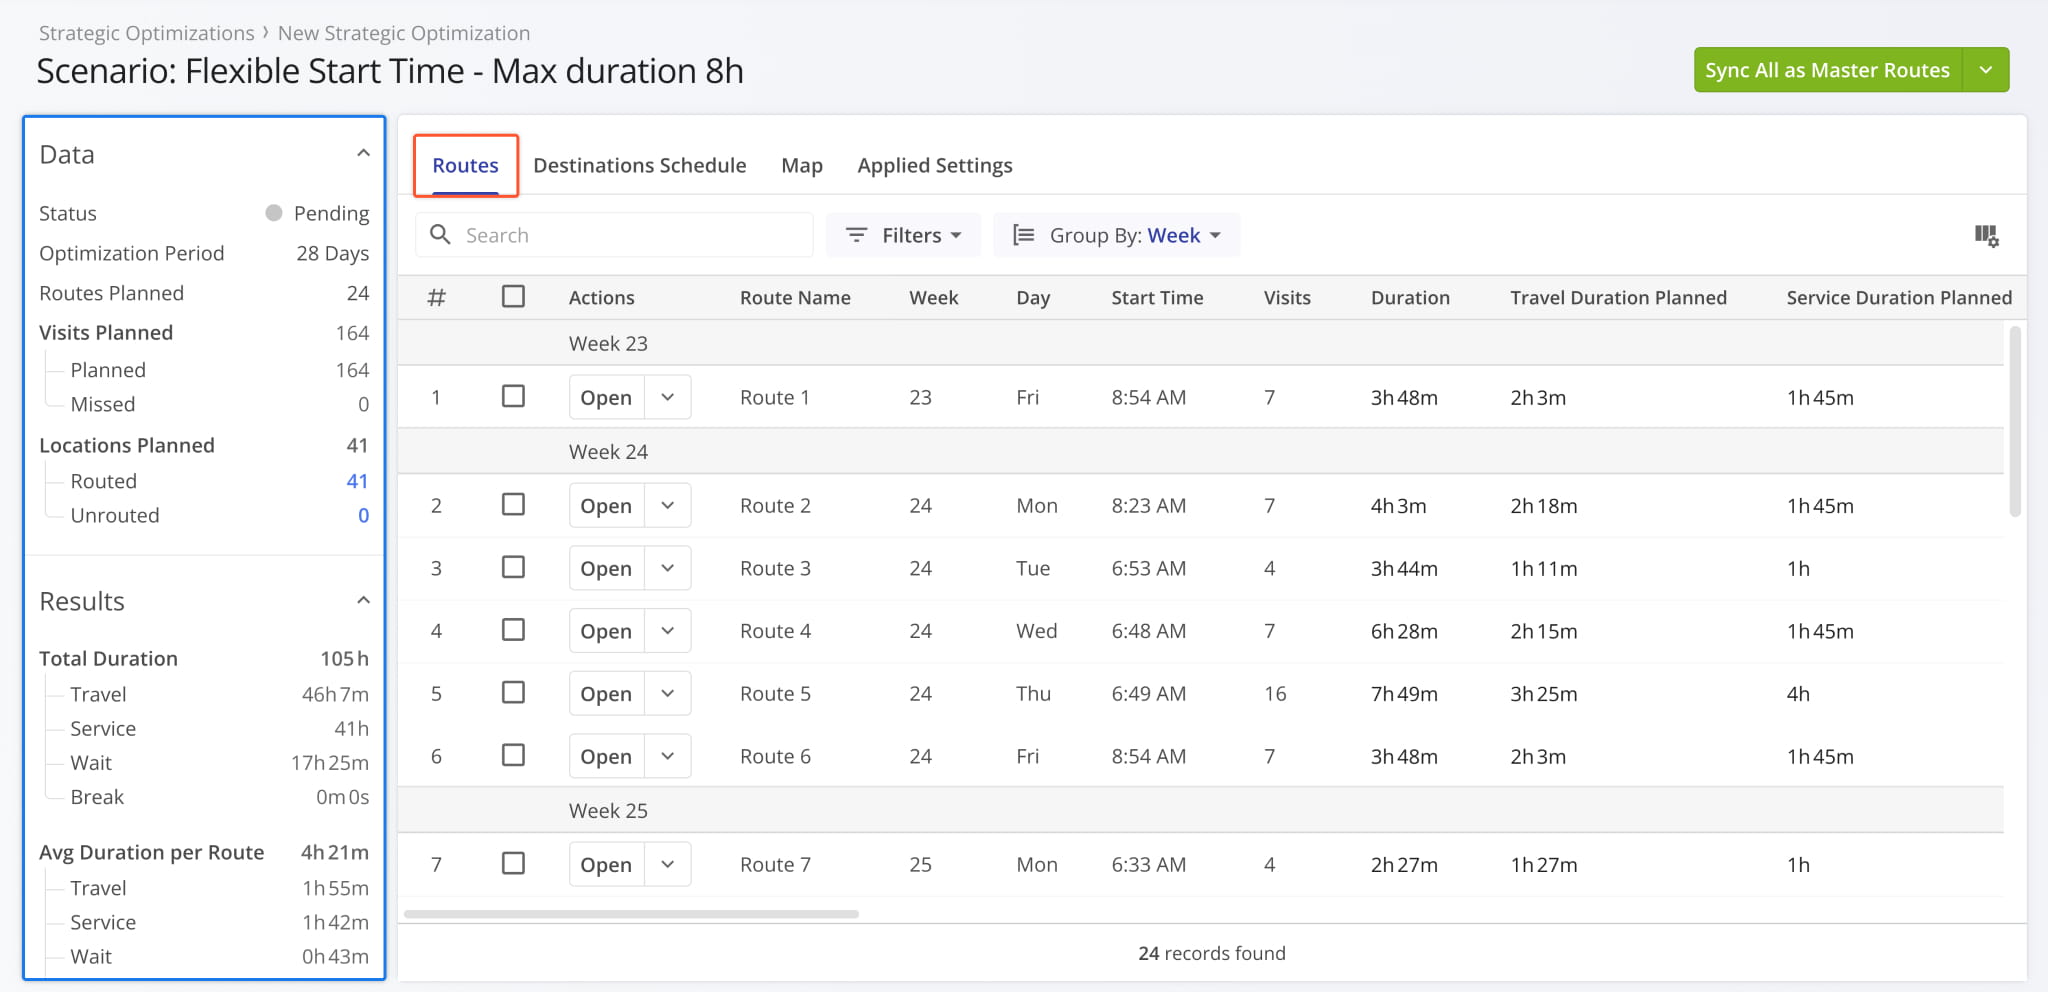
When you open a Scenario, the “Routes” tab is automatically selected, showing you a list of its associated routes. On the left, you can see a summary of key Scenario metrics. See the table below to learn more.
Status
Current status of the Scenario based on whether its routes have been synced.
Optimization Period
Period of time across which Scenario Routes will be scheduled once synced.
Routes Planned
Number of routes included in the Scenario.
Visits Planned
Number of Destination visits included in the Scenario divided between:
- Planned: Successfully planned visits according to your schedule rules.
- Missed: Schedule rule visits that couldn't be added to routes based on constraints.
Locations Planned
Number of Locations from the Strategic Dataset included in the Scenario divided between:
- Routed: Used as Destination in Scenario routes.
- Unrouted: Not used as Destinations in Scenario routes.
Total Duration
Combined duration of Scenario routes, broken down by:
- Travel: Time spent traveling between Destinations.
- Service: Time spent at Destinations completing visits.
- Wait: Time not spent traveling or servicing Destinations.
- Break: Planned break time for the assigned team member.
Avg Duration per Route
Average duration of Scenario routes, broken down by:
- Travel: Time spent traveling between Destinations.
- Service: Time spent at Destinations completing visits.
- Wait: Time not spent traveling or servicing Destinations.
- Break: Planned break time for the assigned team member.
Total Distance
Combined distance of Scenario routes, broken down by:
- Avg Δ Route: Average total route distance.
- Avg Δ Destination: Average distance between Destinations
Total Pieces
Total number of units associated with Destinations on all routes in the Scenario.
Total Weight
Total Weight value of orders associated with Destinations on all routes in the Scenario.
Total Cube
Total cubic volume of orders associated with Destinations on all routes in the Scenario.
Total Cost
Total Cost value associated with Destinations on all routes in the Scenario.
Total Revenue
Total revenue to be generated by visiting Destinations on all routes in the Scenario.
Strategic Scenarios Applied Optimization Settings
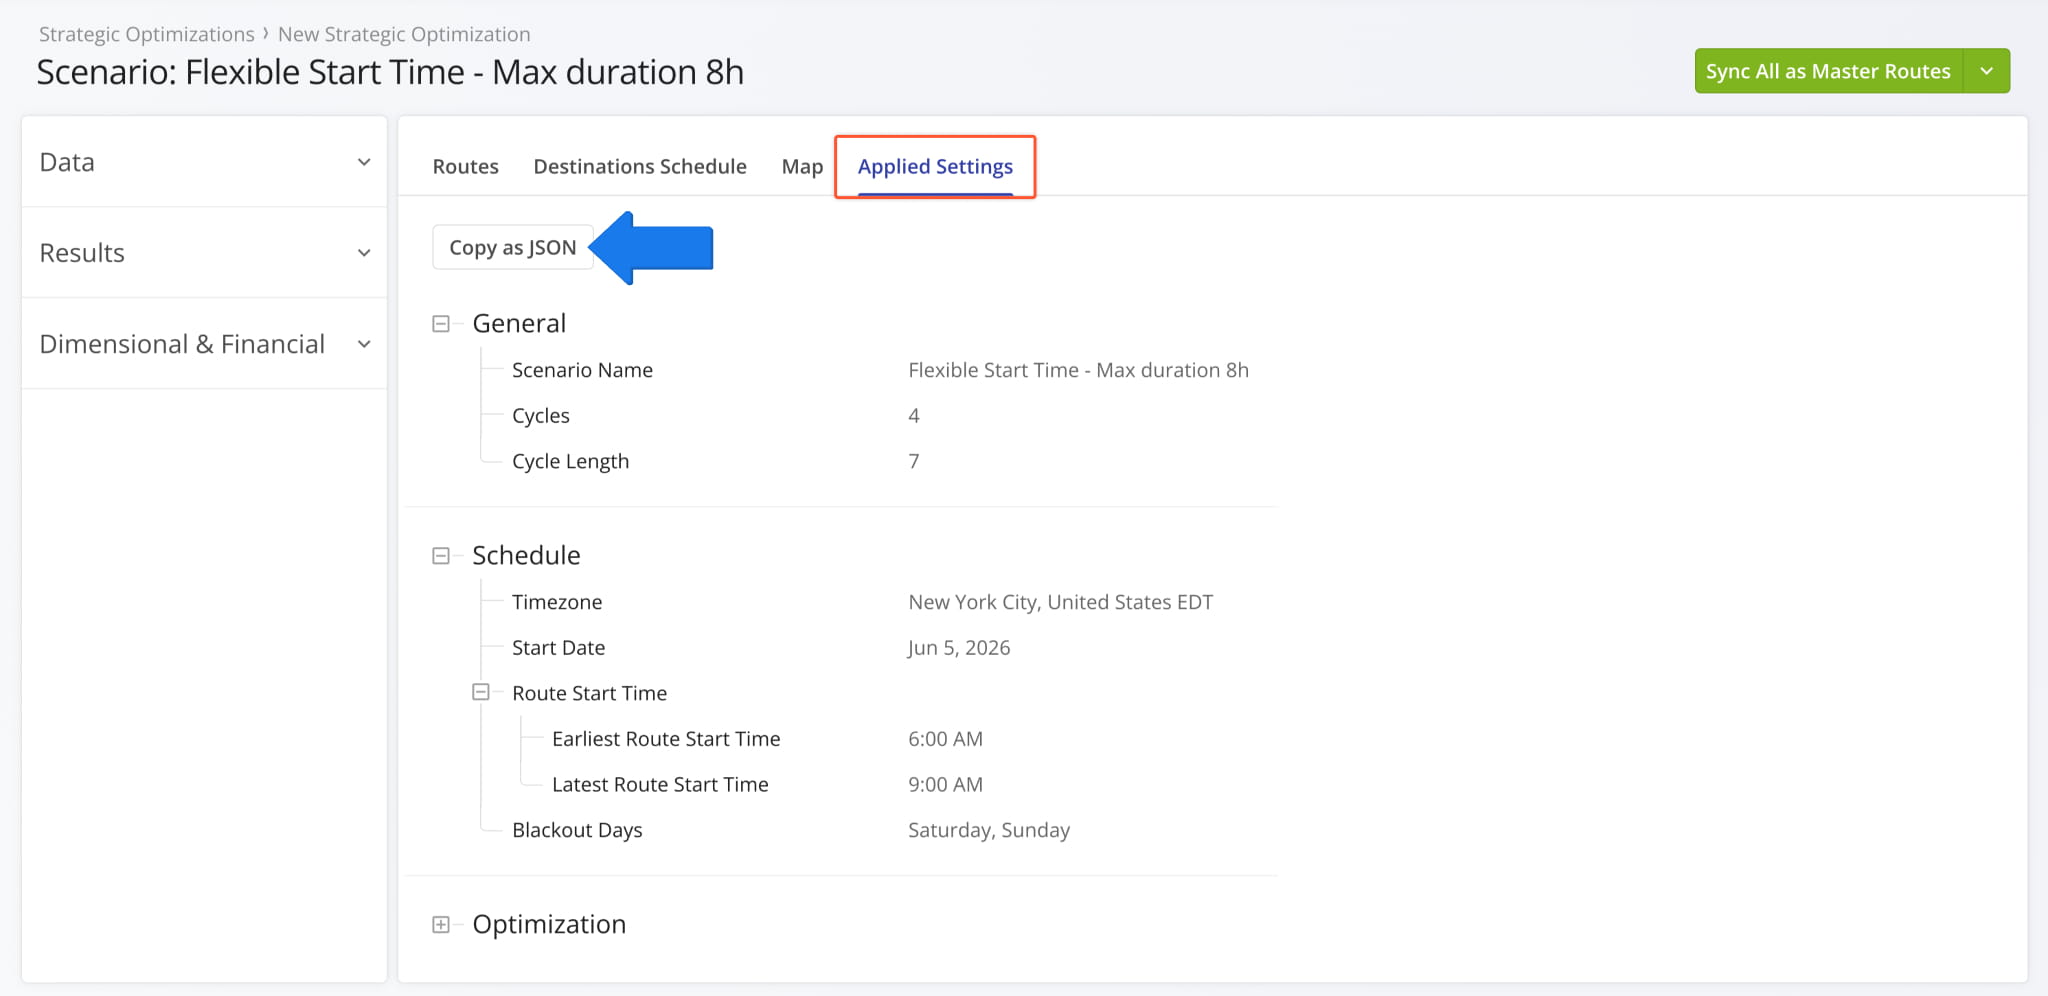
When you create Strategic Optimizations, you configure Strategic Scenario Settings used to optimize routes. Click the “Applied Settings” tab to see the settings applied to the current Strategic Scenario.
You can also copy the Scenario’s settings as JSON code by clicking the “Copy as JSON” button. This enables you to import those settings as a Scenario Template when adding or planning new Scenarios.
Export Scenarios And Routes As Customizable CSVs And JSON Code
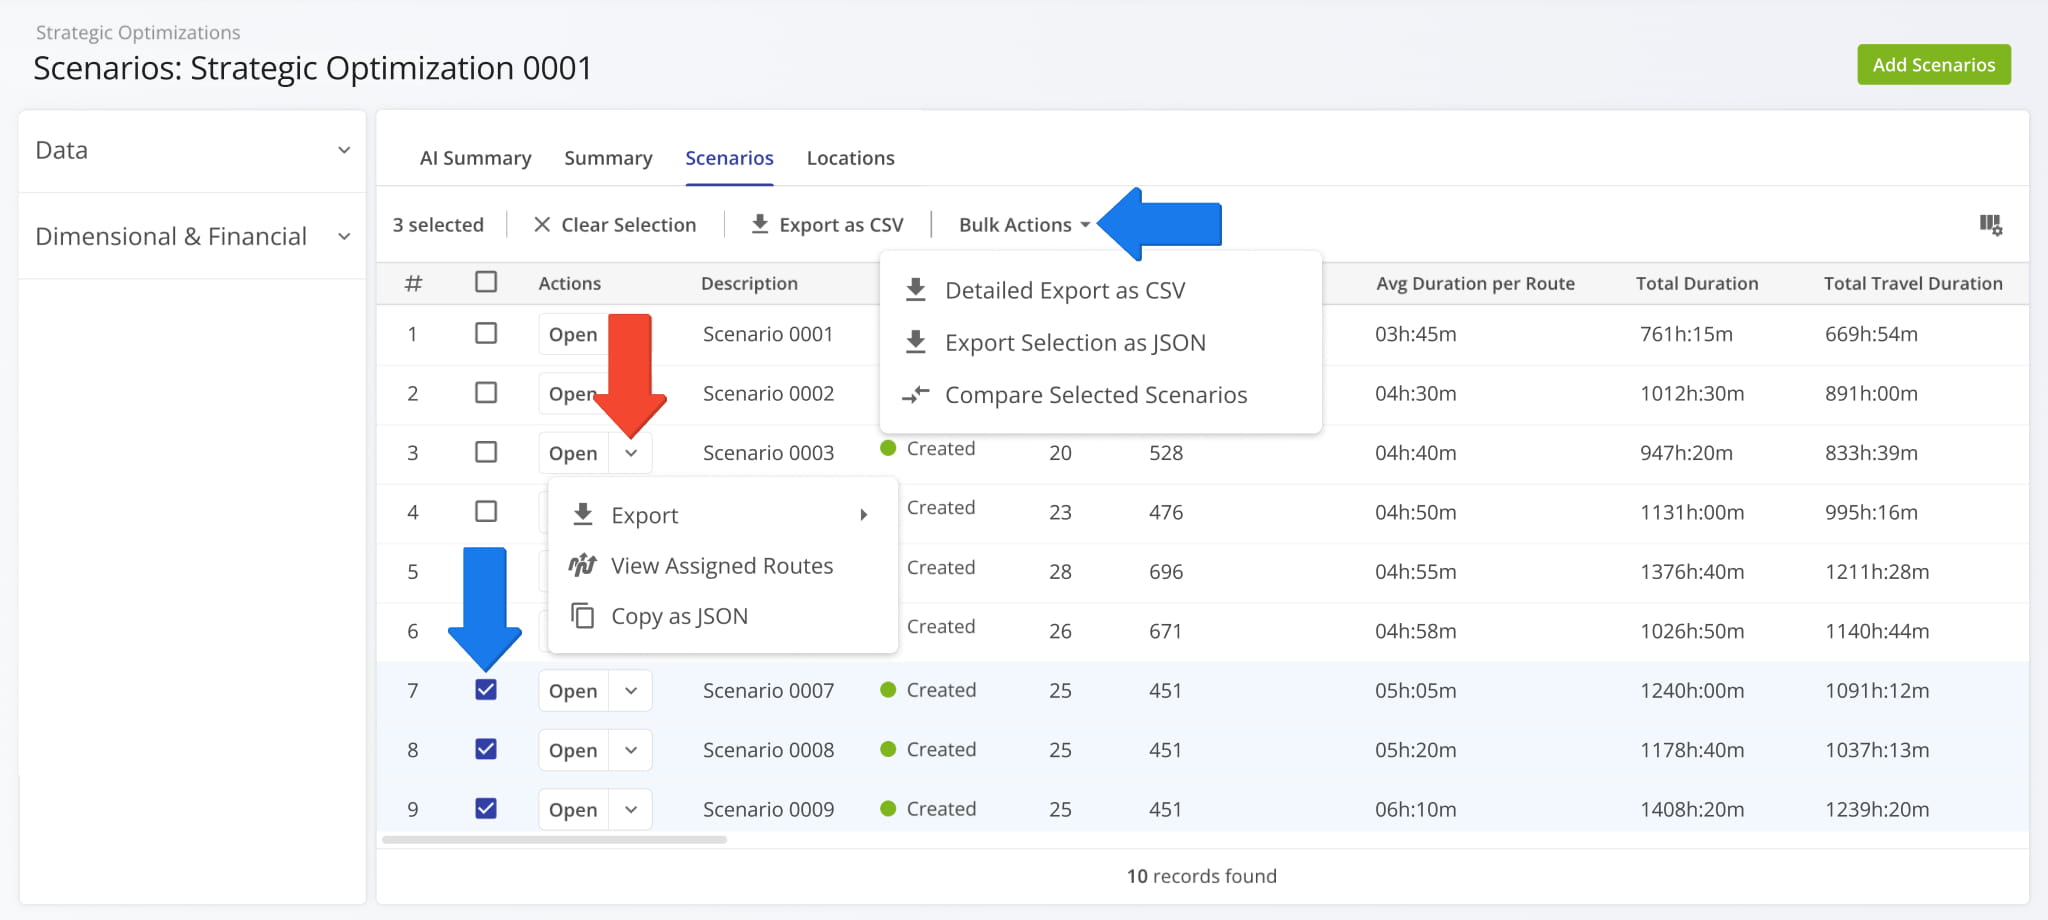
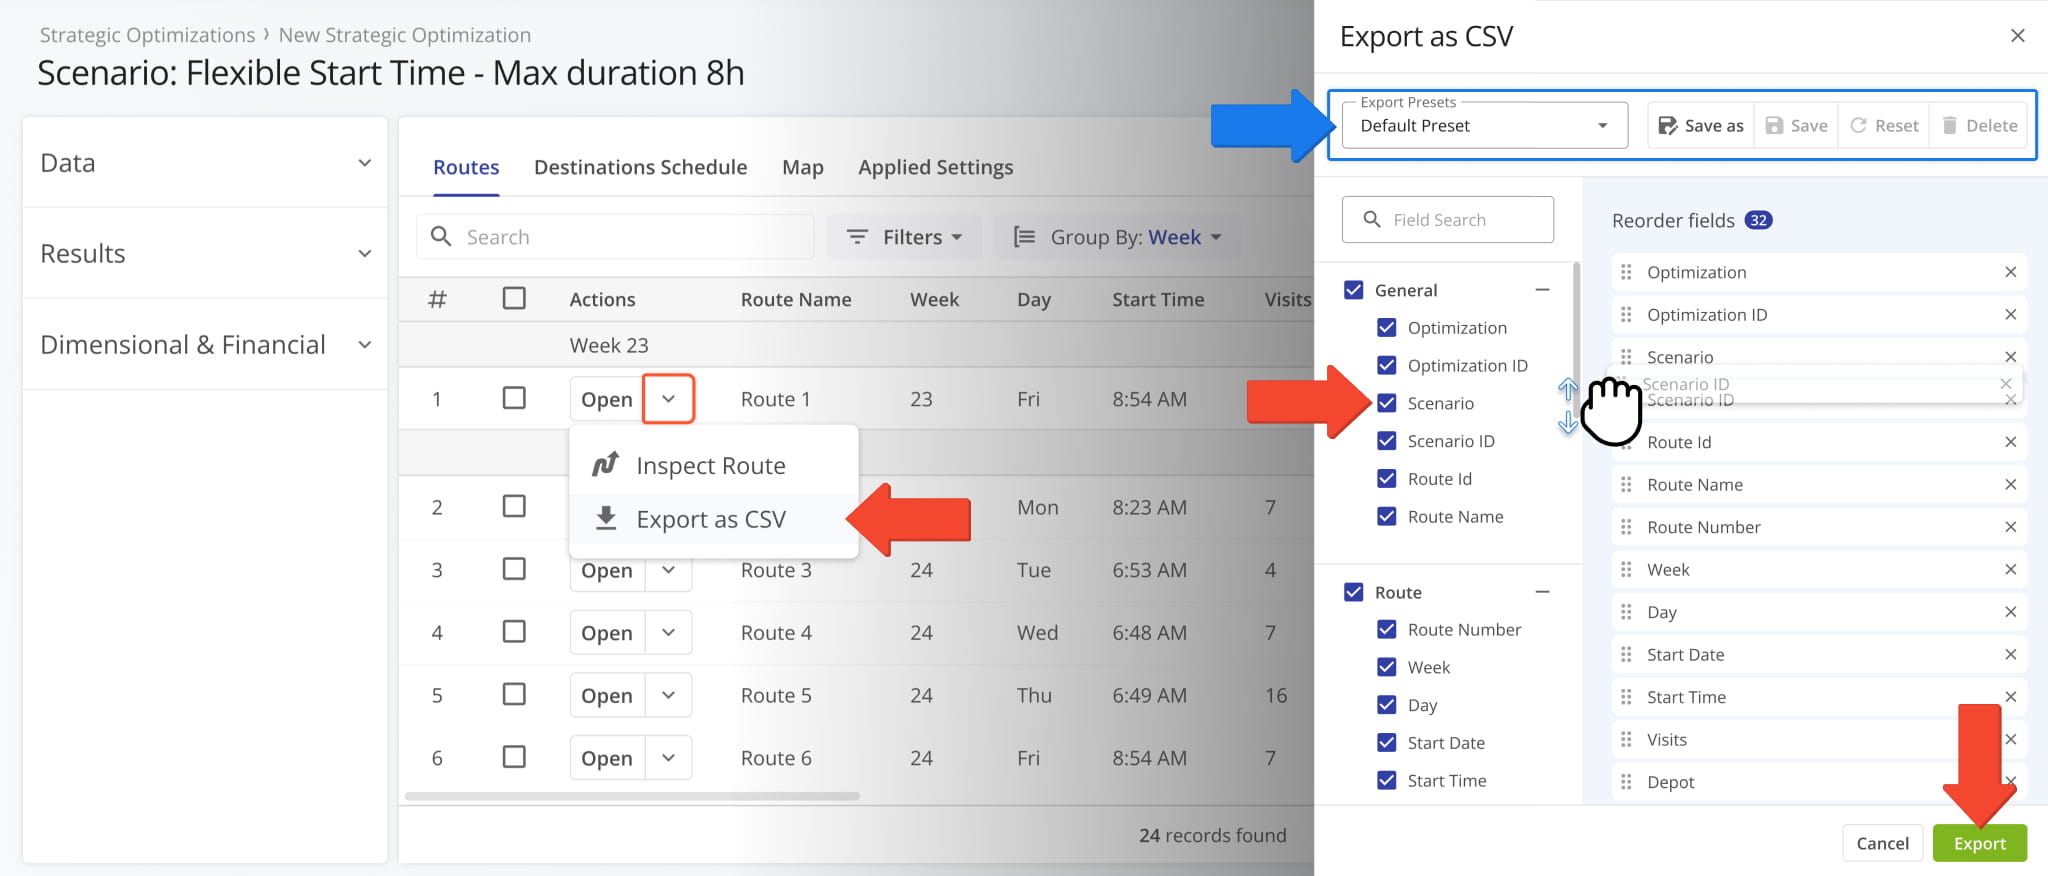
To download one or more Scenarios as customizable CSV spreadsheets or JSON code, first open the associated Strategic Optimization. Then, click the Down Arrow next to a Scenario and select your preferred option.
If you need to export multiple Scenarios, check the boxes next to them and, in the action bar above the Scenarios List, click “Export as CSV” or use the “Bulk Actions” menu . Keep reading to learn more about exporting Strategic Scenarios.
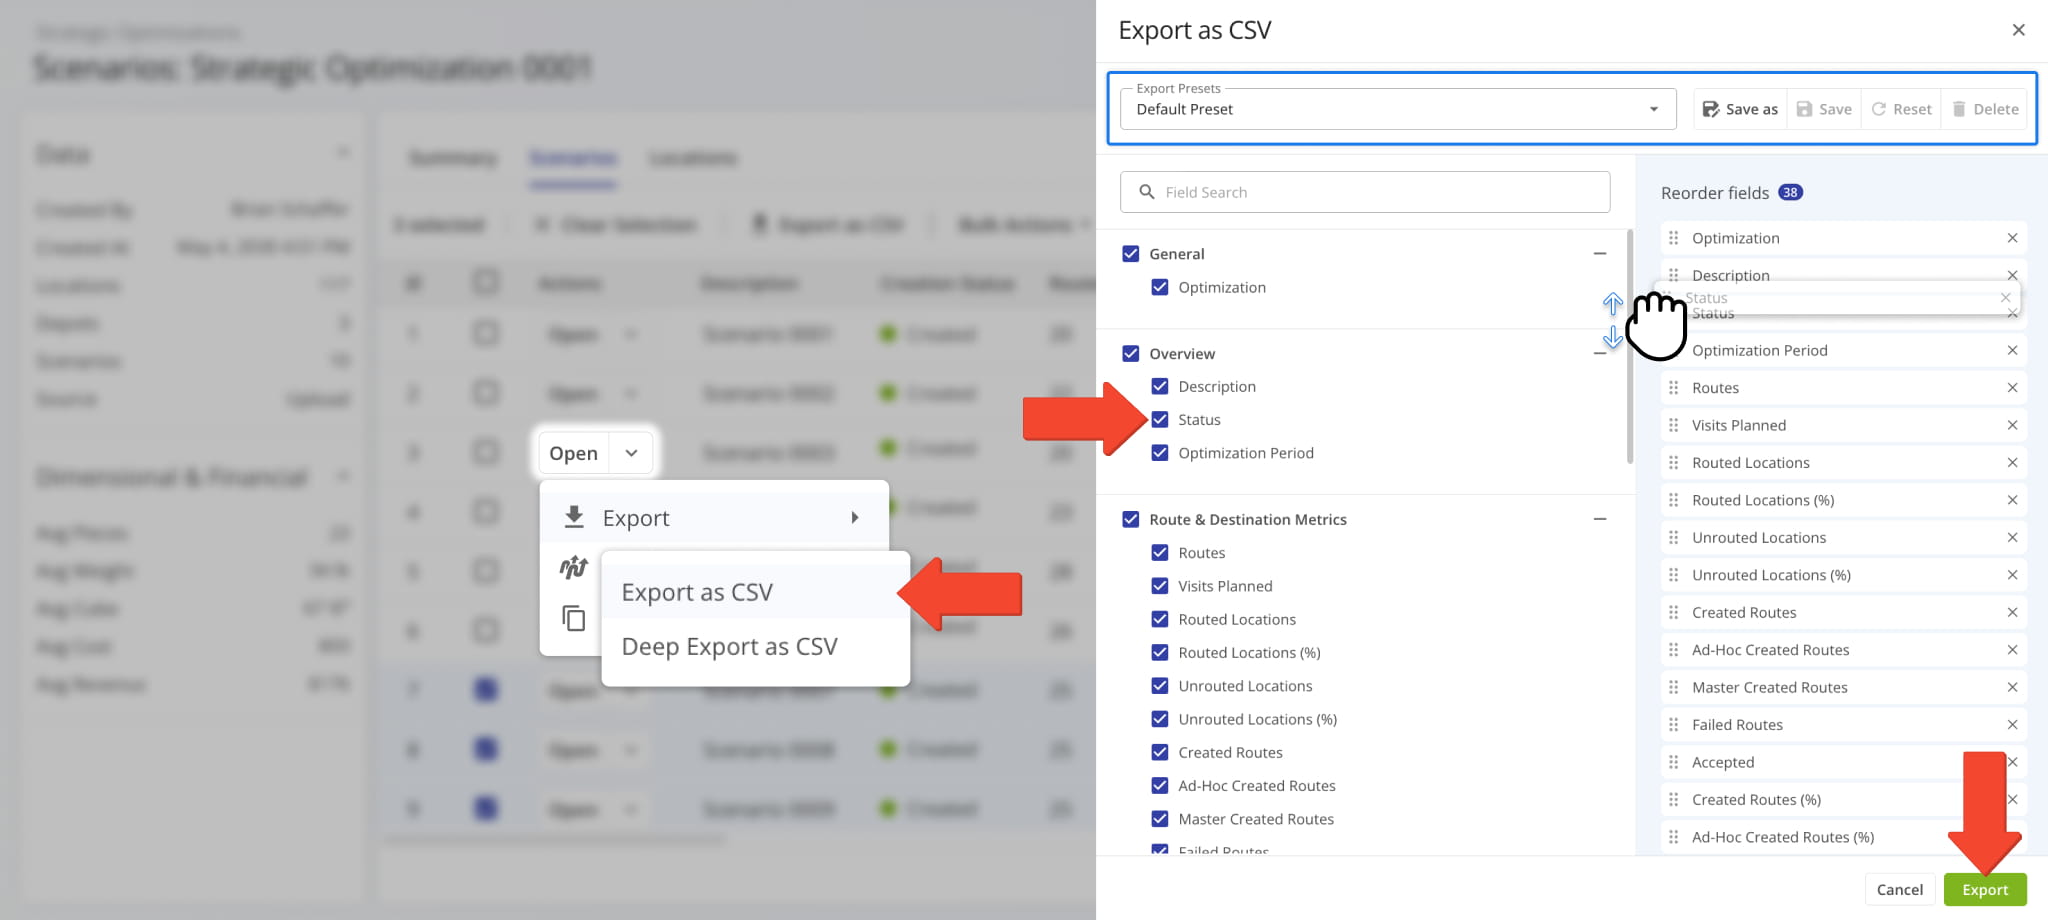
The “Export as CSV” option enables you to customize an export file by checking boxes next to data items you want to include. Just like display columns, you can re-arrange your export columns by clicking and dragging their names in the “Reorder fields” section. Click “Export” to download your configured CSV spreadsheet.
You can use the “Export Presets” field at the top to save your settings as an export template for future use.
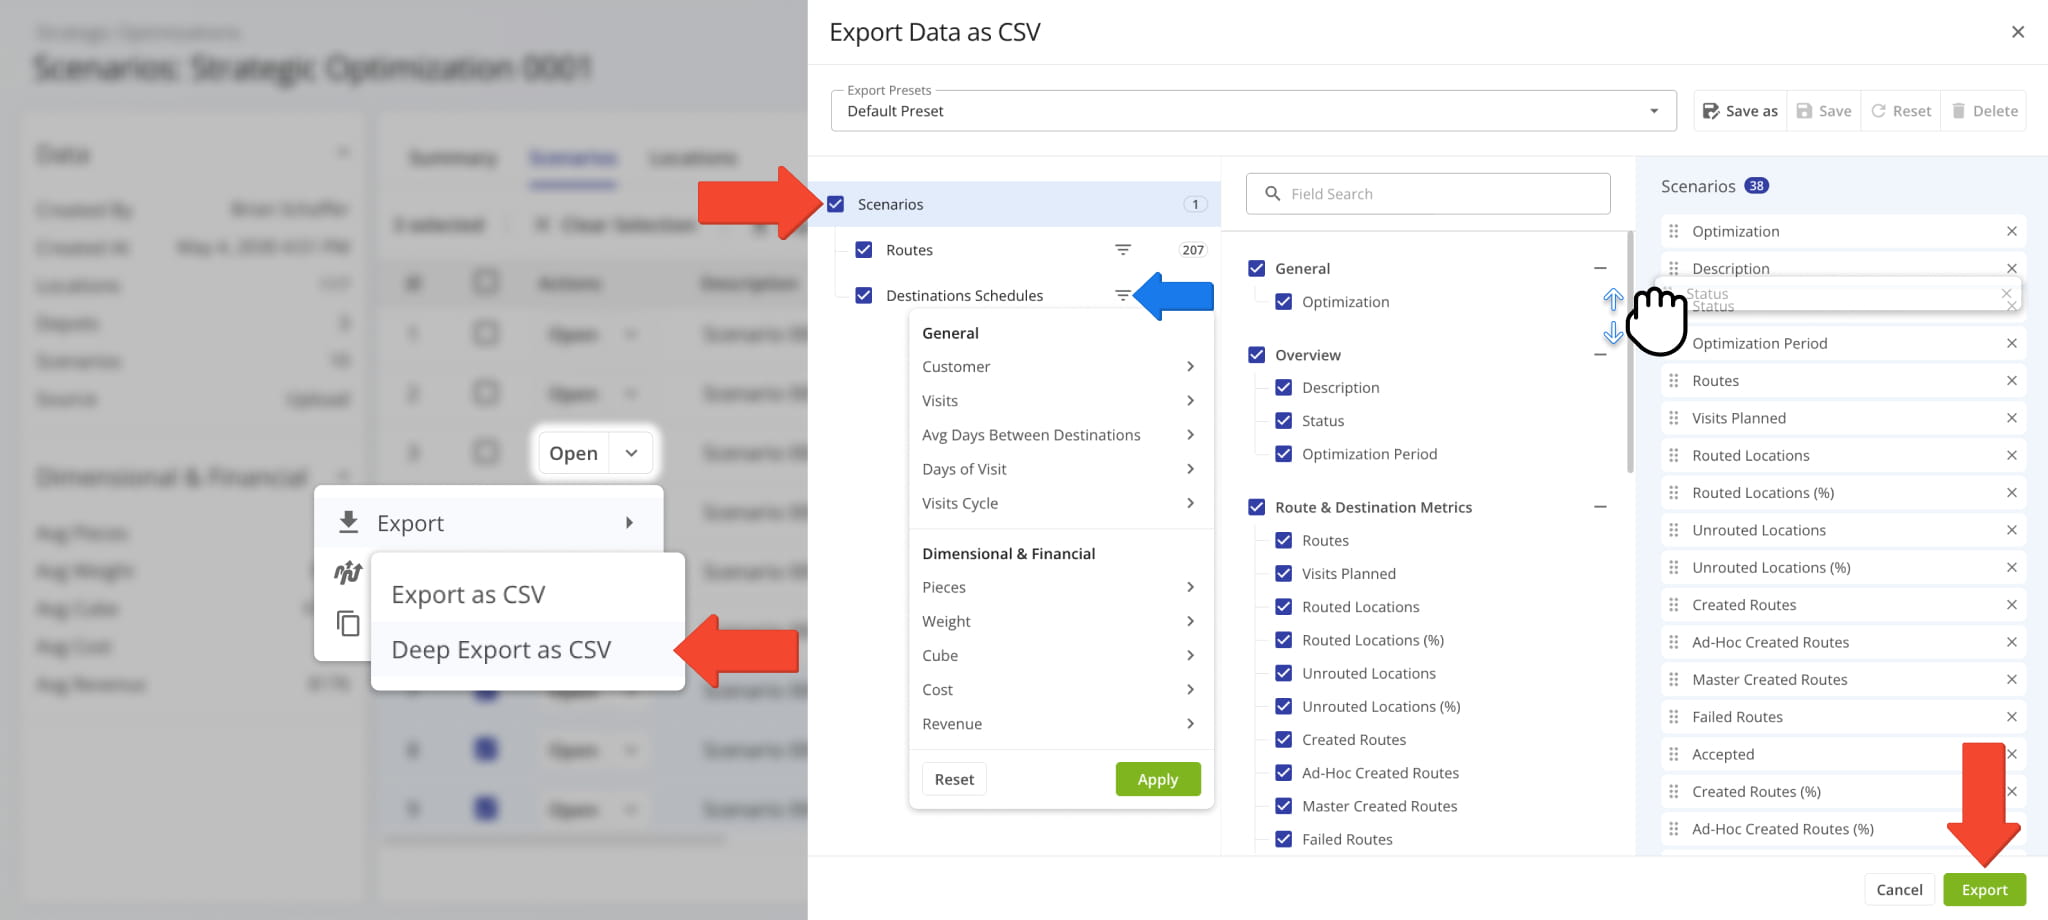
If you need more in-depth export options, select “Deep Export as CSV“. Deep Export provides access to all the data items described in this guide, divided into the same Strategic Scenarios categories.
In addition to the two familiar sections, you’ll see a hierarchy on the left. It corresponds to the structure of a Strategic Scenario. Each item in the hierarchy is a category with its own data types and filters, which match those of the Strategic Scenario, i.e. the “Routes” export category has the same data and filter options as the “Routes” tab in a Scenario.
Enable and arrange items to customize your export file as usual and click “Export” to download the CSV.
Strategic Scenario Destinations Schedule For Customer Locations
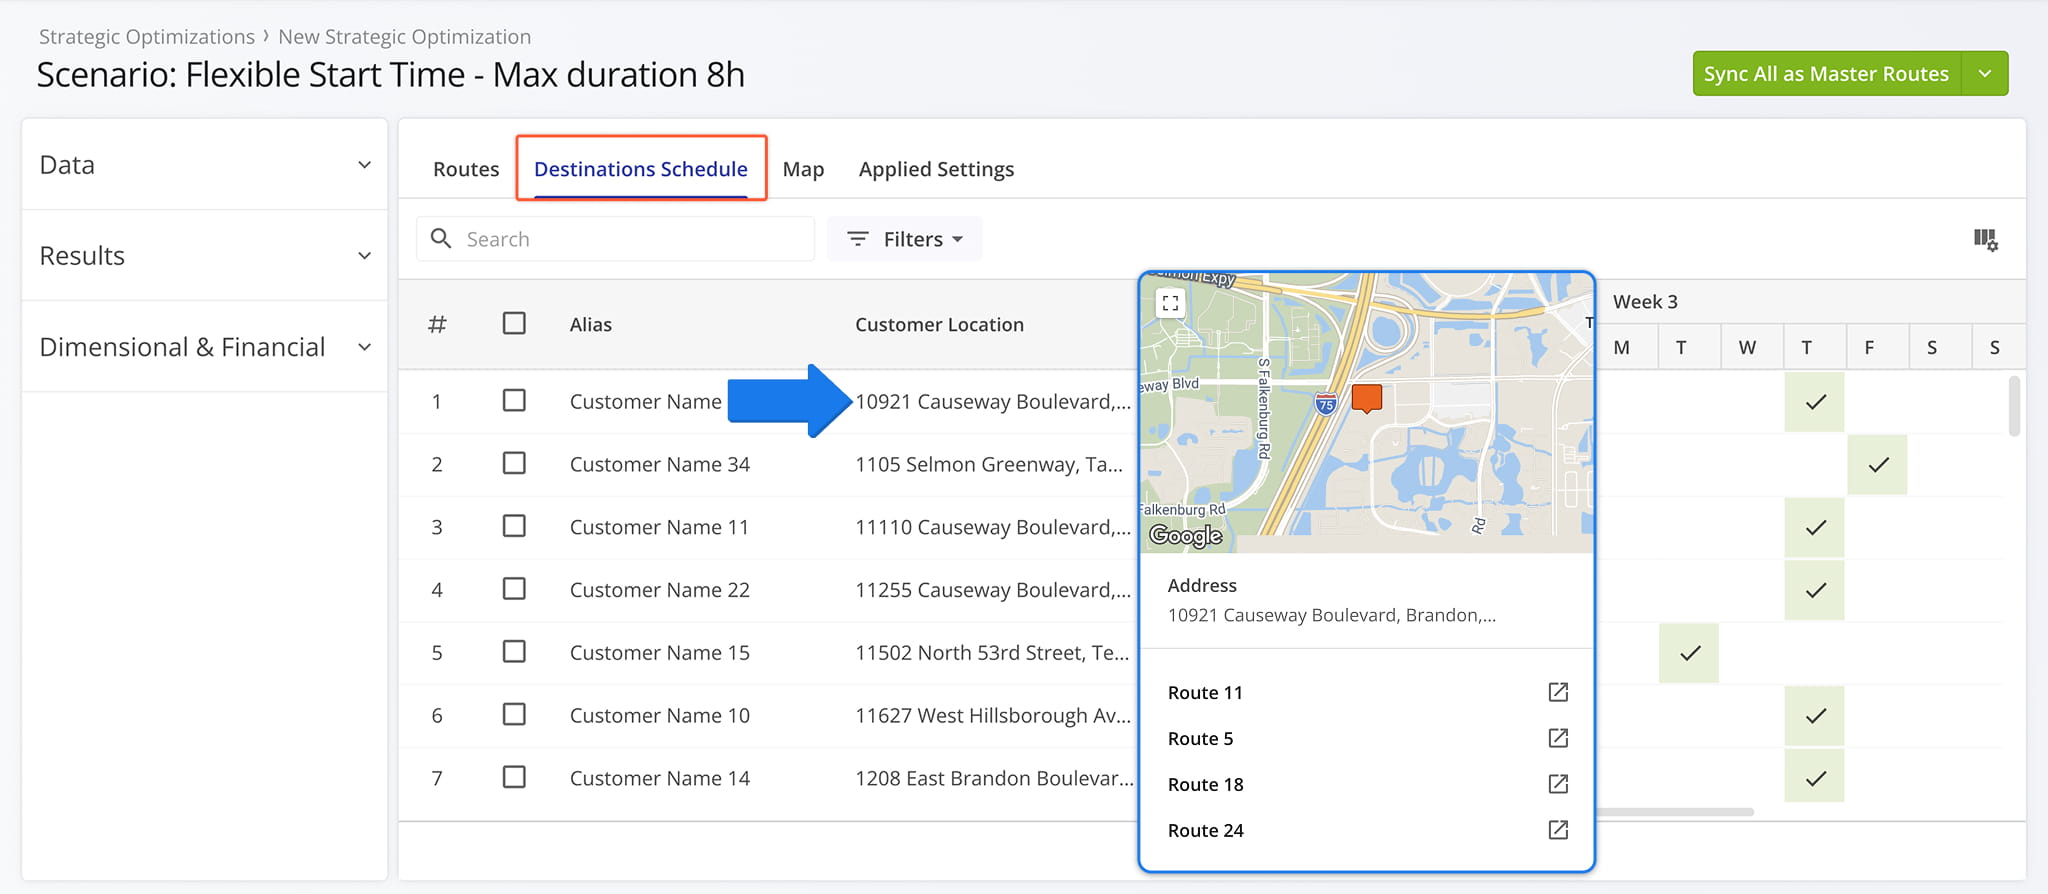
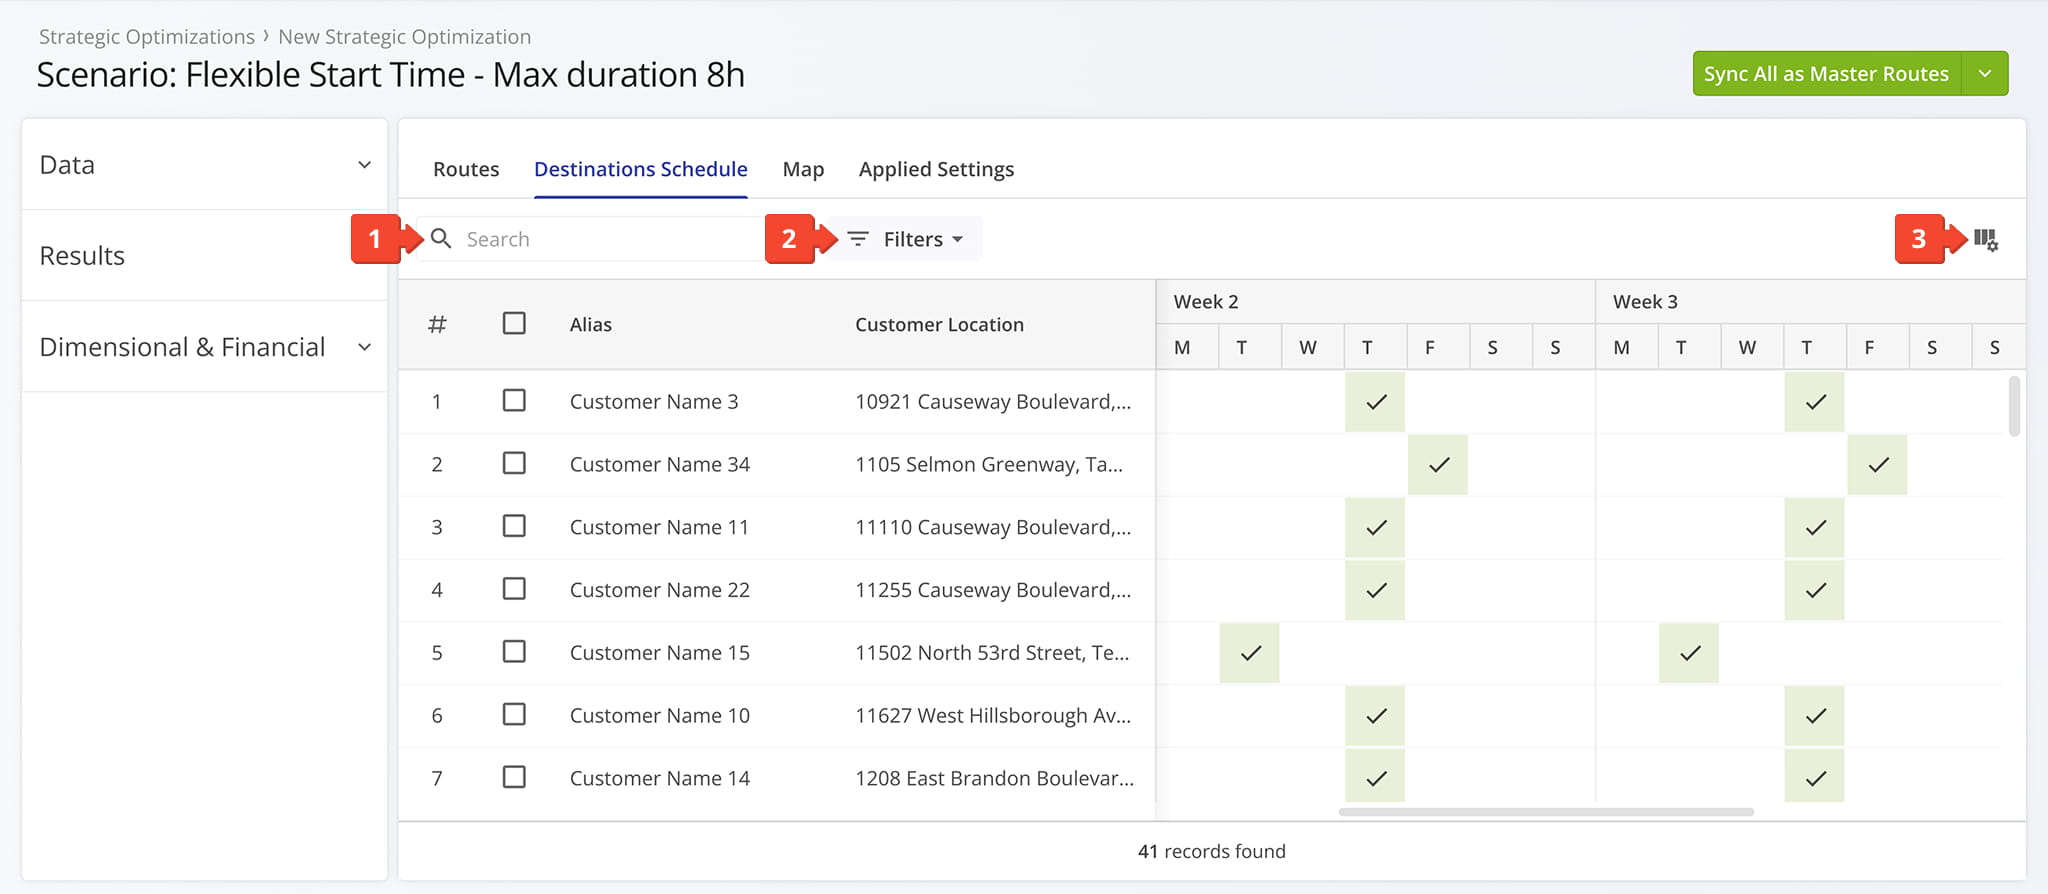
Go to the “Destinations Schedule” section to see more in-depth data related to the Scenario’s recurring visitation schedules.
Additionally, you can hover over Customer Locations to see map previews and their associated Strategic Scenario Routes.
Filter And Customize Strategic Scenario Destinations Schedules
To filter and customize the data shown in the “Destinations Schedule” section, you can:
- Use the “Search” field to find specific Locations by names or attributes.
- Click “Filters” to select specific data values to filter Locations by.
See the Strategic Optiomizations Data Catalog for a full list of data columns. - Click the Columns Button to customize the data columns shown in the Destinations Schedule tab.
See the Strategic Optiomizations Data Catalog for a full list of data columns.
Export Destination Schedules As Customizable CSV Spreadsheets
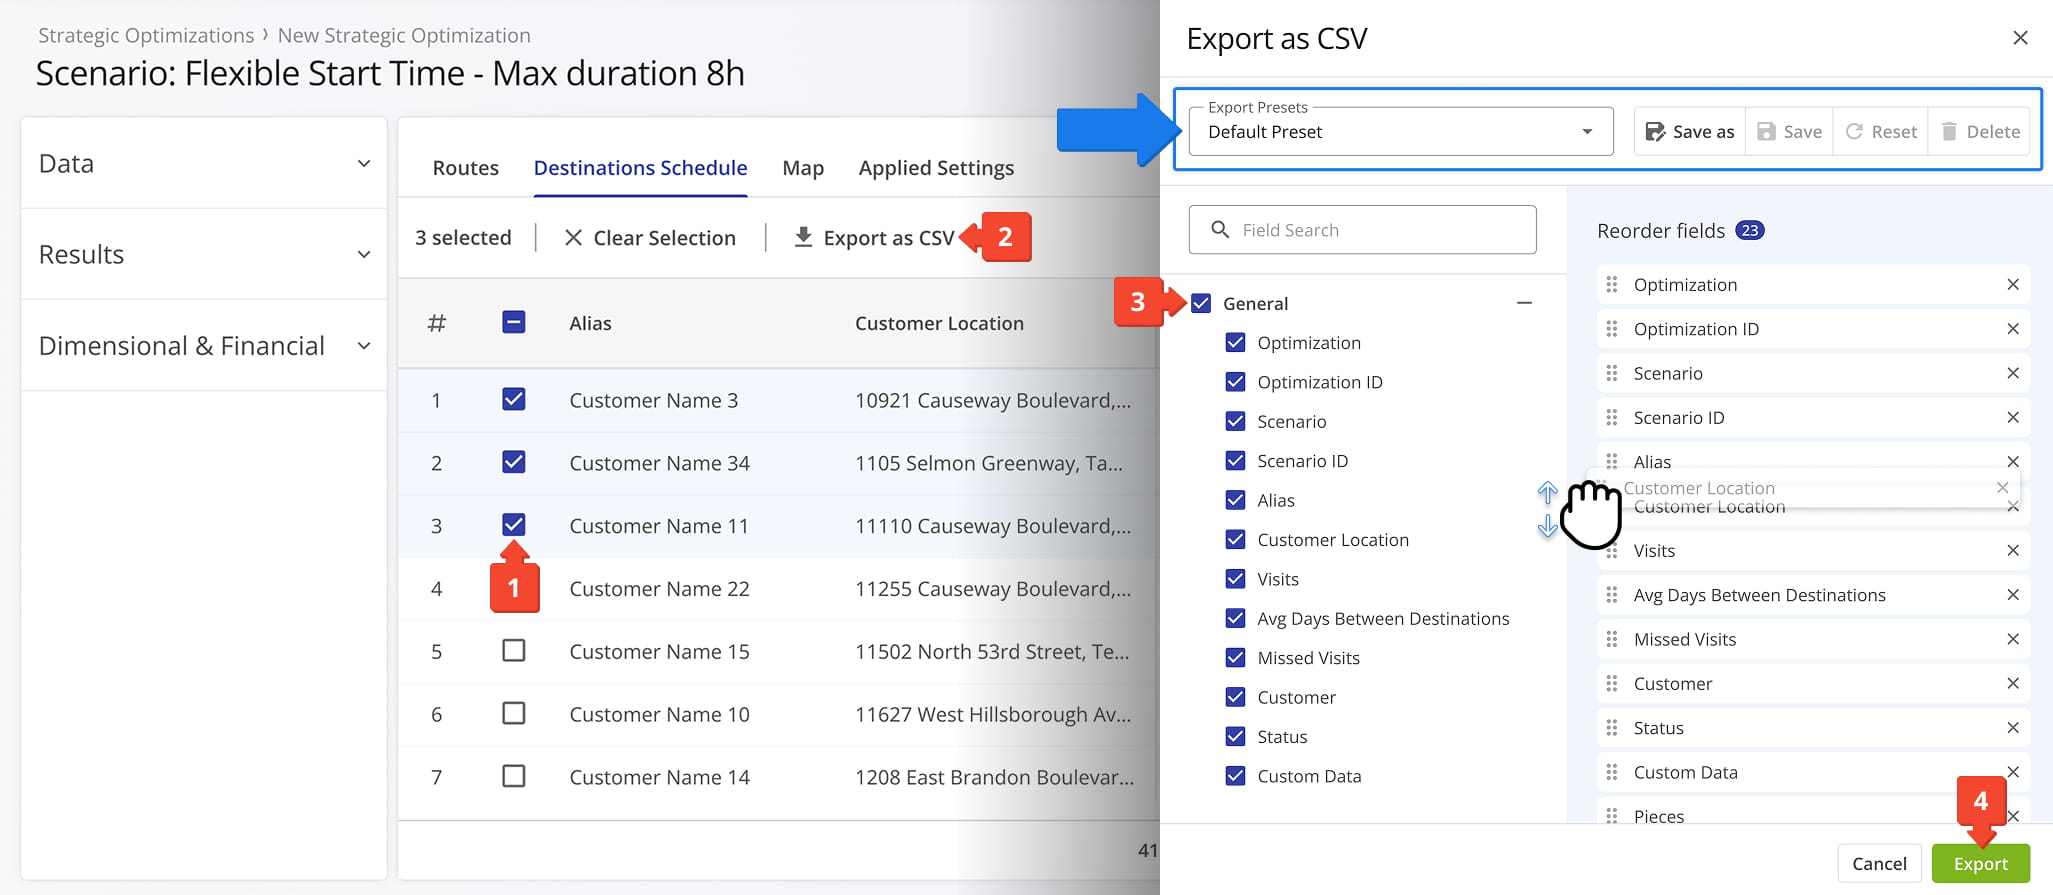
You can also export Customer Location schedules from a Strategic Scenario by following these steps:
- Select the relevant Locations by checking the boxes next to them.
- Click “Export as CSV” from the action bar above the data table.
- Enable the schedule data items you want to export by checking the boxes next to them.
You can change the order of export columns by dragging column names in the “Reorder fields” section. - Click “Export” to finalize and download your customized CSV spreadsheet.
You can use the “Export Presets” field at the top to save your settings as an export template for future use.
Strategic Scenario Routes – Access And Compare Draft Routes Data
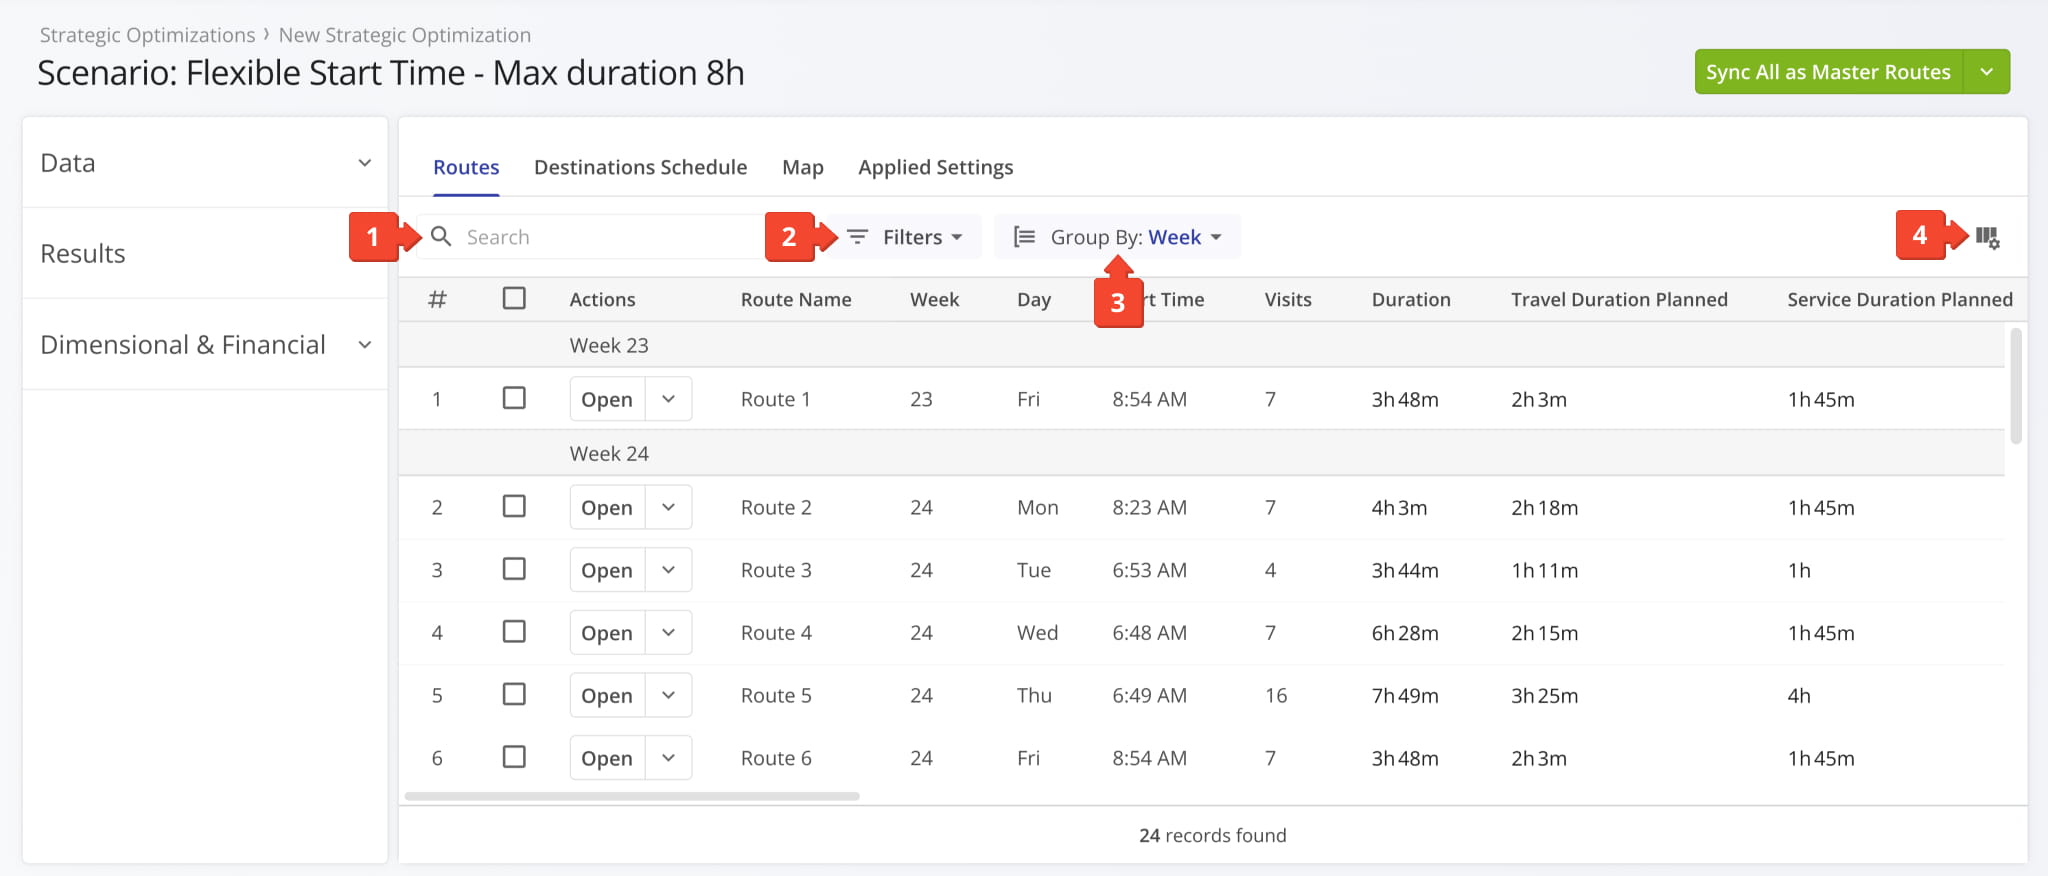
To more easily find Strategic Draft Routes and see the data relevant to your needs in the “Routes” tab, you can:
- Find routes using the “Search” field.
- Filter the displayed routes by using the “Filters” menu.
Learn more about supported filters in the Strategic Routing Data Catalog. - Group routes using the “Group By” menu.
- Customize the data columns displayed for your Strategic Scenario Routes by clicking the Columns Button.
Learn more about supported columns in the Strategic Routing Data Catalog.
Keep reading to learn about managing Scenario Routes and syncing routes for Recurring Routing.
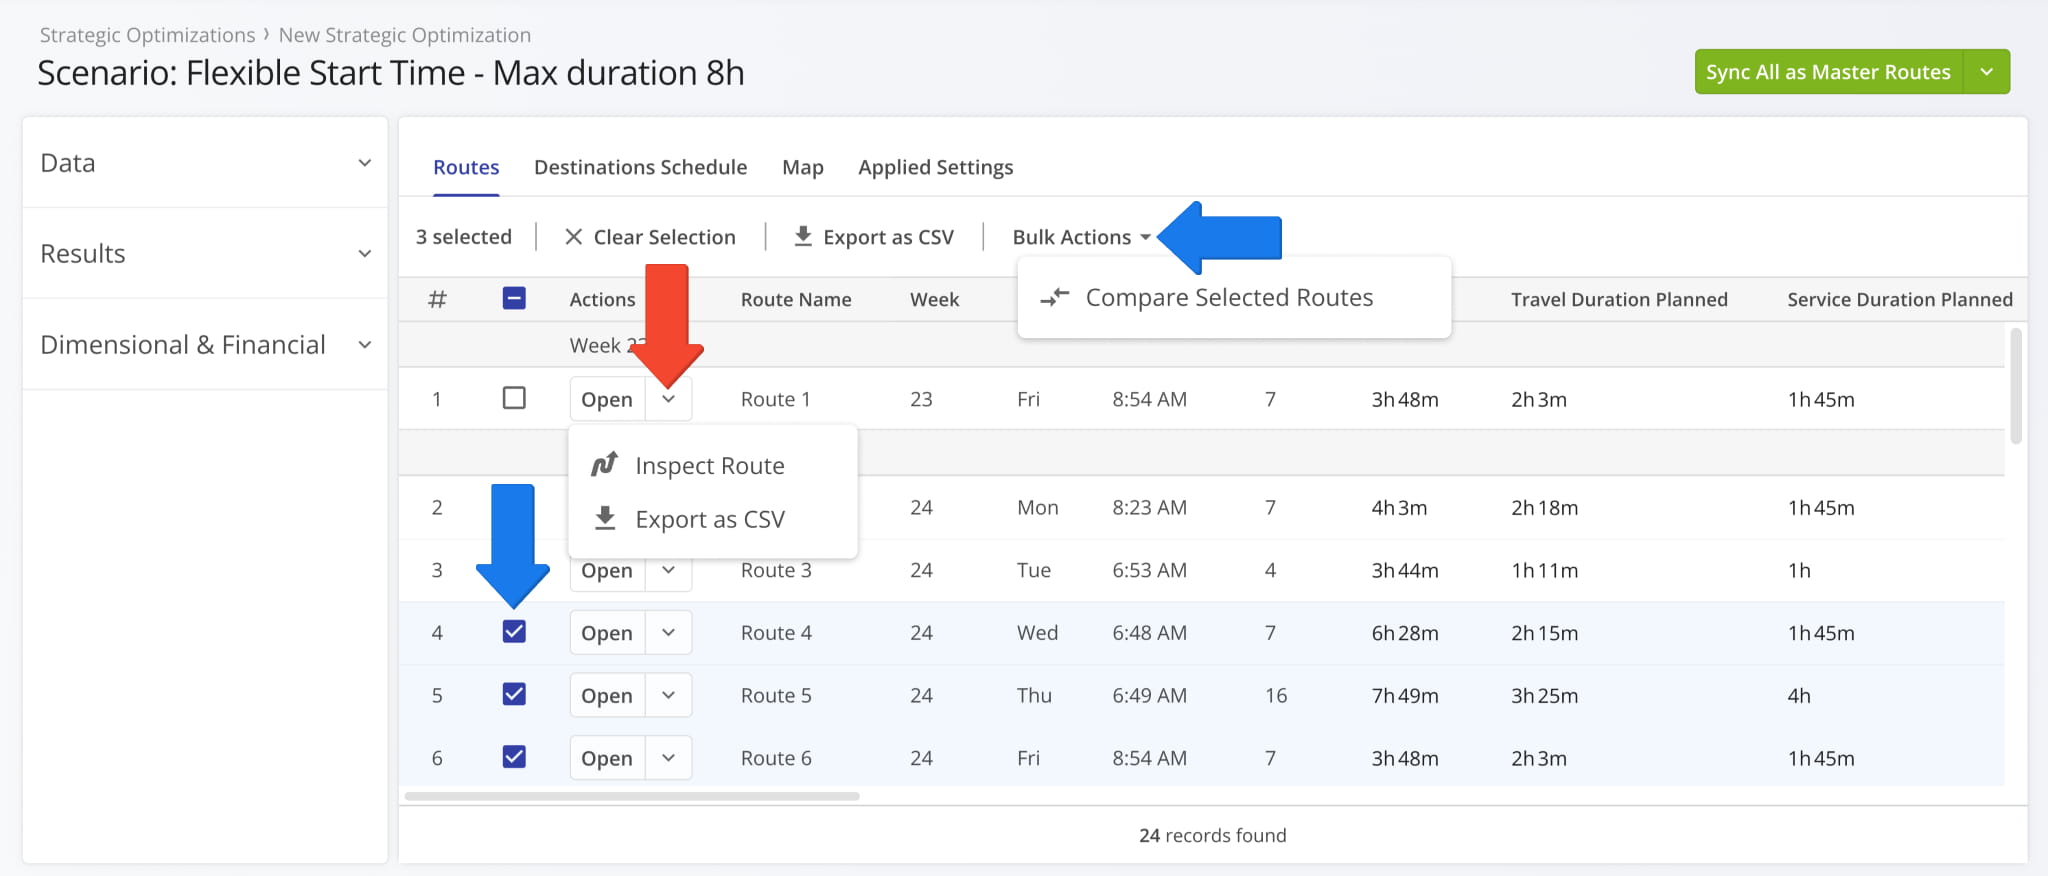
In an open Scenario, you can use the following Strategic Scenario Route management options:
- Single Routes: Click the Down Arrow to inspect or export a route.
- Multiple Routes: Check boxes to select routes and use the action bar to “Export as CSV” or “Compare Selected Routes“.
You can learn more about these route management actions below.
Inspect Routes – Detail Scenario Route View Mode
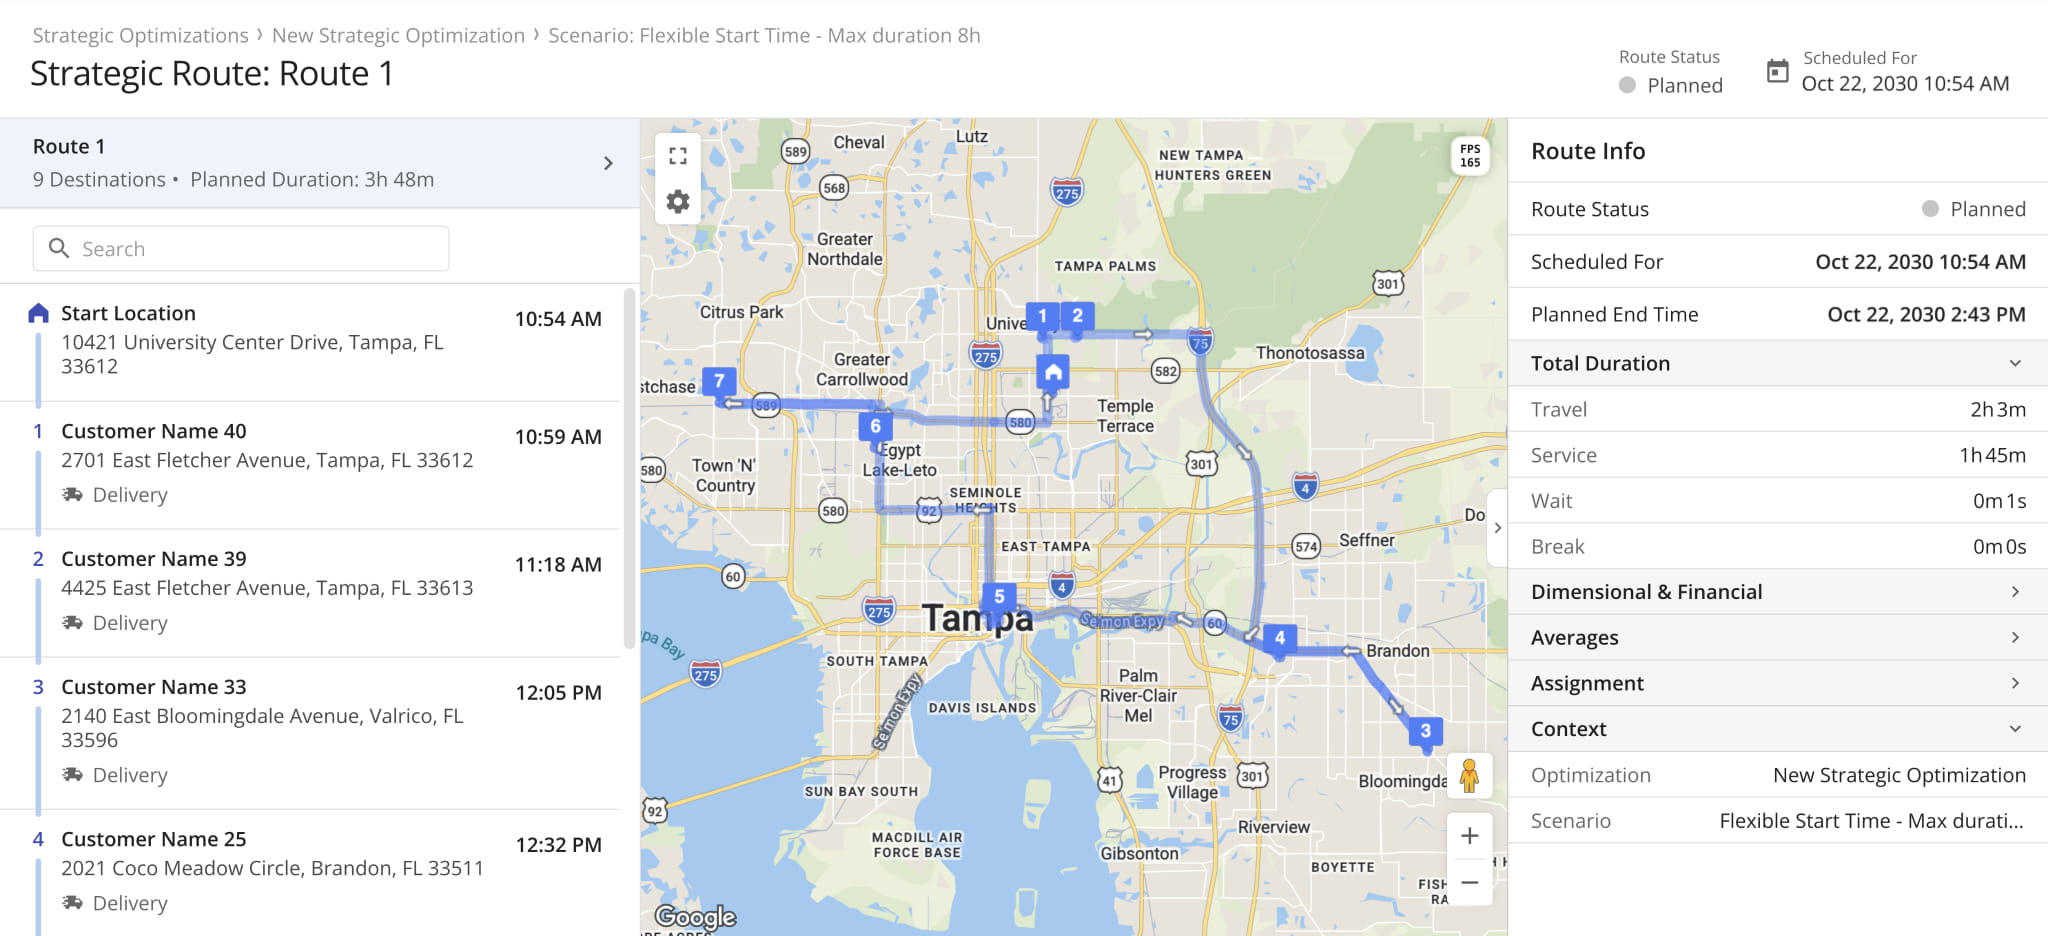
When you select to “Inspect Route“, as described above, you’ll see a detailed view of the route, including a list of destinations, a planned route map view, route info and metrics, schedule details, and more. This interface is similar to the Route Editor.
You can refer to our Route Editor Guide to learn about the available fields and settings. NOTE: Inspect Routes View is intended for viewing Strategic Scenario routes in detail and doesn’t support the same management actions as the Route Editor.
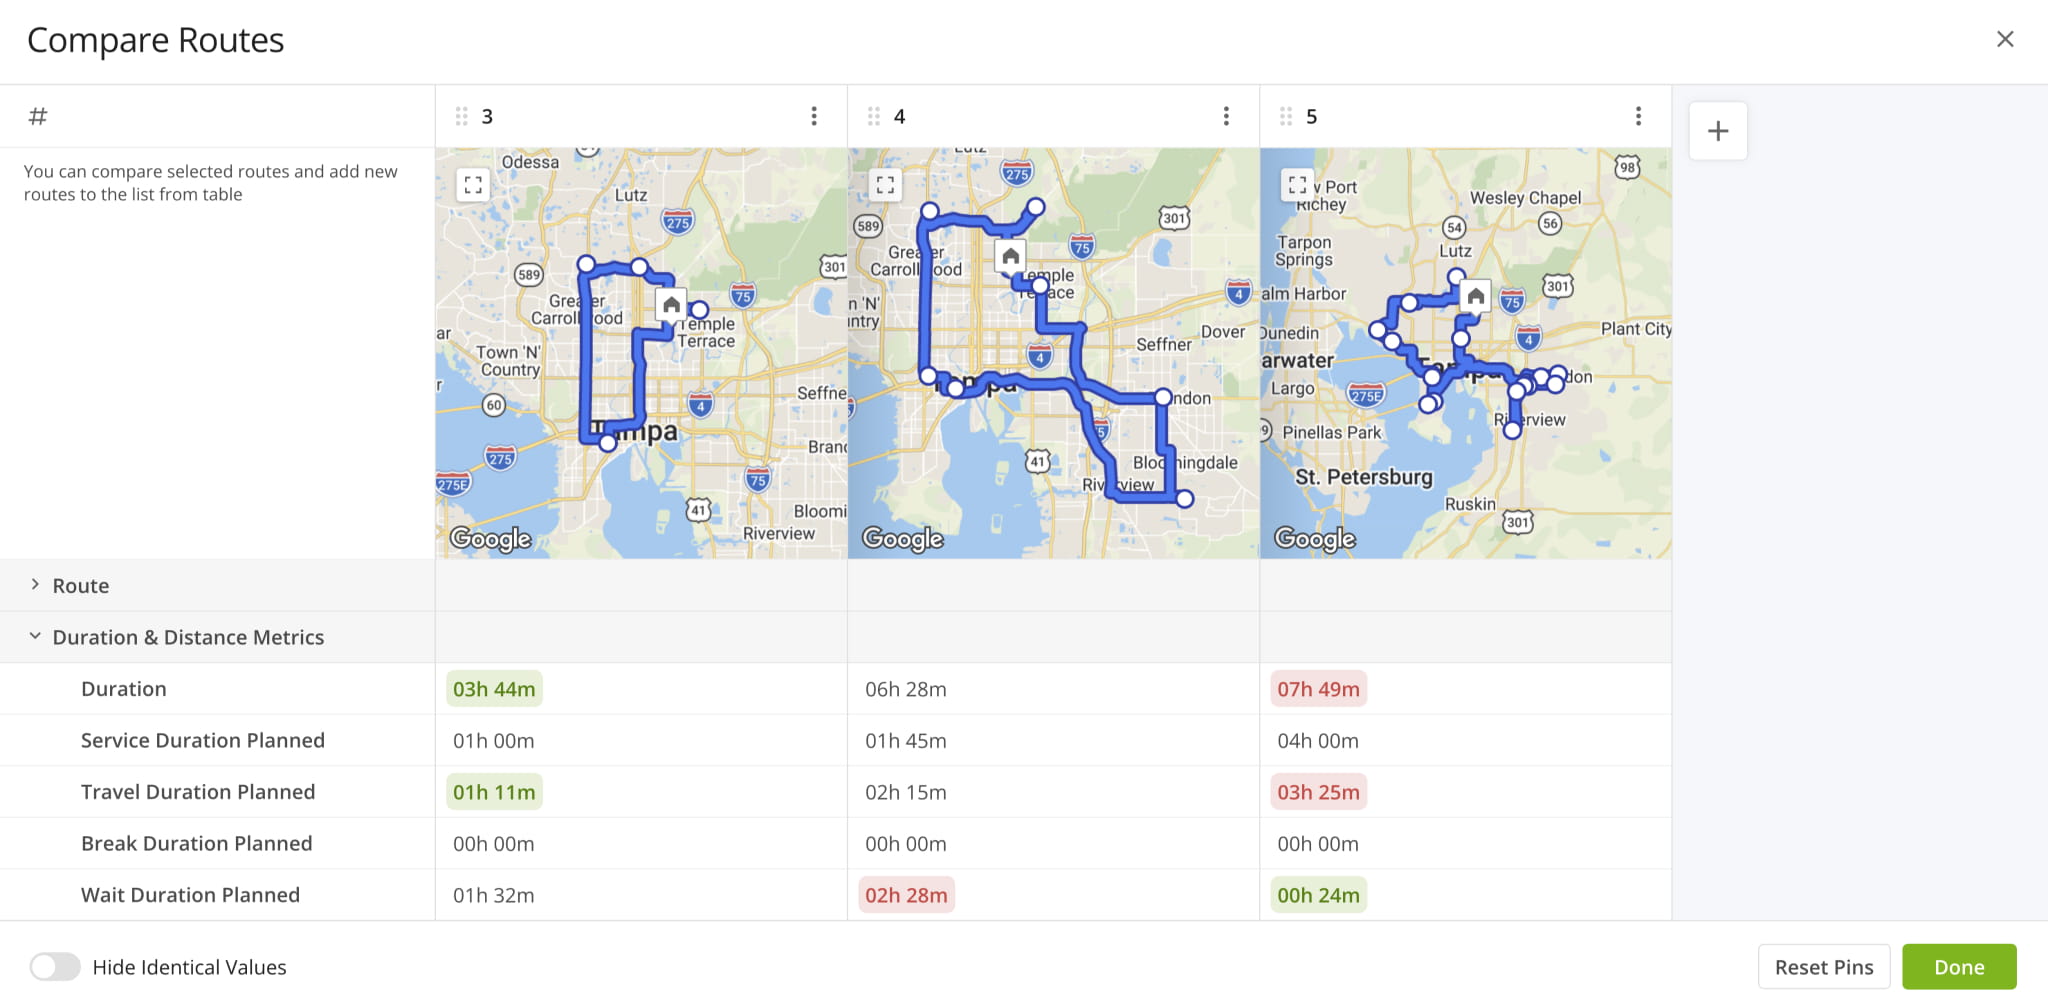
Compare Strategic Scenario Routes Side By Side
When you use Bulk Actions to compare routes, you’ll see a new screen with your selected routes arranged side by side. This interface supports the same actions and functionality as the regular route comparison tool. Learn more about comparing routes side-by-side.
Export Strategic Scenario Routes As Customizable CSV
After selecting the “Export as CSV” option, add data items for export by checking the boxes next to them. Under “Reorder fields“, you can drag data column names to adjust their order. When done, click “Export” to save the CSV file.
You can use the “Export Presets” field at the top to save your settings as an export template for future use.
Strategic Routes Map And Route Metrics Summary
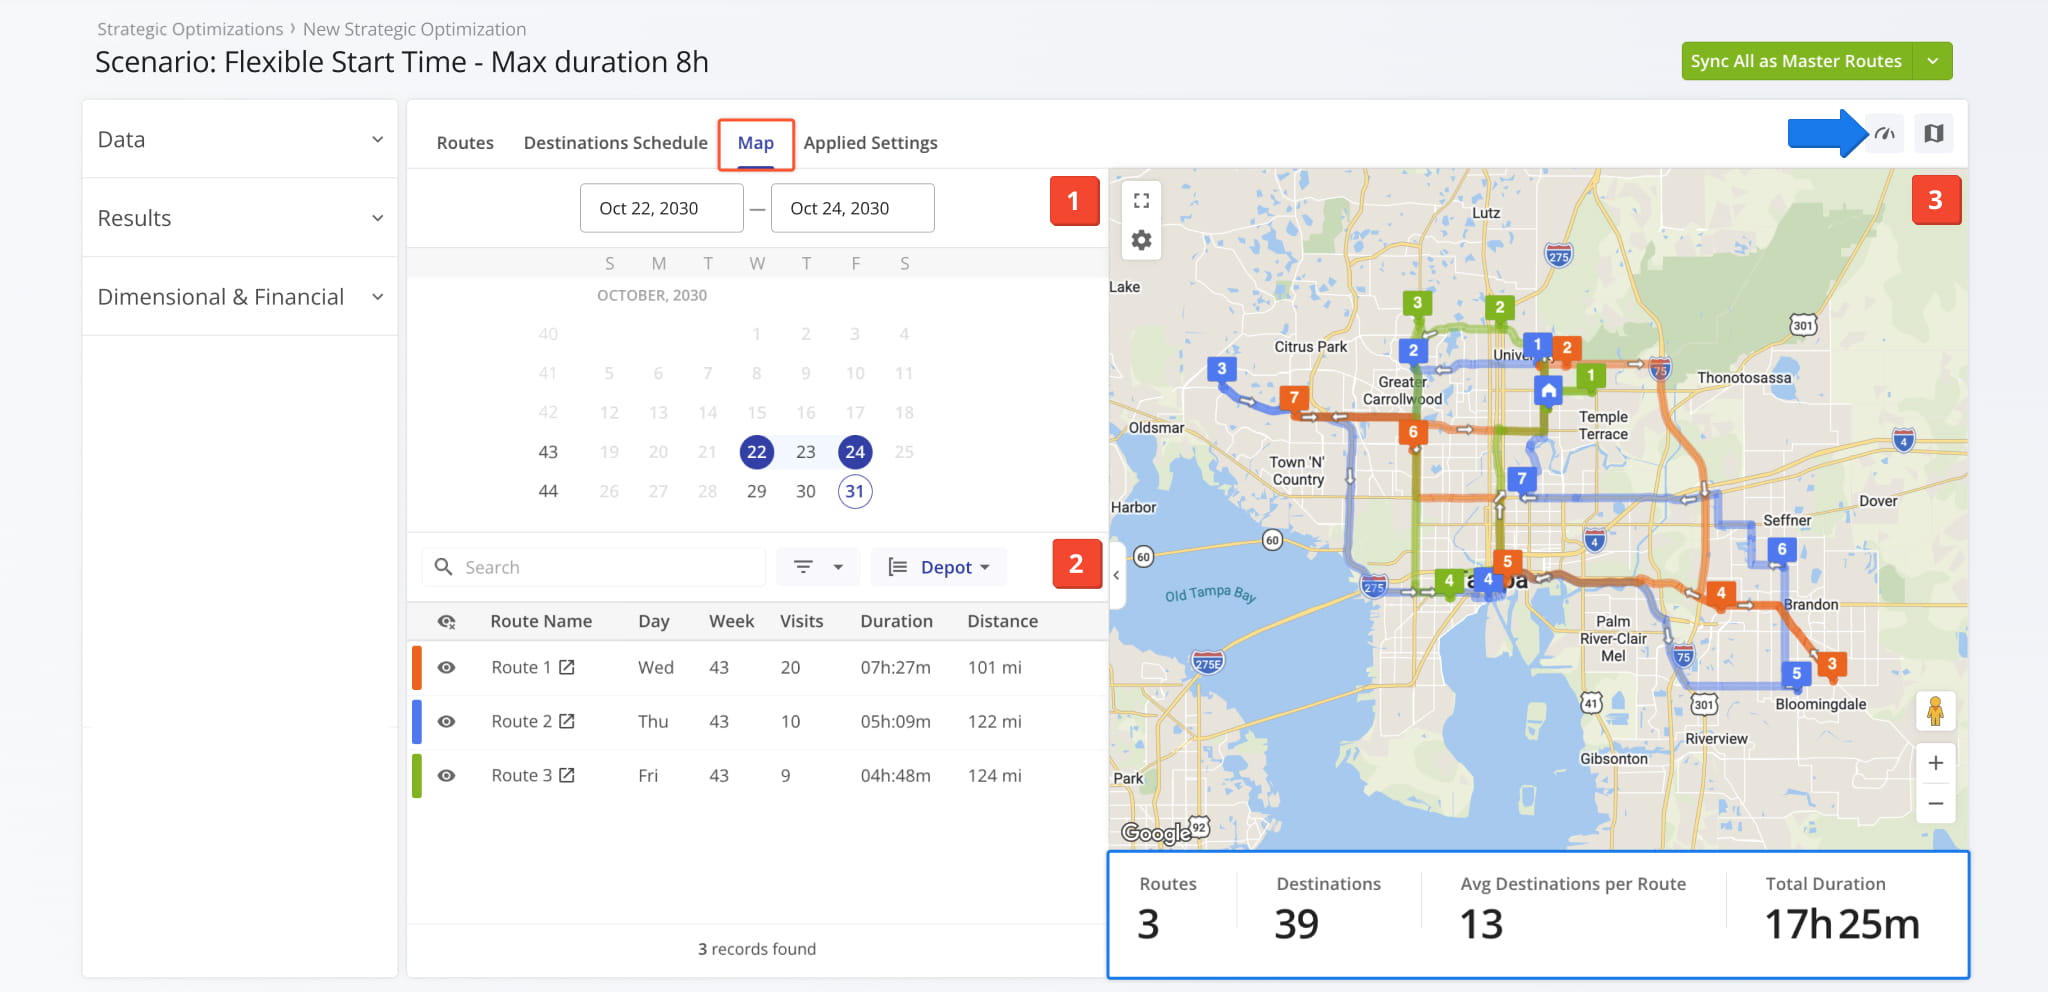
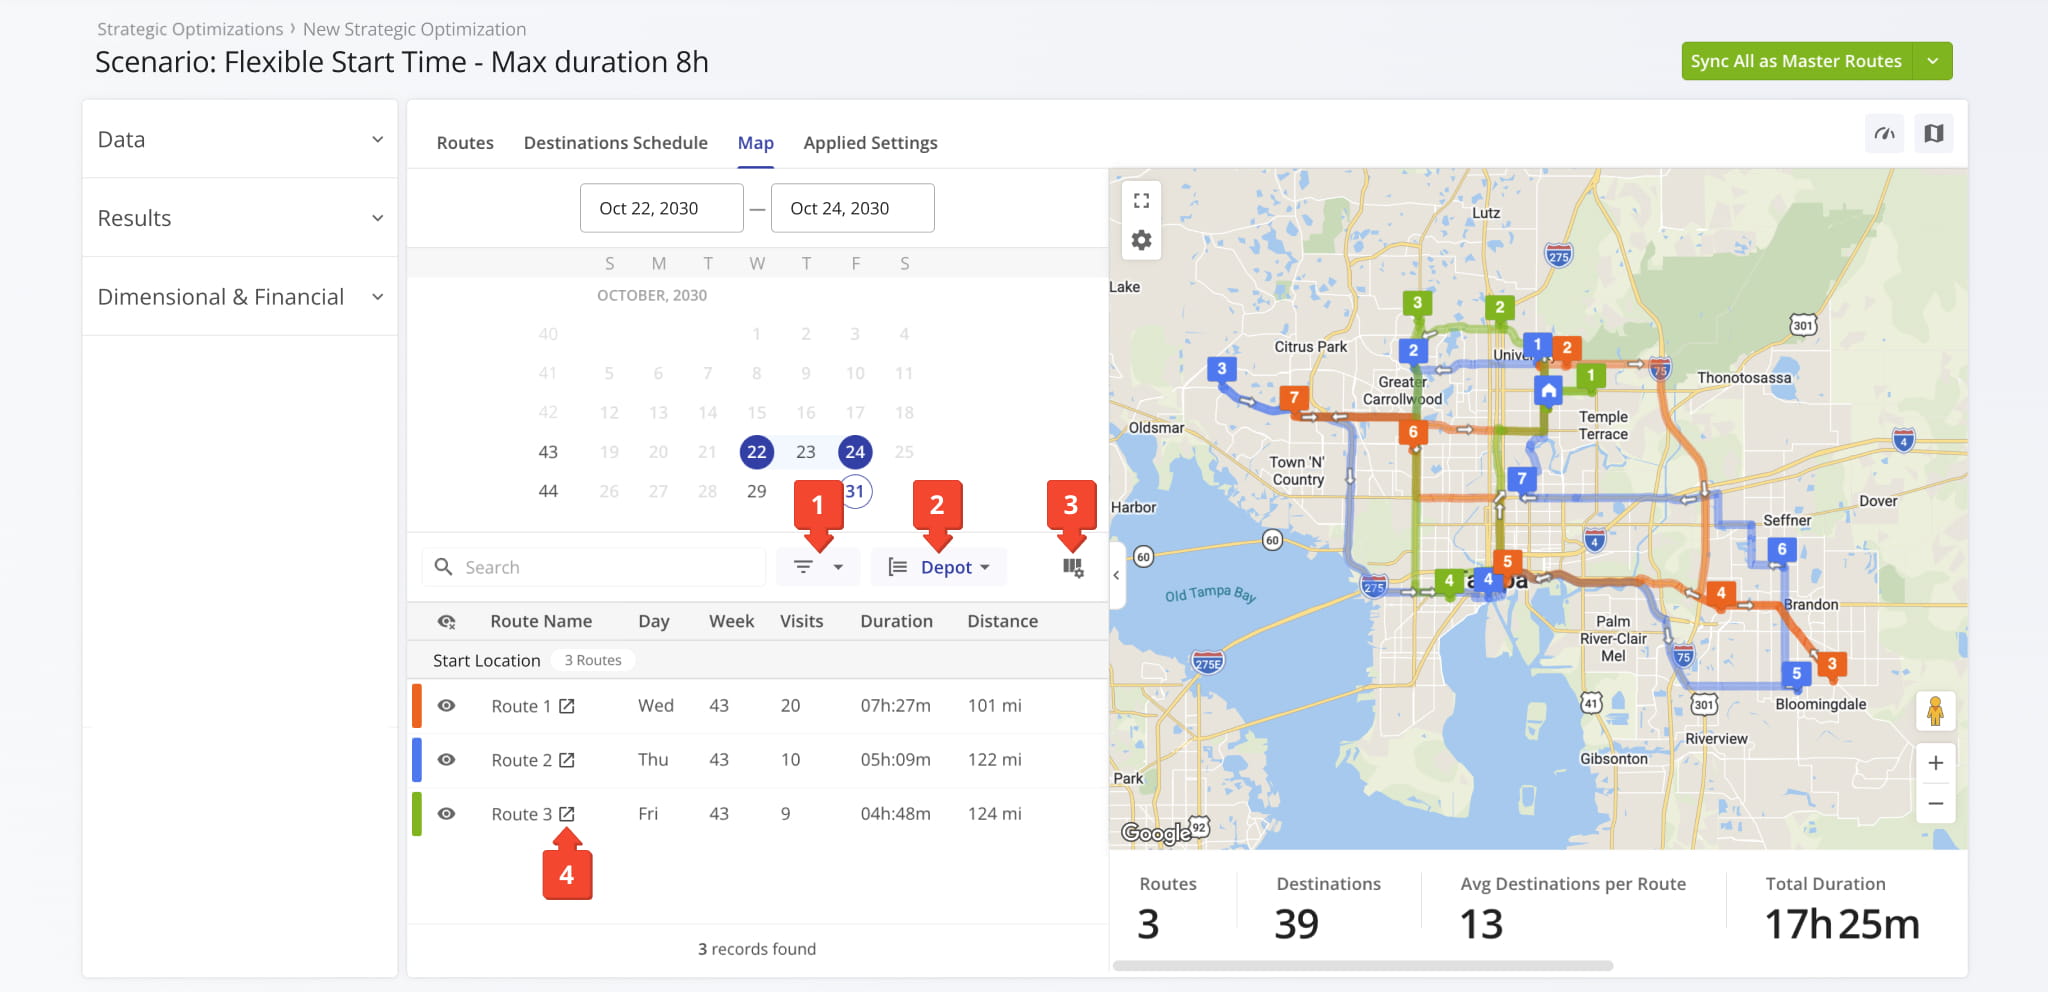
Click the “Map” tab to open the Scenario Routes Map where you can get a visual overview of routes for specific days and date ranges. You’ll see three main sections in this interface:
- Calendar: Pick a date or date range. Only routes scheduled for the select date(s) will be displayed.
- Routes List: Pick which routes to show on the map and see their associated details and attributes.
- Routes Map: Shows all routes enabled in the Routes List on the map, including their combined metrics.
To see combined route metrics at the bottom of the map, simply click the Metrics Button in the top-right.
Enabling routes on the map is easy. Simply click the Eye Icon next to those routes you want to see on the map to enable them.
You can also click destinations on the map to see their details and open corresponding Strategic Location Snapshots.

The Routes List in the “Map” section supports the following actions and settings:
- Filter routes using the same customizable filters as the main “Routes” section.
- Group routes by their scheduled week or depot (route start location).
- Customize data columns. The same options are available as the main “Routes” section.
- Open Strategic Route Snapshots by clicking the Open Icon.
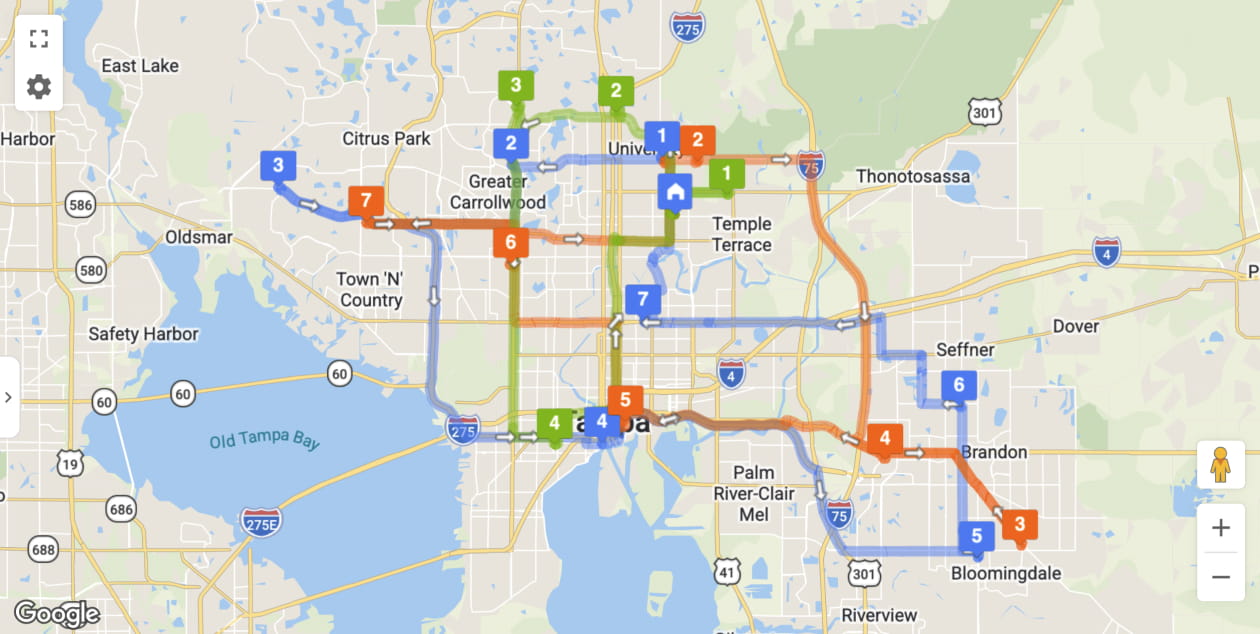
To customize the Routes Map, click the Gear Icon to open the Map Settings. See the table below for a list of available options.
Additionally, you can expand the “User Settings” menu to configure how locations are displayed, map label and weather unit preferences, and more.

Road Network
Easily readable road network map mode.
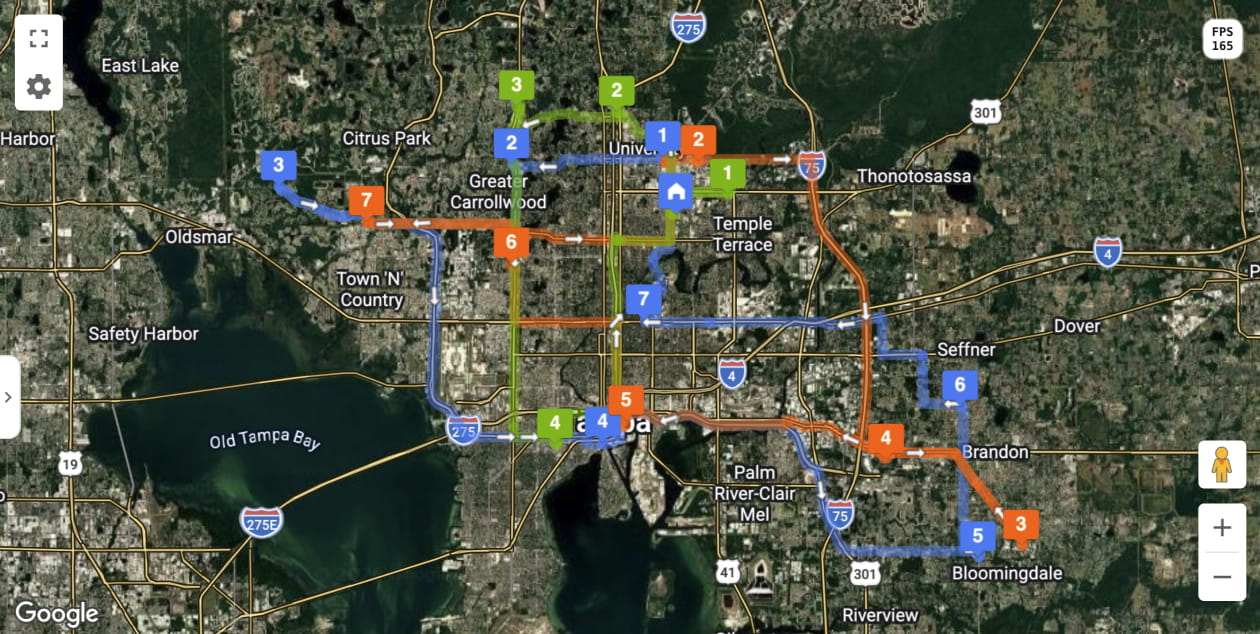
Satellite Map
Satellite imaging map mode, which provides high context for an area or environment.
Locations
Select how Locations and destinations will be shown on the map:
- Points: Each Location is an individual point.
- Clusters: Locations are clustered to improve visibility.
- Heatmap: Location density is shown as a colored heatmap.
Label Markers By
Select how destination markers are labeled:
- Destination Number: Each destination inherits its sequence number from its corresponding route.
- Route Number: Each destination inherits the number of its corresponding route within the Strategic Scenario.
Show Popover
Select how the Destination Info Popover is opened:
- On Hover: Destination info is shown when you hover the cursor over a destination.
- On Click: Destination info is only shown when you click a destination on the map.
Temperature
Select the temperature unit used to show local temperature when the Weather Map Layer is enabled.
Enable Facility location indicators on the map.
Enable Vehicle location indicators on the map.
Enable User location indicators on the map.
NOTE: User location is only synced during active route time.
Enable an overlay showing your Avoidance Zone areas on the map.
Enable an overlay showing your Territory areas on the map.
Enable an overlay showing destination geofences and Custom Location Geofences.
Traffic
Enable a live traffic overlay on the map.
Enable a customizable live weather overlay on the map.
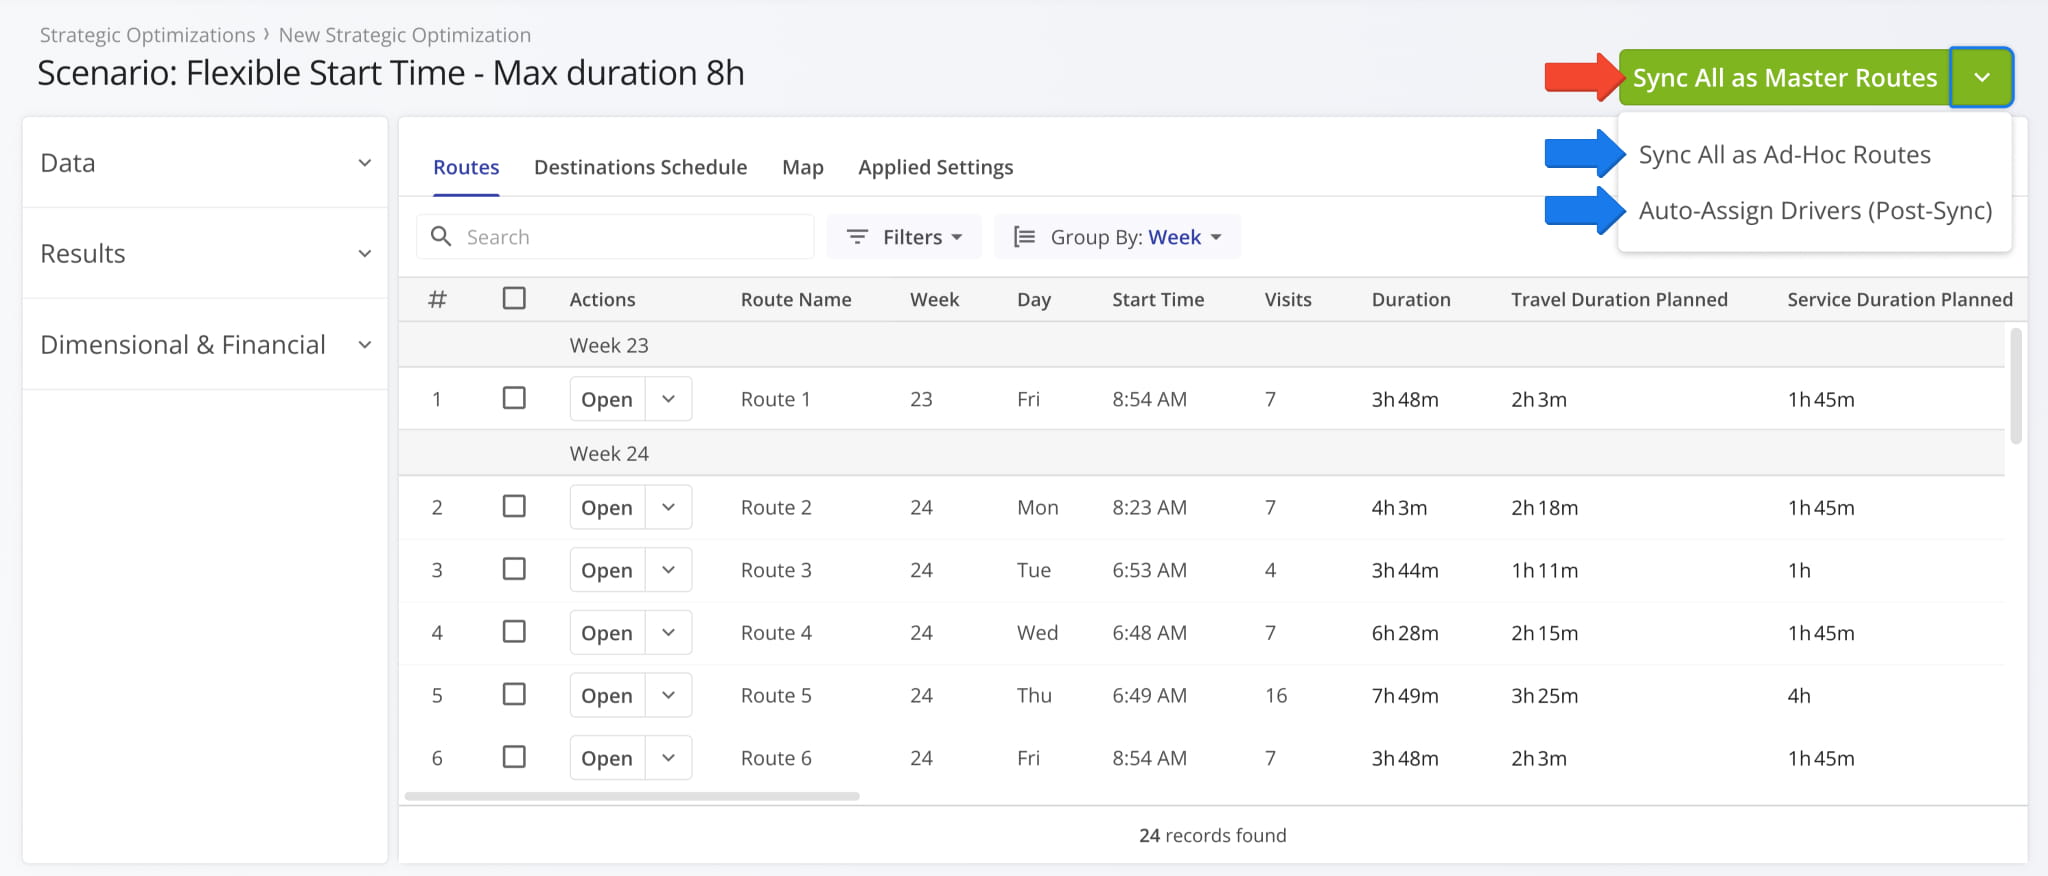
Sync And Import Strategic Scenario Routes With Recurring Schedules
Once you’ve confirmed a Strategic Scenario’s routes meet your requirements, you can sync them for Recurring Routing. Simply, click the “Sync All as Master Routes” button to import the Scenario’s routes into your Recurring Routes.
Alternatively, click the Down Arrow and select “Sync All as Ad-Hoc Routes” to import routes as one-time non-recurring routes into your Routes List. You can also use the “Auto-Assign Drivers” option if you’ve added User Skills to your Scenario Settings.
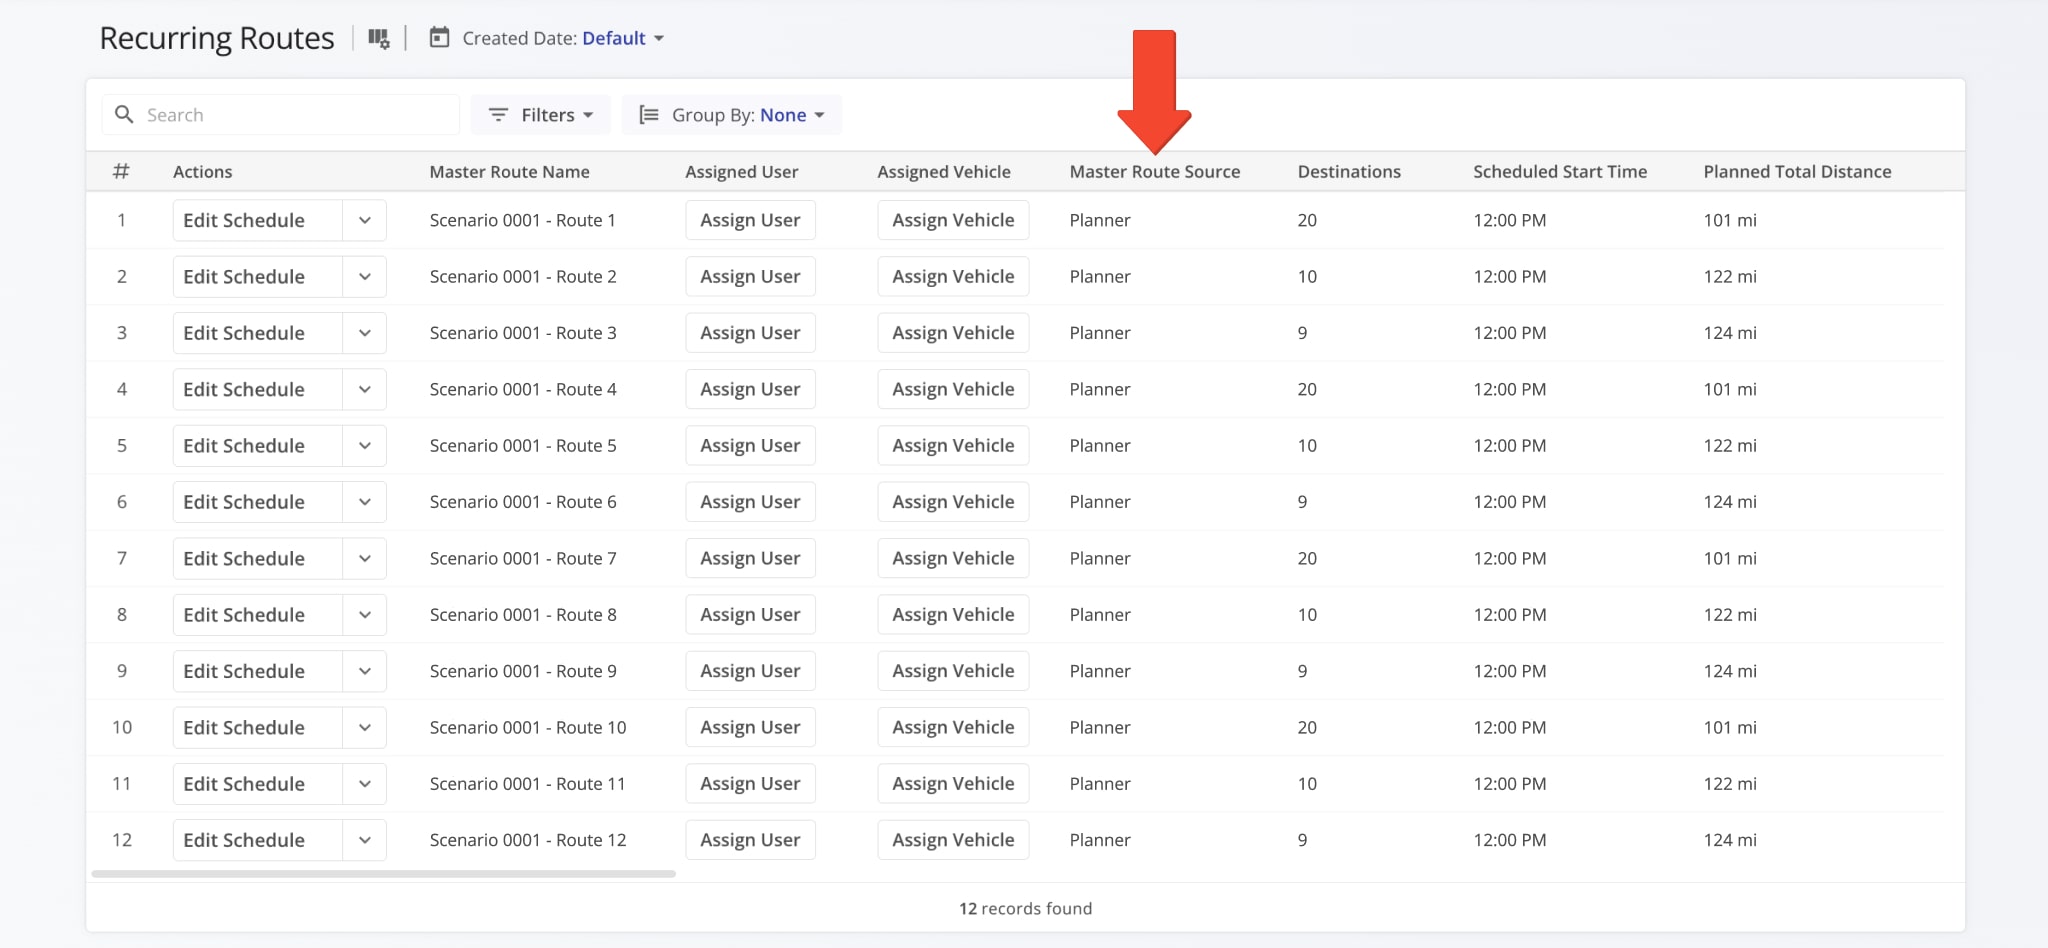
After you sync Scenario routes as Master Routes for Recurring Routing, you’ll find them on your “Recurring Routes” page. Schedule data from the Scenario will be imported as Recurring Schedules for those routes.
Routes synced from Strategic Routing Scenarios will list “Planner” as their “Master Route Source” on your account. This makes them easy to find when using filters. Learn more about managing Recurring Routes and schedules.
Visit Route4Me's Marketplace to Check out Associated Modules:
- Operations
Audit Logging and Activity Stream
- Operations
Custom Data Add-On
- Operations
Advanced Team Management Add-On
About author: Kristian Andreev
Kristian is a Technical Writer at Route4Me. With over a decade of experience in writing and localization, he's an expert at communicating complex technical data in a clear, concise, and user-friendly way. Passionate about bridging the gap between engineers and users, he specializes in creating documentation to streamline onboarding, enhance product usability, and support global teams on the path to success.