Advanced Configuration Editor And Expert Mode – Customize Account Features
With Route4Me’s Advanced Configuration Editor, you can add additional features and customizations to your account to better meet your last mile routing, logistics, and business needs. Customize features, modify the user interface, enhance system performance, and configure Route4Me, the best route optimization software, for your unique business requirements. This guide will show you how to add, enable, and disable Advanced Configurations and provide you with a list of available Configuration options that you can use to enhance your account.
NOTE: Only Account Owners can use the Advanced Configuration Editor. Learn about User Types and Account-Level Permissions.
Table of Contents
Open Your Advanced Configuration Editor
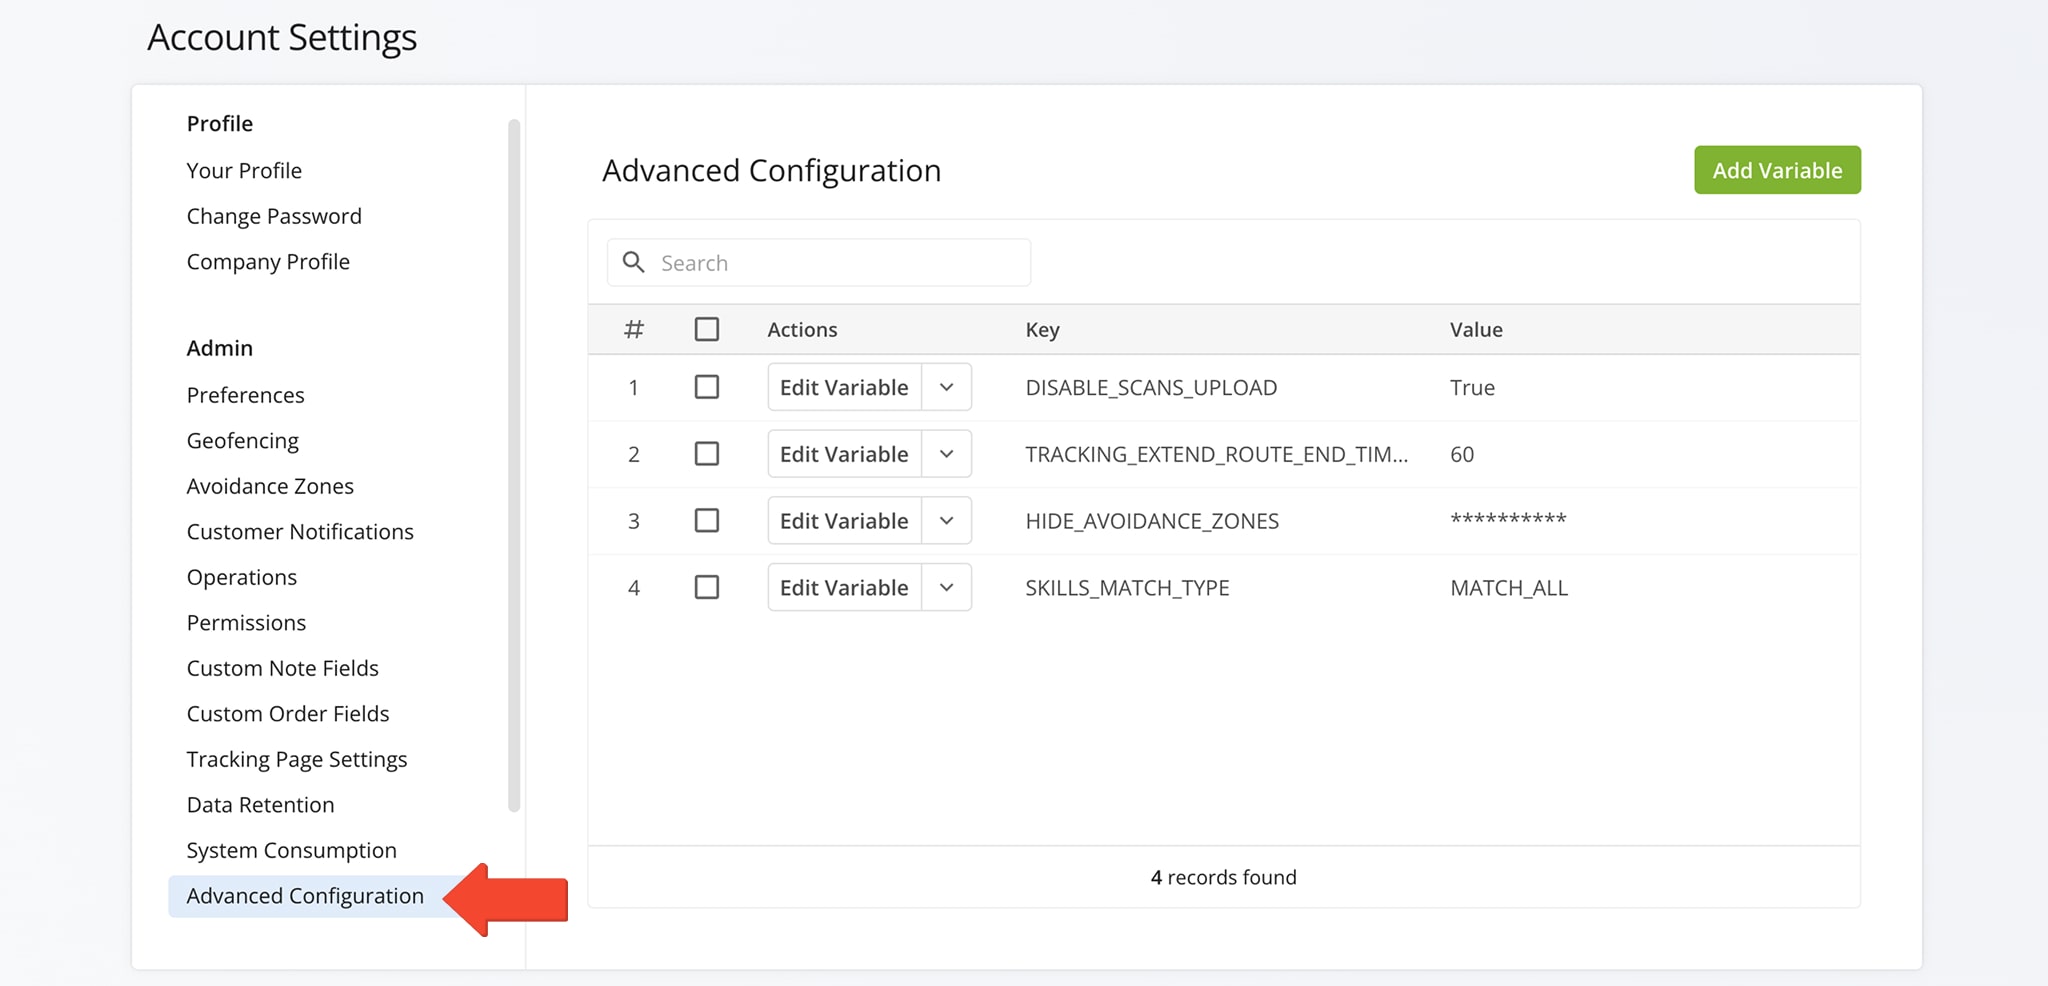
To access your Advanced Configuration Editor, go to “Settings” > “Organization Settings” from the Navigation Menu and select “Advanced Configuration“. Please be advised, the Advanced Configuration Editor can only be accessed by the Account Owner or an Administrator.
NOTE: If you haven’t already enabled the Advanced Configuration Editor for your account, please contact your Route4Me Routing Expert or our Customer Support Team to help you get set up.
Open Your Advanced Configuration Editor
Add And Manage Advanced Route4Me Account Configurations
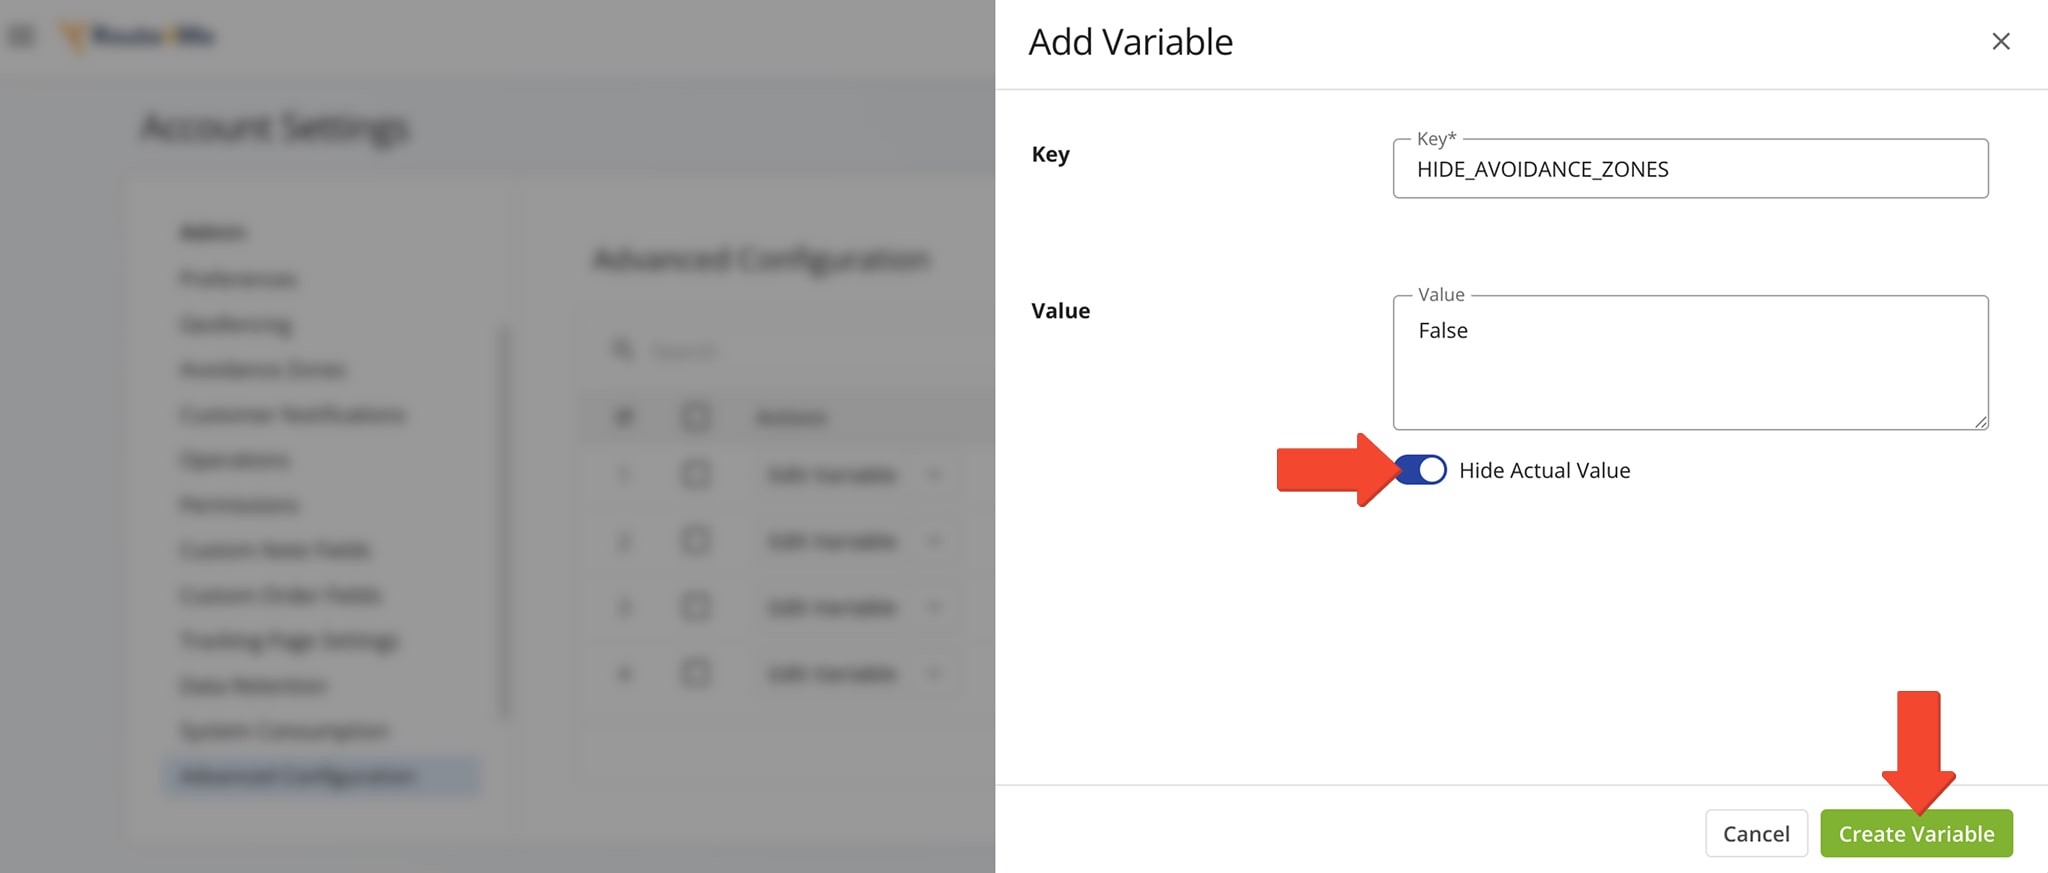
To add a new Configuration to your account, click the “Add Variable” button. Then, add the Configuration Key, a string or a line of code. Next, add one or more Configuration Values that enable or disable the configuration, add custom configuration settings, etc. Click “Create Variable” to add the new configuration.
NOTE: You can hide confidential values in any added configuration by toggling the “Hide Actual Value” switch. Be sure to click “Create Variable” to update the configuration. Boolean values are case-insensitive. For example, “true”, “True”, and “TRUE” are all interpreted the same.
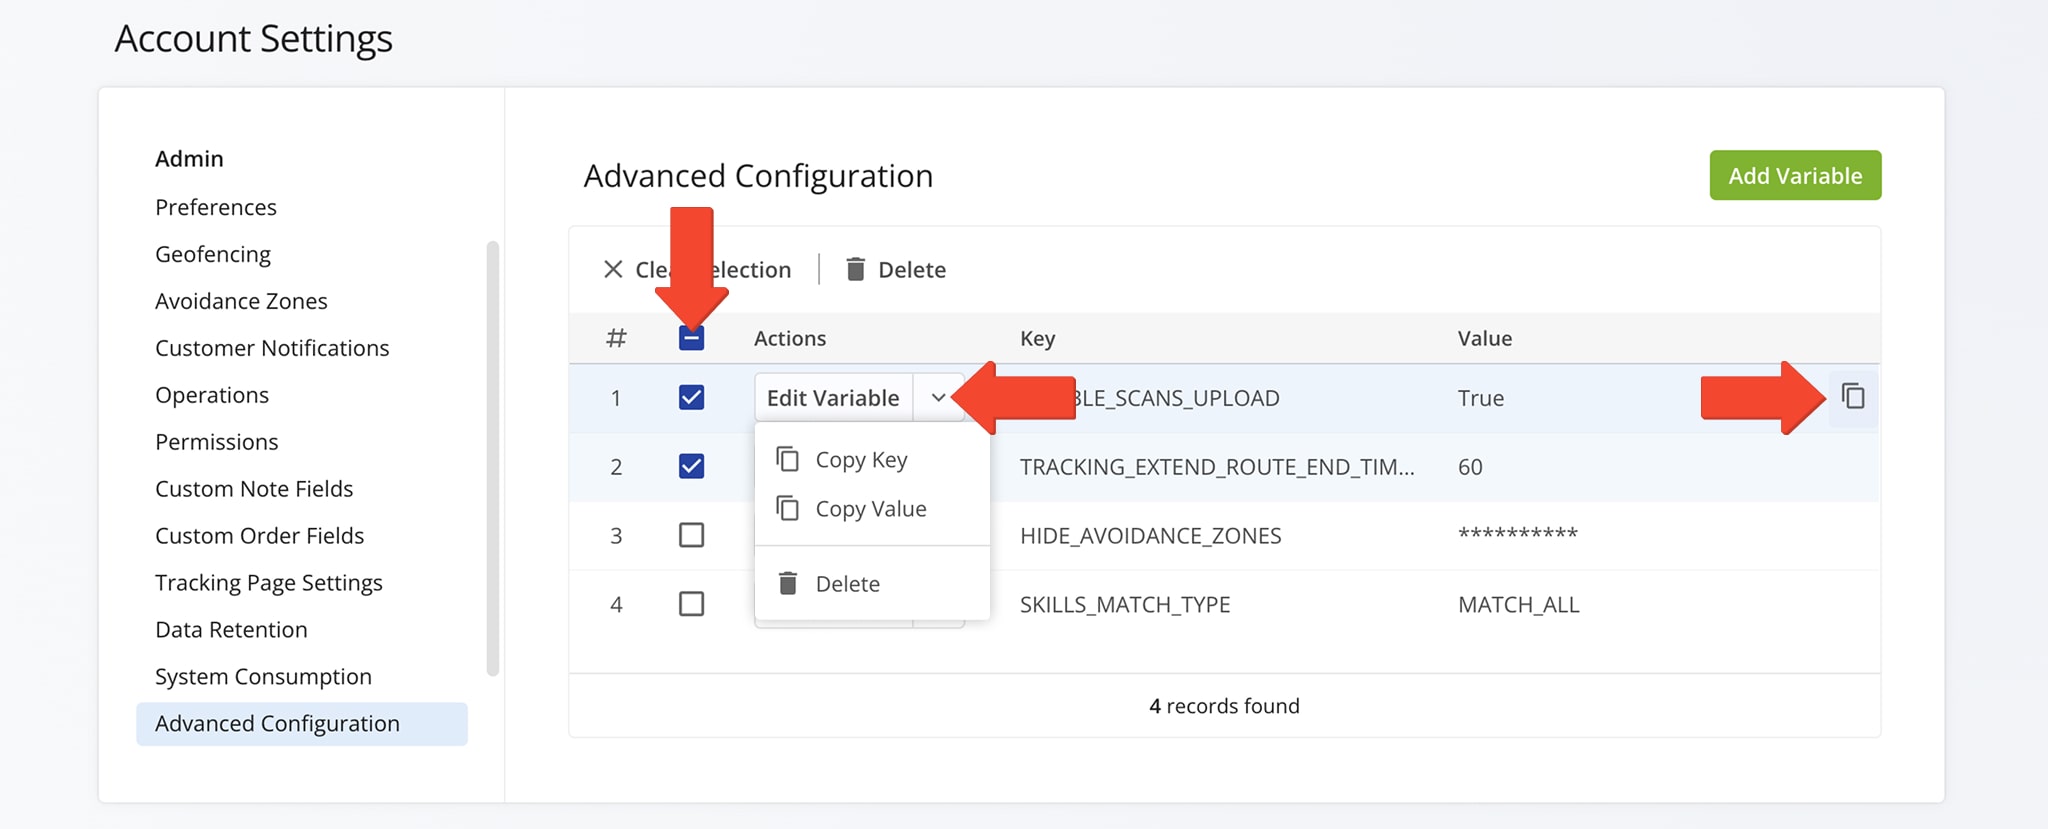
You can instantly access and manage newly created Configurations in your Advanced Configuration Editor. Just click the “Edit Variable” button next to a Configuration to modify it. Click the Arrow button to copy its Key and Value.
To delete a Configuration, click the Arrow button, then “Delete“. To remove multiple Configurations, check the boxes next to them and click “Delete“. To copy a Configuration, hover your cursor over to it, then click the Copy Icon that appears.
Web Platform Advanced Configurations
Explore in the table below advanced Configurations that modify the functionality of your Route4Me business route planner software. These include enabling or disabling user interface elements, showing or hiding user details, controlling access to specific functions based on user type, and more.
NOTE: Adding the “true” value enables the corresponding configuration and makes it active, and adding the “false” value or not adding the configuration at all disables it and makes it inactive. Boolean values are case-insensitive. For example, “true”, “True”, and “TRUE” are all interpreted the same.
| Key | Values | Description |
|---|---|---|
| ENABLE_DISTANCE_OPTIMIZATION_OPTION | True/False | Enables “Distance” tab when planning routes which allows the use of: Drive Time Optimization, Straight Line Optimization, and Big City Optimization. Default value: False |
| ENABLE_MATRIX_FALLBACK_CALCULATION | True/False | Enables planning a route to a destination that has no known driving directions. When enabled, and a destination doesn’t have any known driving directions (i.e., physical roads), the system will generate a straight line to the destination’s coordinates (rooftop latitude and longitude). This allows planning routes to off-road locations, new or unmapped areas, etc. Default value: False |
| HIDE_AVOIDANCE_ZONES | True/False | Hides the “Avoidance Zones” tab when planning routes. Default value: False |
| DISABLE_ROUTE_NATIVE_CONTEXT_MENU | True/False | Disables the native context window in the Routes List so users can’t open new browser tabs and view Route4Me-related content. Default value: False |
| DISABLE_ROUTE_NATIVE_CONTEXT_MENU | True/False | Disables opening the native context windows in multiple Route4Me user interfaces (Routes List, Routes Map, Route Editor, Address Book List, Address Book Map, and Orders). Default value: False |
| OPEN_ROUTE_BUTTON_FOR_ROUTES_LIST | True/False | Allows adding the “Open Route” button to all routes in the Routes List. The configuration also disables opening the native context windows for all routes in the Routes List so that users can’t open new browser tabs and view Route4Me-related content. Default value: False |
| DISABLE_SCANS_UPLOAD | True/False | Disables the “Upload Scan(s)” feature used for planning routes. Default value: False |
| HIDE_MEMBERS_EMAILS | True/False | Hides the Email addresses of members assigned to the corresponding routes in the Routes List. Default value: False |
| ASSIGN_DRIVERS_ONLY | True/False | Restricts assigning all user types to routes except for the Driver user type. When the “assign_drivers_only” configuration is enabled, only the Driver user type can be assigned to routes. Default value: False |
| HIDE_SHARING_IN_ROUTE_PARAMETERS_DIALOG | True/False | Disables sharing when planning routes by hiding the “Sharing” tab. Default value: False |
| HIDE_USERS_MANAGEMENT_LINK_IN_ROUTE_PARAMETERS_DIALOG | True/False | Hides the “Manage Users” option when planning routes. Default value: False |
| HIDE_VEHICLES_MANAGEMENT_LINK_IN_ROUTE_PARAMETERS_DIALOG | True/False | Hides the “Add New Vehicle” and vehicle management options when planning routes. Default value: False |
| APPEND_ASSIGNEE_TO_THE_ROUTE_NAME_IN_ROUTES_LIST | True/False | Appends the names of team members assigned to corresponding routes in the Routes List. When the “hide_members_emails” configuration is enabled, instead of Emails, the names of the assigned members are displayed next to the corresponding routes. The “append_assignee_to_the_route_name_in_routes_list” configuration helps to hide or display the names of the members assigned to routes. Default value: False |
| TRACKING_PAGE_ETA_SOURCE | 1(Planned) or 2(Predicted) | Show planned or predicted ETA on the Customer Order Tracking Page. Default value: 1 (Planned) |
| DISABLE_ROUTES_LIST_HOVER_PREVIEW | True/False | Hides the pop-up overview shown when you hover over routes in the Routes List. Default value: False |
| SKILLS_MATCH_TYPE | MATCH_ANY or MATCH_ALL | With the “MATCH_ANY” value, a driver can be assigned to an address if they have Driver Skills that match ANY of the Required Skills specified for that address. With the “MATCH_ALL” value, a driver can be assigned to an address if they have Driver Skills that match ALL of the Required Skills specified for that address. |
| TRACKING_EXTEND_ROUTE_END_TIME_FOR_SECONDS | Number of seconds | Extends the duration of asset tracking past the end of the route by the specified number of seconds. In detail, asset position updates continue to be synchronized after the end of the route for the specified number of seconds. Useful for resolving tracking update issues. |
| IGNORE_SDR_TIME_WINDOWS | True/False | Ignores Time Window values when planning routes by uploading spreadsheets and leaves Time Window fields of Destinations empty. |
| ROUTES_MAP_MAX_ALLOWED_SELECTED_ROUTES | Number of routes | Defines the maximum number of routes that can be selected and opened on the Routes Map simultaneously to improve performance. Default value: 75 |
| MAP_TEAM_POSITION_LIFETIME | Number of hours | Defines the period of time (number of hours), from the most recent location update, after which User and Vehicle location pins on the Routes List Map will be grayed out. Default value: 24 |
Mobile Apps Advanced Configurations
Additionally, you can customize the user interface and functionality of Route4Me’s iPhone Routing App and Android Route Navigation App. Modify menus, buttons, and route planning options, add custom content, and more.
NOTE: Adding the “true” value enables the corresponding configuration and makes it active, and adding the “false” value or not adding the configuration at all disables it and makes it inactive. Boolean values are case-insensitive. For example, “true”, “True”, and “TRUE” are all interpreted the same.
| Key | Value | Platform | Description |
|---|---|---|---|
| HIDE_VISITED_MENU | True/False | iOS & Android | Hides the button to mark destinations as “Arrived“. NOTE: After marking a particular destination as “Arrived“, the app automatically allows you to mark it as “Departed” with the same button. Thus, when hiding the button to mark destinations as “Arrived“, the button to mark them as “Departed” is also hidden. |
| HIDE_DEPARTED_MENU | True/False | iOS & Android | Hides the button to mark destinations as “Departed“. NOTE: If “HIDE_VISITED_MENU” is enabled, then destinations can be marked as “Arrived” but not marked as “Departed“. |
| VISITED_MENU_TEXT | Custom Text | iOS & Android | Enables you to specify the custom text to be displayed under the button used for marking route destinations as “Arrived“. |
| DEPARTED_MENU_TEXT | Custom Text | iOS & Android | Enables you to specify the custom text to be displayed under the button used for marking route destinations as “Departed“. |
| DISABLE_ADD_NEW_ROUTE | True/False | iOS & Android | Hides the button on the “Routes” screen that allows a user to start planning and optimizing new routes. |
| HIDE_PLAN_ROUTE_BUTTON | True/False | iOS & Android | Hides the “Plan Route” button that allows a user to optimize a new route after specifying settings and adding or importing addresses. This way, you can start planning a new route, specify settings, add or import addresses, and save this route as a Draft without the ability to optimize and synchronize it with your Route4Me Routes List. |
| HIDE_REPLAN_ROUTE_BUTTON | True/False | iOS & Android | Hides the “Done Editing” and “Replan Route” buttons on the “Destinations” screen where a user can re-optimize already planned routes. Re-optimizing a planned route enables you to either apply the new optimization settings or re-optimize the route after modifying its sequence or optimization settings. |
| HIDE_SHARE_ROUTE_MENU | True/False | iOS & Android | Prohibits a user from sharing routes by hiding all route-sharing UI elements and buttons from all app interfaces. |
| HIDE_DUPLICATE_ROUTE_MENU | True/False | iOS & Android | Prohibits a user from duplicating routes by hiding all “Duplicate Route” UI elements and options from all app interfaces. |
| HIDE_ASSIGN_USER_MENU | True/False | iOS & Android | Prohibits a user from assigning other users to routes by hiding all “Assign User” UI elements and buttons from all app interfaces. |
| CUSTOM_CONTENT_MENU_ALIAS | Custom Text | iOS | Preferred name for the Custom Content URL tab in your iPhone Route Planner app. |
| HIDE_CUSTOM_NOTE_TYPE_DROPDOWN | True/False | Android | Use the “true” value to hide the default note type or stop status drop-down or “false” to display it. |
| HIDE_MINOR_ROUTES_LIST_NOTIFICATIONS | True/False | iOS & Android | Disables route update notifications on Route4Me’s Mobile Apps. |
| HIDE_MULTI_ORDERS_ROUTING_OPTION | True/False | iOS | Use the “true” value to disable planning routes with multiple orders or “false” to maintain the functionality of planning routes with orders on Route4Me’s iOS App. |
| MANDATORY_SIGNATURE_NOTE_FOR_MARK_STOP | True/False | iOS & Android | Toggles mandatory signature capture before marking route destinations as “Done” on Route4Me’s Mobile Apps. |
| MANDATORY_IMAGE_NOTE_FOR_MARK_STOP | True/False | iOS & Android | Toggles mandatory image (picture) capture before marking route destinations as “Done” on Route4Me’s Mobile Apps. |
| MANDATORY_TEXT_NOTE_FOR_MARK_STOP | True/False | iOS & Android | Toggles mandatory text note entry before marking route destinations as “Done” on Route4Me’s Mobile Apps. |
| SINGLE_BARCODE_RECONCILIATION_ENABLED | True/False | iOS & Android | Toggles a requirement to scan order barcodes for loading and unloading orders at route destinations. |
| SINGLE_BARCODE_SCAN_ENABLED | True/False | iOS & Android | Toggles a requirement to scan order barcodes only for unloading packages at route destinations. |
| SCAN_QR_CODE | True/False | iOS & Android | Enable the QR code scanner on Route4Me’s Mobile Apps. |
Route Navigation And Compliance Advanced Configurations
You also have the ability to customize navigation, tracking, and compliance features with Advanced Configurations. You can adjust navigation apps available for field employees, track compliance with planned routes, and define how drivers navigate routes.
NOTE: Adding the “true” value enables the corresponding configuration and makes it active, and adding the “false” value or not adding the configuration at all disables it and makes it inactive. Boolean values are case-insensitive. For example, “true”, “True”, and “TRUE” are all interpreted the same.
| Key | Value | Default Value | Description |
|---|---|---|---|
| DISABLE_EXTERNAL_NAVIGATION | True/False | False | Only allow drivers to use Route4Me’s in-app route navigation instead of Apple Maps, Google Maps, or Waze. |
| DISABLE_NAVIGATION_PATH_COMPLIANCE | True/False | False | By default, route directions in Route4Me’s navigation app are identical to the planned route on the Web Platform. When enabled, this configuration disconnects the route path on the mobile app from that on the Web Platform. The sequence of destinations remains the same, while driving directions can be different on the mobile app due to real-time traffic data, weather, and more. |
| DEFAULT_NAVIGATION_MODE | Single/Continuous | Single | When “single” destination navigation is enabled, a driver or field employee can navigate to one destination at a time and select which destination to navigate to. When “continuous” route navigation is enabled, a driver or field employee can only navigate to the next destination on the route and all destinations will be navigated to in the planned sequence. |
Client-Side Geofencing Advanced Configurations
Along with Route4Me’s default Geofencing, the Advanced Configuration Editor can help you automate the reporting of route visitation data via client-side Geofencing Configurations. In this context, “client” refers to Route4Me’s Mobile Apps. The advanced configurations in the table below enable automatic reporting of arrival and departure data from the mobile app.
NOTE: Adding the value “true” enables the configuration, while “false” or leaving it empty disables it. Boolean values are case-insensitive. For example, “true”, “True”, and “TRUE” are all interpreted the same.
| Key | Value | Description | Fields Updates |
|---|---|---|---|
| TRIGGER_GEOFENCE_ARRIVED_USING_CLIENT_GEOFENCE | True/False | When a user enters a geofence, the mobile app automatically sets the Reported Arrival Time and coordinates without the user marking address as “Arrived” on the mobile app. | geofence_local_visited_timestamp, geofence_local_visited_lng, geofence_local_visited_lat |
| TRIGGER_GEOFENCE_DEPARTED_USING_CLIENT_GEOFENCE | True/False | When a user leaves a geofence, the mobile app automatically sets the Reported Departure Time and coordinates without any user making changes on the mobile app or Web Platform. | geofence_local_departed_timestamp, geofence_local_departed_lng, geofence_local_departed_lat, geofence_local_service_time, geofence_local_service_time |
| TRIGGER_DESTINATION_ARRIVED_USING_GEOFENCE | True/False | When a user enters a geofence, the mobile app automatically marks destinations as “Arrived” and sets the corresponding timestamp. This “Arrival Time” is used together with the “Departure Time” to calculate the “Reported Time On Site” on the Web Platform. | timestamp_last_visited, visited_lat, visited_lng, is_visited |
| TRIGGER_DESTINATION_DEPARTED_USING_GEOFENCE | True/False | When a user leaves a geofence, the mobile app automatically marks destinations as “Departed” and sets the corresponding timestamp. This “Departure Time” is used together with the “Arrival Time” to calculate the “Reported Time On Site” on the Web Platform. | timestamp_last_departed, departed_lat, departed_lng, is_departed |
| TRIGGER_STATUS_DONE_USING_GEOFENCE | True/False | When a user leaves a geofence, the mobile app automatically marks destinations as “Done“. When this configuration is disabled or not added, drivers must manually mark destinations as “Done“. NOTE: Learn more about setting destination status. | additional_status |
| AUTOMATIC_ROUTE_START_WHEN_DEPOT_LEFT | True/False | Routes will automatically be started, with the “Started” status, when the assigned user leaves the geofence around the route start address or depot. A user no longer needs to manually start the route from the Route4Me Mobile App, as the route will start automatically based on the detected depot geofence departure | actual_start_timestamp |
White-Labeling Advanced Configurations
Route4Me’s business route management software offers white-labeling options, enabling partners to customize branding. Using configurations, you can hide or disable Route4Me-branded content, including elements of the user interface, branded menus, and links and pop-ups. The available configurations are listed below.
NOTE: Adding the “true” value enables the corresponding configuration and makes it active, and adding the “false” value or not adding the configuration at all disables it and makes it inactive. Boolean values are case-insensitive. For example, “true”, “True”, and “TRUE” are all interpreted the same.
| Key | Value | Description |
|---|---|---|
| HIDE_BRANDED_CONTENT | True/False | Allows the hiding of Route4Me branded content from particular menus of the platform’s user interface (i.e., Route4Me video tutorials in the route planning menus, etc.). |
| HIDE_HELP_MENU | True/False | Allows the hiding of the Route4Me branded help menu with all its content from all user interfaces. |
| ENABLE_TELEMATICS_POPUP_OVERLAY | True/False | Allows enabling Route4Me branded telematics popups in all user interfaces of the platform. |
| HIDE_UPSELLING_IN_ROUTE_PARAMETERS_DIALOG | True/False | Allows the hiding of Route4Me branded upgrade links and content from the platform’s user interface. |
| HIDE_COVID19_WARNING | True/False | Hides the Pandemic Subscription Alert pop-up window on the Order Tracking Customer Portal. |
Visit Route4Me's Marketplace to Check out Add-Ons for Your Account:
- Operations
Custom Data Add-On
- Operations
Advanced Team Management Add-On
- Operations
Audit Logging and Activity Stream
