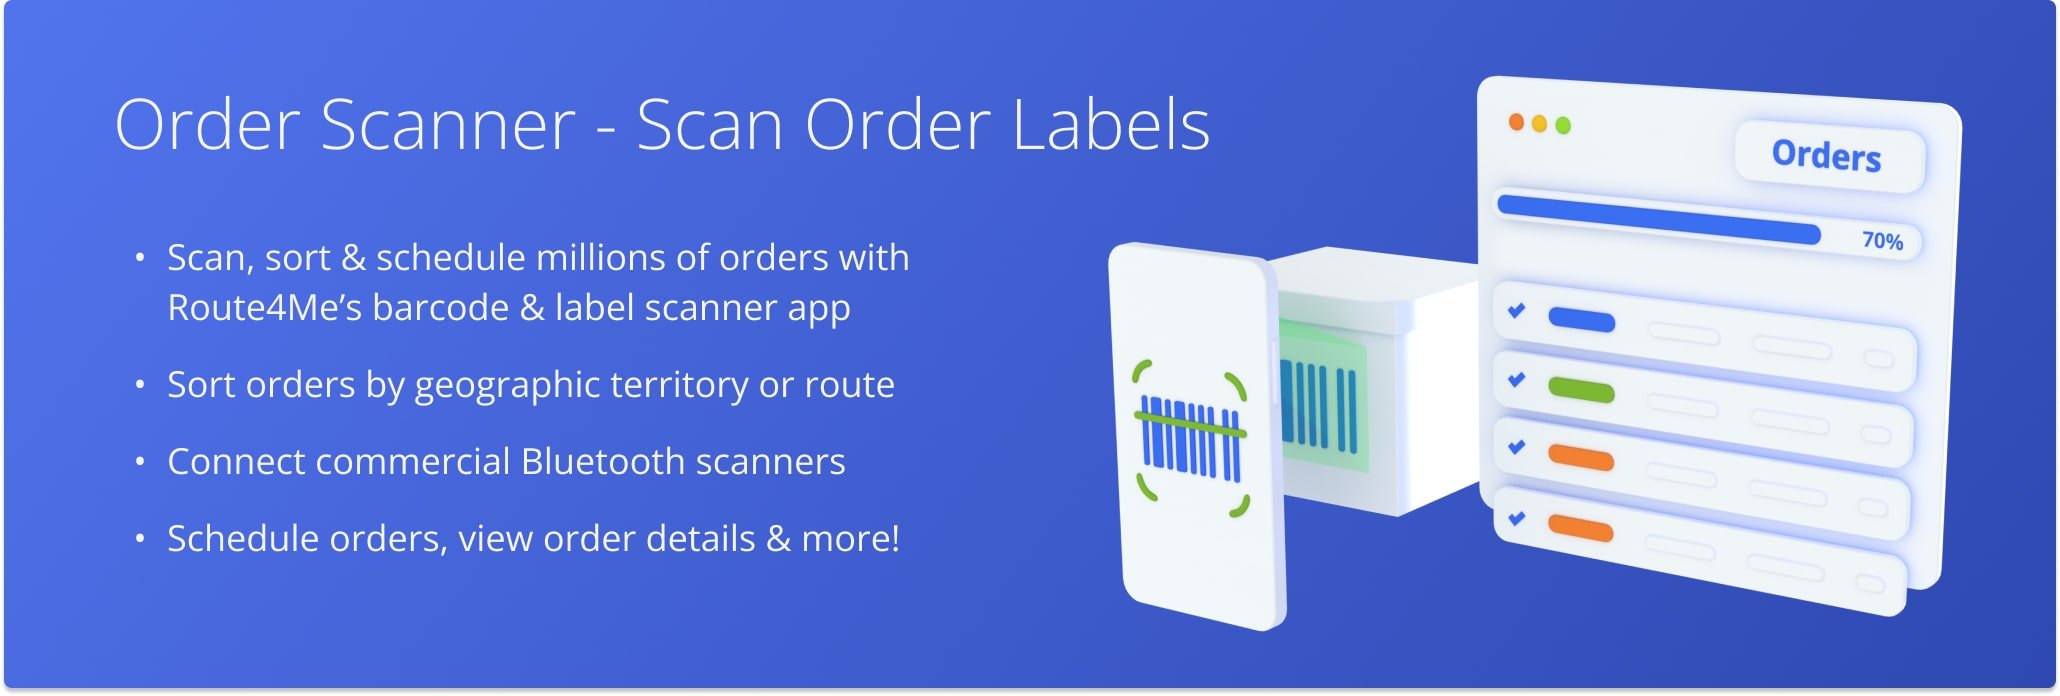
Scan To Sort And Schedule Orders With In-App Barcode Scanner
The Route4Me ERP Order Management System helps you import, store, manage, and optimize routes with millions of customer orders. The Android Order Route Planner includes a built-in barcode scanner and supports commercial Bluetooth scanners for faster processing. Using the in-app label scanner, you can quickly add, sort, and complete orders, including those imported from CRM systems through the ERP order import API. This guide explains how to use the label code scanner to sort orders by territory and route, update order details, and schedule orders efficiently.
NOTE: Depending on your account settings, some features in this guide may be enabled or disabled, or available only for Route4Me’s Android App or Route4Me’s iPhone App. Contact your Routing Expert or Route4Me Support for assistance.
Table of Contents
Sorter User Type – Scanning To Sort And Schedule User Permissions
For efficient team management, Route4Me’sOrder Management System offers a dedicated “Sorter” User Type with access to the in-app label scanner to register imported orders, sort them by territory and route, and scan to schedule orders.
This allows you to control which team members can scan barcodes for sorting and scheduling.
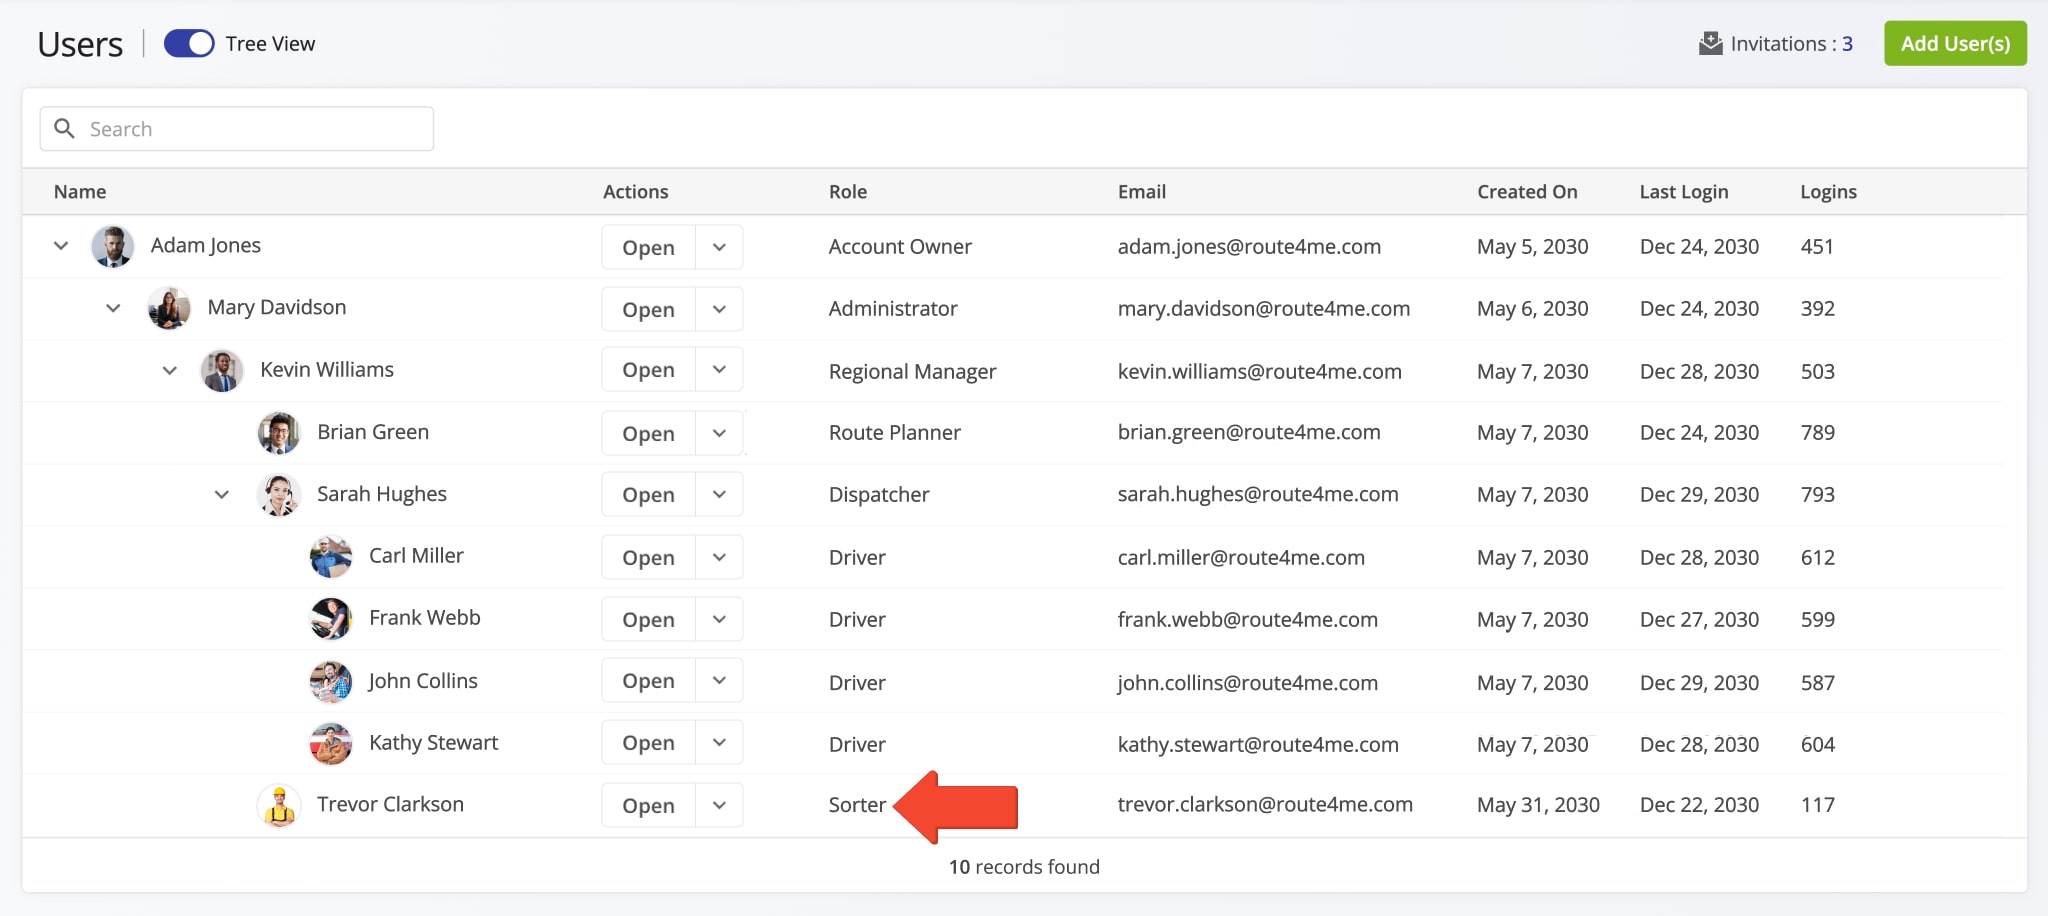
You can set or change a user’s User Type when creating or editing users. In the Navigation Menu, click “Team & Equipment” > “Users” to access your Users page.
To edit an existing user, click the Down Arrow button and select “Edit“. Or click “Add Users” to create a new user. From either option, follow these steps to assign the “Sorter” User Type.
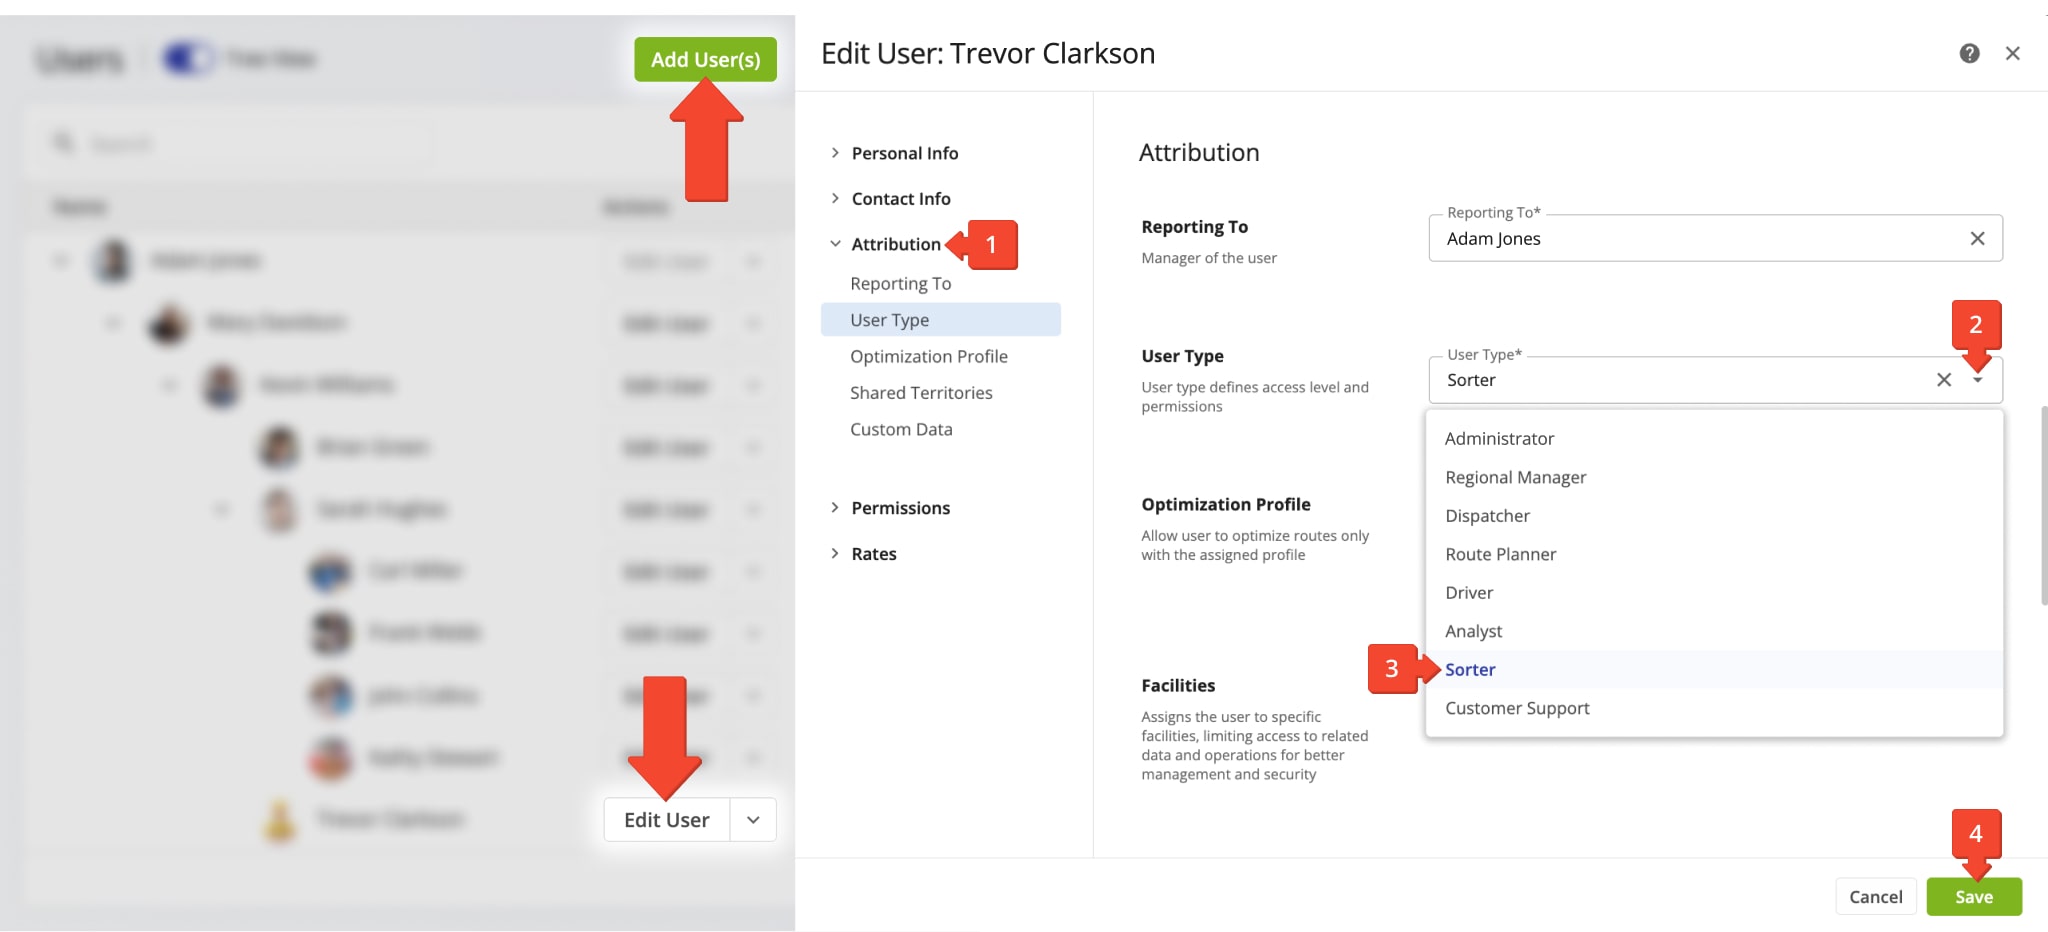
- Click the “Attribution” tab to open user settings.
- Click the Down Arrow in the “User Type” field.
- Select “Sorter” from the dropdown list.
- Click “Save” to update an existing user or “Create User” to add the new user.
NOTE: Each User Types has specific account-level permissions. Learn more about User Types and Team Hierarchy.
Global Orders Visibility – Orders List Visibility Permissions For Users
By default, new team members cannot see all orders in your main Route4Me account. Using User Permissions and Visibility Settings, you can allow Sorters, Admins, Regional Managers, and other User Types to access the Global Orders List.
To do this, open the Edit User panel. In the “Permissions” section, go to the “Company Visibility” tab. Then, click the “Global Orders List” toggle to enable visibility for all orders and click “Save“.
NOTE: Visibility settings are only available when editing users. To adjust visibility for new users, first create the user and then edit their Company Visibility settings.

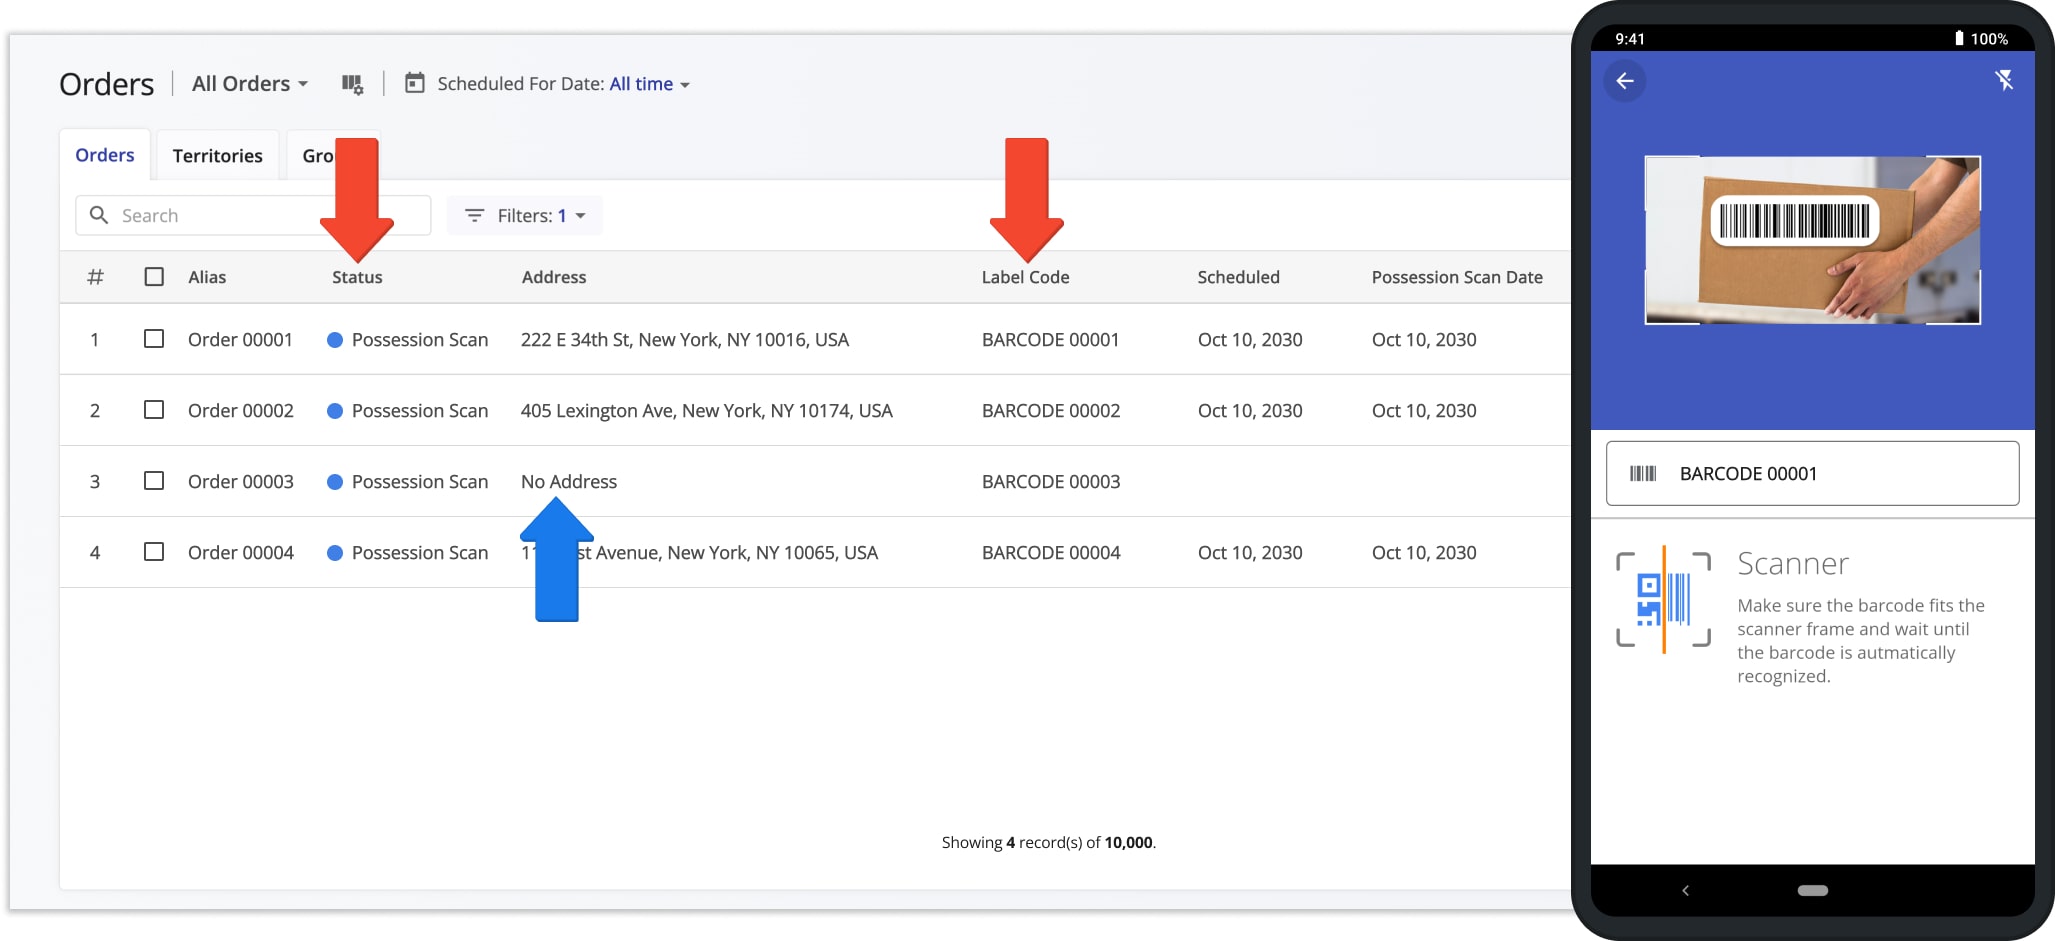
Possession Scan – Adding And Registering Imported Orders
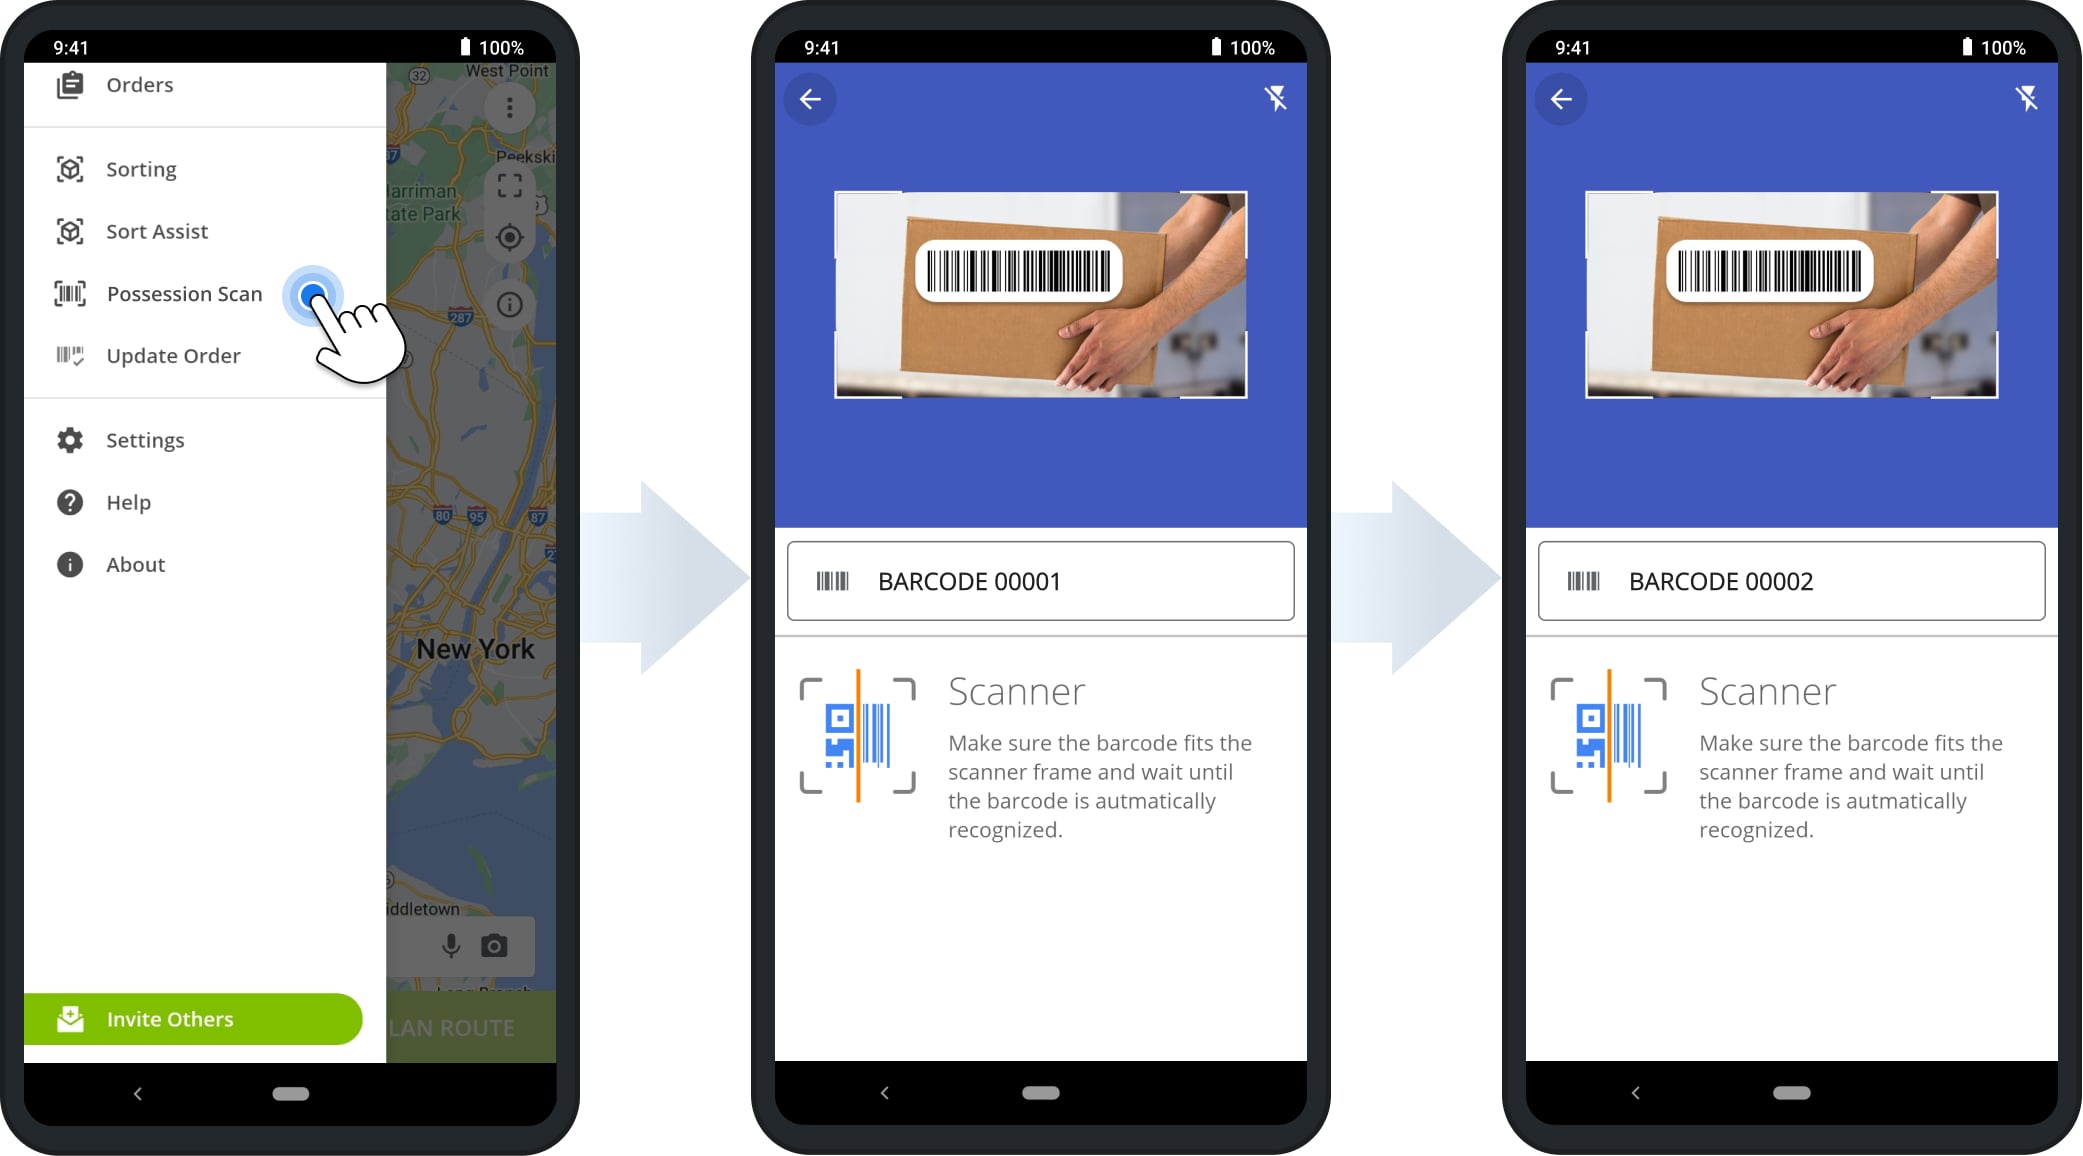
Sorters can use the Possession Scan to register imported orders.
Open Route4Me’s Android Mobile Scanner App and tap “Possession Scan” in the Navigation Menu. Then, use the in-app barcode scanner or a connected Bluetooth scanner to scan label codes on the orders you want to add.
When scanned, each barcode appears in the designated field and is automatically registered in the system. You can scan multiple label codes consecutively without closing the scanner. Process numerous orders quickly, without interruption.
When Sorters scan barcodes, Route4Me automatically creates new orders with the corresponding barcodes and schedules them for the current date.
Orders with the “Possession Scan” order status may not include an address if address details were missing during import. To use these orders for route planning, they must have address information.
You can add addresses manually in the Orders List or while sorting orders with the integrated barcode scanner.
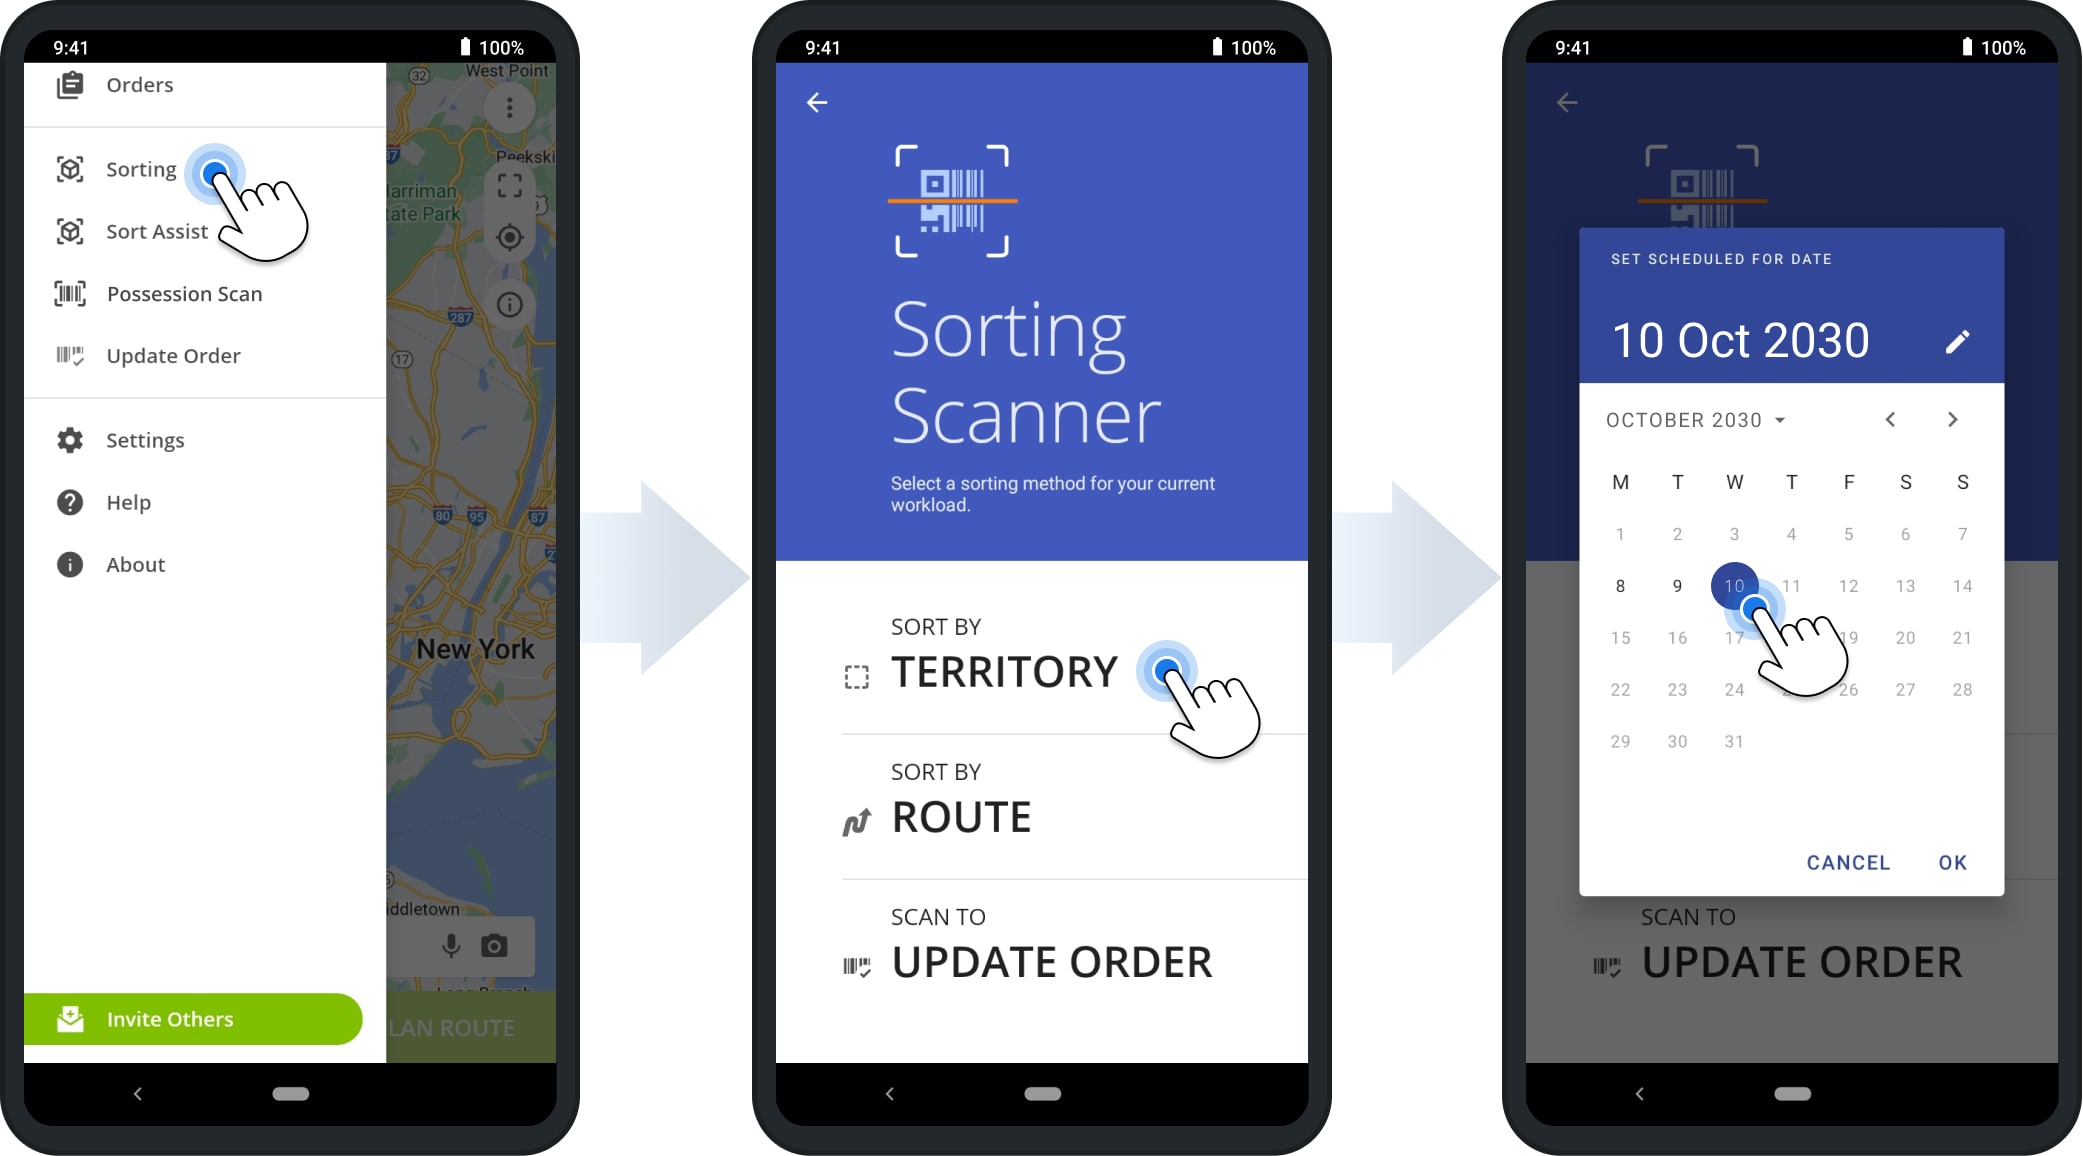
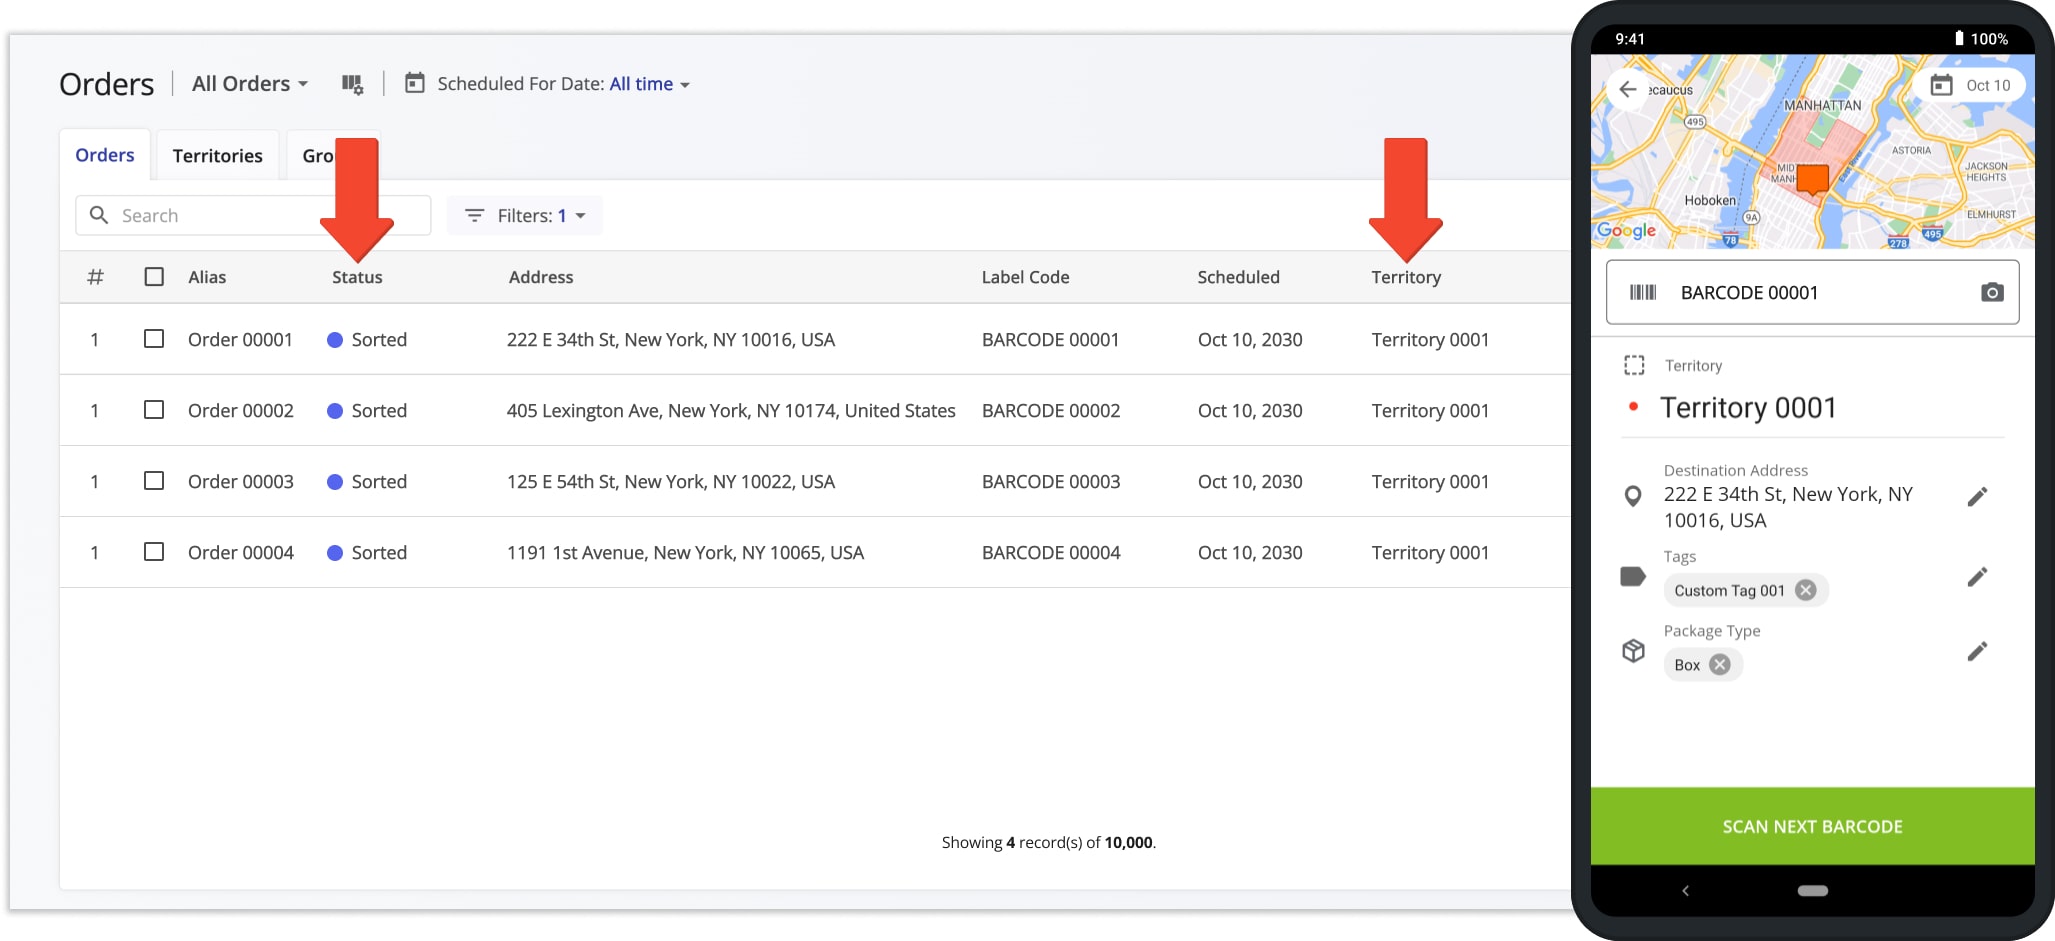
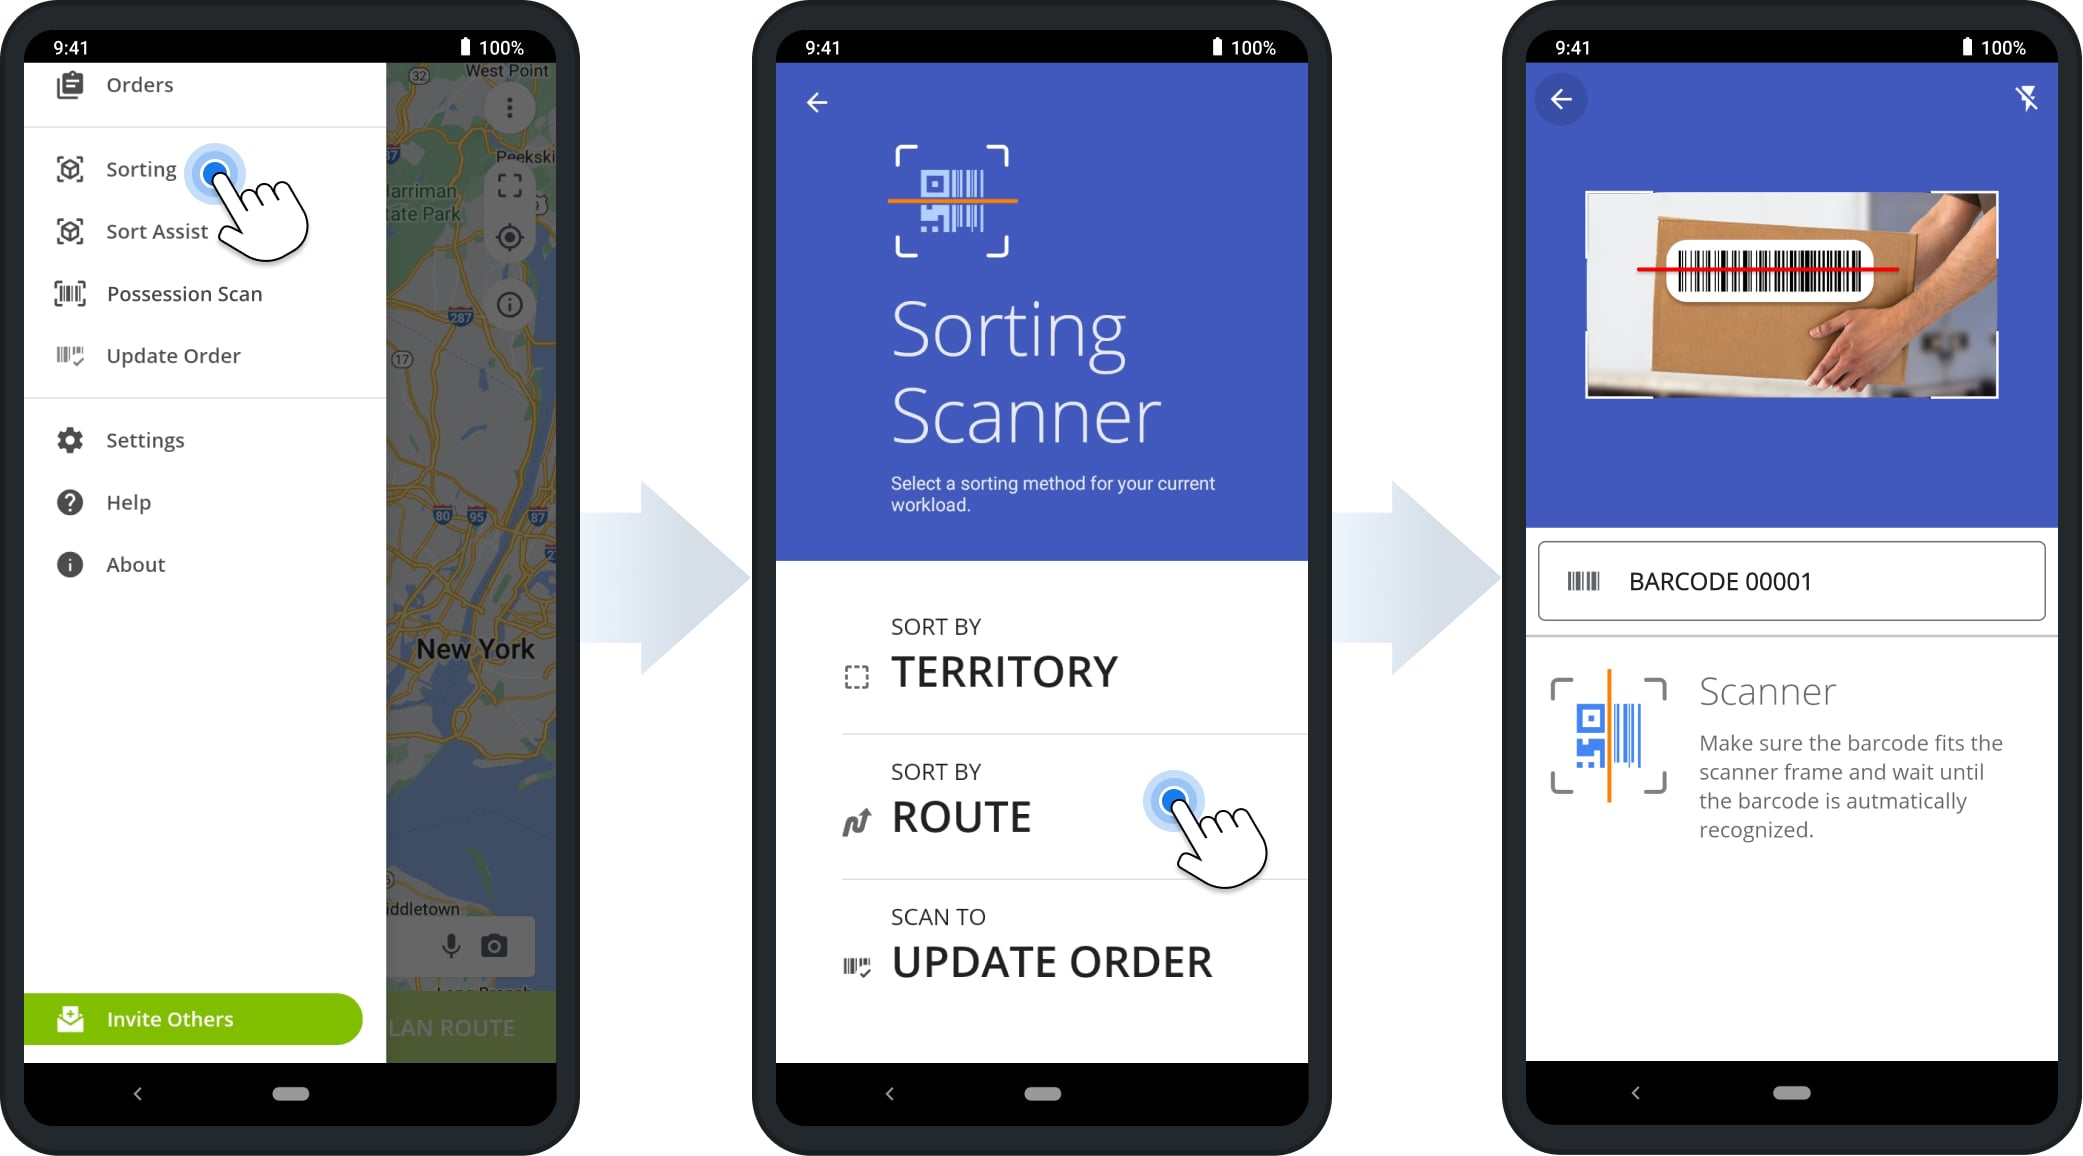
Scan To Schedule Imported Orders And Sort By Address Territory
The “Sorting” scan schedules orders for a specific date and automatically sorts them by Territory based on their delivery address.
Open Route4Me’s Android Mobile Scanner App and tap “Sorting” in the Navigation Menu. Then, tap “Sort by Territory” and select the date for scheduling the scanned orders. The barcode scanner will open automatically.
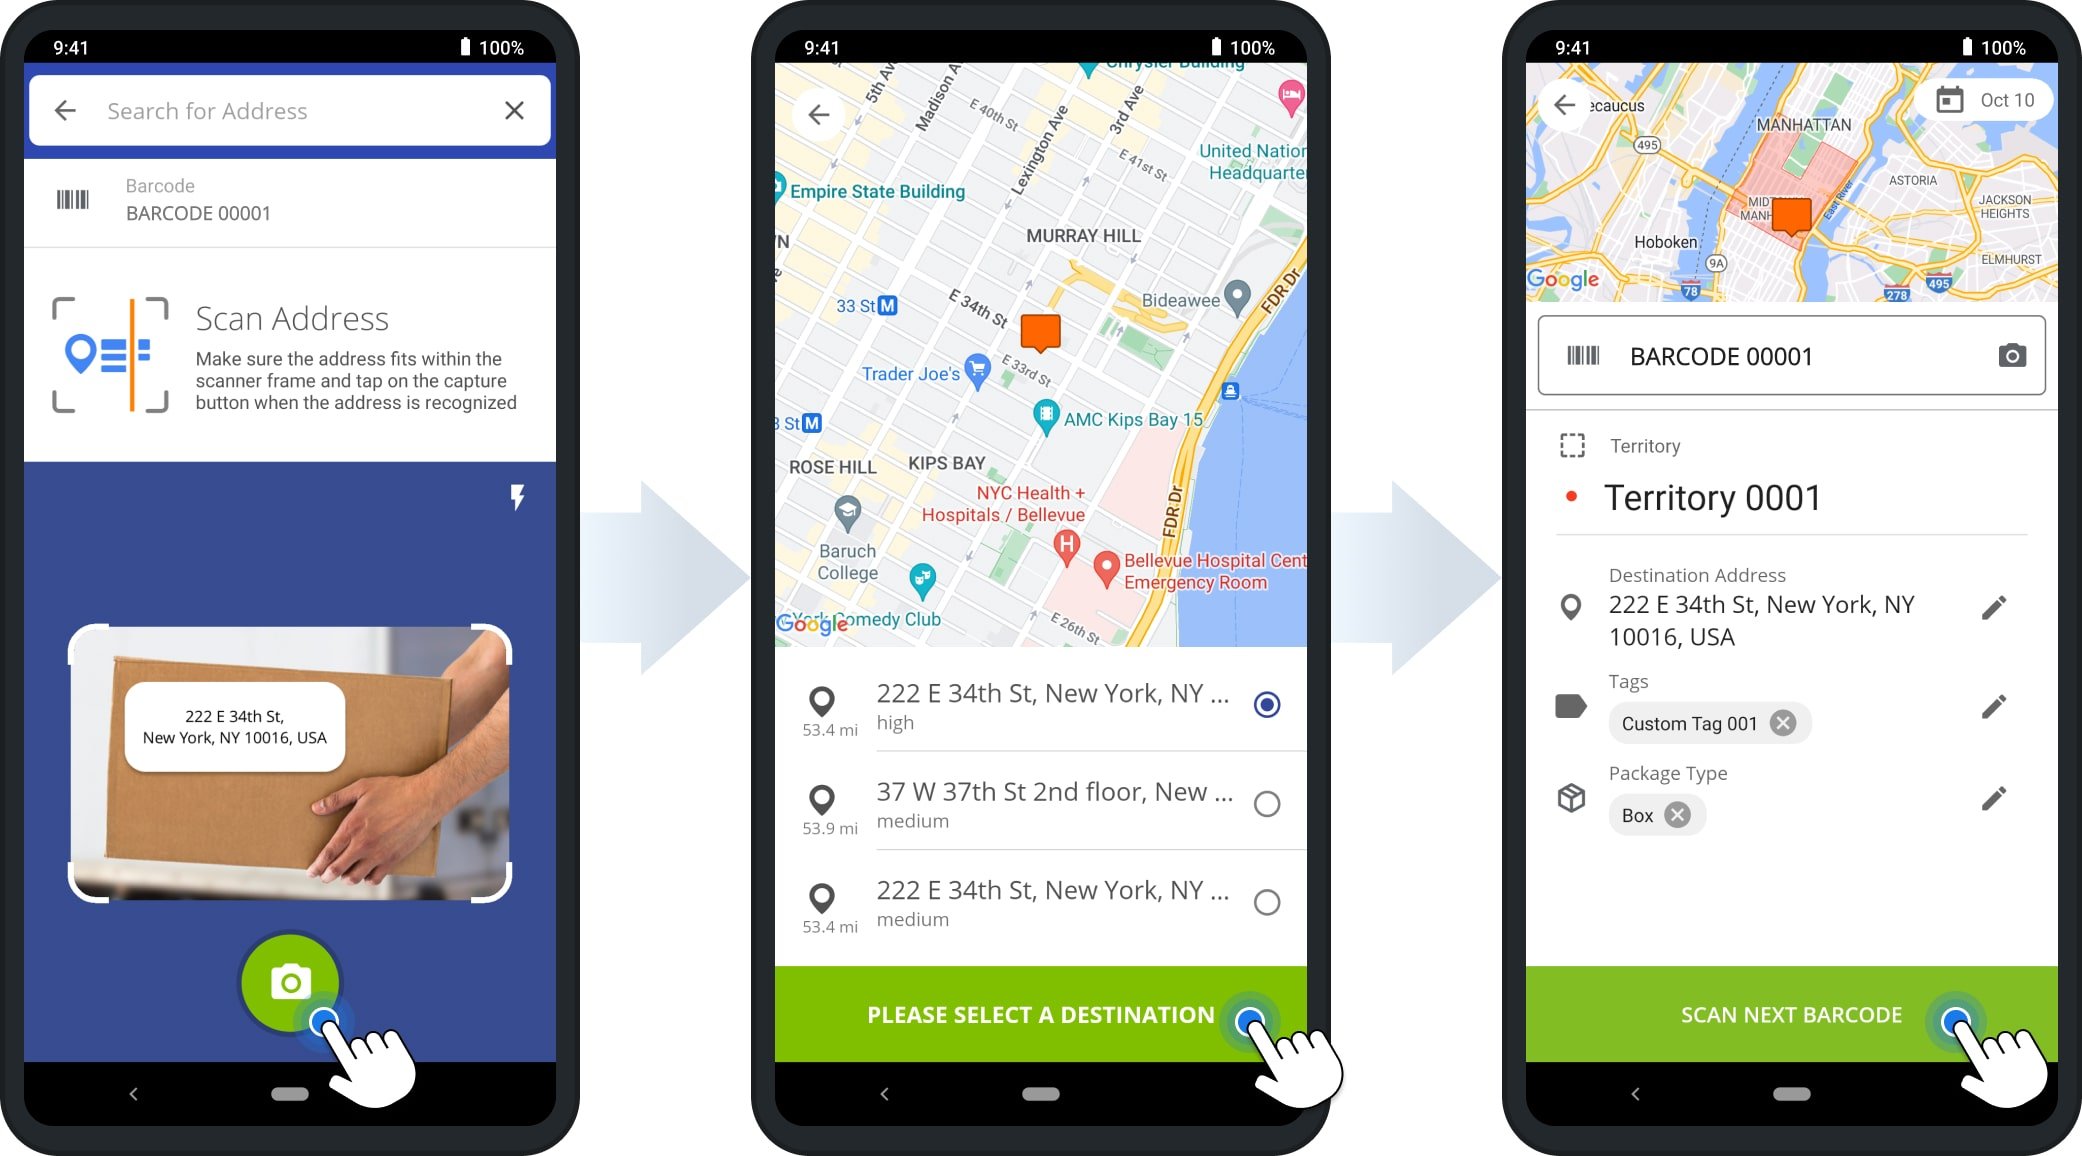
Sort And Schedule Orders Imported Without Address Details
Orders with the “Possession Scan” status may not have an address. When sorting these orders, you can add address details by scanning the address text on the package or another label after scanning the order’s barcode.
Select the correct geocoded address, add the required “Tags” and “Package Type“, then scan the next barcode. The app will automatically schedule the order for the selected date, assign it to the appropriate Territory, and update its status to “Sorted”.
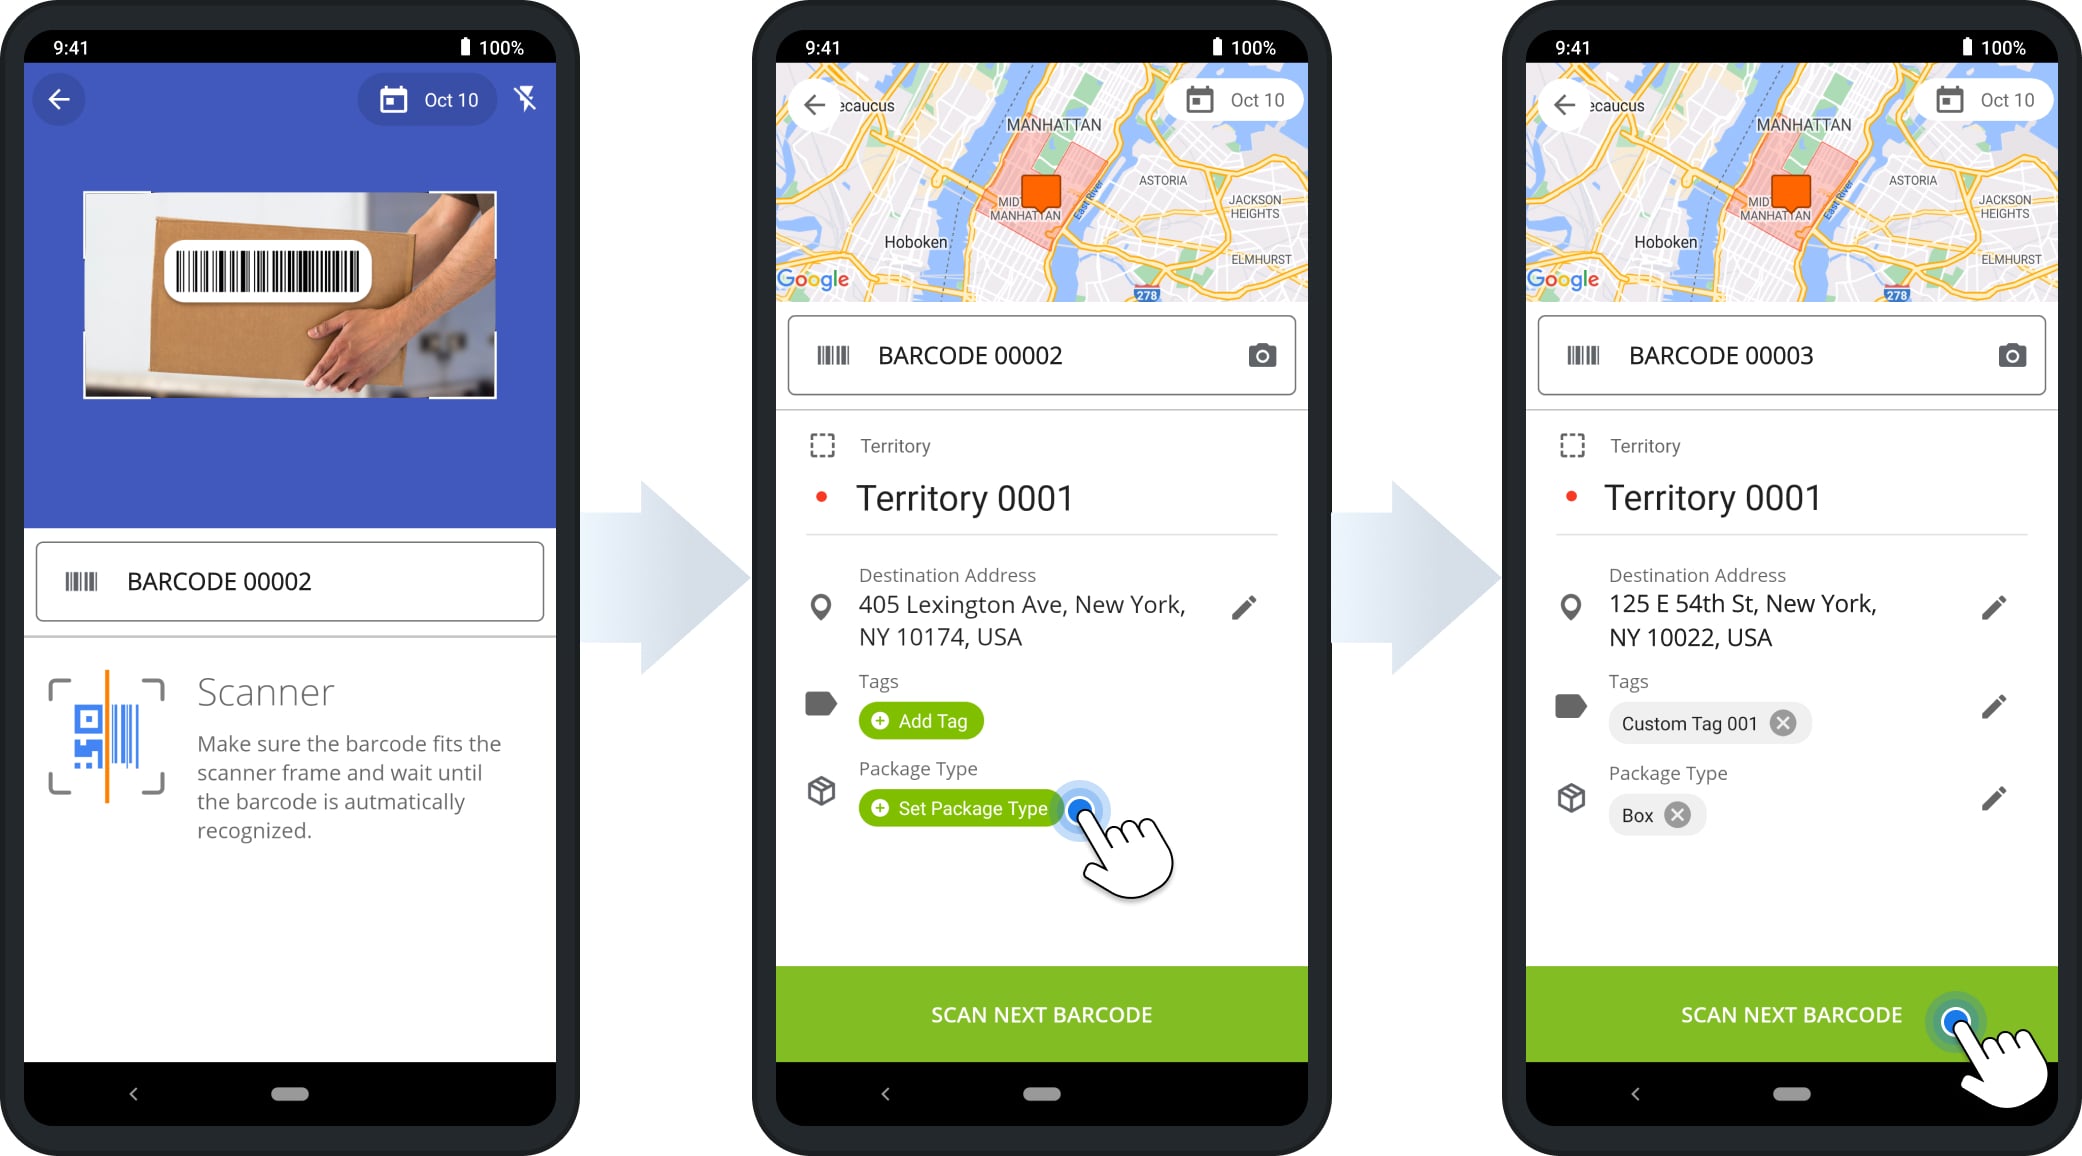
Sort And Schedule Orders Imported With Address Details
When sorting orders that already have an address, scan the package barcode, and the app will automatically display the order’s address and associated Territory. Add the required Tags” and “Package Type“, then scan the next barcode.
The app will schedule the order for the selected date and update its status to “Sorted“.
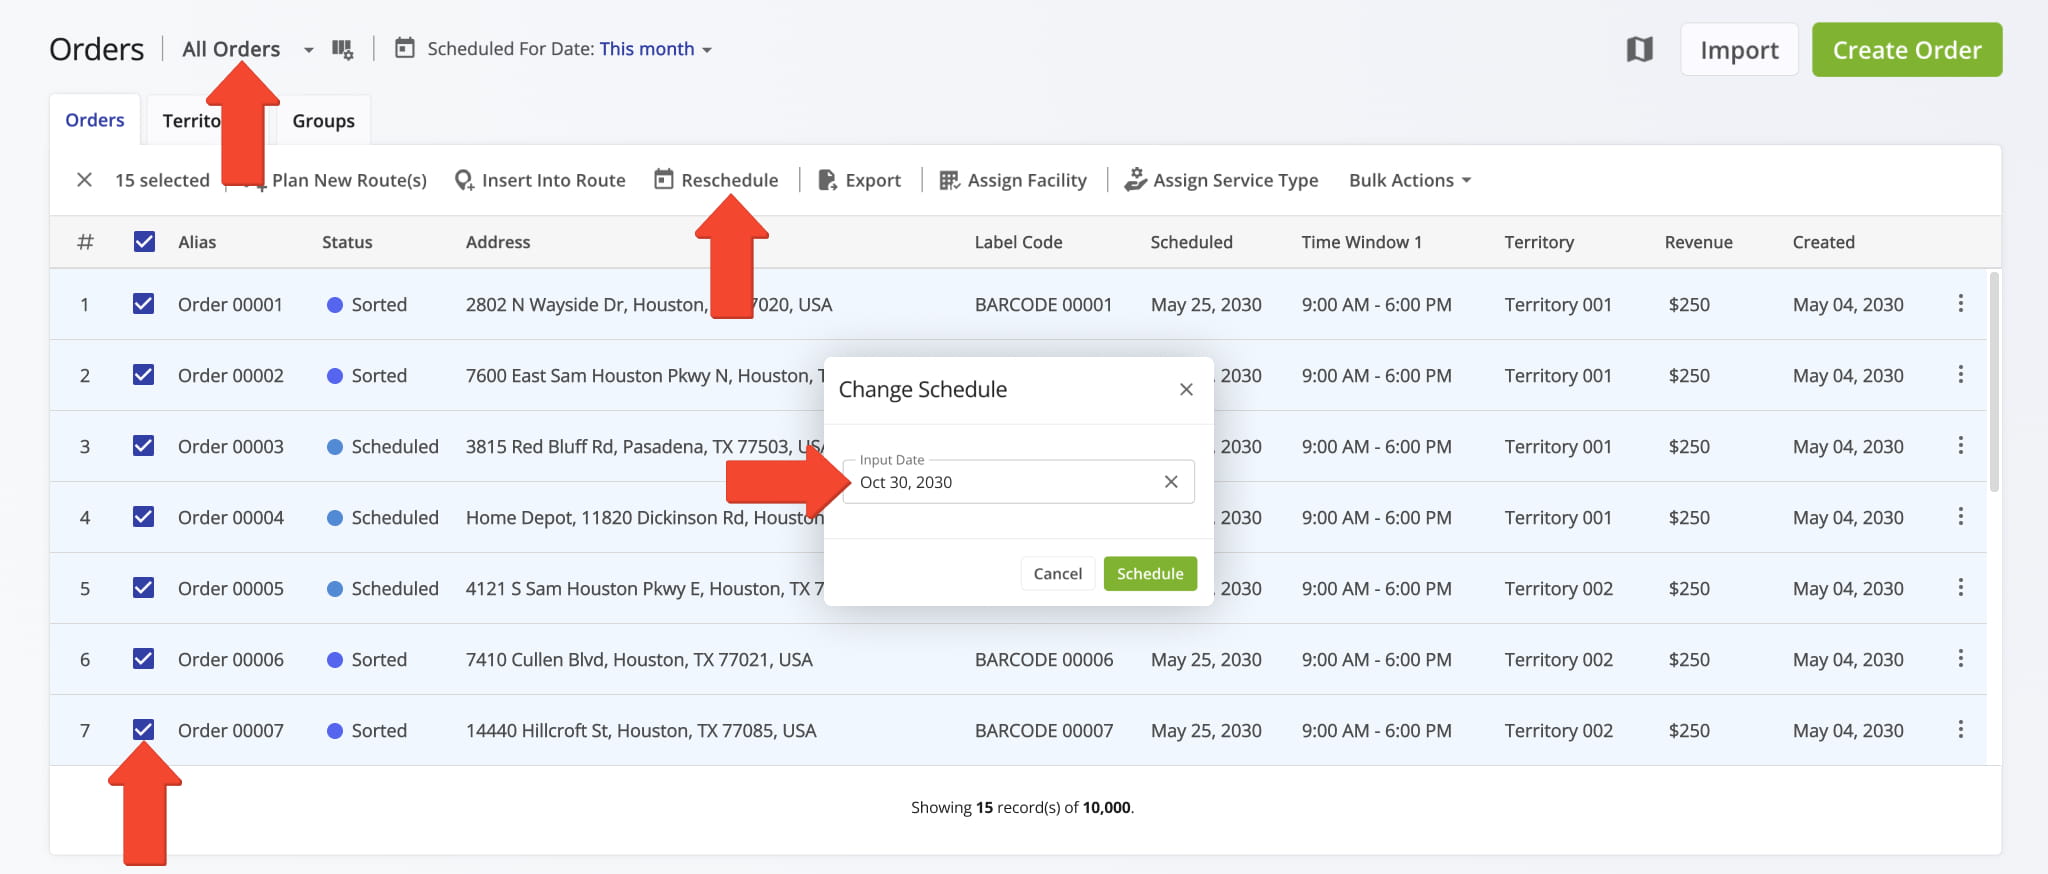
Use Sorted And Scheduled Orders To Plan Routes
You can use “Sorted” orders to plan routes from the Orders List or route Order Territories, or via Order Groups routes.
To filter “Sorted” orders in the Orders List, filter by the scheduled date assigned during sorting. Then, enable “Plan Routes” View Mode and select the “Sorted” status in the “Order Status” filter.
Check the boxes next to the orders you want to include, and click “Plan New Route(s)“.
Alternatively, you can schedule orders manually instead of scanning. Enable the “All Orders” or “Open/Pending” View Mode, filter the orders, and select them by checking the boxes next to each.
Click “Reschedule” and select the desired date. You can schedule or reschedule orders with any status except “Closed“. NOTE: Learn more about order statuses on Route4Me’s ERP Order Management System.
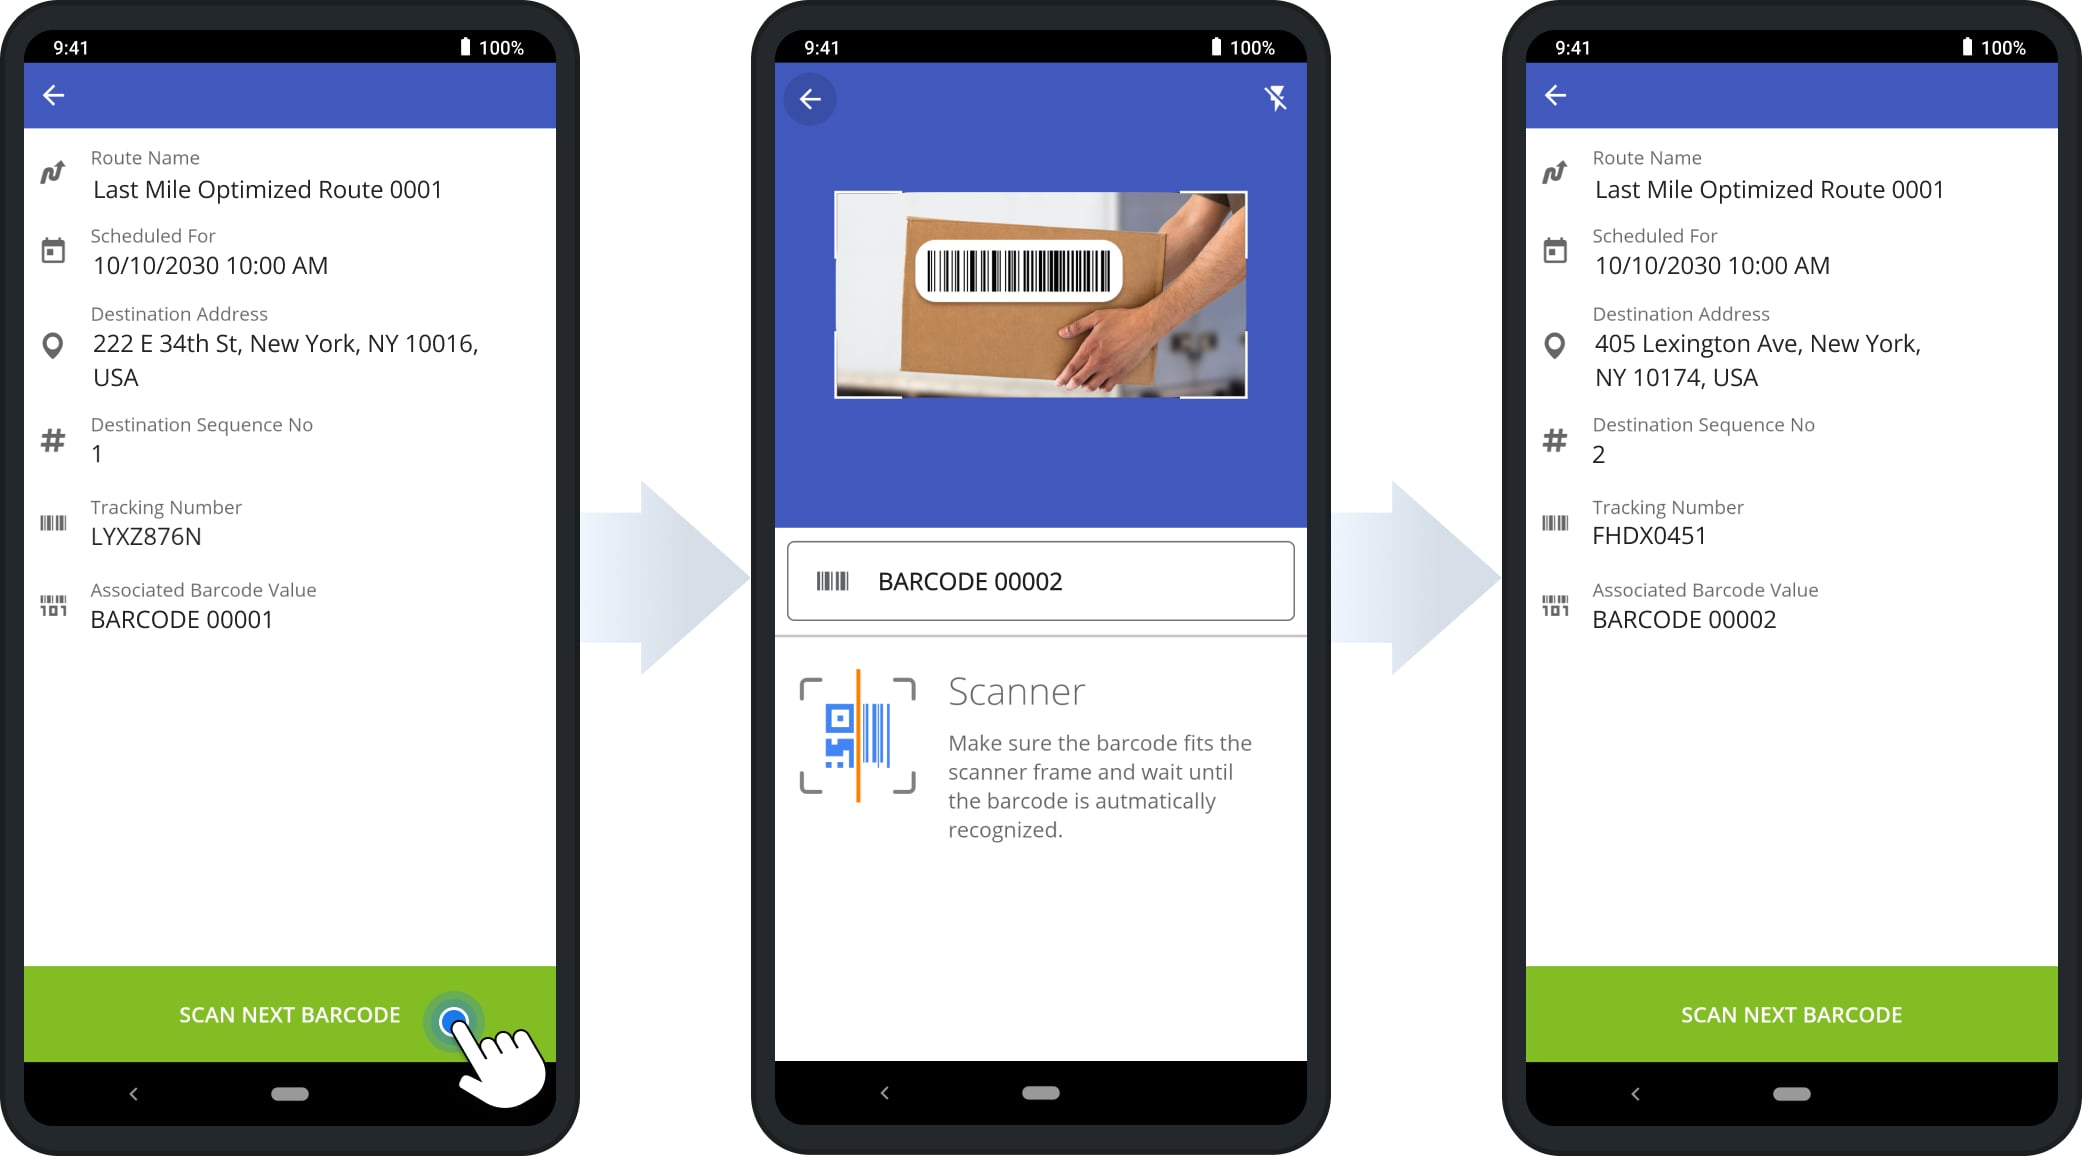
Sort By Route – Scan To View Order Details In Planned Routes
You can also sort orders by route to view details of orders used as destinations on planned and optimized routes.
Open the Android Barcode Scanner, tap “Sorting” in the Navigation Menu, then select “Sort by Route” to launch the scanner. Scan the label code of the order you want to check.
The app will automatically detect and open the associated route and order details, including the route name, start date, destination address, and other order information. To scan another order, tap “Scan Next Barcode“.
Note: When sorting by routes, the app only displays routes scheduled for today and tomorrow (based on the current date).
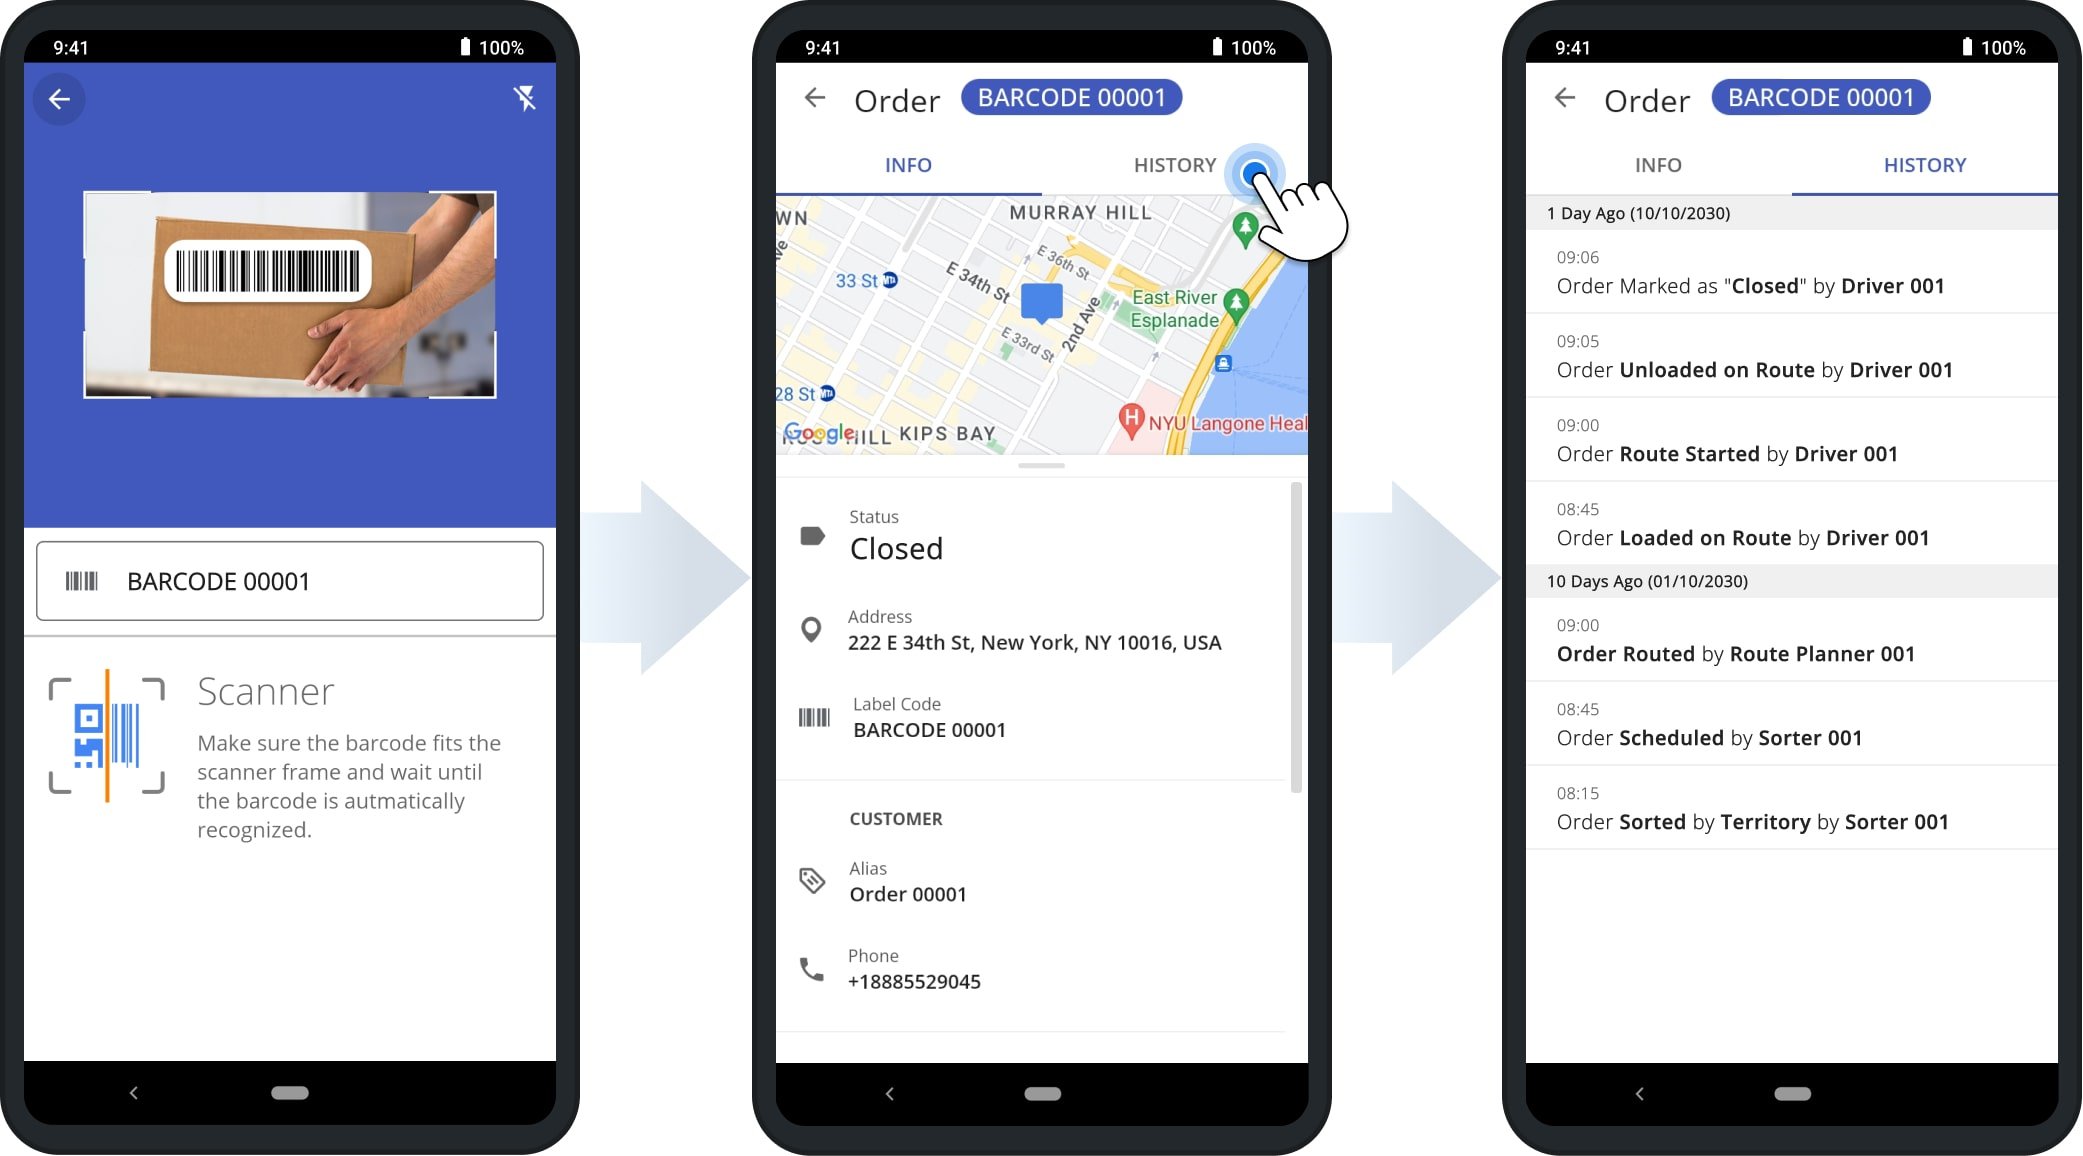
Scan To Update – Scan Orders To View Order Data And History
You can also scan orders to view detailed analytics, data, and order history. Open the Android Barcode Scanner, tap “Sorting” in the Navigation Menu, then select “Scan to Update Order” to launch the scanner. Scan the order’s label code to view its details.

The app will automatically validate the order label code and display the associated order data, including physical attributes, order type, custom data, schedule, and address details.
You can also view a detailed activity history with timestamps for all actions that updated the order status.
Visit Route4Me's Marketplace to Check out Associated Modules:
- Operations
Advanced Team Management Add-On
- Operations
Custom Data Add-On
About author: Alex Yasko
Alex Yasko is the Go-to-Market Product Manager and Information Architecture Manager at Route4Me. With thousands of hours of experience, Alex specializes in breaking down complex last-mile optimization and routing scenarios into simple, actionable instructions, helping last-mile businesses streamline their operations effortlessly.