Custom Data Add-On – Route Destinations, Orders, Addresses, And Users
Depending on your last mile routing needs and business model, you may need to manage data that doesn’t fit into Route4Me’s default interface fields. Route4Me’s Custom Data Add-On lets you attach extra details to route stops, orders, addresses, and more – such as adding additional order or location details to route stops or custom fields to user profiles. This flexibility helps you tailor Route4Me to your operational workflows and information requirements. In this guide, you’ll learn how to add and manage Custom Data across your Route4Me account.
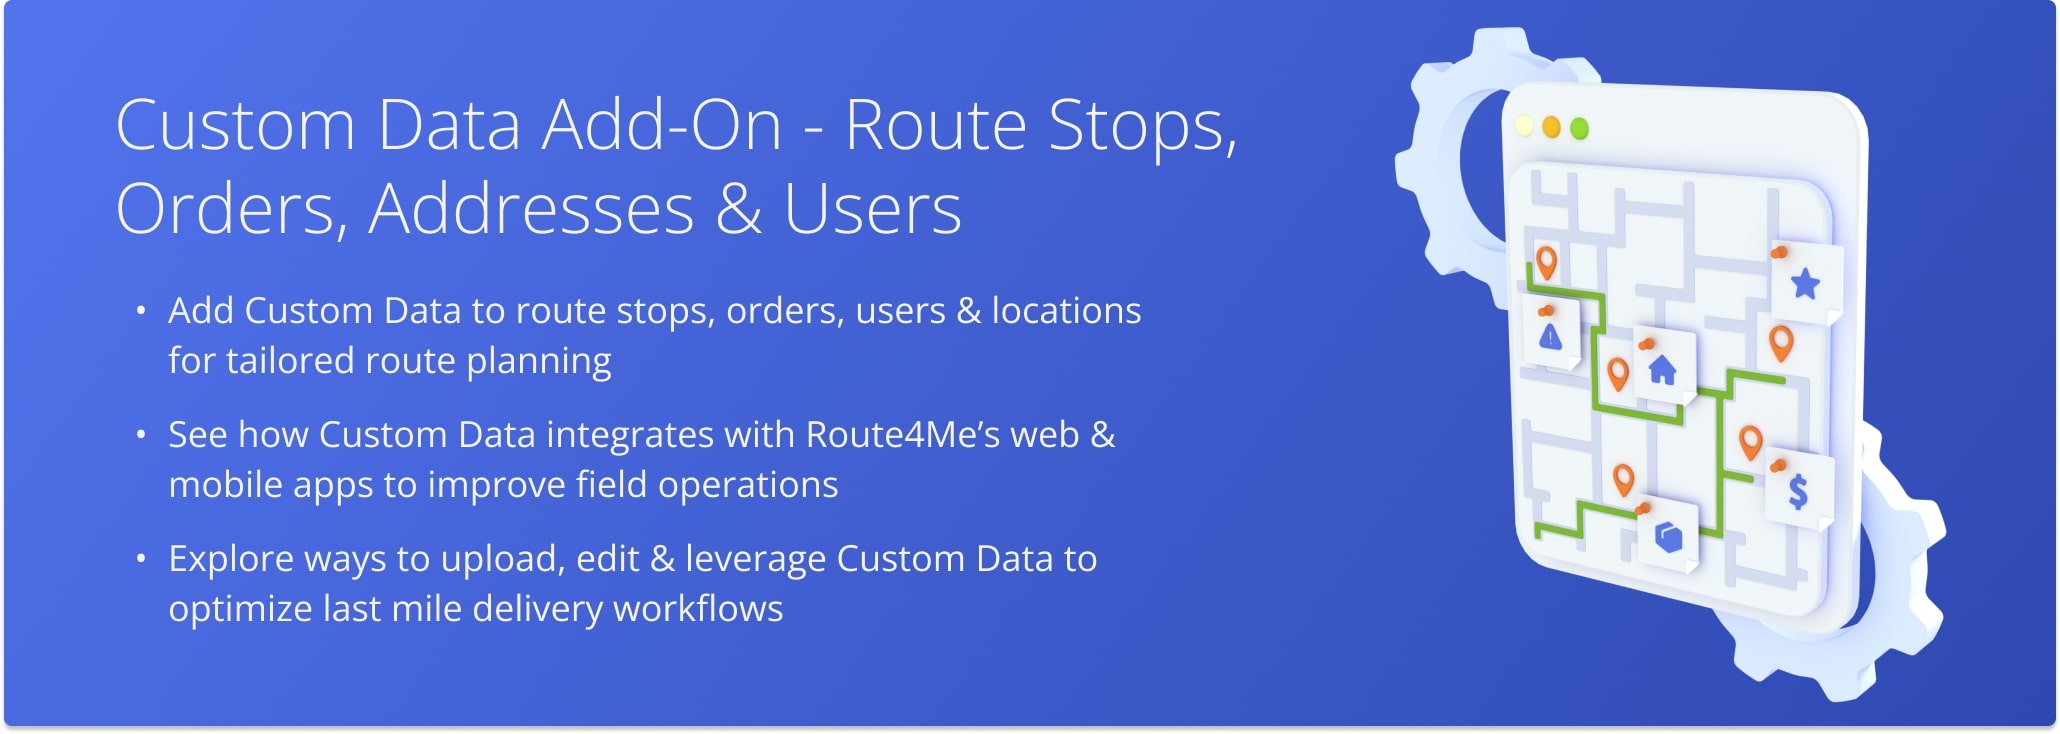
Table of Contents
Upload, Add, And Manage Route Destinations With Custom Data
Route4Me’s Custom Data Add-On lets you attach extra customer, order, or location details to route destinations. Upload data via spreadsheets or add it manually. Drivers and team members can access it through Route4Me’s Mobile Route Planning Apps.
Upload Destinations With Custom Data To Plan Routes
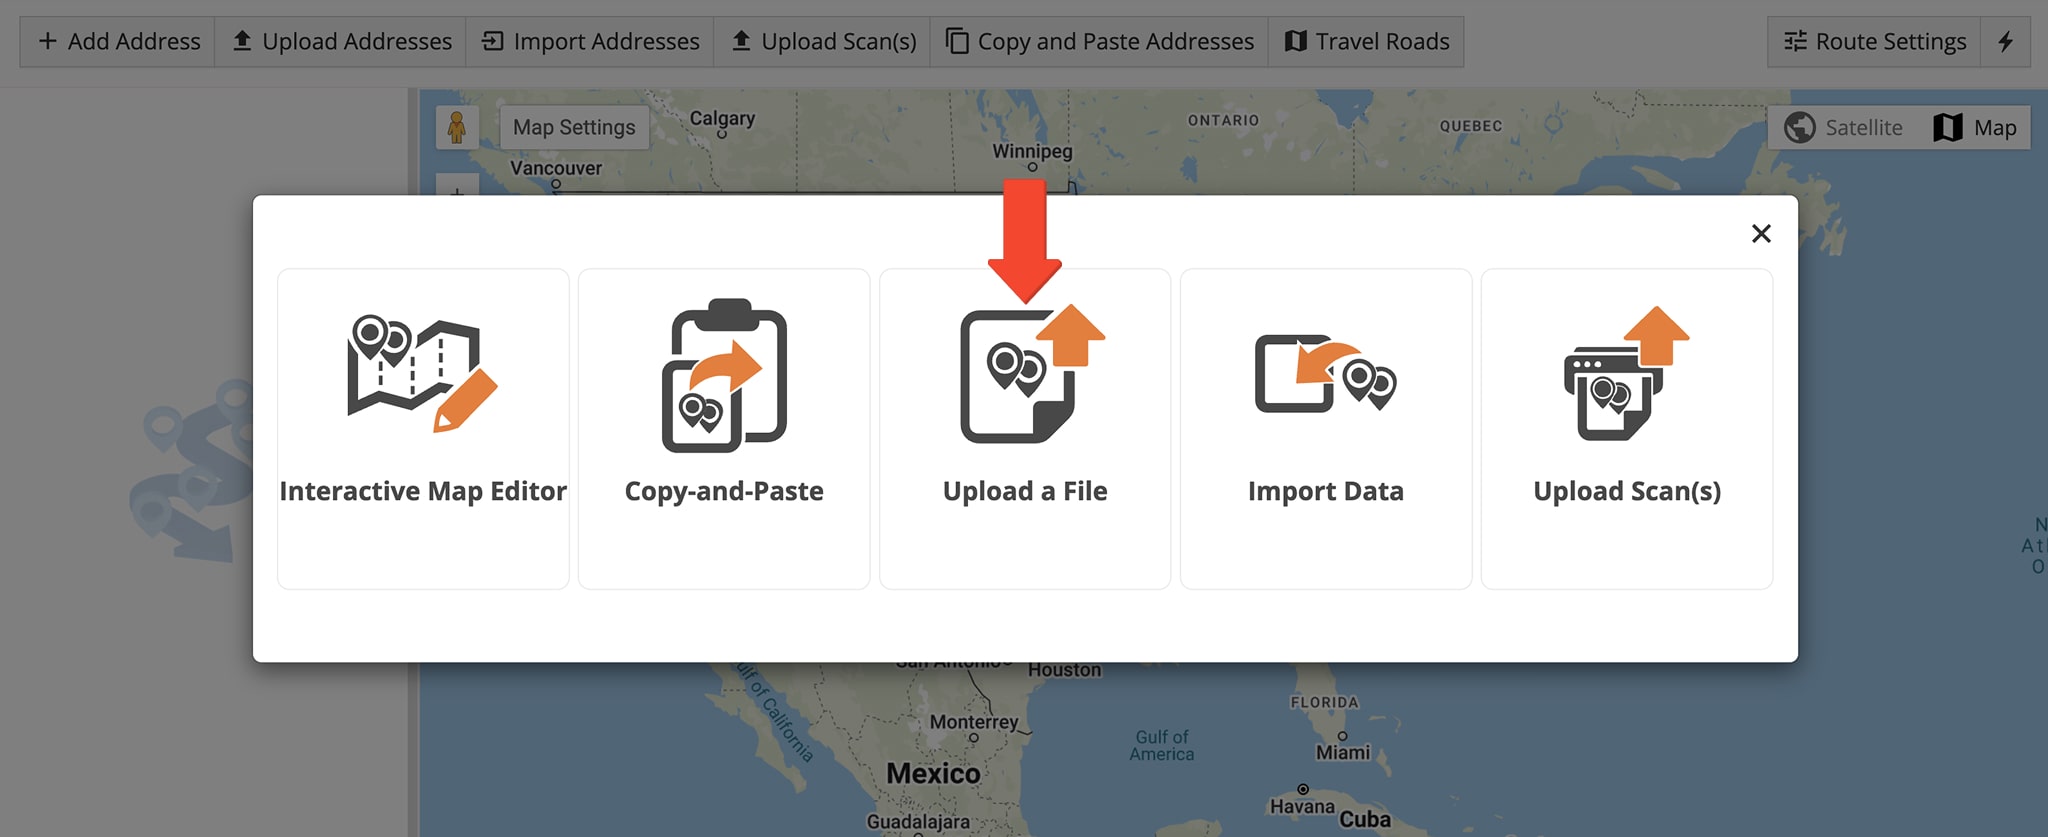
To upload route addresses with Custom Data, click “Dynamic Routing” > “Plan New Route” in the Navigation Menu. When prompted to choose your route planning method, be sure to select “Upload a File“.
NOTE: Learn more about planning routes using spreadsheet uploads.
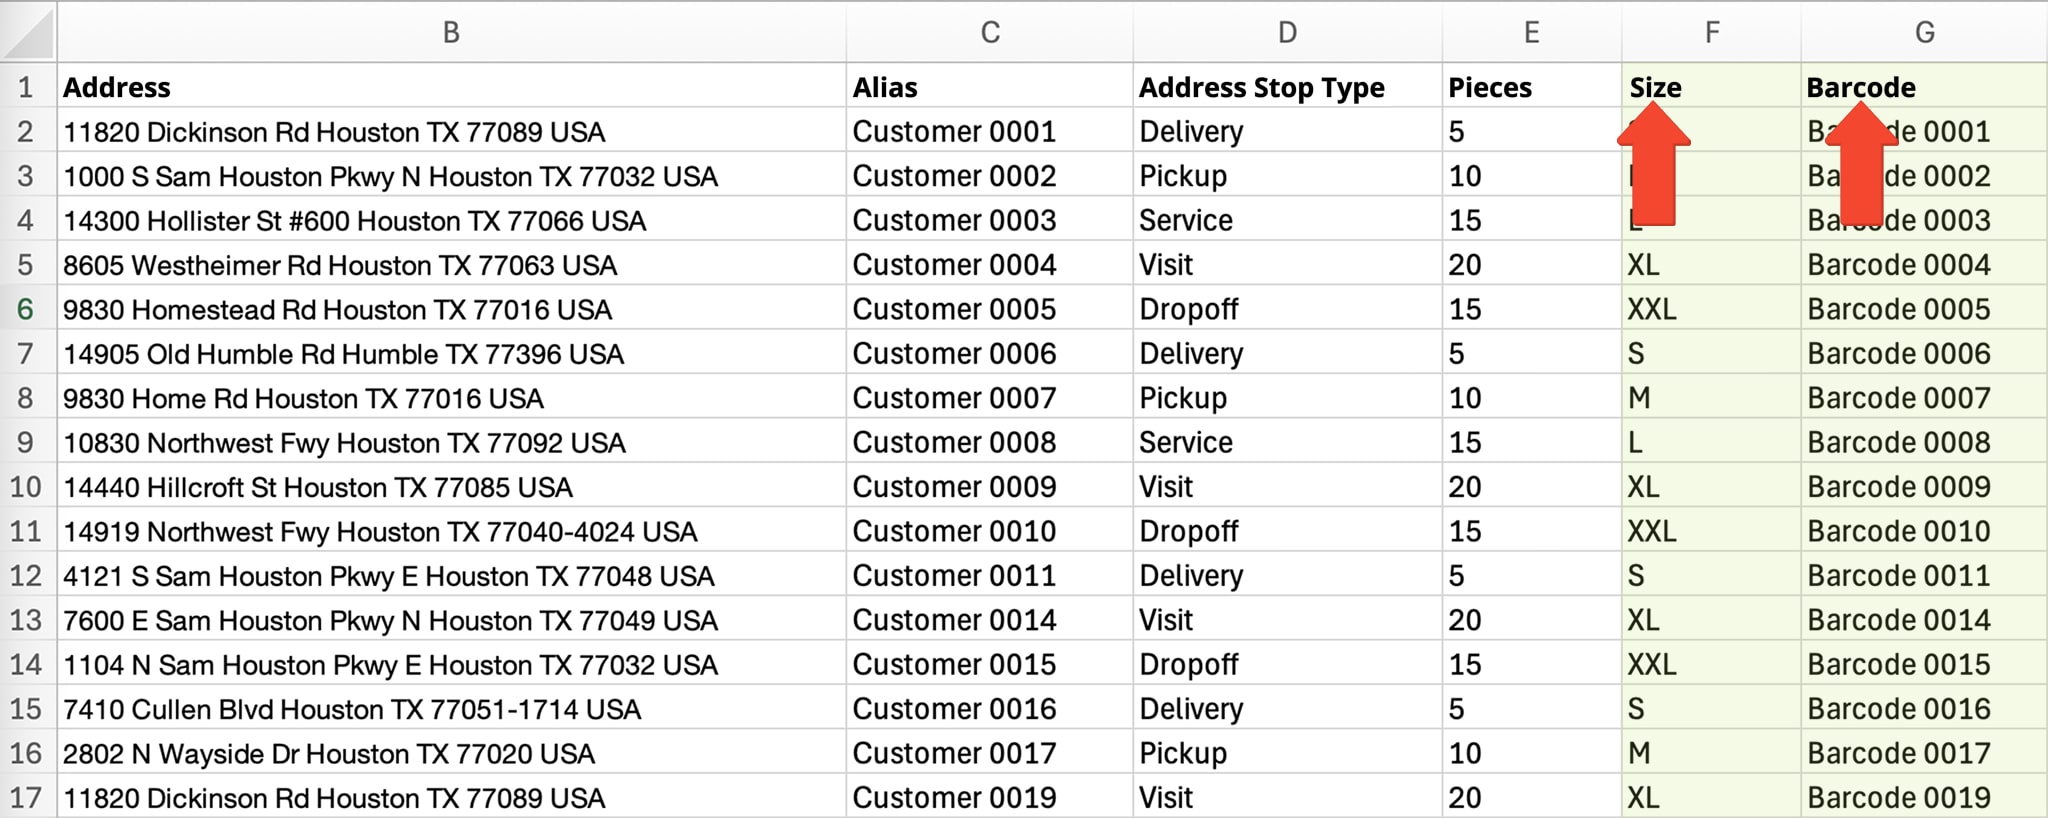
Ensure your spreadsheet is correctly formatted with column headers in the top row and corresponding data below. Route4Me supports reserved fields like address, alias, and destination type. But you can also include Custom Data by adding your own column headers and values.
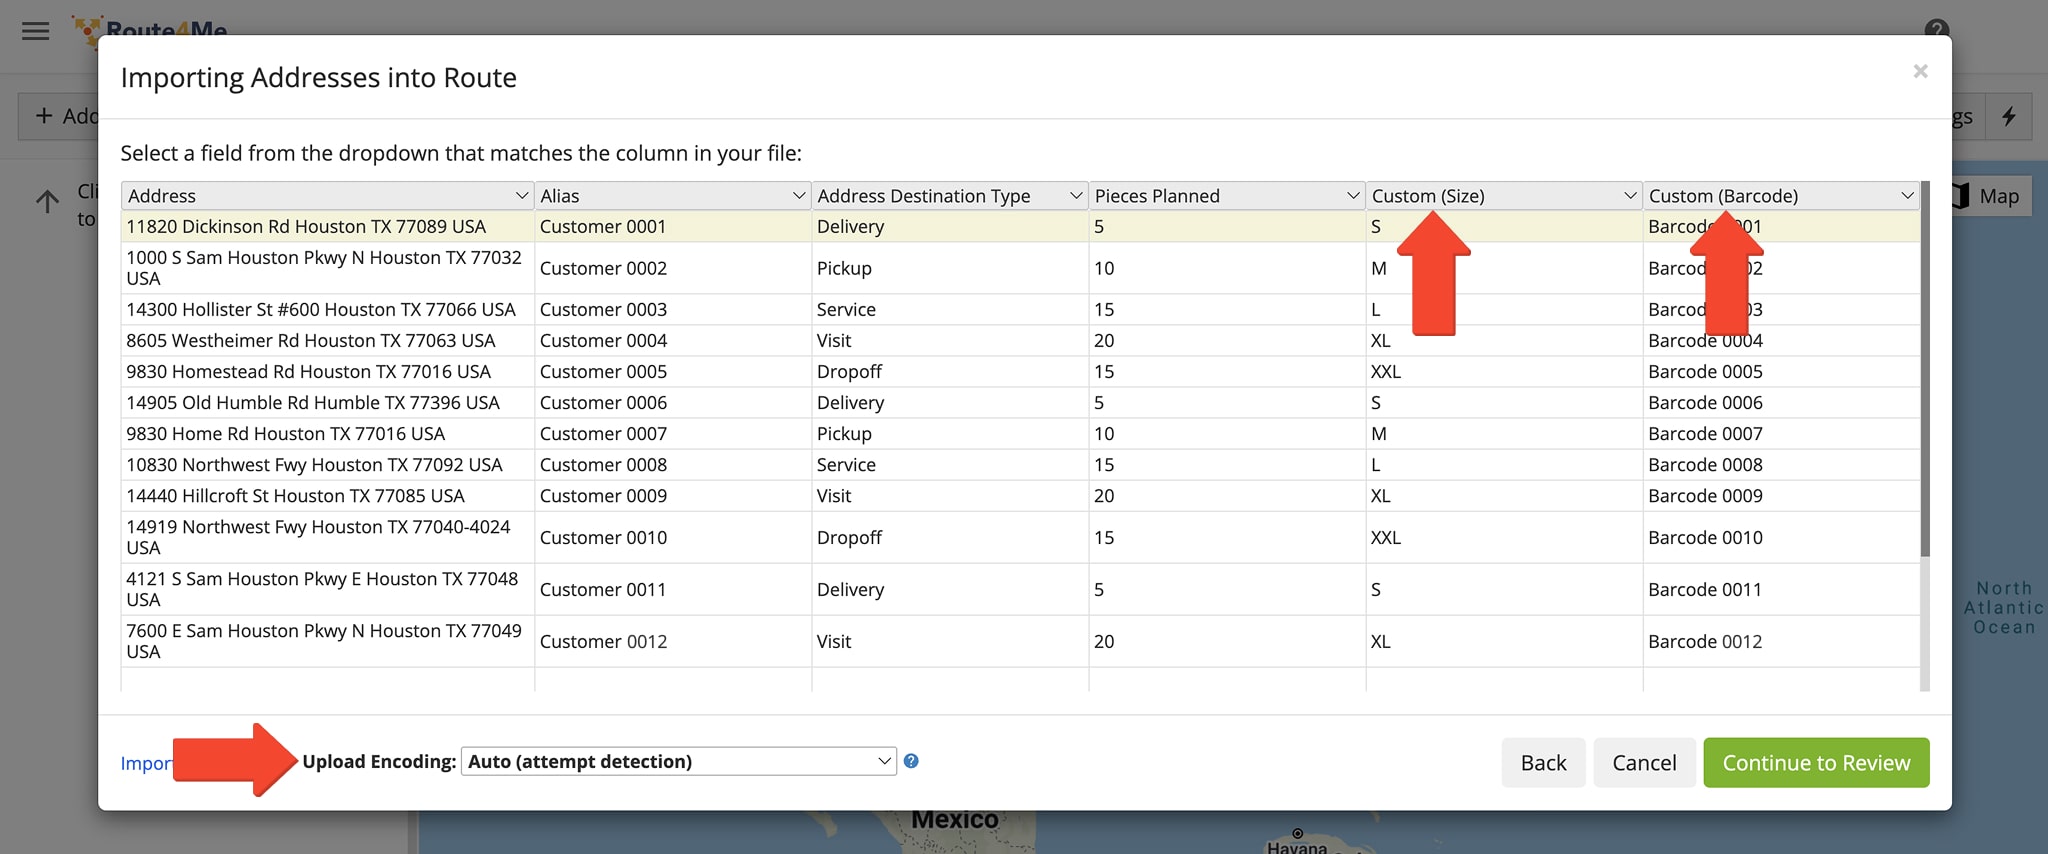
After uploading your route spreadsheet, Route4Me automatically verifies and maps columns that match reserved fields. Columns with Custom Data are labeled as “Custom” followed by the custom column names in parenthesis.
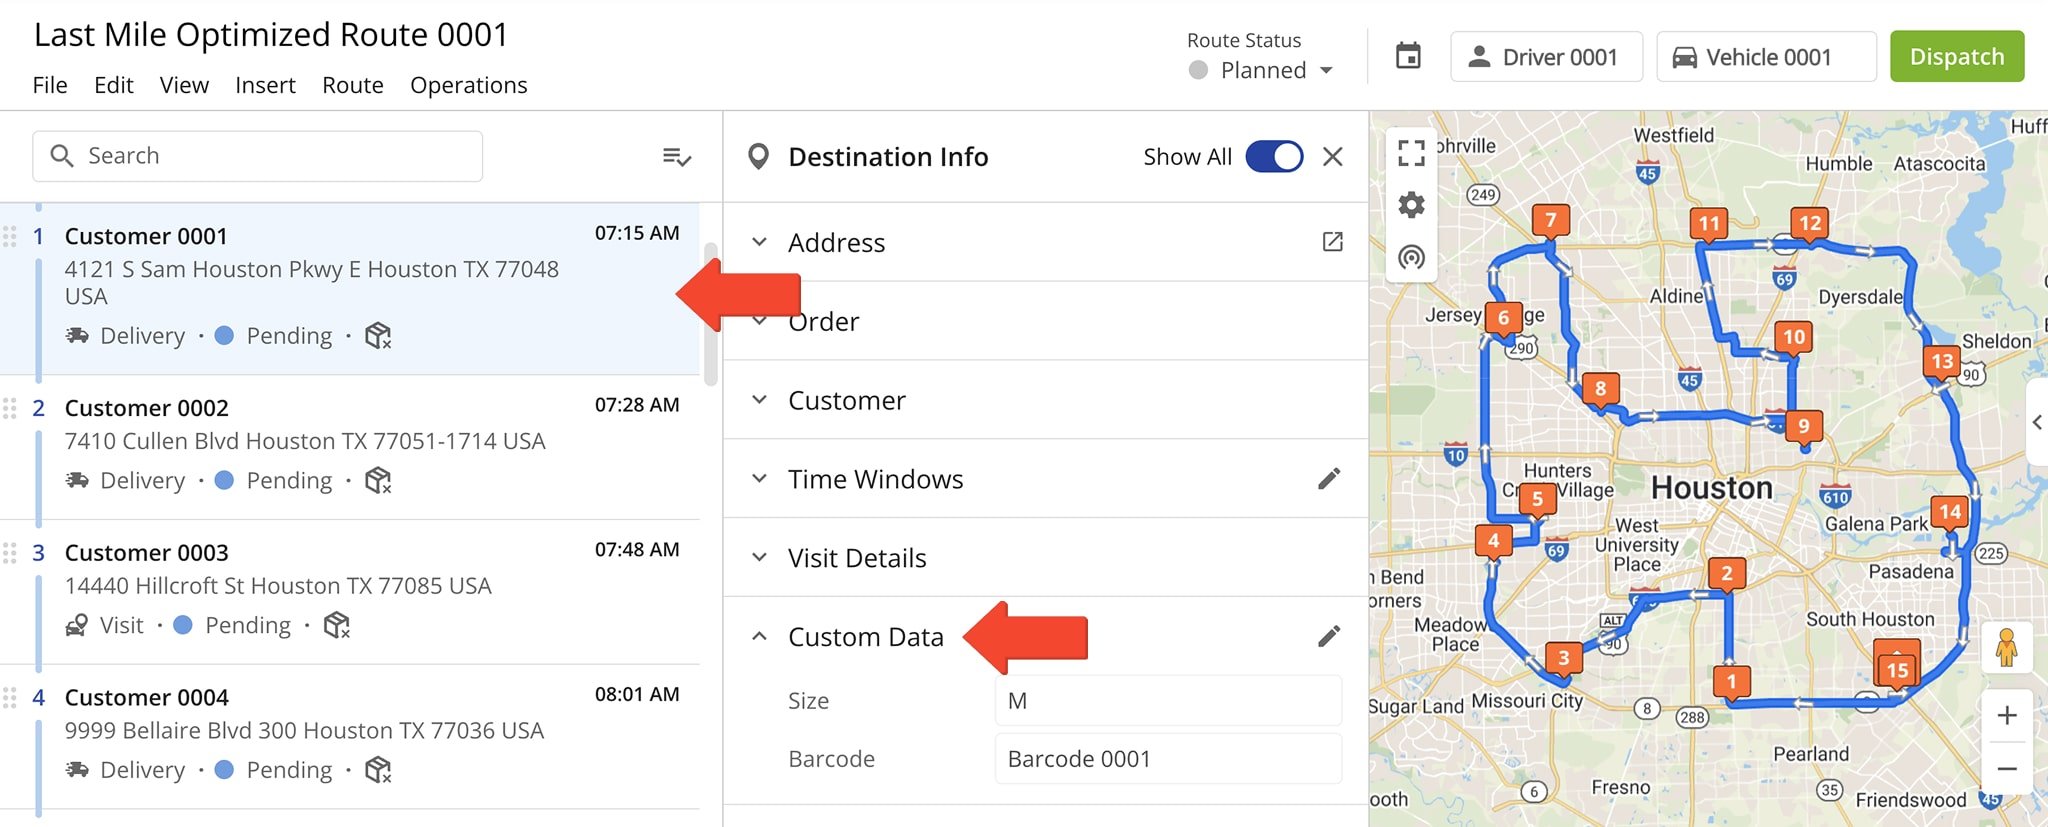
After uploading the spreadsheet, Custom Data will be automatically attached to corresponding destinations. To view and manage it, open the route in the Route Editor, click on a stop to open its manifest, and scroll down to the “Custom Data” section.
Add And Edit Custom Data For Route Destinations
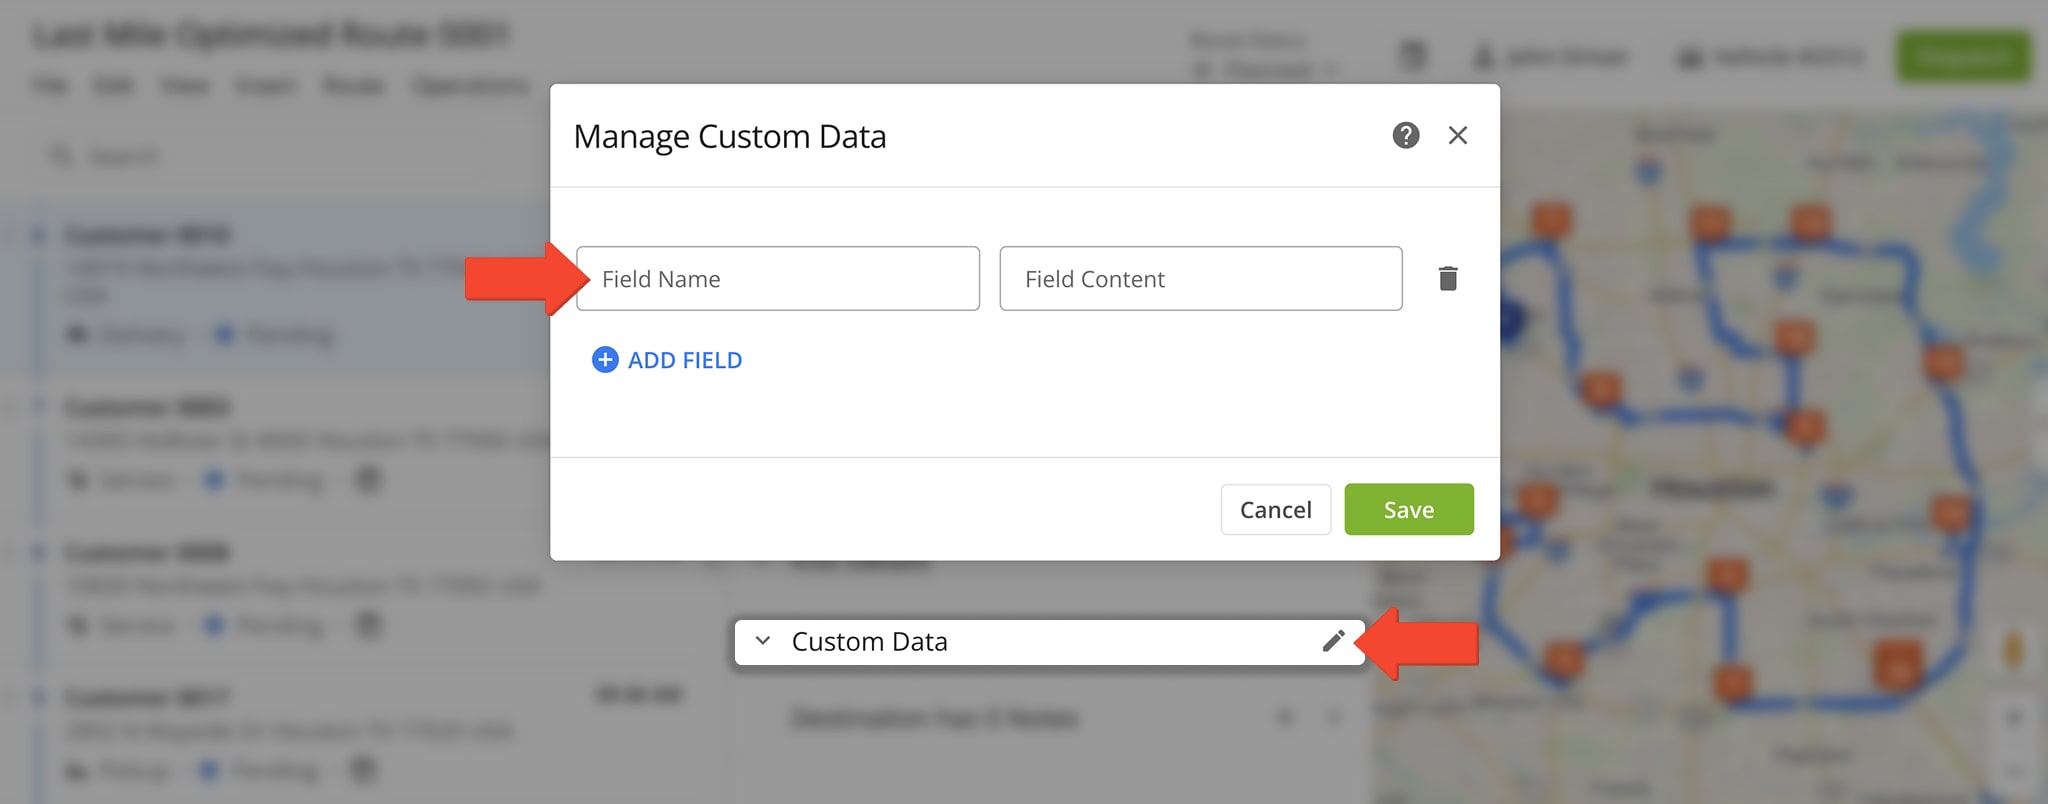
You can also manually add Custom Data to individual stops by opening the route in the Route Editor, selecting a destination to open its manifest, then clicking the Pencil Icon next to “Customer Data“. You can add multiple entries, each with a field name and corresponding value.
Order Management – Add And Manage Orders Custom Data
Route4Me’s Delivery Management System lets you efficiently import, organize, schedule, and route hundreds of thousands of orders, with the option to attach Custom Data. This data automatically transfers to route stops and is accessible via Route4Me’s route planner and mobile apps.
Upload Orders With Custom Data To Your Route4Me Orders List
You can upload orders via CSV file, with each row representing a single order and each column containing specific order details. To add Custom Data, include custom column names in the header and enter corresponding values for each order.
Then, to import your spreadsheet, click “Business Operations” > “Orders” in the Navigation Menu. Click “Import” in the top right corner of the Orders List to upload your file.
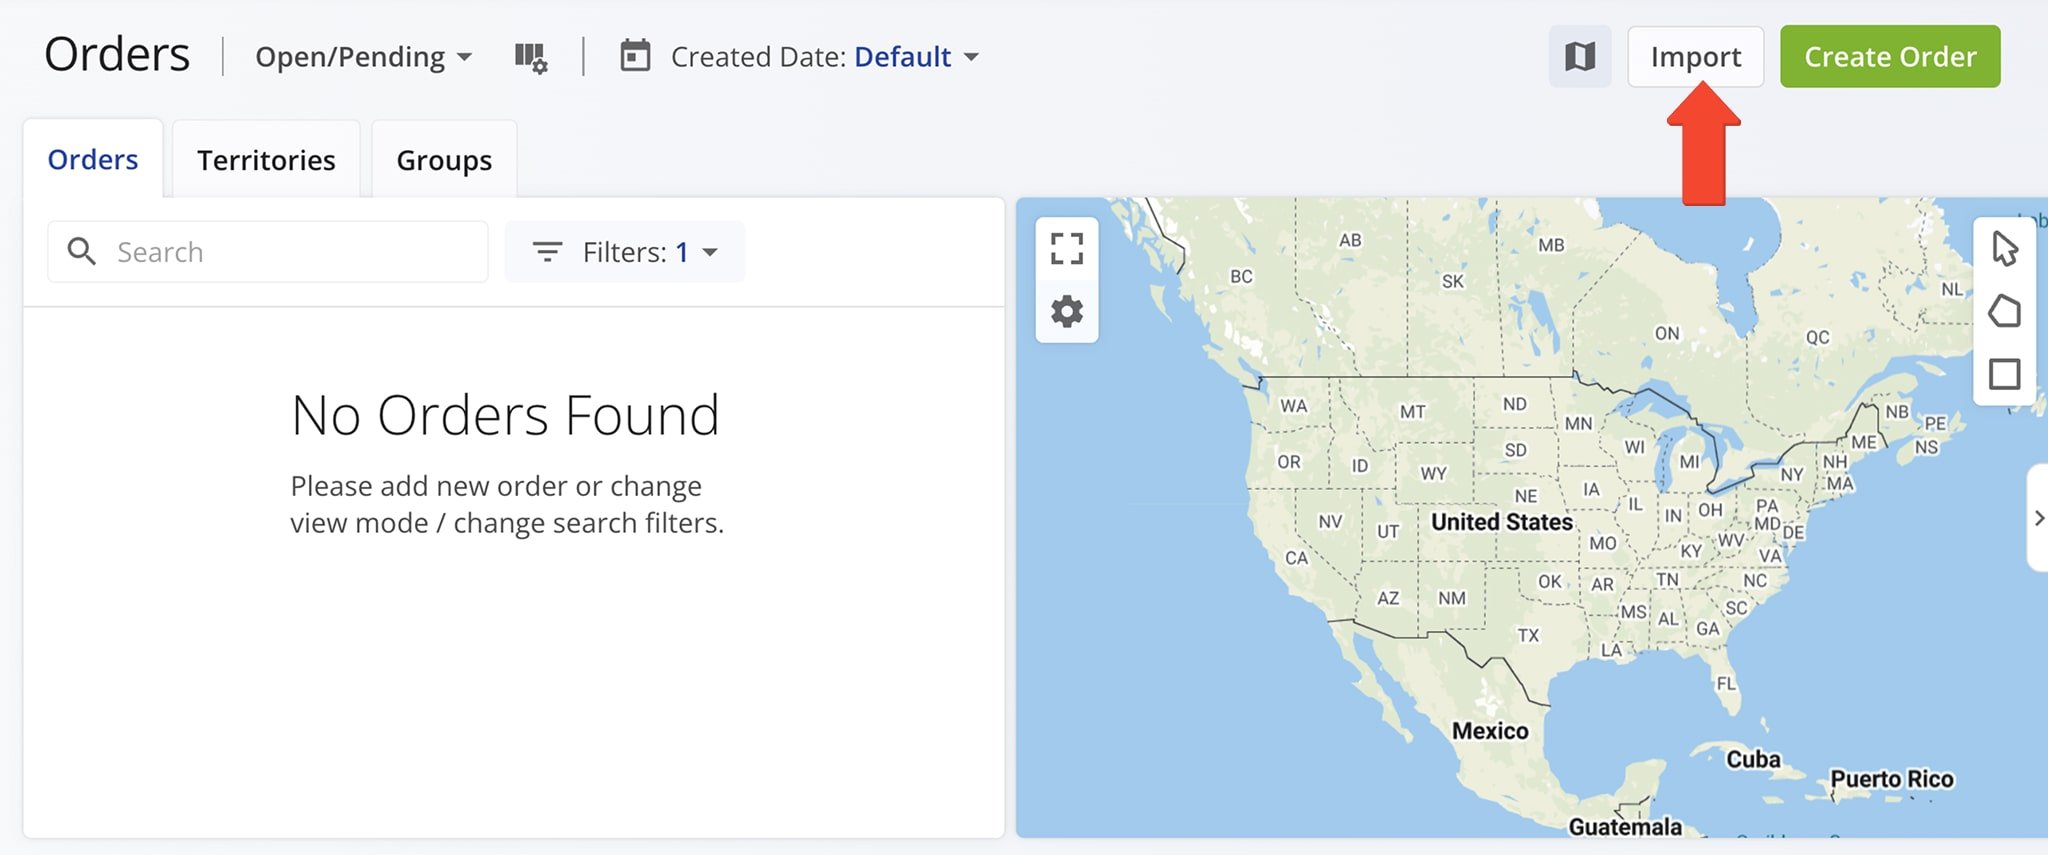
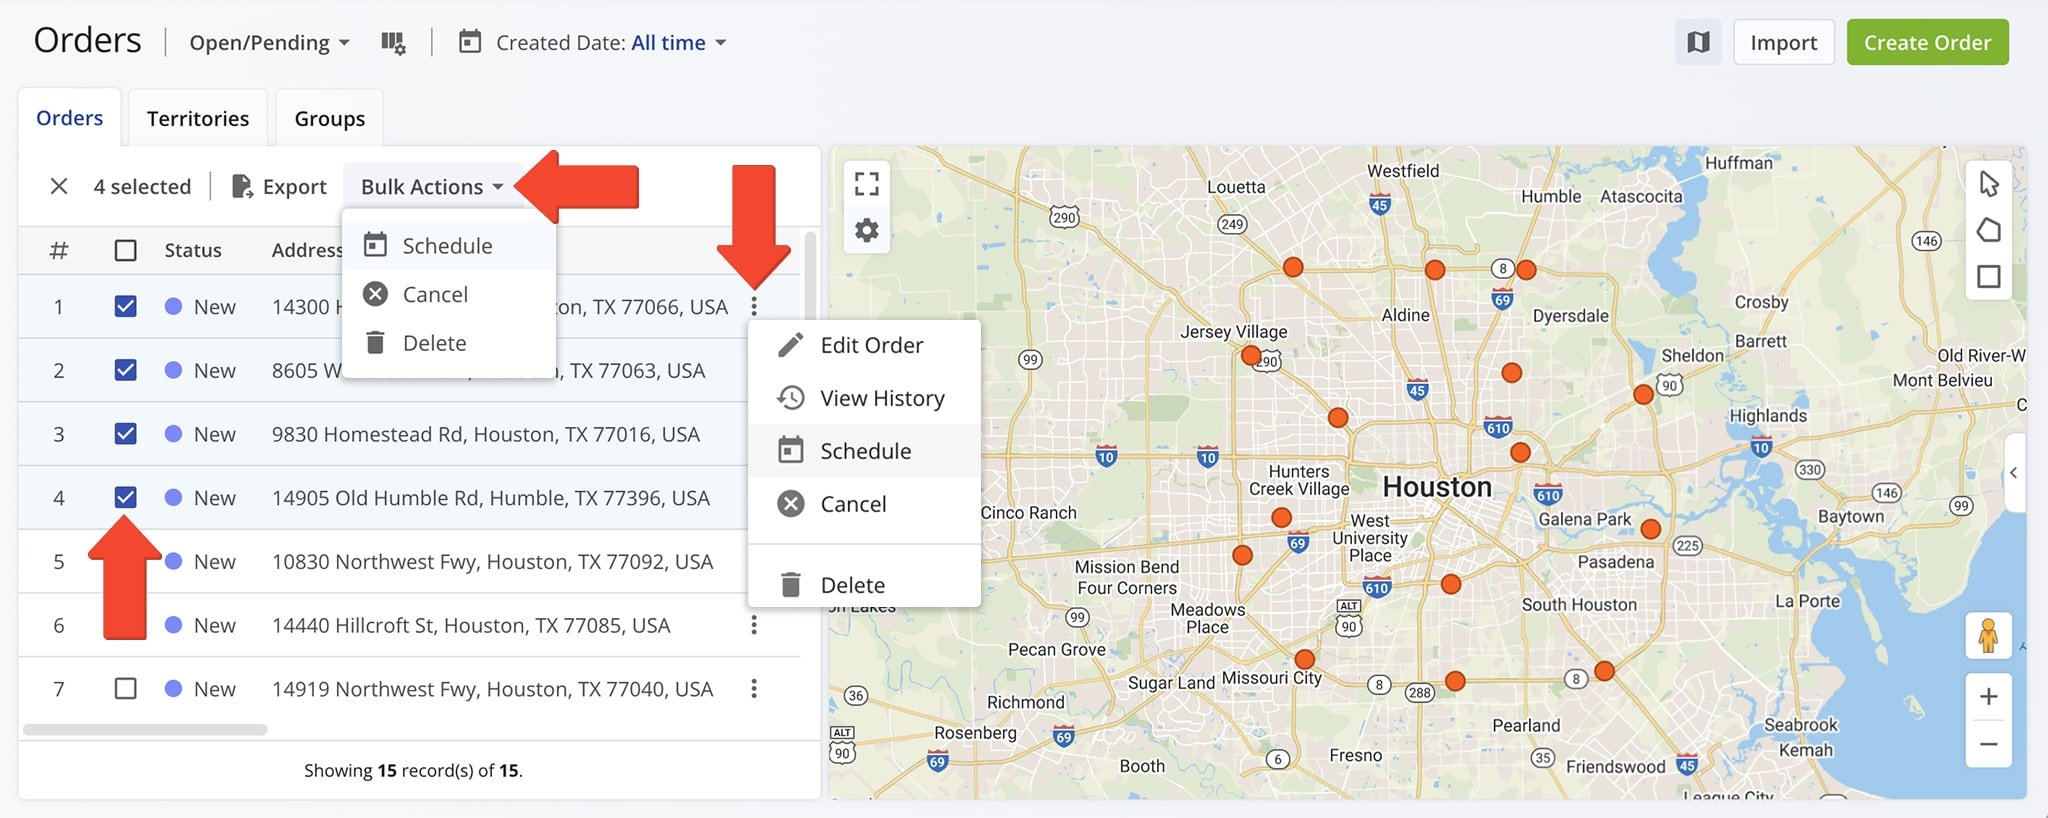
Once uploaded, orders appear in your Orders List with a “New” status. To schedule a single order, click the Three-dot icon next to it and select “Schedule“. To schedule multiple orders at once, check the boxes next to them and click “Schedule” in the Toolbar.
To view or edit Custom Data for an order, click the Three-dot Icon next to it and choose the appropriate option from the menu. NOTE: See our guide on uploading and using orders for planning routes.
Add Custom Data To Individual Orders In Your Route4Me Orders List
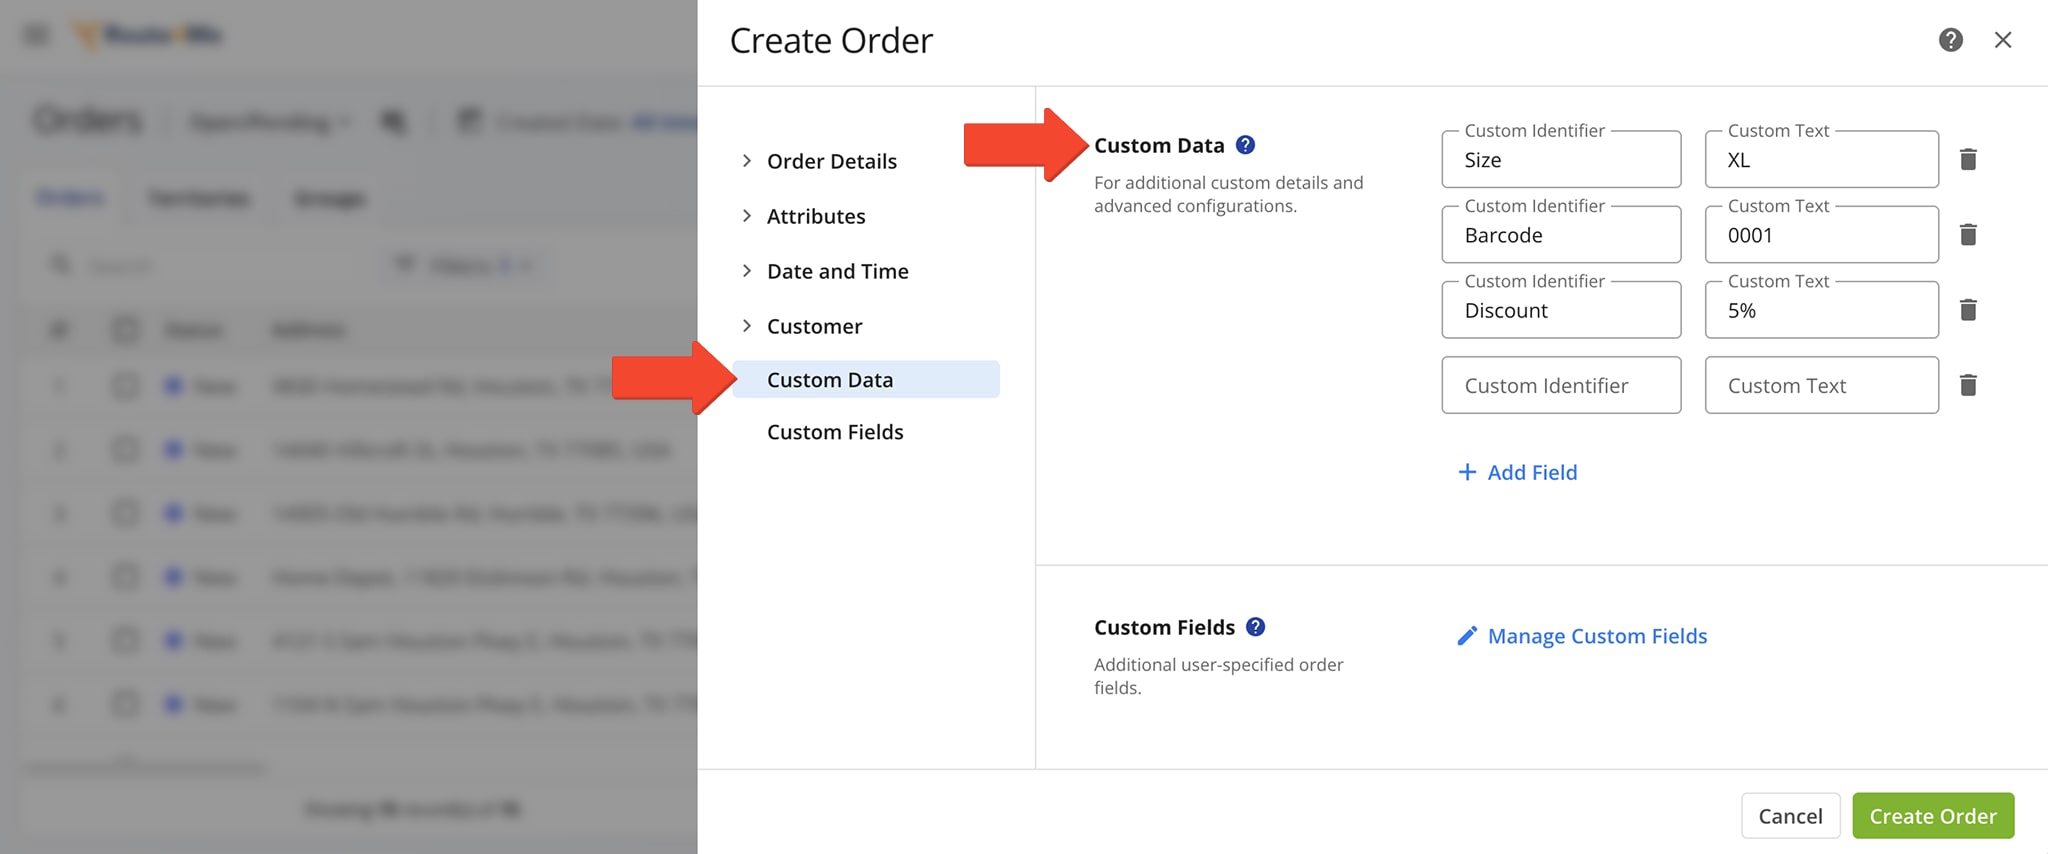
You can also add Custom Data when creating a new order. Click “Create Order” in the Orders List and fill in the required details.
In the “Custom Data” tab, you can add or update Custom Data by specifying a Custom Data Field and its corresponding value. For more, see our guide on creating new orders and managing existing orders.
Plan And Optimize Routes With Orders Custom Data
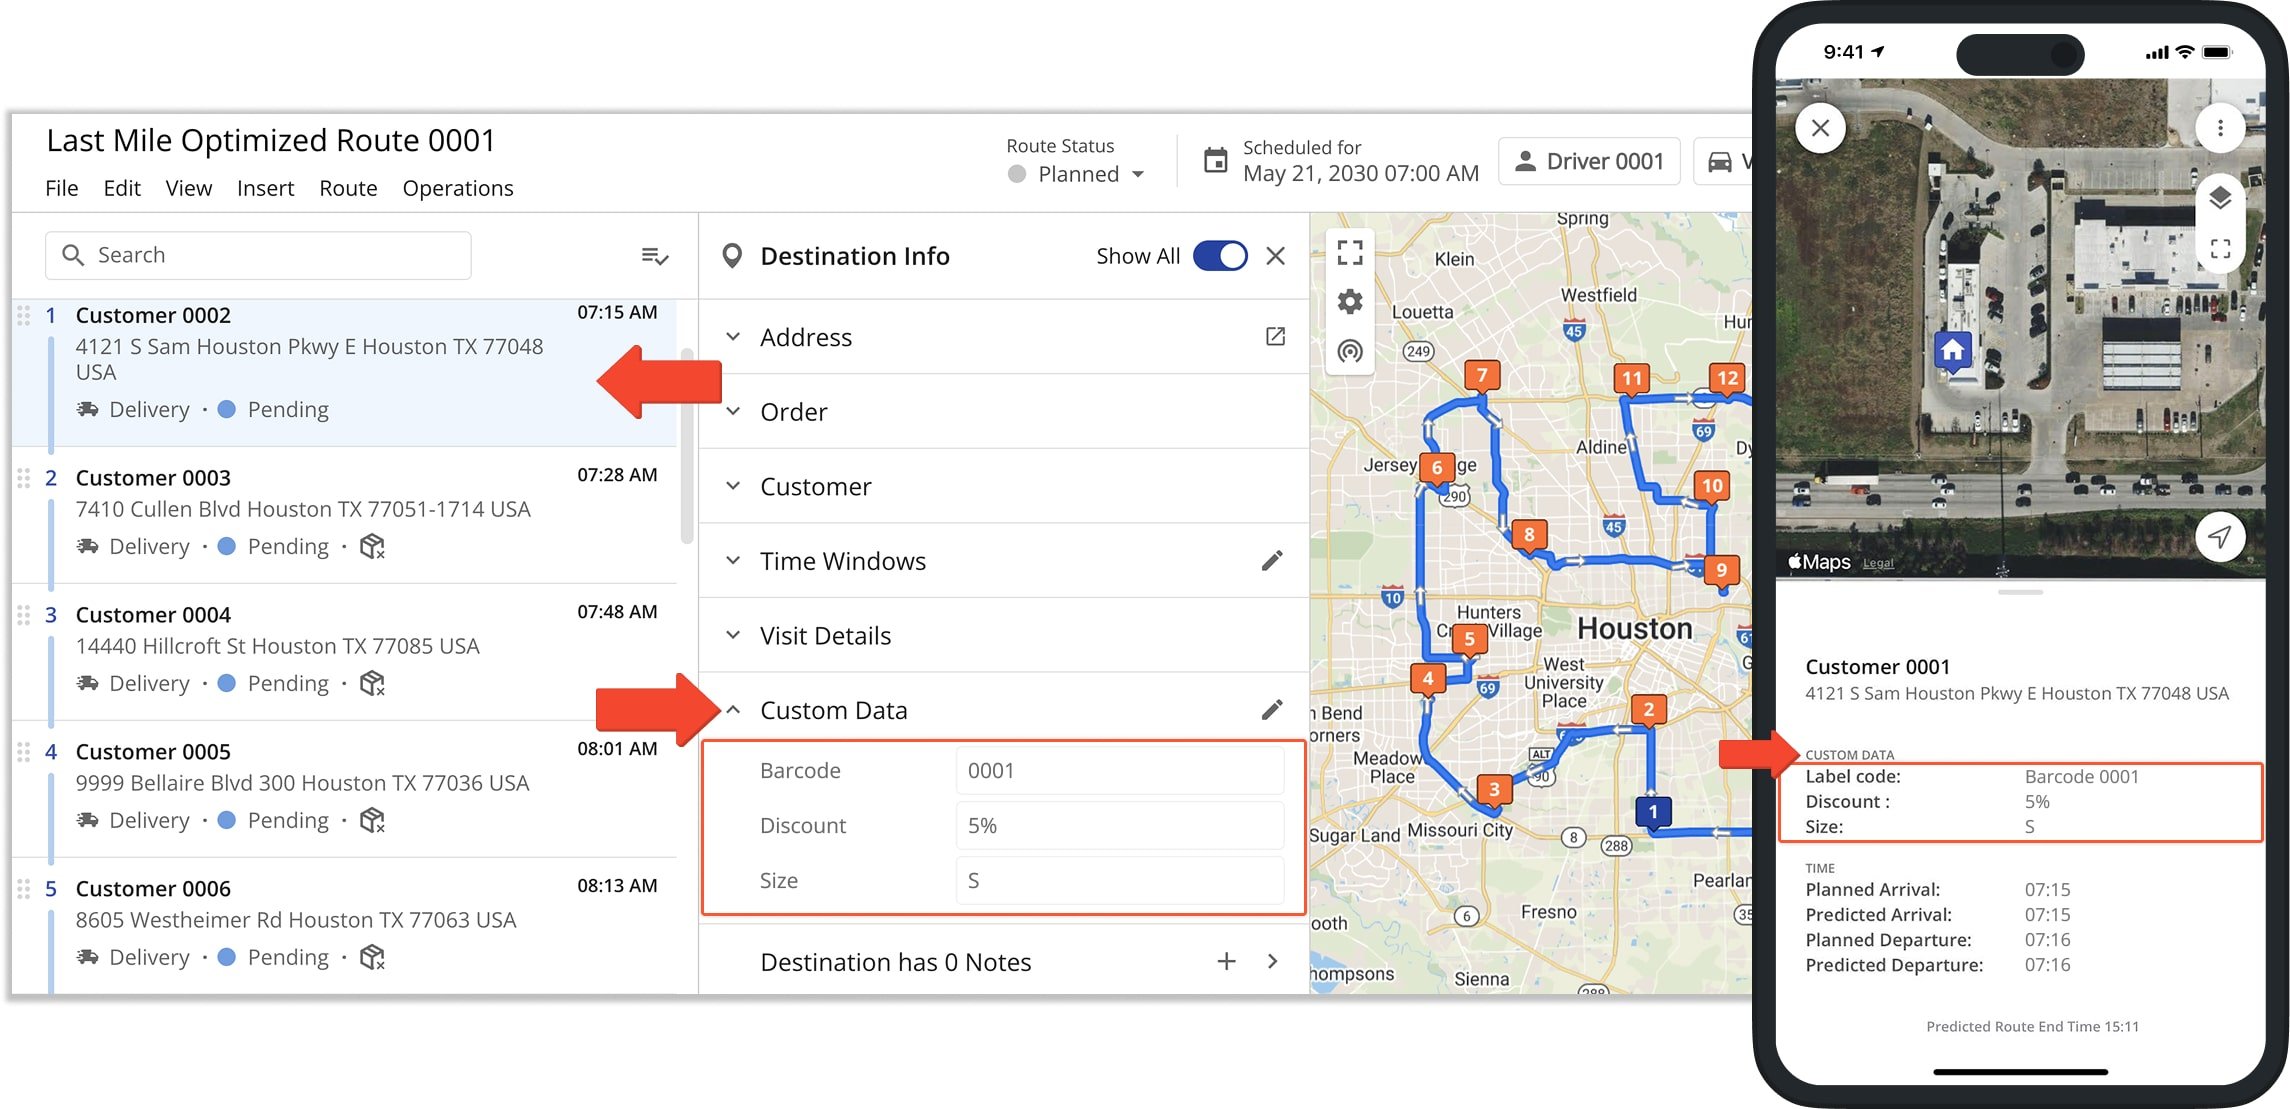
You can use orders to plan and optimize routes, with each order becoming a route stop. These stops inherit all order details (e.g., address, alias, etc.) as well as all associated Custom Data.
To view or edit the Custom Data for a route destination, open the desired route in the Route Editor, click on the destination to view its manifest, and scroll to the “Custom Data” section. Drivers and field members can also access this Custom Data through Route4Me’s Mobile Route Planning Apps.
User And Team Management – Add User Profile Custom Data
Route4Me helps you create an organized network of managers, planners, dispatchers, drivers, and team members, with customizable profiles and permissions. To further tailor user profiles, you can attach Custom Data when creating or editing users.
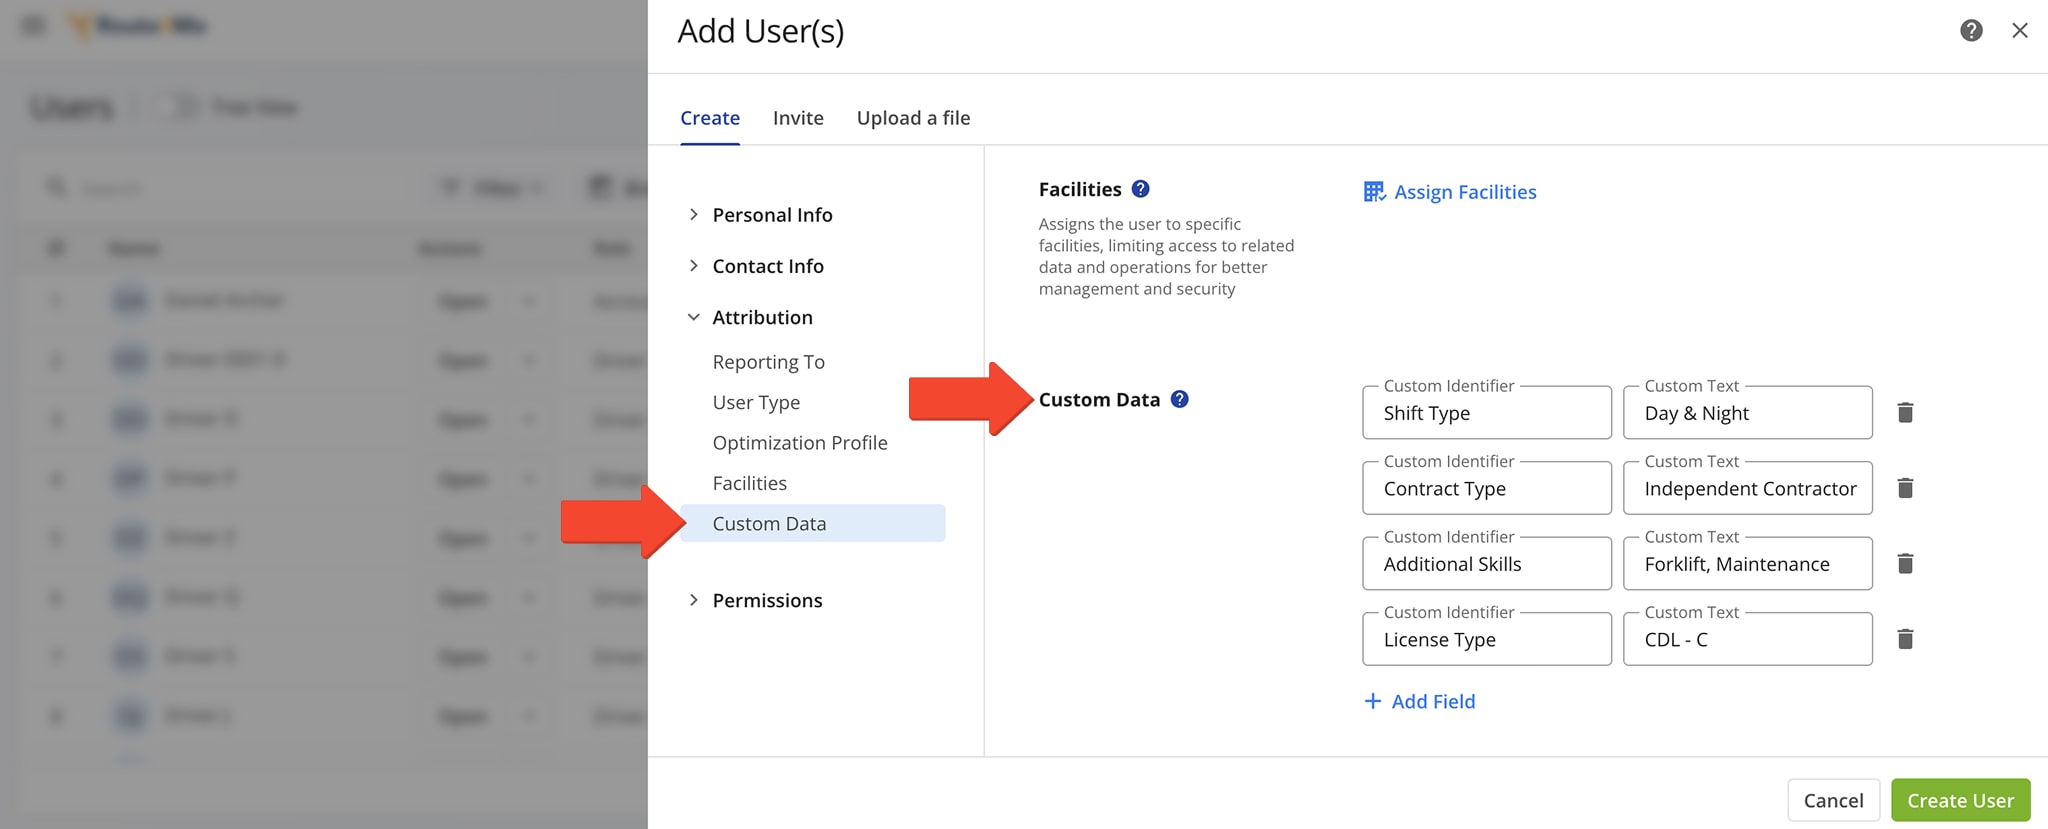
To add Custom Data to a new user profile, go to “Team & Equipment” > “Users” in the Navigation Menu, then click “Add User(s)“. For existing users, click the Down Arrow Button next to their name and select “Add Sub-User“.
In the “Add User” panel, click the “Attribution” tab, followed by “Custom Data“. Then, create a new Custom Data Field with its corresponding content.
Customer Locations Management – Add Locations Custom Data
You can add and manage Custom Data for Customer Locations in your centralized Customer Locations page, which syncs updates in real time across users and devices.
To add Custom Data to a Customer Location, go to “Database” > “Locations” in the Navigation Menu, then click “Add Location“. To add Custom Data to an existing Customer Location, click the “Edit” Button next to it.
In the “Add Location” panel, click the “Custom Data” tab under “Location“. Then, create a new Custom Data Field with its corresponding content.

Address Book Management – Add And Manage Address Custom Data
Route4Me’s Address Book Map and Address Book List let you add Custom Data in addition to standard details like name, phone number, and address. When planning routes, this data is automatically applied to destinations and accessible on both web and mobile apps – ideal for enterprise business teams needing detailed location insights.
Upload Addresses With Custom Data Into Your Route4Me Address Book
You can upload addresses using a CSV spreadsheet. Route4Me will automatically geocode and create each entry. To include Custom Data, simply add custom column names to the spreadsheet header and enter the corresponding data in each row.
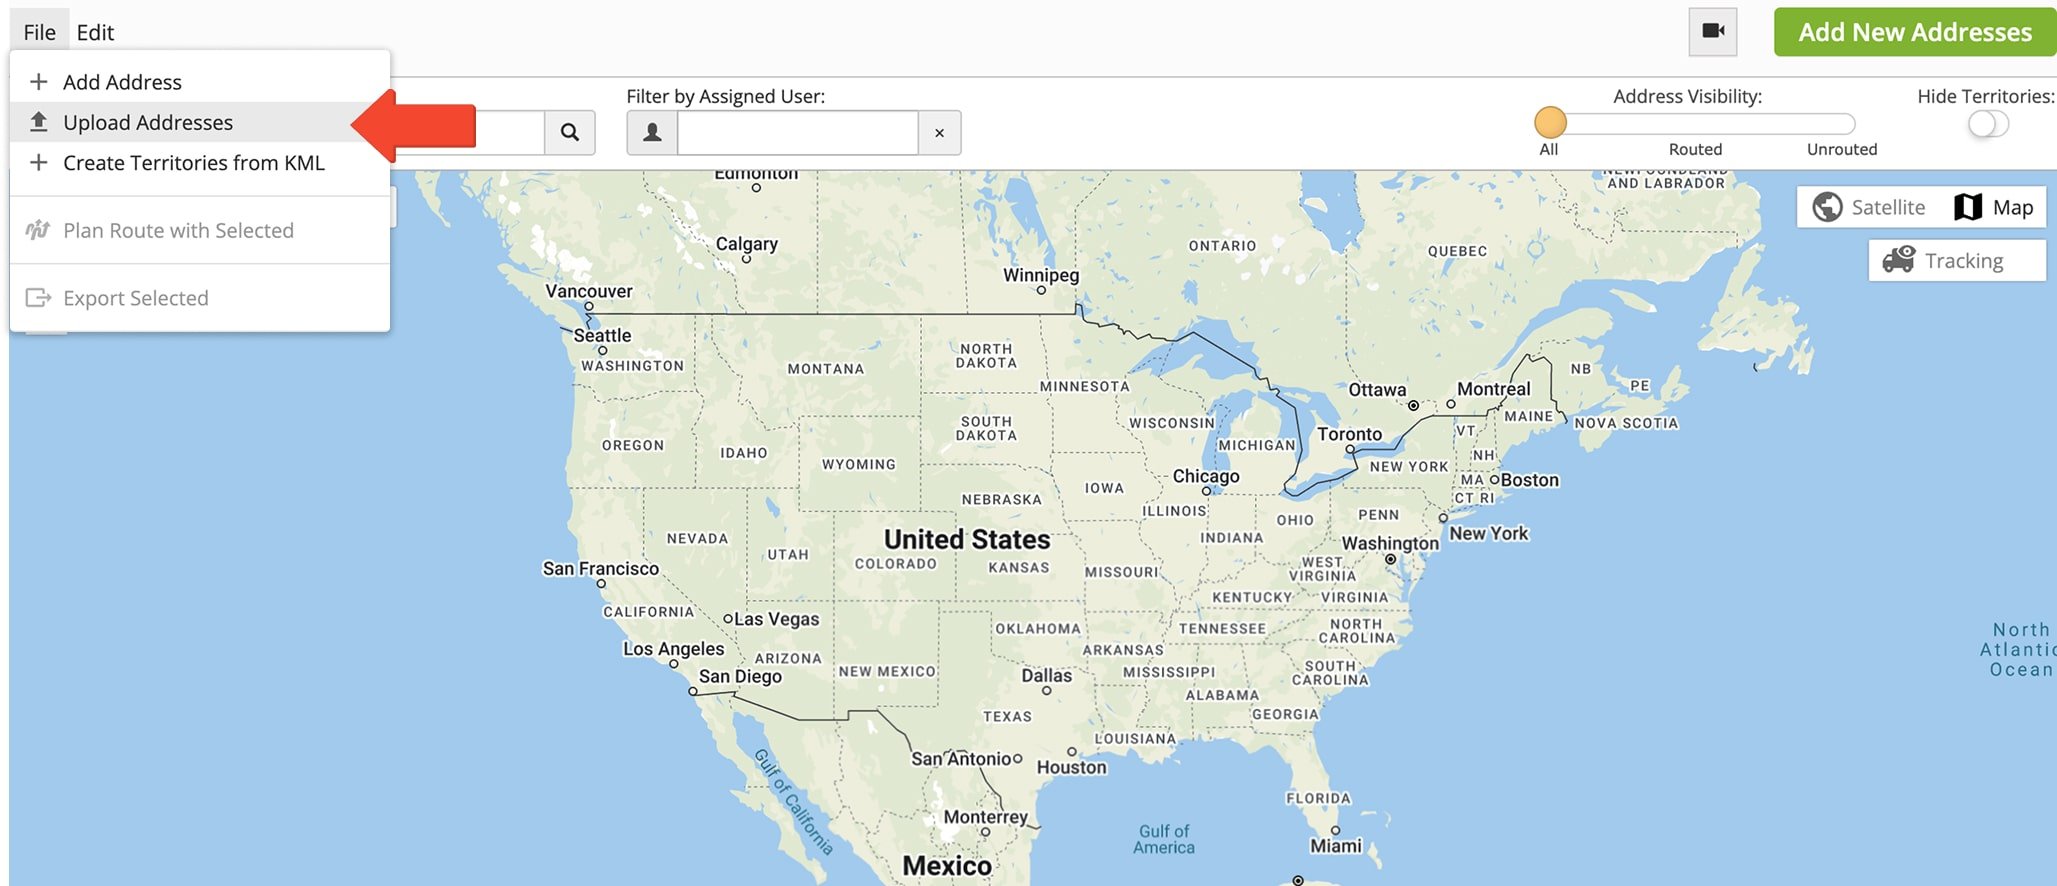
To upload your spreadsheet, click “Customers” in the Navigation Menu and select “Address Book List” or “Address Book Map“. Then, from the Toolbar, click “File” and choose “Upload Addresses“. Once addresses are uploaded, they instantly become available in your Route4Me account.
Add And Edit Custom Data In Your Route4Me Address Book
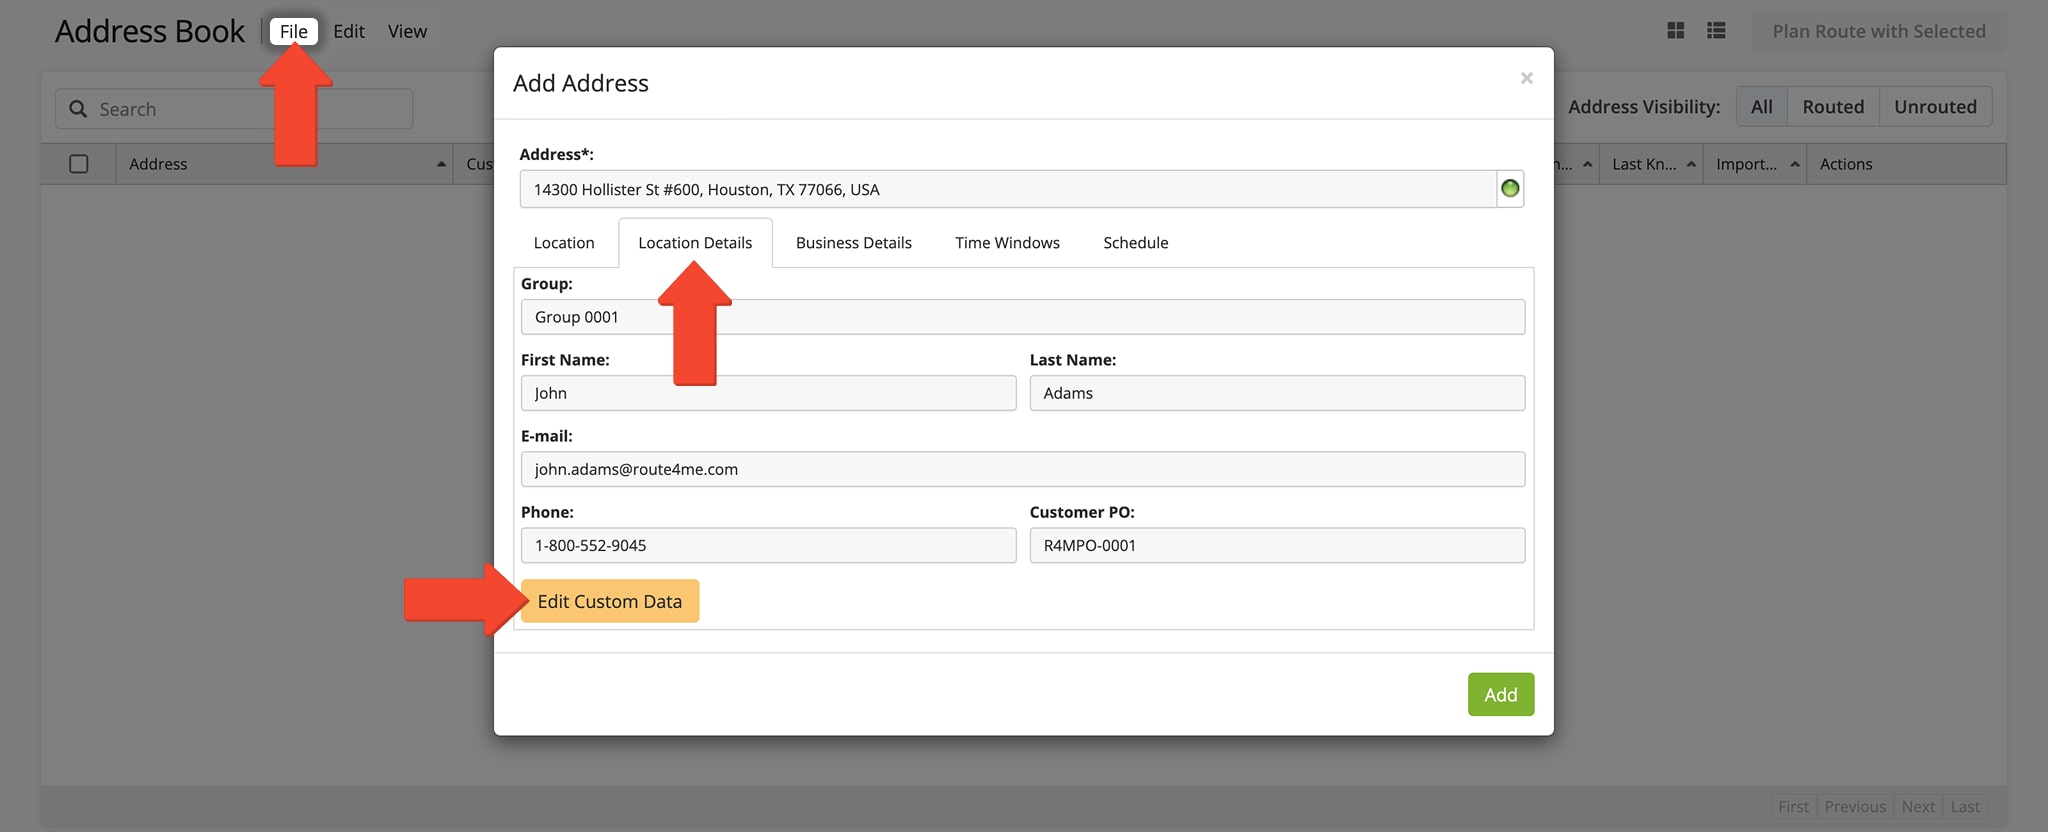
You can add Custom Data to individual addresses when creating or editing entries in your Address Book. To create a new address, go to “File” in the Toolbar and select “Add Address.” Then, in the pop up editor, open the “Location Details” tab where you can add or manage Custom Data by clicking “Edit Custom Data“.
To edit Custom Data already attached to an address, right click an address and select “Edit” from the pop up menu. Then, in the “Edit Address” pop up editor, open the “Location Details” tab and click the “Edit Custom Data” button.
Plan And Optimize Routes With Address Book Custom Data
You can plan and optimize routes using addresses, with each one becoming a route destination that inherits all associated details, including Custom Data.
To manage this data, open the route in the Route Editor, click the destination, and scroll to the “Custom Data” section in its manifest. This data is also accessible to drivers and field teams via Route4Me’s Mobile Route Planning Apps.
iPhone And Android Mobile Route Planning Apps Custom Data
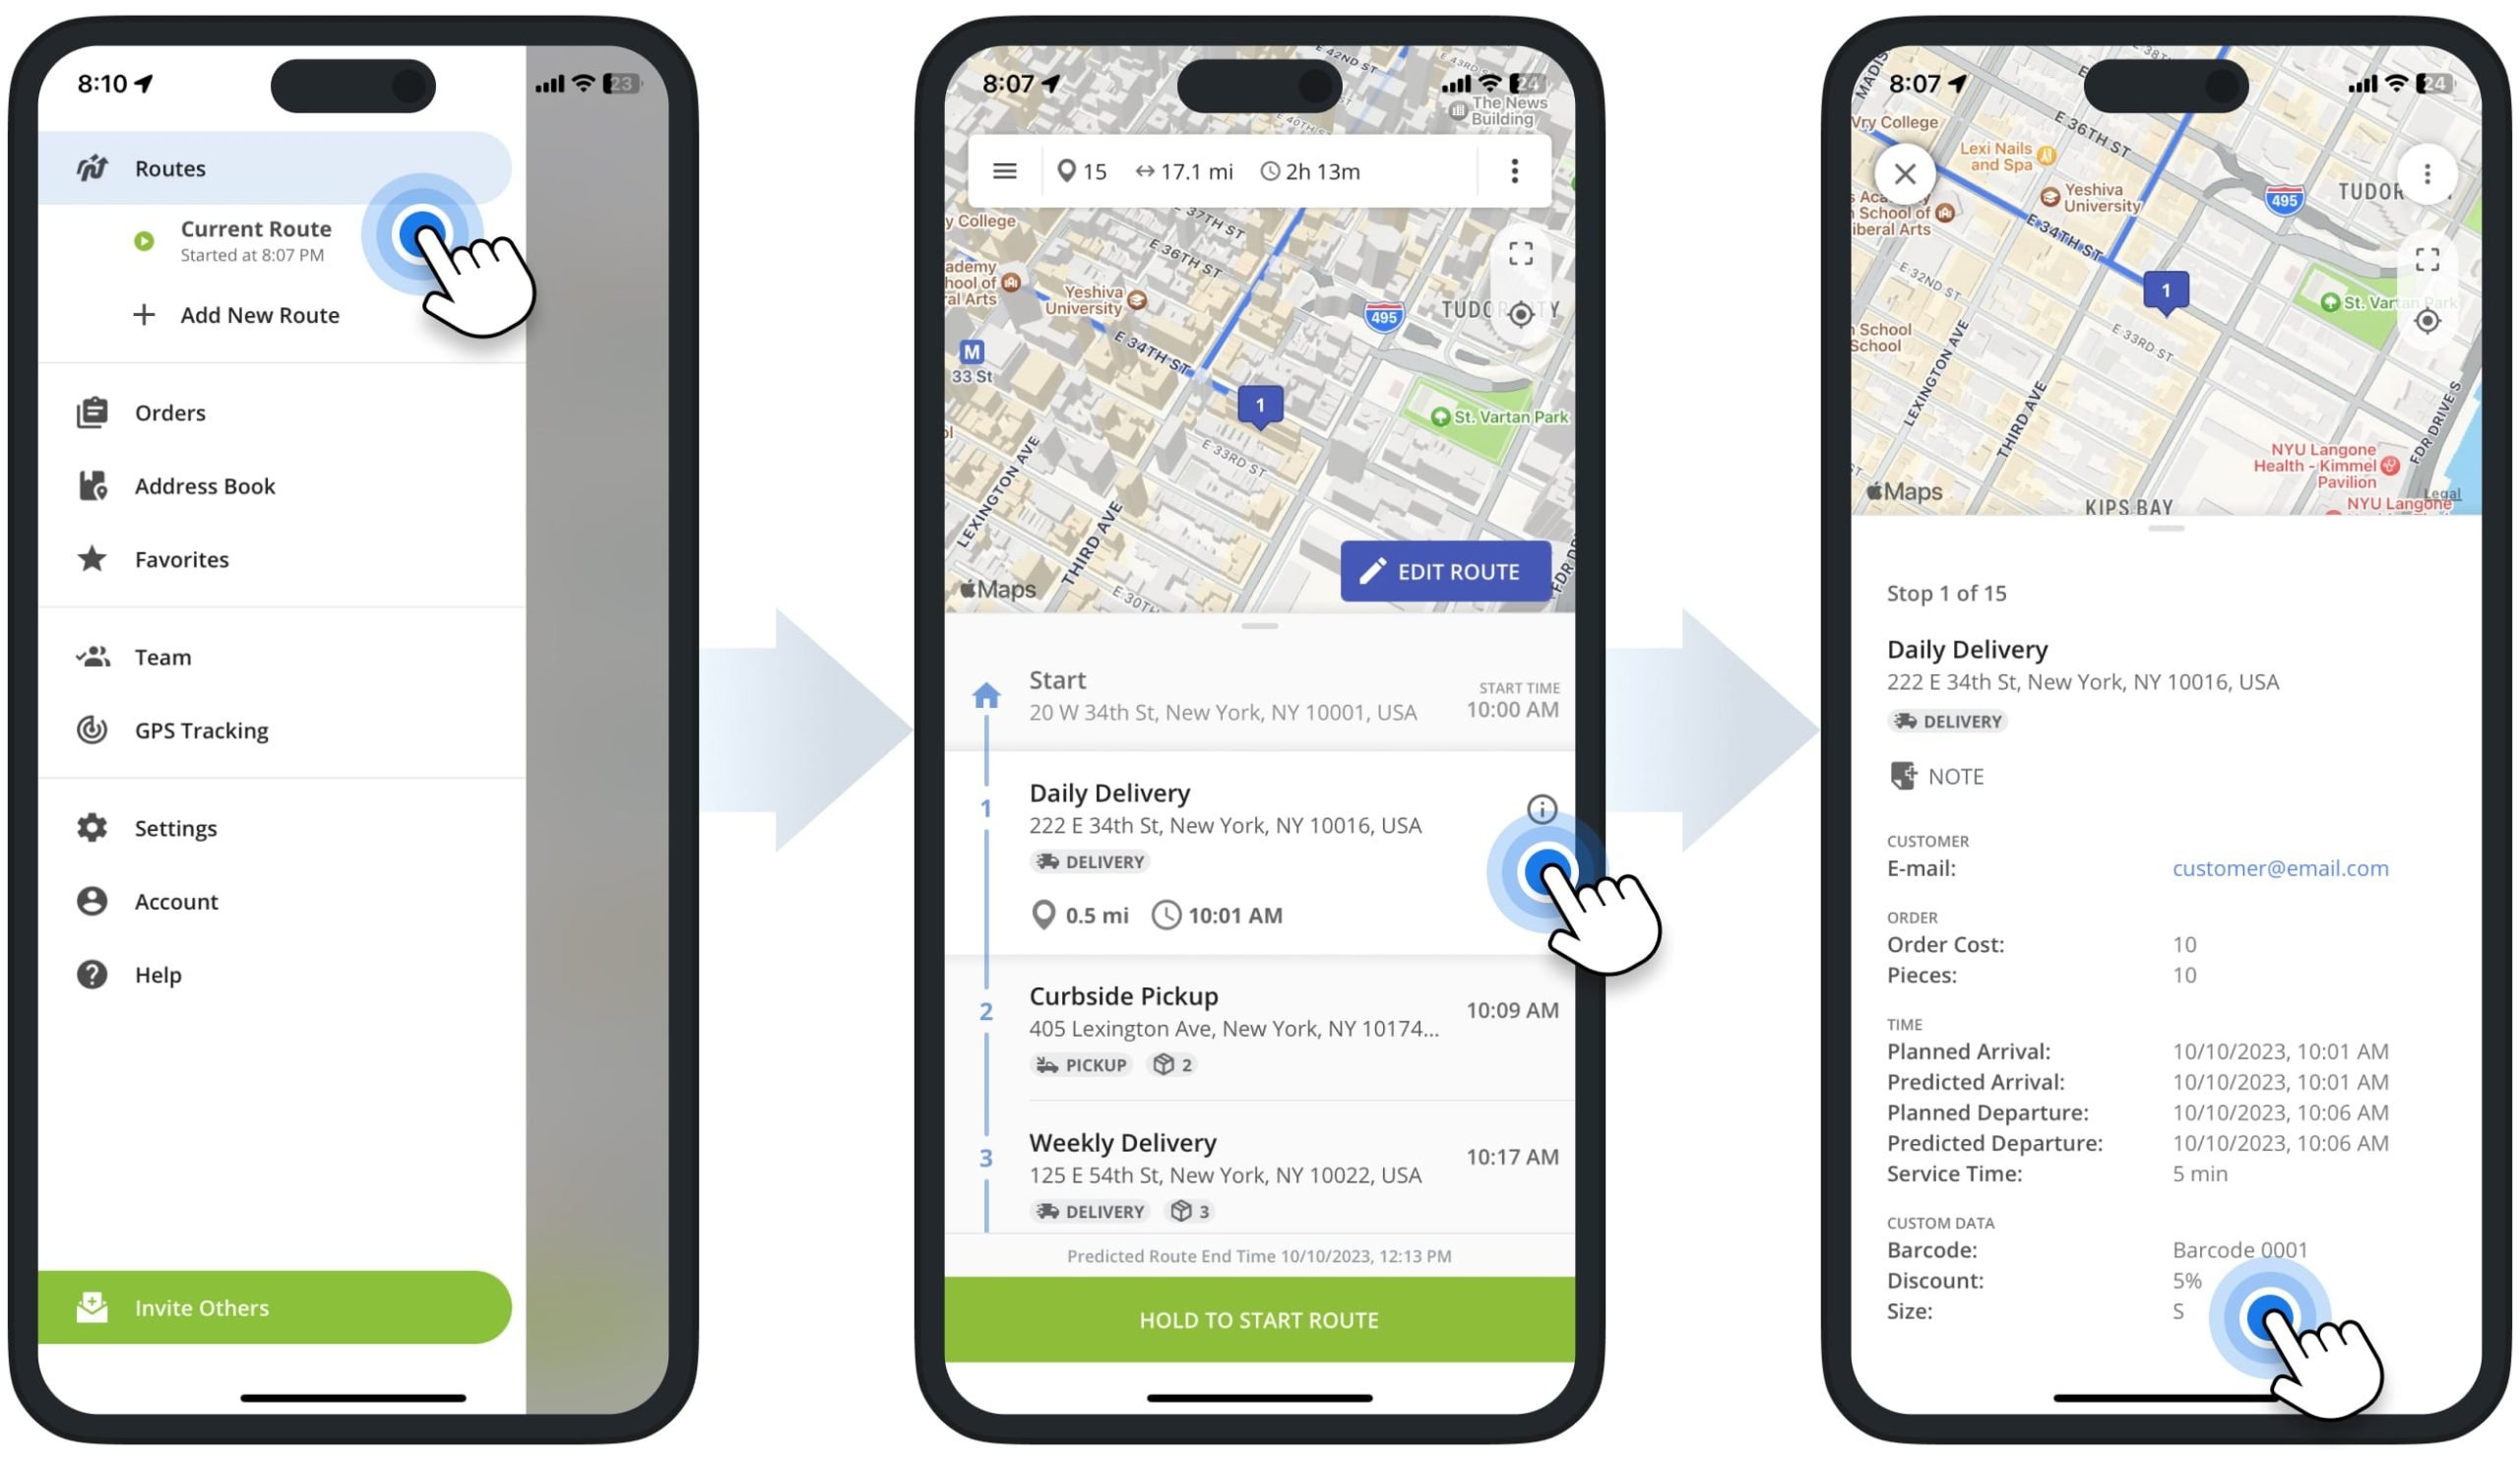
You can add Custom Data to route stops using Route4Me’s Web Platform, then dispatch the route to drivers or field teams. Assigned users can view this data in Route4Me’s Android or iOS Route Planning Mobile Apps. NOTE: Custom Data is view-only on mobile and can’t be edited.
To view Custom Data in the Route4Me iOS Route Planner App or Android Route Planner App, open the desired route, tap the route destination, then tap the information icon next to it.
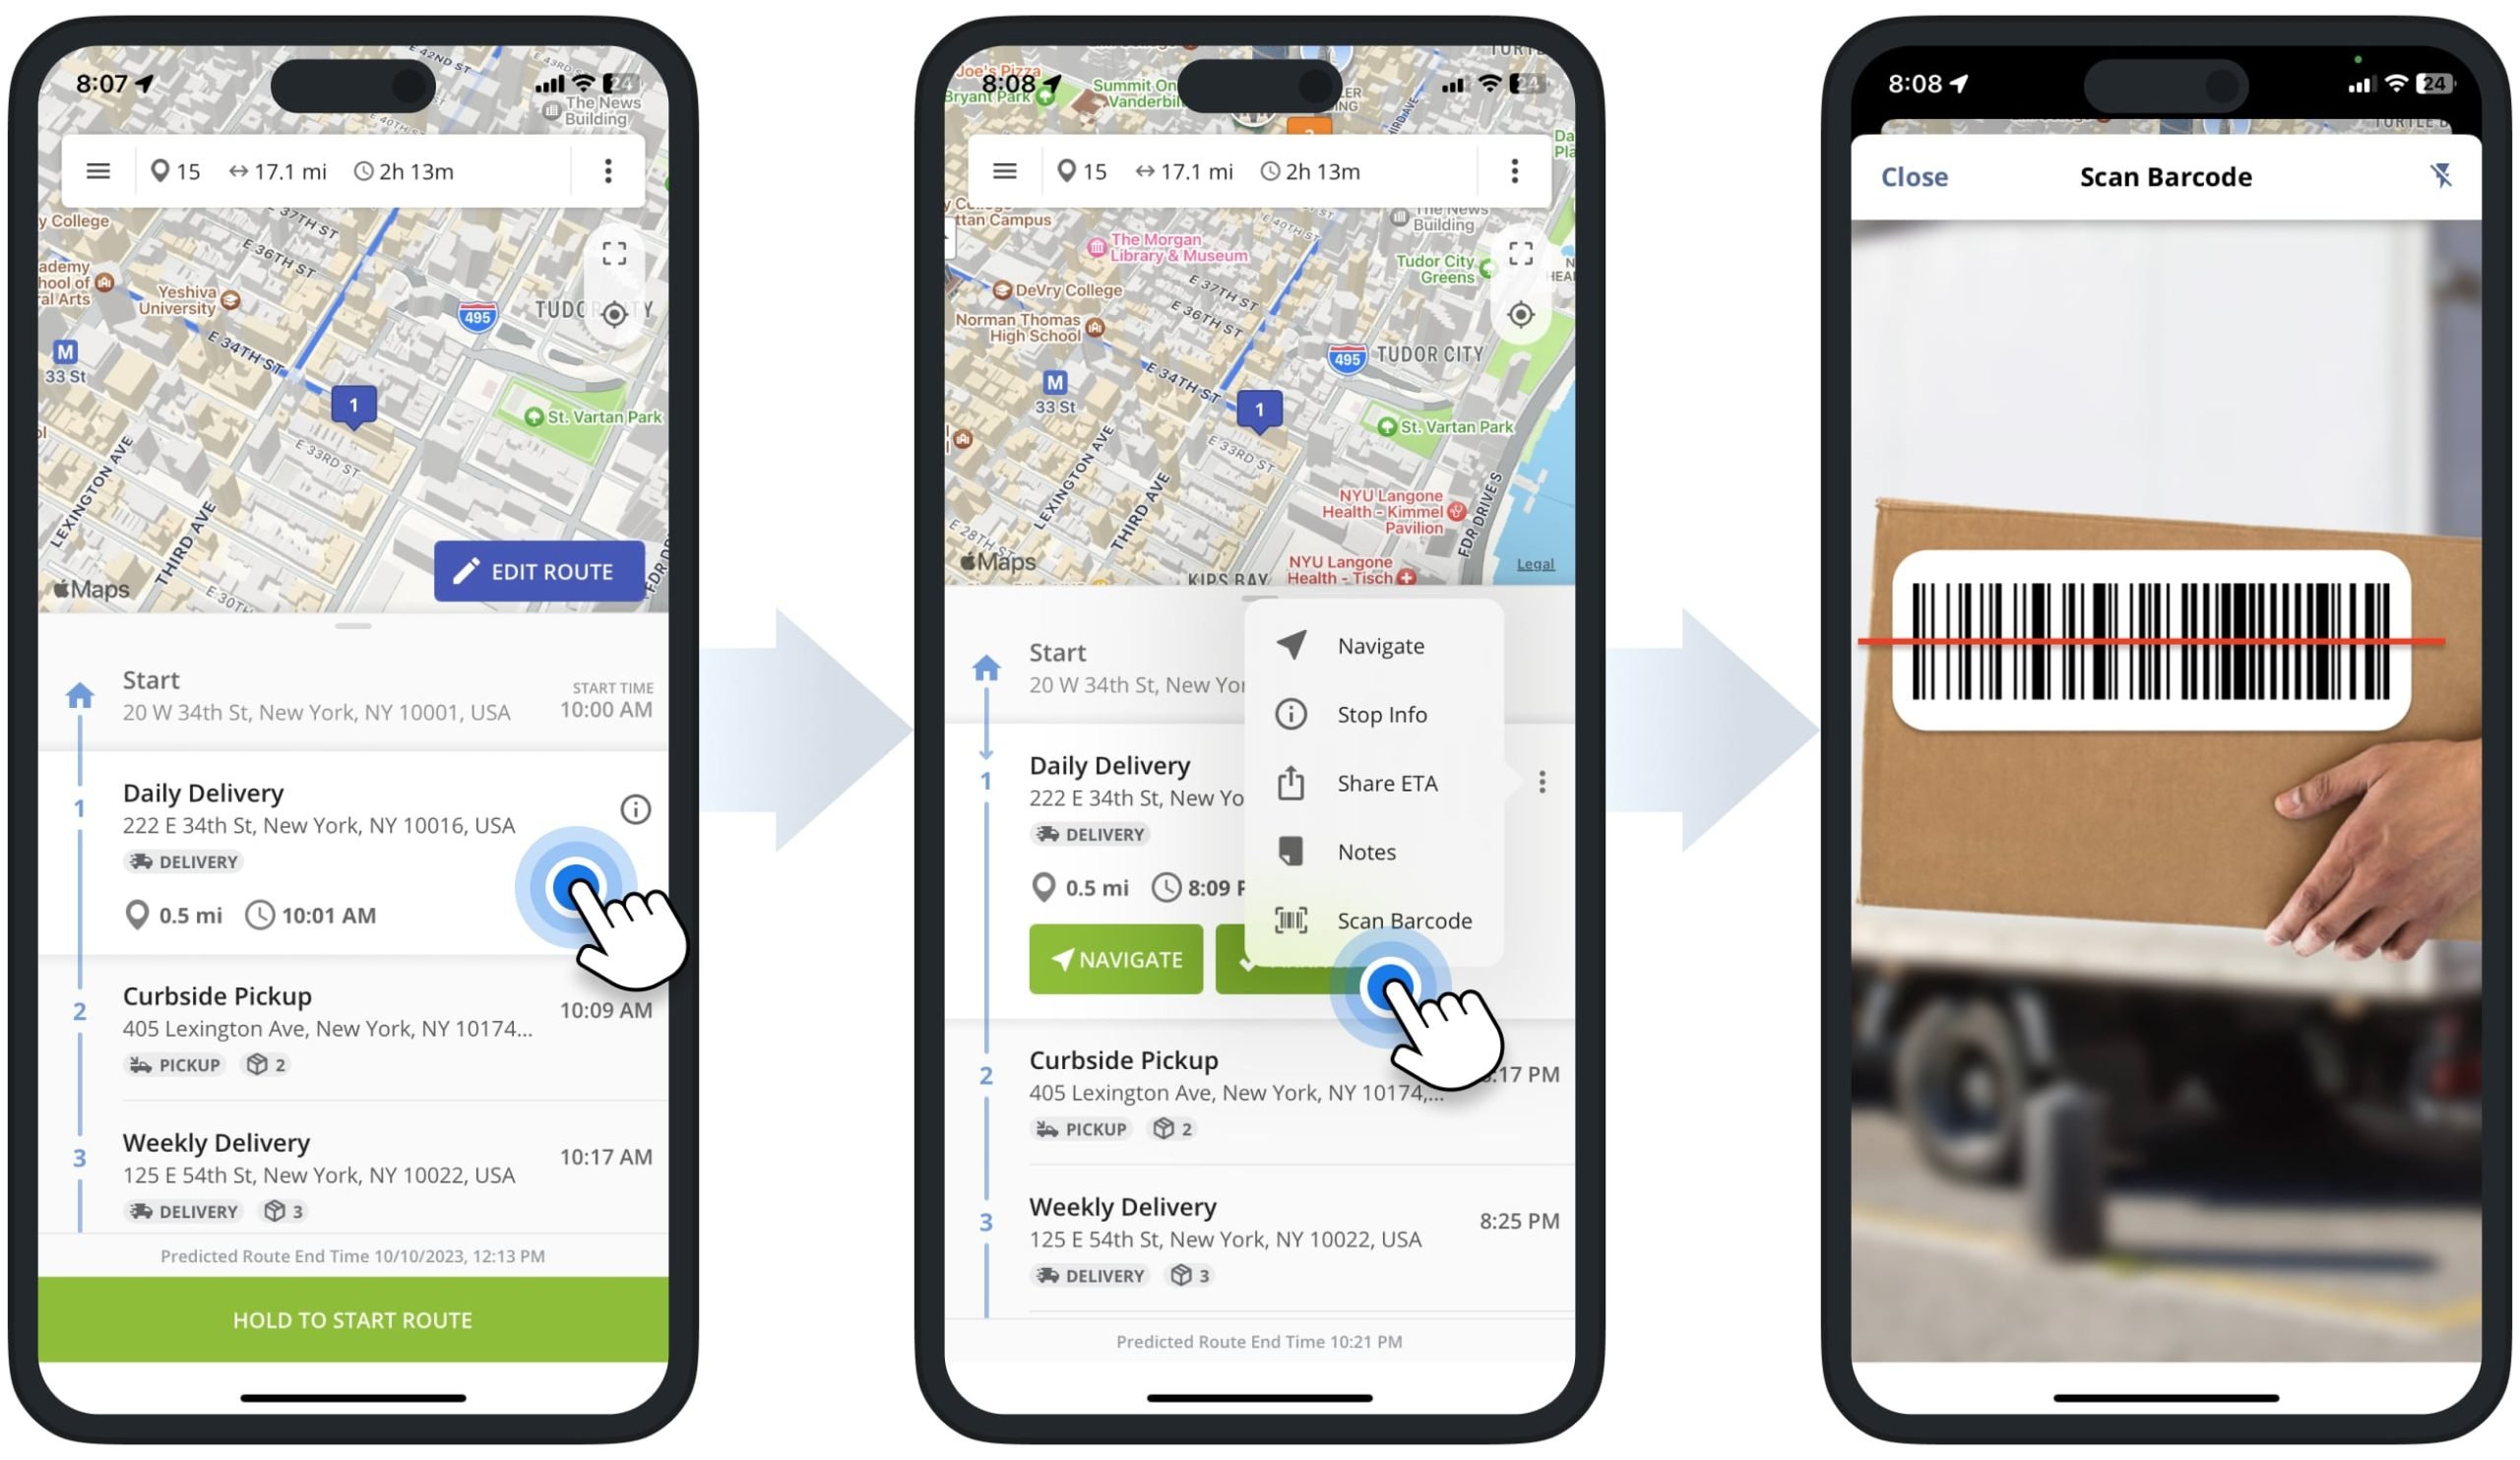
You can also attach Custom Data to route destinations using the Route Planner App’s barcode scanner. Tap the route destination, select the Three-dot Icon next to it, and choose “Barcode Scanner“. Then, scan the barcode, and the app will automatically attach the barcode data as Custom Data to the route destination.
NOTE: For more, see our guides on using the Route4Me iPhone Route Planner app’s barcode scanner or the Android Route Planner app’s barcode scanner.
Visit Route4Me's Marketplace to Check Out More Associated Add-Ons:
- Operations
Custom Data
- Operations
Advanced Team Management Add-On
- Route Optimization
Address Book and Territories Planning