Customer Portal – Online Order Tracking Page Link In SMS And Email
Route4Me’s Online Order Tracking Page enables you to offer customers a seamless track and trace experience similar to USPS tracking, UPS tracking, or FedEx tracking. Customers can view real-time shipment updates, order statuses, delivery dates, and more by simply entering their tracking number. This eliminates the need for manual tracking support and reduces “Where is my package?” inquiries. You can also enable automated tracking alerts and delivery notifications to keep customers informed every step of the way. Learn how to set up and use the Online Order Tracking Page to enhance your customer experience.
![]()
Table of Contents
Open Online Order Tracking Page – Access Customer Tracking Page
Customers can access the Online Order Tracking Page using a Tracking Page link sent via email or SMS. After entering their unique tracking number, they can view order status, driver location, and additional details.
NOTE: You have the option to send customers the Tracking Page link with their tracking number already embedded. This way, tracking details automatically appear when customers open the link.
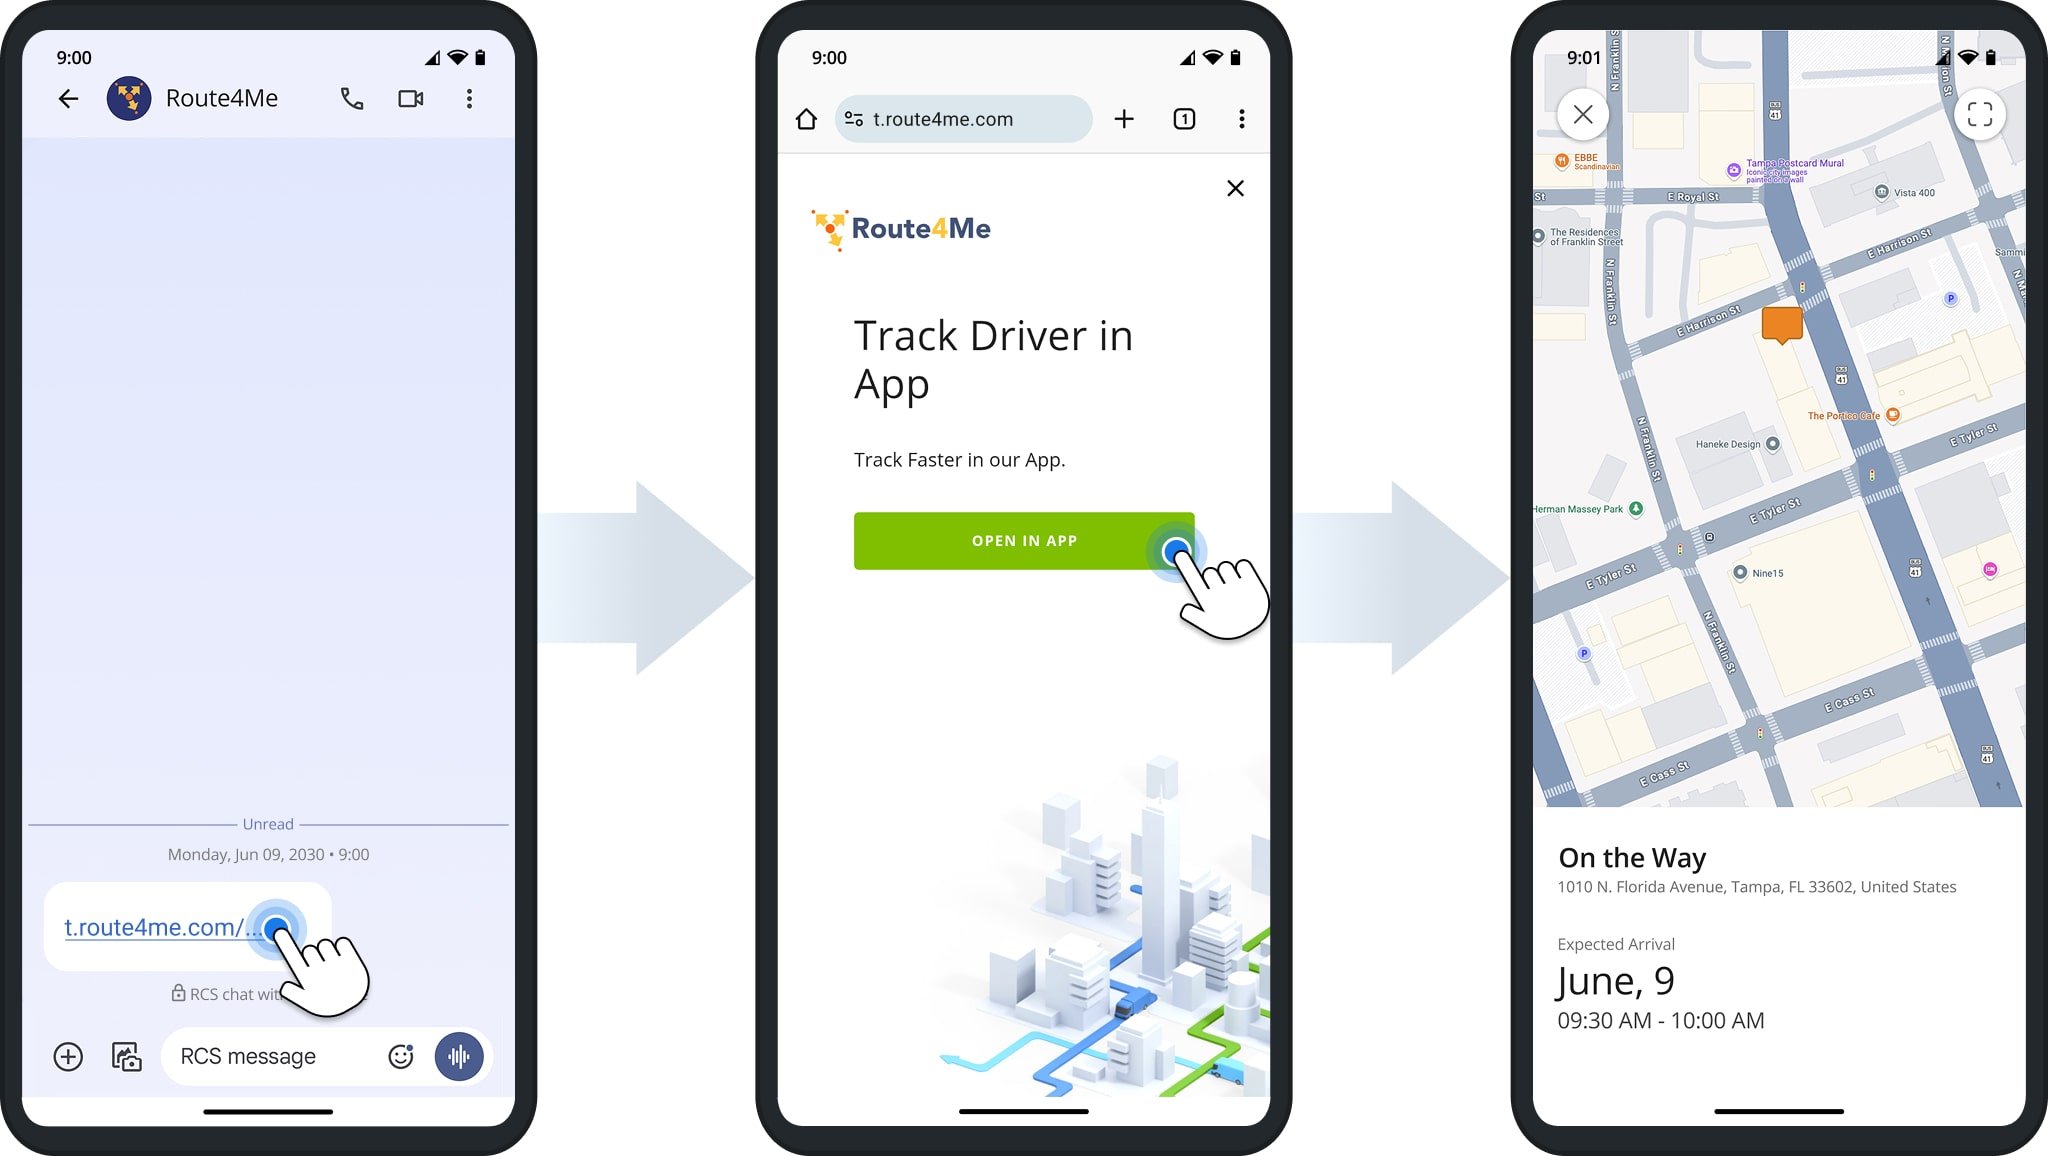
Open Customer Online Order Tracking Page
![]()
When a customer opens a tracking link on Android, they’re prompted to view it in the Route4Me Android App for faster, more responsive tracking. Tapping “Open In App“, redirects them to Google Play to install the app (if not already installed).
Once installed, the tracking page loads automatically, no extra steps needed. Future tracking links will also open directly in the app, making the order tracking process even more seamless for repeat customers.
NOTE: This functionality is currently available only on Android and not yet supported on iOS.
Customize Branding Settings For Your Online Order Tracking Page
You can tailor the Online Order Tracking Page by adding your logo, customizing map icons, and choosing a map style that reflects your brand. These visual settings create a consistent, professional experience for your customers.
You can customize these details from your Customer Portal page. To access this page, click “Customer Experience” > “Customer Notifications” in the Navigation Menu.
Add A Custom Logo
In the “Logo” section of your Customer Portal, you can enhance your Online Tracking Page’s branding by adding your company logo or other branding imagery.
Paste your image file’s URL into the appropriate fields. Your image will appear at the top of the Order Manifest or Order Status window. NOTE: The image must be hosted on a valid domain with a public URL that can be opened in a web browser.
![]()
Customize Destination And Driver Icons
You can also upload your own icons to customize how driver and customer locations appear on the Online Order Tracking map. You can use different icons for locations before and after they’re marked as visited.
Scroll down to “Map Icons“, then enter the public URLs for your custom icons. Once added, they will appear on the map. To adjust their placement, use the “Icon Size” and “Icon Anchor” fields.
![]()
Set The Map View And Display Options
You can choose a preferred map view for your Online Customer Tracking Page. From the “Map” section, you can enable “Show Map Zoom Controls“, “Display Destination Address“, and whether the map appears in Grayscale or Default standard view.

Manage Order Visibility Settings For Your Online Order Tracking Page
Choose which driver details, order information, images, notes, and status updates appear on the Tracking Page. These settings let you control how much information is shared with customers throughout the delivery process.
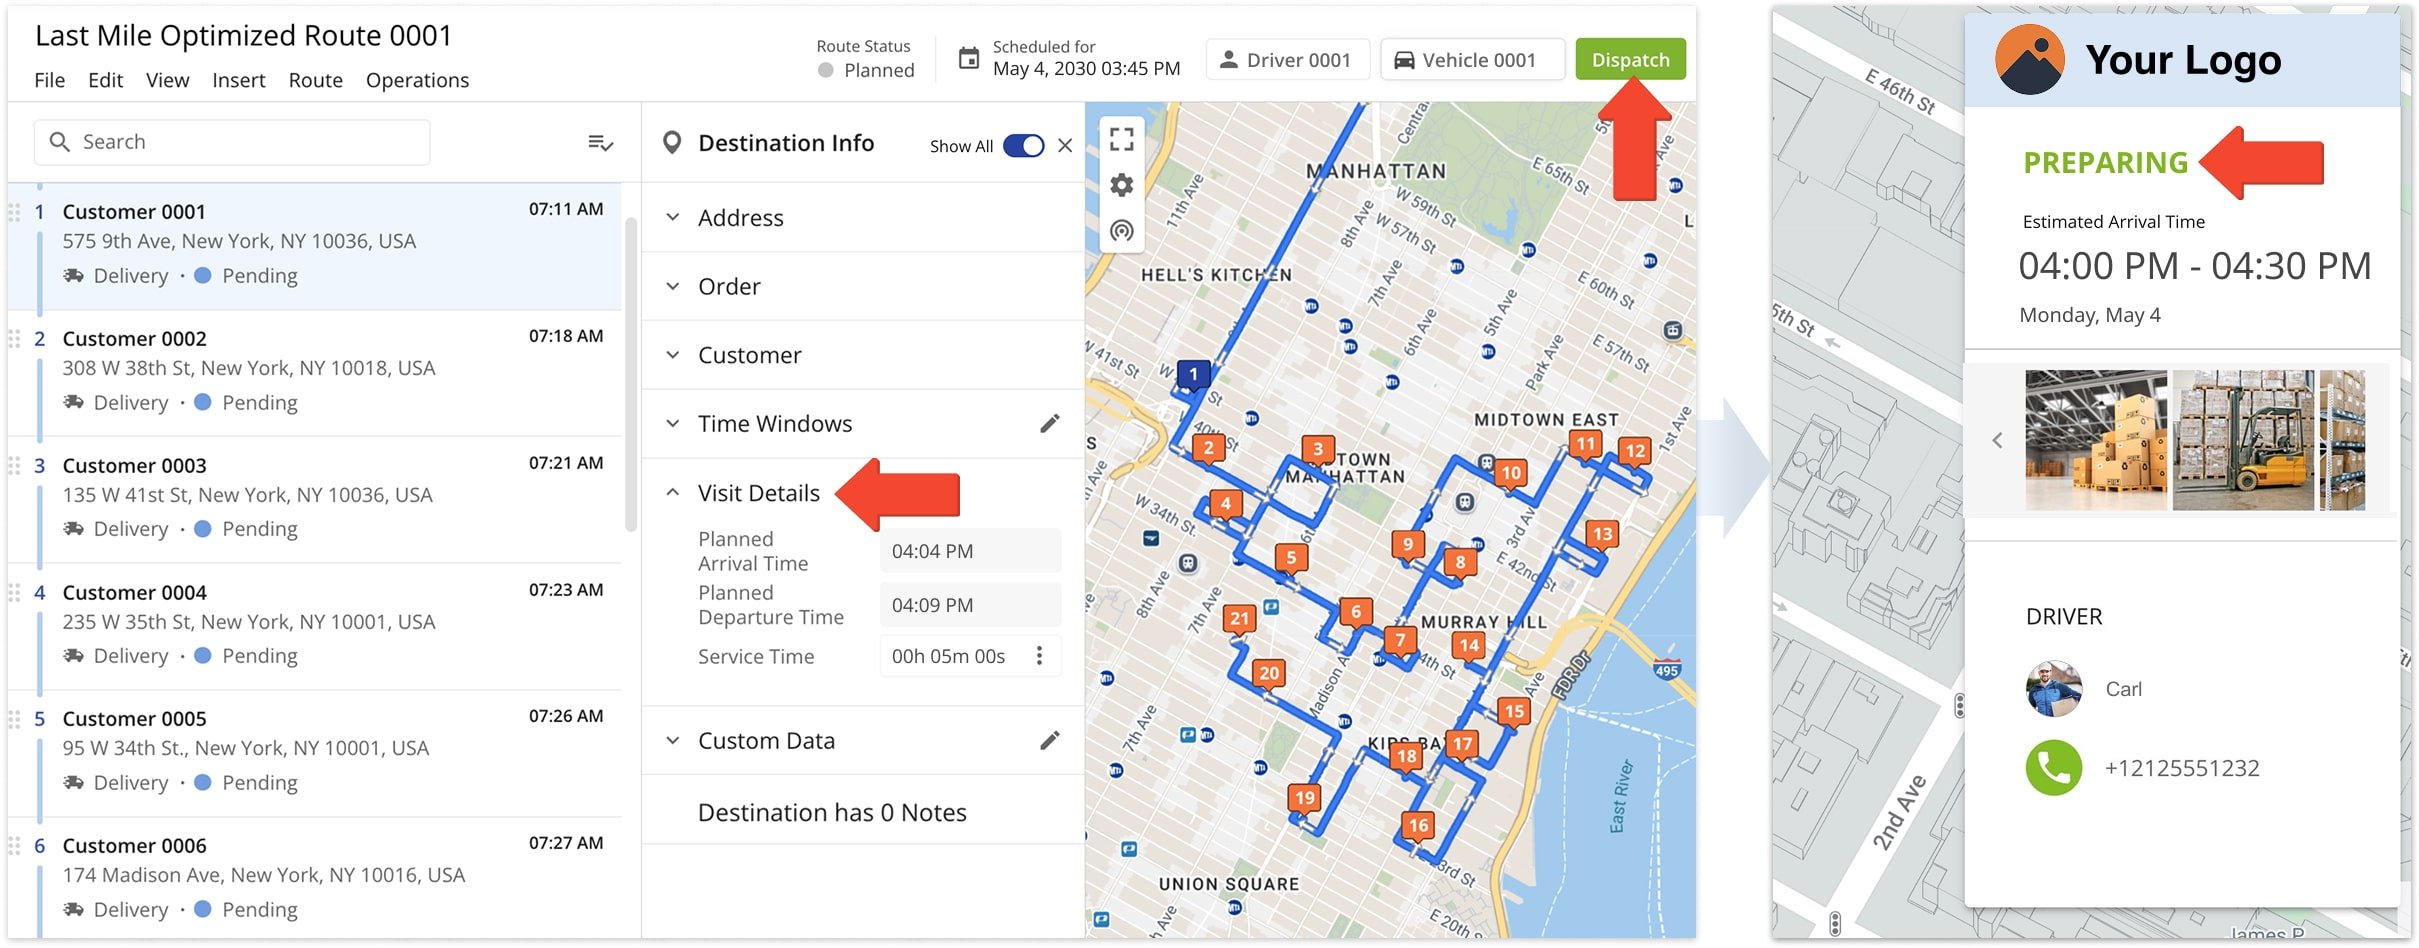
Automatic Status Updates To Track Order Progress
The Online Order Tracking page displays three order statuses based on the driver’s progress. These progress updates are displayed automatically, requiring no action on your end:
- “Preparing” appears when the route hasn’t yet been dispatched to a driver, i.e., the route hasn’t started.
- “On Its Way” appears when a driver starts the route.
- “Done” appears when a driver marks the customer’s address as visited via the iOS Route Planner App or Android Mobile Route Planner.
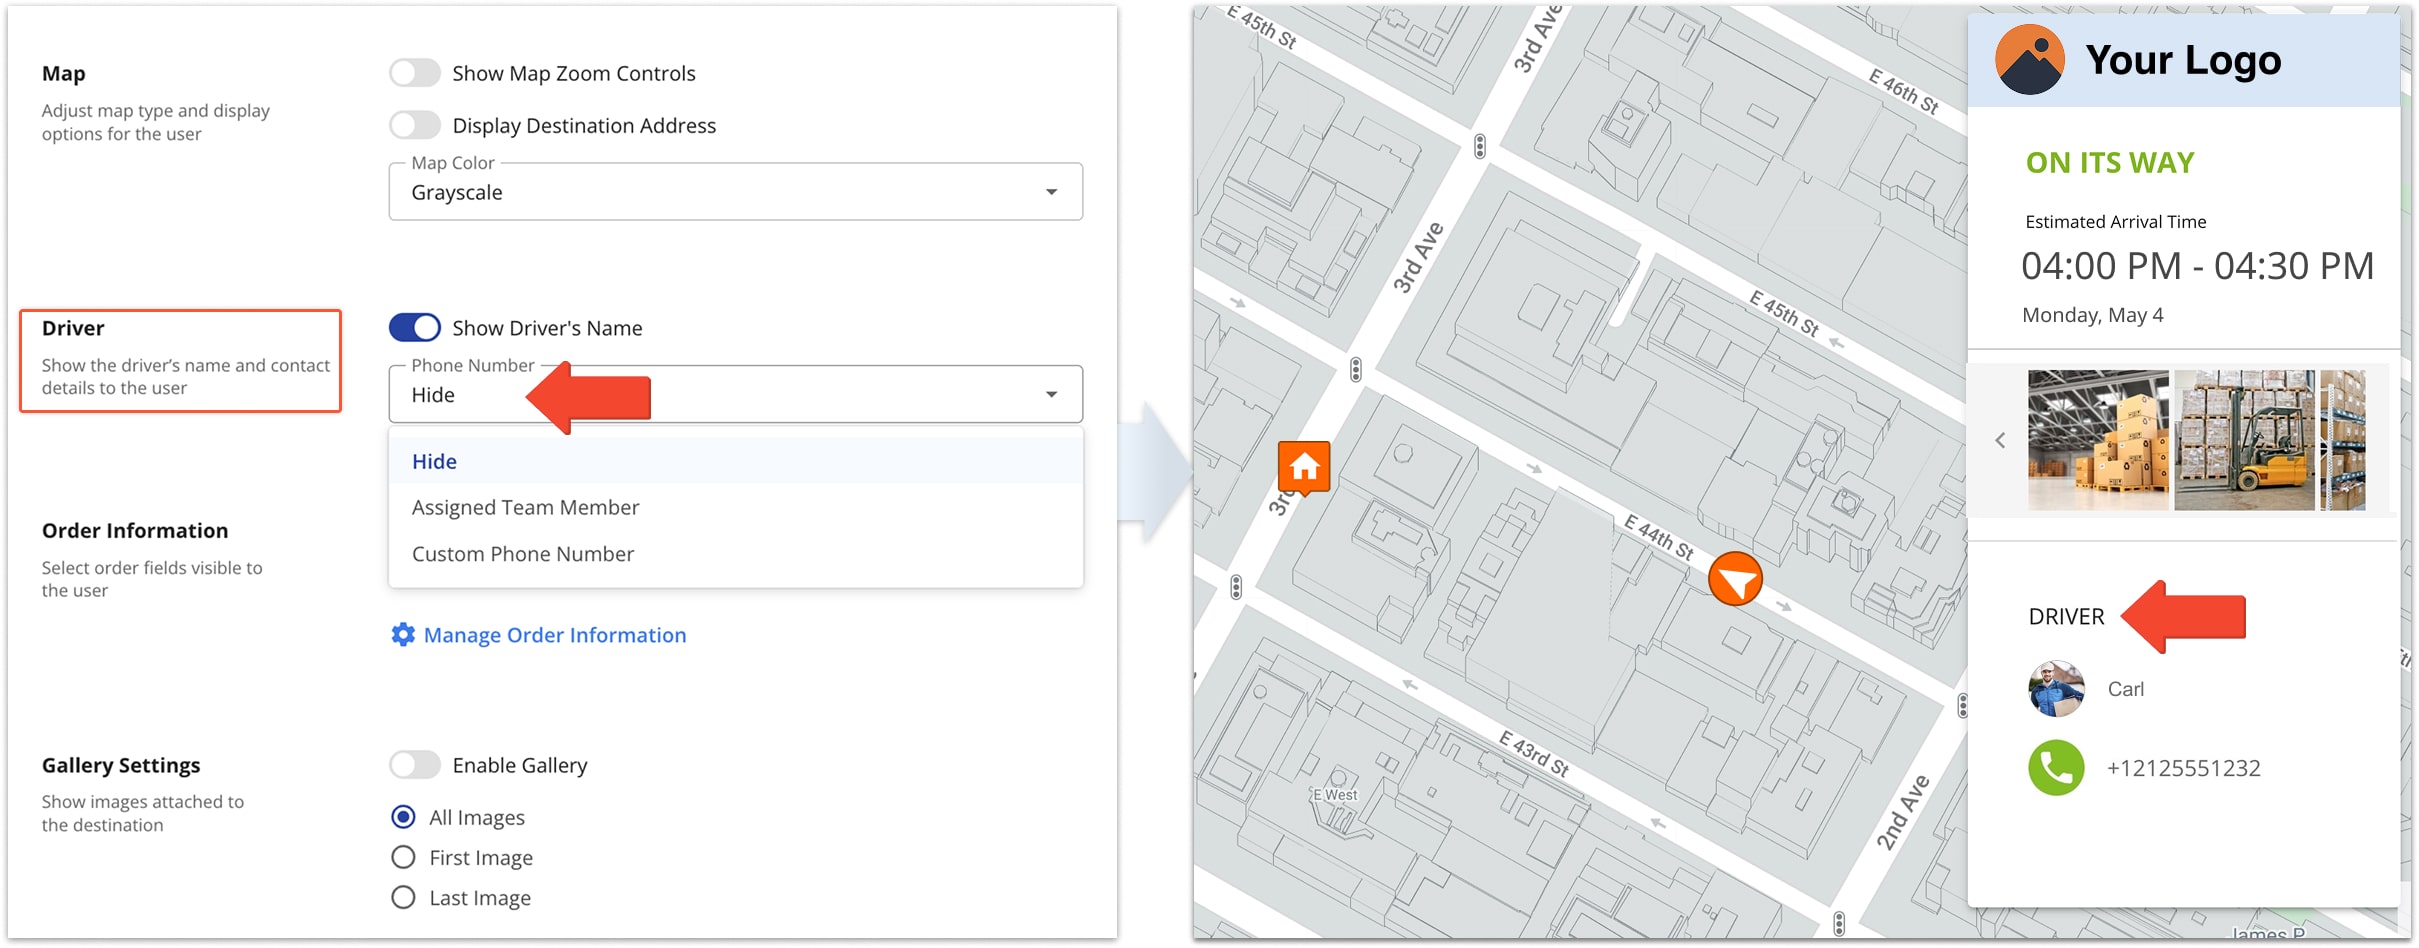
Show Or Hide Driver Details
In the “Driver” section, toggle “Show Driver’s Name” to show or hide the driver’s name. In the “Phone Number” field, you can show or hide the assigned driver’s phone, or provide a custom phone number. Selected details appear in the Driver section.
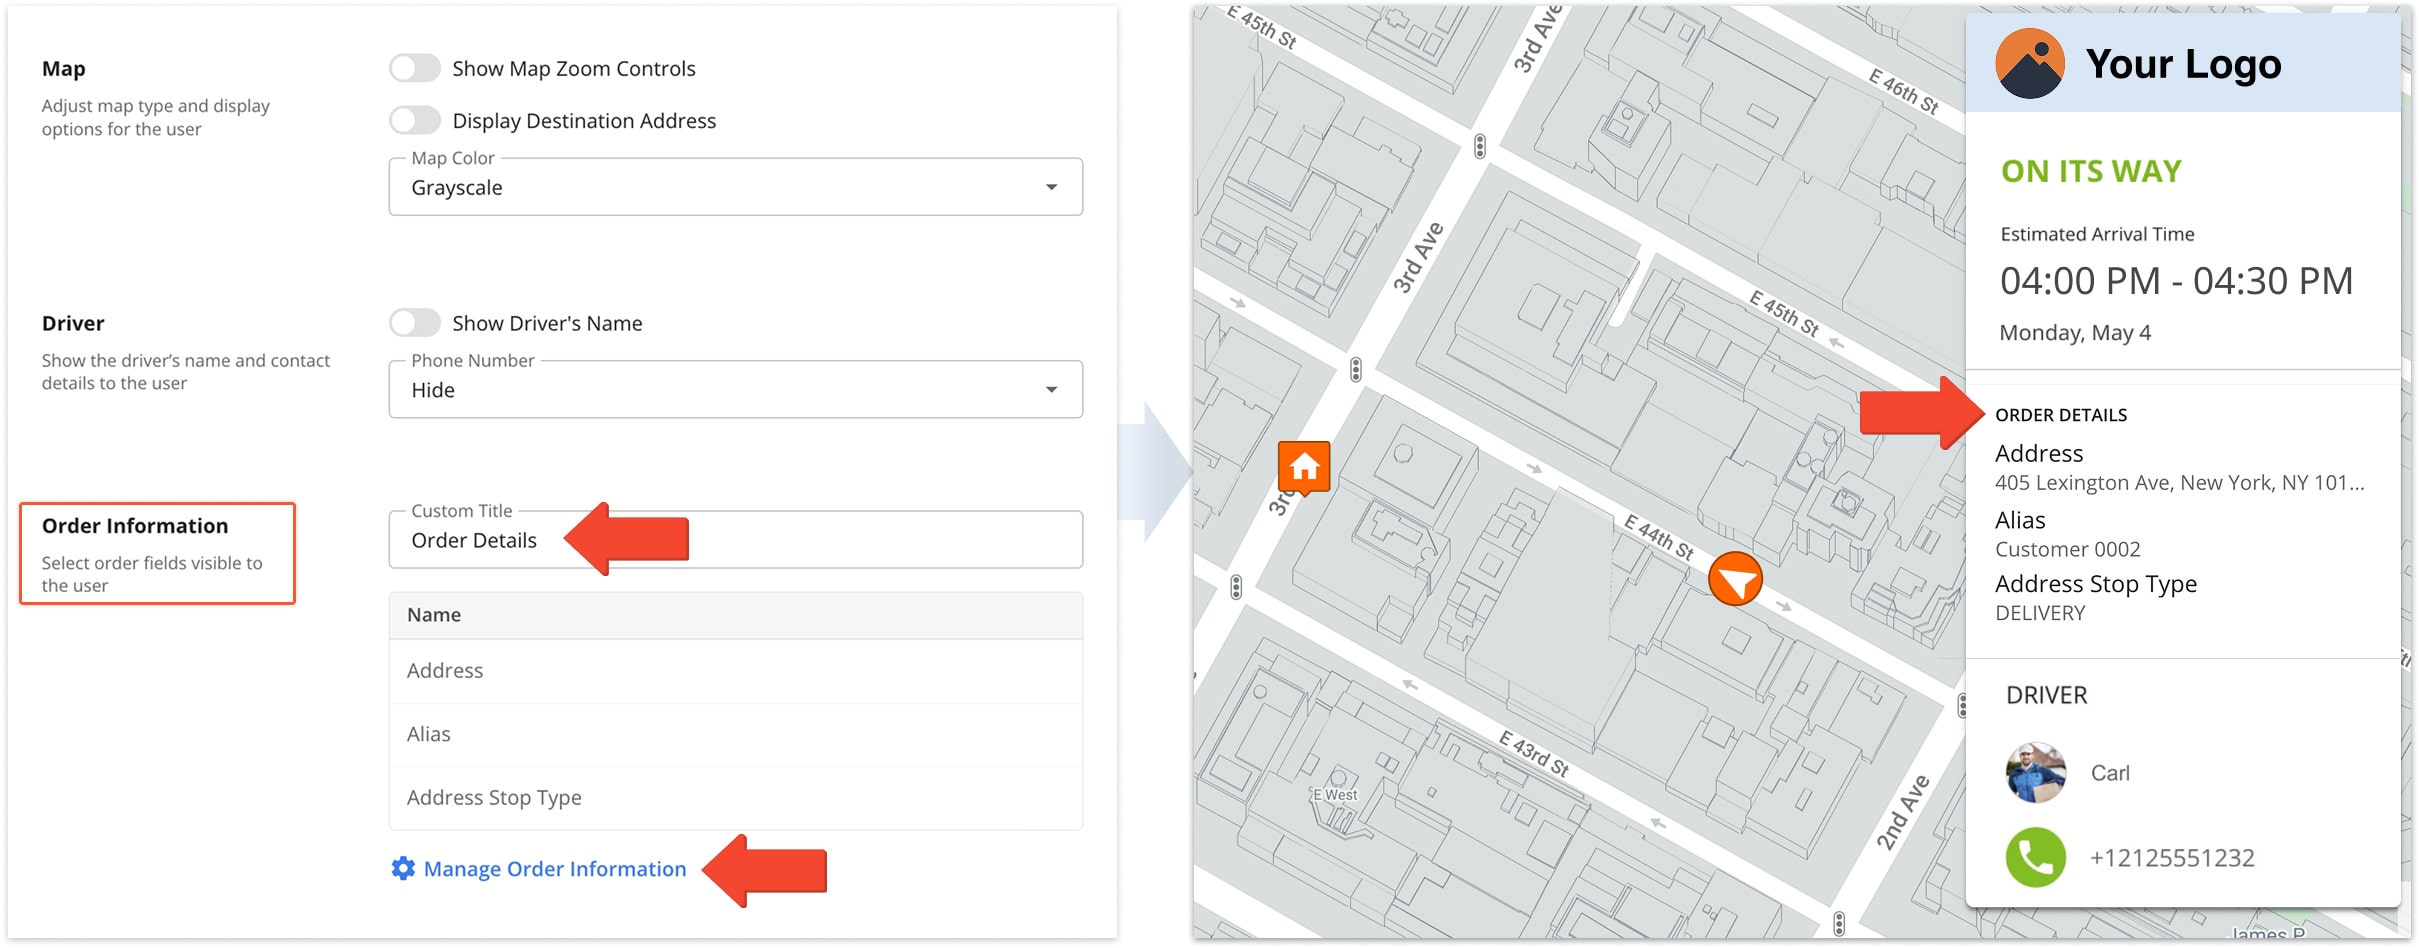
Display Order Details And Custom Data
You can customize which order details appear on the Tracking Map. In the “Order Information” section, click “Manage Order Information” then, in the pop up editor panel, check the boxes next to the attributes you want to display.
You can also set a custom title for the Order Information section using the Custom Title field.
Enable And Configure The Image Gallery And Note Details
From “Gallery Settings” and “Note Details“, you can choose how you want to display note images and attachments, such as proof of visit updates added from the driver’s Route4Me Mobile Apps.
To enable Gallery settings, toggle “Enable Gallery” and specify which images customers will be able to view on the Tracking Page. Then, specify whether or not customers will also be able to view note details.
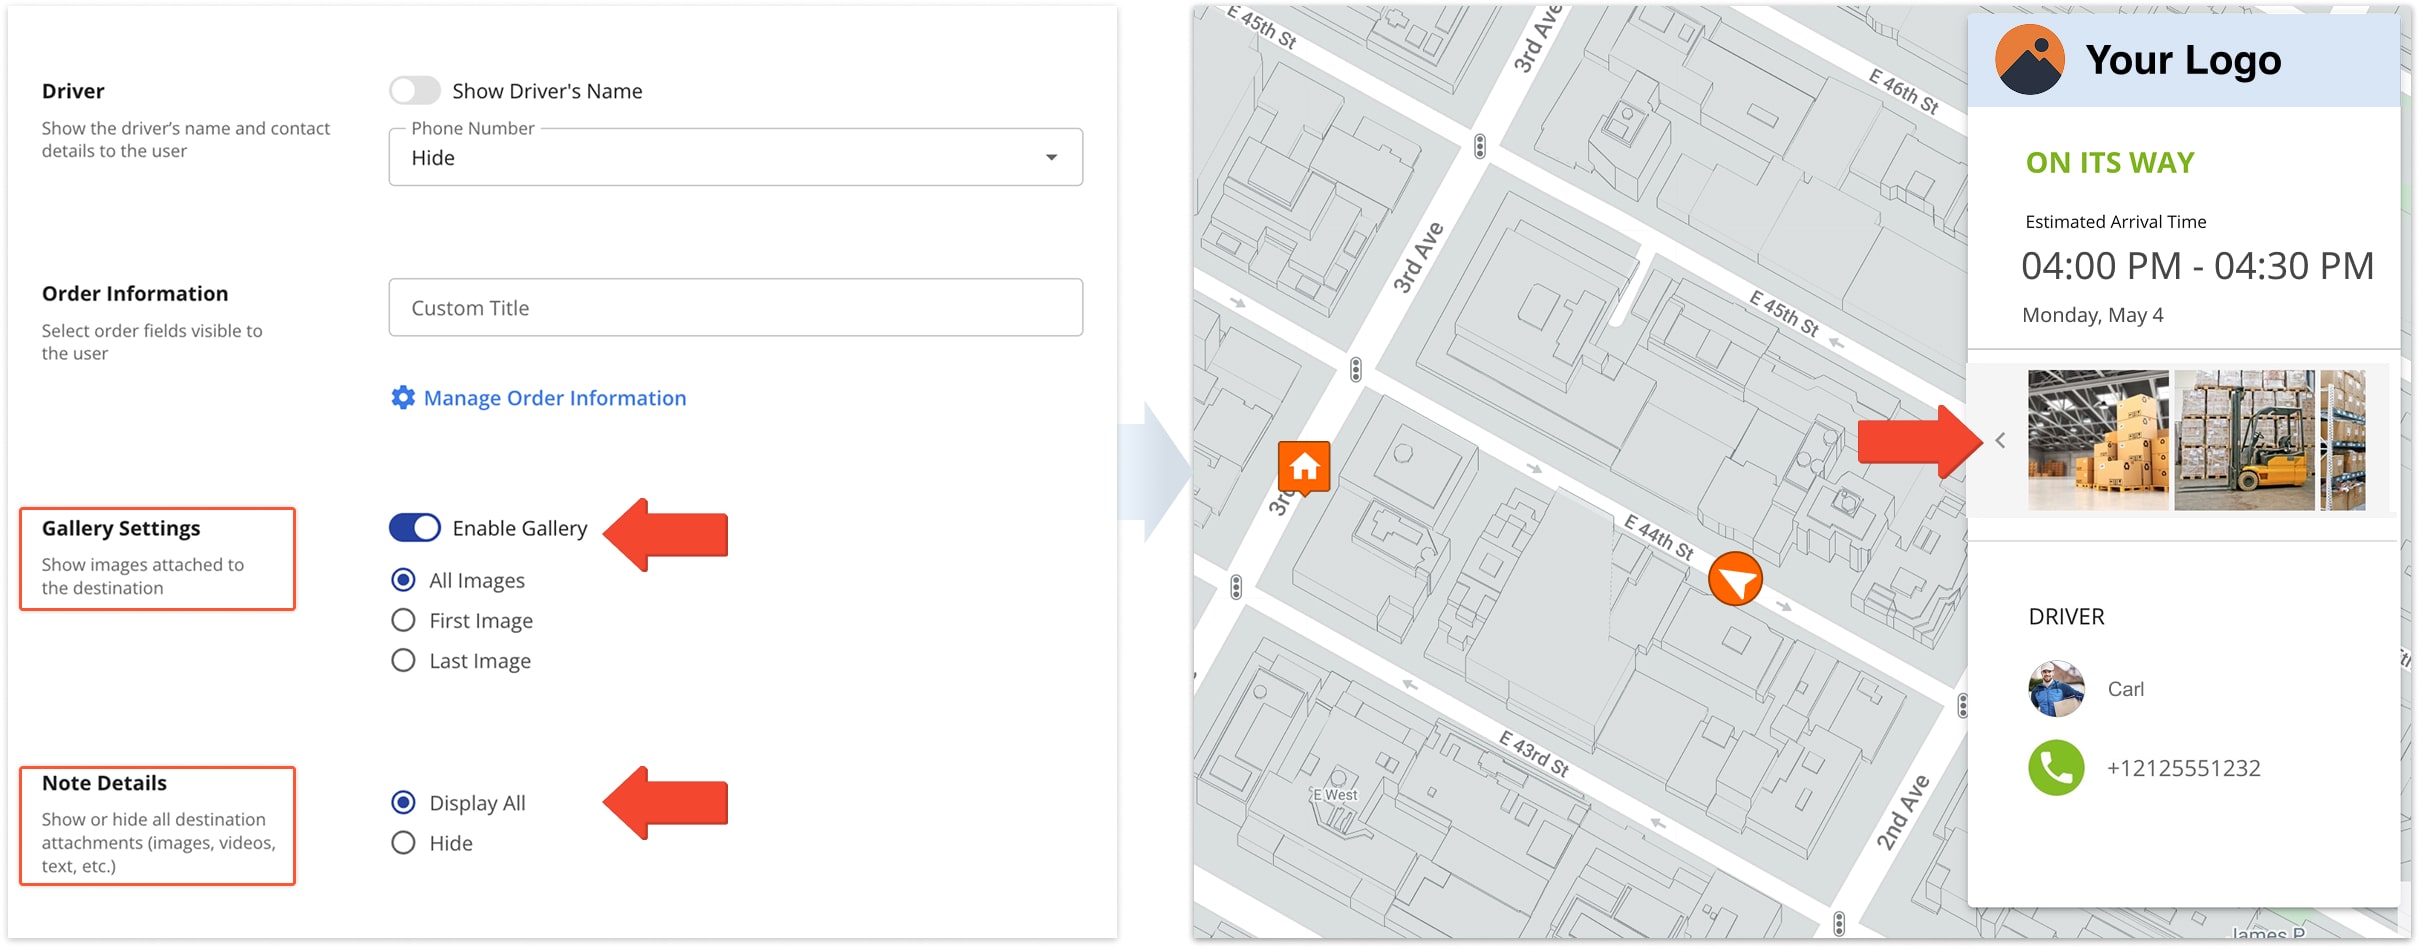
| Options | Description | |
|---|---|---|
| Gallery | ||
| All Images | All images attached to all notes that were added to the destination will be visible. | |
| First Image | Only the first image of all images attached to all notes will be visible. | |
| Last Image | Only the last image of all images attached to all notes will be visible. | |
| Note Details | ||
| Display All | All destination attachments, including text, images, and video, will be visible. | |
| Hide | No destination attachments will be visible. | |
Configure Advanced Settings For Your Online Order Tracking Page
Fine-tune how arrival times, customer information, and delivery progress appear. These settings let you control the visibility of key details to match your privacy policies, timing preferences, and customer communication needs.
Customize Timing And Visibility
From “General Settings“, you can customize date, time, and ETA formats to match your regional standards and delivery preferences. You can also set expiration rules to hide tracking details after delivery for added customer privacy.
For details on each setting, see the settings chart below.
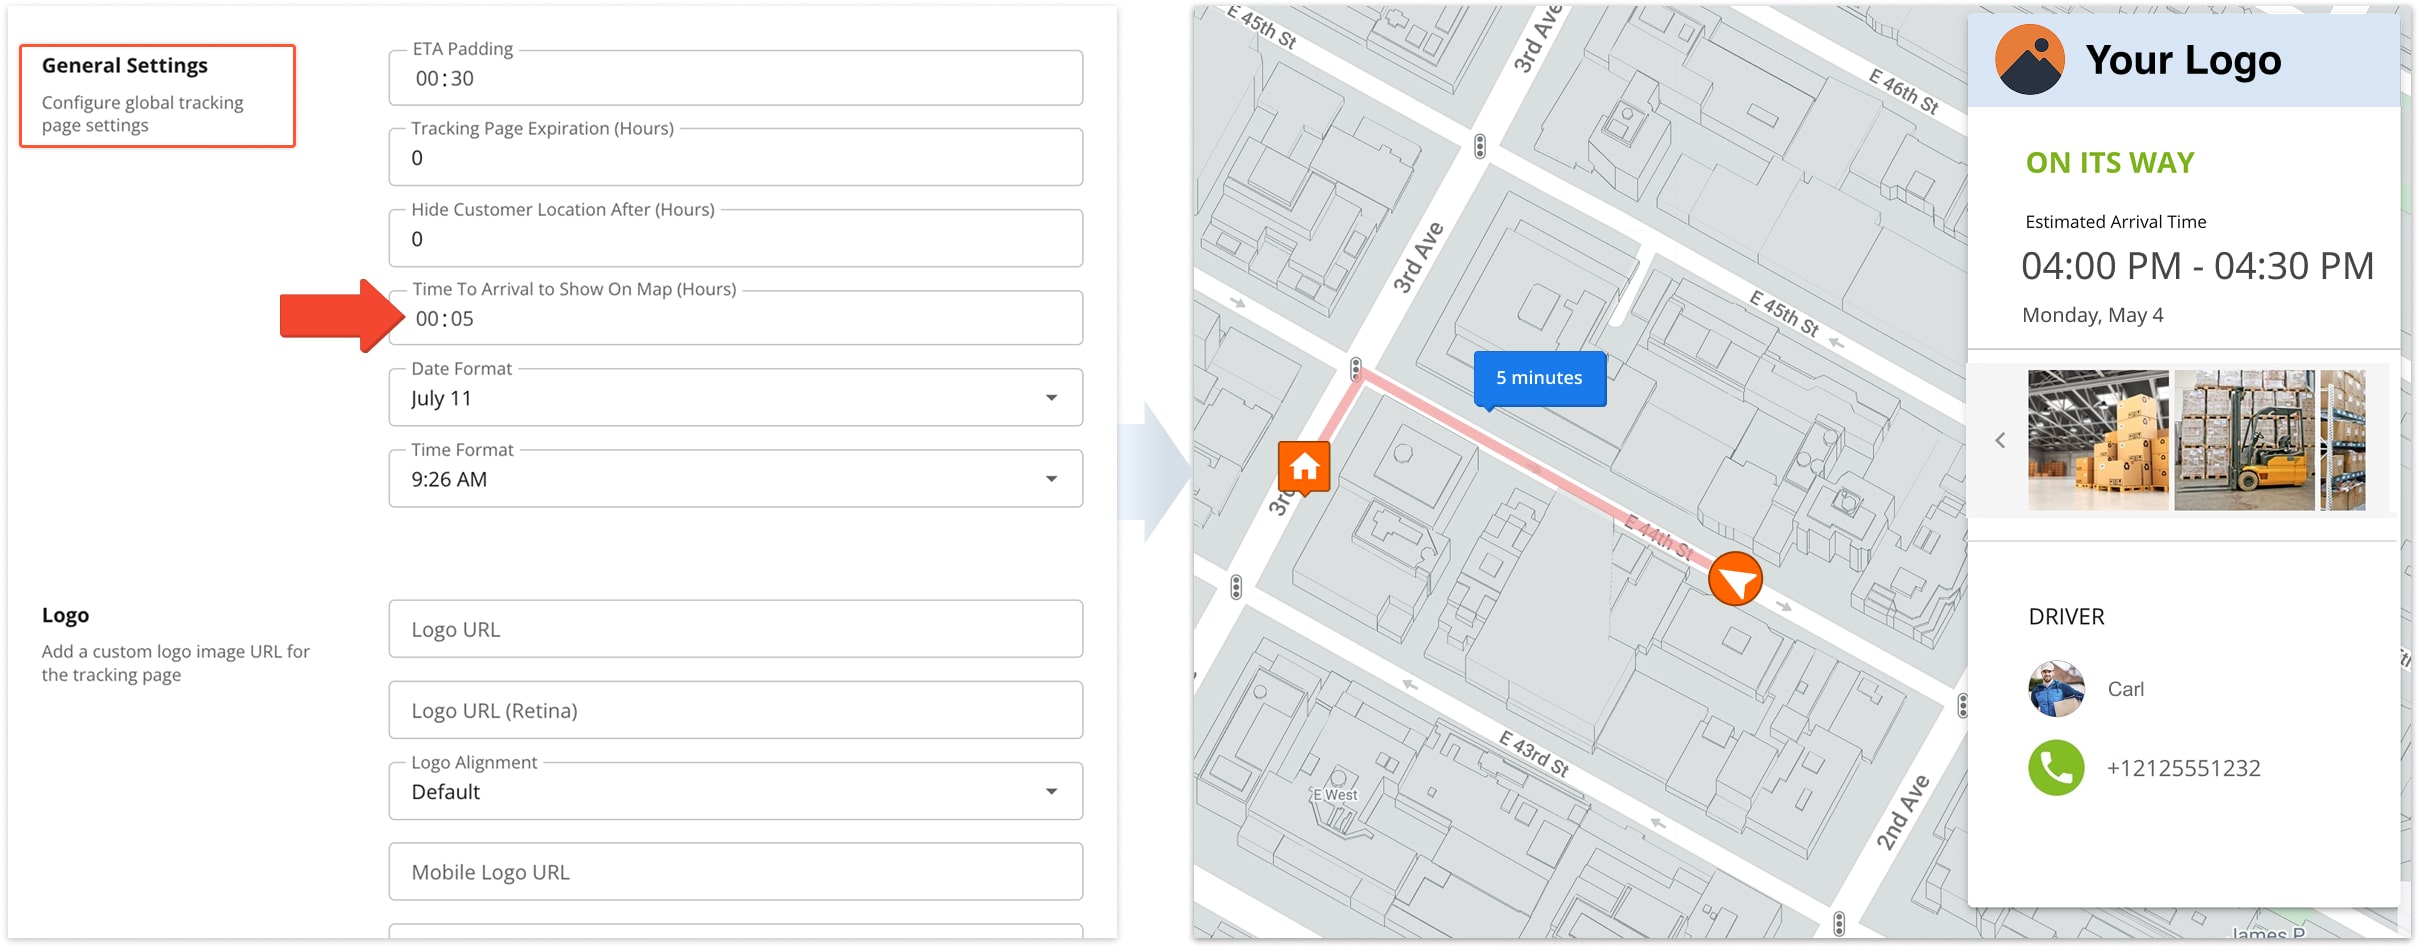
| Settings | Description |
|---|---|
| ETA Padding (HH:MM) | Adds extra time to the planned arrival window. |
| Tracking Page Expiration (Hours) | Hides order details after the set number of hours from when the destination is marked “Visited” by the driver. By default, details remain visible. |
| Hide Customer Location After (Hours) | Hides the customer’s address after the set number of hours from when the destination is marked “Done” by the driver. |
| Time to Arrival to Show Driver on Map (HH:MM) | Driver appears on the map only when their ETA is less than this time. |
| Date Format | Sets how the delivery or visit date is displayed. |
| Time Format | Sets how the delivery or visit time is displayed. |
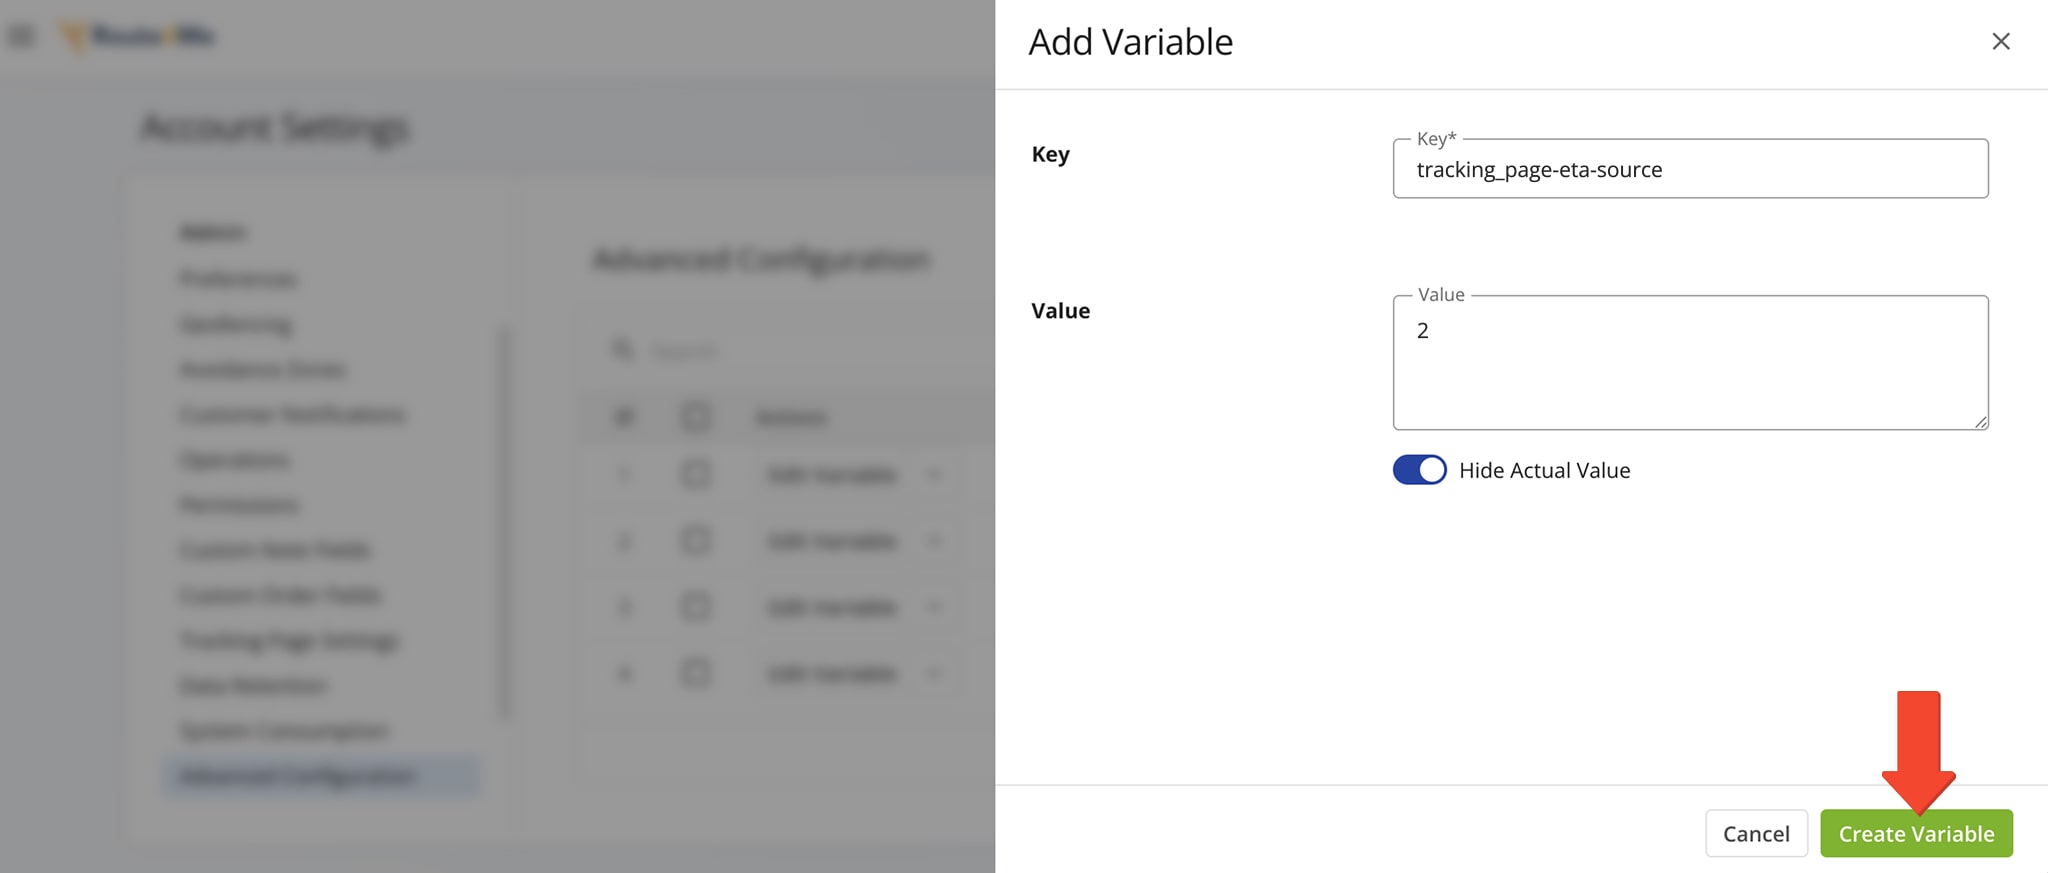
Control Planned vs. Predicted ETA
You can switch between displaying the Planned ETA or the Predicted ETA on the tracking page. The Planned ETA is based on the original route plan and estimated travel times, while the Predicted ETA dynamically updates based on real-time driver progress.
This behavior is controlled by the advanced configuration key “tracking_page_eta_source” which can be managed using Route4Me’s Advanced Configuration Editor. NOTE: To enable the Editor for your account, contact Route4Me’s Support Team.
| Configuration Key | Display Planned ETA Value | Display Predicted ETA Value |
|---|---|---|
| tracking_page_eta_source | 1 | 2 |
Integrating Tracking Links Into SMS And Email Notifications
Automated notifications can be triggered once a route is dispatched from the Routes List, Route Editor, or Route Map. After dispatch, Route4Me generates a unique tracking number and tracking link for each destination.
From the Route Editor, for instance, click on a route to open the “Destination Info” panel. Then, from the “Order” tab, click the Direct Link Icon to open the tracking page or the Copy Icon to share the URL. NOTE: Learn more about dispatching notifications.
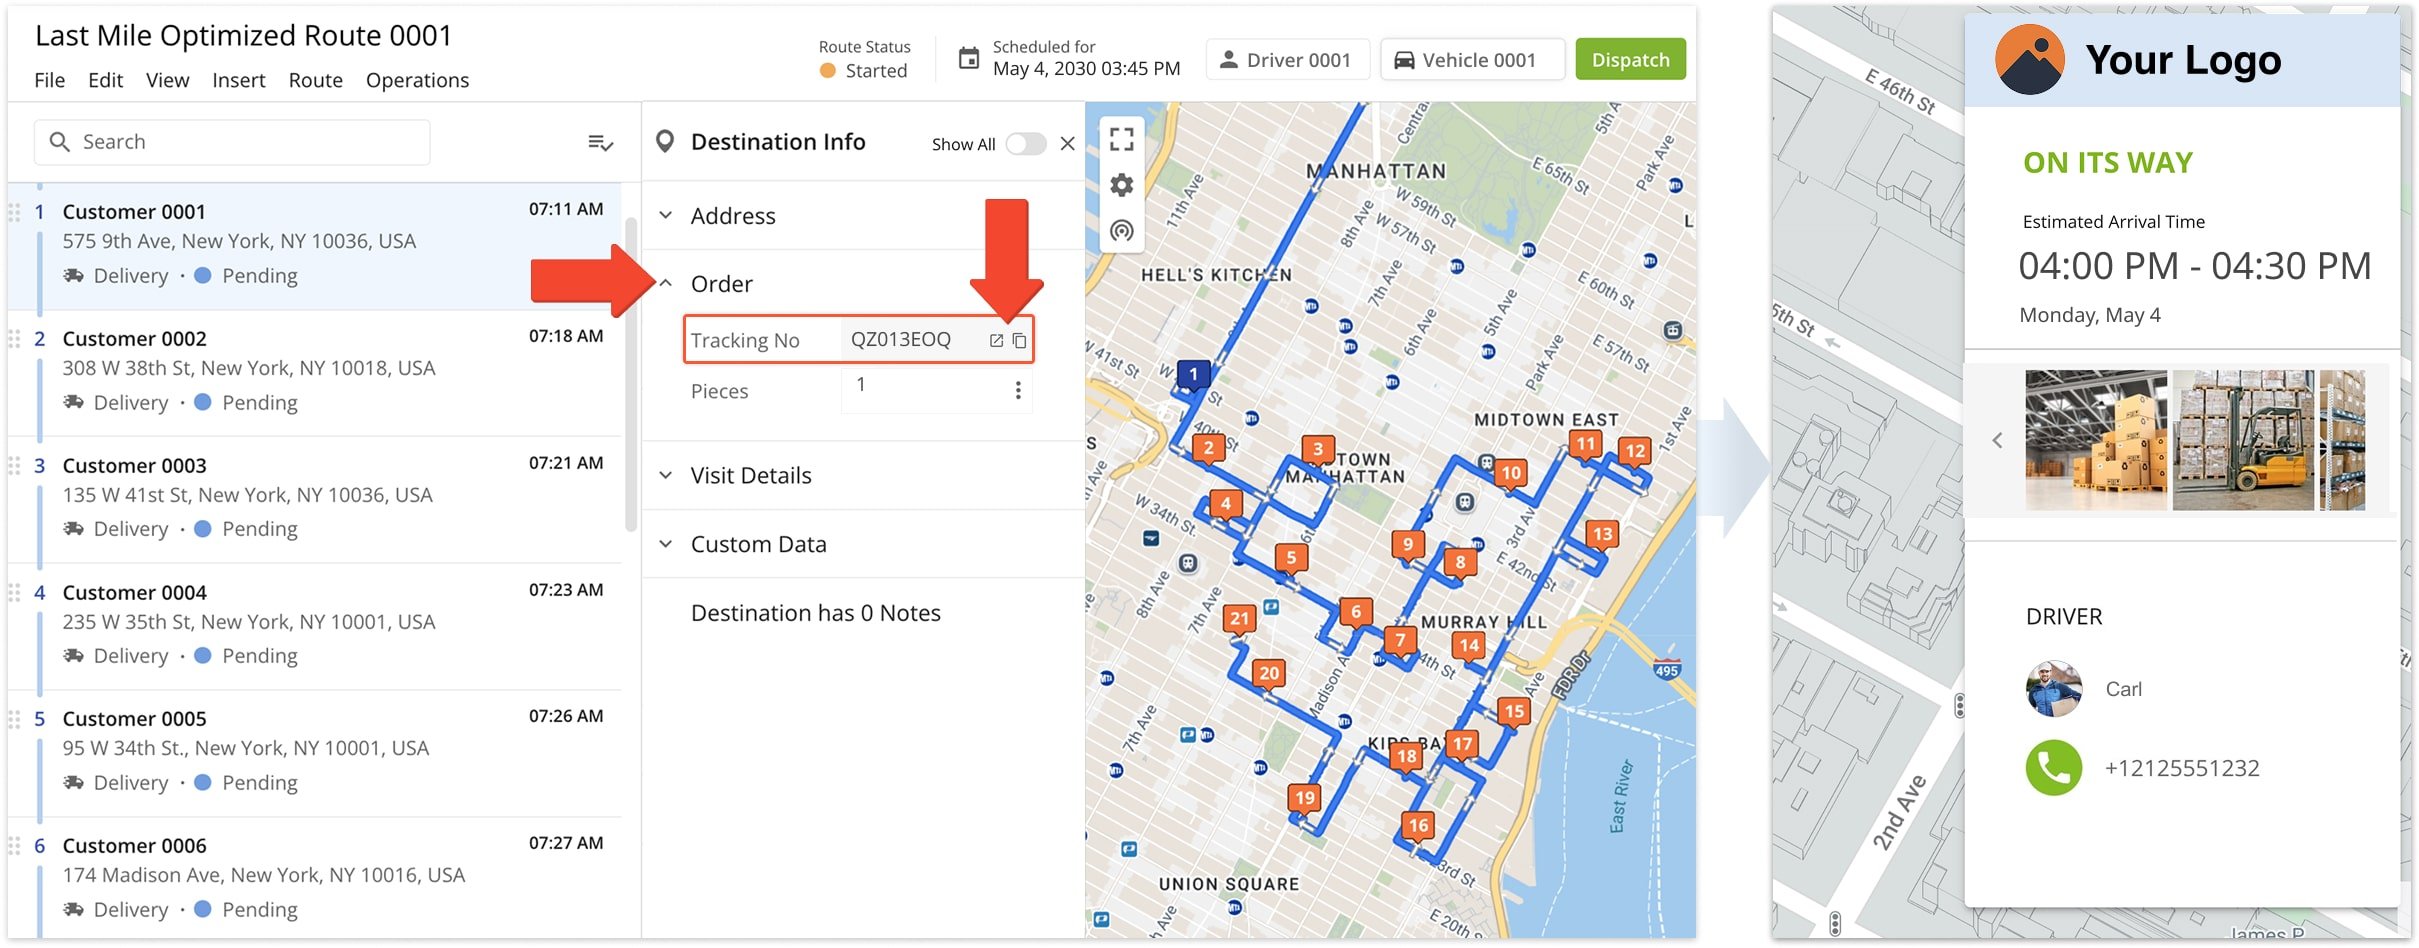
To provide a real-time order status update, you can share the tracking number via a customizable SMS message or email order notification. Just add the {{tracking_number}} placeholder to automatically insert it into your message to the customer.
NOTE: Learn more placeholders in our notification settings guide.
![]()
Visit Route4Me's Marketplace to Check out Associated Add-Ons:
- Notifications & Alerts
Route Scheduled
- Notifications & Alerts
Geofence Entered
- Notifications & Alerts
Geofence Departed
- Notifications & Alerts
Visit Completed
- Notifications & Alerts
Notify Next Customer