Customer Notifications – Automatic Email And SMS Notifications And Messaging Settings
Route4Me’s Customer Alerts and Notifications let you send manually or automatically triggered messages to customers via Email and SMS. You can set custom time windows so notifications are only sent during business hours or a specified period. Notifications can include dynamic placeholders to automatically add order numbers, names, ETAs, tracking links, and other relevant details. The Route4Me Order Tracking Page allows customers to easily track their orders, and you can view or export notification history and customize Customer Satisfaction Surveys to collect driver ratings and feedback.
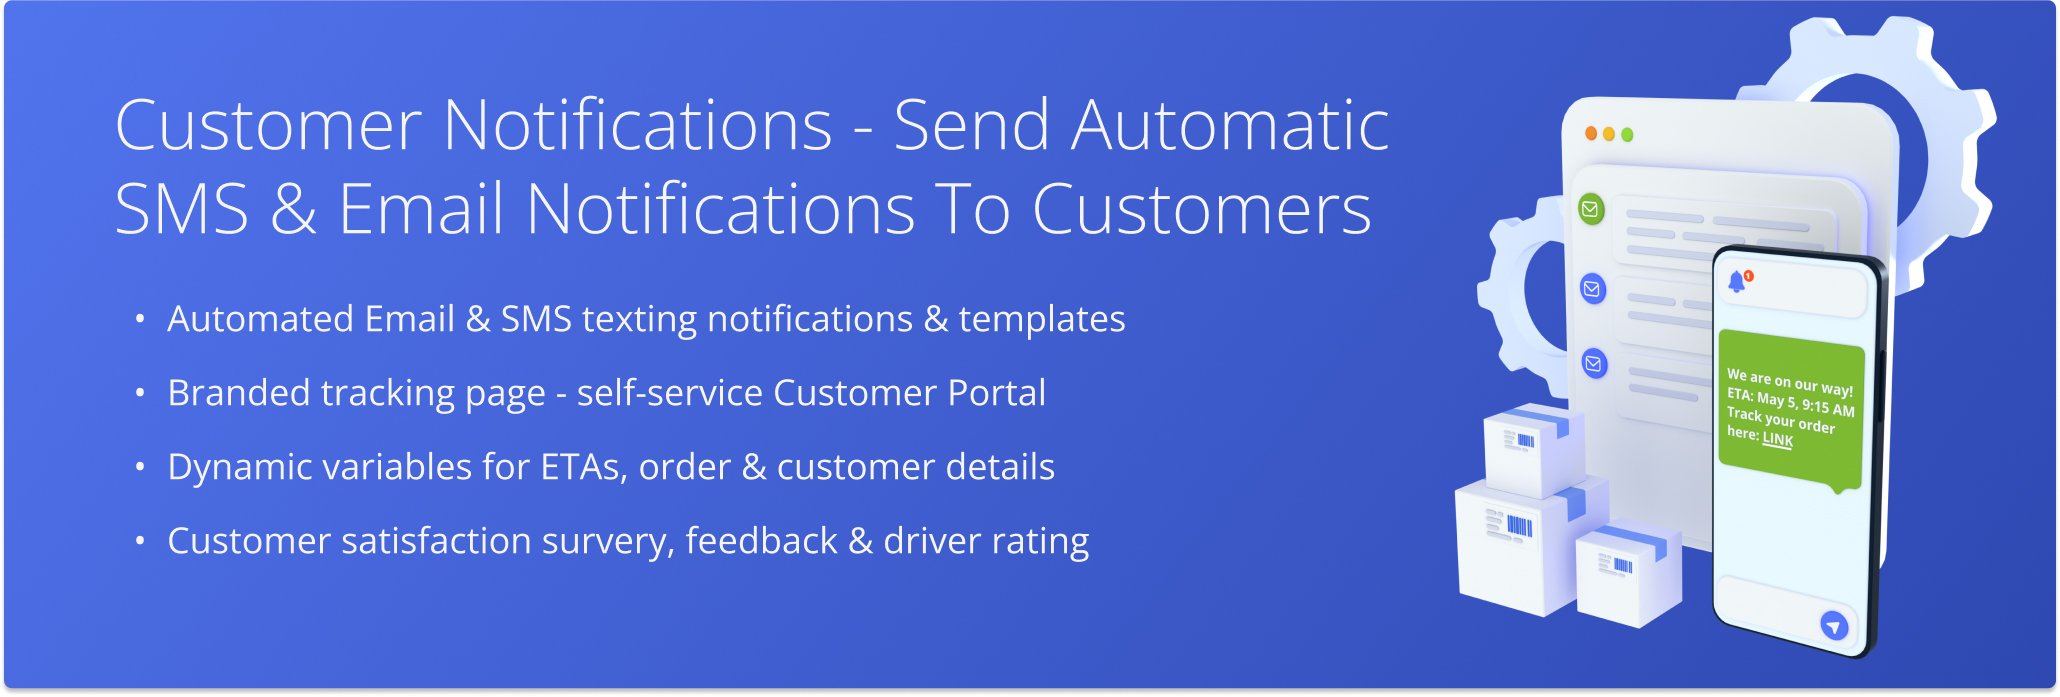
Table of Contents
Customer Notifications Overview
Setting up Route4Me Customer Notifications is quick and easy.
- Open your Notification Settings and configure your Provider and Time Window details.
- Pick a Notification Type and add an email, SMS, or Salesforce notification for that Notification Type.
- Customize the new notification’s text and insert dynamic variables to automatically add details like order number, tracking link, etc.
Learn more about each step of the process further in this guide, what the available Notification Types are, how to customize your notifications and customer portal, and more.
Open Your Notification Settings
Enable Automated SMS And Email Notifications For Customers
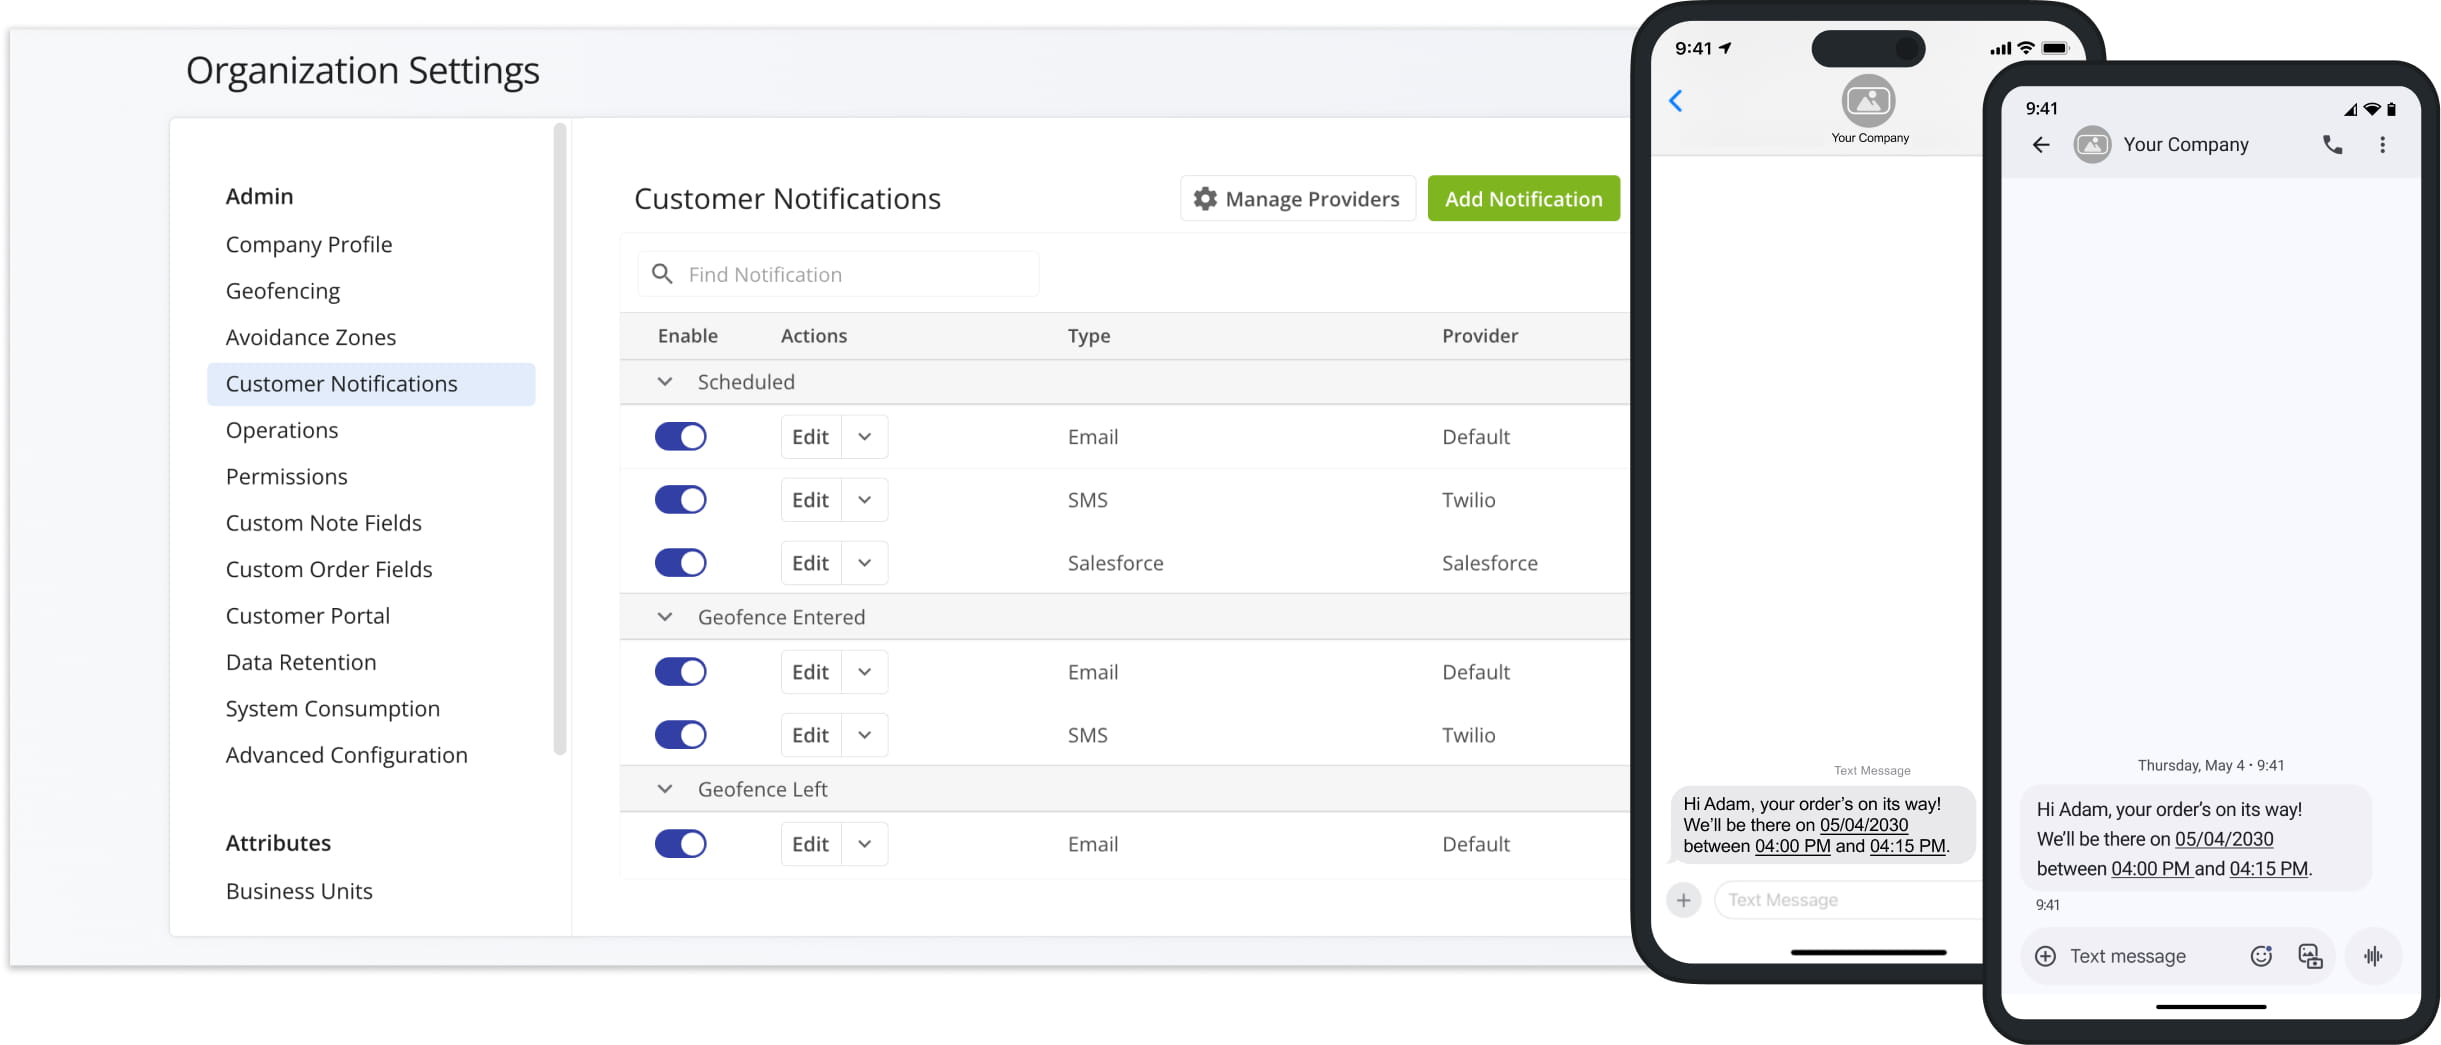
To enable and customize Customer Notifications, Go to “Settings” > “Organization Settings” from the Navigation Menu and follow these steps:
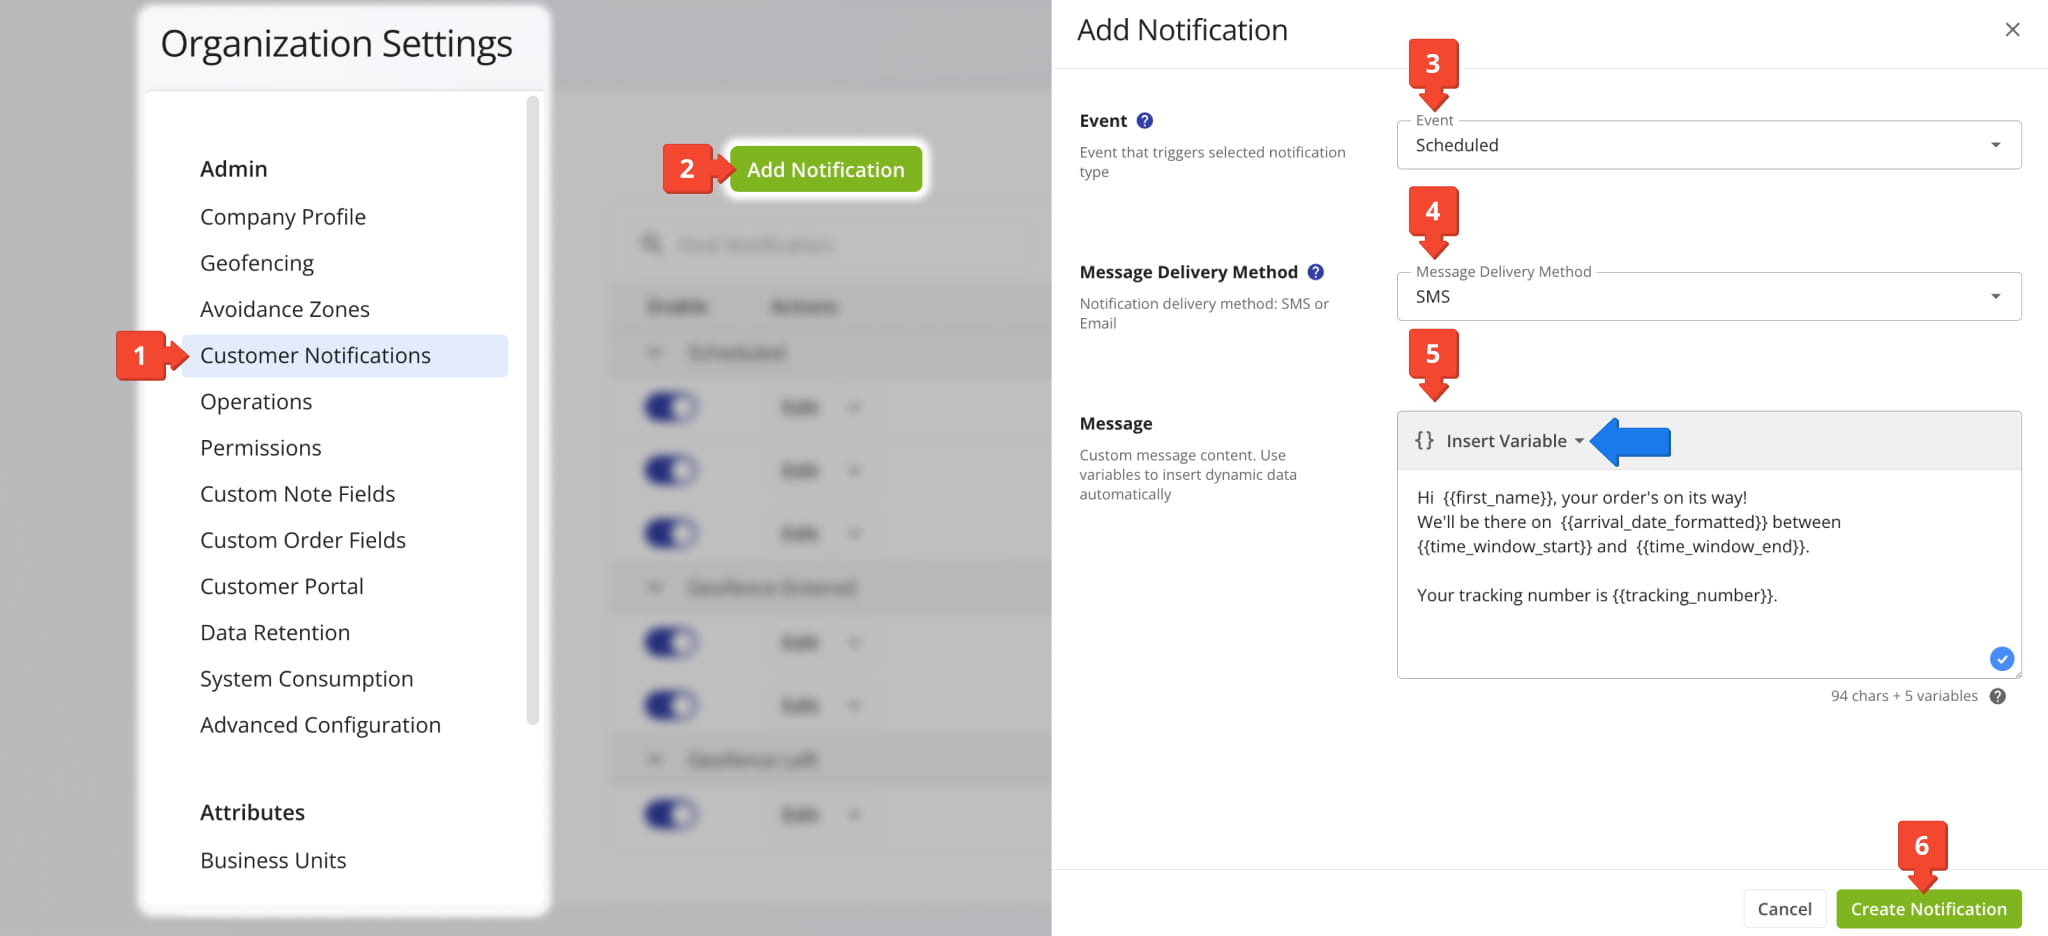
- Click “Customer Notifications” to open your notifications list and settings.
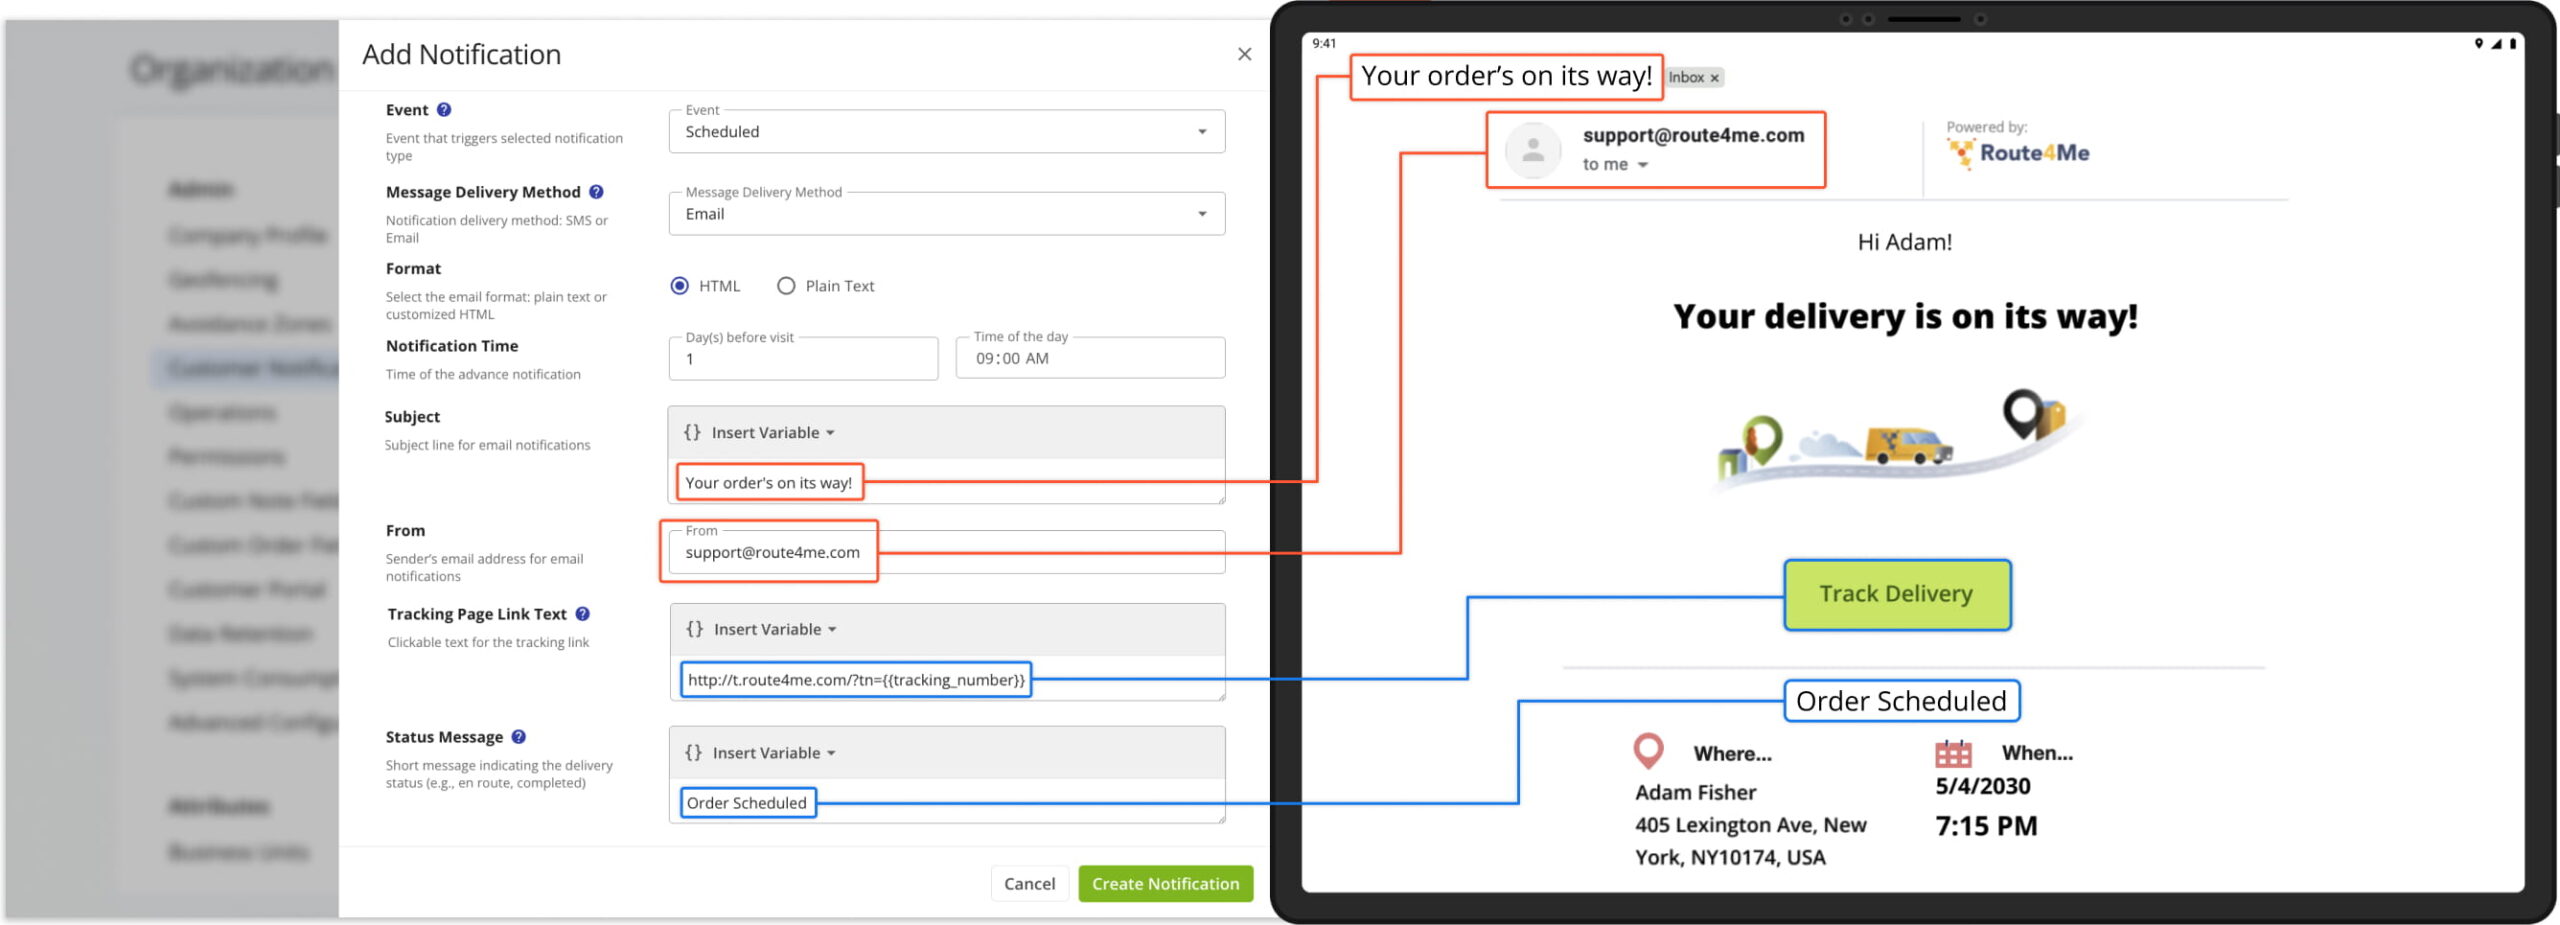
- Click “Add Notification” to create a new Notification Template.
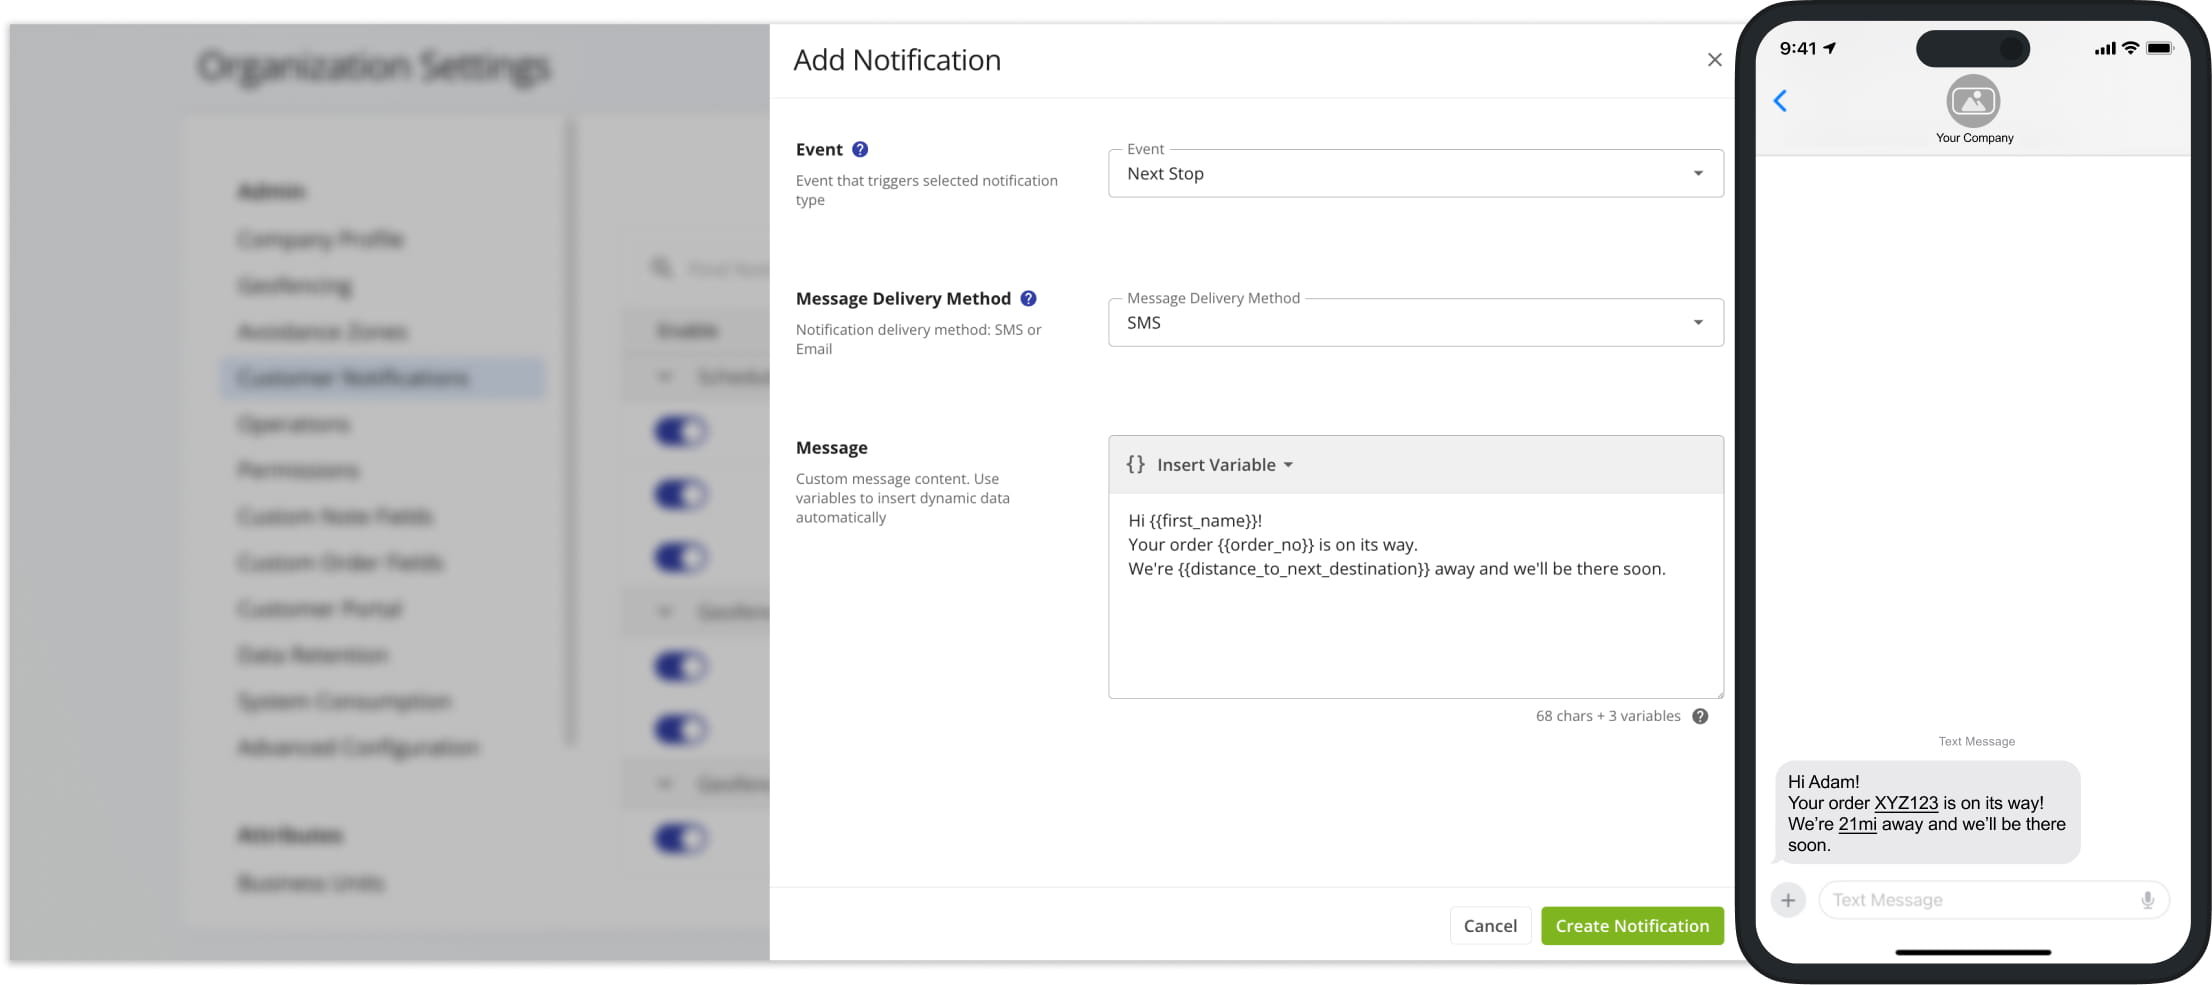
- Use the “Event” dropdown menu to select a Notification Type, which is the event or action that triggers an automated notification.
- Use the “Message Delivery” method to select a communication channel (email, SMS, or Salesforce) for the new Notification Template.
- Input your notification text in the respective field(s) and insert dynamic variables from the “Insert Variable” dropdown menu.
- Click “Create Notificatio” to add the new Notification Template to your account. New notification templates are automatically enabled.
For your convenience, email notification templates are split into different text fields which simplify creating consistent and well-structured email notifications. SMS notifications are streamlined with a single text field, and Salesforce notification content is defined in the JSON format. Keep reading to learn more.
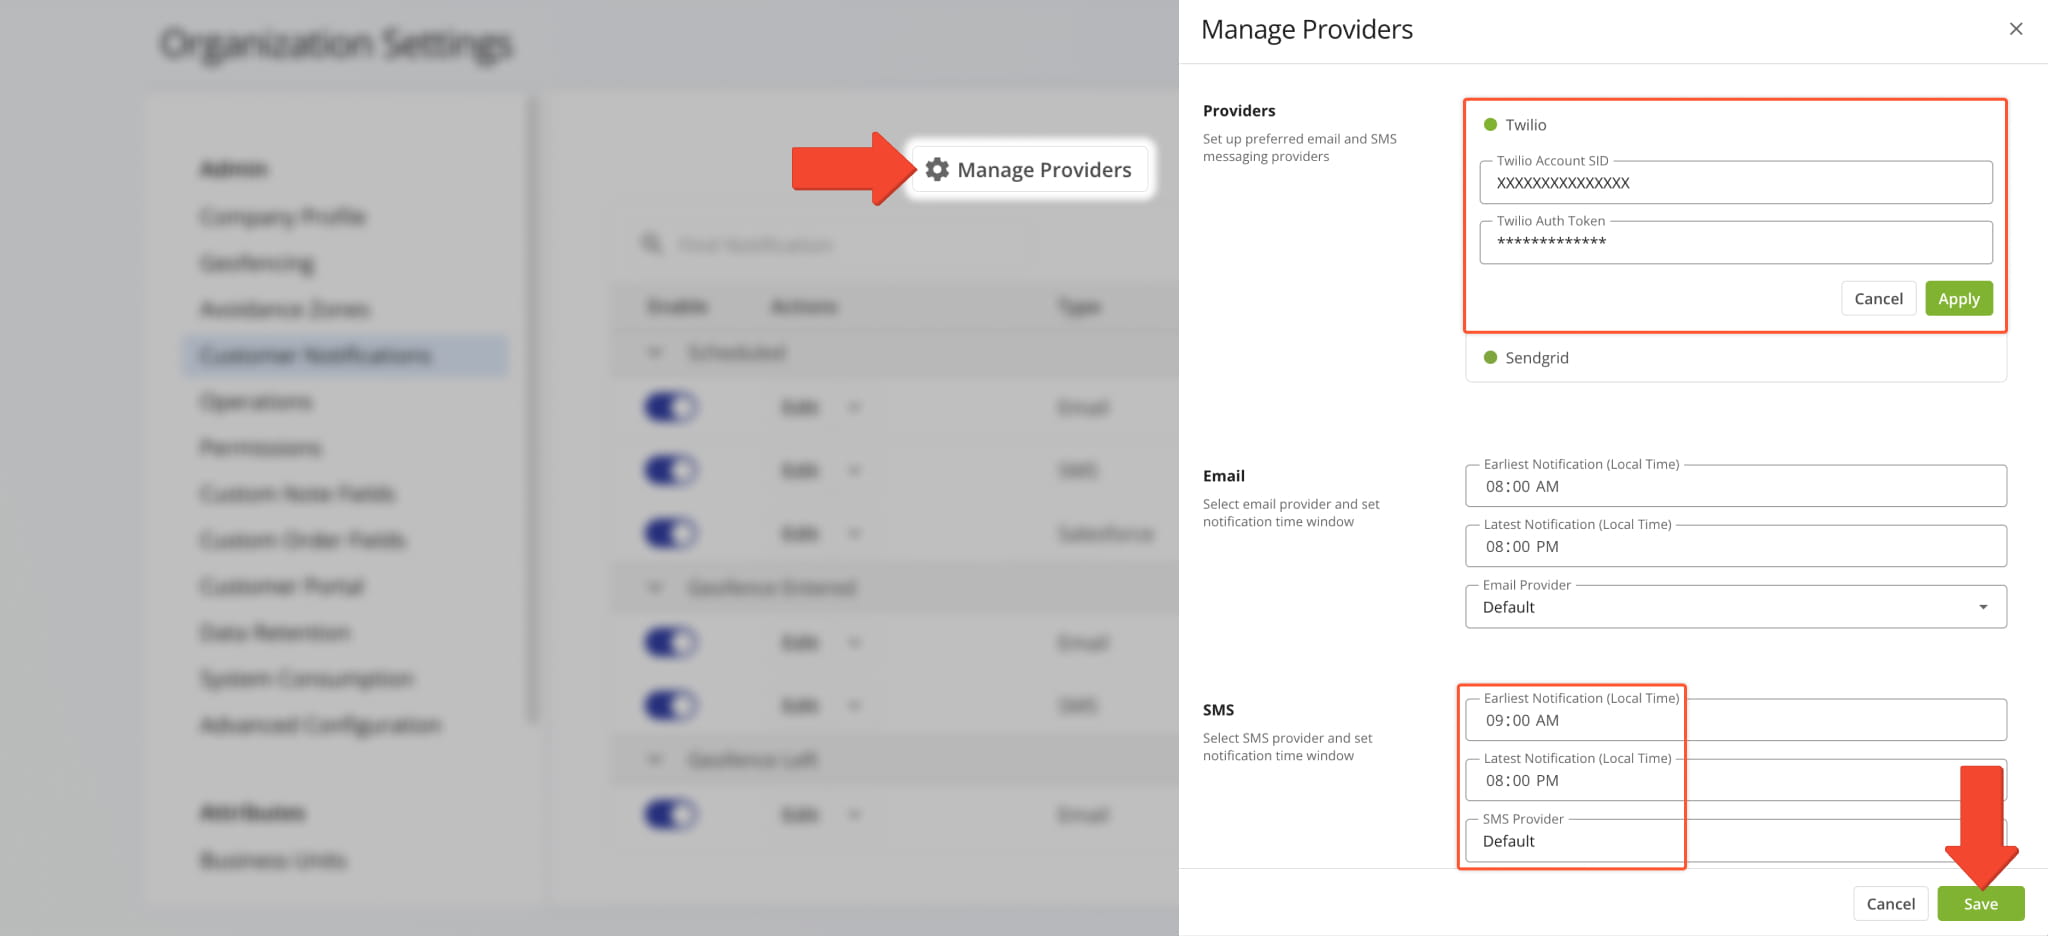
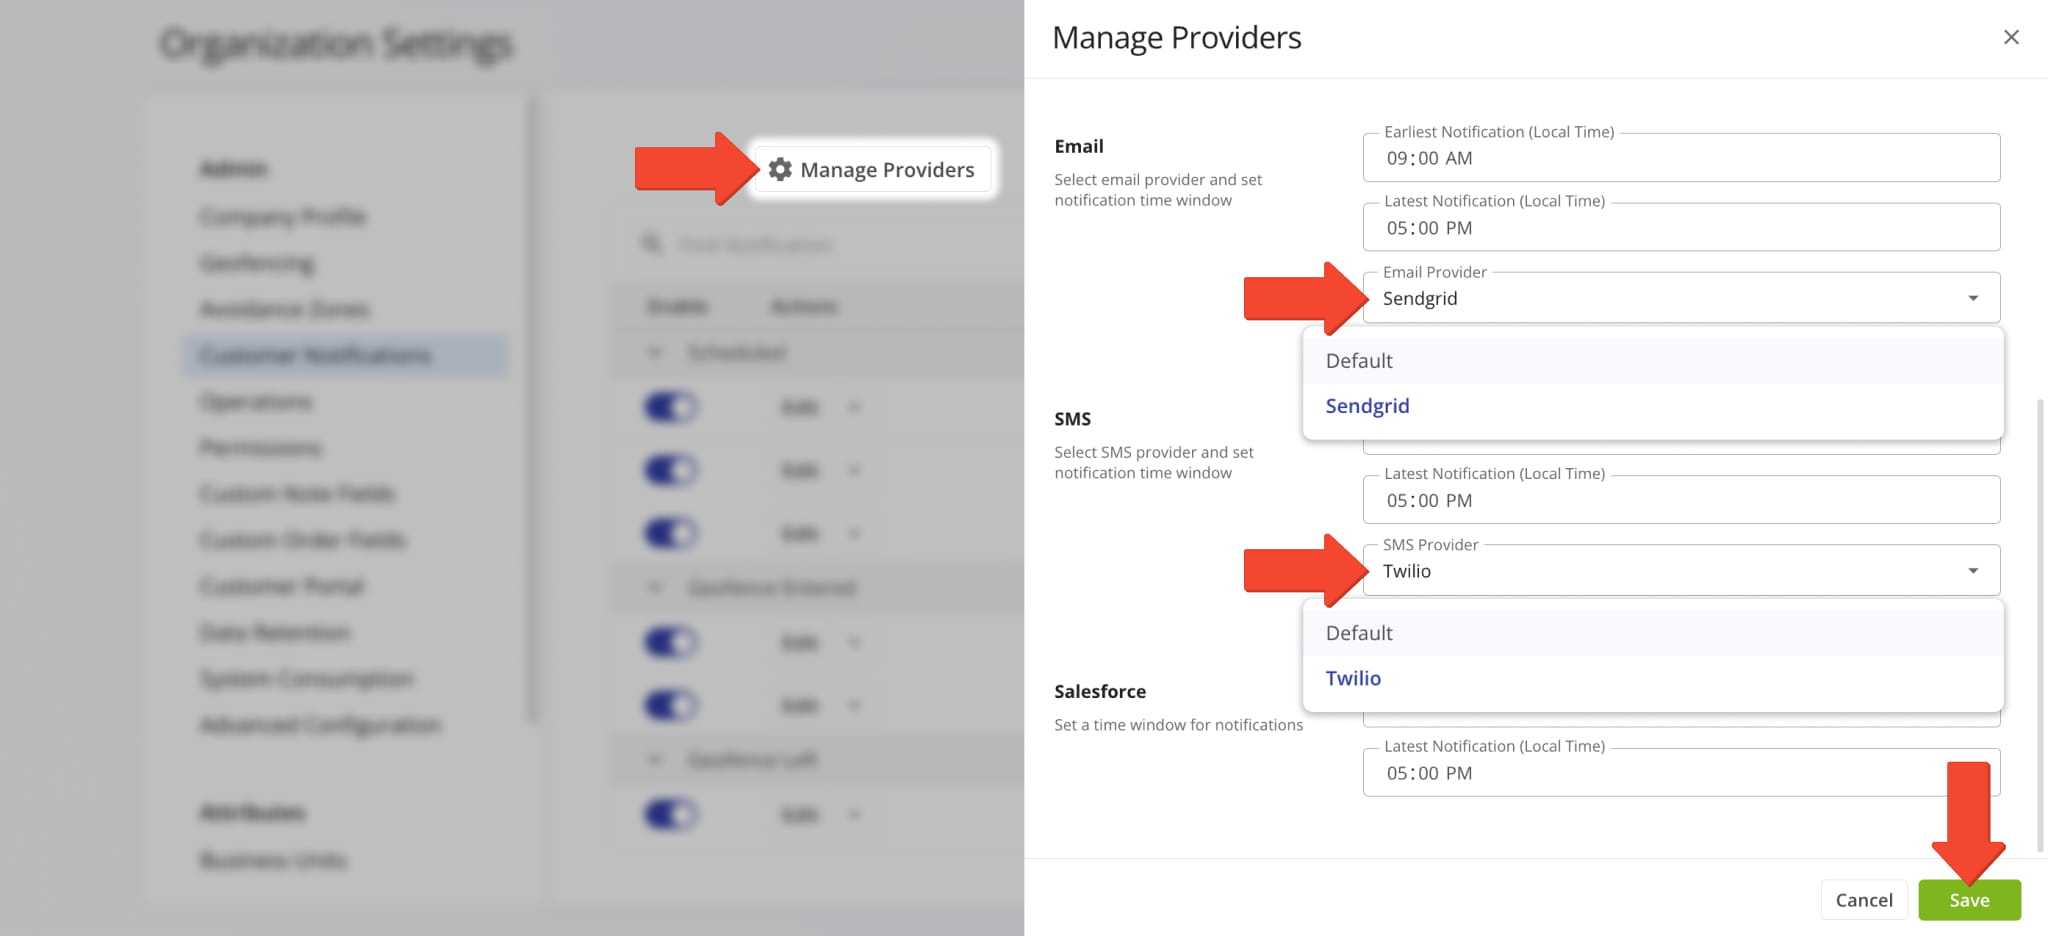
You can set Time Windows to ensure customers receive notifications only during appropriate hours. To configure them, click click “Manage Providers“, choose your earliest and latest notification times, and then click “Save“.
For example, if you set the window to 9:00 AM–5:00 PM, notifications will only be sent within that time range. “Local Time” refers to the time zone of the depot or route start. Be aware that you first need to dispatch route notifications before you can send notifications.
NOTE: The SMS section appears only when SMS notifications are enabled.
Manage Email And SMS Customer Notifications
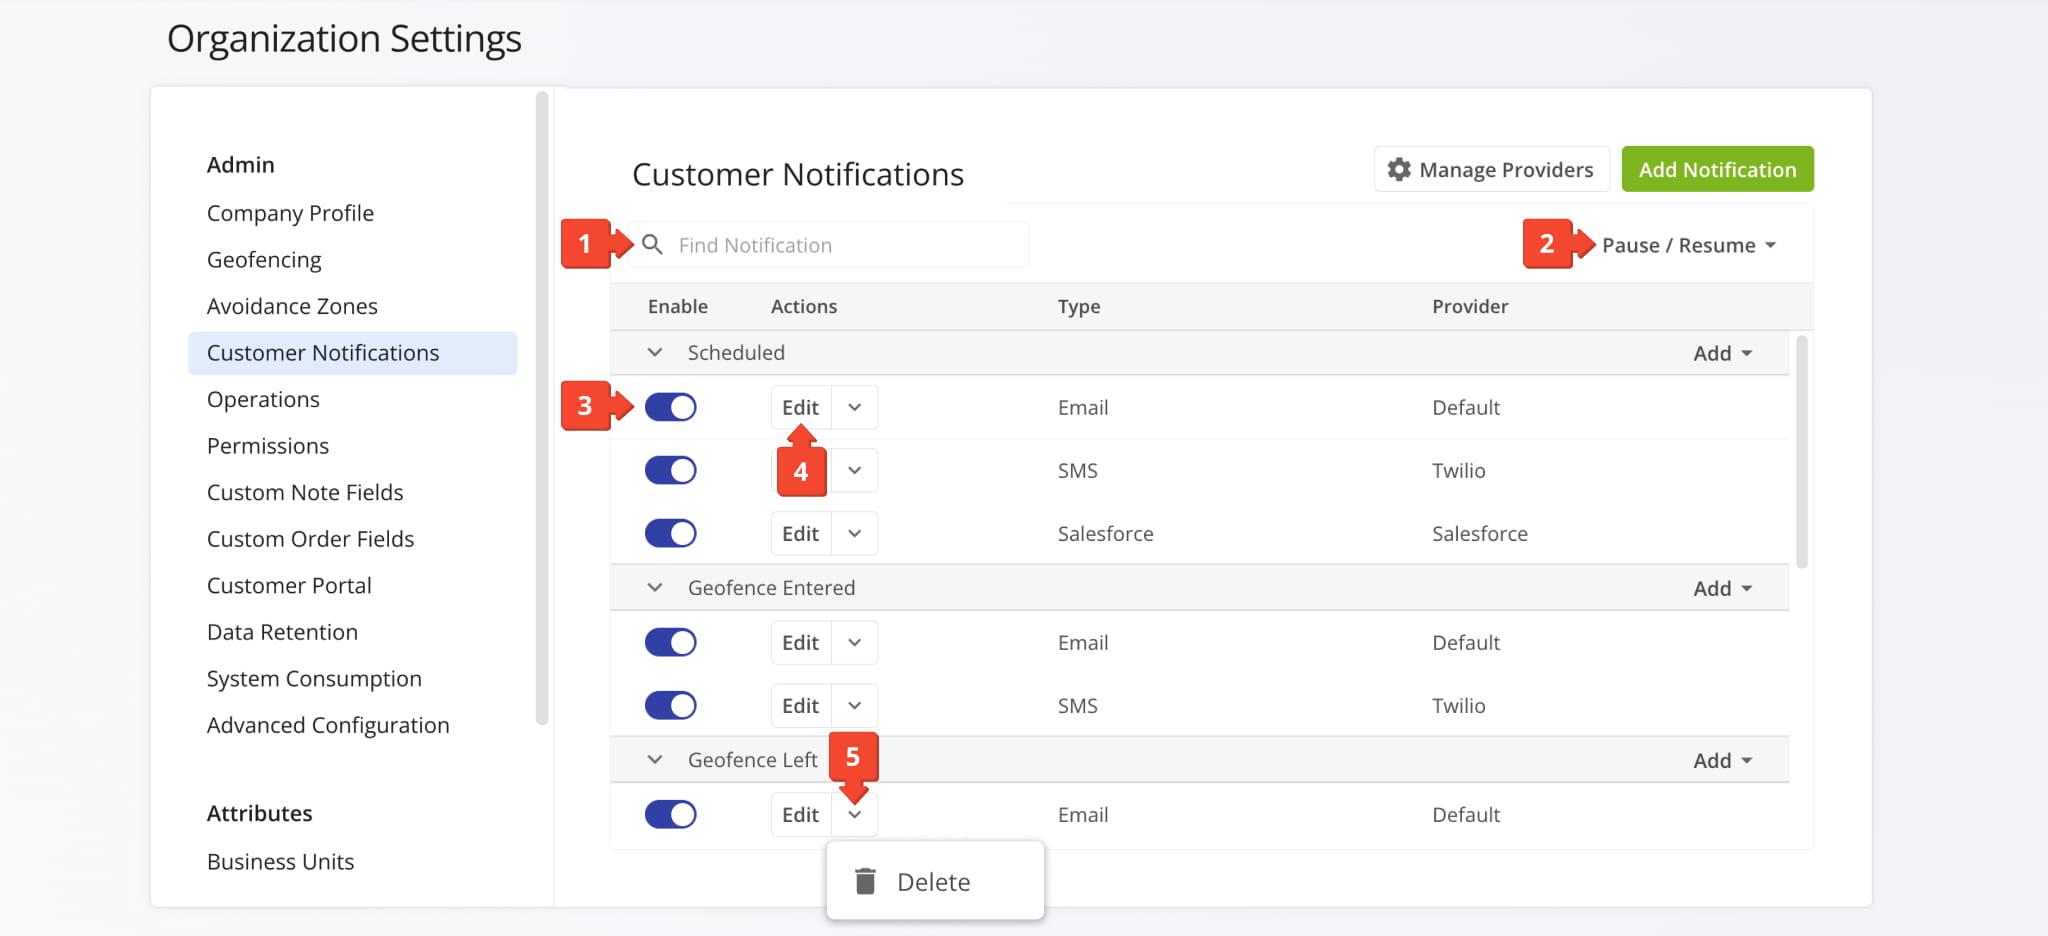
The Customer Notifications page in your Route4Me Account Settings enables you to easily find, edit, manage, and remove notification templates.
- Find Notification Templates: Use the “Find Notification” search field at the top of the list.
- Pause and Unpause Notifications: Click “Pause/Resume” and enable or disable a notification channel in the dropdown menu.
- Enable and Disable Notifications: Click the Toggle Button in the “Enable” column to enable or disable specific notification templates.
- Edit Notification Templates: Click the “Edit” button to adjust the same settings as when adding new notifications.
- Remove Notification Templates: Click the Down Arrow next to “Edit” and select “Delete” from the dropdown menu.
Additionally, you can quickly add new Notification Templates for a specific Notification Type by clicking the “Add” dropdown button and selecting a communication channel from the menu.
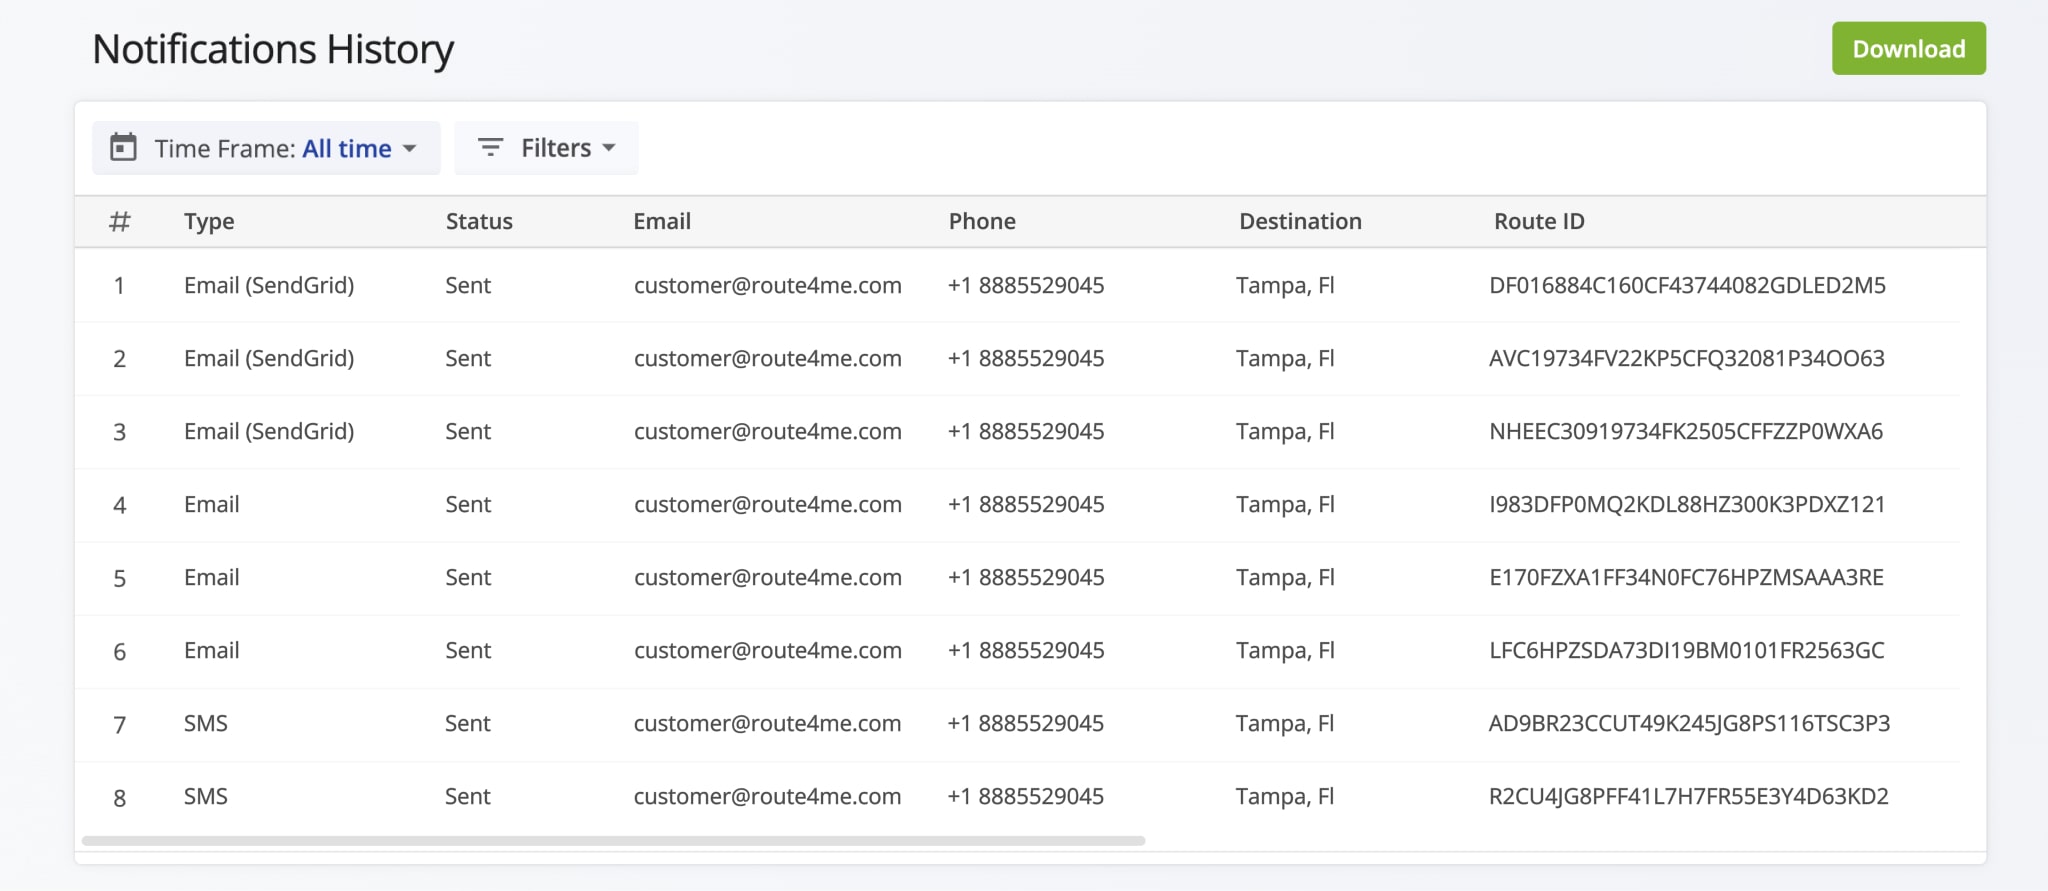
Furthermore, you can view a history of all notifications sent to customers. For example, notifications from the account of a Regional Manager with multiple Drivers or all Email notifications sent for a particular route or even a specific destination, etc.
You can also export your notifications log for reports, analyzing your operations, and other purposes. Learn more about opening the Notification History and exporting sent notifications.
Open Your Notifications History
Email And SMS Customer Notification Provider Settings
To select your email and SMS notification provider and manage your notification provider and Salesforce credentials, click “Manage Providers” and scroll down to the individual communication channel settings.
Next, use the “Email Provider” and “SMS Provider” fields to select either the “Default” notification provider or Sendgrid for email and Twilio for SMS notifications, respectively.
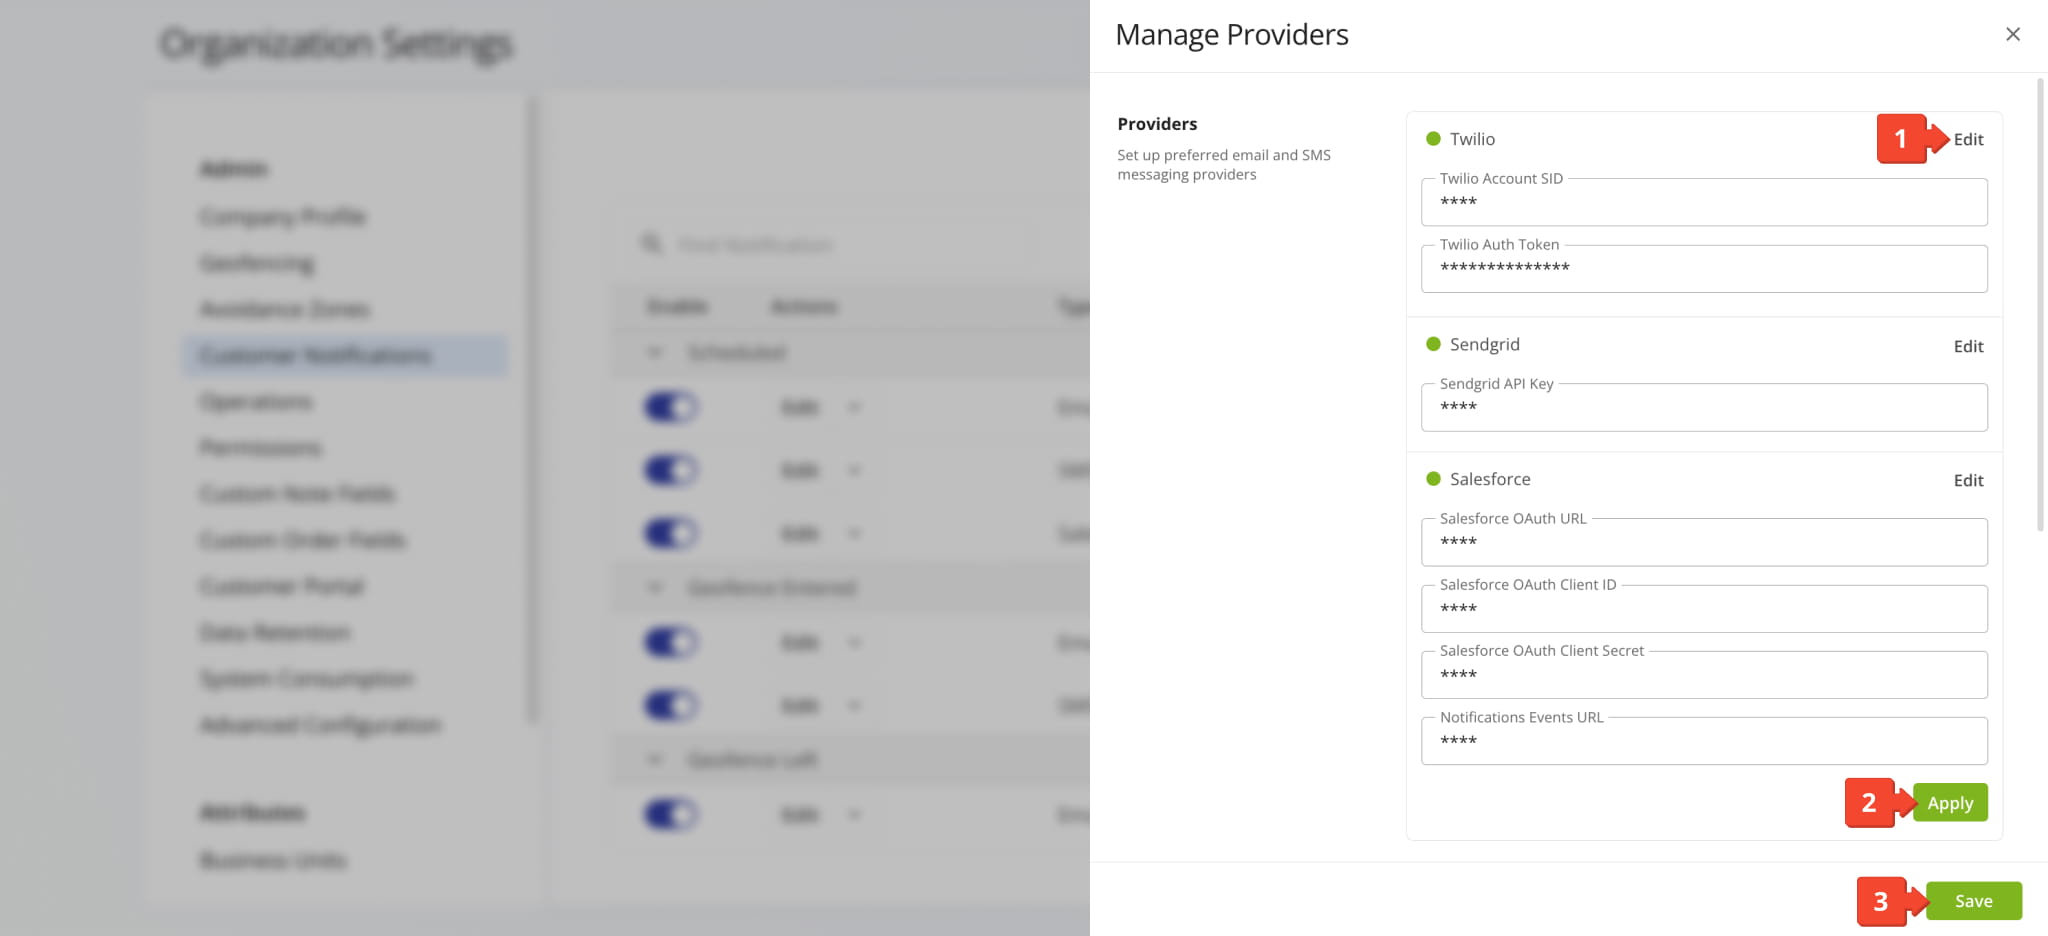
Then, to input and manage your notification provider credentials, scroll up to the “Providers” section and follow these steps:
- Click “Edit” next to a notification provider.
- Input your credentials and click “Apply“.
- Click “Save” to save your changes and update your notification provider settings.
NOTE: If you encounter any issues with customer notifications, you can find a frequently asked questions and troubleshooting section at the end of this guide.
Customer Notification Types – Automatic Notification Triggers And Events
In the table below, you can find a list of Notification Types, which are events that trigger automatic Customer Notifications.
NOTE: Enabled Notification Templates will automatically send Customer Notifications after Route Notification Dispatch or if a route is started by the assigned user on the Route4Me Mobile App.
| Notification Type | Description | |
|---|---|---|
| Schedule Notifications | ||
| Scheduled | Sent when the customer’s destination visit is scheduled. NOTE: The corresponding email template can be configured to send notifications a specific number of days in advance of the scheduled visit. | |
| Next Stop | Sent to a customer when the user assigned to the route sets a status on the last destination before the customer’s address. | |
| Detected Arrival And Departure | ||
| Geofence Entered | Sent to a customer when the user assigned to the route enters the geofence around their address. Learn more about Route4Me Geofencing. | |
| Geofence Left | Sent to a customer when the user assigned to the route departs the geofence around their address. Learn more about Route4Me Geofencing. | |
| Destination Status Updated | ||
| Completed | Sent to a customer when the user assigned to the route marks their destination as “Done” on the Route4Me Mobile App. Learn more about Completing Routes. | |
| Skipped | Sent to a customer when the user assigned to the route marks their destination as “Skipped” on the Route4Me Mobile App. Learn more about Completing Routes. | |
| Failed | Sent to a customer when the user assigned to the route marks their destination as “Failed” on the Route4Me Mobile App. Learn more about Completing Routes. | |
In Advance Visit Scheduled And Next Stop Notifications
The “Scheduled” Notification Type supports sending notifications in advance, before the route is dispatched or started. Simply input your preferred settings in the “Notification Time” section and fill the rest of the fields as usual. Customers will then automatically receive an email with the content of your notification once the specified number of days before visit is reached.
In addition to automatically informing customers when their orders or destination visits are scheduled, you can send automatic “Next Stop” notifications. This notification type is triggered when the last destination before a customer is completed and informs them that the assigned user is on their way.
Detected Destination Arrival And Departure Notifications
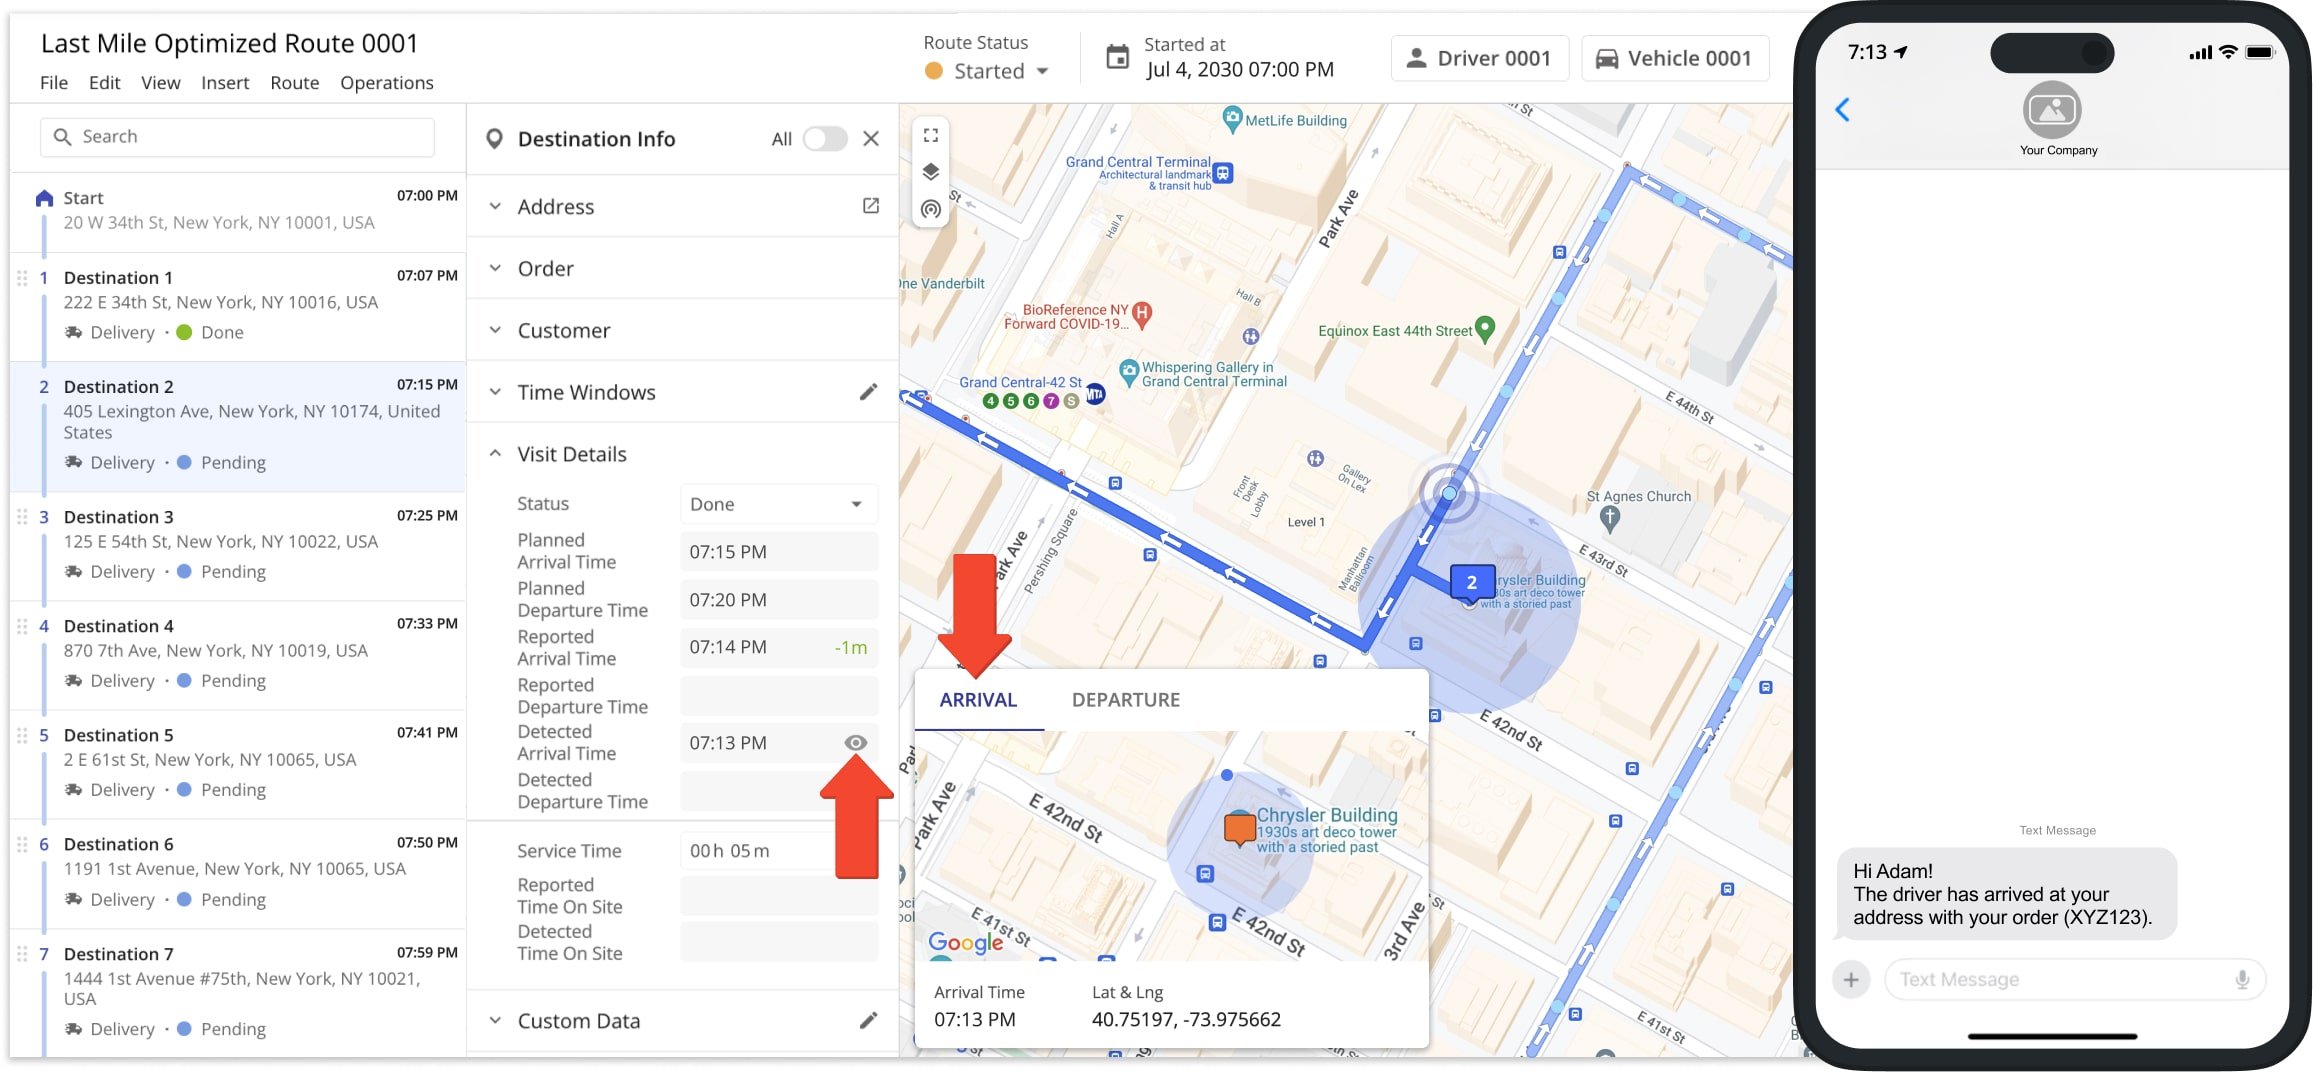
By combining Route4Me Geofencing with Customer Notifications, you can send automatic SMS and email alerts to customers when your drivers arrive at or depart from destinations. The “Geofence Entered” and “Geofence Left” Notification Types are triggered automatically when the assigned user enters and leaves a destinations’ corresponding geofence.
Automatic Destination Status Update Notifications
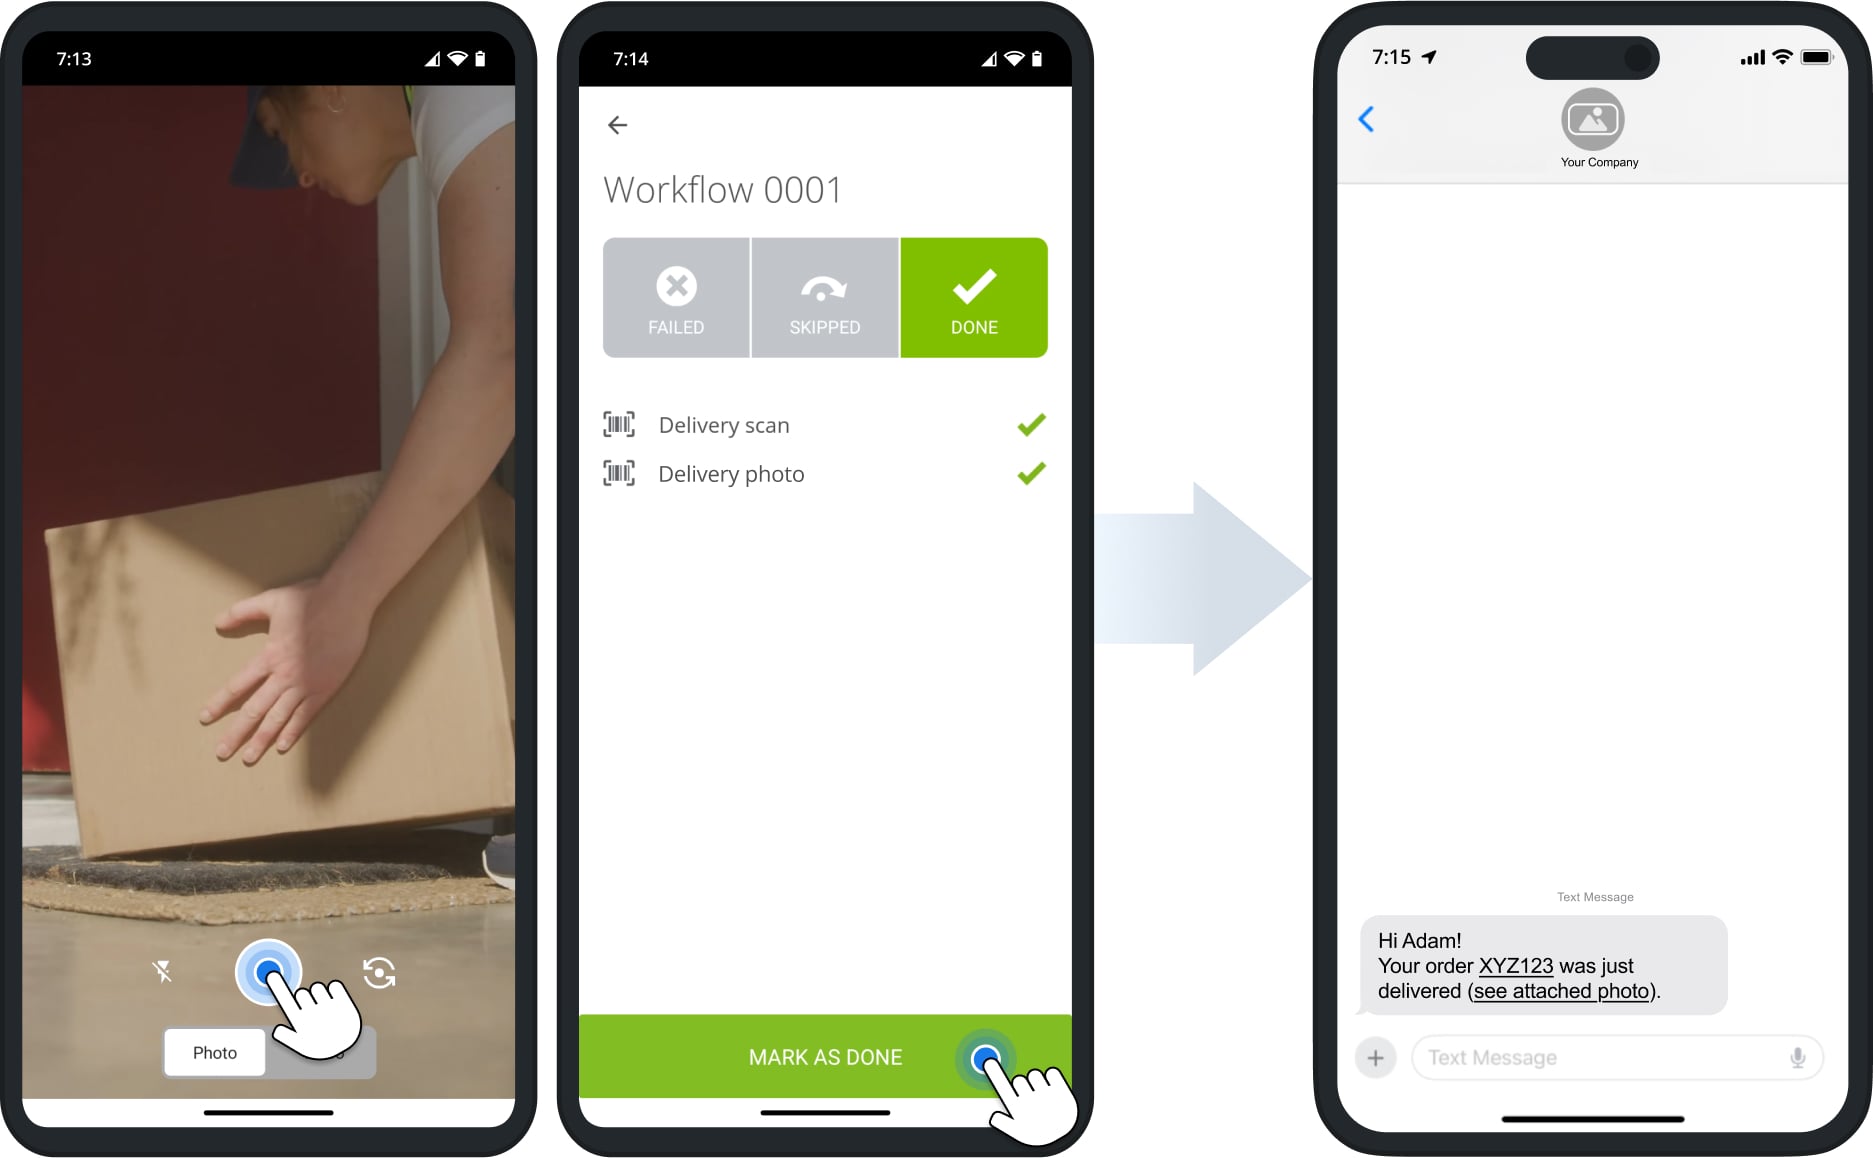
When last mile drivers complete destinations using the Route4Me Mobile Driver App, they can assign the “Done“, “Failed“, or “Skipped” destination statuses. With the “Completed“, “Failed“, and “Skipped” Notification Types, you can instantly inform customers about what happened at their destination. Furthermore, you can use dynamic variables to attach proof of visit or delivery, timestamps, and more.
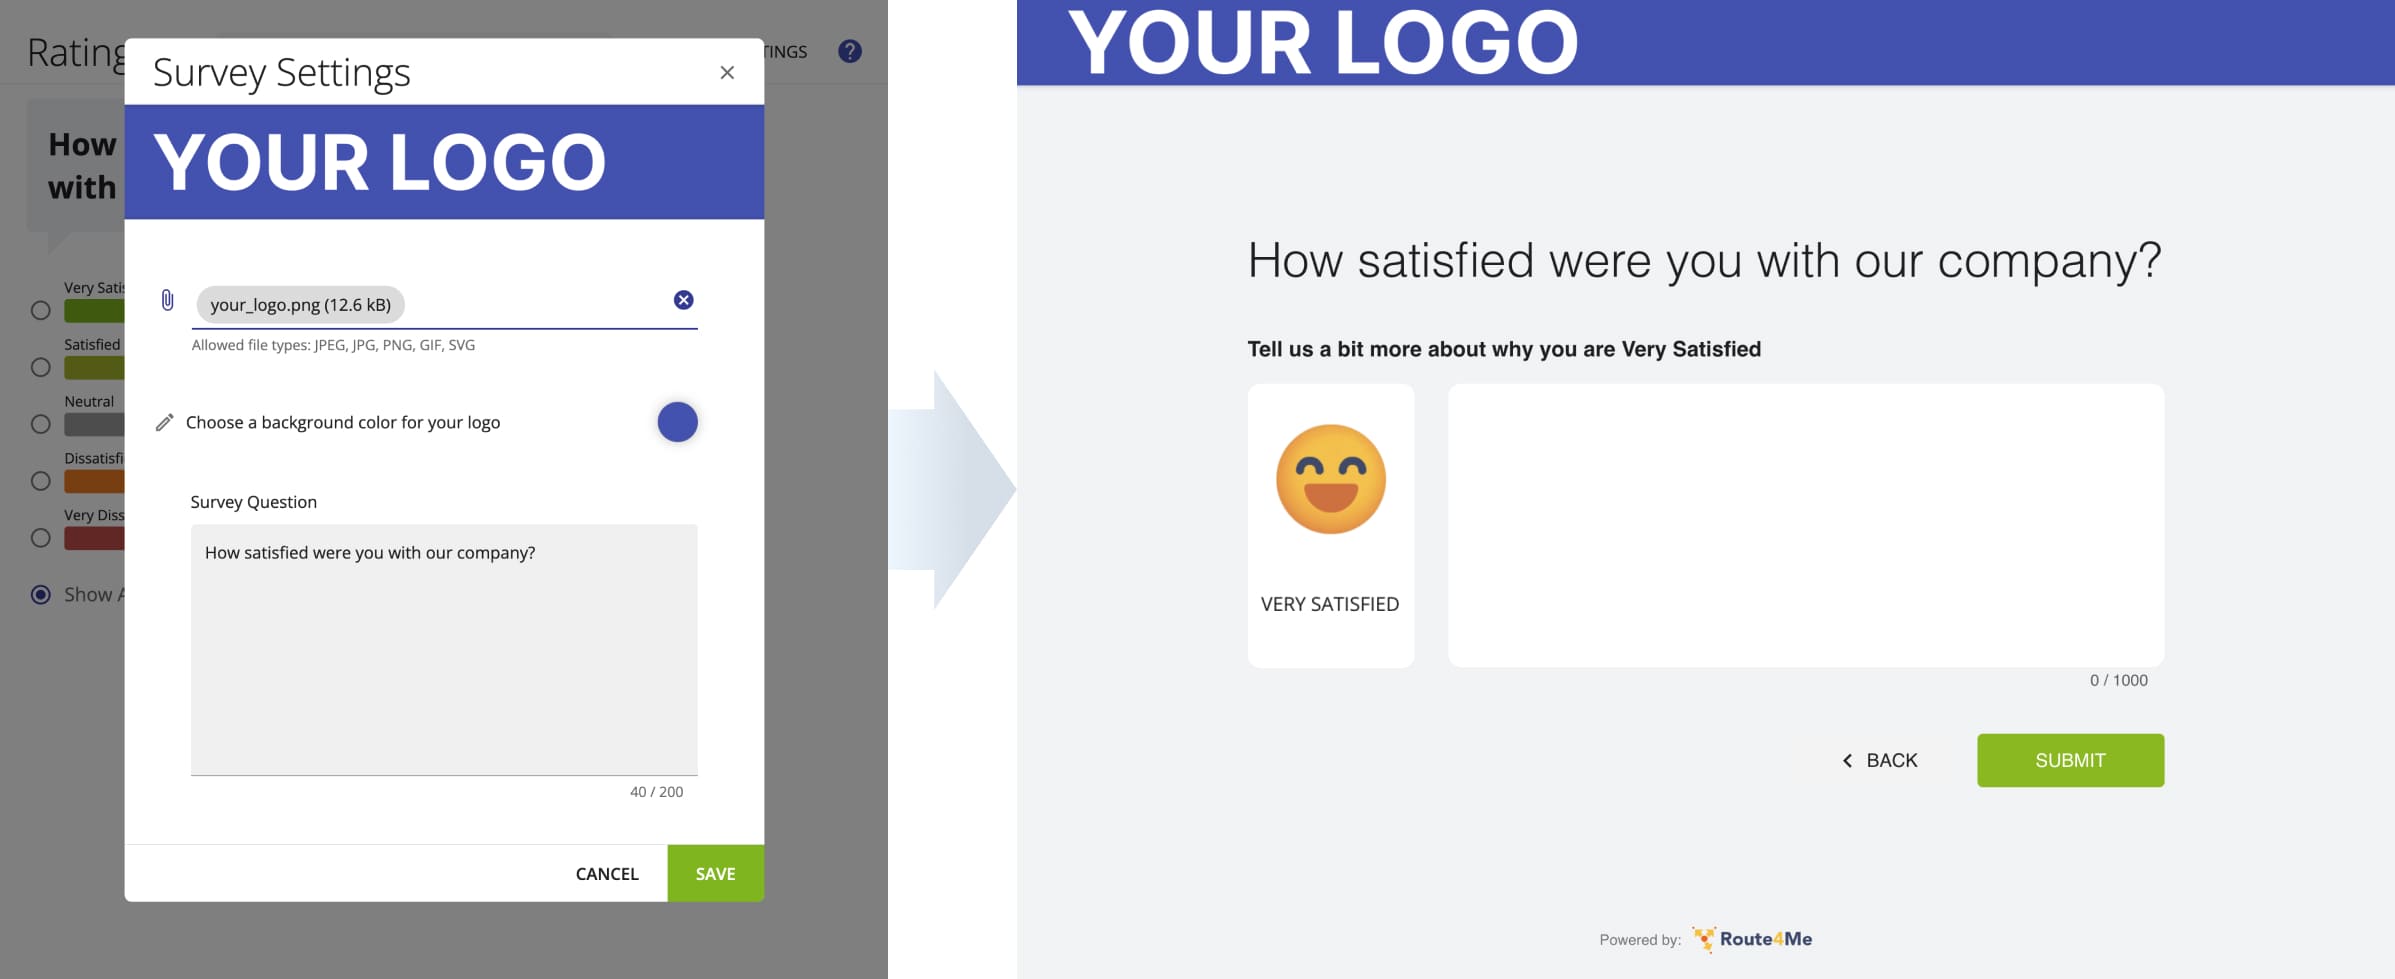
Customer Order Tracking Page And Satisfaction Survey
Customers can access the Online Order Tracking Page using a Tracking Page link sent via email or SMS. After entering their unique tracking number, they can view order status, driver location, and additional details.
NOTE: You have the option to send customers the Tracking Page link with their tracking number already embedded. This way, tracking details automatically appear when customers open the link. Learn more about Route4Me’s Customer Portal.
![]()
Additionally, Route4Me’s Customer Survey and Driver Rating enables you to get a complete overview of the inner workings of your last mile business and maximize customer satisfaction. All you need to do is customize your Customer Satisfaction Survey to fit your company branding and set up notification rules to include your new Customer Survey.
Dynamic Notification Variables – Automatically Insert Details In Notifications
You can use dynamic variables that retrieve data like order numbers, customer names, estimated arrival times, geofence-entered and departed timestamps, etc. and automatically insert them into your notifications as text.
Each Notification Type supports different dynamic variables. Simply add variables to your notification templates, and they’ll be replaced with the text of the respective fixed attribute in the notifications sent to customers.

| Variable | Route4Me Fixed Attribute | Description | Example of Retrieved Data | |
|---|---|---|---|---|
| Address Details | ||||
| {{address}} | Address | Street address of the customer associated with the corresponding destination. | 405 Lexington Ave, New York, NY 10174, USA | |
| {{alias}} | Alias | A user-defined name assigned to a customer or address for internal use. | Customer 001 | |
| {{lat}} | Lat, Lng | Latitude coordinates of the customer’s location. | 40.751868 | |
| {{lng}} | Lat, Lng | Longitude coordinates of the customer’s location. | -73.975554 | |
| {{address_stop_type}} | Address Stop Type | The type of the corresponding destination on the route. | Pickup, Delivery, Break, Meetup, Visit, Service, or Drive By. | |
| Notification And Geofence Timestamps | ||||
| {{now_time}} | Address Visit Details | The current time when the corresponding notification was triggered and sent to the customer. The format of this time can be adjusted in the advanced settings | 07:00AM | |
| {{now_date}} | Address Visit Details | The current date when the corresponding notification was triggered and sent to the customer. The format of this date can be adjusted in the advanced settings | 10.10.2025 | |
| {{now_time_formatted}} | Address Visit Details | The current time when the corresponding notification was triggered and sent to the customer. The format of this time can be adjusted in the advanced settings | 04:10 PM | |
| {{geofence_detected_visited_timestamp}} | Detected as Visited | The timestamp that was automatically generated by the system when the driver entered the geofenced area set around the address. | 07/07/2025 05:00 PM | |
| {{geofence_detected_departed_timestamp}} | Detected as Departed | The timestamp that was automatically generated by the system when the driver left the geofenced area set around the address. | 07/07/2025 05:00 PM | |
| Order Details | ||||
| {{order_no}} | Order No | The order number associated with the destination. | QA000007188 | |
| {{cost}} | Cost | The cost of visiting and servicing the destination. | 100 | |
| {{cube}} | Cube | The cubic volume of the cargo or order that is being delivered to or picked up at the address. | 0.5 | |
| {{invoice_no}} | Invoice No | The order invoice number associated with the address. | ALT12341 | |
| {{pieces}} | Pieces | The number of pieces (items) that are being delivered to or picked up at the destination. | 20 | |
| {{reference_no}} | Reference No | The order reference number associated with the destination. | 789 | |
| {{revenue}} | Revenue | The revenue that is expected to be generated from visiting and servicing the destination. | 1000 | |
| {{weight}} | Weight | The weight of the cargo or order that is being delivered to or picked up at the address. | 100 | |
| {{sequence_no}} | Priority | The sequence number of the destination on the corresponding route. | 1 | |
| {{tracking_number}} | Tracking Number | The tracking number that is automatically assigned to the order by the system. Tracking numbers can be used by customers to check their orders on the customer tracking portal. | E27YMNGK | |
| Customer Details | ||||
| {{name}} | First Name + Last Name | Full name (first name and last name) of the customer associated with the destination. | John Smith | |
| {{first_name}} | First Name | First name of the customer associated with the destination. | John | |
| {{last_name}} | Last Name | Last name of the customer associated with the destination. | Smith | |
| {{email}} | Contact e-mail address of the customer associated with the destination. | [email protected] | ||
| {{phone}} | Phone | Contact phone number of the customer associated with the destination. | +1 212-682-3070 | |
| {{customer_po}} | Customer PO | Purchase order of the customer associated with the destination. | PI000347 | |
| Time Windows | ||||
| {{time_window_start}} | Time Window Start | The start of the destination’s time window (normally used for opening hours). | 09:00 AM | |
| {{time_window_end}} | Time Window End | The end of the destination’s time window (normally used for closing hours). | 09:00 PM | |
| Arrival Time | ||||
| {{arrival_time_formatted}} | Planned Arrival Time | The estimated time when the driver is expected to arrive at the destination. The format of this time can be adjusted in the advanced settings. | 4:10 PM | |
| {{arrival_date_formatted}} | Planned Arrival Date | The estimated date when the driver is expected to arrive at the destination. The format of this date can be adjusted in the advanced settings. | 07.07.2025 | |
| {{earliest_time_formatted}} | Planned Arrival Time with ETA Padding | The estimated time of arrival minus 50% of the defined “ETA Padding” value (i.e., minus 5 minutes from the estimated arrival time). The format of this time can be adjusted in the advanced settings. | 2:10 PM | |
| {{max_arrival_time_formatted}} | Planned Arrival Time with ETA Padding | The estimated time of arrival plus 50% of the defined “ETA Padding” value (i.e., plus 5 minutes to the Estimated Arrival Time). The format of this time can be adjusted in the advanced settings. | 1:50 PM | |
| Note And Driver Rating URLs | ||||
| {{note_attachment_url}} | Note Attachment URL | Online URL for media attached to the respective note of the respective route destination. | Appears as a URL. | |
| {{driver_rating_short_link}} | Customer Satisfaction Survey Link | Online shortened URL link for the Customer Satisfaction Survey of the respective route destination. | Appears as a shortened URL. | |
| {{data.short_note_attachment_url}} | Note Attachment URL | Online shortened URL for media attached to the respective note of the respective route destination. | Appears as a shortened URL. | |
| Custom Data | ||||
| {{custom_fields.}} | Custom Data | Custom Data attached to route destinations. | {{custom_fields.item_1}} | |
Not all placeholders can be used in every notification type. For example, variables relating to attached notes or note media can only be used in the “Completed” Notification Type because destination notes are not available to customers until the destination is marked as “Done“. To learn which placeholders can be used in which notification types, refer to the table below:
Not all placeholders work in every notification type. For example, variables for attached notes or note media can only be used in “Completed” notifications, since destination notes aren’t available to customers until the stop is marked Done. See the table below for which placeholders are supported in each notification type.
| Variable | Scheduled | Geofence Entered | Geofence Departed | Completed | Failed | Skipped | Next Stop |
|---|---|---|---|---|---|---|---|
| {{now_date}} | |||||||
| {{now_time}} | |||||||
| {{now_time_formatted}} | |||||||
| {{now_time_am_pm}} | |||||||
| {{arrival_time_formatted}} | |||||||
| {{arrival_date_formatted}} | |||||||
| {{earliest_time_formatted}} | |||||||
| {{max_arrival_time_formatted}} | |||||||
| {{address}} | |||||||
| {{first_name}} | |||||||
| {{last_name}} | |||||||
| {{name}} | |||||||
| {{tracking_number}} | |||||||
| {{customer_po}} | |||||||
| {{invoice_no}} | |||||||
| {{reference_no}} | |||||||
| {{order_no}} | |||||||
| {{weight}} | |||||||
| {{distance_to_next_destination}} | |||||||
| {{alias}} | |||||||
| {{lat}} | |||||||
| {{lng}} | |||||||
| {{address_stop_type}} | |||||||
| {{cost}} | |||||||
| {{cube}} | |||||||
| {{pieces}} | |||||||
| {{revenue}} | |||||||
| {{sequence_no}} | |||||||
| {{email}} | |||||||
| {{phone}} | |||||||
| {{time_window_start}} | |||||||
| {{time_window_end}} | |||||||
| {{geofence_detected_departed_timestamp}} | |||||||
| {{geofence_detected_visited_timestamp}} | |||||||
| {{timestamp_last_visited}} | |||||||
| {{timestamp_last_departed}} | |||||||
| {{note_attachment_url}} | |||||||
| {{data.short_note_attachment_url}} | |||||||
| {{driver_rating_short_link}} | |||||||
| {{projected_eta_date_formatted}} | |||||||
| {{projected_eta_time_formatted}} | |||||||
| {{subject}} | |||||||
| {{custom_fields.test_data}} |
Frequently Asked Questions And Notifications Troubleshooting
Route4Me strives to ensure that your alerts and notifications always reach your customers, and that they are always satisfied. Please refer to the FAQ below if you have any questions or issues with your Customer Alerting and Notifications Module.
In order to be able to use the Customer Email and SMS Alerting and Notifications – Geofence Entered Add-On and adjust the Geofencing Settings for your account, please make sure that you have both the Customer Email and SMS Alerting and Notifications – Geofence Entered Add-On and the Geofencing Analytics Add-On enabled on your account.
In order to be able to use the Customer Email and SMS Alerting and Notifications – Geofence Left Add-On and adjust the Geofencing Settings for your account, please make sure that you have both the Customer Email and SMS Alerting and Notifications – Geofence Entered Add-On and the Geofencing Analytics Add-On enabled on your account.
Yes, by default, Route4Me’s Customer Alerting and Notifications Module allows you to trigger and send your Email Notifications without providing your own SendGrid details. If you don’t want to use your SendGrid credentials, please leave the corresponding fields empty in the “Advanced” tab of the Notification Settings.
Yes, by default, Route4Me’s Customer Alerting and Notifications Module allows you to trigger and send your SMS Notifications without providing your own Twilio details. If you don’t want to use your Twilio credentials, please leave the corresponding fields empty in the “Advanced” tab of the Notification Settings.
Yes, when specifying the phone numbers of the contacts that you want to receive your SMS Messaging Notifications, you need to add their phone numbers with their corresponding country code(s) (i.e., +1-888-552-9045).
You can use Route4Me’s default Email Notifications Templates without providing your own SendGrid API Key. If you don’t want to use your SendGrid API Key, please make sure to leave the SendGrid API Key field empty in the Advanced tab. You are required to provide your SendGrid API Key only if you want to use your custom SendGrid Email Templates.
If you want to remove Route4Me’s details from your Email Notifications, you need to use your own custom Email Templates. To do so, you need to provide your SendGrid API Key in the Advanced tab and your SendGrid Template ID in the Email Notifications Editor in the Notifications tab. Additionally, learn more about SendGrid Email Templates.
No, in order to be able to send SMS and Email Notifications, you are not required to have any sub-users on your Route4Me account. However, in order for the Geofence Entered and Geofence Left Notifications to be triggered, someone needs to enter and leave the geofences set around the locations of the corresponding customers, or for the Next Stop and Visit Completed Notifications to be triggered, someone needs to mark the corresponding destinations as Visited and Departed. All these actions can be executed by you as the Account Owner, as well as by any of your sub-users (i.e., Drivers).
By default, in the “Service Providers” section in the “Advanced” tab, you have SendGrid selected as your default Email Notifications service provider and Twilio as your default SMS Notifications service provider. NOTE: If you set your Email and SMS Service Providers settings to Default, your Email and SMS notifications will be disabled (the “Default” value disables your Notifications).
To upload the Driver and Destination icons for the Customer Portal associated with your Customer Alerting and Notifications Module, you need to make sure that you have your icons hosted on the hosting service of your choice, and then you need to insert URLs of your icons into the corresponding fields in the “Icons” tab.
Visit Route4Me's Marketplace to Check out Associated Add-Ons:
- Notifications & Alerts
Route Scheduled
- Notifications & Alerts
Geofence Entered
- Notifications & Alerts
Geofence Departed
- Notifications & Alerts
Visit Completed
- Notifications & Alerts
Notify Next Customer
About author: Kristian Andreev
Kristian is a Technical Writer at Route4Me. With over a decade of experience in writing and localization, he's an expert at communicating complex technical data in a clear, concise, and user-friendly way. Passionate about bridging the gap between engineers and users, he specializes in creating documentation to streamline onboarding, enhance product usability, and support global teams on the path to success.