Custom Data Add-On – Route Stops, Orders, Addresses And Users

Depending on your last mile routing optimization needs and unique business model, you may need to operate with various types of data that don’t fit into Route4Me’s reserved user interface fields. Route4Me’s Custom Data Add-On enables you to attach additional details and data to your route stops, drivers and users, customer orders, addresses, and more.

For example, you can attach additional order, customer, or location details to route stops. Add additional information to the user profiles of drivers, route planners, dispatchers, and other team members. Attach additional details to your customer orders and addresses. In this guide, you can learn how to add Custom Data to route stops, orders, addresses, and users on your enterprise route management software.


Table of Contents


Upload, Add And Manage Route Stops With Custom Data

Depending on your specific routing requirements and unique business model, you may need to attach various types of data to your route stops that don’t fit into Route4Me’s reserved business route software fields. You can use Custom Data to attach additional customer, order, location, and any other details to your route stops. Furthermore, the Custom Data attached to route stops from the Route4Me Web Platform can be accessed and used by drivers and file team members using Route4Me’s Mobile Apps.

For your convenience, you can upload spreadsheets with route addresses and Custom Data or manually add Custom Data to individual stops. Further, you can learn how to upload route stop addresses with Custom Data, add Custom Data to route stops, and manage the Custom Data attached to route stops. Additionally, you can learn how to access the Custom Data attached to route stops using Route4Me’s Mobile Route Planning Apps.
 

Upload Route Stops With Custom Data For Route Optimization

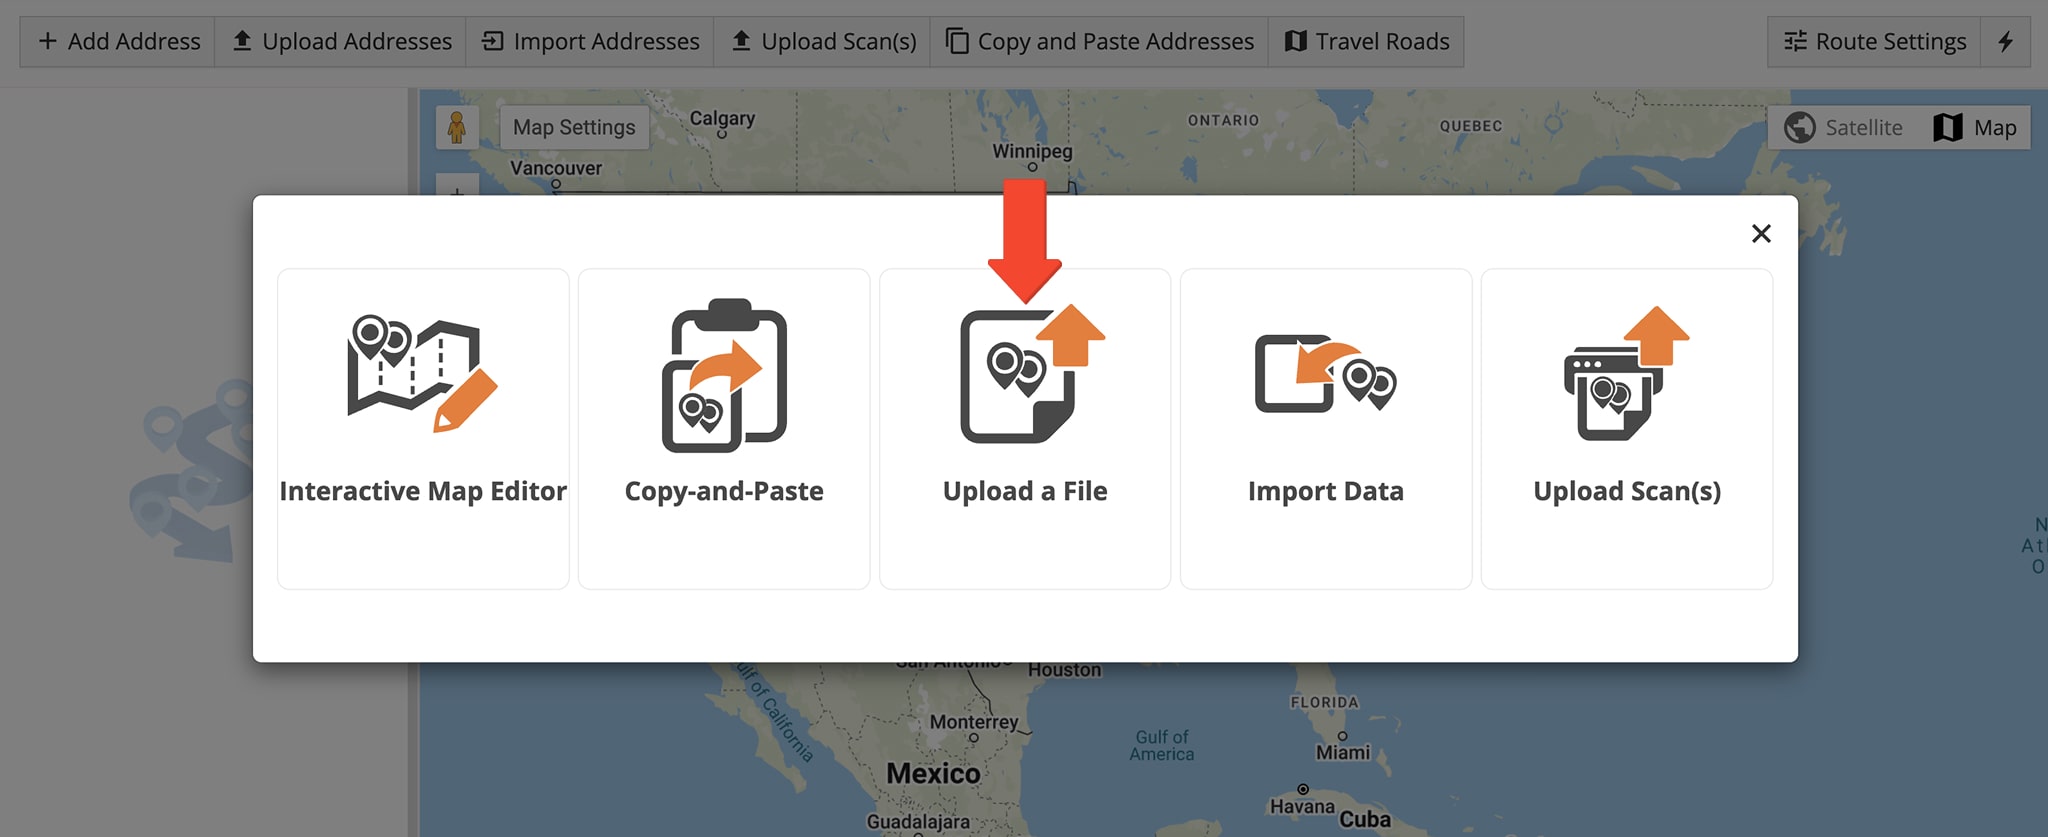
To upload route stops with Custom Data for planning and optimizing routes, go to “Routes” and then select “Plan New Route” in the navigation menu. After that, select the “Upload a File” route stops import method. Additionally, learn more about Planning Routes by Uploading Spreadsheets.

Upload a file with route stop addresses and custom data to plan and optimize routes.


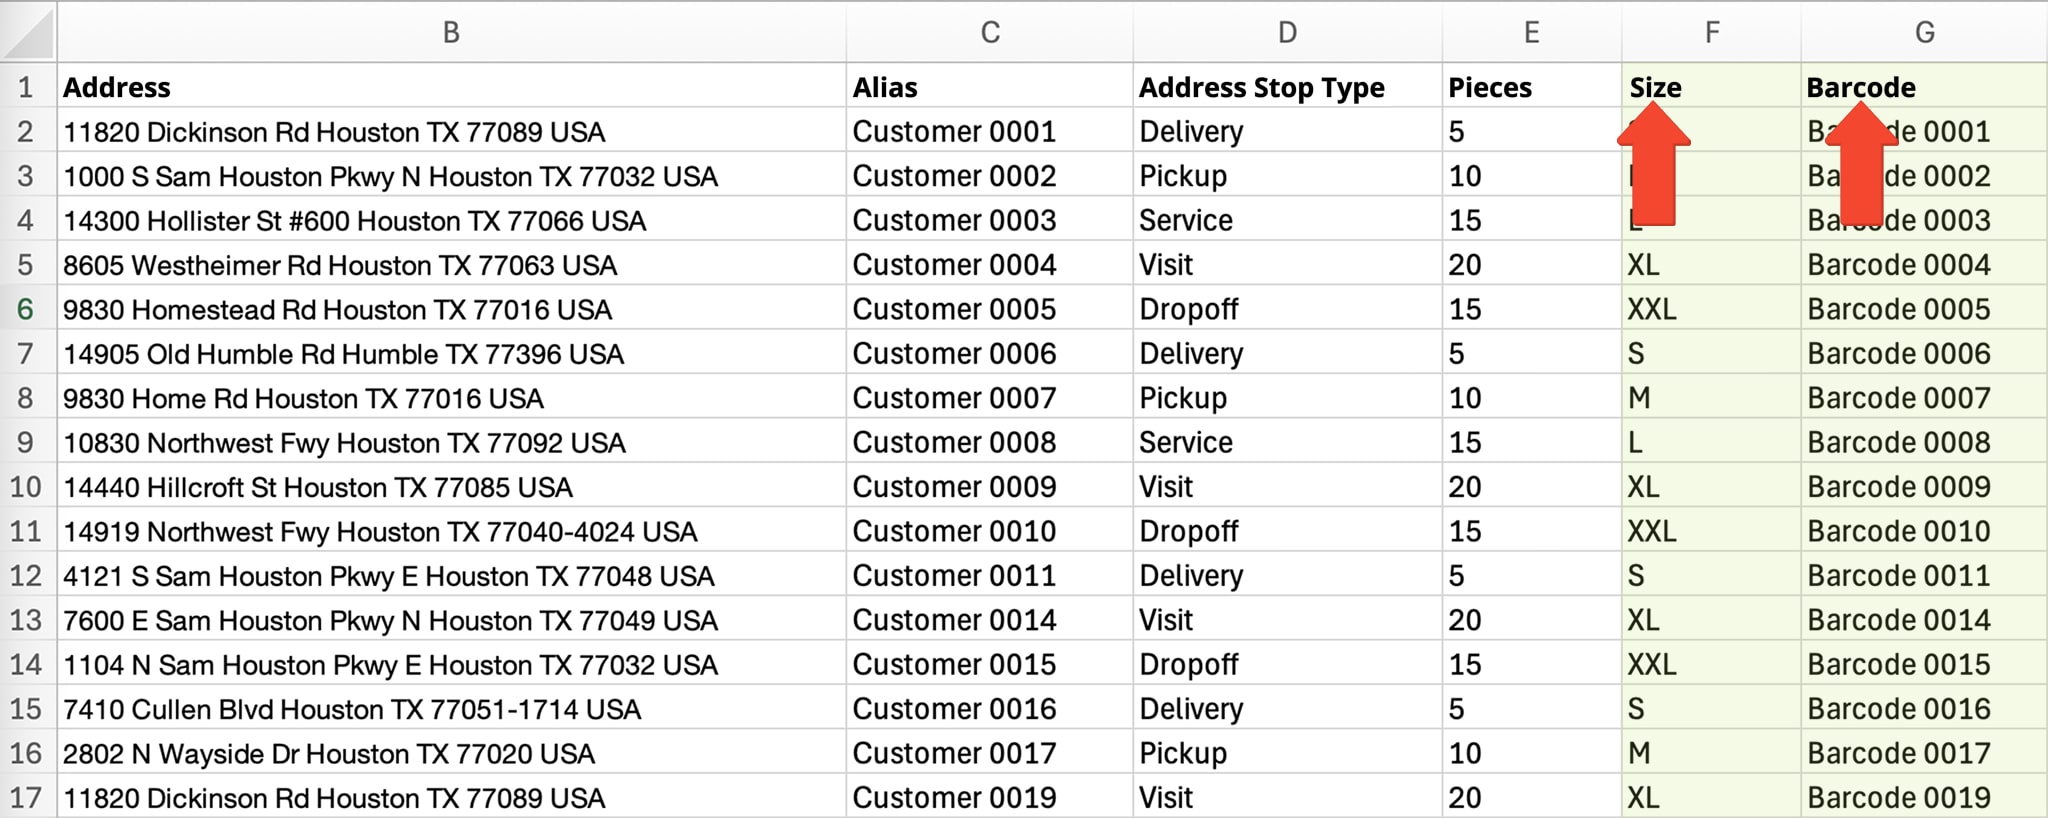
Next, format your route spreadsheet for uploading into Route4Me. In detail, a Route4Me spreadsheet is made of organized Columns and Rows. To create a column, simply add the preferred column name to the header (first row) of your spreadsheet and then populate its following rows with the respective data. Accordingly, Route4Me supports a specific set of reserved fields that can be associated with route stops (i.e., address, alias, email, etc.). To add Custom Data to an address, add columns with custom names to your spreadsheet and then populate custom column rows with the preferred data next to each address. Additionally, learn more about Route4Me’s Spreadsheets Formatting Requirements.

Format a route spreadsheet with Custom Data and upload the file to plan and optimize routes.


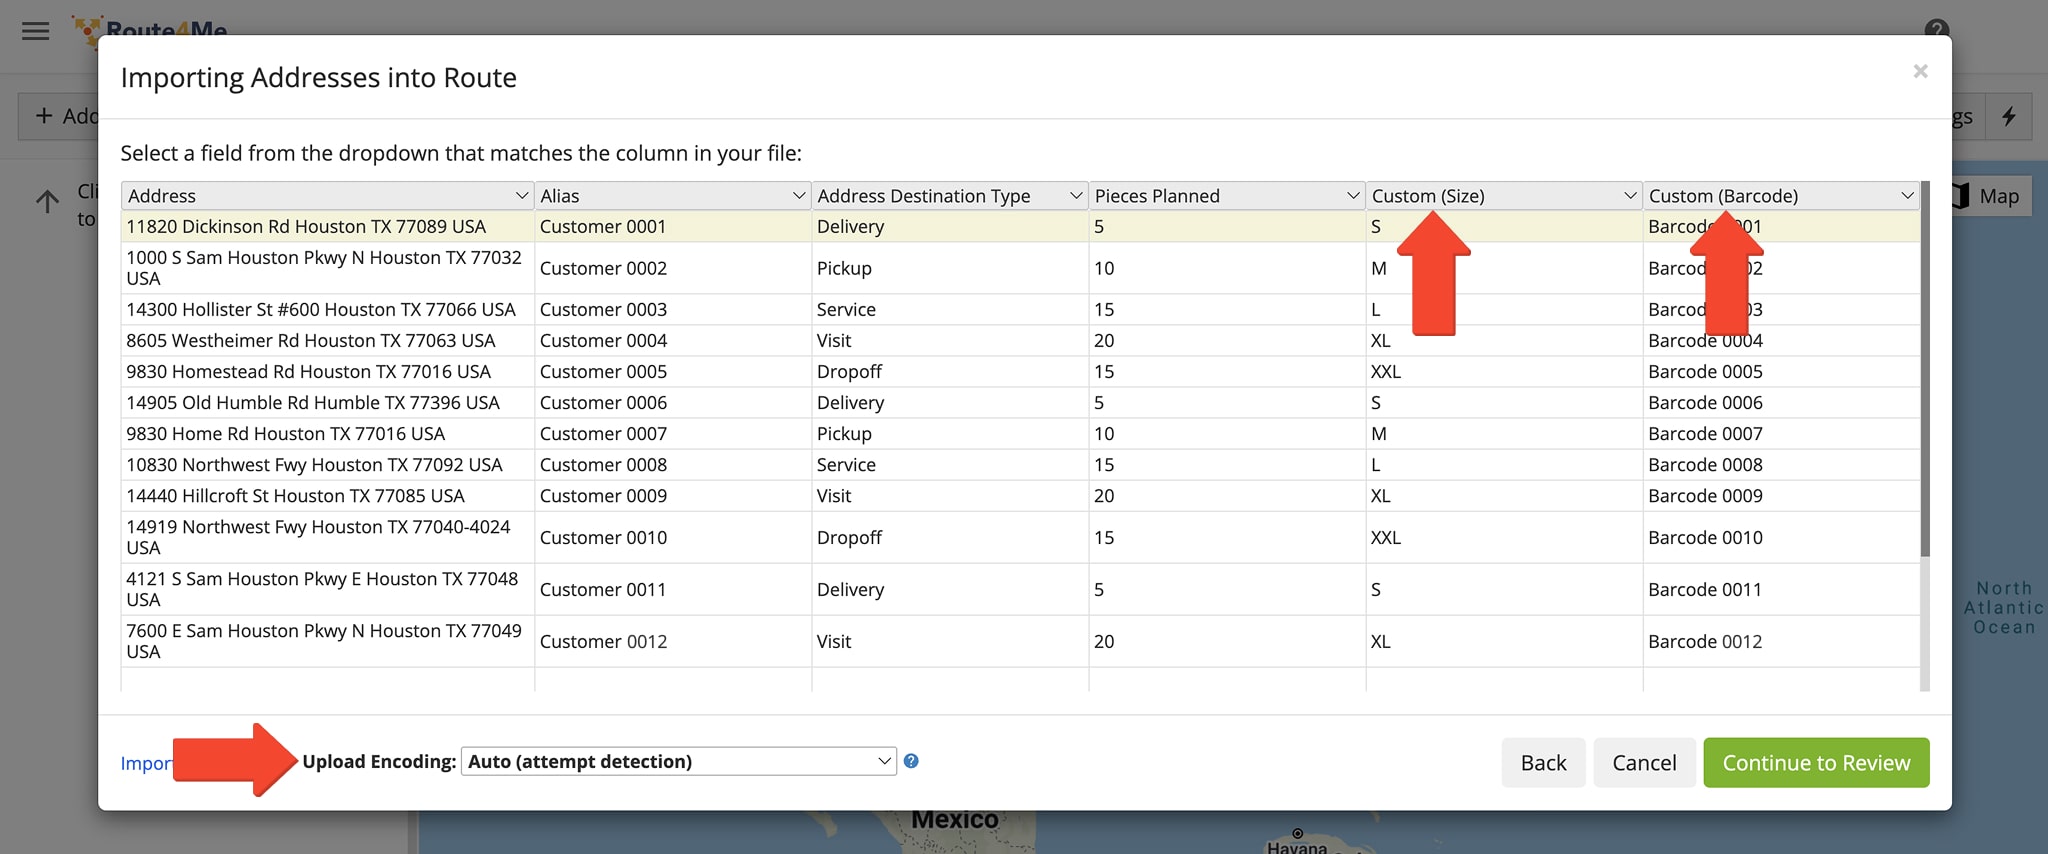
Next, after uploading the route spreadsheet, Route4Me automatically verifies each column. Accordingly, columns that match Route4Me’s reserved fields are automatically mapped to their respective column names. Columns with Custom Data are assigned the “Custom” column name plus the custom column names from the uploaded spreadsheets in brackets.

Verify addresses and custom data in the uploaded route spreadsheet and proceed to plan and optimize last-mile routes.


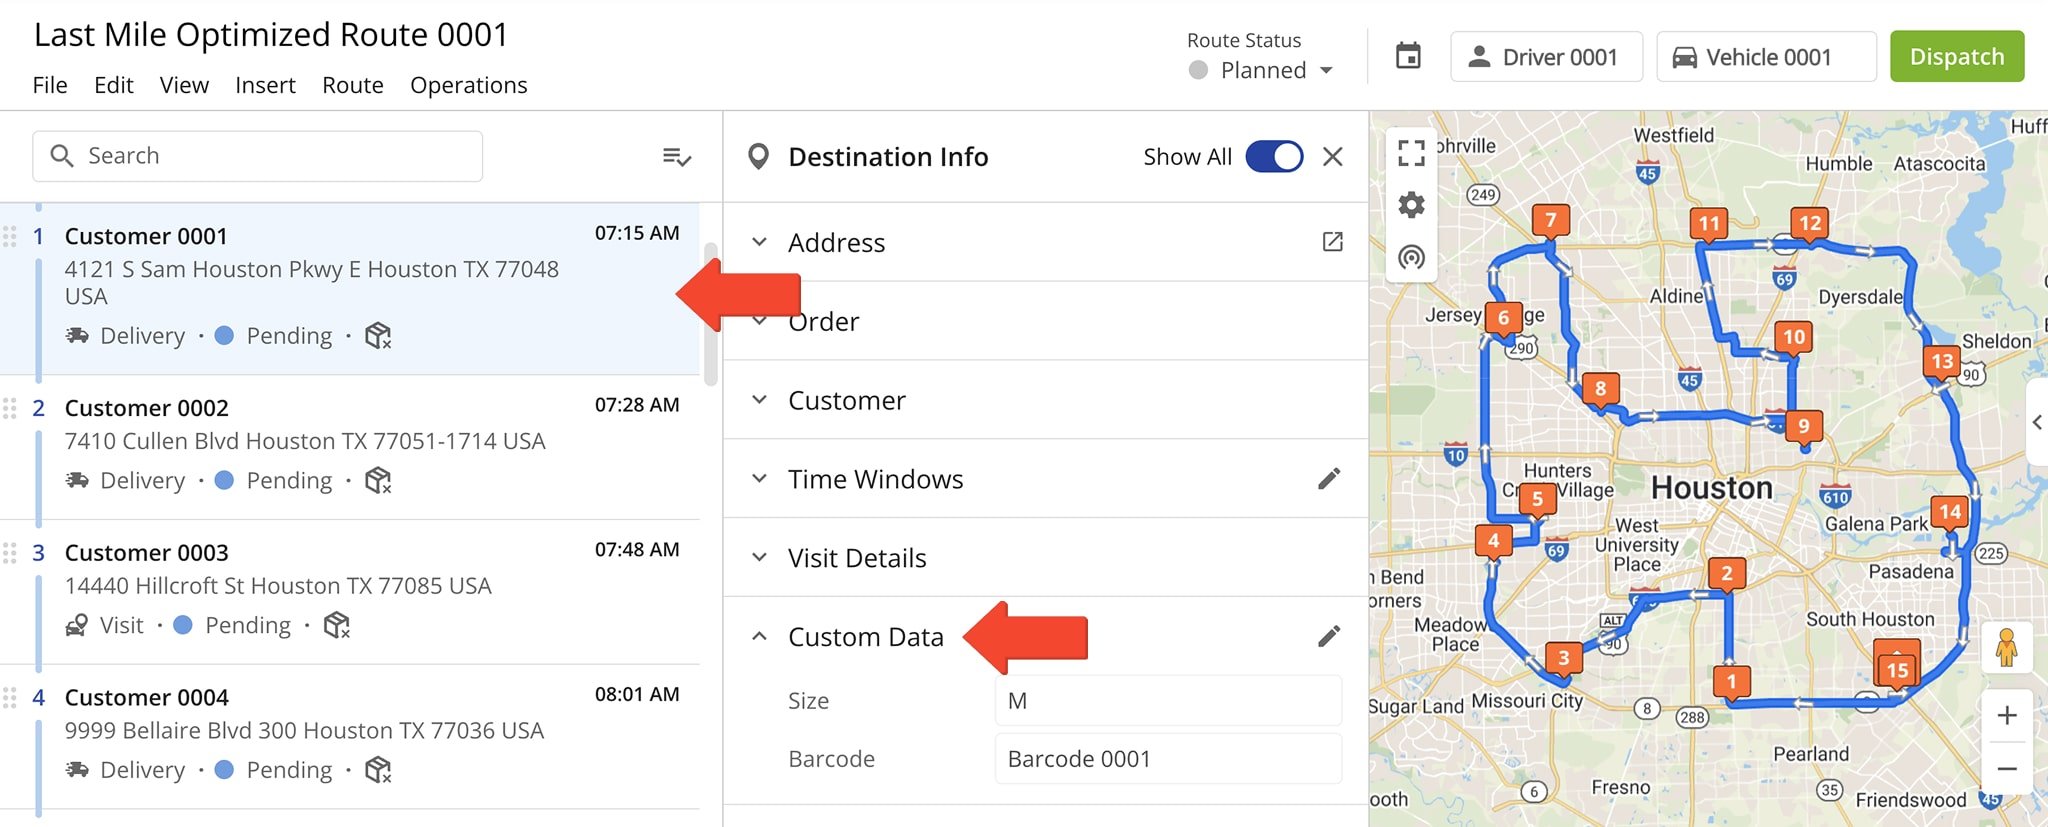
Accordingly, when you upload a spreadsheet and optimize the route, the Custom Data from the spreadsheet is automatically attached to its respective stops. To open and manage the Custom Data attached to a route stop, open the preferred route in the Route Editor. Next, click on the route stop to open its stop manifest and then scroll down to the stop’s “Custom Data” section. In the stop’s “Custom Data” section, you can view and edit the Custom Data attached to the stop.

Custom Data attached to route stops in Route4Me's route planning and optimization Route Editor software.


Add And Edit Custom Data Attached To Route Stops In Route Editor

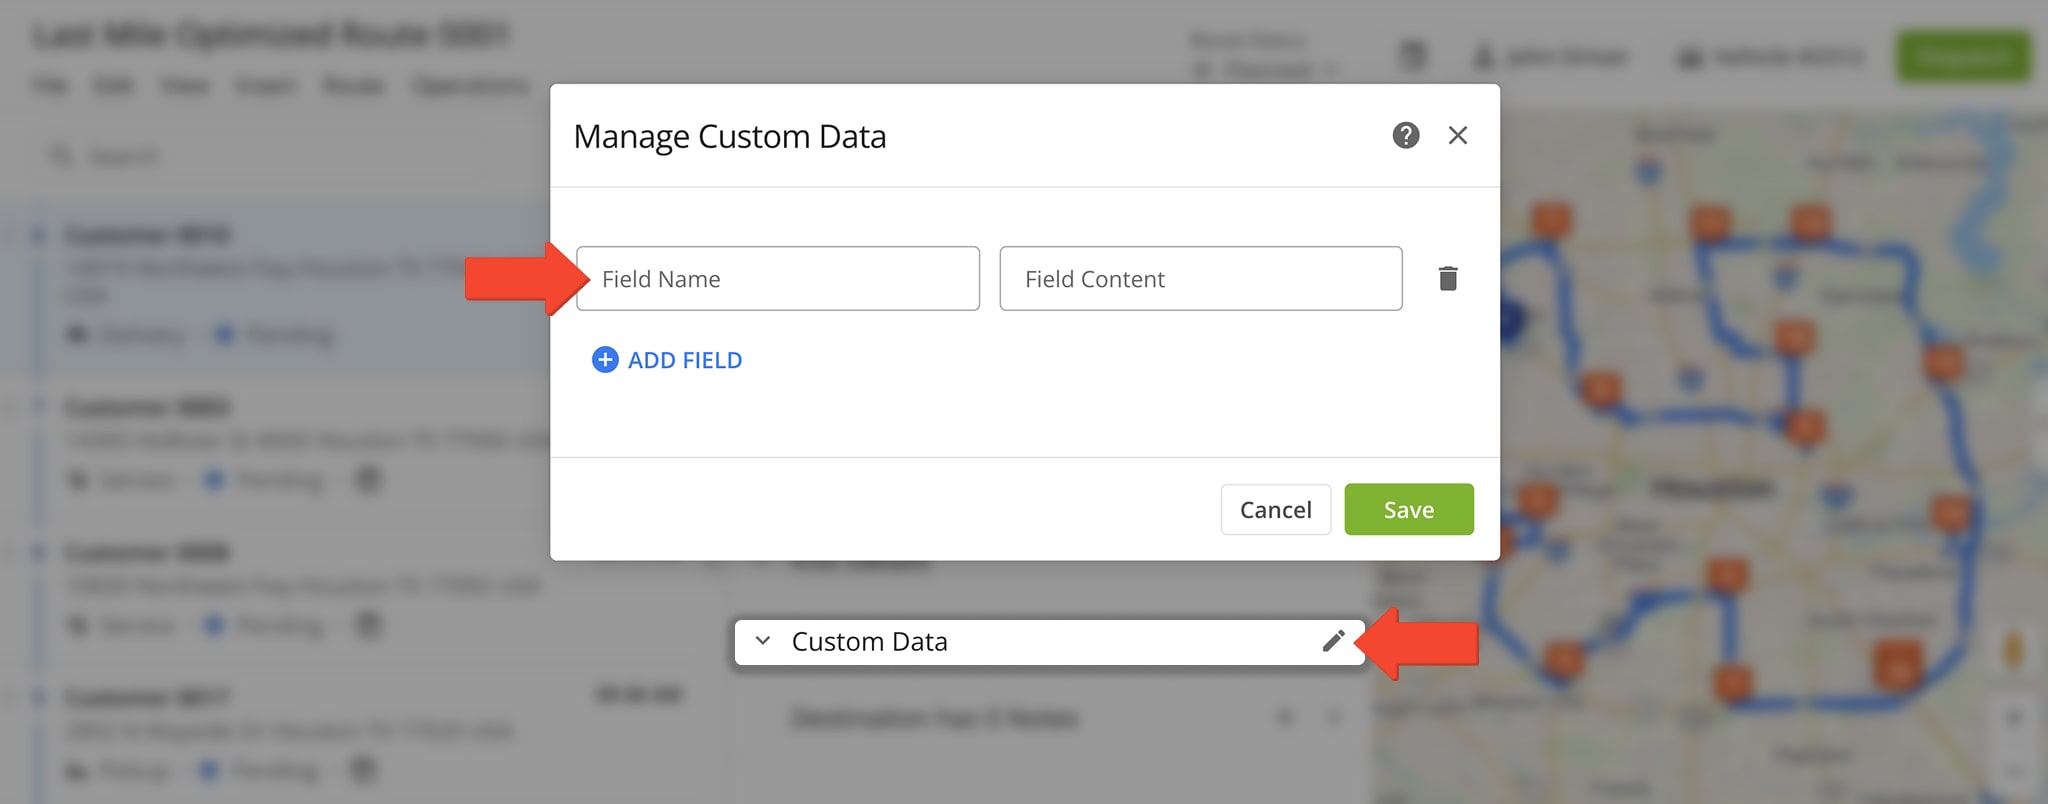
In addition to uploading Custom Data with route stops in a spreadsheet, you can manually attach Custom Data to individual stops. To do so, open the preferred route in the Route Editor. After that, click to open the preferred route stop and then click the “Add Custom Data” button at the top of the stop’s manifest. Next, add one or multiple Custom Data entries. Accordingly, a single Custom Data Entry consists of the Custom Data Field and its respective Custom Data Field Content.

Add Custom Data to route stops in Route4Me's Route Editor.


To open and manage the Custom Data attached to a route stop, open the preferred route in the Route Editor. Next, click on the preferred route stop to open its stop manifest and then scroll down to the stop’s “Custom Data” section.

You can edit the values in Custom Data entries, but you can’t edit Custom Data entry names. Furthermore, you can add the Custom Data entry of one route stop to all stops on the route. To do so, click on the three dots menu icon next to the preferred entry and then select “Apply to All” from the menu. To Delete a Custom Data entry, click on the three dots menu icon next to it and then select “Delete” from the menu. Additionally, learn more about Editing Routes Using Route4Me’s Route Editor.

Open the Custom Data attached to route stops in Route4Me's last-mile route optimization Route Editor software.


iPhone And Android Mobile Route Planning Apps Custom Data

In addition to adding Custom Data to route stops on Route4Me’s business route planner, you can access Custom Data using Route4Me’s Route Planning Mobile Apps. In detail, you can attach Custom Data to route stops using Route4Me’s Web Platform and then dispatch the route to a driver or any other field member. After that, the assigned user can open the respective route using Route4Me’s Android Route Planning App or iOS Route Planning App and view the given Custom Data. NOTE: Route4Me’s Mobile Apps allow only viewing and not editing the Custom Data attached to route stops.


iOS Mobile Route Planning App Route Stops Custom Data

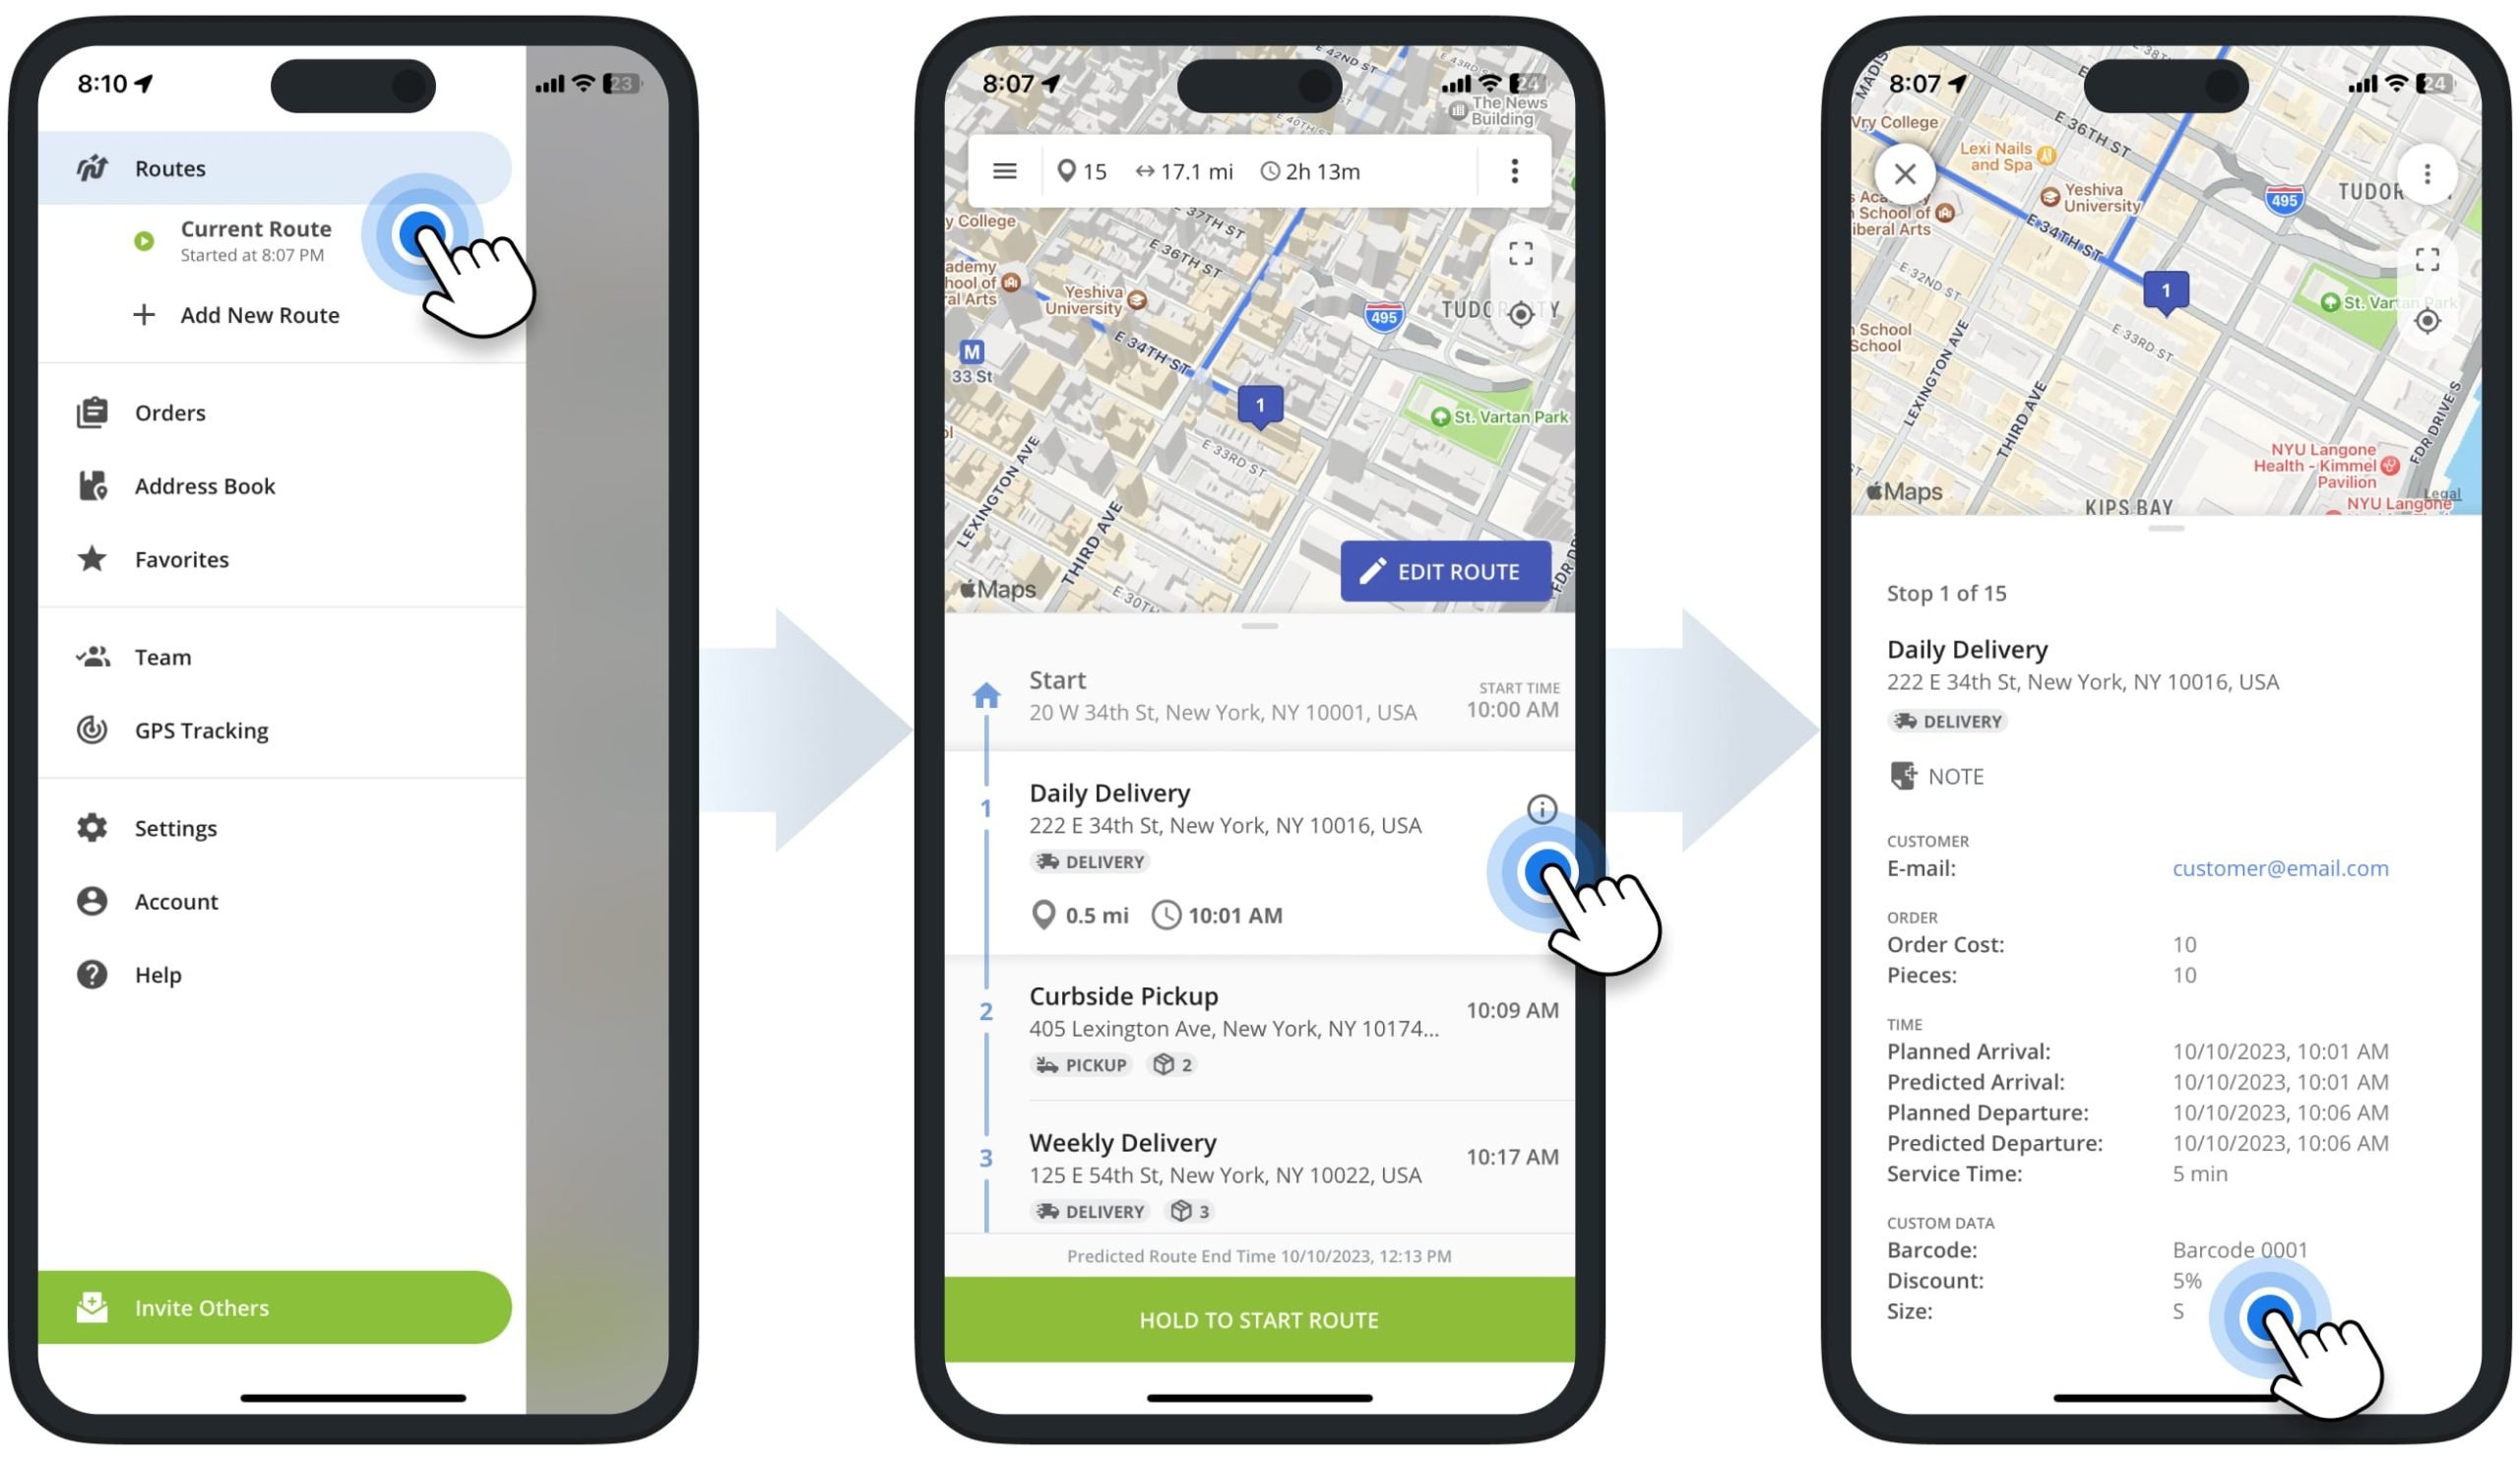
To open Custom Data using Route4Me’s iOS Route Planner App, open the preferred route, tap on the route stop, and then tap the information icon next to this stop. After that, scroll to the “Custom Data” section of the opened route stop.  NOTE: Route4Me’s iOS Mobile Route Planning App allows only viewing and not editing the Custom Data attached to route stops.

Custom Data attached to route stops on Route4Me's iPhone and iPad Route Planning app for drivers, field service, and sales workers.


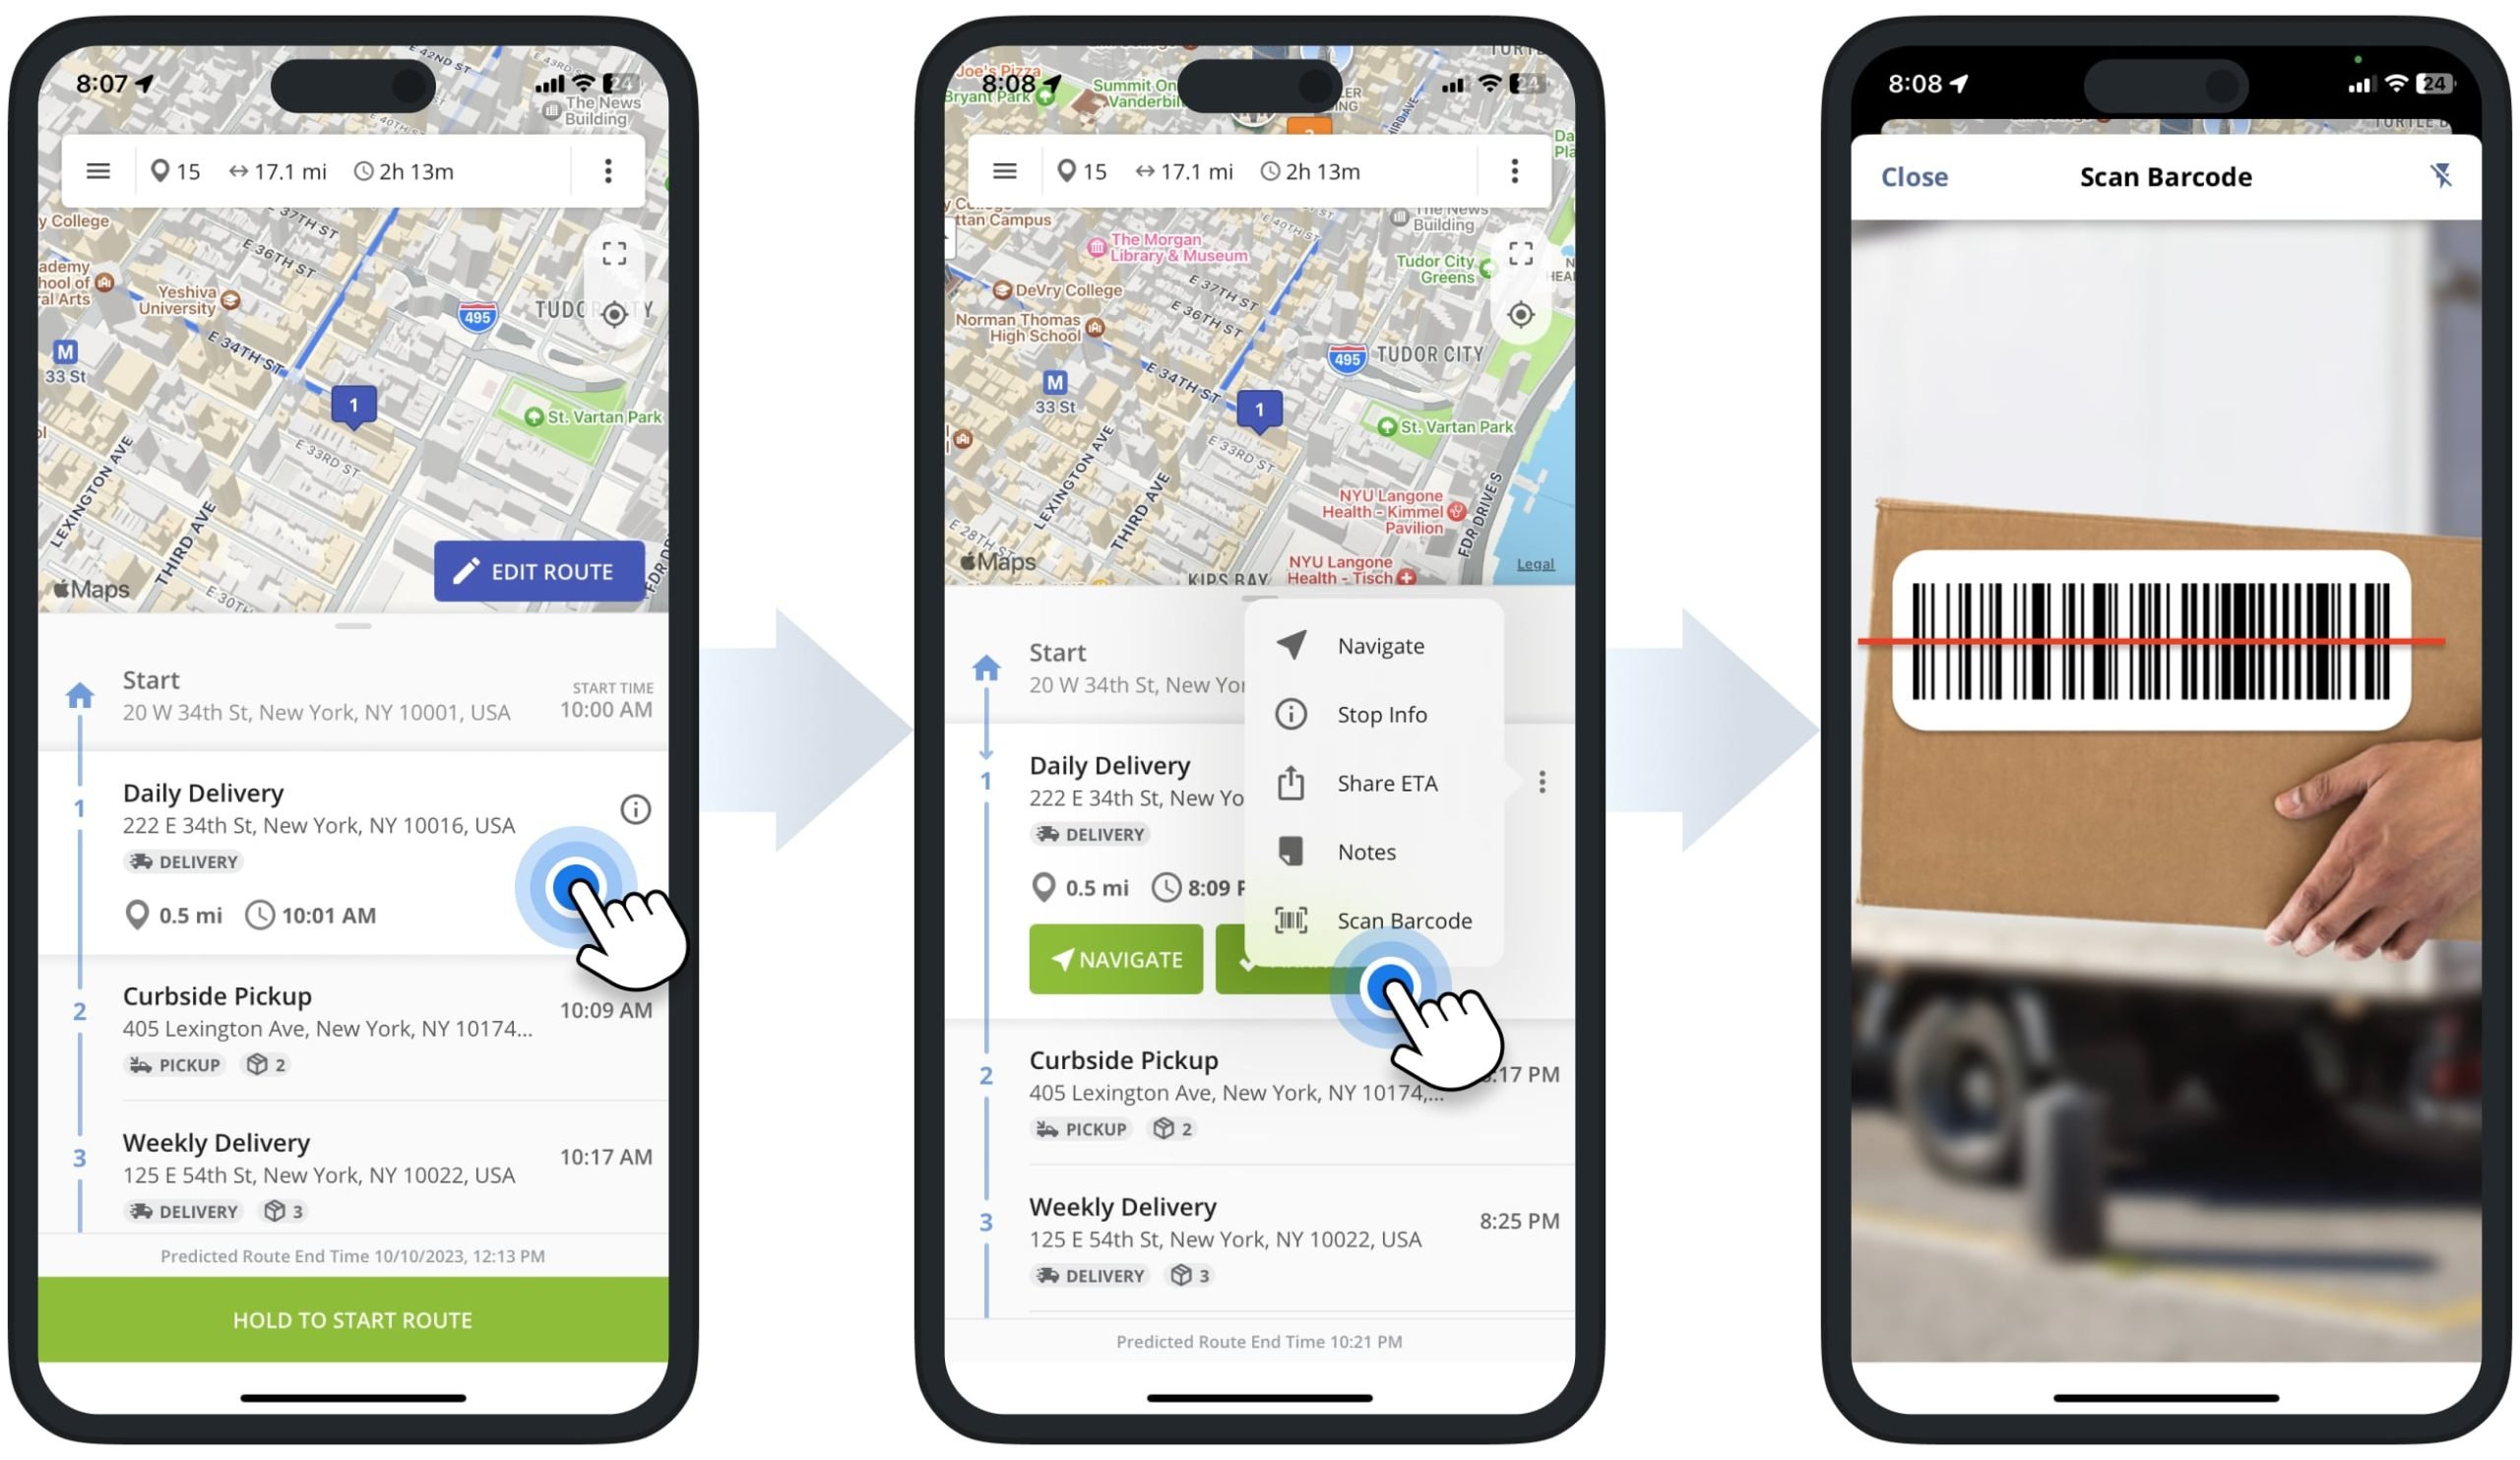
Additionally, you can attach Custom Data to route stops using Route4Me’s iOS Route Planning App integrated barcode scanner. To do so, tap on the preferred routes top, tap the three dots menu icon, and then select “Barcode Scanner” from the menu. Next, use the in-app barcode scanner to scan the barcode, and the app will automatically attach the barcode’s data to the route stop as Custom Data. Additionally, learn more about using Route4Me’s iPhone Route Planner app’s barcode scanner.

Attach barcode Custom Data to route stops using the in-app barcode scanner on Route4Me's iPhone and iPad iOS Route Planning app for drivers.


Android Mobile Route Planning App Route Stops Custom Data

Similarly, to open Custom Data using Route4Me’s Android Route Planner App, open the route, tap on the route stop, and then select “Stop Info” from the menu. After that, scroll to the “Custom Data” section. NOTE: Route4Me’s Android Mobile Route Planning App allows only viewing and not editing the Custom Data attached to route stops.

Custom Data attached to route stops on Route4Me's Android Route Planning app for drivers, field service, and sales team members.


Additionally, you can attach Custom Data to route stops using Route4Me’s Android Route Planning App integrated barcode scanner. To do so, tap on the preferred route stop and then select “Barcode Scanner” from the menu. Next, use the in-app barcode scanner to scan the barcode, and the app will automatically attach the barcode’s data to the route stop as Custom Data. Additionally, learn more about using Route4Me’s Android Route Planner app’s barcode scanner.

Using the in-app barcode scanner on Route4Me's Android Route Planning app for drivers to attach barcode Custom Data to route stops.


Order Management – Add And Manage Orders Custom Data

Route4Me’s Delivery Management System enables you to easily import, sort, schedule, manage, route, and deliver hundreds of thousands of orders. Depending on your specific last-mile routing requirements and unique business model, you may want to attach various types of additional business details and other data to your orders. For your convenience, you can use Custom Data to attach additional details to your orders in addition to using reserved order fields. Furthermore, Custom Data can be used for attaching barcodes to orders and using order barcodes for registering orders, loading orders, unloading orders, and more.

Additionally, you can use your orders for planning and optimizing routes. Accordingly, the Custom Data attached to the orders is automatically attached to the respective route stops on planned routes. Furthermore, the order Custom Data attached to route stops can then be accessed using Route4Me’s trusted route planner and Route4Me’s Mobile Apps.


Upload Orders With Custom Data Into Your Route4Me Orders List

You can easily upload thousands of orders using a CSV spreadsheet, and Route4Me will automatically geocode and create orders for you. Additionally, you can upload orders with Custom Data. In detail, the Order Upload Spreadsheet consists of organized Columns and Rows. To add a column, add the respective column name to the header (first row) of the spreadsheet and then populate its following rows with the corresponding order data. Accordingly, all data added in the same row belongs to the same order. To add Custom Data to orders, simply add the preferred Custom Column Names to your spreadsheet and then populate custom column rows with the preferred information next to each order address. To add barcodes to orders, use the “BARCODE” column. Additionally, learn more about Route4Me’s Spreadsheet Formatting Requirements.

Format a spreadsheet with order details and Custom Data for uploading into Route4Me's route planning software.


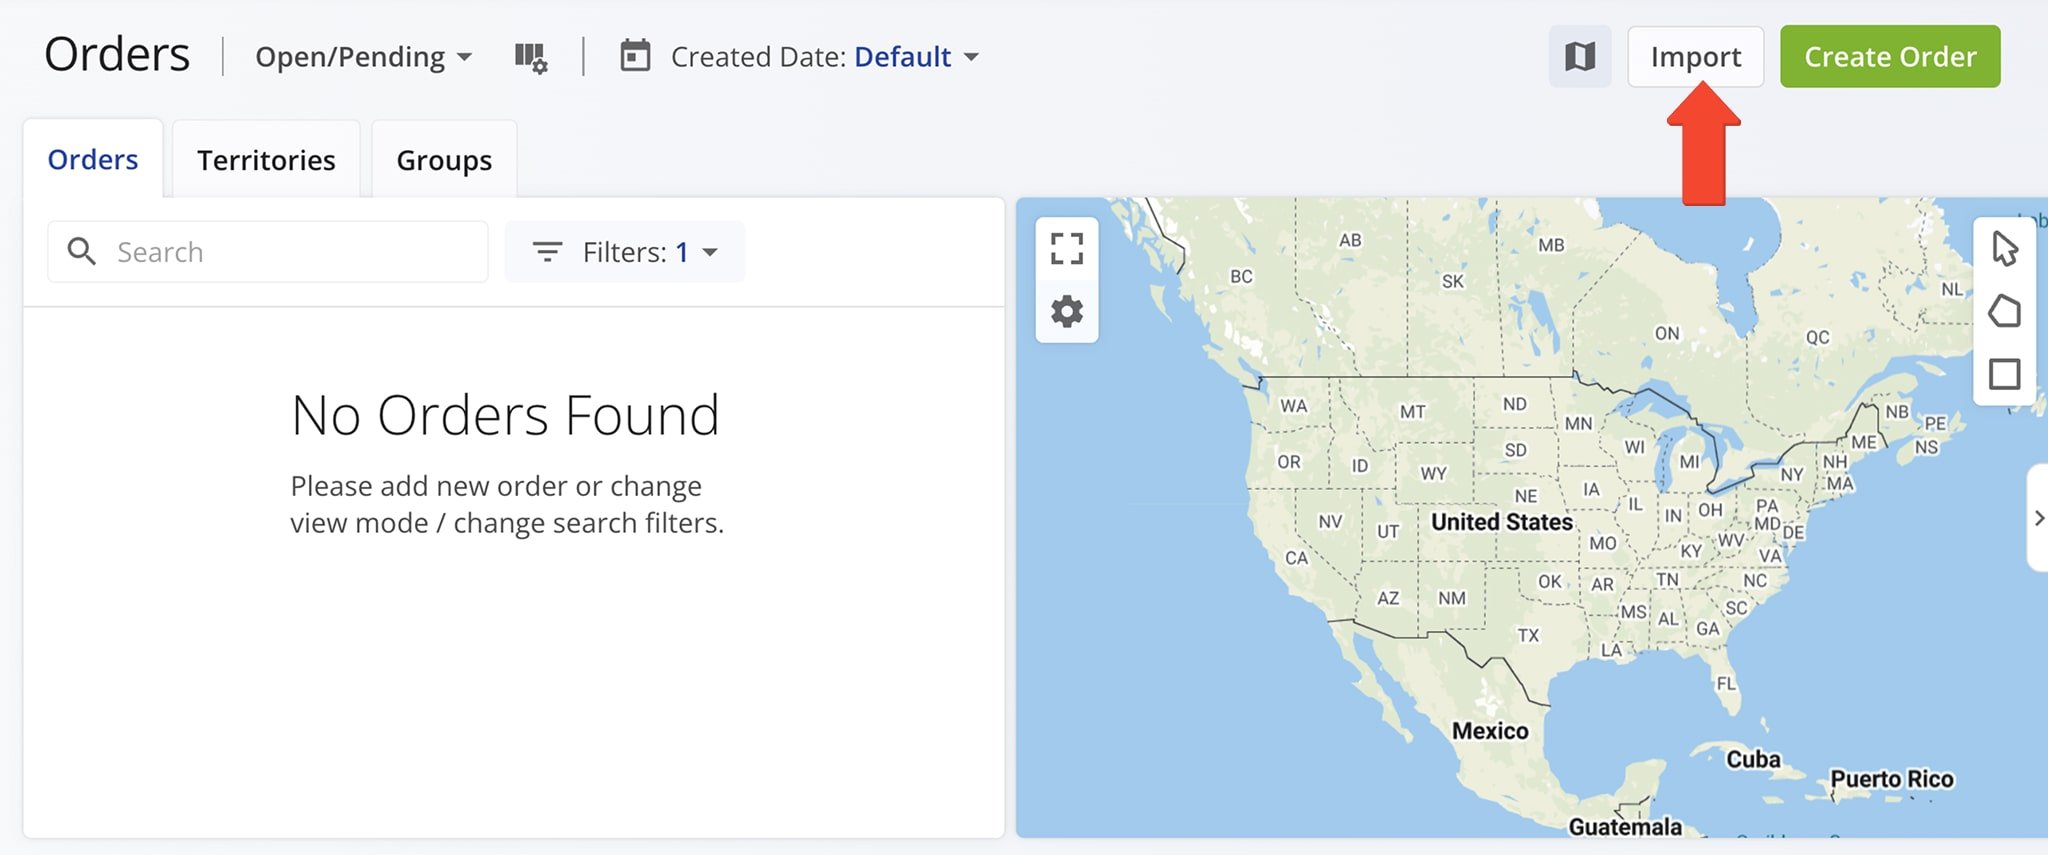
Next, go to “Orders” and then “Orders List” from the navigation menu. After that, click “Upload” in the top right corner of the Orders List and then upload your file. After uploading the spreadsheet, your reliable route planning software automatically validates and matches column names from the uploaded spreadsheet to Route4Me’s order fields. Accordingly, matched column names are displayed with a checkmark next to them. Columns with order Custom Data are assigned the “Custom” column name plus the custom column names from the uploaded spreadsheet in brackets.

Validate uploaded orders with Custom Data in Route4Me's Route Planning Software.


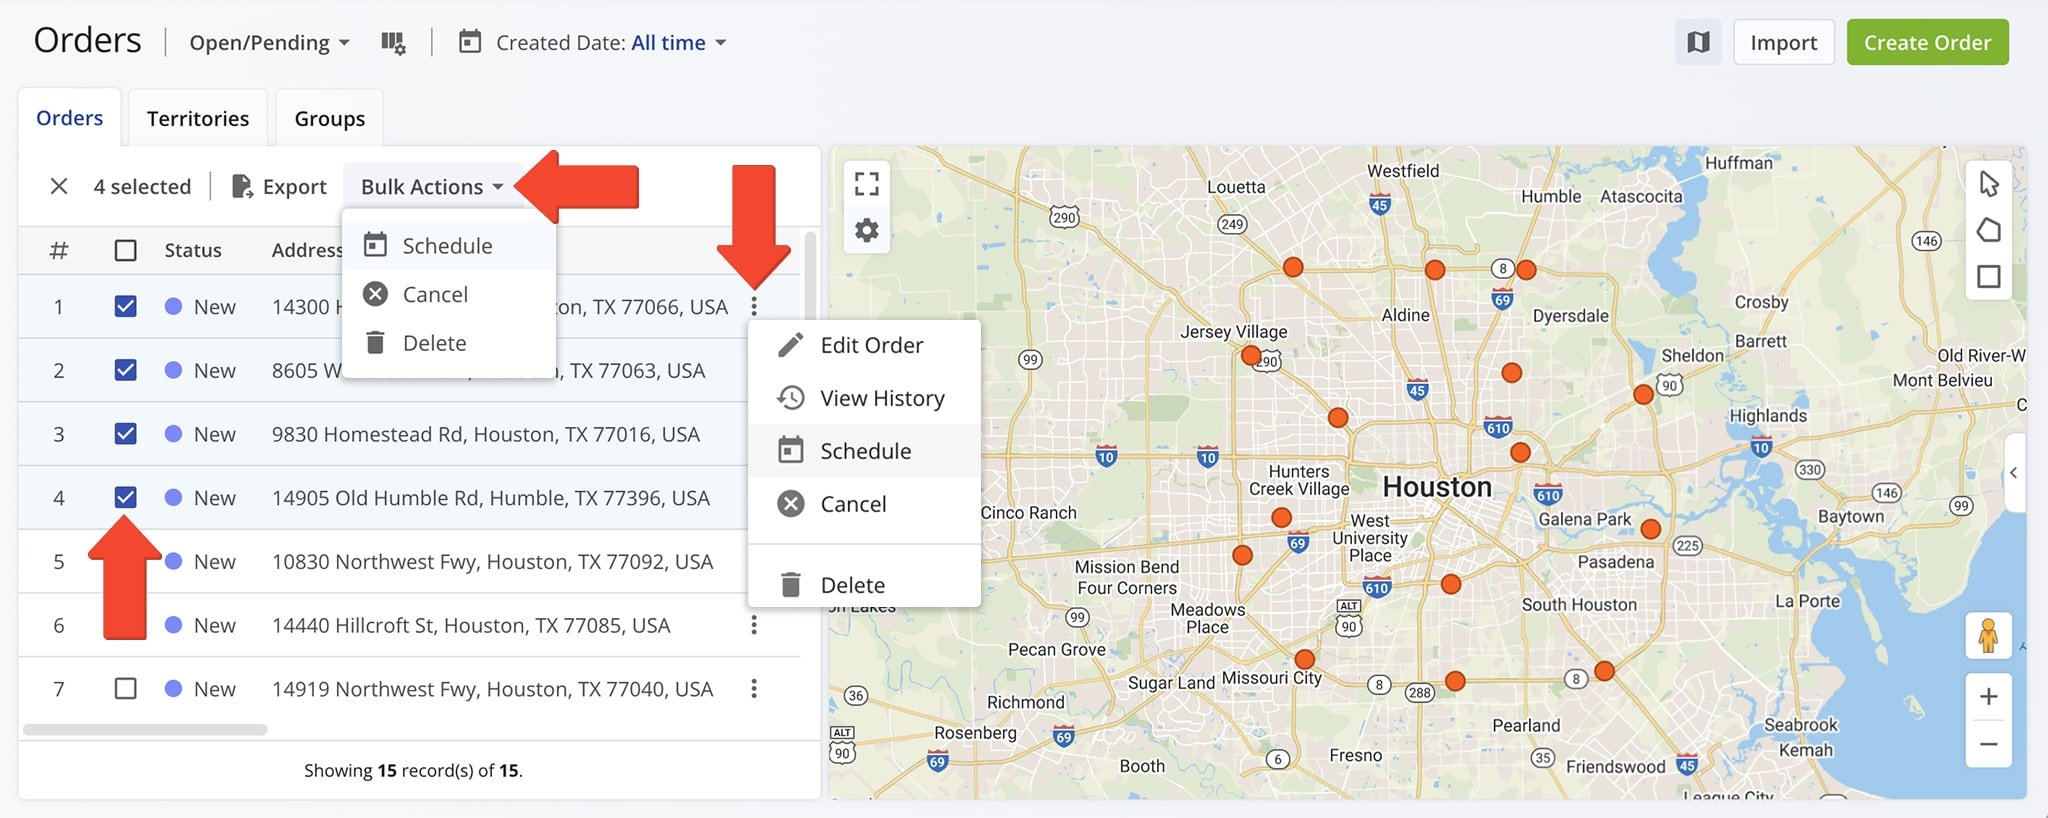
Once orders are uploaded, they instantly become available in your Orders List with the “New” status and are scheduled for the upload date. Accordingly, to use the uploaded orders for planning new routes or insert them into planned routes, schedule these orders for the preferred date. To access the Custom Data attached to a specific order, click on the three dots menu icon next to the preferred order and then select “Edit” from the menu. After that, go to the “Details” tab, where you can view and manage the order’s Custom Data. Additionally, learn more about uploading orders and using orders for planning routes.

Uploaded orders are assigned the New order statuses, and the Custom Data in orders can be managed by editing orders.


Add Custom Data To Individual Orders In Route4Me Orders List

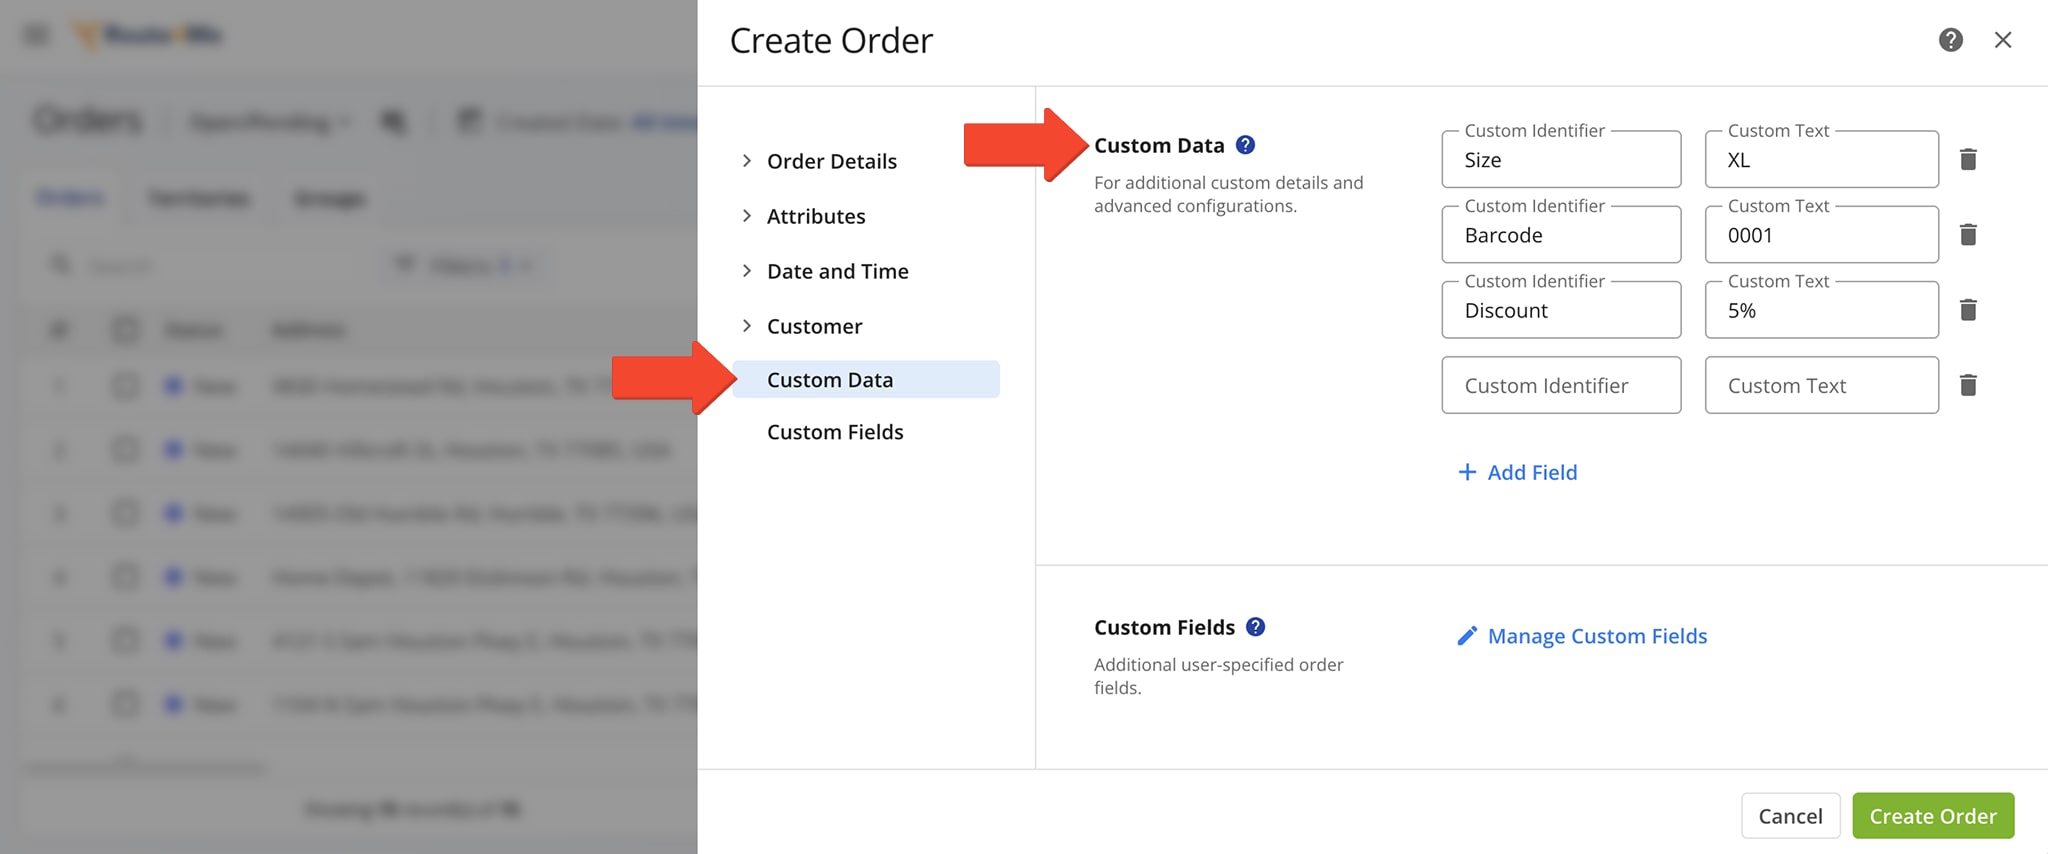
Additionally, you can add Custom Data to individual orders when creating new orders or when editing existing orders. To manually create a new order in your Orders List, click “Add New Order” and then fill out the order’s details. Accordingly, to edit an order, click on the three dots menu icon next to the preferred order and then select “Edit” from the menu.

Next, go to the “Details” tab, where you can add new and manage existing Custom Data of the order. Accordingly, a single Custom Data Entry consists of the Custom Data Field and its respective Custom Data Field Content. Additionally, learn more about creating new orders and managing existing orders, and using Custom Data for order barcodes.

Create new orders or manage scheduled orders and add Custom Data to orders.


Orders With Custom Data On Planned And Optimized Routes

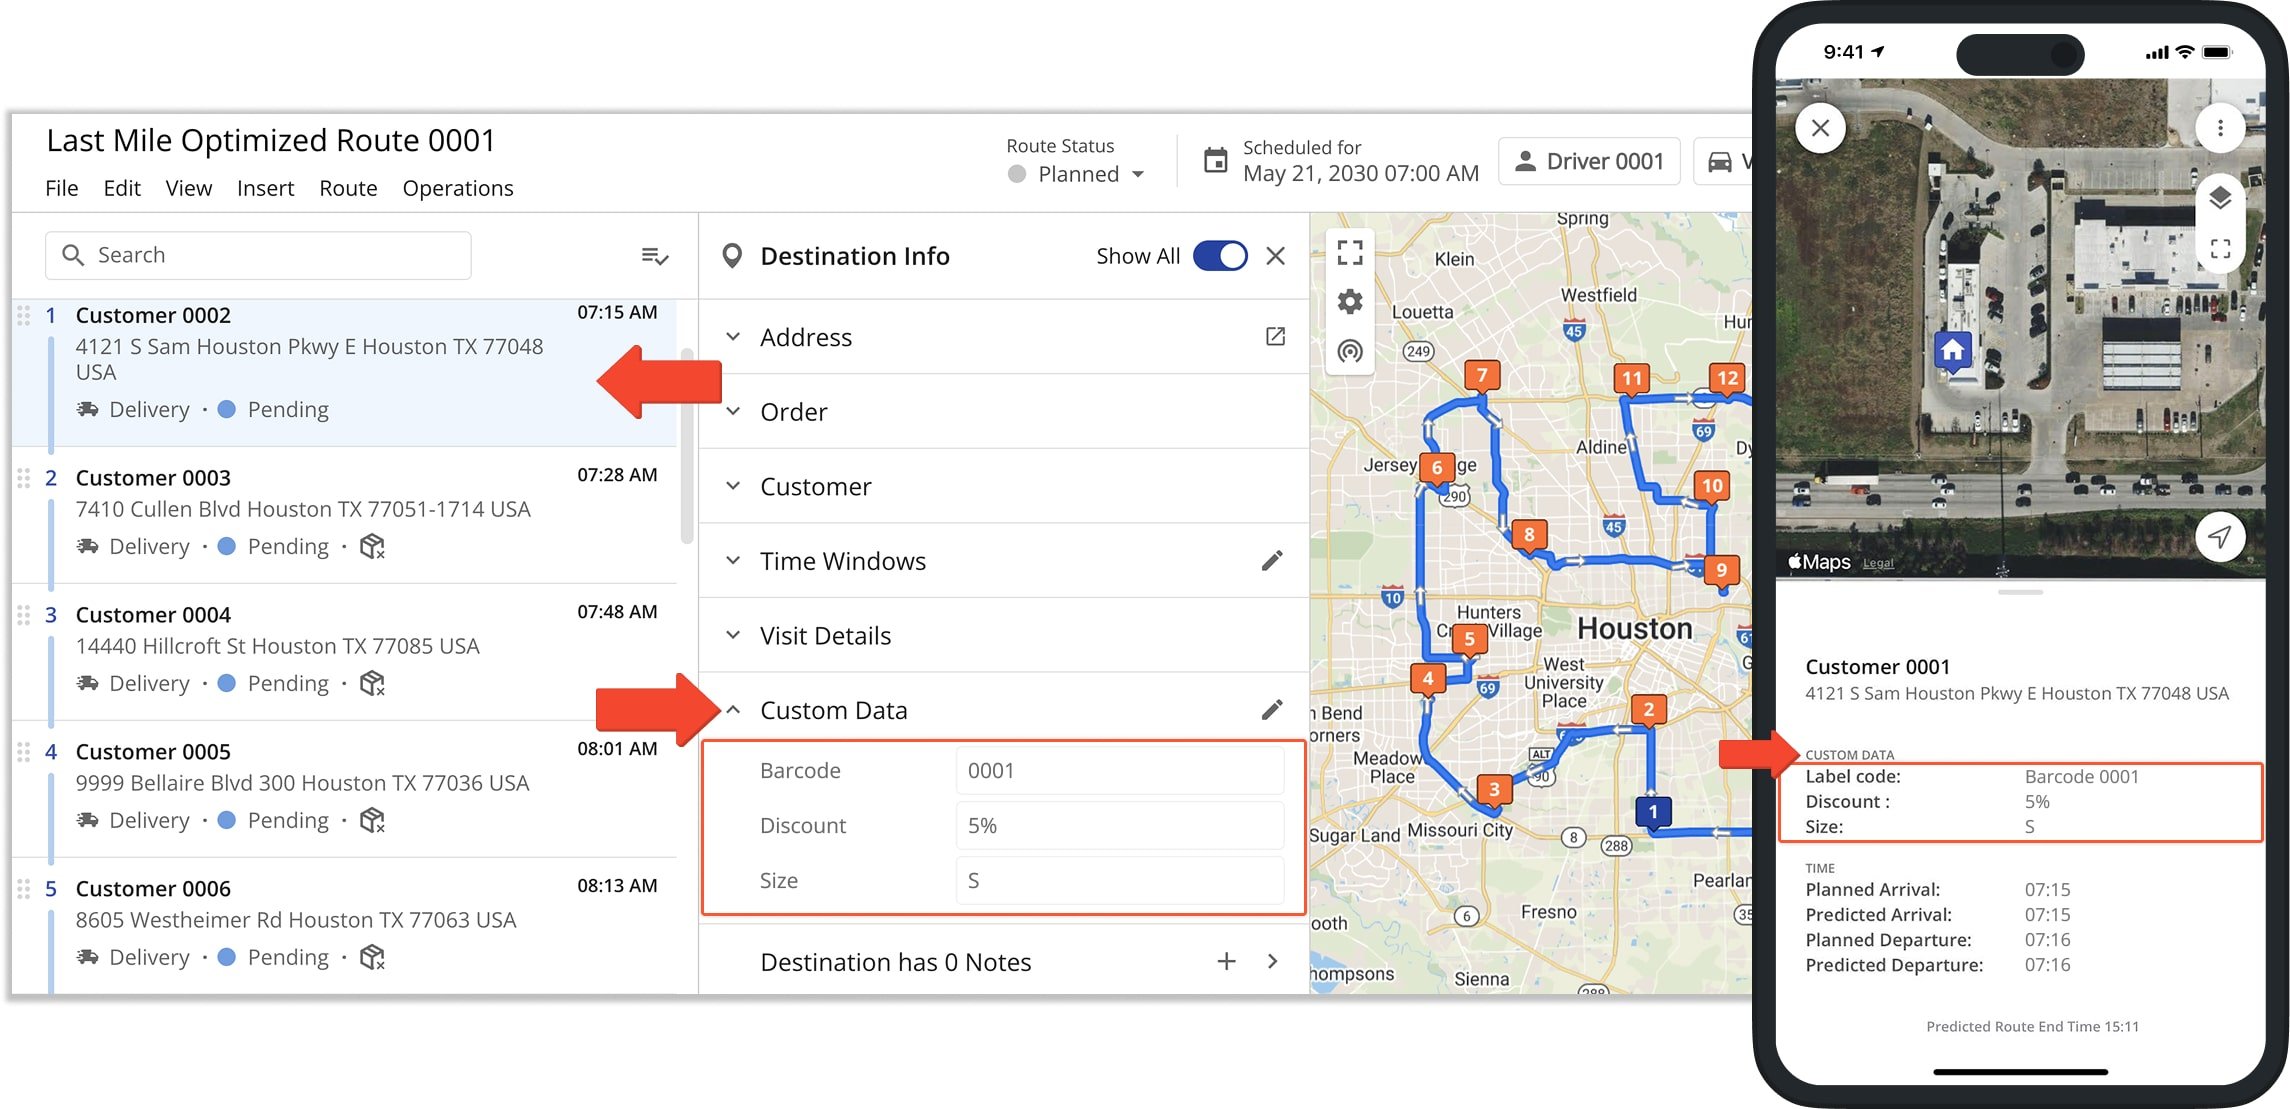
You can use orders for planning and optimizing routes. When you use orders for optimizing routes, orders are used as route stops. Accordingly, route stops inherit the respective order details (i.e., address, alias, etc.), including the order Custom Data. To open and manage the Custom Data attached to a route stop, open the preferred route in the Route Editor. Next, click on the route stop to open its stop manifest and then scroll down to the stop’s “Custom Data” section.

In the stop’s “Custom Data” section, you can view and edit the Custom Data attached to the stop. Furthermore, drivers and other field members can access the same Custom Data using Route4Me’s Mobile Route Planning Apps.

Planned route with orders as route stops and Custom Data attached to route stops.


Address Book Management – Add And Manage Address Custom Data

Your Route4Me Address Book is a centralized database where you can store and manage hundreds of thousands of customer addresses, business locations, etc. Depending on your particular last-mile routing needs and unique business model, you may want to attach additional business details and other data to your addresses. For your convenience, you can use Custom Data to attach additional details to your addresses in addition to using reserved address fields.

Additionally, you can use your Address Book addresses for planning and optimizing routes. Accordingly, the Custom Data attached to the addresses used for optimizing routes is automatically attached to the respective route stops on planned routes. Furthermore, the Custom Data attached to route stops can then be accessed using Route4Me’s Web Platform and Route4Me’s Mobile Route Planning Apps.


Upload Addresses With Custom Data Into Route4Me Address Book

You can easily upload thousands of addresses using a CSV spreadsheet, and Route4Me will automatically geocode and create entries for you. Additionally, you can upload addresses with Custom Data. First, format your spreadsheet for uploading addresses. In detail, the Address Upload Spreadsheet consists of organized Columns and Rows. To add a column, add the respective column name to the header (first row) of the spreadsheet and then populate its following rows with the corresponding address data. Accordingly, the data added in the same row belongs to the same address. To add Custom Data to addresses, simply add the preferred Custom Column Names to your spreadsheet and then populate custom column rows with the preferred information next to each address. Additionally, learn more about Route4Me’s Spreadsheet Formatting Requirements.

Format a spreadsheet for uploading addresses with Custom Data into Route4Me's Route Optimization Software Address Book.


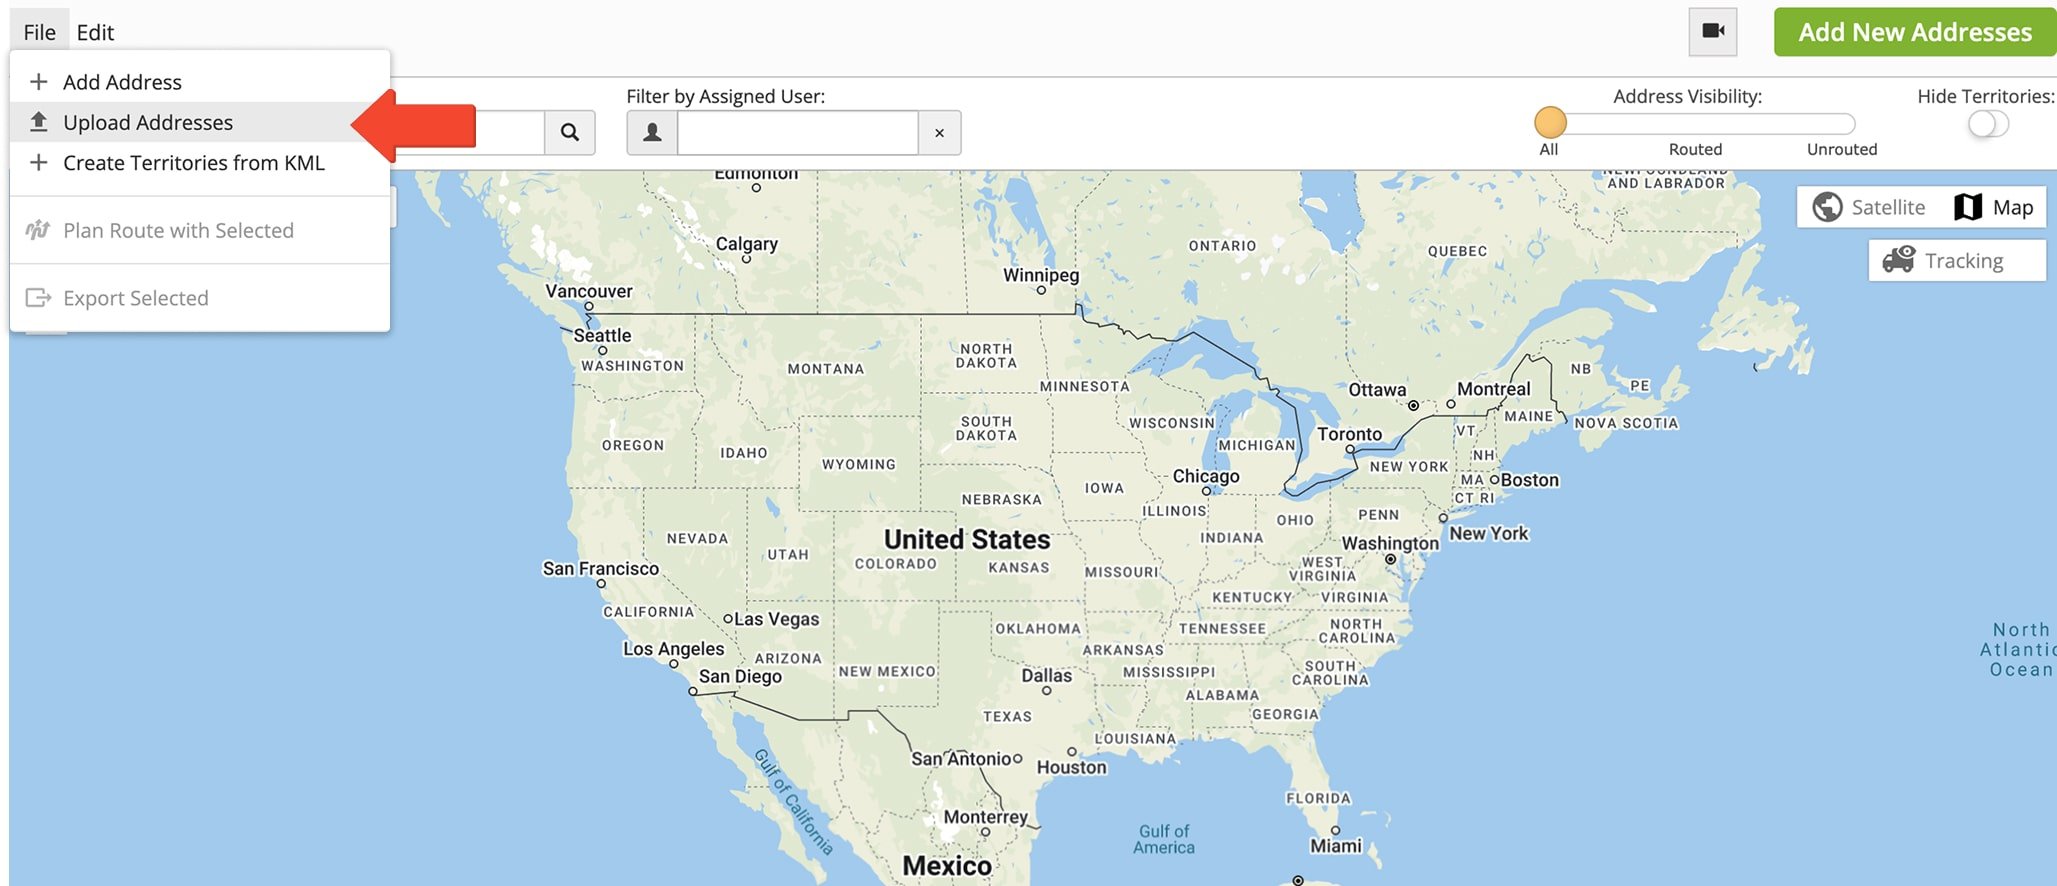
Next, go to “Address Book” and then “Address Book List” or “Address Book Map” from the navigation menu. After that, go to “File” and then select “Upload Addresses” from the menu. After uploading the spreadsheet, Route4Me automatically validates and matches column names from the uploaded spreadsheet to Route4Me’s address fields. Accordingly, columns that match Route4Me’s reserved fields are automatically mapped to their respective column names. Columns with address Custom Data are assigned the “Custom” column name plus the custom column names from the uploaded spreadsheet in brackets.

Validate uploaded addresses with Custom Data in Route4Me's Route Planning Software Address Book.


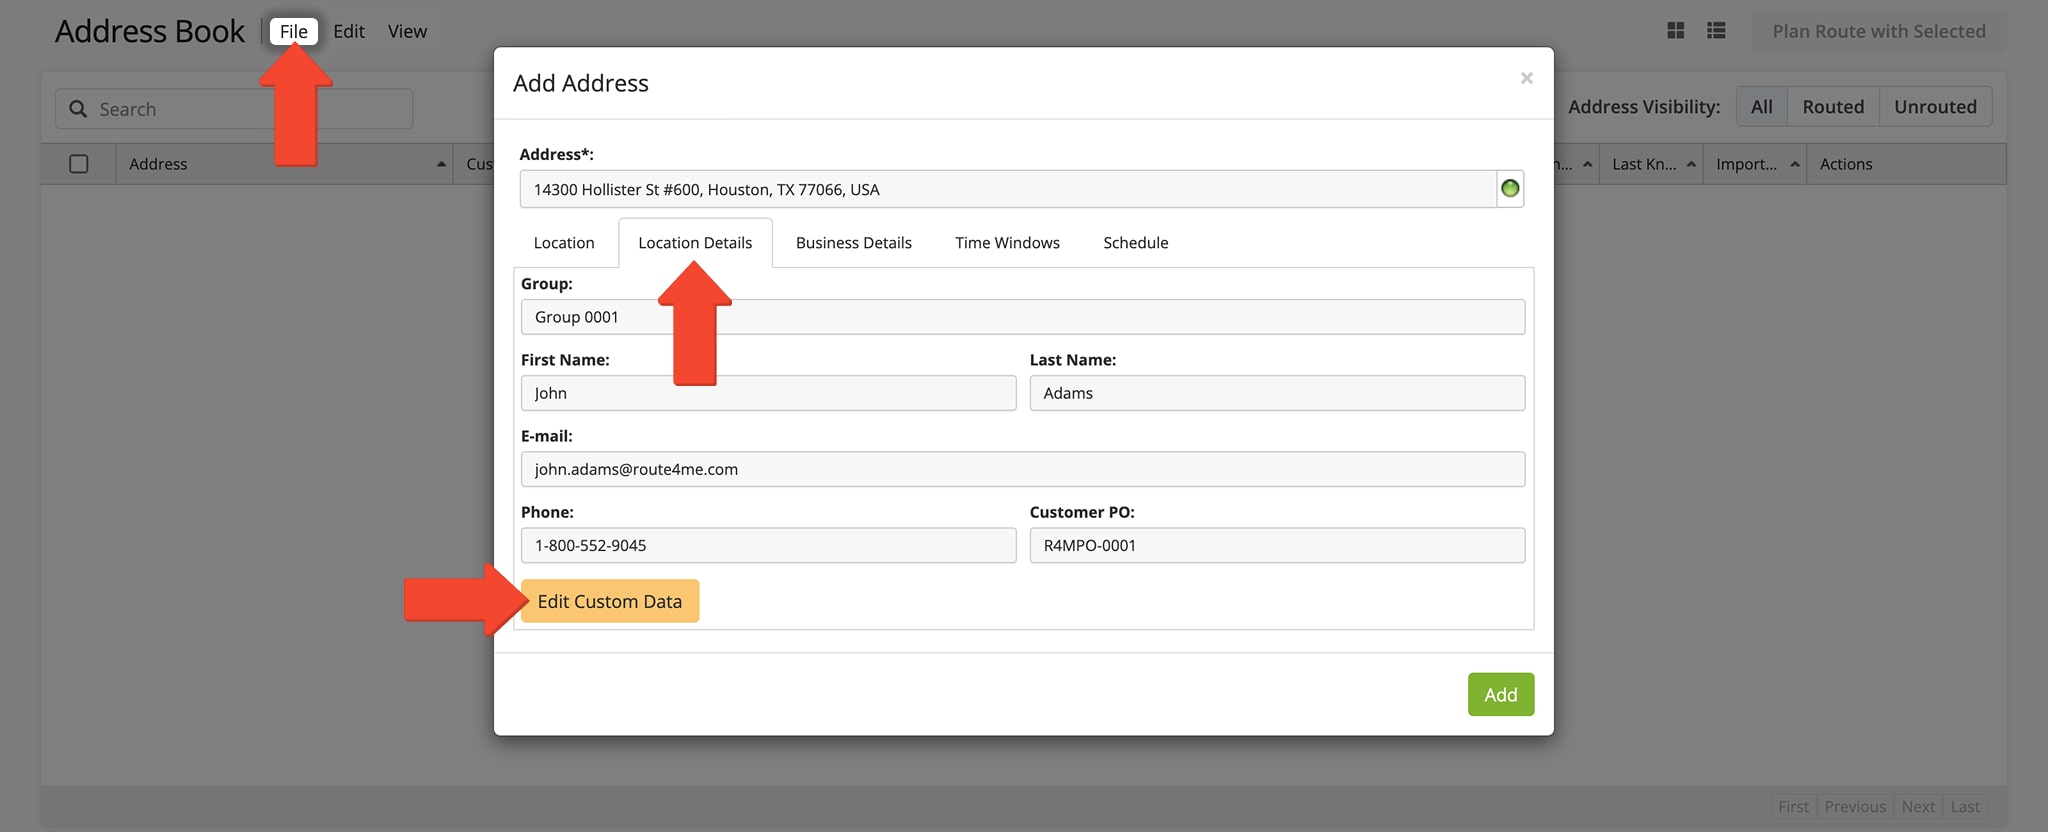
Once addresses are uploaded, they instantly become available in your Route4Me Address Book. To open and manage the Custom Data attached to a specific address, right-click on this address and then select “Edit” from the menu. After that, go to the “Location Details” tab and then click on the “Edit Custom Data” button.

Uploaded addresses with attached Custom Data in Route4Me's Route Optimization Software Address Book Map.


Add Custom Data To Addresses In Your Route4Me Address Book

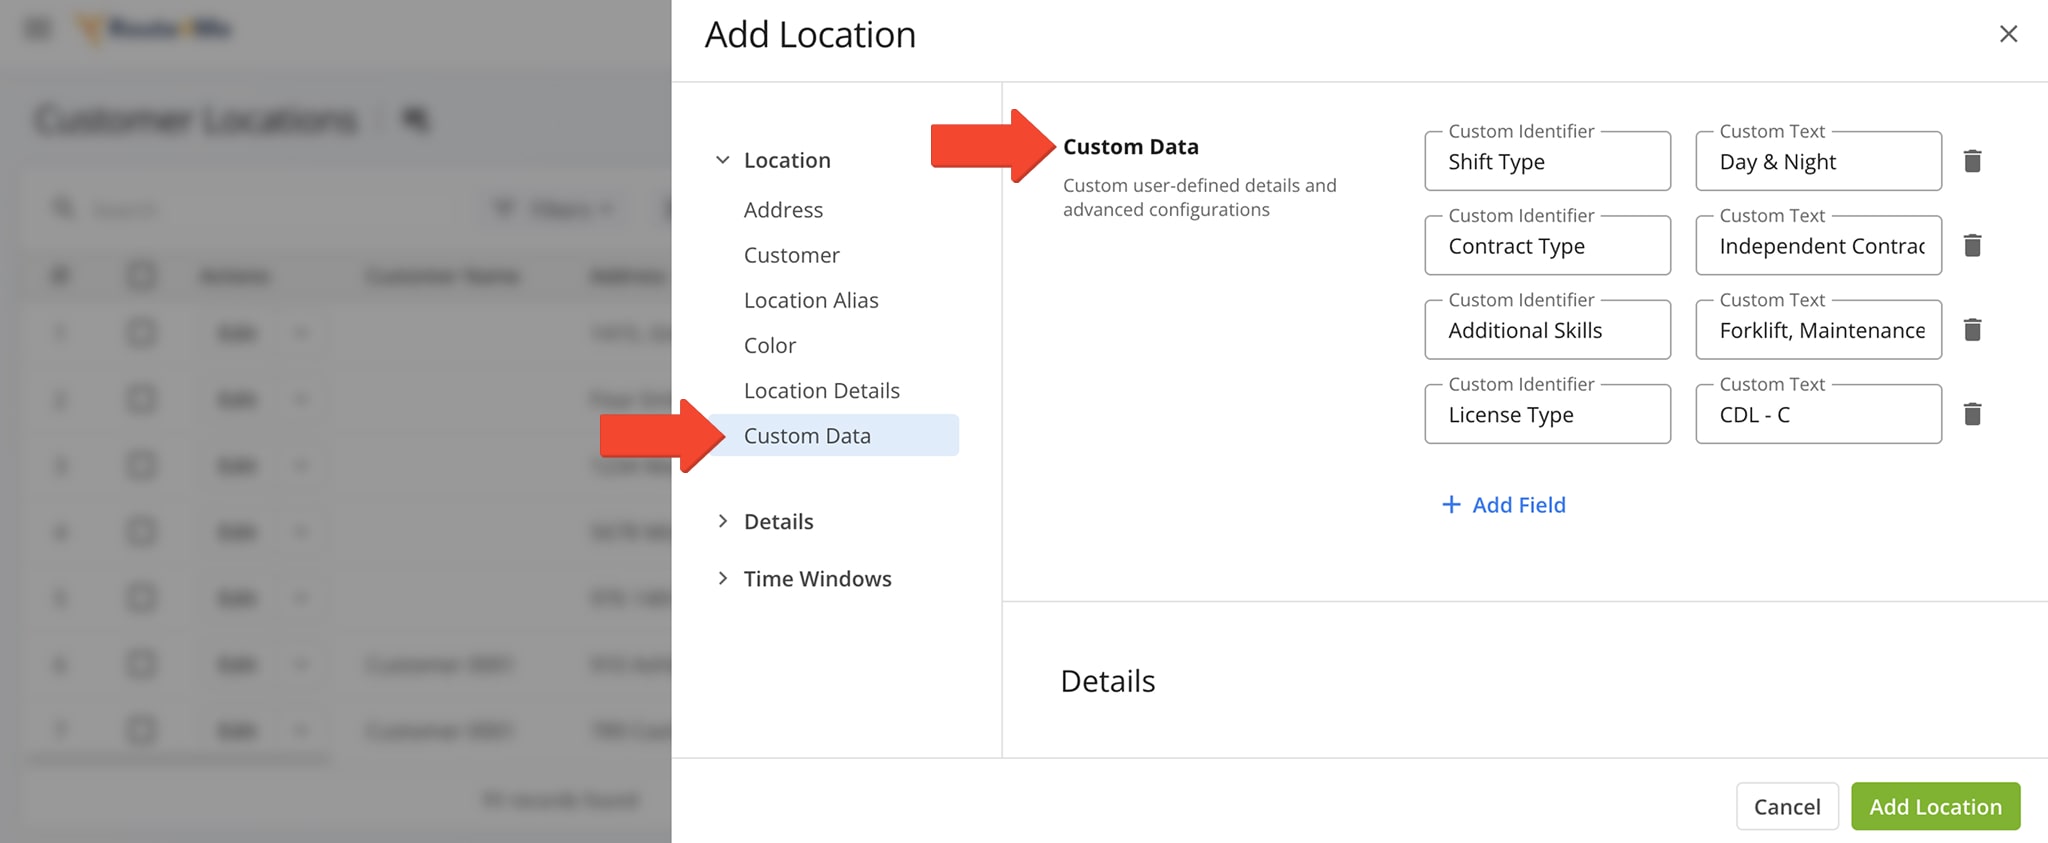
Additionally, you can add Custom Data to individual addresses when creating new addresses or when editing existing addresses. To manually create a new address in your Address Book, go to “File” and then select “Add Address” from the menu. Accordingly, to edit an address, right-click on the preferred address and then select “Edit” from the menu.

Next, go to the “Location Details” tab, where you can add new and manage the existing Custom Data of the address. Accordingly, a single Custom Data Entry consists of the Custom Data Field and its respective Custom Data Field Content. Additionally, learn more about creating new addresses in your Route4Me Address Book.

Create new addresses and attach Custom Data to addresses in Route4Me's Route Planning Software Address Book.


Addresses With Custom Data On Planned And Optimized Routes

You can use your addresses for planning and optimizing routes. When you use addresses for optimizing routes, addresses are used as route stops. Accordingly, route stops inherit the respective address details (i.e., address, alias, etc.), including the address Custom Data. To open and manage the Custom Data attached to a route stop, open the preferred route in the Route Editor. Next, click on the route stop to open its stop manifest and then scroll down to the stop’s “Custom Data” section.

In the stop’s “Custom Data” section, you can view and edit the Custom Data attached to the stop. Furthermore, drivers and other field members can access the same Custom Data using Route4Me’s Mobile Route Planning Apps.

Planned route with addresses added as route stops and Custom Data attached to route stop addresses.


User And Team Management Custom Data

With Route4Me, you can create an organized and easily manageable network of managers, route planners, dispatchers, drivers, and other team members. Depending on your particular last-mile optimization requirements, you can customize your team’s profiles, account-level permissions, route visibility, driver and vehicle access, etc. Furthermore, you can use Custom Data to easily attach additional information to your users, if the information you want to add doesn’t fit into the reserved enterprise route optimizer fields.


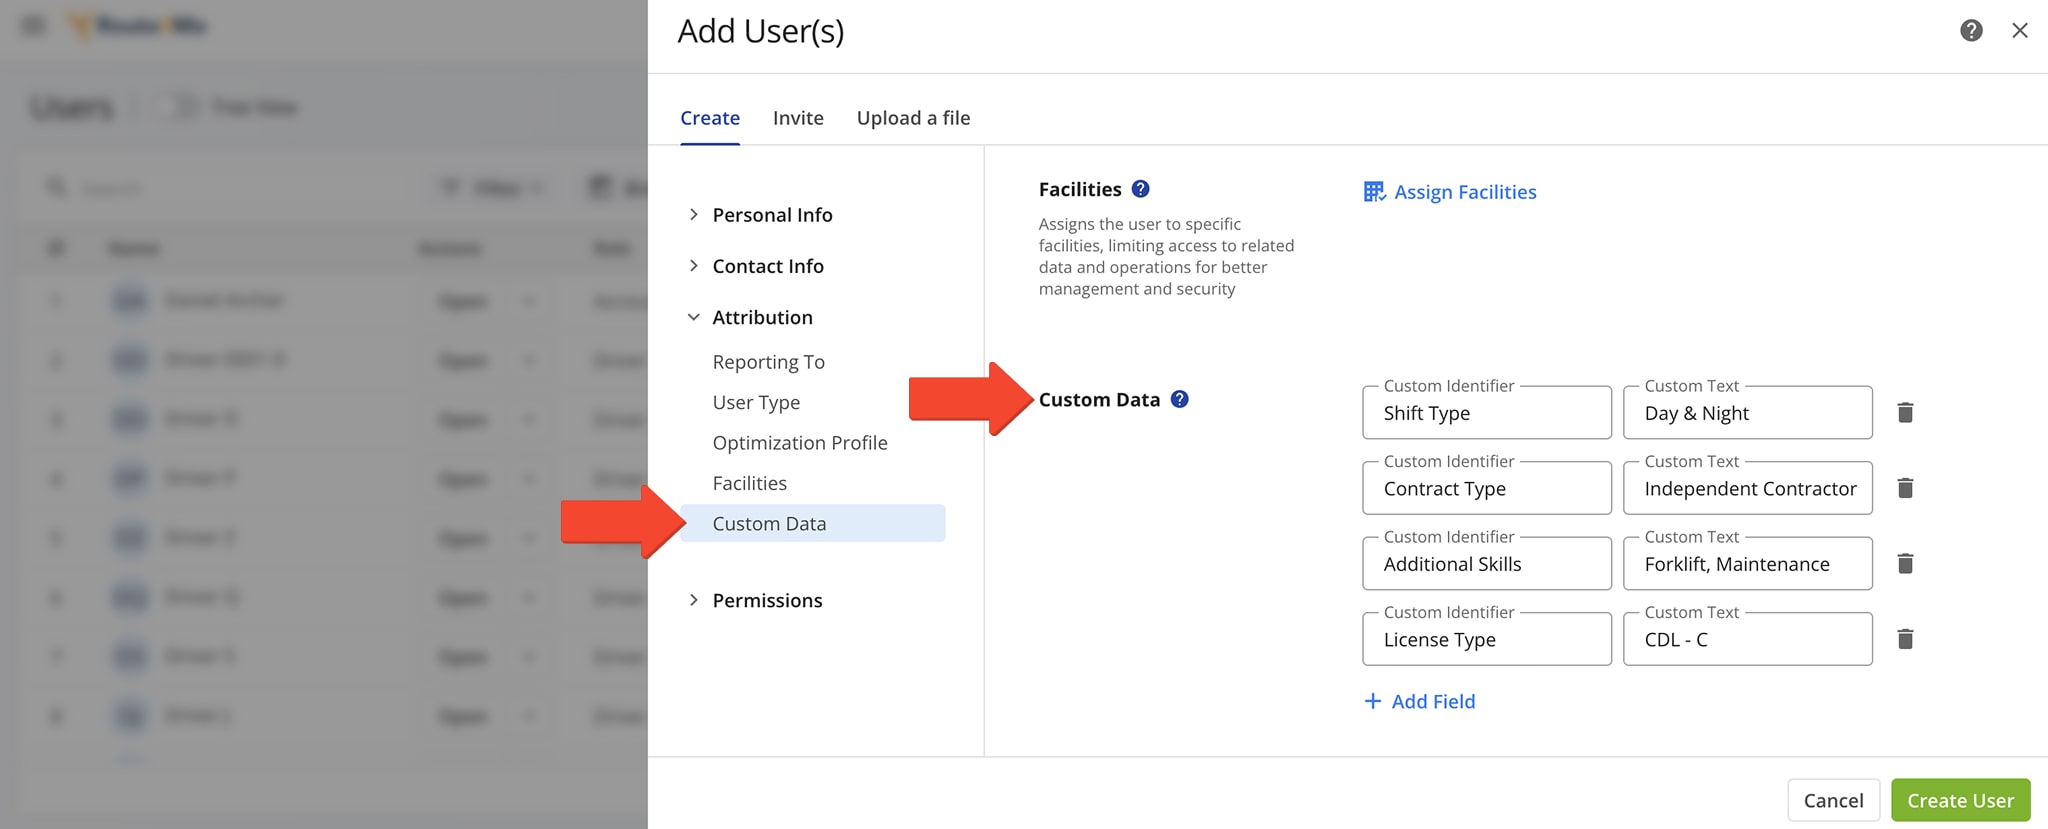
Specifically, you can attach Custom Data when creating a new user and to already existing users. To attach Custom Data when creating a new user, go to “Team” and then select “Users” in the navigation menu. Next, click on the “Create Users” button. Alternatively, click on the three-dot menu icon next to an existing user and then select “Add Sub-User” from the menu. Additionally, learn more about creating new Drivers, Route Planners, and other users.

Add a new driver, manager, route planner, or another team member to your Route4Me Route Optimization software account.


Next, scroll to the “Custom Data” section and then click on the “Add Custom Data” button. After that, add the preferred Custom Data Field and its respective Custom Data Field Content. Once you add a Custom Data entry, you can change its Custom Data Field Content, but you can’t change its Field Name. Therefore, if you want to change the Field Name, you can create a new entry. Equally important, you can attach multiple Custom Data entries to one user profile.

Add Custom Data to the new user to attach additional driver, manager, route planner, or other team member details that don't fit into reserved fields.


Accordingly, you can check, add, and manage the Custom Data of your existing users. First, click on the three dots menu icon next to a user and then select “Edit” from the menu. Additionally, learn more about editing team member user accounts.

Edit an existing driver, route planner, manager, or another user to add Custom Data.


Next, go to the “Custom Data” tab, where you can check, add, and manage the user’s Custom Data. To add new Custom Data to the user, click on the “Add Custom Data” button. Once you add a Custom Data entry, you can change its values, but you can’t change its name. To delete a Custom Data entry, click on the X icon next to the entry you want to remove.

Add Custom Data to the existing user to attach additional driver, route planner, manager, or other user details.


Was this article helpful?
Still can't find what you're looking for? Contact us
Route4Me

About Route4Me

Route4Me has over 40,000 customers globally. Route4Me's Android and iPhone mobile apps have been downloaded over 2 million times since 2009. Extremely easy-to-use, Route4Me's apps create optimized routes, synchronize routes to mobile devices, enable communication with drivers and customers, offer turn-by-turn directions, delivery confirmation, and more. Behind the scenes, Route4Me's operational optimization platform combines high-performance algorithms with data science, machine learning, and big data to plan, optimize, and analyze routes of almost any size in real-time.