Mandatory Signature Capture – Mobile Route Planner Apps
With Route4Me’s Mandatory Tasks, you can easily set up required tasks your team members must perform to complete deliveries, visits, services, etc. In this guide, you can learn how to enable and use the Mandatory Signature Attachment. In detail, this advanced configuration requires attaching a signature to each route stop in order to mark stops as completed.
NOTE: Route4Me’s Mandatory Tasks are scheduled to be disabled soon. Instead of the Mandatory Tasks, you can use Route4Me’s Workflows that offer a wider variety of mandatory tasks, flexible task customization, dedicated user interface, and more.
Table of Contents
Enable Mandatory Signature Capture Advanced Configuration
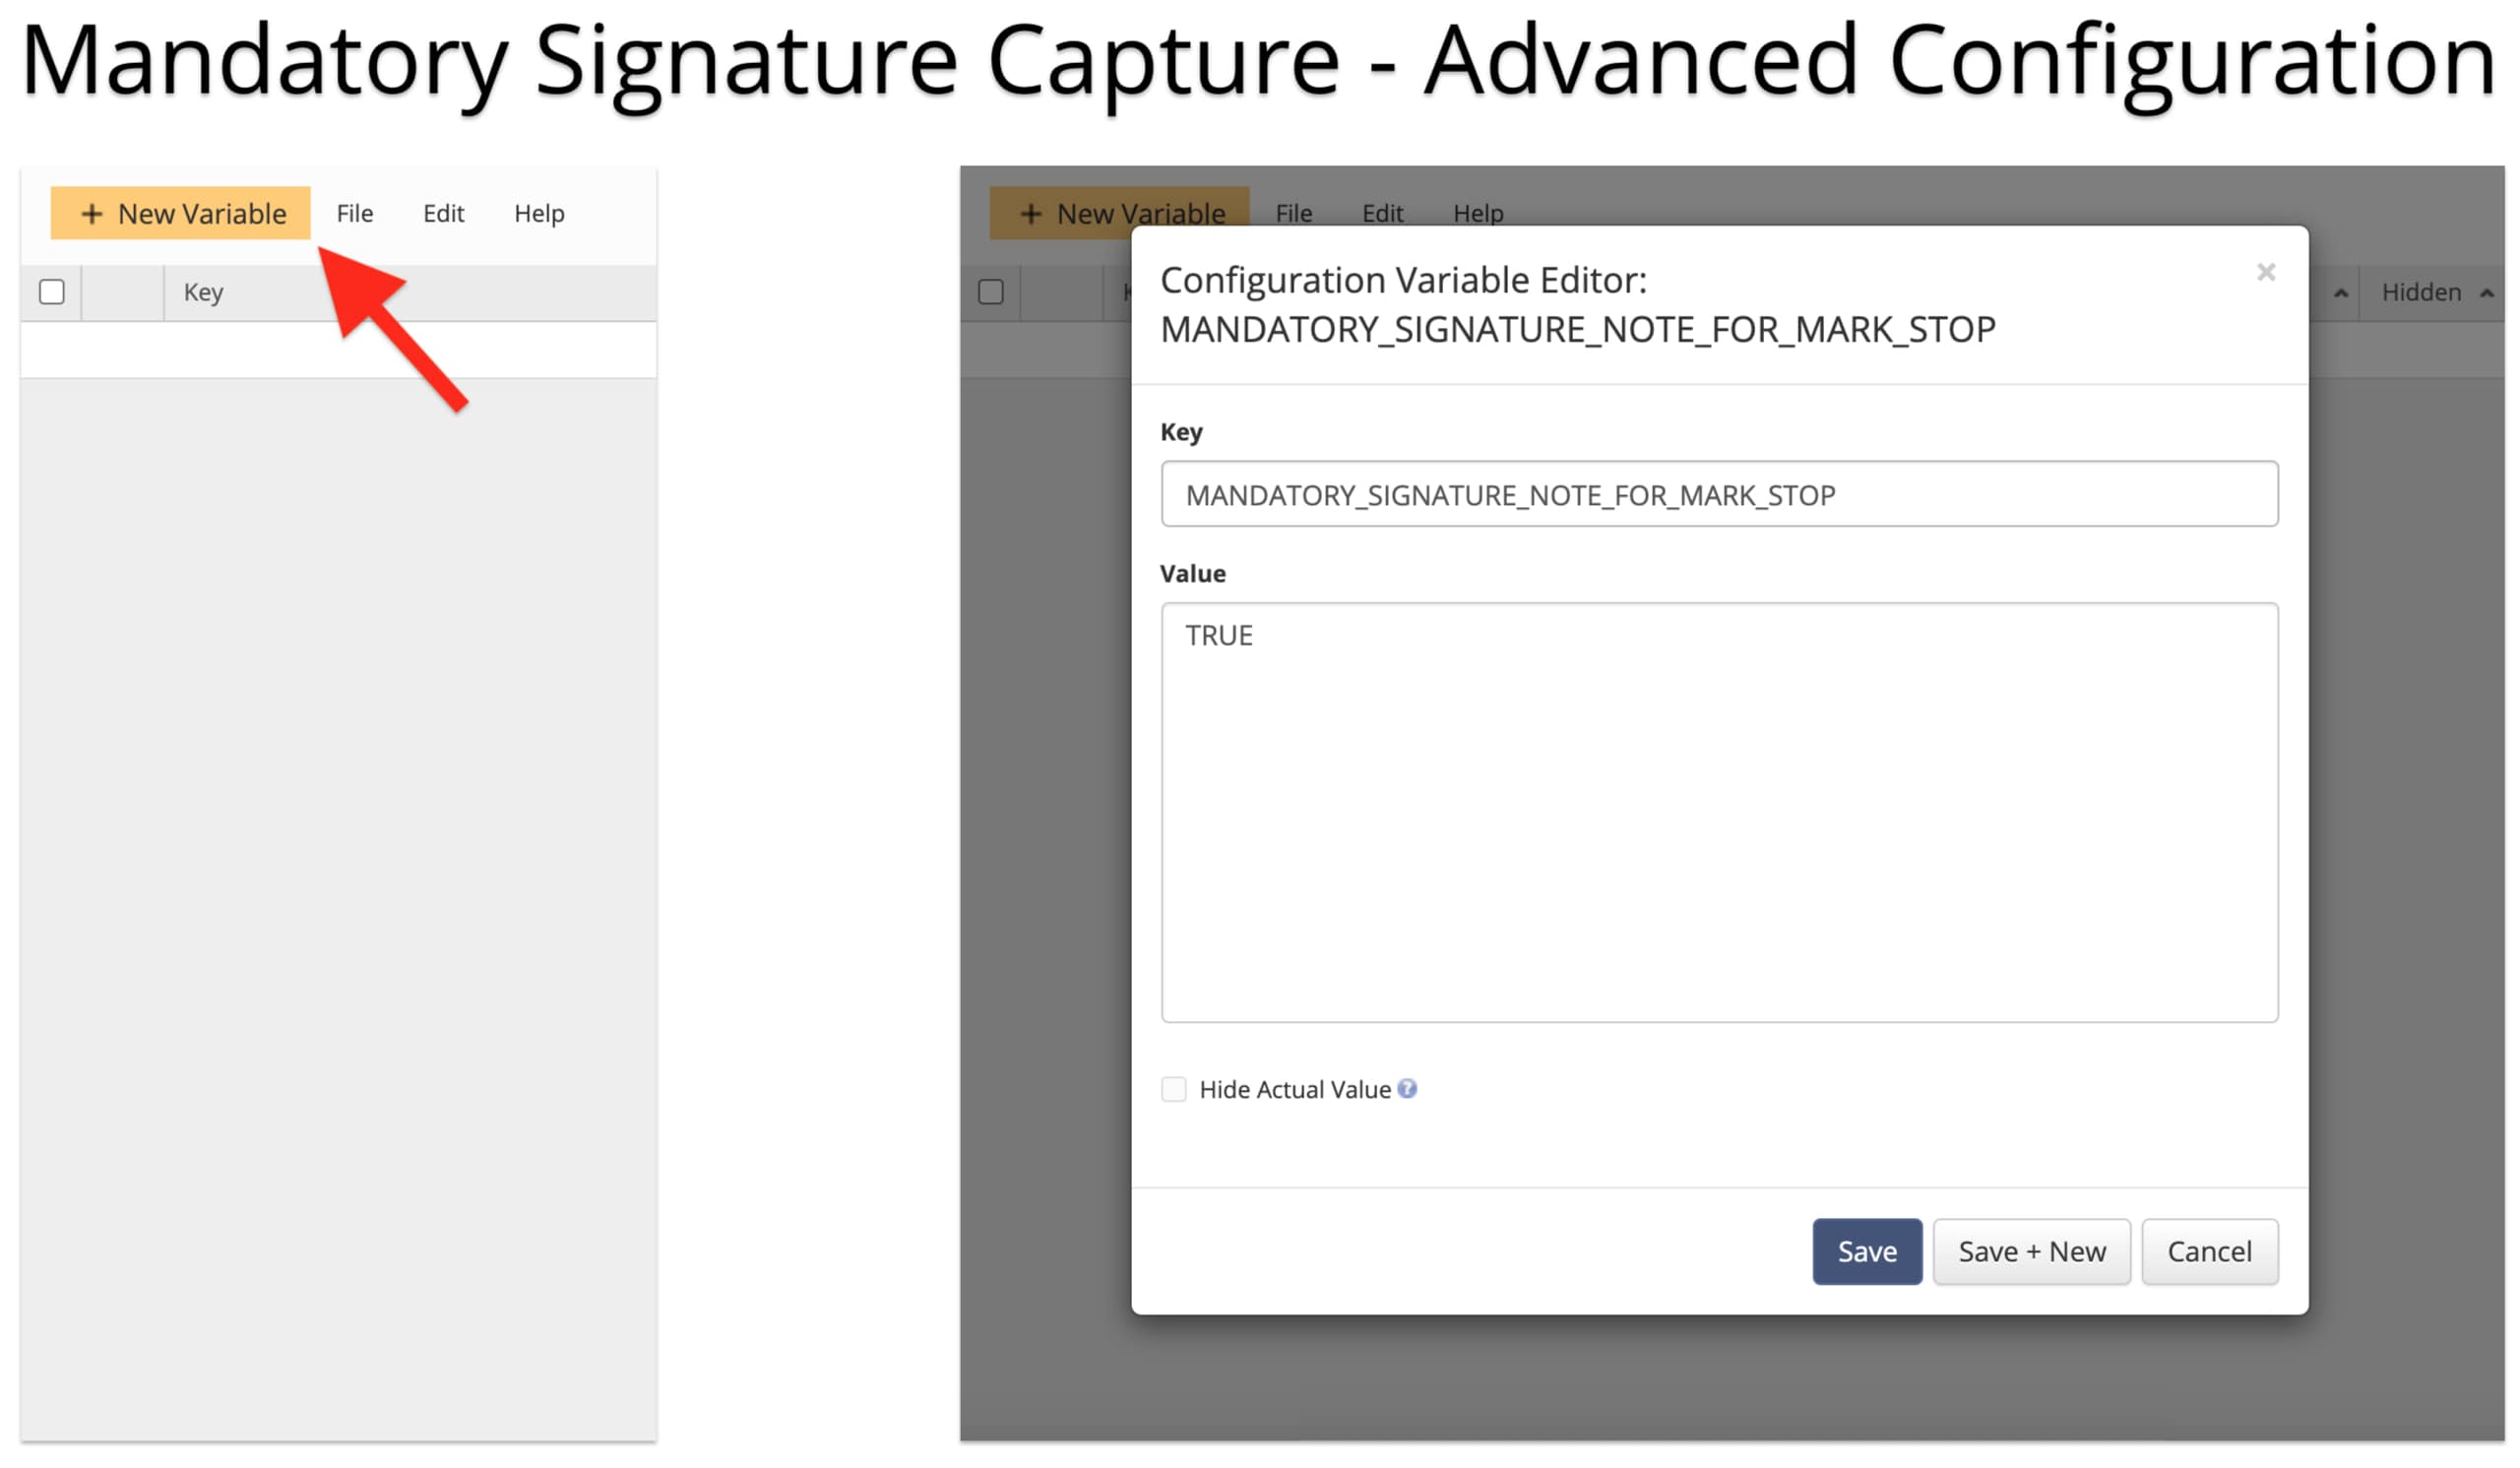
To enable the Mandatory Signature Capture, add the respective advanced configuration to your Route4Me account in the Expert Mode. To do so, open the Advanced Configuration Editor and then click on the “New Variable” button. After that, fill out the following advanced configuration fields:
- Key: MANDATORY_SIGNATURE_NOTE_FOR_MARK_STOP
- Value: use “TRUE” to enable the configuration and “FALSE” to disable it.
Accordingly, after adding and enabling the advanced configuration, you can disable it and enable it back at any time. Learn more about using Route4Me’s Advanced Configuration Editor and advanced configurations for account customizations.
Start Route to Capture E-Signatures on iOS Route Planner
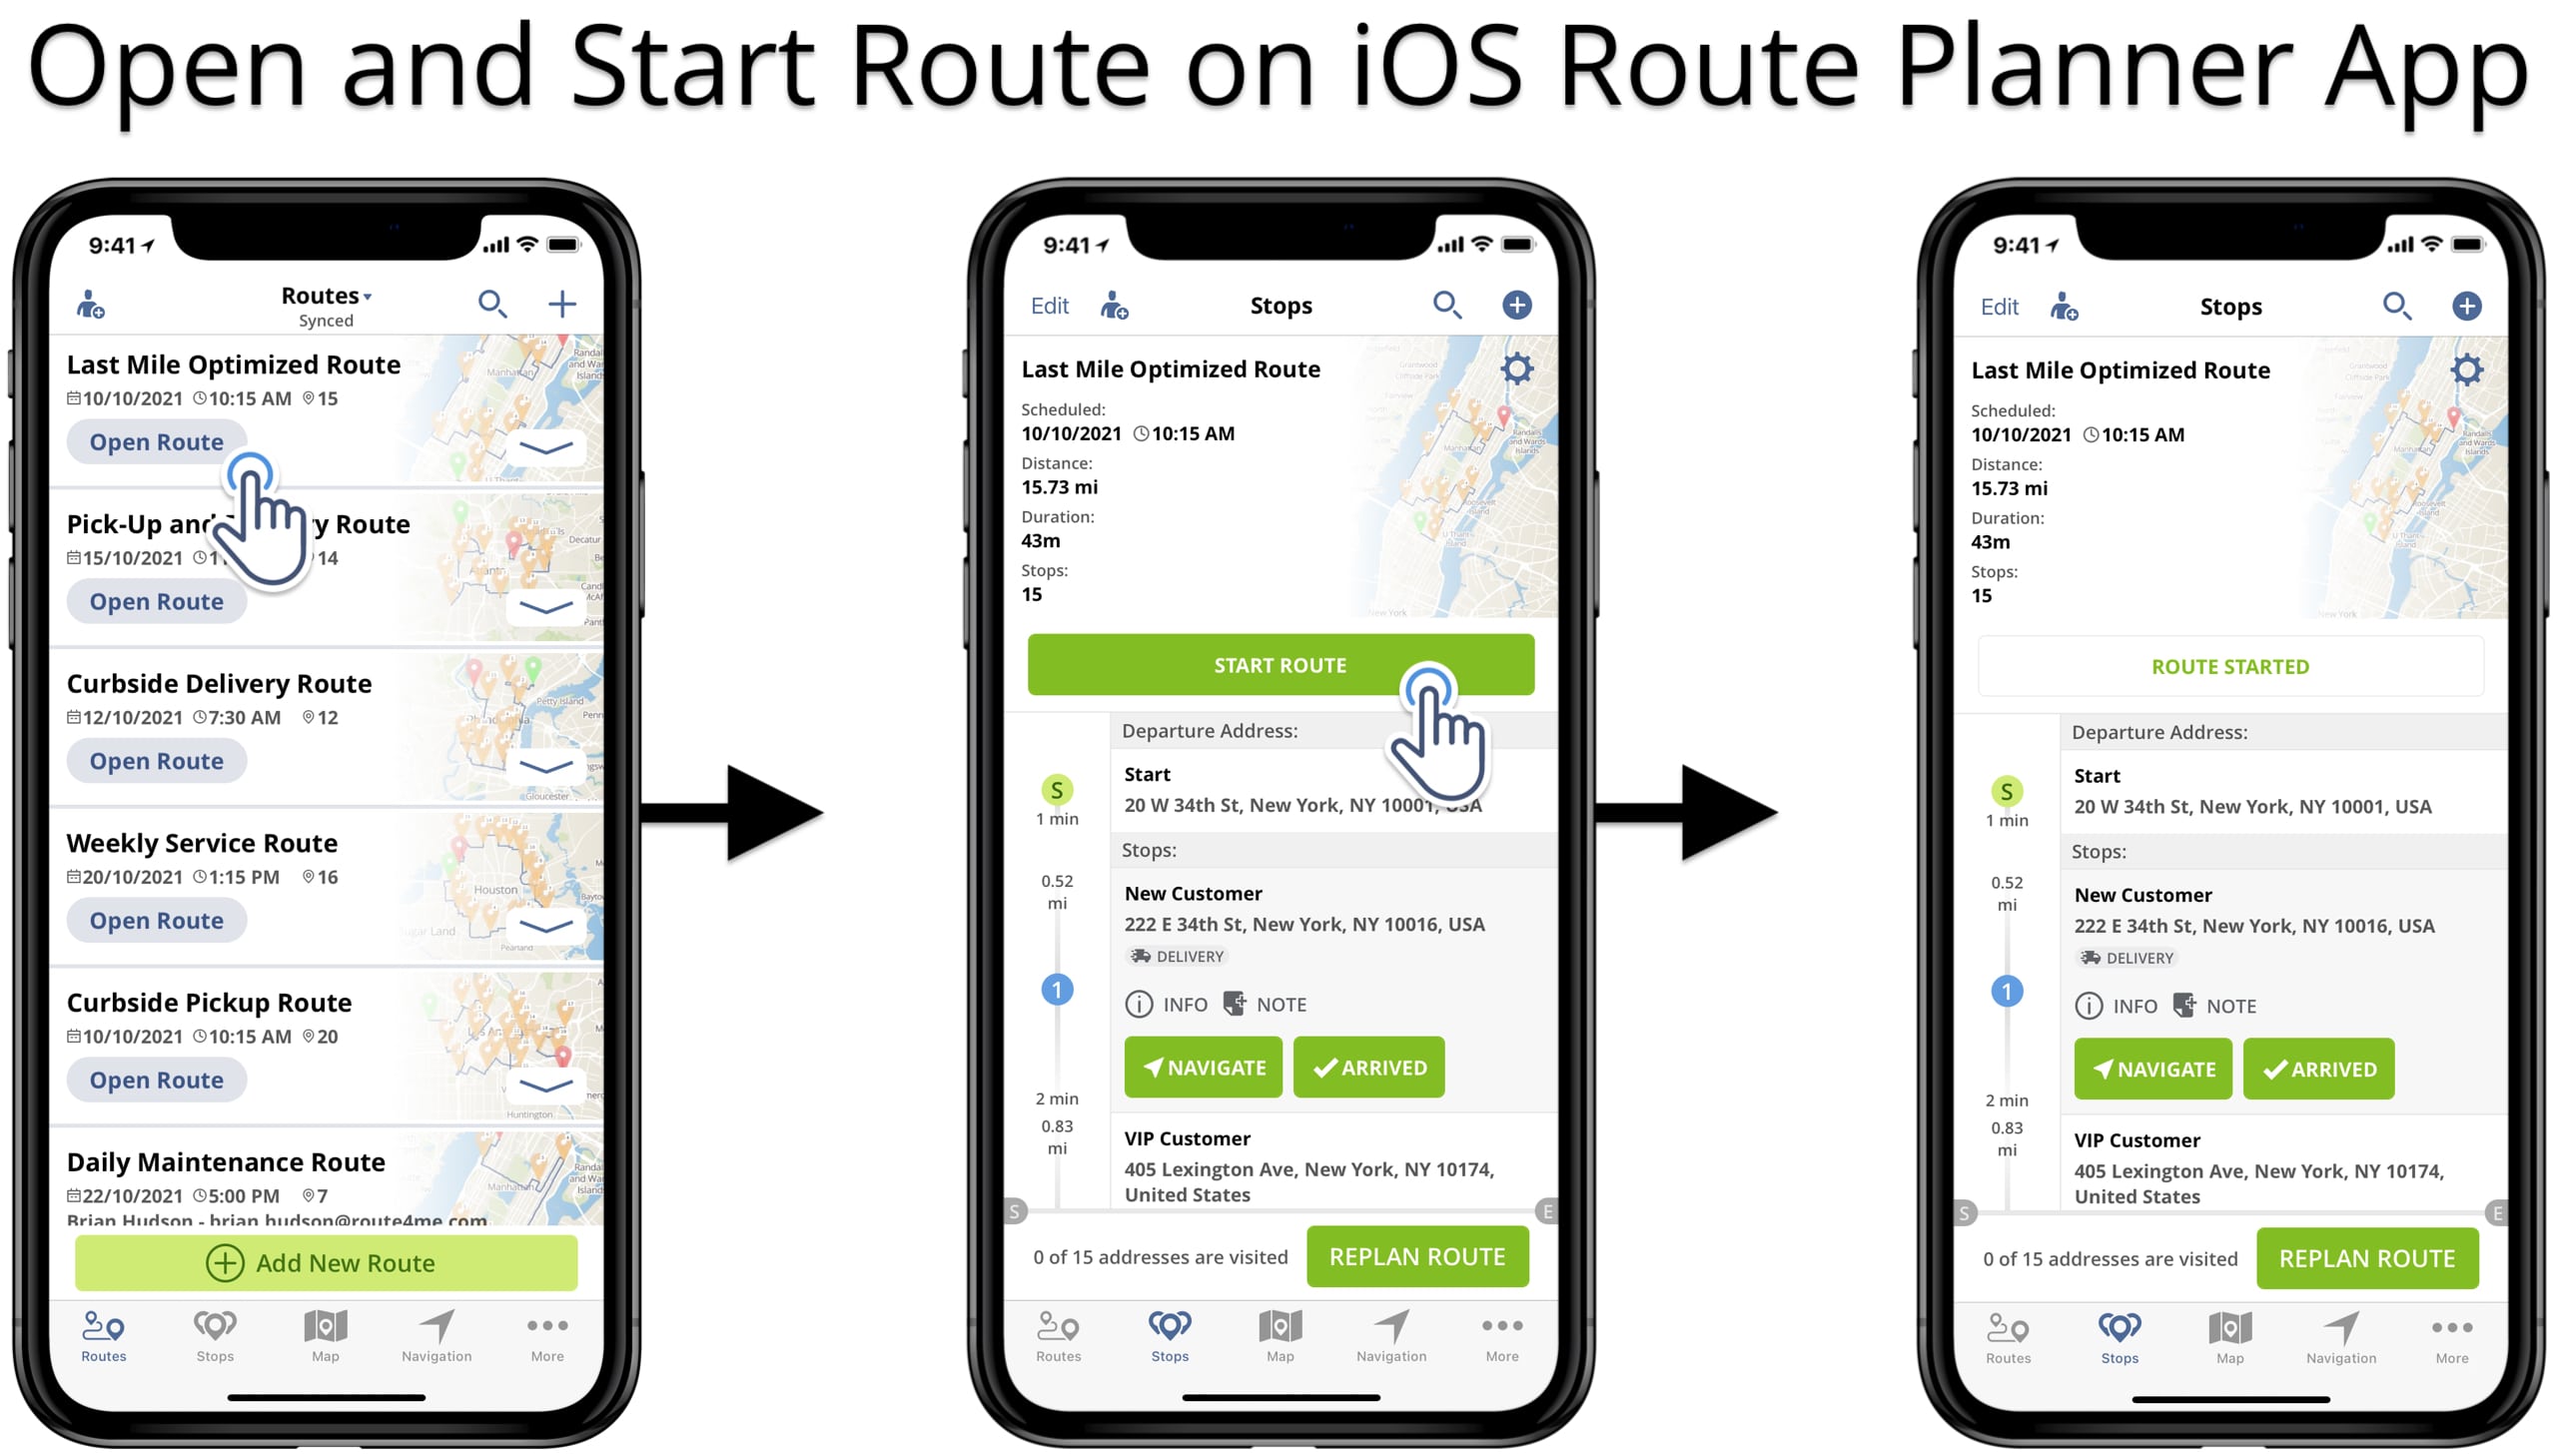
To start navigating a route, completing orders, and adding electronic signatures on the iPhone Route Planner, you need to start the respective route. Namely, open the preferred route and then tap on the “Start Route” button to start a last-mile optimized route.
Mandatory Proof of Delivery Collection on iOS Route Planner
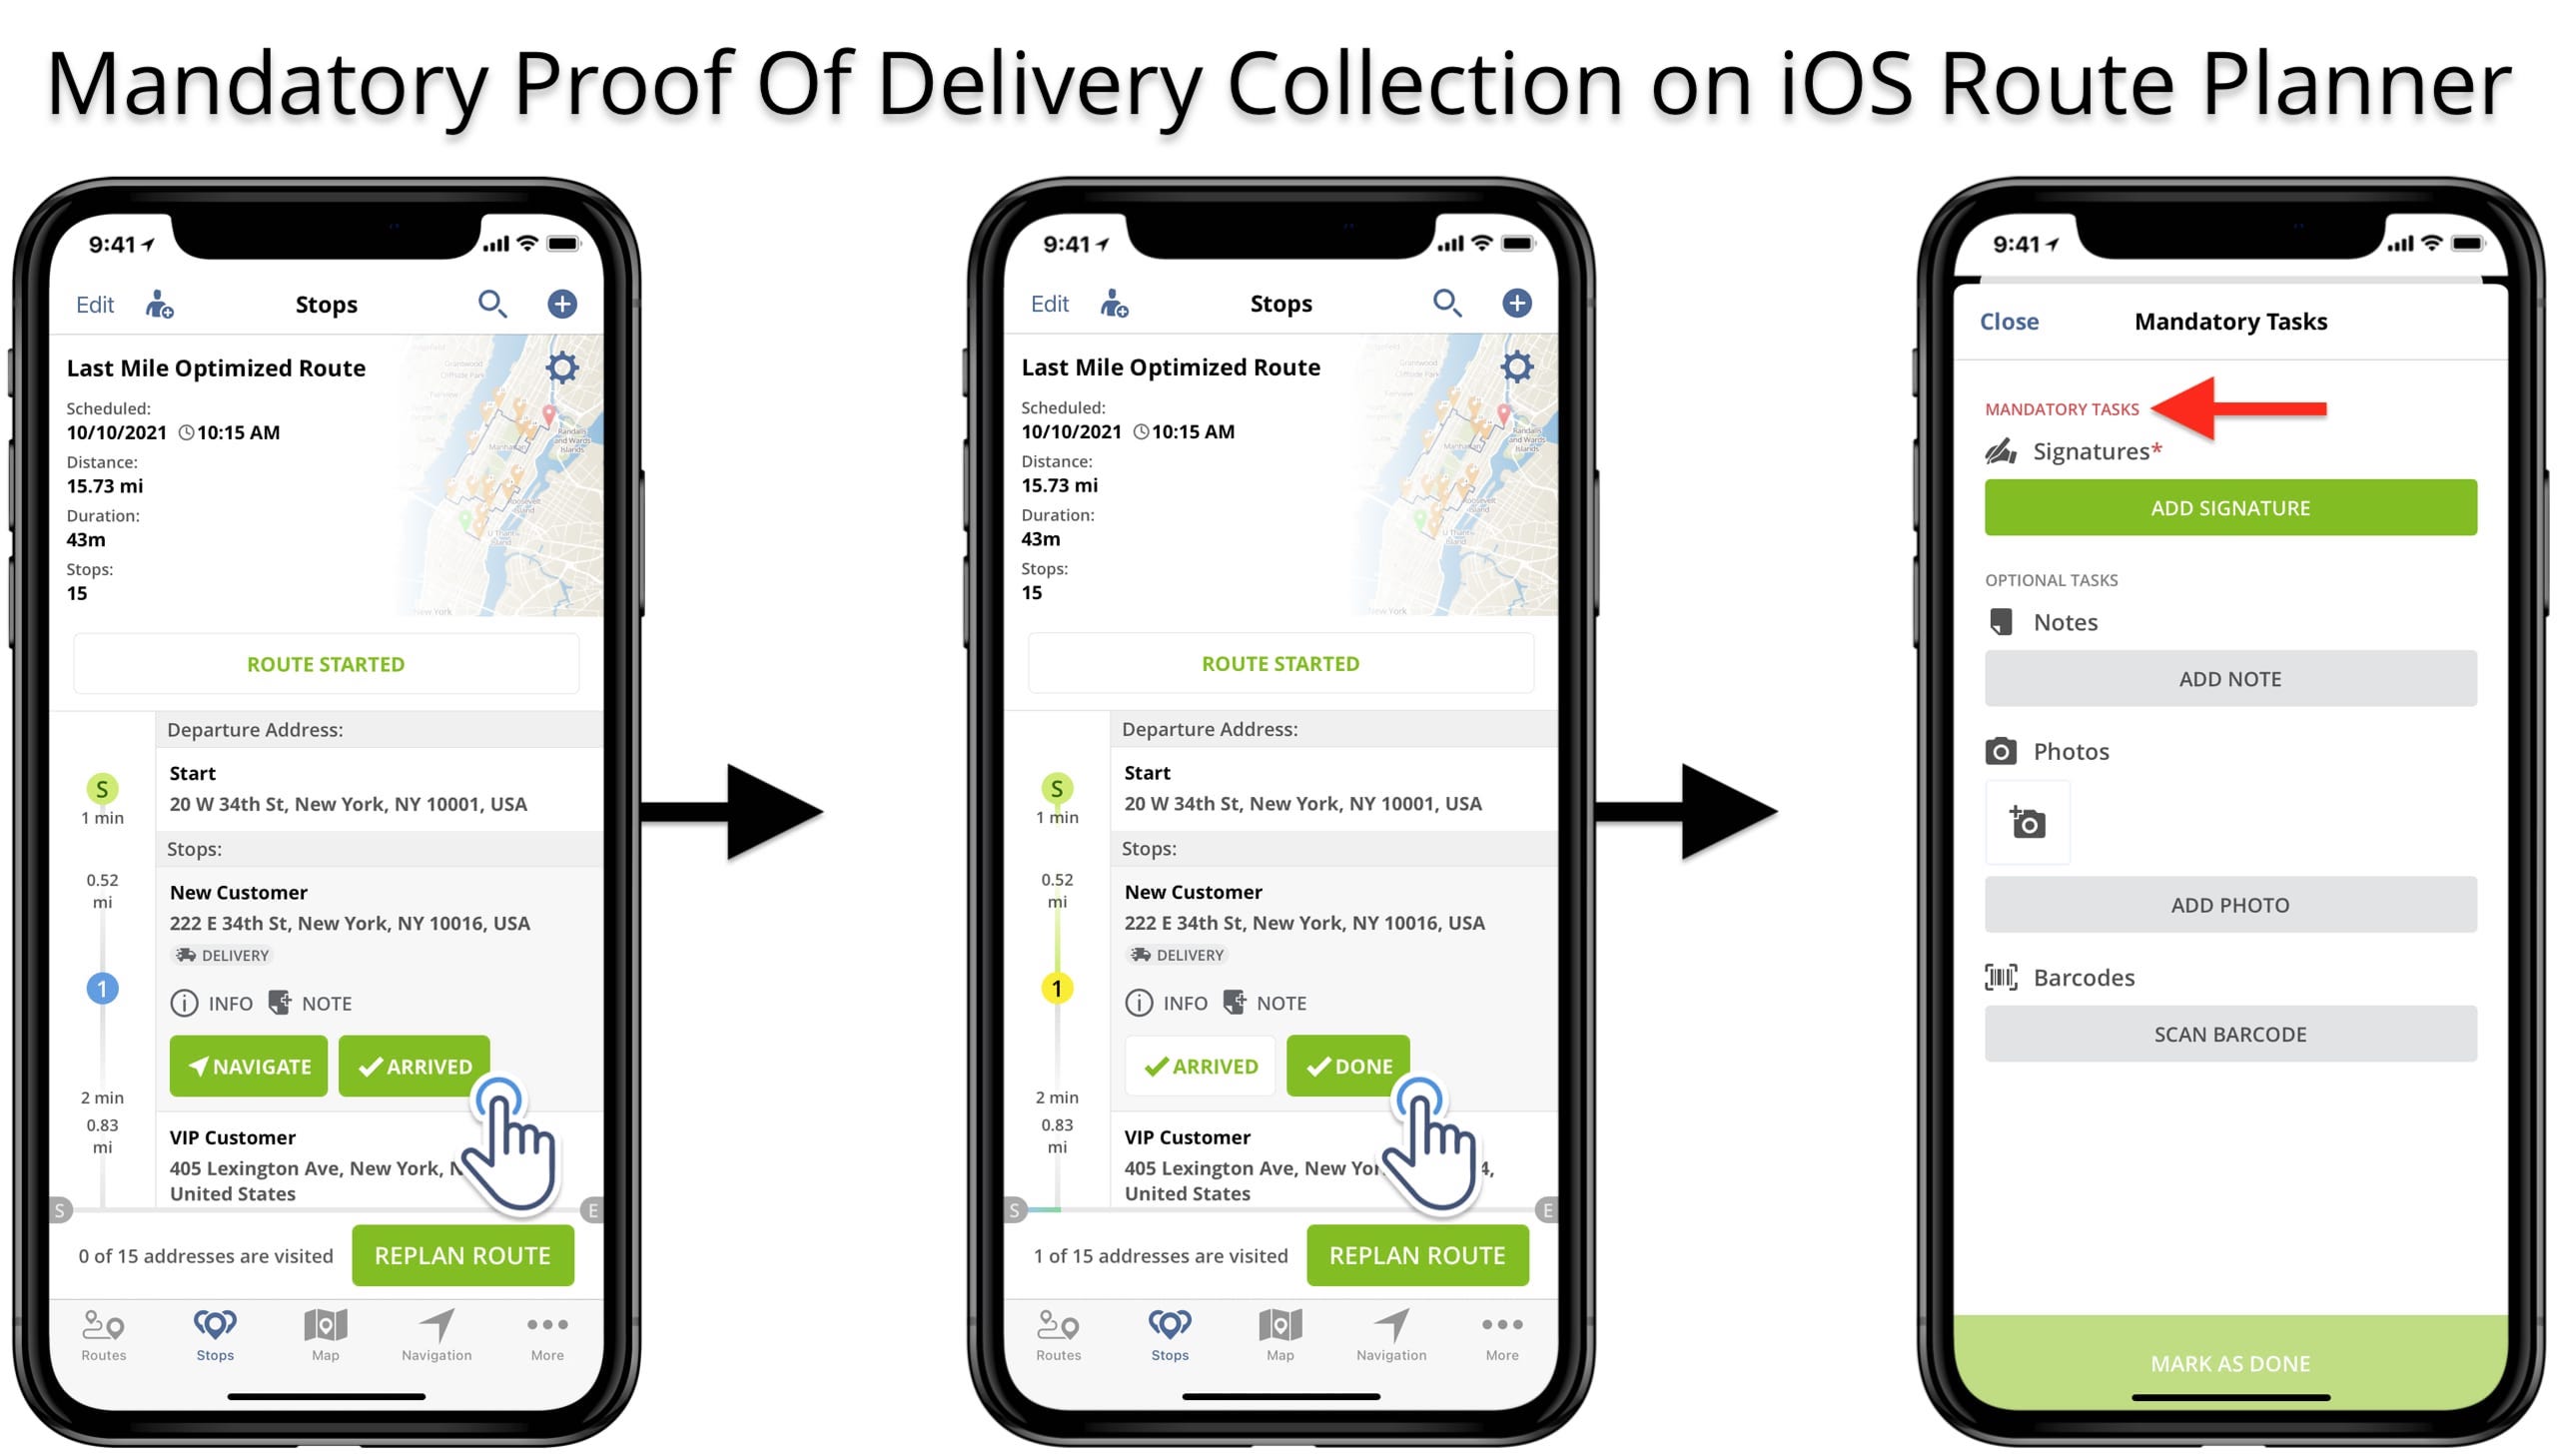
Next, you can start navigating the route and completing deliveries and orders. Specifically, tap on the “Arrived” button to indicate that you’ve arrived at the location. After that, when you tap on the “Done” button to complete the order, the app will prompt you to complete the mandatory tasks first. Accordingly, the “Mark as Done” button will not work until you complete the required mandatory tasks.
For this reason, you can see what tasks are required to be completed in the “Mandatory Tasks” section of the selected route stop. Equally important, you can assign stop statuses to route destinations from the route map on your iOS Route Planner.
Capture Mandatory E-Signatures and Attach POD to Route Stops
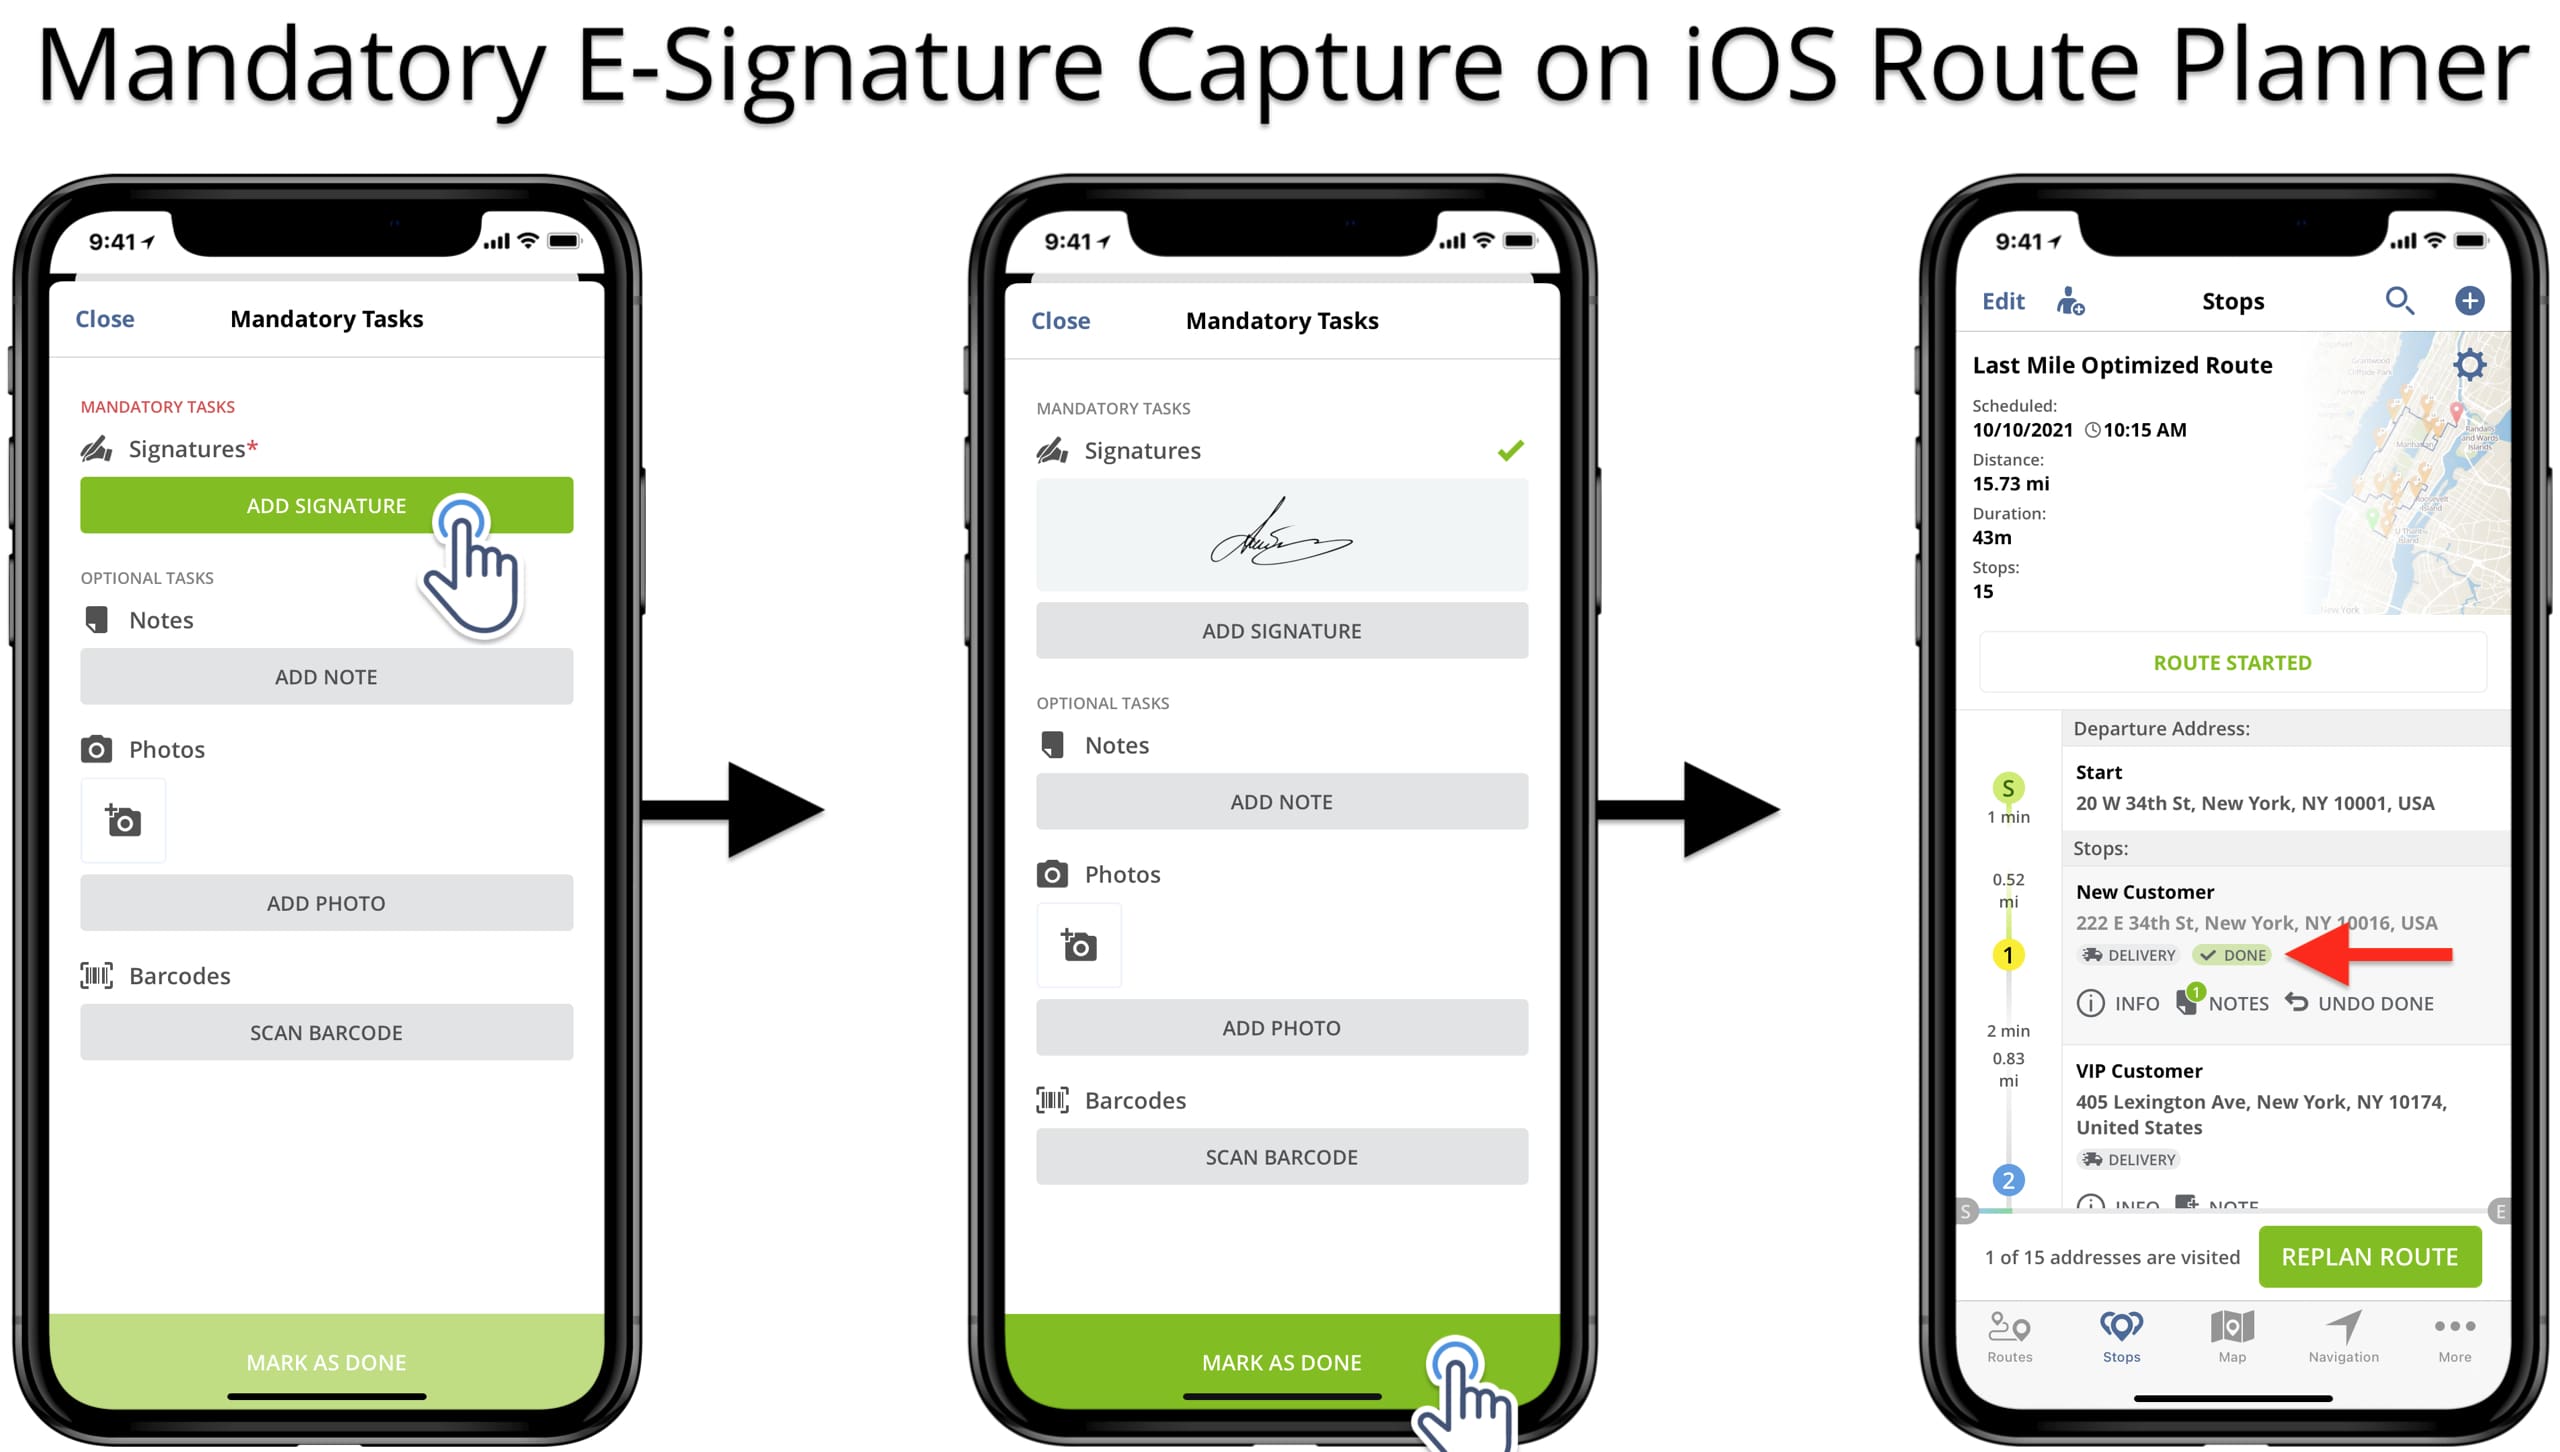
Next, add the mandatory e-signature to the respective route destination. Namely, tap on the “Add Signature” button and then use the iOS Route Planner “Sign on Glass“ feature. After that, the “Mark as Done” button will automatically become available so that you can assign the “Done” status to the selected route stop.
NOTE: The Mandatory Signature Capture advanced configuration required adding a single signature to enable the “Mark as Done” button on the iOS Route Planner.
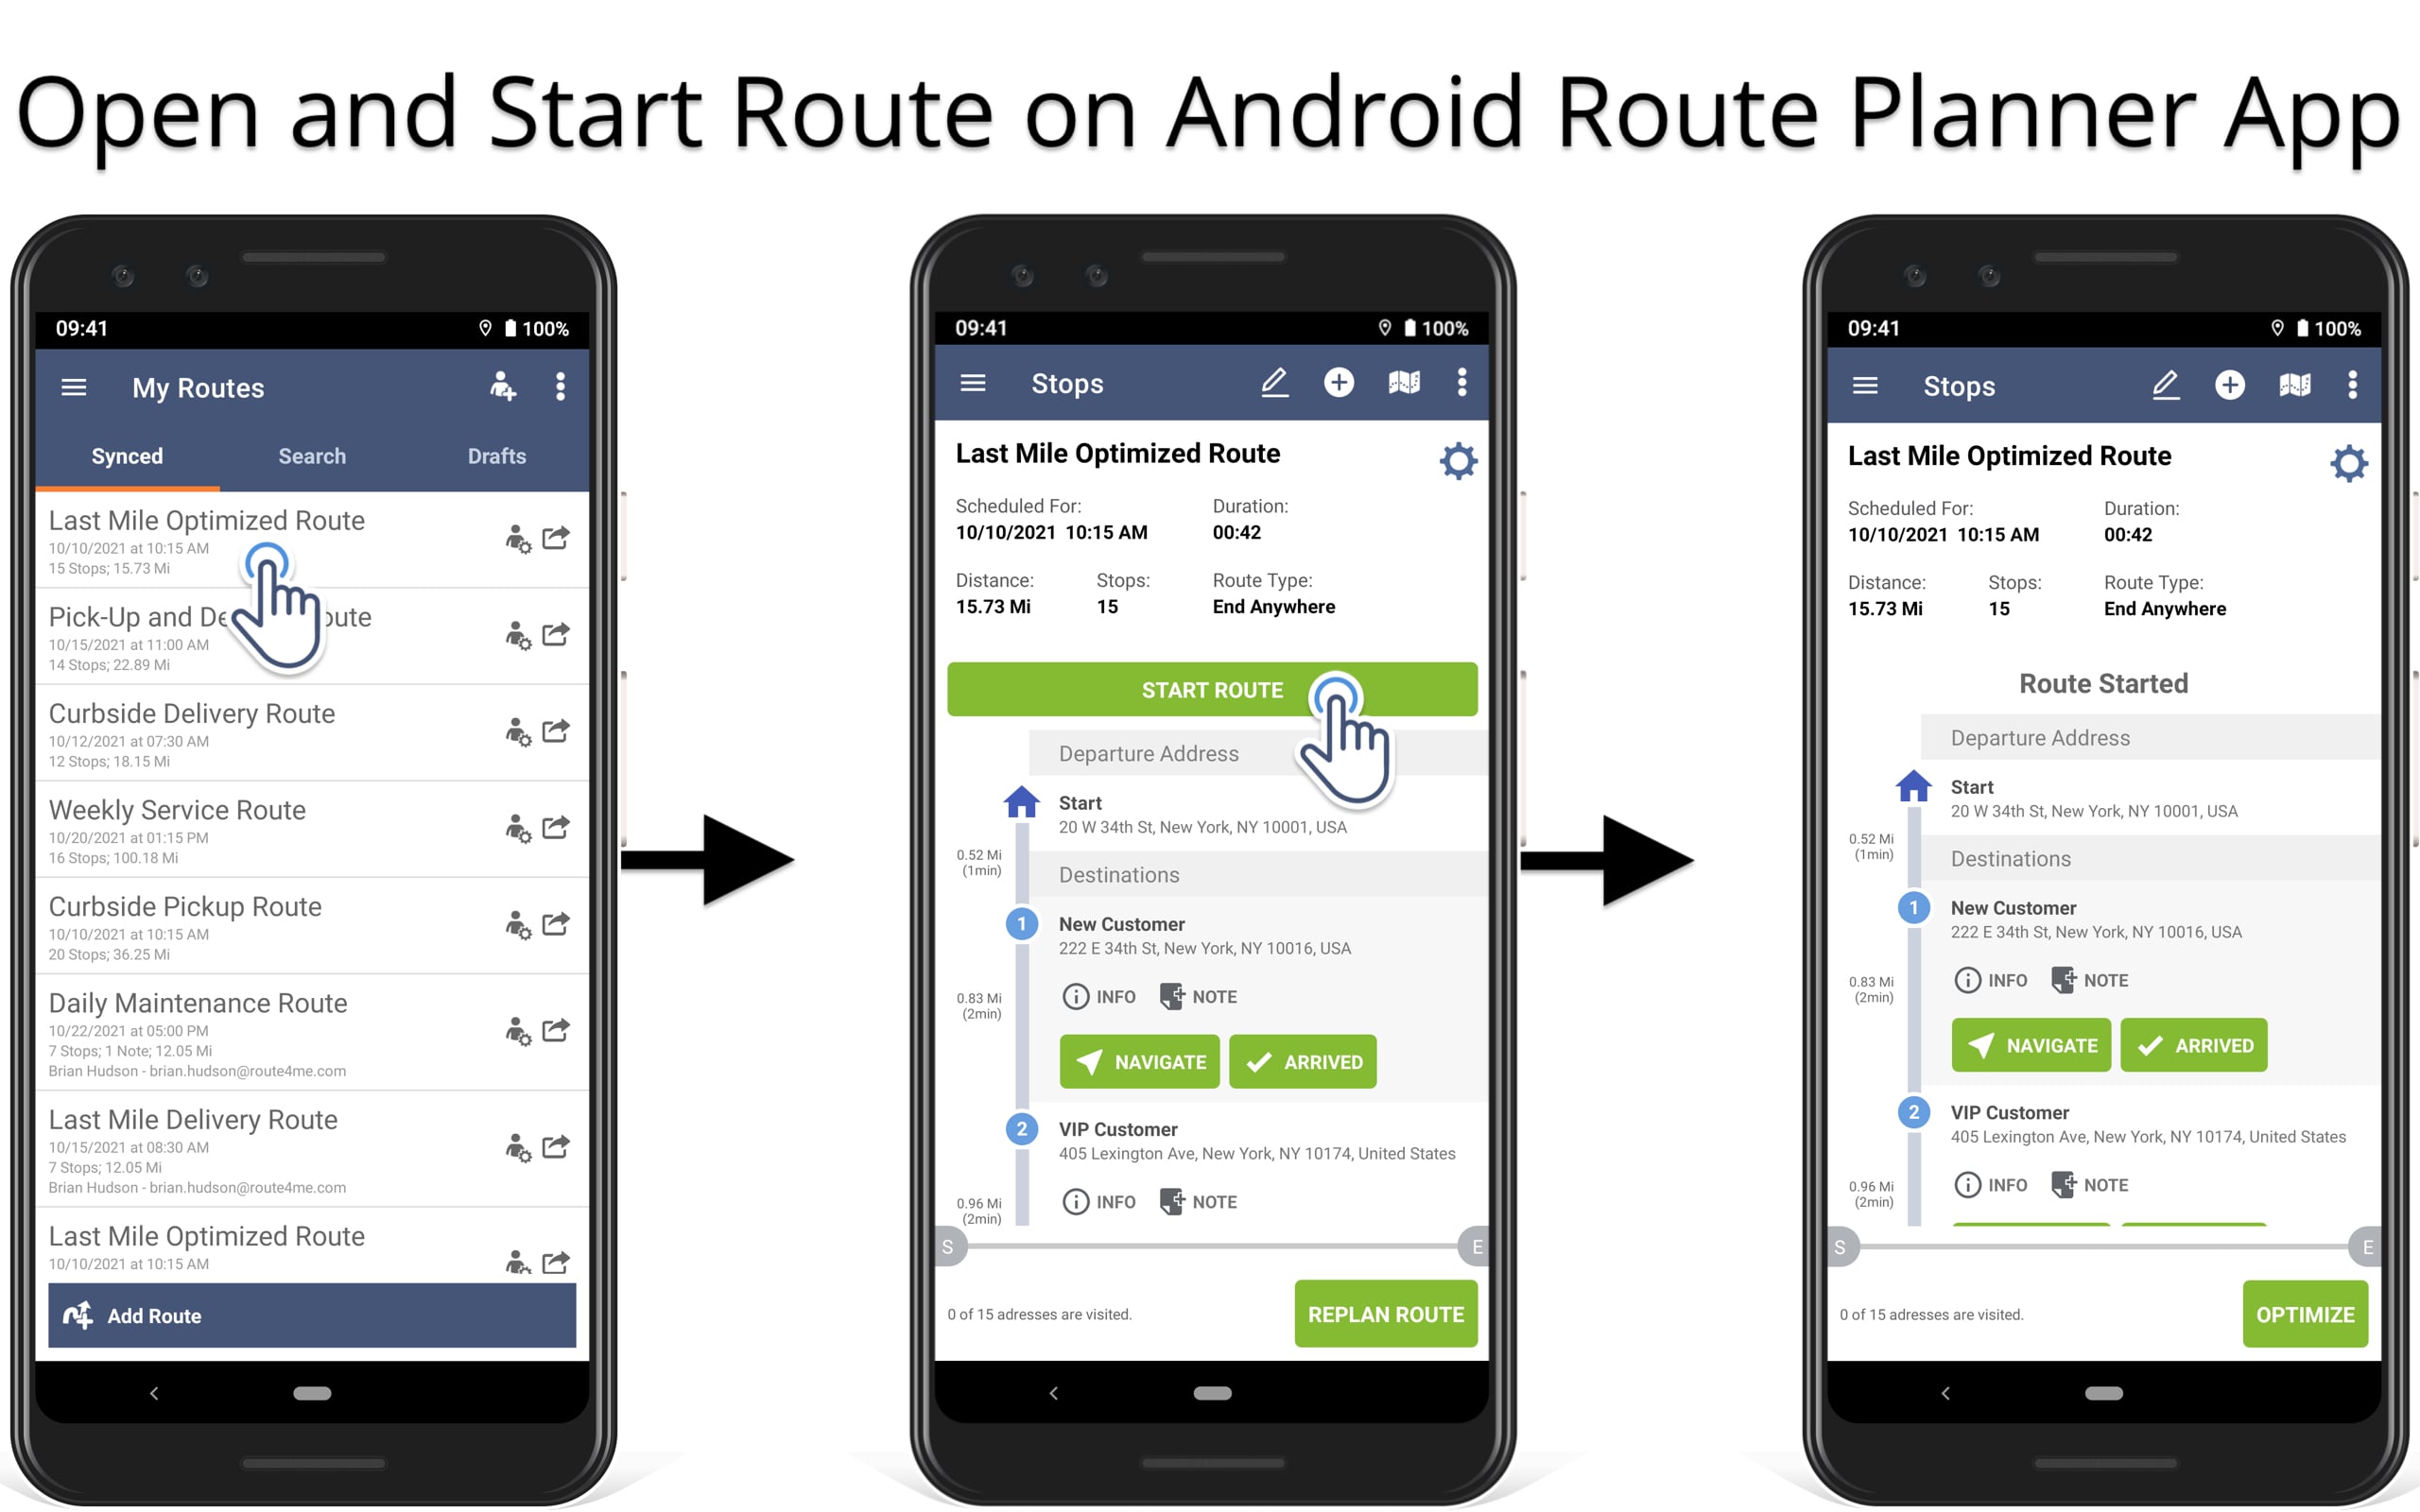
Start Route to Collect Signatures on Android Route Planner
To start route navigation, complete deliveries, and add e-signatures on the Android Route Planner app, start the respective route first. Specifically, open the preferred route and then tap on the “Start Route” button to start the opened last-mile delivery route.
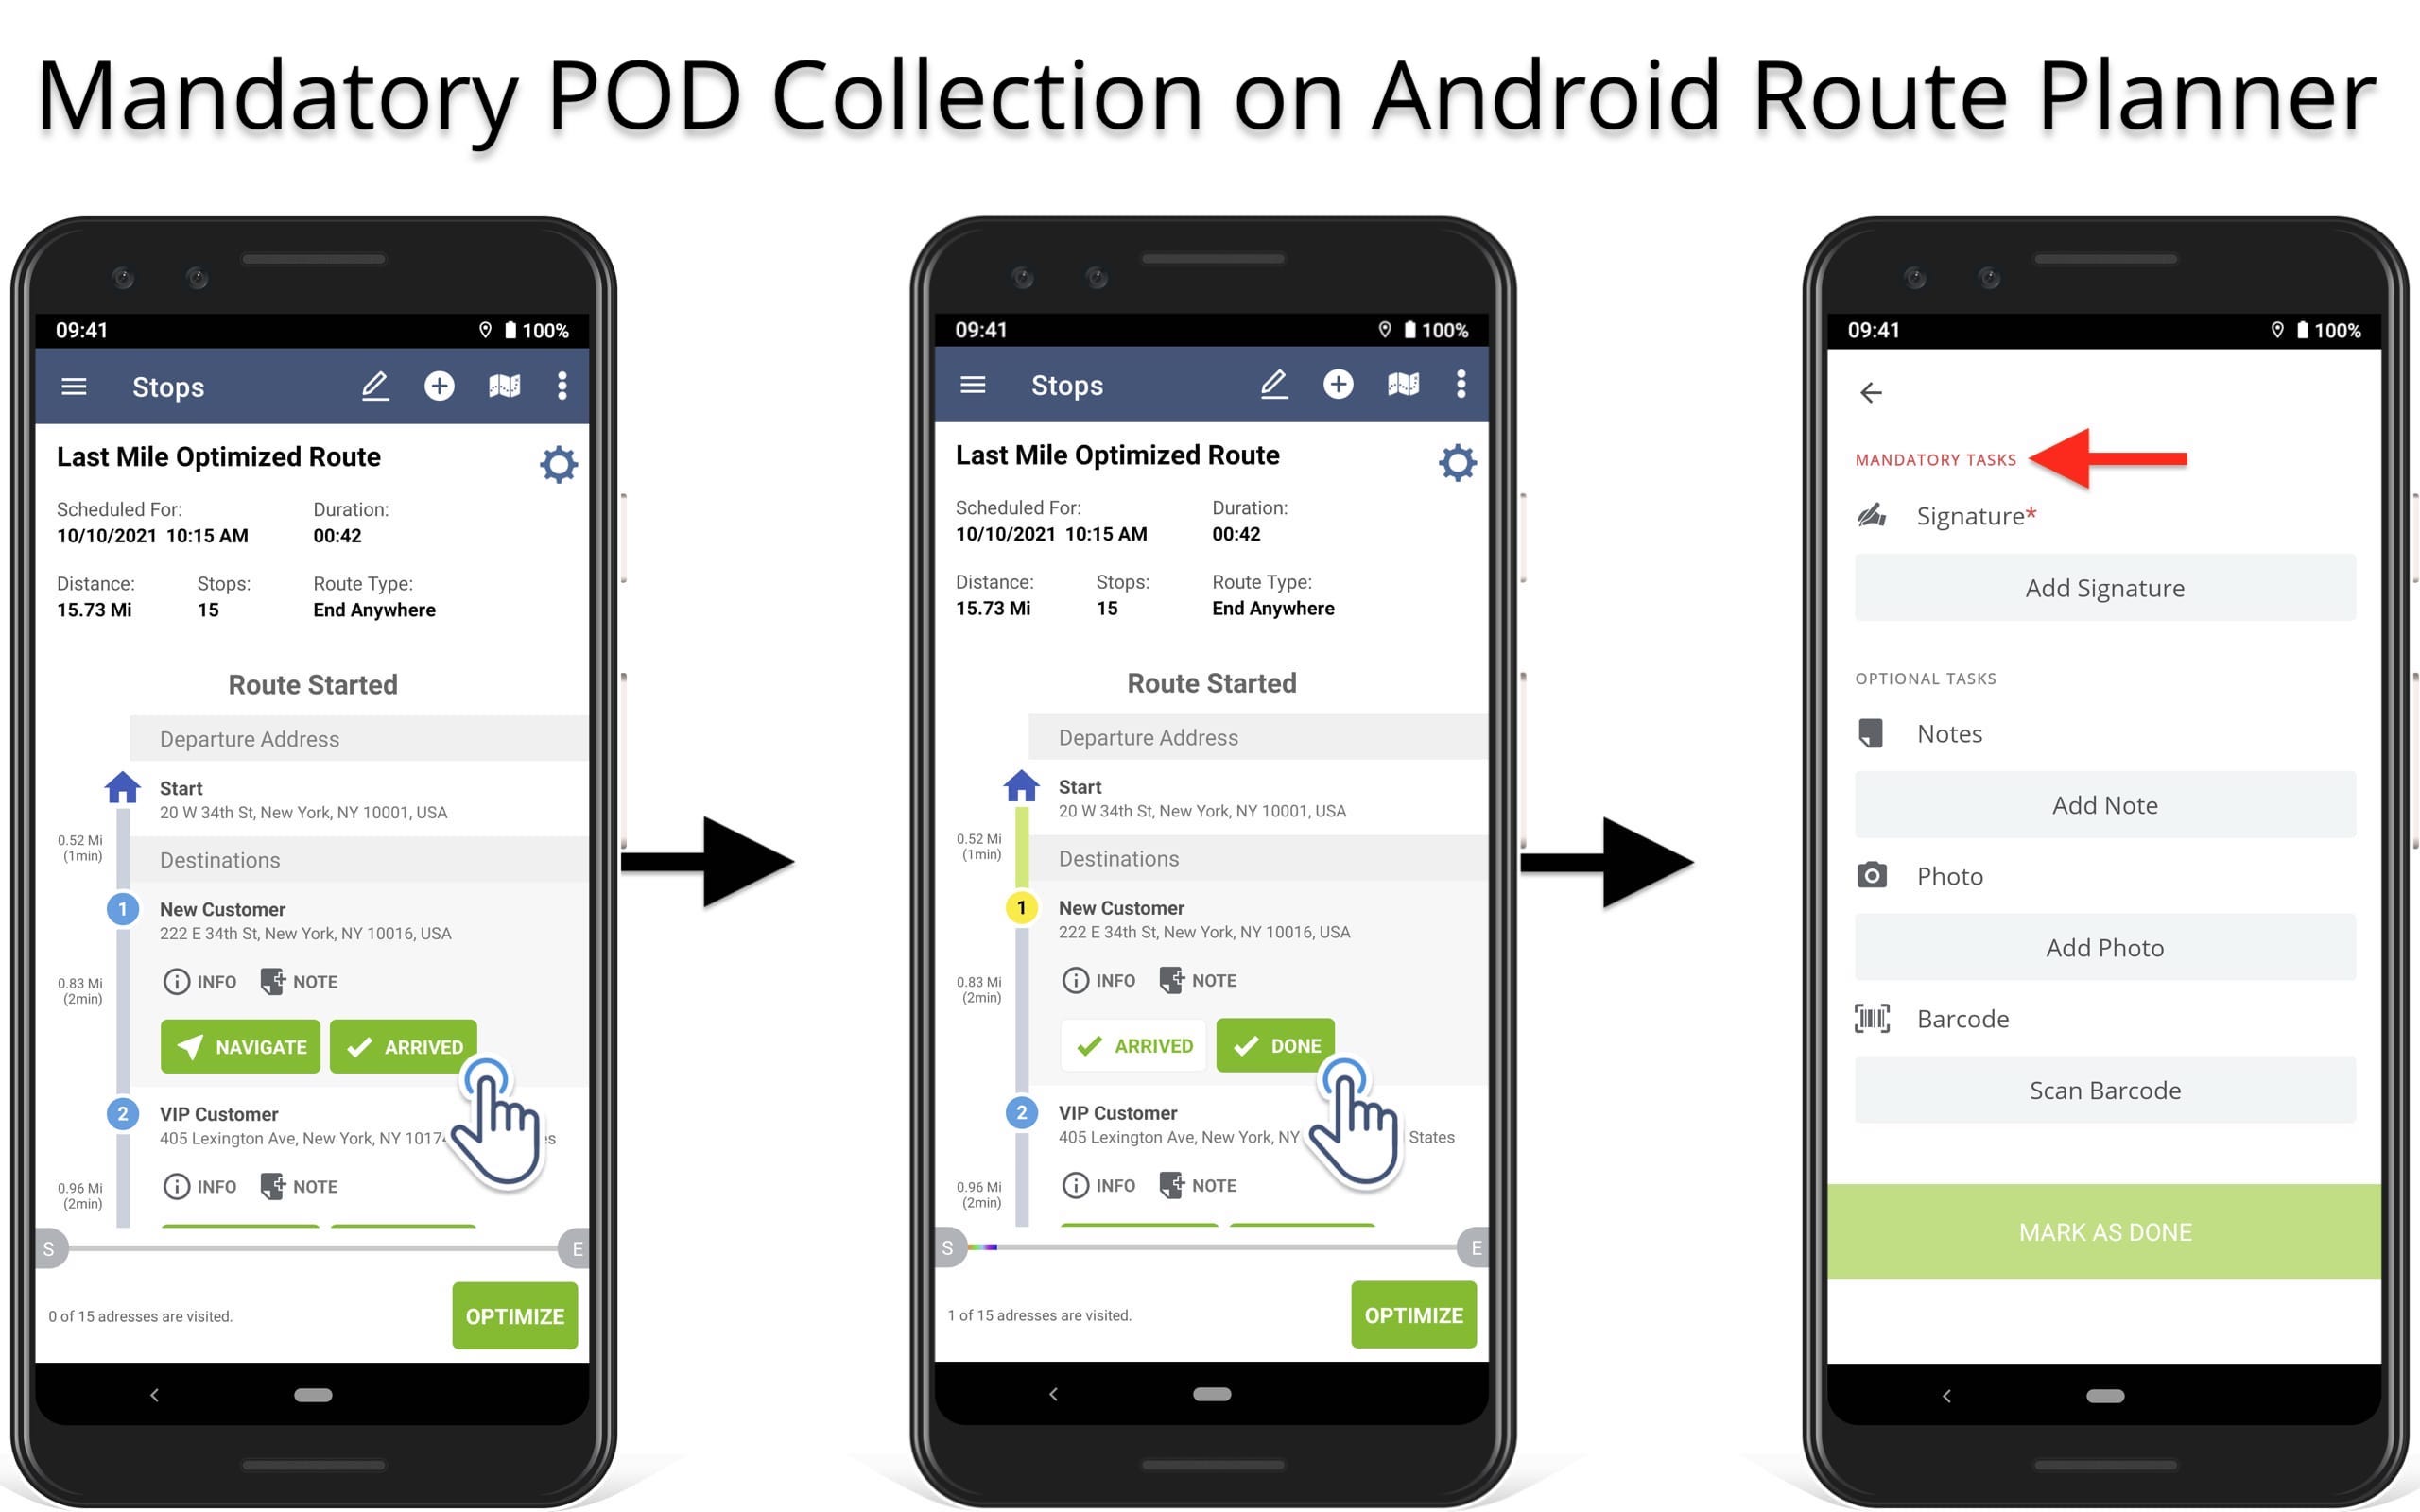
Mandatory Signature Capture on Android Route Planner
After that, proceed to navigate the started route and complete route deliveries and orders. Namely, tap on the “Arrived” button to indicate arriving at the respective route stop. Next, when you tap on the “Done” button to indicate completing the order, the app will automatically prompt you to complete the required mandatory tasks. Accordingly, the “Mark as Done” button is disabled until completing all required mandatory actions.
Therefore, in the “Mandatory Tasks” section of the selected route destination, you can check what tasks are mandatory for completion. Equally important, you can mark route stops as “Arrived” and “Done” using the route map on your Android Route Planner.
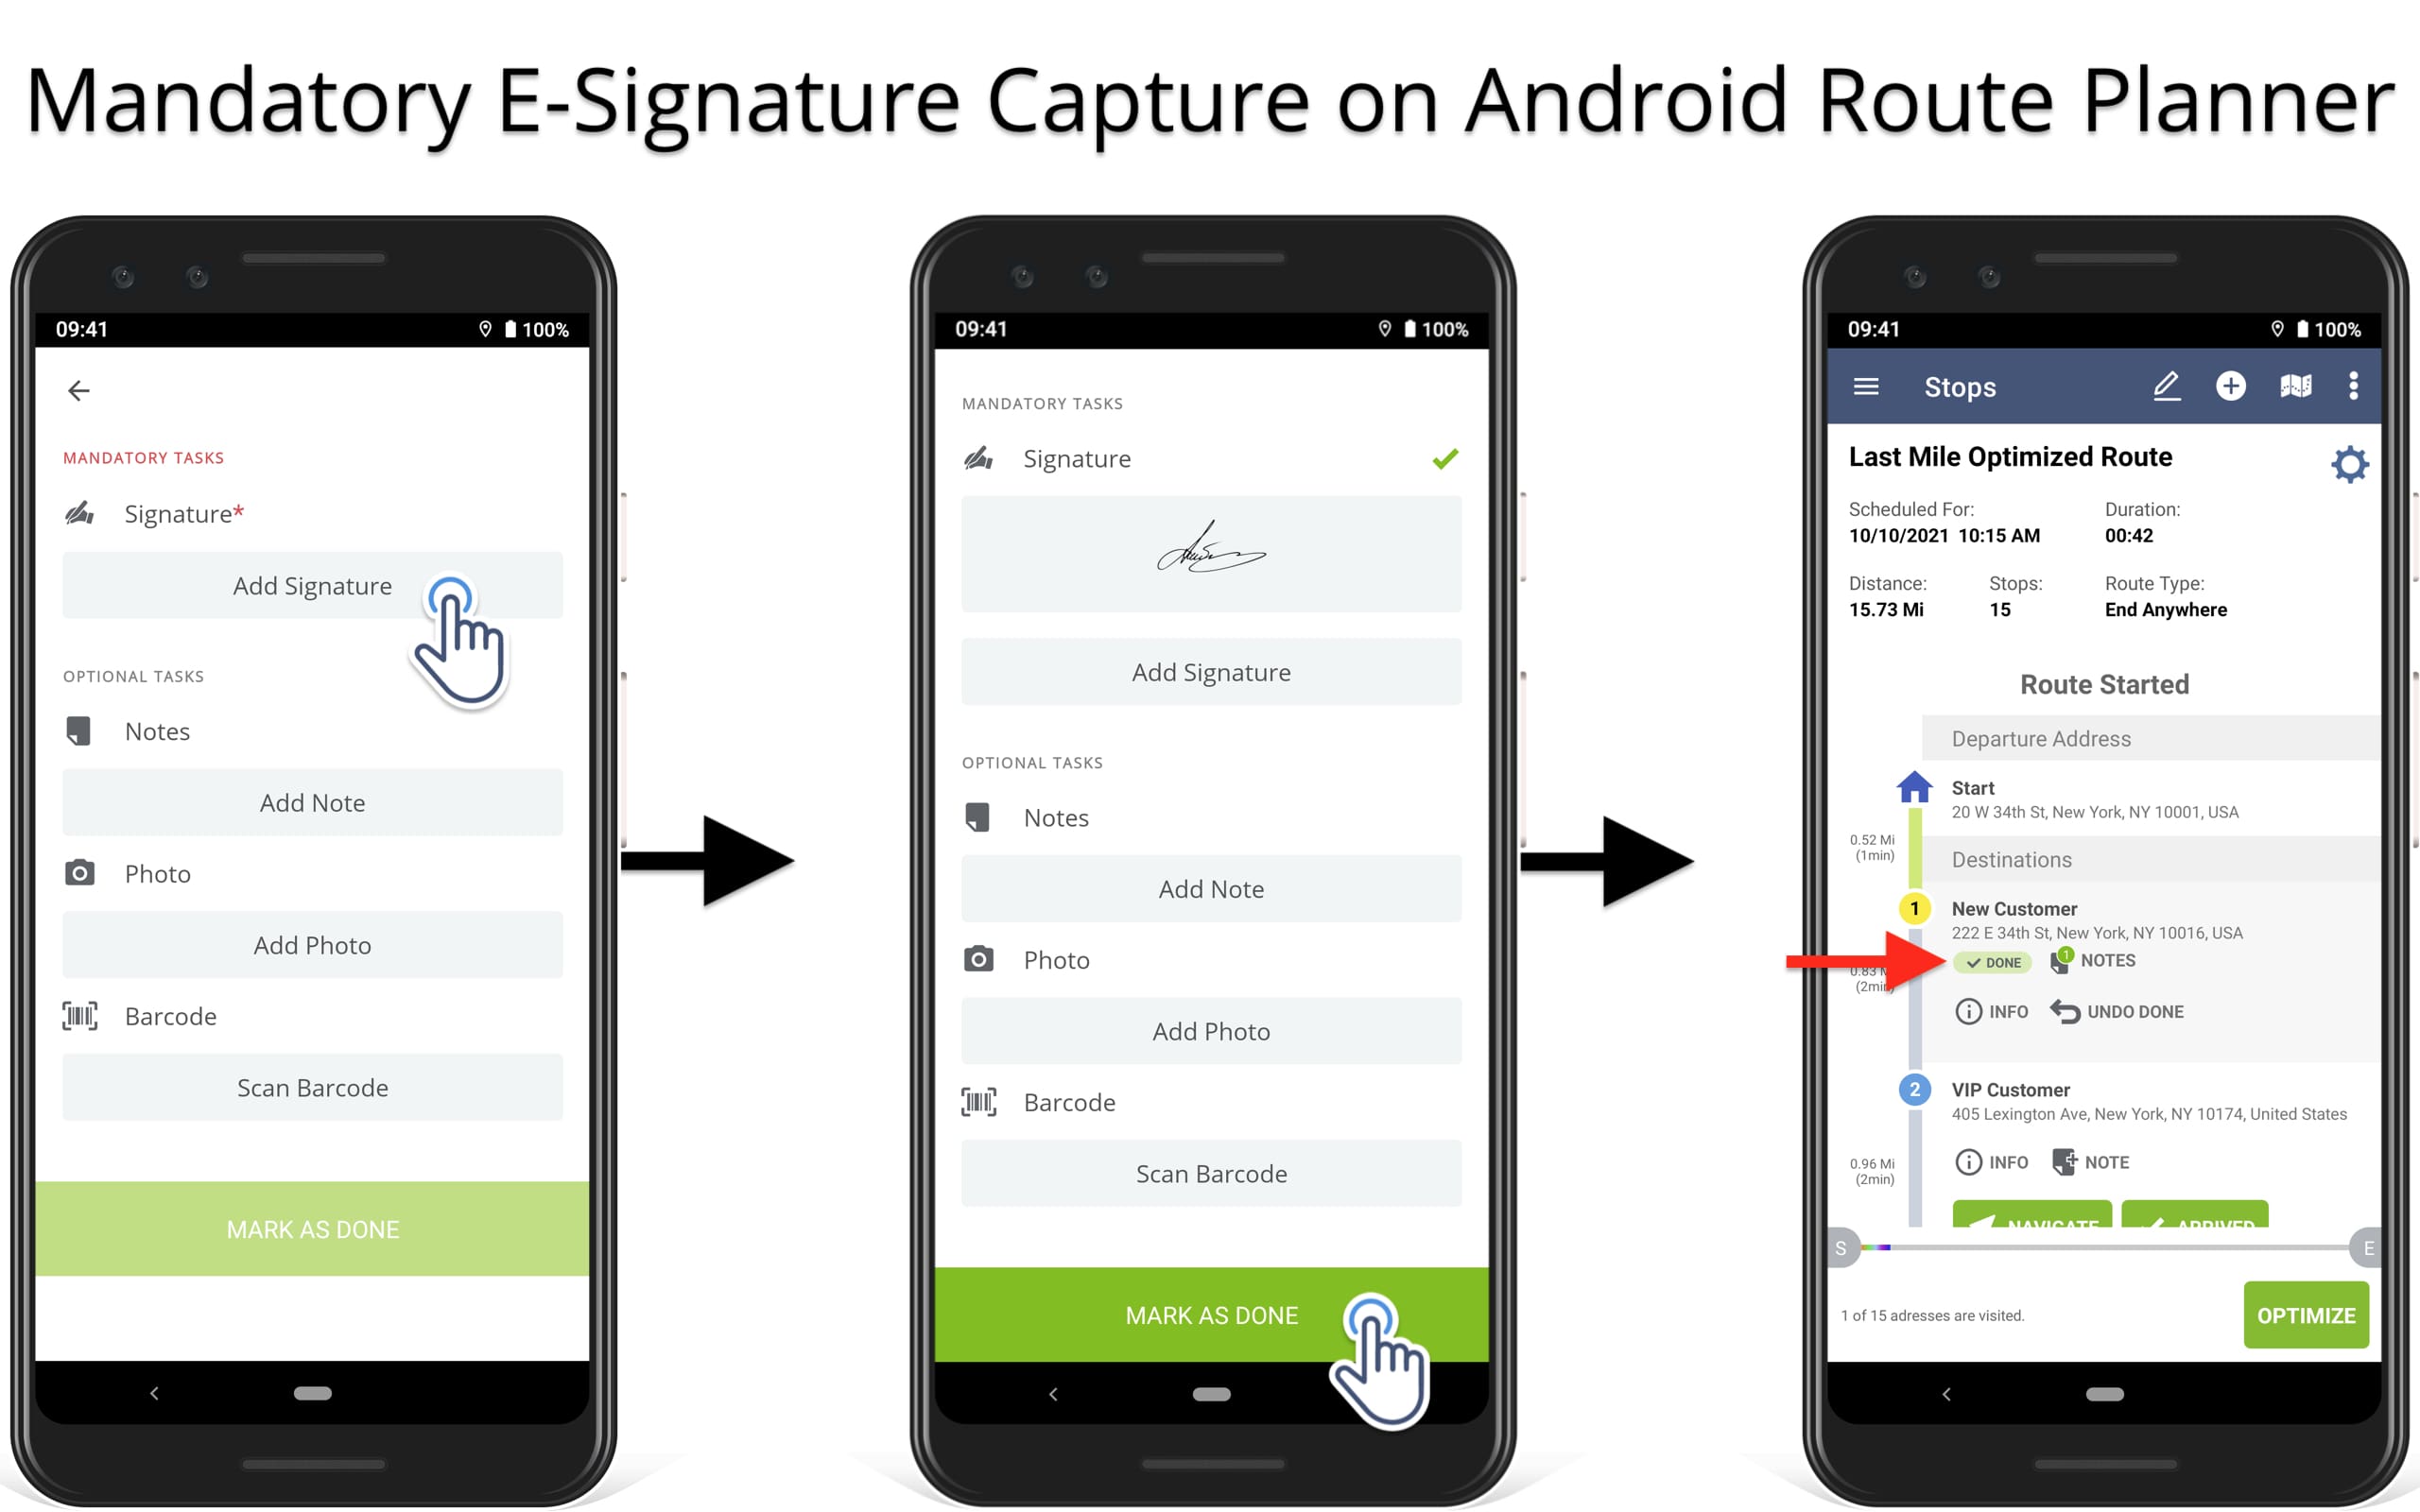
Collect Mandatory Signatures on Android Route Planner
In this case, you are required to add a mandatory signature to the respective route stop. Specifically, tap on the “Add Signature” button and use the Android Route Planner “Sign on Glass“ feature. After that, the “Mark as Done” button will be automatically enabled, allowing you to assign the “Done” status to the opened route stop.
NOTE: The Mandatory Signature Collection configuration requires adding a single signature to enable the “Mark as Done” button on the Android Route Planner app.
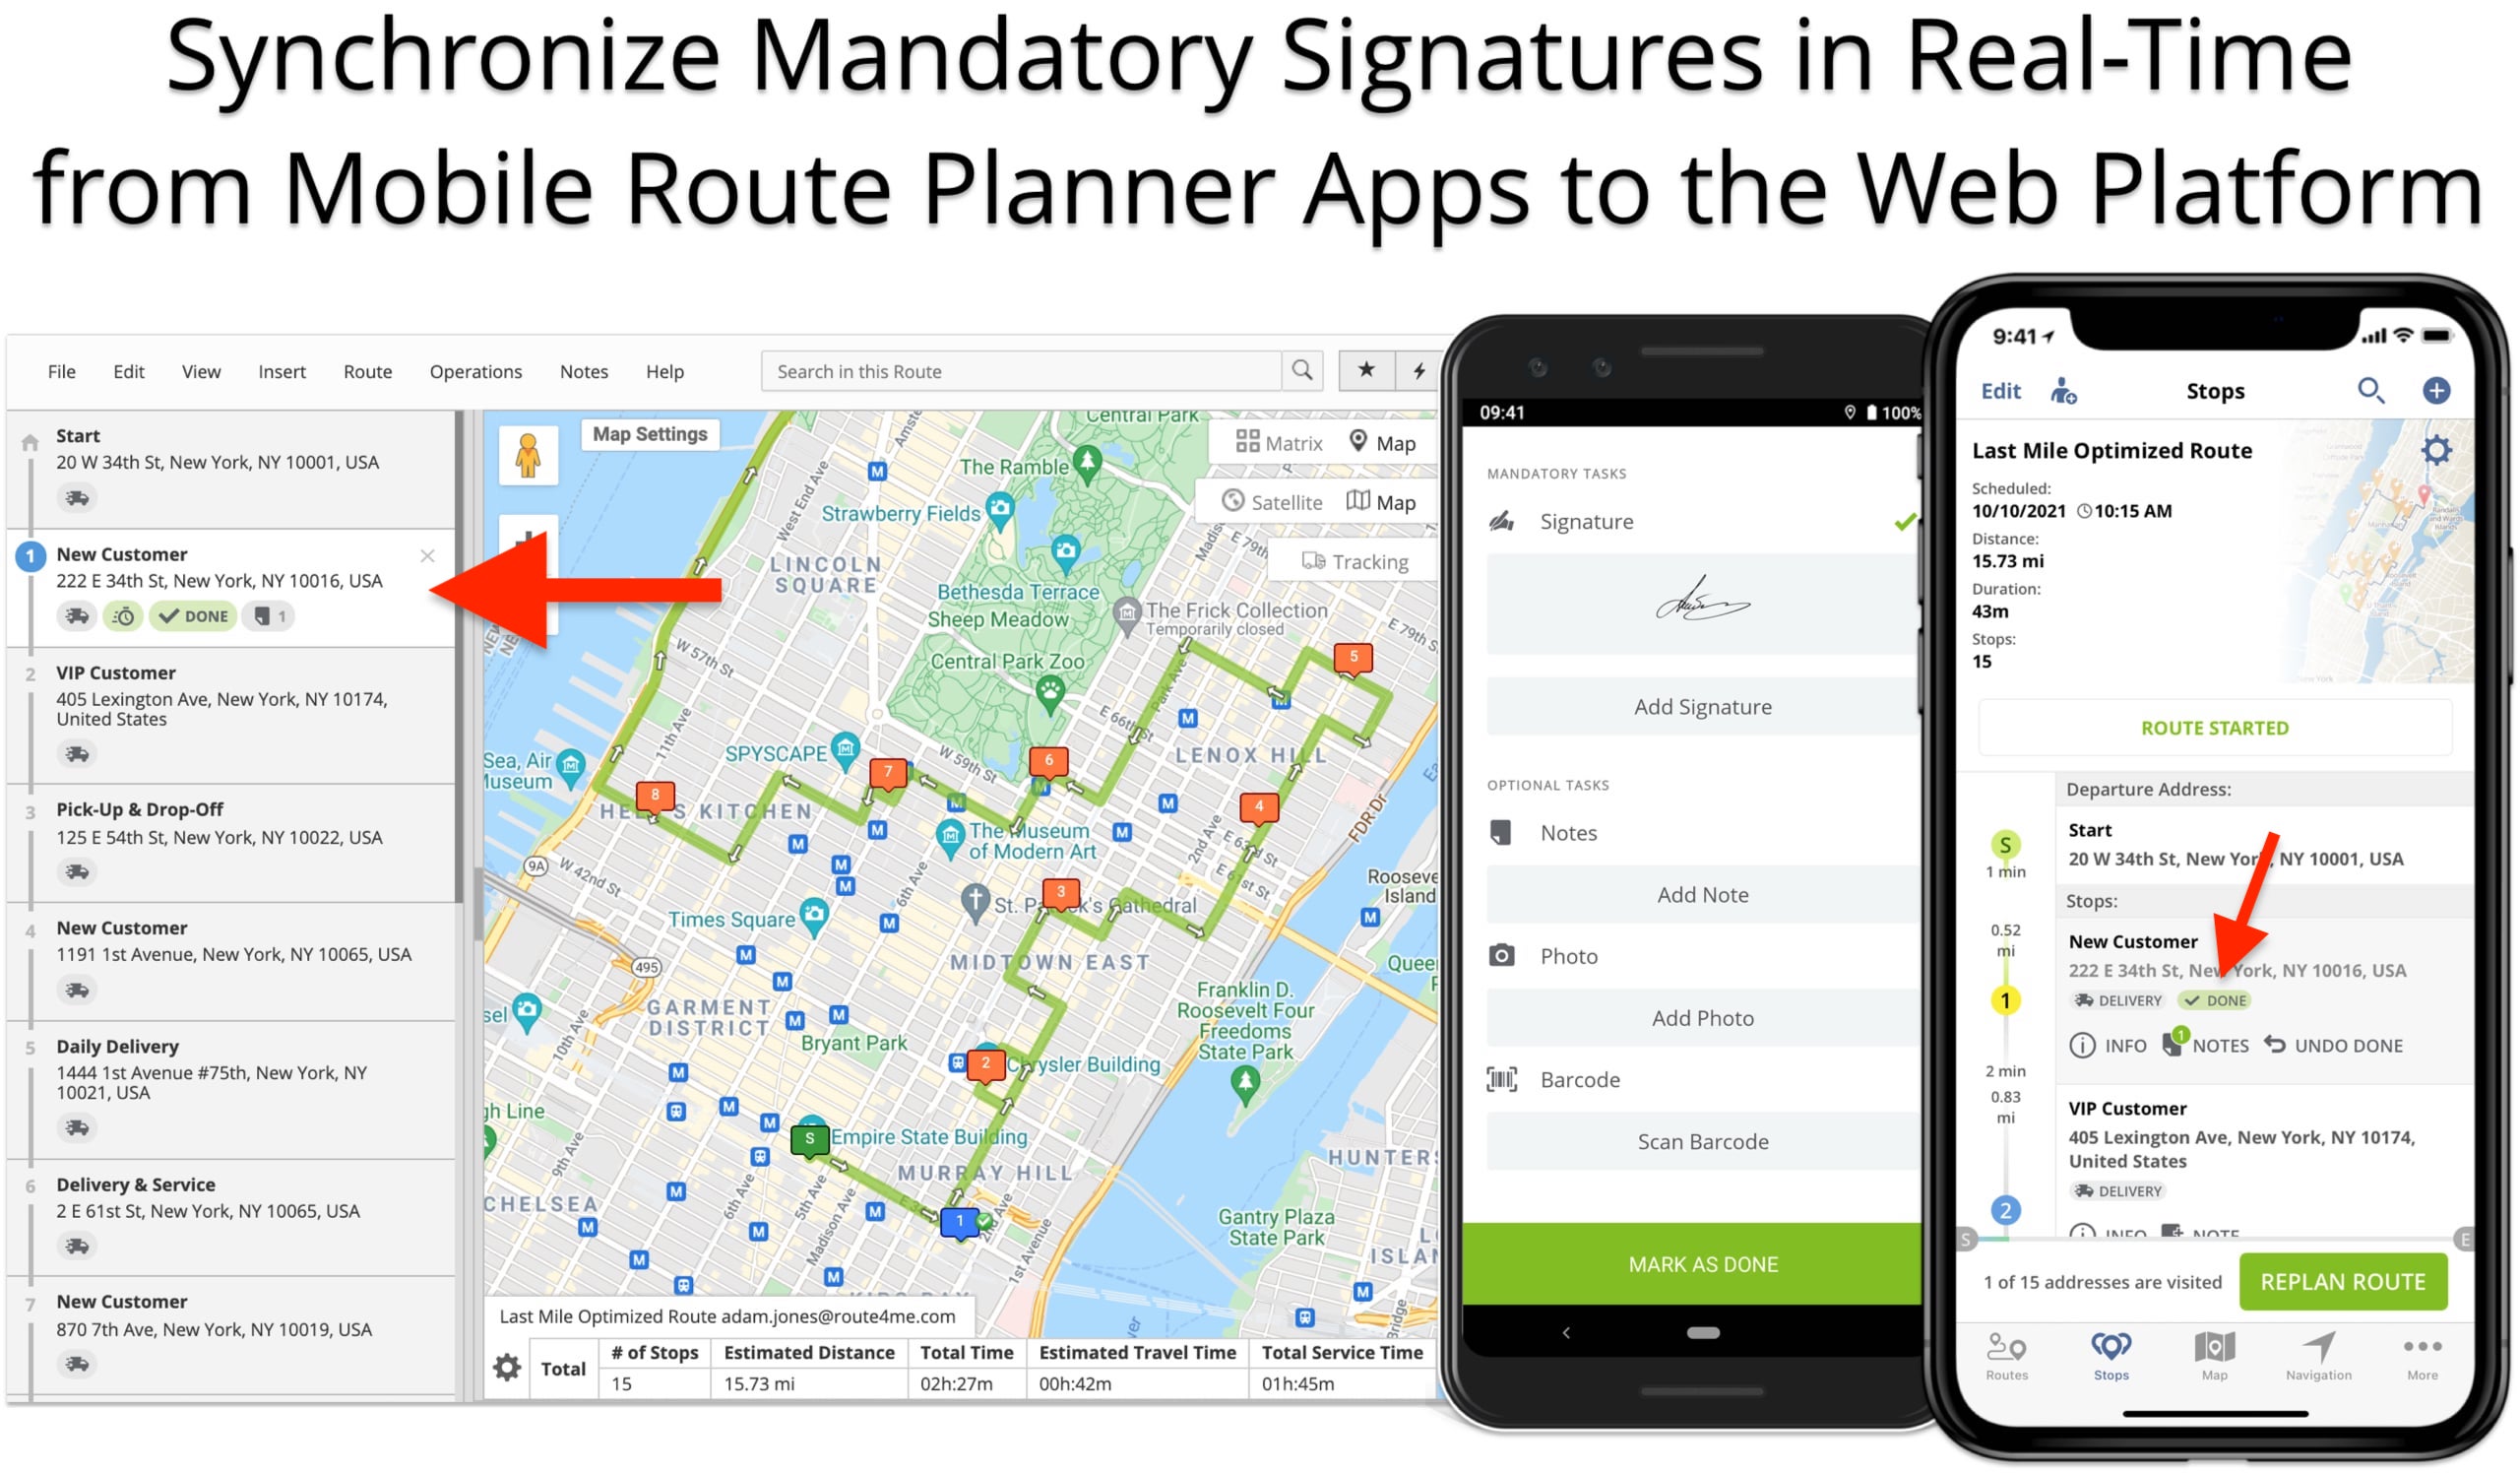
Mobile to Web Route Planner Mandatory Signature Capture Sync
Additionally, Route4Me supports real-time proof of delivery synchronization between mobile route planner apps and the Web Platform. Therefore, when you capture mandatory signatures using Route4Me’s iOS and Android mobile apps, they instantly become available on the Route4Me Website. For example, drivers can collect mandatory proof of delivery documentation when in the field, and managers can access it from the office.
Learn more about the difference between Route4Me’s Mobile and Web subscriptions and the respective access permissions.
Visit Route4Me's Marketplace to Check out Various Modules and Add-Ons:
- Operations
Custom Data Add-On
- Operations
Advanced Team Management Add-On
About author: Alex Yasko
Alex Yasko is the Go-to-Market Product Manager and Information Architecture Manager at Route4Me. With thousands of hours of experience, Alex specializes in breaking down complex last-mile optimization and routing scenarios into simple, actionable instructions, helping last-mile businesses streamline their operations effortlessly.