Add And Manage Users – Route4Me Team Management Guide
Route4Me’s Last Mile Transportation Team Software helps you build a structured routing team with clearly defined roles: Managers, Route Planners, Drivers, and other team members. Each user can be given tailored permissions, route visibility, and access to specific drivers and vehicles, all based on your enterprise model and last mile routing needs. This makes it easy to assign the right routes to the right people in real time. And, to keep everyone aligned, Route4Me syncs updates instantly across all connected devices. Use this guide to add, invite, upload, and manage users.
NOTE: To learn about your account’s user limit or to increase your user limit, please contact Route4Me Support.
Table of Contents
Add New User – Manually Create Profiles, Upload Users Spreadsheet, Invite Users Via Email
Route4Me offers several ways to add users to your team. You can create individual profiles manually, bulk upload multiple users via spreadsheet, or send email invites to new team members. Each method is explained in more detail below.
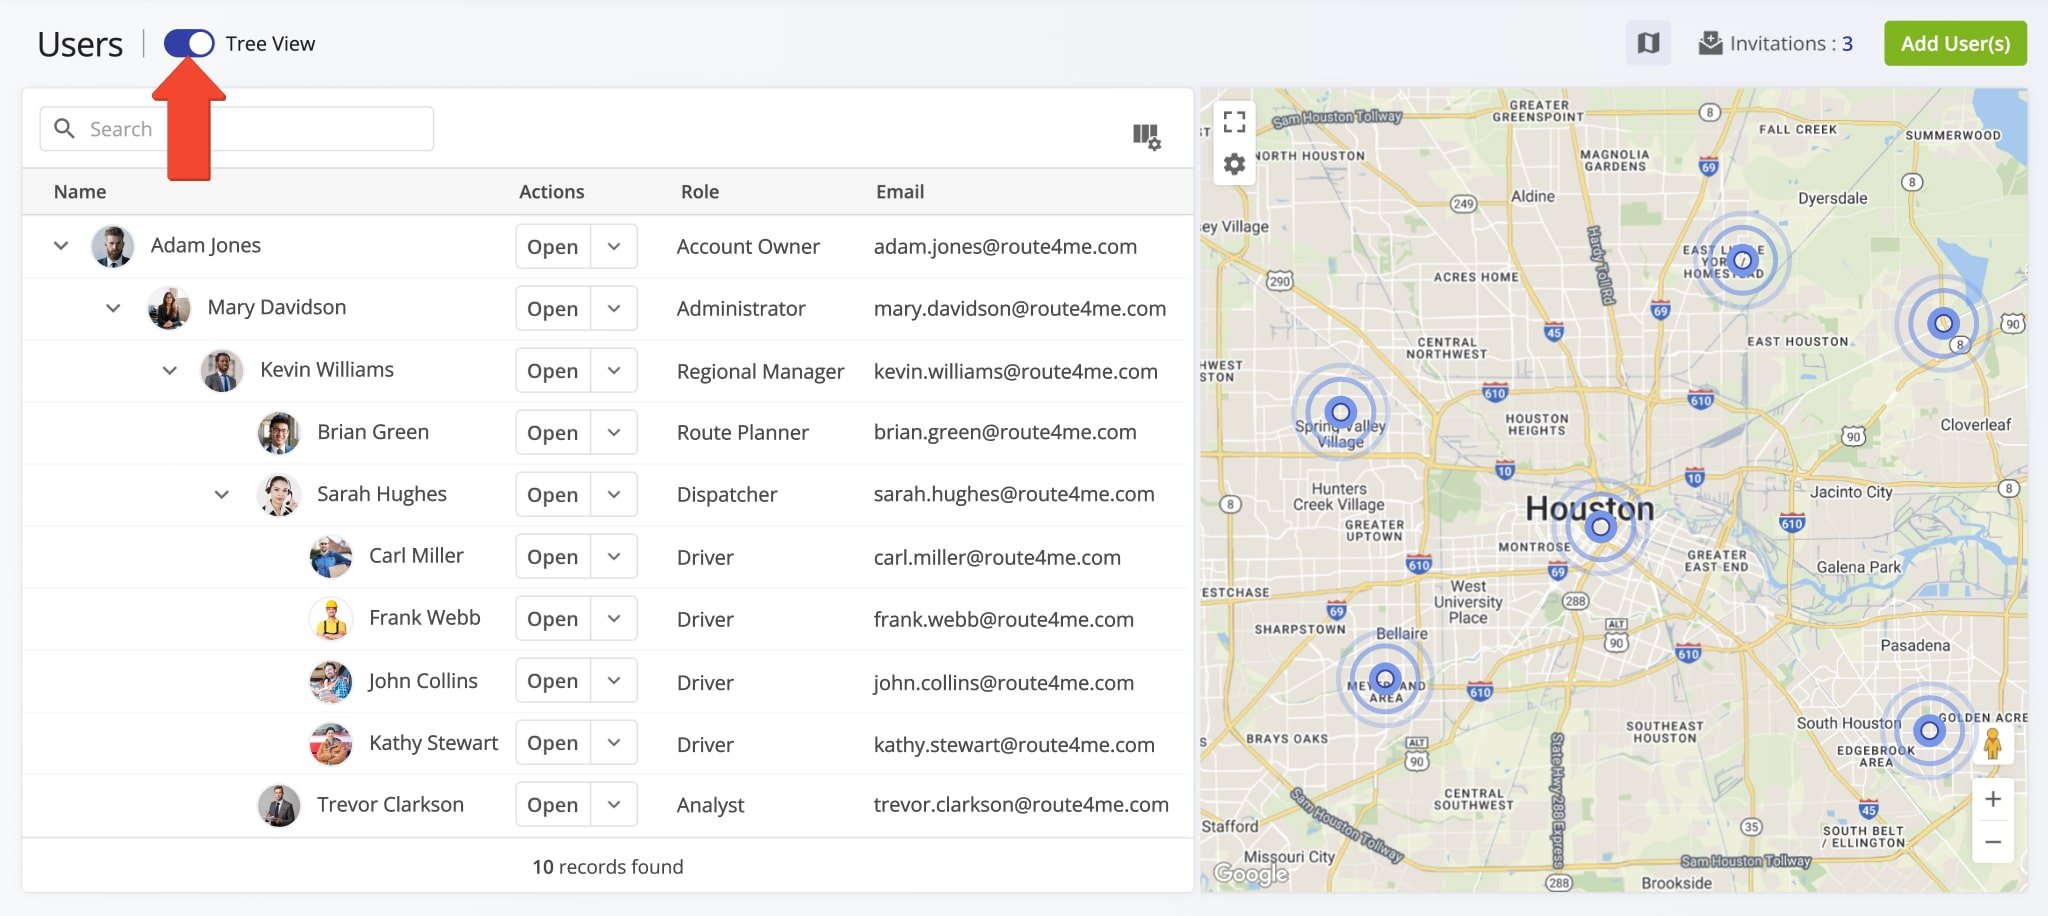
To view your team’s hierarchy and reporting structure, use the “Tree View” toggle at the top of the Users page.
Create Users – Manually Add New Users and Sub-Users To Your Team
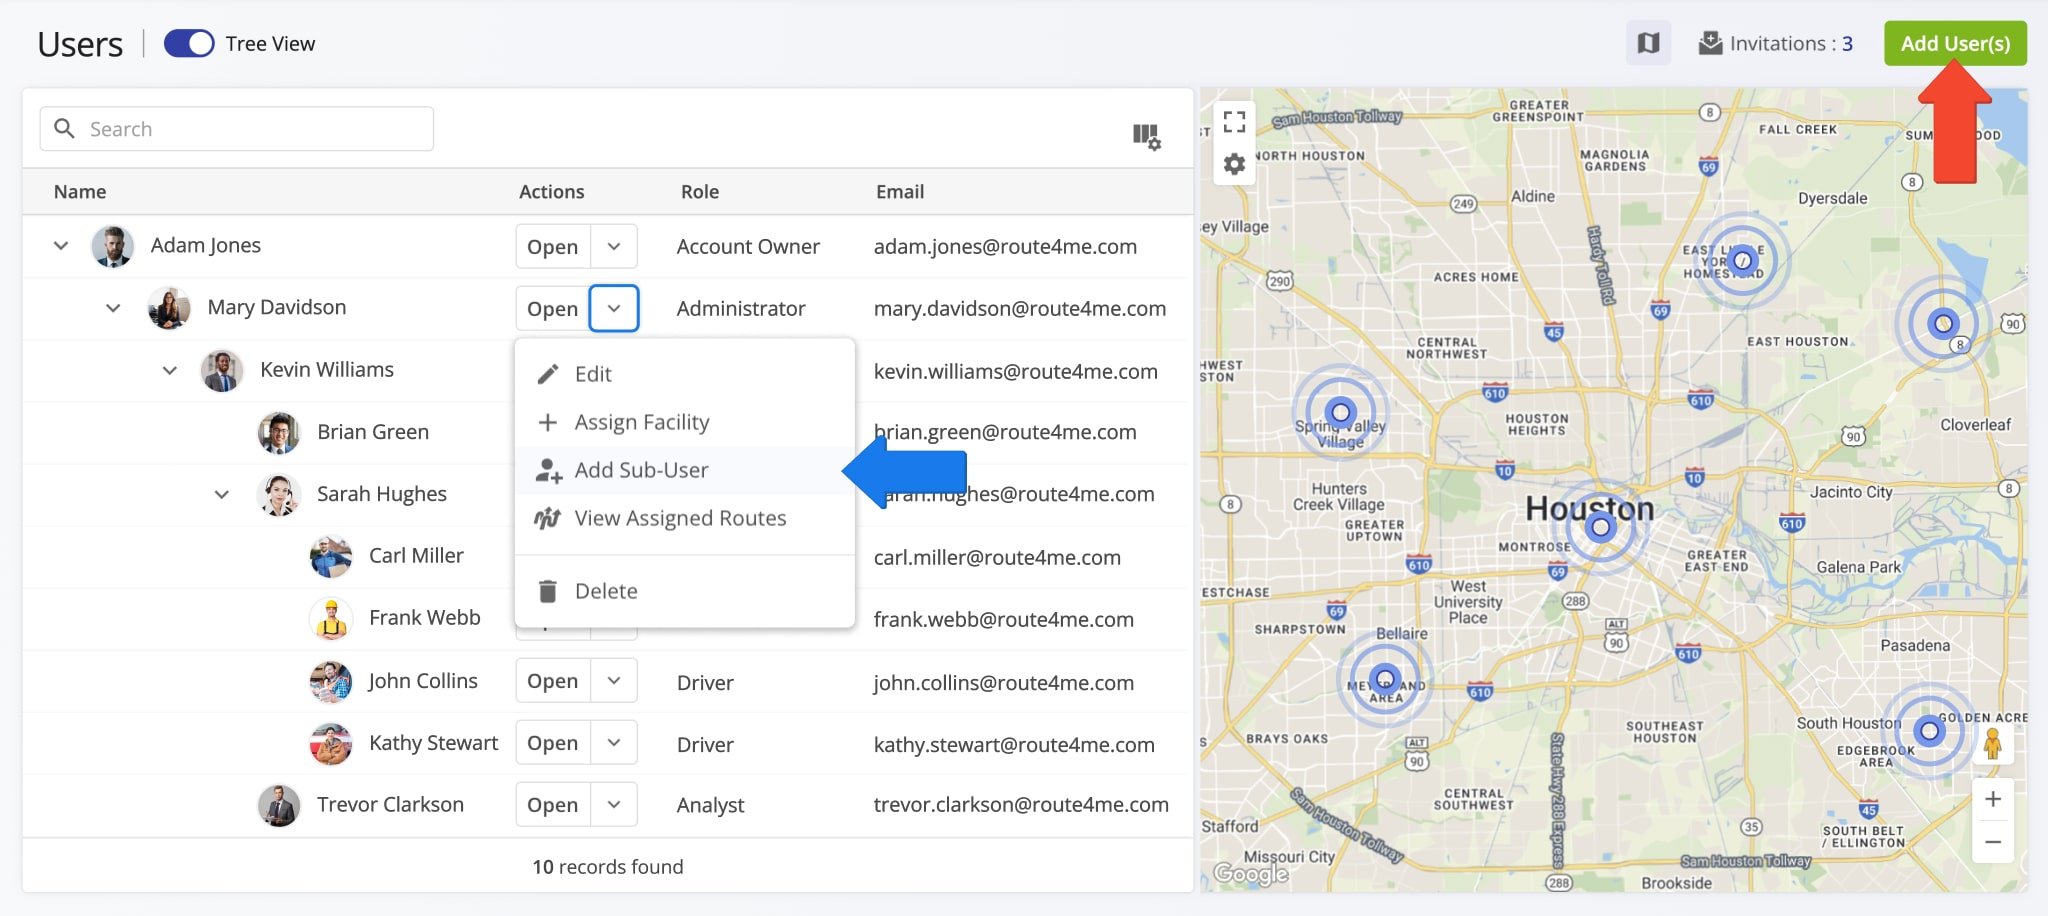
To create a new user, go to “Team & Equipment” > “Users” in the Navigation Menu, then, from your Users page, click “Add User(s)“. Alternatively, click the Down Arrow Button next to an existing user and select “Add Sub-User“.
Your ability to view and manage users depends on your User Type. Based on your permissions, you can add sub-users with different roles and assign them under your account or another team member.
NOTE: Learn more about Route4Me’s Team Hierarchy and User Account Level Permissions.
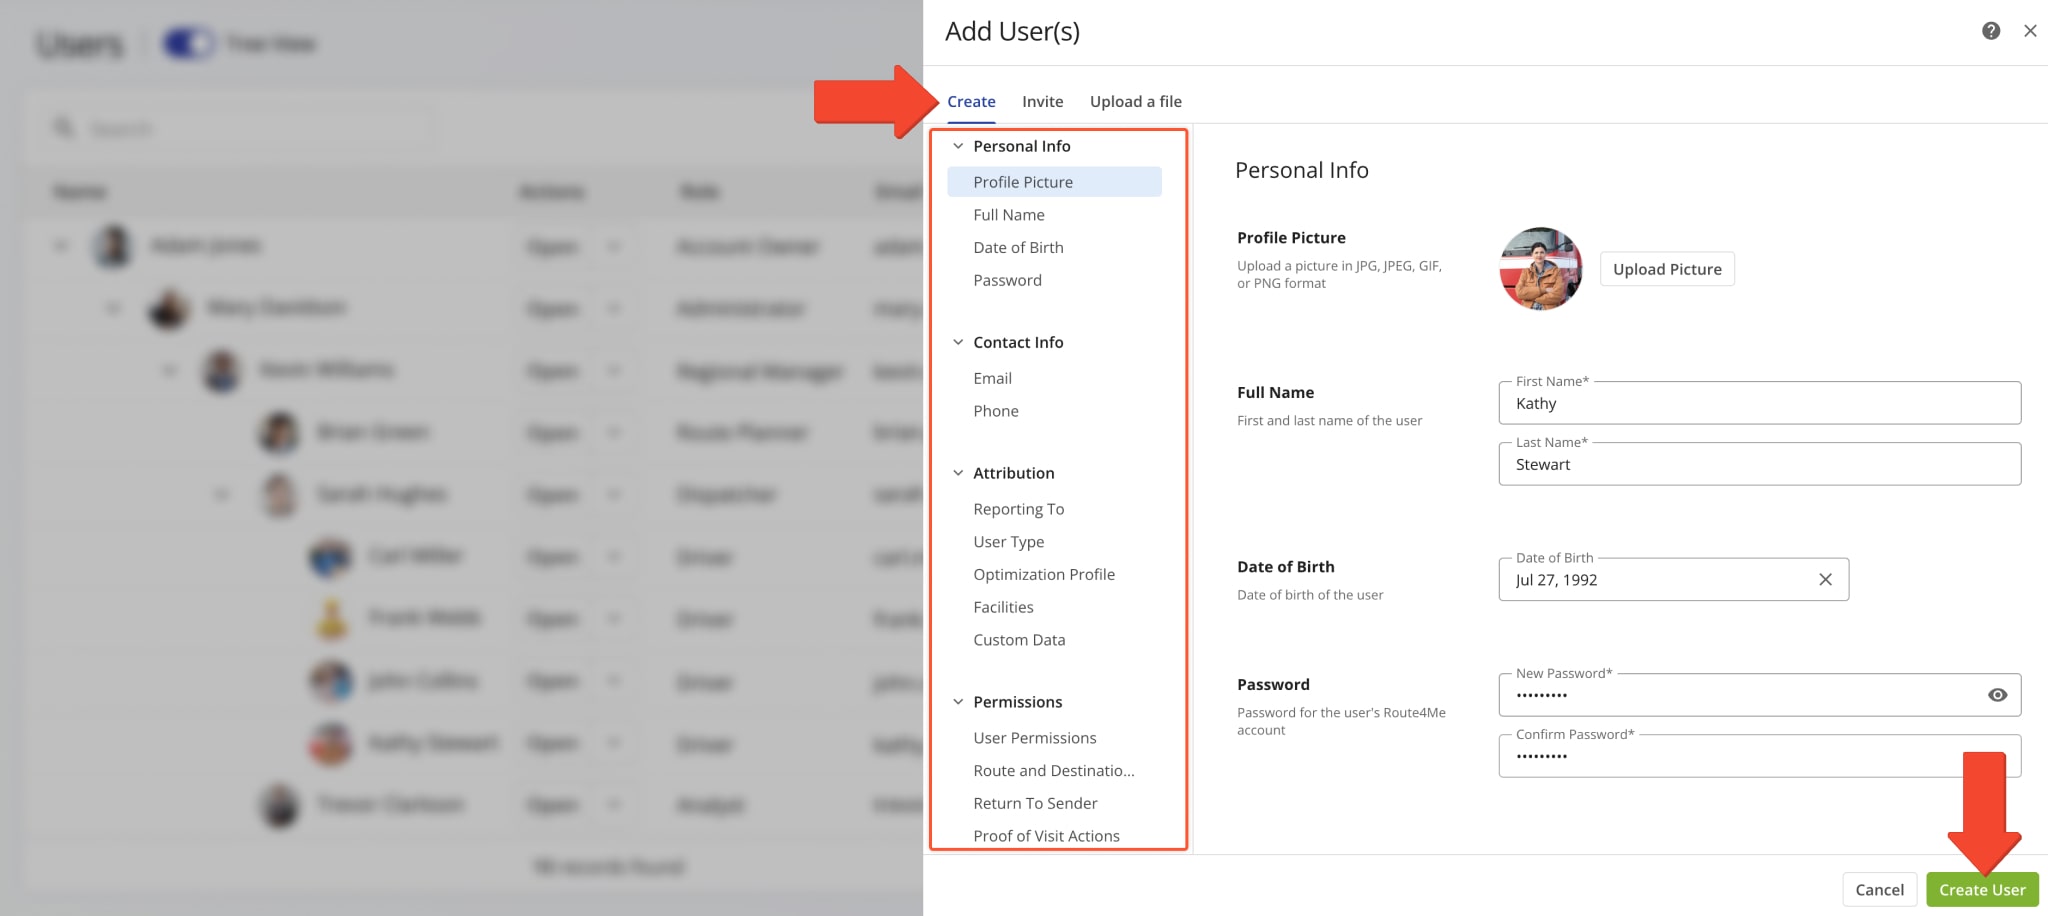
Next, click the “Create” tab to manually set up a new user account. Fill in the required profile fields, then click “Create User” to add the user to your team. Details about each profile section and field are provided in the table below.
| Field | Description | |
|---|---|---|
| Profile Info | ||
| Profile Picture | Click the empty avatar and upload an image or a photo of the team member for personalization. | |
| Full Name | Enter the first and last name of the user in the corresponding field. | |
| Date of Birth | Enter the user’s date of birth on the calendar. | |
| Password | Enter and confirm the password the new team member will use to sign in to their account on the Route4Me Mobile App or Web Platform. NOTE: Users can use the email address specified in the “Contact Info” section as their username when signing in. | |
| Contact Info | ||
| This email address will be used as the sign-in username by the team member to access their new Route4Me user account. | ||
| Phone | Contact phone number of the team member. The user’s phone number can then be used to dial the user from Route4Me’s Mobile Route Planning apps. | |
| Attribution | ||
| Reporting To | Select a manager who will view and manage the new user. | |
| User Type | Select the preferred User Type: Administrator, Regional Manager, Route Planner, Dispatcher, Driver, Analyst, Sorter, or Customer Support. Each User Type has a specific set of default account-level permissions. Learn more about Route4Me’s User Types Hierarchy and Customizing User Account-Level Permissions. | |
| Optimization Profile | Select an Optimization Profile that will automatically be used to optimize last mile routes whenever the user attempts to plan a route. | |
| Facilities | Assign the user to one of your Last Mile Business Facilities. | |
| Custom Data | Route4Me’s Custom Data enables you to add additional information to your users that doesn’t fit into reserved fields. To add custom data to users, enable the Custom Data Add-On on the Primary Route4Me Account. Additionally, learn more about User Custom Data. | |
| Permissions | ||
| User Permissions: Travel-Only | Equivalent to enabling Read-Only Mode when creating users without the Grab & Go feature. The user can see the routes, addresses, orders, users, and work assigned to them but can’t edit routes, addresses, orders, users, and work assigned to them. | |
| User Permissions: Travel and Plan Routes with Orders | Enables the user to scan barcodes on orders and add them as destinations to a route. Routes planned this way will be optimized with the user’s associated Optimization Profile. Additionally, learn more about scanning barcodes on iPhone and using the Android mobile barcode scanner. | |
| User Permissions: Travel and Plan Routes | Equivalent to Read-Only Mode disabled when creating users without the Grab & Go feature. The user can see and edit the routes, addresses, orders, users, and work assigned to them. | |
| Route And Destination Statuses | Allow the user to change route and destination statuses on the Web Platform. NOTE: This feature is not enabled by default. To enable it, contact Route4Me’s Support Team. | |
| Return To Sender | Enable “Return to Sender” scanner option for the Mobile App used to scan order barcodes and mark orders for return to sender. | |
| Proof of Visit Actions | Allow the user to add, edit, or delete notes, photos, signatures, and other records that confirm a destination was visited or completed. | |
Invite Users – Invite New Team Members Via Email Link
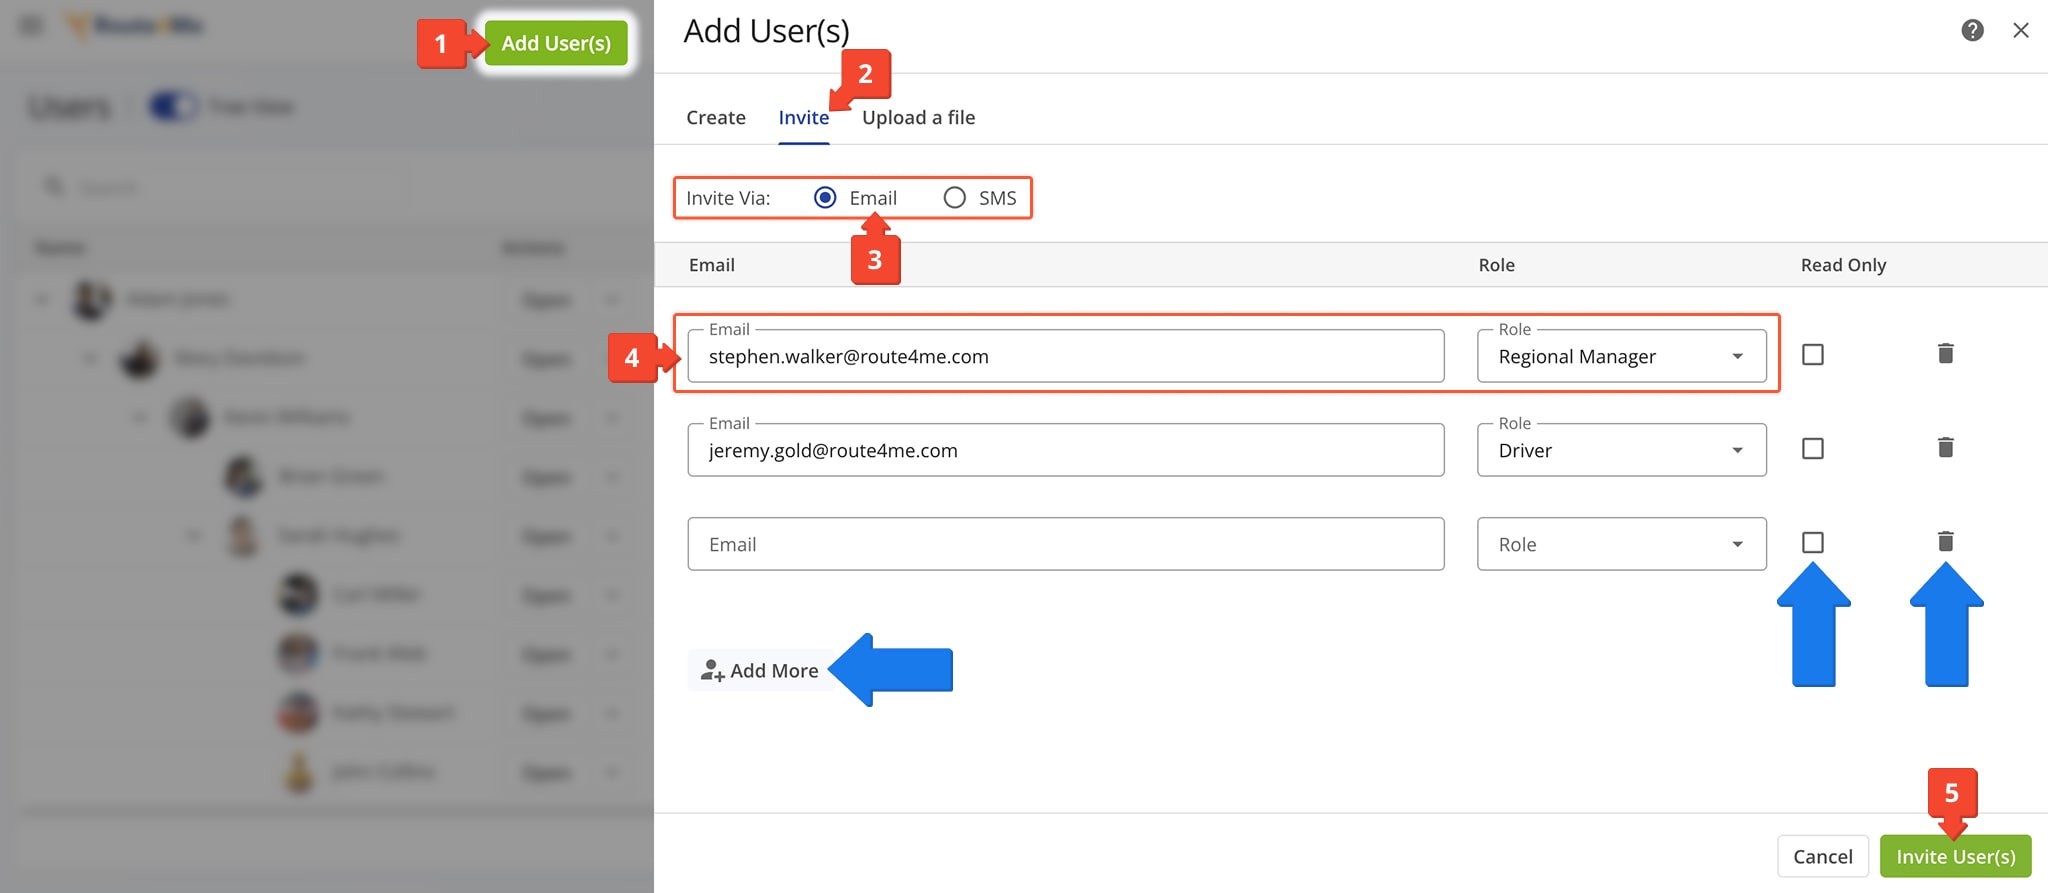
To invite new Users to your last mile transportation team via email:
- Click “Add User(s)” in the top-right of the Users Page.
- Click the “Invite” tab in the “Add User(s)” panel.
- Select “Invite Via: Email“.
- Enter the email address and role of the User(s) you’re inviting.
NOTE: Learn more about Route4Me User Types. - Click “Invite User(s)” to send invitations.
You can also enable Read Only Mode for any invitee by checking the box in the “Read Only” column. Add more invitation rows with the “Add More” button, or remove invitations by clicking the Delete Icon.
Invite Users – Invite New Team Members Via SMS
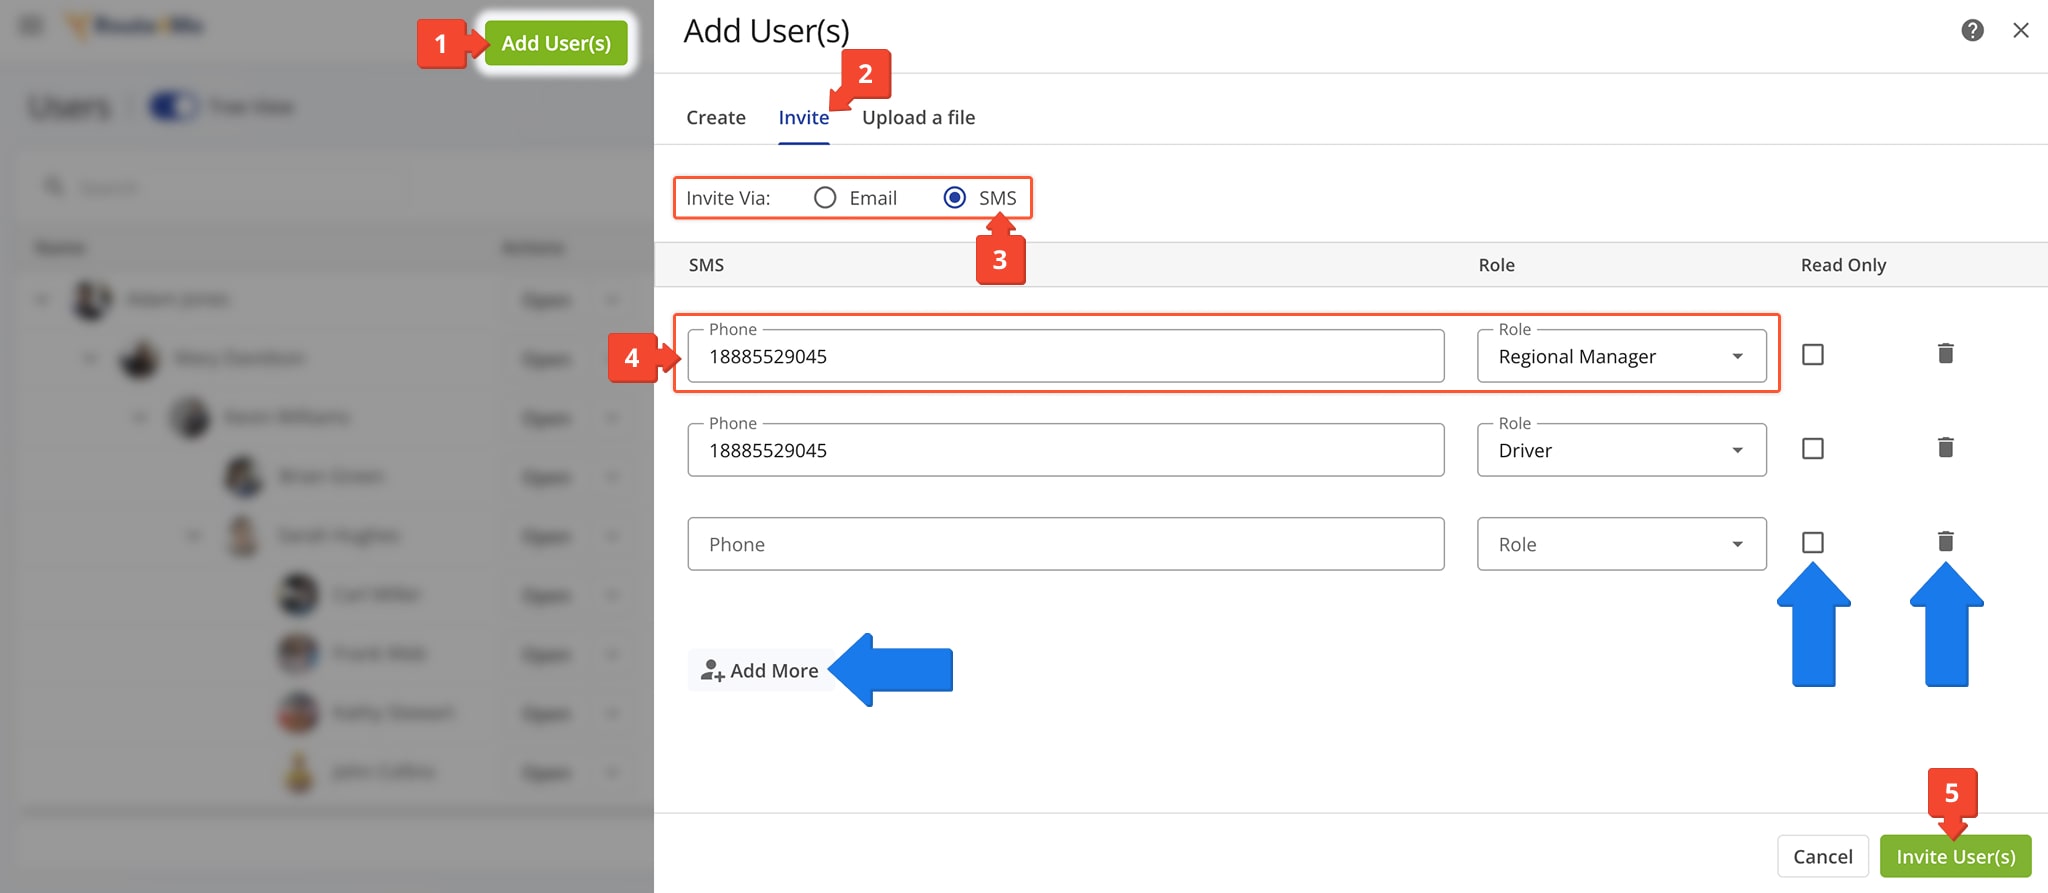
To invite new Users to your last mile transportation team via SMS:
- Click “Add User(s)” in the top-right of the Users Page.
- Click the “Invite” tab in the “Add User(s)” panel.
- Select “Invite Via: SMS“.
- Enter the phone number and role of the User(s) you’re inviting.
NOTE: Learn more about Route4Me User Types. - Click “Invite User(s)” to send invitations.
You can also enable Read Only Mode for any invitee by checking the box in the “Read Only” column. Add more invitation rows with the “Add More” button, or remove invitations by clicking the Delete Icon.
Track User Invitation Status And Re-Send User Invites
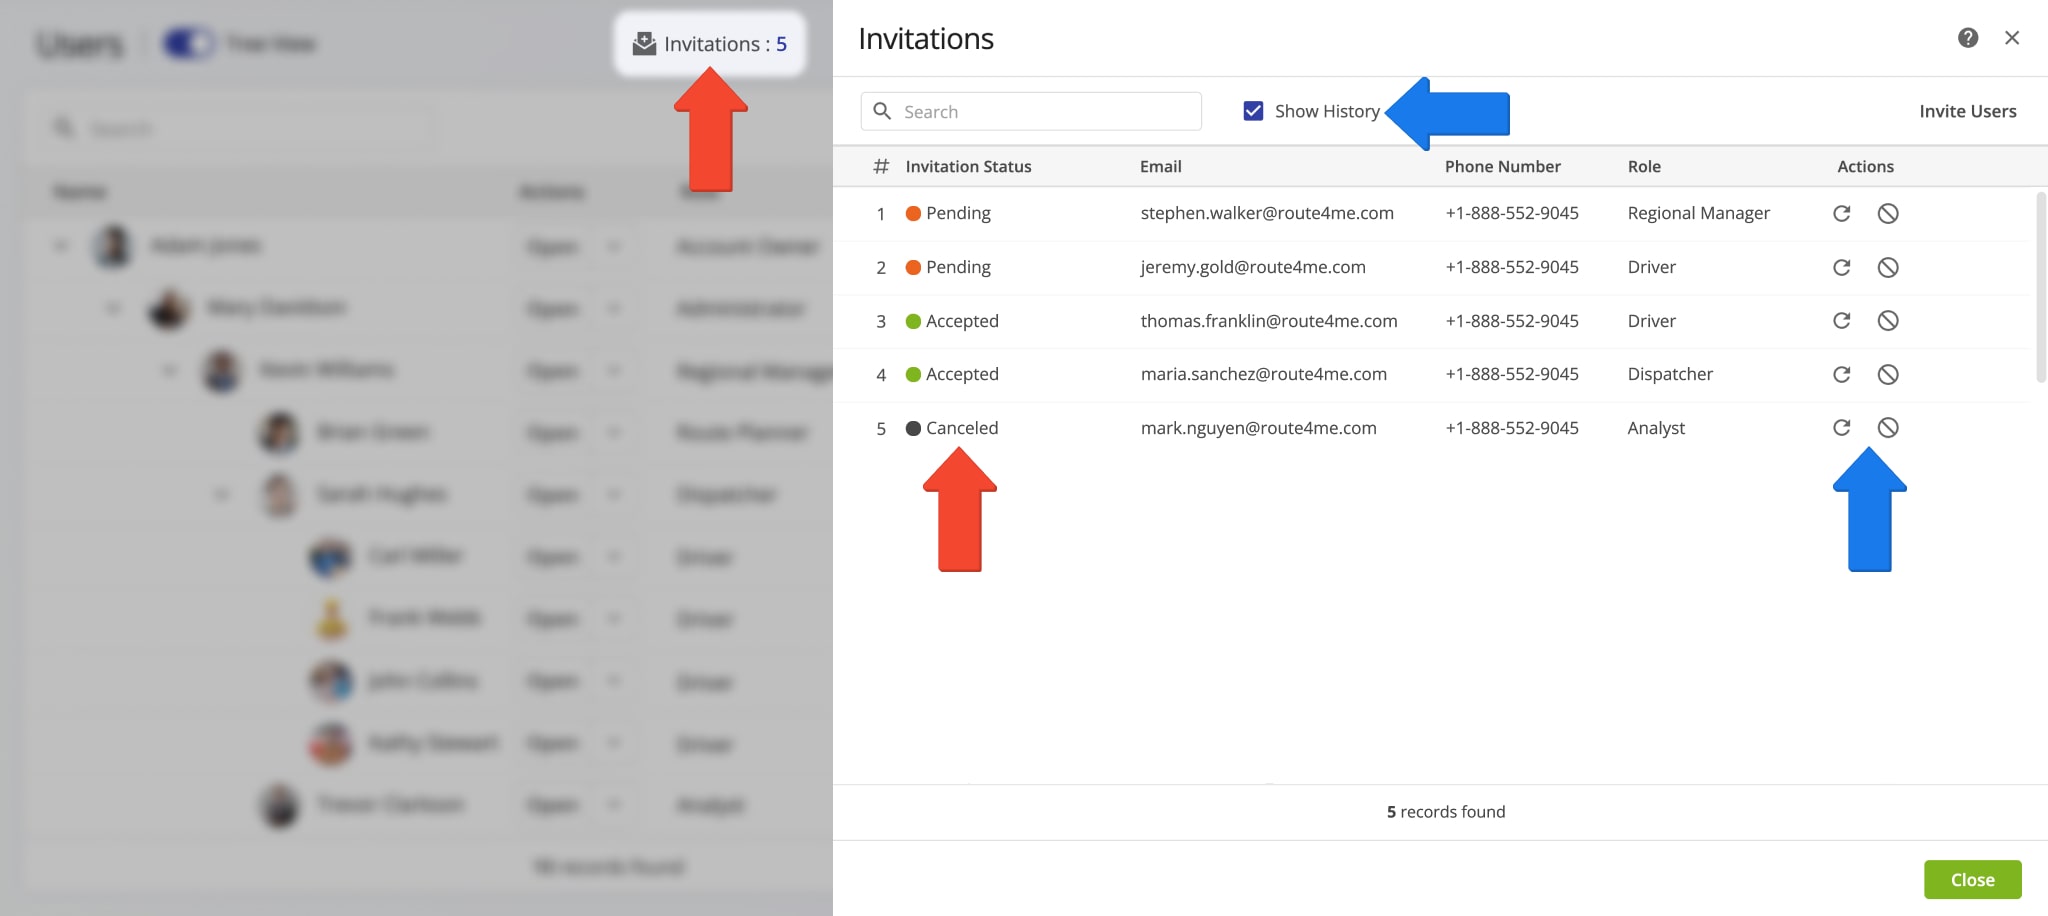
After sending user invitations, you can click the “Invitations” Button to view invitation statuses, or resend or cancel invitations.
To resend an invitation, click the Resend button next to the entry. To cancel one, click the delete icon; this deactivates the registration link immediately. You can also check “Show History” to view all accepted, canceled, or expired invitations.
Below, you’ll find descriptions of all invitation statuses.
| Invitation Status | Status Description |
|---|---|
| Pending | User invitation was sent, and the invited user hasn’t accepted it yet. |
| Accepted | The invited user has accepted the sent invitation and registered a new Route4Me account with the pre-assigned User Type. Accordingly, you can find the users who have registered their Route4Me account on your Route4Me “Team Members” page. |
| Expired | A user invitation link is active for 48 hours. Accordingly, if the invited user doesn’t accept the invitation and register within 48 hours, their registration link automatically expires. |
| Canceled | User invitation was canceled. You and your sub-users can cancel user invitations. Accordingly, when an invitation is canceled, the sent registration link is automatically deactivated. |
Upload Users – Team Members Spreadsheet Formatting And Upload
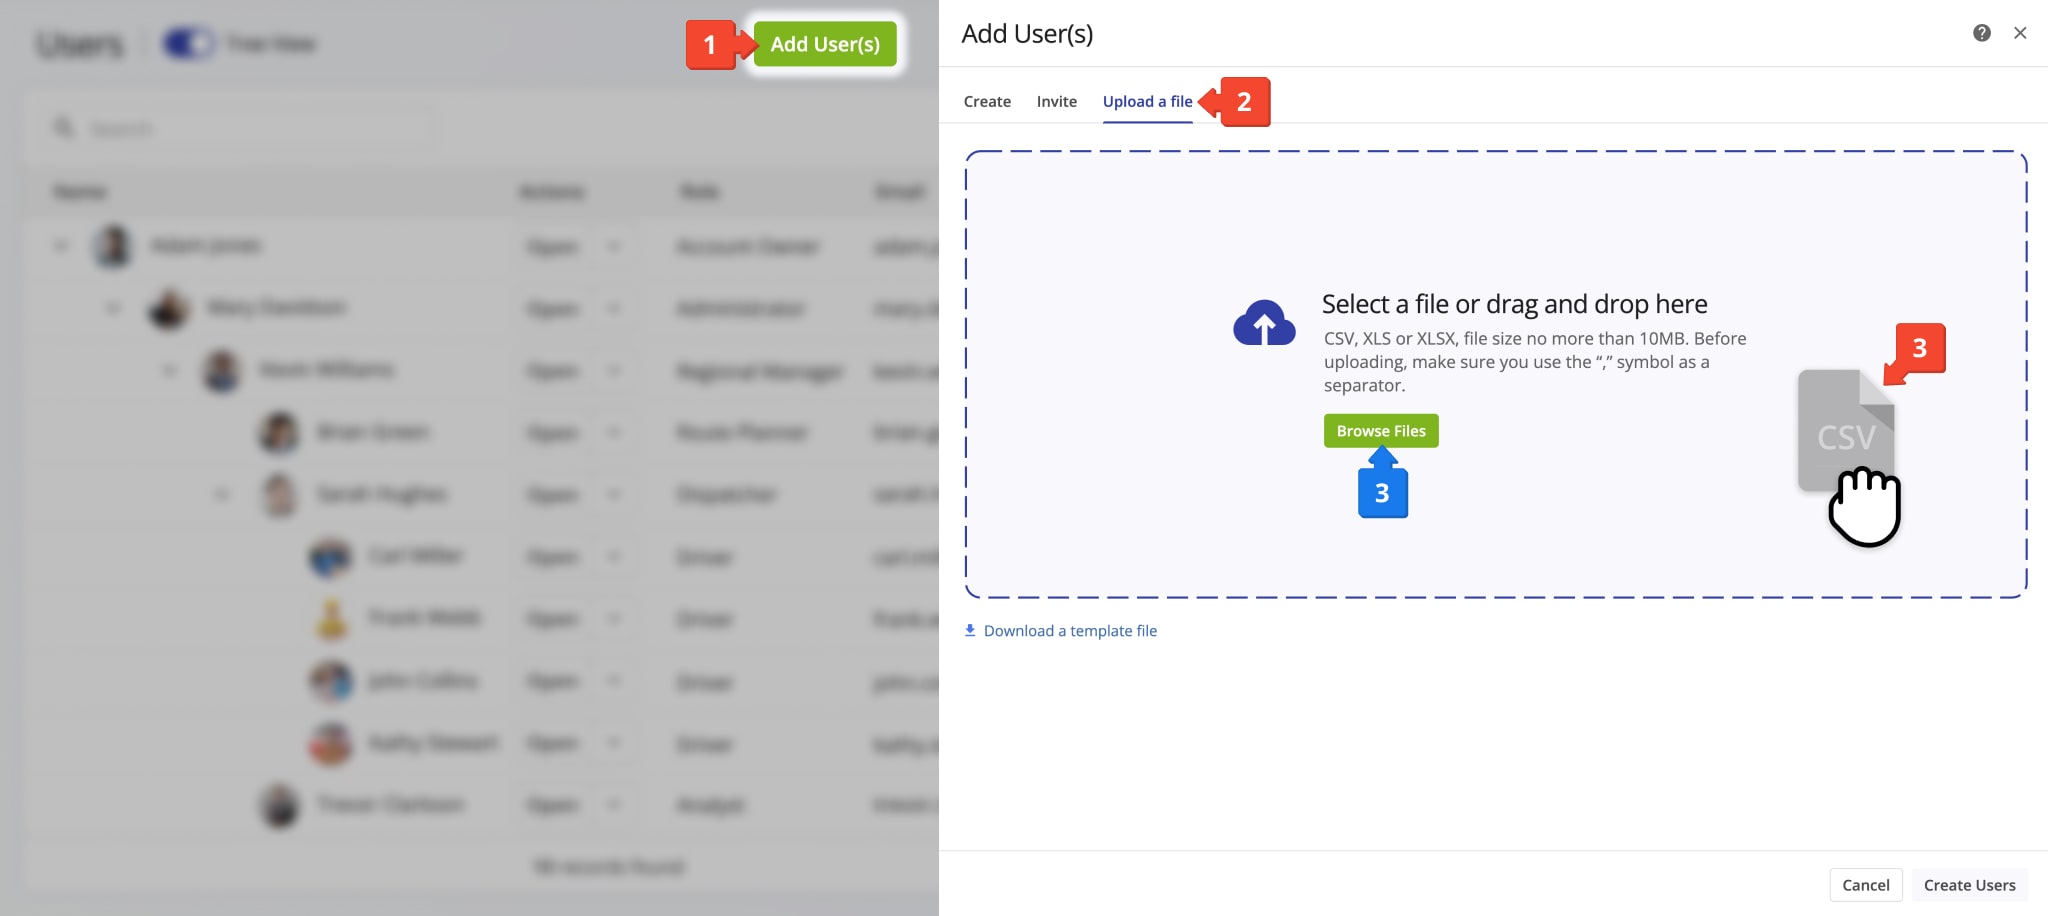
To import team members into your Route4Me account, follow the steps below:
- Click “Add User(s)” in the top-right of the Users Page.
- Click the “Upload A File” tab in the “Add User(s)” panel.
- Drag and drop a CSV, XLS, or XLSX file with user data into the highlighted area or click “Browse Files” to select your file.
For convenience, use Route4Me’s Bulk User Import Spreadsheet Template. Download the template, fill in your team’s information, and upload it to create multiple users at once.
Spreadsheet Formatting Details For Bulk User Upload
The user upload spreadsheet is organized into columns and rows. To add a new column, enter the desired column name in the header row, then fill in the corresponding user data below. Each row represents a single user.
NOTE: Learn more about Route4Me’s Spreadsheets Formatting Requirements.
Below, you can find the list of column names you can add to your spreadsheet. Learn more about Route4Me’s User Types and User Permissions and Route4Me’s User Permissions Settings, Read-Only Mode, Route and Company Visibility Settings.
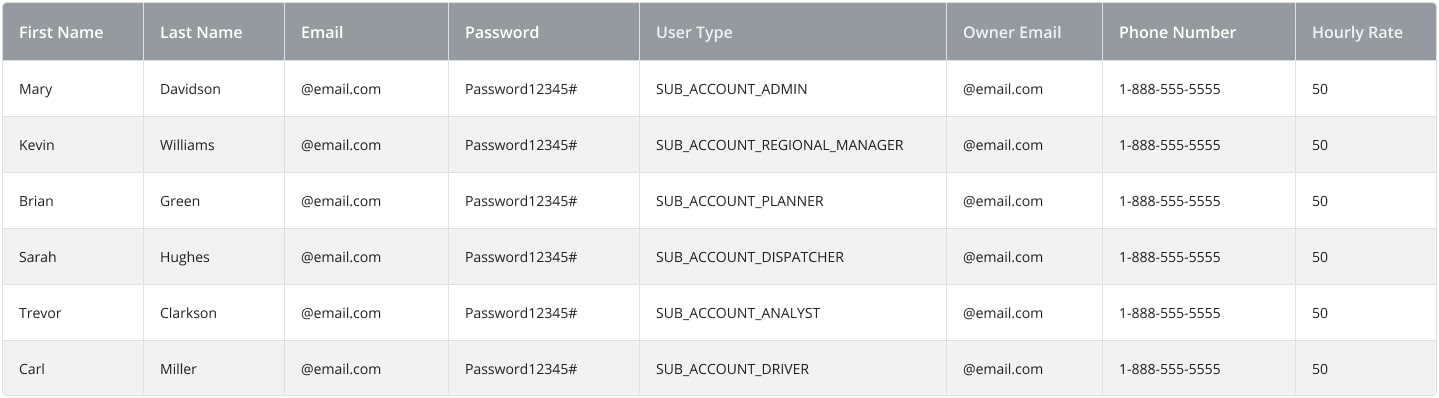
| Column Name | Example Value | Column Description |
|---|---|---|
| First Name | John | First name of the user. |
| Last Name | Doe | Last name of the user. |
| [email protected] | Valid email address of the user. This email address will be used by the user to sign in to their Route4Me account. | |
| Password | Password12345# | This password will be used by the user to sign in to their Route4Me account. |
| User Type | SUB_ACCOUNT_DRIVER | Add the following User Types (in capital letter only): SUB_ACCOUNT_ADMIN, SUB_ACCOUNT_REGIONAL_MANAGER, SUB_ACCOUNT_PLANNER, SUB_ACCOUNT_DISPATCHER, SUB_ACCOUNT_ANALYST, SUB_ACCOUNT_DRIVER. |
| Owner Email | [email protected] | Email address of the user’s manager – an existing user that the newly added user will report to. |
| Date of Birth | 9/25/1980 | Date of birth of the user. |
| Phone | 1-888-555-5555 | Phone number of the user. |
| Hourly Rate | 50 | Hourly rate of the user. |
| Driving Rate per Mile | 50 | Driving rate per mile of the user. |
| Driving Rate per Route | 50 | Driving rate per route of the user. |
| Service Time Rate per Hour | 50 | Service time rate per hour of the user. |
| Wait Time Rate per Hour | 50 | Wait time rate per hour of the user. |
| Hide Routes Scheduled for Before the Current Date | True or False | Add “True” to enable or “False” to disable. When enabled, the user can’t see any routes that are scheduled for before the current date. |
| Show Future Routes Scheduled Number of Days in Advance | 30 | Add the preferred number of days for future routes visibility. For example, if you add “30” days, the user will see only those routes that are scheduled to start within 30 days from the current date. |
| See All Drivers | True or False | Add “True” to enable or “False” to disable. When enabled, the user can see and optionally manage all Drivers stored on the Primary Route4Me Account and accounts of all other users branched under the Account Owner. |
| See All Vehicles | True or False | Add “True” to enable or “False” to disable. When enabled, the user can see and optionally manage all Vehicles stored on the Primary Route4Me Account and accounts of all other users branched under the Account Owner. |
| Global Address Book | True or False | Add “True” to enable or “False” to disable. When enabled, the user can see and optionally manage all Address Book addresses stored on the Primary Route4Me Account and accounts of all other users branched under the Account Owner. |
| Global Orders List | True or False | Add “True” to enable or “False” to disable. When enabled, the user can see and optionally manage all Orders stored on the Primary Route4Me Account and accounts of all other users branched under the Account Owner. |
| Read-Only | True or False | Add “True” to enable or “False” to disable. When the Read-Only Mode is enabled for the user’s account, the user can see the routes and work assigned to them but can’t edit the routes and work assigned to them. |
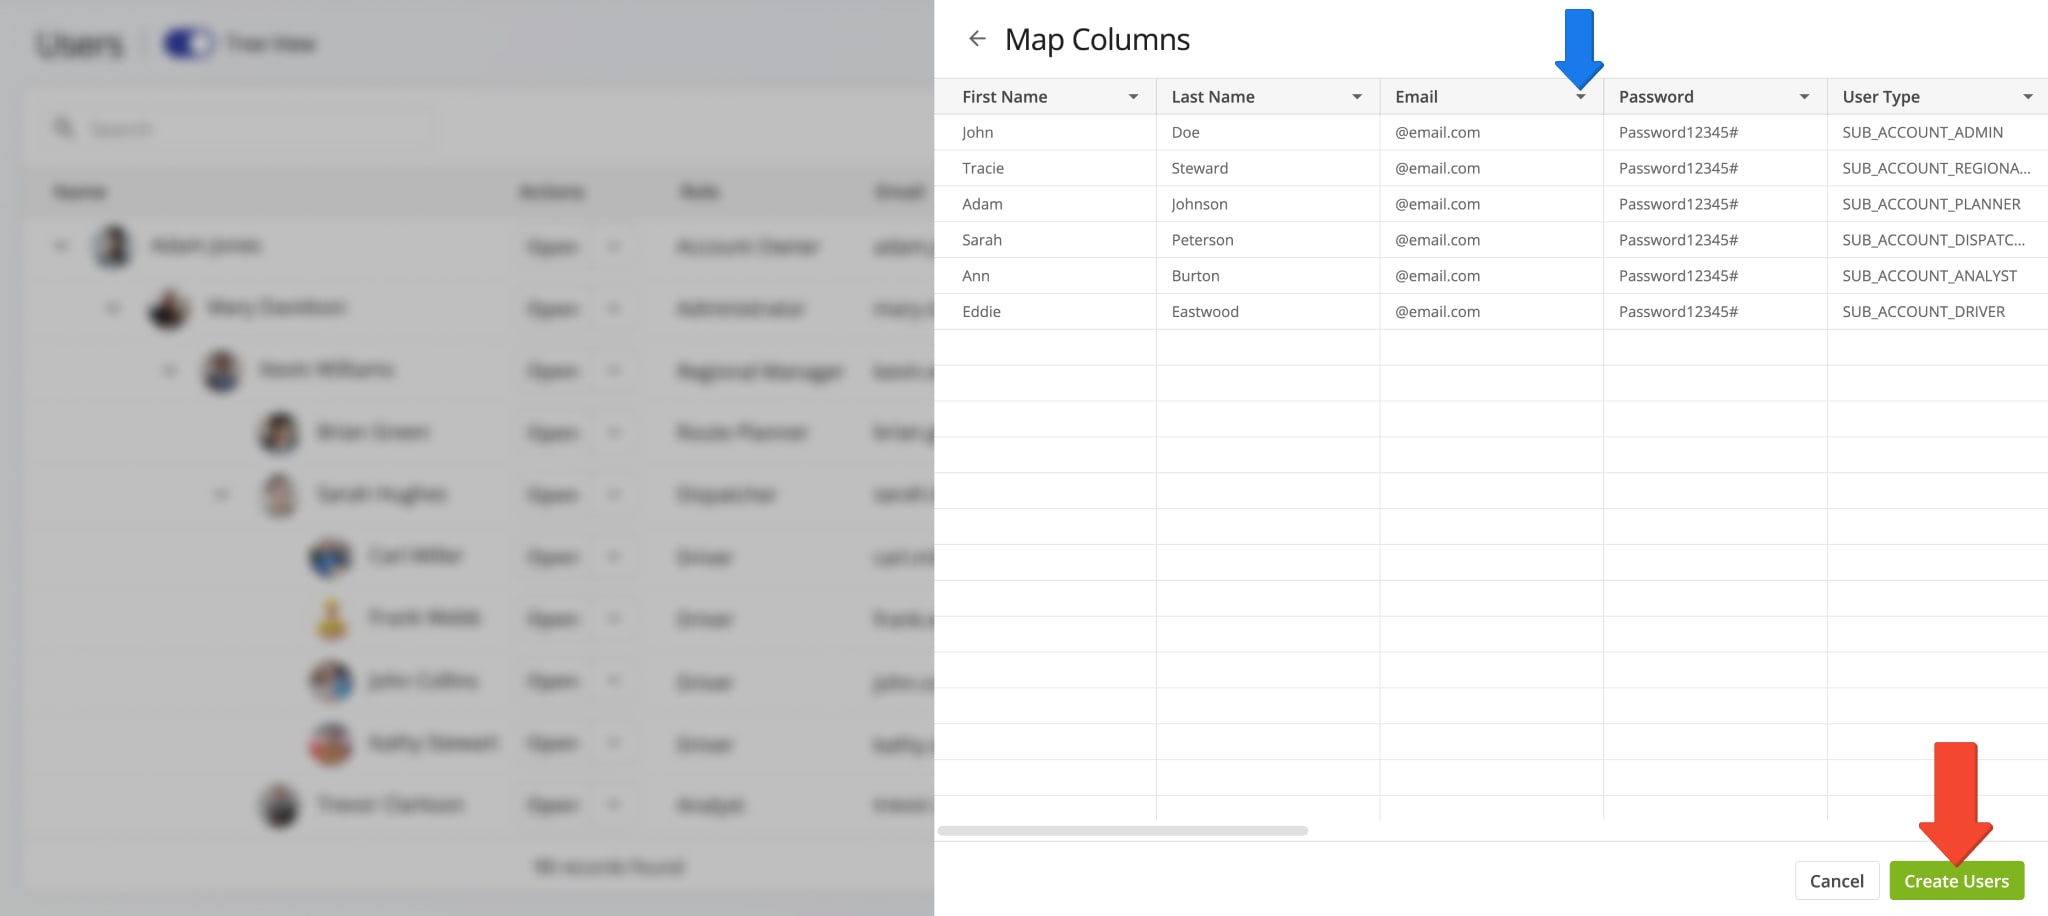
After uploading your spreadsheet, Route4Me automatically matches column headers to User profile fields. If any columns don’t match correctly, you can manually assign them by clicking the Down Arrow in the respective header and selecting the appropriate field from the menu.
Once you’ve confirmed the uploaded data, click “Create Users” to add the new Users to your last mile transportation team.
Manage Users – Edit Team Member Account Details, Permissions, And More
With Route4Me’s Last Mile Team Management Software, you can manage, edit, delete, or reassign users with just a few clicks. All the settings available when creating a new user, such as personal details, team hierarchy, user type, permissions, pay rates, and driver skills, can also be updated for any existing user or sub-user.
View And Edit Users – Adjust User Information, Visibility, And Access Permissions
On your Users page, you can view and manage all users associated with your Route4Me account. Likewise, each user can see and manage the sub-users assigned under them.
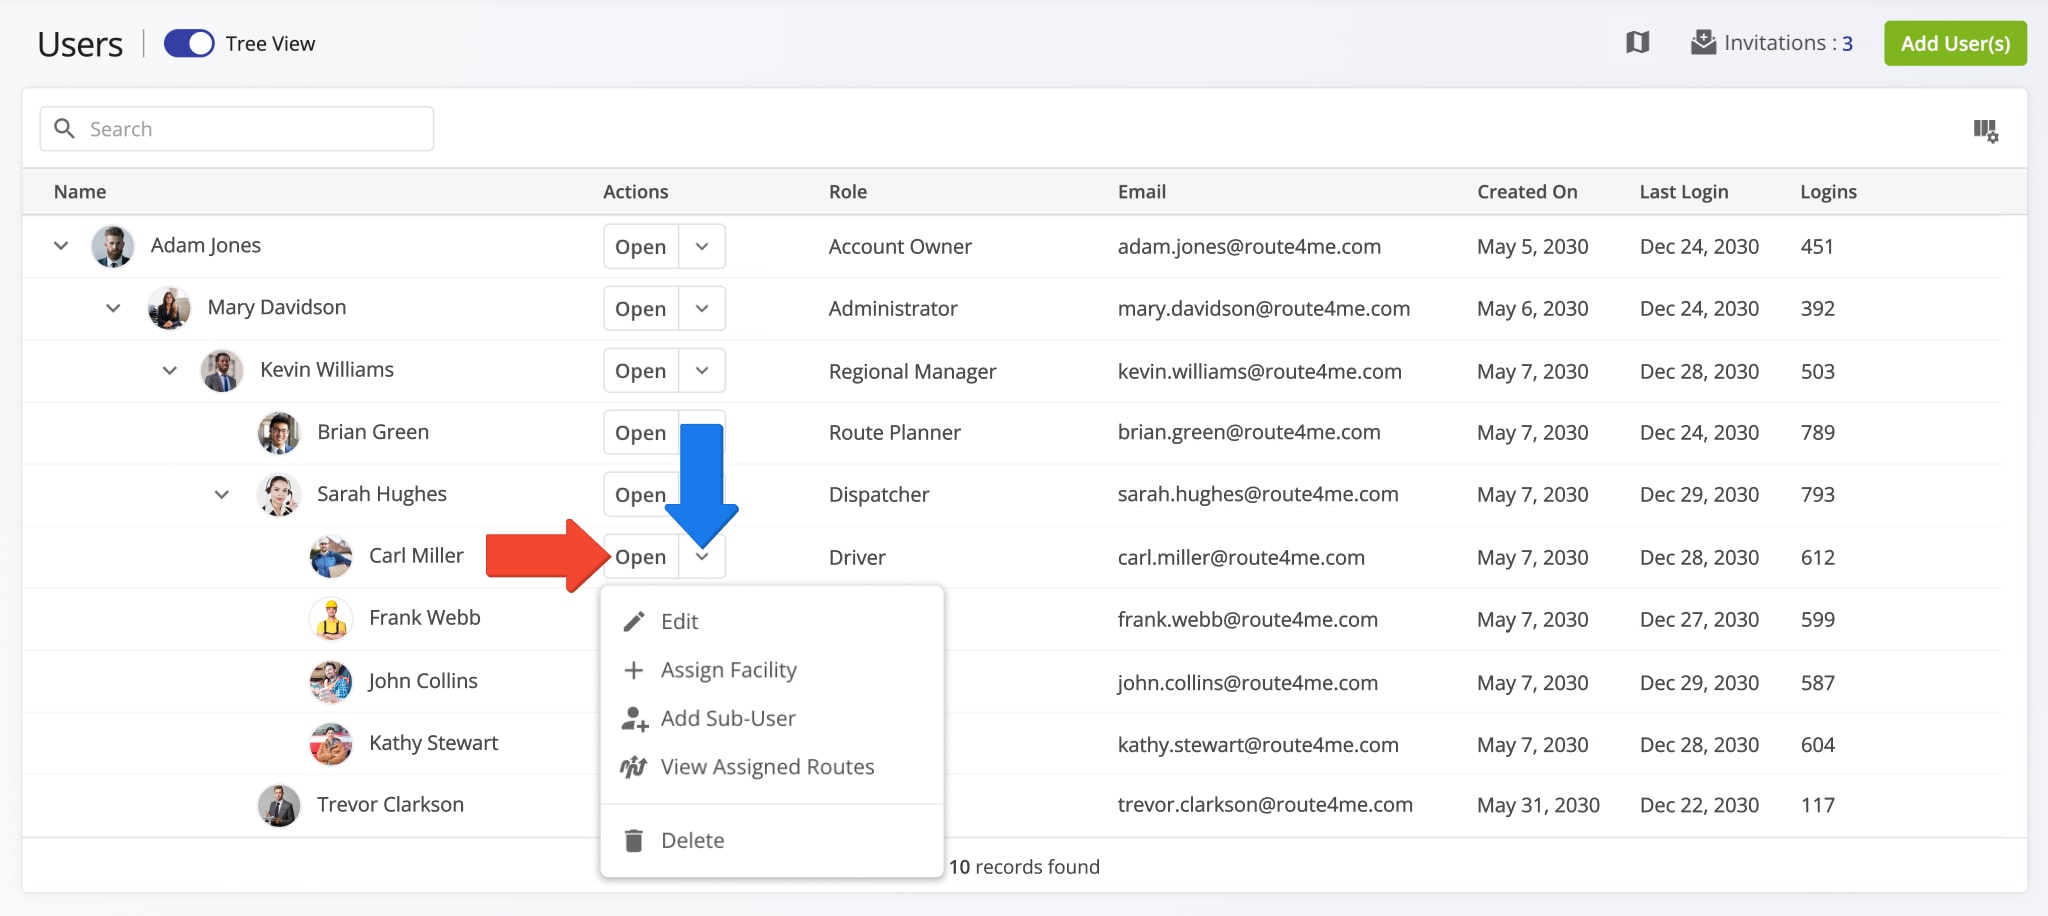
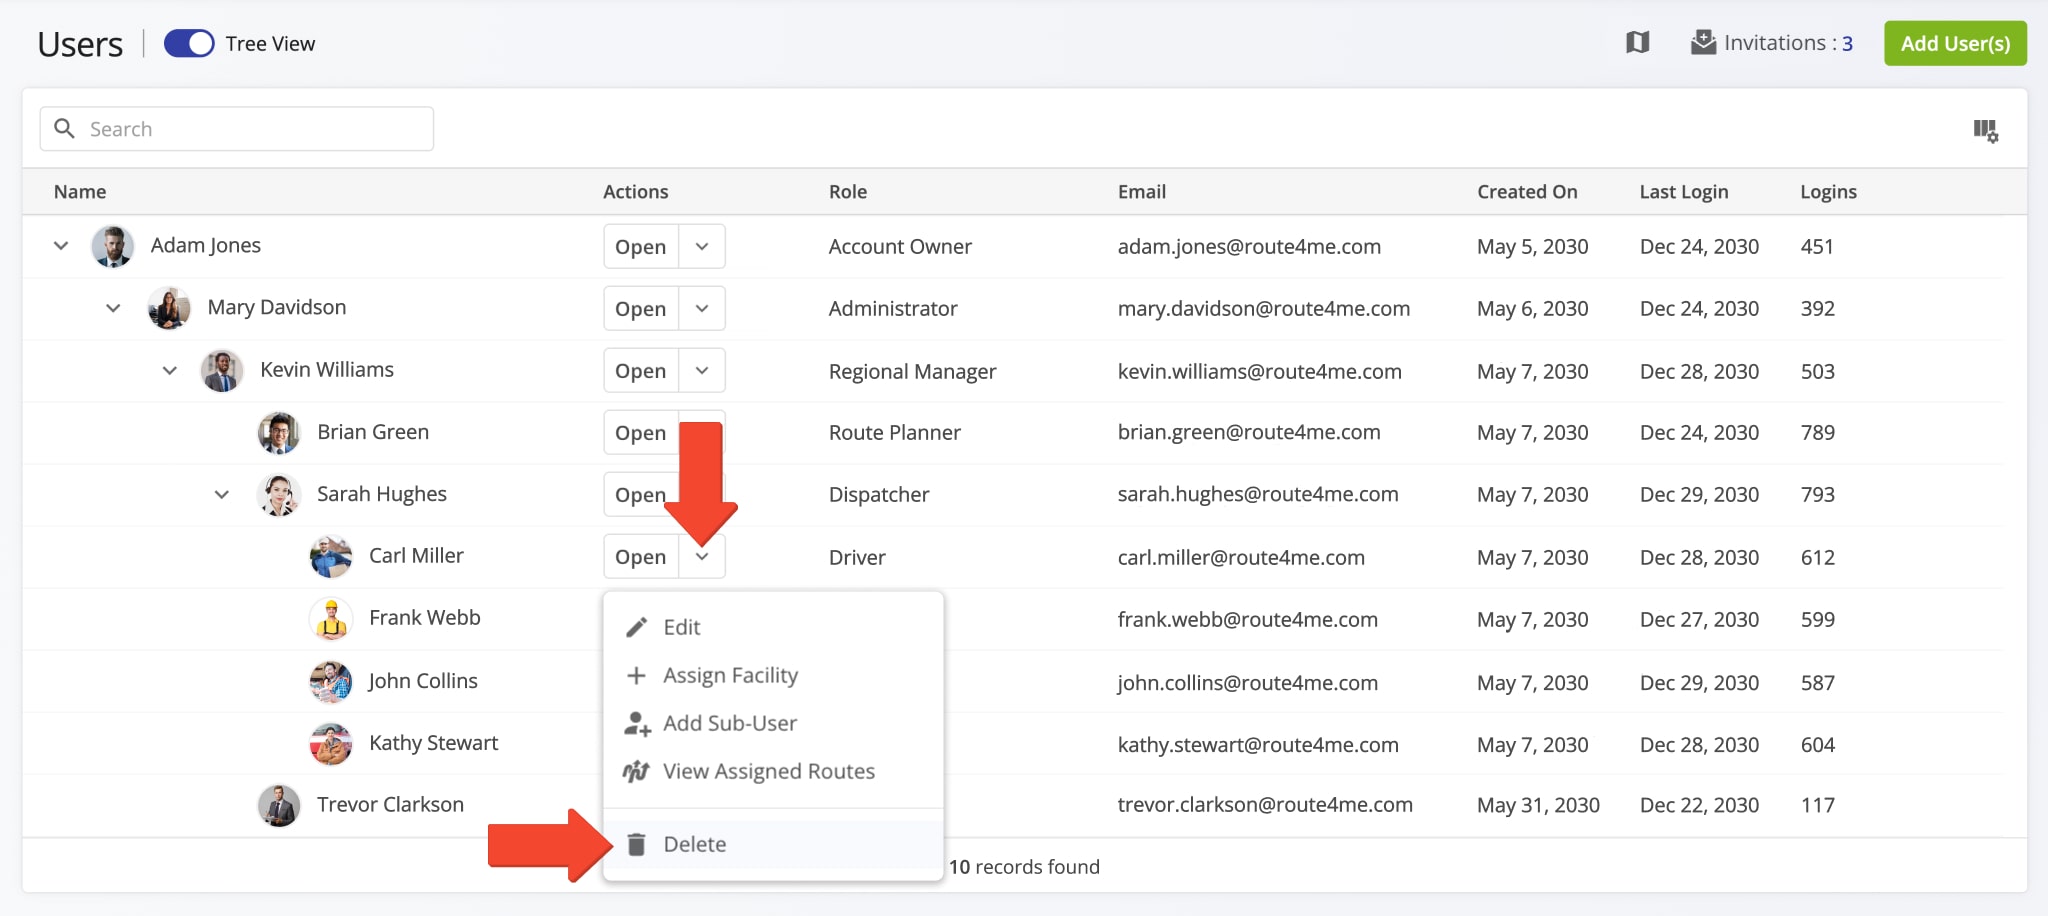
To view a User Snapshot, an overview of key metrics and details associated with the user, click the “Open” button. To edit a profile, click the Down Arrow next to their name. This opens a menu with additional options, described below.
| Action | Description |
|---|---|
| Edit | Update the same settings available during manual User creation. NOTE: A User’s email address cannot be edited. To use a different email, delete the existing account and create a new one. |
| Assign Facility | Associate a User with a Facility on your Route4Me account. |
| Add Sub-User | Add a new sub-user with the respective User Type that will report to the given user. Learn more about creating new users and sub-users. |
| View Assigned Routes | Open the list of all routes that the User is assigned to. Learn more about assigning drivers and users to routes. |
| Delete | Delete the user. NOTE: Deleting a user can’t be undone. To get help with deleting users, Contact Route4Me Support. |
Edit User Permissions – Account-Level Permissions Settings
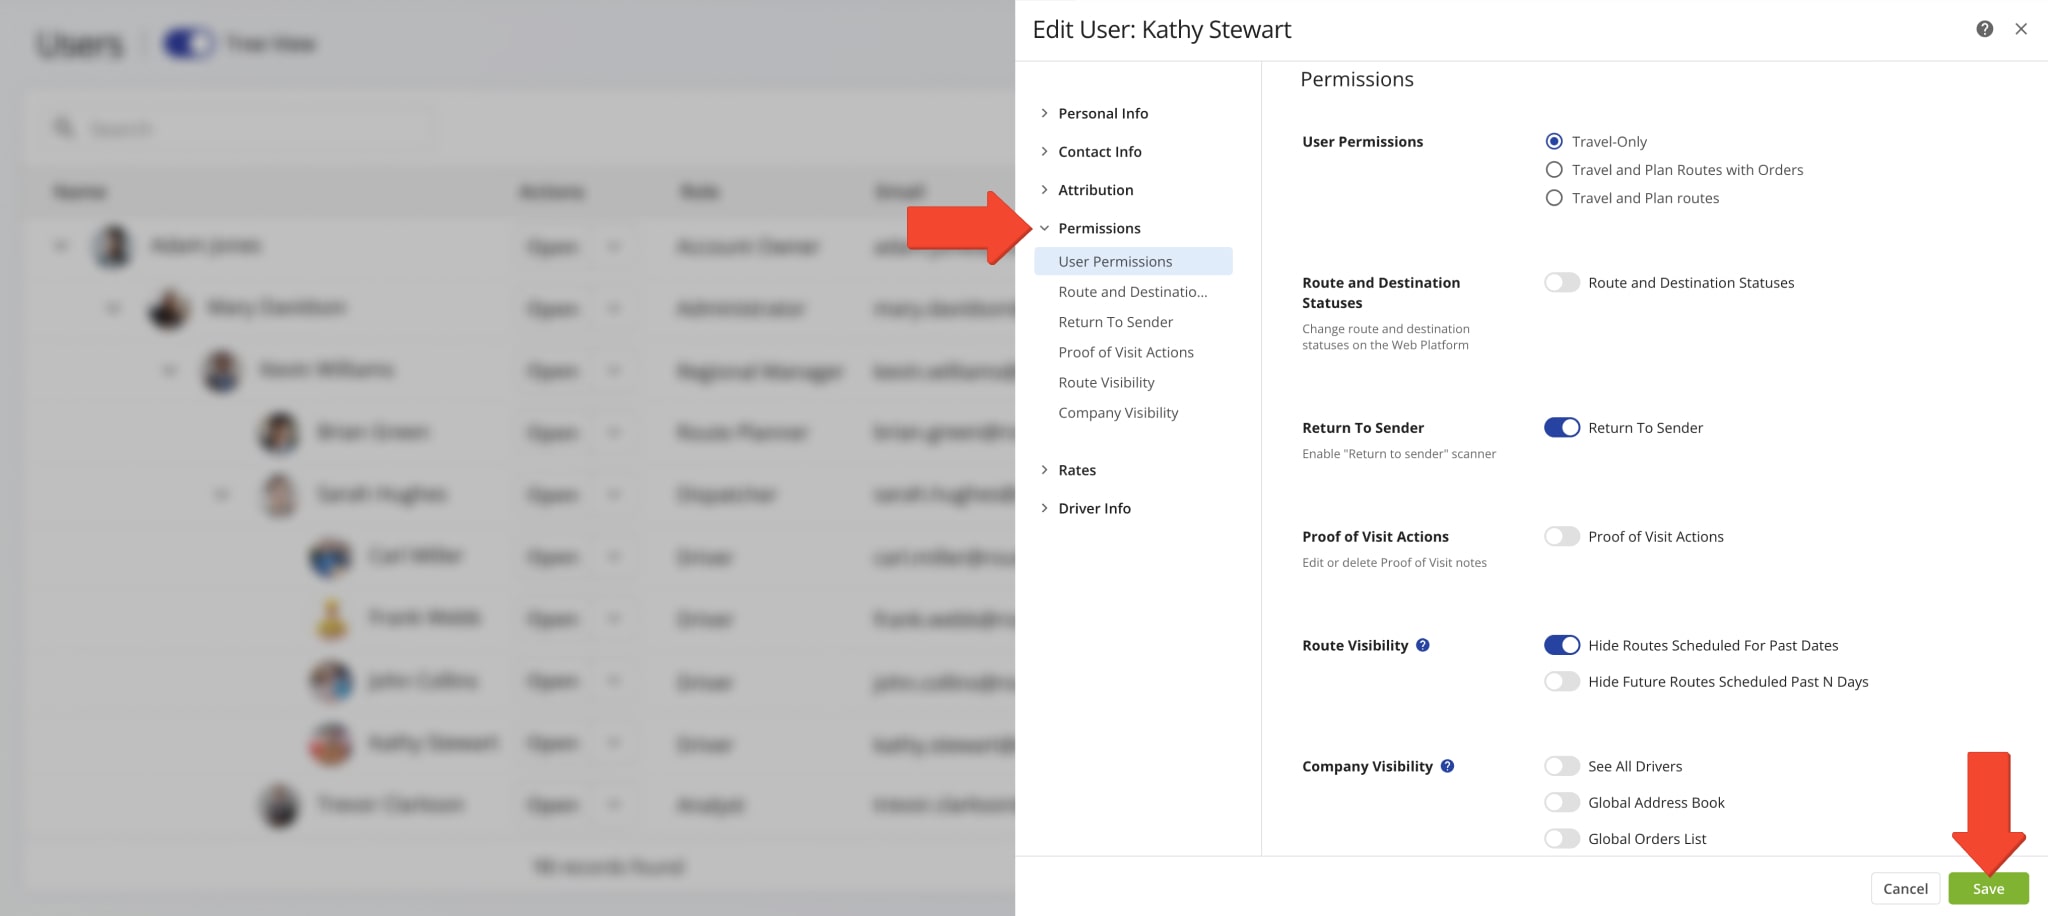
Once a user account is created, you can adjust their visibility and access rights in the “Permissions” tab of the “Edit User” panel. Detailed explanations of each permission setting are provided below.
NOTE: For additional guidance, refer to Route4Me’s User Account-Level Permissions Settings support documentation.
| Permissions Settings | Permissions Descriptions | |
|---|---|---|
| User Permissions | ||
| Travel-Only | Equivalent to enabling Read-Only Mode when creating users without the Grab & Go feature. The user can see the routes, addresses, orders, users, and work assigned to them but can’t edit routes, addresses, orders, users, and work assigned to them. | |
| Travel and Plan Routes With Orders | Enables the user to scan barcodes on orders and add them as destinations to a route. Routes planned this way will be optimized with the user’s associated Optimization Profile. Learn more about scanning barcodes on iPhone and using the Android mobile barcode scanner. | |
| Travel And Plan Routes | Equivalent to Read-Only Mode disabled when creating users without the Grab & Go feature. The user can see and edit the routes, addresses, orders, users, and work assigned to them. | |
| Route And Destination Statuses | ||
| Route And Destination Statuses | Enables the user to change route and destination statuses on the Web Platform. | |
| Return To Sender | ||
| Return To Sender | Enables the “Return To Sender” scanner in the mobile app. Contact Support to Enable. | |
| Proof Of Visit Actions | ||
| Proof Of Visit Actions | When enabled, allows the user to edit or delete collected proof of visit or delivery notes. | |
| Route Visibility | ||
| Hide Routes Scheduled For Past Dates | When enabled, the user can’t see any routes that are scheduled for before the current date. When disabled, the user can see routes regardless of their scheduled date. Contact Support to Enable. | |
| Hide Future Routes Scheduled Past N Days | Enable and add the preferred number of days for future routes visibility. For example, if you add “5” days, the user will see only those routes that are scheduled to start within 5 days of the current date. Contact Support to Enable. | |
| Company Visibility | ||
| See All Drivers | When enabled, the user can see and optionally manage all Drivers stored on the Primary Route4Me Account and all other users branched under the Account Owner. | |
| Global Address Book | When enabled, the user can see and optionally manage all Address Book addresses stored on the Primary Route4Me Account and all other users branched under the Account Owner. | |
| Global Orders List | When enabled, the user can see and optionally manage all Orders stored on the Primary Route4Me Account and all other users branched under the Account Owner. | |
Users Map – Open And Use Dynamic Last Mile Team Map
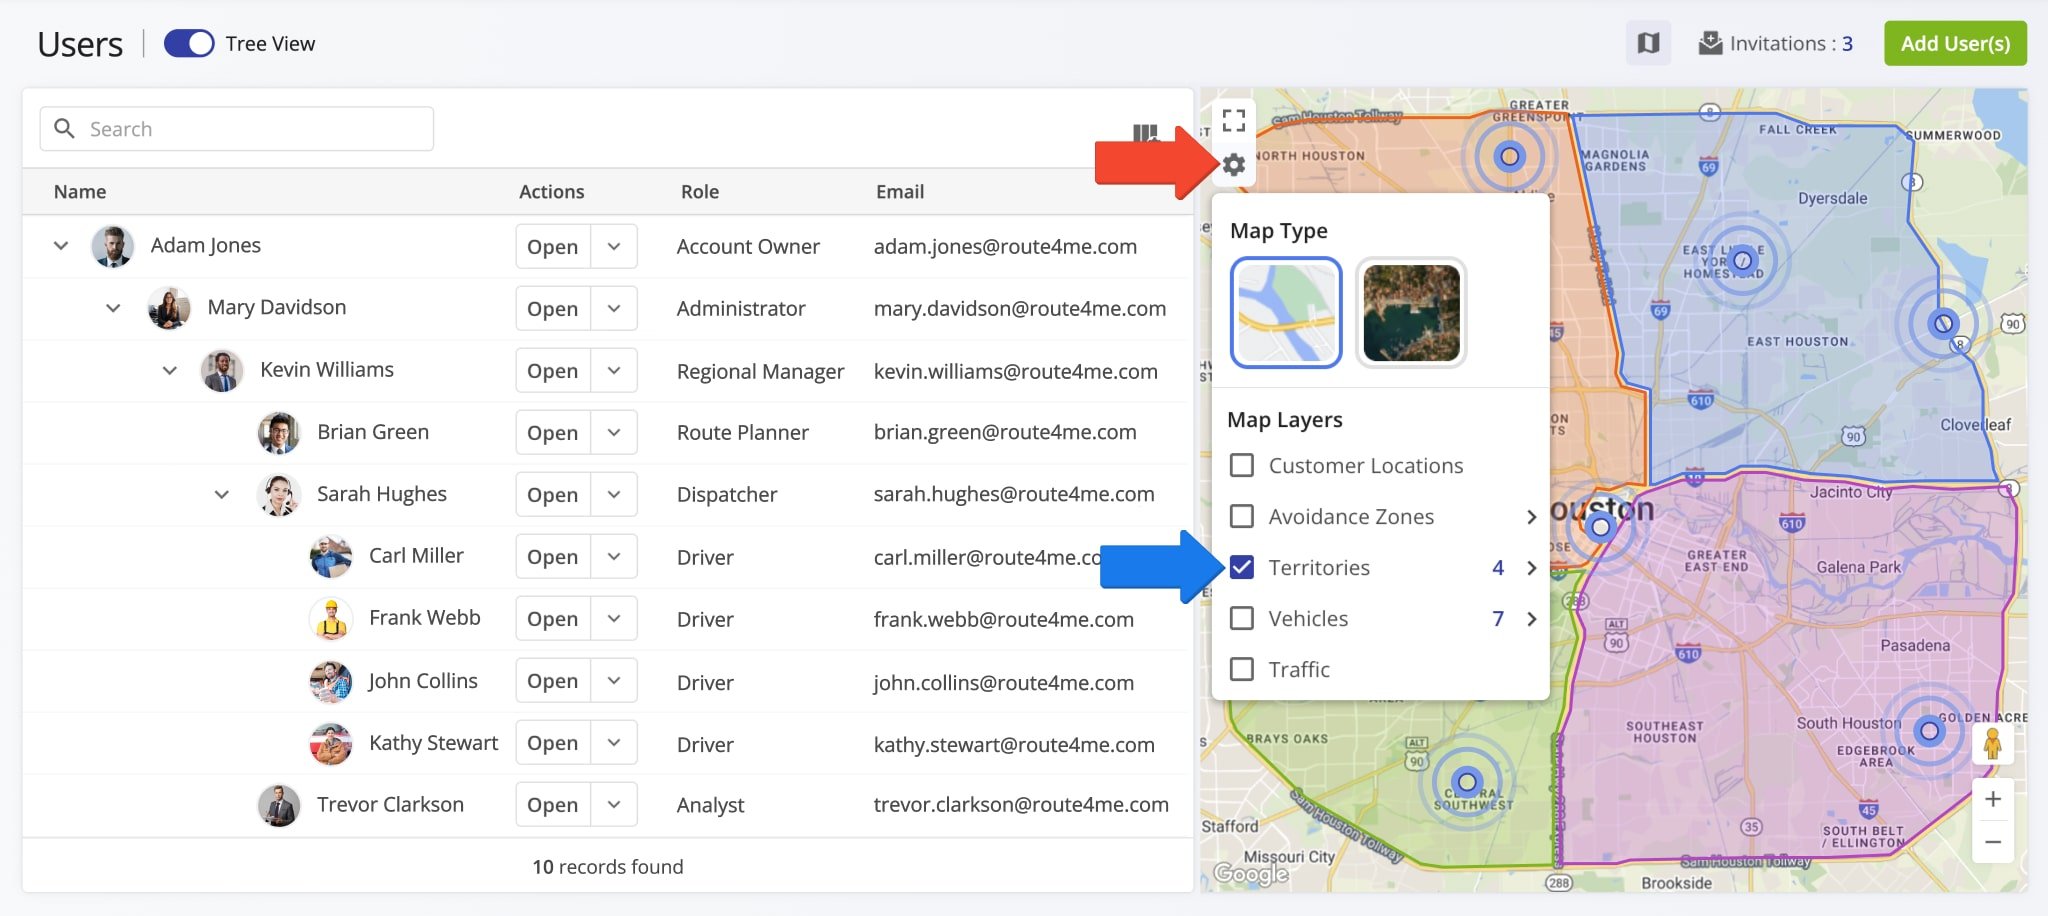
To open or close the Users Map, simply click the Map Icon in the top-right of the Users Page.
Users who have signed in on the Route4Me Mobile App and started a route are shown on the map as blue location markers. Hover over a location marker to see which User is associated with it and when their location was last synchronized. Learn more about User and Vehicle GPS Tracking.

Click the Gear Icon in the top-left of the map to open the Map Settings. You can enable overlays to show the location of different zones and assets from your Route4Me account. To do so, check the box next to the options you want to enable on the map.
The table below contains a list of all settings avaiable on your Users Page Map.
| Option | Description |
|---|---|
| Map Type | Switch between Road Network and Sattelite map modes. |
| Customer Locations | Enable Customer Location markers on the map, including options for Clustering and Distribution Heat Map. |
| Avoidance Zones | Enable overlays on the map according to your Avoidance Zone Account Settings. |
| Territories | Enable Territory overlays on the map that correspond to your Customer Location Territories. |
| Vehicles | Show the last synchronized location of Telematics Vehicles on your account. For convenience, Vehicles locations are a different color from User locations. |
| Traffic | Enable a live traffic volume overlay on the map showing how busy different roads are. |
Delete Users – Remove Team Members From Your Route4Me Account
To delete a user, click the Down Arrow next to their name and select “Delete” from the menu. This action permanently removes the user and all associated data, including their assigned routes, and cannot be undone.
NOTE: If you want to keep the user’s routes, reassign them to another team member before deleting the account. For assistance with deleting users, contact Route4Me Support.
Configure Users Page – Add And Customize User Data Columns
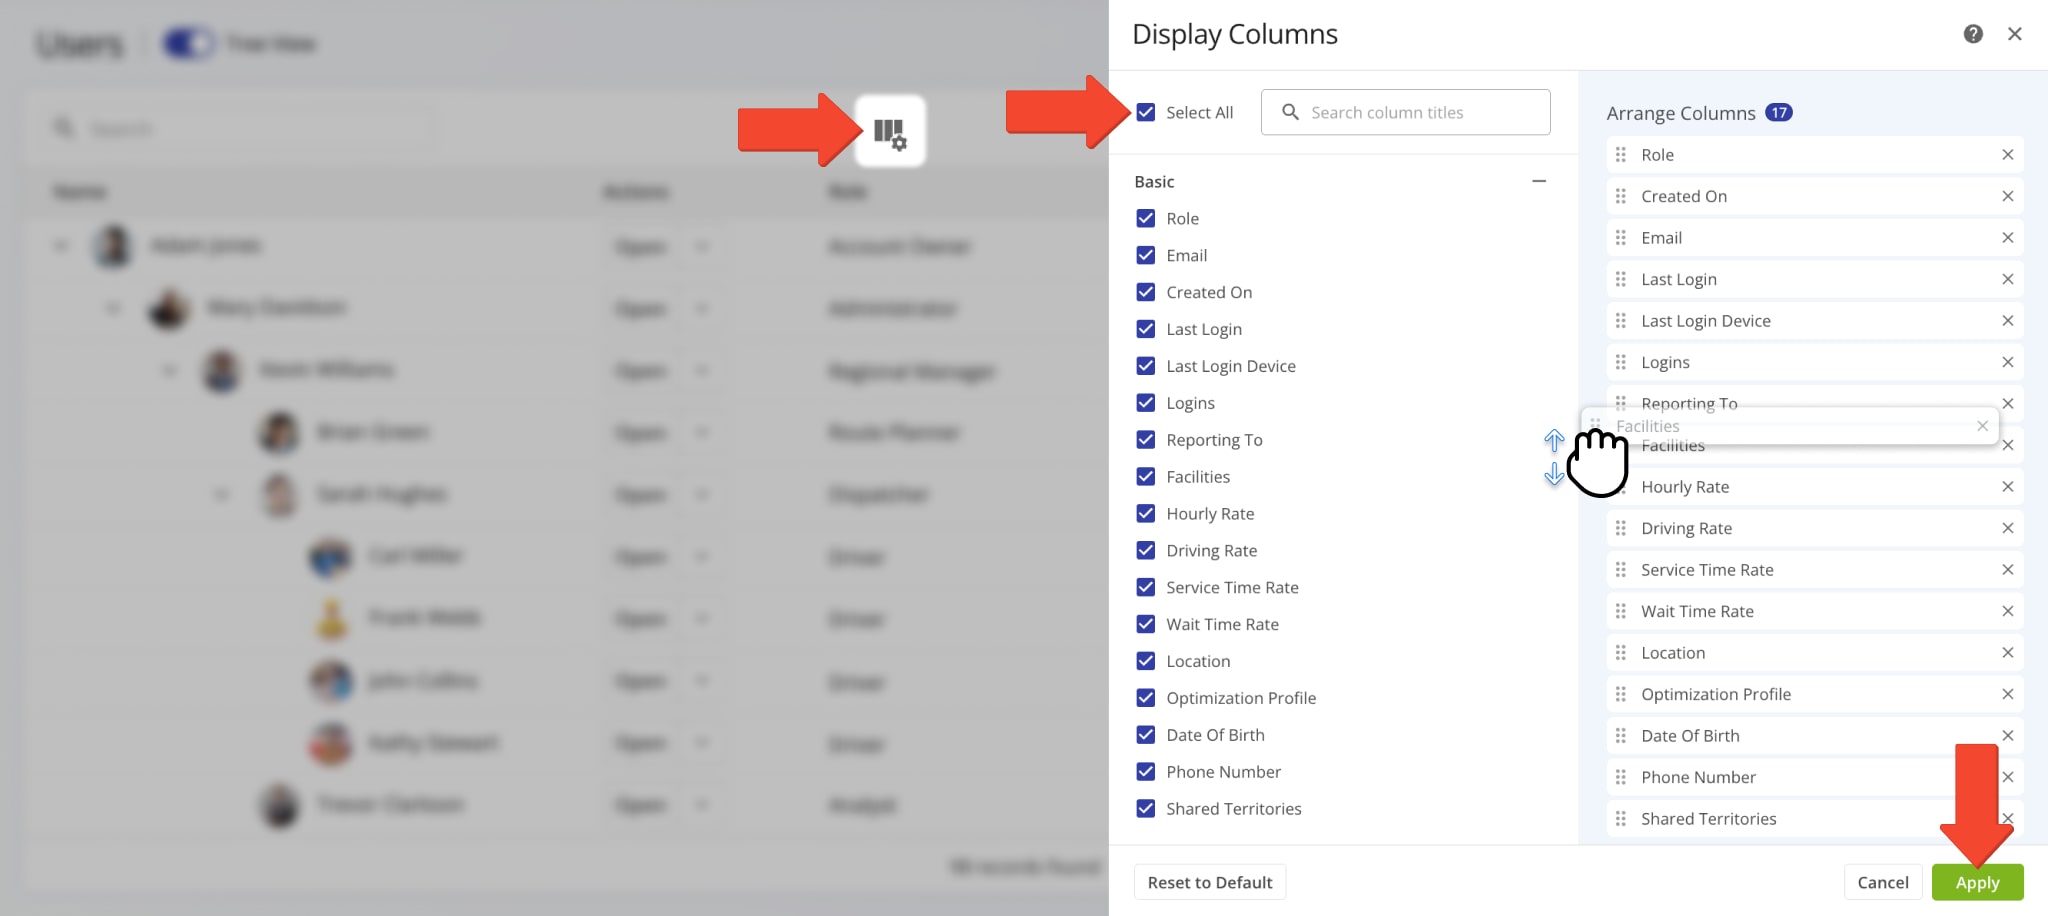
You can customize the data columns on the Users page to display only the information relevant to your needs. Click the Display Columns Icon, then check the boxes next to the columns you want to show.
To reorder columns, drag and drop the column names. The order from top to bottom reflects how they appear left to right on the Users page. Refer to the table below for details on each column.
| Column Name | Description |
|---|---|
| Role | User’s respective User Type, i.e. Administrator, Regional Manager, Route Planner, Dispatcher, Driver, Analyst, Sorter, or Customer Support. Each User Type has a specific set of default account-level permissions. Learn more about Route4Me’s User Types Hierarchy and Customizing User Account-Level Permissions. |
| Email address of the user that functions as their account log in. | |
| Created On | Date when the user’s account was created, invitation accepted, or User account details were first uploaded. |
| Last Login | Timestamp of the last time the user logged in to their Route4Me account. |
| Last Login Device | The device that was last used by the user to log in to their Route4Me account. |
| Logins | The total number of times the user has logged in to their Route4Me account. |
| Reporting To | The direct manager or supervisor the user reports to within the team hierarchy. |
| Facilities | Physical business locations associated with the user. These could include warehouses, depots, distribution centers, or hubs that might serve as start, end, or midpoint locations for routes. |
| Hourly Rate | The cost or pay rate assigned to the user. |
| Driving Rate | The cost or pay rate per mile or kilometer. |
| Service Time Rate | The amount of time allocated or charged for service at each stop. |
| Wait Time Rate | The cost or time allocated for delays or waiting periods at stops. |
| Location | The primary worksite or base where the user is assigned or operates from. |
| Optimization Profile | Default routing preferences and constraints applied to the user. |
| Date of Birth | The Users birthdate, typically used for identification, compliance or Human Resources records. |
| Phone Number | The contact number associated with the user. |
| Shared Territories | A geographic area assigned to multiple users. |
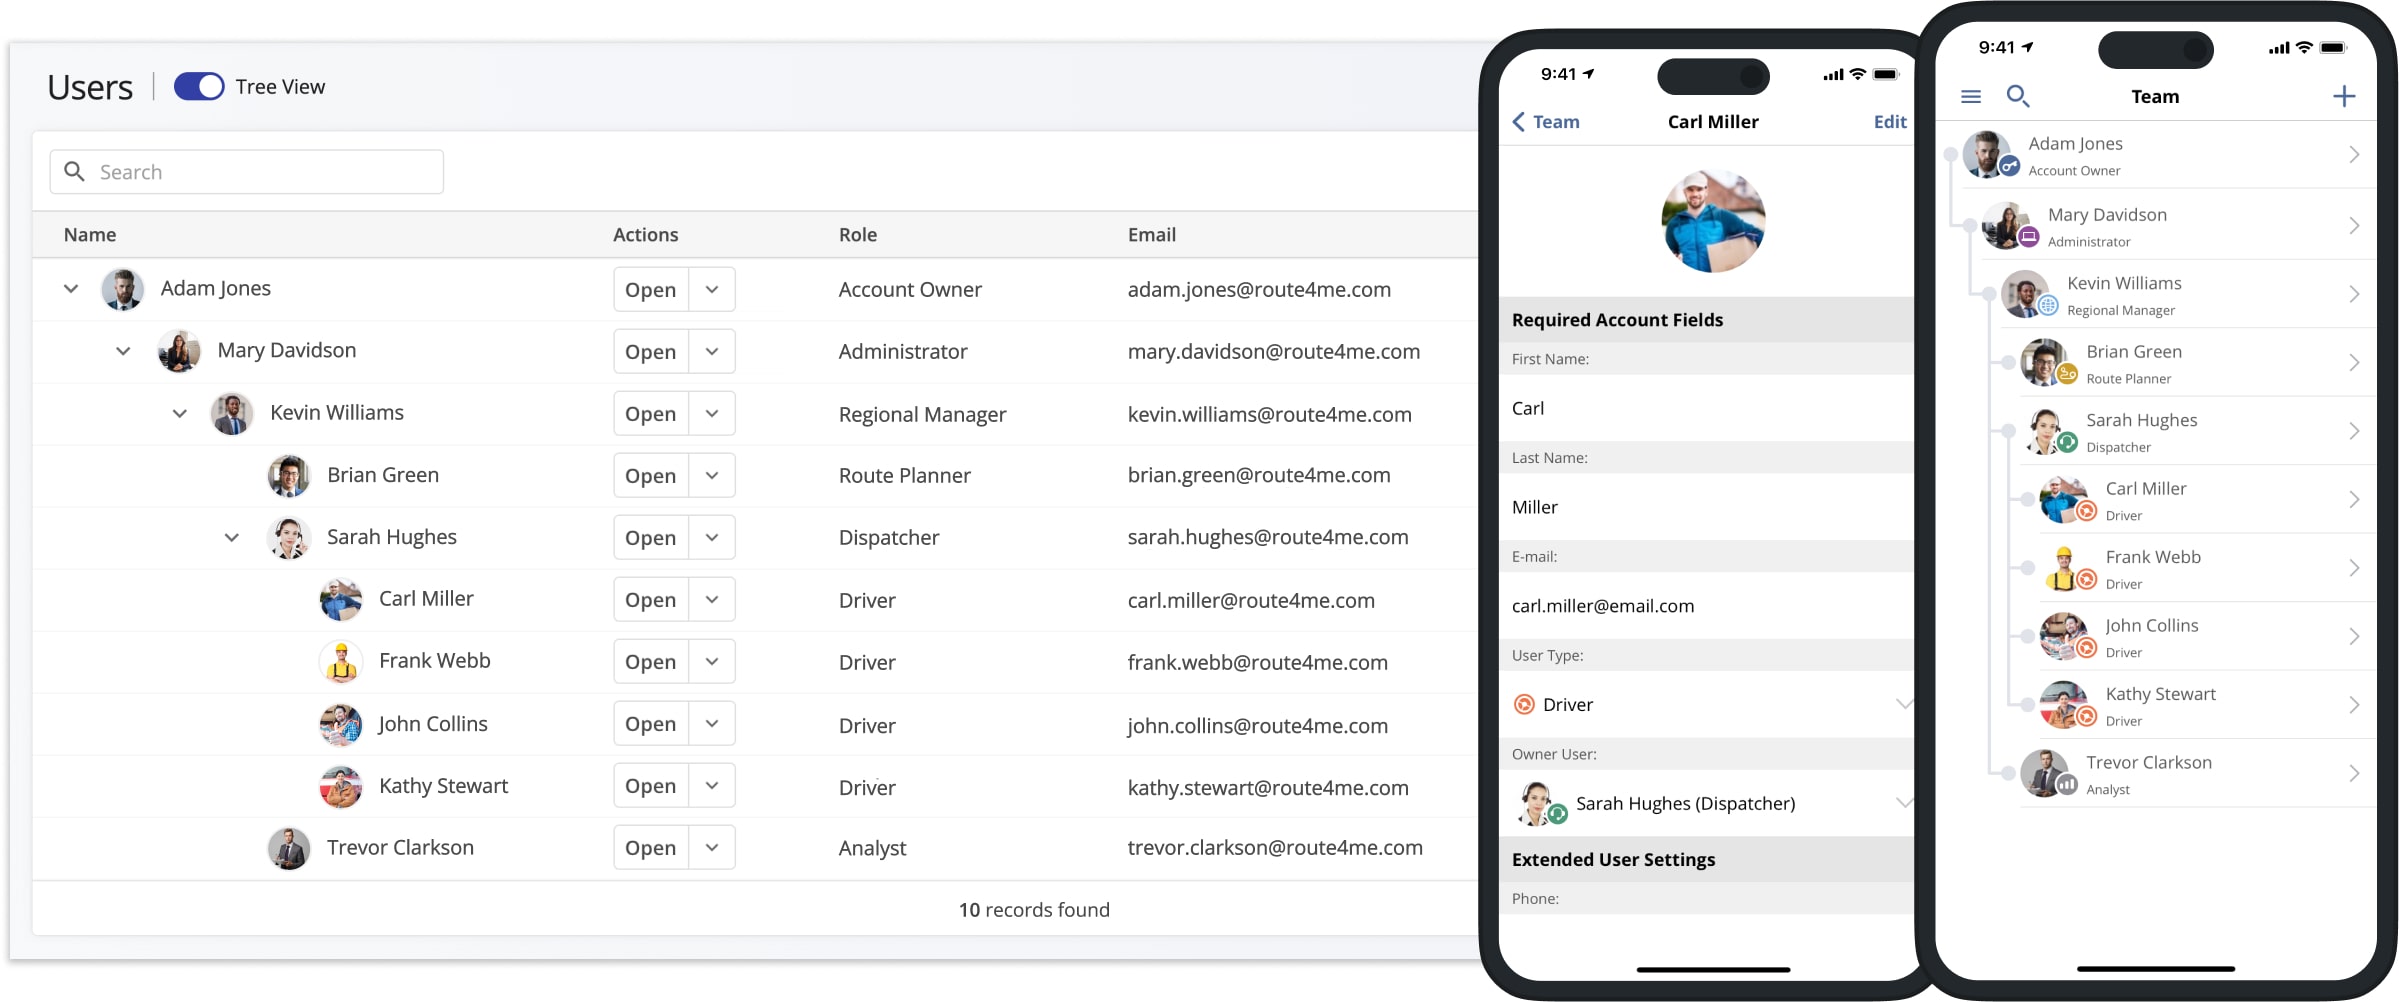
Route4Me Mobile Team Management And Real-Time Synchronization
Route4Me provides real-time synchronization of route and team data across all connected devices. When you add a new team member, their profile is instantly available on all linked Route4Me accounts.
This allows you to access, assign, and manage users seamlessly from Route4Me Business Route Planner desktop software, as well as the iPhone Route Planning app and Android Route Planning app. For example, an Administrator can add new Drivers, and Dispatchers can immediately view them and assign routes.
NOTE: Learn more about team management using Route4Me’s iPhone Mobile App and Android Mobile App.
Visit Route4Me's Marketplace to Check out Associated Modules:
- Operations
Advanced Team Management Add-On
- Operations
Audit Logging and Activity Stream