Mandatory Barcode Reconciliation – Loading and Unloading
With Route4Me’s Mandatory Tasks, you can easily set up required tasks your team members must perform to complete deliveries, visits, services, etc. In this guide, you can learn how to enable and use the Mandatory Barcode Reconciliation. In detail, this advanced configuration requires mandatory barcode scanning for loading packages before starting a route and scanning barcodes for marking orders and deliveries as completed.
NOTE: Route4Me’s Mandatory Tasks are scheduled to be disabled soon. Instead of the Mandatory Tasks, you can use Route4Me’s Workflows that offer a wider variety of mandatory tasks, flexible task customization, dedicated user interface, and more.
Table of Contents
Loading and Unloading Barcode Reconciliation Process Overview
The entire barcode reconciliation process for loading and unloading is extremely easy and error-proof:
- First, add barcodes to route destinations as custom data, manually or automatically through API.
- Before starting a route, drivers are required to scan barcodes to confirm loading packages.
- Next, drivers can start their routes and proceed to the navigation and delivery.
- Finally, when progressing on their routes, drivers are required to scan mandatory barcodes to confirm unloading packages at each respective route destination.
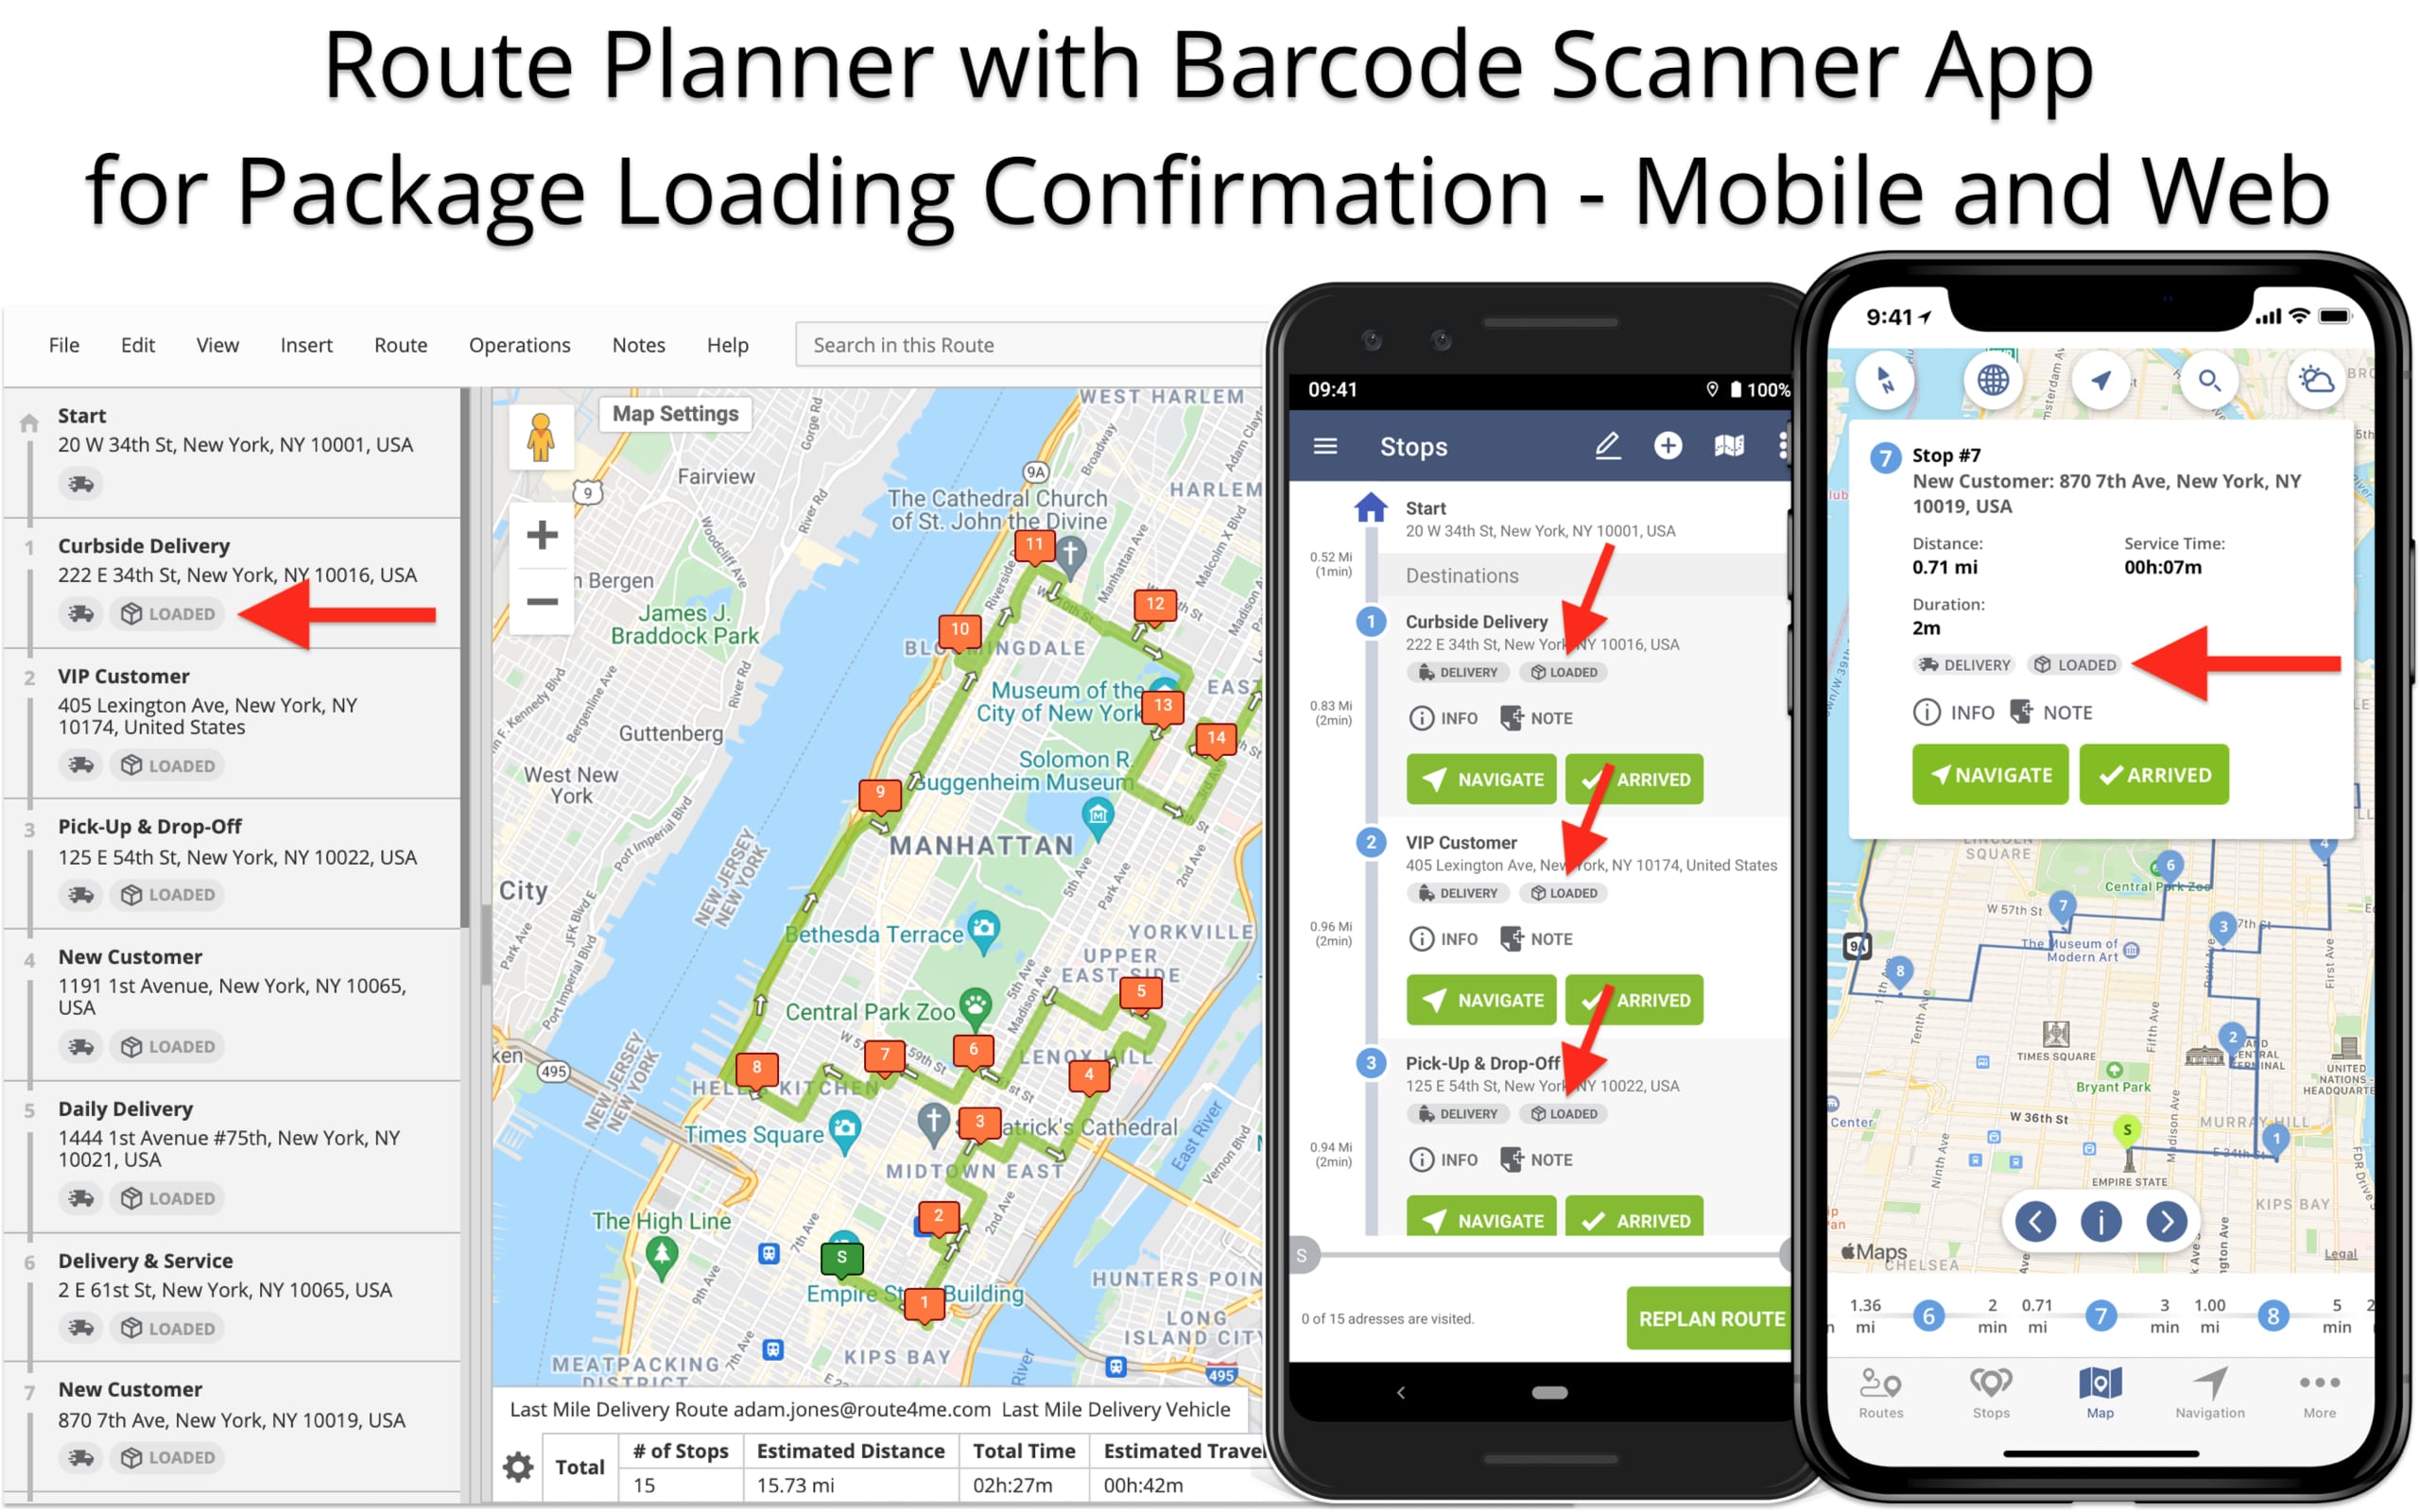
Equally important, this feature works identically on both Route4Me’s mobile apps: iOS Route Planner for iPhone and iPad and Android Route Planner for smartphones and tablets.
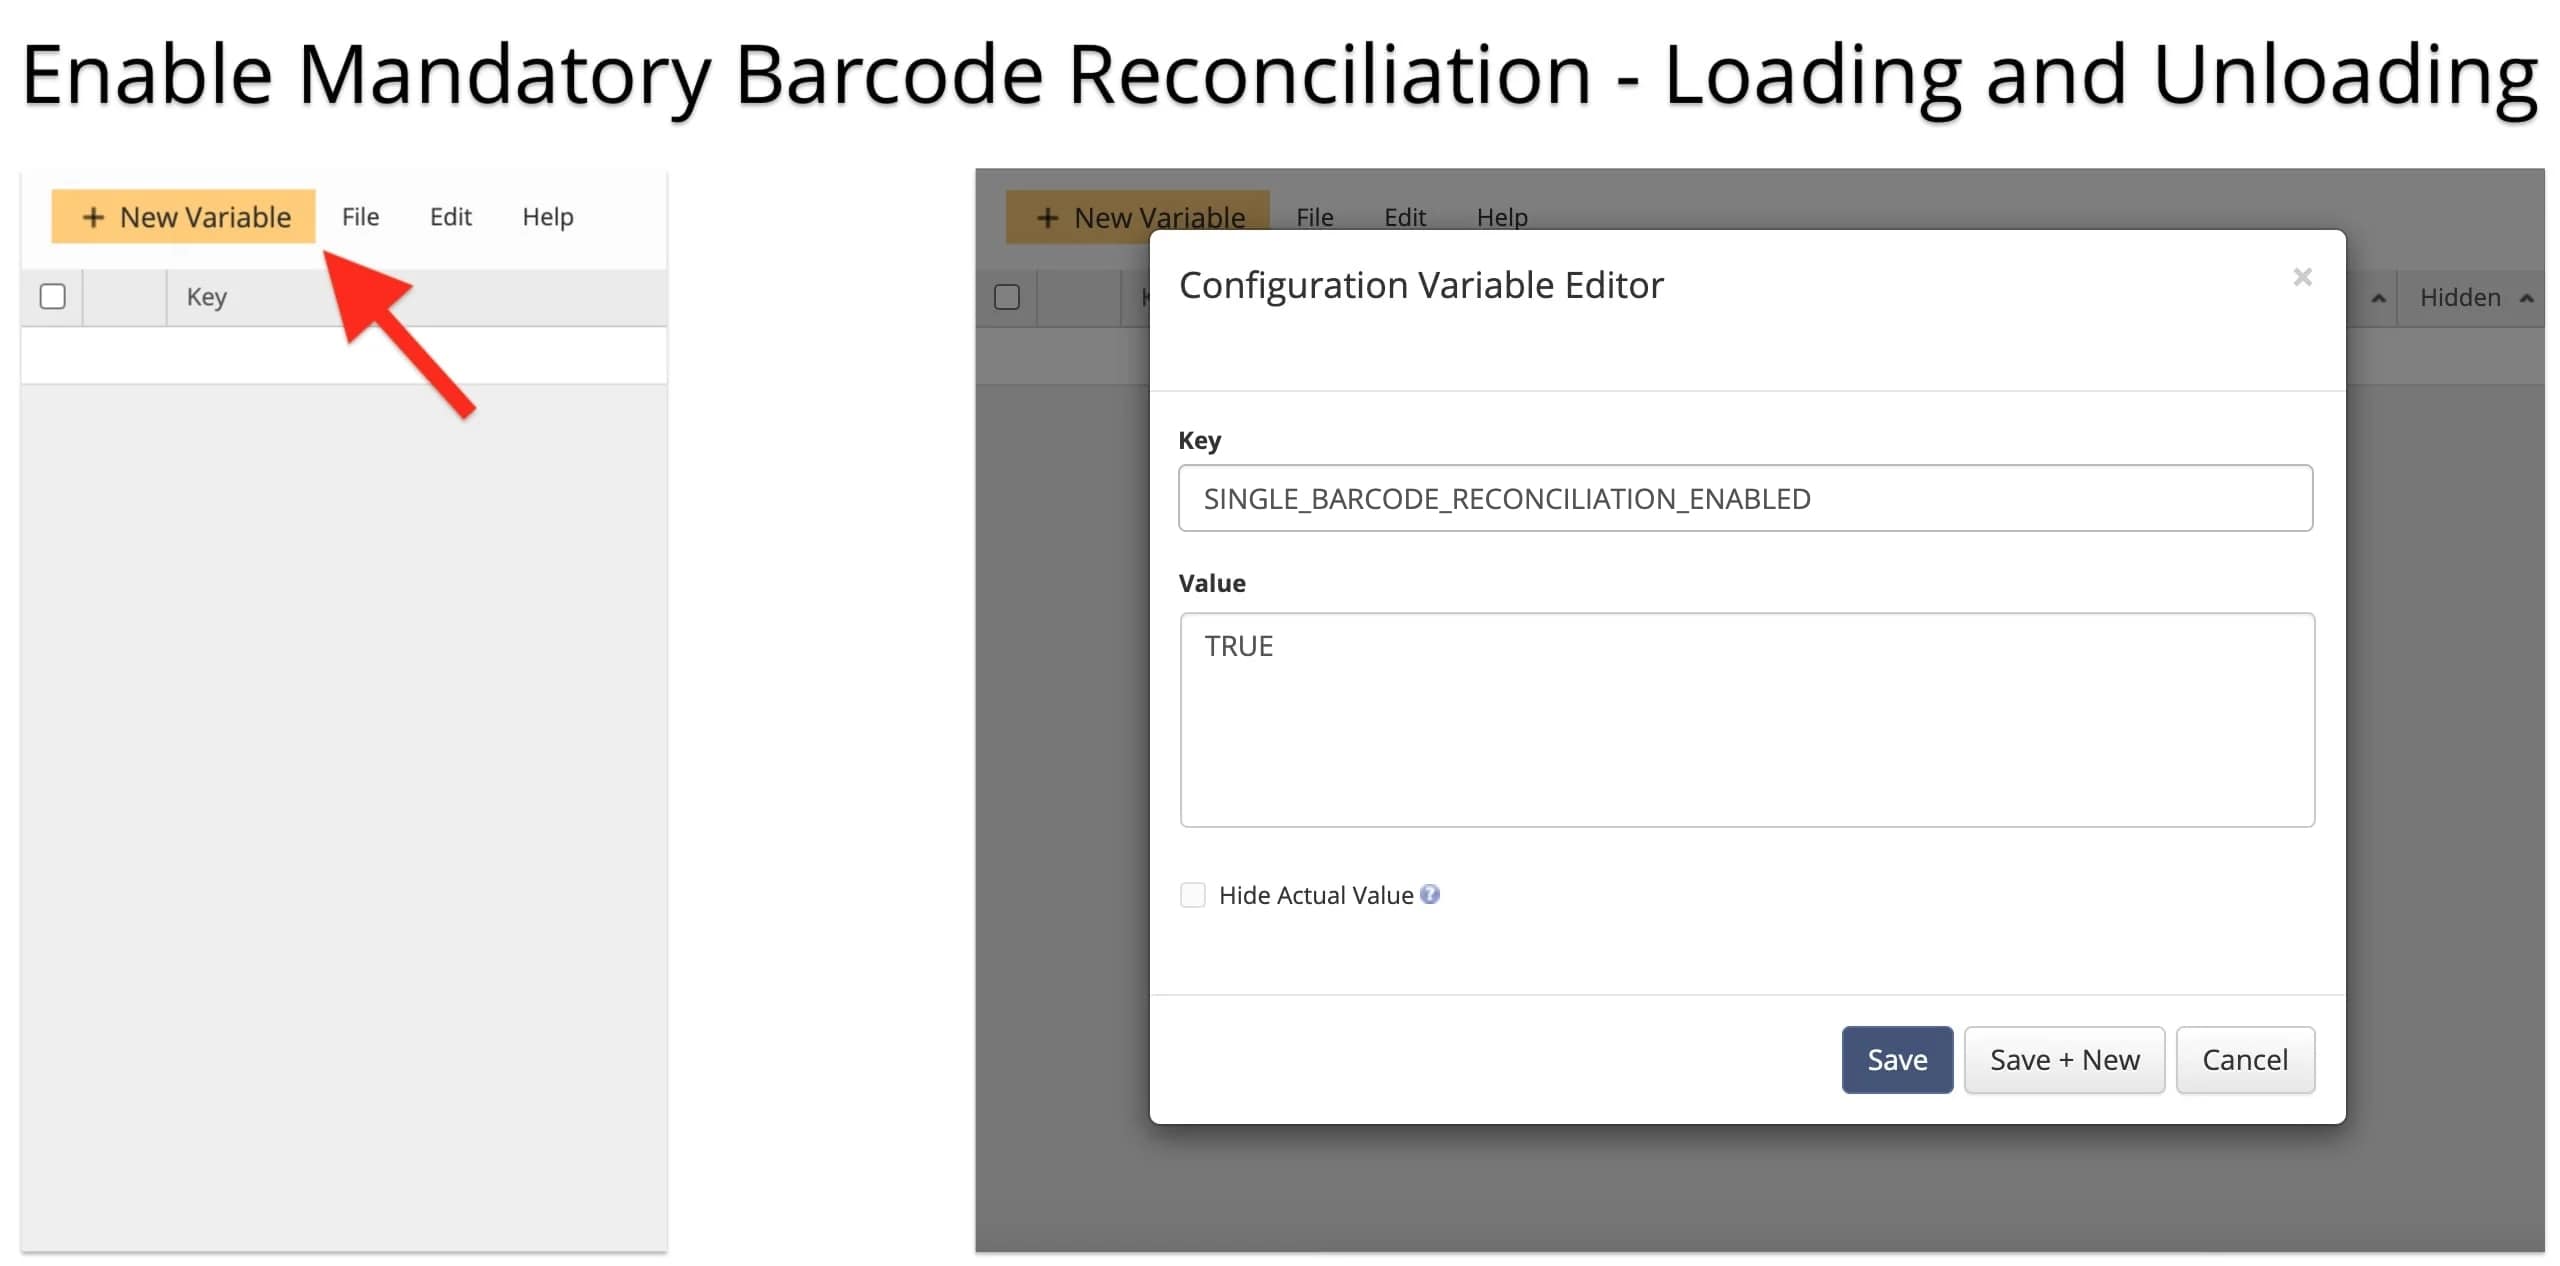
Enable Mandatory Barcode Reconciliation Configurations
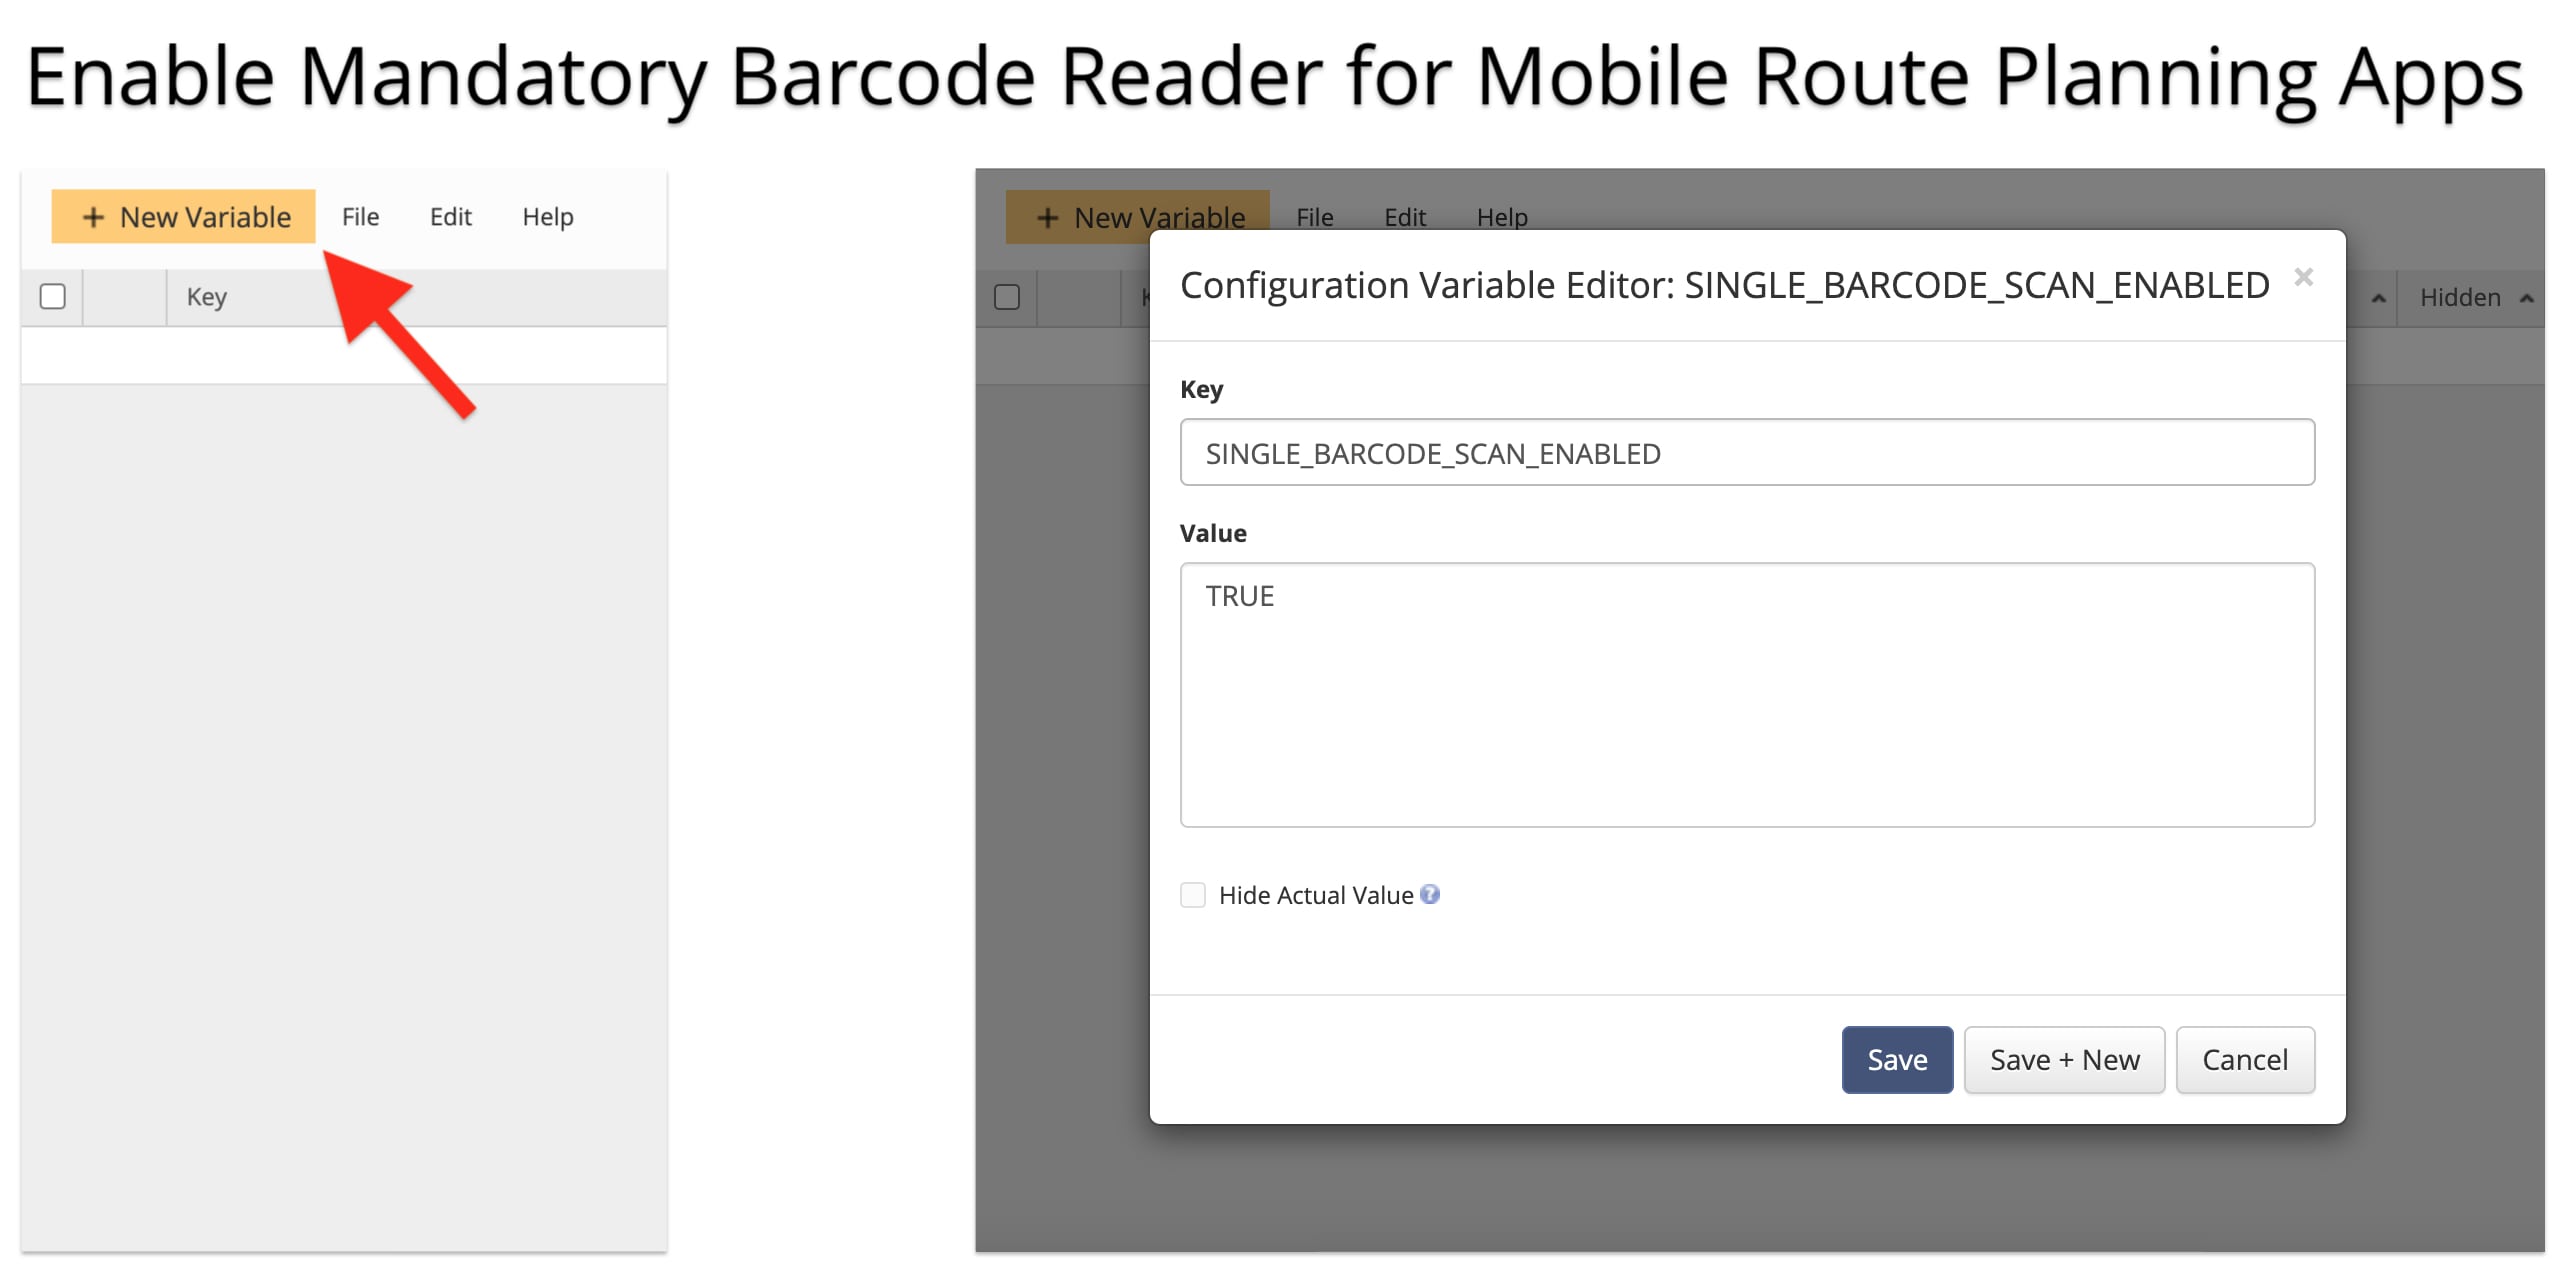
First, open your Route4Me account in Expert Mode to add and enable the Mandatory Barcode reconciliation advanced configuration(s). Specifically, open the Advanced Configuration Editor and then click “New Variable” in the top left corner. Next, fill out the respective fields to add and enable the preferred barcode reconciliation configurations.
Further, after adding and enabling one or multiple advanced configurations, you can disable and enable them using the corresponding values in the editor. Additionally, learn more about using Route4Me’s Advanced Configuration Editor and managing your account’s configurations.
Enable Barcode Loading and Unloading Configuration
To enable mandatory loading and unloading barcode reconciliation, add the following advanced configurations:
| Configuration | Description |
|---|---|
| SINGLE_BARCODE_RECONCILIATION_ENABLED | Requires to reconcile barcodes for loading packages at route destinations. |
| SINGLE_BARCODE_SCAN_ENABLED | Requires to reconcile barcodes for unloading packages at route destinations. |
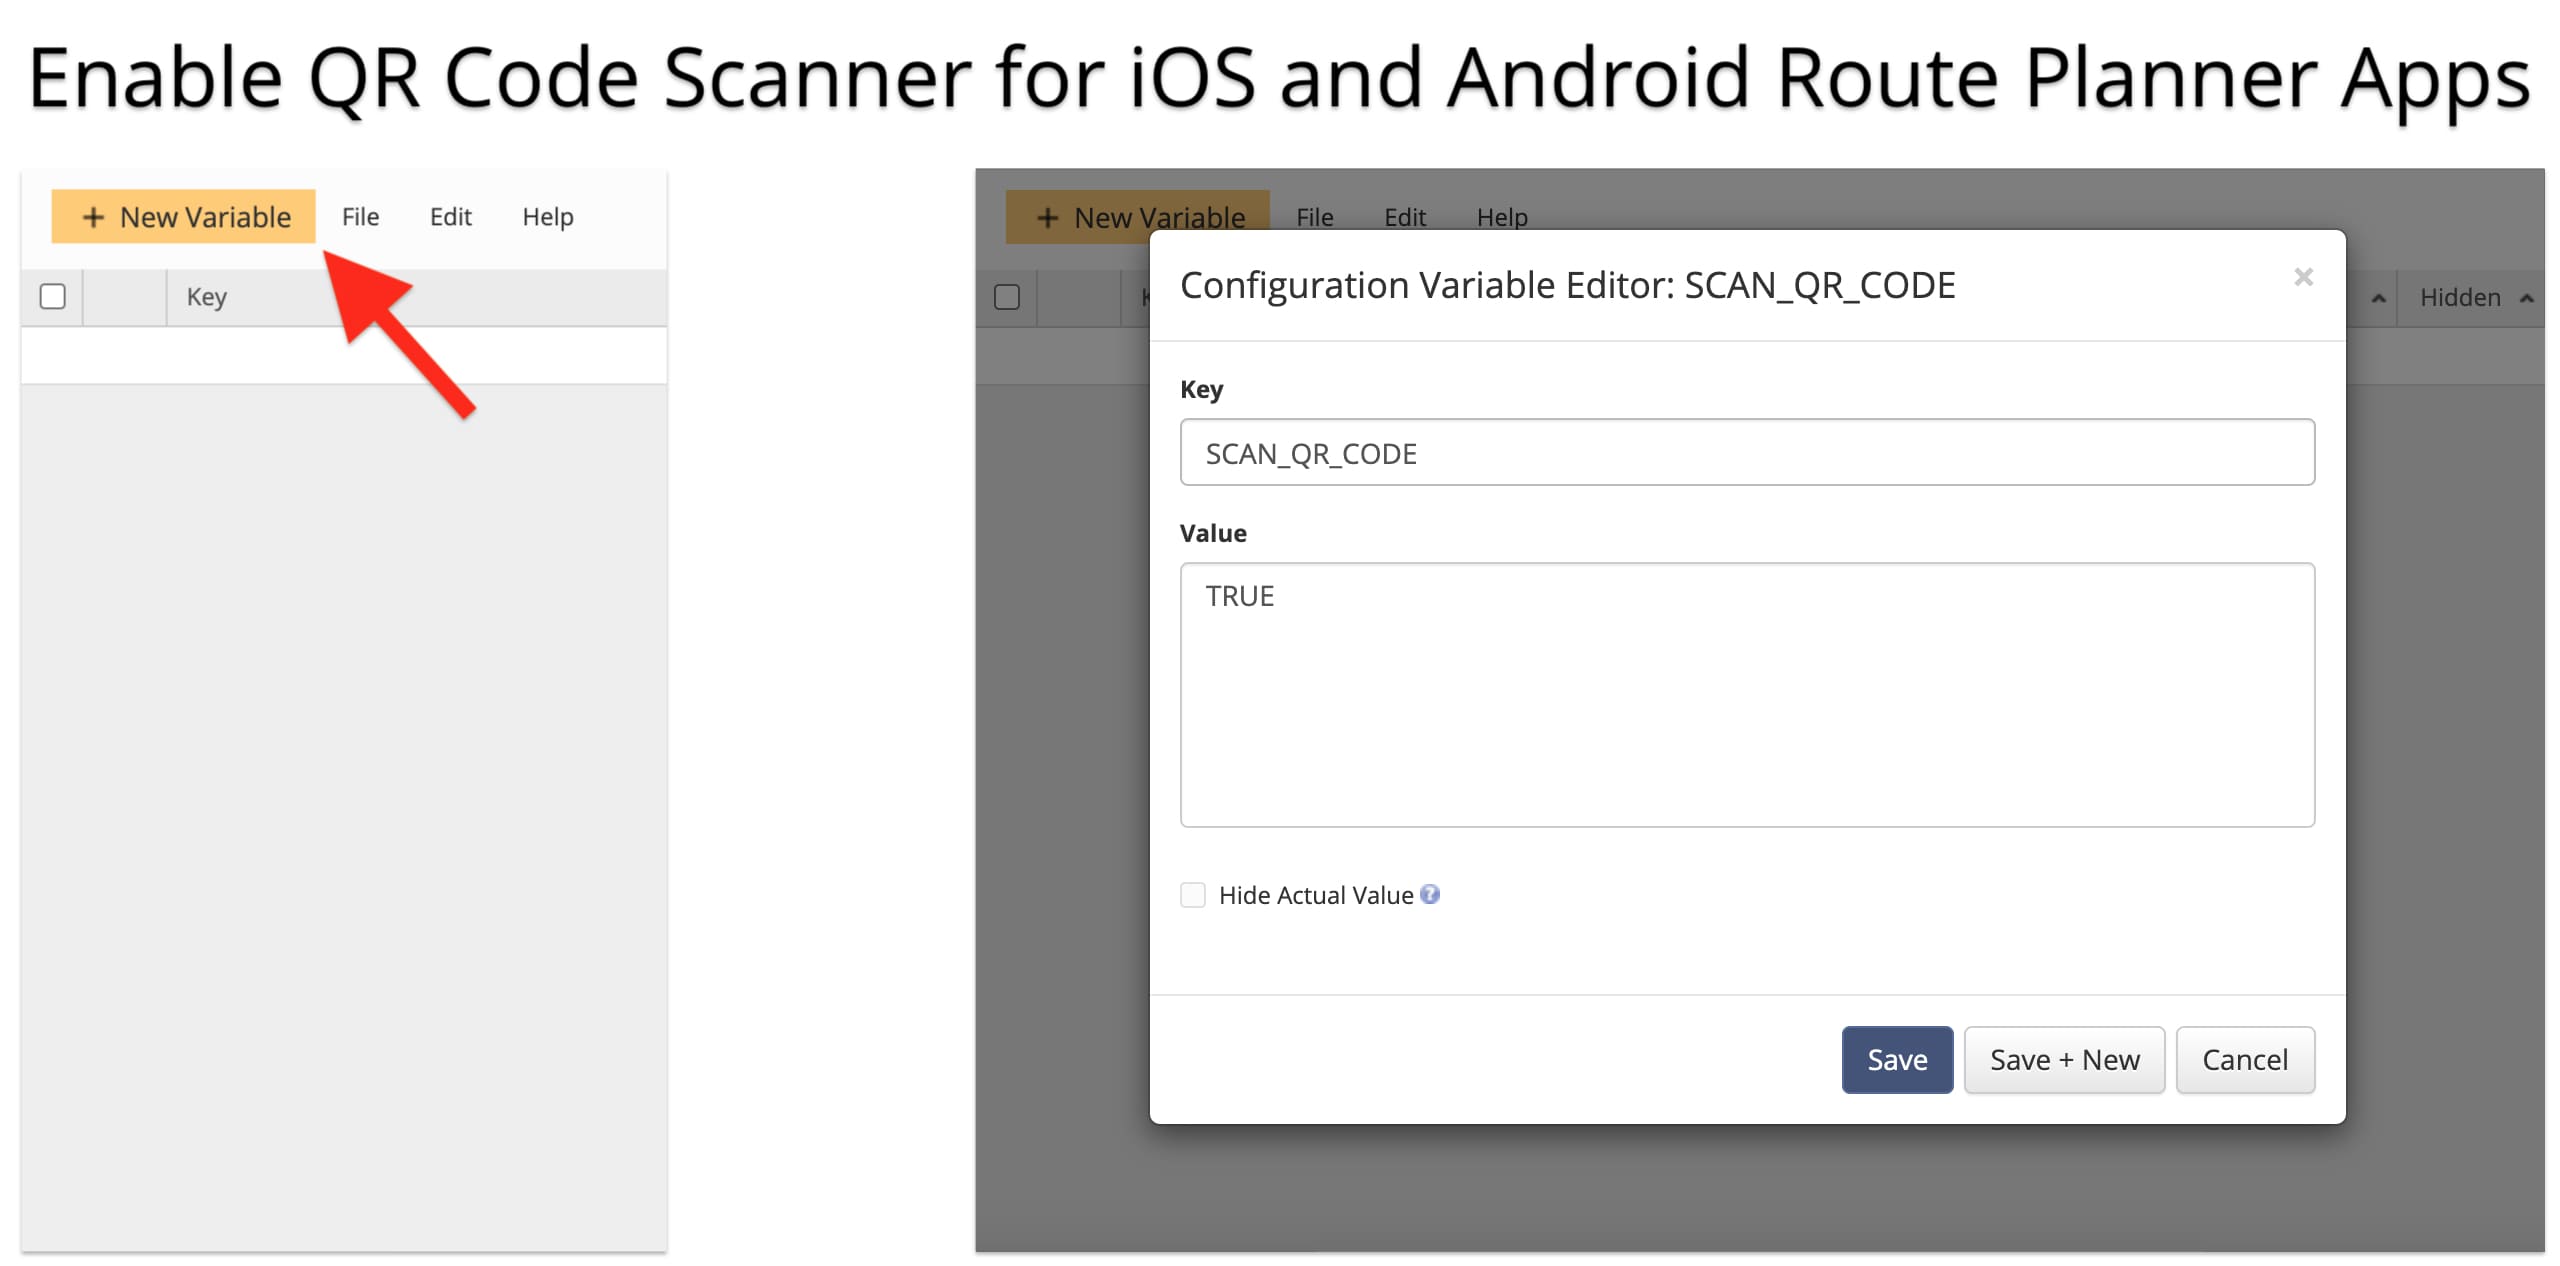
Enable QR Code Scanner Configuration
By default, Route4Me’s mobile routing apps scan barcodes of almost all types. Learn more about the route planner supported barcodes. Additionally, Route4Me’s iOS and Android Mobile Route Planner apps can scan QR Codes. Accordingly, to enable the QR Code scanner for your route planner apps, add the following advanced configuration:
- Key: SCAN_QR_CODE
- Value: “TRUE” to enable the and “FALSE” to disable the configuration.
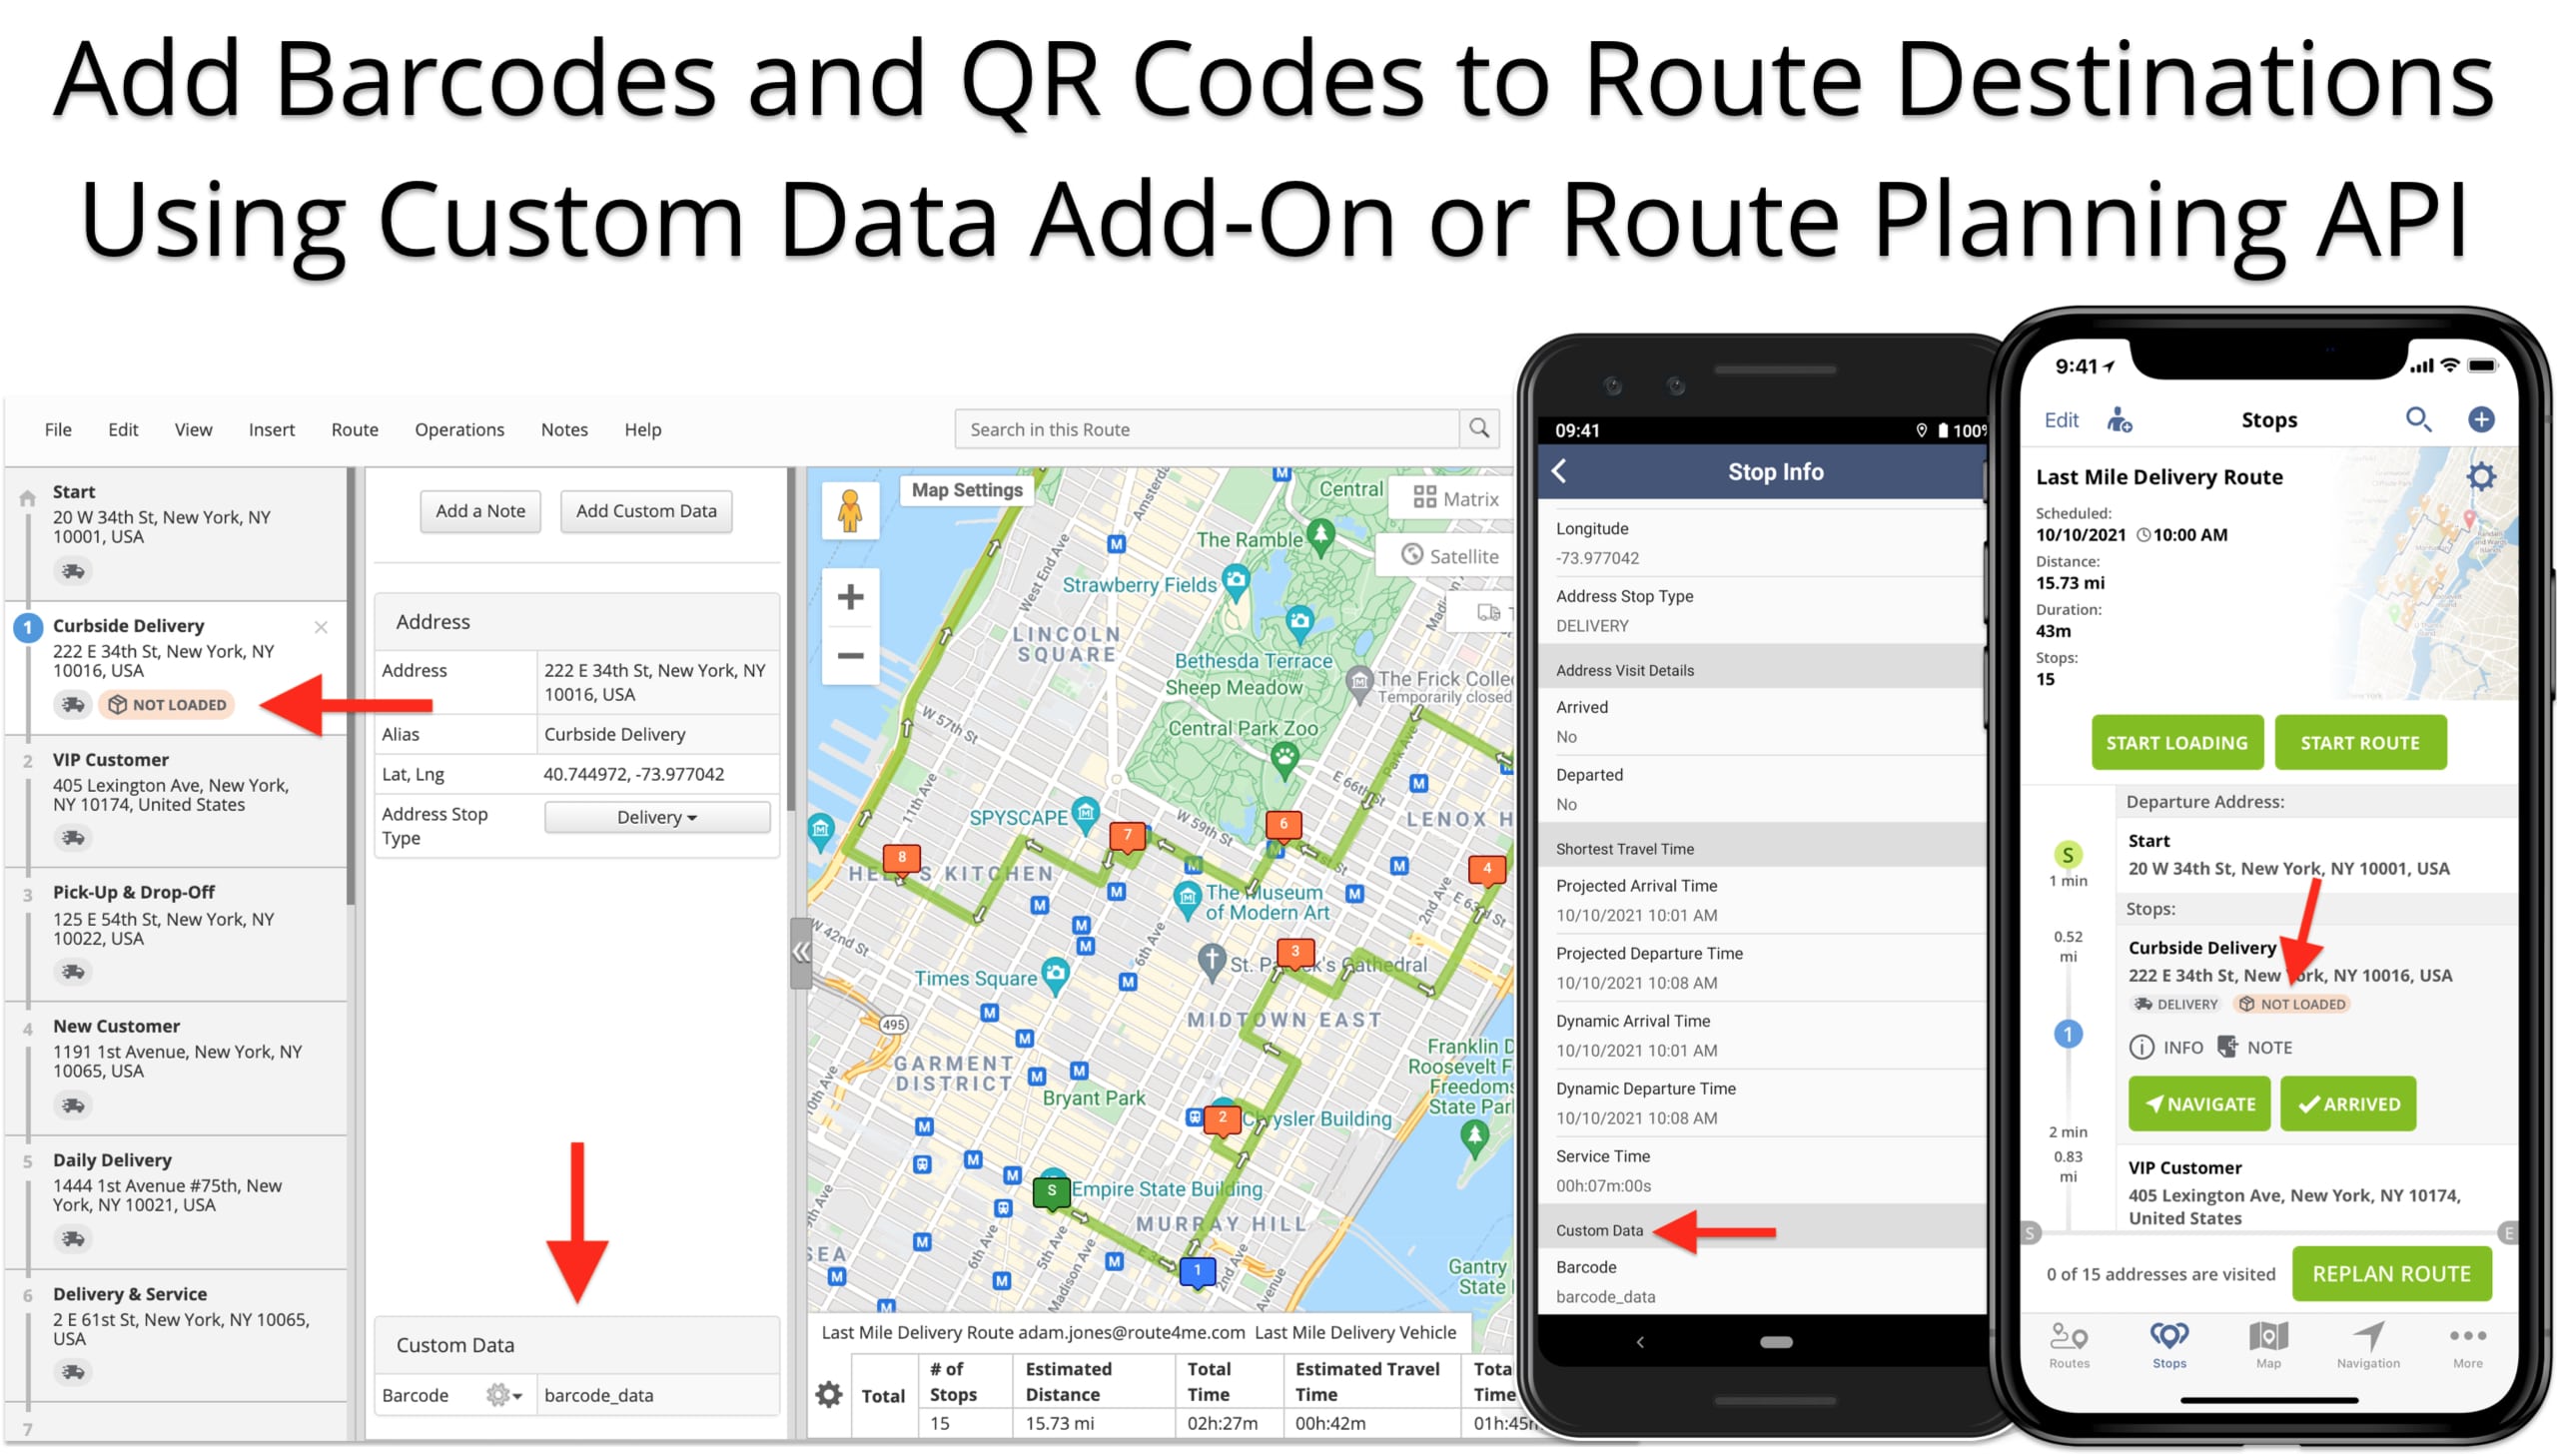
Add Barcodes to Route Destinations Using Custom Data
Next, add the barcode data that needs to be reconciled to the corresponding route destinations as Custom Data. First, you can manually add Custom Data with barcode information to your route stops. To do so, open the preferred route destination in the Route Editor and then click on the “Add Custom Data” button. After that, input “Barcode” into the field name and then specify the barcode data for reconciliation in the field content.
Second, you can add Custom Data with barcode information when uploading a spreadsheet with route destinations. To do so, add the “Barcode” column in your spreadsheet and then add a barcode next to each respective address on the corresponding rows. After that, when uploading your spreadsheet, make sure the “Barcode” column is selected as “Custom” on the column detection screen.
Learn more about formatting route data spreadsheets and using Route4Me’s Custom Data add-on.
Additionally, you can add hundreds of thousands of barcodes to your routes using Route4Me’s flexible API features. To use the API for adding barcodes to your routes, please contact our Customer Success Team.
Not Loaded Route Destinations
Once you have barcodes added to route destinations, these destinations will have the “Not Loaded” status. Accordingly, the “Not Loaded” status indicates that a barcode for the given destination was not scanned and the respective package was not loaded on the vehicle.

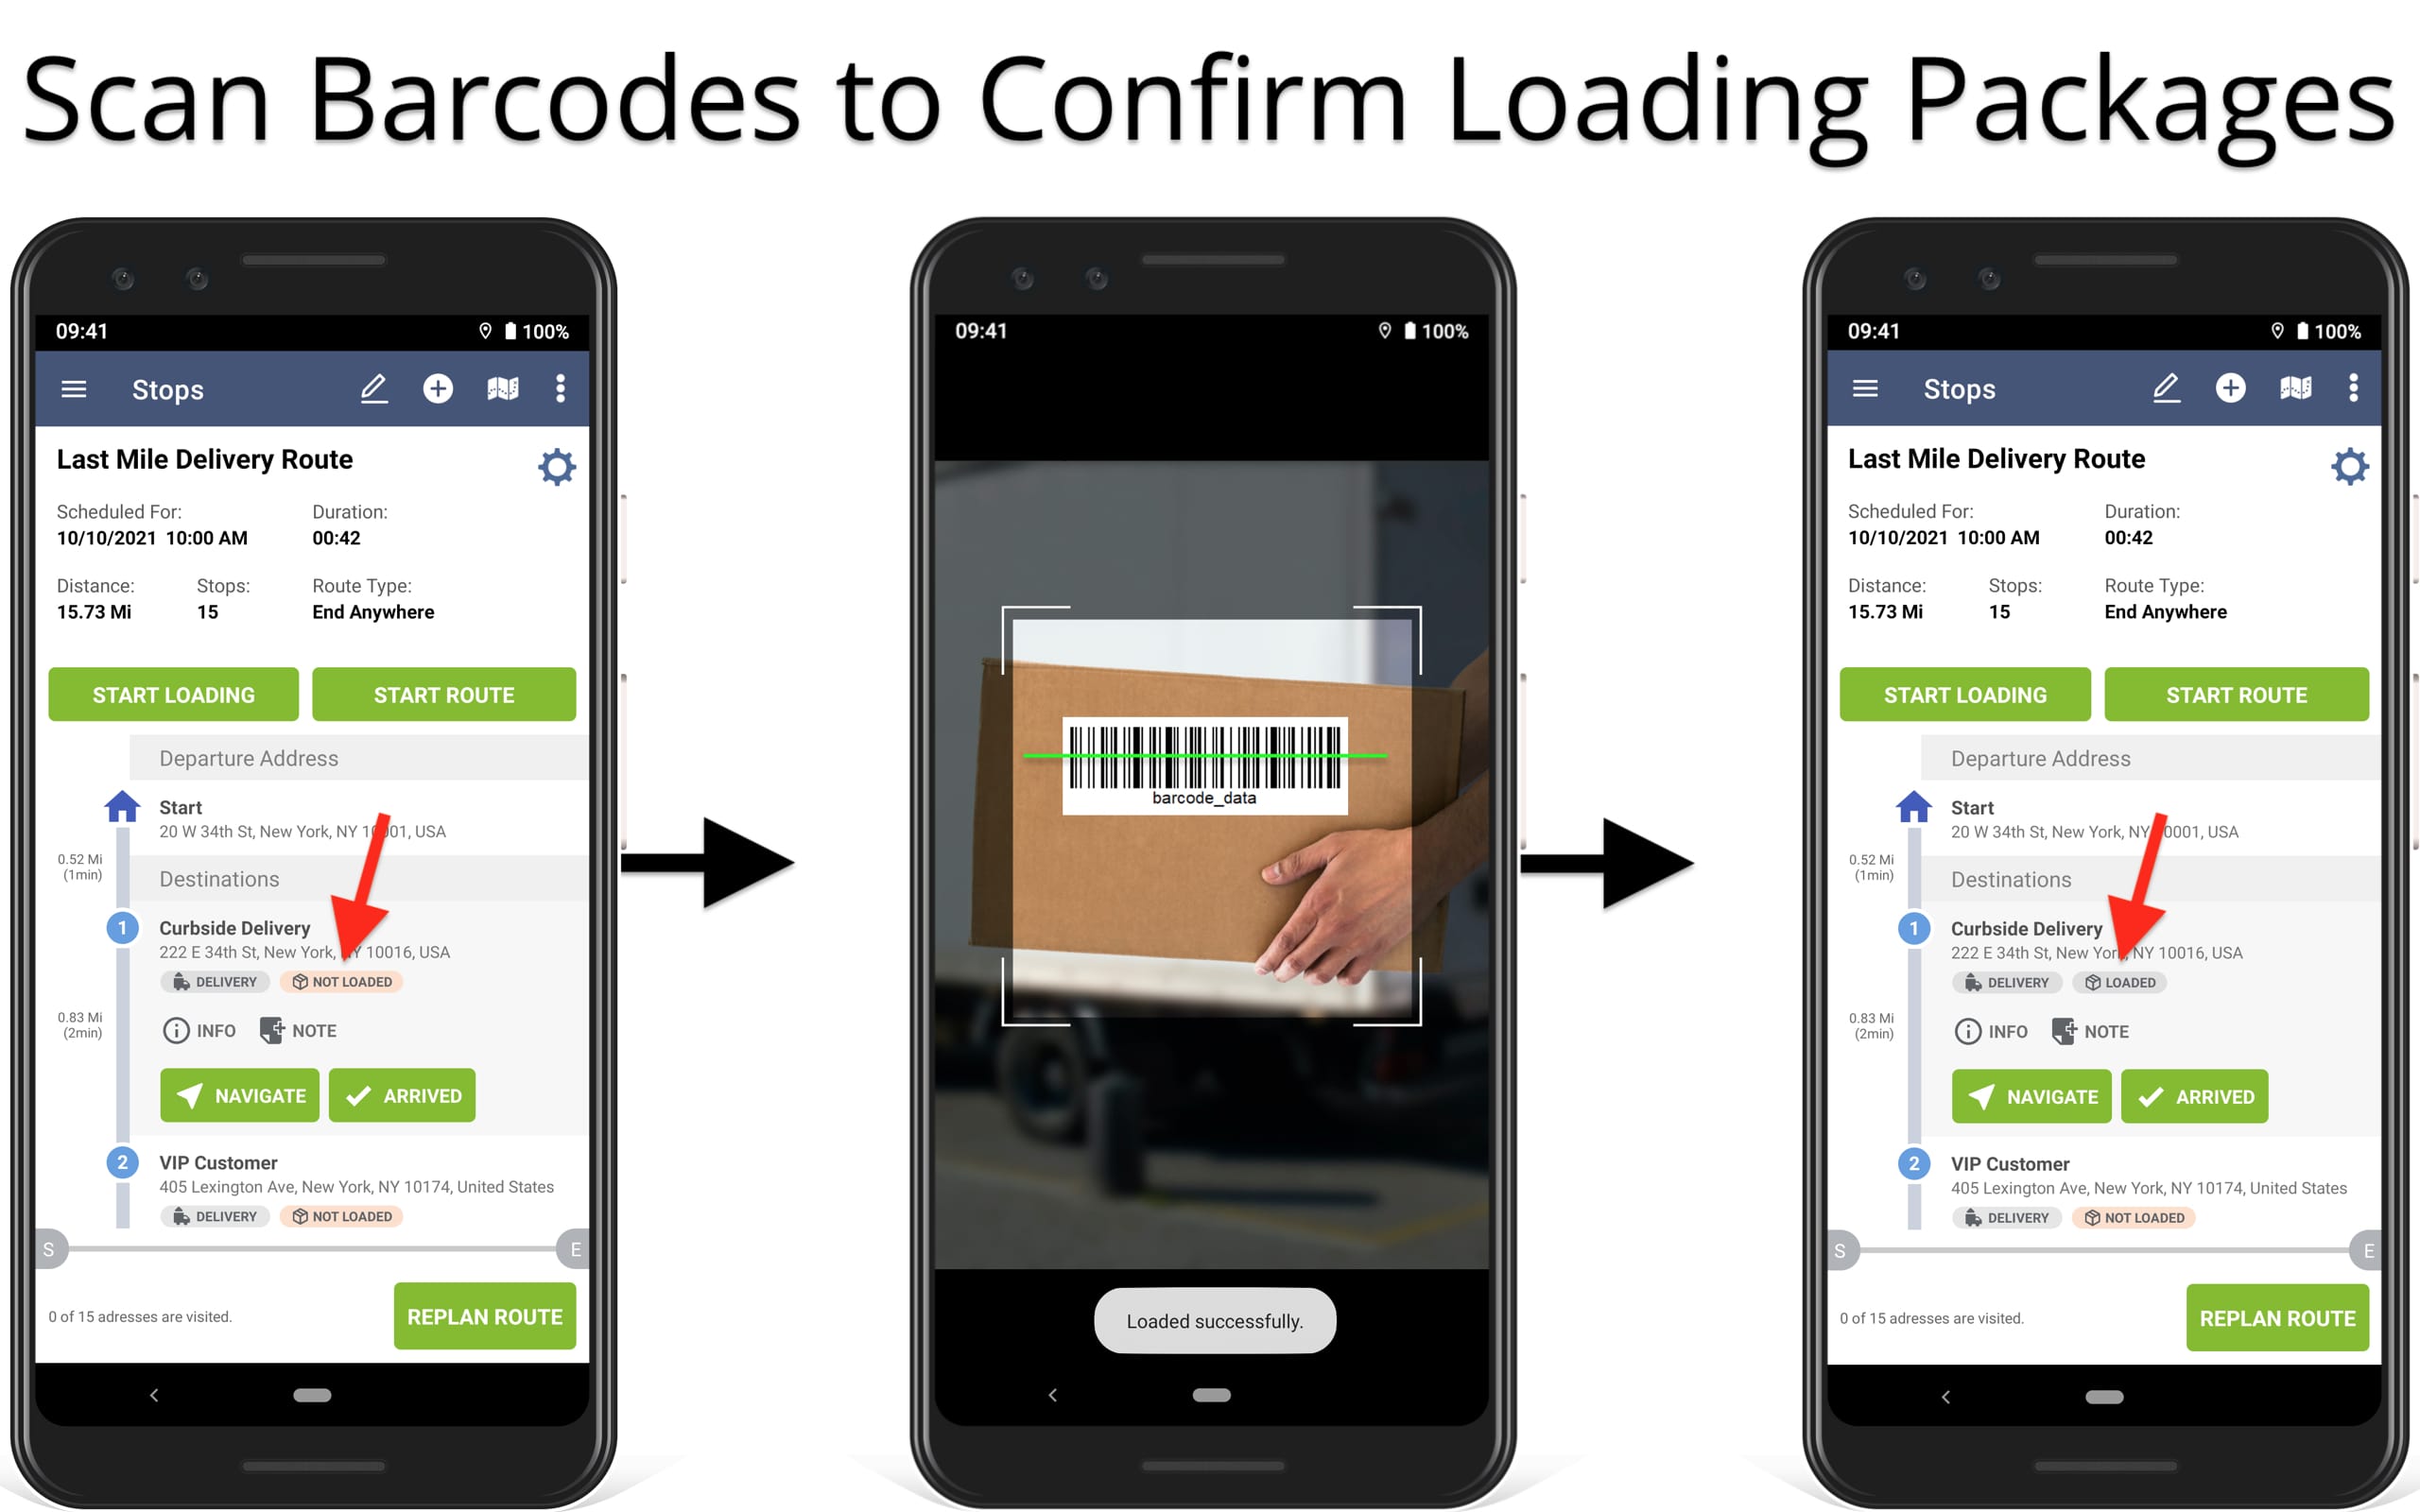
Start Loading – Scan Barcodes to Confirm Loading Packages
To start reconciling barcodes and loading packages, start the preferred route on the iOS or Android Route Planner app. Next, you can check what route destinations have the “Not Loaded” status. Accordingly, tap on the “Start Loading” button at the top of the route to start barcode reconciliation for loading packages.
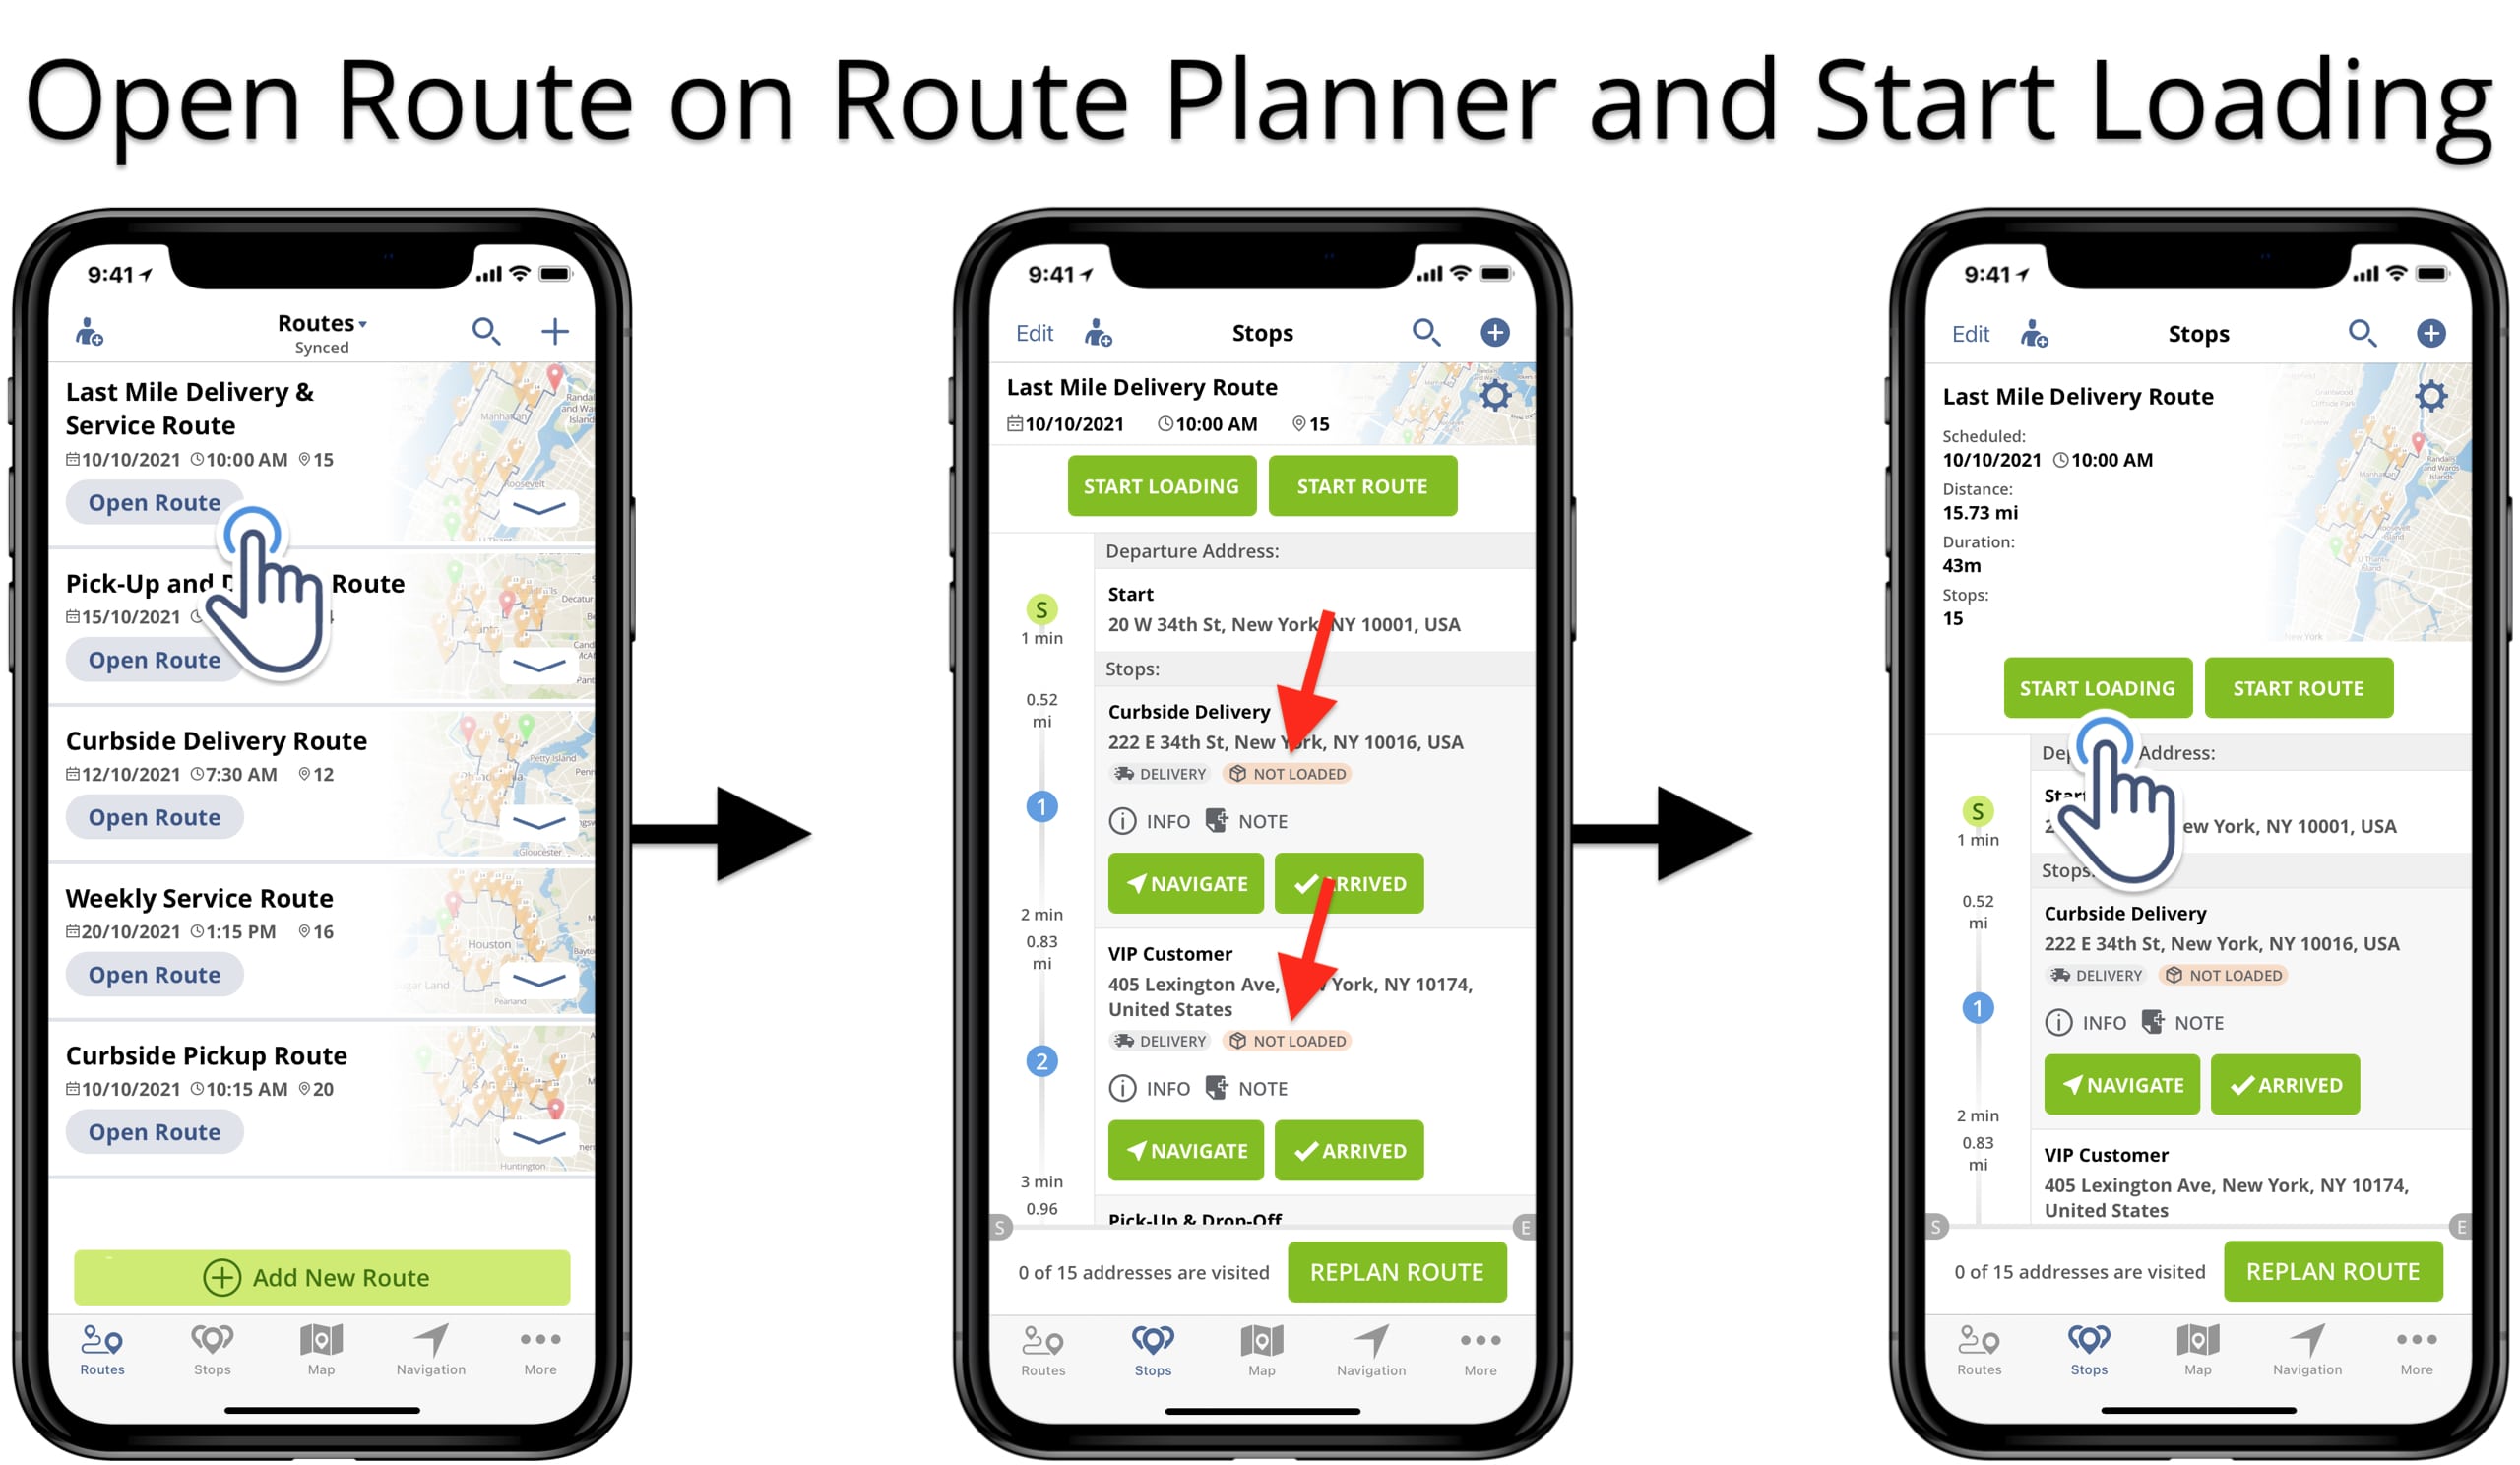
Use Route Planner Barcode Scanner App to Scan Barcodes
After tapping on the “Start Loading” button, the app will automatically launch the barcode scanner app. Next, use your device camera to scan barcodes on the packages that need to be loaded on the vehicle. Accordingly, when you scan a barcode on a package associated with a particular route destination, the app will automatically reconcile it and change the status of the respective destination from “Not Loaded” to the “Loaded” status. Thus, you can continuously scan barcodes on all packages for loading, and the app will automatically detect loaded parcels and assign the respective route destination statuses.
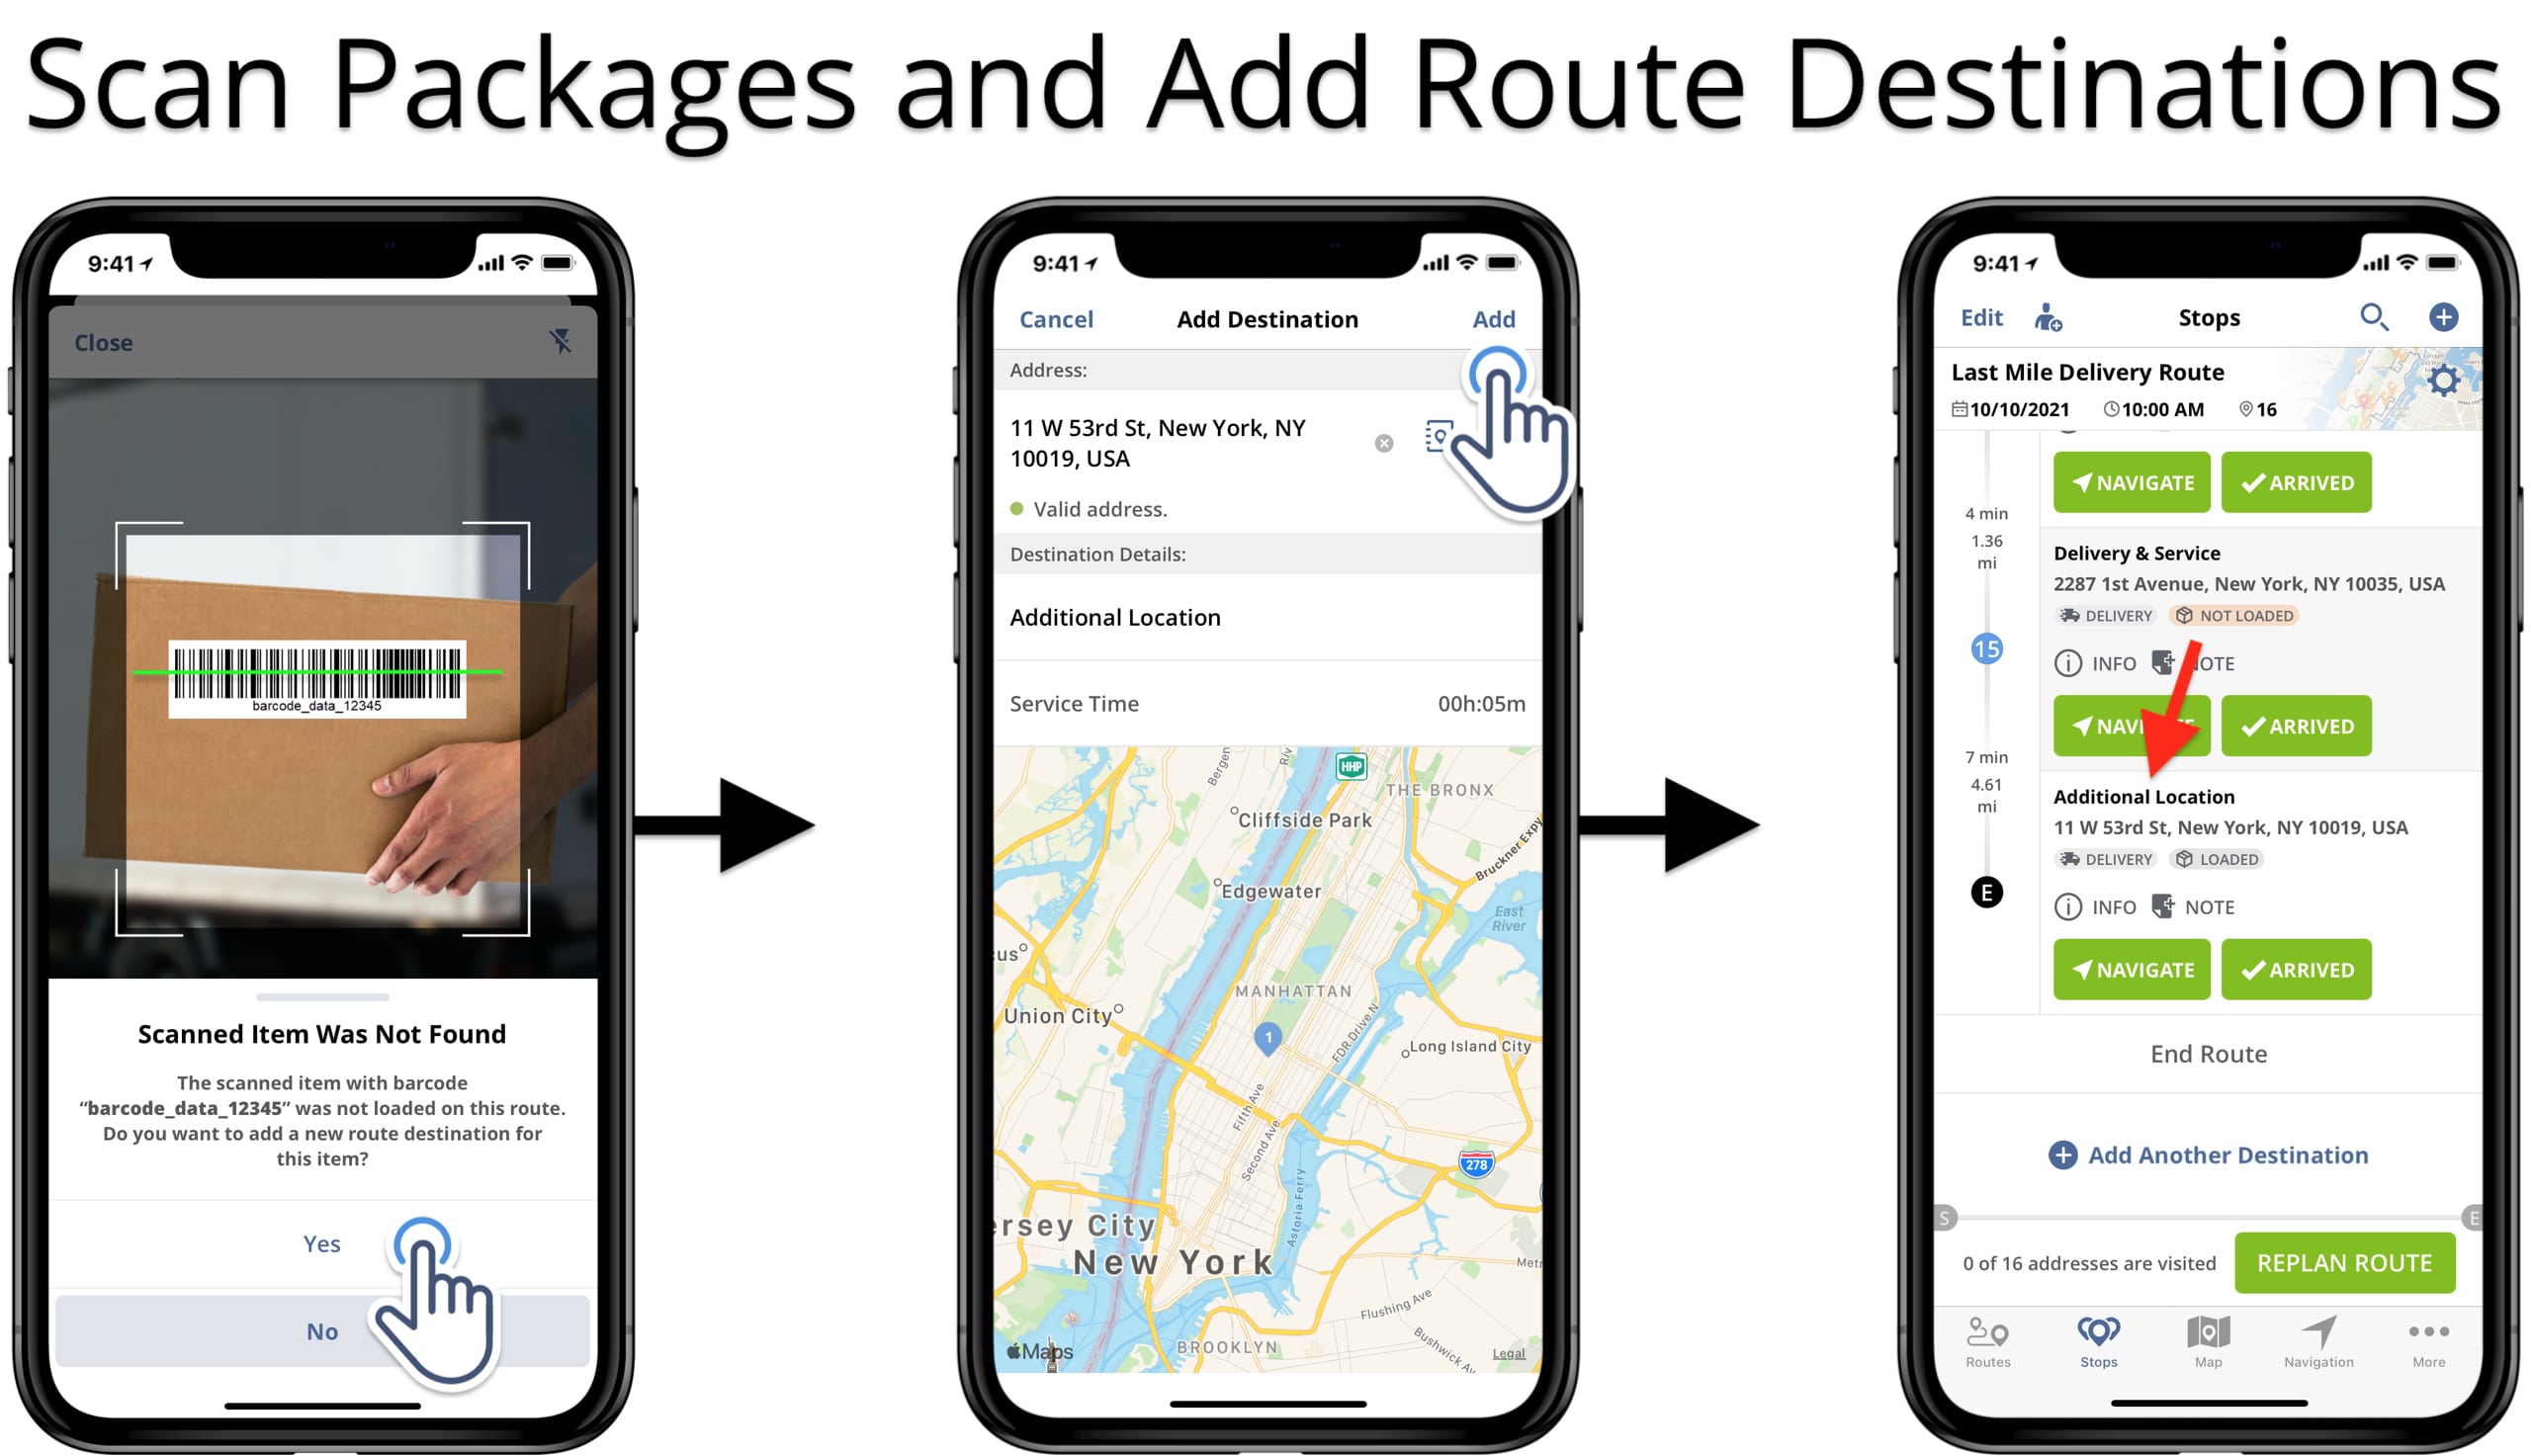
Add New Route Destinations for Unidentified Packages
Equally important, the app allows you to add unidentified packages as additional route destinations. For example, when you scan a package barcode that was not added to the given route, the app will prompt you to add a new route stop for this package. To do so, tap “Yes” when prompted and then add an address for the new route stops. Accordingly, after adding a new stop, the app will place it as the last stop on the route with the “Loaded” reconciliation status. Additionally, you can re-optimize the route on the route planner app to place the new stops at the most optimal sequence position.
Loaded Route Destinations on Route Planner Apps
Accordingly, after reconciling barcodes for loading packages on route destinations, route destinations with reconciled barcodes will have the “Loaded” status. Furthermore, you can automatically synchronize the barcodes reconciled using the barcode scanner app on Route4Me’s iOS and Android Route Planners with Web Platform. In this way, drivers can confirm loading the truck using the mobile app and dispatches, or managers can check loading confirmations at the office.
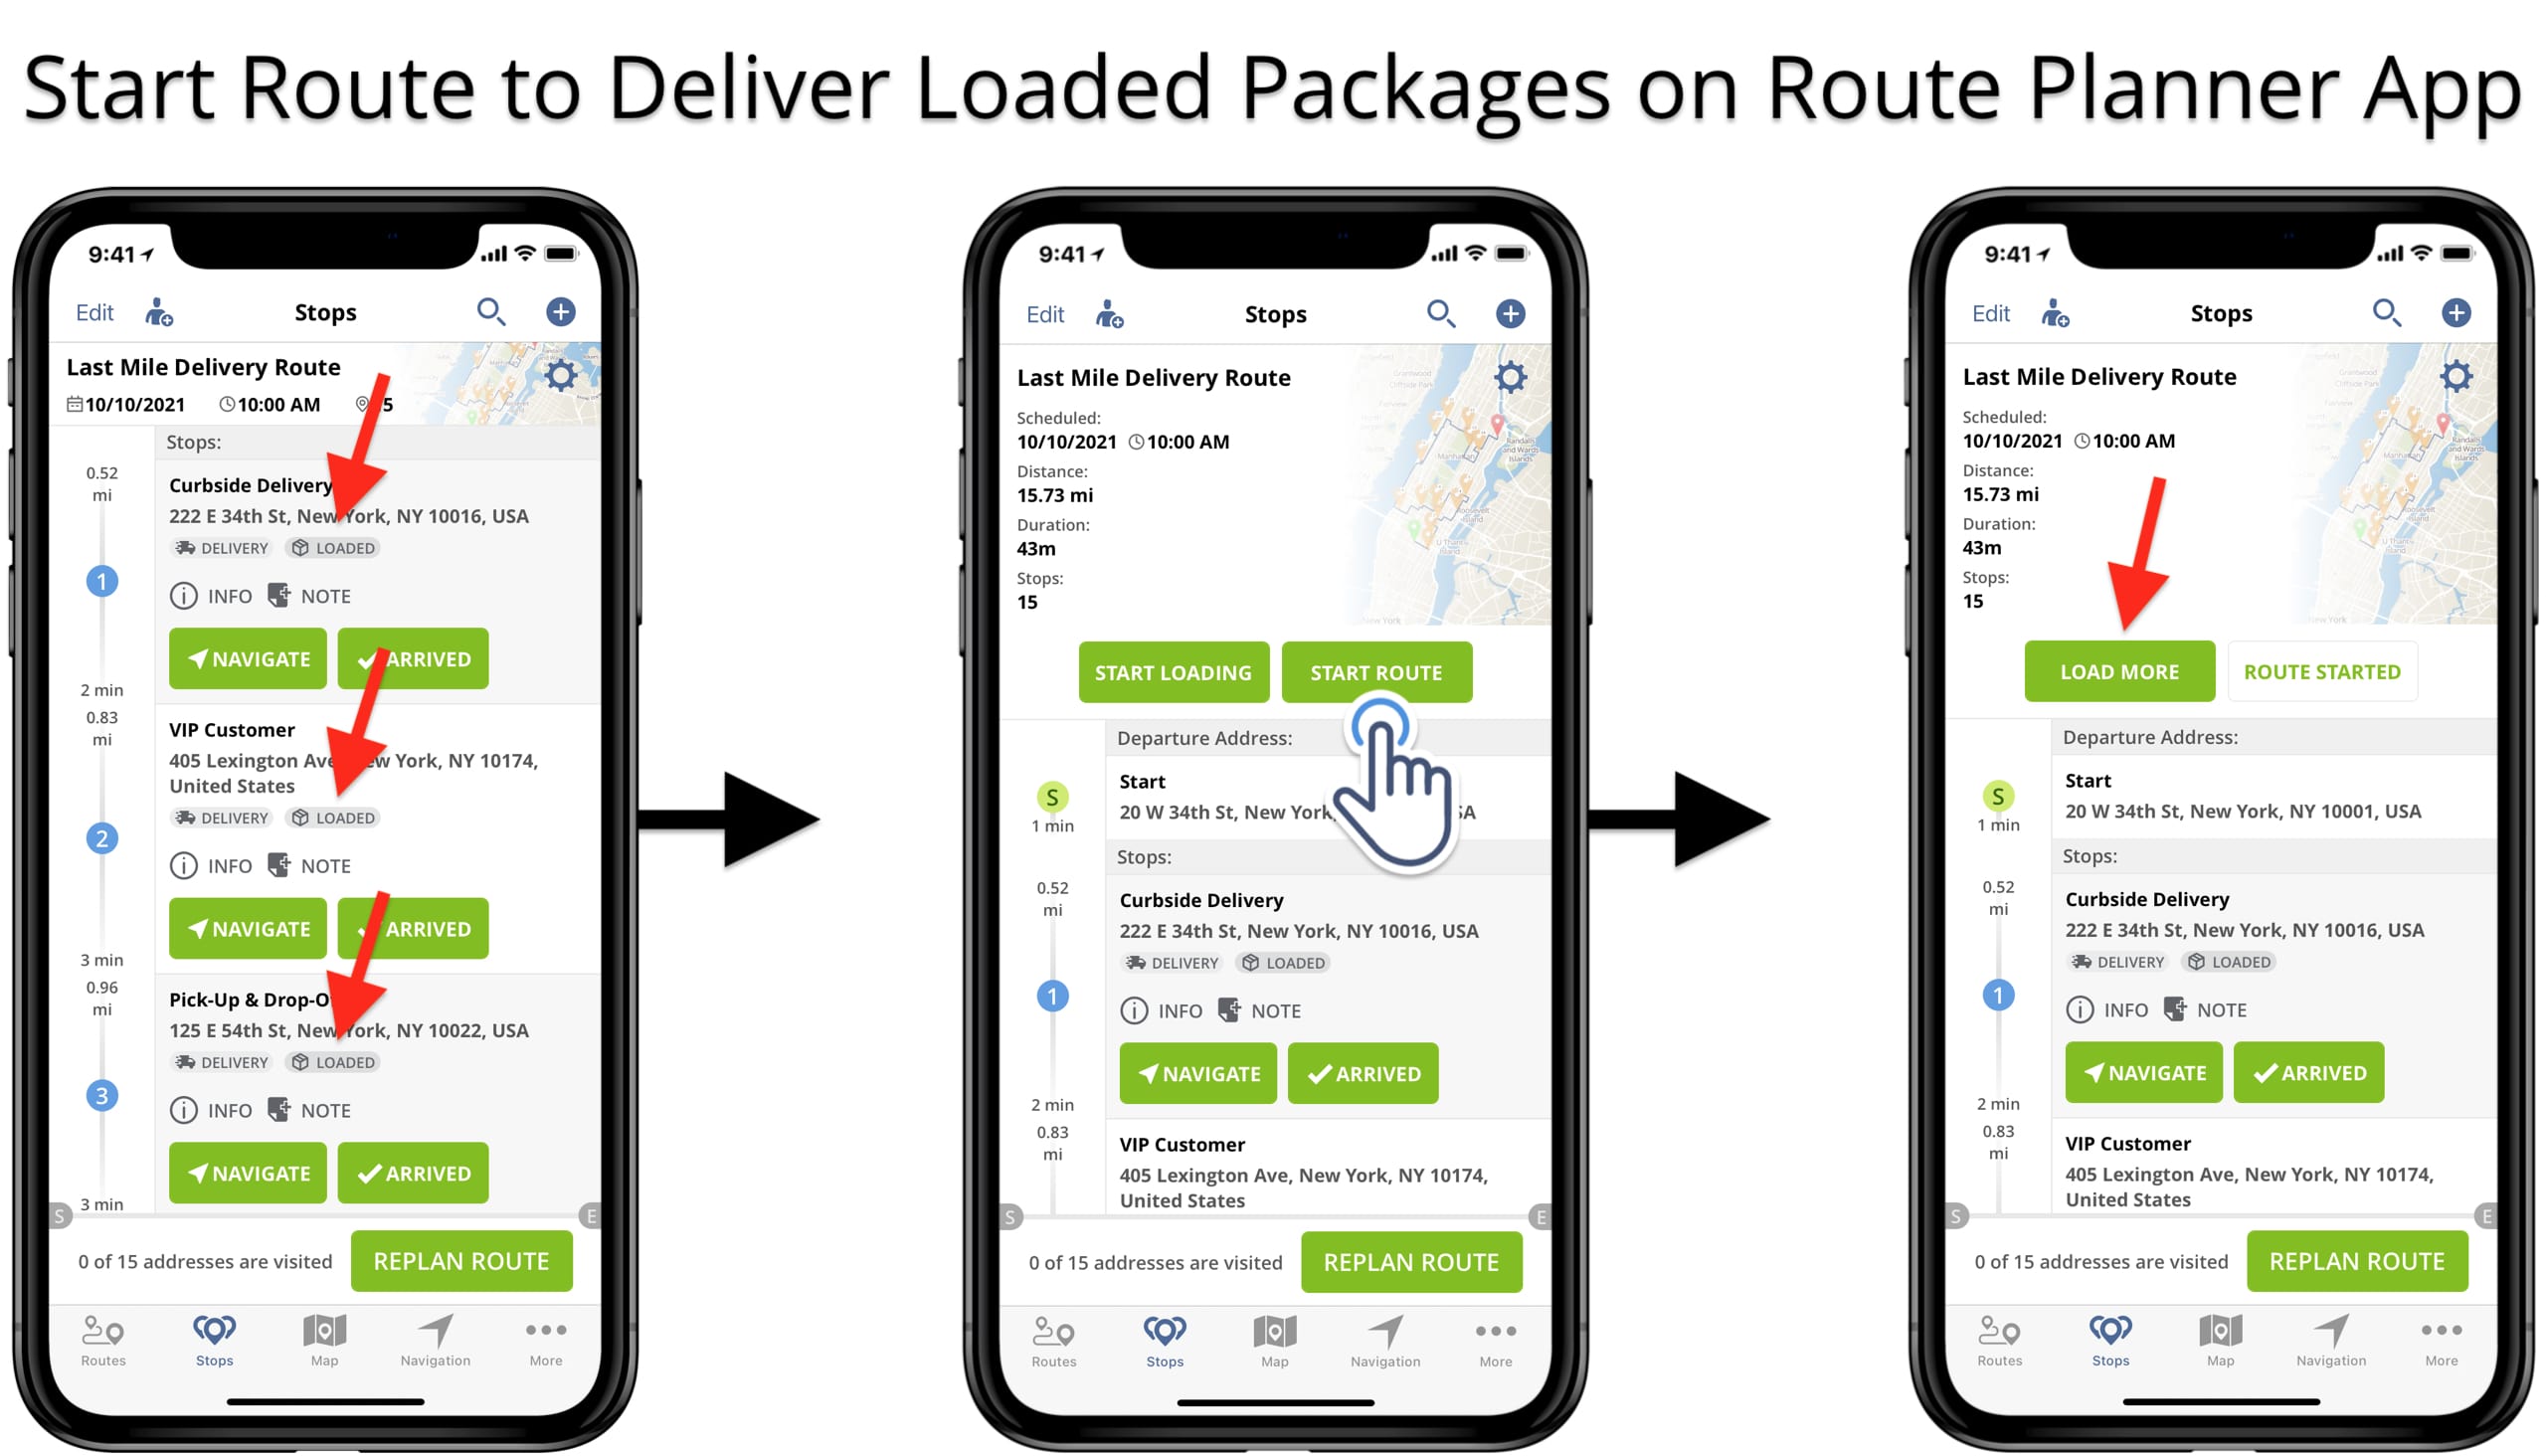
Start Route Navigation and Unloading Packages on Route Planner
After loading the required inventory and packages, you can start navigating the route to complete orders. Accordingly, click on the “Start Route” button to start and navigate the opened route on the route planner app. Another key point, you can load more packages on the route even after you’ve already started the route using the “Load More” button.
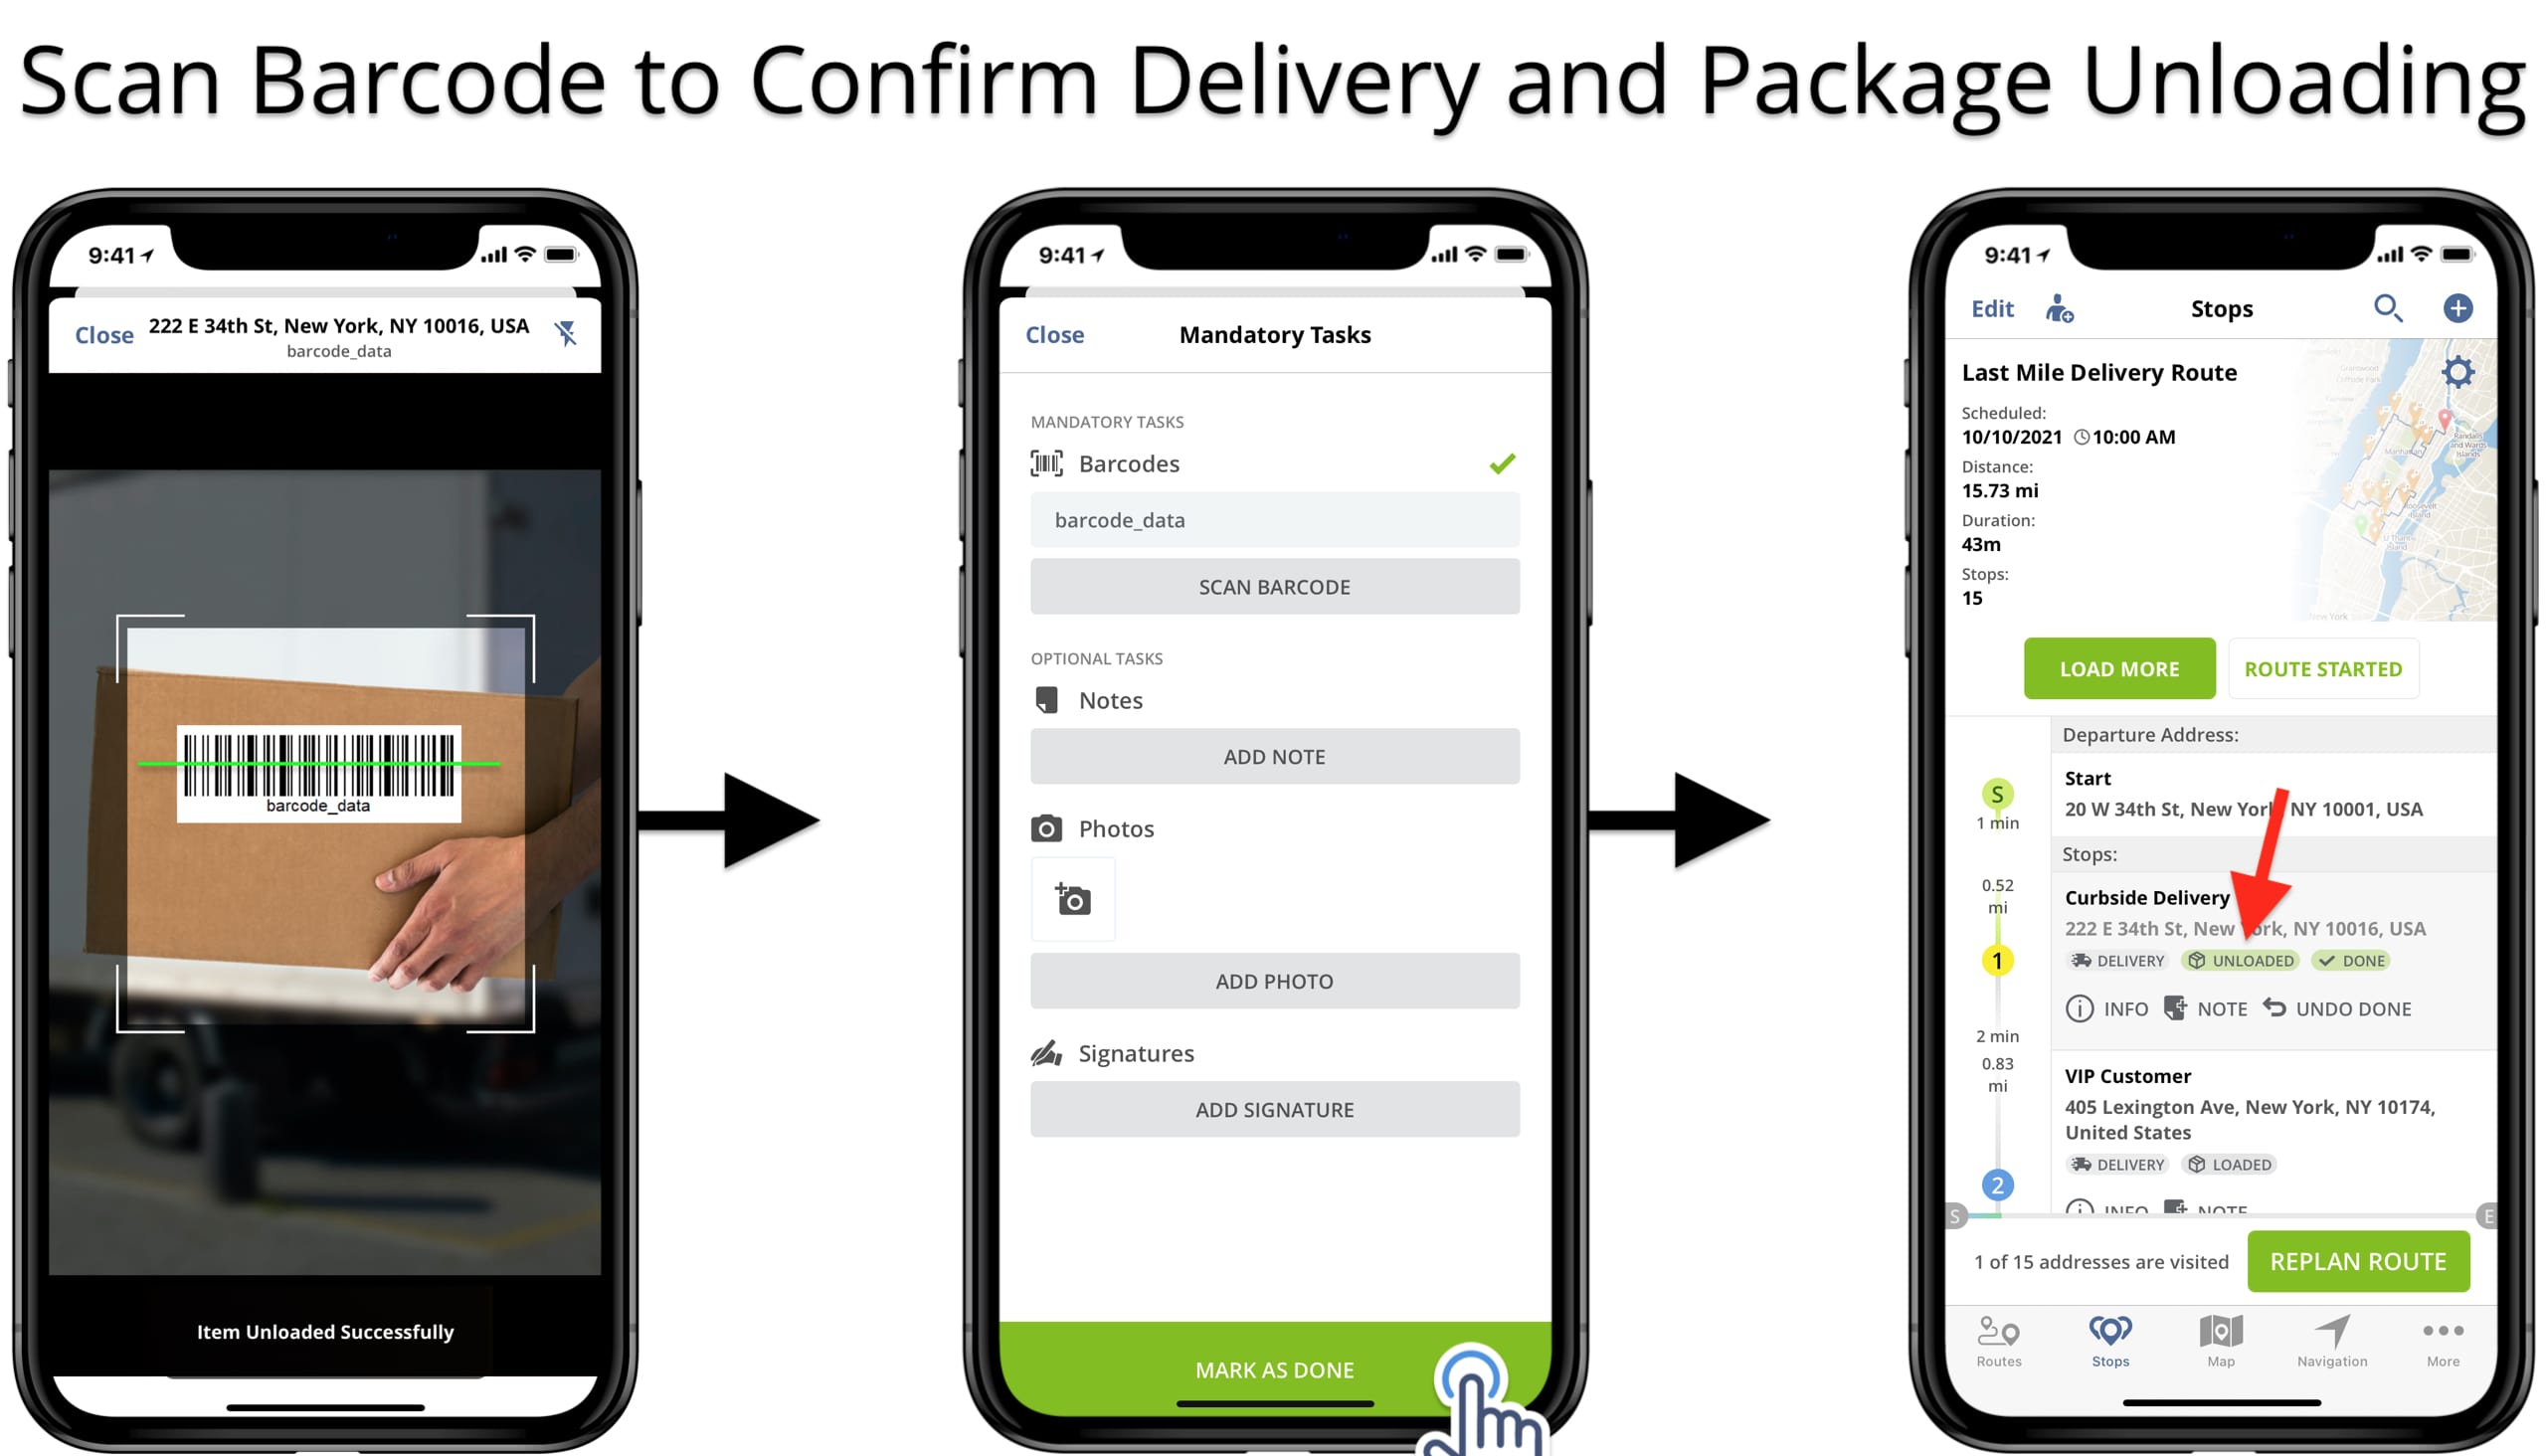
Mandatory Barcode Reconciliation for Package Unloading
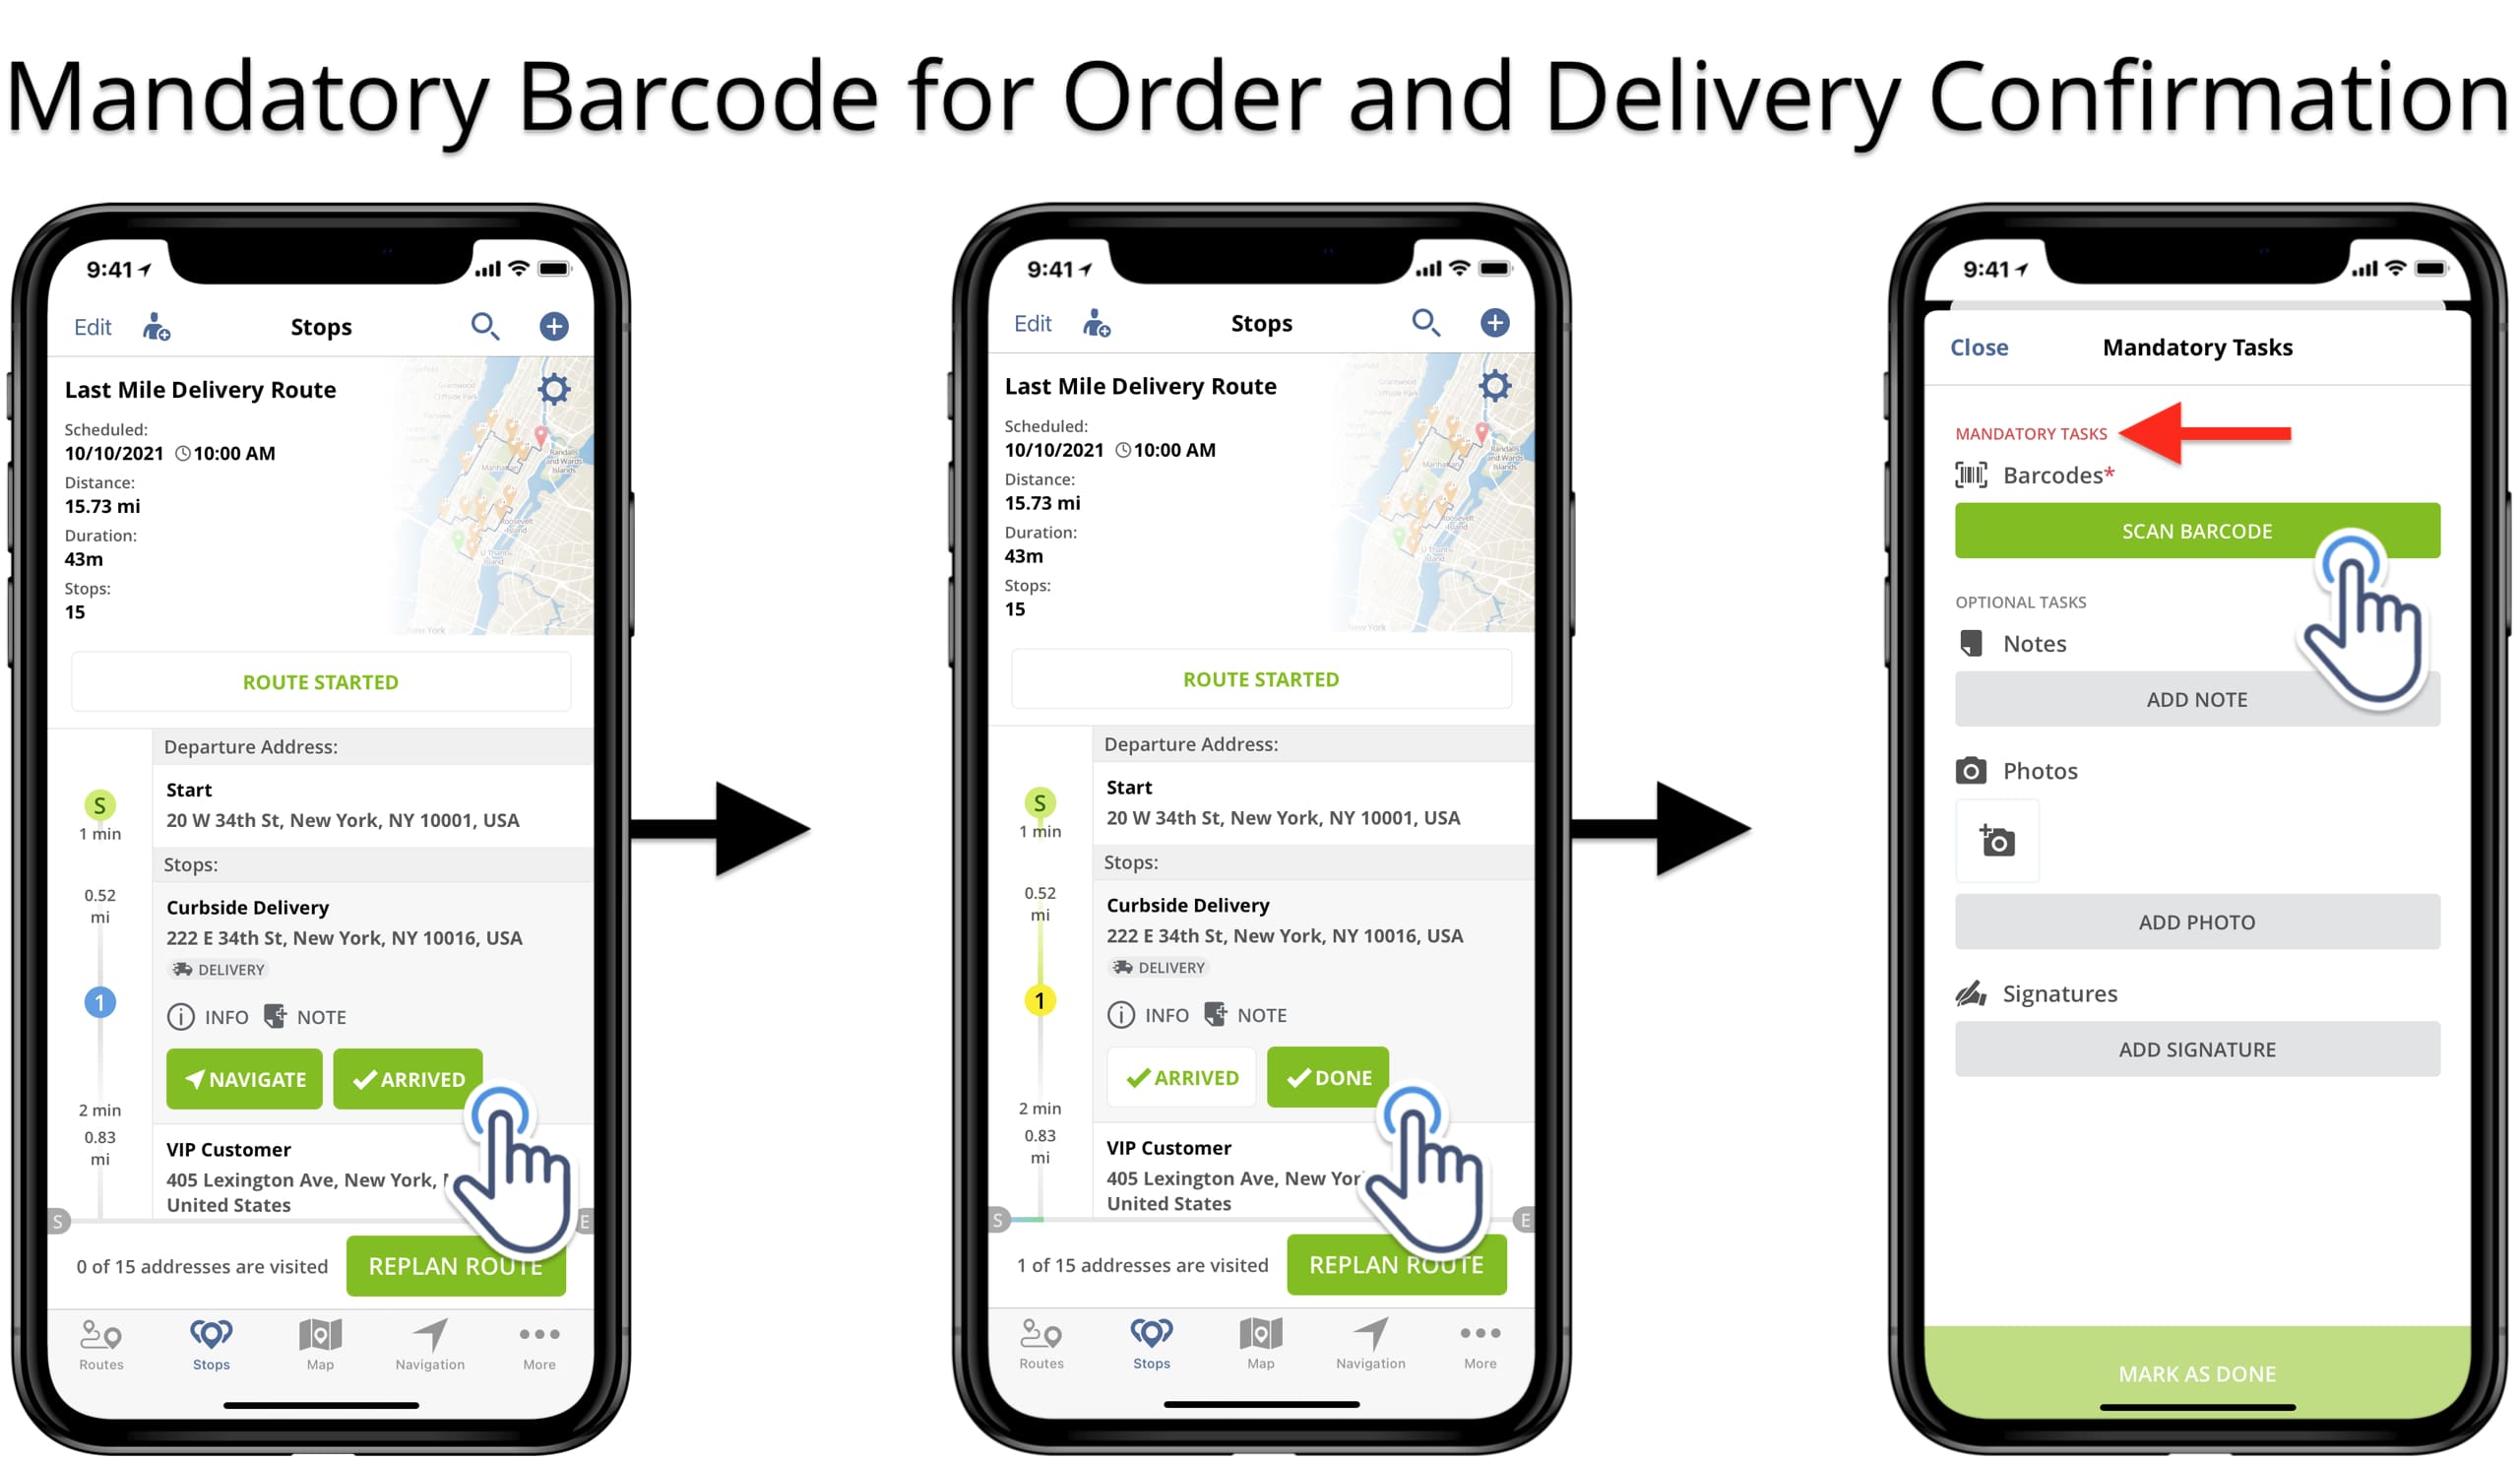
As you progress on the route, you can mark route destinations as “Arrived” to indicate arriving and “Done” to indicate that the order was delivered or completed. Accordingly, when you tap on the “Done” button, the app will automatically prompt you to complete all mandatory tasks required to complete the delivery or order.
With the Mandatory Barcode Reconciliation enabled, the app doesn’t allow marking route stops as “Done” or completed without reconciling the respective barcode first. Therefore, on the “Mandatory Tasks” screen, tap on the “Scan Barcode” button to reconcile the required barcode.
- Track Route Progress on iOS Route Planner (Arrived and Done)
- Track Delivery Route Progress on Android Route Planner (Arrived and Done)

Use Barcode Scanner App to Confirm Unload Packages
Next, use the route planner barcode scanner app to scan the barcode on the package that you want to unload. Additionally, the barcode scanner will show the data encoded into the barcode that needs to be reconciled at the respective route stop. Once you’ve scanned the required barcode, the app will make the “Mark as Done” button available.
After that, tap on the “Mark as Done” button to confirm unloading a package at the given route destination. Accordingly, after you complete unloading, the app will assign the “Unloaded” status to the respective route stop. Thus, the destination with a successfully unloaded package will have both the “Unloaded” and “Done” statuses.
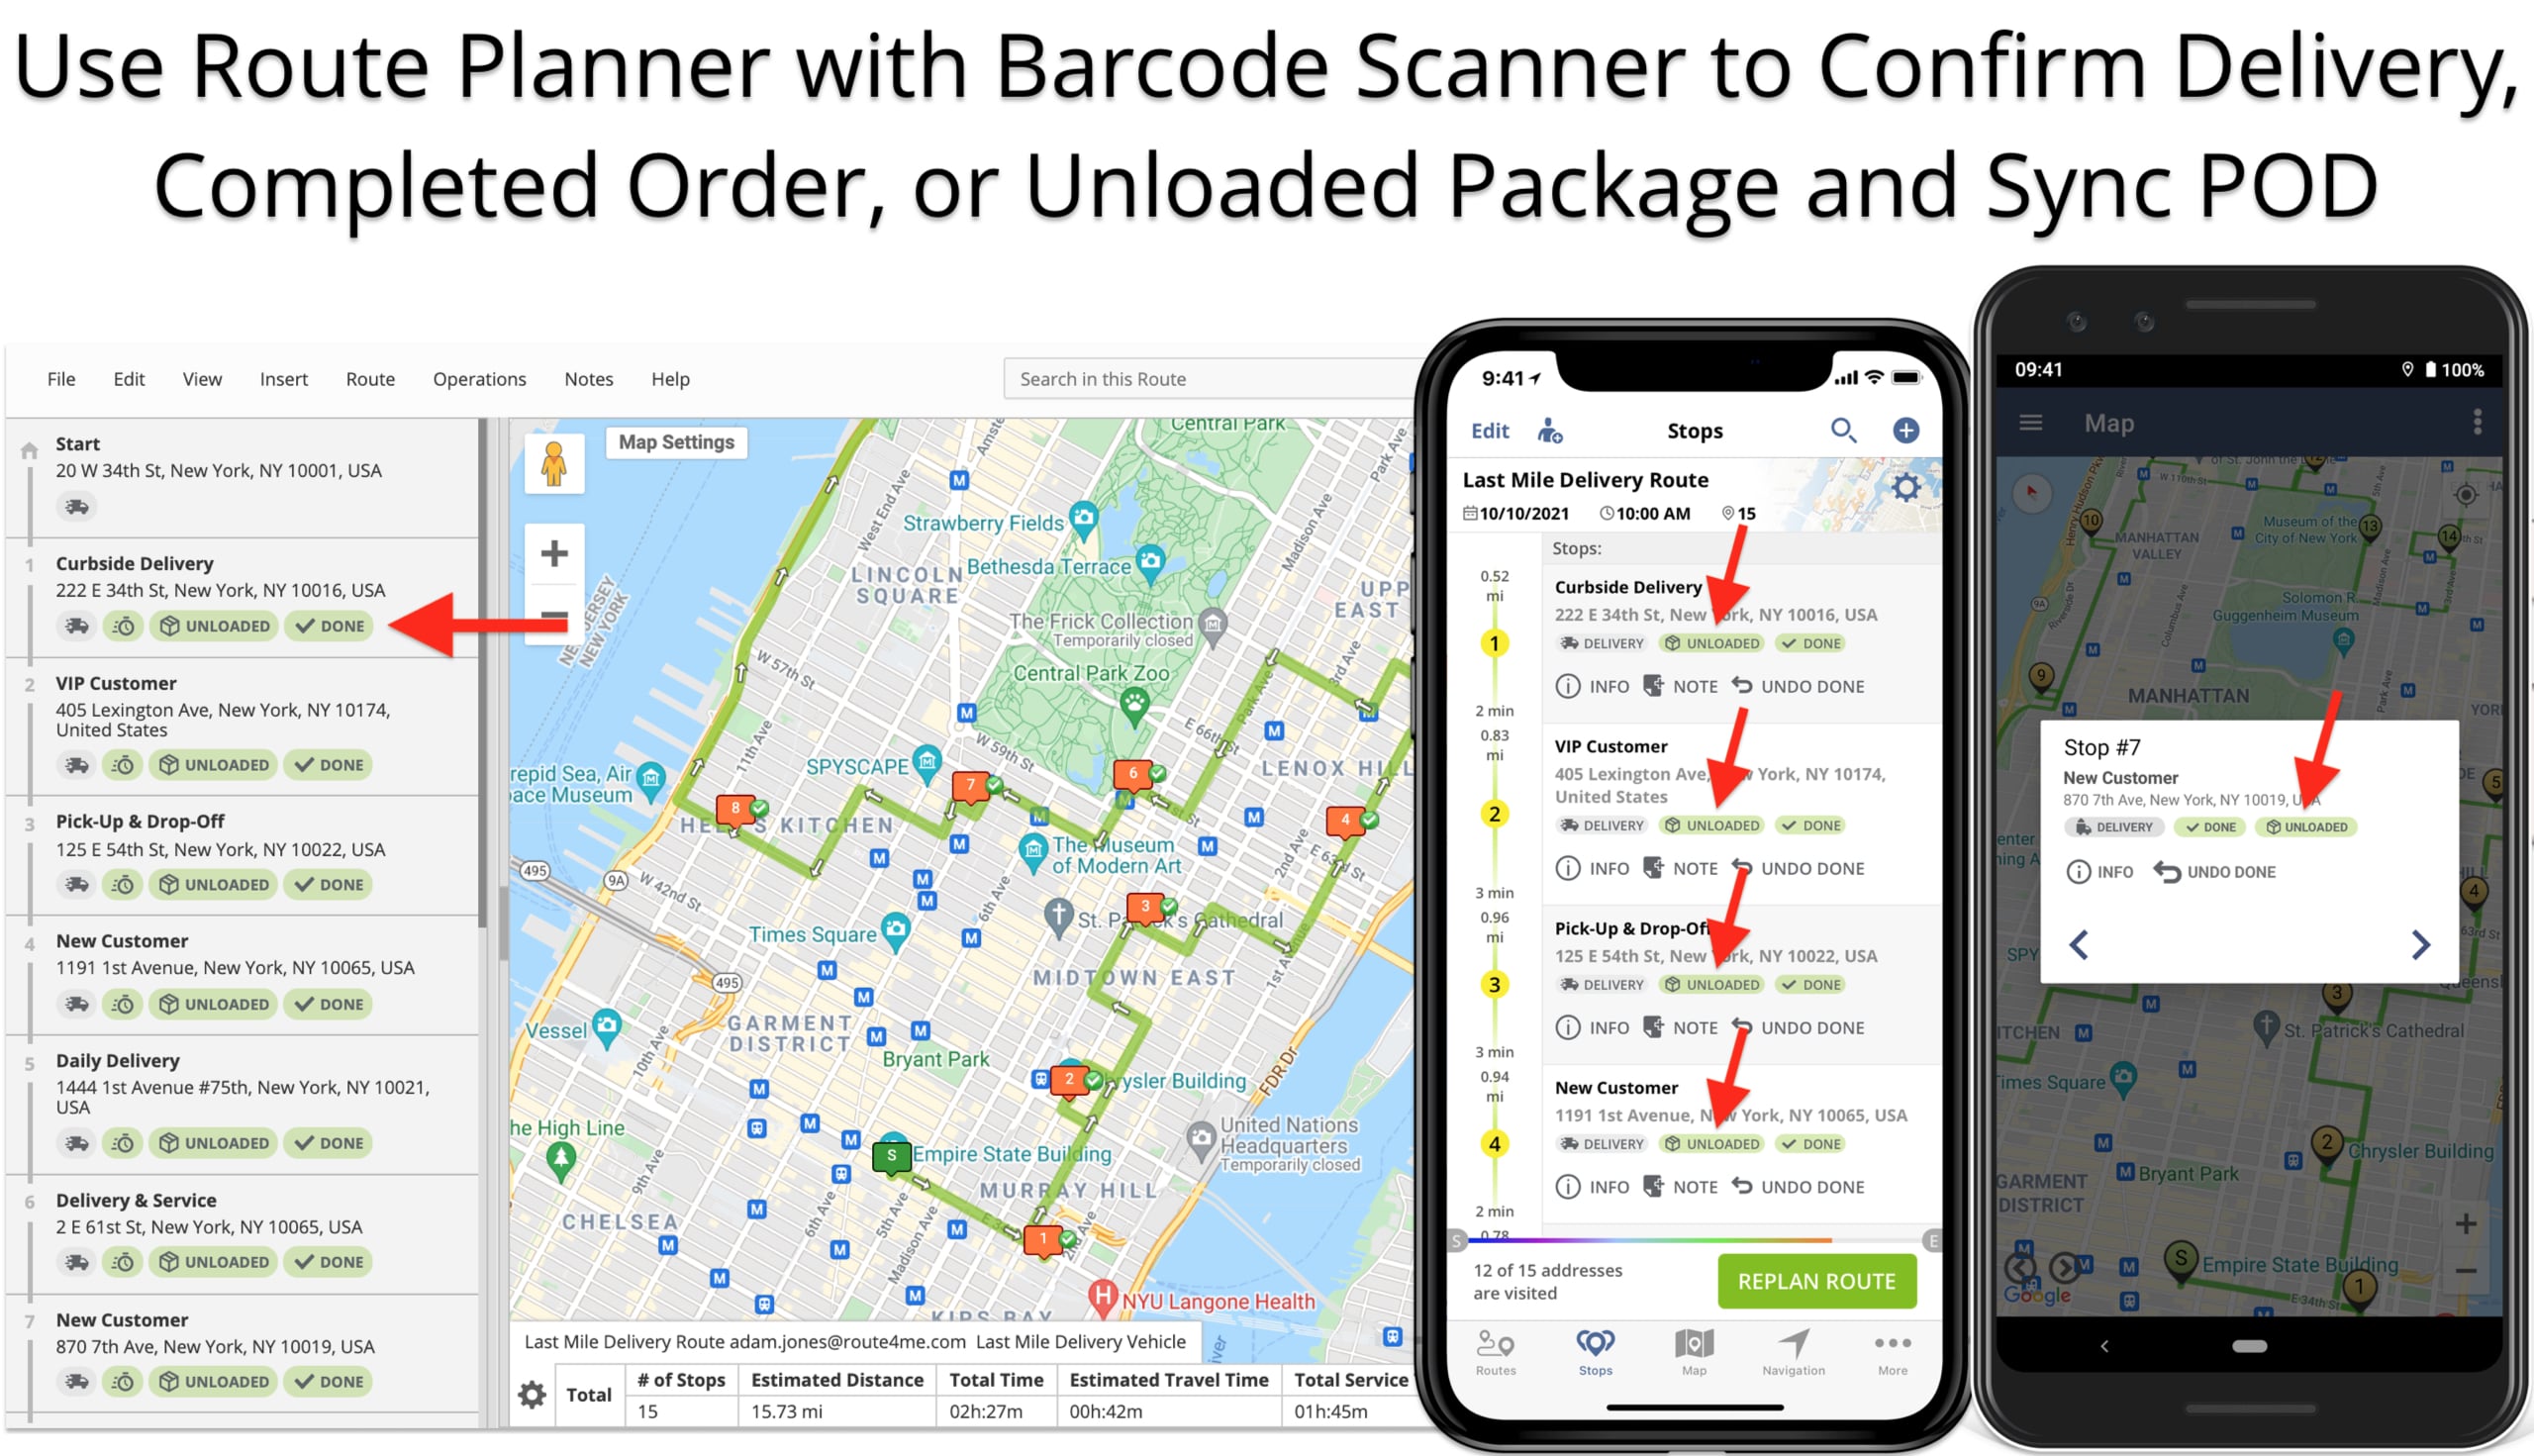
Sync Unloaded Package Confirmations Between Route Planners
When you reconcile barcodes and unload packages using mobile route planner apps, you can synchronize unloading confirmations with the Web Platform in real-time. Accordingly, route destinations with completed unloading will have the “Unloaded” and “Done” statuses on mobile apps and the Web Platform. Thus, you can easily synchronize the unloaded package confirmations between field team members and route planners or dispatches at the headquarters.
Enable Mandatory Barcode Reconciliation for Unloading Only
Additionally, Route4Me enables you to use Mandatory Barcode Reconciliation for unloading confirmation only. Specifically, mobile route planner apps will not allow marking route destinations as “Done” without scanning the required barcode first. To enable the Mandatory Barcode Reconciliation for package unloading only, add and enable the following advanced configuration:
- Key: SINGLE_BARCODE_SCAN_ENABLED
- Value: “TRUE” to enable and “FALSE” to disable the configuration.
Mandatory Barcode Reconciliation for Unloading Packages
With the mandatory barcodes for unloading, you need to reconcile barcodes only when unloading packages. Accordingly, tap on the “Arrived” button when arrived and then tap on the “Done” button to complete the delivery. The app will automatically prompt you to the “Mandatory Tasks” screen, where you need to tap on the “Scan Barcode” button to reconcile the required barcode.
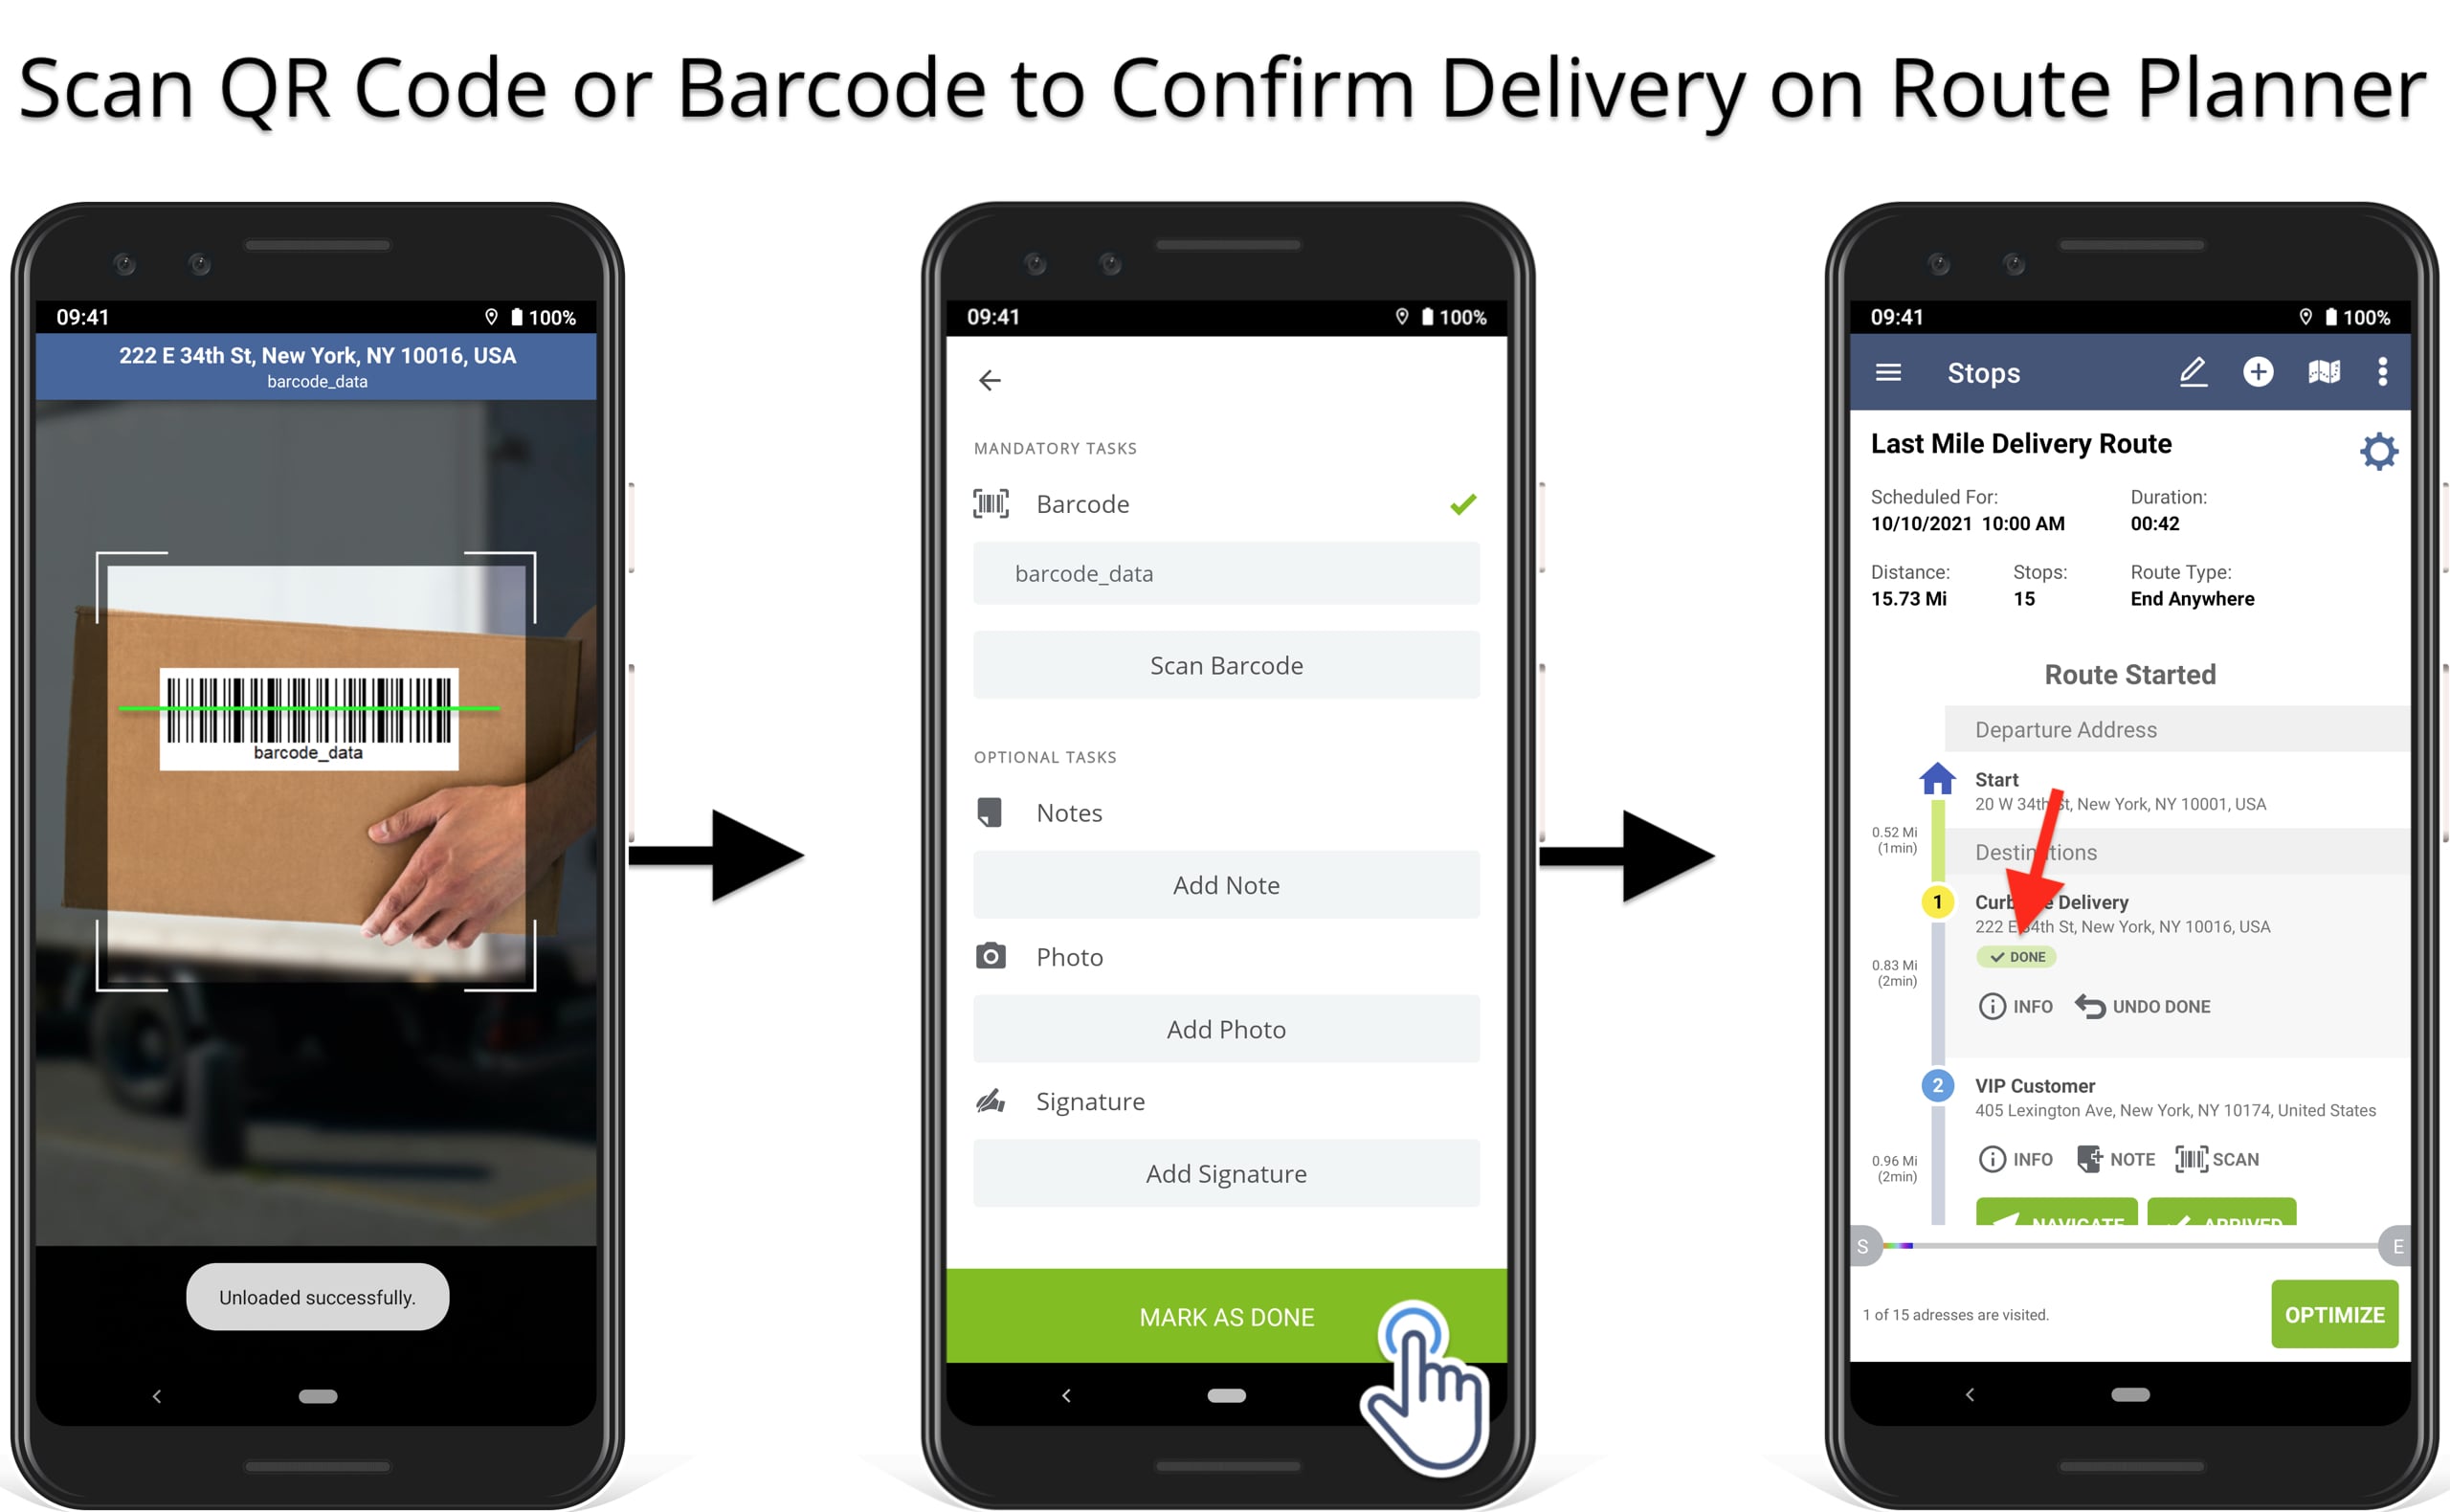
Scan QR Code or Barcode to Confirm Package Delivery
Next, use the barcode scanner app to scan the QR code or barcode on the package that you want to unload. After you’ve scanned the required barcode, the app will enable the “Mark as Done” button so that you can complete the unloading.
NOTE: The barcode reconciliation for unloading only doesn’t show the “Unloaded” status next to route destinations. Since the app doesn’t allow marking stops as “Done” without scanning the required barcodes, the “Done” status indicates completed unloading.
Visit Route4Me's Marketplace to Check out Various Modules and Add-Ons:
- Operations
Custom Data Add-On
- Operations
Advanced Team Management Add-On
About author: Alex Yasko
Alex Yasko is the Go-to-Market Product Manager and Information Architecture Manager at Route4Me. With thousands of hours of experience, Alex specializes in breaking down complex last-mile optimization and routing scenarios into simple, actionable instructions, helping last-mile businesses streamline their operations effortlessly.