Notifications Settings – Email And SMS Messaging Customer Notifications Settings
Route4Me’s Customer Alerts and Notifications enable you to send manually and automatically triggered notifications to customers via Email and SMS Messaging. Accordingly, you can ensure notifications are always received by your customers, no matter what type of communication channels they prefer. Moreover, you can set up custom time windows for each notification type so notifications are sent to customers only during their hours of availability. In addition to the custom text in your customer notifications, you can also use informative placeholders and variables that retrieve data from particular Route4Me Enterprise Route Management Software fixed attributes (i.e., order numbers, customers’ names, estimated arrival times, etc.) and automatically insert this data into your notifications. Additionally, the Route4Me Order Tracking Portal for Customers enables your customers to view and track their orders based on your preferred settings. Furthermore, you can create customer satisfaction surveys to collect driver ratings and customer satisfaction data, and you can open and export your customer Notification History, and more.
Open Your Notification Settings
Table of Contents
Enable Notifications – Activate Customer Email and SMS Alerts
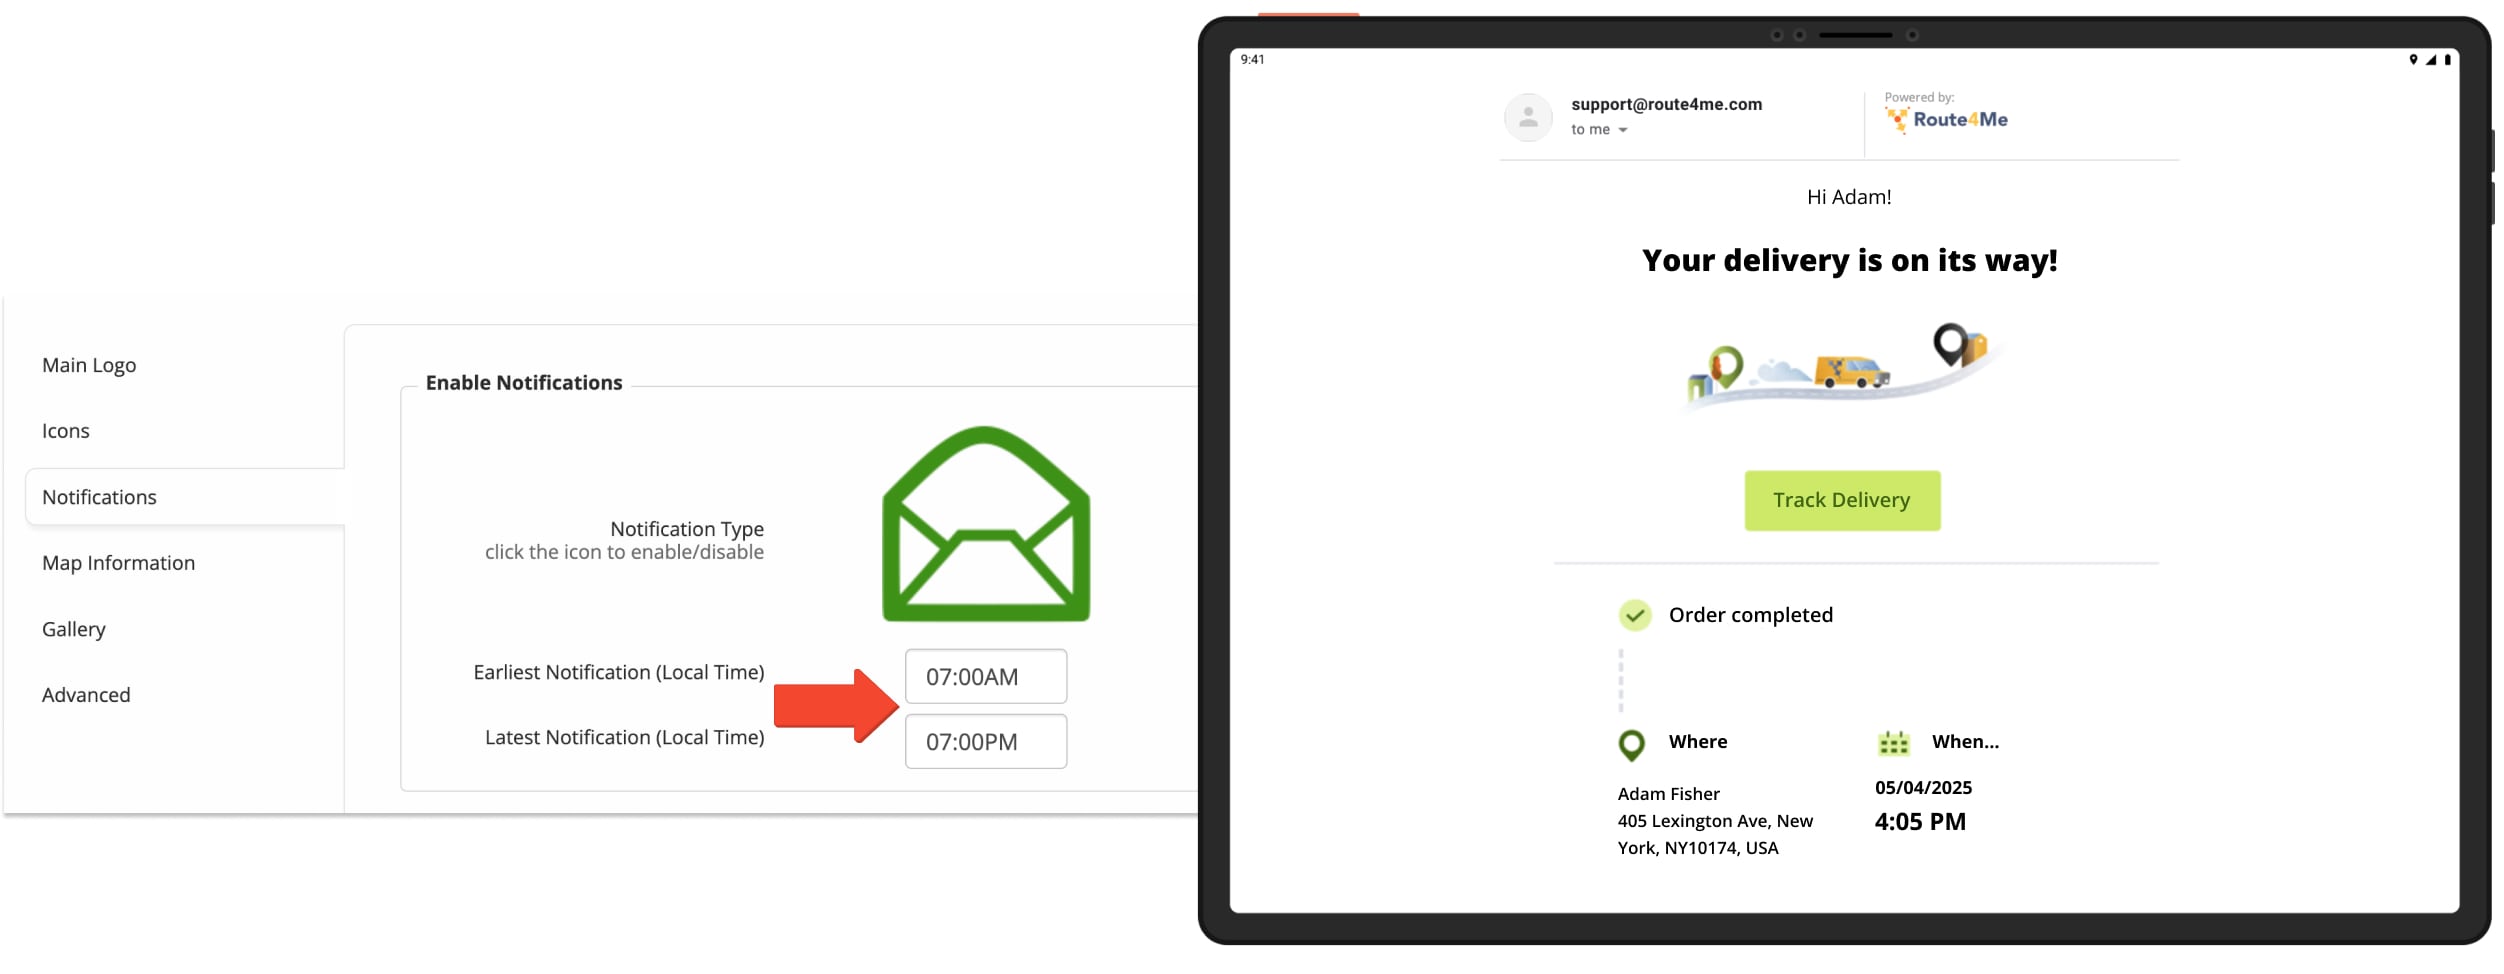
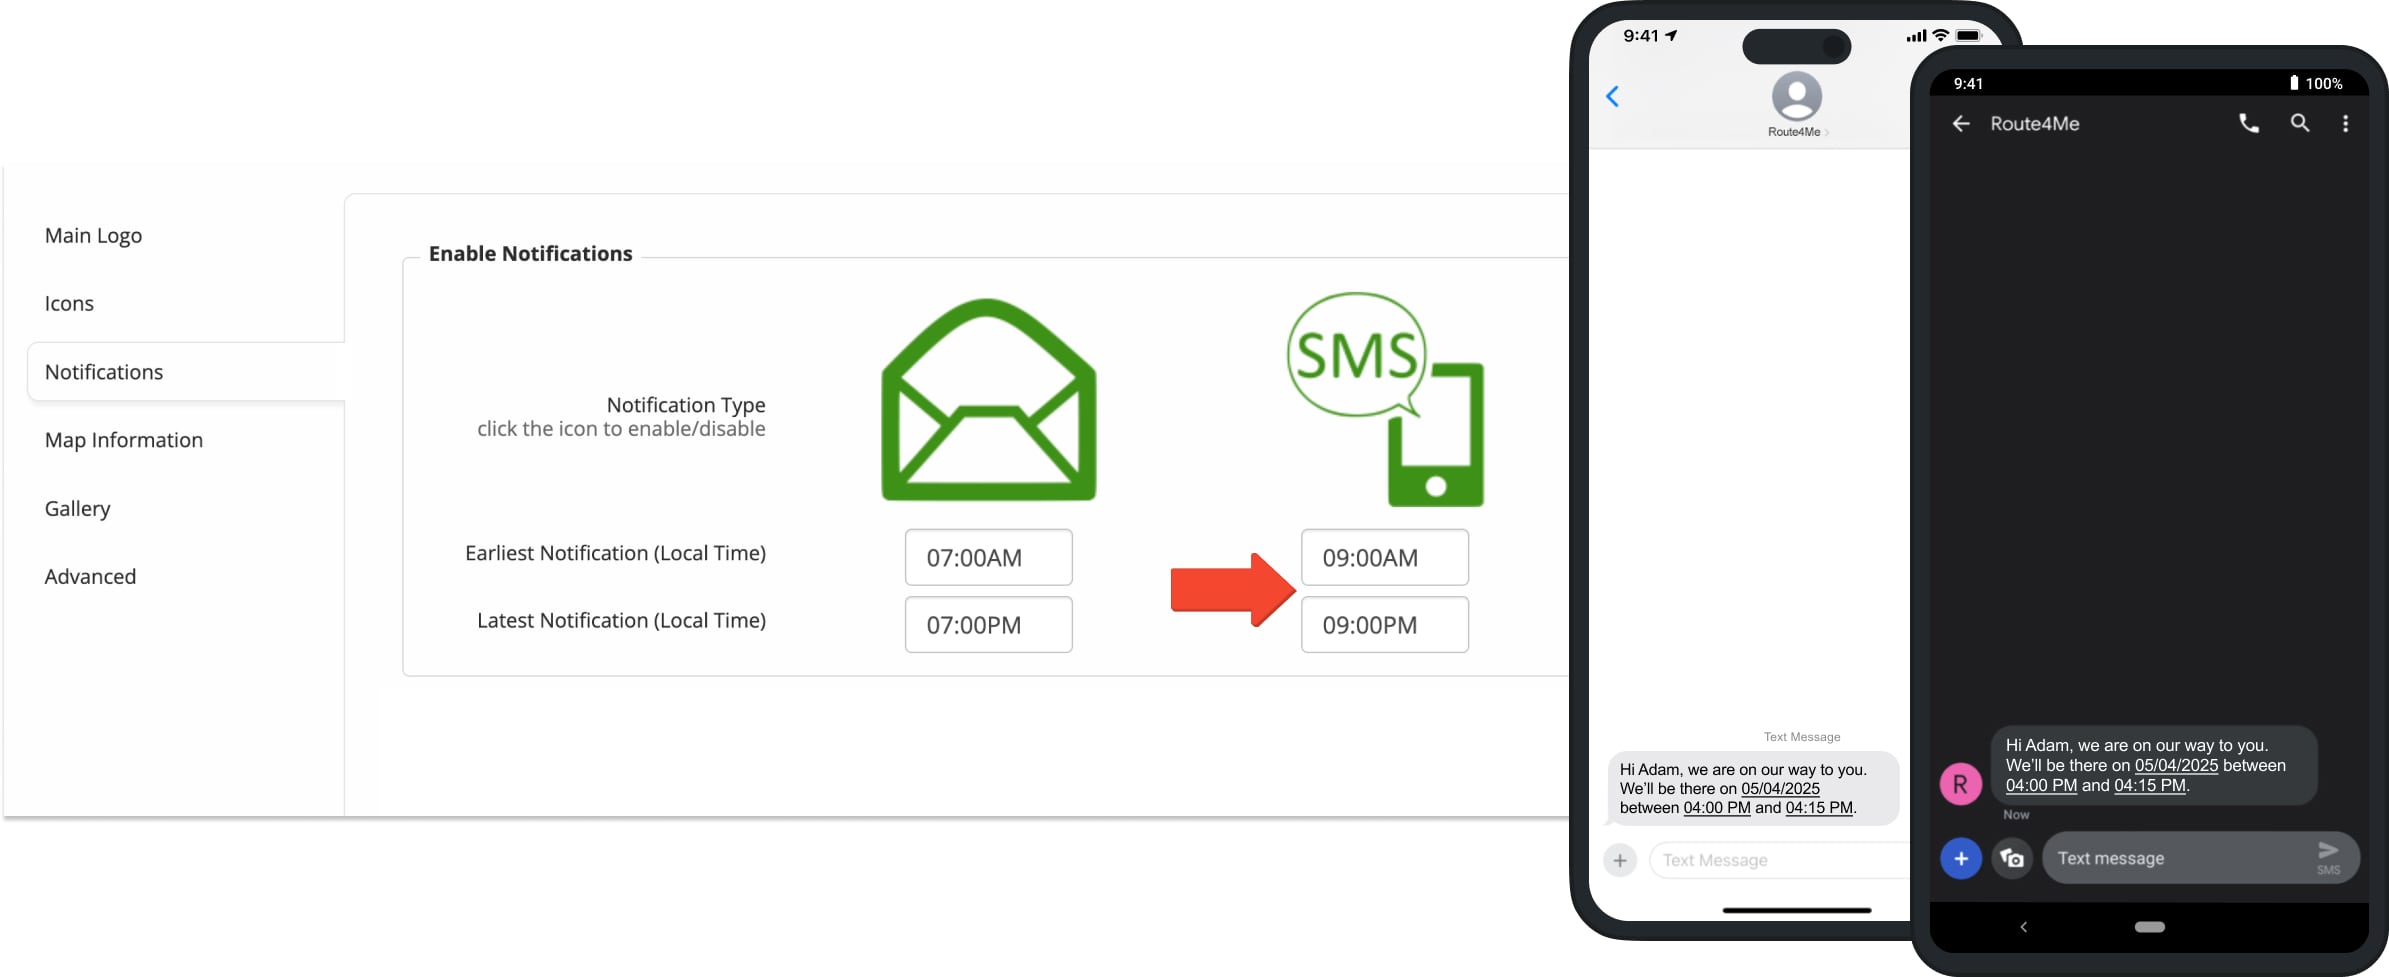
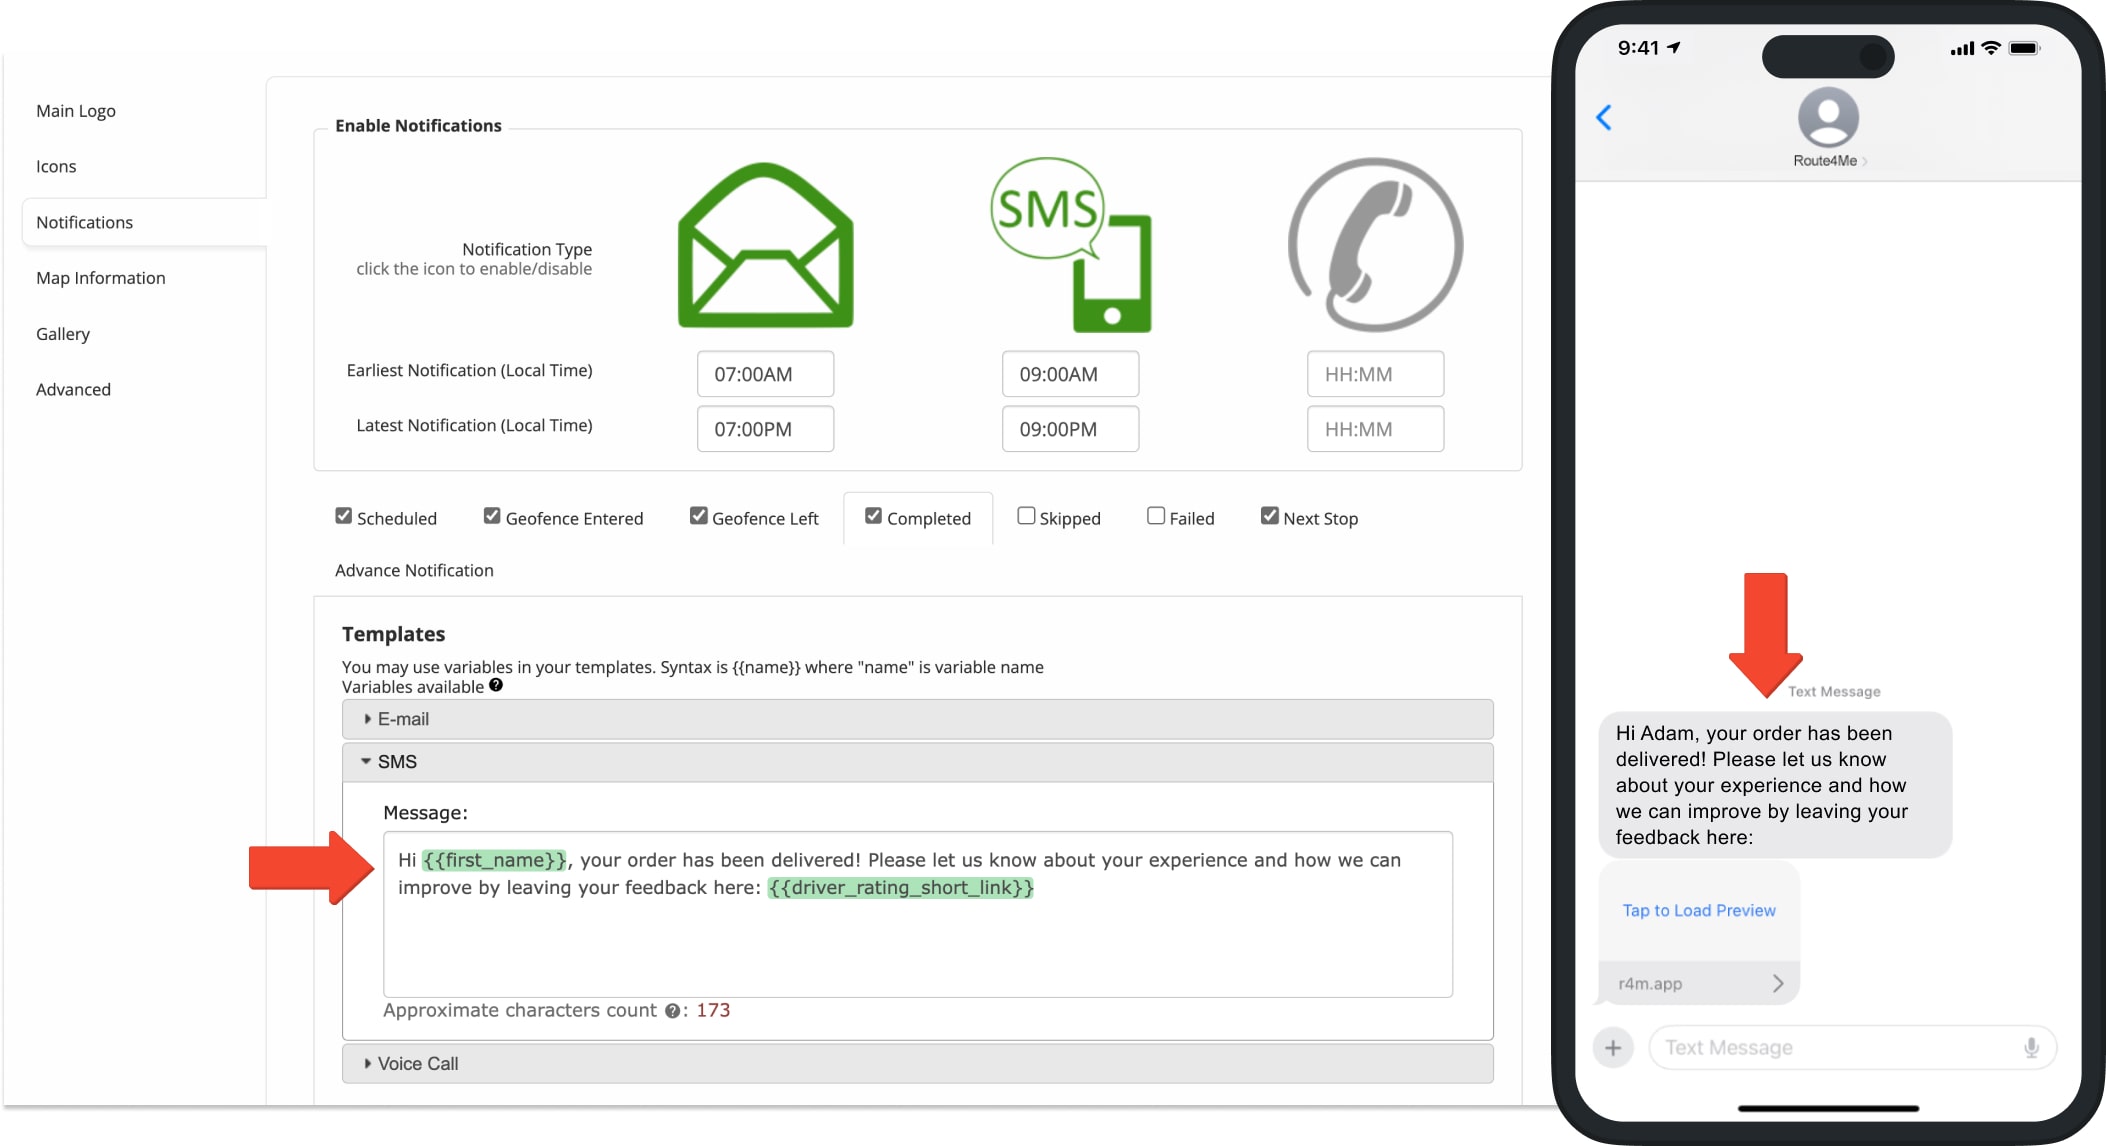
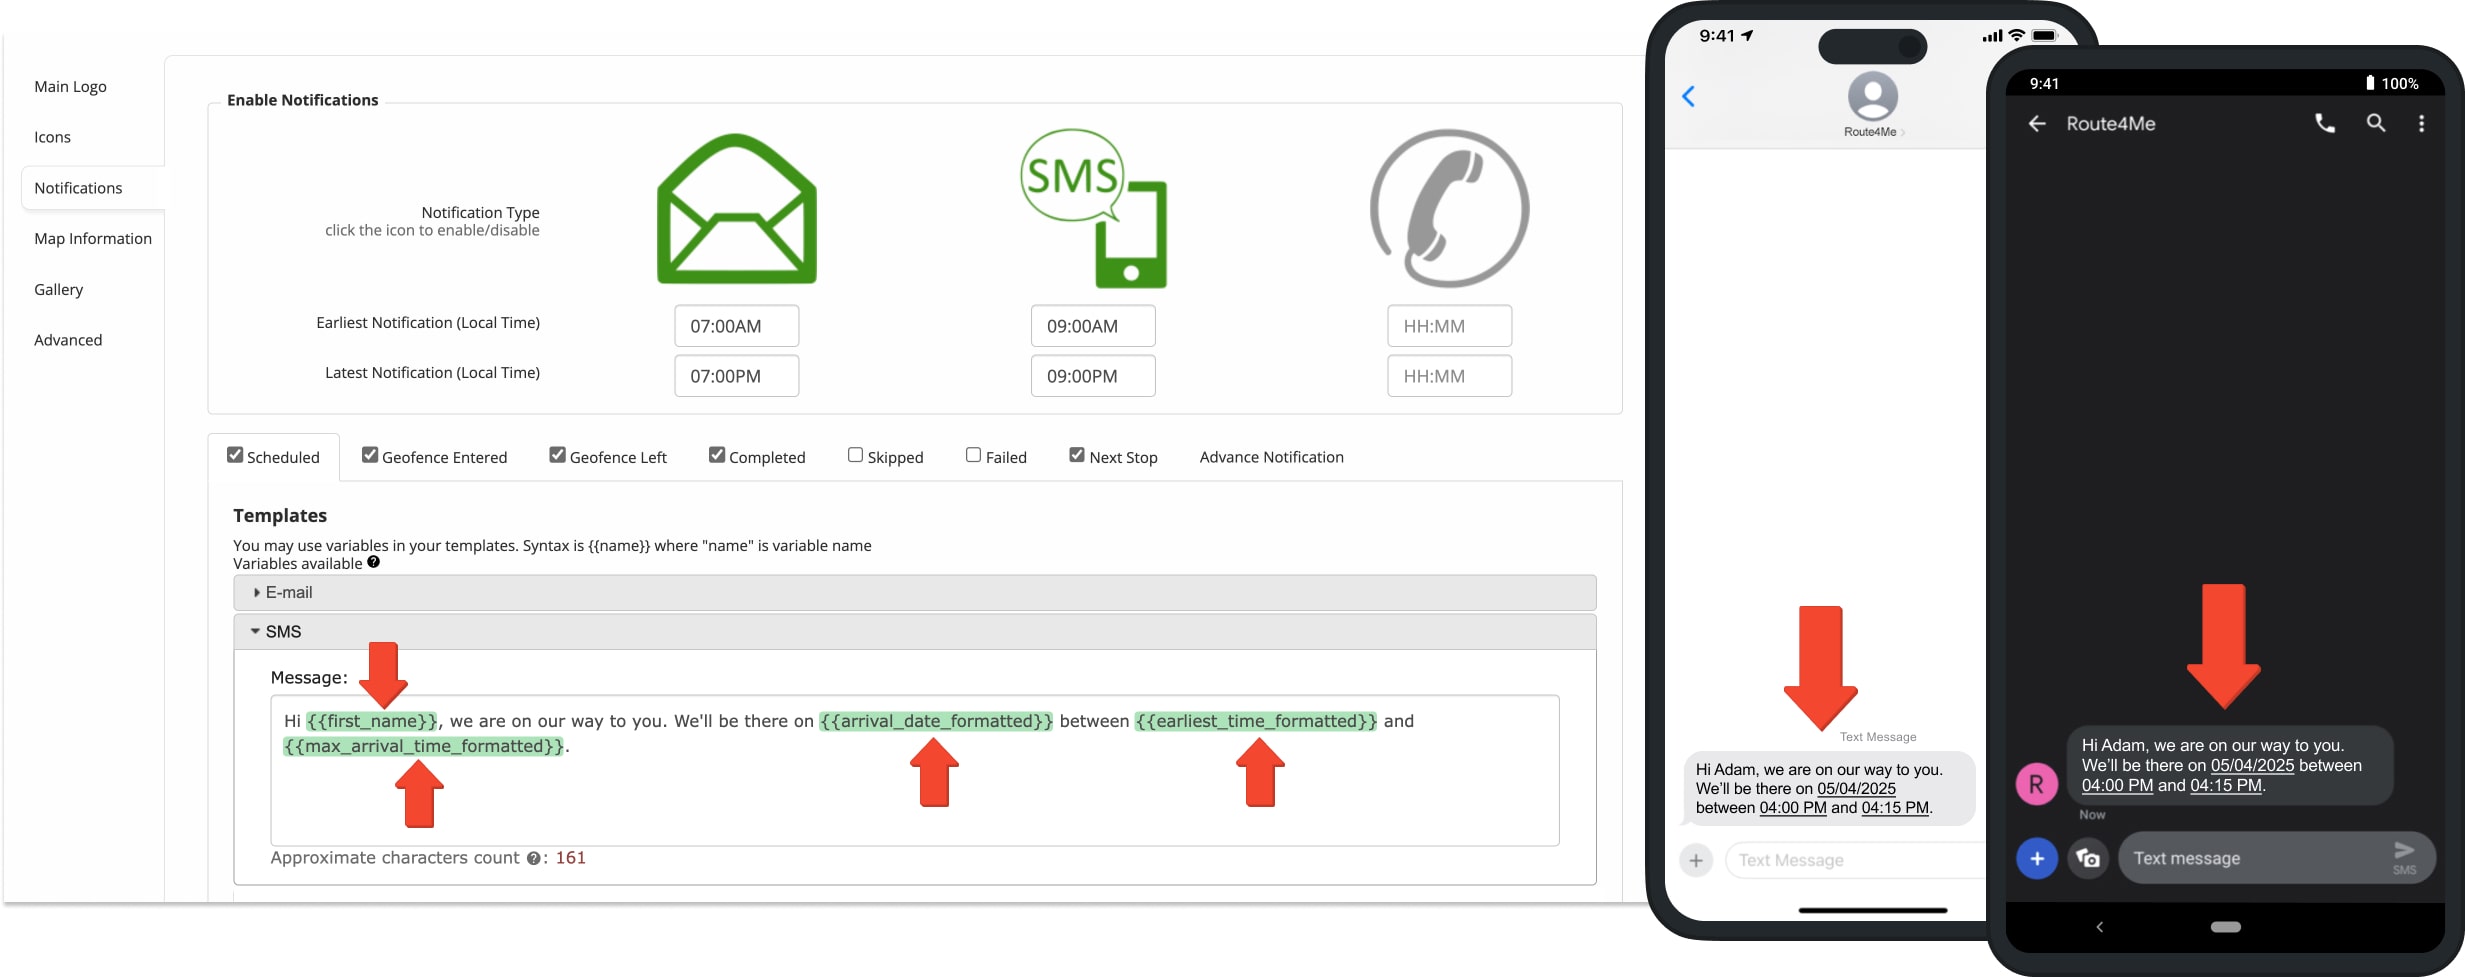
To enable the sending of customer notifications, go to “My Account” from the Navigation Menu and select “Notification Settings“. On the Notification Settings screen, select the “Notifications” tab from the options on the left. Here, you can enable Email Notifications by clicking the Email Notifications Icon or enable SMS Text Notifications by clicking the SMS Notifications Icon, respectively. The enabled notification method is marked in green.
In the “Enable Notifications” section of the Notification Settings screen, you can additionally set your preferred “Earliest Notification (Local Time)” time and “Latest Notification (Local Time)” time below the respective notification icons. For example, if the Earliest Notification time is set to 09:00 AM and the Latest Notification time is set to 08:00 PM, the corresponding notifications can be sent to customers only within the time window between 09:00 AM and 08:00 PM. Local Time for notifications is the local time where the depot or route origin is located. NOTE: Notifications can only be sent for routes that are dispatched from the Route Editor.

Email Notifications are sent to customers as regular Emails with predefined custom templates, Email subject, sender name, and your own customized visual design. In addition to the custom text in your Email notifications, you can also insert placeholder variables that retrieve data from particular Route4Me fixed attributes (i.e., order numbers, customers’ names, estimated arrival times, etc.) and automatically insert this data into your Emails.
SMS Notifications are sent to customers as regular SMS text messages, where you can define the contents of the text message. In addition to the custom text in your SMS notifications, you can also insert placeholder variables that retrieve data from particular Route4Me fixed attributes (i.e., order numbers, customers’ names, estimated arrival times, etc.) and automatically insert this data into your SMS text messages.
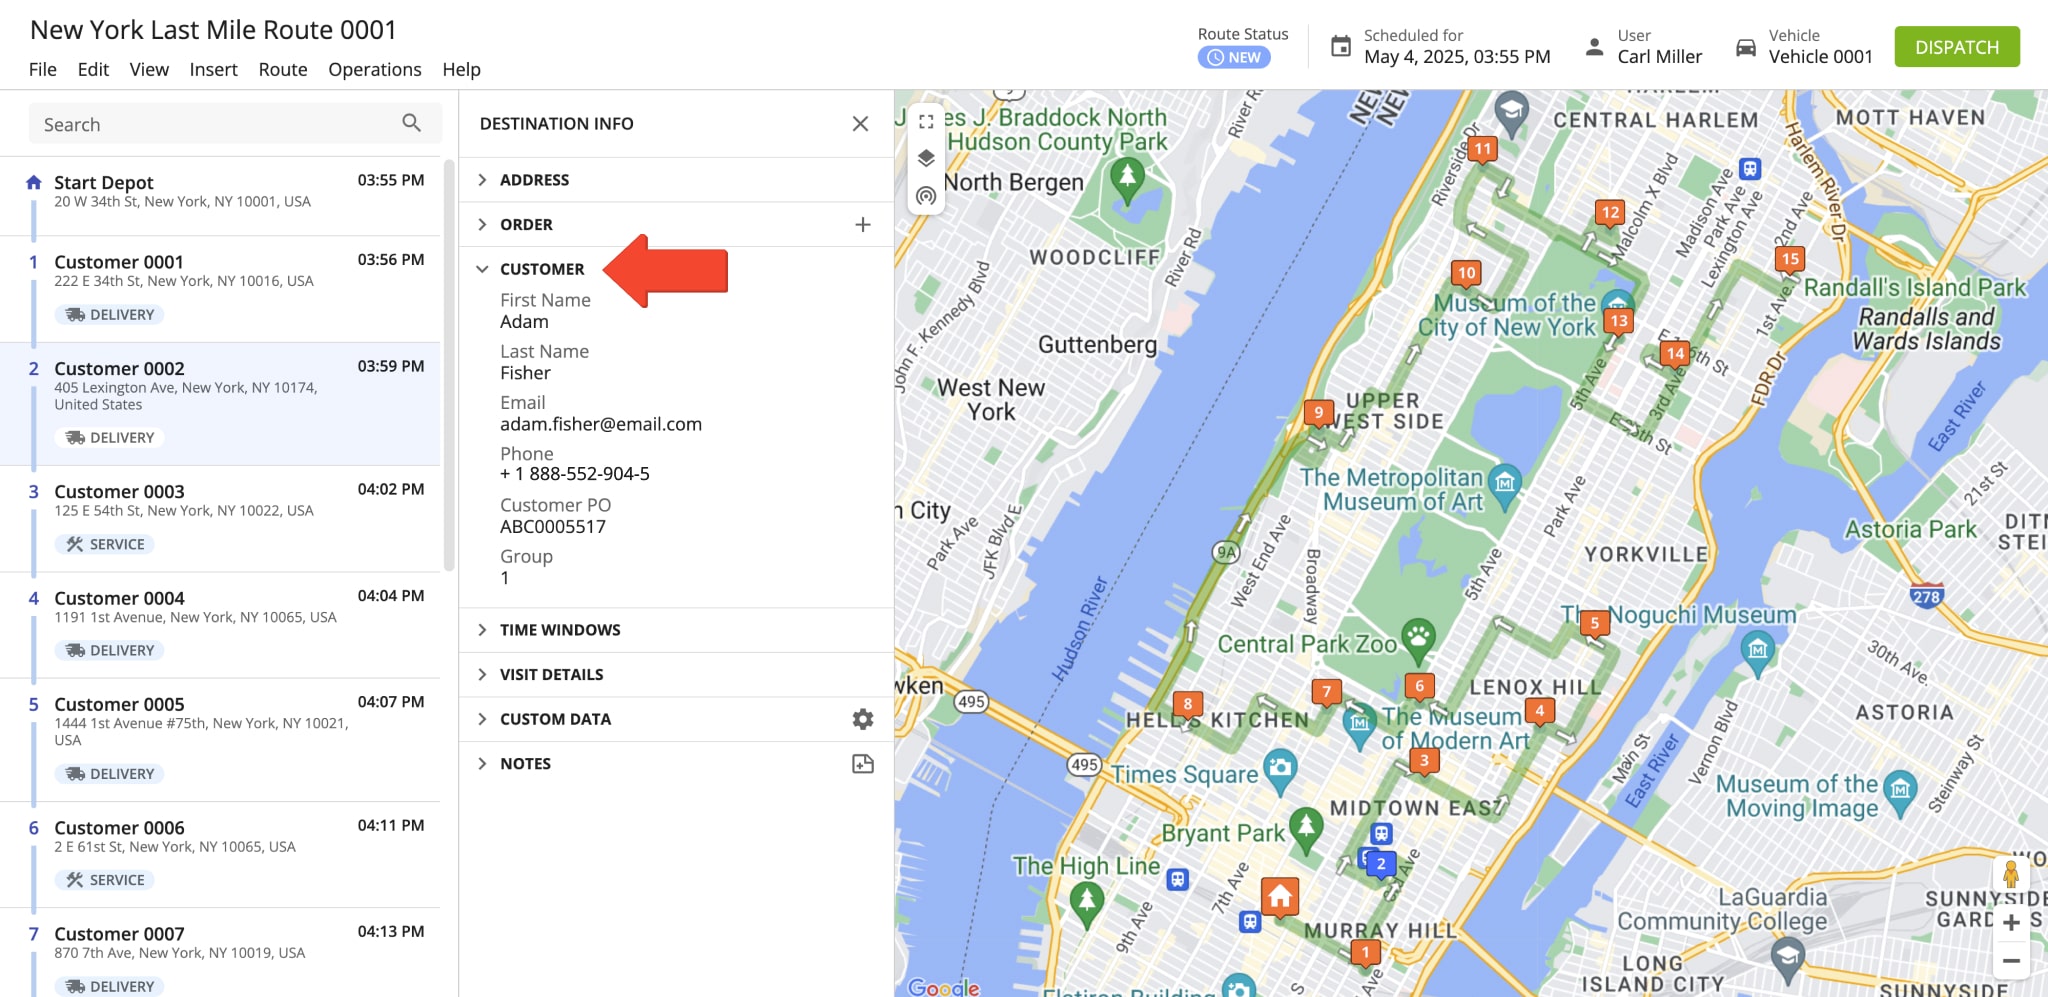
All notification types are sent to the customers whose contact information is defined in the Customer section of the corresponding route destinations. The “Customer” section of each route destination can be accessed and modified using the Route Editor in real-time.
Notification Settings – Notification Type, Timing And Tracking Page For Customers
Your Notifications Settings page is separated into different sections where you can adjust settings for Customer Notifications and your Tracking Page for Customers. You can select the preferred Notification Settings section by clicking the respective tab on the left.

| Settings | Description |
|---|---|
| Main Logo | Set a custom logo image for your Tracking Page for Customers on Web and Mobile. Additionally, you can adjust Logo Alignment and preview your changes. |
| Icons | Set custom Destination Icons and Vehicle Icon for your Tracking Page for Customers. Additionally, you can preview your changes. |
| Notifications | Enable Email and SMS texting notifications, set earliest and latest notification time, and create notification templates for different notification types. Additionally, you can use custom SenGrid notification template options. |
| Map Information | Additional settings for your Tracking Page for Customers. Specifically, options to Display Destination Address, Show Map Zoom Controls, Hide Driver’s Name and other details, and customize displayed order info. |
| Gallery | Enable and customize image and note details gallery for your Tracking Page for Customers. |
| Advanced Settings | Additional scheduling options such as ETA padding (expand arrival time window), Tracking Page Expiration after a certain number of hours, Hide Customer Location After a certain number of hours, date and time format, and more. Additionally, you can select your Email and SMS Messaging service providers in the “Advanced Settings” tab. |
In the “Notifications” section, you can enable Email and SMS texting notifications, set their scheduling options, and also enable different notification types, and create notification templates. To enable a specific Customer Notification type on your account, simply check the box next to its name.
Additionally, clicking on a preferred notification type allows you to create Email and SMS notification templates in the “Templates” section. To create notification templates, simply enter your preferred text in the “From” (sender), “Subject“, and “Message” fields for Email and the “Message” field for SMS Messaging. Furthermore, you can add informative placeholders that retrieve data from particular Route4Me fixed attributes (i.e., order numbers, customers’ names, estimated arrival times, geofence-entered and departed timestamps, etc.) and automatically insert this data into your notifications as text.
Notification Types – Automated Customer Notification Types
Furthermore, Route4Me’s Enterprise Route Planner Software enables you to send customer notifications for a variety of triggered events. Specifically, you can enable and customize notifications by going to “My Account” from the Navigation Menu, then select “Notifications Settings” and going to the “Notifications” tab. Additionally, learn more about different Customer Notification Types.

| Notification Type | Description |
|---|---|
| Scheduled | Notify customers when the route has been dispatched to a driver. This notification informs customers that their delivery has been scheduled. |
| Geofence Entered | Notify customers when the driver has entered the geofenced area, and the vehicle has been automatically detected as entering the geofenced area. |
| Geofence Left | Notify customers when the driver has left the geofenced area, and the vehicle has been automatically detected as leaving the geofenced area. |
| Completed | Notify customers when a route address has been marked as “Completed” by the driver. This notification informs customers of a successfully delivered order or successfully executed route destination. |
| Skipped | Notify customers when their address is skipped by the driver. This notification informs customers that the driver did not attempt delivery or service. |
| Failed | Notify customers when their address is marked as “Failed” by the driver. This notification informs customers that the address was visited but not successfully serviced or the delivery could not be made. |
| Next Stop | Notify customers when their address is the next to be visited on the current route. This notification informs a customer that the driver is on their way to the customer’s address. |
Customer Portal – Tracking Page For Customers
Additionally, the “Notification Settings” screen enables you to adjust settings for the Tracking Page for Customers. With Route4Me’s Customer Portal, you can effortlessly enable your customers to track the status of their orders on their own without having to invest valuable resources doing this work manually. From the “Notifications Settings” page, you can set custom logos and icons to customize your Customer Portal, adjust map visibility, route and order information, and more. Additionally, learn more about using and managing your Tracking Portal for Customers.
![]()
Driver Rating – Route4Me Customer Satisfaction Survey
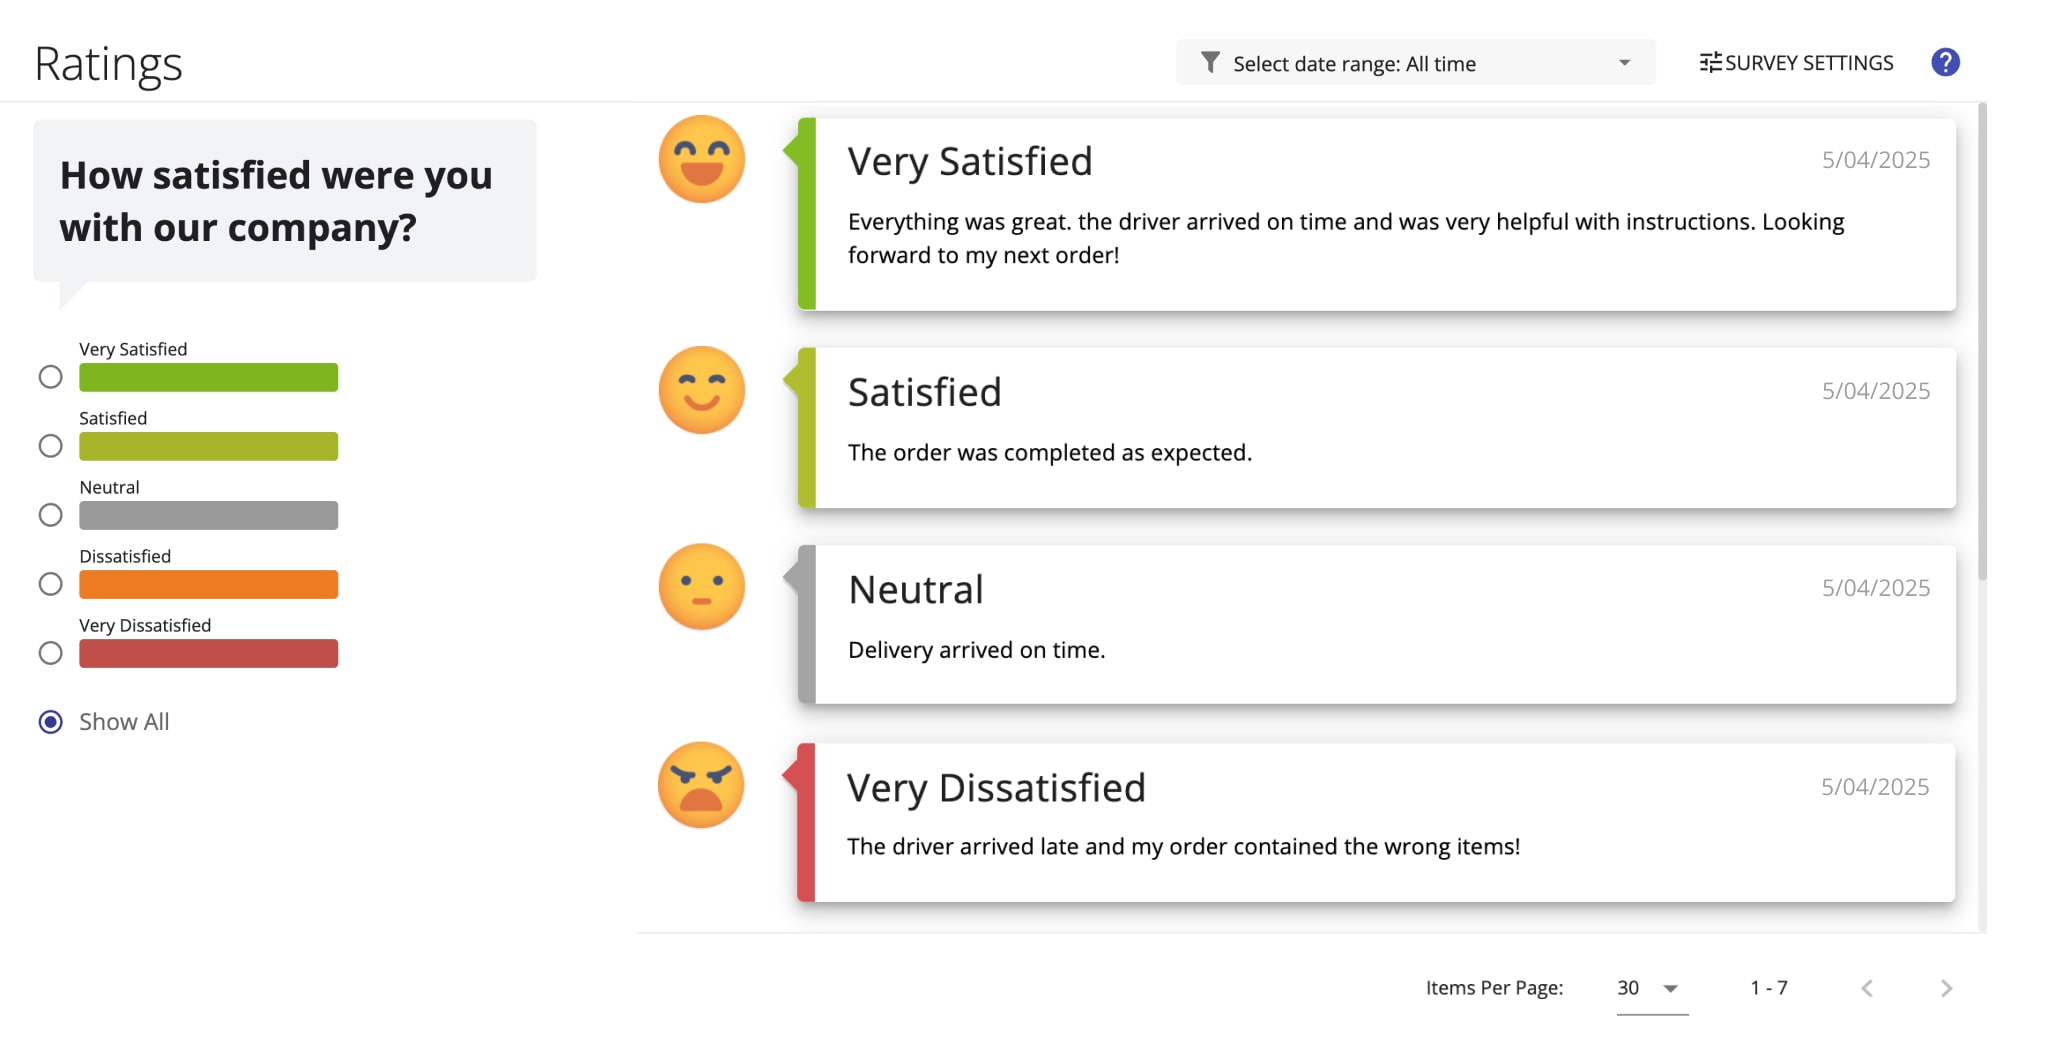
Further, Route4Me also enables you to collect customer satisfaction data. You can customize your customer satisfaction survey to fit your company branding and set up the preferred notification rules. Route4Me will automatically collect data such as customer satisfaction, service quality information, and driver ratings from all your customers. Specifically, whenever an order is delivered, a destination is serviced or completed, a link to fill out a customized survey is automatically sent to the customer. In detail, to access the Driver Ratings Survey Settings, go to “Analytics” from the Navigation Menu and select “Driver Rating Dashboard“. Additionally, learn more about driver ratings and customer satisfaction survey.
Notification History – View And Export Past Notifications
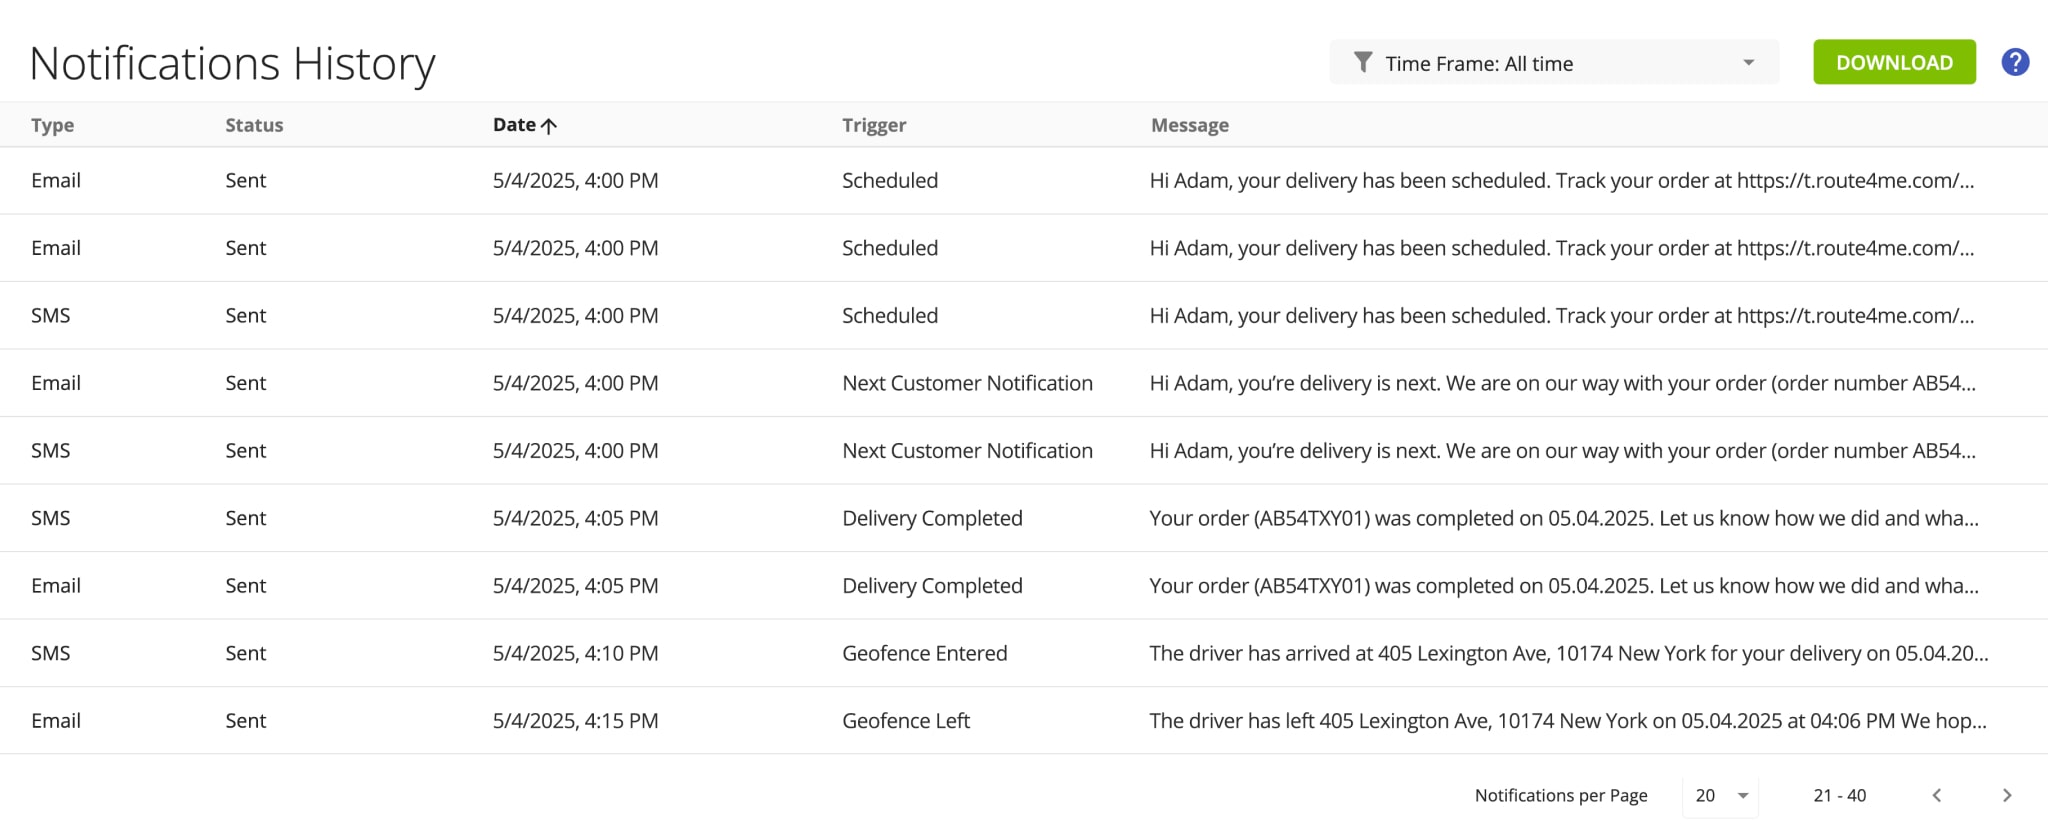
Furthermore, you can view a history of all notifications that were sent to customers. For example, all notifications from the account of a Regional Manager with multiple Drivers. All SMS notifications that were triggered by entering and leaving geofences. All Email notifications that were sent from a particular route or even a specific route destination, etc. Furthermore, you can also export your notifications log for reports, analyzing your operations, and other purposes. Learn more about opening the Notification History and exporting notifications history.
Advanced Notification – Send Visit Scheduled Notification In Advance
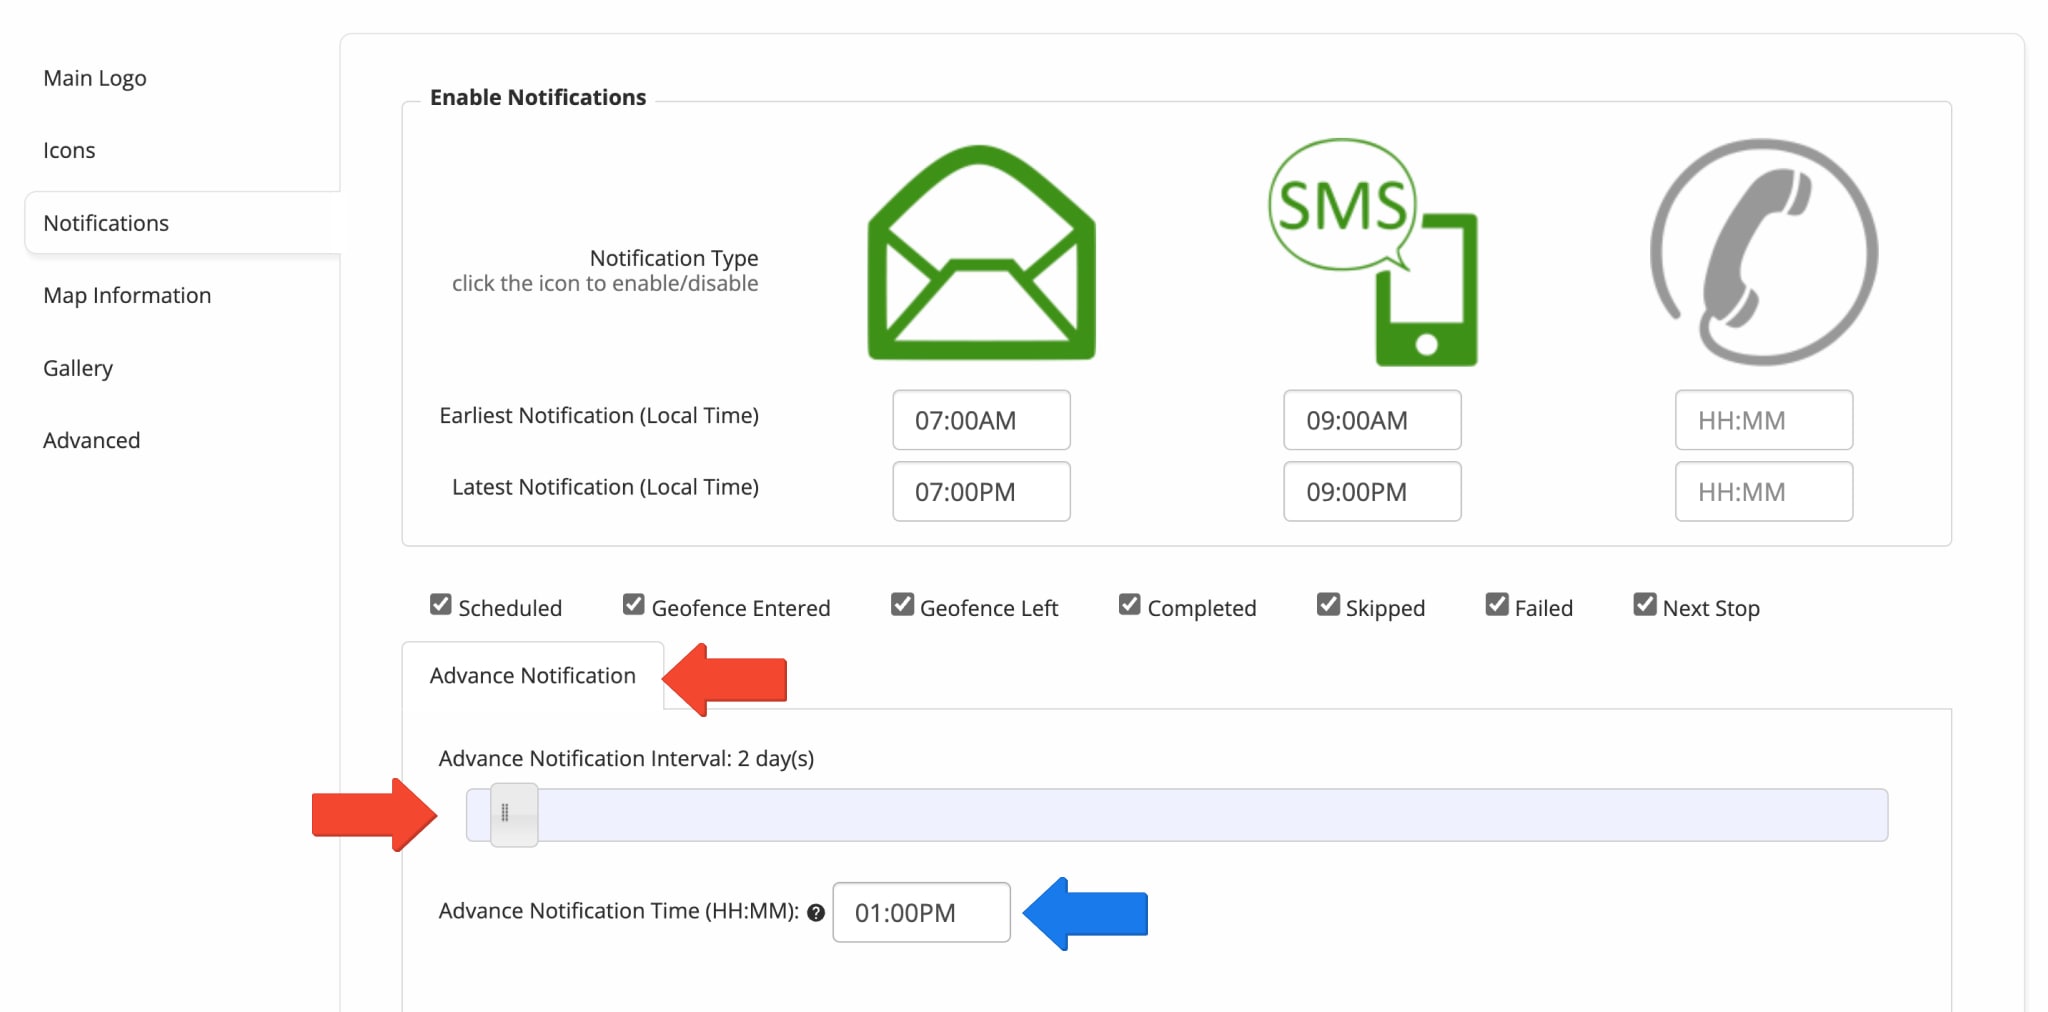
In the “Notifications” tab, you can set up the time for sending out notifications to customers when their routes are dispatched in advance of the scheduled time. To do so, first, in the “Notifications” tab, go to “Advance Notification“. Next, drag the “Advance Notification Interval” toggle to set up the number of days for the advance notifications. After that, input the “Advance Notification Time” at which you want the corresponding notifications to be sent out. In the example below, if a particular route is dispatched two days in advance of its scheduled start time, then the customers on this route will get the corresponding notifications 1 day in advance of the route’s start, at 07:00 AM. NOTE: The “Advance Notification” settings are applied only to the “Scheduled” notification type.
Placeholders – Notification Template Placeholders For Email And SMS Notifications
In addition to the custom text in your notification messages, you can also use multiple informative placeholders that retrieve data from particular Route4Me fixed attributes (i.e., order numbers, customers’ names, estimated arrival times, geofence-entered and departed timestamps, etc.) and automatically insert this data into your notifications as text. You can add these placeholders to your notification templates for any of the available notification types. Simply add the preferred placeholder into the text of your notification templates, and it will be replaced with the text of the respective fixed attribute in the sent customer notifications. NOTE: Different notification types support different fixed attribute placeholders.
| Placeholder | Route4Me Fixed Attribute | Description | Example of Retrieved Data | |
|---|---|---|---|---|
| Address Details | ||||
| {{address}} | Address | Street address of the customer associated with the corresponding destination. | 405 Lexington Ave, New York, NY 10174, USA | |
| {{alias}} | Alias | A user-defined name assigned to a customer or address for internal use. | Customer 001 | |
| {{lat}} | Lat, Lng | Latitude coordinates of the customer’s location. | 40.751868 | |
| {{lng}} | Lat, Lng | Longitude coordinates of the customer’s location. | -73.975554 | |
| {{address_stop_type}} | Address Stop Type | The type of the corresponding destination on the route. | Pickup, Delivery, Break, Meetup, Visit, Service, or Drive By. | |
| Notification And Geofence Timestamps | ||||
| {{now_time}} | Address Visit Details | The current time when the corresponding notification was triggered and sent to the customer. The format of this time can be adjusted in the advanced settings | 07:00AM | |
| {{now_date}} | Address Visit Details | The current date when the corresponding notification was triggered and sent to the customer. The format of this date can be adjusted in the advanced settings | 10.10.2025 | |
| {{now_time_formatted}} | Address Visit Details | The current time when the corresponding notification was triggered and sent to the customer. The format of this time can be adjusted in the advanced settings | 04:10 PM | |
| {{geofence_detected_visited_timestamp}} | Detected as Visited | The timestamp that was automatically generated by the system when the driver entered the geofenced area set around the address. | 07/07/2025 05:00 PM | |
| {{geofence_detected_departed_timestamp}} | Detected as Departed | The timestamp that was automatically generated by the system when the driver left the geofenced area set around the address. | 07/07/2025 05:00 PM | |
| Order Details | ||||
| {{order_no}} | Order No | The order number associated with the destination. | QA000007188 | |
| {{cost}} | Cost | The cost of visiting and servicing the destination. | 100 | |
| {{cube}} | Cube | The cubic volume of the cargo or order that is being delivered to or picked up at the address. | 0.5 | |
| {{invoice_no}} | Invoice No | The order invoice number associated with the address. | ALT12341 | |
| {{pieces}} | Pieces | The number of pieces (items) that are being delivered to or picked up at the destination. | 20 | |
| {{reference_no}} | Reference No | The order reference number associated with the destination. | 789 | |
| {{revenue}} | Revenue | The revenue that is expected to be generated from visiting and servicing the destination. | 1000 | |
| {{weight}} | Weight | The weight of the cargo or order that is being delivered to or picked up at the address. | 100 | |
| {{sequence_no}} | Priority | The sequence number of the destination on the corresponding route. | 1 | |
| {{tracking_number}} | Tracking Number | The tracking number that is automatically assigned to the order by the system. Tracking numbers can be used by customers to check their orders on the customer tracking portal. | E27YMNGK | |
| Customer Details | ||||
| {{name}} | First Name + Last Name | Full name (first name and last name) of the customer associated with the destination. | John Smith | |
| {{first_name}} | First Name | First name of the customer associated with the destination. | John | |
| {{last_name}} | Last Name | Last name of the customer associated with the destination. | Smith | |
| {{email}} | Contact e-mail address of the customer associated with the destination. | [email protected] | ||
| {{phone}} | Phone | Contact phone number of the customer associated with the destination. | +1 212-682-3070 | |
| {{customer_po}} | Customer PO | Purchase order of the customer associated with the destination. | PI000347 | |
| Time Windows | ||||
| {{time_window_start}} | Time Window Start | The start of the destination’s time window (normally used for opening hours). | 09:00 AM | |
| {{time_window_end}} | Time Window End | The end of the destination’s time window (normally used for closing hours). | 09:00 PM | |
| Arrival Time | ||||
| {{arrival_time_formatted}} | Planned Arrival Time | The estimated time when the driver is expected to arrive at the destination. The format of this time can be adjusted in the advanced settings. | 4:10 PM | |
| {{arrival_date_formatted}} | Planned Arrival Date | The estimated date when the driver is expected to arrive at the destination. The format of this date can be adjusted in the advanced settings. | 07.07.2025 | |
| {{earliest_time_formatted}} | Planned Arrival Time with ETA Padding | The estimated time of arrival minus 50% of the defined “ETA Padding” value (i.e., minus 5 minutes from the estimated arrival time). The format of this time can be adjusted in the advanced settings. | 2:10 PM | |
| {{max_arrival_time_formatted}} | Planned Arrival Time with ETA Padding | The estimated time of arrival plus 50% of the defined “ETA Padding” value (i.e., plus 5 minutes to the Estimated Arrival Time). The format of this time can be adjusted in the advanced settings. | 1:50 PM | |
| Note And Driver Rating URLs | ||||
| {{note_attachment_url}} | Note Attachment URL | Online URL for media attached to the respective note of the respective route destination. | Appears as a URL. | |
| {{driver_rating_short_link}} | Customer Satisfaction Survey Link | Online shortened URL link for the Customer Satisfaction Survey of the respective route destination. | Appears as a shortened URL. | |
| {{data.short_note_attachment_url}} | Note Attachment URL | Online shortened URL for media attached to the respective note of the respective route destination. | Appears as a shortened URL. | |
| Custom Data | ||||
| {{custom_fields.}} | Custom Data | Custom Data attached to route destinations. | {{custom_fields.item_1}} | |
Additionally, not all placeholders can be used in all notification types. For example, placeholders relating to attached destination notes or note media can only be used in the “Completed” notification type because destination notes are not available to customers until the destination is marked as Completed. To learn which placeholders can be used in which notification types, refer to the table below.
| Placeholder | Scheduled | Geofence Entered | Geofence Departed | Completed | Failed | Skipped | Notify Next Customer |
|---|---|---|---|---|---|---|---|
| {{now_date}} | |||||||
| {{now_time}} | |||||||
| {{now_time_formatted}} | |||||||
| {{now_time_am_pm}} | |||||||
| {{arrival_time_formatted}} | |||||||
| {{arrival_date_formatted}} | |||||||
| {{earliest_time_formatted}} | |||||||
| {{max_arrival_time_formatted}} | |||||||
| {{address}} | |||||||
| {{first_name}} | |||||||
| {{last_name}} | |||||||
| {{name}} | |||||||
| {{tracking_number}} | |||||||
| {{customer_po}} | |||||||
| {{invoice_no}} | |||||||
| {{reference_no}} | |||||||
| {{order_no}} | |||||||
| {{weight}} | |||||||
| {{distance_to_next_destination}} | |||||||
| {{alias}} | |||||||
| {{lat}} | |||||||
| {{lng}} | |||||||
| {{address_stop_type}} | |||||||
| {{cost}} | |||||||
| {{cube}} | |||||||
| {{pieces}} | |||||||
| {{revenue}} | |||||||
| {{sequence_no}} | |||||||
| {{email}} | |||||||
| {{phone}} | |||||||
| {{time_window_start}} | |||||||
| {{time_window_end}} | |||||||
| {{geofence_detected_departed_timestamp}} | |||||||
| {{geofence_detected_visited_timestamp}} | |||||||
| {{timestamp_last_visited}} | |||||||
| {{timestamp_last_departed}} | |||||||
| {{note_attachment_url}} | |||||||
| {{data.short_note_attachment_url}} | |||||||
| {{driver_rating_short_link}} | |||||||
| {{projected_eta_date_formatted}} | |||||||
| {{projected_eta_time_formatted}} | |||||||
| {{subject}} | |||||||
| {{custom_fields.test_data}} |
Visit Route4Me's Marketplace to Check out Associated Add-Ons:
- Notifications & Alerts
Route Scheduled
- Notifications & Alerts
Geofence Entered
- Notifications & Alerts
Geofence Departed
- Notifications & Alerts
Visit Completed
- Notifications & Alerts
Notify Next Customer
Last Updated: