Geofencing Guide – Geofence Settings, Detected Arrival And Departure Timestamps With GPS Tracking
When completing routes, drivers and field employees manually mark customer locations as “Arrived” and “Done” after finishing workflows. To simplify this process and improve accuracy, Route4Me provides geofences that automatically detect when team members visit or leave a customer location, generating immutable Arrival and Departure Time timestamps. You can create geofences with custom parameters to match your business needs and maintain consistency with customers. Detailed geofence tracking analytics provide further insight into team activities and operational performance.
Table of Contents
Geofence Settings – Geofence Type, Size, Time On Site And Check-In Speed
To enable geofencing and customize geofence settings on your enterprise route planning software account, go to “Settings” and “Organization Settings” from the Navigation Menu.
Then, select the “Geofencing” tab, where you can configure the shape, size, required time on site, and maximum check-in speed for your geofences. These settings are important for ensuring field employees visit geofenced destinations and provide you with essential visitation data.
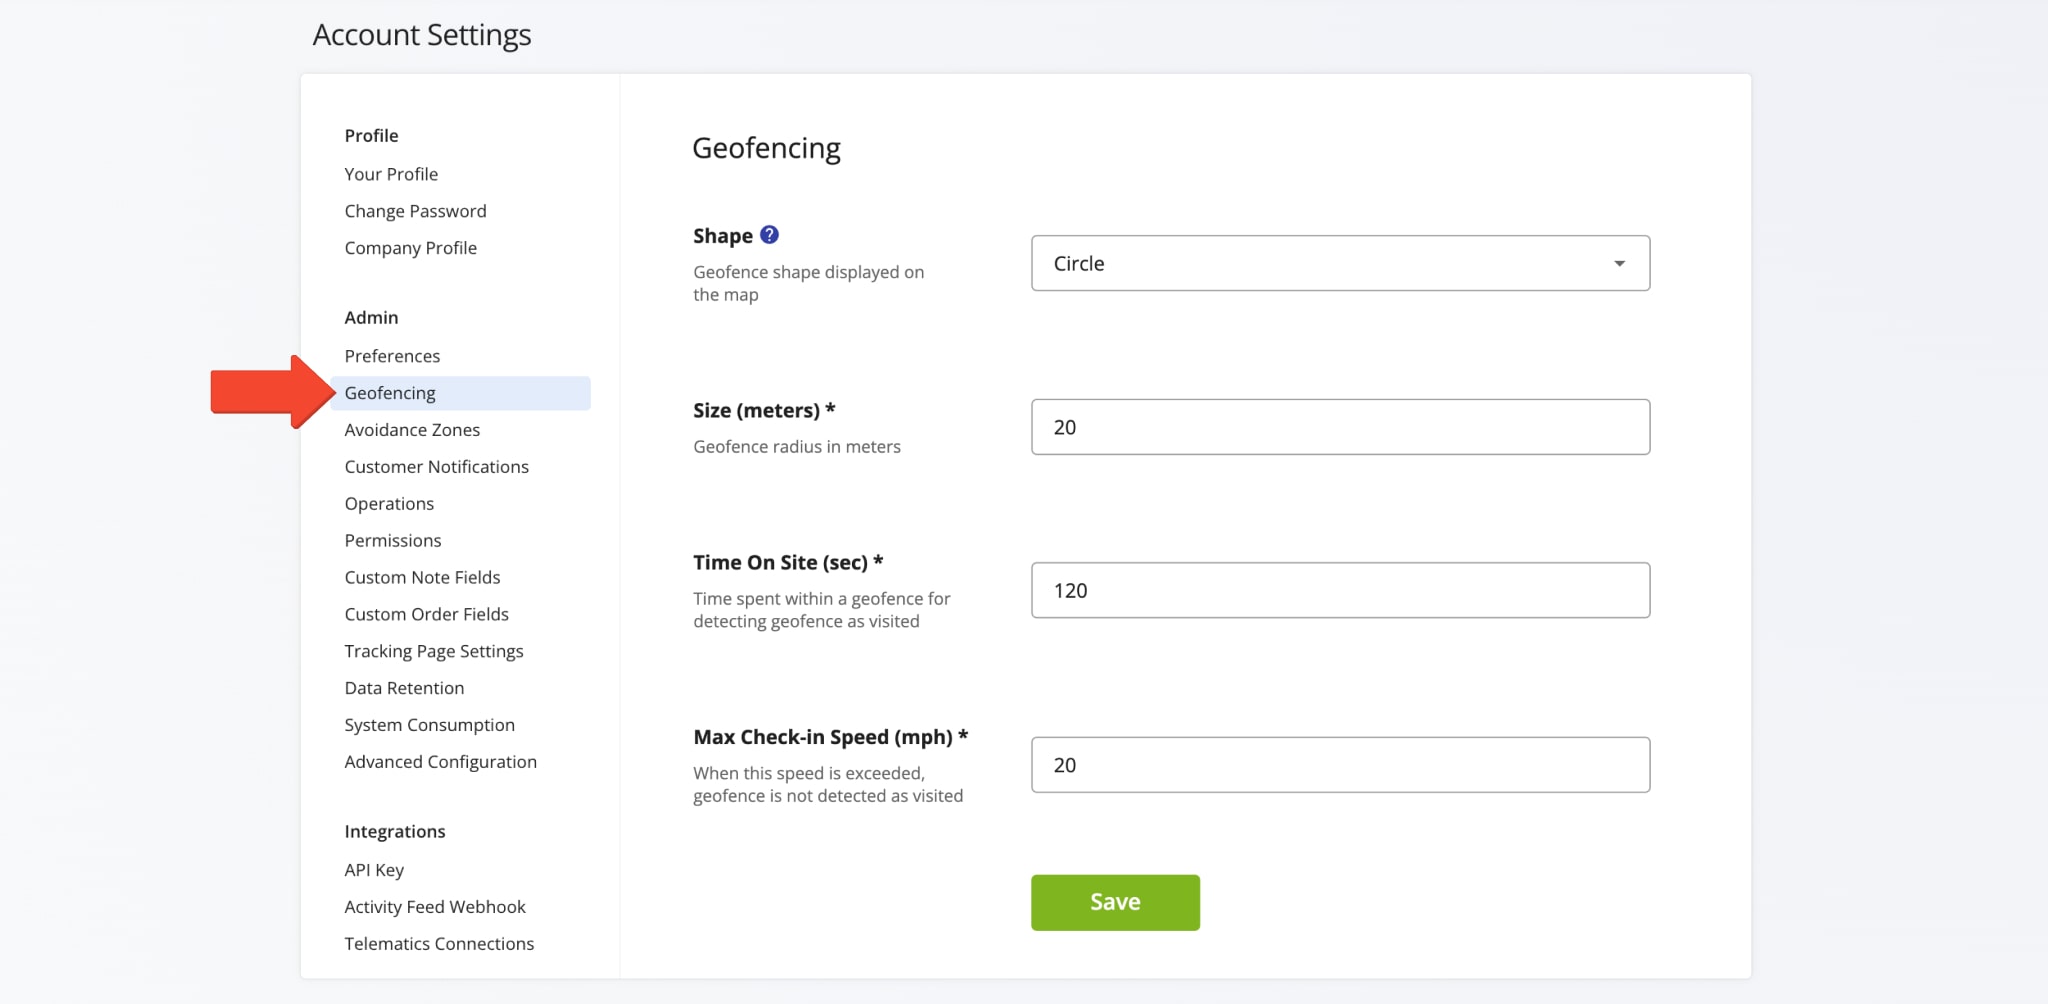
On the Geofence Settings screen, you can select your Geofence Type between square and circle, depending on your routing or tracking needs.
To do so, open the “Shape” dropdown menu and select “Square” or “Circle“. Depending on the unique factors of your destinations and routing operations, each Geofence Type may provide more accurate detection and help avoid errors.
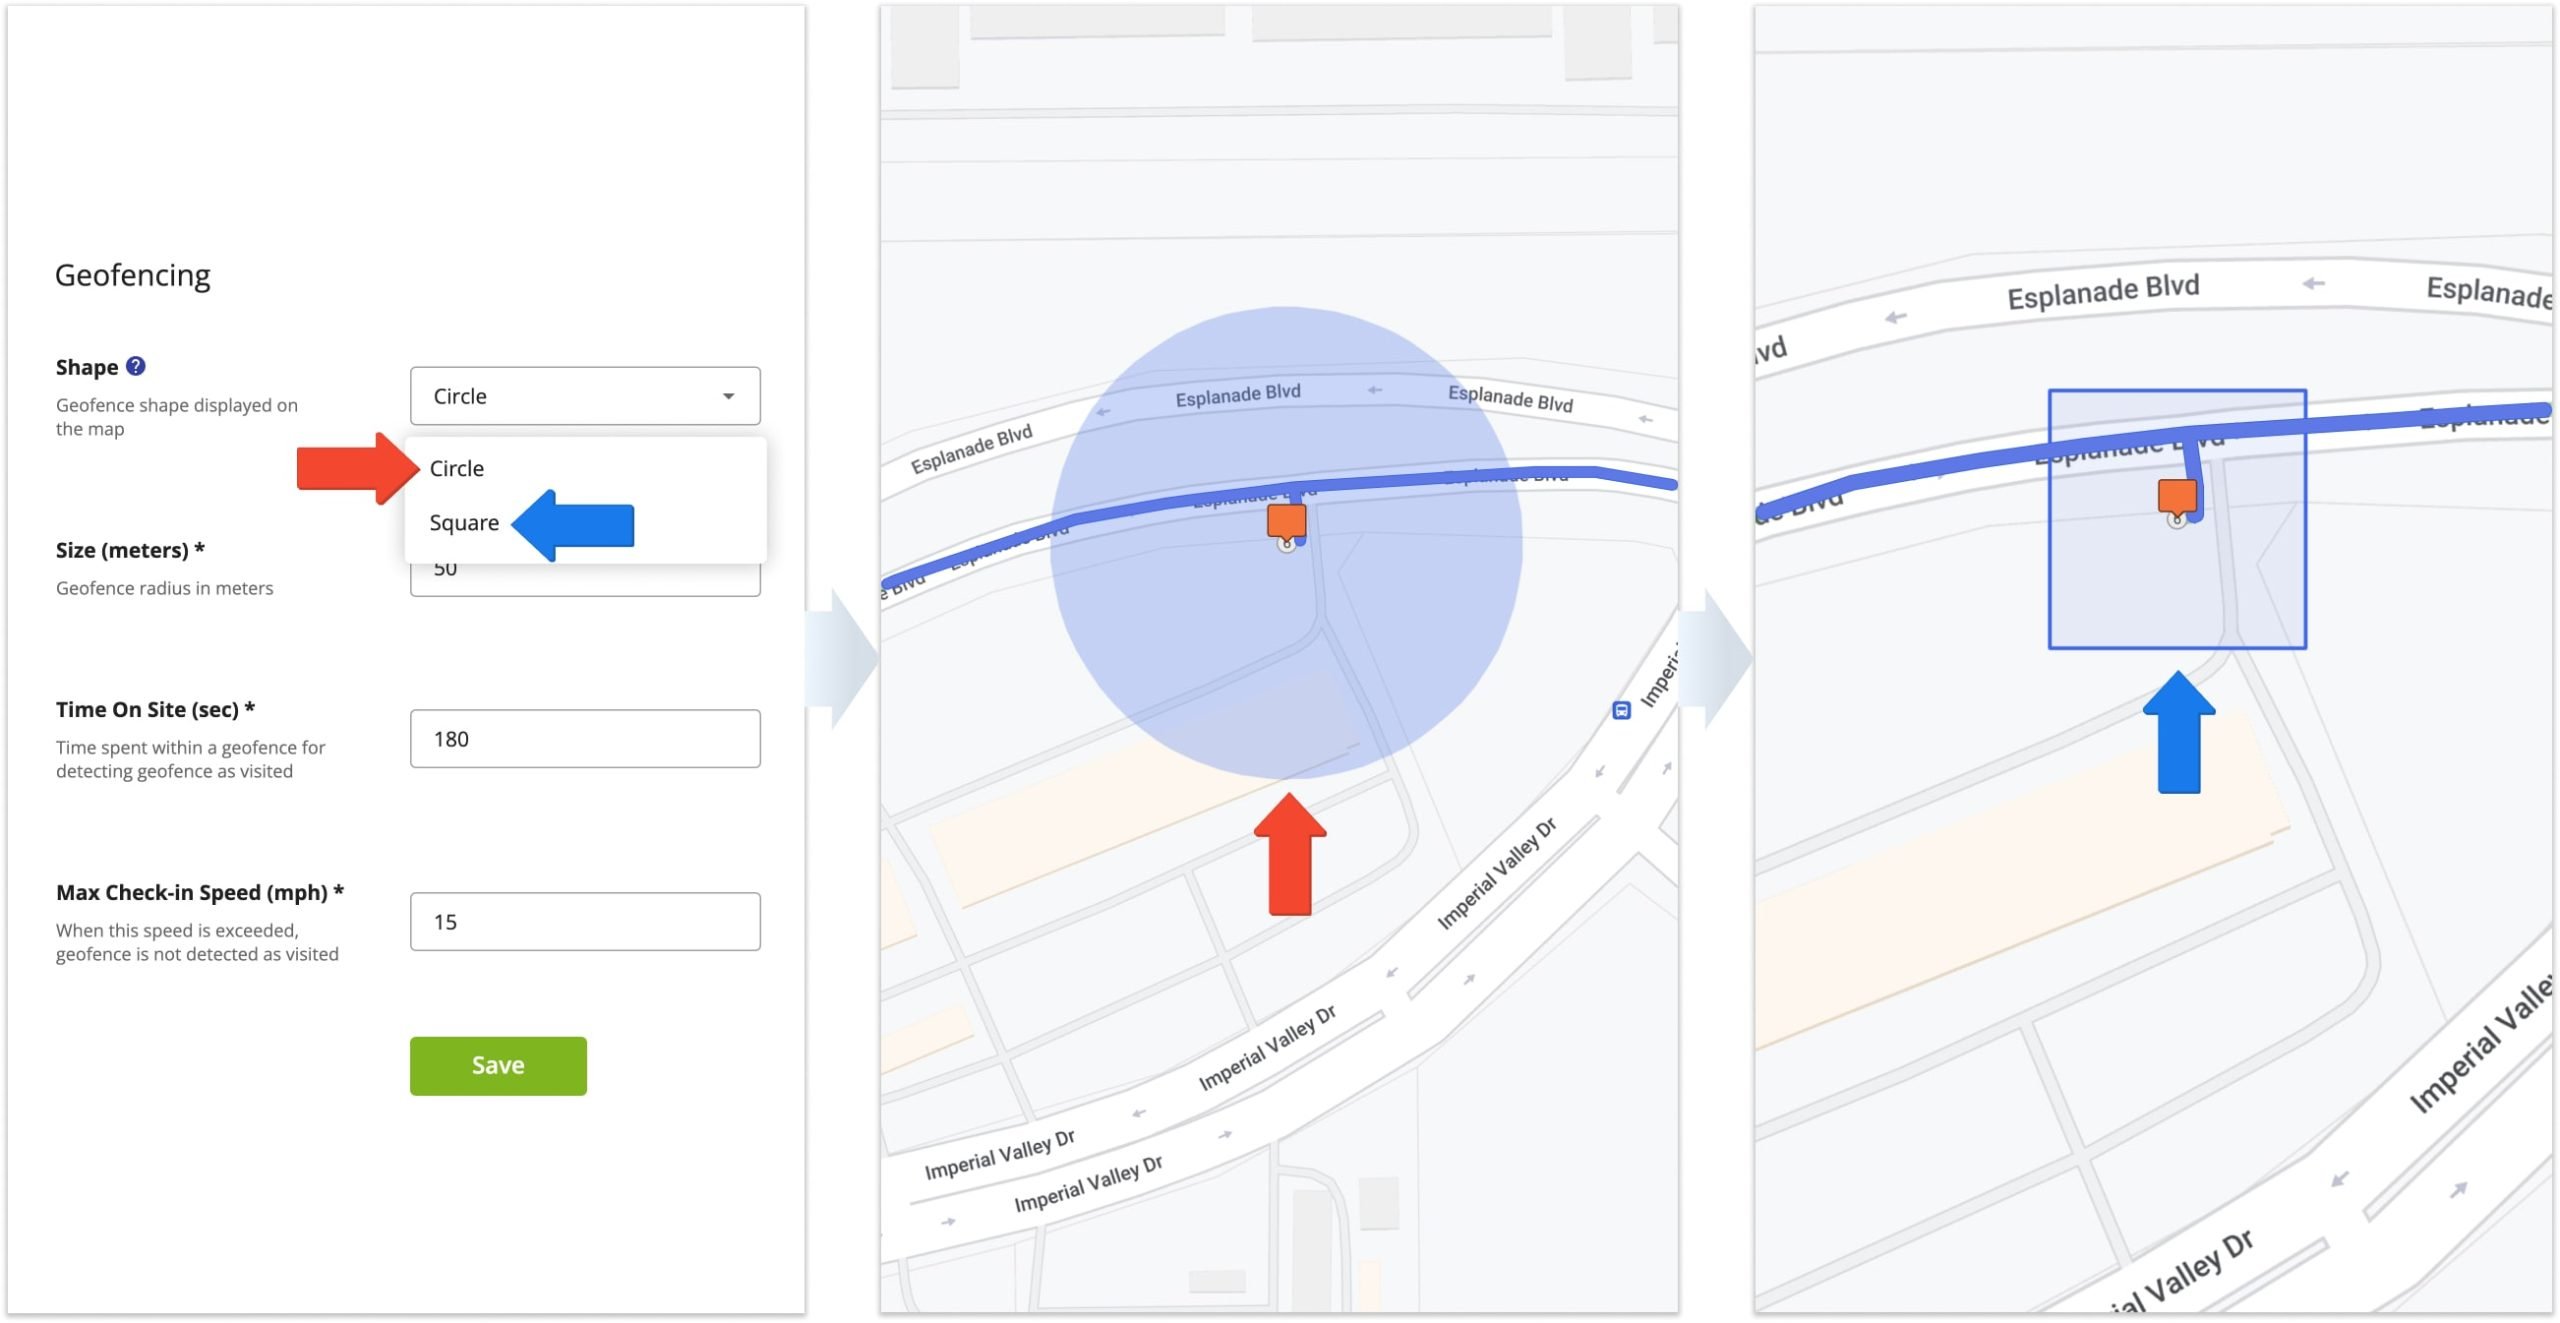
Furthermore, depending on the specifics of your routing operations and customer destinations, you may need smaller or larger geofences.
To configure the size of your geofences, input the preferred size in the “Size” field in meters. Additionally, larger or smaller geofences combine with maximum allowed check-in speed to fine-tune your detection parameters.

Moreover, to ensure compliance and that your field employees are completing addresses visits, you can define how long a user must stay within a geofence for the system to detect the corresponding destination as Departed upon leaving.
Input the desired time in the “Time On Site” field, measured in seconds. If you input 180 seconds into the “Time On Site” field, whenever your team members enter a geofence, they’ll have to stay within the geofence for more than 180 seconds for the system to detect the destination as Departed and create the “Departure Time” timestamp.
The total Time On Site is displayed as “Detected Time On Site” in the Destination Info panel.

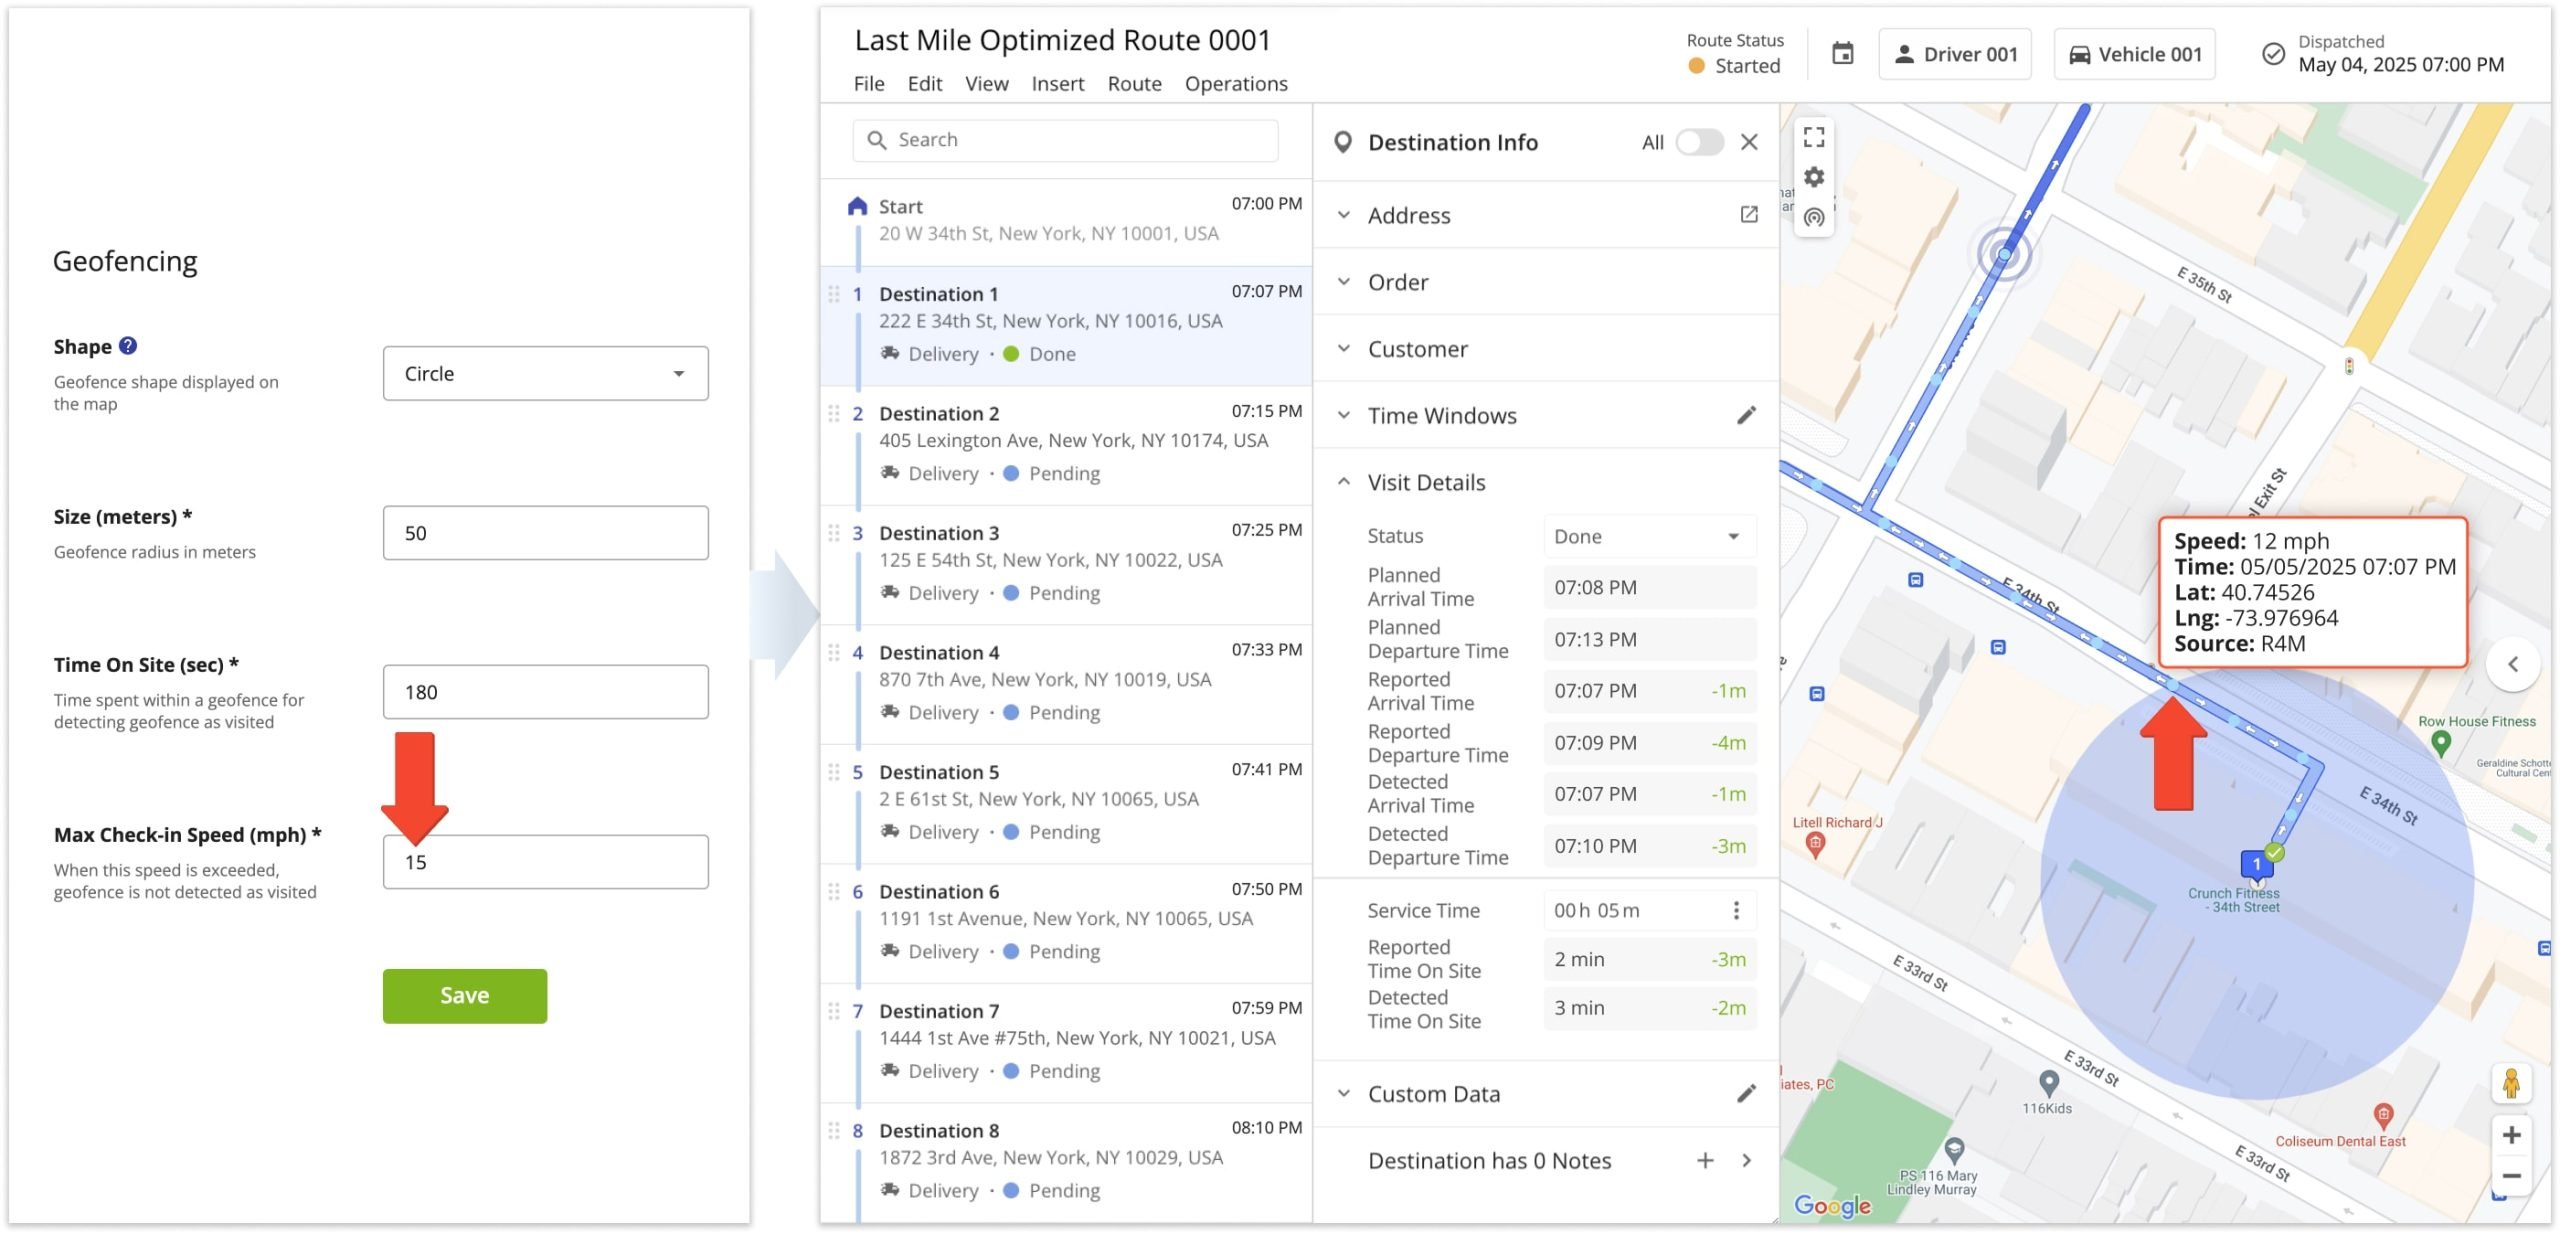
For security and safety purposes, and as an additional method of ensuring drivers are visiting your destination, you can set a “Maximum Check-in Speed” for a destination to be detected as Visited. If the defined speed is exceeded when entering geofences, the addresses will not be detected as Arrived.
For example, if the “Max Check-in Speed” is set to 15 mph, and the driver enters the geofence at 20 mph, the geofence will not be detected as Arrived until the vehicle slows to less than 15 mph while inside the geofenced area.
Furthermore, Vehicle Position Refresh Rate dictates how often the position of the vehicle is synched and updated in the system. The refresh rate can be as quick as updating the vehicle’s position every second.
Vehicle position updates can be triggered either by the Route4Me Mobile Apps or a telematics devices on your GPS vehicles. You can access the Vehicle Position Refresh Rate setting when you establish a Telematics Connection through the Telematics Gateway.
Specifically, each time a vehicle’s position is updated, a breadcrumb indicator is generated on the map. Furthermore, hover over breadcrumbs to view the speed, time, and coordinates for those location updates.

Geofences On Map – Enable Geofences In Route Editor And Routes Map
To view the geofences of a route on the map, open it in the Route Editor or open multiple routes on the Routes Map.
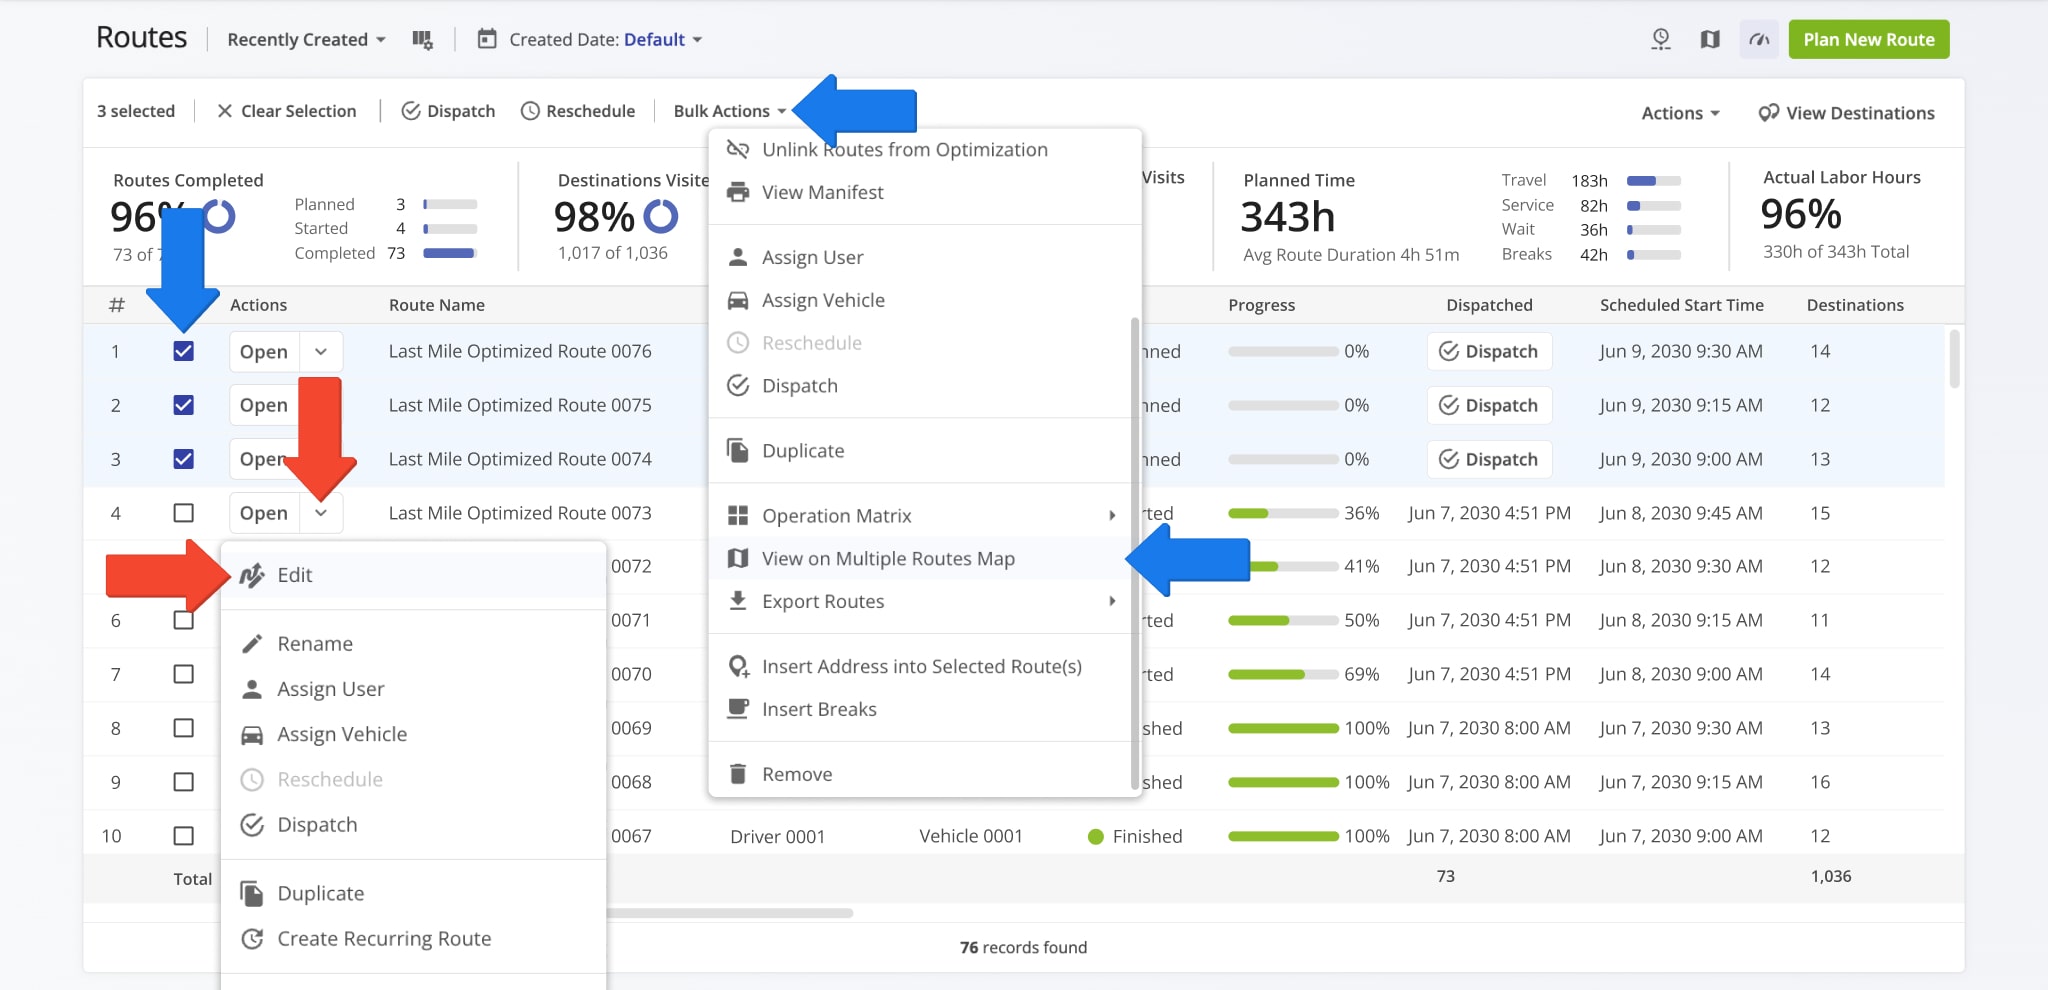
To do so, go to “Operations” and then “Routes” from the Navigation Menu. Then, click the Down Arrow next to a route and select “Edit” from the menu. To open multiple routes, check the boxes next to them, click “Bulk Actions” in the top menu bar, and select “View on Multiple Routes Map“.
After that, on the Route Editor, click the Map Setting Icon and check the “Geofences” box. Once enabled, your geofences will appear around destinations on the map. The displayed geofence areas correspond in shape and size to your geofence settings.

To enable geofences on the multiple Routes Map, click the “Map Settings” button. Then, check the box labeled “Geofences” to enable geofences on the Interactive Map.
Additionally, check the box labeled “Geofence Activities” to display markers on the map for the “Arrival Time” and “Departure Time” timestamps.

Detected Arrival And Departure Timestamps And Map Markers
To view the detected visitation and departure timestamps of destinations on a particular route, open the route in the Route Editor from your Routes List or Routes Map.
Then, click the preferred destination to open its Destination Info panel. Scroll to the “Visit Details” section with automatically detected and manually marked visitation, departure, and time on site values.

Furthermore, you can enable user tracking to view the movement of your team members on the map in near real-time.
To do so, click the Tracking Button in the top-left of the map and select “Breadcrumbs” to enable vehicle path tracking with breadcrumb indicators corresponding to the coordinates where the vehicle’s position was updated. Once enabled, you can view your team members moving on the map.
![]()
Detected As Arrived Timestamp And Map Marker
The detected “Arrival Time” timestamp is generated when a vehicle enters the geofence around a destination. When a vehicle enters a geofence, location data from the driver’s Route4Me iOS or Android mobile app, or third-party GPS device from a Telematics Provider, is sent to Route4Me.
This generates an immutable “Arrival Time” timestamp that can’t be modified. To see the arrival timestamp, move your cursor into the “Detected Arrival Time” field and click the Eye Icon.
In addition to the “Arrival Time“, you can see the location where the geofence was detected as Arrived on the minimap. The arrival location may be partway into the geofence due to geofence settings or vehicle position refresh rate.

Detected As Departed Timestamp And Map Marker
The detected “Departure Time” timestamp is generated when a vehicle departs the geofence around a destination. When a vehicle leaves a geofence, location data from the driver’s Route4Me iOS or Android mobile app, or third-party GPS device from a Telematics Vendor, is sent to Route4Me.
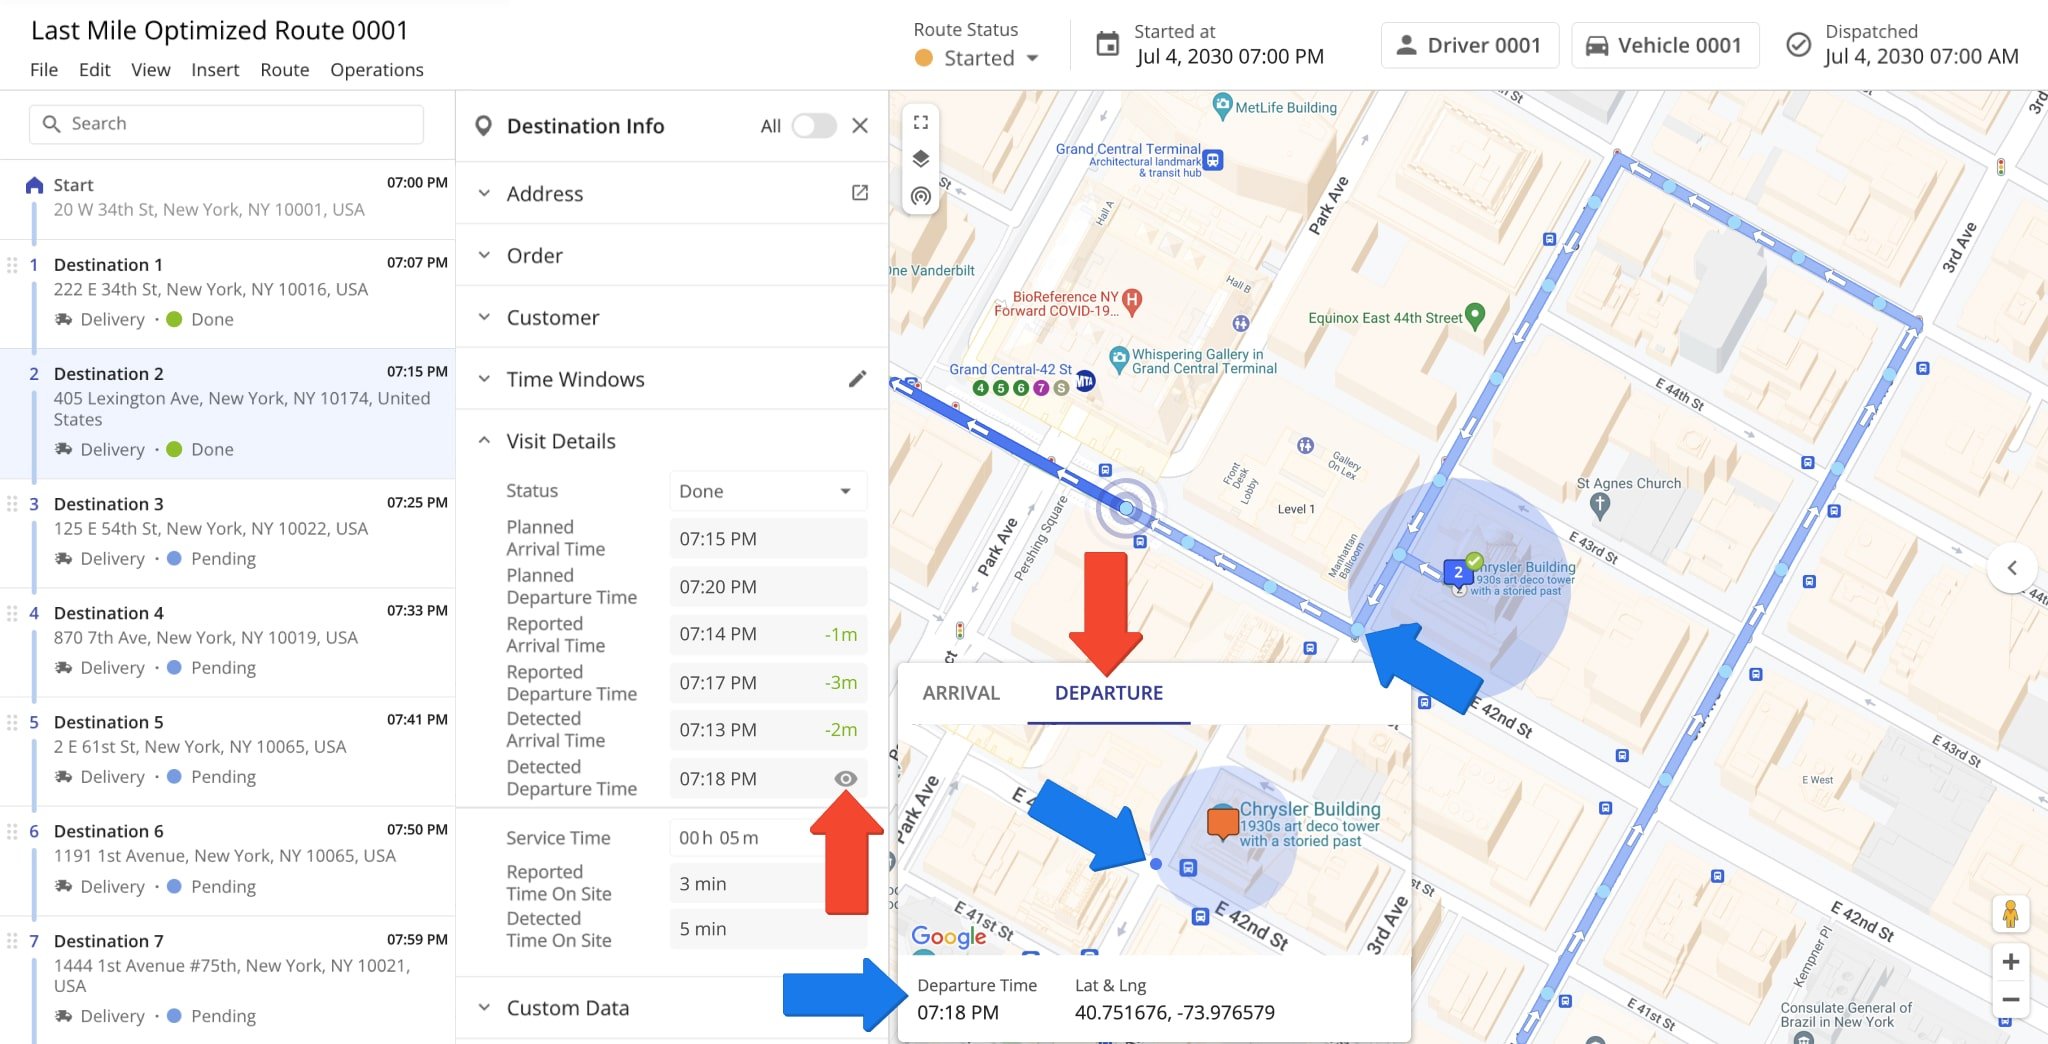
This generates an immutable “Departure Time” timestamp that can’t be modified. To see the departure timestamp, move your cursor into the “Detected Departure Time” field and click the Eye Icon.
In addition to the “Departure Time“, you can see the location where the geofence was detected as Departed on the minimap. The departure location may be outside the geofence due to geofence settings or vehicle position refresh rate.
Time On Site – Detected Time Spent In Geofence Area
Geofence settings enable you to set a minimum required Time on Site to successfully detect the geofenced area as departed when a vehicle leaves a geofence. To view the Detected Time on Site of a destination, open the corresponding route in the Route Editor and click the destination to open the “Destination Info” panel.
Detected Time on Site is displayed in the “Visit Details” section. The reported Time on Site is displayed as “Reported Visit Time” and is the difference between the time the driver marked the destination as “Arrived” and then “Done” on the Route4Me Mobile App.
The “Detected Visit Time” is the difference between the time the geofence was detected as “Arrived” and “Departed“.

Mobile Apps Route Navigation And Telematics Vehicle Tracking
Furthermore, location updates are sent to Route4Me from the Mobile Driver Apps or installed Telematics Device on GPS vehicles if you’ve established a Telematics Connection through the Telematics Gateway. This enables you to track the position of drivers and vehicles in real-time as vehicle location updates can be sent as often as once a second.
Additionally, field employees can use the Route4Me app for iOS or Android to navigate routes and mark destinations as “Arrived” and “Done“, respectively.
The position of vehicles is updated according to the Vehicle Position Refresh Rate, allowing for real-time tracking. Position updates are visible on the map in the Route Editor and Routes Map when tracking and breadcrumbs are enabled. Each breadcrumb corresponds to a location update sent to the system.
Additionally, click a breadcrumb to view the speed, times, coordinates, and source of the update.
![]()
Automatically Detected VS Manually Marked Arrival And Departure
Geofencing enables you to automatically detect when and where a driver or field employee enters and leaves a specific geofenced area and provides corresponding timestamps and map markers.
The Arrival Time and Departure Time values are also manually reported by team members. This generates two values, an automatic Detected Visit Time and a manual Reported Visit Time.
To view visitation timestamps, open the destination’s corresponding route in the Route Editor, click the destination to open its Destination Info, and find the reported and detected visit time values in the “Visit Details” section.
NOTE: Discrepancies in the reported and detected visit times of destinations are due to reported times being manually submitted by users, while detected times are automatically detected through geofencing.

The “Reported Arrival Time” and “Reported Departure Time” timestamps are created when field employees manually mark destinations as “Arrived” and then “Done” from their Route4Me iOS or Android mobile app.
Furthermore, you can view the exact location where a field employee updated a destination’s status by clicking the Eye Icon in the corresponding field.
Additionally, the time between the “Reported Arrival Time” and “Reported Departure Time” is shown as the “Reported Time On Site” value.

Client-Side Geofencing Advanced Configurations
In addition to the default geofencing functionality, Route4Me Advanced Configuration Editor enables you to trigger reported visitation events automatically.
Triggers will be used to set destination statuses, automatically generate reported values, and more. The default geofencing functionality is not affected by any of the following advanced configurations.

| Key | Value | Description |
|---|---|---|
| TRIGGER_GEOFENCE_ARRIVED_USING_CLIENT_GEOFENCE | true/false | When this configuration is enabled, and a user enters a geofence, the mobile app automatically sets the Reported Arrival Time and coordinates without the user marking address as arrived on the mobile app. |
| TRIGGER_GEOFENCE_DEPARTED_USING_CLIENT_GEOFENCE | true/false | When this configuration is enabled, and a user leaves a geofence, the mobile app automatically sets the Reported Departure Time and coordinates without any user making changes on the mobile app or enterprise route optimizer. |
| TRIGGER_DESTINATION_ARRIVED_USING_GEOFENCE | true/false | When this configuration is enabled, and a user enters a geofence, the mobile app automatically marks destinations as “Arrived” and sets the corresponding timestamp. This “Arrival Time” is used together with the “Departure Time” to calculate the “Reported Time On Site” on the enterprise route software. |
| TRIGGER_DESTINATION_DEPARTED_USING_GEOFENCE | true/false | When this configuration is enabled, and a user leaves a geofence, the mobile app automatically marks destinations as “Departed” and sets the corresponding timestamp. This “Departure Time” is used together with the “Arrival Time” to calculate the “Reported Time On Site” on the enterprise route planning software. |
| TRIGGER_STATUS_DONE_USING_GEOFENCE | true/false | When this configuration is enabled, and a user leaves a geofence, the mobile app automatically marks destinations as “Done“. When this configuration is disabled or not added, drivers must manually mark destinations as “Done“. Additionally, learn more about setting destination status. |
Geofence Driver Notifications And Alerts For Adding Notes
Moreover, you can set up geofencing notifications that are triggered when a driver enters a geofence. Drivers don’t receive such notifications by default. When enabled, geofence-triggered alerts notify your drivers to add notes that can serve as proof of service or electronic proof of delivery (ePOD) to destinations.
To enable this feature, define a specific custom data field in the Route Editor for each destination. This can be added to route addresses either by adding a corresponding column in the route planning spreadsheet or added manually for each address in the Route Editor after the route has been planned.
Specifically, add a column with the header “custom_trigger_open_notes_dialog” and type “TRUE” on the row of each destination you want to apply the automatic geofence-triggered driver notification to add notes.

To enable automatic geofence driver notifications for adding notes after a route has been planned, open the preferred route in the Route Editor and follow the steps below:
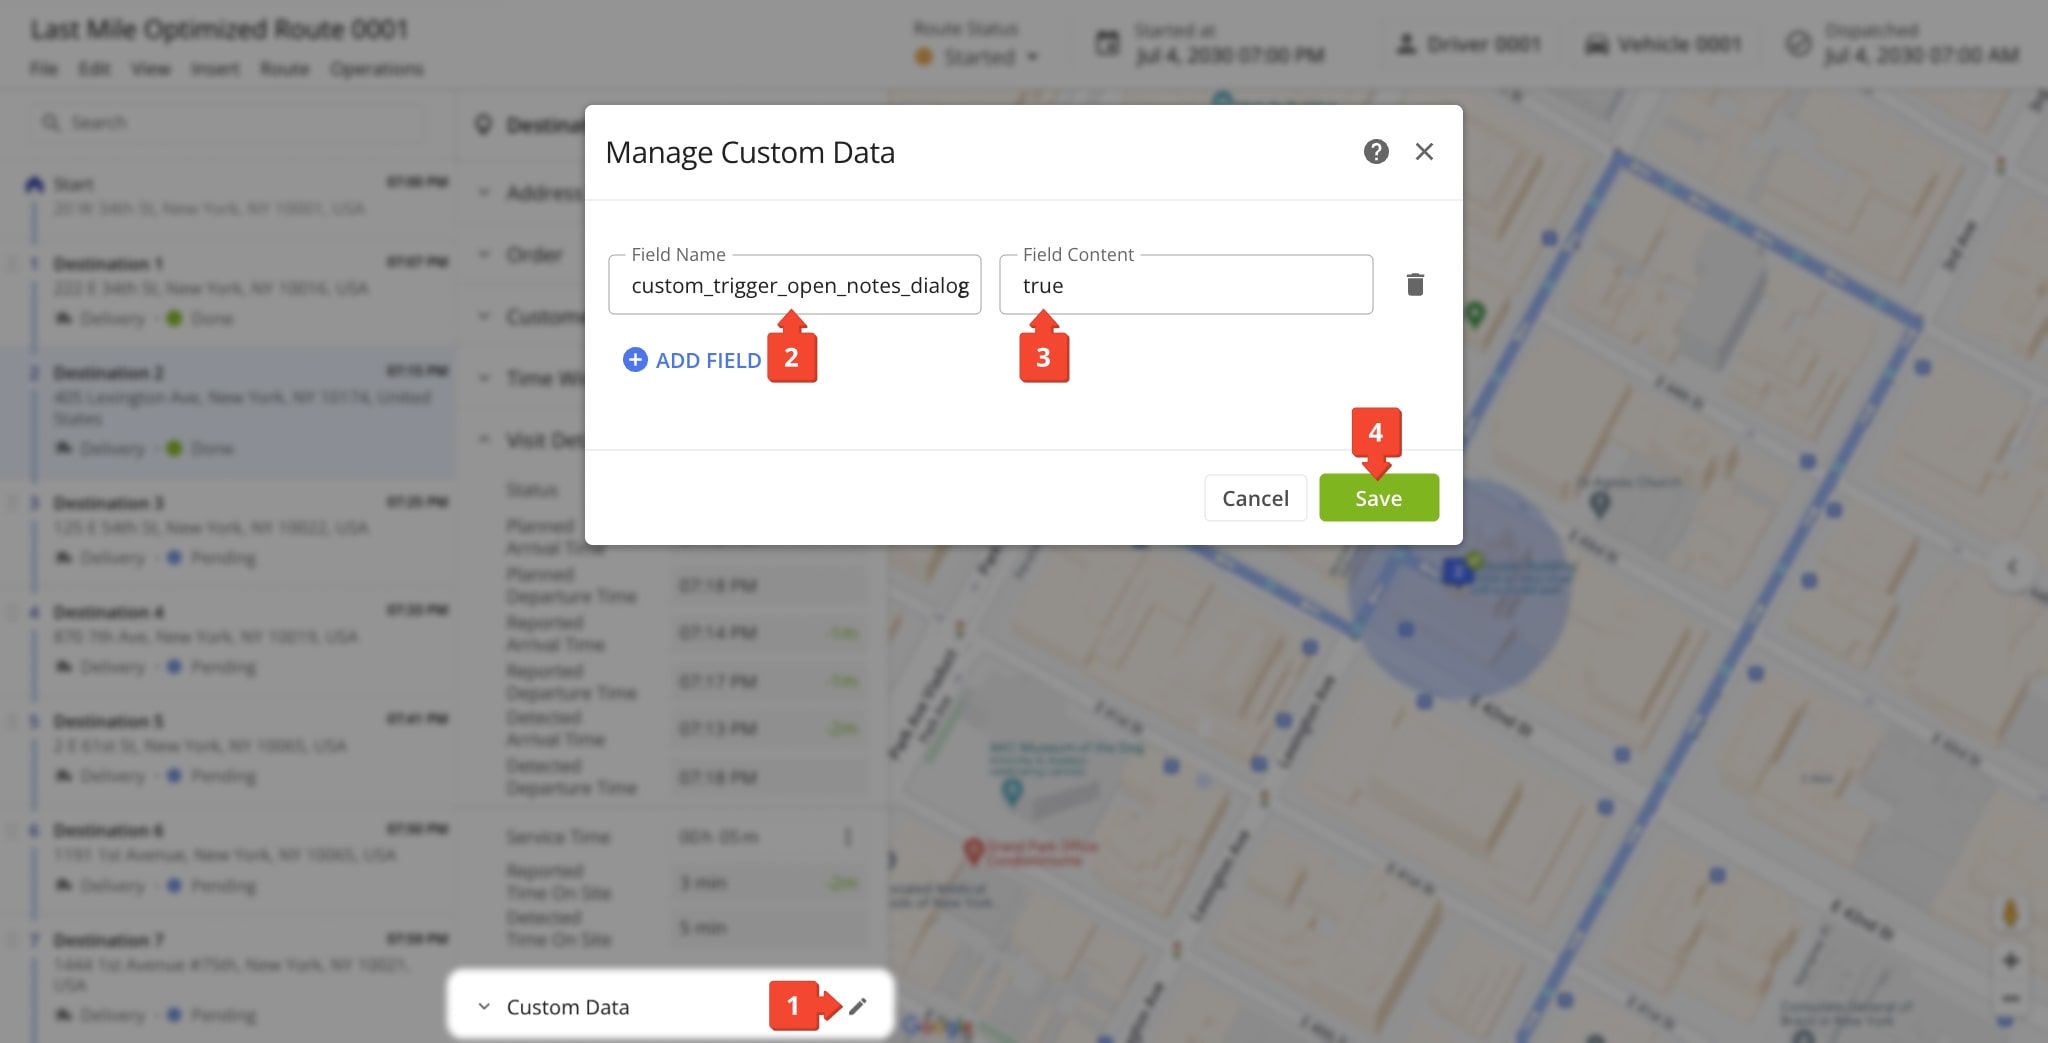
- Click a destination to open its respective Destination Info panel. Next, in the “Custom Data” section, click the Pencil Icon to open the “Manage Custom Data” window.
- Then, enter “custom_trigger_open_notes_dialog” in the “Field Name” field.
- Enter “TRUE” in the “Field Content” field.
- Click the “Save” button to apply the Custom Data to the destination.
Additionally, learn more about Route4Me Advanced Configuration and Custom Data functionality.
Then, when the driver enters the corresponding destination geofence, they are notified with a visual and audio notification that the corresponding notes section must be completed for the respective destination.
Upon ending navigation and marking the destination as “Arrived” from the mobile app, the notes section will open automatically and must be completed for the driver to successfully mark the destination as “Done“.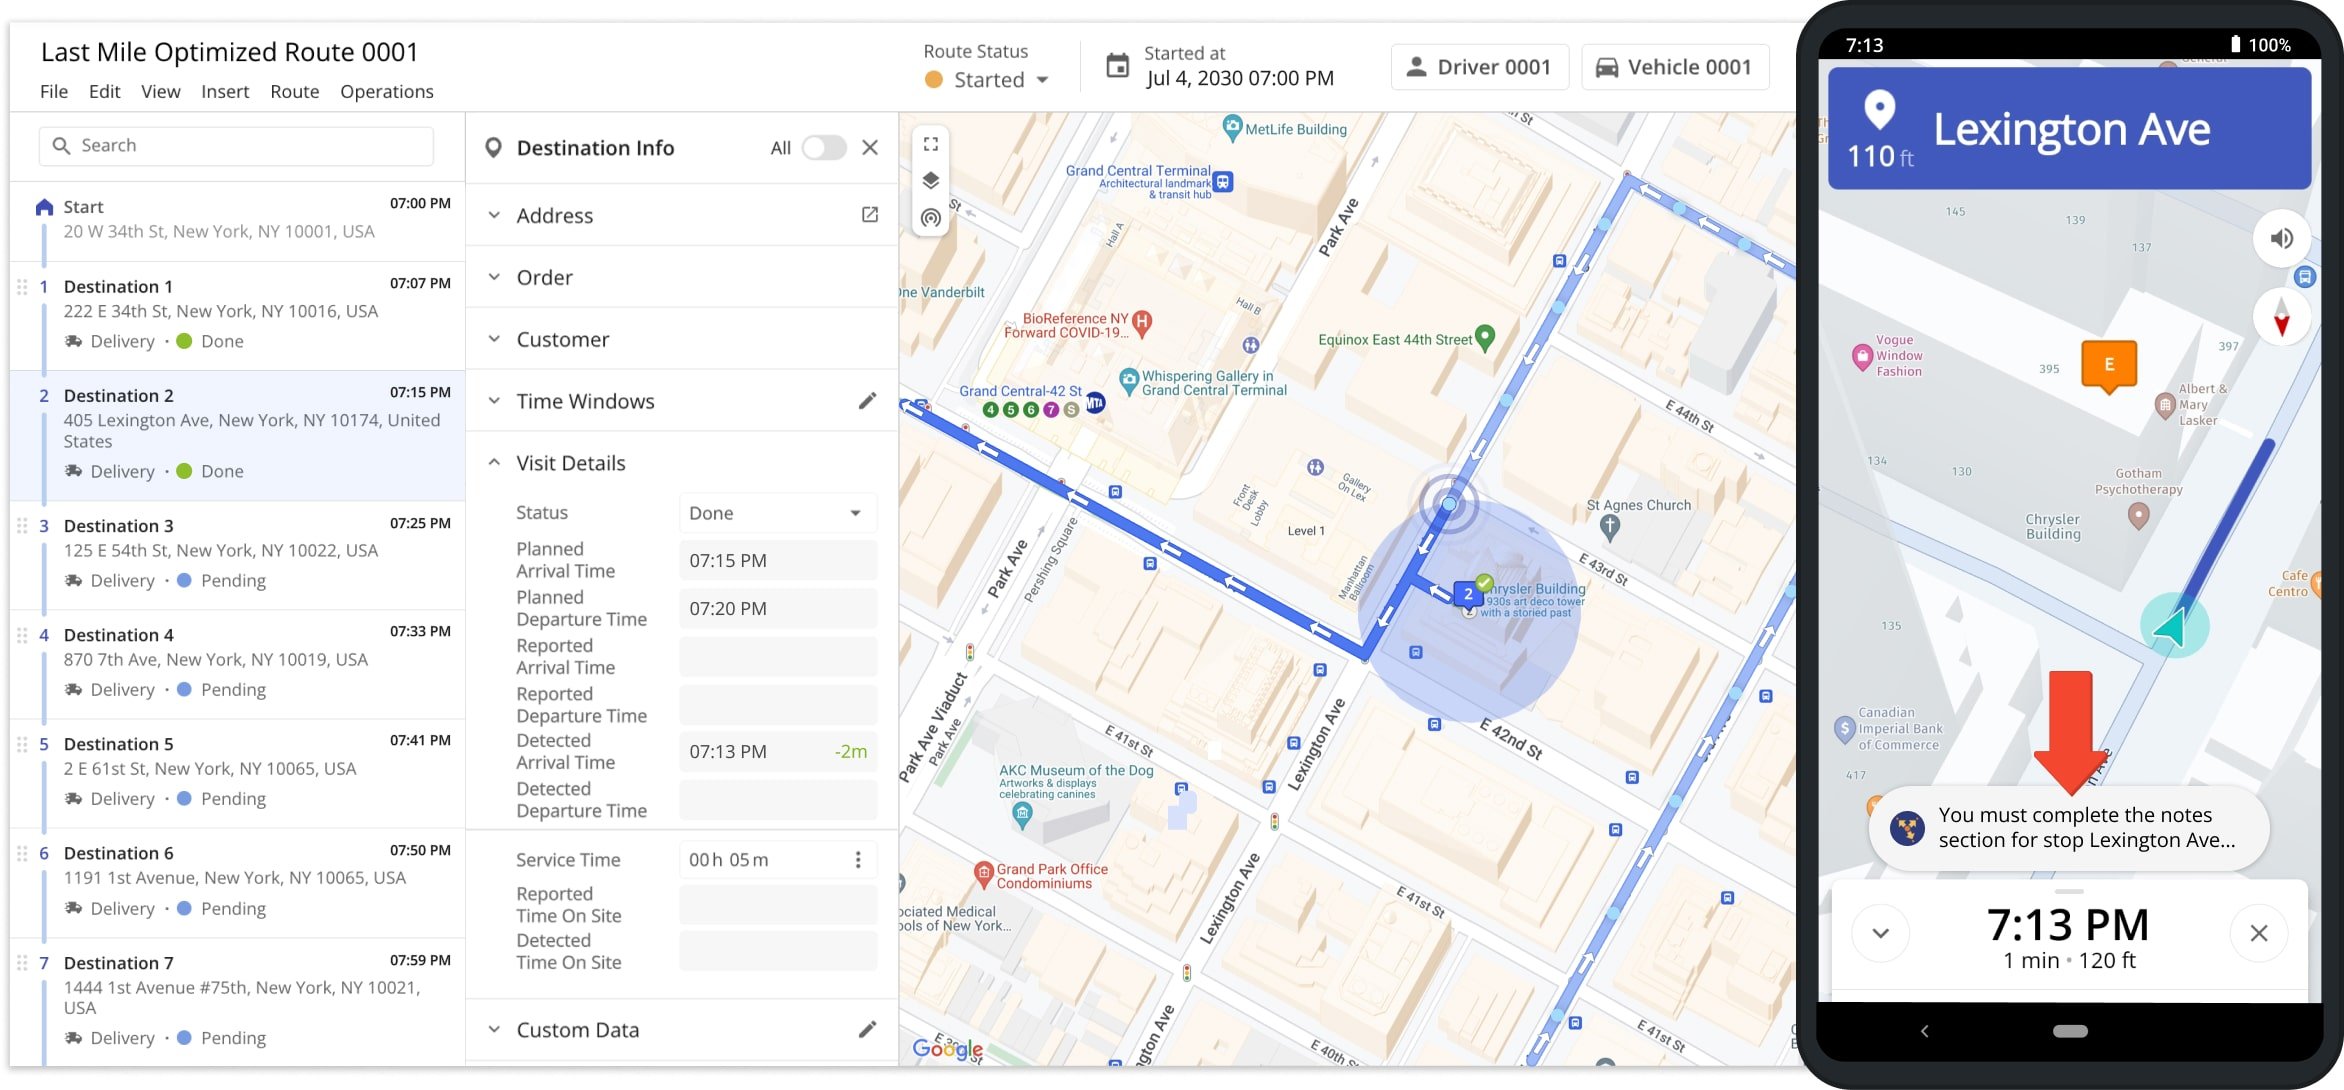
Geofencing Analytics – Export Route Visitation Geofence Data
Furthermore, you can export geofencing data and analytics for any of your routes.
To do so, open a route in the Route Editor and click “File” in the top menu bar. Then, hover over “Export Route” and select “Export CSV” to customize which items to include in your route data export spreadsheet.
After that, select the geofencing data and analytics items to include in your route export spreadsheet by selecting them in the left column. Then, click the “Export” button to download your selected data and analytics items as a spreadsheet. Additionally, learn more about exporting route data.

| Data | Description | |
|---|---|---|
| Default Geofence-Detected Data | ||
| Geofence Visited Time | Timestamp of the detected arrival time when the user entered the corresponding geofence. | |
| Geofence Departed Time | Timestamp of the detected departure time when the user left the corresponding geofence. | |
| Geofence Time On Site | Time value of duration the user spent inside the geofence calculated based on the detected arrival and departure time, identical to “Detected Time On Site” value. | |
| Geofence Entrance Latitude | Latitude coordinate value of the user at the detected arrival time. | |
| Geofence Entrance Longitude | Longitude coordinate value of the user at the detected arrival time. | |
| Geofence Departure Latitude | Latitude coordinate value of the user at the detected departire time. | |
| Geofence Departure Longitude | Longitude coordinate value of the user at the detected departure time. | |
| Client-Side Geofence Reported Data | ||
| Geofence Local Visited Time | Timestamp of the automatically reported arrival time generated when the user entered the corresponding geofence. This value is only available when the “TRIGGER_GEOFENCE_ARRIVED_USING_CLIENT_GEOFENCE” configuration is enabled. | |
| Geofence Local Departed Time | Timestamp of the automatically reported departure time generated when the user left the corresponding geofence. This value is only available when the “TRIGGER_GEOFENCE_DEPARTED_USING_CLIENT_GEOFENCE” configuration is enabled. | |
| Geofence Local Time On Site | Time value of duration the user spent inside the geofence calculated based on the reported arrival and departure time, identical to “Reported Time On Site” value. This value is only available when the “TRIGGER_GEOFENCE_ARRIVED_USING_CLIENT_GEOFENCE” and “TRIGGER_GEOFENCE_DEPARTED_USING_CLIENT_GEOFENCE” configurations are enabled. | |
| Geofence Local Visited Latitude | Latitude coordinate value of the automatically reported arrival location generated when the user entered the corresponding geofence. This value is only available when the “TRIGGER_GEOFENCE_ARRIVED_USING_CLIENT_GEOFENCE” configuration is enabled. | |
| Geofence Local Visited Longitude | Longitude coordinate value of the automatically reported arrival location generated when the user entered the corresponding geofence. This value is only available when the “TRIGGER_GEOFENCE_ARRIVED_USING_CLIENT_GEOFENCE” configuration is enabled. | |
| Geofence Local Departed Latitude | Latitude coordinate value of the automatically reported departure location generated when the user entered the corresponding geofence. This value is only available when the “TRIGGER_GEOFENCE_DEPARTED_USING_CLIENT_GEOFENCE” configuration is enabled. | |
| Geofence Local Departed Longitude | Longitude coordinate value of the automatically reported departure location generated when the user entered the corresponding geofence. This value is only available when the “TRIGGER_GEOFENCE_DEPARTED_USING_CLIENT_GEOFENCE” configuration is enabled. | |
Visit Route4Me's Marketplace to Check Out More Add-Ons and Modules:
- Route Optimization
Address Book and Territories Planning
- Operations
Custom Data Add-On
About author: Kristian Andreev
Kristian is a Technical Writer at Route4Me. With over a decade of experience in writing and localization, he's an expert at communicating complex technical data in a clear, concise, and user-friendly way. Passionate about bridging the gap between engineers and users, he specializes in creating documentation to streamline onboarding, enhance product usability, and support global teams on the path to success.