Route4Me iPhone And iPad Route Planner App White-Labeling Guide
Route4Me is a next-generation last mile routing and smart logistics optimization platform with more than 10 years of experience in the industry and over 2 million app downloads across mobile platforms. Businesses of various types and all sizes use Route4Me’s Android and iOS mobile apps for streamlining their last mile routing operations and supply chains, driving down operating costs, improving communication between teams, raising customer satisfaction, and more. That being said, building and maintaining your own in-house optimization platform is extremely expensive and takes years to develop. Thus, Route4Me allows its Partners and Resellers to frictionlessly integrate Route4Me’s cost-effective and user-friendly white-labeled solutions within their business environments.
Route4Me’s white-labeled features allow businesses around the world to customize and resell Route4Me’s powerful optimization capabilities under their own brand and expand their product and service lines without having to develop new Web, iOS, and Android solutions from scratch. As a Route4Me Reseller or Partner, you will have the ability to customize the graphical user interface of the Route4Me iOS Route Planner to match the vision of your brand and reconfigure the app’s functionality to accommodate the specific needs of your customers. In this way, you will be able to provide your customers with the most powerful last mile routing and smart logistics optimization solutions without having to invest millions of dollars and years of work-hours into creating and maintaining new software.
Table of Contents
How to Enable Route4Me’s iOS Route Planner White-Labeling Features
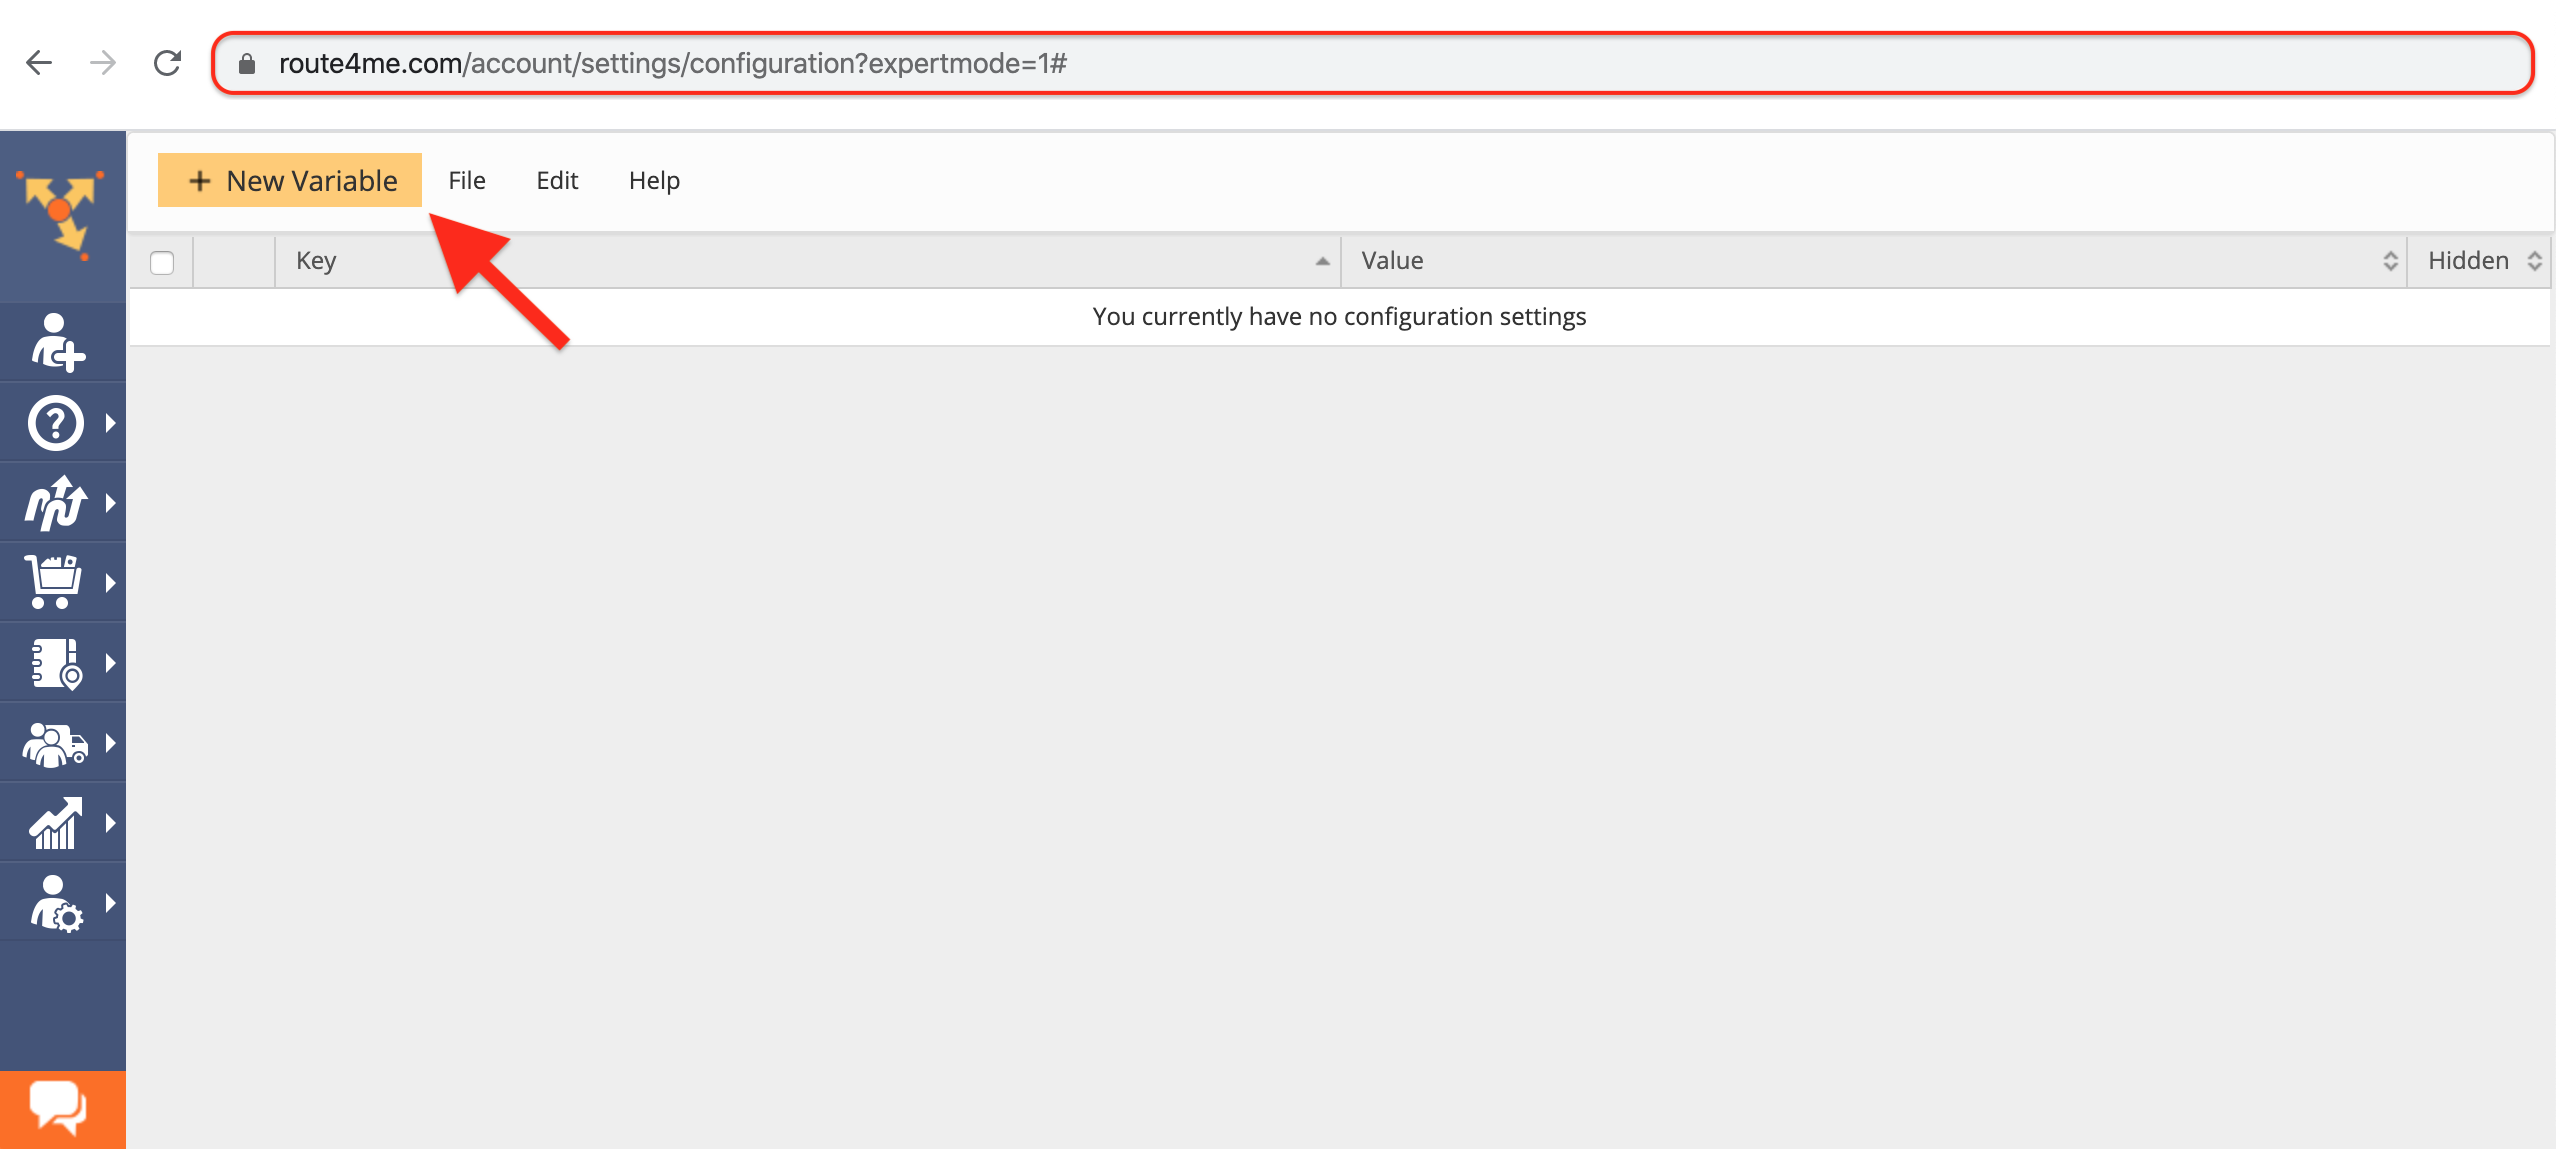
To create and manage white-labeling configurations on your Route4Me iOS Route Planner, first, log into your Primary Route4Me Web account that you use for logging into your Route4Me iOS app and managing all your sub-users. After that, open your Route4Me Web account in the Expert Mode by launching the Advanced Configuration Editor. To do so, after logging into your Route4Me account, open the Route4Me Expert Mode URL in your web browser.
Once you are in the Advanced Configuration Editor, click on the “New Variable” button in the top left corner to create/add a new white-labeling configuration.
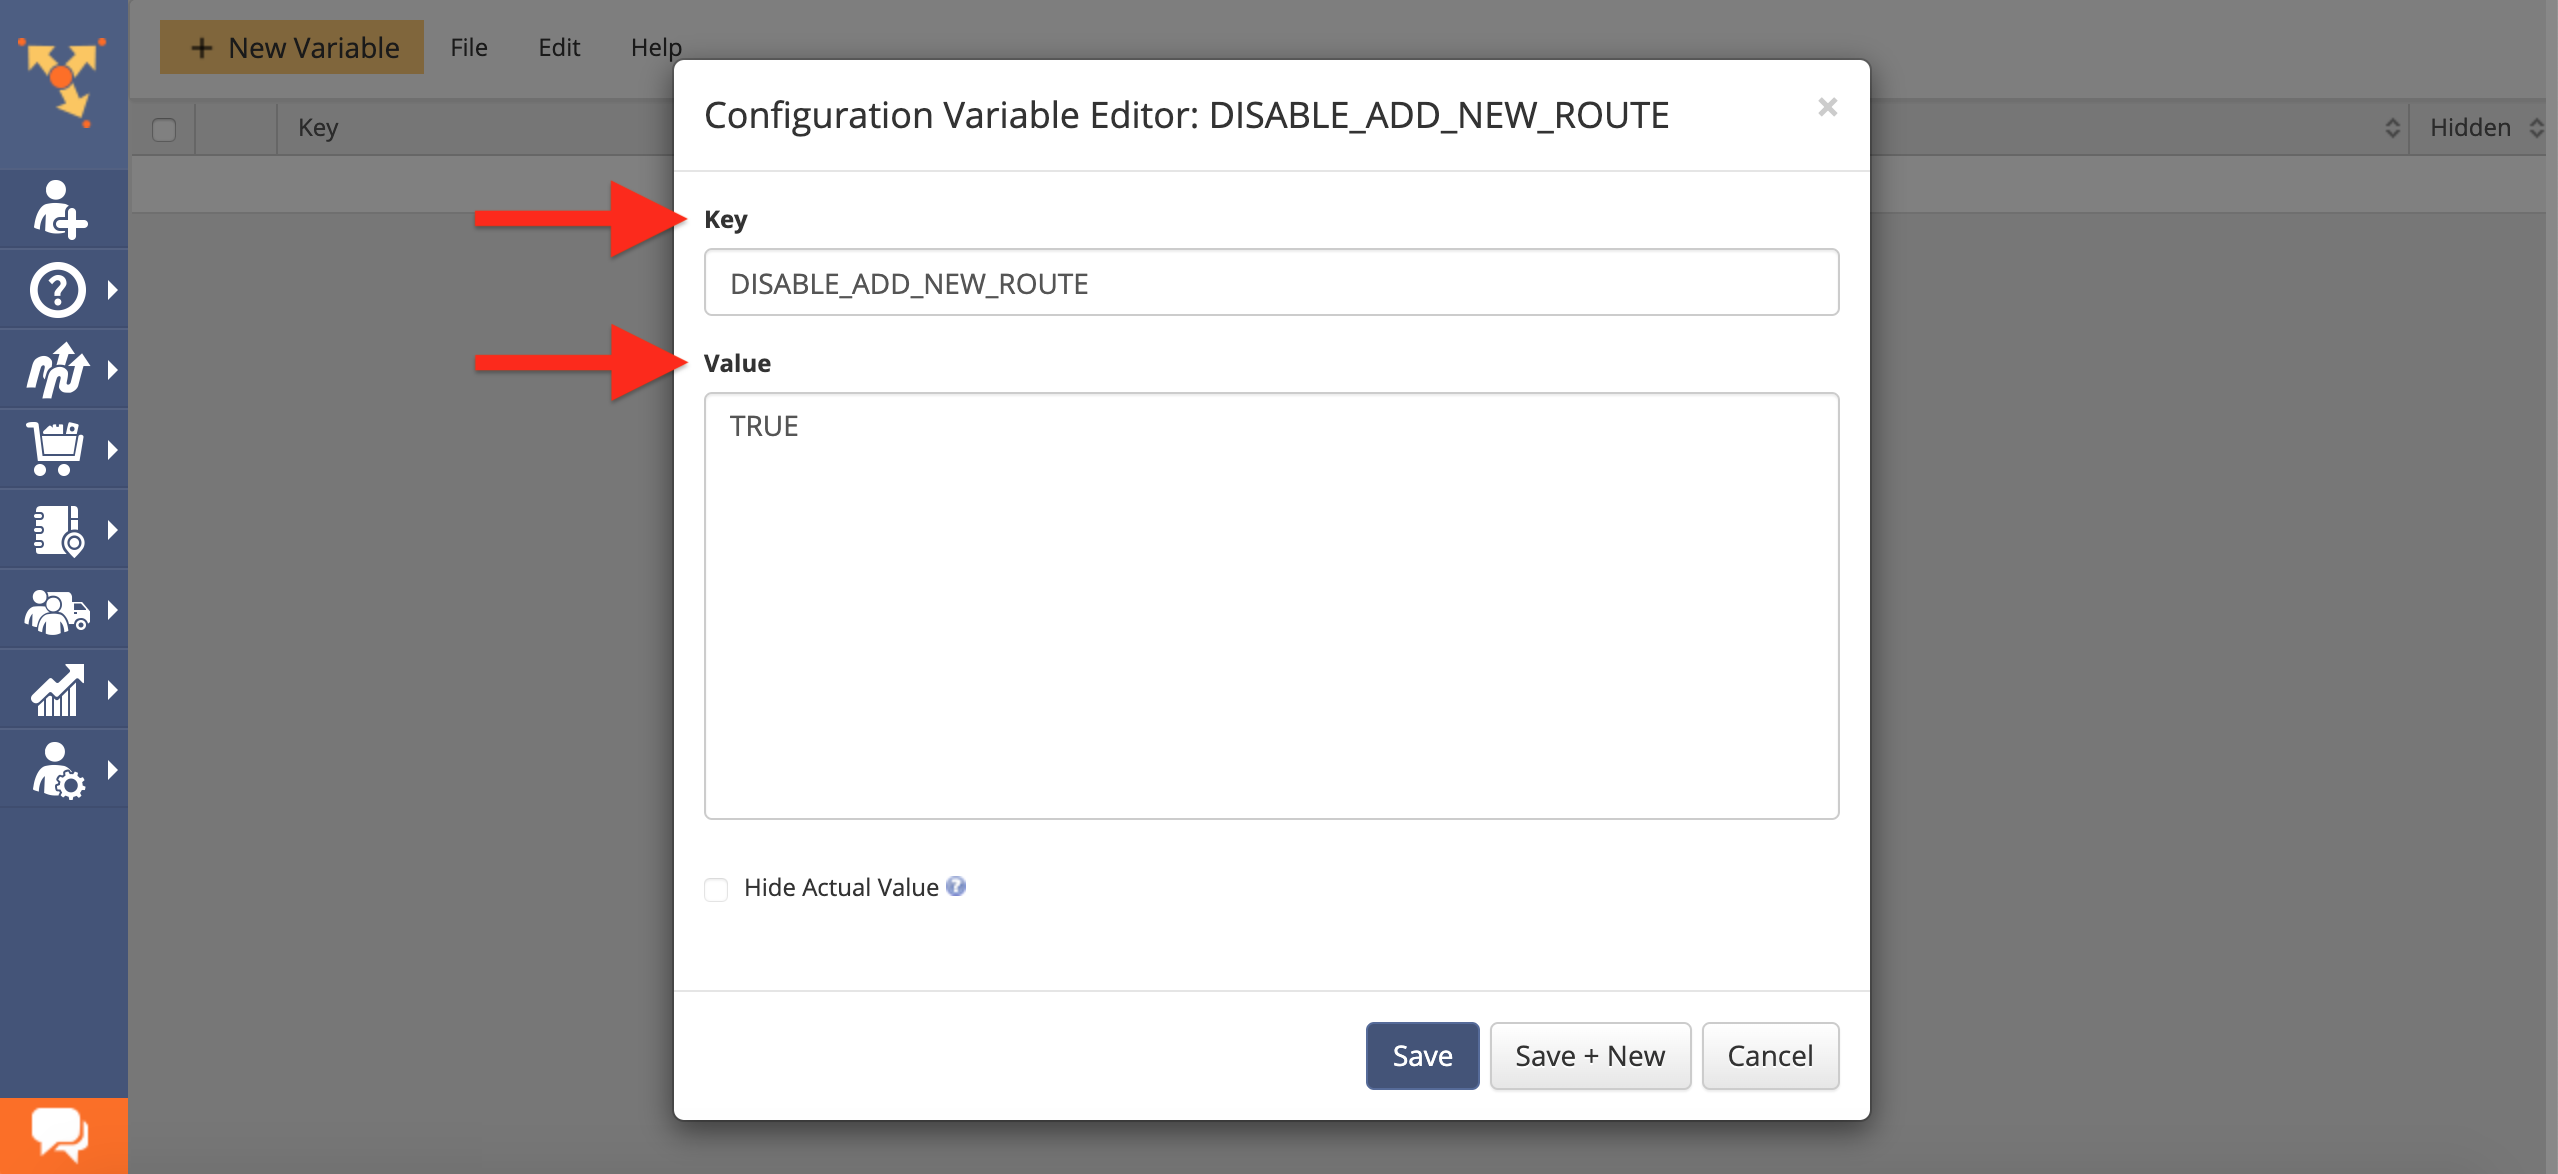
After that, fill out the “Key” and “Value” fields with the preferred white labeling configuration details:
- Key: The name or ID of the white-labeling configuration you want to create, enable, disable, or customize for your Route4Me iOS Route Planner (Route4Me account);
- Value: The value that enables or disables the given white-labeling configuration, adds custom text to particular UI elements of the app or modifies other settings and UI elements.
To apply the changes, click on the “Save” button. To learn more about using Route4Me’s Advanced Configuration Editor for creating, enabling, disabling, and customizing your Route4Me account white-labeling configurations, visit this page. NOTE: White-labeling configurations are enabled for your entire Route4Me account and all associated sub-user accounts.
Route4Me iOS Route Planner White-Labeling Configurations
The table below provides the list of white-labeling configurations you can enable for your Route4Me account and all associated sub-user accounts. Configurations are enabled using the “TRUE” value and disabled using the “FALSE” value. Certain white-labeling configurations can be configured to modify specific UI elements (i.e., change interface text, etc.). Please refer to the table below for enabling, disabling, or modifying white-labeling configurations for your Route4Me iOS Route Planner.
| Feature | Enable/Disable | Description |
|---|---|---|
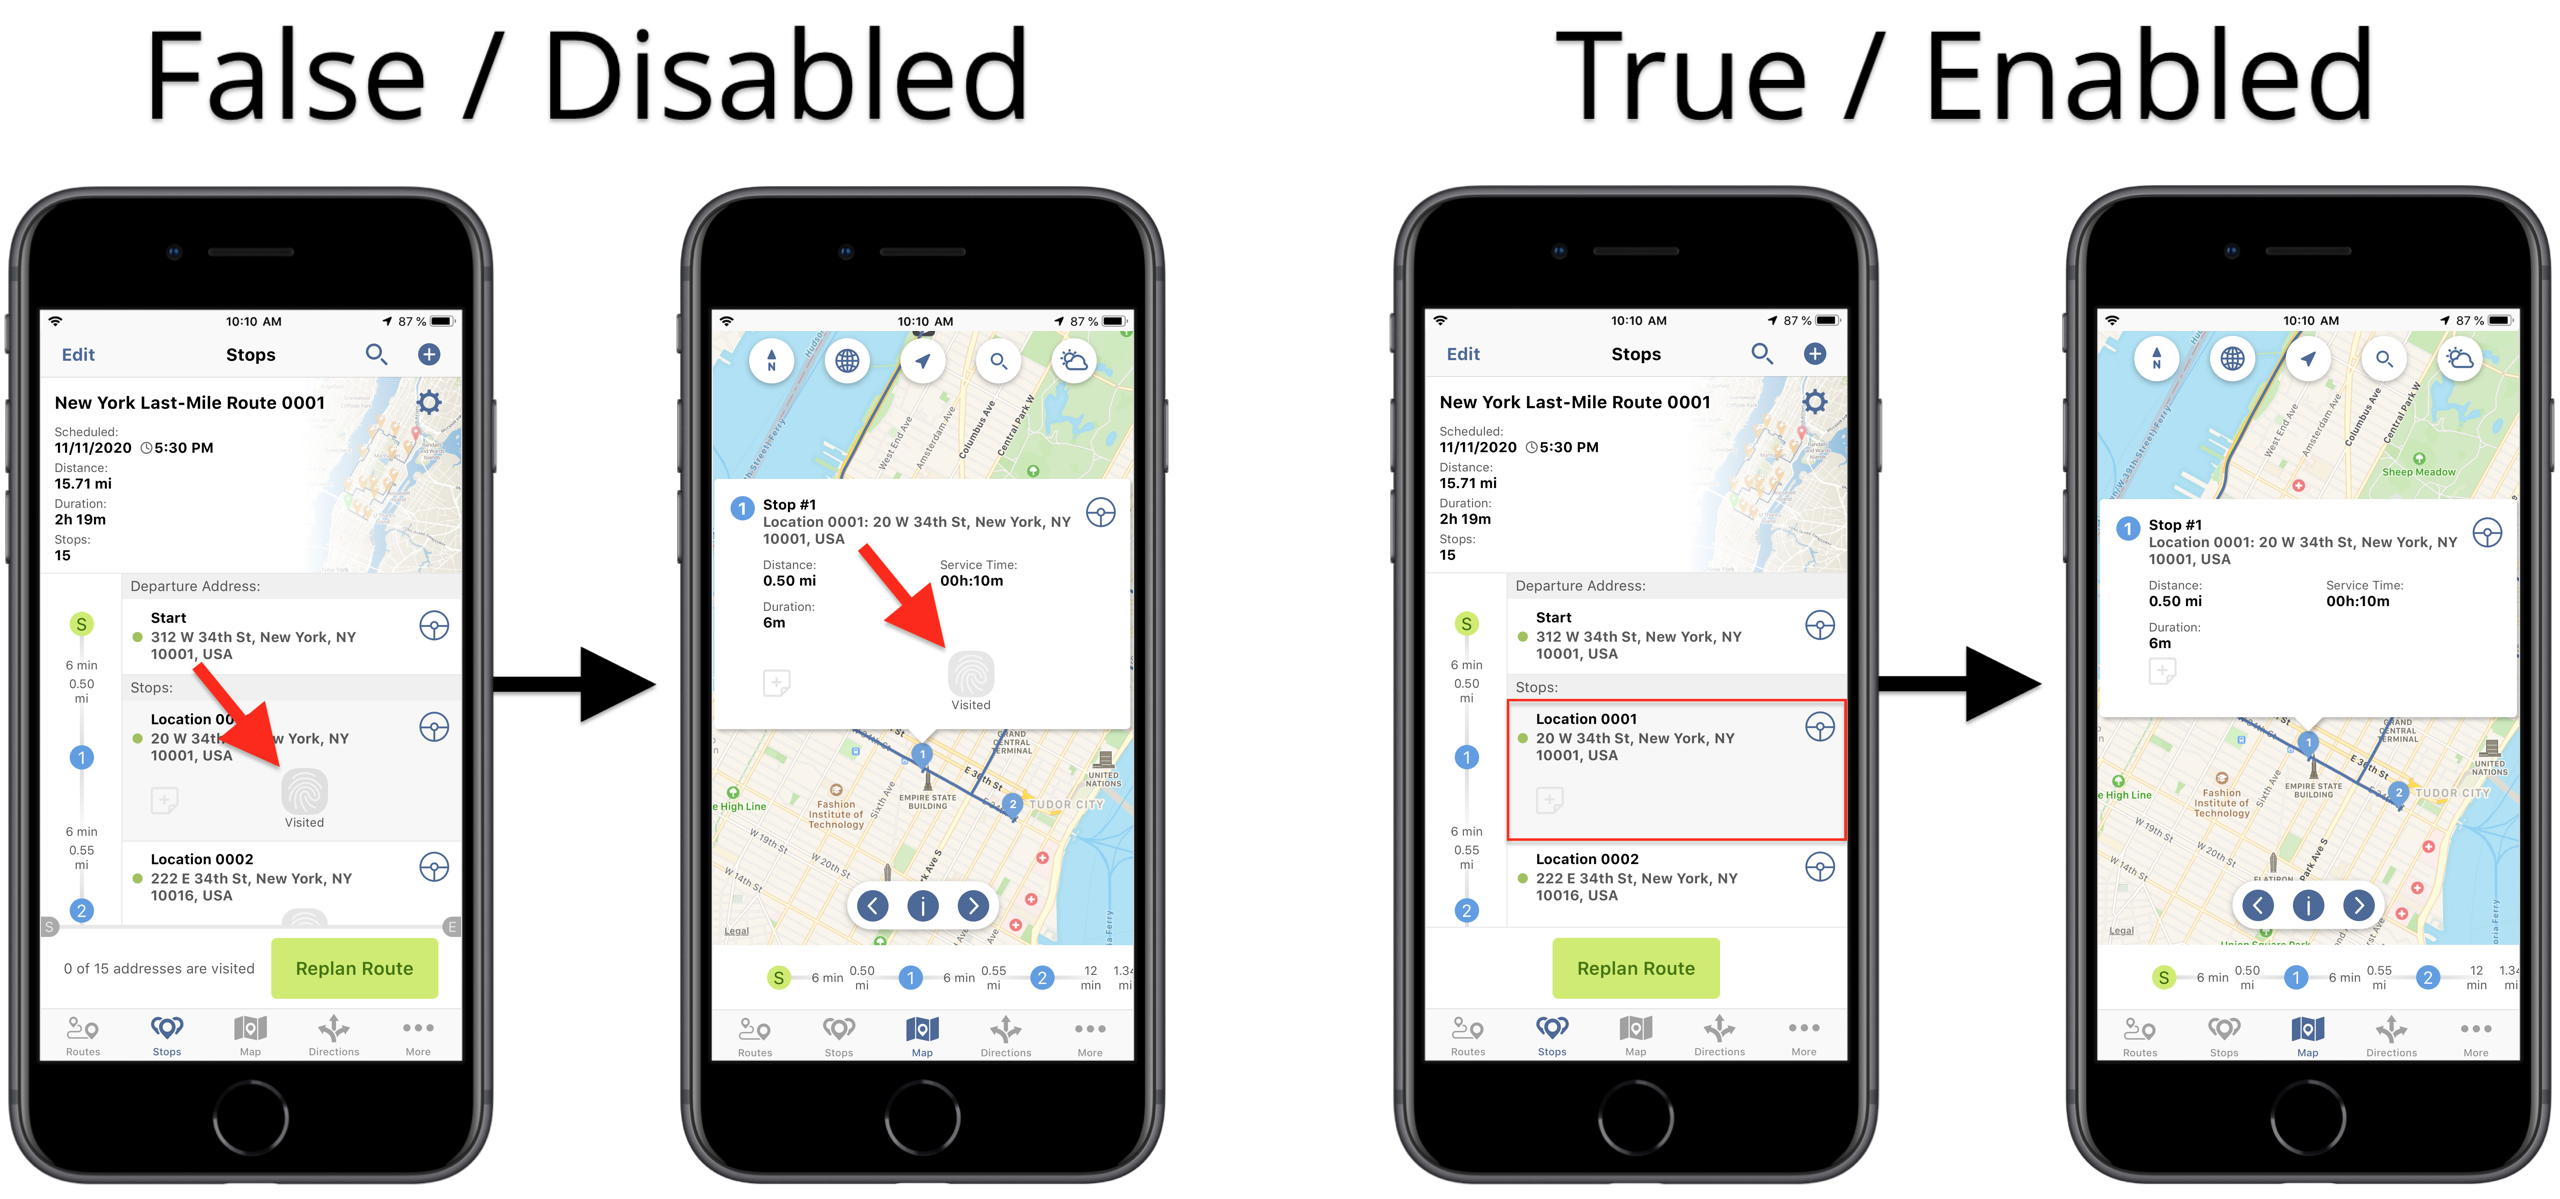
| HIDE_VISITED_MENU | TRUE / FALSE | When this white-labeling configuration is enabled (set to “TRUE”), it permits you to hide the UI element (button) used for marking stops on routes as Visited. NOTE: After you mark a particular route stop as Visited, the app automatically allows you to mark this route stop as Departed. Thus, when hiding the button that allows marking route stops as Visited, consequently, you are also hiding the button that allows marking route stops as Departed. |
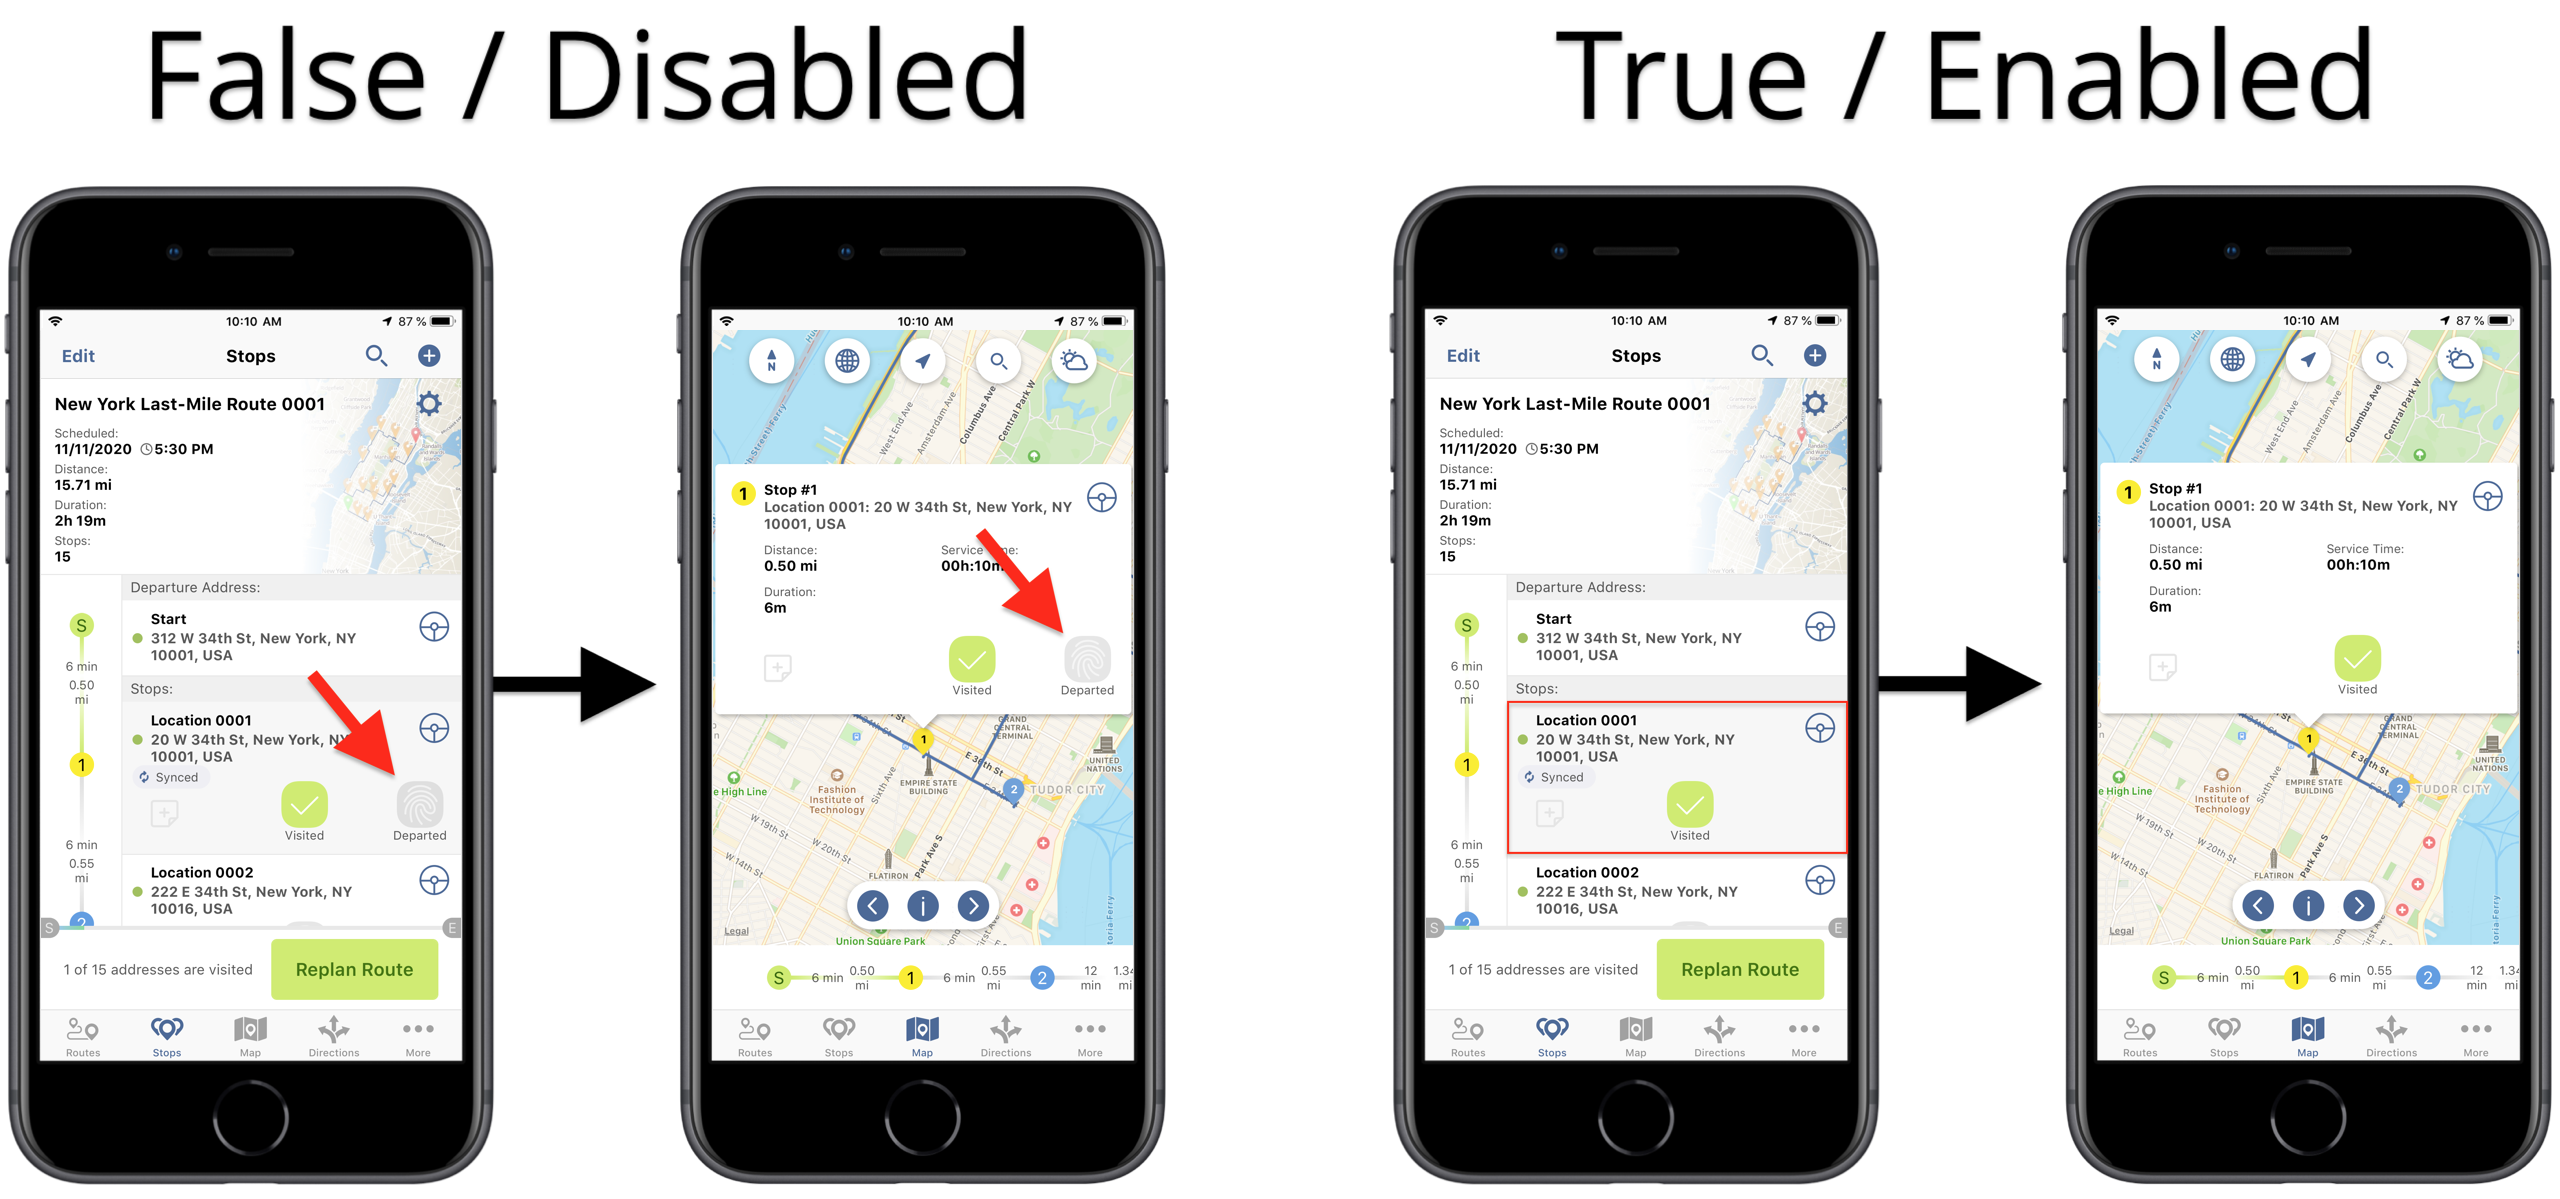
| HIDE_DEPARTED_MENU | TRUE /FALSE | When this white-labeling configuration is enabled (set to “TRUE”), it permits you to hide the UI element (button) used for marking stops on routes as Departed. If the “HIDE_VISITED_MENU” white-labeling configuration is disabled (set to “FALSE”) and the “HIDE_DEPARTED_MENU” white-labeling configuration is enabled (set to “TRUE”), then you can mark your route stops as Visited but the UI element (button) that permits you to mark stops as Departed will be hidden. |
| VISITED_MENU_TEXT | Custom Text | When this white-labeling configuration is added, it permits you to specify the custom text that you want to be displayed under the UI element (button) that is used for marking route destinations as Visited. |
| DEPARTED_MENU_TEXT | Custom Text | When this white-labeling configuration is added, it permits you to specify the custom text that you want to be displayed under the UI element (button) that is used for marking route destinations as Departed. |
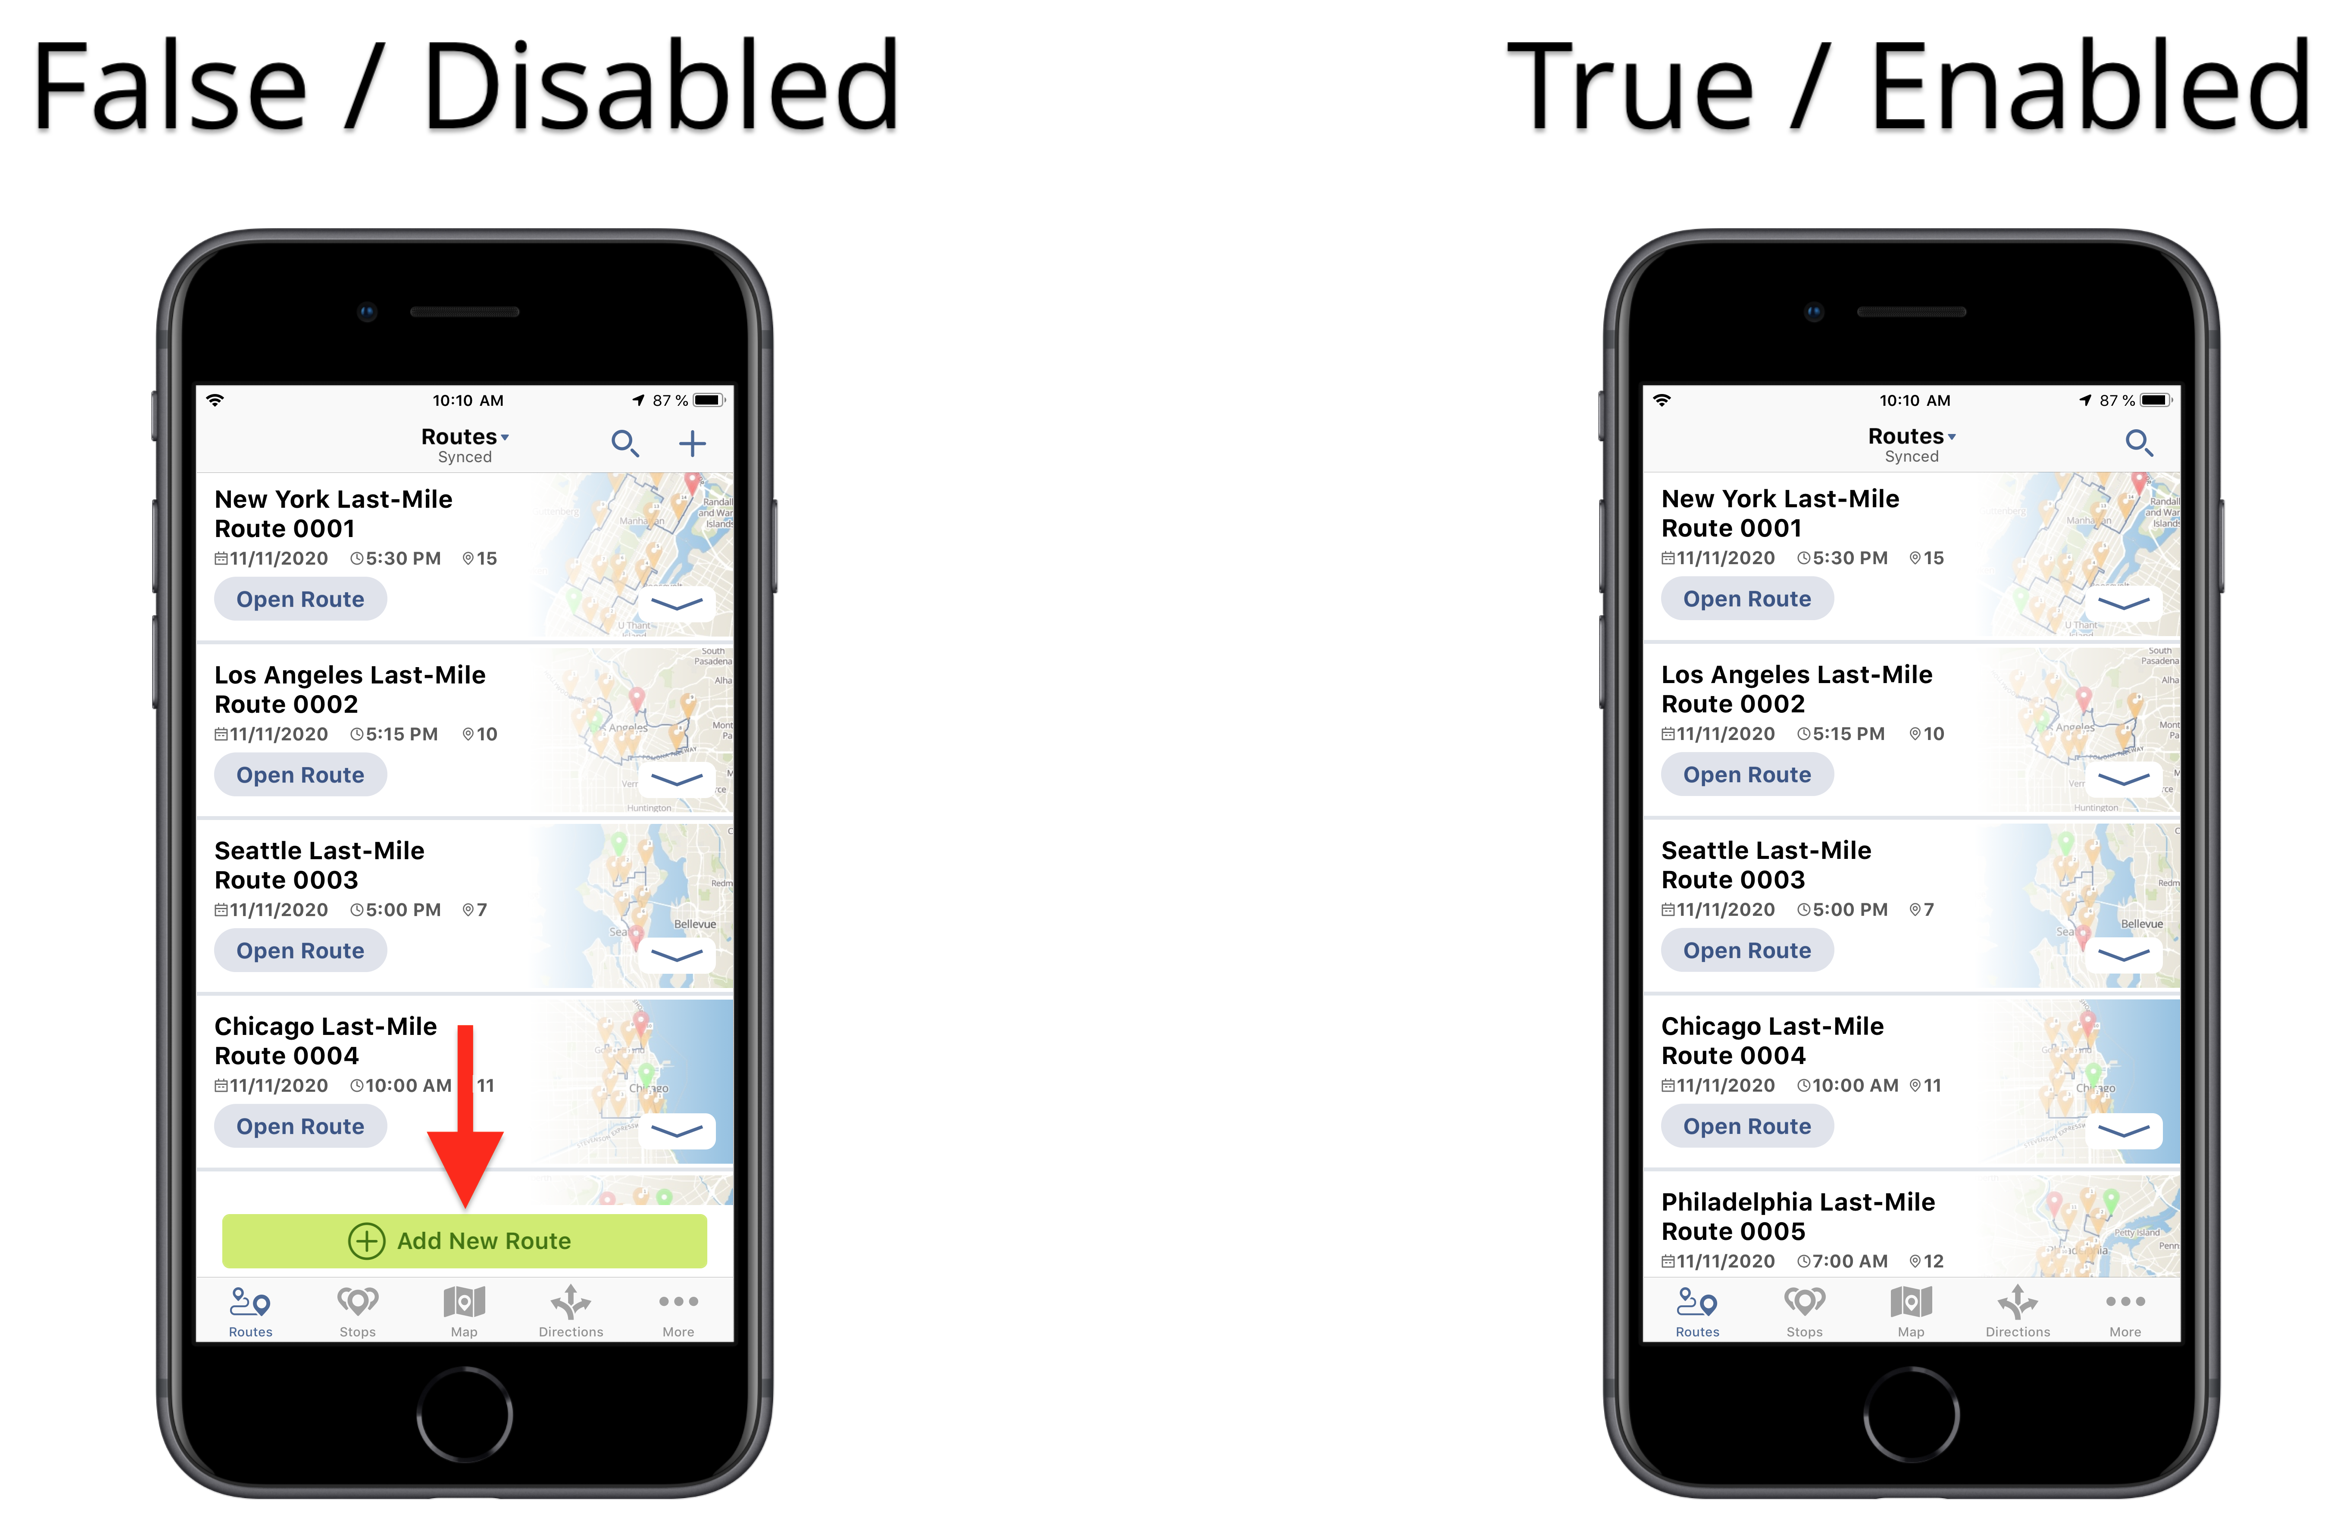
| DISABLE_ADD_NEW_ROUTE | TRUE / FALSE | When this white-labeling configuration is enabled (set to “TRUE”), it hides the UI element (button) on the “Routes” screen that allows you to start planning and optimizing new routes. |
| HIDE_PLAN_ROUTE_BUTTON | TRUE / FALSE | When this white-labeling configuration is enabled (set to “TRUE”), it hides the “Plan Route” UI element (button) that permits you to optimize a new route after specifying this route’s settings and adding/importing addresses. In this way, you can start planning a new route, specify this route’s settings, add or import route addresses, and only save this route as a Draft without the ability to optimize and synchronize it with your Route4Me Routes List. |
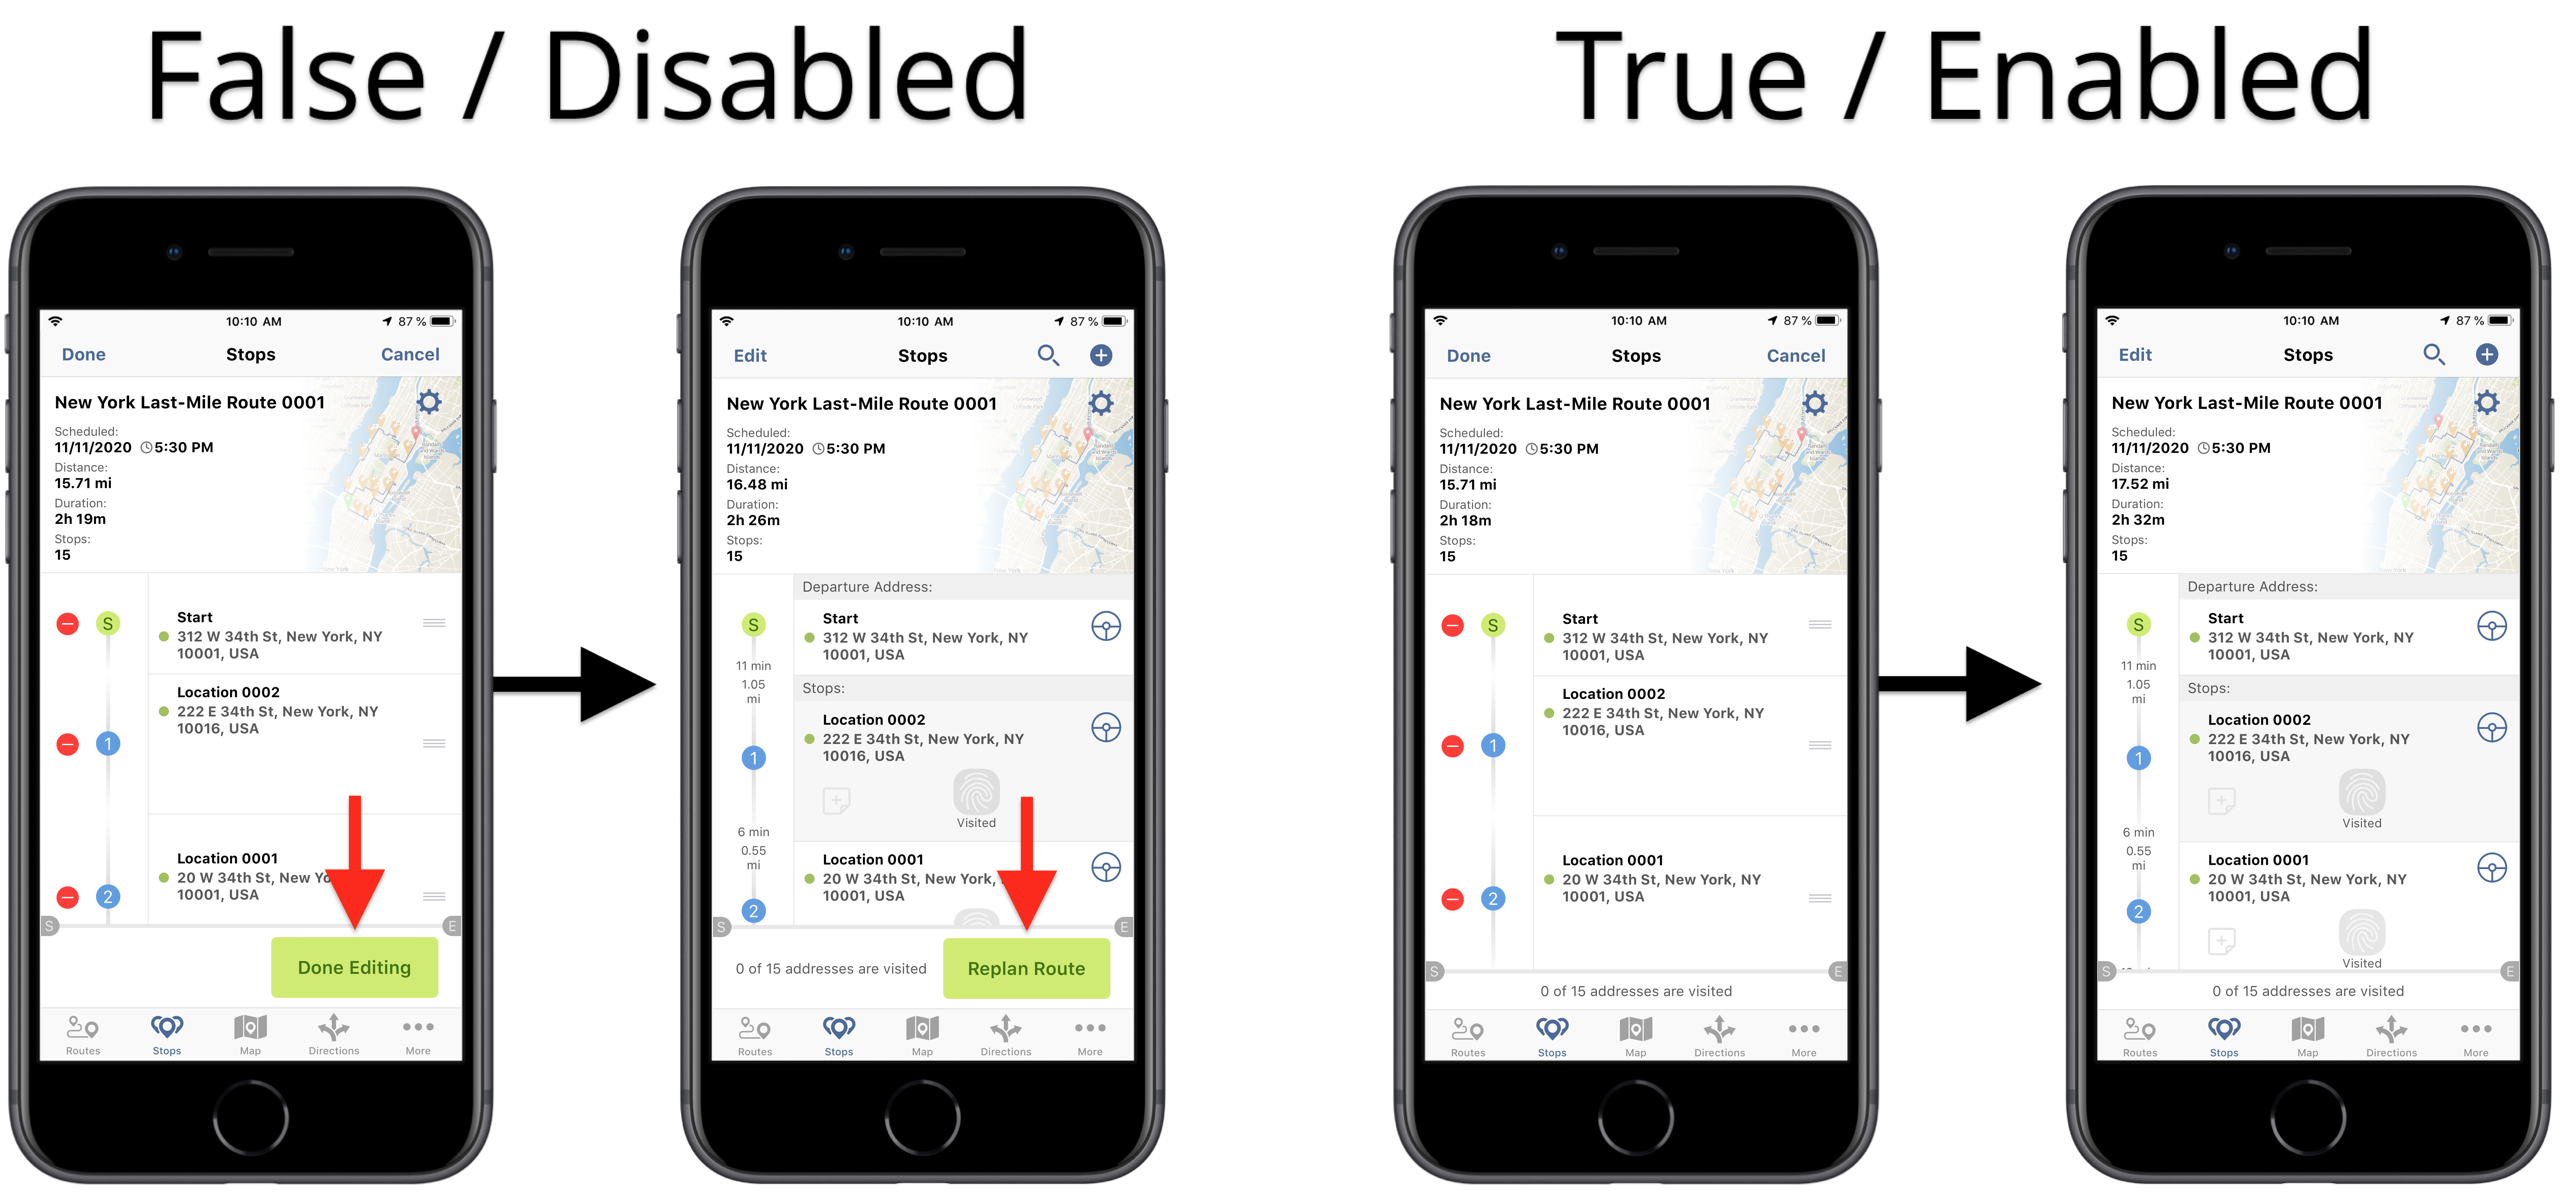
| HIDE_REPLAN_ROUTE_BUTTON | TRUE / FALSE | When this white-labeling configuration is enabled (set to “TRUE”), it hides the “Done Editing” and “Replan Route” UI elements (buttons) on the “Stops” screen of your routes that permit you to re-optimize already planned routes. Re-optimizing a planned route permits you to either apply the new optimization settings or re-optimize the route after modifying its sequence of stops and/or optimization settings. |
| HIDE_SHARE_ROUTE_MENU | TRUE / FALSE | When this white-labeling configuration is enabled (set to “TRUE”), it prohibits you from sharing routes by hiding all route sharing UI elements/buttons from all app interfaces. |
| HIDE_DUPLICATE_ROUTE_MENU | TRUE / FALSE | When this white-labeling configuration is enabled (set to “TRUE”), it prohibits you from duplicating routes by hiding all Duplicate Route UI elements/options from all app interfaces. |
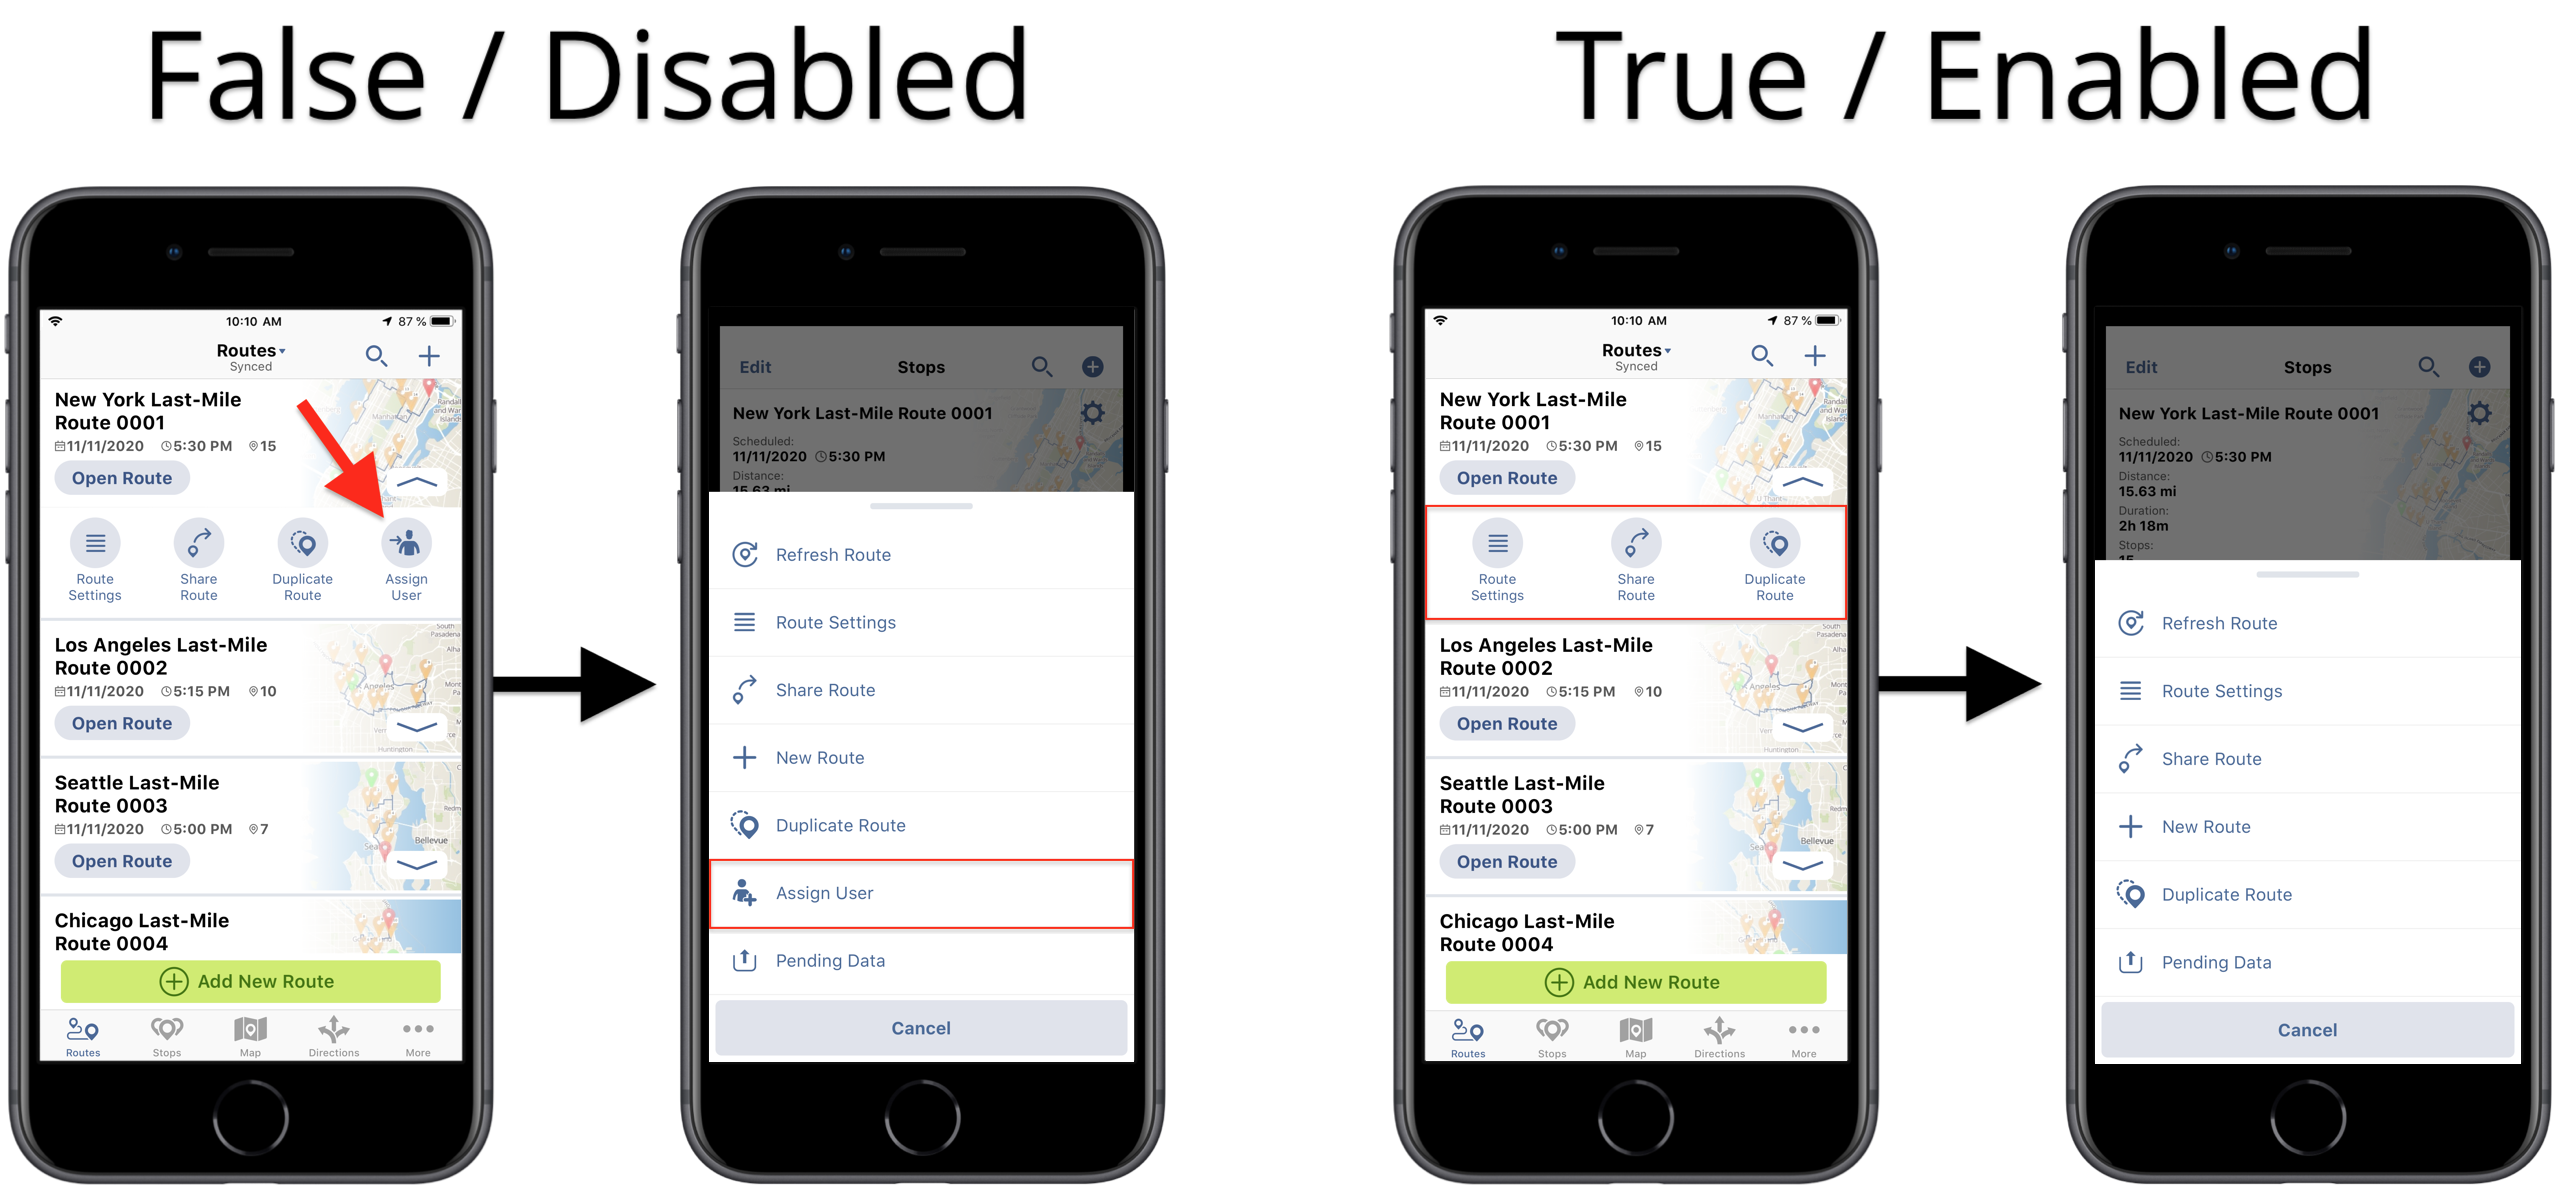
| HIDE_ASSIGN_USER_MENU | TRUE / FALSE | When this white-labeling configuration is enabled (set to “TRUE”), it prohibits you from assigning users to routes by hiding all Assign User UI elements/buttons from all app interfaces. |
iOS Route Planner White-Labeling Configurations Examples
Below you can find examples of how Route4Me’s white labeling configurations can be used for customizing the user interface and other features of your Route4Me iOS (iPhone) Route Planner.
HIDE_VISITED_MENU
When the “HIDE_VISITED_MENU” white-labeling configuration is enabled (set to “TRUE“), it hides the UI element (button) for marking route destinations as Visited from all app interfaces. When marking a route stop as Visited using Route4Me’s iOS Route Planner, the app automatically permits you to mark the given stop as Departed. Thus, when hiding the UI element (button) that allows you to mark stops as Visited, consequently, you are also hiding/disabling the UI element (button) that allows you to mark stops as Departed. To learn more about marking route stops as Visited and Departed using your Route4Me iOS Route Planner, visit this page.
HIDE_DEPARTED_MENU
When the “HIDE_DEPARTED_MENU” white-labeling configuration is enabled (set to “TRUE“), it allows you to hide the UI element (button) used for marking route stops as Departed. If the “HIDE_VISITED_MENU” white-labeling configuration is disabled (set to “FALSE“) and the “HIDE_DEPARTED_MENU” configuration is enabled (set to “TRUE“), then you will be able to mark your route stops as Visited but the UI element (button) that allows marking route stops as Departed will be automatically hidden. To learn more about marking route stops as Visited and Departed using your Route4Me iOS Route Planner, visit this page.
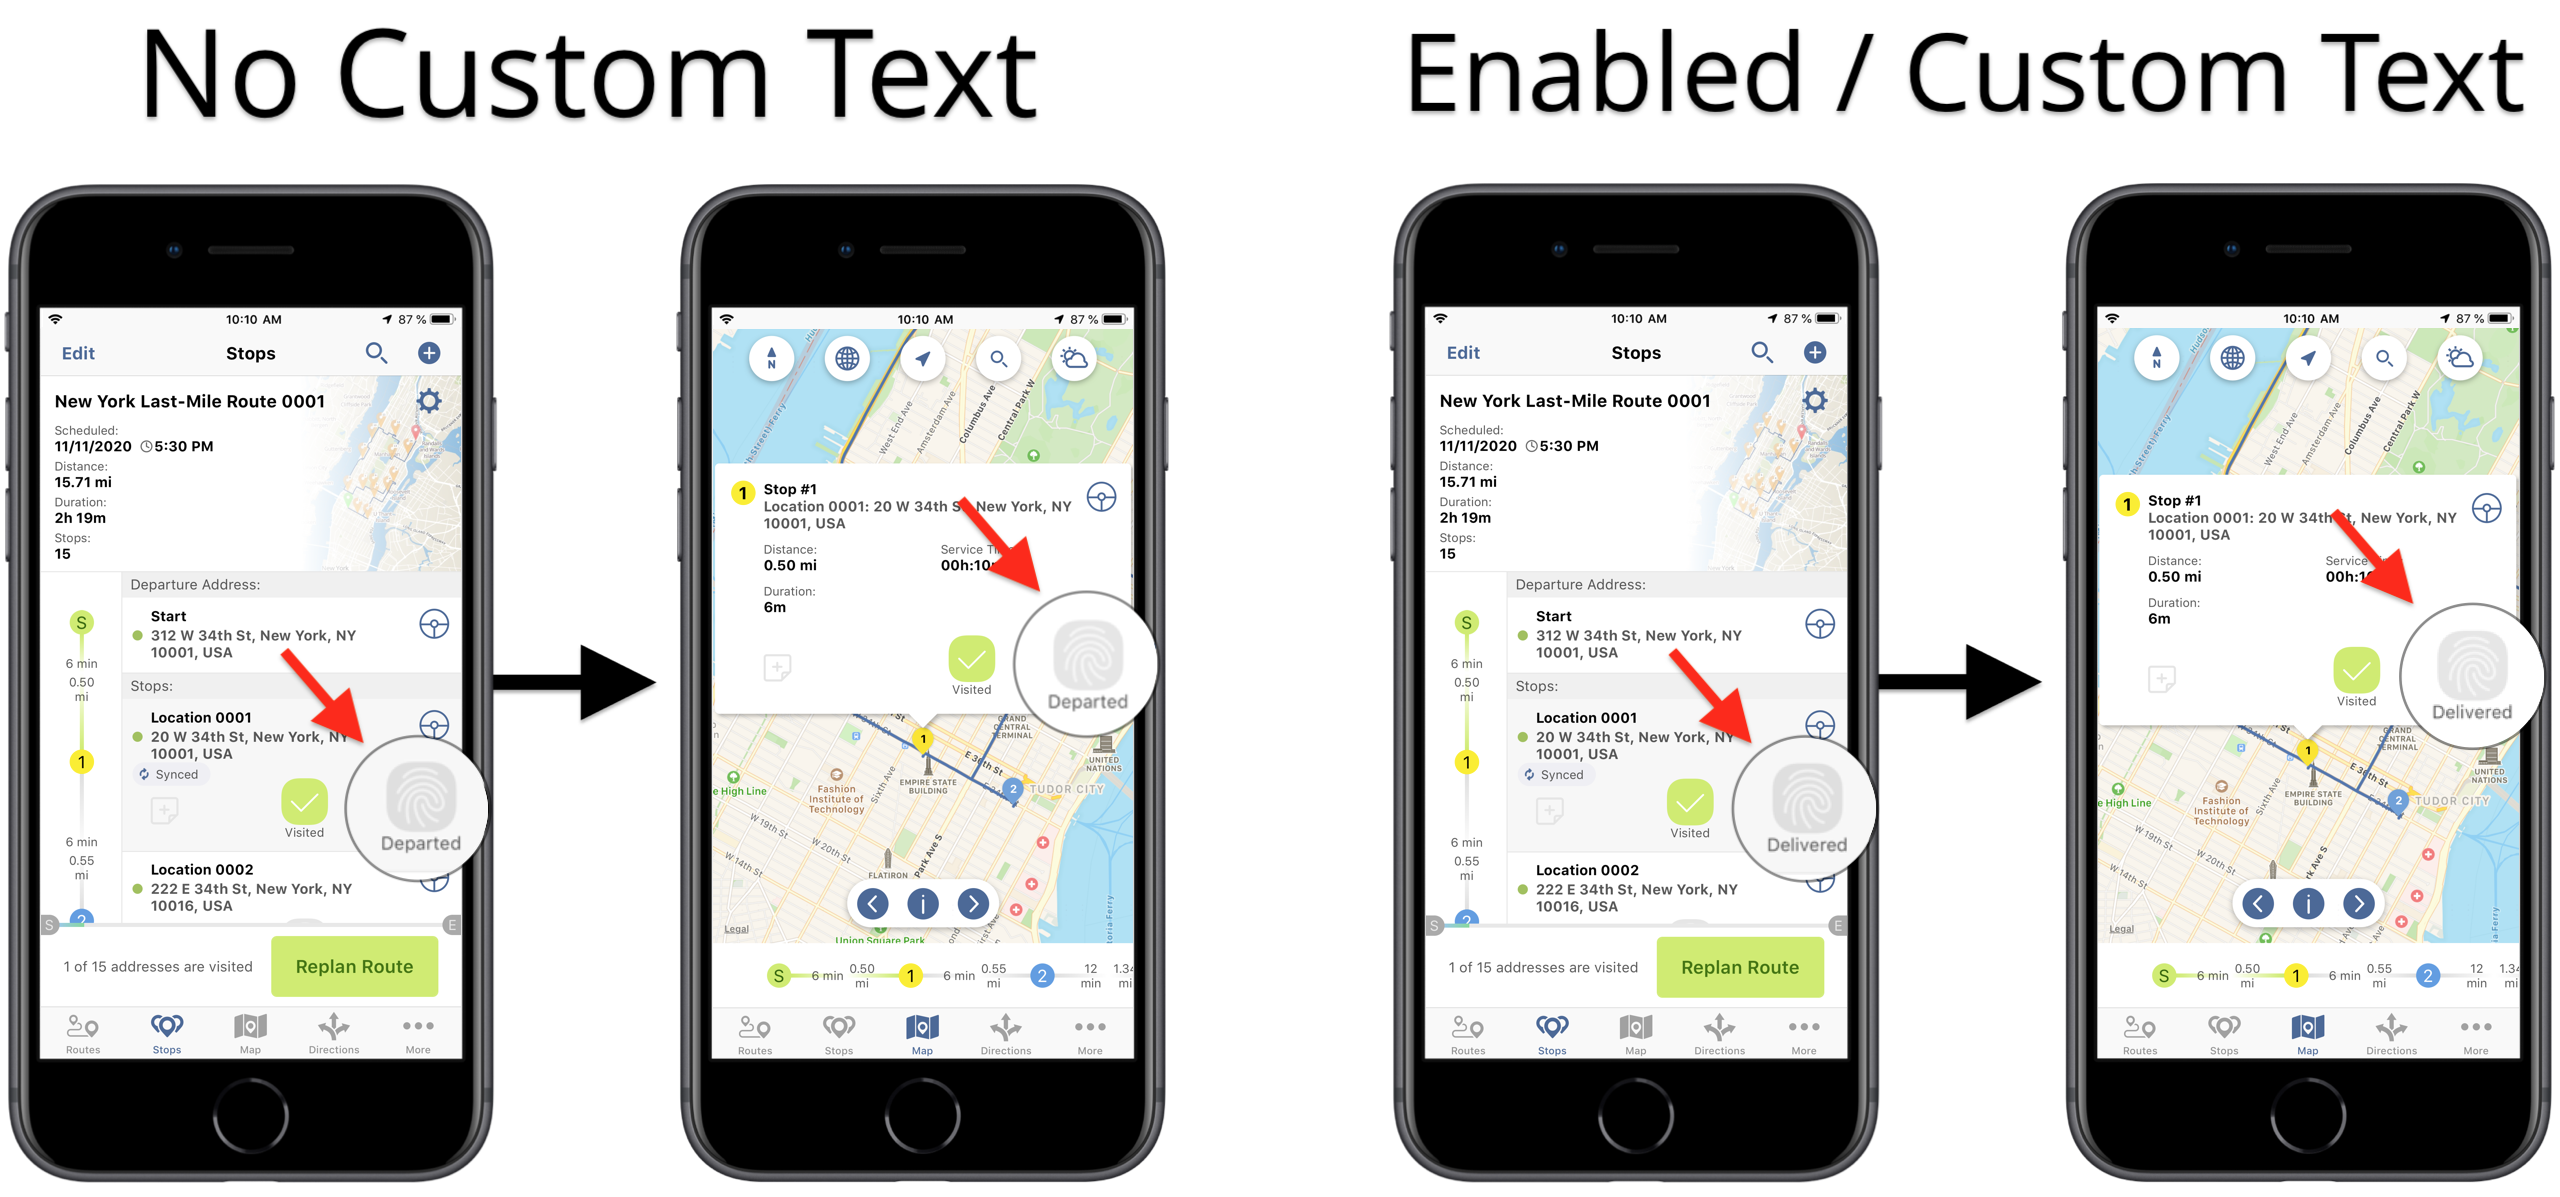
VISITED_MENU_TEXT
When the “VISITED_MENU_TEXT” white-labeling configuration is created/enabled for your Primary Route4Me account with a particular custom text, the specified custom text is displayed under the UI element (button) used for marking route destinations as Visited on all app screens/app interfaces. By default (without this white -labeling configuration), the UI element (button) that is used for marking route destinations as Visited displays the “Visited” text.

DEPARTED_MENU_TEXT
When the “DEPARTED_MENU_TEXT” white-labeling configuration is created/enabled for your Primary Route4Me account with a particular custom text, the specified custom text is displayed under the UI element (button) that is used for marking route destinations as Departed on all app screens/app interfaces. By default (without this white -labeling configuration), the UI element (button) that is used for marking route destinations as Departed displays the “Departed” text.
DISABLE_ADD_NEW_ROUTE
When the “DISABLE_ADD_NEW_ROUTE” white-labeling configuration is enabled (set to “TRUE“), it hides the “Add New Route” UI element (button) on the “Routes” screen that is used for starting to plan and optimize a new route. Since the “Add New Route” button on the “Routes” screen is the only option to start planning a new route, by enabling this white-labeling configuration, you disable the ability to plan new routes for your account and all associated sub-user accounts. To learn more about planning a new route on your Route4Me iOS Route Planner, visit this page.
HIDE_PLAN_ROUTE_BUTTON
When the “HIDE_PLAN_ROUTE_BUTTON” white-labeling configuration is enabled (set to “TRUE“), it permits you to hide the “Plan Route” UI element (button) used for optimizing a new route after specifying this route’s settings and adding or importing addresses. Thus, when this white-labeling configuration is enabled, you can start planning a new route, specify this route’s settings, add or import route addresses, and then you can save this route only as a Draft without having the ability to optimize it. To learn more about creating and managing Draft Routes on your Route4Me iOS Route Planner, visit this page.

HIDE_REPLAN_ROUTE_BUTTON
When the “HIDE_REPLAN_ROUTE_BUTTON” white-labeling configuration is enabled (set to “TRUE“), it permits you to hide the “Done Editing” UI element (button) on the “Stops” screen when editing a route and the “Replan Route” UI element (button) on the “Stops” screen for re-optimizing a modified route. The “Done Editing” UI element (button) on the “Stops” screen is used for applying dynamic modifications to a route without optimizing it. The “Replan Route” UI element (button) on the “Stops” screen permits you to re-optimize already planned routes that have been modified in any way. To learn more about modifying routes using Route4Me’s iOS Route Planner, visit this page.
HIDE_SHARE_ROUTE_MENU
When the “HIDE_SHARE_ROUTE_MENU” white-labeling configuration is enabled (set to “TRUE“), it allows you to hide/disable the route sharing UI element (button/option) in all app menus and interfaces on your Route4Me iOS Route Planner. To learn more about sharing routes using your Route4Me iOS Route Planner, visit this page.
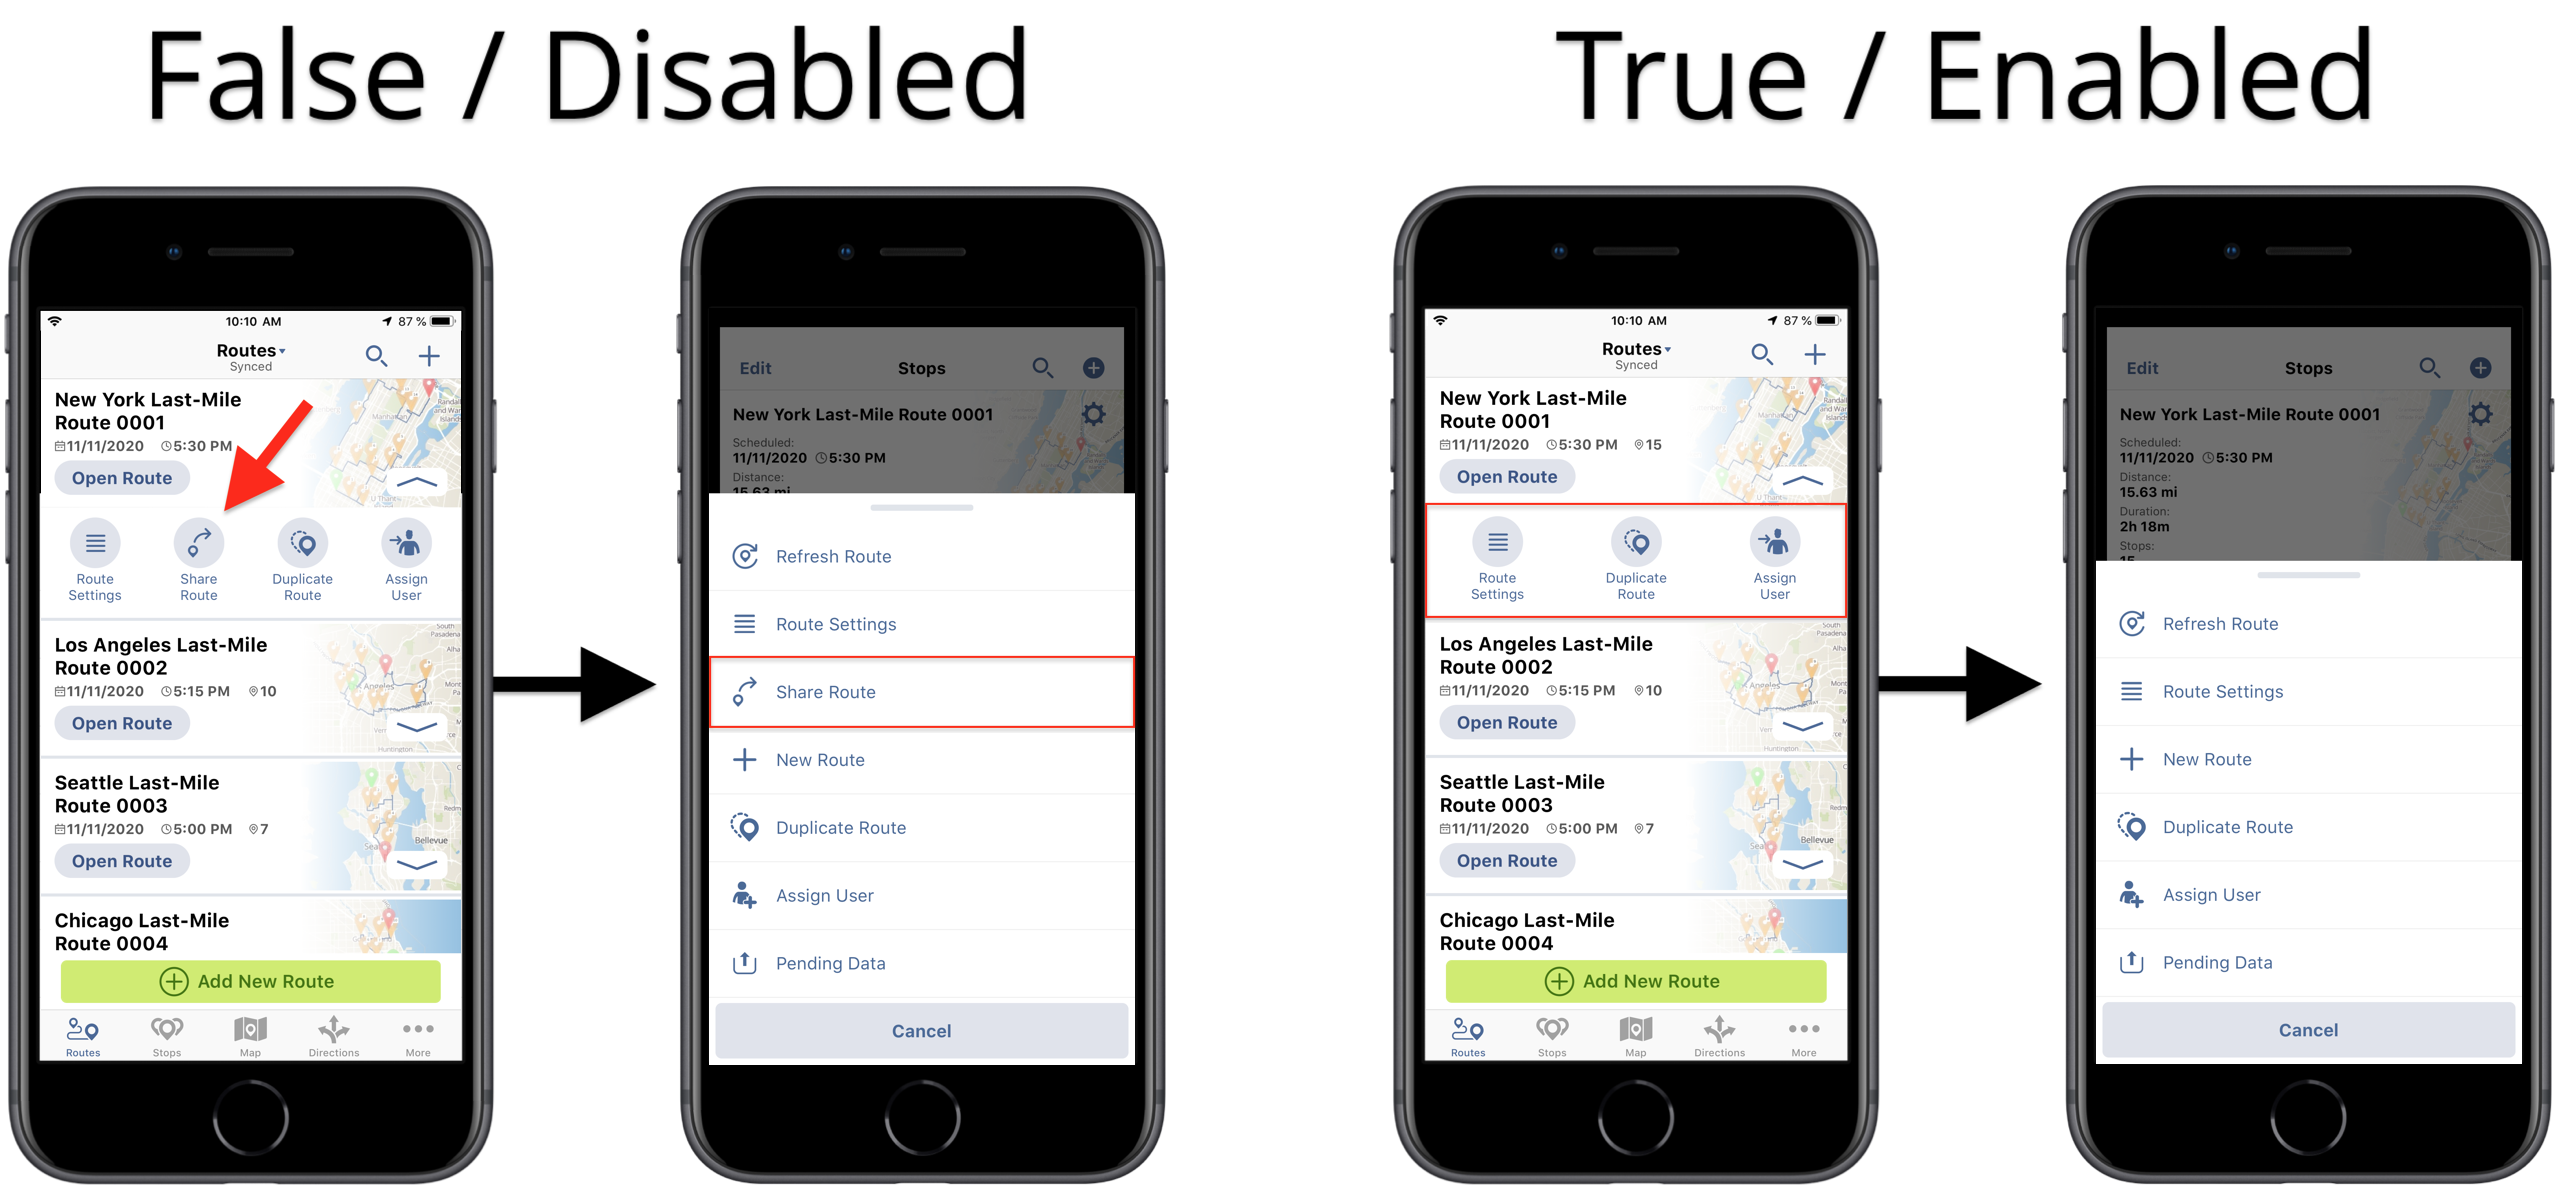
HIDE_DUPLICATE_ROUTE_MENU
When the “HIDE_DUPLICATE_ROUTE_MENU” white-labeling configuration is enabled (set to “TRUE“), it allows you to hide/disable the Duplicate Route UI element (button/option) in all app menus/app interfaces on your Route4Me iOS Route Planner. To learn more about duplicating routes using your Route4Me iOS Route Planner, visit this page.

HIDE_ASSIGN_USER_MENU
When the “HIDE_ASSIGN_USER_MENU” white-labeling configuration is enabled (set to “TRUE“), it allows you to hide/disable the Assign User UI element (button/option) in all app menus/app interfaces on your Route4Me iOS Route Planner. To learn more about assigning users/team members to routes using your Route4Me iOS Route Planner, visit this page.
Visit Route4Me's Marketplace to Check out Associated Modules:
- Operations
Advanced Team Management Add-On
- Operations
Audit Logging and Activity Stream
About author: Alex Yasko
Alex Yasko is the Go-to-Market Product Manager and Information Architecture Manager at Route4Me. With thousands of hours of experience, Alex specializes in breaking down complex last-mile optimization and routing scenarios into simple, actionable instructions, helping last-mile businesses streamline their operations effortlessly.