Service Time – Add And Edit Route Address Service Times
Route4Me’s Service Time parameter enables you to account for the time spent at each address on your last mile optimized route. It helps factor in activities like parking, unloading, and navigating to a customer’s location, ensuring more accurate route planning. This is especially useful when some customers require more time than others, which can complicate route duration calculations. By defining specific service times for each location, you can automatically calculate a more realistic total route time. This guide will show you how to effectively apply and manage Service Time in your routes.
Table of Contents
Plan Routes With Service Times – Account For Address Visit Duration
You can plan routes with Service Times by uploading or importing address spreadsheets with predefined Service Times, adding them to Optimization Profiles, or setting them manually during route optimization.
Import or Upload Spreadsheets To Specify Service Times
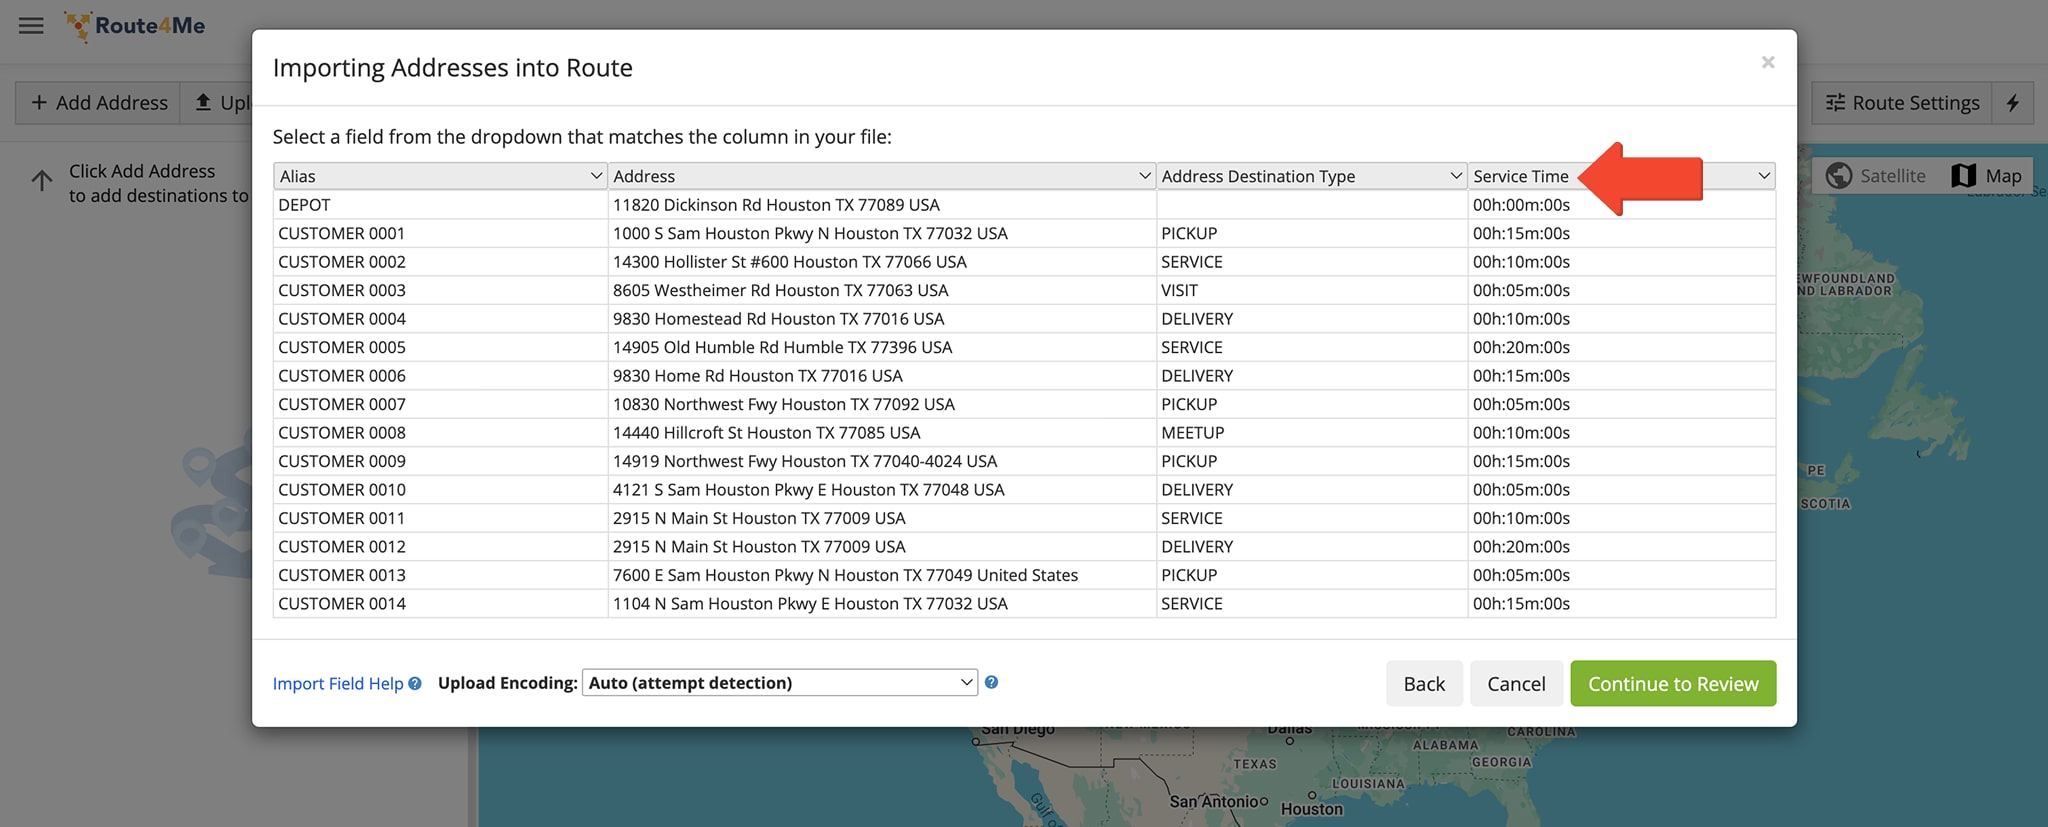
You can upload or import a spreadsheet with Service Times for each destination. To do this, go to “Operations” in the Navigation Menu and select “Plan New Route”. Then choose “Upload a File” or “Import Data” to upload or import your spreadsheet. NOTE: Learn more about route planning methods to better understand how uploading files differs from importing data.
As you plan the route, you will be directed to the “Importing Addresses into Route” window. Here, you can confirm that the system accounts for the Service Time settings you’ve included in your spreadsheet. NOTE: Learn more about specifying constraints in your route planning spreadsheets.
Add Service Times To New Or Existing Optimization Profiles
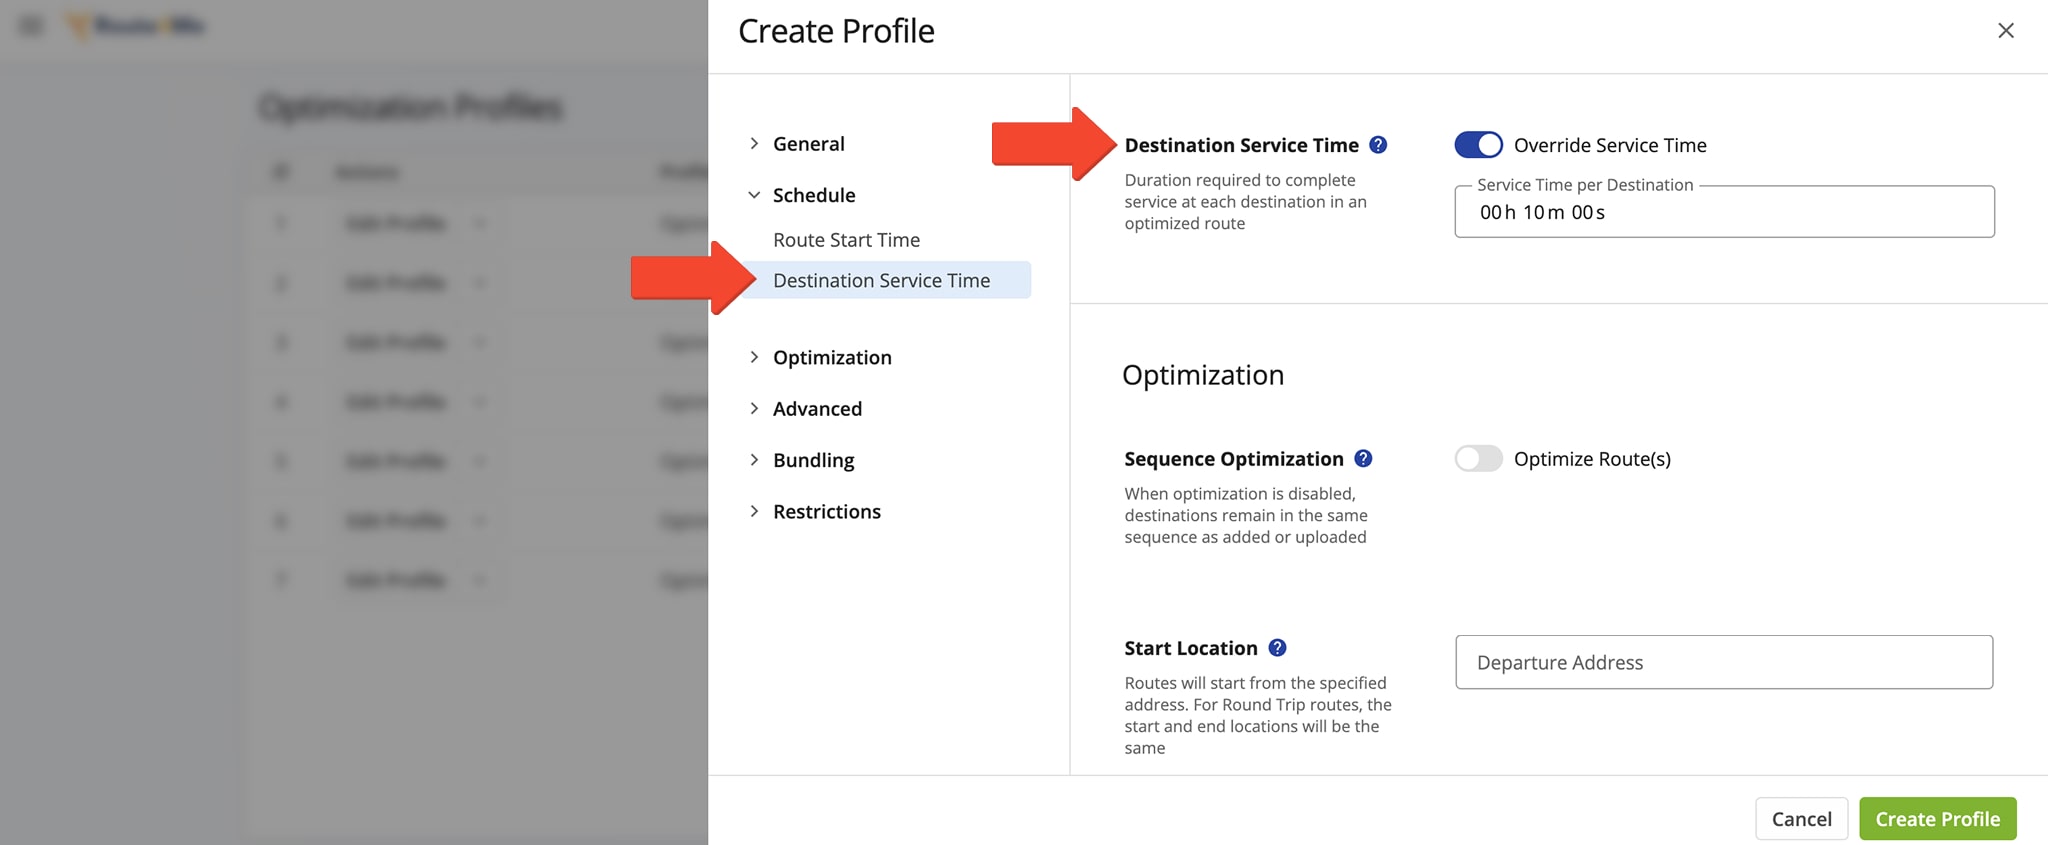
You can also add Service Times to addresses when you create or edit an Optimization Profile. To do this, go to “Settings” in the Navigation Menu and select “Optimization Profiles”. You can edit an existing profile by clicking “Edit Profile” or create a new one by selecting “Create Profile”.
Then, open the “Schedule” and click “Destination Service Time“. Toggle the “Override Service Time” toggle, then enter a Service Time in the “Service Time per Destination” field. NOTE: Learn more about creating and managing Optimization Profiles.
Open Your Optimization Profiles
Set Service Times In Optimization Settings When Planning A Route
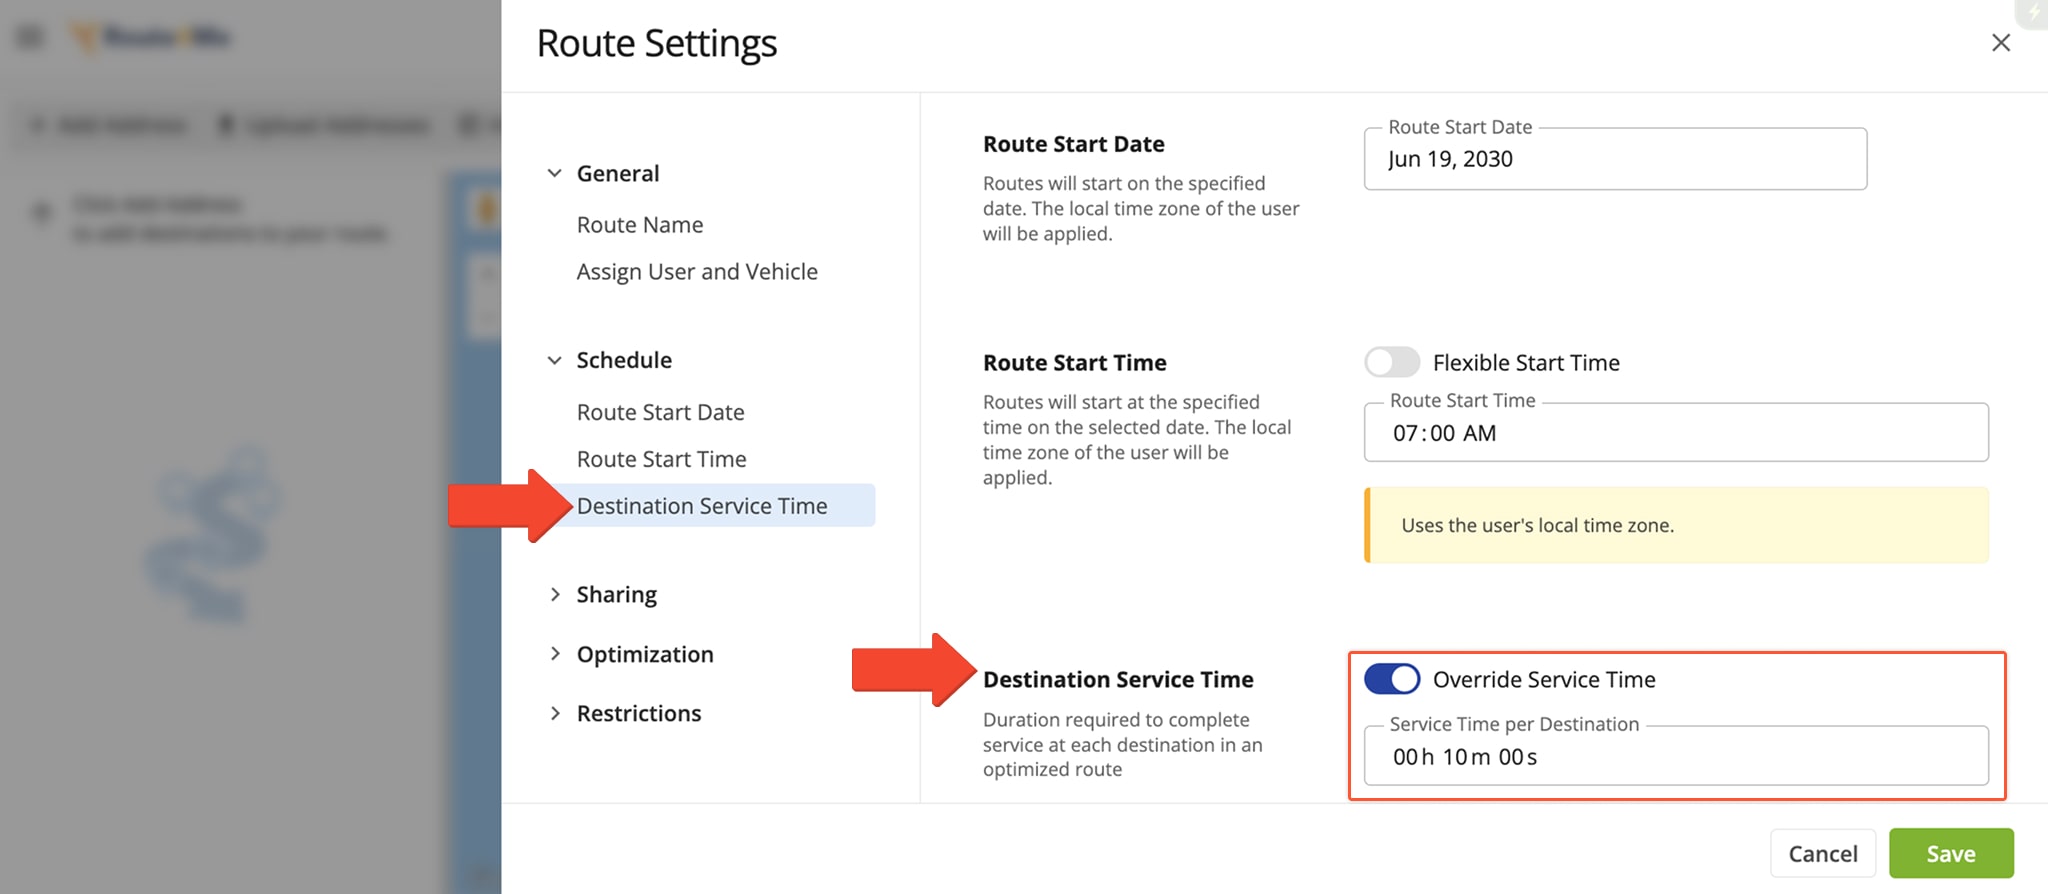
Lastly, you can set Service Times when you manually optimize a new route. Go to “Operations” in the Navigation Menu and select “Plan New Route”. Choose how you will add addresses, then click “Skip” when prompted to select an Optimization Profile.
Click “Destination Service Time” under “Schedule”. Then, turn on “Override Service Time” to enter a per destination service time .
Manage Service Times – Open, View, And Edit Service Time Details
You can easily manage Service Times by viewing and editing them through Route Snapshots, the Route Editor, and the Routes Map. These options allow you to access, adjust, and apply Service Time settings across destinations on a route.
View Planned Service Times In A Route Snapshot
From a Route Snapshot, you can view the planned Service Time for a specific route. To access a Route Snapshot, go to “Operations” in the Navigation Menu and select “Routes“. From the Routes page, click the “Open Route” button next to the route with the Service Time you wish to review.
In the left-hand Route Summary, you will find Service Time details. However, you can also filter the Route Snapshot’s Data Columns to view more detailed Service Time information. See the below table for further information.
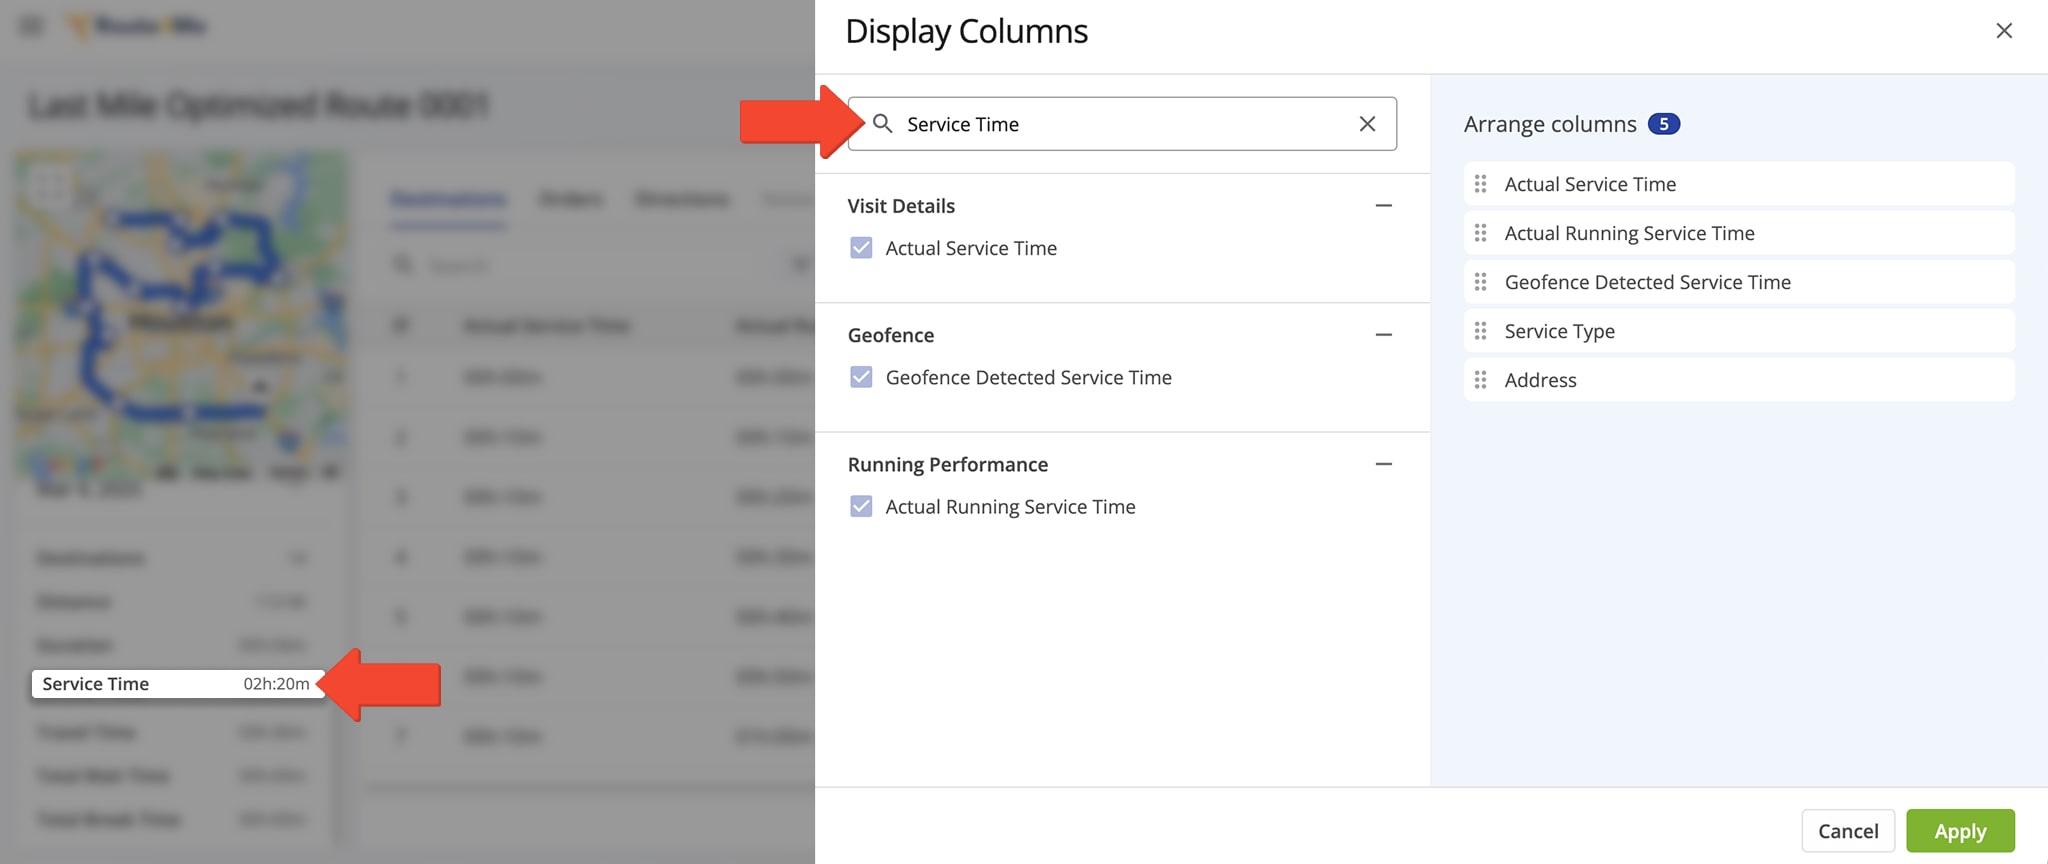
| Service Time Data Type | Section Description |
|---|---|
| Actual Service Time | The actual Service Time of all Destinations across routes scheduled for a specified timeframe. Actual Service Time is the time assigned Users spend inside Destination Geofences. |
| Actual Running Service Time | The ongoing total time spent at destinations during a route, as it accumulates in real-time. It tracks the service time as the driver performs tasks like parking, unloading, or interacting with customers, updating continuously throughout the route. |
| Geofence Detected Service Time | The amount of time a vehicle or driver spends within a predefined geofence area at a destination. This time is automatically recorded when the vehicle enters and remains within the geofence while performing service tasks. |
Use The Route Editor To Manage Service Times
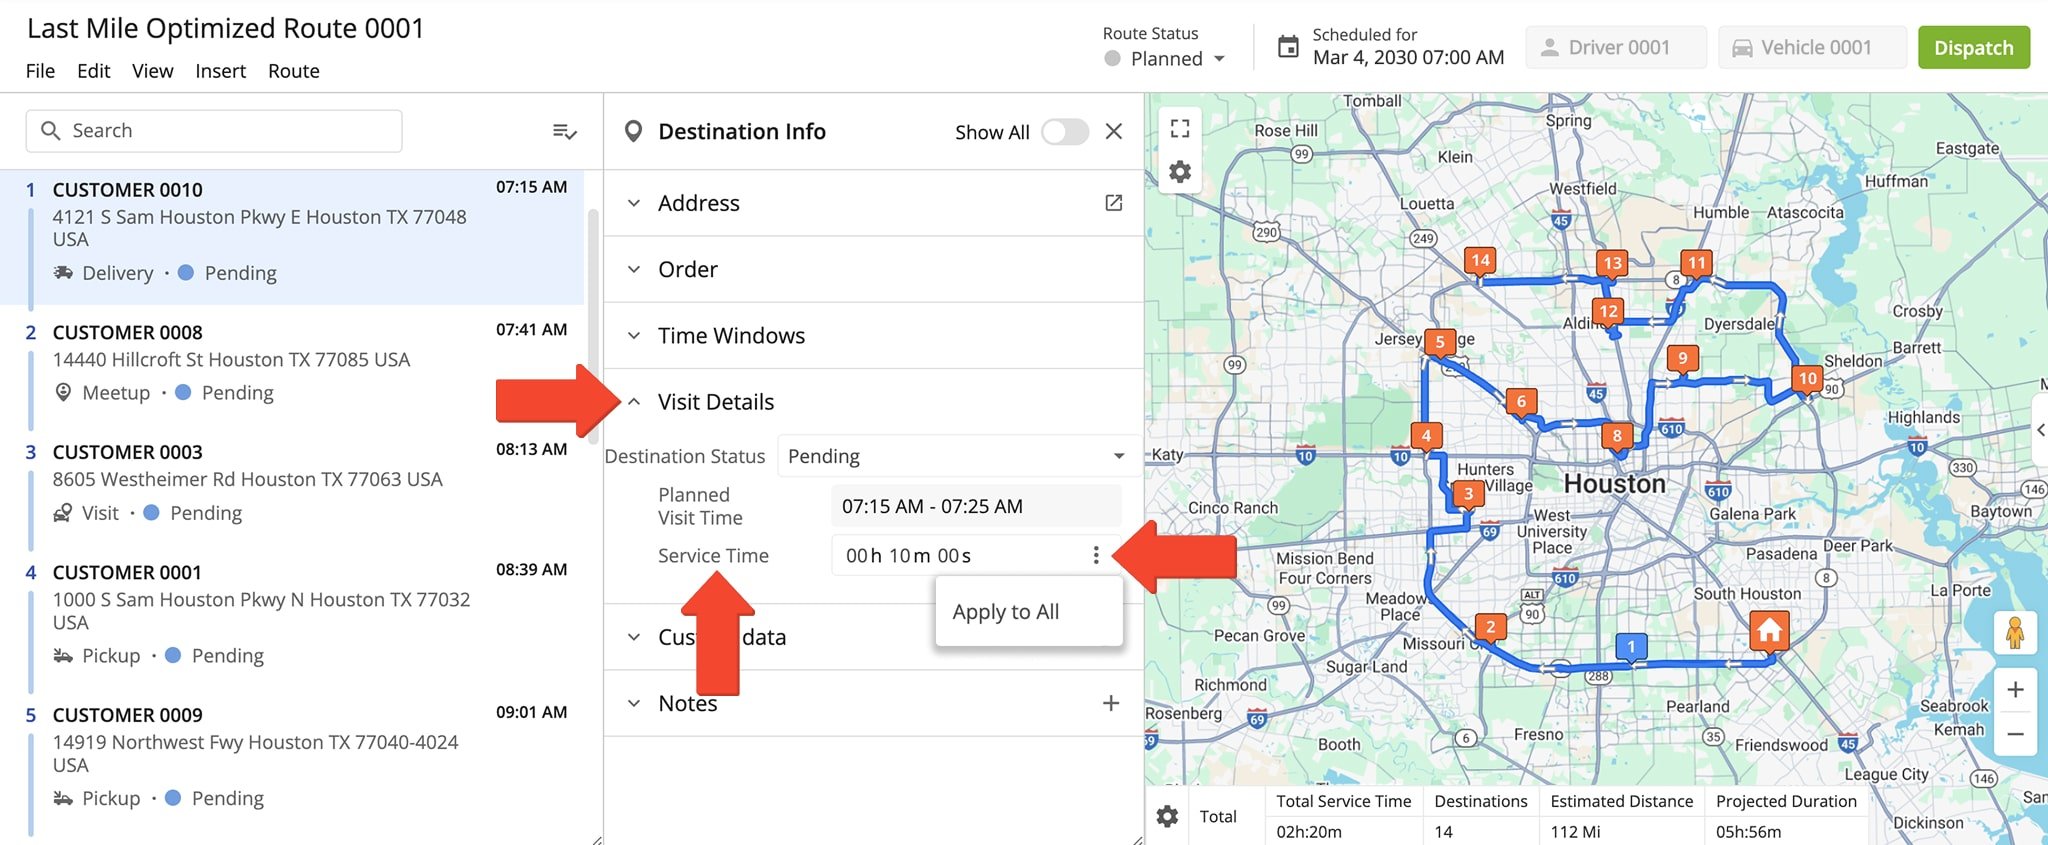
You can manage Service Times from the Route Editor. To do so, go to “Operations” from the Navigation Menu and select “Routes“. From your Routes List, click “Open Route” next to a route which contains Service Times you want to view or edit.
Then, in the Route Editor, click on a specific destination. In the “Destination Info” panel, open “Visit Details“. Here, you can manually adjust the “Service Time” field. You can also click the Three-dot Icon to apply these same Service Time settings to all destinations associated with this route.
Adjust Service Times From The Routes Map
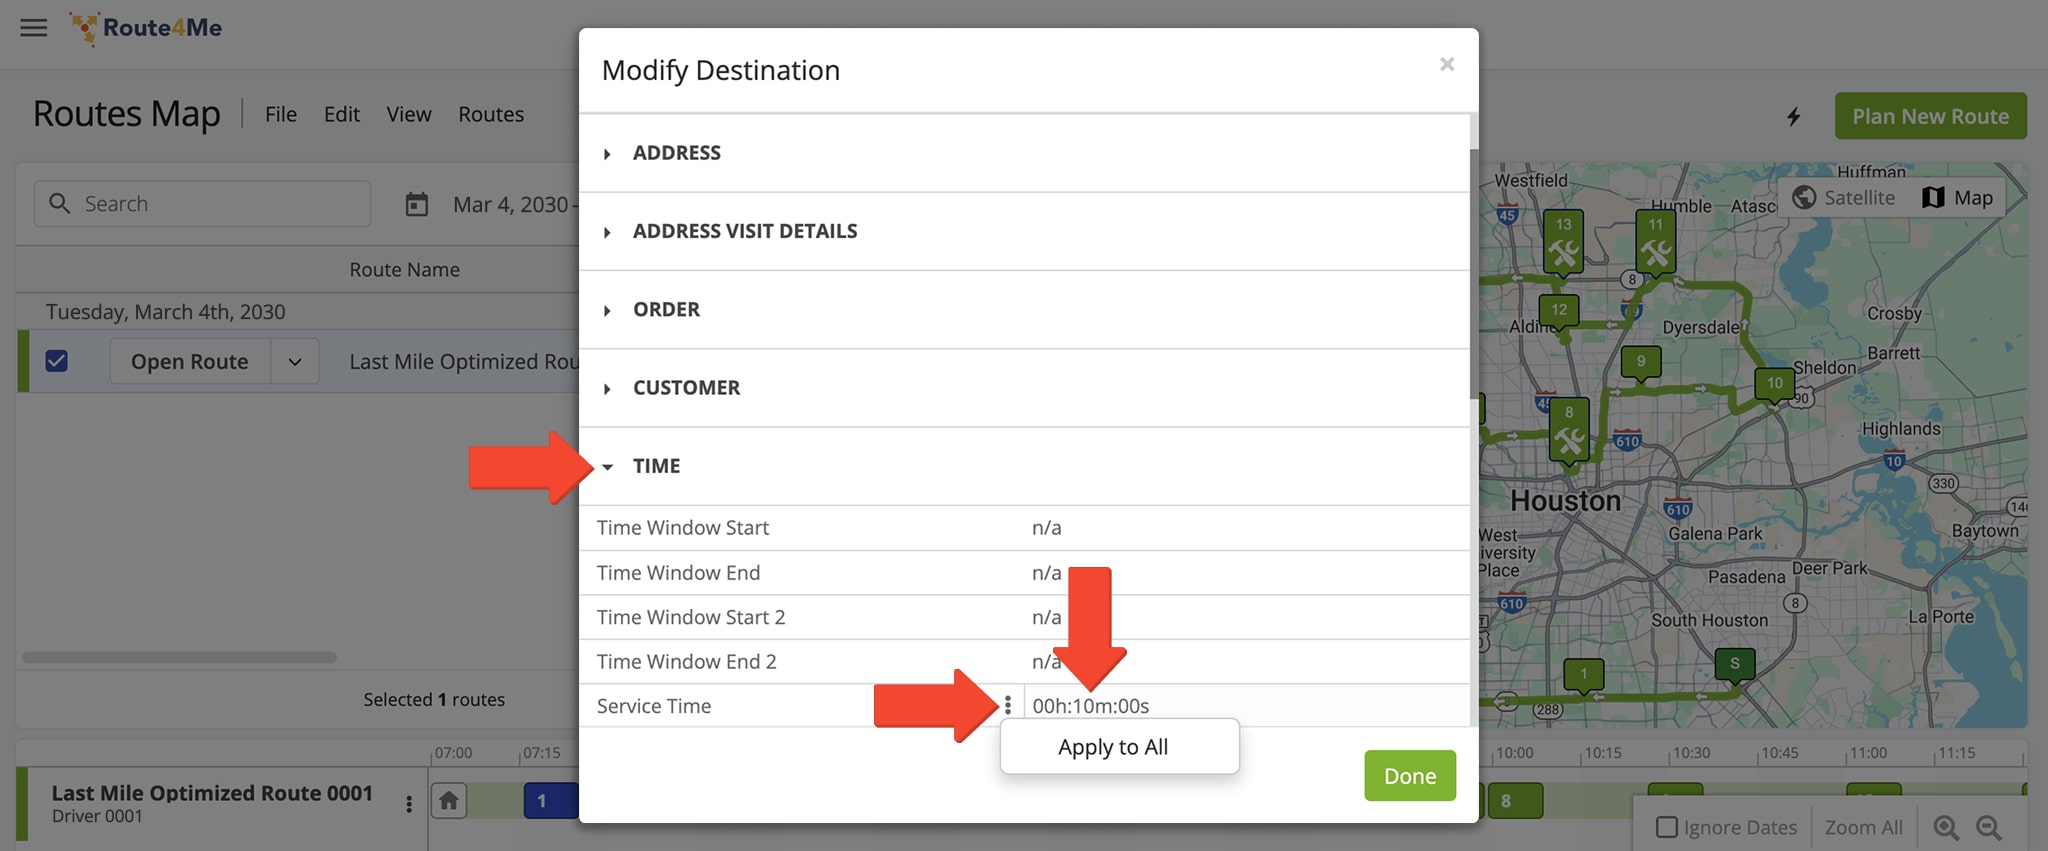
You can also manage Service Times from the Routes Map. To do so, go to “Operations” in the Navigation Menu and select “Routes Map“. Check the box next to the route or routes which contains Service Times you want to view or edit. All destinations for the route(s) you’ve selected will appear in both the Timeline and the Interactive Map.
To modify a Service Time, right-click a destination in either the Timeline or the Interactive Map and select “Modify Destination”. In the “Modify Destination” window, open the “Time” section. Here, you can manually adjust the “Service Time” field. You can also click the Three-dot Icon to apply these same Service Time settings to all destinations associated with this route.
Export Service Time Data – Download A Service Time CSV Spreadsheet
Another way to view Service Time details is to download route data as a CSV spreadsheet. You can so this from the Routes List, Route Editor, or Routes Map.
To export Service Time data from your Routes Page, go to “Operations” in the Navigation Menu and select “Routes“. From your Routes List, click the Arrow Button next to the route you want to export. Then click “Export Routes“, followed by “Export as CSV“.
This will open the “Export Route Data” panel. To access Service Time data, filter your search by entering “Service Time” in the search field. Then click the boxes next to the specific types of Service Time data you want to export. Click “Export” when finished. NOTE: See the table below to learn more about the Service Time data you can export.

| Service Time Data Type | Section Description |
|---|---|
| Service Time | The amount of time spent at each destination during a route, including tasks like parking, unloading, or interacting with the customer. |
| Actual Average Service Time | The average amount of time spent at each destination during a route, based on real-time data of activities like parking, unloading, and customer interactions. |
| Planned Average Service Time | The estimated amount of time allocated for each destination on a route, based on prior calculations or expectations before the route is completed. |
| Running Service Time | The cumulative amount of time spent on service-related activities at each destination during an active route. It tracks the real-time service time as the route progresses. |
| Actual Service Time | The actual Service Time of all Destinations across routes scheduled for a specified timeframe. Actual Service Time is the time assigned Users spend inside Destination Geofences. |
| Expected Actual Service Time | The anticipated amount of time that will be spent at each destination during a route, based on historical data or planned estimates, before the actual service time is recorded. |
| Actual Service Time Computation Method | Calculates the total time spent at each destination during a route. It is based on real-time data, typically tracked by GPS or geofencing, to measure how long a vehicle or user spends within a destination’s designated area. |
| Actual Total Service Time Driver Action | The total time a driver spends performing service-related tasks at each destination, such as parking, unloading, or interacting with the customer. It is measured from the moment the driver begins these tasks until they complete them, providing a clear picture of the time spent on service activities during the route. |
| Actual Total Service Time Geofence | The total time spent within a designated geofence area at each destination. This time is tracked using GPS technology, capturing the duration a vehicle or driver spends within the boundaries of the geofence while performing service tasks. |
| Planned Total Service Time | The total planned Service Time of all Destinations across all routes scheduled for a specified timeframe. |
Visit Route4Me's Marketplace to Check out Associated Modules:
Last Updated:
About author: Daniel Archer
With a background in pedagogy and writing instruction, Daniel is a former tenured English Instructor who, after nearly 20 years of teaching, transitioned into content strategy and leading writing teams for global brands. Now, as Technical Documentation Manager at Route4Me, he translates complex logistics technology into clear, accessible content that empowers users.