Manage And Edit Routes And Stops – Android Route Planner App
Route4Me’s Android Route Planner app provides seamless continuity throughout the entire process of planning and sequencing routes, as well as navigating and completing multi-stop routes. In this guide, you can learn how to manage and edit your routes. Specifically, how to access your and team’s routes, edit routes and stops, re-optimize routes, change route settings, insert and delete stops, reschedule routes, change stops sequence, assign users to routes, and more.
NOTE: Depending on your account settings, you can have a different set of features available on your Android Route Optimization App. To enable specific features for your account, please Contact Route4Me’s Support Team. Additionally, you can learn more about the difference between Route4Me’s Mobile and Marketplace Subscriptions and the features they support.
Table of Contents
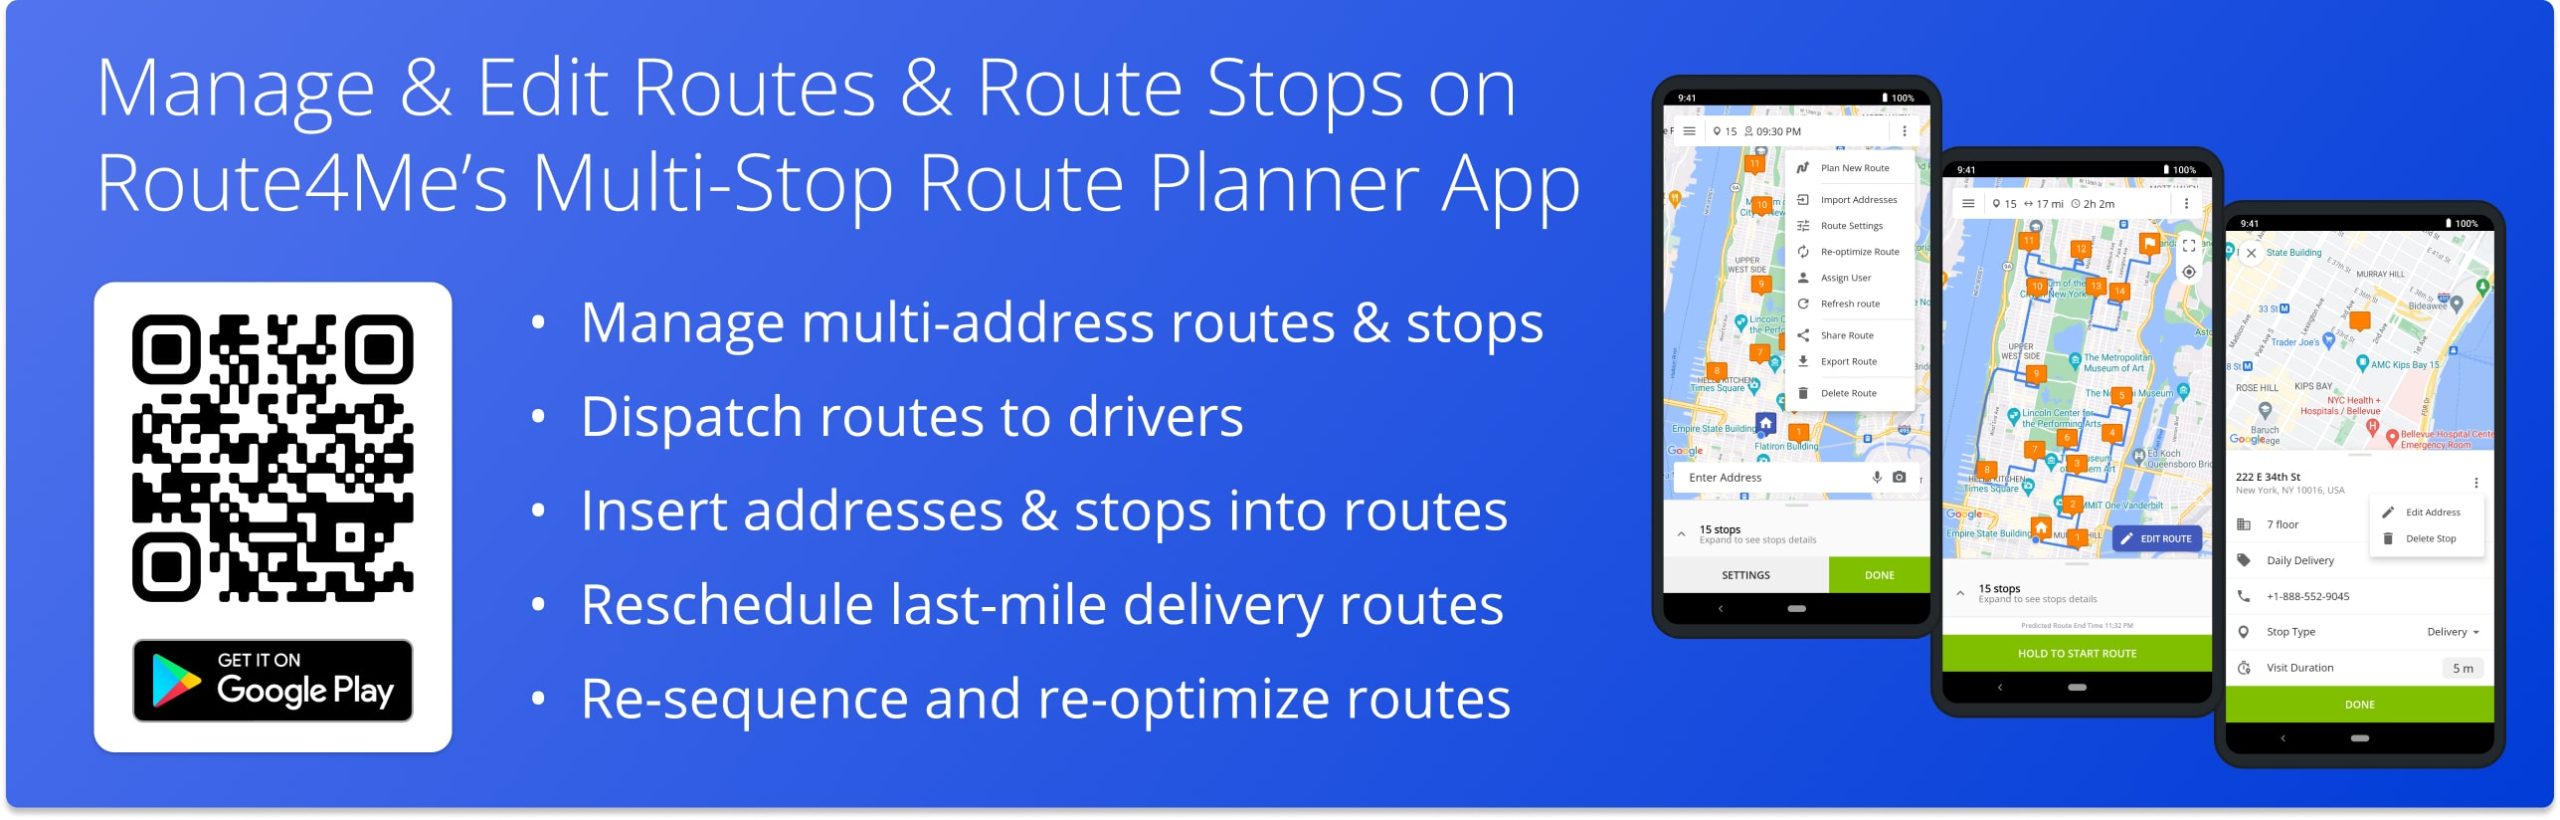
Routes Visibility – My Routes, All Routes, and Route Drafts
Your Route4Me Routes List is centralized storage where you can access and manage all routes available for your account. Depending on your subscription and user type, you can access your routes and routes of other drivers and team members. Additionally, learn more about Route4Me’s User Types and Account-Level Permissions and Marketplace vs Mobile Subscriptions.
To open your Route4Me Routes List, go to “Routes” in the app’s main menu. In the “My Routes” tab, you can access the routes you planned, and routes you are assigned to. In the “All Routes” tab, you can access the routes you and your sub-users planned, and routes you and your sub-users are assigned to. In the “Drafts” tab, you can access and finish planning your unfinished draft routes. Additionally, learn more about Assigning and Dispatching Routes to Drivers and Users.
Mobile App and Web Platform Real-Time Route Data Synchronization
Furthermore, Route4Me’s Marketplace Subscriptions support real-time route data synchronization between the best Android Route Planner app and Route4Me’s Web Platform. In detail, when drivers and other users start and navigate routes, set stop statuses, reschedule routes, insert or delete stops, plan new or delete existing routes, or make any other route changes using Route4Me’s Android app, all updates can be automatically synchronized with Route4Me’s easiest route software in real-time, and vice versa.

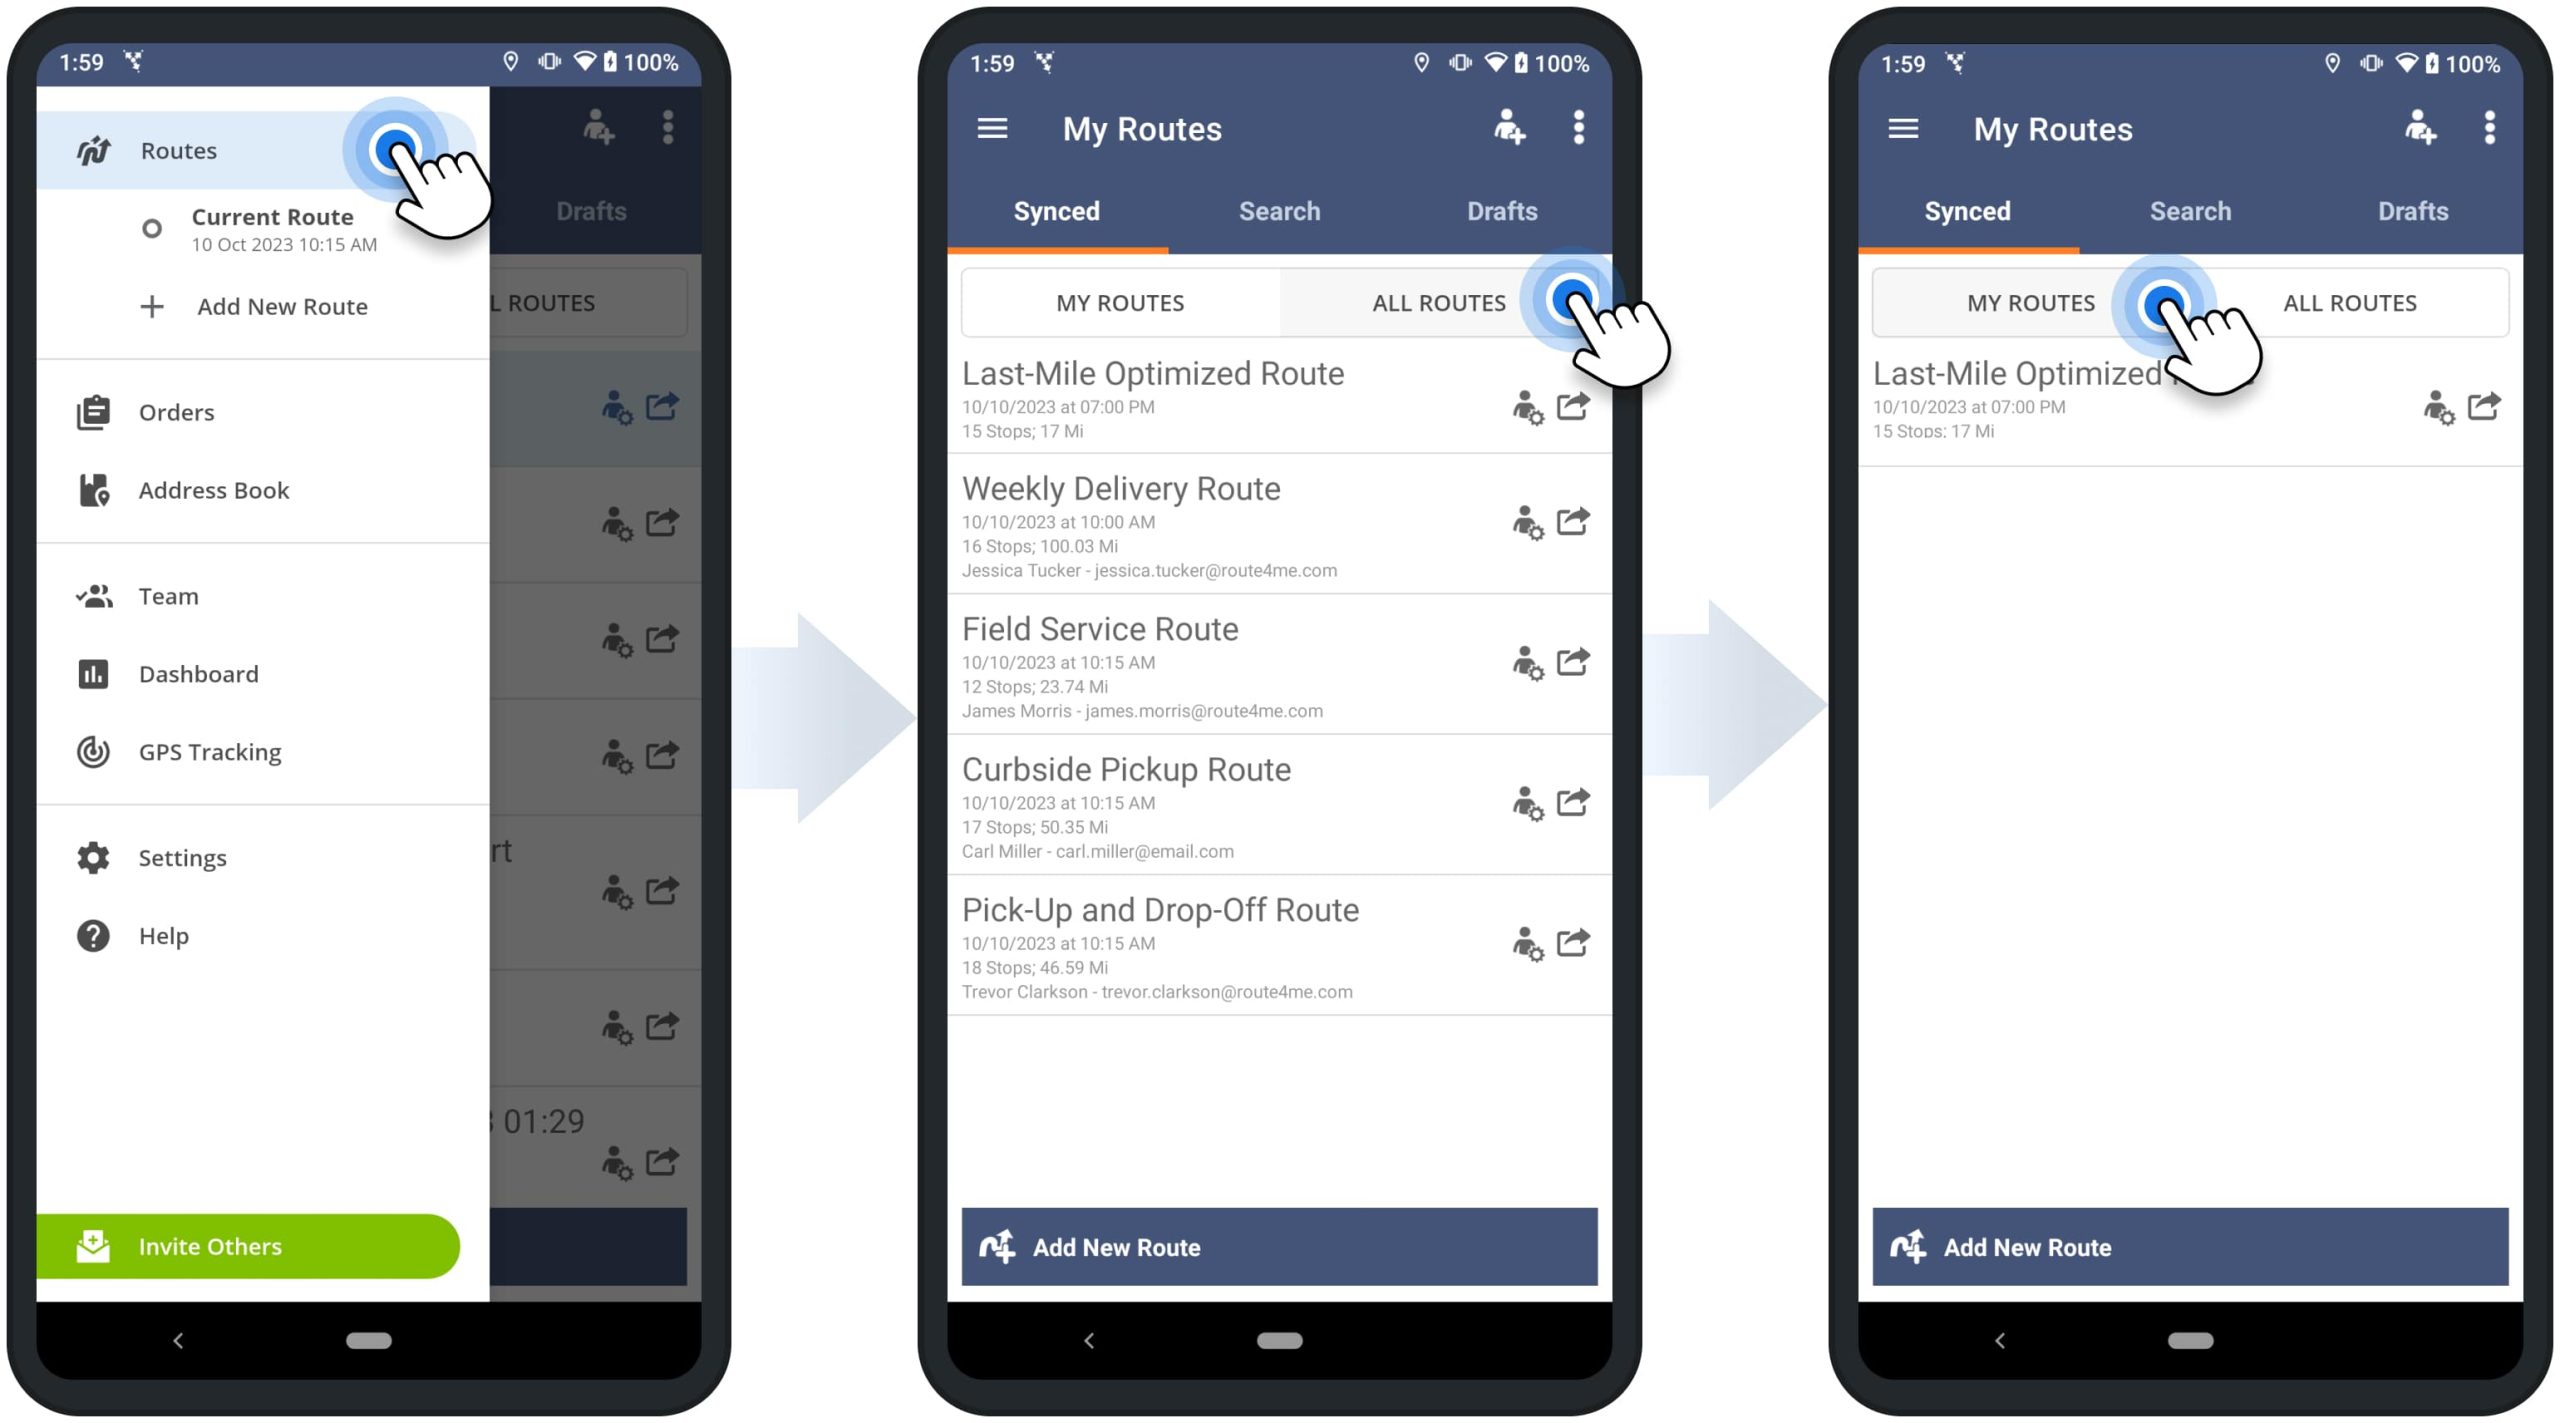
Assign Users to Routes – Dispatch Routes to Drivers and Team
You can easily dispatch routes to drivers and other team members by assigning users to routes. Specifically, when a user is assigned to a route, this route becomes available on the user’s account in real-time. After that, the assigned user can access, manage, start, navigate, and complete the route based on their respective user route permissions.
To assign a user to a route from the Routes List, tap on the user icon next to the preferred route and then select a user from the list. Once the user is assigned to the route, the user’s name and email address are displayed next to the route. Additionally, learn more about Route4Me’s Team Hierarchy and User Types and Sending Routes from the Web Platform to Mobile Driver Apps.
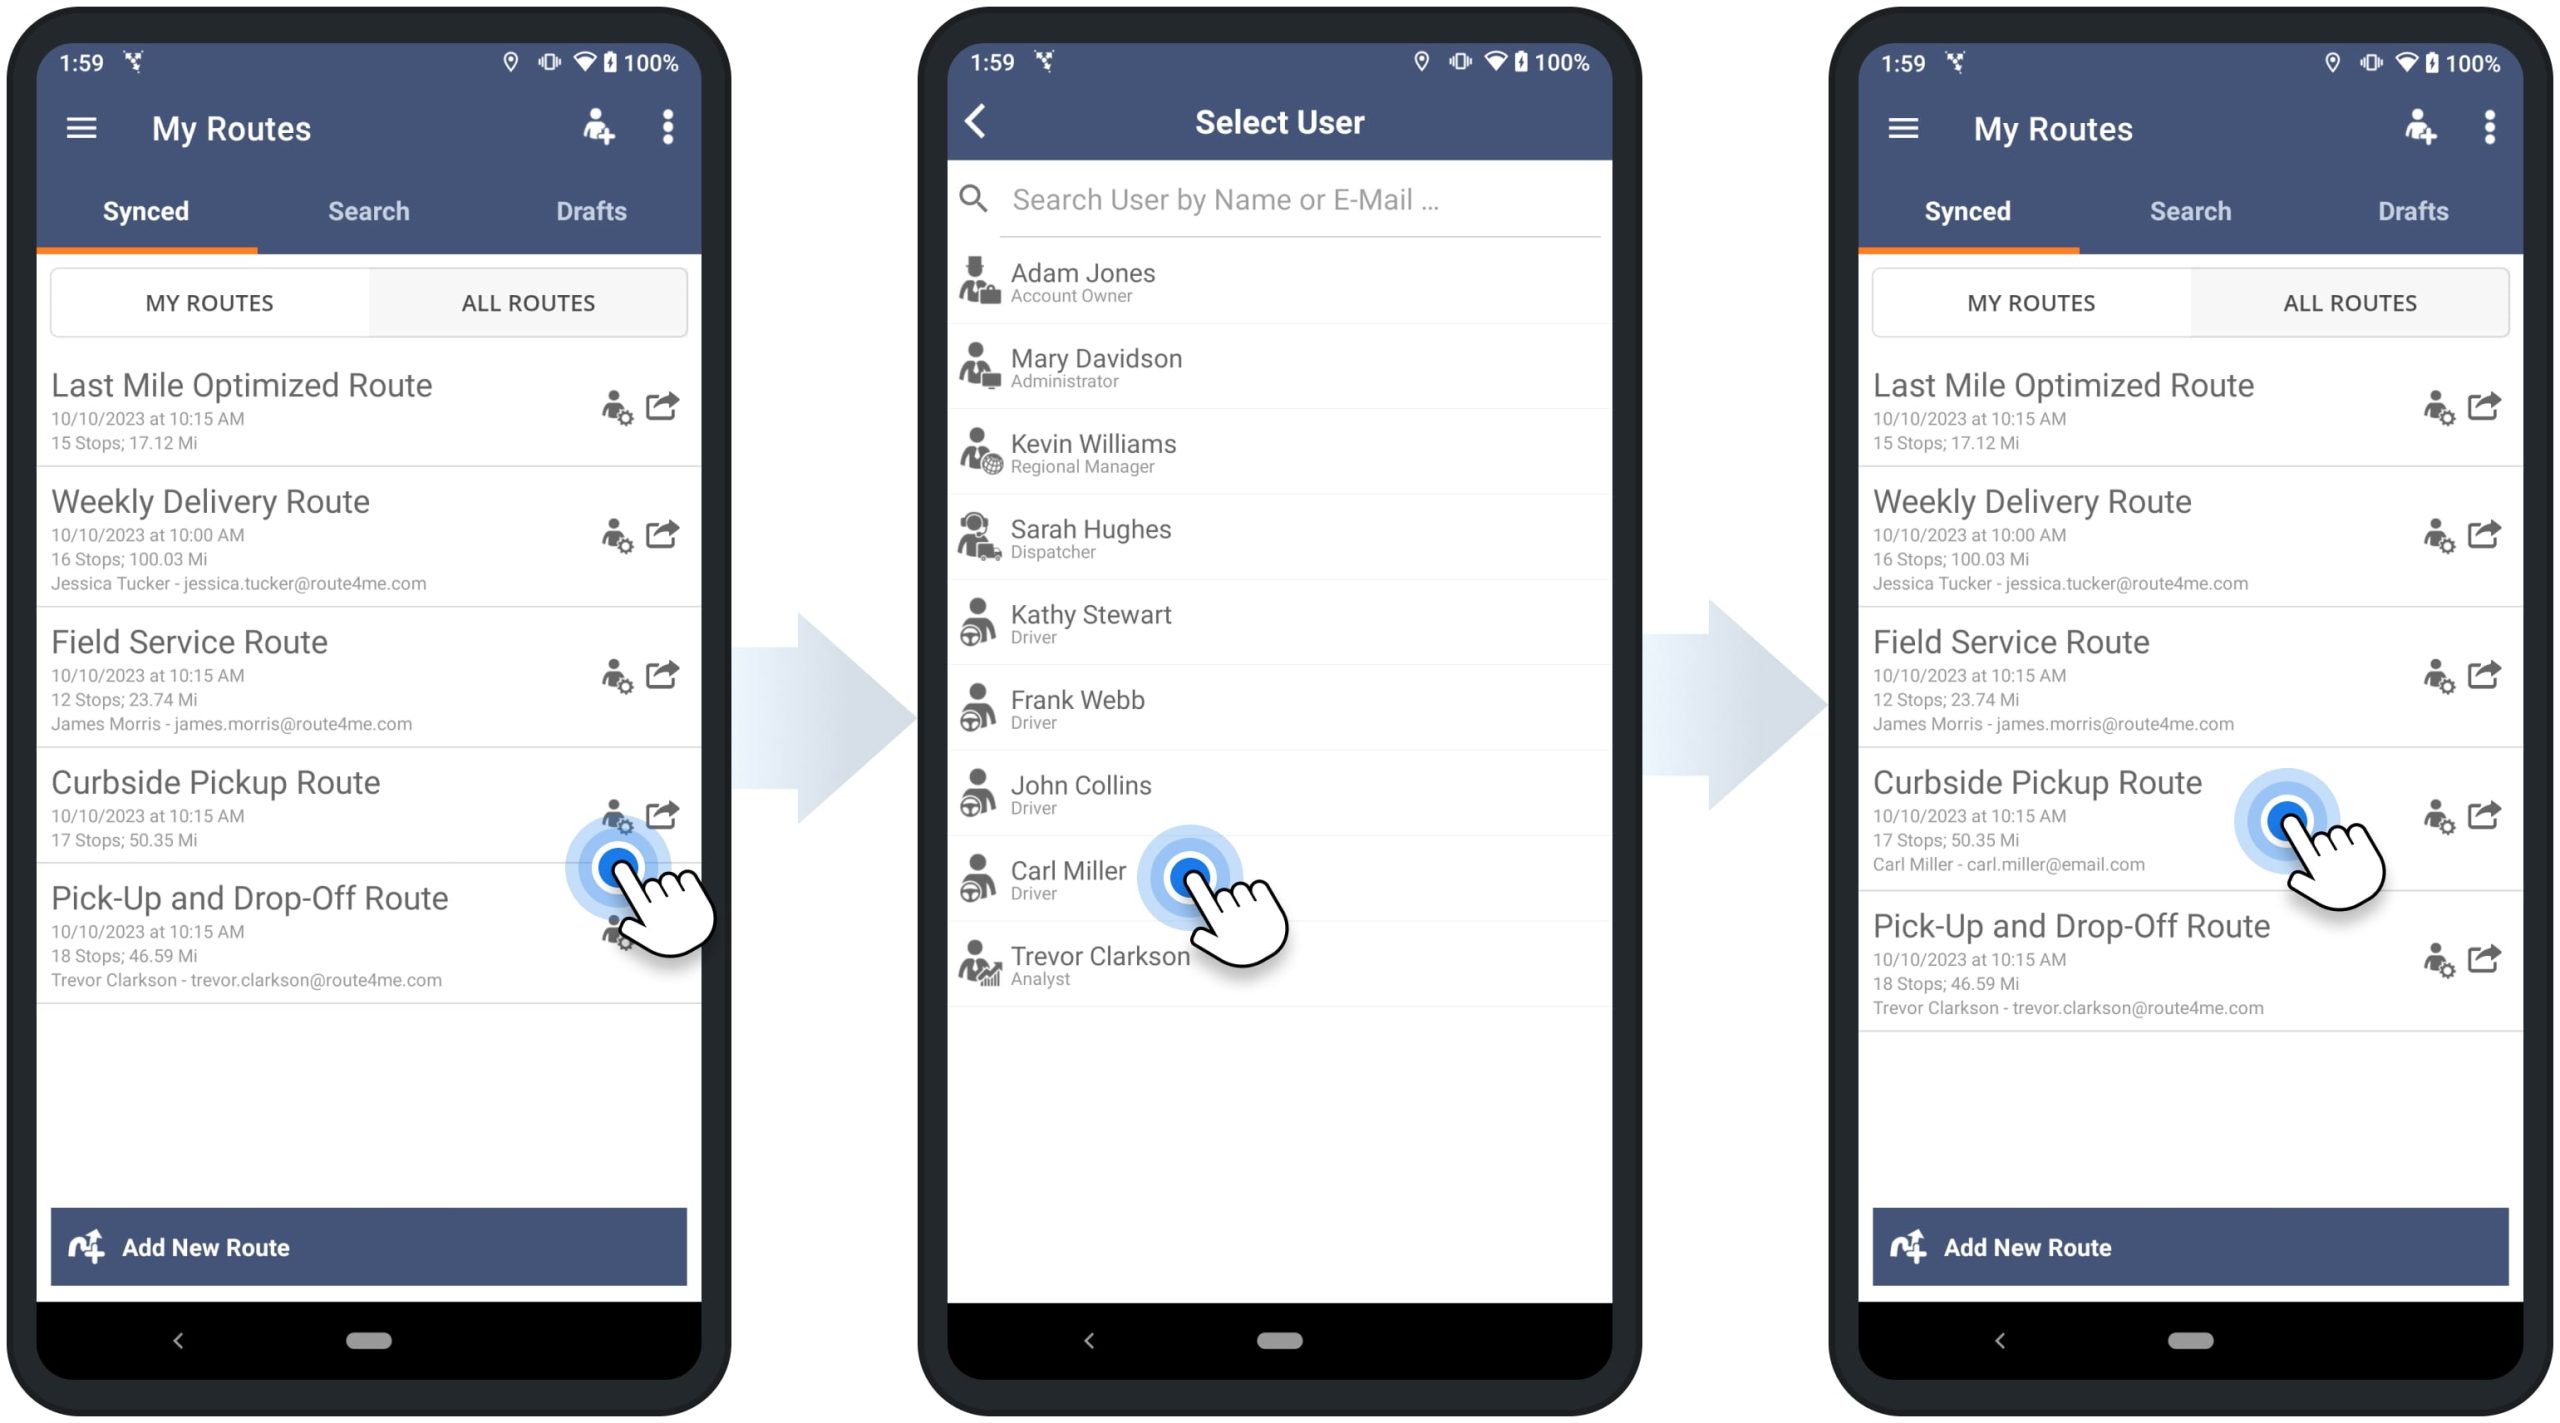
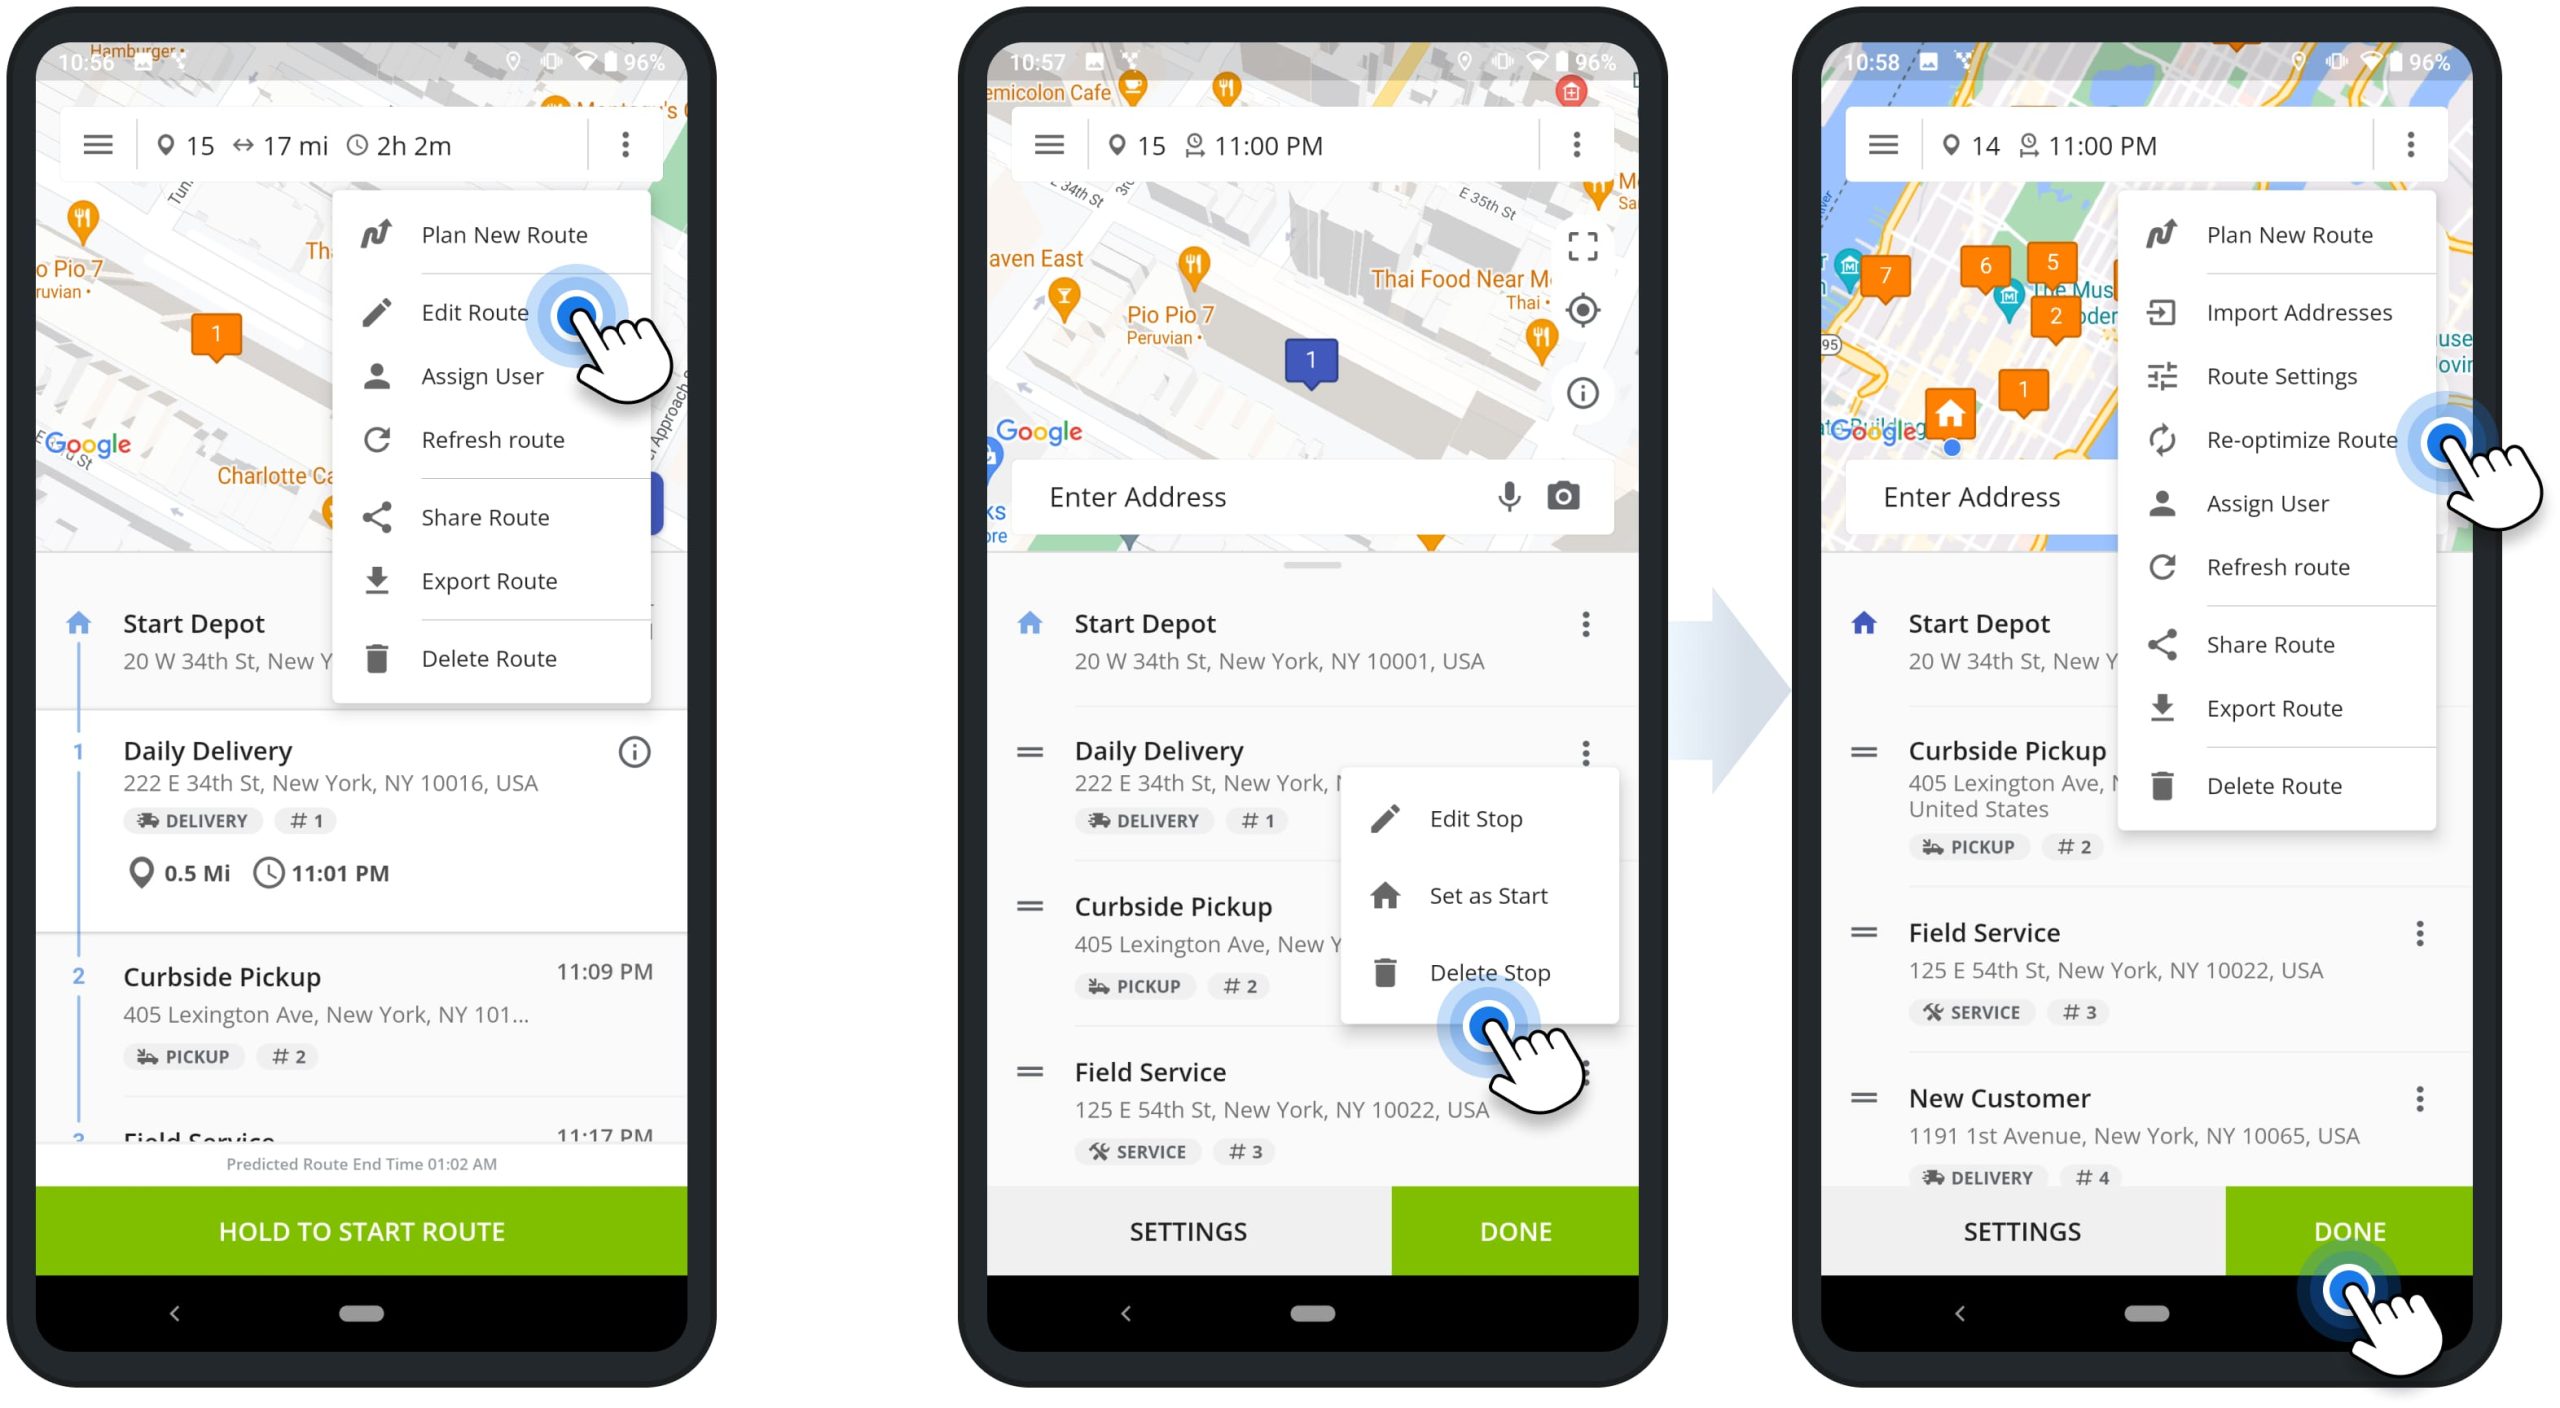
Alternatively, to assign a user to an opened route, tap on the three-dots menu icon in the top right corner of the screen and then select “Assign User” from the menu. Next, you can search for users by name and select the available user. Accordingly, after assigning the user to the route, the route will become available on the user’s Route4Me account in real-time.
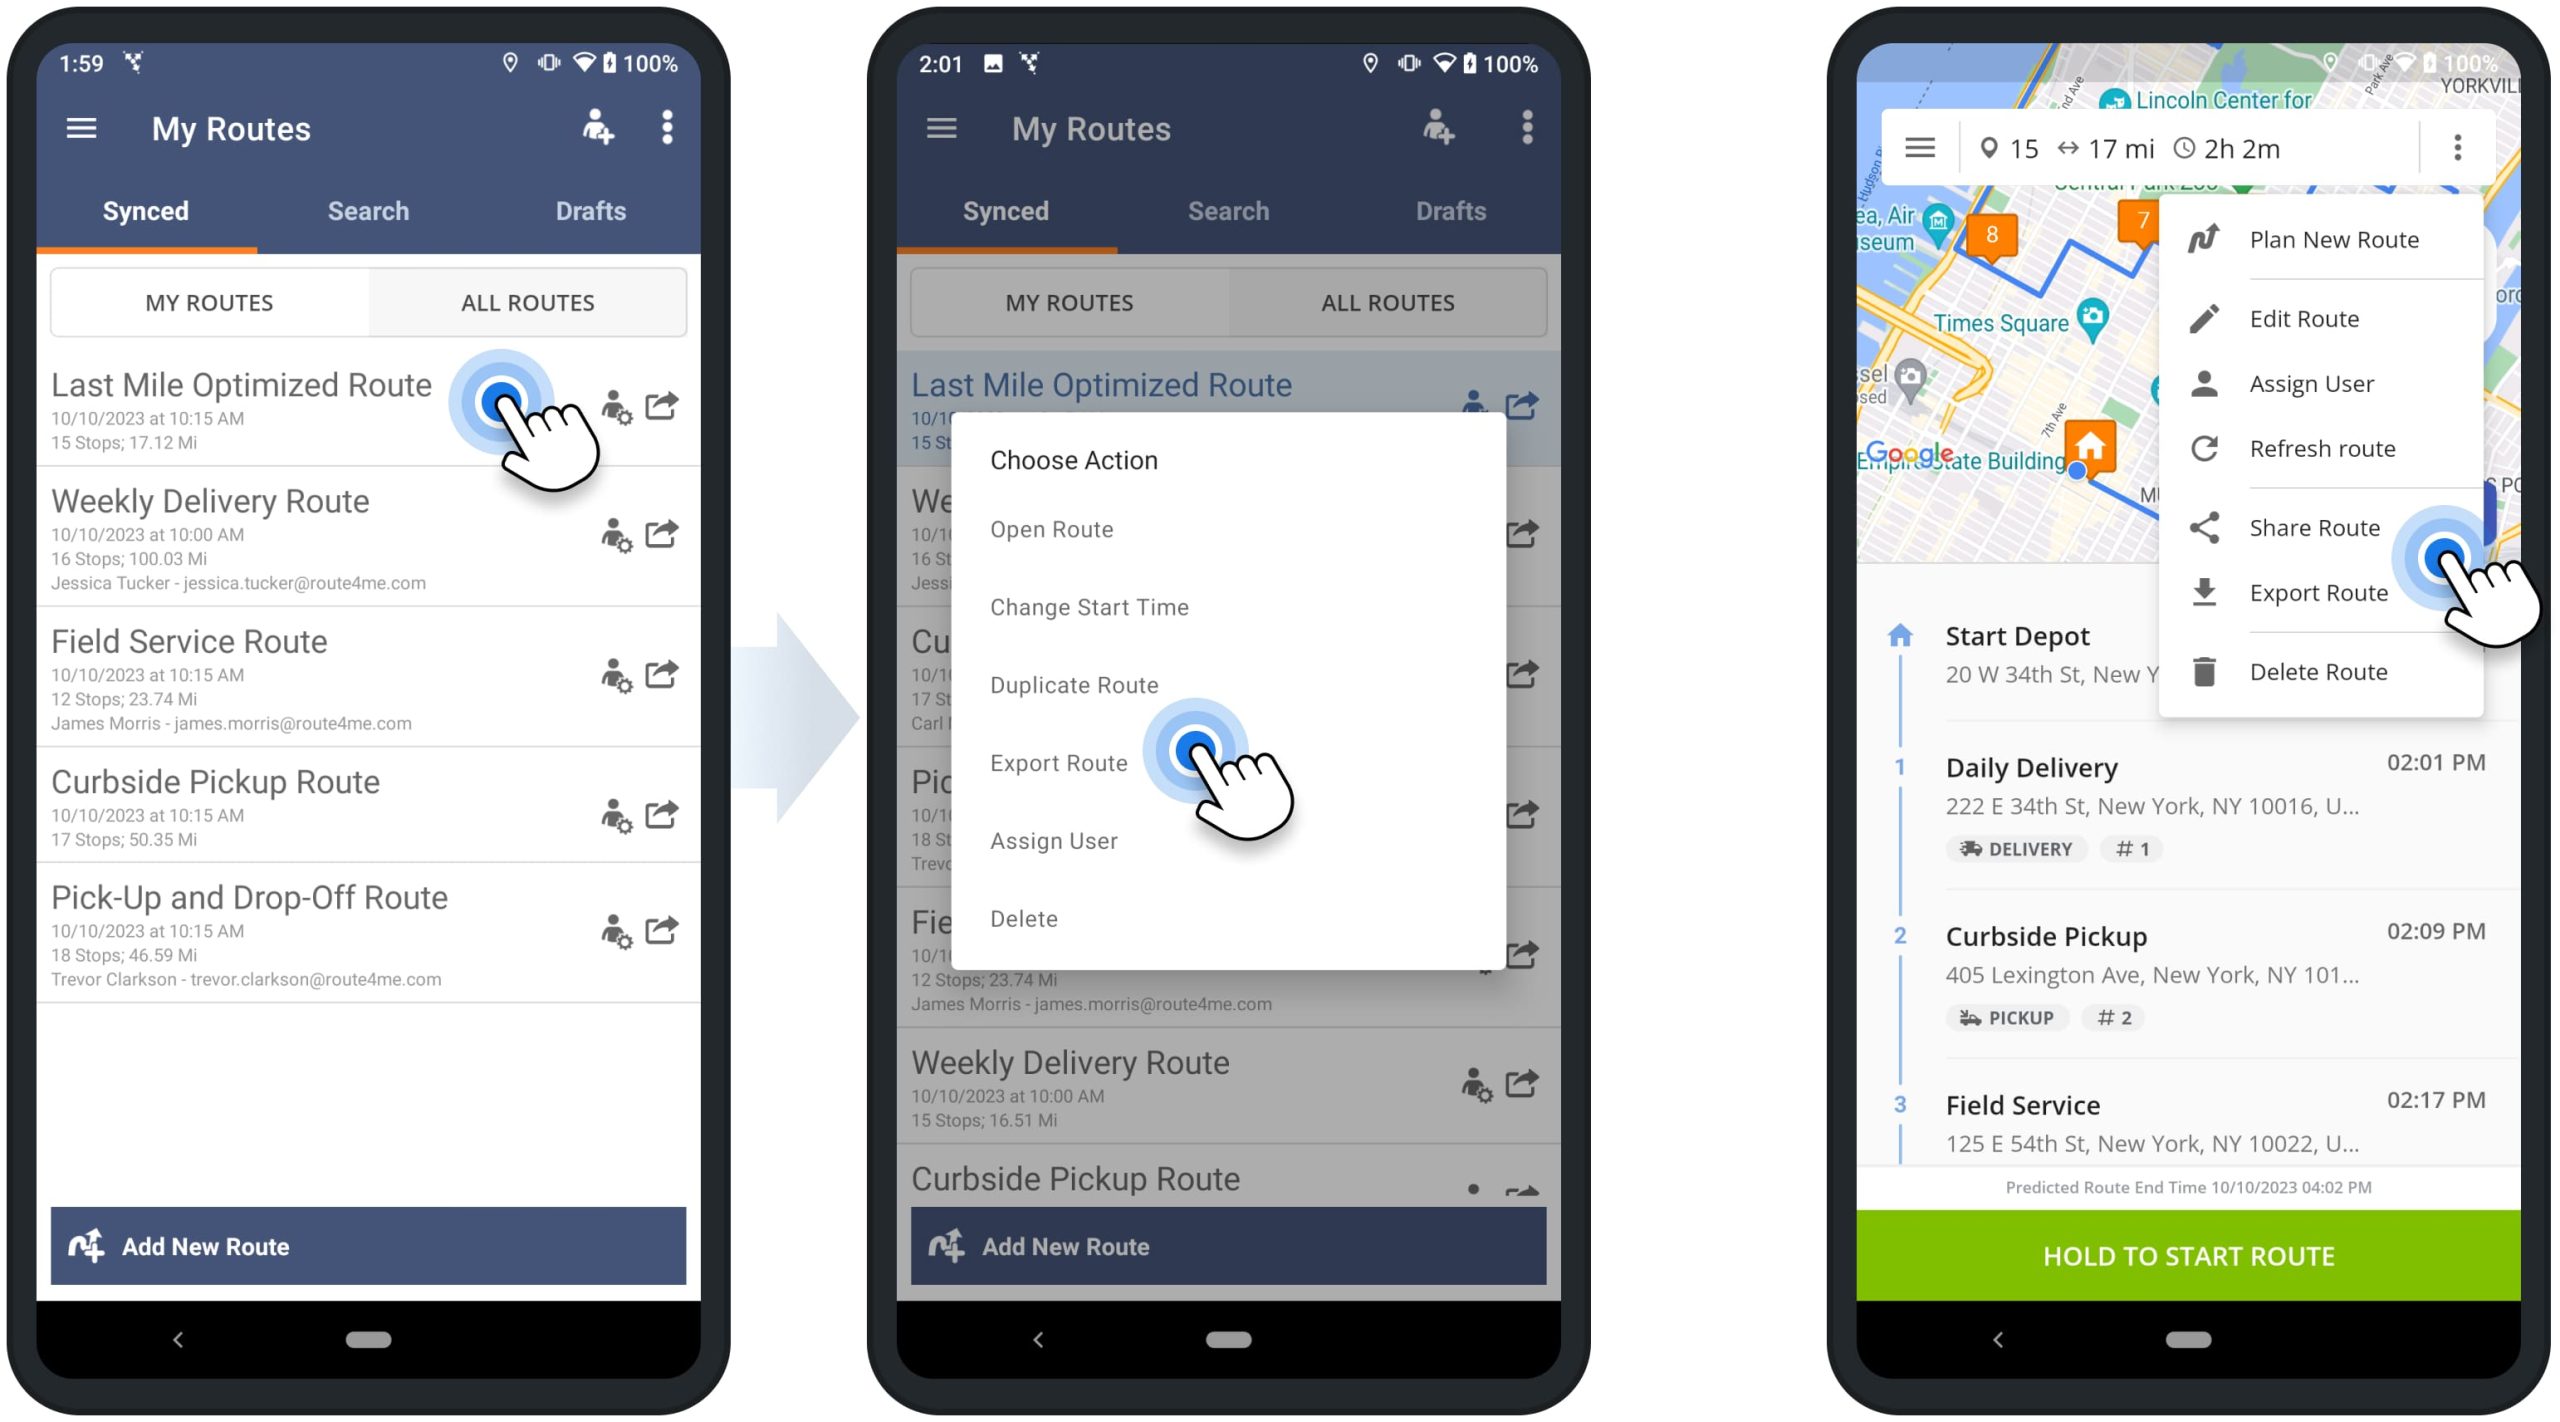
Share, Duplicate, and Export Routes on Route Planner App
You can share routes via email, duplicate routes or make route copies, and export or download routes. To do so, go to “Routes” in the app’s main menu to open your Routes List. Next, tap on the preferred route (long press on an opened route) and then select “Duplicate Route” or “Export Route” from the menu.
Alternatively, open the preferred route and then tap the three-dots menu icon in the top right corner of the screen. Next, you can select “Share Route” or “Export Route” from the menu. Below, you can learn more about the respective options.
| Action | Description |
|---|---|
| Share Route | After selecting the “Share Route“ option, select the preferred method for choosing or entering the recipient’s email. Once you share the route, the recipient will receive a public link to the route that permits them to see the route but doesn’t permit them to edit the route. |
| Duplicate Route | After selecting the “Duplicate Route” option, the app will create an identical copy of the route with the exact same route addresses, stops sequence, settings, and other details and parameters. Equally important, the duplicated route will not inherit any of the original route’s progress (visited stop statuses, attached photos or signatures, etc.). |
| Export Route | After selecting the “Export Route” option, you can select the preferred method for downloading the CSV file of the route. For example, you can easily export routes to Google Drive, iCloud Drive, your device’s local storage, Slack, Gmail, Dropbox, etc. |
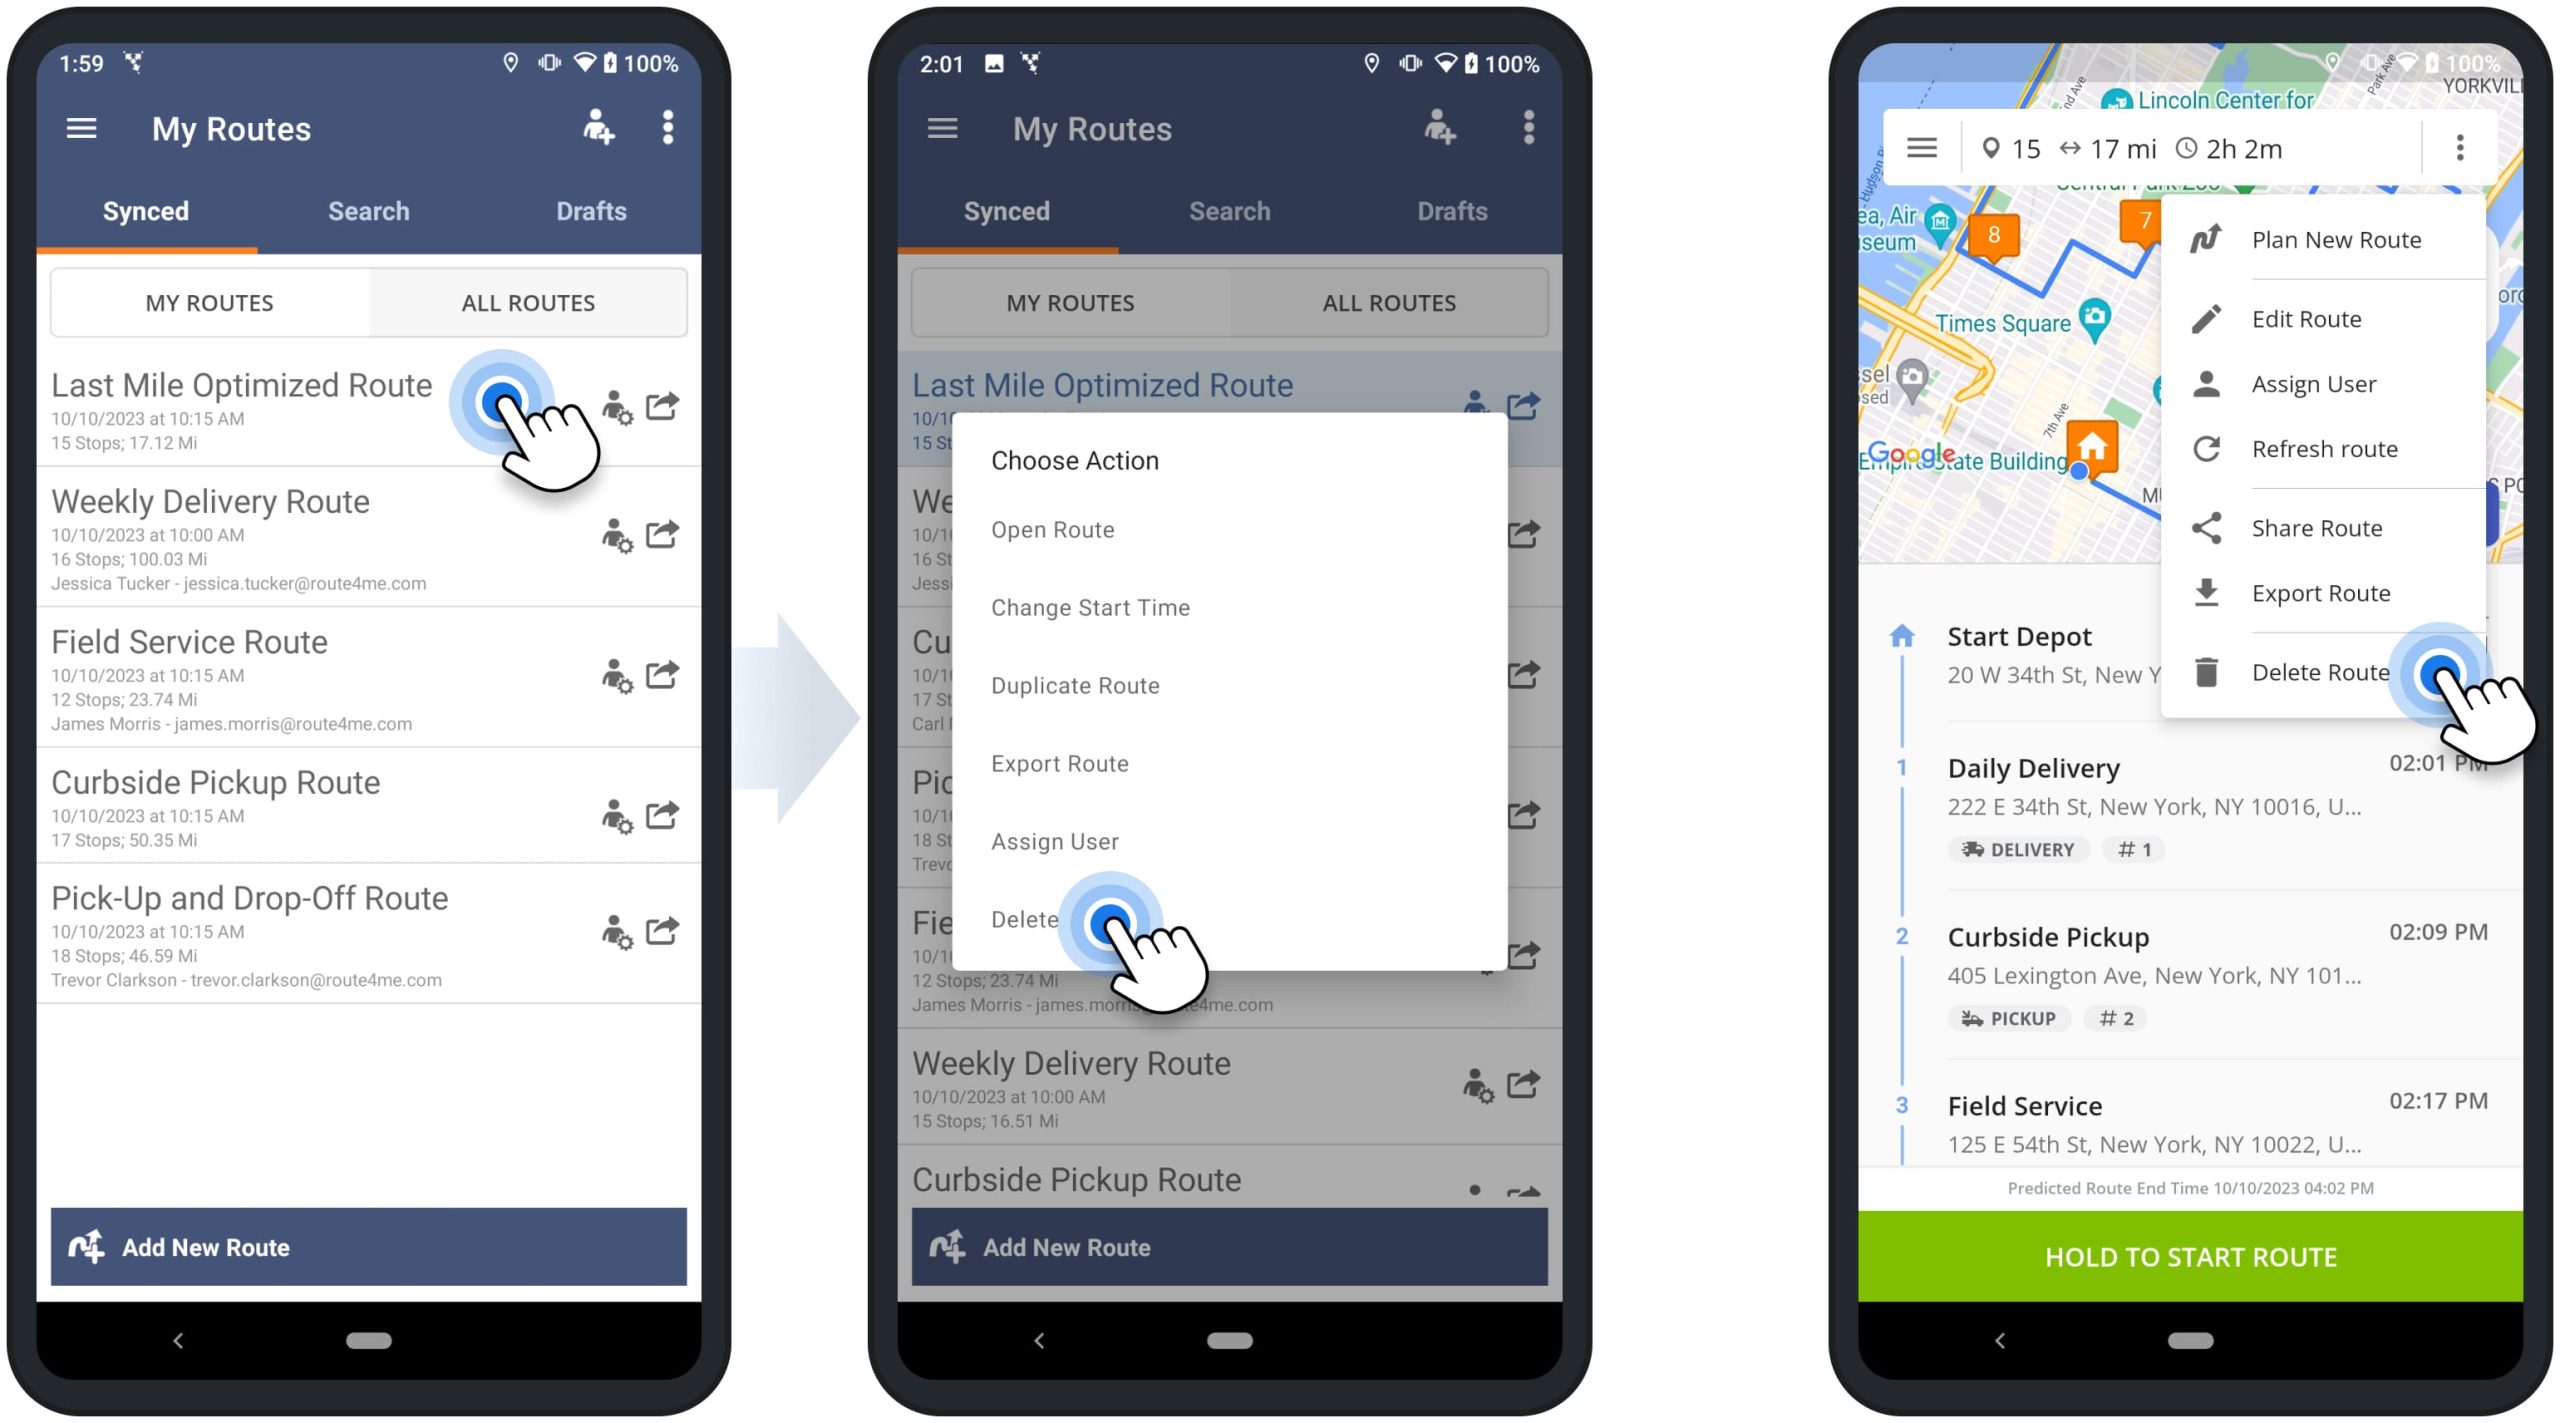
Delete Routes – Permanently Remove Planned Routes
To delete a route in your Routes List, go to “Routes” in the app’s main menu. Next, tap on the preferred route (long press on an opened route) and then select “Delete” from the menu. Alternatively, open the preferred route, tap the three-dots menu icon in the top right corner, and then select “Delete Route” from the menu.
NOTE: When you delete a route, this action can’t be undone, and the route can’t be restored. Equally important, when you delete a route that has an assigned user, this route is automatically deleted from the user’s account in real-time.
Reschedule Routes – Change Route Start Time and Date
To reschedule a route from your Routes List, go to “Routes” in the app’s main menu and tap on the preferred route. Next, select “Change Start Time” from the menu and then reschedule the route for the preferred date and time.
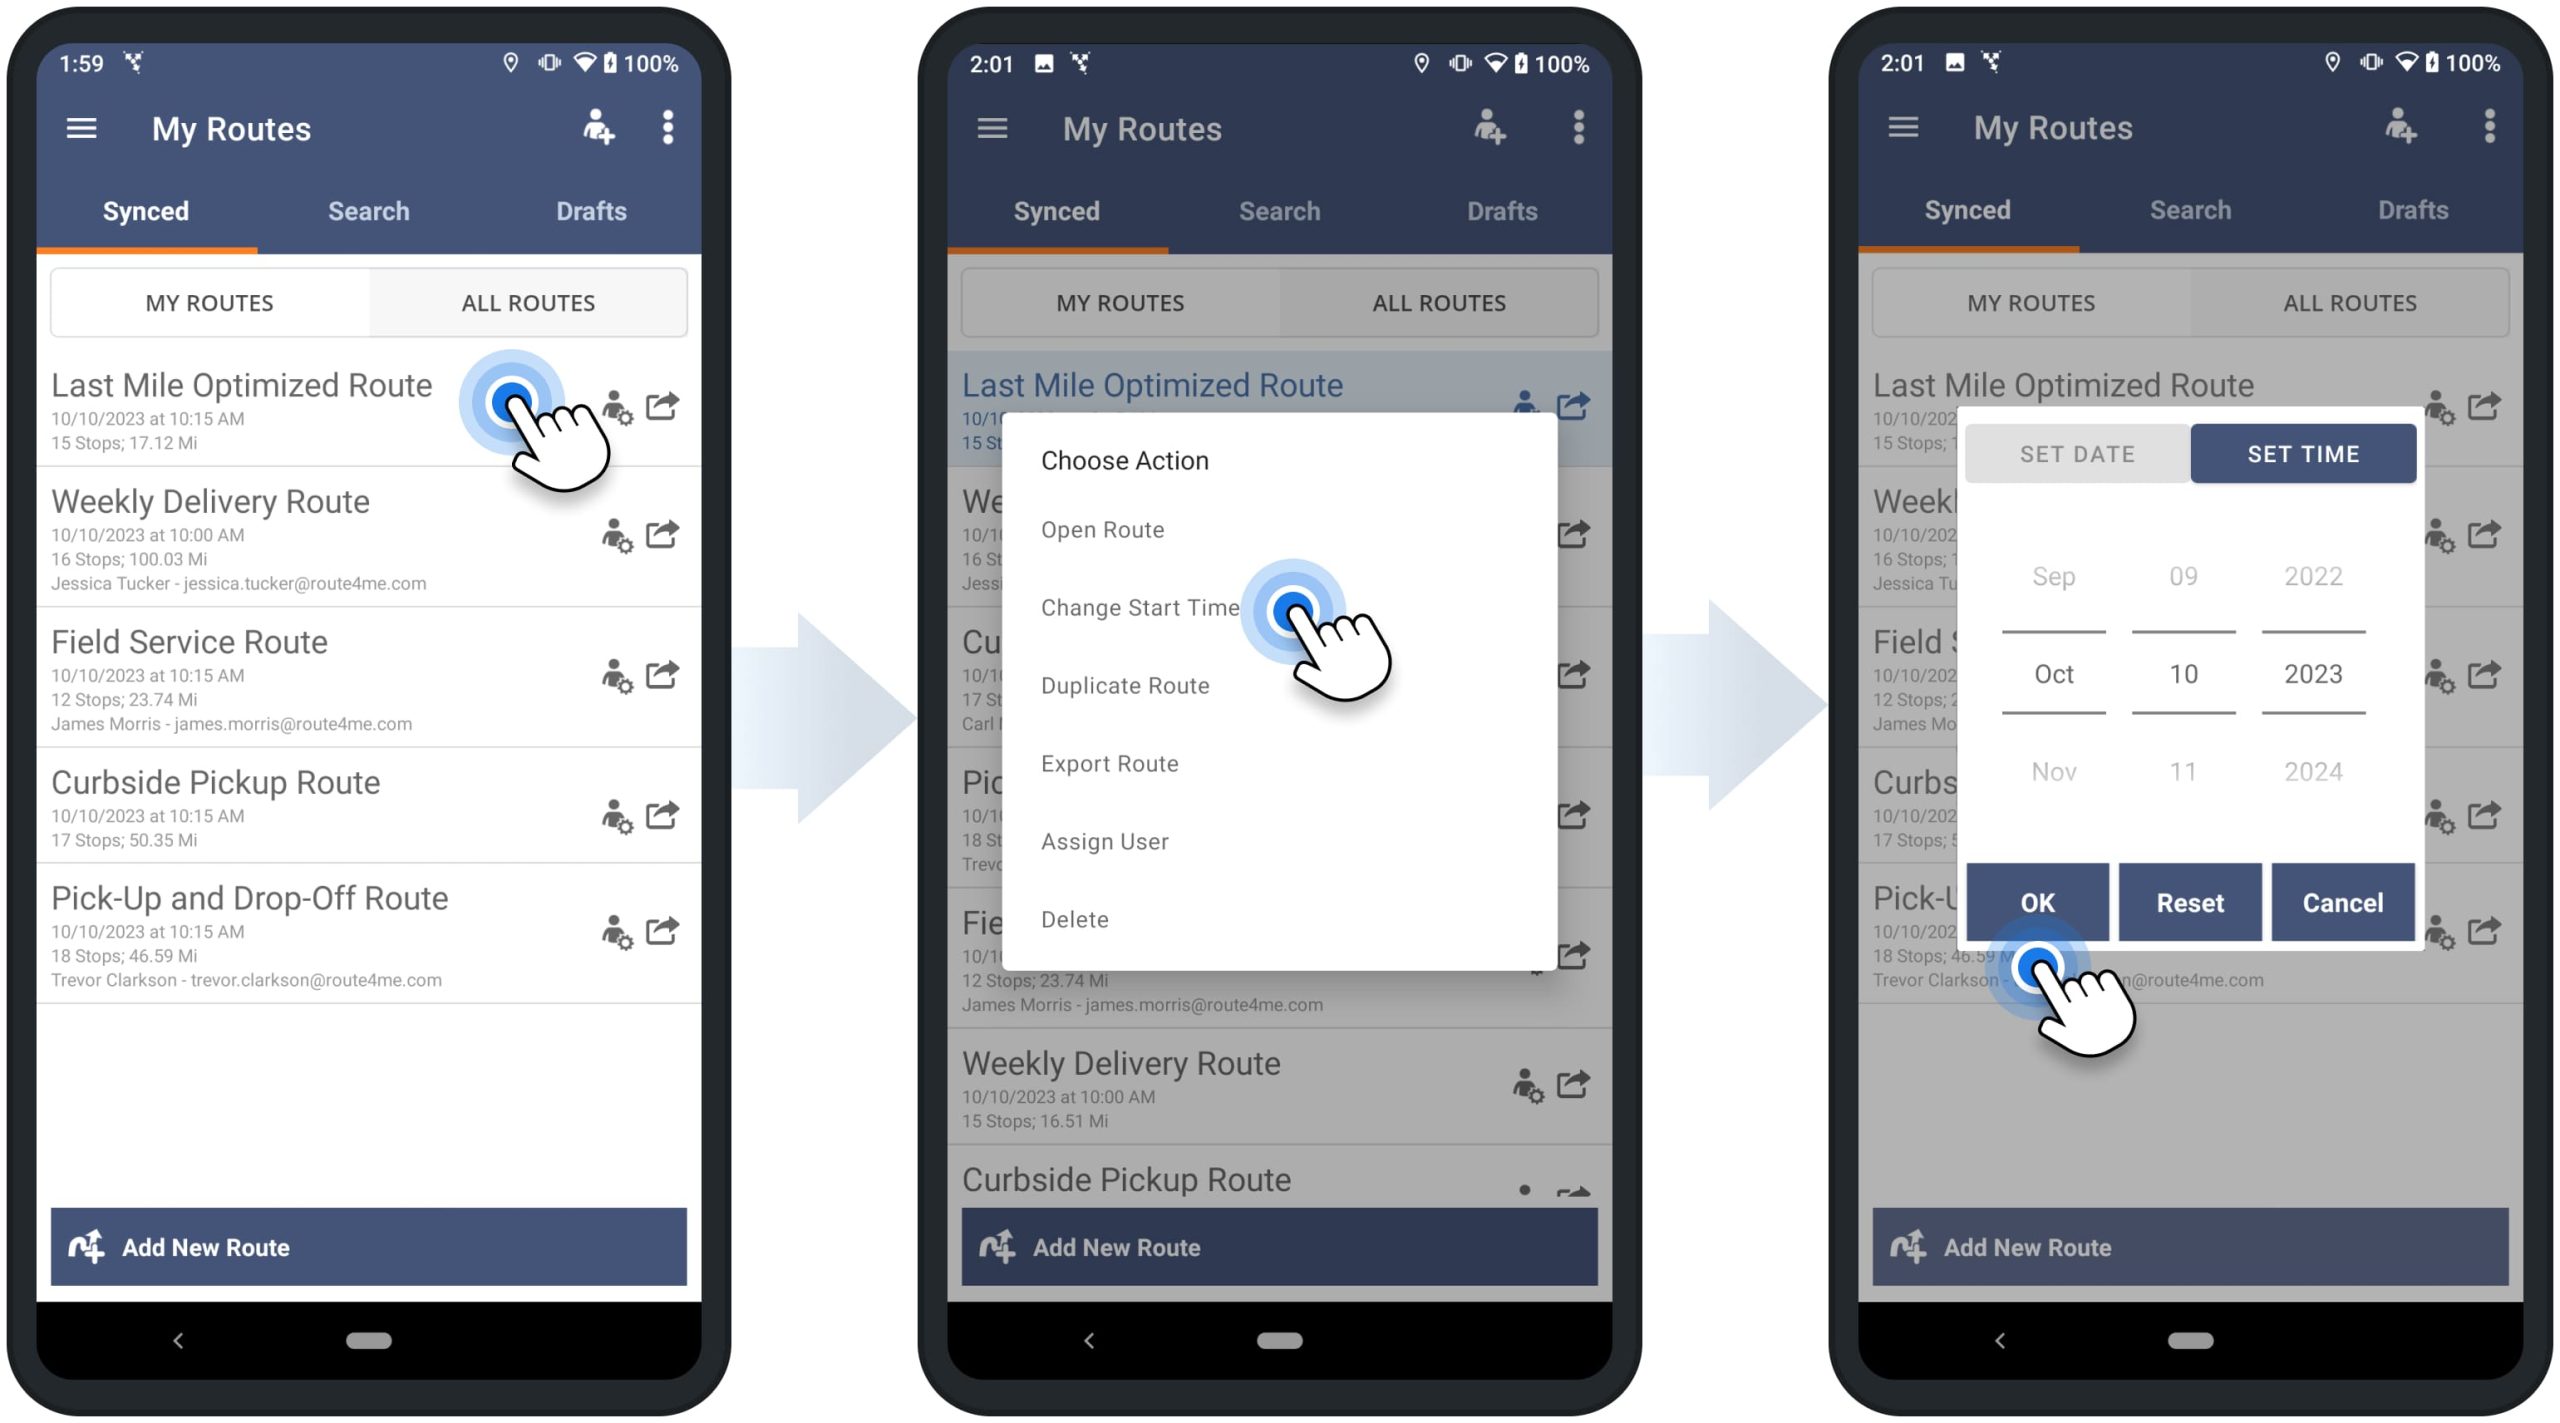
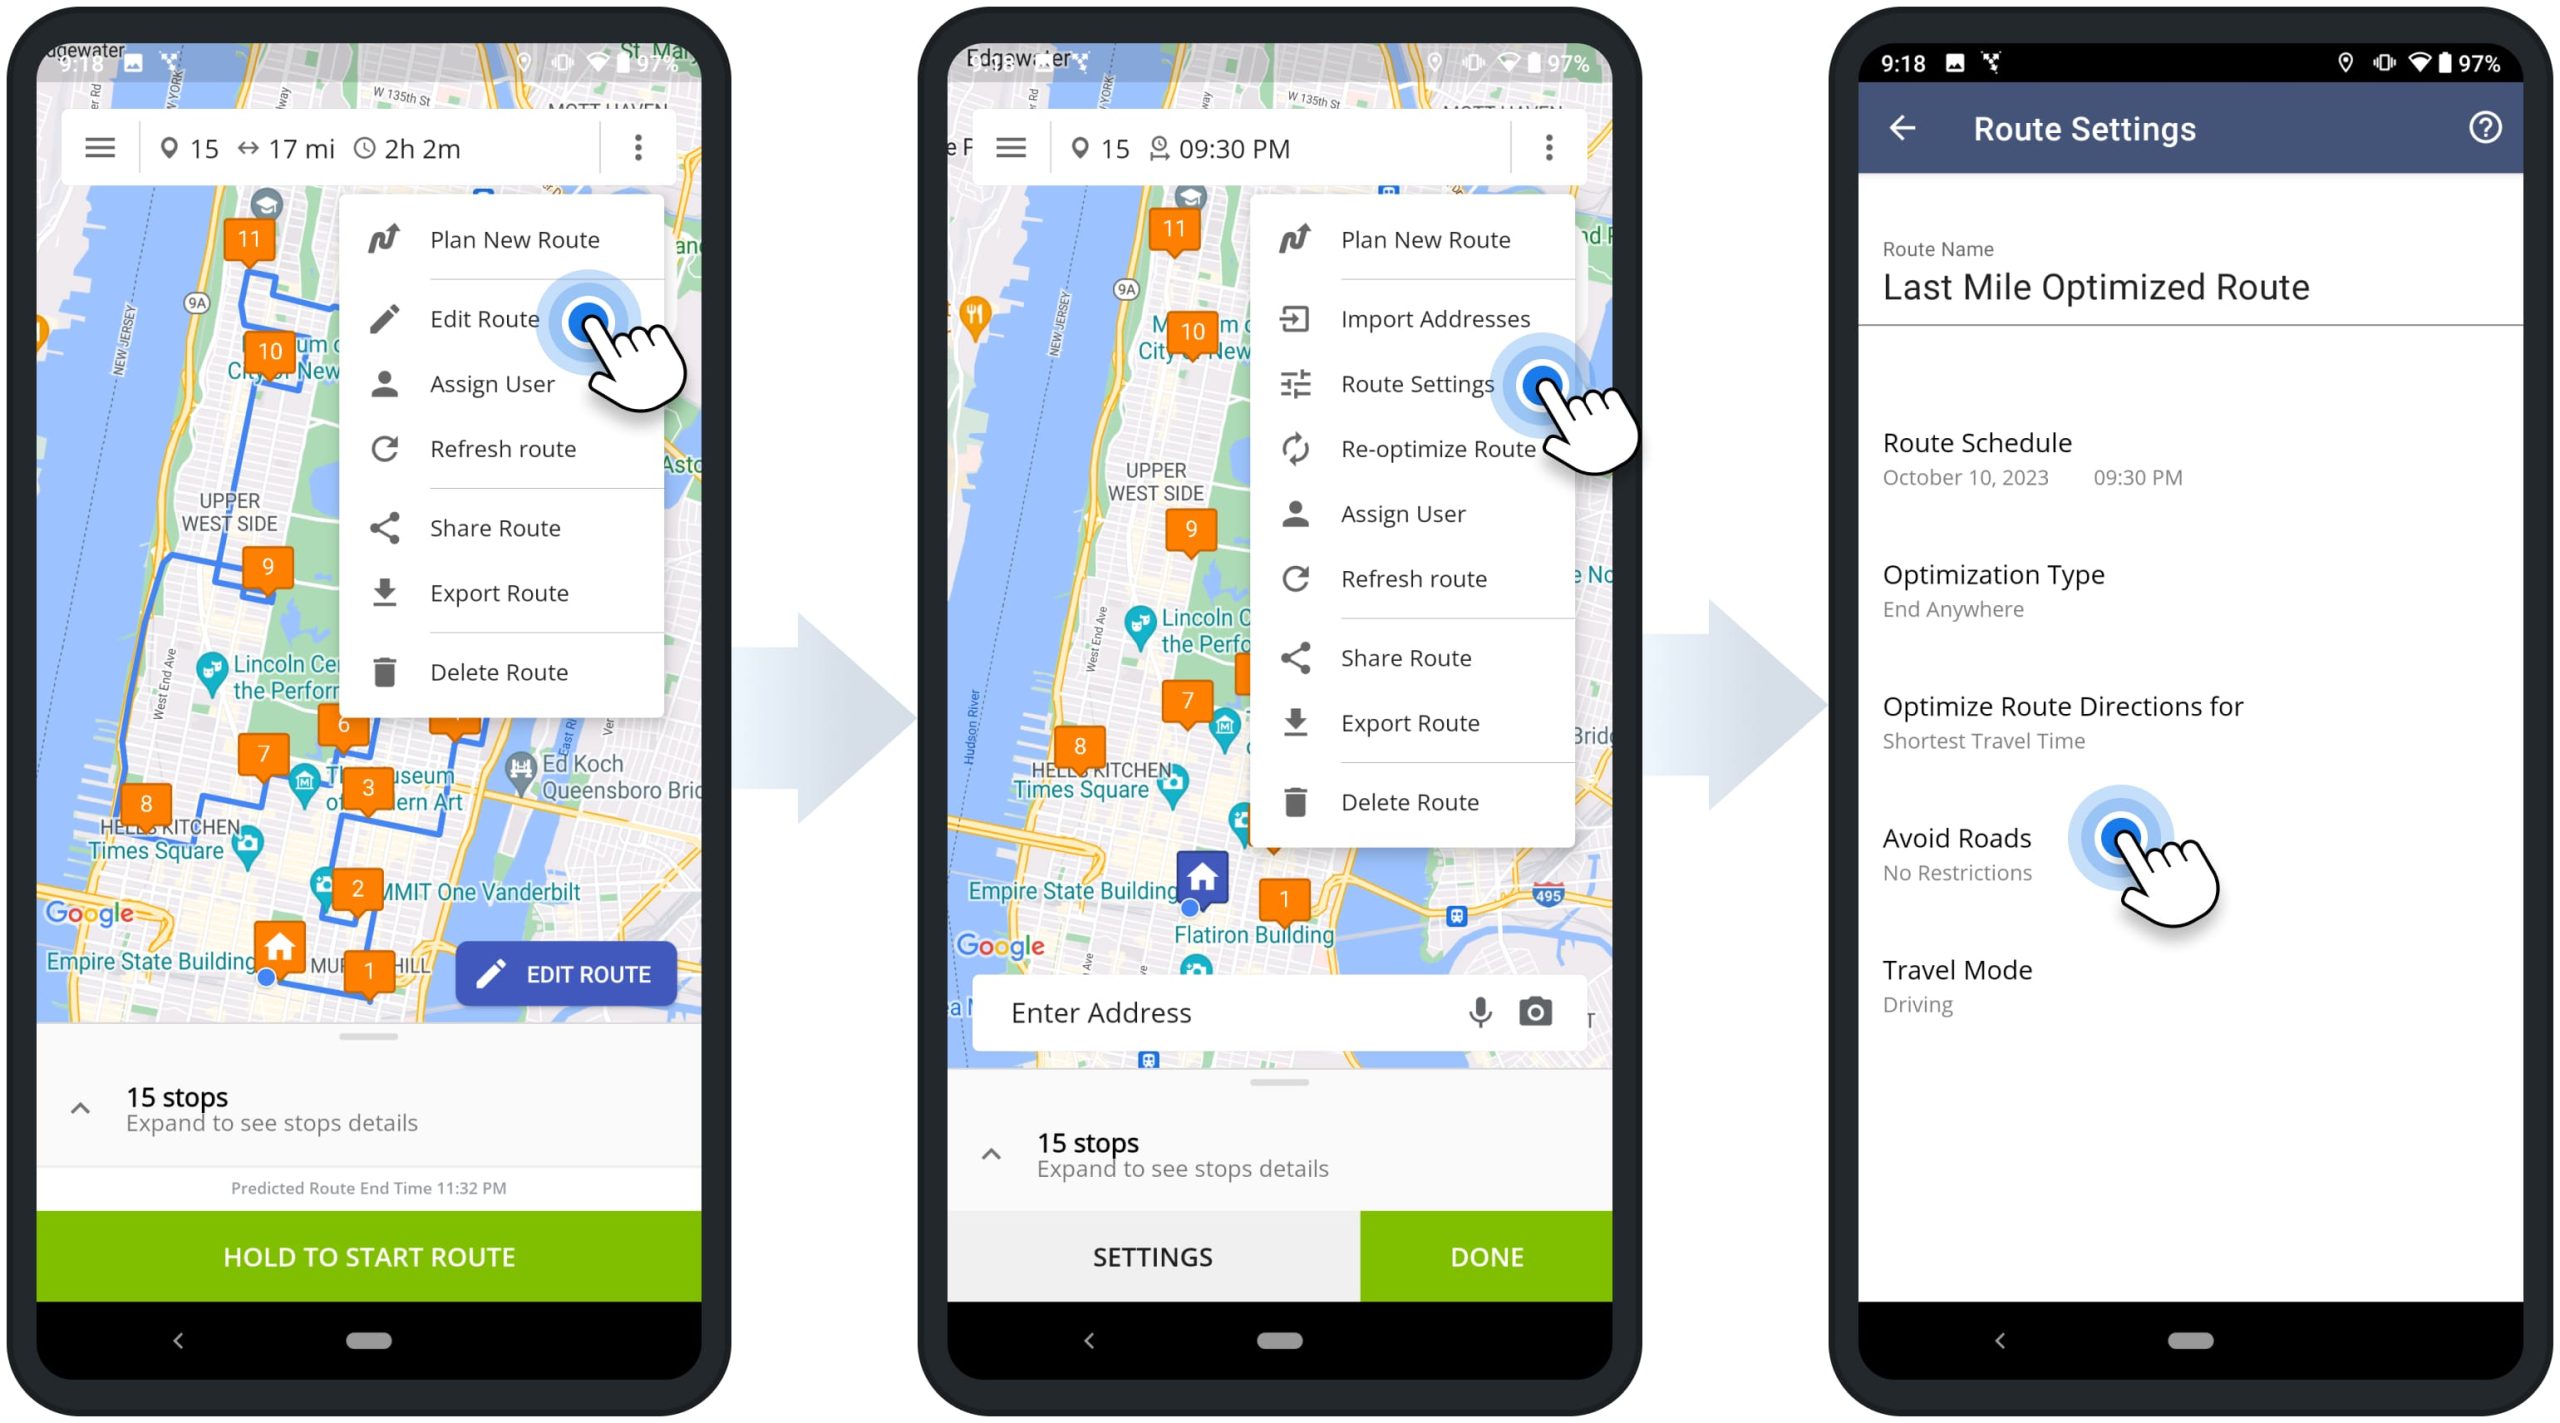
Alternatively, to reschedule an opened route, tap the three-dots menu icon in the top right corner and then select “Edit Route” from the menu. Next, tap the three-dots menu icon again and then select “Route Settings” from the menu. After that, select the new preferred route start time and date in the “Route Schedule” calendar.
To apply the changes, tap the back button in the top left corner and then tap the “Done” button. Accordingly, if the route had an assigned user, the route’s start time and date will be automatically updated in the user’s Routes List.
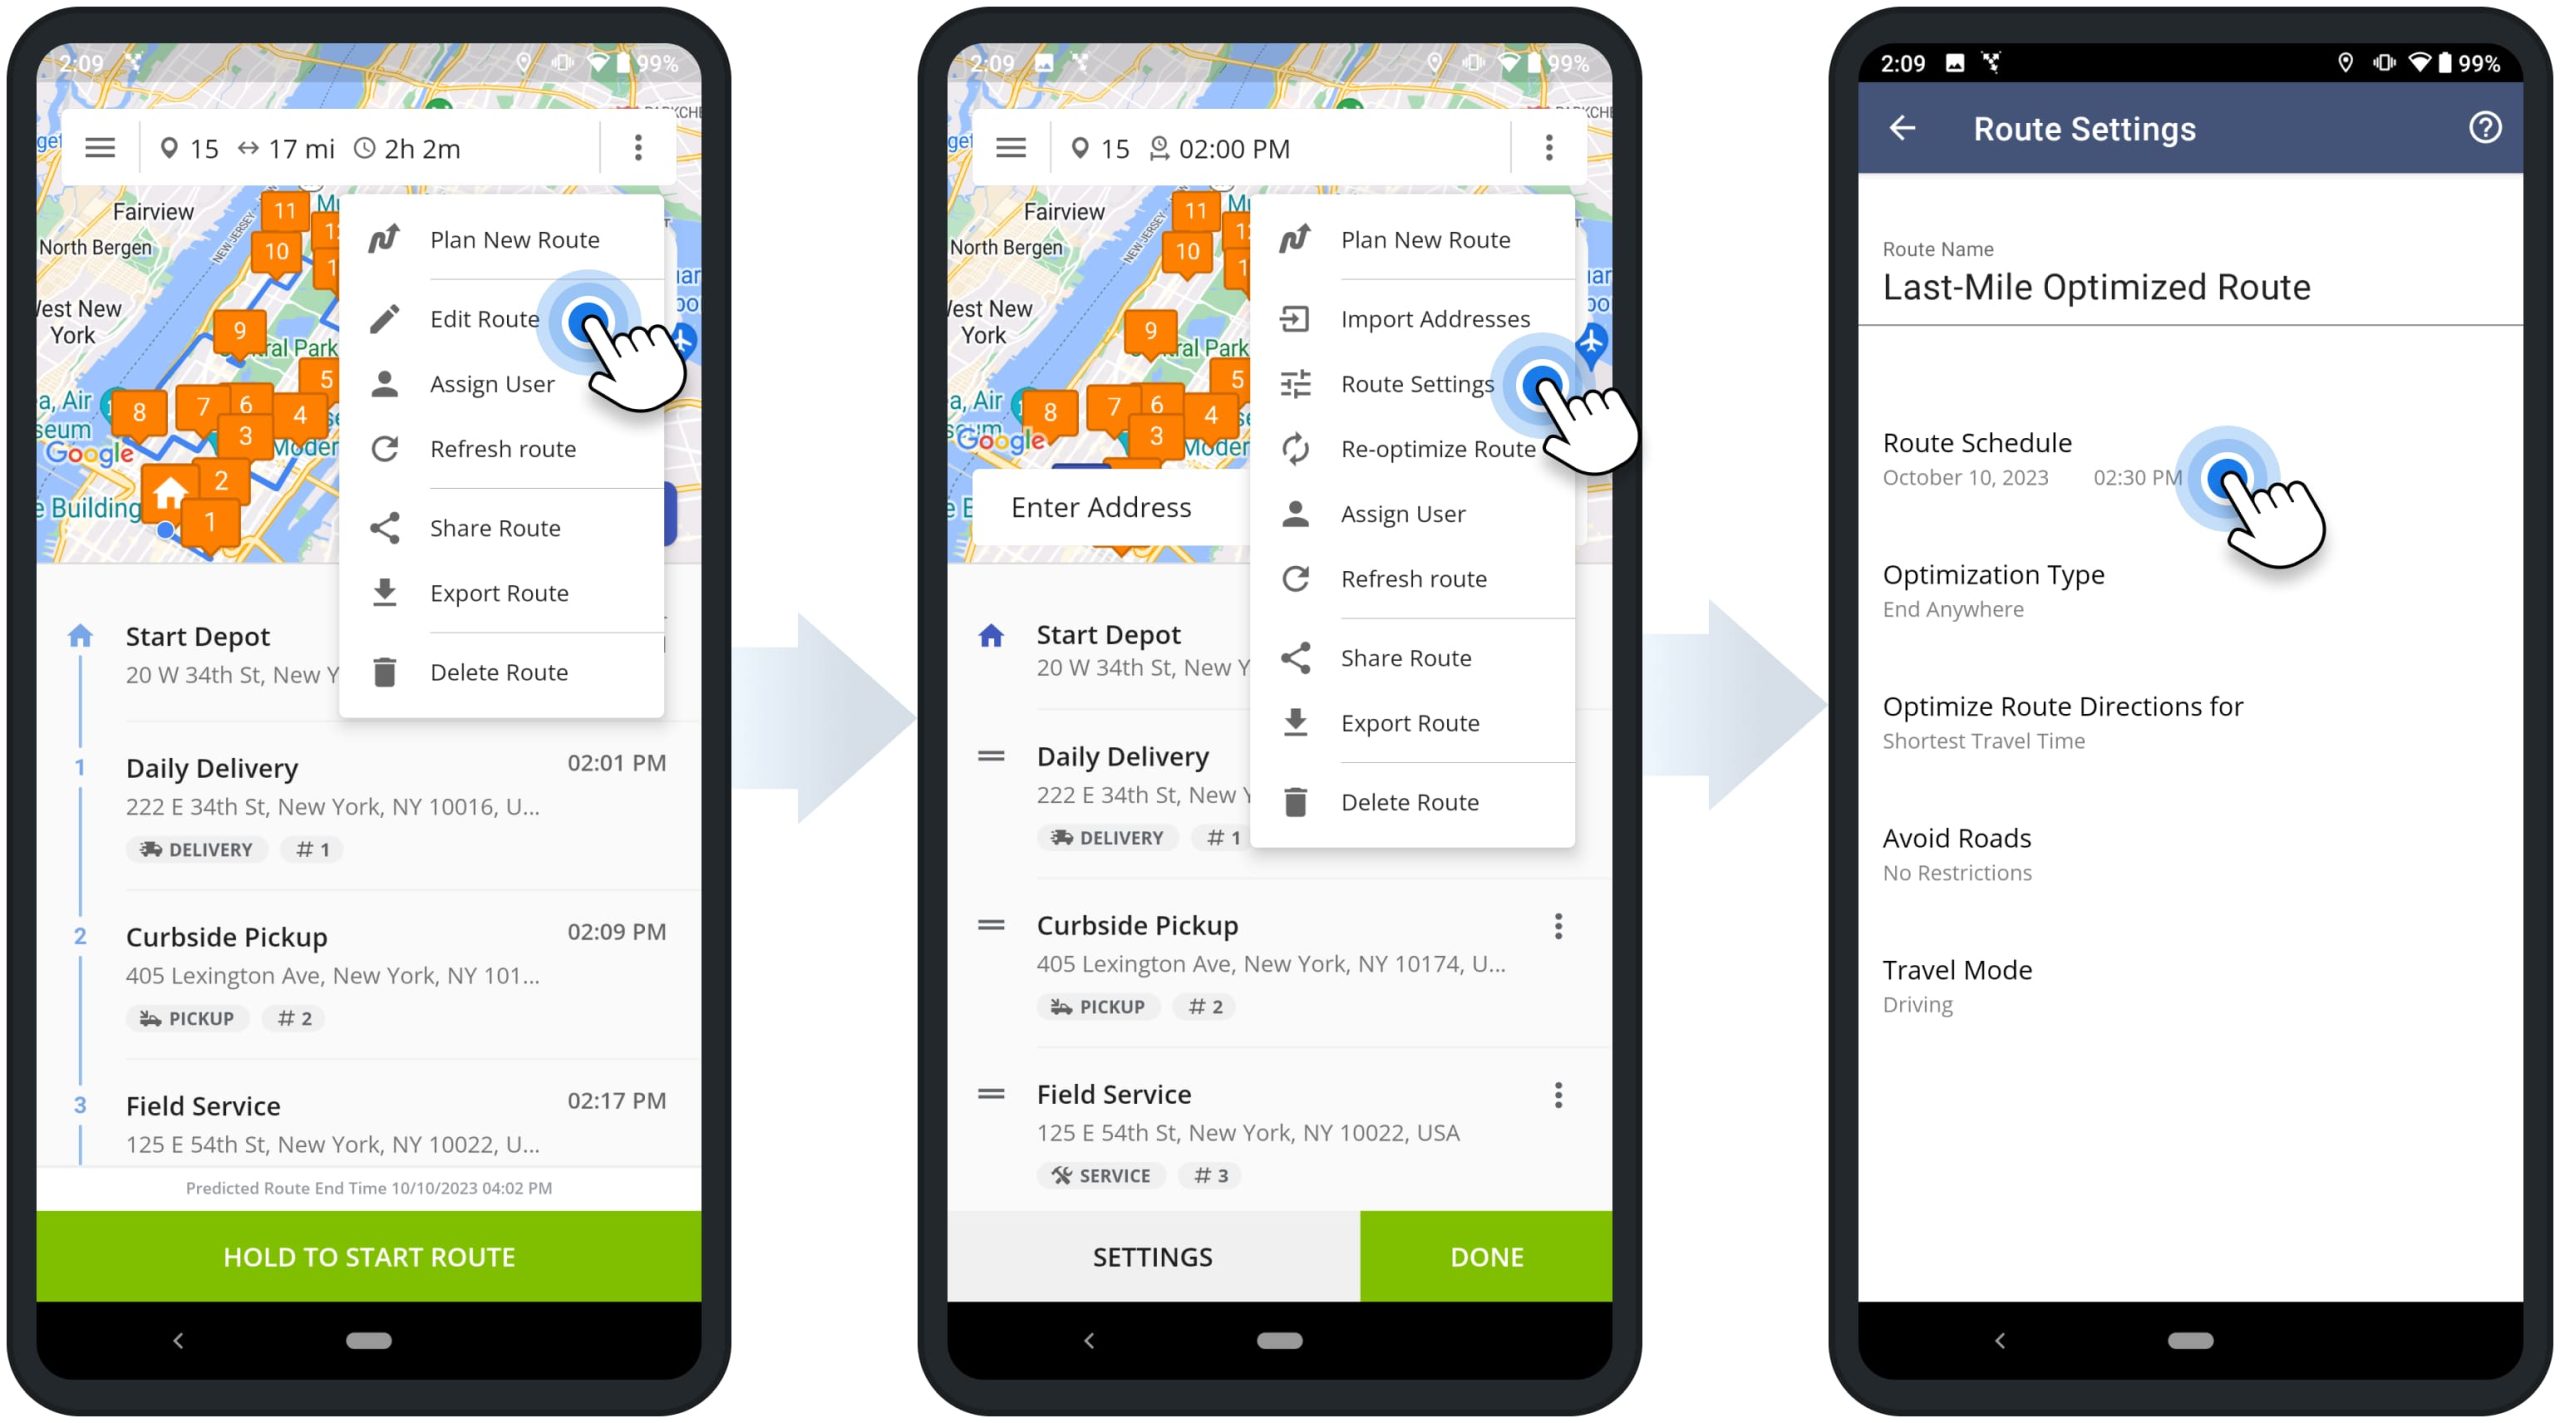
Route Settings – Update Route Settings and Re-Optimize Routes
To update route settings or re-optimize a route, go to “Routes” in the app’s main menu and then open the preferred route. Next, tap the three-dots menu icon in the top right corner, and then select “Edit Route” from the menu. After that, tap the three-dots menu icon again and then select “Route Settings” from the menu. Next, you can select the preferred Optimization Type, Route Directions Optimization Mode, Road Avoidance Option, and Travel Mode.
Below, you can learn more about the respective route optimization settings. After that, tap the back icon in the top left corner to return to the route. After changing the route’s settings, you can update the route or re-optimize the route. Furthere, you can learn about the difference between updating routes and re-optimizing routes.
| Settings | Description | |
|---|---|---|
| Optimization Type | ||
| Round Trip | Optimize route and sequence route addresses, starting and ending the route at the same address. | |
| Lock Last Destination | Optimize route and sequence route addresses, ending the route at the last added address or the last address in the imported file. | |
| End Anywhere | Optimize route and sequence route addresses and end the route at the most optimal address. | |
| Disable Optimization – End Anywhere | Plan the route with the exact same sequence of addresses as they were added or imported, ending the route at the last added or imported address. | |
| Disable Optimization – Round Trip | Plan the route with the exact same sequence of addresses as they were added or imported, starting and ending the route at the same address. | |
| Optimize Directions For | ||
| Shortest Travel Time | Optimize route and sequence route addresses in the most optimal visitation order, not accounting for the current traffic. | |
| Shortest Travel Time with Traffic | Optimize route and sequence route addresses in the most optimal visitation order, accounting for the current traffic. | |
| Avoid Roads | ||
| No Restrictions | Don’t apply any highways or toll road avoidance restrictions. | |
| Avoid Highways | Generate route directions that don’t include highways, as much as possible. | |
| Avoid Tolls | Generate route directions that don’t include toll roads, as much as possible. | |
| Avoid Highways & Tolls | Generate route directions that don’t include highways and toll roads, as much as possible. | |
| Travel Mode | ||
| Driving Travel Mode | Generate driving route directions for a vehicle. | |
| Bicycling Travel Mode | Generate bicycling route directions for a bicycle. | |
| Walking Travel Mode | Generate walking route directions for a pedestrian. | |
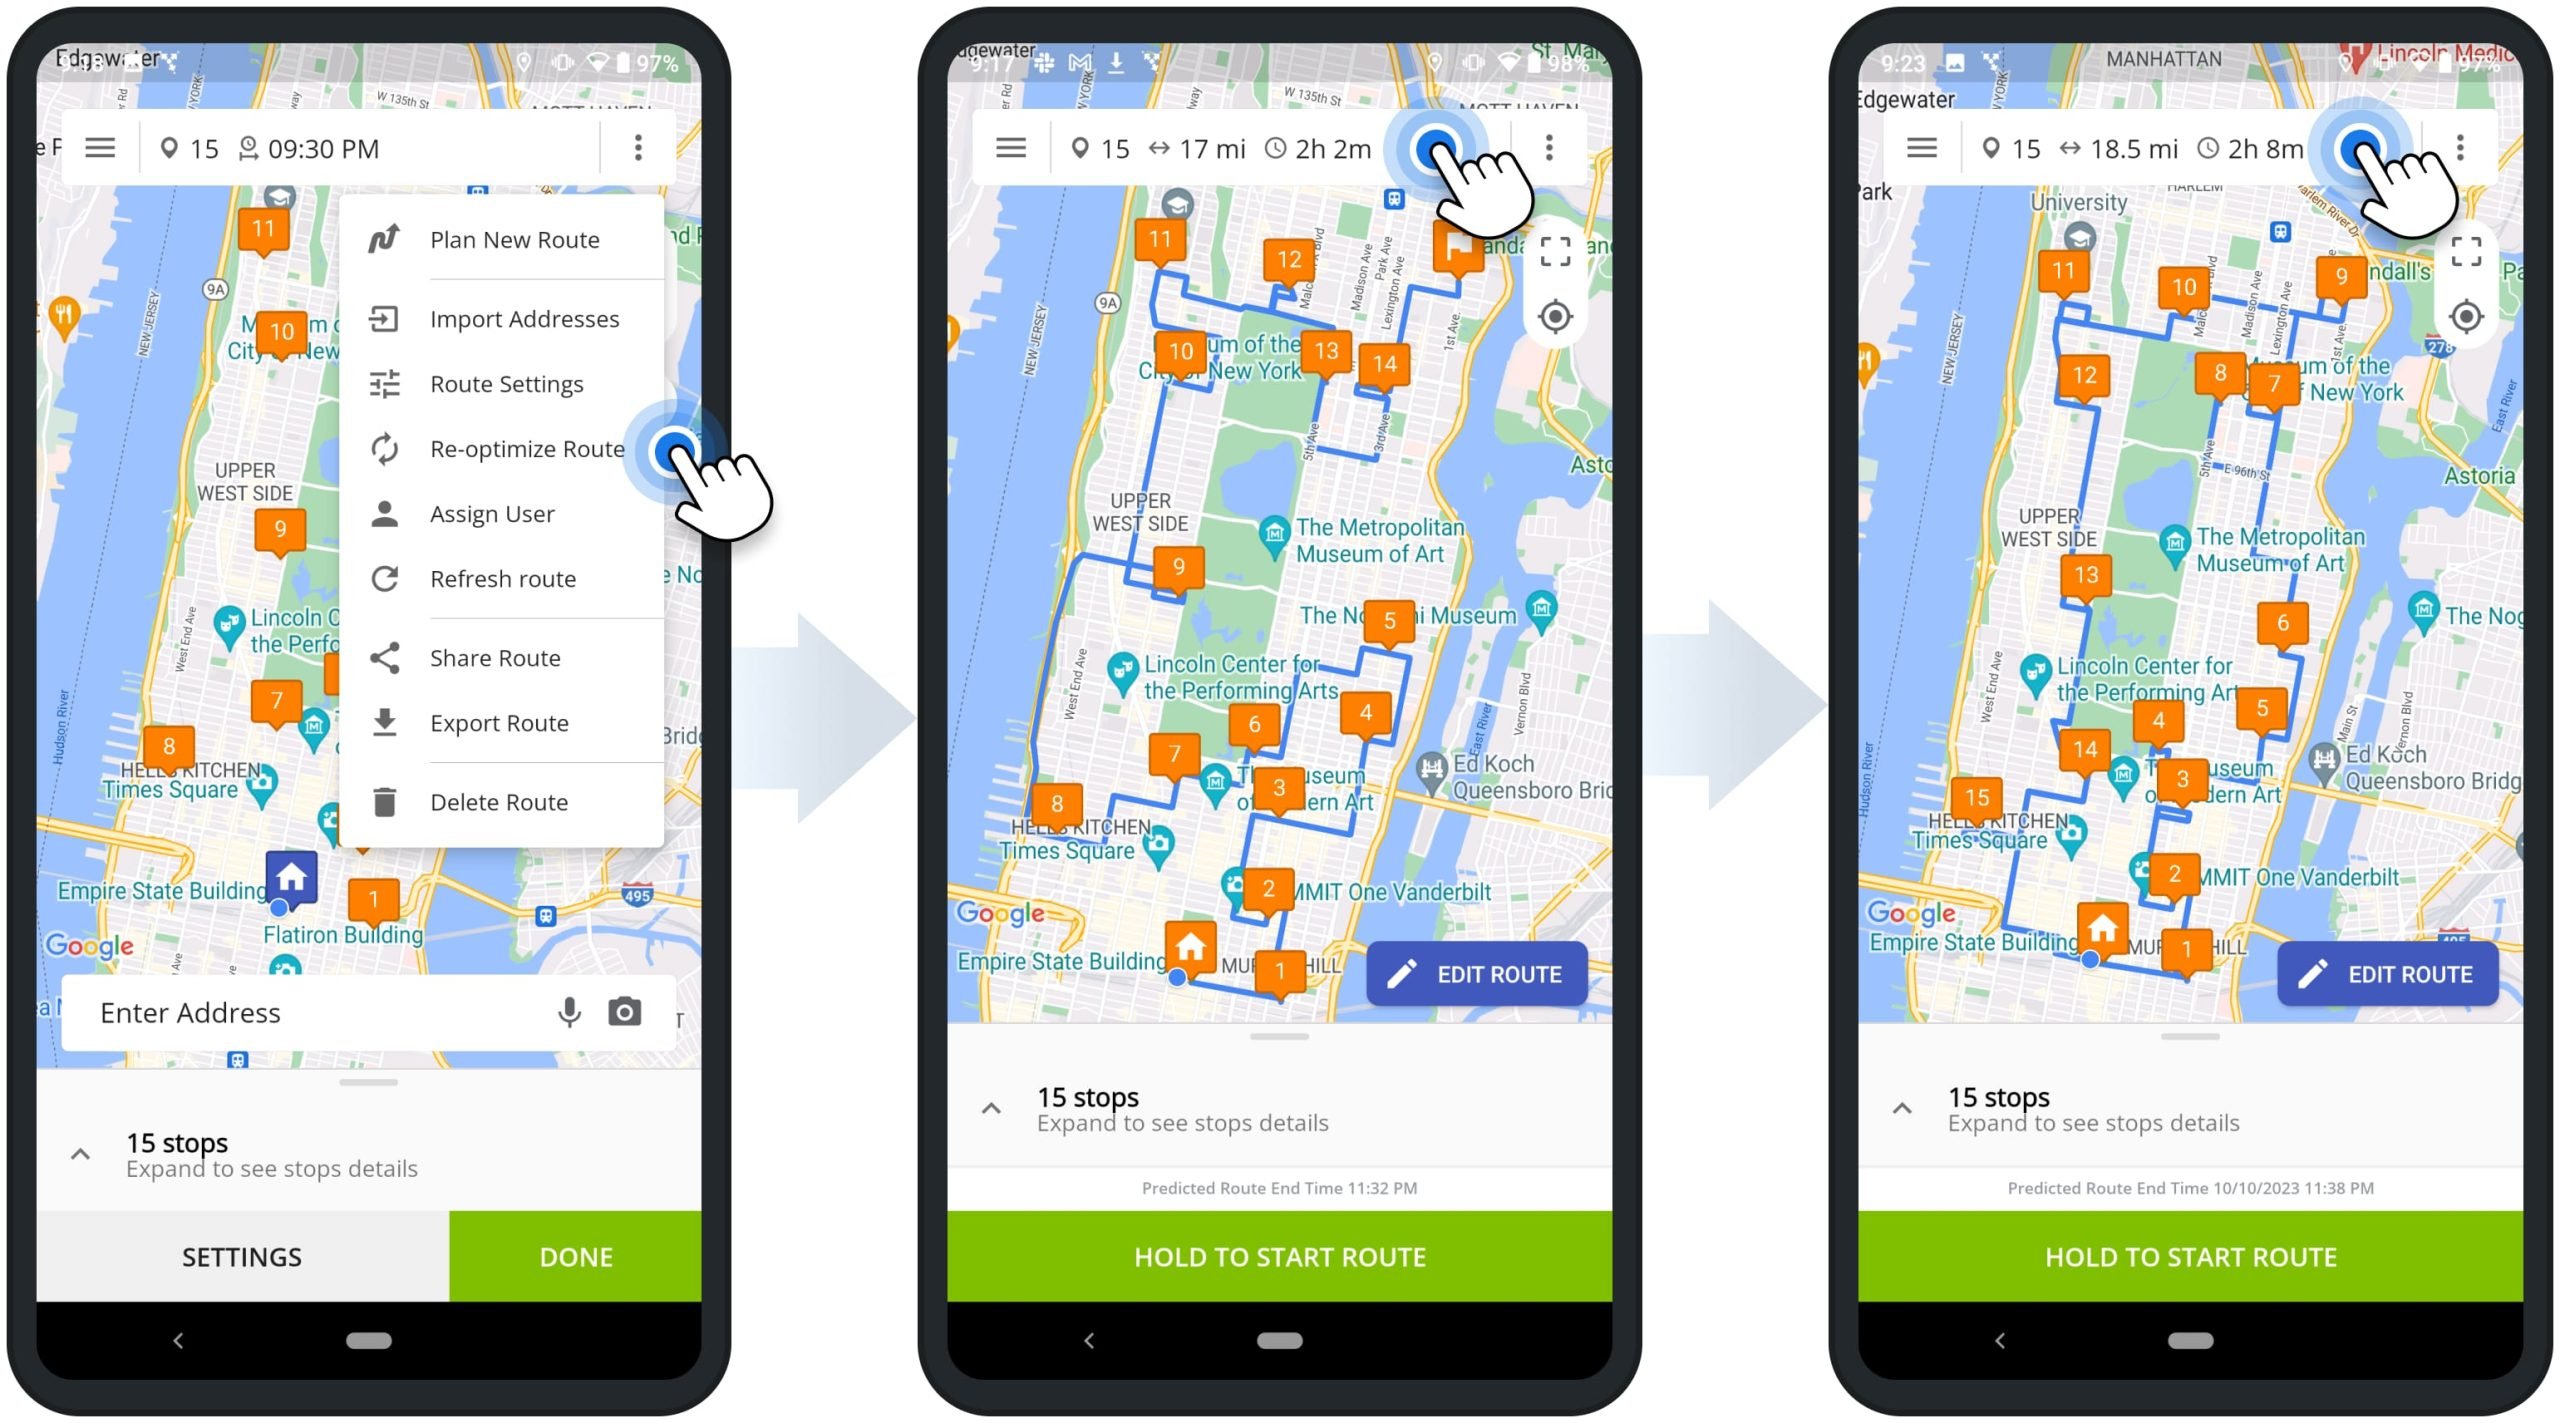
Re-Optimize and Resequence Routes vs Update Route Settings
When You Re-Optimize a Route, Route4Me applies the specified route settings and automatically re-sequences all stops on the route for the most optimal visitation order. For example, you can re-optimize a route after adding stops, removing stops, applying a new optimization type, etc.
To re-optimize the opened route, tap the three-dots menu icon in the top right corner and then select “Edit Route“. Next, you can change the stops sequence, remove stops or add new stops. To change route settings, tap the three-dots menu icon again and then select “Route Settings” from the menu. After that, modify the route’s optimization settings and then tap the back icon in the top left corner to return to the route.
After making the preferred route changes, tap the three dots menu icon in the top right corner and then select “Re-Optimize Route” from the menu. After that, Route4Me will automatically sequence the route’s stops for the most optimal visitation order based on the new settings. Equally important, if the route has already visited stops (stops with a status), these stops will not be resequenced, and only stops without a status will be resequenced.
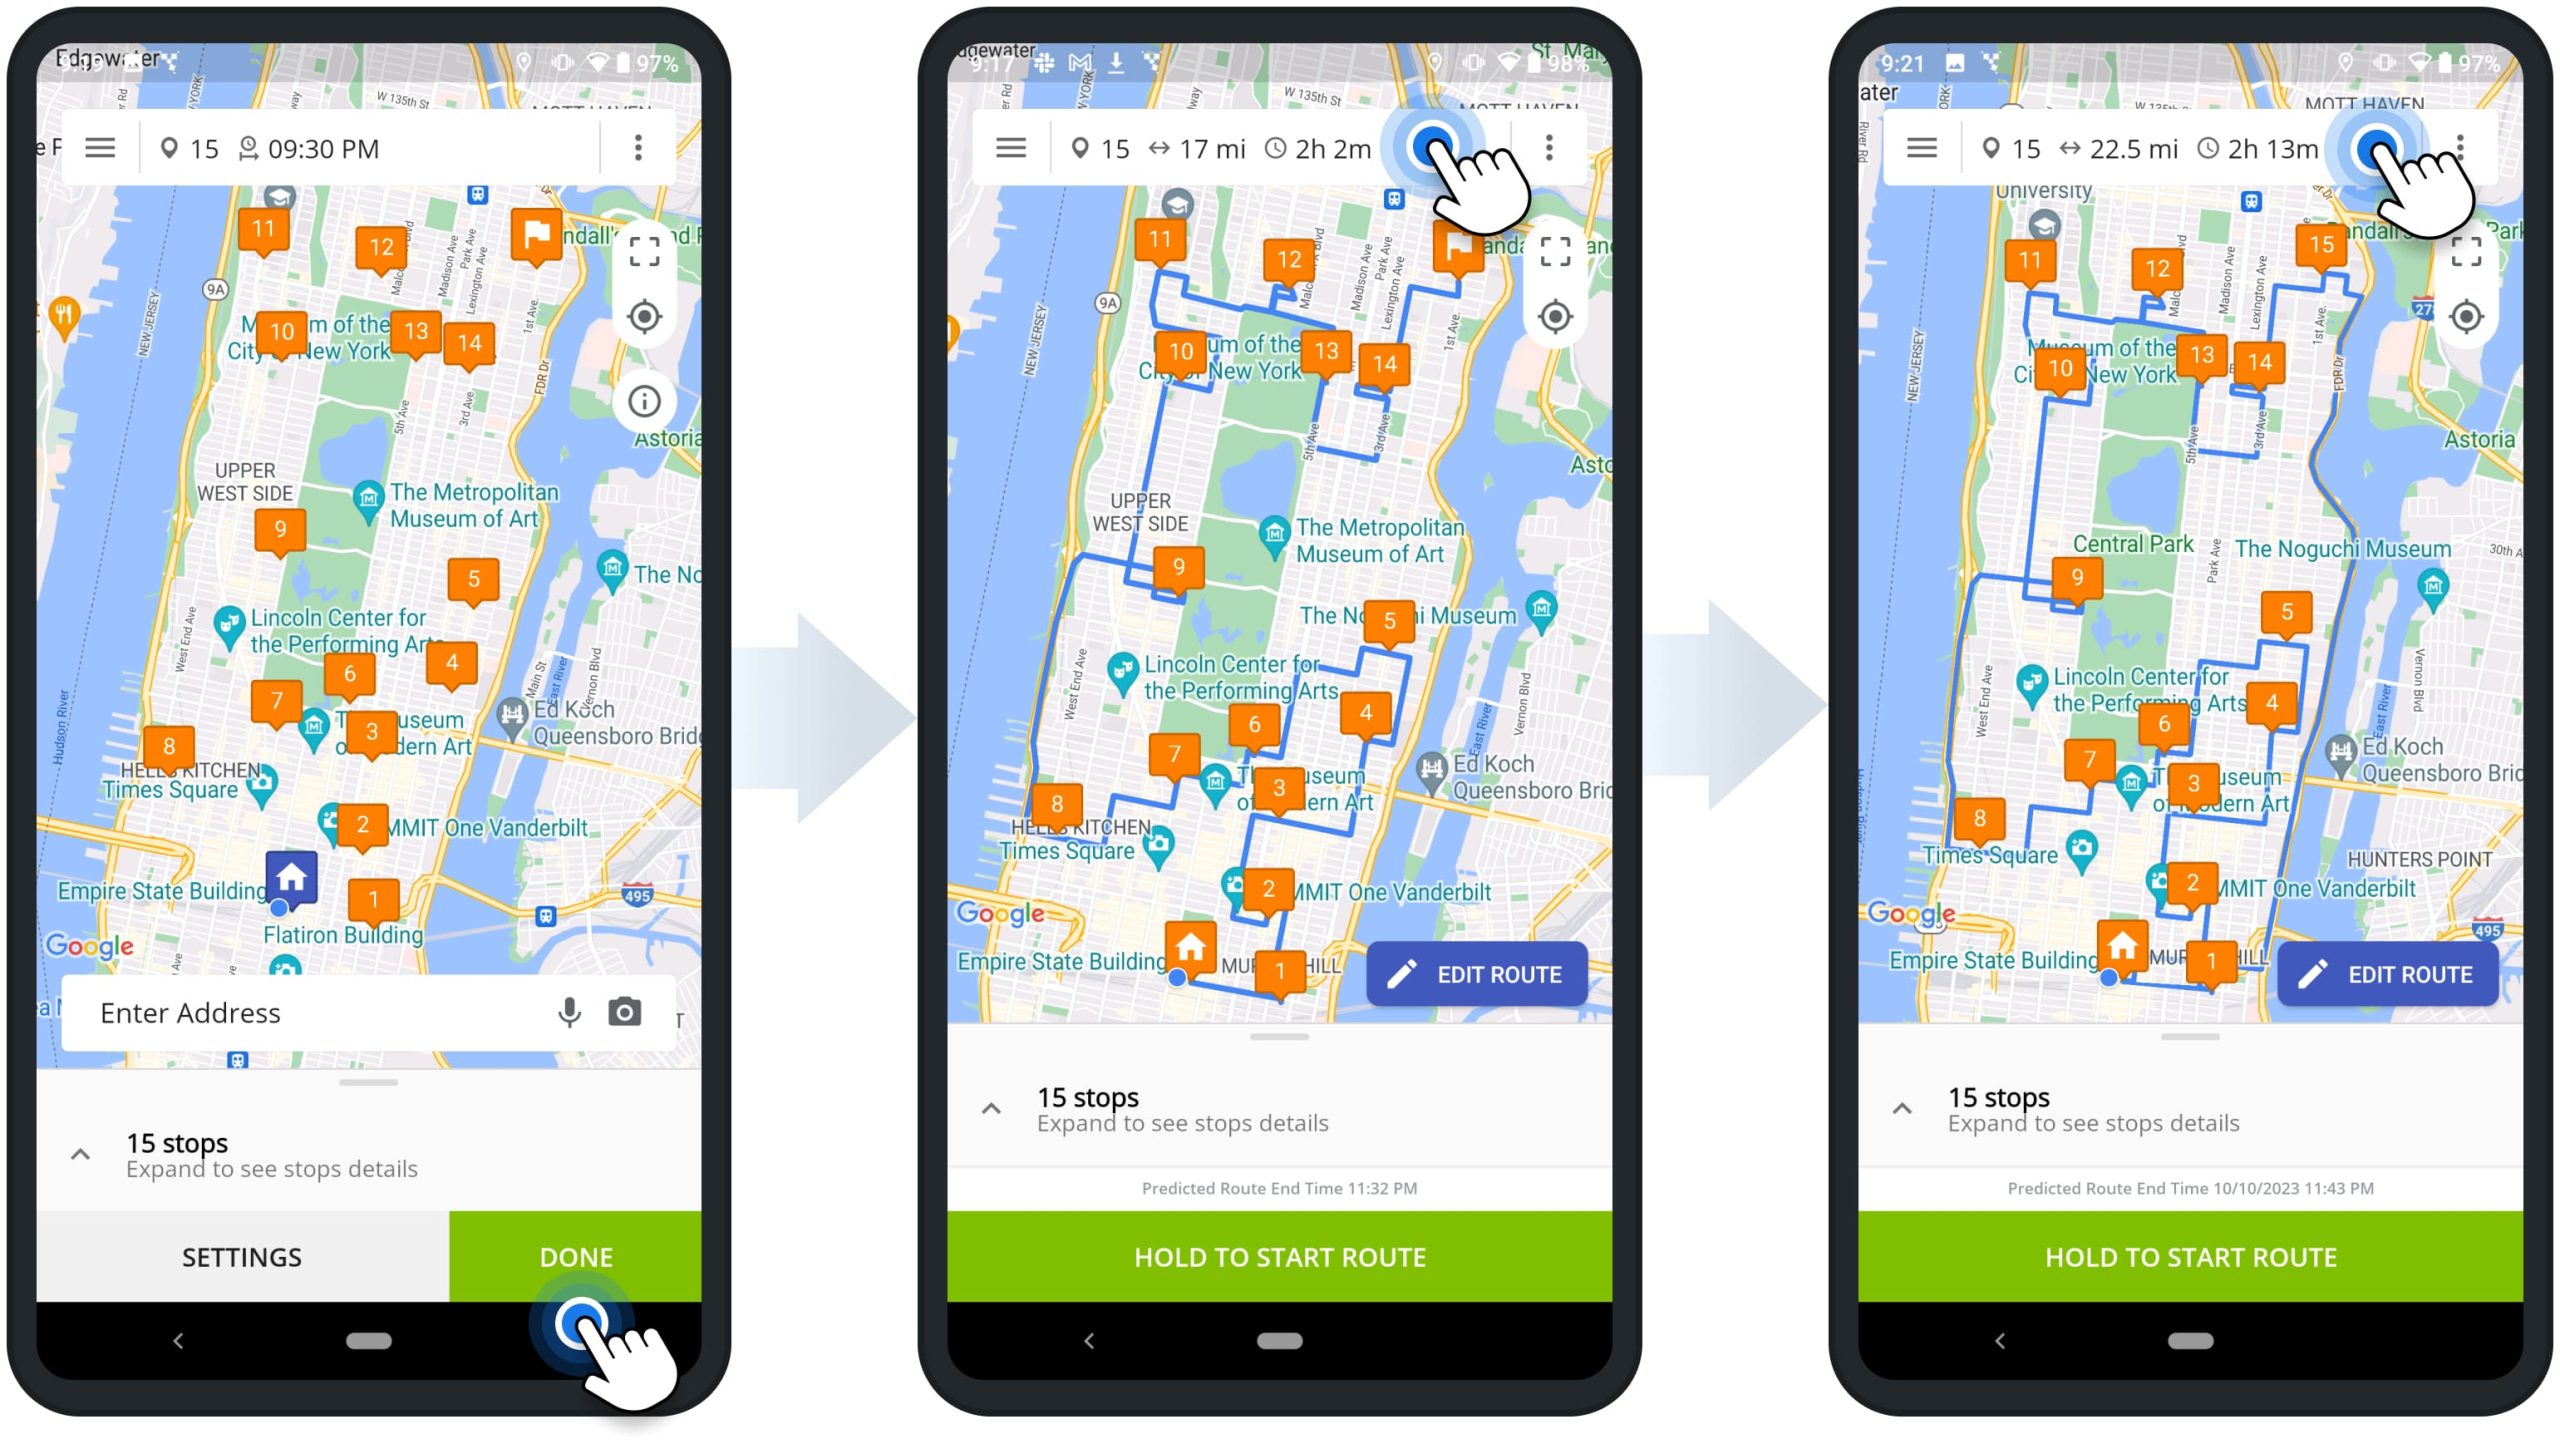
When You Update Route Settings, Route4Me applies the specified settings and doesn’t change the current sequence of the route’s stops. For example, you can update a route after rescheduling the route, changing route start and end, adding new addresses, manually rearranging stops, etc.
To update the settings of the opened route, tap the three-dots menu icon in the top right corner and then select “Edit Route“. Next, you can change the stops sequence, remove stops or add new stops. To change route settings, tap the three-dots menu icon again and then select “Route Settings” from the menu. After that, modify the route’s optimization settings and then tap the back icon in the top left corner to return to the route.
After that, tap the “Done” button to apply the new settings without re-optimizing the route. Accordingly, Route4Me will apply the new route settings without changing the route’s stops sequence.
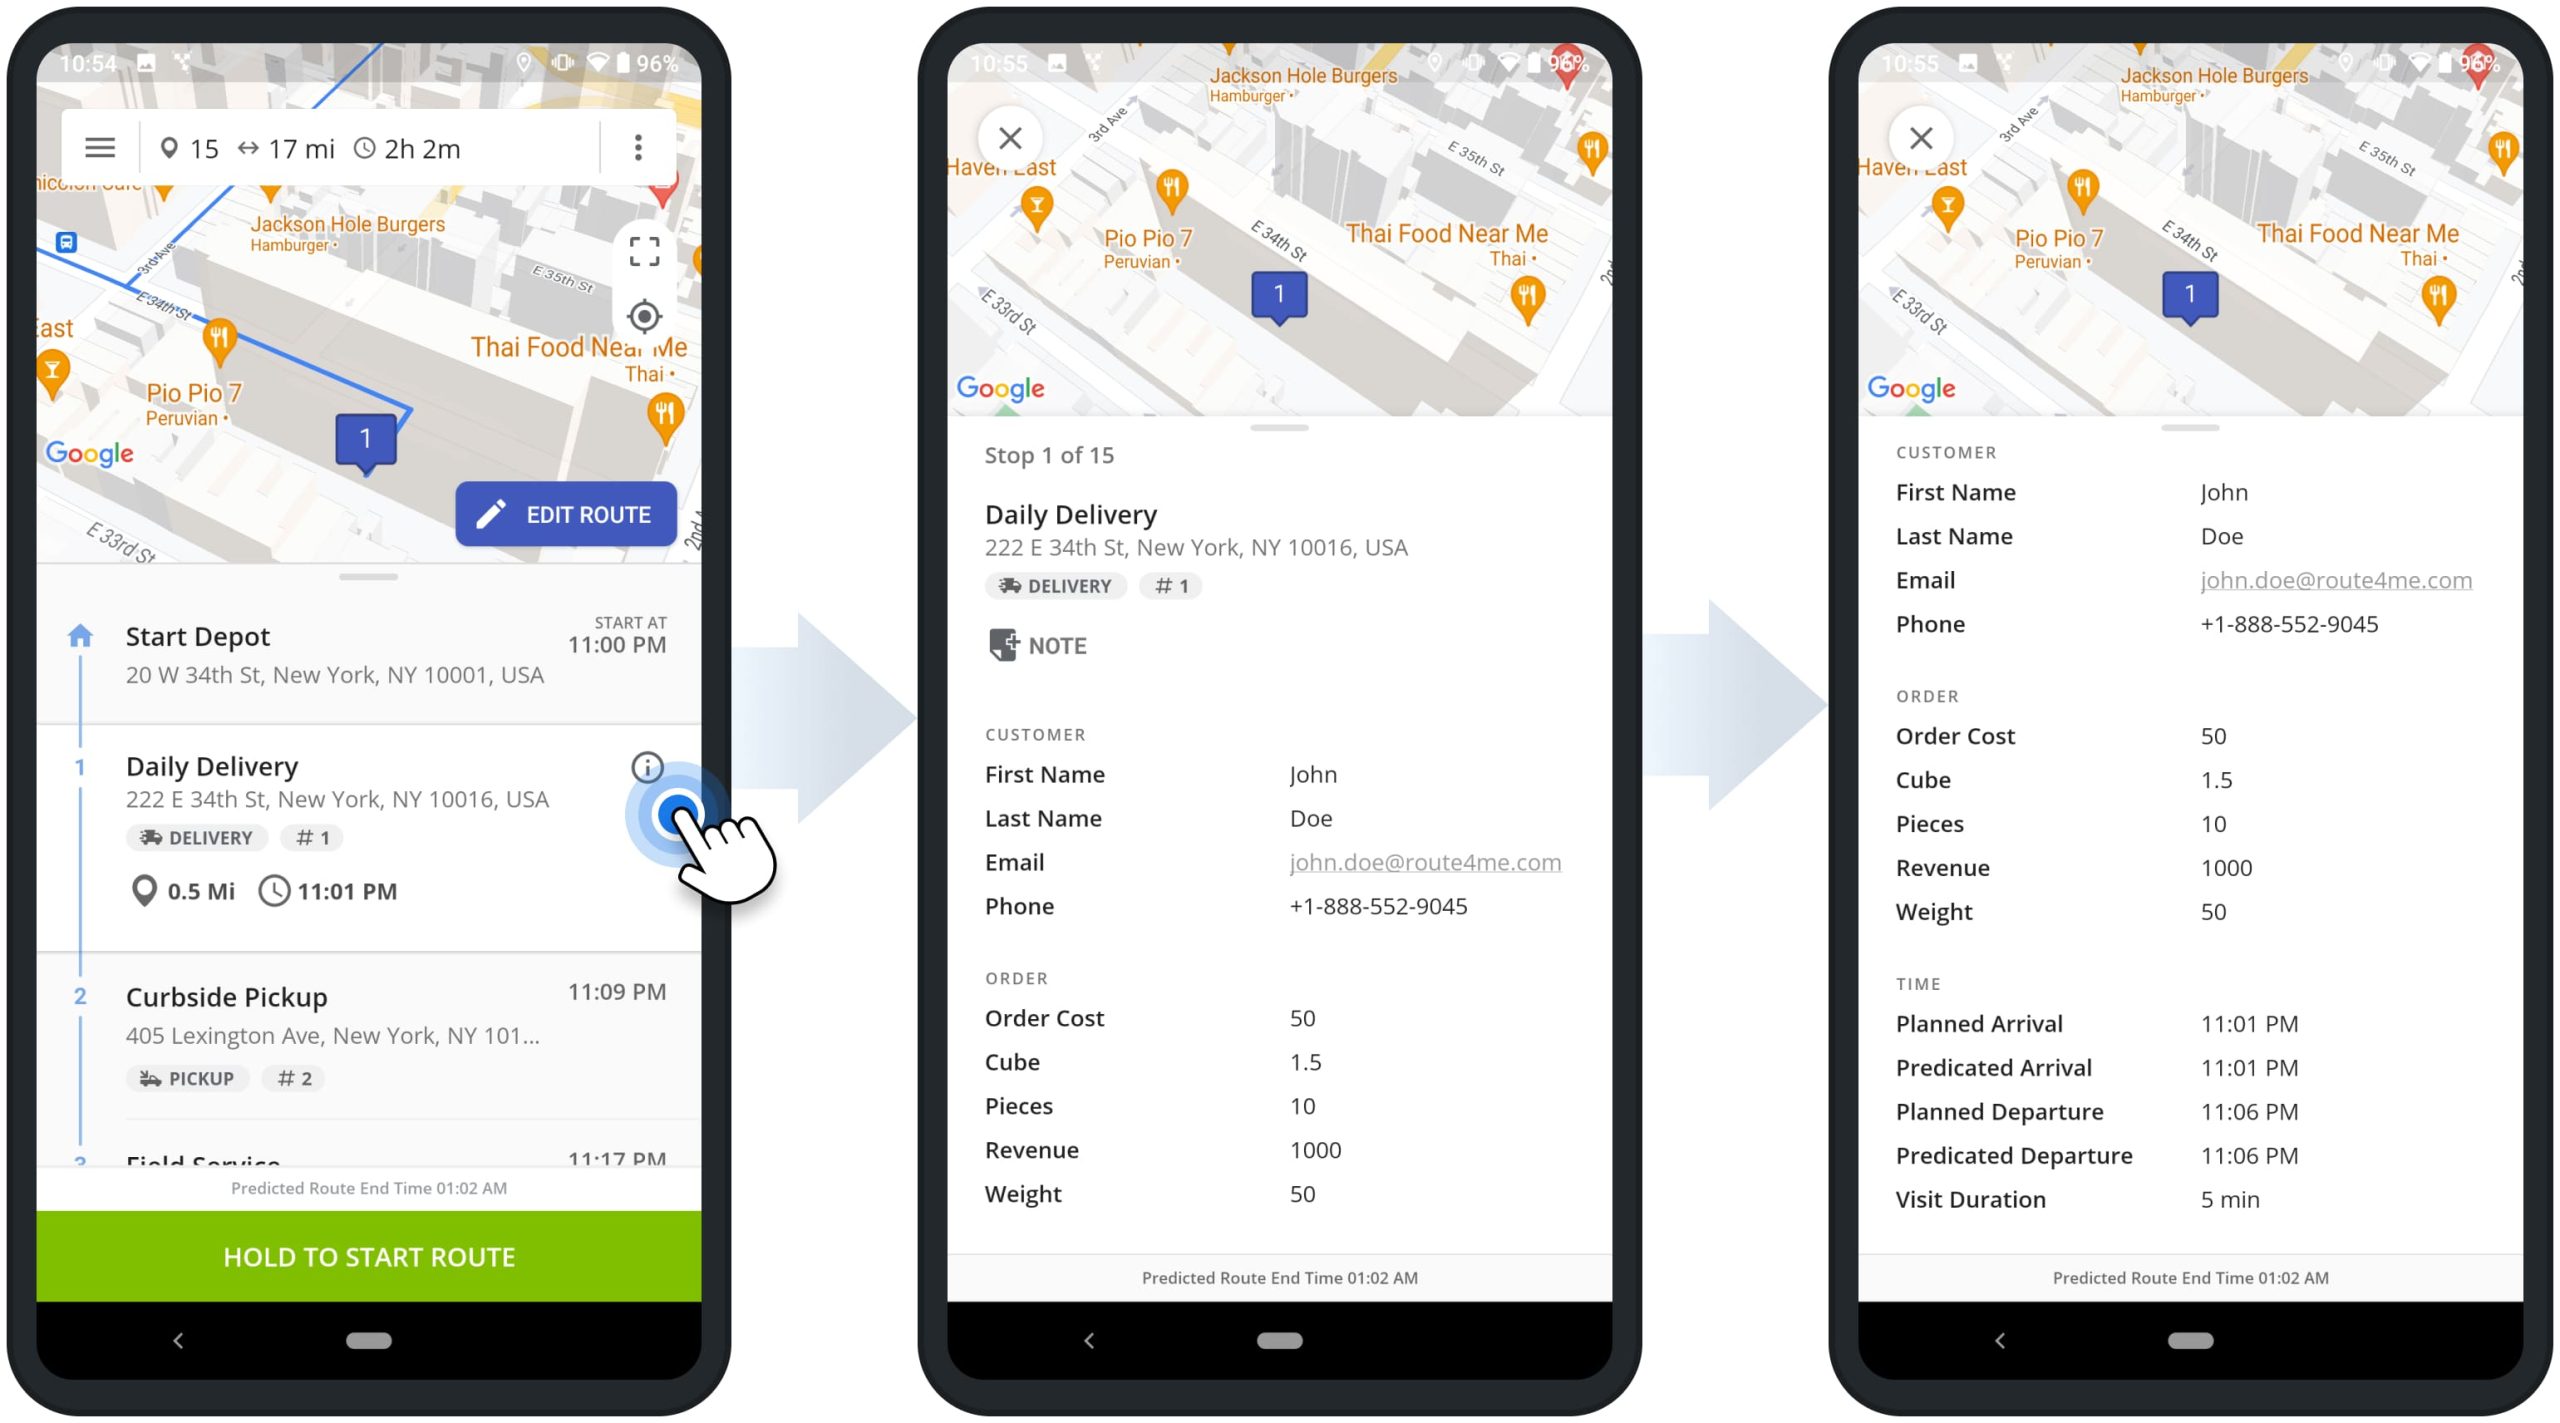
Stop Info – Address, Customer and Order Details, ETAs, and More
To open the details of a route stop, tap on the information icon next to the preferred stop on the opened route. The Stop Info screen shows the stop’s Address, Alias, Stop Type, Attached Notes with Proof of Visit, Customer Details (i.e., name, email, phone, etc.), order details (i.e., Weight, Pieces, Cube, etc.), ETAs, Custom Data, Time Windows, and more.
Equally important, stops can have different data attached to them based on your account settings, subscription type, enabled add-ons, user type, etc. Additionally, learn more about the difference between Route4Me’s Mobile and Marketplace Subscriptions.
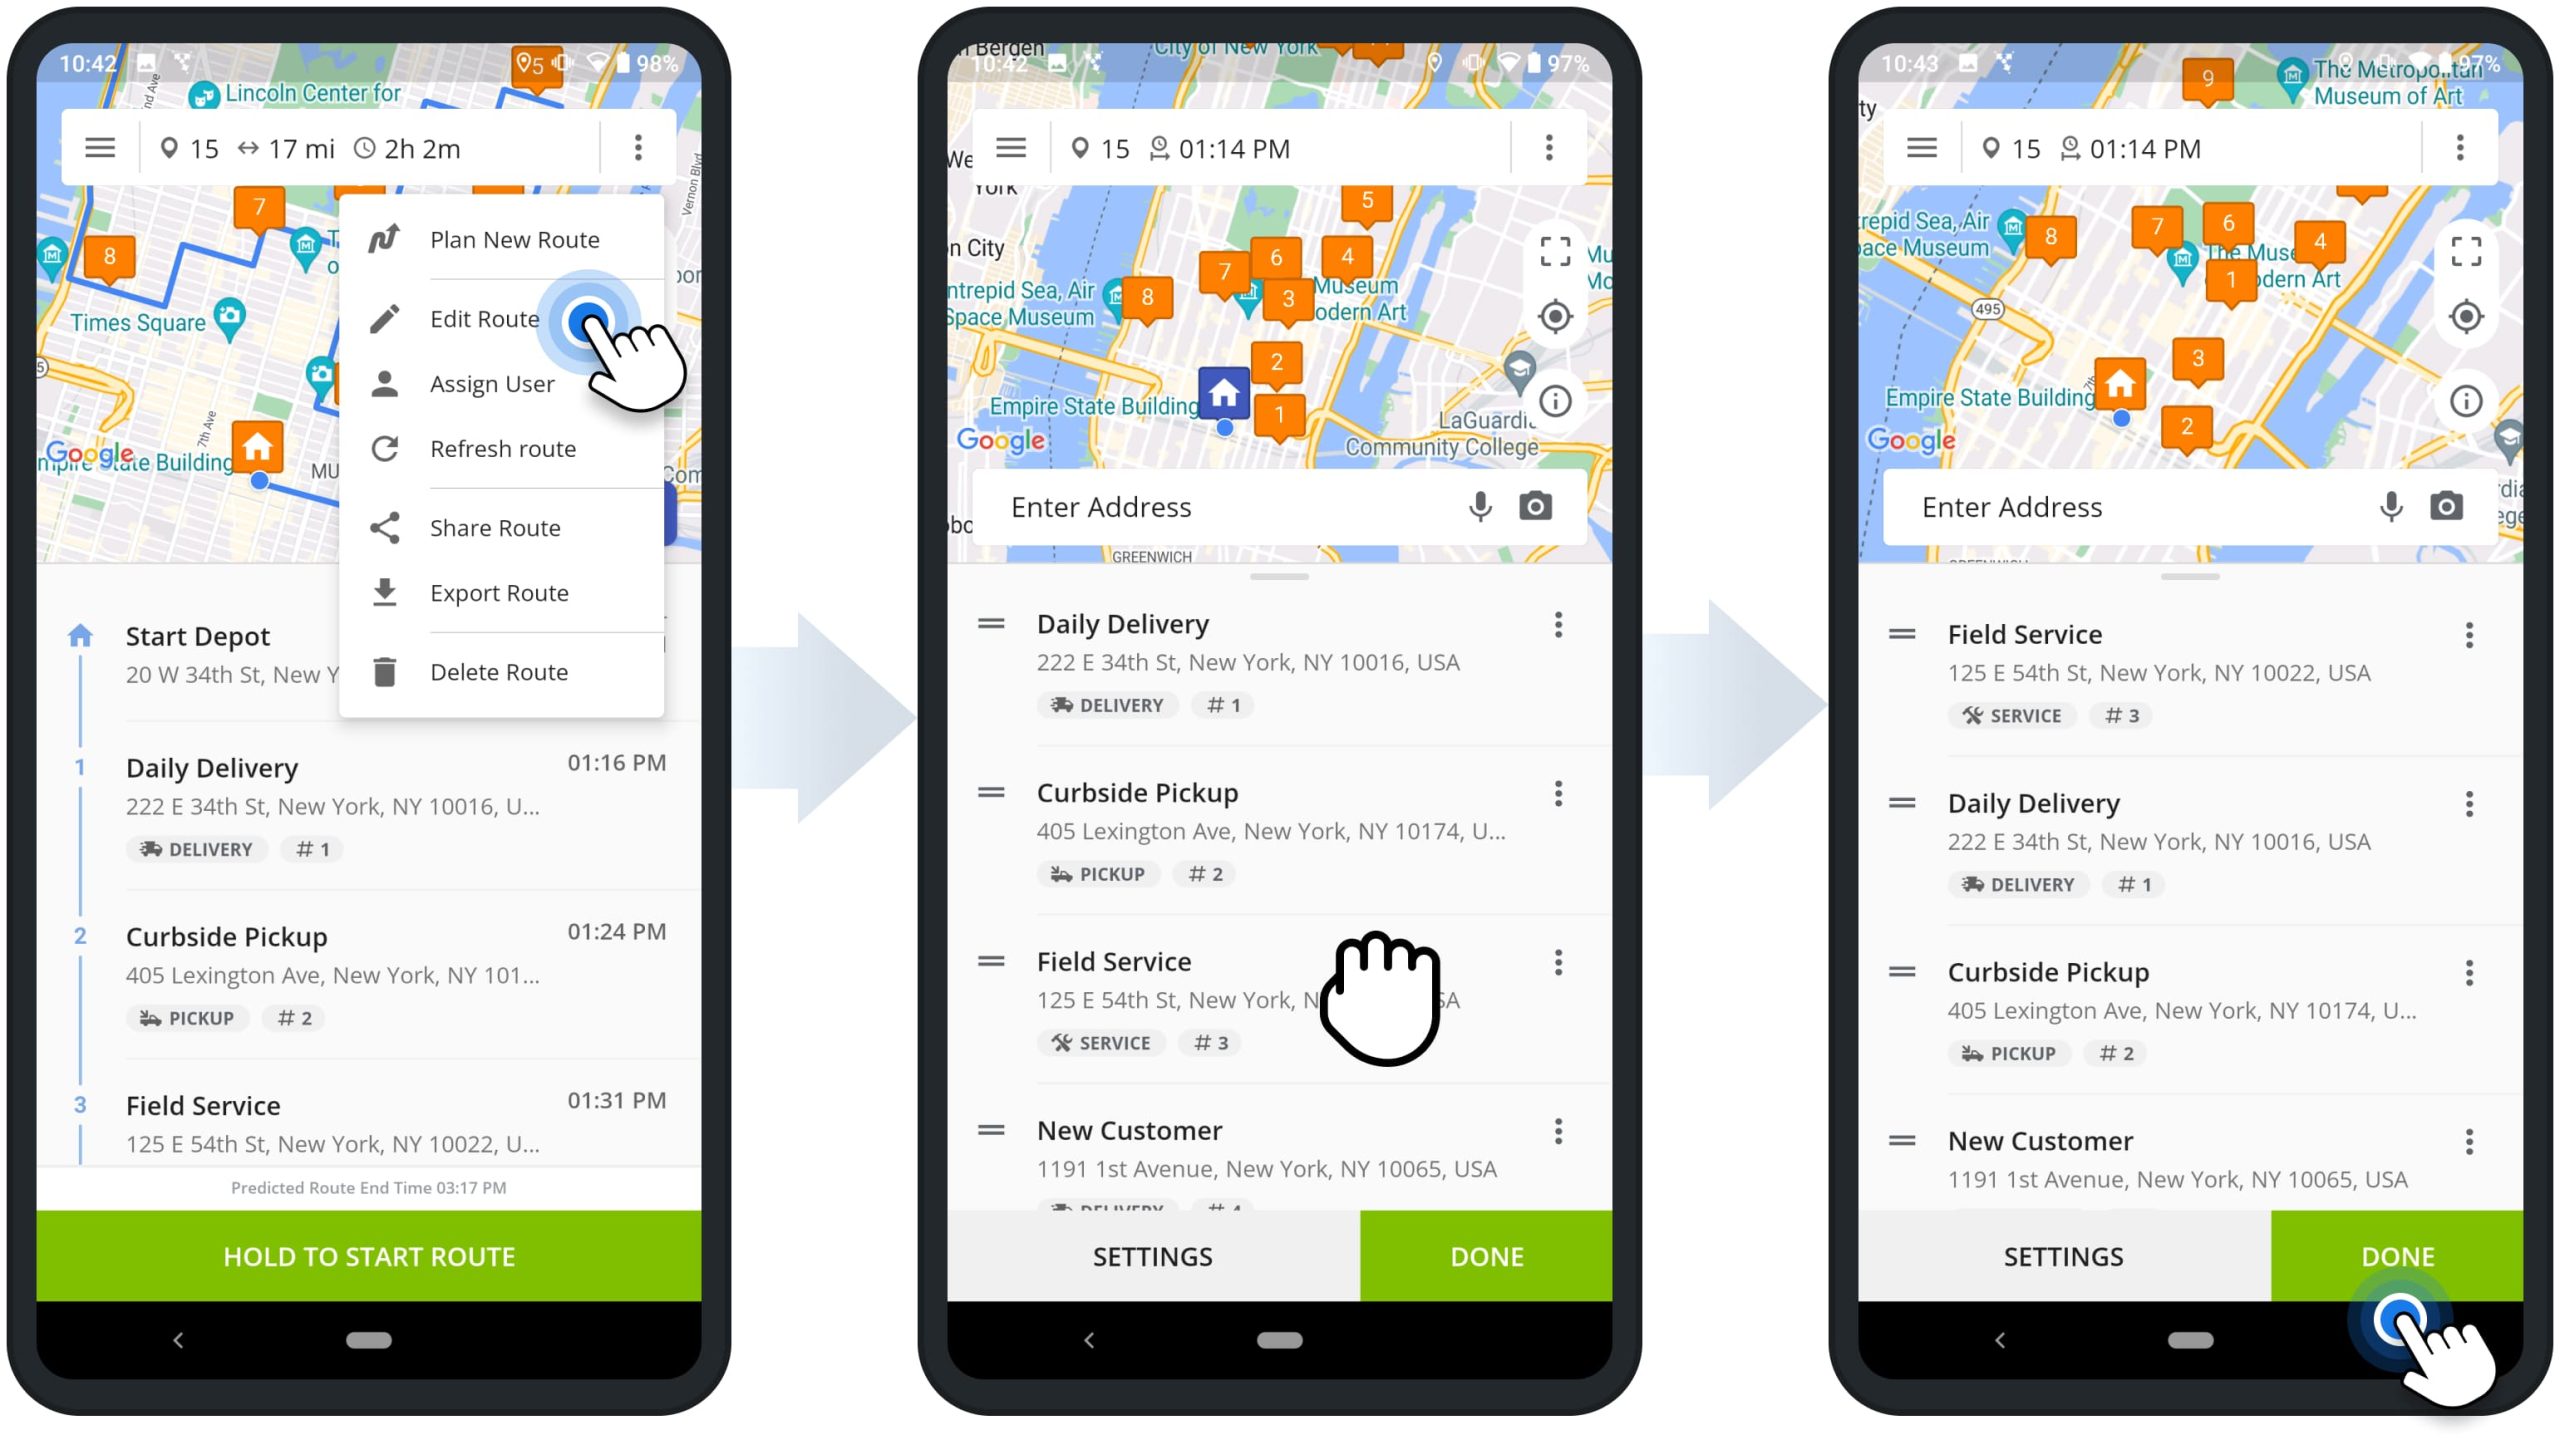
Change Stops Sequence – Re-Sequence Route Stops and Addresses
For your convenience, you can manually change the sequence of stops on planned and sequenced routes. First, tap the three dots menu icon in the top right corner of the opened route and then select “Edit Route” from the menu. After that, you can drag and drop stops to the preferred sequence position on the route. After resequencing the route, tap the “Done” button, and Route4Me will automatically generate the most optimal driving directions for the new stops sequence.
NOTE: If you re-optimize the route (tap the three dots menu icon in the top right corner and then select “Re-Optimize Route“) after manually changing the route’s stops sequence, Route4Me will automatically sequence all route stops for the most optimal visitation order, shortest travel time, and distance. Accordingly, the manually sequenced stops may be resequenced.
Add Stops – Insert Addresses and Stops into Planned Routes
Furthermore, you can easily insert addresses and stops into planned or optimized routes and already started routes. First, tap the three-dots menu icon in the top right corner of the opened route and then select “Edit Route” from the menu. Next, tap the “Enter Address” field and then use the preferred method for adding new addresses.
Specifically, you can enter addresses with autocomplete and geocoding, import addresses from your device, Google Drive, Dropbox, and other cloud services, use the OCR Address Scanner, use voice dictation, and more. Additionally, learn more about all available methods for Adding and Importing Addresses into Routes.
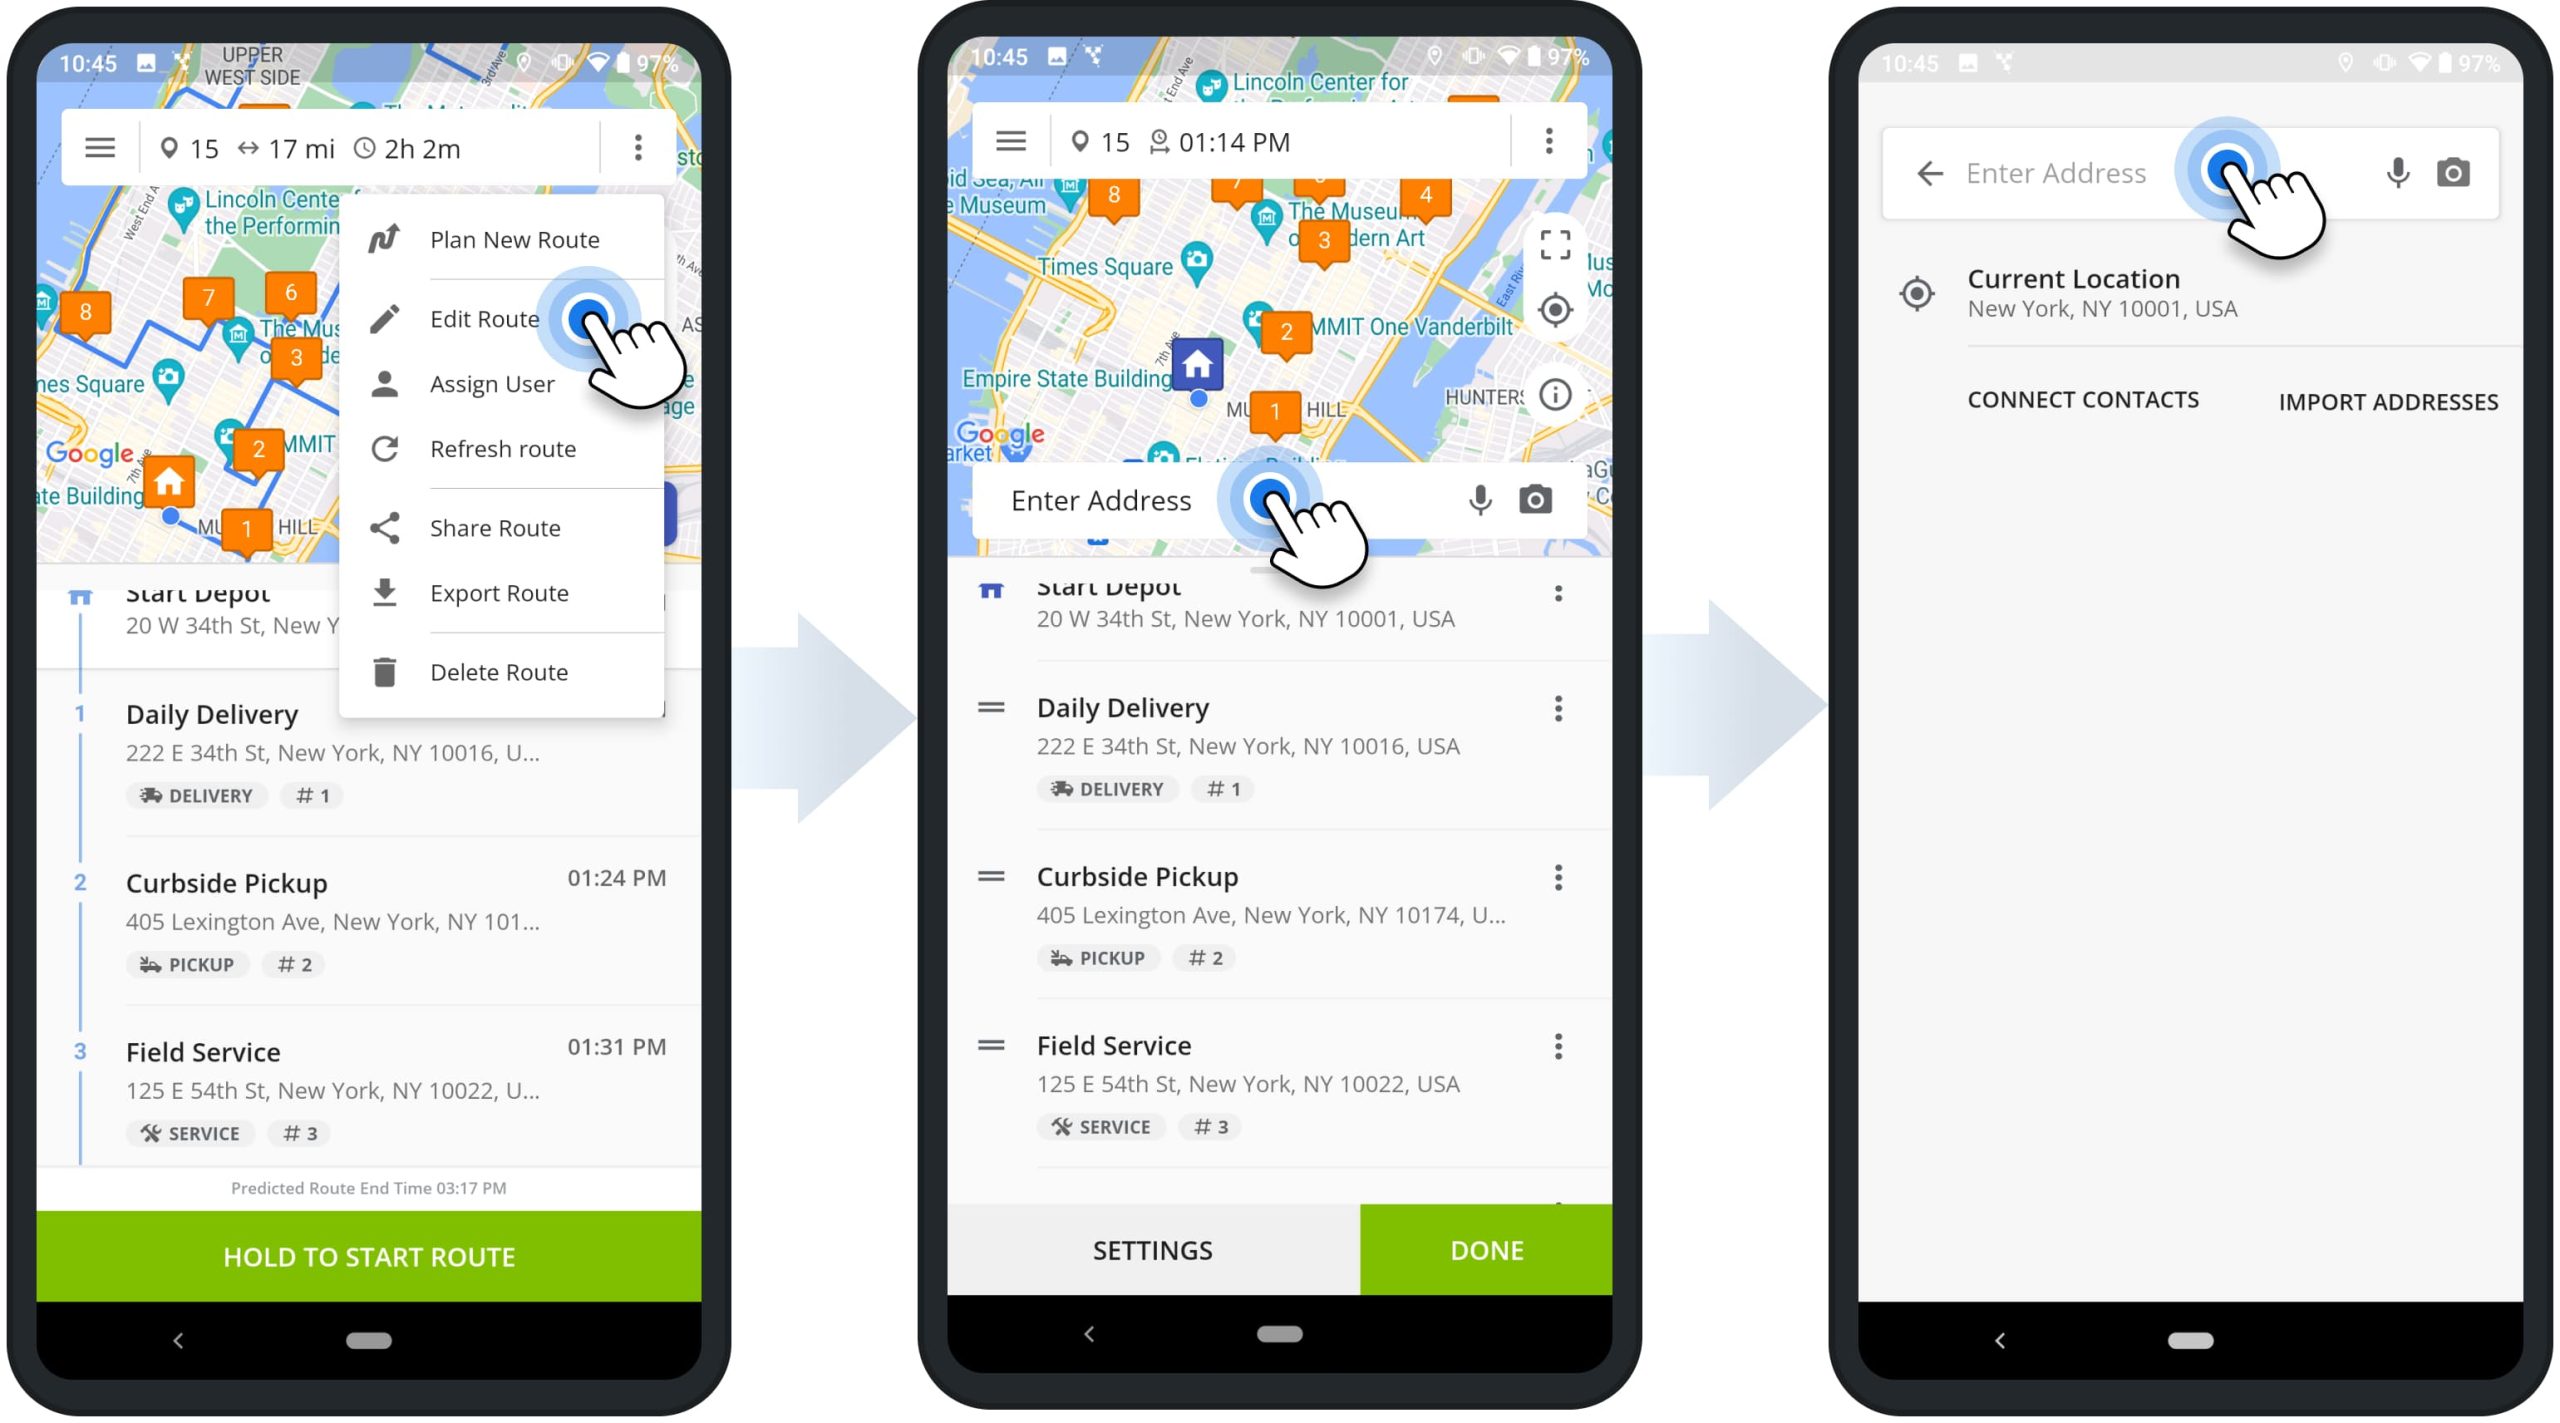
Moreover, when adding new addresses, you can add such as additional details as Stop Alias, Phone Number, Stop Type, Visit Duration, etc. After adding one or multiple addresses, the app automatically adds them as stops at the end of the route. Accordingly, if you want to keep new addresses at the end of the route without resequencing the route, tap the “Done” button.
Alternatively, you can re-optimize and sequence the route based on its optimization settings and the newly added stop addresses. To do so, tap the three dots menu icon in the top right corner and then select “Re-Optimize Route“. Equally important, if the route has visited stops (stops with a status), these stops will not be resequenced, and only stops without a status will be resequenced.
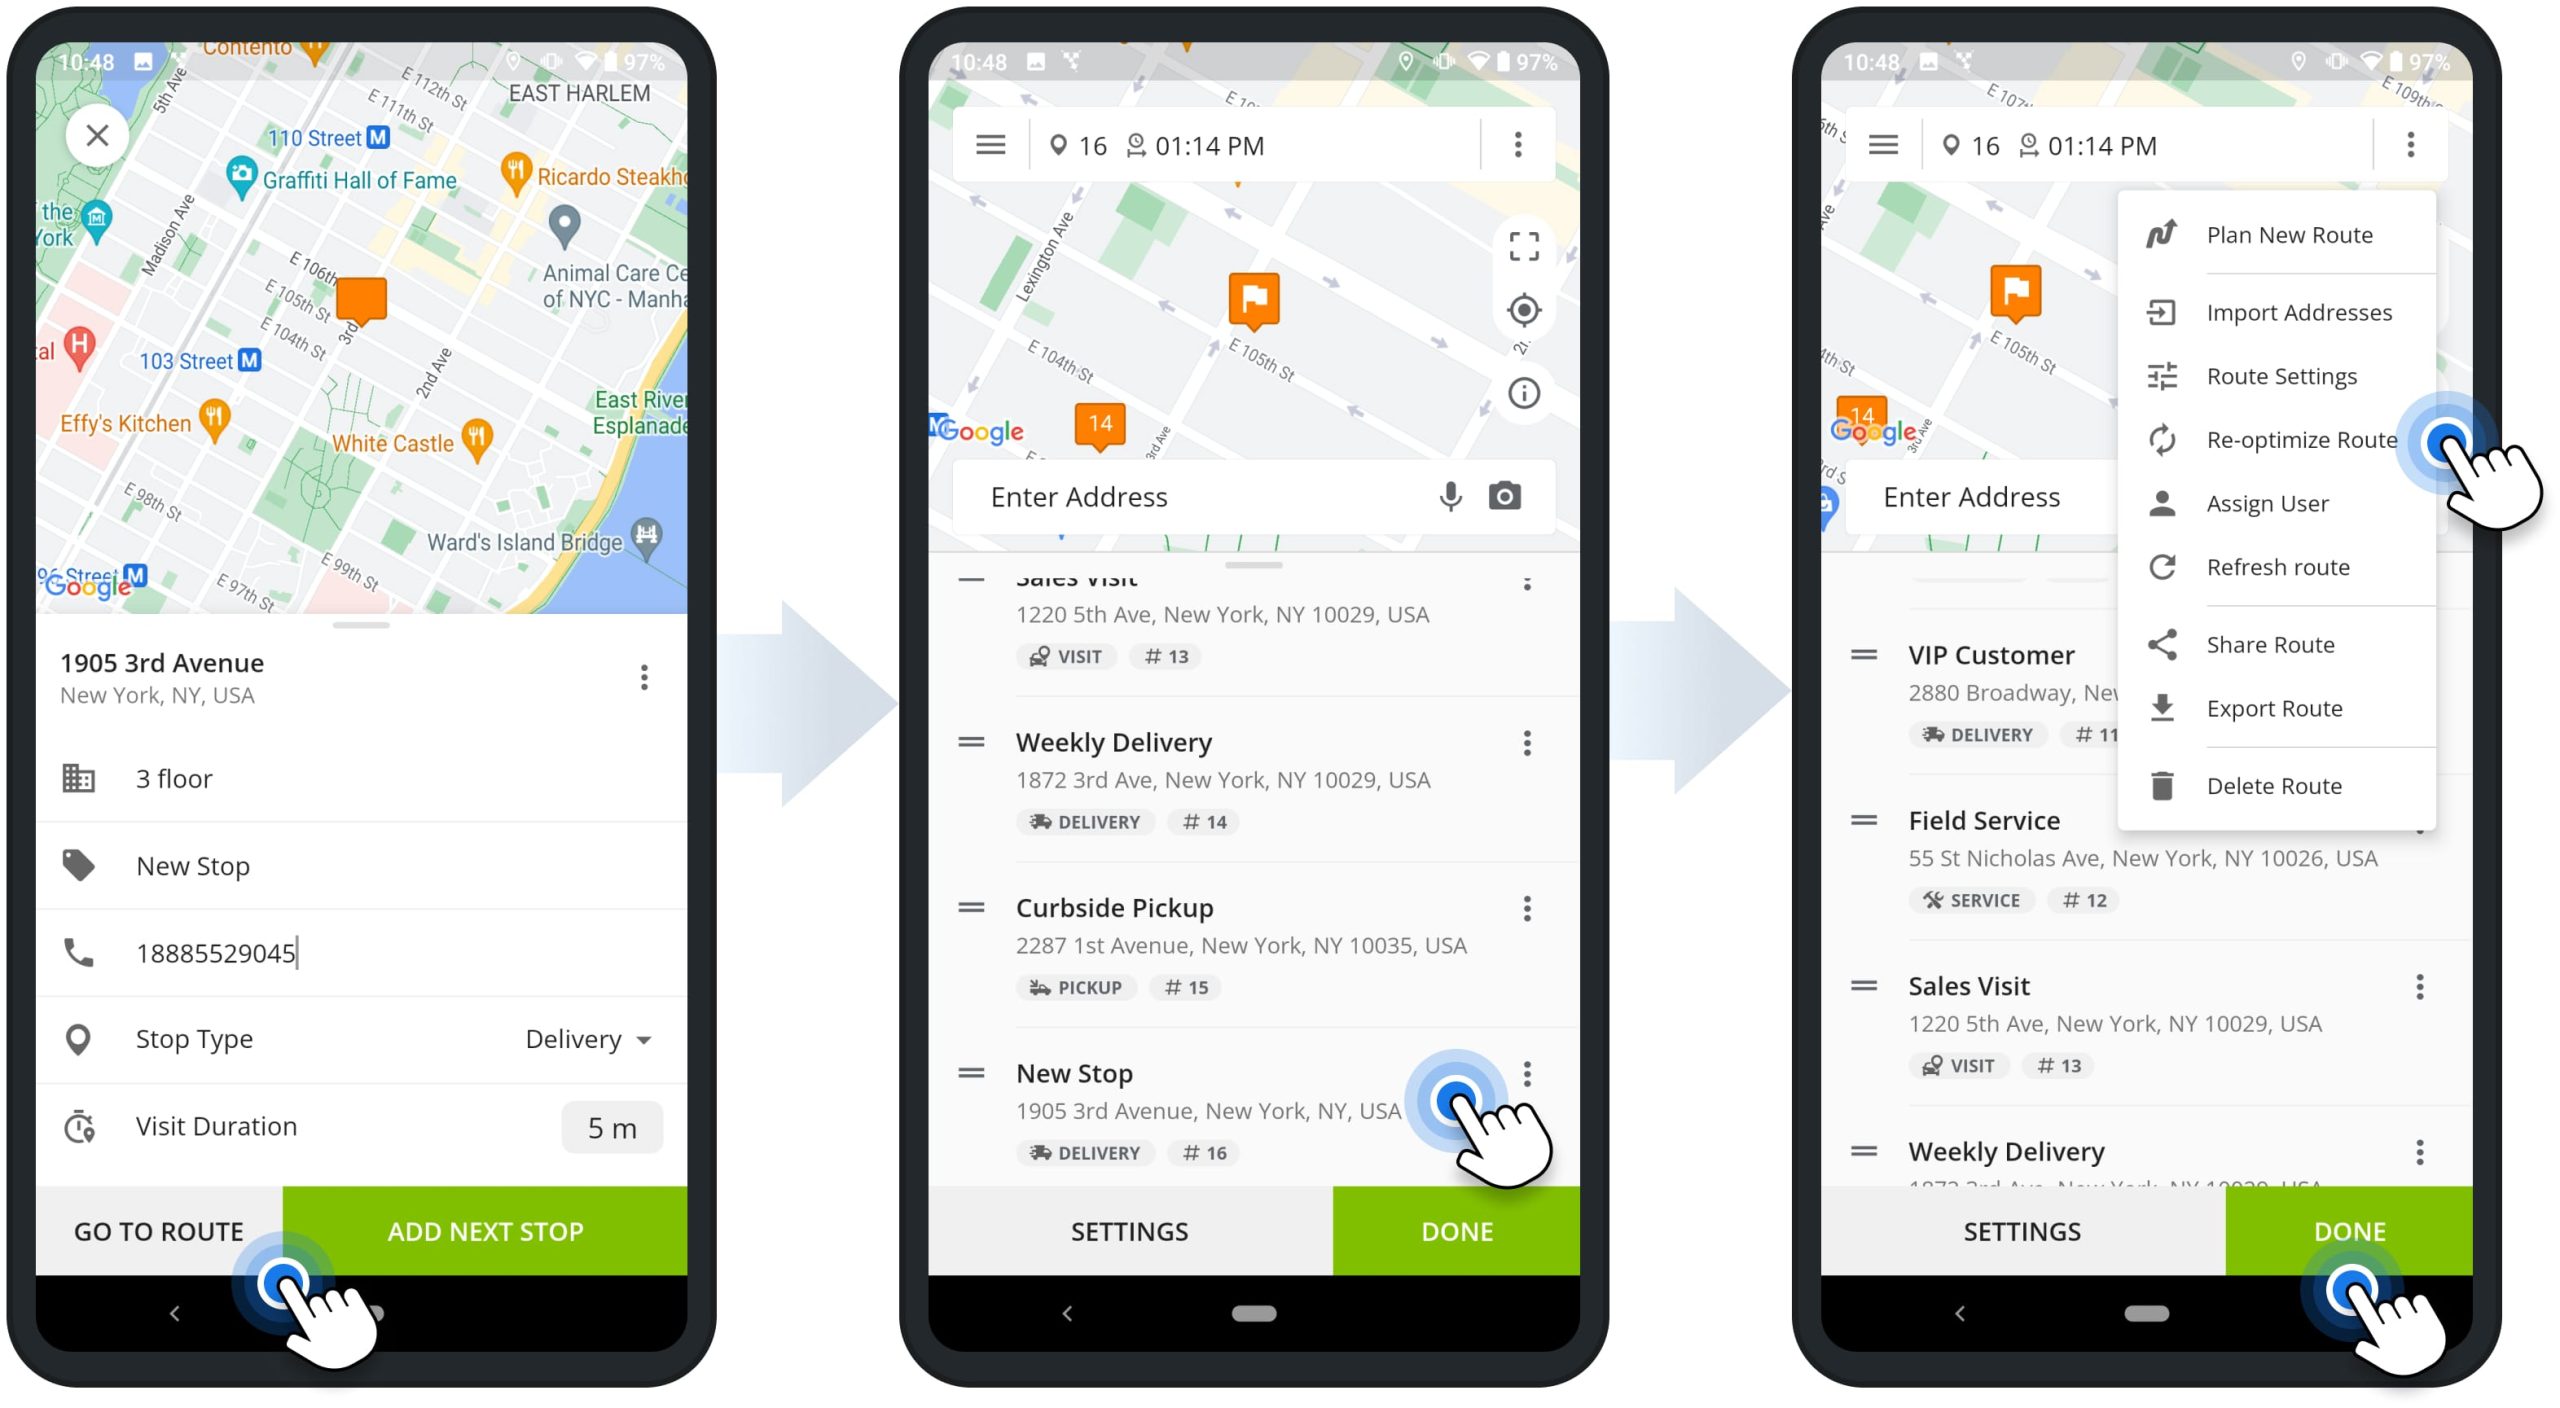
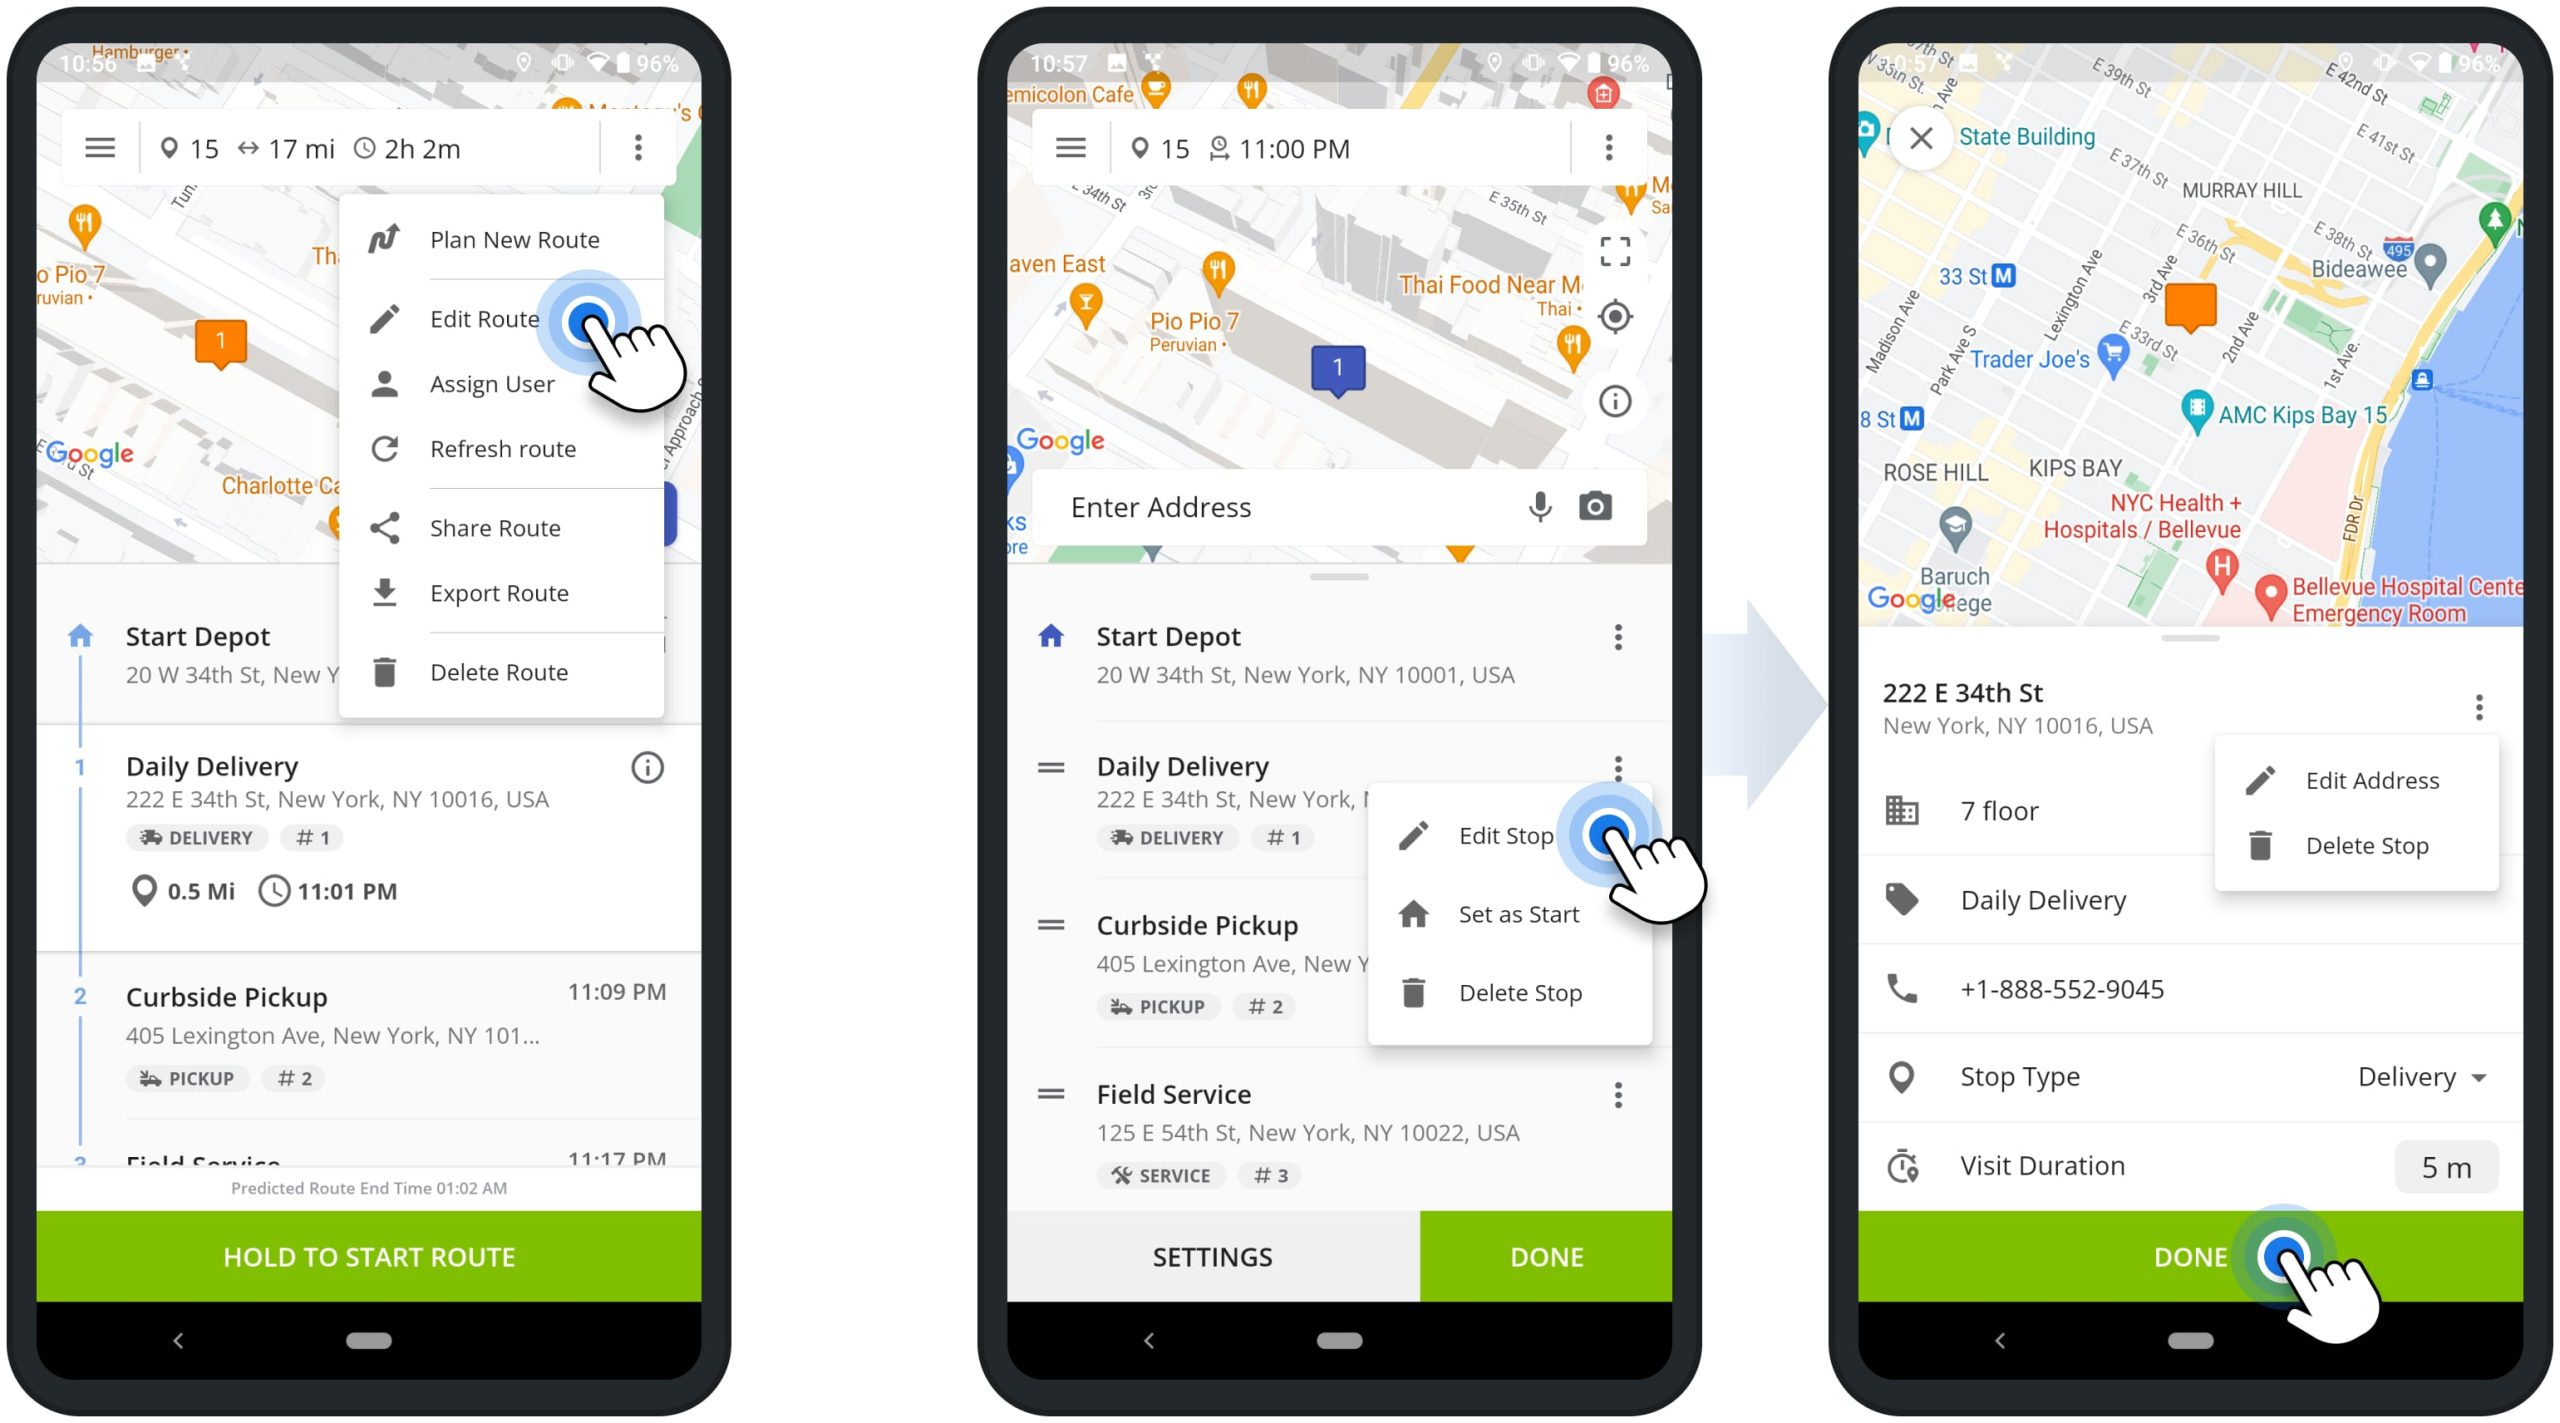
Edit Stops – Update Route Stop Address and Information
To edit a route stop, tap the three dots menu icon in the top right corner of the opened route and then select “Edit Route” from the menu. Next, tap the three dots menu icon next to the preferred stop and then select “Edit Stop” from the menu. After that, you can update the stop’s Address and additional address details, Alias, Phone Number, Stop Type, and Visit Duration.
After updating the stop’s details, tap the “Done” button to save the changes. If you update the stop’s address, you can re-optimize the route to automatically resequence the route’s stops and place the new address at the most optimal sequence position. To re-optimize the route, tap the three dots menu icon in the top right corner and then select “Re-Optimize Route” from the menu.
Delete Stops – Remove Stops and Addresses from Routes
To delete a route stop, tap the three-dots menu icon in the top right corner of the opened route and then select “Edit Route” from the menu. Next, tap the three dots menu icon next to the preferred stop and then select “Delete Stop” from the menu. NOTE: Deleting stops can’t be undone, and deleted stops can’t be restored.
After deleting one or multiple stops, you can keep the same stops sequence. To do so, tap the “Done” button to update the route’s directions without resequencing stops.
Alternatively, you can re-optimize and resequence the route to account for the deleted stops. To do so, tap the three dots menu icon in the top right corner and then select “Re-Optimize Route” from the menu.
Visit Route4Me's Marketplace to Check out Associated Modules:
- Operations
Custom Data Add-On
- Operations
Advanced Team Management Add-On
Last Updated:
About author: Alex Yasko
Alex Yasko is the Go-to-Market Product Manager and Information Architecture Manager at Route4Me. With thousands of hours of experience, Alex specializes in breaking down complex last-mile optimization and routing scenarios into simple, actionable instructions, helping last-mile businesses streamline their operations effortlessly.