Notifications Troubleshooting And FAQ – Solve Email And SMS Messaging Issues
Route4Me’s Customer Alerting and Notifications Module allows you to send out action-triggered and geofence-triggered Email and SMS messaging notifications to your customers. Route4Me strives to ensure that your alerts and notifications always reach your customers, and that they’re always satisfied. If your Email or SMS notifications don’t reach their recipients, your Email templates don’t work, or you experience any other issues with your Email or SMS alerts and notifications, please refer to the troubleshooting instructions provided in this article. Additionally, if the troubleshooting instructions couldn’t help with your particular issue, you can also find a list of frequently asked questions further below. Alternatively, contact the Route4Me Support Team directly to get help with your particular issue or question.
Table of Contents
Email Troubleshooting – Solve Email Alert And Notification Issues
Here, you can find instructions on how to troubleshoot your Email Customer Alerting and Notifications Module. Additionally, learn more about Route4Me’s Email Customer Alerts and Notifications. NOTE: After enabling Email notifications or changing the Email notifications settings, it takes more than two minutes for the applied changes to take effect.
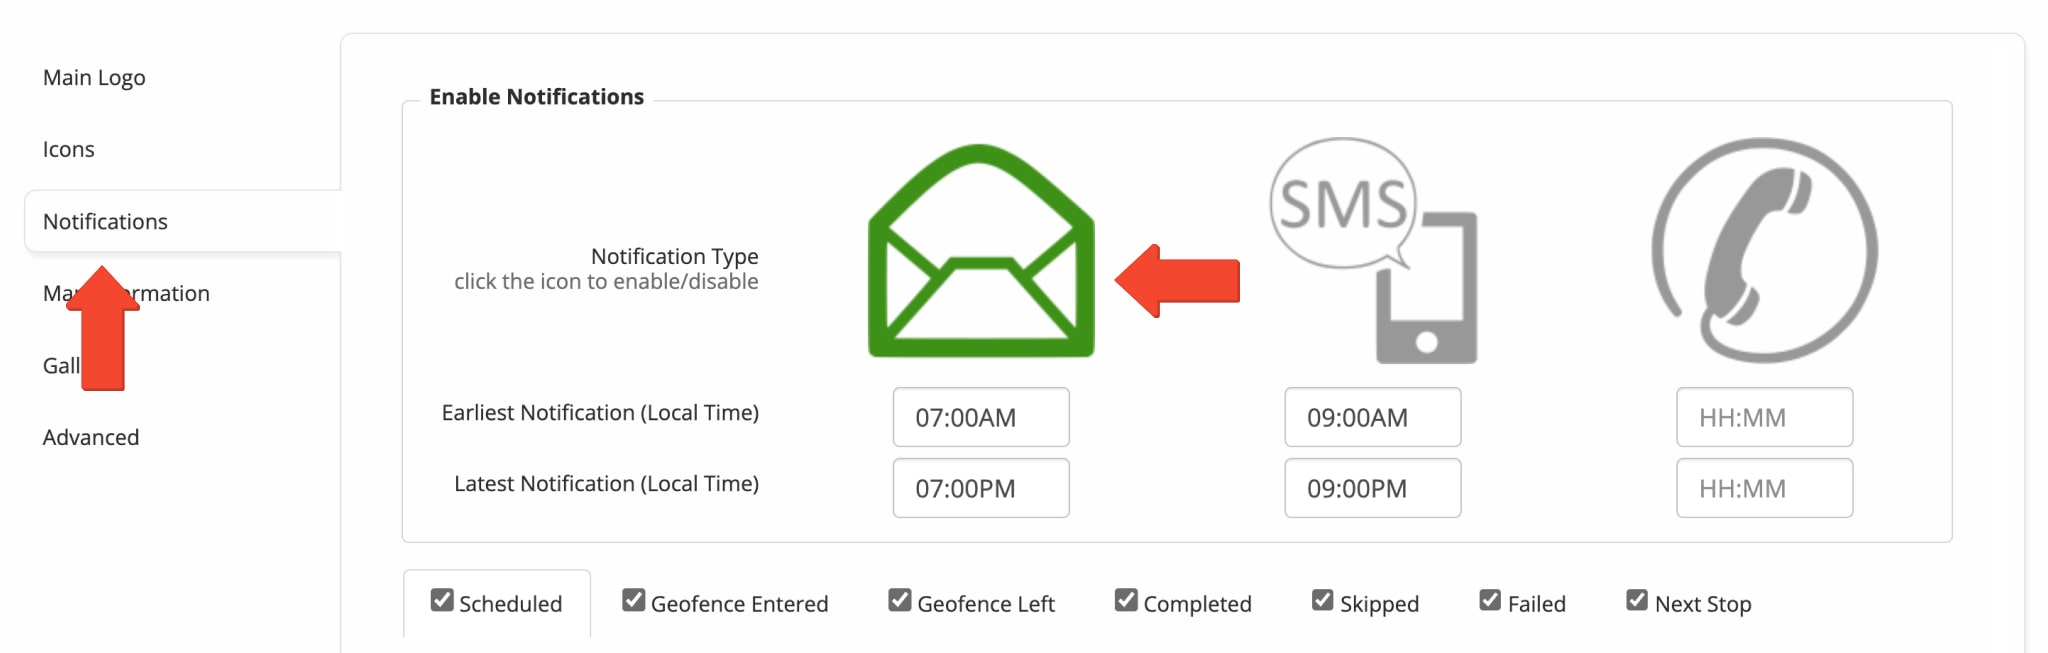
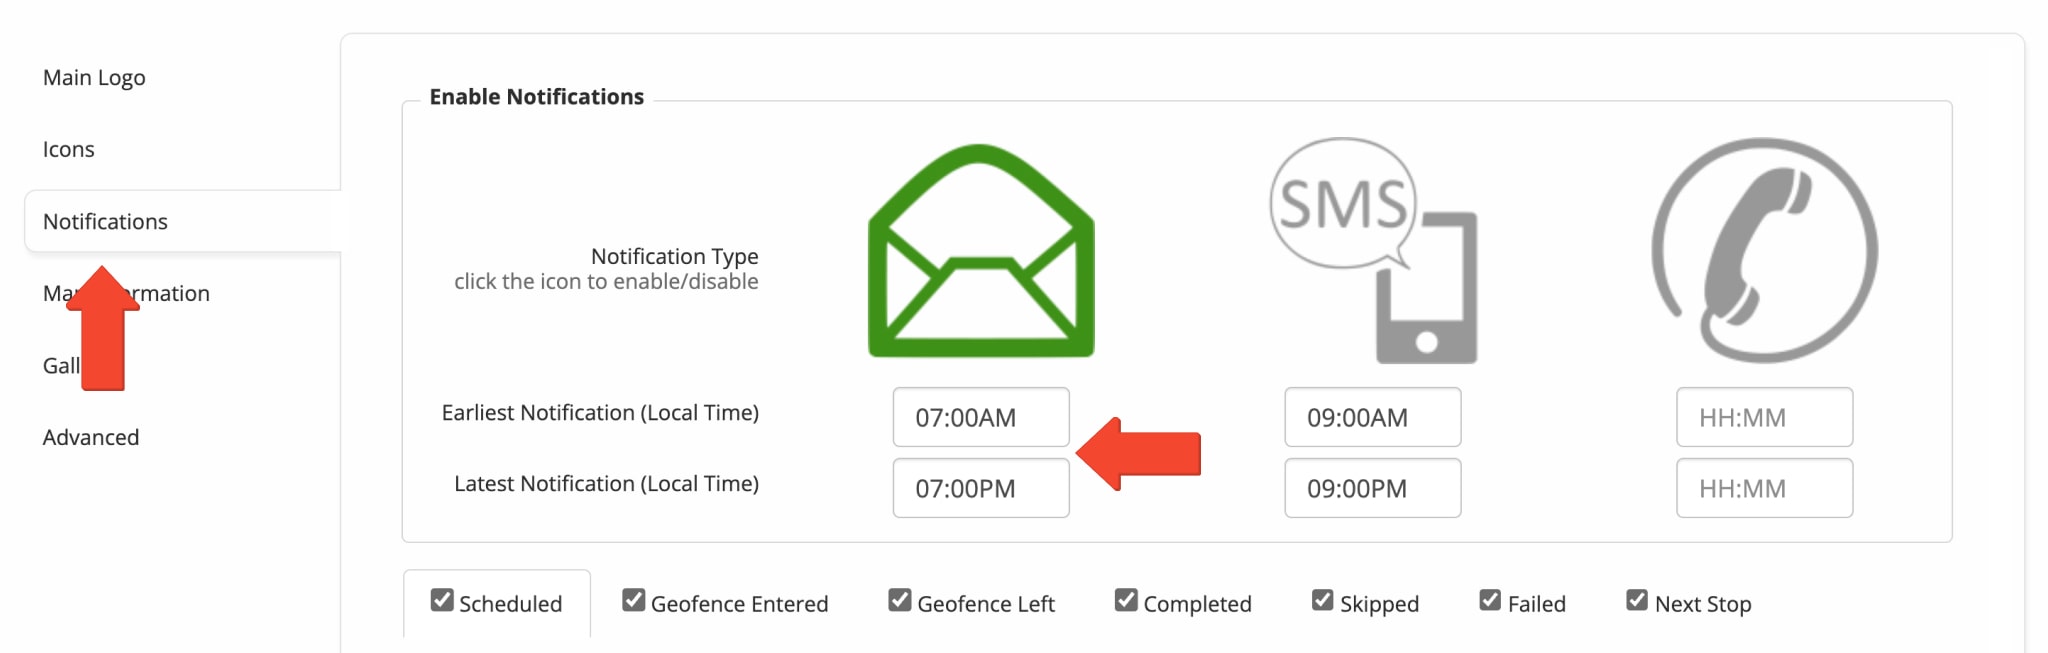
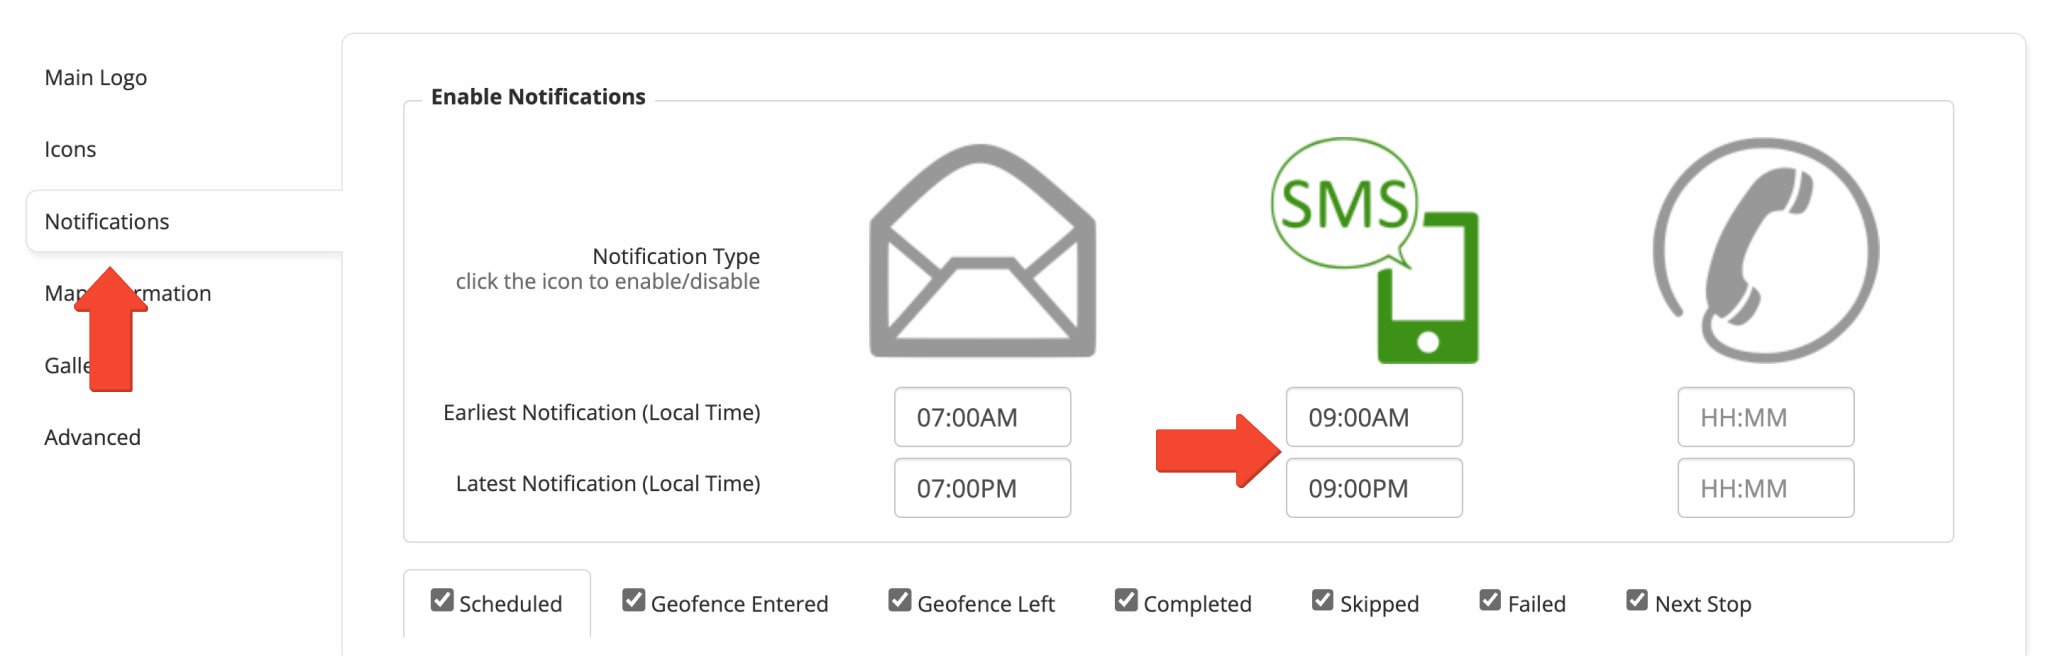
Specifically, make sure that Email Alerts and Notifications are enabled for your account. To do so, go to “My Account” from the Navigation Menu and then “Notification Settings“. In the “Notifications” tab, click the Email Icon to activate the Email notification type. The Email Icon is colored green when Email notifications are active.
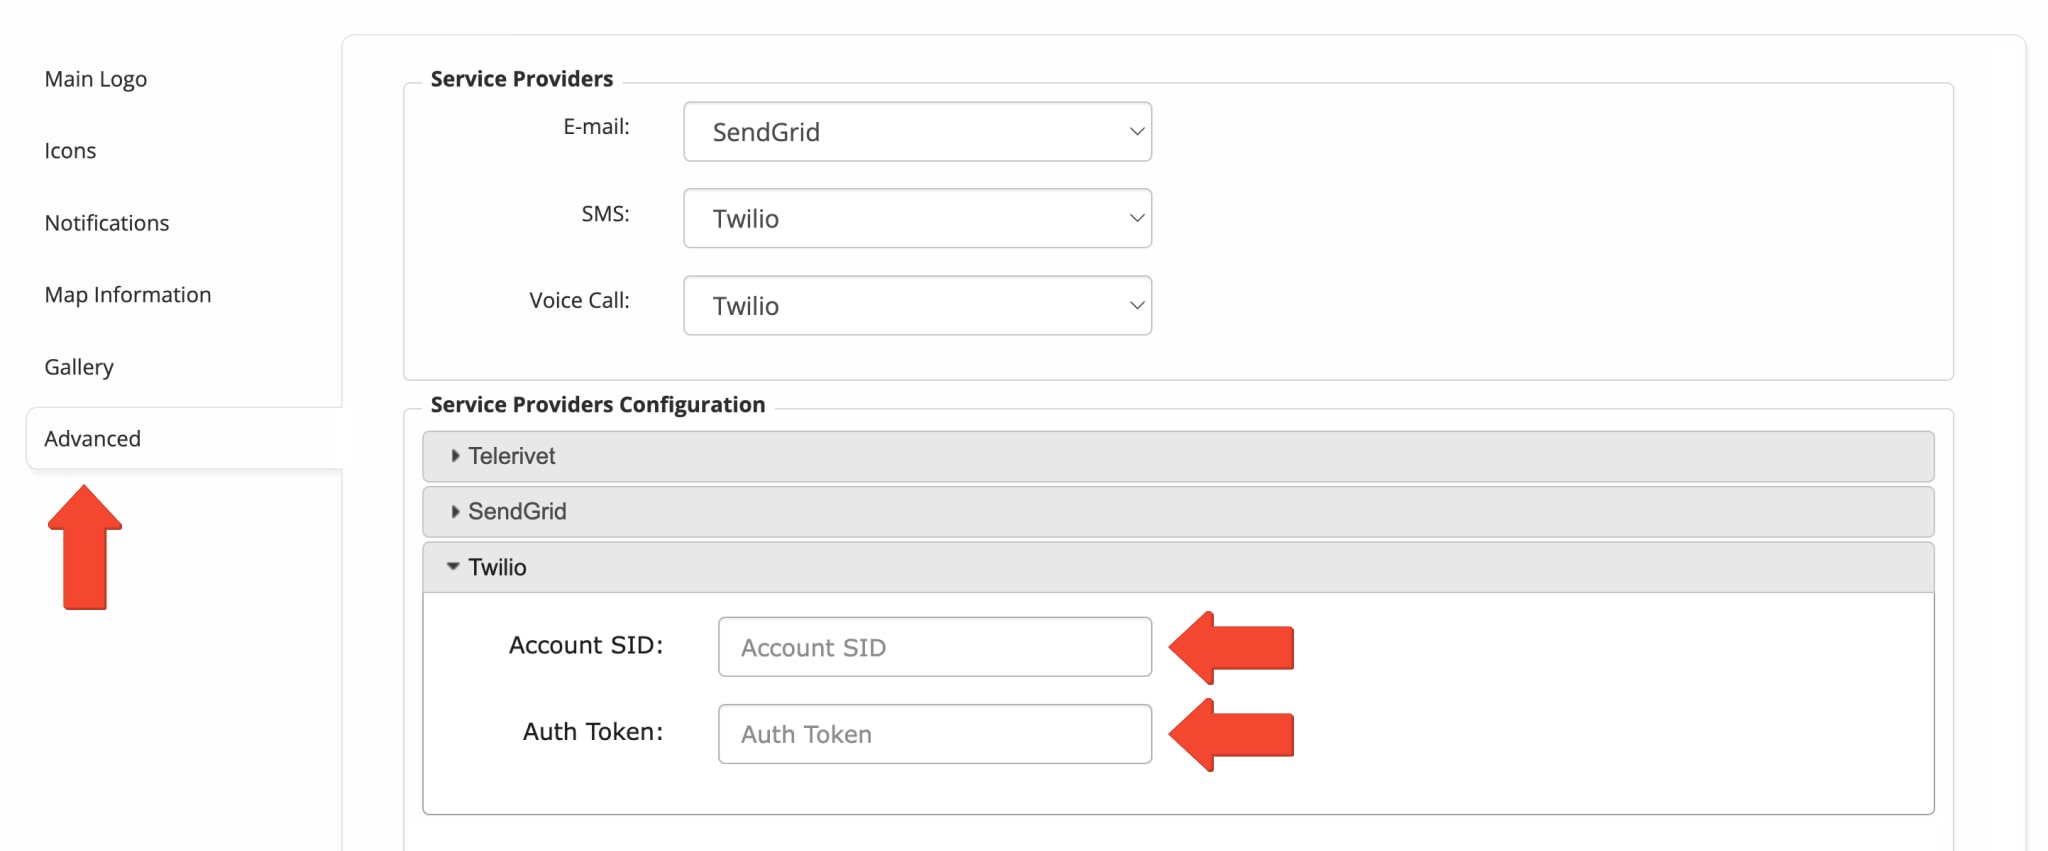
Make sure that you have “SendGrid” selected in the “Email” menu and “Twilio” selected in the “SMS” menu in the “Service Providers” section in the “Advanced” tab of the Notification Settings. Make sure that you do not have “Default” selected in the “Email” or “SMS” menus.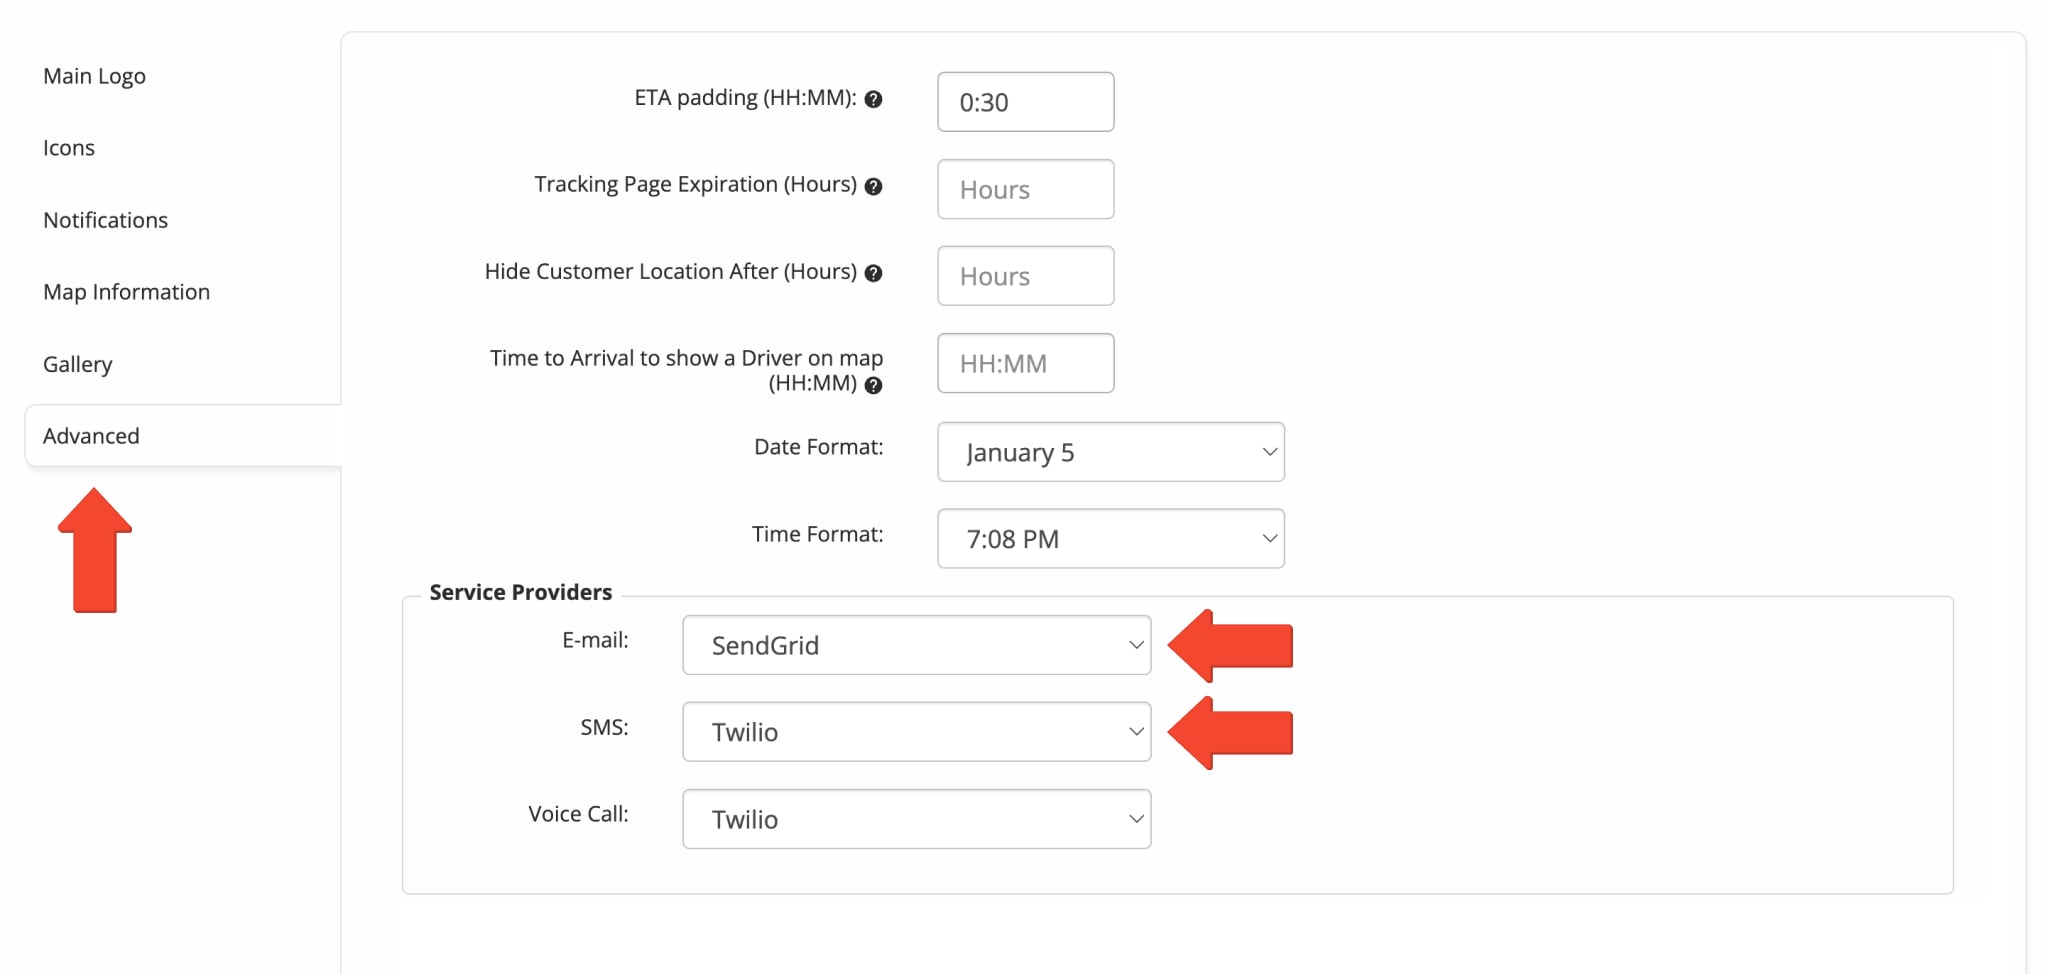
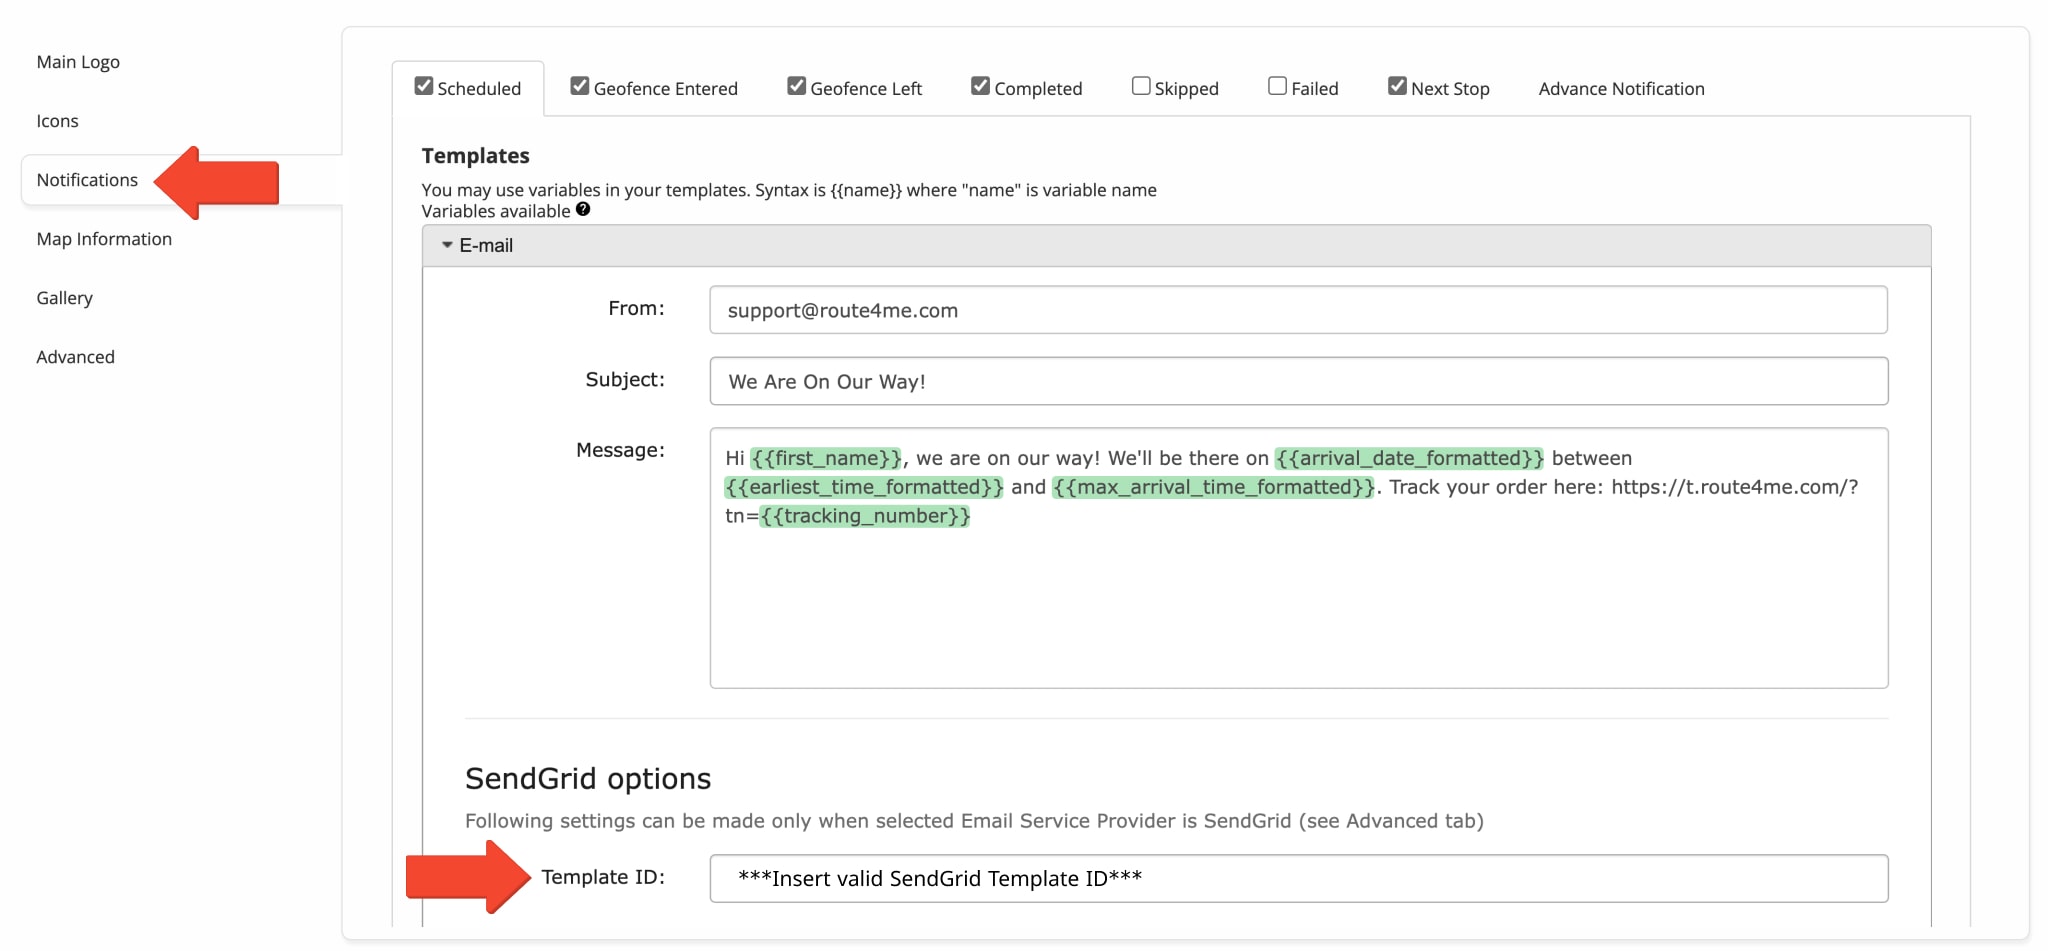
Make sure that the Email address inserted into the “From” field in the Email Notifications editor is valid (i.e., [email protected]).
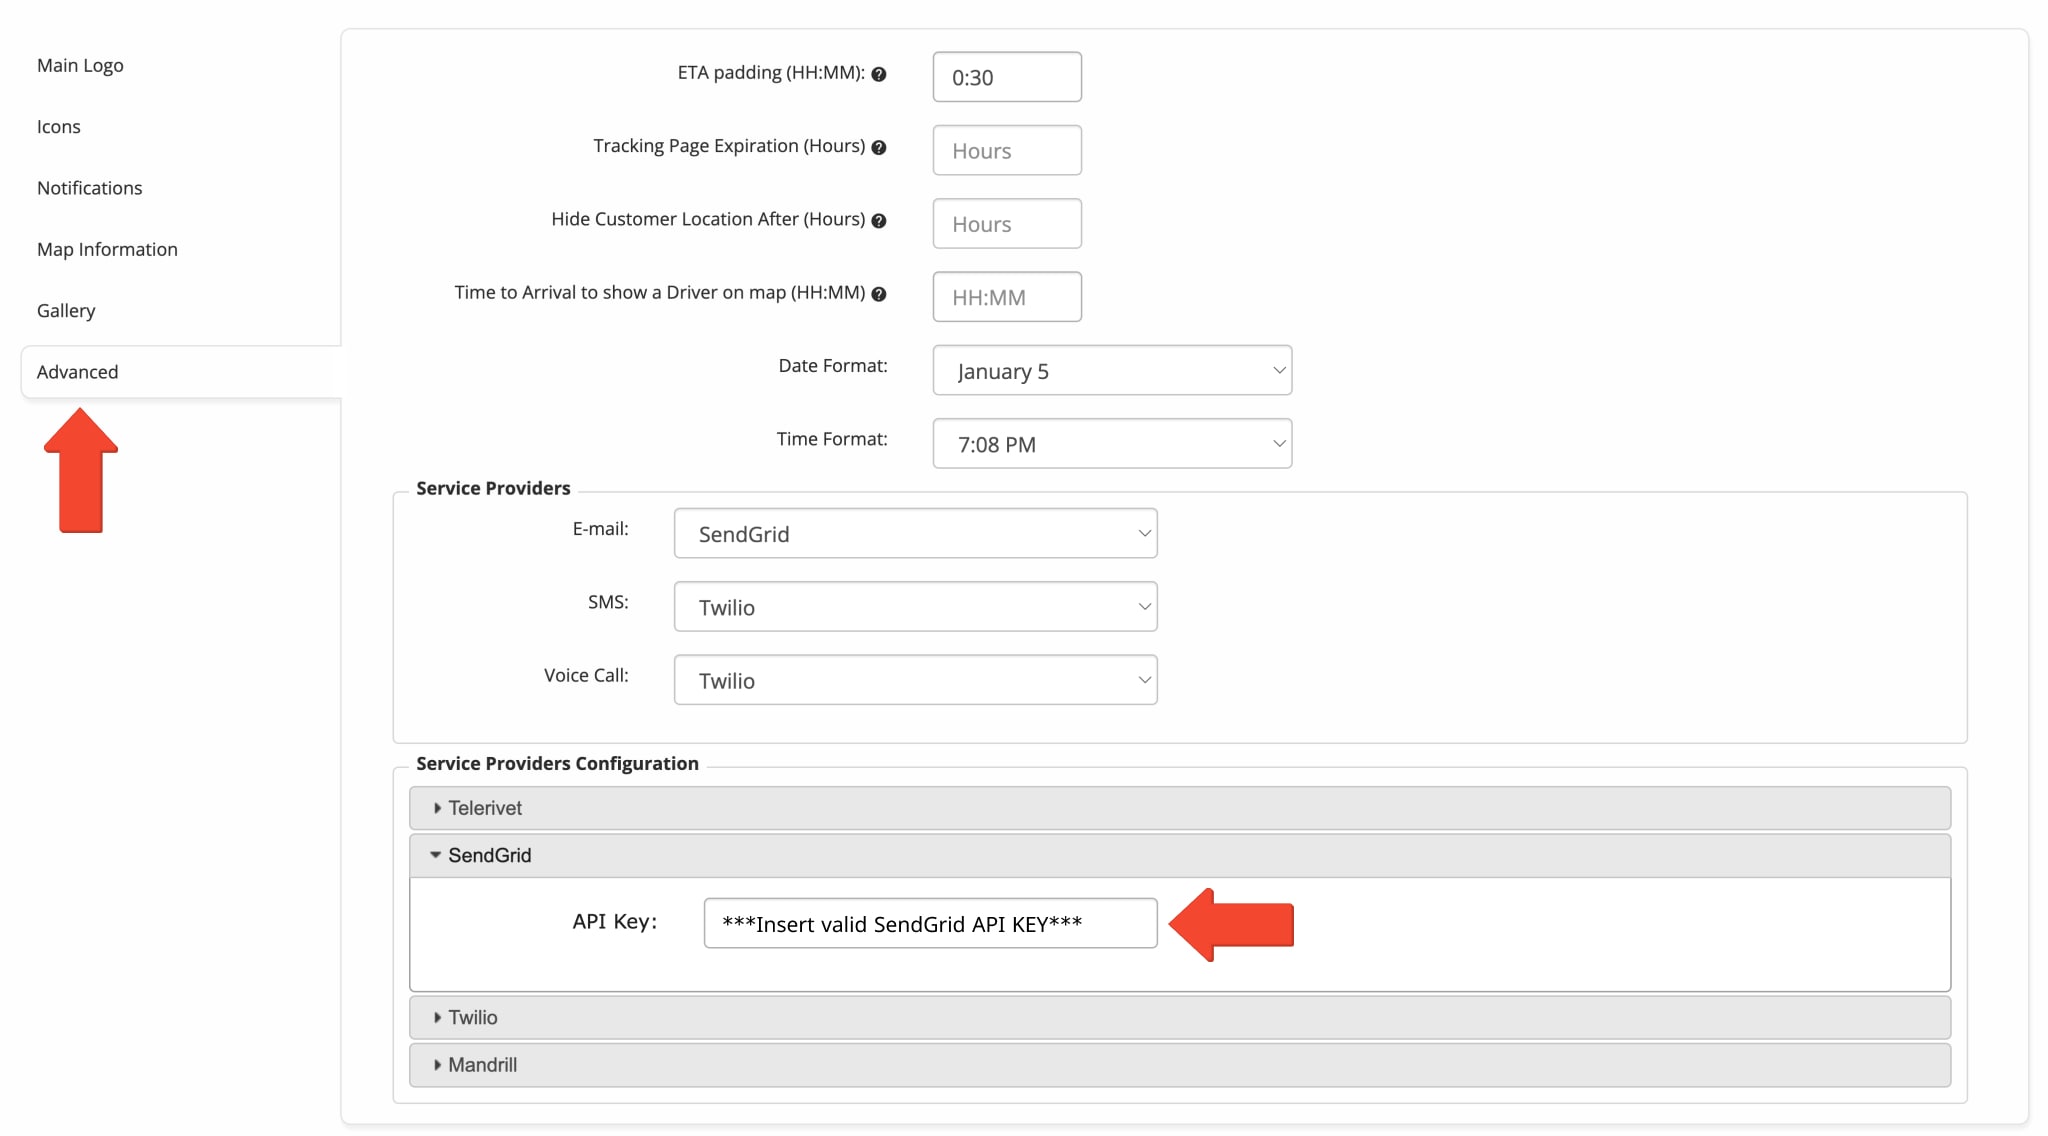
If you are using SendGrid as your Email notifications provider (Email template provider), make sure that you have a valid SendGrid API key inserted in the “Service Providers Configuration” section in the “Advanced” tab. Alternatively, leave the SendGrid API key field empty in the “Service Providers Configuration” section in the “Advanced” tab. Additionally, learn more about SendGrid Email Templates.
If you are using SendGrid as your Email notifications provider (Email template provider), make sure that you have a valid SendGrid Template ID inserted in the “Template ID” field in the “SendGrid Options” section in the “Notifications” tab.
Furthermore, ensure that the “Earliest Notification (Local Time)” and the “Latest Notification (Local Time)” fields are not empty in the “Enable Notifications” section in the “Notifications” tab, and that you’re sending your Email notifications within the specified time windows. NOTE: The “Local Time” value is the local time of the depot or route origin.
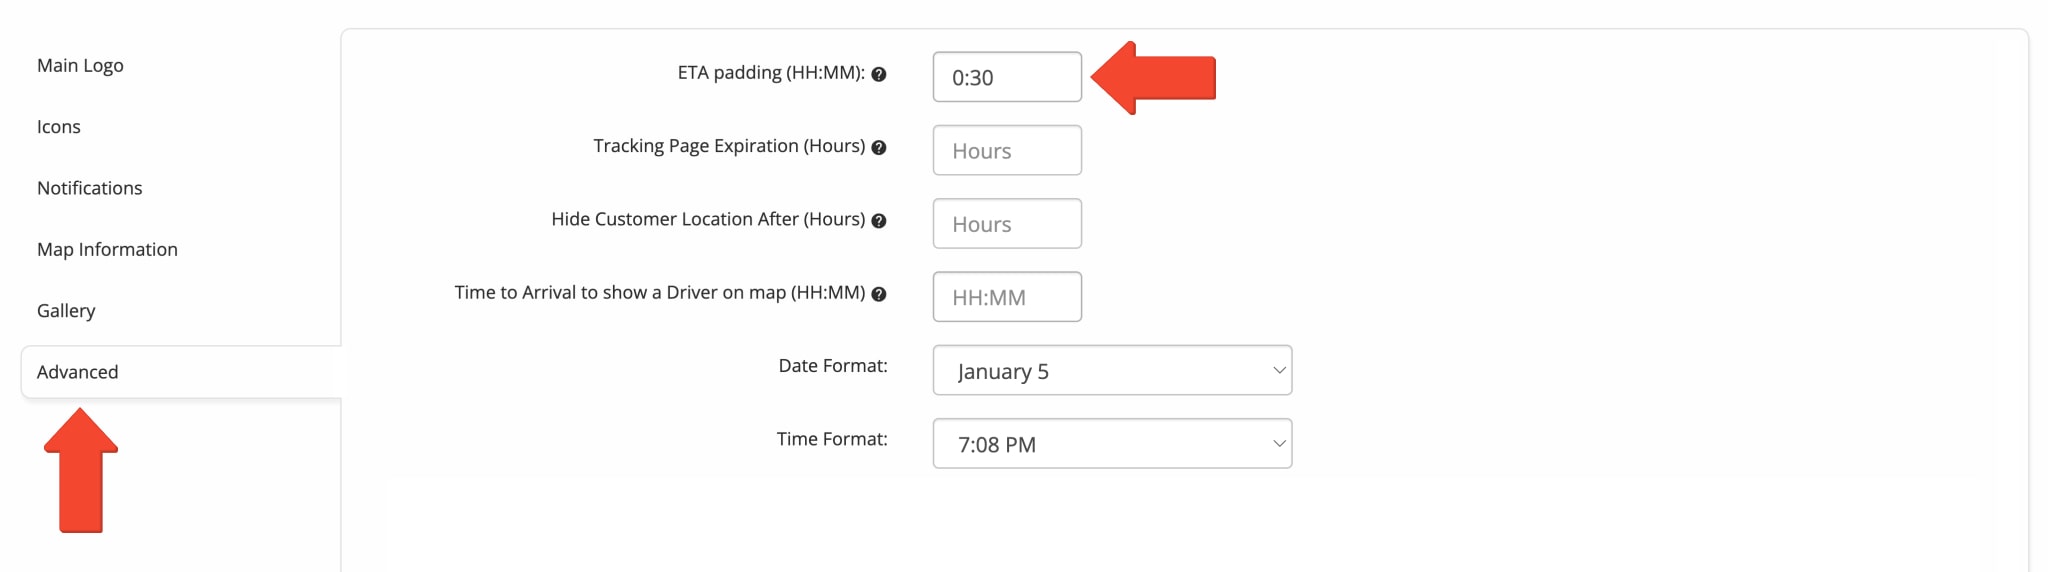
Additionally, make sure that the “ETA padding (HH:MM)” field in the “Advanced” tab is not empty. If you don’t want to set up any ETA padding for your notifications, enter “0:00“.
SMS Troubleshooting – Resolve SMS Messaging Notification Issues
Here, you can find the instructions on how to troubleshoot your SMS messaging Customer alerting and notifications. Additionally, learn more about Route4Me’s SMS Messaging Alerts and Notifications. NOTE: After enabling SMS messaging notifications or changing the SMS notifications settings, it takes more than two minutes for the applied changes to take effect.
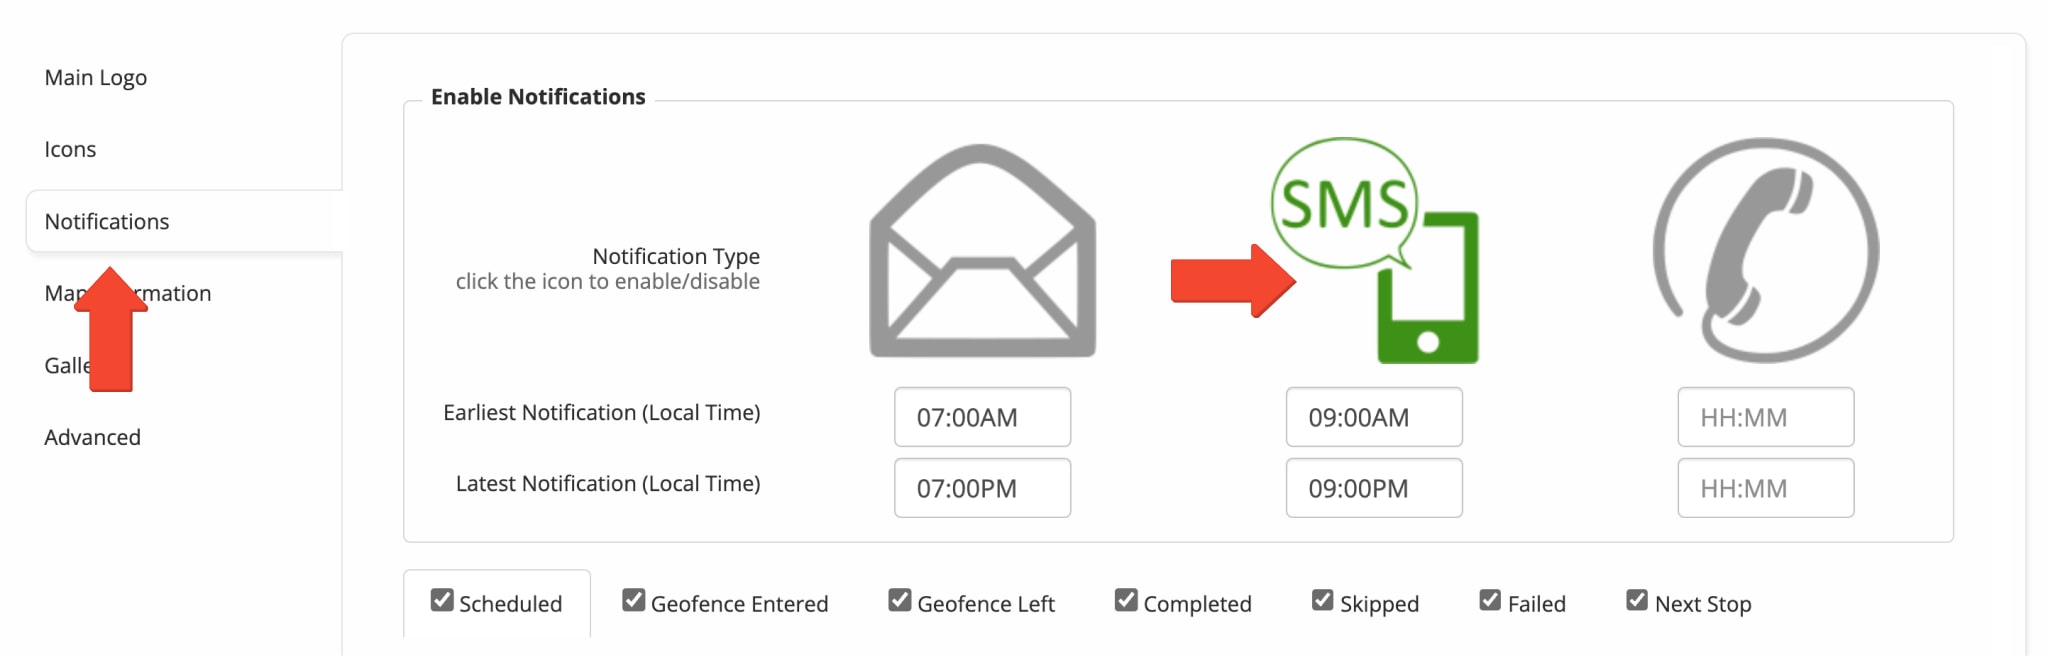
Furthermore, ensure that SMS messaging alerts and notifications are enabled on your account. To do so, go to “My Account” from the Navigation Menu and then “Notification Settings“. In the “Notifications” tab, click the SMS Icon to activate the SMS texting notification type. vc
Additionally, make sure that you have “Twilio” selected in the “SMS” menu and “SendGrid” selected in the “Email” menu in the “Service Providers” section in the “Advanced” tab of the Notification Settings. Make sure that you do not have “Default” selected in the “SMS” or “Email” menu in the “Service Providers” section in the “Advanced” tab.
Make sure that the “Earliest Notification (Local Time)” and the “Latest Notification (Local Time)” fields are not empty in the “Enable Notifications” section in the “Notifications” tab, and that you are sending your SMS notifications within the specified time windows. NOTE: The “Local Time” value is the local time of the depot or route origin.
Make sure that the “ETA padding (HH:MM)” field in the “Advanced” tab is not empty. If you don’t want to set up any ETA padding for your notifications, enter “0:00“.
If you are using Twilio as your SMS messaging notifications provider, make sure that you have a valid Twilio Account SID and Twilio Auth Token inserted in the “Service Providers Configuration” section in the “Advanced” tab of the Notification Settings. Alternatively, leave the “Twilio Account SID” and “Twilio Auth Token” fields empty.
Notifications FAQ – Frequently Asked Questions For Automated Customer Notifications
Route4Me strives to ensure that your alerts and notifications always reach your customers, and that they are always satisfied. Please refer to the FAQ below if you have any questions or issues with your Customer Alerting and Notifications Module.
In order to be able to use the Customer Email and SMS Alerting and Notifications – Geofence Entered Add-On and adjust the Geofencing Settings for your account, please make sure that you have both the Customer Email and SMS Alerting and Notifications – Geofence Entered Add-On and the Geofencing Analytics Add-On enabled on your account.
In order to be able to use the Customer Email and SMS Alerting and Notifications – Geofence Left Add-On and adjust the Geofencing Settings for your account, please make sure that you have both the Customer Email and SMS Alerting and Notifications – Geofence Entered Add-On and the Geofencing Analytics Add-On enabled on your account.
Yes, by default, Route4Me’s Customer Alerting and Notifications Module allows you to trigger and send your Email Notifications without providing your own SendGrid details. If you don’t want to use your SendGrid credentials, please leave the corresponding fields empty in the “Advanced” tab of the Notification Settings.
Yes, by default, Route4Me’s Customer Alerting and Notifications Module allows you to trigger and send your SMS Notifications without providing your own Twilio details. If you don’t want to use your Twilio credentials, please leave the corresponding fields empty in the “Advanced” tab of the Notification Settings.
Yes, when specifying the phone numbers of the contacts that you want to receive your SMS Messaging Notifications, you need to add their phone numbers with their corresponding country code(s) (i.e., +1-888-552-9045).
You can use Route4Me’s default Email Notifications Templates without providing your own SendGrid API Key. If you don’t want to use your SendGrid API Key, please make sure to leave the SendGrid API Key field empty in the Advanced tab. You are required to provide your SendGrid API Key only if you want to use your custom SendGrid Email Templates.
If you want to remove Route4Me’s details from your Email Notifications, you need to use your own custom Email Templates. To do so, you need to provide your SendGrid API Key in the Advanced tab and your SendGrid Template ID in the Email Notifications Editor in the Notifications tab. Additionally, learn more about SendGrid Email Templates.
No, in order to be able to send SMS and Email Notifications, you are not required to have any sub-users on your Route4Me account. However, in order for the Geofence Entered and Geofence Left Notifications to be triggered, someone needs to enter and leave the geofences set around the locations of the corresponding customers, or for the Next Stop and Visit Completed Notifications to be triggered, someone needs to mark the corresponding destinations as Visited and Departed. All these actions can be executed by you as the Account Owner, as well as by any of your sub-users (i.e., Drivers).
By default, in the “Service Providers” section in the “Advanced” tab, you have SendGrid selected as your default Email Notifications service provider and Twilio as your default SMS Notifications service provider. NOTE: If you set your Email and SMS Service Providers settings to Default, your Email and SMS notifications will be disabled (the “Default” value disables your Notifications).
To upload the Driver and Destination icons for the Customer Portal associated with your Customer Alerting and Notifications Module, you need to make sure that you have your icons hosted on the hosting service of your choice, and then you need to insert URLs of your icons into the corresponding fields in the “Icons” tab.
Visit Route4Me's Marketplace to Check out Associated Add-Ons:
- Notifications & Alerts
Route Scheduled
- Notifications & Alerts
Geofence Entered
- Notifications & Alerts
Geofence Departed
- Notifications & Alerts
Visit Completed
- Notifications & Alerts
Notify Next Customer
About author: Alex Yasko
Alex Yasko is the Go-to-Market Product Manager and Information Architecture Manager at Route4Me. With thousands of hours of experience, Alex specializes in breaking down complex last-mile optimization and routing scenarios into simple, actionable instructions, helping last-mile businesses streamline their operations effortlessly.