Add Addresses – Upload A File, Interactive Map Editor, Copy And Paste, Import Data
Planning routes shouldn’t be complicated or time-consuming, especially for businesses managing deliveries, pickups, or service appointments. Route4Me makes the process simple with multiple ways to add addresses: selecting points on a map, copying and pasting, uploading spreadsheets, or scanning documents. With just a few clicks, you can generate optimized routes that save time, reduce costs, and keep operations running smoothly. Learn about each method so you can choose the best option.
Table of Contents
Add Addresses To Plan A Route – Choose A Method For Adding Destinations
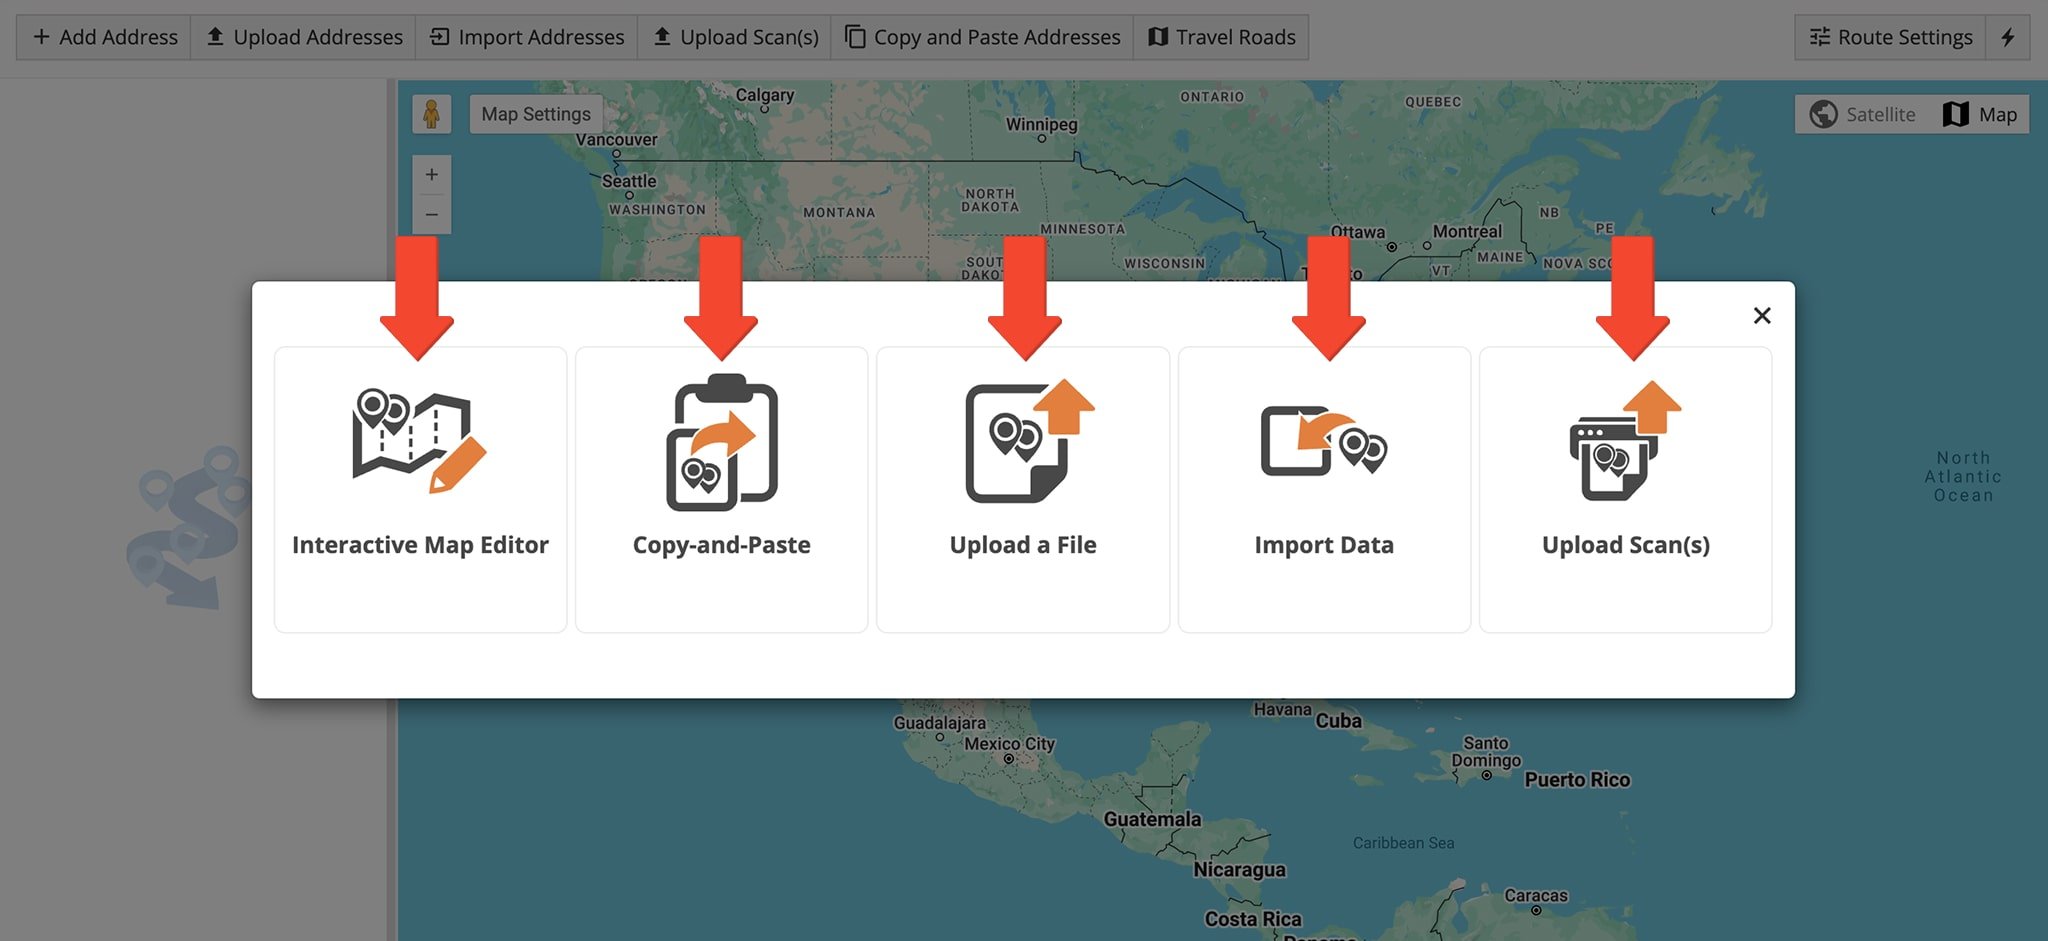
To plan a new route, go to “Dynamic Routing” > “Plan New Route” in the Navigation Menu. From the Route Planner, choose how you wish to add addresses by clicking on one of the 5 options.
For convenience, Route4Me offers multiple ways to upload, import, or enter addresses. See the table below for a quick summary of each method. NOTE: Each option is described in greater detail further in this guide.
| Method | Description |
|---|---|
| Interactive Map Editor | Select addresses or exact location coordinates (latitude and longitude) on the interactive map and add them to your routes. Route4Me automatically geocodes and validates map-selected locations. |
| Copy and Paste | Copy and paste a list of addresses into Route4Me’s mapping software. Route4Me will automatically geocode and validate them. |
| Upload a File | Upload a CSV, XLS, or XLSX spreadsheet with addresses, and Route4Me will automatically detect and validate them. You can also include order details, customer information, Time Windows, and more. |
| Import Data | Import a CSV, XLS, or XLSX spreadsheet with addresses from cloud storage like Google Drive, Dropbox, or Box. |
| Upload Scan(s) | Upload a scan with your addresses, and Route4Me will automatically detect, geocode, and validate them. |
After choosing the method that works best for you, customize your route and optimization settings. You have the option to select a ready-to-use Optimization Profile with predefined settings or manually customize your settings.
If you prefer to use an Optimization Profile, enter the name of the Profile and click “Continue“. You’ll then be prompted to enter a Route Start Date before you can proceed with adding addresses. NOTE: Learn more about Creating and Using Optimization Profiles.
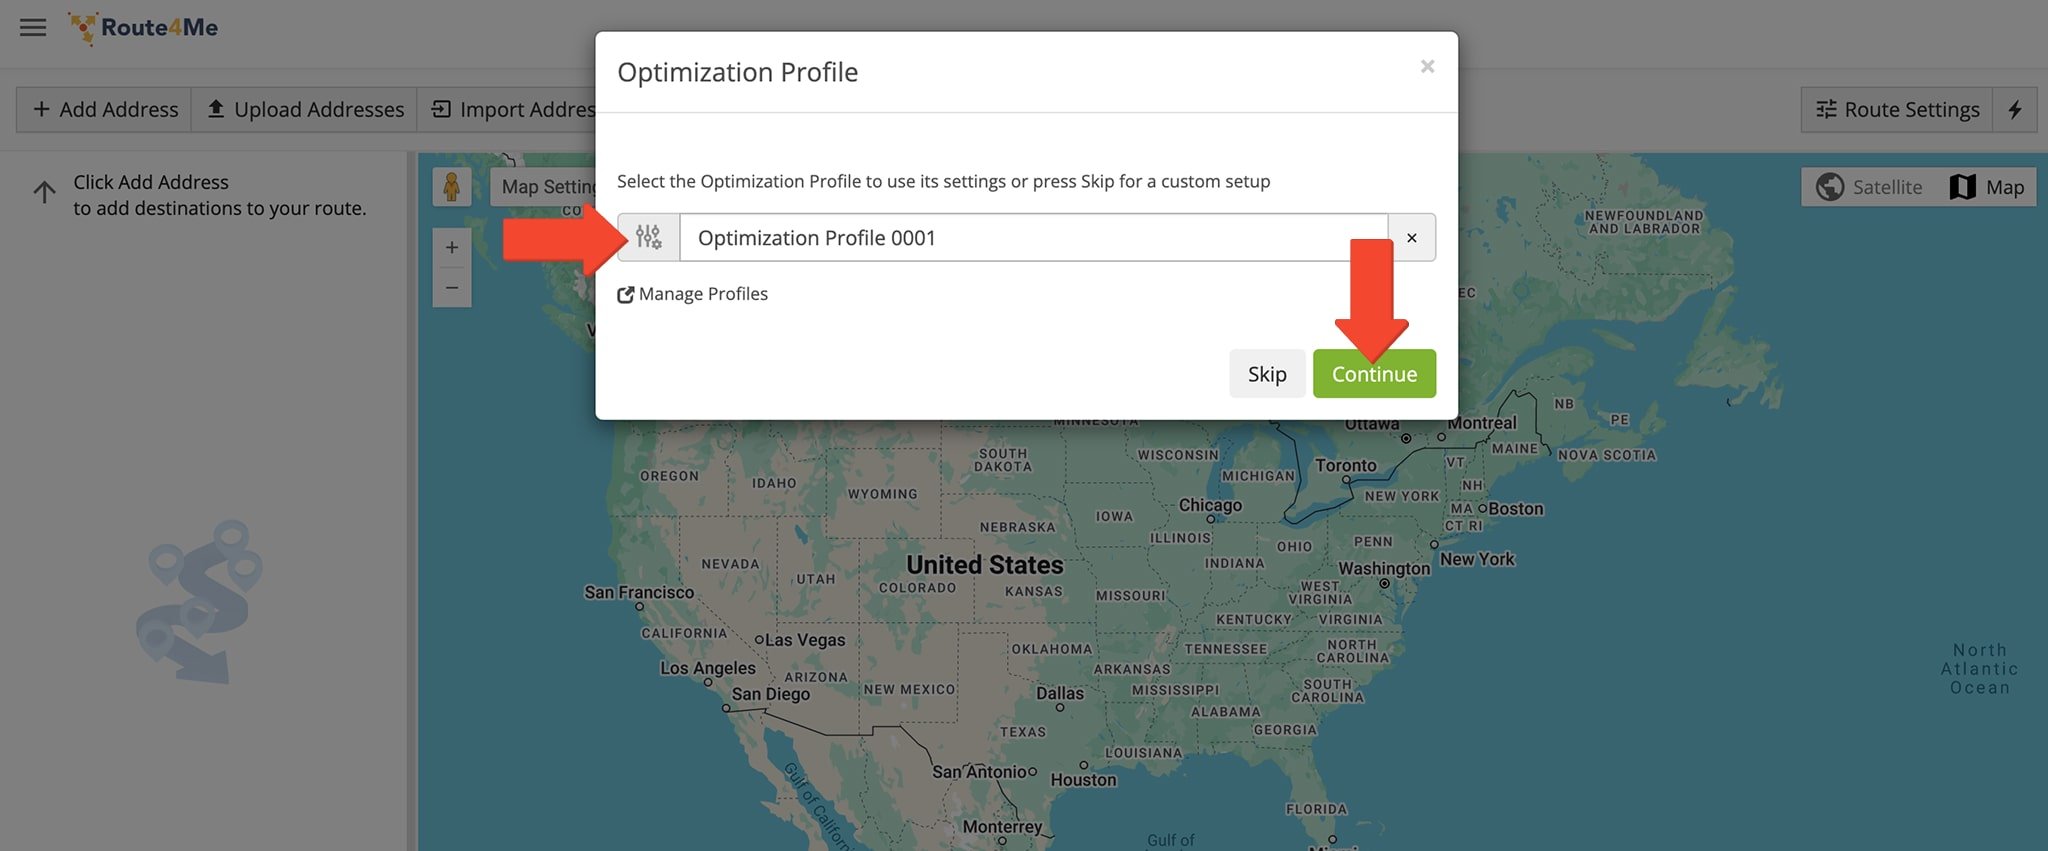
If you prefer to not use an Optimization Profile, click “Skip” to customize your route and optimization settings manually. NOTE: Refer to Route4Me’s Business Rules and Optimization Constraints to choose the best custom route optimization settings for your needs.

Add Addresses Using The Interactive Map Editor
Route4Me’s Interactive Map Editor lets you select addresses or exact coordinates directly from a map and add them to your routes. It uses advanced geocoding for accuracy and provides a detailed visual overview of the route you are planning.
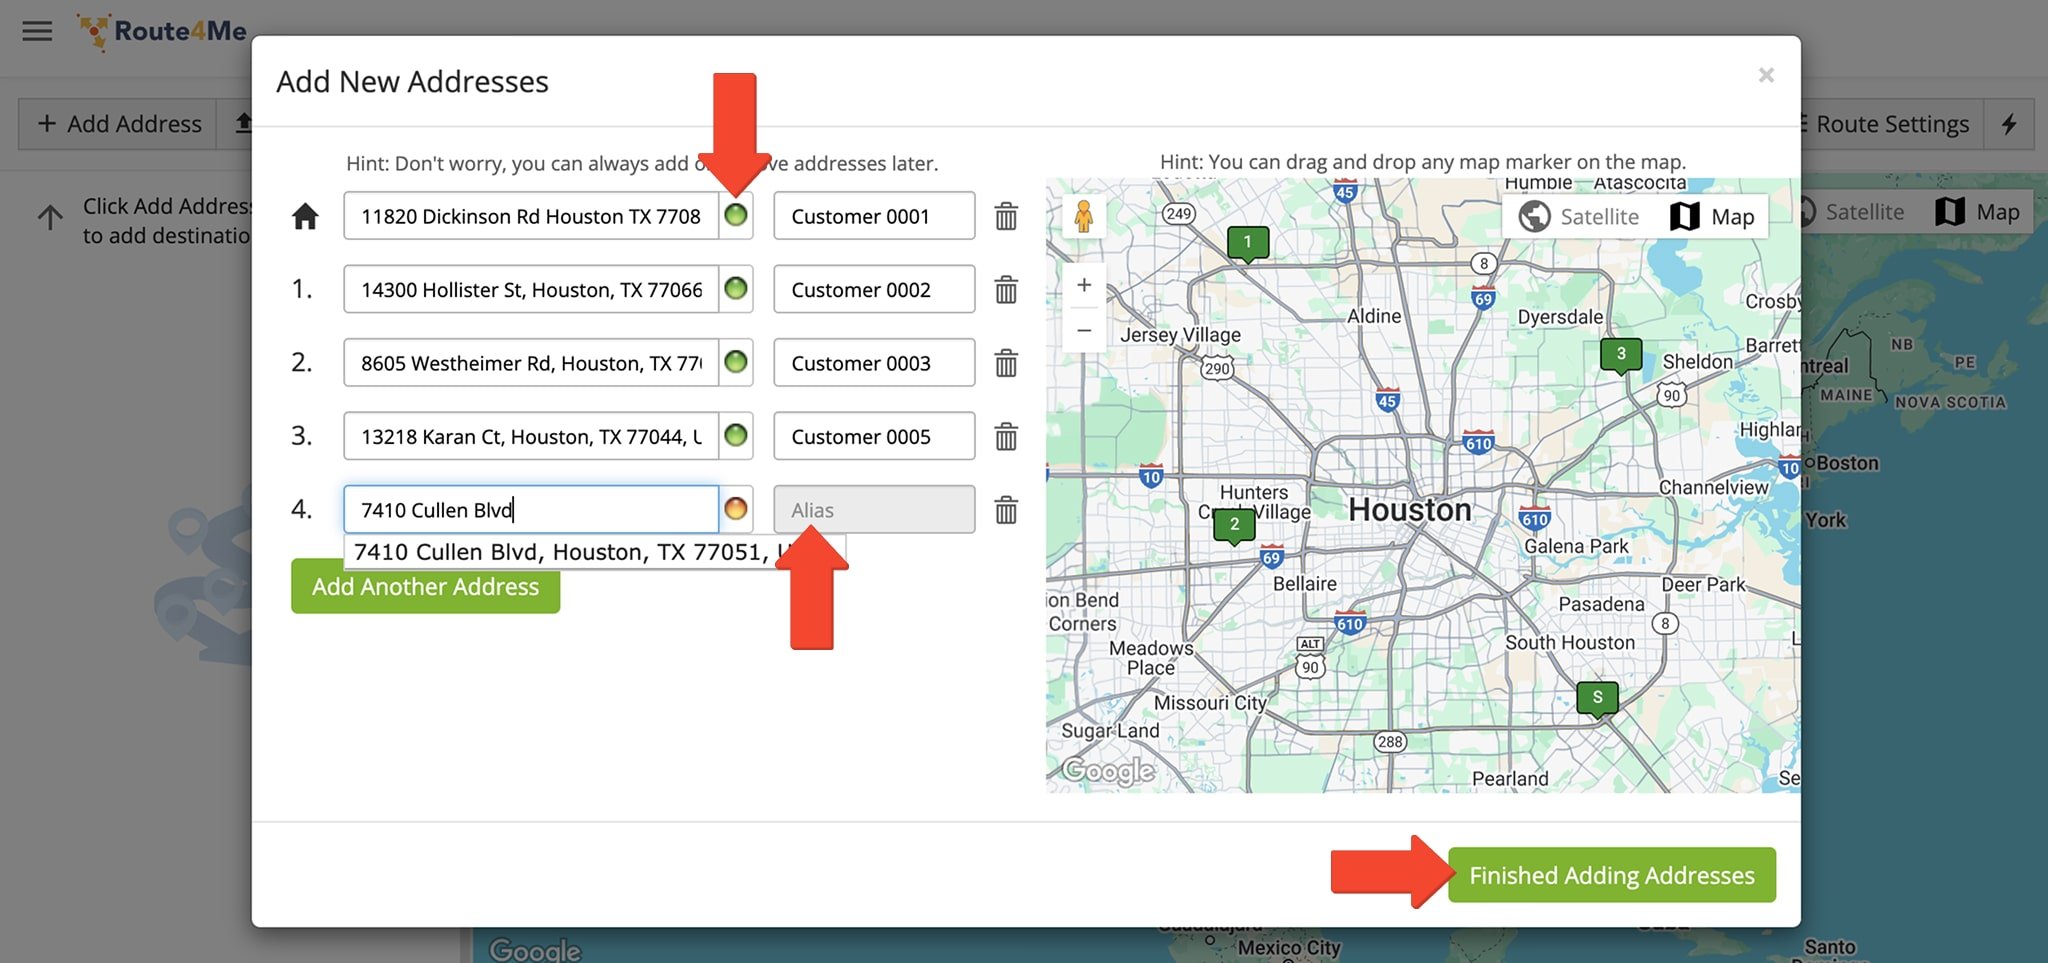
To add an address, enter full or partial address details and select a suggested option. If the address you enter is incorrect or incomplete, the editor automatically processes and corrects it, providing an accurate, geocoded address.
Alternatively, you can click on a specific location on the map to add an address. For convenience, you can zoom in and out on the map to locate the address you wish to add.
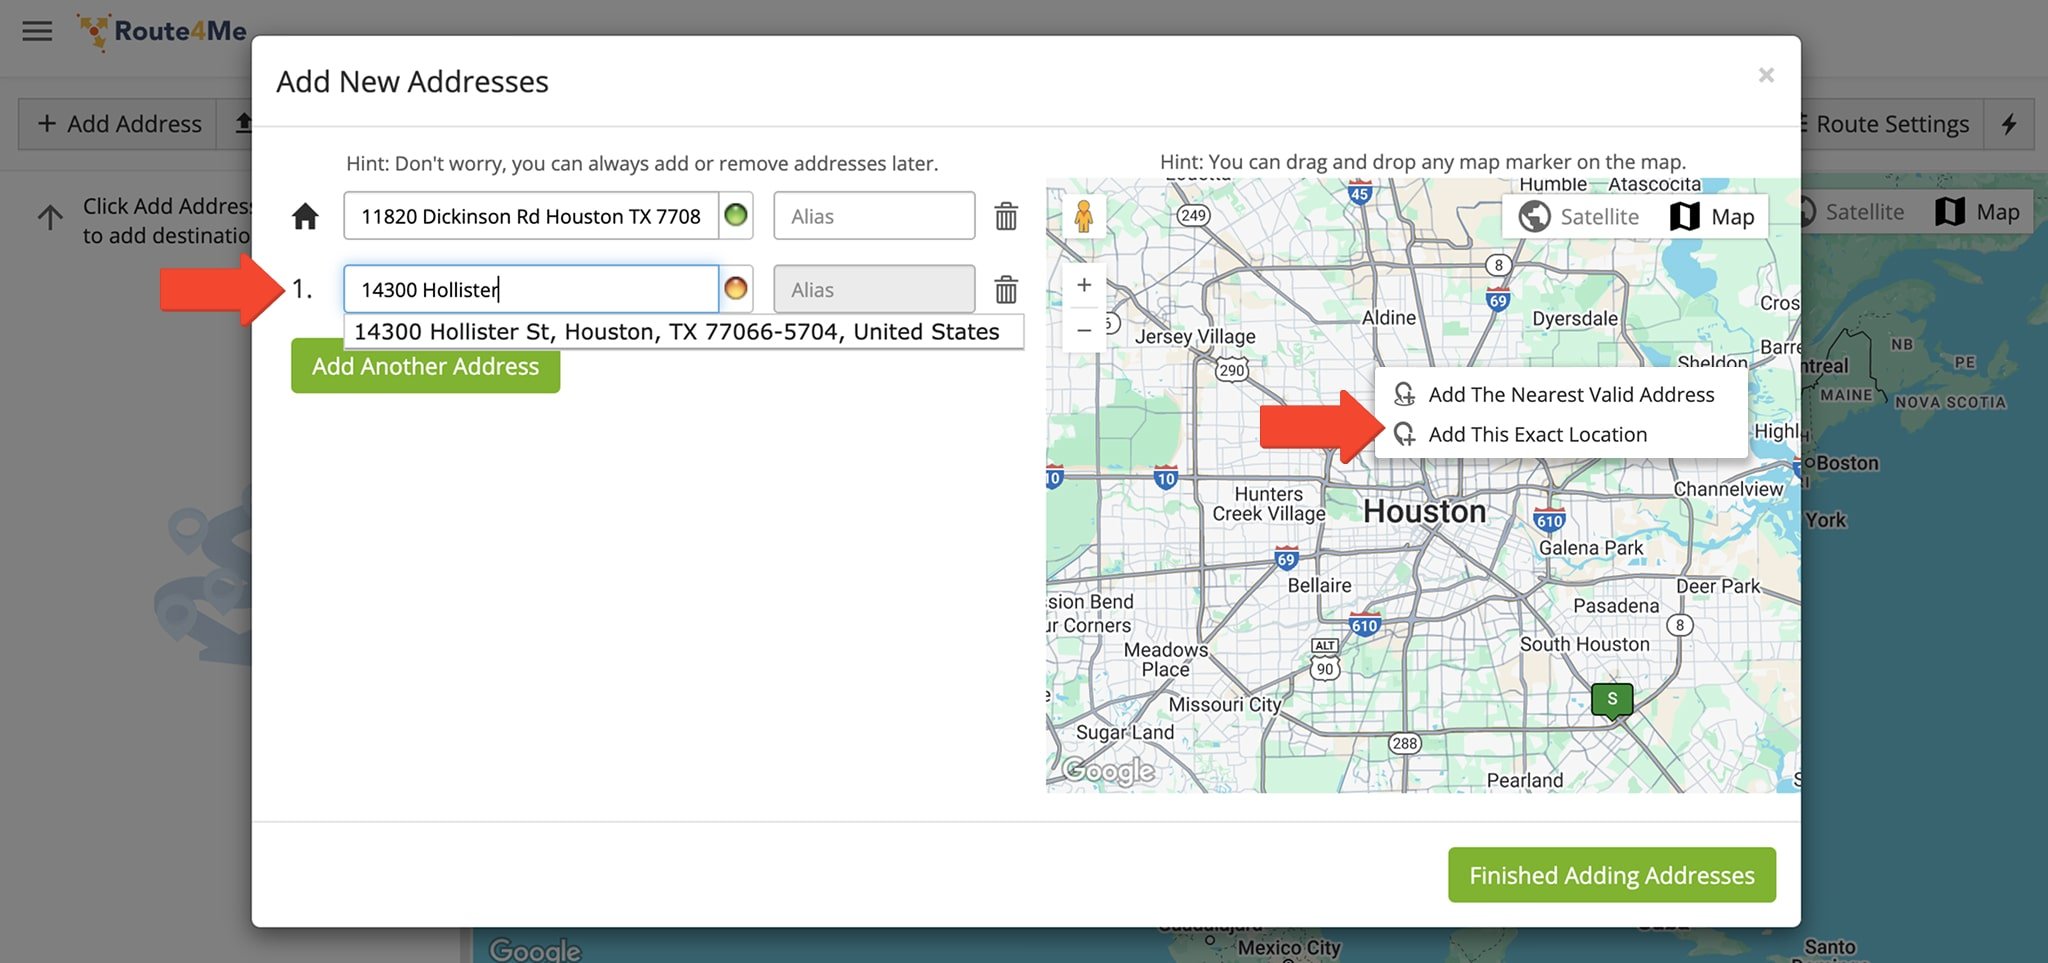
A green dot indicates an address successfully geocoded with high confidence. These addresses will appear on the interactive map. Yellow or red dots signal addresses that need review and correction. These will not appear on the map.
As you enter and validate each address, you can give them an alias so they are easier to identify and differentiate once the route is planned. When finished adding addresses to the route, click the “Finished Adding Addresses” button to finalize.
You’ll be redirected to your Route Editor, where you’ll find detailed route information.
Add Destination By Copying And Pasting Them Into Your Route Planner
With the Copy-and-Paste import method, you can easily plan multi-stop routes by pasting addresses into Route4Me from any third-party app, storage device, or software. The system automatically processes, corrects, and geocodes them for accurate, optimized route planning.
Copy and paste route addresses into the “Paste Addresses Below” field, one address per line. The first address will serve as the route’s starting point. Click “Add Addresses to Route” when finished.

You’ll be redirected to the “Verify Addresses on Map” window. Here, you can view pasted addresses and check their geocoding status. Green dots indicate successful geocoding with high confidence, while yellow and red dots signal addresses that need review and correction.
When finished checking addresses, click “Finish Import“. You’ll be redirected to your Route Editor where you will find detailed route information.

Add Addresses By Uploading A File – Import Spreadsheet Data To Plan Routes
You can upload spreadsheets containing delivery addresses and GPS coordinates to streamline route planning, allowing you to quickly import large volumes of data. This process eliminates manual entry and enables Route4Me to efficiently compute and optimize the best routes.
You can either drag and drop a file into the “Upload Addresses” window or click anywhere in the window to select and upload a file from your device. Route4Me supports CSV, XLS, and XLSX formats, with CSV being the recommended format for the most accurate results.
NOTE: To ensure correct formatting, you can download an example spreadsheet template. You can also learn more about Route4Me’s spreadsheet formatting requirements.

After uploading your file, you’ll be prompted to review your addresses in the “Verify Addresses on Map” window. Green dots indicate addresses successfully geocoded with high confidence, while yellow and red dots alert you to addresses that need to be reviewed and corrected.
When finished checking addresses, click “Finish Import“. You’ll be redirected to your Route Editor where you will find detailed route information.

Add Addresses From Cloud Storage – Upload From Google Drive, Dropbox, And Box.net
Importing files with delivery addresses and GPS coordinates from a cloud storage service is another way to streamline route data entry. You can easily import files from any device or location without relying on external hardware storage or manual input.
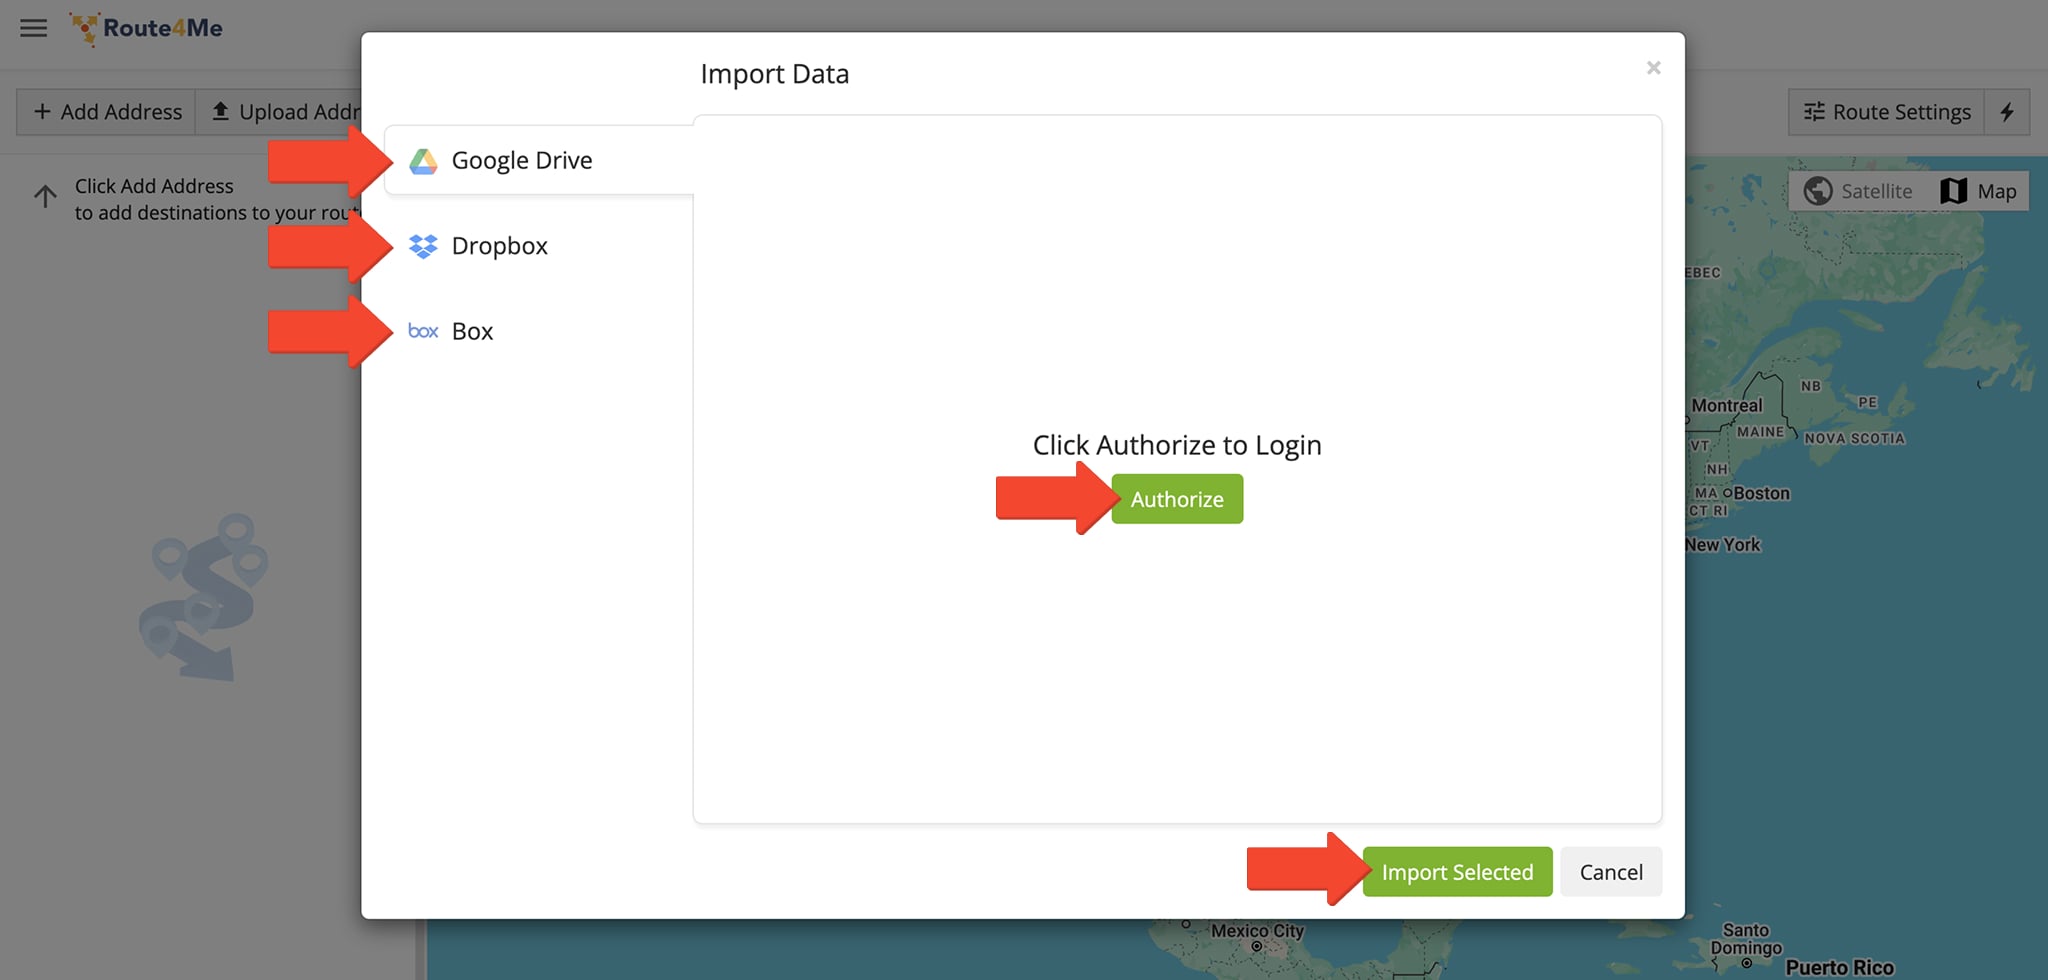
Route4Me supports data import from Google Drive, Dropbox, and Box.net. No matter the option you choose, Route4Me will always ask you to review all addresses before they are geocoded and validated.
To import data, click on one of the three tabs to select your option. Then click the “Authorize” button and follow the instructions for connecting your cloud storage service with your Route4Me account. Once authorized, select your file and click the “Import Selected” button.
Input Location Data Via Scanned Uploads – Plan Routes From Paper Records
The Upload Scan(s) method lets you plan routes using scanned documents with addresses and relevant routing information. Adding addresses this way saves time, eliminating manual data entry so you can quickly generate optimized routes.
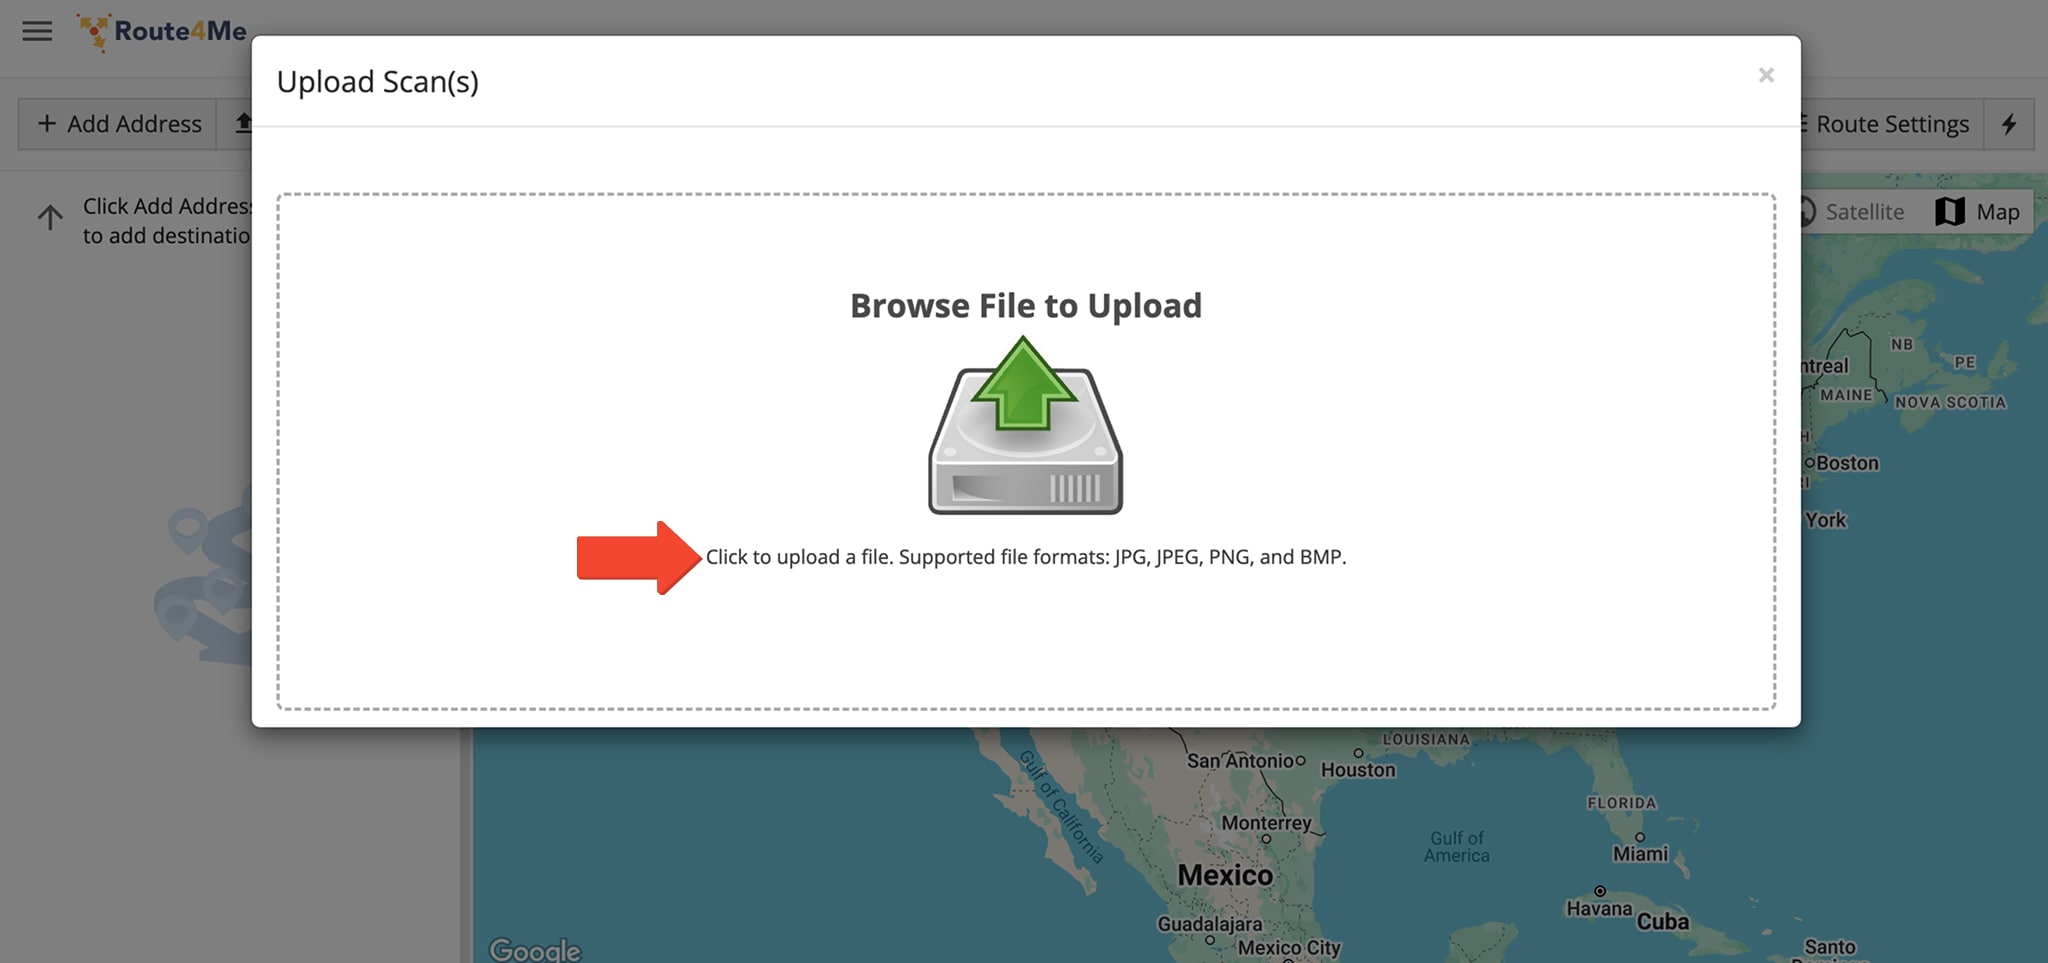
To upload scans, either drag and drop a file into the “Upload Scan(s)” window or click anywhere in the window to access and upload a file from your device. Once uploaded, Route4Me will automatically populate your data to create the route.
To ensure accurate conversion of scanned documents into digital data, use a clear, sharp image that includes full addresses and route details. You can upload JPG, JPEG, PNG, and BMP file formats but, for the best results, ensure the content aligns with Route4Me’s spreadsheet guidelines.
Visit Route4Me's Marketplace to Check Out More Add-Ons and Modules:
- Route Optimization
Address Book and Territories Planning
- Operations
Custom Data Add-On