Dispatch Dashboard – Real-Time Order Dispatch And Schedule Management
The Dispatch Dashboard is a powerful tool that gives team members full control over order assignment and scheduling. You can dispatch orders to drivers, reassign tasks, and resolve schedule conflicts directly on the interactive timeline. Changes are synchronized in real time across all connected apps and devices, enabling fast and informed decision-making. In this guide, you’ll learn how to use the dashboard to filter key information, manage order dispatch, and help your team members minimize downtime while maximizing last mile order operations.
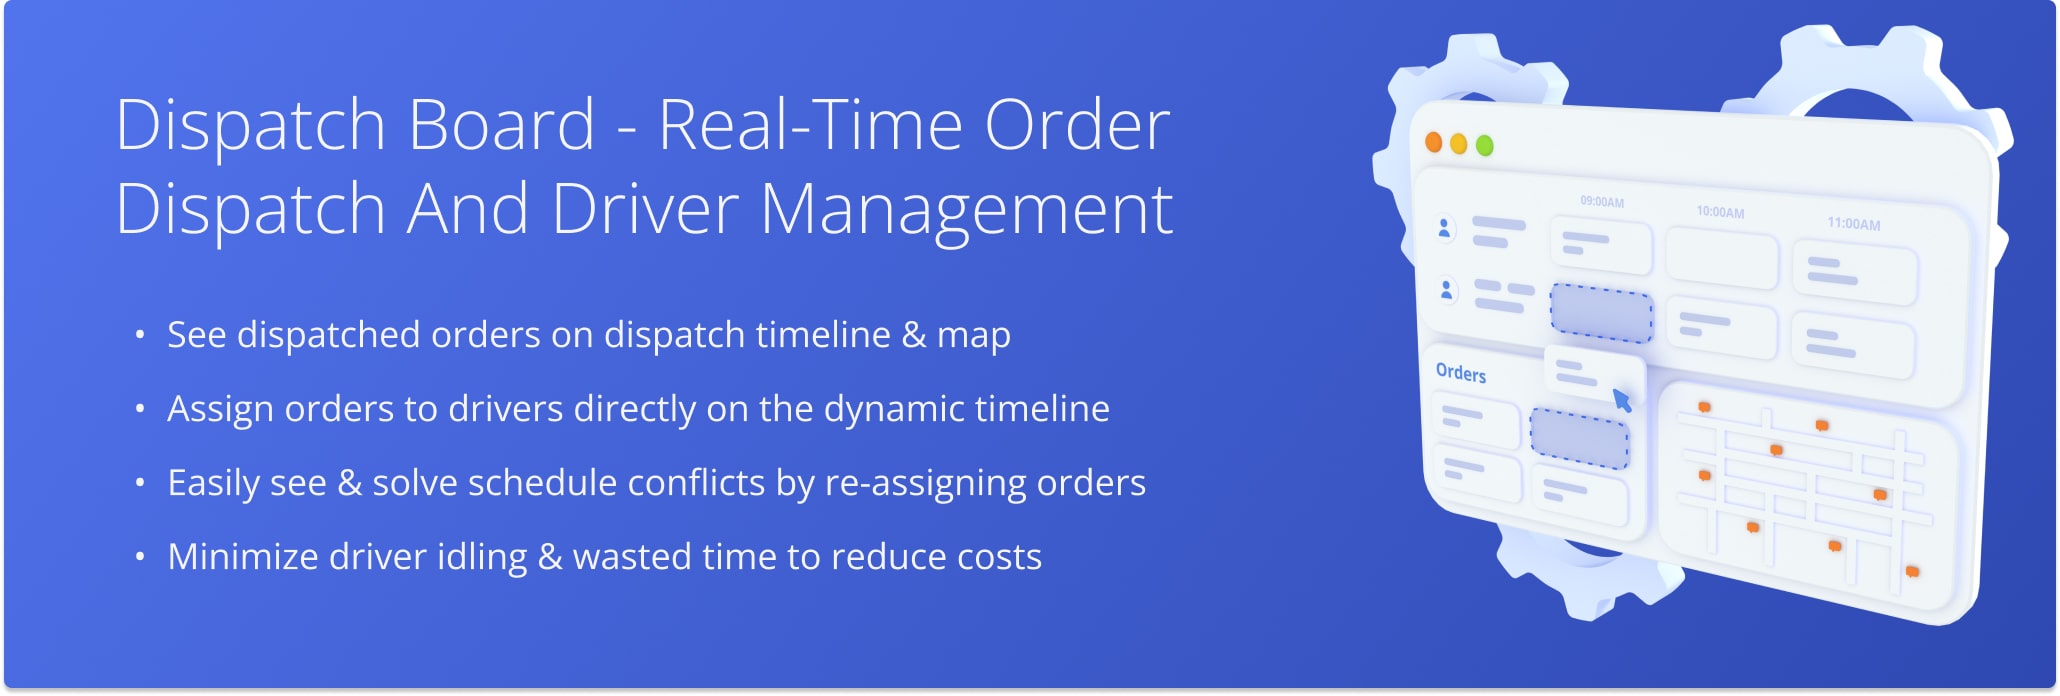
Table of Contents
Dashboard Overview – Open And Use Order Dispatch Dashboard
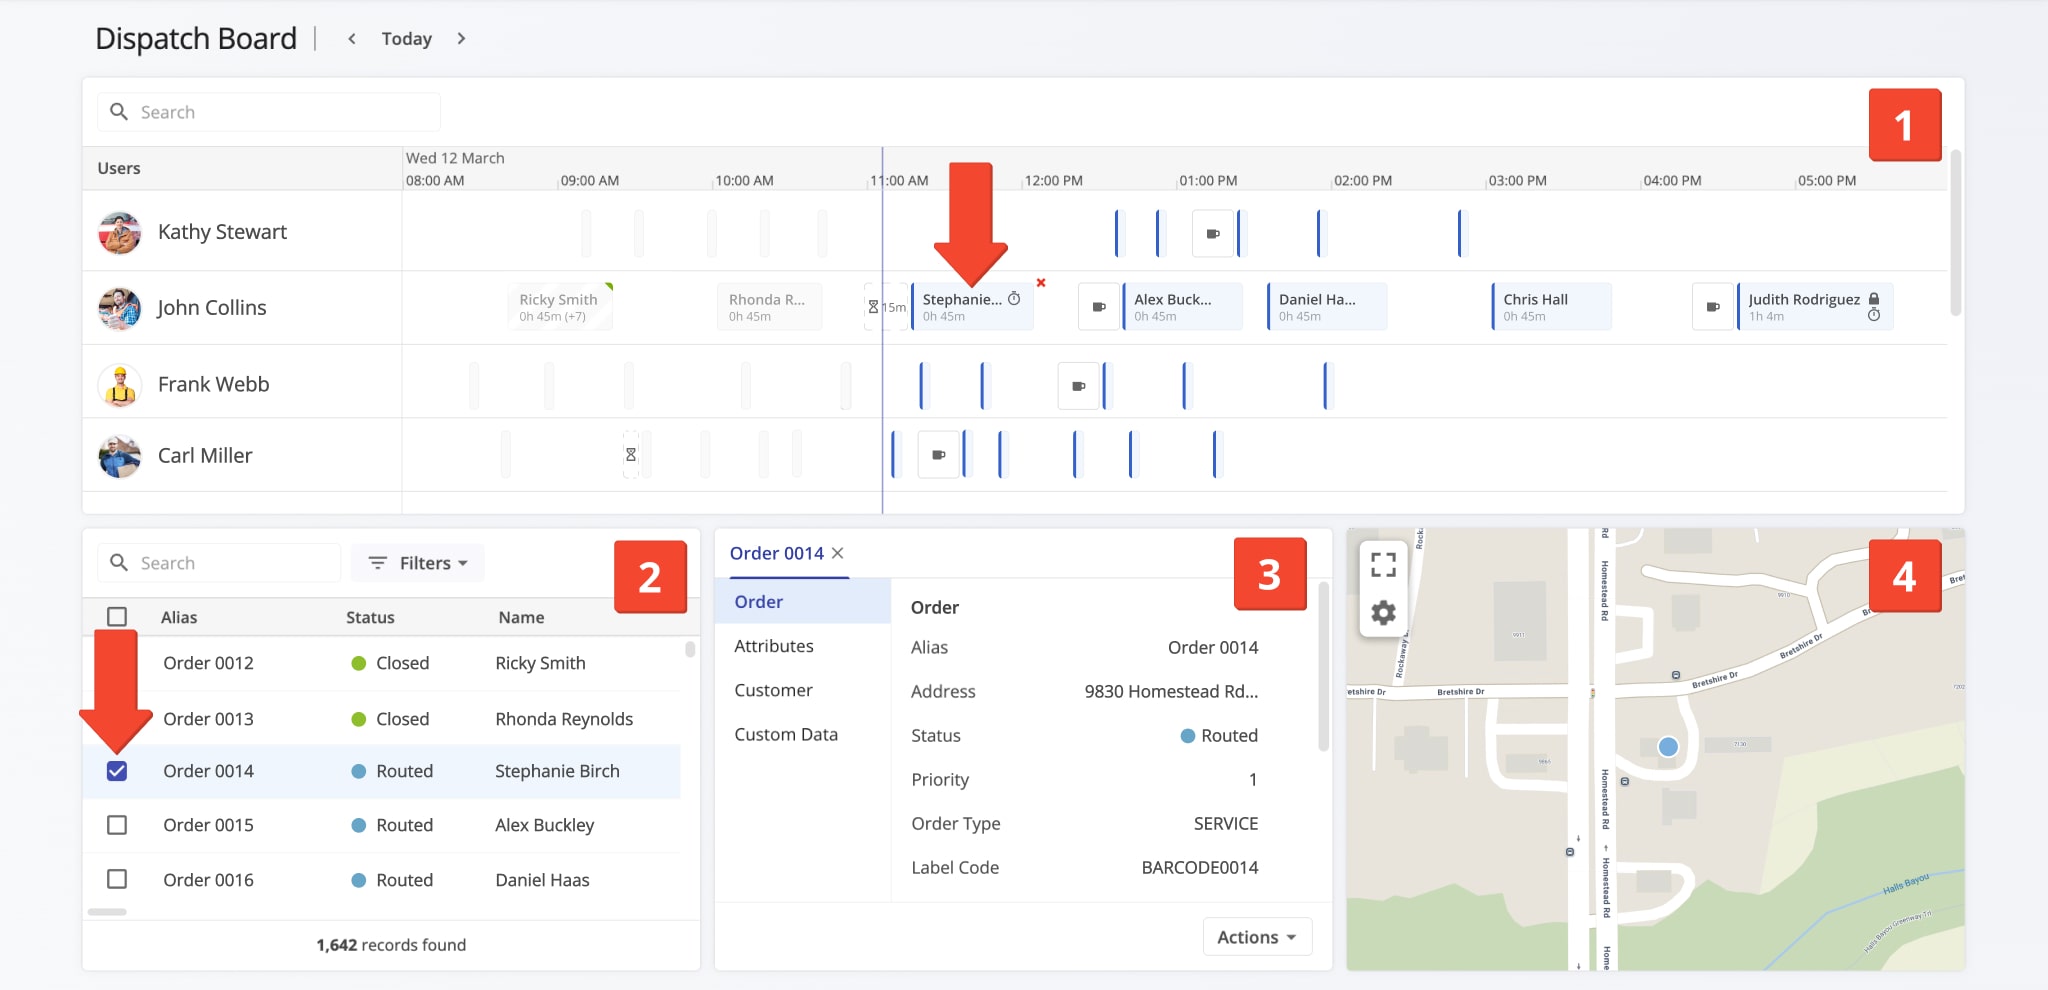
To open the Order Dispatch Dashboard, click the green button below. The dashboard makes it easy to see all the information you need and seamlessly schedule, dispatch, and re-assign Orders. Here’s a list of the main tools of the Dispatch Dashboard:
- Timeline: Interactive Order schedule sorted by User. You can see when Orders are scheduled, their Service Times, Wait Times, etc.
- Orders List: You can use the Orders List to filter and find Orders on your account and customize Order data columns.
- Order Info: When you select an Order, you can see its associated details and information in this panel.
- Order Map: When you select an Order, you can see its location directly on the map.
You can select an order by checking the box next to it in the Orders List or, if the Order is scheduled and dispatched, clicking on it in the Timeline. To deselect an Order, just click the X Icon next to it in the Timeline or the Order Info panel.
NOTE: If you can’t access the Dispatch Dashboard, or it isn’t enabled on your account, contact Route4Me support.
Filter Dispatch Dashboard – Find And Filters Drivers And Orders
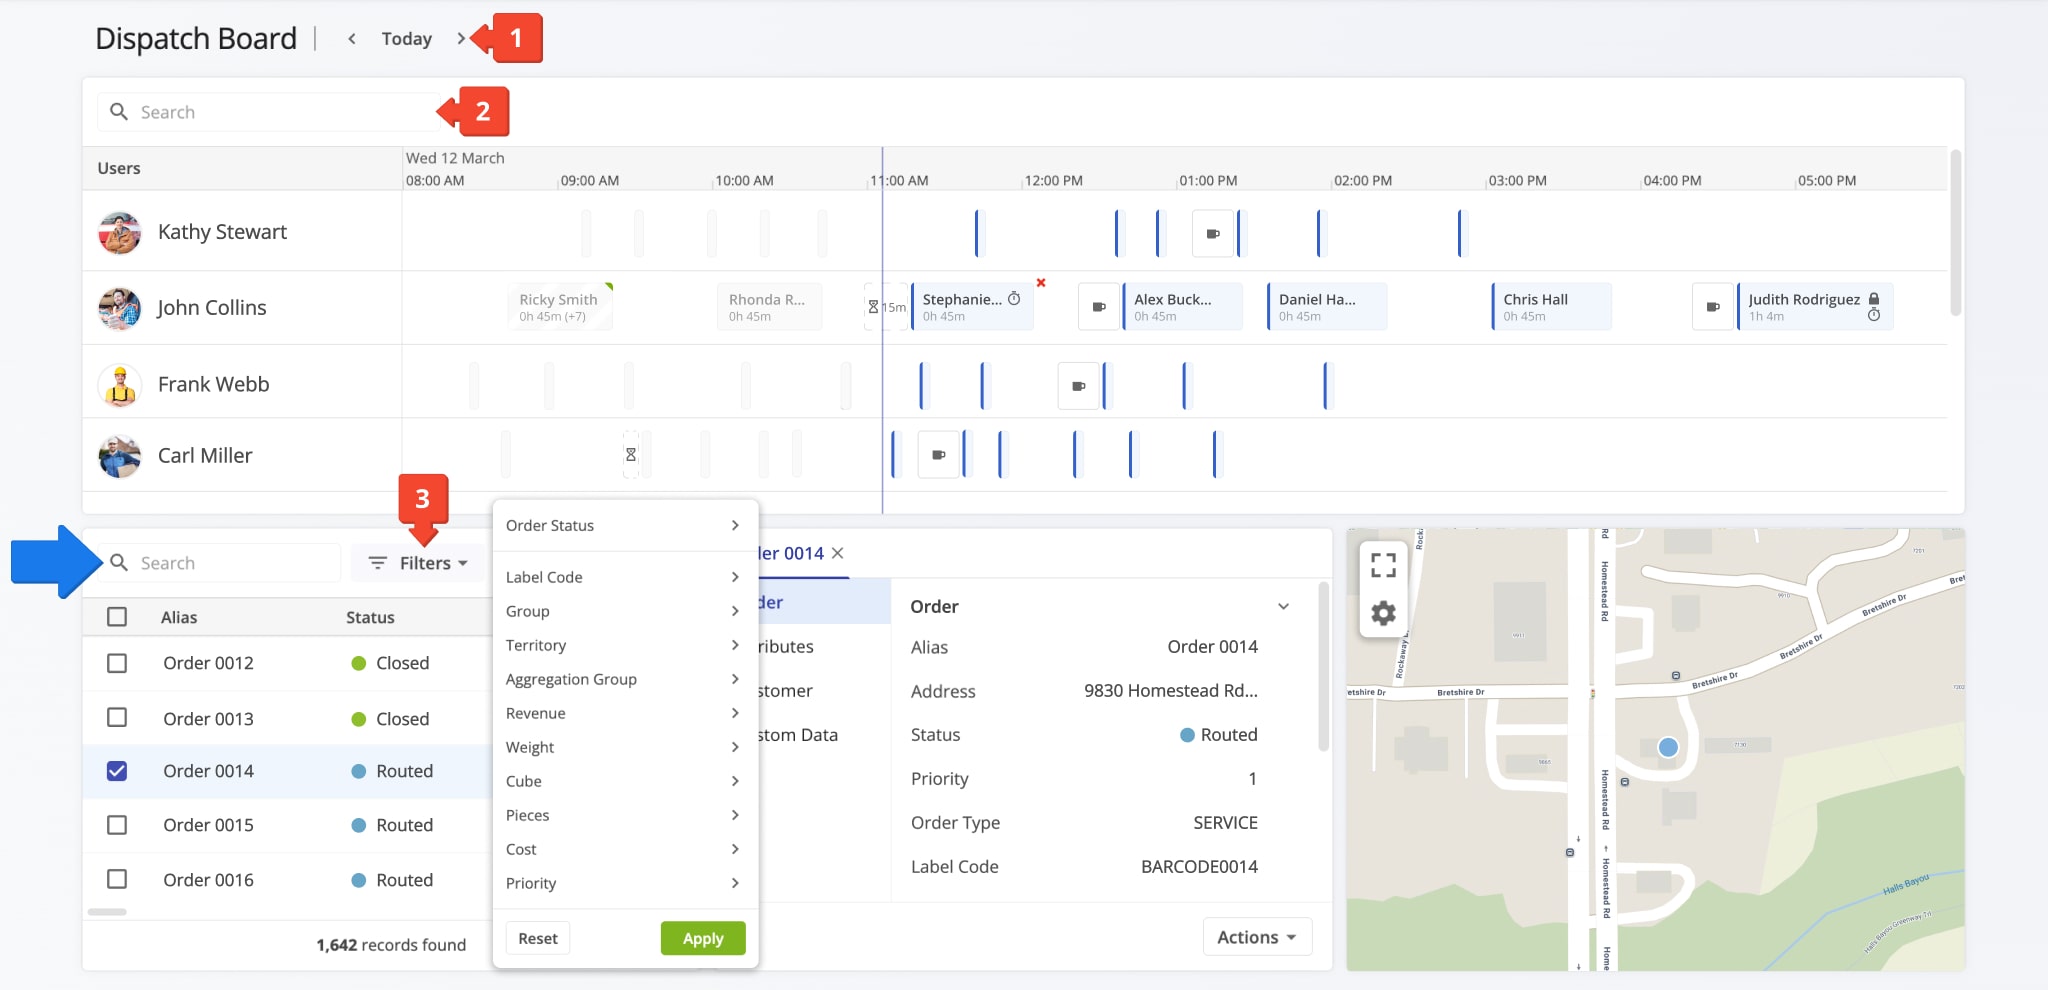
Use the following fields and buttons to filter the Dispatch Dashboard and easily find the data you need:
- Date Selection: Adjust the position of the Timeline according to the selected date. The current date is used as the default.
- Search Field: Search for Users by name, email, or other associated information with the “Search” field in the Timeline.
- Order Filters: Click the “Filters” button in the Orders List to filter only the Orders you want to see.
You can also use the “Search” field in the Orders List to quickly find Orders by entering any of their associated information. Learn more about Order Management.
Order Dispatch – Schedule Orders And Assign Orders To Drivers
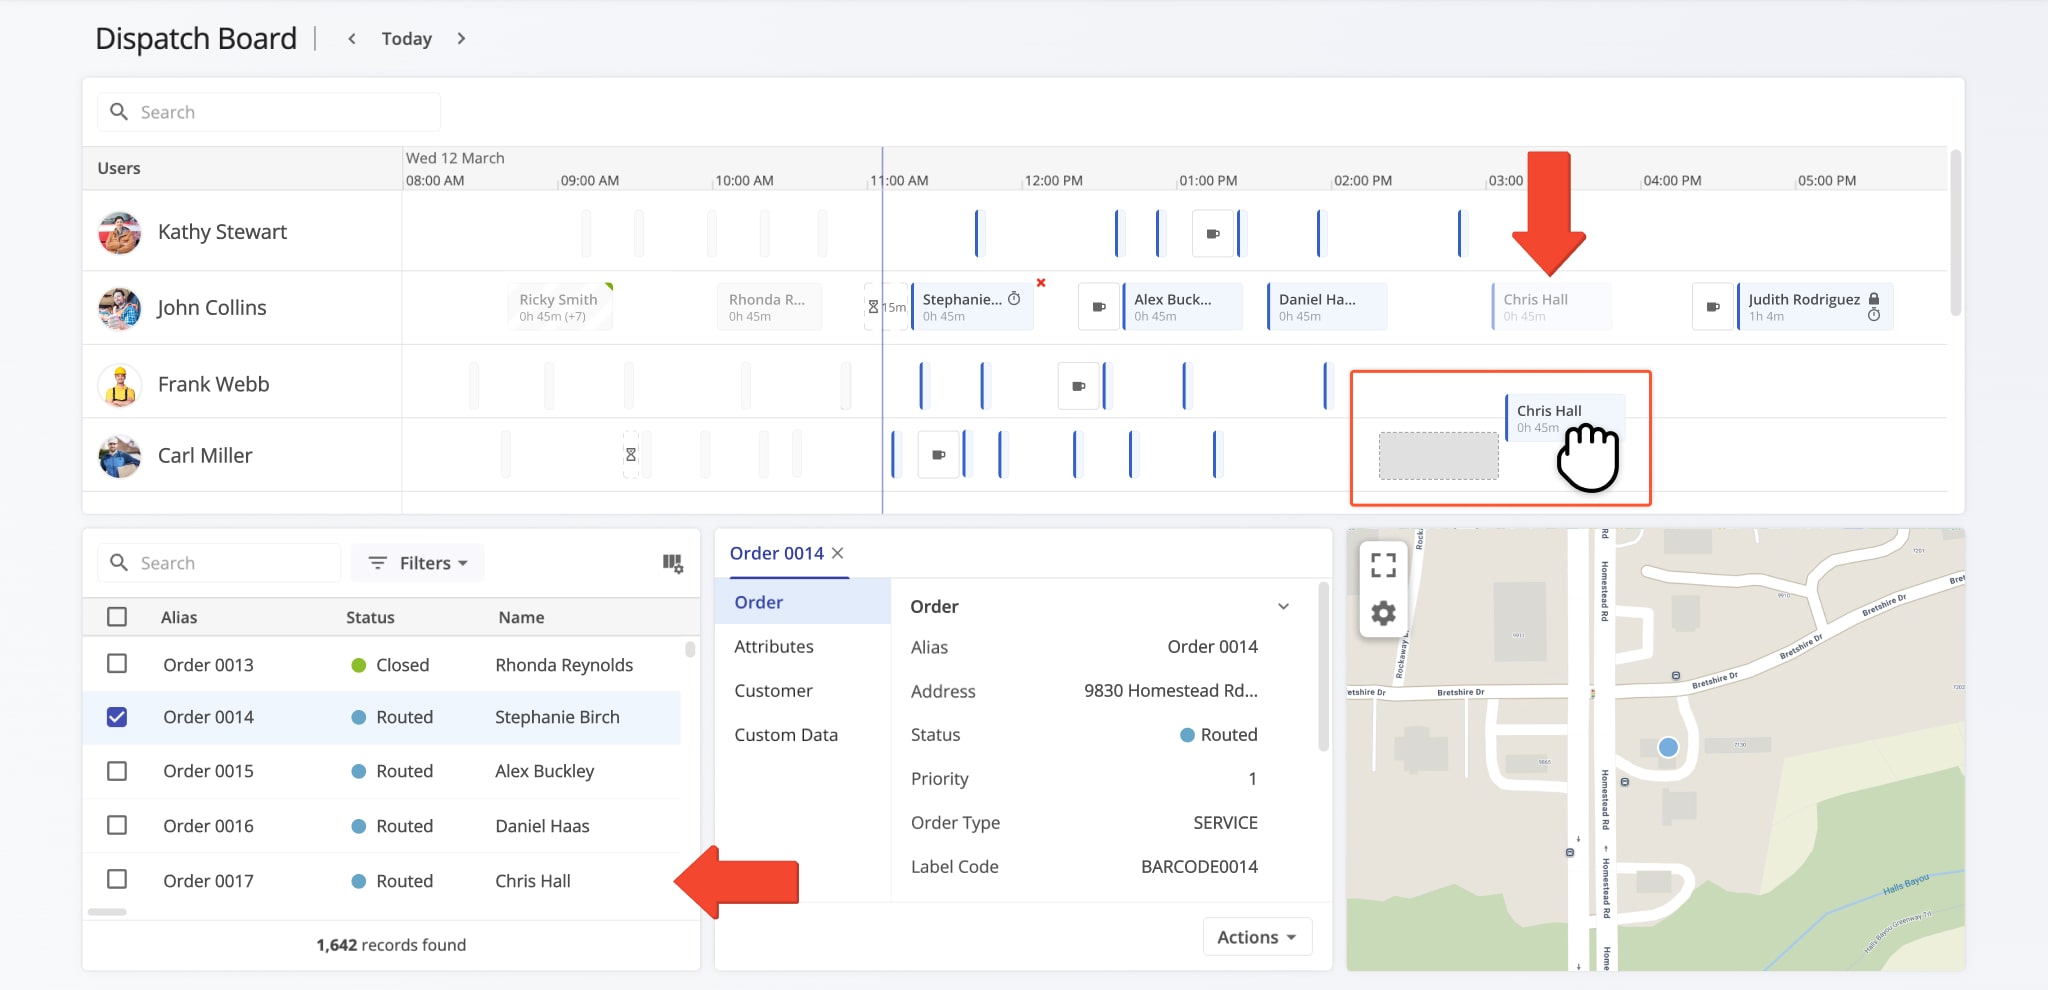
Dispatching Orders is easy with the Dispatch Dashboard.
Just click and drag an Order from the Orders List to the Timeline of the User you want to assign it to. To re-assign an Order from one User to another, drag it from the current User’s Timeline to the Timeline of your preferred User. Where on the Timeline you place an Order corresponds to the time the Order will be rescheduled for on the selected date.
On the Timeline, the width of an Order corresponds to its Service Time, which you can see in hours and minutes under the name of the Order. Orders with the “DELIVERY” type may have short Service Times and only display as narrow indicators on the Timeline. You can still use all Order interactions on the Timeline regardless of an Order’s type.
Customize Orders List – Order Data Column Customization
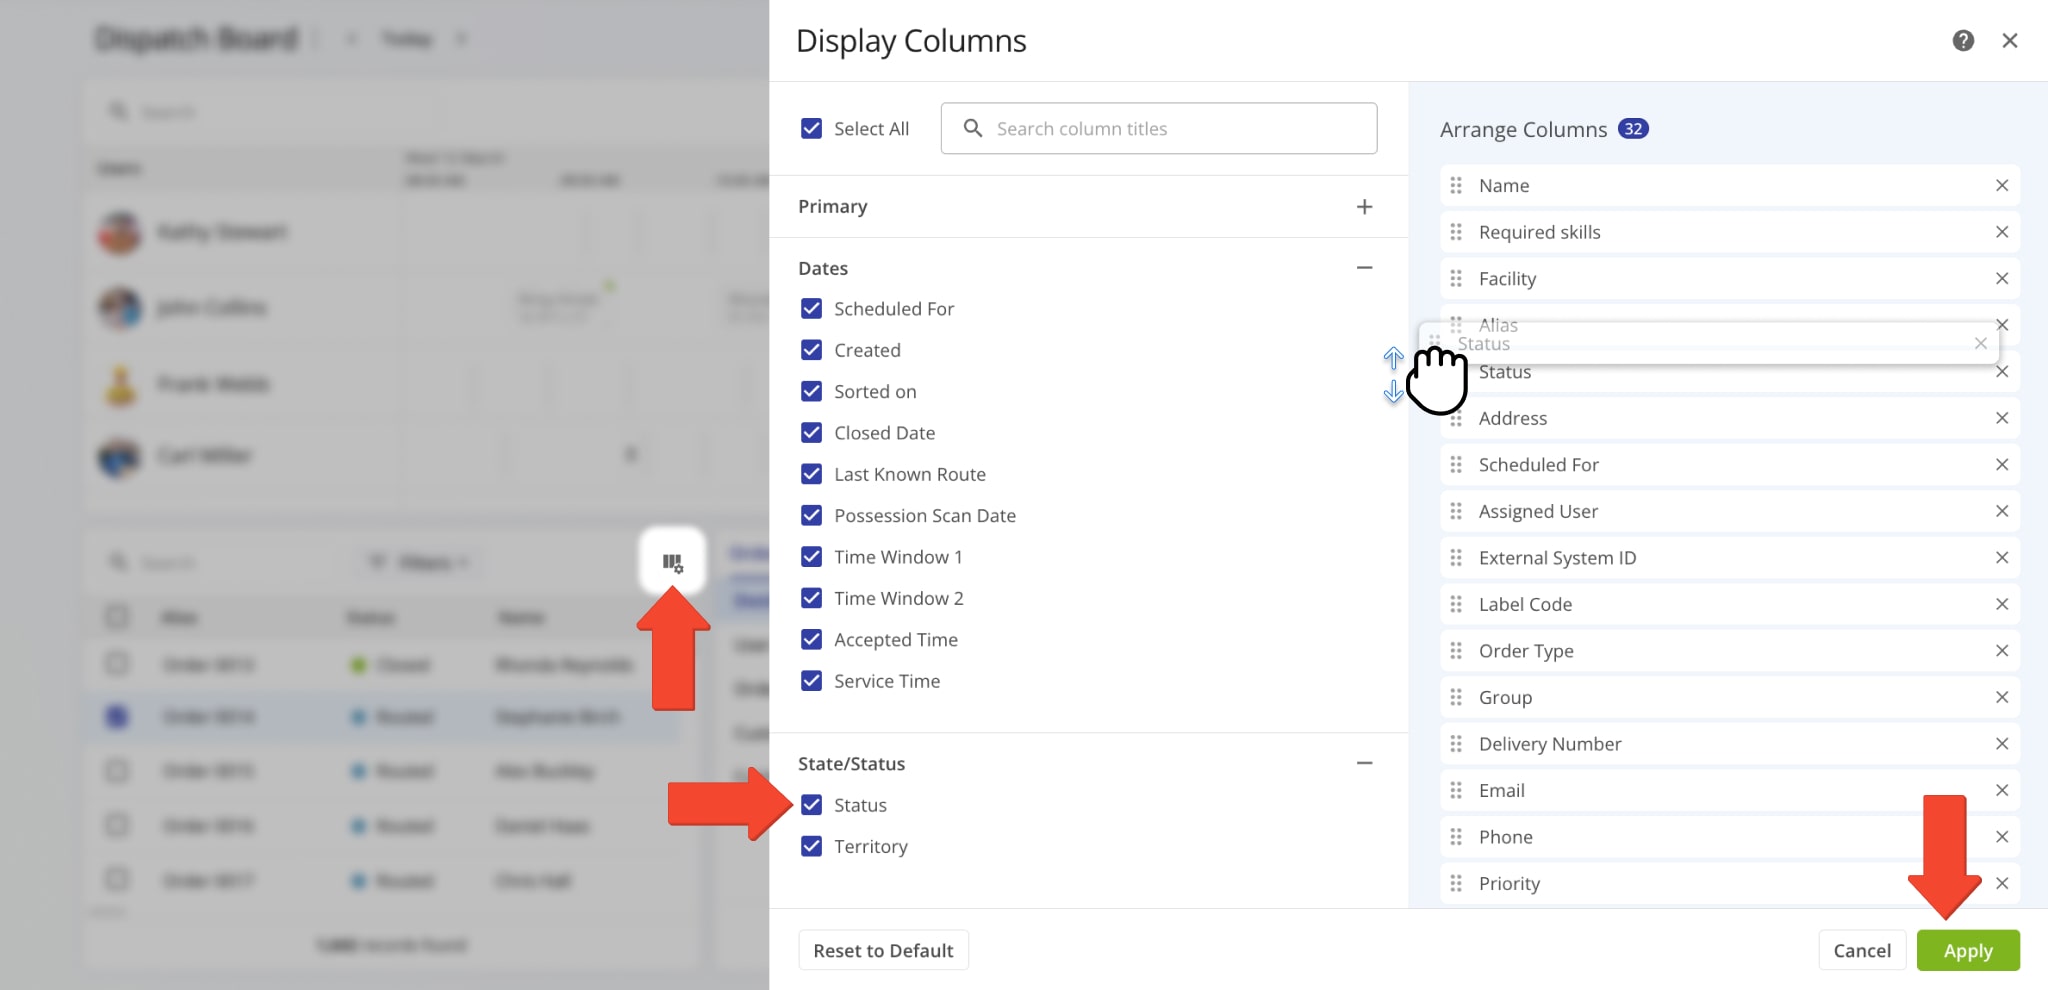
To customize the Orders list and see the data columns relevant to your needs, click the Display Columns Icon in the top-right of the Orders List. Then, check the boxes next to the columns you want to enable in the “Display Columns” panel.
You can click and drag column names in the “Arrange columns” section to change their Orders. When you’re done customizing columns, click the “Apply” button to save your changes.
The Orders List on your Dispatch Dashboard supports the same data table functionality as your account Orders Page. If you need to see detailed Order data and analytics or manage Orders, go to “Orders” from the Navigation Menu.
| Columns | Description | |
|---|---|---|
| Primary | ||
| External System ID | A unique identifier assigned to the order by an external system, such as a CRM or ERP, used for integration and tracking purposes. | |
| Label Code | Custom order label code used when importing, uploading, and adding orders. The Route4Me Mobile App Barcode Scanner can read this code to verify orders, sort and schedule them, and scan barcodes to plan routes. | |
| Order Type | The category of visit required to complete the order, such as pickup, delivery, break, and meetup. | |
| Alias | Сustom alias or name of the order. This name can be used to filter and find orders in the Orders List. | |
| Name | Name of the customer associated with the order. This name can be used to filter and find orders in the Orders List. | |
| Address | Full address of the order. When planning routes with orders, this address is used as the destination address of the order’s corresponding destination on the route. | |
| Group | A Custom Order Group ID used to filter and organize orders with the same custom group identifier. Learn more about Order Groups for better order organization. | |
| Delivery Number | Reserved value. | |
| Email address of the contact or customer associated with the order. | ||
| Phone | Phone number of the contact or customer associated with the order. | |
| Priority | Higher priority orders are placed earlier on optimized route. The highest order priority is “1” with the lowest set at “65,535“. | |
| Pieces | Pieces optimization constraint value of the order. Learn more about the Pieces route optimization constraint. | |
| Weight | Weight optimization constraint value of the order. Learn more about the Weight route optimization constraint. | |
| Cube | Cube optimization constraint value of the order. Learn more about the Cube route optimization constraint. | |
| Revenue | Revenue optimization constraint value of the order. Learn more about the Revenue route optimization constraint. | |
| Cost | Cost of completing the order. You can add the “Cost” value when importing, uploading, and adding orders. | |
| Order ID | A unique internal identifier automatically generated by Route4Me for each order to track and manage it within the system. | |
| Assigned User | The Route4Me user or Driver assigned to complete the order, enabling route assignment and tracking. | |
| Facility | Facility associated with the order. | |
| Required Skills | Required skills associated with the order or destination. Used for Driver Skills and Vehicle Attributes Route Optimization. | |
| Dates | ||
| Scheduled For | The date assigned to an order for completion. This date helps you organize orders and plan routes based on when they need to be fulfilled. Learn more about the Scheduled order status. | |
| Created | Date on which the order was created, uploaded, or imported in the system. Learn more about orders import, creation, and upload. | |
| Sorted on | Automatically generated timestamp when the order was sorted using Route4Me’s Mobile Barcode Scanner App. Learn more about scanning order barcodes and Sorted order status. | |
| Closed Date | Date when the driver completed the order by marking the destination as “Done” after completing all mandatory Order Workflow tasks. | |
| Last Known Route | The most recent route that included the order, such as in cases of “Failed” and “Skipped” orders. | |
| Possession Scan Date | Automatically generated timestamp when the order was scanned and assigned the “Inbound Scan” status. Learn more about scanning order barcodes and Inbound Scan order status. | |
| Time Window 1 | Start and end time of the first Time Window (working hours) within which the order’s address can be visited and serviced. Learn more about Route4Me’s Time Windows Route Optimization Constraint. | |
| Time Window 2 | Start and end time of the second Time Window (working hours) within which the order’s address can be visited and serviced. Learn more about Route4Me’s Time Windows Route Optimization Constraint. | |
| Accepted Time | The timestamp when a Driver or user accepts the assigned order or route, confirming their commitment to complete it. | |
| Service Time | The estimated amount of time required to complete the order at the destination. | |
| State/Status | ||
| Status | The current real-time lifecycle status of the order. Different Orders List View Modes support specific statuses. Learn more about Route4Me ERP Order Management System View Modes and Order Statuses. | |
| Territory | The name of the Order Territory containing the order’s address. Orders are linked to the Territory whose boundaries include their address. Learn how to Plan Routes Using Order Territories. | |
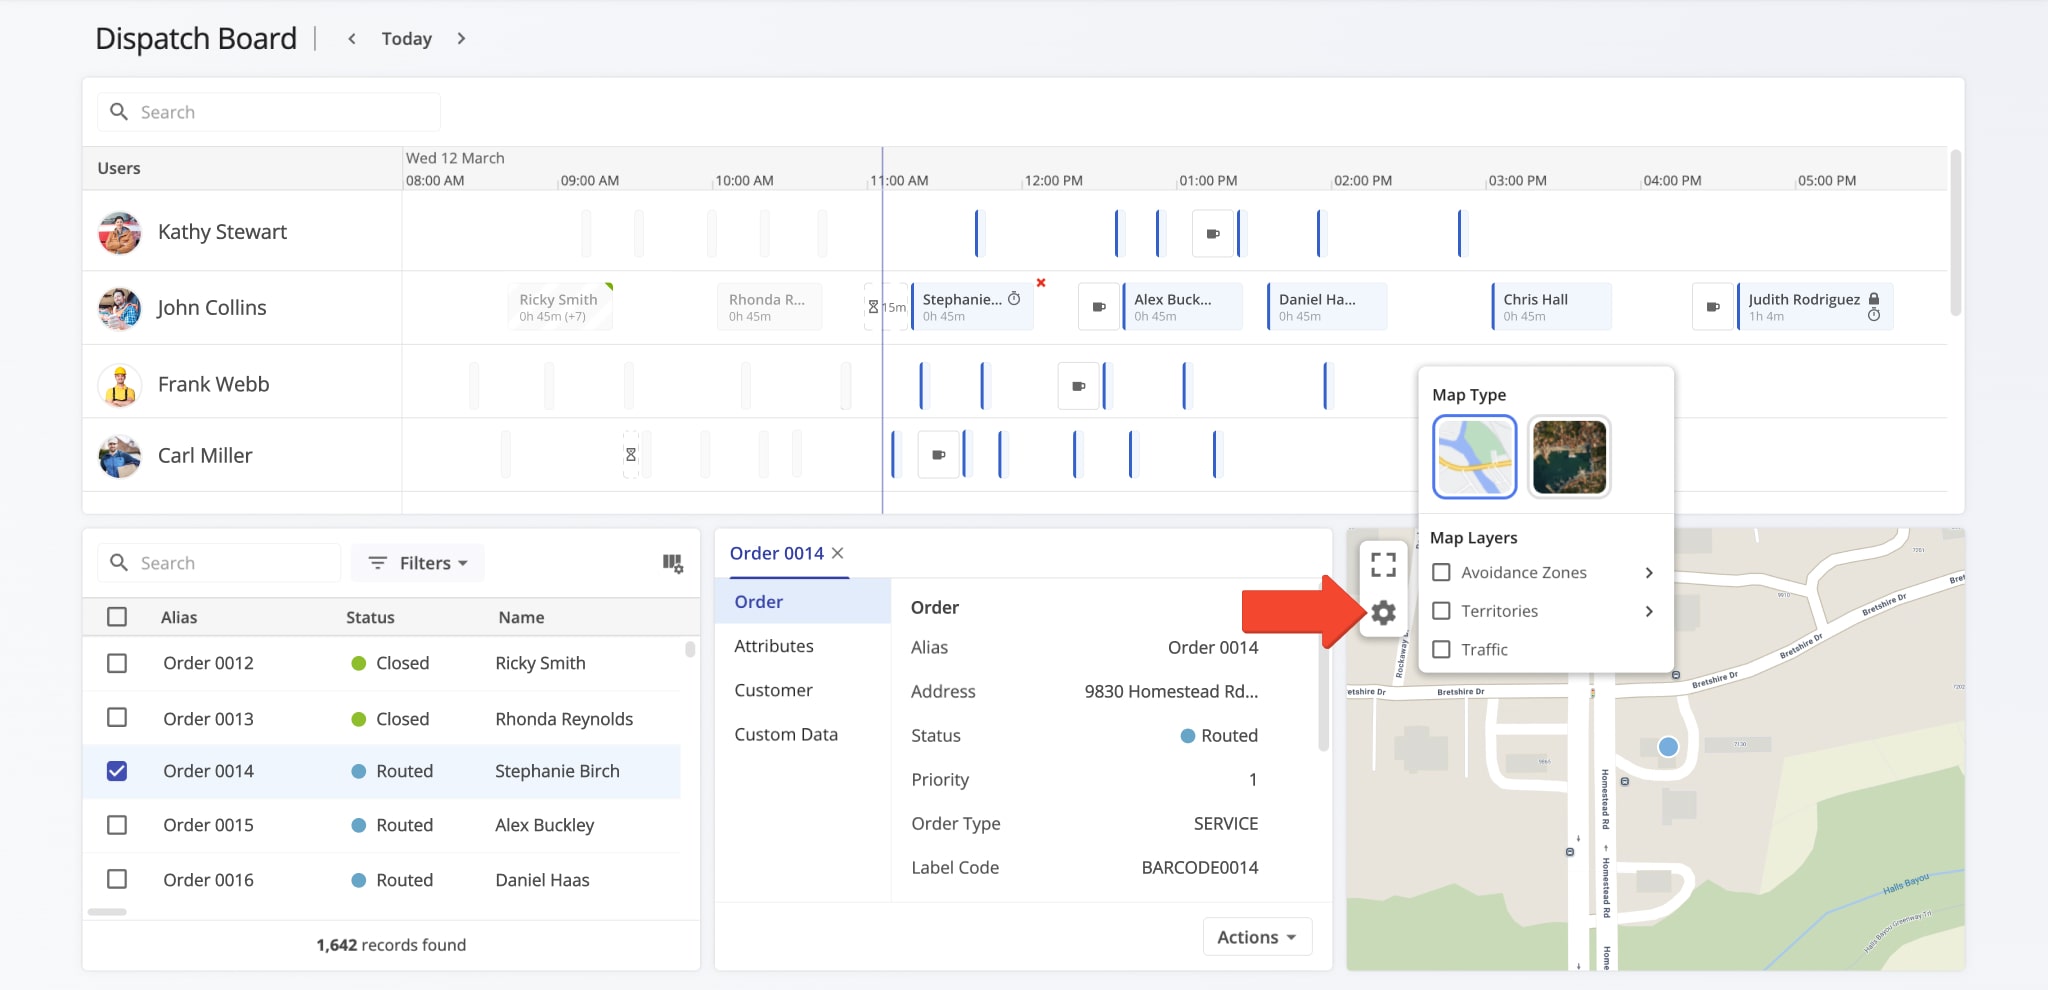
In addition to customizing Orders List data columns, you can customize the Orders Map on the Dispatch Board. Click the Gear Icon to open the Map Settings menu. You can find the available settings in the table below.
| Map Settings | Description |
|---|---|
| Map Type | Switch between satellite and road network map types. |
| Avoidance Zones | Enable Avoidance Zones on the map as overlays. |
| Territories | Enable Avoidance Zones on the map as overlays. |
| Traffic | Enable a live traffic overlay that shows how heavy the traffic is on roads. |
Visit Route4Me's Marketplace to Check out Associated Modules:
- Operations
Audit Logging and Activity Stream
- Operations
Custom Data Add-On
- Operations
Advanced Team Management Add-On
About author: Kristian Andreev
Kristian is a Technical Writer at Route4Me. With over a decade of experience in writing and localization, he's an expert at communicating complex technical data in a clear, concise, and user-friendly way. Passionate about bridging the gap between engineers and users, he specializes in creating documentation to streamline onboarding, enhance product usability, and support global teams on the path to success.