Accept & Route Orders – Accept To Be Delivered Orders & Plan Order Routes
In this guide, you can learn how to accept orders and assign the dedicated “Accepted” Order Status, navigate to each corresponding customer address, deliver accepted orders, collect proof of delivery (POD) by completing mandatory tasks, plan and complete routes with multiple customer orders, process failed orders, and more.
Table of Contents
Open And Filter Orders By Status, Scheduled Date And Distance
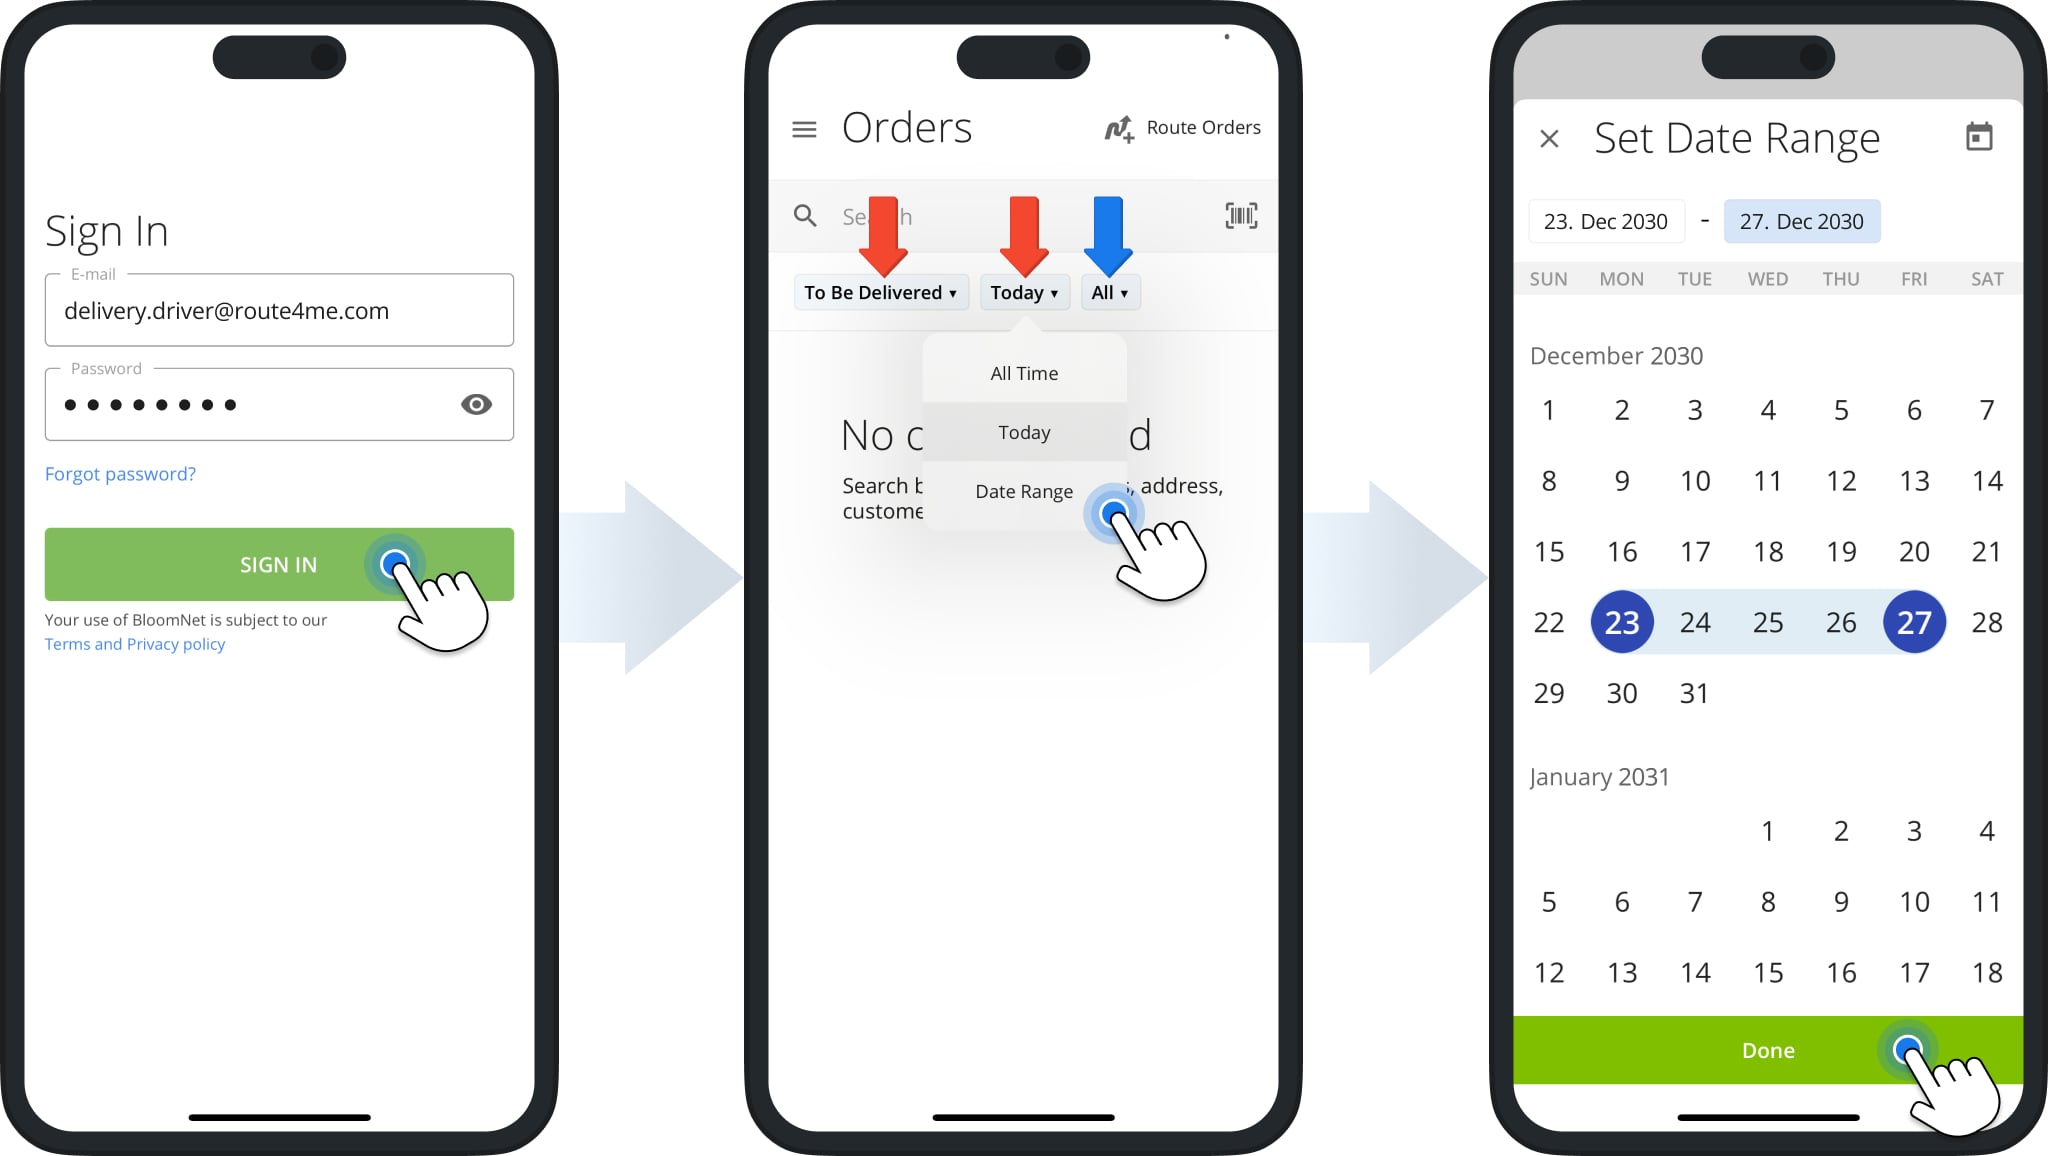
After orders are scheduled and assigned to a user, they can be accepted for delivery from the Android or iPhone app. The Android and iPhone apps support mostly identical Accepted Orders functionality. You can use the “Search” field to find specific orders by entering any of their order details or use filter options to open only those orders that match your preferred parameters. To filter scheduled to-be-delivered orders by date range, follow these steps:
- Enter your account email and password and tap the “Sign In” button to sign in to your account.
- Tap “Today” (or the middle filter) and select “Date Range“.
- Select the preferred date range on the calendar and tap “Done“.
After that, the app will show all orders scheduled for the specified date range in the Orders List. Learn more about the other filter options in the table below.
| Filter | Description | |
|---|---|---|
| Order Status (1st filter) | ||
| All Orders | See all orders regardless of their current order status scheduled for the dates specified in the Scheduled Date filter. | |
| To Be Delivered | See all orders with the “To Be Delivered” status scheduled for the dates specified in the Scheduled Date filter. | |
| Accepted By Me | See all orders with the “Accepted” status assigned to you that are scheduled for the dates specified in the Scheduled Date filter. These are orders you’ve previously accepted, and orders accepted by other drivers won’t be shown. | |
| Scheduled Date (2nd filter) | ||
| All Time | See all orders regardless of their scheduled delivery date with a status matching the Order Status filter. | |
| Today | See all orders scheduled for the current date with a status matching the Order Status filter. | |
| Date Range | Select a date range and see all orders scheduled for that date range with a status matching the Order Status filter. | |
| Distance (3rd filter) | ||
| Anywhere | See orders regardless of their location scheduled for the dates specified in the Scheduled Date filter with a status matching the Order Status filter. | |
| Within 1 mi | See orders within 1 mile of your current location scheduled for the dates specified in the Scheduled Date filter with a status matching the Order Status filter. | |
| Within 10 mi | See orders located within 10 miles of your current location scheduled for the dates specified in the Scheduled Date filter with a status matching the Order Status filter. | |
| Within 2000 mi | See orders located within 2000 miles of your current location scheduled for the dates specified in the Scheduled Date filter with a status matching the Order Status filter. | |
Accept To-Be-Delivered Orders On Android And iPhone Mobile App
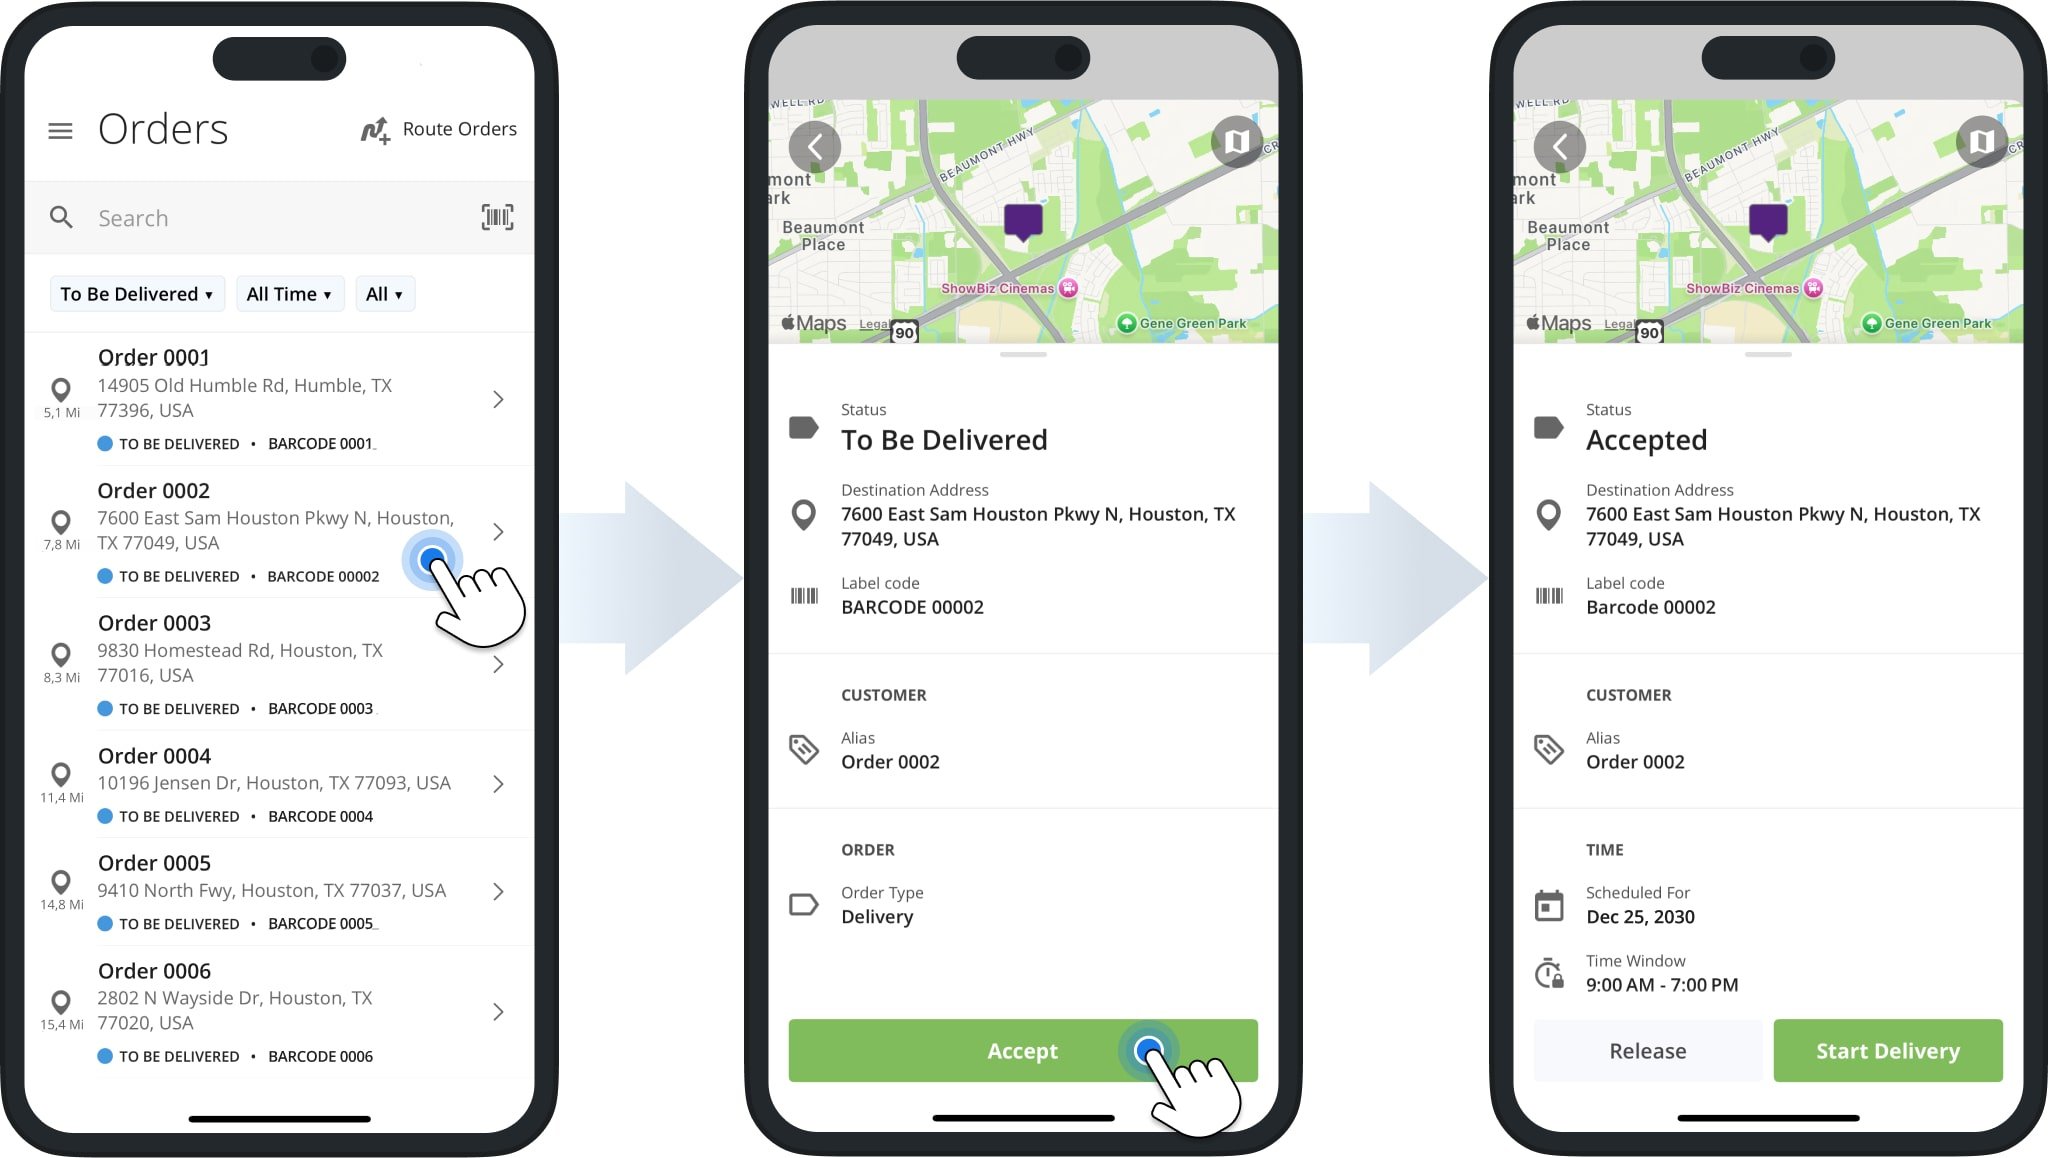
To accept orders assigned to you, open your Android or iPhone app, sign in to your account, and follow the steps below:
- Tap the order you want to accept in the Orders List to open its corresponding order details.
- Confirm the order details match the order you want to deliver.
- Tap the “Accept” button.
The order’s associated Order Status will change to “Accepted“, and you’ll be able to start and navigate a route to the corresponding customer destination, deliver or complete the order, and collect proof of delivery.
Deliver Accepted Orders And Collect Proof Of Delivery Or Visit
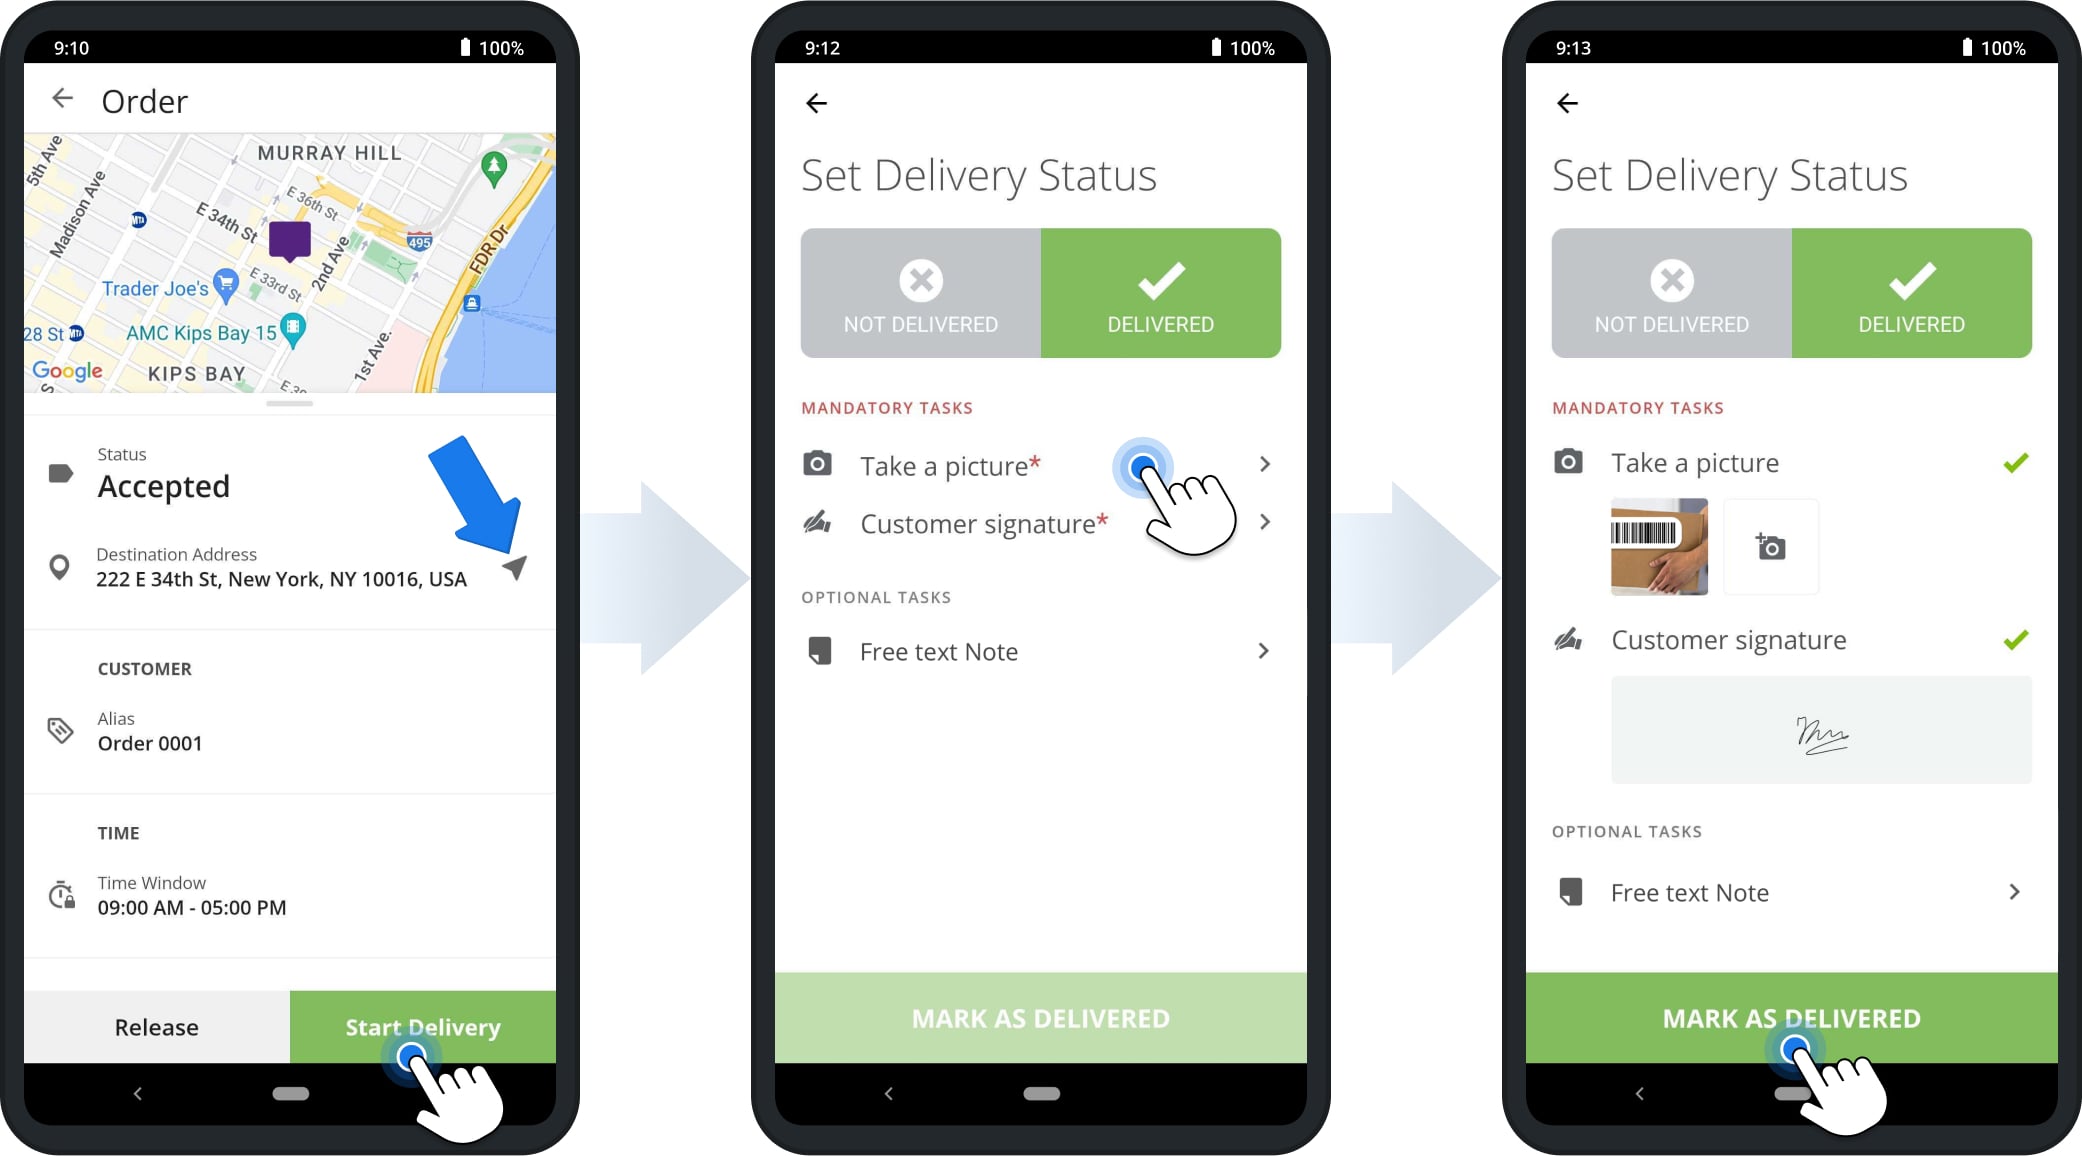
You can start delivery of an order as soon as you accept it. Optionally, if you’re using the Android version of the app, you can tap the Arrow Icon next to “Destination Address” to open the in-app voice-guided navigation.
Once you’ve arrived at the customer’s address, you can fulfill the order and collect proof of visit or delivery by completing mandatory and optional workflow tasks. To do so, follow these steps:
- Tap the “Start Delivery” button.
- Tap and complete each of the tasks under “Mandatory Tasks“. The order can only be marked as delivered after all mandatory workflow tasks are completed.
- After completing all mandatory tasks and any preferred optional tasks, tap “Mark As Delivered” to complete the order.
Successfully delivered orders will get the “Delivered” status and will only be visible in the app when the “All Orders” filter is enabled. In some cases, you won’t be able to successfully fulfill orders and will have to mark orders as “Not Delivered“ on the “Set Delivery Status” screen instead. You can learn how to do so further in this guide.
Cancel Delivery And Release Accepted Orders To Remove Accepted Order Status
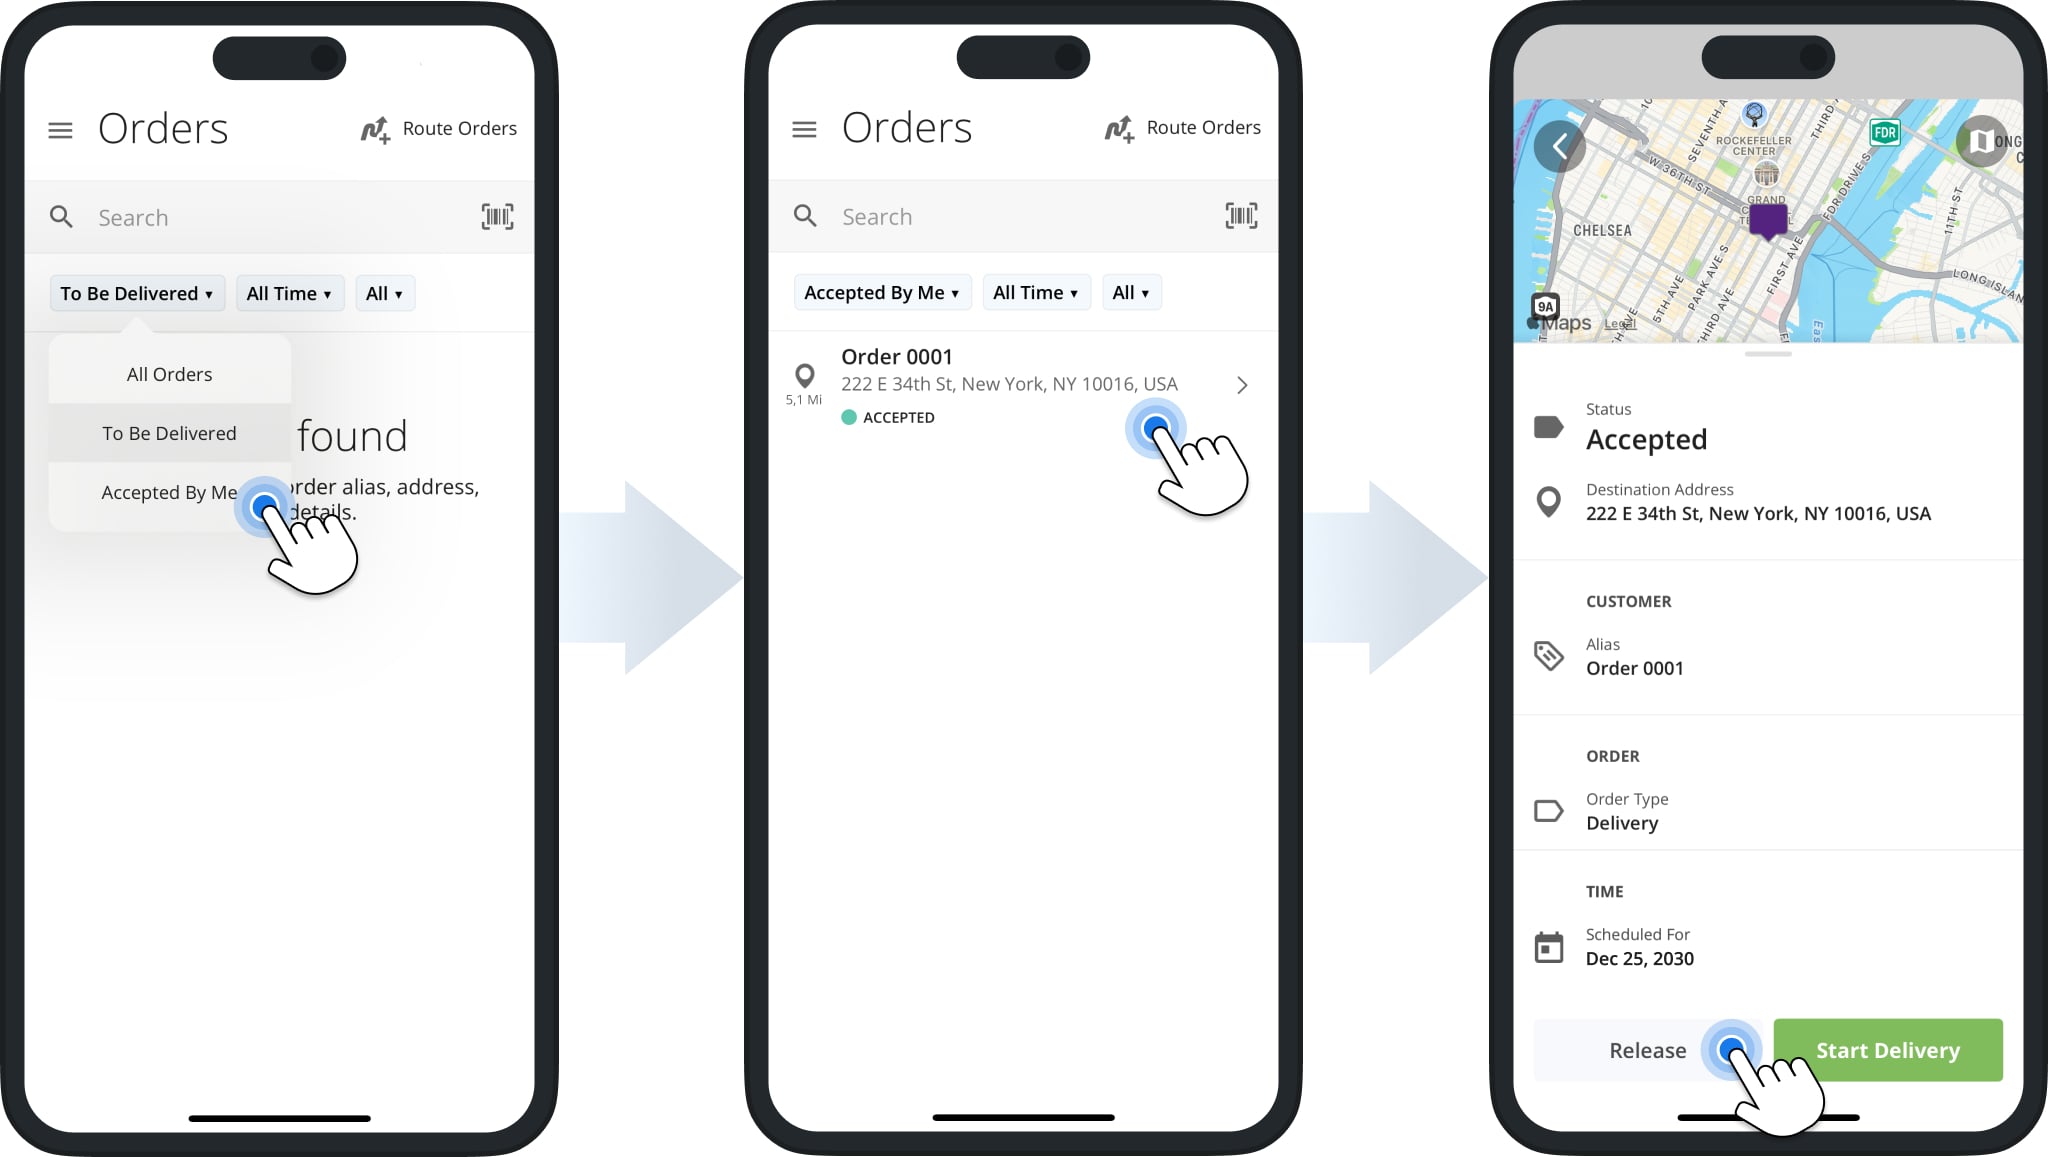
In some cases, after you accept orders it may be necessary to unaccept an order. To cancel delivery of an order you’ve previously accepted and remove the “Accepted” status from that order, follow these steps:
- Sign in to the app with your account and, on the Orders List, tap “To Be Delivered” (1st filter) and select “Accepted By Me” to show only orders you’ve previously accepted.
- Tap the order you want to cancel delivery for to open its associated order details.
- Tap the “Release” button.
The order’s “Accepted” status will be removed, and it will revert to the status “To Be Delivered“.
Route Accepted Orders – Plan Routes And Navigate To Customer Destinations To Deliver Accepted Orders
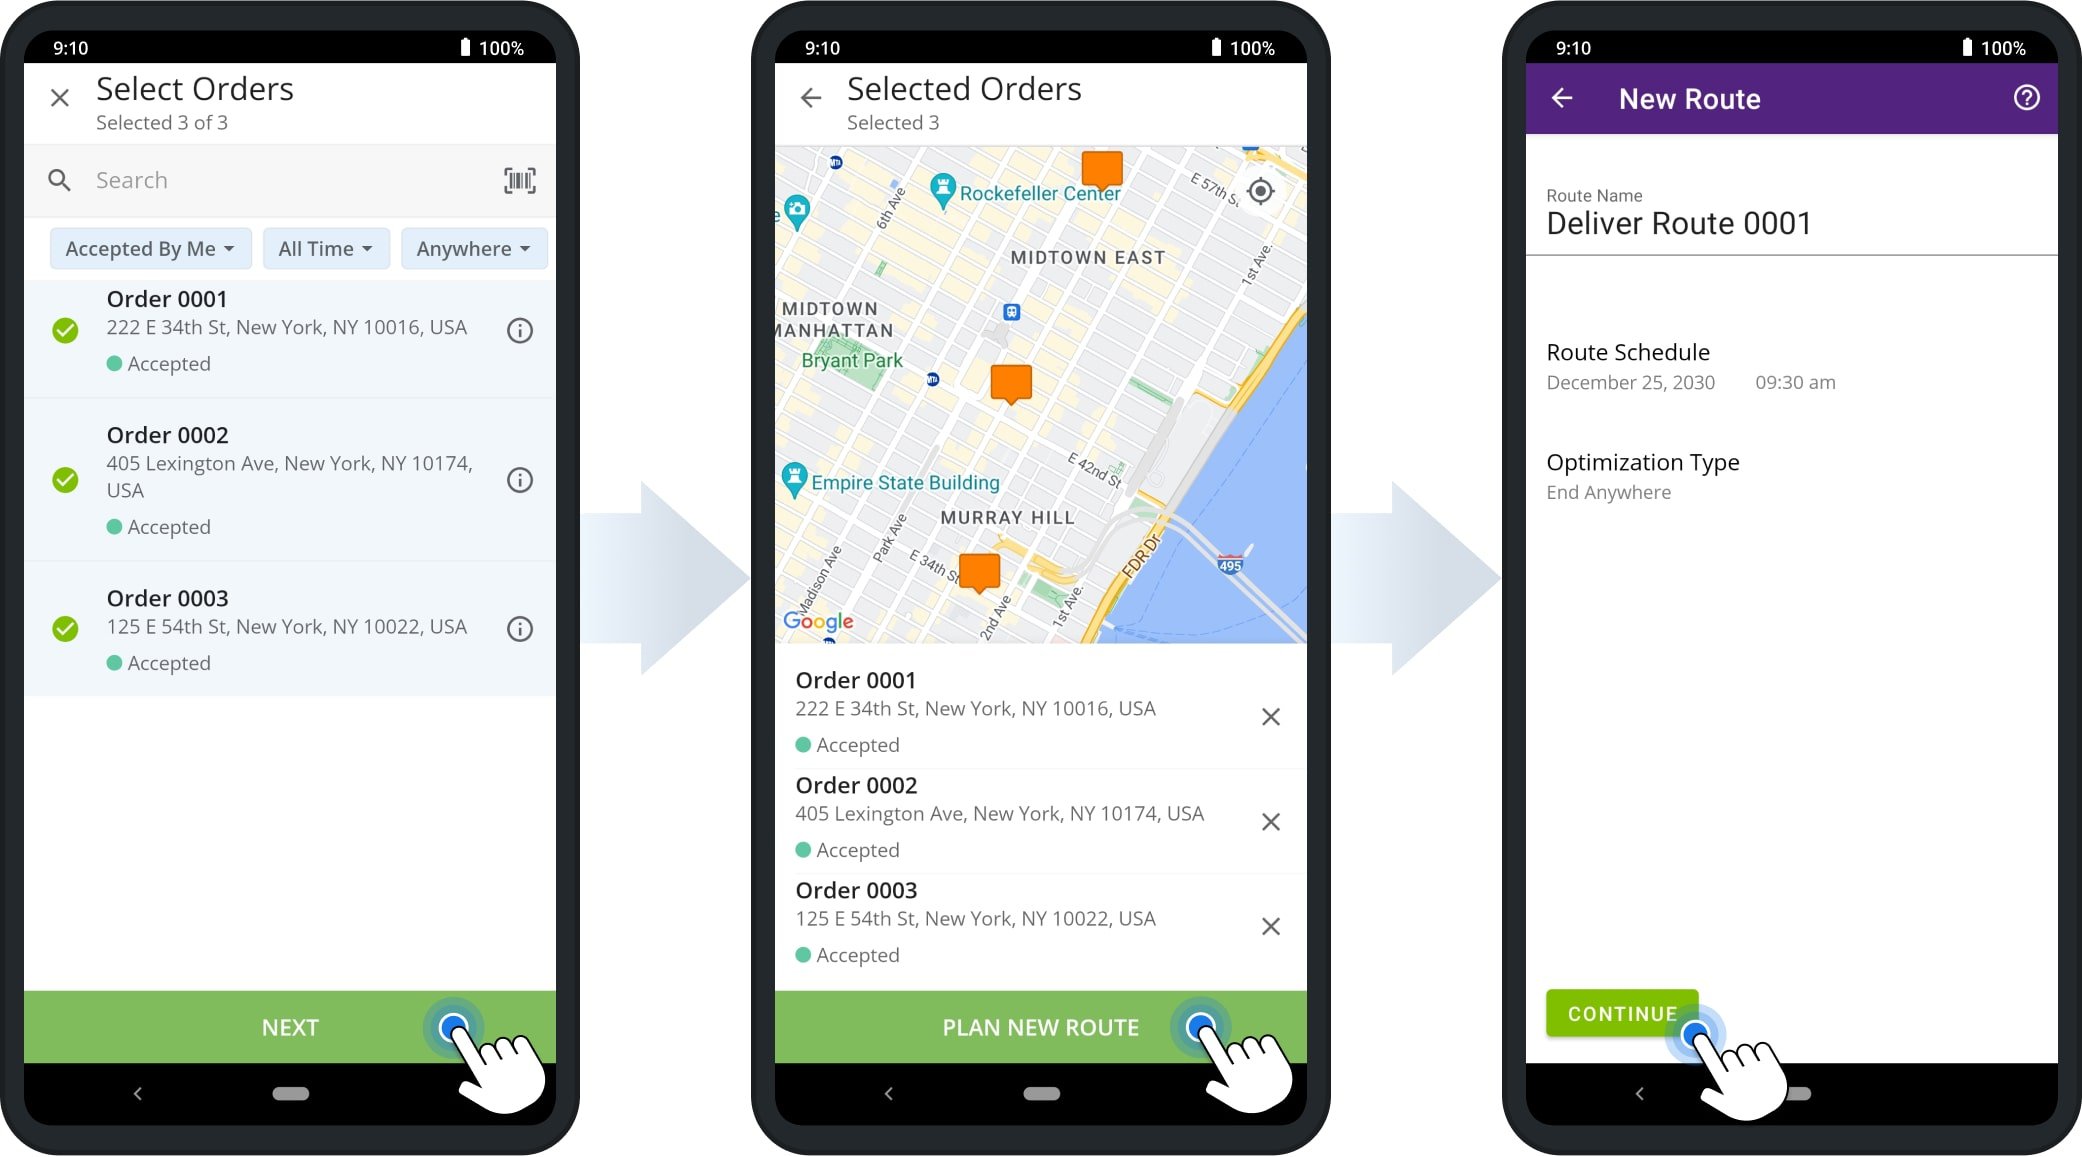
The Android and iOS mobile apps enable you to plan routes with multiple orders in the most optimal sequence to deliver all your accepted orders in the shortest time possible. To do so, open your Orders List and enable the “Accepted By Me” filter to see only orders you’ve previously accepted and follow these steps:
- Tap on all the orders you want to include in a route to select them and tap “Next“. Selected orders are marked with a green checkmark.
- Confirm the selected orders are those you want to include in a new delivery route and tap “Plan New Route“.
- Enter your preferred route name, set the route’s schedule, select a preferred optimization type, and tap “Continue“.
You can then proceed to add a start destination to your route and begin navigating to destinations, delivering orders, and collection proof of visit or delivery. Additionally, learn more about the available optimization types in the table below.
| Optimization Type | Description |
|---|---|
| Round Trip | Routes will be optimized to return to the route start address after the final destination is completed. |
| Lock Last Destination | Routes will be optimized with the best possible destination sequence, ending at the final destination in the address list used to plan them. |
| End Anywhere | Routes will be optimized with the best possible destination sequence, ending at the most optimal destination to minimize travel time and distance. |
| Disable Optimization – Round Trip | The route sequence will match the sequence of the address list and return to the route start address after the final destination is completed. |
| Disable Optimization – End Anywhere | The route sequence will match the sequence on the address list and end at the final destination. |
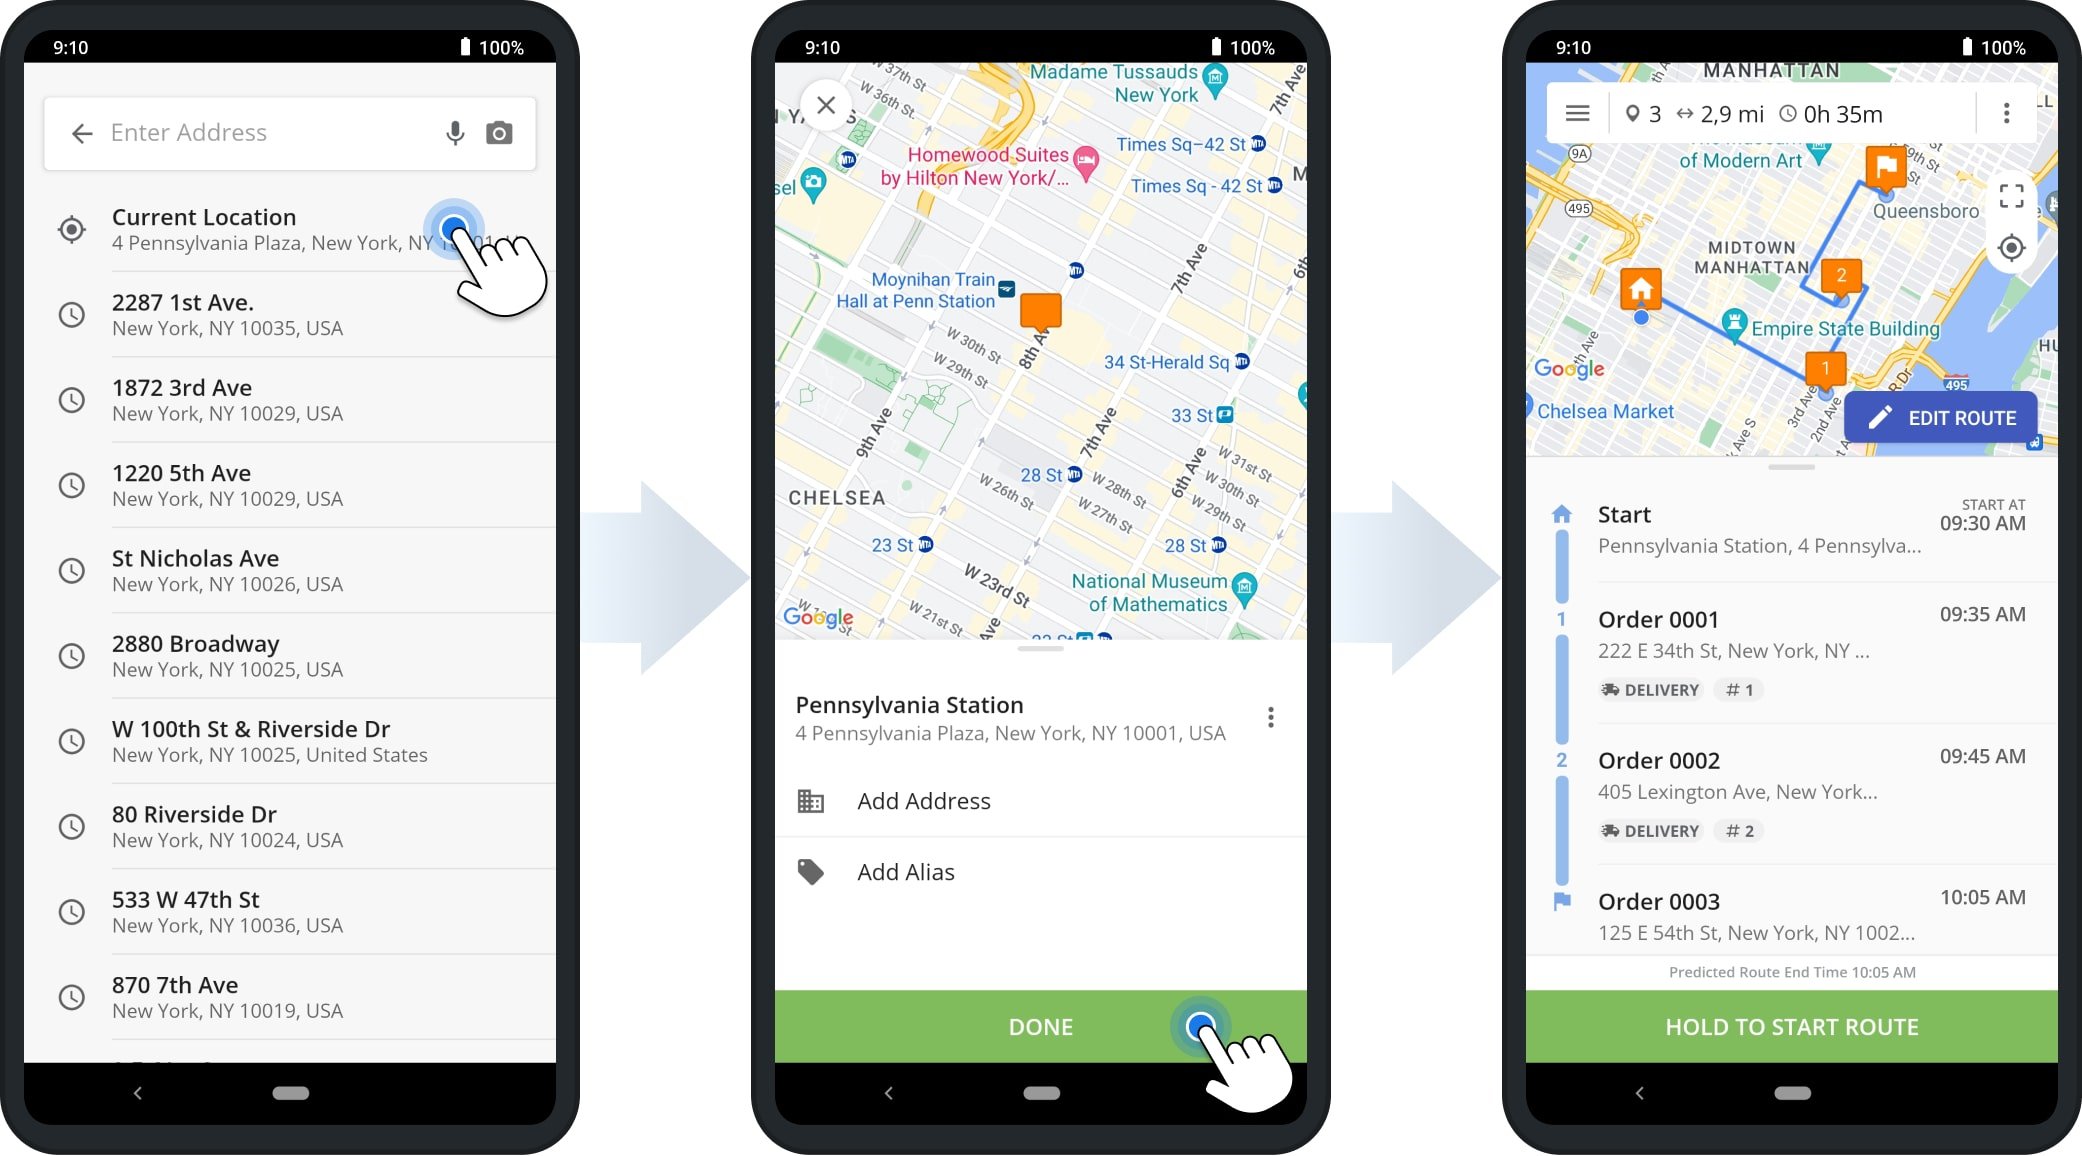
After adding orders to your route and adjusting route settings, the app will prompt you to select a start location. Your current location will always be shown at the top of the list. Simply tap on an address to select it as the route start, confirm your selection by tapping “Done“, and the app will automatically plan and optimize a new delivery route with your selected orders using the optimization settings you specified.
Navigate To Customer Order Addresses And Start Delivery Of Accepted Orders
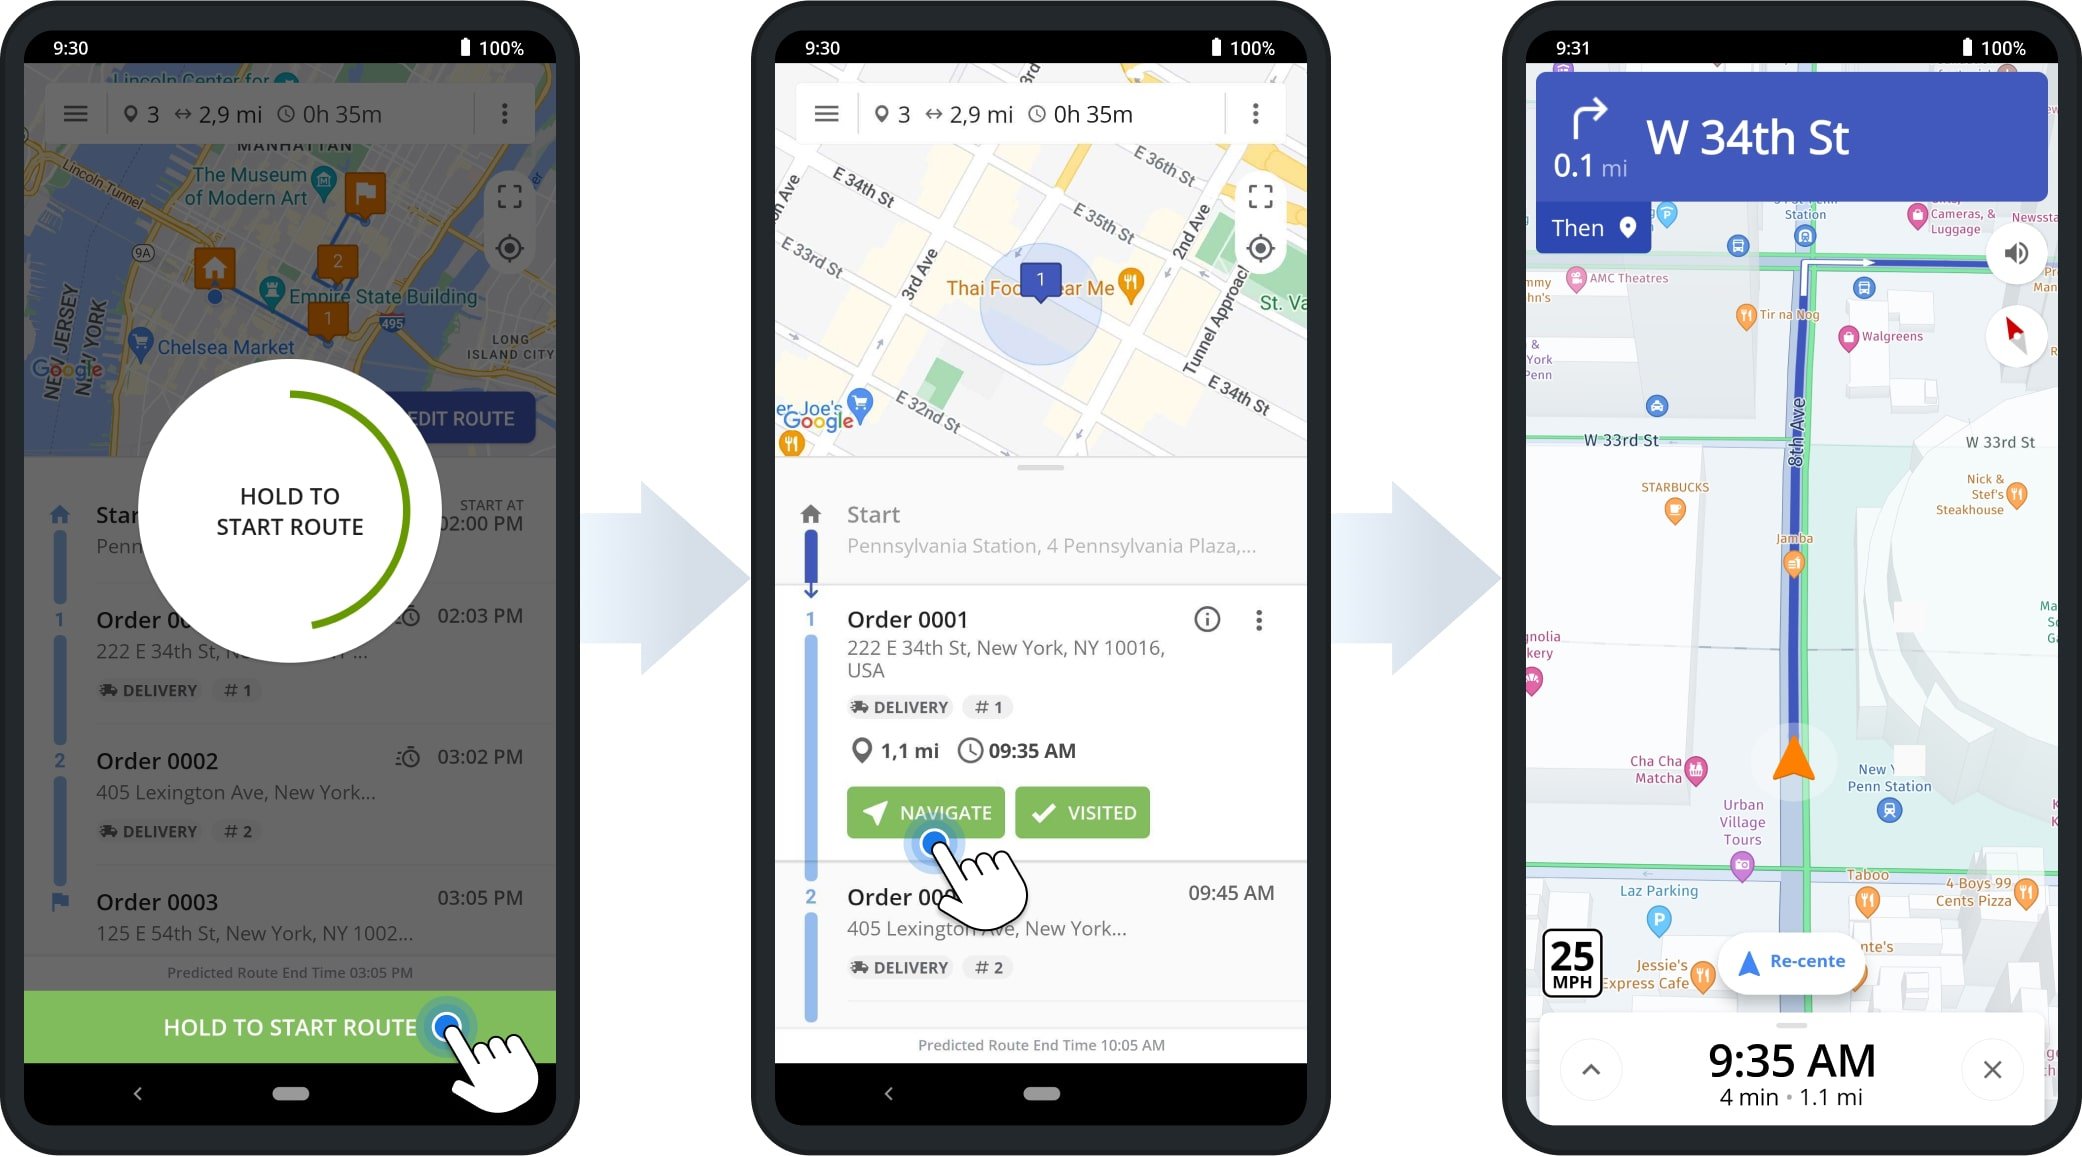
Once you’ve planned a route with multiple orders, you can seamlessly begin navigating to customer addresses and delivering orders. To do so, follow the steps below.
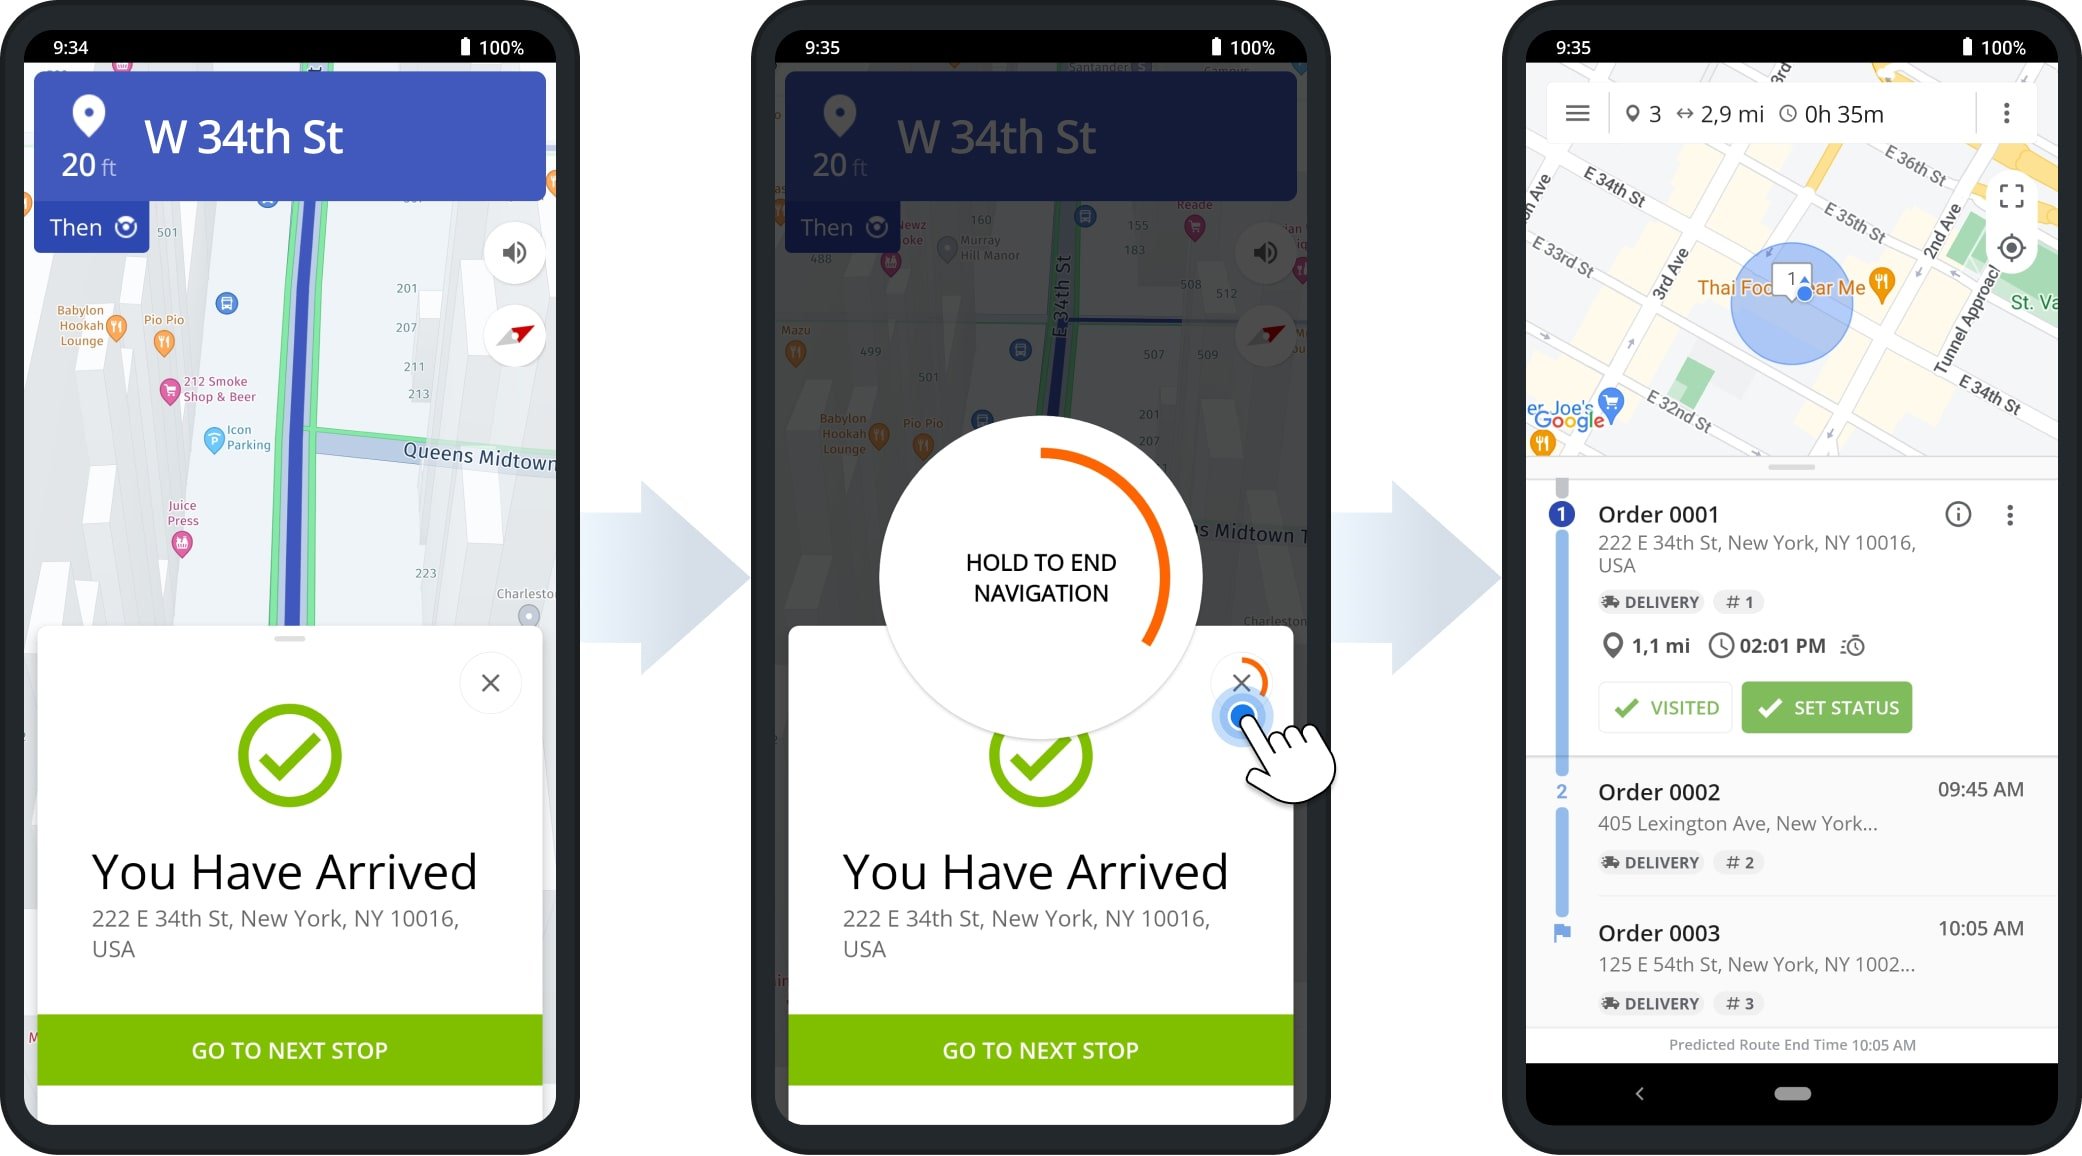
- Tap and hold “Hold To Start Route“.
- Tap on an order destination to select it and tap “Navigate” to open the in-app navigation.
- Follow the voice-guided navigation directions until you reach your destination.
The app will inform you when you’re getting close the destination address or the order.
When you arrive at the order destination, the app will notify you. Tap and hold the X Icon to exit navigation so you can start delivery of your accepted orders, complete mandatory delivery tasks, and collect proof of visit or delivery.
Collect Proof Of Delivery Or Visit To Complete Accepted Orders And Mark Orders As Delivered
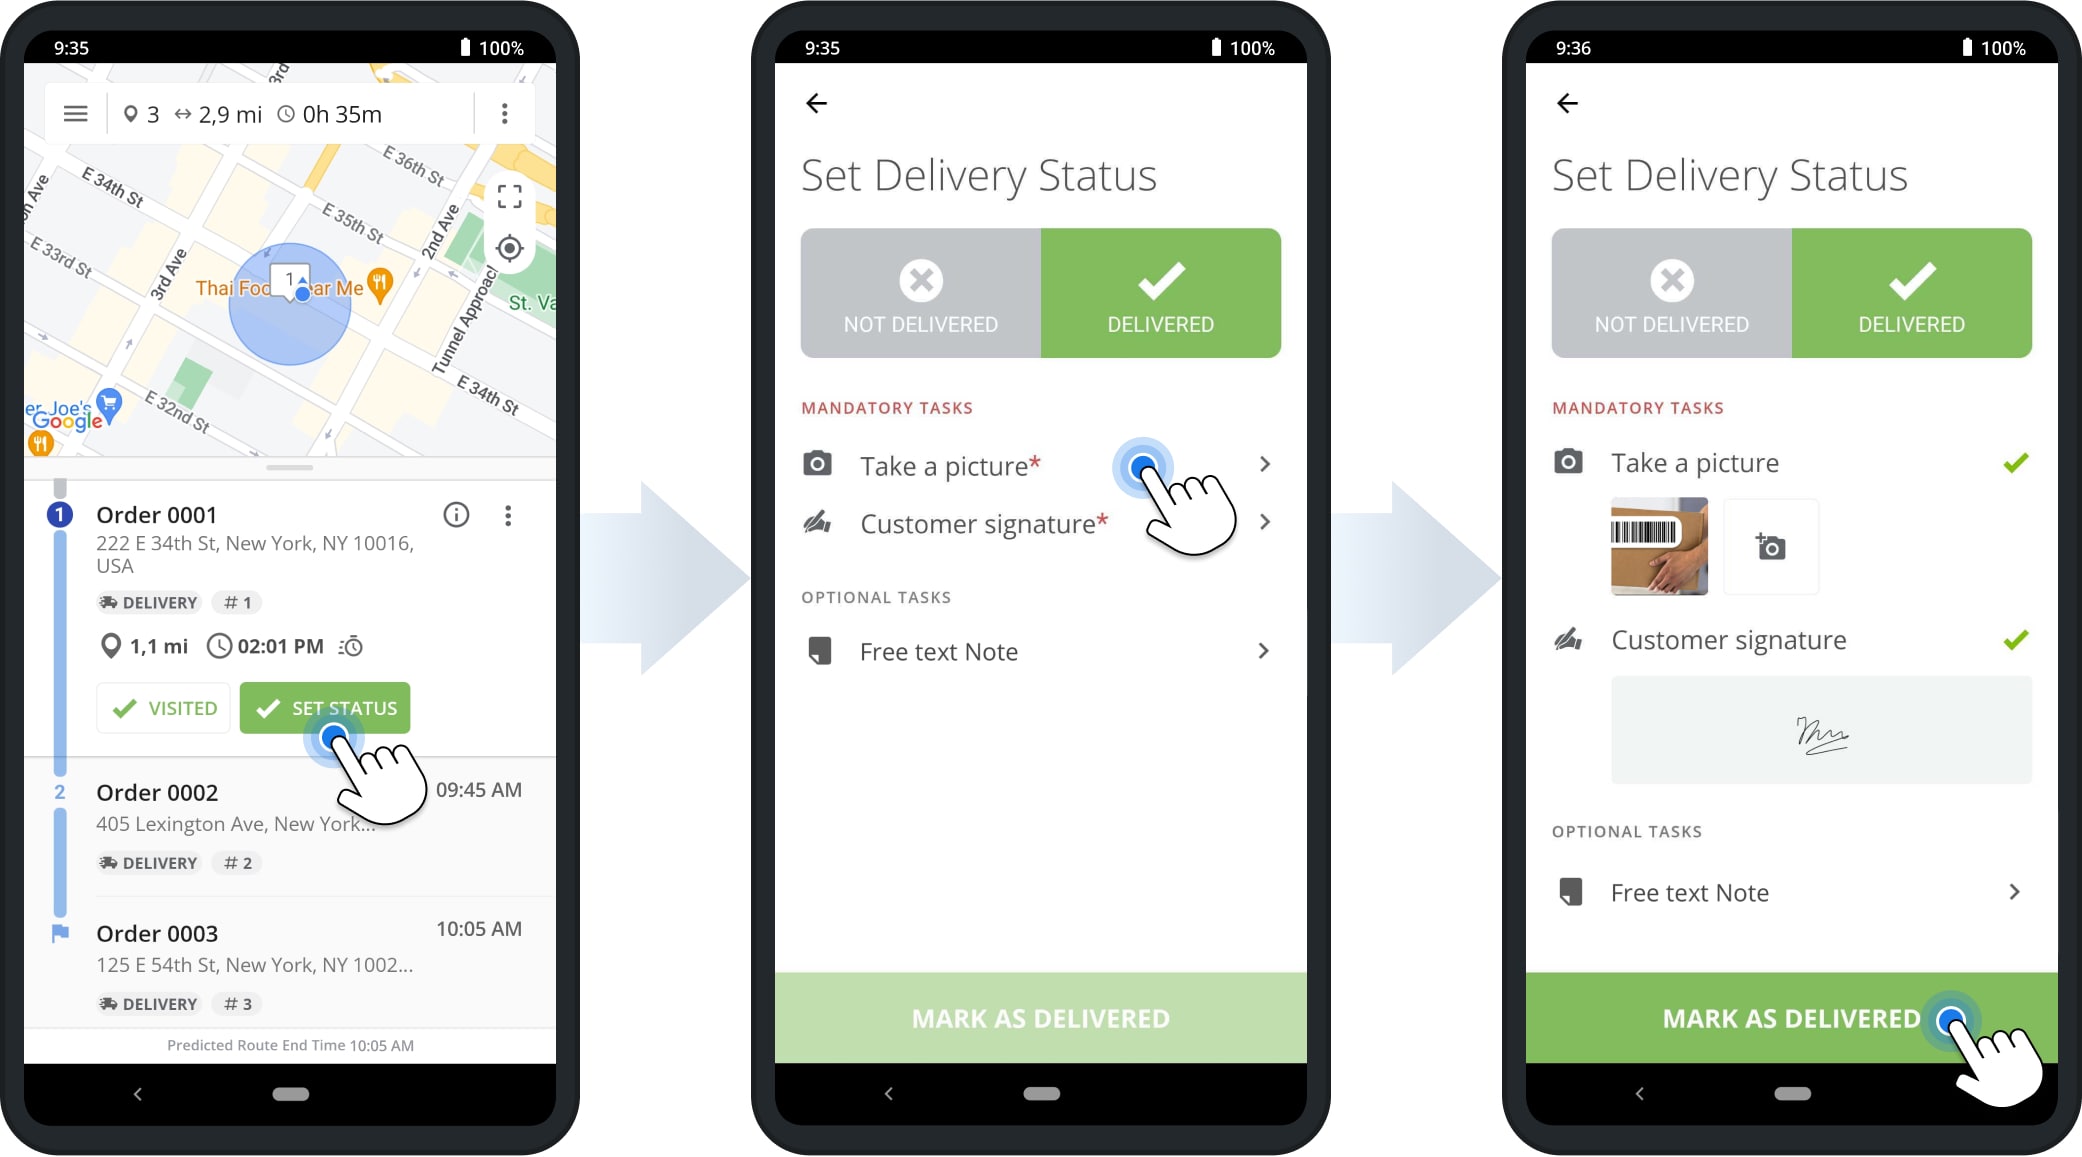
To start delivery of an order on your route after you’ve arrived at the corresponding customer address, follow these steps:
- Tap “Set Status” on the route destination.
- Tap and complete each of the tasks under “Mandatory Tasks“. The order can only be marked as delivered after all mandatory workflow tasks are completed.
- After completing all mandatory tasks and any preferred optional tasks, tap “Mark As Delivered” to complete the order.
Then, you can proceed to navigate to the remaining destinations on your final mile order route.
Failed Orders – Process Unsuccessful Orders And Failed Delivery Attempts
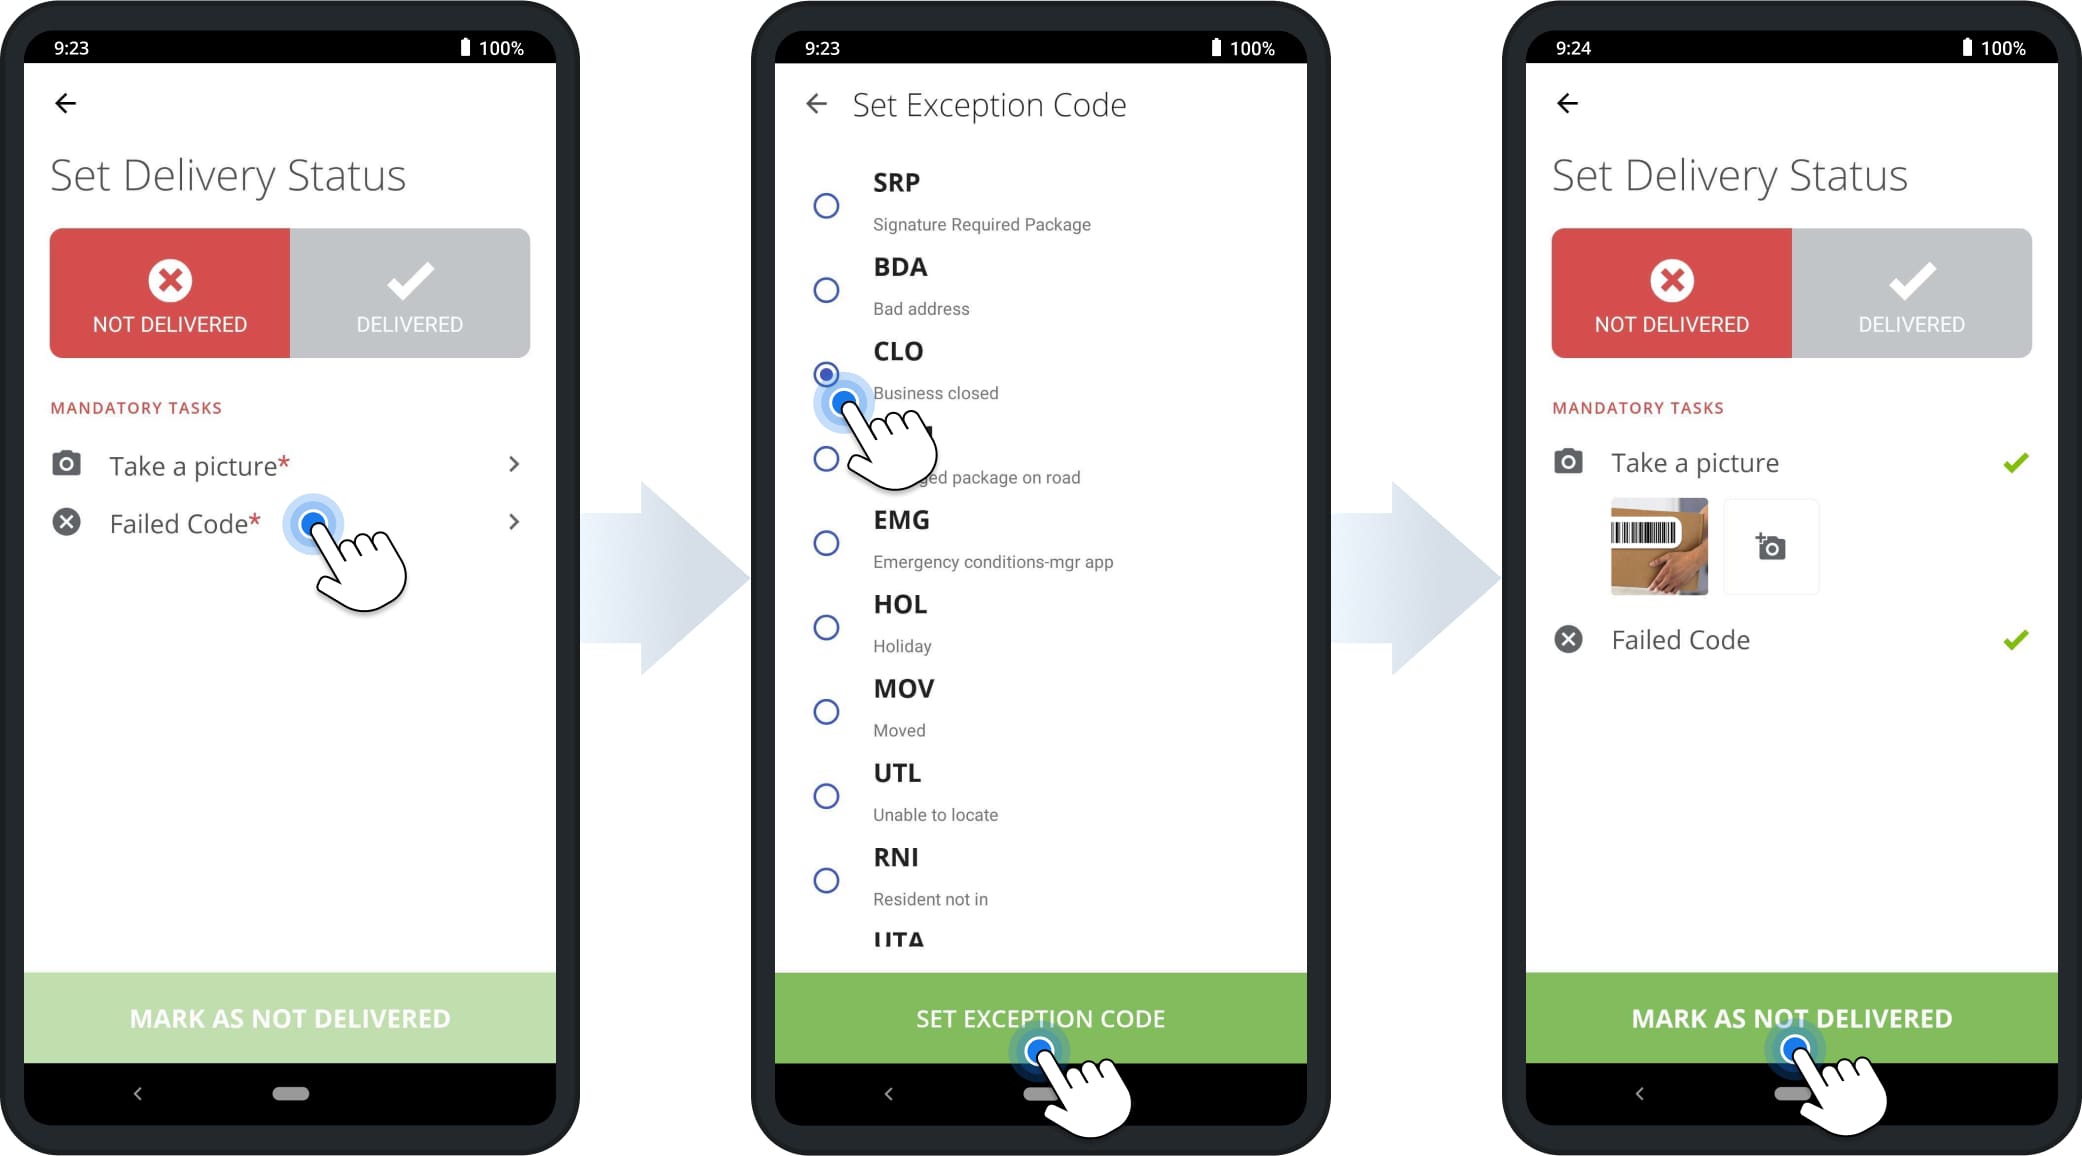
When it’s not possible to complete an order, you can seamlessly process failed orders similarly to delivering orders. To do so, open the order details of the order you attempted to deliver, tap “Not Delivered“, and follow the steps below:
- Tap and complete each of the tasks under “Mandatory Tasks“. The order can only be marked as failed after all mandatory workflow tasks are completed.
- If the workflow of the order you attempted to deliver includes the “Failed Code” mandatory task, select the code corresponding to the reason for unsuccessful delivery from the list and tap “Set Exception Code“.
- After completing all mandatory tasks and any preferred optional tasks, tap “Mark As Not Delivered” to mark the order as failed.
Unsuccessfully delivered orders will get the “Attempted” status and will only be visible when the “All Orders” filter is enabled.
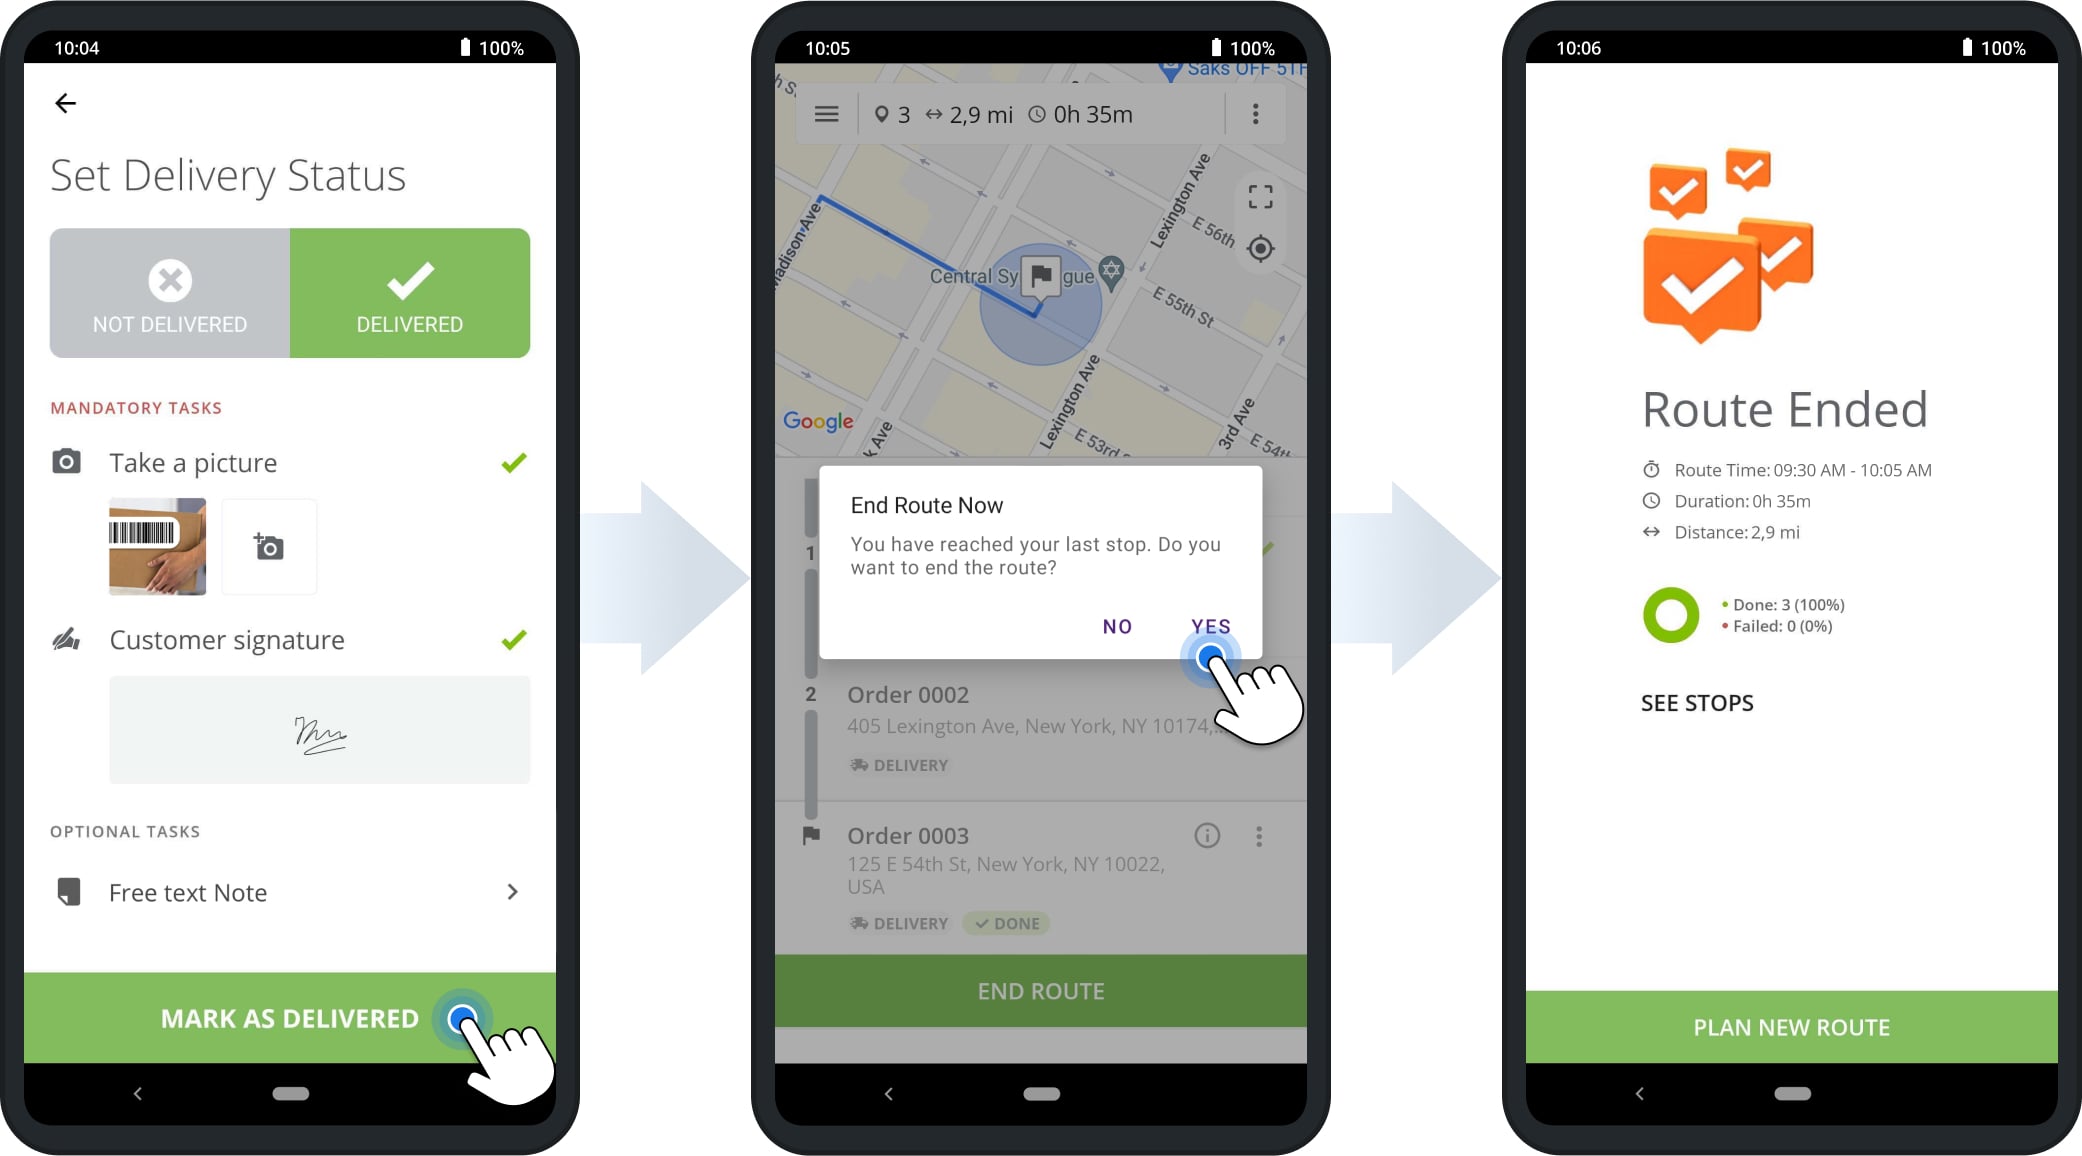
End Successfully Completed Delivery Routes On The Android And iPhone Driver App
When you visit the final destination on your delivery route and complete its respective mandatory tasks, the app will ask if you want to end the route. Unless otherwise required, tap “Yes” when prompted, and you’ll see the “Route Ended” screen with a summary of you successfully completed order delivery route.
