Custom Destination View Details – Add Custom Text To Mobile App Destination View
Enhance your routes by adding custom details to the destination view, helping drivers save time, boost efficiency, and improve safety in the field. This guide will walk you through the process of adding, customizing, and using custom destination view details to streamline your operations.
Table of Contents
Enable Additional Mobile App Destination Data Fields
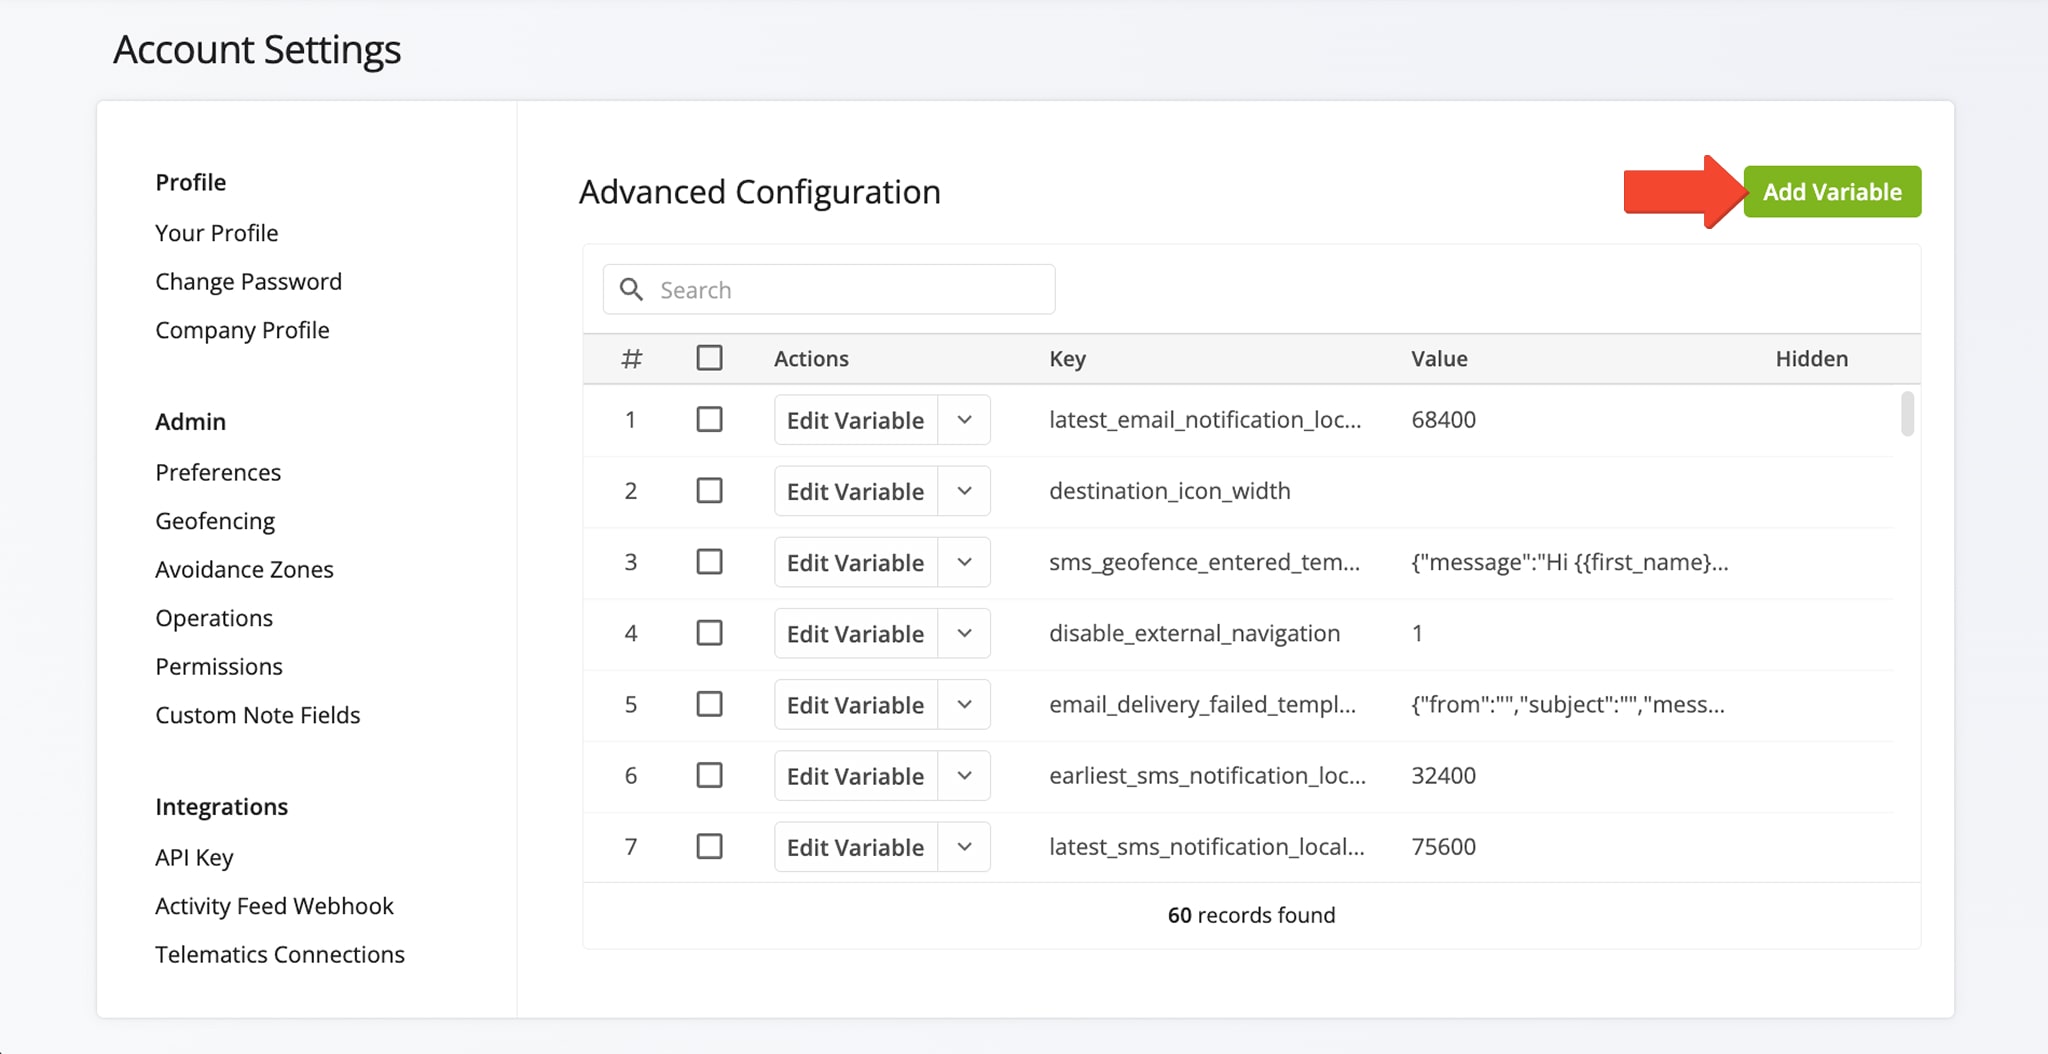
To show additional destination details on the Route screen in Route4Me’s mobile app, enable the respective Advanced Configurations. You can do so in the Advanced Configuration Editor. First, open the editor and click the “Add Variable” button.
Open Your Advanced Configuration Editor
Then, you can enter the advanced configurations described in the table below. Each configuration is explained in more detail further in this guide. NOTE: When you customize the destination view, your modifications apply to all destinations associated with your account and sub-accounts. For example, if you add “Order Number“, it will be displayed on all route destinations within your account and those of your sub-users. Learn more about Route4Me’s user types and account-level permissions.
| Configuration | Description |
|---|---|
| STOP_LIST_ITEM_VISIBLE_FIELD_IDS | Data field IDs of the fields you want to enable on the mobile app. |
| STOP_LIST_ITEM_VISIBLE_FIELD_NAMES | User-friendly names for the data fields you want to enable on the mobile app. Specifically, the enabled fields will be labeled according to the values added in this configuration. |
| STOP_LIST_ITEM_VISIBLE_CUSTOM_DATA_FIELD_IDS | Route4Me Custom Data fields you want to enable on the mobile app. |
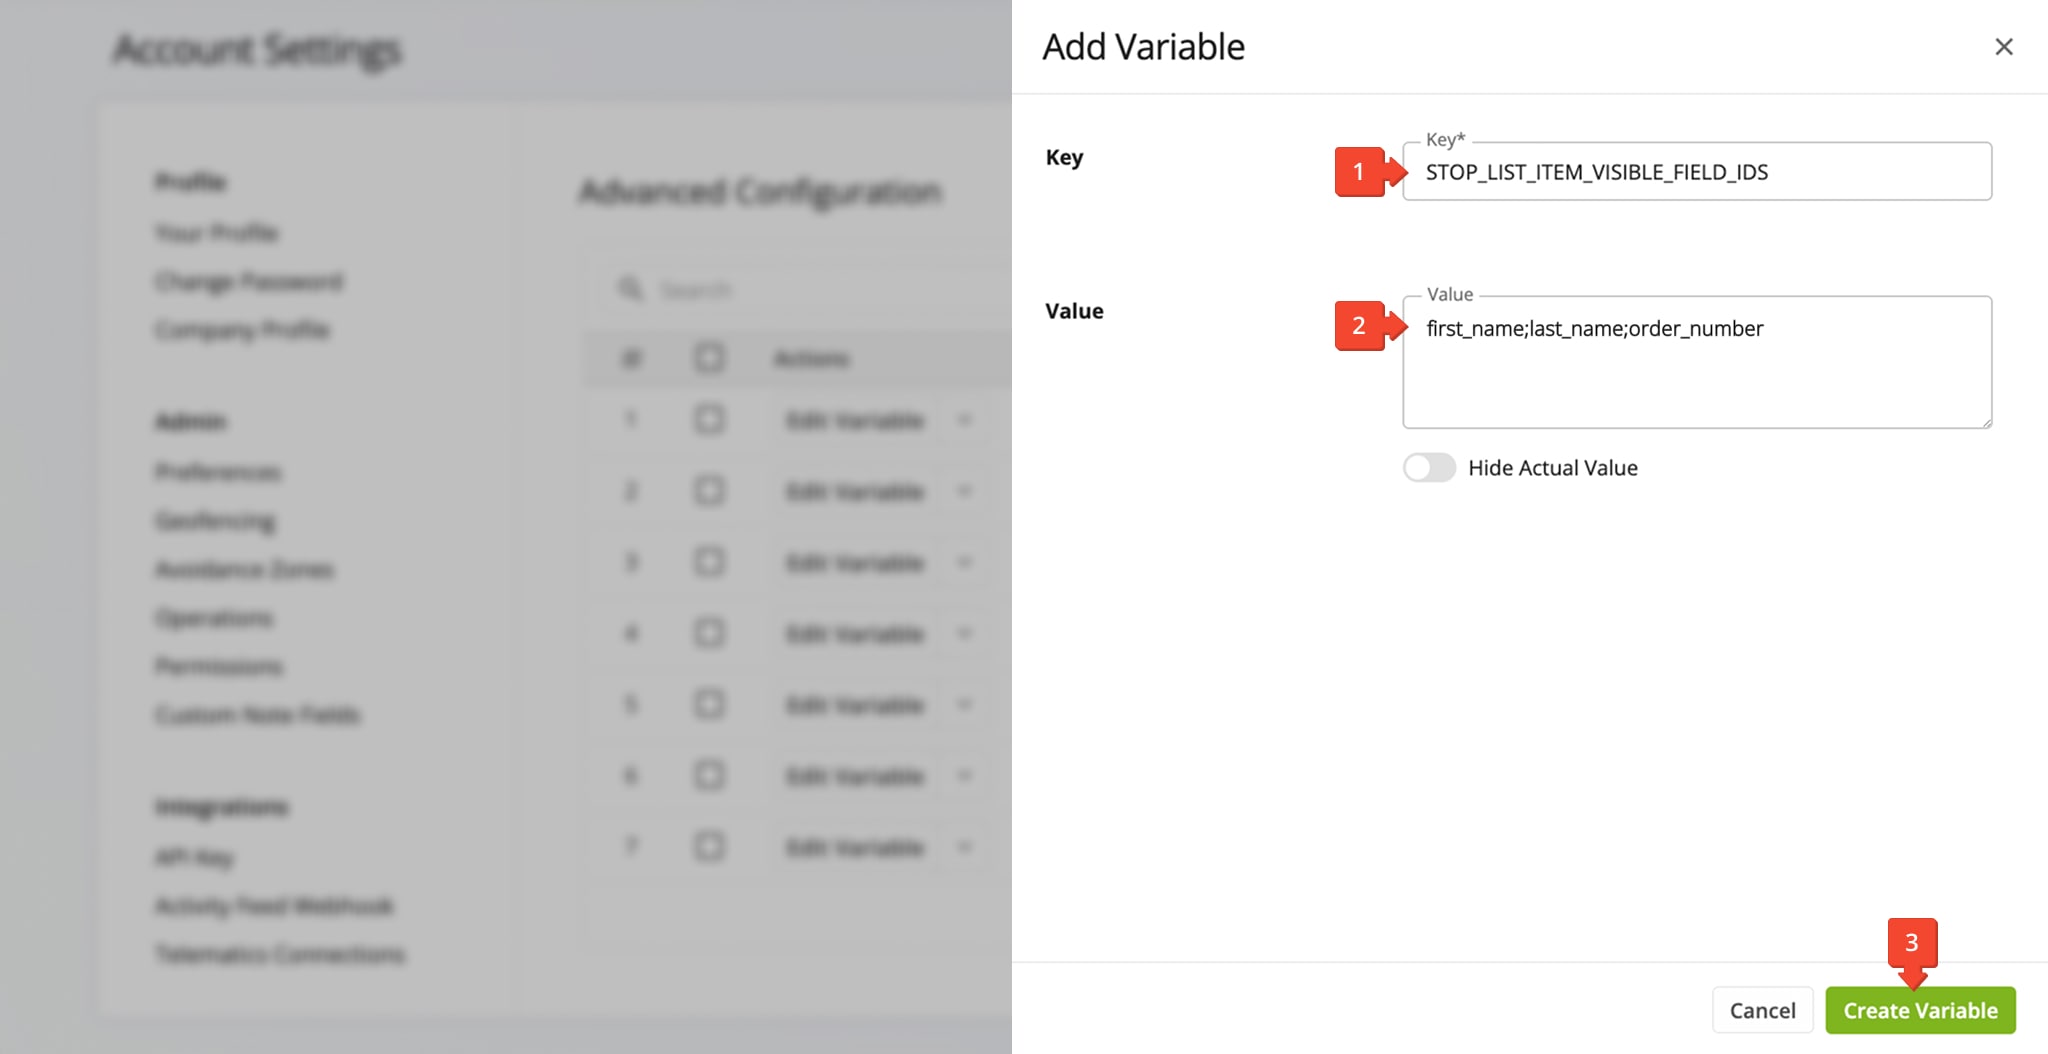
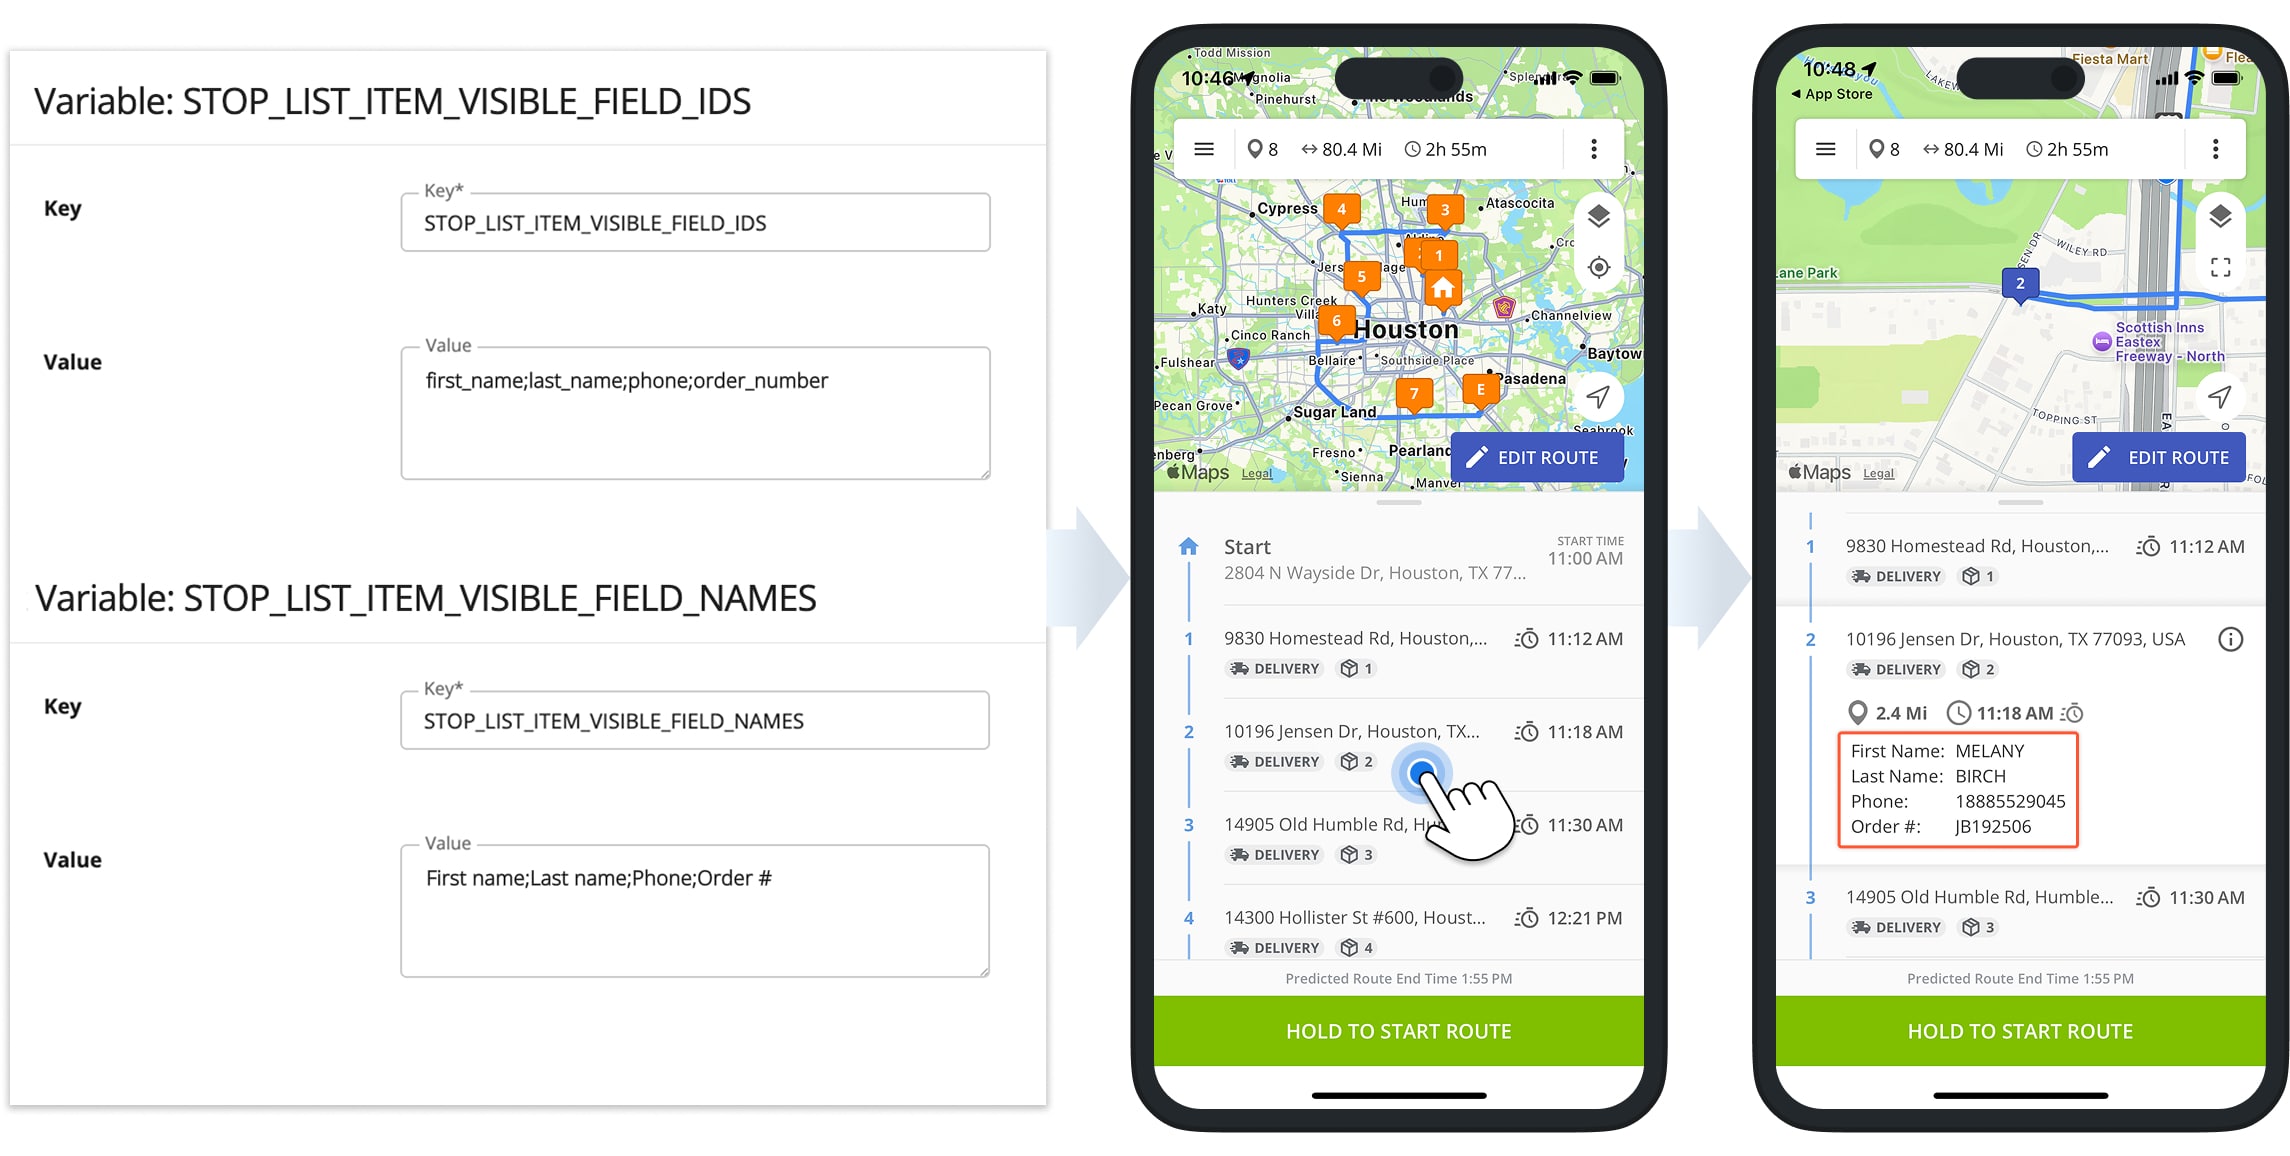
The “STOP_LIST_ITEM_VISIBLE_FIELD_IDS” configuration is used to enable specific Route4Me data fields on the mobile app Route screen. To enable this configuration and add data fields to the destination view, follow these easy steps:
- Enter “STOP_LIST_ITEM_VISIBLE_FIELD_IDS” in the “Key” field.
- Enter your preferred data field IDs in the “Value” field. You can use these separators to add more IDs: “;” “,” or “|“
- Click the “Create Variable” button to save your new advanced configuration.
You can find a list of available data fields further in this guide. Additionally, you can enable most destination data fields from your address upload spreadsheet. Learn more about Route4Me Spreadsheet Formatting.
The “STOP_LIST_ITEM_VISIBLE_FIELD_NAMES” configuration is for adding user-friendly names to your destination data fields. The steps to enable this configuration and add field names to the destination view are the same as those for adding field IDs.
- Enter “STOP_LIST_ITEM_VISIBLE_FIELD_NAMES” in the “Key” field.
- Enter your preferred data field names in the “Value” field. You can use these separators to add more IDs: “;” “,” or “|“
- Click the “Create Variable” button to save your new advanced configuration.
NOTE: Field Names should follow the same sequence as the Field IDs from the previous configuration. Ensure the sequence of names matches the sequence of IDs to avoid mismatched names and data. Additionally, if the number of IDs and names doesn’t match, no additional destination data will be shown on the Route screen of the mobile app.

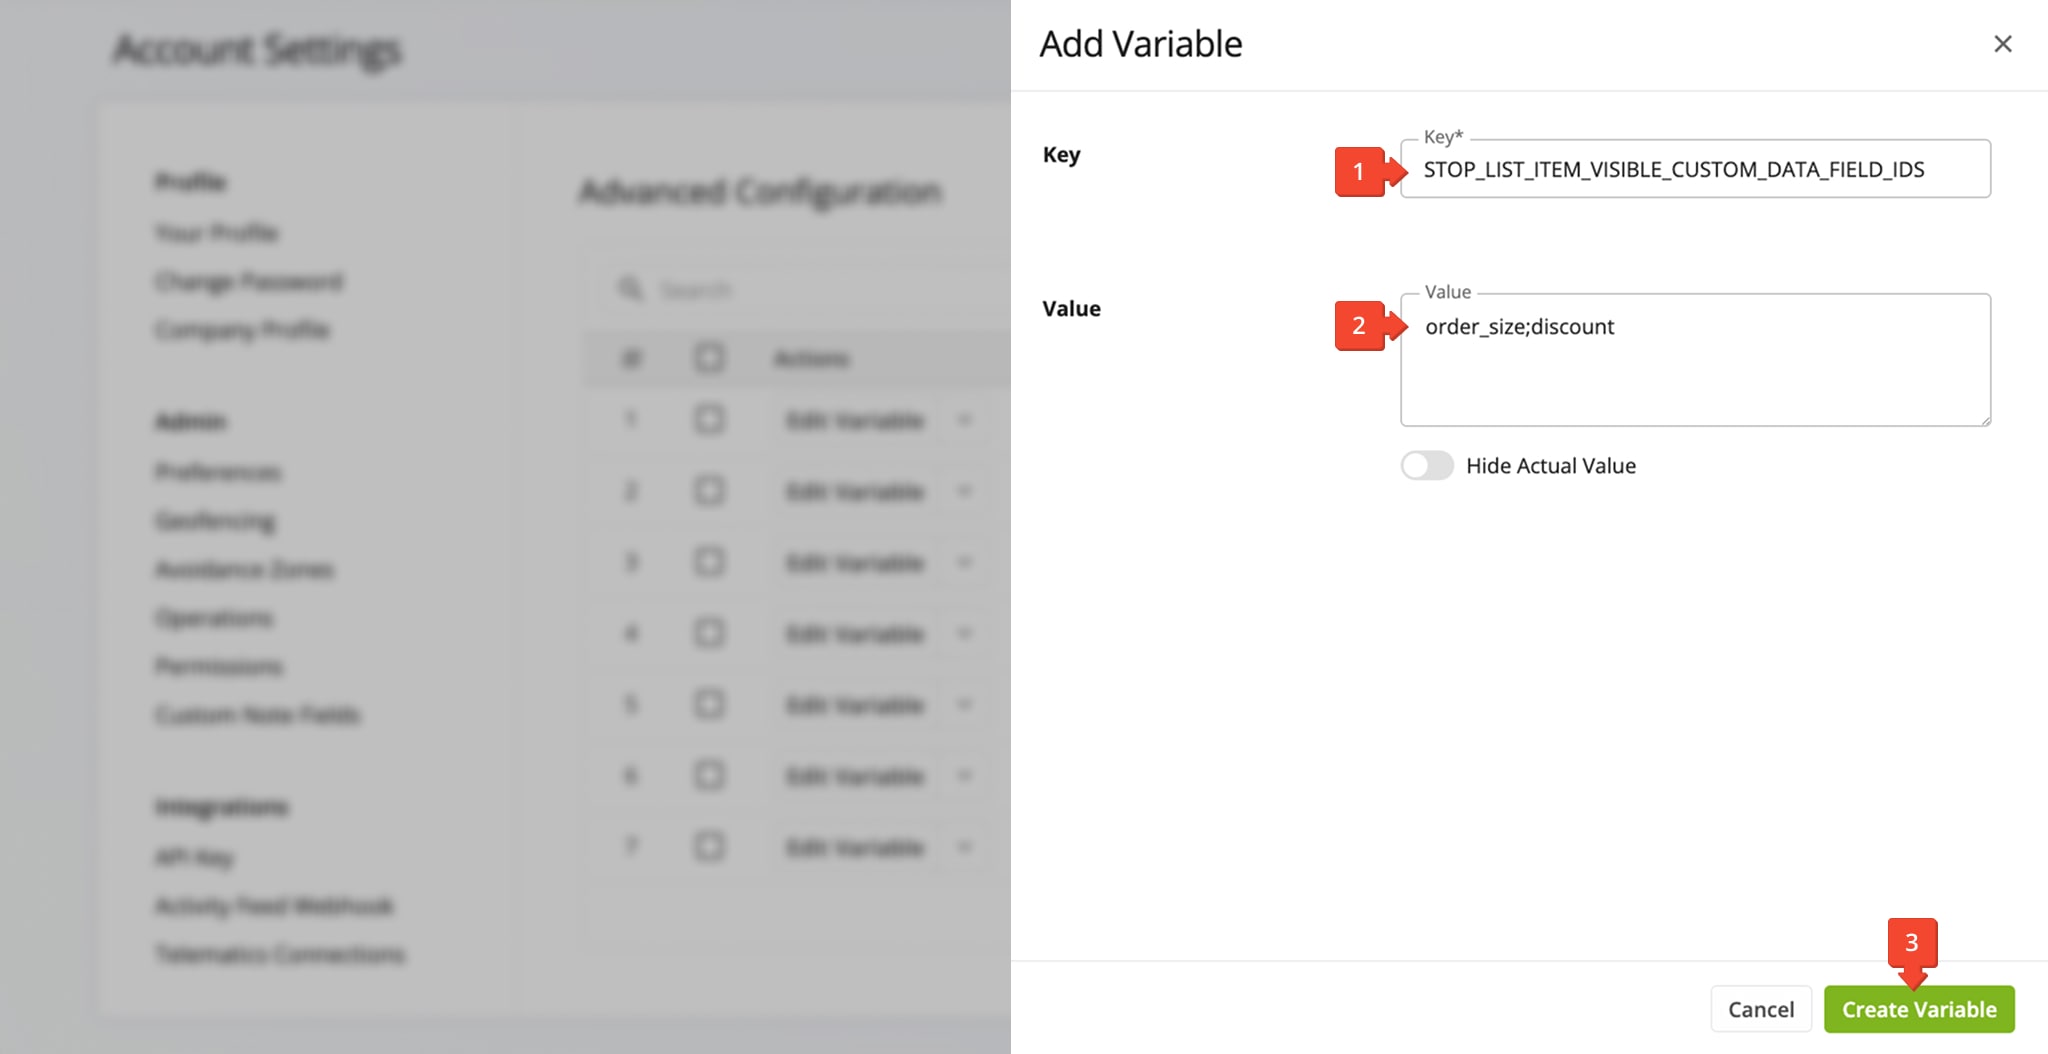
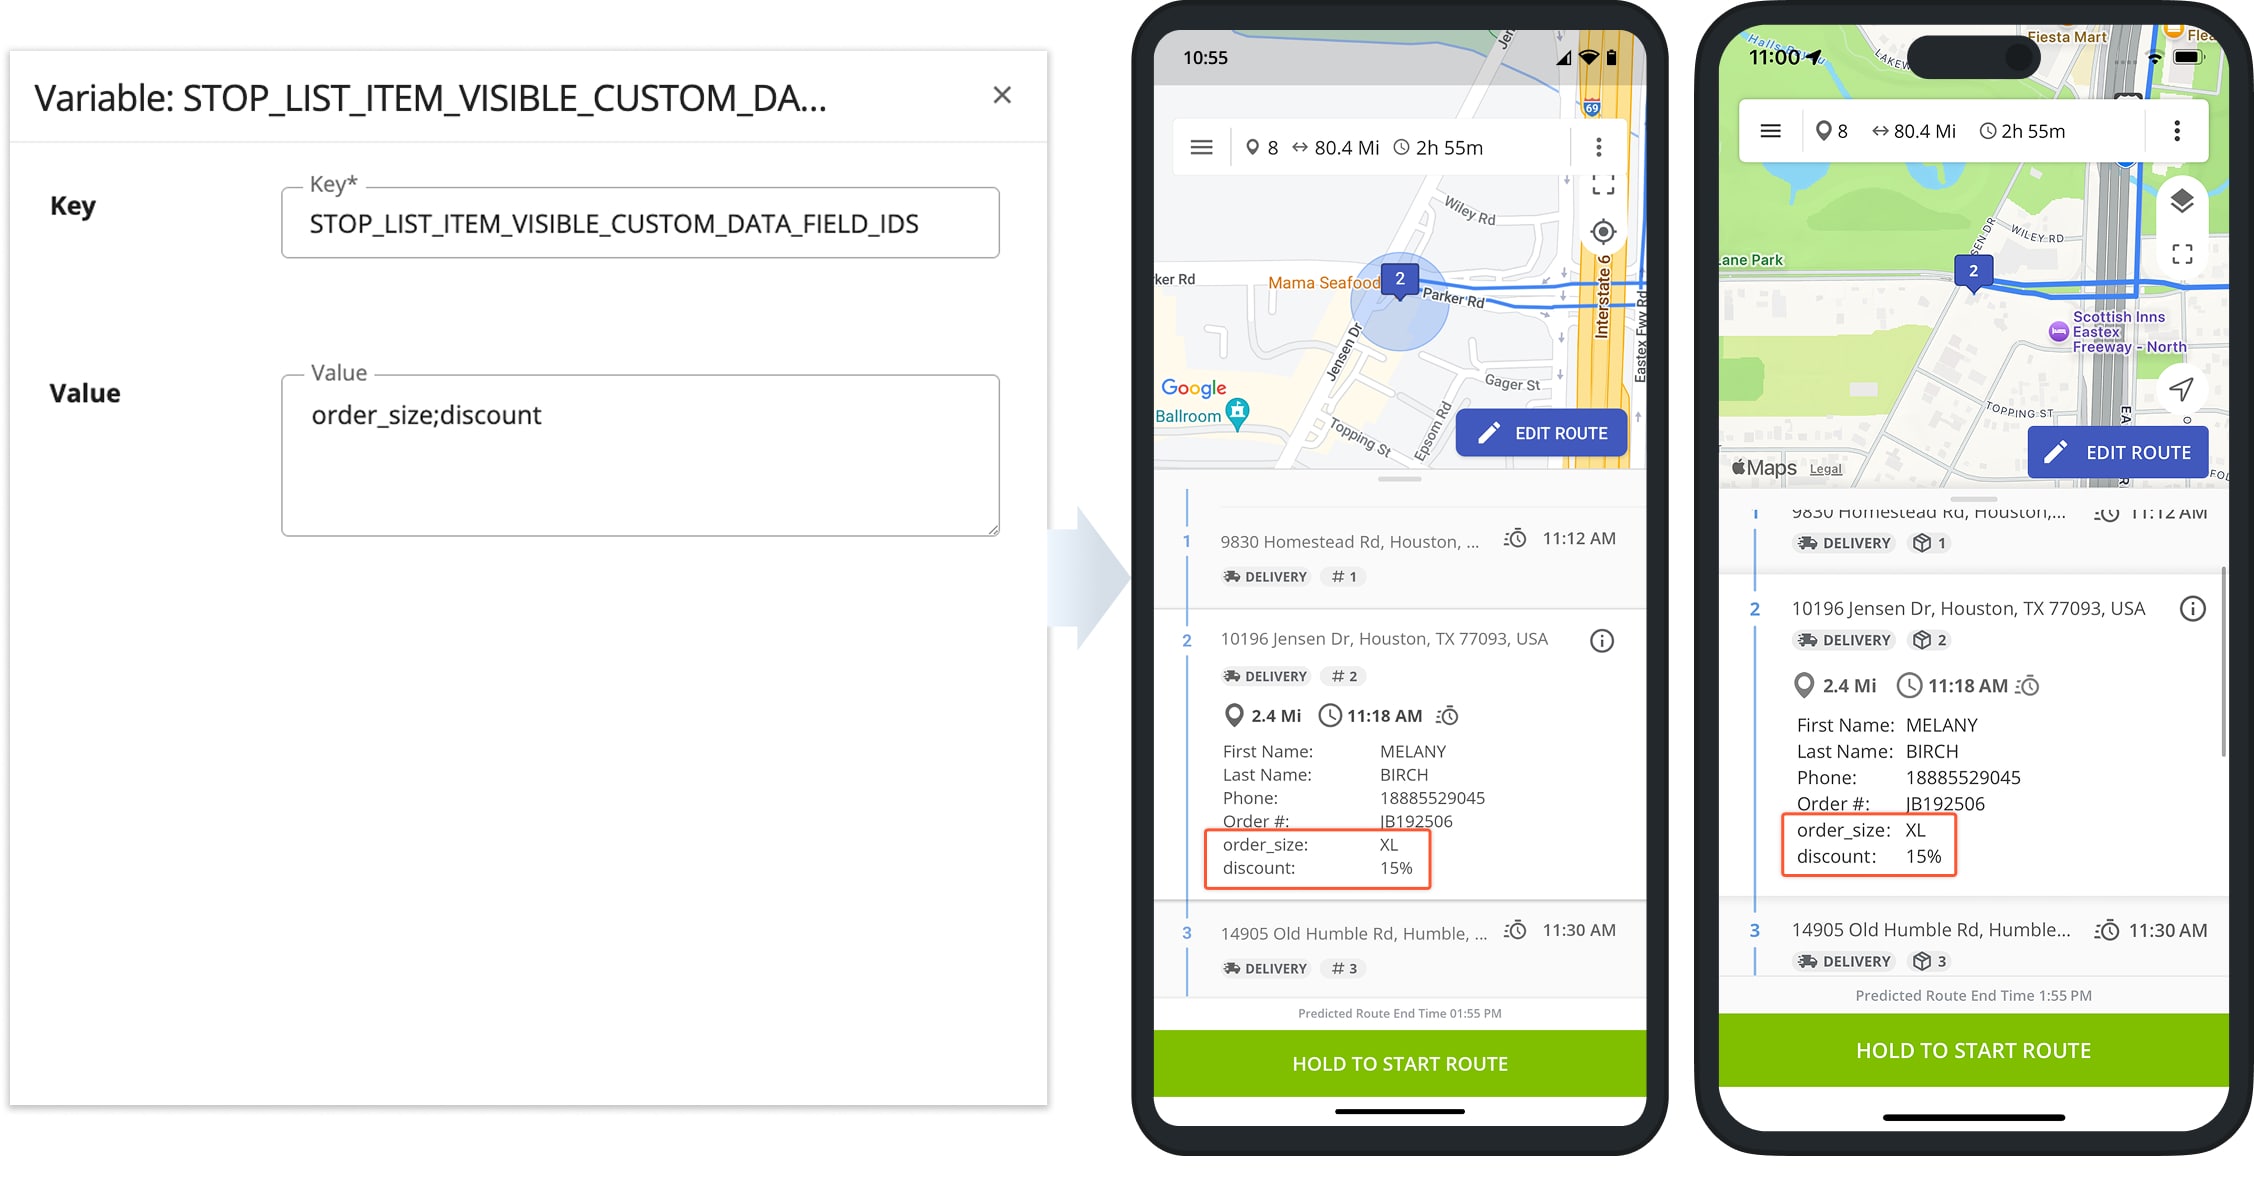
The “STOP_LIST_ITEM_VISIBLE_CUSTOM_DATA_FIELD_IDS” configuration enables you to add Custom Data fields to the destination view on the mobile app. The steps are the same as described above for regular data fields.
- Enter “STOP_LIST_ITEM_VISIBLE_CUSTOM_DATA_FIELD_IDS” in the “Key” field.
- Enter your preferred Custom Data fields in the “Value” field. You can use these separators to add more IDs: “;” “,” or “|“
- Click the “Create Variable” button to save your new advanced configuration.
NOTE: Custom Data Fields are labeled the same as their IDs. If you add names for custom fields in the “STOP_LIST_ITEM_VISIBLE_FIELD_NAMES” configuration, the number or sequence of names and IDs from the “STOP_LIST_ITEM_VISIBLE_FIELD_IDS” configuration will no longer match, and no data will be shown in the destination view.
Mobile App Examples – Custom Destination View Fields In Route4Me Mobile App
Once you’ve added your preferred destination details to the Advanced Configurations described above, they become instantly available in Route4Me’s Mobile Route App. The assigned User simply needs to tap a destination with the corresponding details, and they will be instantly visible directly on the Route screen.
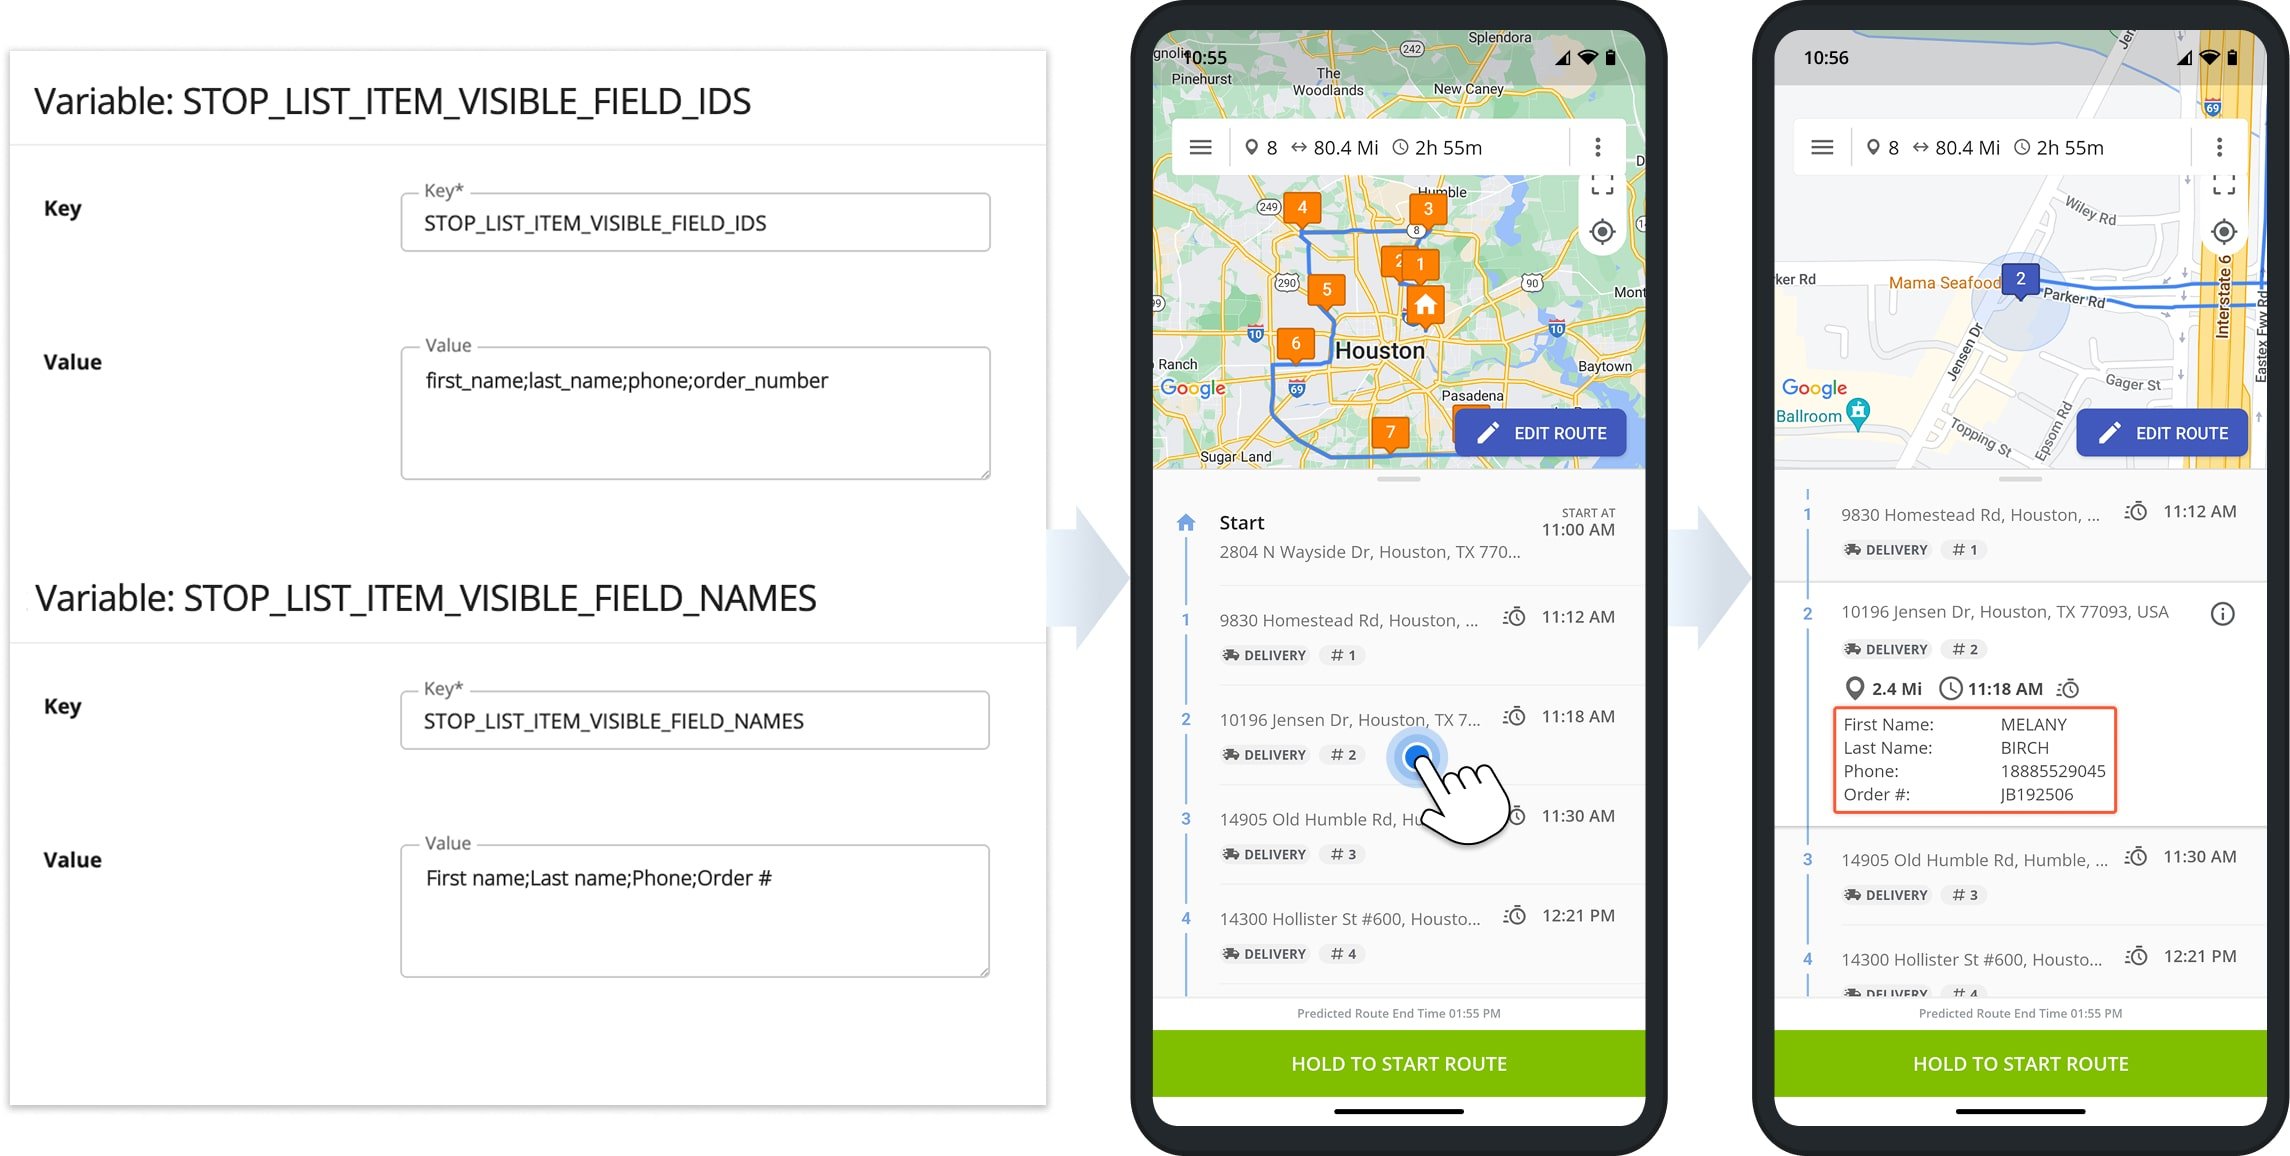
No additional action is required from you or the assigned User. Furthermore, custom destination view details are supported on both the Route4Me Android Route Navigation App and iPhone Route Planner App.
If you’ve enabled Custom Data Fields in the destination view, they will appear beneath any enabled destination details. As described above, destination view details are identical regardless of the device or operating system.
Supported Data Fields – Available Mobile App Destination View Details
In the table below, you can find a list of available details you can add to your destination view:
- Field Name: The custom name of the field displayed on the destination view. You can customize this name to suit your preferences. Note that this field will display data corresponding to its respective Field ID.
- Field ID: The unique identifier (ID) that retrieves data for the corresponding field in the destination’s details. This ID is added to the respective configuration using the Advanced Configuration Editor, as shown above in this guide.
- Description: Explanation of the data returned by the respective Field ID.
| Field Name | Field ID | Description | |
|---|---|---|---|
| Destination Details | |||
| Destination Alias | alias | Сustom alias or name of the route stop (address). You can assign aliases to route stops (addresses) for faster and easier route searches or other operating requirements. | |
| Destination Type | address_stop_type | The type of the stop or address from the available address types. Specifically, Pickup, Delivery, Break, Meetup, Service or Visit. | |
| Customer Details | |||
| First Name | first_name | First name of the expected contact person at the receiving stop or address. | |
| Last Name | last_name | Last name of the expected contact person at the receiving stop or address. | |
| Email address of the contact person for the receiving route stop or address. | |||
| Phone Number | phone | Phone number of the contact person for the receiving route stop or address. | |
| Order Details | |||
| Order Number | order_no | The number of the order associated with the stop or address. | |
| Invoice Number | invoice_no | Custom number of the invoice associated with the stop or address. | |
| Reference Number | reference_no | Custom reference number of the stop or address on the route. Useful for identifying individual stops. | |
| Weight Value | weight | Total weight capacity of a vehicle upon visiting a stop or address. Positive Weight values indicate the amount of loaded weight on the vehicle, while negative weight values indicate the total reserved weight capacity on the vehicle. | |
| Cost Value | cost | Cost of the order associated with the stop or address. | |
| Revenue Value | revenue | Revenue generated from servicing the stop or address. | |
| Cube Value | cube | Total cubical volume that is picked up or dropped off at the stop or address. | |
| Pieces Value | pieces | Total number of pieces or deliveries that are picked up or dropped off at the stop or address. | |
| Tracking Number | tracking_number | Tracking number associated with the stop, address, or respective delivery. | |
| Time Details | |||
| Service Time | time | Service Time (integer minutes or HH:MM:SS) required to service the route stop or address. | |
| Time Window Start | time_window_start | Start time of the Time Window (working hours) when the route stop can be visited and serviced (Day 1, + HH:MM:SS or military time. For example: “Day 1, 9:00 AM”). Learn more about Route4Me’s Time Windows Route Optimization Constraint. | |
| Time Window End | time_window_end | End time of the Time Window (working hours) when the route stop can be visited and serviced (Day 1, + HH:MM:SS or military time. For example: “Day 1, 5:00 PM”). | |
| Time Window Start 2 | time_window_start_2 | Start time of the Second Time Window (working hours) when the route stop can be visited and serviced (Day 2, + HH:MM:SS or military time. For example: “Day 2, 9:00 AM”). | |
| Time Window End 2 | time_window_end_2 | End time of the Second Time Window (working hours) when the route stop can be visited and serviced (Day 2, + HH:MM:SS or military time. For example: “Day 2, 5:00 PM”). | |
| Planned Arrival Time | projected_arrival_time_ts | Estimated arrival time when a driver will arrive at the stop or address. The arrival time is calculated based on the route start time, the travel time to the next stop, the wait time (if applicable) to the next stop, and the service time at each stop. | |
| Planned Departure Time | projected_departure_time_ts | Estimated departure time when the driver will depart from the stop or address. The departure time is calculated based on the route start time, the travel time to the next stop, the wait time (if applicable) to the next stop, and the service time at each stop. | |
| Predicted Arrival Time | estimated_arrival_time_ts | When a driver arrives at the stop or address earlier or later, the Predicted Arrival Time of all remaining stops on the route will be affected. | |
| Predicted Departure Time | estimated_departure_time_ts | When a driver departs from the stop or address earlier or later, the Predicted_Departure_Time of all remaining stops on the route will be affected. The Predicted Departure Time constantly changes to accurately reflect when a driver will depart to the next stop or address on the route. | |
Visit Route4Me's Marketplace to Check out Add-Ons for Your Account:
- Operations
Custom Data Add-On
- Operations
Advanced Team Management Add-On
- Operations
Audit Logging and Activity Stream
About author: Kristian Andreev
Kristian is a Technical Writer at Route4Me. With over a decade of experience in writing and localization, he's an expert at communicating complex technical data in a clear, concise, and user-friendly way. Passionate about bridging the gap between engineers and users, he specializes in creating documentation to streamline onboarding, enhance product usability, and support global teams on the path to success.