Territory Routing And Territory Management – Address Book Map Territories Guide
Route4Me’s dynamic routing software lets you create map Territories with customer addresses, depots, commercial facilities, warehouses, and other real-world locations from your synchronized Address Book. Territories help you create multi-destination routes, assign tasks to field team members, and save fuel, time, and money. For businesses offering multiple services requiring different employee skills or equipment, you can create separate Territories to maximize fleet resources using our enterprise route dispatch software. Learn how to create and manage Territories, plan Territory Routes, and optimize operations.
Table of Contents
Create Territories – Custom Shaped Territories On Address Book Map
A Route4Me Territory is a geographical area on the map that is defined by its custom-shaped borders. You can create Territories by simply drawing them on the map. Accordingly, if the addresses of customers or orders are located within a specific Territory, they’re automatically associated with that Territory.
Open YourAddress Book Territories Map
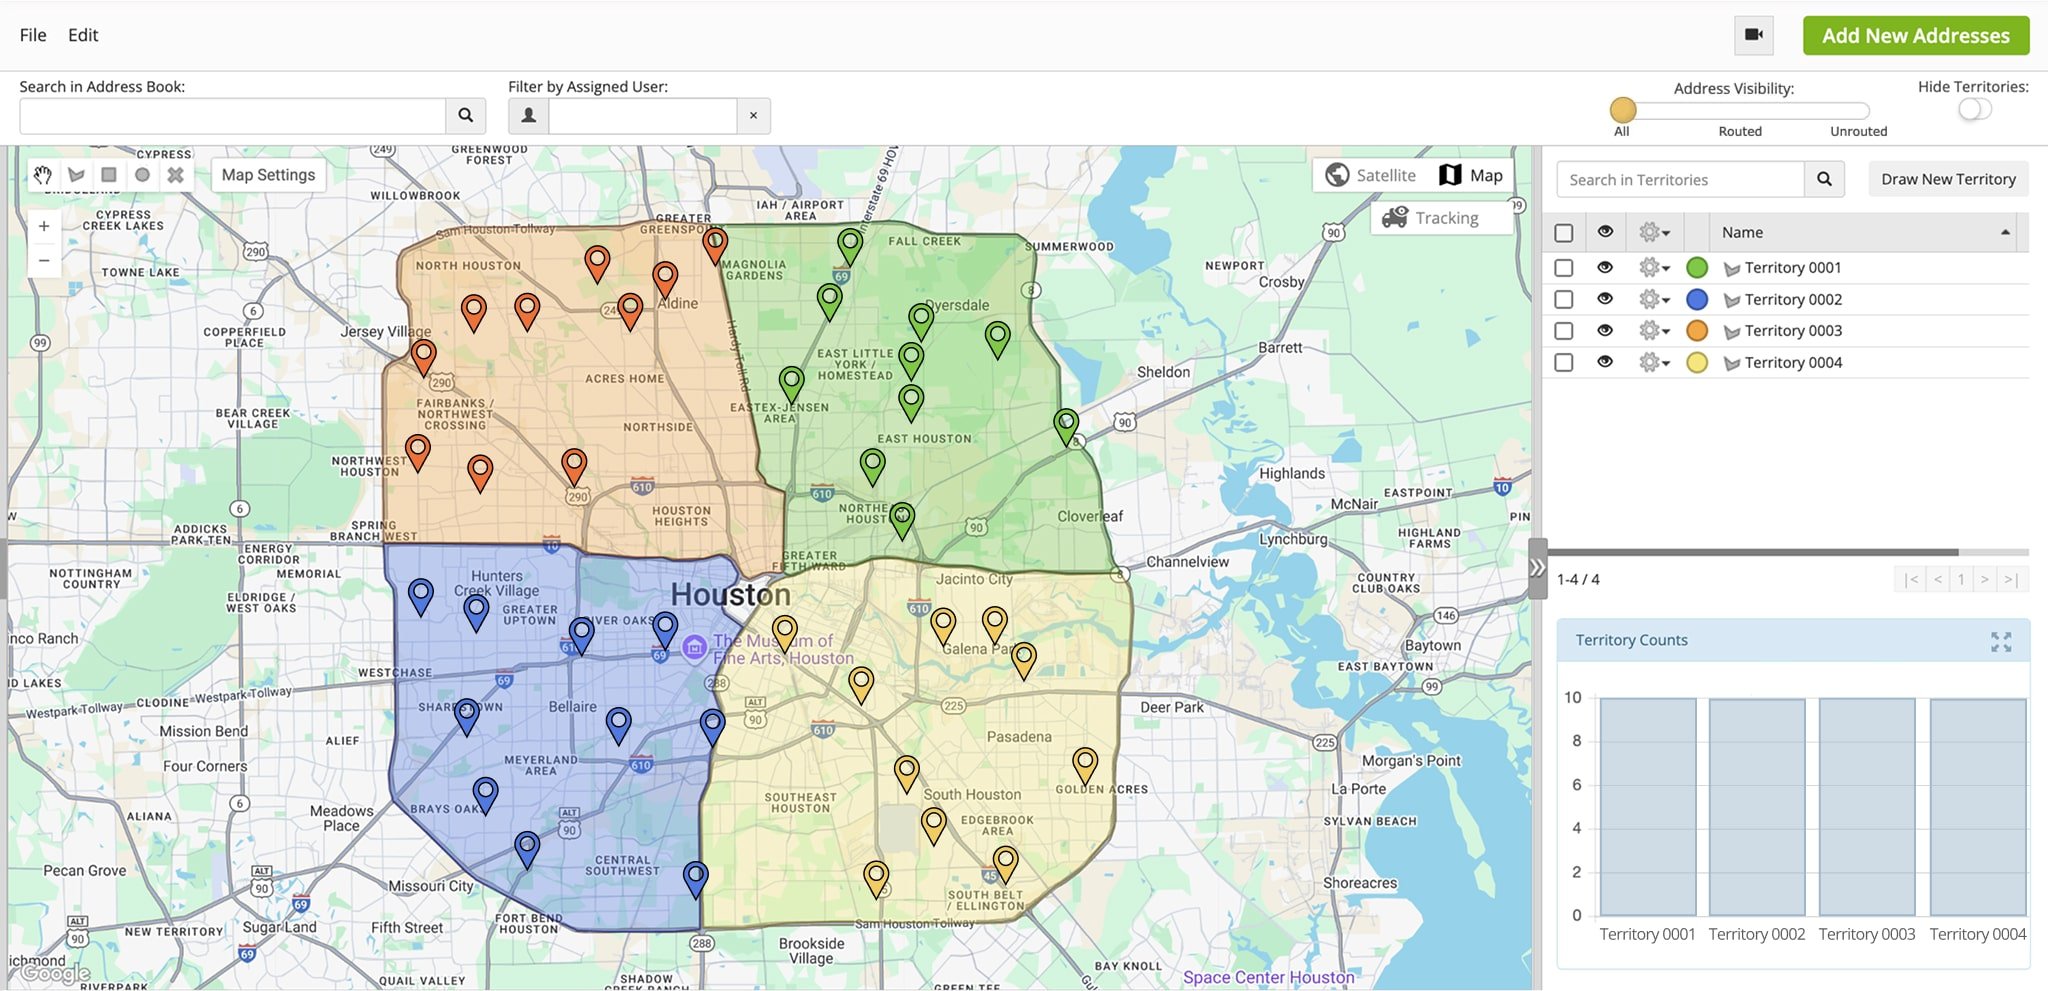
To create Territories on the Address Book Map, follow these easy steps:
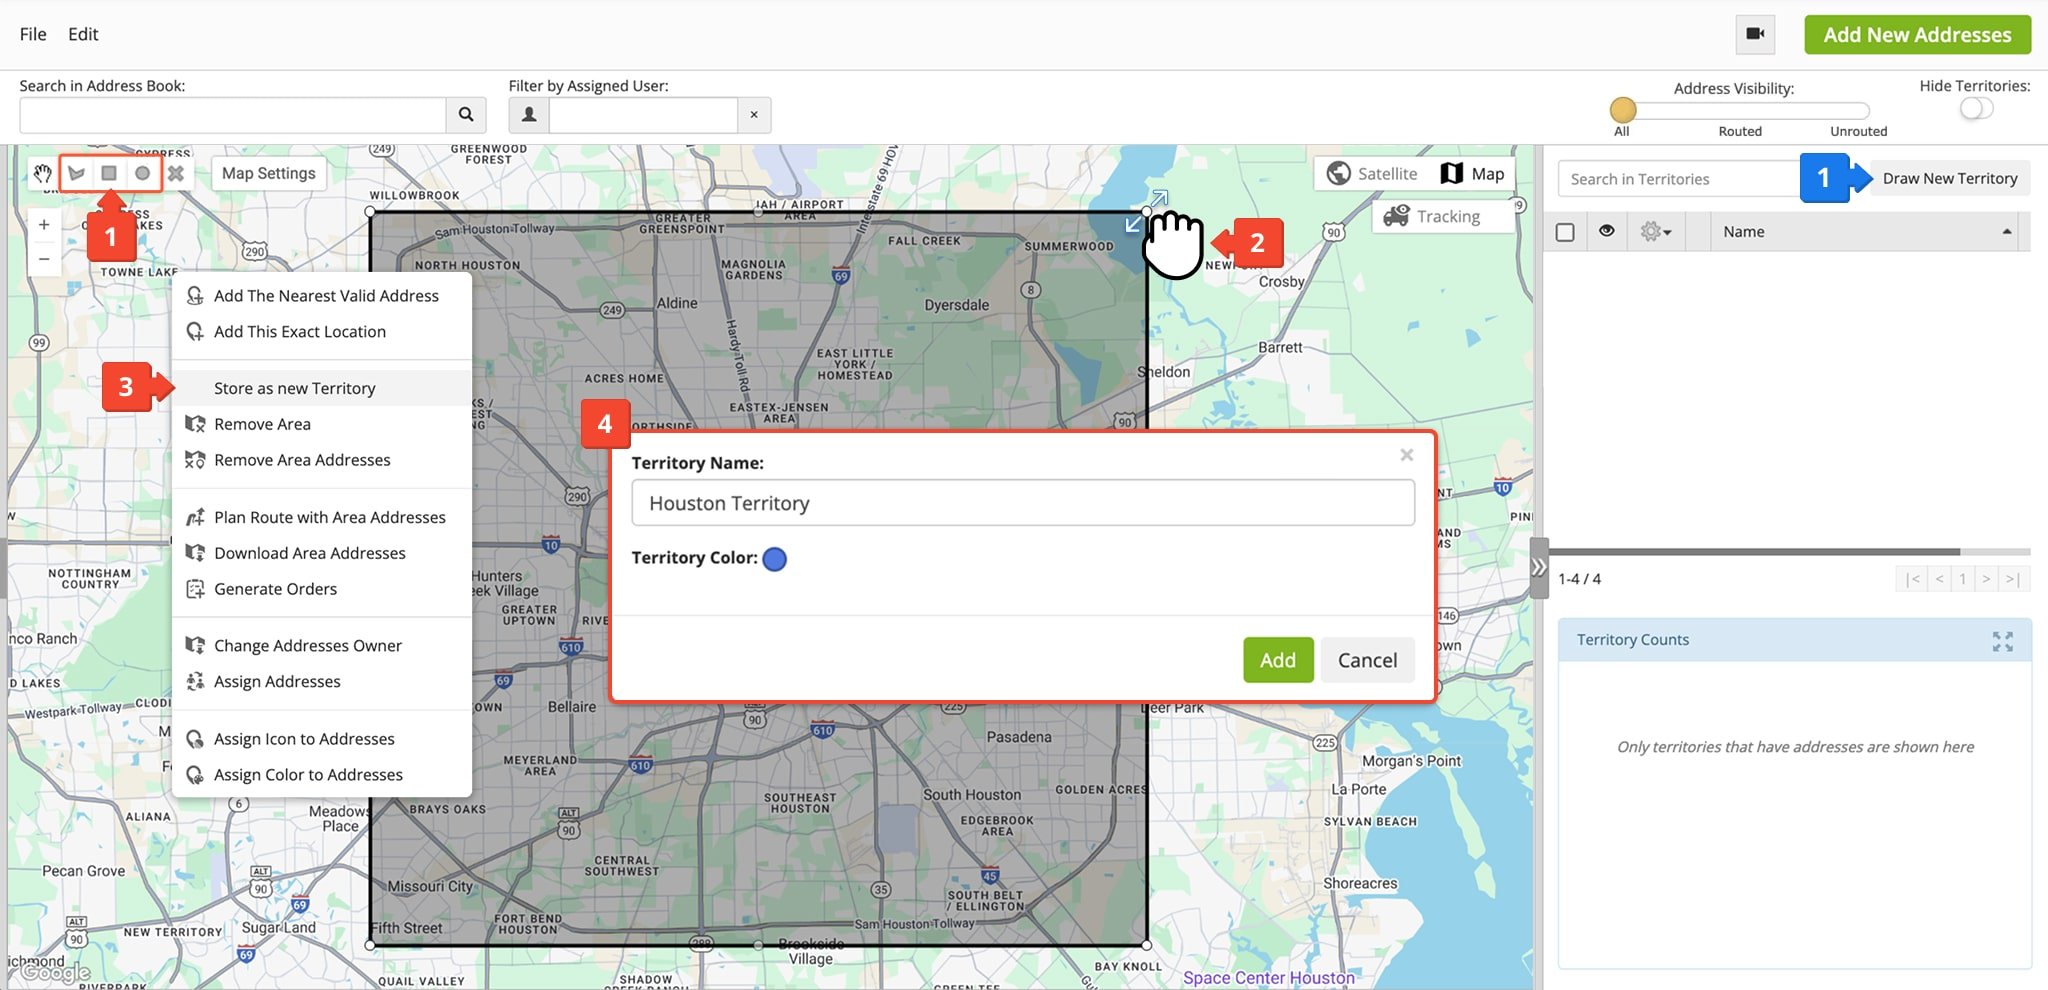
- Click one of the Draw Area buttons (Polygon, Rectangle, Circle) in the top-left. Alternatively, click the “Draw New Territory” button in the Territory Panel on the right.
- Click and drag to draw a circle or rectangle, or click to add points to a polygon.
NOTE: To move the area, click the Hand Button in the top-left. To delete the area, click the X Button in the top-left. - Once you’ve drawn your preferred Territory shape on the map, right-click inside the area and select “Store as new Territory” from the menu.
- Enter a unique name in the “Territory Name” field and select a color by clicking the circle next to “Territory Color“. When done, click the “Add” button to create your new territory.
All order and customer addresses located within the newly created Territory will be associated with it and can be used for planning territory routes right away. Learn how to plan Territory Routes further in this guide. NOTE: To plan order territory routes, orders need to have the appropriate order status.
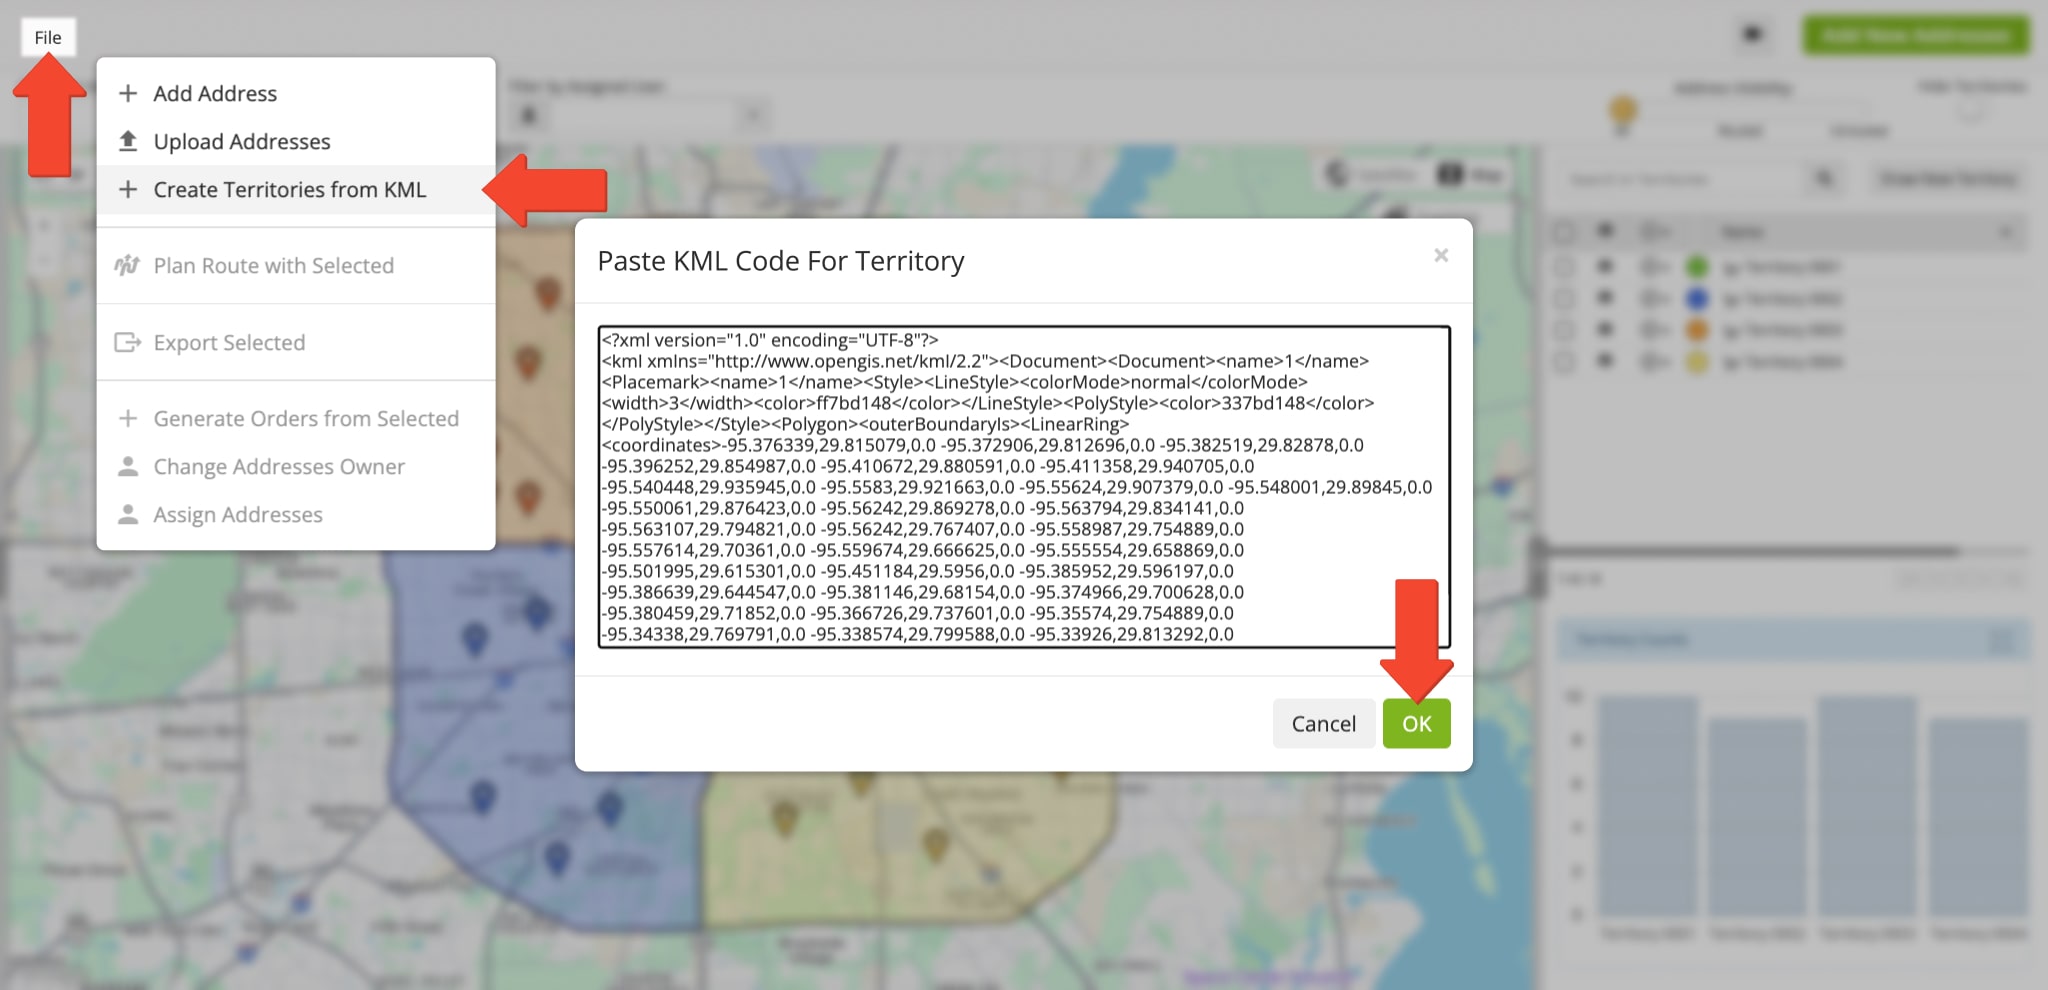
Alternatively, you can use a KML file to create Territories with geographic data. To do so, click “File” from the top menu bar and select “Create Territories from KML“. Then, simply paste the contents of your KML file and click “OK” to create a new Territory.
Manage Territories – Edit, Export, Assign, Route, Or Remove Territories And More
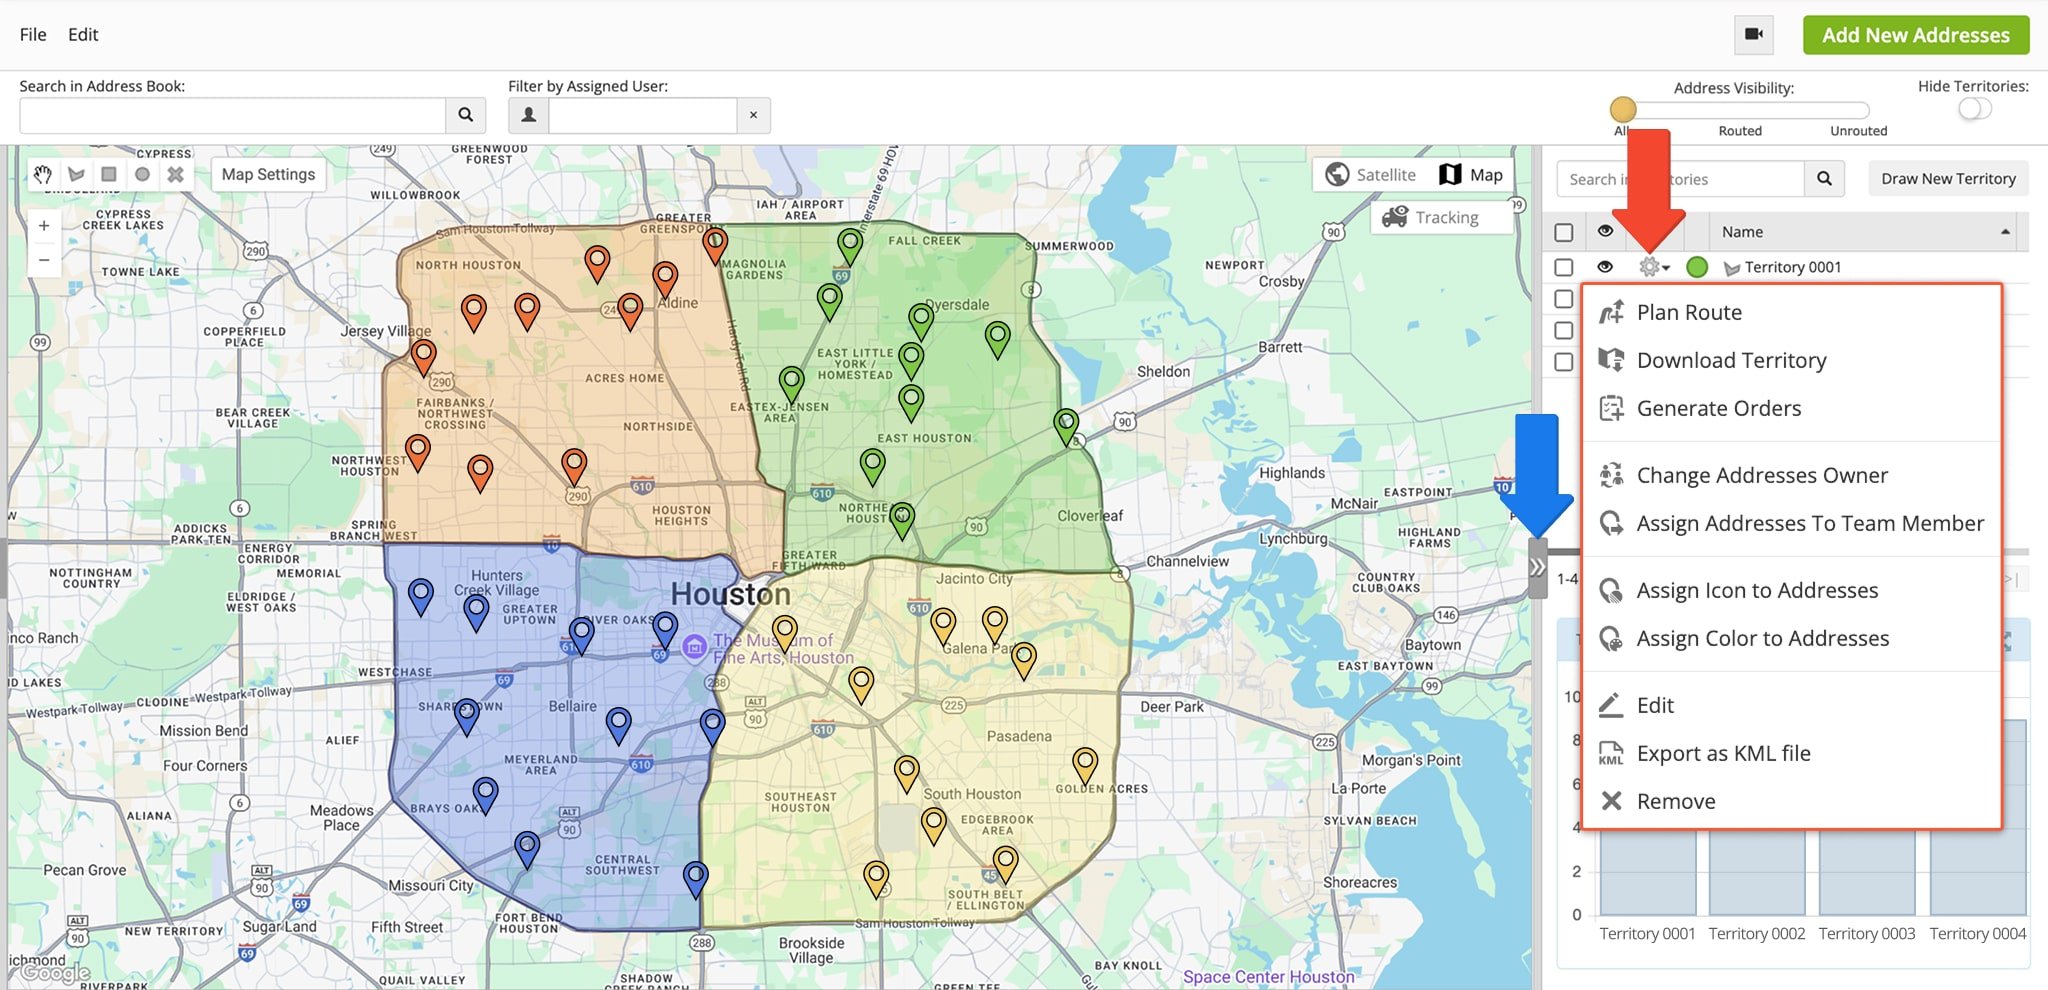
To edit or manage a Territory, click the Gear Icon next to it in the Territory Panel on the right. If the Territory Panel isn’t visible and has been closed, click the button in the middle of the divider on the right side of the screen. Learn more about the available Territory Management actions in the table below.
| Route4Me Feature | Description |
|---|---|
| Plan Route | Plan a route with the addresses in the Territory. |
| Download Territory | Export Territory addresses and their associated data as a CSV file. |
| Generate Orders | Create customer orders with address data from addresses in the Territory |
| Change Addresses Owner | Set the default User addresses in the Territory will be associated with. This is also the User addresses are re-assigned to after the duration specified in the “Assign Addresses To Team Member” option expires. |
| Assign Addresses To Team Member | Associate addresses in the Territory with a User on your account. Specifically, you can customize when the address assignment will expire and to which User the addresses will be re-assigned after that. |
| Assign Icon To Addresses | Assign an icon to replace the default address marker (pin) of addresses in the Territory. Custom address icons can help you easily identify different address types or get a better visual overview of your address distribution. |
| Assign Color To Addresses | Assign a color to the address markers (pins) of addresses in the Territory. If you’ve replaced the default address marker with another icon, this option will change the color of the icon’s background. |
| Edit | Change the Territory’s name and color. |
| Export As KML File | Export the Territory as a KML geographic data file. You can use KML files to create new Territories and transfer Territory geographic data. |
| Remove | Remove the Territory from the Address Book Map. Addresses in the Territory won’t be removed, and they will no longer be associated with the Territory after its removal. |
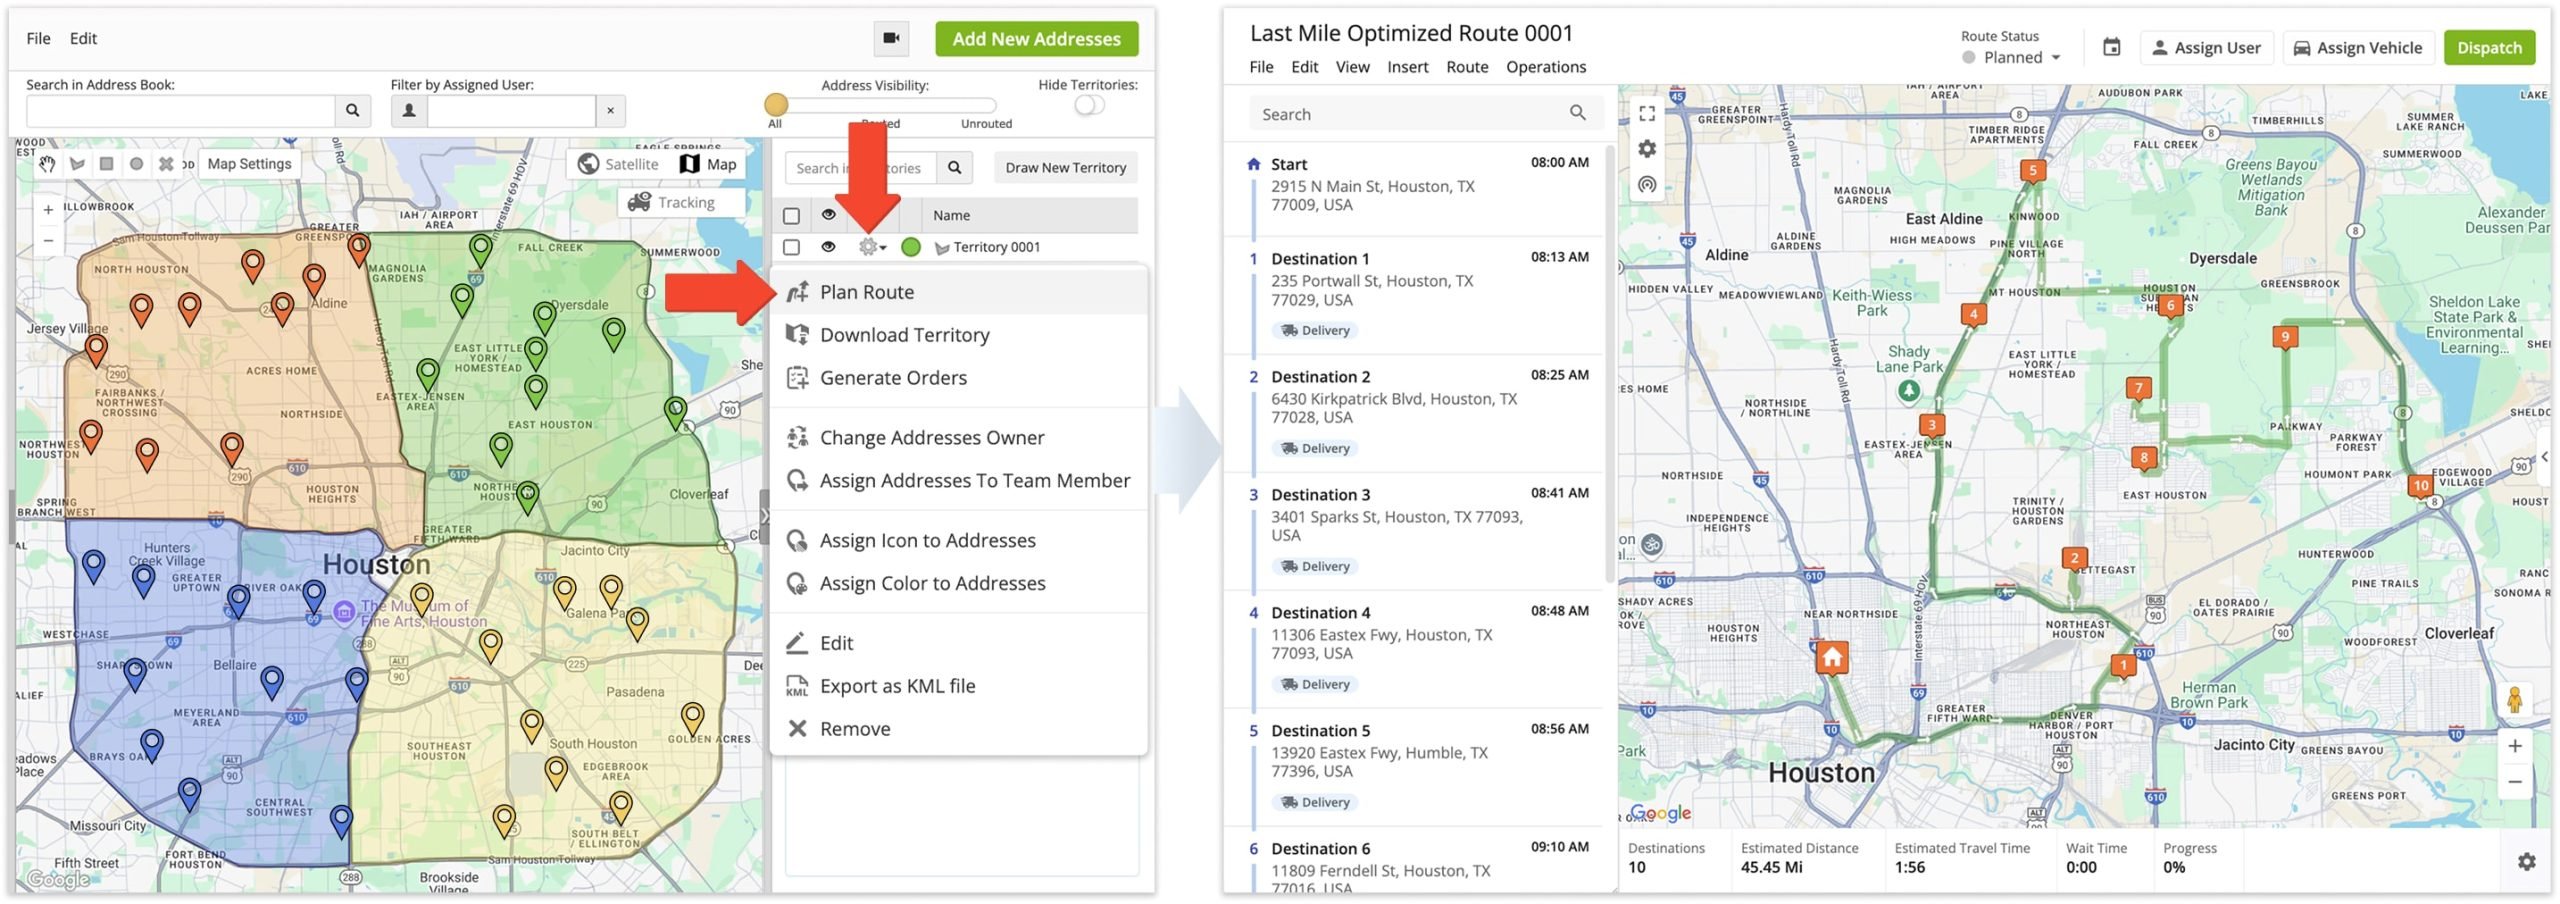
Plan Territory Routes – Use Address Book Map Territories To Plan Routes
To plan a route with a Territory from the Address book Map, simply click the Gear Icon next to the preferred Territory in the Territory Panel and select “Plan Route” from the menu. Then, follow the same steps as usual when you plan a route by selecting an Optimization Profile or manually adjusting optimization settings.
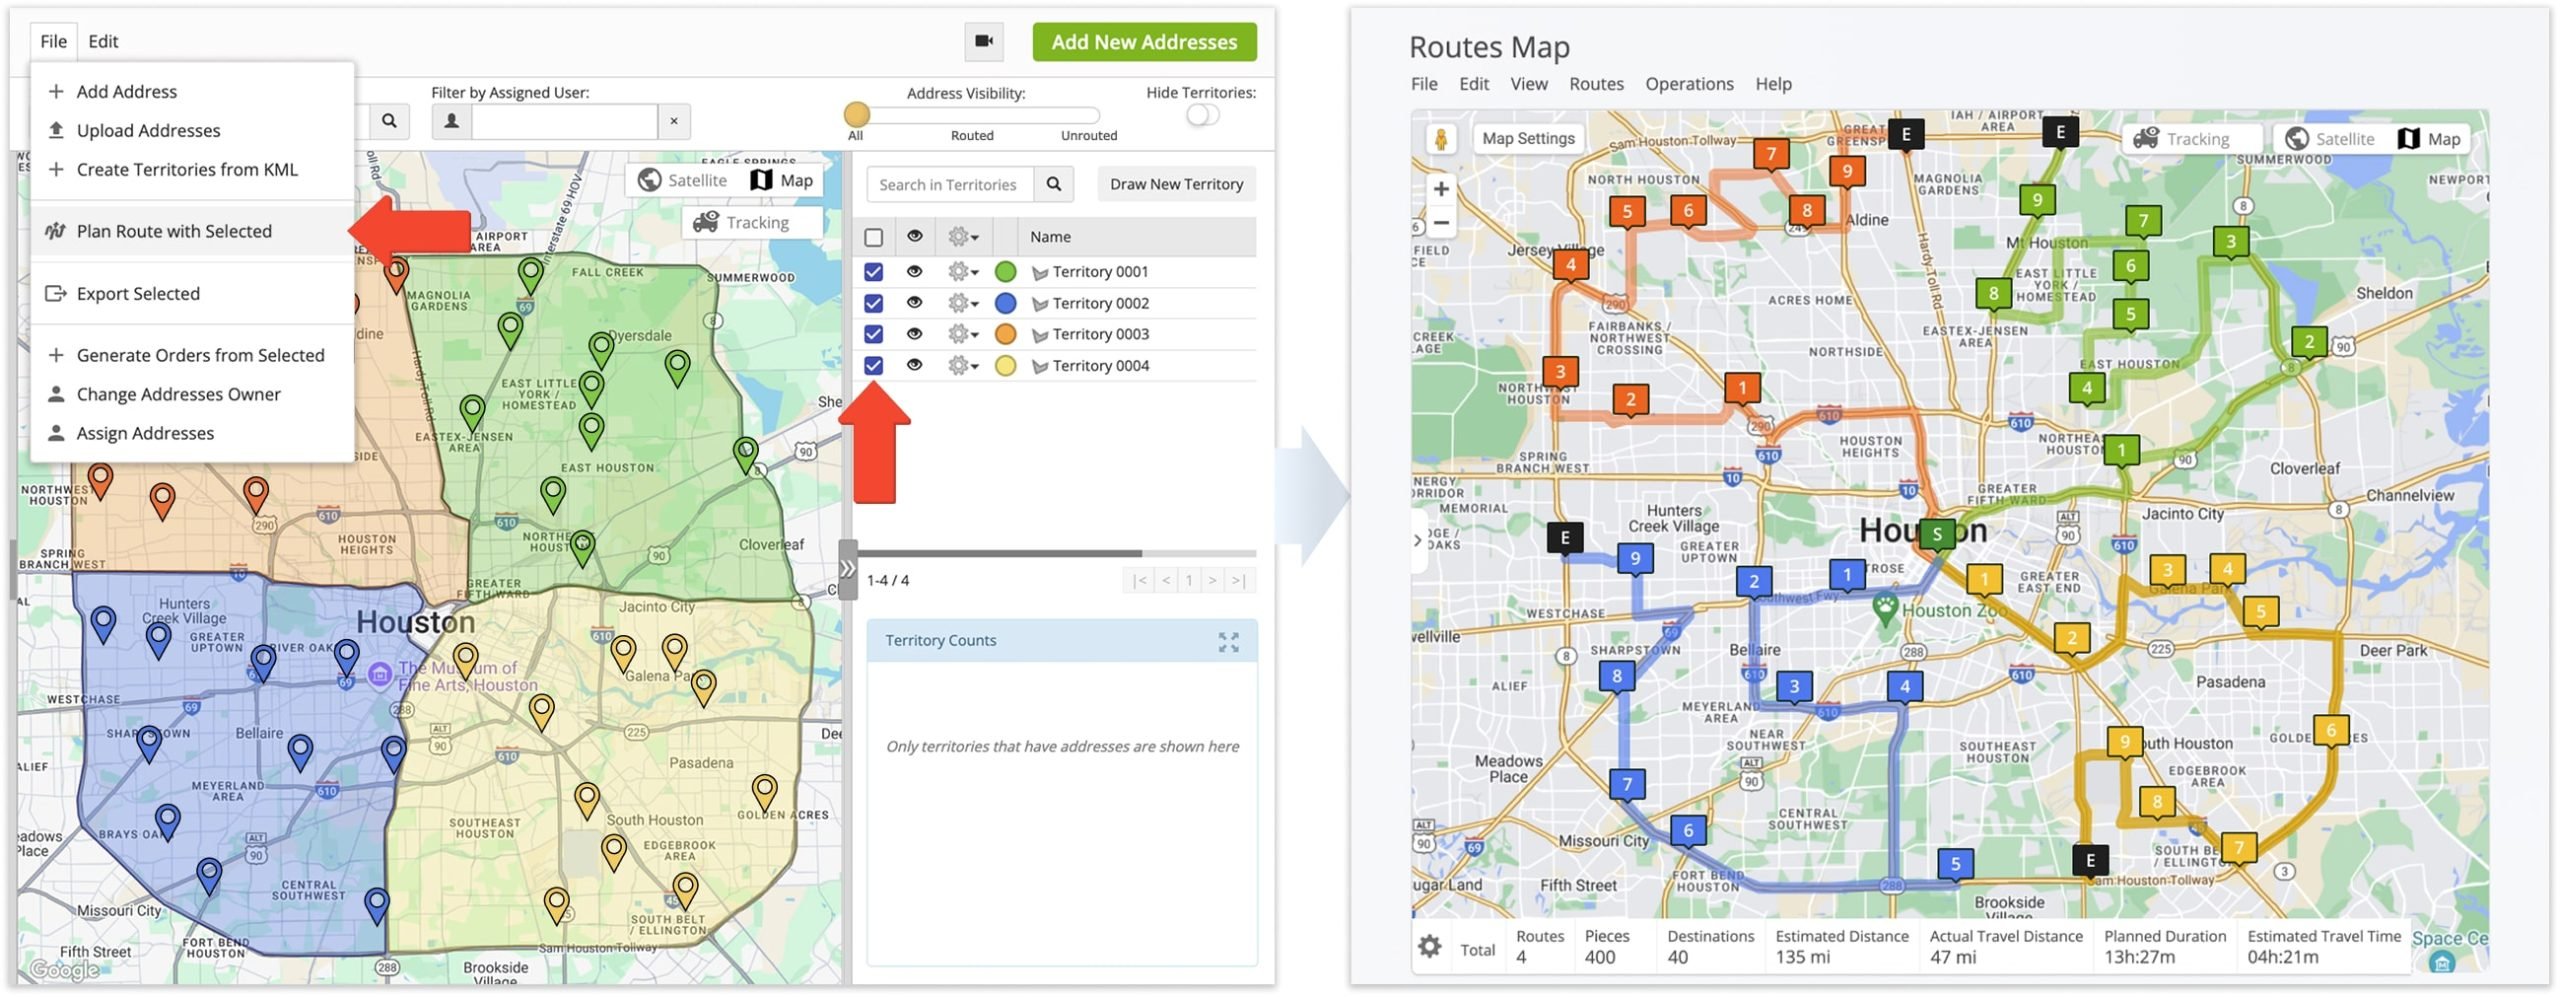
You can also select multiple Territories for route planning. Just check the boxes next to them in the Territory Panel, click “File” in the top menu bar, and select “Plan Route With Selected“. Route4Me’s enterprise route optimization software will plan one or multiple routes according to your optimization settings or the Optimization Profile you select. When the system plans multiple routes, the Routes Map will automatically open with the new routes shown on the map. NOTE: To plan routes without mixing addresses from different Territories, plan individual routes from the preferred Territories as described above.
Visit Route4Me Marketplace to Check Out More Add-Ons:
- Optimization
Address Book and Territories Planning
- Route Optimization
Commercial Vehicle & Truck Routing
- Operations
Audit Logging and Activity Stream
About author: Alex Yasko
Alex Yasko is the Go-to-Market Product Manager and Information Architecture Manager at Route4Me. With thousands of hours of experience, Alex specializes in breaking down complex last-mile optimization and routing scenarios into simple, actionable instructions, helping last-mile businesses streamline their operations effortlessly.