Plan Routes – Optimize Routes On The Route4Me Web Platform
With Route4Me, you can easily plan and optimize the most optimal, efficient, profitable, and sustainable multi-address routes. In this guide, you can learn how to plan and optimize routes using Route4Me’s fastest route planning software. Specifically, add, upload, and import addresses, use Optimization Profiles, schedule routes, and use different optimization types and custom route settings. You’ll also learn where and how you can manage planned routes with Route4Me.

NOTE: Depending on the add-ons and modules enabled on your Route4Me Route Planning Solution account, you will have the respective set of available features and capabilities.
Additionally, you can learn how to Use the Feature Manager to Customize Your Route4Me Route Planning Software Account.
Table of Contents
Quick Steps To Plan And Optimize Routes On Route4Me’s Web Platform
With Route4Me’s best route optimization software, the entire route planning and sequencing process is extremely fast and easy. Follow these steps to plan and sequence profitable and efficient routes using Route4Me’s Business Route Planner Software:
- Go to “Dynamic Routing” > “Plan New Route” in the Navigation Menu and select an address import method.
- Select a ready-to-use Optimization Profile or select manual route optimization settings.
- Add your addresses for Address Verification and Geocoding using the previously selected method.
- Check your automatically geocoded addresses on the map and click one button to optimize routes according to your preferences.
Route4Me will automatically plan and optimize the most optimal number of efficient routes based on the specified settings.
NOTE: If your route includes commercial vehicles, not all areas may support truck-safe routing. See where Route4Me provides commercial navigation to plan accordingly.
Add Route Addresses Using Spreadsheets, Cloud Drive, Interactive Map
To plan a new route, go to “Dynamic Routing” > “Plan New Route” in the Navigation Menu. Next, you can select your preferred method for adding your route addresses. For your convenience, Route4Me supports multiple methods for uploading, importing, and adding addresses. Below, you can learn more about the available methods for adding route addresses.

| Options | Description |
|---|---|
| Interactive Map Editor | Pick addresses or exact location coordinates (latitude and longitude) on the interactive map and add them to your routes. Accordingly, Route4Me automatically geocodes locations and validates addresses picked from the map. |
| Copy and Paste | Copy and paste a list of addresses into Route4Me’s route mapping software. Route4Me will automatically geocode and validate the pasted addresses. |
| Upload a File | Upload a CSV, XLS, or XLSX spreadsheet with addresses from your computer or device. Route4Me will automatically detect and validate addresses in the uploaded spreadsheet. In addition to addresses, you can add to your spreadsheets such data as order details, customer information, Time Windows, etc. |
| Import Data | Import a CSV, XLS, or XLSX spreadsheet with addresses from a cloud storage or cloud drive. For example, you can upload spreadsheets from Google Drive, Dropbox, or Box. |
| Upload Scan(s) | Upload a scan with your addresses, and Route4Me will automatically detect, geocode, and validate your addresses. |
Customize Route Settings, Schedule, Optimization, Drivers And Vehicles
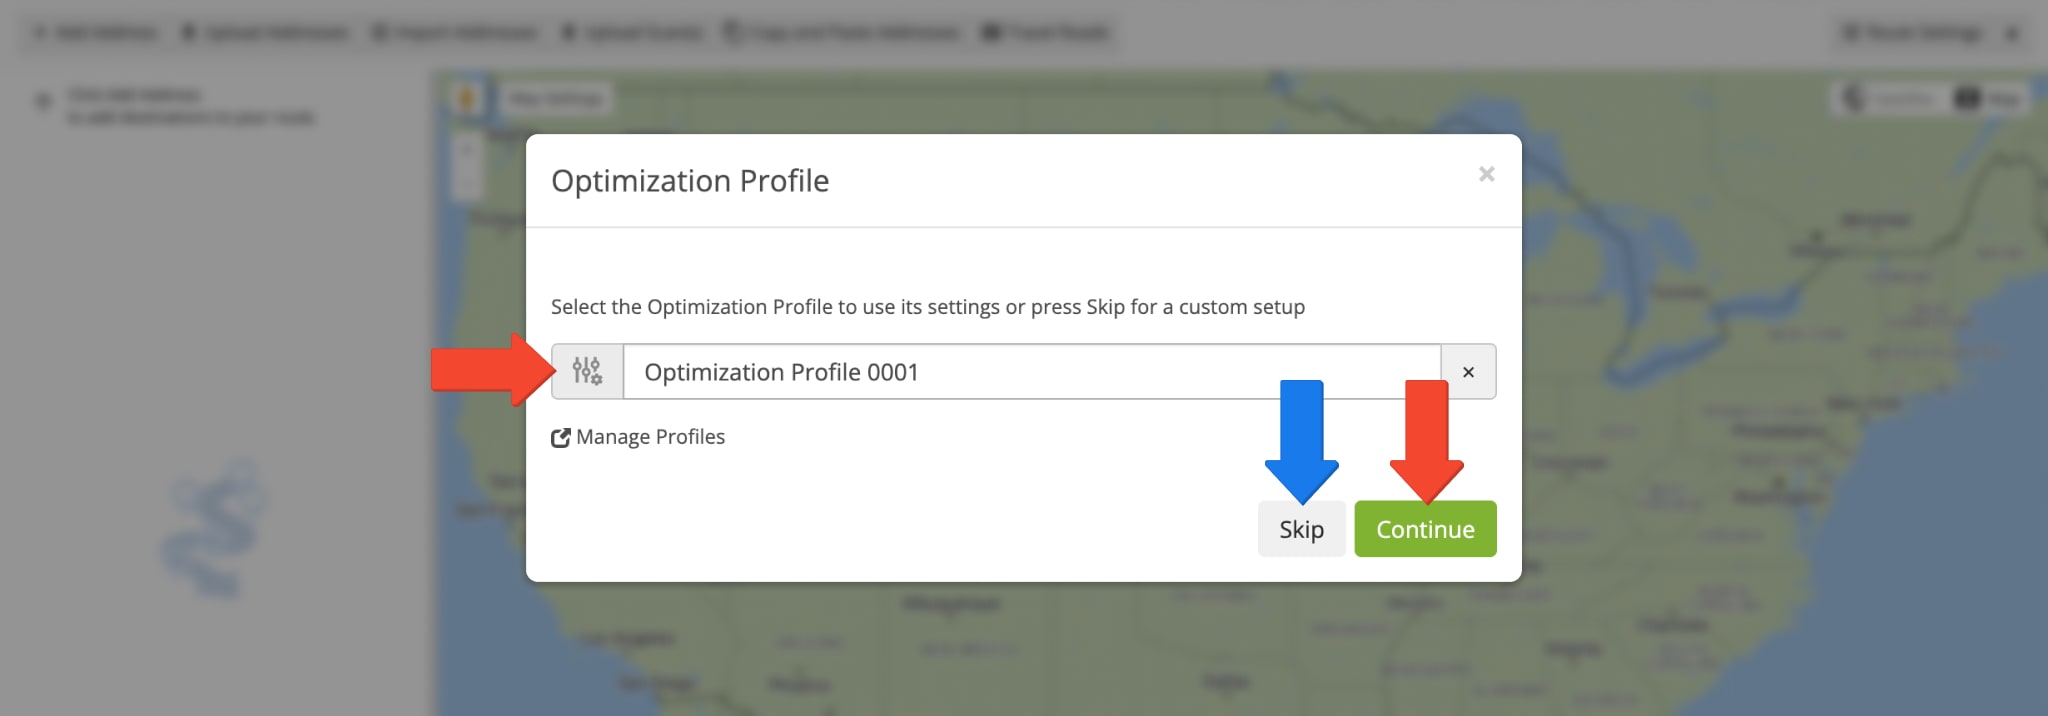
After selecting a method for adding addresses, you can specify optimization settings. In detail, you can select a ready-to-use Optimization Profile with predefined settings or click “Skip” and manually customize your route and optimization settings.
To use an Optimization Profile, simply select a profile and click the “Continue” button to proceed to adding addresses. Additionally, you can learn more about Creating and Using Route4Me Optimization Profiles.
When you skip selecting an Optimization Profile, you can manually schedule your routes, assign drivers and vehicles to routes, select where the routes will start and end, etc. Additionally, you can use Route4Me Business Rules and Optimization Constraints to customize your route optimization.
Below, you can learn more about the available manual route and optimization settings categories.
| Settings | Description | |
|---|---|---|
| Name | ||
| Route Name | Name your routes. You can then search for routes by name in the Routes List and Routes Map. | |
| Departure | ||
| Start Location | Enter an address from which your planned routes will start in the “Find Address” field. Click “Multi Depots” to enable route planning with multiple departure addresses. | |
| Schedule | ||
| Flexible Start Time | Click the “Flexible Start Time” toggle to enable Flexible Start Time and define an earliest and latest start time. | |
| Route Start Date | Specify the date on which the route will be scheduled to begin. | |
| Route Start Time | Specify the time of day at which the route will be scheduled to begin. NOTE: This will be in time zone of the Departure Address – not the time zone from your Account Settings. | |
| Service Time Per Destination | The time needed to complete a Destination or Customer Order. Click the “Override Service Time” toggle to replace Destination Service Times from your upload or import with a new Service Time duration. | |
| Service Time Slowdown | Increase the Service Time of route Destinations by the specified percentage. This may reduce the total number of Destinations on each optimized route. | |
| Travel Time Slowdown | Increase the Total Route Time of optimized routes by the specified percentage. This may reduce the total number of Destinations on each optimized route. | |
| Sharing | ||
| E-Mail Route | Share a route link via email. Accordingly, recipients can use the public route link to open and view the shared route without the ability to edit or manage it. Use commas to add multiple email addresses. | |
| Optimization | ||
| Sequence Optimization | Click the “Optimize Route(s)” toggle to enable Sequence Optimization. When optimization is disabled, destinations remain in the same sequence as added or uploaded. | |
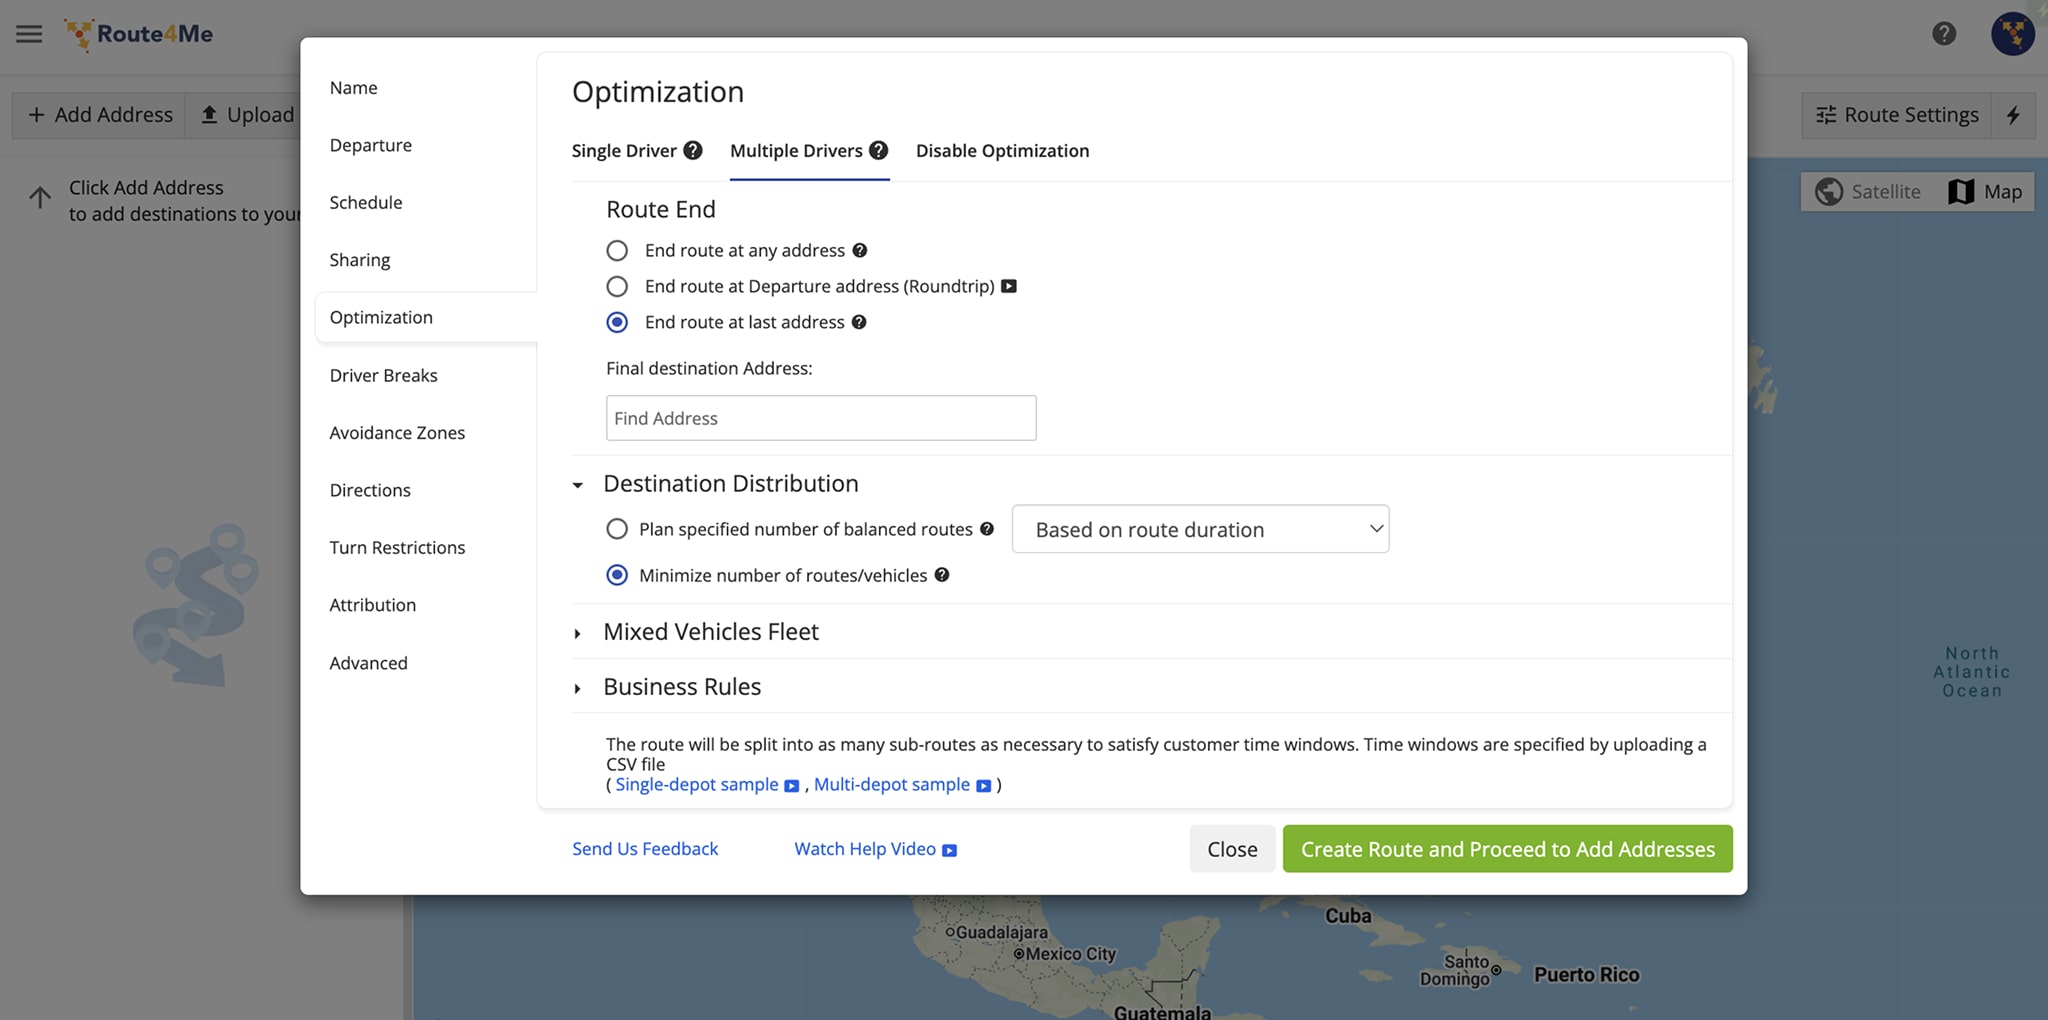
| Route End | Select “End route at any address“ to plan the most optimized route. Select “End route at departure address (Round Trip)“ to plan a route that returns to the departure address. Select “End route at last address“ to use the final address from your upload or import as the route end. Or, use the “Find Address” search field to locate a specific address. NOTE: The “End route at last address“ option may not be available on all accounts. | |
| Mixed Fleet | Plan the most optimal number of routes for vehicles with different capacities, maximizing the capacity of each vehicle. First, check the “Enable Mixed Vehicles Fleet” checkbox. Next, select the preferred vehicles with a preview of their respective Vehicle Capacity Profiles. | |
| Optimization Fine-Tuning | Customize the Optimization Fine-Tuning settings to prioritize lower Route Distance, Travel Time, or Waiting Time. Accordingly, you can select the preferred prioritization percentage for each available option. | |
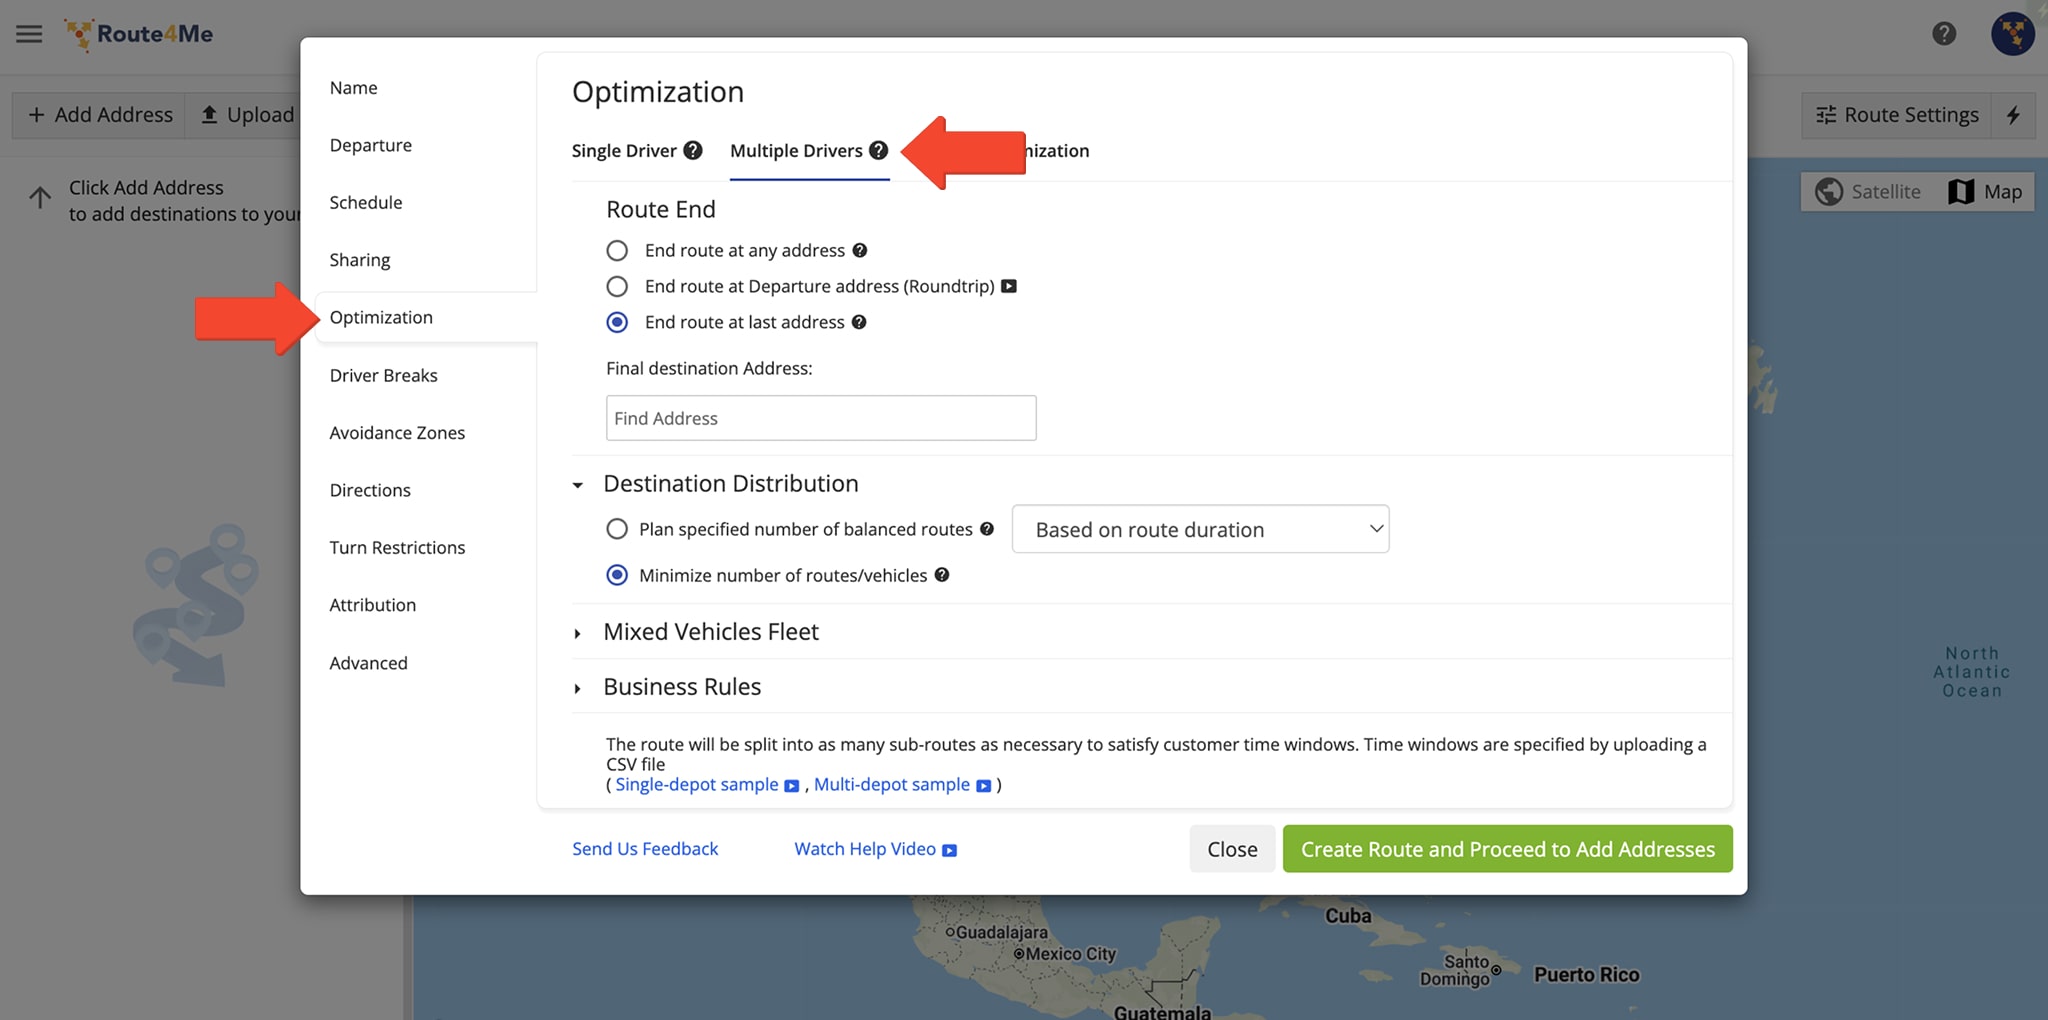
| Business Rules | Input per-route constraints, optimizing routes by limiting distance, time, weight, package count, cubic volume, number of destinations, and revenue. NOTE: If Legacy Route Settings are enabled on your account, click “Multiple Drivers” under “Optimization” to access Business Rules settings. | |
| Ignore Time Windows | Ignore specified Time Windows to visit destinations at the most optimal time when planning routes. | |
| Driver Breaks | ||
| Insert Breaks | Add customizable Hours of Service Driver Breaks to the route. | |
| Break Duration | The duration of the automatically-inserted Driver Breaks. | |
| Break Trigger Type | Select the frequency type of Driver Breaks associated with the respective profile. Available Break Types: Travel Time, Travel Time & Service Time, Destination Number. | |
| Avoidance Zones | ||
| Avoidance Zones | Click the “Enable Avoidance Zones” toggle to add Avoidance Zones to your planned routes. Then, click “Select Avoidance Zones” and check the boxes next to any zones you want to take into account when planning routes. | |
| Directions | ||
| Navigate By | Select between Distance, Time, and Time With Traffic navigation modes. | |
| Travel Mode | Select between Driving, Cycling, and Walking travel mode types for route optimization. | |
| Highways and Tolls | Click the “Avoid Highways” toggle to plan routes that avoid highways as much as possible. | |
| Avoid Ferries | Toggle “Avoid Ferries” to to plan routes that bypass ferry crossings whenever possible.. | |
| Turn Restrictions | ||
| Permit Left Turns / Permit Right Turns | Select whether to allow all turns, restrict left-turns, or restrict right-turns. | |
| Attribution | ||
| Assign User | Automatically dispatch planned routes to a specific Team User. | |
| Assign Vehicle | Automcatically dispatche planned routes to a specific Fleet Vehicle. | |
| Assign Facility | Automatically dispatch planned routes to a specific Facility, such as a warehouse, depot, or service location. | |
| Attribution | ||
| Use Depots as Advanced Constraint | Enable this option to plan routes using depot locations as an additional constraint for assigning the most suitable drivers or vehicles. | |
| Match Depots and Users | Check to enable Depot Matching for automatic Driver Skill Route Dispatch. | |
| Match Vehicles and Drivers | Enable this option to automatically pair vehicles with compatible drivers based on predefined skills or requirements. | |
Depending on the features, add-ons, and configurations enabled on your account, you’ll have different settings available. To enable additional features and settings for your account, can use the Feature Manager or contact Route4Me Support.
If Legacy Route Settings are available on your account, you’ll find the “Single Driver“, and “Multiple Drivers” sections in the “Optimization” tab. To use Business Rules and Optimization Constraints, click “Multiple Drivers“. With the new Route Settings panel seen above, Route4Me automatically optimizes routes for one or multiple drivers based on your settings and unique account parameters with no further action required.
Verify Imported Route Data And Geocode Addresses On Map
Next, after specifying your route and optimization settings, you can proceed to review and verify addresses. Equally important, when you upload or import spreadsheets, you can add additional data to your route stops. For example, Time Windows, order details, customer information, etc. Accordingly, the trusted route planner will automatically verify, validate, and match column names in the header of your spreadsheet to entities and attributes in the system.
Furthermore, you can manually match data columns from the uploaded spreadsheet to the system’s reserved entities and attributes. Additionally, learn more about Route4Me’s Spreadsheets Formatting Requirements.

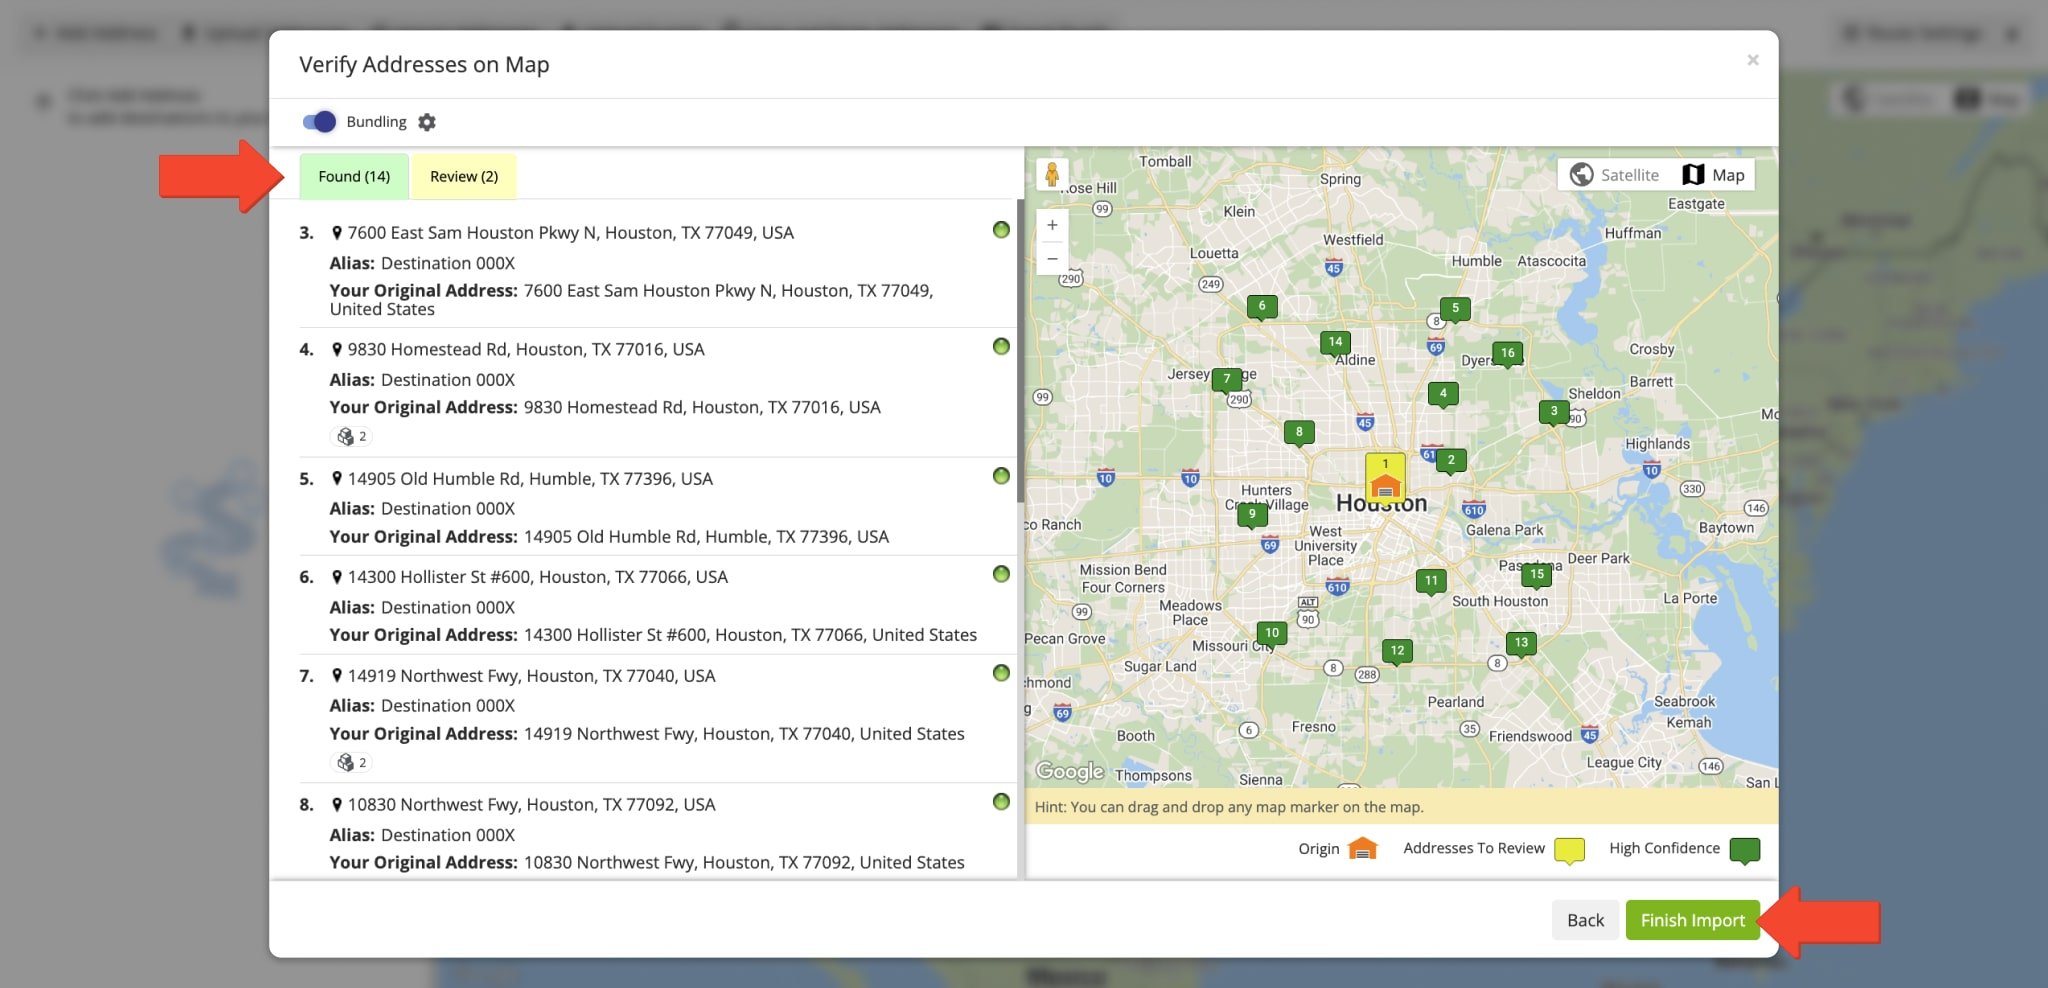
After that, Route4Me’s best route planning software will automatically geocode and validate addresses. Next, you can review the geocoded addresses on the address routing map. Accordingly, addresses with a green marker are geocoded with high confidence, and addresses with a yellow marker require review.
After adding and reviewing addresses, click “Finish Import” to plan and optimize routes based on your settings.
Manage Planned Routes – Route Editor, Routes Map And Routes List
Accordingly, Route4Me will automatically plan and optimize one or multiple routes based on your specified settings. After that, you can easily manage your planned routes using the Route Editor, Routes Map, and Routes List.
When Route4Me’s Enterprise Route Optimization Software plans a single route, it automatically opens in the Route Editor. That’s your primary tool for opening, viewing, and managing individual planned routes. You can use the Route Editor to manage destinations and addresses, check route progress and KPIs, change optimization settings, synchronize route changes with our mobile driver apps, etc. Learn more about Route4Me’s Route Editor Route Management.

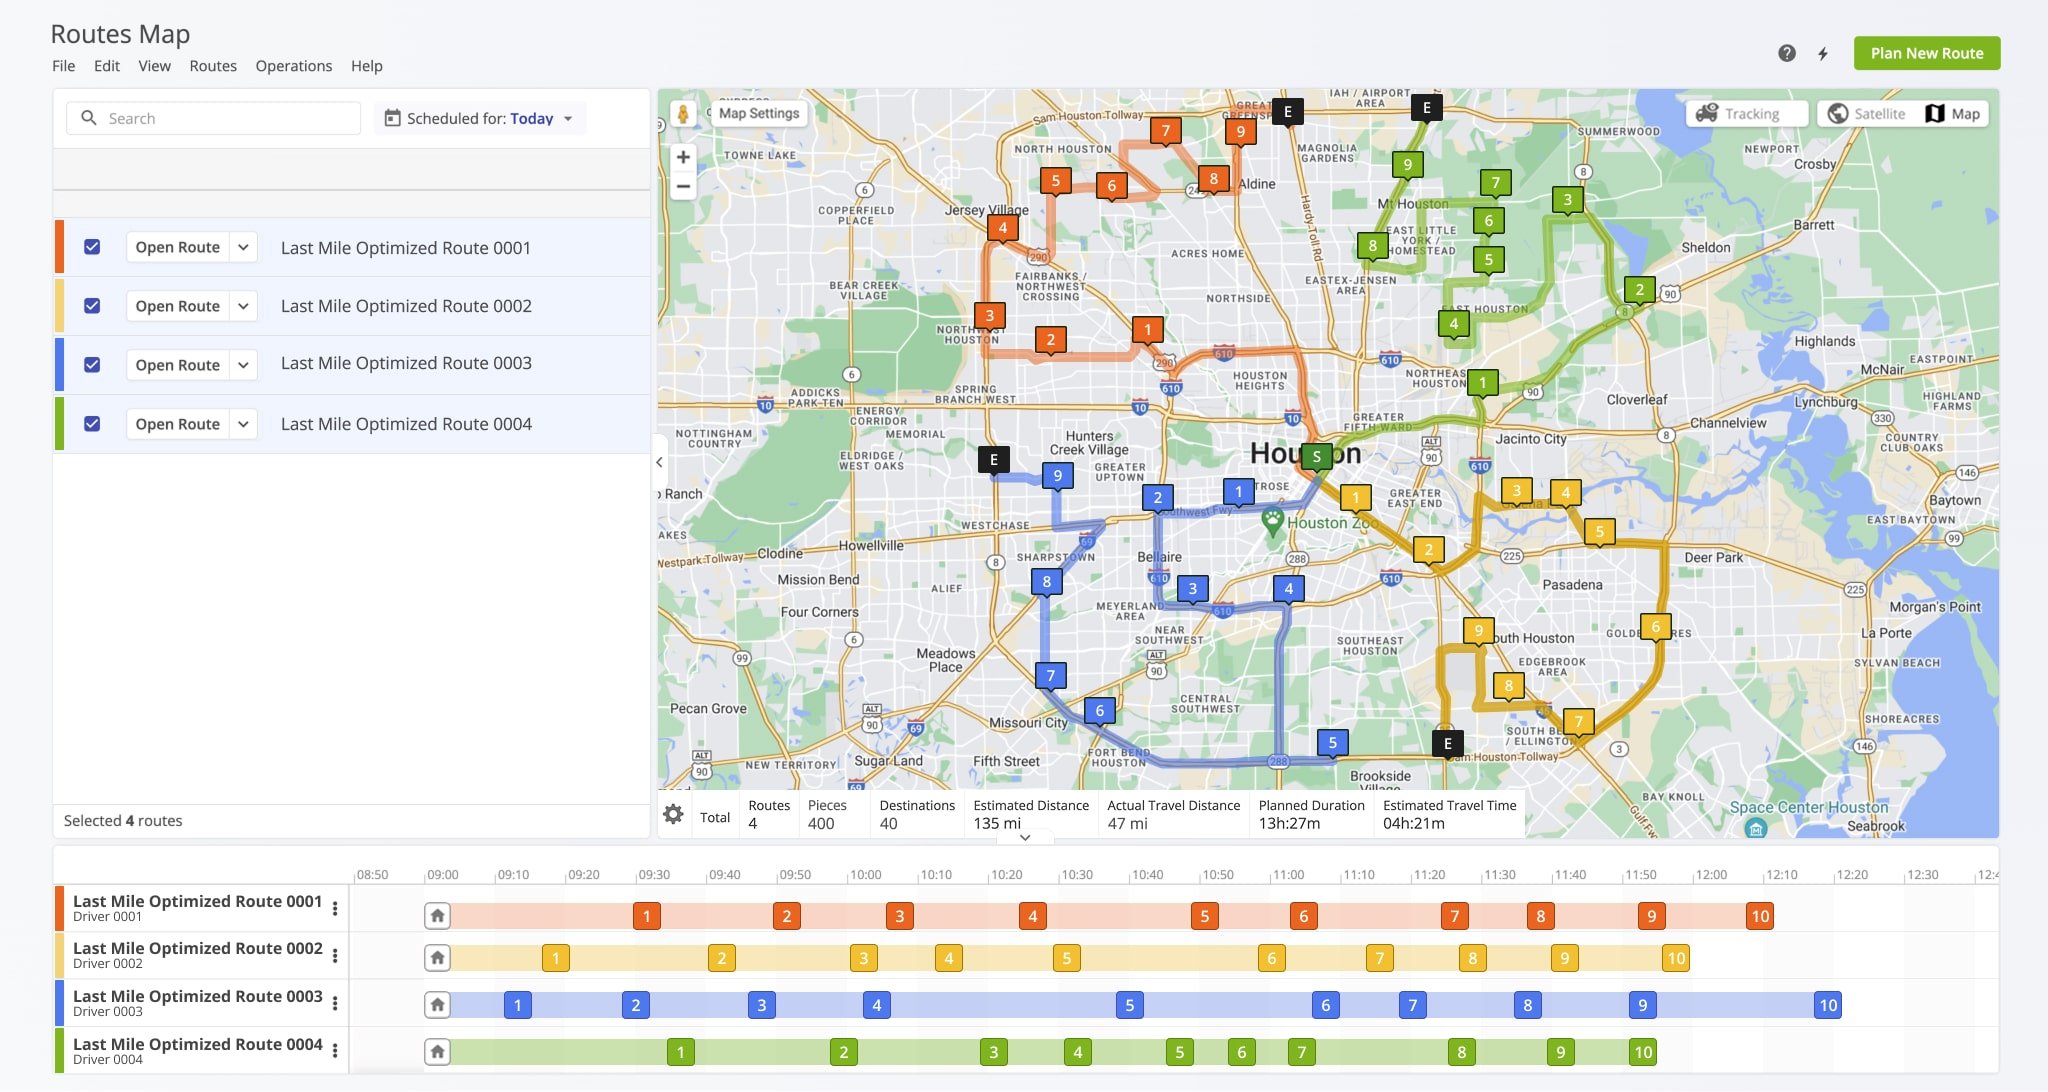
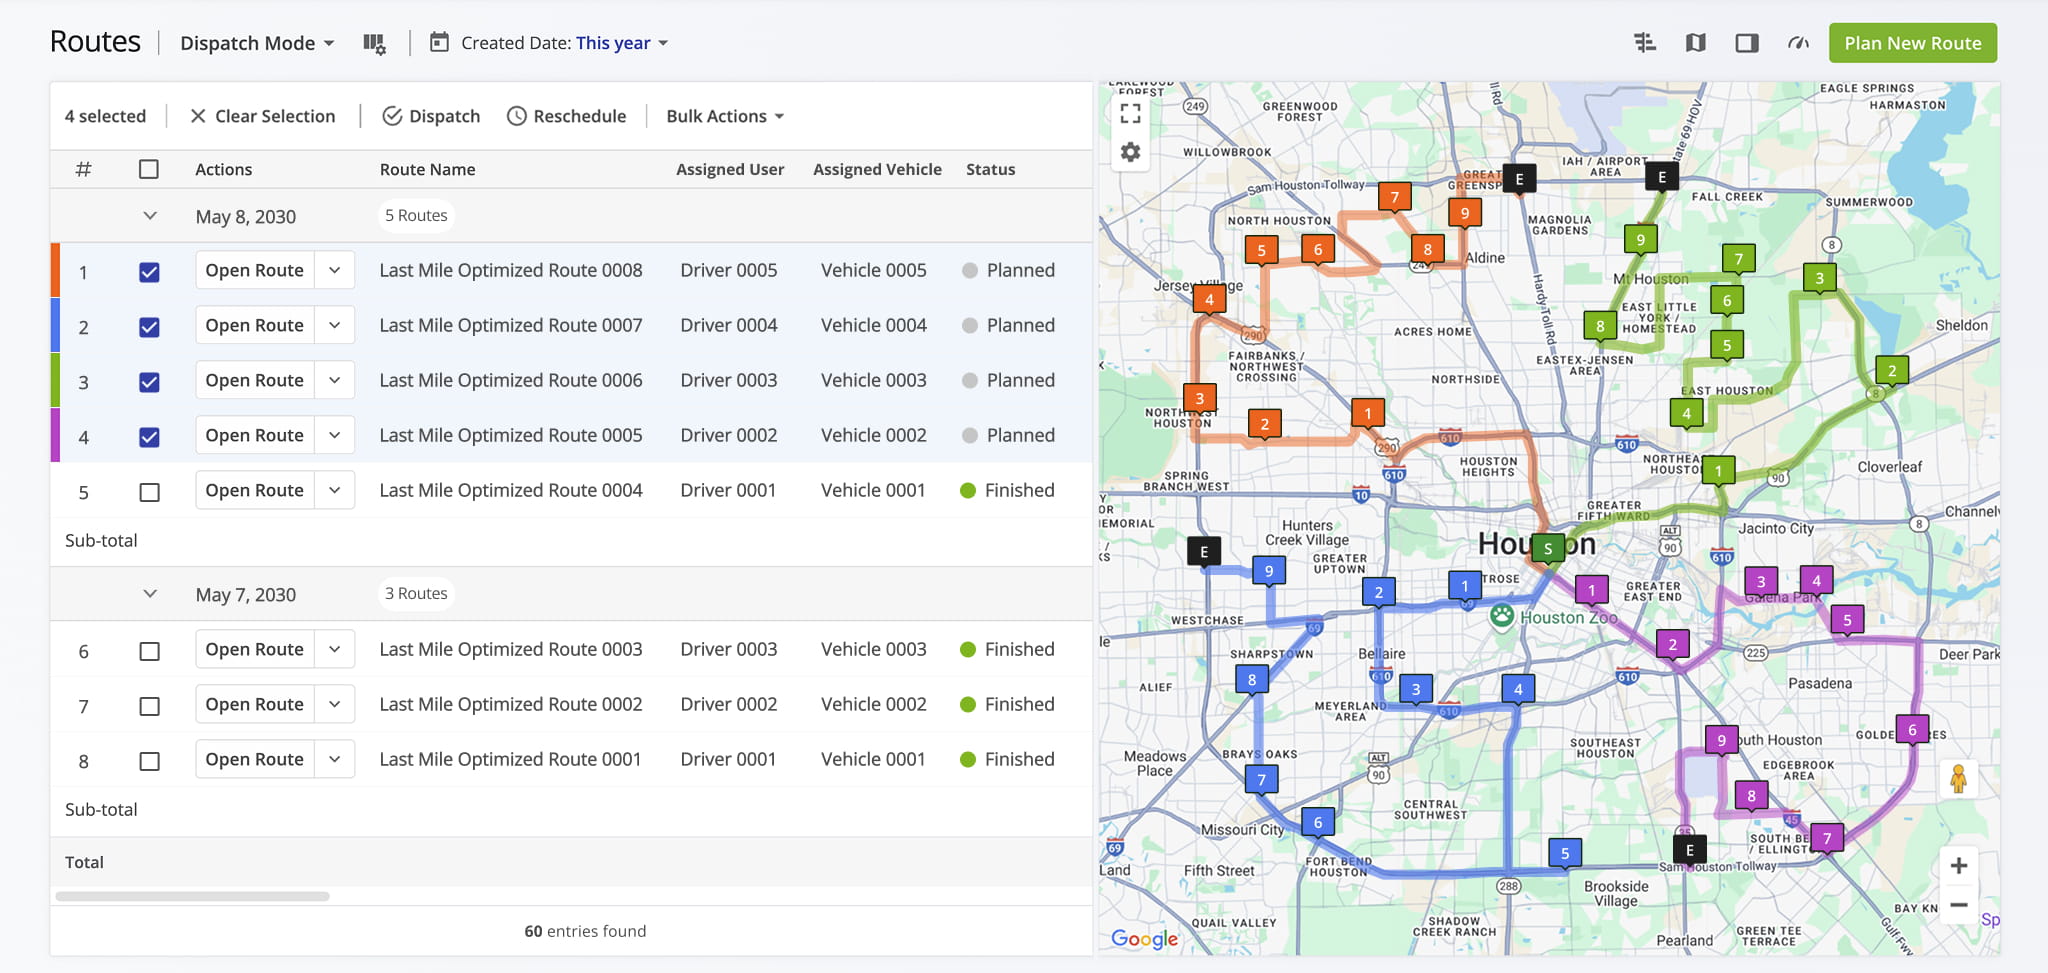
When you plan multiple routes, Route4Me’s enterprise route management software automatically opens the Routes Map. There, you can simultaneously view and manage multiple routes on the same interactive map. In detail, you can compare routes, check route start times, move stops between routes, track route progress in real-time, track multiple drivers and vehicles on the map, etc. Learn more about Route4Me’s Routes Map Route Management.
Furthermore, Route4Me will automatically save planned routes in your Routes List, which is the best route management software database. There, you can store and easily manage hundreds of thousands of optimized routes. In detail, you can edit routes, track route progress in real-time, check destination and order statuses, reschedule routes, dispatch routes to drivers and GPS vehicles, etc. Learn more about Route4Me’s Routes List Route Management.
Visit Route4Me's Marketplace to Check out Associated Modules:
- Operations
Custom Data Add-On
- Operations
Advanced Team Management Add-On
About author: Kristian Andreev
Kristian is a Technical Writer at Route4Me. With over a decade of experience in writing and localization, he's an expert at communicating complex technical data in a clear, concise, and user-friendly way. Passionate about bridging the gap between engineers and users, he specializes in creating documentation to streamline onboarding, enhance product usability, and support global teams on the path to success.