Route4Me SAML SSO – Security Assertion Markup Language Single Sign-On
In this guide, you can learn how to use Single Sign-On (SSO) with SAML (Security Assertion Markup Language) to log in to Service Provider websites such as Route4Me with your existing user identity from your website or app. Additionally, you can learn how to add your app as an SAML Identity Provider for SSO to Route4Me.
NOTE: SSA must be enabled before submitting any of the requests mentioned in this guide. Additionally, SAML SSO can only be set up by using the API key of your primary Route4Me account (the main account owner).
Table of Contents
How SAML SSO Works
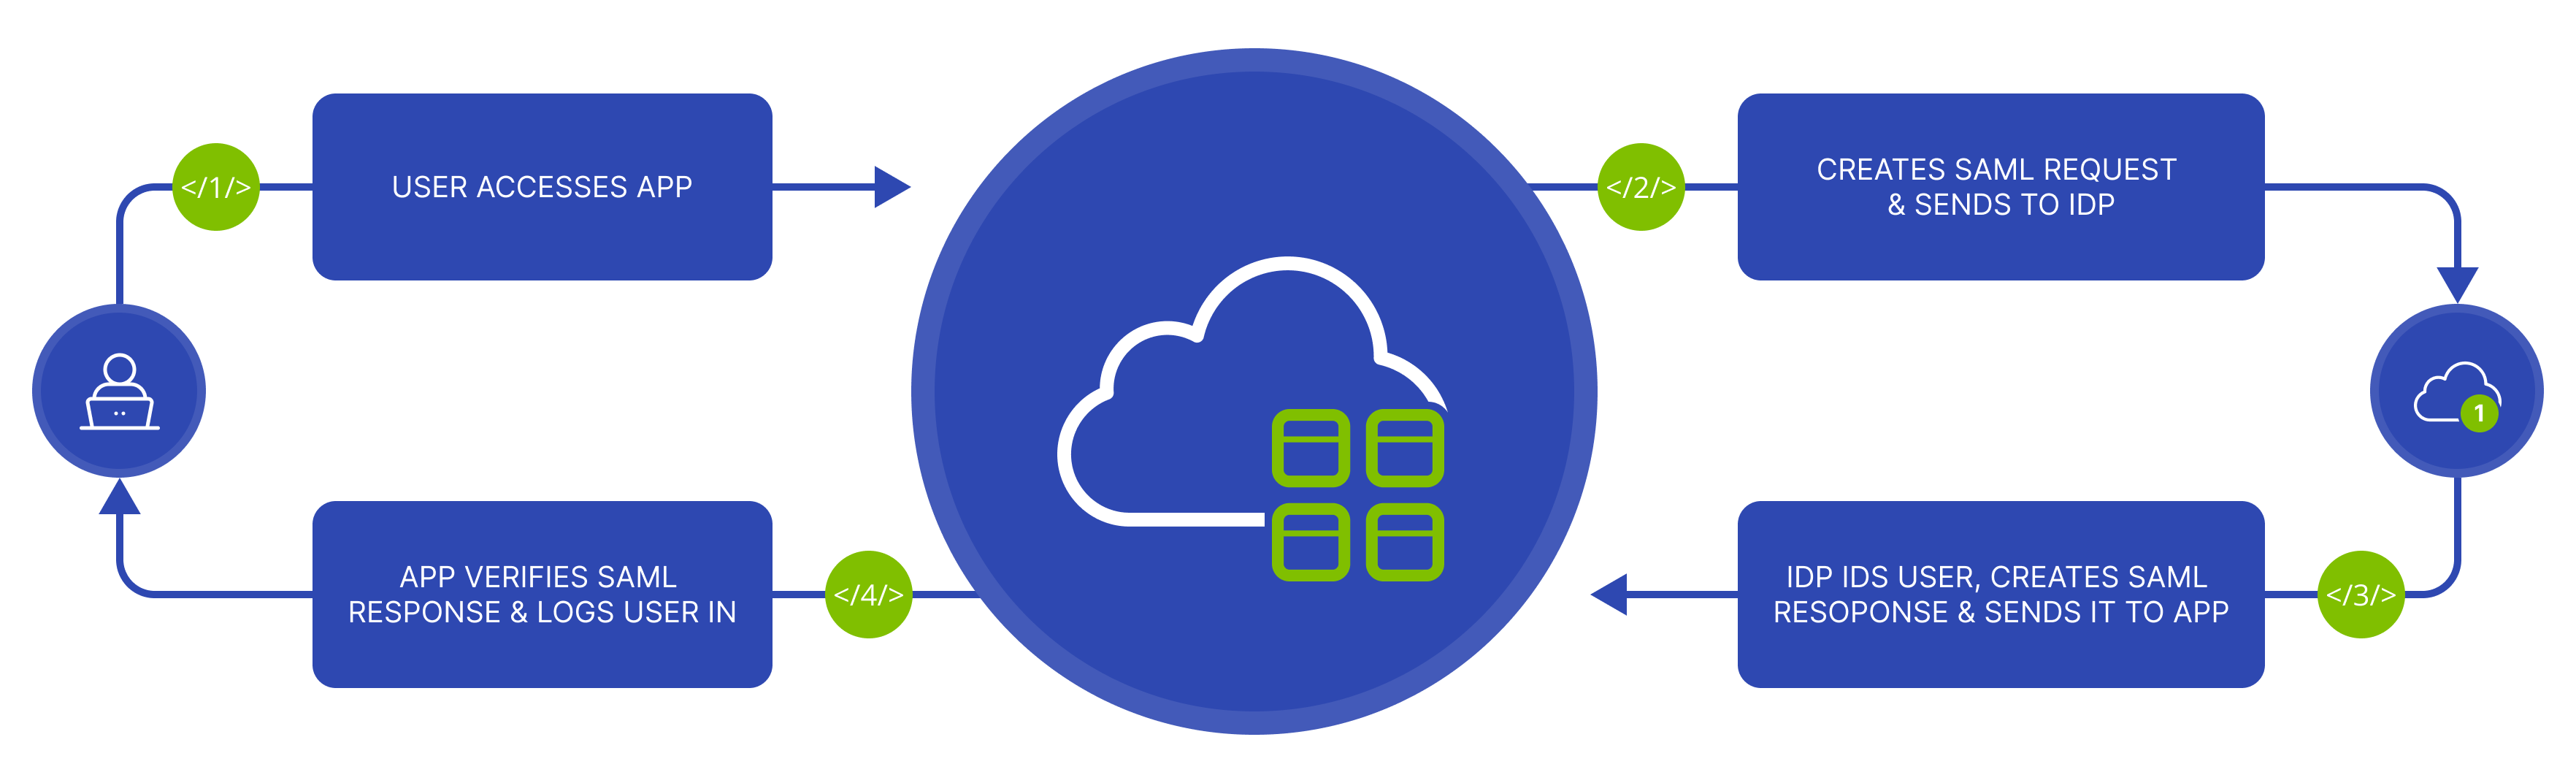
SAML SSO works by transferring a user’s identity from one place to another, from the Identity Provider to the Service Provider. Specifically, your website is the Identity Provider, and Route4Me is the Service Provider. The identity transfer is done with an exchange of digitally signed XML documents.
For example, you are logged into a system (Identity Provider) and want to log in to a remote application, such as a support or accounting application (the Service Provider). In that scenario, you can follow the steps below.
- Open the SAML login page on the Route4Me website and enter your work Email.
- The application identifies your origin by Email and redirects you back to the Identity Provider, asking for authentication (authentication request).
- You either have an active browser session with the Identity Provider or create one by logging into the Identity Provider.
- The Identity Provider builds the authentication response as an XML document that contains your Username or Email address, signs it using an X.509 certificate, and sends this information to the Service Provider.
- The Service Provider, which already knows the Identity Provider and has a certificate fingerprint, retrieves the authentication response and validates it with the certificate fingerprint.
- Your identity is established, and you gain app access.
The diagram below illustrates the SAML Single Sign-On flow.
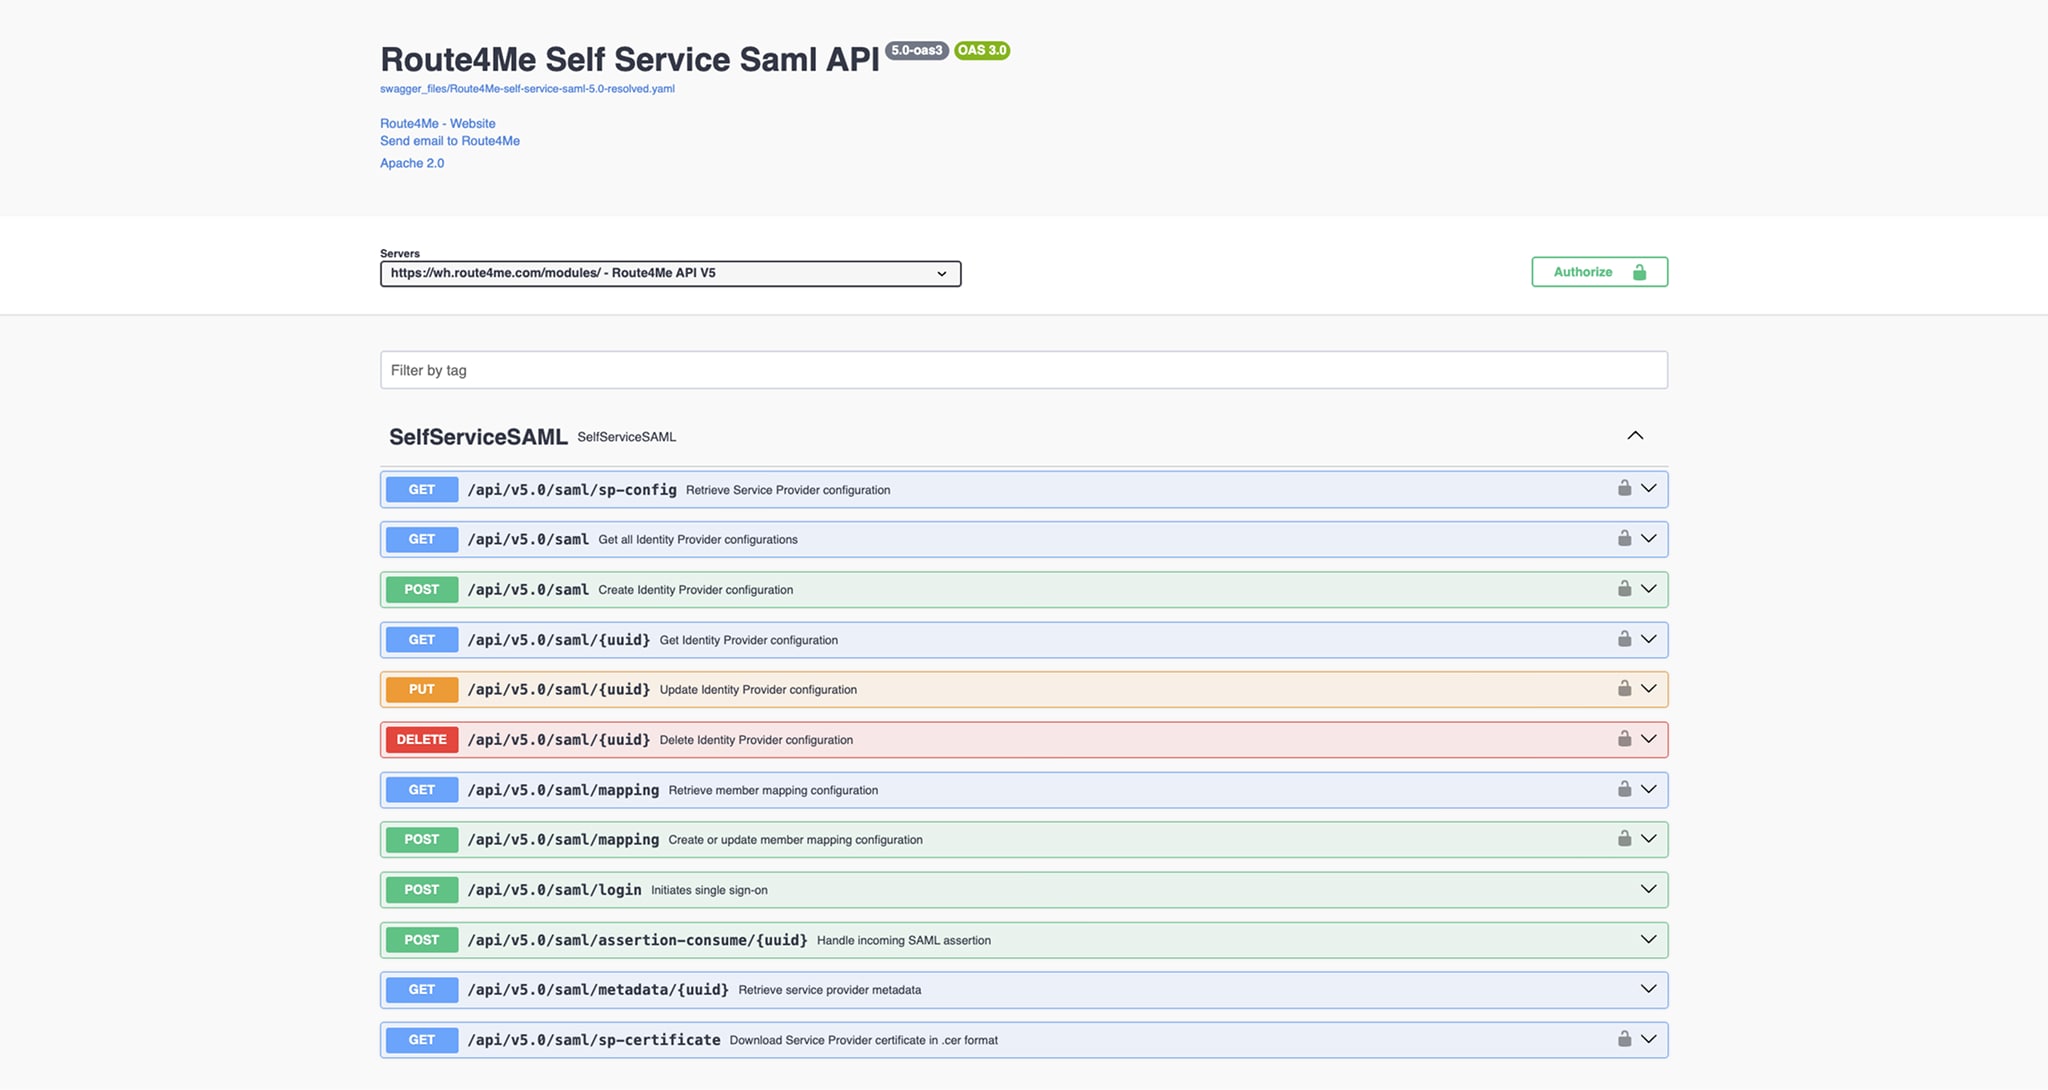
How To Set Up Route4Me SAML With The Swagger API
You can set up Route4Me SAML SSO using the Swagger API. To do so, you need to:
- Create a Service Provider Configuration.
- Configure the Identity Provider.
- Create or update Identity Provider Configurations.
- Retrieve Identity Provider Configurations.
- Configure Member Mapping.
- Retrieve Current Member Mapping.
- Test your SAML SSO.
With these steps, your SAML setup should be fully configured and functional, which you can test using “/login“. Keep reading for a detailed breakdown of each step. If any specific part of the process requires additional explanation, reach out, and we’ll be happy to help.
Step 1: Create A Service Provider Configuration
Service Provider configuration data is required to connect the Service Provider (SP) to the Identity Provider (IdP). This configuration includes details such as the SP’s “entity_id“, SAML assertion consumer URL, and certificate.
To do so, first send a “POST” request to the Service Provider configuration endpoint () to create a new Identity Provider and get the Service Provider Configuration like in the example below:
curl --location --request POST 'https://wh.route4me.com/modules/api/v5.0/saml' \
--header 'Accept: application/json' \
--header 'Content-Type: application/json' \
--header 'Authorization: Bearer YOUR_API_KEY'
Then, you should receive the following expected response:
{
  "configuration_id": "0196E841475970D589E15DA2A5CECAD5",
  "sp_config": {
    "entity_id": "https://route4me.com",
    "assertion_consumer_service_url": "https://wh.route4me.com.com/modules/api/v5.0/saml/acs/………",
    "x509_cert": "MIID…..pHM=",
    "metadata_url": "https://wh.route4me.com.com/modules/api/v5.0/saml/metadata/……"
  },
  "idp_config": {
    "entity_id": null,
    "single_sign_on_service": null,
    "x509_cert": null
  }
}
In detail, the parameters in the response correspond to the following data:
- entity_id: Unique identifier of the Service Provider.
- assertion_consumer_service_url: Endpoint where SAML assertions will be sent by the Identity Provider.
- certificate (cert): Public certificate for encryption or validation.
- metadata_url: Endpoint for downloading the Service Provider’s metadata XML.
Step 2: Configure The Identity Provider
Using the metadata retrieved in Step 1, configure your Identity Provider (IdP) such as Okta, Google Workspace, or Azure AD. To do so, you need the following details:
- Entity ID (entity_id): Use this to identify the SP.
- SSO Endpoint (assertion_consumer_service_url): Use this for the IdP to send SAML assertions.
- SP Certificate (certificate): Use this for encrypting or signing the assertions.
If you’re using Okta as your Identity Provider, simply add a new SAML application using the “entity_id” and “assertion_consumer_service_url” from Step 1 and upload the SP certificate. For other providers, look for a SAML configuration or metadata upload section and provide the respective configuration metadata. Once the Identity Provider is configured, proceed to verify or create its configuration in your application.
NOTE: Ensure that both the SAML response and assertions are signed in your Identity Provider settings. This can typically be configured in the dashboard by selecting the “Sign Assertions” and “Sign Responses” options.
Step 3: Create Or Update Identity Provider Configurations
To create an Identity Provider configuration, send a “PUT” request to the “{configuration_id}” endpoint like in the following example:
curl --location --request PUT 'https://wh.route4me.com/modules/api/v5.0/saml/{configuration_id}' \
--header 'Accept: application/json' \
--header 'Content-Type: application/json' \
--header 'Authorization: Bearer YOUR_API_KEY' \
--data '{
  "entity_id": "https://idp.example.com",
  "single_sign_on_service": "https://idp.example.com/login",
  "x509_cert": "MIIDq...pRffA=="
}'
This configuration connects your application with the Identity Provider for authentication. You should receive the following expected response:
{
  "configuration_id": "0196E841475970D589E15DA2A5CECAD5",
  "sp_config": {
    "entity_id": "https://route4me.com",
    "assertion_consumer_service_url": "https://wh.route4me.com.com/modules/api/v5.0/saml/acs/………",
    "x509_cert": "MIID…..pHM=",
    "metadata_url": "https://wh.route4me.com.com/modules/api/v5.0/saml/metadata/……"
  },
  "idp_config": {
    "entity_id": "https://idp.example.com",
    "single_sign_on_service": "https://idp.example.com/login",
    "x509_cert": "MIIDq...pRffA=="
  }
}
Step 4: Retrieve Identity Provider Configuration
Next, check the Identity Provider configuration in your application. To retrieve current Identity Provider configurations from the system, send a “GET” request to the “” endpoint like in the below example:
curl --location 'https://wh.route4me.com/modules/api/v5.0/saml' \
--header 'Accept: application/json' \
--header 'Content-Type: application/json' \
--header 'Authorization: Bearer YOUR_API_KEY'
Then, you should receive an expected response, like in the example below. Check if this matches the configuration details of your Identity Provider. If not, you’ll need to create or update the configuration from Step 3.
{
  "data": [
    {
      "configuration_id": "0196E841475970D589E15DA2A5CECAD5",
      "sp_config": {
        "entity_id": "https://route4me.com",
        "assertion_consumer_service_url": "https://wh.route4me.com.com/modules/api/v5.0/saml/acs/………",
        "x509_cert": "MIID…..pHM=",
        "metadata_url": "https://wh.route4me.com.com/modules/api/v5.0/saml/metadata/……"
      },
      "idp_config": {
        "entity_id": "https://idp.example.com",
        "single_sign_on_service": "https://idp.example.com/login",
        "x509_cert": "MIIDq...pRffA=="
      }
    }
  ]
}
Step 5: Configure Team Member Mapping
Once you have the Identity Provider Configuration, you can proceed to define or update the mapping configuration for member attributes, including assigning a default member type. To do so, send a “POST” request to the “” endpoint like in the following example:
curl -X POST "https://wh.route4me.com/modules/api/v5.0/saml/mapping" \
-H "Authorization: Bearer YOUR_API_KEY" \
-H "Content-Type: application/json" \
-d '{
  "member_email": "emailAttribute",
  "member_first_name": "firstNameAttribute",
  "member_last_name": "lastNameAttribute",
  "default_member_type": "SUB_ACCOUNT_DRIVER"
}'
You should receive the following expected result:
{
  "member_email": "emailAttribute",
  "member_first_name": "firstNameAttribute",
  "member_last_name": "lastNameAttribute",
  "default_member_type": "SUB_ACCOUNT_DRIVER"
}
In detail, the parameters in the response correspond to the following data:
- member_email: The SAML attribute mapped to the email address of a user in the system.
- member_first_name: The SAML attribute mapped to the first name of a user in the system.
- member_last_name: The SAML attribute mapped to the last name of a user in the system.
- default_member_type: The default role for new members.
Step 6: Configure Current Member Mapping
Next, check the Identity Provider configuration in your application by sending a “GET” request to the “”, like in the example, to retrieve the current Identity Provider member mapping from the system.
curl -X GET "https://wh.route4me.com/modules/api/v5.0/saml/mapping" \
-H "Authorization: Bearer YOUR_API_KEY"
You should receive the following expected response:
{
  "member_email": "emailAttribute",
  "member_first_name": "firstNameAttribute",
  "member_last_name": "lastNameAttribute",
  "default_member_type": "SUB_ACCOUNT_DRIVER"
}
Step 7: Test Your SAML Single Sign-On (SSO)
Finally, you can test the SSO workflow by initiating a login request. To do so, send a “POST” request to the “/api/v5.0/saml/login” endpoint like in the following example:
curl -X POST "https://wh.route4me.com/modules/api/v5.0/saml/login" \
-H "Authorization: Bearer YOUR_API_KEY" \
-H "Content-Type: application/json" \
-d '{
  "email": "[[email protected]]"
}'
You should receive the following expected response and can redirect the user to the “redirect_to” URL. The user can then sign in via the Identity Provider.
{
  "redirect_to": "https://idp.example.com/login?SAMLRequest=...&RelayState=..."
}
Get Certificate For Service Integration
Additionally, you can get a separate certificate file you can use to create integrations with services such as Okta SAML.
To do so, send a “Get” request to the “/api/v5.0/saml/sp-certificate” endpoint like in the following example:
curl --location "https://wh.route4me.com/modules/api/v5.0/saml/sp-certificate" \
--header "Accept: application/json" \
--header "Authorization: Bearer YOUR_API_KEY" \
You should receive the following expected response with the contents of your certificate. Simply paste the contents into any text editor and save the file with the “.cer” or “.crt” extension.
-----BEGIN CERTIFICATE-----
YOUR CERTIFICATE
-----END CERTIFICATE-----
Multiple Configuration Support And Flexible Service Connection
Additionally, Route4Me’s Self-Service SAML API offers multiple configuration support, making service connection settings more flexible. For your convenience, you can also authorize through a connected platform such as Azure Entra ID or Okta SAML.
Last Updated:
About author: Kristian Andreev
Kristian is a Technical Writer at Route4Me. With over a decade of experience in writing and localization, he's an expert at communicating complex technical data in a clear, concise, and user-friendly way. Passionate about bridging the gap between engineers and users, he specializes in creating documentation to streamline onboarding, enhance product usability, and support global teams on the path to success.