Service Time – Add And Edit Service Times On Route Addresses
Route4Me’s Service Time parameter makes it much easier for you to account for the time your team spends servicing each address on every optimized last mile route. For example, you run a food delivery business that requires visiting ten customers per route, and you calculate that driving the route takes around one hour. In reality, you have to find a parking spot for your delivery truck or van, unload the cargo, get to a particular floor of the customer’s building, and so on. If servicing each client takes around 15 minutes, the total route time will increase to more than three hours, significantly longer than a single hour of driving. Often, some customers require more service time than others, and calculating the total time it takes to finish the route gets even more complicated. With the Service Time parameter, you can define the same or different service times for each destination on your routes, and the software will automatically compute the total route time, providing a more realistic and precise duration for the complete route. With properly calculated service times, you can streamline your logistics operations while saving time, improving customer satisfaction, and making more money. Additionally, learn about the Dynamic Service Time Add-On.
Table of Contents
Add Service Time In Spreadsheets – Import Or Upload Routes With Address Service Time
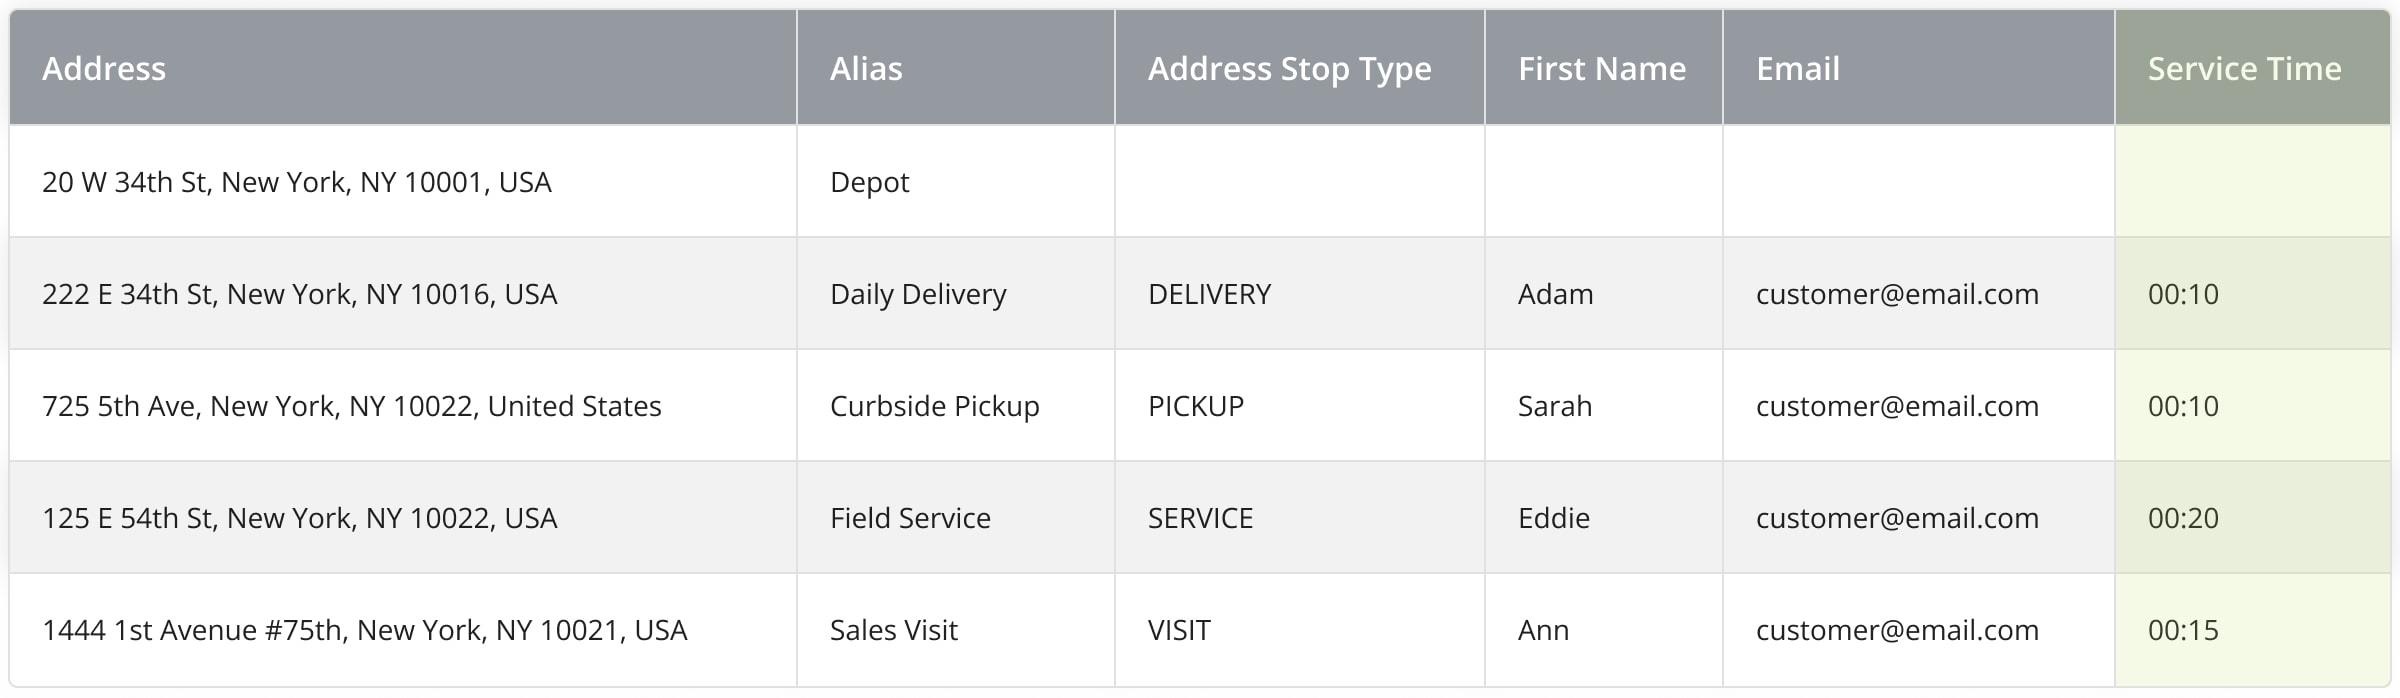
Route4Me’s Route Planning and Optimization Software enables you to upload routes in a spreadsheet and import address spreadsheets. Additionally, you can specify a Service Time for each address before planning your routes. When importing a spreadsheet with route data, for it to be successfully processed, the spreadsheet must contain a header row and data rows. The header defines the type of information, while the rows contain the actual data that you want to import or upload.
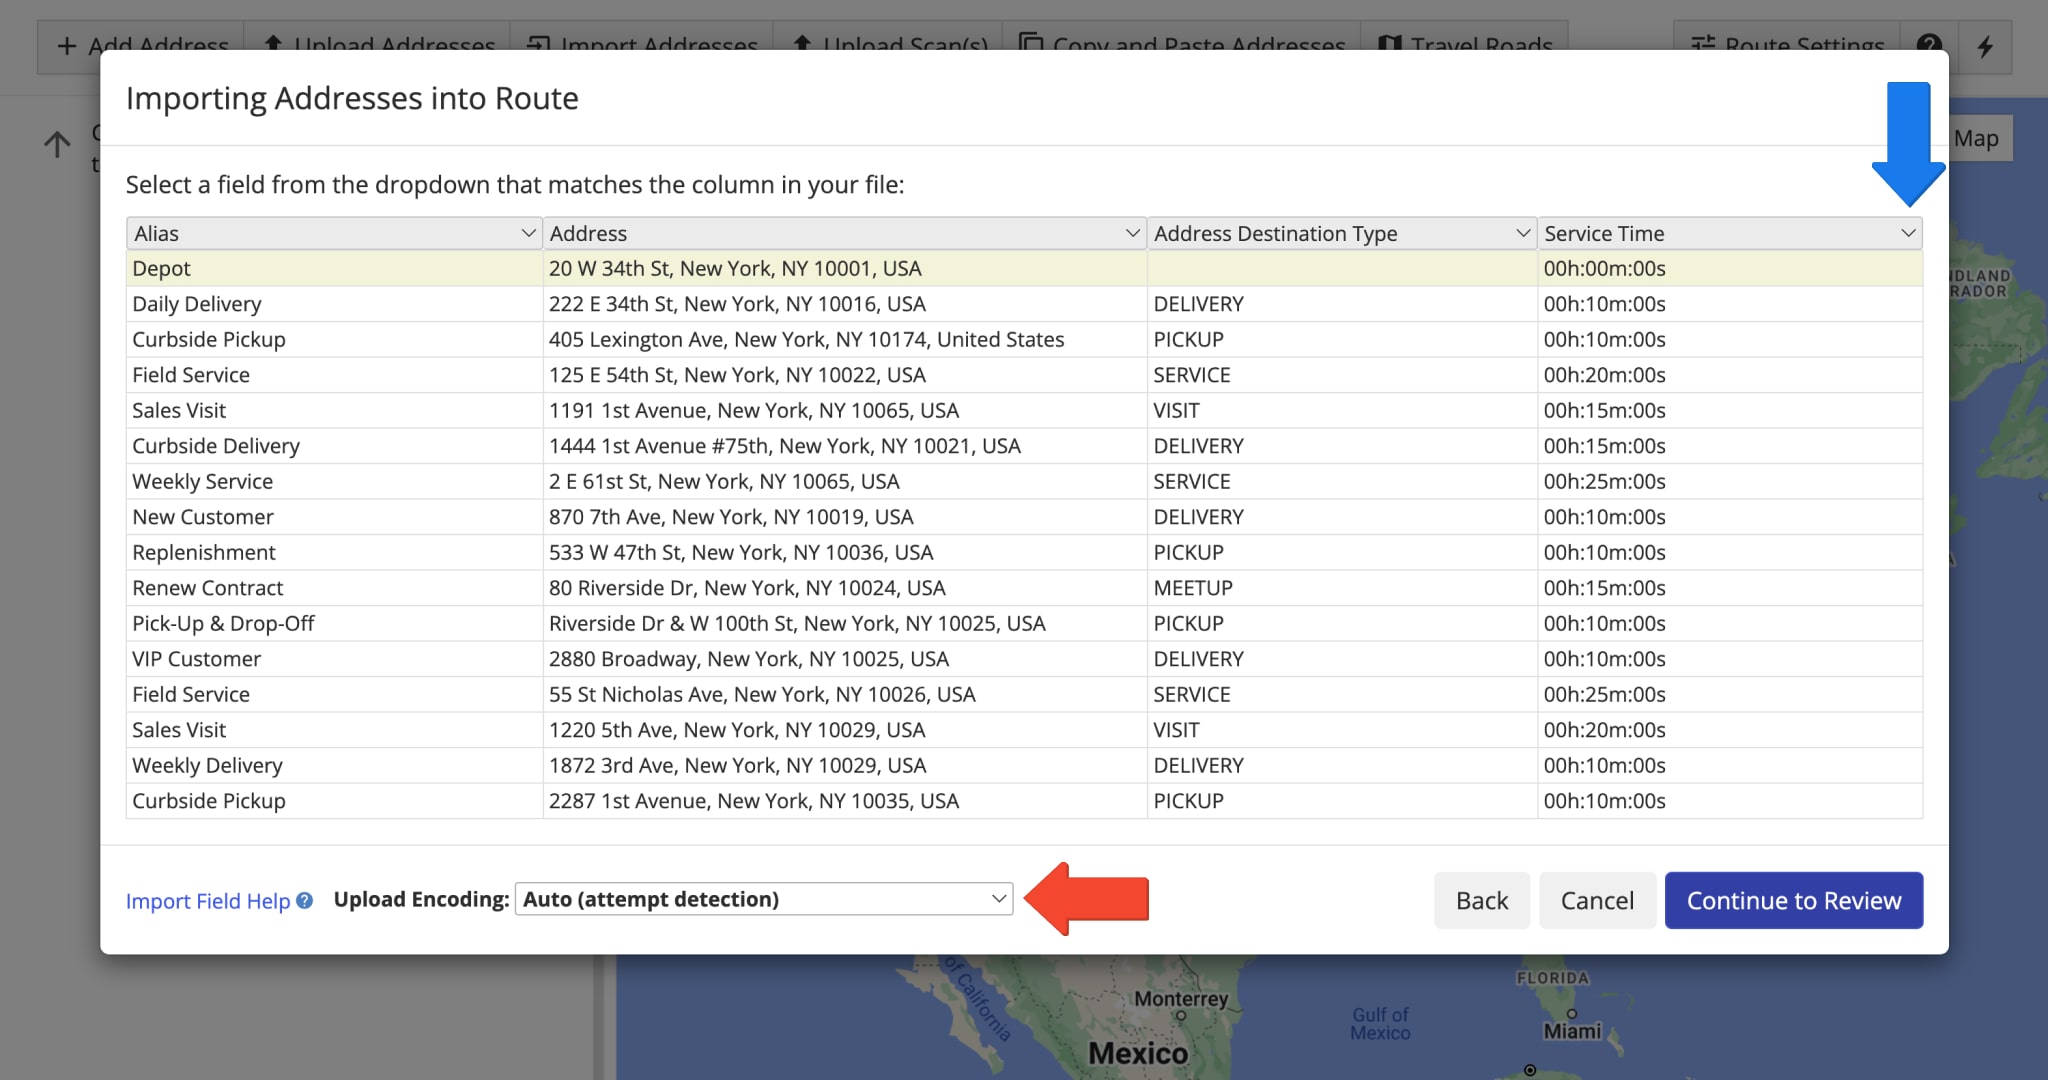
Furthermore, along with the obligatory “Address” column, you can also include other data. If you want to define the Service Time constraint for each address on the route, you need to add the corresponding column to your spreadsheet. In the “Service Time” column, you can define the time needed to service each route destination. Additionally, learn more about using spreadsheets.
To plan routes with spreadsheets that include the Service Time constraint, go to “Routes” and then “Plan New Route” from the Navigation Menu. Next, select your preferred route data import method, route spreadsheet upload, or cloud spreadsheet import.
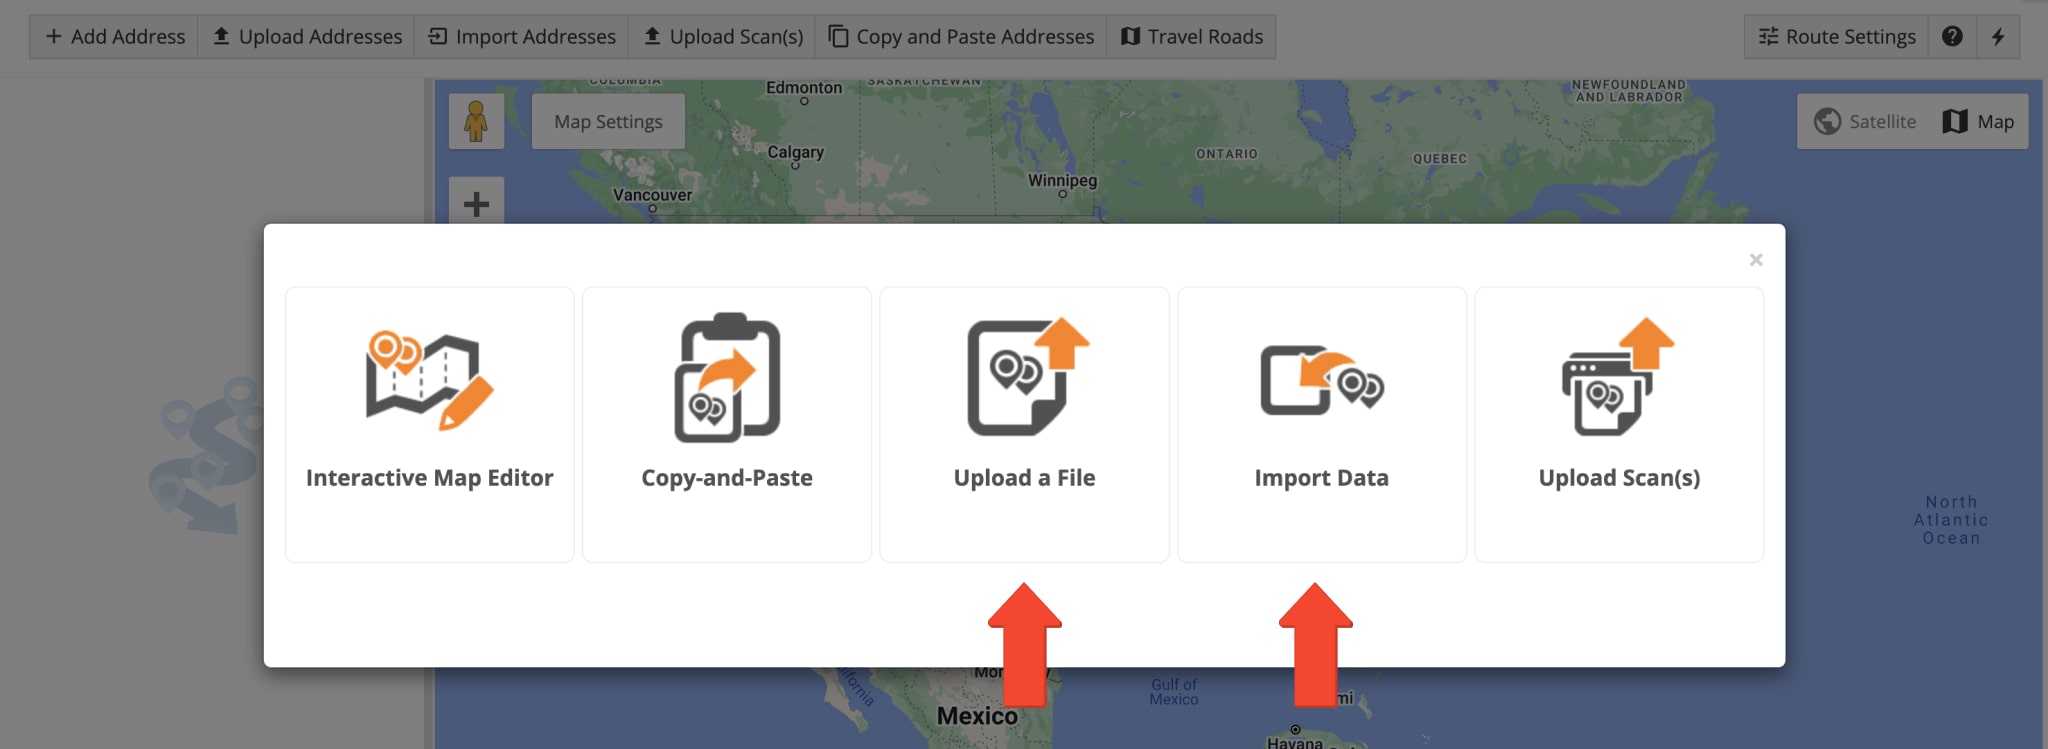
Select your preferred Optimization Profile or adjust optimization settings manually. Next, import the route addresses using one of the previously selected methods. Once you’ve imported or uploaded your spreadsheet, Route4Me processes the imported data and displays it in the corresponding window. For the system to process the data automatically, select the “Auto (attempt detection)” option. Alternatively, you can manually match column titles to the data contained in the corresponding columns. To proceed, click the “Continue to Review” button.
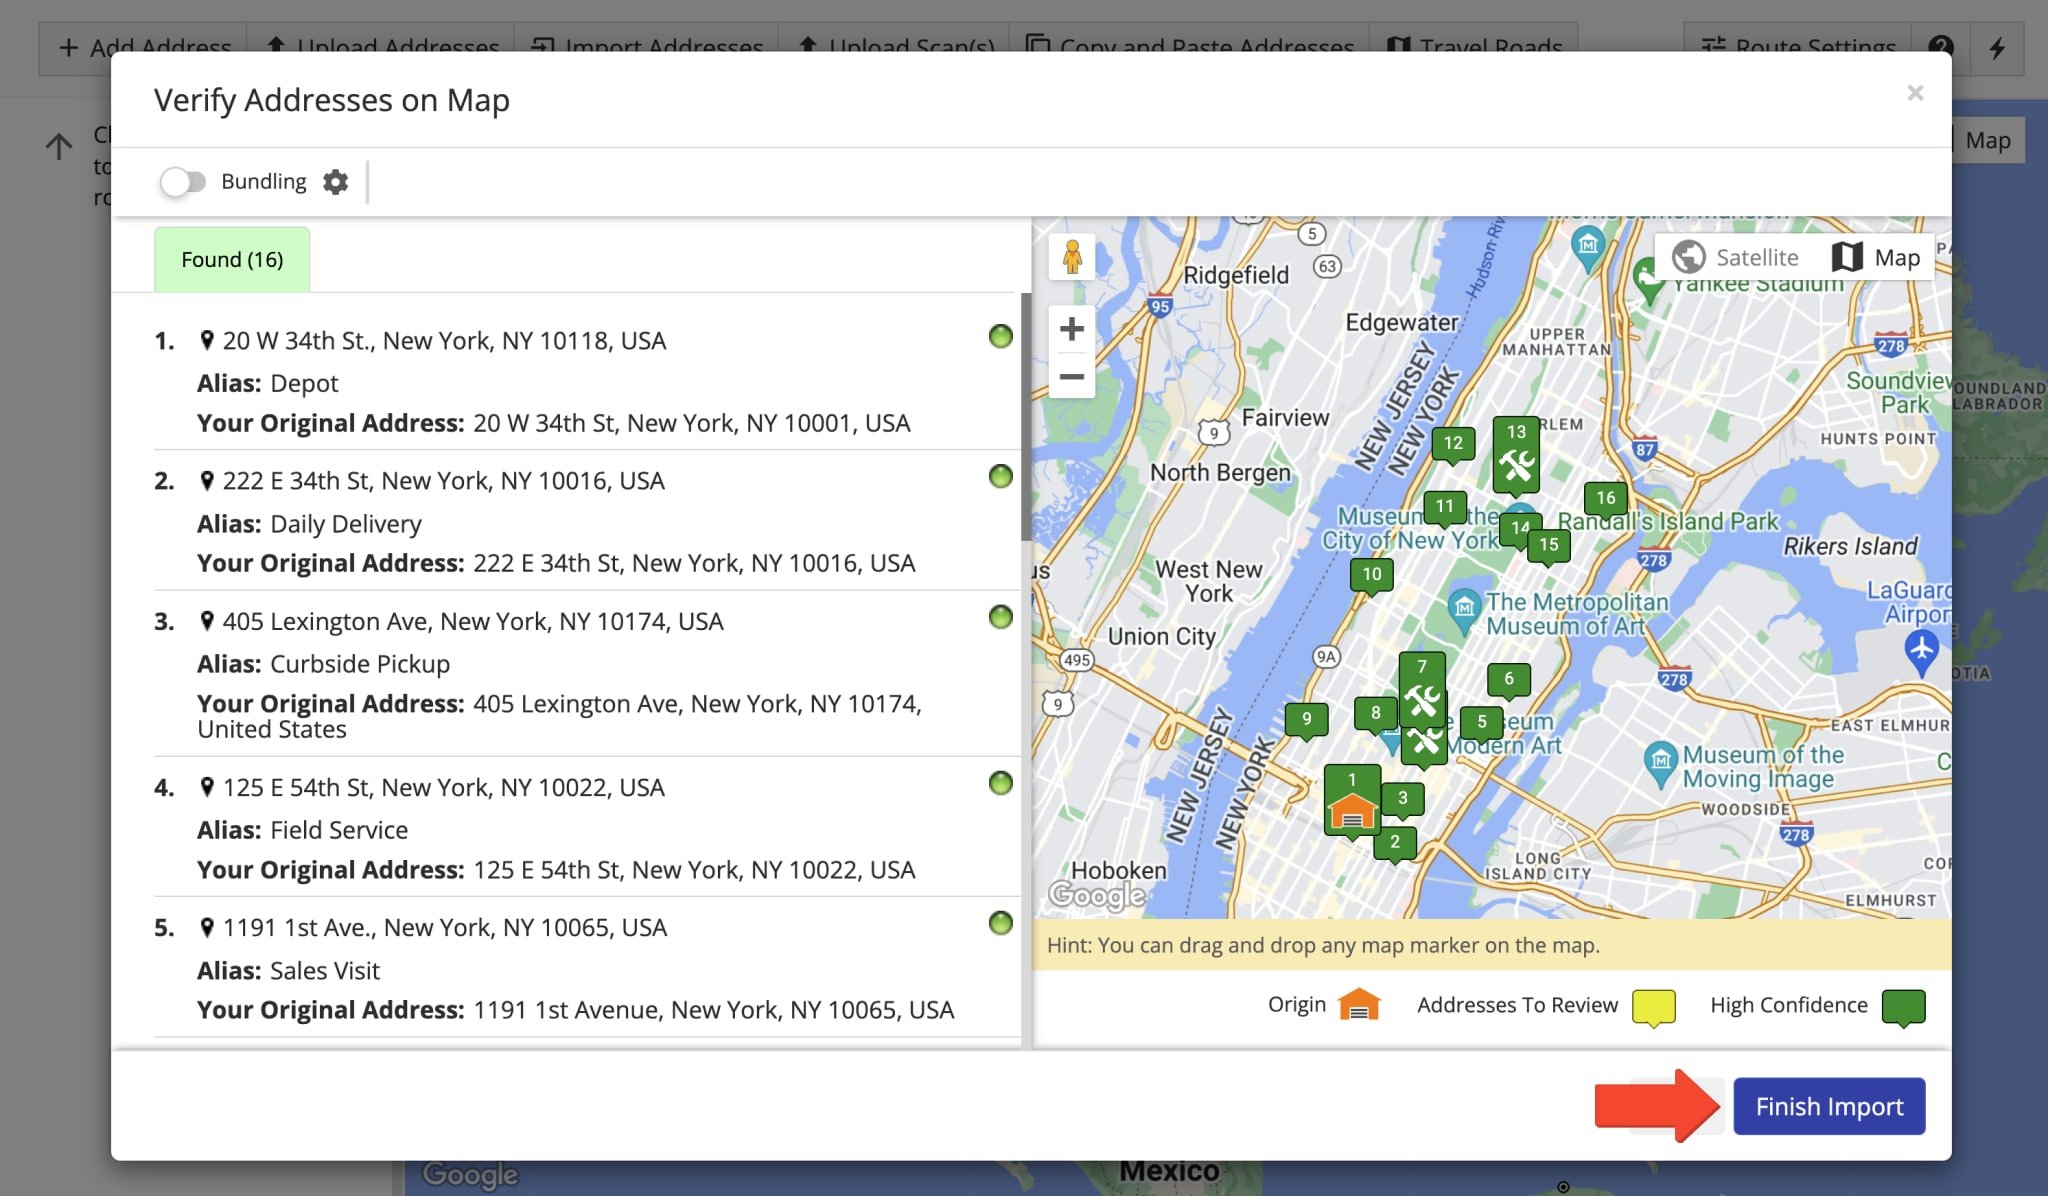
In the “Verify Addresses on Map” window, you can view all imported and processed addresses on the map and check their geocode status. Addresses marked in green were successfully geocoded with “High Confidence“. Addresses marked in yellow should be reviewed and adjusted accordingly, while those marked in red require review or manual correction. Once finished, click the “Finish Import” button to import your route addresses with their respective Service Times.
Set Service Time In Optimization Profiles – Automatically Add Service Time To Route Destinations
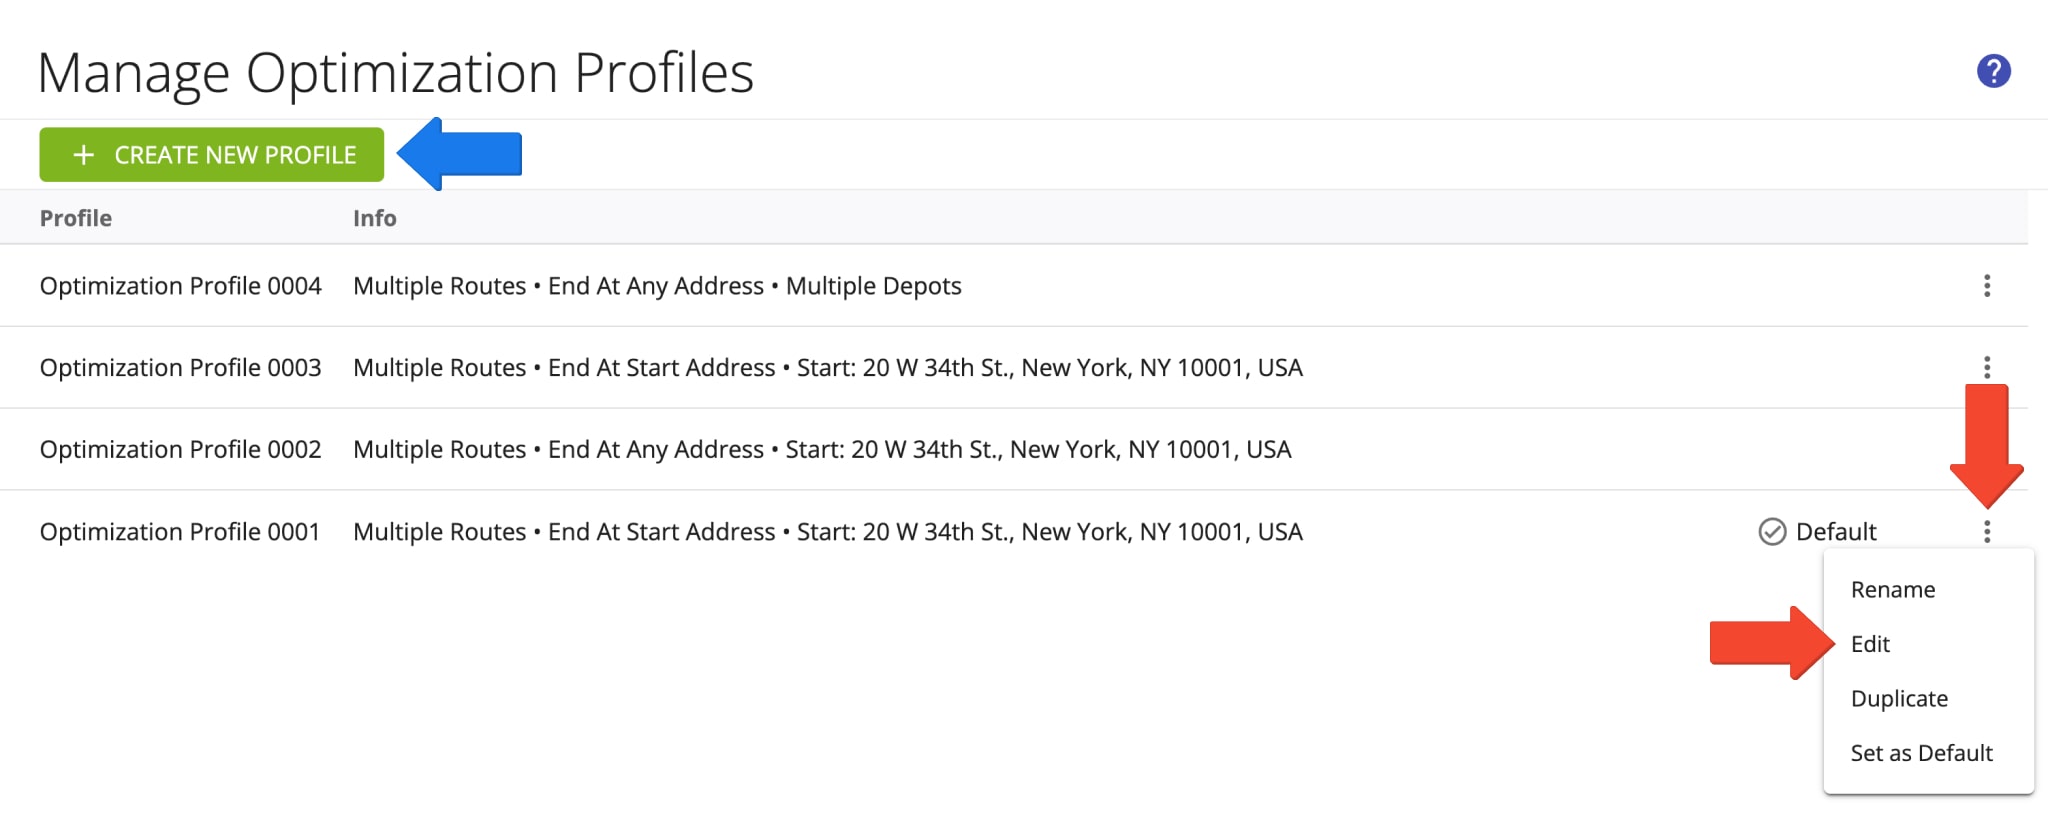
Additionally, Route4Me enables you to automatically add Service Times to addresses as part of the Optimization Profiles used to sequence and optimize routes. To manage your Optimization Profiles, go to “Routes” and then “Optimization Profiles” from the Navigation Menu. Alternatively, when planning routes, you are prompted to select your preferred Optimization Profile. Click the “Manage Profiles” button to access your Optimization Profiles.
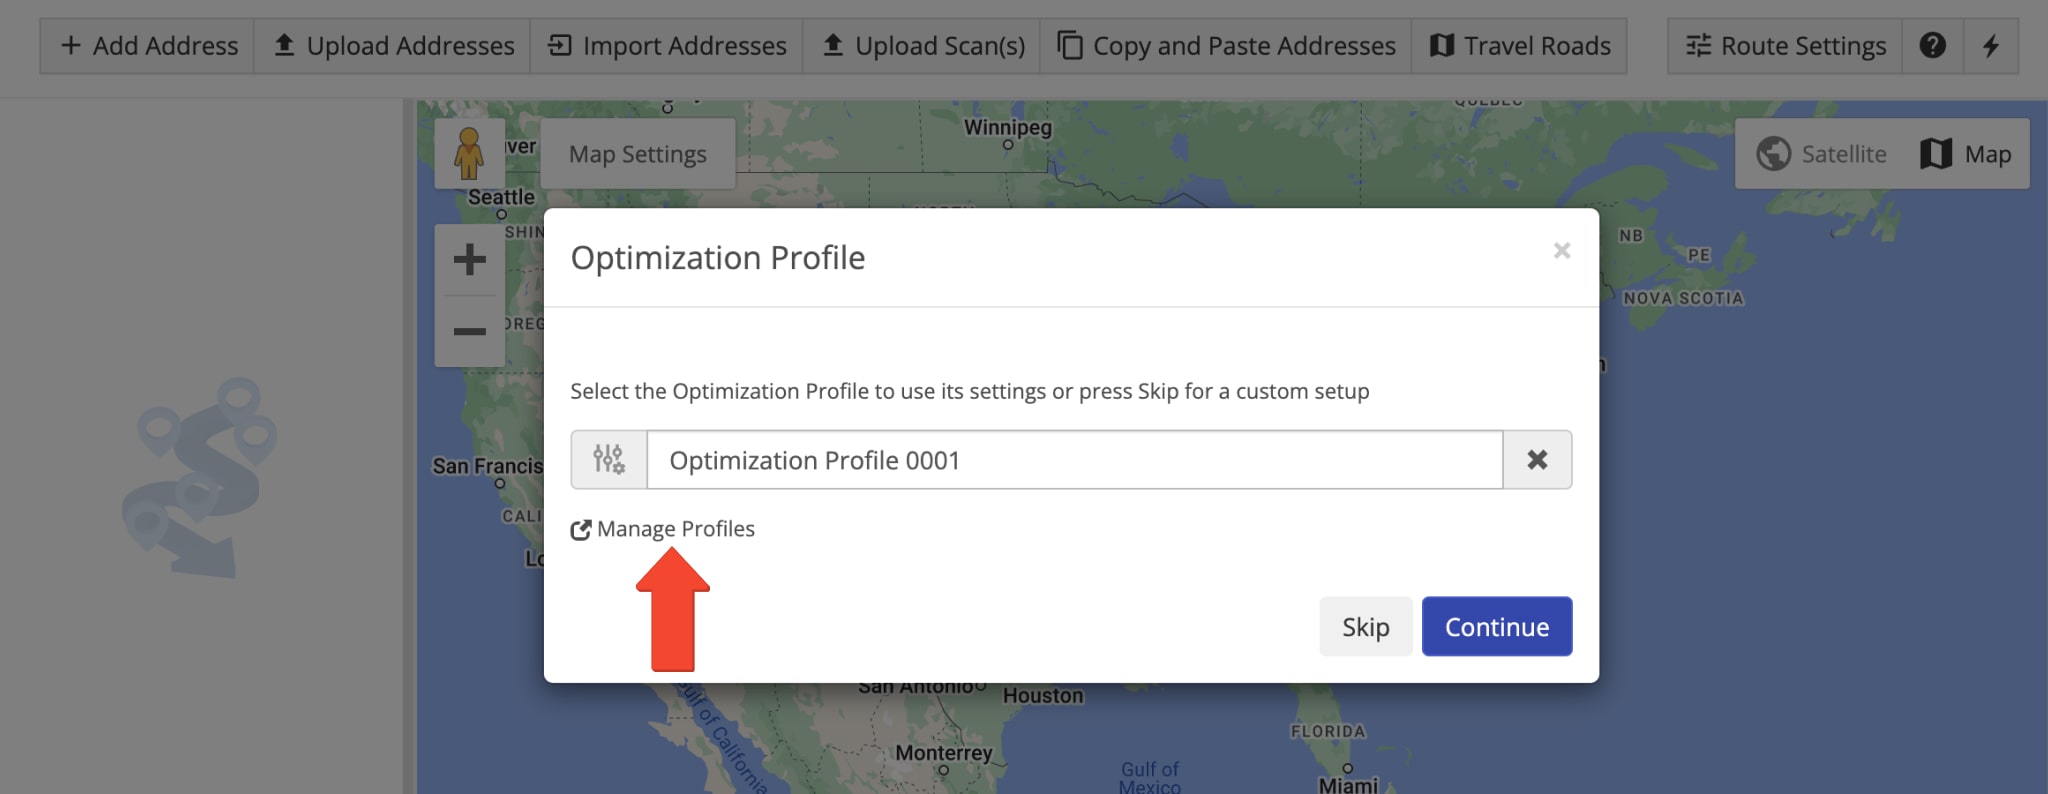
To add Service Times to an existing Optimization Profile, click the Three-dot Icon next to the preferred route and select “Edit” from the menu. Alternatively, you can create a new Optimization Profile by clicking the “Create New Profile” button.
Then, on the “Create Optimization Profile” or “Configure Optimization Profile” screen, go to the “Schedule” tab. Under the “Service Time” section, enable the “Use destination service time” option to use Service Times from an uploaded or imported spreadsheet when optimizing routes with the respective Optimization Profile. Alternatively, enable the “Override service time” option and enter the preferred Service Time in HH:MM:SS. This will apply the specified Service Time to all destinations on routes optimized with the respective Optimization Profile.
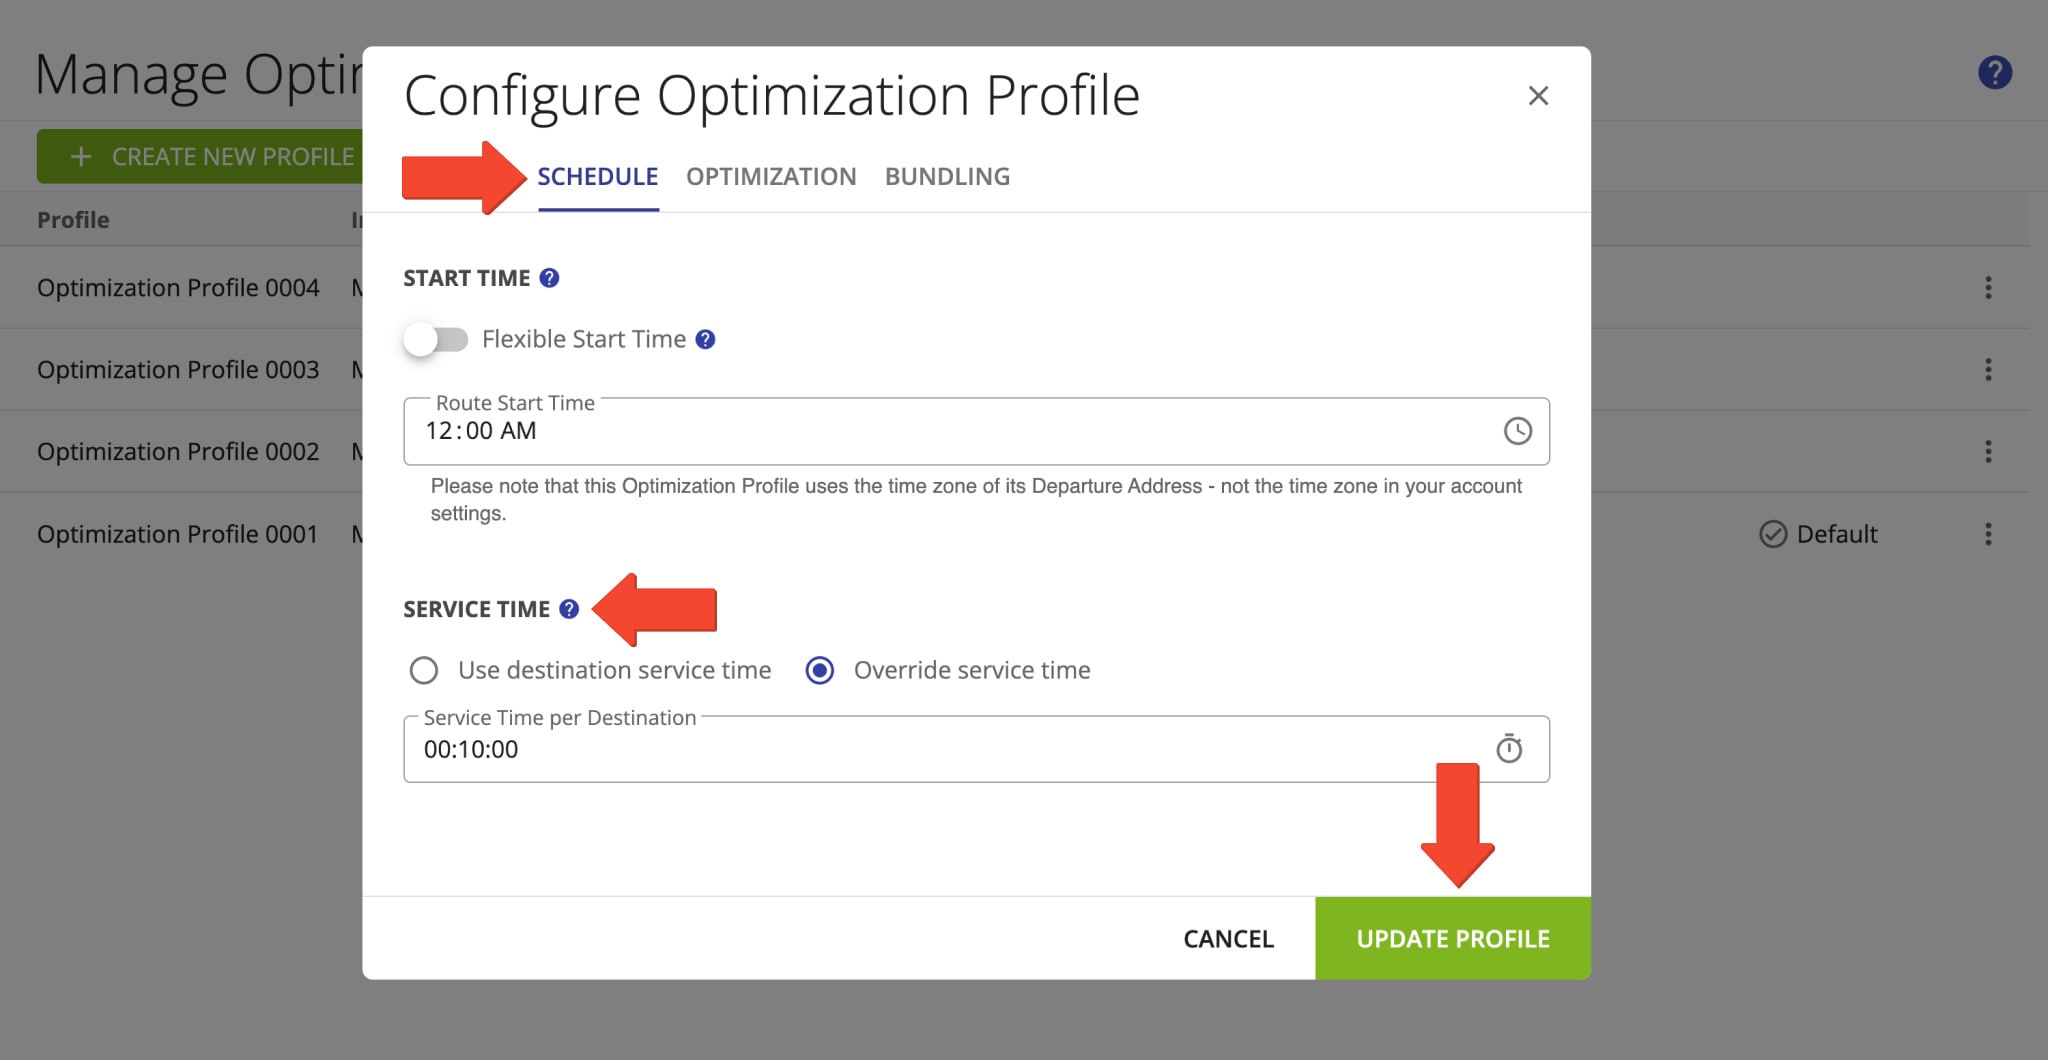
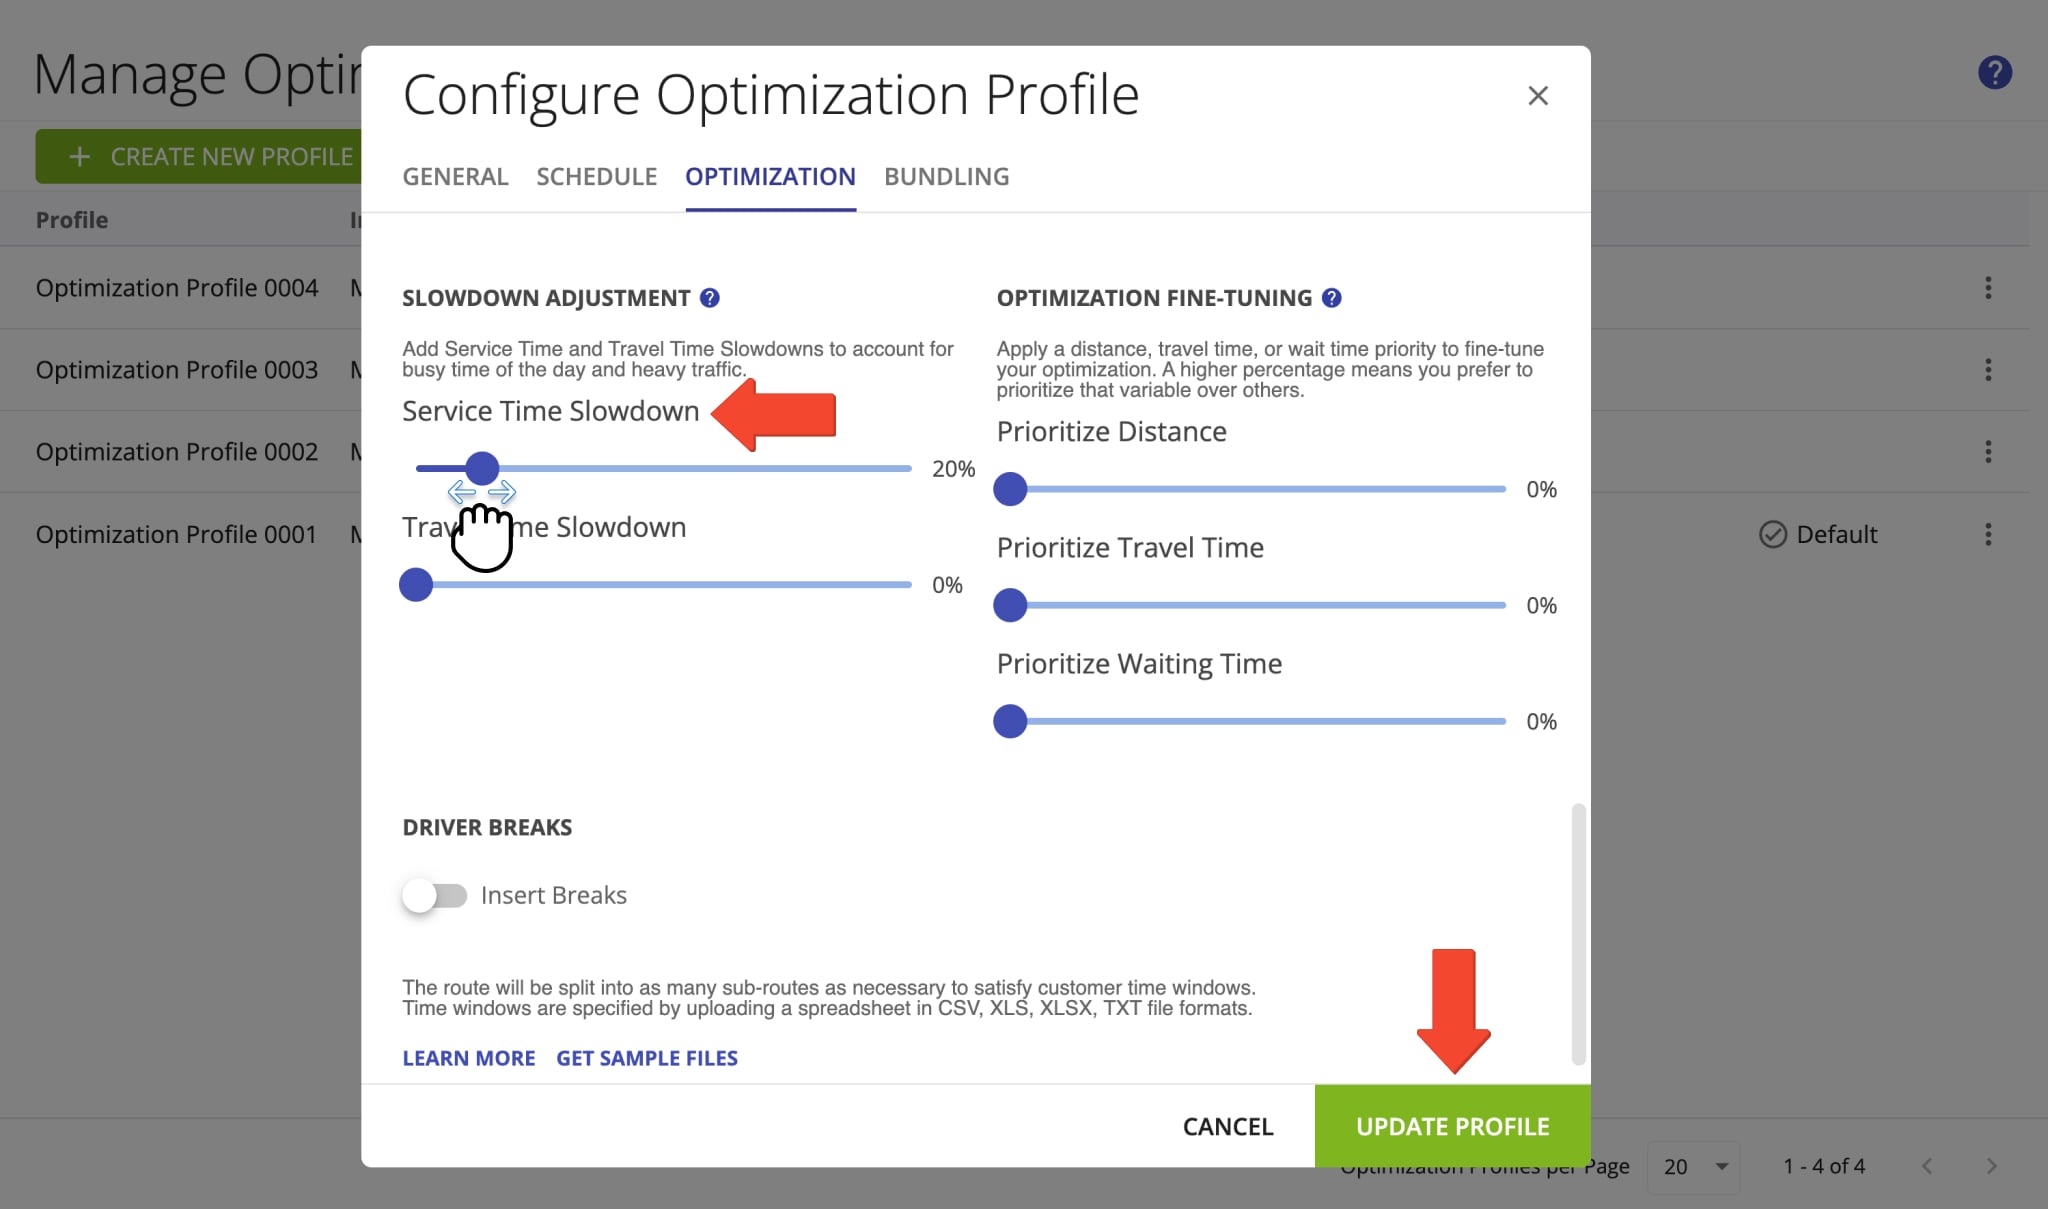
Additionally, you can set a Service Time Slowdown percentage. Specifically, this will extend all Service Times on routes optimized with the corresponding Optimization Profile by the specified percentage. On the “Create Optimization Profile” or “Configure Optimization Profile” screen, go to the “Optimization” tab. Then, scroll down to the “Slowdown Adjustment” section and set the desired “Service Time Slowdown” percentage using the slider.
Set Service Time In Optimization Settings – Automatically Add Address Service Time To Routes
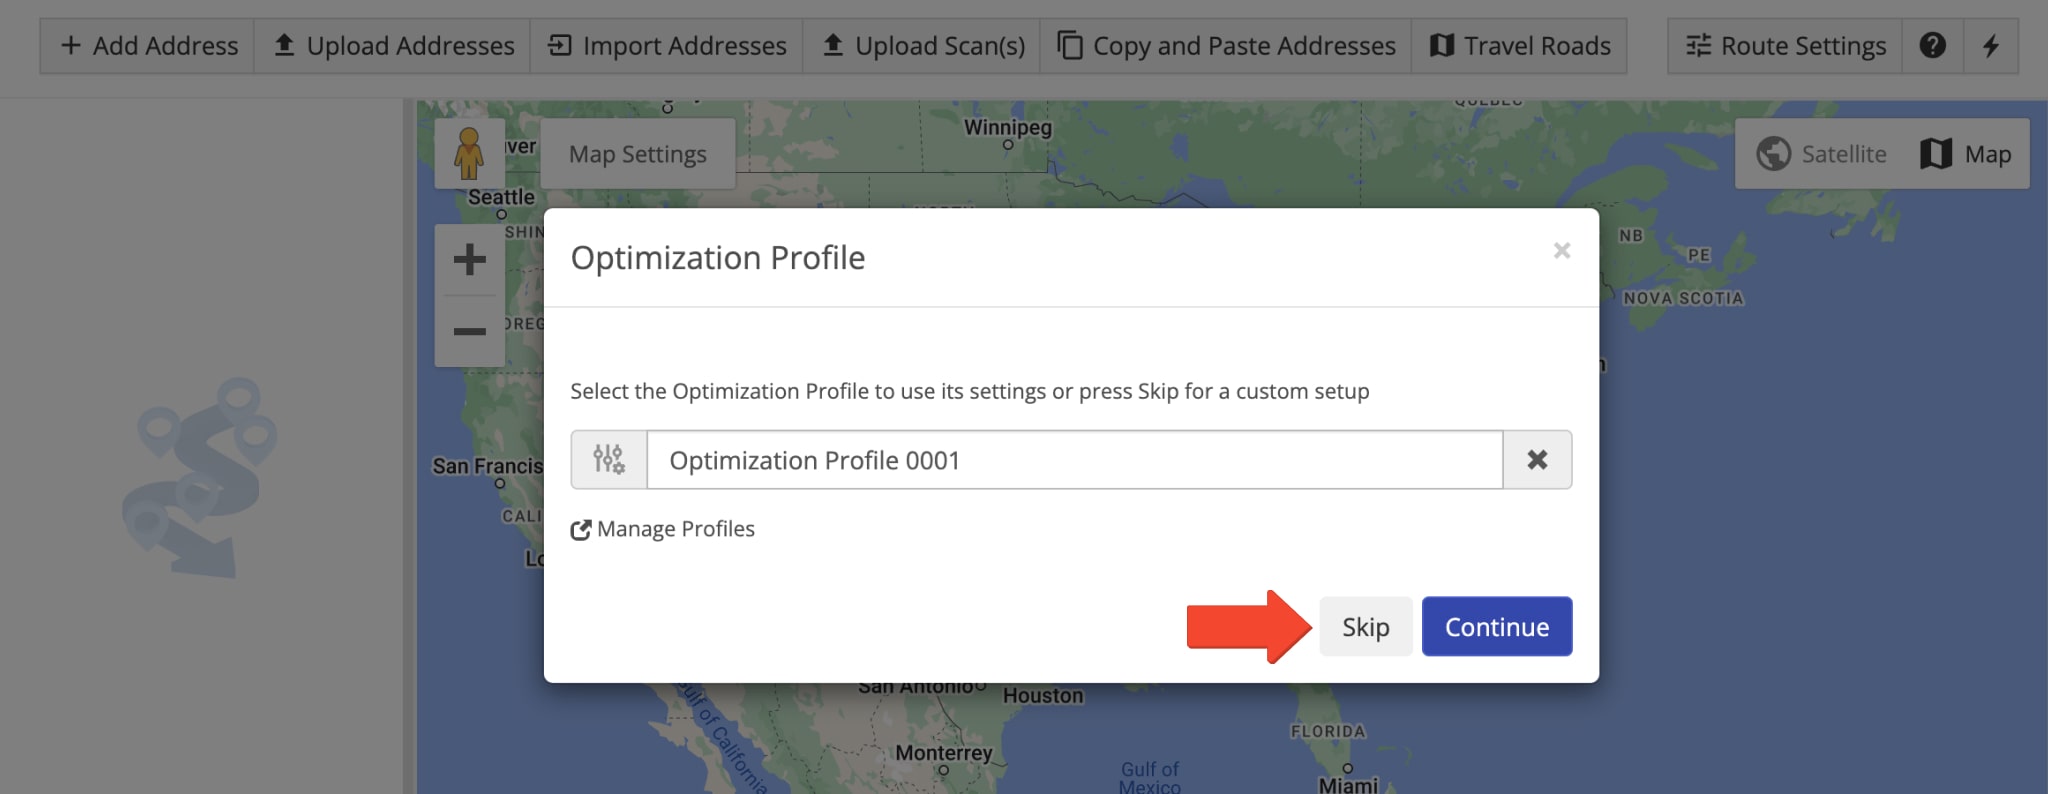
Furthermore, you can set the Service Time for a given route’s destinations on a per-route basis. Go to “Routes” and then “Plan New Route” from the Navigation Menu. Select your preferred method for adding addresses, then click the “Skip” button when prompted to select an Optimization Profile.
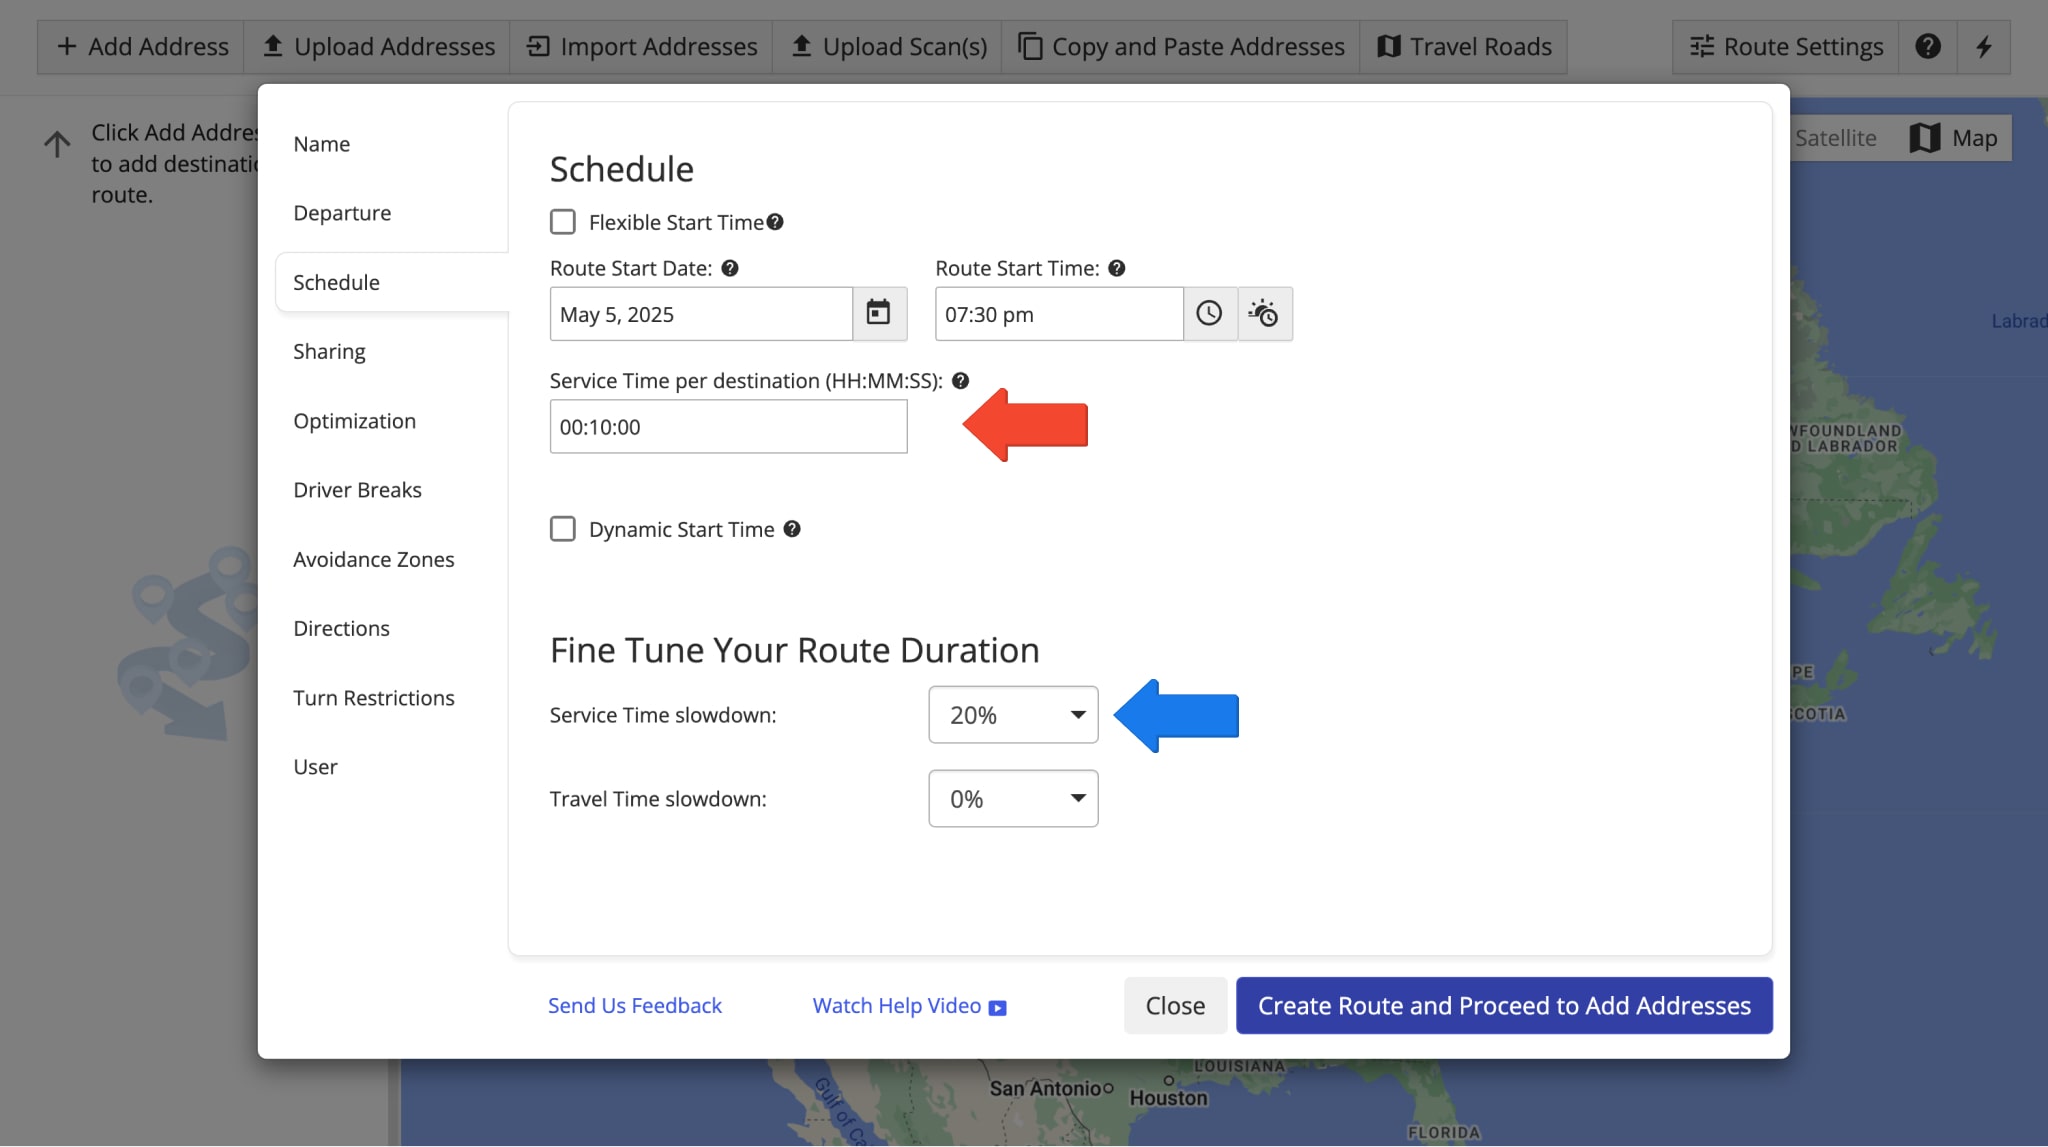
Then, select the “Schedule” tab. Enter the desired destination Service Time in the “Service Time per destination” field in the HH:MM:SS format. Additionally, you can set a Service Time Slowdown percentage. Specifically, this will extend all Service Times on the corresponding route by the specified percentage. Enter your preferred Service Time Slowdown percentage by typing it manually or click the Arrow Icon to open a dropdown menu and select the preferred percentage in 5% increments.
Open Service Time – View And Adjust Service Time In Route Editor
To view or change the service time of a particular destination directly, go to “Routes” and then “Routes” from the Navigation Menu to open the Routes List. Then, click the Open Icon next to the preferred route to open it in the Route Editor.
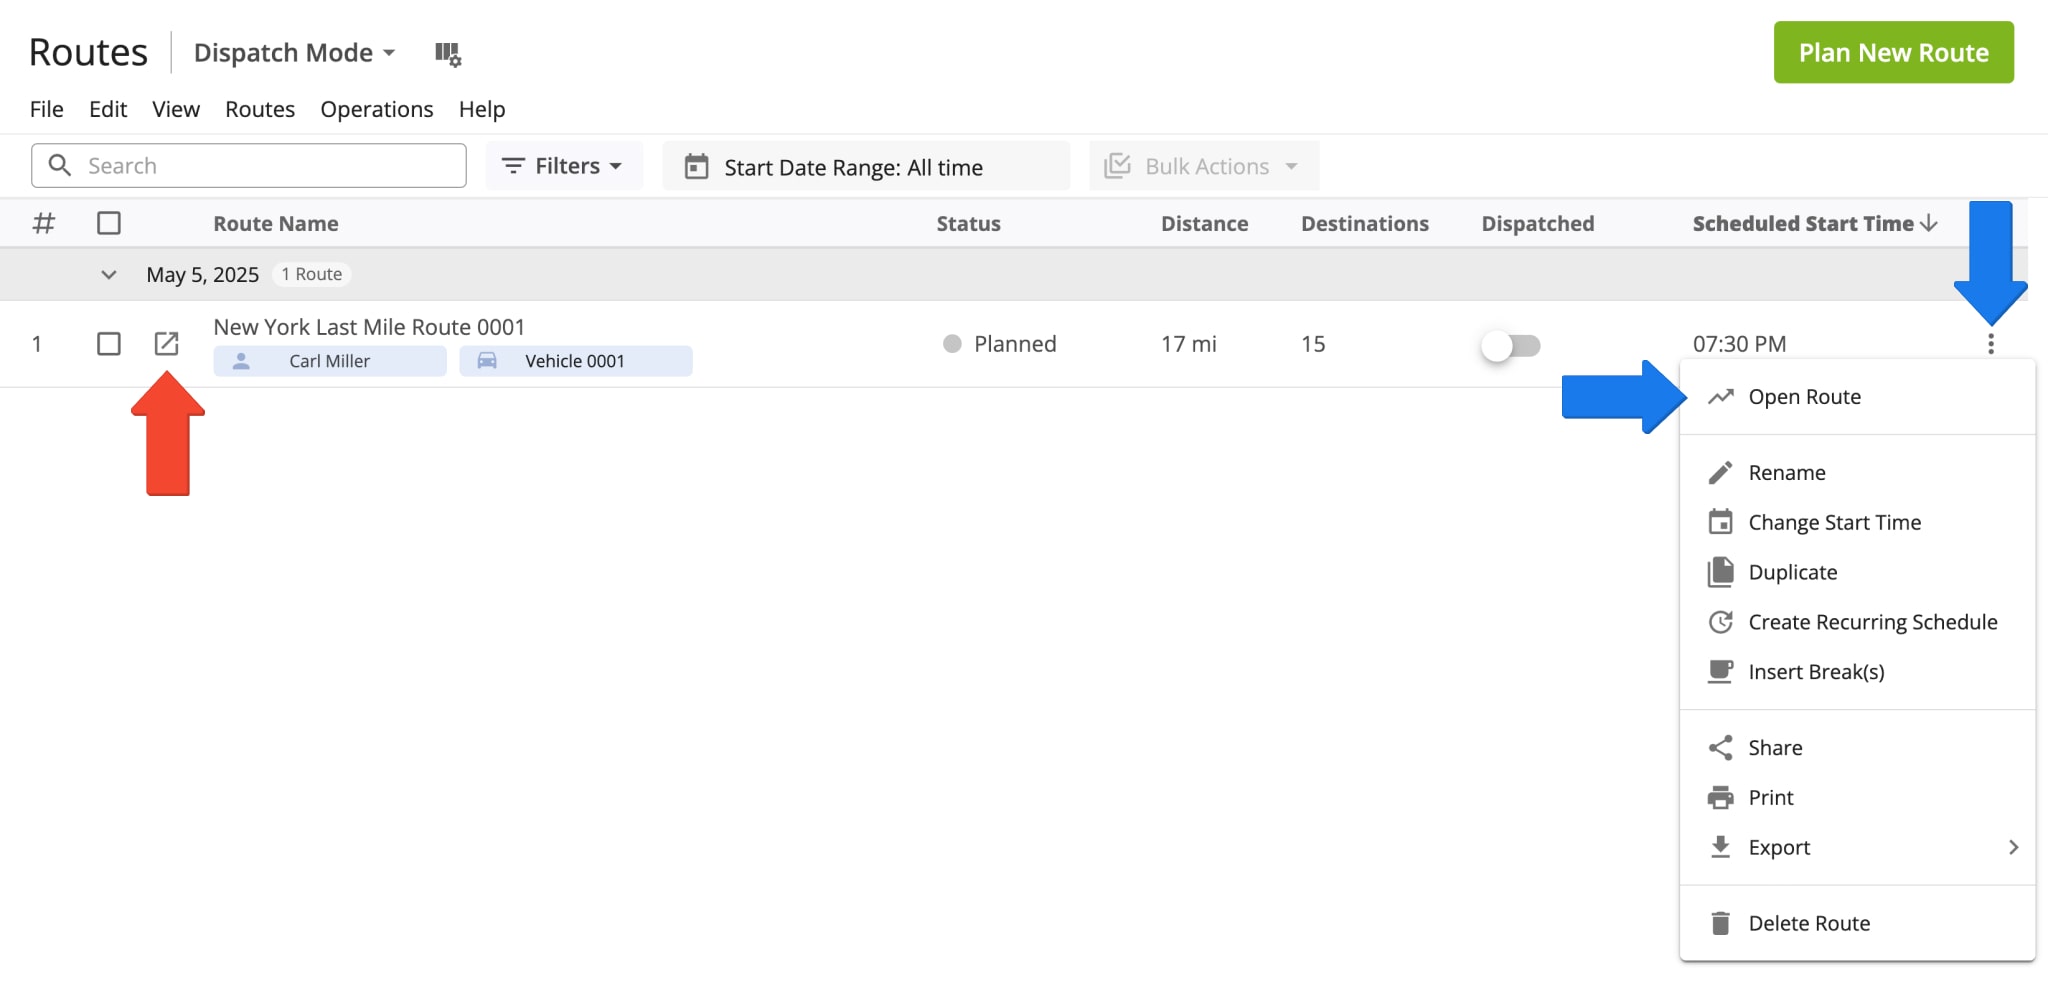
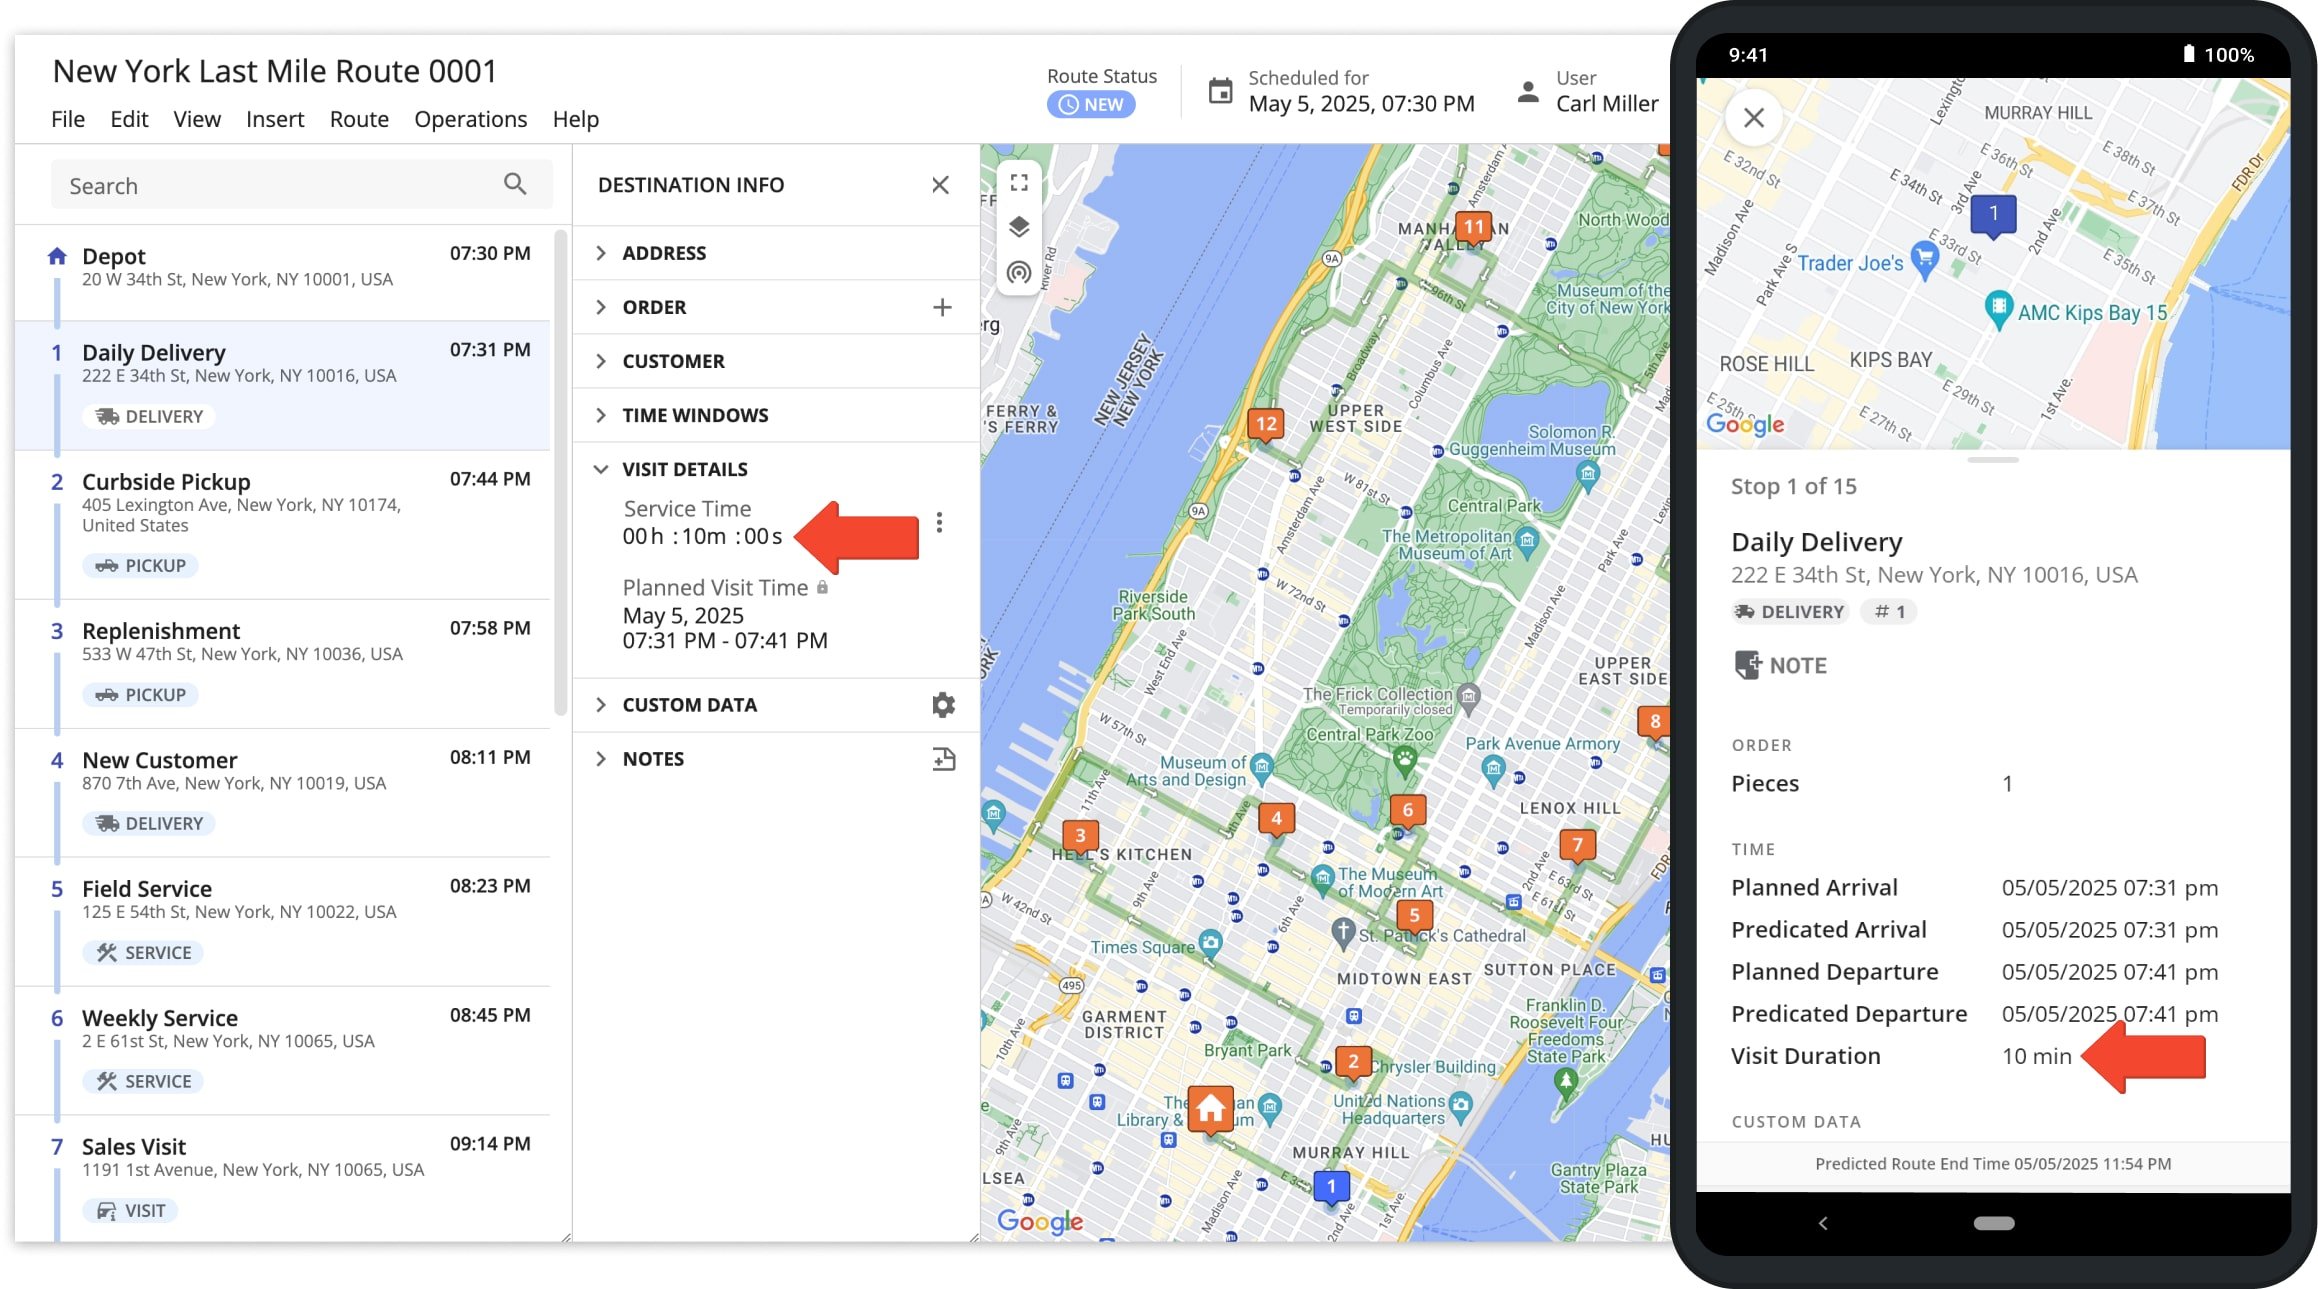
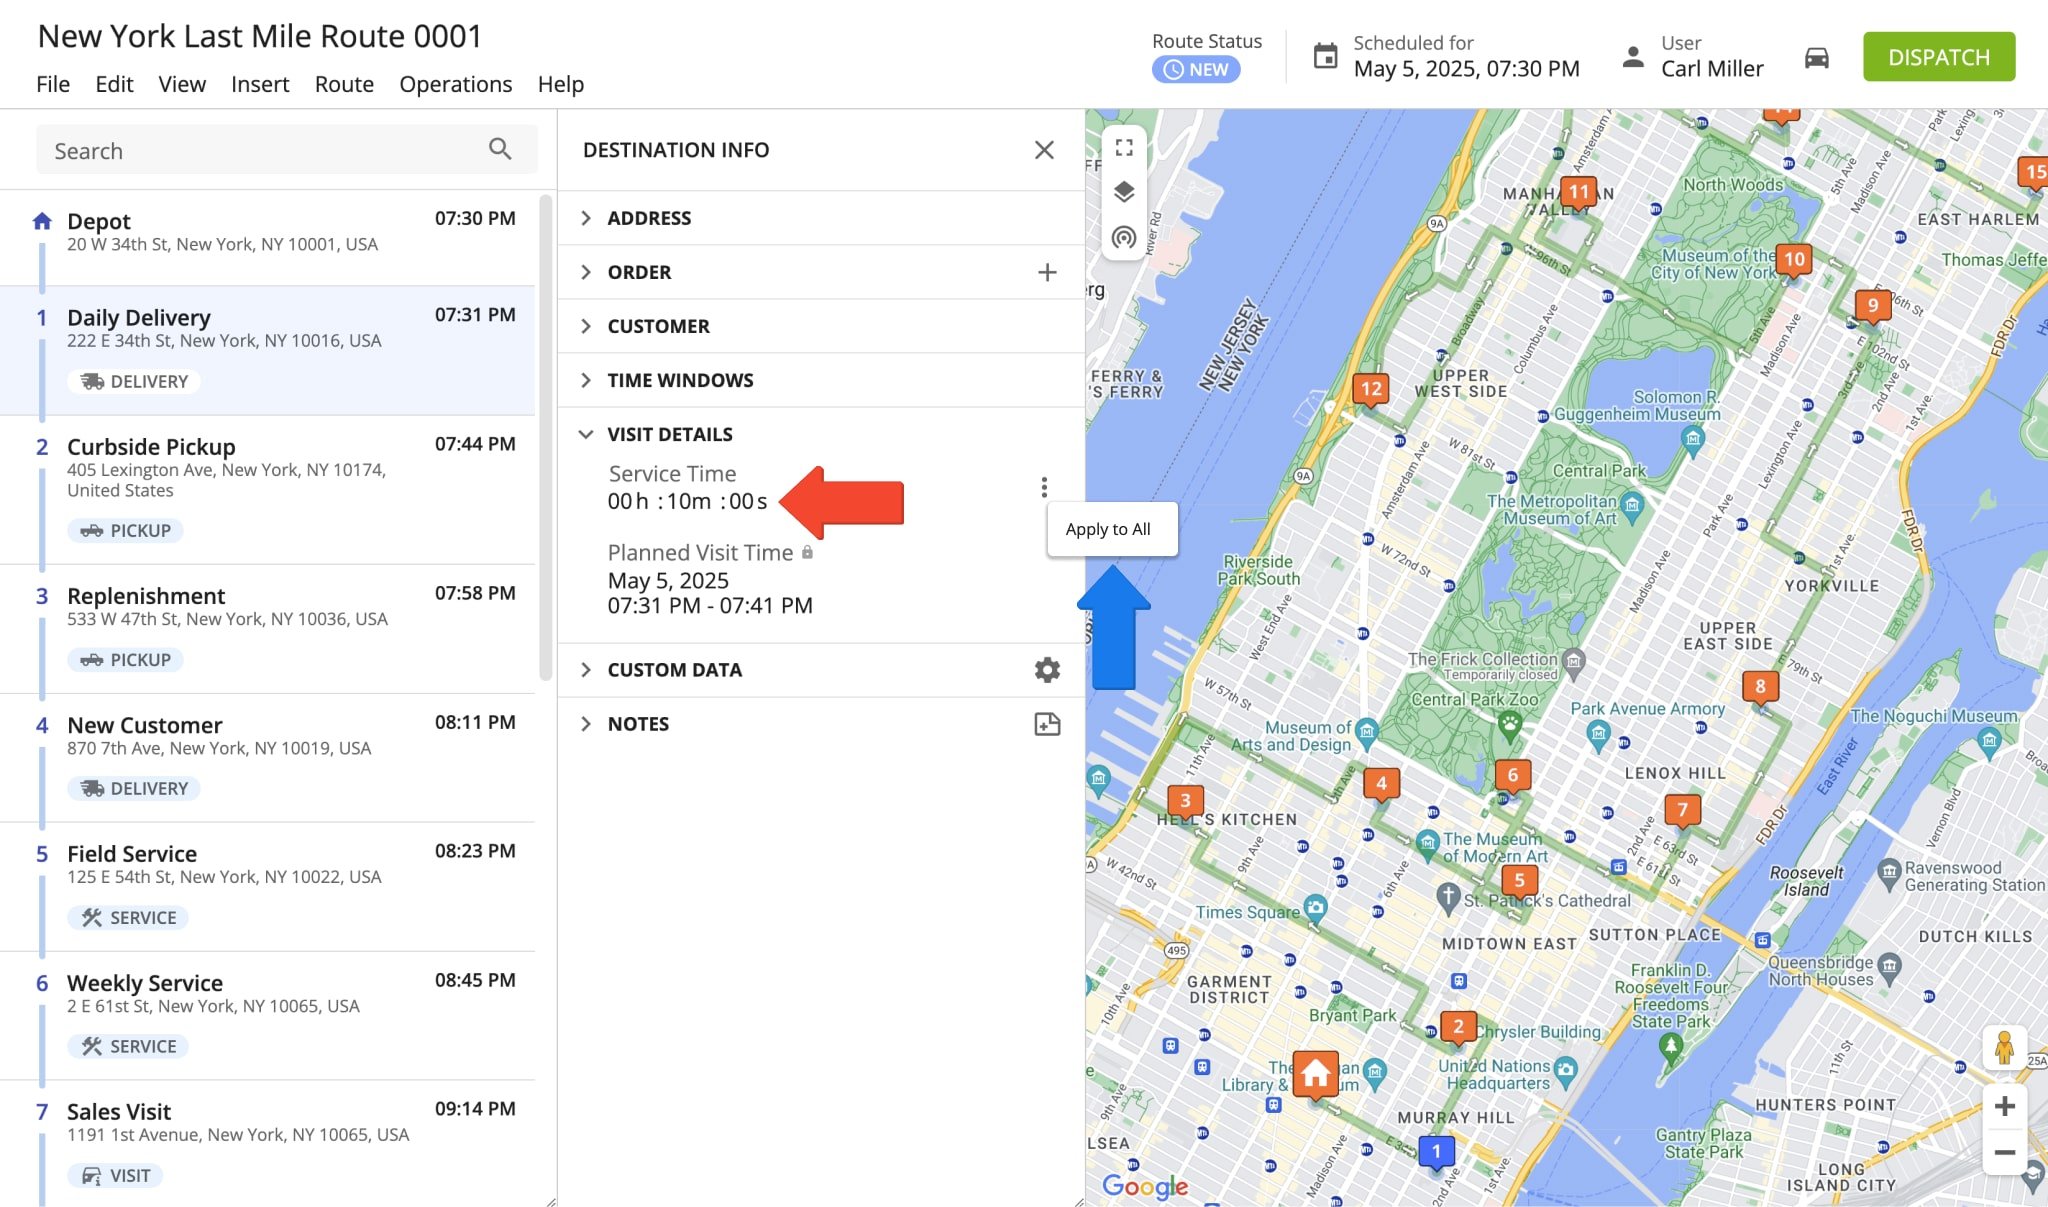
After that, click the preferred destination to open its Destination Info. You can view the Service Time in the “Visit Details” section of the “Destination Info” panel. To modify the Service Time value, click the corresponding field and input a new value. To apply the same Service Time to all stops on the route, click the Three-dot Icon next to the Service Time field and select “Apply to All“.
View Service Time On Map – Open Address Service Time On Routes Map
Additionally, the Route4Me Web Platform enables you to view destination Service Times on the interactive Routes Map. Specifically, go to “Routes” and then “Routes Map” from the Navigation Menu. Then, to filter the available routes, click the Date Range field or the Callendar Icon in the Top Menu Bar and select the respective date range. To open one or multiple routes, check the boxes next to the preferred routes.
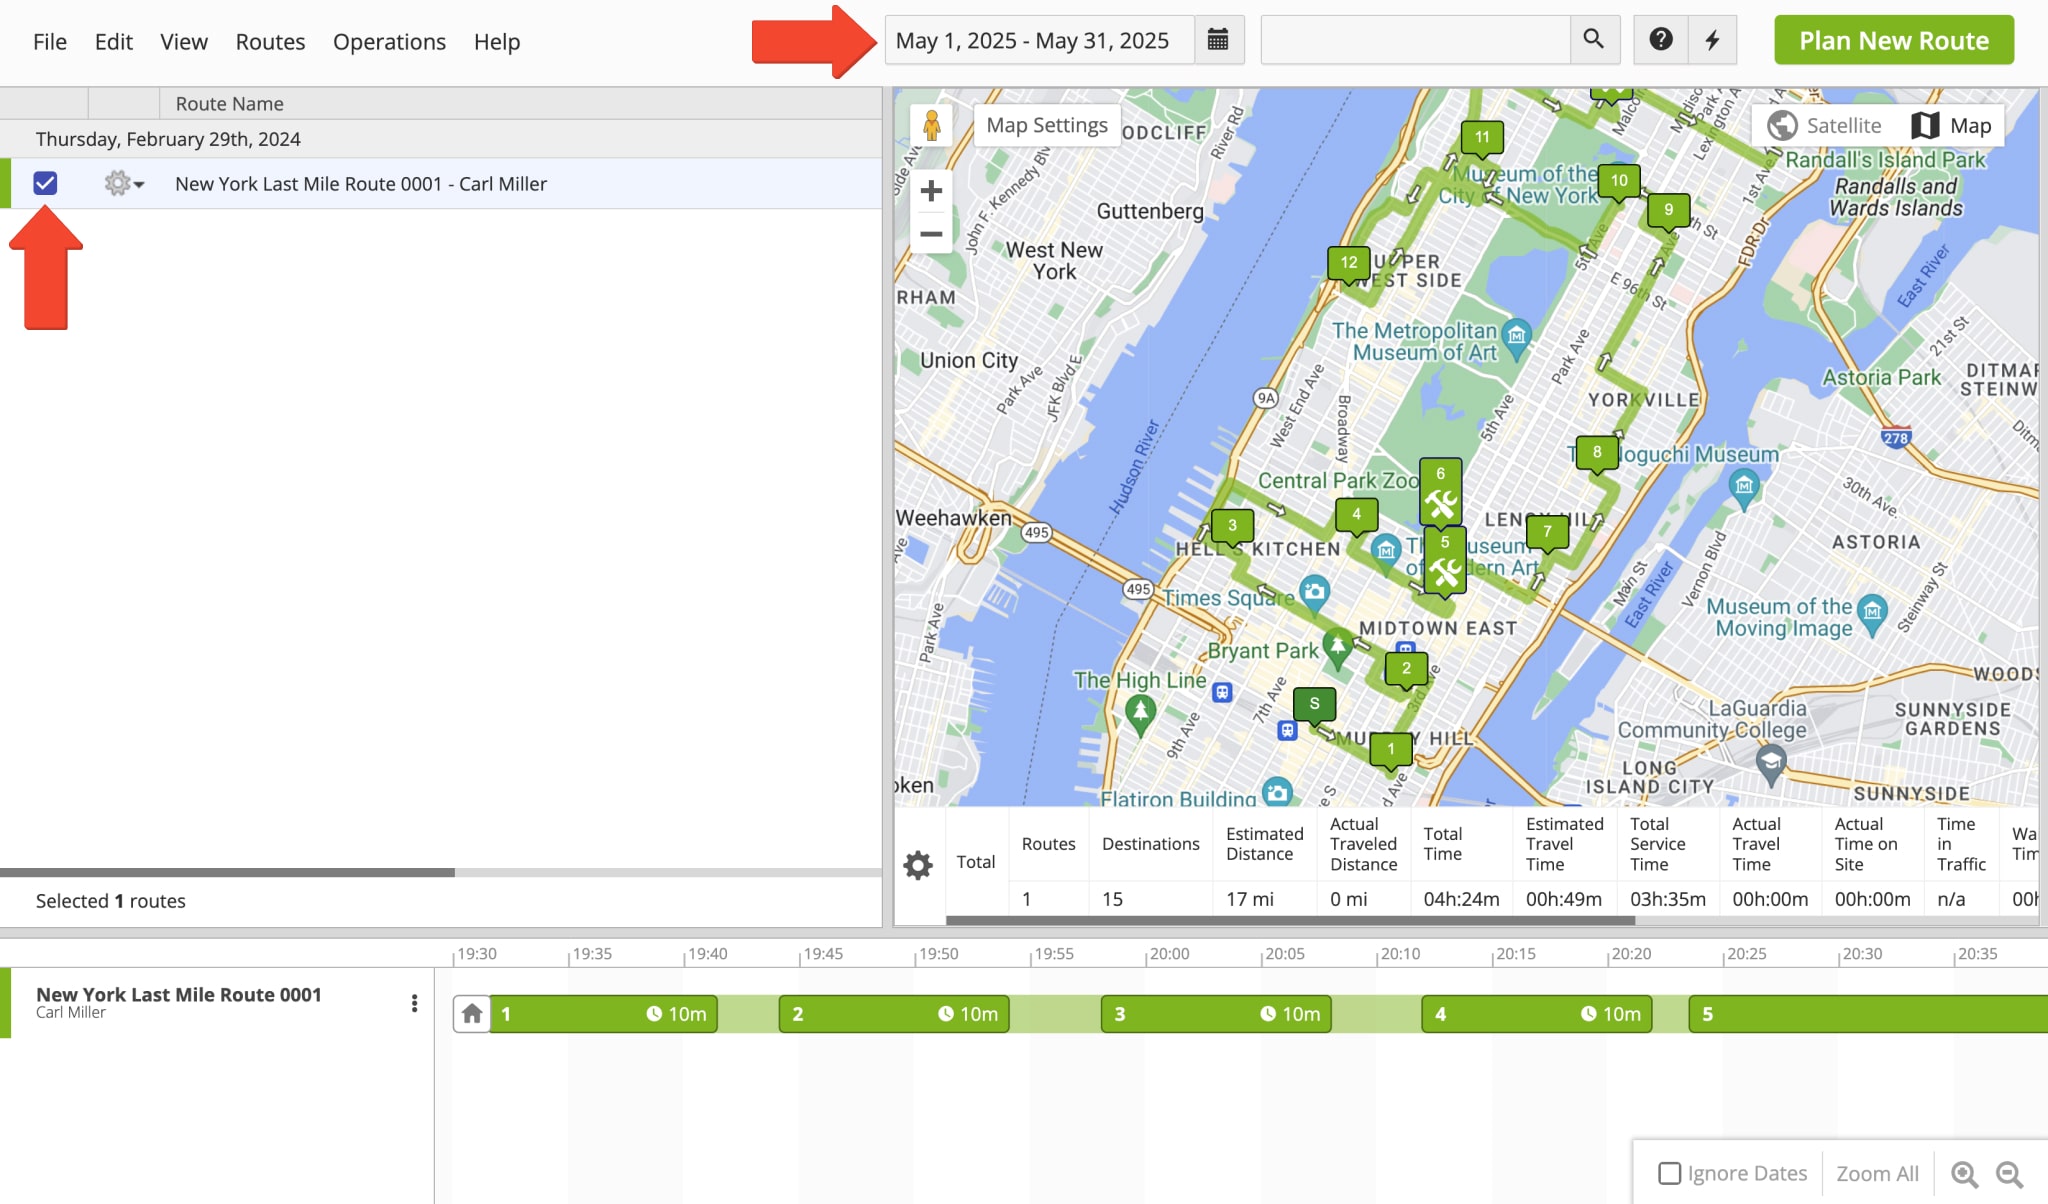
Once you’ve opened your preferred routes, hover over any destination on the map or route timeline to view the respective Destination Info and Service Time. Additionally, you can see the Service Time of every route address in the timeline, shown as the value on the right side of the destination node in the timeline.
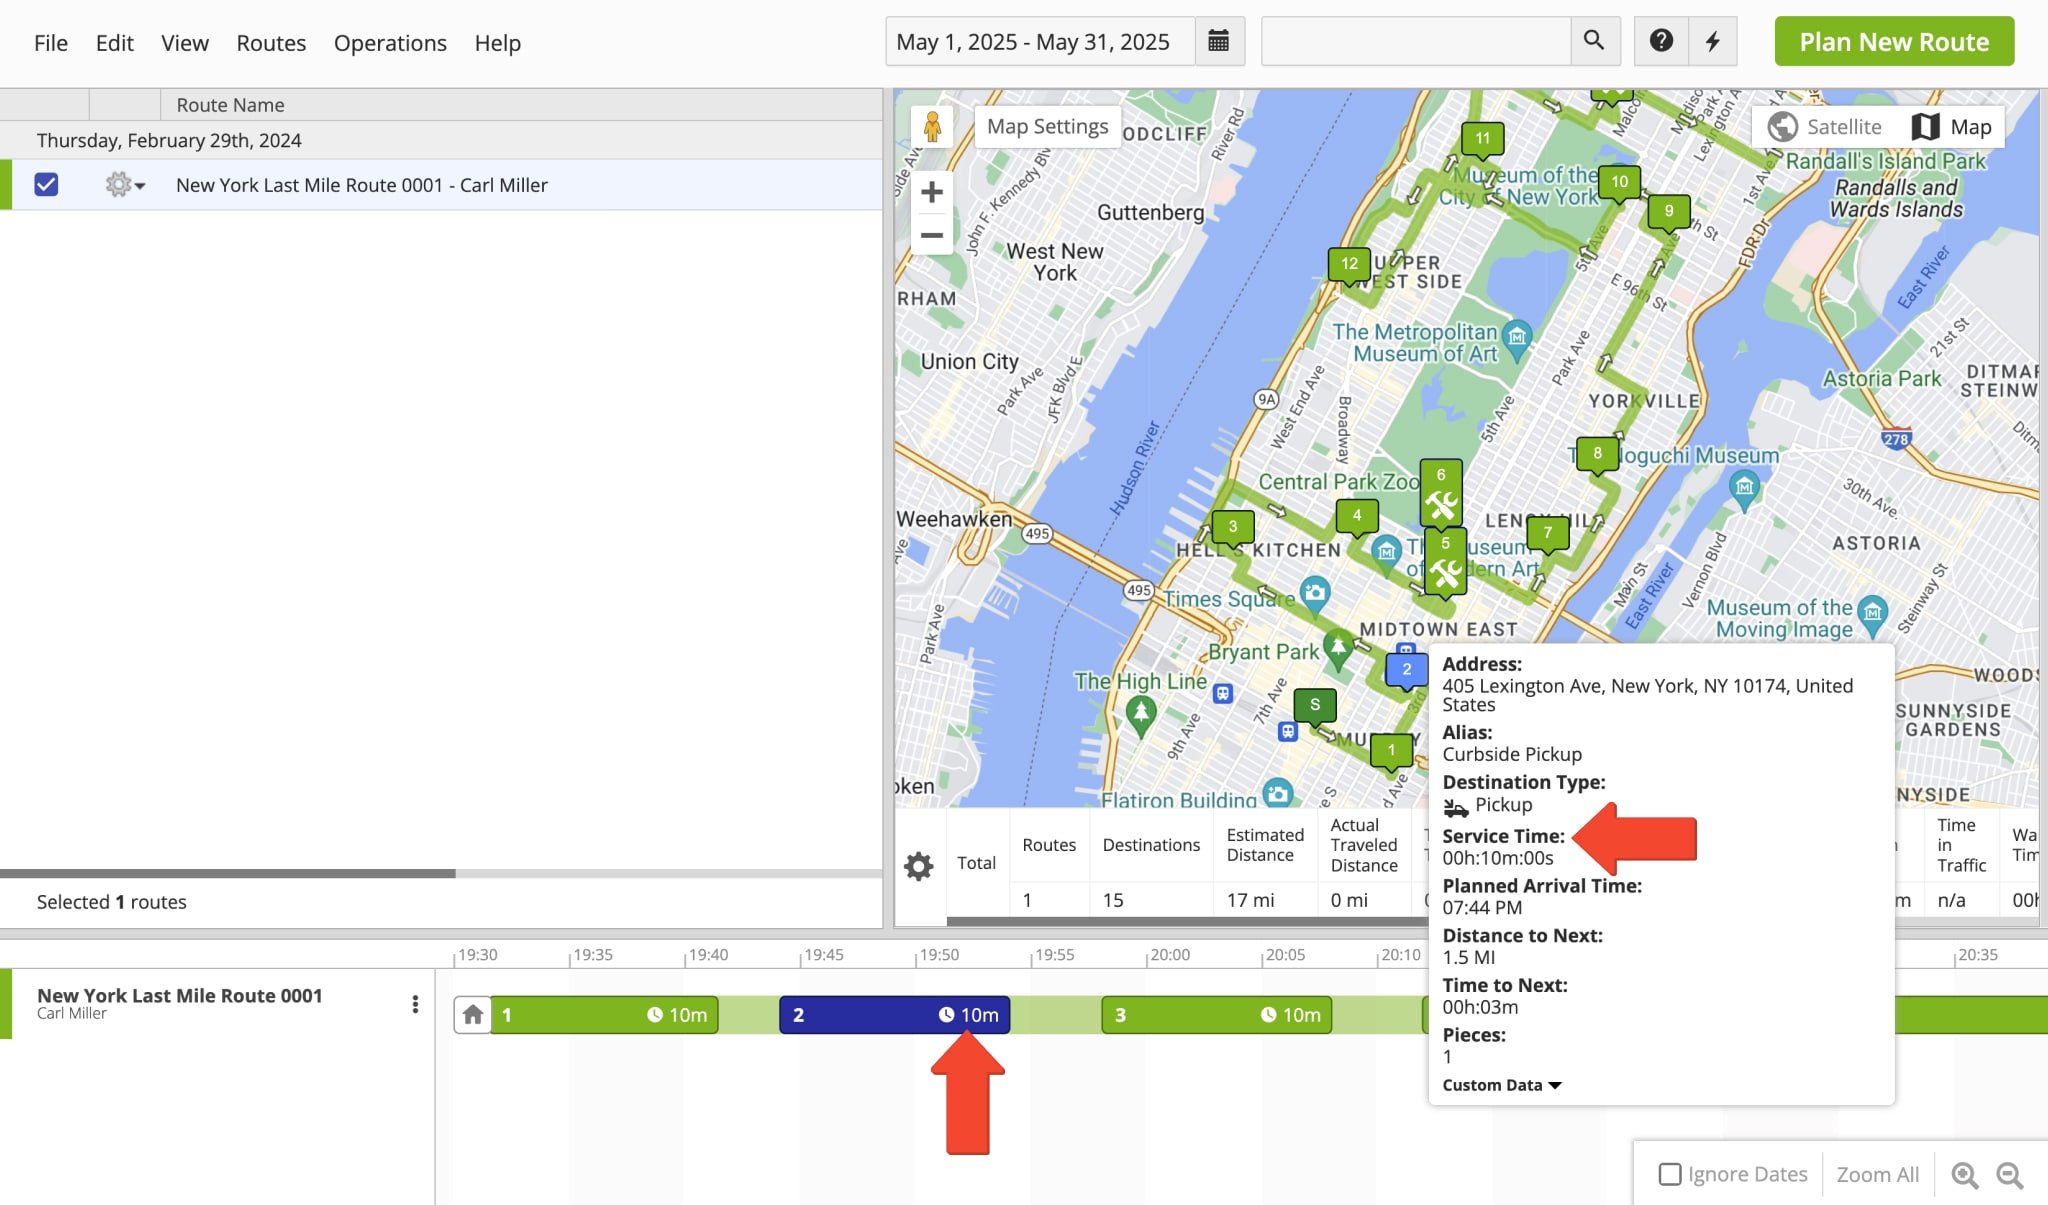
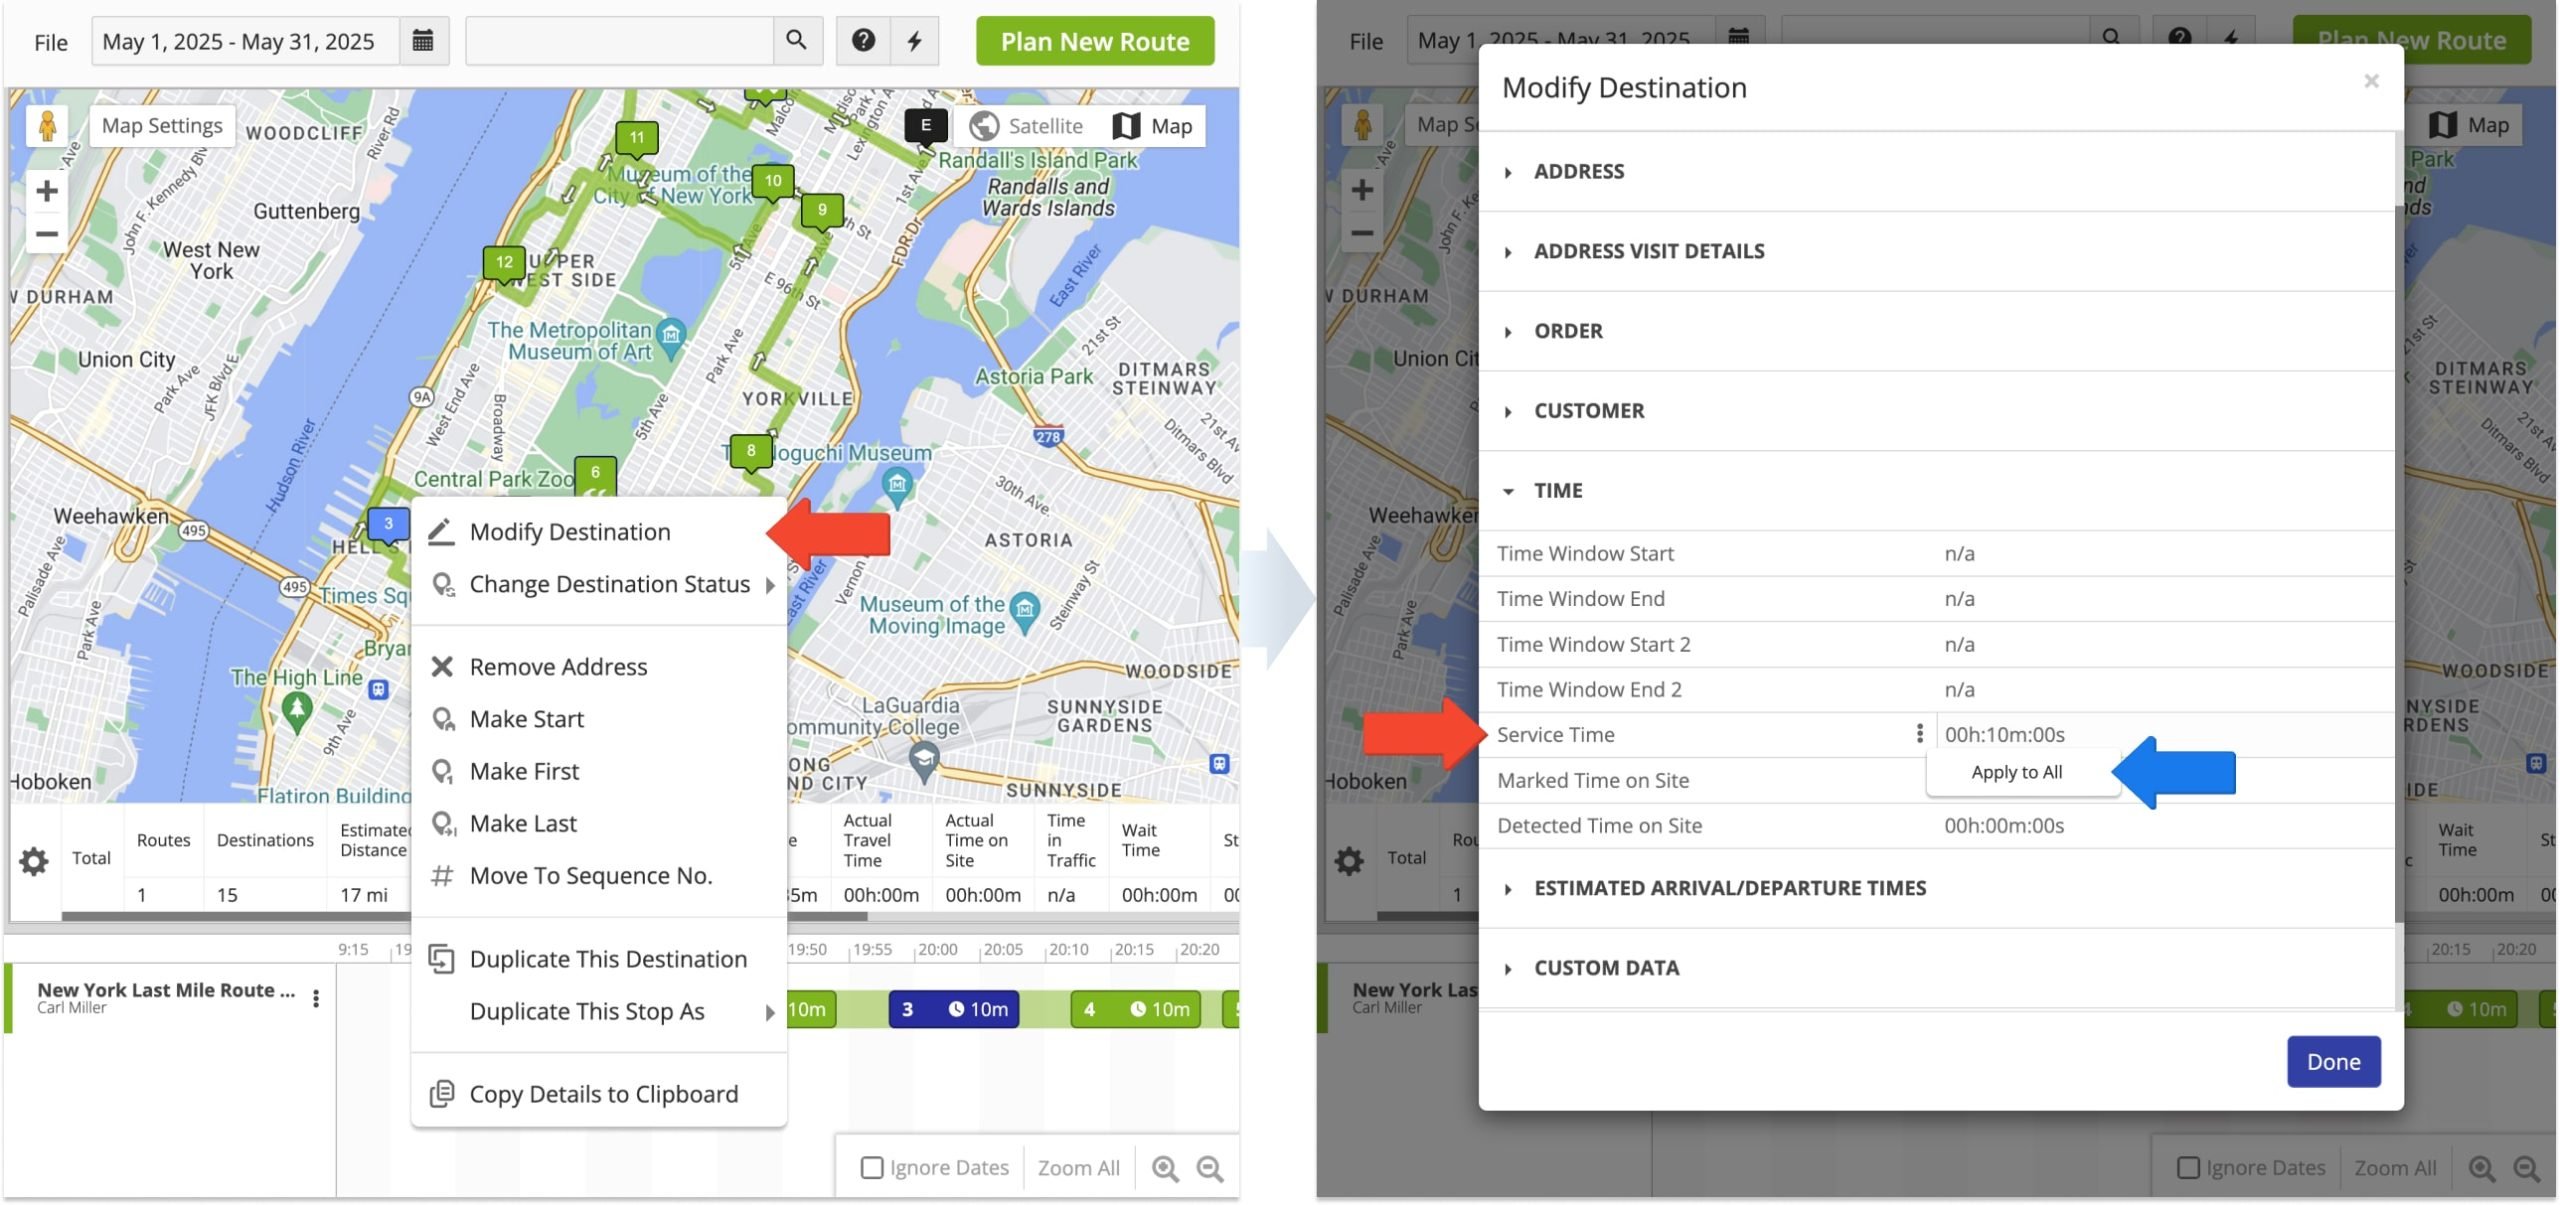
Furthermore, you can open and edit the Destination Info of any route address on the Routes Map. Right-click the preferred destination on the map or in the timeline and select “Modify Destination” from the menu. Then, scroll down to the “Time” section of the “Modify Destination” panel. You can modify the Service Time of the respective destination by entering a value manually. Additionally, to apply that Service Time to all destinations on the same route, click the Three-dot Icon and select “Apply to All“.
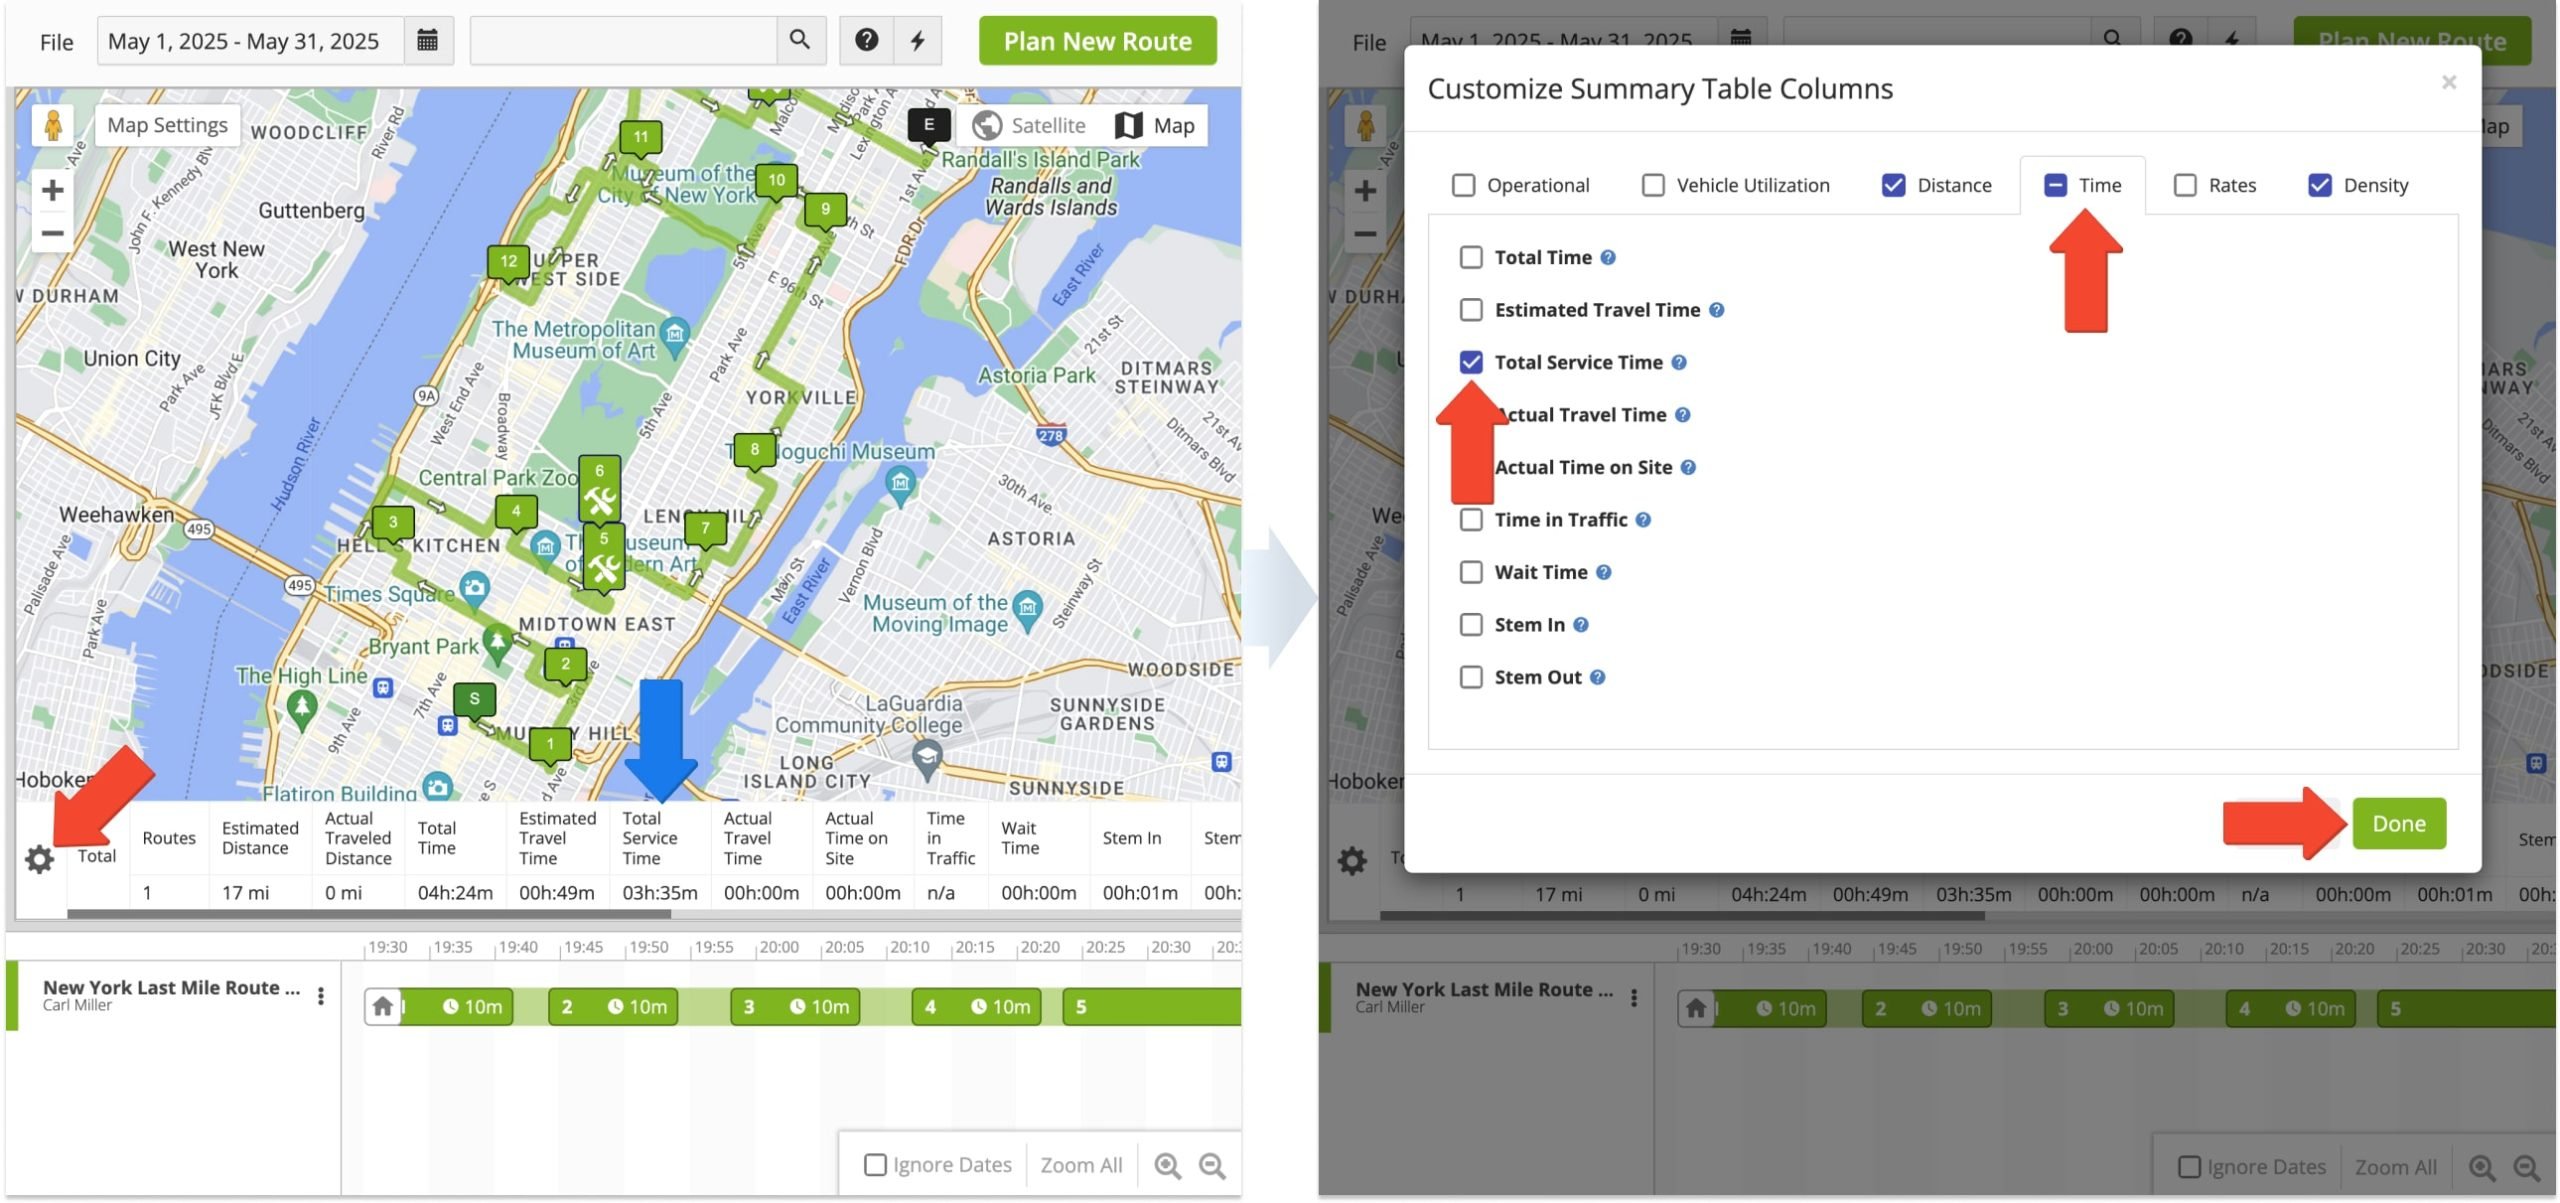
Additionally, the Routes Map enables you to quickly view the Total Service Time of the selected routes in the Summary Table. Click the Gear Icon on the left side of the Summary Table to open the “Customize Summary Table Columns” panel. Then, go to the “Time” tab and check the box next to “Total Service Time“.
Service Time In Route Manifest – Generate Route Manifest With Dynamic Service Times
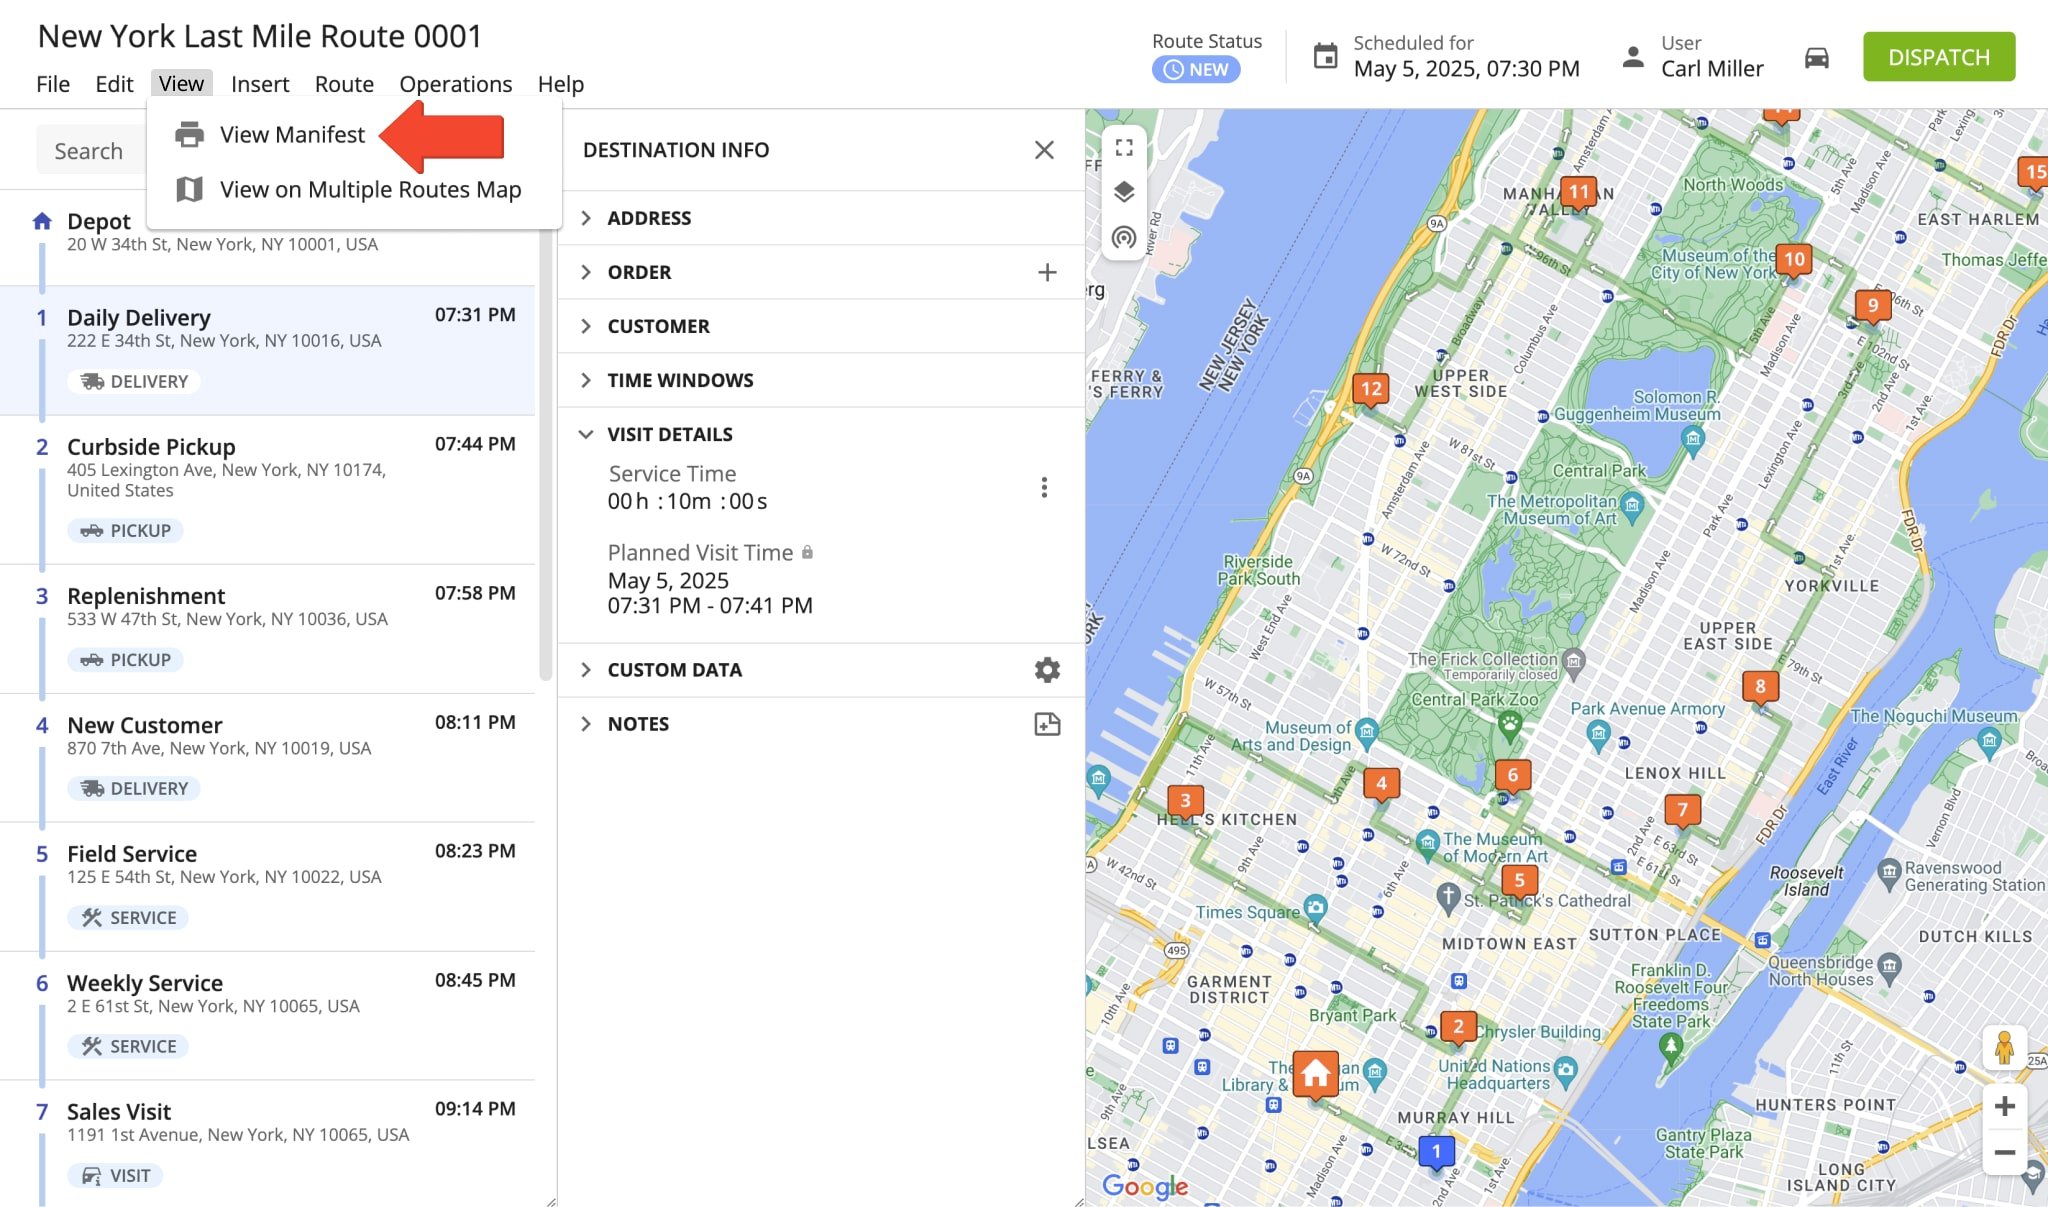
Furthermore, you can get an overview of the dynamic service times of each destination on the route with the Route Manifest. To do so, in the Route Editor or Routes Map, click “View” from the top menu bar and then select “View Manifest” from the menu.
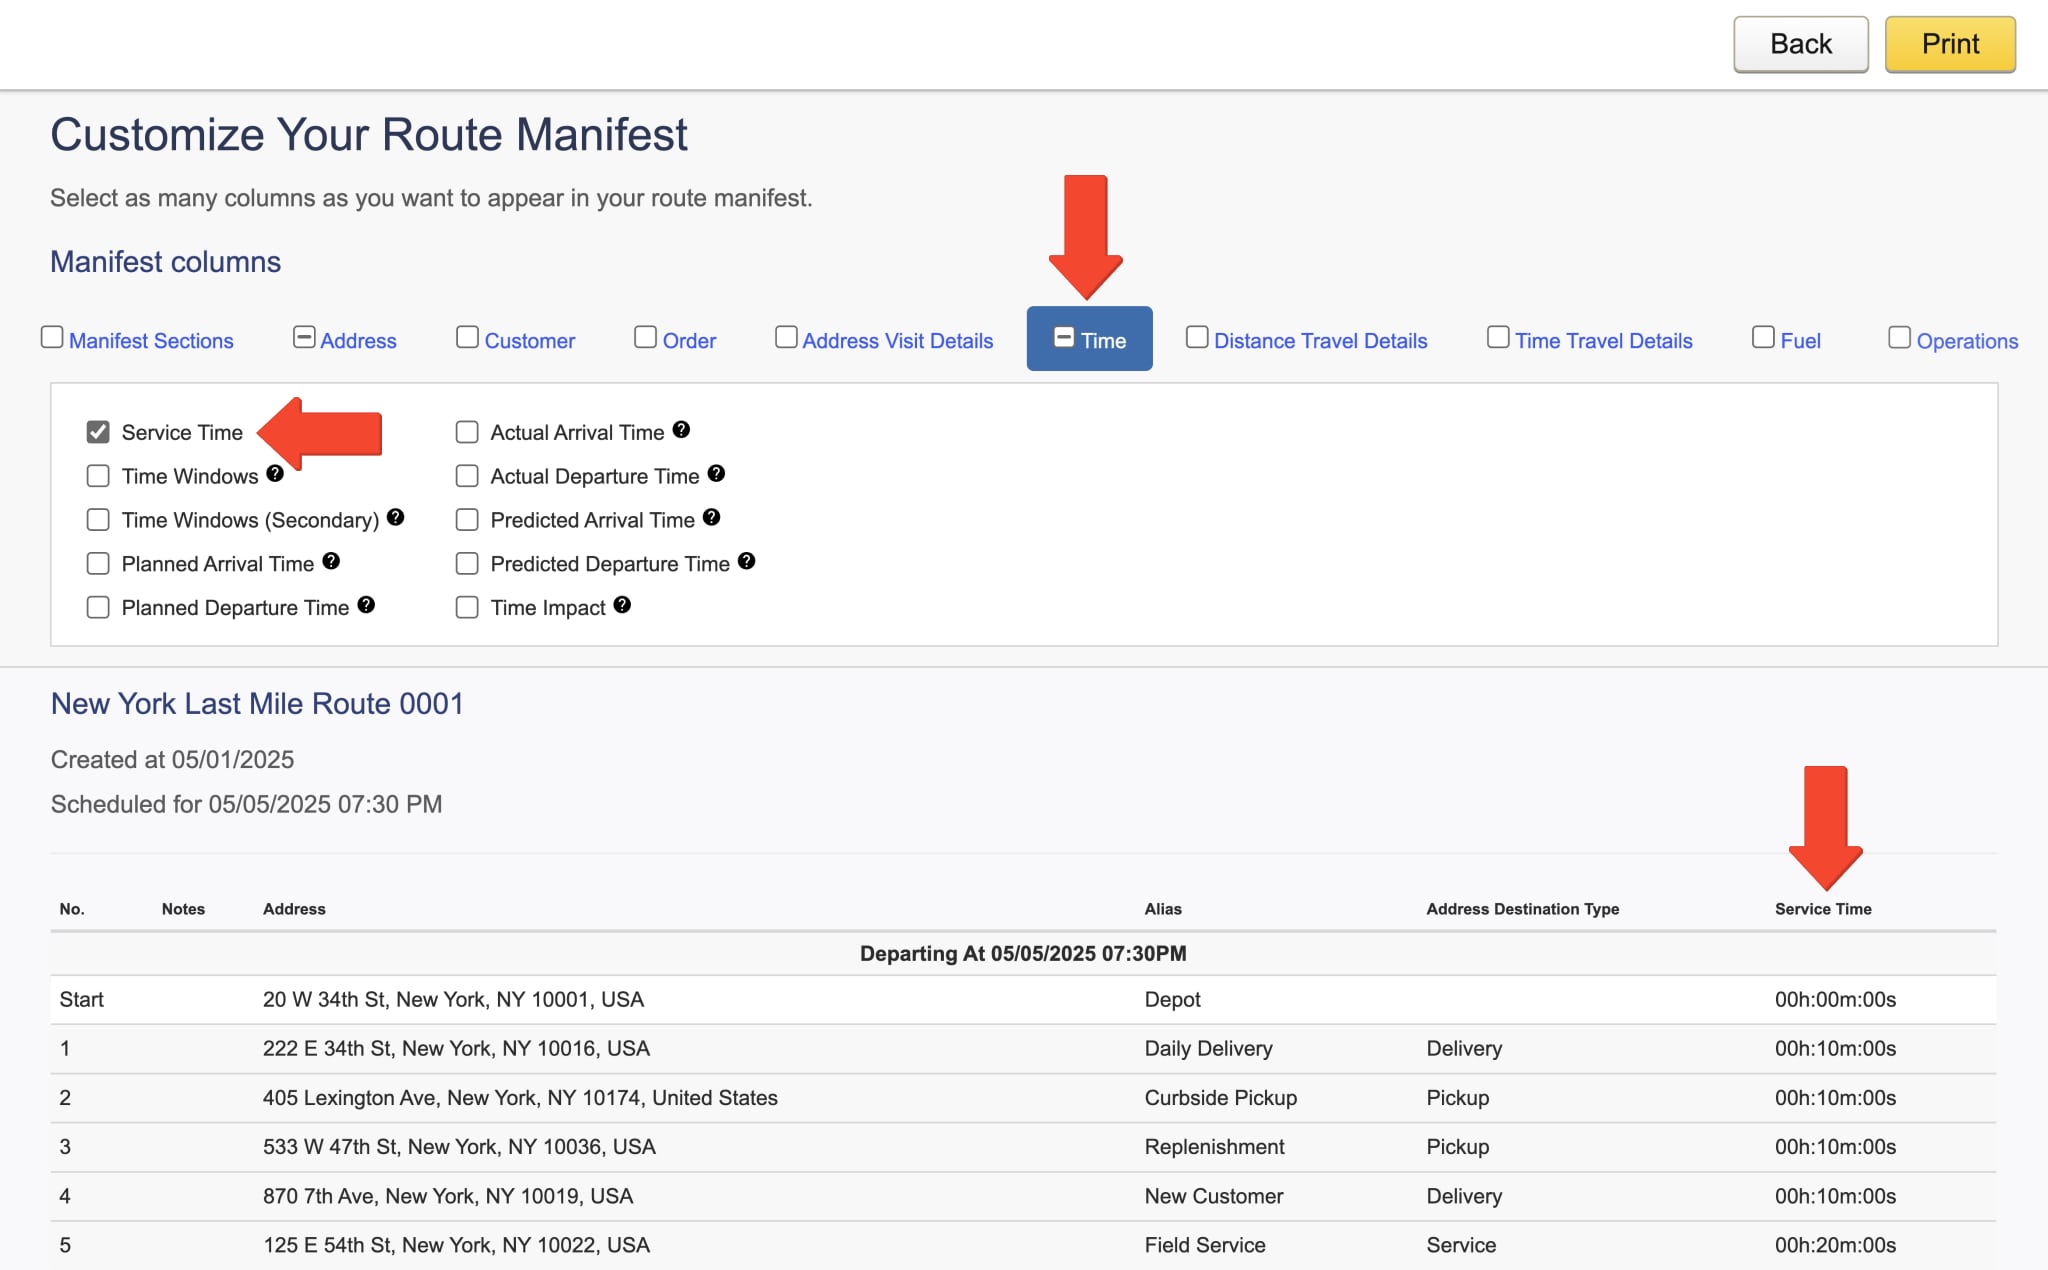
Next, on the “Customize Your Route Manifest” screen, go to the ‘Time” tab and check the box next to “Service Time” to add the Service Time column to the Route Manifest table. Once you have customized your manifest, click the “Print” button to download your manifest as a PDF file or physically print the manifest.
Export Service Time – Download Service Times As CSV Spreadsheet
Further, you can export route data as CSV spreadsheet to view Service Times. Open the preferred route or routes in the Route Editor or Routes Map. Then, click “File” in the top menu bar, hover over “Download as” and select “Export CSV” from the menu.
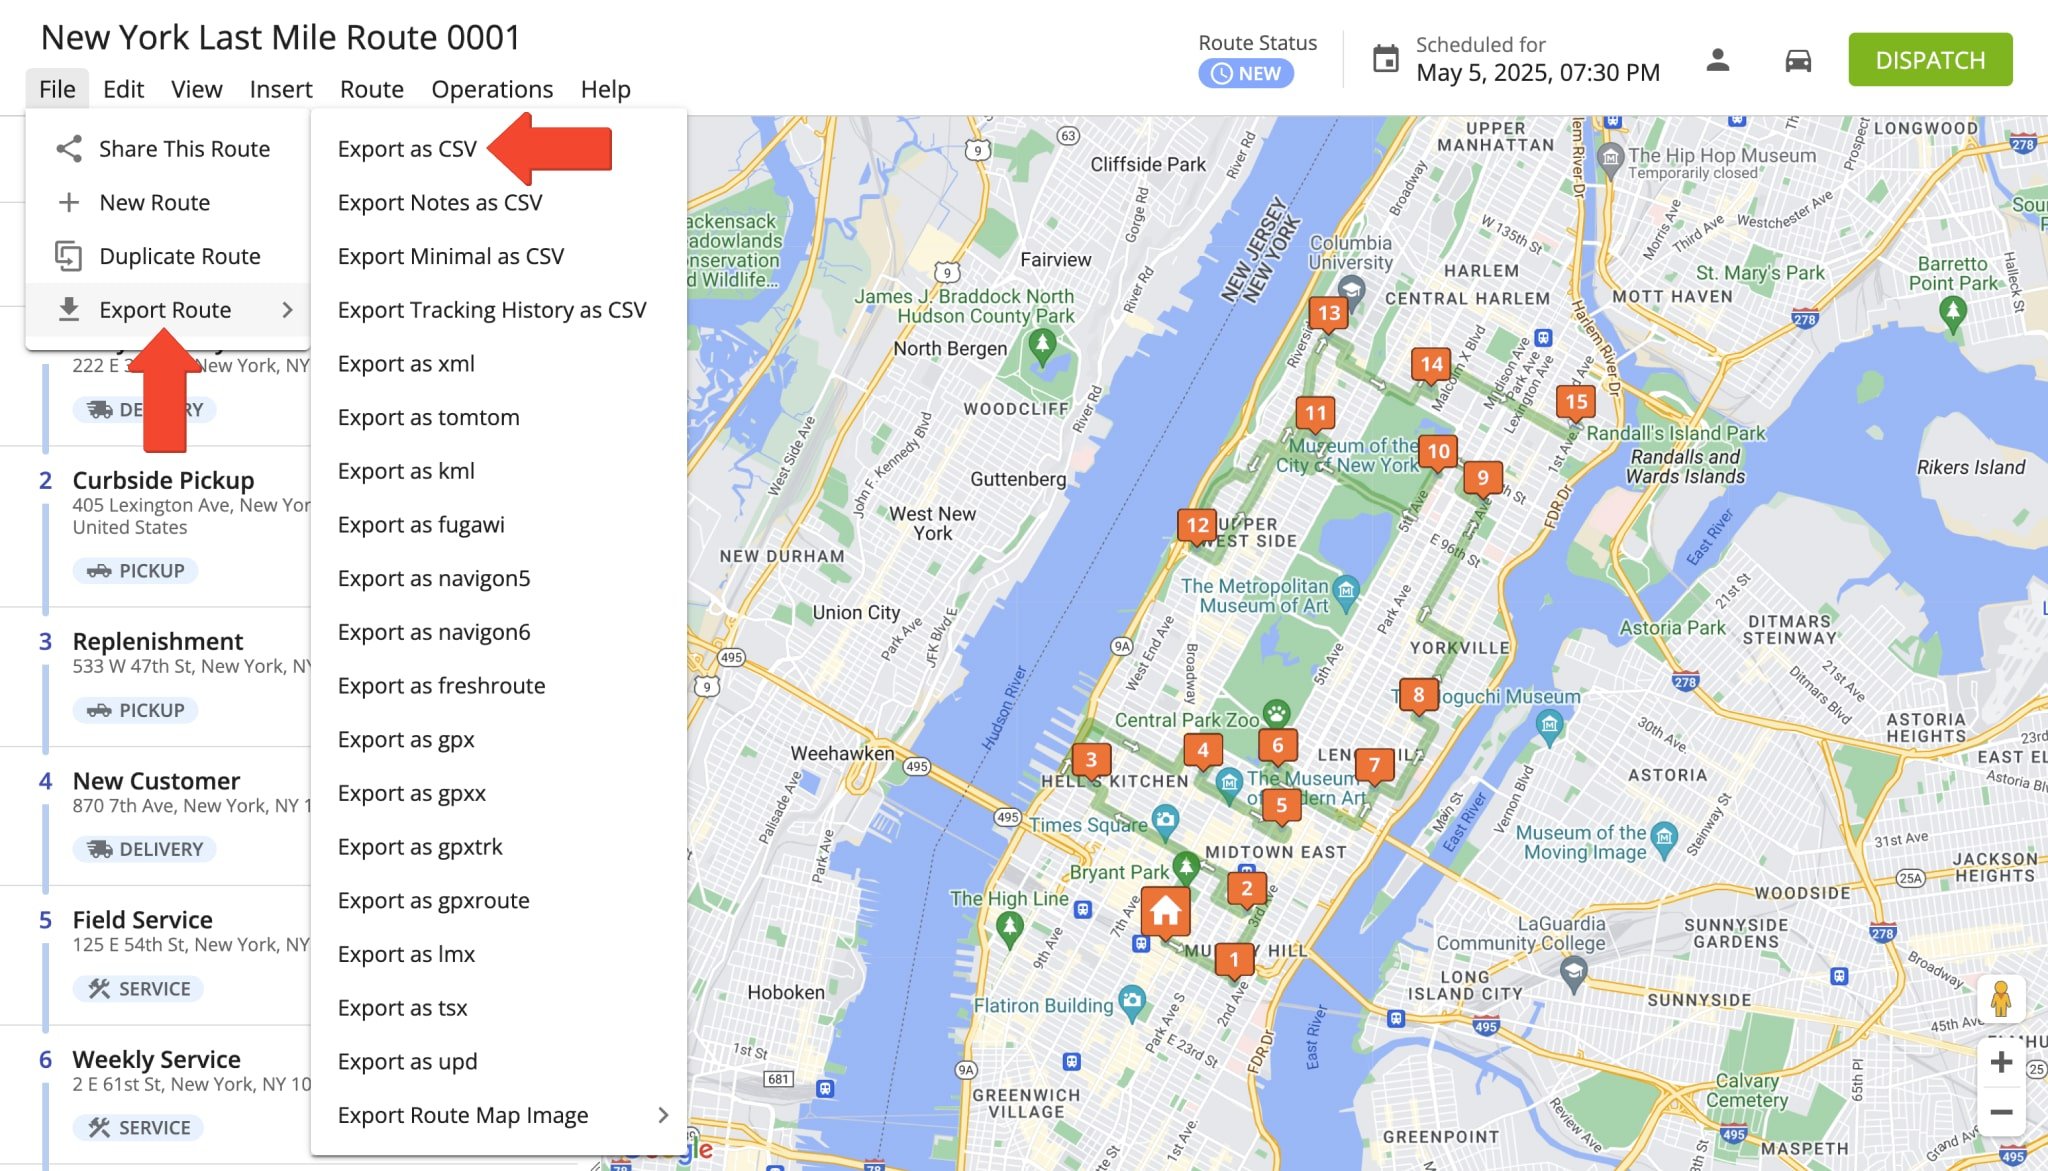
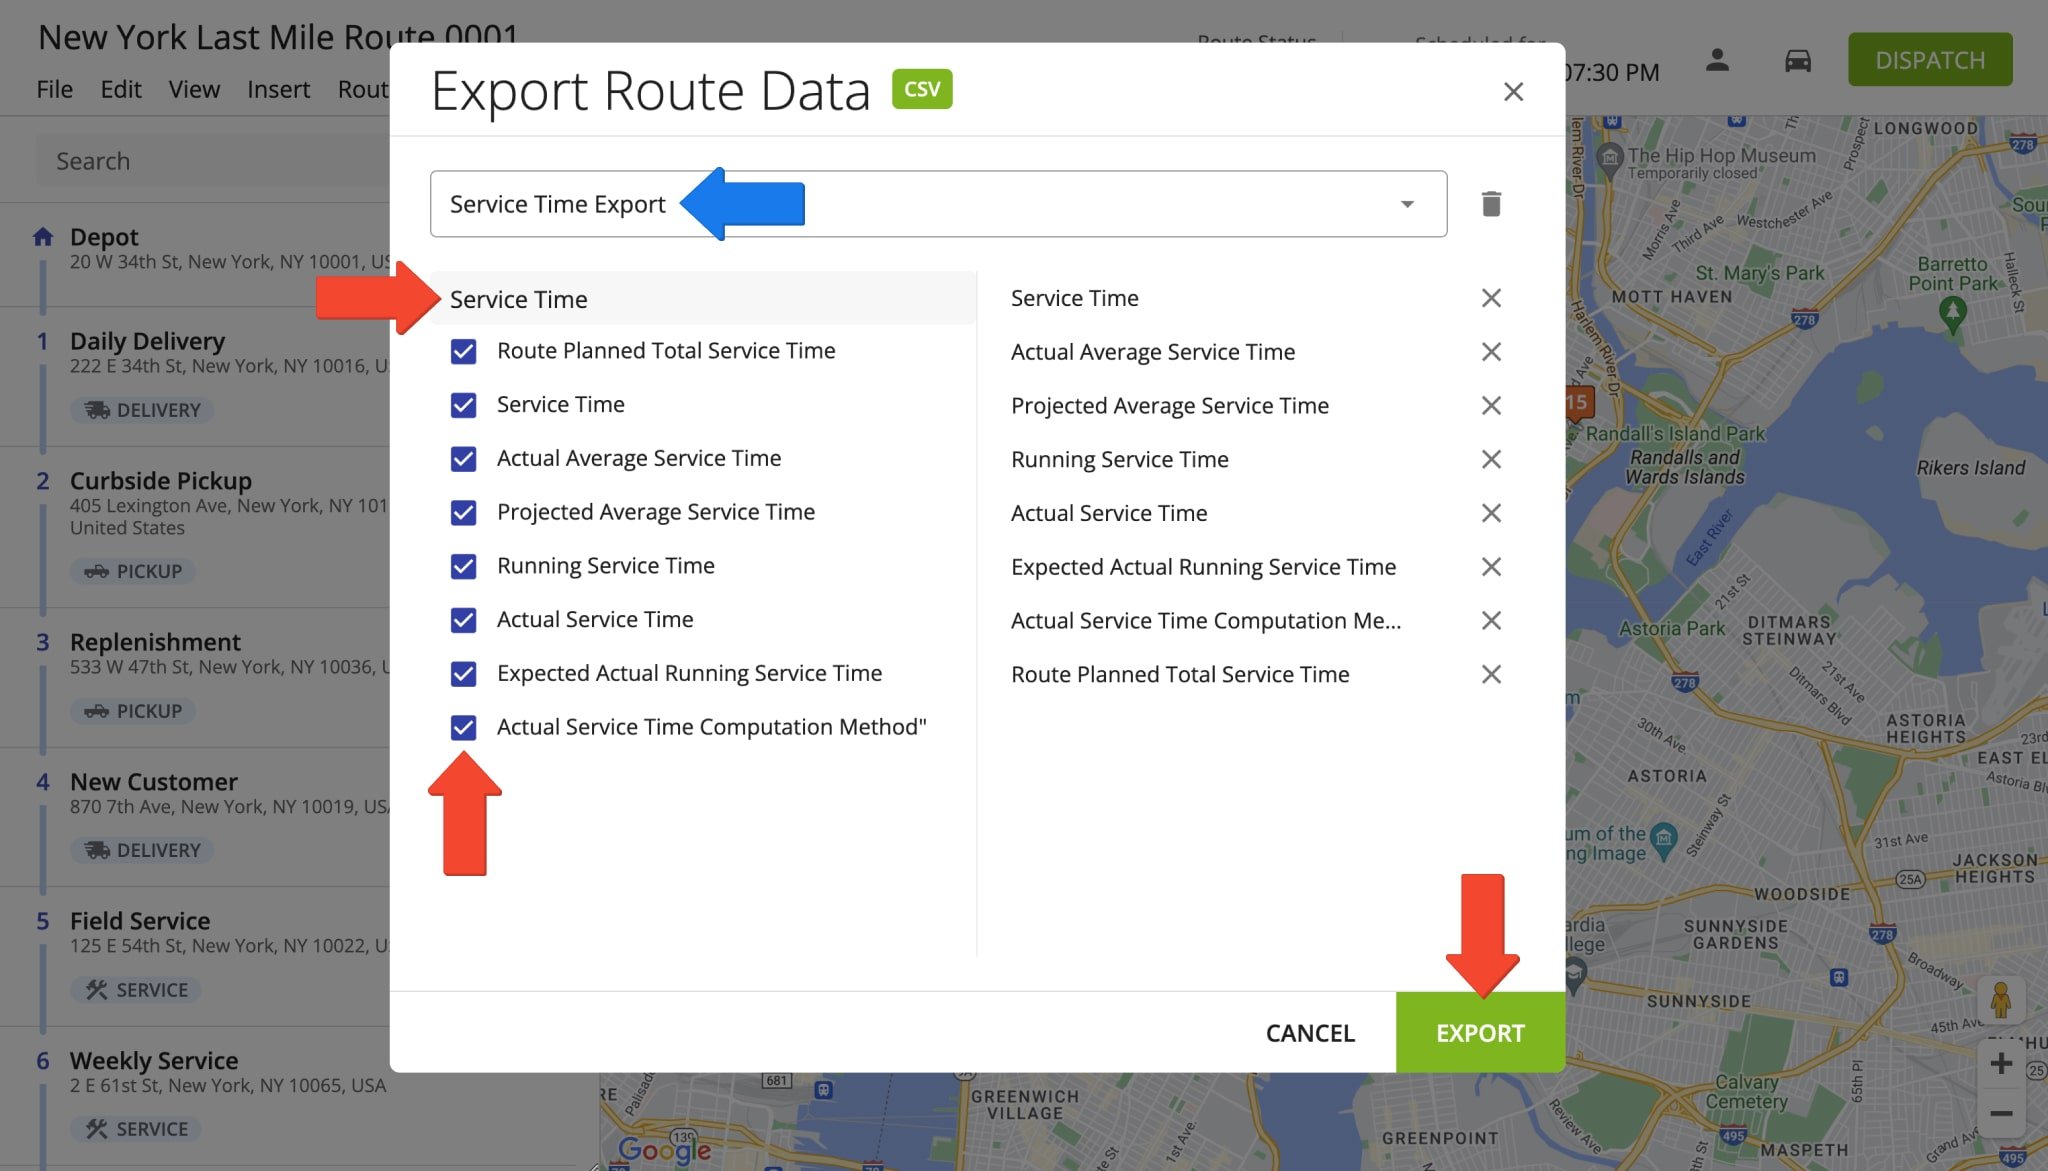
Next, use the “Field search” bar to find the desired Service Time data you want to download. After that, check the corresponding boxes next to the preferred items you want to include in the export file. Finally, click the “Export” button to download the file to your device. Additionally, learn more about route data export.
Open Service Times On Route4Me Mobile Route Planner Apps For Android And iPhone
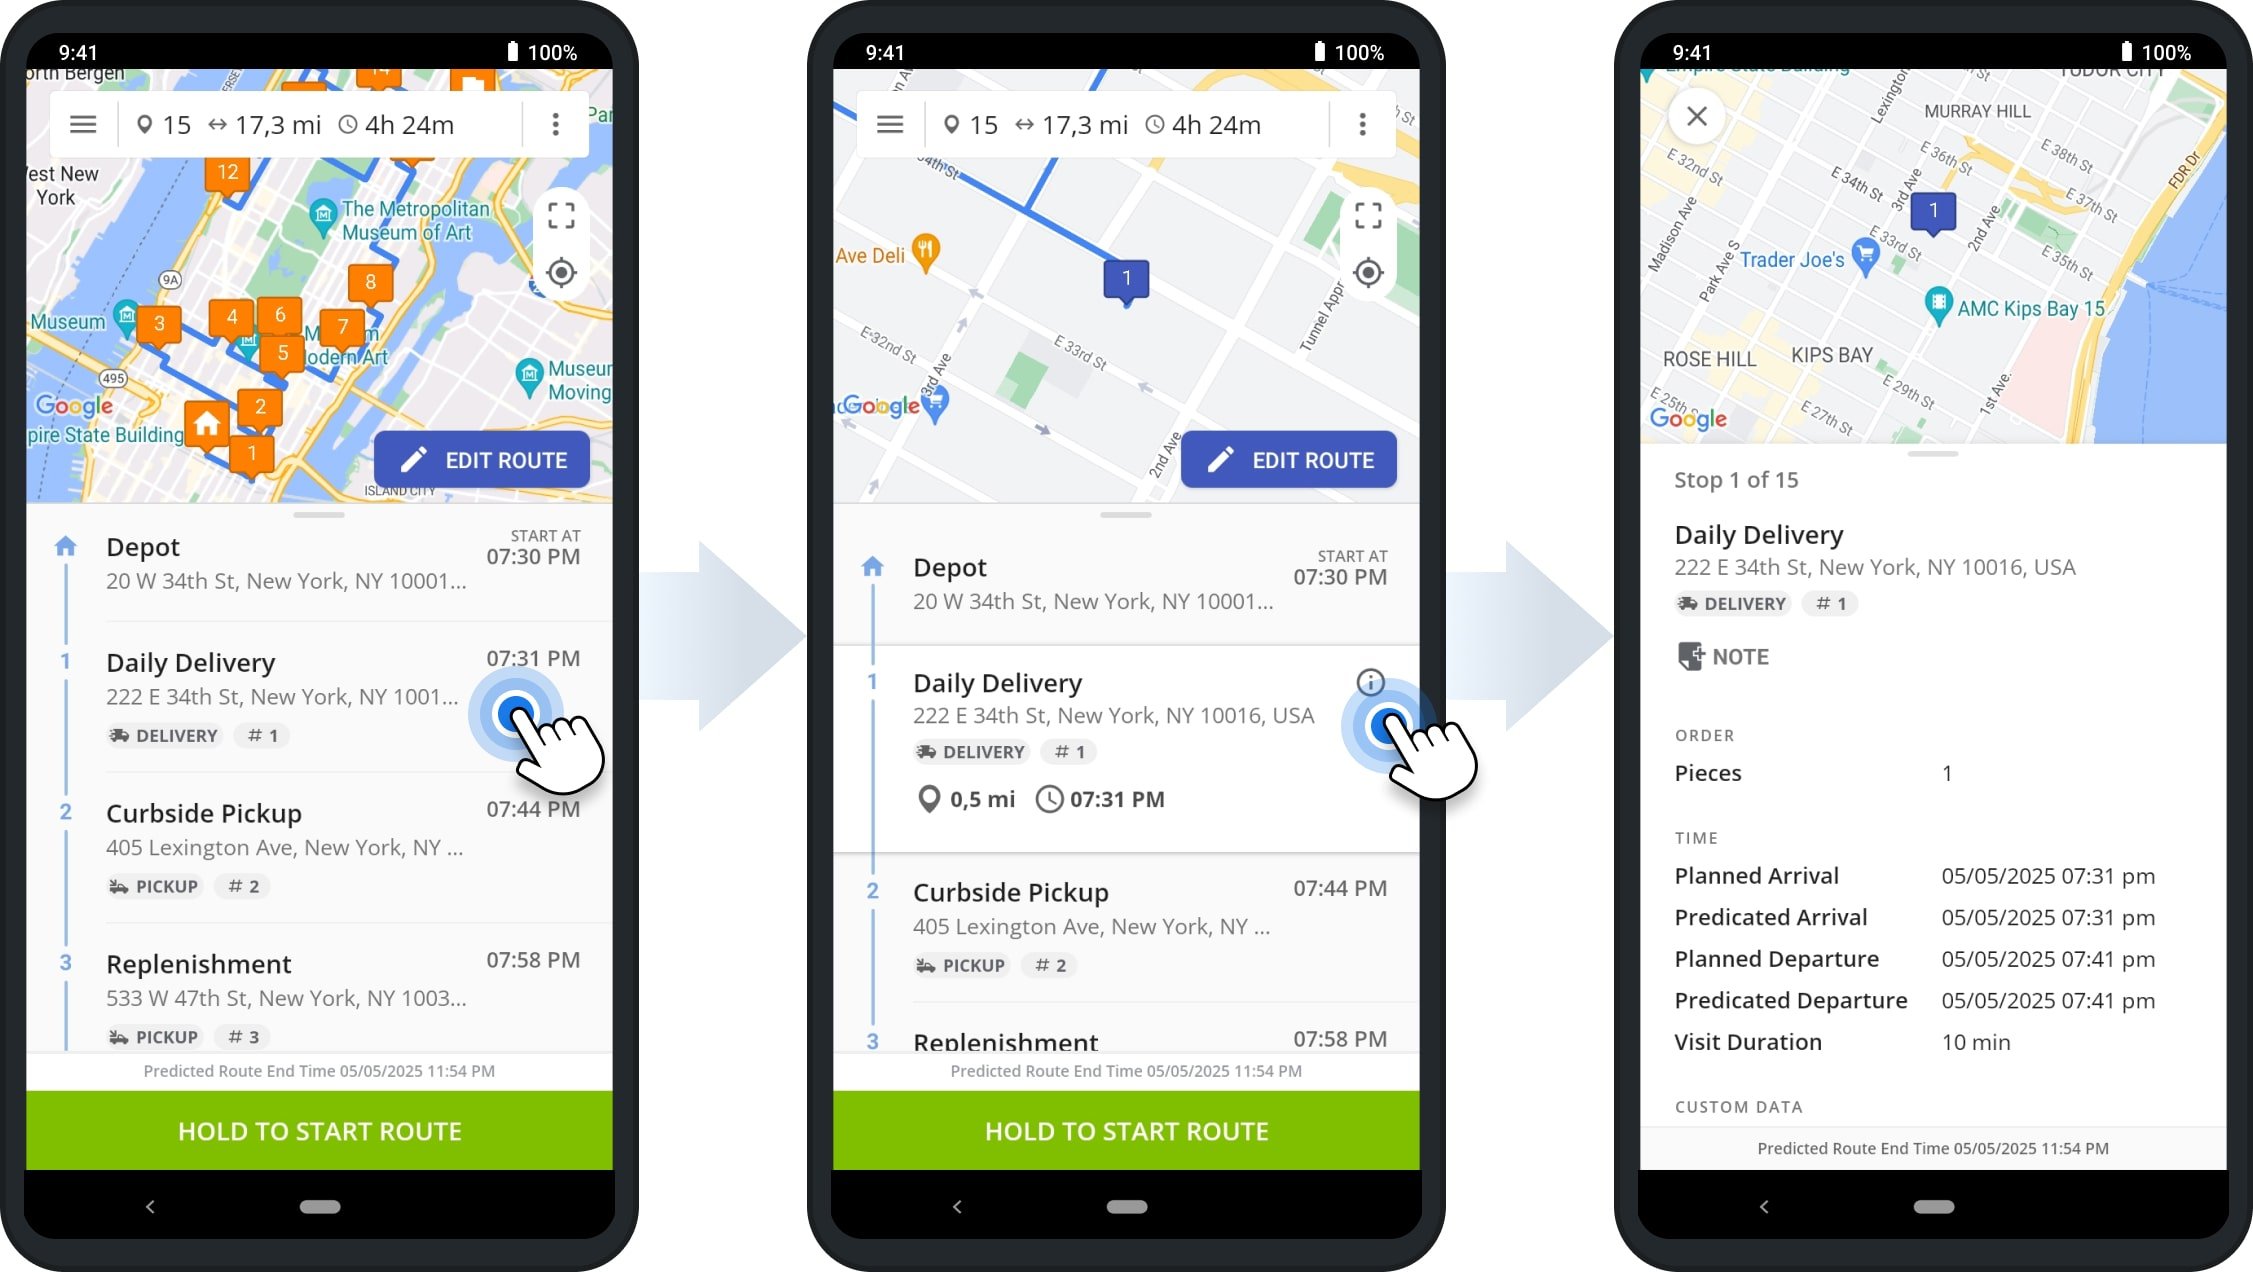
Additionally, Route4Me’s iOS and Android Mobile Route Planner enables you and your team members to easily view the Service Time of any route destination. Open the respective route and tap on the preferred destination. Then, tap the Information Icon to open the Destination Info for that address. The Service Time is displayed as “Visit Duration” in the “Time” section of the Destination Info.
Route4Me provides real-time data synchronization across all associated devices so that any changes made on the Route4Me Route Optimization Web Platform can be effortlessly synchronized with Route4Me’s iOS and Android Route Planner apps in seconds. Specifically, managers and dispatchers can modify the Service Time of any destination, and the change is synchronized with drivers’ mobile devices nearly instantly.