Notification Types – Customer Alerting And Notification Types
Route4Me route optimization software enables you to effortlessly notify your customers about their order statuses. Once you dispatch a route, all contacts that are associated with this route can be notified about when, where, and how their orders will be completed or their address will be serviced. In addition to the custom text in your notification messages, you can also insert multiple informative placeholders that retrieve data from particular Route4Me fixed attributes (i.e., order numbers, customer names, estimated arrival times, etc.) and automatically insert this data into your notifications as text. Moreover, to fully accommodate your particular business needs or last mile requirements, Route4Me route optimization software also enables you to customize the design of your customer notifications using custom SendGrid templates that can include your company’s logos, contact details, unique color schemes, and more. Learn more about Notification Settings.
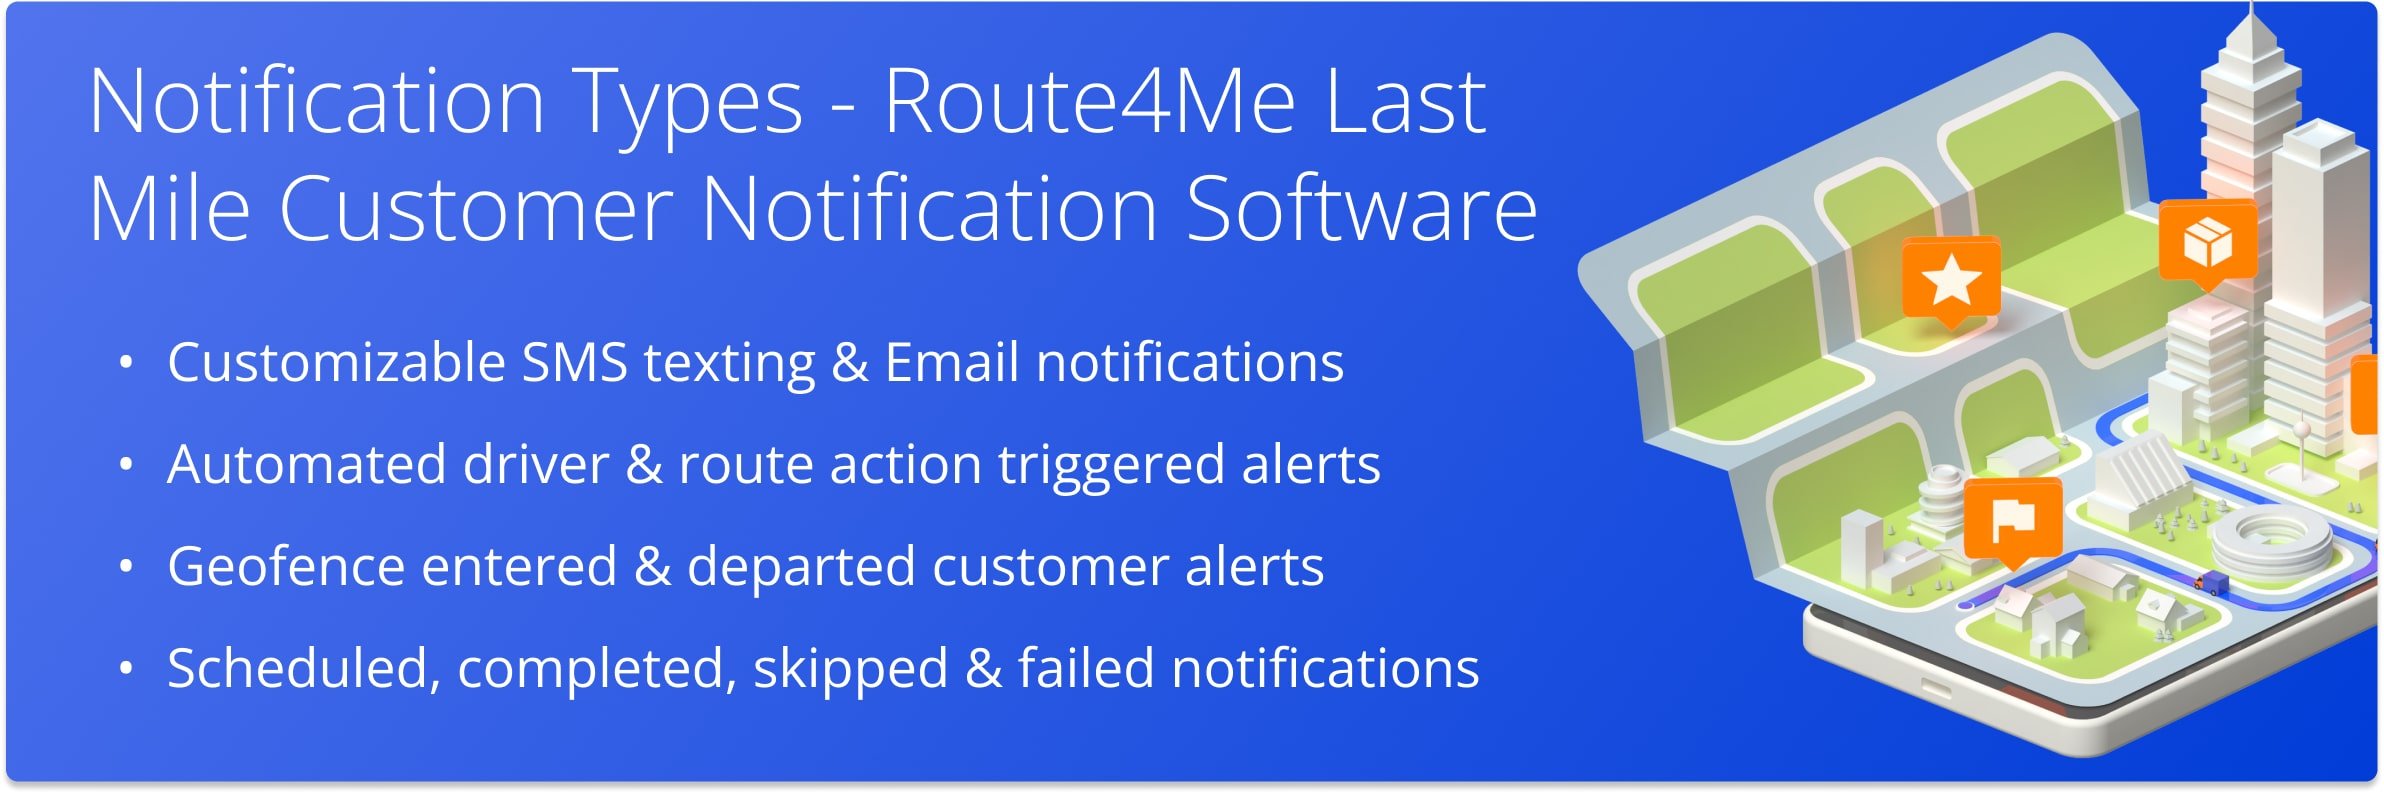
Table of Contents
Notification Type Settings – Automatically And Manually Triggered Customer Alerts
Route4Me enables you to send customer notifications for a variety of manually or automatically triggered events. Specifically, you can enable and customize such notifications by going to “My Account” from the Navigation Menu, then selecting “Notifications Settings” and going to the “Notifications” tab. Specifically, you can send customer notifications when you dispatch routes, informing customers that their destination or delivery is scheduled, when a route address is marked Failed, Skipped, or Completed, when a customer’s address is the next destination on the route, and when a specific geofence is detected as entered or left. NOTE: To send customer notifications for a particular route, you must dispatch the route in the Route Editor.
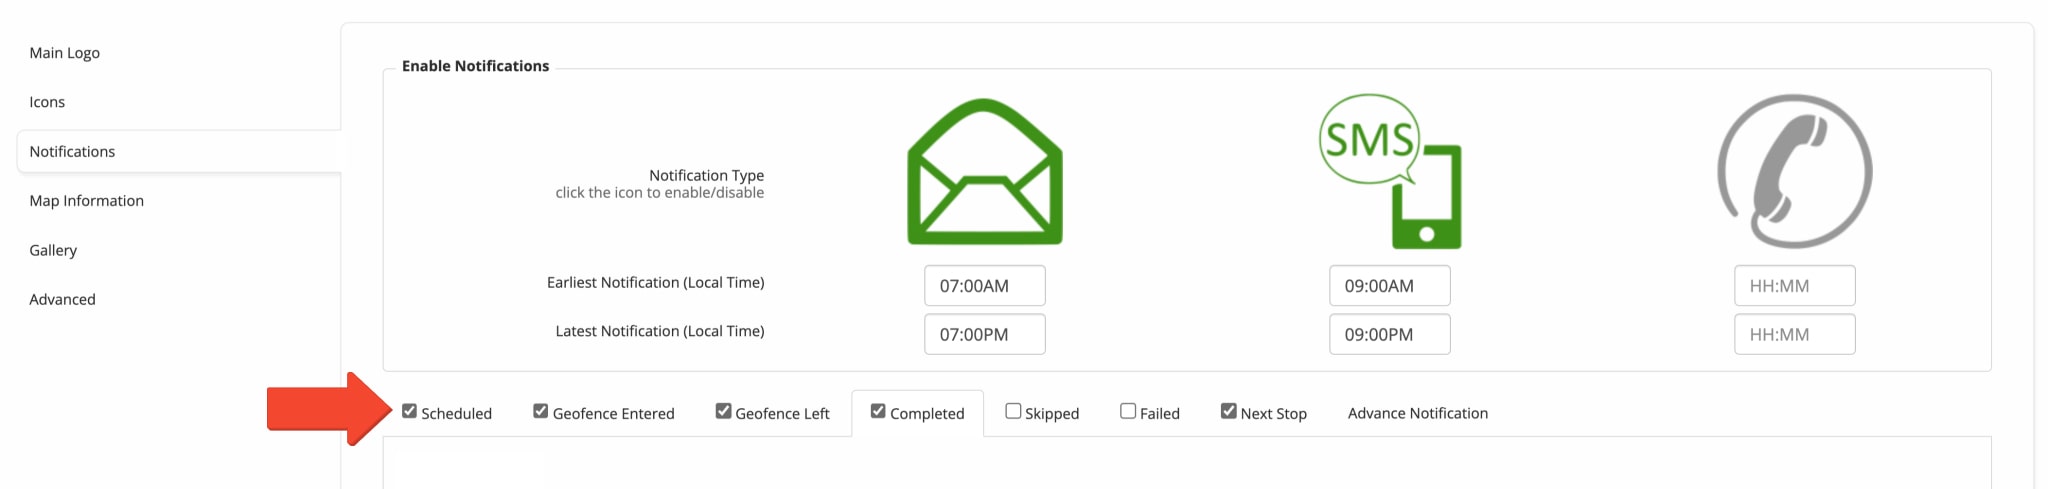
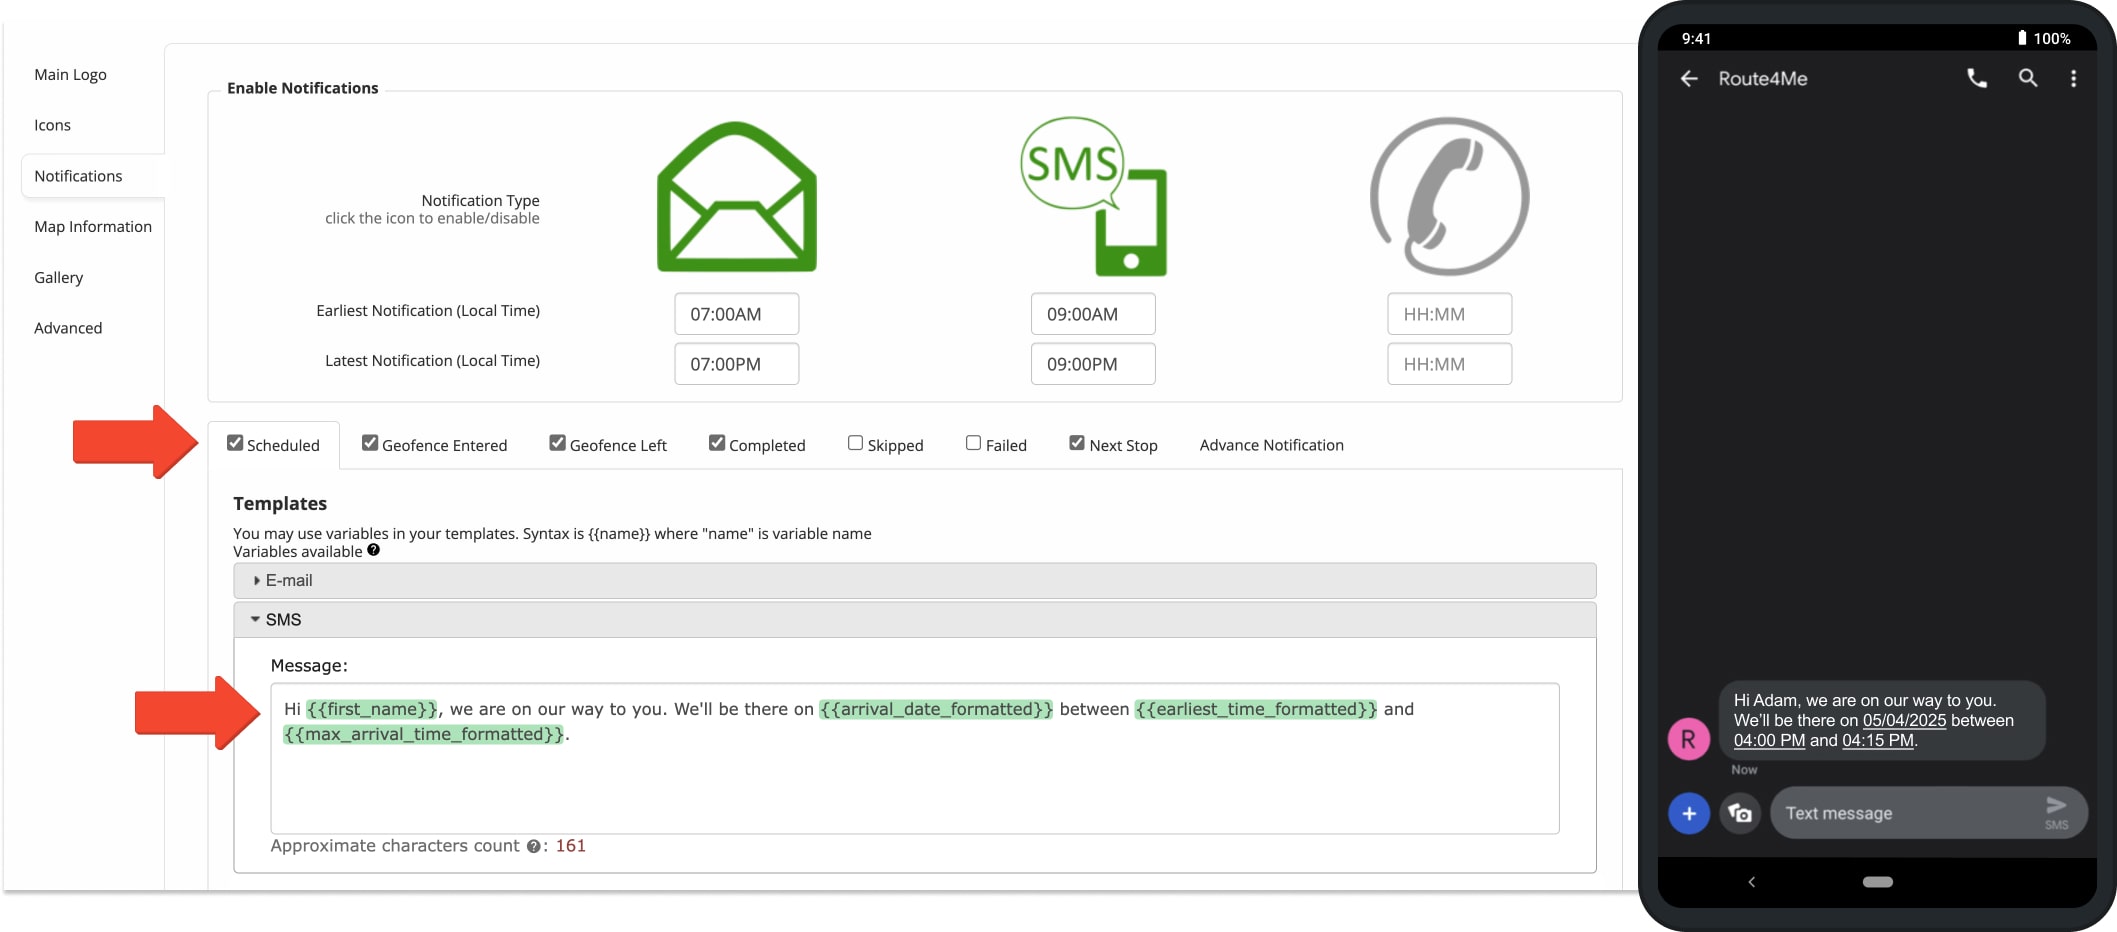
To create notification templates for the different notification types, click the preferred notification type, i.e., “Scheduled“, “Geofence Entered“, “Geofence Left“, “Completed“, “Skipped“, “Failed“, or “Next Stop” depending on the active Add-On Modules on your Route4Me account. Then, enter the preferred text for your notifications in the “Message” field in the “Email” and “SMS” tabs. Additionally, to include schedule, customer, address, and order data, you can add notification placeholders that retrieve data from particular Route4Me fixed attributes (i.e., order numbers, customers’ names, estimated arrival times, etc.) and automatically insert this data into your notifications as text.
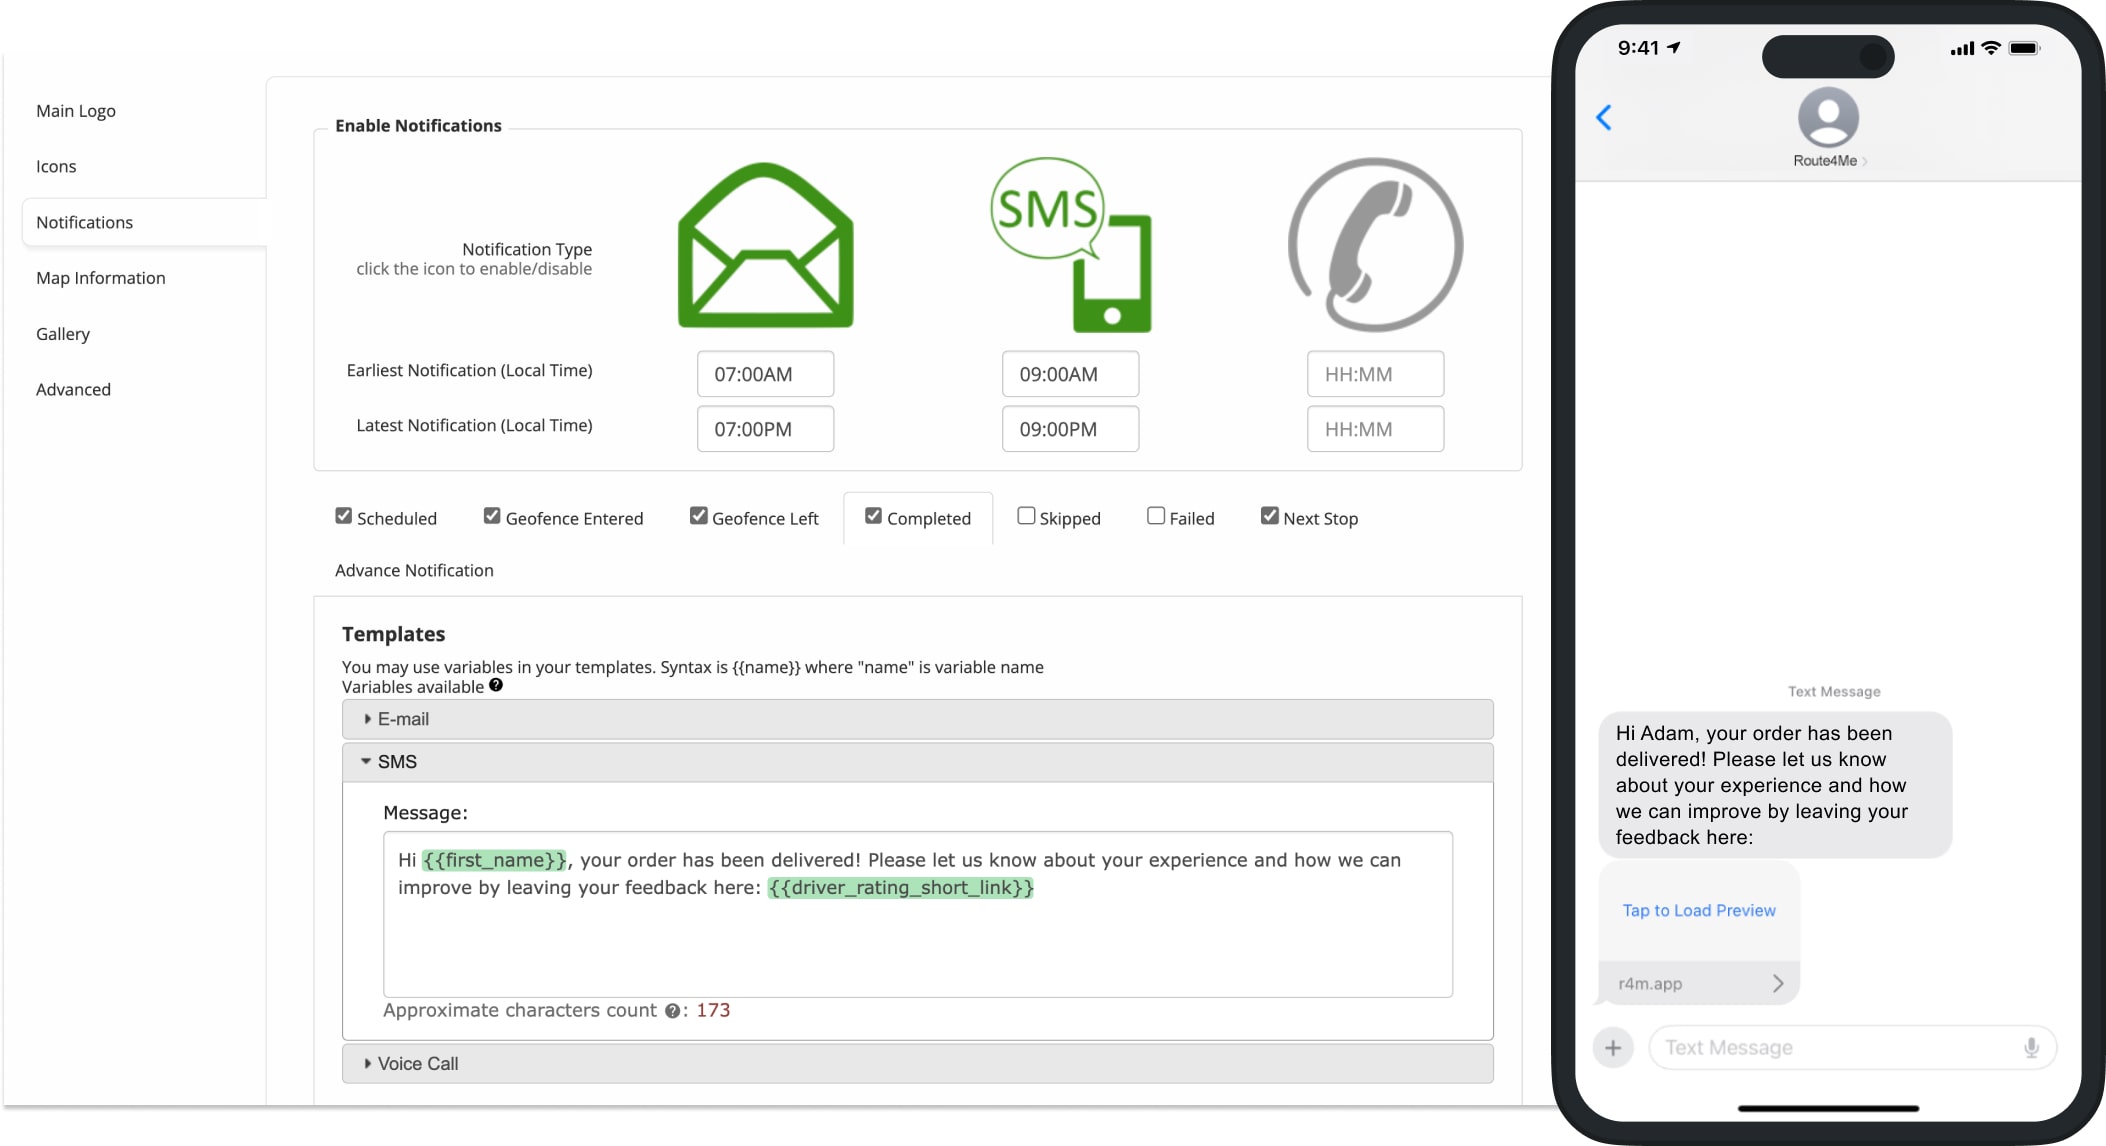
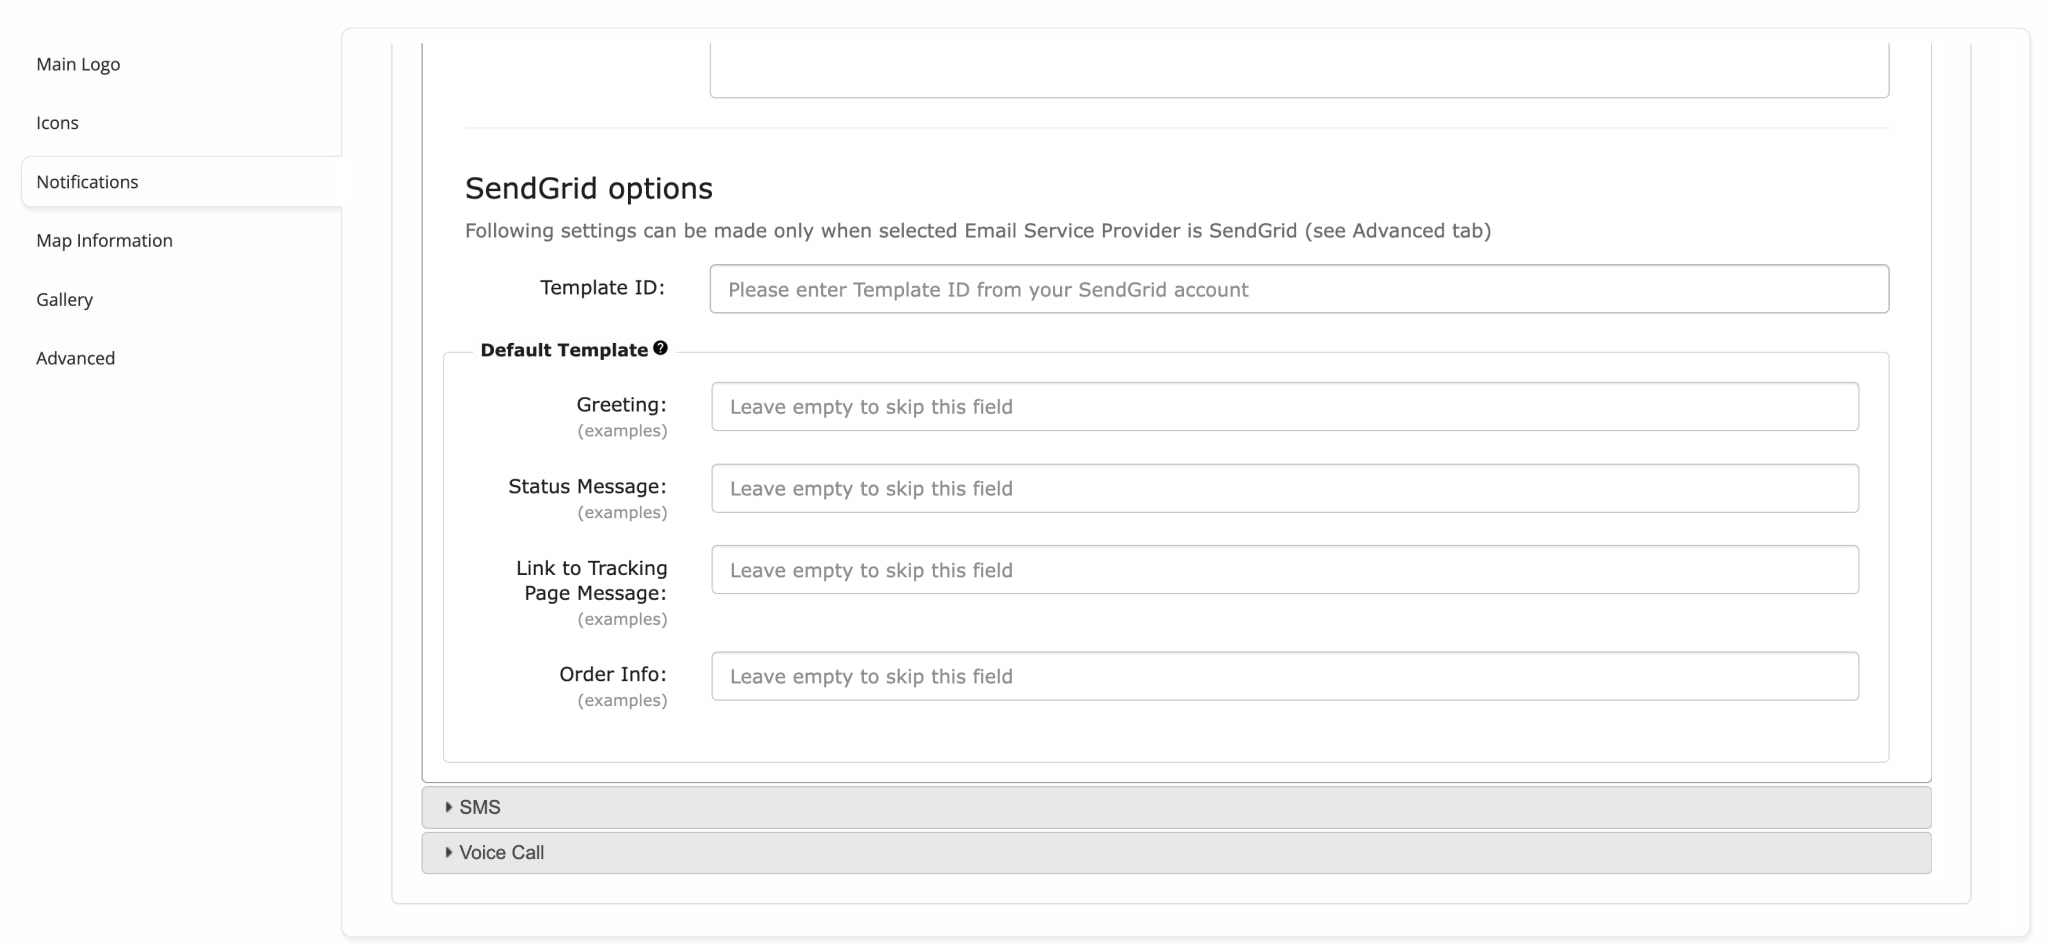
Additionally, depending on your particular business model or specific business needs, you may want to customize the way your Email notifications look and how your customers interact with them. For example, you may want to use your company logo, attach a link to your website, add a button for customer surveys, etc. To make sure that your notifications are sent in accordance with your unique business vision, Route4Me allows you to add white-labeled designs and functionalities to your email notifications using SendGrid templates. Learn more about how to use SendGrid templates to customize Email notifications.
Route Scheduled – Planned Visit Time Email And SMS Notifications
The Scheduled notifications are sent to the associated customers once the respective route is dispatched and their address visit time is predicted. The “Planned Visit Time” timestamp is displayed in the “Visit Details” section of the given address’ “Destination Info” in the Route Editor. All “Planned Visit Time” timestamps are generated automatically by the software upon scheduling a route for a specific time. NOTE: To send Scheduled notifications, the Customer SMS Notifications – Scheduled and Customer Email Notifications – Scheduled Add-Ons must be enabled on your Route4Me account, respectively.
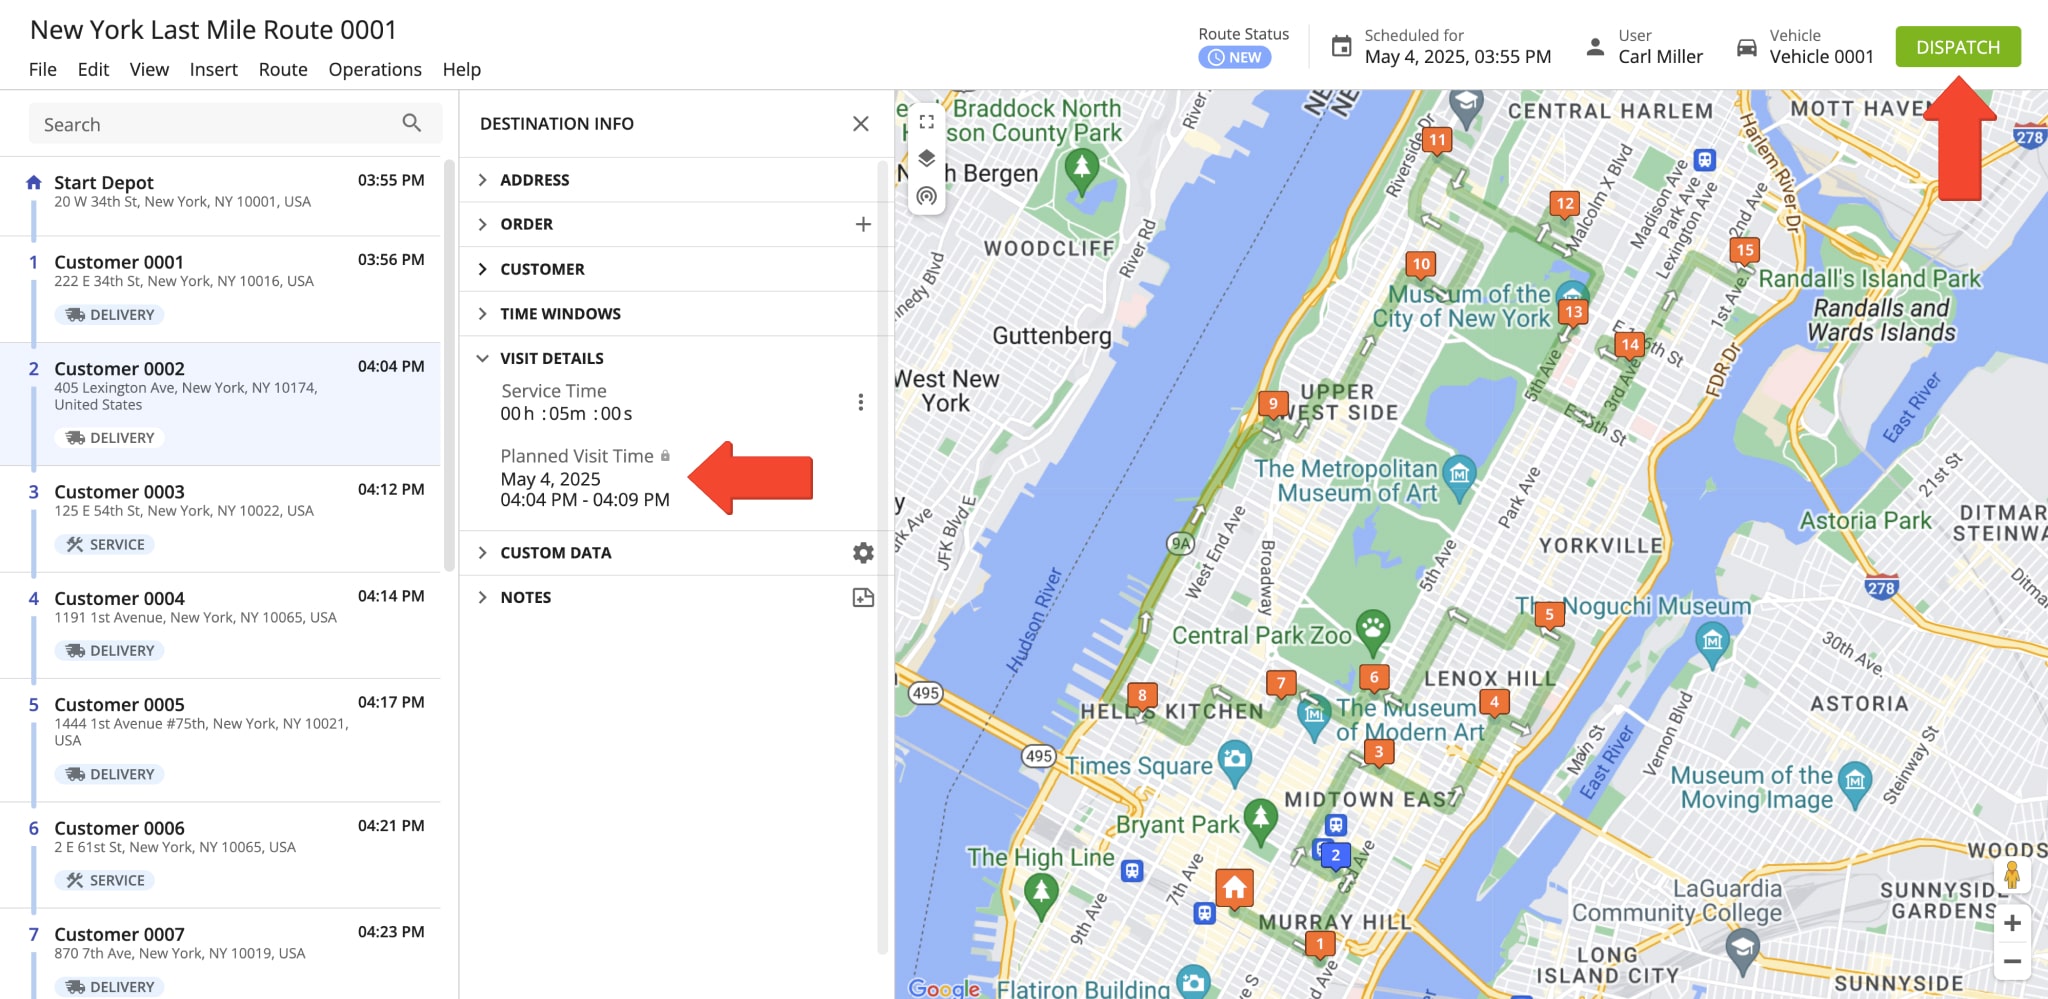
To set up “Scheduled” notifications, go to “My Account” and then “Notification Settings” from the Navigation Menu. After that, go to the “Notifications” tab and check the box next to “Scheduled“. Next, enable the preferred notification types (Email and SMS) by clicking the respective icons. Then, use the “Earliest Notification (Local Time)” and the “Latest Notification (Local Time)” fields to define the preferred custom time window for each notification type. This is the Local Time where the depot or route origin is located.
Geofence Entered – Geofence Visited Email And SMS Notifications
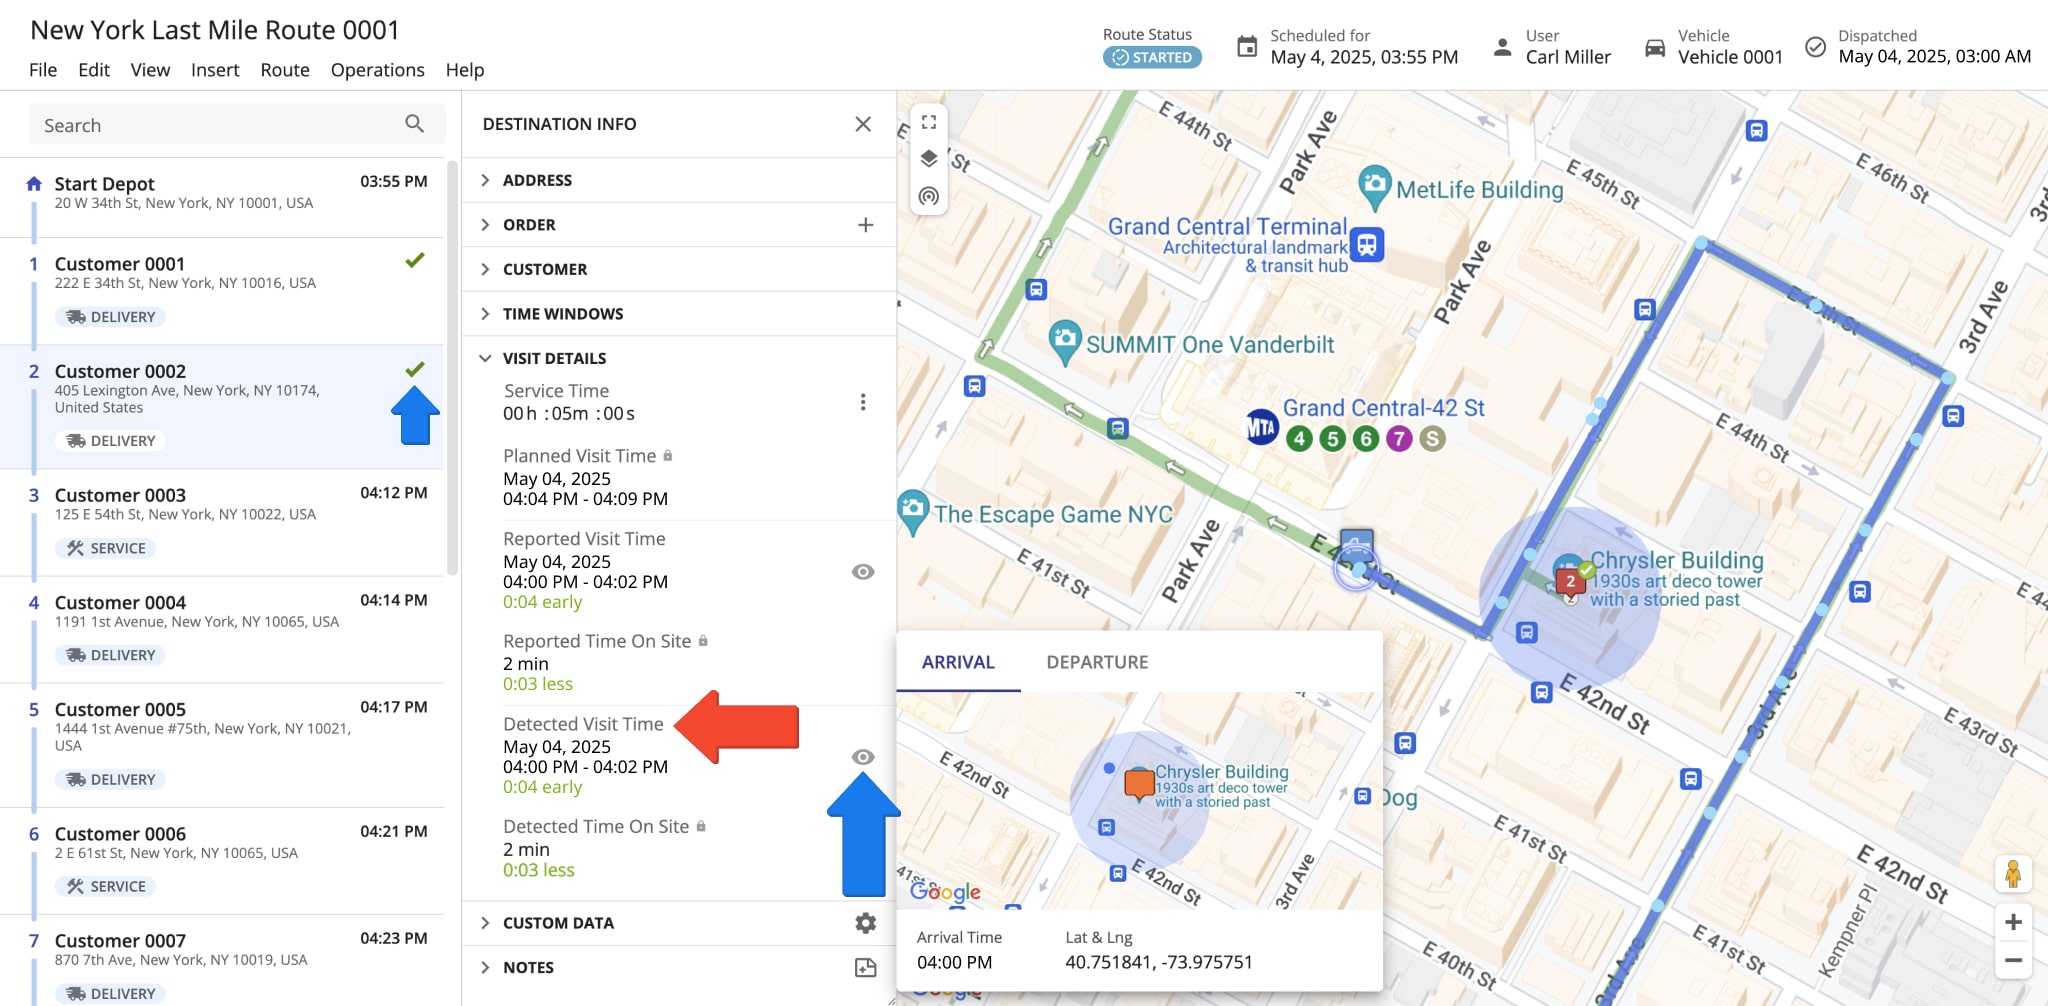
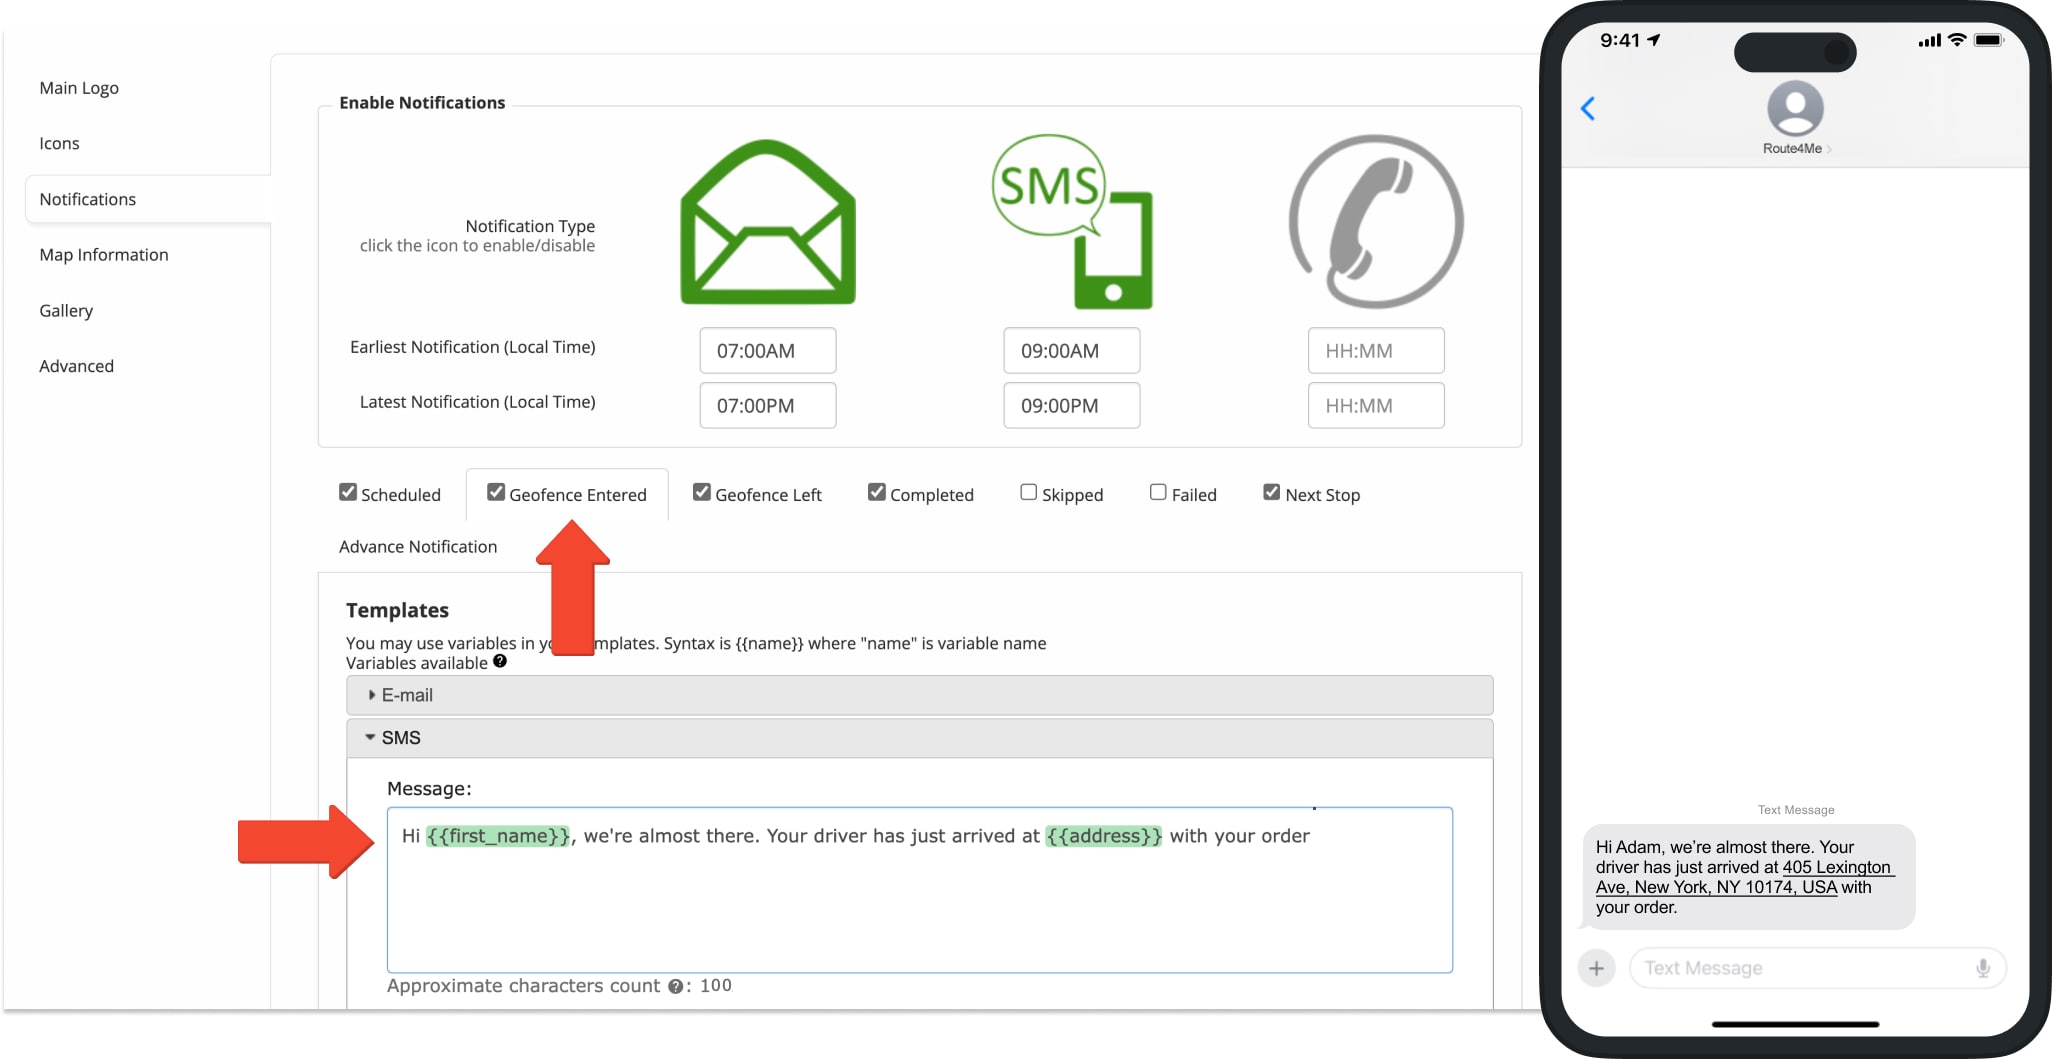
The Geofence Entered notifications are sent to the associated customers once a driver or field employee enters the geofence set around their location. The “Detected Visit Time” timestamp is displayed in the “Visit Details” section of the given address’ “Destination Info” in the Route Editor. All Detected as Visited timestamps are generated automatically by the software upon entering the corresponding geofences and marking the respective destination as “Done“. Additionally, you can click the Eye Icon to view exactly when and where the vehicle was detected as entering the respective geofence. Learn more about how to set up geofences. NOTE: To send Geofence Entered notifications, the Customer SMS Notifications – Geofence Entered Add-On must be enabled on your Route4Me account.
To set up “Geofence Entered” notifications, go to “My Account” and then “Notification Settings” from the Navigation Menu. After that, go to the “Notifications” tab and check the box next to “Geofence Entered“. Next, enable the preferred notification types (Email and SMS) by clicking the respective icons. Then, use the “Earliest Notification (Local Time)” and the “Latest Notification (Local Time)” fields to define the preferred custom time window for each notification type. This is the Local Time where the depot or route origin is located.
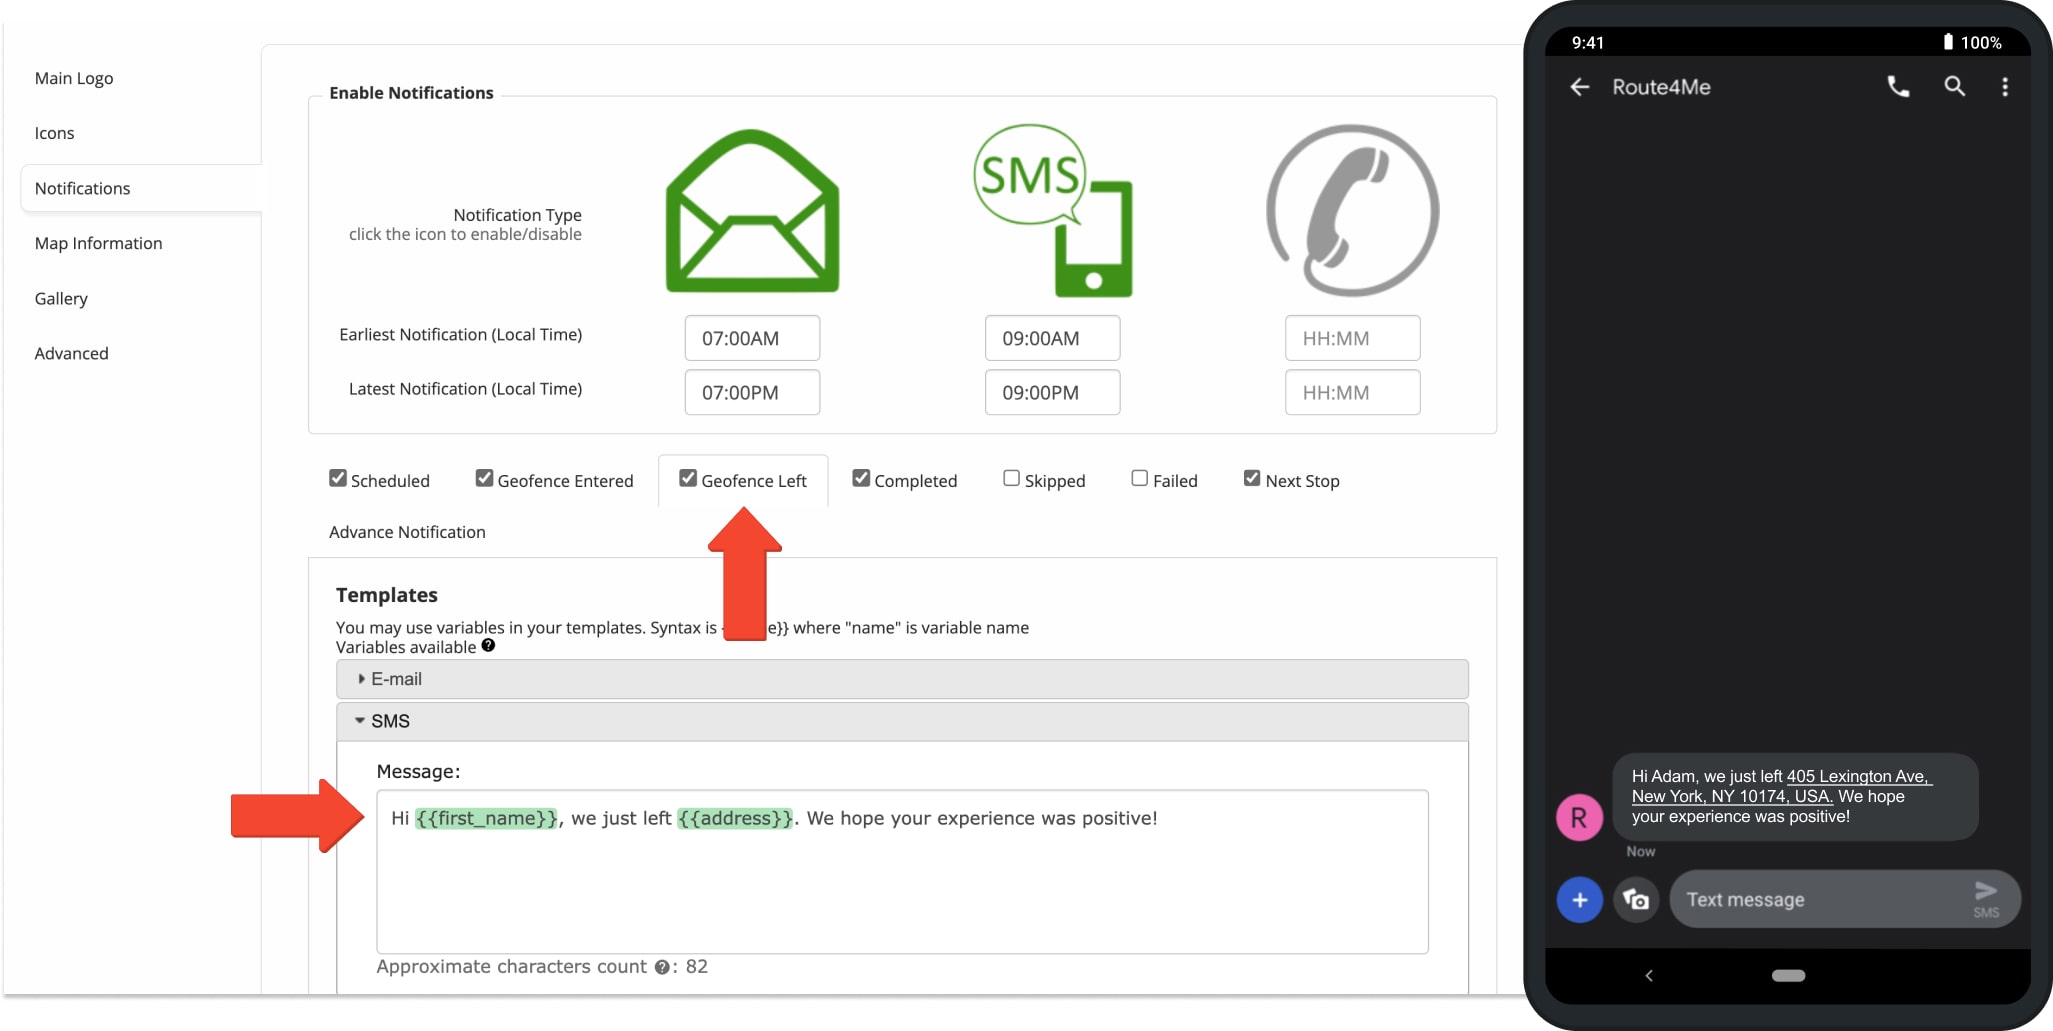
Geofence Left – Geofence Departed Email And SMS Notifications
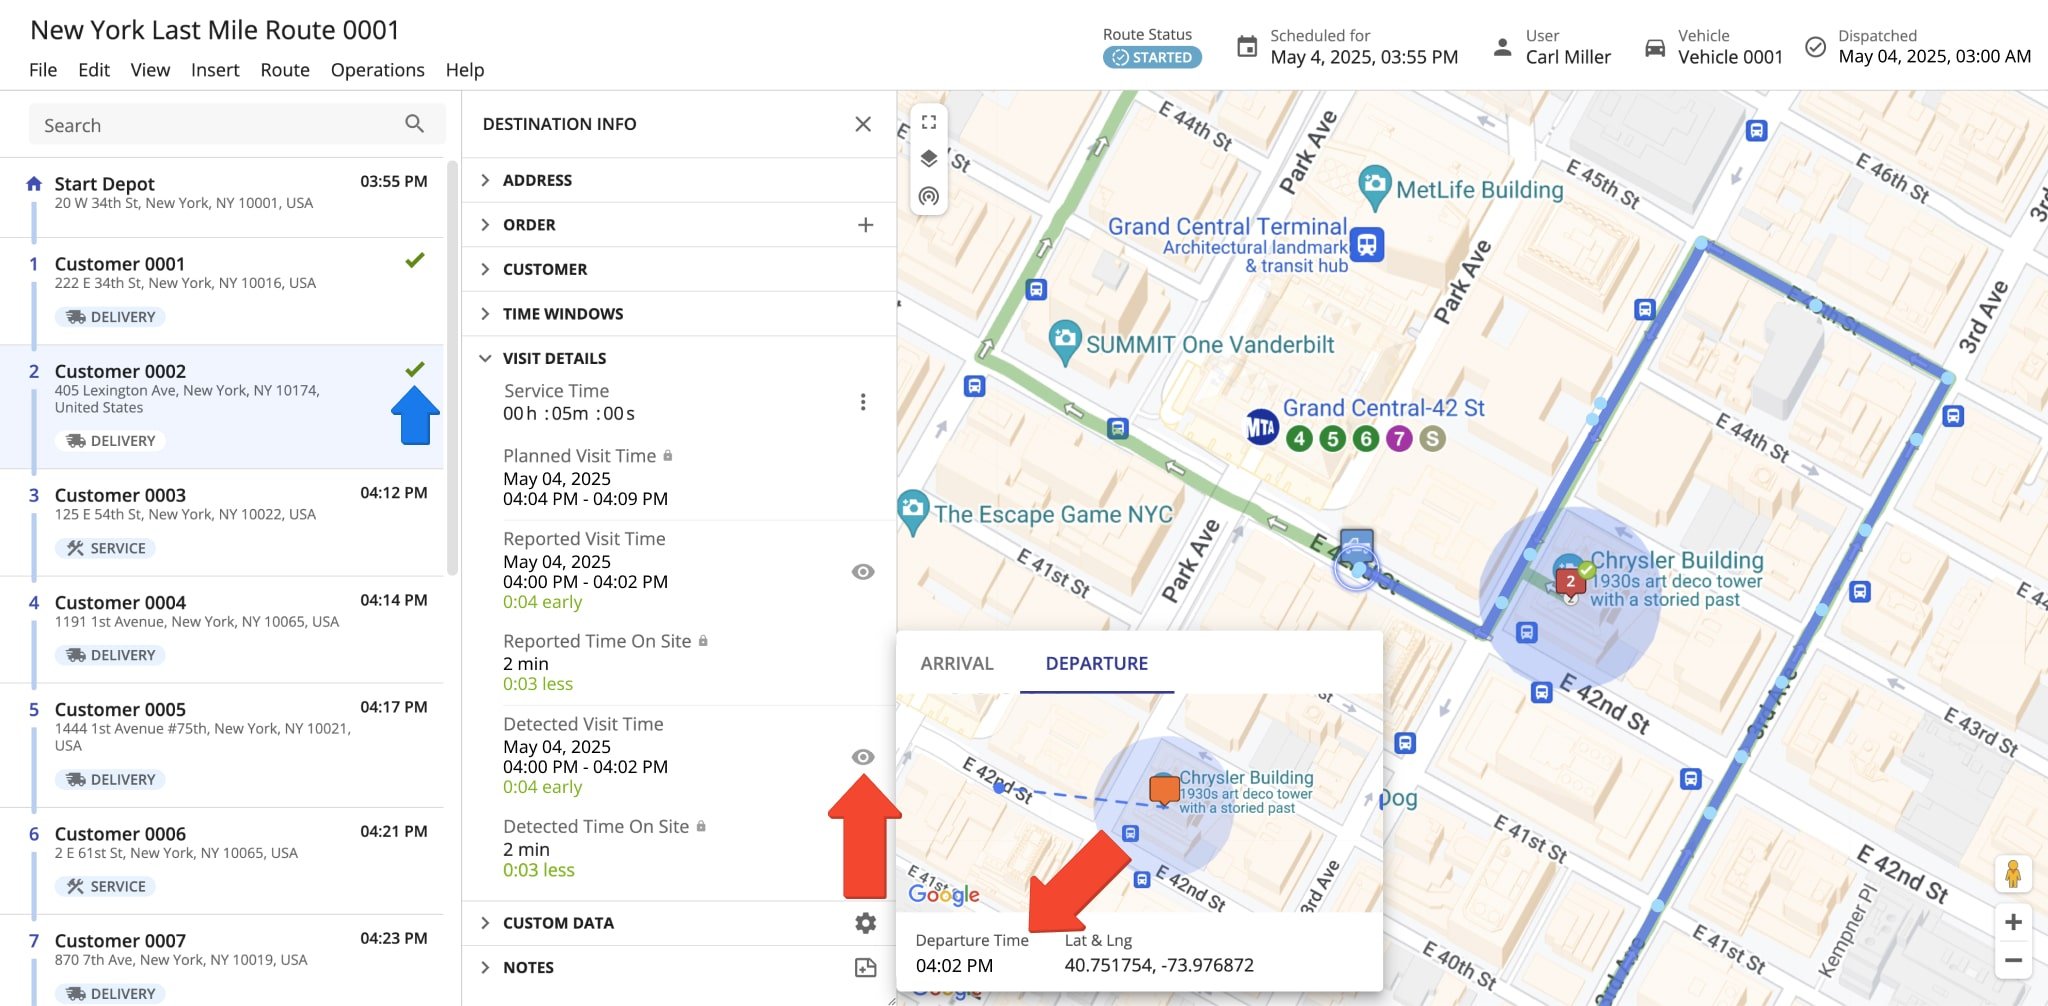
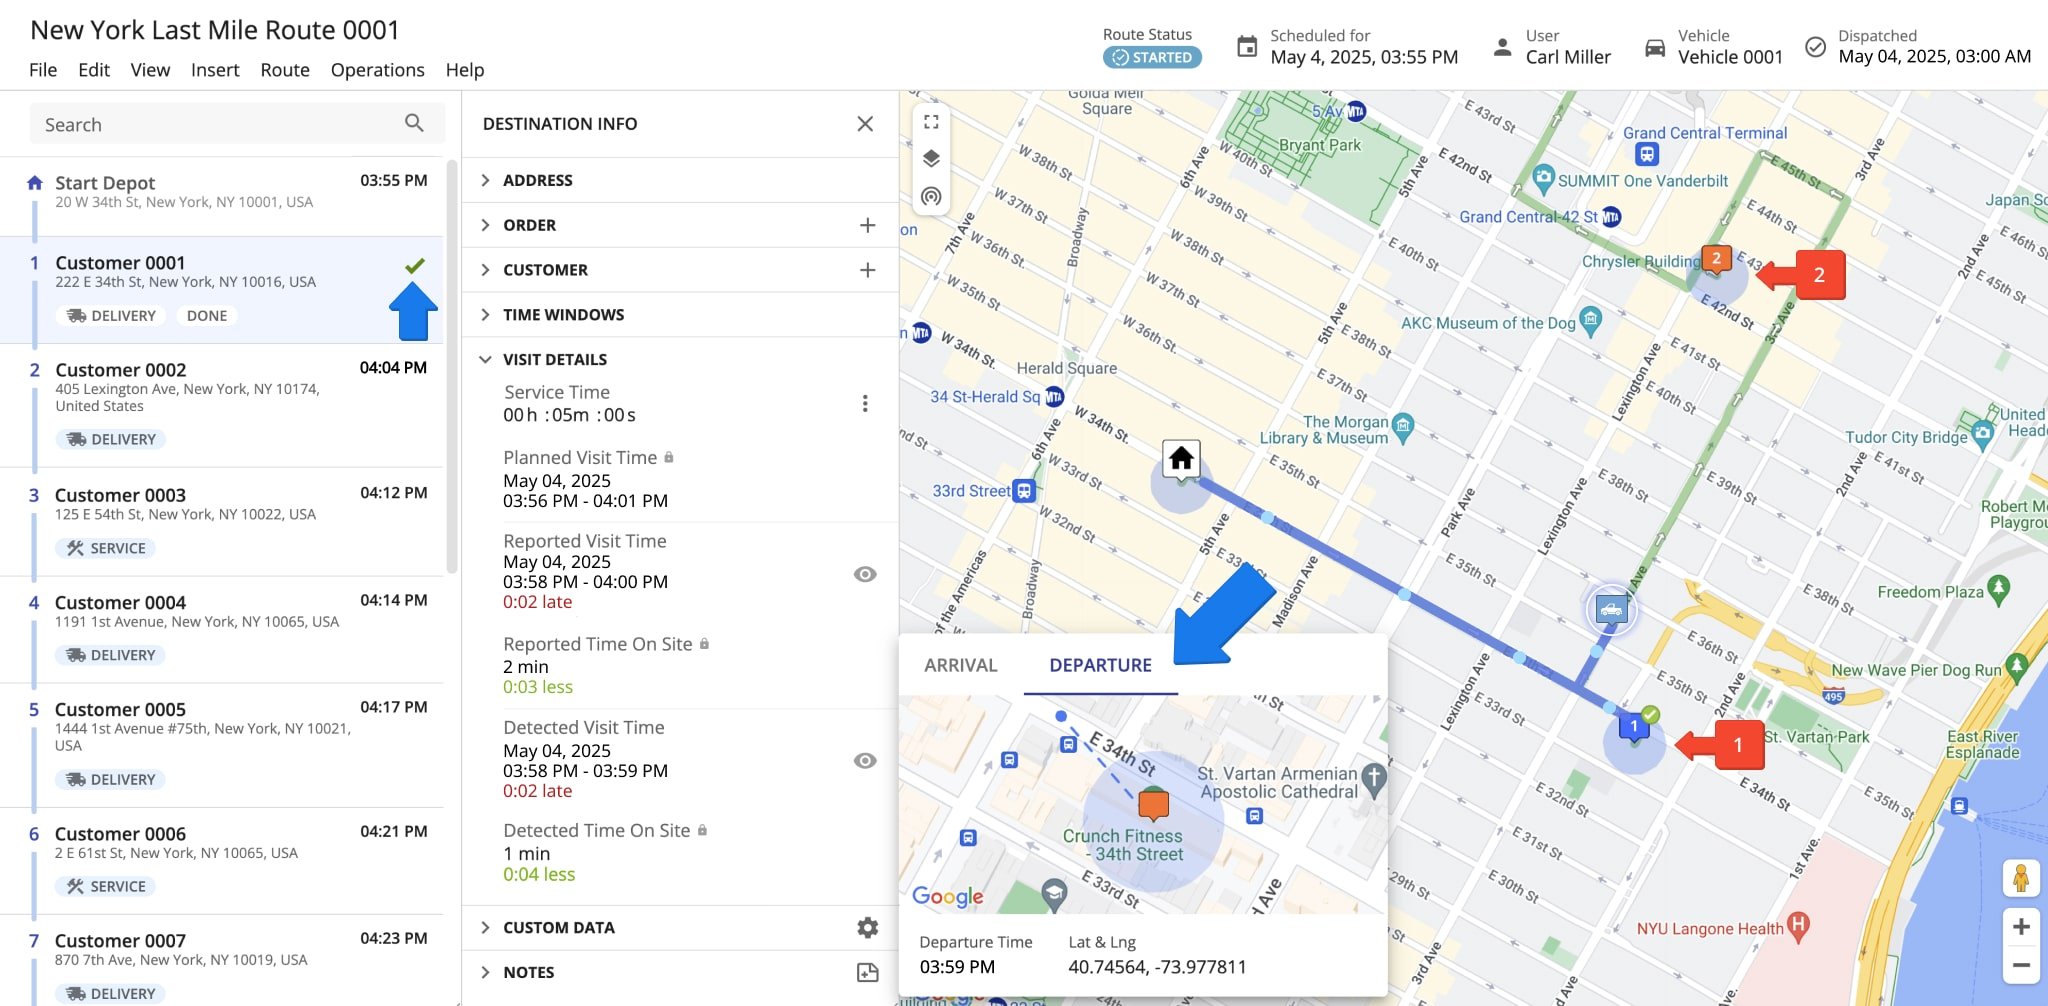
The Geofence Left notifications are sent to the associated customers once a driver or field employee exits the geofence set around their location. The “Departure Time” timestamp is displayed in the “Departure” tab when you click the Eye Icon next to “Detected Visit Time” in the “Visit Details” section of the given address’ “Destination Info” in the Route Editor. All “Departure Time” timestamps are generated automatically by the system upon exiting the corresponding geofences after the driver marks the respective destination as “Done“. Learn more about how to set up geofences. NOTE: To send Geofence Left notifications, the Customer SMS Notifications – Geofence Left Add-On must be enabled on your Route4Me account.
To set up “Geofence Left” notifications, go to “My Account” and then “Notification Settings” from the Navigation Menu. After that, go to the “Notifications” tab and check the box next to “Geofence Left“. Next, enable the preferred notification types (Email and SMS) by clicking the respective icons. Then, use the “Earliest Notification (Local Time)” and the “Latest Notification (Local Time)” fields to define the preferred custom time window for each notification type. This is the Local Time where the depot or route origin is located.
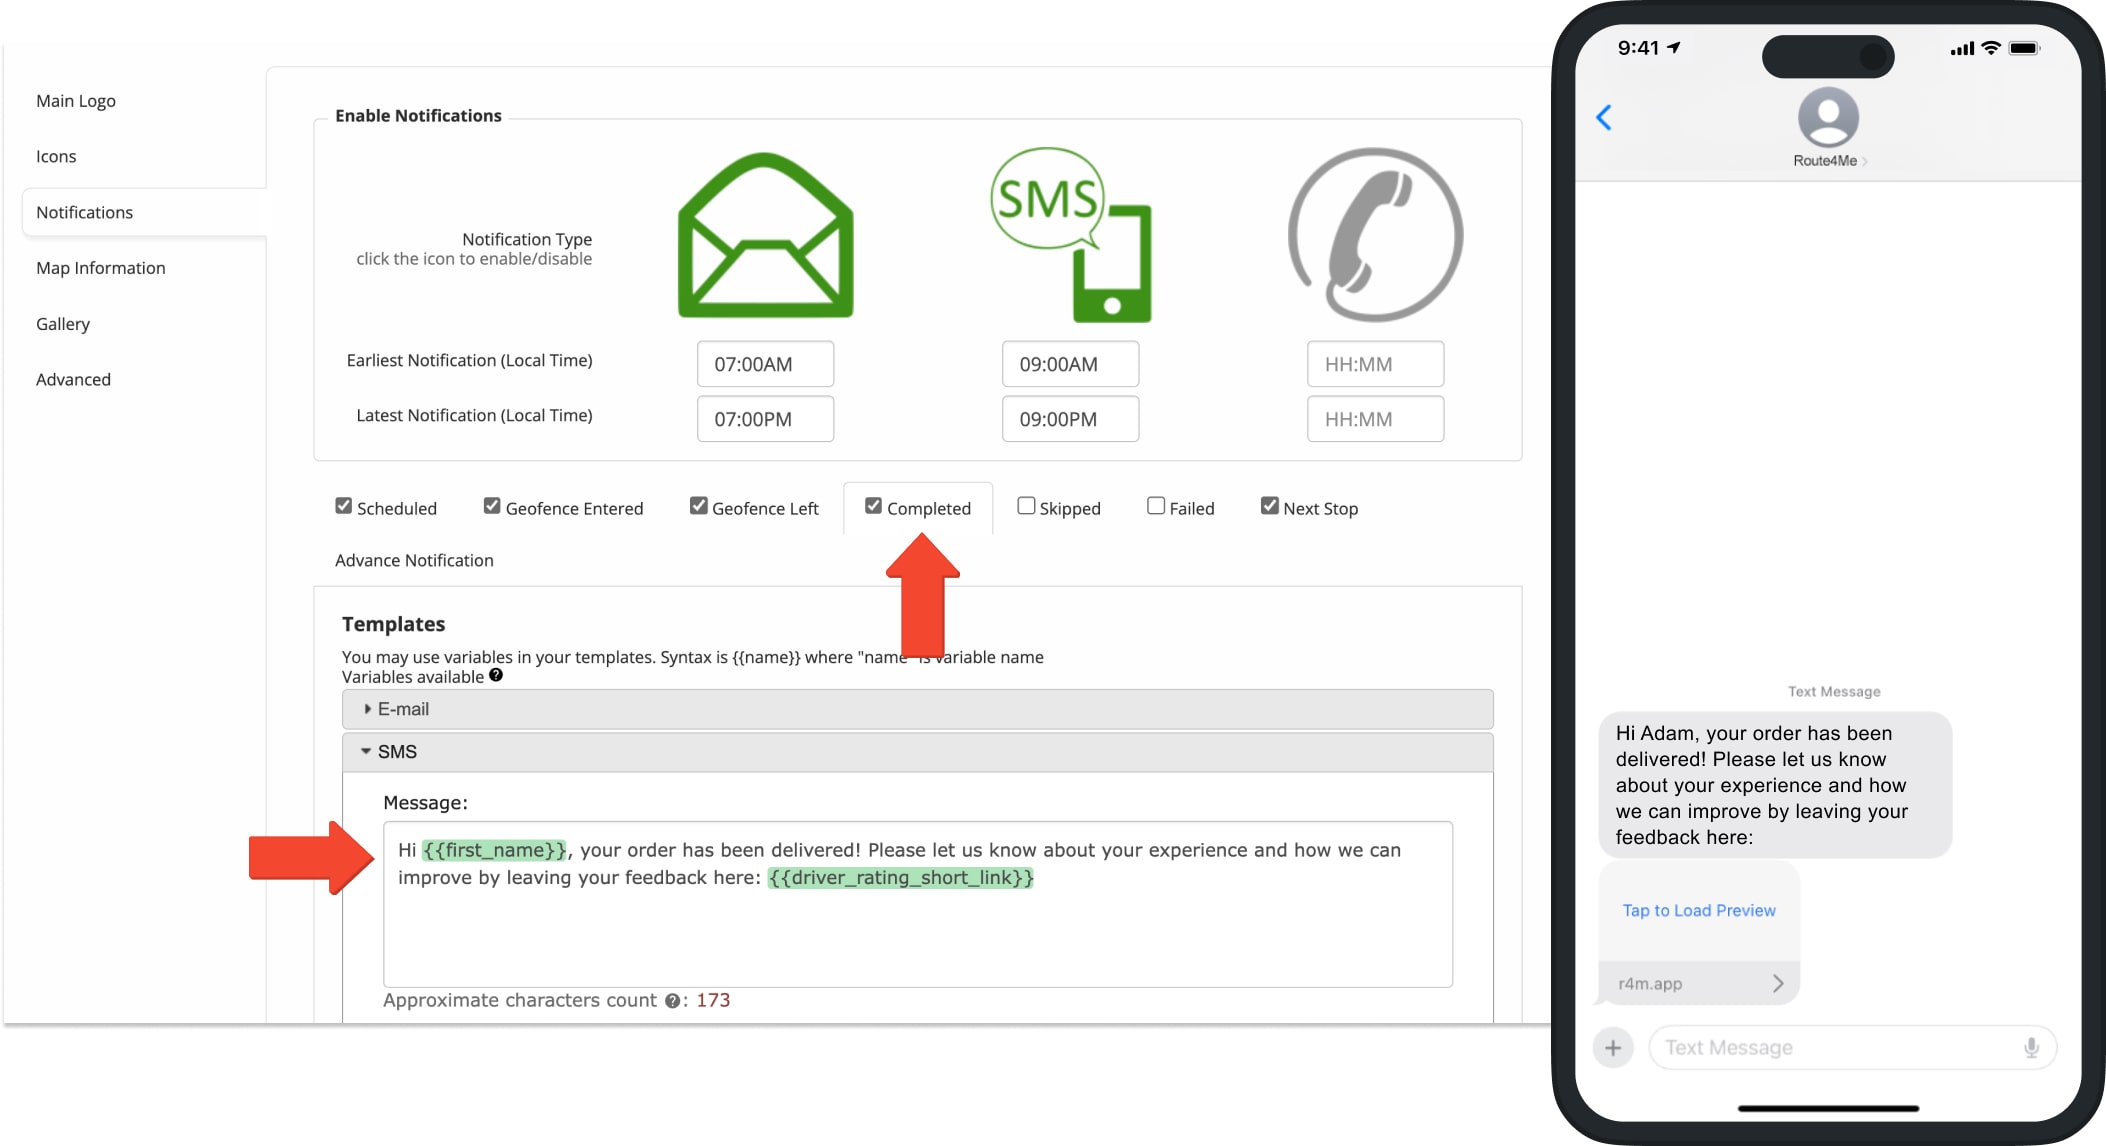
Completed – Address Successfully Visited Emal And SMS Notifications
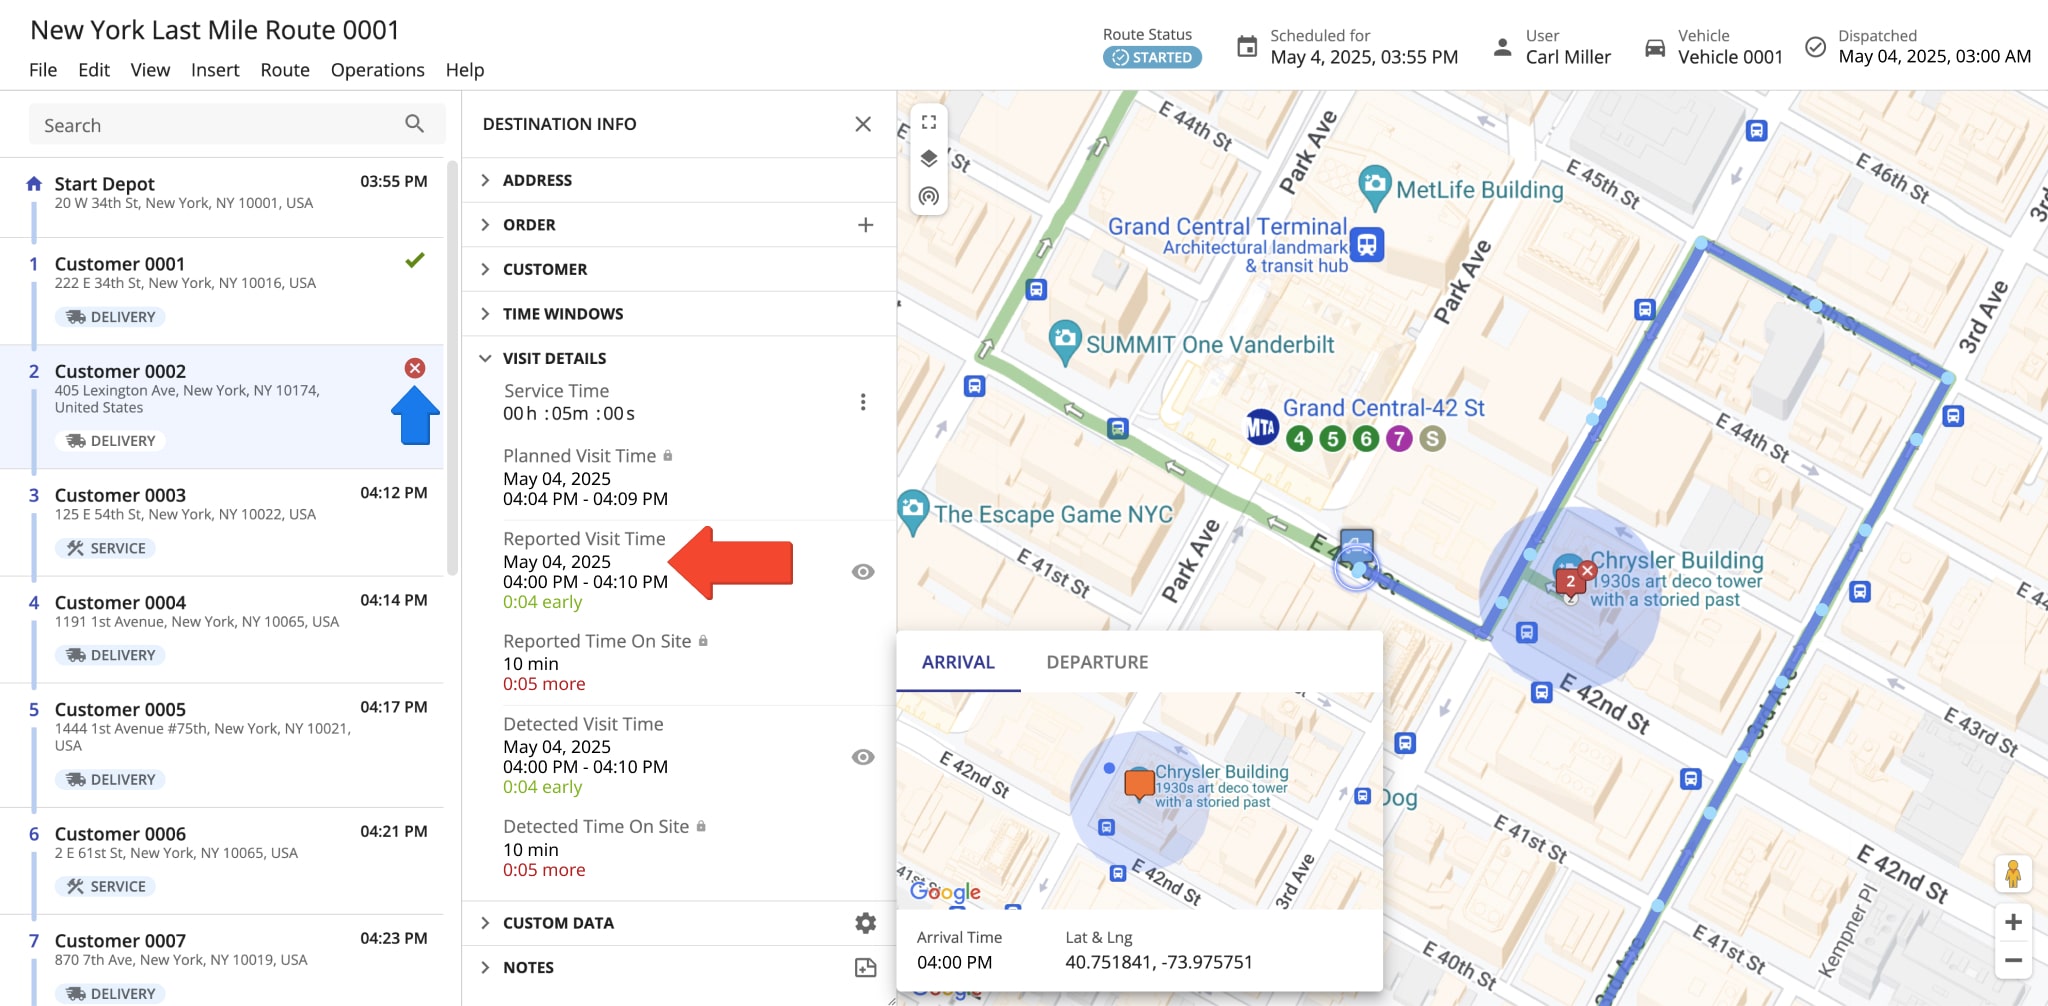
The Completed notifications are sent to the associated customers once your delivery drivers or field employees manually mark destinations as “Done” on the Mobile Route Planner App. The “Reported Visit Time” timestamp is displayed in the “Visit Details” section of the given address’ “Destination Info” in the Route Editor. Learn more about the difference between geofence detection and manually marking as visited. NOTE: To send Completed notifications, the Customer SMS Notifications – Completed and Customer Email Notifications – Completed Add-Ons must be enabled on your Route4Me account, respectively.

To set up “Completed” notifications, go to “My Account” and then “Notification Settings” from the Navigation Menu. After that, go to the “Notifications” tab and check the box next to “Completed“. Next, enable the preferred notification types (Email and SMS) by clicking the respective icons. Then, use the “Earliest Notification (Local Time)” and the “Latest Notification (Local Time)” fields to define the preferred custom time window for each notification type. This is the Local Time where the depot or route origin is located.
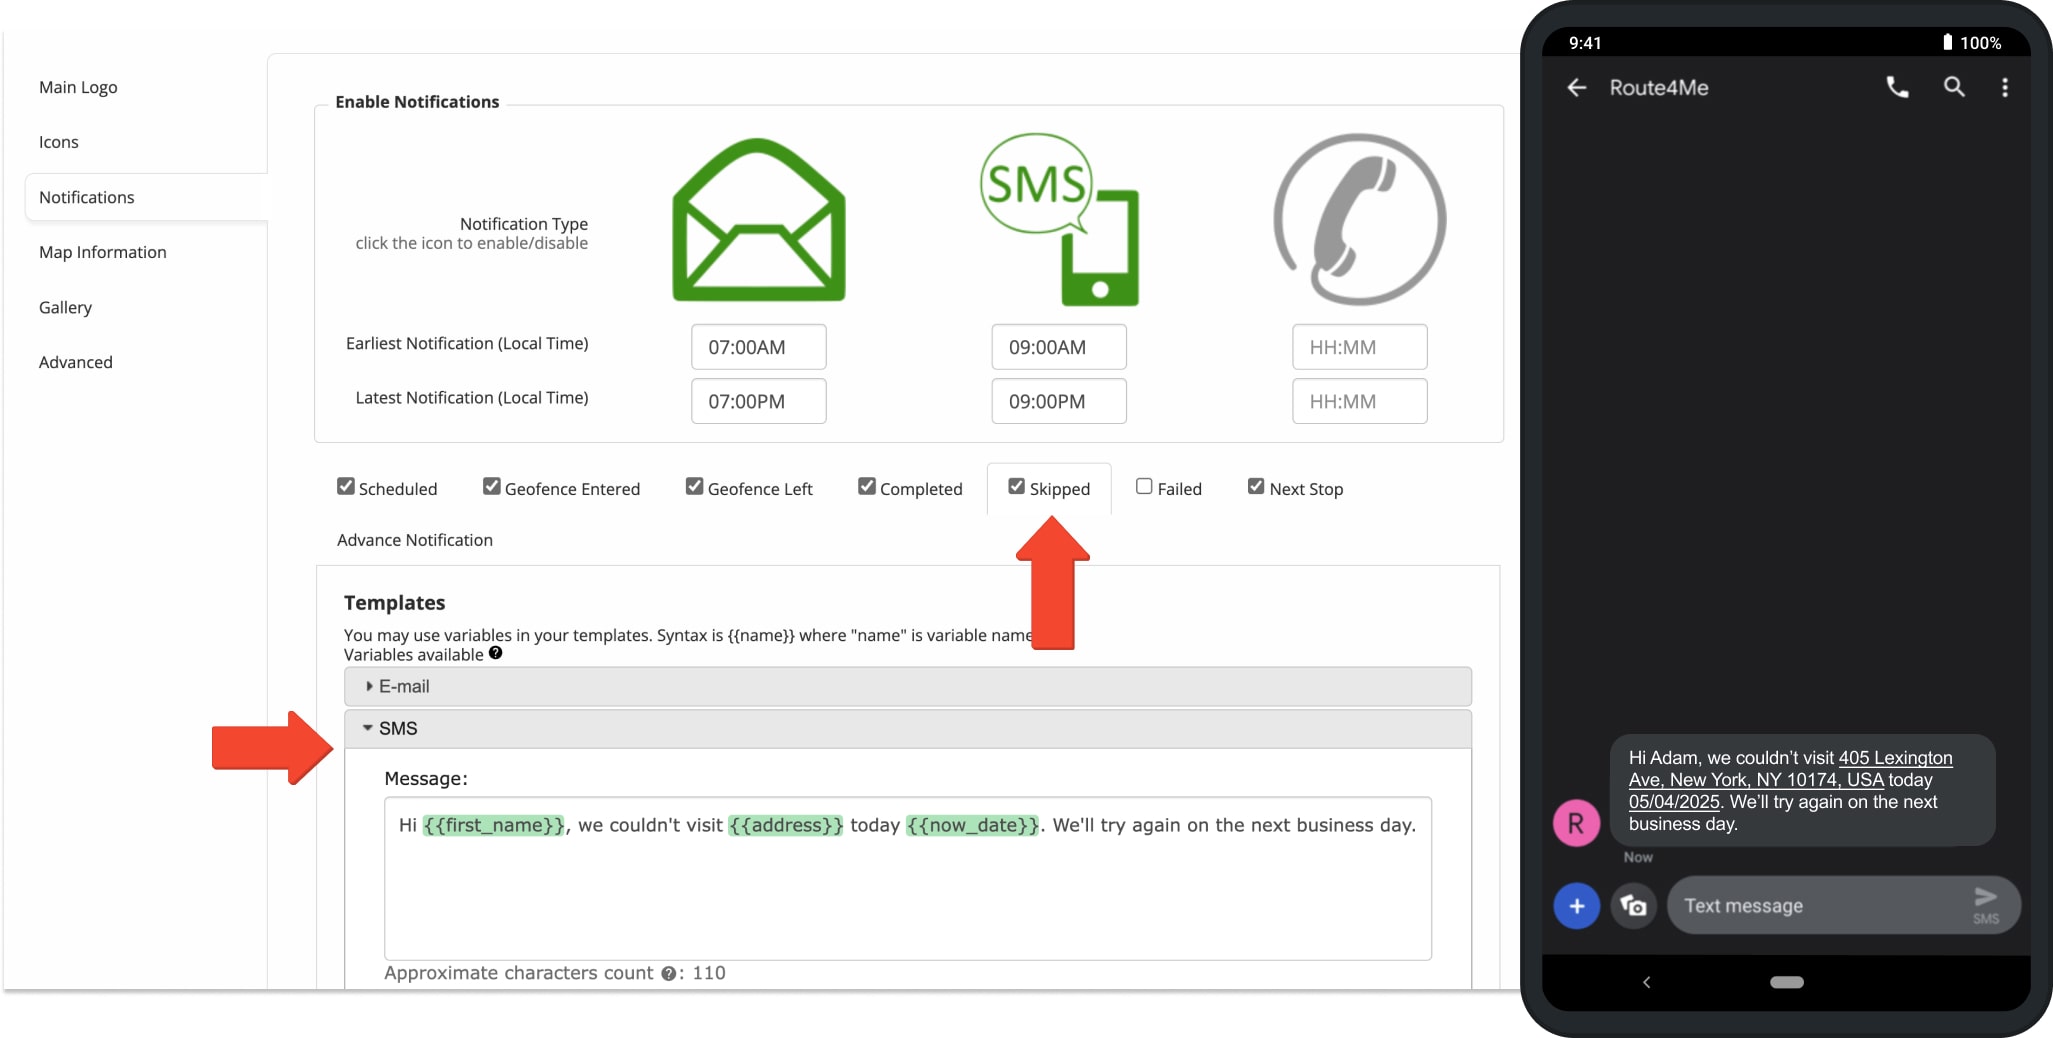
Skipped – Address Not Visited Email And SMS Notifications
The Skipped notifications are sent to the associated customers when your delivery drivers or field employees manually mark addresses as “Skipped” on the Mobile Route Planner App. The “Reported Visit Time” timestamp is displayed in the “Visit Details” section of the given address’ “Destination Info” in the Route Editor. A destination marked as “Skipped” is an address where delivery, visitation, or service was not attempted (i.e., traffic prevents a timely visit). NOTE: To send Skipped notifications, the respective feature must be enabled on your Route4Me account. To enable the Skipped notifications feature, contact the Route4Me Support Team.

To set up “Skipped” notifications, go to “My Account” and then “Notification Settings” from the Navigation Menu. After that, go to the “Notifications” tab and check the box next to “Skipped“. Next, enable the preferred notification types (Email and SMS) by clicking the respective icons. Then, use the “Earliest Notification (Local Time)” and the “Latest Notification (Local Time)” fields to define the preferred custom time window for each notification type. This is the Local Time where the depot or route origin is located.
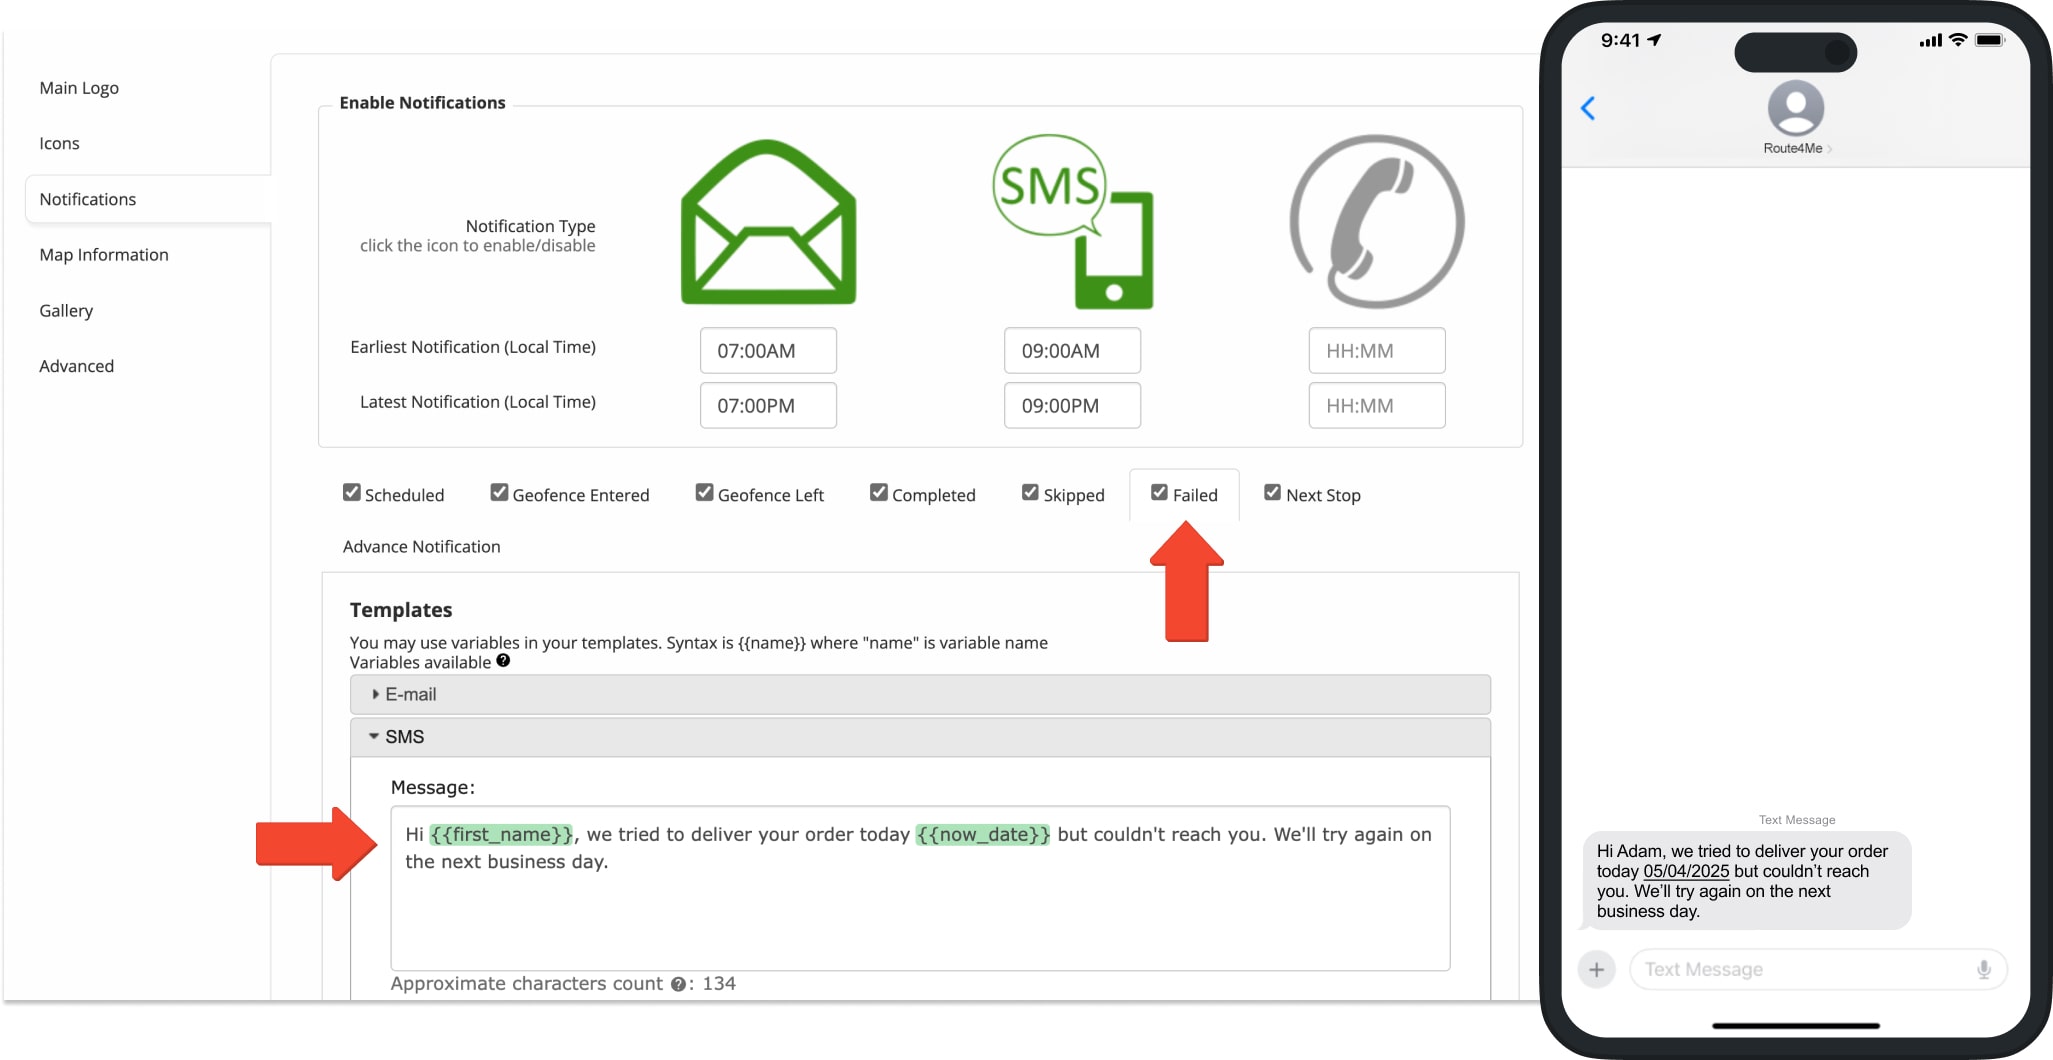
Failed – Failed Delivery Or Service Email And SMS Notifications
The Failed notifications are sent to the associated customers when your delivery drivers or field employees manually mark destinations as “Failed” on the Mobile Route Planner App. The “Reported Visit Time” timestamp is displayed in the “Visit Details” section of the given address’ “Destination Info” in the Route Editor. An address marked as “Failed” is one where delivery, visitation, or service was attempted but was not successful (i.e., the customer was not present to receive a delivery). NOTE: To send Failed notifications, the respective feature must be enabled on your Route4Me account. To enable the Failed notifications feature, contact the Route4Me Support Team.
To set up “Failed” notifications, go to “My Account” and then “Notification Settings” from the Navigation Menu. After that, go to the “Notifications” tab and check the box next to “Failed“. Next, enable the preferred notification types (Email and SMS) by clicking the respective icons. Then, use the “Earliest Notification (Local Time)” and the “Latest Notification (Local Time)” fields to define the preferred custom time window for each notification type. This is the Local Time where the depot or route origin is located.
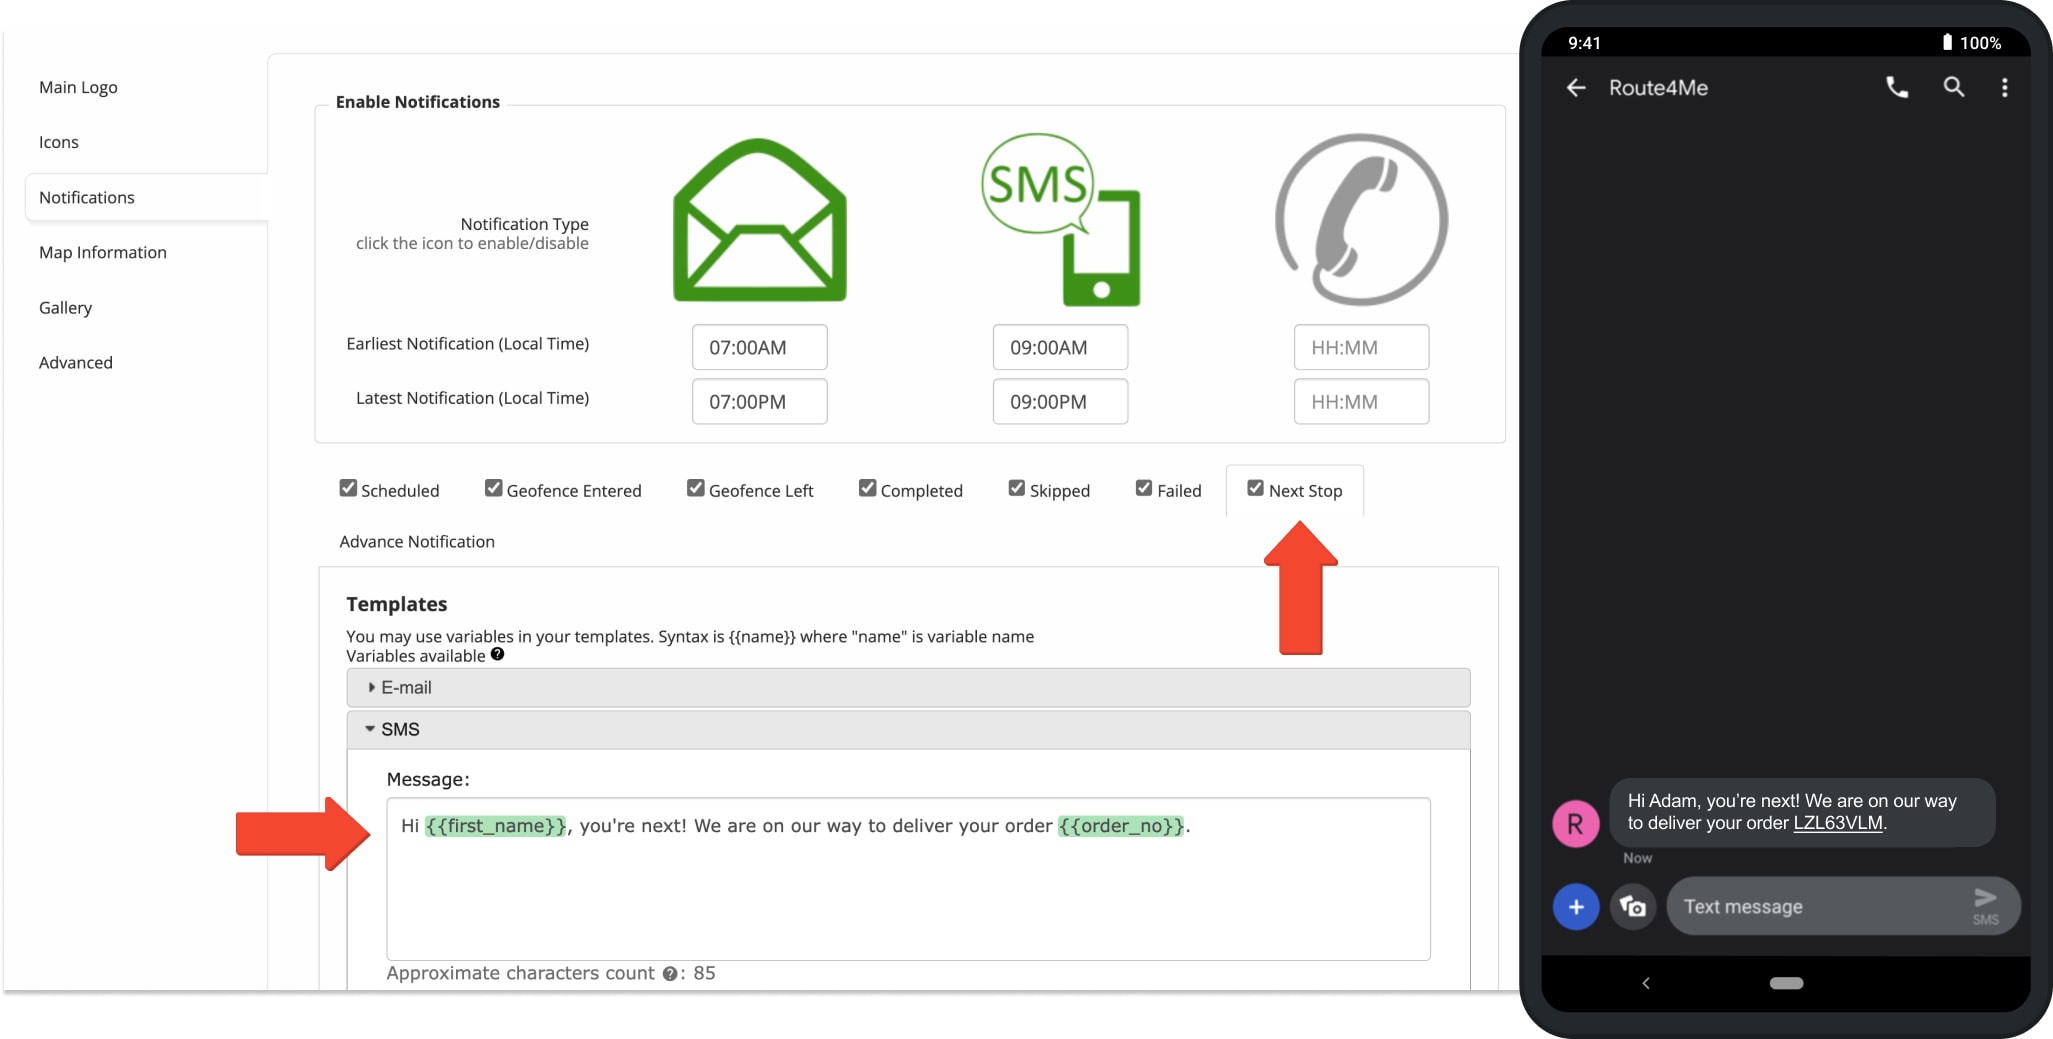
Next Stop – Next Customer Email And SMS Notifications
The Next Stop Notifications are sent to a customer whose address is next to be visited or serviced on the route. For example, once the first destination on a particular route is marked as “Done” or detected as departed, the customer who is associated with the second destination on the given route will receive the corresponding predefined Email and SMS notifications. Additionally, once the route is started on the Route4Me Mobile App, the customer or contact person for the first destination will receive this notification. NOTE: To send Next Stop Notifications, the Customer SMS Notifications – You Are Next and Customer Email Notifications – You Are Next Add-Ons must be enabled on your Route4Me account, respectively.
To set up “Next Stop” Notifications, go to “My Account” and then “Notification Settings” from the Navigation Menu. After that, go to the “Notifications” tab and check the box next to “Next Stop“. Next, enable the preferred notification types (Email and SMS) by clicking the respective icons. Then, use the “Earliest Notification (Local Time)” and the “Latest Notification (Local Time)” fields to define the preferred custom time window for each notification type. This is the Local Time where the depot or route origin is located.
Visit Route4Me's Marketplace to Check out Associated Add-Ons:
- Notifications & Alerts
Route Scheduled
- Notifications & Alerts
Geofence Entered
- Notifications & Alerts
Geofence Departed
- Notifications & Alerts
Visit Completed
- Notifications & Alerts
Notify Next Customer